

Page 1

Setup Guide
English
Safety Instructions . . . . . . . . . . . . . . . . . . . . . . . . . . 1
Assembling the Printer . . . . . . . . . . . . . . . . . . . . . . 2
Setting Up the Printer . . . . . . . . . . . . . . . . . . . . . . . . 3
Loading Roll Paper . . . . . . . . . . . . . . . . . . . . . . . . . 6
Loading Cut-Sheet Paper . . . . . . . . . . . . . . . . . . . . 8
Connecting the Printer with Your Computer . . . . 11
Installing the Printer Driver and Software. . . . . . . 12
Using the Online User’s Guide . . . . . . . . . . . . . . . 13
Page 2

Printer Parts
Front view
Rear view
Roll paper cover
Rear manual
feed slot
Ink lever
Ink cartridge slot
Paper lever
Top cover
Control panel
Roll paper support
Maintenance tank
Paper tray cover
Paper tray
Front manual feed slot
Ink compartment
Knobs
Rear cover
AC inlet
USB interface connector
Network interface connector
No part of this publication may be reproduced, stored in a retrieval system, or transmitted in any form or by any means, electronic, mechanical,
photocopying, recording, or otherwise, without the prior written permission of Seiko Epson Corporation. The information contained herein is
designed only for use with this Epson printer. Epson is not responsible for any use of this information as applied to other printers.
Neither Seiko Epson Corporation nor its affiliates shall be liable to the purchaser of this product or third parties for damages, losses, costs, or
expenses incurred by the purchaser or third parties as a result of accident, misuse, or abuse of this product or unauthorized modifications,
repairs, or alterations to this product, or (excluding the U.S.) failure to strictly comply with Seiko Epson Corporation's operating and maintenance
instructions.
Seiko Epson Corporation shall not be liable for any damages or problems arising from the use of any options or any consumable products other
than those designated as Original Epson Products or Epson Approved Products by Seiko Epson Corporation.
Seiko Epson Corporation shall not be held liable for any damage resulting from electromagnetic interference that occurs from the use of any
interface cables other than those designated as Epson Approved Products by Seiko Epson Corporation.
®
EPSON
Microsoft
Apple
is a registered trademark, and EPSON STYLUS™ and Exceed Your Vision are trademarks of Seiko Epson Corporation.
®
and Windows® are registered trademarks of Microsoft Corporation.
®
and Macintosh® are registered trademarks of Apple Inc.
General Notice: Other product names used herein are for identification purposes only and may be trademarks of their respective owners. Epson disclaims any
and all rights in those marks.
Copyright © 2007 Seiko Epson Corporation. All rights reserved.
Page 3

Safety Instructions
Read all of these instructions before using your
printer. Also be sure to follow all warnings and
instructions marked on the printer.
Warning, Cautions, and Notes
Warnings must be followed carefully to avoid
w
bodily injury.
c
Notes contain important information and useful tips
on the operation of your printer.
When choosing a place for this product
❏ Place this product on a flat, stable surface that
Cautions must be observed to avoid damage to
your equipment.
is larger than this product. This product will
not operate properly if it is tilted or at an angle.
When setting up this product
❏ Use only the type of power source indicated
on this product’s label.
❏ Use only the power cord that comes with this
product. Use of another cord may result in fire
or electric shock.
❏ This product’s power cord is designed for use
with this product only. Using it with other
equipment may result in fire or electric shock.
❏ Do not use a damaged or frayed power cord.
❏ If you use an extension cord with this product,
make sure the total ampere rating of devices
plugged into the extension cord does not
exceed the cord’s ampere rating. Also, make
sure the total ampere rating of all devices
plugged into the wall outlet does not exceed
the wall outlet’s ampere rating.
❏ Do not block or cover the openings in this
product’s cabinet.
❏ If damage occurs to the plug, replace the cord
set or consult a qualified electrician. If there
are fuses in the plug, make sure you replace
them with fuses of the correct size and rating.
English
15 cm
or more
40 cm
or more
15 cm
or more
❏ Avoid places subject to rapid changes in
temperature and humidity. Also keep this
product away from direct sunlight, strong
light, or heat sources.
❏ Avoid places subject to shocks and vibrations.
❏ Keep this product away from dusty areas.
❏ Place this product near a wall outlet where the
plug can be easily unplugged.
❏ If you use a stand, the stand must be able to
support at least 50 kg (110.3 lb).
35 cm
or more
When using this product
❏ Do not put your hand inside this product or
touch the ink cartridges during printing.
❏ Do not move the print head by hand;
otherwise you may damage this product.
❏ Do not insert objects through the slots. Take
care not to spill liquid on this product.
❏ Do not attempt to service this product
yourself.
❏ Unplug this product and refer servicing to
qualified service personnel under the
following conditions:
The power cord or plug is damaged; liquid has
entered this product; this product has been
dropped or the cabinet damaged; this product
does not operate normally or exhibits a
distinct change in performance.
1
Page 4
When handling the ink cartridges
❏ Keep ink cartridges out of the reach of
children and do not drink their contents.
❏ Store ink cartridges in a cool, dark place.
❏ If ink gets on your skin, wash it off with soap
and water. If ink gets in your eyes, flush them
immediately with water.
❏ Shake an ink cartridge well before installing it
for best results.
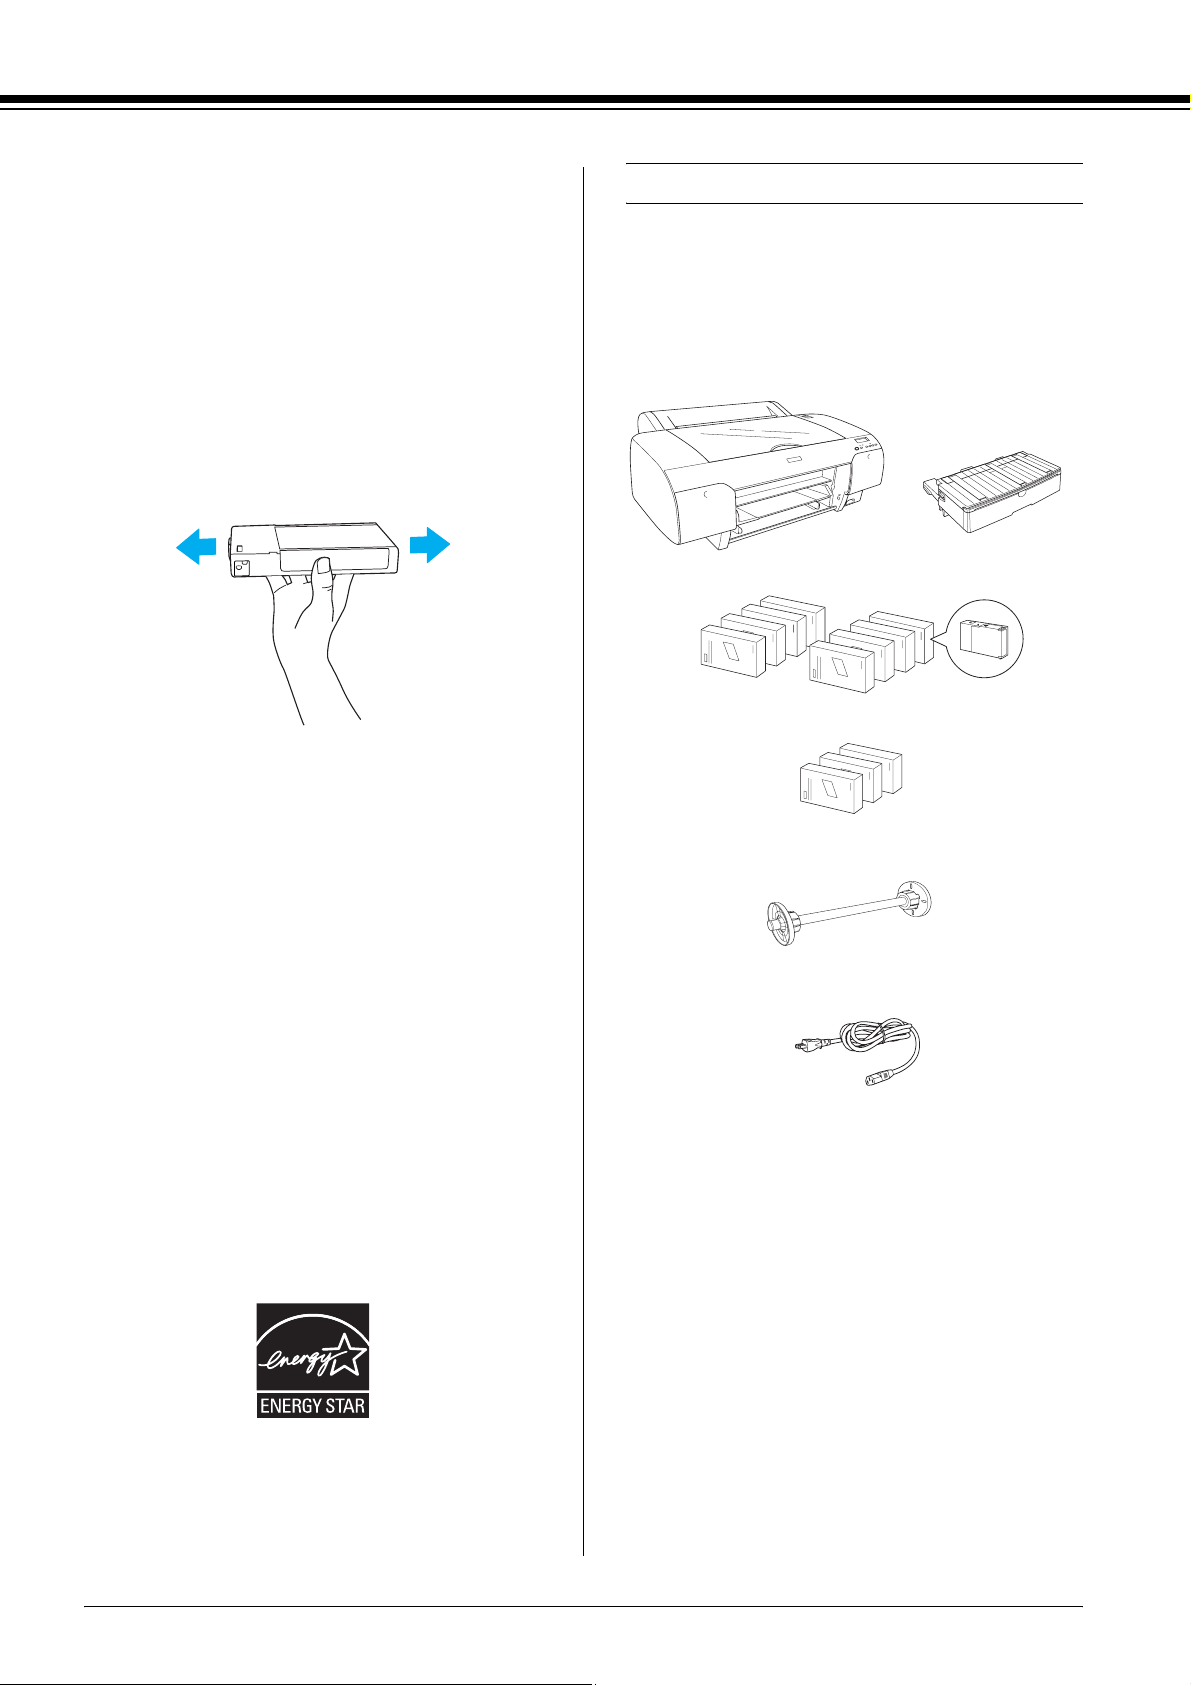
Assembling the Printer
Checking the contents
Make sure that all of the items shown are included,
and are not damaged.
Caution:
c
Do not shake cartridges (that have been
installed previously) with too much force.
❏ Do not use an ink cartridge beyond the date
printed on the cartridge carton.
❏ Use up the ink cartridge within six months of
installation for best results.
❏ Do not dismantle the ink cartridges or try to
refill them. This could damage the print head.
❏ Do not touch the ink supply port or its
surrounding area and the green IC chip on the
side of the ink cartridge. Doing so may affect
normal operation and printing.
Printer
Ink cartridges
Black ink conversion kit
(for EPSON Stylus Pro 4880/4880C only)
Roll paper spindle and gray attachments for
roll paper with 3-inch core
Power cord
Note:
❏ The contents in the printer box vary by location.
Paper tray
ENERGY STAR® Compliance
2
❏ There are 4 ink cartridges for EPSON Stylus Pro
4450 and 8 ink cartridges for EPSON Stylus Pro
4880/4880C.
Page 5

Removing the protective materials
To prevent damage during shipping, your printer
is packed with several pieces of protective
material. Remove the protective material from
your printer before using it. Open the top cover,
loosen the two screws, and then pull out the
carriage fixed board.
You also need to unlock the print head, by pulling
the green tab on the left side of the print head.
Setting Up the Printer
Connecting the power cord
1. Check the label on the back of the printer to
make sure the voltage required by the printer
matches that of the wall outlet. Also, make
sure that you have the correct power cord for
your power source.
Caution:
c
It is not possible to change the printer’s
voltage. If the rated voltage and your outlet
voltage do not match, do not plug in the
power cord, and contact your dealer for
assistance.
2. Connect the power cord to the AC inlet on the
back of the printer.
English
Caution:
c
Be careful not to touch the parts highlighted
below; otherwise, the printer may be damaged.
AC inlet
3. Plug the power cord into a properly grounded
wall outlet.
Caution:
c
Do not use an outlet that is controlled by an
automatic timer or a wall switch; otherwise,
accidental shut down or damage to your
printer may occur.
3
Page 6

Installing the paper tray
Insert the paper tray in the slots at the front of the
printer.
❏ The right ink compartment of EPSON Stylus Pro
4450 cannot be opened. Do not press the cover too
hard; otherwise, you may break it.
Installing the ink cartridges
Warning:
w
The ink cartridges are self-contained units.
Under ordinary use, ink does not leak from the
cartridges. If ink does get on your hands, wash
them thoroughly with soap and water. If ink gets
into your eyes, flush them immediately with
water.
Note:
❏ The ink cartridges packaged with your printer are
partly used during the initial setup. In order to
produce high-quality prints, the print head in your
printer will be fully charged with ink. This one-off
process consumes a quantity of ink and therefore
these cartridges print fewer pages compared to
subsequent ink cartridges.
1234
No. EPSON Stylus Pro
4880/4880C
#1 Matte Black or
Photo Black
#2 Cyan Cyan
#3 Vivid Magenta Magenta
#4 Yellow Yellow
#5 Light Black -
#6 Light Cyan -
#7 Vivid Light Magenta -
#8 Light Light Black -
EPSON Stylus Pro 4450
Matte Black
5678
1. Turn on the printer by pressing the Power
button. After a short time NO INK CRTG appears
on the LCD panel.
2. Open the ink compartment cover(s) by
pushing it.
❏ Initial ink charging requires approximately
8 minutes.
❏ Each slot can hold a particular color of ink. Be sure
to install the ink cartridges in the correct slots
according to the ink mode you choose.
❏ The following illustration uses EPSON Stylus Pro
4880/4880C. Slot # 5 to 8 are not available on
EPSON Stylus Pro 4450.
4
Page 7

3. Raise the ink levers.
4. Remove the package from an ink cartridge,
and then shake the ink cartridge well for best
results.
7. After inserting all ink cartridges in their
corresponding slot, lower the ink levers. The
printer starts initial ink charging.
8. After approximately two minutes, ink lever
messages appear on the LCD panel. Raise or
lower the ink levers accordingly until READY
appears on the LCD panel, which indicates
initial ink charging is completed.
Caution:
c
Never perform the following tasks while the
Pause light is flashing; otherwise, damage
may occur.
English
5. Hold the ink cartridge with the arrow mark
facing up and pointing to the rear of the
printer, and then insert it in the slot.
6. Repeat steps 4 to 5 to install the other ink
cartridges.
❏ Turn off the printer.
❏ Open the top cover.
❏ Remove the rear cover.
❏ Move the paper lever to the released
position.
❏ Remove the ink cartridges.
❏ Remove the maintenance tank.
❏ Unplug the power cord.
9. Close the ink compartment cover(s).
Note:
If you have installed 220 ml ink cartridges, do not
close the ink compartment cover(s).
5
Page 8

Loading Roll Paper
Attaching the roll paper to the spindle
When installing the roll paper onto the spindle,
follow the steps below.
4. Slide the movable flange (removed in step 1)
onto the spindle and into the end of the roll
paper until it fixes into place.
Attaching roll paper to the printer
1. Slide the movable flange off the end of the
spindle.
2. When attaching roll paper with a 3-inch core,
keep the gray attachments attached.
When attaching the roll paper with a 2-inch
core, remove the gray attachments from the
flange.
Note:
Keep the gray attachments in a safe place for future
use.
To attach roll paper to the printer, follow the steps
below.
1. Open the roll paper cover.
2. Make sure that the movable flange is fixed into
the end of the roll paper properly.
3. Hold the roll paper spindle so that the black
movable flange is on the left side. Then place
the spindle in the groove located on the top of
the printer.
3. Place the roll paper on a flat surface so that it
does not unwind. Slide the roll paper onto the
spindle and onto the flange until it fixes into
place.
Note:
Do not stand the spindle when attaching the roll
paper. It may cause slant paper feeding.
6
Black movable flange
Page 9

4. Move the paper lever to the released position.
5. Hold the both sides of the paper, and load the
paper in the paper insertion slot.
7. Hold both the fixed and movable flanges, and
rewind the paper to the line marked with an
arrow mark.
English
8. Move the paper lever to the secured position.
The printer automatically feeds the paper to
the printing position.
6. Pull the paper until it hangs down over the
paper tray.
Note:
If thin paper is loaded, press the Paper Feed
button to decrease the value of paper suction. If
thick and curled paper is loaded, press the Paper
Feed button to increase the value of paper
suction.
9. Close the roll paper cover.
10. Raise the roll paper support.
7
Page 10

11. Extend the paper tray and the paper tray cover
according to the paper length to be used for
printing.
Loading Cut-Sheet Paper
To load cut-sheet paper in the paper tray, follow
the steps below.
Note:
This section describes loading cut-sheet paper smaller
than A3 size. If you want to load A3 or a larger paper,
or if you want to know the details of paper handling, see
"Paper Handling" in the User’s Guide included on the
Printer Software CD-ROM shipped with your printer.
1. Make sure the printer is on and in the READY
state.
12. Press the Paper Source button to select Roll
Auto Cut On on the LCD panel.
Caution:
c
Do not leave the paper in the printer for a long
period of time; its quality will deteriorate. We
recommend that you remove the paper from the
printer after printing.
2. Press the Paper Source button to select
Sheet
3. Lift up the paper tray cover, and then pull the
paper guide roller up.
4. Raise the paper guide, and then slide the edge
guide to the left slightly wider than the width
of your paper.
on the LCD panel.
8
Page 11

5. Fan a stack of paper, and then tap it on a flat
surface to even the edges.
If the paper is curled, flatten it before you load
it. If it curls excessively and jams frequently,
stop using it.
❏ The loadable capacity of paper in the paper tray
differs depending on the media and its size.
The paper tray can hold up to 250-sheets of
17 lb or 64 g/m² plain paper. Do not load the
paper above the arrow mark on the inside
surface of the left edge guide.
For information on the loadable capacity of
Epson special media, see the following table.
English
6. Clean the inside of the tray to remove any
dust. Dust may decrease the printout quality.
7. Load the sheets with the printable side facing
down and the right edge of the paper resting
against the right side of the paper tray.
Note:
❏ Always set the paper’s short edge first.
❏ Make sure the sheets lie flat on the bottom of
the tray, and put the edge of the paper against
the right inner corner of the paper tray;
otherwise, printing may become misaligned.
Epson special
media
Premium
Semigloss Photo
Paper
Premium Luster
Photo Paper
Singleweight
Matte Paper
Photo Quality Ink
Jet Paper
Epson Proofing
Paper White
Semimatte
Archival
(Enhanced) Matte
Paper
Size Loadable
capacity in
the paper tray
A4 100
Letter 100
A3 50
Super
A3/B
Letter 100
Super
A3/B
Super
A3/B
A2 50
US C 50
A4 200
Letter 200
A3 100
Super
A3/B
Super
A3/B
A4 100
Letter 100
A3 50
50
50
100
100
1*
Watercolor
Paper-Radiant
White
Super
A3/B
A2 50
US C 50
Super
A3/B
50
20
* 50 sheets of paper can be set under the
following conditions (temperature is 15 to
23°C and humidity is 40 to 60%).
9
Page 12

8. Adjust the length of the paper guide and the
edge guide according to the paper size.
Loading paper into the rear manual feed slot
Note:
❏ You can load one sheet at a time into the rear feed
slot.
❏ Load paper with the printable surface up.
❏ Paper with a thickness between 0.08 and 1.6 mm
can be set in the landscape position. However,
always set recycled or plain paper and A4, Letter
size, or 8 × 10 in. paper in the portrait position,
regardless of the thickness.
9. Put the paper guide roller down, and then
re-attach the paper tray cover.
Note:
Make sure the roll paper support is not raised.
1. Make sure the printer is on and in the READY
state.
2. Press the Paper Source button to select
Sheet
3. Hold the left and right edges of the paper.
Align the left edge of the paper with the target
paper size on the roll paper cover, and then
insert the paper until it meets resistance.
on the LCD panel.
10
The printer automatically feeds the paper to
the printing position.
Note:
If you press the Pause button, the printer starts to
feed the paper to the printing position immediately.
Page 13

4. Adjust the length of the paper tray and the
paper tray cover according to the paper size.
If you do not extend them, the printout may
fall.
Note:
Make sure the roll paper support is not raised.
Connecting the Printer with Your Computer
Connect the printer and computer with a USB
cable or Ethernet cable. Use the following cables.
❏ USB cable
❏ 10BaseT or 100BaseTX Category 5 Shielded
twisted-pair cable
1. Make sure the printer is turned off.
2. Connect the cable to the printer, and plug the
other end of the USB cable to the computer or
the other end of the Ethernet cable to the
Ethernet hub.
English
Caution:
c
Do not leave the paper in the printer for a long
period of time; its quality will deteriorate. We
recommend that you remove the paper from the
printer after printing.
USB connection:
Network connection:
Note:
When you connect both USB cable and Ethernet cable,
install the printer software from each computer
separately. You can connect both USB cable and
Ethernet cable to the printer at the same time.
11
Page 14

Installing the Printer Driver and Software
After connecting the printer to your computer,
you need to install the software included on the
Printer Software CD-ROM shipped with your
printer.
steps below.
Note:
Be sure that you have an administrator rights to install
the software.
1. Insert the Printer Software CD-ROM shipped
To install your printer software, follow the
with your printer in the CD-ROM drive.
Note:
If the following dialog box appears, make sure the
publisher is SEIKO EPSON, and then click
Unblock.
2. When the following dialog box appears,
install the printer driver according to your
connection. Select Set up the printer via a
local connection when the printer is
connected to the computer directly or Set up
the printer via a network connection when
the printer is connected to the network. Follow
the on-screen instructions.
3. If you want to install other printer software,
select it from the dialog box in step 2.
Selecting your printer
After you have installed the printer software on
your computer, you need to select your printer.
You must select a printer the first time you use it
or whenever you want to switch to another
printer. Your computer will always print using the
last printer selected.
1. Double-click Macintosh HD (default setting).
2. Double-click the Applications folder.
3. Double-click the Utilities folder.
4. Double-click Print Center (for Mac OS X
10.2.x) or Printer Setup Utility (for Mac OS X
10.3.x or later).
5. Click Add.
12
6. Select your printer, and then click Add.
If your printer does not appear in the list, click
More Printers, and select a connection, such
as EPSON TCP/IP. Select your printer from the
list, and then click Add.
7. Make sure the Printer List contains the printer
you just added. Then, close the Printer List
dialog box.
Page 15

Using the Online User’s Guide
What to do next
After completing the hardware setup and the
driver installation, see the User’s Guide for detailed
information on your printer’s functions,
maintenance, troubleshooting, technical
specifications and optional products.
Using the online User’s Guide
It contains detailed instructions on using the
printer, and information on using the optional
products.
To view the User’s Guide, double-click the
ESPR4450_488X Manual icon on the desktop.
On Windows, you can also access the User’s Guide
via the Start menu. Click Start, point to All
Programs on Windows XP/Vista or Programs on
Windows 2000. Select EPSON, and then select
EPSON Stylus Pro 4450_488X Manual.
English
Note:
To read the online guide, you must have Adobe Acrobat
Reader 5.0 or later, or Adobe Reader, installed on your
computer.
13
Page 16

 Loading...