

Page 1

User’s Guide
4113114-06
Page 2

Copyright and Trademarks
All rights reserved. No part of this publication may be reproduced, stored in a retrieval system, or transmitted in any
form or by any means, electronic, mechanical, photocopying, recording, or otherwise, without the prior written
permission of Seiko Epson Corporation. No patent liability is assumed with respect to the use of the information
contained herein. While every precaution has been taken in the preparation of this book, Seiko Epson Corporation
assumes no responsibility for errors or omissions. Neither is any liability assumed for damages resulting from the
use of the information contained herein.
Neither Seiko Epson Corporation nor its affiliates shall be liable to the purchaser of this product or third parties for
damages, losses, costs, or expenses incurred by purchaser or third parties as a result of: accident, misuse, or
abuse of this product or unauthorized modifications, repairs, or alterations to this product, or (excluding the U.S.)
failure to strictly comply with Seiko Epson Corporation’s operating and maintenance instructions.
Seiko Epson Corporation shall not be liable against any damages or problems arising from the use of any options
or any consumable products other than those designated as Original Epson Products or Epson Approved Products
by Seiko Epson Corporation.
EPSON is a registered trademark of Seiko Epson Corporation in Japan and other countries/regions.
Microsoft, Windows, Windows Vista, and Windows Server are registered trademarks of Microsoft Corporation in
the United States and/or other countries.
General Notice: Other product names used herein are for identification purposes only and may be trademarks of
their respective owners. Epson disclaims any and all rights in those marks.
NOTICE: The contents of this manual are subject to change without notice.
Copyright © 2008 Seiko Epson Corporation. All rights reserved.
Copyright and Trademarks 2
Page 3

Contents
Copyright and Trademarks
Important Notice and Safety Instructions
Important Note . . . . . . . . . . . . . . . . . . . . . . . . . . . . . . . . . . . . . . . . . . . . . . . . . . . . . . . . . . . . . 7
Important Safety Instructions. . . . . . . . . . . . . . . . . . . . . . . . . . . . . . . . . . . . . . . . . . . . . . . . . . 7
Setting up the Product . . . . . . . . . . . . . . . . . . . . . . . . . . . . . . . . . . . . . . . . . . . . . . . . . . . 7
Choosing a Place for the Product . . . . . . . . . . . . . . . . . . . . . . . . . . . . . . . . . . . . . . . . . . 8
Using the Product . . . . . . . . . . . . . . . . . . . . . . . . . . . . . . . . . . . . . . . . . . . . . . . . . . . . . . 9
Handling Ink Cartridges . . . . . . . . . . . . . . . . . . . . . . . . . . . . . . . . . . . . . . . . . . . . . . . . . . 9
Notice for CD/DVD Discs . . . . . . . . . . . . . . . . . . . . . . . . . . . . . . . . . . . . . . . . . . . . . . . . 10
Concerning Incidental Loss Arising out of Use of this Product . . . . . . . . . . . . . . . . . . . 11
About Usage Limitation . . . . . . . . . . . . . . . . . . . . . . . . . . . . . . . . . . . . . . . . . . . . . . . . . 11
Warnings, Cautions, and Notes . . . . . . . . . . . . . . . . . . . . . . . . . . . . . . . . . . . . . . . . . . . 12
Chapter 1 Using Your Software
System Requirements . . . . . . . . . . . . . . . . . . . . . . . . . . . . . . . . . . . . . . . . . . . . . . . . . . . . . . 14
Using the Product . . . . . . . . . . . . . . . . . . . . . . . . . . . . . . . . . . . . . . . . . . . . . . . . . . . . . 14
Setting a Working Folder and Log . . . . . . . . . . . . . . . . . . . . . . . . . . . . . . . . . . . . . . . . . . . . . 16
Adding the Product . . . . . . . . . . . . . . . . . . . . . . . . . . . . . . . . . . . . . . . . . . . . . . . . . . . . . . . . 17
Setting for Notification of Job Completion . . . . . . . . . . . . . . . . . . . . . . . . . . . . . . . . . . . . . . . 18
Overview of Applications . . . . . . . . . . . . . . . . . . . . . . . . . . . . . . . . . . . . . . . . . . . . . . . . . . . . 19
EPSON Total Disc Maker . . . . . . . . . . . . . . . . . . . . . . . . . . . . . . . . . . . . . . . . . . . . . . . 19
EPSON Total Disc Monitor . . . . . . . . . . . . . . . . . . . . . . . . . . . . . . . . . . . . . . . . . . . . . . 19
EPSON Total Disc Setup . . . . . . . . . . . . . . . . . . . . . . . . . . . . . . . . . . . . . . . . . . . . . . . . 19
Using EPSON Total Disc Maker . . . . . . . . . . . . . . . . . . . . . . . . . . . . . . . . . . . . . . . . . . . . . . 19
Starting EPSON Total Disc Maker . . . . . . . . . . . . . . . . . . . . . . . . . . . . . . . . . . . . . . . . . 19
Getting Information through Online Help . . . . . . . . . . . . . . . . . . . . . . . . . . . . . . . . . . . . 20
Overview of Printer Driver . . . . . . . . . . . . . . . . . . . . . . . . . . . . . . . . . . . . . . . . . . . . . . . . . . . 20
Accessing the Printer Driver . . . . . . . . . . . . . . . . . . . . . . . . . . . . . . . . . . . . . . . . . . . . . 20
Getting Information through Online Help . . . . . . . . . . . . . . . . . . . . . . . . . . . . . . . . . . . . 21
Uninstalling Software . . . . . . . . . . . . . . . . . . . . . . . . . . . . . . . . . . . . . . . . . . . . . . . . . . . . . . . 22
Chapter 2 Publishing Discs
Introduction . . . . . . . . . . . . . . . . . . . . . . . . . . . . . . . . . . . . . . . . . . . . . . . . . . . . . . . . . . . . . . 23
Contents 3
Page 4

Turning Power On/off. . . . . . . . . . . . . . . . . . . . . . . . . . . . . . . . . . . . . . . . . . . . . . . . . . . 23
Overview of Publishing Modes. . . . . . . . . . . . . . . . . . . . . . . . . . . . . . . . . . . . . . . . . . . . 24
Drive Settings. . . . . . . . . . . . . . . . . . . . . . . . . . . . . . . . . . . . . . . . . . . . . . . . . . . . . . . . . 25
Printer Settings . . . . . . . . . . . . . . . . . . . . . . . . . . . . . . . . . . . . . . . . . . . . . . . . . . . . . . . 26
Notice for CD/DVD Writing and Printing . . . . . . . . . . . . . . . . . . . . . . . . . . . . . . . . . . . . 26
Precautions for Duplicating CDs/DVDs . . . . . . . . . . . . . . . . . . . . . . . . . . . . . . . . . . . . . 28
Printing on CDs/DVDs with a Commercially Available Software Package . . . . . . . . . . 29
Notice for Barcode Printing . . . . . . . . . . . . . . . . . . . . . . . . . . . . . . . . . . . . . . . . . . . . . . 29
Standard Mode . . . . . . . . . . . . . . . . . . . . . . . . . . . . . . . . . . . . . . . . . . . . . . . . . . . . . . . . . . . 30
Loading CDs/DVDs . . . . . . . . . . . . . . . . . . . . . . . . . . . . . . . . . . . . . . . . . . . . . . . . . . . . 30
Accessing EPSON Total Disc Maker . . . . . . . . . . . . . . . . . . . . . . . . . . . . . . . . . . . . . . . 32
Registering Data . . . . . . . . . . . . . . . . . . . . . . . . . . . . . . . . . . . . . . . . . . . . . . . . . . . . . . 32
Creating Labels . . . . . . . . . . . . . . . . . . . . . . . . . . . . . . . . . . . . . . . . . . . . . . . . . . . . . . . 35
Making the Stacker Settings . . . . . . . . . . . . . . . . . . . . . . . . . . . . . . . . . . . . . . . . . . . . . 38
Publishing Discs. . . . . . . . . . . . . . . . . . . . . . . . . . . . . . . . . . . . . . . . . . . . . . . . . . . . . . . 40
External Output Mode . . . . . . . . . . . . . . . . . . . . . . . . . . . . . . . . . . . . . . . . . . . . . . . . . . . . . . 42
Loading CDs/DVDs . . . . . . . . . . . . . . . . . . . . . . . . . . . . . . . . . . . . . . . . . . . . . . . . . . . . 42
Accessing EPSON Total Disc Maker . . . . . . . . . . . . . . . . . . . . . . . . . . . . . . . . . . . . . . . 46
Registering Data . . . . . . . . . . . . . . . . . . . . . . . . . . . . . . . . . . . . . . . . . . . . . . . . . . . . . . 46
Creating Labels . . . . . . . . . . . . . . . . . . . . . . . . . . . . . . . . . . . . . . . . . . . . . . . . . . . . . . . 49
Making the Stacker Settings . . . . . . . . . . . . . . . . . . . . . . . . . . . . . . . . . . . . . . . . . . . . . 52
Publishing Discs. . . . . . . . . . . . . . . . . . . . . . . . . . . . . . . . . . . . . . . . . . . . . . . . . . . . . . . 54
Batch Mode . . . . . . . . . . . . . . . . . . . . . . . . . . . . . . . . . . . . . . . . . . . . . . . . . . . . . . . . . . . . . . 56
Loading CDs/DVDs . . . . . . . . . . . . . . . . . . . . . . . . . . . . . . . . . . . . . . . . . . . . . . . . . . . . 56
Accessing EPSON Total Disc Maker . . . . . . . . . . . . . . . . . . . . . . . . . . . . . . . . . . . . . . . 60
Registering Data . . . . . . . . . . . . . . . . . . . . . . . . . . . . . . . . . . . . . . . . . . . . . . . . . . . . . . 61
Creating Labels . . . . . . . . . . . . . . . . . . . . . . . . . . . . . . . . . . . . . . . . . . . . . . . . . . . . . . . 63
Making the Stacker Settings . . . . . . . . . . . . . . . . . . . . . . . . . . . . . . . . . . . . . . . . . . . . . 66
Publishing Discs. . . . . . . . . . . . . . . . . . . . . . . . . . . . . . . . . . . . . . . . . . . . . . . . . . . . . . . 68
Taking Out Discs . . . . . . . . . . . . . . . . . . . . . . . . . . . . . . . . . . . . . . . . . . . . . . . . . . . . . . . . . . 69
Pausing Publishing . . . . . . . . . . . . . . . . . . . . . . . . . . . . . . . . . . . . . . . . . . . . . . . . . . . . . . . . 71
Resuming Publishing . . . . . . . . . . . . . . . . . . . . . . . . . . . . . . . . . . . . . . . . . . . . . . . . . . . . . . . 72
Canceling Publishing . . . . . . . . . . . . . . . . . . . . . . . . . . . . . . . . . . . . . . . . . . . . . . . . . . . . . . . 73
Priority Publishing . . . . . . . . . . . . . . . . . . . . . . . . . . . . . . . . . . . . . . . . . . . . . . . . . . . . . . . . . 74
Chapter 3 Replacing Ink Cartridges
Checking the Ink Cartridge Status. . . . . . . . . . . . . . . . . . . . . . . . . . . . . . . . . . . . . . . . . . . . . 75
Precautions on Ink Cartridge Replacement. . . . . . . . . . . . . . . . . . . . . . . . . . . . . . . . . . . . . . 76
Replacing an Ink Cartridge . . . . . . . . . . . . . . . . . . . . . . . . . . . . . . . . . . . . . . . . . . . . . . . . . . 77
Chapter 4 Maintaining Your Product
Contents 4
Page 5

Checking the Print Head Nozzles . . . . . . . . . . . . . . . . . . . . . . . . . . . . . . . . . . . . . . . . . . . . . 81
Using the Nozzle Check Utility. . . . . . . . . . . . . . . . . . . . . . . . . . . . . . . . . . . . . . . . . . . . 81
Cleaning the Print Head. . . . . . . . . . . . . . . . . . . . . . . . . . . . . . . . . . . . . . . . . . . . . . . . . . . . . 82
Using the Head Cleaning Utility . . . . . . . . . . . . . . . . . . . . . . . . . . . . . . . . . . . . . . . . . . . 83
Using the Product Buttons . . . . . . . . . . . . . . . . . . . . . . . . . . . . . . . . . . . . . . . . . . . . . . . 84
Aligning the Print Head . . . . . . . . . . . . . . . . . . . . . . . . . . . . . . . . . . . . . . . . . . . . . . . . . . . . . 84
Using the Print Head Alignment Utility . . . . . . . . . . . . . . . . . . . . . . . . . . . . . . . . . . . . . . 84
Correcting the Printing Position . . . . . . . . . . . . . . . . . . . . . . . . . . . . . . . . . . . . . . . . . . . . . . . 85
Using the Correcting the Printing Position Utility . . . . . . . . . . . . . . . . . . . . . . . . . . . . . . 85
Cleaning Your Product. . . . . . . . . . . . . . . . . . . . . . . . . . . . . . . . . . . . . . . . . . . . . . . . . . . . . . 86
Cleaning the Exterior of the Product . . . . . . . . . . . . . . . . . . . . . . . . . . . . . . . . . . . . . . . 86
Cleaning the Interior of the Product . . . . . . . . . . . . . . . . . . . . . . . . . . . . . . . . . . . . . . . . 86
Cleaning the Filter . . . . . . . . . . . . . . . . . . . . . . . . . . . . . . . . . . . . . . . . . . . . . . . . . . . . . 87
Getting Maintenance Information. . . . . . . . . . . . . . . . . . . . . . . . . . . . . . . . . . . . . . . . . . . . . . 88
Transporting Your Product. . . . . . . . . . . . . . . . . . . . . . . . . . . . . . . . . . . . . . . . . . . . . . . . . . . 89
Chapter 5 Troubleshooting
Diagnosing the Problem . . . . . . . . . . . . . . . . . . . . . . . . . . . . . . . . . . . . . . . . . . . . . . . . . . . . 91
Error Indicators . . . . . . . . . . . . . . . . . . . . . . . . . . . . . . . . . . . . . . . . . . . . . . . . . . . . . . . 91
EPSON Total Disc Monitor . . . . . . . . . . . . . . . . . . . . . . . . . . . . . . . . . . . . . . . . . . . . . . 98
Checking Product Status . . . . . . . . . . . . . . . . . . . . . . . . . . . . . . . . . . . . . . . . . . . . . . . . . . . . 98
Using EPSON Total Disc Monitor . . . . . . . . . . . . . . . . . . . . . . . . . . . . . . . . . . . . . . . . . 98
Disc or the CD/DVD Tray Does Not Feed Correctly . . . . . . . . . . . . . . . . . . . . . . . . . . . . . . 100
Disc Does Not Feed. . . . . . . . . . . . . . . . . . . . . . . . . . . . . . . . . . . . . . . . . . . . . . . . . . . 100
Multiple Disc Feeds . . . . . . . . . . . . . . . . . . . . . . . . . . . . . . . . . . . . . . . . . . . . . . . . . . . 101
Disc Jams . . . . . . . . . . . . . . . . . . . . . . . . . . . . . . . . . . . . . . . . . . . . . . . . . . . . . . . . . . 101
Writing Problem . . . . . . . . . . . . . . . . . . . . . . . . . . . . . . . . . . . . . . . . . . . . . . . . . . . . . . . . . . 102
Cannot Write to the Disc . . . . . . . . . . . . . . . . . . . . . . . . . . . . . . . . . . . . . . . . . . . . . . . 102
Print Quality Problems. . . . . . . . . . . . . . . . . . . . . . . . . . . . . . . . . . . . . . . . . . . . . . . . . . . . . 103
Horizontal Banding. . . . . . . . . . . . . . . . . . . . . . . . . . . . . . . . . . . . . . . . . . . . . . . . . . . . 103
Vertical Misalignment. . . . . . . . . . . . . . . . . . . . . . . . . . . . . . . . . . . . . . . . . . . . . . . . . . 104
Banding . . . . . . . . . . . . . . . . . . . . . . . . . . . . . . . . . . . . . . . . . . . . . . . . . . . . . . . . . . . . 104
Incorrect or Missing Colors . . . . . . . . . . . . . . . . . . . . . . . . . . . . . . . . . . . . . . . . . . . . . 104
Blurry or Smeared Printout . . . . . . . . . . . . . . . . . . . . . . . . . . . . . . . . . . . . . . . . . . . . . 105
Miscellaneous Printout Problems . . . . . . . . . . . . . . . . . . . . . . . . . . . . . . . . . . . . . . . . . . . . 105
Incorrect or Garbled Characters . . . . . . . . . . . . . . . . . . . . . . . . . . . . . . . . . . . . . . . . . 105
Incorrect Margins . . . . . . . . . . . . . . . . . . . . . . . . . . . . . . . . . . . . . . . . . . . . . . . . . . . . . 106
Printout Has a Slight Slant . . . . . . . . . . . . . . . . . . . . . . . . . . . . . . . . . . . . . . . . . . . . . . 106
Printed Side is Smeared or Scuffed. . . . . . . . . . . . . . . . . . . . . . . . . . . . . . . . . . . . . . . 106
Printing is too Slow . . . . . . . . . . . . . . . . . . . . . . . . . . . . . . . . . . . . . . . . . . . . . . . . . . . 106
Ink Adheres to the Recording Surface . . . . . . . . . . . . . . . . . . . . . . . . . . . . . . . . . . . . . 107
The Product Does Not Function . . . . . . . . . . . . . . . . . . . . . . . . . . . . . . . . . . . . . . . . . . . . . 107
All Lights Are Off . . . . . . . . . . . . . . . . . . . . . . . . . . . . . . . . . . . . . . . . . . . . . . . . . . . . . 107
Contents 5
Page 6

Lights Came On and then Went Out . . . . . . . . . . . . . . . . . . . . . . . . . . . . . . . . . . . . . . 107
Only the Power Light is On . . . . . . . . . . . . . . . . . . . . . . . . . . . . . . . . . . . . . . . . . . . . . 108
The Ink Light is Flashing or is On after you Replace the Cartridge . . . . . . . . . . . . . . . 108
Software Cannot be Installed. . . . . . . . . . . . . . . . . . . . . . . . . . . . . . . . . . . . . . . . . . . . 108
Ink Pad Nearly Full Message is Displayed by the Software. . . . . . . . . . . . . . . . . . . . . 109
Disc Cannot be Published . . . . . . . . . . . . . . . . . . . . . . . . . . . . . . . . . . . . . . . . . . . . . . 109
Disc Information Cannot be Read . . . . . . . . . . . . . . . . . . . . . . . . . . . . . . . . . . . . . . . . 109
DVD Drive of the Product is not Displayed when You Click
"Safely Remove Hardware" Icon . . . . . . . . . . . . . . . . . . . . . . . . . . . . . . . . . . . . . . . 109
Appendix A Where To Get Help
Contacting Customer Support . . . . . . . . . . . . . . . . . . . . . . . . . . . . . . . . . . . . . . . . . . . . . . . 110
Before Contacting Epson . . . . . . . . . . . . . . . . . . . . . . . . . . . . . . . . . . . . . . . . . . . . . . . 110
Help for Users in the United States and Canada. . . . . . . . . . . . . . . . . . . . . . . . . . . . . 110
Help for Users in the Europe (EMEA) . . . . . . . . . . . . . . . . . . . . . . . . . . . . . . . . . . . . . 111
Help for Australia . . . . . . . . . . . . . . . . . . . . . . . . . . . . . . . . . . . . . . . . . . . . . . . . . . . . . 111
Appendix B Product Information
Product Parts and Control Panel Functions. . . . . . . . . . . . . . . . . . . . . . . . . . . . . . . . . . . . . 112
Product Parts . . . . . . . . . . . . . . . . . . . . . . . . . . . . . . . . . . . . . . . . . . . . . . . . . . . . . . . . 112
Control Panel . . . . . . . . . . . . . . . . . . . . . . . . . . . . . . . . . . . . . . . . . . . . . . . . . . . . . . . . 114
Ink and Disc. . . . . . . . . . . . . . . . . . . . . . . . . . . . . . . . . . . . . . . . . . . . . . . . . . . . . . . . . . . . . 115
Ink Cartridges. . . . . . . . . . . . . . . . . . . . . . . . . . . . . . . . . . . . . . . . . . . . . . . . . . . . . . . . 115
Discs . . . . . . . . . . . . . . . . . . . . . . . . . . . . . . . . . . . . . . . . . . . . . . . . . . . . . . . . . . . . . . 116
Technical Specifications . . . . . . . . . . . . . . . . . . . . . . . . . . . . . . . . . . . . . . . . . . . . . . . . . . . 116
Discs . . . . . . . . . . . . . . . . . . . . . . . . . . . . . . . . . . . . . . . . . . . . . . . . . . . . . . . . . . . . . . 116
Ink Cartridges. . . . . . . . . . . . . . . . . . . . . . . . . . . . . . . . . . . . . . . . . . . . . . . . . . . . . . . . 120
Job Processing . . . . . . . . . . . . . . . . . . . . . . . . . . . . . . . . . . . . . . . . . . . . . . . . . . . . . . 121
Number of Products that can be Connected to One Computer . . . . . . . . . . . . . . . . . . 121
Printing. . . . . . . . . . . . . . . . . . . . . . . . . . . . . . . . . . . . . . . . . . . . . . . . . . . . . . . . . . . . . 121
Write Speed . . . . . . . . . . . . . . . . . . . . . . . . . . . . . . . . . . . . . . . . . . . . . . . . . . . . . . . . . 122
Mechanical. . . . . . . . . . . . . . . . . . . . . . . . . . . . . . . . . . . . . . . . . . . . . . . . . . . . . . . . . . 122
Electrical . . . . . . . . . . . . . . . . . . . . . . . . . . . . . . . . . . . . . . . . . . . . . . . . . . . . . . . . . . . 122
Environmental . . . . . . . . . . . . . . . . . . . . . . . . . . . . . . . . . . . . . . . . . . . . . . . . . . . . . . . 123
Standards and Approvals. . . . . . . . . . . . . . . . . . . . . . . . . . . . . . . . . . . . . . . . . . . . . . . 123
Interface . . . . . . . . . . . . . . . . . . . . . . . . . . . . . . . . . . . . . . . . . . . . . . . . . . . . . . . . . . . . 123
Lifetime . . . . . . . . . . . . . . . . . . . . . . . . . . . . . . . . . . . . . . . . . . . . . . . . . . . . . . . . . . . . 124
Contents 6
Page 7

Important Notice and Safety Instructions
Important Note
You may use the software to operate the EPSON PP-100. You may use the EPSON
PP-100 to copy materials onto media, including but not limited to CDs and DVDs. You
agree to respect the rights of copyright owners. EPSON shall have no liability for, and you
shall hold EPSON harmless from, any copyright infringement by you or your employees,
representatives, or agents.
Important Safety Instructions
Read all the instructions in this section before using the product. Also, be sure to follow all
warnings and instructions marked on the product.
Setting up the Product
Observe the following when setting up the product:
❏ Do not block or cover the vents and openings in the product.
❏ Use only the type of power source indicated on the product’s label.
❏ Use only the power cord that comes with the product. Use of another cord may result in
fire or electric shock.
❏ The product’s power cord is for use with this product only. Use with other equipment
may result in fire or electric shock.
❏ Be sure the AC power cord meets the relevant local safety standard.
❏ For safety reasons, make sure to ground the power cord.
❏ Avoid using outlets on the same circuit as photocopiers or air control systems that
regularly switch on and off.
❏ Avoid electrical outlets controlled by wall switches or automatic timers.
❏ Keep the entire computer system away from potential sources of electromagnetic
interference, such as loudspeakers or the base units of cordless telephones.
Important Notice and Safety Instructions 7
Page 8

❏ Do not use a damaged or frayed power cord.
❏ If you use an extension cord with the product, make sure that the total ampere rating of
the devices plugged into the extension cord does not exceed the cord’s ampere rating.
Also, make sure that the total ampere rating of all devices plugged into the wall outlet
does not exceed the wall outlet’s ampere rating.
❏ Do not attempt to service the product yourself.
❏ Unplug the product and refer servicing to qualified service personnel under the
following conditions:
The power cord or plug is damaged; liquid has entered the product; the product has
been dropped or the casing is damaged; the product does not operate normally or
exhibits a distinct change in performance.
❏ If you plan to use the product in Germany, the building installation must be protected by
a 10 or 16 amp circuit breaker to provide adequate short-circuit protection and
over-current protection for the product.
❏ When connecting the product to a computer or other device with a cable, ensure the
correct orientation of the connectors. Each connector has only one correct orientation.
Inserting a connector in the wrong orientation may damage both devices connected by
the cable.
❏ If damage occurs to the plug, replace the cord set or consult a qualified electrician. If
there are fuses in the plug, make sure you replace them with fuses of the correct size
and rating.
❏ Commercially available replacement drives do not function on this product.
Choosing a Place for the Product
Observe the following when choosing a place for the product:
❏ Place the product on a flat, stable surface that extends beyond the base of the product
in all directions. If you place the product by the wall, leave more than 10 cm (3.94")
between the back of the product and the wall. The product will not operate properly if it
is tilted at an angle.
❏ Leave enough space in front of the product for the disc cover to be fully opened.
❏ Avoid places subject to rapid changes in temperature and humidity. Also, keep the
product away from direct sunlight, strong light, or heat sources.
❏ Avoid places subject to dust, shocks, vibrations, or cigarette smoke.
❏ Leave enough room around the product to allow for sufficient ventilation.
Important Notice and Safety Instructions 8
Page 9

❏ Place the product near a wall outlet where the plug can be easily unplugged.
Using the Product
Observe the following when using the product:
❏ Do not insert objects in the product.
❏ Take care not to spill liquid on the product.
❏ Do not use aerosol products that contain flammable gases inside or around this
product. Doing so may cause fire.
❏ Always turn the product off using the P power button. When this button is pressed, the
power light flashes. Do not unplug the product or turn off the power to the outlet
until the power light stops flashing.
❏ Leave the ink cartridges installed. Removing the cartridges can dry out the print head
and may prevent the product from printing.
❏ Be careful not to trap your fingers when closing the disc cover.
❏ The product uses galvanized sheet metal, and this may cause rusting at the edges;
however, this does not cause any harm to the function of the product.
❏ Do not place any drink or liquid on the product as penetration by liquid inside the
product will cause a malfunction.
❏ Do not open disc cover while running a job (busy indicator is flashing), unless the
application instructs to add or remove discs. This may affect write quality or print
quality. Also, for safety reasons, do not put your hands inside the product while
beeping, as arm is still moving.
❏ The product cannot be used as a shared printer using the Windows sharing setting.
Handling Ink Cartridges
Observe the following when handling the ink cartridges:
❏ Keep ink cartridges out of the reach of children. Do not allow children to drink from or
handle the cartridges.
❏ Do not shake ink cartridges; this can cause leakage.
Important Notice and Safety Instructions 9
Page 10

❏ Be careful when you handle used ink cartridges, as there may be some ink remaining
around the ink supply port. If ink gets on your skin, wash the area thoroughly with soap
and water. If ink gets into your eyes, flush them immediately with water. If discomfort or
vision problems remain after a thorough flushing, see a doctor immediately.
❏ Do not remove or tear the label on the cartridge; this can cause leakage.
❏ Install the ink cartridge immediately after you remove it from its package. If you leave a
cartridge unpacked for a long time before using it, normal printing may not be possible.
❏ Use the ink cartridge before the expiration date printed on its package.
❏ Do not dismantle ink cartridges or try to refill them. This could damage the print head.
❏ After bringing an ink cartridge inside from a cold storage site, allow it to warm up at
room temperature for at least three hours before using it.
❏ Store ink cartridges in a cool, dark place.
❏ Do not touch the green IC chip on the side of the cartridge. Doing so may prevent
normal operation and printing.
❏ The IC chip on this ink cartridge retains a variety of cartridge-related information, such
as the ink cartridge status, so that the cartridge may be removed and reinserted freely.
However, each time the cartridge is inserted, some ink is consumed because the
product automatically performs a reliability check.
❏ Do not place ink cartridges with the ink supply area facing down. This may result in ink
leakage. Also, dirt attached to the ink supply area may result in the product not
functioning properly.
Notice for CD/DVD Discs
Before using the product, an operation check should be conducted to ensure the unit’s
functionality. Also, back up the data on the CD/DVD, if needed. Data may be damaged or
lost in the following cases:
-Influence of static or electrical noise
-Incorrect usage
-Malfunction or repair
-Damage due to natural disaster
Epson does not hold any responsibility for lost or damaged data, due to causes not limited
to those listed above, even the product is under warranty period.
Important Notice and Safety Instructions 10
Page 11

Concerning Incidental Loss Arising out of Use of this Product
Should the expected results from this product, including bundled software, not be obtained,
we cannot compensate for incidental loss arising from that fact, such as expenses required
for use of this product and lost earnings that would have been gained through the use of
this product.
About Usage Limitation
❏ When this product is used for applications requiring high reliability / safety, such as
transportation devices related to aviation, rail, marine, automotive, etc.; disaster
prevention devices; various safety devices, etc.; or functional / precision devices, etc.,
you should use this product only after giving consideration to including fail-safes and
redundancies into your design to maintain safety and total system reliability. Because
this product was not intended for use in applications requiring extremely high reliability
/ safety, such as aerospace equipment, main communication equipment, nuclear power
control equipment, or medical equipment related to direct medical care, etc., please
make your own judgment on this product’s suitability after a full evaluation.
❏ When copying a CD or DVD, you must meet the conditions that the work recorded on
the discs does not have a copyright, that you have a copyright for the work, that you
have received permission from the author, or that copying of the work onto the discs is
legally approved. Copying of a CD or DVD without meeting these conditions is illegal
and should not be done.
❏ This product is for business use and not for household use.
Important Notice and Safety Instructions 11
Page 12

Warnings, Cautions, and Notes
Warnings, Cautions, and Notes in this User's Guide as indicated below have the following
meanings.
Warnings
must be followed carefully to avoid bodily injury.
w
Cautions
must be observed to avoid damage to your equipment.
c
Notes
contain important information and useful tips on the operation of the product.
WARNING
The connection of a non-shielded interface cable to this product will invalidate the EMC
standards of this device. You are cautioned that changes or modifications not expressly
approved by Seiko Epson Corporation could void your authority to operate the equipment.
FCC Compliance Statement For American Users
This equipment has been tested and found to comply with the limits for a Class B digital
device, pursuant to Part 15 of the FCC Rules. These limits are designed to provide
reasonable protection against harmful interference in a residential installation.This
equipment generates, uses, and can radiate radio frequency energy and, if not installed
and used in accordance with the instruction manual, may cause harmful interference to
radio communications. However, there is no guarantee that interference will not occur in a
particular installation. If this equipment does cause harmful interference to radio or
television reception, which can be determined by turning the equipment off and on, the
user is encouraged to try to correct the interference by one or more of the following
measures:
-Reorient or relocate the receiving antenna.
-Increase the separation between the equipment and receiver.
-Connect the equipment into an outlet on a circuit different from that to which the receiver
is connected.
-Consult the dealer or an experienced radio/TV technician for help.
For Canadian Users
This Class B digital apparatus complies with Canadian ICES-003.
Important Notice and Safety Instructions 12
Page 13

DECLARATION of CONFORMITY
According to 47CFR, Part 2 and 15 for Class B Personal Computers and Peripherals;
and/or CPU Boards and Power Supplies used with Class B Personal Computers:
We: EPSON AMERICA, INC.
Located at: MS 3-13
3840 Kilroy Airport Way
Long Beach, CA 90806
Telephone: (562) 290-5254
Declare under sole responsibility that the product identified herein, complies with 47CFR
Part 2 and 15 of the FCC rules as a Class B digital device. Each product marketed, is
identical to the representative unit tested and found to be compliant with the standards.
Records maintained continue to reflect the equipment being produced can be expected to
be within the variation accepted, due to quantity production and testing on a statistical
basis as required by 47CFR §2.909 Operation is subject to the following two conditions: (1)
this device may not cause harmful interference, and (2) this device must accept any
interference received, including interference that may cause undesired operation.
Trade Name: EPSON
Type of Product: DVD Publisher / DVD Printer
Model: N131A / N151A
Important Notice and Safety Instructions 13
Page 14

Chapter 1
Using Your Software
System Requirements
Using the Product
Windows requirements
To use this product, you must have any of the following Windows operating systems
installed.
Operating system Windows 2000 Professional SP4 or later
Windows XP (32bit, SP2 or later)
Home Edition/Professional
Windows Vista (32bit/64bit, SP1 or later)
Home Basic/Home Premium/Business/Enterprise/
Ultimate
Windows 7 (32bit/64bit)
Home Premium/Professional/Enterprise/Ultimate
Windows Server 2003 (32bit, SP2 or later)
Standard/Enterprise
Windows Server 2003 R2 (32bit, SP2 or later)
Standard/Enterprise
Windows Server 2008 (32bit/64bit, SP2 or later)
Standard/Enterprise
Windows Server 2008 R2 (64bit)
Standard/Enterprise
CPU Windows 2000
Windows XP
Windows Vista
Windows 7
Windows Server 2003
Windows Server 2003 R2
Windows Server 2008
Windows Server 2008 R2
Intel Pentium 4 (or compatible processor) 1.4 GHz or
faster processor
Intel Pentium 4 (or compatible processor) 2.0 GHz or
faster processor
Using Your Software 14
Page 15

Memory Windows 2000
Windows XP
Windows Server 2003
Windows Server 2003 R2
512 MB or more (1 GB or more recommended)
Windows Vista
Windows 7 32bit
Windows 7 64bit
Windows Server 2008
Windows Server 2008 R2
HDD
available
space
HDD rotation speed 7200 rpm or faster
Interface USB 2.0
Windows 2000
Windows XP
Windows Server 2003
Windows Server 2003 R2
Windows Vista 25 GB or more
Windows 7 32bit 26 GB or more
Windows 7 64bit 30 GB or more
Windows Server 2008
Windows Server 2008 R2
1 GB or more
2 GB or more
10 GB or more
12.9 GB or more
50 GB or more
❏ Compatible with USB 2.0 standard
❏ Ensure Hi-Speed USB performance
Display XGA (1024 x 768 pixels) or higher
65,536 colors or more
Other Making music CD: Requires sound device with
appropriate driver installed.
Windows Media Player 6.4 or higher must be installed.
Note:
❏ If your file system is FAT, you may not write to a DVD.
❏ ATI South Bridge chip set IPX460 or earlier is incompatible with this product.
❏ Refer to the URLs listed on pages “Help for Users in the United States and Canada” on page
110 and “Help for Users in the Europe (EMEA)” on page 111 for chip sets that are not
supported.
❏ The product may not function properly if third party writing software is installed, anti-virus
software is installed, and another USB device is connected.
❏ Use a drive that supports commands and operations compatible with MMC 4.0 or higher and
can read subchannel data as a source drive for copying.
Using Your Software 15
Page 16

Setting a Working Folder and Log
After the software installation, create a Working Folder on the hard disk for the disc
publishing operation. You can also set for log files. Log files are useful for service and
support of the product.
Note:
These settings are reflected for all the CD/DVD publishers registered (except for the PP-100N).
1. Select Start ( in Windows 7 or Windows Vista) - All Programs (or Programs) EPSON Total Disc Maker - EPSON Total Disc Setup.
The EPSON Total Disc Setup will start.
2. Select Common Setting for Publishing from the Tool menu.
The Common Setting for Publishing screen will appear.
3. Click Browse to select a folder to create a Working Folder.
Note:
Select a drive with sufficient free space. For information on the necessary HDD space, see the
following section.
& See “System Requirements” on page 14.
4. Check the checkbox for Save publication log if you want to save the usage history of
the product.
Note:
When the log files saved in the computer exceed 200MB, the older ones will be deleted (starting
with the oldest one) to make room for new ones.
5. Click OK.
Using Your Software 16
Page 17

Adding the Product
Use the EPSON Total Disc Setup to add the product (CD/DVD publisher) to the computer.
Note:
The product must be added when the connection point (port) is set manually. However, the product
does not need to be added when the connection point (port) is set automatically.
1. Make sure that the product is connected to the computer via the USB cable and that the
product is turned on.
2. Select Start ( in Windows 7 or Windows Vista) - All Programs (or Programs) EPSON Total Disc Maker - EPSON Total Disc Setup.
The EPSON Total Disc Setup will start.
3. Click Add.
4. Select Local CD/DVD publisher, then click Next.
5. Select the product to be added from CD/DVD Publisher List, then click Next.
6. Enter any name and click OK.
Using Your Software 17
Page 18
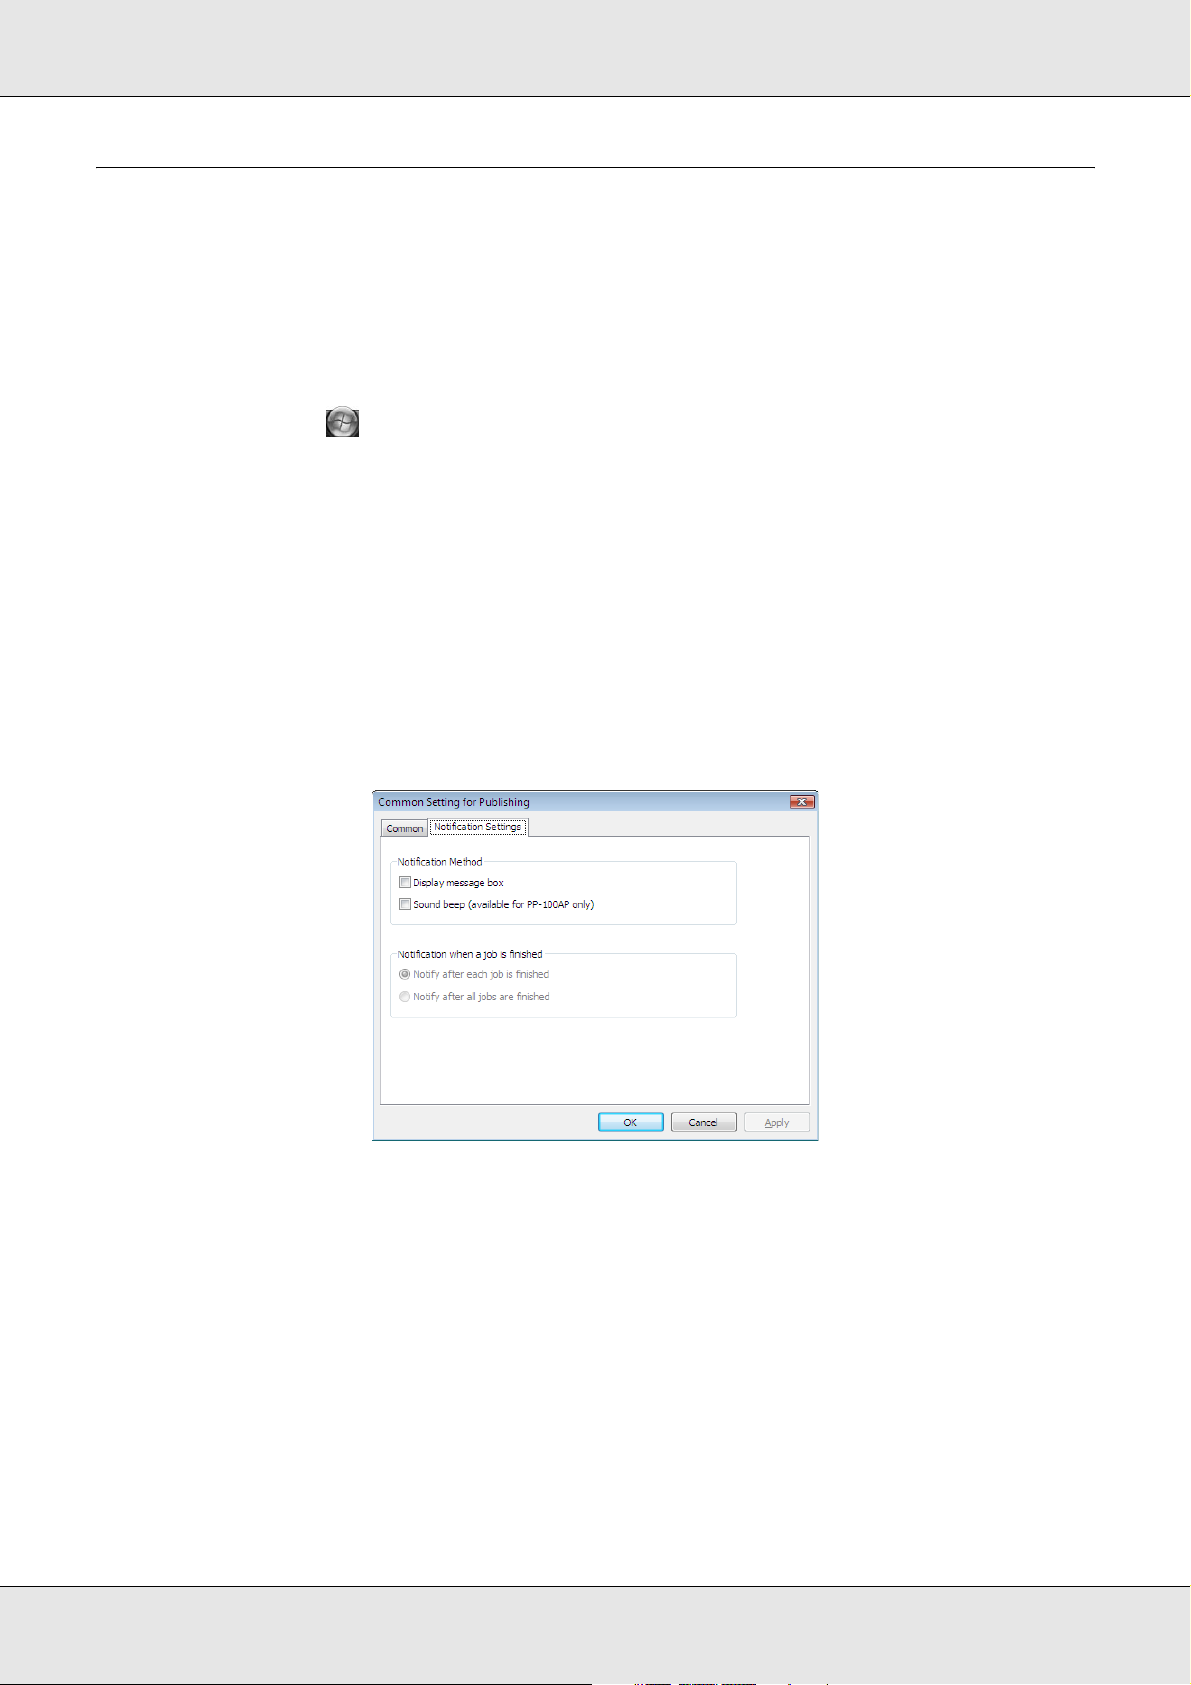
Setting for Notification of Job Completion
A setting can be made to display a message on the screen that notifies you that a job (or
jobs) is finished.
Note:
This setting is reflected for all the CD/DVD publishers registered.
1. Select Start ( in Windows 7 or Windows Vista) - All Programs (or Programs) EPSON Total Disc Maker - EPSON Total Disc Setup.
The EPSON Total Disc Setup will start.
2. Select Common Setting for Publishing from the Tool menu.
The Common Setting for Publishing screen will appear.
3. Click Notification Settings tab.
The Notification Settings screen will appear.
4. Check Display message box for Notification Method.
5. Select either one of the options for Notification when a job is finished.
6. Click OK.
Using Your Software 18
Page 19

Overview of Applications
The EPSON Total Disc Maker software included with the product allows you to write or
copy CDs/DVDs, create CD/DVD labels, and publish CDs/DVDs.
EPSON Total Disc Maker
EPSON Total Disc Maker lets you write CDs/DVDs and print CD/DVD labels. The process
used to write CDs/DVDs and print CD/DVD labels is called "Publish" in the EPSON Total
Disc Maker program. Using EPSON Total Disc Maker, you can also duplicate CDs/DVDs.
EPSON Total Disc Monitor
EPSON Total Disc Monitor is a utility that monitors the product and gives you information
about its current status. Using EPSON Total Disc Monitor, you can also pause/cancel jobs
or change the order of jobs to be processed.
EPSON Total Disc Setup
EPSON Total Disc Setup is a utility to register the product to the computer and to set basic
settings to publish CD/DVDs, such as settings for the publish mode, stackers, and drives.
Using EPSON Total Disc Maker
Use EPSON Total Disc Maker to do the following:
❏ Writing data to DVDs, video to DVDs, data to CDs, music to CDs, music and data to
CDs, or video to CDs, or copying CD/DVDs.
❏ Creating and editing CD/DVD labels.
Starting EPSON Total Disc Maker
Click Start ( in Windows 7 or Windows Vista), point to All Programs or Programs
Point to EPSON Total Disc Maker, and then click EPSON Total Disc Maker.
Using Your Software 19
Page 20

Getting Information through Online Help
You can access online help for EPSON Total Disc Maker from the software or from the
Windows Start menu.
In window of EPSON Total Disc Maker, EPSON Total Disc Monitor, or EPSON Total Disc
Setup, click the button to display online help for each utility.
Overview of Printer Driver
The printer driver lets you choose from a wide variety of settings to get the best printing
results.
Accessing the Printer Driver
You can access the printer driver from EPSON Total Disc Maker, EPSON Total Disc
Setup, most Windows-based applications, and the Windows Start menu.
If displayed from EPSON Total Disc Maker
The settings are only reflected in EPSON Total Disc Maker. The settings are lost when you
exit EPSON Total Disc Maker.
If displayed from EPSON Total Disc Setup or the Start menu
The information you set is saved as the printer driver settings, and after this, it is reflected
in the printer settings for EPSON Total Disc Maker and all other applications.
Refer to the following sections to access the printer driver.
From EPSON Total Disc Maker
1. Click Start ( in Windows 7 or Windows Vista), point to All Programs or Programs.
Point to EPSON Total Disc Maker, and then click EPSON Total Disc Maker.
2. Select Print Settings from Tool menu.
From EPSON Total Disc Setup
1. Click Start ( in Windows 7 or Windows Vista), point to All Programs or Programs.
Point to EPSON Total Disc Maker, and then click EPSON Total Disc Setup.
2. Select CD/DVD Publisher then click Properties.
Using Your Software 20
Page 21

From Windows applications
1. Click Print or Print Setup in the File menu.
2. In the window that appears, click Printer, Setup, Options, Preferences, or
Properties. (Depending on your application, you may need to click one or a
combination of these buttons.)
From the Start menu
1. Windows 7:
Click , Control Panel, then click Devices and Printers.
Windows Vista/Windows Server 2008:
Click or Start, Control Panel, then click Printers.
Windows XP Professional:
Click Start, then click Printers and Faxes.
Windows XP Home Edition/Windows Server 2003:
Click Start, Control Panel, then click Printers and Faxes.
Windows 2000:
Click Start, point to Settings, then click Printers or Printers and Faxes.
2. Right-click EPSON PP-100PRN, then click Printing Preferences in the menu.
Getting Information through Online Help
You can access online help for items in the printer driver from your application or from the
Windows Start menu.
& See “Accessing the Printer Driver” on page 20.
In the printer driver window, try one of the following procedures.
❏ Right-click the item, then select Help.
❏ Click Help.
Using Your Software 21
Page 22

Uninstalling Software
You can uninstall the software by following the steps below.
Note:
❏ In Windows 7, Windows Vista, or Windows Server 2008, you may be asked for an administrator
password or confirmation when uninstalling the software. When asked for a password, enter the
password to proceed with the operation.
❏ In Windows XP, Windows 2000, or Windows Server 2003, log onto Windows as a user with
administrator privileges (belonging to the administrator group) to uninstall the software.
❏ When installing the software, various Microsoft components may be installed. Some of them
may not be uninstalled when uninstalling the software.
1. Close all applications.
2. Windows 7, Windows Vista, Windows XP, Windows Server 2008, or Windows
Server 2003:
Click Start ( in Windows 7 or Windows Vista), and then select Control Panel.
Windows 2000:
Click Start, point to Settings, and then select Control Panel.
3. Click Uninstall a program (Windows 7, Windows Vista, or Windows Server 2008) or
double-click the Add or Remove Programs icon (Windows XP, Windows 2000, or
Windows Server 2003).
4. Choose EPSON Total Disc Maker.
5. Click Uninstall/Change (Windows 7, Windows Vista, or Windows Server 2008) or click
Change/Remove (Windows XP, Windows 2000, or Windows Server 2003).
Note:
If you cannot perform the uninstallation due to any problem, uninstall the software by
double-clicking setup.exe in PP-100 Series Utility & Documents Disc.
6. Select Remove and click Next.
7. When the confirmation message appears, click Yes.
8. Follow the on-screen instructions.
Using Your Software 22
Page 23

Chapter 2
Publishing Discs
Introduction
This section guides you through the procedures for creating and printing CDs/DVDs.
Note:
For information on CDs/DVDs, see the following section.
& See “Discs” on page 116.
Turning Power On/off
This section describes how to turn on/off power.
Turning power on
1. Connect the power cable.
2. Press P Power button until the power light flashes.
Power light flashes in green, then stays on.
Turning power off
Press the P Power button. The Power light will flash in green then turn off; then
power is turned off.
Caution:
❏ Fan will operate after turning power off, but it will automatically stop after 15 minutes.
c
❏ If the product is operating, wait for 10 seconds after operation is stopped, then turn off
power.
❏ The product may not be recognized by the computer when the power is turned back on
while fan is operating. In this case, disconnect the USB cable and connect it again.
Note:
❏ If turning off the product while power on the PC is on, follow the procedure below. If the product
is turned off without following the procedure, data in the PC maybe damaged.
1. If Total Disc Maker, Total Disc Monitor, or Total Disc Setup is running, close the software.
2. Double click "Safely Remove Hardware" on the task tray.
3. Select DVD drive on the product and select Stop.
Publishing Discs 23
Page 24

Overview of Publishing Modes
To write data to CDs/DVDs and to print labels that you created/edited are called “Publish”
in EPSON Total Disc Maker. The product has three kinds of publishing modes.
Standard Mode
This mode uses stacker 1 as the input stacker, and stacker 2 or 4 as the output stacker.
When stacker 2 is selected as the output stacker, up to 50 CDs/DVDs can be created at
once. Also, if you refill discs in the input stacker and take out published discs from the
output stacker at the same time, up to 1000 CDs/DVDs can be published in a single job.
If stacker 4 is selected as the output stacker, discs can be removed without stopping the
product while running a job.
Note:
This mode does not use stacker 3.
& See “Standard Mode” on page 30.
External Output Mode
This mode uses stacker 1 and 2 as the input stackers, and stacker 3 or 4 as the output
stacker.
Different types of discs (CD and DVD) can be loaded into each of the 2 stackers and can
create different types of discs. This is ideal for creating small batches of discs at once.
If the same type of discs are loaded into stacker 1 and 2 and Auto is selected for the input
stacker setting, up to 100 CDs/DVDs can be continuously published by taking out
published discs without refilling discs.
Up to 1000 CDs/DVDs can be continuously published in a single job by refilling discs and
taking out published discs.
If stacker 4 is selected as the output stacker, discs can be removed without stopping the
product while running a job.
Note:
This mode does not use stacker 3 if you select stacker 4 as the output stacker.
& See “External Output Mode” on page 42.
Publishing Discs 24
Page 25

Batch Mode
This mode uses stacker 1 and 2 as the input stackers, and stacker 2 and 3 as the output
stackers.
You can create up to 100 CDs/DVDs at once without refilling and taking out discs while
publishing. Up to 1000 CDs/DVDs can be continuously published in a single job by refilling
discs and taking out published discs. To use this mode, you need to place stacker 3 into
the product.
& See “Batch Mode” on page 56.
Drive Settings
Drive to be used
Select Drive to Use from the following.
Use Both
Use both drive 1 and 2 to write data. Job will be efficiently processed by using 2 drives. If
trouble occurrs on either drive and it cannot write data, other drive will be used
automatically.
Use Drive 1 Only
Use only drive 1.
Use Drive 2 Only
Use only drive 2.
Number of write retries
Select 0 to 9 for the Number of write retries.
The Number of write retries is a setting to retry writing if a write error occurs.
Setting the Number of write retries will enable the job to continue without pausing if a write
error occurrs.
Publishing Discs 25
Page 26

Printer Settings
Printer name
Select Printer Name.
Note:
When changing the printer name, do not use Unicode characters. The device will not be recognized
correctly.
Failure error mark
If you check this check box, an error mark will be printed on any disc with a write error. This
is useful to identify the disc which encountered the write error.
The disc with the write error will be ejected to different stackers depending on the print
mode.
❏ Standard Mode: Ejected to stacker 4
❏ External Output Mode: Ejected to stacker 3 or 4
❏ Batch Mode: Ejected to stacker 2 or 3
Note:
The error mark will not be printed in the following cases.
❏ The job was canceled
❏ An incorrect disc type was found in the stacker
❏ Fatal error
❏ Not enough ink was left to print the error mark
Notice for CD/DVD Writing and Printing
❏ Store the stacker out of direct sunlight. A warped or damaged stacker may stop the
product from operating normally.
❏ Use only CDs/DVDs labeled as suitable for printing, for example “Printable on the label
surface” or “Printable with ink jet printers.”
❏ For more details on handling CDs/DVDs and for guidelines for writing data to
CDs/DVDs, refer to your CD/DVD documentation.
Publishing Discs 26
Page 27

❏ When using the product for the first time after storing it for a long time or after an error,
missing dots or ink stains may appears and print quality may be reduced. If publishing
a large number of discs, check print quality by publishing one disc in advance. If any
dots are missing, run head cleaning.
❏ When writing and printing discs separately, it is recommended to print after writing. If
you write discs after printing, ink may cause discs to stick to each other and result in a
transport error, or dirt, stains, or scratches on the disc may cause a write error.
❏ Printing on rib area may result in ink sticking, disc sticking, or color loss.
❏ Try to test print on a spare CD/DVD, and check the printed surface after waiting for one
full day, especially before printing a large number of CDs/DVDs.
❏ After printing the first copy, check the print quality to see if any dots are missing.
❏ Before using or touching the printed surface of your CDs/DVDs, make sure they are
completely dry and keep them out of direct sunlight.
❏ If the printed surface is sticky even after it has dried, do the following.
1. Change label type.
2. Change color saturation level.
3. Change the disc.
❏ Moisture on the printable surface may cause smearing.
❏ When using Epson specified discs, only [1] can be selected for Print Mode setting.
❏ Reprinting on the same CD/DVD may not improve the print quality.
❏ Be sure to clean the inside of the stacker before using if there is any dirt.
❏ Please check disc before printing, as the size of the receptor may vary.
❏ Ink may not bond if printed outside the receptor.
❏ If the product is operating, wait for 10 seconds after the operation is finished, and then
turn the power off.
❏ Data may be lost depending on the disc or storing condition; therefore, store important
data on multiple discs. Epson does not guarantee the data against loss.
❏ Do not insert a disc between DVD drive 1 and DVD drive 2, as you may not be able to
remove it.
❏ Do not insert an object like a screwdriver or clip into the CD/DVD slots as this may
cause a malfunction.
Publishing Discs 27
Page 28

❏ A published CD/DVD may not be readable on another type of drive or player due to
compatibility.
❏ The quality of the blank disc determines print and write quality. It is recommended to
use only the specified disc type.
❏ It is recommended that you run a compare while writing data.
❏ Making a backup is recommended if the data is important. Recorded data may degrade
over long storing periods. It is recommended to make backups periodically.
❏ Do not shock or vibrate the product while reading or writing, as this may result in
malfunction of the drive or make the disc unusable.
❏ Do not use a cracked, warped, or deformed disc because it may break in pieces inside
the product and cause malfunction or injury.
❏ A disc may become unreadable or unwritable if it has a small scratch or dirt; therefore,
please handle it with care.
❏ Hold disc by the edge, and do not touch either surface.
❏ The completed job display of EPSON Total Disc Monitor shows the number of
successes, number of failures, and number of discs printed.
❏ Do not use discs with lens cleaner, CD/DVD label sticker, or condensation on them as
it may cause mechanical error or malfunction.
❏ If the file system of the computer used is FAT, DVD writing may not be possible.
Precautions for Duplicating CDs/DVDs
❏ Please use a CD/DVD drive that supports MMC 4.0-compatible commands and
operates in conformity with MMC 4.0 as a source drive for copying. (Please check the
Epson website for a list of drives for which operation has been verified.)
❏ Copying CDs/DVDs may not be possible depending on the type of CD/DVD source
drive used. If problems occur, please try using a different CD/DVD source drive for
copying.
❏ To copy from the drive using EPSON Total DIsc Maker, please log onto Windows as a
user with administrator privileges (belonging to the administrator group). Otherwise,
copying is not possible, because certain parts of the drive cannot be accessed with a
limited user account.
❏ If the source disc is a multi-session CD/DVD, it cannot be copied.
Publishing Discs 28
Page 29

❏ If the source disc is a packet-written CD, it cannot be copied.
Printing on CDs/DVDs with a Commercially Available Software Package
When you print on CDs/DVDs with a commercially available software package that
supports CD/DVD printing, you have to make the following settings.
Size 124 x 124 mm (4.88 x 4.88")
Type CD/DVD Label, CD/DVD Premium Label, or Epson
Specified CD/DVD Label
Margins on all sides 2 mm (0.08")
Notice for Barcode Printing
❏ When printing barcodes and 2D codes, be sure to use Epson brand ink cartridges.
❏ When printing barcodes and 2D codes on discs that are not Epson specified CD/DVDs,
check whether the printed barcodes or 2D codes can be read correctly by a scanner.
❏ Do not place barcodes or 2D codes where they overlap other print data, or where they
extend beyond the print area.
❏ Barcodes and 2D codes use the ratio of black to white to indicate information. If ink
penetration results in a deterioration of the ratio of black to white, barcodes and 2D
codes may not be able to be read correctly. Check whether the printed barcodes and
2D codes can be read correctly by a scanner.
❏ If a barcode printed with bidirectional printing cannot be read correctly, align the print
head and then print the barcode, or print the barcode with unidirectional printing.
Publishing Discs 29
Page 30

Standard Mode
Loading CDs/DVDs
Follow the steps below to load CDs/DVDs.
1. Open the disc cover.
2. Take out stacker 1.
3. Fan a stack of discs to prevent them from sticking together. Be careful not to scratch the
recording side of the disc.
Publishing Discs 30
Page 31

4. Load CDs/DVDs into stacker 1 with the printable side facing up.
Caution:
Do not load the discs above the red line marked on the stacker; otherwise, the discs or
c
product may be damaged.
5. Insert stacker 1.
6. If you select stacker 4 as the output stacker, unlock the lock lever located on stacker 4.
Publishing Discs 31
Page 32

7. Close the disc cover.
Caution:
Do not install stacker 3.
c
Accessing EPSON Total Disc Maker
After loading discs into the stacker, access EPSON Total Disc Maker to make settings for
writing discs, and create the labels printed on the discs.
Click Start ( in Windows 7 or Windows Vista), point to All Programs or Programs.
Point to EPSON Total Disc Maker, and then click EPSON Total Disc Maker.
To learn how to use EPSON Total Disc Maker, go to the Help menu.
Registering Data
The following instructions explain how to register data to be written on discs.
1. Start EPSON Total Disc Maker and click Disc on the menu bar of EPSON Total Disc
Maker.
Publishing Discs 32
Page 33

2. Select type of discs to be published from the list, then click Apply.
Publishing Discs 33
Page 34

3. Drag and drop files or folders to the data tree or data list. For details, see Help for
EPSON Total Disc Maker.
Note:
To access Help for EPSON Total Disc Maker, select Help from the Help menu.
Publishing Discs 34
Page 35

Creating Labels
The following instructions explain how to create labels using templates provided with the
software.
1. Click Label on the menu bar of EPSON Total Disc Maker.
Publishing Discs 35
Page 36

2. Click Template tab and select a label design from the list, then click Apply.
Publishing Discs 36
Page 37

3. Make changes on the label as needed in the Background, Edit Item, and Layout tabs.
For details, see Help for EPSON Total Disc Maker.
Note:
To access Help for EPSON Total Disc Maker, select Help from the Help menu.
Publishing Discs 37
Page 38

Making the Stacker Settings
The following instructions explain how to set stackers.
1. Click Publish on the menu bar of EPSON Total Disc Maker.
2. Click Properties on the Publish screen of EPSON Total Disc Maker or EPSON Total
Disc Setup.
Publishing Discs 38
Page 39

3. Set Stacker Settings.
❏ Publish Mode: Select Standard Mode.
❏ Stacker 1: Select the type of discs that you loaded into stacker 1.
❏ Stacker 2: Output Stacker will be displayed.
4. Click OK.
Publishing Discs 39
Page 40

Publishing Discs
The following instructions explain how to publish CDs/DVDs.
1. Make the publish settings on the Publish screen of EPSON Total Disc Maker. For
details, see Help for EPSON Total Disc Maker.
Note:
To access Help for EPSON Total Disc Maker, select Help from the Help menu.
2. Click the Publish button.
Publishing Discs 40
Page 41

Caution:
❏ Do not open the disc cover while the product is publishing discs, unless the application
c
instructs to add or remove discs. This may affect write quality or print quality. Also, do not
put your hands inside the product while it is beeping, as arm is still moving.
❏ Beep will sound if you open disc cover while running a job, and the job will pause. Closing
the disc cover automatically resumes the job.
❏ Do not operate the stacker while the unit is beeping, as the arm may be damaged.
❏ If you need to open the disc cover, pause or cancel your job before opening it.
❏ Depending on the disc or the computer used, writing speed may become slower than the
set speed.
❏ Depending on the disc used, the recommended writing speed of the disc cannot be used.
In this case, reduce the writing speed. Especially with DVD±R DL, it is recommended to
write with slow speed.
Note:
If Windows shuts down while processing a job, the job may be resumed when restarting Windows
next time.
Publishing Discs 41
Page 42

External Output Mode
Loading CDs/DVDs
Follow the steps below to load CDs/DVDs.
1. Open the disc cover.
2. Take out stacker 1.
3. Fan a stack of discs to prevent them from sticking together. Be careful not to scratch the
recording side of the disc.
Publishing Discs 42
Page 43

4. Load CDs/DVDs into stacker 1 with the printable side facing up.
Caution:
Do not load the discs above the red line marked on the stacker; otherwise, the discs or
c
product may be damaged.
5. Insert stacker 1.
Publishing Discs 43
Page 44

6. Take out stacker 2.
7. Fan a stack of discs to prevent them from sticking together. Be careful not to scratch the
recording side of the disc.
8. Load CDs/DVDs into stacker 2 with the printable side facing up.
Caution:
Do not load the discs above the red line marked on the stacker; otherwise, the discs or
c
product may be damaged.
Publishing Discs 44
Page 45

9. Insert stacker 2.
10.If you select stacker 3 as the output stacker, insert stacker 3.
Caution:
❏ Make sure that there are no discs in stacker 3 and 4.
c
❏ Do not pull out stacker 4. Be sure to lock the lock lever located on stacker 4.
Publishing Discs 45
Page 46

11.If you select stacker 4 as the output stacker, unlock the lock lever located on stacker 4.
Caution:
Do not install stacker 3.
c
12.Close the disc cover.
Accessing EPSON Total Disc Maker
After loading discs into the stackers, access EPSON Total Disc Maker to make settings for
writing discs, and create the labels printed on the discs.
Click Start ( in Windows 7 or Windows Vista), point to All Programs or Programs.
Point to EPSON Total Disc Maker, and then click EPSON Total Disc Maker.
To learn how to use EPSON Total Disc Maker, go to the Help menu.
Registering Data
The following instructions explain how to register data to be written on discs.
1. Start EPSON Total Disc Maker and click Disc on the menu bar of EPSON Total Disc
Maker.
Publishing Discs 46
Page 47

2. Select type of discs to be published from the list, then click Apply.
Publishing Discs 47
Page 48

3. Drag and drop files or folders to the data tree or data list. For details, see Help for
EPSON Total Disc Maker.
Note:
To access Help for EPSON Total Disc Maker, select Help from the Help menu.
Publishing Discs 48
Page 49

Creating Labels
The following instructions explain how to create labels using templates provided with the
software.
1. Click Label on the menu bar of EPSON Total Disc Maker.
Publishing Discs 49
Page 50

2. Click Template tab and select a label design from the list, then click Apply.
Publishing Discs 50
Page 51

3. Make changes on the label as needed in the Background, Edit Item, and Layout tabs.
For details, see Help for EPSON Total Disc Maker.
Note:
To access Help for EPSON Total Disc Maker, select Help from the Help menu.
Publishing Discs 51
Page 52

Making the Stacker Settings
The following instructions explain how to set stackers.
1. Click Publish on the menu bar of EPSON Total Disc Maker.
2. Click Properties on the Publish screen of EPSON Total Disc Maker or EPSON Total
Disc Setup.
Publishing Discs 52
Page 53

3. Set Stacker Settings.
❏ Publish Mode: Select External Output Mode.
❏ Stacker 1: Select the type of discs that you loaded into stacker 1.
❏ Stacker 2: Select the type of discs that you loaded into stacker 2.
❏ Stacker 3: If you want to eject published discs to stacker 3, select Output
stacker.
If you want to eject published discs to stacker 4, select Do not
use.
4. Click OK.
Publishing Discs 53
Page 54

Publishing Discs
The following instructions explain how to publish CDs/DVDs.
1. Make the publish settings on the Publish screen of EPSON Total Disc Maker. For
details, see Help for EPSON Total Disc Maker.
Note:
To access Help for EPSON Total Disc Maker, select Help from the Help menu.
2. Click the Publish button.
Publishing Discs 54
Page 55

Caution:
❏ Do not open the disc cover while the product is publishing discs, unless the application
c
instructs to add or remove discs. This may affect write quality or print quality. Also, for
safety reasons, do not put your hands inside the product while it is beeping, as arm is still
moving.
❏ Beep will sound if you open disc cover while running a job, and the job will pause. Closing
the disc cover automatically resumes the job.
❏ Do not operate the stacker while the unit is beeping, as the arm may be damaged.
❏ If you need to open the disc cover, pause or cancel your job before opening it.
❏ Depending on the disc or the computer used, writing speed may become slower than the
set speed.
❏ Depending on the disc used, the recommended writing speed of the disc cannot be used.
In this case, reduce the writing speed. Especially with DVD±R DL, it is recommended to
write with slow speed.
Note:
If Windows shuts down while processing a job, the job may be resumed when restarting Windows
next time.
Publishing Discs 55
Page 56

Batch Mode
Loading CDs/DVDs
Follow the steps below to load CDs/DVDs.
1. Open the disc cover.
2. Take out stacker 1.
3. Fan a stack of discs to prevent them from sticking together. Be careful not to scratch the
recording side of the disc.
Publishing Discs 56
Page 57

4. Load CDs/DVDs into stacker 1 with the printable side facing up.
Caution:
Do not load the discs above the red line marked on the stacker; otherwise, the discs or
c
product may be damaged.
5. Insert stacker 1.
Publishing Discs 57
Page 58

6. Take out stacker 2.
7. Fan a stack of discs to prevent them from sticking together. Be careful not to scratch the
recording side of the disc.
8. Load CDs/DVDs into stacker 2 with the printable side facing up.
Caution:
Do not load the discs above the red line marked on the stacker; otherwise, the discs or
c
product may be damaged.
Publishing Discs 58
Page 59

9. Insert stacker 2.
10.Insert stacker 3.
Caution:
❏ Make sure that there are no discs in stacker 3 and 4.
c
❏ Do not pull out stacker 4. Be sure to lock the lock lever located on stacker 4.
Publishing Discs 59
Page 60

11.Close the disc cover.
Accessing EPSON Total Disc Maker
After loading discs into the stackers, access EPSON Total Disc Maker to make settings for
writing discs, and create the labels printed on the discs.
Click Start ( in Windows 7 or Windows Vista), point to All Programs or Programs.
Point to EPSON Total Disc Maker, and then click EPSON Total Disc Maker.
To learn how to use EPSON Total Disc Maker, go to the Help menu.
Publishing Discs 60
Page 61

Registering Data
The following instructions explain how to register data to be written on discs.
1. Start EPSON Total Disc Maker and click Disc on the menu bar of EPSON Total Disc
Maker.
2. Select type of discs to be published from the list, then click Apply.
Publishing Discs 61
Page 62

3. Drag and drop files or folders to the data tree or data list. For details, see Help for
EPSON Total Disc Maker.
Note:
To access Help for EPSON Total Disc Maker, select Help from the Help menu.
Publishing Discs 62
Page 63

Creating Labels
The following instructions explain how to create labels using templates provided with the
software.
1. Click Label on the menu bar of EPSON Total Disc Maker.
Publishing Discs 63
Page 64

2. Click Template tab and select a label design from the list, then click Apply.
Publishing Discs 64
Page 65

3. Make changes on the label as needed in the Background, Edit Item, and Layout tabs.
For details, see Help for EPSON Total Disc Maker.
Note:
To access Help for EPSON Total Disc Maker, select Help from the Help menu.
Publishing Discs 65
Page 66

Making the Stacker Settings
The following instructions explain how to set stackers.
1. Click Publish on the menu bar of EPSON Total Disc Maker.
2. Click Properties on the Publish screen of EPSON Total Disc Maker or EPSON Total
Disc Setup.
Publishing Discs 66
Page 67

3. Set Stacker Settings.
❏ Publish Mode: Select Batch Mode.
❏ Stacker 1: Select the type of discs that you loaded into stacker 1.
4. Click OK.
Publishing Discs 67
Page 68

Publishing Discs
1. Make the publish settings on the Publish screen of EPSON Total Disc Maker. For
details, see Help for EPSON Total Disc Maker.
Note:
To access Help for EPSON Total Disc Maker, select Help from the Help menu.
2. Click the Publish button.
Publishing Discs 68
Page 69

Caution:
❏ Do not open the covers while the product is publishing discs, unless the application
c
instructs to add or remove discs. This may affect write quality or print quality. Also, for
safety reasons, do not put your hands inside the product while it is beeping, as arm is still
moving.
❏ Beep will sound if you open disc cover while running a job, and the job will pause. Closing
the disc cover automatically resumes the job.
❏ Do not operate the stacker while the unit is beeping, as the arm may be damaged.
❏ If you need to open the covers, pause or cancel your job before opening it.
❏ Depending on the disc or the computer used, writing speed may become slower than the
set speed.
❏ Depending on the disc used, the recommended writing speed of the disc cannot be used.
In this case, reduce the writing speed. Especially with DVD±R DL, it is recommended to
write with slow speed.
Note:
If Windows shuts down while processing a job, the job may be resumed when restarting Windows
next time.
Taking Out Discs
Follow the steps below to take out the published discs from the stackers.
Caution:
If you select stacker 4 as the output stacker in Standard Mode or External Output Mode,
c
❏ Do not yank stacker 4 when pulling it out to remove published discs.
❏ Do not pull out stacker 4 when the stacker 4 LED is flashing fast. Discs may be damaged.
1. Open the disc cover (only for output to stacker 2 or 3), and take out the stacker.
2. Take out the published discs from the stacker. The output stacker differs according to
the publishing mode. Refer to the following table.
Output stacker Mode Number of discs
Stacker 2 Standard Mode
Batch Mode
Stacker 3 External Output Mode
Batch Mode
Up to about 50 discs
Up to about 50 discs
Publishing Discs 69
Page 70

Stacker 4 Standard Mode
External Output Mode
Stacker 2 Stacker 3 Stacker 4
Up to about 5 discs
Note:
❏ Be sure to let CDs and DVDs dry completely before using them or touching the printed surface.
Allow Epson specified discs to dry for at least 1 hour and other types of discs for at least 24
hours.
❏ If the print position is misaligned, adjust it using the printer driver. For details, refer to the printer
driver Help.
❏ If the ink smears, adjust the color saturation. For details, refer to the printer driver Help.
❏ When publishing discs using Batch Mode, the number of discs output to stacker 3 is not always
the same as the number of discs loaded into stacker 2. Also, the number of discs does not
always become 50. The same applies to the number of discs output to stacker 2. For Batch
Mode, the output stacker switches to stacker 2 when the ejected discs accumulated in stacker
3 reach the height limit. As a result, the number of discs output to the stacker depends on the
thickness of the discs used.
Publishing Discs 70
Page 71

Pausing Publishing
If you need to pause publishing, follow the instructions below.
When you start publishing, the screen of EPSON Total Disc Monitor appears on your
computer screen. Select the job you want to pause in the Unfinished Job list, and then
select Pause Job from the Job menu or click button.
Note:
❏ If there is a disc being published, the job is paused after the processing is finished.
❏ The processing of any subsequent job also does not start while the job is paused.
Publishing Discs 71
Page 72

Resuming Publishing
If you need to resume publishing, follow the instructions below.
Start EPSON Total Disc Monitor. Select the job you want to resume in the Unfinished Job
list, and then select Resume Job from the Job menu or click button.
Publishing Discs 72
Page 73

Canceling Publishing
If you need to cancel publishing, follow the instructions below.
Start EPSON Total Disc Monitor. Select the job you want to cancel in the Unfinished Job
list, and then select Cancel Job from the Job menu or click button.
Note:
If a disc is being published, that processing is stopped, and the disc is output to the output stacker.
Publishing Discs 73
Page 74

Priority Publishing
If you need to process a job before the others when more than one job is being published,
follow the instructions below.
Start EPSON Total Disc Monitor. Select the job you want to give priority to in the Unfinished
Job list, and then select Priority Publishing from the Job menu or click button. The
selected job will be processed after the job in progress.
Note:
Any job cannot be given priority before such operations as nozzle checking, aligning print head, and
correcting printing position.
Publishing Discs 74
Page 75

Chapter 3
Replacing Ink Cartridges
Checking the Ink Cartridge Status
Note:
❏ Epson cannot guarantee the quality or reliability of ink not made by EPSON.
❏ When an ink cartridge is running low, the status is displayed on the EPSON Total Disc Monitor.
To check the ink cartridge status, do the following:
❏ EPSON Total Disc Monitor appears automatically when you start a job. You can check
the ink cartridge status from this window.
You can also run EPSON Total Disc Monitor from the Start menu.
& See “Using EPSON Total Disc Monitor” on page 98.
Note:
If any of the ink cartridges installed in the product is broken, incompatible with the product
model, or improperly installed, EPSON Total Disc Monitor will not display an accurate
calculation of the ink cartridge status. Be sure to replace or reinstall any such ink cartridge with
an ink cartridge supported by the product.
Replacing Ink Cartridges 75
Page 76

Precautions on Ink Cartridge Replacement
Read all the instructions in this section before replacing the ink cartridges.
❏ Install all six ink cartridges. Disc publishing (write/print) cannot be done even if only one
ink cartridge is missing.
❏ This product uses ink cartridges equipped with an IC chip that monitors the amount of
ink used by each cartridge. Cartridges are usable even if they are removed and
reinserted. However, some ink is consumed each time cartridges are inserted, because
the product automatically checks their reliability.
❏ The valve in the ink supply port is designed to contain any excess ink that may be
released. However, careful handling is recommended. Do not touch the supply port of
the ink cartridge or its surrounding area.
❏ Ink is consumed during the following operations: ink charging when an ink cartridge is
installed, print head cleaning, and automatic cleaning executed periodically.
❏ For maximum ink efficiency, only remove an ink cartridge when you are ready to
replace it. Ink cartridges with low ink status may not be used when reinserted.
❏ Do not refill the ink cartridges. Other products not manufactured by Epson may cause
damage that is not covered by Epson's warranties, and under certain circumstances,
may cause erratic product behavior.
❏ Keep ink cartridges out of the reach of children. Do not allow children to drink from or
handle the cartridges.
❏ Be careful when you handle used ink cartridges, as there may be some ink around the
ink supply port. If ink gets on your skin, wash the area thoroughly with soap and water.
If ink gets into your eyes, flush them immediately with water. If discomfort or vision
problems continue after a thorough flushing, see a doctor immediately.
❏ Epson recommends the use of genuine Epson ink cartridges. The use of non-genuine
ink may cause damage that is not covered by Epson's warranties, and under certain
circumstances, may cause erratic product behavior.
❏ Do not open the ink cartridge package until you are ready to install it in the product.
❏ Use ink cartridges within six months after opening the packages.
❏ Leave the old cartridge installed in the product until you have obtained a replacement;
otherwise, ink remaining in the print head nozzles may dry out.
Replacing Ink Cartridges 76
Page 77

❏ You cannot continue printing with an ink cartridge after it has reached its replacement
time, even if the other cartridges still contain ink. Before printing, replace the used
cartridge.
❏ Do not turn off the product or open the ink cartridge cover while loading ink (Power light
is flashing). Opening of covers may cause the ink to reload, resulting in more of the ink
being consumed. Also, normal printing may be disturbed.
❏ If the ink cartridge is not recognized even if it is correctly installed, dirt may be attached
to the green circuit board. Remove the cartridge, wipe the circuit board with a soft cloth
and install it again.
❏ Color adjustment of the product is based on the use of genuine Epson ink cartridges.
Use of non-genuine ink cartridges may result in reduced print quality and the product
performance may not be optimum.
❏ When the Ink lamp is flashing or lit, the ink cartridge is not correctly installed. Check that
it is installed correctly.
❏ If installing an ink cartridge does not provide normal printing, press the Cleaning button
for 3 seconds. If it does not resolve the problem, repeat the process for 1 or 2 times.
❏ By turning off the product using the Power button, print head is automatically covered
to prevent ink from drying. When not in use after installing ink cartridges, make sure to
turn off using the Power button. Do not unplug the power cord or shut down the breaker
while the power is on.
❏ When moving or transporting the product after installing ink cartridges, move or
transport with ink cartridges installed.
Replacing an Ink Cartridge
Note:
❏ Do not open the ink cartridge package until you are ready to install it in the product.
❏ To confirm the status of each ink cartridge, see the following section:
& See “Using EPSON Total Disc Monitor” on page 98.
Replacing Ink Cartridges 77
Page 78

This table describes the status of the lights and the actions you need to take.
Lights Action
Ink is low. Obtain a replacement ink cartridge.
The ink cartridge has reached its replacement time. Replace the
used ink cartridge with a new one.
: flashing : on
To replace an ink cartridge, follow the steps below.
Caution:
Do not remove the cartridge from the product until you are ready to replace it with another.
c
Note:
The illustrations show replacement of the light magenta ink cartridge, but the instructions are the
same for all the cartridges.
1. Make sure that the Power light is on, but not flashing.
2. Open the ink cartridge cover.
Note:
Wait for 4 seconds or more before removing the ink cartridge. Otherwise, ink may squirt.
Replacing Ink Cartridges 78
Page 79

3. Push in the used cartridge so the cartridge pops out slightly.
4. Carefully pull the used cartridge straight out of the slot. Dispose of it properly.
5. Remove the new ink cartridge from the package.
Caution:
❏ Do not touch the green IC chip on the side of the cartridge. This can damage the ink
c
cartridge.
❏ Always install an ink cartridge immediately after removing the old cartridge. If the
cartridge is not installed promptly, the print head may dry out and be unable to print.
❏ Do not refill the ink cartridge. Other products not manufactured by Epson may cause
damage that is not covered by Epson's warranties, and under certain circumstances,
may cause erratic product behavior.
Replacing Ink Cartridges 79
Page 80

6. Place the new ink cartridge into the slot. Then push the ink cartridge until it clicks into
place.
7. When you are finished replacing cartridges, close the ink cartridge cover.
Replacing Ink Cartridges 80
Page 81

Chapter 4
Maintaining Your Product
Checking the Print Head Nozzles
If you find that the printout is unexpectedly faint or that dots are missing, you may be able
to identify the problem by checking the print head nozzles.
You can check the print head nozzles from your computer by using the nozzle check utility.
Using the Nozzle Check Utility
Follow the steps below to use the nozzle check utility.
1. Make sure that an unprinted disc is installed in stacker 1.
2. Make sure that no lights are indicating errors and that the disc cover is closed.
3. Access the printer driver.
See “Accessing the Printer Driver” on page 20.
4. Click the Utility tab; then click the Nozzle Check button.
5. Follow the on-screen instructions.
Below are two sample nozzle check patterns.
Compare the quality of the printed check page with the sample shown below. If there
are no print quality problems, such as gaps or missing segments in the test lines, the
print head is fine.
Maintaining Your Product 81
Page 82

If any segment of the printed lines is missing, as shown below, this could mean a
clogged ink nozzle.
& See “Cleaning the Print Head” on page 82.
Cleaning the Print Head
If you find that the printout is unexpectedly faint or that dots are missing, you may be able
to solve these problems by cleaning the print head, which ensures that the nozzles are
delivering ink properly.
You can clean the print head from your computer using the head cleaning utility in the
printer driver or from the product by using the buttons.
Caution:
❏ Do not open the ink cartridge cover while cleaning print head. Print head cleaning stops
c
if the ink cartridge cover is opened.
❏ Print head cleaning consumes ink. Excess print head cleaning will result in reduction of
ink cartridge life.
Note:
❏ Clean the print head only if print quality declines; for example, if the printout is blurry or the color
is incorrect or missing.
❏ Use the nozzle check utility first to confirm that the print head needs to be cleaned. This saves
ink.
❏ When ink is low you may not be able to clean the print head. When ink has reached its
replacement time, you cannot clean the print head. Replace the appropriate ink cartridge first.
Maintaining Your Product 82
Page 83

Using the Head Cleaning Utility
<Normal> <Clogged>
Follow the steps below to clean the print head using the head cleaning utility.
1. Make sure the product is turned on.
2. Make sure no lights indicate errors and the disc cover is closed.
3. Access the printer driver.
See “Accessing the Printer Driver” on page 20.
4. Click the Utility tab; then click the Head Cleaning button.
5. Follow the on-screen instructions.
The Power light flashes while the product performs the cleaning cycle.
Caution:
Never turn off the product while the Power light is flashing. Doing so may damage the
c
product.
Note:
❏ If print quality has not improved after repeating this procedure about four times, turn the product
off and wait at least six hours. Then run the nozzle check again and repeat the head cleaning if
necessary.
❏ If the print quality still has not improved, at least one of your ink cartridges may be old or
damaged and may need to be replaced.
& See “Replacing an Ink Cartridge” on page 77.
Maintaining Your Product 83
Page 84

Using the Product Buttons
Follow the steps below to clean the print head using the product buttons.
1. Make sure the PC is turned on.
2. Make sure the product is turned on.
3. Make sure no lights indicate errors and the disc cover is closed.
4. Press and hold down the Cleaning button for three seconds.
The product starts cleaning the print head and the Power light begins flashing.
Caution:
Never turn off the product while the Power light is flashing. Doing so may damage
c
the product.
5. When the Power light stops flashing, print a nozzle check pattern to confirm that
the head is clean.
& See “Checking the Print Head Nozzles” on page 81.
Note:
❏ If print quality has not improved after repeating this procedure about four times, turn the product
off and wait for at least six hours. Then run the nozzle check again and repeat the head cleaning
if necessary.
❏ If the print quality still has not improved, at least one of your ink cartridges may be old or
damaged and may need to be replaced.
& See “Replacing an Ink Cartridge” on page 77.
Aligning the Print Head
If you notice a misalignment of vertical lines or horizontal banding, you may be able to
solve this problem by using the print head alignment utility in your printer driver.
Note:
Disc thickness may vary, depending on their manufacturer. Using discs with various thicknesses
may result in misalignment of the print head. Use the print head alignment utility to check and adjust
the print head alignment. It is recommended to use the same product and type of discs when
publishing several discs.
Using the Print Head Alignment Utility
Follow the steps below to align the print head using the print head alignment utility.
Maintaining Your Product 84
Page 85

1. Make sure an unprinted disc is inserted in stacker 1.
2. Make sure no lights indicate errors and the disc cover is closed.
3. Access the printer driver.
See “Accessing the Printer Driver” on page 20.
4. Click the Utility tab, then click the Print Head Alignment button.
5. Follow the on-screen instructions to align the print head.
Caution:
❏ When you enter a value in the confirmation screen after the initial adjustment, adjustment
c
will be done using the initial value and the entered value added together. To clear the
adjustment value, select Reset and click Exit.
❏ If the label printing surface is not aligned with center of the disc after aligning the print
head as described above, print will appear out of alignment compared to printing surface.
Correcting the Printing Position
If you notice a misalignment of vertical printing position, you may be able to solve this
problem by using the correcting the printing position utility in your printer driver.
Using the Correcting the Printing Position Utility
Follow the steps below to adjust the vertical and horizontal printing position using the
Correcting the printing position utility.
1. Make sure an unprinted disc is inserted in stacker 1.
2. Make sure no lights indicate errors and the disc cover is closed.
3. Access the printer driver.
See “Accessing the Printer Driver” on page 20.
4. Click the Utility tab, then click the Correcting the Printing Position button.
5. Follow the on-screen instructions to adjust the vertical and horizontal printing position.
Maintaining Your Product 85
Page 86

Cleaning Your Product
Cleaning the Exterior of the Product
To keep your product operating at its best, clean it thoroughly several times a year by using
the following procedure.
Caution:
❏ Never use alcohol or thinner to clean the product. These chemicals can damage the
c
product.
❏ Take care to prevent water from getting inside the product. If moisture, dirt, or other
matter gets inside of the product, besides affecting print quality, it may cause the electric
circuits to short.
1. Make sure the product is turned off and all the lights are off, and then unplug the power
cord from the electrical outlet.
2. Use a soft, clean cloth to carefully remove any dust or dirt.
If the dirt does not come off, clean it using a soft, clean cloth dampened with a mild
detergent. Then, wipe the outside of the product dry with a dry, soft cloth.
Note:
❏ After cleaning the product, close the disc cover and the stacker 4 tray to protect the product
from dust.
❏ Make sure to clean the filter that is located on the rear of the product at regular intervals. See
the next section.
Cleaning the Interior of the Product
To keep your printouts at their best, clean the inside by using the following procedure.
Maintaining Your Product 86
Page 87

1. Make sure the product is turned off and all the lights are off, and then unplug the power
cord from the electrical outlet.
2. Open the disc cover, and remove the stackers from the product.
3. Use a soft, clean cloth to carefully remove any dust or dirt from the stackers and inside
of the product.
4. Place the stackers back in position.
Caution:
❏ Be careful to keep water away from the electronic components.
c
❏ Do not spray the inside of the product with lubricants.
❏ Dirt attached to stacker 3 or 4 should be wiped clean with a soft cloth moistened with
neutral detergent.
Cleaning the Filter
Clean the filter located on the rear of the product once every six months.
1. Make sure the product is turned off and all the lights are off, and then unplug the power
cord from the electrical outlet.
2. Loosen and remove the screws from the filter covers to open them.
3. Remove the filters from the filter covers.
Maintaining Your Product 87
Page 88

4. Use a vacuum-cleaner to clean the dust on the filters.
5. Place the filters back in position.
6. Tighten the screws to close the filter covers.
Caution:
Clean the filter periodically (once in every six months).
c
Getting Maintenance Information
You can get helpful information for maintenance and support of the product, the cumulative
number of printed discs, and the service life of the drives.
1. Make sure that the product is connected to the computer via the USB cable and that the
product is turned on.
2. Access the printer driver.
See “Accessing the Printer Driver” on page 20.
3. Click the Maintenance Info tab.
Note:
When Service life of Drive1/Drive2 is close to 100%, it is time to replace it.
Maintaining Your Product 88
Page 89

Transporting Your Product
If you need to transport your product some distance, carefully prepare and repack it. Be
sure to use the original box and packing materials.
Warning:
The product is heavy, so have two people lift the product.
w
Caution:
❏ When storing or transporting the product, do not tilt it, stand it up vertically, or turn it
c
upside down. If you need to transport the product, carefully prepare and repack it using
the original box and packing materials in order to protect the product from shock.
❏ Leave the ink cartridges installed. Removing the cartridges can dry out the print head and
may prevent the product from printing.
1. Turn off the product and unplug its power cord.
2. Disconnect the interface cable.
3. Remove all discs from the stackers.
4. Open the ink cartridge cover. Secure the ink cartridges with tape; then close the ink
cartridge cover.
5. Close the disc cover and stacker 4 tray. Secure them with tape.
6. Attach the protective materials to both sides of the product.
7. Repack the product and accessories in the original box.
Note:
❏ Keep the product level during transport.
❏ Be sure to remove the protective materials and tape from the product before using it again.
Maintaining Your Product 89
Page 90

❏ Be sure to lift the product by the correct positions, as shown below.
Maintaining Your Product 90
Page 91

Chapter 5
Troubleshooting
Diagnosing the Problem
Troubleshooting product problems is best handled in two steps: first diagnose the problem,
then apply likely solutions until the problem is fixed.
The information that you need to diagnose and solve most common problems is provided
by Help, the control panel, and the EPSON Total Disc Monitor Utility. Refer to the
appropriate section below.
If you have a specific problem relating to publishing quality, a problem not related to
publishing quality, a disc feeding problem, or if the product does not publish at all, refer to
the appropriate section.
To solve a problem, you may need to cancel publishing.
& See “Canceling Publishing” on page 73.
Error Indicators
You can identify many common problems using the lights on your product. If the product
stops working and the lights are on or flashing, use the following table to diagnose the
problem; then follow the recommended corrective measures.
Note:
Condition of indicator lights after error may change, depending on the operation.
Troubleshooting 91
Page 92

: on, : off, : flashing, : flashing fast
Error associated with cover
Lights
Stacker
Power Busy Error Ink
1 2 3 4
Error associated with disc transfer
Lights
Stacker
Power Busy Error Ink
1 2 3 4
Conditions/Remedies
Disc cover or ink cartridge cover open
Close covers.
Job is paused because disc cover or ink cartridge cover was opened while processing
the job
Wait for the job to resume.
Conditions/Remedies
Disc pick up error
Resolve the problem as follows.
1. Open the disc cover and fan the discs
inside the input stacker.
2. Close the disc cover and publish disc
again.
If the same error occurs frequently, contact
your dealer.
Multiple feed error
Resolve the problem as follows.
1. Open the disc cover.
2. Remove the discs from both the drive tray
and the printer tray.
3. Fan the discs inside the input stacker to
avoid disc sticking.
4. Insert other discs into the input stacker.
5. Close the disc cover and publish disc
again.
If the same error occurs frequently, contact
your dealer.
Troubleshooting 92
Page 93

Lights
Power Busy Error Ink
Stacker
1 2 3 4
Conditions/Remedies
Disc transfer error
Turn off the product and remove the disc. If
the same error occurs frequently, contact
your dealer.
Arm failed to release disc
Turn off the product and remove disc.
Do not remove disc from the arm by hand if
arm is picking up the disc. This may damage
the arm. To remove the disc from the arm,
turn on the product again and let initializing
process remove the disc.
If the same error occurs frequently, contact
your dealer.
Internal error
Turn off the product and check inside for any
objects, then turn on the product again.
If the same error occurs frequently, contact
your dealer.
Do not remove disc from the arm by hand if
arm is picking up the disc. This may damage
the arm. To remove the disc from the arm,
turn on the product again and let initializing
process remove the disc.
Error associated with stacker
Lights
Power Busy Error Ink
Stacker
1 2 3 4
Conditions/Remedies
Stacker 3 is inserted for Standard Mode or
External Output Mode (when stacker 4 is set
as the output stacker)
Remove stacker 3.
Stacker 1 is not correctly inserted
Make sure stacker 1 is correctly inserted.
Stacker 2 is not correctly inserted
Make sure stacker 2 is correctly inserted.
Troubleshooting 93
Page 94

Lights
Power Busy Error Ink
Stacker
1 2 3 4
Conditions/Remedies
Stacker 3 is not correctly inserted for External
Output Mode (when stacker 3 is set as the
output stacker) or Batch Mode
Make sure stacker 3 is correctly inserted.
Stacker 1 is empty
Load discs into stacker 1.
Note:
The Stacker lamp flashes when the
source stacker is out of discs; however,
the timing of the light flashing may not
match the timing of the stacker
becoming empty.
Stacker 2 is empty
Load discs into stacker 2.
Note:
The Stacker lamp flashes when the
source stacker is out of discs; however,
the timing of the light flashing may not
match the timing of the stacker
becoming empty.
Stacker 1 is overloaded
Remove discs so that discs are below the red
line.
Stacker 2 is overloaded
Remove discs so that discs are below the red
line.
Stacker 3 is overloaded
Remove all the discs from stacker 3.
Stacker 2 is full
Remove published discs from stacker 2.
Stacker 3 is full
Remove published discs from stacker 3.
Stacker 4 is full
Remove published discs from stacker 4.
Stacker 4 is open
Close stacker 4.
Troubleshooting 94
Page 95

Error associated with ink
Lights
Power Busy Error Ink
Stacker
1 2 3 4
Conditions/Remedies
Ink low
Obtain a replacement ink cartridge. To
determine which cartridge is low, check the
ink cartridge status.
See “Checking the Ink Cartridge Status” on
page 75.
The ink has reached its replacement time or it
is not installed correctly.
Replace the ink cartridge or reinstall it.
If the ink cartridge is not recognized even if it
is installed correctly, there may be dirt on the
green circuit board. Wipe it with soft cloth
and install it again.
The product will stop operation before ink is
completely empty in order to maintain print
head quality. Therefore, some ink will be left
in the ink cartridge.
It is recommended to use a genuine ink
cartridge.
Ink cartridge not fully inserted
All Ink lights are on.
Check ink cartridges and make sure they are
all fully inserted.
Troubleshooting 95
Page 96

Error associated with product
Lights
Power Busy Error Ink
Stacker
1 2 3 4
Conditions/Remedies
Ink pad full
Please have an authorized Epson service
center service the ink pad right away. The
pad is full and the unit can no longer
function. Do not attempt to service the unit
yourself.
Note:
If ink pad is nearly full, an "Ink Pad Nearly
Full" message will be displayed by the
software. There will be no lights indicating it.
Please have an authorized Epson service
center service the ink pad right away. The
pad is nearly full and the unit will stop
functioning when the pad becomes full. Do
not attempt to service the unit yourself.
Product maintenance error
A product maintenance error has occurred.
Turn off the product and contact your
dealer.
Internal error
Turn off the product and check inside for any
objects. If the same error occurs frequently,
contact your dealer.
❏ Leaving the product off after the error
may result in clogging of print head.
Make sure to turn on the product
immediately after it is turned off.
❏ If resuming label printing after the error,
run a nozzle check and confirm the
condition of the print head.
❏ If publishing does not start, check if a print
job remains in the print spooler and
delete all print jobs.
Troubleshooting 96
Page 97

Error associated with drive
Lights
Power Busy Error Ink
Stacker
1 2 3 4
Conditions/Remedies
Drive tray open/close error
Turn off the product, unplug the power cord,
and check inside for any objects. Then,
publish the disc again. If the same error
occurs frequently, contact your dealer.
Internal drive error
Turn off the product, unplug the power
cable, and then check the inside of the
drive. If the same error occurs frequently,
contact your dealer.
Writing error
The error could not be cleared even if it
repeated itself for the retry number of times.
Disc may have a problem. Replace the disc
and resume job.
If there is a problem with the drive, change
the drive with EPSON Total Disc Setup and
resume the job. If the same error occurs
frequently, contact your dealer.
Invalid disc error
An invalid disc error has occurred, such as
the disc may not be blank or the disc does
not have enough space. Or, the disc loaded
in the stacker differs from the disc type you
set in the EPSON Total Disc Setup Properties
dialog box.
The error could not be cleared even if it
repeated itself for the retry number of times.
Check that the disc is blank and not
damaged.
Then, in the EPSON Total Disc Setup Properties
dialog box, select the disc type that is the
same as the discs loaded in the stacker. If
you use the proper disc but the same error
occurs frequently, contact your dealer.
Troubleshooting 97
Page 98

Other error
Lights
Stacker
Power Busy Error Ink
1 2 3 4
Improper status error
Turn the product off and on. If the same error
occurs frequently, contact your dealer.
Conditions/Remedies
EPSON Total Disc Monitor
If a problem occurs while publishing, an error message will appear in the EPSON Total
Disc Monitor window.
If an error message appears indicating the parts inside the product are near the end of their
service life or the waste ink pad in the product is saturated, contact your dealer to replace it.
Checking Product Status
Using EPSON Total Disc Monitor
EPSON Total Disc Monitor displays detailed information on the product status.
There are three ways to access EPSON Total Disc Monitor:
❏ When you send a job to the product, EPSON Total Disc Monitor appears.
❏ In the EPSON Total Disc Maker window, click the Publish button. From the Tool menu,
select Start Total Disc Monitor.
❏ Click Start ( in Windows 7 or Windows Vista), point to All Programs or Programs.
Point to EPSON Total Disc Maker, and then click EPSON Total Disc Monitor.
Troubleshooting 98
Page 99

When you access EPSON Total Disc Monitor, the following window appears:
Job List
Operation
Guidance
Ink Cartridge
Status
Drive/Printer/
Stacker Status
EPSON Total Disc Monitor provides the following information:
❏ Job List:
You can check a list of jobs (up to 1000 for Unfinished Job and 50 for Finished Job) and
its information, and also you can cancel, pause, and restart unfinished jobs.
❏ Operation Guidance:
This provides device status information. It also displays error messages as well as
helpful tips for better publishing.
❏ Ink Cartridge Status:
This provides a graphic display of the ink cartridge status.
Note:
Printable copies is an approximate value based on the number of labels that can be printed
from the present time when printing the same label as last time. This value may differ from the
actual value as a result of influences such as the printing data and printing environment. Up to
1000 is indicated as “1000 or more discs,” and less than 1000 is indicated in increments of 10.
❏ Drive, Printer, Stacker Status:
This provides a graphic display of the drives, printer, and stacker status. It also shows
where an error occurs.
Troubleshooting 99
Page 100

Disc or the CD/DVD Tray Does Not Feed Correctly
Disc Does Not Feed
Remove the stack of discs and make sure of the following:
❏ The disc is not damaged.
❏ The disc is not too old. See the instructions that came with the disc for more
information.
❏ The discs are not loaded above the red line in the stacker.
❏ Discs may have stuck together because of incorrect transportation of the discs;
therefore, discs should be separated thoroughly before loading into the stacker. Also,
storing discs in the stacker for an extended period of time may cause discs to stick to
each other again. If discs are stored in the stacker for an extended period of time,
separate the discs again before operating the product.
❏ A disc is not jammed inside the product. If it is, remove the jammed disc.
& See “Disc Jams” on page 101.
❏ The ink cartridges have not reached replacement time. If a cartridge has reached its
replacement time, replace it.
& See “Replacing an Ink Cartridge” on page 77.
If a disc does not feed from the input stacker:
1. Open the disc cover.
2. Remove blank discs from the stacker.
3. Fan a stack of discs to prevent them from sticking together.
4. Insert discs back in the stacker.
5. Close the disc cover.
6. Publish disc again.
If a disc does not feed from the drive tray or the printer tray.
1. Turn the power off.
2. Turn the power back on.
3. Publish disc again.
If the arm has picked up a disc:
Do not remove the disc by hand, as the arm may be damaged. To remove the disc, turn off
the power and turn on the power again, and let the initializing process remove the disc.
Troubleshooting 100
 Loading...