England's Stove Works 50-SHW25, 24-ICD, 50-TRW25 User Manual

INSTALLATION & OPERATION MANUAL
Thank you for purchasing this product from a fine line of heating equipment. We wish you many years of safe heating pleasure.
Visit our web site at www.englandsstoveworks.com for helpful information, frequently asked questions, parts & accessory orders and more.
NOTE: IF YOU HAVE A PROBLEM WITH THIS UNIT DO NOT RETURN IT TO THE DEALER. CONTACT CUSTOMER SERVICE @ 1-800-245-6489.
Please note the following Precautionary Statements:
CAUTION: This unit must be installed in accordance with these instructions and must comply with local building and fire codes. Failure to do so could result in a chimney or house fire, property damage, bodily injury or even death.
England’s Stove Works highly recommends the use of smoke detectors and Carbon Monoxide detectors with any hearth product, including this unit. Follow all manufacturer’s instructions when using smoke or Carbon Monoxide detectors.
Keep children, furniture, fixtures and all combustibles away from any heating appliance.
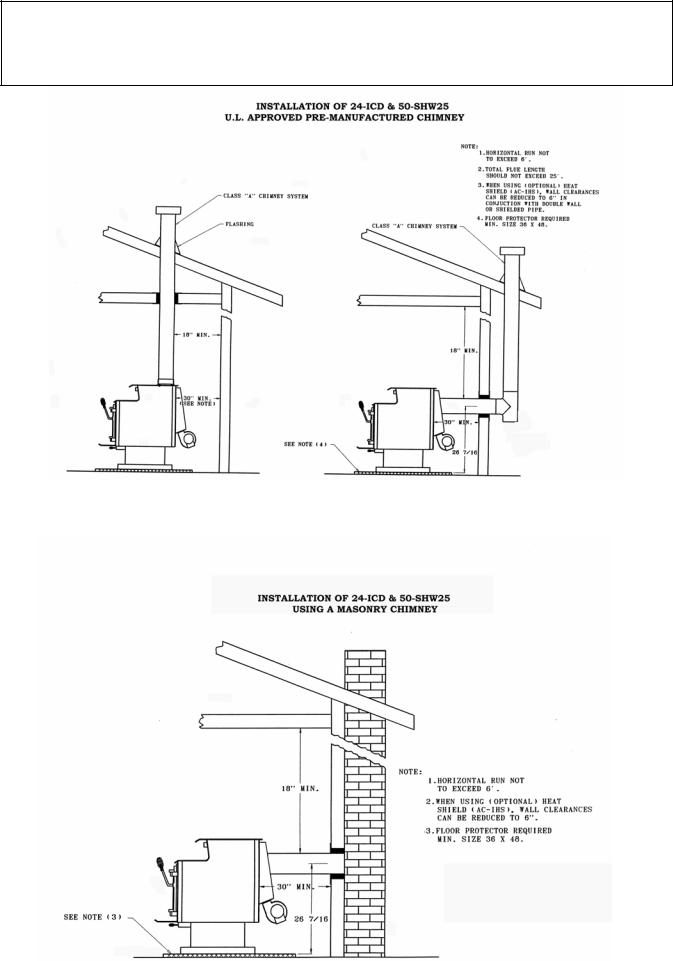
Maintain a minimum clearance of thirty inches (30”) from the firebox and eighteen inches (18”) from the flue pipe to any combustible. This can be reduced to six inches (6”) by using a heat shield and double wall or shielded pipe.
This product contains a catalytic combustor, which needs periodic inspection and replacement for proper operation. It is against the law to operate this wood heater with the catalytic combustor removed, deactivated or in a manner inconsistent with the operating instruction in this manual.
Our catalytic stoves are designed to burn seasoned, dry wood.
THIS STOVE IS NOT MOBILE HOME APPROVED.
DO NOT PLACE IN A MOBILE HOME!
24-ICD, 50-SHW25 and 50-TRW25
COMPLIANCE STATUS
Type of Fuel |
Wood |
Emission Rate |
2.4 Grams/Hour |
Tested Overall Efficiency |
83.78% |
EPA Certificate Number |
443 |
This unit is certified to EPA phase II standards.
Revised 1/06

SAFETY NOTICE:
IF THIS UNIT IS NOT PROPERLY INSTALLED, A HOUSE FIRE MAY RESULT. FOR YOUR SAFETY, FOLLOW THE INSTALLATION DIRECTIONS. CONTACT LOCAL BUILDING OR FIRE OFFICIALS CONCERNING RESTRICTIONS AND INSTALLATION INSPECTIONS IN YOUR AREA.
SECTION I: FLUE SYSTEM
CAUTION: Follow the pipe manufacturer’s installation instructions and directions for passing through combustible walls and ceilings. Check local codes in your area.
A. Existing Flue System
This is a freestanding unit and is designed to connect to an existing flue system, such as masonry or a pre-manufactured Class A flue system. If you have a masonry system, the inner liner should be inspected very carefully for cracks; if there is no liner in your chimney, we recommend you install one or have a stainless steel liner installed. If you have an existing stainless steel liner it should be inspected to ensure there is no buckling, warping or cracks in the system.
Either type chimney should be thoroughly cleaned before installing the new unit. We strongly recommend that you have a qualified chimney sweep do the inspection and cleaning. The sweep can spot problems that you might overlook, and at the same time advise of any required changes. In most cases the sweep can make any necessary changes or at least recommend qualified people to do so. Note: It is not permissible to connect this unit to a chimney that serves another unit.
B. Flue Size
The proper flue size is determined by the inside diameter of the flue collar on the unit. This unit comes with a six inch (6”) Top or Rear exhaust flue collar. The connector pipe should be at least six inches (6”) or larger and never smaller than the collar; the area of the chimney must also be equal to or greater than the area of the flue collar. If the area of the flue is greater than the area of the collar, it should not be more than three (3) times greater.
Example: The area of a six inch (6”) flue collar is 28.87 square inches, therefore the area of the connector pipe should be at least 28.87 square inches and never more than 84.8 square inches.
C. Top or Rear Exhaust
This stove comes with an adaptable top or rear exhaust system. The unit is packaged at the plant with the top exhaust system but can be changed by switching the parts; if you switch to a rear exhaust be sure the gaskets are in place and all the bolts are tight. The connector pipe should be 24-gauge steel pipe and inserted (crimped end) into the flue collar. This will reverse the pipe and keep any creosote inside the connector pipe.
*IMPROPER INSTALLATION: The manufacturer will not be held responsible for damage caused by the malfunction of a stove due to improper venting or installation. Call (800-245-6489) and/or consult a professional installer if you have any questions.

Note on Outside Air Hookup: You can use an outside air hookup with our catalytic stoves. We highly recommend it for homes built since the more air-tight construction standards went into effect. This involves connecting a metal pipe (usually three inches (3”) in diameter - check your stove - and the pipe can be flex or rigid) from the air inlet pipe located on the bottom rear of the stove through your floor or wall. The outside end of this pipe should be covered in some manner to keep it clear of foreign matter.
D. Installation of a New Flue System
1. Masonry Flue:
Most masonry flue systems are on the outside wall of the house and extend upward against the outside wall. The flue thimble is on the inside wall and makes the connection with the vertical flue and your stove flue pipe. You must maintain the proper clearance between the connecting flue pipe and any combustibles; if your chimney has a clean-out door, it is necessary this door be airtight. All the combustion air should be pulled through the stove and not through the clean-out, pipe seams or any other place.
If you are planning to build a masonry flue system, we highly recommend you hire a professional, as he will be more familiar with local building and fire codes. It is your responsibility to ensure the chimney or flue system is in safe operating condition. The manufacturer will not be responsible for an accident attributed to a faulty chimney.
2.Pre-Manufactured Flue System:
This type system has become very popular because it is very easy to install and is very safe when installed correctly. In making your choice be sure the system has a recognized label of approval such as U.L., B.O.C.A. or I.C.B.O. -- any of these approvals will assure the flue system is constructed of the proper materials and meets the required safety standards. Your local dealer will normally handle a top grade approved flue pipe.
There are two very popular methods of installing a pre-manufactured flue system. The first and least expensive is through the ceiling and out the roof -- this is the most direct route, requires fewer pipes and creates a better draw. It is less expensive
not only because less pipe is required, but also because double wall pipe is only required from the ceiling through the roof. Single wall 24 gauge pipe is used from the stove up to the ceiling. The second method is to go through the wall and up the outside of the house. This method is more expensive, because it requires insulated pipe through the wall and up the outside of the house; in either type of installation you should be careful, as proper clearances to combustibles are very important. You can consult with your local dealer for information on a qualified contractor or installer. It your responsibility to ensure the flue system is safe and in good operating condition. The manufacturer will not be responsible for an accident attributed to a unit connected to a faulty flue system.
SECTION II: FLOOR AND WALL PROTECTION
A.Floor Protection
You will not need any floor protection if your floor is constructed of a non-combustible material such as brick or concrete. If your floor is made of a combustible material such as hardwood, carpet or linoleum, you must have protection between the stove and the floor. Any stove board that is purchased should be U.L. listed and rated. This stove will require a minimum board size of 36” x 48” for the floor. The approved protector should be large enough to provide eight inches (8”) behind the unit, eight inches (8”) on each side and sixteen inches (16”) in the front of the stove.
Note: Flue systems and flue pipe are not furnished with the unit. They must be purchased separately.
 Loading...