

Page 1
Installation Manual
MMI-20020979, Rev AB
Micro Motion® Gas Density Meters (GDM)
Fiscal gas density measurement
May 2015
Page 2

Safety and approval information
This Micro Motion product complies with all applicable European directives when properly installed in accordance with the
instructions in this manual. Refer to the EC declaration of conformity for directives that apply to this product. The EC declaration of
conformity, with all applicable European directives, and the complete ATEX Installation Drawings and Instructions are available on
the internet at www.micromotion.com or through your local Micro Motion support center.
Information affixed to equipment that complies with the Pressure Equipment Directive can be found on the internet at
www.micromotion.com/documentation.
For hazardous installations in Europe, refer to standard EN 60079-14 if national standards do not apply.
Other information
Full product specifications can be found in the product data sheet. Troubleshooting information can be found in the transmitter
configuration manual. Product data sheets and manuals are available from the Micro Motion web site at
www.micromotion.com/documentation.
Return policy
Micro Motion procedures must be followed when returning equipment. These procedures ensure legal compliance with
government transportation agencies and help provide a safe working environment for Micro Motion employees. Failure to follow
Micro Motion procedures will result in your equipment being refused delivery.
Information on return procedures and forms is available on our web support system at www.micromotion.com, or by phoning the
Micro Motion Customer Service department.
Emerson Flow customer service
Email:
• Worldwide: flow.support@emerson.com
• Asia-Pacific: APflow.support@emerson.com
Telephone:
North and South America Europe and Middle East Asia Pacific
United States 800-522-6277 U.K. 0870 240 1978 Australia 800 158 727
Canada +1 303-527-5200 The Netherlands +31 (0) 704 136 666 New Zealand 099 128 804
Mexico +41 (0) 41 7686 111 France 0800 917 901 India 800 440 1468
Argentina +54 11 4837 7000 Germany 0800 182 5347 Pakistan 888 550 2682
Brazil +55 15 3413 8000 Italy 8008 77334 China +86 21 2892 9000
Venezuela +58 26 1731 3446 Central & Eastern +41 (0) 41 7686 111 Japan +81 3 5769 6803
Russia/CIS +7 495 981 9811 South Korea +82 2 3438 4600
Egypt 0800 000 0015 Singapore +65 6 777 8211
Oman 800 70101 Thailand 001 800 441 6426
Qatar 431 0044 Malaysia 800 814 008
Kuwait 663 299 01
South Africa 800 991 390
Saudi Arabia 800 844 9564
UAE 800 0444 0684
Page 3

Contents
Contents
Chapter 1 Planning ...........................................................................................................................1
1.1 Installation checklist .......................................................................................................................1
1.2 Best practices .................................................................................................................................2
1.3 Recommended sample flow rate ....................................................................................................3
1.4 Power requirements .......................................................................................................................4
1.5 Installation requirements for the thermo-well pocket .................................................................... 5
1.6 Recommended installations for gas density applications ................................................................6
1.7 Perform a pre-installation meter check .........................................................................................14
Chapter 2 Mounting .......................................................................................................................16
2.1 Mount the meter in the pipeline ...................................................................................................16
2.2 Connect the gas bypass lines ........................................................................................................18
2.3 Rotate the electronics on the meter (optional) .............................................................................20
2.4 Rotate the display on the transmitter (optional) ...........................................................................20
2.5 Post-installation check ................................................................................................................. 22
Chapter 3 Wiring ........................................................................................................................... 23
3.1 Available output terminals and wiring requirements .................................................................... 23
3.2 Hazardous area output wiring ...................................................................................................... 23
Chapter 4 Grounding ......................................................................................................................32
Installation Manual i
Page 4

Contents
ii Micro Motion® Gas Density Meters
Page 5

1 Planning
Topics covered in this chapter:
• Installation checklist
• Best practices
• Recommended sample flow rate
• Power requirements
• Installation requirements for the thermo-well pocket
• Recommended installations for gas density applications
• Perform a pre-installation meter check
1.1 Installation checklist
Verify the contents of the product shipment to confirm that you have all parts and
□
information necessary for the installation.
Planning
Part Quantity
Micro Motion® Gas Density Meter (GDM) 1
Accessories kit:
- M20 to 1/2-inch NPT adapter (if applicable)
- 1/2-inch NPT blanking plug
- 2.5 mm hex key
Aluminum sleeve 1
Silicon fluid 1
Thermo-well pocket kit (if applicable) 1
Calibration certificate 1
Safety instructions booklets 2
Micro Motion Product Documentation DVD 1
Make sure that all electrical safety requirements are met for the environment in
□
which the meter will be installed.
Make sure that the local ambient and process temperatures and process pressure
□
are within the limits of the meter.
Make sure that the hazardous area specified on the approval tag is suitable for the
□
environment in which the meter will be installed.
If installing the meter in a hazardous area, confirm that you have the required safety
□
barriers or galvanic isolators for your installation.
Make sure that you will have adequate access to the meter for verification and
□
maintenance.
1
Installation Manual 1
Page 6

Planning
Make sure that the process gas meets the recommended characteristics regarding
□
composition, temperature, and pressure for your installation.
Verify that you have all equipment necessary for your installation. Depending on
□
your application, you may be required to install additional parts for optimal
performance of the meter.
Follow recommended best practices for installing the GDM to account for the
□
effects of density, temperature, and pressure equilibrium.
1.2 Best practices
The following information can help you get the most from your meter.
• Handle the meter with care. Follow local practices for lifting or moving the meter.
• Ensure that the process gas is clean and dry.
• Do not use gases incompatible with the materials of construction. To prevent
corrosion of the sensing element, the process gas should be compatible with
Ni-Span-C.
• Do not expose the meter to excessive vibration (greater than 0.5 g continuously).
Vibration levels in excess of 0.5 g can affect the meter accuracy.
• Perform a Known Density Verification (KDV) check of the meter prior to installing
the meter in your system.
• Installing the meter in a bypass configuration allows you to remove the meter for
servicing or calibration without affecting the main pipeline.
• Install the meter in a thermo-well pocket to ensure the temperature of the sample
gas is equal to that of the pipeline gas. Micro Motion thermo-well pocket kits are
available for purchase.
• Minimize the length and volume of the input sample pipe to ensure an optimal
meter response time. Use 6 mm (1/4 in) instrument tubing and low-volume inlet
filters.
• Control gas flow with a needle valve mounted before or after the meter, depending
on the installation.
• Install an external coalescing filter in the sample gas inlet pipework to minimize
condensate and dust contamination.
• Verify that the filters in your system are not causing any excessive flow restrictions.
• Verify that the pressure of the process gas is approximately equal to the pipeline
pressure.
• Do not exceed more than a 10% reduction of the cross-sectional area at the point of
insertion in the pipeline to ensure minimal effect on pressure.
• Ensure that the meter and associated pipework are pressure-tested to 1½ times the
maximum operating pressure after installation.
• Install thermal insulation to the meter and the inlet and bypass-loop pipeline to
maintain temperature equilibrium between the sample and pipeline gases. Do not
insulate the transmitter (electronics) and maintain a nominal 1-in clearance
between the insulation and the transmitter housing.
2 Micro Motion® Gas Density Meters
Page 7

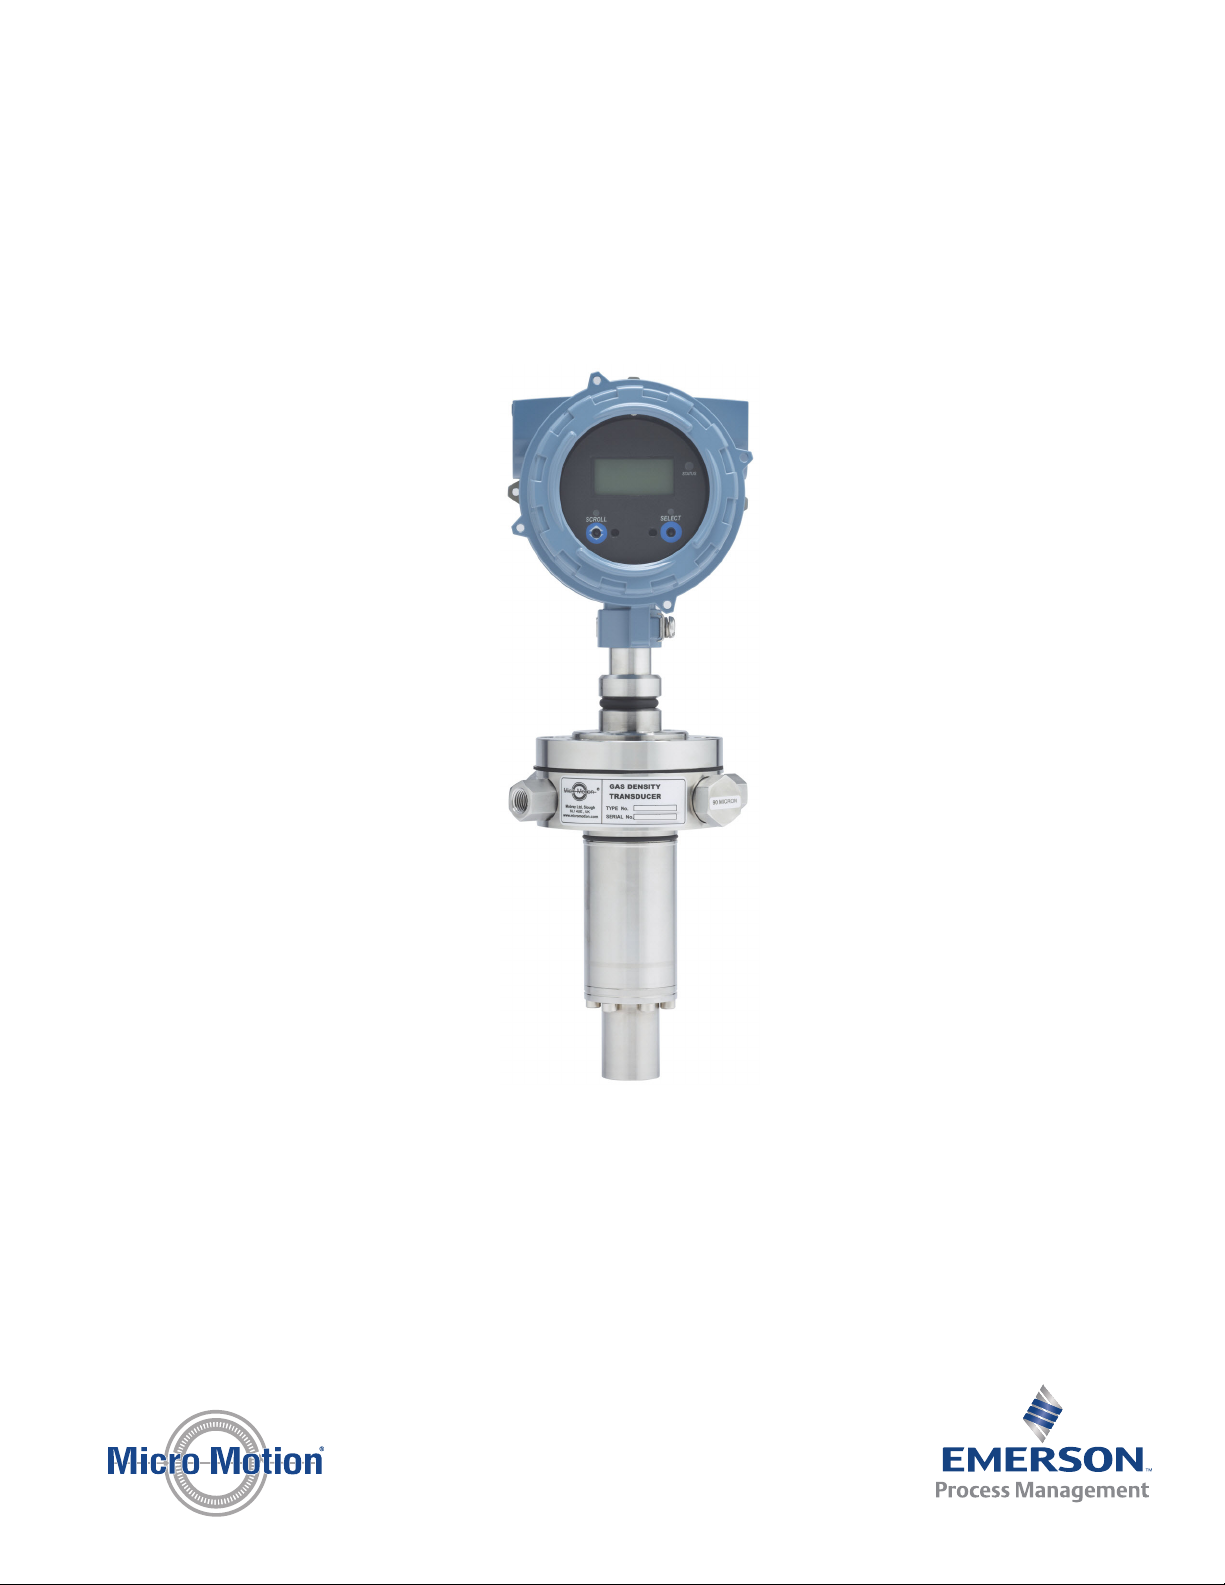
1.3 Recommended sample flow rate
Volume of gas in meter = 40 cm
3
3.5
3
2.5
2
1.5
1
.5
0
0 2 4 6 8 10
Flowrate (lt/hr)
Recommended
operating
flow rate
Volume of gas in meter = 2.44 in
3
1.2
1.0
.8
.6
.4
.2
0
0 0.05 0.1 0.15 0.2 0.25 0.3 0.35
Flowrate (ft3/hr)
Pressure drop (mbar)
Pressure drop (inch WC)
Recommended
operating
flow rate
Use the smallest acceptable flow rate for the process gas passing through the meter. This
ensures a sample gas flow rate that is representative of the main flow with regard to the
proportions of different gas constituents.
Micro Motion recommends a gas flow rate of 5 ±1 l/hr (0.176 ±0.35 ft3/hr), although a flow
rate between 1 to 10 l/hr (0.035 to 0.35 ft3/hr) is acceptable.
At flow rates greater than 10 l/hr (0.35 ft3/hr), the density reading can become slightly
unstable and may introduce a small density error. For natural gas with a typical application
density of approximately 0.06 g/cm3 (60 kg/m3), a pressure differential of approximately
1.66 mbar (0.67 in WC) is required to maintain a flow rate of 5 l/hr (0.176 ft3/hr) .
Pressure drop through the meterFigure 1-1:
Planning
Installation Manual 3
Page 8
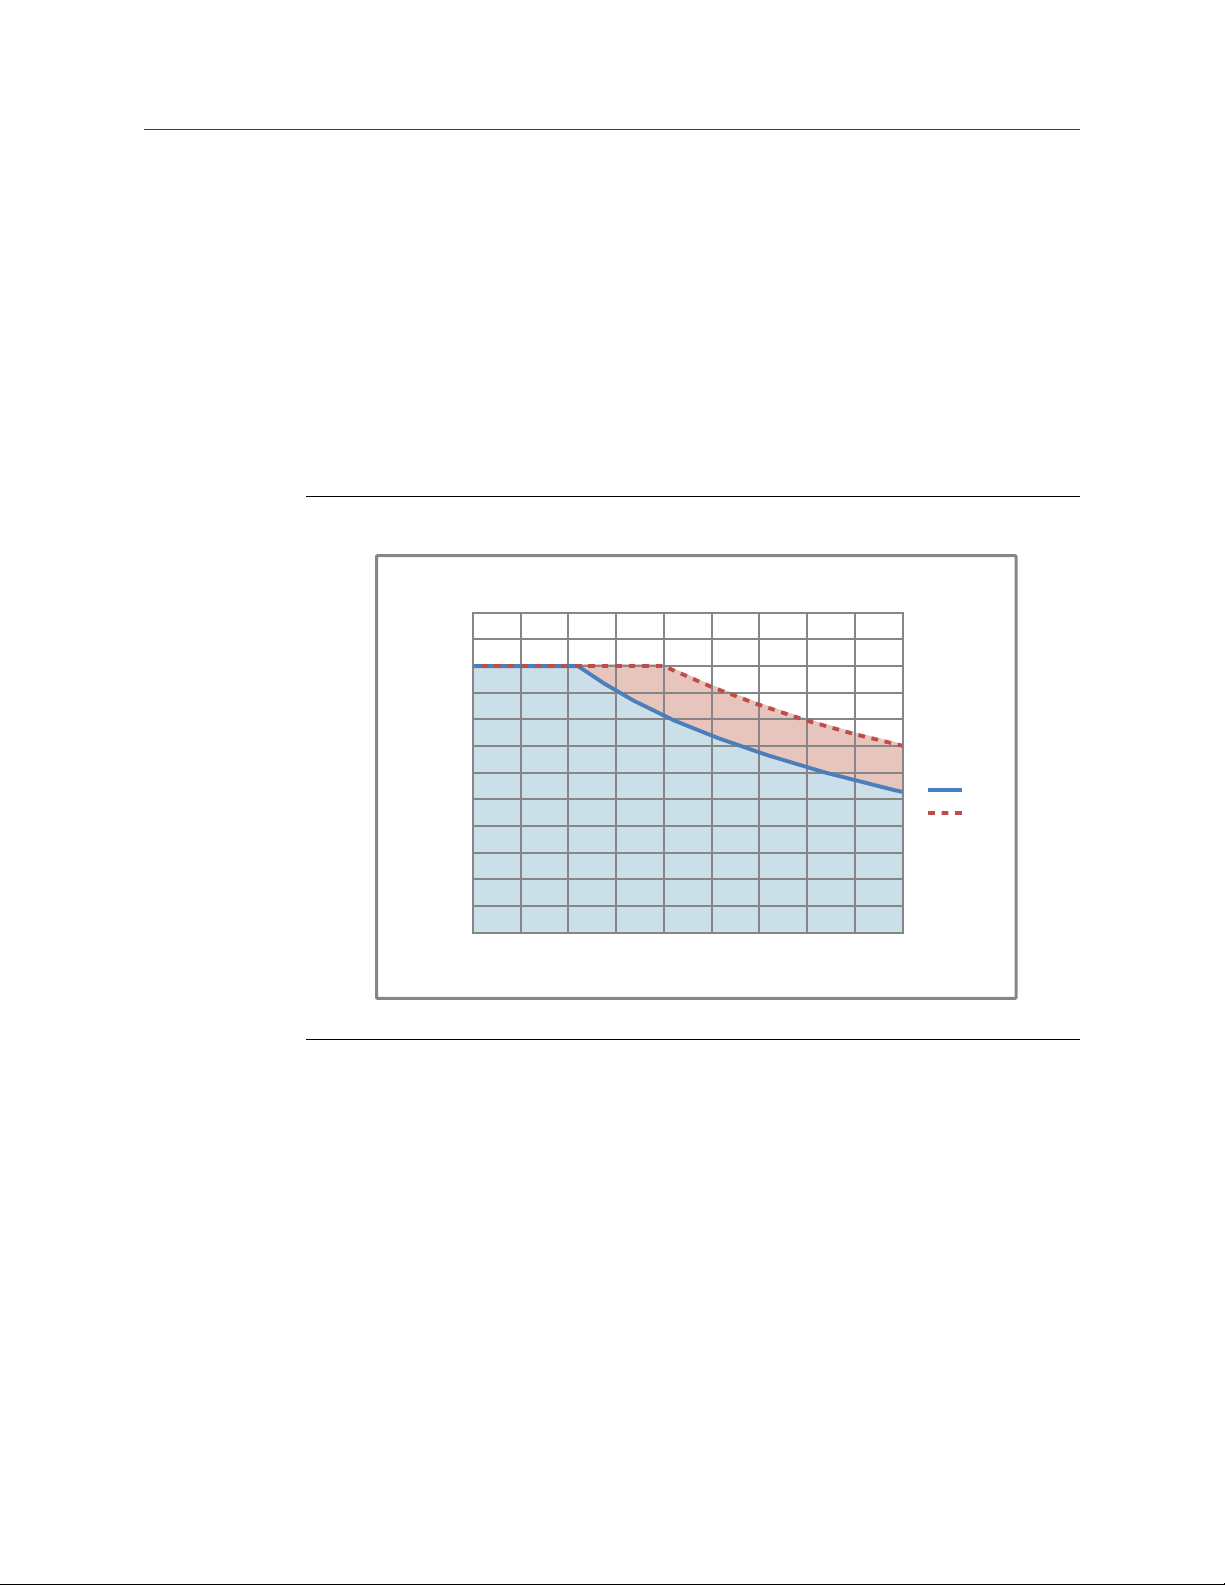
300 600 900 1200 1500 1800 2100 2400 2700 3000
Distance of Installation (f t)
22.8V
24V
14
15
16
17
18
19
20
21
22
23
24
25
26
AWG
Minimum Wire Gauge
Planning
1.4 Power requirements
Following are the DC power requirements to operate the meter:
• 24 VDC, 0.45 W maximum
• Minimum 22.8 VDC with 1000 m (3280 ft) of 0.20 mm2 (18 AWG) power-supply
cable
• At startup, power source must provide a minimum of 0.5 A of short-term current at
a minimum of 19.6 V at the power-input terminals.
Power cable recommendations
Minimum wire gauge (AWG per feet)Figure 1-2:
4 Micro Motion® Gas Density Meters
Page 9
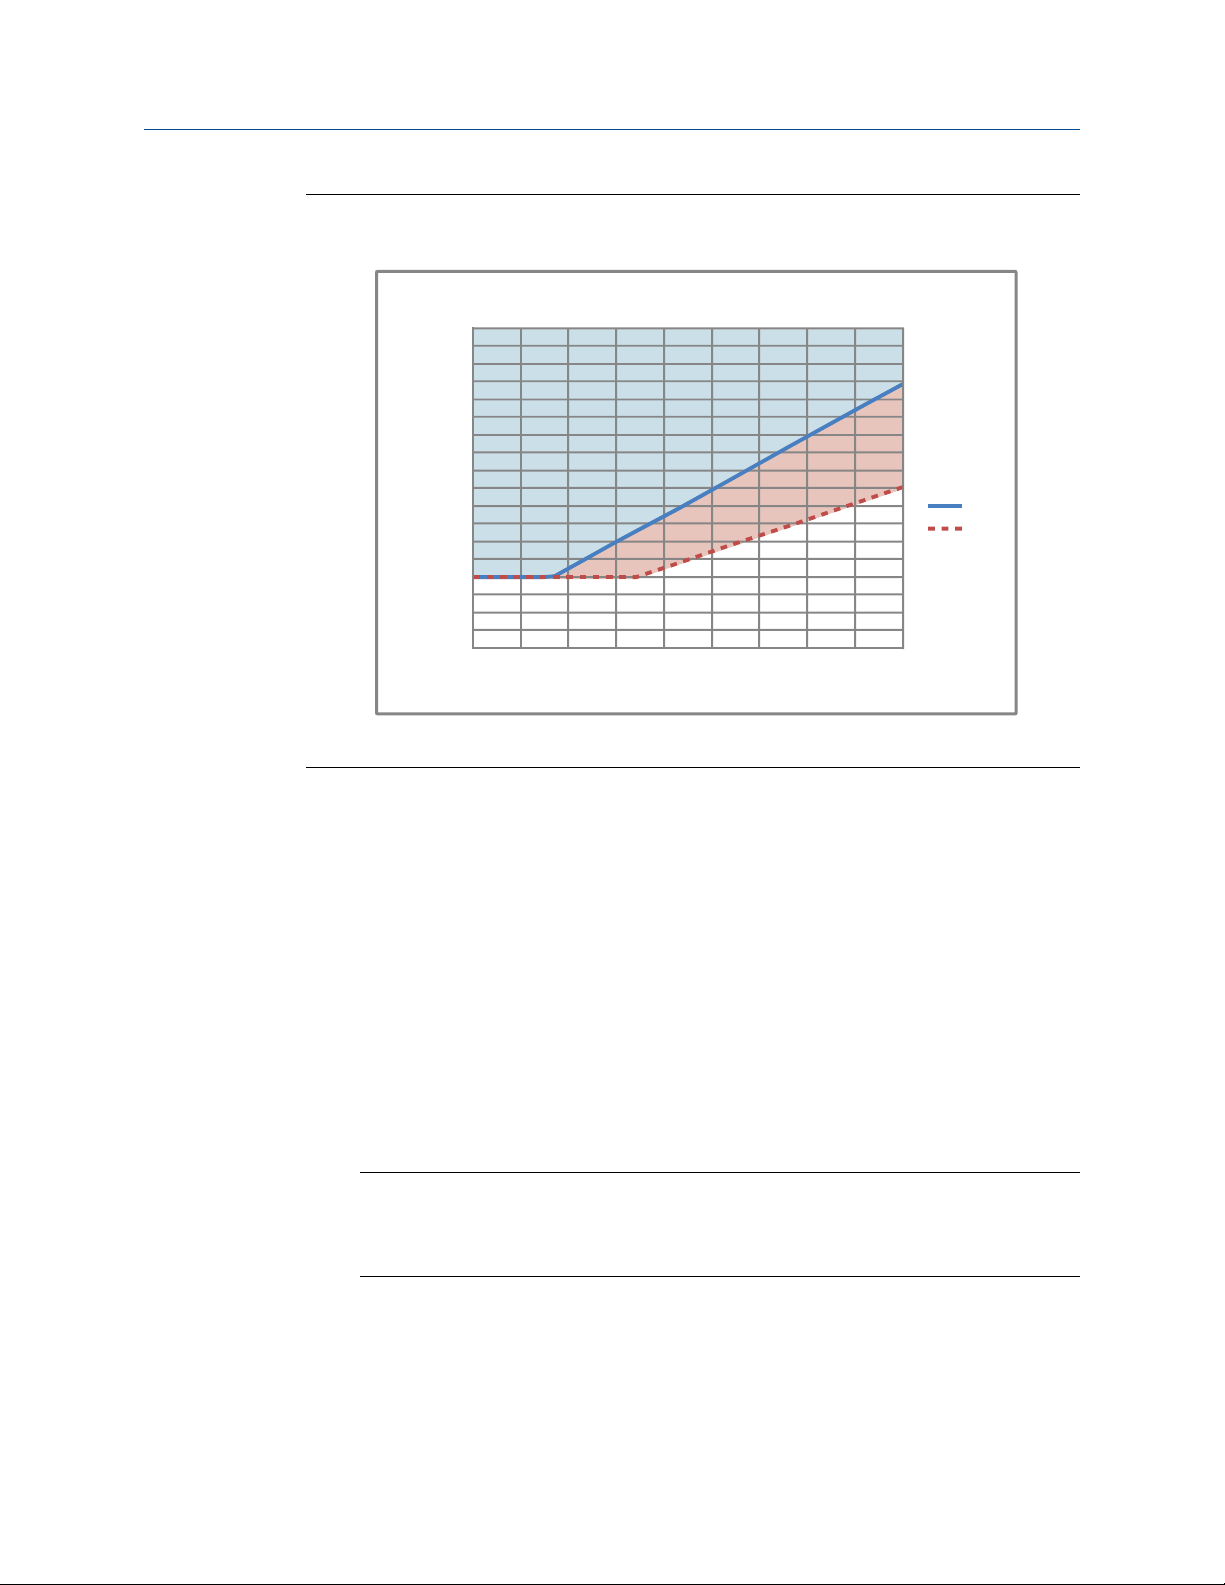
0.000
0.050
0.100
0.150
0.200
0.250
0.300
0.350
0.400
0.450
0.500
0.550
0.600
0.650
0.700
0.750
0.800
0.850
0.900
100 200 300 400 500 600 700 800 900 1000
Minimum Wire Area (mm
2
)
Distance of Installation (m)
Minimum Wire Area (mm2)
22.8V
24V
Planning
Minimum wire area (mm2 per meter)Figure 1-3:
1.5 Installation requirements for the thermo-well pocket
Installation of the GDM in a thermo-well pocket helps maintain temperature equilibrium
between the sample gas and pipeline gas. Micro Motion provides thermo-well pocket
installation kits for purchase. Contact your local sales representative or Micro Motion
Customer Support at flow.support@emerson.com for more information.
A thermo-well pocket installation requires the following, before you can mount and
connect the GDM:
1. Create an aperture in the pipeline to receive the pocket (see Figure 1-4 for the pocket
Installation Manual 5
dimensions).
Important
Micro Motion recommends that you do not exceed more than a 10% reduction of the crosssectional area at the point of insertion to ensure minimal effect on pressure. Follow local
practices and guidelines for welding in hazardous areas, if applicable.
2. Install and weld the pocket in place. Be sure to follow local practices and guidelines
for welding in hazardous areas, if applicable.
Page 10
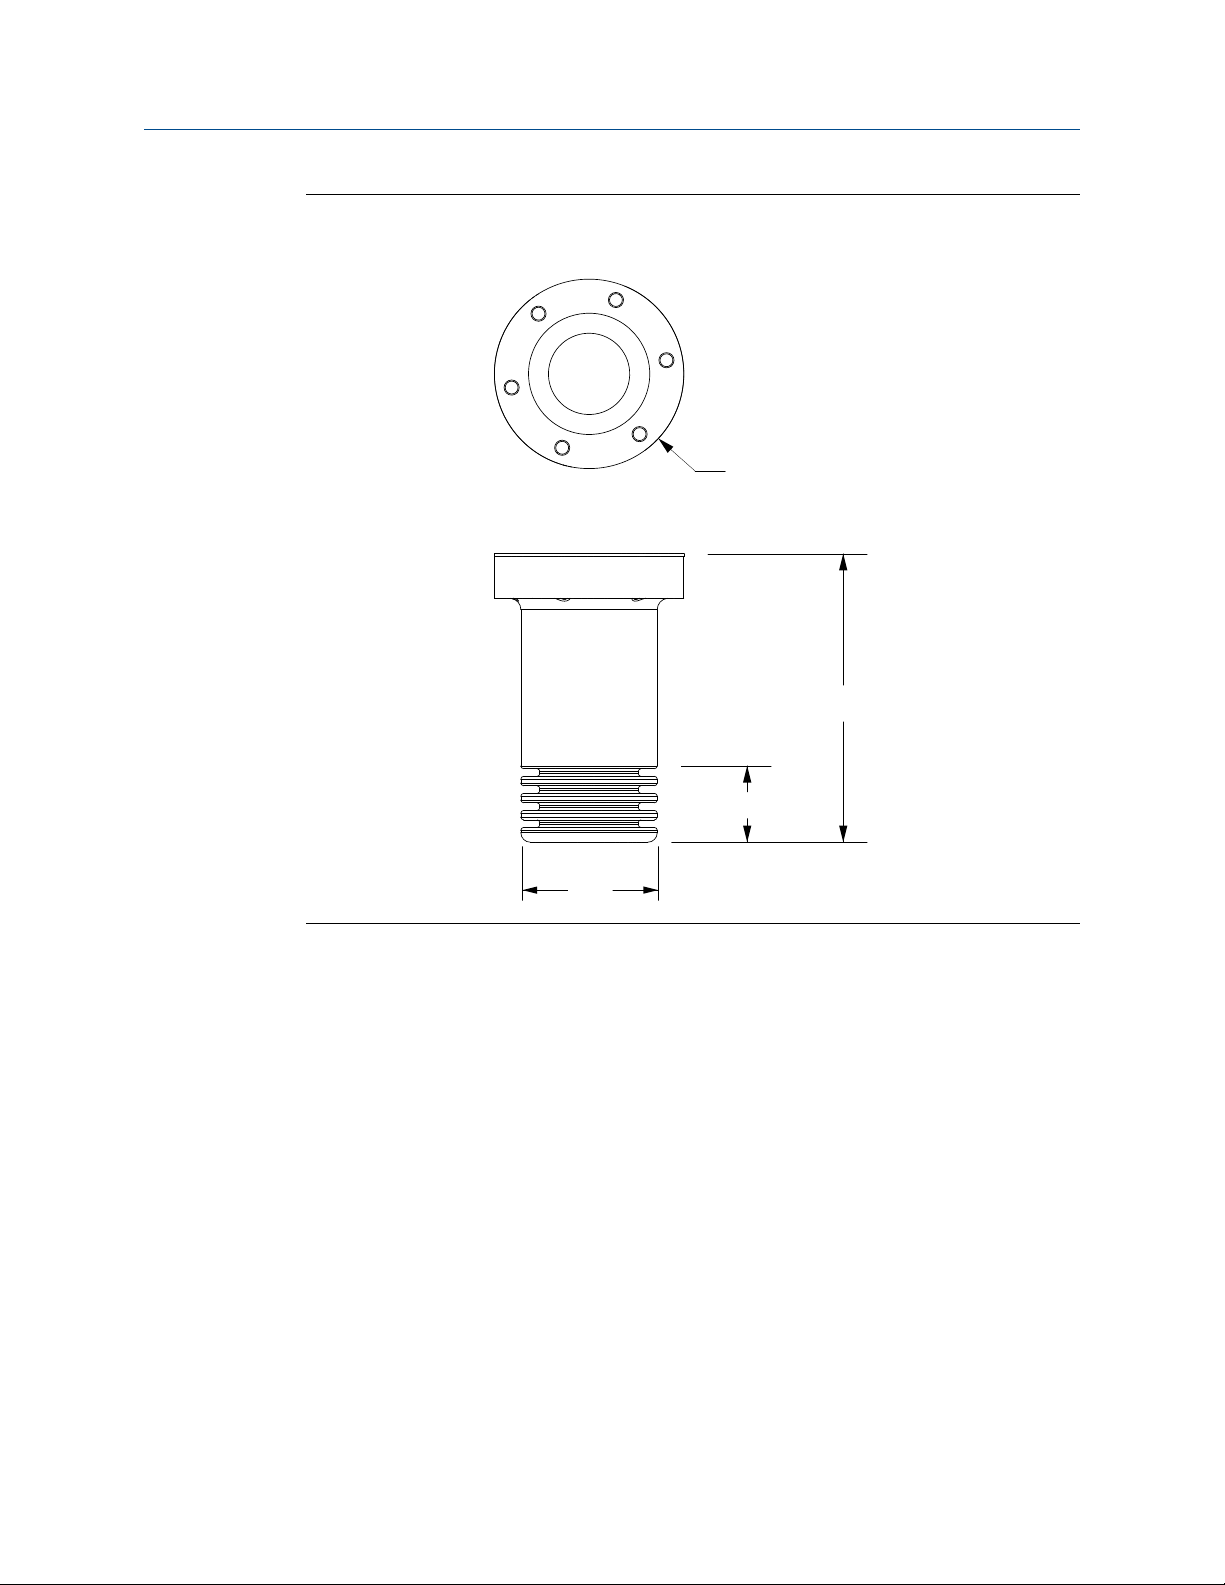
6.00
(152.30)
Ø3.94
(100.00)
1.59
(40.30)
2.83
(72.00)
Dimensions in
inches
(mm)
Planning
Micro Motion thermo-well pocket dimensionsFigure 1-4:
1.6 Recommended installations for gas density applications
Micro Motion recommends specific installations for the GDM depending on the gas
density application – as defined by international standards, ISO 5167 and AGA 3. This
information is provided for your reference only.
1.6.1 Installation in an orifice plate metering system
The orifice plate metering system is a widely used method for accurate flow measurement
of natural gas. The orifice meter is a differential pressure device in which the orifice plate
causes a pressure drop between the upstream and downstream sides. The flow rate is
determined from the dimensions of the system (as defined by international standards ISO
5167 and AGA 3), and from measurements of differential pressure and fluid density.
6 Micro Motion® Gas Density Meters
Page 11

Planning
Meter installation in a pressure recovery application
The most common location for a density device in an orifice plate metering system is
downstream from the orifice plate. This installation is commonly referred to as the
pressure recovery method. The pressure recovery method allows an optimal gas flow rate,
and provides easy access for checking filters and verifying the meter calibration.
Tip
Use 6-mm (1/4-in) instrument tubing for the gas input pipework. Use 12-mm (1/2-in) insertion
tubing for the gas return pipework.
Installation Manual 7
Page 12

STATUS
SCROLL SELECT
C
A
E
A
B
D
G
F
H
J K
I
GDM
Planning
Meter installation in pressure recovery applicationFigure 1-5:
A. Meter isolation valves
B. Flowmeter
C. Venting valve
D. Flow control needle valve
E. Filter
F. Pipeline diameter
G. Differential pressure transmitter
H. Density point
I. Distance is eight times the pipeline diameter
J. Thermal insulation
K. Vent/vacuum test point
Note
Do not insulate the transmitter (electronics) and maintain a nominal 1-in clearance between the insulation and the transmitter
housing.
With the pressure recovery installation method:
• No bypass of the orifice plate is necessary.
• Density is measured at the downstream tapping of the orifice plate, which reduces
the significance of pressure build-up across the fine-gauge filters.
• Flow is achieved because the pressure after the orifice plate is lower than that
further downstream.
8 Micro Motion® Gas Density Meters
Page 13

Planning
• Pressure drops through the valves and filters do not affect the reading. The pressure
inside the meter and at the gas outlet is equal to the pressure at the orifice
downstream point.
• The correct expansion factor for the downstream point is used in the orifice flow
calculations.
• The measured density at the density point is used in the mass flow calculation, as
defined by ISO 5167 and AGA 3.
Meter installation in differential pressure application
An alternative to the downstream installation method is the upstream installation method,
as defined by AGA 3. This method is also known as the differential pressure method, which
is optimal for orifice plate metering. A disadvantage of this installation is that the sample
gas flow is not measured because it bypasses the orifice plate.
Installation Manual 9
Page 14

STATUS
SCROLL SELECT
E
A
A
B
D
C
F
G
H
GDM
Planning
Meter installation in differential pressure applicationFigure 1-6:
A. Meter isolation valves
B. Flowmeter
C. Venting valve
D. Flow control needle valve
E. Filter
F. Differential pressure transmitter
G. Thermal insulation
H. Vent/vacuum test point
Note
Do not insulate the transmitter (electronics) and maintain a nominal 1-in clearance between the insulation and the transmitter
housing.
With the differential pressure installation method:
• The process gas flow bypasses the meter, but should be low enough [for example,
5 lt/hrs (0.176 ft3/hr)] to not be of significance.
• The measured density is the upstream density.
• The control valve and the flowmeter can be mounted on either side of the meter to
suit the installation and dependent on where the density point is.
10 Micro Motion® Gas Density Meters
Page 15

Tip
To avoid excessive pressure drops in your sample pipeline, be sure to monitor the condition of the
filters. Do this by varying the sample flow rate and monitoring the magnitude of the resultant density
changes. Pressure drops through the filters can cause density errors if they become too large.
1.6.2 Meter installation in a vented gas application
The vented gas method allows the gas to be vented to flare or, in some cases, to
atmosphere. With this method, the full-pipe pressure is available as a pressure drop. For
high-pressure applications, a two-stage letdown system may be required to prevent icing.
CAUTION!
Because the full-pipe pressure is available as a pressure drop, ensure that the flow is
adequately controlled by the control valve.
Planning
Installation Manual 11
Page 16

STATUS
SCROLL SELECT
A
B
D
F
A
E
C
G
H
GDM
GDM
I
Planning
Meter installation in a vented gas applicationFigure 1-7:
A. Meter isolation valves
B. Flowmeter
C. Venting valve
D. Flow control needle valve
E. Filter
F. Pressure regulator
G. Thermal insulation
H. Vent/vacuum test point
I. Low-pressure vent system connection point
Note
Do not insulate the transmitter (electronics) and maintain a nominal 1-in clearance between the insulation and the transmitter
housing.
1.6.3 Meter installation in an ultrasonic meter application
To use the GDM with a full-bore ultrasonic meter, Micro Motion recommends that you
install a Rosemount Annubar® flowmeter downstream from the ultrasonic meter as a
means to provide differential pressure.
The following diagram shows a Rosemount Annubar meter installed to provide differential
pressure for the measurement system. This type of installation method does not require
sample gas to be vented to atmosphere. The Annubar and GDM must be installed a
specific distance downstream from the ultrasonic meter in your pipeline. Refer to all
manufacturer guidelines for best practices or recommendations for installing the meters in
your system.
12 Micro Motion® Gas Density Meters
Page 17

STATUS
SCROLL SELECT
E
C
A
B
D
A
G
H
F
GDM
Planning
Meter installation in an ultrasonic meter applicationFigure 1-8:
A. Meter isolation valves
B. Flowmeter
C. Venting valve
D. Flow control needle valve
E. Filter
F. Annubar flowmeter
G. Thermal insulation
H. Vent/vacuum test point
Note
Do not insulate the transmitter (electronics) and maintain a nominal 1-in clearance between the insulation and the transmitter
housing.
1.6.4 Meter installation with a turbine flow meter
The following diagram shows a meter measurement system with a gas turbine flowmeter
installation. Refer to manufacturer guidelines for best practices or recommendations for
installing the meter in your system.
Installation Manual 13
Page 18

STATUS
SCROLL SELECT
A
B
D
A
E
C
H
F
G
GDM
Planning
Meter installation with a turbine flow meterFigure 1-9:
A. Meter isolation valves
B. Flowmeter
C. Venting valve
D. Flow control needle valve
E. Filter
F. Turbine flowmeter
G. Thermal insulation
H. Vent/vacuum test point
Note
Do not insulate the transmitter (electronics) and maintain a nominal 1-in clearance between the insulation and the transmitter
housing.
1.7 Perform a pre-installation meter check
1. Remove the meter from the box.
14 Micro Motion® Gas Density Meters
Page 19

CAUTION!
MTL7728P+
3
4
1
2
Handle the meter with care. Follow all corporate, local, and national safety regulations
for lifting and moving the meter.
2. Visually inspect the meter for any physical damage.
If you notice any physical damage to the meter, immediately contact Micro Motion
Customer Support at flow.support@emerson.com.
3. Position and secure the meter in a vertical position with the flow arrow pointing
upward.
4. Connect the power wiring, and power up the meter.
Remove the back transmitter housing cover to access the PWR terminals.
Power supply wiring terminalsFigure 1-10:
Planning
5. Perform a Known Density Verification (KDV) check.
Use the Known Density Verification procedure to match the current meter
calibration with the factory calibration. If the meter passes the test, then it has not
drifted or changed during shipment.
For more information on performing a KDV check, see the configuration and use
manual that shipped with the product.
Installation Manual 15
Page 20

Mounting
2 Mounting
Topics covered in this chapter:
• Mount the meter in the pipeline
• Connect the gas bypass lines
• Rotate the electronics on the meter (optional)
• Rotate the display on the transmitter (optional)
• Post-installation check
2.1 Mount the meter in the pipeline
Prerequisites
Important
Micro Motion recommends that you install the meter in a thermo-well pocket to maintain
temperature equilibrium between the sample gas and the pipeline gas. For ease of maintenance, you
can insert and remove the meter from the pocket as needed. See Section 1.5 for more information on
the pocket installation.
The following parts are recommended for installation in a pipeline.
• Micro Motion ® Gas Density Meter (GDM)
• Thermo-well pocket kit, which includes:
- Thermo-well pocket
- Anti-vibration gaskets
- Aluminum sleeve
- Silicone fluid
- Mounting screws
16 Micro Motion® Gas Density Meters
Page 21
STATUS
SCROLL SELECT
C
D
E
B
A
Mounting
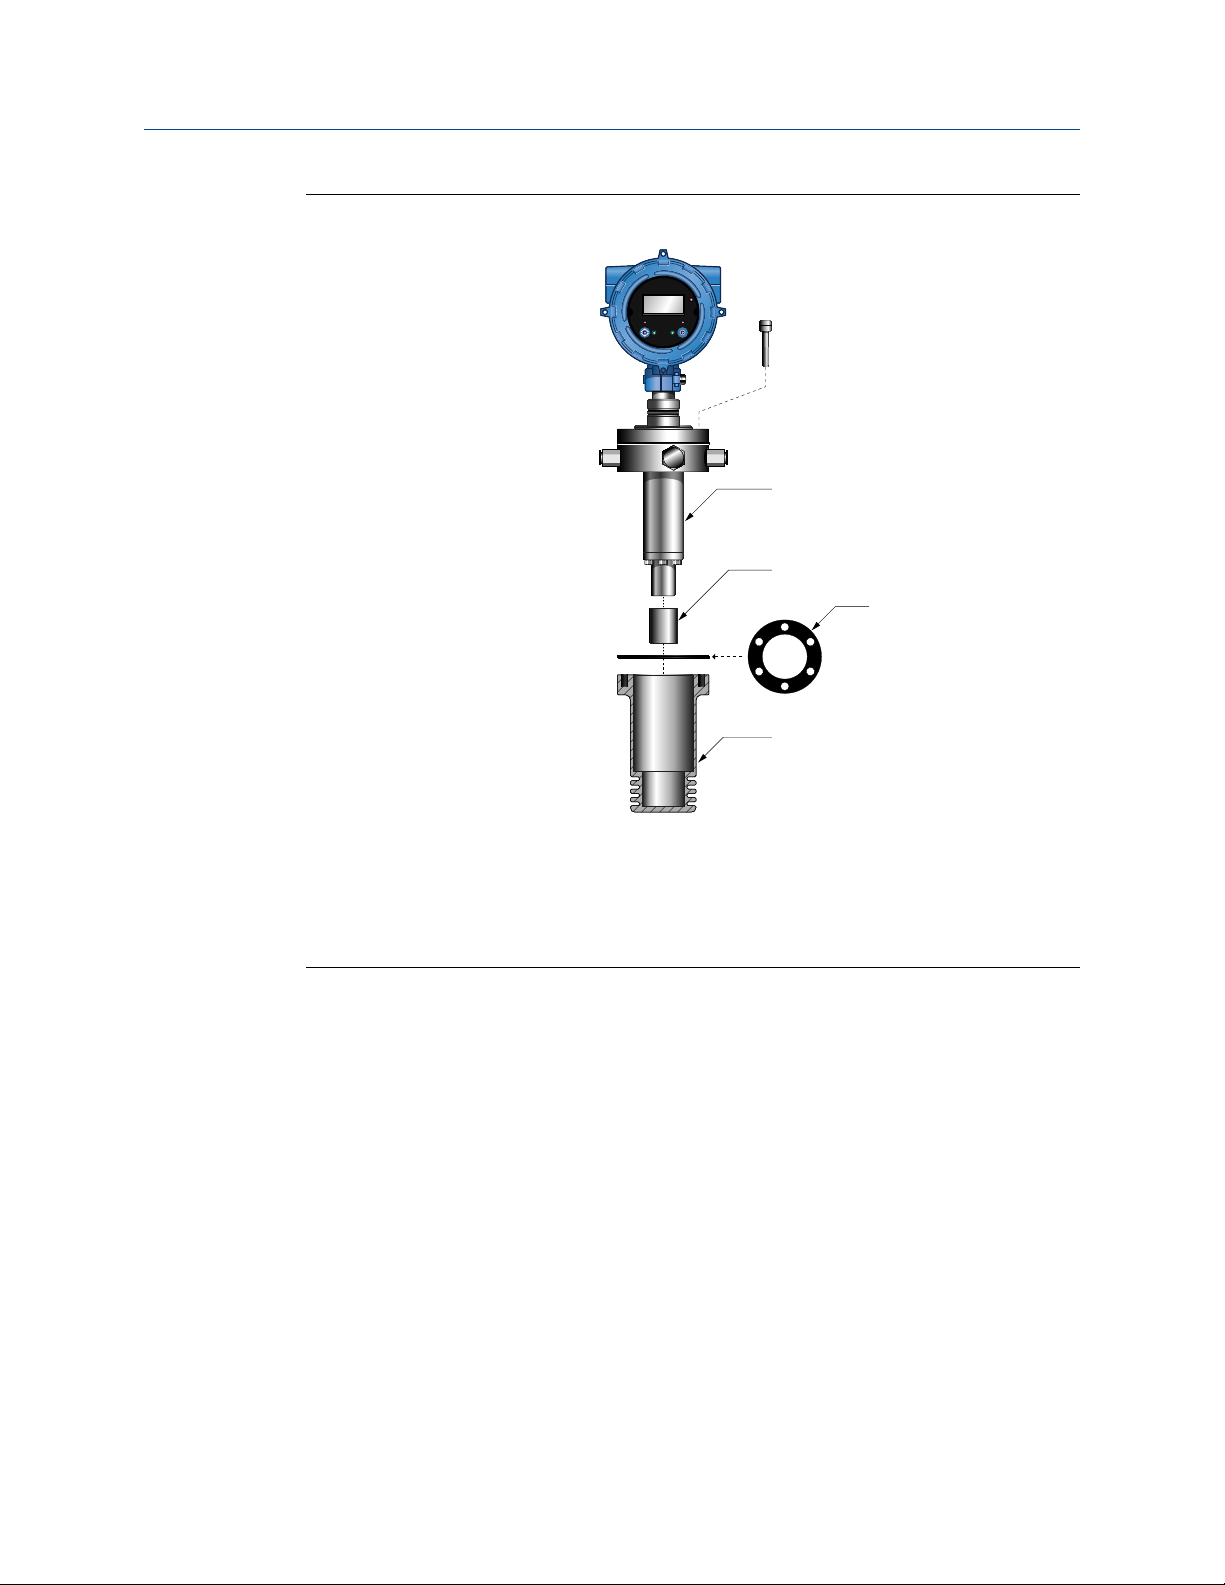
Meter installation piecesFigure 2-1:
A. M8 socket-head cap screw (for mounting)
B. Meter housing
C. Aluminum sleeve (cylinder)
D. Anti-vibration gasket
E. Thermo-well pocket
Procedure
1. (Recommended) Install the thermo-well pocket in the aperture created in the
pipeline and weld it into place.
2. Pour the supplied silicon fluid (an amount of 20 cm3) into the interior of the pocket.
3. Place one 5-mm anti-vibration gasket on top of the pocket.
Align the anti-vibration gasket holes with the bolt holes on the pocket.
4. Place the aluminum sleeve over the end of the meter housing.
5. Insert the meter housing into the pocket.
6. Secure the meter into place, using the supplied mounting screws.
Installation Manual 17
Page 22

STATUS
SCROLL SELECT
Dimensions in inches (mm)
3.74 (95)
Mounting
Typical installation in pipeline (with thermo-well pocket)Figure 2-2:
2.2 Connect the gas bypass lines
Once you have mounted the meter in the pipeline, you are ready to connect the gas
bypass lines.
Adjacent to the gas connection ports, the meter provides two filters to ensure optimal
performance of the meter sensing element.
• 2 micron filter for the inlet connection
• 90 micron filter for the outlet connection
The outlet filter provides additional protection if reverse gas flow occurs. This filter
arrangement is best suited for density measurement at the process gas return point.
Procedure
Connect the process gas bypass lines to the gas inlet/outlet ports.
18 Micro Motion® Gas Density Meters
Page 23

Gas inlet/outlet connectorsFigure 2-3:
STATUS
SCROLL SELECT
C
BA
A. Process gas outlet
B. Process gas inlet
C. Filter
Mounting
Installation Manual 19
Page 24

A
Mounting
2.3 Rotate the electronics on the meter (optional)
You can rotate the transmitter on the meter up to 90°.
1. Using a 4 mm hex key, loosen the cap screw that holds the transmitter in place.
Component to secure transmitter in placeFigure 2-4:
A. M5 socket-head cap screw
2. Rotate the transmitter clockwise to the desired orientation up to 90°.
3. Secure the cap screw in place and tighten to 60 lb·in (6.8 N·m).
2.4 Rotate the display on the transmitter (optional)
The display on the transmitter electronics module can be rotated 90° or 180° from the
original position.
20 Micro Motion® Gas Density Meters
Page 25

Display componentsFigure 2-5:
B
C
D
A
D
E
A. Transmitter housing
B. Sub-bezel
C. Display module
D. Display screws
E. Display cover
Mounting
Procedure
1. If the meter is powered up, power it down.
2. Turn the display cover counterclockwise to remove it from the main enclosure.
3. Carefully loosen (and remove if necessary) the semi-captive display screws while
holding the display module in place.
4. Carefully pull the display module out of the main enclosure until the sub-bezel pin
terminals are disengaged from the display module.
Note
If the display pins come out of the board stack with the display module, remove the pins and
reinstall them.
5. Rotate the display module to the desired position.
6. Insert the sub-bezel pin terminals into the display module pin holes to secure the
display in its new position.
7. If you have removed the display screws, line them up with the matching holes on the
sub-bezel, then reinsert and tighten them.
8. Place the display cover onto the main enclosure.
9. Turn the display cover clockwise until it is snug.
10. If appropriate, power up the meter.
Installation Manual 21
Page 26

Mounting
2.5 Post-installation check
After you complete the installation of the meter, pressure test the meter and associated
pipework to 1½ times the maximum operating pressure.
22 Micro Motion® Gas Density Meters
Page 27

3 Wiring
Topics covered in this chapter:
• Available output terminals and wiring requirements
• Hazardous area output wiring
3.1 Available output terminals and wiring
requirements
Three pairs of wiring terminals are available for transmitter outputs. These outputs vary
depending on your transmitter output option ordered. The Analog (mA), Time Period
Signal (TPS), and Discrete (DO) outputs require external power, and must be connected to
an independent 24 VDC power supply.
The screw connectors for each output terminal accept a maximum wire size of 14 AWG
(2.5 mm2).
Wiring
Important
• Output wiring requirements depend on the hazardous area classification of the environment
in which the meter is installed. It is your responsibility to verify that this installation meets all
corporate, local, and national safety requirements and electrical codes.
• If you will configure the meter to poll an external temperature or pressure device, you must
wire the mA output to support HART communications. You may use either HART/mA singleloop wiring or HART multi-drop wiring.
Transmitter outputsTable 3-1:
Output channels
Transmitter version
Analog 4–20 mA + HART 4–20 mA Modbus/RS-485
Time period signal (TPS) 4–20 mA + HART Time Period Sig-
Fixed 4–20 mA (tem-
A B C
nal (TPS)
Time period sig-
perature)
nal (TPS)
3.2 Hazardous area output wiring
Modbus/RS-485
Disabled
Micro Motion provides safety barrier and galvanic isolator installation kits for wiring the
meter in a hazardous environment. These kits provide the appropriate barriers or isolators
depending on the outputs available and approvals required.
Installation Manual 23
Page 28

Wiring
Information provided about wiring the safety barriers and galvanic isolators is intended as
an overview. You should wire the meter according to the standards that are applicable at
your site.
CAUTION!
• Meter installation and wiring should be performed by suitably trained personnel only in
accordance with the applicable code of practice.
• Refer to the hazardous area approvals documentation shipped with your meter. Safety
instructions are available on the Micro Motion Product Documentation DVD and
accessible on the Micro Motion website at www.micromotion.com.
3.2.1 Hazardous area entity parameters
DANGER!
Hazardous voltage can cause severe injury or death. To reduce the risk of hazardous voltage,
shut off power before wiring the meter.
DANGER!
Improper wiring in a hazardous environment can cause an explosion. Install the meter only in
an area that complies with the hazardous classification tag on the meter.
Input entity parameters
Input entity parameters: all connectionsTable 3-2:
4–20 mA /Discrete
Output/Time Period
Parameter Power supply
Voltage (Ui) 30 VDC 30 VDC 18 VDC
Current (Ii) 484 mA 484 mA 484 mA
Power (Pi) 2.05 W 2.05 W 2.05 W
Internal capacitance
(Ci)
Internal inductance (Li) 0.0 H 0.0 H 0.0 H
0.0 pF 0.0 pF 0.0011 pF
Signal RS-485
RS-485 output and cable parameters
All connections to the meter receive their power from the connected intrinsically safe
barrier. All cable parameters are derived from the output parameters of these devices. The
RS-485 connection also receives power from the connected barrier (MTL7761AC),
although this connection has specific output and cable parameters.
24 Micro Motion® Gas Density Meters
Page 29

RS-485 output and cable entity parameters (MTL7761AC)Table 3-3:
Input parameters
Voltage (Ui) 18 VDC
Current (Ii) 100 mA
Internal capacitance (Ci) 1 nF
Internal inductance (Li) 0.0 H
Output parameters
Voltage (Uo) 9.51 VDC
Current (instantaneous) (Io) 480 mA
Current (steady state) (I) 106 mA
Power (Po) 786 mW
Internal resistance (Ri) 19.8 Ω
Cable parameters for Group IIC
External capacitance (Co) 85 nF
External inductance (Lo) 154 µH
External inductance/resistance ratio (Lo/Ro) 31.1 µH/Ω
Wiring
Cable parameters for Group IIB
External capacitance (Co) 660 nF
External inductance (Lo) 610 µH
External inductance/resistance ratio (Lo/Ro) 124.4 µH/Ω
Hazardous area
voltage
Hazardous area
current
The meter entity parameters require the selected barrier’s opencircuit voltage to be limited to less than 30 VDC (Vmax = 30 VDC).
The meter entity parameters require the selected barrier’s shortcircuit currents to sum to less than 484 mA (Imax = 484 mA) for all
outputs.
Hazardous area
capacitance
The capacitance (Ci) of the meter is 0.0011 μF. This value added to
the wire capacitance (Ccable) must be lower than the maximum
allowable capacitance (Ca) specified by the safety barrier. Use the
following equation to calculate the maximum length of the cable
between the meter and the barrier: Ci + Ccable ≤ Ca
Hazardous area
inductance
The inductance (Li) of the meter is 0.0 μH. This value plus the field
wiring inductance (Lcable), must be lower than the maximum
allowable inductance (La) specified by the safety barrier. The
following equation can then be used to calculate the maximum cable
length between the meter and the barrier: Li + Lcable ≤ La
Installation Manual 25
Page 30

Wiring
3.2.2 Wire all available outputs using safety barriers
Micro Motion provides a safety barrier installation kit for wiring the meter in a hazardous
area. Contact your local sales representative or Micro Motion Customer Support at
flow.support@emerson.com for more information on ordering a barrier kit.
CAUTION!
• Meter installation and wiring should be performed by suitably trained personnel only in
accordance with the applicable code of practice.
• Refer to the hazardous area approvals documentation shipped with your meter. Safety
instructions are available on the Micro Motion Product Documentation DVD and
accessible on the Micro Motion website at www.micromotion.com.
The safety barrier kit provides barriers for connecting all of the available meter outputs.
Use the provided barriers with the designated output.
Output(s) Barrier
4–20 mA MTL7728P+
• 4–20 mA
• Time Period Signal (TPS)
• Discrete
Modbus/RS-485 MTL7761AC
Power MTL7728P+
MTL7728P+
Procedure
Wire the barriers to the appropriate output terminal and pins.
26 Micro Motion® Gas Density Meters
Page 31

Bus
Bar
Hazardous Area
Non-Hazardous Area
MTL7761AC
RS-485 A
RS-485 B
3
4
1
2
24 VDC
24 VDC
MTL7728P+
24 VDC
3
4
1
2
MTL7728P+
3
4
1
2
250 Ω
MTL7728P+
3
4
1
2
HART
Device
Signal
Device
See
note
mA1+
HART
RS-485
PWR
mA2/
TPS/DO
A
B
Wiring
Hazardous area mA/DO/TPS output wiring using safety barriersFigure 3-1:
Note
The recommended resistance will vary depending on your Channel B output. For mA outputs, 250 Ω is the recommended
resistance. For TPS or Discrete outputs, 500–1000 Ω is the recommended resistance.
3.2.3 Wire Analog outputs using galvanic isolators
Micro Motion provides a galvanic isolator installation kit specific to wiring the Analog
version of the meter in a hazardous area. Contact your local sales representative or
Micro Motion Customer Support at flow.support@emerson.com for more information on
ordering an isolator kit for your meter.
Installation Manual 27
Page 32

Wiring
CAUTION!
• Meter installation and wiring should be performed by suitably trained personnel only in
accordance with the applicable code of practice.
• Refer to the hazardous area approvals documentation shipped with your meter. Safety
instructions are available on the Micro Motion Product Documentation DVD and
accessible on the Micro Motion website at www.micromotion.com.
The galvanic isolator kit (Analog version) provides isolators for connecting the following
outputs. Use the provided isolators with the designated output.
Note
The RS-485 barrier is not isolated.
Output(s) Isolator
4–20 mA + HART MTL5541
4–20 mA MTL5541
Modbus/RS-485 MTL7761AC
Power MTL5523
Procedure
Wire the isolators to the appropriate output terminal and pins.
28 Micro Motion® Gas Density Meters
Page 33

mA1+
HART
PWR
mA2
Hazardous Area
Non-Hazardous Area
MTL7761AC
RS-485 A
RS-485 B
3
4
1
2
MTL5541
2
1
14
13
12
11
MTL5523
2
1
24 VDC
14
13
12
11
24 VDC
LINK
250 Ω
MTL5541
2
1
14
13
12
11
24 VDC
250 Ω
A
B
HART
Device
Signal
Device
Wiring
Hazardous area output wiring using galvanic isolators (mA outputs option)Figure 3-2:
3.2.4 Wire Time Period Signal (TPS) or Discrete output options using galvanic isolators
Micro Motion provides a galvanic isolator installation kit specific to wiring the Time Period
Signal (TPS) and Discrete versions of the meter in a hazardous area. Contact your local
sales representative or Micro Motion Customer Support at flow.support@emerson.com for
more information on ordering an isolator kit for your meter.
CAUTION!
• Meter installation and wiring should be performed by suitably trained personnel only in
accordance with the applicable code of practice.
• Refer to the hazardous area approvals documentation shipped with your meter. Safety
instructions are available on the Micro Motion Product Documentation DVD and
accessible on the Micro Motion website at www.micromotion.com.
The galvanic isolator kit (TPS/Discrete version) provides isolators for connecting the
following outputs. Use the provided isolators with the designated output.
Installation Manual 29
Page 34

mA1+
HART
PWR
SIG
Hazardous Area
Non-Hazardous Area
MTL7761AC
MTL5532
RS-485 A
RS-485 B
5
3
4
1
2
1
11
12
13
14
4
1 kΩ
MTL5541
2
1
14
13
12
11
MTL5523
2
1
24 VDC
24 VDC
14
13
24 VDC
1 kΩ
250 Ω
A
B
HART
Device
Signal
Device
Wiring
Note
The RS-485 barrier is not isolated.
Output(s) Isolator
4–20 mA + HART MTL5541
• Time Period Signal (TPS)
• Discrete
Modbus/RS-485 MTL7761AC
Power MTL5523
Procedure
1. Wire the isolators to the appropriate output terminal and pins.
Hazardous area output wiring using galvanic isolators (TPS and Discrete output options)Figure 3-3:
MTL5532
2. Set the isolator switch settings for the TPS/DO connection (MTL5532 isolator). You
must set the isolator switches appropriately for Pins 1 through 5 (see Table 1).
30 Micro Motion® Gas Density Meters
Page 35

1 2 3 4
OFF
ON
Wiring
The switches are located on the side of the isolator, and must be set to either Off (the
up position) or On (the down position).
MTL5532 switch location (plus ON/OFF switch position)Figure 3-4:
MTL5532 switch settingsTable 3-4:
Switch ON/OFF?
1 ON
2 OFF
3 OFF
4 OFF
Installation Manual 31
Page 36

Grounding
4 Grounding
The meter must be grounded according to the standards that are applicable at the site.
The customer is responsible for knowing and complying with all applicable standards.
Prerequisites
Micro Motion suggests the following guides for grounding practices:
• In Europe, EN 60079-14 is applicable to most installations, in particular Sections
12.2.2.3 and 12.2.2.4.
• In the U.S.A. and Canada, ISA 12.06.01 Part 1 provides examples with associated
applications and requirements.
• For IECEx installations, IEC 60079-14 is applicable.
If no external standards are applicable, follow these guidelines to ground the meter:
• Use copper wire, 18 AWG (0.75 mm2) or larger wire size.
• Keep all ground leads as short as possible, less than 1 Ω impedance.
• Connect ground leads directly to earth, or follow plant standards.
CAUTION!
Ground the meter to earth, or follow ground network requirements for the facility. Improper
grounding can cause measurement error.
Procedure
Check the joints in the pipeline.
- If the joints in the pipeline are ground-bonded, the sensor is automatically grounded
and no further action is necessary (unless required by local code).
- If the joints in the pipeline are not grounded, connect a ground wire to the grounding
screw located on the sensor electronics.
32 Micro Motion® Gas Density Meters
Page 37

Grounding
Installation Manual 33
Page 38

Micro Motion Inc. USA
Worldwide Headquarters
7070 Winchester Circle
Boulder, Colorado 80301
T +1 303-527-5200
T +1 800-522-6277
F +1 303-530-8459
www.micromotion.com
Micro Motion Europe
Emerson Process Management
Neonstraat 1
6718 WX Ede
The Netherlands
T +31 (0) 70 413 6666
F +31 (0) 318 495 556
www.micromotion.nl
*MMI-20020979*
MMI-20020979
Rev AB
2015
Micro Motion Asia
Emerson Process Management
1 Pandan Crescent
Singapore 128461
Republic of Singapore
T +65 6777-8211
F +65 6770-8003
Micro Motion United Kingdom
Emerson Process Management Limited
Horsfield Way
Bredbury Industrial Estate
Stockport SK6 2SU U.K.
T +44 0870 240 1978
F +44 0800 966 181
Micro Motion Japan
Emerson Process Management
1-2-5, Higashi Shinagawa
Shinagawa-ku
Tokyo 140-0002 Japan
T +81 3 5769-6803
F +81 3 5769-6844
©
2015 Micro Motion, Inc. All rights reserved.
The Emerson logo is a trademark and service mark of Emerson
Electric Co. Micro Motion, ELITE, ProLink, MVD and MVD Direct
Connect marks are marks of one of the Emerson Process
Management family of companies. All other marks are property of
their respective owners.
 Loading...