

Emerson Rosemount 1066 Quick Start Guide
Rosemount™ 1066
Single Channel Transmitter
Quick Start Guide
00825-0100-3166, Rev AC
May 2020

Quick Start Guide May 2020
Safety Information
For information on specifications, programming, calibration, and HART® communications, see the
Rosemount 1066 Transmitter Reference Manual at Emerson.com/Rosemount.
Emerson designs, manufactures, and tests its products to meet many national and international
standards. Because these instruments are sophisticated technical products, you must properly install,
use, and maintain them to ensure they continue to operate within their normal specifications. You
must adhere to the following instructions and integrate them into your safety program when
installing, using, and maintaining Emerson's Rosemount products. Failure to follow the proper
instructions may cause any one of the following situations to occur: loss of life, personal injury,
property damage, damage to this instrument, and warranty invalidation.
• Read all instructions prior to installing, operating, and servicing the product.
• If this Quick Start Guide is not the correct one, call 1-800-854-8257 or 949-757-8500 to request
the correct Quick Start Guide. Save this Quick Start Guide for future reference.
• If you do not understand any of the instructions, contact your Emerson representative for
clarification.
• Follow all warnings, cautions, and instructions marked on and supplied with the product.
• Inform and educate your personnel in the proper installation, operation, and maintenance of the
product.
• Install equipment as specified in the installation instructions of the appropriate Reference Manual
and per applicable local and national codes. Connect all products to the proper electrical and
pressure sources.
• When replacement parts are required, ensure that qualified people use replacement parts
specified by Emerson. Unauthorized parts and procedures can affect the product's performance,
place the safe operation of your process at risk, and VOID YOUR WARRANTY. Look-alike
substitutions may result in fire, electrical hazards, or improper operation.
• Ensure that all equipment doors are closed and protective covers are in place, except when
maintenance is being performed by qualified people, to prevent electrical shock and personal
injury.
WARNING
Risk of electrical shock
Do not open while the circuit is live.
Only clean with a damp cloth.
NOTICE
If a 475 Universal HART® Communicator is used with these transmitters, the software within the 475
may require modification. If a software modification is required, please contact your local Emerson
Service Group or National Response Center at 1-800-654-7768.
2 Emerson.com/Rosemount

May 2020 Quick Start Guide
WARNING
Electrostatic ignition hazard
Special conditions for safe use (when installed in hazardous areas)
The plastic enclosure, except the front panel, must only be cleaned with a damp cloth. The surface
resistivity of the non-metallic enclosure materials is greater than one gigaohm. Take care to avoid
electrostatic charge build-up. Do not rub or clean the transmitter with solvents or a dry cloth.
The panel mount gasket has not been tested for type of protection IP66 or Class II and III. Type of
protection IP66 and Class II, III refer to the enclosure only.
Special condition of use of Rosemount 1066 C FF/FII5 and 1066 T FF/FII5. For use with simple
apparatus Rosemount 140, 141, 142, 150, 400, 401, 402, 402VP, 403, 403VP, 404, and 410VP
contacting conductivity sensors and Rosemount 222, 225, 226, and 228 toroidal sensors.
WARNING
Physical access
Unauthorized personnel may potentially cause significant damage to and/or misconfiguration of end
users’ equipment. This could be intentional or unintentional and needs to be protected against.
Physical security is an important part of any security program and fundamental to protecting your
system. Restrict physical access by unauthorized personnel to protect end users’ assets. This is true for
all systems used within the facility.
Contents
Install........................................................................................................................................... 5
Wire........................................................................................................................................... 12
Navigating the display................................................................................................................23
Start up transmitter....................................................................................................................27
Product certifications................................................................................................................. 29
Declaration of Conformity..........................................................................................................33
China RoHS table........................................................................................................................35
Quick Start Guide 3

Quick Start Guide May 2020
4 Emerson.com/Rosemount
May 2020 Quick Start Guide
1 Install
1.1 Unpack and inspect
Procedure
1. Inspect the shipping container. If it is damaged, contact the shipper
immediately for instructions.
2. If there is no apparent damage, unpack the container. Be sure all
items shown on the packing list are present. If items are missing,
notify Emerson immediately.
1.2 Mount
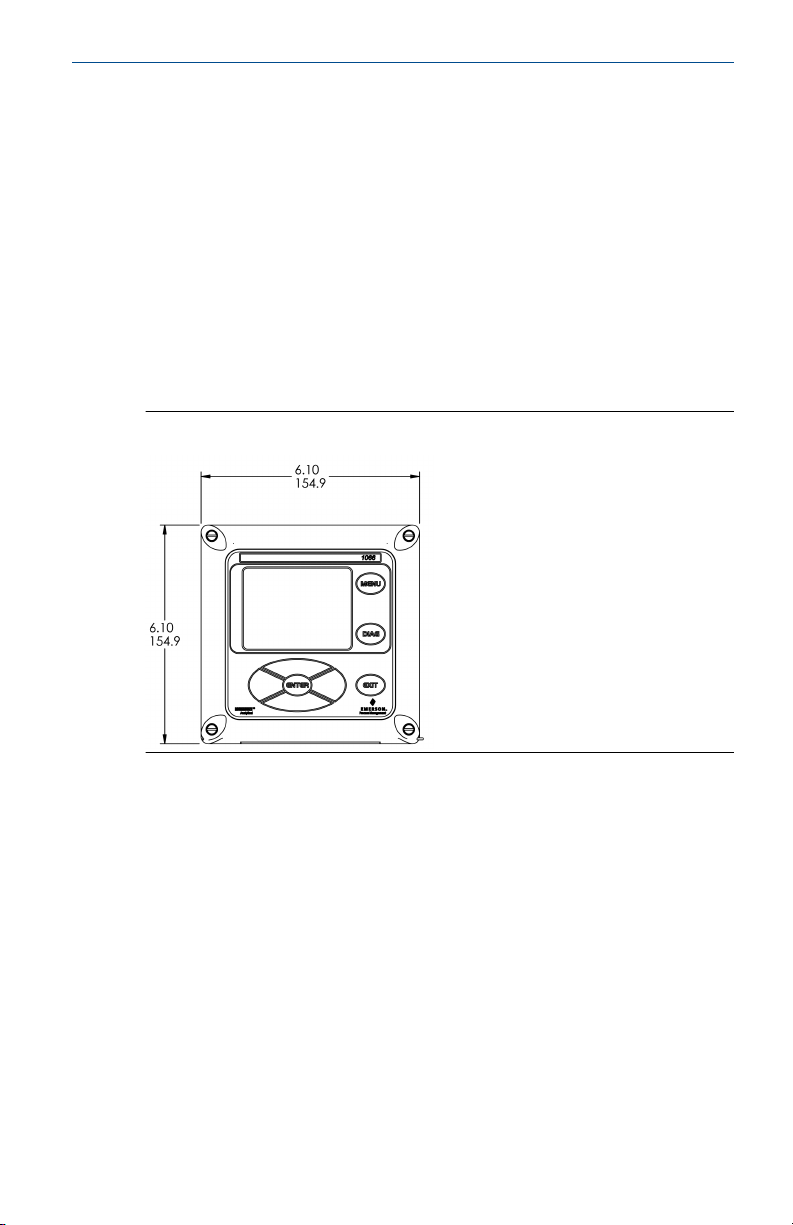
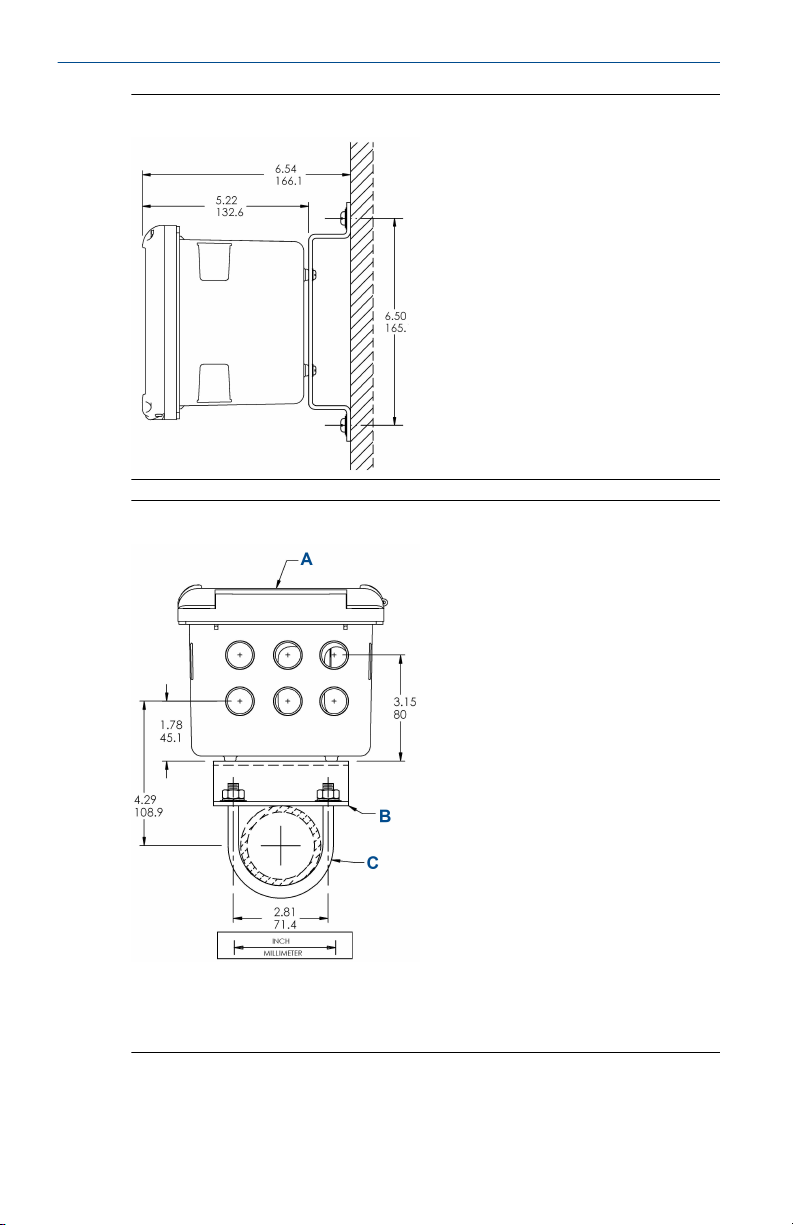
Figure 1-1: Panel Mount Front View
Quick Start Guide 5
Quick Start Guide May 2020
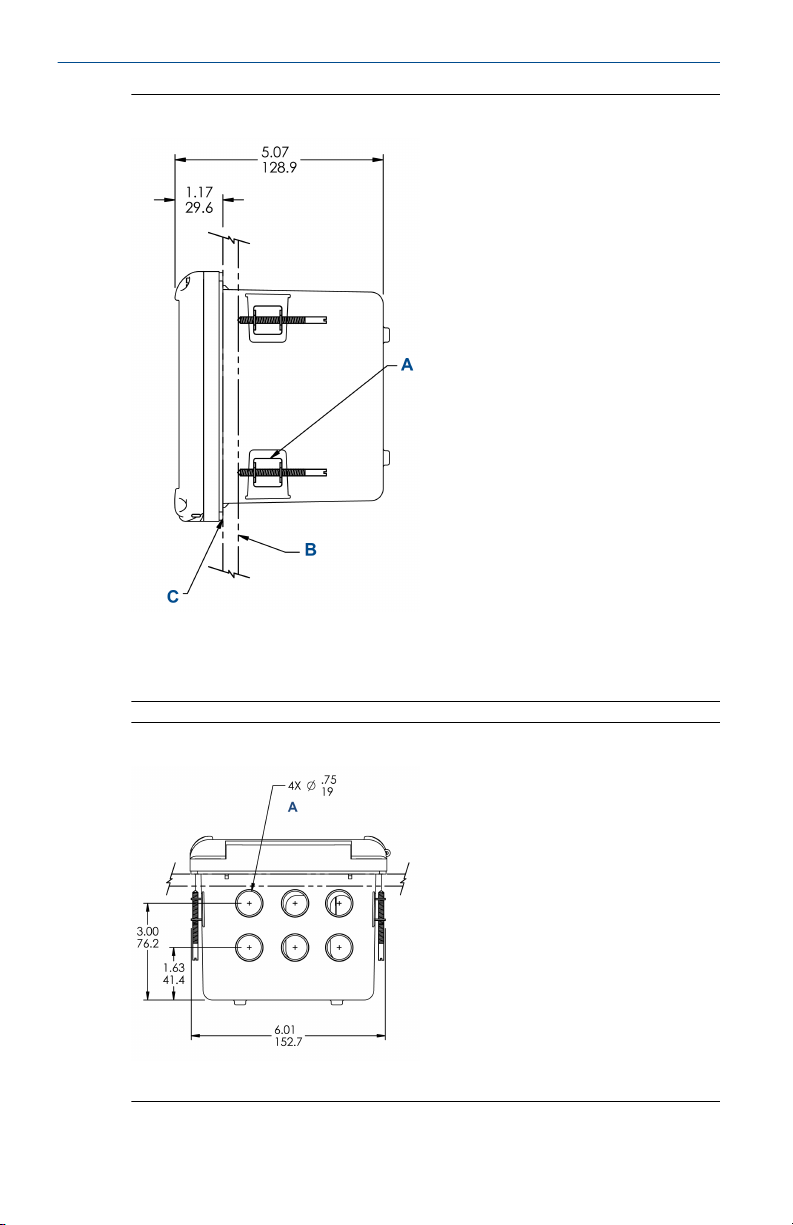
Figure 1-2: Panel Mount Side View
A. Four mounting brackets and screws provided with instrument
B. Panel supplied by others. Maximum thickness: 0.375 in. (9.52 mm)
C. Panel mount gasket
Figure 1-3: Panel Mount Bottom View
A. Conduit openings
6 Emerson.com/Rosemount
May 2020 Quick Start Guide
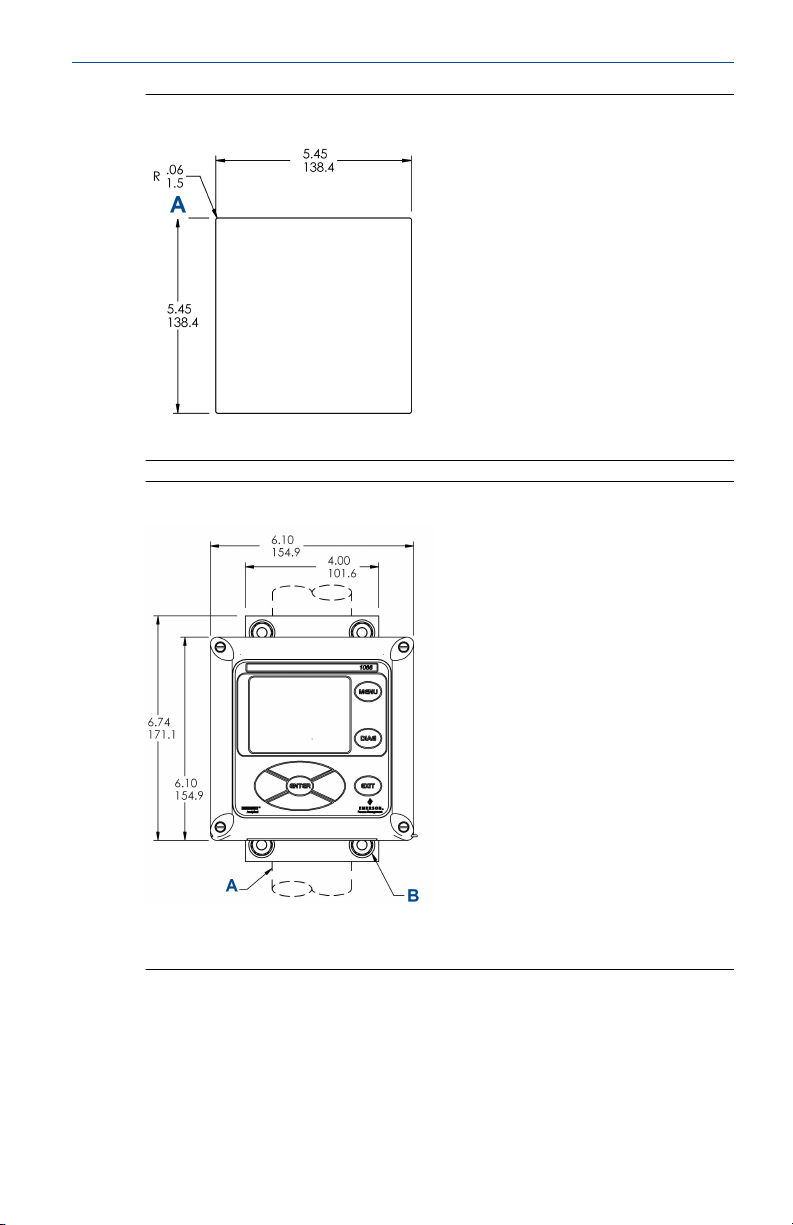
Figure 1-4: Panel Cut-Out
A. Maximum
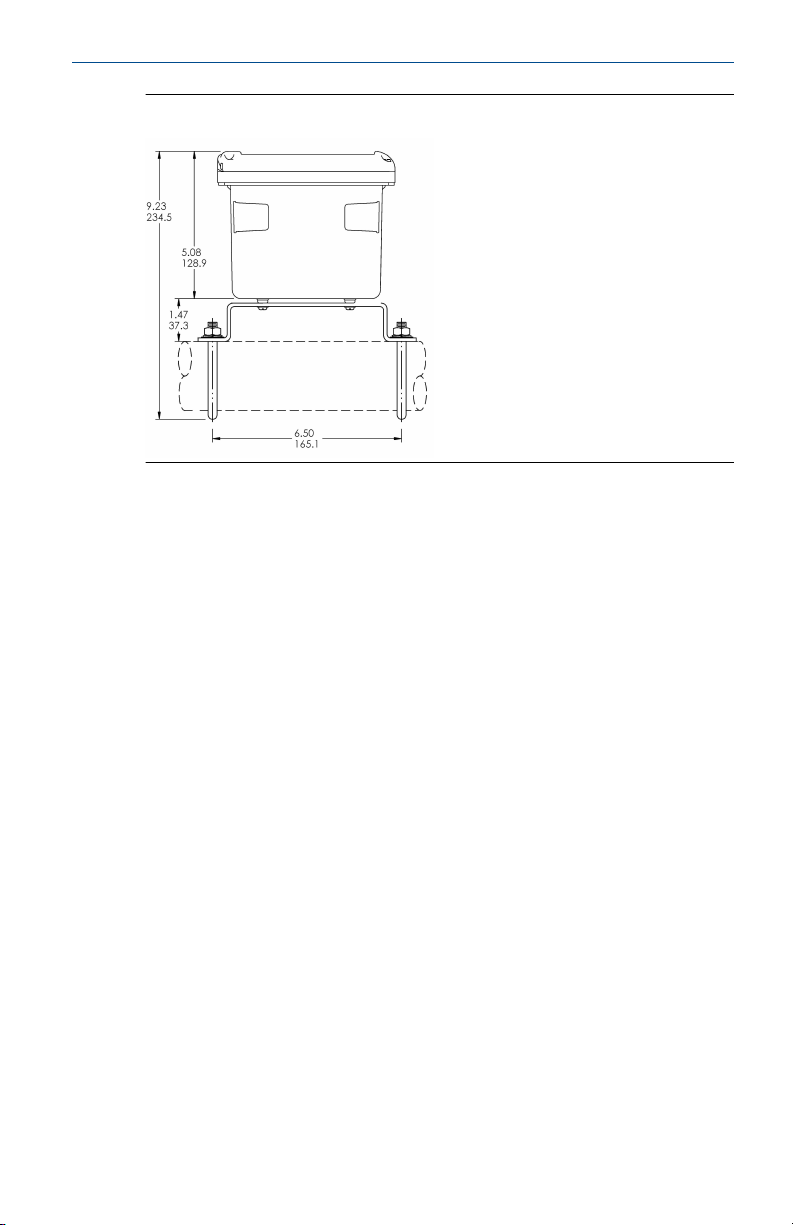
Figure 1-5: Wall Mount Front View
A. 2-in. (50.8 mm) pipe supplied by customer
B. Four cover screws
Quick Start Guide 7
Quick Start Guide May 2020
Figure 1-6: Wall Mount Side View
Figure 1-7: Pipe Mount Bottom View
A. Front panel
B. 2-in. (50.8 mm) pipe mount bracket
C. Two sets of U-bolts for 2-in. (50.8 mm) pipe in kit PN 23820-00
8 Emerson.com/Rosemount
May 2020 Quick Start Guide
Figure 1-8: Pipe Mount Side View
1.3 General installation information
1. Install the transmitter with a sunshield or out of direct sunlight and
areas with extreme temperatures.
2. Install the system in an area where vibrations and electromagnetic
and radio frequency interference are minimized or absent.
3. Keep the transmitter and sensor wiring at least 1 ft. (0.3 m) from
high voltage conductors. Be sure there is easy access to the
transmitter and sample conditioning system.
4. The transmitter is suitable for panel, pipe, or surface mounting.
5. The transmitter case has six ½-in. (12.7 mm) conduit openings. Use
separate conduit openings for the power/output cable, the sensor
cable, and the other sensor cable as needed (pH input for free
chlorine with continuous pH correction).
6. Use weathertight cable glands to keep moisture out of the
transmitter. If using a conduit, plug and seal the connections at the
transmitter housing to prevent moisture from getting inside the
instrument.
7. Install cable gland fittings and plugs as needed to properly seal the
transmitter on all six enclosure openings. The USB port cover must be
fully installed on the front cover to ensure proper transmitter sealing.
Quick Start Guide 9
Quick Start Guide May 2020
1.4 Prepare conduit openings
There are six conduit openings in all configurations of the transmitter.
Note
Emerson fits four of the openings with plugs upon shipment.
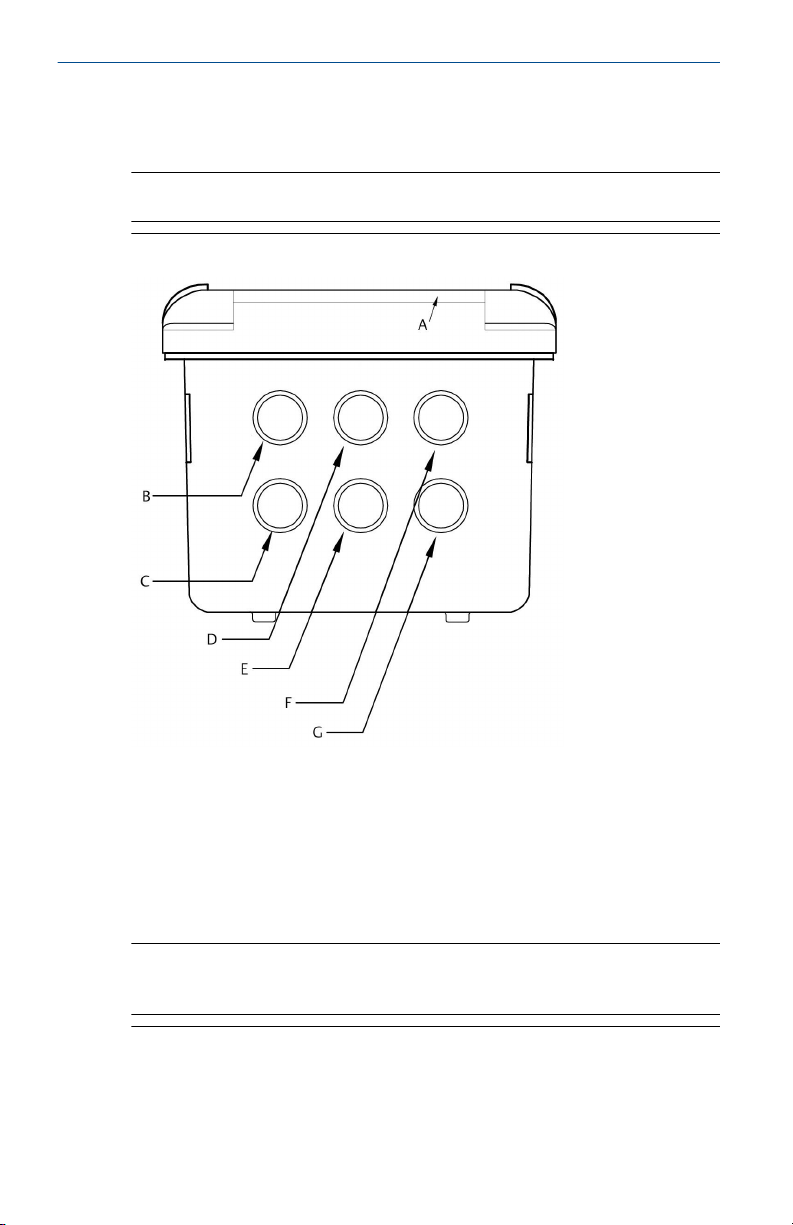
Figure 1-9: Conduit Openings
A. Front panel/keypad
B. Power leads
C. Alarm relay leads
D. Sensor 1 cable
E. 4-20 mA/HART®/Profibus® leads
F. Sensor 2 cable
G. Spare opening
Note
Always use proper cable gland fittings and plugs for wire and cable
installations.
Conduit openings accept ½-in. (12.7 mm) conduit fittings or PG13.5 cable
glands. To keep the case watertight, block unused openings with Type 4X or
IP66 conduit plugs.
10 Emerson.com/Rosemount

May 2020 Quick Start Guide
To maintain ingress protection for outdoor use, seal unused conduit holes
with suitable conduit plugs.
Note
Use watertight fittings and hubs that comply with your requirements.
Connect the conduit hub to the conduit before attaching the fitting to the
transmitter.
Important
Electrical installation must be in accordance with the National Electrical
Code (ANSI/NFPA-70) and/or any other applicable national or local codes.
Quick Start Guide 11
 Loading...