

Page 1
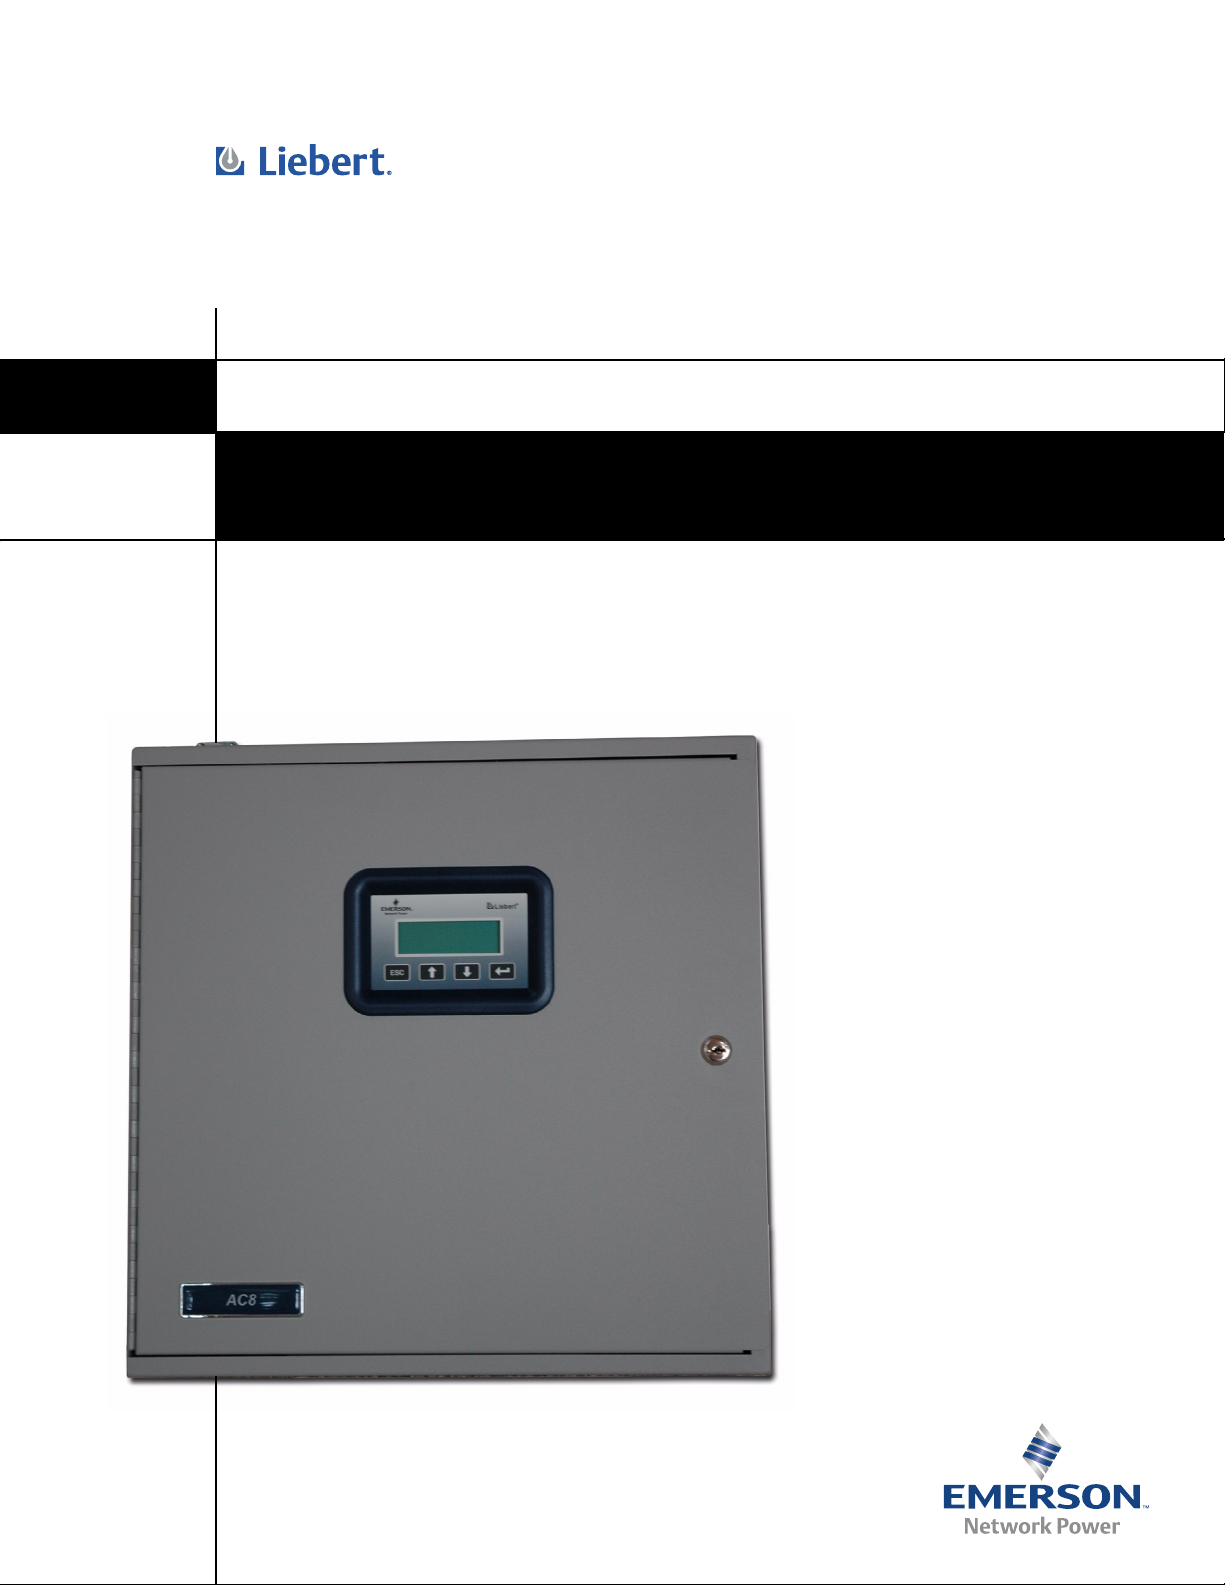
AC8
SITE MONITORING AND SERVICES
USER MANUAL
Page 2

Page 3

TABLE OF CONTENTS
1.0 INTRODUCTION
1.1 Methods of Viewing and Configuring the AC8 . . . . . . . . . . . . . . . . . . . . . . . . . . . . . . . . . . . . . 1
1.2 Data Logs . . . . . . . . . . . . . . . . . . . . . . . . . . . . . . . . . . . . . . . . . . . . . . . . . . . . . . . . . . . . . . . . . . 1
1.3 Transformer Module. . . . . . . . . . . . . . . . . . . . . . . . . . . . . . . . . . . . . . . . . . . . . . . . . . . . . . . . . . 1
1.4 Available Alarms . . . . . . . . . . . . . . . . . . . . . . . . . . . . . . . . . . . . . . . . . . . . . . . . . . . . . . . . . . . . 1
1.5 Outside Enclosure Overview . . . . . . . . . . . . . . . . . . . . . . . . . . . . . . . . . . . . . . . . . . . . . . . . . . . 2
1.6 Typical Configuration. . . . . . . . . . . . . . . . . . . . . . . . . . . . . . . . . . . . . . . . . . . . . . . . . . . . . . . . . 3
1.7 Controller Board Overview . . . . . . . . . . . . . . . . . . . . . . . . . . . . . . . . . . . . . . . . . . . . . . . . . . . . 4
1.8 LED Indicators . . . . . . . . . . . . . . . . . . . . . . . . . . . . . . . . . . . . . . . . . . . . . . . . . . . . . . . . . . . . . . 6
1.9 Typical Sequence . . . . . . . . . . . . . . . . . . . . . . . . . . . . . . . . . . . . . . . . . . . . . . . . . . . . . . . . . . . . 7
2.0 INSTALLATION
2.1 Installation Considerations . . . . . . . . . . . . . . . . . . . . . . . . . . . . . . . . . . . . . . . . . . . . . . . . . . . . 8
2.1.1 Unpacking and Preliminary Inspection . . . . . . . . . . . . . . . . . . . . . . . . . . . . . . . . . . . . . . . . . . . 8
2.2 Surface-Mounting the AC8 . . . . . . . . . . . . . . . . . . . . . . . . . . . . . . . . . . . . . . . . . . . . . . . . . . . . 9
2.2.1 Mounting the Panel . . . . . . . . . . . . . . . . . . . . . . . . . . . . . . . . . . . . . . . . . . . . . . . . . . . . . . . . . . . 9
2.3 Flush-Mounting the AC8 . . . . . . . . . . . . . . . . . . . . . . . . . . . . . . . . . . . . . . . . . . . . . . . . . . . . . 10
2.3.1 Mounting the Panel . . . . . . . . . . . . . . . . . . . . . . . . . . . . . . . . . . . . . . . . . . . . . . . . . . . . . . . . . . 10
2.4 Connect Power to the AC8 . . . . . . . . . . . . . . . . . . . . . . . . . . . . . . . . . . . . . . . . . . . . . . . . . . . . 11
2.4.1 Termination and Mounting . . . . . . . . . . . . . . . . . . . . . . . . . . . . . . . . . . . . . . . . . . . . . . . . . . . . 11
2.4.2 Connecting the Battery Pack . . . . . . . . . . . . . . . . . . . . . . . . . . . . . . . . . . . . . . . . . . . . . . . . . . . 12
2.4.3 Turning On the AC8 . . . . . . . . . . . . . . . . . . . . . . . . . . . . . . . . . . . . . . . . . . . . . . . . . . . . . . . . . . 12
3.0 WIRING AND CONNECTIONS
3.1 Wiring Specifications . . . . . . . . . . . . . . . . . . . . . . . . . . . . . . . . . . . . . . . . . . . . . . . . . . . . . . . . 13
3.2 Connecting Digital Inputs and Digital Outputs . . . . . . . . . . . . . . . . . . . . . . . . . . . . . . . . . . . 14
3.2.1 Connecting Digital Inputs . . . . . . . . . . . . . . . . . . . . . . . . . . . . . . . . . . . . . . . . . . . . . . . . . . . . . 14
3.2.2 Connecting Digital Outputs . . . . . . . . . . . . . . . . . . . . . . . . . . . . . . . . . . . . . . . . . . . . . . . . . . . . 15
3.2.3 Setting the Digital Output Jumpers . . . . . . . . . . . . . . . . . . . . . . . . . . . . . . . . . . . . . . . . . . . . . 15
3.2.4 Connecting Control Relay Outputs . . . . . . . . . . . . . . . . . . . . . . . . . . . . . . . . . . . . . . . . . . . . . . 16
3.2.5 Connecting the Emergency Power Operation (EPOP) Input . . . . . . . . . . . . . . . . . . . . . . . . . . 16
3.2.6 Setting the EPOP Jumper . . . . . . . . . . . . . . . . . . . . . . . . . . . . . . . . . . . . . . . . . . . . . . . . . . . . . 16
3.3 Connecting Analog Inputs . . . . . . . . . . . . . . . . . . . . . . . . . . . . . . . . . . . . . . . . . . . . . . . . . . . . 17
3.3.1 Setting the 12VDC/24VDC Analog Power Jumper. . . . . . . . . . . . . . . . . . . . . . . . . . . . . . . . . . 17
3.3.2 Connecting the Analog Ground . . . . . . . . . . . . . . . . . . . . . . . . . . . . . . . . . . . . . . . . . . . . . . . . . 17
3.4 Connecting Common Alarm Outputs . . . . . . . . . . . . . . . . . . . . . . . . . . . . . . . . . . . . . . . . . . . 18
3.5 EIA422 SiteScan Web Connector . . . . . . . . . . . . . . . . . . . . . . . . . . . . . . . . . . . . . . . . . . . . . . 18
3.6 Communications Connections . . . . . . . . . . . . . . . . . . . . . . . . . . . . . . . . . . . . . . . . . . . . . . . . . 18
3.6.1 RS232 Connector . . . . . . . . . . . . . . . . . . . . . . . . . . . . . . . . . . . . . . . . . . . . . . . . . . . . . . . . . . . . 18
3.6.2 Phone Line Connector . . . . . . . . . . . . . . . . . . . . . . . . . . . . . . . . . . . . . . . . . . . . . . . . . . . . . . . . 18
4.0 OVERVIEW OF MENUS
4.1 Opening Screen Overview . . . . . . . . . . . . . . . . . . . . . . . . . . . . . . . . . . . . . . . . . . . . . . . . . . . . 20
4.2 Main Menu Overview . . . . . . . . . . . . . . . . . . . . . . . . . . . . . . . . . . . . . . . . . . . . . . . . . . . . . . . . 20
4.3 LCD Menu Overview . . . . . . . . . . . . . . . . . . . . . . . . . . . . . . . . . . . . . . . . . . . . . . . . . . . . . . . . 20
i
Page 4

5.0 VIEW STATUS OPTIONS
5.1 View Active Alarms . . . . . . . . . . . . . . . . . . . . . . . . . . . . . . . . . . . . . . . . . . . . . . . . . . . . . . . . . 22
5.1.1 Active Alarms . . . . . . . . . . . . . . . . . . . . . . . . . . . . . . . . . . . . . . . . . . . . . . . . . . . . . . . . . . . . . . . 22
5.2 View Alarm Log . . . . . . . . . . . . . . . . . . . . . . . . . . . . . . . . . . . . . . . . . . . . . . . . . . . . . . . . . . . . 23
5.2.1 Alarm Log . . . . . . . . . . . . . . . . . . . . . . . . . . . . . . . . . . . . . . . . . . . . . . . . . . . . . . . . . . . . . . . . . . 23
5.2.2 Backing Up the Alarm Log (Service Terminal Interface only) . . . . . . . . . . . . . . . . . . . . . . . . . 23
5.3 View Event Log. . . . . . . . . . . . . . . . . . . . . . . . . . . . . . . . . . . . . . . . . . . . . . . . . . . . . . . . . . . . . 24
5.3.1 Event Log . . . . . . . . . . . . . . . . . . . . . . . . . . . . . . . . . . . . . . . . . . . . . . . . . . . . . . . . . . . . . . . . . . 24
5.3.2 Backing Up the Event Log (Service Terminal Interface only) . . . . . . . . . . . . . . . . . . . . . . . . . 24
5.4 View Trend Log. . . . . . . . . . . . . . . . . . . . . . . . . . . . . . . . . . . . . . . . . . . . . . . . . . . . . . . . . . . . . 25
5.4.1 Select a Sensor . . . . . . . . . . . . . . . . . . . . . . . . . . . . . . . . . . . . . . . . . . . . . . . . . . . . . . . . . . . . . . 25
5.4.2 View a Trend Log . . . . . . . . . . . . . . . . . . . . . . . . . . . . . . . . . . . . . . . . . . . . . . . . . . . . . . . . . . . . 25
5.4.3 Backing Up the Trend Log (Service Terminal Interface only) . . . . . . . . . . . . . . . . . . . . . . . . . 25
5.5 View Input Status . . . . . . . . . . . . . . . . . . . . . . . . . . . . . . . . . . . . . . . . . . . . . . . . . . . . . . . . . . 26
5.5.1 Input Status . . . . . . . . . . . . . . . . . . . . . . . . . . . . . . . . . . . . . . . . . . . . . . . . . . . . . . . . . . . . . . . . 26
5.6 View Output Status . . . . . . . . . . . . . . . . . . . . . . . . . . . . . . . . . . . . . . . . . . . . . . . . . . . . . . . . . 27
5.6.1 Output Status . . . . . . . . . . . . . . . . . . . . . . . . . . . . . . . . . . . . . . . . . . . . . . . . . . . . . . . . . . . . . . . 27
5.7 View Pager Numbers . . . . . . . . . . . . . . . . . . . . . . . . . . . . . . . . . . . . . . . . . . . . . . . . . . . . . . . . 28
5.7.1 Select a Pager . . . . . . . . . . . . . . . . . . . . . . . . . . . . . . . . . . . . . . . . . . . . . . . . . . . . . . . . . . . . . . . 28
5.7.2 View a Pager Number . . . . . . . . . . . . . . . . . . . . . . . . . . . . . . . . . . . . . . . . . . . . . . . . . . . . . . . . 28
5.7.3 View a Pager PIN . . . . . . . . . . . . . . . . . . . . . . . . . . . . . . . . . . . . . . . . . . . . . . . . . . . . . . . . . . . . 28
5.8 View Operation. . . . . . . . . . . . . . . . . . . . . . . . . . . . . . . . . . . . . . . . . . . . . . . . . . . . . . . . . . . . . 29
5.8.1 Select a Zone . . . . . . . . . . . . . . . . . . . . . . . . . . . . . . . . . . . . . . . . . . . . . . . . . . . . . . . . . . . . . . . . 29
5.8.2 View Operation . . . . . . . . . . . . . . . . . . . . . . . . . . . . . . . . . . . . . . . . . . . . . . . . . . . . . . . . . . . . . . 29
5.9 View Control Status . . . . . . . . . . . . . . . . . . . . . . . . . . . . . . . . . . . . . . . . . . . . . . . . . . . . . . . . . 30
5.9.1 Control Status. . . . . . . . . . . . . . . . . . . . . . . . . . . . . . . . . . . . . . . . . . . . . . . . . . . . . . . . . . . . . . . 30
6.0 SILENCE ALARM & BACKUP LOG FILES (SERVICE TERMINAL INTERFACE)
6.1 Silence Alarm (Service Terminal Interface) . . . . . . . . . . . . . . . . . . . . . . . . . . . . . . . . . . . . . . 31
6.2 Back Up Log Files (Service Terminal Interface only) . . . . . . . . . . . . . . . . . . . . . . . . . . . . . . . 32
7.0 SYSTEM AND CONTROL OPTIONS
7.1 Login . . . . . . . . . . . . . . . . . . . . . . . . . . . . . . . . . . . . . . . . . . . . . . . . . . . . . . . . . . . . . . . . . . . . . 34
7.2 Setup System - Overview . . . . . . . . . . . . . . . . . . . . . . . . . . . . . . . . . . . . . . . . . . . . . . . . . . . . . 36
7.3 Setup System - Setup Inputs . . . . . . . . . . . . . . . . . . . . . . . . . . . . . . . . . . . . . . . . . . . . . . . . . . 36
7.3.1 Change Label (Name of Input) . . . . . . . . . . . . . . . . . . . . . . . . . . . . . . . . . . . . . . . . . . . . . . . . . 37
7.3.2 Define Input as Normally Open or Normally Closed . . . . . . . . . . . . . . . . . . . . . . . . . . . . . . . . 37
7.3.3 Define Input as Alarmable or Event . . . . . . . . . . . . . . . . . . . . . . . . . . . . . . . . . . . . . . . . . . . . . 37
7.3.4 Set Up Alarmable Inputs in Latched or Unlatched Mode . . . . . . . . . . . . . . . . . . . . . . . . . . . . 38
7.3.5 Set Up Delay Time . . . . . . . . . . . . . . . . . . . . . . . . . . . . . . . . . . . . . . . . . . . . . . . . . . . . . . . . . . . 38
7.4 Setup System - Setup Common Alarm . . . . . . . . . . . . . . . . . . . . . . . . . . . . . . . . . . . . . . . . . . 39
7.5 Setup System - Setup Sensor. . . . . . . . . . . . . . . . . . . . . . . . . . . . . . . . . . . . . . . . . . . . . . . . . . 40
7.5.1 Identify the Sensor as Connected . . . . . . . . . . . . . . . . . . . . . . . . . . . . . . . . . . . . . . . . . . . . . . . 41
7.5.2 Change Sensor Label (Name) . . . . . . . . . . . . . . . . . . . . . . . . . . . . . . . . . . . . . . . . . . . . . . . . . . 41
7.5.3 Change Units Label . . . . . . . . . . . . . . . . . . . . . . . . . . . . . . . . . . . . . . . . . . . . . . . . . . . . . . . . . . 41
7.5.4 Change 4 mA Value . . . . . . . . . . . . . . . . . . . . . . . . . . . . . . . . . . . . . . . . . . . . . . . . . . . . . . . . . . 42
7.5.5 Change 20 mA Value . . . . . . . . . . . . . . . . . . . . . . . . . . . . . . . . . . . . . . . . . . . . . . . . . . . . . . . . . 42
7.5.6 Change Offset Value. . . . . . . . . . . . . . . . . . . . . . . . . . . . . . . . . . . . . . . . . . . . . . . . . . . . . . . . . . 42
7.5.7 Define Sensor as Alarmable or Event . . . . . . . . . . . . . . . . . . . . . . . . . . . . . . . . . . . . . . . . . . . . 43
7.5.8 Set Up Alarmable Sensors in Latched or Unlatched Mode . . . . . . . . . . . . . . . . . . . . . . . . . . . 43
7.5.9 Change Low Setpoint . . . . . . . . . . . . . . . . . . . . . . . . . . . . . . . . . . . . . . . . . . . . . . . . . . . . . . . . . 44
7.5.10 Change High Setpoint . . . . . . . . . . . . . . . . . . . . . . . . . . . . . . . . . . . . . . . . . . . . . . . . . . . . . . . . 44
7.5.11 Set Up Delay Time . . . . . . . . . . . . . . . . . . . . . . . . . . . . . . . . . . . . . . . . . . . . . . . . . . . . . . . . . . . 45
ii
Page 5

7.6 Setup System - Setup Zones . . . . . . . . . . . . . . . . . . . . . . . . . . . . . . . . . . . . . . . . . . . . . . . . . . 46
7.6.1 Set Up a Zone . . . . . . . . . . . . . . . . . . . . . . . . . . . . . . . . . . . . . . . . . . . . . . . . . . . . . . . . . . . . . . . 46
7.7 Setup System - Setup Outputs . . . . . . . . . . . . . . . . . . . . . . . . . . . . . . . . . . . . . . . . . . . . . . . . 47
7.7.1 Define Output as Normally Open or Normally Closed. . . . . . . . . . . . . . . . . . . . . . . . . . . . . . . 47
7.7.2 Define Operating or Standby Mode . . . . . . . . . . . . . . . . . . . . . . . . . . . . . . . . . . . . . . . . . . . . . . 48
7.7.3 Enable or Disable an Output Device in Alarm Status . . . . . . . . . . . . . . . . . . . . . . . . . . . . . . . 48
7.7.4 Enable or Disable a Device during Emergency Power Operation . . . . . . . . . . . . . . . . . . . . . . 48
7.7.5 Configure Output for Loss of Power (“Fail-Safe”) . . . . . . . . . . . . . . . . . . . . . . . . . . . . . . . . . . . 48
7.8 Setup System - Setup Modem & Pagers . . . . . . . . . . . . . . . . . . . . . . . . . . . . . . . . . . . . . . . . . 49
7.8.1 Modem Setup - Initialization String . . . . . . . . . . . . . . . . . . . . . . . . . . . . . . . . . . . . . . . . . . . . . 49
7.8.2 Modem Setup - Additional Features (Service Terminal Interface only) . . . . . . . . . . . . . . . . . 51
7.8.3 Pager Setup - Pager Number and PIN . . . . . . . . . . . . . . . . . . . . . . . . . . . . . . . . . . . . . . . . . . . 53
7.8.4 Pager Setup - Communications Check (Service Terminal Interface only). . . . . . . . . . . . . . . . 55
7.9 Setup System - Setup System Info . . . . . . . . . . . . . . . . . . . . . . . . . . . . . . . . . . . . . . . . . . . . . 57
7.9.1 Change Password . . . . . . . . . . . . . . . . . . . . . . . . . . . . . . . . . . . . . . . . . . . . . . . . . . . . . . . . . . . . 58
7.9.2 Change Date & Time/Automatic Daylight Saving Time . . . . . . . . . . . . . . . . . . . . . . . . . . . . . 58
7.9.3 Setup Site ID. . . . . . . . . . . . . . . . . . . . . . . . . . . . . . . . . . . . . . . . . . . . . . . . . . . . . . . . . . . . . . . . 59
7.9.4 Connect Battery . . . . . . . . . . . . . . . . . . . . . . . . . . . . . . . . . . . . . . . . . . . . . . . . . . . . . . . . . . . . . 59
7.9.5 Backup and Upload Configuration File (Service Terminal Interface only) . . . . . . . . . . . . . . . 60
7.9.6 Setup Serv Ph Num - Enter Phone Number . . . . . . . . . . . . . . . . . . . . . . . . . . . . . . . . . . . . . . . 63
7.9.7 Setup Serv Ph Num - Communications Check (Service Terminal Interface only) . . . . . . . . . 64
7.9.8 Factory Defaults . . . . . . . . . . . . . . . . . . . . . . . . . . . . . . . . . . . . . . . . . . . . . . . . . . . . . . . . . . . . . 65
7.9.9 Perform Firmware Update (Service Terminal Interface only) . . . . . . . . . . . . . . . . . . . . . . . . . 65
7.9.10 Initiate Remote Alarm Test (Service Terminal Interface only) . . . . . . . . . . . . . . . . . . . . . . . . 67
7.10 Setup Operation . . . . . . . . . . . . . . . . . . . . . . . . . . . . . . . . . . . . . . . . . . . . . . . . . . . . . . . . . . . . 68
7.10.1 Turn Automatic Sequencing On or Off . . . . . . . . . . . . . . . . . . . . . . . . . . . . . . . . . . . . . . . . . . . 69
7.10.2 Turn Standby Testing On or Off . . . . . . . . . . . . . . . . . . . . . . . . . . . . . . . . . . . . . . . . . . . . . . . . 70
7.10.3 Specify Failed Standby Response . . . . . . . . . . . . . . . . . . . . . . . . . . . . . . . . . . . . . . . . . . . . . . . 70
7.10.4 Specify Hold Delay Time . . . . . . . . . . . . . . . . . . . . . . . . . . . . . . . . . . . . . . . . . . . . . . . . . . . . . . 71
7.10.5 Specify Restart Time . . . . . . . . . . . . . . . . . . . . . . . . . . . . . . . . . . . . . . . . . . . . . . . . . . . . . . . . . 71
7.10.6 Specify Staging . . . . . . . . . . . . . . . . . . . . . . . . . . . . . . . . . . . . . . . . . . . . . . . . . . . . . . . . . . . . . . 72
7.11 Setup System - Setup I/O Matrix . . . . . . . . . . . . . . . . . . . . . . . . . . . . . . . . . . . . . . . . . . . . . . 73
7.11.1 Set Up Mapping for a Digital Input . . . . . . . . . . . . . . . . . . . . . . . . . . . . . . . . . . . . . . . . . . . . . 73
7.11.2 Set Up Mapping for an Analog Sensor Input . . . . . . . . . . . . . . . . . . . . . . . . . . . . . . . . . . . . . . 74
7.12 Override Output . . . . . . . . . . . . . . . . . . . . . . . . . . . . . . . . . . . . . . . . . . . . . . . . . . . . . . . . . . . . 75
7.13 Clear Alarms & Logs . . . . . . . . . . . . . . . . . . . . . . . . . . . . . . . . . . . . . . . . . . . . . . . . . . . . . . . . 76
7.13.1 Clear Active Alarms . . . . . . . . . . . . . . . . . . . . . . . . . . . . . . . . . . . . . . . . . . . . . . . . . . . . . . . . . . 76
7.13.2 Clear the Alarm Log . . . . . . . . . . . . . . . . . . . . . . . . . . . . . . . . . . . . . . . . . . . . . . . . . . . . . . . . . . 76
7.13.3 Clear the Event Log . . . . . . . . . . . . . . . . . . . . . . . . . . . . . . . . . . . . . . . . . . . . . . . . . . . . . . . . . . 77
7.13.4 Clear the Trend Logs . . . . . . . . . . . . . . . . . . . . . . . . . . . . . . . . . . . . . . . . . . . . . . . . . . . . . . . . . 77
8.0 SPECIFICATIONS
8.1 AC8 Specifications . . . . . . . . . . . . . . . . . . . . . . . . . . . . . . . . . . . . . . . . . . . . . . . . . . . . . . . . . . 78
iii
Page 6

APPENDIX A-SERVICE TERMINAL INTERFACE . . . . . . . . . . . . . . . . . . . . . . . . . . . . . . . . . . . . . . .79
A.1 Comparison of Functions: LCD and Service Terminal Interface. . . . . . . . . . . . . . . . . . . . . . 79
A.2 Connecting to the Service Terminal Interface . . . . . . . . . . . . . . . . . . . . . . . . . . . . . . . . . . . . 80
A.2.1 Connection Methods . . . . . . . . . . . . . . . . . . . . . . . . . . . . . . . . . . . . . . . . . . . . . . . . . . . . . . . . . . 80
A.2.2 Create a Connection . . . . . . . . . . . . . . . . . . . . . . . . . . . . . . . . . . . . . . . . . . . . . . . . . . . . . . . . . . 80
A.2.3 Set Up the COM1 Port - Direct Connection Only . . . . . . . . . . . . . . . . . . . . . . . . . . . . . . . . . . . 81
A.2.4 Set Up the Connection’s Properties . . . . . . . . . . . . . . . . . . . . . . . . . . . . . . . . . . . . . . . . . . . . . . 82
A.2.5 Connect to the Service Terminal Interface . . . . . . . . . . . . . . . . . . . . . . . . . . . . . . . . . . . . . . . . 83
A.3 Overview of Menus. . . . . . . . . . . . . . . . . . . . . . . . . . . . . . . . . . . . . . . . . . . . . . . . . . . . . . . . . . 84
A.3.1 View Status Overview . . . . . . . . . . . . . . . . . . . . . . . . . . . . . . . . . . . . . . . . . . . . . . . . . . . . . . . . 84
A.3.2 Silence Alarm and Backup Log Files. . . . . . . . . . . . . . . . . . . . . . . . . . . . . . . . . . . . . . . . . . . . . 84
A.3.3 Setup Menu Overview . . . . . . . . . . . . . . . . . . . . . . . . . . . . . . . . . . . . . . . . . . . . . . . . . . . . . . . . 84
A.4 View Status Menus. . . . . . . . . . . . . . . . . . . . . . . . . . . . . . . . . . . . . . . . . . . . . . . . . . . . . . . . . . 85
A.4.1 View Active Alarms . . . . . . . . . . . . . . . . . . . . . . . . . . . . . . . . . . . . . . . . . . . . . . . . . . . . . . . . . . 85
A.4.2 View Alarm Log . . . . . . . . . . . . . . . . . . . . . . . . . . . . . . . . . . . . . . . . . . . . . . . . . . . . . . . . . . . . . 86
A.4.3 View Event Log. . . . . . . . . . . . . . . . . . . . . . . . . . . . . . . . . . . . . . . . . . . . . . . . . . . . . . . . . . . . . . 87
A.4.4 View Trend Log. . . . . . . . . . . . . . . . . . . . . . . . . . . . . . . . . . . . . . . . . . . . . . . . . . . . . . . . . . . . . . 88
A.4.5 View Input Status. . . . . . . . . . . . . . . . . . . . . . . . . . . . . . . . . . . . . . . . . . . . . . . . . . . . . . . . . . . . 89
A.4.6 View Output Status . . . . . . . . . . . . . . . . . . . . . . . . . . . . . . . . . . . . . . . . . . . . . . . . . . . . . . . . . . 89
A.4.7 View Pager Numbers . . . . . . . . . . . . . . . . . . . . . . . . . . . . . . . . . . . . . . . . . . . . . . . . . . . . . . . . . 90
A.4.8 View Operation . . . . . . . . . . . . . . . . . . . . . . . . . . . . . . . . . . . . . . . . . . . . . . . . . . . . . . . . . . . . . . 91
A.4.9 View Control Status . . . . . . . . . . . . . . . . . . . . . . . . . . . . . . . . . . . . . . . . . . . . . . . . . . . . . . . . . . 91
A.5 Silence Alarm & Back Up Log Files (Service Terminal Interface only). . . . . . . . . . . . . . . . . 92
A.5.1 Silence Alarm (Service Terminal Interface only) . . . . . . . . . . . . . . . . . . . . . . . . . . . . . . . . . . . 92
A.5.2 Back Up Log Files (Service Terminal Interface only) . . . . . . . . . . . . . . . . . . . . . . . . . . . . . . . . 93
A.6 Setup Menu. . . . . . . . . . . . . . . . . . . . . . . . . . . . . . . . . . . . . . . . . . . . . . . . . . . . . . . . . . . . . . . . 95
A.6.1 Setup Inputs . . . . . . . . . . . . . . . . . . . . . . . . . . . . . . . . . . . . . . . . . . . . . . . . . . . . . . . . . . . . . . . . 97
A.6.2 Setup Common Alarm . . . . . . . . . . . . . . . . . . . . . . . . . . . . . . . . . . . . . . . . . . . . . . . . . . . . . . . . 97
A.6.3 Setup Sensor . . . . . . . . . . . . . . . . . . . . . . . . . . . . . . . . . . . . . . . . . . . . . . . . . . . . . . . . . . . . . . . . 98
A.6.4 Setup Zones. . . . . . . . . . . . . . . . . . . . . . . . . . . . . . . . . . . . . . . . . . . . . . . . . . . . . . . . . . . . . . . . . 99
A.6.5 Setup Output . . . . . . . . . . . . . . . . . . . . . . . . . . . . . . . . . . . . . . . . . . . . . . . . . . . . . . . . . . . . . . . 99
A.6.6 Setup Modem & Pagers . . . . . . . . . . . . . . . . . . . . . . . . . . . . . . . . . . . . . . . . . . . . . . . . . . . . . . 100
A.6.7 Setup System Info. . . . . . . . . . . . . . . . . . . . . . . . . . . . . . . . . . . . . . . . . . . . . . . . . . . . . . . . . . . 102
A.6.8 Setup Operation . . . . . . . . . . . . . . . . . . . . . . . . . . . . . . . . . . . . . . . . . . . . . . . . . . . . . . . . . . . . 107
A.6.9 Override Output . . . . . . . . . . . . . . . . . . . . . . . . . . . . . . . . . . . . . . . . . . . . . . . . . . . . . . . . . . . . 113
A.6.10 Clear Alarms & Logs . . . . . . . . . . . . . . . . . . . . . . . . . . . . . . . . . . . . . . . . . . . . . . . . . . . . . . . . 114
A.6.11 Setup I/O Matrix. . . . . . . . . . . . . . . . . . . . . . . . . . . . . . . . . . . . . . . . . . . . . . . . . . . . . . . . . . . . 116
APPENDIX B-DEFAULT SETTINGS QUICK REFERENCE GUIDE . . . . . . . . . . . . . . . . . . . . . . . . . . 117
iv
Page 7

FIGURES
Figure 1 AC8 enclosure—external features . . . . . . . . . . . . . . . . . . . . . . . . . . . . . . . . . . . . . . . . . . . . . . . . . . . 2
Figure 2 AC8 enclosure—internal features . . . . . . . . . . . . . . . . . . . . . . . . . . . . . . . . . . . . . . . . . . . . . . . . . . . 2
Figure 3 Typical Configuration . . . . . . . . . . . . . . . . . . . . . . . . . . . . . . . . . . . . . . . . . . . . . . . . . . . . . . . . . . . . . 3
Figure 4 Example of typical sequence. . . . . . . . . . . . . . . . . . . . . . . . . . . . . . . . . . . . . . . . . . . . . . . . . . . . . . . . 7
Figure 5 Mounting dimensions . . . . . . . . . . . . . . . . . . . . . . . . . . . . . . . . . . . . . . . . . . . . . . . . . . . . . . . . . . . . . 9
Figure 6 Power wiring to TM115 . . . . . . . . . . . . . . . . . . . . . . . . . . . . . . . . . . . . . . . . . . . . . . . . . . . . . . . . . . 12
Figure 7 Power wiring to TM230 . . . . . . . . . . . . . . . . . . . . . . . . . . . . . . . . . . . . . . . . . . . . . . . . . . . . . . . . . . 12
Figure 8 LCD Menu overview . . . . . . . . . . . . . . . . . . . . . . . . . . . . . . . . . . . . . . . . . . . . . . . . . . . . . . . . . . . . . 20
Figure 9 Menu overview - View Status menu . . . . . . . . . . . . . . . . . . . . . . . . . . . . . . . . . . . . . . . . . . . . . . . . 21
Figure 10 Menu overview - System and Control menu . . . . . . . . . . . . . . . . . . . . . . . . . . . . . . . . . . . . . . . . . . 35
Figure 11 Menu overview - Setup System Info menu . . . . . . . . . . . . . . . . . . . . . . . . . . . . . . . . . . . . . . . . . . . 57
Figure 12 Menu overview - Setup Operation menu . . . . . . . . . . . . . . . . . . . . . . . . . . . . . . . . . . . . . . . . . . . . . 68
TABLES
Table 1 Controller board components . . . . . . . . . . . . . . . . . . . . . . . . . . . . . . . . . . . . . . . . . . . . . . . . . . . . . . . 4
Table 2 LED indicators summary . . . . . . . . . . . . . . . . . . . . . . . . . . . . . . . . . . . . . . . . . . . . . . . . . . . . . . . . . . 6
Table 3 Packing manifest. . . . . . . . . . . . . . . . . . . . . . . . . . . . . . . . . . . . . . . . . . . . . . . . . . . . . . . . . . . . . . . . . 8
Table 4 Wiring specifications . . . . . . . . . . . . . . . . . . . . . . . . . . . . . . . . . . . . . . . . . . . . . . . . . . . . . . . . . . . . . 13
Table 5 Digital output jumper settings . . . . . . . . . . . . . . . . . . . . . . . . . . . . . . . . . . . . . . . . . . . . . . . . . . . . . 15
Table 6 Guide to AC8 functions. . . . . . . . . . . . . . . . . . . . . . . . . . . . . . . . . . . . . . . . . . . . . . . . . . . . . . . . . . . 19
Table 7 Primary functions overview . . . . . . . . . . . . . . . . . . . . . . . . . . . . . . . . . . . . . . . . . . . . . . . . . . . . . . . 20
Table 8 Alarm log conditions . . . . . . . . . . . . . . . . . . . . . . . . . . . . . . . . . . . . . . . . . . . . . . . . . . . . . . . . . . . . . 23
Table 9 Event log conditions . . . . . . . . . . . . . . . . . . . . . . . . . . . . . . . . . . . . . . . . . . . . . . . . . . . . . . . . . . . . . 24
Table 10 Trend log conditions . . . . . . . . . . . . . . . . . . . . . . . . . . . . . . . . . . . . . . . . . . . . . . . . . . . . . . . . . . . . . 25
Table 11 Analog input states . . . . . . . . . . . . . . . . . . . . . . . . . . . . . . . . . . . . . . . . . . . . . . . . . . . . . . . . . . . . . . 26
Table 12 Digital input states . . . . . . . . . . . . . . . . . . . . . . . . . . . . . . . . . . . . . . . . . . . . . . . . . . . . . . . . . . . . . . 26
Table 13 Digital output states . . . . . . . . . . . . . . . . . . . . . . . . . . . . . . . . . . . . . . . . . . . . . . . . . . . . . . . . . . . . . 27
Table 14 Valid characters for data entry . . . . . . . . . . . . . . . . . . . . . . . . . . . . . . . . . . . . . . . . . . . . . . . . . . . . 34
Table 15 Default settings - digital inputs . . . . . . . . . . . . . . . . . . . . . . . . . . . . . . . . . . . . . . . . . . . . . . . . . . . . 36
Table 16 Input and output labels . . . . . . . . . . . . . . . . . . . . . . . . . . . . . . . . . . . . . . . . . . . . . . . . . . . . . . . . . . 37
Table 17 Default settings - analog sensor inputs . . . . . . . . . . . . . . . . . . . . . . . . . . . . . . . . . . . . . . . . . . . . . . 40
Table 18 Default zones . . . . . . . . . . . . . . . . . . . . . . . . . . . . . . . . . . . . . . . . . . . . . . . . . . . . . . . . . . . . . . . . . . . 46
Table 19 Default settings - digital outputs . . . . . . . . . . . . . . . . . . . . . . . . . . . . . . . . . . . . . . . . . . . . . . . . . . . 47
Table 20 Supported modem settings . . . . . . . . . . . . . . . . . . . . . . . . . . . . . . . . . . . . . . . . . . . . . . . . . . . . . . . . 49
Table 21 Default settings - modem . . . . . . . . . . . . . . . . . . . . . . . . . . . . . . . . . . . . . . . . . . . . . . . . . . . . . . . . . 49
Table 22 Country codes . . . . . . . . . . . . . . . . . . . . . . . . . . . . . . . . . . . . . . . . . . . . . . . . . . . . . . . . . . . . . . . . . . 50
Table 23 Pager dialing results. . . . . . . . . . . . . . . . . . . . . . . . . . . . . . . . . . . . . . . . . . . . . . . . . . . . . . . . . . . . . 53
Table 24 Guidelines for dialing pagers . . . . . . . . . . . . . . . . . . . . . . . . . . . . . . . . . . . . . . . . . . . . . . . . . . . . . . 54
Table 25 Battery alarms . . . . . . . . . . . . . . . . . . . . . . . . . . . . . . . . . . . . . . . . . . . . . . . . . . . . . . . . . . . . . . . . . 59
Table 26 Service phone number dialing results . . . . . . . . . . . . . . . . . . . . . . . . . . . . . . . . . . . . . . . . . . . . . . . 63
Table 27 Guidelines for dialing service phone number . . . . . . . . . . . . . . . . . . . . . . . . . . . . . . . . . . . . . . . . . 63
Table 28 Default settings - operation features . . . . . . . . . . . . . . . . . . . . . . . . . . . . . . . . . . . . . . . . . . . . . . . . 68
Table 29 Failed Standby response. . . . . . . . . . . . . . . . . . . . . . . . . . . . . . . . . . . . . . . . . . . . . . . . . . . . . . . . . . 70
Table 30 Default mapping of digital inputs to relays. . . . . . . . . . . . . . . . . . . . . . . . . . . . . . . . . . . . . . . . . . . 73
Table 31 Default mapping of analog inputs to relays . . . . . . . . . . . . . . . . . . . . . . . . . . . . . . . . . . . . . . . . . . 74
Table 32 Automatic / manual control - output points. . . . . . . . . . . . . . . . . . . . . . . . . . . . . . . . . . . . . . . . . . . 75
Table 33 Guide to AC8 functions. . . . . . . . . . . . . . . . . . . . . . . . . . . . . . . . . . . . . . . . . . . . . . . . . . . . . . . . . . . 79
Table 34 Steps to set up a direct or remote connection . . . . . . . . . . . . . . . . . . . . . . . . . . . . . . . . . . . . . . . . . 80
Table 35 AC8 - default settings for inputs and outputs . . . . . . . . . . . . . . . . . . . . . . . . . . . . . . . . . . . . . . . . 117
Table 36 AC8 - other default settings . . . . . . . . . . . . . . . . . . . . . . . . . . . . . . . . . . . . . . . . . . . . . . . . . . . . . . 118
v
Page 8

vi
Page 9

1.0 INTRODUCTION
The Liebert AC8 is ideal for coordinated control of systems with redundant equipment, such as
multiple environmental units or pumps. When the AC8 controller detects an alarm in an operating
device, the AC8 enables a standby device and controls the device in alarm as configured, either
leaving that device operating or disabling it.
The AC8 controller can also balance usage of devices by rotating units through Operating and
Standby modes according to a user-defined schedule. This helps keep redundant equipment operating
efficiently and only when needed. The AC8 can perform routine testing of standby devices and alert
personnel if a standby device fails an operating test and requires attention.
The staging feature permits standby devices to be turned on or off when a sensor detects specified
levels. For example, the AC8 might be configured to turn on a fan when the temperature reaches
75°F, then turn on a second fan at 80°F. When the temperature falls below 80°F, the second fan is
turned off; when it drops below 75°F, the first fan is turned off.
Another capability of the AC8 is monitoring the status of connected devices and keeping personnel
apprised through local alarming. The AC8 employs local alarming and remote paging services to keep
personnel on-site and at remote locations apprised of the status of equipment.
The AC8 controller can interface with anything that closes an electrical contact. To improve process
efficiency and troubleshooting, the controller tracks data in three types of logs: alarm, event and trend.
The AC8 has a local LCD interface and a remote dial-up interface.
When an alarm condition arises, the AC8 displays alarm information, sounds an audible alarm,
changes the state of the common alarm relay and turns connected devices on or off according to user
configuration. If configured, the controller also sends pager notifications. See 1.6 - Typical Configu-
ration for a more detailed example.
Introduction
1.1 Methods of Viewing and Configuring the AC8
The AC8 features access through two interfaces that allow users to configure the unit, silence alarms,
back up logs, and perform many other functions to keep a large or small operation running smoothly
and safely.
• LCD—liquid crystal display on the front of the panel
• Service Terminal Interface—accessible via computer connected directly through an RS232
port or remotely through the AC8’s onboard modem
These interfaces permit easy access and configuration of the AC8, allowing users to view data, silence
alarms and have full access to information stored in the controller, including logs of alarms and events.
One more interface—Liebert’s SiteScan Web enterprise monitoring system—is primarily for monitoring, though SiteScan also provides some configuration functions.
1.2 Data Logs
The three types of data logs—alarm history, event history and trend data of analog sensor readings—
can be viewed on the LCD on the front of the AC8 and downloaded through onboard communications
ports.
1.3 Transformer Module
A Transformer Module converts 115VAC or 230VAC to 24VAC.
1.4 Available Alarms
The alarms available with the AC8 are:
• Discrete input alarm
(for each digital input)
•High setpoint
• Low setpoint
• Loss of power
• Low battery
• Check battery
• Battery unplugged
• Internal modem fault
• No standby available
• Standby device
failed
1
• No restart available
• Emergency power
alarm
Page 10
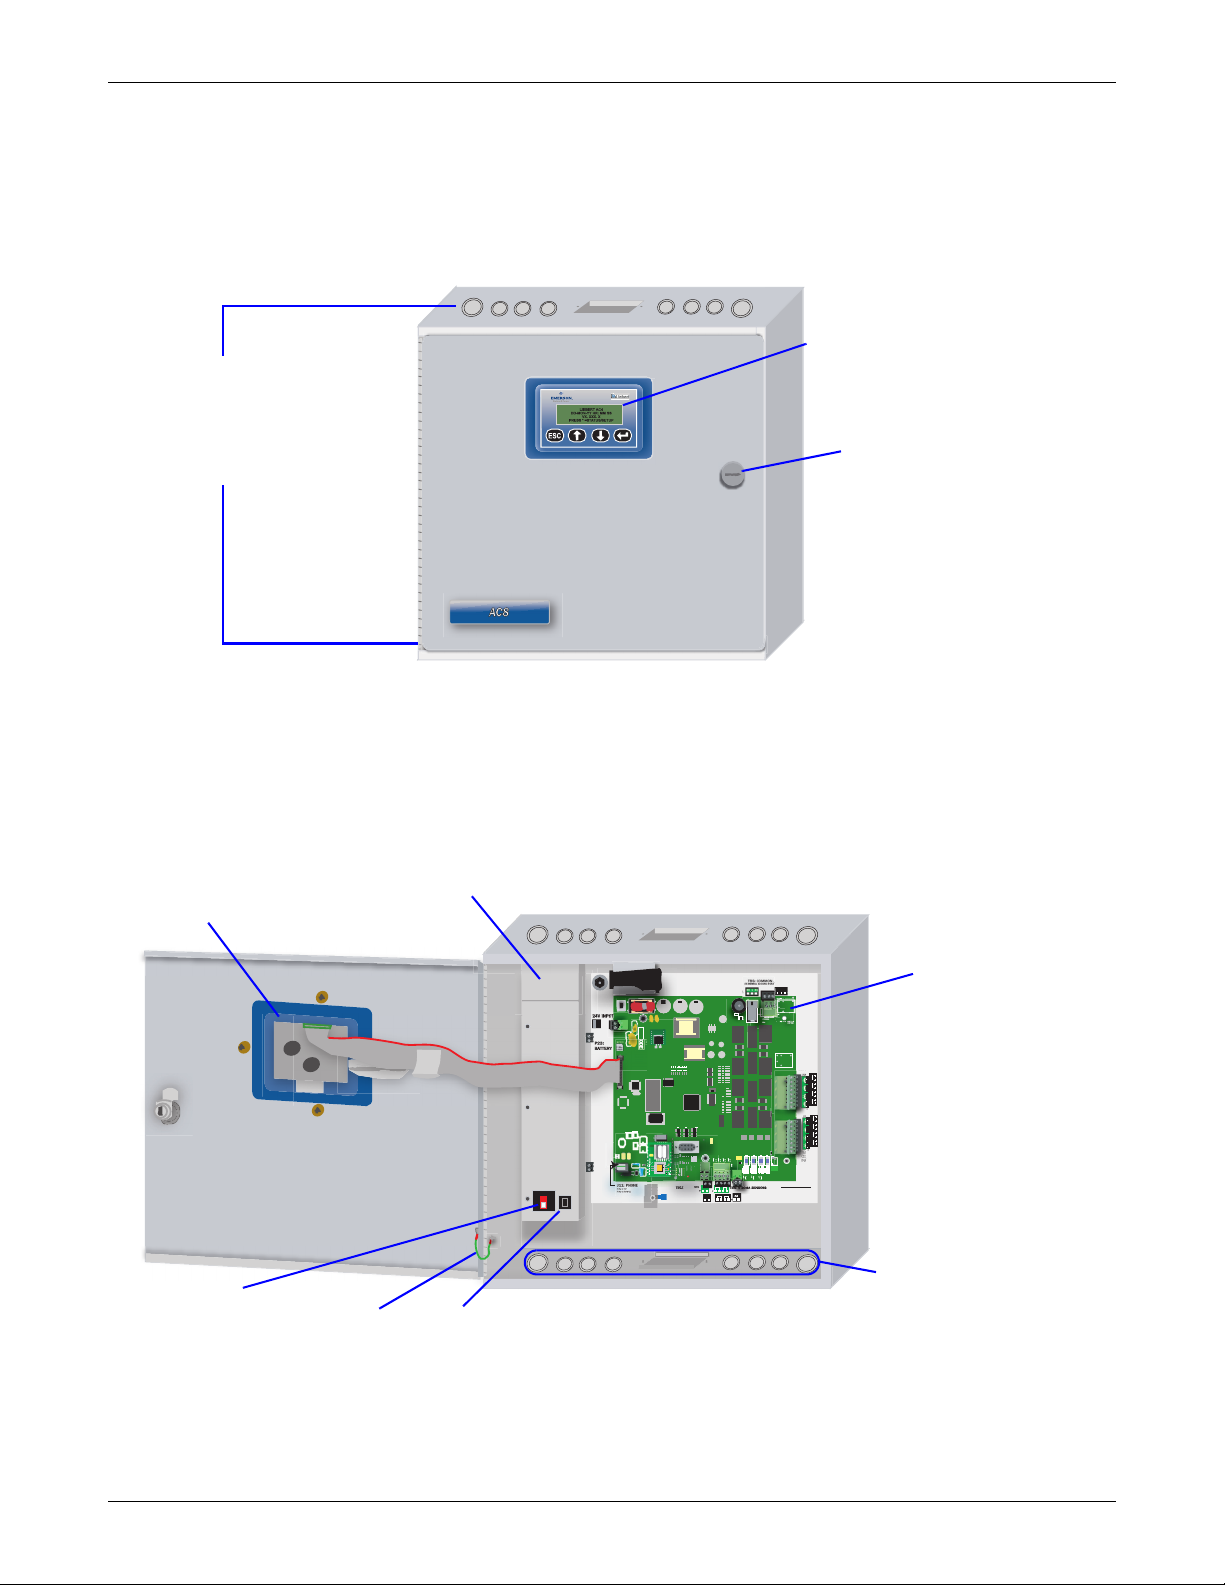
1.5 Outside Enclosure Overview
BAR CODE
NO
SENS
The AC8’s controller board comes in an enclosure that is 2-3/4" deep and has a built-in liquid crystal
display (LCD) and a key lock, as shown in Figure 1. The enclosure is made of metal to accommodate
secure conduit fittings and protect components against environmental debris.
Figure 1 AC8 enclosure—external features
The enclosure
has knockouts
and access slots
on top and
bottom for
cables and wires.
Introduction
LCD for configuration
and operation
Key lock
The enclosure houses the controller board and Transformer Module, as shown in Figure 2.
The enclosure must be secured to a wall, either flush-mounted or recessed in the wall, as described in
2.0 - Installation. Knockouts and access slots on the top and bottom allow easy connection of wires
and cables (see 3.0 - Wiring and Connections) with either mounting type.
Figure 2 AC8 enclosure—internal features
Transformer Module
Back of LCD
On/Off switch
for Transformer
Module
Ground wire
for LCD
Power receptacle
(115VAC model only)
TB5: COMMON ALARM
(TERMINAL BLOCKS ROTATED IN VIEW)
NO C NC NO C NC
(BOTTOM)
(TOP)
LS1
TB7:
START
BAR CODE
LIEBERT
MODEM
J11: PHONE
PIN 3-TIP
ON
PIN 4-RI"N"G
+
ENABLE
P11
AUDIBLE
R402
ALARM
R26
Q11
TOP
TB3:
RELAY
OUTPUTS
(BOTTOM)
(BOTTOM)
(TOP)
8
4
7
3
6
2
5
1
(BOTTOM)
(BOTTOM)
(TOP)
8
4
7
3
6
2
5
1
TB2:
CONTACT
ASS REV
TB9: ANALOG
GROUND
ALL CIRCUITS;
CLASS 2
INPUTS
1-2 TOP
3-4 BOTTOM
(TOP)
—
——
+
+ +
485
—
+—+
(BOTTOM)
—
+
Controller Board
Knockouts and
access slots
(top and bottom)
2
Page 11
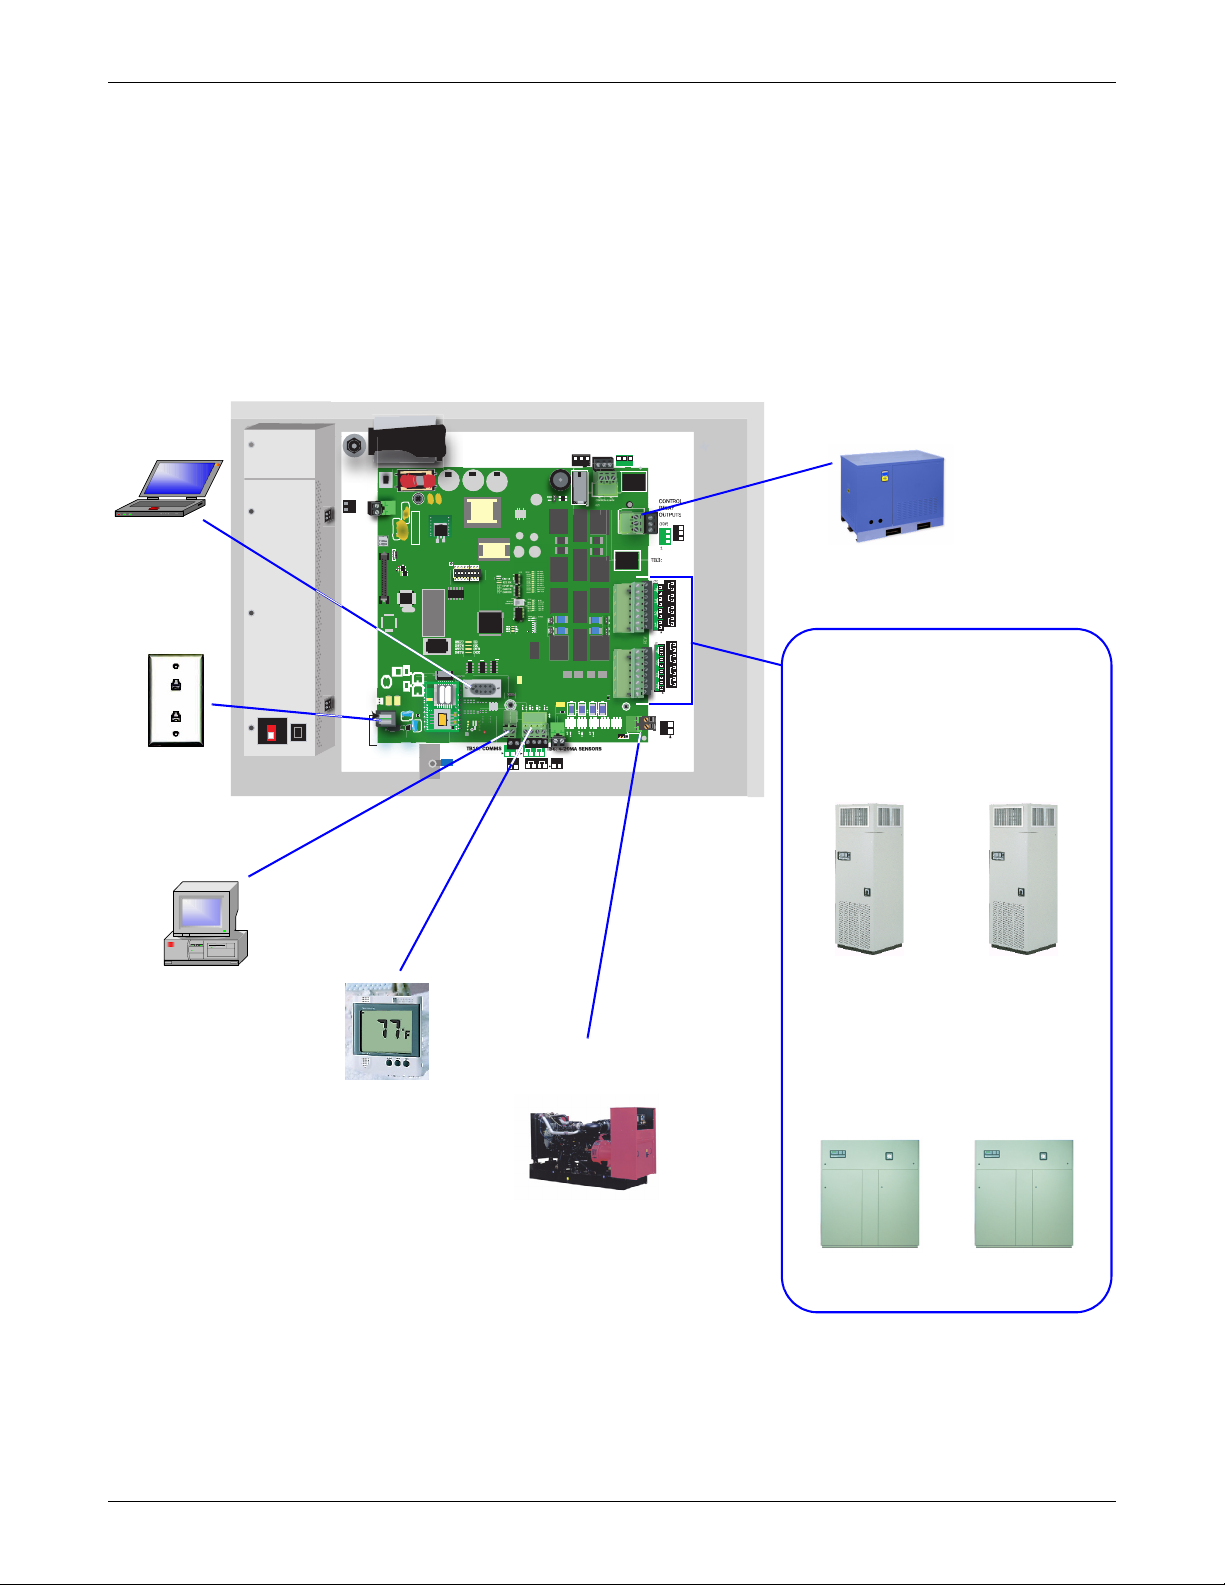
1.6 Typical Configuration
BAR CODE
Figure 3 shows an example of external devices connected to the AC8’s controller board. Up to eight
devices may be connected to the eight digital inputs and eight digital outputs. There may be up to four
analog sensors connected to the analog inputs, and up to two devices connected to the control relay
outputs. The EPOP connection allows for one device, possibly a UPS or generator input actuated
during a power failure.
Remote access is available via SiteScan Web and through the modem, which enables pager notifications and use of the Service Terminal Interface. A computer may be connected to the RS232 port, providing access to the features of the Service Terminal Interface.
Figure 3 Typical Configuration
TB7:
START
24V INPUT
BATTERY
RS232
ON
Phone
line
P23:
BATTERY
VBATT
J11: PHONE
PIN 3-TIP
PIN 4-RING
LCD
CONTRAST
BAR CODE
LIEBERT
Introduction
Contact relay
TB5: COMMON ALARM
RELAY OUTPUTS
NO C NC
LS1
+
ENABLE
P11
AUDIBLE
Q11
TP1
GND
ON
ON
DIP
S2
1
2345678
OFF
MODEM
MODEM
OUTPUT1
DS56
OUTPUT2
DS54
OUTPUT3
DS63
OUTPUT4
DS61
OUTPUT5
DS60
OUTPUT6
DS62
OUTPUT7
DS55
OUTPUT8
DS57
CTRLLOCK
DS59
DS83
SENLOCK
DS58
CAN TX
CMN ALR
DS84
DS53
CAN RX
MOP
F PROG
574 TX
574 RX
485 RX
485 TX
INPUT1
INPUT2
INPUT3
INPUT4
DS70
INPUT5
DS67
INPUT6
DS66
INPUT7
DS65
INPUT8
DS64
R334
C71
1-2 TOP
3-4 BOTTOM
485
(TOP)
—
——
+
+ +
AG
422
TB9: ANALOG
—
+—+
(BOTTOM)
GROUND
—
+
(TOP)
NO C NC
BOTTOM
TOP
PFM5 PFM2
TB1
EPOP INPUT
EPOP
P19
EPOP
DIS EN
TB1, TB2 INPUTS:
DRY CONTACTS ONLY.
TB3, TB4, TB5
OUTPUT RELAY
RATINGS: 24V, 3A
CLASS 2 ONLY.
RELAY
OUTPUTS
(TOP)
4
3
2
1
(TOP)
REV
4
3
2
1
TB2:
CONTACT
ASS
INPUTS
TB1: EPOP
CONTACT
INPUT
TB4:
(BOTTOM)
NC
NC
C
C
NO
NO
2
(BOTTOM)
8
7
6
5
(BOTTOM)
8
7
6
5
Input 1 &Output 1
output
Humidity
lockout
DEVICES CONNECTED TO
DIGITAL INPUTS & OUTPUTS
ZONE 1 DEVICES
Device 1
connected to
Device 2
connected to
Input 2 & Output 2
SiteScan Web
Analog inputs
EPOP contact
input
Generator
3
Liebert
Challenger
3000
ZONE 2 DEVICES
Device 3
connected to
Input 3 &Output 3
Liebert
Himod
Liebert
Challenger
3000
Device 4
connected to
Input 4 & Output 4
Liebert
Himod
Page 12
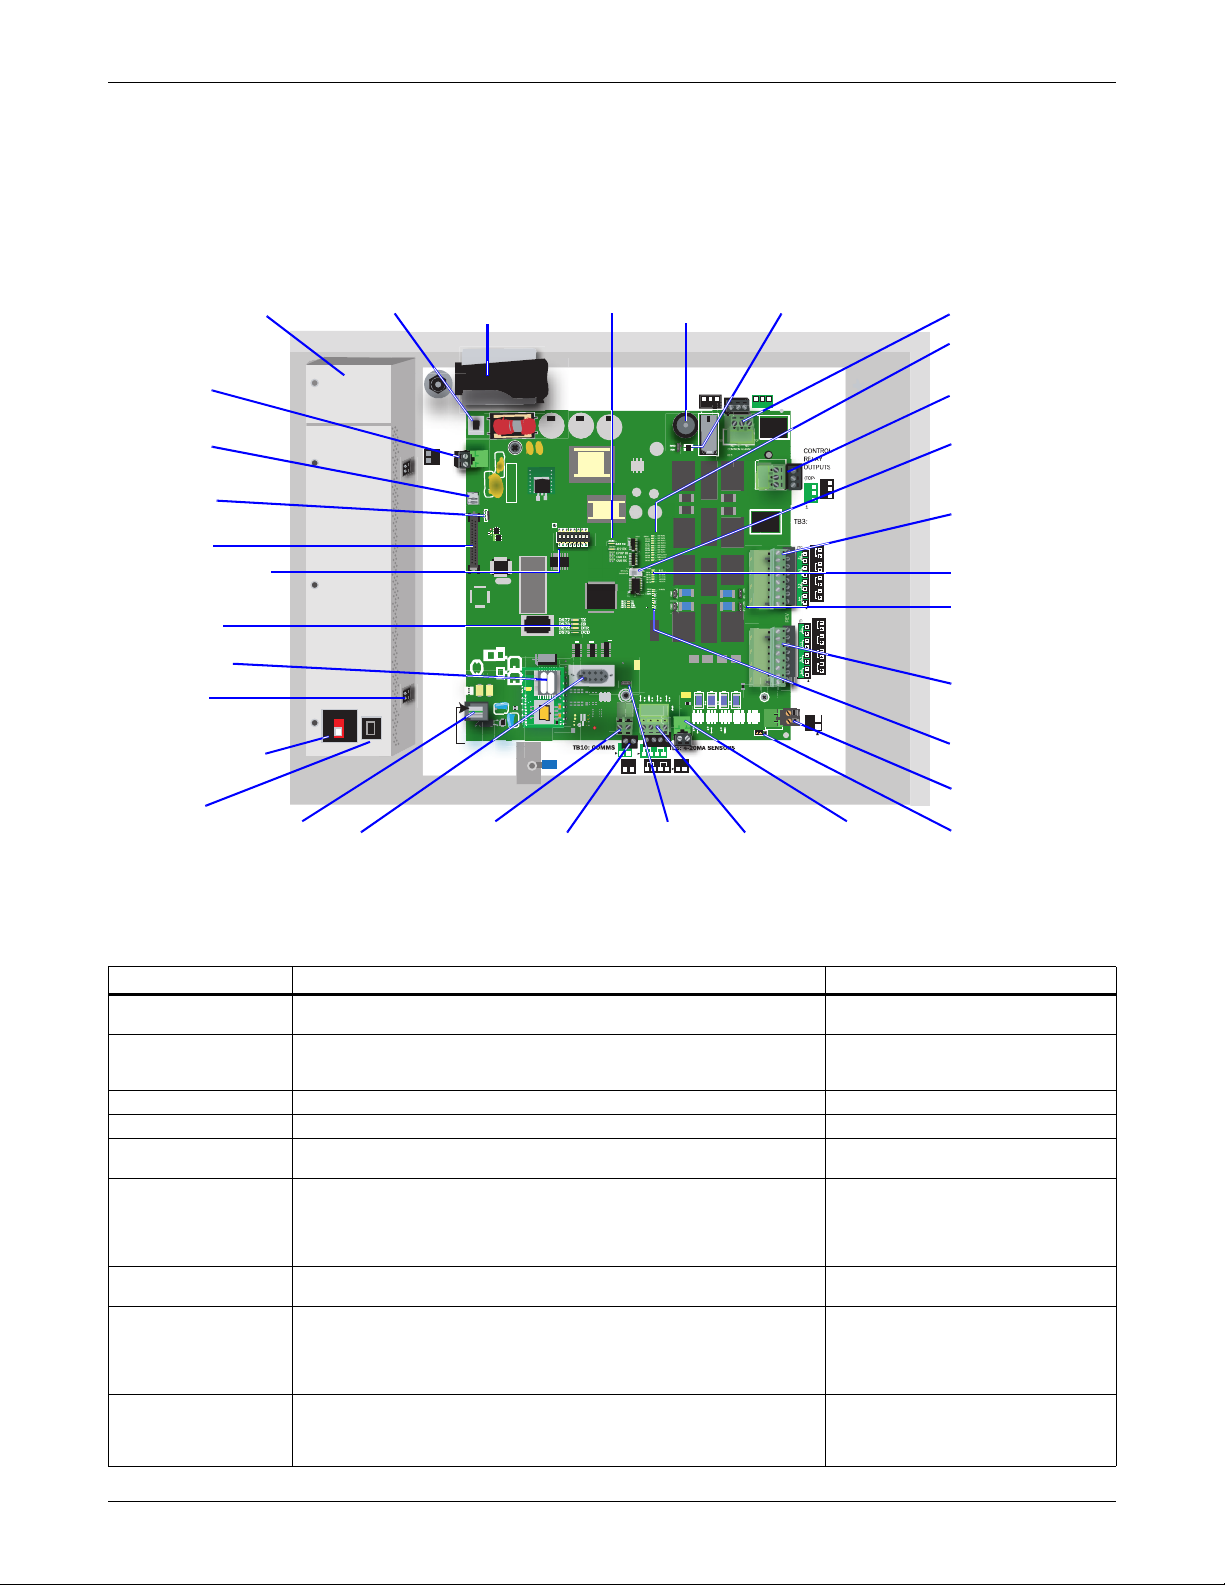
1.7 Controller Board Overview
BAR CODE
The AC8’s controller board has connectors for eight digital inputs, four analog inputs, eight digital
outputs, two control relay outputs and an EPOP contact input, as shown below. The board comes complete with light emitting diodes (LEDs) to display the status of connected devices, a battery pack for
short-term backup, communications ports, power connections and other features necessary to control
your operation.
HH - Transformer
Module
GG - 24VAC power
connector
FF - Battery pack
connector
EE - LCD contrast
adjustment
DD - LCD
connector
CC - DIP switch 1
BB - Modem
status LEDs
AA - Modem
Z - 24VAC
connector
Y - Power On/Off
switch
X - Power
receptacle
W - Phone
line
connector
A - Power
On/Off switch
ON
V - Serial
interface
connector
(RS232/EIA574)
B - Battery
pack
TB7:
24V INPUT
P23:
BATTERY
U - EIA485
connector
START
BAR CODE
LIEBERT
BATTERY
LCD
CONTRAST
VBATT
J11: PHONE
PIN 3-TIP
PIN 4-RING
T - SiteScan
Web
connector
(EIA422)
C - EIA422
LEDs
TP1
GND
ON
ON
S2
1
2345678
OFF
MODEM
MODEM
DIP
(TOP)
(BOTTOM)
OUTPUT1
DS56
OUTPUT2
DS54
OUTPUT3
DS63
OUTPUT4
DS61
OUTPUT5
DS60
OUTPUT6
DS62
OUTPUT7
DS55
OUTPUT8
DS57
CTRLLOCK
DS59
DS83
SENLOCK
DS58
CAN TX
CMN ALR
DS84
DS53
CAN RX
DS70
DS67
DS66
DS65
DS64
R334
C71
485
—
——
+
+ +
422
+—+
—
+
S - 12VDC/
24VDC analog
input jumper
D - Audible
horn
TB5: COMMON ALARM
RELAY OUTPUTS
NO C NC
LS1
+
ENABLE
P11
AUDIBLE
Q11
MOP
F PROG
574 TX
574 RX
485 RX
485 TX
INPUT1
INPUT2
INPUT3
INPUT4
INPUT5
INPUT6
INPUT7
INPUT8
1-2 TOP
3-4 BOTTOM
AG
TB9: ANALOG
—
GROUND
E - Audible horn
jumper
(TOP)
NO C NC
TB3, TB4, TB5
OUTPUT RELAY
BOTTOM
RATINGS: 24V, 3A
CLASS 2 ONLY.
TOP
TB4:
(BOTTOM)
NC
NC
C
C
NO
NO
2
RELAY
OUTPUTS
(BOTTOM)
(TOP)
8
4
7
3
6
2
5
1
PFM5 PFM2
REV
TB2:
CONTACT
ASS
INPUTS
TB1
EPOP INPUT
EPOP
P19
EPOP
DIS EN
TB1: EPOP
CONTACT
INPUT
TB1, TB2 INPUTS:
DRY CONTACTS ONLY.
(BOTTOM)
(TOP)
8
4
7
3
6
2
5
1
R - Analog
input
connectors
Q - Analog
ground
connector
Introduction
F - Common
Alarm
connectors
G - Digital output
status LEDs
H - Control relay
outputs
I - Manual
Override Switch
(outputs)
J - Digital output connectors
K - Status LEDs
L - Digital output
loss-of-power
jumper
M - Digital input
connectors
N - Digital input
status LEDs
O - EPOP
contact input
P - EPOP
jumper
Table 1 Controller board components
Item Description For more information, see:
A - Power On/Off
switch
B - Battery pack
C - EIA422 LEDs Indicates the connection status between the AC8 and SiteScan Web. 1.8: LED Indicators
D - Audible horn Provides audible notification when an alarm occurs. N/A
E - Audible horn
jumper
F - Common Alarm
connectors
G - Digital output
status LEDs
H - Control relay
outputs
I - Manual Override
Switch (outputs)
Power switch for the controller board. When switched off, the battery
pack is disabled.
Provides battery backup during a power loss to maintain normal
operation of the panel for a minimum of 10 minutes. The analog inputs
will not be functional during a power loss (P/N 133455P1).
2.4: Connect Power to the AC8
2.4.2: Connecting the Battery Pack
7.9.4: Connect Battery
Jumper to disable the audible horn (factory default is enabled). N/A
The two common alarm connections are used to connect to a secondary
warning device such as a horn, light or Building Management System
(BMS). When an alarm is present, the contacts close and the external
warning device is activated/notified. The common alarm contacts may
be configured to be reset with the Silence button/command.
Each output has an LED to indicate its status: ON/OFF (energized/deenergized).
Each of the two output connections is a two-state point: ON/OFF
(energized/de-energized). Digital and analog inputs may be mapped to
either or both relays to trigger change in state.
An example of a control relay output point is a humidity lock-out.
Placing the switch in the ON position will turn ON, or energize, all eight
outputs simultaneously. This switch removes all automatic output control
from the AC8.
3.0: Wiring and Connections
3.4: Connecting Common Alarm
7.4: Setup System - Setup Common
1.8: LED Indicators
3.0: Wiring and Connections
3.2.4: Connecting Control Relay
5.9: View Control Status
7.11: Setup System - Setup I/O Matrix
7.12: Override Output
The factory default is OFF (outputs controlled by programming).
4
Outputs
Alarm
Outputs
Page 13

Table 1 Controller board components (continued)
Item Description For more information, see:
J - Digital output
connectors
K - Status LEDs Indicates the operational status of the controller board. 1.8: LED Indicators
L - Digital output
loss-of-power
jumper
M - Digital input
connectors
N - Digital input
status LEDs
O - EPOP contact
input
P - EPOP jumper
Q - Analog ground
connector
R - Analog input
connectors
S - 12VDC/24VDC
analog input jumper
T - SiteScan Web
connector (EIA422)
U - EIA485 connector Not presently used N/A
V - Serial interface
connector (RS232/
EIA574)
W - Phone line
connector
X - Power receptacle
(Transformer Module)
Y - Power On/Off
switch (Transformer
Module)
Z - 24VAC connector
(Transformer Module)
AA - Modem On-board modem with 9600 baud rate.
BB - Modem status
LEDs
CC - DIP switch 1 DIP switch used for resetting password to default. 7.9.1: Change Password
DD - LCD connector Connection for the LCD on the enclosure door. N/A
EE - LCD contrast
adjustment
FF - Battery pack
connector
GG - 24VAC power
connector
HH - Transformer
Module
Each of the eight output connections is a two-state point: ON/OFF
(energized/de-energized).
An example of a field digital output point is an air unit On/Off control
circuit.
One of eight output jumpers. Each digital output has a jumper to set the
fail-safe position of the output point when power fails. The OFF position
makes the contact Normally Open (factory default). The ON position
makes the contact Normally Closed.
Note: The jumper position has no effect on the contact when the AC8
has power.
Each of the eight input connections is a two-state point: ON/OFF
(energized/de-energized).
An example of a field digital input point is a common alarm contact on an
air unit.
Each input has an LED to indicate its status: ON/OFF (energized/deenergized).
The emergency power operation (EPOP) input connection is a two-state
point: ON/OFF (energized/de-energized).
An example of an EPOP input point is a UPS or a generator.
Jumper to enable or disable emergency power operation (EPOP). Factory
default is disabled.
Connection for an externally powered analog sensor that needs a
reference to ground.
Each of the four input connections accepts a 4/20 mA signal.
An example of a field analog input point is a temperature sensor.
Jumper to select voltage supplied for two-wire analog sensors. The
jumper supplies all four analog input connectors with the same voltage.
Factory default is 24VDC.
Connection to monitor AC8 from Liebert’s SiteScan Web graphical
monitoring package.
Connection for laptop or video terminal. Used for configuration and
monitoring using the Service Terminal Interface. Requires a null modem
cable for connectivity
(P/N 201258P1).
Connection for phone line. Used for pager notifications, service phone
number, and configuration and monitoring using the Service Terminal
Interface. Requires an RJ11 connector.
115VAC power receptacle to power laptop during configuration and
diagnostics. Receptacle not available on 230VAC Transformer Module.
Power switch to turn power On/Off to both Transformer Module 24VAC
connectors and power receptacle.
One of the two 24VAC connectors for power (the second is also on the
right side of the Transformer Module near the top). Each connector is
rated for 40VA.
Indicates the operational status of the modem. 1.8: LED Indicators
Adjustment contrast for the LCD on the enclosure door. N/A
Connection for battery pack lead. 2.4.2: Connecting the Battery Pack
Power connection for the controller. Requires 24VAC. 2.4: Connect Power to the AC8
Transformer Module used to convert 115VAC or 230VAC to 24VAC. 2.4.1: Termination and Mounting
3.0: Wiring and Connections
3.2.2: Connecting Digital Outputs
5.6: View Output Status
7.7: Setup System - Setup Outputs
3.2.3: Setting the Digital Output
Jumpers
7.7.5: Configure Output for Loss of
Power (“Fail-Safe”)
3.0: Wiring and Connections
3.2.1: Connecting Digital Inputs
5.5: View Input Status
7.3: Setup System - Setup Inputs
1.8: LED Indicators
3.0: Wiring and Connections
3.2.5: Connecting the Emergency
Power Operation (EPOP) Input
3.2.6: Setting the EPOP Jumper
3.3.2: Connecting the Analog Ground
3.0: Wiring and Connections
3.3: Connecting Analog Inputs
5.5: View Input Status
7.5: Setup System - Setup Sensor
3.3.1: Setting the 12VDC/24VDC
Analog Power Jumper
3.0: Wiring and Connections
3.5: EIA422 SiteScan Web
Connector
3.6.1: RS232 Connector
A.2: Connecting to the Service
Terminal Interface
3.6.2: Phone Line Connector
7.8: Setup System - Setup Modem &
Pagers
7.9.6: Setup Serv Ph Num - Enter
Phone Number
A.2: Connecting to the Service
Terminal Interface
2.4.1: Termination and Mounting
3.0: Wiring and Connections
2.4.1: Termination and Mounting
3.0: Wiring and Connections
2.4.1: Termination and Mounting
3.0: Wiring and Connections
7.8: Setup System - Setup Modem &
Pagers
Introduction
5
Page 14
1.8 LED Indicators
BAR CODE
The AC8’s controller board has LED indicators that show the status of inputs, outputs and the common alarm, as well as the modem, SiteScan Web and EPOP connections.
Introduction
EIA422
EIA422
SS Web
EPOP
SiteScan Web
& EPOP
LEDs
DS50
DS49
DS68
Modem LEDs
MODEM
DS77 TX
DS76 RX
DS74 DTR
DS75 DCD
TB7:
START
24V INPUT
P23:
BATTERY
ON
BATTERY
LCD
CONTRAST
VBATT
J11: PHONE
PIN 3-TIP
PIN 4-RING
BAR CODE
LIEBERT
TP1
GND
ON
ON
DIP
S2
1
2345678
OFF
DS83
CAN TX
DS84
CAN RX
MODEM
MODEM
485
(TOP)
—
+
422
(BOTTOM)
—
+
TB5: COMMON ALARM
RELAY OUTPUTS
(TOP)
NO C NC
NO C NC
LS1
+
ENABLE
P11
AUDIBLE
Q11
OUTPUT1
DS56
OUTPUT2
DS54
OUTPUT3
DS63
OUTPUT4
DS61
OUTPUT5
DS60
OUTPUT6
DS62
OUTPUT7
DS55
OUTPUT8
DS57
CTRLLOCK
DS59
SENLOCK
DS58
CMN ALR
DS53
MOP
F PROG
574 TX
574 RX
485 RX
485 TX
INPUT1
INPUT2
INPUT3
INPUT4
DS70
INPUT5
DS67
INPUT6
DS66
INPUT7
DS65
INPUT8
DS64
R334
C71
1-2 TOP
3-4 BOTTOM
——
+ +
AG
TB9: ANALOG
—
+—+
GROUND
BOTTOM
TOP
PFM5 PFM2
TB1
EPOP INPUT
EPOP
P19
EPOP
DIS EN
TB1, TB2 INPUTS:
DRY CONTACTS ONLY.
TB3, TB4, TB5
OUTPUT RELAY
RATINGS: 24V, 3A
CLASS 2 ONLY.
RELAY
OUTPUTS
(TOP)
4
3
2
1
(TOP)
REV
4
3
2
1
TB2:
CONTACT
ASS
INPUTS
TB1: EPOP
CONTACT
INPUT
TB4:
(BOTTOM)
NC
NC
C
C
NO
NO
2
(BOTTOM)
8
7
6
5
(BOTTOM)
8
7
6
5
Table 2 LED indicators summary
LED Type LED Color Description
EIA422
LEDs
EPOP LED
Modem
LEDs
Output
LEDs
Status
LEDs
Input
LEDs
422 TX Green AC8 is transmitting information over the EIA422 port
422 RX Green AC8 is receiving information over the EIA422 port
EPOP IN Red Indicates Emergency Power Operation is open or in alarm
TX Green AC8 is transmitting information via the modem
RX Green AC8 is receiving information via the modem
DTR Green Indicates data terminal is ready (DTR)—lights up when modem is dialing
DCD Green Indicates data carrier is detected (DCD)—lights up when modem has connection
OUTPUT1 Green Indicates output is ON or energized
OUTPUT2 Green Indicates output is ON or energized
OUTPUT3 Green Indicates output is ON or energized
OUTPUT4 Green Indicates output is ON or energized
OUTPUT5 Green Indicates output is ON or energized
OUTPUT6 Green Indicates output is ON or energized
OUTPUT7 Green Indicates output is ON or energized
OUTPUT8 Green Indicates output is ON or energized
CTRLLOCK Green Indicates Control Relay 2 is ON or energized
SENLOCK Green Indicates Control Relay 1 is ON or energized
CMN ALR Green Indicates Common Alarm Relay is ON or energized
MOP Green
Indicates the microprocessor is operating properly (MOP)—must be on before AC8
will function
FPROG Green Indicates firmware is being upgraded—lights up during upgrade process
574 TX or 232 TX Green AC8 is transmitting information via the RS232 port
574 RX or 232 RX Green AC8 is receiving information via the RS232 port
485 RX Green Not used
485 TX Green Not used
INPUT1 Red Indicates input is ON or energized
INPUT2 Red Indicates input is ON or energized
INPUT3 Red Indicates input is ON or energized
INPUT4 Red Indicates input is ON or energized
INPUT5 Red Indicates input is ON or energized
INPUT6 Red Indicates input is ON or energized
INPUT7 Red Indicates input is ON or energized
INPUT8 Red Indicates input is ON or energized
DS56
DS54
DS63
DS61
DS60
DS62
DS55
DS57
DS59
DS58
DS53
DS51
DS48
DS47
DS78
DS52
DS79
DS69
DS71
DS72
DS70
DS67
DS66
DS65
DS64
OUTPUT1
OUTPUT2
OUTPUT3
OUTPUT4
OUTPUT5
OUTPUT6
OUTPUT7
OUTPUT8
CTRLLOCK
SENLOCK
CMN ALR
MOP
F PROG
574 TX
574 RX
485 RX
485 TX
INPUT1
INPUT2
INPUT3
INPUT4
INPUT5
INPUT6
INPUT7
INPUT8
Output LEDs
CTRLLOCK
Control Relay 2
SENLOCK
Control Relay 1
CMN ALR
Common Alarm
Status
LEDs
Input LEDs
6
Page 15
1.9 Typical Sequence
ESC
ESC
Figure 4 shows a typical sequence of how the AC8 functions after detecting a change in a monitored
device. Many responses depend on configuration settings. This example shows what happens when a
digital input changes state—assuming the input is defined as alarmable—and when the condition
returns to normal.
Figure 4 Example of typical sequence
RESPONSES TO AN ALARM RETURN-TO-NORMAL SEQUENCE
Introduction
ALARM CONDITION DETECTED
A device connected to the AC8
changes state.
RETURN TO NORMAL
The device that triggered the alarm
returns to its normal state.
The alarm is cleared
The horn sounds (audible horn on
the controller board—silence horn by
pressing any key on the LCD keypad)
(automatically if Unlatched; must be
cleared manually if Latched)
The horn stops sounding
(if user hasn’t silenced it)
UNIVERSAL MONITOR
05-SEP-02 14:04:13
V5.100.0
PRESS =STATUS/SETUP
ESC
The LCD flashes
(except during setup)
UNIVERSAL MONITOR
05-SEP-02 14:04:13
V5.100.0
PRESS =STATUS/SETUP
ESC
Pager numbers are dialed
(up to four configured pagers)
Service number is dialed
The LCD stops flashing
Pager numbers & service
number are dialed
Return-to-normal message sent
(if configured)
User setup determines output
control (for example, the device
in alarm might be disabled and a
standby device set to operate)
DEVICE_1 ALARM
CONTACT CLOSED
30-SEP-04 16:23:04
DEVICE_1 ALARM
CONTACT CLOSED
DEVICE_4 STARTED
30-SEP-04 16:23:10
Entry in Alarm Log
Condition (
& state (
ALARM)
CONTACT CLOSED)
Entry in Active Alarm Log
Condition (
& state (
ALARM)
CONTACT CLOSED)
Entry in Event Log
Status change
(DEVICE_4 STARTED)
ALARMS CLEARED
30-SEP-04 16:24:04
DEVICE_1 STARTED
DEVICE_2 STARTED
DEVICE_3 STARTED
DEVICE_4 OFF
30-SEP-04 16:24:06
Entry in Alarm Log
ALARMS CLEARED)
(
Entry in Event Log
Actions in response to event
(DEVICE_1 STARTED,
DEVICE_4 OFF
)
7
Page 16

2.0 INSTALLATION
This section provides instructions for installing, mounting and connecting power to the AC8.
2.1 Installation Considerations
The AC8 must be installed indoors and may be mounted on the surface of a wall or flush-mounted,
depending on the user’s application, the location of equipment and sensors to be monitored and the
type of wall the unit will be mounted on.
The AC8 should be mounted where it can be easily accessed. On-site personnel would access the unit
through the LCD on its front cover, service terminal connected to the RS232 port or through SiteScan.
For off-site monitoring, the AC8 should be placed near communications means such as a telephone
line connection that would permit remote access.
In addition to the communications connections, the site also must have electrical service and must
permit connecting the unit’s eight digital inputs, eight digital outputs and four analog inputs.
The wall material must be capable of supporting the weight of the AC8: see 8.0 - Specifications.
NOTE
This equipment has been tested and found to comply with the limits for a Class A digital
device, pursuant to part 15 of the FCC rules. These limits are designed to provide reasonable
protection against harmful interference when the equipment is operated in a commercial
environment. This equipment generates, uses, and can radiate radio frequency energy and, if
not installed and used in accordance with the instruction manual, may cause harmful
interference to radio communications. Operation of this equipment in a residential area is
likely to cause harmful interference in which case the user will be required to correct the
interference at his own expense.
Installation
2.1.1 Unpacking and Preliminary Inspection
• Before unpacking the AC8, inspect the shipping carton for damage or signs of mishandling, such
as gashes or holes in the carton or severely flattened corners.
• Open the shipping crates carefully. Use care to avoid puncturing the container with sharp objects
that might damage the contents.
• Inspect the AC8 and all included components for damage.
• If any damage from shipping or mishandling is observed, immediately file a damage claim with
the shipping agency and forward a copy to:
Liebert Corporation
1050 Dearborn Drive
P.O. Box 29186
Columbus, OH 43229
Packing Contents
Table 3 Packing manifest
Standard Components
• AC8 controller board in enclosure
• User Manual
• Keys (2) to panel door lock
• Backup Battery - installed in unit (not connected or charged)
• RS232 Configuration Cable
8
Page 17
2.2 Surface-Mounting the AC8
NOTE
Removing the conduit knockouts before mounting the AC8 on the wall will ease installation
and prevent strain on the mounting hardware and wall. It is imperative to remove the
knockouts if the unit is to be flush-mounted.
After determining where to place the unit, check to ensure that you have all the hardware required to
install the panel on the surface of a wall. Obtain the needed tools and material.
Required tools
• Electric drill (if surface is too hard to drive screws without pilot holes)
• Screwdriver
• Marker to denote layout of holes
• Four screws, each #10
2.2.1 Mounting the Panel
CAUTION
!
Check building plans and other relevant documents to determine whether mounting the AC8
at the selected location might cause cutting or otherwise damaging electrical or
communication wiring or pipes.
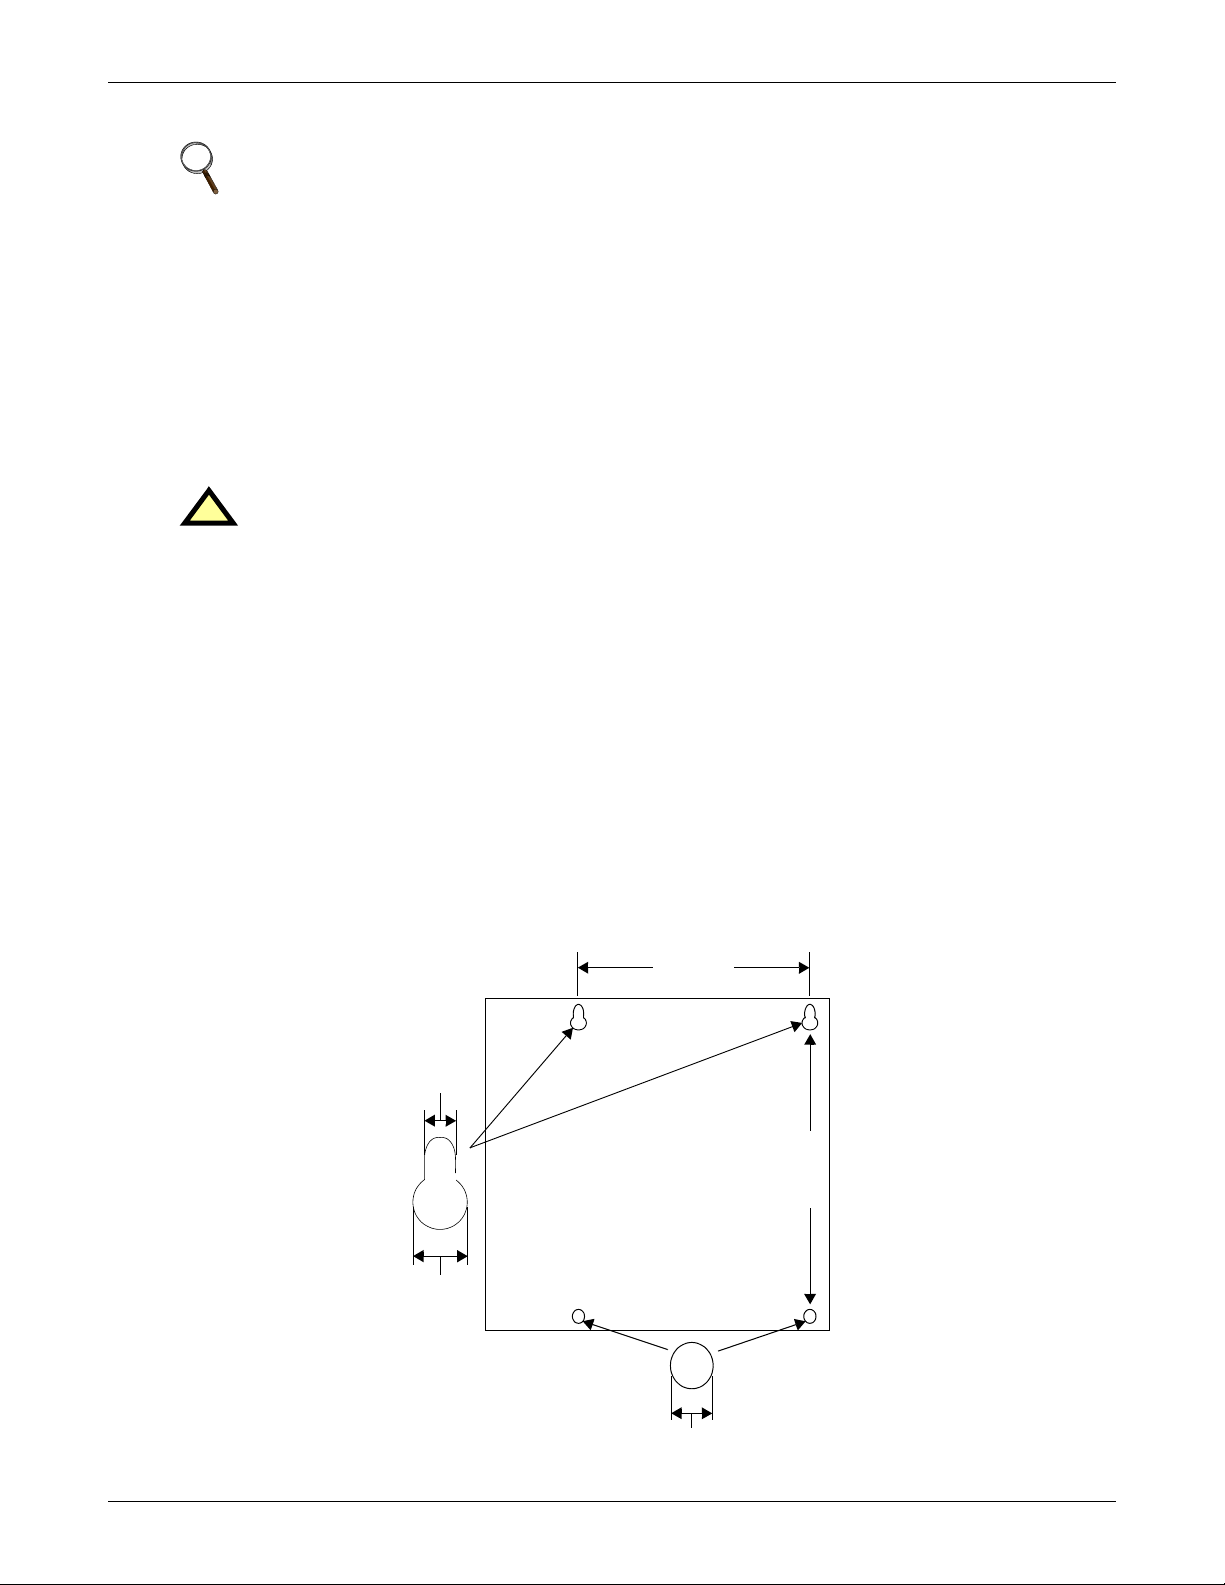
1. Mark the wall for mounting holes, using the back of the unit as a template (see Figure 5).
2. Drill holes, if required, to install the four #10 screws that will secure the AC8 to the wall. Clean
up the debris.
3. If the wall material is not strong enough to hold the screws securely, use wall anchors.
4. Install the top two screws—the screw heads must be small enough to slip through the larger,
bottom portion of the pear-shaped mounting slot in the AC8 (see inset in Figure 5). The screws
must also be large enough to extend over the edges of the top of the mounting slot.
5. Hang the AC8 on the screws, letting the panel slip down until the screws are in the smaller, upper
portion of the slot.
6. Tighten the screws until they are snug.
7. Insert the remaining two screws in the bottom holes on the back of the panel and tighten.
Installation
Figure 5 Mounting dimensions
Mounting Slot
ENCLOSURE
12"
(304.8mm)
0.213"
(5.4mm)
16"
(406.4mm)
AC8
back plate
0.375"
(9.6mm)
0.213" (5.4mm)
Bottom hole diameter
9
Page 18

2.3 Flush-Mounting the AC8
NOTE
Removing the conduit knockouts before mounting the AC8 on the wall will ease installation
and prevent strain on the mounting hardware and wall. It is imperative to remove the
knockouts if the unit is to be flush-mounted.
The rectangular access doors on the top and bottom of the AC8 must be reversed so they slide
the opposite direction. Leaving the doors as shipped from the factory prevents them from being
opened when the panel is flush mounted in a wall.
The AC8 may be flush-mounted according to company practices—either with screws through the sides
of the panel into wall supports or with hanging hardware that attaches to the back of the panel. After
determining how and where to place the unit, check to ensure that you have all the hardware
required to install the panel in the wall. Obtain the needed tools.
Required tools
•Saw
• Electric drill
• Screwdriver
• Marker to denote layout of the hole to accommodate the AC8
• Mounting hardware
2.3.1 Mounting the Panel
Installation
CAUTION
!
Check building plans and other relevant documents to determine whether mounting the AC8
at the selected location might cause cutting or otherwise damaging electrical or
communication wiring or pipes.
1. Mark the wall for the cutout to accommodate the panel, using the back of the unit as a template.
2. Drill a pilot hole for the saw blade, if required.
3. Use the saw to cut out the marked section of the wall (if not new construction).
4. Rest the AC8 in the wall and mark where mounting screws will be inserted into the wall studs or
other support member.
5. Remove the panel and drill the holes for the mounting screws or wall anchors. Clean up the
debris.
6. Reverse the slide direction of the rectangular access doors on the top and bottom of the AC8.
Leaving the doors as shipped from the factory prevents them from being opened when the panel is
flush mounted in a wall.
7. Attach any field-supplied mounting hardware.
8. Reinsert the assembly into the wall.
9. Insert and tighten the screws or wall anchors.
10
Page 19
2.4 Connect Power to the AC8
The AC8 must be supplied with 115VAC or 230VAC; the power supplied must match the rating of the
unit’s Transformer Module. For information, consult your local dealer, Liebert representative or the
Liebert Worldwide Support Group.
The AC8 must be installed on a branch circuit protected by a certified 15A overcurrent device.
WARNING
!
Check that power is removed from wires prior to installation.
CAUTION
!
The AC8 is designed for use on properly grounded (earthed) 115VAC or 230VAC power, 60Hz
or 50Hz. The ground wire for the power lead must be wired to the earth ground terminal (stud
located next to the 24VAC terminal block).
This equipment is intended to be installed by a qualified and certified electrician who must
review and approve customer supplied wiring and circuit breakers, verify correct input and
grounded (earthed) connections to ensure compliance with technical standards and national
and local electrical codes.
WARNING
!
Be sure that the Power On/Off switch is set to OFF before installing any wiring to this unit.
The switch is in the top left corner of the unit, just below the battery pack.
2.4.1 Termination and Mounting
Installation
WARNING
!
Be sure that the Power On/Off switch is set to OFF before installing any wiring to this unit.
The switch is at the bottom of the unit.
Input Power Connections
To connect electrical power to the Transformer Module:
1. Install electrical wiring from utility power to the Transformer Module.
2. Use copper wires only; proper wiring to use for power is 14/2 AWG copper wire with ground.
3. For the TM230 only: strip wires 3/8" (9.6mm).
Note: For the TM115, wires are pre-stripped 0.4" (10.2mm) at the factory.
4. Connect the wiring as follows:
TM115 TM230 Connection Type
White wire Neutral (L2) Neutral
Black wire Line (L1) Power (Line)
Green wire Ground lead Ground
5. Secure the incoming electrical service wires to the TM115 input wires with wire nuts as shown in
Figure 6 or to the TM230 connectors as shown in Figure 7.
11
Page 20
Installation
24 VAC Output Power Connections
To connect to the 24VAC outputs:
1. Install electrical wiring from device requiring 24VAC power to the Transformer Module.
2. Use copper wire only; proper wiring to use for power is 18, 20 or 22 AWG copper wire. Strip
wire 1/4".
3. There are two 24 VAC output connectors (TB1 and TB2). Terminate wires to the connector as
shown in Figures 6 and 7. TB1 and TB2 are NOT polarity sensitive.
4. Secure the wires to the connector.
Figure 6 Power wiring to TM115 Figure 7 Power wiring to TM230
TM115
Wire nuts
connecting
electrical
wiring
Troubleshooting - Transformer Module
A common problem and possible solution are shown in the table below. For further information or if
you have other problems with the unit, consult your local dealer, Liebert representative or the Liebert
Worldwide Support Group.
Problem Possible Solution Replacement Fuse Part Numbers
24VAC power
not available
from TB1 or TB2
Check fuse for respective
output (TB1 or TB2).
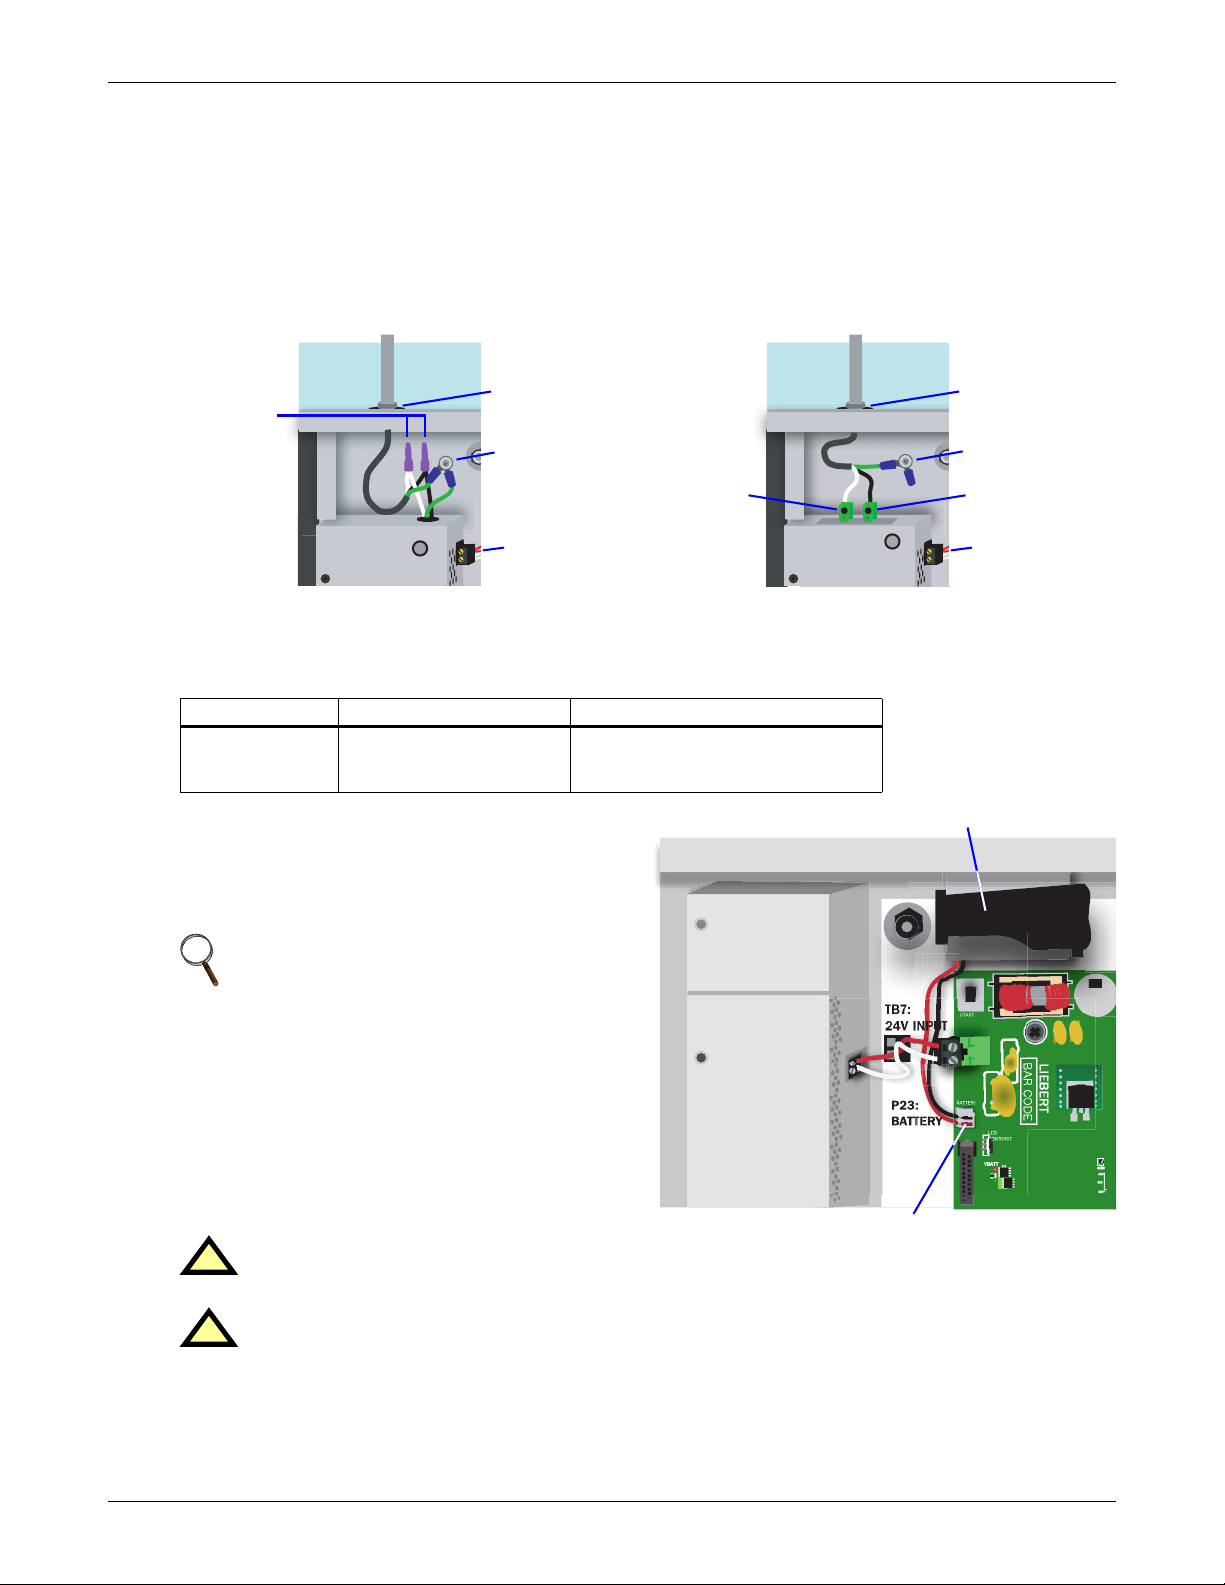
2.4.2 Connecting the Battery Pack
Before connecting input power to the AC8, connect
the panel’s backup battery (factory-supplied) to the
jumpers so it will begin charging when electrical
power to the AC8 is switched on.
Knockout for
external wiring
Ground
24VAC output
(TB1)
• LITTLEFUSE 218002
or
• BUSSMANN GDC-2A
TM230
Neutral
(L2)
Knockout for
external wiring
Ground
Line (L1)
24VAC output
(TB1)
Battery pack
NOTE
If the battery is not hooked up BEFORE the
AC8 is switched on, it will trigger an alarm.
To connect the battery pack, insert the battery
leads into the jumpers as shown at right.
(To disconnect the battery pack, remove the
battery leads from the jumpers.)
Obtaining a Replacement Battery Pack
To obtain a replacement battery pack, contact your
local dealer or Liebert representative. The Liebert
part number is 133455P1.
WARNING
!
To prevent the risk of fire or explosion, replace only with 7.2 V rechargeable NiCad battery pack.
CAUTION
!
Dispose of the battery properly by sending it back to Liebert Corporation or an approved
battery recycling facility.
2.4.3 Turning On the AC8
After connecting the backup battery, turn on the power On/Off switches to the AC8 and the Transformer Module (see 1.7 - Controller Board Overview for location of switches).
Battery pack connector
12
Page 21

Wiring and Connections
3.0 WIRING AND CONNECTIONS
CAUTION
!
Switch OFF electric power to the AC8 before installing any wiring to the unit or changing
input or output connections. The Power On/Off switch is in the top left corner of the unit, just
below the battery pack.
3.1 Wiring Specifications
Input and output connections to the AC8 may be made in any order—it is not necessary, for example,
to make all input connections before making any output connections. Use copper conductors only for
all wiring.
Table 4 Wiring specifications
Connection Supported Wire Type Maximum Wire Length Rating
Digital
Input/
EPOP
Digital
Output/
Control
Relay
Analog Input
2-Wire
Transducer
Analog Input
4-Wire
Transducer
Common
Alarm
Output
Communication
RS232
Communication
EIA422
SiteScan
Communication
EIA485
Phone/Modem
Line
24VAC Power
Connection
(TB7)
Power Connections (Transformer Module)
115VAC
230VAC
* Recommended
18-22 AWG Stranded & Unshielded
18 AWG* (recommended)
Non Plenum - Belden 9740
Plenum - Belden 89740
18-22 AWG Stranded & Unshielded
18 AWG* (recommended)
Non Plenum - Belden 9740
Plenum - Belden 89740
18-22 AWG Stranded & Unshielded
18 AWG* (recommended)
Non Plenum - Belden 9740
Plenum - Belden 89740
18-22 AWG Stranded & Unshielded
18 AWG* (recommended)
Non Plenum - Belden 8489
Plenum - Belden 88489
18-22 AWG Stranded & Unshielded
18 AWG* (recommended)
Non Plenum - Belden 9740
Plenum - Belden 89740
Null Modem Cable 50 ft. (15m) N/A
18-22 AWG Stranded & Shielded
22 AWG* (recommended)
Non Plenum - Belden 9461
Plenum - Belden 88761
18-22 AWG Stranded & Shielded
22 AWG* (recommended)
Non Plenum - Belden 9461
Plenum - Belden 88761
4 Wire (Pins 3 & 4)
RJ11 Connector
18-22 AWG Stranded & Shielded
18 AWG* (recommended)
Non Plenum - Belden 8770
Plenum - Belden 88770
14 AWG Stranded & Unshielded
Non Plenum - Belden 5101UE
14 AWG Stranded & Unshielded
Non Plenum - Belden 5101UE
18 AWG*
(recommended)
@3A 50 ft. (15m)
@2A 100 ft. (30m)
@1A 200 ft. (60m)
18 AWG*
(recommended)
@3A 50 ft. (15m)
@2A 100 ft. (30m)
@1A 200 ft. (60m)
750 ft. (225m)
20 AWG 22 AWG
@3A 40 ft. (12m)
@2A 60 ft. (18m)
@1A 100 ft. (30m)
750 ft. (225m)
750 ft. (225m)
20 AWG 22 AWG
@3A 40 ft. (12m)
@2A 60 ft. (18m)
@1A 100 ft. (30m)
1000 ft. (300m) N/A
3000 ft. (900m) N/A
N/A N/A
150 ft. (45m)
150 ft. (45m)
150 ft. (45m)
@3A 25 ft. (7m)
@2A 35 ft. (10m)
@1A 75 ft. (23m)
@3A 25 ft. (7m)
@2A 35 ft. (10m)
@1A 75 ft. (23m)
Dry Contact
24VAC@3A
4-20 mA Signal
Input Selectable
Power Source
(12/24VDC)
4-20 mA Signal
Input Selectable
Power Source
(12/24VDC)
(24VDC,
10 mA)
24VAC
@3A
24VAC
@1.3A
115VAC
@4A
230VAC
@0.5A
13
Page 22
3.2 Connecting Digital Inputs and Digital Outputs
The digital inputs, digital outputs and control relay outputs are found on the right side of the AC8’s
printed wiring assembly board. Each set has two terminal blocks—one green, the other black:
• Digital inputs: two terminal blocks, with four inputs per block (8 inputs total)
• Digital outputs: two terminal blocks, with four outputs per block (8 outputs total)
• Control relay outputs: two terminal blocks, with one output per block (2 outputs total)
Each input is tied to an output with the same number:
• Input 1 is tied to Output 1 (default name: Device_1)
• Input 2 is tied to Output 2 (default name: Device_2)
• Input 3 is tied to Output 3 (default name: Device_3)
.
.
.
• Input 8 is tied to Output 8 (default name: Device_8)
Up to eight devices may be connected to the AC8. Each device must be connected to an input and an
output with the same number.
To determine the proper wire size, see Table 4 - Wiring specifications.
NOTE
Each terminal block is a removable, two-part assembly to permit easier connection of more
than one input at a time. If making multiple connections, grasp the upper portion of a block
and pull firmly to the right until the assembly pulls apart.
After making the connections, push the removed piece back into the portion attached to the
printed wiring assembly until the terminal block pieces lock together.
Wiring and Connections
Connecting Liebert Environmental Units
For Liebert environmental units, follow these steps (be sure to connect the same device to inputs and
outputs with the same number—one device to Input 1 and Output 1, another to Input 2 and Output 2,
and so on):
• Connect a digital input from the AC8 to the Common Alarm Relay of the environmental unit:
terminals 75/76 or TB1-6, TB1-7.
• Connect a digital output (numbered the same as the input) from the AC8 to the Remote Shutdown
(Power Control) of the environmental unit: terminal 37/38 or TB1-4, TB1-5.
3.2.1 Connecting Digital Inputs
To connect a digital input:
1. Turn OFF electrical power to the AC8.
2. If necessary, remove a conduit knockout
to permit wire entry into the AC8
enclosure.
3. Bring the wire(s) into the AC8 enclosure
through a conduit knockout or access slot.
4. Loosen the appropriate screw and slip the
stripped end of the wire into the terminal
block.
5. Tighten the screw until it holds the wire
snugly.
NOTE
Connect digital inputs to
nonpowered (dry) contacts only.
PFM2
PFM5
TB1
EPOP INPUT
EPOP
RELAY
OUTPUTS
(TOP)
4
3
2
1
(TOP)
REV
4
3
2
1
TB2:
CONTACT
ASS
INPUTS
(BOTTOM)
8
7
6
5
(BOTTOM)
8
7
6
5
NUMBERING KEYS Note numbering begins
with 1 at the bottom and
proceeds up to 4 (green);
and 5 up to 8 (black)
DIGITAL INPUT
TERMINAL BLOCKS
14
Page 23
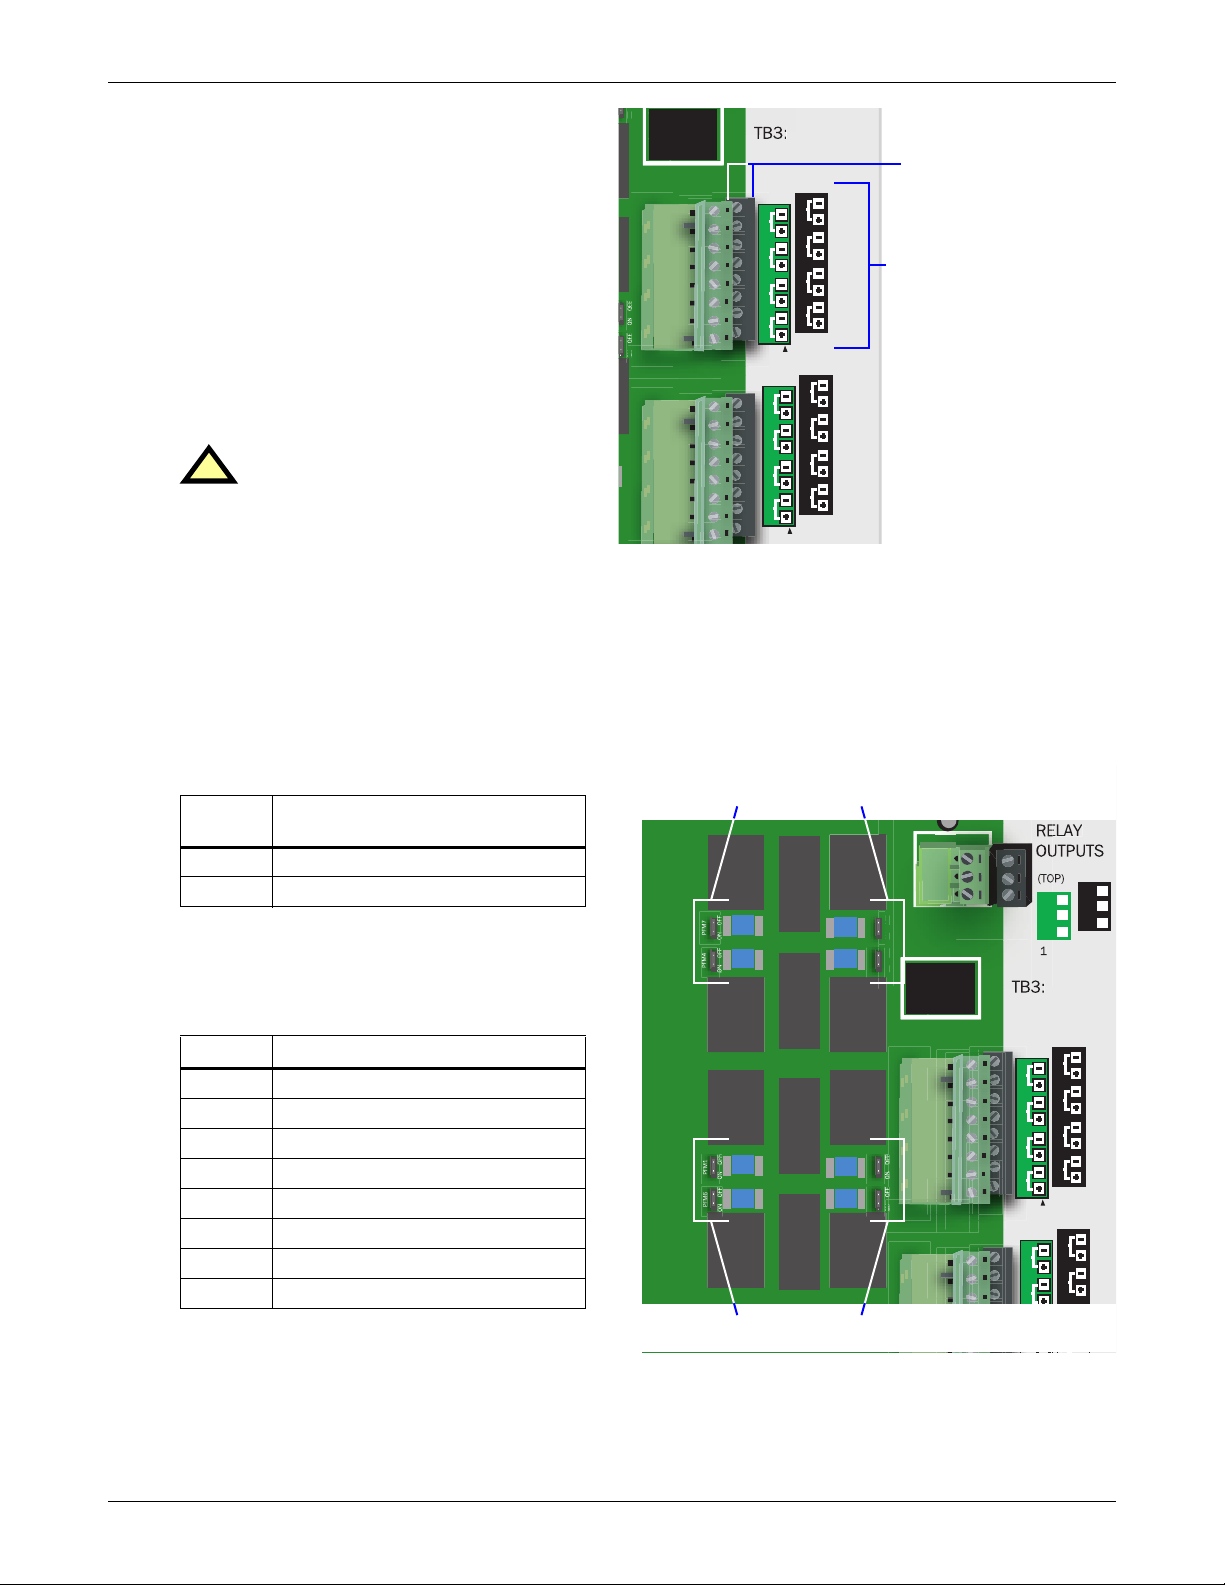
Wiring and Connections
F
M
3.2.2 Connecting Digital Outputs
To connect a digital output:
1. Turn OFF electrical power to the AC8.
2. If necessary, remove a conduit knockout to
permit wire entry into the AC8 enclosure.
3. Bring the wire(s) into the AC8 enclosure
through a conduit knockout or access slot.
4. Loosen the appropriate screw and slip the
stripped end of the wire into the terminal
block.
5. Tighten the screw until it holds the wire
snugly.
CAUTION
!
To reduce the risk of fire or electric
shock, do not interconnect the outputs
of different Class 2 circuits.
3.2.3 Setting the Digital Output Jumpers
Each digital output has an associated jumper to define its operation when power is interrupted and
there is no battery backup to the board. This puts the AC8 in a fail-safe mode and ensures proper
functioning when the board has no power or battery backup.
P
RELAY
OUTPUTS
(BOTTOM)
(TOP)
8
4
7
3
6
2
REV
1
(TOP)
4
3
2
1
5
(BOTTOM)
8
7
6
5
PFM2
PFM5
DIGITAL OUTPUT
TERMINAL BLOCKS
NUMBERING KEYS Note numbering begins
with 1 at the bottom and
proceeds up to 4 (green);
and 5 up to 8 (black)
The AC8 comes from the factory with all digital output jumpers in the OFF position (Normally Open).
The jumper setting for each digital output can be changed to ON (Normally Closed). The settings are
shown in Table 5.
Table 5 Digital output jumper settings
Setting
(power loss & no battery backup)
OFF Normally Open
ON Normally Closed
Output status
To change the output jumper setting:
1. Find the respective black output jumper on
the circuit board, shown in the illustration,
using the following guide.
Jumper Associated output
PFM1 Output 1
PFM2 Output 2
PFM3 Output 3
PFM4 Output 4
PFM5 Output 5
PFM6 Output 6
PFM7 Output 7
PFM8 Output 8
2. Decide whether your configuration requires
Digital output jumpers
Digital output jumpers
TB4:
(BOTTO
NC
NC
C
C
PFM8
FF
PFM3
NO
NO
2
RELAY
OUTPUTS
(BOTTOM)
(TOP)
8
4
7
3
6
2
REV
1
(TOP)
4
3
2
5
(BOTTOM)
8
7
6
PFM2
PFM5
the jumper to be OFF or ON.
3. Set the jumper as needed:
• Set the jumper to OFF by placing the black jumper on the middle and top pins.
• Set the jumper to ON by placing the black jumper on the middle and bottom pins.
15
Page 24
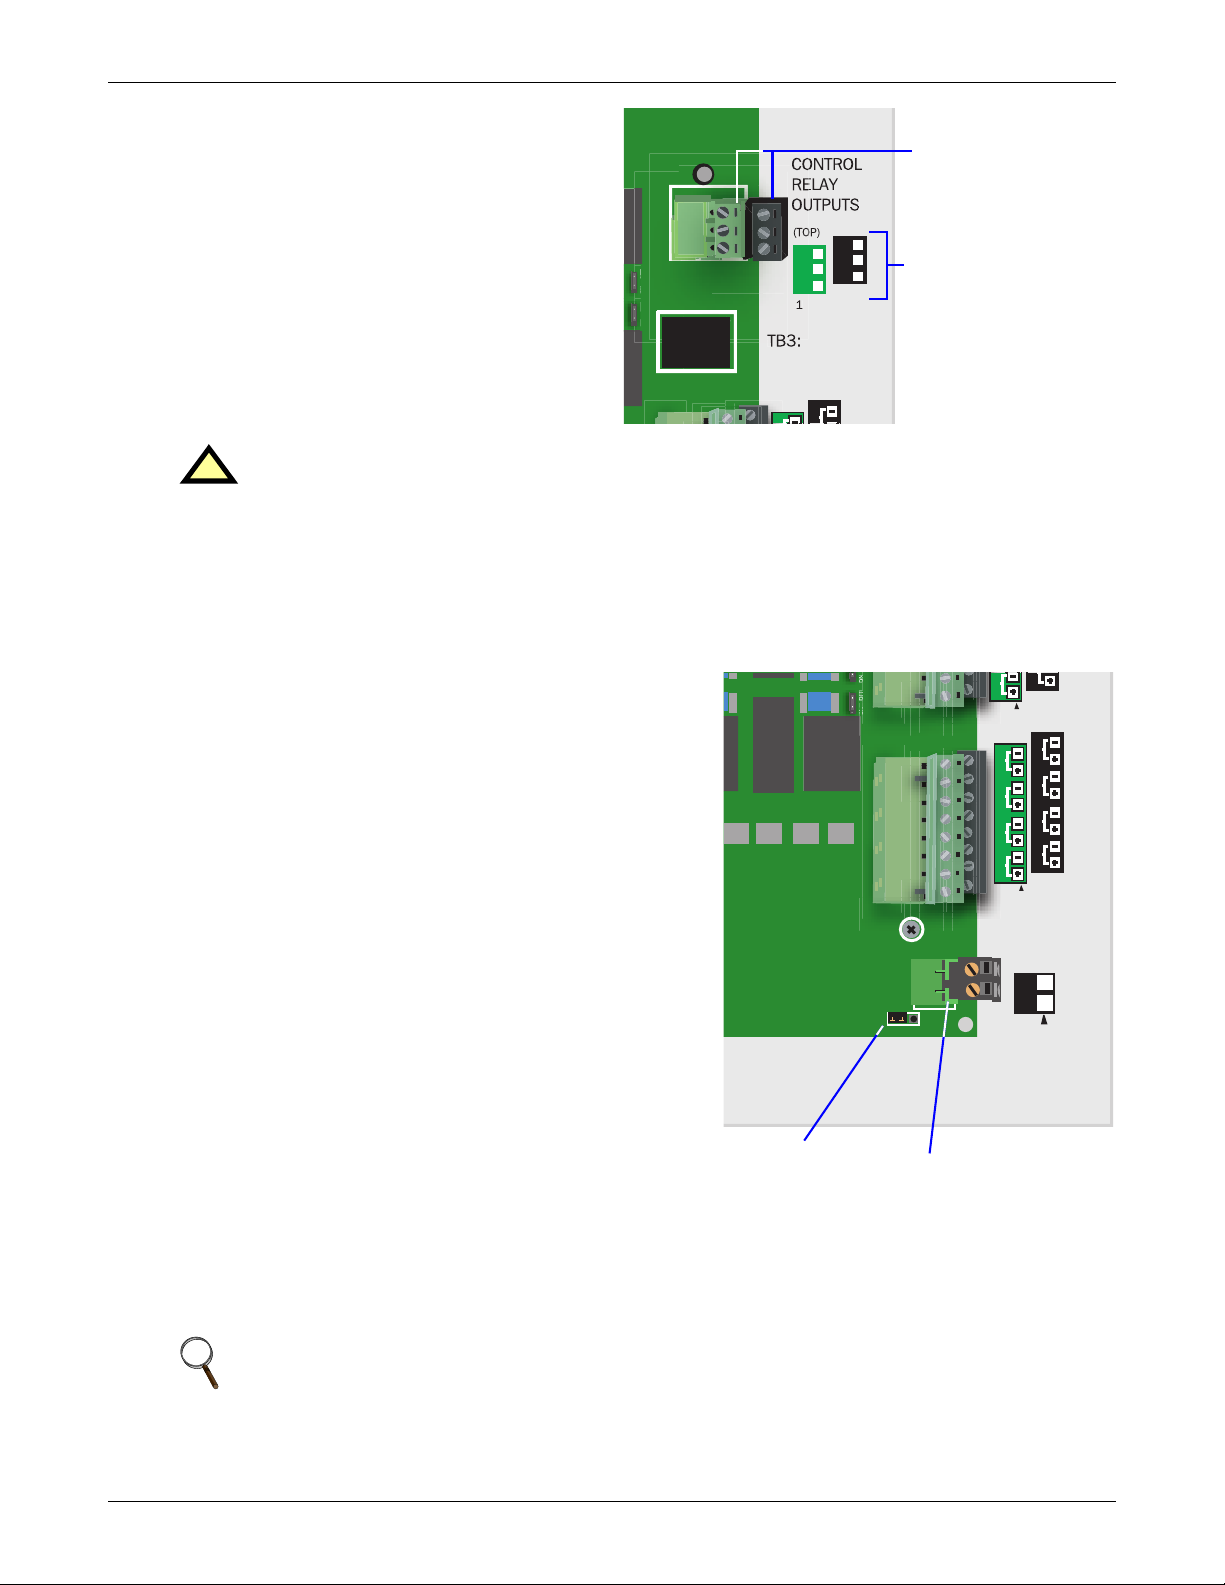
3.2.4 Connecting Control Relay Outputs
5
F
To connect a control relay output:
1. Turn OFF electrical power to the AC8.
2. If necessary, remove a conduit knockout to
permit wire entry into the AC8 enclosure.
3. Bring the wire(s) into the AC8 enclosure
through a conduit knockout or access slot.
4. Loosen the appropriate screw and slip the
PFM8
FF
PFM3
stripped end of the wire into the terminal
block.
5. Tighten the screw until it holds the wire
snugly.
CAUTION
!
To reduce the risk of fire or electric shock, do not interconnect the outputs of different Class 2
RELAY
OUTPUTS
(TOP)
circuits.
3.2.5 Connecting the Emergency Power Operation (EPOP) Input
The emergency power operation, or EPOP, input connector block (TB1) is at the bottom right corner of
the AC8 printed circuit board, just below the digital inputs.
To determine the proper wire size, see Table 4 - Wiring specifications.
To connect to the EPOP input:
1. Turn OFF electrical power to the AC8.
2. If necessary, remove a conduit knockout to permit
wire entry into the AC8 enclosure.
3. Bring the wire into the AC8 enclosure through a
conduit knockout or access slot.
4. Loosen each screw and slip the stripped end of the
wire into the terminal block.
5. Tighten each screw until it holds the wire snugly.
3.2.6 Setting the EPOP Jumper
The EPOP contact input has an associated jumper to
enable or disable emergency power operation (EPOP).
The AC8 comes from the factory with the EPOP jumper in
the Disabled position (DIS); it may be changed to Enabled
(EN).
To change the EPOP jumper setting:
1. Find the black EPOP jumper on the circuit board, as
shown at right. The jumper is at the bottom right
corner of the board just below the EPOP contact input
(see 1.7 - Controller Board Overview).
2. Decide whether your configuration requires the jumper to be enabled or disabled.
3. Set the jumper as needed:
• To enable EPOP, place the black jumper on the middle and right pins. The right side of the
EPOP
jumper
jumper is labeled EN for Enabled.
TB4:
NC
C
NO
(BOTTOM)
(BOTTOM)
NC
C
NO
2
Wiring and Connections
RELAY OUTPUT
TERMINAL BLOCKS
NUMBERING KEYS Relay 1 at left (green);
Relay 2 at right (black)
P
PFM5
REV
1
(TOP)
4
3
2
1
TB2:
CONTACT
ASS
INPUTS
TB1
EPOP INPUT
EPOP
P19
EPOP
DIS EN
TB1, TB2 INPUTS:
DRY CONTACTS ONLY.
TB1: EPOP
CONTACT
INPUT
EPOP
input
(BOTTOM)
8
7
6
5
NOTE
When the EPOP jumper is set to Enabled, a Normally Closed contact must be attached or an
alarm will be generated and the outputs will default to the EPOP operation setting.
• To disable EPOP, place the black jumper on the middle and left pins. The left side of the
jumper is labeled DIS for Disabled.
16
Page 25
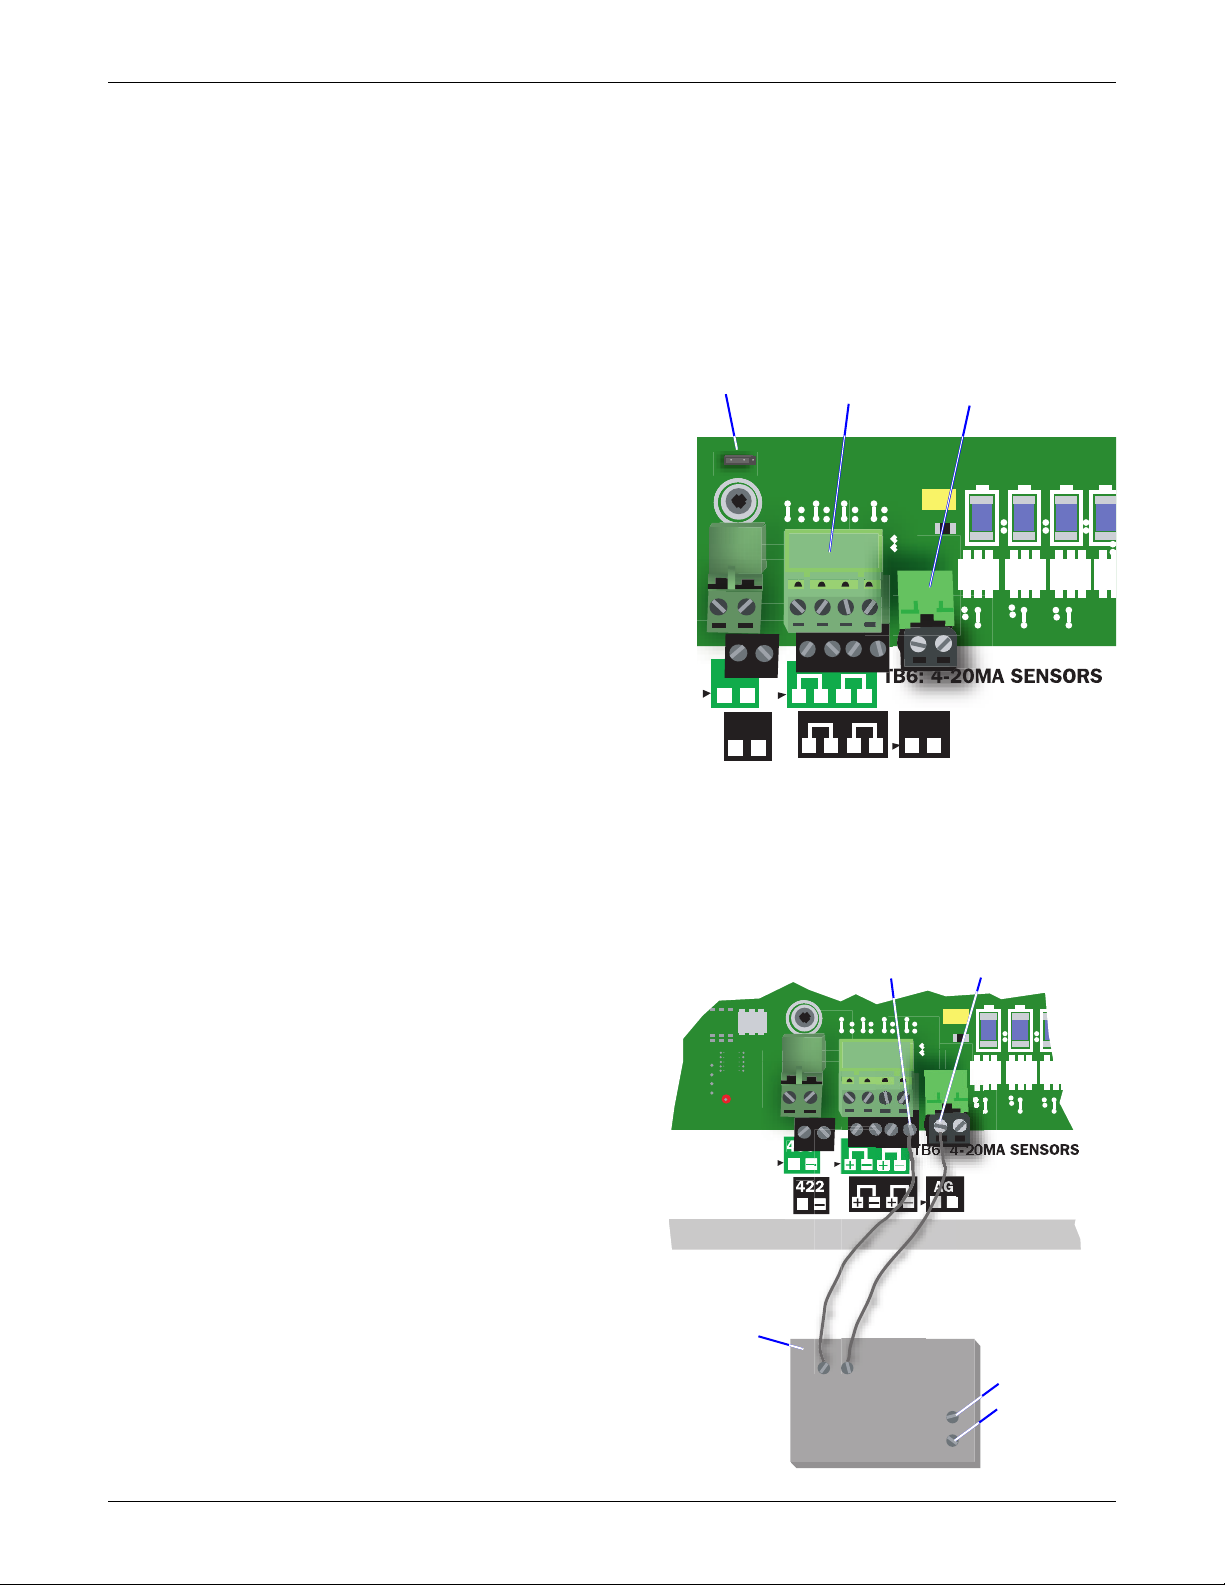
3.3 Connecting Analog Inputs
The analog input connector blocks are at the bottom center of the AC8 printed circuit board, as shown
below right. The blocks are two-part assemblies to permit easier connections. To determine the proper
wire size, see Table 4 - Wiring specifications.
To connect an input:
1. Turn OFF electrical power to the AC8.
2. If necessary, remove a conduit knockout to permit wire entry into the AC8 enclosure.
3. Bring the wire(s) into the AC8 enclosure through a
conduit knockout or access slot.
4. Loosen the appropriate screw and slip the stripped
end of the wire into the terminal block.
5. Tighten the screw until it holds the wire snugly.
3.3.1 Setting the 12VDC/24VDC Analog Power Jumper
The analog power jumper sets the common voltage
that is applied to all of the analog input connections.
The jumper permits the user to modify the voltage
supplied to the sensors, according to the power
requirements.
The factory default position is 24VDC; it may be
changed to 12VDC.
To change the analog power jumper setting:
1. Find the black analog jumper on the circuit board,
as shown at right. The jumper is at the bottom of
the board near the middle (see 1.7 - Controller
Board Overview).
2. Decide whether your configuration requires the jumper to be 24VDC or 12VDC.
3. Set the jumper as needed:
• To set the jumper to the 24VDC position, place the black jumper on the middle and right pins.
• To set the jumper to the 12VDC position, place the black jumper on the middle and left pins.
Analog
power
jumper
485
—
+
422
M)
+
—
Analog
inputs
——
+ +
+—+
Wiring and Connections
Analog
ground
1-2 TOP
3-4 BOTTOM
AG
—
TB9: ANALOG
GROUND
3.3.2 Connecting the Analog Ground
The AC8 features an analog ground connection
for four-wire sensors that have an external
power source. Such a four-wire sensor requires
a reference to ground because they get power
from an external power source.
A two-wire transducer, which does not have an
external power source, does not need to be
connected to the analog ground.
The analog ground connector has two
terminals, each of which can accommodate two
wires. This is adequate to connect four sensors
that require a reference to ground because they
get power from an external power source.
Connect the analog ground to an external
four-wire sensor, as shown in the illustration at
right.
TB10: COMMS
Four-wire
transducer
Sensor
with
external
power
(TOP)
(BOTTOM)
+
+
+
4/20mA
Output
Analog
input
—
24V Input
1-2 TOP
3-4 BOTTOM
+
—
Analog
ground
TB9: ANALOG
GROUND
24V from
external
power
source
17
Page 26
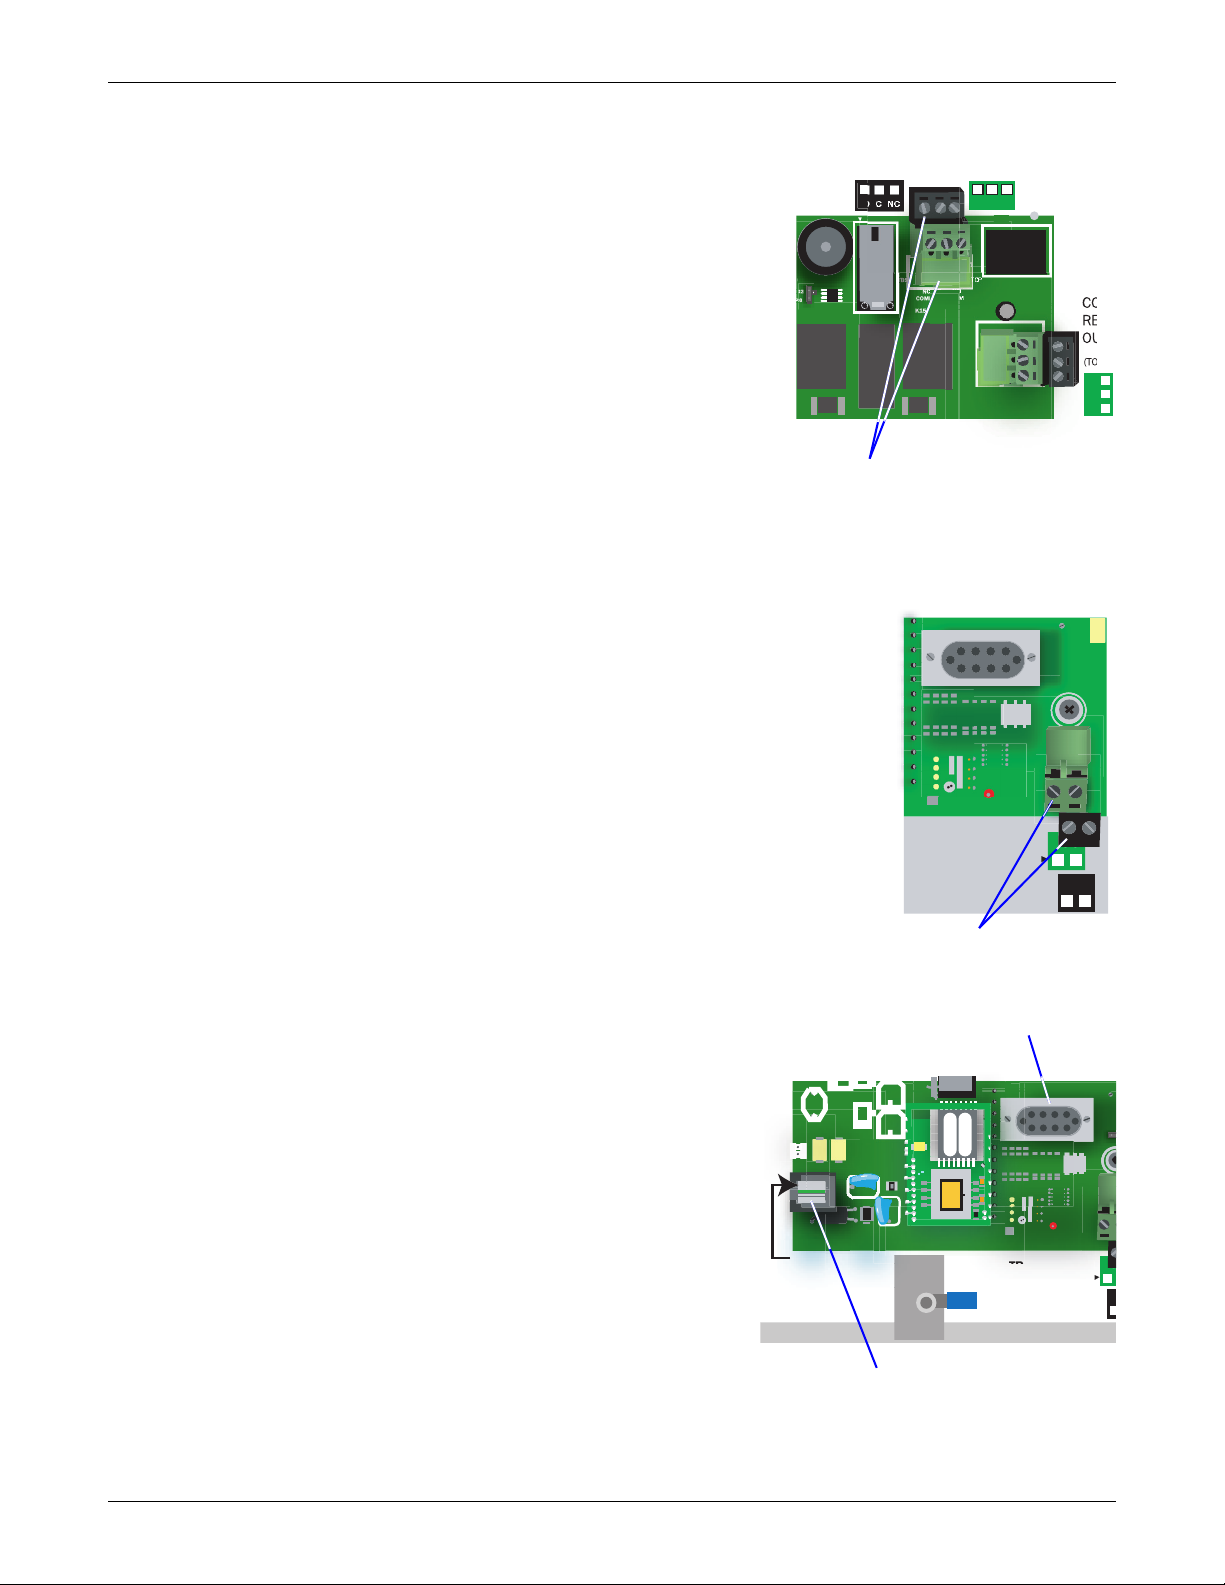
3.4 Connecting Common Alarm Outputs
T
P
)
(
T
E
4
N
11
M
S
8
+
TB10: COMMS
4
The common alarm relay, found in the top right corner of the
AC8, permits the user to connect auxiliary notification
equipment, such as lights, horns and sirens, to the AC8. To
determine the proper wire size, see Table 4 - Wiring
specifications.
There are two connectors for the common alarm output. However,
the connectors are not individual relay outputs. The connectors
should be treated as a double-pole, double-throw (DPDT) relay.
The common alarm relay is energized whenever an alarm occurs.
To connect an output:
1. Turn OFF electrical power to the AC8.
2. If necessary, remove a conduit knockout to permit wire entry
into the AC8 enclosure.
3. Bring the wire(s) into the AC8 enclosure through a conduit
knockout or access slot.
4. Loosen the appropriate screw and slip the stripped end of the wire into the terminal block.
5. Tighten the screw until it holds the wire snugly.
3.5 EIA422 SiteScan Web Connector
The AC8 will interface with Liebert’s SiteScan Web enterprise monitoring
system. SiteScan can be used to monitor analog and digital equipment from
a host computer and also to perform some configuration.
To connect the SiteScan host computer to the AC8:
1. Turn OFF electrical power to the AC8.
2. If necessary, remove a conduit knockout to permit wire entry into the
AC8 enclosure.
3. Bring the wire(s) into the AC8 enclosure through a conduit knockout or
access slot.
4. Loosen the appropriate screw and slip the stripped end of the wire into
the terminal block.
5. Tighten the screw until it holds the wire snugly.
3.6 Communications Connections
The AC8’s Service Terminal Interface offers full configuration
and monitoring capability via the RS232 port and the phone
line connector (see A.2 - Connecting to the Service
Terminal Interface). The phone line connector is also used
for pager notifications and service phone number options.
Wiring and Connections
TB5: COMMON ALARM
RELAY OUTPUTS
ON ALAR
NO C NC
BOTTOM
TOP
NO C NC
ENABLE
P
AUDIBLE
Q11
Common alarm outputs
TB10: COMM
EIA422 SiteScan Web
connector
Serial interface connector
(RS232/EIA574)
(TOP)
(TOP)
(BOTTOM)
TB3, TB4,
OUTPUT R
RATINGS: 2
CLASS 2 O
—
+
422
—
+
TB4:
NC
C
NO
N
T
P
3.6.1 RS232 Connector
The RS232 port requires a null modem cable.
• Connect one end of the cable to the AC8’s RS232 port, as
shown at right.
• Connect the other end to the COM1 port of a laptop
computer or video terminal.
3.6.2 Phone Line Connector
The Phone Line Connector requires an RJ11 connector.
• Connect one end of the connector to the AC8’s phone line
connector, shown at right.
• Connect the other end to a telephone wall jack.
18
RJ11: PHONE
PIN 3-TIP
PIN 4-RING
MODEM
Phone line connector
(TOP)
(BOTTOM)
4
+
Page 27

Overview of Menus
4.0 OVERVIEW OF MENUS
There are two ways to access the AC8: the LCD on the front of the enclosure and the Service Terminal
Interface, which is accessible through any computer using a communications program. Many viewing
and configuration tasks can be performed through either interface, but some are available only
through the Service Terminal Interface.
• Step-by-step instructions for all functions appear in Sections 5.0 through 7.0. These instructions
use examples of LCD screens to illustrate most functions, except those not available via the LCD.
• Examples of all Service Terminal Interface screens appear in Appendix A - Service Terminal
Interface, along with instructions on how to connect to the Service Terminal Interface.
Table 6 lists all AC8 functions and shows whether they can be performed through the LCD interface
and where to find information.
Table 6 Guide to AC8 functions
Can be performed via: Where to find:
Function
VIEW STATUS FUNCTIONS
View Active Alarms ✔✔ page 22 page 85
View Alarm Log ✔✔ page 23 page 86
View Event Log ✔✔ page 24 page 87
View Trend Log ✔✔ page 25 page 88
View Input Status ✔✔ page 26 page 89
View Output Status ✔✔ page 27 page 89
View Pager Numbers ✔✔ page 28 page 90
View Operation ✔✔ page 29 page 91
View Control Status ✔✔ page 28 page 91
SILENCE ALARM & BACK UP LOGS FUNCTIONS
Silence Alarm (On the LCD, press any key to silence an alarm) ✔✔ page 31 page 92
Back Up Log Files — ✔ page 32 page 93
SYSTEM & CONTROL FUNCTIONS
Login ✔✔ page 34 page 95
Setup System ✔✔ page 36 page 96
Setup Inputs ✔✔ page 36 page 97
Setup Common Alarm ✔✔ page 39 page 97
Setup Sensor ✔✔ page 40 page 98
Setup Zones ✔✔ page 46 page 116
Setup Outputs ✔✔ page 47 page 99
Setup Modem & Pagers ✔✔ page 49 page 100
Initialization String ✔✔ page 49 page 101
Modem
Setup
Pager
Setup
Setup System Info ✔✔ page 57 page 102
Change Password ✔✔ page 58 page 102
Change Date & Time/Automatic Daylight Saving Time ✔✔ page 58 page 103
Setup Site ID ✔✔ page 59 page 103
Connect Battery ✔✔ page 59 page 103
Backup and Upload Configuration File — ✔ page 60 page 104
Setup Serv Ph Num - Enter Phone Number ✔✔ page 63 page 105
Setup Serv Ph Num - Communications Check — ✔ page 64 page 105
Factory Defaults ✔✔ page 65 page 105
Perform Firmware Update — ✔ page 65 page 106
Initiate Remote Alarm Test — ✔ page 67 page 106
Setup Operation ✔✔ page 68 page 107
Setup I/O Matrix ✔✔ page 73 page 116
Override Output ✔✔ page 75 page 113
Clear Alarms & Logs ✔✔ page 76 page 114
Clear Active Alarms ✔✔ page 76 page 114
Clear the Alarm Log ✔✔ page 76 page 114
Clear the Event Log ✔✔ page 77 page 115
Clear the Trend Logs ✔✔ page 77 page 115
Enter AC8 Phone Number — ✔ page 51 page 101
Enable Modem Diagnostic Messages — ✔ page 51 page 101
Change Modem Dial Prefix — ✔ page 51 page 101
Change Modem Hang Up Delay After a Call — ✔ page 51 page 101
Pager Number & PIN ✔✔ page 53 page 100
Communications Check — ✔ page 55 page 100
LCD
Service
Terminal
Instructions on
using function
Service Terminal
screen examples
19
Page 28
4.1 Opening Screen Overview
The AC8 displays the Opening Screen at startup, as shown in Figure 8.
• If any alarms are active, the Current Alarm screen appears. (Pressing any key on the LCD keypad
will silence the audible alarm.)
• If any analog input sensors are connected, the LCD screen will alternately display the Opening
Screen and a screen showing the analog value of each sensor.
If no alarms are present, the Main Menu appears.
4.2 Main Menu Overview
The Main Menu offers access to all functions within the panel. As shown in Table 7, the functions are
organized into three sections with step-by-step instructions.
Table 7 Primary functions overview
Section Description
These features are available to all users. This permits all personnel to check the
5.0 - View Status Options
(both LCD and Service
Terminal Interface)
6.0 - Silence Alarm & Backup
Log Files (Service
Terminal Interface only)
7.0 - System and Control
Options (some functions
available via Service
Terminal Interface only)
status of any monitored equipment or location. From this menu, any user may:
• View current monitoring data—active alarms and the status of inputs and outputs
• View data stored in alarm, event and trend logs
• View pager numbers
• View auto sequencing and standby testing status
These features—available via the Service Terminal Interface only—allow users to:
• Silence the audible alarm
• Back up the alarm, event and trend logs
These options require a password. Authorized users may:
• Configure the AC8
• Override automatic control of outputs to force an output ON or OFF
• Clear active alarms and delete all records in the alarm, event and trend logs
Overview of Menus
4.3 LCD Menu Overview
Figure 8 shows an overview of the initial screens available through the LCD interface. For comparable information about the Service Terminal Interface screens, see A.3 - Overview of Menus.
Figure 8 LCD Menu overview
“View Status” selected
> VIEW STATUS
SYSTEM AND CONTROL
↑↓=NEXT
View Status Menu
(All users - no password)
VIEW ACTIVE ALARMS
VIEW ALARM LOG
VIEW EVENT LOG
VIEW TREND LOG
VIEW INPUT STATUS
VIEW OUTPUT STATUS
VIEW PAGER NUMBERS
VIEW OPERATION
VIEW CONTROL STATUS
↵=SELECT
Opening Screen
LIEBERT AC8
DD-MON-YY HR:MM:SS
PRESS
VX.XXX.X
↵=STATUS/SETUP
Main Menu
VIEW STATUS
SYSTEM AND CONTROL
↑↓=NEXT
See Section
5.0
See Section
5.1
5.2
5.3
5.4
5.5
5.6
5.7
5.8
5.9
↵=SELECT
(If any alarms detected)
Current Alarm screen
(see 5.1 - View Active Alarms)
“System & Control” selected
VIEW STATUS
> SYSTEM AND CONTROL
↑↓=NEXT
↵=SELECT
System & Control Menu
(Password required)
SETUP SYSTEM
OVERRIDE OUTPUT
CLEAR ALARMS & LOGS
See Section
7.0
See Section
7.2
7.12
7.13
20
Page 29

5.0 VIEW STATUS OPTIONS
NOTE
For ease of understanding, this section uses the LCD interface to illustrate most instructions,
except for features that are available only through the Service Terminal Interface. All Service
Terminal Interface screens appear in Appendix A - Service Terminal Interface.
The View Status menu allows any user to view currently active alarms, monitoring data stored in the
alarm, event and trend logs, the status of all inputs and outputs, and the four pager numbers. The
arrows
This section presents step-by-step instructions for each of the following options:
Figure 9 shows the main options available from the View Status menu.
Figure 9 Menu overview - View Status menu
↑↓ are used to scroll through the menu. The Enter ↵ key is used to select the menu item.
• View Active Alarms • View Trend Log • View Pager Numbers
• View Alarm Log • View Input Status • View Operation
• View Event Log • View Output Status • View Control Status
Opening Screen
DD-MON-YY HR:MM:SS
PRESS ↵=STATUS/SETUP
View Status Options
LIEBERT AC8
VX.XXX.X
Main Menu
> VIEW STATUS
SYSTEM AND CONTROL
↑↓=NEXT ↵=SELECT
View Status
VIEW ACTIVE ALARMS
VIEW ALARM LOG
VIEW EVENT LOG
VIEW TREND LOG
VIEW INPUT STATUS
VIEW OUTPUT STATUS
VIEW PAGER NUMBERS
VIEW OPERATION
VIEW CONTROL STATUS
View Status options
View Active Alarms View Alarm Log View Event Log View Trend Log
> ACTIVE ALARM 22/22
SENSOR_1 101.0 DEG
HIGH SETPOINT ALARM
SENSOR_2 ------ DEG
SENSOR PROBLEM
DEVICE_7 ALARM
CONTACT OPEN
BATTERY
CHECK BATTERY
See
Section
5.1
> ALARM RECORD 99/99
SENSOR_2 80.0 DEG
HIGH SETPOINT ALARM
29-AUG-05 09:29:10
MODEM
INTERNAL FAULT
29-AUG-05 09:20:00
DEVICE_8 ALARM
CONTACT CLOSED
29-AUG-05 07:30:00
See
Section
5.2
> EVENT RECORD 99/99
PAGER
UNSUCCESSFUL PAGE
07-MAY-05 10:07:00
DEVICE_1 FORCE ON
CONTACT CLOSED
06-MAY-05 02:47:03
DEVICE_8 ON
CONTACT OPEN
05-MAY-05 05:22:17
See
Section
5.3
SENSOR TO VIEW?
> SENSOR_1
SENSOR_2
SENSOR_3
SENSOR_4
> TREND LOG 100/100
SENSOR_1 75.4 DEG
NORMAL
28-AUG-05 15:45:51
See
Section
5.4
View Input Status View Output Status View Pager Numbers View Operation View Control Status
INPUT / STATUS
> SENSOR_1 +80.00 DEG
SENSOR_2 ------ DEG
SENSOR_3
SENSOR_4 +79.50 RH
DEVICE_1 NORMAL
DEVICE_2 ALARM
DEVICE_3 EVENT
DEVICE_4 ALARM
DEVICE_5 ALARM
DEVICE_6 EVENT
DEVICE_7 NORMAL
DEVICE_8 NORMAL
See
OUTPUT / STATUS
Sec.
> DEVICE_1 ALARM
5.5
DEVICE_2 OPERATING
DEVICE_3 OPERATING
DEVICE_4 OPERATING
DEVICE_5 STANDBY
DEVICE_6 NOT USED
DEVICE_7 NOT USED
DEVICE_8 NOT USED
See
Sec.
> PAGER NUMBER 1
5.6
VIEW PAGER NUMBER
VIEW PAGER PIN
PAGER 1 NUMBER
9,,18005551212##
PAGER TO VIEW?
PAGER NUMBER 2
PAGER NUMBER 3
PAGER NUMBER 4
See
Sec.
5.7
PAGER 1 PIN
01234567891011121344
SELECT ZONE FOR
> ZONE 1
AUTO SEQUENCING ON
DAY 01 OF 02 (08:55)
STANDBY TESTING OFF
VIEWING
See
CONTROL STATUS
Sec.
RELAY 1 OFF
5.8
RELAY 2 OFF
See
Sec.
5.9
21
Page 30
View Status Options
5.1 View Active Alarms
The Active Alarm screen displays all alarms that are occurring, up to a
maximum of 22.
A Current Alarm screen appears automatically whenever an alarm
occurs—except during setup. This screen can display only the two most
recent active alarms. To view any other active alarms, use the View
Active Alarms feature.
You may view active alarms at any time by using the following steps:
• From the Main Menu, use the arrows
shown at right, and then press Enter ↵.
• From the View Status Menu, use the arrows
Active Alarms and press Enter ↵.
5.1.1 Active Alarms
The Active Alarms screen displays up to 22 records; it shows any active
alarm and any Latched alarm that has not been cleared. Examples of
alarms include inputs in alarm status, a low battery condition and a
loss of connection to an analog input. When any alarms are present, the
Active Alarms screen shows descriptive details for each alarm:
• the source of the alarm (for example,
• the status of an input or output (
• a brief description of the problem (
BATTERY)
If there are no active alarms, the screen displays the message:
NO ALARMS PRESENT
↑↓ to choose View Status, as
↑↓ to choose View
SENSOR_1 or BATTERY)
101.0 DEG)
HIGH SETPOINT ALARM or CHECK
Main Menu
> VIEW STATUS
SYSTEM AND CONTROL
↑↓=NEXT
↵=SELECT
View Status Menu
> VIEW ACTIVE ALARMS
VIEW ALARM LOG
VIEW EVENT LOG
VIEW TREND LOG
VIEW INPUT STATUS
VIEW OUTPUT STATUS
VIEW PAGER NUMBERS
VIEW OPERATION
VIEW CONTROL STATUS
Active Alarms
> ACTIVE ALARM 22/22
SENSOR_1 101.0 DEG
HIGH SETPOINT ALARM
SENSOR_2 ------ DEG
SENSOR PROBLEM
DEVICE_7 ALARM
CONTACT OPEN
BATTERY
CHECK BATTERY
Viewing Additional Screens
There may be up to 22 records of alarm data.
• To view additional records, use the arrows
↑↓.
• To return to the previous screen, press the ESC key.
Clearing Active Alarms
To clear all active alarms, see 7.13 - Clear Alarms & Logs. Alarm records are stored in the Alarm
Log.
22
Page 31

View Status Options
5.2 View Alarm Log
The Alarm Log contains up to 99 records of alarms that have occurred.
Records are added to this log as alarms occur.
To view the Alarm Log:
• From the Main Menu, use the arrows
then press Enter ↵.
• From the View Status Menu, use the arrows
Alarm Log, then press Enter ↵.
5.2.1 Alarm Log
The Alarm Log screen displays up to 99 records showing alarm data,
including input alarms and other conditions, such as loss of power or
low battery. If the log contains any alarm records, the Alarm Log
screen displays details for each alarm:
• the source of the alarm (for example,
• the status of an input or output (
• a brief description of the problem (
INTERNAL FAULT)
• the date and time the alarm occurred
Table 8 shows conditions that the alarm log records for digital inputs
and analog inputs and in the panel itself.
Table 8 Alarm log conditions
SOURCE Digital Input Analog Input
CONDITIONS
RECORDED
SOURCE Panel
CONDITIONS
RECORDED
ALARM
NORMAL
LOSS OF POWER
LOW BATTERY
CHECK BATTERY
BATTERY UNPLUGGED
↑↓ to choose View Status,
↑↓ to choose View
SENSOR_2 or MODEM)
80.0 DEG)
HIGH SETPOINT ALARM or
HIGH SETPOINT ALARM
LOW SETPOINT ALARM
RETURN TO NORMAL
SENSOR PROBLEM (denoted by dashes ------)
ALARMS CLEARED
ALARM SILENCED
MODEM INTERNAL
FAULT
Main Menu
> VIEW STATUS
SYSTEM AND CONTROL
↑↓=NEXT
↵=SELECT
View Status Menu
VIEW ACTIVE ALARMS
> VIEW ALARM LOG
VIEW EVENT LOG
VIEW TREND LOG
VIEW INPUT STATUS
VIEW OUTPUT STATUS
VIEW PAGER NUMBERS
VIEW OPERATION
VIEW CONTROL STATUS
Alarm Log
> ALARM RECORD 99/99
SENSOR_2 80.0 DEG
HIGH SETPOINT ALARM
29-AUG-05 09:29:10
MODEM
INTERNAL FAULT
29-AUG-05 09:20:00
DEVICE_8 ALARM
CONTACT CLOSED
29-AUG-05 07:30:00
NO STANDBY AVAILABLE
STANDBY DEVICE FAILED
NO RESTART AVAILABLE
EMERGENCY PWR ALARM
If there are no alarms in the log, the screen displays the message:
NO ALARMS
Viewing Additional Screens
There may be up to 99 records of alarm data.
• To view additional records, use the arrows
↑↓.
• To return to the previous screen, press the ESC key.
5.2.2 Backing Up the Alarm Log (Service Terminal Interface only)
The alarm log is stored as a file in the AC8; it can hold no more than 99 records. When the log is full,
the oldest records are deleted from the end of the file as new alarm records are added at the beginning.
You may back up the alarm log file to a remote computer using the Service Terminal Interface, as
described in 6.2 - Back Up Log Files (Service Terminal Interface only).
To delete all records in the alarm log, see 7.13 - Clear Alarms & Logs.
23
Page 32

View Status Options
5.3 View Event Log
In addition to alarms, the AC8 tracks other changes in the Event Log
to assist users with verifying operational and troubleshooting
problems. Events reflect changes in the status of an input that is
defined as an event or the change of state of an output (i.e., manually
Main Menu
> VIEW STATUS
SYSTEM AND CONTROL
↑↓=NEXT
forced ON or OFF). Other events may be informational, such as a user
login or an unsuccessful page attempt. The Event Log contains up to
99 records of events, which are added as they occur.
To view the Event Log:
• From the Main Menu, use the arrows
↑↓ to choose View Status,
then press Enter ↵.
• From the View Status Menu, use the arrows
↑↓ to choose View
Event Log, then press Enter ↵.
View Status Menu
VIEW ACTIVE ALARMS
VIEW ALARM LOG
> VIEW EVENT LOG
VIEW TREND LOG
VIEW INPUT STATUS
VIEW OUTPUT STATUS
VIEW PAGER NUMBERS
VIEW OPERATION
VIEW CONTROL STATUS
5.3.1 Event Log
The Event Log screen displays up to 99 recent events. If the log
contains any event records, the Event Log screen displays details for
each event:
• the event source (for example,
• the status of an input or output (
• a brief description of the event (
CLOSED
)
PAGER or DEVICE_1)
FORCE ON)
UNSUCCESSFUL PAGE or CONTACT
• the date and time the event occurred
Table 9 shows conditions that the event log records for inputs and
outputs and in the panel itself.
Table 9 Event log conditions
SOURCE Digital Input Analog Input Digital Output
CONDITIONS
RECORDED
SOURCE Panel
CONDITIONS
RECORDED
EVENT
NORMAL
ALARMS CLEARED
ALARM SILENCED
DIAL OUT TEST PASSED
DIAL OUT TEST FAILED
UNSUCCESSFUL PAGE
HIGH SETPOINT EVENT
LOW SETPOINT EVENT
RETURN TO NORMAL
SENSOR PROBLEM
(denoted by dashes ------)
DEFAULT PASSWORD SET
MODEM RESET
TIME & DATE SET
USER LOGIN
NOT USED DEVICES IN ZONE
FORCE ON
FORCE OFF
AUTO
HW FORCE ON
ON
OFF
NO STANDBY OUTPUTS AVAILABLE
NO STANDBY TESTING DEVICE
AVAILABLE
EMERGENCY PWR ALARM
STAGING DISABLED
Event Log
> EVENT RECORD 99/99
PAGER
UNSUCCESSFUL PAGE
07-MAY-05 10:07:00
DEVICE_1 FORCE ON
CONTACT CLOSED
06-MAY-05 02:47:03
DEVICE_8 ON
CONTACT OPEN
05-MAY-05 05:22:17
DISABLED
STAGING DEVICE ON
STAGING DEVICE OFF
RESTORED
STARTED
↵=SELECT
If there are no records in the log, the screen displays the message:
NO EVENTS
Viewing Additional Screens
There may be up to 99 records of event data.
• To view additional records, use the arrows
↑↓.
• To return to the previous screen, press the ESC key.
5.3.2 Backing Up the Event Log (Service Terminal Interface only)
The event log is stored as a file in the AC8; it can hold no more than 99 records. When the log is full,
the oldest records are deleted from the end of the file as new event records are added at the beginning.
You may back up the event log file to a remote computer using the Service Terminal Interface, as
described in 6.2 - Back Up Log Files (Service Terminal Interface only).
To delete all records in the event log, see 7.13 - Clear Alarms & Logs.
24
Page 33

View Status Options
5.4 View Trend Log
The AC8 takes readings of configured analog input sensors at regular
intervals and stores them in four separate trend logs, one for each
sensor. The time interval is 30 minutes. Each log contains up to
100 records.
Follow these steps to select a sensor and view its trend log:
5.4.1 Select a Sensor
To select a sensor:
• From the Main Menu, use the arrows
then press Enter ↵.
• From the View Status Menu, use the arrows
Trend Log, then press Enter ↵.
• From the Sensor Selection Menu, use the arrows
sensor you want to view—Sensor_1 in the example at right—and
press Enter ↵.
5.4.2 View a Trend Log
The Trend Log screen displays up to 100 records for the selected sensor.
If the log contains records, the screen displays details for each reading:
• the name of the selected sensor (for example,
•the reading (
• a brief description of the reading status (
• the date and time of the reading
Table 10 shows conditions that the trend log records for analog inputs.
Each analog input has its own trend log.
Table 10 Trend log conditions
SOURCE Analog Input
CONDITIONS
RECORDED
75.4 DEG)
LOW SETPOINT ALARM
LOW SETPOINT EVENT
HIGH SETPOINT ALARM
HIGH SETPOINT EVENT
RETURN TO NORMAL
NORMAL
SENSOR PROBLEM (denoted by dashes ------)
↑↓ to choose View Status,
↑↓ to choose View
↑↓ to choose the
SENSOR_1)
NORMAL)
Main Menu
> VIEW STATUS
SYSTEM AND CONTROL
↑↓=NEXT
↵=SELECT
View Status Menu
VIEW ACTIVE ALARMS
VIEW ALARM LOG
VIEW EVENT LOG
> VIEW TREND LOG
VIEW INPUT STATUS
VIEW OUTPUT STATUS
VIEW PAGER NUMBERS
VIEW OPERATION
VIEW CONTROL STATUS
Select Sensor Menu
SENSOR TO VIEW?
> SENSOR_1
SENSOR_2
↑↓=NEXT ↵=SELECT
SENSOR_3
SENSOR_4
Trend Log
> TREND LOG 100/100
SENSOR_1 75.4 DEG
NORMAL
28-AUG-05 15:45:51
SENSOR_1 70.5 DEG
LOW SETPOINT EVENT
28-AUG-05 15:15:51
SENSOR_1 79.9 DEG
RETURN TO NORMAL
28-AUG-05 14:45:21
If there are no records in the log, the screen displays the message:
NO TRENDS
Viewing Additional Screens
There may be up to 100 records of trend data for the selected sensor.
• To view additional records, use the arrows
↑↓.
• To return to the previous screen, press the ESC key.
5.4.3 Backing Up the Trend Log (Service Terminal Interface only)
The four trend logs are stored as files in the AC8, with a maximum of 100 records per sensor. When a
log is full, the oldest records are deleted from the end of the file as new trend records are added at the
beginning.
You may back up each trend log file to a remote computer using the Service Terminal Interface, as
described in 6.2 - Back Up Log Files (Service Terminal Interface only).
To delete all records in the trend logs, see 7.13 - Clear Alarms & Logs.
25
Page 34

View Status Options
5.5 View Input Status
The Input Status option allows you to view the current status of all
inputs: the four analog sensor inputs and the eight digital inputs.
To view the Input Status:
• From the Main Menu, use the arrows
then press Enter ↵.
• From the View Status Menu, use the arrows
Input Status, then press Enter ↵.
5.5.1 Input Status
The Input Status screen displays the status of each analog sensor and
digital input.
Analog Sensor Inputs
The following details are displayed for analog sensor inputs:
• the name of the analog sensor input (for example,
• the current reading (
while being viewed
There are three possible states for an analog input, as shown in
Table 11.
Table 11 Analog input states
State Description
Functional Reading—-for example, +80.00 DEG or +79.50 RH
Problem with
connection
Not configured Blank
Dashes (------)
↑↓ to choose View Status,
↑↓ to choose View
SENSOR_1)
+80.00 DEG)—values are updated constantly
Main Menu
> VIEW STATUS
SYSTEM AND CONTROL
↑↓=NEXT
↵=SELECT
View Status Menu
VIEW ACTIVE ALARMS
VIEW ALARM LOG
VIEW EVENT LOG
VIEW TREND LOG
> VIEW INPUT STATUS
VIEW OUTPUT STATUS
VIEW PAGER NUMBERS
Input Status
INPUT / STATUS
> SENSOR_1 +80.00 DEG
SENSOR_2 ------ DEG
SENSOR_3
SENSOR_4 +79.50 RH
> DEVICE_1 ALARM
DEVICE_2 NORMAL
DEVICE_3 NORMAL
DEVICE_4 NORMAL
DEVICE_5 ALARM
DEVICE_6 EVENT
DEVICE_7 NORMAL
DEVICE_8 NORMAL
NOTE
If the status displays dashes (
------), the AC8 was unable to take a reading. There may be a
connection problem.
If the status is blank, the sensor is not configured as being connected.
Digital Inputs
The following details appear for digital inputs:
• the name of the digital input (for example,
• the current status (
NORMAL)—values are updated constantly while being viewed
DEVICE_1)
There are three possible states for a digital input, as shown in Table 12.
Table 12 Digital input states
State Description
NORMAL In normal state
ALARM In alarm status (for an input configured as alarmable)
EVENT An event has occurred (for an input configured as an event)
Viewing Additional Input Data
All input data may be viewed by scrolling beyond the four lines that appear on the LCD at one time:
• To view all inputs, use the arrows
• To return to the previous screen, press the ESC key.
↑↓.
26
Page 35

View Status Options
5.6 View Output Status
The Output Status option allows you to view the current status of all
eight outputs.
To view the Output Status:
• From the Main Menu, use the arrows
then press Enter ↵.
• From the View Status Menu, use the arrows
Output Status, then press Enter ↵.
5.6.1 Output Status
The Output Status screen displays the status of each digital output.
The following details appear for digital outputs:
• the name of the output (for example,
• the current status (
being viewed
There are eight possible states for a digital output, as shown in
Table 13.
Table 13 Digital output states
State Description
OPERATING Device operating, or ON
STANDBY Device in standby mode
ALARM Device in alarm
FORCE ON Device forced ON by operator
FORCE OFF Device forced OFF by operator
HW FORCE ON Device forced ON by hardware switch
STAGED ON Device staged on by high sensor
EPOP OFF Device forced off by emergency power operation
PENDING Pending delay timer
NOT USED Device not used
↑↓ to choose View Status,
↑↓ to choose View
DEVICE_1)
ALARM)—values are updated constantly while
Main Menu
> VIEW STATUS
SYSTEM AND CONTROL
↑↓=NEXT
↵=SELECT
View Status Menu
VIEW ACTIVE ALARMS
VIEW ALARM LOG
VIEW EVENT LOG
VIEW TREND LOG
VIEW INPUT STATUS
> VIEW OUTPUT STATUS
VIEW PAGER NUMBERS
VIEW OPERATION
VIEW CONTROL STATUS
Output Status
OUTPUT / STATUS
> DEVICE_1 ALARM
DEVICE_2 OPERATING
DEVICE_3 OPERATING
DEVICE_4 OPERATING
Viewing Additional Output Data
All output data may be viewed by scrolling beyond the four lines that appear on the LCD at one time:
• To view all outputs, use the arrows
• To return to the previous screen, press the ESC key.
↑↓.
27
Page 36

View Status Options
5.7 View Pager Numbers
The AC8 may be set up to dial pager numbers when an alarm is
detected. Up to four pagers may be configured, as described in 7.8 -
Setup System - Setup Modem & Pagers.
The View Pager Numbers option allows you to view the pager numbers
and PINs for all configured pagers. Use the following steps to select a
pager and view its information.
5.7.1 Select a Pager
To select a pager:
• From the Main Menu, use the arrows
then press Enter ↵.
• From the View Status Menu, use the arrows
Pager Numbers, then press Enter ↵.
• From the Pager Selection screen, use the arrows
pager you want to view—Pager Number 1 in the example at
right—and press Enter ↵.
• Use the following steps to view a pager number or PIN for the
selected pager.
5.7.2 View a Pager Number
To view a pager number:
• Choose View Pager Number from the Pager Menu and press
Enter ↵.
• The Pager Number screen displays the number that is configured
for the selected pager.
In the example at right, the telephone number is preceded by A to
dial an alphanumeric pager and includes a comma (,) to pause two
seconds after dialing “1” before proceeding to dial the area code and
number. To change this number, see 7.8.3 - Pager Setup - Pager
Number and PIN.
• Press ESC to return to the Pager Menu.
↑↓ to choose View Status,
↑↓ to choose View
↑↓ to choose the
Main Menu
> VIEW STATUS
SYSTEM AND CONTROL
↑↓=NEXT
↵=SELECT
View Status Menu
VIEW ACTIVE ALARMS
VIEW ALARM LOG
VIEW EVENT LOG
VIEW TREND LOG
VIEW INPUT STATUS
VIEW OUTPUT STATUS
> VIEW PAGER NUMBERS
VIEW OPERATION
VIEW CONTROL STATUS
Pager Selection
PAGER TO VIEW?
> PAGER NUMBER 1
PAGER NUMBER 2
PAGER NUMBER 3
PAGER NUMBER 4
Pager Menu
> VIEW PAGER NUMBER
VIEW PAGER PIN
Pager Number
PAGER 1 NUMBER
A1,8005551212
5.7.3 View a Pager PIN
To view a pager PIN:
• Choose View Pager PIN from the Pager Menu and press
Enter ↵.
• The Pager PIN screen displays the PIN that is configured for the
selected pager. To change this number, see 7.8 - Setup System -
Setup Modem & Pagers.
• Press ESC to return to the Pager Menu.
Pager Menu
VIEW PAGER NUMBER
> VIEW PAGER PIN
Pager PIN
PAGER 1 PIN
01234567891011121344
28
Page 37

View Status Options
5.8 View Operation
The Operation option allows you to view the current settings for Auto
Sequencing, Standby Testing and Staging in each zone.
Use the following steps to select a zone and view the status of these
features.
5.8.1 Select a Zone
To select a zone:
• From the Main Menu, use the arrows
then press Enter ↵.
• From the View Status Menu, use the arrows
Operation, then press Enter ↵.
• From the Zone Selection screen, use the arrows
zone you want to view—Zone 1 in the example at right—and press
Enter ↵.
5.8.2 View Operation
The Operation screen displays the following details for each feature:
• the name of the feature (for example,
•the status (
• the date and time when Auto Sequencing or Standby Testing is
scheduled to occur (for example,
appears in the format HH:MM (hours and minutes in military
time)
OR
• the target setpoint and sensitivity level that will initiate Staging
To change these settings, see the following sections in 7.10 - Setup
Operation:
• 7.10.1 - Turn Automatic Sequencing On or Off
• 7.10.2 - Turn Standby Testing On or Off
• Press ESC to return to the Zone Selection Menu.
ON or OFF)
↑↓ to choose View Status,
↑↓ to choose View
↑↓ to choose the
AUTO SEQUENCING)
DAY 01 OF 02 (08:55). The time
Main Menu
> VIEW STATUS
SYSTEM AND CONTROL
↑↓=NEXT
↵=SELECT
View Status Menu
VIEW ACTIVE ALARMS
VIEW ALARM LOG
VIEW EVENT LOG
VIEW TREND LOG
VIEW INPUT STATUS
VIEW OUTPUT STATUS
VIEW PAGER NUMBERS
> VIEW OPERATION
VIEW CONTROL STATUS
Zone Selection
SELECT ZONE FOR
> ZONE 1
↑↓=NEXT ↵=EDIT
VIEWING
Operation
AUTO SEQUENCING ON
DAY 01 OF 02 (08:55)
STANDBY TESTING OFF
STAGING OFF
29
Page 38

View Status Options
5.9 View Control Status
The Control Status option allows you to view the current status of the
two control relays.
To view the Control Status:
• From the Main Menu, use the arrows
then press Enter ↵.
• From the View Status Menu, use the arrows
Control Status, then press Enter ↵.
5.9.1 Control Status
The Control Status screen displays the status of each relay.
• the name of the output (for example,
•the status (
ON or OFF)
↑↓ to choose View Status,
↑↓ to choose View
RELAY 1)
Main Menu
> VIEW STATUS
SYSTEM AND CONTROL
↑↓=NEXT
↵=SELECT
View Status Menu
VIEW ACTIVE ALARMS
VIEW ALARM LOG
VIEW EVENT LOG
VIEW TREND LOG
VIEW INPUT STATUS
VIEW OUTPUT STATUS
VIEW PAGER NUMBERS
VIEW OPERATION
> VIEW CONTROL STATUS
Control Status
CONTROL STATUS
RELAY 1 OFF
RELAY 2 OFF
30
Page 39

Silence Alarm & Backup Log Files (Service Terminal Interface)
6.0 SILENCE ALARM & BACKUP LOG FILES (SERVICE TERMINAL INTERFACE)
This section describes two features that are available in the Service Terminal Interface:
• Silence Alarm
• Backup Log Files
6.1 Silence Alarm (Service Terminal Interface)
The Silence Alarm menu item allows you to silence the audible alarm and reset the Common Alarm
Relay output if the common alarm is configured to reset with silence.
This menu item is available only through the Service Terminal Interface and SiteScan Web connection.
NOTE
An alarm may also be silenced by pressing any key on the LCD keypad on the front
of the AC8. The LCD does not offer Silence Alarm as a menu item.
To silence the alarm remotely through the Service Terminal Interface:
• Connect to the AC8 either from a remote computer or through the RS232 port (see
A.2 - Connecting to the Service Terminal Interface).
• At the Main Menu, enter 8 (Silence Alarm).
• At the Silence Alarm menu, shown below, enter 1 to silence the audible alarm immediately. (To
exit without silencing the alarm, enter 2 or press the Escape key.)
Silence Alarm (Service Terminal Interface only)
SILENCE ALARM
Silence alarm and reset
common alarm relay if
common alarm relay is
configured to reset with
silence alarm
1=SILENCE ALARM
2=RETURN TO MAIN MENU
SELECT A NUMBER:1
>ALARM HAS BEEN SILENCED
• A confirmation message appears: “Alarm has been silenced.”
NOTE
Through SiteScan Web, this option is available via the AC8 Graphic
Screen.
31
Page 40

Silence Alarm & Backup Log Files (Service Terminal Interface)
6.2 Back Up Log Files (Service Terminal Interface only)
The AC8 maintains three types of logs—alarm, event and trend—that may be backed up to a remote
computer.
This feature is available only through the Service Terminal Interface.
To back up any of the alarm, event or trend logs:
1. Connect to the AC8 either from a remote computer or through the RS232 port (see
A.2 - Connecting to the Service Terminal Interface).
2. At the Main Menu, enter 9 (Backup Log Files).
3. At the Backup Log Files menu, as shown below, enter a number for the type of file you want to
back up:
• Enter 1 to back up the Alarm Log
• Enter 2 to back up the Event Log
• Enter 3 to back up the Trend Log for the first sensor (Sensor_1)
• Enter 4 to back up the Trend Log for the second sensor (Sensor_2)
• Enter 5 to back up the Trend Log for the third sensor (Sensor_3)
• Enter 6 to back up the Trend Log for the fourth sensor (Sensor_4)
Backup Log Files - Alarm Log File (Service Terminal Interface only)
BACKUP LOG FILES
Backup alarm, event and trend log files
1=BACKUP ALARM LOG FILE
2=BACKUP EVENT LOG FILE
3=BACKUP TREND LOG FILE-SENSOR_1
4=BACKUP TREND LOG FILE-SENSOR_2
5=BACKUP TREND LOG FILE-SENSOR_3
6=BACKUP TREND LOG FILE-SENSOR_4
7=RETURN TO MAIN MENU
SELECT A NUMBER:1
4. At the prompt to initiate a backup of the selected log file, enter Y (Yes - begin) or N (No - cancel),
then press Enter. The current setting appears in brackets—[N] in the following example.
>INITIATE A BACKUP OF ALARM LOG-YES(Y) OR NO(N)?
>[N]
>[
32
Page 41

Silence Alarm & Backup Log Files (Service Terminal Interface)
NOTE
The following instructions refer to the Microsoft
®
Windows® HyperTerminal program. These
steps may vary for other communications programs.
5. At the top of the HyperTerminal window, shown below, click on Transfer, then on Receive File.
Enter folder
Select Xmodem
Enter filename for example,
alarm.log
6. In the Receive File window, as shown above:
• In the Place Received File in the Following Folder box, enter the name and location of the
folder where the configuration file should be placed—for example, C:\—or click on the
Browse button to locate the folder.
• In the Use Receiving Protocol box, select Xmodem from the drop-down list.
• Click on the Receive button. (To close the window without backing up the file, click on Close
or Cancel.)
7. In the Receive Filename window, enter a name for the log file—alarm.log in the example above.
8. When the transfer is complete, a confirmation message appears in the Service Terminal Interface
window: “Backup Successful.”
9. The display returns to the Backup Log Files menu. You may choose another type of log file to back
up (return to Step 3) or press 7 (or Escape) to return to the Main Menu.
After backing up a log file, you may want to delete all records in the AC8’s log of that type. See 7.13 -
Clear Alarms & Logs for details.
33
Page 42

7.0 SYSTEM AND CONTROL OPTIONS
NOTE
For ease of understanding, this section uses the LCD interface to illustrate most instructions,
except for features that are available only through the Service Terminal Interface. All Service
Terminal Interface screens appear in Appendix A - Service Terminal Interface.
The System and Control menu allows you to configure the AC8—setting up inputs and outputs and an
input/output matrix to trigger actions, the modem and pagers, and system features such as date and
time. This menu also provides a vehicle for manually changing the state of an output to ON or OFF,
clearing active alarms and deleting records from the AC8’s alarm log, event log and trend logs.
The arrows
and enter new information. Table 14 shows characters that may be entered in labels and values.
Table 14 Valid characters for data entry
Alphanumeric Special characters
A-Z, 0-9 space [ ] ^ _ ! " # $ % & ( ) * + - / , . ; < = > @
The System and Control options require a password to prevent unauthorized users from making
changes to the system.
This section presents step-by-step instructions for each of the following:
• Login - enter the password
• Setup System - configure inputs, outputs, modem, pagers, system features
• Override Output - manually override automatic control of outputs; release the override
• Clear Alarms & Logs - clear active alarms; delete records from the alarm, event and trend logs
↑↓ are used to scroll through the menu. The Enter ↵ key is used to select the menu item
System and Control Options
7.1 Login
Users must enter a password to access any of the system and control
options. The password consists of four characters (see Table 14 for
valid characters); the default password is AAAA. To set up or change
the password, see 7.9.1 - Change Password.
To log in:
• From the Main Menu, use the arrows
Control, then press Enter ↵, as shown at right.
• Use the arrows
Enter ↵. The Login menu appears.
• To enter your password (the default is AAAA):
The System and Control Menu appears next, with these options that
are described in the following sections:
• Setup System (Section 7.2 - Section 7.9)
• Override Output (Section 7.12)
•Clear Alarms & Logs (Section 7.13)
NOTE
If an alarm occurs while a user is logged on, the LCD backlight will flash and the audible
alarm will sound. To obtain specific information about the alarm, you must access the Active
Alarm screen (see 5.1 - View Active Alarms) or the Alarm Log (see 5.2 - View Alarm Log).
Main Menu
VIEW STATUS
> SYSTEM AND CONTROL
↑↓ to choose System and
↑↓ to choose System and Control, and press
• Use the arrows
↑↓ to choose a character.
• Press Enter ↵ to advance to the next character position.
• When finished, press Enter ↵ again.
↑↓=NEXT
Login
LOGIN
AAAA
↑↓=SELECT ↵=NEXT/END
System & Control Menu
> SETUP SYSTEM
OVERRIDE OUTPUT
CLEAR ALARMS & LOGS
↑↓=NEXT
↵=SELECT
↵=SELECT
NOTE
If, after logging in, you press the ESC key to return to a previous screen that is not passwordprotected, you must log in again, including entering your password if you wish to access
password-protected functions.
Figure 10 shows the main options available from the System & Control menu.
34
Page 43

Figure 10 Menu overview - System and Control menu
Opening Screen
LIEBERT AC8
DD-MON-YY HR:MM:SS
VX.XXX.X
PRESS ↵=STATUS/SETUP
Main Menu
VIEW STATUS
> SYSTEM AND CONTROL
↑↓=NEXT ↵=SELECT
Login Screen
LOGIN
AAAA
↑↓=SELECT ↵=NEXT/END
System and Control Options
System & Control menu
Setup System selected
> SETUP SYSTEM
OVERRIDE OUTPUT
CLEAR ALARMS & LOGS
System & Control menu
Override Output selected
SETUP SYSTEM
> OVERRIDE OUTPUT
CLEAR ALARMS & LOGS
System & Control menu
Clear Alarms&Logs selected
SETUP SYSTEM
OVERRIDE OUTPUT
> CLEAR ALARMS & LOGS
Setup System menu Select Output Clear Alarms/Logs menu
SETUP INPUTS
SETUP COMMON ALARM
SETUP SENSOR
SETUP ZONES
SETUP OUTPUTS
SETUP MODEM&PAGERS
SETUP SYSTEM INFO
SETUP OPERATION
SETUP I/O MATRIX
See
Section
7.2
Setup System options
OVERRIDE OUTPUT
> DEVICE_1 AUTO
DEVICE_2 AUTO
.
.
.
DEVICE_8 AUTO
Override Output
SELECT DEVICE_1
AUTO
See
Section
7.12
CLEAR ACTIVE ALARMS
ARE YOU SURE? N
CLEAR EVENT LOG
ARE YOU SURE? N
CLEAR ACTIVE ALARMS
CLEAR ALARM LOG
CLEAR EVENT LOG
CLEAR TREND LOGS
CLEAR ALARM LOG
ARE YOU SURE? N
CLEAR TREND LOGS
ARE YOU SURE? N
See
Section
7.13
Setup Inputs Setup Common Alarm Setup Sensor Setup Zones Setup Outputs
SELECT INPUT
> DEVICE_1 NO-AL-L
DEVICE_2 NO-AL-L
.
.
.
DEVICE_8 NO-AL-L
SETUP DEVICE_1
LABEL: DEVICE_1
NORM OPEN/CLOSE: NO
ALARM/EVENT: AL
LATCHED: Y
DELAY: 00:01
See
Sec.
7.3
RESET COMMON ALARM
WITH SILENCE? N
See
Sec.
7.4
SELECT SENSOR
> SENSOR_1 +80.00 DEG
.
.
.
SENSOR_4 +79.50 RH
SETUP SENSOR_1
CONNECTED: N
LABEL: SENSOR_1
UNITS: DEG
4 mA: +045.0
20 mA: +096.0
OFFSET: +000.0
ALARM/EVENT: AL
LATCHED: N
LOW SETPT: +0050.0
HIGH SETPT: +0090.0
SENSOR DELAY: 00:01
See
Sec.
7.5
SETUP ZONES
> ZONE 1:4
ZONE 2:0
ZONE 3:0
ZONE 4:0
# DEVICES IN ZONE
ZONE 1:4
See
> DEVICE_1 NO-OP-E-E
Sec.
7.6
DEVICE_2 NO-ST-E-E
DEVICE_8 NO-NU-E-E
NORM OPEN/CLOSE: NO
MODE: OPERATING
IN ALARM: ENABLE
EMERG OP: ENABLE
SELECT OUTPUT
.
.
.
SETUP DEVICE_1
See
Sec.
7.7
Setup Modem & Pagers Setup System Info Setup Operation Setup I/O Matrix
SETUP PAGERS
SETUP MODEM
SELECT PAGER
PAGER NUMBER 1
.
.
.
PAGER NUMBER 4
SET PAGER 1 NUMBER
SET PAGER 1 PIN
See
Sec.
7.8
ENTER INIT STRING
ATS0=1
CHANGE PASSWORD
CHANGE DATE & TIME
SETUP SITE ID
CONNECT BATTERY
SETUP SERV PH NUM
FACTORY DEFAULTS
See Figure 11
for details on
Setup System Info
35
SELECT ZONE FOR
See
THE OPERATION
Sec.
> ZONE 1
7.9
> AUTO SEQUENCING OFF
STANDBY TESTING OFF
FAILED STANDBY N
HOLD DELAY : 10:00
RESTART : 00:06
STAGING : OFF
See Figure 12
for details on
Setup Operation
See
Sec.
7.10
DEVICE_1
DEVICE_2
DEVICE_8
1 CONTROL RELAY
MAP INPUT TO RELAY
MAP SENSOR TO RELAY
SELECT INPUT
.
.
.
1 2
Y N
See
Sec.
7.11
SELECT SENSOR
SENSOR_1 HIGH STPT
SENSOR_1 LOW STPT
.
.
.
SENSOR_4 LOW STPT
1H CONTROL RELAY
1 2
Y N
Page 44
7.2 Setup System - Overview
The Setup System screen displays seven options that allow you to configure input and output
devices and their relationships, the common alarm, the modem, pagers to be dialed when alarms
occur, and a variety of system details, such as login password and system date and time:
System and Control Options
• Setup Inputs
• Setup Common Alarm
• Setup Sensor
• Setup Zones
• Setup Outputs
• Setup Modem & Pagers
• Setup System Info
• Setup Operation
•Setup I/O Matrix
7.3 Setup System - Setup Inputs
The AC8 has eight digital input points that may be configured
individually. These inputs may have a wide variety of Liebert or other
manufacturers’ equipment connected for monitoring.
To configure a digital input:
Log In and Choose Setup System
• From the Main Menu, use the arrows
Control, then press Enter ↵ (see 7.1 - Login for help).
• Enter your password at the Login screen.
• From the System and Control Menu, use the arrows
Setup System, then press Enter ↵.
Select a Digital Input to Configure
• From the Setup System Menu, shown at right, use the arrows
press Enter ↵.
• From the Select Input Menu, choose the input you want—for example, Device_1—and press
Enter ↵.
↑↓ to choose System and
↑↓ to choose
Setup System Menu
> SETUP INPUTS
SETUP COMMON ALARM
SETUP SENSOR
↑↓=NEXT ↵=SELECT
SETUP ZONES
SETUP OUTPUTS
SETUP MODEM&PAGERS
SETUP SYSTEM INFO
SETUP OPERATION
SETUP I/O MATRIX
Select Input Menu
SELECT INPUT
> DEVICE_1 NO-AL-L
DEVICE_2 NO-AL-L
↑↓=NEXT ↵=SELECT
DEVICE_3 NO-AL-L
DEVICE_4 NO-AL-L
DEVICE_5 NO-AL-L
DEVICE_6 NO-AL-L
DEVICE_7 NO-AL-L
DEVICE_8 NO-AL-L
↑↓ to choose Setup Inputs and
Table 15 shows the digital input features you may change, along with the default settings: you may
change the name of the input, define it as Normally Open or Normally Closed, and specify it as alarmable or as an event.
• Alarmable inputs may be defined as either Unlatched or Latched.
• Event status allows you to monitor a digital input’s state—and use a change in state to initiate an
action through an output, if desired—without triggering an alarm. Events are always Unlatched.
• You may also specify a time delay before the AC8 responds to an alarm or event.
Use the steps following Table 15 to change the default settings for any digital input.
Table 15 Default settings - digital inputs
Feature Default Other Options
LABEL DEVICE_1 Any name (up to eight characters)
NORM OPEN/CLOSE NO (Normally Open) NC (Normally Closed)
ALARM/EVENT AL (Alarmable) EV (Event)
LATCHED L (Latched) / Y (Yes)* NL (Unlatched) / N (No)*
DELAY 00:01 (1 second) Any time (in minutes and seconds) from 00:00 to 99:59
* NOTE: Different abbreviations are used to designate a digital input as Latched or Unlatched as shown below.
Settings - Select Input
Menu (see Section 7.3)
Unlatched NL (Not Latched) N (No, not latched)
Latched L (Latched) Y (Yes, latched)
36
When configuring an input
(see Section 7.3.4)
Page 45

System and Control Options
7.3.1 Change Label (Name of Input)
Each input has a default label (Device_1, Device_2, etc.) that you may
change to a more descriptive name for ease in recognizing alarms and
events associated with the input. The label may consist of up to eight
characters (see Table 14 for valid characters).
The device name assigned through this menu is also displayed for the
corresponding output.
Table 16 Input and output labels
Label Applies to: Label Applies to:
Device_1 Input 1 and Output 1 Device_5 Input 5 and Output 5
Device_2 Input 2 and Output 2 Device_6 Input 6 and Output 6
Device_3 Input 3 and Output 3 Device_7 Input 7 and Output 7
Device_4 Input 4 and Output 4 Device_8 Input 8 and Output 8
If the input label is changed, the output will change also.
• From the Setup Inputs Menu, choose Label for the selected input—Label: Device_1 in the
example above right—and press Enter ↵.
• To change the input’s label, which may consist of up to eight characters:
• Use the arrows
↑↓ to choose a character.
• Press Enter ↵ to advance to the next character position.
• When finished, press Enter ↵ again.
7.3.2 Define Input as Normally Open or Normally Closed
Each input may be set up as Normally Open (NO) or Normally Closed
(NC). The default setting for all input points is NO (Normally Open).
If you require an input to be a supervised point, define the input as
Normally Closed (NC).
• From the Setup Inputs Menu, choose Norm Open/Close, as
shown at right, and press Enter ↵.
• To change the normal state for this input, use the arrows
choose NO (Normally Open) or NC (Normally Closed), then press
Enter ↵.
7.3.3 Define Input as Alarmable or Event
Each digital input may be defined as Alarmable (AL) or as an
Event (EV).
↑↓ to
Setup Inputs Menu
SETUP DEVICE_1
> LABEL: DEVICE_1
NORM OPEN/CLOSE: NO
ALARM/EVENT: AL
↑↓=NEXT ↵=SELECT
LATCHED: Y
DELAY: 00:01
Change Label
CHANGE LABEL
DEVICE_1
↑↓=SELECT ↵=NEXT/END
Setup Inputs Menu
SETUP DEVICE_1
LABEL: DEVICE_1
> NORM OPEN/CLOSE: NO
ALARM/EVENT: AL
↑↓=NEXT ↵=SELECT
LATCHED: Y
DELAY: 00:01
Normally Open / Closed
IS INPUT NORMALLY
OPEN OR CLOSED? NO
↑↓=NO/NC ↵=END
• For a digital input defined as alarmable, the following alarm
reactions occur when the status of the monitored input device
changes: the LCD flashes, the audible horn sounds, configured
pager numbers will be notified and a record is entered in the
Alarm Log.
• For a digital input defined as an event, the status change is
recorded in the Event Log.
For both types (alarmable and event), user setup determines output
control—whether the device that changed status is disabled or kept in
operating mode and whether a standby device is set to operate.
By default, all digital inputs are set up as AL (Alarmable).
• From the Setup Inputs Menu, choose Alarm/Event, as shown at
right, and press Enter ↵.
• To change the type of digital input, use the arrows
↑↓ to choose
AL (Alarmable) or EV (Event), then press Enter ↵.
37
Setup Inputs Menu
SETUP DEVICE_1
LABEL: DEVICE_1
NORM OPEN/CLOSE: NO
> ALARM/EVENT: AL
↑↓=NEXT ↵=SELECT
LATCHED: Y
DELAY: 00:01
Alarmable / Event
IS INPUT AN ALARM
OR EVENT? AL
↑↓=AL/EV ↵=END
Page 46
System and Control Options
7.3.4 Set Up Alarmable Inputs in Latched or Unlatched Mode
Alarmable input points may be set up in Latched mode (Y), which
requires the user to clear the AC8 alarms after an alarm has occurred,
or Unlatched mode (N), in which alarms will automatically clear after
a return-to-normal state. The default setting for alarmable inputs is
L(Latched).
Any input defined as an event is automatically Unlatched.
A digital input defined as Latched does not reset automatically after
an alarm. It will remain in the triggered position even after the moni-
tored device returns to normal. After an alarm, the user must manually reset Latched inputs, as described in 7.13.1 - Clear Active
Alarms. This also means that any digital outputs linked to a Latched
digital input will remain triggered until the input is manually reset.
A digital input defined as Unlatched will automatically track the status of the monitored device. No action by the user is required.
• From the Setup Inputs Menu, choose Latched, as shown above
right, and press Enter ↵.
• To change this feature, use the arrows
Latched) or N (No - Unlatched), then press Enter ↵.
NOTE: Only alarmable input points may be set up as Latched. Once
an input is defined as an event, the Latched entry displays N/A. If you
attempt to set up an event as Latched, the message shown at right
appears. Press the ESC key to return to the previous screen to continue configuring the digital input.
The only way to reset latched alarms is by clearing active alarms. This
step is required to return latched points to their normal state. For
details, see 7.13.1 - Clear Active Alarms.
↑↓ to choose Y (Yes -
Setup Inputs Menu
SETUP DEVICE_1
LABEL: DEVICE_1
NORM OPEN/CLOSE: NO
ALARM/EVENT: AL
↑↓=NEXT ↵=SELECT
> LATCHED: Y
DELAY: 00:01
Latched / Unlatched
IS ALARM
LATCHED? N
↑↓=Y/N ↵=END
Message (if input has
been defined as an event)
LATCH NOT ALLOWED
WHEN IN EVENT MODE
ESC=BACK
7.3.5 Set Up Delay Time
Each input may be set up with a specified time delay between the
occurrence of an alarm or event—a monitored device changes state—
and any response by the AC8. This feature can prevent needless
responses to transient conditions.
This delay is the amount of time that must elapse before the AC8
acknowledges the change of state in the monitored device and takes
any further action, such as dialing configured pagers. The default time
delay is 1 second (displayed as 00 MIN : 01 SEC).
The time delay applies only when a monitored device changes from its
normal state—for example, the AC8 detects a closed contact that is
defined as Normally Open.
When the monitored device returns to its normal state, the AC8
acknowledges the change of state immediately.
• From the Setup Inputs Menu, choose Delay, as shown at right,
and press Enter ↵.
• To change the time delay in minutes and seconds (in the range of 00:00 to 99:59):
• For minutes (MIN), press and hold one of the arrow keys
• Press Enter ↵ to advance to seconds (SEC).
• For seconds (SEC), press and hold one of the arrow keys
• When finished, press Enter ↵ again.
Setup Inputs Menu
SETUP DEVICE_1
LABEL: DEVICE_1
NORM OPEN/CLOSE: NO
ALARM/EVENT: AL
↑↓=NEXT ↵=SELECT
LATCHED: N
DELAY: 00:01
Delay Time
DELAY TIME BEFORE
TRIGGER?
00
MIN : 01 SEC
↑↓=SELECT
↑↓ scroll through the numbers 00-99.
↑↓ scroll through the numbers 00-59.
↵=NEXT/END
38
Page 47

7.4 Setup System - Setup Common Alarm
The audible alarm sounds after the AC8 detects an alarm condition in any input that has been
defined as alarmable, including digital and analog sensor inputs. Once the alarm is silenced, there
are two options:
• By default, the common alarm remains energized until the input alarm is cleared.
• You may change this setting to de-energize the common alarm automatically once the alarm is
silenced.
You might want to reset the common alarm with silence if an external alarm—for example, a horn—is
connected to the common alarm output contacts.
You might not want to reset the common alarm contacts (let contacts reflect/track alarms) and simply
silence the audible horn.
System and Control Options
To change the common alarm setting:
Log In and Choose Setup System
• From the Main Menu, use the arrows
↑↓ to choose System and
Control, then press Enter ↵ (see 7.1 - Login for help).
• Enter your password at the Login screen.
• From the System and Control Menu, use the arrows
↑↓ to choose
Setup System, then press Enter ↵.
Change to Reset (Y) or Not Reset (N)
• From the Setup System Menu, shown at right, use the arrows
to
choose Setup Common Alarm and press Enter ↵.
• By default, the common alarm is set up not to reset automatically
when the alarm is silenced (N). To change this setting, use the
arrows
↑↓ to choose Y (Yes - reset with silence) or N (No - not
reset), then press Enter ↵.
Setup System Menu
SETUP INPUTS
> SETUP COMMON ALARM
SETUP SENSOR
↑↓=NEXT ↵=SELECT
SETUP ZONES
SETUP OUTPUTS
SETUP MODEM&PAGERS
SETUP SYSTEM INFO
SETUP OPERATION
↑↓
SETUP I/O MATRIX
Reset Common Alarm
RESET COMMON ALARM
WITH SILENCE? N
↑↓=Y/N ↵=END
39
Page 48

7.5 Setup System - Setup Sensor
The AC8 has four analog sensor input points that may be configured individually. The panel monitors
connected equipment for any 4-20 mA input—for example, temperature and humidity. Each sensor
input is dedicated to a specific zone:
• Sensor_1 is for Zone 1
• Sensor_2 is for Zone 2
• Sensor_3 is for Zone 3
• Sensor_4 is for Zone 4
System and Control Options
To configure a sensor:
Log In and Choose Setup System
• From the Main Menu, use the arrows
↑↓ to choose System and
Control, then press Enter ↵ (see 7.1 - Login for help).
• Enter your password at the Login screen.
• From the System and Control Menu, use the arrows
↑↓ to choose
Setup System, then press Enter ↵.
Select a Sensor to Configure
• From the Setup System Menu, shown at right, use the arrows
↑↓ to
Setup System Menu
SETUP INPUTS
SETUP COMMON ALARM
> SETUP SENSOR
↑↓=NEXT ↵=SELECT
SETUP ZONES
SETUP OUTPUTS
SETUP MODEM&PAGERS
SETUP SYSTEM INFO
SETUP OPERATION
SETUP I/O MATRIX
choose Setup Sensor and press Enter ↵.
• From the Select Sensor Menu, choose the sensor you want—for
example, Sensor_1—and press Enter ↵.
Table 17 shows sensor features that may be changed, along with the
default settings. By default, sensor inputs are not connected.
To activate a sensor input, you must specify it as connected and enter
Select Sensor Menu
SELECT SENSOR
> SENSOR_1 +80.00 DEG
SENSOR_2 ------ DEG
↑↓=NEXT ↵=SELECT
SENSOR_3
SENSOR_4 +79.50 RH
corresponding values for 4 and 20 mA, as well as high and low setpoints. Other features that may be altered include the name of the sensor, the abbreviation for the units, and defining the sensor as
alarmable or as an event.
• Alarmable sensors may be Latched (Y) or Unlatched (N).
• Event status allows you to monitor a sensor’s high and low setpoints—and use those setpoints to
change the status of an output, if desired—without triggering an alarm. Events are always
Unlatched.
• You may also specify a time delay before the AC8 responds to an alarm or event.
Use the steps following Table 17 to change the default settings for any analog sensor input.
Table 17 Default settings - analog sensor inputs
Feature Default Other Options
CONNECTED* N (Not connected)* Y (Connected)**
LABEL SENSOR_1 Any name (up to eight characters)
UNITS DEG Any units (up to three characters)
4 mA +045.0 Can define up to two decimal places—for example, -99.99
20 mA +096.0 Can define up to two decimal places—for example, +99.99
OFFSET +000.0 Can define up to two decimal places—for example, +00.00
ALARM/EVENT AL (Alarmable) EV (Event)
LATCHED N (Unlatched) Y (Latched)
LOW SETPT +0050.0 Can define up to two decimal places—for example, -999.99
HIGH SETPT +0090.0 Can define up to two decimal places—for example, +999.99
SENSOR DELAY 00:01 (1 second) Any time (in minutes and seconds) from 00:00 to 99:59
* If a sensor is configured as N (Not connected), the display will show an empty reading (blank spaces).
** If a sensor is configured as Y (Connected) and is functioning properly, the display will show a reading.
If the connected sensor is not functioning properly, the display will show dashes (------) indicating a problem.
40
Page 49

System and Control Options
7.5.1 Identify the Sensor as Connected
To make use of an analog sensor, you must specify it as Connected (Y).
By default, analog sensors are Not connected (N).
Disconnecting a sensor will turn off staging for that sensor’s zone if
staging has been turned on for the zone (see 7.10.6 - Specify Staging
for details on staging).
• From the Setup Sensor Menu, choose Connected, as shown at
right, and press Enter ↵.
• To change this feature, use the arrows
nected) or N (No - Not connected), then press Enter ↵.
7.5.2 Change Sensor Label (Name)
Each sensor has a default label (Sensor_1, Sensor_2, etc.) that you may
change to a more descriptive name. The label may consist of up to eight
characters (see Table 14 for valid characters).
• From the Setup Sensor Menu, choose Label for the selected sen-
sor—Label: Sensor_1 in the example—and press Enter ↵.
• To change the sensor’s label, which may consist of up to eight characters:
• Use the arrows
• Press Enter ↵ to advance to the next character position.
• When finished, press Enter ↵ again.
↑↓ to choose a character.
↑↓ to choose Y (Yes - Con-
Setup Sensor Menu
SETUP SENSOR_1
> CONNECTED: N
LABEL: SENSOR_1
↑↓=NEXT ↵=SELECT
UNITS: DEG
4 mA: +045.0
20 mA: +096.0
OFFSET: +000.0
ALARM/EVENT: AL
LATCHED: N
LOW SETPT: +0050.0
HIGH SETPT: +0090.0
SENSOR DELAY: 00:01
Sensor Connected
IS THE SENSOR
CONNECTED? N
↑↓=Y/N ↵=END
Setup Sensor Menu
SETUP SENSOR_1
CONNECTED: Y
> LABEL: SENSOR_1
↑↓=NEXT ↵=SELECT
UNITS: DEG
4 mA: +045.0
20 mA: +096.0
OFFSET: +000.0
ALARM/EVENT: AL
LATCHED: N
LOW SETPT: +0050.0
HIGH SETPT: +0090.0
SENSOR DELAY: 00:01
7.5.3 Change Units Label
For each sensor, you may use a three-character label to specify measurement units, such as DEG (see Table 14 for valid characters).
• From the Setup Sensor Menu, choose Units for the selected sensor
and press Enter ↵.
• To enter the units label, which may consist of up to three characters:
• Use the arrows
• Press Enter ↵ to advance to the next character position.
• When finished, press Enter ↵ again.
↑↓ to choose a character.
Change Sensor Label
CHANGE SENSOR LABEL
LABEL: ROOM TMP
↑↓=SELECT ↵=END
Setup Sensor Menu
SETUP SENSOR_1
CONNECTED: Y
LABEL: ROOM_TMP
↑↓=NEXT ↵=SELECT
> UNITS: DEG
4 mA: +045.0
20 mA: +096.0
OFFSET: +000.0
ALARM/EVENT: AL
LATCHED: N
LOW SETPT: +0050.0
HIGH SETPT: +0090.0
SENSOR DELAY: 00:01
Change Units Label
CHANGE UNITS LABEL
UNITS: DEG
↑↓=SELECT ↵=NEXT/END
41
Page 50

System and Control Options
7.5.4 Change 4 mA Value
For the 4 mA value, enter the smallest value for the range of the sensor—for example, 50°F for a temperature sensor with a range of 50°F
to 90°F.
The default value for each sensor is +045.0. Values that can be entered
range from -999.9 to +999.9.
To enter a new value:
• From the Setup Sensor Menu, choose 4mA for the selected sensor
and press Enter ↵.
• To change the 4 mA value:
• Use the arrows
• Press Enter ↵ to advance to the next character position.
• When finished, press Enter ↵ again.
7.5.5 Change 20 mA Value
For the 20 mA value, enter the largest value for the range of the sensor—for example, 90°F for a temperature sensor with a range of 50°F
to 90°F.
The default value for each sensor is +096.0. Values that can be entered
range from -999.9 to +999.9.
To enter a new value:
• From the Setup Sensor Menu, choose 20 mA for the selected sen-
sor and press Enter ↵.
• To change the 20 mA value:
• Use the arrows
• Press Enter ↵ to advance to the next character position.
• When finished, press Enter ↵ again.
↑↓ to choose a character.
↑↓ to choose a character.
Setup Sensor Menu
SETUP SENSOR_1
CONNECTED: Y
LABEL: ROOM_TMP
↑↓=NEXT ↵=SELECT
UNITS: DEG
> 4 mA: +045.0
20 mA: +096.0
OFFSET: +000.0
ALARM/EVENT: AL
LATCHED: N
LOW SETPT: +0050.0
HIGH SETPT: +0090.0
SENSOR DELAY: 00:01
Change 4 mA Value
CHANGE 4 mA VALUE
4 mA: +050.0
↑↓=SELECT ↵=NEXT/END
Setup Sensor Menu
SETUP SENSOR_1
CONNECTED: Y
LABEL: ROOM_TMP
↑↓=NEXT ↵=SELECT
UNITS: DEG
4 mA: +050.0
> 20 mA: +096.0
OFFSET: +000.0
ALARM/EVENT: AL
LATCHED: N
LOW SETPT: +0050.0
HIGH SETPT: +0090.0
SENSOR DELAY: 00:01
Change 20 mA Value
CHANGE 20 mA VALUE
7.5.6 Change Offset Value
For the Offset value, enter an adjustment factor—for example, if the
sensor reading shows 70°F when the actual temperature is 75°F, the
offset might be 5°F.
The default Offset value for each sensor is +000.0. Values that can be
entered range from -999.9 to +999.9.
To enter a new value:
• From the Setup Sensor Menu, choose Offset for the selected sensor
and press Enter ↵.
• To change the Offset value:
• Use the arrows
• Press Enter ↵ to advance to the next character position.
• When finished, press Enter ↵ again.
↑↓ to choose a character.
42
20 mA: +090.0
↑↓=SELECT ↵=NEXT/END
Setup Sensor Menu
SETUP SENSOR_1
CONNECTED: Y
LABEL: ROOM_TMP
↑↓=NEXT ↵=SELECT
UNITS: DEG
4 mA: +050.0
20 mA: +090.0
> OFFSET: +000.0
ALARM/EVENT: AL
LATCHED: N
LOW SETPT: +0050.0
HIGH SETPT: +0090.0
SENSOR DELAY: 00:01
Change Offset Value
CHANGE OFFSET VALUE
OFFSET: +005.0
↑↓=SELECT ↵=NEXT/END
Page 51

System and Control Options
7.5.7 Define Sensor as Alarmable or Event
Each sensor may be defined as Alarmable (AL) or as an Event (EV).
• For a sensor defined as alarmable, the following alarm reactions
occur when the high-setpoint threshold is crossed: the LCD flashes,
the audible horn sounds, configured pager numbers will be notified
and a record is entered in the Alarm Log.
• For a sensor defined as an event, the high-setpoint occurrence is
recorded in the Event Log.
By default, all sensors are set up as AL (Alarmable).
• From the Setup Sensor Menu, choose Alarm/Event, as shown at
right, and press Enter ↵.
• To change the type of sensor, use the arrows
↑↓ to choose
AL (Alarmable) or EV (Event), then press Enter ↵.
7.5.8 Set Up Alarmable Sensors in Latched or Unlatched Mode
Alarmable sensor points may be set up in Latched mode (Y), requiring
the user to clear the AC8 alarms after an alarm has occurred, or
Unlatched mode (N), meaning that alarms will automatically clear
after a return-to-normal state. The default setting for alarmable sensors is N (Unlatched). Any sensor defined as an event is automatically
Unlatched.
A sensor defined as Latched does not reset automatically after an
alarm. It will remain in the triggered position even after the monitored
sensor returns to normal. After an alarm, the user must manually
reset Latched sensors, as described in 7.13.1 - Clear Active Alarms.
This also means that any digital outputs linked to a Latched sensor
will remain triggered until the sensor is manually reset.
A sensor defined as Unlatched will automatically track the status of
the monitored sensor. No action by the user is required.
• From the Setup Sensor Menu, choose Latched, as shown at right,
and press Enter ↵.
• To change this feature, use the arrows
Latched) or N (No - Unlatched), then press Enter ↵.
NOTE: Only alarmable sensors may be set up as Latched. If you
attempt to set up an event as Latched, the message shown at right
appears. Press the ESC key to return to the previous screen to continue configuring the digital input.
↑↓ to choose Y (Yes -
Setup Sensor Menu
SETUP SENSOR_1
CONNECTED: Y
LABEL: ROOM_TMP
↑↓=NEXT ↵=SELECT
UNITS: DEG
4 mA: +050.0
20 mA: +090.0
OFFSET: +005.0
> ALARM/EVENT: AL
LATCHED: N
LOW SETPT: +0050.0
HIGH SETPT: +0090.0
SENSOR DELAY: 00:01
Alarmable / Event
IS SENSOR AN ALARM
OR EVENT? AL
↑↓=AL/EV ↵=END
Setup Sensor Menu
SETUP SENSOR_1
CONNECTED: Y
LABEL: ROOM_TMP
↑↓=NEXT ↵=SELECT
UNITS: DEG
4 mA: +050.0
20 mA: +090.0
OFFSET: +005.0
ALARM/EVENT: AL
> LATCHED: N
LOW SETPT: +0050.0
HIGH SETPT: +0090.0
SENSOR DELAY: 00:01
Latched / Unlatched
IS ALARM
LATCHED? N
↑↓=Y/N ↵=END
Message (if sensor has
been defined as an event)
LATCH NOT ALLOWED
WHEN IN EVENT MODE
The only way to reset latched alarms is by clearing active alarms. This
step is required to return latched points to their normal state. For
details, see 7.13.1 - Clear Active Alarms.
43
ESC=BACK
Page 52

System and Control Options
7.5.9 Change Low Setpoint
When the sensor detects a condition below the Low Setpoint value, an
alarm or event will occur, depending on the sensor configuration.
The Low Setpoint value must not be set below the sensor’s 4 mA value
plus the offset value. For example, if the 4 mA value is 50°F and the
Offset value is 5°F, the Low Setpoint must be 55°F or higher.
The default Low Setpoint for each sensor is +0050.0. Values that can
be entered range from:
• the 4 mA value + the Offset value (in the example, 50+ 5 =55)
to
• the 20 mA value + the Offset value (in the example, 90+ 5= 95)
To view or change these values, see 7.5.4 - Change 4 mA Value,
7.5.5 - Change 20 mA Value and 7.5.6 - Change Offset Value.
To enter a new value:
• From the Setup Sensor Menu, choose Low Setpt for the selected
sensor and press Enter ↵.
• To change the Low Setpoint:
• Use the arrows
• Press Enter ↵ to advance to the next character position.
• When finished, press Enter ↵ again.
Setup Sensor Menu
SETUP SENSOR_1
CONNECTED: Y
LABEL: ROOM_TMP
↑↓=NEXT ↵=SELECT
UNITS: DEG
4 mA: +050.0
20 mA: +090.0
OFFSET: +005.0
ALARM/EVENT: AL
LATCHED: N
> LOW SETPT: +0050.0
HIGH SETPT: +0090.0
SENSOR DELAY: 00:01
Change Low Setpoint
CHANGE LOW SETPOINT
LOW SETPT: +0060.0
↑↓=SELECT ↵=NEXT/END
↑↓ to choose a character.
7.5.10 Change High Setpoint
When the sensor detects a condition above the High Setpoint value, an
alarm or event will occur, depending on the sensor configuration.
The High Setpoint value must not be set above the sensor’s 20 mA value
plus the offset value. For example, if the 20 mA value is 90°F and the
Offset value is 5°F, the High Setpoint must be 95°F or lower.
The default High Setpoint for each sensor is +0090.0. Values that can
be entered range from:
• the 4 mA value + the Offset value (in the example, 50+ 5 =55)
to
• the 20 mA value + the Offset value (in the example, 90+ 5= 95)
To view or change these values, see 7.5.4 - Change 4 mA Value,
7.5.5 - Change 20 mA Value and 7.5.6 - Change Offset Value.
To enter a new value:
• From the Setup Sensor Menu, choose High Setpt for the selected
sensor and press Enter ↵.
•To change the High Setpoint:
• Use the arrows
• Press Enter ↵ to advance to the next character position.
• When finished, press Enter ↵ again.
Setup Sensor Menu
SETUP SENSOR_1
CONNECTED: Y
LABEL: ROOM_TMP
↑↓=NEXT ↵=SELECT
UNITS: DEG
4 mA: +050.0
20 mA: +090.0
OFFSET: +005.0
ALARM/EVENT: AL
LATCHED: N
LOW SETPT: +0060.0
> HIGH SETPT: +0090.0
SENSOR DELAY: 00:01
Change High Setpoint
CHANGE HIGH SETPOINT
HIGH SETPT: +0085.0
↑↓=SELECT ↵=NEXT/END
↑↓ to choose a character.
44
Page 53

System and Control Options
7.5.11 Set Up Delay Time
Each sensor may be set up with a specified time delay between the
triggering of a high or low setpoint—a monitored sensor crosses the
high or low setpoint threshold—and any response by the AC8. This feature can prevent transient conditions from prompting unnecessary
responses.
This delay is the amount of time that must elapse before the AC8
acknowledges the change in the monitored sensor and takes any further action, such as dialing configured pagers. The default time delay
is 1 second (displayed as 00 MIN : 01 SEC).
The time delay applies to the triggering of a high or low setpoint and
also after the monitored sensor returns to its normal state. When the
monitored device returns to its normal state, the specified time delay
must elapse before the AC8 acknowledges the return-to-normal condition.
• From the Setup Sensor Menu, choose Sensor Delay, as shown at
right, and press Enter ↵.
• To change the time delay in minutes and seconds (in the range of
00:00 to 99:59):
• For minutes (MIN), press and hold one of the arrow keys
• Press Enter ↵ to advance to seconds (SEC).
• For seconds (SEC), press and hold one of the arrow keys
Setup Sensor Menu
SETUP SENSOR_1
CONNECTED: Y
LABEL: ROOM_TMP
↑↓=NEXT ↵=SELECT
UNITS: DEG
4 mA: +050.0
20 mA: +090.0
OFFSET: +005.0
ALARM/EVENT: AL
LATCHED: N
LOW SETPT: +0060.0
HIGH SETPT: +0085.0
SENSOR DELAY: 00:01
Delay Time
DELAY TIME BEFORE
TRIGGER?
00
↑↓=SELECT
↑↓ scroll through the numbers 00-99.
↑↓ scroll through the numbers 00-59.
MIN : 01 SEC
↵=NEXT/END
45
Page 54

7.6 Setup System - Setup Zones
The AC8 has four zones that may be used to define different areas—rooms or sections of a room. If set
up with four zones, the AC8 effectively performs as four separate units, controlling each zone separately, for example, using a different rotation sequence for devices in each zone.
System and Control Options
A single zone may have one to eight outputs associated with it. The
minimum number of outputs per zone is one, and the maximum for all
zones combined is eight.
By default, the AC8 is configured to have one zone with four outputs:
Zone 1 has four associated outputs and Zones 2-4 have none.
To set up zones:
Log In and Choose Setup System
• From the Main Menu, use the arrows
Control, then press Enter ↵ (see 7.1 - Login for help).
• Enter your password at the Login screen.
• From the System and Control Menu, use the arrows
Setup System, then press Enter ↵.
Select Setup Zones
• From the Setup System Menu, shown at right, use the arrows
choose Setup Zones and press Enter ↵.
7.6.1 Set Up a Zone
• From the Setup Zones Menu, choose a zone—for example,
Zone 1—and press Enter ↵.
• In the Number of Devices screen, use the arrows ↑↓ to select the
number of outputs for this zone, then press Enter ↵. The example
at right shows four outputs in Zone 1.
Guidelines for Setting Up Zones
• The AC8 assigns outputs to zones in numerical order, based
on entries in the Number of Devices screen. For example:
Example Zone 1 Zone 2 Zone 3 Zone 4
If the Number of Devices is: 4 2 2 (none)
The AC8 assigns these
outputs to this zone:
• The total number of outputs for all zones cannot exceed 8.
If you try to enter more than 8 devices in total, Message 1 appears
(shown at right). Press Escape to return to the Setup Zones menu.
• Zones must be set up in order, starting with Zone 1.
If you try to enter devices for Zone 2 before Zone 1 has any outputs,
Message 2 appears (shown at right). Press Escape and set up
Zone 1 before attempting to set up Zone 2.
• Remove outputs in descending order, ending with Zone 1.
If you try to remove all devices from Zone 1 before Zone 2,
Message 3 appears (shown at right). Press Escape and remove
devices from Zone 2 before removing devices from Zone 1.
Outputs
1-4
↑↓ to choose System and
↑↓ to choose
Outputs
5-6
Outputs
7-8
(none)
↑↓ to
Setup System Menu
SETUP INPUTS
SETUP COMMON ALARM
SETUP SENSOR
↑↓=NEXT ↵=SELECT
> SETUP ZONES
SETUP OUTPUTS
SETUP MODEM&PAGERS
SETUP SYSTEM INFO
SETUP OPERATION
SETUP I/O MATRIX
Setup Zones
SETUP ZONES
> ZONE 1:4
ZONE 2:0
↑↓=NEXT ↵=SELECT
ZONE 3:0
ZONE 4:0
Number of Devices
# DEVICES IN ZONE
ZONE 1:4
↑↓=SELECT ↵=NEXT/END
MESSAGES:
1. Total devices > 8
TOO MANY DEVICES
ESC BACK
2. Previous zone has no
devices
USE ZONE BEFORE
ESC BACK
3. Subsequent zone has
devices
Table 18 shows the default number of outputs for each zone.
Table 18 Default zones
Zone Default number of outputs
Zone 1 4 (Outputs 1-4)
Zone 2 0
Zone 3 0
Zone 4 0
46
ZERO ZONE AFTER
ESC BACK
Page 55

7.7 Setup System - Setup Outputs
The AC8 has eight outputs that may be configured individually. These outputs correspond to the
eight numbered inputs. For example, Device_1 is the unit connected to Input 1 and to Output 1.
System and Control Options
The output name is the same as the input name, as described in 7.3.1 Change Label (Name of Input).
To configure an output:
Log In and Choose Setup System
• From the Main Menu, use the arrows
↑↓ to choose System and
Control, then press Enter ↵ (see 7.1 - Login for help).
• Enter your password at the Login screen.
• From the System and Control Menu, use the arrows
↑↓ to choose
Setup System, then press Enter ↵.
Select an Output to Configure
• From the Setup System Menu, shown at right, use the arrows
↑↓ to
choose Setup Outputs and press Enter ↵.
• From the Select Output Menu, choose an output—for example,
Device_1—and press Enter ↵.
Table 19 shows digital output features and their default settings: you
may define an output as Normally Open or Normally Closed, set the
device’s mode—operating, standby or not used—and specify whether to
disable the device during emergency power operation.
Use the steps following Table 19 to change the default settings for any
digital output.
Table 19 Default settings - digital outputs
Feature Default Other Options
NORM OPEN/CLOSE NO (Normally Open) NC (Normally Closed)
Outputs 1-2:
MODE*
IN ALARM E (Enable) D (Disable)
EMERG OP E (Enable) D (Disable)
* Outputs defined as Not Used should be kept in a separate zone that does not include
any outputs defined as Operating or Standby. The Auto Sequencing feature will not
function properly in a zone with outputs defined as Not Used. See 7.10.1 - Turn
Automatic Sequencing On or Off for more information.
Outputs 3-4:
Outputs 5-8:
OP (Operating)
ST (Standby)
NU (Not Used)
OP (Operating)
ST (Standby)
NU (Not Used)
Setup System Menu
SETUP INPUTS
SETUP COMMON ALARM
SETUP SENSOR
↑↓=NEXT ↵=SELECT
SETUP ZONES
> SETUP OUTPUTS
SETUP MODEM&PAGERS
SETUP SYSTEM INFO
SETUP OPERATION
SETUP I/O MATRIX
Select Output Menu
SELECT OUTPUT
> DEVICE_1 NO-OP-E-E
DEVICE_2 NO-ST-E-E
↑↓=NEXT ↵=SELECT
DEVICE_3 NO-ST-E-E
DEVICE_4 NO-ST-E-E
DEVICE_5 NO-NU-E-E
DEVICE_6 NO-NU-E-E
DEVICE_7 NO-NU-E-E
DEVICE_8 NO-NU-E-E
7.7.1 Define Output as Normally Open or Normally Closed
Each output may be set up as Normally Open (NO) or Normally Closed
(NC). The default setting for all output points is NO (Normally Open).
• From the Setup Outputs Menu, shown at right, use the arrows
to
choose Norm Open/Close and press Enter ↵.
• To change the normal state for this output, use the arrows
choose the state:
• NO (Normally Open)
• NC (Normally Closed)
• Press Enter ↵.
47
↑↓ to
Setup Outputs Menu
SETUP DEVICE_1
> NORM OPEN/CLOSE: NO
↑↓
MODE: OPERATING
↑↓=NEXT ↵=SELECT
IN ALARM: ENABLE
EMERG OP: ENABLE
Change State
SET TO NORMAL OPEN
OR NORMAL CLOSE? N
↑↓=NO/NC
O
↵=END
Page 56

System and Control Options
7.7.2 Define Operating or Standby Mode
Each output may be defined as Operating (OP), Standby (ST), or Not
Used (NU). This setting takes precedence over any setting in the override menu (see 7.12 - Override Output). The default settings are:
• Outputs 1 and 2 are in Operating (OP) mode
• Outputs 3 and 4 are in Standby (ST) mode
• Outputs 5 through 8 are in Not Used (NU)
To change the mode:
• From the Setup Outputs Menu, shown at right, use the arrows
to
choose Mode for the selected output and press Enter ↵.
• To change the output’s mode, use the arrows
↑↓ to choose one of
these options:
• OP (Operating)
• ST (Standby)
• NU (Not Used)
• Press Enter ↵.
7.7.3 Enable or Disable an Output Device in Alarm Status
You may choose whether to Enable or Disable an output when the connected device is in alarm status. The default setting for all output
points is Enabled. If Enabled, the device stays enabled when in alarm
status. If Disabled, the device is disabled when it goes into alarm.
Setup Outputs Menu
SETUP DEVICE_1
NORM OPEN/CLOSE: NO
> MODE: OPERATING
↑↓=NEXT ↵=SELECT
IN ALARM: ENABLE
EMERG OP: ENABLE
Set Mode
↑↓
SET MODE: OP
↑↓=OP/ST/NU
Setup Outputs Menu
SETUP DEVICE_1
NORM OPEN/CLOSE: NO
MODE: OPERATING
↑↓=NEXT ↵=SELECT
> IN ALARM: ENABLE
EMERG OP: ENABLE
↵=EDIT
• From the Setup Outputs Menu, choose In Alarm, as shown at
right, and press Enter ↵.
• To make a change, use the arrows
↑↓ to choose Enable or Disable
to determine what happens when an alarm is detected in the
device.
• Press Enter ↵.
7.7.4 Enable or Disable a Device during Emergency Power Operation
You may choose whether to Enable or Disable an output when the AC8
is in emergency power operation. The default setting for all output
points is Enabled.
• From the Setup Outputs Menu, choose Emerg Op, as shown at
right, and press Enter ↵.
• To make a change, use the arrows
↑↓ to choose Enable or Disable
to specify what occurs in emergency power operation.
• Press Enter ↵.
7.7.5 Configure Output for Loss of Power (“Fail-Safe”)
Each output has an associated jumper that can help prevent undesired
effects when the controller board loses power. For example, without the
proper fail-safe jumper setting, a loss of power might close a switch that is Normally Open (NO)—perhaps shutting off an environmental unit or a fan or closing a valve.
This fail-safe jumper setting is unrelated to configuring an output as Normally Open (NO) or Normally Closed (NC), as described in 7.7.1 - Define Output as Normally Open or Normally Closed.
Change State in Alarm
IN ALARM: DISABLE
↑↓=E/D
↵=EDIT
Setup Outputs Menu
SETUP DEVICE_1
NORM OPEN/CLOSE: NO
MODE: OPERATING
↑↓=NEXT ↵=SELECT
IN ALARM: ENABLE
> EMERG OP: ENABLE
Change State in Emerg Op
EMERG OP: DISABLE
↑↓=E/D
↵=EDIT
To configure a digital output jumper for a loss of power:
• Set the jumper in the “OFF” position (factory default) to make the output Normally Open (NO).
• Set the jumper in the “ON” position to make the output Normally Closed (NC).
For more information, see 3.2.3 - Setting the Digital Output Jumpers.
48
Page 57

7.8 Setup System - Setup Modem & Pagers
To use the modem and pager features, be sure to connect the phone line connector to a telephone wall
jack using an RJ11 cord, as described in 3.6.2 - Phone Line Connector.
7.8.1 Modem Setup - Initialization String
The AC8 has an on-board modem that offers dial-up access to all LCD functions as well as features
available only through the Service Terminal Interface (see A.1 - Comparison of Functions: LCD
and Service Terminal Interface). The modem also permits remote notification of alarms.
Supported Modem Settings
Supported settings vary for different types of access:
Table 20 Supported modem settings
For: Modem supports:
Dial-up via terminal 9600 baud, no parity, 8 data bits, 1 stop bit
Pager access 9600 baud, even parity, 7 data bits, 1 stop bit and TAPI protocol version 1.8
For calls involving countries that do not support country code B5 (see Table 22):
International
dialing
Default Modem Settings
• Modem model MT5600SMI is required (model number is on the modem label).
• +GCI=xx (xx is the country code) must be added to the initialization string (see Step 7 in
this section).
System and Control Options
Table 21 shows the default settings for modem options.
Table 21 Default settings - modem
Feature Default Other Options
Initialization String (Init String) ATS0=1
Enable Modem Diagnostic Messages N (disable) Y (enable)
Modem Dial Prefix ATE0X4DT Any string
Modem Hang Up Delay After a Call 10 seconds Any number (up to 99 seconds)
Any string (up to 40 characters); for international dialing,
add +GCI=xx, where xx is the country code (except B5
countries—see Table 22)
Configuring the Modem
To configure the modem:
Log In and Choose Setup System
1. From the Main Menu, use the arrows
Control, then press Enter ↵ (see 7.1 - Login for help).
2. Enter your password at the Login screen.
3. From the System and Control Menu, use the arrows
Setup System, then press Enter ↵.
Select Modem Setup
4. From the Setup System Menu, shown at right, use the arrows
to
choose Setup Modem&Pagers and press Enter ↵.
5. Use the arrows
↑↓ to choose Setup Modem from the Pagers &
Modem Menu and press Enter ↵.
6. The Setup Modem Menu displays the initialization string
(Init String), which may consist of up to 40 characters (see
Table 14 for valid characters). The default Init String is ATS0=1.
↑↓ to choose System and
↑↓ to choose
↑↓
Setup System Menu
SETUP INPUTS
SETUP COMMON ALARM
SETUP SENSOR
↑↓=NEXT ↵=SELECT
SETUP ZONES
SETUP OUTPUTS
> SETUP MODEM&PAGERS
SETUP SYSTEM INFO
SETUP OPERATION
SETUP I/O MATRIX
Pagers & Modem Menu
SETUP PAGERS
> SETUP MODEM
↑↓=NEXT
↵=SELECT
Setup Modem Menu
ENTER INIT STRING
ATS0=1
49
↑↓=NEXT
↵=SELECT
Page 58

System and Control Options
International Dialing
7. To enable international dialing involving countries that do not support country code B5 (see
Table 22), you must add the appropriate country codes to the initialization string using the
format:
+GCI=xx
where xx is the country code.
(This also requires the modem model MT5600SMI; the model number can be found on the modem
label.)
Note: For countries that support B5, there is no need to add country codes to the init string.
Table 22 Country codes
Country Code* Country Code* Country Code* Country Code*
Argentina 07 Finland FD Italy FD Philippines B5
Australia 09 France FD Japan 00 Portugal FD
Austria FD Germany FD Korea B5 Slovak Republic FD
Belgium FD Greece FD Liechtenstein FD Spain FD
Canada B5 Hong Kong 99 Luxembourg FD Sweden FD
China B5 Hungary FD Mexico B5 Switzerland FD
Cyprus FD Iceland FD Netherlands FD Taiwan FE
Czech Republic FD Indonesia 99 New Zealand 7E United Kingdom FD
Denmark FD Ireland FD Norway FD United States B5
* B5 is the default setting—initialization string +GCI=xx is not needed for these countries
Edit the Init String
8. To enter or edit the Init String:
• Use the arrows
↑↓ to choose a character.
• Press Enter ↵ to advance to the next character position.
• When finished, press Enter ↵ again.
50
Page 59

System and Control Options
7.8.2 Modem Setup - Additional Features (Service Terminal Interface only)
The Service Terminal Interface offers four additional options for the modem that are not available
through the LCD interface:
• Enter AC8 phone number
• Enable modem diagnostic messages
• Change modem dial prefix
• Change modem hang up delay after a call
To access these options:
• Connect to the AC8 either from a remote computer or through the RS232 port (see
A.2 - Connecting to the Service Terminal Interface).
• At the Main Menu, enter 0 (zero—Setup System - Login Required).
• At the Login Menu, enter your password, then press the Enter key.
• At the Setup Menu, enter 6 (Setup Modem&Pagers).
• At the Setup Modem & Pagers menu, shown below, enter 5 to begin configuration.
Setup Modem & Pagers - Modem Setup (Service Terminal Interface only)
SETUP MODEM&PAGERS
Input pager and
modem information
Select pager or modem
1=PAGER NUMBER 1 An "A" is required
2=PAGER NUMBER 2 as 1st character
3=PAGER NUMBER 3 for an alpha pager,
4=PAGER NUMBER 4 an "N" for a numeric
5=MODEM CONFIGURATION pager, and an "M"
6=RETURN TO SETUP MENU for a remote modem.
7=RETURN TO MAIN MENU *******************
SELECT A NUMBER:5
CURRENT NUMBER
*******************
• At the Change Modem Initialization String prompt, you may press Enter to bypass this option (or
see 7.8.1 - Modem Setup - Initialization String for instructions on entering the string).
>CHANGE MODEM INITIALIZATION STRING(40 CHARACTERS MAX).
>[ATS0=1]
>[
>COMMAND SUCCESSFUL
Enter AC8 Phone Number
This entry allows you to store the phone number that must be dialed to access the AC8 for future reference. This has no effect on the AC8’s modem settings or functionality—it simply places the phone
number in an accessible location.
• At the AC8 Phone Number prompt, enter the phone number for the AC8. The current setting
appears in brackets []—nothing has been entered in the following example.
>ENTER AC8 PHONE NUMBER(40 CHARACTERS MAX).
>[]
>[
>COMMAND SUCCESSFUL
• Press Enter to proceed, or Escape to cancel the entry. If you make a change, a confirmation message appears: “Command Successful.”
51
Page 60

System and Control Options
Enable Modem Diagnostic Messages
Enabling modem diagnostics will provide the following additional information about the modem to
the computer using the Service Terminal Interface:
Hang-up modem
Modem model number
No dial tone
No carrier
Busy
No answer
Pager checksum error
Pager pin number error
Error (indicates incorrect phone number, dial prefix or modem initialization string)
For alphanumeric pager failures:
Paging company non answer on 1st
Paging company non answer on 2nd
Paging company non answer on Last
Paging company non answer on Handshake
• At the Enable Modem Diagnostic Messages prompt, enter Y (Yes - enable) or N (No - disable). The
current setting appears in brackets—[N] in the following example.
>ENABLE MODEM DIAGNOSTIC MESSAGES-YES(Y) OR NO(N)?
>[N]
>[
>COMMAND SUCCESSFUL
• Press Enter to proceed, or Escape to cancel the entry. If you make a change, a confirmation message appears: “Command Successful.”
Change Modem Dial Prefix
• At the Change Modem Dial Prefix prompt, enter the prefix to be dialed. The current setting
appears in brackets—[ATE0X4DT] in the following example.
>CHANGE MODEM DIAL PREFIX.
>[ATE0X4DT]
>[
>COMMAND SUCCESSFUL
• For international dialing involving countries that do not support B5 (see Table 22), add country
codes to the initialization string using the format +GCI=xx, where xx is the country code.
(Note: Also requires MT5600SMI modem; model number is on modem label.)
See 7.8.1 - Modem Setup - Initialization String for more information.
• Press Enter to proceed, or Escape to cancel the entry. If you make a change, a confirmation message appears: “Command Successful.”
Change Modem Hang Up Delay After a Call
• At the Change Modem Hang Up Delay After a Call prompt, enter the number of seconds to delay
hanging up after a call. The maximum is 99 seconds. The current setting appears in brackets—
[10] in the following example.
>CHANGE MODEM HANG UP DELAY AFTER A CALL(99 SEC MAX).
>[10]
>[
>COMMAND SUCCESSFUL
• Press Enter to proceed, or Escape to cancel the entry. If you make a change, a confirmation message appears: “Command Successful.”
52
Page 61

7.8.3 Pager Setup - Pager Number and PIN
The AC8 may be configured to dial numeric or alphanumeric pagers when an alarm is detected. You
may enter up to four pager numbers—all configured pagers will be dialed each time an alarm occurs.
For each configured pager, you must enter the pager number to be dialed and the pager’s Personal
Identification Number (PIN).
See 8.1 - AC8 Specifications for supported pager settings.
The AC8 can send numeric or alphanumeric messages to supported pagers, as shown in the following
example:
Alphanumeric pager
message example
When an alarm is detected, the first pager number is dialed—up to three times, if needed. After a successful page or three dialing attempts, the next pager number is dialed, again with three attempts as
needed, and so on for all configured pagers.
Table 23 Pager dialing results
Result of Page Action Message Generated
Successful AC8 dials next configured pager. —
Unsuccessful due to:
Busy signal / no answer /
no dial tone
General modem
communication problem
No communication with
modem
(internal hardware problem)
LIEBERT TEST
DEVICE_1 ALARM
CONTACT CLOSED
2:07 PM 06/09/04
AC8 generates message after all three redial attempts
have failed, dials next configured pager.
AC8 resets modem, generates message, redials pager
up to three more times.
AC8 generates messages, makes no further dialing
attempts.
System and Control Options
Pager company time stamp
Unsuccessful Page
(Event Log)
Modem Reset
(Event Log)
Modem Internal Fault
(Active Alarm Report,
Alarm History Log)
To configure a pager:
Log In and Choose Setup System
• From the Main Menu, use the arrows
↑↓ to choose System and
Control, then press Enter ↵ (see 7.1 - Login for help).
• Enter your password at the Login screen.
• From the System and Control Menu, use the arrows
↑↓ to choose
Setup System, then press Enter ↵.
Select a Pager to Configure
• From the Setup System Menu, shown at right, use the arrows
to
choose Setup Modem&Pagers and press Enter ↵.
• Use the arrows
↑↓ to choose Setup Pagers from the Pagers &
Modem Menu, and press Enter ↵.
• From the Select Pager Menu, choose the pager number you
want—for example, Pager Number 1—and press Enter ↵.
Setup System Menu
SETUP INPUTS
SETUP COMMON ALARM
SETUP SENSOR
↑↓=NEXT ↵=SELECT
SETUP ZONES
SETUP OUTPUTS
> SETUP MODEM&PAGERS
SETUP SYSTEM INFO
SETUP OPERATION
SETUP I/O MATRIX
↑↓
Pagers & Modem Menu
> SETUP PAGERS
SETUP MODEM
↑↓=NEXT
Select Pager Menu
SELECT PAGER
> PAGER NUMBER 1
PAGER NUMBER 2
↑↓=NEXT ↵=SELECT
PAGER NUMBER 3
PAGER NUMBER 4
↵=SELECT
53
Page 62

System and Control Options
Enter a Pager Number
• From the Setup Pager Menu, choose Setup Pager Number for
the selected pager—Setup Pager 1 Number in the example at
right—and press Enter ↵.
• See Table 24 for guidelines on entering the pager number, which
may consist of up to 40 characters. To enter the pager number:
• Use the arrows
↑↓ to choose a character.
• Press Enter ↵ to advance to the next character position.
• When finished, press Enter ↵ again.
Table 24 Guidelines for dialing pagers
Device type Required entries Example
Numeric
pager
Alphanumeric
pager
Remote
modem
Device type Optional entries Example
All types
of devices
Numeric
pager
The first character must be “N”. N18005551212
The first character must be “A”. A18005551212
The first character must be “M”. M18005551212
Use “9” if needed to access an outside
line—place after first character (N, A or M).
Use “W” to wait for a second dial tone
before dialing if the phone system has two
dial tones (initial tone and a second tone
for outside line)—place after “9” (before the
number to be dialed).
Use “,” (comma) to pause two seconds. N1,8005551212
Use “#” as the last character to terminate
page string if required by paging company.
A918005551212
A9W18005551212
N18005551212
,,,,1234567#
Setup Pager Menu
> SET PAGER 1 NUMBER
SET PAGER 1 PIN
↑↓=NEXT
↵=SELECT
Pager # - Numeric
ENTER PAGER 1 NUMBER
N1,8005551212,,,,123
4567#
↑↓=SELECT
↵=NEXT/END
Pager # - Alphanumeric
ENTER PAGER 1 NUMBER
A9W18005551212
↑↓=SELECT
↵=NEXT/END
Enter a Pager PIN Number
• From the Setup Pager Menu, choose Setup Pager PIN, as shown
for Pager Number 1 in the example at right, and press Enter ↵.
• To enter the pager PIN, which may consist of up to 20 characters
(see Table 14 for valid characters):
• Use the arrows
↑↓ to choose a character.
• Press Enter ↵ to advance to the next character position.
• When finished, press Enter ↵ again.
NOTE
For international dialing, you might need to add country codes
in the modem initialization string. See 7.8.1 - Modem Setup -
Initialization String.
Setup Pager Menu
SET PAGER 1 NUMBER
> SET PAGER 1 PIN
↑↓=NEXT
↵=SELECT
Enter Pager PIN
ENTER PAGER 1 PIN
01234567891011121314
↑↓=SELECT
↵=NEXT/END
54
Page 63

System and Control Options
7.8.4 Pager Setup - Communications Check (Service Terminal Interface only)
The Service Terminal Interface offers two additional options for pager setup, which are not available
through the LCD interface:
• Enable communications check
• Enter time to perform communications check
To access these options:
• Connect to the AC8 either from a remote computer or through the RS232 port (see
A.2 - Connecting to the Service Terminal Interface).
• At the Main Menu, enter 0 (zero—Setup System - Login Required).
• At the Login Menu, enter your password, then press the Enter key.
• At the Setup Menu, enter 6 (Setup Modem&Pagers).
• At the Setup Modem & Pagers menu, shown below, enter a number (1-4) to select a pager.
Setup Modem & Pagers - Pager Setup (Service Terminal Interface only)
SETUP MODEM&PAGERS
Input pager and
modem information
Select pager or modem
1=PAGER NUMBER 1 An "A" is required
2=PAGER NUMBER 2 as 1st character
3=PAGER NUMBER 3 for an alpha pager,
4=PAGER NUMBER 4 an "N" for a numeric
5=MODEM CONFIGURATION pager, and an "M"
6=RETURN TO SETUP MENU for a remote modem.
7=RETURN TO MAIN MENU *******************
SELECT A NUMBER:1
CURRENT NUMBER
*******************
• At the Enter Pager Number prompt, you may press Enter to bypass this option (or see 7.8.3 Pager Setup - Pager Number and PIN for instructions on entering the pager number).
>ENTER PAGER NUMBER(40 CHARACTERS MAX).
>[]
>[
>COMMAND SUCCESSFUL
• At the Enter Pager PIN Number prompt, you may press Enter to bypass this option (or see 7.8.3 Pager Setup - Pager Number and PIN for instructions on entering the pager PIN).
>ENTER PAGER PIN NUMBER (20 CHARACTERS MAX).
>[]
>[
>COMMAND SUCCESSFUL
55
Page 64

System and Control Options
Enable Communications Check
Enabling this function permits a daily communications test between the AC8 and the selected pager.
Once each day the AC8 dials the pager at a specified time and sends this message: “AC8 COMM
CHECK.” (The time of the test is specified at the next prompt, Enter Time To Perform Communi-
cations Check.)
• At the Enable Communications Check prompt, enter Y (Yes - enable) or N (No - disable). The current setting appears in brackets—[N] in the following example.
>ENABLE COMMUNICATIONS CHECK-YES(Y) OR NO(N)?
>[N]
>[
>COMMAND SUCCESSFUL
• Press Enter to proceed, or Escape to cancel the entry. If you make a change, a confirmation message appears: “Command Successful.”
Enter Time To Perform Communications Check
This function schedules the daily communications test between the AC8 and the selected pager, as
described in the previous section.
• At the Enter Time To Perform Communications Check prompt, enter the time to initiate the communications check, using the format HH:MM (hours and minutes in military time), ranging from
00:00 for midnight to 23:59 for 11:59 p.m. The current setting appears in brackets—[00:00] in the
following example.
>ENTER TIME TO PERFORM COMMUNICATIONS CHECK(HH:MM).
>[00:00]
>[
>COMMAND SUCCESSFUL
• Press Enter to proceed, or Escape to cancel the entry. If you make a change, a confirmation message appears: “Command Successful.”
56
Page 65

7.9 Setup System - Setup System Info
The Setup System Info options allow users to:
• Change Password—used for access to system setup functions
• Change Date & Time/Automatic Daylight Saving Time—used to set the AC8’s date and time
and to enable automatic time change for Daylight Saving Time
• Setup Site ID—the AC8’s location to differentiate among sites if more than one AC8 is in use
• Connect Battery—stops the AC8 battery from backing up the panel
• Backup and Upload Configuration File (Service Terminal Interface only)—permits the
user to copy the AC8’s configuration settings and to upload the file to the AC8
• Setup Serv Ph Num—enables alarm notification to the telephone number entered (in addition
to the four pager numbers).
• Restore Defaults—returns the AC8 to its factory settings
• Perform Firmware Update (Service Terminal Interface only)—changes the AC8’s firmware
to newest version
• Initiate Remote Alarm Test (Service Terminal Interface only)—used to test auxiliary
alarm
To change any Setup System Info features:
System and Control Options
Log In and Choose Setup System
• From the Main Menu, use the arrows
↑↓ to choose System and
Control, then press Enter ↵ (see 7.1 - Login for help).
• Enter your password at the Login screen.
• From the System and Control Menu, use the arrows
Setup System, then press Enter ↵.
Select Setup System
• From the Setup System Menu, shown at right, use the arrows
choose Setup System Info and press Enter ↵.
• Use the steps following Figure 11 to access any of the Setup System Info options.
Figure 11 offers a quick look at the Setup System Info screens available via the LCD interface.
Figure 11 Menu overview - Setup System Info menu
Setup System Info
SETUP SYSTEM INFO
CHANGE PASSWORD
CHANGE DATE & TIME
SETUP SITE ID
CONNECT BATTERY
SETUP SERV PH NUM
FACTORY DEFAULTS
Setup System Info options
↑↓ to choose
↑↓ to
Setup System Menu
SETUP INPUTS
SETUP COMMON ALARM
SETUP SENSOR
↑↓=NEXT ↵=SELECT
SETUP ZONES
SETUP OUTPUTS
SETUP MODEM&PAGERS
> SETUP SYSTEM INFO
SETUP OPERATION
SETUP I/O MATRIX
Change Password Change Date & Time Setup Site ID
CHANGE PASSWORD
AAAA
See
Section
7.9.1
CHANGE DATE & TIME
DAYLIGHT SVG TIME: Y
18-MAY-05 10:56:30
See
Section
7.9.2
SETUP SITE ID
AAAAAAAAAAAAAAAAAAAA
AAAAAAAAAAAAAAAAAAAA
Connect Battery Setup Serv Ph Num Factory Defaults
IS THE BATTERY
CONNECTED? Y
See
Section
7.9.4
ENTER PHONE NUMBER
9,,18005551212
See
Section
7.9.6
57
See
Section
7.9.3
RESTORE ALL DEFAULTS
ARE YOU SURE? N
See
Section
7.9.8
Page 66
System and Control Options
7.9.1 Change Password
A password is required to access the AC8’s system and control options,
as described in 7.1 - Login. The password consists of four characters
(see Table 14 for valid characters). The default password is AAAA.
Change the Password
To change the password:
• From the Setup System Info Menu, use the arrows
Change Password, then press Enter ↵.
• To change your password:
• Use the arrows
• Press Enter ↵ to advance to the next character position.
• When finished, press Enter ↵ again.
Reset Password to the Factory Default (“AAAA”)
To reset the password to the factory default of AAAA:
• Locate DIP switch 1 on the unit’s circuit board (see 1.7 - Controller Board Overview) and move
all switches to the OFF position (down).
• Move the second switch to the ON position, then to the OFF position.
• Move the seventh switch to the ON position, then to the OFF position.
• Move the eighth switch to the ON position, then to the OFF position.
The password should now be AAAA.
↑↓ to choose a character.
↑↓ to choose
Setup System Info Menu
SETUP SYSTEM INFO
> CHANGE PASSWORD
CHANGE DATE & TIME
↑↓=NEXT ↵=SELECT
SETUP SITE ID
CONNECT BATTERY
SETUP SERV PH NUM
FACTORY DEFAULTS
Change Password
CHANGE PASSWORD
AAAA
↑↓=SELECT ↵=NEXT/END
7.9.2 Change Date & Time/Automatic Daylight Saving Time
The AC8 has a built-in real-time clock that is backed up by an encapsulated lithium battery and set
up to adjust automatically for daylight saving time twice a year. The Setup System Info menu allows
you to change the date or time or automatic adjustment at any time.
To change the daylight saving time setting, date or time:
• From the Setup System Info Menu, use the arrows
Change Date & Time, then press Enter ↵.
• To change the daylight saving time setting:
• To the right of Daylight Svg Time?
use the arrows ↑↓ to
choose Y (Yes - automatically adjust for daylight saving time)
or N (No), then press Enter ↵.
• The format of the date and time is DD-MMM-YY HR:MM:SS. To
change the date or time:
• Press Enter ↵ to advance to the next character position you
want to change.
• Use the arrows
Date Day (DD) 0-31
Time Hour (HR) 00-23
↑↓ to choose from available entries:
Month (MMM) JAN-DEC
Year (YY) 00-99
Minutes (MM) 00-59
Seconds (SS) 00-59
• Press Enter ↵ to advance to the next character position.
• When finished, press Enter ↵ again.
↑↓ to choose
Setup System Info Menu
SETUP SYSTEM INFO
CHANGE PASSWORD
> CHANGE DATE & TIME
↑↓=NEXT ↵=SELECT
SETUP SITE ID
CONNECT BATTERY
SETUP SERV PH NUM
FACTORY DEFAULTS
Change Date & Time
CHANGE DATE & TIME
DAYLIGHT SVG TIME: Y
18-MAY-05 10:56:30
↑↓=SELECT ↵=NEXT/END
58
Page 67

System and Control Options
7.9.3 Setup Site ID
You may enter a Site ID to identify the AC8’s location, using a name
that may consist of up to 40 characters (see Table 14 for valid characters). The Site ID will appear with each alarm.
To enter or change the Site ID:
• From the Setup System Info Menu, use the arrows
Setup Site ID, then press Enter ↵.
• To enter a Site ID:
• Use the arrows
• Press Enter ↵ to advance to the next character position.
• If the Site ID is less than 40 characters, you may enter an
underscore (_) character to indicate the end of the name.
• When finished, press Enter ↵ again.
7.9.4 Connect Battery
By default, the AC8 checks the battery and sounds an alarm when the power fails, the battery runs
low or the battery needs to be checked. The battery’s main purpose is to provide enough power to the
modem to notify pagers of a power loss.
NOTE
The battery will continue to power and provide full operation of the AC8 with the exception of
powering the analog inputs (sensors). The battery will provide backup for a minimum of 10
minutes.
Using the following procedure to disconnect the battery will disable battery alarm features only. The
battery itself will continue to provide backup. If battery backup is not desired, the battery must be
unplugged from the circuit board. This can be done by removing the battery leads from the jumpers
(see 2.4.2 - Connecting the Battery Pack).
↑↓ to choose a character.
↑↓ to choose
Setup System Info Menu
SETUP SYSTEM INFO
CHANGE PASSWORD
CHANGE DATE & TIME
↑↓=NEXT ↵=SELECT
> SETUP SITE ID
CONNECT BATTERY
SETUP SERV PH NUM
FACTORY DEFAULTS
Setup Site ID
SETUP SITE ID
AAAAAAAAAAAAAAAAAAAA
AAAAAAAAAAAAAAAAAAAA
↑↓=SELECT ↵=NEXT/END
The default is to connect the battery. However, there may be times that you want to disconnect the
battery so that it does not provide backup.
Table 25 shows battery problems that will affect operation.
Table 25 Battery alarms
Result of Battery Action Message Generated
Battery falls below a minimum charge. Battery will not provide battery backup. LOW BATTERY
Battery is connected to the circuit board but
not recognized by the circuit board.
Battery is unplugged from the circuit board. Battery will not provide battery backup BATTERY UNPLUGGED
Utility power (24VAC) to the circuit board is
too low to power the board.
To connect or disconnect the battery:
• From the Setup System Info Menu, use the arrows
Connect Battery, then press Enter ↵.
• Use the arrows
↑↓ to choose Y (Yes - the battery is connected) or
N (No - the battery is not connected), then press Enter ↵.
Battery will not provide battery backup. CHECK BATTERY
AC8 board will not be able to function
properly.
LOSS OF POWER
Setup System Info Menu
↑↓ to choose
SETUP SYSTEM INFO
CHANGE PASSWORD
CHANGE DATE & TIME
↑↓=NEXT ↵=SELECT
SETUP SITE ID
> CONNECT BATTERY
SETUP SERV PH NUM
FACTORY DEFAULTS
Connect Battery
IS THE BATTERY
CONNECTED? Y
59
↑↓=Y/N ↵=END
Page 68

System and Control Options
7.9.5 Backup and Upload Configuration File (Service Terminal Interface only)
This operation may be performed only through the Service Terminal Interface. It permits the user to
make a copy of the AC8’s configuration settings and save it as a file on the computer connected
through the RS232 port. Should the need arise, the user can upload the configuration file from the
computer to the AC8, instead of re-entering the settings manually.
To access these options:
1. Connect to the AC8 either from a remote computer or through the RS232 port (see
A.2 - Connecting to the Service Terminal Interface).
2. At the Main Menu, enter 0 (zero—Setup System - Login Required).
3. At the Login Menu, enter your password, then press the Enter key.
4. At the Setup Menu, enter 7 (Setup System Information).
5. At the Setup System Information Menu, enter 5 (Backup & Upload Configuration File). The
Backup & Upload Configuration File menu appears, shown below:
Backup & Upload Configuration File - Backup (Service Terminal Interface only)
BACKUP AND UPLOAD CONFIGURATION FILE
Backup from panel saves panel configurations
Upload to panel restores panel configurations
Select to backup or upload file
1=BACKUP CONFIGURATION FILE
2=UPLOAD CONFIGURATION FILE
3=RETURN TO SETUP SYSTEM INFO MENU
4=RETURN TO SETUP MENU
5=RETURN TO MAIN MENU
SELECT A NUMBER:1
6. Enter 1 to back up the configuration file from the AC8 to the computer and proceed to Step 8,
OR
7. Enter 2 to upload the configuration file from the computer to the AC8 and proceed to Step 13.
NOTE: This will replace the current configuration settings in the AC8 with the most recent
backup.
60
Page 69

System and Control Options
Back Up the Configuration File
8. At the prompt to Initiate a Backup of Configuration File, enter Y (Yes - begin) or N (No - cancel).
The current setting appears in brackets—[N] in the following example.
>INITIATE A BACKUP OF CONFIGURATION FILE-YES(Y) OR NO(N)?
>[N]
>[
NOTE
The following instructions refer to the Microsoft Windows HyperTerminal program. These
steps may vary for other communications programs.
9. At the top of the HyperTerminal window, shown below, click on Transfer, then on Receive File.
Enter folder
Select Xmodem
Enter filename for example,
ac8_conf.sav
10. In the Receive File window, as shown above:
• In the Place Received File in the Following Folder box, enter the name and location of the
folder where the configuration file should be placed—for example, C:\—or click on the
Browse button to locate the folder.
• In the Use Receiving Protocol box, select Xmodem from the drop-down list.
• Click on the Receive button. (To close the window without backing up the file, click on Close
or Cancel.)
11. In the Receive Filename window, enter a name for the file—for example, ac8_conf.sav—and
click OK.
12. When the transfer is complete, a confirmation message appears in the Service Terminal Interface
window: “Backup Successful.”
61
Page 70

System and Control Options
Upload the Configuration File
13. At the prompt to Initiate an Upload of Configuration File, enter Y (Yes - begin) or N (No - cancel).
The current setting appears in brackets—[N] in the following example.
>INITIATE AN UPLOAD OF CONFIGURATION FILE-YES(Y) OR NO(N)?
>[N]
>[
NOTE
The following instructions refer to the Microsoft Windows HyperTerminal program. These
steps may vary for other communications programs.
14. At the top of the HyperTerminal window, shown below, click on Transfer, then on Send File.
Enter filename for example,
ac8_conf.sav
Select Xmodem
Send button
15. In the Send File window, as shown above:
• In the Filename box, enter the full path of the file to be uploaded—for example,
C:\ac8_conf.sav—or click on the Browse button to locate the file.
• In the Protocol box, select Xmodem from the drop-down list.
• Click on the Send button. (To close the window without sending the file, click on Close or
Cancel.)
16. When the transfer is complete, a confirmation message—“Upload Successful”—appears in the
Service Terminal Interface window and the AC8 reboots with the new configuration.
62
Page 71

7.9.6 Setup Serv Ph Num - Enter Phone Number
The Service Phone Number (Serv Ph Num) is used for remote monitoring by Liebert Global Services.
The number is designed to allow remote monitoring services to connect to the AC8. All alarms will be
sent to this number. When an alarm occurs, this number is dialed before any of the four pager
numbers.
To use the service phone number features, be sure to connect the phone line connector to a telephone
wall jack using an RJ11 cord, as described in 3.6.2 - Phone Line Connector.
Table 26 Service phone number dialing results
Result of Dialing Action Message Generated
Successful ——
Unsuccessful due to:
Busy signal / no answer /
no dial tone
General modem
communication problem
No communication with modem
(internal hardware problem)
AC8 generates message after all three
redial attempts have failed, dials next configured pager.
AC8 resets modem, generates
message, redials up to three more times.
AC8 generates messages, makes no
further dialing attempts.
System and Control Options
Unsuccessful Page
(Event Log)
Modem Reset
(Event Log)
Modem Internal Fault
(Active Alarm Report,
Alarm History Log)
To set up the service phone number:
• From the Setup System Info Menu, use the arrows
↑↓ to choose
Setup Serv Ph Num, then press Enter ↵.
• See Table 27 for guidelines on entering the phone number, which
may consist of up to 40 characters. To enter the phone number:
• Use the arrows
↑↓ to choose a character.
• Press Enter ↵ to advance to the next character position.
• When finished, press Enter ↵ again.
Table 27 Guidelines for dialing service phone number
Device type Required entries Example
Remote
modem
Device type Optional entries Example
All types
of devices
The first character must be “M”. M18005551212
Use “9” if needed to access an outside
line—place after first character (M).
Use “W” to wait for a second dial tone
before dialing if the phone system has
two dial tones (initial tone and a second
tone for outside line)—place after “9”
(before the number to be dialed).
Use “,” (comma) to pause two seconds. M1,8005551212
M918005551212
M9W18005551212
Setup System Info Menu
SETUP SYSTEM INFO
CHANGE PASSWORD
CHANGE DATE & TIME
↑↓=NEXT ↵=SELECT
SETUP SITE ID
CONNECT BATTERY
> SETUP SERV PH NUM
FACTORY DEFAULTS
Setup Serv Ph Num
ENTER PHONE NUMBER
M18005551212
↑↓=SELECT ↵=NEXT/END
63
Page 72

System and Control Options
7.9.7 Setup Serv Ph Num - Communications Check (Service Terminal Interface only)
The Service Terminal Interface offers two additional options for setting up the Service Phone Number
(Serv Ph Num) that are not available through the LCD interface:
• Enable communications check
• Enter time to perform communications check
To access these options:
• Connect to the AC8 either from a remote computer or through the RS232 port (see
A.2 - Connecting to the Service Terminal Interface).
• At the Main Menu, enter 0 (zero—Setup System - Login Required).
• At the Login Menu, enter your password, then press the Enter key.
• At the Setup Menu, enter 7 (Setup System Information).
• At the Setup System Information Menu, enter 6 (Setup Service Phone Number).
• At the Setup Service Phone Number menu, shown below, enter 1 to begin the setup.
Setup Service Phone Number (Service Terminal Interface only)
SETUP SERVICE PHONE NUMBER
This number receives all alarms
in addition to the 4 pagers
1=SETUP SERVICE PHONE NUMBER
2=RETURN TO SETUP SYSTEM INFO MENU ******************
3=RETURN TO SETUP MENU An “M” is required
4=RETURN TO MAIN MENU as 1st character.
CURRENT NUMBER
******************
SELECT A NUMBER:1
• At the Enter Service Phone Number prompt, you may press Enter to bypass this option (or see
7.9.6 - Setup Serv Ph Num - Enter Phone Number for instructions on entering the number).
>ENTER SERVICE PHONE NUMBER(40 CHARACTERS MAX).
>[]
>[
>COMMAND SUCCESSFUL
Enable Communications Check
Enabling this function permits a daily communications test between the AC8 and the selected service
phone number. Once each day the AC8 dials the service phone number at a specified time and sends
this message: “AC8 COMM CHECK.” (The time of the test is specified at the next prompt, Enter
Time To Perform Communications Check.)
• At the Enable Communications Check prompt, enter Y (Yes - enable) or N (No - disable). The current setting appears in brackets—[N] in the following example.
>ENABLE COMMUNICATIONS CHECK-YES(Y) OR NO(N)?
>[N]
>
>COMMAND SUCCESSFUL
• Press Enter to proceed, or Escape to cancel the entry. If you make a change, a confirmation message appears: “Command Successful.”
Enter Time To Perform Communications Check
This function schedules the daily communications test between the AC8 and the selected service
phone number, as described in the previous section.
• At the Enter Time To Perform Communications Check prompt, enter the time to initiate the communications check, using the format HH:MM (hours and minutes in military time), ranging from
00:00 for midnight to 23:59 for 11:59 p.m. The current setting appears in brackets—[00:00] in the
following example.
>ENTER TIME TO PERFORM COMMUNICATIONS CHECK(HH:MM).
>[00:00]
>[
>COMMAND SUCCESSFUL
• Press Enter to proceed, or Escape to cancel the entry. If you make a change, a confirmation message appears: “Command Successful.”
64
Page 73

System and Control Options
7.9.8 Factory Defaults
At any time, you may restore all default values for settings in the AC8
as it was shipped.
NOTE
This action will overwrite any configuration settings. You may
want to back up your settings before restoring the factory
defaults. See Backup and Upload Configuration File
(Service Terminal Interface only) in A.6.7 - Setup System
Info for details on backing up settings using the Service
Terminal Interface.
The password is the sole exception when reverting to the factory
default settings. The password can be reset to the factory default of
AAAA only through the DIP switches. For details, see Change
Password on page 58.
7.9.9 Perform Firmware Update (Service Terminal Interface only)
This function, which may be performed only through the Service Terminal Interface, upgrades the
AC8’s firmware to the newest version.
NOTE
This action will overwrite any configuration settings. You may
want to back up your settings before restoring the factory
defaults. See Backup and Upload Configuration File
(Service Terminal Interface only) in A.6.7 - Setup System
Info for details on backing up settings using the Service
Terminal Interface.
Setup System Info Menu
SETUP SYSTEM INFO
CHANGE PASSWORD
CHANGE DATE & TIME
↑↓=NEXT ↵=SELECT
SETUP SITE ID
CONNECT BATTERY
SETUP SERV PH NUM
> FACTORY DEFAULTS
Factory Defaults
RESTORE ALL DEFAULTS
ARE YOU SURE? N
↑↓=Y/N ↵=END
• Connect to the AC8 either from a remote computer or through the RS232 port (see
A.2 - Connecting to the Service Terminal Interface).
• At the Main Menu, enter 0 (zero—Setup System - Login Required).
• At the Login Menu, enter your password, then press the Enter key.
• At the Setup Menu, enter 7 (Setup System Information).
• At the Setup System Info menu, enter 8 (Perform Firmware Update).
• At the Perform Firmware Update menu, shown below, enter 1 to proceed with an update.
Firmware Update (Service Terminal Interface only)
PERFORM FIRMWARE UPDATE
This command will update
the existing firmware
1=PERFORM FIRMWARE UPDATE
2=RETURN TO SETUP SYSTEM INFO MENU
3=RETURN TO SETUP MENU
4=RETURN TO MAIN MENU
SELECT A NUMBER:1
To perform the update:
1. At the Perform Firmware Update prompt, enter Y (Yes - begin) or N (No - cancel). The current
setting appears in brackets—[N] in the following example.
>PERFORM FIRMWARE UPDATE-YES(Y) OR NO(N)?
>[N]
>[
65
Page 74

System and Control Options
NOTE
The following instructions refer to the Microsoft Windows HyperTerminal program. These
steps may vary for other communications programs.
2. The firmware update is a two-step process—this step describes how to upload the file
prog###.s19 (where ### is a number—for example, prog118.s19) to the AC8:
a. At the top of the HyperTerminal window, shown below, click on Transfer, then on Send File.
Enter filename prog###.s19 or
flash####.s19
Select
Xmodem
Send button
b. In the Send File window, as shown above:
• In the Filename box, enter the full path of the file to be uploaded—prog###.s19—or click
on the Browse button to locate the file.
• In the Protocol box, select Xmodem from the drop-down list.
• Click on the Send button. (To close the window without sending the file, click on Close or
Cancel.)
• When the transfer is complete, a confirmation message appears in the Service Terminal
Interface window.
3. Next, follow these steps to upload the file flash####.s19 (where #### is a number—for example,
flash1000.s19) to the AC8:
a. At the top of the HyperTerminal window, shown above, click on Transfer, then on Send File.
b. In the Send File window, shown above:
• In the Filename box, enter the full path of the file to be uploaded—flash####.s19—or
click on the Browse button to locate the file.
• In the Protocol box, select Xmodem from the drop-down list.
• Click on the Send button. (To close the window without sending the file, click on Close or
Cancel.)
• When the transfer is complete, a confirmation message—“Firmware Update Successful”—
appears in the Service Terminal Interface window and the AC8 reboots with the new
firmware update.
66
Page 75

7.9.10 Initiate Remote Alarm Test (Service Terminal Interface only)
The service phone number is used for remote monitoring by Liebert Global Services. The Service Terminal Interface may be used to test communications between the AC8 and the service modem. This
test will send a “DIAL OUT TEST PASSED” message to the service phone number.
The test is used to simulate an alarm to verify the proper configuration and functioning of the modem
and other communications required for receiving alarms. This simulated alarm bypasses the normal
alarm sequence—the LCD will not flash, the horn will not sound and there will be no record in the
Alarm Log. A message is sent to the service phone number only if the alarm system is set up correctly.
To initiate the remote alarm test:
• Connect to the AC8 either from a remote computer or through the RS232 port (see
A.2 - Connecting to the Service Terminal Interface).
• At the Main Menu, enter 0 (zero—Setup System - Login Required).
• At the Login Menu, enter your password, then press the Enter key.
• At the Setup Menu, enter 7 (Setup System Information).
• At the Setup System Info menu, enter 9 (Initiate Remote Alarm Test).
• At the Initiate Remote Alarm Test menu, shown below, enter 1 to initiate the remote alarm.
Initiate Remote Alarm Test (Service Terminal Interface only)
INITIATE REMOTE ALARM TEST
This command simulates an alarm
to test alarm notification setup
for the service phone number
System and Control Options
1=INITIATE REMOTE ALARM TEST
2=RETURN TO SETUP SYSTEM INFO MENU
3=RETURN TO SETUP MENU
4=RETURN TO MAIN MENU
SELECT A NUMBER:1
• At the Simulate An Alarm Condition prompt, enter Y if you wish to proceed or N if you want to
cancel the alarm simulation.
>SIMULATE AN ALARM CONDITION-YES(Y) OR NO(N)?
>[N]
>[
>COMMAND SUCCESSFUL
• After the “Command Successful” message appears, disconnect from the modem—at the top of the
HyperTerminal window, click on Call, then on Disconnect, as shown below.
Disconnect
• Wait for the AC8 to dial out to send a test message.
• To verify whether the test was successful, check the Event Log (see 5.3 - View Event Log) for
one of these two messages: Dial out test passed or Dial out test failed.
NOTE
Also verify that a message was received at the Service Phone Number.
If the test is NOT successful, check the following:
• Modem configuration (see 7.8.1 - Modem Setup - Initialization String)
• Pager configuration (see 7.8.3 - Pager Setup - Pager Number and PIN)
67
Page 76

7.10 Setup Operation
The AC8’s operation features allow you to set up a rotation sequence to
alternate which devices are operating and which are placed on
Standby, as well as test devices while in Standby mode and specify
what to do when a Standby device goes into alarm as it is powered up.
You may specify delay times after an output changes state, directing
the AC8 to wait before acknowledging inputs (hold delay time) or turning an output on or off (restart delay time). With staging, you may configure the AC8 to turn a standby device on or off when an analog sensor
detects a condition above or below specified levels.
To change any operation feature:
Log In and Choose Setup System
• From the Main Menu, use the arrows
Control, then press Enter ↵ (see 7.1 - Login for help).
• Enter your password at the Login screen.
• From the System and Control Menu, use the arrows
Setup System, then press Enter ↵.
↑↓ to choose System and
↑↓ to choose
System and Control Options
Setup System Menu
SETUP INPUTS
SETUP COMMON ALARM
SETUP SENSOR
↑↓=NEXT ↵=SELECT
SETUP ZONES
SETUP OUTPUTS
SETUP MODEM&PAGERS
SETUP SYSTEM INFO
> SETUP OPERATION
SETUP I/O MATRIX
Select Zone Menu
SELECT ZONE FOR
THE OPERATION
> ZONE 1
↑↓=NEXT ↵=EDIT
Select Setup Operation
• From the Setup System Menu, shown at right, use the arrows
choose Setup Operation and press Enter ↵.
Select a Zone to Configure
• From the Select Zone Menu, use the arrows
you want—for example, Zone_1—and press Enter ↵.
• Use the steps following Table 28 to access any of the Setup Operation options.
Table 28 shows the default settings for operation options: automatic sequencing, standby testing,
failed standby, hold delay, restart and staging.
Table 28 Default settings - operation features
Feature Default Other Options
AUTO SEQUENCING OFF (Deactivated) ON (Activated), 12h (Activated for 12-hour intervals)
STANDBY TESTING OFF (Deactivated) ON (Activated)
FAILED STANDBY N (Deactivated) Y (Activated)
HOLD DELAY 10:00 (No delay) Any time (in minutes and seconds) from 00:00 to 99:59
RESTART 00:06 (No delay) Any time (in minutes and seconds) from 00:00 to 99:59
STAGING OFF (Deactivated) ON (Activated)
Figure 12 provides an overview of the Setup Operation screens available via the LCD interface.
Figure 12 Menu overview - Setup Operation menu
Setup Operation
↑↓ to choose the zone
AUTO SEQUENCING OFF
STANDBY TESTING OFF
FAILED STANDBY N
HOLD DELAY : 10:00
RESTART : 00:06
STAGING : OFF
↑↓ to
Setup Operation Menu
> AUTO SEQUENCING OFF
STANDBY TESTING OFF
FAILED STANDBY N
↑↓=NEXT ↵=SELECT
HOLD DELAY : 10:00
RESTART : 00:06
STAGING : OFF
Setup Operation options
Auto Sequencing Standby Testing Failed Standby
AUTO SEQUENCING ON
3 DAYS
EVERY 0
AT 00:00
See
Section
7.10.1
> STANDBY TESTING ON
3 DAYS
EVERY 0
AT 00:00 FOR 10 MIN
See
Section
7.10.2
FAILED STANDBY N See
Hold Delay Restart Staging
HOLD DELAY
MIN : 00 SEC
10
See
Section
7.10.4
RESTART DELAY
MIN : 06 SEC
00
See
Section
7.10.5
68
Section
7.10.3
STAGING: ON
TARGET: +0070.0
SENSITIVITY: +005.0
See
Section
7.10.6
Page 77

7.10.1 Turn Automatic Sequencing On or Off
Use automatic sequencing to set up a schedule for rotation of redundant devices. For example, three
devices might be in operating mode while a fourth device is in standby mode. Every two days, the AC8
returns the standby device to operating mode and places one of the operating devices on standby.
When zones are used, the AC8 manages the rotation sequence for each zone separately, so each zone
might have one device in operating mode and one in standby mode.
NOTE
Auto sequencing will not function in a zone with any devices defined as Not Used. All outputs
in the zone must be defined as Operating or Standby (see 7.7 - Setup System - Setup
Outputs).
Auto sequencing is OFF (deactivated) by default. When auto sequencing is activated (ON or 12h, for a
12-hour interval), the AC8 cycles devices at the specified interval and time of day as follows:
• An output device in Standby mode is returned to Operating mode.
• An output device that is Operating is put in Standby mode.
When more than one device is in Standby mode or turned On, the AC8 performs the operations in a
sequence that rotates the order. For example, in a sequence set up to occur every two days:
• Monday: Device 1 is placed on Standby, and Devices 2, 3 and 4 operate.
• Wednesday: Device 2 is placed on Standby, and Devices 1, 3 and 4 operate.
• Friday: Device 3 is placed on Standby, and Devices 1, 2 and 4 operate.
• Sunday: Device 4 is placed on Standby, and Devices 1, 2 and 3 operate.
System and Control Options
NOTE
The AC8 will not cycle outputs that have been manually forced On or Off through the Override
Output Menu or the hardware switch (see 7.12 - Override Output).
To change the auto sequencing settings:
1. From the Setup System Operation Menu, use the arrows
↑↓ to
choose Auto Sequencing, then press Enter ↵.
Activate or Deactivate
2. In the Activate / Deactivate screen, use the arrows
↑↓ to choose one
of three options:
a. ON for intervals of every 1 to 99 days, then press Enter ↵ and
proceed to Step 3.
b. 12h for an interval of every 12 hours, then press Enter ↵ and
proceed to Step 4.
c. OFF to deactivate auto sequencing, then press Enter ↵ to
return to the previous menu.
Specify Start Time and Interval: Every 1 to 99 Days
3. Select the interval for how often the sequencing should occur in the
Every 0
3 Days field. The default is 3 days; valid entries range
from 0 to 99 days.
• For each digit, use the arrows
↑↓ to choose a number from 0 to
9, then press Enter ↵ to advance to the next digit.
• When finished, press Enter ↵ to set the time of day.
Specify Start Time: Every 12 Hours
4. Specify the time of day the sequencing should begin in the At 00
:00
field. The format is HH:MM for hours and minutes.
• Use the arrows
↑↓ to choose from available entries for hours
(00-23), then press Enter ↵ to advance to minutes.
• Use the arrows
↑↓ to select minutes (00-59).
• When finished, press Enter ↵ again.
Setup Operation Menu
> AUTO SEQUENCING OFF
STANDBY TESTING OFF
FAILED STANDBY N
↑↓=NEXT ↵=SELECT
HOLD DELAY : 10:00
RESTART : 00:06
STAGING : OFF
Activate / Deactivate
AUTO SEQUENCING OFF
↑↓=NEXT
↵=EDIT
Set Interval & Start Time
(1- to 99-Day Interval)
AUTO SEQUENCING ON
EVERY 0
AT 00:00
↑↓=NEXT
3 DAYS
↵=EDIT
Set Start Time
(12-Hour Interval)
AUTO SEQUENCING 12h
AT 00
:00
↑↓=NEXT
↵=EDIT
69
Page 78

7.10.2 Turn Standby Testing On or Off
Standby testing permits scheduling an automatic operational check of devices in Standby mode.
When this feature is activated (ON), the AC8 tests all devices in Standby mode by putting each device
in operating mode for a designated time. If an operating unit is designated as disabled on alarm, the
unit is turned off during standby testing, then turned on when the test ends.
You may specify the time of day the testing begins, the duration of the test and the interval between
tests. Standby testing is OFF (deactivated) by default.
To change the standby testing settings:
1. From the Setup System Operation Menu, use the arrows
choose Standby Testing, then press Enter ↵.
2. In the Activate / Deactivate screen, use the arrows
a. Choose ON to activate standby testing, then press Enter ↵ and
proceed to Step 3.
a. Choose OFF to deactivate the feature, then press Enter ↵ and
return to the previous screen.
3. Select the desired interval for how frequently testing should occur
in the Every 0
range from 0 to 99 days.
• For each digit, use the arrows
9, then press Enter ↵ to advance to the next digit.
• When finished, press Enter ↵ to configure the time of day.
4. Specify the time of day the test should begin in the At 00
The format is HH:MM for hours and minutes.
• Use the arrows
(00-23), then press Enter ↵ to advance to minutes.
• Use the arrows
• When finished, press Enter ↵ again.
5. Specify the duration of the test in minutes—the length of time the
standby units will be turned On—in the For 10 Min field. Use the arrows
from 0 to 59 minutes. The default is 10 minutes.
6. When finished, press Enter ↵.
3 Days field. The default is 3 days; valid entries
↑↓ to choose from available entries for hours
↑↓ to select minutes (00-59).
↑↓ to
↑↓ to choose:
↑↓ to choose a number from 0 to
:00 field.
System and Control Options
Setup Operation Menu
AUTO SEQUENCING OFF
> STANDBY TESTING OFF
FAILED STANDBY N
↑↓=NEXT ↵=SELECT
HOLD DELAY : 10:00
RESTART : 00:06
STAGING : OFF
Activate / Deactivate
STANDBY TESTING OFF
↑↓=NEXT
↵=EDIT
Change Standby Testing
> STANDBY TESTING ON
EVERY 0
AT 00:00 FOR 10 MIN
↑↓=NEXT
3 DAYS
↵=EDIT
↑↓ to choose a number
7.10.3 Specify Failed Standby Response
The AC8’s Failed Standby feature determines what happens when an operating device fails and a
standby device then becomes an operating unit. A subsequent alarm in the newly operating unit (previously the standby device) results in either restarting the previously operating device that was
alarmed or not. This feature specifies whether each device remains in its current state or returns to
its previous state of operation.
When this feature is activated (Y), each device returns to its previous state, as Table 29 shows. The
newly enabled Standby device is disabled; the previously operating device returns to Operating mode.
The default setting is N (deactivated), meaning that each device
remains in its current state: the Standby device remains enabled and
the previously operating unit remains disabled.
Table 29 Failed Standby response
Failed Standby
Setting
Activated (Y) Disabled Returns to Operating mode
Deactivated (N) Remains enabled Remains disabled
To change the Failed Standby settings:
• From the Setup System Operation Menu, use the arrows
choose Failed Standby, then press Enter ↵.
• In the Change Failed Standby screen, press use the arrows
choose Y to activate or N to deactivate the feature.
• Press Enter ↵.
Previous Standby Device
(alarm after being enabled)
Previously Operating
Device
↑↓ to
↑↓ to
Setup Operation Menu
AUTO SEQUENCING OFF
STANDBY TESTING OFF
> FAILED STANDBY N
↑↓=NEXT ↵=SELECT
HOLD DELAY : 10:00
RESTART : 00:06
STAGING : OFF
Change Failed Standby
FAILED STANDBY N
↑↓=NEXT ↵=END
70
Page 79

7.10.4 Specify Hold Delay Time
After an output changes state, the hold delay timer directs the AC8 to ignore all inputs in the same
zone for the specified time.
This delay is the amount of time that must elapse before the AC8 acknowledges a change of state in
any input. The default is 10 minutes (displayed as 10 MIN : 00 SEC).
The time delay applies only when a monitored output device changes from its normal state—for
example, the AC8 detects a closed contact that is defined as Normally Open.
System and Control Options
When the output device returns to its normal state, the AC8 acknowledges any input change of state immediately.
The hold delay timer also takes effect when the AC8 is powered up. All
alarms are ignored until the hold delay time expires.
To change the Hold Delay Time settings:
• From the Setup Operation Menu, choose Hold Delay, as shown at
right, and press Enter ↵.
• To change the time delay in minutes and seconds (in the range of
00:00 to 99:59):
• For minutes (MIN), press and hold one of the arrow keys
scroll through the numbers 00-99.
• Press Enter ↵ to advance to seconds (SEC).
• For seconds (SEC), press and hold one of the arrow keys
scroll through the numbers 00-59.
• When finished, press Enter ↵ again.
7.10.5 Specify Restart Time
The restart delay timer directs the AC8 to wait a specified time before changing the state of an output. This feature can prevent needless responses to transient conditions.
If two or more outputs change state simultaneously, the AC8 begins a
new countdown between each output change of state.
The default is 6 seconds (displayed as 00 MIN : 06 SEC).
To change the Restart Time settings:
• From the Setup Operation Menu, choose Restart, as shown at
right, and press Enter ↵.
• To change the time delay in minutes and seconds (in the range of
00:00 to 99:59):
• For minutes (MIN), press and hold one of the arrow keys
scroll through the numbers 00-99.
• Press Enter ↵ to advance to seconds (SEC).
• For seconds (SEC), press and hold one of the arrow keys
scroll through the numbers 00-59.
• When finished, press Enter ↵ again.
↑↓ to
↑↓ to
↑↓ to
↑↓ to
Setup Operation Menu
AUTO SEQUENCING OFF
STANDBY TESTING OFF
FAILED STANDBY N
↑↓=NEXT ↵=SELECT
> HOLD DELAY : 10:00
RESTART : 00:06
STAGING : OFF
Hold Delay Time
HOLD DELAY
10
MIN : 00 SEC
↑↓=SELECT
↵=NEXT/END
Setup Operation Menu
AUTO SEQUENCING OFF
STANDBY TESTING OFF
FAILED STANDBY N
↑↓=NEXT ↵=SELECT
HOLD DELAY : 10:00
> RESTART : 00:06
STAGING : OFF
Restart Delay Time
RESTART DELAY
00
MIN : 06 SEC
↑↓=SELECT
↵=NEXT/END
71
Page 80

7.10.6 Specify Staging
Staging allows a standby device to be turned On when a sensor detects a monitored point reaching a
specified setpoint. The AC8 continues to turn On additional standby units, if available, at specified
intervals.
Staging also turns Off devices as the condition returns to normal. Devices are turned off in a last-on /
first-off order, triggered by decreases of half the specified sensitivity increment.
The following example illustrates the staging process for a temperature sensor with a
Target setpoint of 70°F and a Sensitivity increment of 5°F.
Temperature Reaches Target Level: First Device Turned On
• When the temperature in Zone 1 reaches 75°F (target plus sensitivity), the AC8
turns On a cooling unit that has been on standby.
Temperature Rises by Sensitivity Increments: Second & Third Devices Turned On
• When the temperature reaches 80°F—an additional 5°F—the AC8 turns On a second standby cooling unit.
• If the zone has a third standby unit and the temperature rises another 5°F to 85°F,
a third standby unit is turned On.
Temperature Returns to Normal: Devices Turned Off
• When the temperature drops from 85°F to 82.5°F (a decrease of 2.5°F, half the sensitivity increment of 5°F), the third unit is turned Off.
• When the temperature falls to 77.5°F, the second device is turned Off.
• When the temperature falls below 75°F, the first device is turned Off.
System and Control Options
Staging is OFF by default.
To change the Staging settings:
• From the Setup Operation Menu, choose Staging, as shown at
right, and press Enter ↵.
• In the Activate/Deactivate screen, use the arrows
↑↓ to choose ON
to activate or OFF to deactivate the feature, then press Enter ↵.
NOTE: If the sensor for the zone is not connected, a SENSOR
NOT CONNECTED message is displayed, shown below right.
Press Escape to return to the previous screen.
The sensor in the zone must be set to CONNECTED to turn staging on.
• Once the feature is activated (ON), set the following features in
the Staging screen:
• Use the arrow keys
↑↓ to set the Target sensor reading value
that will initiate the staging process.
• Press Enter ↵ to advance to Sensitivity.
• Use the arrow keys
↑↓ to set the Sensitivity that defines the
increment for the next change in the staging process.
The default value is 2.
• When finished, press Enter ↵ again.
Setup Operation Menu
AUTO SEQUENCING OFF
STANDBY TESTING OFF
FAILED STANDBY N
↑↓=NEXT ↵=SELECT
HOLD DELAY : 10:00
RESTART : 00:06
> STAGING : OFF
Activate / Deactivate
STAGING: OFF
↑↓=NEXT
↵=EDIT
Staging
STAGING: ON
TARGET: +0070.0
SENSITIVITY: +005.0
↑↓=NEXT
↵=SELECT
Message
(if sensor for zone is not
connected to AC8)
SENSOR NOT
CONNECTED
72
Page 81

7.11 Setup System - Setup I/O Matrix
The Setup I/O Matrix menu allows you to configure the AC8’s digital and analog inputs to trigger various actions in either or both of the two control relays. Each relay can be set up to respond to more
than one digital or analog input.
Almost any mapping combination can be used. For example, you may decide to trigger an action in
Control Relay 1 when Device_1 goes into alarm, or you might want to generate an action in Control
Relay 2 when Sensor_1 High Setpoint goes into alarm.
System and Control Options
To set up the mapping of inputs to relays:
Log In and Choose Setup System
• From the Main Menu, use the arrows
Control, then press Enter ↵ (see 7.1 - Login for help).
• Enter your password at the Login screen.
• From the System and Control Menu, use the arrows
Setup System, then press Enter ↵.
Select Setup I/O Matrix
• From the Setup System Menu, shown at right, use the arrows
choose Setup I/O Matrix and press Enter ↵.
• Use the following instructions to set up the mapping of each digital input or analog sensor input
to each relay.
7.11.1 Set Up Mapping for a Digital Input
• Use the arrows ↑↓ to choose Map Input To Relay from the Map
Input/Sensor Menu, and press Enter ↵.
• From the Select Input Menu, choose the input you want—for exam-
ple, Device_1—and press Enter ↵.
• On the Input-to-Relay Map screen, you may map the selected input
to either or both of the control relays (1-2). The example at right
shows Device_1 mapped to Control Relay 1.
To make changes to the mapping:
• If needed, press Enter ↵ to advance to the position directly
below the relay.
• Use the arrows ↑↓ to choose Y (Yes - Mapped to this relay) or
N (No - Not mapped), then press Enter ↵.
• Press Enter ↵ to advance to the next position where you want
to make a change.
• Use the arrows ↑↓ to choose Y (Yes - Mapped to this relay) or
N (No - Not mapped), then press Enter ↵.
• When finished, press Enter ↵ again.
Default Mappings - Digital Inputs to Control Relays
By default, digital inputs are not mapped to any control relay, as shown
in Table 30.
Table 30 Default mapping of digital inputs to relays
Digital input By default, mapped to control relay:
Device_1 (none)
Device_2 (none)
Device_3 (none)
Device_4 (none)
Device_5 (none)
Device_6 (none)
Device_7 (none)
Device_8 (none)
↑↓ to choose System and
↑↓ to choose
↑↓ to
Setup System Menu
SETUP INPUTS
SETUP COMMON ALARM
SETUP SENSOR
↑↓=NEXT ↵=SELECT
SETUP ZONES
SETUP OUTPUTS
SETUP MODEM&PAGERS
SETUP SYSTEM INFO
SETUP OPERATION
> SETUP I/O MATRIX
Map Input/Sensor Menu
> MAP INPUT TO RELAY
MAP SENSOR TO RELAY
↑↓=NEXT
↵=SELECT
Select Input
SELECT INPUT
> DEVICE_1
DEVICE_2
↑↓=NEXT ↵=SELECT
DEVICE_3
DEVICE_4
DEVICE_5
DEVICE_6
DEVICE_7
DEVICE_8
Input-to-Relay Map
1 CONTROL RELAY
1 2
Y
N
↑↓=Y/N ↵=NEXT/END
73
Page 82

System and Control Options
7.11.2 Set Up Mapping for an Analog Sensor Input
• Use the arrows ↑↓ to choose Map Sensor To Relay from the Map
Input/Sensor Menu, and press Enter ↵.
• From the Select Sensor Menu, choose the input you want—for
example, Sensor_1 High Stpt—and press Enter ↵.
Map Sensor to Control Relay
• On the Sensor-to-Relay Map screen, you may map the selected sensor to either or both of the control relays (1-2). The example at right
shows Sensor_1 High Stpt mapped to Control Relay 1.
To make changes to the mapping:
• If needed, press Enter ↵ to advance to the position directly
below the relay.
• Use the arrows ↑↓ to choose Y (Yes - Mapped to this relay) or
N (No - Not mapped), then press Enter ↵.
• Press Enter ↵ to advance to the next position where you want
to make a change.
• Use the arrows ↑↓ to choose Y (Yes - Mapped to this relay) or
N (No - Not mapped), then press Enter ↵.
• When finished, press Enter ↵ again.
Default Mappings - Analog Inputs to Control Relays
By default, analog inputs are not mapped to any control relay, as
shown in Table 31.
Table 31 Default mapping of analog inputs to relays
Analog input By default, mapped to control relay:
Sensor_1 (none)
Sensor_2 (none)
Sensor_3 (none)
Sensor_4 (none)
Map Input/Sensor Menu
MAP INPUT TO RELAY
> MAP SENSOR TO RELAY
↑↓=NEXT
↵=SELECT
Select Sensor
SELECT SENSOR
> SENSOR_1 HIGH STPT
SENSOR_1 LOW STPT
↑↓=NEXT ↵=SELECT
SENSOR_2 HIGH STPT
SENSOR_2 LOW STPT
SENSOR_3 HIGH STPT
SENSOR_3 LOW STPT
SENSOR_4 HIGH STPT
SENSOR_4 LOW STPT
Sensor-to-Relay Map
1H CONTROL RELAY
1 2
Y
N
↑↓=Y/N ↵=NEXT/END
74
Page 83

7.12 Override Output
The Override Output feature allows you to manually change the state of any digital output to ON or
OFF, overriding automatic control by the AC8 (the default setting for all outputs). This menu also
allows you to release the manual override, returning any output to automatic control.
There are two ways to override automatic control of outputs:
• Use the Override Output menu, as described in this section, to turn any output ON or OFF.
• Use the hardware switch on the AC8 circuit board to force all eight outputs ON at the same time
(see Item I - Manual Override Switch (outputs) in 1.7 - Controller Board Overview).
After an output is forced manually ON or OFF through the Override Output menu, it remains in that
state until returned to automatic control through this menu.
Table 32 summarizes the four types of control, including the abbreviated message that appears on
the LCD and in log reports.
Table 32 Automatic / manual control - output points
Message Description
AUTO Automatic
FORCE ON Manually ON This output has been forced ON
FORCE OFF Manually OFF
HW FORCE ON
To force an output point ON or OFF or return it to automatic control:
Log In and Choose Override Output
• From the Main Menu, use the arrows
Control, then press Enter ↵ (see 7.1 - Login for help).
• Enter your password at the Login screen.
• From the System and Control Menu, use the arrows
Override Output, then press Enter ↵.
Select an Output
The Select Output menu, shown at right, displays the current status of
all eight outputs.
• Use the arrows
Device_1—and press Enter ↵.
Turn Output ON or OFF / Return to Automatic
• From the Override Output menu, use the arrows
of these options:
• AUTO - return to automatic control
• FORCE ON - manually turn this output ON (operating)
• FORCE OFF - manually turn this output OFF
• Press Enter ↵.
Manually ON
(all outputs)
Controlled by AC8
(default for all outputs)
(operating) or OFF via the Override
Output menu
All outputs have been forced ON
(operating) via the hardware switch on
the circuit board (see Item I - Manual
Override Switch (outputs) in 1.7 Controller Board Overview)
↑↓ to choose System and
↑↓ to choose
↑↓ to choose the output you want—for example,
↑↓ to choose one
System and Control Options
Main Menu
VIEW STATUS
> SYSTEM AND CONTROL
↑↓=NEXT
↵=SELECT
Login
LOGIN
↑↓=SELECT ↵=NEXT/END
AAAA
System & Control Menu
SETUP SYSTEM
> OVERRIDE OUTPUT
CLEAR ALARMS & LOGS
↑↓=NEXT
↵=SELECT
Select Output
OVERRIDE OUTPUT
> DEVICE_1 AUTO
DEVICE_2 AUTO
↑↓=NEXT ↵=SELECT
DEVICE_3 AUTO
DEVICE_4 FORCE ON
Override Output
SELECT DEVICE_1
F
↑↓=SELECT ↵=END
ORCE ON
75
Page 84

System and Control Options
7.13 Clear Alarms & Logs
The Clear Alarms & Logs menu allows you to clear active alarms or
delete all records from any of the AC8’s three logs: alarm, event and
trend logs.
To clear alarms or logs:
Log In and Choose Clear Alarms & Logs
• From the Main Menu, use the arrows
Control, then press Enter ↵ (see 7.1 - Login for help).
• Enter your password at the Login screen.
• From the System and Control Menu, use the arrows
Clear Alarms & Logs, then press Enter ↵.
• Use the following steps to clear alarms or delete log records.
7.13.1 Clear Active Alarms
To clear all active alarms:
• From the Clear Alarms/Logs Menu, use the arrows
Clear Active Alarms, then press Enter ↵.
• Use the arrows
N (No - do not clear alarms), then press Enter ↵.
Clearing active alarms is the only means to reset latched alarms. This
step is required to return latched points to their normal state. To set up
a digital input or an analog sensor input as latched, see:
• 7.3.4 - Set Up Alarmable Inputs in Latched or Unlatched
Mode
• 7.5.8 - Set Up Alarmable Sensors in Latched or Unlatched
Mode
↑↓ to choose Y (Yes - clear all active alarms) or
↑↓ to choose System and
↑↓ to choose
↑↓ to choose
Main Menu
VIEW STATUS
> SYSTEM AND CONTROL
↑↓=NEXT ↵=SELECT
Login
LOGIN
AAAA
↑↓=SELECT ↵=NEXT/END
System & Control Menu
SETUP SYSTEM
OVERRIDE OUTPUT
> CLEAR ALARMS & LOGS
↑↓=NEXT ↵=SELECT
Clear Alarms/Logs Menu
> CLEAR ACTIVE ALARMS
CLEAR ALARM LOG
CLEAR EVENT LOG
↑↓=NEXT ↵=SELECT
CLEAR TREND LOGS
Clear Active Alarms
CLEAR ACTIVE ALARMS
ARE YOU SURE? N
↑↓=Y/N ↵=END
7.13.2 Clear the Alarm Log
The alarm log contains up to 99 records of alarms that have occurred.
You may want to clear the log after backing up the file or simply to free
up space.
NOTE
Before deleting the records in the alarm log, you may want to
back up the file to a remote computer using the Service
Terminal Interface, as described in 6.2 - Back Up Log Files
(Service Terminal Interface only).
To delete all records from the alarm log:
• From the Clear Alarms/Logs Menu, use the arrows
Clear Alarm Log, then press Enter ↵.
• Use the arrows
N (No - do not clear the alarm log), then press Enter ↵.
NOTE
Clear active alarms is the only means to reset Latched alarms.
This action must be taken to return Latched points to their
normal state.
↑↓ to choose Y (Yes - clear the alarm log) or
↑↓ to choose
Clear Alarms/Logs Menu
CLEAR ACTIVE ALARMS
> CLEAR ALARM LOG
CLEAR EVENT LOG
↑↓=NEXT ↵=SELECT
CLEAR TREND LOG
Clear Alarm Log
CLEAR ALARM LOG
ARE YOU SURE? N
↑↓=Y/N ↵=END
76
Page 85

7.13.3 Clear the Event Log
System and Control Options
The event log contains up to 99 records of events detected by the AC8.
You may want to clear the log after backing up the file or simply to
free up space.
NOTE
Before deleting the records in the event log, you may want to
back up the file to a remote computer using the Service
Terminal Interface, as described in 6.2 - Back Up Log Files
(Service Terminal Interface only).
To delete all records from the event log:
• From the Clear Alarms/Logs Menu, use the arrows
Clear Event Log, then press Enter ↵.
• Use the arrows
↑↓ to choose Y (Yes - clear the event log) or N (No -
do not clear the event log), then press Enter ↵.
7.13.4 Clear the Trend Logs
The AC8 maintains a separate trend log for each configured analog
input sensor. Each log contains up to 100 records of data collected at
regular intervals. You may want to clear the logs after backing up the
files or simply to free up space.
Using the Clear Trend Logs command will clear all four trend logs
maintained by the AC8. There is no method of clearing records from
individual logs.
NOTE
Before deleting the records in the trend logs, you may want to
back up the files to a remote computer using the Service
Terminal Interface, as described in 6.2 - Back Up Log Files
(Service Terminal Interface only).
↑↓ to choose
Clear Alarms/Logs Menu
CLEAR ACTIVE ALARMS
CLEAR ALARM LOG
> CLEAR EVENT LOG
↑↓=NEXT ↵=SELECT
CLEAR TREND LOGS
Clear Event Log
CLEAR EVENT LOG
ARE YOU SURE? N
↑↓=Y/N ↵=END
Clear Alarms/Logs Menu
CLEAR ACTIVE ALARMS
CLEAR ALARM LOG
CLEAR EVENT LOG
↑↓=NEXT ↵=SELECT
> CLEAR TREND LOGS
Clear Trend Log
CLEAR TREND LOGS
ARE YOU SURE? N
↑↓=Y/N ↵=END
To delete the records from ALL four trend logs:
• From the Clear Alarms/Logs Menu, use the arrows
Clear Trend Logs, then press Enter ↵.
• Use the arrows
↑↓ to choose Y (Yes - clear all trend logs) or N (No -
do not clear the trend logs), then press Enter ↵.
↑↓ to choose
77
Page 86

8.0 SPECIFICATIONS
8.1 AC8 Specifications
Specifications
Transformer Module
115VAC
Power
Requirements
Dimensions
W x D x H, in. (mm)
Weight (Assembled) 20.56 lb. (9.33 kg)
Enclosure Type NEMA 1
Liquid Crystal Display (LCD) Four line, 20 character, backlit
Mounting Surface Building Wall or Structural Member
Ambient Operating
Environment
Processor Specifics
Model Motorola XC68HC812A4
Clock speed 16MHz
Total RAM 256Kb
Total FLASH 4M
Total EEPROM 4K
A/D Resolution (Analog IN) 12 Bit
Modem Type Embedded 14.4K bps
Clock Type Real-Time Clock
Clock battery backup type Lithium Cell (non-replaceable)
Clock battery life 7 years, constant, no power
Modem battery backup type Nickel Cadmium (replaceable)
Modem battery life 10 minutes at full load
Communications
Local Communications RS232
Remote Communications
Modem (9600-N-8-1)
Supported pagers
SiteScan Web IGM Protocol, EIA422
Agency Listings
UL UL1012 UL1585
CSA
CE Yes
FCC Compliance N/A
Inputs & Outputs (Quantity)
Digital Inputs (8) Dry Contact Closure 24VDC, 10 mA
Analog Inputs (4)
Digital Outputs (8) 24VAC, 3A
Common Alarm Outputs (2) 24VAC, 3A
Baud rate 9600 bps, Parity=None, Data bits=8, Stop bits=1
UML11500
115VAC ±10%
of nominal;
60Hz, 4A,
460VA
18 x 2-3/4 x 18
(457.2 x 69.85 x 457.2)
32ºF to 104ºF (0ºC to 40ºC)
0% RH to 95% RH (non-condensing)
9600 E-7-1 supports TAPI protocol version 1.8
Transformer Module
115VAC
(TM115)
C22.2 No. 66 and
C22.2 No. 107.1
4-20 mA signal input with selectable
power source of 12VDC or 24VDC
230VAC
UML23000
230VAC ±10%
of nominal;
50Hz, 0.5A,
115VA
230VAC
(TM230)
NOTE
If the equipment is
used in a manner
not specified by the
manufacturer, the
protection provided
by the equipment
may be impaired.
78
Page 87

Comparison of Functions: LCD and Service Terminal Interface
APPENDIX A- SERVICE TERMINAL INTERFACE
The Service Terminal Interface allows access to all functions of the AC8, including some that are not
possible through the LCD interface. This interface is accessible through any computer using a communications program such as Microsoft
®
Windows® HyperTerminal.
This appendix provides directions for connecting to the Service Terminal Interface, an overview of
each type of function and sample screens for each menu available through the Service Terminal Interface. References to more detailed instructions about each function are provided.
A.1 COMPARISON OF FUNCTIONS: LCD AND SERVICE TERMINAL INTERFACE
Table 33 lists all functions for viewing and configuring the AC8 and shows whether they can be performed through the LCD interface and where to find information.
Table 33 Guide to AC8 functions
Can be performed via: Where to find:
Function
VIEW STATUS FUNCTIONS
View Active Alarms ✔✔ page 22 page 85
View Alarm Log ✔✔ page 23 page 86
View Event Log ✔✔ page 24 page 87
View Trend Log ✔✔ page 25 page 88
View Input Status ✔✔ page 26 page 89
View Output Status ✔✔ page 27 page 89
View Pager Numbers ✔✔ page 28 page 90
View Operation ✔✔ page 29 page 91
View Control Status ✔✔ page 30 page 91
SILENCE ALARM & BACK UP LOGS FUNCTIONS
Silence Alarm (On the LCD, press any key to silence an alarm) ✔✔ page 31 page 92
Back Up Log Files — ✔ page 32 page 93
SYSTEM & CONTROL FUNCTIONS
Login ✔✔ page 34 page 95
Setup System ✔✔ page 36 page 96
Setup Inputs ✔✔ page 36 page 97
Setup Common Alarm ✔✔ page 39 page 97
Setup Sensor ✔✔ page 40 page 98
Setup Outputs ✔✔ page 47 page 99
Setup Modem & Pagers ✔✔ page 49 page 100
Initialization String ✔✔ page 49 page 101
Modem
Setup
Pager
Setup
Setup System Info ✔✔ page 57 page 102
Change Password ✔✔ page 58 page 102
Change Date & Time/Automatic Daylight Saving Time ✔✔ page 58 page 103
Setup Site ID ✔✔ page 59 page 103
Connect Battery ✔✔ page 59 page 103
Backup and Upload Configuration File — ✔ page 60 page 104
Setup Serv Ph Num - Enter Phone Number ✔✔ page 63 page 105
Setup Serv Ph Num - Communications Check — ✔ page 64 page 105
Factory Defaults ✔✔ page 65 page 105
Perform Firmware Update — ✔ page 65 page 106
Initiate Remote Alarm Test — ✔ page 67 page 106
Setup Operation ✔✔ page 68 page 107
Setup I/O Matrix ✔✔ page 73 page 116
Override Output ✔✔ page 75 page 113
Clear Alarms & Logs ✔✔ page 76 page 114
Clear Active Alarms ✔✔ page 76 page 114
Clear the Alarm Log ✔✔ page 76 page 114
Clear the Event Log ✔✔ page 77 page 115
Clear the Trend Logs ✔✔ page 77 page 115
Enter AC8 Phone Number — ✔ page 51 page 101
Enable Modem Diagnostic Messages — ✔ page 51 page 101
Change Modem Dial Prefix — ✔ page 51 page 101
Change Modem Hang Up Delay After a Call — ✔ page 51 page 101
Pager Number & PIN ✔✔ page 53 page 100
Communications Check — ✔ page 55 page 100
LCD
Service
Terminal
Instructions on
using function
Service Terminal
screen examples
79
Page 88

Connecting to the Service Terminal Interface
A.2 CONNECTING TO THE SERVICE TERMINAL INTERFACE
This section describes how to set up and connect to the Service Terminal Interface.
A.2.1 Connection Methods
There are two ways to access the Service Terminal Interface:
• Direct—Use a null modem cable to connect a computer’s COM1 port to the AC8’s RS232 port,
OR
• Remote—Use a remote computer’s modem to dial the telephone number of the phone line connected to the AC8.
Both methods require a communications program, such as HyperTerminal, to connect to the Service
Terminal Interface.
Refer to Table 34 for step-by-step instructions to set up each type of connection. Note that the remote
connection does not require setting up the COM1 port.
Table 34 Steps to set up a direct or remote connection
Direct Remote
A.2.2 - Create a Connection ✔✔
A.2.3 - Set Up the COM1 Port - Direct Connection Only ✔ N/A
A.2.4 - Set Up the Connection’s Properties ✔✔
A.2.5 - Connect to the Service Terminal Interface ✔✔
The instructions in this section refer to the HyperTerminal program—they may vary for other communications programs.
A.2.2 Create a Connection
Before connecting to the Service Terminal Interface, you must create a connection and specify the
method to be used for connection, as described in the following steps.
1. Start the HyperTerminal program—to do this, click on the Start button, then on Programs, then
Accessories, then Communications, and finally HyperTerminal.
2. At the top of the HyperTerminal window, click on File, then on New Connection, as shown
below left.
Enter a name for
the connection for example,
AC8
3. In the Connection Description window, shown above right, enter a name for the connection—for
example, AC8. This becomes the file name (with the extension “.ht”).
4. Click OK to close the window.
80
Page 89

Connecting to the Service Terminal Interface
5. In the Connect To window, shown below, select the appropriate connection method from the
Connect Using drop-down list:
DIRECT CONNECTION
Choose COM1
& proceed to Step 6
Direct Connection via RS232
• To set up a direct connection via the
AC8’s RS232 port, select COM1 as
shown above.
This opens the COM1 Properties
window.
• Proceed to Step 6 (next section).
REMOTE CONNECTION
Choose the computer’s modem
& proceed to Step 8
Remote Connection via Modem
• To make a remote connection through the AC8’s
modem, select your computer’s modem—Standard
9600 bps Modem in the example shown above.
• Enter the area code and phone number of the AC8’s
modem.
•Skip Steps 6 and 7 and proceed to Step 8 in A.2.4 -
Set Up the Connection’s Properties.
A.2.3 Set Up the COM1 Port - Direct Connection Only
The following steps apply only to setting up a direct connection to the Service Terminal Interface via
the AC8’s RS232 port. If you are setting up a remote connection via modem, skip to Step 8 (next section).
COM1 Port Setup
6. In the COM1 Properties window, shown below, make the following selections:
• Bits per second: 9600
• Data bits: 8
•Parity: None
• Stop bits: 1
• Flow control: None
7. Click OK. When the connection is open, the connection name appears in the title bar of the
HyperTerminal window. To complete the setup, continue with Step 8 (next section).
81
Page 90

A.2.4 Set Up the Connection’s Properties
The following steps are needed for both direct and remote connection to the AC8.
Properties Setup
8. Open the Properties window by clicking on File, then on Properties, as shown below left.
9. In the Properties window, above right, click on the Settings tab and choose the following settings:
• Function, arrow, and ctrl keys act as: Terminal keys
• Backspace key sends: Ctrl+H
• Emulation: ANSIW
• Telnet terminal ID: VT100
• Backscroll buffer lines: 500
• Play sound when connecting or disconnecting: Unchecked
Connecting to the Service Terminal Interface
Settings
tab
ASCII Setup
10. In the Properties window, click on the ASCII Setup button, shown below left.
ASCII
Setup
button
11. In the ASCII Setup window, shown above right, choose the following settings:
• ASCII Sending: place a check mark (
• ASCII Receiving: place a check mark (
•Click OK.
The setup is now complete. To use the new connection, proceed to the next section, A.2.5 - Connect
to the Service Terminal Interface.
✔) in the Send Line Ends With Line Feeds box.
✔) in the Wrap Lines That Exceed Terminal Width box.
82
Page 91
A.2.5 Connect to the Service Terminal Interface
After creating and setting up a connection, use a communications program such as HyperTerminal to
access the AC8’s Service Terminal Interface.
1. Verify communications connections between the remote computer and the AC8:
a. For direct connection (via RS232 port):
• Connect a null modem cable from the computer’s COM1 port to the AC8’s RS232 port (for
location, see 3.6.1 - RS232 Connector).
b. For remote connection (via modem):
• Verify modem connections between the remote computer and the AC8. The remote computer should have connectivity through a telephone line, high-speed cable or an Ethernet.
The AC8 must have a telephone line connected to its RJ11 port (for location, see 3.6.2 -
Phone Line Connector).
2. Start the HyperTerminal program—click on the Start button, then on Programs, then
Accessories, then Communications, and finally HyperTerminal.
3. Open the AC8 connection created in A.2.2 - Create a Connection. To do this, click on File, then
on Open, as shown below.
Connecting to the Service Terminal Interface
Click on the file name for example, AC8.ht
4. In the Open window, shown above right, select the file name—AC8.ht in this example—and then
click on the Open button.
5. Follow the steps below to display the Main Menu of the Service Terminal Interface:
a. For direct connection (via RS232 port):
• Press Enter (or Escape) to initiate communication and bring up the Main Menu.
b. For remote connection (via modem):
• The Connect window opens, as shown below left. Click the OK button.
• In the Connect window, below right, click Dial.
• If the dialing attempt is successful, the Main Menu appears.
Dial button
OK button
For more information on the AC8’s options:
• See A.3 - Overview of Menus for examples of the Service Terminal Interface screens.
• See Table 33 to locate step-by-step instructions for each AC8 function.
83
Page 92

A.3 OVERVIEW OF MENUS
The Main Menu offers choices for viewing the status of the AC8, silencing the audible alarm and
backing up the unit’s log files. It also allows access to the System and Control features, which require
a password.
The following shows where to find examples of the Main Menu screens:
Main Menu For sample screens, see:
1=VIEW ACTIVE ALARMS A.4 - View Status Menus
2=VIEW ALARM LOG
3=VIEW EVENT LOG
4=VIEW TREND LOG
5=VIEW INPUT & SENSOR STATUS
6=VIEW OUTPUT STATUS
7=VIEW PAGER NUMBERS
8=SILENCE ALARM A.5 - Silence Alarm & Back Up
Overview of Menus
Log Files (Service Terminal
Interface only)9=BACKUP LOG FILES
0=SETUP SYSTEM-LOGIN REQUIRED A.6 - Setup Menu
A.3.1 View Status Overview
The View Status features are available to all users. This permits all personnel to check on the status
of any equipment or location being monitored. These options allow any user to:
• View current monitoring data—active alarms and the status of all inputs and outputs
• View data stored in alarm, event and trend logs
• View pager numbers
A.3.2 Silence Alarm and Backup Log Files
Two Main Menu options—Silence Alarm and Backup Log Files—are unique to the Service Terminal
Interface. As with the View Status options, these features do not require a password:
• Silence Alarm—silence the AC8’s audible alarm and reset the Common Alarm Relay output.
• Backup Log Files—make backup copies of the AC8’s Alarm Log, Event Log and Trend Logs and
save the copies to a computer.
A.3.3 Setup Menu Overview
The Setup Menu options require a password. Authorized users may:
• Configure the AC8—this includes setting up digital and analog inputs, digital outputs, the
modem, up to four pagers, and system features such as setting the date and time
Three system features—Backup and Upload Configuration File, Firmware Update and
Initiate Remote Alarm Test—are unique to the Service Terminal Interface.
• Override automatic control of outputs to force an output ON or OFF
• Clear active alarms and delete all records in the alarm, event and trend logs
84
Page 93

A.4 VIEW STATUS MENUS
The View Status menu allows any user to view currently active alarms, monitoring data stored in the
alarm, event and trend logs, the status of all inputs and outputs, and the four pager numbers.
Main Menu
After connecting to the Service Terminal Interface, the Main Menu appears, as shown below. This
section presents Service Terminal Interface screens for options 1 through 7:
Main Menu
LIEBERT AC8
View Status Menus
LIEBERT CORPORATION COPYRIGHT 2005
VX.XXX.X
ALL RIGHTS RESERVED
MAIN MENU
1=VIEW ACTIVE ALARMS Section A.4.1
2=VIEW ALARM LOG Section A.4.2
3=VIEW EVENT LOG Section A.4.3
4=VIEW TREND LOG Section A.4.4
5=VIEW INPUT & SENSOR STATUS Section A.4.5
6=VIEW OUTPUT STATUS Section A.4.6
7=VIEW PAGER NUMBERS Section A.4.7
8=SILENCE ALARM
9=BACKUP LOG FILES
A=VIEW OPERATION STATUS Section A.4.8
B=VIEW CONTROL RELAYS STATUS Section A.4.9
0=SETUP SYSTEM - LOGIN REQUIRED
SELECT A NUMBER:1
A.4.1 View Active Alarms
For details on this feature, see 5.1 - View Active Alarms.
View Active Alarms
ACTIVE ALARMS
For sample screens, see:
Input points/hardware
presently in an alarm state
SENSOR_1 101.1 DEG
HIGH SETPOINT ALARM
SENSOR_2 ------ DEG
SENSOR PROBLEM
DEVICE_7 ALARM
CONTACT OPEN
BATTERY
CHECK BATTERY
<ENTER>=MORE <ESC>=EXIT <A>=ALL
1=REFRESH ACTIVE ALARMS
2=RETURN TO MAIN MENU
SELECT A NUMBER:
85
Page 94

A.4.2 View Alarm Log
For details on this feature, see 5.2 - View Alarm Log.
View Alarm Log
ALARM LOG
Alarm history
SENSOR_2 80.0 DEG
HIGH SETPOINT ALARM
29-AUG-05 09:29:10
MODEM
INTERNAL FAULT
29-AUG-05 09:20:10
DEVICE_8 ALARM
CONTACT CLOSED
29-AUG-05 09:19:10
SENSOR_2 79.0 DEG
RETURN TO NORMAL
28-AUG-05 19:29:10
View Status Menus
<ENTER>=MORE <ESC>=EXIT <A>=ALL
SENSOR_2 ------ DEG
SENSOR PROBLEM
28-AUG-05 15:08:10
SYSTEM
LOSS OF POWER
19-AUG-05 02:50:10
BATTERY
LOW BATTERY
18-AUG-05 05:23:10
BATTERY
BATTERY UNPLUGGED
12-AUG-05 22:47:10
1=REFRESH ALARM LOG
2=RETURN TO MAIN MENU
SELECT A NUMBER:
86
Page 95

A.4.3 View Event Log
For details on this feature, see 5.3 - View Event Log.
View Event Log
EVENT LOG
Event history
PAGER
UNSUCCESSFUL PAGE
23-OCT-05 18:05:26
DEVICE_3 STARTED
23-OCT-05 18:03:17
DEVICE_3 ON
CONTACT CLOSED
23-OCT-05 18:03:17
DEVICE_2 STARTED
23-OCT-05 18:03:11
<ENTER>=MORE <ESC>=EXIT <A>=ALL
View Status Menus
SENSOR_2 ------ DEG
SENSOR PROBLEM
22-OCT-05 07:10:10
SYSTEM
USER LOGIN
22-OCT-05 02:50:10
LIEBERT GLOBAL SERV
DIAL OUT TEST FAILED
20-OCT-05 05:23:10
MODEM
MODEM RESET
18-OCT-05 22:47:10
LIEBERT GLOBAL SERV
DIAL OUT TEST PASSED
18-OCT-05 05:23:10
<ENTER>=MORE <ESC>=EXIT <A>=ALL
1=REFRESH EVENT LOG
2=RETURN TO MAIN MENU
SELECT A NUMBER:
87
Page 96

A.4.4 View Trend Log
For details on this feature, see 5.4 - View Trend Log.
View Trend Log
TREND LOG
Trend history
for each sensor
Select sensor for trend
you want to view.
1=SENSOR_1
2=SENSOR_2
3=SENSOR_3
4=SENSOR_4
5=RETURN TO MAIN MENU
SELECT A NUMBER:1
TREND LOG
Trend history
SENSOR_1 75.4 DEG
NORMAL
28-AUG-05 15:45:10
View Status Menus
SENSOR_1 70.5 DEG
LOW SETPOINT EVENT
28-AUG-05 15:15:10
SENSOR_1 79.9 DEG
RETURN TO NORMAL
28-AUG-05 14:45:10
SENSOR_1 ------ DEG
SENSOR PROBLEM
28-AUG-05 14:15:10
<ENTER>=MORE <ESC>=EXIT <A>=ALL
SENSOR_1 65.9 DEG
LOW SETPOINT ALARM
28-AUG-05 13:45:10
SENSOR_1 69.9 DEG
LOW SETPOINT EVENT
28-AUG-05 13:15:10
SENSOR_1 80.7 DEG
HIGH SETPOINT EVENT
28-AUG-05 12:45:10
1=REFRESH TREND LOG
2=VIEW A DIFFERENT SENSOR
3=RETURN TO MAIN MENU
SELECT A NUMBER:
88
Page 97

A.4.5 View Input Status
For details on this feature, see 5.5 - View Input Status.
View Input & Sensor Status
INPUT & SENSOR STATUS
Sensor values & discrete inputs status
INPUT STATUS
SENSOR_1 80.0 DEG
SENSOR_2 ------ DEG
SENSOR_3 80.0 DEG
SENSOR_4 79.5 RH
DEVICE_1 NORMAL
DEVICE_2 ALARM
DEVICE_3 EVENT
DEVICE_4 ALARM
DEVICE_5 ALARM
DEVICE_6 EVENT
DEVICE_7 NORMAL
DEVICE_8 NORMAL
<ENTER>=MORE <ESC>=EXIT <A>=ALL
1=VIEW SENSOR_1 DYNAMICALLY
2=VIEW SENSOR_2 DYNAMICALLY
3=VIEW SENSOR_3 DYNAMICALLY
4=VIEW SENSOR_4 DYNAMICALLY
5=REFRESH INPUT & SENSOR STATUS
6=RETURN TO MAIN MENU
View Status Menus
SELECT A NUMBER:1
VIEW SENSOR_1 DYNAMICALLY
SENSOR_1 80.0 DEG
PRESS <ESC> KEY TO EXIT
A.4.6 View Output Status
For details on this feature, see 5.6 - View Output Status.
View Output Status
OUTPUT STATUS
Output status to device
OUTPUT STATE MODE ZONE *****************************************
DEVICE_1 ON OPERATING 1 STANDBY = IN STANDBY MODE
DEVICE_2 ON OPERATING 1 ALARM = IN ALARM
DEVICE_3 ON OPERATING 1 FORCE ON = FORCE ON BY OPERATOR
DEVICE_4 OFF STANDBY 1 FORCE OFF = FORCE OFF BY OPERATOR
DEVICE_5 OFF NOT USED 0 HW FORCE ON = FORCE ON BY HARDWARE SWITCH
DEVICE_6 OFF NOT USED 0 PENDING = PENDING DELAY TIMER
DEVICE_7 OFF NOT USED 0 NOT USED = DEVICE NOT USED
DEVICE_8 OFF NOT USED 0 *****************************************
OPERATING = OPERATING/ON
1=REFRESH OUTPUT STATUS
2=RETURN TO MAIN MENU
SELECT A NUMBER:
89
Page 98

A.4.7 View Pager Numbers
For details on this feature, see 5.7 - View Pager Numbers.
View Pager Numbers
PAGER & PIN NUMBERS
Numbers to dial
for an alarm
PAGER 1 NUMBER
A1,8005551212
PAGER 1 PIN
01234567891011121314
PAGER 2 NUMBER
A9W1,8005551212
PAGER 2 PIN
01234567891011121314
<ENTER>=MORE <ESC>=EXIT <A>=ALL
View Status Menus
PAGER 3 NUMBER
N18005551212,,,,1234567#
PAGER 3 PIN
PAGER 4 NUMBER
M1,8005551212
PAGER 4 PIN
1=REFRESH PAGER & PIN NUMBERS
2=RETURN TO MAIN MENU
SELECT A NUMBER:
90
Page 99

A.4.8 View Operation
For details on this feature, see 5.8 - View Operation.
View Operation
OPERATION STATUS
Autosequencing and Standby Testing
1=ZONE 1
2=ZONE 2
3=ZONE 3
4=ZONE 4
5=RETURN TO MAIN MENU
SELECT A NUMBER:1
ZONE 1
AUTO SEQUENCING ON
DAY 01 OF 02 (08:55)
STANDBY TESTING ON
DAY 00 OF 03 (00:00)
STAGING ON
CURRENT VALUE 73.8 DEG
SET VALUE +0070.0 DEG
SENSITIVITY +005.0 DEG
View Status Menus
1=VIEW A DIFFERENT ZONE
2=RETURN TO MAIN MENU
SELECT A NUMBER:
A.4.9 View Control Status
For details on this feature, see 5.9 - View Control Status.
View Control Status
CONTROL STATUS
RELAY STATUS
RELAY 1 OFF
RELAY 2 OFF
1=REFRESH CONTROL STATUS
2=RETURN TO MAIN MENU
SELECT A NUMBER:
91
Page 100

Silence Alarm & Back Up Log Files (Service Terminal Interface only)
A.5 SILENCE ALARM & BACK UP LOG FILES (SERVICE TERMINAL INTERFACE ONLY)
This section presents two options from the Main Menu that are available via the Service Terminal
Interface only.
Main Menu
After connecting to the Service Terminal Interface, the Main Menu appears, as shown below. This
section presents Service Terminal Interface screens for options 8 and 9:
Main Menu
LIEBERT AC8
LIEBERT CORPORATION COPYRIGHT 2005
SELECT A NUMBER:1
VX.XXX.X
ALL RIGHTS RESERVED
MAIN MENU
1=VIEW ACTIVE ALARMS
2=VIEW ALARM LOG
3=VIEW EVENT LOG
4=VIEW TREND LOG
5=VIEW INPUT & SENSOR STATUS
6=VIEW OUTPUT STATUS
7=VIEW PAGER NUMBERS
8=SILENCE ALARM Section A.5.1
9=BACKUP LOG FILES Section A.5.2
A=VIEW OPERATION STATUS
B=VIEW CONTROL RELAYS STATUS
0=SETUP SYSTEM - LOGIN REQUIRED
For sample screens, see:
A.5.1 Silence Alarm (Service Terminal Interface only)
For details on this feature, see 6.1 - Silence Alarm (Service Terminal Interface).
Silence Alarm
SILENCE ALARM
Silence alarm and reset
common alarm relay if
common alarm relay is
configured to reset with
silence alarm
1=SILENCE ALARM
2=RETURN TO MAIN MENU
SELECT A NUMBER:1
>ALARM HAS BEEN SILENCED
92
 Loading...