

Page 1

Instruction Manual
Form 5475
January 2015
Type 63EG-98HM
Type 63EG-98HM Pilot-Operated Relief Valve or
Backpressure Regulator
WARNING
!
Failure to follow these instructions or
to properly install and maintain this
equipment could result in an explosion,
re and/or chemical contamination
causing property damage and personal
injury or death.
Fisher® relief valves or backpressure
regulators must be installed, operated
and maintained in accordance with
federal, state and local codes, rules
and regulations and Emerson Process
Management Regulator Technologies,
Inc. (Emerson™) instructions.
If a leak develops or if the outlet
continually vents gas, service to the
unit may be required. Failure to correct
trouble could result in a hazardous
condition. Only a quali ed person must
install or service the unit.
Installation, operation and maintenance
procedures performed by unquali ed
personnel may result in improper
adjustment and unsafe operation. Either
condition may result in equipment
damage or personal injury. Use quali ed
personnel when installing, operating and
maintaining the Type 63EG-98HM
Pilot-Operated Relief Valve or
Backpressure Regulator.
Introduction
Scope of the Manual
This manual describes and provides instructions and
a parts list for the Type 63EG-98HM relief valve or
backpressure regulator. Instructions and parts lists
for other equipment used with this valve are found in
separate manuals.
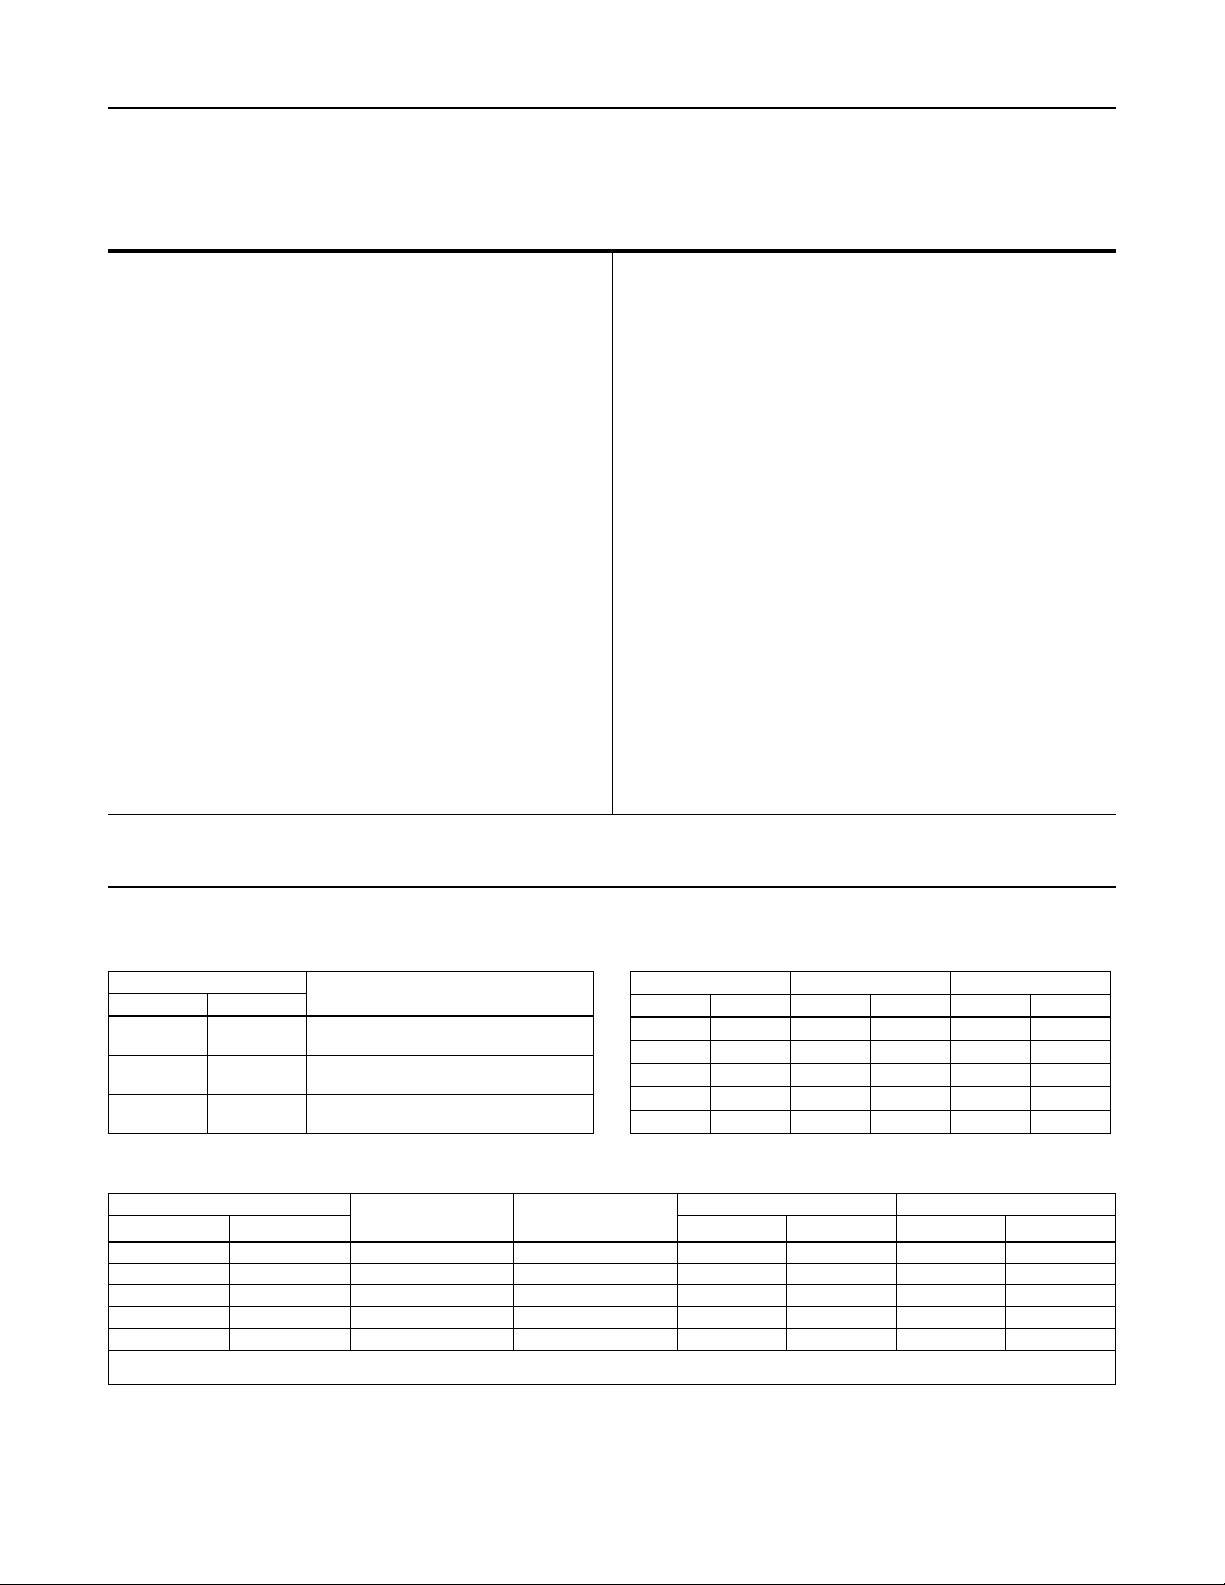
W6866
Figure 1. Type 63EG-98HM Pilot-Operated Relief Valve or
Backpressure Regulator
Product Description
The Type 63EG-98HM pilot-operated relief valve
or backpressure regulator is used for gas or liquid
applications. For applications up to 450°F / 232°C,
the Type 63EG-98HM utilizes high temperature
Ethylenepropylene (EPR) or Per uoroelastomer
(FFKM) elastomers for Class VI shutoff. If used in a
corrosive service, Per uoroelastomer (FFKM) and other
elastomers are available options that offer superior
resistance to heat and most corrosive chemicals. This
unit is not an ASME certi ed device.
www.fisherregulators.com
D102630X012
Page 2
Type 63EG-98HM
Specications
This section lists the specications for Type 63EG-98HM relief valves or backpressure regulators. Factory
specication is stamped on the nameplate fastened on the regulator at the factory.
Main Valve Body Sizes and End Connection Styles
See Table 1
Maximum Design Pressure
(2)(3)
600 psig / 41.4 bar or body rating limit, whichever
is lower
Maximum Operating Relief (Inlet) Pressure
Including Build-up
(2)(3)
450 psig / 31.0 bar or body rating limit, whichever
is lower
Maximum Outlet Pressure
(2)(3)
450 psig / 31.0 bar
Maximum Differential Pressure
(2)
400 psig / 27.6 bar
Relief Set Pressure/Backpressure Control Ranges
See Table 3
Port Diameter and Valve Plug Travels
See Table 2
Differential and Build-up Pressure Requirements
See Table 4
1. Other ratings and end connections can usually be supplied; consult the local Sales Ofce.
2. The pressure/temperature limits in this Instruction Manual and any applicable standard limitation should not be exceeded.
3. Fluorocarbon (FKM) diaphragm is limited to 300 psig / 20.7 bar.
4. Set pressure is dened as the pressure at which the pilot starts-to-discharge.
(1)
Temperature Capabilities
Fluorocarbon (FKM): 0 to 300°F / -18 to 149°C
Not acceptable in water in excess of 180°F / 82°C
Ethylenepropylene (EPR):
Steel: -20 to 350°F / -29 to 177°C
Stainless steel: -40 to 350°F / -40 to 177°C
Peruoroelastomer (FFKM): 0 to 450°F /
-18 to 232°C
Main Valve Flow Characteristics
Linear (standard) or Whisper Trim™ III Cage (optional)
Pilot Control Line Connection
1/8 NPT
Pilot Spring Case Connection
(4)
1/4 NPT
Approximate Weights (Including pilot)
NPS 2 / DN 50 body: 65 lbs / 29 kg
NPS 3 / DN 80 body: 105 lbs / 48 kg
NPS 4 / DN 100 body: 155 lbs / 70 kg
(2)
NPS 6 / DN 150 body: 340 lbs / 154 kg
NPS 8 x 6 / DN 200 x 150 body: 630 lbs / 286 kg
(2)
Table 1. Body Sizes and End Connection Styles
MAIN VALVE BODY SIZE
NPS DN
2 50
3, 4, 6 80, 100, 150
8 x 6 200 x 150
END CONNECTION STYLE
NPT, ASME CL150 RF, CL300 RF,
CL600 RF or PN 16/25/40 anged
ASME CL150 RF, CL300 RF,
CL600 RF or PN 16/25/40 anged
ASME CL150 RF, CL300 RF
and CL600 RF anged
Table 2. Port Diameters and Valve Plug Travels
BODY SIZE PORT DIAMETER VALVE PLUG TRAVEL
NPS DN In. mm In. mm
2 50 2-3/8 60 1-1/8 29
3 80 3-3/8 86 1-1/2 38
4 100 4-3/8 111 2 51
6 150 7-3/16 183 2 51
8 x 6 200 x 150 7-3/16 183 2 51
Table 3. Relief Set Pressure or Backpressure Control Ranges
CONTROL PRESSURE RANGE
psig bar In. mm In. mm
15 to 35 1.0 to 2.4 ERCA04288A0 Yellow 2.50 63.5 0.207 5.26
25 to 75 1.7 to 5.2 ERAA01910A0 Green 2.595 65.9 0.234 5.94
70 to 140 4.8 to 9.7 ERAA01911A0 Red 2.44 62.0 0.283 7.19
130 to 200 9.0 to 13.8 ERAA02889A0 Blue 2.250 57.2 0.331 8.41
150 to 375
1. All springs may be backed off to 0 psig / 0 bar. However, highest capacities and best performances are obtained by using these springs in their recommended ranges.
2. 150 to 375 psig / 10.3 to 25.9 bar spring range is for the Type MR98HH pilot construction.
2
(2)
10.3 to 25.9
(1)
PART NUMBER COLOR
(2)
1N943427142 Unpainted 5.063 129 0.394 10.0
SPRING FREE LENGTH SPRING WIRE DIAMETER
Page 3
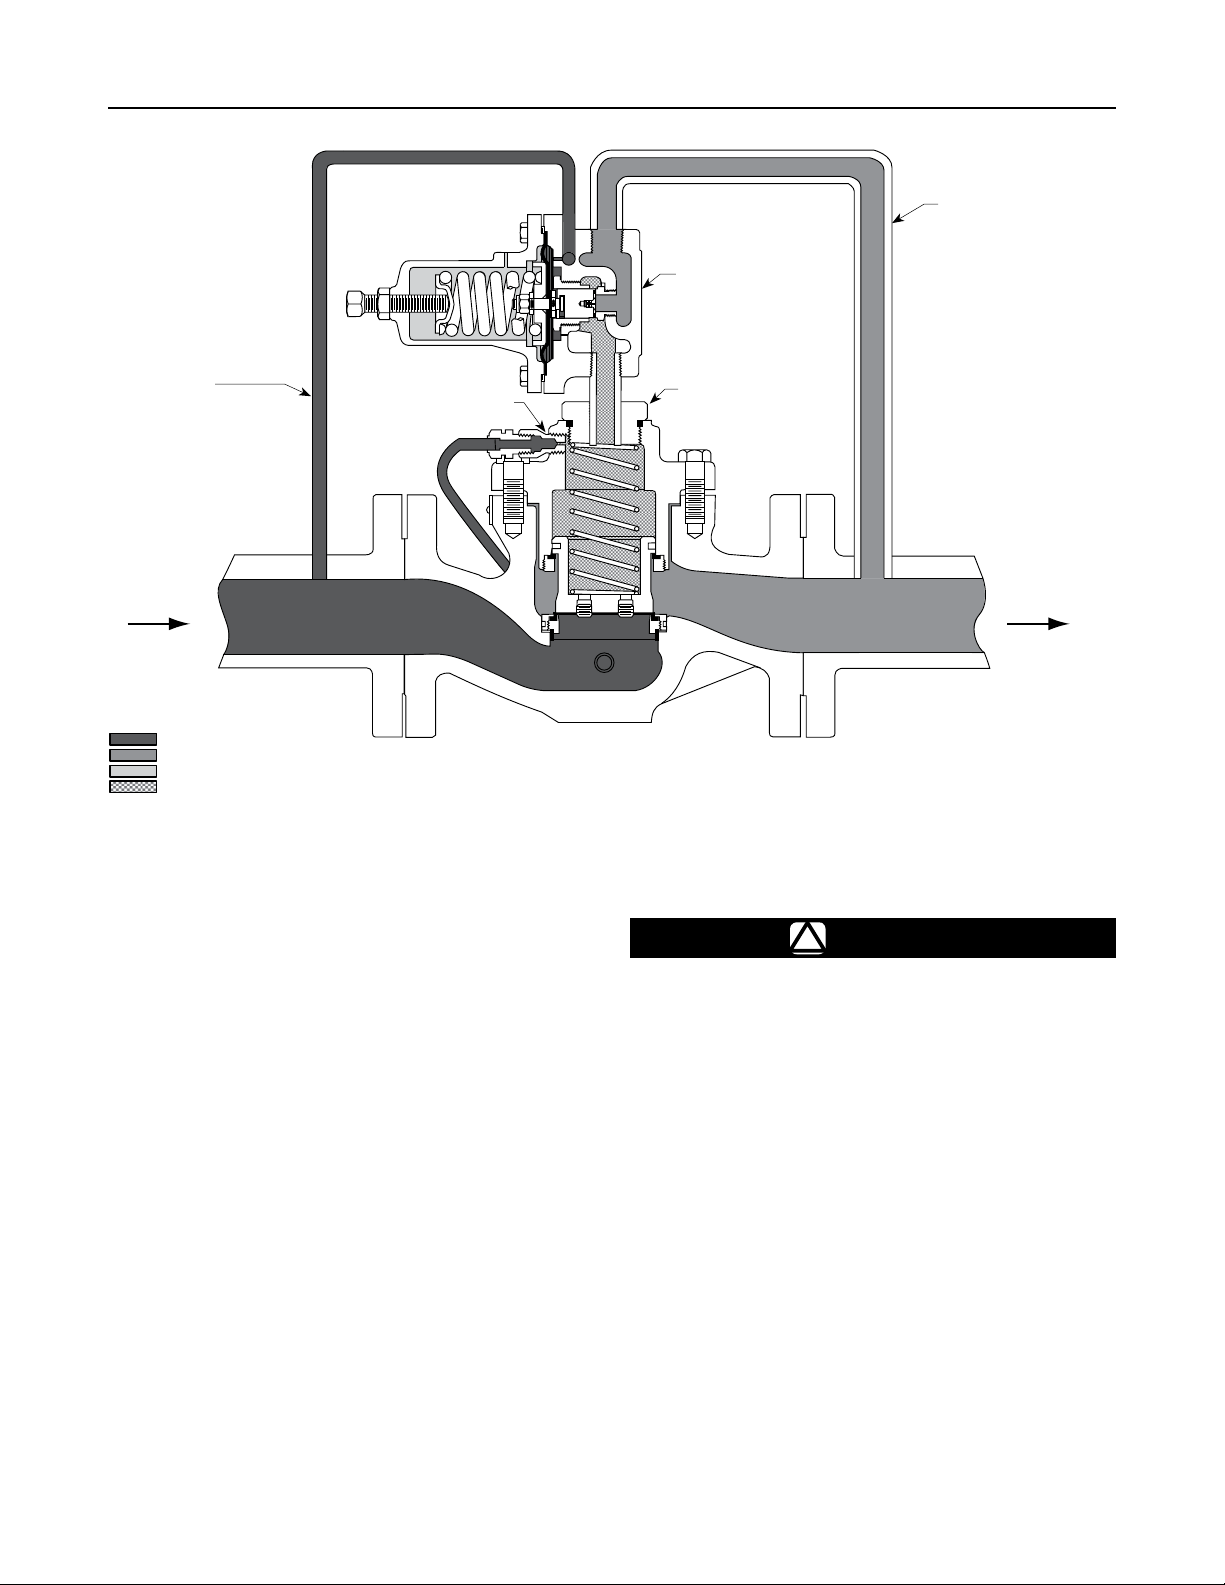
Type 63EG-98HM
INLET PRESSURE
OUTLET PRESSURE
ATMOSPHERIC PRESSURE
PILOT EXHAUST
(PIPE DOWNSTREAM
IF MINIMUM DIFFERENTIAL
IS MET)
TYPE MR98H
COMP
CONTROL LINE
(MUST BE AT LEAST
3/8 IN. / 9.5 mm TUBING)
A6926_2
INLET PRESSURE
OUTLET PRESSURE
ATMOSPHERIC PRESSURE
LOADING PRESSURE
Note: On an actual Type 63EG-98HM, the pilot spring case points downstream.
FIXED RESTRICTION
Figure 2. Operational Schematic
Specications
Specications for a given construction as it originally
comes from the factory are stamped on the main valve
and pilot nameplates. The main valve nameplate
is located on the main valve body. The pilot relief
pressure range appears on the pilot nameplate.
Principle of Operation
As long as inlet pressure remains below set pressure,
the pilot control spring keeps the pilot valve plug
closed (Figure 2). This pressure provides the loading
pressure to help the main valve spring keep the main
valve plug tightly shutoff.
An inlet pressure rise above the set pressure
overcomes the pilot control spring and opens the
pilot valve plug. Loading pressure bleeds out the pilot
exhaust faster than it can be replaced through the pilot
restriction. This permits inlet pressure to unbalance
the main valve plug and open the main valve. As inlet
pressure drops below set pressure, the pilot control
spring closes the pilot valve plug. Loading pressure
again builds up to close the main valve plug.
TYPE 63EG
Installation
WARNING
!
Personal injury, equipment damage or
leakage due to escaping gas (or liquid)
or bursting of pressure-containing
parts may result if the relief valve is
installed where its capabilities can be
exceeded or where conditions exceed
any ratings of the adjacent piping or
piping connections. To avoid this, install
a Type 63EG-98HM relief valve where:
• Service conditions are within unit
capabilities (including those given in
the Specications section)
• Service conditions are within applicable
codes, regulations or standards
Additionally, physical damage to the
relief valve could break the pilot off the
main valve, causing personal injury and
property damage due to escaping gas (or
liquid). To avoid such injury or damage,
install the unit in a safe location.
3
Page 4
Type 63EG-98HM
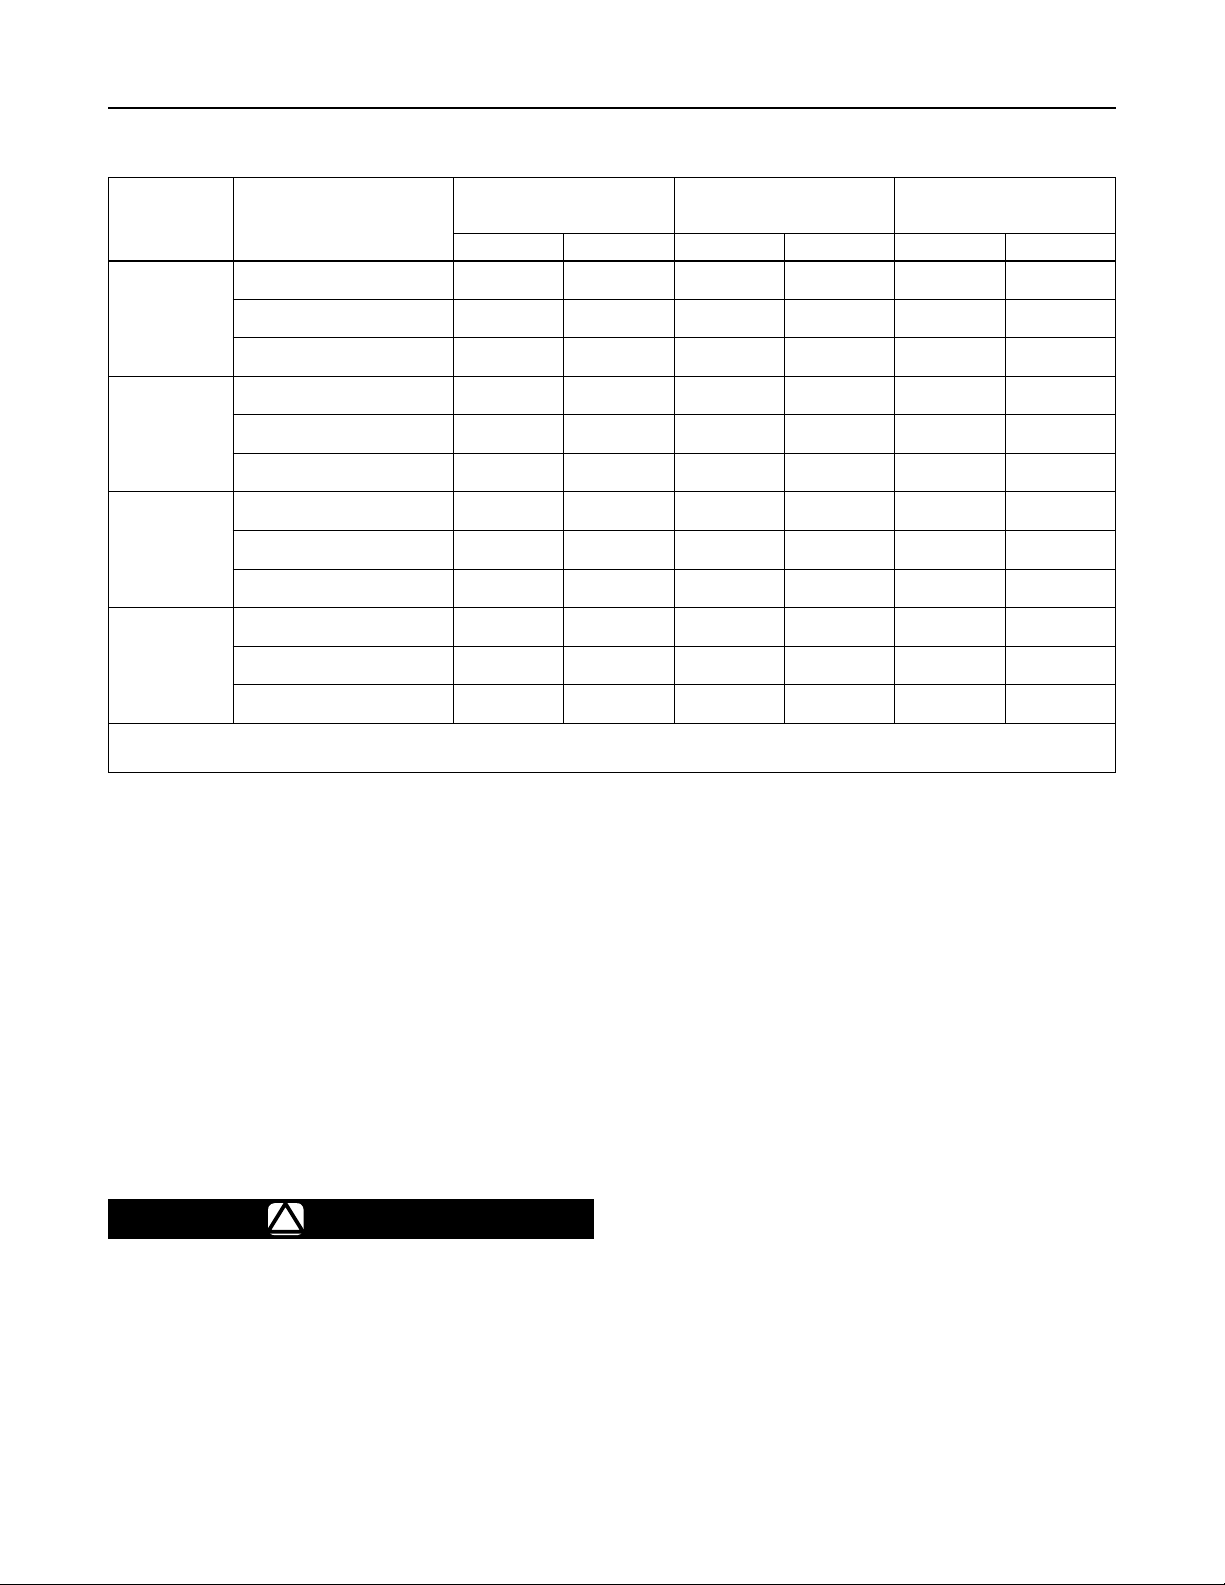
Table 4. Minimum and Maximum Differential and Build-up Required for Wide-Open Flow
BODY SIZE,
NPS / DN
2 / 50
3 / 80
4 / 100
6, 8 x 6 /
150, 200 x 150
1. Minimum differential is dened as the difference between the inlet pressure to the main valve body and the exhaust pressure from the pilot outlet. If the pilot exhaust is piped to the
immediate downstream system, the differential is between the inlet and outlet pressure of the backpressure regulator. The pilot exhaust also may be discharged to atmosphere.
2. CL150 steel body is limited to 290 psig / 20 bar.
MAIN VALVE SPRING RANGE,
SPRING PART NUMBER
AND COLOR
10 to 40 psig / 0.69 to 2.8 bar
14A6768X012 Yellow
30 to 125 psig / 2.1 to 8.6 bar
14A6626X012 Green
85 to 400 psig / 5.9 to 27.6 bar
14A6628X012 Red
10 to 40 psig / 0.69 to 2.8 bar
14A6771X012 Yellow
30 to 125 psig / 2.1 to 8.6 bar
14A6629X012 Green
85 to 400 psig / 5.9 to 27.6 bar
14A6631X012 Red
10 to 40 psig / 0.69 to 2.8 bar
14A6770X012 Yellow
30 to 125 psig / 2.1 to 8.6 bar
14A6632X012 Green
85 to 400 psig / 5.9 to 27.6 bar
14A6634X012 Red
10 to 40 psig / 0.69 to 2.8 bar
15A2253X012 Yellow
30 to 125 psig / 2.1 to 8.6 bar
14A9686X012 Green
85 to 400 psig / 5.9 to 27.6 bar
15A2615X012 Red
MINIMUM DIFFERENTIAL
PRESSURE REQUIRED
FOR FULL STROKE
psi bar psi bar psi bar
22 1.5 7 0.48 40 2.8
30 2.1 9 0.6 125 8.6
90 6.2 23 1.6 400
19 1.3 5 0.34 40 2.8
25 1.7 7 0.48 125 8.6
60 4.1 17 1.2 400
16 1.1 4 0.28 40 2.8
20 1.4 6 0.4 125 8.6
55 3.8 16 1.1 400
16 1.1 4 0.28 40 2.8
20 1.4 6 0.4 125 8.6
55 3.8 16 1.1 400
(1)
BUILD-UP OVER SET
PRESSURE REQUIRED
FOR FULL STROKE
MAXIMUM DIFFERENTIAL
PRESSURE
(2)
28
(2)
28
(2)
28
(2)
28
(2)
(2)
(2)
(2)
1. Call a qualied personnel when installing,
operating, and maintaining relief valves and
backpressure regulators. Before installing,
inspect the main valve, pilot and tubing for any
shipment damage or foreign material that may
have collected during crating and shipment. Make
certain the body interior is clean and the pipelines
are free of foreign material. Apply pipe compound
only to the external pipe threads with an NPT
body, or use suitable line gaskets and good bolting
practices with a anged body.
2. A Type 63EG-98HM may be installed in any
orientation, as long as ow through the valve
matches the direction of the arrow on the main
valve body.
WARNING
!
Type 63EG relief valves vent from the
main valve outlet and from the pilot
exhaust. In hazardous or ammable
gas service, personal injury, death or
property damage may occur due to re
or explosion or exposure of vented gas
(or liquid) that has accumulated. To
prevent such injury or damage, provide
piping or tubing to vent the gas (or
liquid) to a safe location. The exhaust
piping must be designed and installed to
guard against excessive ow restriction.
This piping must be protected against
condensation or anything else that could
clog it.
For safety during shutdown, vent valves
are required immediately upstream
and downstream of the main valve on a
backpressure or bypass installation.
3. If system operation is necessary during
maintenance or inspection, install isolating and
vent valves as needed.
4. A relief valve must be installed so that the pilot
exhausts properly and in a safe place. Make
sure to keep the pilot spring case vent open to
atmospheric pressure.
5. If the exhaust is to be piped to the main valve
outlet or remotely vented, install obstruction-free
tubing or piping with a minimum number of bends
into the 1/2 NPT pilot exhaust connection.
4
Page 5

Type 63EG-98HM
6. If using pipe, apply a good grade of pipe
compound to the external pipe threads before
making the connection. Install tubing or piping into
the appropriate pilot connection.
7. Set pressure is dened as the pressure at which
the pilot starts to discharge. The set pressure
of a unit is adjusted by changing the control
spring compression on the pilot, by using the
adjusting screw.
8. Each pilot is factory set for the relief set pressure
specied on the order. If no setting is specied, set
pressure is factory set at the midrange of the pilot
control spring.
Startup and Adjustment
Key numbers are referenced in Figures 4, 5 and 6
unless otherwise indicated.
1. With proper installation and adjustment completed,
slowly open the upstream shutoff valve while using
gauges to monitor pressure. On backpressure or
bypass applications using an isolating bypass,
also open the downstream shutoff valve and close
the bypass valve.
Maintenance
Relief valve and backpressure regulator parts are
subject to normal wear and must be inspected and
replaced as necessary. The frequency of inspection
and replacement of parts depends upon the severity
of service conditions or the requirements of local, state
and federal regulations. Due to the care Emerson™
takes in meeting all manufacturing requirements
(heat treating, dimensional tolerances, etc.), use
only replacement parts manufactured or furnished by
Emerson. All O-rings, gaskets and seals should be
lightly lubricated with a good grade of general purpose
grease and installed gently rather than forced into
position. Be certain that the nameplates are updated
to accurately indicate any eld changes in equipment,
materials, service conditions or pressure settings.
WARNING
!
To avoid personal injury and
equipment damage, isolate the valve
from all pressure. Cautiously release
pressure from the valve before
attempting disassembly.
2. If set pressure adjustment is necessary,
monitor inlet pressure with a gauge during the
adjustment procedure.
Pilot Adjustment
Adjust the set pressure by loosening the pilot jam nut
(key 17) and turning the pilot adjusting screw (key 15)
clockwise to increase or counterclockwise to decrease
the set pressure. When the required set pressure is
maintained for several minutes, tighten the jam nut to
lock the adjusting screw in position.
Shutdown
Relief Installations
Slowly close the upstream shutoff valve. Release all
pressure from the main valve and pilot by opening the
upstream vent valve.
Backpressure or Bypass Installations
Slowly close the upstream shutoff valve while opening
the bypass valve if an isolating bypass is used. Then
close the downstream shutoff valve and open both
vent valves to release all pressure from the main valve
and pilot.
Type 63EG Main Valve
Replacing Trim Parts
Perform this procedure if inspecting, cleaning or
replacing individual parts in the trim package.
Key numbers for the Type 63EG main valve are
referenced in Figures 4 and 5.
Note
Access to the spring (key 9) or ange
O-ring (key 21) in step 1 can be gained
without removing the body ange (key 2).
1. Remove the pilot and pilot pipe nipple from the valve
body. Remove the body ange plug (key 27) and the
spring (key 9) and attached parts. Proceed to step 5 if
only performing maintenance on these parts.
2. Remove the cap screws (key 3) and pry the body
ange (key 2) loose from the valve body (key 1).
3. The valve body (key 1) can be used as a holding
xture by ipping the body ange over and anchor
it on the valve body as shown in Figure 3.
4. To gain access to the port seal (key 12), upper seal
(key 15) or valve plug parts, unscrew the seat ring
(key 13) from the cage (key 11) and the cage from
the body ange (key 2). For leverage, a wrench
5
Page 6

Type 63EG-98HM
W3012-1
REPLACING ENTIRE TRIM PACKAGE
Figure 3. Easy Trim Maintenance
handle or similar tool may be inserted into the ori ce
slots (Figure 3) and a strap wrench may be wrapped
around the cage or a soft bar may be inserted
through the windows of a standard cage. To remove
the piston ring (key 14) and/or plug O-ring (key 20),
remove the valve plug (key 16) from the body ange,
insert a screw-driver into the pre-cut fold over area of
the piston ring and unfold the piston ring.
5. Replace parts such as the gasket (key 4) and
cage O-ring (key 17) if worn or damaged, making
sure that if the port seal (key 12) and upper seal
(key 15) were removed they are installed in their
retaining slots with the grooved sides facing out.
Lightly lubricate seating surfaces and parts as
necessary for ease of installation. For proper
operation, a Type 63EG valve plug must have pipe
plugs (key 31) installed in all four balancing ports.
6. Install the plug O-ring (key 20) and piston ring
(key 14) onto the valve plug (key 16). Insert the
valve plug into the body ange (key 2), install the
cage (key 11) plus upper seal (key 15) and cage
O-ring (key 17) into the body ange and then install
the seat ring (key 13) plus port seal (key 12) into
the cage. Use the valve body as a holding xture
during this step as shown in Figure 3 and insert a
wrench handle or similar tool into the ori ce slots for
leverage when tightening the ori ce and cage.
W2772-1
REPLACING TRIM PARTS ON SITE
USING BODY AS HOLDING FIXTURE
screws or stud bolts (key 3). Install the pilot and its
pipe nipple and connect the pilot tubing.
8. Install the spring (key 9) and place the ange O-ring
(key 21) on the ange plug (key 27). Install the ange
plug; if necessary, compress the spring enough to
ensure secure engagement of plug and body ange
threads before nal tightening of the plug.
Type MR98H Pilot
WARNING
!
To avoid personal injury, property
damage or equipment damage caused
by sudden release of pressure or
uncontrolled process uid, do not
attempt any maintenance or disassembly
without rst isolating the regulator
from system pressure and relieving all
internal pressure from the regulator.
Relief valves or regulators that have been
disassembled for repair must be tested
for proper operation before being returned
to service. Only parts manufactured by
Emerson™ should be used for repairing
Fisher® relief valves and regulators.
Note
When installing the trim package, align the
body ange and valve body side tappings.
7. Remove the upside-down body ange (key 2) if
it was anchored on the body. Lightly lubricate the
cage seating surfaces of the valve body web and
the body ange. Install the body ange on the
body (key 1) and secure it evenly with the cap
6
Due to normal wear and damage that may occur from
external sources, relief valve parts such as the O-rings,
gaskets, diaphragm, ori ce and valve plug should be
inspected periodically and replaced as necessary. The
frequency of inspection and replacement depends upon
the severity of service conditions or the requirements of
state and federal laws.
The following instructions explain the disassembly of
the Type MR98H relief or backpressure pilot. Lightly
apply a good quality lubricant when reassembling. Key
numbers are referenced in Figure 7.
Page 7

Type 63EG-98HM
Table 5. Type 63EG Main Valve Body Part Numbers (Key 1)
BODY MATERIAL END CONNECTION STYLE
NPT 38A8848X012
CL150 RF anged 38A8853X012 38A8872X012 38A8867X012 38A7115X012 GE05973X012
WCB Steel
WCB Steel (NACE)
CF8M Stainless steel
CL300 RF anged 38A8849X012 38A8871X012 38A8869X012 38A8873X012 GE05974X012
CL600 RF anged 38A8844X012 38A8852X012 38A8866X012 38A8874X012 GE05975X012
PN 16/25/40 RF GE05960X012 GE05965X012 GE05969X012 GE05972X012 Contact local Sales Ofce
NPT 38A8848X022
CL150 RF anged 38A8853X052 38A8872X062 38A8867X032 38A7115X022 Contact local Sales Ofce
CL300 RF anged 38A8849X022 38A8871X042 38A8869X022 38A8873X022 Contact local Sales Ofce
CL600 RF anged 38A8844X022 38A8852X032 38A8866X022 38A8874X022 Contact local Sales Ofce
NPT 38A8848X032
CL150 RF anged 38A8853X072 38A8872X052 38A8867X042 38A7115X032 Contact local Sales Ofce
CL300 RF anged 38A8849X032 38A8871X052 38A8869X032 38A8873X032 Contact local Sales Ofce
CL600 RF anged 38A8844X032 38A8852X042 38A8866X032 38A8874X032 Contact local Sales Ofce
PN 16/25/40 RF GE05960X022 GE05965X022 GE05969X022 GE05972X022 Contact local Sales Ofce
NPS 2 / DN 50 NPS 3 / DN 80 NPS 4 / DN 100 NPS 6 / DN 150
- - - - - - - - - - - - - - - - - - - - - - - - - - - - - - - - - - - - - - - - - - - -
- - - - - - - - - - - - - - - - - - - - - - - - - - - - - - - - - - - - - - - - - - - -
- - - - - - - - - - - - - - - - - - - - - - - - - - - - - - - - - - - - - - - - - - - -
Table 6. Type 63EG Main Valve Spring Part Numbers (Key 9)
SPRING RANGE
BODY SIZES,
NPS / DN
2 / 50 14A6768X012 14A6626X012 14A6628X012 16A5502X012 16A5501X012 16A5499X012
3 / 80 14A6771X012 14A6629X012 14A6631X012 16A5505X012 16A5503X012 16A5500X012
4 / 100 14A6770X012 14A6632X012 14A6634X012 16A5507X012 16A5506X012 16A5998X012
6 and 8 x 6 /
150 and 200 x 150
10 to 40 psig /
0.69 to 2.8 bar
15A2253X012 14A9686X012 15A2615X012 16A5509X012 16A5510X012 16A6000X012
Standard NACE
30 to 125 psig /
2.1 to 8.6 bar
85 to 400 psig /
5.9 to 27.6 bar
PART NUMBER
10 to 40 psig /
0.69 to 2.8 bar
30 to 125 psig /
2.1 to 8.6 bar
NPS 8 x 6 /
DN 200 x 150
85 to 400 psig /
5.9 to 27.6 bar
1. Shut down the backpressure regulator or relief valve.
2. Relieve the spring tension by loosening the jam
nut (key 17) and turning the adjusting screw
(key 15) counterclockwise. Remove cap screws
(key 16) and lift off the spring case (key 2), upper
spring seat (key 9) and relief valve spring (key 11).
3. Lift out the diaphragm unit which includes the
lock nut (key 31), lock washer (key 28), pusher
post (key 10), gasket (key 29), lower spring
seat (key 8), diaphragm (key 12) and valve plug
(key 4).
4. Check the orice (key 3) for wear or damage. If
it needs to be replaced, unscrew the valve plug
guide (key 7) and then the orice. The valve plug
(key 4) can be removed by sliding it off of the
pusher post (key 10).
5. Place a small amount of sealant on the threads of
the orice (key 3) and valve plug guide (key 7) and
reinstall these to the body (key 1).
6. To replace the valve plug O-ring (key 53), remove the
machine screw (key 24) and O-ring retainer (key 25)
from the plug. Remove and replace the O-ring.
7. Separate the remainder of the diaphragm unit
parts. Take the lock nut (key 31) off of the pusher
post (key 10). Slide off the lock washer (key 28),
lower spring seat (key 8), diaphragm (key 12),
washer (key 58) and gasket (key 29).
8. Slip the valve plug (key 4) onto the pusher post
(key 10). Place a gasket (key 29) on the shaft of
the pusher post over the threaded portion until
it rests on the base of the post. The printed side
should be facing upwards when installed. Place a
metal washer (key 58) on top of the gasket.
9. Slip the lower spring seat (key 8) and lock washer
(key 28) back onto the pusher post (key 10).
Lubricate the threads of the pusher post and
tighten the pusher post lock nut (key 31) until
the lock washer is at and then turn the nut an
additional 1/8 to 1/4 turn. Return the diaphragm
(key 12), spring seat and pusher post assembly to
the body (key 1).
10. Set the relief valve spring (key 11) in the lower
spring seat and place the upper spring seat (key 9)
on the spring.
11. Put the spring case (key 2) over the spring
(key 11) and onto the body (key 1). Tighten the
cap screws (key 16) nger tight only.
12. To ensure proper slack in the diaphragm (key 12),
apply some spring compression by turning
the adjusting screw (key 15) clockwise. Finish
tightening the cap screws (key 16) with 10 to
13 ft-lbs / 13.56 to 17.63 N•m of torque.
7
Page 8

Type 63EG-98HM
Parts Ordering
Each Type 63EG-98HM is assigned a serial
number or FS number which can be found on the
nameplates. Refer to this number when contacting
your local Sales Ofce.
When ordering a replacement part, be sure to include
the 11-character part number found in the Parts List.
Separate kits containing all recommended spare parts
are available for both the main valve and pilot.
Parts List
Type 63EG Main Valve
Key Description Part Number
Parts Kit for WCC Steel Bodies
(includes keys: 4, 7, 12, 14, 15, 17, 20 and 21)
NPS 2 / DN 50 body
Fluorocarbon (FKM) R63EGXFK122
Ethylenepropylene (EPR) R63EGXEP122
NPS 3 / DN 80 body
Fluorocarbon (FKM) R63EGXFK132
Ethylenepropylene (EPR) R63EGXEP132
NPS 4 / DN 100 body
Fluorocarbon (FKM) R63EGXFK142
Ethylenepropylene (EPR) R63EGXEP142
NPS 6 / DN 150 body
Fluorocarbon (FKM) R63EGXFK162
Ethylenepropylene (EPR) R63EGXEP162
1 Main Valve Body See Table 5
2 Body Flange
NPS 2 / DN 50 body
WCC Steel 25A2254X012
CF8M Stainless steel 25A2254X082
NPS 3 / DN 80 body
WCC Steel 25A2300X012
CF8M Stainless steel 25A2300X122
NPS 4 / DN 100 body
WCC Steel 24A9032X012
CF8M Stainless steel 24A9032X042
NPS 6 / DN 150 body
WCC Steel 34A7152X012
CF8M Stainless steel 34A7152X052
3 Cap Screw for Steel body
NPS 2 / DN 50 body (8 required) 1A453324052
NPS 3 / DN 80 body (8 required) 1A454124052
NPS 4 / DN 100 body (8 required) 1A485724052
NPS 6 / DN 150 body (12 required) 1U513124052
Stud Bolt for Stainless steel body
NPS 2 / DN 50 body (8 required) 1K242935222
NPS 3 / DN 80 body (8 required) 1A378135222
NPS 4 / DN 100 body (8 required) 1R369035222
NPS 6 / DN 150 body (12 required) 1A365635222
4* Gasket
NPS 2 / DN 50 body
Composition 14A5685X012
Graphite 14A5685X072
NPS 3 / DN 80 body
Composition 14A5665X012
Graphite 14A5665X022
NPS 4 / DN 100 body
Composition 14A5650X012
Graphite 14A5650X062
NPS 6 / DN 150 body
Composition 14A6984X012
Graphite 14A6984X032
*Recommended spare part
Key Description Part Number
9 Spring See Table 6
11* Cage
NPS 2 / DN 50 body
316 Stainless steel Linear Cage 34B5838X012
416 Stainless steel Whisper Trim™ Cage 24A5707X012
316 Stainless steel Whisper Trim Cage 24A5707X022
NPS 3 / DN 80 body
316 Stainless steel Linear Cage 34B5839X012
416 Stainless steel Whisper Trim Cage 24A5708X012
316 Stainless steel Whisper Trim
NPS 4 / DN 100 body
316 Stainless steel Linear Cage 34B5840X012
416 Stainless steel Whisper Trim Cage 24A5709X012
316 Stainless steel Whisper Trim Cage 24A5709X022
NPS 6 / DN 150 body
316 Stainless steel Linear Cage 34B5841X012
416 Stainless steel Whisper Trim Cage 24A8174X012
316 Stainless steel Whisper Trim Cage 24A8174X022
12* Port Seal
NPS 2 / DN 50 body
Fluorocarbon (FKM) 25A7412X012
Peruoroelastomer (FFKM) 24A5673X082
Ethylenepropylene (EPR) 24A5673X062
NPS 3 / DN 80 body
Fluorocarbon (FKM) 25A7375X012
Peruoroelastomer (FFKM) 24A5658X052
Ethylenepropylene (EPR) 24A5658X062
NPS 4 / DN 100 body
Fluorocarbon (FKM) 25A7469X012
Peruoroelastomer (FFKM) 24A5643X032
Ethylenepropylene (EPR) 24A5643X052
NPS 6 / DN 150 body
Fluorocarbon (FKM) 14A6996X012
Peruoroelastomer (FFKM) 14A8175X042
Ethylenepropylene (EPR) 14A8175X022
13* Seat Ring
NPS 2 / DN 50
416 Stainless steel 24A5670X012
316 Stainless steel 24A5670X022
NPS 3 / DN 80
416 Stainless steel 24A5655X012
316 Stainless steel 24A5655X022
NPS 4 / DN 100
416 Stainless steel 24A5640X012
316 Stainless steel 24A5640X022
NPS 6 / DN 150
416 Stainless steel 24A6989X012
316 Stainless steel 24A6989X022
NPS 8x6 / DN 200x150
416 Stainless steel 38A4216X012
14* Piston Ring
NPS 2 / DN 50 body
Polytetrauoroethylene (PTFE) 14A5675X012
NPS 3 / DN 80 body
Polytetrauoroethylene (PTFE) 14A5660X012
NPS 4 / DN 100 body
Polytetrauoroethylene (PTFE) 14A5645X012
NPS 6 / DN 150 body
Polytetrauoroethylene (PTFE) 14A6985X022
15* Upper Seal
NPS 2 / DN 50 body
Fluorocarbon (FKM) 25A7413X012
Peruoroelastomer (FFKM) 24A5674X082
Ethylenepropylene (EPR) 24A5674X062
NPS 3 / DN 80 body
Fluorocarbon (FKM) 25A7376X012
Peruoroelastomer (FFKM) 24A5659X052
Ethylenepropylene (EPR) 24A5659X062
Cage 24A5708X042
- continued -
8
Page 9

Type 63EG Main Valve (continued)
Key Description Part Number
15* Upper Seal (continued)
NPS 4 / DN 100 body
Fluorocarbon (FKM) 25A7468X012
Peruoroelastomer (FFKM) 24A5644X032
Ethylenepropylene (EPR) 24A5644X052
NPS 6 / DN 150 body
Fluorocarbon (FKM) 14A8185X012
Peruoroelastomer (FFKM) 14A8176X042
Ethylenepropylene (EPR) 14A8176X022
16* Valve Plug
NPS 2 / DN 50
416 Stainless steel 24A6772X012
316 Stainless steel 24A6772X032
NPS 3 / DN 80
416 Stainless steel 24A9421X012
316 Stainless steel 24A9421X022
NPS 4 / DN 100
416 Stainless steel 24A8182X012
316 Stainless steel 24A8182X022
NPS 6 and 8 x 6 / DN 150
and 200 x 150
416 Stainless steel 24A6992X012
316 Stainless steel 24A6992X022
17* Cage O-ring
NPS 2 / DN 50 body
Fluorocarbon (FKM) 10A7779X022
Peruoroelastomer (FFKM) 10A7779X132
Ethylenepropylene (EPR) 10A7779X052
NPS 3 / DN 80 body
Fluorocarbon (FKM) 14A5688X022
Peruoroelastomer (FFKM) 14A5688X112
Ethylenepropylene (EPR) 14A5688X082
NPS 4 / DN 100 body
Fluorocarbon (FKM) 10A3483X012
Peruoroelastomer (FFKM) 10A3481X032
Ethylenepropylene (EPR) 10A3481X052
NPS 6 / DN 150 body
Fluorocarbon (FKM) 18A2556X032
Peruoroelastomer (FFKM) 18A2556X062
Ethylenepropylene (EPR) 18A2556X072
20* Plug O-ring
NPS 2 / DN 50 body
Fluorocarbon (FKM) 14A5686X022
Peruoroelastomer (FFKM) 14A5686X072
Ethylenepropylene (EPR) 14A5686X052
NPS 3 / DN 80 body
Fluorocarbon (FKM) 1V3269X0042
Peruoroelastomer (FFKM) 1V3269X0082
Ethylenepropylene (EPR) 1V3269X0062
NPS 4 / DN 100 body
Fluorocarbon (FKM) 14A5688X022
Peruoroelastomer (FFKM) 14A5688X112
Ethylenepropylene (EPR) 14A5688X082
NPS 6 / DN 150 body
Fluorocarbon (FKM) 1V547606382
Peruoroelastomer (FFKM) 1K8793X0022
Ethylenepropylene (EPR) 1K8793X0012
21* O-ring
NPS 2, 3 and 4 / DN 50, 80 and 100 bodies
Fluorocarbon (FKM) 1R727606382
Peruoroelastomer (FFKM) 10A3800X062
Ethylenepropylene (EPR) 10A3800X042
NPS 6 / DN 150 body
Fluorocarbon (FKM) 1F2629X0012
Peruoroelastomer (FFKM) 1F2629X0042
Ethylenepropylene (EPR) 1F2629X0032
24 Drive Screw (4 required) 1A368228982
25 Flow Arrow - - - - - - - - - - -
*Recommended spare part
Type 63EG-98HM
Key Description Part Number
26 Nameplate - - - - - - - - - - 27 Travel Indicator Plug
Steel
NPS 2, 3 and 4 / DN 50, 80 and 100 bodies 17B4894X012
NPS 6 / DN 150 17B4893X032
Stainless steel
NPS 2, 3 and 4 / DN 50, 80 and 100 bodies 17B4894X022
NPS 6 / DN 150 body 17B4893X032
29 Hex Nut - for stainless steel bodies
NPS 2 / DN 50 (8 required) 1A377235252
NPS 3 / DN 80 (8 required) 1A376035252
NPS 4 / DN 100 (8 required) 1A352035252
NPS 6 / DN 150 (12 required) 1A440935252
31 Pipe Plug (4 required)
416 Stainless steel 1E823128982
316 Stainless steel 1E8231X0012
32 NACE Tag - - - - - - - - - - 33 Tag Wire - - - - - - - - - - 34 Pipe Nipple
Standard 1B828626012
NACE 1B8286X0012
35 Tubing - - - - - - - - - - 36* Restrictor
Standard 17B5175X022
NACE 17B5175X012
37 Connector (2 required, 4 for Type MR98H
with Needle valve) 15A6002X602
39 Pipe Nipple, Zinc-plated steel
(for option with needle valve, 2 required) 1C559926232
40 Tee, Carbon steel (for option
with needle valve, 2 required) 1B8606X0032
41 Needle Valve, Stainless steel (for option
with needle valve) 1R2214X0372
45 Pipe plug
Carbon Steel (not available for
8 x 6 in. / DN 200 x 150) 1A398524182
316 Stainless steel 1A398535072
Type MR98H Pilot
Key Description Part Number
Parts Kit (included are keys 3, 4,
12, 29, 59 and 63)
With Stainless steel diaphragm and trim RMR98HX0052
1 Regulator Body, 1/2 NPT
WCC Steel ERAA01934A1
CF8M Stainless steel ERAA01934A3
2 Spring Case, 1/4 NPT Tapped Vent
Use with all other springs
WCC Steel ERAA01886A0
CF8M Stainless steel ERAA01886A1
Use with 150 to 375 psig / 10.3 to 25.9 bar spring
WCC Steel ERCA00619A0
CF8M Stainless steel ERCA00619A2
3* Orice
416 Stainless steel GF05552X022
316 Stainless steel, NACE GF05552X032
4* Valve Plug
416 Stainless steel ERCA01333A0
316 Stainless steel, NACE ERCA01333A1
5 Bottom Plug
416 Stainless steel GF05532X022
316 Stainless steel, NACE GF05532X032
7 Valve Plug Guide
416 Stainless steel GF05534X022
316 Stainless steel, NACE GF05534X032
- continued -
9
Page 10

Type 63EG-98HM
35A3174-A
A2812
24
4
15
26
11
2
21127169
12
Figure 4. Type 63EG Main Valve
201314
31
3 24 25
17
15
16 21 27 9 2
11 17 12 13 20 14 4
35A3174-A
A2812
Figure 5. Type 63EG Main Valve Trim Package
CONTROL LINE
CONNECTION
FIXED RESTRICTION
27
36
37B5269
E0387
Figure 6. Type 63EG-98HM Mounting Parts
EXHAUST
34
35
37
10
Page 11

Type 63EG-98HM
15L2
2
10L2
28
(2)
L2
16
12
58
4
L1
63
(3)
OR
GF04916
APPLY
T = THREAD LOCKER
L1 = GENERAL PURPOSE PTFE OR LITHIUM GREASE FOR O-RINGS
L2 = ANTI - SEIZE COMPOUND
L4 = GRAPHITE SEALANT FOR GRAPHITE RING
1. Lubricants and sealants must be selected such that they meet the temperature requirements.
2. Apply L2 (anti-seize compound) on key 16 for stainless steel bolts.
3. Apply L4 (graphite sealant) instead of L1 (general purpose PTFE or lithium grease) on key 63 for graphite ring.
L4
(1)
:
17
9 L2
11
31
8
1
29
7 L2
3 L2
5 L2
Figure 7. Type MR98H
24T
COMPOSITE SEAT OPTION
59
25
Type MR98H Pilot (continued)
Key Description Part Number
8 Lower Spring Seat
Use with all other springs
Aluminum 1L339708012
Stainless steel 1L3397X0012
Use with 150 to 375 psig / 10.3 to 25.9 bar spring
Aluminum 1N943024272
Stainless steel 1N9430X0012
9 Upper Spring Seat
Use with all other springs
Steel ERCA00823A0
Stainless steel ERCA00823A1
Use with 150 to 375 psig / 10.3 to 25.9 bar spring
Steel ERCA00430A0
Stainless steel ERCA00430A1
10* Pusher Post
416 Stainless steel ERCA01344A0
316 Stainless steel, NACE ERCA01344A1
11 Control Spring
15 to 35 psig / 1.0 to 2.4 bar,
Powder-coated steel, Yellow ERCA04288A0
25 to 75 psig / 1.7 to 5.2 bar,
Powder-coated steel, Green ERAA01910A0
*Recommended spare part
Key Description Part Number
11 Control Spring (continued)
70 to 140 psig / 4.8 to 9.7 bar,
Powder-coated steel, Red ERAA01911A0
130 to 200 psig / 9.0 to 13.8 bar,
Powder-coated steel, Blue ERAA02889A0
150 to 375 psig / 10.3 to 25.9 bar,
Powder-coated steel, Unpainted 1N943427142
12* Diaphragm (2 required)
Fluorocarbon (FKM) ERCA00512A1
EPDM ERCA00512A2
302 Stainless steel ERCA00496A0
13 Nameplate - - - - - - - - - - 14 Diaphragm Protector, PTFE (if required) 11A5136X012
15 Adjusting Screw
Use with all other springs GF05553X012
Use with 150 to 375 psig / 10.3 to 25.9 bar spring ERAA02340A0
16 Cap Screw (8 required)
Steel ERCA00100A0
Stainless steel ERCA00100A1
17 Jam Nut, Steel ERCA00380A0
18 Drive Screw, (4 required) ERAA01884A0
24 Machine Screw, Stainless steel 1J4159X0012
- continued -
11
Page 12

Type 63EG-98HM
Type MR98H Pilot (continued)
Key Description Part Number
25 O-ring Retainer
416 Stainless steel 1L341535232
316 Stainless steel, NACE 1L341535072
28 Lock Washer
Steel ERAA01919A0
Stainless steel ERAA01919A1
29* Gasket, Composition ERAA02651A0
31 Locknut, Steel ERCA00663A0
51 Vent, Type Y602-12 ERAA02123A0
53* Valve Plug Sealing O-ring
Fluorocarbon (FKM) ERCA02968A1
Ethylene Propylene (EPDM) ERCA02968A2
Peruoroelastomer (FFKM) ERCA02968A3
*Recommended spare part
Key Description Part Number
58 Washer
416 Stainless steel GF05050X012
316 Stainless steel GF05050X022
59* Valve Plug O-ring
Fluorocarbon (FKM) seat 1D2888X0052
Ethylene Propylene (EPDM) seat 1N5301X0012
Peruoroelastomer (FFKM) seat 1N5301X0022
63* Bottom Plug Seal
Fluorocarbon (FKM) ERCA03016A1
Ethylenepropylene (EPDM) ERCA03016A2
64 Flow arrow - - - - - - - - - - -
Industrial Regulators
Emerson Process Management
Regulator Technologies, Inc.
USA - Headquarters
McKinney, Texas 75070 USA
Tel: +1 800 558 5853
Outside U.S. +1 972 548 3574
Asia-Pacic
Shanghai 201206, China
Tel: +86 21 2892 9000
Europe
Bologna 40013, Italy
Tel: +39 051 419 0611
Middle East and Africa
Dubai, United Arab Emirates
Tel: +971 4811 8100
For further information visit www.fisherregulators.com
The Emerson logo is a trademark and service mark of Emerson Electric Co. All other marks are the property of their prospective owners. Fisher is a mark owned by Fisher Controls International LLC,
a business of Emerson Process Management.
The contents of this publication are presented for informational purposes only, and while every effort has been made to ensure their accuracy, they are not to be construed as warranties or
guarantees, express or implied, regarding the products or services described herein or their use or applicability. We reserve the right to modify or improve the designs or specications of such
products at any time without notice.
Emerson Process Management Regulator Technologies, Inc. does not assume responsibility for the selection, use or maintenance of any product. Responsibility for proper selection, use and
maintenance of any Emerson Process Management Regulator Technologies, Inc. product remains solely with the purchaser.
Natural Gas Technologies
Emerson Process Management
Regulator Technologies, Inc.
USA - Headquarters
McKinney, Texas 75070 USA
Tel: +1 800 558 5853
Outside U.S. +1 972 548 3574
Asia-Pacic
Singapore 128461, Singapore
Tel: +65 6770 8337
Europe
Bologna 40013, Italy
Tel: +39 051 419 0611
Chartres 28008, France
Tel: +33 2 37 33 47 00
Middle East and Africa
Dubai, United Arab Emirates
Tel: +971 4811 8100
TESCOM
Emerson Process Management
Tescom Corporation
USA - Headquarters
Elk River, Minnesota 55330-2445, USA
Tels: +1 763 241 3238
+1 800 447 1250
Europe
Selmsdorf 23923, Germany
Tel: +49 38823 31 287
Asia-Pacic
Shanghai 201206, China
Tel: +86 21 2892 9499
©Emerson Process Management Regulator Technologies, Inc., 2000, 2015; All Rights Reserved
 Loading...