

Page 1

ACTURA Flex 48330 Power System
User Manual
Version: V1.0
Revision date: May 20, 2005
BOM: 31011084
Emerson Network Power provides customers with technical support.
Users may contact the nearest Emerson local sales office or service
center.
Copyright © 2005 by Emerson Network Power Co., Ltd.
All rights reserved. The contents in this document are subject to
change without notice.
Emerson Network Power Co., Ltd.
Address: No.1 Kefa Rd., Science & Industry Park, Nanshan District
518057, Shenzhen China
Homepage: www.emersonnetworkpower.com.cn
E-mail: support@emersonnetwork.com.cn
Page 2

Safety Precautions
To avoid accident, read the safety precautions very carefully before operation.
The "Caution, Notice, Warning, Danger" in this manual do not represent all the
safety points to be observed. Therefore, the installation and operation
personnel must be strictly trained and master the correct operations and all the
safety points before actual operation.
When operating Emerson products, the safety rules in the industry, the general
safety precautions and special safety instructions must be strictly observed.
Electrical Safety
1. Hazardous voltage
Some components of the power system carry hazardous voltage in operation,
direct contact or indirect contact through moist objects with these components
will result in fatal injury.
Safety rules in the industry must be observed when installing the power
system. The installation personnel must be licensed to operate high voltage
and AC power.
In operation, be sure to remove conductive objects, such as watch, bracelet,
ring, and so on.
When water or moisture is found on the cabinet, turn off the power immediately.
In moist environment, take precautions to keep moisture out of the power
system.
"Prohibit" warning label must be attached to the switches and buttons which
are not permitted to be operated on during installation.
High voltage operation may cause fire and electric shock. The connection and
wiring of AC cables must be in compliance with the local codes and
regulations. Only those who are licensed to operate high voltage and AC
power can perform high voltage operations.
2. Tools
In high voltage and AC operation, special tools must be used. No common or
homemade tools should be used.
3. Thunderstorm
Never operate on high voltage, AC, iron tower or mast on a day with
thunderstorm.
Page 3

In thunderstorms, a strong electromagnetic field will be generated in the air.
Therefore the equipment should be well-earthed in time to avoid damage by
lightning strikes.
4. ESD
The static electricity generated by the human body will damage the static
sensitive elements on PCBs, such as large-scale ICs. Before touching any
plug-in board, PCB or IC chip, ESD wrist strap must be worn to prevent body
static from damaging the sensitive elements. The other end of the ESD wrist
strap must be well earthed.
5 Short-circuit
During operation, never short the positive and negative terminals of the MFU
of the system or the non-earthing terminal and the earth. The power system is
a constant voltage DC power equipment, short circuit will result in equipment
burning and endanger human safety.
Check carefully the polarity of the cable and connection terminal when
performing DC live operations.
Never wear a watch, bracelet, ring, or other conductive objects during
operation.
Insulated tools must be used.
Battery
Before any operation on battery, read very carefully the safety precautions for
battery transportation and the correct battery connection method.
Non-standard operation on the battery will cause danger. In operation,
precautions should be taken to prevent battery short circuit and overflow of
electrolyte. The overflow of electrolyte will pose potential threat to the
equipment, it will erode the metal objects and PCBs, thus causing equipment
damage and short circuit of PCBs.
Before any operation on battery, pay attention to the following points:
Remove the watch, bracelet, bangle, ring, and other metal objects on the wrist.
Use special insulated tools.
Wear an eye protection device, and take preventive measures.
Wear rubber gloves and apron to guard against electrolyte overflow.
In battery transportation, the electrode of the battery should always be kept
facing upward. Never put the battery upside down or slanted.
Page 4

Special Safe Requirements of This Equipment
The equipment has multi power inputs;
The equipment shall be installed on cement ground.
Others
1 Safety requirement
Please use the same model fuse to replace the fuse in the DC Power System.
2. Sharp object
When moving equipment by hand, wear protective gloves to avoid injury by
sharp object.
3. Cable connection
Please verify the compliance of the cable and cable label with the actual
installation prior to cable connection.
4. Binding the signal cables
The signal cables should be installed separately far away from heavy current
and high voltage cables, with distance at least 150mm.
Page 5

Contents
Chapter 1 System Description................................................................................................1
1.1 Abbreviation..............................................................................................................1
1.2 Introduction...............................................................................................................1
1.3 Features....................................................................................................................1
1.4 Sy
1.5 Components..............................................................................................................4
Chapter 2 Installation...........................................................................................................12
2.1 Installation Preparation ...........................................................................................12
2.2 Installation Procedures............................................................................................15
2.3 External Electrical Connection
2.4 Battery Installation And Cabling
2.5 Parallel Connection Of Cabinets.............................................................................29
stem Configuration................................................................................................2
1.5.1 Rectif
1.5.2 Rectif
1.5.3 SCU................................................................................................................7
1.5.4 Multi-Function Unit (MFU)...............................................................................9
1.5.5 Battery Connection Unit (BCU).....................................................................10
1.5.6 Sy
2.1.1 Env
2.1.2 Power Supply................................................................................................12
2.1.3 Si
2.1.4 Tools & Material............................................................................................13
2.1.5 Unpacking.....................................................................................................14
2.2.1 Cabinet Installati
2.3.1 Connection Of Inpu
2.3.2 Connection Of Load Cables..........................................................................20
2.3.3 Connection
2.3.4 Layout Of Connector Board S6415X2...........................................................22
2.3.5 Interface Definition Of Connector Board S6415X2........................................23
2.3.6 Connection
2.3.7 Connection With MODEM.............................................................................24
2.3.8 Connection
2.4.1 Battery Installation ........................................................................................25
2.4.2 Battery Cable Connection.............................................................................26
ier Shelf..................................................................................................4
ier...........................................................................................................6
stem Cabinet.............................................................................................11
ironmental Conditions.............................................................................12
te Survey
...................................................................................................13
on .......................................................................................15
Interface .................................................................17
t Cables..........................................................................17
Of Communication Cables.........................................................21
Of Temperature Sensor Cables.................................................24
With Dry Contacts......................................................................25
..............................................................................25
Chapter 3
3.1 Checki
3.2 Startup Process
3.3 Parameters Configuration.......................................................................................31
Startup.................................................................................................................30
ng Before Startup.........................................................................................30
......................................................................................................31
Page 6

Chapter 4 Testing.................................................................................................................32
4.1 Testing MFU ...........................................................................................................32
4.2 Testing Rectifier......................................................................................................32
4.3 Testing SCU............................................................................................................32
4.4 Battery
4.5 BCU Te
Breaker Test...............................................................................................33
st ................................................................................................................33
4.6 Load Breaker Test ..................................................................................................33
Chapter 5 Operating SC
U....................................................................................................34
5.1 Operation Panel......................................................................................................34
5.2 Operation Procedures.............................................................................................35
5.3 Query
5.3.1 First Page Of System Informatio
ing System Status .........................................................................................36
n.................................................................36
5.3.2 Other System Information Screen.................................................................37
5.4 Querying Rectifier Status........................................................................................39
5.5 Querying Alarms And Setting Alarm Plans
..............................................................40
5.5.1 Querying Active Alarm..................................................................................40
5.5.2 Query Alarm History
......................................................................................41
5.5.3 Alarm Type Table..........................................................................................43
5.5.4 Changing Audible/Visual Alarm And Alarm Call Back Pl
an...........................46
5.5.5 Changing Alarm Types Of Dry Contacts.......................................................46
5.5.6 Setting Alarm Type For Dry
Contacts ...........................................................46
5.5.7 Set the Alarm Names Through PLC Function...............................................48
5.6 Maintenance ...........................................................................................................51
5.7 Setting System Parameters ....................................................................................53
5.7.1 Parameter Setting
Method............................................................................53
5.7.2 Batt. Selection...............................................................................................55
5.7.3 LVD
Parameter Description..........................................................................56
5.7.4 Charging Management Parameters..............................................................57
5.7.5 Bat
tery Test Parameters...............................................................................60
5.7.6 Temperature Compensation Coefficient Parameters....................................62
5.7.7 AC Se
ttings...................................................................................................63
5.7.8 DC Setting ....................................................................................................64
5.7.9 Rect Settings ................................................................................................65
5.7.10 Sy
stem Settings..........................................................................................66
5.7.11 Alarm Settings.............................................................................................70
Chapter
6 Routine Maintenance...........................................................................................72
6.1 Mainte
nance Of Rectifier.........................................................................................72
6.2 Maintenance Of SCU..............................................................................................72
6.3 Mainte
nance Of MFU..............................................................................................72
6.4 Cover Plates ...........................................................................................................73
6.5 Battery Maint
6.5.1 Stora
enance...............................................................................................73
ge And Supplementary.........................................................................73
Page 7

6.5.2 Daily Inspection.............................................................................................73
6.5.3 Replacement.................................................................................................74
Chapter 7 Troubleshooting...................................................................................................75
7.1 Troubleshooting Rectifier........................................................................................75
7.2 Mains Failure ..........................................................................................................76
7.3 Disastrous Accidents ..............................................................................................76
Appendix 1 System Technical Parameters ..........................................................................77
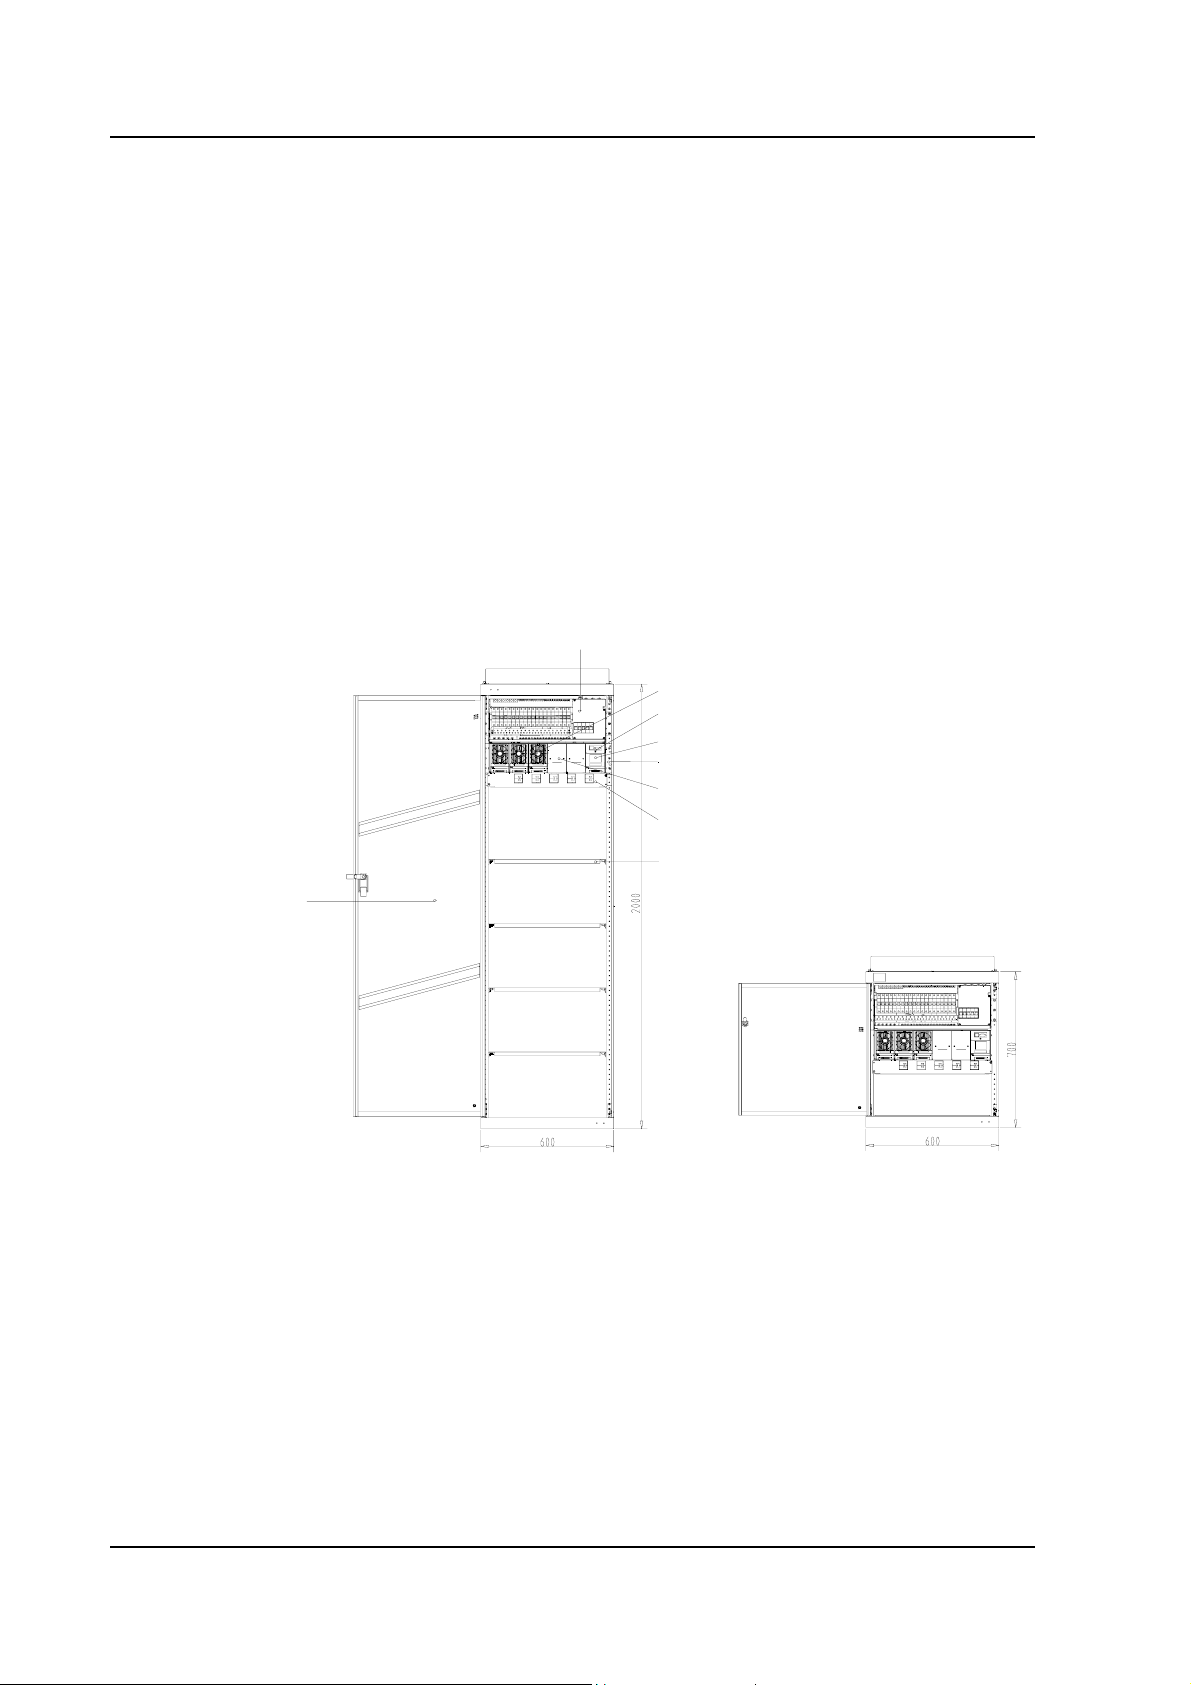
Appendi
x 2 Engineering Design Diagram ............................................................................79
Appendi
x 2.1 Engineering Design Diagram For 2000mm%600mm%600mm Cabinet
Appendix 2.2 Engineering Design Diagram For 2000mm%600mm%400mm Cabinet
Appendix 2.3 Engineering Design Diagram For 700mm%600mm%400mm Cabinet....81
Appendi
x 2.4 System Input And Output Connecto
Appendix 3 System Circ
uit Diagram.....................................................................................82
r Specs............................................81
Appendix 3.1 System Electric Schematic Diagram.......................................................82
Appendix 3.2 System Wiring Diagram
..........................................................................83
Appendix 3.3 MFU Electric Wiring Diagram..................................................................84
Appendix 3.4 BCU Electric Wiring Diagram..................................................................85
Appendi
x 4 Glossary............................................................................................................86
..79
..80
Page 8

Table List
Table 1-1 Configurations of Actura Flex 48330 Power System..............................................3
Table 1-2 Dimensions of rectifier shelf...................................................................................5
1-3 Function of indicators.............................................................................................7
Table
Table 1-4 Authority and default password..............................................................................9
Table 1-5 Configuration of MFU...........................................................................................10
Table 1-6 BCU configuration................................................................................................11
2-1 Environmental conditions in power room .............................................................12
Table
Table 2-2 AC input modes ...................................................................................................17
Table 2-3 Configuration number of load MCBs and battery MCBs.......................................20
Table 2-4 Interface definition of connector board S6415X2.................................................23
3-1 System checklist before startup...........................................................................30
Table
Table 5-1 Functions of LED indicators.................................................................................34
Table 5-2 Functions of SCU keys.........................................................................................34
Table 5-3 Alarm type table
Table 5-4 Changing audible/visual alarm and alarm call back plan......................................46
Table 5-5 Optional alarm types............................................................................................47
Table 5-6 Logic matrix used for configuring 8 dry contacts..................................................49
Table 5-7 Example of PLC setting........................................................................................49
Table 5-8 PLC SN and Alarm...............................................................................................49
5-9 Password levels and authorities...........................................................................54
Table
Table 5-10
Table 5-11 Value description of the LVD parameters...........................................................57
Table
Table 5-13 Value description of the battery test parameters................................................61
Table 5-14 Value description of temperature compensation coefficient...............................62
Table 5-15 Value description of AC se
Table 5-16 Value description of DC se
Table 5-17 Value description of rectifier settings..................................................................65
Value description of the basic battery parameters .............................................56
5-12 Charging management parameter value description..........................................59
...................................................................................................43
ttings........................................................................63
ttings........................................................................64
Table 5-18 Value description of system settings
Table 5-19 Relationship between system model and system type.......................................70
Table 5-20 Value description of alarm settings ....................................................................71
Table 7-1 Troubleshooting ...................................................................................................75
..................................................................68
Page 9

Figure List
Figure 1-1 Outline .................................................................................................................. 2
Figure 1-2 Rectifier shelf outline.............................................................................................
Figure 1-3 Rectifier shelf with rectifiers and CU.....................................................................4
Figure 1-4 Dimensions...........................................................................................................6
Figure 1-5 Outline of SCU......................................................................................................7
Figure 1-6 Outline and components of MFU..........................................................................9
Figure 1-7
Figure 2-1 Installation dimensions of the cabinet base ........................................................15
Figure 2-2 Installing expansive pipe.....................................................................................16
Figure 2-3 Fixing cabinet with Tap.......................................................................................16
Figure
Figure 2-5 Connection of input terminals .............................................................................18
Figure 2-6 Top cover............................................................................................................18
Figure 2-7 Connection of 3-phase AC power input ..............................................................18
Figure 2-8
Figure 2-9 Connection of dual-phase AC power input..........................................................19
Figure 2-10 Connection of load cables.................................................................................20
Figure 2-11 Cable connection to MCB
Outline of battery connection unit (BCU).............................................................10
2-4 Cable mounted with H terminal...........................................................................17
Connection of single-phase AC power input.......................................................19
.................................................................................20
4
Figure 2-12 Connector board in rectifier shelf......................................................................21
Figure 2-13 Layout of connector board S6415X2.................................................................22
Figure 2-14 Input/output interfaces of TD-5648DC MODEM................................................24
Figure 2-15
Figure 2-16 Connection of battery cables. ...........................................................................27
Figure 2-17 Positive and negative battery cables in each level............................................27
Figure 2-18 Negative battery cables connection in BCU......................................................28
Figure 2-19 Parallel connection of DC power system cabinet with battery cabinet..............29
Figure
Figure
Figure 5-3 Schematic diagram of the test function...............................................................61
Figure
Cabinet with four battery strings ins
5-1 SCU Front Panel.................................................................................................34
5-2 BC/FC switchover diagram.................................................................................59
5-4 System model description...................................................................................69
talled .........................................................26
Page 10

Page 11

Chapter 1 System Description
1.1 Abbreviation
AC Alternate Current
DC Direct Current
SCU Standard Controller Unit
BCU Battery Connection Unit
CSU Central Supervision Unit
HVSD High Voltage Shutdown
MCB Miniature Circuit Breaker
Chapter 1 System Description 1
APFC Active Power Factor Correction
MFU Multi-Function Unit
1.2 Introduction
The ACTURA Flex 48330 Power system consists of 50A rectifiers, Control Unit,
Multi-Function Unit (MFU), rectifier shelf and BCU (optional).
The product is used in base station, small exchange station, satellite
communication, data communication, and so on, with a strong adaptability to power
network fluctuation.
This system is used as a power supply for telecom equipment with system nominal
voltage of -48V and positive terminal earthed.
1.3 Features
The DC power system is easy-to-operate, easy-to-install and easy-to-maintain. Its
main features are:
Rectifier uses APFC technology and therefore its PF is up to 0.99;
Wide AC input voltage range of 85~290V;
Rectifier efficiency is at least 90%;
Extra low EMI of rectifier and excellent EMC performance;
ACTURA Flex 48330 Power System User Manual
Page 12
2 Chapter 1 System Description
High power density of rectifier;
Rectifier has damage-free hot plugging/unplugging function, the replacement
time is less than 1min;
Rectifier has two kinds of over-voltage protection methods;
Perfect battery management with BLVD function;
Up to 200 PCS of historical alarms can be stored in SCU;
Provide RS232, Modem and dry contacts communication interfaces;
1.4 System Configuration
The outline of the DC Power System is illustrated in Figure 1-1:
Multi-function unit
Rectifier
Connector Board
Control unit
Rectifier shelf
Rectifier cover
Battery connection unit
Battery shelf
Door
Figure 1-1 Outline
There are three kinds of DC Power Systems, and their detail configurations are as
shown in Table 1-1:
ACTURA Flex 48330 Power System User Manual
Page 13
Chapter 1 System Description 3
Table 1-1 Configurations of Actura Flex 48330 Power System
Configuration
Cabinet dimension
2.0 % 0.6 % 0.6 m3 2.0 % 0.6 % 0.4 m3 0.7 % 0.6 % 0.4 m3
3P+N/380V AC input with SPD
3P+N/380V AC input without SPD
1P+N/220V AC input with SPD
1P+N/220V AC input without SPD
AC distribution
DC distribution Up to 28 13mm-wide MCB, or 20 18mm-wide MCB
Rectifier Up to 5 rectifiers
Control unit 1 SCU
BCU 1 BCU with up to 5 battery circuit breakers
Battery
Dimensions
(H×W ×D) mm
L1+L2/220V AC input with SPD
L1+L2/220V AC input without SPD
3P/220V AC input with SPD
3P/220V AC input without SPD
5 2P AC input MCBs
Individual AC cables with just terminals
Telion 12V 165Ah FT:
16 Blocks
Hawker 12V 155Ah FT:
16 Blocks
Hawker 12V 105Ah FT:
20 Blocks
Hawker 12V 105Ah FT
and 6U space:
16 Blocks
2000×600×600 2000×600×400 700×600×400
Hawker 12V82F:
16 Blocks
Hawker SBSC11 and
3U space:
16 Blocks
EB4: 20 Blocks
Hawker 12V82F( no
BCU):
20 Blocks
No battery
ACTURA Flex 48330 Power System User Manual
Page 14
4 Chapter 1 System Description
1.5 Components
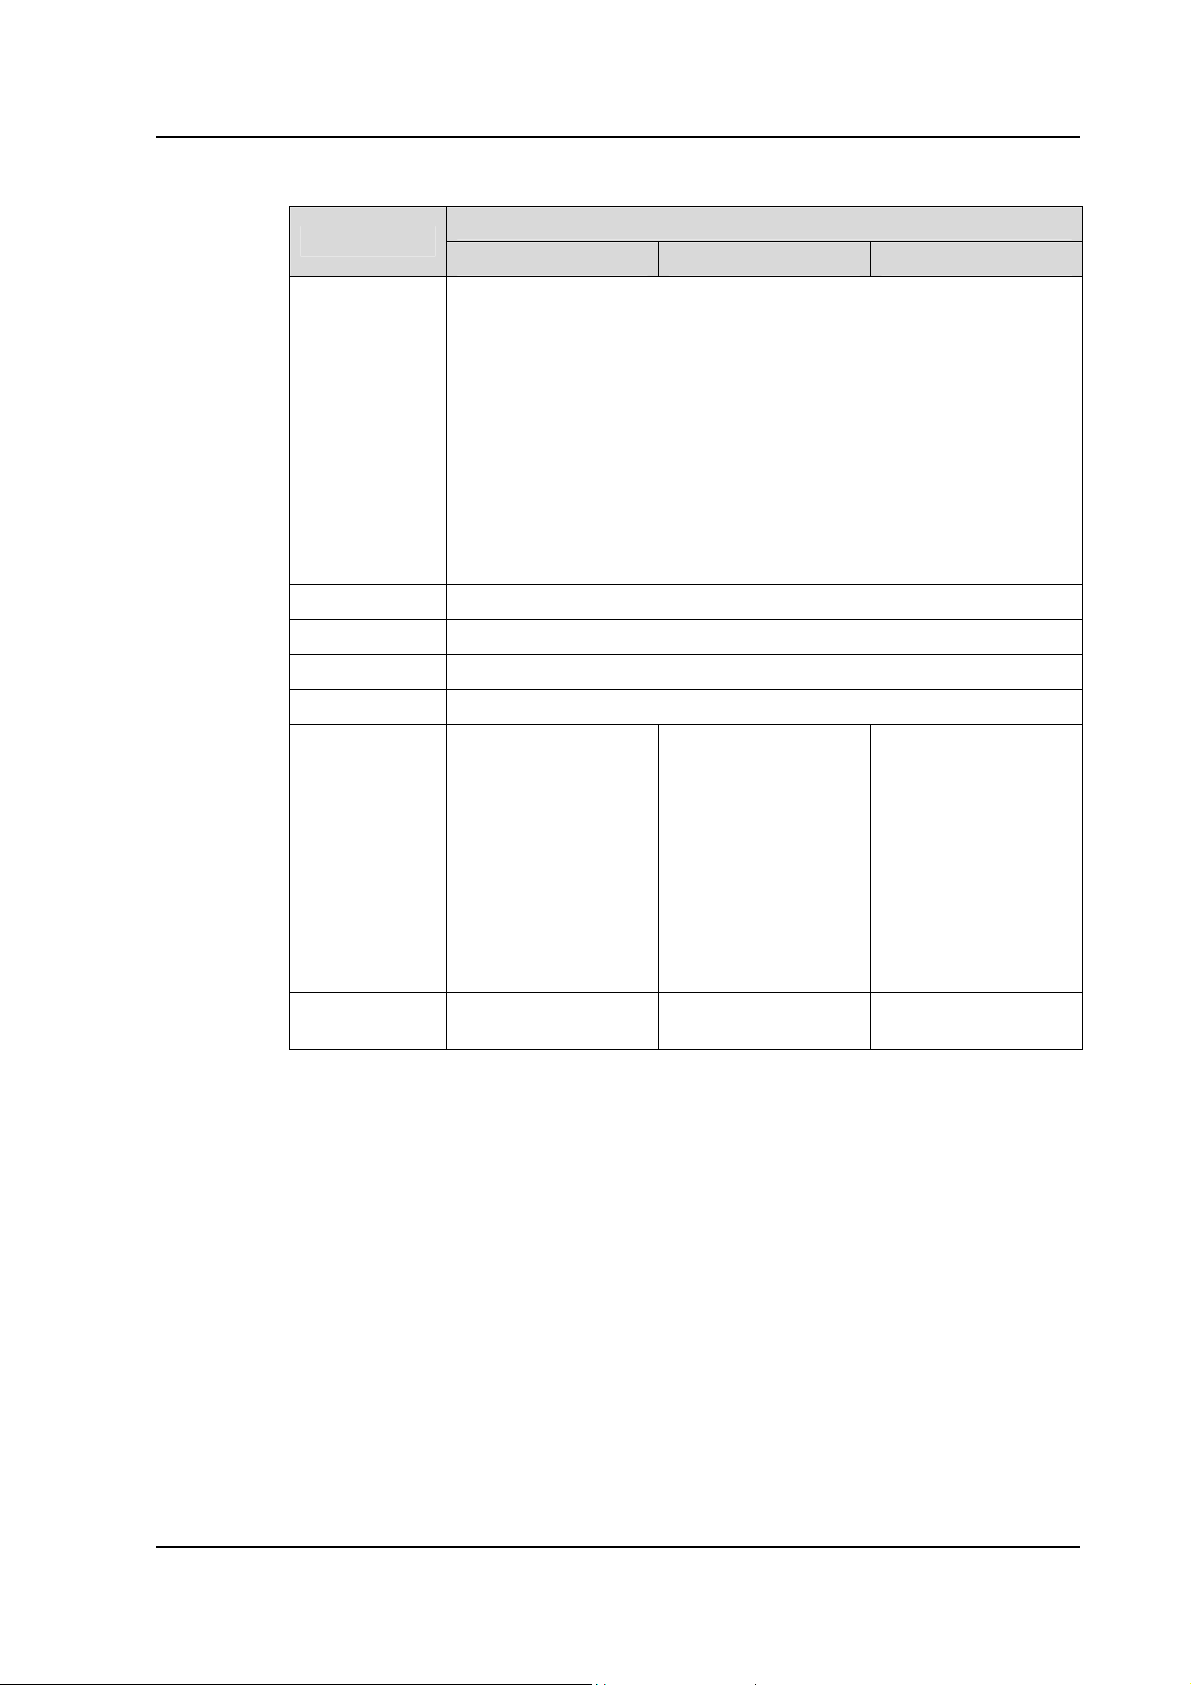
1.5.1 Rectifier Shelf
Outline
The outline of the Rectifier Shelf is illustrated in Figure 1-2:
Chassis
Terminal connecting
50A Rectifier
Connector Board
Ear Bracket
(a) Actual appearance (front view)
Bus Bar
Back Board
(b) Actual appearance (rear view)
Figure 1-2 Rectifier shelf outline
The shelf can accommodate 5 rectifiers and a control unit as shown in Figure 1-3.
The user can mount the rectifier shelf into cabinets with widths of 600mm and
depths of 400mm. The rectifier shelf has a height of 3U (132.5mm).
Figure 1-3 Rectifier shelf with rectifiers and CU
ACTURA Flex 48330 Power System User Manual
Page 15

Chapter 1 System Description 5
The Dimension of Rectifier Shelf are given in Table 1-2
Table 1-2 Dimensions of rectifier shelf
Manufacture type W(mm) ×D(mm) ×H(mm) Note
PSS485023/C 584.2×327×132.5 23’’ with controller
Backboard
The backboard has the functions below:
DC power source feed for controller and the connector board.
DC input filter and input fuse.
All the ingoing and outgoing signals of the controller
The backboard also contains system internal connectors below:
10 Distribution unit fuses alarm signal measurement input
4 battery fuse alarm signal measurement input
2 battery current shunt measurement inputs
1 load Current shunt measurement input
System bus-bar DC Voltage measurement input
Three-phase from two mains AC Voltage measurement inputs
CAN communication between rectifiers and controller
AC alarm module signals
System fault indicator drivers
LLVD & BLVD mono contactor driver outputs
The entire signal outgoing to the connector board
Connector board
Connector board is a user interface board and has the functions below:
8-channel relay outputs
8-channel digital inputs
One power source feed terminal (for digital inputs)
2-channel temperature sensor inputs
2-channel RS232 parallel connection outputs
LLVD & BLVD bistable contactor driver circuits and outputs
ACTURA Flex 48330 Power System User Manual
Page 16
6 Chapter 1 System Description
One Ethernet output
One RS485 output
One console output for ECU debug
The connector board can be hot plug and has enough space for
accommodating all the interface cables.
The connector board should space the hollow to the SCU convection for air
flowing
The connector board is mounted in the room 1U×2U at the top of the SCU.
The shelf has a 1U×2U panel for the connector board.
One RS232 and Ethernet ports are located at the front of the connector board.
The shelf has two rails for supporting the connector board
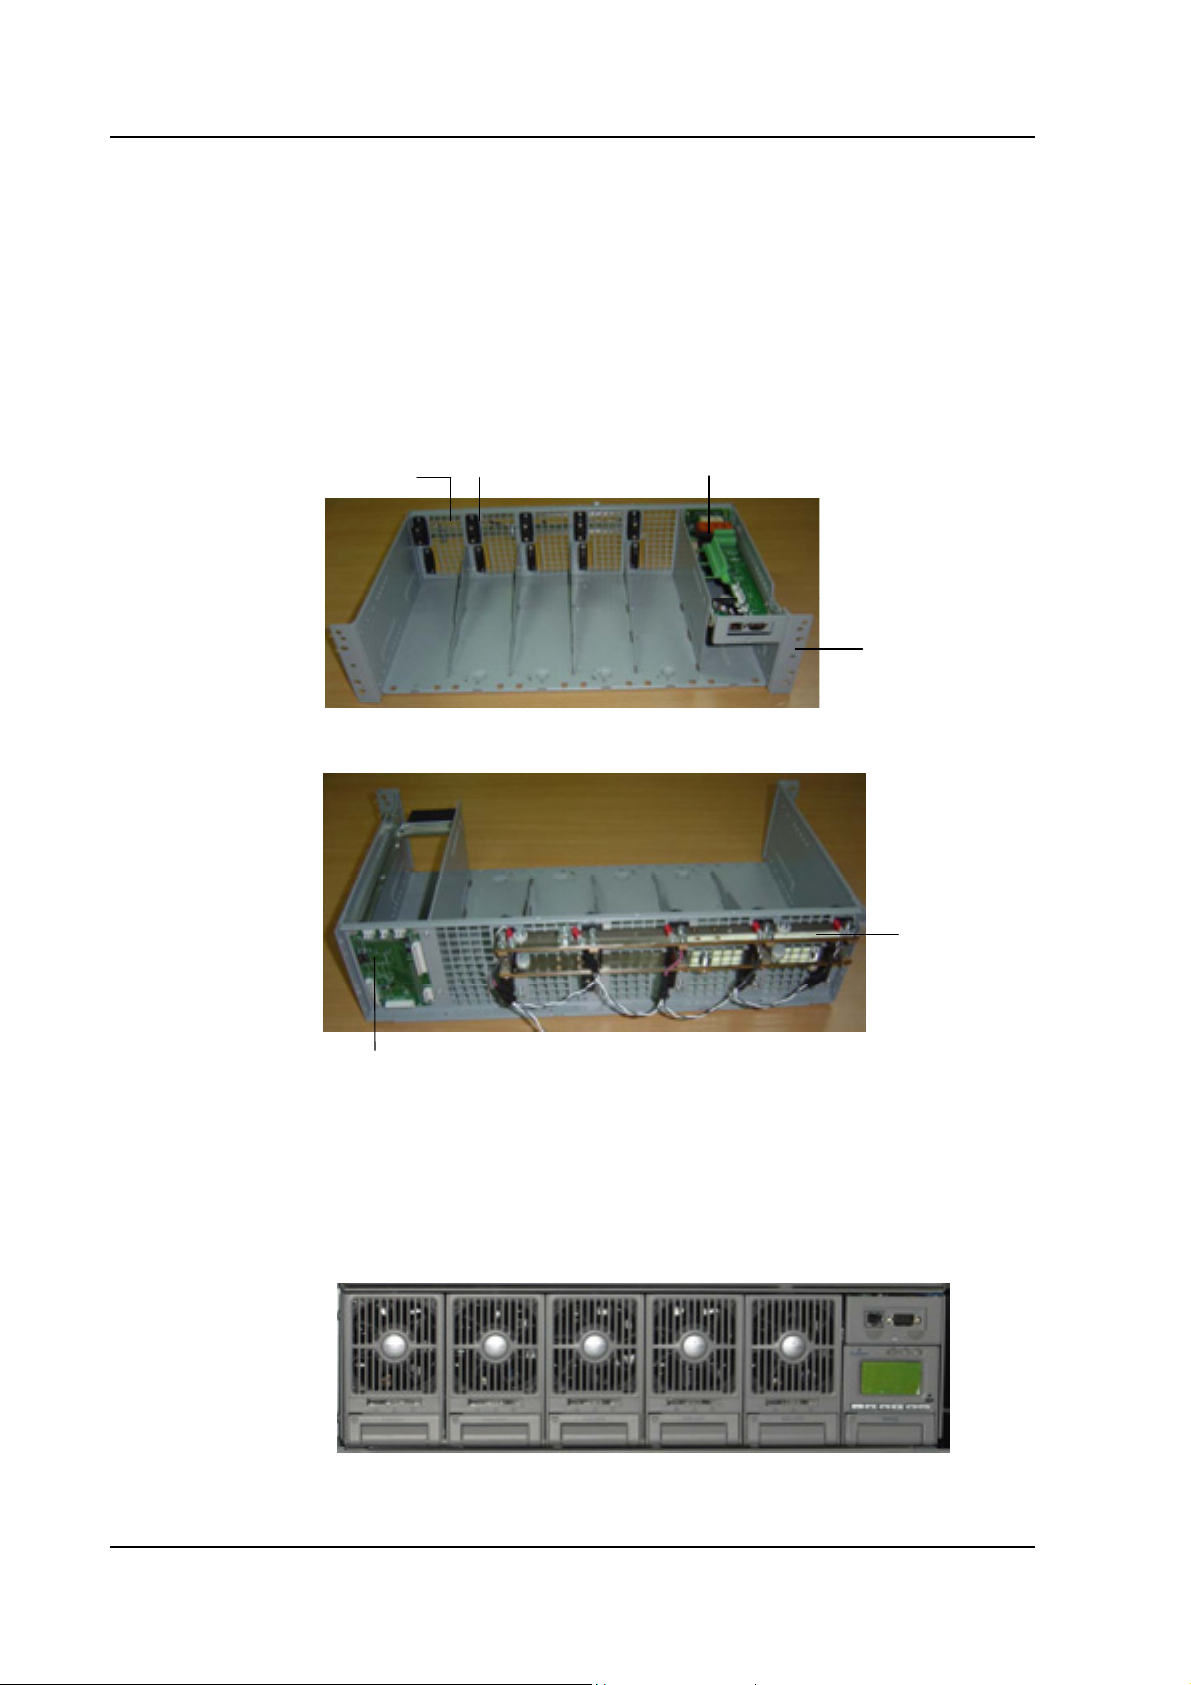
1.5.2 Rectifier
Outline
The appearance and dimensions (unit: mm) of the rectifier are illustrated in the
following figure.
Figure 1-4 Dimensions
Weight: ≤3.5kg
Dimensions (H × W % D): 124.3mm % 84mm % 287mm
The functions of the indicators in front panel are listed in Table 1-3.
ACTURA Flex 48330 Power System User Manual
Page 17
1.5.3 SCU
LED Normal Abnormal Cause of abnormality
Power indicator (green) ON
Protection indicator
(yellow)
Alarm indicator (red) OFF
OFF
Outline
Chapter 1 System Description 7
Table 1-3 Function of indicators
OFF No AC Mains Supply
Blinking Rectifier is under control by SCU
ON
Blinking Communication of rectifier with SCU failure
ON Output Over-voltage
Blinking Fan Failure
AC input over/under voltage, PFC
over/under voltage and over temperature
Figure 1-5 Outline of SCU
Dimension (H % W % D):132mm % 85mm % 287mm
Weight: 0.76kg
Multi-Communication mode
SCU communicates with MC (Main Computer) through the RS232/MODEM
communication port and 8 groups of alarm dry contacts on the Signal Junction
Board.
SCU supports both China Telecom Communication Protocol and EEM Protocol.
Make sure that the baud rates for receiving and transmitting are set to be
consistent when using SCU.
1. Communication through RS232
RS232 communication mode is mainly used for short-distance point-to-point
communication. The communication distance shall be less than 15m. If SCU
communicates with MC through RS232, just connect SCU RS232 port to the
RS232 port of MC.
2. Communication through MODEM or ES-MOD
ACTURA Flex 48330 Power System User Manual
Page 18

8 Chapter 1 System Description
When SCU communicates with MC through MODEM or ES-MOD, it uses PSTN to
realize long-distance monitoring. Power supply cables and communication cables
shall be prepared for the communication through MODEM.
3. Dry Contacts Output
SCU has 8 dry-contact outputs. Every dry-contact output has NC (normally closed)
and NO (normally-open) contacts. Every dry-contact output shall be configured
before the alarm event occurs. Different dry-contact output can trigger different
alarms. Once the alarm event occurs, the dry-contact will close or open to generate
the alarm.
If the user has other intelligent equipment to be monitored by SCU, the user can
connect the dry contacts to the interface of the intelligent equipment, and control
the intelligent equipment through these dry contacts.
Capacity of dry contacts: 2A@30Vdc; 05A@125Vac;
Maximum power dissipation: 60W
Functions fulfilled by SCU and MC
In RS232 and MODEM communication modes, the MC can fulfill the following
functions through SCU:
1. Remote acquisition of analog and digital values: MC can acquire the real-time
analog and digital values of DC Power System through SCU;
2. Remote control functions: MC can shut down the rectifiers, change the boost
charge status to float charge status (or in reverse), silence the alarm and stop/start
the battery test through SCU.
Alarm category settings for dry contact output
1. Through setting the parameter of “Relate Relay”, the user can configure the
alarm category for every dry-contact output. Every dry-contact output has been
configured to correspond to an alarm category before SCU is delivered to
customer.
2. SCU has PLC functions in the alarm management. The PLC is to realize simple
logic operation, i.e. the "And", "Or" and "Not" operations. The PLC inputs are all the
possible alarm signals, and the PLC outputs can be used to select one of the 8 dry
contacts. The alarm categories can be configured flexibly for every dry-contact
output through MC. The PLC settings for every dry-contact have three alarm inputs,
and two relation flag. The SN of three alarm categories and the mutual logic
relationships need to be configured.
PLC can be set to “Disabled”. If PLC functions and alarm co-relation are enabled at
the same time, the dry contact will act to activate an alarm when any alarm event
occurs.
ACTURA Flex 48330 Power System User Manual
Page 19
Chapter 1 System Description 9
Password protection for important operations
The users must input the correct password before they conduct “Maintenance” and
“Settings” operations. The password has 3 levels: user, operator or administrator.
The authorities of the 3 levels are the same while conducting “Maintenance”, but
different in conducting “Settings”. The operator can see 3 more pages than the user,
which are “resetting system”, “resetting password” and “modifying system type”.
The administrator can see 2 more pages than the operator, which are “modifying
password of all levels” and “controlling alarm sound volume”. In addition, the
administrator can browse the rectifier parameter serial No., software version and
the setting of internal switches. See the following table:
Table 1-4 Authority and default password
Level Authority Default password
User Configuration of general parameters 123456
Operator
Administrator
User’s authority, plus resetting system, resetting
password and modifying system type.
Operator’s authority, plus modifying password of all
levels, controling alarm sound volume, browsing system
parameters that can be set only through the host
654321
640275
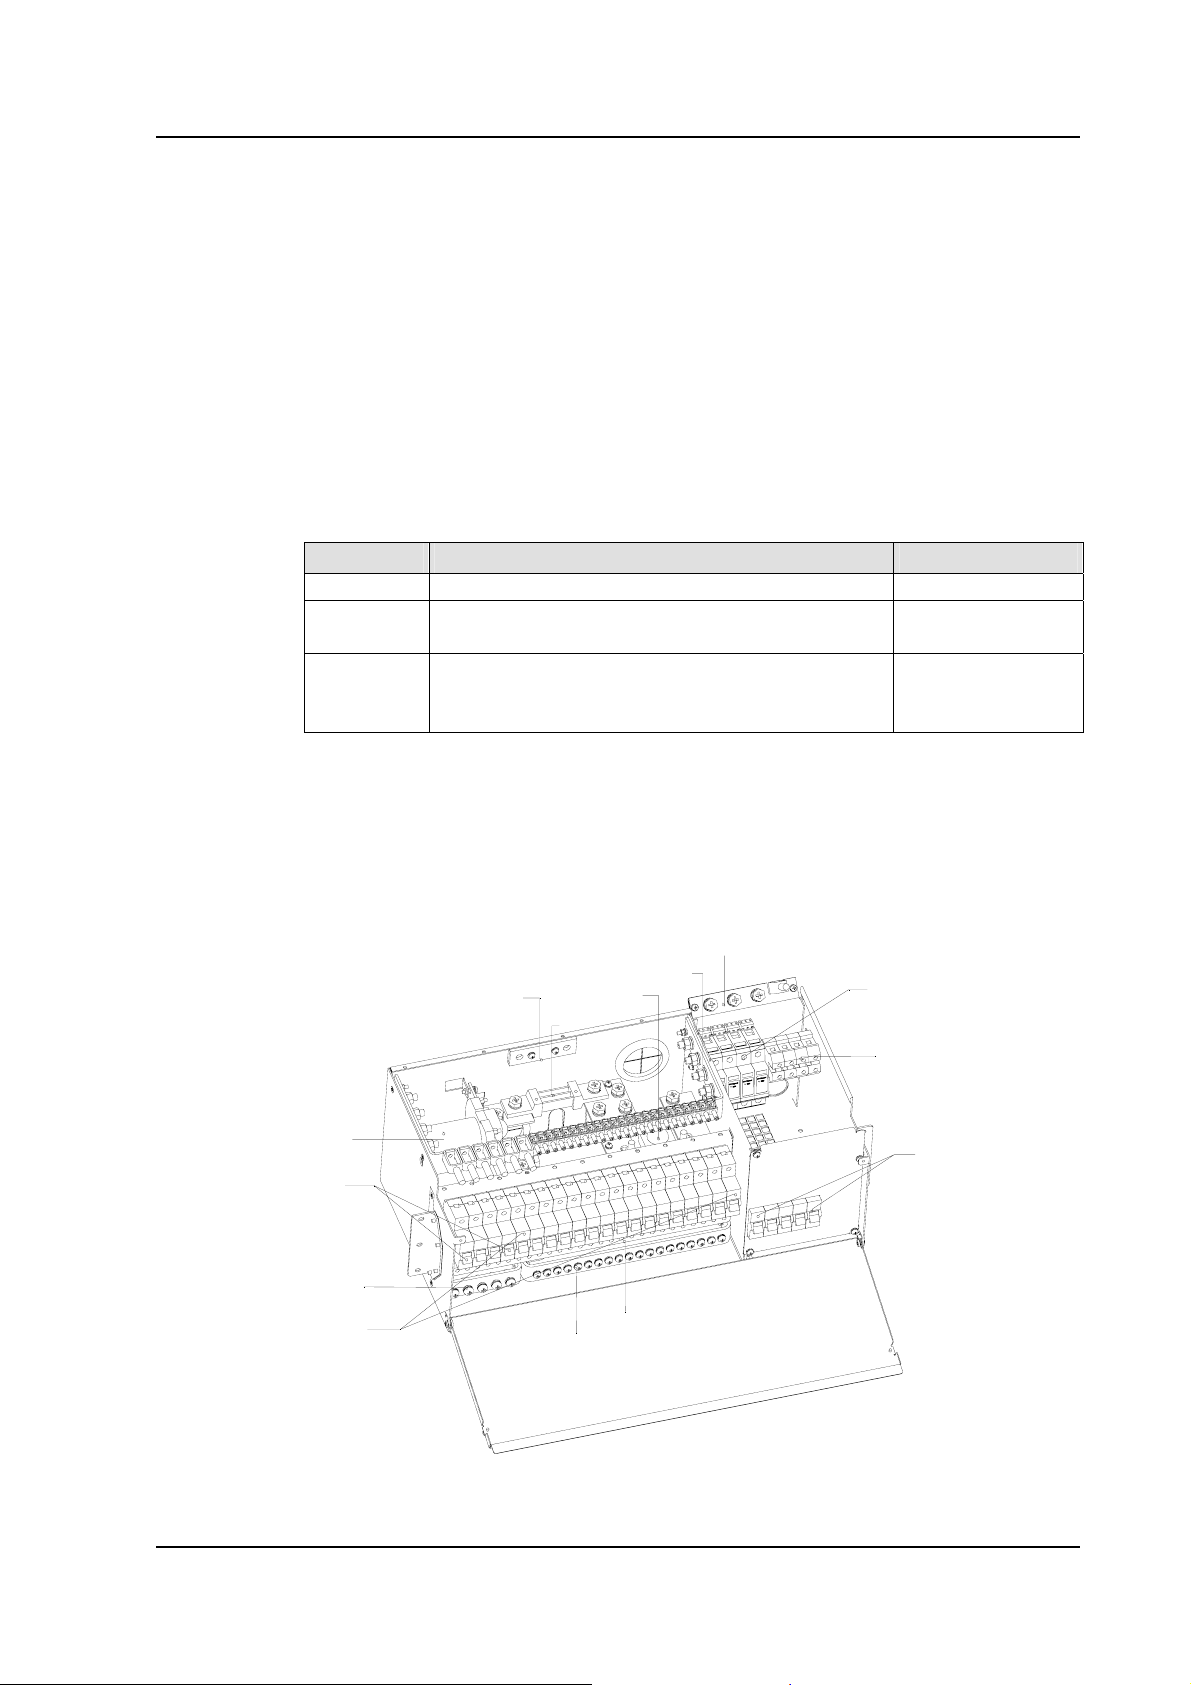
1.5.4 Multi-Function Unit (MFU)
Outline and components
The outline and the components of the MFU are illustrated in the following figure.
Bypass bar
BLVD contactor
Battery MCB
Battery -48V bus
Load MCB
OV DC bus
LLVD contactor
Shunt
Prior load bus
PE bus
SPD
AC input terminals
Rectifier AC input MCB
Low prior load bus
Figure 1-6 Outline and components of MFU
ACTURA Flex 48330 Power System User Manual
Page 20
10 Chapter 1 System Description
Table 1-5 Configuration of MFU
No. Component Description
1 SPD
2 AC input terminals Rating Current 150A
3 Rectifier AC input MCB Rating Current 25A
4 BLVD contactor 200A or 400A optional
5 LLVD contacto r 200A or 400A optional
6 Shunt 300A/75mV
7 Battery MCB 100A MCB (up to 5 battery MCBs can be selected to configure)
8 Load MCB Selected according to user’s requirement
The user can mount the distribution unit into cabinets with widths of 600mm and
depths of 400mm and 600mm. It has a height of 4.5U (200mm).
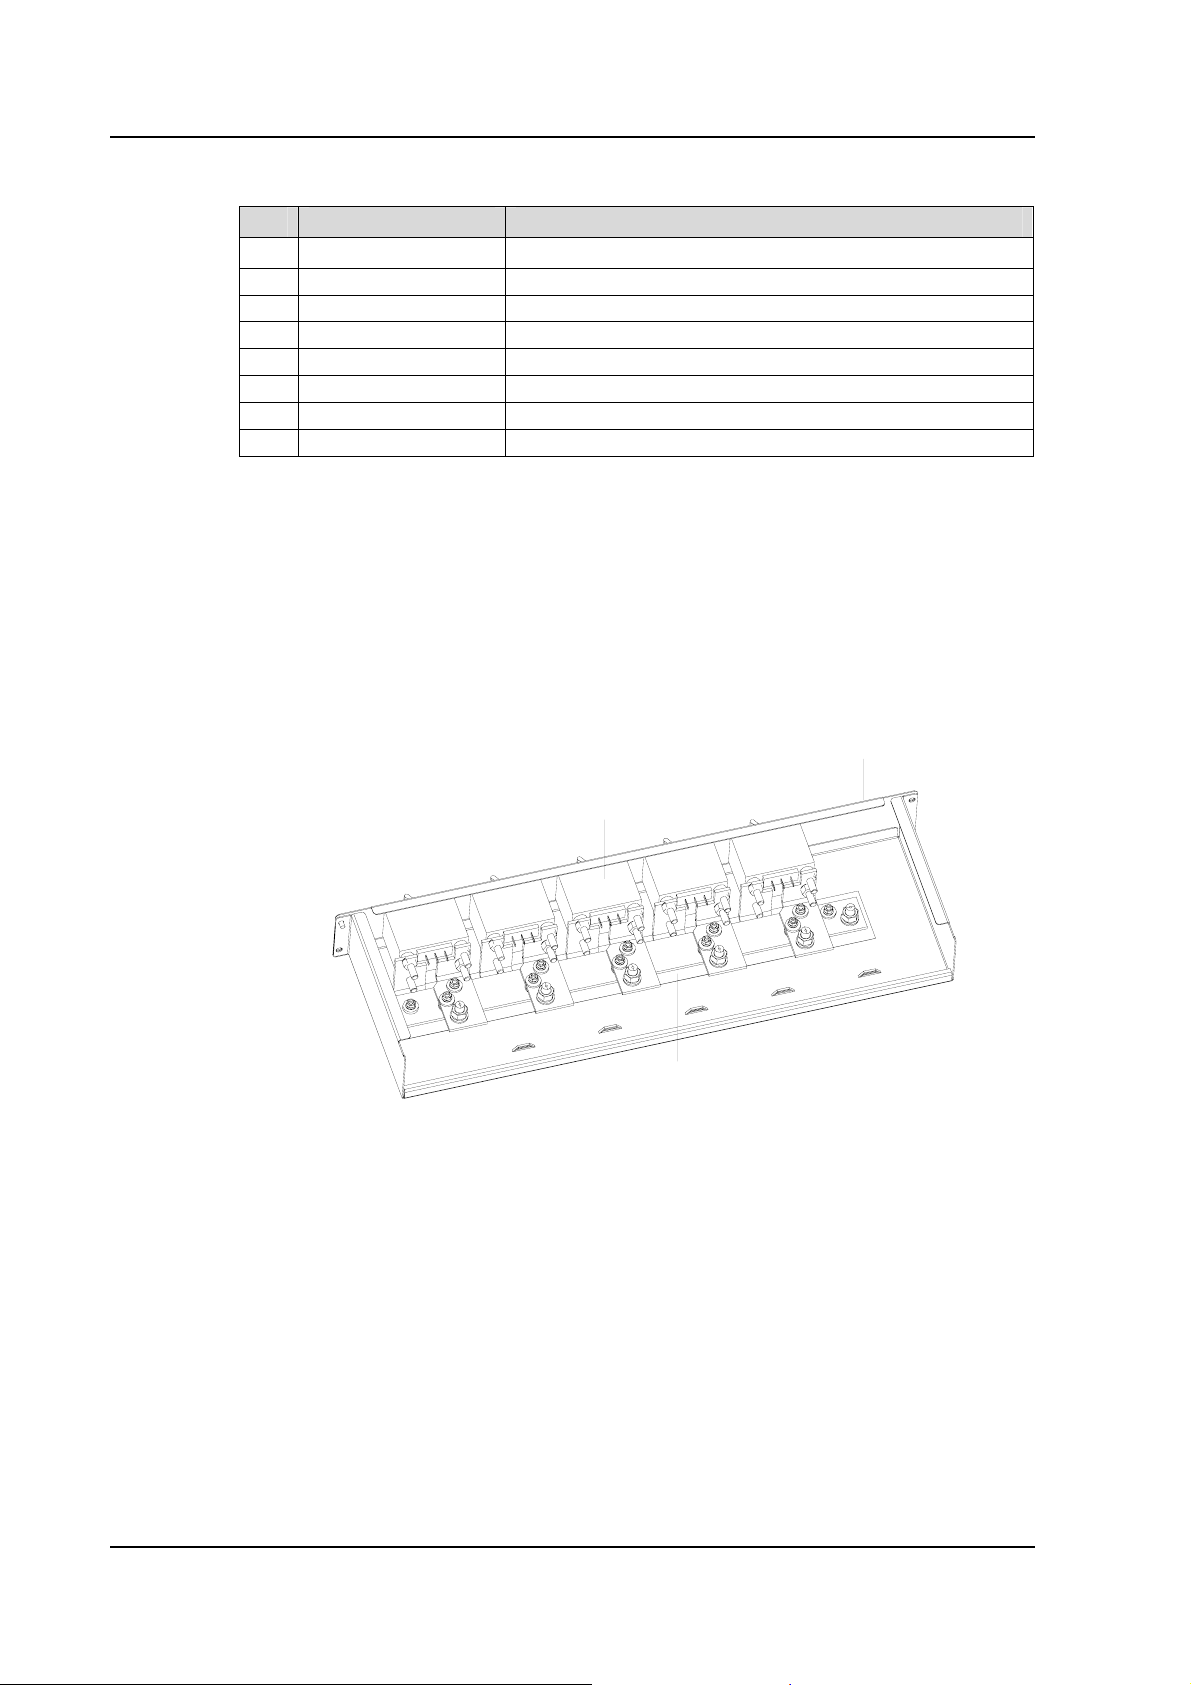
1.5.5 Battery Connection Unit (BCU)
Outline
Norminal Dischage Current(8/20μS) 20kA; Ue=385V
The outline of the Battery Connection Unit (BCU) is illustrated in Figure1-7.
Enclosure
Battery MCB
-48V DC Bus
Figure 1-7 Outline of battery connection unit (BCU)
Physical size
Battery Connection Unit (BCU) can be installed in cabinets with widths of 600mm
and depths of 400mm and 600mm. BCU has a maximum height of 1.5U (67mm).
BCU contains 2 to 5 circuit breakers, each with ratings of 100A and 200A.
Alarm output
The BCU will generate an alarm if a battery circuit breaker is off. This alarm shall be
possible to connect to the connector board for display in the Controller. It shall be
possible to combine the alarms from 2 BCUs to generate a single alarm in the
controller. It shall also be possible to combine the alarm from the BCU with an
ACTURA Flex 48330 Power System User Manual
Page 21

alarm generated from battery circuit breakers that are switched off in the BCU (for
example when using a BCU in an extension battery cabinet and battery circuit
breakers in the BCU in a main cabinet).
BCU configuration
The BCU configuration is as shown in Table 1-6:
Item Function unit Amount
Battery connection unit
1.5.6 System Cabinet
There are three kinds of cabinets. Their dimensions are 2.0m % 0.6m % 0.6m, 2.0m
% 0.6m % 0.4m and 0.7m % 0.6m % 0.4m respectively.
Chapter 1 System Description 11
Table 1-6 BCU configuration
100A CB for battery input 2/3/4/5
200A CB for battery input 2/3/4/5
2.0m % 0.6m % 0.6m cabinet
This cabinet is installed with 1 % MFU, 1 % Rectifier Sub-rack, 1 % BCU and the
following combination of units:
16 Blocks of Telion 12V 165Ah FT batteries or 16 % Hawker 12V 155Ah FT
batteries
20 Blocks of Hawker 12V 105Ah FT batteries
16 Blocks of Telion 12V 100Ah FT batteries (20 blocks is preferred, if possible)
16 Blocks of Hawker 12V 105Ah Ft batteries and 6U of unspecified equipment
(such as DC/DC converters or similar)
2.0m % 0.6m % 0.4m cabinet
This cabinet accommodates 1 % MFU,1 % Rectifier Sub-rack, 1 % BCU and the
following combination of units:
16 Blocks of Hawker 12V82F batteries or 16 Blocks of Hawker SBSC11 and
3U available for additional equipment such as DC/DC converters
20 Blocks of EB4 batteries
20 blocks of Hawker 12V82F batteries (20 blocks and BCU is preferred, if possible)
0.7m % 0.6m % 0.4m cabinet
This cabinet accommodates 1 % MFU, 1 % Rectifier Sub-racks and 1 % BCU.
There shall be 3U available for the mounting of additional equipment such as
DC/DC converters. The cabinet should not be installed any battery.
ACTURA Flex 48330 Power System User Manual
Page 22

12 Chapter 2 Installation
Chapter 2 Installation
2.1 Installation Preparation
2.1.1 Environmental Conditions
Make sure the following environmental conditions are satisfied when selecting the
installation site:
Table 2-1 Environmental conditions in power room
Environmental conditions Recommended range
Ambient temperature
Humidity ≤90%RH, non-condensing
Dust
Sunlight No direct sunlight
Corrosives No pollutants, such as salt, acid, and smoke, etc.
Shake
Insects, pests, and termites None
Mildew None
Moisture Water proof
Fire protection No flammable on the top/bottom of the cabient.
The DC Power system will be damaged if dust or sand accumulates in it. The
following measures are recommended for dusty environment:
-5~50°C (If ambient temperature > 45°C, for the cabinet with
400mm depth, it should demount the front door of cabinet to
ensure the normal operation of the system.)
3
≤1mg/m
≤1.5m/s
2
1.The system should be installed in an airtight and air-conditioned power room. The
air-conditioner filter should be well serviced without being obstructed. To reduce the
dust in the power room, un-attendance in the power room is recommended.
2.The air filter should be cleaned periodically.
3.The product should be installed on a cement ground.
2.1.2 Power Supply
AC power supply for communication uses AC mains as its main power source.
Backup batteries and generator should be configured according to the actual power
supply situation. The AC power supply system composed of AC mains and
generator should adopt centralized power supply mode to supply power, while low
ACTURA Flex 48330 Power System User Manual
Page 23

voltage AC power supply system should adopt three-phase five-line or single-phase
three-line modes.
The AC power cable should adopt copper core cable, and the cable section should
suit the load. It is recommended that the power cable outside the power room be
buried directly under the ground or by means of cable pipe. Power cable should be
wired separately from signal line.
The AC mains voltage shall be within the range of the voltage input range of
rectifiers.
The DC power system has a circuit breaker that can cut the AC mains power to it.
2.1.3 Site Survey
The power room must be surveyed prior to installation, which should be focused
on:
1. Checking the wiring device, including cable chute, wiring rack, floor, wiring holes.
Chapter 2 Installation 13
2. Checking the environmental conditions, including temperature, humidity, dust.
3. Checking the conditions for implementing the installation, including power supply
and lighting.
2.1.4 Tools & Material
1. Tools required for power equipment installation include electric drill, wire cutter,
wire presser, various wrenches, screwdriver, electrician knife, and steel saw. The
tools must be insulated and antistatic handled before they are used.
2. Power cables for electrical connection include AC cables, DC load cables,
battery cables, earth cables, earth bar and lighting connection cables. Their design
specifications should be in accordance with relevant specifications in the electrical
industry and the materials should be purchased according to the design material
list.
AC cables: this system uses 3-phase or single-phase AC power. Copper-core
flame-retardant PVC insulated cable and PVC sleeve soft cable, such as NH-BVR,
are recommended for the AC cables, whose sectional area should suit the load.
When the wiring distance is less than 30 meters, take 2.5A/mm
current density to calculate the sectional area of the AC cables.
2
of economical
The sectional area of the DC load cables and battery cables should be calculated
using the following formula:
A=ΣI×L/K△U
ACTURA Flex 48330 Power System User Manual
Page 24

14 Chapter 2 Installation
In this formula: A is the sectional area of the lead (mm2), ΣI is the total current (A)
flowing through the lead, L is the length (m) of the lead loop, △U is the permitted
voltage drop on the lead, while K is the conductivity. Kcopper=57. For safety, the
voltage drop on the cables connecting battery and load cannot exceed 3.2V.
The sectional area of the lightning protection earth cable should not be less than
2
6mm
, and that of the DC operation earth cable, usually between 35-50mm2, is
determined by user. Take the greatest sectional area among the above 3 earth
cables as that of the cable connecting the user earth bar.
3. Purchase materials according to the materials list and inspect the materials, for
example, check the heat durability, moisture resistance, flame resistance, and
voltage resistance of the cable.
4. The auxiliary materials for power supply installation include expansive bolts,
binding strips, and insulating tape.
2.1.5 Unpacking
To ensure smooth installation, the power equipment must be carefully inspected
when it is unpacked.
The equipment unpacking and inspection are allowed only after it arrives the
installation site. The inspection is co-accomplished by the user representative and
representative from Emerson Network Power Co., Ltd.
When inspecting the equipment, first open the packing case with packing list put in
it, take out the packing list, and conduct inspection against the packing label,
including the customer name, customer address, machine No., total amount, case
No., contract No., etc.
Unpacking and inspection: after opening the packing case, check the goods one by
one according to the goods list on the packing label. The checking should include:
1. The number and serial number marked on the packing cases according to the
actual number of the packing cases.
2. The correctness of the equipment packing according to the packing list.
3. The number and model of the accessories according to the accessory list.
4. The completeness of the equipment set according to the system configuration.
5. The condition of the goods through visual inspection. For example, check if the
cabinet is damaged, if the cabinet has regained moisture; shake gently the rectifiers
and monitoring module to see if the parts and connections have been loosened
during delivery.
ACTURA Flex 48330 Power System User Manual
Page 25
2.2 Installation Procedures
2.2.1 Cabinet Installation
Installation on the floor
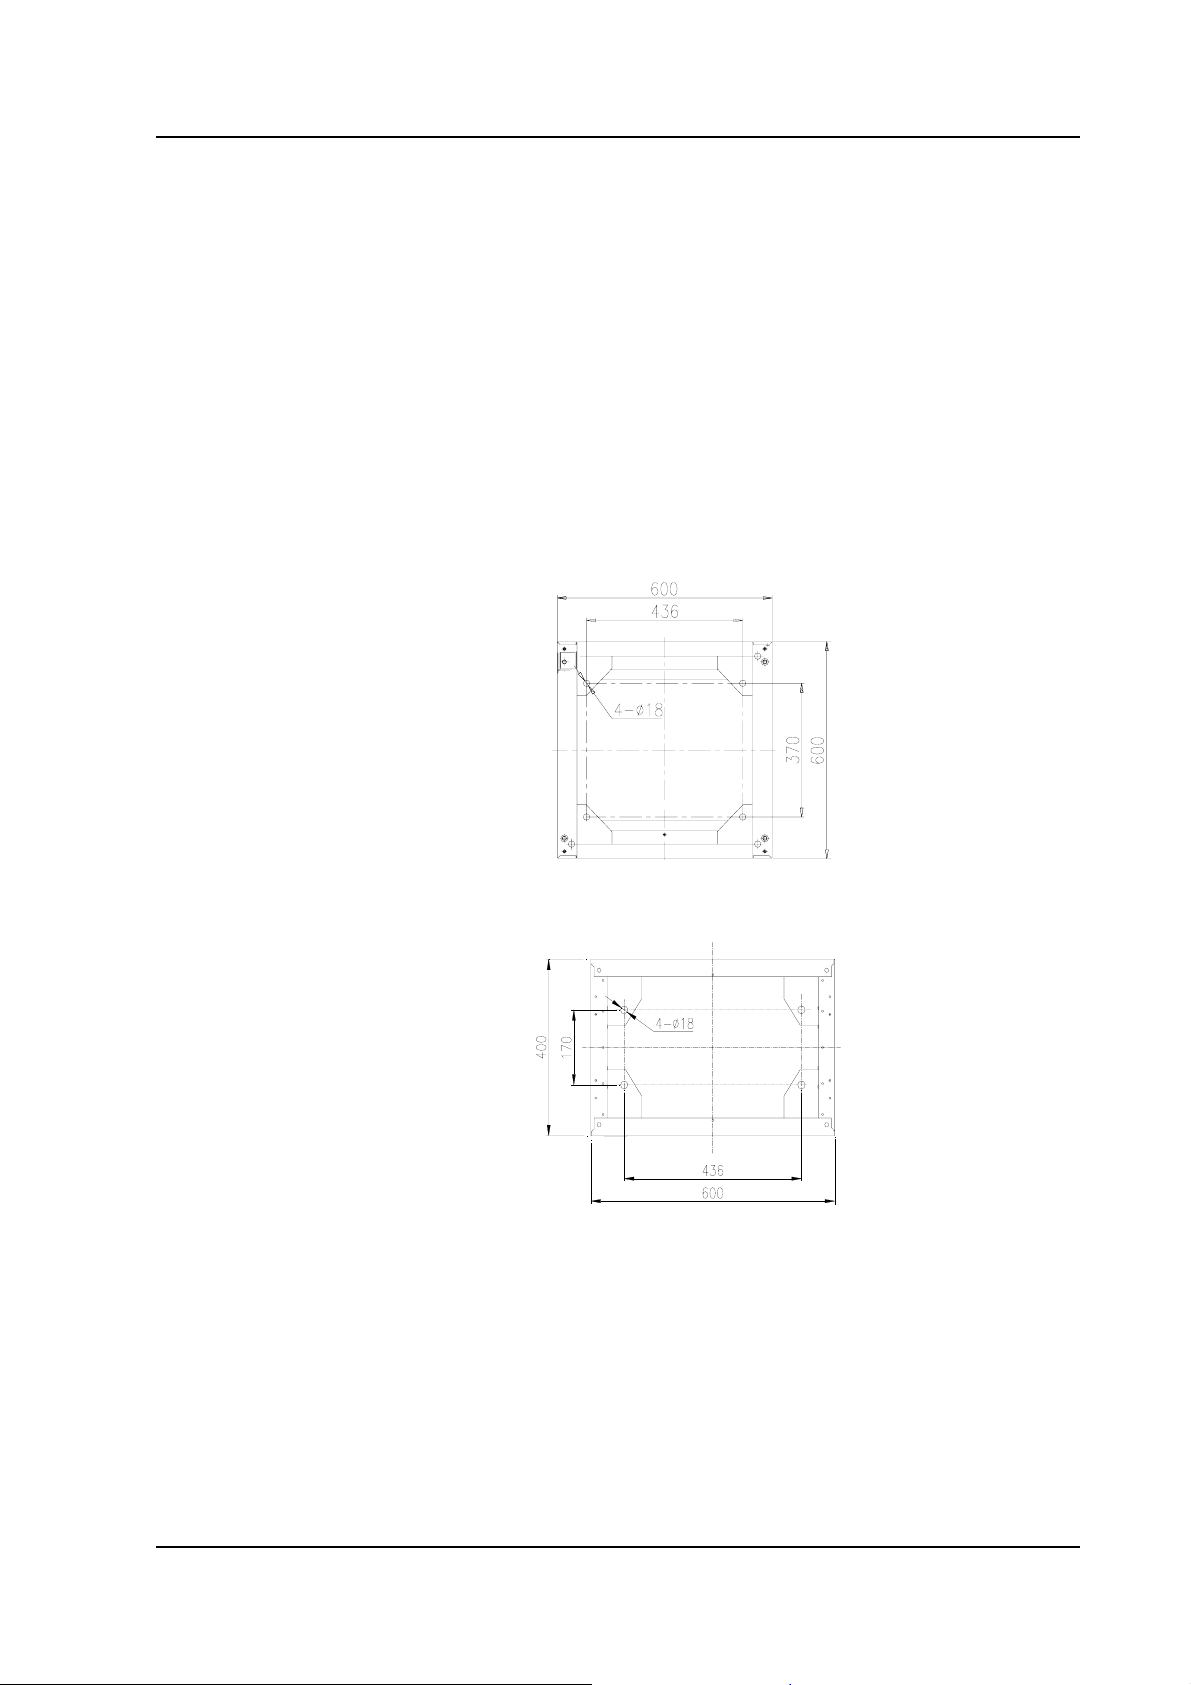
Step 1: mark the position where the power system is to be installed.
Determine the installation position of the power supply cabinet in the power room
according to the installation chart. Based on the mechanical specifications (see Fig.
2-1) of the installation holes of the power supply cabinet, determine the accurate
position of the center points of the installation holes on the floor, and mark them
with a pencil or oil pen.
Chapter 2 Installation 15
(Applicable to the cabinet with 600mm depth)
(Applicable to the cabinet with 600mm depth)
Figure 2-1 Installation dimensions of the cabinet base
Step 2: drill reserve holes.
The expansive pipes delivered with the power system are M10%55mm, therefore,
use electric drill with drill bit Φ12 and depth 70mm to drill holes at the center points
of the installation holes marked on the ground. To avoid being off-center, be careful
ACTURA Flex 48330 Power System User Manual
Page 26
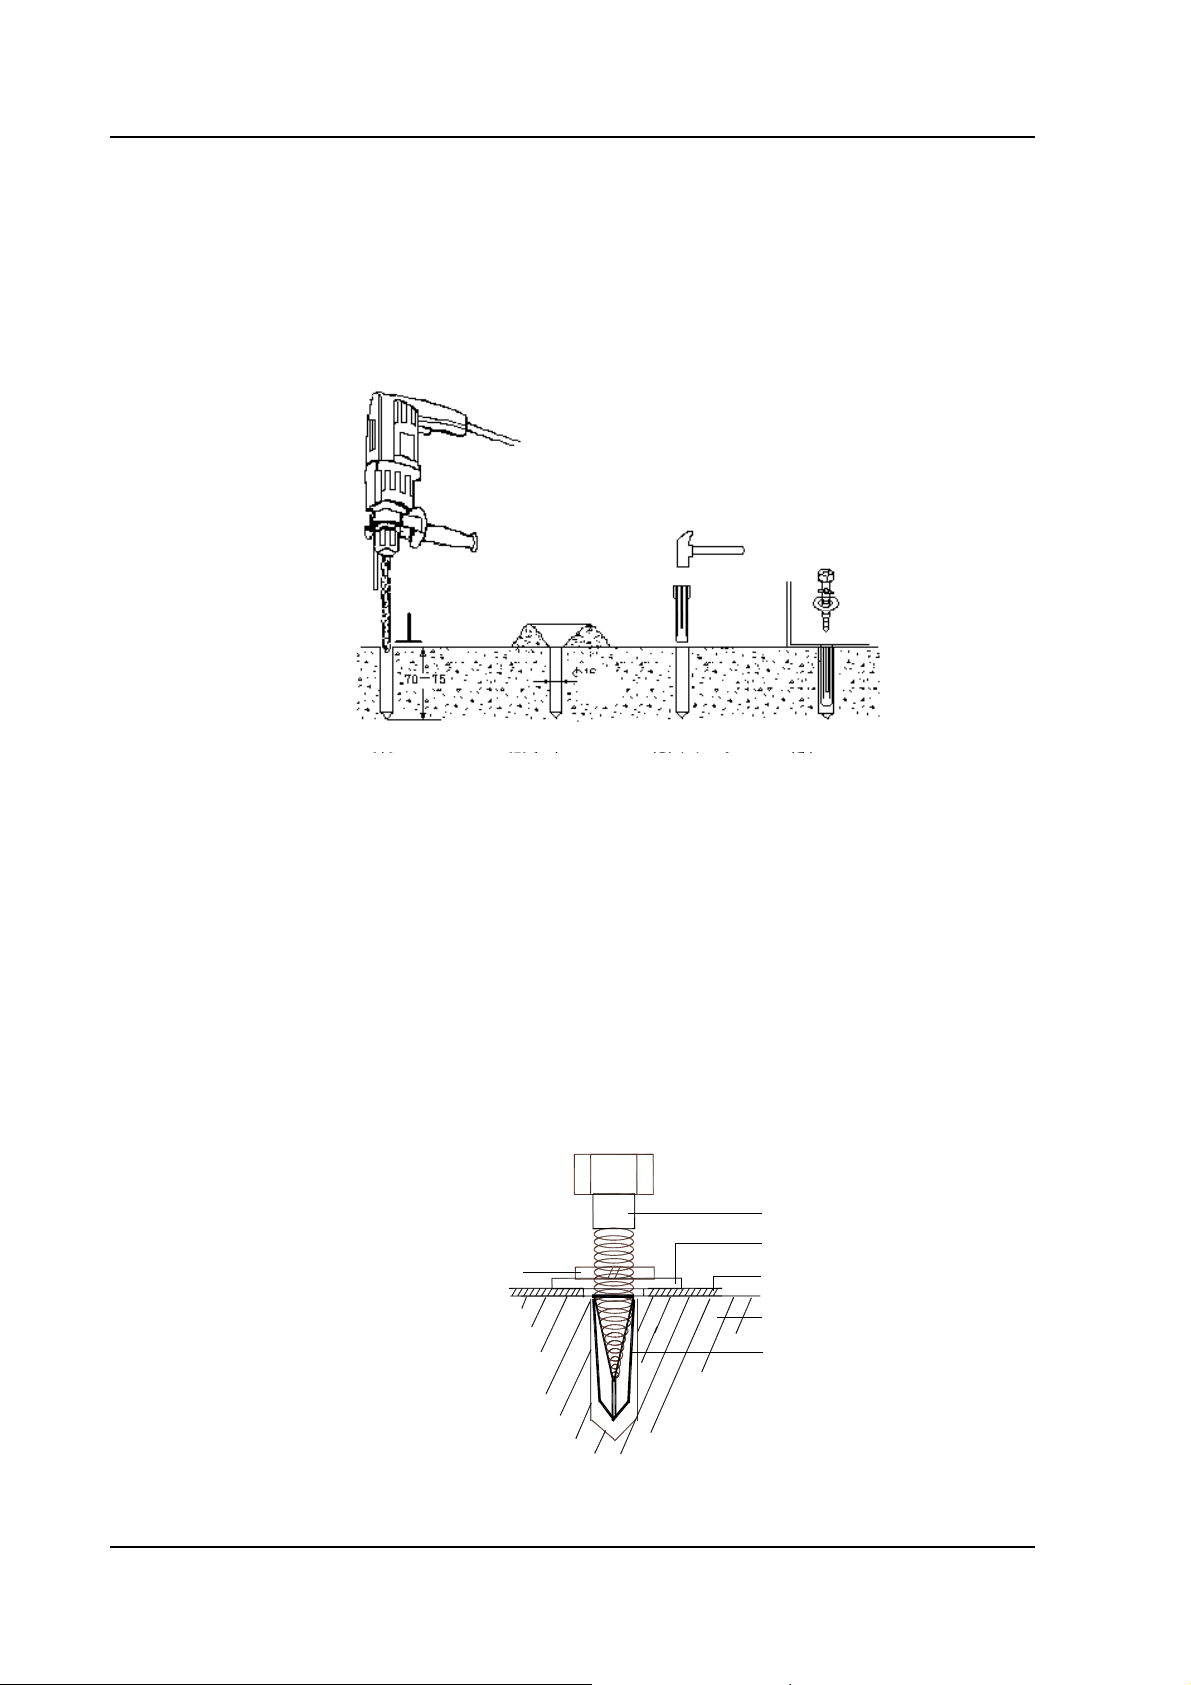
16 Chapter 2 Installation
not to shake the drill, and try to keep as vertical as possible to the ground, as
shown in Figure 2-2.
Step 3: install expansive pipes.
Clean the dust, and insert the expansive pipe into the reserve hole, knock it down
gently using a hammer until the top of the expansive pipe is level with the ground,
as shown in Figure 2-2.
Power
cabinet
1) Drill vertically
Expansive
pipe
2) Clean the dust 4) Tighten the bolt
3) Knock it into place
Figure 2-2 Installing expansive pipe
Step 4: place cabinet in position
Move the cabinet to the installation position aligning the installation holes of the
cabinet to the expansive pipe on the ground.
Step 5: fix the cabinet
After the cabinet is in position, make some horizontal and vertical adjustments.
Insert some iron pieces under the lower edge and corner of the cabinet to adjust
the vertical obliquity of the cabinet within 5 degrees. Finally, screw down the tap
bolt with plain washer and spring washer into the expansive pipe, and tighten it with
wrench. The cabinet fixation is illustrated in Figure 2-3.
Tap bolt
Spring washer
Cabinet base
Ground
Expansive pipe
Figure 2-3 Fixing cabinet with Tap
ACTURA Flex 48330 Power System User Manual
Plain washer
Page 27
2.3 External Electrical Connection Interface
2.3.1 Connection Of Input Cables
The AC input terminals, SPD, rectifier AC input switch, PE bus and PE terminals
are illustrated in Figure 1-6. SPD is just adjacent to the AC input terminals and has
been connected in before delivery. PE bus is at the top of the MFU and is
connected to the DC Power Cabinet through screws. PE bus is connected PE
terminal through a cable.
Connection requirements
The AC mains is connected to the AC input terminals directly. There are 6 AC input
modes as shown in Table 2-2:
Table 2-2 AC input modes
Item Function unit Amount
3P+N/380V AC input
1P+N /220V AC input
AC distribution
L1+L2/220V AC input
3P/220V AC input
Terminals only - for individual rectifier AC feeds
2P MCB only - for individual rectifier AC feeds
Chapter 2 Installation 17
Connection method
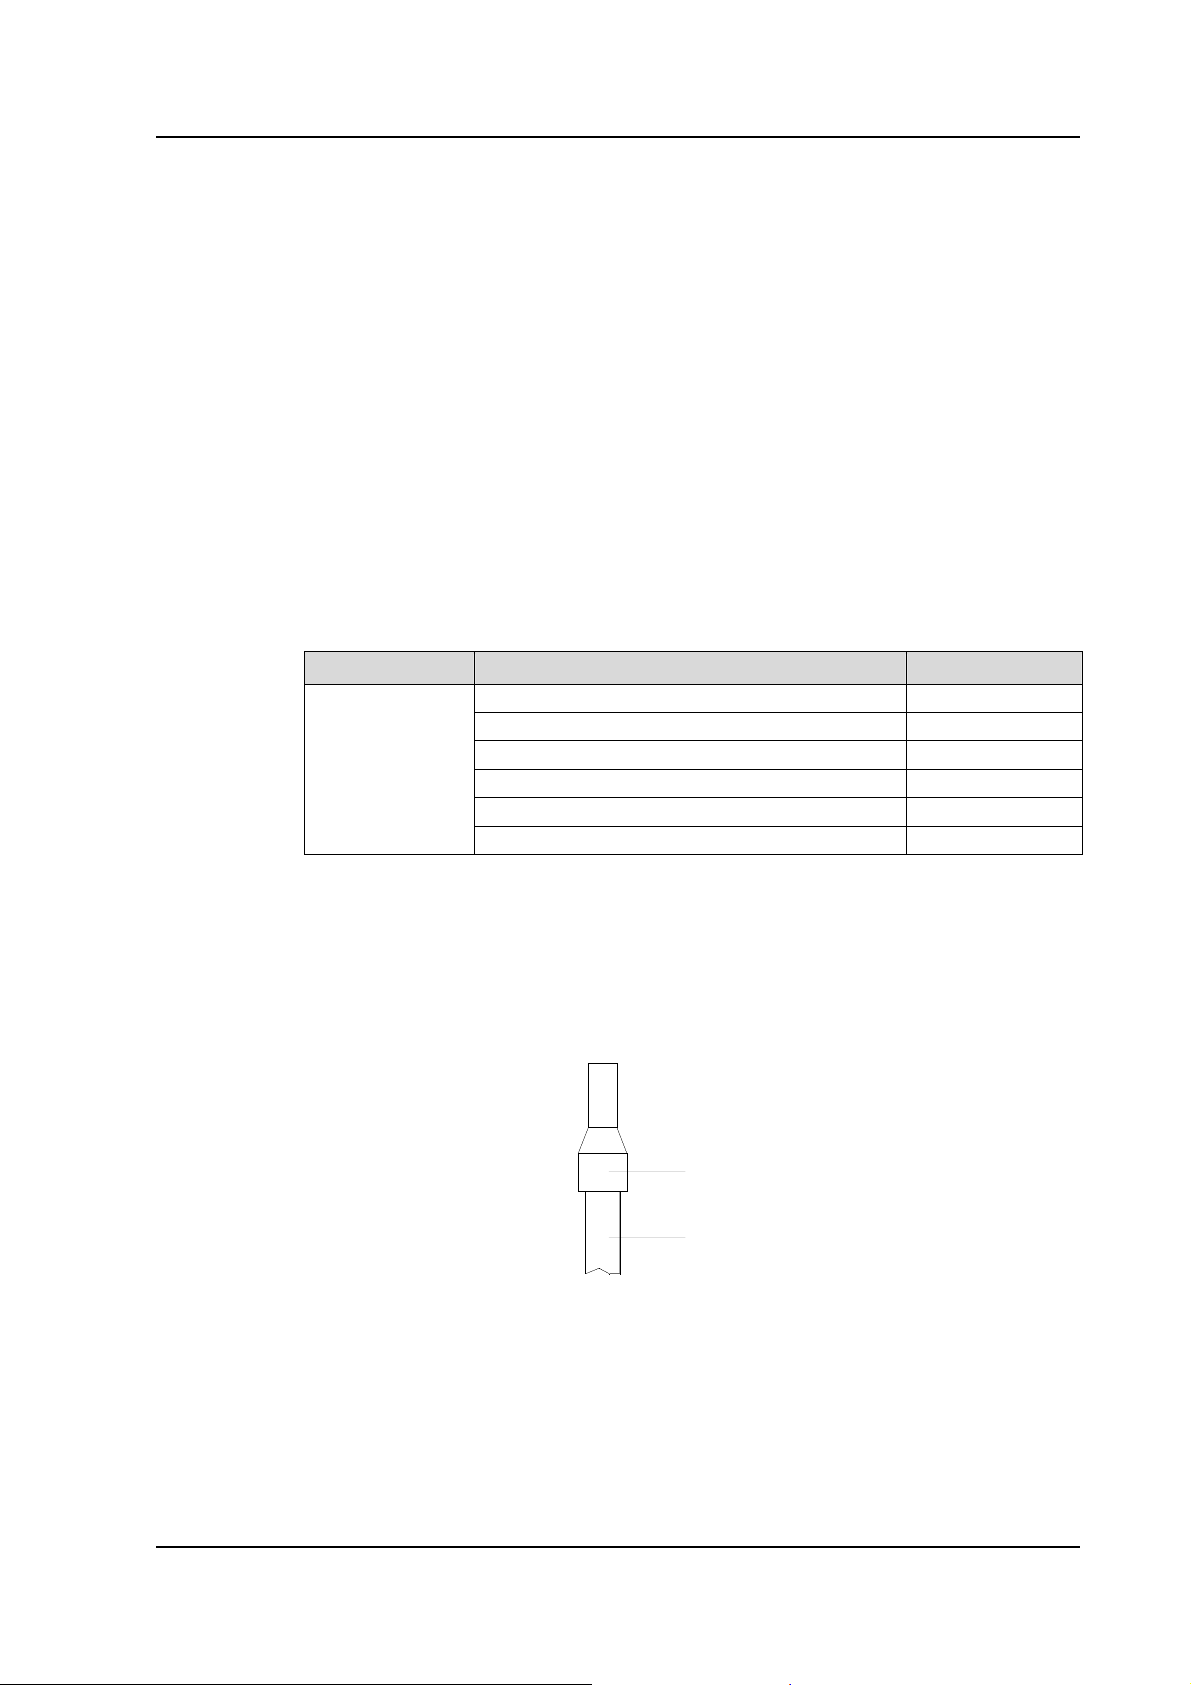
Strip the insulation layer of one end of the AC input cable, and then mounted the
cable end with an H terminal.
The cable mounted with an H terminal is shown in Figure 2-4.
H Terminal
AC Input Cable
Figure 2-4 Cable mounted with H terminal
After attaching the H terminal to the AC input cable, connect the AC input cable to
the AC input terminals as shown in Figure 2-5:
ACTURA Flex 48330 Power System User Manual
Page 28
18 Chapter 2 Installation
A
A
A
C input terminals
Figure 2-5 Connection of input terminals
The AC input cable is fed to the system through the top cover of the cabinet, as
shown in Figure 2-6:
C input cable
Cable bracket
Top cover
Figure 2-6 Top cover
There is a cable bracket on the top cover. The input cables are bound to the cable
bracket with a cable tie.
Different cable connection modes
There are 4 AC input terminals. For 3-phase AC power input, just connect the AC
input cables as shown in Figure 2-7:
L1 L2 L3 N
C input terminals
Figure 2-7 Connection of 3-phase AC power input
ACTURA Flex 48330 Power System User Manual
Page 29
Chapter 2 Installation 19
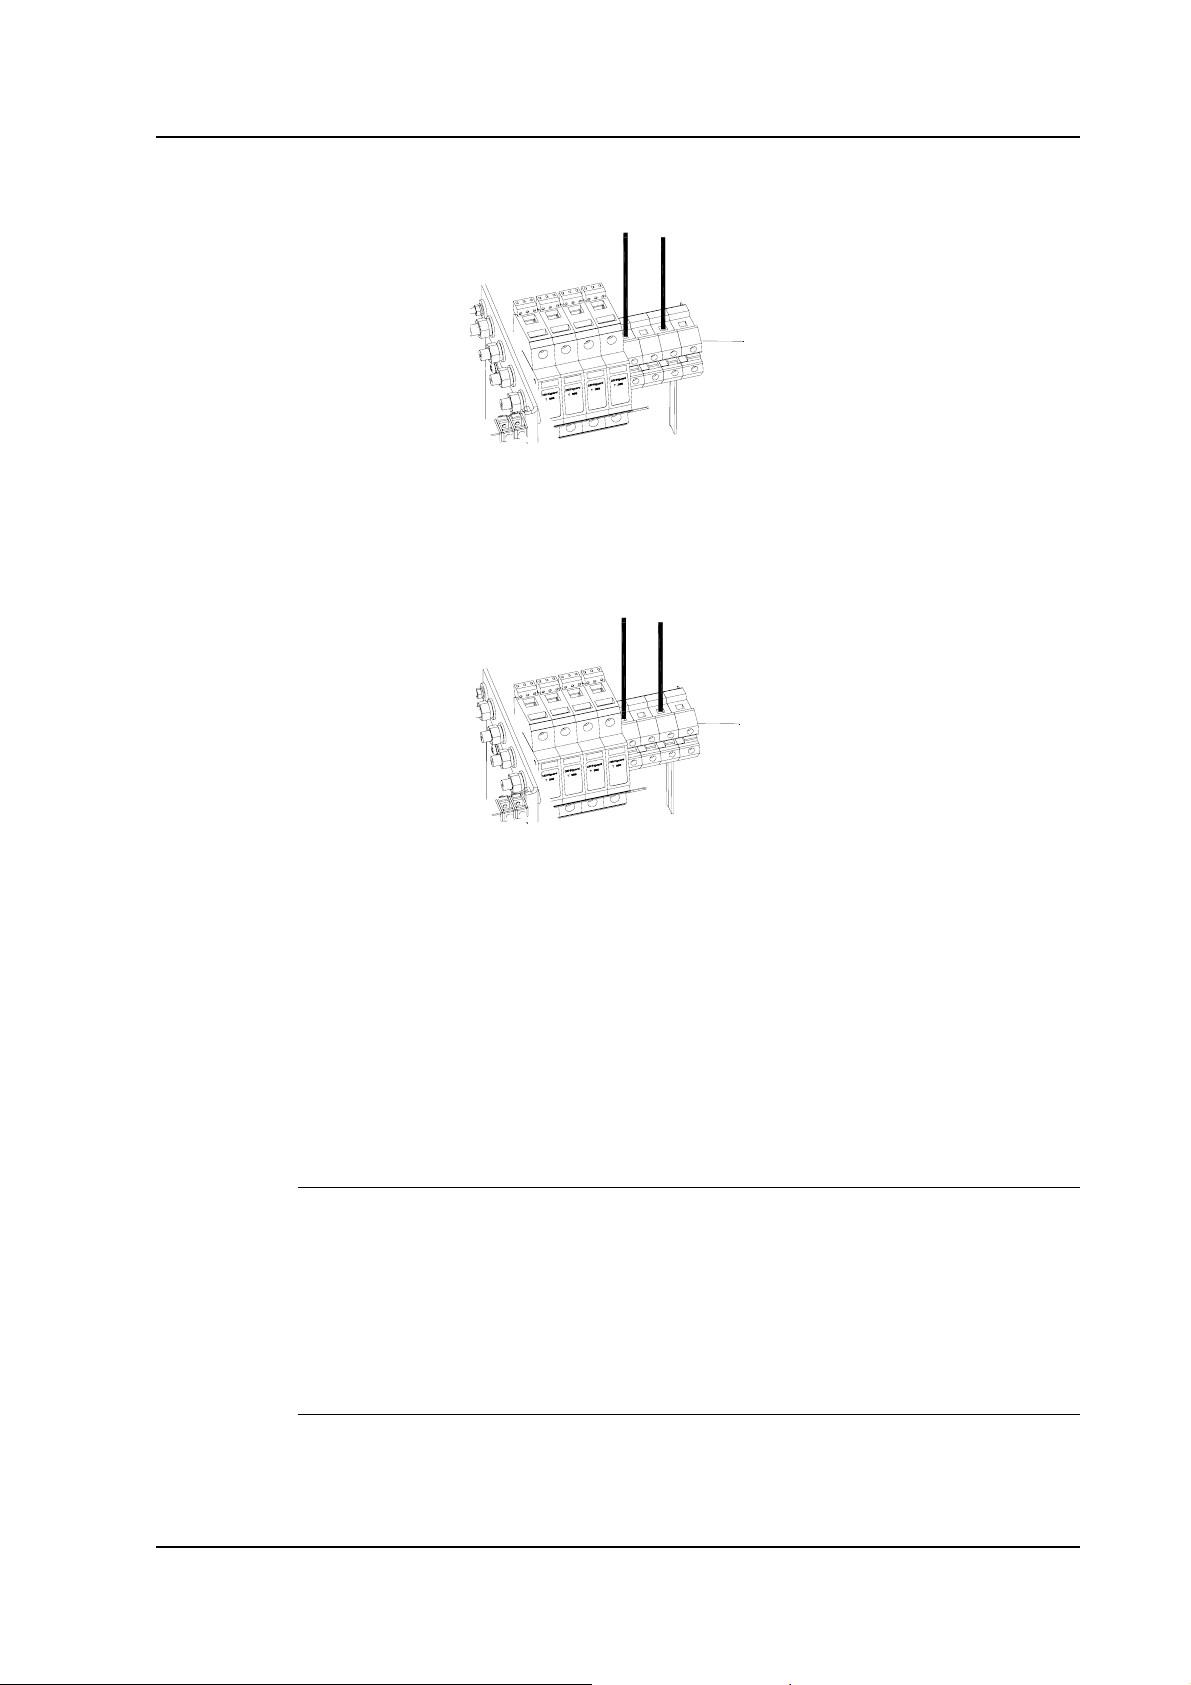
For single-phase AC power input, connect the AC input cables as in Figure 2-8:
L
N
AC Input Terminals
Figure 2-8 Connection of single-phase AC power input
If the AC input is single phase, the second and fourth terminals are not connected.
For dual-phase AC power input, connect the AC input cables as in Figure 2-9:
L1
L2
AC Input Terminals
Figure 2-9 Connection of dual-phase AC power input
If the AC input is dual-phase, the second and fourth terminals are not connected.
The yellow, green, red, and light blue AC cables correspond respectively to the AC
phase L1, L2, L3 and neutral lines. If the cables are the same color, they should be
identified with labels.
The AC cables should be laid separately from the DC cables.
No splice, damage, or scratch on the cables is permitted.
The rectifier AC input cables have already been connected in factory.
Note
1.To insure AC input cable has enough bearing current capability, the section area of the AC
input cable for 3-phase AC power input should not be less than 10mm
AC power input and dual-phase AC power, it should not be less than 25mm
area of input earth line should not be less than 35mm
2
.
2. The external AC input MCB of cabinet must be sure to disconnect all the AC input lines
(including live lines, zero line), but input earth line can not be disconnected by any breaking
device. It is recommended that the rated current of the AC input MCB is not less than 125A.
2
; and for single-phase
2
. The section
ACTURA Flex 48330 Power System User Manual
Page 30

20 Chapter 2 Installation
2.3.2 Connection Of Load Cables
Loads are connected to the MCB with suitable capacity to avoid their failure to
function in the case of overload. The capacity of the MCBs is recommended to be
about 1.5 times of the peak value of the load capacity. The load circuit breakers are
shown in Figure 1-7. The circuit breakers can be ABB or CBI circuit breakers.
We take the CBI circuit breakers of 13mm for example to illustrate the load cable
connection, as shown in the Figure 2-10.
connected with
low-priorit y loa d
busbar
Low-priority
load busbar
Battery –48V busbar
High-priority load busbar
connected with
high-priority load
busbar
Figure 2-10 Connection of load cables
Explanation: the load MCBs and battery MCBs can be configured flexible according
to the actual requirements. Their setting range is shown in the following table.
Table 2-3 Configuration number of load MCBs and battery MCBs
Busbar type Max. load number Note
Battery -48V busbar 0~5
High-priority load busbar 0~19
Low-priority load busbar 0~28
Total number of the load should not
exceed 20 with 18mm-width MCB or
not exceed 28 with 13mm-width MCB.
Cable connection to MCB: strip the power cable end, crimp-connect the copper
core to an H terminal, See Figure 2-4 for the cable mounted with a H terminal. After
attaching the H terminal to the cable, insert the cable into the wiring hole of the
MCB, then tighten the screw to fix the copper core, as shown in Figure 2-11:
Cable
H terminal
Figure 2-11 Cable connection to MCB
ACTURA Flex 48330 Power System User Manual
Page 31

Note
1. The cable should not be spliced. The load cable, signal cable and AC cables should be
wired separately as possible to avoid them affecting each other.
2. If the power supply system is in operation, switch off the DC output MCB before
connecting the cables.
3. The rated current of the output cable should be bigger than tha t of the correspo ndi ng
MCB connected with it.
DC output branch should match the load capacity. It is highly recommended to
connect priority load to BLVD branch, and normal load to LLVD branch.
2.3.3 Connection Of Communication Cables
There is a connector board in the rectifier shelf. The board is shown in Figure 2-12:
Chapter 2 Installation 21
J10
J11
Ethernet Port
Figure 2-12 Connector board in rectifier shelf
There is an Ethernet port and a DB9 RS232 port on the front panel. For the
connection of communication cables, first connect the Ethernet port to the
transmission equipment, and then connect the DB9 RS232 port to the Main
Computer.
ACTURA Flex 48330 Power System User Manual
Page 32

22 Chapter 2 Installation
2.3.4 Layout Of Connector Board S6415X2
Figure 2-13 Layout of connector board S6415X2
ACTURA Flex 48330 Power System User Manual
Page 33

2.3.5 Interface Definition Of Connector Board S6415X2
Table 2-4 Interface definition of connector board S6415X2
Connector Pin Signal name Mark number Logic relation
1 Relay output 1 normal cl ose DO1_NC
2 Relay output 2 normal cl ose DO2_NC
J3
J4
J5
J6
J10
J11
J12, J18
J13
3 Relay output 1 common DO1_COM
4 Relay output 2 common DO2_COM
5 Relay output 1 normal open DO1_NO
6 Relay output 2 normal open DO2_NO
1 Relay output 3 normal cl ose DO3_NC
2 Relay output 4 normal cl ose DO4_NC
3 Relay output 3 common DO3_COM
4 Relay output 4 common DO4_COM
5 Relay output 3 normal open DO3_NO
6 Relay output 4 normal open DO4_NO
1 Relay output 5 normal cl ose DO5_NC
2 Relay output 6 normal cl ose DO6_NC
3 Relay output 5 common DO5_COM
4 Relay output 6 common DO6_COM
5 Relay output 5 normal open DO5_NO
6 Relay output 6 normal open DO6_NO
1 Relay output 7 normal cl ose DO7_NC
2 Relay output 8 normal cl ose DO8_NC
3 Relay output 7 common DO7_COM
4 Relay output 8 common DO8_COM
5 Relay output 7 normal open DO7_NO
6 Relay output 8 normal open DO8_NO
1 Digital circuits power +5V
2 Temperature signal 1 input TEMP1 4~20mA
3 Analog ground GND
1 Digital circuits power +5V
2 Temperature signal 2 input TEMP2 4~20mA
3 Analog ground GND
1 Data Carrier Detect DCD232
2 Receive Data RXD232
3 Transmit Data TXD232
4 Data Terminal Ready DTR232
5 Data Communication ground DGND
6 Empty
7 Request To Send RTS232
8,9 Empty
1 Ethernet TX+ NETTX+
2 Ethernet TX- NETTX-
3 Ethernet TR+ NETTR+
4 Empty
5
6 Ethernet TR- NETTR-
7~12 Empty
Chapter 2 Installation 23
Empty
ACTURA Flex 48330 Power System User Manual
Page 34

24 Chapter 2 Installation
Connector Pin Signal name Mark number Logic relation
1 RS485 communication+ E485+
J14
J19
2 RS485 communication- E485-
3 Protection ground PGNG
1 48V+ POWER+
2 48V- POWER-
2.3.6 Connection Of Temperature Sensor Cables
There are two 3-pin terminals on the connector board in rectifier shelf. These two
terminals are J11 and J10 respectively. They are used to connect the temperature
sensors. The locations of J11 and J10 are as shown in Figure 2-12.
The user can connect the temperature sensor cables to J11 and J10.
2.3.7 Connection With MODEM
Take e-TEK TD-5648DC MODEM for example to illustrate the connection.
Power
Figure 2-14 Input/output interfaces of TD-5648DC MODEM
Conneting modem with M500D control unit
MODEM connects with M500D monitoring module through connector board
S6415X2:
1. Connect telephone line to the “LINE” port of MODEM.
2. Connect the 48V “POWER” terminal of MODEM with the J19 socket of connector
board S6415X2.
3. Connect “RS-232” (DB25 female) communication port of MODEM with the J12 or
J18 terminal (DB9 male) of connector board S6415X2 using a communication
cable.
Note
When the cabinet has a front door, before con nect in g the RS232 terminal, pull out the
S6415X2 board first, pass the RS232 terminal through the opening on the right side o f the
rectifier subrack and connect it with the J18 terminal on the S6415X2 board, then insert the
S6415X2 board.
ACTURA Flex 48330 Power System User Manual
Page 35

2.3.8 Connection With Dry Contacts
The M500D monitoring module provides 8 sets of alarm dry contacts through the
J3-J6 sockets on the connector board S6415X2. Each set has a normally open
contact and a normally closed contact. Once the corresponding alarm event occurs,
the dry contact will act to report alarms under the control of M500D monitoring
module. Through the dry contact networking, the system can realize the level
isolation transmission of fault signals.
When delivery, each set of dry contacts is corresponding to one default alarm type,
and users can reset it as other alarm types.
Connecting method
After peeling the signal cable terminal, insert it into the dry contact terminal, then
tighten the hold-down bolt to compress the signal cable.
2.4 Battery Installation And Cabling
Chapter 2 Installation 25
2.4.1 Battery Installation
The DC Power System with standard configuration has 4 battery strings. The DC
Power System with non-standard configuration can connect to up to 5 battery
strings. In the system cabinet, there are 5 levels and each battery string is installed
in one level. One battery string has four +12V battery blocks.
Procedures to install battery:
1. Install the batteries in the cabinet from low level to high level;
2. Place the battery on the level and push it inward until the battery is blocked;
3. Connect the positive and negative battery cable to the battery string.
The cabinet with four battery strings installed is shown in Figure 2-15:
ACTURA Flex 48330 Power System User Manual
Page 36

26 Chapter 2 Installation
Battery Connection Unit(BCU)
Battery(4 in a string)
Battery Shelf
Figure 2-15 Cabinet with four battery strings installed
Note
To satisfy the safety requirement of the whole equipment, the fire-retardant class of the
battery materials should not be lower than V-2.
Insure that the charge/discharge current of single battery group is not bigger than 100A, and
the total charge/discharge current of the all battery groups are not bigger than 200A.
2.4.2 Battery Cable Connection
The battery connection for the cabinet with standard configuration is different from
that of the cabinet with non-standard configuration.
Standard configuration
The DC Power System with standard configuration has no BCU. The system has
four battery strings. The negative battery cable is of blue color and the positive one
is of black color. There are two connection methods, one is for the cabinet of 600 %
400 % 700(mm), and another is for the cabinets of 600 % 400 % 2000(mm) and
600 % 600 % 2000(mm).
1) Batter Connection for Cabinet of 600 % 400 % 700(mm)
The four left-most circuit breakers in the MFU connect to the negative battery
cables (blue) respectively as shown in Figure 2-16. Another end of the negative
ACTURA Flex 48330 Power System User Manual
Page 37

Chapter 2 Installation 27
battery cable is connected to the negative terminals of the battery string in each
level as shown in Figure 2-16:
Negative Battery Cables
4 Battery Circuit Breakers
Figure 2-16 Connection of battery cables.
2) Batter Connection for Cabinets of 600 % 400 % 2000(mm) and 600 % 600 %
2000(mm)
The connection is show in Figure 2-17:
Negative battery
cable
Positive battery
cable
Figure 2-17 Positive and negative battery cables in each level
One end of positive battery cable is connected to the neutral bus of the DC power
cabinet. Another end of the positive battery cable is connected to the positive
terminal of the battery string in each level as shown in Figure 2-17.
ACTURA Flex 48330 Power System User Manual
Page 38

28 Chapter 2 Installation
Note
The actual number of battery circuit breakers in MFU may be 0~5 according to the user’s
need.
Non-standard configuration
The DC power system with non-standard configuration has a BCU. The connection
of positive cables is the same with that of the system with standard configuration.
The only difference is that there are five positive battery cables because the system
has five battery strings. One end of positive battery cable is connected to the
neutral bus of the DC power cabinet. Another end of the positive battery cable is
connected to the positive terminal of the battery string in each level as shown in
Figure 2-17.
One end of negative battery cable is connected to the negative terminal of the
battery string in each level as shown in Figure 2-17. Another end is connected to
the BCU as shown in Figure 2-18. The connection has already been done in
factory.
Negative Battery Cables(Blue)
Figure 2-18 Negative battery cables connection in BCU
Note
1. Before connecting the battery cables, the corresponding battery fuse or the battery switch
must be disconnected.
2. Be careful not to reverse connect the battery, otherwise, the battery and the power supply
system will be damaged!
Since the battery voltage decreases in discharge, hence the sectional area of the
cable connecting the battery and the MFU or BCU should be relatively big to keep
the voltage drop on the cable within 0.5V.
ACTURA Flex 48330 Power System User Manual
Page 39

2.5 Parallel Connection Of Cabinets
In order to prolong the backup time of battery, the battery capacity should be
increased. Another cabinet can be connected in parallel with the DC power system
cabinet. The expanded cabinet has no rectifier shelf and Multi-Function Unit. It is
only installed with battery strings and a BCU. So, it is actually the battery cabinet.
BCU in Extension Unit connects to Main Unit through cables. The parallel
connection of the DC power system cabinet with the battery cabinet is shown in
Figure 2-19:
Chapter 2 Installation 29
Main cabinet
BCU
Batteries
Extension cabinet
Figure 2-19 Parallel connection of DC power system cabinet with battery cabinet
DC/Parallel connections
The DC cables are connected to the output of the rectifier shelf in the MFU.
Up to two Battery Connection Units (BCUs) can be connected in the DC Power
System – up to one BCU in the main cabinet and up to one BCU in an extension
battery cabinet.
SCU can display the alarm signals from these two BCUs.
The user can connect the MFU to an additional extension MFU (only for additional
load circuit breakers) through suitably rated cables.
ACTURA Flex 48330 Power System User Manual
Page 40

30 Chapter 3 Startup
Chapter 3 Startup
3.1 Checking Before Startup
Check the DC Power System according to Table 3-1 before startup.
Table 3-1 System checklist before startup
Item Action Result
Check all the circuit breakers of the
1
shelf and BCU
Check the mains supply fuses/circuit
2
breakers.
Check with an ohmmeter between
3
the positive and negative terminals of
battery.
Check with an ohmmeter between
4
the battery terminals and shelf
chassis.
Check the battery block voltage and
5
total battery voltage.
6 Check the mains phase voltage.
7 Check the connection of cables.
They should be switched off.
They should be removed/switched off.
They must be no short circuit (>50ohms)
They must be no short circuit (>50ohms)
The voltages shall correspond to the
values given by battery manufacturer.
The voltage shall be within the rectifier
input voltage range (85Vac~290Vac).
The cables shall be connected to their
correct terminals firmly.
Comments (fill in
“Ok” or not)
ACTURA Flex 48330 Power System User Manual
Page 41

3.2 Startup Process
Chapter 3 Startup 31
Item Action Result
The LEDs on the rectifiers and the
controller will emit light.
Connect/switch on the mains supply
1
fuses/circuit breakers of the DC shelf.
The rectifier fans will start.
The LVD contactors will operate.
The green LEDs of the rectifiers and
the controller will flash for about 10 s.
and then emit steady light.
The voltage should be close to what
Check the DC voltage on the test outlet
2
marked U in the supervision unit.
has been set in the controller.
If temperature compensated charging
is activated, the difference may be
V from the set value.
If temperature compensated
charging is activated, warn the
3
sensor on the battery with your hand
and observe the system voltage.
The voltage should start to drop.
The battery voltage will increase and
reach the system voltage.
4
Switch on the battery circuit breakers.
(Might take hours, depending on the
charging state of the battery.)
5
Switch on the circuit breakers in MFU. The loads will get DC supply.
6
Check all the LEDs of the shelf.
Only the green LEDs are On should
emit light. No LED shall flash.
Comments (Fill
in “OK” or not)
±
3
3.3 Parameters Configuration
After start up the DC Power System, following parameters need to be configured:
Password, AC parameters, DC parameters, rectifier parameters, battery
parameters, time and communication parameters.
Refer to Chapter 5 on how to configure the parameters.
ACTURA Flex 48330 Power System User Manual
Page 42

32 Chapter 4 Testing
4.1 Testing MFU
Measure the L-N voltage at the input terminals with a multi-meter to check if it is
normal.
4.2 Testing Rectifier
1. Turn on one rectifier input MCB in the MFU to feed AC supply to the
corresponding rectifier, the rectifier should operate normally;
2. Turn off this MCB, and turn on the other rectifier input MCBs one by one to check
if all the other rectifiers operate normally.
Chapter 4 Testing
If all of the rectifiers can operate normally, switch them on. In case of rectifier
malfunction, take the rectifier out and inspect it.
4.3 Testing SCU
When the rectifiers are operating normally, switch on the SCU, the SCU should
start and display the start screen. If the system self-test is normal, seconds later,
SCU displays Initial Screen with System Information:
There are default system parameter settings in the SCU, including the AC voltage
alarm points, DC voltage alarm points, battery management parameters, which are
available on the parameter card delivered with the system. If the battery capacity or
charging parameters set by user are different from those on the parameter card, or
if user has different BLVD management requirements, please reset the system
parameters according to the actual situation, and record the new settings on the
parameter card.
2004-09-16
53.5V 300 A
System: Alarm
Auto /BC
ACTURA Flex 48330 Power System User Manual
Page 43

4.4 Battery Breaker Test
1. Before turning on the battery circuit breaker, confirm with a multi-meter that the
battery is not reverse-connected.
2. When connecting the battery, be careful not to short the two battery terminals.
3. When connecting two batteries, be careful to avoid battery mutual charging due
to unequal terminal voltages of the two batteries.
4.5 BCU Test
The BCU can connect to a single battery via suitably sized cables from the
Distribution Unit.
The BCU can connect to up to five battery strings via suitably sized cables.
The user can route the battery cables via the left hand side and via the right hand
side of the BCU. A maximum of 7 cables can be routed via the left hand side of the
BCU and a maximum of 5 cables via the right hand side of the BCU.
Chapter 4 Testing 33
The user can mount the BCU 15mm or more above a Front terminal battery. Care
shall be taken to connect the battery to the BCU via cables in this orientation.
The user can safely connect battery cables on a live system with only front access.
BCU can be partially slid out in order for this to be achieved.
The user can safely install or replace a battery circuit breaker on a live system with
only front access. BCU can be partially slid out in order for this to be achieved.
4.6 Load Breaker Test
Before connecting load to the system, check with a multi-meter if the connection
polarity of the load and the power system is correct and the voltage is
1. Close the load MCB, DC power should be fed to the load;
2. Adjust the system parameters through the SCU, and make sure that the
information viewing and output control functions are normal.
normal.
ACTURA Flex 48330 Power System User Manual
Page 44

34 Chapter 5 Operating SCU
运行指示灯
A
Chapter 5 Operating SCU
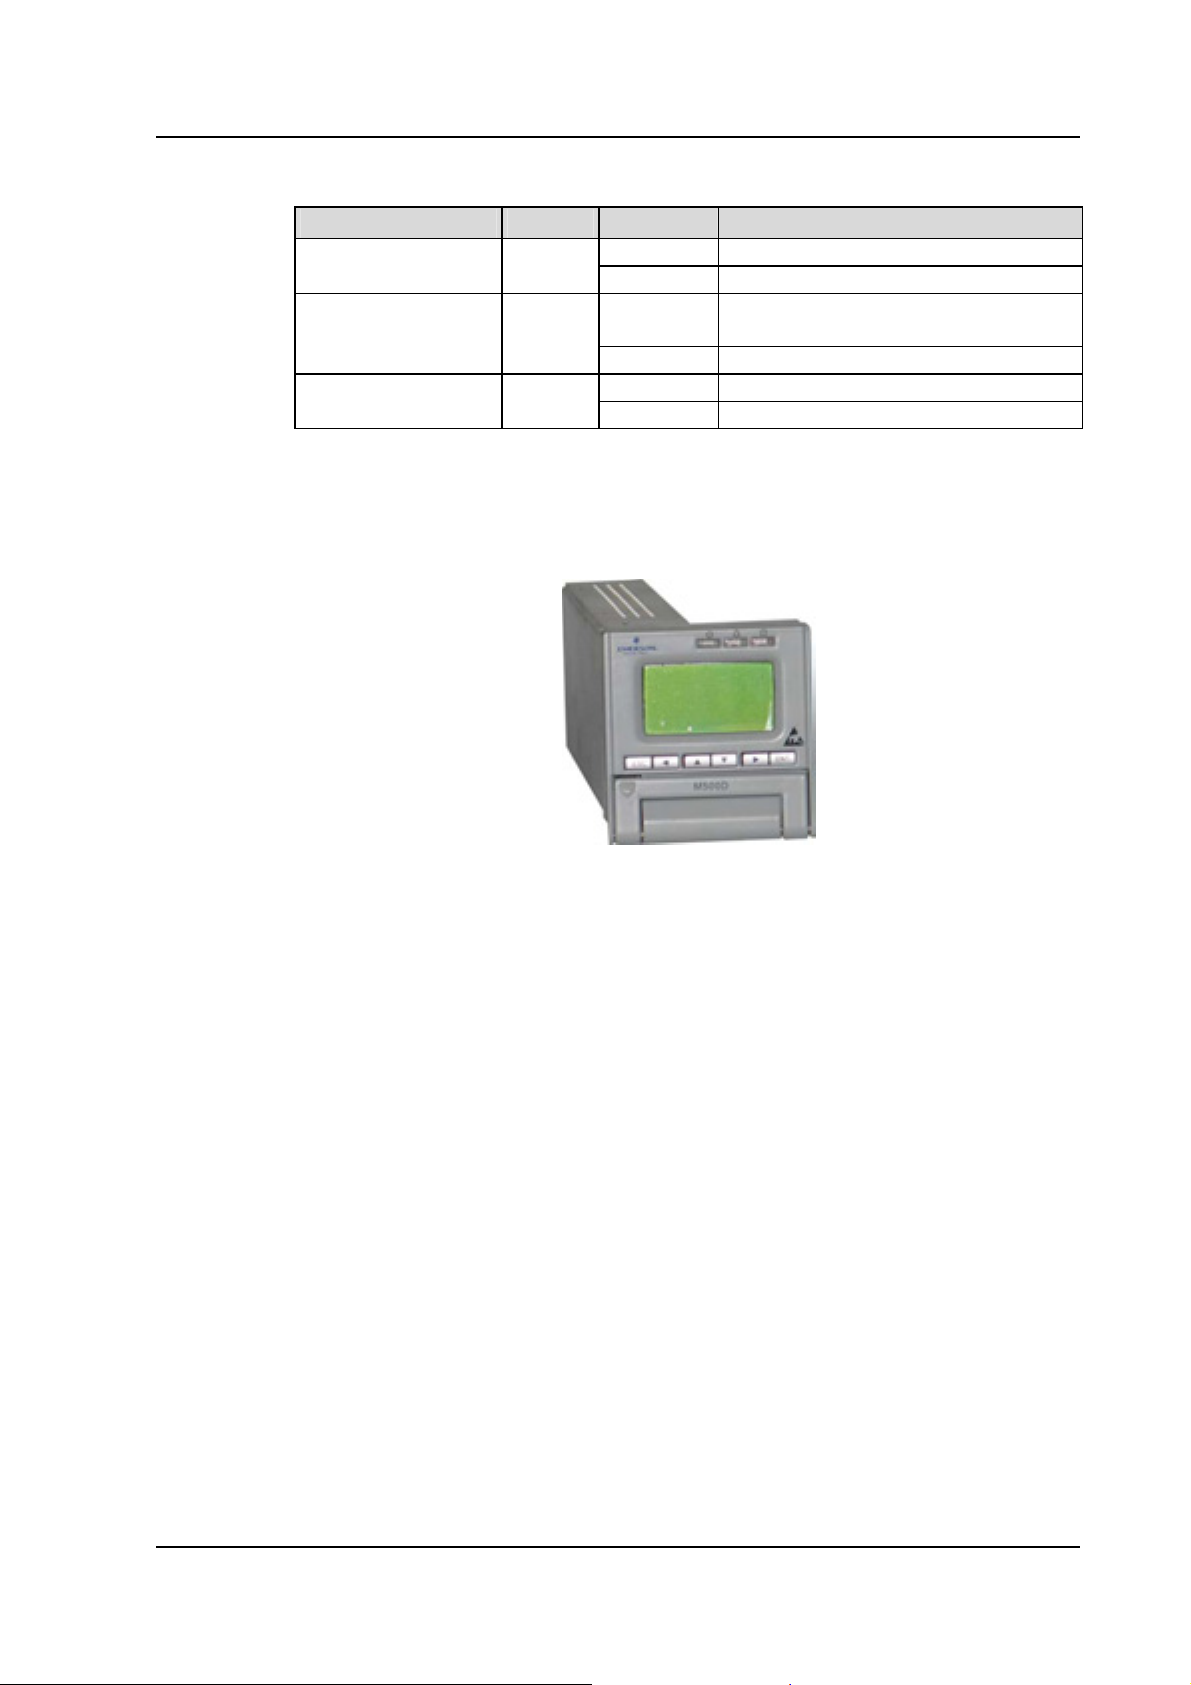
5.1 Operation Panel
SCU has a LCD with backlight, keys, LEDs and a latch, as shown in Figure 5-1:
Run indicator
告警指示灯
larm indicator
Critical alarm indicator
紧急告警指示灯
液晶显示屏
LCD
ESC
M500D
ENT
功能操作键
Functional key s
Figure 5-1 SCU Front Panel
Functions of LED indicators are illustrated in Table 5-1
Table 5-1 Functions of LED indicators
Indicator Normal state Fault state Fault cause
RUN (Green) On Off No operation power supply
Alarm (Yellow) Off On There are observation alarms
Critical alarm (Red) Off On There are major or critical alarms
SCU controller uses a 128×64 dot-matrix LCD unit. It has 6 functional keys. Its
interface is easy-to-use and supports multi-language display. The panel of the
controller is easy-to-remove. The functions of these 6 keys are shown in Table 5-2:
Table 5-2 Functions of SCU keys
Key Function
ESC Return to the upper level menu.
ENT
“” and
”
“
“” and
”
“
Enter the main menu or confirm the menu
operation
Shift among parallel menus or parameters.
Change values at a value setting interface.
At the first page of system information, use
these two keys to change LCD contrast.
Pressing ESC and ENT simultaneously
can reset the monitoring module
To change a character string whose
digits needs setting separately, use
““ and ““ to move the curso left or
right, or “
” and “” to set each digit.
ACTURA Flex 48330 Power System User Manual
Page 45

5.2 Operation Procedures
After the system is powered on for the first time, you should set the system type
according to the actual configuration. The monitoring module will restart after the
system type is changed. In that case, you should re-configure those parameters
whose default values are inconsistent with the actual situation. Only after that can
the monitoring module operate normally.
After configuring the system parameters, you can carry out various operations
directly without resetting the parameter values. As for those important parameters
related to battery management, such as BLVD, you should be fully aware of their
influence upon the system before you change their values.
Note
For the exact meanings of the abbreviations used in LCD displayer, see Appendix E
Glossary.
1. The LCD will prompt you to select a language once the monitoring module is
powered on.
Chapter 5 Operating SCU 35
英文
English
You can use “
”, “”, “” or “” to select the language you want, and press
“ENT” to confirm.
2. The monitoring module will prompt you to wait, and start initialization.
Waiting……..
3. The first system information page appears
2004-09-16
53.5V 125 A
System: No alarm
Auto /BC
The system information is shown in many pages. You can repeatedly press “
view other system information pages in a cycle.
” to
ACTURA Flex 48330 Power System User Manual
Page 46

36 Chapter 5 Operating SCU
4. At any system information page, press “ENT” to enter the “MAIN MENU” page,
which contains 3 sub-menus: “Status”, “Maintenance” and “Settings”.
You can press “
” or “” repeatedly to select a sub-menu, and press “ENT” to
enter the sub-menu. Press “ESC” to return to the menu of higher level.
1) Status
Including rectifier information, active alarm information and alarm history
information.
2) Maintenance
The maintenance operation can be conducted only when the battery management
mode is set to “Manual”. The maintenance includes battery FC, BC and test, load
power off/on, battery power off/on and rectifier voltage trimming, current limit,
switch control and resetting.
Main Menu
Status
Maintenance
Settings
3) Settings
Including the setting of alarm parameter, battery parameter, AC/DC parameter,
rectifier parameter and system parameter.
5.3 Querying System Status
5.3.1 First Page Of System Information
1. At the main menu page, press “ESC” to return to the first system information
page.
2. If no operation is conducted on the monitoring module keypad for 8 minutes, the
LCD will return to the first system information page and shut down the backlight to
protect the screen. Pressing any key will turn on the back light.
The first system information page contains the major system operation information,
including date/time, busbar voltage, total load current, system operation state
(normal or alarm), battery management mode (AUTO or MANUAL) and battery
state.
Among which, the battery state include FC, temperature compensation, BC, Cyclic
Boost, test, short test and scheduled test. The current time are displayed in two
pages shifting at the interval of 2s. One page shows year, month and date, the
ACTURA Flex 48330 Power System User Manual
Page 47

Chapter 5 Operating SCU 37
other shows hour, minute and second. The year is displayed with 4 digits; other
time units are in 2 digits.
10:09:16
53.5V 125 A
System: No alarm
Auto /BC
2004-09-16
53.5V 125 A
System: No alarm
Auto /BC
Note
1. At this page, you may use “” and “" to adjust the LCD contrast (7-level).
2. If there has been no keypad operation for 8 minutes, the monitoring module will return to
the first system information page. The time of that return will be recorded automatically,
and can be queried through the host.
5.3.2 Other System Information Screen
The system information is shown in many pages. The default page of the
monitoring module after the system power on is the system information first page.
You can press “
as shown in the following page:
Battery information page
1. Battery 1, battery 2
They represent respectively the current of the battery that battery shunt 1 and shunt
2 is connected to. If the “Shunt Coeff” of a certain battery group is set to “No”, this
situation will be reflected at the battery information page by “Not connected”, and
no actual capacity will be displayed.
” or “” to scroll up or down to view more operation information,
Batt1: 295 A
Actual: 99.1%
Batt2: 0 A
Remain: 0%
Note
There is only one current shunt in the system, that is “shunt 1”.
ACTURA Flex 48330 Power System User Manual
Page 48

38 Chapter 5 Operating SCU
2. Actual battery capacity
The monitoring module can approximately calculate the remaining battery capacity
in real time. Through configuration at the host, the remaining battery capacity can
be displayed in the mode of percentage, remaining Ah or remaining time, etc. The
default is the percentage.
During the normal BC/FC management, the monitoring module regards the rated
capacity as the capacity that each battery group can reach. When the battery
discharges, the monitoring module will calculate the battery remaining capacity
according to the discharge current, discharge time and the preset “battery
discharge curve”. When the battery is being charged, the monitoring module will
calculate the real-time battery capacity according to the detected charge current,
charge time and preset “battery charge efficiency”. If the calculated battery
remaining capacity is higher than the rated capacity, the monitoring module will
automatically change the calculated battery remaining capacity to the rated
capacity.
AC information page
There is no AC data acquisition board in ACTURA Flex 48330 Power System,so
the configuration of “AC Input” can only be set to “None”.
BC prompt and temperature information page
System Power:
23%
Cyc BC After:
55h
Bat. Temp:
25°C
Amb. Temp:
5°C
If the monitoring module bans BC and no temperature sensor is configured, this
page will not be displayed.
The first line of the information page displays the BC prompts, which will be
different with different systems, including:
1. Prompt the time of next Cyclic Boost according to the battery state
2. If BC is going on, the “Charging” will be prompted
3. If BC is disabled, this row will be empty
ACTURA Flex 48330 Power System User Manual
Page 49

The 2nd and 3rd rows of the page are the temperature information detected by the
temperature sensor. The display will vary with different parameter settings (see 4.7
for parameter setting). If the temperature sensor is not connected or is faulty,
system will prompt invalid. Meanwhile, the 4
Sensor”.
5.4 Querying Rectifier Status
The rectifier information includes the rectifier serial No., voltage, current, current
limit, mains situation, rectifier power limit and temperature power limit.
1. At any page of the system information, press “ENT” to enter the main menu.
2. Use “” or “” keys to select the “Status” sub-menu in the main menu, and
press “ENT” to confirm.
Status
Rectifiers
Active Alarm
Alarm History
3. Use “
Press “ENT” to confirm.
” or “” to select the “Rect Info” submenu, as shown in the above figure.
Chapter 5 Operating SCU 39
th
row will display “Check Temp
Rect 1: 01234 567
54.1V 30.2A
AC On DC on
AC Volt: 220V
Rect 1: 01234567
CurrLimit: 34%
AC Derated: Y
Temp Derated: N
The information of every rectifier is displayed in two pages. The information in the
first page includes: rectifier serial No., output voltage and current, AC/DC on/off
state and AC input voltage. The information in the second page includes: rectifier
serial No., current limit, the states of “AC Derated” and “Temp Derated”. Press “
to scroll to the next page, or “
4. Press “
” or “” to query other rectifier’s information.
” to return to the last.
”
At most 48 pieces of rectifier’s information can be displayed. If the rectifier does not
exist, there will be no information. If the rectifier communication is interrupted, the
information will be displayed in high light.
ACTURA Flex 48330 Power System User Manual
Page 50

40 Chapter 5 Operating SCU
5. At any rectifier information page, press “ESC” repeatedly and you can return to
the higher-level menus.
5.5 Querying Alarms And Setting Alarm Plans
The monitoring module can locate and record the system fault according to the
collected data, as well as raise audible/visual alarms and output through dry
contact according to the preset alarm level. Meanwhile, it reports the alarms to the
host.
You can query historical alarms and active alarms through the LCD of the
monitoring module.
5.5.1 Querying Active Alarm
When a new alarm is raised, and there is no operation on monitoring module
keypad within 2 minutes, the LCD of the monitoring module will prompt
automatically the active alarm.
If there are multiple alarms in the current system, you can query alarms through the
following steps:
1. At any system information page, press “ENT” to enter the main menu
2. Use “
” or “” to select the “Status” submenu in the main menu and press
“ENT” to confirm.
Status
Rectifiers
Active Alarm
Alarm History
3. Press “
” or “” to select the “Active Alarm”, as shown in the above figure, and
press “ENT” to confirm.
1) If there is no active alarm, “Active Alarm: None” will be displayed
Active Alarm!
None
ACTURA Flex 48330 Power System User Manual
Page 51

Chapter 5 Operating SCU 41
2) If there is any alarm, the display will be like the following:
Active Alarm!
3
1 Major Alarm
AC! Ph-A Failure
040412 12:30:23
The information in the active alarm information pages includes: alarm serial No.,
alarm level, alarm name and time (year, month, day, hour, minute and second). The
alarm raising time determines the sequence it is displayed, with the latest alarm
displayed first. Use “
” or “” to view all active alarms.
While querying rectifier alarms, press “
”, and the rectifier ID will be displayed,
and the “Run” indicator of the corresponding rectifier will blink.
Rect ID
02030405
In the case of battery test alarm or maintenance time alarm, press “
” to display
the prompt information.
Notice:
Press ENT Clear
ESC Key Quit
In the prompt page, press “ENT” to confirm the alarm.
4. At any active alarm information page, press “ESC” repeatedly and you can return
to the higher-level menus.
5.5.2 Query Alarm History
1. At any system information page, press “ENT” to enter the main menu
2. Press “
” or “” to select the “Status” submenu, and press “ENT” to confirm.
ACTURA Flex 48330 Power System User Manual
Page 52

42 Chapter 5 Operating SCU
3. Use “
” or “” to select the “Alarm History”, as shown in the above figure and
press “ENT” to confirm.
If there is no historical alarm, the prompt will be “Alarm History: None”.
The historical alarms of the monitoring module are stored in cyclic order. Up to 200
alarms will be recorded. Above that, the earliest alarm will be cleared automatically.
Status
Rectifiers
Active Alarm
Alarm History
ALARM HISTORY
None
1Alarm
SPD Fault
040411 20:08:30
040411 22:08:30
At the monitoring module, the displayed historical alarm information includes: alarm
serial No., alarm name and alarm start/end time (year, month, day, hour, minute,
second).
If it is a rectifier that raised the alarm, the ID of that rectifier will be displayed.
4. At any Alarm History information page, press “ESC” repeatedly to return to the
higher-level menus.
ACTURA Flex 48330 Power System User Manual
Page 53

5.5.3 Alarm Type Table
Chapter 5 Operating SCU 43
Table 5-3 Alarm type table
Serial
No.
1 Input MCB Trip The system AC input MCB tripped Critical None
2 SPD Fault T he SPD circuit is faulty Critical 8
3 Digit Input Fault
4 DC/DC Failure Including DC/D C converter fault Critical None
5 AC Over Volt
6 Ph-X Volt Low
7 Phase failure
8 Power Failure
9 DC Voltage High
10 DC Under-volt
11 DC Voltage Low
12 Batt Overtemp
13 Batt Temp High
Alarm Description
The alarm name is user defined, not
longer than 10 characters. The
high/low level alarm can be set in the
alarm mode.
The system AC input voltage is
higher than the set value of
parameter “OverVolt”
The system AC input voltage is lower
than the set value of parameter
“LowVolt”
The AC input voltage of the power
system is lower than 80V
In double-AC auto-switchover
system:
1. All AC voltage inputs are lower
than 80V.
2. Both AC inputs 1 and 2 are
broken.
In single AC input system or
double-AC manual-switchover
system, the AC voltage of all
rectifiers are lower than 80V
System DC output voltage is higher
than the set value of parameter
“Temp Threshold: Over”
System DC output voltage is lower
than the set value of parameter
“Temp Threshold: Under”
System DC output voltage is lower
than the set value of parameter
“Temp Threshold: Low”
Battery temperature is higher than
the set value of parameter “Temp
Threshold: Over Temp”
Battery temperature is higher than
the set value of parameter “Temp
Threshold: High Temp”
Default
alarm level
No alarm None
Critical None Over-voltage alarm
Critical None Under-voltage alarm
Critical None
Major 1
Critical 2 Over-voltage alarm
Critical 2 Under-voltage alarm
Observation 2 Low-voltage alarm
Major None
Observation None
Default
related
relay
Related parameter
configuration
Only in a system with
AC sampling board
In a system with AC
sampling board, you can
name 2 routes; in a
system without AC
sampling, you can name
8 routes
Over-temperature alarm
point
High temperature alarm
point
ACTURA Flex 48330 Power System User Manual
Page 54

44 Chapter 5 Operating SCU
Serial
No.
14 Batt Temp Low
15 Amb Temp High
16 Amb Temp Low
17 No TempSensor1
18 No TempSensor2
19
20 TempSensor2 Err
21 LLVD
22 BLVD
23 Load 1 Faiure
24 Load 2 Faiure
25 Load 3 Faiure
26 Load 4 Faiure
27 Load 5 Faiure
28 Load 6 Faiure
29 Load 7 Faiure
30 Load 8 Faiure
31 Load 9 Faiure
32 Aux Load Fails The last route faulty Critical 6
33 Batt1 Failure
34 Batt2 Failure
35 Batt3 Failure
Alarm Description
Battery temperature is lower than the
set value of parameter “Temp
Threshold: Low Temp”
Ambient temperature is higher than
the set alarm point
Ambient temperature is lower than
the alarm point
Temperature sensor 1 has been set,
but no sensor is actually connected
Temperature sensor 2 has been set,
but no sensor is actually connected
TempSensor1
Err
Temperature sensor 1 detected
unreasonable temperature
Temperature sensor 2 detected
unreasonable temperature
1. Load disconnection
2. Manual load disconnection
1. When battery discharges till its
voltage is lower than the “BLVD
Volt”, or the discharge time is longer
than the “BLVD Time”, the BLVD
contactor will be open automatically
2. BLVD through manual operation
Over-load, short circuit, manual
disconnection or alarm circuit faulty
Over-load, short circuit, manual
disconnection or alarm circuit faulty
Over-load, short circuit, manual
disconnection or alarm circuit faulty
Over-load, short circuit, manual
disconnection or alarm circuit faulty
Over-load, short circuit, manual
disconnection or alarm circuit faulty
Over-load, short circuit, manual
disconnection or alarm circuit faulty
Over-load, short circuit, manual
disconnection or alarm circuit faulty
Over-load, short circuit, manual
disconnection or alarm circuit faulty
Over-load, short circuit, manual
disconnection or alarm circuit faulty
Over-load, short circuit, manual
disconnection or alarm circuit faulty
Over-load, short circuit, manual
disconnection or alarm circuit faulty
Over-load, short circuit, manual
disconnection or alarm circuit faulty
Default
alarm level
Observation None
Observation None
Observation None
Critical None
Critical None
Critical None
Critical None
Critical 5 LLVD enabled
Critical 4 BLVD enabled
Critical 6
Critical 6
Critical 6
Critical 6
Critical 6
Critical 6
Critical 6
Critical 6
Critical 6
Critical None
Critical None
Critical None
Default
related
relay
Related parameter
configuration
Low temperature alarm
point
ACTURA Flex 48330 Power System User Manual
Page 55

Chapter 5 Operating SCU 45
Serial
No.
36 Batt4 Failure
37 Batt1 Over-curr
38 Batt2 Over-curr
39 Rect Vac Err
40 Rect Over Temp
41 Rect Failure
42 Rect Protect
43 Rect Fan Fails Fan faulty Major 3
44 Rect PowerLimit
45 Rect Com Failure
46 Multi Rect Fail More than 2 rectifiers raised alarms Critical None
47 Self-detect error
48 Manual Mode
49 Non-FC Status
50 Batt Discharge Battery being dischargin g No alarm None
51 Curr Imbalance
52 Batt Test Error
53 Short Test Fault
54 Outvolt Fault
55 System Maintain
56 Alarm Block
Alarm Description
Over-load, short circuit, manual
disconnection or alarm circuit faulty
The charge current of battery group 1
is bigger than the set value of
parameter “Over”
The charge current of battery group 2
is bigger than the set value of
parameter “Over”
All AC voltages are lower than the
AC low-volt point
Rectifier internal temperature higher
than 90°C
Rectifier over-voltage, higher than
rectifier high threshold
AC over-voltage (ƒ295V) or
under-voltage (80V)
AC voltage lower than 176V, with
rectifier internal higher than 85°C or
temperature at inlet higher than 45°C
Rectifier and monitoring module
communication interrupted
Error is detected through hardware
self-detection
Battery management in the manual
state
Including auto-BC, Cyclic Boost,
constant current test and short test
In a system with load shunt, the
detected load current plus battery
current differs sharply from the
rectifier output current
Battery discharge time unexpectedly
short
During the short test, the two
batteries discharged more than the
set value
The maintenance FC voltage
different from the busbar voltage, or
the reported data. The difference is
more than 1V
The pre-set system maintenance
time is due
Alarms sent to the host are blocked,
valid in EEM-M protocol
Default
alarm level
Critical None
Observation None
Observation None
Major 3
Observation None
Critical 3
Observation 3
Observation 3
Major 3
No alarm None
No alarm None
No alarm 7
No alarm None
Observation None
Observation None
Observation None
Observation None
No alarm None
Default
related
relay
Related parameter
configuration
Not existent in this
power system series
ACTURA Flex 48330 Power System User Manual
Page 56

46 Chapter 5 Operating SCU
Note
When the DC load 9 and its above (load 10, load 11 …) have circuit fault alarm, the
monitoring module all display “Load 9 Failure” or “Aux Load Fails”.
5.5.4 Changing Audible/Visual Alarm And Alarm Call Back Plan
There are different audible/visual alarms and call back modes for alarms of different
levels. For the products in China market, the alarming mode for major alarms and
critical alarms are the same.
Table 5-4 Changing audible/visual alarm and alarm call back plan
Alarm level
Critical ON / ON Y Callback No. can be set
Major ON / ON Y Callback No. can be set
Observation / ON OFF N
No alarm OFF OFF OFF N
Red
indicator
Yellow
indicator
Therefore, changing the alarm level of different alarms may change their
audible/visual alarm mode and call back plan too.
Pressing any key on the monitoring module can silence the alarm sound. The
sound will disappear and alarm indicator will be off when all alarms are cleared.
You can configure how long an alarm sound will last, or choose to make no alarm
sound. For details, see 5.7.11 Alarms Settings.
5.5.5 Changing Alarm Types Of Dry Contacts
As one of the alarm type parameter, “Related Relay” refers to the serial No. of the
dry contract corresponding to the alarm type, whose value is either 1 ~ 8 or “None”.
“None” means there is no corresponding dry contact. For details, see 4.7.1 1 Alarms
Settings.
Alarm
horn
Call back Remark
5.5.6 Setting Alarm Type For Dry Contacts
The Programmable Logic Control (PLC) is configured through the host software.
The way to configure the PLC function is:
C = A (Status) * B (Status)
C: The dry contract serial No. of the corresponding output. Range: 1 ~ 8.
A, B: The input alarm type. Status: Whether the alarm has been raised.
ACTURA Flex 48330 Power System User Manual
Page 57

Chapter 5 Operating SCU 47
*: The logic relationship between the two alarms. Options: “And”/”Or”.
The optional alarm types are listed in the following table:
Table 5-5 Optional alarm types
Alarm type Remark
Alarm Block
Load route 1
Load route 2
Load route 3
Load route 4
Load route 5
Load route 6
Load route 7
Load route 8
Load route 9
Auxiliary load route
SPD faulty
AC input MCB tripped
AC route 1 in operation
AC route 2 in operation
DC/DC faulty
Digit Input (DI) 7
DI 8
DC voltage
Phase A of AC route 1
Phase B of AC route 1
Phase C of AC route 1
Phase A of AC route 2
Phase B of AC route 2
Phase C of AC route 2
Load current Valid in the system with load shunt
Battery 1 current Valid in the system with battery shunt
Battery 2 current Valid in the system with battery shunt
Fuse of battery 1
Fuse of battery 2
Fuse of battery 3
Fuse of battery 4
Temperature detection 1
Temperature detection 2
Monitoring module in operation Used for monitoring module power off
Module self test
Manual mode
Non-FC state of battery
Battery discharge
Current imbalance
Battery short test
Battery test alarm
LLVD
Valid in the double AC inputs auto-switchover
power system
Valid in the double AC inputs auto-switchover
power system
ACTURA Flex 48330 Power System User Manual
Page 58

48 Chapter 5 Operating SCU
BLVD
Output voltage abnormal
AC power off
Multiple rectifiers alarm
Time for system maintenance (replace the fan)
Any rectifier comm interrupted
Any rectifier AC power off
Any rectifier over-temperature
Any rctifier faulty
Any rectifier in protection
Any rectifier fan faulty
Any AC derated rectifier
Any temperature derated rectifier
For example: To make dry contact No.3 act when battery route 1 is broken but AC
power is still on, the PLC should be configured like this:
A: battery route 1, with “status” set as “Alarm”.
Alarm type Remark
B: AC power off, with “status” set as “No alarm”.
C: Dry contact No.3
*: “AND”.
5.5.7 Set the Alarm Names Through PLC Function
Connect the serial port of MC to the RS-232 port of SCU, then configure the alarm
types that correspond to the dry contact outputs through MC.
An 8 (row) % 6 (column) logic matrix is used in configuring these 8 dry contacts.
Every row in the matrix corresponds to one dry contact. The setting of one dry
contact has 6 bytes.
Byte 0: The dry contact is disabled if byte 0 is set to 0, and enabled if byte0 is set to
1.
Bytes 1, 3 and 5 are the SN of the 3 alarms respectively. The range of SN is 0-56,
see section “5.5.3 Alarm List” for details.
Bytes 2 and 4 define the logic relationship between 3 alarms. The setting of byte 2
or 4 is 0-3. If the setting is 0, the logic is “AND”; If the setting is “1”, the logic is
“NOT”; If the setting is “2”, the logic is “OR”; and if the setting is “3”, the logic is
“AND”.
ACTURA Flex 48330 Power System User Manual
Page 59

Chapter 5 Operating SCU 49
Table 5-6 Logic matrix used for configuring 8 dry contacts
Dry Contact 0 0
Dry Contact 1 1
Dry Contact 2 2
Dry Contact 3 3
Dry Contact 4 4
Dry Contact 5 5
Dry Contact 6 6
Dry Contact 7 7
Setting 0,1 Alarm SN Logic Alarm SN Logic Alarm SN
Column(B)
Row(A)
0 1 2 3 4 5
The format of PLC setting is AlarmPLC[A][B]=C.
Where, “A” is the row No., and “B” is the column No., and “C” is the value of the
matrix element. An example is shown in the following table:
Table 5-7 Example of PLC setting
PLC byte Byte description Function
AlarmPLC[3][0]=1 Elemant value of Row 3 and Column 0 is 1. Use Dry Contact 3
AlarmPLC[3][1]=1 Elemant value of Row 3 and Column 1 is 1. Alarm SN of Fuse 1 Blow up
AlarmPLC[3][2]=3 Elemant value of Row 3 and Column 2 is 3. AND Logic
AlarmPLC[3][3]=2 Elemant value of Row 3 and Column 3 is 2. Alarm SN of Fuse 2 Blow up
AlarmPLC[3][4]=3 Elemant value of Row 3 and Column 4 is 3. OR Logic
AlarmPLC[3][5]=43 Elemant value of Row 3 and Column 5 is 43. Alarm SN of LLVD
For the above PLC setting: When alarms of “Fuse 1 Blow up” and “Fuse 2 Blow up”
occur at the same time, or LLVD occurs, dry contact 3 will output the alarm signal.
Relationship between PLC SN and Alarm:
Table 5-8 PLC SN and Alarm
PLC
SN
0 Alarm Block Disabled for China Market, Enabled for rest of world
1 Load 1 Failure
2 Load 2 Failure
3 Load 3 Failure
Alarm
description
Remark
4 Load 4 Failure
5 Load 5 Failure
ACTURA Flex 48330 Power System User Manual
Page 60

50 Chapter 5 Operating SCU
PLC
SN
6 Load 6 Failure
7 Load 7 Failure
8 Load 8 Failure
9 Load 9 Failure
10 Aux Load Fails Load 10 is Auxiliary Load for China Market
11 SPD Fault Enabled when an AC Signal Acquisition Board is installed.
12 Input MCB Trip Enabled when an AC Signal Acquisition Board is installed.
13
14
15 DC/DC Failure Enabled when an AC Signal Acquisition Board is installed.
16 Digital Input 6
17 Digital Input 7
18 Digital Input 8
19 DC Voltage
Alarm
description
Flag of Effective
AC Input
Flag of Effective
AC Input
Remark
Flag of Effective AC Input
Flag of Effective AC Input
20 Phase A of AC 1 Enabled when an AC Signal Acquisition Board is installed.
21 Phase B of AC 1 Enabled when an AC Signal Acquisition Board is installed.
22 Phase C of AC 1 Enabled when an AC Signal Acquisition Board is installed.
23 Phase A of AC 2 Enabled when an AC Signal Acquisition Board is installed.
24 Phase B of AC 2 Enabled when an AC Signal Acquisition Board is installed.
25 Phase C of AC 2 Enabled when an AC Signal Acquisition Board is installed.
26 Load Current Enabled when a load shunt is connected in D C Power System
27 Batt1 Curr Enabled when a battery shunt is connected in DC Power System
28 Batt2 Curr Enabled when a battery shunt is connected in DC Power System
29 Batt1 Fuse
30 Batt2 Fuse
31 Batt3 Fuse
32 Batt4 Fuse
33 Measured Temp1
34 Measured Temp2
35 SCU Working For LVD
36 Self-detect Error
37 Manual Mode
38 Non-FC Status
39 Batt Discharge
40 Curr Imbalance Only for China Market
ACTURA Flex 48330 Power System User Manual
Page 61

Chapter 5 Operating SCU 51
PLC
SN
41 Short Test Error
42 BattTest Error
43 LLVD
44 BLVD
45 Outvolt Error
46 Power Failure
47 Multi-Rect Fails Disabled for China Market, Enabled for rest of world
48 Rect Fan Fails
49 Rect Com Failure
50 Rect Vac Err
51 Rect Over Temp
52 Rect Failure
53 Rect Protect
54 Rect Fan Fails
55 Rect PowerLimit
Alarm
description
Remark
56 Derateby Temp
5.6 Maintenance
Note
1. This operation can be conducted only when the battery management is set to “Manual”.
2. Be careful! BLVD operations may result in power interruption.
Operation Procedures:
1. At any information page, press “ENT” to enter the main menu.
2. Press “
You cannot enter the system Maintenance menu if the “Battery Management” is set
to “Auto”.
3. Press “ENT” and input the correct operation password. Press “ENT” again to
enter the “Maintenance” menu.
” to select the “Maintenance” menu.
Enter Password:
123456
ACTURA Flex 48330 Power System User Manual
Page 62

52 Chapter 5 Operating SCU
To input the password, use “” or “” to modify numbers, and use “” or “” to
move the cursor. After the input, press “ENT” to confirm.
If the password is incorrect, system will prompt “password incorrect”. If the
password is less than 6 digits, end it with a “#”.
Note
You can choose to enter the “Maintenance” menu by using either the user, operator or
administrator password, for in this menu, all users have the same authority.
4. Press “
There are two pages:
” or “” to scroll to the operation page you need.
Maintenance
Start : BC
Batt: Reconnect
Load: Disconnect
RectTrim: 53.5V
CurrLimit: 110%
Rect 1: DC On
ID 01234567
5. Press "
" and "" to select the needed action.
“Start”: The options include “FC”, “BC” and “Test”. If system is not configured with
any battery, the control would be invalid. If there is AC power off alarm, or the
busbar voltage is too low, the BC and battery test control will not be executed by
the system. No battery test control can be conducted when the rectifier
communication is interrupted. Finally, after the battery test, the battery management
mode will be changed from “Manual” to “Auto” automatically.
“Battery”: The options include “Reconnect” and “Disconnect”. If there is no battery,
or there is a battery alarm, the battery operations will be invalid.
“Load”: The options include “Reconnect” and “Disconnect”.
The following maintenance over the rectifier can be conducted only when the power
system is in the FC state.
”RectTrim”: Range: 42V ~ 58V. It can be used to improve the current sharing
among rectifiers. Note that the value of this parameter cannot exceed the
over-voltage alarm point, or the parameter will be invalid.
”RectLimit”: Range: 10% ~ 121%.
ACTURA Flex 48330 Power System User Manual
Page 63

Chapter 5 Operating SCU 53
The maintenance operations over a single rectifier include: “DC ON/OFF”, “AC
ON/OFF” and “Reset”. The operation method is:
① Use “
” or ”” to select the rectifier parameter, and “” or “” to change the
rectifier serial No. Then press “ENT” to confirm. The bottom line of the page
displays the rectifier ID.
② Use “
“
” or “” to select the value.
” or “” to move the cursor to the maintenance operation area, and
If the rectifier voltage is too high, you can select “Reset” to restore the output
voltage of that rectifier to normal.
6. There will be prompts as the confirmation of control commands. If the
maintenance operation is valid, system will prompt you press “ENT” to confirm and
execute the operation, or “ESC” to abort the operation. Otherwise, system will
prompt you the operation is invalid, and press “ESC” to quit.
Press ENT to Run
Other Key Quit
No Maintain!
ESC Quit
Press “ESC” to return to the menu of higher level.
5.7 Setting System Parameters
Battery parameters are very important, for they are related to the life of battery.
Before delivery, the battery parameters have been initialized. Without any special
needs, you only need to reset the battery group number and battery capacity, and
accept the defaults for other parameters.
5.7.1 Parameter Setting Method
1. At any system information page, press “ENT” to enter the main menu.
MAIN MENU
status
Maintenance
Settings
ACTURA Flex 48330 Power System User Manual
Page 64

54 Chapter 5 Operating SCU
2. Use “” or “” to select the submenu “Settings” and press “ENT” to confirm.
System will then prompt you to input the password.
3. Press "
" or "" to select the number of password digits. Enter the password
digit by digit using “
setting submenu.
Users with different password levels have different authorities. See the following
table:
Enter Password:
123456
” or “”. Press “ENT” to confirm and enter the parameter
Settings
Alarms Settings
Battery Settings
AC Settings
Parameter Set
DC Settings
Rect Settings
Sys Settings
Table 5-9 Password levels and authorities
Level Authority Default password
User Configuration of general parameters 123456
Operator
Administrator
User’s authority, plus resetting system, resetting
password and modifying system type.
Operator’s authority, plus modifying password of all
levels, controling alarm sound volume, browsing system
parameters that can be set only through the host
654321
640275
4. There are two pages of “Settings”. Shift page by using “
the parameter by using “
” or “”. Press “ENT” to confirm.
” or “”, and select
As shown in the above figure, the monitoring module divides the parameters to be
set into 6 kinds: alarms parameter, battery parameter, AC parameter, DC parameter,
rectifier parameter and system parameter.
Among which, the battery parameters are divided into 5 kinds: basic, BLVD,
charging management, battery test, temperature coefficient, and they are displayed
in two pages, as shown below:
ACTURA Flex 48330 Power System User Manual
Page 65

Chapter 5 Operating SCU 55
Battery Setting
Batt. Selection
LVD Setting
Charge
What follows is the description of the parameter functions and values by dividing
them into 5 small categories and 5 big categories.
5.7.2 Batt. Selection
1. The first page of the Batt. Selection is shown below:
” or “” to select the page and the parameter to be set, and “” or “” to
Use “
select the proper value for the parameter. Press “ENT” to confirm.
Battery Setting
Batt. Test
Temp Comp
Mode: Manual
Batt String: 1
Capacity: 300Ah
Batt Name: 1#
After setting the “Battery Type”, the following prompt will appear, asking you to
name a certain type of battery for the sake of identifying them:
Battery Name:
Batt1
To name a rectifier, you can use “
” or “” to change the number, and “” or “”
to move the cursor left or right. Press “ENT” to confirm afterwards.
2. If setting parameter “System Type” does not require setting the battery shunt
coefficient, the second page of the basic battery settings is as follows:
Batt Shunt1:
Y
Batt Shunt2:
Y
ACTURA Flex 48330 Power System User Manual
Page 66

56 Chapter 5 Operating SCU
3. If setting parameter “System Type” requires setting the battery shunt coefficient,
the second page of the basic battery settings is as follows:
Batt Shunt1: Yes
Batt Shunt2: No
Shunt Coeff:
300A / 75mV
4. The value description of the basic battery parameters is listed below:
Table 5-10 Value description of the basic battery parameters
Parameter Range Defaults Value description
In normal situation, it should be in the “Auto” mode, which enables
the monitoring module manage the whole power system
Mgmt Mode
(Management
mode)
Batt String
(number of
battery strings)
Rated AH (rated
capacity)
BTT Name 1# ~ 11# 1#
Battery Name 10 characters Name different battery types to identify them
Batt Shunt1 Yes
Batt Shunt2
Shunt Coeff
(shunt
coefficient)
Auto, Manual Auto
0 ~ 4 4
50 ~ 5000Ah 300Ah
Yes, No
Dependent on system type
No
automatically, including: Automatic FC/BC switchover, LLVD and
BLVC. In the manual mode, you can do operations like BC, FC,
test and battery on/off, as well as enabling automatic battery BC
time protection and capacity calculation. Upon the system DC
under-voltage alarm, system can automatically switch to the “Auto”
mode, lest wrong manual operation should damage the system
You should set this parameter according to the actual battery
configuration. If “Batt Shunt” is set as “Y”, there should be batteries
actually configured
The capacity of a single battery string. You should set this
parameter according to the actual battery configuration.
Select “Y” when a corresponding shunt is configured, otherwise,
select “N”. Battery management aims at only the batteries
connected to the shunt
In the system type setting, if the parameter “Shunt” is set to “Y”,
this parameter will be displayed. Otherwise this parameter will take
the default value, and is the same for both battery strings.
5.7.3 LVD Parameter Description
1. Function description
LLVD means the monitoring module opens the LLVD contactor, so that the
non-priority load will be powered off. In this way, the battery remaining capacity can
sustain the priority load longer.
BLVD means the monitoring module opens the BLVD contactor. In this way, the
battery will stop powering the load, preventing over-discharge.
2. There are 3 related pages, as shown below:
ACTURA Flex 48330 Power System User Manual
Page 67

Chapter 5 Operating SCU 57
LLVD Enable: Y
BLVD Enable: Y
LVD Mode:
Voltage
LVD Vlotage
LLVD: 44.0
BLVD: 43.2
LVD Time
LLVD: 300min
BLVD: 600min
” or “” to select one page or one of the parameters, and “” or “” to
Use “
select the parameter value. Press “ENT” to confirm and save.
Note
Generally you do not need to set the LVD parameters’ value. The defaults will do.
3. The value description of the LVD parameters is listed below.
Table 5-11 Value description of the LVD parameters
Parameter Range Default Value description
LLVD Enable Select “Y” to enable LLVD function
BLVD Enable
LLVD Mode
LLVD Volt 44.0V
BLVD Volt
LLVD Time 300min
BLVD Time
Y, N Y
Time,
voltage
40V ~ 60V
3 ~ 1,000
min
Voltage
43.2V
600min
Select “Y” to disable the BLVD function
Select “Voltage”, when the monitoring module detects that the battery
voltage is lower than the prestet “LLVD Volt”, the load will be
disconnected, and so is the battery when the battery voltage is lower
than the preset ‘BLVD Volt”.
Select “Time”, when the discharge time reaches the preset “LLVD Time”,
the monitoring module will disconnect the load; when the discharge time
reaches the preset “BLVD Time”, it will disconnect the battery
5.7.4 Charging Management Parameters
1. There are 6 related pages, as shown below:
Float: 53.5
Boost: 56.4
Limit: 0.100C10
Over: 0.300c10
ACTURA Flex 48330 Power System User Manual
Page 68

58 Chapter 5 Operating SCU
Automatic Boost
Y
Cyclic Boost:
Y
To Boost
Current: 80%
Capacity: 0.06C10
Constant Boost
Current: 0.01C10
Duration: 180min
Cyclic Boost
Interval: 400h
Duration: 300min
Boost Limit
Time: 300min
” or “” to select one page or one of the parameters, and “” or “” to
Use “
select the parameter value. Press “ENT” to confirm and save.
Note
Generally you do not need to set the management value. The defaults will do.
2. The charging management parameter value description is listed below:
ACTURA Flex 48330 Power System User Manual
Page 69

Chapter 5 Operating SCU 59
Table 5-12 Charging management parameter value description
Parameter Range Default Value description
Float 53.5V
42V ~ 58V
Boost
Limit (current
limit)
Over (over current
point)
Automatic Boost Select “Y”, and BC will be conducted when conditions allow
0.1 ~ 0.25C10 0.1C10
0.3C
~ 1.0C10 0.300C
10
Yes, No Y
56.4V
Cyclic Boost
Cyclic Boost
Interval
48 ~ 8760h 2400h
Cyclic Boost Time 30 ~ 2880min 720min
To Boost Current 0.50 ~ 0.80C10 0.06C10
To Boost
Capacity
0.1 ~ 0.95 0.80
Constant BC Curr 0.02 ~ 0.99C10 0.01C10
Duration (of
constant BC)
30 ~ 1440min 180min
Boost Limit 60 ~ 2880min 1080min
In the FC state, all rectifiers output
voltage according to the set “Float”
In the BC state, all rectifiers output
The “Boost” must be
higher than the “Float”
voltage according to the set “Boost”
When the monitoring module detects that the battery charging
current is higher than the “Limit”, it will control the current of the
rectifiers, through which it can limit the battery charging current.
C10 is the battery rated capacity, generally set to 10 ~ 20% of the
rated capacity of one battery string.
When the monitoring module detects that the battery charging
current is higher than the “Over”, it will raise the battery charge
10
over-current alarm.
Select “Y”, and the monitoring module will control the system to
enter the Cyclic Boost when the FC time reaches the “Cyclic Boost
Interval”. The battery charging voltage is the preset “Boost”, and
the time is the preset “Cyclic Boost Time”
The monitoring module will control the system enter the BC state
when the battery capacity decreases to the value of “To Boost
Capacity”, or when the charge current reaches the “To Boost
Current”. The charge voltage will be the “Boost”.
The system in the BC state will enter the FC state when the charge
current decreases to the “Constant BC Curr” and after the
“Duration”. The battery charge voltage then will be the “Float”.
To ensure safety, the monitoring module will forcefully control the
system to enter the FC state if during the BC state, the BC time
reaches the “Boost Limit”, or abnormalities occur (such as AC
failure and battery route faulty, etc.).
3. The BC/FC switchover diagram is shown below:
FC time longer than "Scheduled BC Interval"
Battery charge current
bigger than "To BC Current"
Battery capacity smaller
FC
than "To BC Capacity"
Constant BC
time-up
Constant
BC
BC time longer than
"BC LVD Time"
Abnormal situation
Charge current
smaller than
"Constant BC
Curr"
Figure 5-2 BC/FC switchover diagram
ACTURA Flex 48330 Power System User Manual
BC
Page 70

60 Chapter 5 Operating SCU
5.7.5 Battery Test Parameters
1. There are 7 related pages, as shown below:
Battery Test
Voltage: 45.2
Time: 300min
Test End Cap:
0.700C10
Planned Test:
N
Planned Test1:
01.02 12Hr
Planned Test2:
04.02 12Hr
Planned Test3:
07.02 12Hr
Planned Test4:
07.02 12Hr
Short Test:
Enable: Y
Alarm Current
10A
Short Test:
Cyclye: 300h
Duration:
5min
Stable Test
Enable: Y
Current:
9999A
” or “” to select one page or one of the parameters, and “” or “” to
Use “
select the parameter value. Press “ENT” to confirm and save.
ACTURA Flex 48330 Power System User Manual
Page 71

Chapter 5 Operating SCU 61
2. The value description of the parameters is listed below:
Table 5-13 Value description of the battery test parameters
Parameter Range Default Value description
Battery test
voltage
Battery test time 5 ~ 1440min 300min
Test End Cap
(capacity)
Scheduled Test Y, N Y
Planned Test 1 00:00, Jan. 1st
Planned Test 2 00:00, April 1st
Planned Test 3 00:00, July 1st
Planned Test 4
Alarm Current 1A ~ 100A 10A
ShortTest Cycle 24h ~ 8,760h 720h
ShortTest
Duration
StableTest
Enable
StableTest
Current
43.1V ~
57.9V
0.01C
10
.95C
0
10
Month,day,
hour
1 ~ 60min 5min
Y, N
0 ~ 9999A 9999A
~
45.2V
0.7C
10
00:00, Oct. 1
The monitoring module can do battery test, and record 10 sets of
test data (accessible only through the host). The battery test has to
be started manually, then monitoring module will control the rectifier
output voltage, make it lower than the battery voltage, and the
battery discharge will begin. Monitoring module will stop the test if
the battery voltage reaches the “Battery test voltage”, or the
discharge time reaches “Battery test time”, or the battery capacity
reaches “Test End Cap”. Afterwards, it will restore the rectifier
output voltage to the normal FC voltage, begin the battery charge
and switch the system to battery auto-management. Meanwhile the
test start time/voltage and end time/voltage and battery remaining
capacity will be recorded. The records can be queried through the
host.
During the battery test, if abnormalities occur, the monitoring
module will stop the battery test automatically.
When the parameter “Scheduled Test” is set to “Y”, the monitoring
module will test the battery according to the 4 sets of test time. You
can set at most 12 sets of test time through the host.
st
If the battery have not discharged within the “ShortTest Cycle”, the
monitoring module will start a short test, whose operation time is
set by the parameter “ShortTest Duration”. By the end of the test, if
the difference in the discharge currents of batteries is bigger than
the “Alarm Current”, the battery discharge imbalance alarm will be
raised. This alarm will automatically end after 5min of delay. Also
you can end it by confirming it.
The stable test is conducted with constant battery current, whose
value is set through the parameter “StableTest Current”. If the
parameter “StableTest Enable” is set to “Y”, and the test will be
started once the battery satisfies the test condition
3. The schematic diagram of the test function is shown below:
Manually start
battery test
"Test End Voltage"
Rectifier output
voltage lower than
battery voltage
Battery
discharges
Rectifier hot
standby
is reached
"Test End Cap" is
reached
"Test End Time" is
reached
Figure 5-3 Schematic diagram of the test function
ACTURA Flex 48330 Power System User Manual
Battery
Auto-management
Page 72

62 Chapter 5 Operating SCU
5.7.6 Temperature Compensation Coefficient Parameters
1. The first page of the setting interface is shown below:
Temp 1:
Ambient
Temp 2:
Battery
2. If the “Temperature1” or “Temperature2” is set to “Battery Temp”, you need to set
the following parameters:
Center Temp:
25°C
Temp. Comp:
70mV / °C /Str
Batt Temp Alarm
Over: 70°C
High: 50°C
Low: 0°C
” or “” to select one page or one of the parameters, and “” or “” to
Use “
select the parameter value. Press “ENT” to confirm and save.
3. The value description of the parameters is listed below:
Table 5-14 Value description of temperature compensation coefficient
Parameter Range Default Value description
Temp 1
Temp 2
When Temp 1
or Temp 2 is
set to “Battery
Temp”
Ambient Temp,
None, Battery Temp
Center
Temp
Temp
Comp
10°C ~40°C 25°C
0~
500mV/°C
None
The default is
72mV/°C for
48V system
and 36mV/°C
for 24V
system.
The “Ambient Temp” and “Battery Temp” refer to the
measurement of the ambient or battery temperature
sensor at the local power system. “None” means there is
no measurement input. You should set the parameter
according to the actual situation. The temperature
measurement data will be displayed in the system
operation information screen.
Batteries are sensitive to temperature. To ensure
battery’s capacity and life, its FC voltage should change
together with the temperature: lower FC voltage for higher
temperature, and vice versa.
FC = BattTemp – Center Temp % Temp Comp
<
Upon alarms such as “Rect Com Failure”, “DC Under-volt”
and “DC Voltage High”, the monitoring module will not do
temperature compensation to the battery FC voltage.
Set this parameter according to the actual battery
technical parameters
ACTURA Flex 48330 Power System User Manual
Page 73

Chapter 5 Operating SCU 63
Parameter Range Default Value description
When Temp 1
or Temp 2 is
set to “Battery
Temp”
Over
High
Low
10 C ~
100 C
10°C ~
100°C
-40°C ~
10°C
50°C
50°C
0°C
When the detected battery temperature is
higher than the “Over”, the monitoring
module will raise an alarm
When the detected battery temperature is
higher than the “High”, the monitoring
module will raise an alarm
The monitoring module will raise an alarm when the
detected battery temperature is lower than the “Low”
5.7.7 AC Settings
1. The configuration interface is shown below:
OverVolt: 240V
LowVolt: 210V
UnderVolt: 200V
AC Input: None
” or “” to select one page or one of the parameters, and “” or “” to
Use “
select the parameter value. Press “ENT” to confirm and save.
The “High”
must not be
higher than
the “Over”
2. The value description of the parameters is listed below:
Table 5-15 Value description of AC settings
Parameter Range Default Value description
OverVolt
LowVolt
UnderVolt
AC Input
50V ~
300V
50V ~
300V
50V ~
300V
3-phase,
Single
Phase,
None
280V
170V
80V
Dependat
on
system
type
The monitoring module will raise an alarm when
the AC input voltage is higher than the “OverVolt”
The monitoring module will raise an alarm when
the AC input voltage is lower than the “LowVolt”.
The monitoring module will raise an alarm when
the AC voltage of an operating route is lower than
the “UnderVolt”, but there will be no alarm when
the AC voltage of the standby route is lower than
the “UnderVolt”
Set this parameter according to the actual situation. In a system with an AC
sampling board, you can only select “Single Phase” or “3-phase”; in a system
without an AC sampling board, you can select only “None”.
The “OverVolt” must be
higher than the “LowVolt”.
To avoid alrm disorder, it
is suggested to use the
default values
The “UnderVolt” must be
lower than the “LowVolt”.
ACTURA Flex 48330 Power System User Manual
Page 74

64 Chapter 5 Operating SCU
5.7.8 DC Setting
1. There are three related pages, as shown below:
” or “” to select one page or one of the parameters, and “” or “” to
Use “
select the parameter value. Press “ENT” to confirm and save.
DC Volt Alarm
Over: 58.5V
Low: 45.0V
Under: 45.0V
Amb. Temp Alarm
High: 25°C
Low: 0°C
Load Shunt
None
Shunt Coeff:
None
2. The value description of the parameters is listed below:
Table 5-16 Value description of DC settings
Parameter Range Default Value description
Over
(over-voltage)
Low
(low-voltage)
Under
(under-voltage)
High (high
temperature)
Low (low
temperature)
Load shunt Y, None None Set according to the system actual situation
Shunt Coeff
40V ~ 60V
10°C ~
100°C
-40°C ~
10°C
Dependent on system
type
58.5V
45.0V
45.0V
40°C
-5°C
The “DC Over Voltage” alarm will be raised when
the system DC output voltage is higher than the
value of “Over”
The DC low voltage alarm will be raised when the
system DC output voltage is lower than the value
of “Low”
The DC under voltage alarm will be raised when
the system DC output voltage is lower than the
value of “Under”
The high temperature alarm will be raised when
the detected ambient temperature is higher than
the value of “High”
The low temperature alarm will be raised when
the detected ambient temperature is lower than
the value of “Low”
In the system with a load shunt, this parameter can be set only when
the parameter “Shunt” (as a system type) is set to “Set”.
The values of
these three
parameters should
be: Over > Low >
Under
The value of
parameter “High”
must be higher
than that of
parameter “Low”
ACTURA Flex 48330 Power System User Manual
Page 75

5.7.9 Rect Settings
1. There are three related pages, as shown below:
” or “” to select one page or one of the parameters, and “” or “” to
Use “
select the parameter value. Press “ENT” to confirm and save.
Rect Over Volt:
59.0V
Default Volt:
42.0V
Walk-in Enabled
N
Walk-in Time:
8s
Fan Speed
Full Speed
HVSD Time:
300s
Chapter 5 Operating SCU 65
2. The value description of the parameters is listed below:
Table 5-17 Value description of rectifier settings
Parameter Range Default Value description
The rectifier over voltage alarm will be
Rect Over Volt 56V ~ 59V 59V
Default Volt 48V ~ 58V 53.5V
Walkin Enabled Y, N N
Walkin Time 8s ~ 128s 10s
Fan Speed
HVSD Time 50s ~ 300s 300s
Full Speed,
Half Speed
Half
speed
raised when the rectifier output voltage is
higher than the “Rect Over Volt”
The output soft start function means the rectifier voltage will rise from 0V
to the “Default Volt” after the “Walkin Time”
When set to “Half Speed”, the rectifier will regulate the fan speed
according to the temperature. When set to “Full Speed”, the fan will
operate at full speed
The rectifier will shut off automatically upon over-voltage, and restart after
a certain delay to see whether it is still over-voltage then. That delay is set
through the parameter “HVSD Time”. If the rectifier’s output voltage is
normal within the delay, the rectifier is regarded normal; otherwise, the
rectifier will be locked out and auto-restart function will be disabled
The “Default Volt” must be
lower than the “Rect Over Volt”
ACTURA Flex 48330 Power System User Manual
Page 76

66 Chapter 5 Operating SCU
5.7.10 System Settings
Users of different password levels have different authorities.
1. For the user level password (123456), there are 2 related pages, as shown
below:
” or “” to select one page or one of the parameters, and “” or “” to
Use “
select the parameter value. Press “ENT” to confirm and save.
Adress: 1
Text: Chinese
CommMode:Modem
Baud: 9600
Set Date:
2004-05-01
Set Time:
17:30:30
When the “CommMode” is “modem” or “EEM-M”, the “CallBack Number” and
“CallBack Num” (how many times should callback be made) should be set.
Call back Num:
5
Call back Set
Code1
CallBack Number:
01234567901234
56789
” or “” to change the number, and “” or “” to move the cursor left or
Use “
right. Press “ENT” to confirm.
2. For the operator level password (by default: 654321) or administrator level
password (by default: 640275), you can see the following pages, besides the pages
above, as shown below:
ACTURA Flex 48330 Power System User Manual
Page 77

Chapter 5 Operating SCU 67
System Type:
48V/50A/300/NONE
Serial No:
2004051025252
There will be a prompt when resetting the system:
Notice:
All Param Lost!
ENT Continue
ESC Quit
3. For administrator level password (by default: 640275), you can see the following
pages, besides all those above, as shown below:
Change Password:
Code
Con Alarm Voice:
1 Hour
Serial:
12345689101112
SW Ver: 1.00
Set Enable: Y
You can change the value of “Change Password” and press “ENT” to confirm.
Enter New PWD:
000000
Input Again!
” or “” to change the number, and “” or “” to move the cursor left or
Use “
right. Press “ENT” to confirm. You should input the same number twice to complete
the setting.
4. The value description of the parameters is listed below:
ACTURA Flex 48330 Power System User Manual
Page 78

68 Chapter 5 Operating SCU
Table 5-18 Value description of system settings
Parameter Range Default Value description
Text
Address 1 ~ 254
CommMode
BaudRate
When
“CommMode
” is set to
“MODEM” or
“EEM-M”
Set Date 2,000 ~ 2,099
Set Time Hour, min, sec
Operator
level or
above
CallBack
Num.
CallBack
Number
Initialize
password
Init Param
(Initialize
parameter
s)
Chinese, English and
Spanish
modem, EEM-M,
RS-232
1200bps, 2400bps,
4800bps, 9600bps
1 ~ 10 3
19 digits at most
Y, N N
Y, N N
Chinese Set accordi ng to your need
The addresses of power systems that are at the
same monitored office should be different
“MODEM”: Through modem and based on the
Telecom protocol.
“EEM-M”: Through modem and based on the EES
protocol.
“RS-232”: Through a transparent serial port and
based on the Telecom protocol
Make sure the baud rates of both the sending and
receiving parties are the same
Set according to the actual need. In a extension
system, sometimes you need to put a “,” between the
main number and extension number. When the
callback number is less than 19 digits, end it with a
“#”
Set the time according to the current actual time,
regardless of whether it is a leap year or not
Selecting “Y” can reset the user level and
administrator level passwords to the defaults
When the system parameters cannot be set normally,
and the usual resetting methods do not work, you
can set the “Init Param” to Y, and all the system
parameters will be restored to defaults. Alarms may
be raised for the defaults may fail to meet the actual
situation. Set the parameters according to the actual
situation then.
ACTURA Flex 48330 Power System User Manual
Page 79

Chapter 5 Operating SCU 69
Parameter Range Default Value description
Operator
level or
above
Administrator
System
Type
Change
Password
Con Alarm
Voice
Serial The production serial No. of the monitoring module. This parameter cannot be changed
SW Ver The software version No. of the monitoring module. This parameter cannot be changed
Set Enable
24V/75A/500/NONE
24V/75A/500/MAN
24V/75A/500/AUTO
24V/50A/500/NONE
24V/50A/500/MAN
24V/50A/500/AUTO
48V/50A/500/NONE
48V/50A/500/MAN
48V/50A/500/AUTO
48V/50A/300/NONE
48V/50A/300/MAN
48V/50A/300/AUTO
48V/30A/300/NONE
48V/30A/300/MAN
48V/30A/300/AUTO
48V/30A/100/NONE
48V/30A/100/MAN
48V/30A/100/AUTO
This parameter has been set according to the actual situation
upon delivery and needs not to be changed. However, when a
new monitoring module is used, its “System Type” should be
set according to the actual situation.
After this parameter is changed, the monitoring module will
restart automatically, and other parameters of the monitoring
module will be changed to the defaults of the corresponding
system type. You should change some parameters according
to the actual situation.
48V/15A/100/NONE
48V/15A/100/MAN
48V/15A/100/AUTO
48V/100A/SET/NON
48V/100A/SET/MAN
48V/100A/SET/AUT
48V/50A/SET/NONE
48V/30A/SET/NONE
User, Operator, Admin
3min, 10min, 1h, 4h,
constant
The password can be 6 digits long at most. If it is shorte than 6
digits, end it with a “#”
Contstant The period that an alarm sound will last
Reflecting the jumper status of a hardware switch within the monitoring module. If this
parameter is set to ”N”, you are not allowed to use the jumper, nor change any
parameter except the battery management mode. The maintenance over the monitoring
module will not be affected
5. The model description is shown below:
48V / 30A / 300 / NONE
Figure 5-4 System model description
ACTURA Flex 48330 Power System User Manual
No AC data acqui sitio n
board
System shunt coefficie nt:
100/300/500/SET
Rectifier rated output curren t:
15A/30A/50A/75A/100A
Rectif ier r a te d outp ut
voltage: 48V/24V
Page 80

70 Chapter 5 Operating SCU
The relationship between the system model and system type is listed in the
following table:
Table 5-19 Relationship between system model and system type
PS48400-3/2900, Single AC Input 48V/50A/300/NONE
PS48400-3/2900, Double AC Inputs, Manual Switchover 48V/50A/300/MAN
PS48400-3/2900, Double AC Inputs, Auto Switchover 48V/50A/300/AUTO
PS48600-3/2900, Single AC Input 48V/50A/500/NONE
PS48600-3/2900, Double AC Inputs, Manual Switchover 48V/50A/500/MAN
PS48600-3/2900, Double AC inputs, Auto Switchover 48V/50A/500/AUTO
Note
SCU can monitor multiple power systems made by Emerson. If the system type is not set
correctly, unpredictable faults may occur.
5.7.11 Alarm Settings
Power system model System type
1. The first page of the setting interface is show below:
Alarm Settings
Alarm Type
Alarm Mode
Alarm Control
There are 3 submenus. Use “
” or “” to select one, and use “ENT” to confirm.
2. The three submenus are shown below:
Alarm Type
Alarm Block
Level: Major
Relate Relay: 1
Alarm Mode
DI No: 1#
Mode: High
Set DI Name: 2#
Clear His. Alarm:
N
Block Alarm:
Y
ACTURA Flex 48330 Power System User Manual
Page 81

Chapter 5 Operating SCU 71
Use “” or “” to select one page or one of the parameters, and “” or “” to
select the parameter value. Press “ENT” to confirm and save.
3. After setting the “Set DI Name” and confirming it, the system will prompt you to
name the DI:
DI Name
Digital 1
” or “” to change the number, and “” or “” to move the cursor left or
Use “
right. Press “ENT” to confirm.
4. The value description of the parameter is listed below:
Table 5-20 Value description of alarm settings
Parameter Range Default Value description
Alarm Type
Level
Relate Relay Empty, No.1 ~ 8
DI No. No. 1 ~ 8 1
Alarm Mode High, Low Low
Set DI Name 1# ~ 8# 1#
DI Name
Clear His Alarm Y, N N “Y”: Delete historical alarms
Block Alarm Y, N N
56 names of alarm
events
Critical, Major,
Observation, None
Figures or letters,
10 at most
Alarms of
different
types have
different
levels and
different
Relate
Relays
Digital
Select those alarm events whose levels and relate relays
should be reset
There are different audible/visual alarm modes and callback
modes for alarm events of different levels
“Empty”: The corresponding dry contact will not output alarm
information upon an alarm event
“No. 1 ~ 8”: There will be a dry contact in the range of No.1 ~
8 that outputs the alarm information upon an alarm event
The 8 corresponding connecting terminals,
queued up in the order that the hardware
switches are put
“High”: alarm upon high level;
“Low”: alarm upon low level.
Set according to the actual situation
Serial No. of the connecting terminal for DI
input
When there are DI alarms, this parameter
shows the alarm name you have actually
defined. In the system with an AC sampling
board, you can define by yourself the DIs of
routes No.7 and No.8.
In the system without an AC sampling board,
you can define all DIs
“Y”: The active alarms will not be sent to the host (valid in
EEM protocol)
Effective
only to
self-defined
DI alarms
ACTURA Flex 48330 Power System User Manual
Page 82

72 Chapter 6 Routine Maintenance
Chapter 6 Routine Maintenance
6.1 Maintenance Of Rectifier
The fan of rectifier shall be maintained periodically.
The fan shall be replaced if it does not work due to faults.
Follow the procedures below to replace the fan:
1. Loosen the 3 screws on the baffle and remove the baffle.
2. Unplug the power cable of the fan and remove the fan.
3. Replace the fan.
4. Plug the fan power cable back into the corresponding socket.
5. Push back the fan (the side with the tag facing inward).
6. Mount the front baffle and fix it with screws.
6.2 Maintenance Of SCU
If any SCU fault affects the normal operation of DC power system, just turn off the
SCU.
6.3 Maintenance Of MFU
1. Short-circuit of load
If some of the loads have short circuit fault, just turn off the circuit breakers in the
MFU to disconnect the power to the loads.
2. MFU short-circuit
When MFU short-circuit occurs, disconnect the AC power supply, isolate the
batteries from the system, and then use battery or rectifier to directly supply power
to load.
ACTURA Flex 48330 Power System User Manual
Page 83

6.4 Cover Plates
The Multi-Function Unit has a cover plate to protect the load and battery circuit
breakers and to create a neat finish. This cover plate is easy to open/remove in
order to switch on or off a circuit breaker, or to connect additional loads. The
cover plate can be opened or removed without the need of using special tools. The
DC section of the Distribution Unit is made safe for a “User” to access, which
follows the “Look and Feel” guidelines.
6.5 Battery Maintenance
6.5.1 Storage And Supplementary
During storage, the capacity of the battery decreases because of self-discharging.
When using a stored battery, always carry out supplementary charging before use.
Refer to the battery user manual or follow battery manufacturer’s advices to
perform supplementary charging.
Chapter 6 Routine Maintenance 73
Store the battery in a cool dry place.
6.5.2 Daily Inspection
1. Check the battery regularly. The battery needs to be replaced if any abnormal
condition occurs, such as:
Any voltage abnormalities;
Any physical defects (e.g., a cracked or deformed container cover);
Any electrolyte leakage;
Any abnormal heat generation.
2. Clean any dust contamination with a wet cloth. Never use organic solvents
(gasoline or thinners), otherwise the container or cover may crack.
3. Voltage checks.
Total voltage
The total voltage of the batteries should not deviate from the recommended 2.25 V
per cell (54V in a 48V DC power system at reference temperature). If it deviates,
check your system to see that the setting is correct and that the temperature
compensation is correct.
Unit voltage
ACTURA Flex 48330 Power System User Manual
Page 84

74 Chapter 6 Routine Maintenance
After one year of operation, all the units should be within the range of 13.50±0.48V.
6.5.3 Replacement
1) Replacing Criterion
Replace the battery if its capacity measured during the battery test is less than 80%
of the battery rated capacity. The capacity measured during the battery test shall be
evaluated at a discharge rate close to its actual use.
2) Replacement Interval
The battery is expendable, and has a certain life cycle. Considering the use
condition and ambient temperature, the new battery should replace the old battery
before it reaches its design life to ensure the normal and safety operation of the DC
power system. For instance, in an environment where the mean temperature is
35°C, it is necessary to replace the battery every 5-year operation.
ACTURA Flex 48330 Power System User Manual
Page 85

Chapter 7 Troubleshooting
7.1 Troubleshooting Rectifier
1. Troubleshoot Rectifier according to LED Indication
The usual fault symptoms of the rectifier include: power indicator (green) off,
protection indicator (yellow) on, protection indicator (yellow) blinking, alarm
indicator (red) on, and alarm indicator (red) blinking.
Symptom Cause Suggestion
No input voltage Make sure there is input voltage
Power indicator (green) off
Input polarity reversed or input fuse
blown
AC input voltage outside the normal
range
PFC over-voltage Replace the rectifier
Chapter 7 Troubleshooting 75
Table 7-1 Troubleshooting
Replace the fuse with a new one of the same
model or reconnect the input power with
correct polarity.
Ensure the AC input voltage remain within
normal range
Current sharing function is disabled Replace the rectifier
Rectifier over-temperature protection, which is caused by:
Protection indicator (yellow)
on
Protection indicator (yellow)
blinking
Alarm indicator (red) on Rectifier over-voltage
Alarm indicator (red) blinking Fan not running Replace the fan
1. Fan blocked 1. Remove the obstacle that blocks the fan
2. Ventilation blocked: the inlet or
outlet blocked
3. Ambient temperature too high or
rectifier inlet too close to an heater
Rectifier not inserted into the slot
completely
Rectifier communication failure Check the communication cables
2. Remove the objects that blocks the inlet or
outlet
3. Remove the heater, lower the ambient
temperature
Insert the rectifier again properly
Remove the rectifier from the DC power
system, restart the rectifier, and replace the
rectifier if over-voltage still occurs.
2. Rectifier Current Sharing Unbalanced
When multiple rectifiers are in parallel connection and the unbalance of current
sharing among them is bigger than 3%, check if the communication cables are
correctly connected.
ACTURA Flex 48330 Power System User Manual
Page 86

76 Chapter 7 Troubleshooting
If the current sharing is still unsuccessful after the correction, replace the rectifier of
which the current sharing function is disabled.
7.2 Mains Failure
Mains failure often occurs in power system operation. Batteries will provide backup
DC power in case of short-period of mains failure. If the cause of mains failure
remains unknown or the failure lasts too long, the generator should be started to
provide mains supply to the system. It is suggested that the generator should
supply power to the power system at least 5 minutes after it is started so as to
reduce the effect of the start process on the power system.
7.3 Disastrous Accidents
Disastrous accidents such as lightning strike, flood, earthquake and fire lead to the
communication equipment faults. For the disasters that will severely affect the
safety of communications, efforts should be mainly made to prevention actions.
Meanwhile, communication stations should have adequate human and material
resources and work out effective countermeasures to cope with these disasters.
They should also have emergency management regulations and serious accidents
emergency plans.
ACTURA Flex 48330 Power System User Manual
Page 87

Appendix 1 System Technical Parameters 77
Appendix 1 System Technical Parameters
Parameter category Note
AC input alarm and
protection
DC output alarm and
protection
EMC
AC input over-voltage
alarm point
AC input over-voltage
recovery point
AC input under-voltage
alarm point
AC input under-voltage
recovery point
DC output over-voltage
protection point
DC output over-voltage
alarm point
DC output over-voltage
recovery point
DC output under-voltage
alarm point
DC output under-voltage
recovery point
LLVD
BLVD
Output delay
Fan speed adjustable Rectifier fan speed can be set to half or full speed.
CS
RS
Immunity to EFT EN61000-4-4, Level 3
Immunity to ESD Air discharge: 8kV. Contact discharge: 4kV. EN61000-4-2
Immunity to Surges EN61000-4-5, Level 4
Default: 280 ! 5Vac, cofigurable through monitoring module
Default: 270 ! 5Vac, 10Vac lower than the AC input
over-voltage alarm point
Default: 180 ! 5Vac, configurable through monitoring module
Default: 190 ! 5Vac, 10Vac higher than the AC input
under-voltage alarm point
Default: 59.0 ! 0.2Vdc
Default: 58.5 ! 0.2Vdc, configurable through monitoring
module
Default: 58 ! 0.2Vdc, 0.5Vdc lower than the over-voltage
alarm point
Default: 45.0 ! 0.2Vdc, configurable through monitoring
module
Default: 45.5 ! 0.2Vdc, 0.5Vdc higher than the under-voltage
alarm point
Default: 44 ! 0.2Vdc, configurable through monitoring module
Default: 43.2 ! 0.2Vdc, configurable through monitoring
module
Output voltage can rise slowly upon rectifier start up. The rise
time is configurable
EN300386 2001, Class A
Lightning protection
features
Others
At AC side
Acoustic noise
Insulation resistance
ACTURA Flex 48330 Power System User Manual
The AC input side can withstand 10/700μs simulated
lightning voltage 5kV for !5 times, or 8/20μs simulated
lightning surge current 20kA for !5 times, or 8/20μs
simulated lightning surge current 40kA once. The test interval
is not smaller than 1 minute.
55dB (A)
At temperature of 15°C ~ 35°C and relative humidity not
higher than 90%RH, apply a test voltage of 500Vdc. The
insulation resistances between AC circuit and earth, between
DC circuit and earth, or between AC and DC circuits are no
less than 10MΩ
Page 88

78 Appendix 1 System Technical Parameters
Parameter category Note
Others
Dielectric strength
MTBF 250,000hr
Size (mm)
Mechanica
Weight
(Remove the SPD, monitoring module and rectifiers from the
system before the test.)
AC to DC circuits, AC circuit to earth: 50Hz, 3,000Vac (RMS).
DC circuit to earth: 50Hz, 1,000Vac (RMS).
Assistant circuit (not directly connected to the host circuit):
50Hz, 500Vac (RMS).
For all the three tests above, there should be no breakdown
or flashover within 1min, with leakage current not bigger than
10mA.
600 (W) % 600 (D)
2000 (H)
%
<135kg (without
rectifiers)
600 (W) % 400
(D) % 2000 (H)
<125kg (without
rectifiers)
600 (W) % 400 (D)
700 (H)
%
<60kg (without
rectifiers)
ACTURA Flex 48330 Power System User Manual
Page 89

Appendix 2 Engineering Design Diagram 79
Appendix 2 Engineering Design Diagram
Appendix 2.1 Engineering Design Diagram For
2000mm%600mm%600mm Cabinet
ACTURA Flex 48330 Power System User Manual
Page 90

80 Appendix 2 Engineering Design Diagram
Appendix 2.2 Engineering Design Diagram For
2000mm%600mm%400mm Cabinet
ACTURA Flex 48330 Power System User Manual
Page 91

Appendix 2 Engineering Design Diagram 81
Appendix 2.3 Engineering Design Diagram For
700mm%600mm%400mm Cabinet
Appendix 2.4 System Input And Output Connector Specs
Connector Connector specs
2
)
2
)
2
2
)
)
AC Power
distribution
DC Power
distribution
AC input terminal
Grounding busbar
Positive bus bar
Output route MCB
H cable terminals, 2-4 pcs (cable section 35mm
1 M8 bolt
1 big wire connectors, (cable section 25mm
4 M8blots, 6 big wire connectors, (cable section 25mm
23 small wire connectors, (cable section 16mm
H cable terminals (cable section 25mm
2
)
ACTURA Flex 48330 Power System User Manual
Page 92

Appendix 3 System Circuit Diagram
Appendix 3.1 System Electric Schematic Diagram
Appendix 3 System Circuit Diagram 82
ACTURA Flex 48330 Power System User Manual
Page 93

Appendix 3.2 System Wiring Diagram
Appendix 3 System Circuit Diagram 83
ACTURA Flex 48330 Power System User Manual
Page 94

Appendix 3.3 MFU Electric Wiring Diagram
Appendix 3 System Circuit Diagram 84
ACTURA Flex 48330 Power System User Manual
Page 95

Appendix 3.4 BCU Electric Wiring Diagram
Appendix 3 System Circuit Diagram 85
ACTURA Flex 48330 Power System User Manual
Page 96

86 Appendix 4 Glossary
Amb.Temp Ambient Temperature
Batt Battery
BC Boost Charging
BLVD Battery Lower Voltage Disconnection
Cap Capacity
CommMode Communication Mode
CurrLimit Current Limit
CycBC Cyclic Boost Charging
Con Alarm Voice Control Alarm Voice
Hist Alarm Historical alarm
HVSD High Voltage Shutdown
InitParam Initialize Parameters
InitPWD Initialize Password
LLVD Load Low Voltage Disconnection
LVD Low Voltage Disconnection
Ph-A Phase A
PWD Password
Rect Rectifier
Shunt coeff Shunt Coefficient
SPD Surge Protection Device
SW Version Software Version
Sys System
Temp Temperature
Temp Comp Temperature Compensation
Volt Voltage
Appendix 4 Glossary
Abbreviation Full word
ACTURA Flex 48330 Power System User Manual
 Loading...