

Page 1

A Science Guide with Supplemental Experiment Kit
AGES
8+
Requires 2 x AA batteries
(Not included)
This product contains a small magnet.
WARNING:
across intestines causing serious infections and death. Seek immediate medical
attention if magnet is swallowed or inhaled. Not suitable for children under 8 years.
Swallowed magnets can stick together
Page 2

E
B
G
D
F
C
A
E
G
D
F
B
A
E
C
G
F
B
D
A
C
G
E
B
C
D
A
E
F
B
C
G
D
A
E
F
G
D
B
G
A
E
C
B
F
D
A
2
JR.SCIENTIST
Page 3

CONTENTS
PICKUP
(Transfers string vibrations
to an electric signal)
BRIDGE
(Changes the
string length)
Part List 04
Assemble 05
Basic Chords 1 2
Useful Tips 1 4
TUNING PEGS
(Tune the pitch)
Mini Electric Guitar
3
Page 4

How to Assemble
Built-in Amp and Speaker
Mini Electric Guitar
Part List
Headstock
battery compartment cover
Speaker
Circuit board
Body
Neck
Neck cover
Strings (4)
Pickup top plate Magnet
Bolts/Nuts
(2 each)
Washer head
screw (8)
Body cover
Tuning peg
nuts (4)
Screw (large)
Things you will need
Screwdriver; cellophane tape; rubber bands; scissors; two AA
alkaline batteries or two zinc-carbon batteries. (* NiCd and other
rechargeable batteries have low voltage. Therefore the guitar
may not work when these batteries are used. Oxyride batteries
have high voltage. Using these batteries may break the circuit.)
Notes for tightening screws
When tightening screws, rmly press the screwdriver
straight against the screw and turn. It is said that 70
percent of the force applied is used for pushing against the
screw and 30 percent for turning it. The types of screws
used are those that carve grooves into the plastic as they
are inserted (self-threading). For this reason, the screw
hole may be damaged if you exert too much force when
tightening the screw. Since it is difcult to turn a precision
screwdriver, please use a small driver that has a grip radius
of about 2 cm.
Full scale
image
of screwdriver
(1)
Lead wires
Coil wire StickerPickup bottom
String anchor
shaft
Screw (medium)
(5)
CAUTION!
• Take necessary caution when handling parts with pointed edges. There is a risk of injury.
• This kit includes screws and other small parts. Be careful not to swallow them.
There is a risk of suffocation.
Two AA batteries are used. Incorrect use of the batteries may cause the generation
of heat, explosions or liquid leakage. The following precautions should be taken.
• Do not use rechargeable batteries such as NiCd batteries, or Oxyride batteries
• Ensure that the positive and negative terminals of the batteries are aligned
correctly.
• If liquid that leaked from batteries gets into your eyes, rinse it well with plenty of
water and consult a doctor immediately. If liquid leaks onto your skin or clothes,
immediately wash it off.
• Always remove the batteries after use.
• Do not mix old and new batteries.
• Store the kit in a location out of the reach of small children.
* Please read the instructions and cautions thoroughly before use.
* For your safety, be sure to follow the instructions and cautions in this manual. In
addition, do not use any parts that have become damaged or deformed during use.
plate
Bridges (4)
Screw (small)
(1)
Tuning shafts (4)
Tuning peg knobs (4)
Please be sure to read the following instructions
before assembling this kit.
Volume dial
Pick
4
JR.SCIENTIST
Page 5
Assembled
Neck
Pegs
Headstock
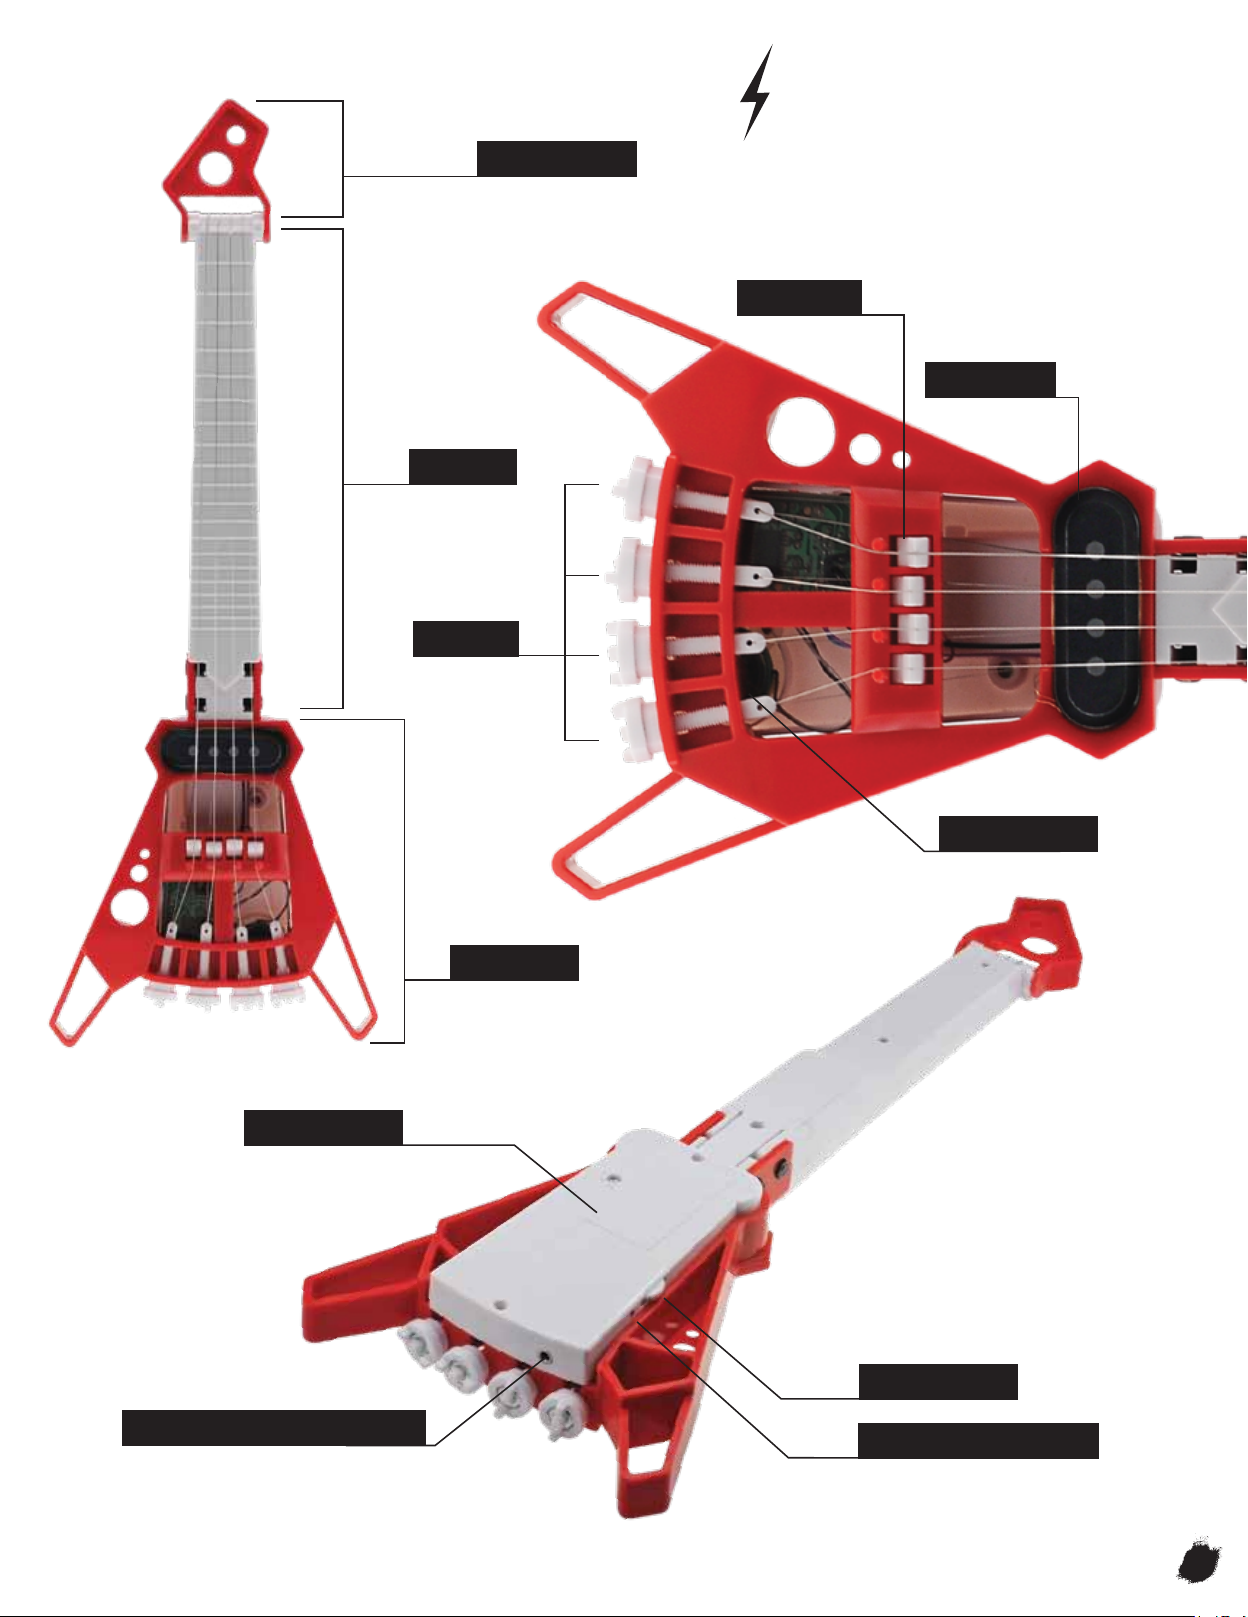
Product and Part Name
Bridge
Pickup
Battery Box
Speaker
Body
Volume Dial
Audio-out/Headphone Jack*
* For external connection to headphones or external speaker
LED Power Indicator
Mini Electric Guitar
5
Page 6

Assembling
The Body
Assemble the tuning unit
1
1. Attach the tuning shafts to the body
Face the side with the square protrusion up and insert the
tuning shafts rmly from the outside.
If the tuning shaft
cannot be inserted
properly, try
Tuning
shafts
Protrusion
CAUTION
Make sure that 7 to 10mm
of the tuning shaft sticking
out.
pressing the shaft in
while rocking it left
and right.
7 to 10 mm
Attach the neck
2
Turn the neck and body over and attach the body to the neck
from above. Fasten the neck side (a) only with a bolt and nut.
At this point, there is no need to tighten the bolt and nut
rmly.
(a)
Bolt
Nut
Although it may protrude slightly
from the body, this is not a problem.
3
Attach the strings
1. Temporarily insert the washer head screws
into the back of the neck.
Leave about 2mm of the head protruding
Temporarily
insert the
washer head
screws
2. Attach the tuning peg knobs
Attach the tuning peg nuts to the
tuning peg knobs. Then attach them to
the tuning shafts by turning the knob.
Tuning peg nut
Tuning peg knob
CAUTION
Make adjustments so that
the wings of the knob are
the same height as the
tuning shaft.
Wings of the knob
Tuning shaft
2. Slide the strings onto the string anchor shaft
Unwind the strings leaving the piece of paper bundling
them. Once you have unwound the strings, remove the
paper. Slide the rings on the tips of the strings onto the
shaft to attach the strings in order of thickness.
CAUTION
Take caution not to injure hands or face with the tips of the strings.
String anchor shaft
Thin
6
JR.SCIENTIST
Thick
Page 7

3. Secure the string anchor shaft
Insert the string anchor shaft into the
groove in the neck. Pass the bolt over the
String anchor shaft
(Note the direction in which it is attached)
Separate the strings so
that there are two on each
side of the protrusion
strings while holding the strings and string
anchor shaft. Secure it with a bolt and nut.
Bolt
Nut
4. Attach the strings
(1) Pass the strings through the holes on the tuning shafts to the front of the body. (2) Along the protrusions, (3) pass the strings
through the groove at the top of the neck and pull. (4) Then, wrap the strings clockwise one and a half times around the washer head
screws that were temporarily inserted in step 1, and secure the strings with the washer head screws.
CAUTION
Approximately 5 to 6 cm of excess
string may be left and the rest can
be cut off using tools such as a wire
cutter. Take caution not to cause
any injuries with the excess strings.
①
Repeat steps (1) to (4) and attach all strings.
Wrap the string clockwise around
④
the washer head screw
②
When seen from the front, each
string should lie against the
protrusions as shown in the gure.
③
Strings should lie in the groove guides
CAUTION
Attach the strings so that they are parallel to
the neck and adjust them so that the width of
spaces between the strings is even.
String should be in the groove
Width of spaces
is even
Parallel
Parallel
5. Attach the bridges
Attach the bridges and lay the
strings in the grooves in the center
of the bridges. Turn the pegs and
adjust the string tension so that
they are relatively tight (be careful
not to overtighten the strings). If it
is difcult to attach the bridge
because the strings are too tight,
loosen the strings slightly.
Face the raised
side of the bridge
towards the neck
and place it on the
closest position to
the neck.
Bridge
Lay the strings in the center of the bridges.
Mini Electric Guitar
7
Page 8

4
Assemble the electrical components
1. Attach the volume dial
Align the volume dial hole and place the volume dial onto
the volume dial protrusion on the circuit board and fasten it
to the circuit board with the screw (small).
Screw (small)
Volume dial
Circuit board
Circuit board volume
2. Attach the speaker to the body cover
Secure the speaker with washer head screws.
4. Mount the circuit board
Adjust the position of the circuit board so that the volume
dial and the LED power indicator protrude from the holes
in the side of the body cover. Secure the circuit board
with the screw (Large).
Screw (Large)
Circuit board
CAUTION
Washer head screws
The speaker may become tilted if the screw is
overtightened. Do not secure the speaker while it is
tilted. If this happens, loosen the washer head screw
half a turn.
Speaker
Body cover
The side with the transparent
cone should face up. Try not to
touch the cone.
It becomes easier to secure the
speaker if the washer head
screws have been passed
through the screw holes on the
rubber part of the speaker
beforehand.
3. Connect the power connector
Plug in the power connector to the circuit
board. (Plug it in rmly.)
Body cover
Assemble the pickup
5
1. Combine the top and bottom plates of the pickup
Press the top and bottom plates of the pickup together
until they click into place.
Pickup bottom plate
Pickup top plate
2. Pass the coil wire through the hole in the pickup
bottom plate
Pass the coil wire through the pickup bottom plate. At
this point, pull about 5cm of the coil wire through and
afx it with cellophane tape.
8
JR.SCIENTIST
Power connector
*Note the direction of the connector
Pull about 5 cm of the coil wire
through.
Page 9

3. Wind the coil wire
Wind the entire length of the coil wire around the pickup
CAUTION
• Try not to leave any slack in the coil wire when winding it.
• Be careful as pulling the coil wire too tight will break it.
• The coil wire can be wound around in either direction.
4. Bundle the coil wire
Pass the end of the coil wire through the hole in the pickup
bottom plate and through the other hole (a), remove the
cellophane tape, and pass the other end of the coil wire
through the rst hole (b).
Wind the coil wire and lead wires that have been bundled
together with cellophane tape around the pickup. Excess
coil wire should be folded and wound around the pickup.
Do not wind this part around the pickup.
6. Cover the coil wire and lead wires
Cover the coil wire and lead wires with rubber bands or a
thinly cut piece of cellophane tape.
Rubber band
Cellophane tape or craft
tape (3 to 5mm width)
Sticker
(a)
(b)
5. Bundle the coil and lead wires
CAUTION
Bundle each end of the coil wire and lead wires by
twisting them together. Fasten one end of both the coil
and lead wires with cellophane tape, twist them together
and then bundle them again with cellophane tape.
Do not cut off the silver parts on each of the coil
wire. Doing so will cause current to stop owing
•
through the wire and the speaker to stop
producing sound.
7. Insert the magnet into
the pickup top plate
Insert the magnet into
the top plate of the
pickup and afx the
provided sticker on top.
8. Install the pickup to the body
Insert the pickup in from the side, below the strings, and
attach it to the body from behind using the washer head
screws.
Pickup
Washer head screw
Magnet
Either the purple or blue lead wires can be bundled.
Twist the lead wires
together beforehand
as shown below.
Cellophane tape Lead wires
CAUTION
Pass the lead wires of the pickup to the back from
between the body and the end most string.
Mini Electric Guitar
9
Page 10

9. Connect the lead wires and earth wire
Connect the lead wires that have been passed through to the
back to the connector for the lead wires on the circuit board.
In addition, after slightly loosening the screw (a) on the back
of the neck which fastens the second thinnest string, attach
the earth wire on the circuit board to the screw (a) and
re-tighten the screw (a).
(a)
Lead wires
11. Attach the neck cover and headstock
Attach the neck cover to the neck and secure it
with washer head screws in three locations. Then
attach the headstock.
Screws (Medium)
Earth wire
10. Mount the body cover onto the body
Mount the body cover onto the body and secure it with the
screws (Medium).
Screws (Medium)
Retighten the
bolts and nuts.
Earth wire
Neck cover
CAUTION
Be careful not to pinch the strings when tightening
the screws. After attaching the neck cover, observe
the guitar from the side to make sure that the neck
and body are attached together evenly. If the neck
is not straight, loosen the two bolts, straighten the
neck and retighten the bolts.
10
JR.SCIENTIST
Lead wire
CAUTION
Q &A
The guitar does not produce any sound when turned on.
Q.
Conrm that the batteries are new and that they have been inserted in
A:
the correct direction.
Ensure that the pickup and battery connectors have been securely
A:
fastened in place.
Increasing the volume has little effect.
Q.
Ensure that the speaker is facing the correct direction. (The
A:
transparent cone should be facing outward.)
Indentation of the transparent speaker cone can also cause the volume
A:
to stay low.
Ensure that the lead wires of the pickup do not come
off.
Q.
The coil wire has broken.
A:
Join the two broken ends and continue winding.
The coil wire has a transparent coating and this
should be removed using sand paper or the like.
Following this, ensure that the strands are well
wrapped around each other.
Finished!
Turning the tuning peg does not cause the pitch to rise.
Q.
The initial string tension may be insufcient. Remove the neck
A:
cover, loosen washer head screw securing the string in question,
increase the tension in the string, and then retighten the screw.
Note that excessive tightening of the tuning peg can damage the
A:
threads on the tuning shaft. If this has occurred, remove the string
in question, move the peg lug to a position beyond the damaged
threads, and then tighten the string.
The guitar cannot be tuned properly.
Q.
Check whether the bridge has become detached or is angeled
A:
incorrectly.
Page 11

Let's make
some noise
Insert the batteries and turn the
1
power on
Insert the batteries into the battery box and turn the
volume dial to ON. The LED power indicator lights when
the power is on. You can adjust the volume with the
volume dial.
Battery compartment cover
Let’s adjust each part
3
After you have actually made some sound, try changing
the spacing between the strings or the position of the
pickup. You may nd a dierence in ease of play and in
the sound. Try moving them around until you nd
positions that you like.
Loosen the screws securing the pickup
before adjusting the position of the pickup.
Power lamp Volume dial
Let’s tune
2
If you have a musical instrument nearby, tune the guitar
using the scales of the instrument. Turn the pegs to adjust
the tension of the strings until getting the desired pitch.
When you turn the pegs, you are increasing the tension in
the strings from loose to tense. The pitch will gradually
increase while you are turning the pegs. Stop turning when
you have reached the desired pitch. If you have tuned too
high, turn the pegs to reduce the tension in the strings and
start tuning again. Because the tension in a string changes
during tuning, it may aect the other strings. Since the
tuning of one string will aect that of the others and may
change their pitch, once you have nished tuning all four
strings, start again from the thickest string.
For lower
For higher
How to change strings
Change a string if it has broken or become worn. Use strings for
electric gutars. We recommend the string gauges to the right. To
change the string, (1) turn the pegs so that there is no tension
remaining in any of the strings. (2) Remove the neck cover and body
cover. (3) Remove the washer head screw on the back of the neck
that is securing the string to be changed. (4) Remove the bolt
securing the string anchor shaft. (5) Pull and lift up the string anchor
shaft and remove the string from the shaft. (6) Pass the new string
through the shaft and retighten the string.
String gauges (inch)
1st String .009 to .010
2nd String .011 to .013
3rd String .016 to .017
4th String .024 to .026
D
G
B
E
The pitch of each string is as shown to the left. Pitches that
are connected with arrows are the same pitch. Therefore, if
you tune one string, you can use that string to tune the
other strings as well. If
you do not have any
musical instruments
nearby, the pitch for
the dial tone when you
pick up the phone is
“G”. You may nd it
useful to tune the 3rd
string with this pitch.
E
B
G
D
1 2 3 4 5
E
B
G
Mini Electric Guitar
11
Page 12

Basic Chords
How to read:
Symbol:
1
: Index Finger
2
: Middle Finger
1
Press all the strings
under the mark
1
3 4 5 621
Fret number
Chord Notation
(eg. D chord)
Root Note
Open String
1
2
1
2
3
3
: Ring Finger
4
: Small Finger
0
1
0
2
4
5
6
: Marks the string
that you don’t play
: Open String
: Root Note
Press the index nger
down on strings 1, 2,
2
3
2
0
1
2
1
2
3
4
5
6
and 3 altogether at the
2nd fret.
Press the middle
nger on string 2
at the 3rd fret.
1
2
1
2
3
4
5
6
Fret number
String 1
String 2
String 3
String 4
Tab (Tablature)
MAJOR CHORDS
What is shown on the right
1
2
1
2
3
4
0
0
1
2
1
2
3
1
2
1
1
2
3
5
6
3
4
5
6
are called major triads. The
chords are laid out the same
way as a keyboard. (C, C#,
D, D#...etc.) Each chord has
3
a rootnote such as C in C
1
2
3
4
3
0
0
0
5
6
String 1 (E string)
String 2 (B string)
chord and D in D chord. The
string marked with a is
the root of the chord.
12
JR.SCIENTIST
Fret 1 to 20
(Top to bottom)
String 3 (G string)
String 4 (D string)
MINOR CHORDS
Minor chords have a little
sadder and melancholic
tonality. The same rule
applies to the roots of the
major chords. By the way, a
chord with # and a chord with
♭ can become the same
chord sometimes, for
example, C♯ = D♭
1
1
2
3
4
0
2
2
2
1
2
4
4
4
5
6
1
3
4
5
6
Page 13

MAJOR CHORDS MINOR CHORDS
1
2
1
1
2
1
1
2
3
1
2
3
3
4
5
6
3
4
5
5
2
1
2
1
3
4
3
1
1
2
3
5
2
3
4
5
6
1
3
2
0
0
0
0
2
2
2
1
2
4
3
3
4
5
6
1
2
3
4
5
6
6
1
2
4
3
4
5
6
3
3
4
5
6
1
2
1
2
3
3
4
5
6
2
4
3
4
4
3
4
5
6
1
2
2
3
1
2
1
2
3
4
3
4
5
6
1
1
1
3
3
1
2
3
4
5
6
1
1
2
3
2
2
2
4
3
4
5
6
1
1
1
1
1
1
2
3
1
4
5
6
3
3
3
5
2
3
3
4
5
6
1
2
3
4
4
4
6
1
3
4
5
6
1
3
2
1
2
3
4
3
3
3
1
1
2
3
4
5
6
0
1
2
2
1
5
6
1
2
3
1
2
3
1
2
3
3
4
5
6
2
1
2
3
4
4
3
2
3
4
5
6
Mini Electric Guitar
13
Page 14

Useful Tips
How to hold the Mini
Electric Guitar
Holding the guitar securely is
a key point in playing a guitar.
Your left hand should gently
grip the neck while the right
hand holds the body.
Pose
The Mini Electric Guitar is very delicate. The angle of the neck
sensitively affects the sound. Turning the neck up in order to see the
fret (left picture) or peeking into the fret by slouching your back (right
picture) are not good posture. Even when you tune the guitar, keep
holding your body as the same way as when you play.
14
JR.SCIENTIST
Page 15

Holding a pick, and play
Hold the pick with thumb and index nger.
Strum the string near the pickup. Use side of
your palm to mute the string.
Alternate picking is a technique that employs
strictly alternating downward and upward
picking strokes in a continuous run, and is
the most common method of plectrum
playing.
It is easier to play if your thumb is relaxed
and points toward the tip of the pick.
Adding expression to the sound
Let's learn some techniques that will make
you sound like an advanced player.
Vibrato
Hold a string in one position and shake the
string. The rapid shake of the string bends
the sound and makes vibrato. Shown in the
pictures below, the most common method is
to hold a string in one position and rapidly
twist the wrist and shake the nger back and
forth. You can use another method for the
Mini Electric Guitar to create a vibrato. Hold
a string in one position and change the
pressure (hard and soft) rapidly.
Tapping
One of the more advanced and impressive
techniques is tapping.
Tapping is performed either one-handedly or
two-handedly incorporating hammer-ons and
pull-offs. Hammer-on is done by sharply
bringing a nger down on the ngerboard to
make a sound. Pull-off is to make sound by
pulling off a fretting nger slightly across the
face of the string. It is a very effective
technique and makes a performance very
dramatic.
It is easier to tap if you hold the guitar neck up
right. It is not force that makes tapping loud,
but more the way you tap. Practice nger
movement patiently till you get a hang of it!
Mini Electric Guitar
15
Page 16

Mini Electric Guitar
Enjoy and deeply understand the themes of this book.
Experience things that you can't get from science textbook.
New type laboratory where you can conduct
experiments with your bonus items
This Science Guide and bonus kit contains all the materials
you need to conduct experiments and thoroughly understand
fundamental principles.
© GAKKEN
First published in Japan by Gakken Co.,Ltd., Tokyo
MADE IN CHINA P38-GK016-81001000
 Loading...