

Page 1
753057
Copyright © 2010, 1998 ELENCO
®
ELECTRONIC
PLAYGROUND
TM
and LEARNING CENTER
MODEL EP-50
ELENCO
®
Wheeling, IL, USA
Page 2

-2-
TABLE OF CONTENTS
Definition of Terms Page 3
Answers to Quizzes 5
Introduction to Basic Components 6
Experiment #1: The Light Bulb 8
More About Resistors 10
Experiment #2: Brightness Control 11
Experiment #3: Resistors in Series 12
Experiment #4: Parallel Pipes 13
Experiment #4B: Comparison of Parallel Currents 14
Experiment #5: Combined Circuit 15
Experiment #6: Water Detector 16
Introduction to Capacitors 17
Experiment #7: Slow Light Bulb 19
Experiment #8: Small Dominates Large 20
Experiment #9: Large Dominates Small 21
Experiment #10: Make Your Own Battery 22
Test Your Knowledge #1 23
Introduction to Diodes 23
Experiment #11: One - Way Current 24
Experiment #12: One - Way Light Bulbs 25
Introduction to Transistors 26
Experiment #13: The Electronic Switch 27
Experiment #14: The Current Amplifier 28
Experiment #15: The Substitute 29
Experiment #16:
Standard Transistor Biasing Circuit
30
Experiment #17: Very Slow Light Bulb 31
Experiment #18: The Darlington 32
Experiment #19: The Finger Touch Lamp 33
Experiment #20: The Battery Immunizer 34
Experiment #21: The Voltmeter 35
Experiment #22: 1.5 Volt Battery Tester 36
Experiment #23: 9 Volt Battery Tester 37
Experiment #24: The Anti-Capacitor 38
Introduction to Inductors and Transformers 40
Test Your Knowledge #2 41
Experiment #25: The Magnetic Bridge 42
Experiment #26: The Lighthouse 43
Experiment #27: Electronic Sound 44
Experiment #28: The Alarm 46
Experiment #29: Morse Code 47
Experiment #30: Siren 48
Experiment #31: Electronic Rain 49
Experiment #32: The Space Gun 50
Experiment #33: Electronic Noisemaker 51
Experiment #34: Drawing Resistors 52
Experiment #35: Electronic Kazoo 53
Experiment #36: Electronic Keyboard 54
Experiment #37: Fun with Water 55
Experiment #38: Transistor Radio 56
Experiment #39: Radio Announcer 58
Experiment #40: Radio Jammer / Metal Detector 59
Experiment #41: Blinking Lights 60
Experiment #42: Noisy Blinker 61
Experiment #43: One Shot 62
Experiment #44: Alarm With Shut - Off Timer 63
Experiment #45: The Flip - Flop 64
Experiment #46: Finger Touch Lamp With Memory 65
Experiment #47: This OR That 66
Experiment #48: Neither This NOR That 67
Experiment #49: This AND That 68
Experiment #50: Audio AND, NAND 69
Experiment #51: Logic Combination 70
Test Your Knowledge #3 71
Troubleshooting Guide 71
For Further Reading 71
Page 3

-3-
DEFINITION OF TERMS
(Most of these will be introduced and explained during the experiments).
AC Common abbreviation for
alternating current.
Alternating Current A current that is constantly
changing.
AM Amplitude modulation. The
amplitude of the radio signal is
varied depending on the
information being sent.
Amp Shortened name for ampere.
Ampere (A) The unit of measure for electric
current. Commonly shortened
to amp.
Amplitude Strength or level of something.
Analogy A similarity in some ways.
AND Gate A type of digital circuit which
gives a HIGH output only if all
of its inputs are HIGH.
Antenna Inductors used for sending or
receiving radio signals.
Astable Multivibrator A type of transistor
configuration in which only one
transistor is on at a time.
Atom The smallest particle of a
chemical element, made up of
electrons, protons, etc.
Audio Electrical energy representing
voice or music.
Base The controlling input of an NPN
bipolar junction transistor.
Battery A device which uses a
chemical reaction to create an
electric charge across a
material.
Bias The state of the DC voltages
across a diode or transistor.
Bipolar Junction
Transistor (BJT) A widely used type of transistor.
Bistable Switch A type of transistor
configuration, also known as
the flip-flop.
BJT Common abbreviation for
Bipolar Junction Transistor.
Capacitance The ability to store electric
charge.
Capacitor An electrical component that
can store electrical pressure
(voltage) for periods of time.
Carbon A chemical element used to
make resistors.
Clockwise In the direction in which the
hands of a clock rotate.
Coil When something is wound in a
spiral. In electronics this
describes inductors, which are
coiled wires.
Collector The controlled input of an NPN
bipolar junction transistor.
Color Code A method for marking resistors
using colored bands.
Conductor A material that has low
electrical resistance.
Counter-Clockwise Opposite the direction in which
the hands of a clock rotate.
Current A measure of how fast
electrons are flowing in a wire
or how fast water is flowing in a
pipe.
Darlington A transistor configuration which
has high current gain and input
resistance.
DC Common abbreviation for direct
current.
Decode To recover a message.
Detector A device or circuit which finds
something.
Diaphragm A flexible wall.
Differential Pair A type of transistor
configuration.
Digital Circuit A wide range of circuits in
which all inputs and outputs
have only two states, such as
high/low.
Diode An electronic device that allows
current to flow in only one
direction.
Direct Current A current that is constant and
not changing.
Disc Capacitor A type of capacitor that has low
capacitance and is used mostly
in high frequency circuits.
Electric Field The region of electric attraction
or repulsion around a constant
voltage. This is usually
associated with the dielectric in
a capacitor.
Electricity A flow of electrons between
atoms due to an electrical
charge across the material.
Electrolytic Capacitor A type of capacitor that has
high capacitance and is used
mostly in low frequency
circuits. It has polarity
markings.
Page 4

Electron A sub-atomic particle that has
an electrical charge.
Electronics The science of electricity and
its applications.
Emitter The output of an NPN bipolar
junction transistor.
Encode To put a message into a format
which is easier to transmit.
Farad, (F) The unit of measure for
capacitance.
Feedback To adjust the input to
something based on what its
output is doing.
Flip-Flop A type of transistor
configuration is which the
output changes every time it
receives an input pulse.
FM Frequency modulation. The
frequency of the radio signal is
varied depending on the
information being sent.
Forward-Biased The state of a diode when
current is flowing through it.
Frequency The rate at which something
repeats.
Friction The rubbing of one object
against another. It generates
heat.
Gallium Arsenide A chemical element that is
used as a semiconductor.
Generator A device which uses steam or
water pressure to move a
magnet near a wire, creating an
electric current in the wire.
Germanium A chemical element that is
used as a semiconductor.
Ground A common term for the 0V or
“
–” side of a battery or
generator.
Henry (H) The unit of measure for
Inductance.
Inductance
The ability of a wire to create an
induced voltage when the current
varies, due to magnetic effects.
Inductor A component that opposes
changes in electrical current.
Insulator A material that has high
electrical resistance.
Integrated Circuit A type of circuit in which
transistors, diodes, resistors,
and capacitors are all
constructed on a
semiconductor base.
Kilo- (K) A prefix used in the metric
system. It means a thousand of
something.
LED Common abbreviation for light
emitting diode.
Light Emitting Diode A diode made from gallium
arsenide that has a turn-on
energy so high that light is
generated when current flows
through it.
Magnetic Field The region of magnetic
attraction or repulsion around a
magnet or an AC current. This
is usually associated with an
inductor or transformer.
Magnetism A force of attraction between
certain metals. Electric
currents also have magnetic
properties.
Meg- (M) A prefix used in the metric
system. It means a million of
something.
Micro- (μ) A prefix used in the metric
system. It means a millionth
(0.000,001) of something.
Microphone A device which converts sound
waves into electrical energy.
Milli- (m) A prefix used in the metric
system. It means a thousandth
(0.001) of something.
Modulation Methods used for encoding
radio signals with information.
Momentum The power of a moving object.
Morse Code A code used to send messages
with long or short transmit
bursts.
NAND Gate A type of digital circuit which
gives a HIGH output if some of
its inputs are LOW.
NOR Gate A type of digital circuit which
gives a HIGH output if none of
its inputs are HIGH.
NOT Gate A type of digital circuit whose
output is opposite its input.
NPN Negative-Positive-Negative, a
type of transistor construction.
Ohm’s Law
The relationship between
voltage, current, and resistance.
Ohm, (Ω) The unit of measure for
resistance.
OR Gate A type of digital circuit which
gives a HIGH output if any of its
inputs are HIGH.
Oscillator A circuit that uses feedback to
generate an AC output.
Parallel When several electrical
components are connected
between the same points in the
circuit.
-4-
Page 5

Pico- (p) A prefix used in the metric
system. It means a millionth of
a millionth (0.000,000,000,001)
of something.
Pitch The musical term for frequency.
Printed Circuit Board A board used for mounting
electrical components.
Components are connected
using metal traces “printed” on
the board instead of wires.
Receiver The device which is receiving a
message (usually with radio).
Resistance The electrical friction between
an electric current and the
material it is flowing through;
the loss of energy from
electrons as they move
between atoms of the material.
Resistor Components used to control
the flow of electricity in a circuit.
They are made of carbon.
Resistor-TransistorLogic (RTL) A type of circuit arrangement
used to construct digital gates.
Reverse-Biased When there is a voltage in the
direction of high-resistance
across a diode.
Saturation The state of a transistor when
the circuit resistances, not the
transistor itself, are limiting
the current.
Schematic A drawing of an electrical circuit
that uses symbols for all the
components.
Semiconductor A material that has more
resistance than conductors but
less than insulators. It is used
to construct diodes, transistors,
and integrated circuits.
Series When electrical components
are connected one after the
other.
Short Circuit When wires from different parts
of a circuit (or different circuits)
connect accidentally.
Silicon The chemical element most
commonly used as a
semiconductor.
Solder A tin-lead metal that becomes a
liquid when heated to above
360 degrees. In addition to
having low resistance like other
metals, solder also provides a
strong mounting that can
withstand shocks.
Speaker A device which converts
electrical energy into sound.
Switch A device to connect (“closed” or
“on”) or disconnect (“open” or
“off”) wires in an electric circuit.
Transformer A device which uses two coils
to change the AC voltage and
current (increasing one while
decreasing the other).
Transient Temporary. Used to describe
DC changes to circuits.
Transistor An electronic device that uses
a small amount of current to
control a large amount of
current.
Transmitter The device which is sending a
message (usually with radio).
Truth Table A table which lists all the
possible combinations of inputs
and outputs for a digital circuit.
Tungsten A highly resistive material used
in light bulbs.
Tuning Capacitor A capacitor whose value is
varied by rotating conductive
plates over a dielectric.
Variable Resistor A resistor with an additional
arm contact that can move
along the resistive material and
tap off the desired resistance.
Voltage A measure of how strong an
electric charge across a
material is.
Voltage Divider A resistor configuration to
create a lower voltage.
Volts (V) The unit of measure for voltage.
-5-
QUIZ ANSWERS
First Quiz: 1. electrons; 2. short; 3. battery; 4. increase; 5. insulators, conductors; 6. decreases, increases; 7. decreases;
8. voltage; 9. alternating, direct; 10. increases, decreases.
Second Quiz: 1. reverse; 2. LEDs; 3. amplifier; 4. integrated; 5. saturated; 6. alternating, direct; 7. decreases, increases;
8. magnetic; 9. increases; 10. twice
Third Quiz: 1. feedback; 2. air, pressure; 3. decreases; 4. radio; 5. inductors; 6. OR; 7. NAND
Page 6
-6-
INTRODUCTION TO BASIC COMPONENTS
Welcome to the exciting world of Electronics! Before
starting the first experiment, let’s learn about some of the
basic electronic components. Electricity is a flow of subatomic (very, very, very, small) particles, called
electrons. The electrons move from atom to atom when
an electrical charge is applied across the material.
Electronics will be easier to understand if you think of the
flow of electricity through circuits as water flowing
through pipes (this will be referred to as the water pipe
analogy).
Wires:
Wires can be thought of as large, smooth pipes
that allow water to pass through easily. Wires are made
of metals, usually copper, that offer very low resistance to
the flow of electricity. When wires from different parts of
a circuit connect accidentally we have a short circuit or
simply a short. You probably know from the movies that
this usually means trouble. You must always make sure
that the metal from different wires never touches except
at springs where the wires are connecting to each other
.
The electric current, expressed in amperes (A, named
after Andre Ampere who studied the relationship
between electricity and magnetism) or milliamps (mA,
1/1000 of an ampere), is a measure of how fast electrons
are flowing in a wire just as a water current describes
how fast water is flowing in a pipe.
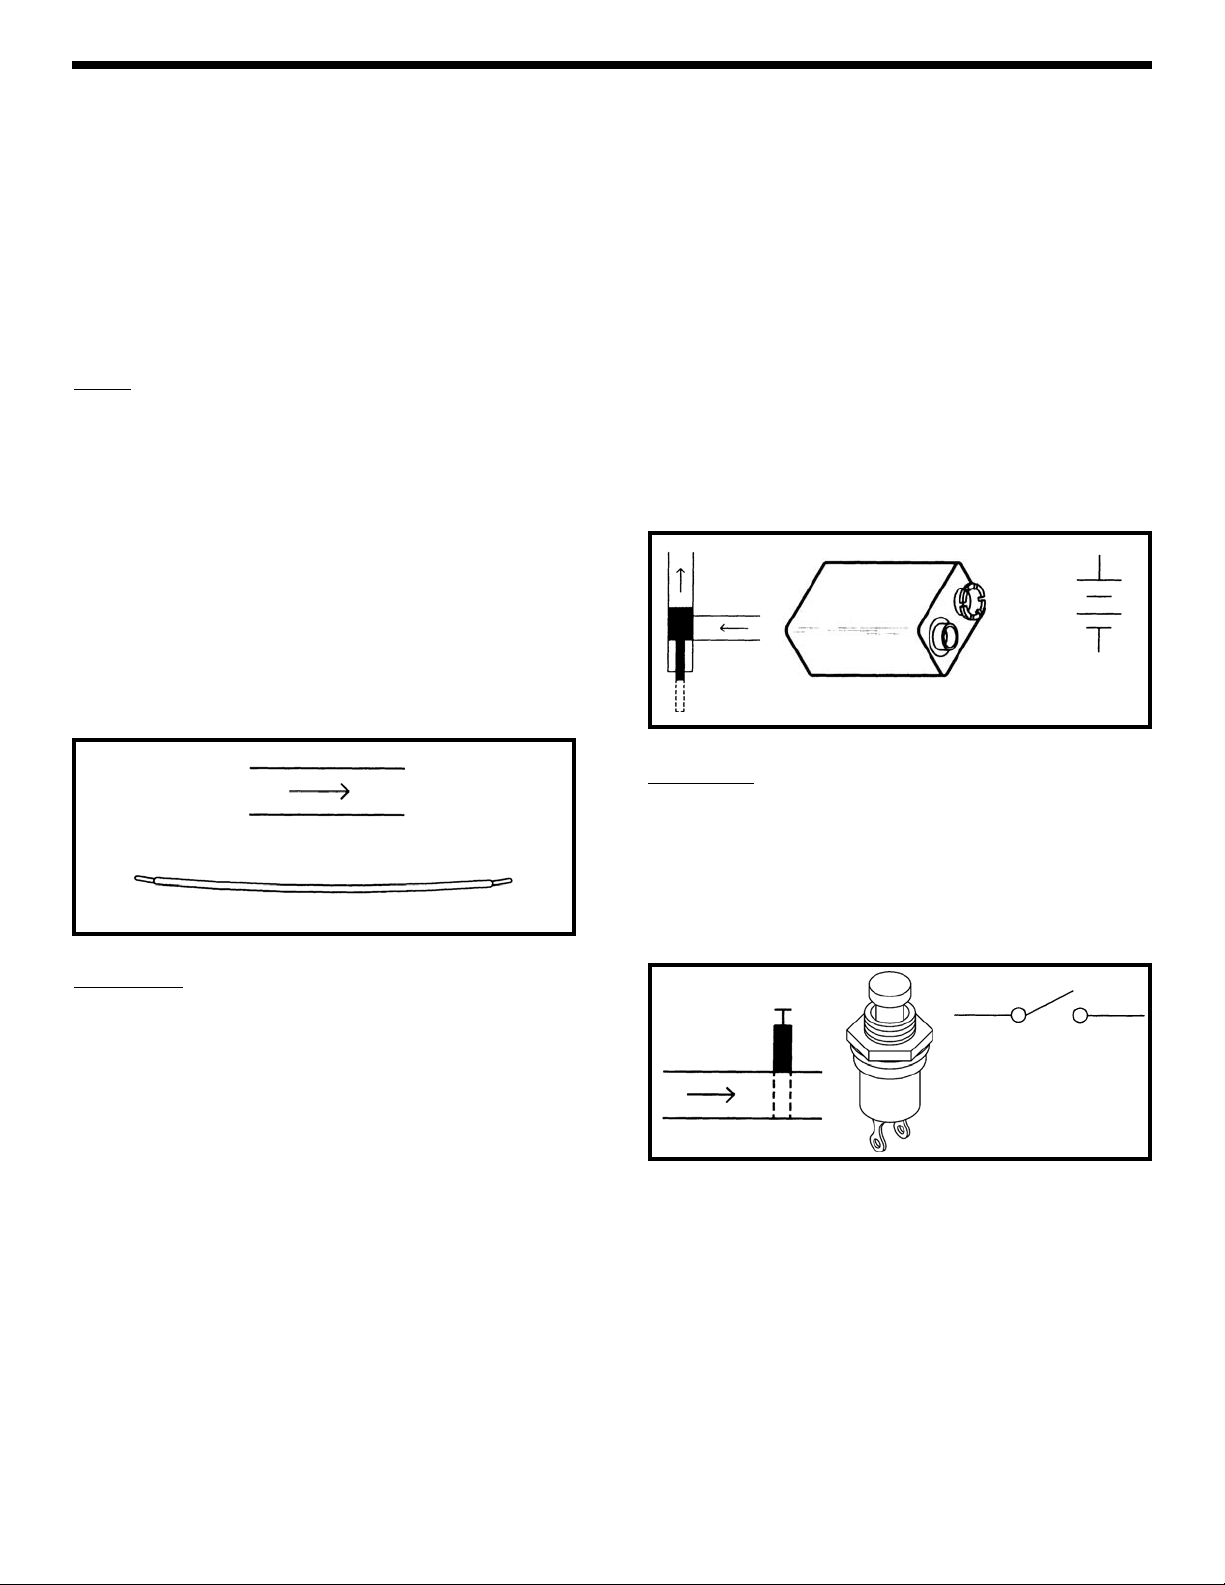
The Battery:
To make water flow through a pipe we need
a pump. To make electricity flow through wires we use a
battery or a generator to create an electrical charge
across the wires. A battery does this by using a chemical
reaction and has the advantage of being simple, small,
and portable. If you move a magnet near a wire then
electricity will flow in the wire. This is done in a generator.
The electric power companies have enormous
generators driven by steam or water pressure to produce
electricity for your home.
The voltage, expressed in volts (V, and named after
Alessandro Volta who invented the battery in 1800), is a
measure of how strong the electric charge from your
battery or generator is, similar to the water pressure.
Your Electronic Playground uses a 9V battery. Notice the
“+” and “–” signs on the battery. These indicate which
direction the battery will “pump” the electricity, similarly to
how a water pump can only pump water in one direction.
The 0V or “–” side of the battery is often referred to as
“ground”. Notice that just to the right of the battery
pictured below is a symbol, the same symbol you see
next to the battery holder. Engineers are not very good
at drawing pictures of their parts, so when engineers
draw pictures of their circuits they use symbols like this to
represent them. It also takes less time to draw and takes
up less space on the page. Note that wires are
represented simply by lines on the page.
The Switch:
Since you don’t want to waste water when
you are not using it, you have a faucet or valve to turn the
water on and off. Similarly, you use a switch to turn the
electricity on and off in your circuit. A switch connects
(the “closed” or “on” position) or disconnects (the “open”
or “off” position) the wires in your circuit. As with the
battery, the switch is represented by a symbol, shown
below on the right.
Pipe
Wire
Water
Pump
Battery
Symbol for
Battery
(+)
9V
(–)
Val ve
Switch
Symbol for Switch
Page 7
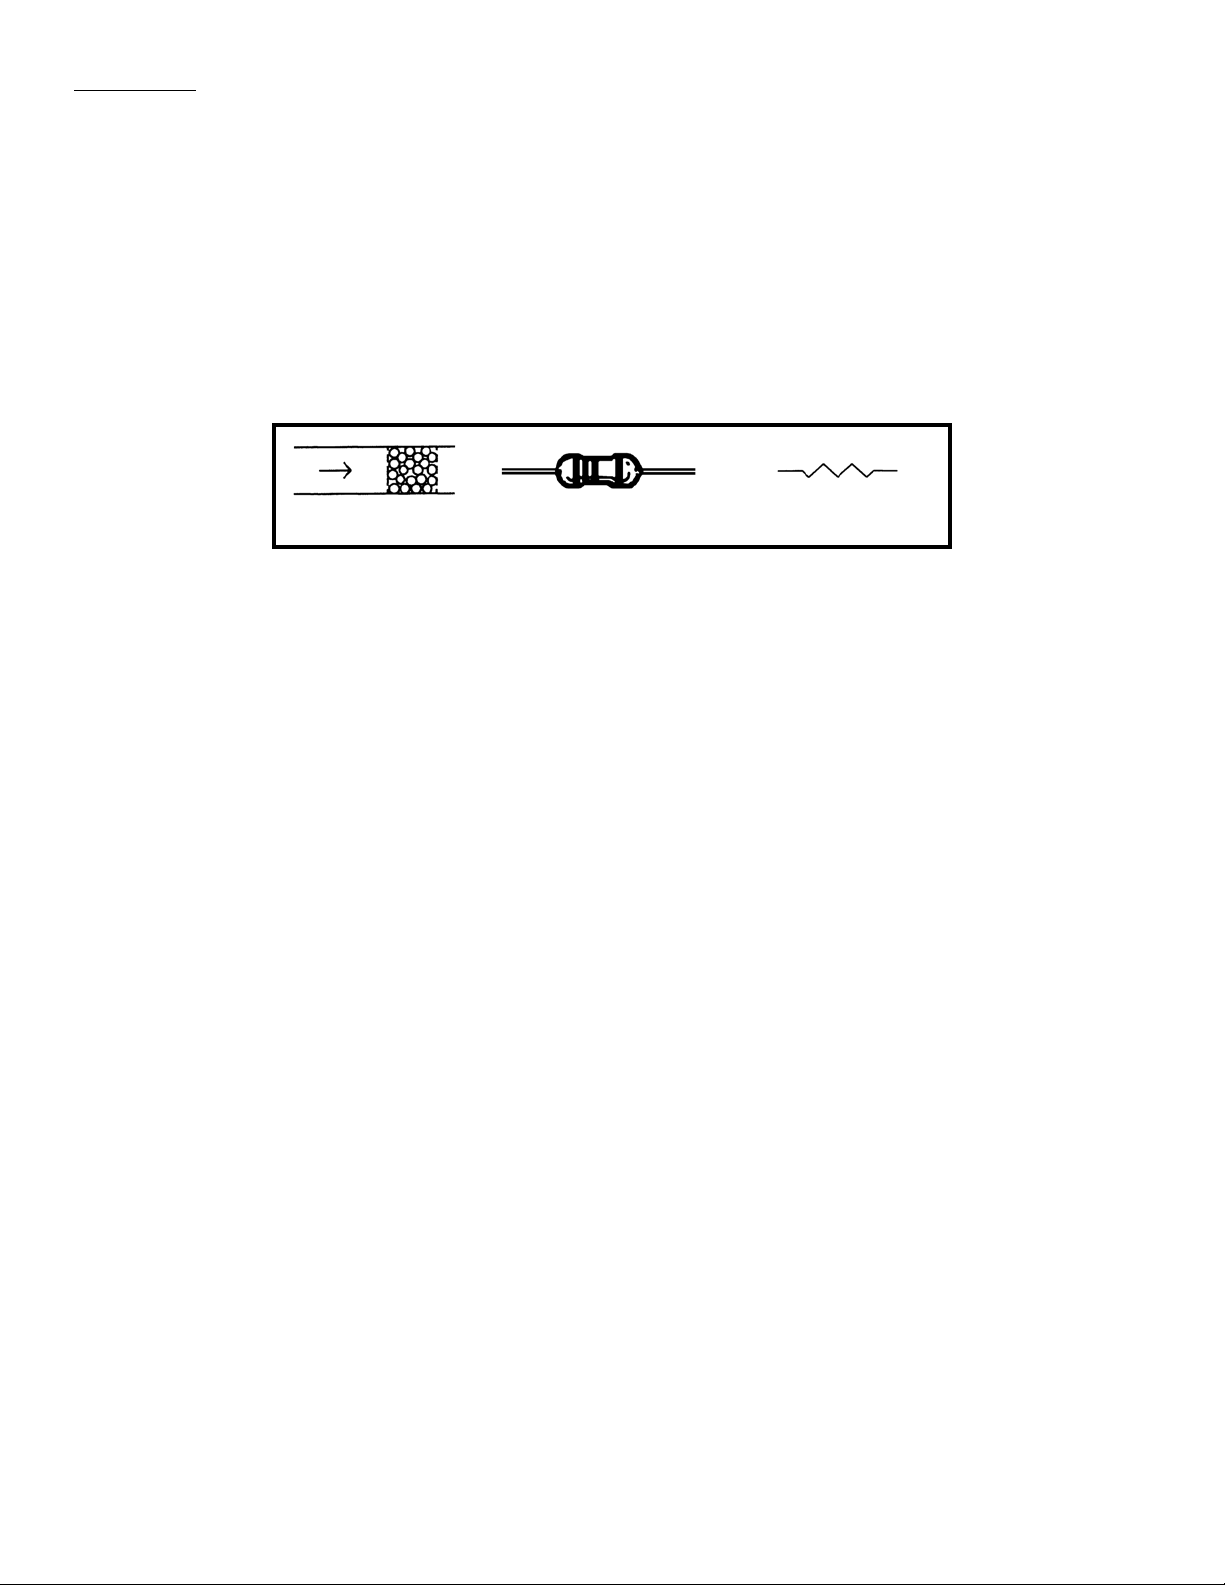
The Resistor: Why is the water pipe that goes to your
kitchen faucet smaller than the one that comes to your
house from the water company? And why is it much
smaller than the main water line that supplies water to
your entire town? Because you don’t need so much
water. The pipe size limits the water flow to what you
actually need. Electricity works in a similar manner,
except that wires have so little resistance that they would
have to be very, very thin to limit the flow of electricity.
They would be hard to handle and break easily. But the
water flow through a large pipe could also be limited by
filling a section of the pipe with rocks (a thin screen would
keep the rocks from falling over), which would slow the
flow of water but not stop it. Resistors are like rocks for
electricity, they control how much electric current flows.
The resistance, expressed in ohms (Ω, named after
George Ohm), kilohms (KΩ, 1000 ohms), or megohms
(MΩ, 1,000,000 ohms) is a measure of how much a
resistor resists the flow of electricity. To increase the
water flow through a pipe you can increase the water
pressure or use less rocks. To increase the electric
current in a circuit you can increase the voltage or use a
lower value resistor (this will be demonstrated in a
moment). The symbol for the resistor is shown on the
right.
Rocks in Pipe Resistor Resistor Symbol
-7-
Page 8

EXPERIMENT #1: The Light Bulb
First, you need a 9V battery (alkaline is best). Fold out
the the battery holder cutouts and snap the battery into
its clip. Always remove the battery from its clip if you
won’t be using your Playground for a while.
Your Electronic Playground consists of electronic parts
connected to springs and mounted on a cardboard panel.
You will use wires to connect these springs together to
form a circuit. You are provided with several different
lengths of wires, and it is usually best to use the shortest
length of wire that comfortably reaches between two
springs so that your wiring appears less confusing and
easier to check. Notice that each spring has a number
next to it. For each circuit we will tell you the spring
numbers to connect in order to build the circuit. And as
you build each circuit you will slowly learn more and more
about electronics.
Enough talk, let’s start building your first circuit. To
connect a wire to a spring, bend the spring back to one
side with one finger and slip the metal end of the wire into
the spring; let go of the spring and it should clamp the
wire firmly in place. Tug lightly on the wire to make sure
you have a secure connection. And be sure the spring
touches the metal
portion of the wire, the colored plastic
insulation doesn’t count. To remove a wire, bend the
spring and pull the wire away. When you have two or
more wires connecting to the same spring, make sure
that one wire does not come loose while you connect the
others. This will be easier if you connect the wires on
different sides of the spring.
1
2 3
-8-
Now connect the wires for this circuit
according to the list below, which we’ll call
the Wiring Checklist. When you’re
finished your wiring should look like the
diagram shown here:
Wiring Checklist:
o 27-to-56
o 55-to-45
o 44-to-3
o 4-to-26
Be sure all your wires are securely in
place and not loose. Also make sure the
metal
in the wires is only touching the
spring and wires that it is connected to,
and not to any nearby springs or other
wires.
Page 9

-9-
Press the switch (next to springs 55 and 56) and the LED
(light emitting diode) lights up, and turns off when you
release the switch. The LED converts electrical energy
into light, like the light bulbs in your home. You can also
think of an LED as being like a simple water meter, since
as the electric current increases in a wire the LED
becomes brighter. It is shown here, with its symbol.
Take a look at the water diagram that follows. It shows
the flow of water from the pump through the faucet, the
small pipe, the water meter, the large pipes, and back to
the pump. Now compare it to the electrical diagram next
to it, called a schematic. Schematics are the “maps” for
electronic circuits and are used by all electronic
designers and technicians on everything from your
Electronic Playground to the most advanced
supercomputers. They show the flow of electricity from
the battery through the switch, the resistor, the LED, the
wires, and back to the battery. They also use the symbols
for the battery, switch, resistor, and LED that we talked
about. Notice how small and simple the schematic looks
compared to the water diagram; that is why we use it.
Now you will see how changing the resistance in the
circuit increases the current through it. Press the switch
again and observe the brightness of the LED. Now
remove the wires from the 10KΩ resistor (springs 44 and
45) and connect them to the 1KΩ resistor (springs 40 and
41). Press the switch. The LED is brighter now, do you
understand why? We are using a lower resistance (less
rocks), so there is more electrical current flowing (more
water flows), so the LED is brighter. Now replace the
1KΩ resistor with the 100KΩ resistor (springs 51 and 52)
and press the switch again. The LED will be on but will
be very dim (this will be easier to see if you wrap your
hand near the LED to keep the room lights from shining
on it).
Well done! You’ve just built YOUR first electronic circuit!
Water Meter LED Symbol for LED
Water Diagram
On/Off
Valve
Water
Meter
Rocks
Pump
Schematic
Page 10

Ohm’s Law: You just observed that when you have less
resistance in the circuit, more current flows (making the
LED brighter). The relationship between voltage, current,
and resistance is known as Ohm’s Law (after George
Ohm who discovered it in 1828):
Current =
Resistance:
Just what is Resistance? Take your hands
and rub them together very fast.Your hands should feel
warm. The friction between your hands converts your
effort into heat. Resistance is the electrical friction
between an electric current and the material it is flowing
through; it is the loss of energy from electrons as they
move between atoms of the material. Resistors are
made using carbon and can be constructed with different
resistive values, such as the seven parts included in your
Electronic Playground. If a large amount of current is
passed through a resistor then it will become warm due
to the electrical friction. Light bulbs use a small piece of
a highly resistive material called tungsten. Enough
current is passed through this tungsten to heat it until it
glows white hot, producing light. Metal wires have some
electrical resistance, but it is very low (less than 1Ω per
foot) and can be ignored in almost all circuits. Materials
such as metals which have low resistance are called
conductors. Materials such as paper, plastic, and air
have extremely high values of resistance and are called
insulators.
Resistor Color Code:
You may have seen the colored
bands on the resistors and may be wondering what they
mean. They are the method for marking the value of
resistance on the part. The first ring represents the first
digit of the resistor’s value. The second ring represents
the second digit of the resistor’s value. The third ring tells
you the power of ten to multiply by
,
(or the number of
zeros to add). The final and fourth ring represents the
construction tolerance. Most resistors have a gold band
for a 5% tolerance. This means the value of the resistor
is guaranteed to be within 5% of the value marked. The
colors below are used to represent the numbers 0
through 9.
Use the color code to check the values of the seven
resistors included in your Electronic Playground. (The
values are marked next to them on the box). They are all
5% tolerance.
The Variable Resistor:
We talked about how a switch is
used to turn the electricity on and off just like a valve is
used to turn the water on and off. But there are many
times when you want some water but don’t need all that
the pipe can deliver, so you control the water by adjusting
an opening in the pipe with a faucet. Unfortunately, you
can’t adjust the thickness of an already thin wire. But you
could also control the water flow by forcing the water
through an adjustable length of rocks, as in the rock arm
shown below.
In electronics we use a variable resistor. This is a normal
resistor (50KΩ in your Playground) with an additional arm
contact that can move along the resistive material and
tap off the desired resistance.
There is a scale printed next to the dial on the variable
resistor which shows the percentage of the total
resistance that is between springs 49 and 50. The
remaining resistance will be between springs 48 and 49.
The resistance between springs 48 and 50 will always be
50KΩ, the total resistance.
Now let’s demonstrate how this works.
MORE ABOUT RESISTORS
-10-
Example of Color Code
OrangeRed
Violet Gold
27 X 103= 27,000 Ω,
with 5% Tolerance
COLOR VA L UE
Black 0
Brown 1
Red 2
Orange 3
Yellow 4
Green 5
Blue 6
Violet 7
Gray 8
White 9
Rock Arm
Variable Resistor
Insulating Base Material
Wiper Contact
Thin Layer of
Resistive
Material
Stationary
Contact
Movable
Arm
Leads
Variable
Resistor
Symbol for Variable
Resistor
Voltage
Resistance
Page 11
-11-
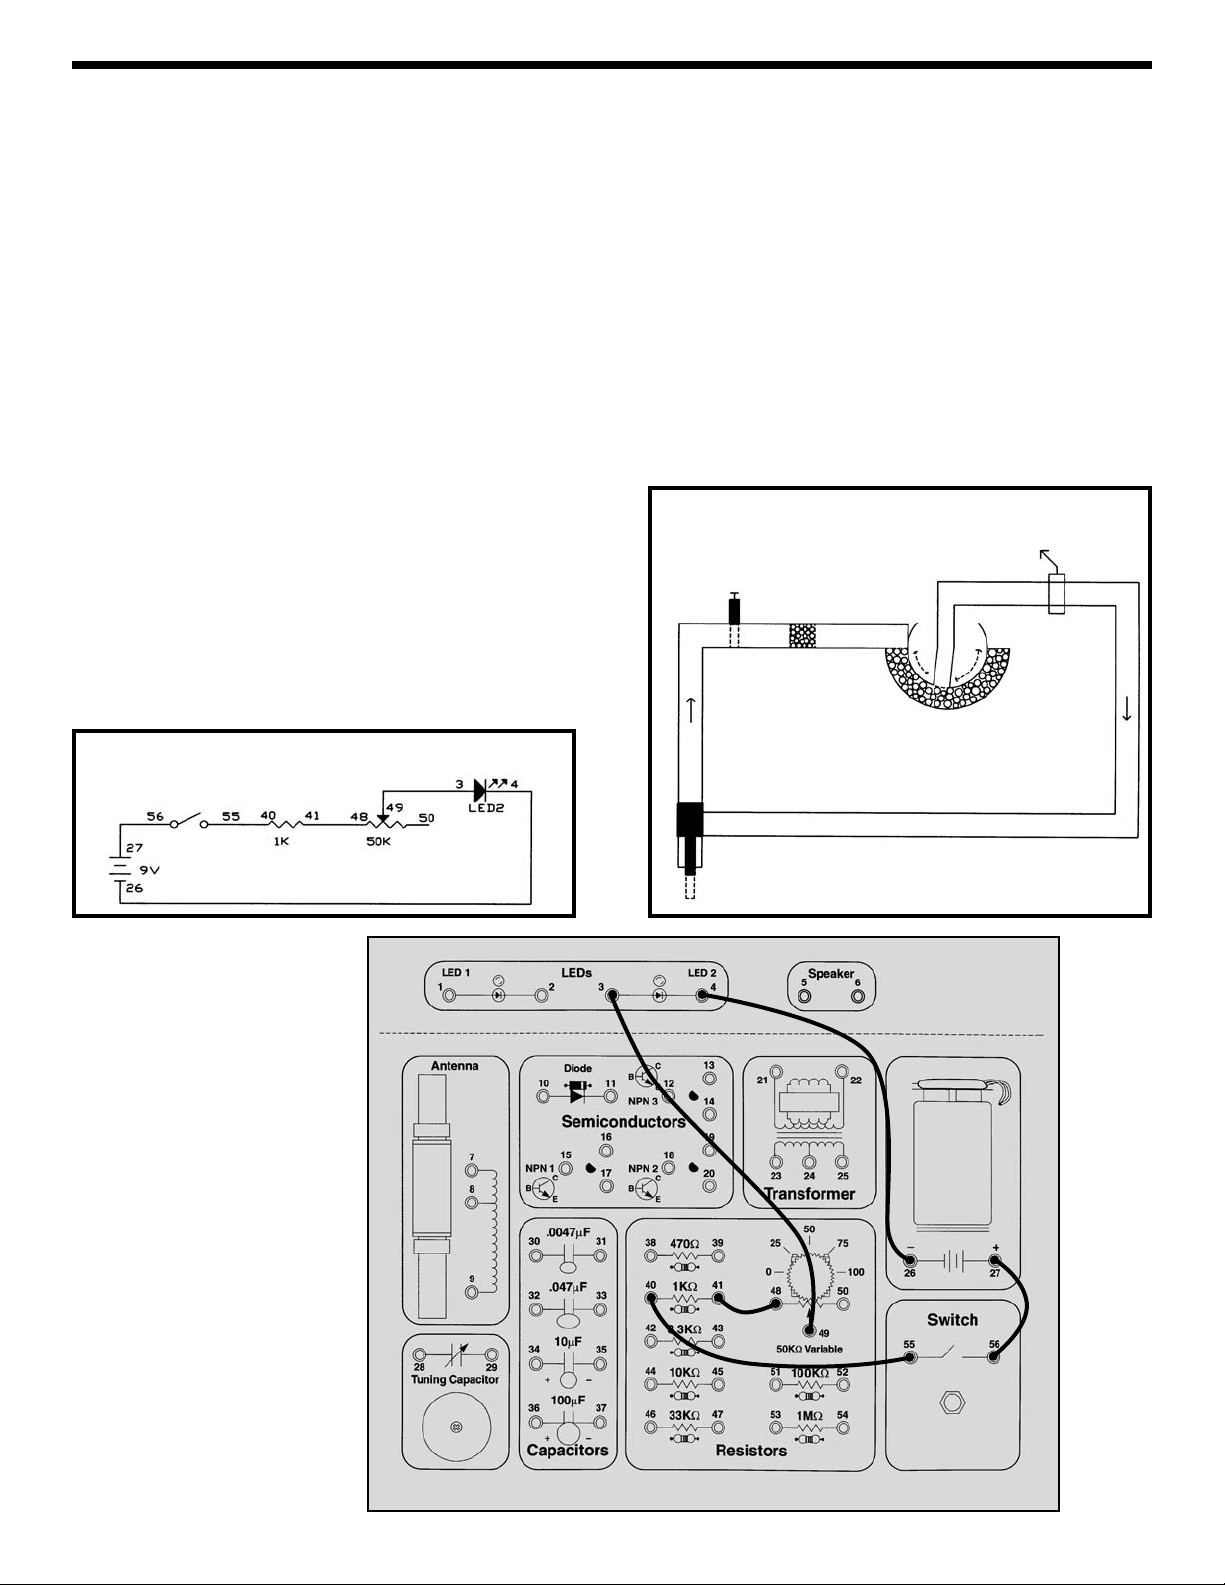
Connect the wires according to the Wiring Checklist.
Press the switch and the LED lights up. Now hold the
switch closed with one hand and turn the dial on the
variable resistor with the other. When the dial setting is
high, the resistance in the circuit is low and the LED is
bright because a large current flows. As you turn the dial
lower the resistance increases and the LED will become
dim, just as forcing the water through a section of rocks
would slow the water flow and lower the reading on your
water meter.
You may be wondering what the 1KΩ resistor is doing in
the circuit. If you set the dial on the variable resistor for
minimum resistance (0Ω) then Ohm’s Law tells us the
current will be very large - and it might damage the LED
(think of this as a very powerful water pump overloading
a water meter). So the 1KΩ was put in to limit the current
while having little effect on the brightness of the LED.
Now remove the wire from spring 48 and connect it to
spring 50 (use a longer wire if necessary). Do you know
what will happen now? Close the switch and you will see
that as you turn the dial from 0 to 100 the LED goes from
very bright to very dim, because you are increasing the
resistance between springs 49 and 50.
Now remove the wire from spring 49 and connect it to
spring 48. What do you think will happen? Close the
switch and turn the dial. The LED is dim and turning the
resistor dial won’t make it any brighter. As discussed
above, the resistance between 48 and 50 is always 50KΩ
and the part acts just like one of the other resistors in
your Electronic Playground.
Variable resistors like this one are used in the light
dimmers you may have in your house, and are also used
to control the volume in your radio, your TV, and many
electronic devices.
EXPERIMENT #2: The Brightness Control
Wiring Checklist:
o 27-to-56
o 55-to-40
o 41-to-48
o 49-to-3
o 4-to-26
Water Diagram
On/Off
Valve
Water
Meter
Rocks
Pump
Schematic
Rock Arm
Page 12
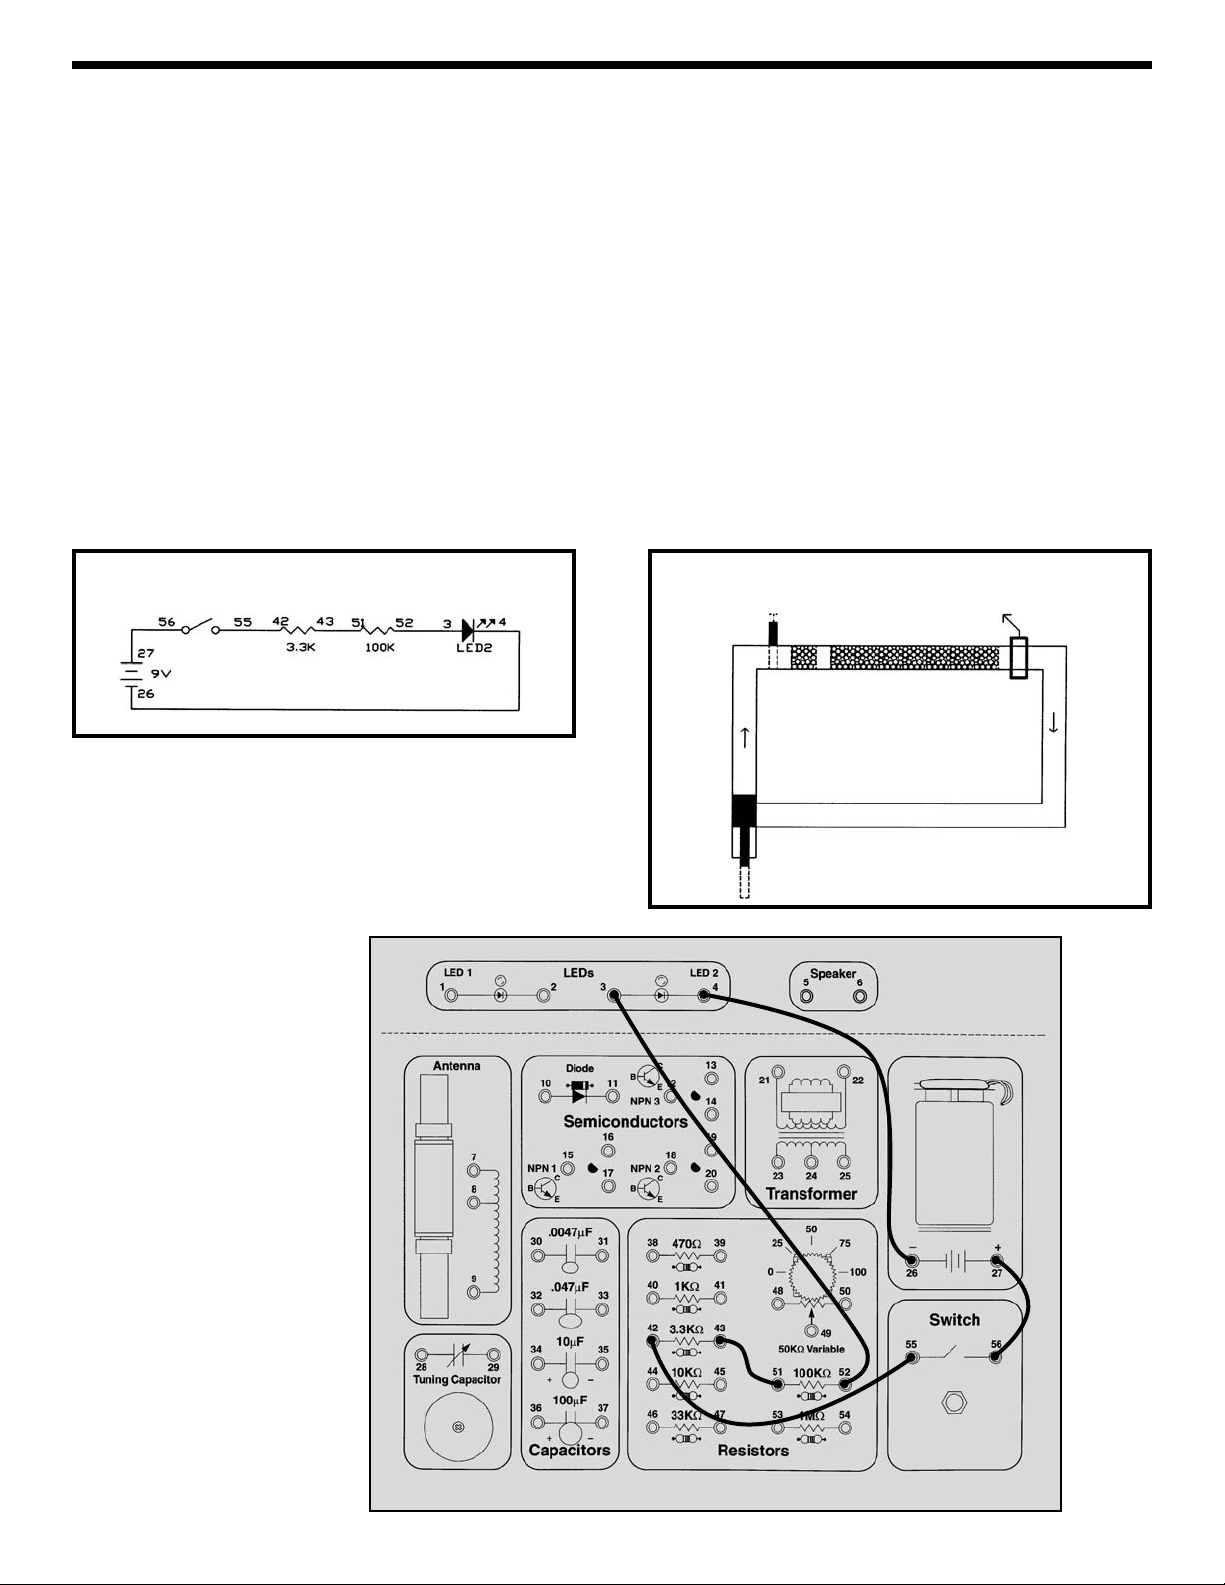
-12-
Connect the wires according to the Wiring Checklist and
press the switch. The LED is on but is very dim (this will
be easier to see if you wrap your hand near the LED to
keep the room lights from shining on it). Take a look at
the schematic. There is a low 3.3KΩ resistor and a high
100KΩ resistor in series (one after another). Since the
LED is dimly lit, we know that the larger 100KΩ must be
controlling the current. You can think of this as where two
sections of the pipe are filled with rock, if one section is
much longer than the other then it controls the water flow.
If you had several rock sections of different lengths then
it is easy to see that these would add together as if they
were one longer section. The total length is what matters,
not how many sections the rock is split into. The same is
true in electronics - resistors in series add together to
increase the total resistance for the circuit. (In our circuit
the 3.3KΩ and 100KΩ resistors add up to 103.3KΩ).
To demonstrate this, disconnect the wires from the
100KΩ resistor and connect them instead to the 10KΩ,
press the switch; the LED should be easy to see now
(total resistance is now only 13.3KΩ). Next, disconnect
the 10KΩ resistor and connect the 1KΩ in its place. The
LED is now bright, but not as bright as when you used the
1KΩ in Experiment #1. Why? Because now the 3.3KΩ
is the larger resistor (total resistance is 4.3KΩ).
Also, in Experiment #2 you saw how the 1KΩ resistor
would dominate the circuit when the variable resistor was
set for 0Ω and how the variable resistor would dominate
when set for 50KΩ.
EXPERIMENT #3: Resistors in Series
Wiring Checklist:
o 27-to-56
o 55-to-42
o 43-to-51
o 52-to-3
o 4-to-26
Water Diagram
On/Off
Valve
Water
Meter
Rocks
Pump
Schematic
Page 13
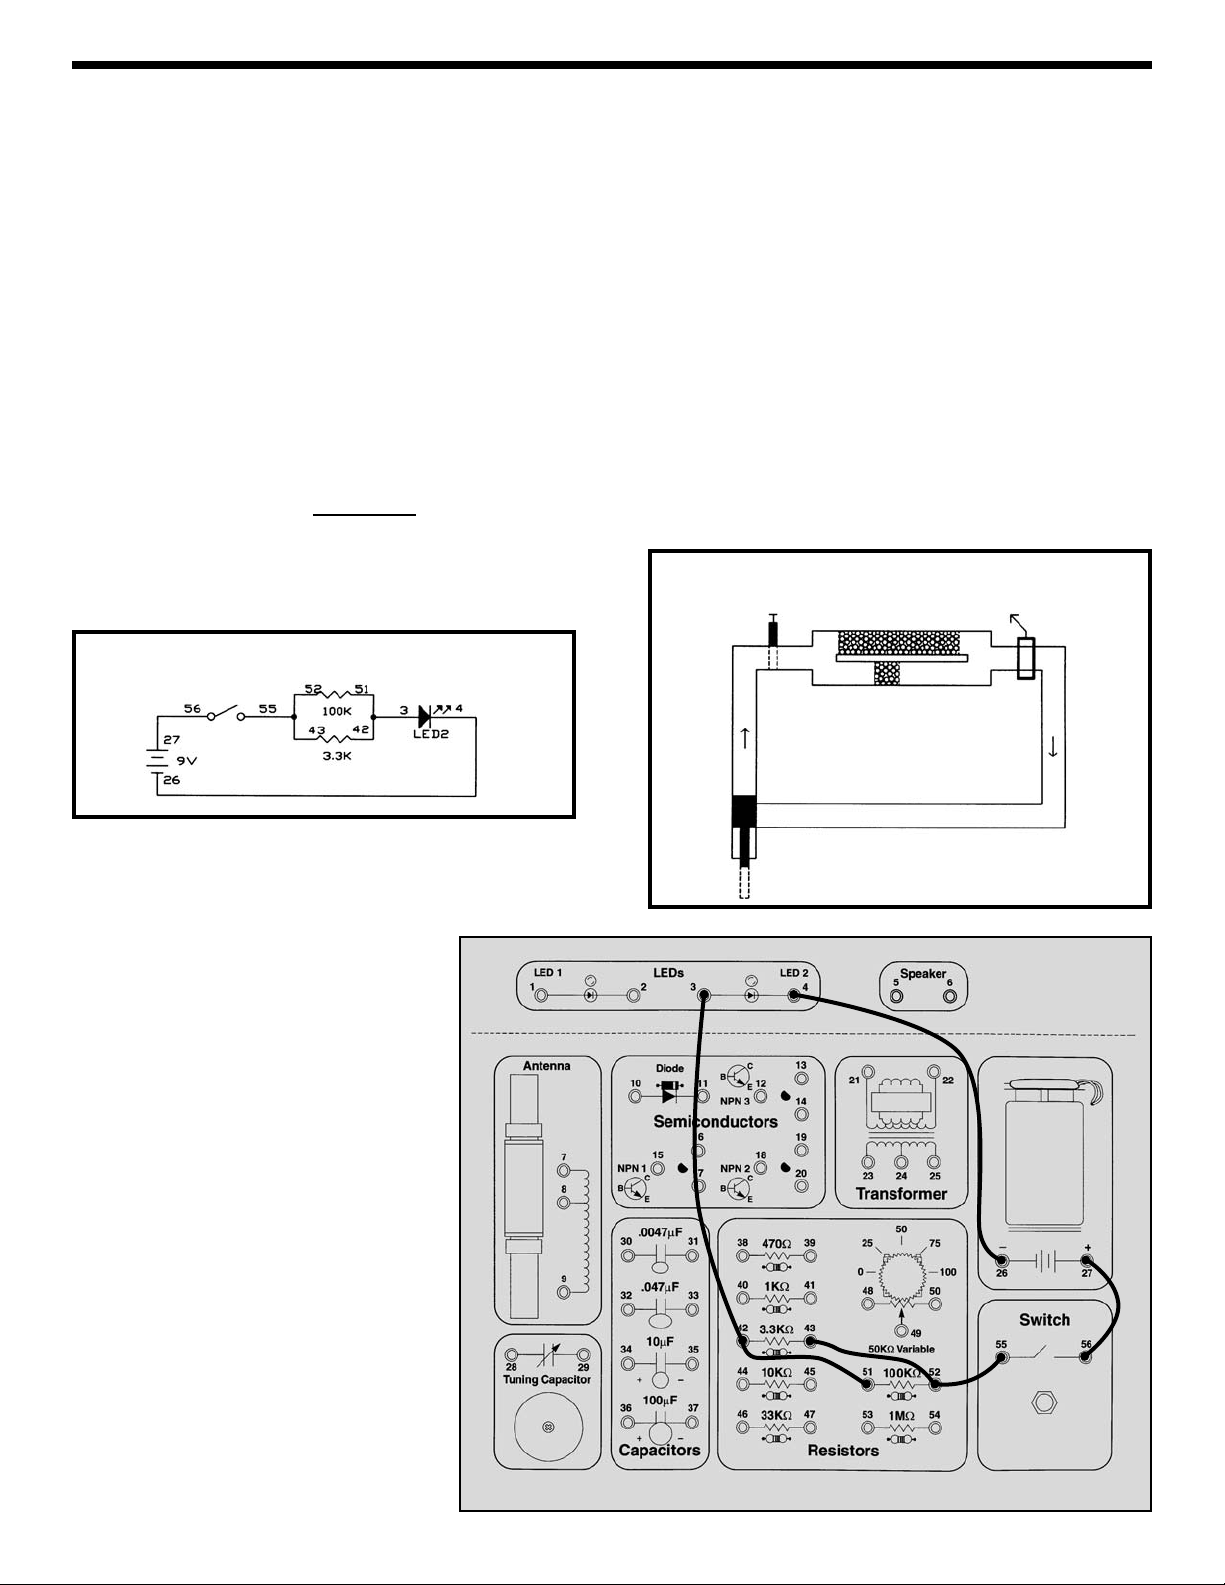
-13-
Connect the wires according to the Wiring Checklist.
Take a look at the schematic. There is a low 3.3KΩ
resistor and a high 100KΩ resistor in parallel (connected
between the same points in the circuit). How bright do
you think the LED will be? Press the switch and see if
you are right. The LED is bright, so most of the current
must be flowing through the smaller 3.3KΩ resistor. This
makes perfect sense when we look at the water diagram,
with most of the water flowing through the pipe with less
rocks. In general, the more water pipes (or resistors)
there are in parallel, the lower the total resistance is
and the more water (or current) will flow. The relationship
is more complicated than for resistors in series and is
given here for advanced students:
R
Parallel
=
For two 10KΩ resistors in parallel, the result would be
5KΩ. The 3.3KΩ and 100KΩ in parallel in our circuit now
give the same LED brightness as a single 3.2KΩ resistor.
To demonstrate this, disconnect the wires from the
100KΩ resistor and connect them to the 10KΩ; press the
switch and the LED should be just as bright. The total
resistance is now only 2.5KΩ, but your eyes probably
won’t notice much difference in LED brightness. Now
disconnect the wires from the 10KΩ and connect them to
the 1KΩ; press the switch. The total resistance is now
only 770Ω, so the LED should now be much brighter.
EXPERIMENT #4: Parallel Pipes
R1x R
2
R1+ R
2
Wiring Checklist:
o 27-to-56
o 55-to-52-to-43 (this will take 2 wires)
o 51-to-42-to-3 (2 wires)
o 4-to-26
Water Diagram
On/Off
Valve
Water
Meter
Rocks
Pump
Schematic
Rocks
Page 14
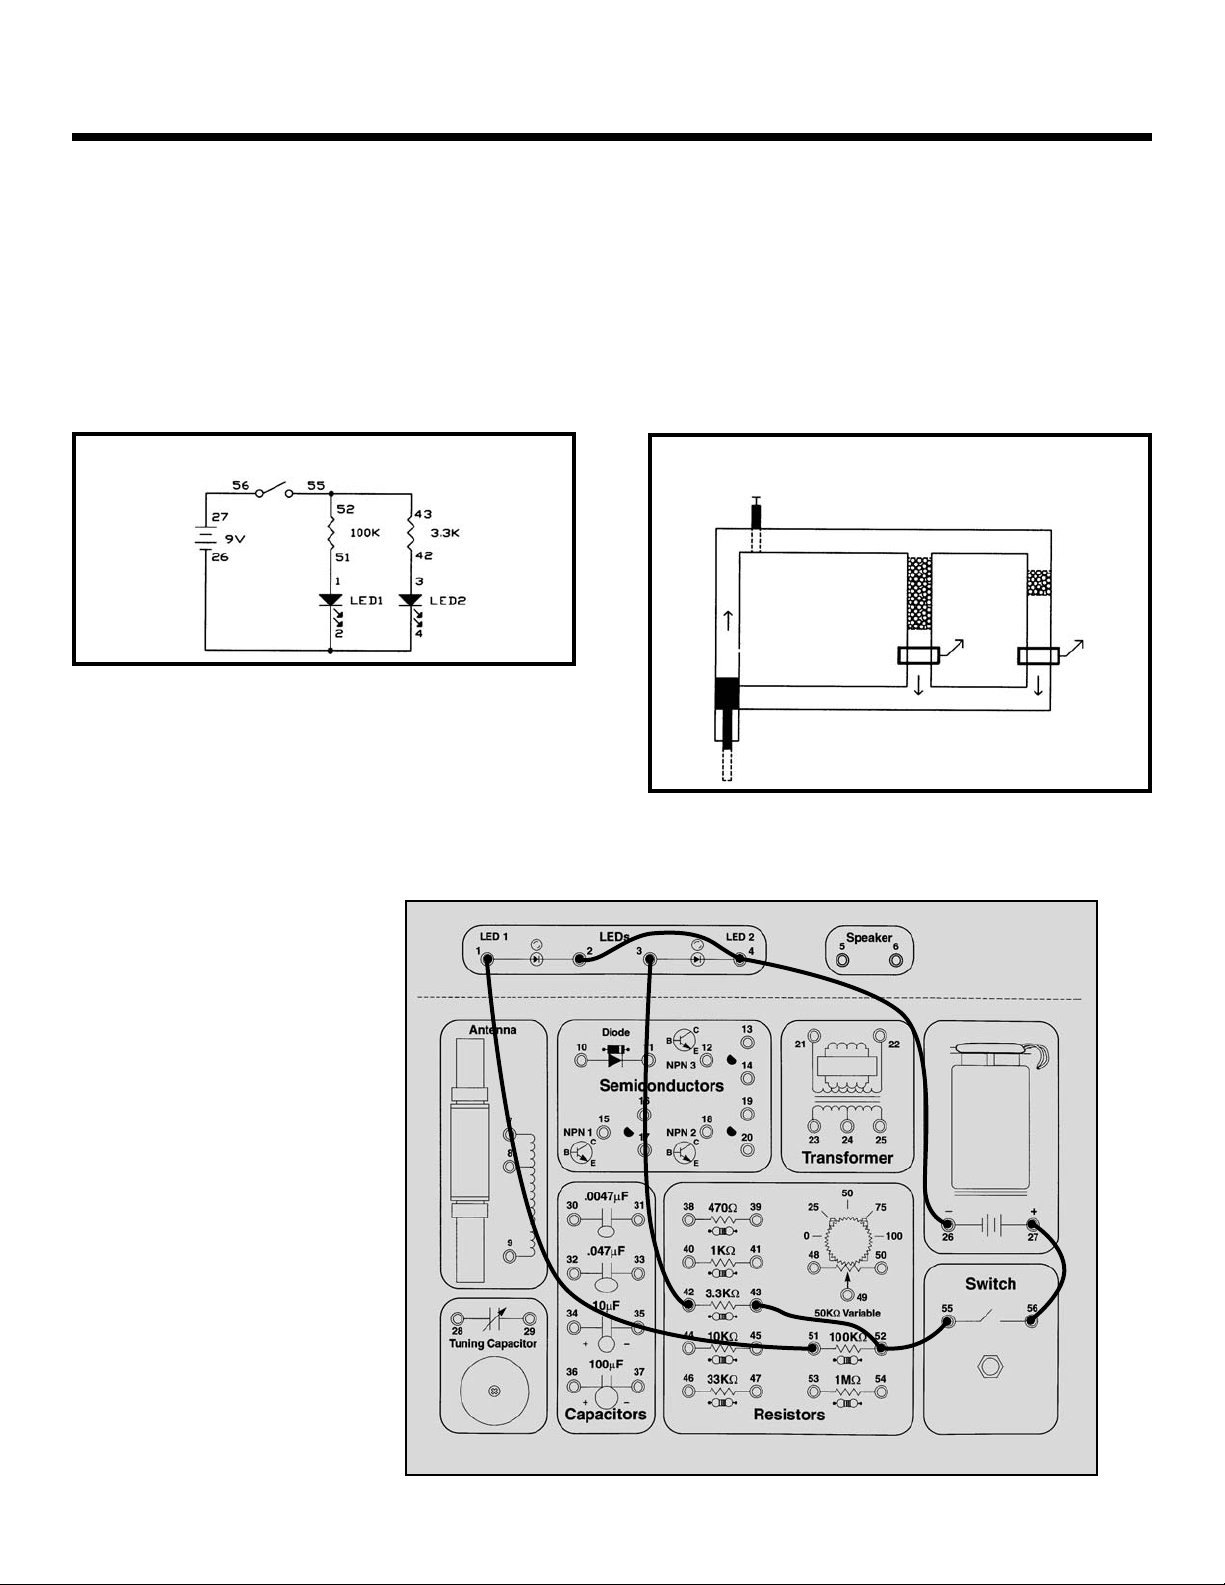
Since we have two resistors in parallel and a second LED
that is not being used, let’s modify the circuit to match the
schematic below. It’s basically the same circuit but
instead of just parallel resistors there are parallel resistorLED circuits. Disconnect the wire between 51 (the
100KΩ resistor) and 42 (the 3.3KΩ resistor) and connect
it between 51 and 1 (LED1) instead (you may need a
longer wire). Add a wire from 2 (LED1) to 4 (LED2).
Replace the 100KΩ resistor with several values as before
(such as 1KΩ, 10KΩ, and others if you wish), pressing
the switch and observing the LEDs each time. The
brightness of LED2 will not change, but the brightness of
LED1 will depend on the resistor value you placed in
series with it.
EXPERIMENT #4B: Comparison of Parallel Currents
-14-
There is an even easier way to explain this:
Wiring Checklist:
o 27-to-56
o 55-to-52-to-43 (2 wires)
o 51-to-1
o 42-to-3
o 2-to-4-to-26 (2 wires)
Water Diagram
On/Off
Valve
Water
Meter
Rocks
Pump
Schematic
Rocks
Water
Meter
Page 15
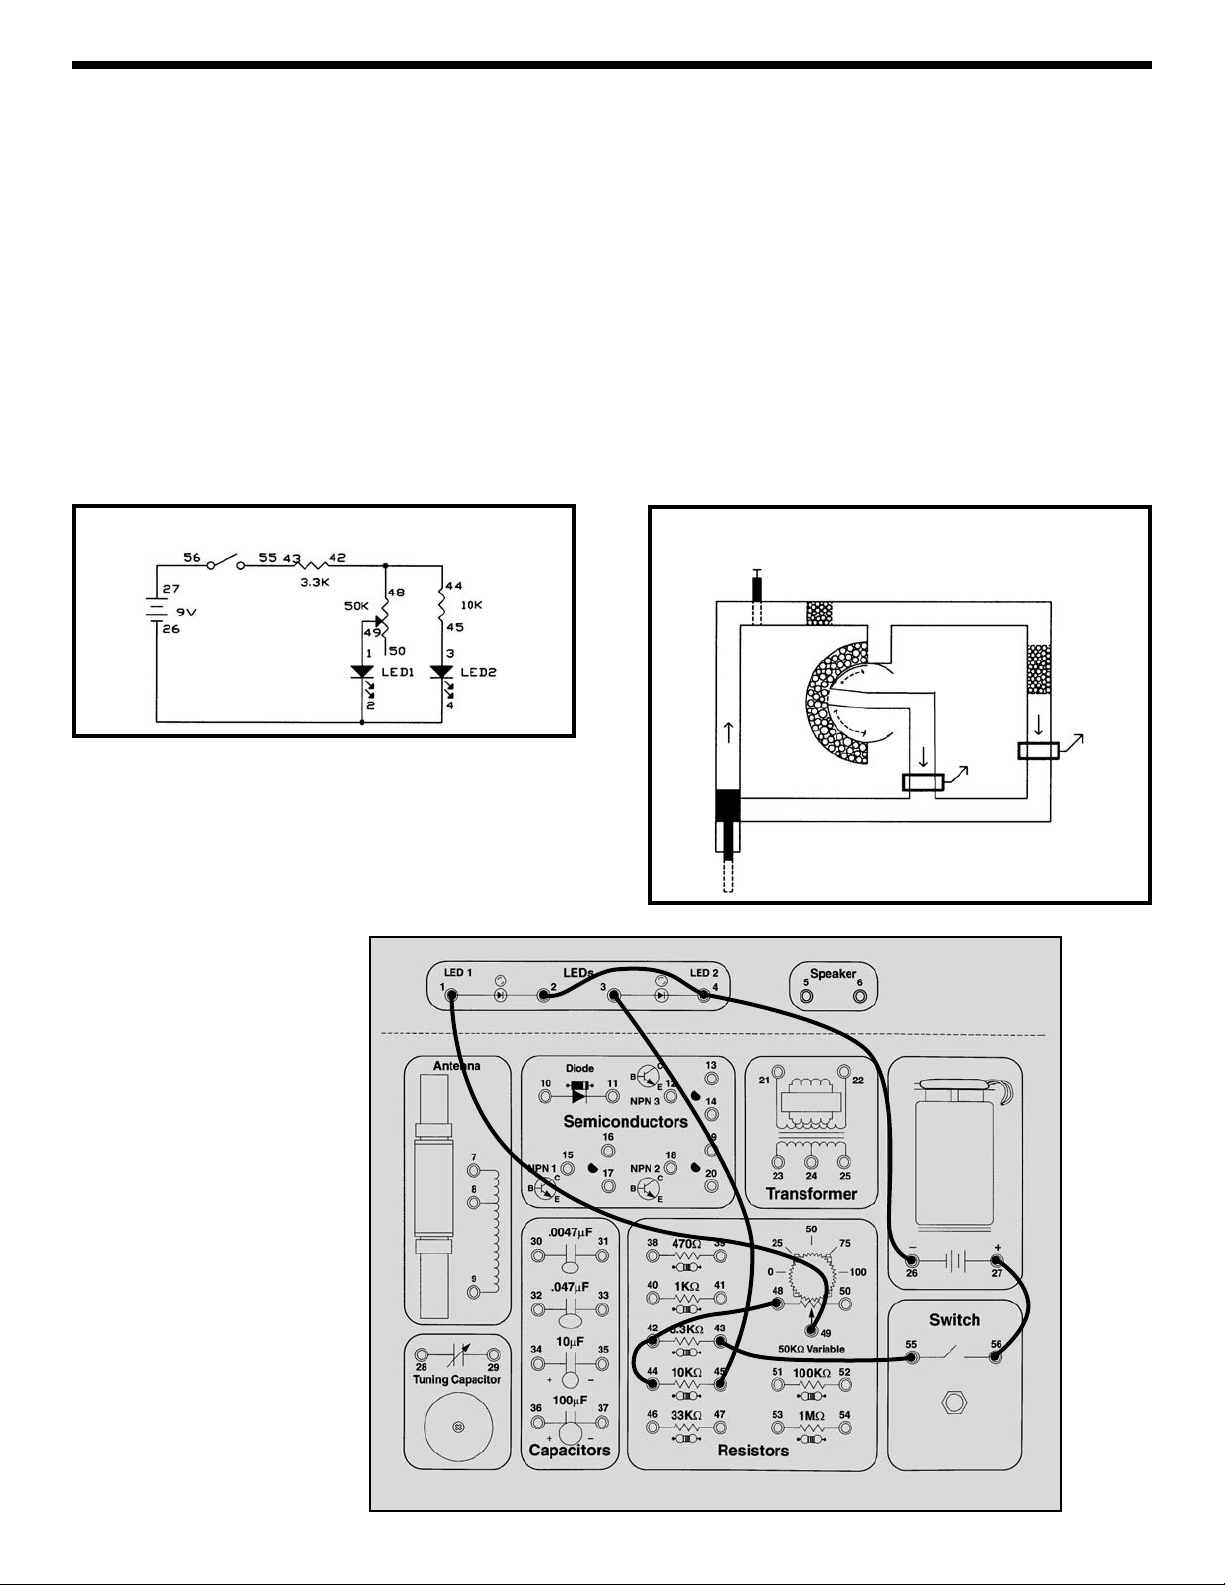
-15-
Let’s combine everything we’ve done so far. Connect the
wires according to the Wiring Checklist. Before pressing
the switch, take a look at the schematic and think about
what will happen as you turn the dial on the variable
resistor (we’ll abbreviate this to VR). Now press the
switch with one hand and turn the dial with the other to
see if you were right. As you turn the VR dial from right
to left LED1 will go from bright to very dim and LED2 will
go from visible to off.
What’s happening is this: With the dial turned all the way
to the right the VR is 0Ω (much smaller than the 10KΩ)
so nearly all of the current passing through the 3.3KΩ will
take the VR-LED1 path and very little will take the 10KΩ-
LED2 path. When the VR dial is turned to 80% the VR is
10KΩ (same as the other path) and the current flowing
through the 3.3KΩ will divide equally between the two
LED paths (making them equally bright). As the VR dial
is turned to the left the VR becomes a 50KΩ (much larger
than the 10KΩ) and LED1 will become dim while LED2
gets brighter.
Now is a good time to take notes on how resistors work
in series and in parallel. All electronic circuits are much
larger combinations of series and parallel circuits such as
these. It’s important to understand these ideas because
soon we’ll apply them to capacitors and inductors!
EXPERIMENT #5: Combined Circuit
Wiring Checklist:
o 27-to-56
o 55-to-43
o 44-to-42-to-48
o 49-to-1
o 45-to-3
o 2-to-4-to-26
Water Diagram
On/Off
Valve
Water
Meter
Rocks
Pump
Schematic
Rocks
Water
Meter
Page 16
You’ve seen how electricity flows through copper wires
easily and how carbon resists the flow. How well does
water pass electricity? Let’s find out.
Connect the wires according to the Wiring Checklist and
take a look at the schematic. There isn’t a switch this
time, so just disconnect one of the wires if you want to
turn the circuit off. Notice that the Wiring Checklist leaves
2 wires unconnected. The LED will be off initially (if you
touch the two loose wires together then it will be on).
Now take a small cup (make sure it isn’t made of metal),
fill it half way with water, and place the two unconnected
wires into the water without touching each other. The
LED should now be dimly lit, but the brightness could
vary depending on your local water quality. You are now
seeing a demonstration of how water conducts (passes)
electricity. (A small cup of water like this may be around
100KΩ, but depends on the local water quality). Try
adding more water to the cup and see if the LED
brightness changes (it should get brighter because we
are “making the water pipe larger”). Since the LED only
lights when it is in water now, you could use this circuit as
a water detector!
Now adjust the amount of water so that the LED is dimly
lit. Now, watching the LED brightness, add some table
salt to the water and stir to dissolve the salt. The LED
should become brighter because water has a lower
electrical resistance when salt is dissolved in it. Looking
at the water pipe diagram, you can think of this as a
strong cleaner dissolving paintballs that are mixed in with
the rocks. You could even use this circuit to detect salt
water like in the ocean!
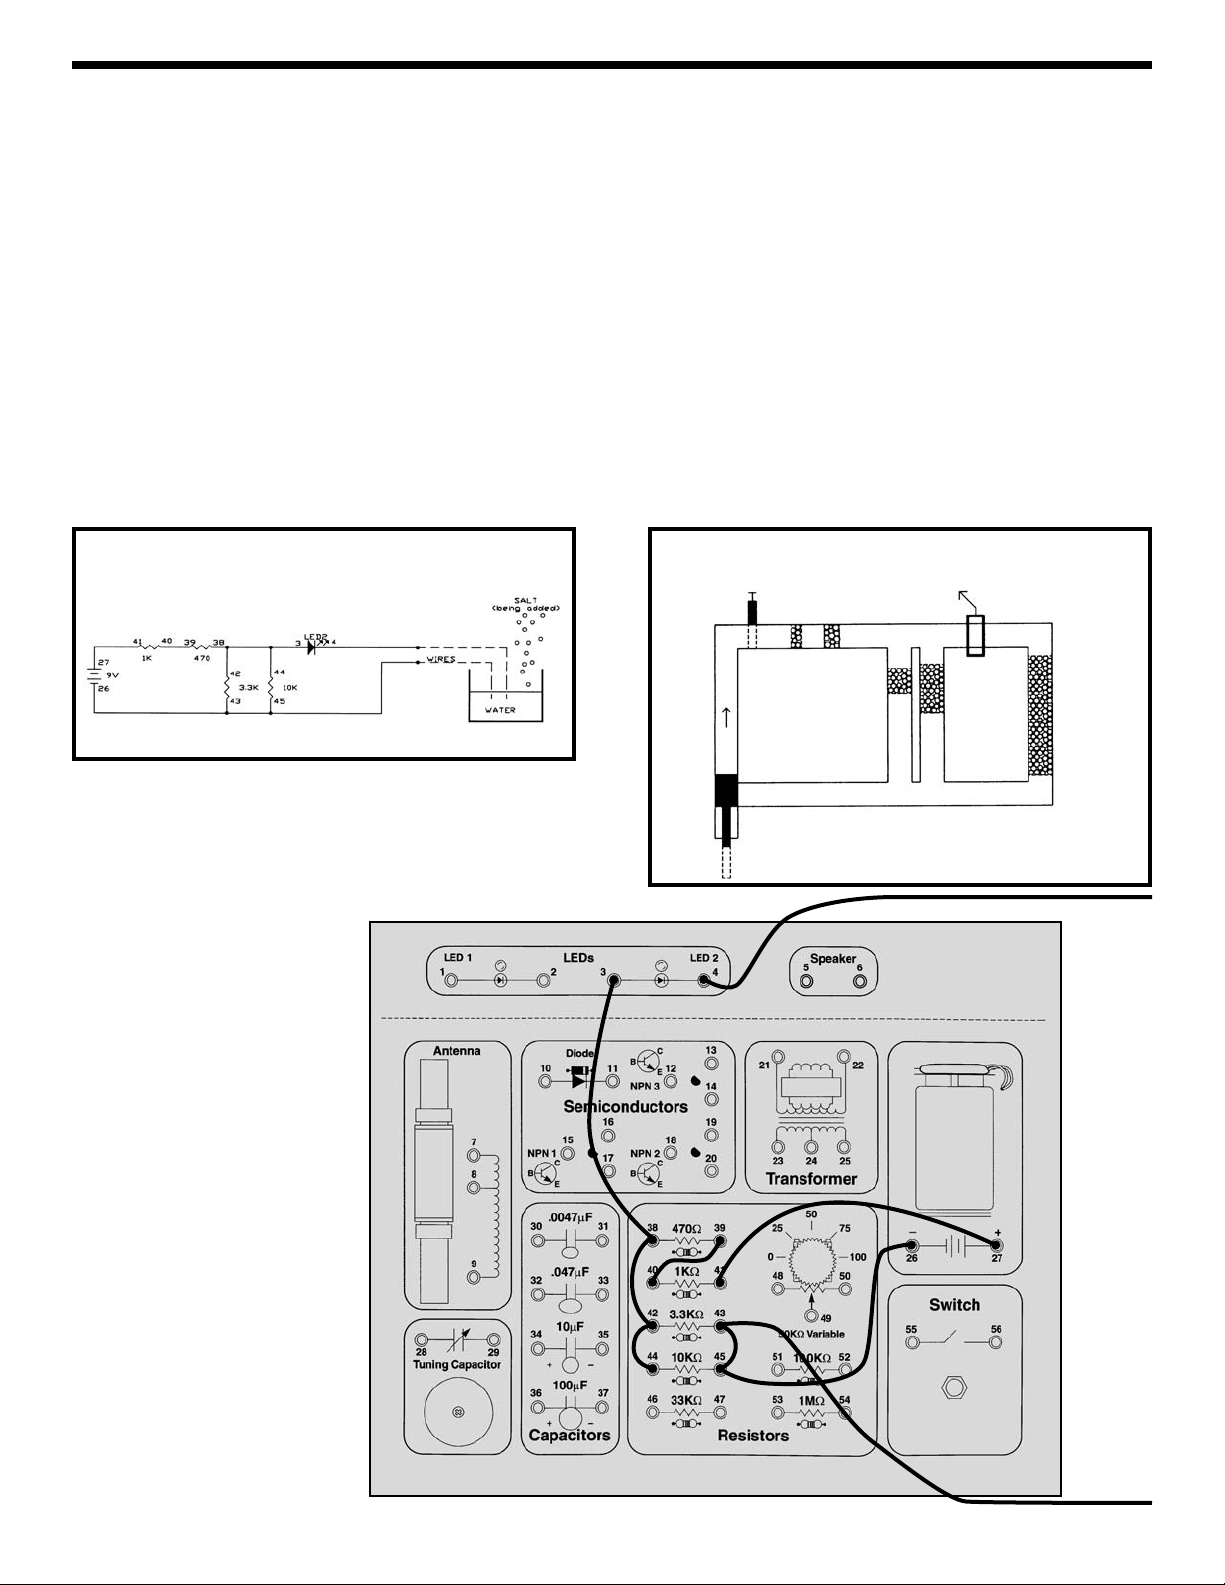
EXPERIMENT #6: Water Detector
Wiring Checklist:
o 27-to-41
o 40-to-39
o 44-to-42-to-38-to-3
o 4-to-unconnected
(use a long wire)
o 26-to-45-to-43-to-
unconnected
(the unconnected
wire should be long)
Water Diagram
On/Off
Valve
Rocks
and
Paintballs
Rocks
Pump
Schematic
Rocks
Rocks
Water
Meter
-16-
Long
Wire to
Wate r
Long
Wire to
Wate r
Page 17
-17-
Capacitors: Capacitors are electrical components that
can store electrical pressure (voltage) for periods of time.
When a capacitor has a difference in voltage (electrical
pressure) across it, it is said to be charged. A capacitor
is charged by having a one-way current flow through it for
a short period of time. It can be discharged by letting a
current flow in the opposite direction out of the capacitor.
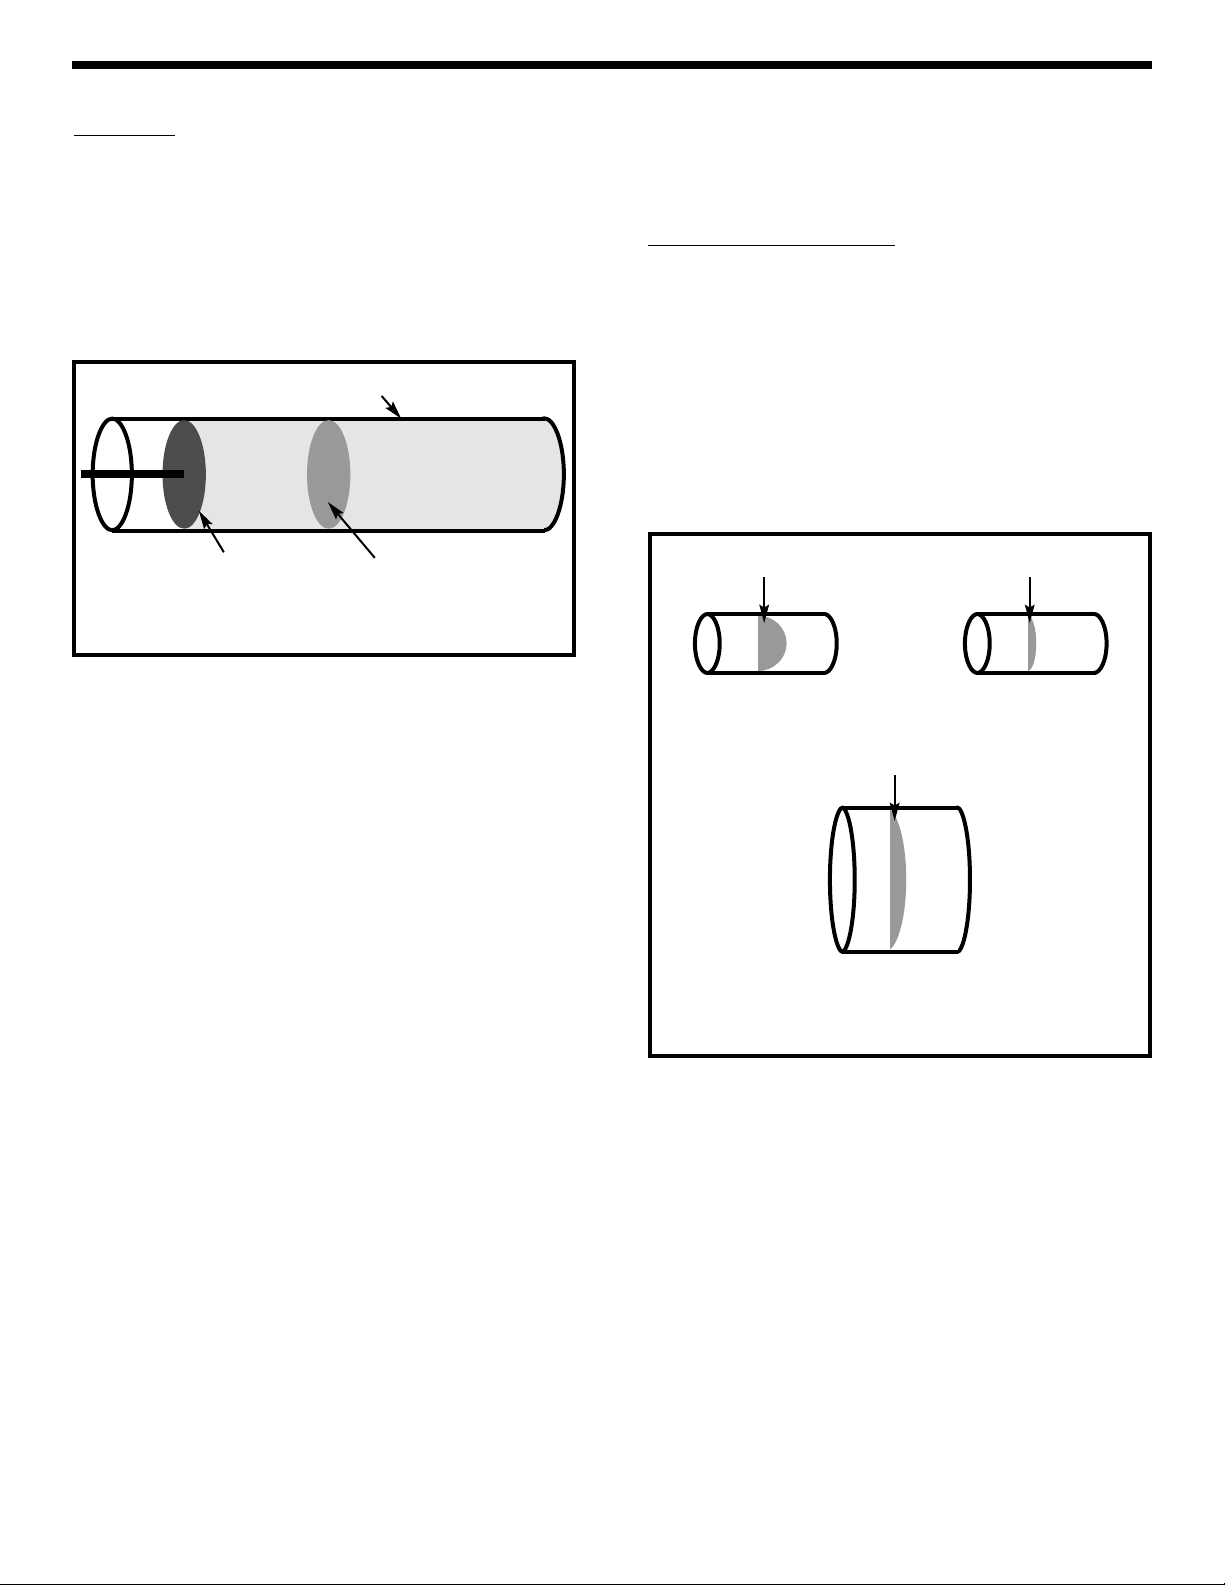
In the water pipe analogy, you may think of the capacitor
as a water pipe that has a strong rubber diaphragm
sealing off each side of the pipe as shown below:
If the pipe had a plunger on one end (or a pump
elsewhere in the piping circuit), as shown above, and the
plunger was pushed toward the diaphragm, the water in
the pipe would force the rubber to stretch out until the
force of the rubber pushing back on the water was equal
to the force of the plunger. You could say the pipe is
charged and ready to push the plunger back. In fact if the
plunger is released it will move back to its original
position. The pipe will then be discharged or with no
pressure on the diaphragm.
Capacitors act the same as the pipe just described.
When a voltage (electrical pressure) is placed on one
side with respect to the other, electrical charge “piles up”
on one side of the capacitor (on the capacitor “plates”)
until the voltage pushing back equals the voltage applied.
The capacitor is then charged to that voltage. If the
charging voltage was then decreased the capacitor
would discharge. If both sides of the capacitor were
connected together with a wire then the capacitor would
rapidly discharge and the voltage across it would become
zero (no charge).
What would happen if the plunger in the drawing above
was wiggled in and out many times each second? The
water in the pipe would be pushed by the diaphragm and
then sucked back by the diaphragm. Since the
movement of the water (current) is back and forth
(alternating) it is called an alternating current or AC.
The capacitor will therefore pass an alternating current
with little resistance. When the push on the plunger was
only toward the diaphragm, the water on the other side of
the diaphragm moved just enough to charge the pipe (a
transient or temporary current). Just as the pipe blocked
a direct push, a capacitor blocks a direct current (DC).
Current from a battery is an example of direct current. An
example of alternating current is the 60 cycle (60 wiggles
per second) current from the electrical outlets in the walls
of your house.
Construction of Capacitors:
If the rubber diaphragm is
made very soft it will stretch out and hold a lot of water
but will break easily (large capacitance but low working
voltage). If the rubber is made very stiff it will not stretch
far but will be able to withstand higher pressure (low
capacitance but high working voltage). By making the
pipe larger and keeping the rubber stiff we can achieve a
device that holds a lot of water and withstands high
pressure (high capacitance, high working voltage, large
size). So the pipe size is determined by its capacity to
hold water and the amount of pressure it can handle.
These three types of water pipes are shown below:
INTRODUCTION TO CAPACITORS
Pipe Filled with Water
Rubber Diaphragm
Sealing Center of Pipe
Plunger
A Rubber Diaphragm in a Pipe is Like a Capacitor
Soft Rubber
Types of Water Pipes
Stiff Rubber
Stiff Rubber
Large Capacity
Low Pressure
Low Capacity
but can withstand
High Pressure
High Capacity and can withstand High Pressure
Page 18
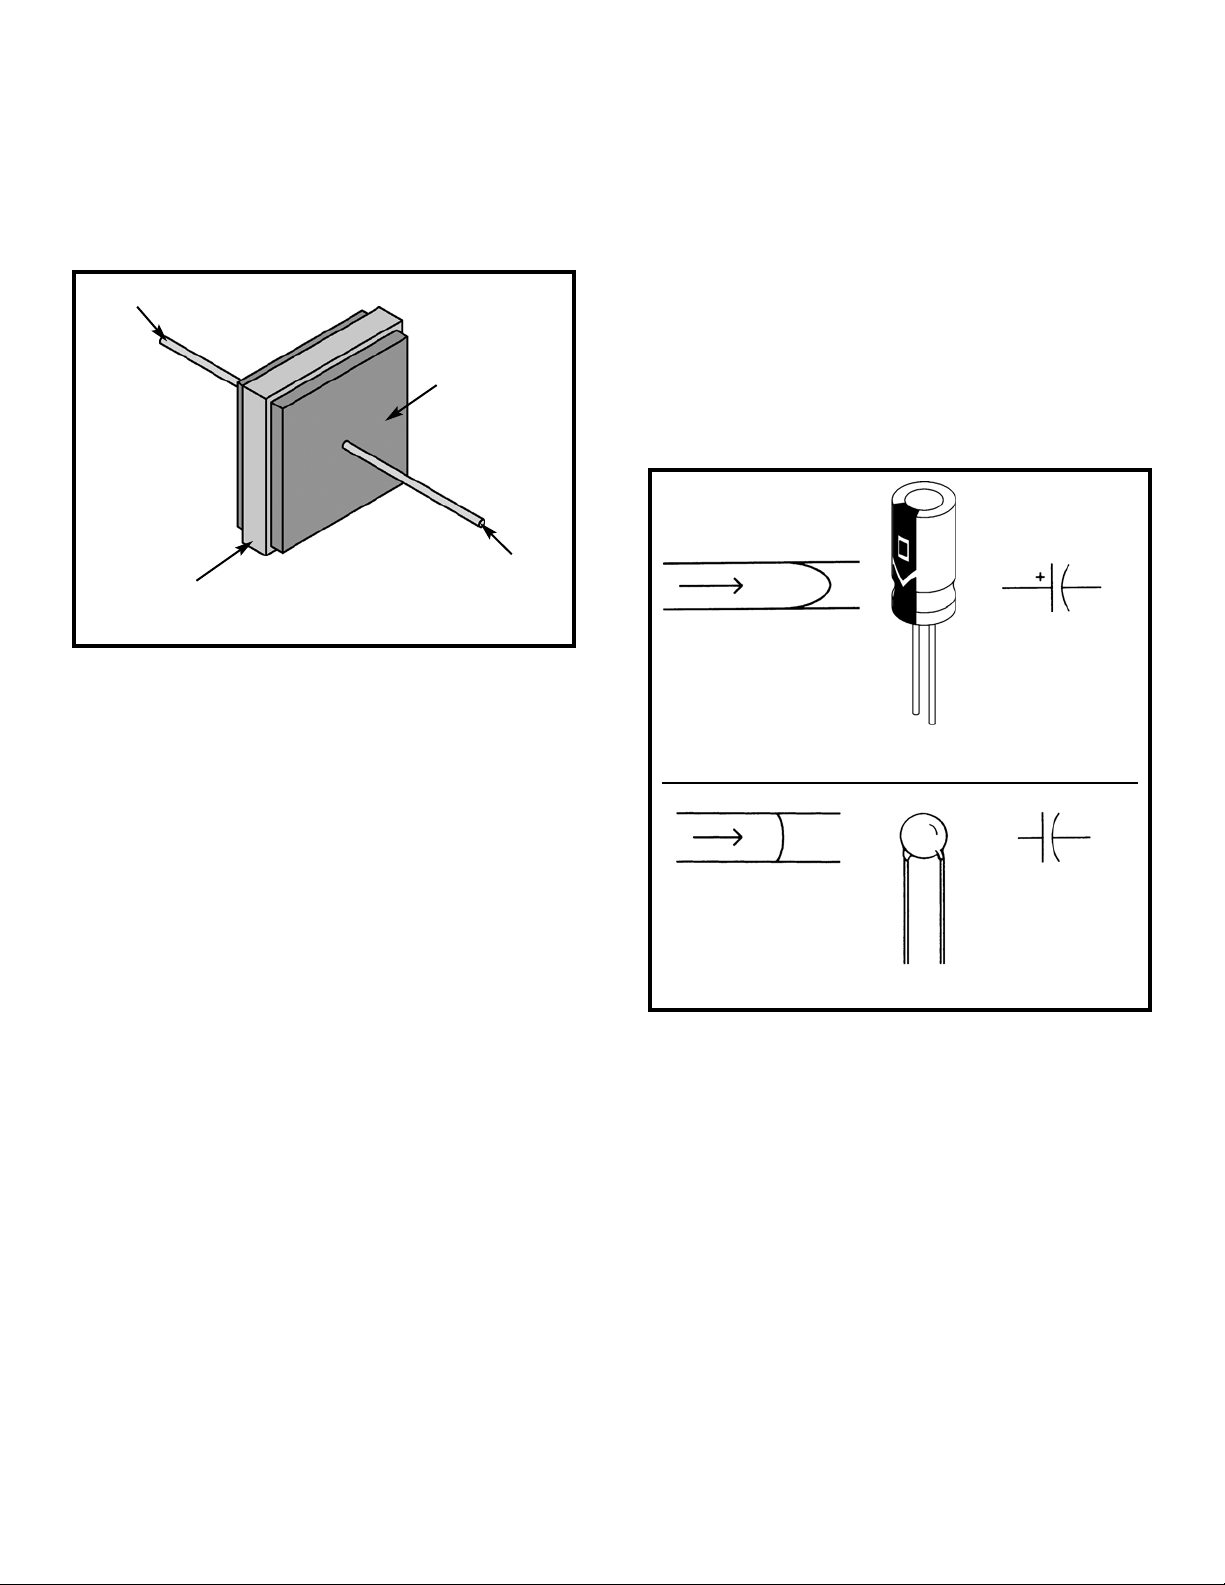
Similarly, capacitors are described by their capacity for
holding electric charge, called their Capacitance, and
their ability to withstand electric pressure (voltage)
without damage. Although there are many different types
of capacitors made using many different materials, their
basic construction is the same. The wires (leads)
connect to two or more metal plates that are separated
by high resistance materials called dielectrics.
The dielectric is the material that holds the electric
charge (pressure), just like the rubber diaphragm holds
the water pressure. Some dielectrics may be thought of
as stiff rubber, and some as soft rubber. The capacitance
and working voltage of the capacitor is controlled by
varying the number and size of metal-dielectric layers,
the thickness of the dielectric layers, and the type of
dielectric material used.
Capacitance is expressed in farads (F, named after
Michael Faraday whose work in electromagnetic
induction led to the development of today’s electric
motors and generators), or more commonly in
microfarads (μF, millionths of a farad) or picofarads (pF,
millionths of a microfarad). Almost all capacitors used in
electronics vary from 1pF to 1000μF.
Your Electronic Playground includes two electrolytic
(10μF and 100μF) and two disc (.0047μF and .047μF)
capacitors. (Mylar capacitors may have been substituted
for the disc ones, their construction and performance is
similar). Electrolytic capacitors (usually referred to as
lytics) are high capacitance and are used mostly in power
supply or low frequency circuits. Their capacitance and
voltage are usually clearly marked on them. Note that
these parts have “+” and “–” polarity (orientation)
markings, the lead marked “+” should always be
connected to a higher voltage than the “–” lead (all of your
Wiring Checklists account for this). Disc capacitors are
low capacitance and are used mostly in radio or high
frequency applications. They don’t have voltage or
polarity markings (they can be hooked up either way).
Capacitors have symbols as follows:
-18-
Construction of a Capacitor
Lead 1
Dielectric
Metal Plate
Lead 2
Soft Diaphragm Symbol for
Electrolytic
Capacitor
(–) (+)
Electrolytic Capacitor
Disc Capacitor
Stiff Diaphragm Symbol for
Disc
Capacitor
Page 19
-19-
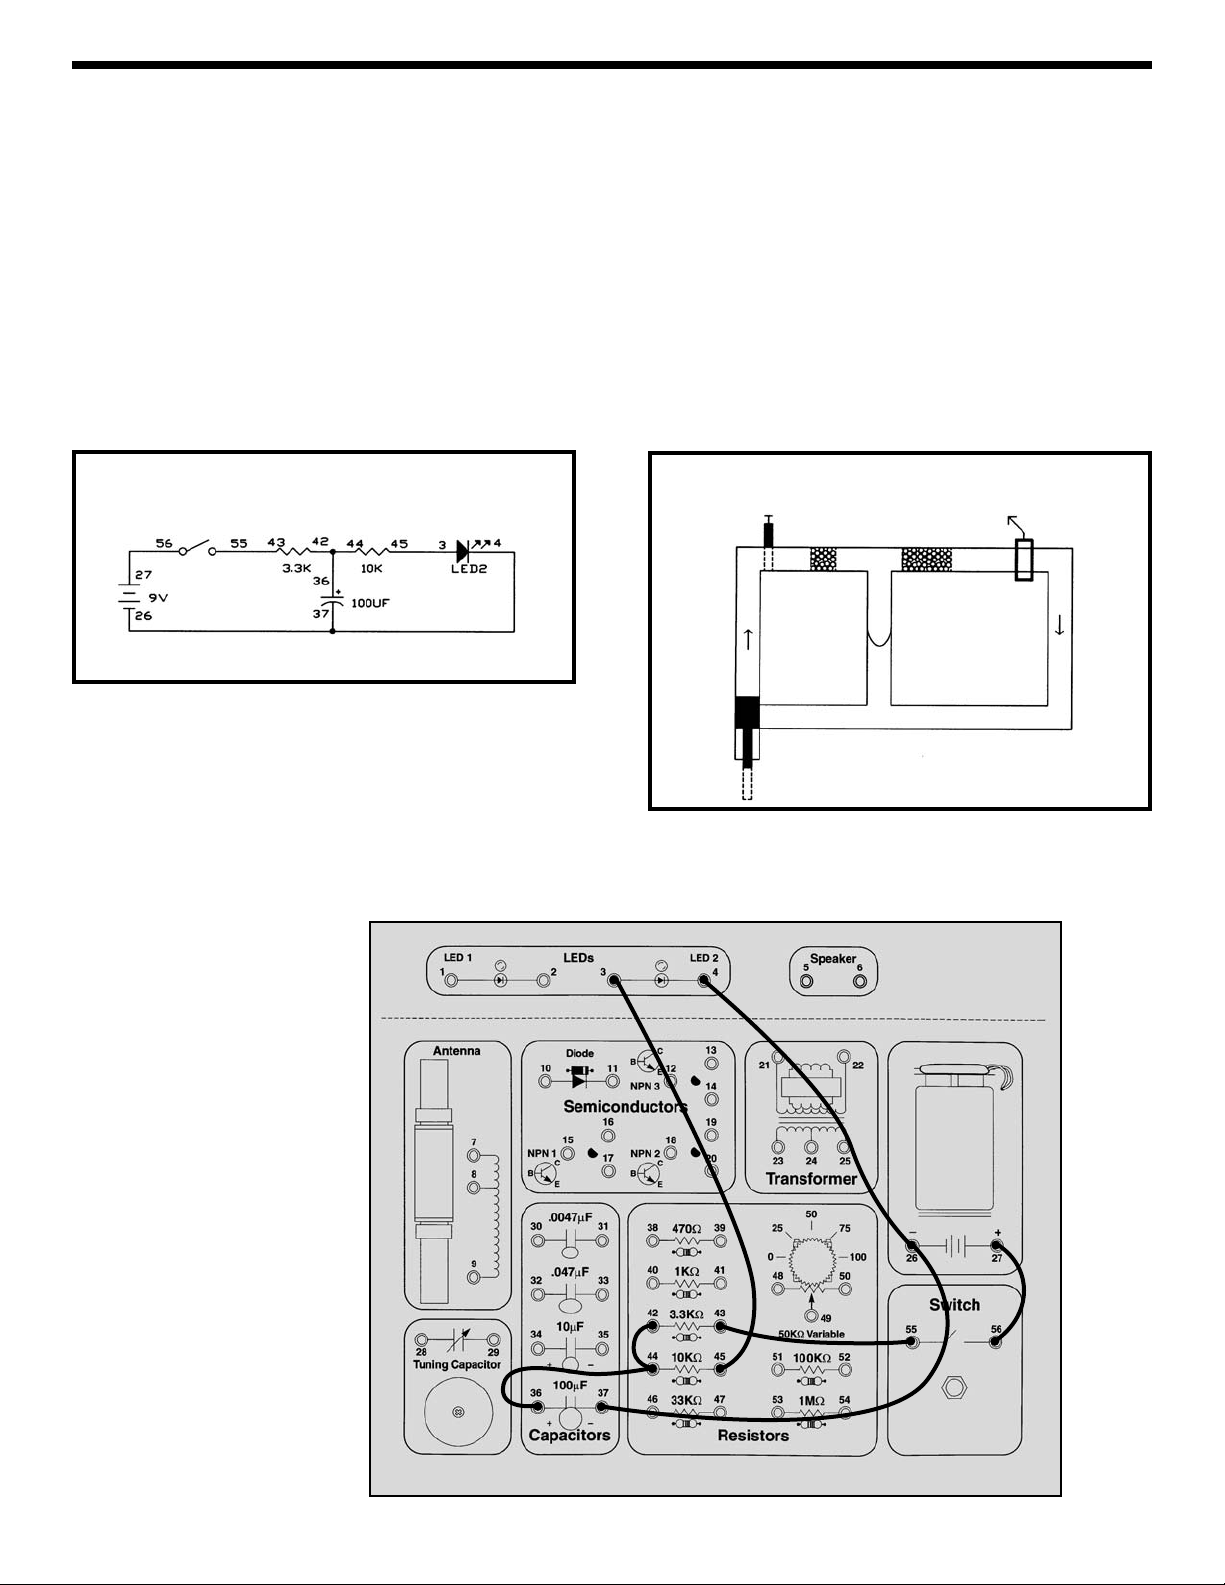
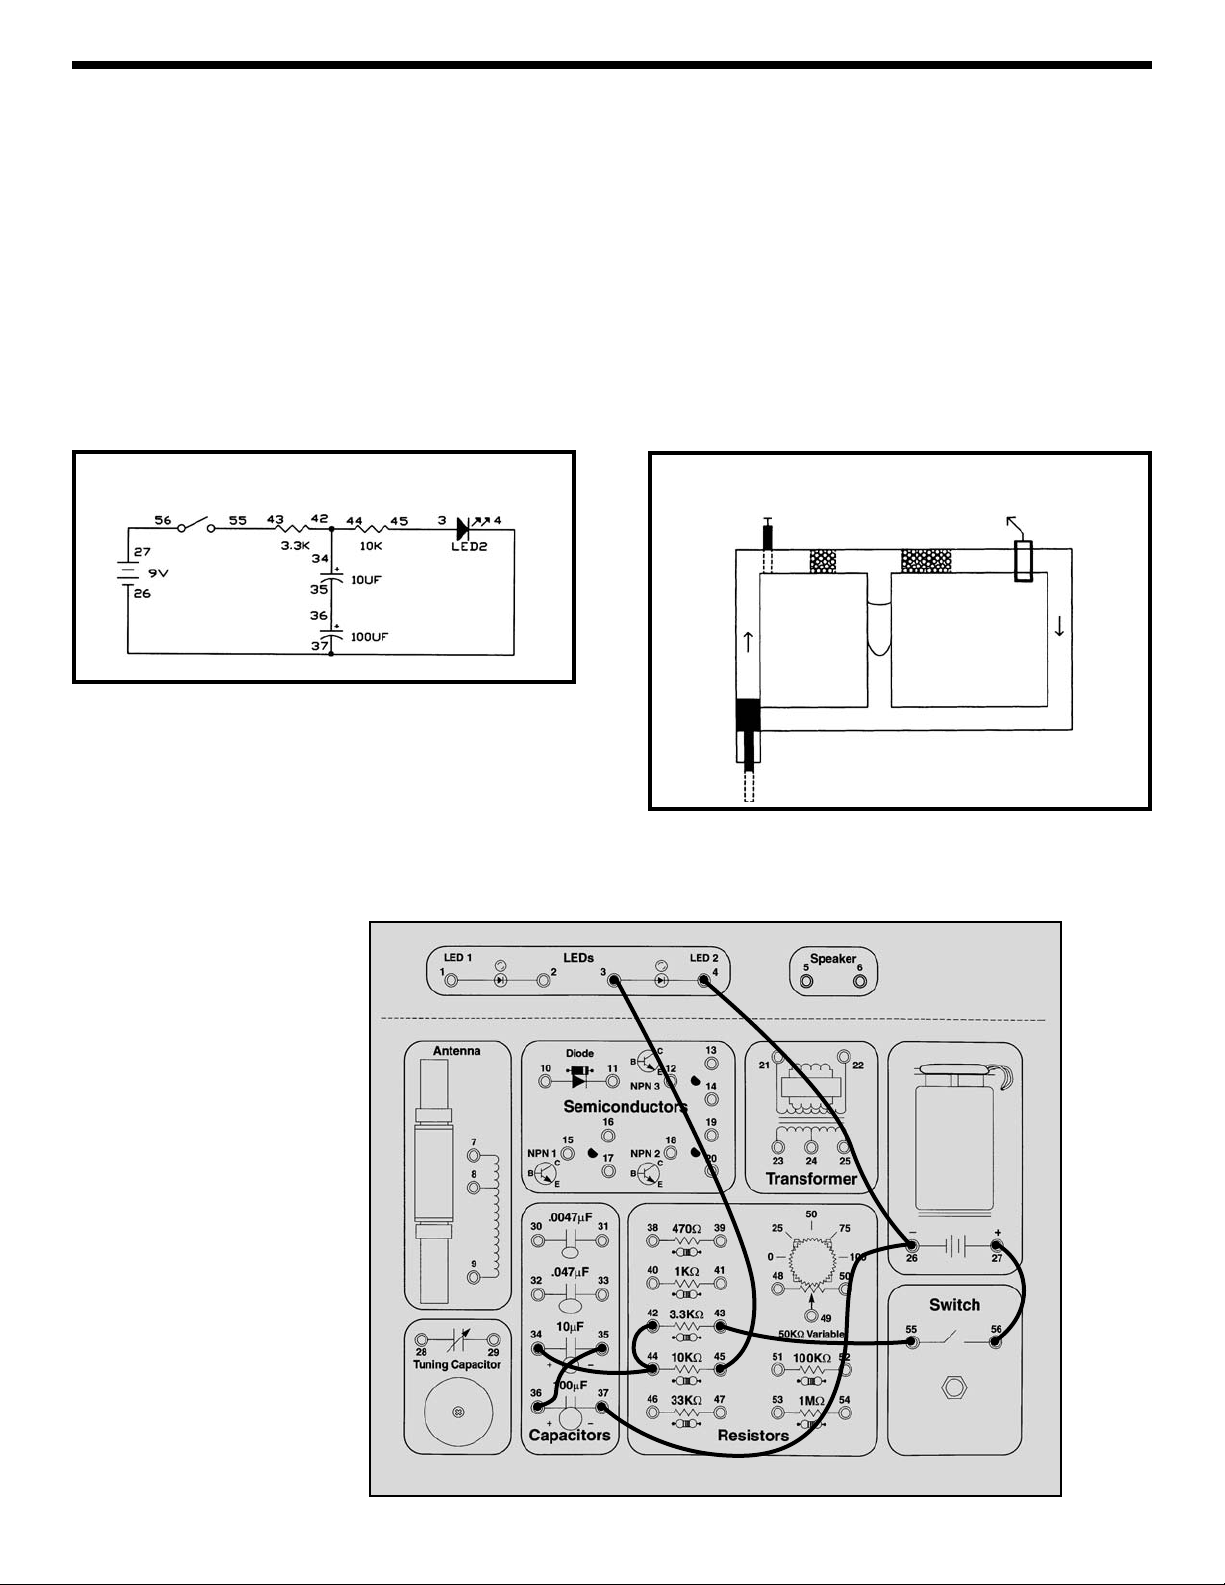
Connect the wires according to the Wiring Checklist and
press the switch several times. You can see it takes time
to charge and discharge the large capacitor because the
LED lights up and goes dim slowly. Replace the 3.3KΩ
resistor with the 1KΩ resistor; now the charge time is
faster but the discharge time is the same. Do you know
why? When the switch is closed the battery charges the
capacitor through the 1KΩ resistor and when the switch
is opened the capacitor discharges through the 10KΩ,
which has remained the same. Now replace the 100μF
capacitor with the 10μF. Both the charge and discharge
times are now faster since there is less capacitance to
charge up. If you like you may experiment with different
resistors in place of the 1KΩ and 10KΩ. If you observe
the LED carefully, you might start to suspect the
relationship between the component values and the
charging and discharging times - the charge/discharge
times are proportional to both the capacitance and
the resistance in the charge/discharge path!
A simple circuit like this is used to slowly light or darken
a room, such as a movie theater.
EXPERIMENT #7: Slow Light Bulb
Wiring Checklist:
o 27-to-56
o 55-to-43
o 36-to-44-to-42
o 45-to-3
o 37-to-26-to-4
Water Diagram
On/Off
Valve
Rubber
Diaphragm
Rocks
Pump
Schematic
Rocks
Water
Meter
Page 20
-20-
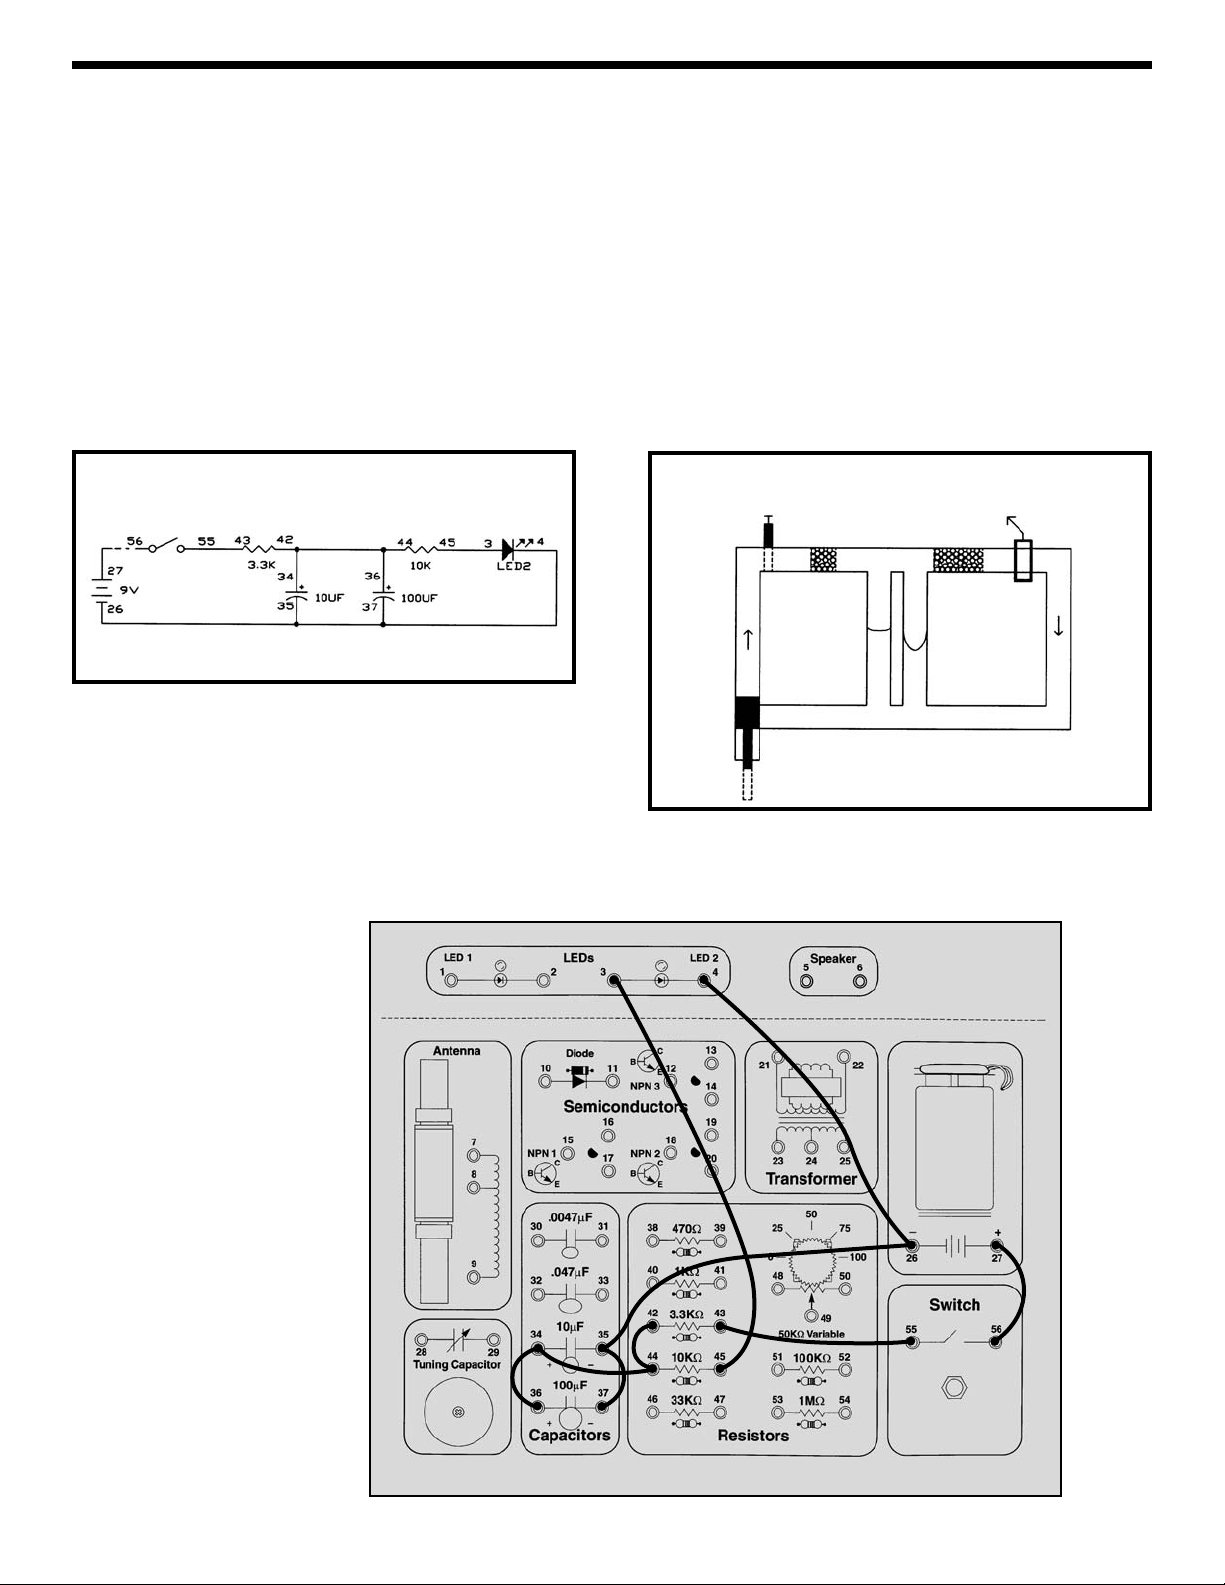
Take a look at the schematic, it is almost the same circuit
as the last experiment except that now there are two
capacitors in series. What do you think will happen?
Connect the wires according to the Wiring Checklist and
press the switch several times to see if you are right.
Looking at the water diagram and the name of this
experiment should have made it clear - the smaller 10μF
will dominate (control) the response since it will take less
time to charge up. As with resistors, you could change
the order of the two capacitors and would still get the
same results (try this if you like). Notice that while
resistors in series add together to make a larger circuit
resistance, capacitors in series combine to make a
smaller circuit capacitance. Actually, capacitors in series
combine the same way resistors in parallel combine
(using the same mathematical relationship given in
Experiment 4). For this experiment, 10μF and 100μF in
series perform the same as a single 9.1μF.
In terms of our water pipe analogy, you could think of
capacitors in series as adding together the stiffness of
their rubber diaphragms.
EXPERIMENT #8: Small Dominates Large - Capacitors in Series
Wiring Checklist:
o 27-to-56
o 55-to-43
o 34-to-44-to-42
o 45-to-3
o 37-to-26-to-4
o 35-to-36
Water Diagram
On/Off
Valve
Rubber
Diaphragms
Rocks
Pump
Schematic
Rocks
Water
Meter
Page 21
-21-
Now you have capacitors in parallel, and you can
probably predict what will happen. If not, just think about
the last experiment and about how resistors in parallel
combine, or think in terms of the water diagram again.
Connect the wires according to the Wiring Checklist and
press the switch several times to see.
Capacitors in parallel add together just like resistors in
series, so here 10μF + 100μF = 110μF total circuit
capacitance. In the water diagram, we are stretching
both rubber diaphragms at the same time so it will take
longer than to stretch either one by itself. If you like you
may experiment with different resistor values as you did
in experiment #7. Although you do have two disc
capacitors and a variable capacitor (which will be
discussed later) there is no point in experimenting with
them now, their capacitance values are so small that they
would act as an open switch in any of the circuits
discussed so far.
EXPERIMENT #9: Large Dominates Small - Capacitors in Parallel
Wiring Checklist:
o 27-to-56
o 55-to-43
o 36-to-34-to-44-to-42
o 45-to-3
o 37-to-35-to-26-to-4
Water Diagram
On/Off
Valve
Rubber
Diaphragms
Rocks
Pump
Schematic
Rocks
Water
Meter
Page 22
-22-
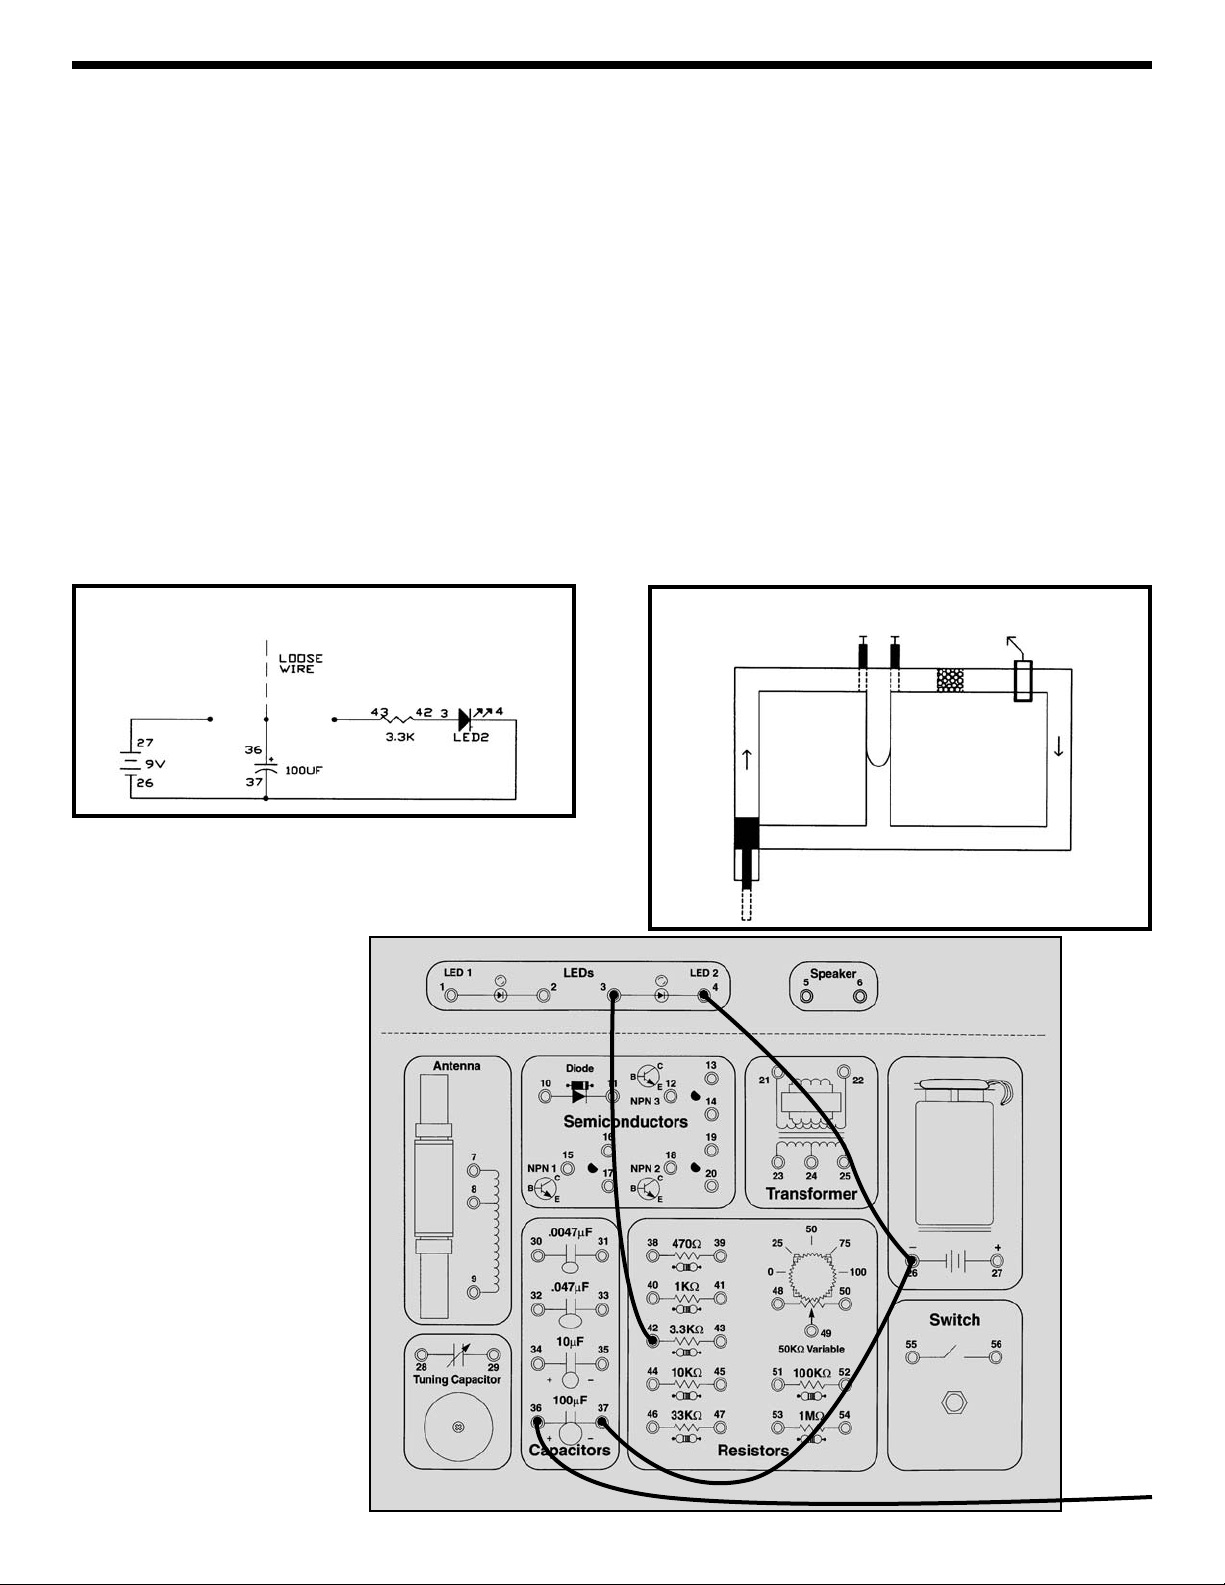
Connect the wires according to the Wiring Checklist,
noting that there is no switch and a long wire with one
end connected to the 100μF capacitor and the other end
unconnected. At this time no current will flow because
nothing is connected to the battery. Now hold the loose
wire and touch it to battery spring 27 and then remove it,
the battery will instantly charge the capacitor since there
is no resistance (actually there is some internal
resistance in the battery and some in the wires but these
are very small). The capacitor is now charged and is
storing the electricity it received from the battery. It will
remain charged as long as the loose wire is kept away
from any metal. Now touch the loose wire to spring 43 on
the 3.3KΩ resistor and watch the LED. It will initially be
very bright but diminishes quickly as the capacitor
discharges. Repeat charging and discharging the
capacitor several times. You can also discharge the
100μF in small bursts by only briefly touching the 3.3KΩ.
If you like you can experiment with using different values
in place of the 3.3KΩ; lower values will make the LED
brighter but it will dim faster while with higher resistor
values the LED won’t be as bright but it will stay on
longer. You can also put a resistor in series with the
battery when you charge the capacitor, then it will take
time to fully charge the capacitor. What do you think
would happen if you used a smaller capacitor value?
When the capacitor is charged up it is storing electricity
which could be used elsewhere at a later time - it is like a
battery! However, an electrolytic capacitor is not a very
efficient battery. Storing electric charge between the
plates of a capacitor uses much more space than storing
the same amount of charge chemically within a battery compare how long the 100μF lit the LED above with how
your 9V battery runs all of your experiments!
Now is a good time to take notes for yourself on how
capacitors work, since next we introduce the diode.
EXPERIMENT #10: Make Your Own Battery
Wiring Checklist:
o 37-to-26-to-4
o 42-to-3
o 36-to-unconnected
(use a long wire)
Water Diagram
At least one valve
is always closed.
Rubber
Diaphragm
Rocks
Pump
Schematic
Water
Meter
Loose
Wire
Page 23
1. __________ are the particles that flow between atoms
as part of an electric current.
2. A __________ circuit occurs when wires or
components from different parts of the circuit
accidentally connect.
3. A __________ produces electricity using a chemical
reaction.
4. To decrease the current in a circuit you may decrease
the voltage or __________ the resistance.
5. Materials which have very high resistance are called
__________ and materials which have very low
resistance are called __________.
6. Adding resistors in parallel __________ the
resistance while adding resistors in series _________
the resistance.
7. The electrical resistance of water __________ when
salt is dissolved in it.
8. Capacitors are components that can store
__________ for periods of time.
9. Capacitors have low resistance to __________
current and high resistance to __________ current.
10. Adding capacitors in parallel __________ the
capacitance while adding capacitors in series
__________ the capacitance.
(Answers are on page 5).
TEST YOUR KNOWLEDGE #1
-23-
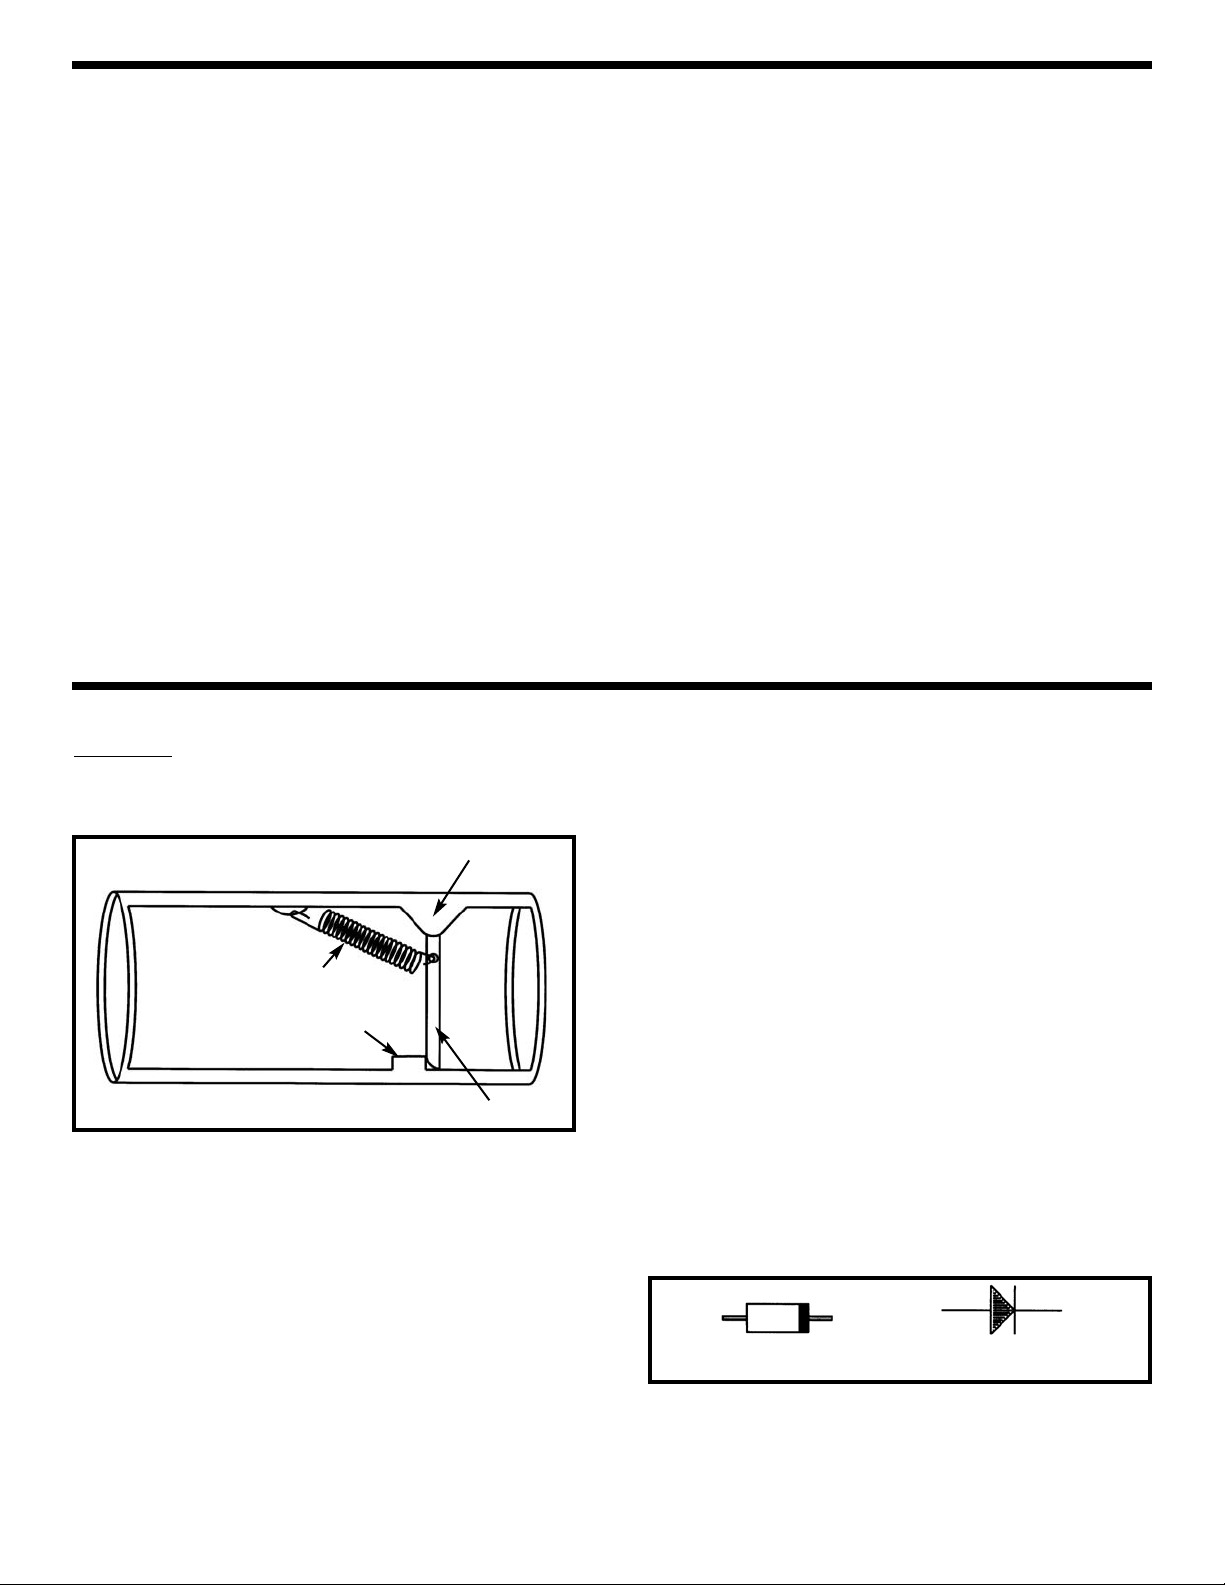
The Diode:
The diode is an electronic device that allows
current to flow in only one direction. In our water pipe
analogy it may be thought of as the check valve shown
here:
The check valve only allows water to flow in one direction,
to the right in this drawing. There is a small spring and if
the water pressure exceeds a certain level then the
spring will be stretched and the valve opened. If the
pressure is to flow to the left then the plate will be
pressed against the solid stop and no water will flow.
Electronic diodes are made from materials called
semiconductors, so-called because they have more
resistance than metal conductors but less than
insulators. Most semiconductors are made of Silicon but
Gallium Arsenide and Germanium are also used. Their
key advantage is that by using special manufacturing
processes their resistance is decreased under certain
operating conditions. The manufacturing processes
create two regions of permanent electrical charge, quite
different from charging a capacitor. While the physics of
how this works is quite complicated, the effect is that
once the voltage across the diode exceeds a small turnon level (0.7V for Silicon) the resistance of the diode
becomes very low in one direction (so low in fact that the
current flow must be limited by other resistances in the
circuit to prevent damage to the diode). When the diode
is turned on like this we refer to it as being forward-
biased. In the other direction the diode is always a very
high resistance, we call this reverse-biased. The
schematic symbol, shown below, indicates that the diode
will allow current to flow from left to right but block current
flow from right to left.
INTRODUCTION TO DIODES
Spring
Solid Stop
Movable Plate
Water-tight Pivot
Diode Symbol for Diode
Page 24
-24-
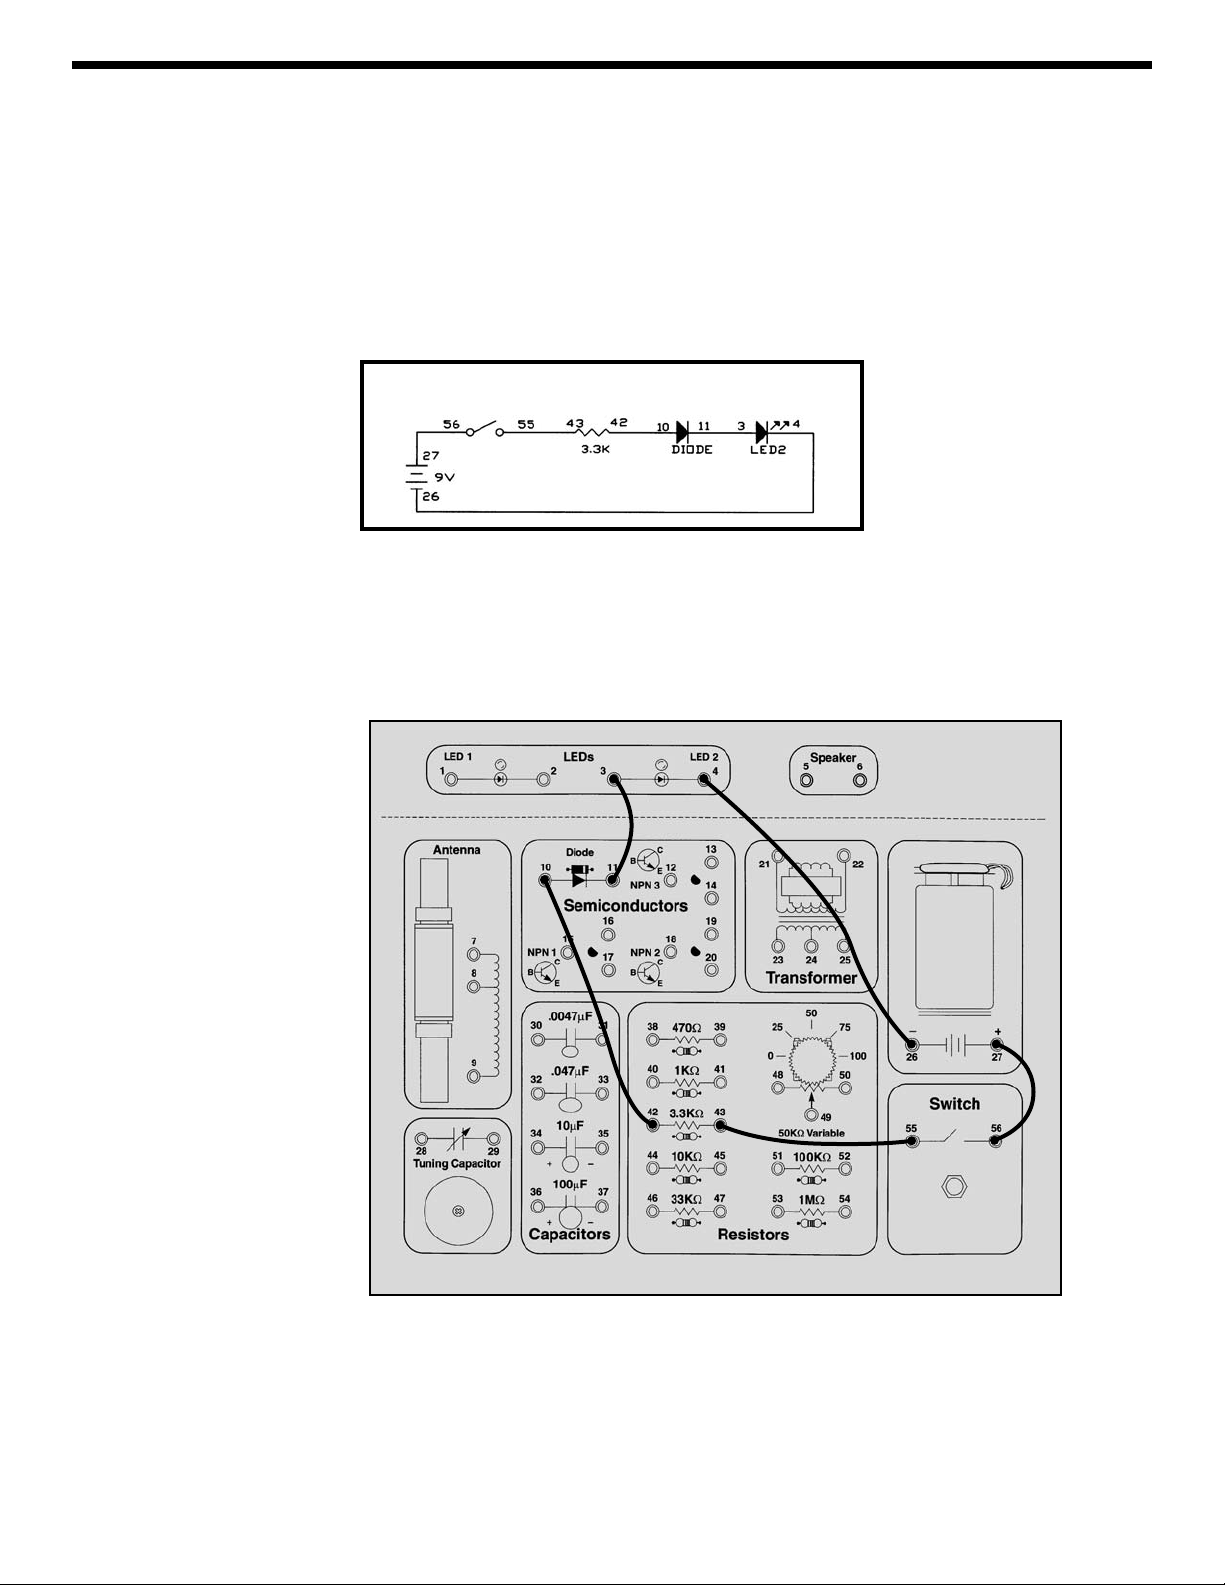
Connect the wires according to the Wiring Checklist and
press the switch, the LED lights up. The diode’s turn-on
voltage of 0.7V is easily exceeded and the diode has little
effect on the circuit. Now reverse the wires to the diode
and try again, nothing happens. The diode is now
reverse-biased and blocks current flow through the
circuit, just like the plate and solid stop block the water
flow in the drawing shown above.
You’ve probably noticed a similarity between the
schematic symbols for the diode and the LED. Re-wire
the diode back to forward-biased or remove it from the
circuit and then reverse the wires to the LED. Press the
switch and LED doesn’t light, do you know why?
Starting now, the equivalent water diagrams will no
longer be presented.
EXPERIMENT #11: One-way Current
Wiring Checklist:
o 27-to-56
o 55-to-43
o 42-to-10
o 11-to-3
o 4-to-26
Schematic
Page 25

-25-
Diodes made of Gallium Arsenide need a higher voltage
across them to turn on, usually about 1.5V This turn-on
energy is so high that light is generated when current
flows through the diode. These diodes are the light
emitting diodes that you have been using.
To demonstrate this, connect the wires according to the
Wiring Checklist. Touch the loose wire to the battery and
watch LED1. It will be bright initially as a current flows to
charge up the 100μF capacitor and then will dim as the
capacitor voltage reaches the battery voltage. LED2 will
not light since it is reverse-biased. Then touch the loose
wire to the negative side of the battery (“ground”) and
watch LED2. It will be bright initially as a current flows to
discharge the 100μF capacitor and then will dim as the
capacitor voltage drops to zero. LED1 will not light since
now it is reverse-biased.
As in Experiment #10, you may try different resistor
values in this circuit if you like.
EXPERIMENT #12: One-way Lightbulbs
Wiring Checklist:
o 37-to-42
o 43-to-1-to-4
o 2-to-3-to-26
o 36-to-unconnected
(use a long wire)
Schematic
Loose Wire
Page 26

The Transistor: The transistor was first developed in
1949 at Bell Telephone Laboratories, the name being
derived from “transfer resistor”. It has since transformed
the world. Did you ever hear of something called a
vacuum tube? They are large and can be found in old
electronic equipment and in museums. They are seldom
used today and few engineers even study them now.
They were replaced by transistors, which are much
smaller and more reliable.
The transistor is best described as a current amplifier - it
uses a small amount of current to control a large amount
of current. There are many different families of transistors
but we will only discuss the type included in your
Electronic Playground, called the NPN Bipolar Junction
Transistor or BJT and made of the semiconductor silicon.
It has three connection points, called the emitter, base,
and collector.
In our water pipe analogy the BJT may be thought of as
the lever pivot shown here:
Notice that it includes a check valve that is connected to
a lever arm. A small amount of “base current” pushes on
the check valve which turns and opens the lever arm. But
before this base current can start to flow though it must
have enough water pressure to overcome the spring in
the check valve (usually 0.7V). If the base pipe is much
smaller than the collector and emitter pipes, then a small
base current I
B
flowing in will cause a large collector
current I
C
to flow in, these will combine and exit the
device as emitter current I
E
.
In transistors the emitter, base, and collector are different
regions of permanent electrical charge, producing the
effects described above for the lever pivot. The
properties and uses of transistors may seem confusing at
first but will become clear as you proceed through the
experiments. All but one of the remaining experiments
will use the transistor, so its importance to electronics
should be apparent.
A key advantage of semiconductors is that several
transistors can be manufactured on a single piece of
silicon. This led to the development of Integrated Circuit
(IC) technology, in which careful control of complex
manufacturing processes has enabled entire circuits
consisting of transistors, diodes, resistors, and capacitors
to be constructed on a silicon base. Some ICs used in
computers now have more than a million transistors on
them. Spectacular improvements in cost, size, and
reliability have been achieved as a result.
The schematic symbol for a transistor is shown below:
Note the small arrow in the emitter, this indicates which
direction the current will flow through the device.
INTRODUCTION TO TRANSISTORS
-26-
Transistor
Symbol for
NPN Transistor
Emitter
Collector
Base
EBC
Page 27

-27-
Connect the wires according to the Wiring Checklist.
Although there is a closed circuit with the battery, 1KΩ,
LED, and transistor, no current will flow since the
transistor is acting like an open circuit (with no base
current the lever arm remains shut). Press the switch; a
base current now flows and opens the lever arm,
resulting in a large collector current which lights the LED.
The transistor is being used as an electronic switch.
Although there is still a normal switch in this circuit, there
could be many electronic switches controlled by one
normal switch.
EXPERIMENT #13: The Electronic Switch
Wiring Checklist:
o 41-to-27-to-56
o 55-to-45
o 44-to-15
o 17-to-26
o 40-to-1
o 2-to-16
Schematic
Page 28

-28-
Connect the wires according to the Wiring Checklist and
press the switch. LED 1 in the collector path is brighter
than LED 2 in the base path because the base current is
amplified by the transistor. The current gain of a
transistor varies anywhere from 10 to 1000 depending on
the type of transistor, the ones in your Electronic
Playground have a gain of about 200.
Note that the battery voltage and circuit resistance will
limit the current gain. For example, if you replace the
1KΩ in this circuit with a 33KΩ then the current gain will
only be about 3. The circuit resistances, not transistor
itself, are limiting the current and the transistor is said to
be saturated.
EXPERIMENT #14: The Current Amplifier
Wiring Checklist:
o 27-to-56
o 52-to-55-to-41
o 40-to-1
o 2-to-16
o 17-to-26
o 15-to-4
o 3-to-51
Schematic
Page 29

-29-
Look again at the water pipe analogy for the transistor,
the lever pivot:
What would happen if the base and collector were
connected together? Once there is enough pressure to
overcome the spring in check valve DE (0.7V) there
would be only slight resistance and no current gain. This
situation should sound familiar since this is exactly how a
diode operates. When the base and collector of a
transistor are connected together the transistor becomes
a diode.
Connect the wires according to the Wiring Checklist and
press the switch, the LED lights. This is the same circuit
as Experiment 11, One-Way Current. This demonstrates
how transistors can be substituted for diodes, and this will
occur in practice sometimes for manufacturing reasons.
EXPERIMENT #15: The Substitute
Wiring Checklist:
o 27-to-56
o 55-to-16-to-15
o 17-to-42
o 43-to-3
o 4-to-26
Schematic
Page 30

-30-
Connect the wires according to the Wiring Checklist and
press the switch while turning the variable resistor from
right to left (from 0Ω to 50KΩ). The 100KΩ and variable
50KΩ are a voltage divider that sets the voltage at the
transistor base. If this voltage is less than 0.7V then the
transistor will be off and no current will flow through the
LED. As the base voltage increases above 0.7V a small
base current starts to flow, which is amplified to produce
a larger collector current that lights the LED. As the base
voltage continues to increase the transistor becomes
saturated and the LED brightness will not increase
further.
This circuit will normally be used with the voltage divider
set so that the transistor is turned on but is not saturated.
Although this circuit does not have many applications by
itself, when a small alternating current (AC) signal is
applied to the base then a larger copy of the signal will
appear at the collector - a small-signal amplifier!
EXPERIMENT #16: Standard Transistor Biasing Circuit
Wiring Checklist:
o 27-to-56
o 55-to-52-to-43
o 42-to-3
o 4-to-19
o 18-to-48-to-51
o 20-to-40
o 41-to-49-to-26
Schematic
Page 31

-31-
Connect the wires according to the Wiring Checklist and
press the switch, hold it down for several seconds. The
LED will slowly light up. Release the switch and the LED
will slowly go dark.
When you first press the switch all of the current flowing
through the 100KΩ resistor goes to charge up the
capacitor, the transistor and LED will be off. When the
capacitor voltage rises to 0.7V the transistor will first turn
on and the LED will turn on. As the capacitor voltage
continues to rise the current flow through the 470Ω
resistor and into the transistor base will increase. The
current through the LED will then rise rapidly due to the
transistor’s current gain.
When the switch is released the capacitor will discharge
through the 470Ω resistor and the transistor base, the
LED will dim as this discharge current decreases. When
the capacitor voltage drops below 0.7V the transistor will
turn off. If you get impatient you may touch a wire
between the two capacitor springs to discharge it
instantly.
Do you know how to change the capacitor charge and
discharge times? The 100KΩ resistor controls the
charge time, the 470Ω controls the discharge, and the
capacitor controls both the charge and discharge.
Replace these parts with some different values and
observe the effects.
Compare this circuit to the one you used in Experiment 7
when we first introduced the capacitor. By adding a
transistor you can use a large resistor for a slow charge
time and still have a bright LED!
EXPERIMENT #17: Very Slow Light Bulb
Wiring Checklist:
o 43-to-27-to-56
o 55-to-52
o 36-to-51-to-39
o 38-to-18
o 42-to-3
o 4-to-19
o 20-to-26-to-37
Schematic
Page 32
-32-
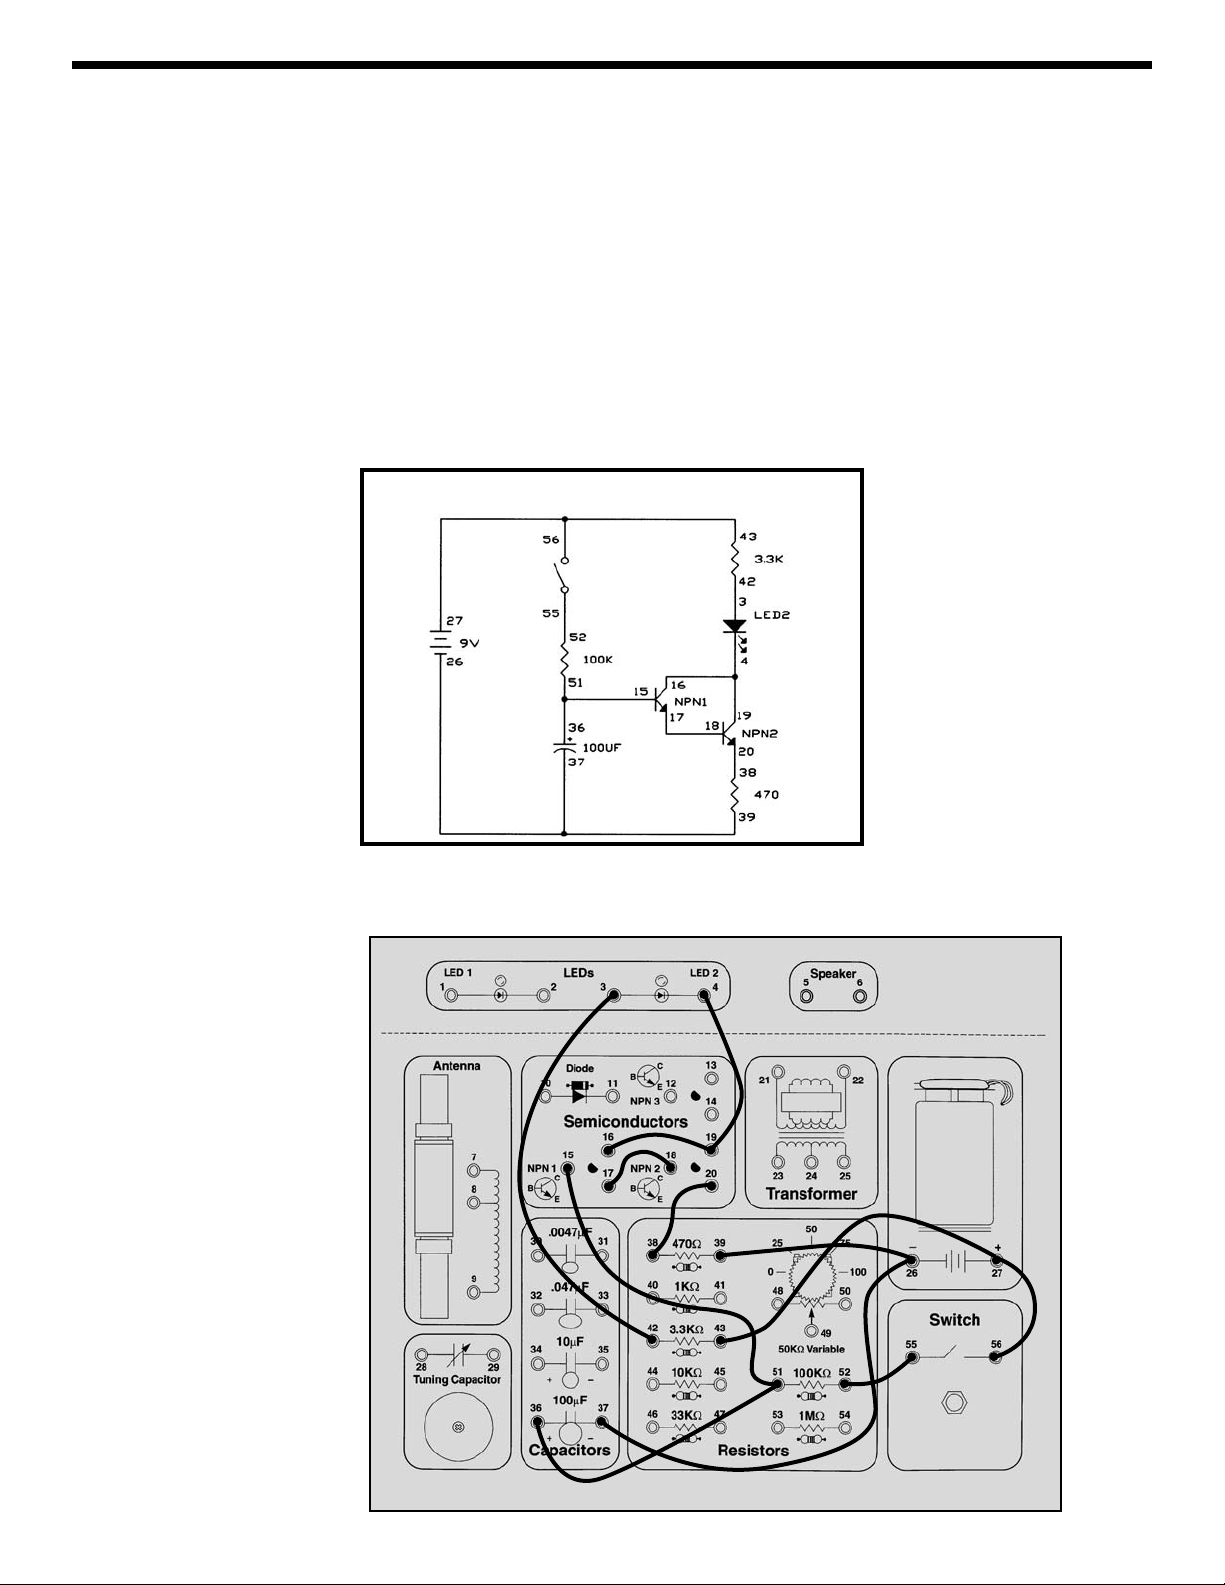
This circuit is very similar to the last one. Connect the
wires according to the Wiring Checklist and press the
switch, hold it down for several seconds. The LED will
slowly light up. Release the switch and the LED stays lit.
Take a look at the schematic. All the current flowing
through the emitter of NPN1 will flow to the base of
NPN2. So the current flowing into the base of NPN1 will
be amplified twice, once by each transistor. This
configuration is called the Darlington configuration. It
has very high current gain and very high input resistance
at the base. Since there are now two transistors to turn
on, the capacitor voltage must exceed 1.4V before the
LED will start to light. And since the input current to the
base is so small it will take much longer to discharge the
capacitor.
But the circuit is functionally the same as Experiment 17
and the LED will eventually go dark, though it may take a
few minutes. You can experiment with changing some of
the component values if you like.
EXPERIMENT #18: The Darlington
Wiring Checklist:
o 43-to-27-to-56
o 55-to-52
o 36-to-51-to-15
o 42-to-3
o 4-to-19-to-16
o 17-to-18
o 20-to-38
o 39-to-26-to-37
Schematic
Page 33
-33-
Take a look at the schematic. You’re probably wondering
how it can work, since nothing is connected to the
transistor base. It can’t, but there is another component
that isn’t shown in the schematic. That component is you.
Connect the wires according to the Wiring Checklist.
Now touch spring 27 (the battery) with one finger and
spring 18 (transistor base) with another. The LED may be
dimly lit. The problem is your fingers aren’t making good
enough electrical contact with the springs. Wet your
fingers with water or saliva and touch the springs again.
The LED should be very bright now. You saw in
Experiment 6 how water can conduct electricity and since
your body is mostly water it shouldn’t surprise you that
your body can also conduct. Your body’s resistance
varies a lot, but is typically a few hundred kilohms. Think
of this circuit as a touch lamp since when you touch it the
LED lights. You may have seen such a lamp in the store
or already have one in your home.
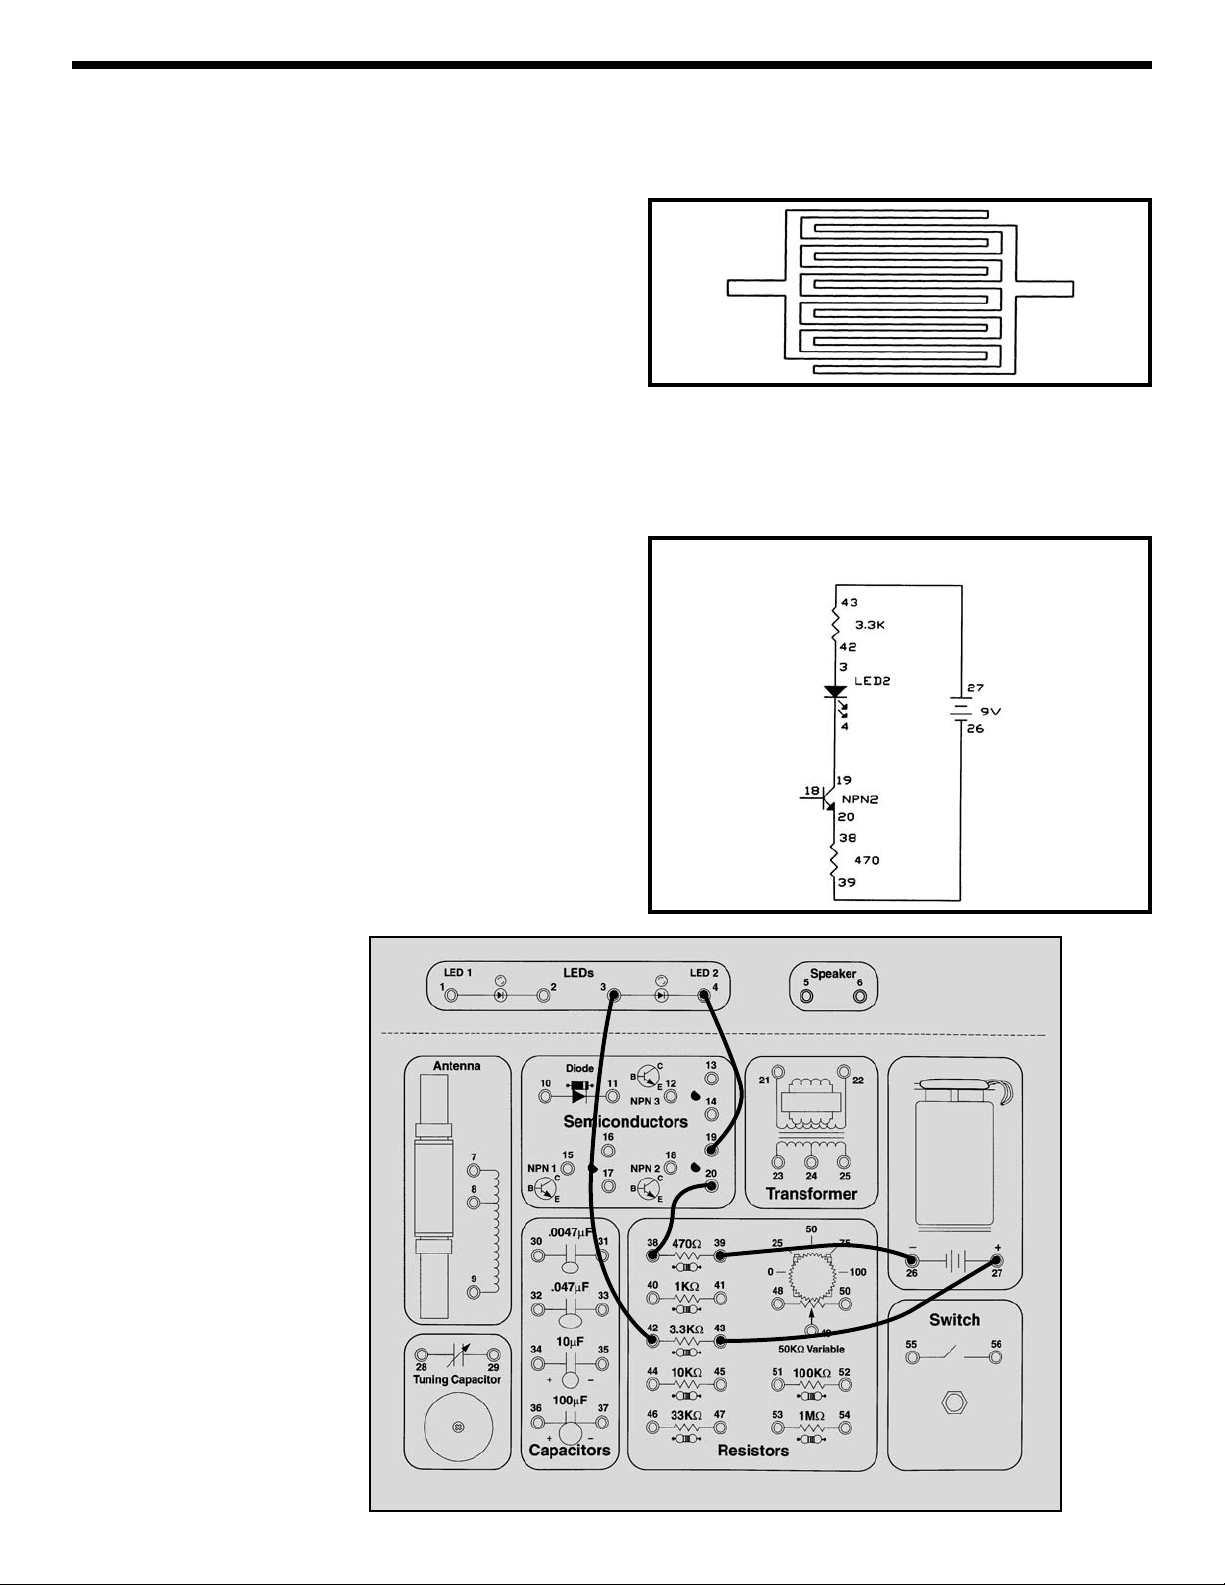
Actually, the touch lamps you see in stores only need to
be touched by one finger to light, not two. So let’s see if
we can improve our circuit to only need one finger.
Connect a wire from spring 27 to spring 54, and another
from spring 18 to spring 52. Wet a large area of one of
your fingers and touch it to springs 52 and 54 at the same
time; the LED lights. To make it easier for one finger to
touch the two contacts, touch lamps or other touch
devices will have the metal contacts interweaved as
shown below and will also be more sensitive so that you
don’t have to wet your finger to make good contact.
This circuit is still different from the touch lamps sold in
stores because the LED goes dark if you remove your
finger from it. We need a way of remembering when
you’ve touched the lamp to turn it on or off - we need a
memory, and we’ll show you one in Experiment 46
.
EXPERIMENT #19: The Finger Touch Lamp
Wiring Checklist:
o 27-to-43
o 42-to-3
o 4-to-19
o 20-to-38
o 39-to-26
Schematic
Battery
Connection
Transistor
Connection
Page 34

-34-
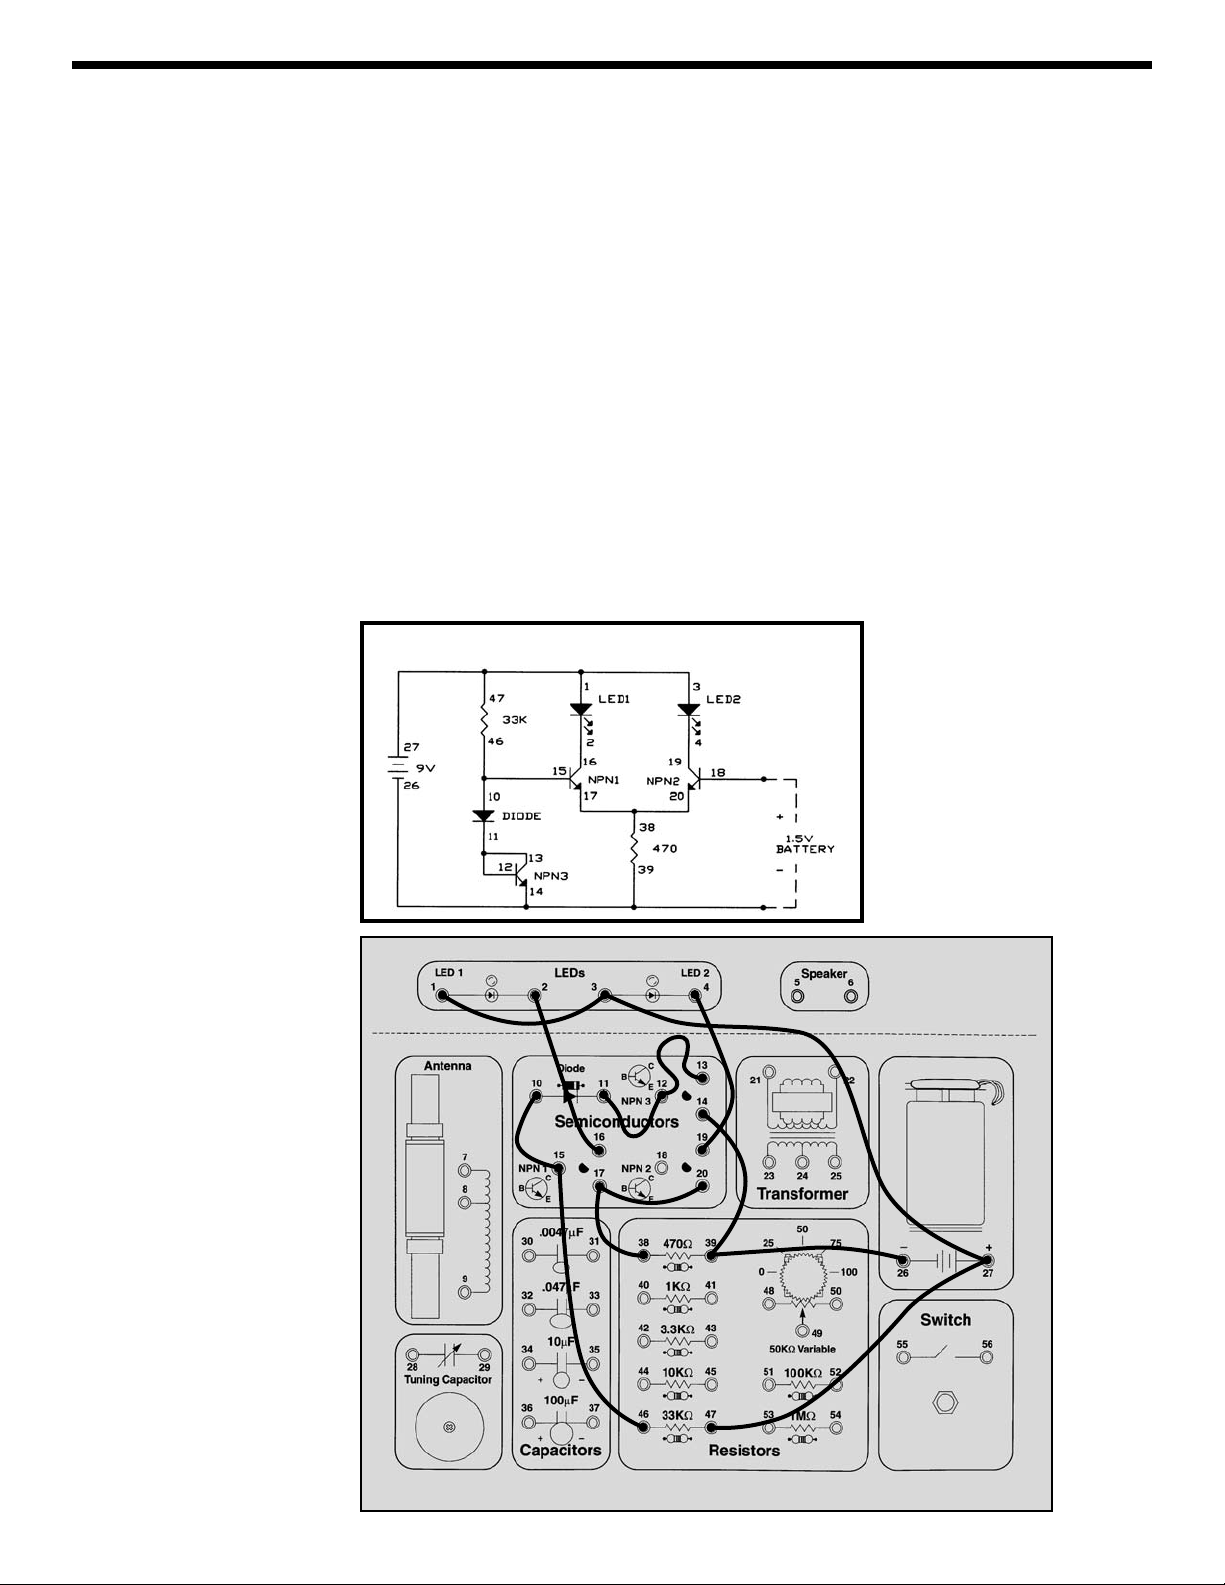
Connect the wires according to the Wiring Checklist and
schematic. Note that the collectors of NPN2 and NPN3
are not connected although their wires cross over each
other in the schematic. Connect the loose wire from
spring 43 (3.3KΩ) to spring 16 (NPN1 collector, or 9V);
the LED is bright. Now connect the wire to spring 17
(NPN1 emitter) instead of spring 16; the LED is just as
bright. So we made a change and nothing happened,
does this seem like a dull experiment? It may seem dull
but the important idea here is that we made a big change
to the circuit but nothing happened to the LED.
Take a look at the schematic. The circuit to the left of the
loose wire reduces the voltage to 4.7V. You connect the
loose wire to either the 9V battery voltage or the modified
4.7V. The circuit to the right of the loose wire creates a
fixed current to the LED, which will not change even if the
voltage (9V or 4.7V) to the circuit changes. So when you
changed which voltage the loose wire was connected to
you didn’t see any change in LED brightness.
In case you’re not convinced by this, let’s change the
circuit to prove it. Place LED2 in series with the 3.3KΩ
resistor (remove the wire from spring 42 and connect it to
spring 2, and add a wire from spring 1 to spring 42). Now
connect the loose wire to the two voltages as before and
you should see LED2 change between bright and dark
while LED1 remains bright as before.
You could use a circuit like this when you don’t want your
performance to be affected as your voltage drops,
perhaps due to a battery weakening over a long period of
use. So you could say your circuit is immune to
(protected against) a weak battery.
EXPERIMENT #20: Battery Immunizer
Wiring Checklist:
o 16-to-27-to-47
o 15-to-46-to-48
o 26-to-50-to-39-to-11
o 10-to-14
o 4-to-12-to-38
o 3-to-20
o 13-to-18-to-42
o 19-to-43-to-unconnected
Schematic
Loose
Wire
Page 35

-35-
Make sure you have a strong 9V battery for this
experiment. Connect the wires according to the Wiring
Checklist, connecting the wire to the battery last since
this will turn on the circuit. And be sure to disconnect this
battery wire when you’re not using the circuit to avoid
draining the battery. The part of the circuit to the left of
the dashed line in the schematic is the voltmeter, the two
resistors on the right produce a voltage that you will
measure. Notice that the variable resistor (VR) will
always act as a 50KΩ across the battery but by turning its
knob you adjust the voltage at the base of NPN1. By
turning this knob you can make one LED brighter than
the other, indicating that the voltages at the bases of
NPN1 and NPN2 are not equal. Adjust the VR so that the
two LEDs are equally bright. The transistor base
voltages are now equal. To determine what voltage you
have measured, simply subtract the percentage shown
on your VR dial from 100 and multiply by 0.09.
If you like you can calculate what voltage you should
have measured. Your measurement may differ from this
due to the tolerances in the resistors and the VR dial, but
you should be close. The resistors on the right are a
voltage adjuster, just like the VR is, and the voltage you
measured (at the base of NPN2) is:
V
Calculated
=xV
Battery
= x 9V = 6.9V
This circuit is a form of the Differential Pair transistor
configuration, which is widely used in integrated circuits.
If the transistor base voltages are equal then the currents
through the LEDs and collectors will also be equal. If one
base voltage is higher than the other then that transistor
will have more current flowing through it’s collector and
associated LED.
You can now replace the two resistors on the right with a
different combination and make a new voltage
measurement. The table below lists different
combinations of your Electronic Playground resistors that
you can measure, but you don’t have to measure them
all. In some combinations resistors are placed in series
or parallel to create new values.
Remember to disconnect the battery wire when you’re
not using the circuit to avoid draining the battery.
EXPERIMENT #21: The Voltmeter
R
Lower
R
Upper
+ R
Lower
33KΩ
10KΩ + 33KΩ
Wiring Checklist:
Schematic
Upper
Resistor
Lower
Resistor
Measured
Voltage
Calculated
Voltage
10KΩ 33KΩ 6.9V
33KΩ 10KΩ 2.1V
33KΩ 100KΩ 6.8V
100KΩ 33KΩ 2.2V
3.3KΩ 10KΩ 6.8V
10KΩ 3.3KΩ 2.2V
1KΩ 3.3KΩ 6.9V
3.3KΩ 1KΩ 2.1V
10KΩ
parallel
33KΩ, 100KΩ
6.4V
parallel
33KΩ, 100KΩ
10KΩ 2.6V
series
10KΩ, 33KΩ
100KΩ 6.3V
100KΩ
series
10KΩ, 33KΩ
2.7V
1KΩ
parallel
3.3KΩ, 10KΩ
6.4V
parallel
3.3KΩ, 10KΩ
1KΩ 2.6V
series 1KΩ,
3.3KΩ
10KΩ 6.3V
10KΩ
series 1KΩ,
3.3KΩ
2.7V
o 1-to-3-to-27-to-48-to-45
o 26-to-50-to-39-to-47
o 15-to-49
o 2-to-16
o 4-to-19
o 38-to-17-to-20
o 18-to-44-to-46
Page 36
-36-
Make sure you have a strong 9V battery for this
experiment. Connect the wires according to the Wiring
Checklist, connecting the wire to the battery last since
this will turn on the circuit. And be sure to disconnect this
battery wire when you’re not using the circuit to avoid
draining the battery. This circuit is a variation of the
differential pair configuration used in Experiment 21, you
will use it to test your 1.5V batteries. Take any 1.5V
battery you have (AAA, AA, A, B, C, or D cells) and
connect it between the base of NPN2 and ground. The
easiest way to do this is to stand your battery (negative
side down) on battery spring 26, connect a wire to spring
18 (the base of NPN2), and hold the wire to the positive
side of your battery.
If LED2 is bright and LED1 is off then your 1.5V battery
is good, otherwise your 1.5V battery is weak and should
be replaced soon. Don’t throw any weak batteries away
without making sure some measure good with this test
because all batteries could fail if your circuit is wired
incorrectly, or if your 9V battery is weak.
This circuit uses two diodes (NPN3 is being used as a
diode) to create a voltage reference. The turn-on voltage
drops for the diodes are combined to produce a constant
voltage of about 1.1V at the base of transistor NPN1.
(We said earlier that a diode turn-on voltage is 0.7V, but
it varies slightly depending on the current. In this
application the drops will be about 0.55V for each). This
is compared to the 1.5V battery voltage at the base of
NPN2, in the same manner as Experiment 21. A strong
1.5V battery will easily exceed 1.1V and only NPN2 and
LED2 will be on, while NPN1 will be shut off. But if the
1.5V battery is weak then the base voltages will be nearly
equal and NPN1 and LED1 will also be on. Diodes are
often used to make voltage references like this in
electronic circuits.
Remember to disconnect the battery wire when you’re
not using the circuit to avoid draining the 9V battery.
EXPERIMENT #22: 1.5 Volt Battery Tester
Wiring Checklist:
o 1-to-3-to-27-to-47
o 26-to-39-to-14
o 10-to-15-to-46
o 11-to-12-to-13
o 2-to-16
o 4-to-19
o 38-to-17-to-20
Schematic
Page 37
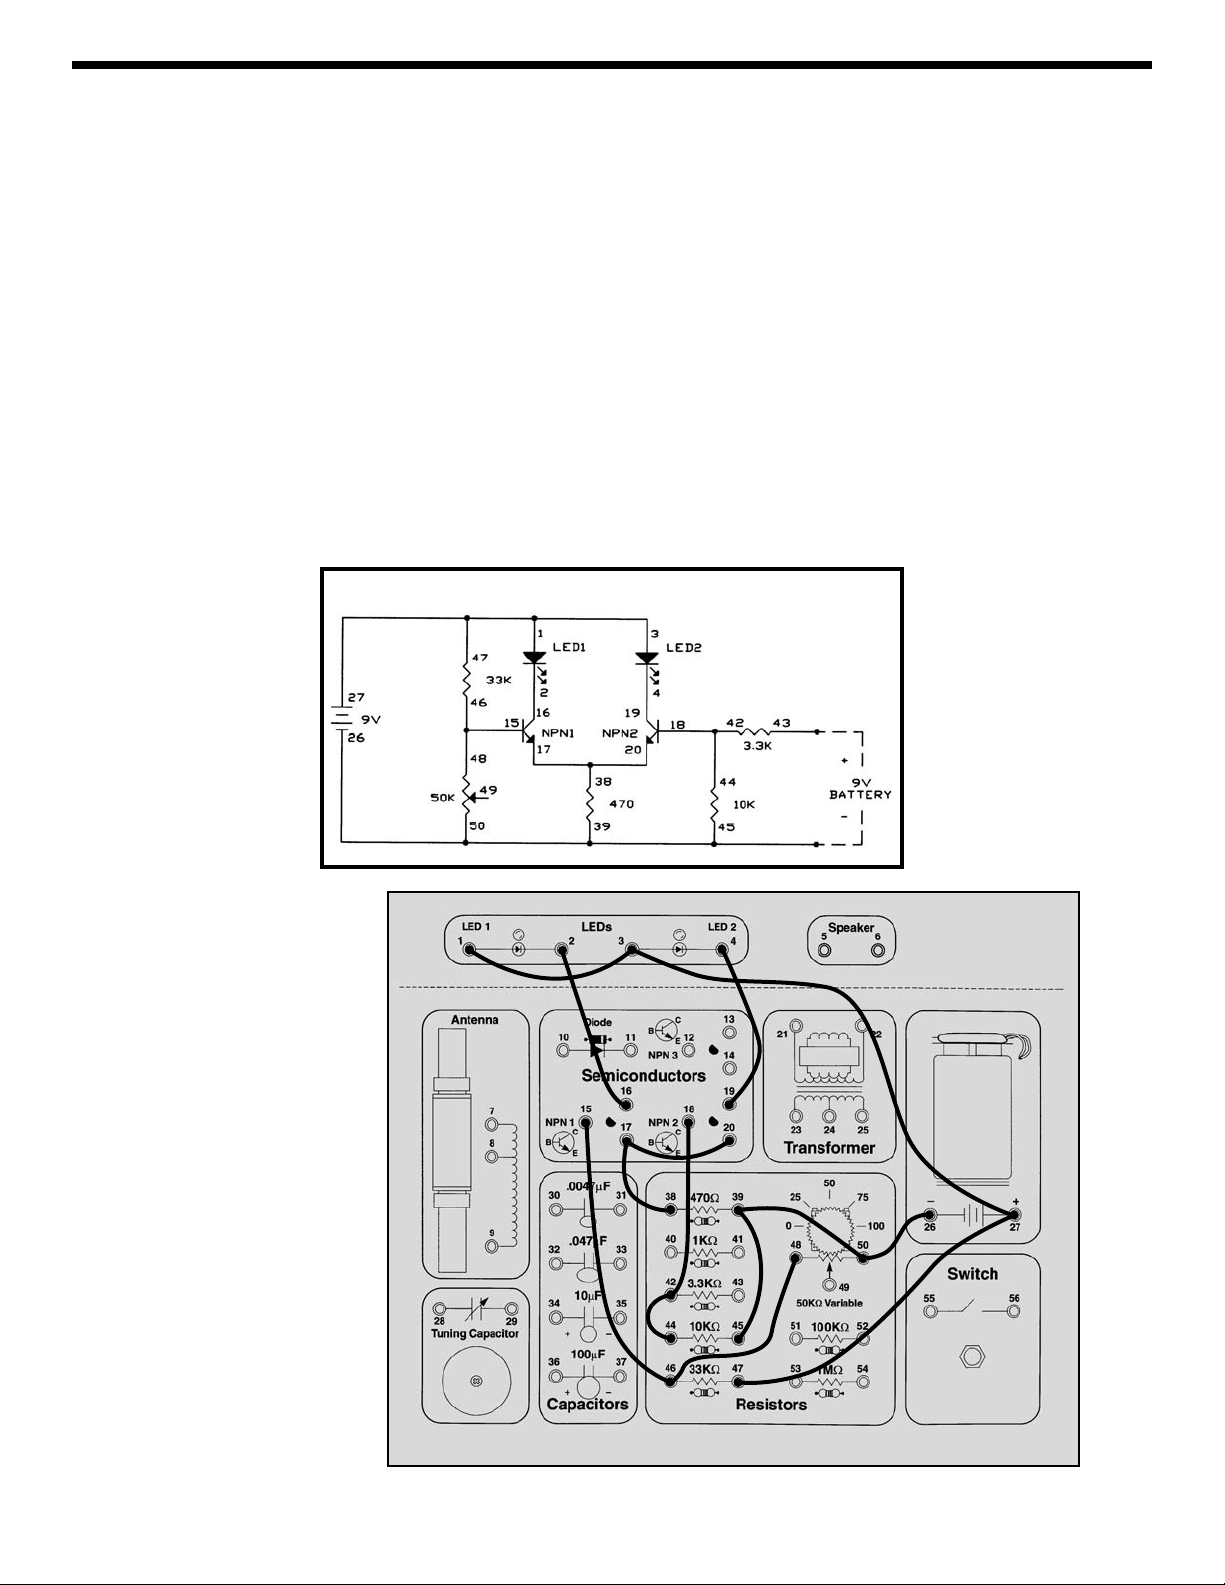
-37-
Make sure you have a strong 9V battery for this
experiment. Connect the wires according to the Wiring
Checklist, connecting the wire to the battery last since
this will turn on the circuit. And be sure to disconnect this
battery wire when you’re not using the circuit to avoid
draining the battery. This time you will measure 9V
batteries, just like the one you are using to power your
Electronic Playground. Take two long wires and connect
one to spring 26 (ground) and spring 43 (3.3KΩ). When
you are ready touch the other ends to the battery you
want to test, being sure to connect them to the positive
and negative battery terminals as shown in the
schematic. If LED2 is bright and LED1 is off then your
battery is good, otherwise your battery is weak and
should be replaced soon. Don’t throw any weak batteries
away without making sure some measure good with this
test because all batteries could fail if your circuit is wired
incorrectly.
As you’d expect, this circuit is similar to Experiments 21
and 22. From the schematic you can see that we are
using resistors to set the voltages at the bases of the
transistors. The resistor values were selected so that if
the two battery voltages are equal then NPN2’s base will
have a higher voltage and only LED2 will be lit (as in
Experiment 22 when we had a good 1.5V battery). In
fact, LED1 will only be on if your Playground’s battery
voltage is at least 2V higher than that of the battery you
are testing. We do this because we don’t want to reject a
good battery that’s just not as good as our reference
battery. Of course, if our reference battery is weak then
any battery tested will appear good.
Remember to disconnect the battery wire when you’re
not using the circuit to avoid draining the 9V battery.
EXPERIMENT #23: 9 Volt Battery Tester
Wiring Checklist:
o 1-to-3-to-27-to-47
o 26-to-50-to-39-to-45
o 15-to-46-to-48
o 2-to-16
o 4-to-19
o 38-to-17-to-20
o 18-to-42-to-44
Schematic
Now it’s time to introduce another component . . .
Page 38
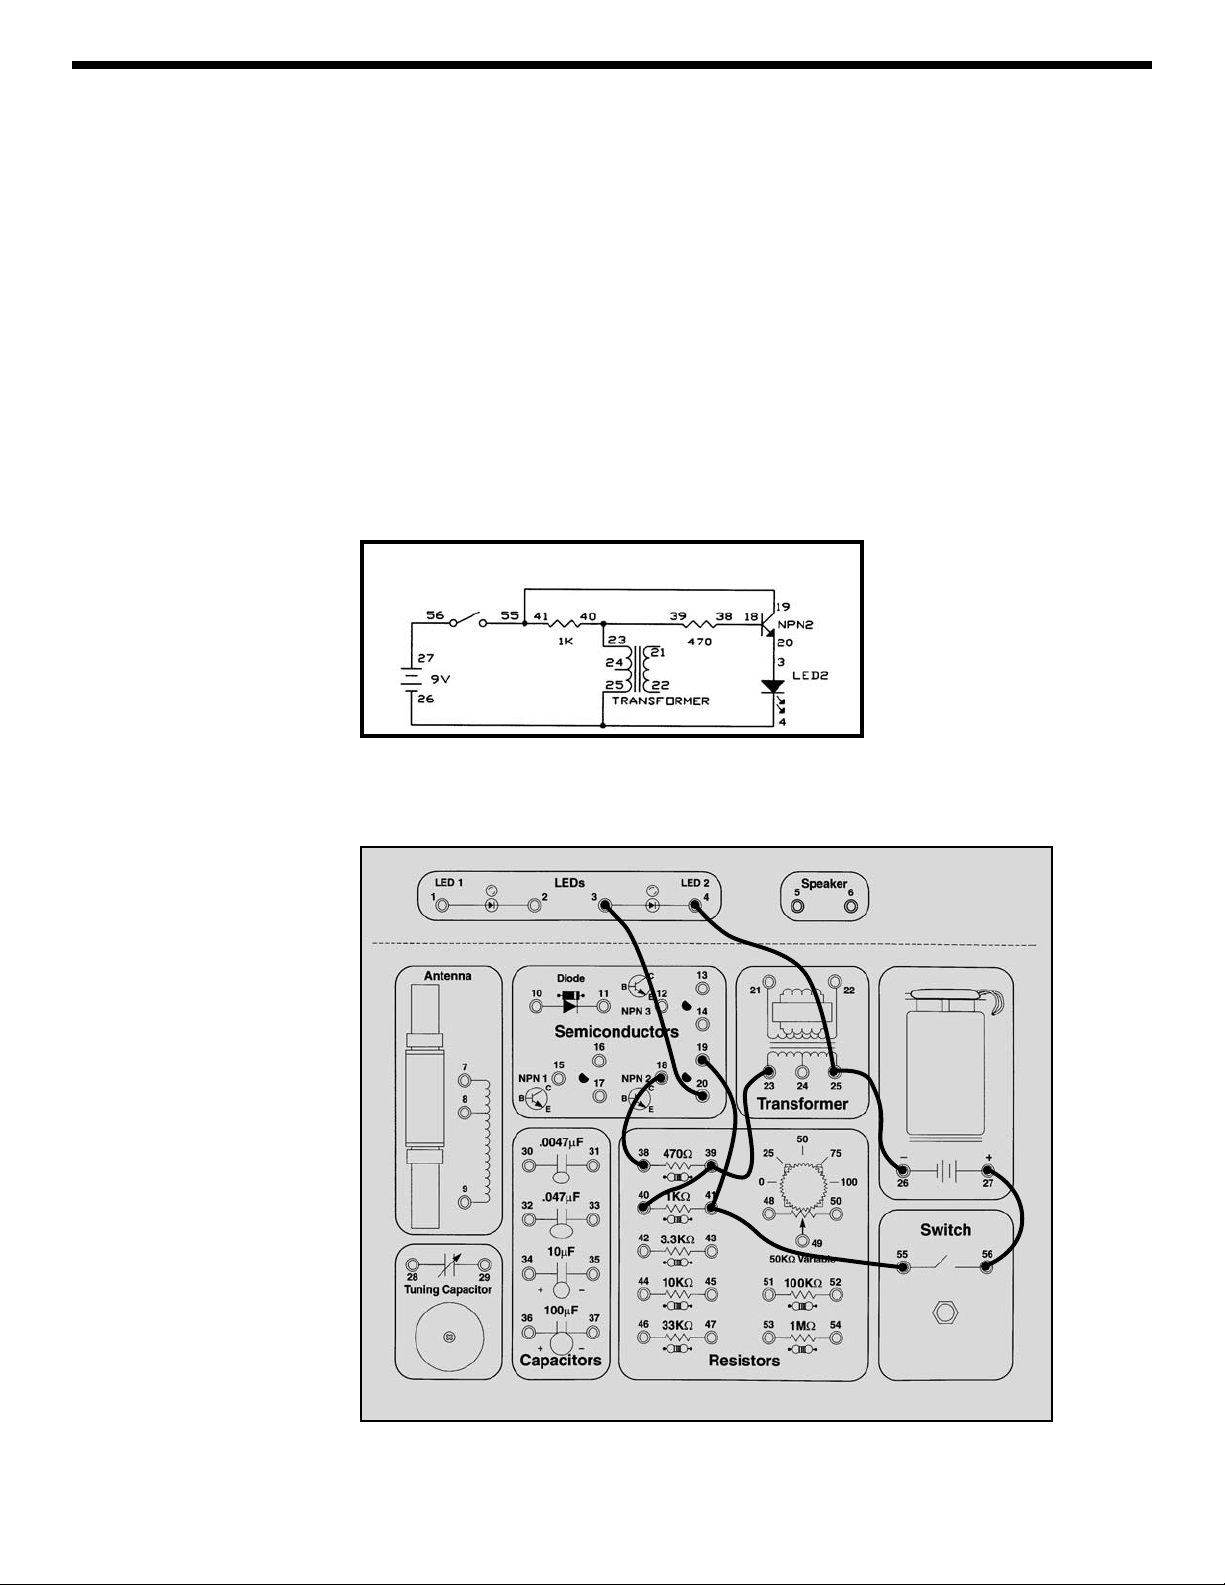
-38-
Recall that capacitors blocked direct current (DC) but
passed alternating current (AC). Take a look at
Experiment 7 again and remember that it took time to
light the LED because you had to charge the capacitor
first; the capacitor passed the initial current surge through
to ground (the negative side of the battery) but blocked
the current once it stabilized, forcing it to go through the
LED. The inductor is the counterpart to this - it blocks
current surges (AC) but passes stable currents (DC).
Before explaining the inductor further, let’s demonstrate it
using almost the same circuit as in Experiment 7.
We will be using an inductor that is part of the
transformer, we’ll explain more about this later. Connect
the wires according to the Wiring Checklist and press the
switch several times. The LED will blink once when the
switch is pressed. Note how this is different from the
capacitor, when the LED became bright when the switch
was pressed and stayed bright until the switch was
released. The inductor effects are brief, so we are using
the transistor to amplify the current to the LED and make
the inductor’s effects easier to see.
Now remove the wire from spring 23 (on the transformer),
connect it to spring 24, and press the switch a few more
times. The LED will not blink as brightly now, because we
are using less inductance.
EXPERIMENT #24: The Anti-Capacitor
Wiring Checklist:
o 27-to-56
o 55-to-41-to-19
o 40-to-39-to-23
o 38-to-18
o 20-to-3
o 4-to-25-to-26
Schematic
Page 39

-39-
NOTES
Page 40

-40-
The Inductor: The inductor can best be described as
electrical momentum (momentum is the power a moving
object has). In our water pipe analogy the inductor can
be thought of as a very long hose wrapped around itself
many times as shown here:
Since the hose is long it contains many gallons of water.
When pressure is applied to one end of the hose with a
plunger the water would not start to move instantly, it
would take time to get the water moving. After a while the
water would start to move and pick up speed. (This is
also similar to a long freight train, which takes more than
a mile to get to full speed or to stop). The speed would
increase until limited by the friction (resistance) of the
hose as normal. If you try to instantly stop the water from
moving by holding the plunger, the momentum of the
water would create a large negative pressure (suction)
that would pull the plunger from your hands.
Inductors are made by coiling a wire, hence they are also
called coils. From the above analogy it should be
apparent that a coiled hose will pass DC (a constant or
unchanging current) with only the resistance of the hose,
which in electronics will be very low since the hose is a
wire. If the pressure on the plunger is alternated (pushed
then pulled) fast enough then the water in the coil will
never start moving and the AC (constantly changing
current) will be blocked. Coils in electronics follow these
same principles - a coil will pass DC and block AC
.
Recall from above that a capacitor will block DC but pass
AC. When determining the response of a circuit to DC,
inductors are treated as closed switches and capacitors
are treated as open switches. For the AC response, the
values of the inductors and capacitors must be
considered along with the rate at which the current
alternates (called the frequency). For DC changes to
the circuit (called transients), such as closing the switch
to connect a battery to capacitor circuit, the circuit
response is initially AC and then reverts to DC.
How do inductors in series and parallel add up? You saw
in Experiment 24 that changing the connection point on
the inductor (to reduce the length of the coiled wire)
reduced LED brightness. If you think of this in terms of
the coiled hose then it is easy - longer hoses will hold
more water, hence more inductance. Two hoses in
parallel will result in more water coming out (less
inductance), since the same water pressure applies to
each hose. This situation should sound familiar since
inductances in series and parallel add together just like
resistors do. For advanced students, the mathematical
relationship is (“L” represents inductance):
L
Series
=L1+ L
2
L
Parallel
=
The inductance is expressed in henrys (H, named after
Joseph Henry who developed electromagnetic induction
at the same time as Faraday), or more commonly in
millihenrys (mH, thousandths of a henry) or microhenrys
(μH, millionths of a henry). A typical inductor and its
symbol are shown below:
Inductors and Transformers:
Our water pipe analogy we
have been using all this time is not entirely accurate.
Electric current is not the same as water. It is a flow of
sub-atomic particles called electrons that not only have
electric properties but also magnetic properties; in the
water pipe analogy you would have to think of the water
as containing millions of very small magnets. Inductance
expresses the magnetic effects between electrons
flowing in the wire of a coil. The number of turns
(windings), diameter, and length of the coil affect the
inductance, the thickness of the wire does not. The
material inside the coil also affects the inductance; if you
wrap the coil wire around an iron bar (which has strong
magnetic properties) then the magnetic effects are
increased and the inductance is increased. This does not
apply to capacitors, which store electric charge in an
electric field, not a magnetic field.
Plunger
Water Pipe
Large Hose Filled
with Water
L1x L
2
L1+ L
2
Inductor
Symbol for
Inductor
Page 41

-41-
If you wrap two wires from different circuits around
different ends of an iron bar then a current flowing
through the wire from the first circuit will magnetically
create a current in the wire from the second circuit! If the
second coil has twice as many turns (more magnetic
linkage) as the first coil then the second coil will have
twice the voltage but half the current as the first coil. A
device like this is called a transformer. Your Electronic
Playground includes one. It consists of a 300mH coil, with
a middle tap point allowing use as two connected 150mH
coils, and a 3mH coil wrapped around an iron bar. In
Experiment 17 we used the 300mH coil by itself but
usually it will be used to drive a speaker, which needs a
high current with low voltage. The symbol for a
transformer is shown on the right:
The magnetic field created in an iron bar by an electric
current in the coil around it can be harnessed if the bar is
allowed to rotate - it is a motor. It could be used to drive
the wheels of a car, for example. The reverse is also true,
if a magnet within a coil is rotating then an electric
current is created in the coil - a generator. These two
statements may not seem important to you at first but
they are actually the foundation of our present society.
Nearly all of the electricity used in our world is produced
at enormous generators driven by steam or water
pressure. Wires are used to efficiently transport this
energy to homes and businesses where it is used.
Motors convert the electricity back into mechanical form
to drive machinery and appliances.
It must be remembered that all of the inductance
properties discussed here for coils and transformers only
apply to AC (alternating current). For DC, inductors act
as wires with no special properties and transformers are
just two separate, unconnected wires.
Transformer
Symbol for
Transformer
1. A diode has very high resistance when it is
__________-biased.
2. Diodes whose turn-on energy is so high that light is
generated are known as __________.
3. The transistor is best thought of as a current
__________.
4. An __________ circuit is one that might have many
resistors, diodes, capacitors and transistors on a
single piece of silicon.
5. A transistor is __________ when the circuit
resistances, not the transistor itself, are limiting the
transistor’s collector current.
6. Inductors have low resistance to __________ current
and high resistance to __________ current.
7. Adding inductors in parallel __________ the
inductance while adding inductors in series
__________ the inductance.
8. Electrons not only have electric properties but also
__________ properties.
9. Wrapping a coil around an iron bar __________ the
inductance.
10. If the second coil in a transformer has half as many
turns as the first coil, then the second coil will have
__________ as much alternating current as the first
coil.
(Answers are on page 5).
TEST YOUR KNOWLEDGE #2
Page 42

-42-
Connect the wires according to the Wiring Checklist. You
are using the antenna for the first time here but only as a
low-value resistor (about 10Ω); it has other properties
that will be explained in later experiemnts. Press the
switch several times. LED1 blinks when the switch is
pressed and LED2 blinks when the switch is released.
Although the LED may blink in the same manner as the
last experiment, the method is quite different. There is no
wire connection across the transformer, its DC resistance
is very high. When you press the switch there is a
sudden surge of current (AC) through the inductor that
magnetically creates a current on the other side of the
transformer, lighting the LED. The current from the
battery quickly settles after the initial surge (becomes
DC) and the magnetic induction stops because the
current is no longer changing, hence no current flows
through the LED even though there is current on the
battery side of the transformer. When you release the
switch the sudden drop in current through the transformer
magnetically creates a new current on the other side of
the transformer, but this time in the opposite direction so
LED2 lights instead of LED1. Again, this current is brief
and the LED only blinks. The transformer has many more
turns (more inductance) on the LED side than on the
battery side; this boosts the voltage to the LEDs (though
it also lowers the current). If you reverse the transformer
then you won’t have enough voltage to turn on the LEDs.
You might think of a transformer as a magnetic bridge in
electronics, since we use magnetism to cross a barrier
that electricity cannot cross by itself. Transformers are
mainly used for isolating and buffering different circuits
from each other, and you will soon see some examples of
this.
EXPERIMENT #25: The Magnetic Bridge
Wiring Checklist:
o 27-to-56
o 55-to-9
o 7-to-21
o 22-to-26
o 2-to-3-to-23
o 1-to-4-to-25
Schematic
Page 43

-43-
Connect the wires according to the Wiring Checklist.
Notice that the transformer is being used as two coils
(inductors) here. Also notice that transformer springs 23
and 24 are not connected although their wires cross in
the schematic. Press the switch and hold it down for a
while. The LED blinks every few seconds, like a tiny
lighthouse!
Notice that the LED blinks at a constant rate. This circuit
is called an oscillator. It uses feedback. Feedback is
when you adjust the input to something based on what its
output is doing. The collector signal is fed back to the
base through a coil (part of the transformer) and the
100μF capacitor. If you disconnect this feedback path
then the LED will be on continuously, because the
feedback is what turns the transistor on and off. The rate
at which the transistor is turned on and off is called the
frequency and is controlled by the resistor, capacitor, and
coil in the circuit. You can speed up the frequency (the
LED blink rate) by changing the resistor or capacitor to
smaller values. Try replacing the 1MΩ resistor with the
100KΩ resistor and see what happens.
Feedback is necessary for this circuit to work, but in
some cases it can be harmful. In an auditorium or
concert hall you sometimes hear a microphone scream
when it is located too close to the speaker. In this case
the sound from the speaker is feeding back into the
microphone.
EXPERIMENT #26: The Lighthouse
Wiring Checklist:
o 27-to-56
o 54-to-55-to-24
o 23-to-36
o 37-to-53-to-18
o 19-to-4
o 3-to-25
o 20-to-26
Schematic
Page 44

-44-
Now it’s time to make some noise. To do this we need a
speaker. A speaker converts electrical energy into
sound. It does this by using the energy of an AC
electrical signal to create mechanical vibrations. These
vibrations create variations in air pressure, called sound
waves, which travel across the room. You “hear” sound
when your ears feel these air pressure variations. You
need high current and low voltage to operate a speaker,
so we will always use the transformer with the speaker.
(Remember that a transformer converts high-voltage/lowcurrent to low-voltage/high-current). We create an AC
signal for the speaker using the oscillator circuit
introduced in the last experiment, with minor changes. A
speaker has a schematic symbol like this:
Connect the wires according to the Wiring Checklist.
Notice that transformer springs 23 and 24 are not
connected although their wires cross in the schematic.
Also notice there are 4 resistors and 4 capacitors
connected to the 3.3KΩ resistor and 2 loose wires
connected to the transformer. Connect the transformer to
one resistor and one capacitor at a time, then press the
switch and listen. All the combinations are listed below,
you don’t need to try all of them but try some and see if
there is a pattern in the frequency or pitch (a term used
in music) of the sound. Record a few comments about
the sound you hear.
You may start to see the same thing we told you about
the blinking LED frequency - that the frequency increases
when you lower the resistance or capacitance. It also
increases if you lower the inductance, but you don’t have
any other inductors you can substitute.
Oscillators are among the most important circuits in
electronics and most of your remaining experiments will
use an oscillator of some form. Although the oscillator
circuits used here are simple ones, some oscillators can
be the most difficult circuits to design.
EXPERIMENT #27: Electronic Sound
Speaker
Symbol for
Speaker
10KΩ 33KΩ 100KΩ 1MΩ
.0047μF
.047μF
10μF
100μF
Page 45

-45-
Wiring Checklist:
o 27-to-56
o 55-to-24
o 25-to-19
o 20-to-26
o 18-to-43
o 5-to-21
o 6-to-22
o 42-to-31-to-33-to-35-to-37-to-44-to-46-to-53-to-51
o unconnected-to-23-to-unconnected (2 loose wires)
Schematic
Loose
Wires
Page 46

-46-
This circuit is unusual in that you turn it on by
disconnecting a wire and turn it off by connecting the
wire. Connect the wires according to the Wiring Checklist
and schematic, including a long wire as the “trip” wire.
Notice that there is no sound. Now disconnect the trip
wire and you hear a sound, an alarm.
This type of circuit is used to detect burglars or other
intruders. If you use a longer trip wire, you can place it
across a doorway or window and when someone goes
through the doorway or window they will trip on the wire
(disconnecting it) and the alarm will sound. This is how
professional burglar alarms work, although some use
beams of light across the doorway or window instead of
wire for the “trip” mechanism. The trip wire could also
alert your local police station instead of turning on the
alarm here.
This circuit is the same oscillator circuit you just used
except that the trip wire was added. The trip wire creates
a “short circuit” across the transistor base, so no current
flows into the base and the transistor stays off.
Disconnecting the trip wire eliminates the short and the
oscillator works normally.
If you like, you can adjust the loudness of the alarm by
replacing the 3.3KΩ resistor with the variable resistor.
EXPERIMENT #28: The Alarm
Wiring Checklist:
o 27-to-24
o 19-to-25
o 18-to-43
o 5-to-21
o 6-to-22
o 54-to-23-to-30
o 31-to-42-to-53
o 20-to-26
o 26-to-53 (use a long wire,
this will be referred to as
the “trip” wire)
Schematic
Long “Trip” Wire
Page 47

-47-
The forerunner of today’s telephone system was the
telegraph, which was widely used in the latter half of the
19th century. It only had two states – on or off (that is,
transmitting or not transmitting), and could not send the
range of frequencies contain in human voices or music.
A code was developed to send information over long
distances using this system and a sequence of dots and
dashes (short or long transmit bursts). It was named
Morse Code after its inventor. It was also used
extensively in the early days of radio communications,
though it isn’t in wide use today except in amateur radio
(“ham” radio). It is sometimes referred to in Hollywood
movies, especially Westerns.
This is the same oscillator circuit that you have been
using. Connect the wires according to the Wiring
Checklist. Press the switch in long and short bursts to
make a sound pattern representing the dots and dashes
shown in the table above. You can use Morse Code and
this circuit to send secret messages to friends in hearing
distance without others knowing what you’re saying. If
the sound bothers others in the room then you may send
Morse Code messages using flashes of light instead.
Use the same circuit as you used in Experiment 13 (The
Electronic Switch) and press the switch in the manner
shown here. During World War II Navy ships sometimes
communicated by flashing Morse Code messages
between ships using searchlights (they did this because
radio transmissions might reveal their presence or
position to the enemy).
EXPERIMENT #29: Morse Code
Wiring Checklist:
o 27-to-56
o 55-to-24
o 19-to-25
o 18-to-43
o 5-to-21
o 6-to-22
o 52-to-23-to-32
o 33-to-42-to-51
o 20-to-26
Schematic
A. _
B _ . . .
C_ . _ .
D_ . .
E.
F. . _ .
G_ _ .
H . . . .
I. .
J . _ _ _
K_ . _
L. _ . .
M_ _
N_ .
O_ _ _
P . _ _ .
Q_ _ . _
R. _ .
S. . .
T_
U. . _
V . . . _
W. _ _
X _ . . _
Y_ . _ _
Z_ _ . .
1 . _ _ _ _
2 . . _ _ _
3 . . . _ _
4 . . . . _
5 . . . . .
6 _ . . . .
7 _ _ . . .
8 _ _ _ . .
9 _ _ _ _ .
0 _ _ _ _ _
Period
. _ . _ . _
Comma
_ _ . . _ _
Question . . _ _ . .
Morse Code
Page 48

-48-
Connect the wires according to the Wiring Checklist and
press the switch. It makes a siren sound.
You saw earlier how you could change the frequency
(pitch) of the oscillator by changing the oscillator’s
resistance. Well this is basically the same oscillator
circuit you’ve been using except that now we are
electronically varying the oscillator’s resistance. The
large 1MΩ resistor and 10μF capacitor cause the base
voltage (and hence base current) on transistor NPN 1 to
rise slowly. As the base current slowly increases, NPN
1’s collector current also increases slowly (though it is
always much higher than the base current). NPN1 is now
limiting the current just as a resistor does! Similar effects
occur after you release the switch and the 10μF slowly
discharges.
If you like you can make the sound louder. Move the wire
from spring 18 to spring 40, and add a wire from spring
41 to spring 18.
EXPERIMENT #30: Siren
Wiring Checklist:
o 5-to-21
o 6-to-22
o 25-to-39
o 38-to-19
o 23-to-32
o 18-to-33-to-44
o 45-to-17
o 15-to-34-to-53
o 54-to-55
o 35-to-26-to-20
o 16-to-24-to-27-to-56
Schematic
Page 49
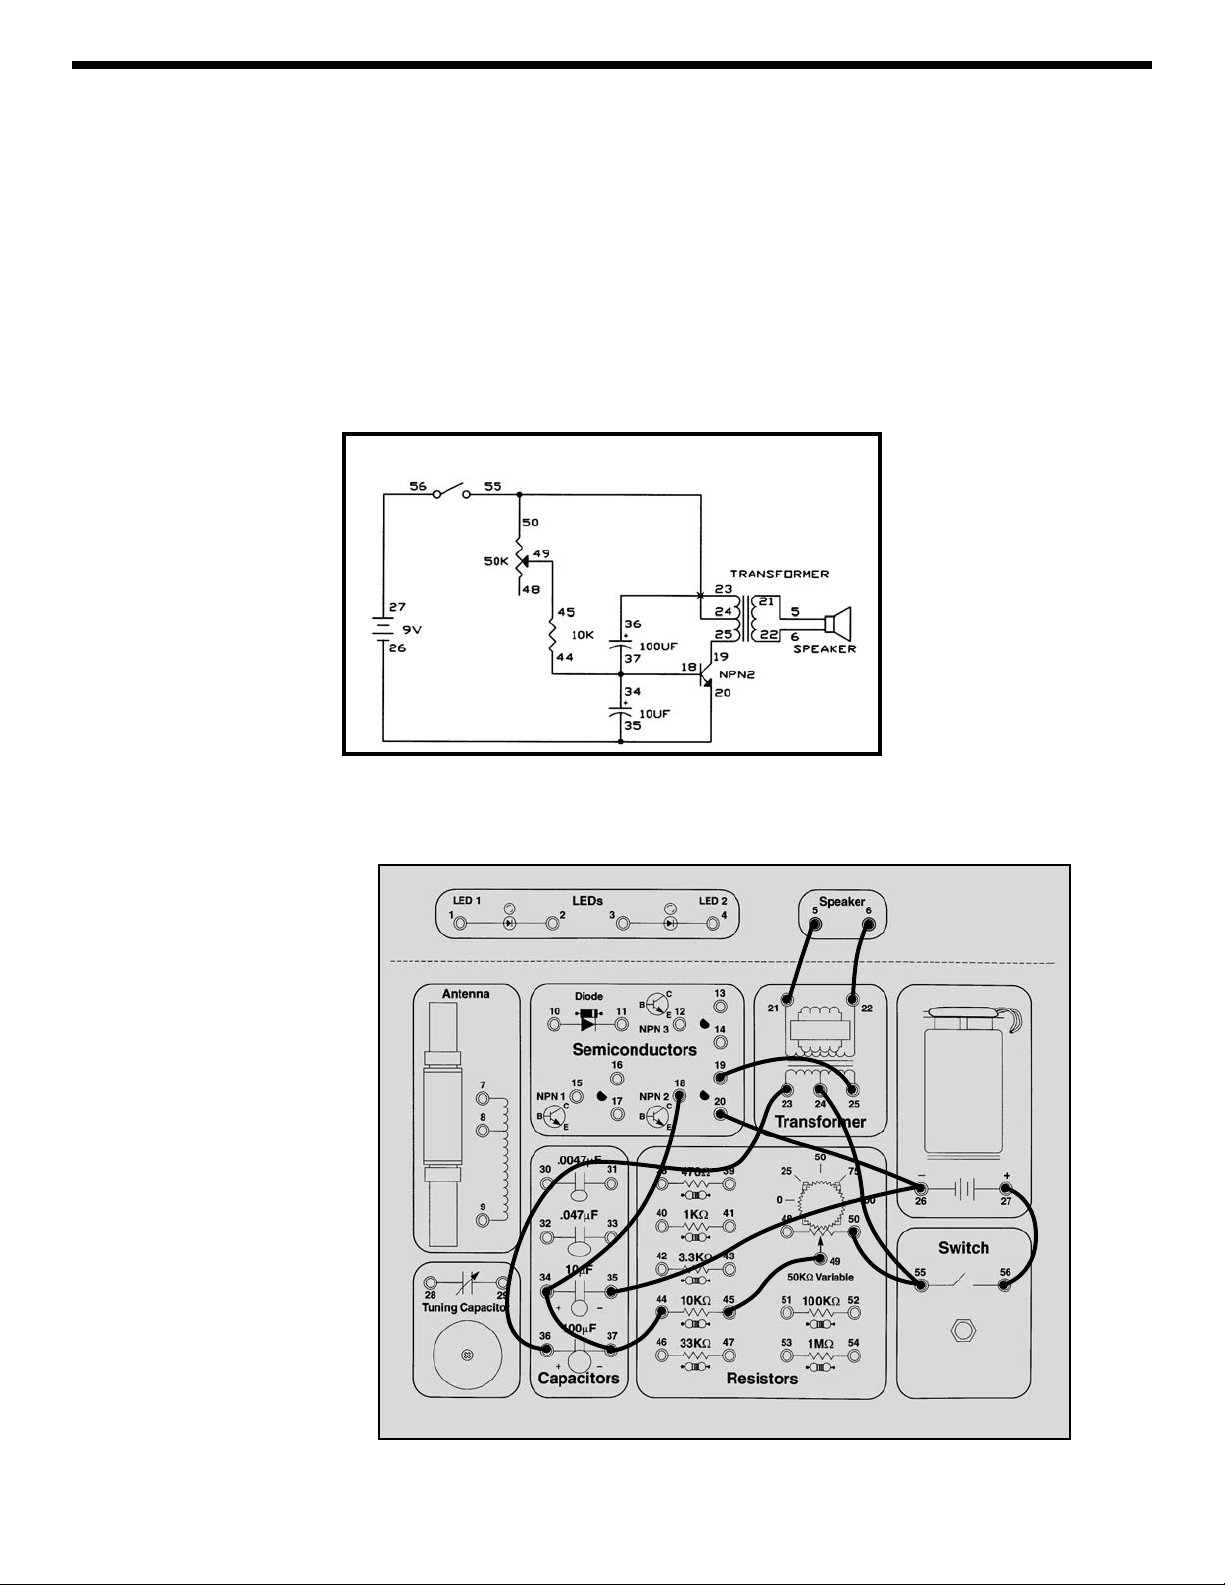
-49-
Connect the wires according to the Wiring Checklist and
press the switch. You hear a sound like raindrops. The
variable resistor (VR) knob controls the rain, turn it to the
right to make a drizzle and turn to the left to make the rain
come pouring down. If you find it inconvenient to turn the
VR knob while pressing the switch then just connect a
wire across the switch.
Do you know how this circuit works? Remember that as
you lower the oscillator’s resistance the frequency
increases, and obviously the VR controls the resistance.
What would happen if you replaced the 10KΩ resistor
with the 100KΩ? Try it. The rain is now very slow, and it
sounds more like a leaky faucet than raindrops.
You can experiment with changing other component
values if you like.
EXPERIMENT #31: Electronic Rain
Wiring Checklist:
o 27-to-56
o 50-to-55-to-24
o 19-to-25
o 5-to-21
o 6-to-22
o 23-to-36
o 18-to-34-to-37-to-44
o 45-to-49
o 20-to-26-to-35
Schematic
Page 50

-50-
Connect the wires according to the Wiring Checklist and
press the switch several times quickly. You hear a sound
like a space gun in the movies. You can adjust the “gun”
sound using the variable resistor. If you find it
inconvenient to turn the VR knob while pressing the
switch then just connect a wire across the switch.
Do you know how this circuit works? It’s basically the
same as the last circuit except for the 10μF capacitor,
which instantly charges up when you press the switch
and then discharges by powering the circuit for a few
seconds after you release the switch.
You can experiment with changing component values if
you like.
EXPERIMENT #32: The Space Gun
Wiring Checklist:
o 27-to-56
o 34-to-55-to-50-to-24
o 19-to-25
o 5-to-21
o 6-to-22
o 23-to-32
o 18-to-39
o 38-to-33-to-46
o 47-to-49
o 20-to-26-to-35
Schematic
Page 51
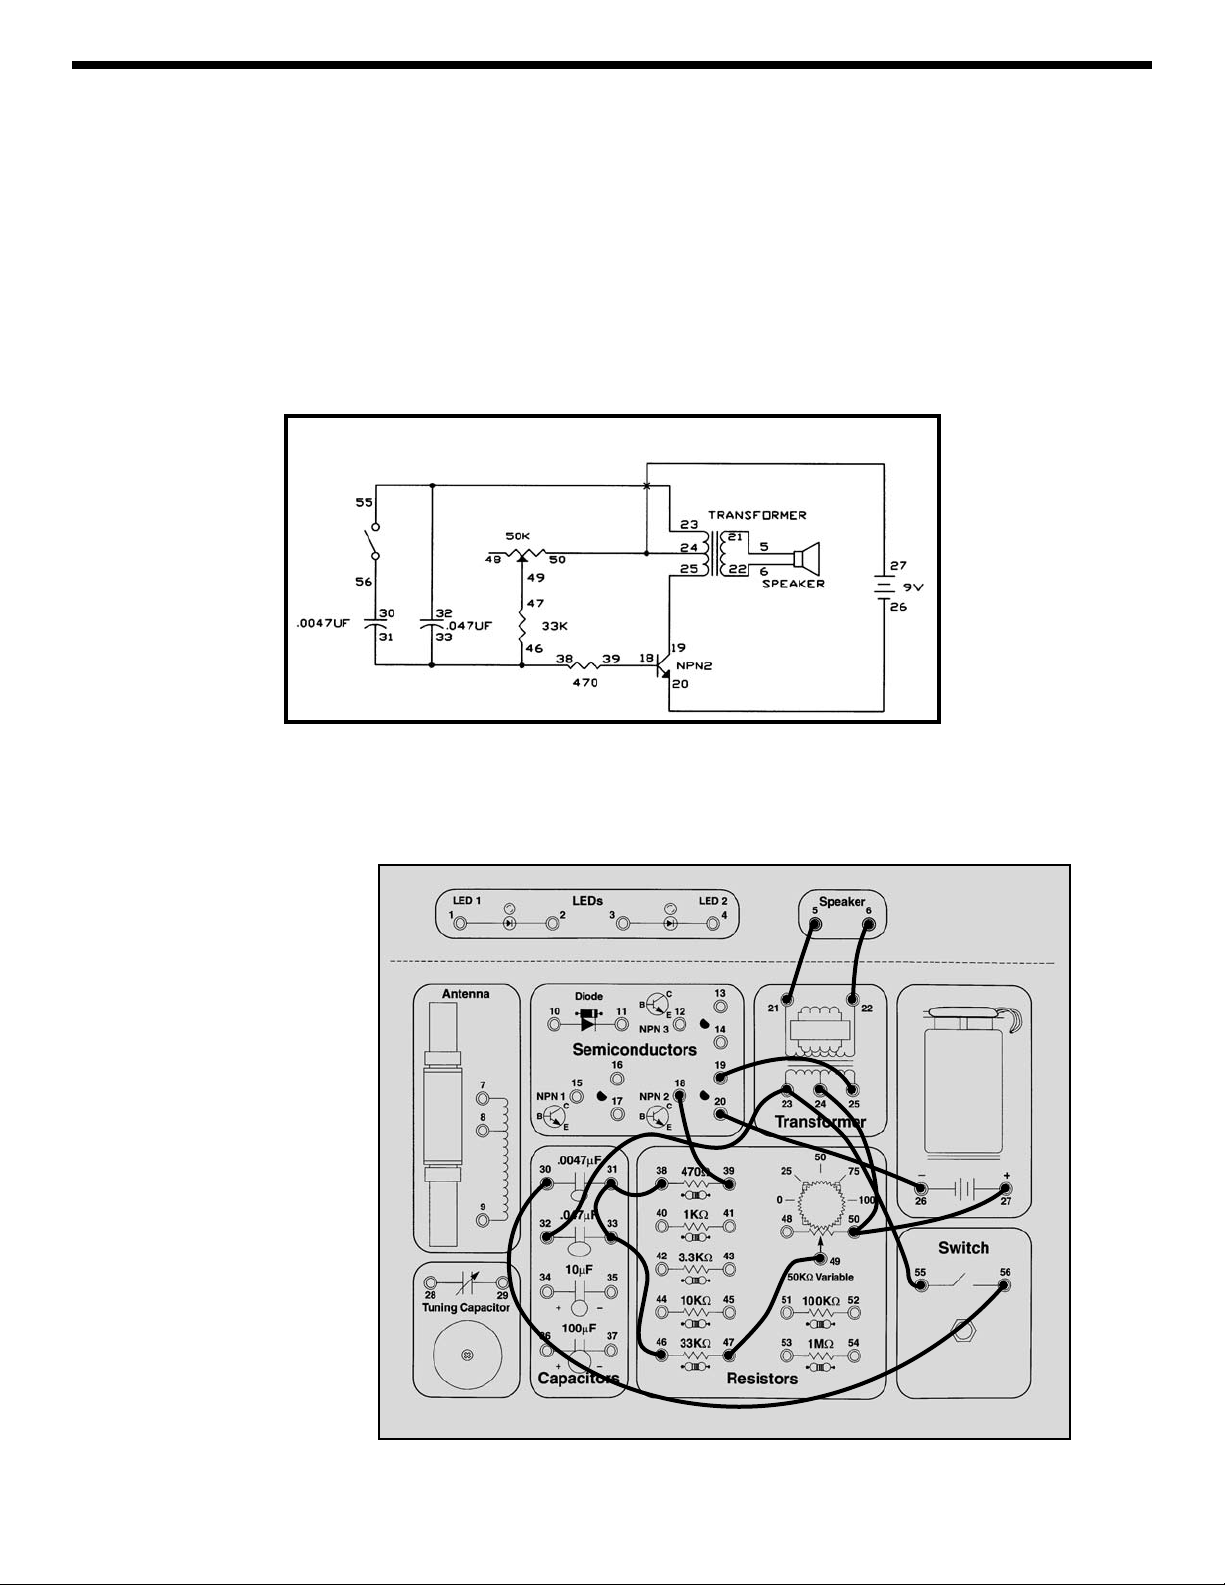
-51-
Connect the wires according to the Wiring Checklist,
connecting the battery wire last since it will turn the circuit
on. Press the switch several times quickly. Then turn the
variable resistor knob to change the frequency of the
sounds.
Do you understand what’s happening when you press the
switch? You increase the oscillator capacitance by
putting the .0047μF in parallel with the .047μF, and this
lowers the oscillator frequency.
As usual you can experiment with changing component
values if you like.
EXPERIMENT #33: Electronic Noisemaker
Wiring Checklist:
o 19-to-25
o 5-to-21
o 6-to-22
o 30-to-56
o 55-to-23-to-32
o 49-to-47
o 46-to-33-to-31-to-38
o 18-to-39
o 20-to-26
o 27-to-50-to-24
Schematic
Page 52

-52-
You need some more parts to do this experiment, so
you’re going to draw them. Take a pencil (No. 2 lead is
best but other types will also work), SHARPEN IT, and fill
in the 4 rectangles you see below. You will get better
results if you place a hard, flat surface between this
page and the rest of this booklet while you are
drawing. Press hard (but don’t rip the paper) and fill in
each several times to be sure you have a thick, even
layer of pencil lead and try to avoid going out of the
boundaries.
Actually, your pencils aren’t made out of lead anymore
(although we still call them “lead pencils”). The “lead” in
your pencils is really a form of carbon, the same material
that resistors are made of. So the drawings you just
made should act just like the resistors in your Electronic
Playground.
Connect the wires according to the Wiring Checklist. It’s
the same basic oscillator circuit you have been using.
Take the two loose wires and touch them to opposite
ends of the smallest rectangle you drew, you should hear
a sound like an alarm. Note: you may get better
electrical contact between the wires and the drawings if
you wet the wires with a few drops of water or saliva.
What kind of sound do you think you’ll get with the other
drawings? (Hint: think about how resistors operate in
series and parallel combinations, or think in terms of the
water pipes). Now touch the loose wires to opposite ends
of the other rectangles you drew (you may need to wet
the wires again) and see if you were right. You can also
slide one of the wires along the drawing and see how the
sound changes.
Making the drawn resistors longer should increase the
resistance (resistors in series or longer water pipes)
while making them wider should reduce the resistance
(resistors in parallel or larger water pipes). So all 4
rectangles should produce the same sound, though you
will see variations due to how thick and evenly you filled
in the rectangles, and exactly where you touch the wires.
If your 4 shapes don’t sound similar then try improving
your drawings.
Be sure to wash your hands after this test, unless you’re
going on to Experiment 35 now.
EXPERIMENT #34: Drawing Resistors
Shapes to be Drawn
Use a SHARP No. 2 pencil, draw
on a hard surface, press hard and
fill in several times for best results.
Wiring Checklist:
o 19-to-25
o 5-to-21
o 6-to-22
o 20-to-26
o 18-to-43
o 23-to-32-to-unconnected
(the unconnected wire
should be long)
o 33-to-42-to-44
o 45-to-unconnected (the
unconnected wire should
be long)
o 27-to-24
Schematic
Loose
Wires
Page 53
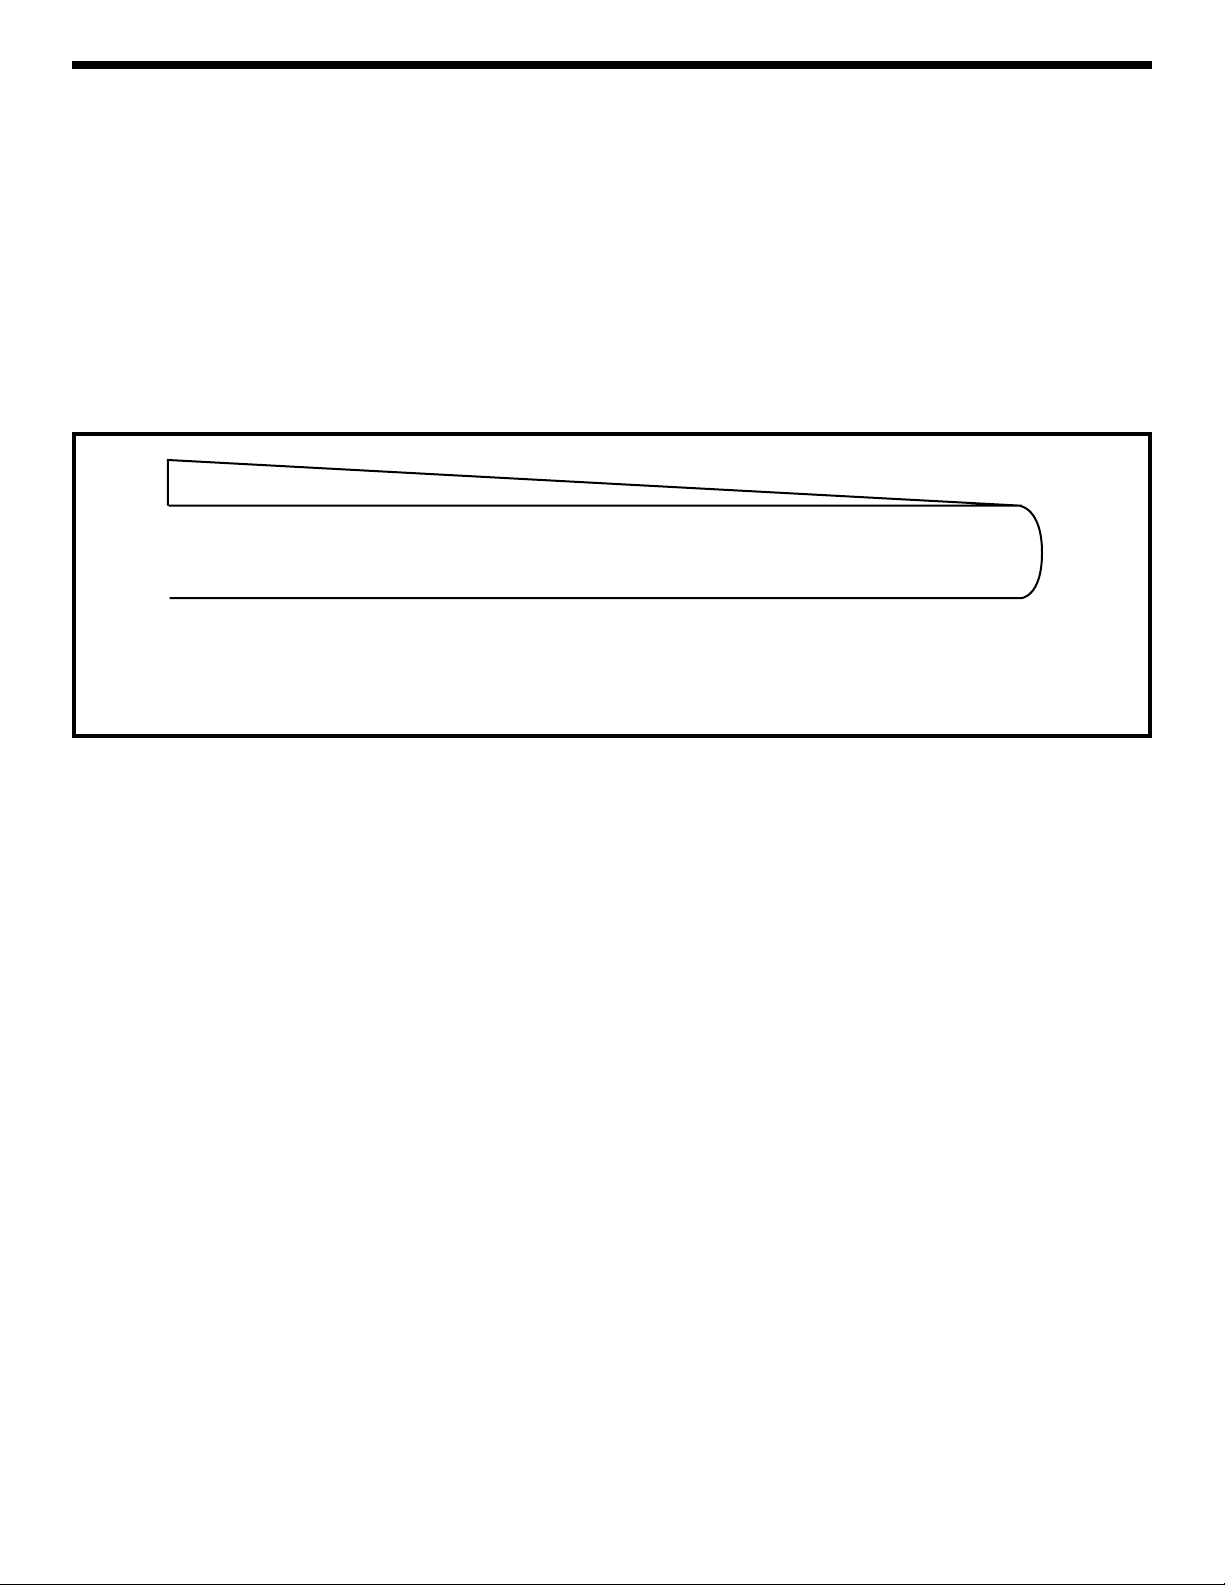
-53-
Now it’s time to make your own music. This experiment
will use the (almost) same circuit as the last one, so there
is no schematic or Wiring Checklist. The only difference
is that you will draw a new shape. A Kazoo is a musical
instrument that is like a one-note flute, and you change
the pitch (frequency) of the sound by moving a plunger
up and down inside a tube.
As before, take a pencil (No. 2 lead is best but other types
will also work), SHARPEN IT again, and fill in the shape
you see below. For best results SHARPEN IT again,
place a hard flat surface between this page and the
rest of this booklet while you are drawing, Press hard
(but don’t rip the paper), fill in each several times to be
sure you have a thick, even layer of pencil lead, and try
to avoid going out of the boundaries. Where the shape
is just a line, draw a thick line and go over it several
times. The black ink in this manual is an insulator just
like paper, so you have to write over it with your pencil.
Take one loose wire and touch it to the widest part of this
shape, at the upper left. Take the other loose wire and
touch it just to the right of the first wire. You should hear
a high-pitch sound. How do you think the sound will
change as you slide the second wire to the right? Do it,
slowly sliding all the way around to the end. The sound
changes from high frequency to low frequency, just like a
kazoo. Note: you may get better electrical contact
between the wires and the drawings if you wet the wires
with a few drops of water or saliva.
This circuit is nearly the same as for Experiment 27
(Electronic Sound), so you can use the notes you took
there to estimate what the resistance is at various points
along your kazoo.
Be sure to wash your hands after this test, unless you’re
going on to Experiment 36 now.
EXPERIMENT #35: Electronic Kazoo
Shape to be Drawn
Use a SHARP No. 2 pencil, draw on a
hard surface, press hard and fill in
several times for best results.
Page 54
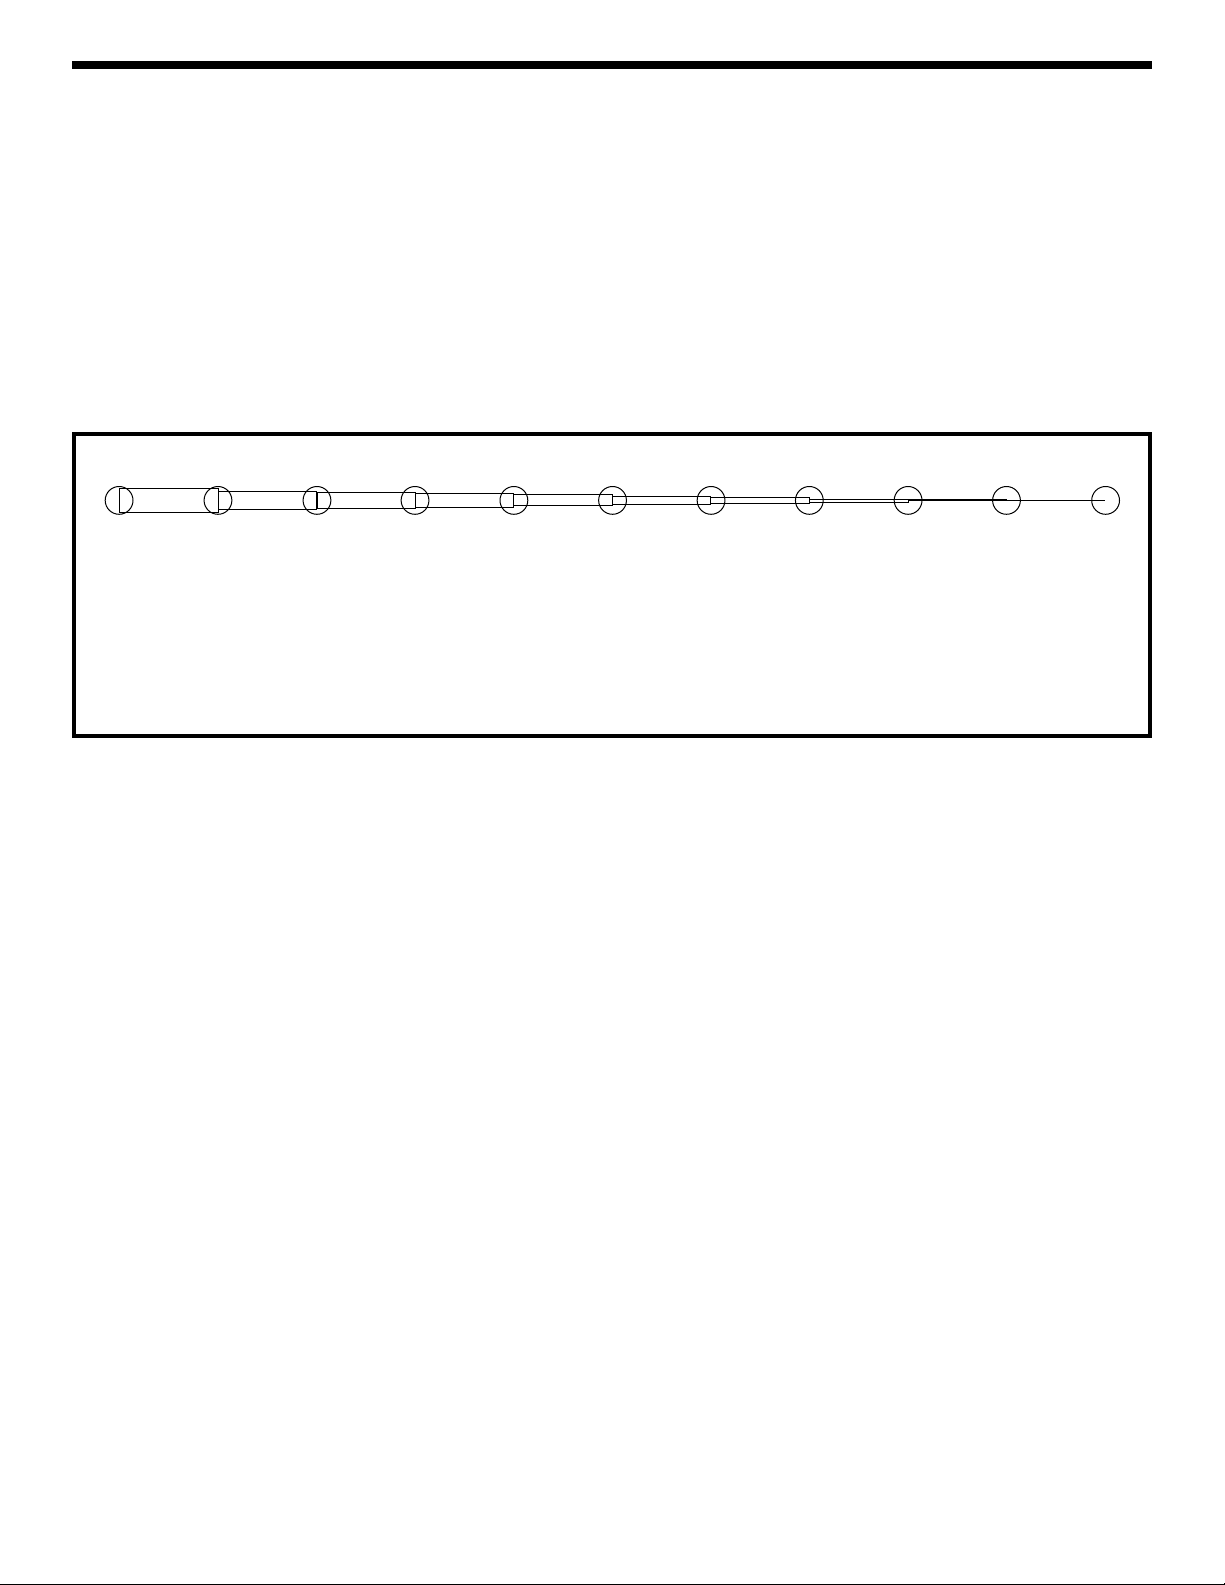
-54-
This experiment will use the (almost) same circuit as the
last one, so there is no schematic or Wiring Checklist.
The only difference is that you will draw a new shape.
As before, take a pencil (No. 2 lead is best but other types
will also work), SHARPEN IT again, and fill in the shape
you see below. For best results SHARPEN IT again,
place a hard flat surface between this page and the
rest of this booklet while you are drawing, Press hard
(but don’t rip the paper), fill in each several times to be
sure you have a thick, even layer of pencil lead, and try
to avoid going out of the boundaries. Where the shape
is just a line, draw a thick line and go over it several
times. The black ink in this manual is an insulator just
like paper, so you have to write over it with your pencil.
Take one loose wire and touch it to the left circle. Take
the other loose wire and touch it to each of the other
circles. The various circles produce different pitches in
the sound, like notes. Since the circles are like keys on a
piano, you now have an electronic keyboard! See what
kind of music you can play with it. Note: you may get
better electrical contact between the wires and the
drawings if you wet the wires with a few drops of water or
saliva.
Now take one loose wire and touch it to the right circle
(#11). Take the other wire and touch it to the circles next
to the numbers shown below, in order:
7 - 5 - 1 - 5 - 7 - 7 - 7
5 - 5 - 5
7 - 7 - 7
7 - 5 - 1 - 5 - 7 - 7 - 7 - 7 - 5 - 5 - 7 - 5 - 1
Do you recognize this nursery rhyme? It is “Mary Had a
Little Lamb”.
By now you see that you can draw any shape you like and
make electronic sounds with it. Experiment on your own
as much as you like. The circuit here is nearly the same
as for Experiment 27 (Electronic Sound), so you can use
the notes you took there to estimate what the resistance
is at various points along your keyboard or any other
shapes you make.
Be sure to wash your hands after this test.
EXPERIMENT #36: Electronic Keyboard
Shape to be Drawn
Use a SHARP No. 2 pencil, draw on a
hard surface, press hard and fill in
several times for best results.
1
2 3 4 5 6 7 8 9 10 11
Page 55

-55-
Connect the wires according to the Wiring Checklist.
Initially the two loose wires are unconnected so there is
no sound. Now touch each wire with fingers from
different hands, you should hear a low-frequency sound.
(Wetting your fingers with water or saliva will make better
electrical contact). You are using your body as an
electrical component, just as you did in Experiment 19
(Finger Touch Lamp). If you like you may make the sound
louder by removing the wire from spring 18 (trans base)
and connecting it to spring 42 (3.3KΩ), then connect a
wire from spring 43 (3.3KΩ) to spring 18.
Now take a small cup (make sure it isn’t made of metal),
fill it half way with water, and place the two wires into the
water but without touching each other. The sound will
now have a much higher frequency because your
drinking water has lower resistance than your body. Now,
with the wires still in the water making noise, add some
table salt to the water and stir to dissolve the salt. You
should hear the frequency increase as you do this.
This circuit makes a good water detector. You could use
it as a warning alarm in case your house starts to flood
during a storm. Or you could use the frequency of the
sound as a water saltiness indicator.
You can also make a water kazoo. Pour a small amount
of water on a table or the floor and spread it with your
finger into a long line. Place one of the wires at one end
and slide the other along the water. You should get an
effect just like the kazoo you drew with the pencil, though
the frequency will probably be different.
You’ve seen how adding salt to water decreases its
resistance. So would it surprise you to know that pure
water (distilled water) has very high resistance? The
drinking water you are using here has small amounts of
minerals in it, which decrease its resistance just like salt
does. Your body conducts electricity because your body
is mostly water, with many things mixed in. When salt
dissolves in water it breaks up into particles called ions,
which are electrically charged. The ions make it easier
for electrons to travel through the water, similar to how
adding impurities makes it easier for electrons to flow
through semiconductors. Their overall effect is that the
resistance of the water is reduced. If you have some
distilled water in your house, try using it with this test.
EXPERIMENT #37: Fun with Water
Wiring Checklist:
o 19-to-25
o 5-to-21
o 6-to-22
o 20-to-26
o 23-to-32-to-unconnected
(the unconnected wire
should be long)
o 18-to-33-to-44
o 45-to-unconnected (the
unconnected wire should
be long)
o 27-to-24
Schematic
Long Wires to Water
Page 56
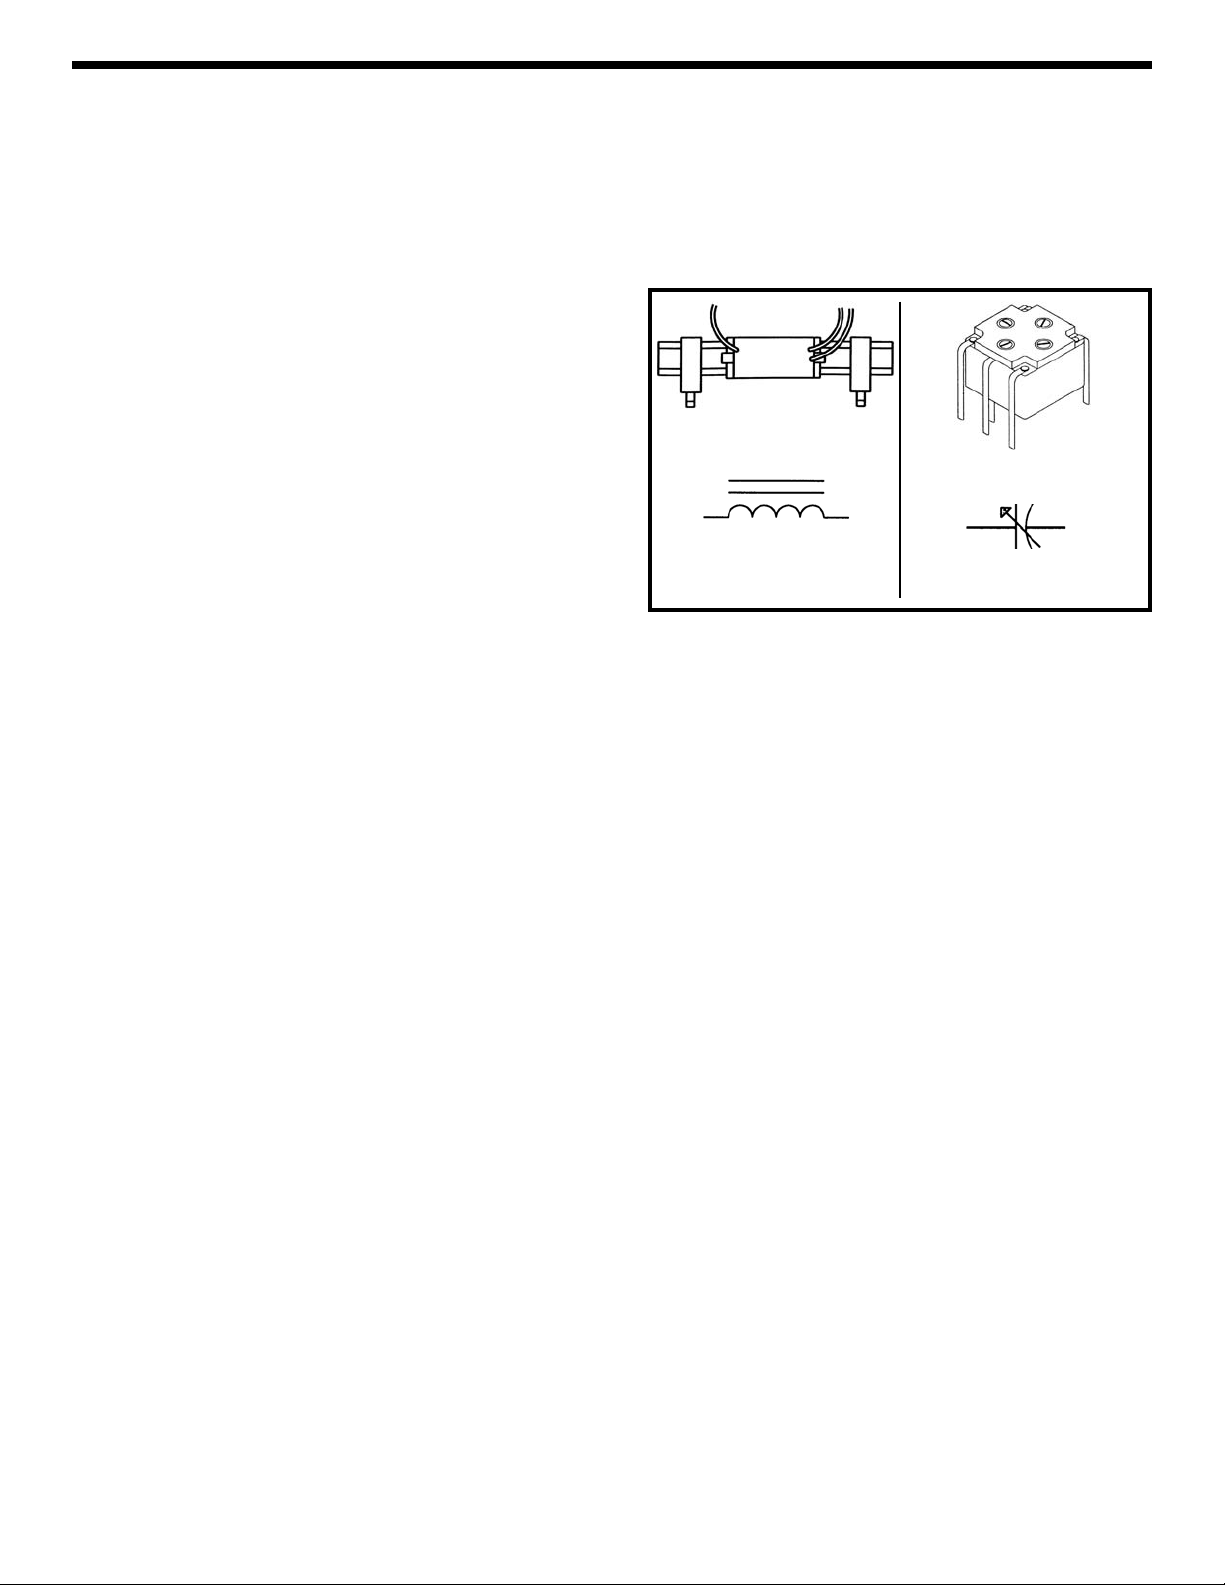
-56-
Back in Experiments 24 (Anti-Capacitor) and 25
(Magnetic Bridge) we talked about how an electric
current through a coil creates a magnetic field and how
this magnetic field can be used to “bridge” air gaps in a
transformer. What if the transformer air gap was larger,
perhaps a few inches? The distant coil would still pick up
some of the energy, but not much. If the original
(“transmitting”) coil and current through it were much
larger, then the electromagnetic field from it could still be
picked up by a “receiving” coil and produce a small
current even if the distance was many miles. This is the
concept of radio, which uses electromagnetic waves to
send information through the air. The coils used for
transmitting and receiving these signals are called
antennas. Today the air around us is full of radio
transmissions for things such as music, television,
cellular phones, aircraft navigation, communication with
probes in outer space, radio-controlled toys, and
thousands of other uses. The Federal Government
makes sure that all of these uses operate on different
frequencies so that they don’t interfere with each other. A
wide range of schemes are used for encoding the radio
signals with the information being sent. These are called
modulation. You’ve probably heard of AM and FM
radios. These stand for Amplitude Modulation and
Frequency Modulation.
There are many different radio signals floating around,
but we only want to listen to one. Think of this as being
in a large, crowded room and trying to talk to someone on
the other side. We solve this by connecting our antenna
to a capacitor in sort of an inductor-capacitor oscillator.
Remember from Experiment 24 that an inductor passes
DC (low frequencies) and blocks AC (high frequencies)
while a capacitor does the opposite. By combining these
two components we can “filter” out a small range of
frequency that we will listen to. By varying the
capacitance (using a tuning capacitor like the one
included in your Electronic Playground) we can adjust or
“tune” the range of frequency that we are listening to. The
tuning dial on all AM and FM radios is a variable
capacitor just like yours. After filtering out the undesired
radio frequencies we amplify the remaining signal using
a transistor amplifier like the one used in Experiment 16,
decode the modulation into the original audio signal
(electrical energy representing voice or music), and
produce sound with a speaker.
The antenna you will use is a 50μH and a 800μH coil
connected together and wrapped around an iron bar. The
variable capacitor varies from 50 to 200pF (which is
.00005 to .0002μF). Notice that these values are much
smaller than the transformer and the other capacitors you
have; that is why they have not been used in any previous
experiments. Their symbols are:
You will now build an AM radio receiver. Connect the
wires according to the Wiring Checklist, connecting the
battery wire last since this will turn on the circuit. You will
get better circuit performance if you keep your wires
short, so don’t use longer wire lengths than you need to.
This is because at high frequencies long wires start to act
like small inductors. AM radio uses a frequency range of
500 to 1600 KHz, where these effects are just starting to
become noticeable. After connecting the last wire, turn
your variable resistor all the way to the left. This part acts
as the speaker loudness control, turn it down (to the right)
if your sound is too loud. Now adjust your tuning
capacitor, turning it slowly. You should be able to hear a
few local radio stations. Although this radio uses the
same types of circuits as AM radios sold in stores, this is
a very simple radio receiver. Take a look inside an old AM
radio in your house, you’ll see a lot more components.
So don’t expect to get as good of performance as with
radios sold in stores.
If you turn the tuning capacitor slowly you should receive
several stations. If not, try walking around your house or
outside with your Playground. This may give you better
radio reception. Or you can connect a wire from battery
spring 26 to a water pipe or other electrical “ground”.
Also check your wiring, as this circuit is more complicated
than most that you have built.
Take a look at the schematic. The antenna and tuning
capacitor for tuning are on the left. Transistor NPN1
amplifies the received radio signal using its current gain.
The diode and .0047μF capacitor are a simple Amplitude
Modulation detector, converting the radio signal back to
the original audio signal. The audio is amplified using
NPN2’s current gain and converted into sound by the
speaker.
EXPERIMENT #38: Transistor Radio
Antenna
Tuning Capacitor
Symbol for Antenna
Symbol for
Tuning Capacitor
Page 57
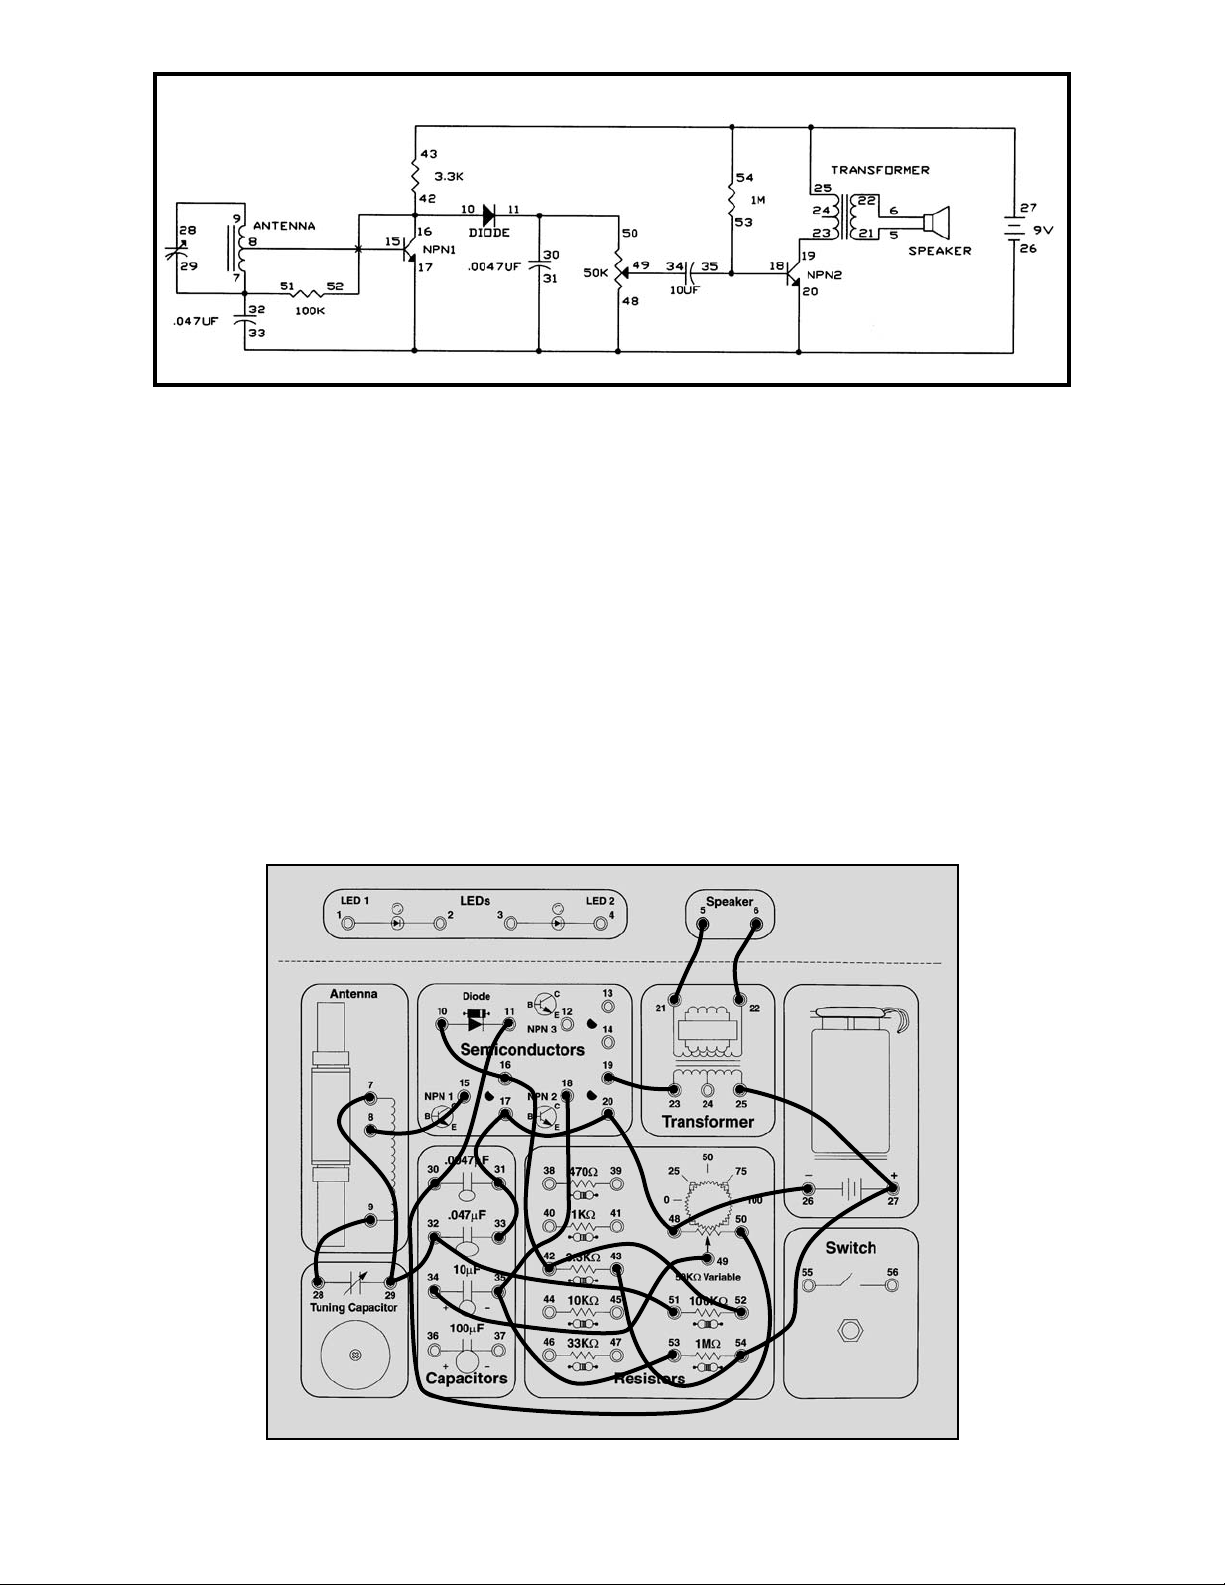
-57-
Wiring Checklist:
o 28-to-9
o 8-to-15
o 7-to-29-to-32-to-51
o 52-to-42-to-16-to-10
o 33-to-31-to-17-to-20-to-48-to-26
o 11-to-30-to-50
o 49-to-34
o 53-to-35-to-18
o 19-to-23
o 5-to-21
o 6-to-22
o 43-to-54-to-27-to-25
Schematic
Page 58

-58-
Now that you’ve built an AM receiver, how about building
an AM transmitter? Ever wanted to be a radio
announcer? You’re about to get your chance. Note: you
need an AM radio for this experiment.
Connect the wires according to the Wiring Checklist,
connecting the battery wire last since this will turn on the
circuit. As in the last experiment you will get better circuit
performance if you keep your wires short, so don’t use
longer wire lengths than you need to.
Take an AM radio you have in your home, turn it on,
extend its antenna, and place it next to your Electronic
Playground. Tune it to the low end of the AM frequency
range or somewhere near the low end where there is only
static and no radio station. Now slowly adjust your
variable capacitor until you hear the static quiet down or
you hear a hum instead. This indicates to you that your
radio is receiving the transmitted signal from your
Playground, so both must be on the same frequency. Tap
the cardboard panel near the speaker, you should hear
this on the radio. Turn the radio volume control up a little
if you don’t hear it at first. If you can’t get your radio and
Playground to be on the same frequency then try tuning
the radio to a different frequency (stay near the low end
of the radio’s tuning range) and try again. The AM
transmitter circuit you are using is a very simple one and
it will not operate across the entire range of AM radio
frequencies. Your radio may have been tuned to a
frequency that your transmitter can’t reach. You can also
tune your radio while tapping near the speaker. When
you hear the tapping then your Playground and radio are
on the same frequency (if this happens to be where an
AM station exists then tune Playground and radio to the
nearest static spot). If you still can’t get this to work then
check your circuit wiring. This is the most complex circuit
you will build, and it is easy to make wiring errors.
Now talk into the speaker, keeping your mouth close to it.
You should hear yourself on the radio! Turn up your radio
volume control or shout if you don’t hear yourself at first.
You can also adjust your variable capacitor slightly to
make sure you are tuned for best transmission.
In this experiment the speaker is being used as a
microphone. A microphone is the opposite of a speaker,
converting sound waves into electrical energy by sensing
the variations in air pressure. (Recall from Experiment 27
that sound waves are variations in air pressure). The
mechanical construction of the speaker allows it to also
be used as a microphone, though it is more efficient as a
speaker than as a microphone. If your voice didn’t sound
very clear on the radio, it is probably because of the
speaker’s limitations as a microphone. The transformer is
used with the speaker as before.
The circuit is complex but advanced students may want
to take a look at the schematic. The signal from the
speaker (microphone) and transformer is applied to a
high gain amplifier built around NPN2. This is the
standard application of the transistor circuit you used in
Experiment 16. The four resistors turn on the transistor
but do not saturate it. The circuit built around transistor
NPN1 is an oscillator, similar to the ones you have been
using only higher in frequency. It uses the antenna as its
inductor instead of the transformer, uses the variable
capacitor to adjust the frequency, and it uses four
resistors (including the 3.3KΩ) to turn on the transistor
without saturating it. It also gets its power from the output
of the NPN2 circuit instead of directly from the battery.
This is how the high-frequency oscillator is amplitude
modulated to carry your voice to the radio. Part of the
oscillator energy is transferred into the air at the antenna.
Now you can use this circuit to be a radio announcer or
DJ!
EXPERIMENT #39: Radio Announcer
Schematic
Page 59

-59-
The circuit you have just built as an AM radio transmitter
also has other applications. There is no schematic or
Wiring Checklist here because we are using the same
circuit.
Can you think of a way to use this circuit as an AM radio
jammer? Here’s how. Place your AM radio next to your
Electronic Playground and tune it to a local AM radio
station that is close in frequency to where the last
experiment operated (at the low end of the radio’s tuning
range). Now adjust the variable capacitor to place your
AM transmitter on the same frequency. When you’ve
done this you will hear a hum or no sound at all instead
of the radio station. If you can’t get this to work then you
probably picked a radio frequency that your AM
transmitter can’t reach, as we discussed in the last
experiment. Pick a different radio station and try again.
So now you have an AM radio jammer. This works
because is the signal from your transmitter is stronger
than the signal from the local radio station and “drowns it
out” the same way someone standing next to you yelling
makes it hard to hear somebody else talking to you softly.
You can test the range of your jammer by moving your
Playground away from the radio until you can hear the
radio station again. And note that your jammer range
depends on which radio station you listen to, since some
stations will be stronger than others. You don’t need to
talk into the speaker to jam because your transmission
itself does the jamming, not what you say. If the jammed
radio station is weak enough then you may be able to talk
into the speaker and be heard on the radio as if you had
taken control of the radio station.
Can you think of a way to use this circuit as a metal
detector? Here’s how. Keep your Playground and AM
radio set up so that you are jamming a local radio station.
Now take a solid metal object, such as a magnet, and
bring it close to your Playground antenna. You should
hear the radio station again, this is your indicator that you
have detected metal. Do you know how this works? Your
metal object changes the antenna’s inductance by
changing the magnetic field around the iron bar through
the antenna, just as wrapping the antenna coil around the
iron bar increased the antenna inductance. By bringing
the metal object close to the antenna you change the
oscillator frequency (since the inductance changed). So
your jammer is still working but its not jamming the
frequency that your radio is tuned to, so you hear the
radio station. Now you can hunt for buried treasure!
EXPERIMENT #40: Radio Jammer / Metal Detector
Wiring Checklist:
o 25-to-26-to-47-to-45-
to-41-to-39-to-33-to-35
o 28-to-9-to-16
o 17-to-38
o 7-to-30-to-29
o 15-to-31-to-44-to-48
o 8-to-32-to-42-to-19
o 20-to-40-to-34
o 18-to-51-to-46-to-36
o 37-to-23
o 5-to-21
o 6-to-22
o 43-to-52-to-50-to-27
Page 60

-60-
Take a look at the schematic. This circuit configuration is
a type of oscillator called an astable multivibrator. What
do you think it will do? Connect the wires according to
the Wiring Checklist, noting that the transistor bases are
not connected although their wires cross in the
schematic. Initially set the variable resistor (VR) to its
minimum value (turn it to the right). Press the switch and
hold it down. One LED is on while the other is off, and
they change about every second. What do you think will
happen as you turn the knob on the VR? The right LED
stays on longer than the left one.
In this circuit, one transistor is always on while the other
is off. In this type of oscillator there is no inductor, the
frequency is controlled only by the resistors and
capacitors. The 100KΩ and 10μF determine how long
NPN1 is on and the 3.3KΩ, VR, and 100μF determine
how long NPN2 is on. If you want to experiment with
changing part values, go ahead. But don’t replace the
capacitors with the smaller disc ones (you’ll see why in
the next experiment).
Blinking lights like this are often used to attract people’s
attention.
EXPERIMENT #41: Blinking Lights
Wiring Checklist:
o 27-to-56
o 55-to-52-to-43-to-41-to-39
o 40-to-1
o 2-to-16-to-34
o 35-to-51-to-18
o 38-to-3
o 4-to-19-to-36
o 15-to-37-to-49
o 48-to-42
o 17-to-20-to-26
Schematic
Page 61

-61-
This circuit is similar to the last one. Connect the wires
according to the Wiring Checklist (noting that the
transistor bases are not connected although their wires
cross in the schematic). Press the switch and hold it
down. The LED lights and you hear sound from the
speaker. Turn the knob on the variable resistor and the
frequency of the sound changes. Can you tell what the
LED is really doing? It is actually blinking about 500
times a second, but to your eyes it appears as a blur or
just dim. (This is why we told you not to replace the large
capacitors with small ones like these in the last
experiment).
You can experiment with changing component values if
you like. The 470Ω resistor limits the sound loudness,
replace it with a wire to make the sound louder and
replace it with a 10KΩ to make the sound softer.
Swapping the two capacitors in the circuit will make the
sound frequency higher, replacing them with the 10μF or
100μF will make the frequency much lower. You can also
change some of the other resistors.
EXPERIMENT #42: Noisy Blinker
Wiring Checklist:
o 27-to-56
o 55-to-52-to-43-to-41-to-39
o 40-to-1
o 2-to-16-to-30
o 18-to-31-to-51
o 38-to-23
o 25-to-19-to-32
o 15-to-33-to-49
o 48-to-42
o 17-to-20-to-26
o 5-to-21
o 6-to-22
Schematic
Page 62

-62-
Do you know what this circuit will do? Connect the wires
according to the Wiring Checklist (noting that the
transistor bases are not connected although their wires
cross in the schematic). Press the switch and release it.
The LED is on for a few seconds and then goes out.
What effect do you think changing the value of the
variable resistor will have? Try it. The higher the
resistance the longer the LED stays on.
This circuit is a variation of the astable multivibrator and
is called a one-shot multivibrator, because the LED
comes on once each time the switch is pressed. The
33KΩ, variable resistor, and 100μF control how long the
LED is on. This circuit can be used as a timer. You might
use a circuit like this with your microwave oven. You
press the switch to turn the oven on and have a knob (the
variable resistor) to adjust how long the oven stays on; it
then shuts off automatically.
EXPERIMENT #43: One-shot
Wiring Checklist:
o 40-to-1
o 2-to-16-to-36-to-56
o 17-to-20-to-26-to-55
o 37-to-49-to-18
o 46-to-48
o 44-to-42-to-19
o 15-to-45
o 41-to-43-to-47-to-27
Schematic
Page 63

-63-
Let’s demonstrate a use for the timer circuit you just built
by combining it with Experiment 28, the Alarm. Connect
the wires according to the Wiring Checklist (noting that
the transistor bases and transformer springs 23 and 24
are not connected although their wires cross in the
schematic). Connect the alarm trip wire and then
connect the battery wire to turn the circuit on. Press the
switch once. Now disconnect the trip wire to activate the
alarm. The alarm stays on for a few seconds and then
goes off. Reconnect the trip wire and press the switch to
reset the alarm and timer. If you only re-connect the trip
wire without resetting the timer then the alarm won’t work
the next time. You could use a circuit like this where you
get lots of false alarms and you want to shut off the alarm
before the battery gets weak. Automobile alarms, for
example, get lots of false alarms.
EXPERIMENT #44: Alarm with Shut-off Timer
Wiring Checklist:
o 11-to-16-to-36-to-56
o 10-to-14
o 17-to-20-to-26-to-55
o 37-to-51-to-18
o 44-to-42-to-19
o 15-to-45
o 5-to-21
o 6-to-22
o 23-to-33-to-47
o 12-to-32-to-46
o 13-to-38
o 39-to-25
o 12-to-14 (use a long wire,
this will be referred to as
the “trip” wire)
o 43-to-52-to-27-to-24
Schematic
Long “Trip” Wire
Page 64

-64-
This circuit is yet another variation of the basic
multivibrator configuration. Connect the wires according
to the Wiring Checklist. One LED will be on, the other off.
Take the loose wire and touch it to the base of the
transistor that is on (spring 15 or 18). That transistor
turns off and the other turns on. Do this a few more times
until you see that touching the “on” transistor base “flips”
the transistors and the LEDs. You might say that the
transistor turning on “flips” and the one turning off “flops”.
Notice that touching the “off” transistor base has no
effect.
This circuit is called formally known as the bistable
switch, but is nicknamed the “flip-flop” due to the way it
operates. The name flip-flop may seem silly to you at
first, but variations of this circuit form one of the basic
building blocks for digital computers. This circuit can be
thought of as a memory because it only changes states
when you tell it to, it “remembers” what you told it to do
even though you removed the loose wire. By combining
several of these circuits you can remember a letter or
number. By combining thousands of these circuits a
computer can remember a small book. A typical
computer has many thousands of flip-flops, all in
integrated circuit form. The operation of this circuit is
simple. If NPN1 is on then it will have a low collector
voltage. Since this collector voltage also connects to
NPN2’s base, NPN2 will be off. But if you ground NPN1’s
base then it will turn off and its collector voltage rises,
turning on NPN2. NPN2 will stay on until you ground its
base.
EXPERIMENT #45: The Flip-Flop
Wiring Checklist:
o 16-to-40-to-51
o 52-to-18
o 19-to-42-to-47
o 46-to-15
o 17-to-1
o 20-to-3
o 2-to-4-to-26-to-unconnected
o 41-to-43-to-27
Schematic
Loose Wire
Page 65
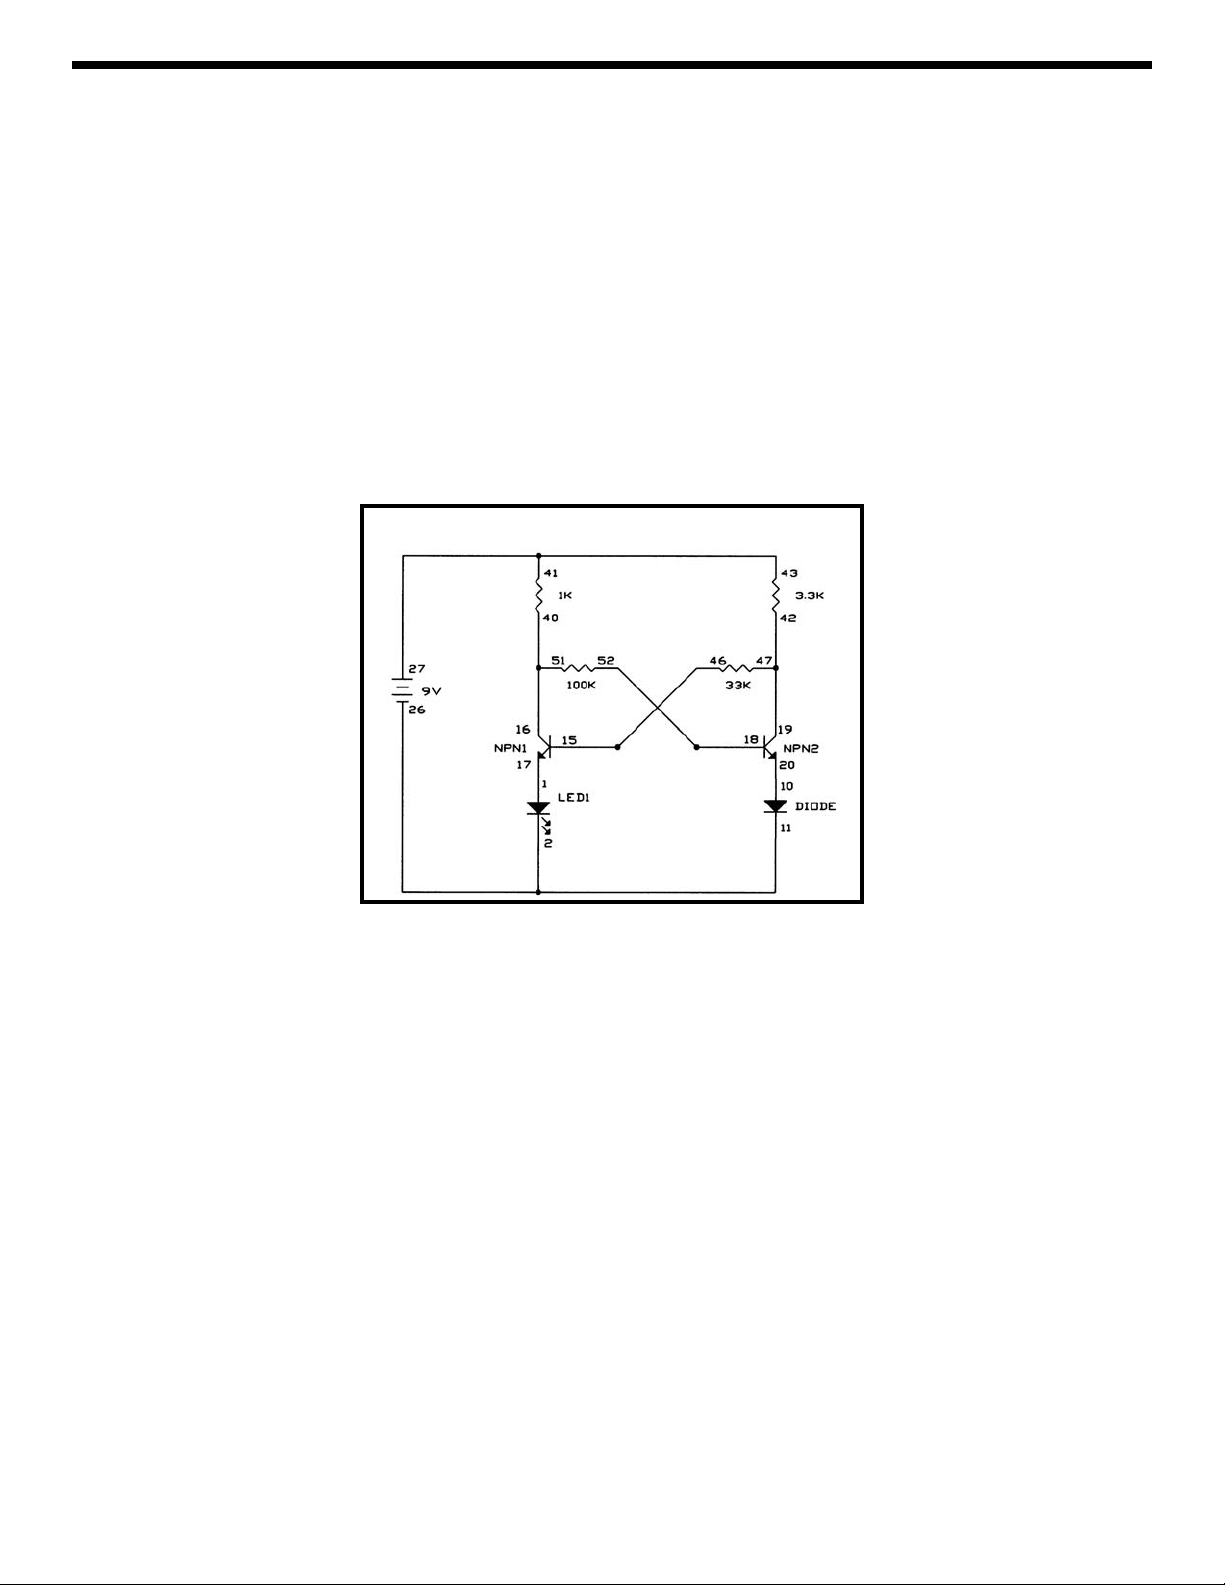
-65-
Instead of using the wire to flip-flop the LED you may also
use your fingers as you did in Experiment 19, the Finger
Touch Lamp. We’ll use almost the same circuit here as in
the last experiment. Just replace LED2 with the diode
(move the wire on spring 3 to spring 10, and the wires on
spring 4 to spring 11) because we don’t need two
“lamps”. Wet two fingers and hold one on battery spring
27 while touching the other to the transistor base springs.
But now you must touch the base of the “off” transistor to
make them flip-flop, not the “on” base. Do you know why?
Your body has more resistance than the other resistors in
the circuit and cannot “short circuit” the transistor bases
to circuit ground like the wire can. So instead we connect
the off transistor to the battery to turn it on.
But this uses two fingers and in Experiment 19 we also
had a one-finger version, so can we do that here?
Connect wires between springs 41 and 32, between 15
and 30, and between 18 and 34. Wet a large area of one
of your fingers and touch it to springs 30 and 32 or 32 and
34 at the same time. Now we have a one-finger touch
lamp with memory!
EXPERIMENT #46: Finger Touch Lamp with Memory
Schematic
Page 66

-66-
Now that you’re familiar with the flip-flop, let’s introduce
some more digital circuits. Digital circuits are circuits that
have only two states, such as high-voltage/low-voltage,
on/off, yes/no, and true/false. Connect the wires
according to Wiring Checklist. Take a look at the
schematic, it is very simple. Wires X and Y are
considered to be digital inputs, so connect them to either
the battery spring 27 (9V, or HIGH) or leave them
unconnected (this is the same as connecting them to 0V,
or LOW). Test the four combinations of X and Y to
determine the state of LED1 (ON or OFF), filling in the
table below:
This type of table is called a truth table. From it, you can
see that if X orY is HIGH then LED1 will be ON. Hence,
this configuration is called an OR gate. X and Y might
represent two switches to turn on a light in your house.
Or they might represent sensors at a railroad crossing; if
either senses a train coming they start the ding-ding
sound and lower the gate. You could also have more than
two inputs, by adding more parts to your circuit and more
columns to the truth table.
EXPERIMENT #47: This OR That
Wiring Checklist:
o 17-to-20-to-26
o 42-to-1
o 2-to-16-to-19
o 15-to-44
o 45-to-unconnected
(this is referred to as wire X)
o 18-to-46
o 47-to-unconnected
(this is referred to as wire Y)
o 43-to-27
Schematic
Wire X
X Y LED 1
LOW/UNCONNECTED LOW/UNCONNECTED
LOW/UNCONNECTED HIGH/POWER
HIGH/POWER LOW/UNCONNECTED
HIGH/POWER HIGH/POWER
Wire Y
Page 67

-67-
Now let’s add on to the previous circuit by adding the
wires listed in the Wiring Checklist (these are in addition
to the wires from Experiment 47, which you should still
have assembled).
Test the four
combinations of X
and Y as before to
determine the state
of LED2 (ON or
OFF), filling in the
table at right:
This table shows that if neither X
nor
Y is HIGH then
LED2 is ON. Hence, this configuration is called a NOR
gate. X and Y might represent your burglar alarm and
flood detector, so if neither X nor Y is on then your “all
clear” light goes on. You may also think of this as adding
a NOT gate to an OR gate to
produce a NOR gate. A NOT gate
is just the opposite of its input:
Gates such as OR, NOR, and NOT form some of the
basic building blocks for computers. The combinations of
resistors and transistors shown here to build them are a
form of Resistor-Transistor-Logic, which was used
extensively in early generations of computers and which
led to the development of many of today’s logic families.
These basic gates are so commonly used that they have
their own symbols:
EXPERIMENT #48: Neither This NOR That
Wiring Checklist (additions to
Experiment 47 Checklist):
o 14-to-26
o 40-to-3
o 4-to-13
o 12-to-51
o 41-to-43
o 19-to-52
Wire X
Wire Y
X Y LED 2
LOW LOW
LOW HIGH
HIGH LOW
HIGH HIGH
Input NOT
LOW HIGH
HIGH LOW
OR Gate NOR Gate NOT Gate
Schematic
Page 68

-68-
Take a look at the schematic. Can you guess what kind
of digital gate this is? We’ll use almost the same circuit
here as in the last experiment. Remove the wire between
springs 17 and 20, and the one between springs 16 and
19. Add a wire between springs 17 and 19. Also,
disconnect the 100KΩ by removing the wire between
springs 19 and 52, we’ll re-connect it later.
Test the four combinations of X and Y to determine the
truth table:
From it, you can see that if X
and
Y are HIGH then LED1
will be ON. Hence, this configuration is called an AND
gate. X and Y might represent two switches to turn on the
same light in your house, the room switch and the master
switch in the electrical box
.
As with the gates we showed
you earlier, you could have more than two inputs by just
adding more parts to the circuit.
Now place the 100KΩ back into the circuit by connecting
a wire between springs 17 and 52 (not 19 and 52), and
look at LED2. Since you are just adding a NOT gate as
you did in the last experiment you probably know what
the new truth table will look like:
It is a NAND gate, a combination of AND and NOT. X and
Y might represent different trip wires for your burglar
alarm (if either is tripped then that input goes LOW and
the alarm sounds). AND and NAND have the schematic
symbols shown below:
Combinations of AND and OR gates are used to add and
multiply numbers together in computers. The additional
use of NOT, NOR, and NAND gates allows a computer to
represent any input/output pattern you can think of. By
combining these gates with the memory and timing
control that flip-flops provide, today’s computers are
created.
EXPERIMENT #49: This AND That
X Y LED 1
LOW LOW
LOW HIGH
HIGH LOW
HIGH HIGH
AND Gate
Schematic
X Y LED 2
LOW LOW
LOW HIGH
HIGH LOW
HIGH HIGH
NAND Gate
Page 69

-69-
Using the LEDs for these truth tables probably seems a
little boring. So let’s use an audio circuit to make a sound
instead of turning on the LED. Connect the wires
according to the Wiring Checklist. Can you tell which
digital gate this circuit represents? Construct the truth
table to find out.
It is the NAND gate. If you use longer wires for X and Y
and leave them connected HIGH then you have an alarm
with two separate trip wires.
You can easily modify the circuit to be an AND gate.
Remove the 3.3KΩ resistor and 10μF capacitor, connect
spring 24 (transformer) to spring 27 (battery) instead of
spring 16 (NPN1 collector), and connect spring 14 (NPN3
emitter) to spring 16 (NPN1 collector) instead of spring
20 (NPN2 emitter). This audio circuit can also be used
with the OR and NOR gates simply by rewiring NPN1,
NPN2, and the 10KΩ, 33KΩ resistors.
EXPERIMENT #50: Audio AND, NAND
Wiring Checklist:
o 14-to-20-to-26
o 17-to-19
o 15-to-44
o 45-to-unconnected (this is
referred to as wire X)
o 18-to-46
o 47-to-unconnected (this is
referred to as wire Y)
o 12-to-32-to-51
o 5-to-21
o 6-to-22
o 13-to-23
o 33-to-52-to-25
o 24-to-16-to-42-to-35
o 34-to-43-to-27
Wire X
Wire Y
Schematic
Page 70

-70-
This last circuit is a combination of some of the other
digital gates, and has 3 inputs. See if you can fill in the
truth table by just looking at the schematic. Then connect
the wires according to the Wiring Checklist, test all eight
input combinations, and see if you were right.
What could this circuit be used for? It might be used to
provide power for your telephones. Z would be controlled
by the phone company and would be high if you paid your
phone bill. X and Y could be different phones in your
house and would be high when you pick up the phone.
The transistor emitters would then provide voltage to the
rest of the telephone circuit.
EXPERIMENT #51: Logic Combination
Wiring Checklist:
o 17-to-20-to-26
o 16-to-19-to-14
o 13-to-2
o 1-to-42
o 15-to-44
o 45-to-unconnected (this is
referred to as wire X)
o 18-to-46
o 47-to-unconnected (this is
referred to as wire Y)
o 12-to-51
o 52-to-unconnected (this is
referred to as wire Z)
o 43-to-27
Schematic
Wire X
X Y Z LED 1
Predicted
LED 1
Measured
LOW LOW LOW
LOW LOW HIGH
LOW HIGH LOW
LOW HIGH HIGH
HIGH LOW LOW
HIGH LOW HIGH
HIGH HIGH LOW
HIGH HIGH HIGH
Wire Y
Congratulations! You’ve finished
all the experiments and can now
show your friends how much you
know about electronics! What to
do next? Well, you can re-do your
favorite experiments or look our
list of other Elenco
®
Electronics
learning products!
Wire Z
Page 71

-71-
1. Adjusting the input to something based on what its
output is doing is an example of __________.
2. A speaker converts electrical energy into __________
__________ variations, called sound waves.
3. An oscillator’s frequency __________ when you add
resistance or capacitance.
4. Sending information through the air using
electromagnetic waves is called __________.
5. Long wires start to act like __________ at high
frequencies.
6. A NOR gate followed by a NOT gate is the same as an
__________ gate.
7. An AND gate followed by a NOT gate is the same as
a __________ gate.
(Answers are on page 5).
TEST YOUR KNOWLEDGE #3
• Check your wiring against the Wiring Checklist and the
schematic, very carefully
. Be sure all your wires are
securely in place and not loose. Also make sure the
metal in the wires is only contacting the spring and
wires that it is connected to, and not to any nearby
springs or other wires. Nearly all problems are due to
wiring errors. Also remember that the battery and
electrolytic capacitors have “+” and “–” terminal
markings.
• Be sure you have a good 9V battery. If not sure then try
a new battery.
• Flip your Playground over and examine the
connections on the back side. Every spring should
have a wire from a component connected to it, and the
connections should be secure (not loose). No wires
should be touching any other wires on the back side
(exception: two wires from the antenna are connected
to spring 8 (the antenna).
TROUBLESHOOTING GUIDE
Contact Elenco®Electronics, Inc. (our address/phone/website is on the back of this booklet) if you further assistance. DO
NOT contact your place of purchase as they will not be able to help you.
Van Valkenburgh, Nooger, and Neville (1993).
Basic Electricity
. Sams (61041)
Rezurch I. (1996).
Electronics Terminology
. Sams (67013)
Johnson J. R. (1994).
Schematic Diagrams
. Sams (61059)
Kamichik S. (1996).
Digital Electronics
. Sams (61075)
FOR FURTHER READING (all of these are available through Elenco
®
Electronics, Inc.)
Page 72

Elenco®Electronics, Inc.
150 Carpenter Avenue
Wheeling, IL 60090
(847) 541-3800
Website: www.elenco.com
e-mail: elenco@elenco.com
 Loading...