

Electrolux MCC 663 User Manual

Instruction manual
AUS ERFAHRUNG GUT
MCC 663
Microwave oven
UK
UK

2
Printed on recycled paper-
AEG - putting words into action
Dear customer,
Thank you for buying an AEG microwave oven and putting your trust in the
AEG brand name.
Before using your AEG microwave oven for the first time, please read the
instruction book thoroughly . This will enable you to take advantage of all the
features that the appliance offers. It will also ensure trouble-free operation
and minimize unnecessary service calls. Please
keep it for future reference. It
contains important instructions concerning installation, use and security measures.
Important information concerning your safety or the operation of your ap-
pliance is noted by this symbol and/or mentions words such as «Warning»,
«Take care». Be sure to follow all instructions carefully.
Throughout the manual, this symbol guides you step by step when operating
the appliance.
This symbol indicates further information concerning the use of the
appliance.
The clover indicates energy-saving tips and hints for environmentally friendly
use of your appliance.
In the event of malfunctioning, please follow the instructions given in the
section «What to do if...»
☞
!
i
¤
¤
¤
)

3
tt
Contents
Important information
Ecologically responsible disposal of packaging
and old appliances . . . . . . . . . . . . . . . . . . . . . . . . . . . . . . . . 5
Electrical connections . . . . . . . . . . . . . . . . . . . . . . . . . . . . . 6
Safety Instructions
General . . . . . . . . . . . . . . . . . . . . . . . . . . . . . . . . . . . . . . . . . 7
For trouble-free and safe operation . . . . . . . . . . . . . . . . . . 7
Microwaves . . . . . . . . . . . . . . . . . . . . . . . . . . . . . . . . . . . . . 8
Grill / convection . . . . . . . . . . . . . . . . . . . . . . . . . . . . . . . . 9
General operating instructions
Suitable ovenware . . . . . . . . . . . . . . . . . . . . . . . . . . . . . . . . 10
What else to note . . . . . . . . . . . . . . . . . . . . . . . . . . . . . . . . 11
Product Description
The appliance . . . . . . . . . . . . . . . . . . . . . . . . . . . . . . . . . . . . 12
Control panel . . . . . . . . . . . . . . . . . . . . . . . . . . . . . . . . . . . . 13
Display . . . . . . . . . . . . . . . . . . . . . . . . . . . . . . . . . . . . . . . . . 14
Accessories . . . . . . . . . . . . . . . . . . . . . . . . . . . . . . . . . . . . . . 15
Before using the appliance
Cleaning . . . . . . . . . . . . . . . . . . . . . . . . . . . . . . . . . . . . . . . . 16
Setting the clock . . . . . . . . . . . . . . . . . . . . . . . . . . . . . . . . . 16
“At a glance” operating instructions . . . . . . . . . . . . . . . . 17

4
Contents
Modes of operation . . . . . . . . . . . . . . . . . . . . . . . . . . . . . . 19
Microwave only . . . . . . . . . . . . . . . . . . . . . . . . . . . . . . . . . . 20
Notes on microwave power levels . . . . . . . . . . . . . . . . . . . . 21
Quick-Start . . . . . . . . . . . . . . . . . . . . . . . . . . . . . . . . . . . . . . 22
Automatic Defrost programmes . . . . . . . . . . . . . . . . . . . . . 23
Grilling . . . . . . . . . . . . . . . . . . . . . . . . . . . . . . . . . . . . . . . . . 24
Combined grill and microwave . . . . . . . . . . . . . . . . . . . . . 25
Convection cooking . . . . . . . . . . . . . . . . . . . . . . . . . . . . . . . 26
Combined convection and microwave . . . . . . . . . . . . . . . . 27
Preset programmes . . . . . . . . . . . . . . . . . . . . . . . . . . . . . . . 28
Child lock . . . . . . . . . . . . . . . . . . . . . . . . . . . . . . . . . . . . . . . 29
Kitchen timer . . . . . . . . . . . . . . . . . . . . . . . . . . . . . . . . . . . . 30
Cooking charts and Tips
Defrosting . . . . . . . . . . . . . . . . . . . . . . . . . . . . . . . . . . . . . . 31
Reheating . . . . . . . . . . . . . . . . . . . . . . . . . . . . . . . . . . . . . . . 32
Cooking . . . . . . . . . . . . . . . . . . . . . . . . . . . . . . . . . . . . . . . . 34
Practical tips for use . . . . . . . . . . . . . . . . . . . . . . . . . . . . . . 35
Tips on microwaving . . . . . . . . . . . . . . . . . . . . . . . . . . . . . . 36
Test procedures . . . . . . . . . . . . . . . . . . . . . . . . . . . . . . . . . . 37
Grilling . . . . . . . . . . . . . . . . . . . . . . . . . . . . . . . . . . . . . . . . . 38
Combined Microwave and Grilling . . . . . . . . . . . . . . . . . . . 39
Tips on roasting and grilling . . . . . . . . . . . . . . . . . . . . . . . . 39
Baking with the convection function . . . . . . . . . . . . . . . . . 40
Baking tips . . . . . . . . . . . . . . . . . . . . . . . . . . . . . . . . . . . . . . 41
Cleaning and Care . . . . . . . . . . . . . . . . . . . . . . . . . . . . . . . 42
What to do if... . . . . . . . . . . . . . . . . . . . . . . . . . . . . . . . . . . 43
Service and Spare Parts . . . . . . . . . . . . . . . . . . . . . . . 44
Customer Care . . . . . . . . . . . . . . . . . . . . . . . . . . . . . . . . . . . 45
Guarantee Conditions . . . . . . . . . . . . . . . . . . . . . . . . . . . . . 46
European Guarantee . . . . . . . . . . . . . . . . . . . . . . . . . . . . . . 47

5
t
Ecologically responsible disposal of packaging
materials and old appliances
Packaging materials
AEG microwave ovens require effective packaging to protect them during
transportation. Only the minimum packaging necessary is used.
Packaging materials (e.g. foil or styrofoam) can place children at risk.
Danger of suffocation. Keep packaging material away from children.
All packaging materials used are environmentally friendly and can be recycled.
The cardboard is made from recycled paper and the wooden parts are
untreated. Plastic items are marked as follows :
«PE» polyethylene eg packaging film
«PS» polystyrene eg packaging (CFC-free)
«PP» polypropylene eg packaging straps
By using and re-using the packaging, raw materials are saved and waste
volume is reduced.
Packaging should be taken to your nearest recycling centre. Contact your
local council for information.
Disposal of old appliances
Old appliances should be made safe before disposal by removing the plug,
and cutting off and disposing of the power cable.
It should then be taken to the nearest recycling centre. Check with your
local Council or Environmental Health Office to see if there are facilities in
your area for recycling the appliance.
Important information
i
!
¤
¤
¤
)
¤
¤
¤
)
Installation
Electrical connections
• WARNING! THIS APPLIANCE MUST BE EARTHED. The manufacturer
declines any liability should this safety measure not be observed.
!
This appliance complies with the following EC Directives :
EMC Directive 89/336/EEC, Low Voltage Directive 73/23/EEC with amendment
90/683/EEC and the CE marking Directive 93/68/EEC.
The oven should be set at least 85 cm above floor level. Make sure that
nothing obstructs the ventilation louvres at the back of the appliance and
that the electrical plug will be accessible after installation. Please refer to
the installation manual included with your oven for further instructions.
Do not use your appliance immediately (wait approx. 1-2 hours) after transfer
from a cold place to a warm place as condensation may cause a malfunction.
¤
¤
¤
)

6
Connecting to the mains
•The oven is delivered with the power
cord and a plug for 230-240 V, 50Hz,
earthed socket outlet.
•Earth protection minimizes the risks
should a short-circuit occur. Check to
ensure the voltage of the oven matches
the supply. N.B. If the oven is connected
to the socket via an extension cord,
make sure the cord is earthed.
This appliance must not be used on a
non-earth protected power supply.
Contact an electrician if you are
uncertain regarding electrical connection
of the oven or provision of earth
protection of the supply.
•Microwave power output :900W
•This appliance complies with E.E.C.
directive No.87/308 of 2.6.87 relative to
radio interference suppression.
Information concerning UK installation
•If this appliance is fitted with a non-
rewirable plug for which your socket is
un-suitable, the plug should be cut off
and the appropriate plug fitted. If it is
necessary to change the fuse in a
non re-wirable plug, the fuse cover must
be refitted. If the fuse cover is lost or
damaged, the plug must not be used
until a re-placement is obtained.
•The plug moulded on to the lead
incorporates a fuse. For replacement,
use a 13 Amp BS1362 fuse. Only ASTA
or BSI approved fuses should be used.
•The plug must not be used if the fuse
cover/carrier is lost.The cover/carrier is
indicated by the coloured insert at the
base of the plug.A replacement cover /
carrier is indicated by the coloured
insert at the base of the plug and must
be obtained from your local Electrolux
Service Centre.
IMPORTANT
•The wires in the mains lead are coloured
in accordance with the following code:
GREEN AND YELLOW EARTH
BLUE NEUTRAL
BROWN LIVE
•If you fit your own plug, the colours of
the wires in the mains lead of your
appliance may not correspond with the
markings identifying the terminals in
your plug, proceed as follows:
Connect the green and yellow (earth)
wire to the terminal in the plug which is
marked with the letter ‘E’or the earth
symbol ( ) or coloured green and
yellow.
Connect the blue (neutral) wire to the
terminal in the plug which is marked with
the letter ‘N’or coloured black.
Connect the brown (live) wire to the
terminal in the plug which is marked with
the letter ‘L’or coloured red.
13 AMP FUSE
BLUE
GREEN & YELLOW
BROWN
CORD
CLAMP

t
General
• The appliance should only be operated with the turntable and turntable
support inserted.
• Only suitable microwave ovenware should be used.
•
To protect the appliance against corrosion from moisture (condensation) in
the cavity or on the door, wipe these areas dry after each use.
•
Do not leave the appliance unattended when warming or cooking food in
disposable containers made of plastic, paper , or other flammable materials due
to fire hazard.
• If smoke is observed, keep the oven door closed to extinguish any flames,
disconnect the power supply and contact your local AEG Service Force
Centre. Never use the microwave oven if it is not functioning properly.
• This appliance complies with all relevant safety instructions. In order to
maintain the safety of the appliance, repairs should only be carried out by
an AEG Service Force Centre.
WARNING: it is dangerous for anyone other than qualified personnel to make
any repairs requiring r emoval of the cover pr oviding protection fr om exposur e
to microwave energy . In the case of any defect or br eakdown, please therefor e
contact your local AEG approved retailer o r the AEG Service Force Centre.
• Should the door seals and/or door seal surfaces, cord or plug be damaged,
the appliance should not be operated until it has been repaired by the AEG
Service Force Centre.
• Damaged appliance parts can only be replaced by exactly the same make of
parts. Special tools are required for this operation.
• WARNING: This appliance is designed to be operated by adults. Do not allow
children to use the microwave oven without supervision unless they have been
thoroughly instructed in the proper use and the dangers of improper
operation.
• In order to evacuate moisture, your appliance is fitted with a delayed
ventilation function. Depending on the applied cooking mode (solo / grill /
combination), the oven ventilation will continue to operate after the cooking
end. It switches off automatically after 3 minutes.
For trouble free and safe operation
• Never jam anything between the door and the door frame.
• Always keep the door seals and their surfaces clean.
• Do not keep any flammable items in the microwave. They could ignite when
the unit is switched on.
• Switch the appliance on only when the food has been placed inside the
cooking space, as it could overload if there is no food present.
Safety instructions
!
!
7
t

8
• Whenever heating liquid, please also place a teaspoon in the container to
avoid delayed boiling. During delayed boiling, the boiling temperature is
attained without the typical steam bubbles rising. When the container is
shaken, even gently, the liquid may then suddenly vigorously boil over or
spurt - with the risk of scalding the user.
• Food with «skin» or «peel», such as potatoes, tomatoes, sausages, and the
like, should be pierced with a fork so that any steam present can escape
and the food will not burst.
• Make sure that a minimum temperature of 70°C is attained for the cooking
or heating of food. Never use a mercury or liquid thermometer for measuring the temperature of the food.
• Baby food in jars or bottles should always be heated without a lid or top,
and well stirred or shaken after heating, to ensure uniform distribution of
the heat. Always check the temperature before feeding your child to
avoid burns.
• The hot food in a microwave oven will heat up the ovenware. For this
reason always use oven gloves for handling hot dishes.
• Never cook your food for too long or at too high a power setting. Some
areas of the food can dry out or even ignite.
• Do not use porcelain or ceramic crockery, or porous earthenware (e.g. on
the handles or unglazed bases) in your microwave as these types of dishes
can absorb moisture from the food as it is cooking. This can cause vapour
pressure to build up which could shatter the dish.
• WARNING: be sur e to r emove the cap or lid before cooking foods or heating
liquids in a sealed bottle or container, which could otherwise explode.
Do not use your microwave oven for the following :
• to boil eggs or escargots in their shells, as they will burst. Eggs can be
poached in a microwave oven as long as the yolks are pricked.
• to heat large quantities of cooking oil (fondue or deep frying) and drinks
containing a high percentage of alcohol - there is danger of sponta-
neous combustion!
• to dry animals, textiles or paper.
MICROWAVE OUTPUT POWER : 900 W
Microwaves
!
!
i

9
t
• The viewing window heats up during grilling and convection cooking (and
in combination with microwave cooking), so keep small children away from
the appliance.
• The cooking area, the grill heating elements, the wire shelf, the rails and the
turntable become very hot during all modes. Make sure to use an oven mitt
to handle dishes, and remember to use only ovenproof cookware such as
ceramic dishes or heat resistant glass. Do not touch heating elements inside
the oven. Take care not to be burned!
• Preheat your oven only when grilling or using the convection functions,
never when microwaving nor in the combined modes of microwave + grill
or microwave + convection cooking.
The grill folds down for easy cleaning :
1 Horizontal position: for cooking au gratin, food laid flat,
e.g. sausages
2 Vertical position : exclusively for cleaning the oven.
Always allow the grill to cool off for 25 minutes before
touching it.
Grill / convection functions
!
Grill
Positions
1
2

10
General operating instructions
Suitable ovenware
X suitable - non suitable
1)
excluding silver, gold, platinum or metal decoration
2)
does not include glaze containing metal
3)
please note the maximum temperature stated by the manufacturer
4)
convection + microwave combined function
Ovenware material Mode of operation
Micro- Convec- Grill Combination
wave tion
Ovenproof glass and ceramic dishes
(without any metal parts, e.g. Pyrex, X X X X
oven-to-tableware, glass tray)
Non ovenproof glass and porcelain X - - -
(e.g. table crockery
1)
Glass ceramic and vitroceramic X X X X
made of fire/frostproof material
(e.g. Arcoflam)
Ovenproof earthenware
2)
XX-X
Plastic, heat-resistant up to
XX
3)
-X
3)
200°C
3)
Paper, cardboard X - - Cling film X - - -
Microwaveable roasting bag
4)
XX-X
4)
Metal roasting pans, e.g. enamel
-XX-
or cast-iron dishes
Black-lacquered or silicone-
coated baking tins - X - -
i

11
t
What else to note...
• Food comes in all shapes, sizes and textures. The quantities also vary. For
these reasons the time and amount of energy needed to defrost, heat or
cook will also vary. As a general rule :
Double the quantity/weight = nearly * double the time
*Please refer to the cooking charts.To be on the safe side, always select the
shorter cooking time.Then extend the time as necessary.
• Microwaves work by making the food itself heat up. Because of this, not all
areas of the food will be heated at the same time. When heating larger
quantities of food, it is particularly important to stir or turn them over.
• “Standing time” is referred to in the cooking charts. This is the time you
should leave the food to stand without power (either inside or outside the
appliance). This ensures even distribution of heat throughout the food.
i

12
Product Description
The appliance
A Control panel
B Door seal
C Door latch and catch
D Viewing window
E Grill
F Turntable support
G Drive shaft
H Turntable
I Shelf support rails
C
E
B
C
H
G
F
A
D
II
13
t
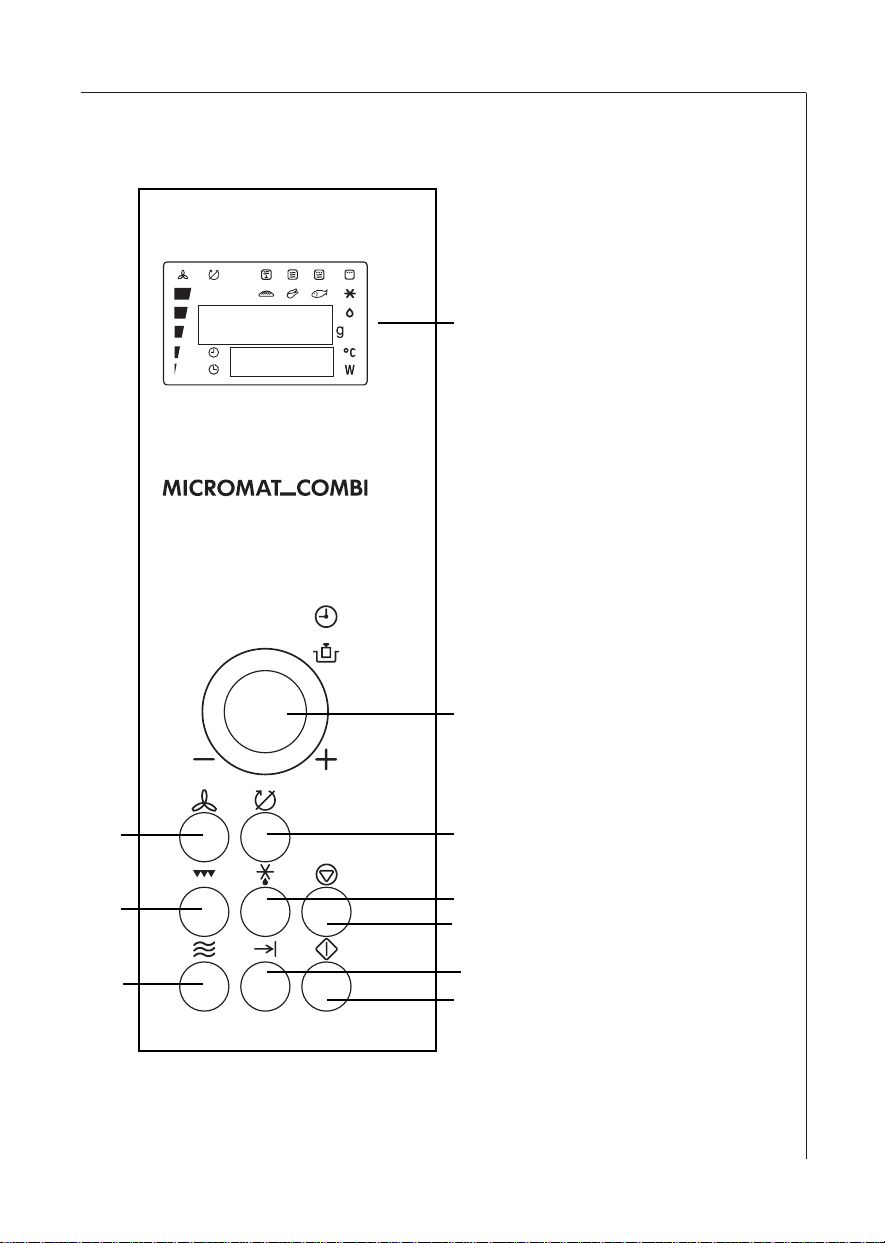
The control panel
A Display for time of day, function,
programme length, power level,
temperature, weight, food type,
etc.
B Selector knob to set the clock, the
programme length, the weight
when using automatic programmes,
the temperature for the convection
functions or the end-time to preset a programme.
C CONVECTION button to cook as
with a traditional oven or combined with microwave power for
speedy results.
D TURNTABLE OFF button to stop
the turntable from revolving.
E GRILL button to set the grill
functions.
F AUTO DEFROST button for auto-
matic defrosting programmes.
G PAUSE/CLEAR button to inter-
rupt a programme (press once) or
to cancel (press twice).
H MICROWAVE button to select
the microwave power level.
I PRESET PROGRAMME button to
set a programme in advance.
J START button to start the selected
function and to switch on QUICK-
START.
A
B
D
F
G
H
J
E
C
I

14
The display
12:30
200
The display guides you in programming with the following symbols:
convection
turntable off Convection Microwave Grill Grill
+ microwave + microwave
choice of food type for automatic defrosting
defrosting symbol
weight in grams for automatic programming
clock time
temperature for
convection
end time for presetting wattage of microwave
programme power levels

15
t
Product Description
Accessories
The turntable and turntable support should be installed as
shown in the diagram. Take car e to ensure the turntable support
is properly in place. The turntable may turn clockwise or
counterclockwise during operation. Do not try to rotate the
turntable support manually, as you could damage the drive
mechanism. If it does not turn smoothly, make sure that
there is nothing in the well beneath the turntable.
2 removable shelf support rails offer a choice of 4 different cooking levels
Adaptable to all your dishes and recipes
dd
cc
bb
aa
•
The wire shelf : for toasting, browning or
grilling.
Never place a metal dish on the wire shelf
when cooking with either microwave or
combination (microwave and convection or
microwave and grill) functions.
However you may heat a dish in an
aluminium tray if it is insulated from the
wire shelf an top of a non metallic plate.
•
The glass tray : you may cook dishes directly
in the tray or set the grill inside the tray
when roasting in order to catch drippings.
with the Grill, or Microwave + Grill functions :
Insert the wire shelf or glass tray into the lowest level for deep dishes such as roasting
pans.
Insert the wire shelf or glass tray into the 3rd level for shallow dishes such as cutlets or
sausages.
with the Convection or Microwave + Convection function :
Always insert the wire shelf or glass tray into the lowest level when cooking with the
convection functions.
➥
 Loading...