

Page 1
User Manual
Tài Liệu Hướng Dẫn Sử Dụng
Panduan Bagi Pengguna
No. Pendaftaran Buku Manual:
"Deperindag No.: 16/DJPDN/MGVII/2000"
EN
Washing Machine ... 3
VI
Máy Giặt ................... 31
IN
Mesin Cuci .............. 59
EWT1212
Page 2

We were thinking of you
when we made this product
Page 3
WELCOME TO THE WORLD OF ELECTROLUX
Thank you for choosing a first class product from Electrolux, which hopefully will
provide you with lots of pleasure in the future. The Electrolux ambition is to offer a
wide variety of quality products that make your life more comfortable. You find
some examples on the cover in this manual. Please take a few minutes to study
this manual so that you can take advantage of the benefits of your new machine.
We promise that it will provide a superior User Experience delivering Ease-of-Mind.
Good luck!
The symbols you will see on some paragraphs of this booklet have the following
meaning:
The warning triangle and/or the key words (Warning!, Caution!) emphasize
information that is particularly important for your safety or correct functioning
of the appliance.
The information marked with this symbol provides additional instructions and
practical tips on the use of the appliance.
Tips and information about economical and ecological use of the machine are
marked with this symbol.
CONTENTS
Safety information ..................................
Product description ................................
Out of Balance Interruption...................
Control panel ..........................................
Use ...........................................................
Washing hints .........................................
Washing program....................................
Care and cleaning ...................................
Helpful hints in dealing with washing
problems..................................................
Troubleshooting......................................
Troubleshooting fault displays..............
Environment concerns ...........................
4
6
8
9
10
20
22
23
25
26
28
30
3
Page 4
SAFETY INFORMATION
In the interest of your safety and to
ensure the correct use, before
installing and first using the
appliance, read this user manual
carefully, including its hints and
warnings.
To avoid unnecessary mistakes
and accidents, it is important to
ensure that all people using the
appliance are thoroughly familiar
with its operation and safety
features.
Save these instructions and make
sure that they remain with the
appliance if it is moved or sold,
so that everyone using it through
its life will be properly informed
on appliance use and safety.
General safety
It is dangerous to alter the
specifications or attempt to modify
this product in anyway.
Make sure that small pets do not
climb into the washbowl . To avoid
this, please check into the washbowl
before using the appliance.
Any objects such as coins, safety
pins, nails, screws, stones or any
other hard, sharp material can cause
extensive damage and must not be
placed into the machine.
Only use the advised quantities of
fabric softener and detergent.
Damage to the fabric can ensue if you
overfill. Refer to the manufacturer’s
recommendations of quantities.
This appliance is not intended for use
by persons (including children) with
reduced physical, sensory or mental
capabilities, or lack of experience and
knowledge, unless they have been
given supervision or instruction
concerning use of the appliance by a
person responsible for their safety.
Wash small items such as socks,
laces, washable belts etc in a washing
bag or pillow case as it is possible for
such items to slip down between the
tub and the agitator.
Do not use your washing machine to
wash articles with whale bones,
material without hems or torn material.
Always unplug the appliance and turn
off the water supply after use, clean
and maintenance.
Under no circumstances should you
attempt to repair the machine
yourself. Repairs carried out by
inexperienced persons may cause
injury or serious malfunctioning.
Contact your local Service Centre.
Always insist on genuine spare parts.
Installation
This appliance is heavy. Care should
be taken when moving it.
When unpacking the appliance,
check that it is not damaged. If in
doubt, do not use it and contact the
Service Centre.
After having installed the appliance,
check that it is not standing on the
inlet and drain hose.
If the machine is situated on a
carpeted floor, please adjust the feet
in order to allow air to circulate freely.
4
Page 5

Always be sure, that there is no water
leakage from hoses and their
connections after the installation.
Any plumbing work required to install
this appliance should be carried out
by a qualified plumber.
Any electrical work required to install
this appliance should be carried out by
a qualified electrician.
Use
This appliance is designed for
domestic use. It must not be used for
purposes other than those for which it
was designed.
Only wash fabrics which are designed
to be machine washed. Follow the
instructions on each garment label.
Do not overload the appliance. See the
relevant section in the user manual.
Before washing, ensure that all
pockets are empty and buttons and
zips are fastened. Avoid washing
frayed or torn articles and treat stains
such as paint, ink, rust, and grass
before washing. Underwired bras must
NOT be machine washed.
Garments which have been in contact
with volatile petroleum products should
not be machine washed. If volatile
cleaning fluids are used, care should
be taken to ensure that the fluid is
removed from the garment before
placing in the machine.
Never pull the power supply cable to
remove the plug from the socket;
always take hold of the plug itself.
Never use the washing machine if the
power supply cable, the control panel,
the working surface or the base are
damaged so that the inside of the
washing machine is accessible.
Risk of burns. Do not use Stain Wand
directly on hands, face, eyes, or any
other part of the body. NEVER USE
STAIN WAND ON GARMENTS THAT
ARE DRESSING OR COVERING THE
BODY. (*)
The temperature of Stain Wand’s tip
may rise up during its operation.
DO NOT TOUCH THE TIP during
operation. (*)
In case the temperature rises too much,
stop using the device immediately and
wait until it cools down before resuming
operation. (*)
Do not use Stain Wand without wetting
the stain. (*)
Never use Stain Wand on flammable
solvents (alcohol, thinner, gasoline,
etc…). (*)
Never use Stain Wand on animals,
pets. (*)
Keep Stain Wand away from children.
(*)
Stop using the Stain Wand immediately
if any physical discomfort occurs. The
use of Stain Wand is not recommended for people with pacemaker. (*)
Do not pour water directly on the Stain
Wand and never immerse it in water or
you may risk damaging the device. (*)
Safety information for Stain Wand.
(*)
Child safety
This washing machine is not intended
for use by young children or infirm
persons without supervision.
Young children should be supervised
to ensure that they do not play with
the appliance.
5
Page 6
The packaging components (e.g. plastic
film, polystyrene) can be dangerous to
children - danger of suffocation! Keep
them out of children’s reach.
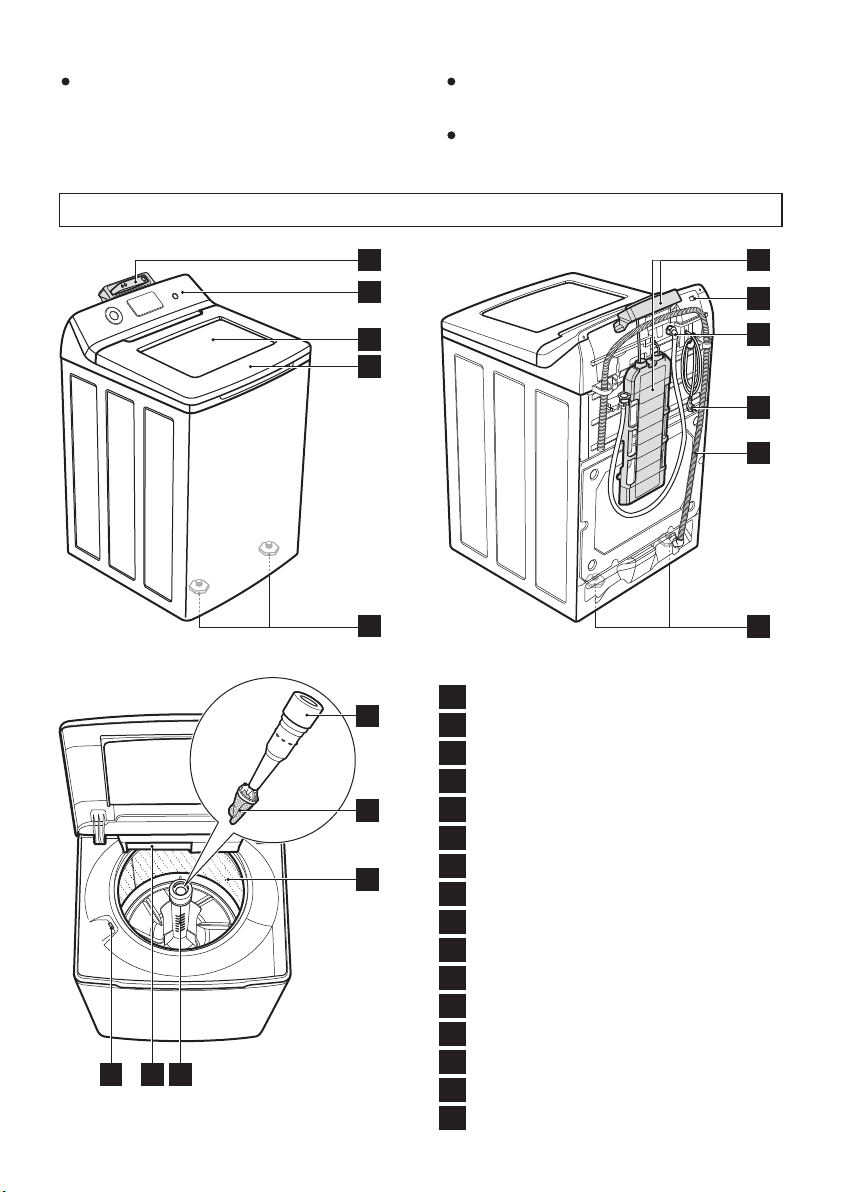
PRODUCT DESCRIPTION
Keep all detergents in a safe place
out of children’s reach.
Make sure that children or pets do
not climb into the washbowl.
14 15 16
11
12
13
1
2
3
1
6
7
4
8
9
5
Stain Wand
1
Control Panel
2
Safety Glass
3
Lid
4
5
Front Feet
On/Off Switch
6
Water Inlet Hose
7
Main Cable
8
Drain Hose
9
Back Feet
10
Fabric Softener Dispenser
11
Lint Filter
12
Wash Bowl
13
Bleach Dispenser
14
15
Detergent Dispenser Drawer
16
Agitator
10
6
Page 7
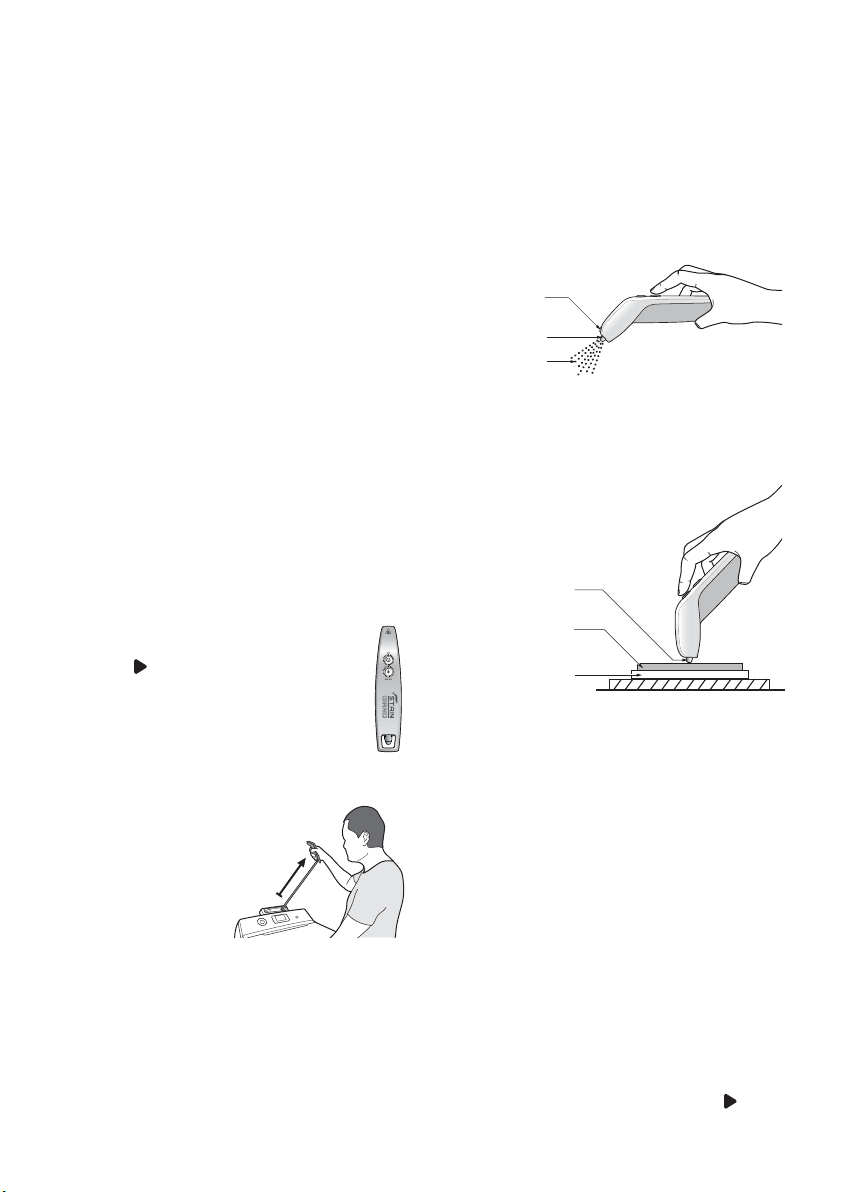
Stain Wand - Operating Instructions
This system was especially developed to
assist in the day-to-day work of removing
stains from your clothing. It works with
ultrasound technology combined with water
that emits vibrations that help loosen the
stains from fabric, turning their removal
easier when washing.
To use Stain Wand, make sure both power
and water is turned ON in your machine.
1.
Before using Stain Wand, first verify the
fabric colour integrity by running the
preliminary test below:
1.1
Spray a small amount of water in a
hidden area of the fabric;
Pour a small amount of colourless
1.2
liquid detergent;
1.3
Apply Stain Wand (according to the
instructions below) on this area;
1.4
Wait until the fabric dries out and
look for any signs of fading. If the
colour didn’t change you may use
the Stain Wand.
2.
With the washing machine lid closed,
push “ ” and “Delay End” buttons
simultaneously for 3 seconds until
“WATER” and “ON” buttons are lit.
The Stain Wand is ready for use.
3.
The cable has a locking position when
completely pulled out. Remove the Stain
Wand from its housing
and pull out cable
completely and release
so that it goes back and
locks at its intended
locking position.
4.
Remove any residue left over the stain by
using a small brush. Place an absorbing
paper or a clean cloth under the stain (this
paper or cloth will absorb the dirt). Since
the washing machine lid is closed, it may
be used as working area.
Pour two drops of colourless liquid
5.
detergent on the stain.
Add more detergent if necessary (in case
of persistent stains).
Push the button “WATER” and direct the
6.
water spray on the stain. Push the button
“WATER” as many times as necessary to
wet the stain. Repeat this procedure
every time the stain dries out.
Light
Stain Wand Tip
Water Spray
For better removal stain must always
remain wet when using the device.
7.
Place the tip on the stain. While pressing
and holding button “ON”, gently drag the
tip on the stain in circular or “zig-zag”
movements.
Place the tip
on the stain
containing stain
Absorbing paper
Fabric
or a clean cloth
You may hear a peculiar sound emitted
when the ultrasound is working, this is
normal. For best results the Stain Wand
should work vertically.
8.
As the stain goes “softer”, remove any
excess dirt and water that eventually
remains on the fabric by using an
absorbing paper or a clean cloth.
Change the paper/cloth under the stain
every time it is too wet.
9.
Repeat steps 5 to 7 if necessary.
Please Note: Some stains can not be
removed 100%.
After use, return the Stain Wand on its
10.
housing by pulling the cable gently until it
unlocks. As the cable retracts, place the
Stain Wand back in its housing.
You can turn it off by pressing “ ” and
“Delay End” buttons simultaneously.
7
Page 8
ATTENTION
Do not use Stain Wand continuously for
more than 5 minutes to avoid excessive
heat and always keep the stain wet by
spraying water during Stain Wand usage
which also helps to cool down Stain
Wand tip. For your safety, Stain Wand will
switch off after 5 minutes of continuous
use, but you can switch on again by
pressing “ON” button.
Use colourless liquid detergent only.
Do not use coloured detergents or
softeners. The colour of detergent or
softener may stain your fabrics even more.
Clothes that carry symbols:
(do not wash at all), (do not
bleach), do not iron) and (dry
cleaning),
are not suitable for Stain Wand pretreatment.
NOTE
Depending on water supply pressure, you
may need to press button “WATER”
several times to inject water to make the
stain wet enough.
To test the Stain Wand, please spray
some water on lid by pressing button
“WATER” and then operate Stain Wand
tip on it by pressing button “ON”. If water
splashes that means Stain Wand is
functioning fine. If not, please contact
Customer Service.
Out of Balance Interruption
The washing machine can stop during the
spin stage of a wash because of an out of
balance condition. The display will show
“ ” and you will hear a short beep
every minute.
Out of balance during spin is caused by an
uneven distribution of clothes in the wash
bowl.
To rectify the out of balance condition,
open the lid and redistribute the clothes
evenly in the space between the agitator
and wall of the wash bowl. Closing the lid
will start the machine and continue the
spin stage of the wash.
If you have frequent out of balance
interruptions, it may be due to your
washing machine not standing firm and
level on the floor. This can be corrected
by adjusting the washing machine legs as
described in the Installation Instructions
supplied with your machine.
Power failure recovery
When there is power failure while machine
is washing or rinsing or spinning. The
machine tries to save the settings at which
stage the machine is doing and then when
the power returns back the machine
shows “ ” on the digital display.
If the Program or any other setting is not
changed within 5 seconds then the
machine starts washing from the stage
where it is left off.
Button Response and Lights
Always press buttons gently. Watch the
lights on the control panel to see the effect
pressing a button or turning a program
selector knob has, and listen for ‘BEEPS’.
When you press a button you will get a
short ‘BEEP’ to acknowledge the entry. If
the option is not available at the time, the
machine will not allow you to select it, and
you will here the long ‘BEEP’ to remind
you the option is not available.
After the machine has started, the entire
wash option button will be disabled and
machine will show “ ” on the display
with three short beeps to indicate the
button is disabled. The start button is still
active but you need to press and hold
the button for 1.2 seconds to pause
machine.
8
Page 9
This is to confirm that you really want to
pause the machine. When in pause mode,
all options will be able to be changed again.
All functions of the washing machine
will stop when the lid is open.
Enabling/Disabling
End-of-Wash Beeping Mode
This mode permits you to either enable or
disable the beeping (4 beeps every 4
minutes) at the end of the wash. As an
example, you might wish to disable this
beeping when you start a wash when
going to bed, so that when the wash
finished approximately 1 hour later, it will
not disturb you through the night.
NOTE: All error beeping is not disabled
by this feature, such as a critical fault,
or lid open during fill/agitate/spin, or
out of balance during spinning.
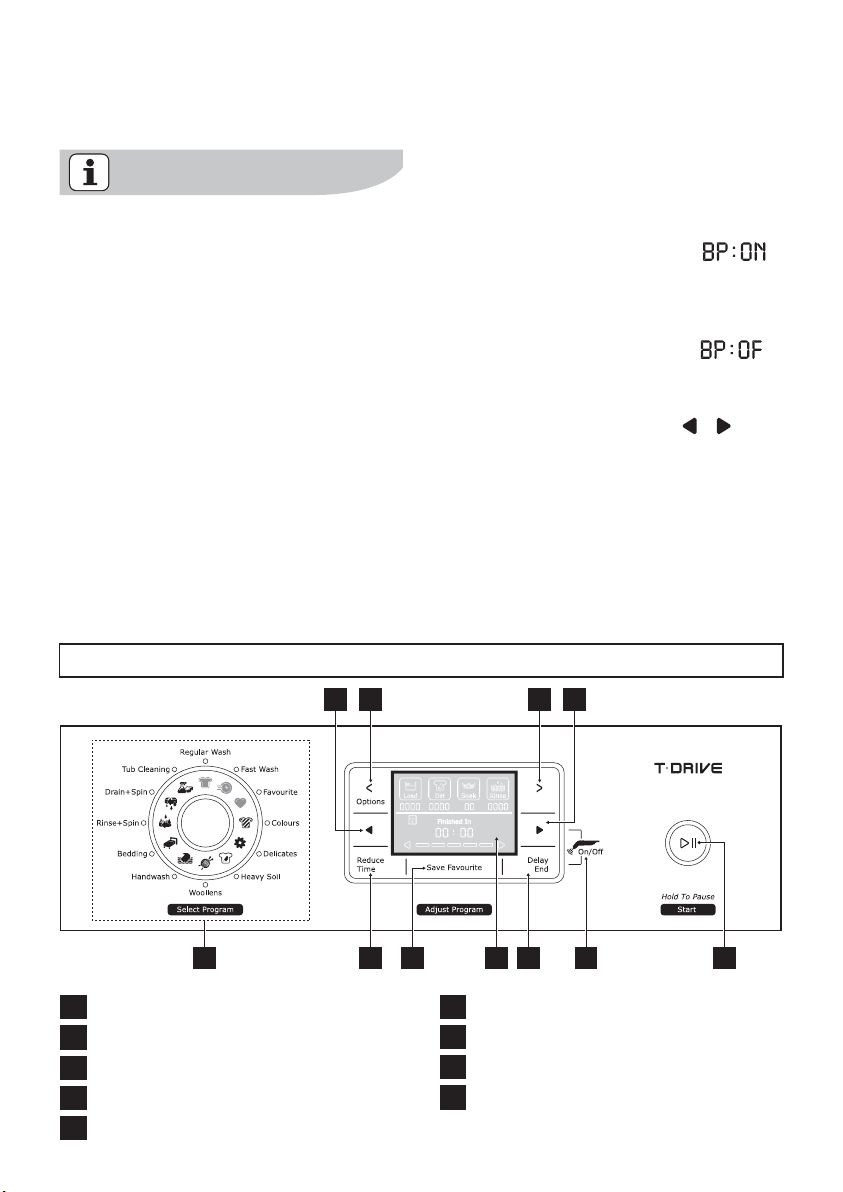
CONTROL PANEL
To change the “beeping” selection:
1.
When the washing machine in
STAND-BY-MODE or PAUSE MODE,
press and hold “Start/Hold To Pause”
button for about 3 seconds to enter
Enabling/Disabling End-Of-Wash
Beeping mode.
The digital display will show “ ”
when the end of wash beeping is
enabled (this is the default factory
setting).
The digital display will show “ ”
when the end of wash beeping is
disabled.
2.
Press the “Modify Option ( , )”
button to change the selection, then
press the Start/Hold To Pause button
to store the new selection.
NOTE: If you do not press a button
within 5 seconds the washing machine
will return to the previous setting. To
reprogram, simply repeat the above
process.
1
Program Select Touchpads
2
Option Select Touchpads
3
Modify Option Touchpads
4
Reduce Time Touchpad
5
Save Favourite Touchpad
2 23 3
4 5 6 891 7
6
Delay End Touchpad
7
Display
8
Start/Hold To Pause Touchpad
9
Stain Wand Option (see page 7)
9
Page 10
ON - OFF Switch
On/Off switch is using
for turn On and turn Off
your washing machine.
USE
The On/Off switch is located at the back
of the control panel on the LH side
above the rating plate.
Follow the instructions in this section for
best washing results.
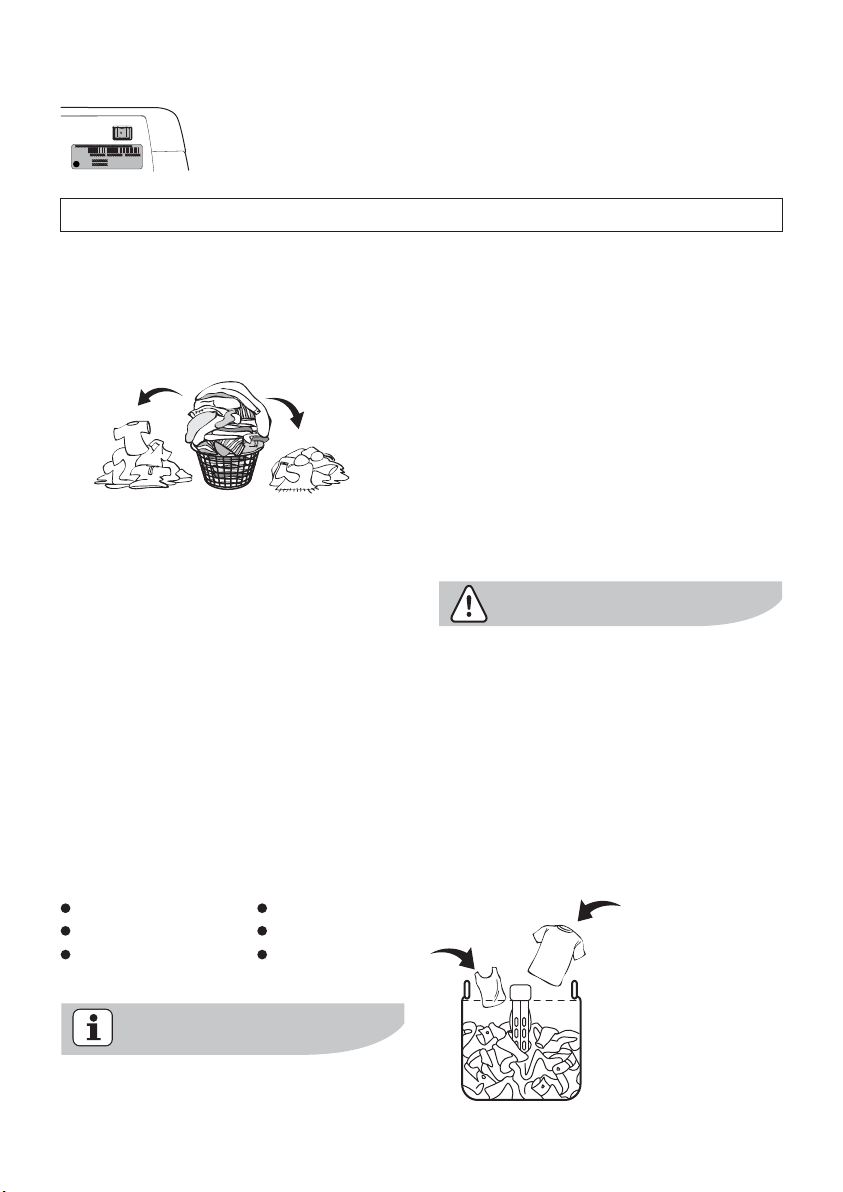
Sort Your Washing Into
Separate Wash Loads
Each load of washing should contain
clothing which needs the same washing
conditions. For example, you should not
wash delicate clothes with very dirty
work clothes.
Colour fast and non-colourfast fabrics
should be separated. Knowing the type
of fabrics you have and how dirty they
are will help when you make selections
from the wash program options.
Some fabrics are lint collectors and can
pick up lint, dirt and colour from other
fabrics which are lint producers. Some
examples are listed below:
Lint collectors
Corduroy
Synthetics
Permanent press
fabrics
Make sure that you wash lint
collectors separately from lint
producers.
Lint producers
Towels
Nappies
Chenille/
Candlewick
Check your clothes to avoid
damage
Empty all pockets. Close all hooks and
zippers to avoid snagging clothes.
Wash bras, pantyhose and other
delicates in a mesh laundry bag, which
you can purchase from your
supermarket.
Pre-treatment sprays and
stain removers
Pre-treatment sprays and stain
remover can damage plastic
components on your washing
machine.
If you use pre-treatment sprays or stain
removers, apply them to the clothing
well away from your washing machine.
Load the washing machine
When loading the
clothes into your
washing machine,
there are four things
to remember:
10
Page 11

Clothes must be loaded evenly
around the agitator. For best results
load small items first, followed by
large items.
Clothes must not be wrapped a
round the agitator.
The washing machine must not be
overloaded. Clothes must be able to
move around during washing.
The load should contain only three or
four large items, for example, sheets.
The rest of the load should be small
items. A mixed load of large and
small items will wash cleaner than a
load of all large items.
Detergent and fabric softener
use
Don’t use the wrong type of detergent.
You must use a low sudsing detergent
designed for washing machines.
Don’t use soap-based products in
your washing machine.
Measure the correct amount of
powder or liquid detergent by following
the recommendations on the package.
It is best to use detergent labelled low
sudsing. Good quality, front load
detergent will perform well in this
machine.
Don’t use too much detergent. This
will give you too many suds causing
low spin speeds, poor rinsing and
overloading the motor during spin
stages of the wash program.
Do not spill fabric softener on the
clothes as it may stain them.
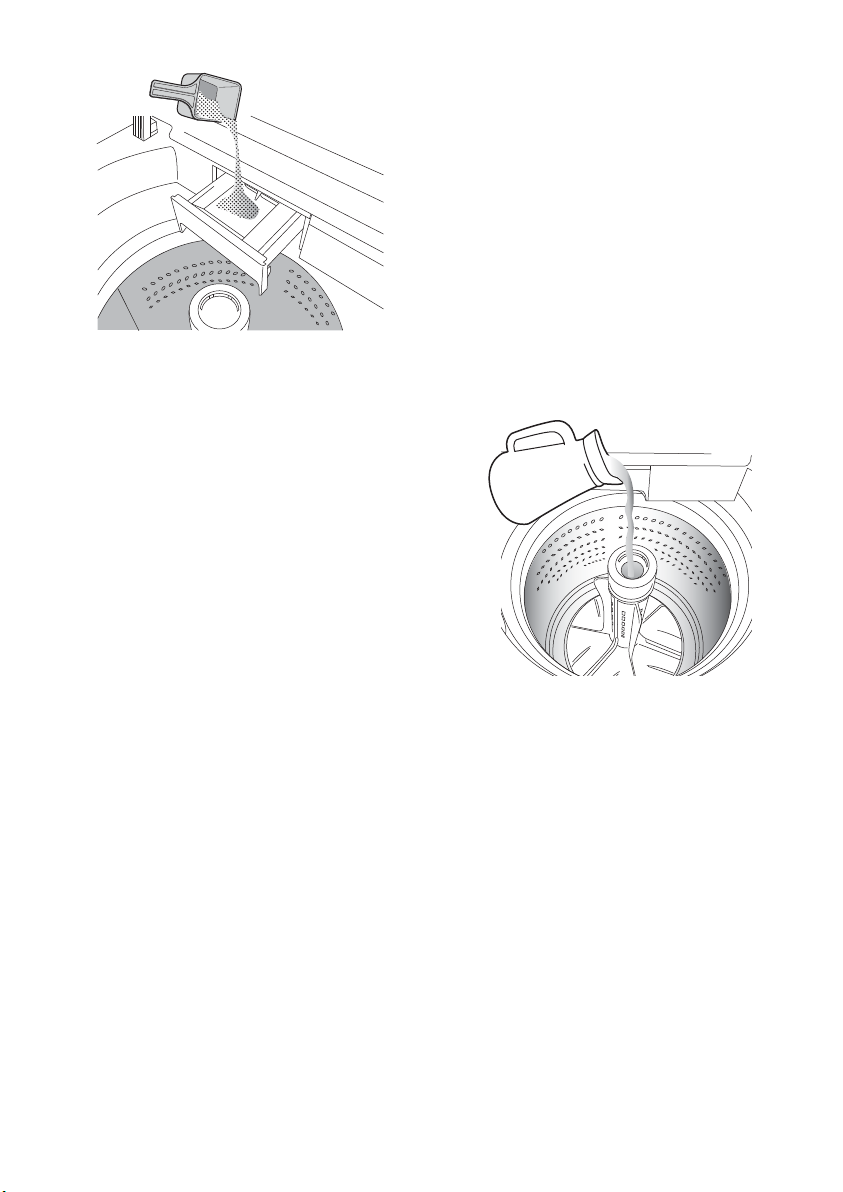
Add the detergent
When using the washing machine for
the first time, check that the dispenser
is set for the type of detergent you will
use. To do this, proceed as follows:
1.
Pull the dispenser drawer forward
until it stops.
Lift the front of the drawer up and
2.
forward to remove it from the
runners.
Check the position of the flap at the
3.
rear of the detergent compartment
in the dispenser drawer. (Factory
setting is flap up for powder.)
Clip flap up
for powder
Clip the flap down if you are going
4.
to use liquid detergent.
Clip flap
down for
liquid
Refit the dispenser back into its
5.
runners.
Remember: If you change the
type of detergent you use, the
position of the flap will need
changing.
You are now ready to add
6.
detergent. Measure the amount you
will use and pour it into the
detergent compartment of the
dispenser drawer.
11
Page 12
When using liquid detergent, some
may leak out of the dispenser into
the wash load earlier than expected
through small openings in the back
of the dispenser. These openings are
to help the flushing out of detergent.
If you want to use fabric softener,
7.
see “Add fabric softener”.
Close the drawer by pushing it
8.
backwards into the top panel of the
washing machine when you have
finished adding detergent.
Add Fabric Softener
Measure the correct amount of fabric
1.
softener by following the
recommendations on the package.
If you are going to use intensive
2.
fabric softener, mix softener with an
equal amount of warm water but
only mix enough to fill to the line
marked inside the cup. The softener
cup holds 75ml.
Pour the mixed softener into the cup
3.
in the top of the agitator.
Do not overfill the cup.
Do not spill fabric softener on the
4.
clothes as it may stain them.
IMPORTANT: If you are going to
use fabric softener, you must
select the DEEP rinse option, i.e
deselect the EXTRA or ECO or
FAST rinse option. Also if
softener is used frequently the
machine must be flushed out
regularly.
NOTE: You do not have to use fabric
softener, your washing machine will
wash the clothes perfectly well
without it.
12
Page 13
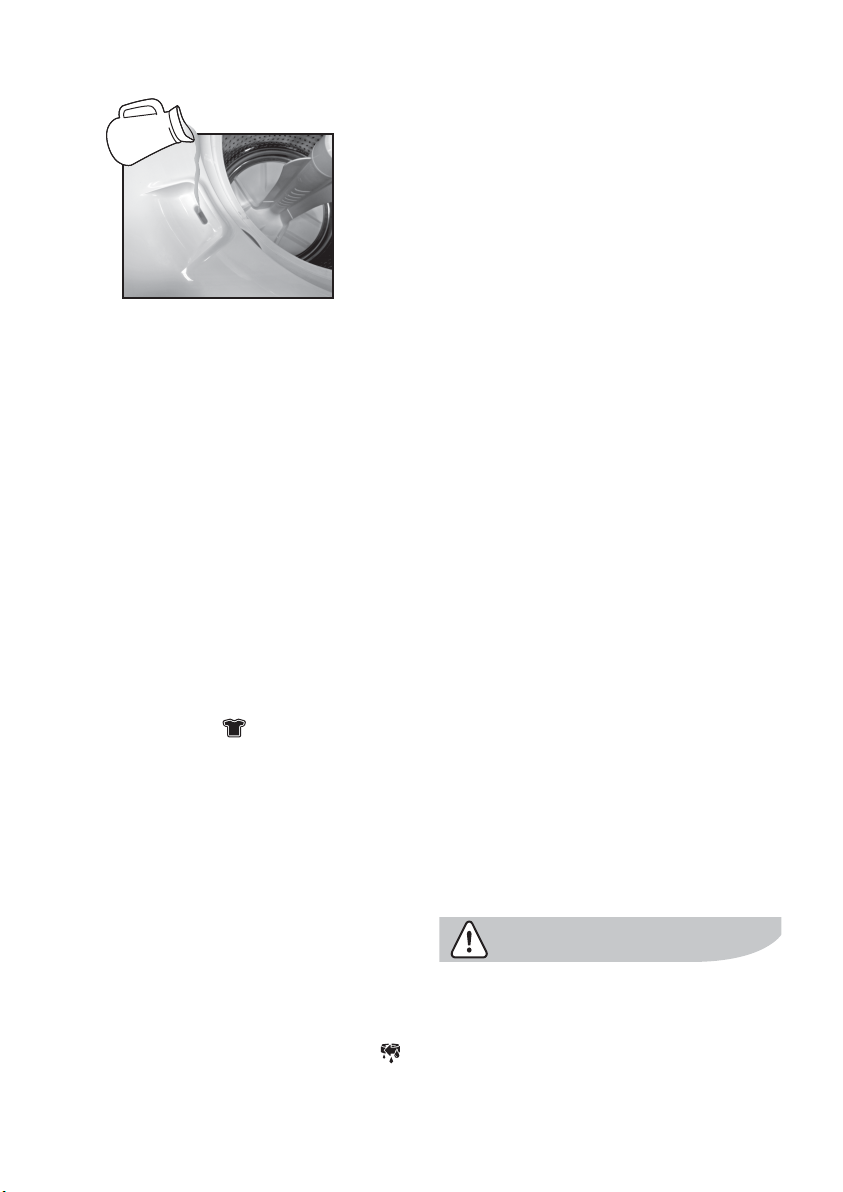
Adding Bleach
You can now wash the clothes load
6.
using detergent and your selected
wash program.
NOTE: Bleach should not be used on
silk, wool, rayon or drip dry clothes.
Operating Your Washing
Machine
Bleaching of clothes can help to remove
stains, heavy soiling and to kill bacteria.
Oxygen type - This is generally a
powder type bleach. Mix the required
quantity with water and pour down the
hole in the top panel during the fill when
there is some water in the wash bowl.
Refer to the instructions on the bleach
container.
Chlorine type - This type of bleach
should not be mixed with detergent.
Mix the bleach with water as per the
instructions on the container.
To do this, proceed as follows:
Select the program
1.
“Regular Wash ” position.
Press the “Start/Hold To Pause”
2.
button to commence water fill.
Pour the bleach solution down the
3.
hole in the top panel during fill when
there is some water in the wash
bowl.
Allow the machine to agitate for a
4.
few minutes, then let it stand for the
required time by press and hold the
“Start/Hold To Pause” button for
1.2 seconds to pause machine.
Select the program “Drain + Spin ”
5.
position and press the “Start/Hold To
Pause” button to empty the wash
bowl.
Starting your washing machine
Turn on the taps and turn power on
1.
at the power point.
Press On-Off switch button to switch
2.
ON the machine.
Close the lid.
3.
The machine will show a pattern of lights.
Wait for this to happen before attempting
to operate the machine.
Your washing machine is now in Stand
By Mode and ready to wash your clothes.
If the settings shown on the control
panel are what you want to use and the
PROGRAM ICON is set to the correct
wash program for your clothes load,
press the “Start/Hold To Pause” button
to start your wash.
Lid Soft Landing Feature
When the lid is fully opened, to close just
pull down initially the lid then the lid will
close down slowly by itself.
Lid soft landing device will not working if
opened less than 80 degree (Please
keep your hand away, lid will close
rapidly and crushes your hand).
13
Page 14
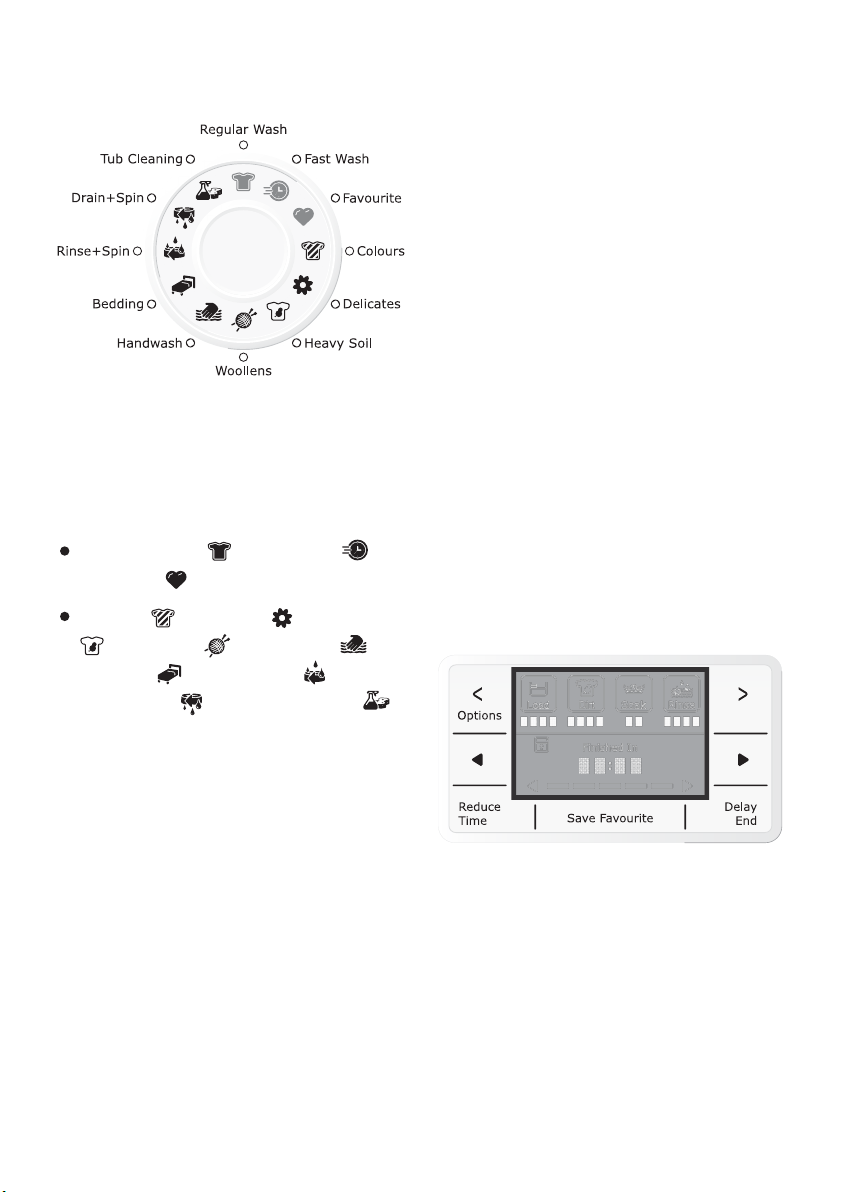
Select The Required Program
Pressing the Program ICON repeatedly,
to choose the wash program you want.
The relevant light will light up.
The program selector is divided into
following sections.
Regular Wash , Fast Wash and
Favourite ;
NOTE: When you choose the
WOOLLENS and BEDDING program,
the DEEP RINSE option is automatically
selected for you. You will not be able to
select and use Eco Rinse and Fast Rinse
with these two programs.
When you select the DRAIN+SPIN
program, there will be a delay of at least
2 minute before the washing machine
starts to spin.
This delay is a pump out (DRAIN) period
to ensure the bowl is empty of water,
which is necessary before spin
commences.
Even though you may have only put wet
clothes into an empty bowl, the delay
before spin will still occur to be safe and
to protect your washing machine.
Colours , Delicates , Heavy Soil
, Woollens , Handwash ,
Bedding , Rinse+Spin ,
Drain+Spin and Tub Cleaning .
Once you select a wash program, the
Program Selected will stay at that
position for the whole of the wash.
If you have started your wash and you
wish to change the program, press the
“Start/Hold To Pause” button and
hold it for 1.2 second to enter
PAUSE mode, selecting the program
ICON to a new program position will
result in the machine resetting to the
start of the new program.
Program Option Buttons
Depending on the program, different
functions can be combined. These
must be selected after choosing the
desired program and before depressing
the “Start/Hold To Pause” button.
14
Page 15
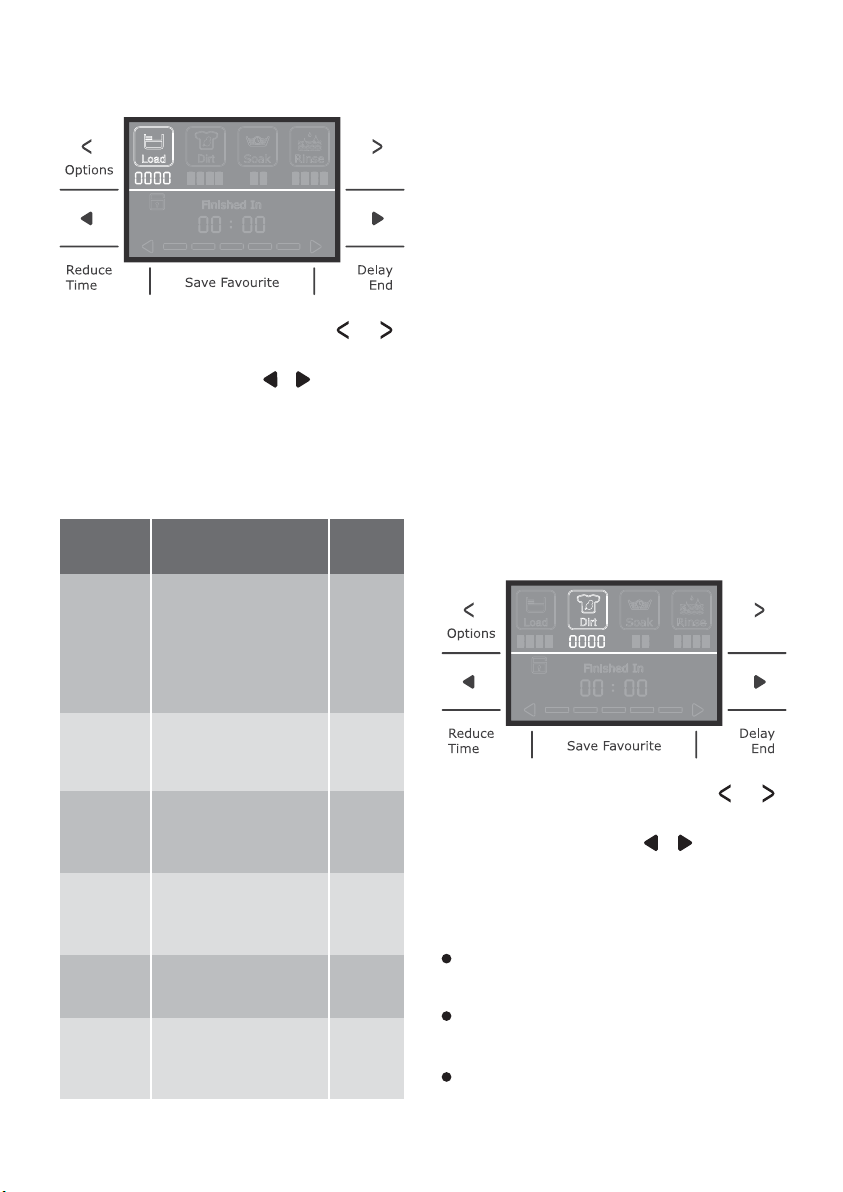
Wash Load Option
Pressing the OPTIONS button ( , )
to select the Load icon, then press the
modify option buttons ( , ) to
choose the level of your load size. The
machine will fill the amount of water to
be used for your wash load.
You can select:
We advise you to use AUTO load level
whenever you can. The AUTO load level
ensures just the right amount of water is
used for the wash load.
Use only the amount of water you need
for the wash load.
If you want to add more water after wash
cycle has started, press and hold the
“Start/Hold To Pause” button for 1.2
seconds to pause machine and then
select the new higher level that you want,
press “Start/Hold To Pause” again to
operate the washing machine.
The washing machine will add water up
to the new level selected and continue
the wash program.
Selection
AUTO -
HIGH
X-MED
(Extra Medium)
MED
(Medium)
LOW
X-LOW
(Extra Low)
Water level
description
The exact water level
required to wash your
clothes effectively is
determined and set for
you automatically,
ensuring no water is
wasted.
The machine will fill the
high amount of water
for your FULL load.
The machine will fill the
extra medium amount
of water for your
NEARLY FULL load.
The machine will fill the
medium amount of
water for your HALF
load.
The machine will fill the
Low amount of water
for your SMALL load.
The machine will fill the
Very Low amount of
water for your VERY
SMALL load.
Clothes
Load
9-12 kg.
6-9 kg.
4-6 kg.
2-4 kg.
0-2 kg.
Dirt Level Option
Pressing the OPTIONS button ( , )
to select the Dirt icon, then press the
modify option buttons ( , ) to
choose the dirty level to be used for
your clothes.
There are 3 dirt levels to choose from:
HIGH for heavily soiled clothes eg.
very dirty work clothes and overalls.
REGULAR for everyday soiled items
eg. family clothes, sheets etc.
LIGHT & FAST for lightly soiled
clothes, just to freshen them up.
15
Page 16
The Dirt Level option chosen will have
an influence on the wash time of the
selected wash program.
For the same wash program, High Dirty
Level will have a longer wash time than
Regular Dirty Level, and Regular Dirty
Level a longer wash time than Light &
Fast Dirty Level.
Rinse Option
Select the Soak Time Option
This option allows you to soak heavily
soiled clothes at the beginning of the
wash.
To do this, press the Options button
( , ) to select the Soak icon, then
press the Modify Option buttons
( , ) to select the soak time to be
used for your wash load.
The lid must be closed to allow Soak
functions to operate, including the
Heavy Soil wash program 6 minutes
soak. At other times, the clothes are
soaking.
Pressing the OPTIONS button ( , )
to select the Rinse icon, then press the
modify option buttons ( , ) to
choose the rinse type for your wash
load.
For most washes the machine
automatically selects “Deep” rinse for
you.
There are four rinses to choose from
Fast rinse, Eco rinse, Deep rinse and
Extra rinse.
Extra rinse, the machine fills twice,
giving you two deep rinses.
Deep rinse the machine fills once,
giving you one deep rinse.
Eco rinse is a spray rinse giving you
maximum water saving.
Fast rinse uses less time then Eco
rinse by performing only 3 Eco sprays
but the amount of water in each spray
is increased.
How does Eco Rinse work ?
When Eco rinse is used, rinse water is
sprayed into the washbowl in pulses.
After each pulse the washbowl will spin
to remove detergent laden water from
the clothes.
16
Page 17
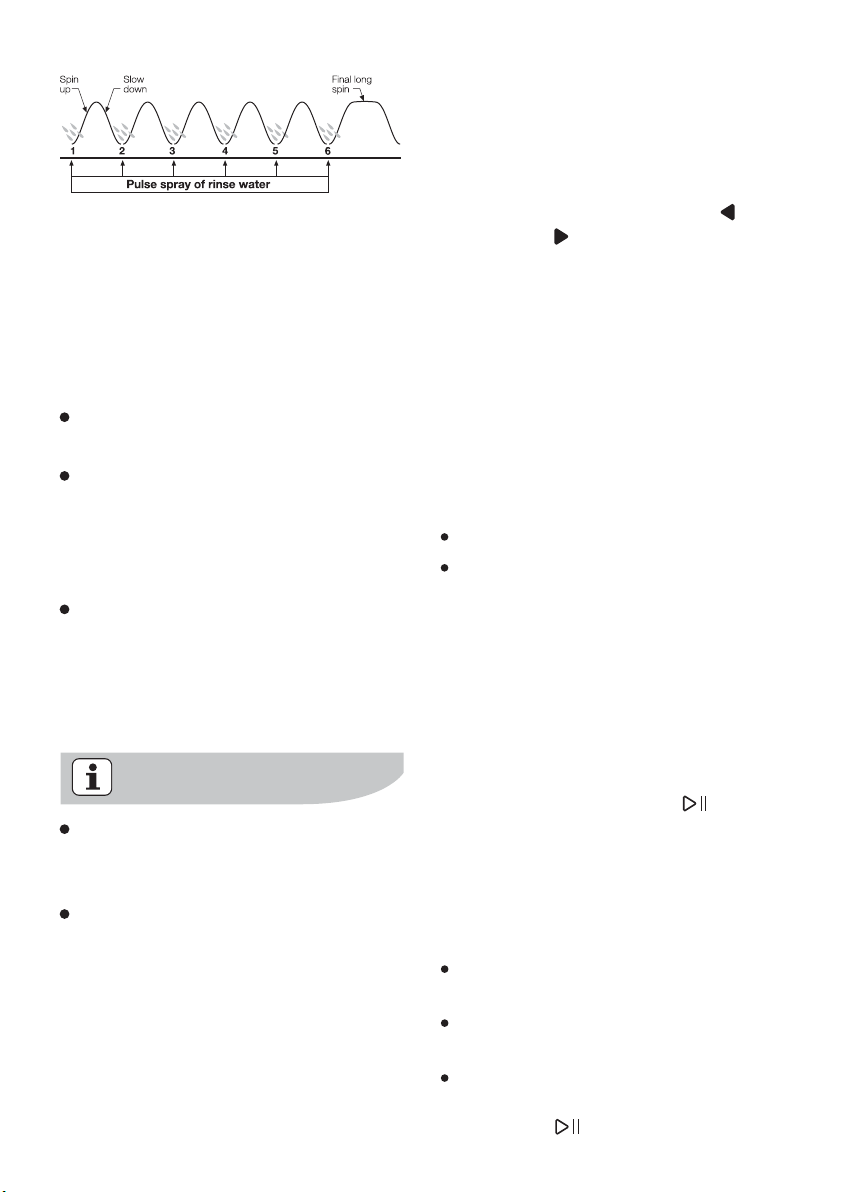
The machine will go through a series of
maximum six pulse spray and short
spin cycles in this manner, depending
on program selection, followed by a
final long spin that removes the water
from the clothes to complete the full
wash program.
Compare this with Deep rinse where
much more water is used.
Deep rinse, water enters the
machine filling up to the wash water
level selected. The washer agitates
and finally empties the rinse water
through the drain hose.
Extra rinse, this is special option for
those people who suffer from
allergies, this extra rinse will provide
two deep rinses to ensure all
detergent residue has been removed.
Eco Rinse and Fast Rinse CANNOT
be selected with Woollens and
Bedding program.
Extra/Eco/Fast rinse is not
designed to be used with fabric
softener.
Select Deep rinse if you are going to
use fabric softener.
Deep rinse ensures the fabric softener
is correctly dispensed and thoroughly
removed from your clothes during
rinsing.
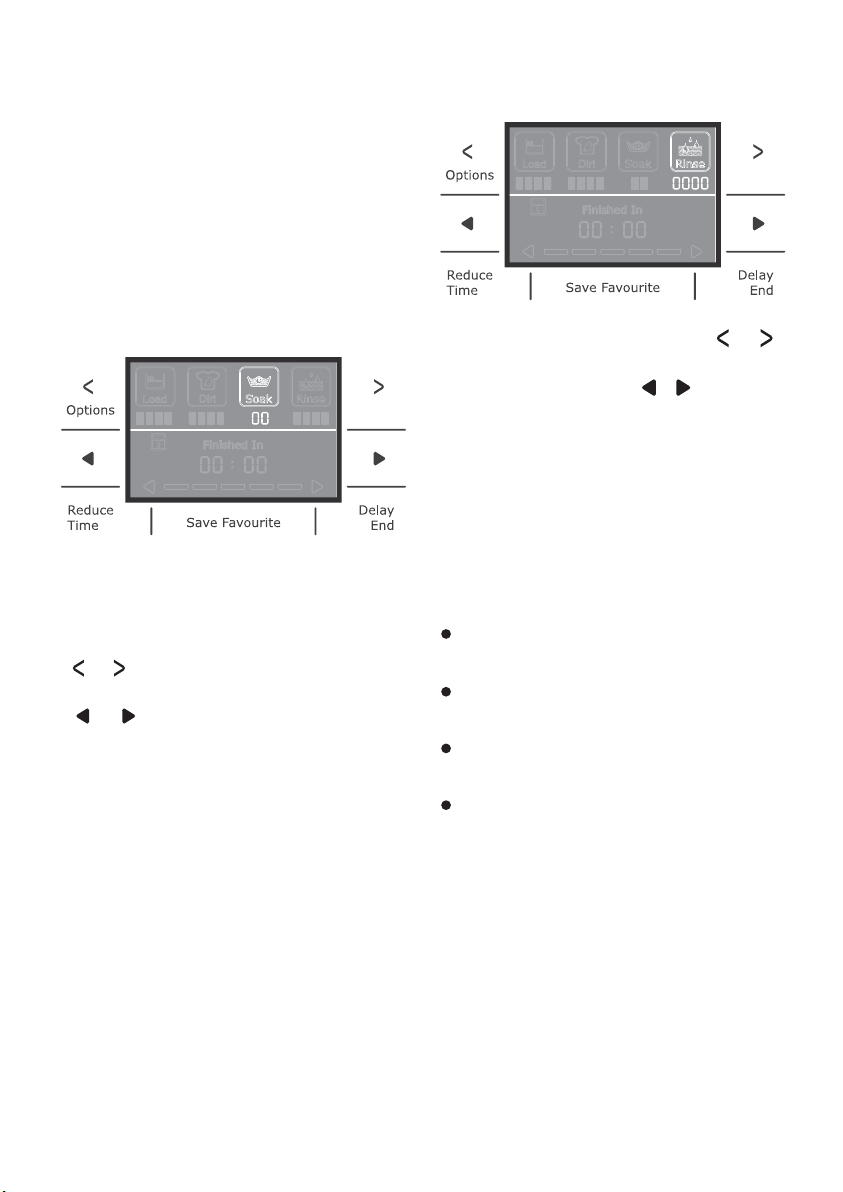
Reduce Time Option
This option allows you to reduce
washing time at the washing process.
By pressing ‘Reduce Time’ button, then
press the modify option buttons to
decrease or to back to default
agitation time.
Save Favourite
To recall the Favourite wash program,
touch once and release the Favourite
button.
On the screen, you will get acknowledgement that Favourite program is loaded.
You can recall a Favourite wash program
ONLY when the washing machine is:
in the program selection mode or
at any stage of a wash program in
pause mode.
Otherwise touching Favourite will have
no effect.
The first time you touch Favourite button,
a factory set Favourite wash program will
load for you. If you want to use the
Favourite program shown on the display
screen without making any changes,
touch Start/Hold To Pause ( ) to begin
your wash.
To reprogram Favourite with your own
selections and save them, proceed by
putting machine in pause mode and
follow following instructions.
Touch the Favourite button to enter
reprogramming mode.
Make desired selections on all other
buttons.
To EXIT reprogramming mode and
NOT save changes, touch Start/Hold
To Pause ( ) button.
17
Page 18
To save new program, touch Save
Favourite once.
You can copy other programs to
Favourite by touching once the program
to copy followed by one touch on Save
Favourite button.
You can also copy the running program
to Favourite by touching Save Favourite
in pause mode.
Delay End Option
Before you start the program, this
option makes it possible to define the
end of the washing program by 2, 4, 6
and 8 hours.
By pressing Delay End button, then
press the modify option buttons ( , )
to choose the end time as your wish.
This option must be selected after
choosing the wash program, and before
pressing the “Start/Hold To Pause”
button.
If after having set the Delay-End option
(and pressed “Start/Hold To Pause”
button) and you wish the cancel or
modify it, follow the below steps:
set the washing machine to PAUSE
1.
by press and hold the “Start/Hold
To Pause” button for 1.2 seconds
deselect the Delay-End option,
2.
changing the status
press the “Start/Hold To Pause” to
3.
start the program.
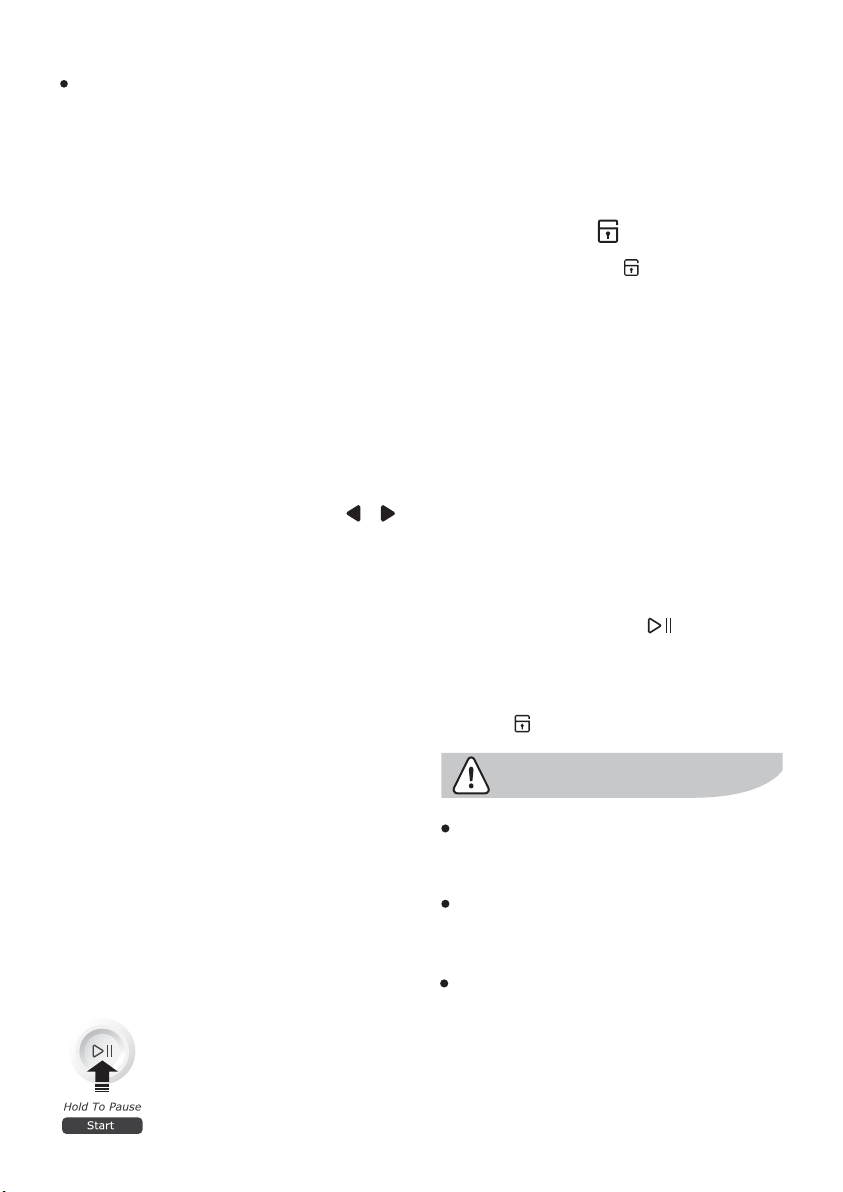
Start/Hold To Pause
To start the selected
program, press the
“Start/Hold To Pause”
button.
If you have started your wash and you
wish to stop it for some reason, press
the “Start/Hold To Pause” button
and hold it for 1.2 second to enter
PAUSE mode
Lid Locked ( )
The padlock symbol is displayed on
the screen to advise you when the lid of
the washing machine is locked in the
closed position. The lid will be
automatically locked when the washbowl
is spinning during Rinse, Spin and Drain
stages.
If the lid is open and the machine is
waiting for it to be closed for the wash
program to continue, you will see ‘ ’
in the digital display accompanied by
‘beeping’.
Should you need to access the washbowl
during spin, press and hold the
“Start/Hold To Pause ” button for
1.2 seconds. You will have to wait a
short time for the bowl to stop spinning
before the lid unlocks and the padlock
symbol in the screen disappear.
DO NOT insert anything into the lid lock
slot in the top panel of the washing
machine.
DO NOT interfere with the lid lock
mechanism to try and disable it or
otherwise change the way it works.
DO NOT try to force open the lid when it
is locked.
LD
18
Page 19
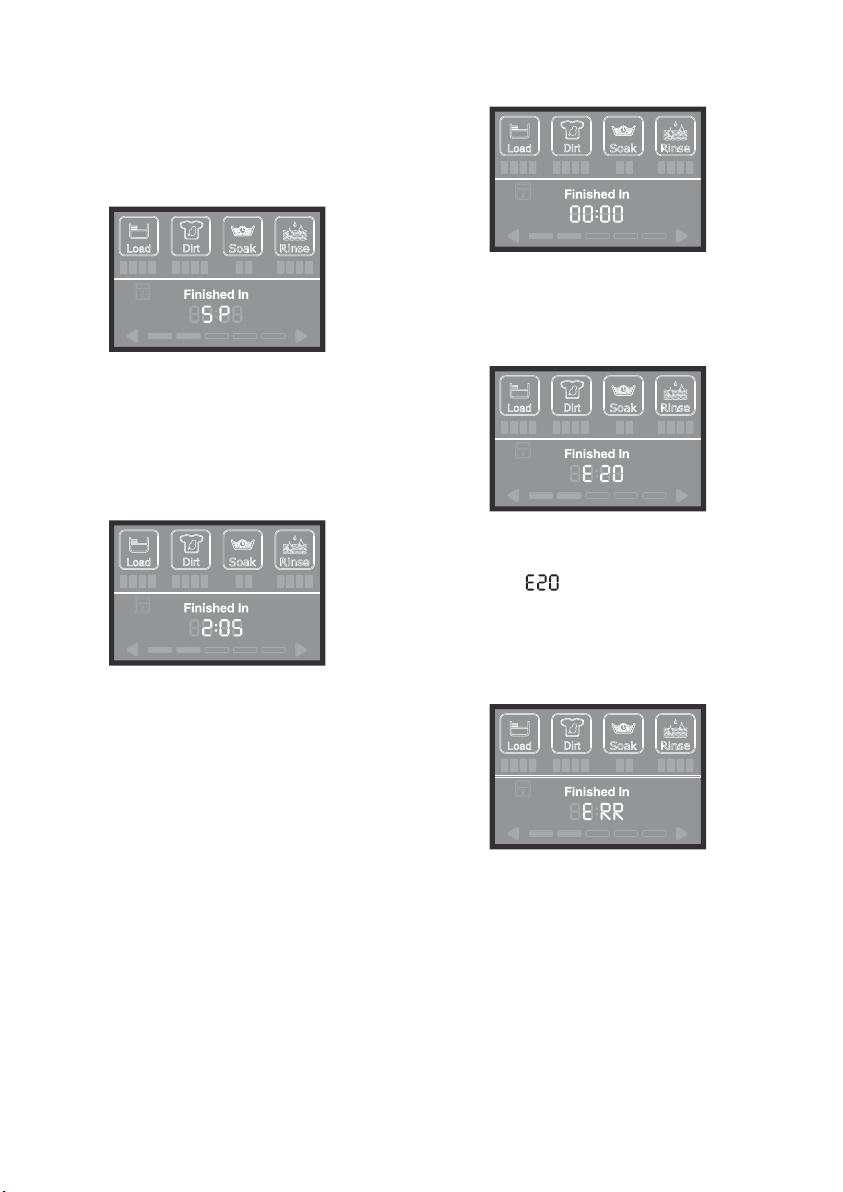
Display
The display showns the following
information:
Machine In Pause Mode
You can tell when your washing machine
is in PAUSE mode. The message “ ”
is displayed.
Estimated time of the selected
program
SP
End Of Program
When the program is completed the 4
zeros will flash.
Alarm Codes
In the event of operating problems,
some alarm codes can be displayed, for
example (see “Troubleshooting”
and “Troubleshooting fault displays” on
page 27, 28).
After selecting a program, the estimate
time is displayed in hours and minutes
(for example ).
The estimate time is calculated
automatically on the basis of the
maximum recommended load for each
type of fabric.
After the program has started, the time
remaining is updated every minute.
2.05
Incorrect Option Selection
If an option which is not compatible
with the set wash program is selected,
the message “ ” is displayed for
about 2 seconds and 3 consecutive
short beeps
19
ERR
Page 20
WASHING HINTS
Sorting The Laundry
Follow the wash code symbols on
each garment label and the
manufacturer’s washing instructions.
Sort the laundry as follows: whites,
coloureds, synthetics, delicates,
woollens.
Before Loading The Laundry
Never wash whites and coloureds
together. Whites may lose their
“whiteness” in the wash.
New coloured items may run in the
first wash; they should therefore be
washed separately the first time.
Make sure that no metal objects
are left in the laundry (e.g. hair
clips, safety pins, pins).
Button up pillowcases, close zip
fasteners, hooks and poppers.
Tie any belts or long tapes.
Remove persistent stains before
washing.
Rub particularly soiled areas with a
special detergent or detergent paste.
Treat curtains with special care.
Remove hooks or tie them up in a
bag or net.
Removing Stains
Stubborn stains may not be removed by
just water and detergent. It is therefore
advisable to treat them prior to washing.
Blood: treat fresh stains with cold water.
For dried stains, soak overnight in water
with a special detergent then rub in the
soap and water.
Oil based paint: moisten with benzine
stain remover, lay the garment on a soft
cloth and dab the stain; treat several
times.
Dried grease stains: moisten with
turpentine, lay the garment on a soft
surface and dab the stain with the
fingertips and a cotton cloth.
Rust: oxalic acid dissolved in hot water
or a rust removing product used cold.
Be careful with rust stains which are not
recent since the cellulose structure will
already have been damaged and the
fabric tends to hole.
Mould stains: treat with bleach, rinse
well (whites and fast coloureds only).
Grass: soap lightly and treat with bleach
(whites and fast coloureds only).
Ball point pen and glue: moisten with
acetone (*), lay the garment on a soft
cloth and dab the stain.
Lipstick: moisten with acetone (*) as
above, then treat stains with methylated
spirits. Remove any residual marks from
white fabrics with bleach.
Red wine: soak in water and detergent,
rinse and treat with acetic or citric acid,
then rinse. Treat any residual marks with
bleach.
Ink: depending on the type of ink,
moisten the fabric first with acetone (*),
then with acetic acid; treat any residual
marks on white fabrics with bleach and
then rinse thoroughly.
Tar stains: first treat with stain remover,
methylated spirits or benzine, then rub
with detergent paste.
(*) do not use acetone on artificial silk.
20
Page 21

Tips For Stain Wand
Tomato Extract / Soy Sauce / Mud:
Warm up a small amount of water to
approximately 40°C, wet the stain, pour
two or more drops of liquid detergent,
spread it over the stain and let it soak
for approximately 5 minutes. After this
time, apply Stain Wand according to the
operating instructions and continue to
pour warm water as needed.
Ketchup / Tomato Extract / Beans
Broth: Prepare a solution of two
measures of white vinegar with one
measure of water. For example: for
each tablespoon of water add two
tablespoons of vinegar. Mix the solution
and wet the entire stain. Apply Stain
Wand according to operating
instructions and keep wetting the stain
with the solution as needed.
Red Wine: Wet the entire stain with cold
water; pour two or more drops of liquid
detergent; spread it over the stain and
let it soak for approximately 5 minutes.
After this time, apply Stain Wand
according to operating instruction.
Best results are achieved on:
Fresh stains that are not completely
settled;
Stains that were previously washed
but not dried in a dryer nor ironed;
Small stains, localized in a small area
of the garment.
Examples: drops and spills of drinks and/
or food; small stains caused by laying the
garment on a dirty surface, etc.
Less efficient on:
Very concentrated or very old stains;
Stains that were previously washed
and dried in a dryer or ironed;
Large stains, spread on a large area of
the garment.
Detergents and Additives
Good washing results also depend on the
choice of detergent and use of the correct
quantities to avoid waste and protect the
environment.
Although biodegradable, detergents
contain substances which, in large
quantities, can upset the delicate
balance of nature.
The choice of detergent will depend on
the type of fabric (delicates, woollens,
cottons, etc.), the colour, washing
temperature and degree of soiling.
Quantity Of Detergent To Be
Used
The type and quantity of detergent will
depend on the type of fabric, load size,
degree of soiling and hardness of the
water used.
Water hardness is classified in so-called
“degrees” of hardness. Information on
hardness of the water in your area can
be obtained from the relevant water
supply company, or from your local
authority.
Follow the product manufacturers’
instructions on quantities to use.
Use less detergent if:
you are washing a small load;
the laundry is lightly soiled;
large amounts of foam form during
washing.
21
Page 22
WASHING PROGRAMS
ProgramIcon Description Options
Regular
Wash*
Fast
Wash
Save
Favourite
For an average domestic load
of mixed fabrics.
For a very small load of
mixed fabrics.
Favourite wash program -
Wash Load / Dirt Level / Soak Time /
Rinse Option / Delay End
Wash Load / Dirt Level /
Soak Time (only ‘No Soak’) /
Rinse Option (can not select ‘Extra’) /
Delay End
Colours
Delicates
Heavy Soil
Woollens
Handwash
Bedding
Rinse+
Spin
For colours item of mixed
fabrics.
For lingerie, lace, trimmed
and embroidered items.
For a heavily soiled cotton
wash load.
For woollen fabrics labelled
“Machine Washable”.
Special program for articles
of clothing whose label
indicates that they must be
hand-washed .
For bedding fabrics labelled
“Machine Washable”.
For items that you want to
rinse and spin eg. clothes
items you have hand washed
in a wash tub.
Wash Load / Dirt Level /
Soak Time (only ‘No Soak’) /
Rinse Option / Delay End
Wash Load / Dirt Level / Soak Time /
Rinse Option / Delay End
Wash Load / Dirt Level / Soak Time /
Rinse Option / Delay End
Wash Load / Dirt Level / Soak Time /
Rinse Option (only ‘Deep’ & ‘Extra’) /
Delay End
Wash Load / Dirt Level / Soak Time /
Rinse Option / Delay End
Wash Load / Dirt Level / Soak Time /
Rinse Option (only ‘Deep’ & ‘Extra’) /
Delay End
Wash Load / Rinse Option /
Delay End
Drain+
Spin
Tub
Cleaning
* “Regular Wash” selected is recommended for a full load of normally soiled cottons.
For very wet clothes to
remove the water.
For cleaning the wash bowl.
22
Delay End
Delay End
Page 23
CARE AND CLEANING
What To Do After You Have
Finished Your Washing.
Press ‘OFF’ at the ON - OFF Switch.
Switch off the electricity at the power
point.
Turn off the water taps.
Leave lid open for a while. This allows
time for moisture inside the washing
machine to evaporate and for any
odours to disperse.
You must DISCONNECT the appliance
from the electricity supply, before you
can carry out any cleaning or
maintenance work.
Cleaning The Dispenser
The dispenser needs to be cleaned
regularly, preferably after each wash.
Inspect the dispenser after each wash to
see if there is any residue of detergent.
To do this proceed as follows:
Pull the dispenser drawer forward
until it stops.
Before replacing the dispenser back
in its recess, clean the inside of the
drawer with an old toothbrush.
Put the dispenser back into its
runners and close the drawer.
Cleaning The Lint Filter
Lint is a collection of threads and fluff
which comes off your clothes during
washing.
Your washing machine collects this lint
in the lint filter. It is important to clean
out this lint filter, preferably after each
wash.
How to clean the lint filter :
Remove the filter column from the
centre of the agitator.
Lift the front of the drawer up and
forward to remove it from the runners.
Clean the dispenser drawer with hot
water and a brush, eg. an old
toothbrush.
Dry the drawer.
23
Page 24
Unclip the filter bag from the column.
Turn the bag inside out and remove
the lint.
Cleaning Stains In The
Washbowl
Stains and residue in the washbowl can
be caused by:
Metal objects such as bobby pins,
dress making pins and nails.
Salt.
Body oils and grease from very dirty
or sweaty clothes being deposited
around the top of the washbowl.
Wash the filter bag in hot water.
Clean the filter bag with an old brush,
making sure water can flow through
the bag mesh.
Reassemble the filter to the column
and place it back in the centre of the
agitator.
Cleaning Your Washing
Machine
To clean the inside and outside of your
washing machine you should:
Wipe the surface with a mild
dishwashing detergent and warm
water.
Wipe dry with a soft cloth.
Never use solvents, aerosol cleaners,
spray pack cleaners, glass cleaners,
metal polishes, caustic materials,
scourers or general household
cleaners on or near the top panel and
lid, control panel or other parts of
your washing machine.
Excessive foam during wash if
incorrect or too much detergent is
used.
Check all pockets before loading
clothes into your washing
machine.
Don’t leave wet clothing
(especially swimwear) in the bowl
for too long before you wash it.
How to clean the washbowl:
Wipe with a cleaning product which
is suitable for stainless steel.
Oily deposits can be removed by
wiping surfaces with a mild
dishwashing detergent and warm
water.
Never use bleach cleaners or steel
wool to clean the stainless steel
washbowl.
24
Page 25
HELPFUL HINTS IN DEALING WITH WASHING PROBLEMS
Residues On Washed Items
If you are experiencing residue on some
clothes, the following tips will help:
Pre-mix the detergent thoroughly in
warm water to improve the dissolving.
Reduce detergent dosage to between
a 1/2 and 2/3 of the manufacturer’s
standard recommendation to avoid
over concentration (the lower water
usage requires lower detergent usage).
Some residue may be re-deposited
lint, so be careful to not have lint
producing items in a load which has
darker clothes.
Select Deep rinse or Extra rinse and
NOT Eco and Fast rinse to help flush
more particles away.
Some detergents have ingredients
which do not fully dissolve and as a
consequence, may leave white
residue or particles evident on the
surface of darker clothes in the
finished wash load.
Similarly, some soils may not
dissolve fully, resulting in residue
evident on lighter coloured clothes.
If you use pre-treatment sprays or stain
removers, apply them to the clothes
items in a well ventilated area away
from your washing machine.
Use light strokes and don’t rub the
stain remover into the fabric.
If you use a chlorine bleach, follow the
instructions on the bottle and dilute it
before putting it on clothing.
Test coloured fabrics on an inside
seam for colour fastness before using
any stain removers or bleaches.
Test synthetic fabric on an inside
seam before using any chemicals or
bleaches.
NOTE: Chemicals referred to for stain
removal are available from your local
supermarket, hardware store or the
chemist.
Pre-treatment sprays and stain
removers can damage plastic
components on your washing
machine.
Do no use dry cleaning fluids or
solvents near your washing machine.
These fluids will damage your
washing machine and may cause an
explosion.
Stained Clothes
Treat all stains as soon as possible. The
longer you leave a stain the harder it will
be to remove. Try soakers and stain
removers first.
25
Page 26
Yellowing Or Greying Clothes
Problem Possible causes What to do
1. ONLY use low sudsing
detergent for washing machine.
2. Re-sort load, then re-wash
using program selections
suitable for the fabric.
3. If the water is very dirty or
very sudsy, repeat 2 above
reducing the amount of detergent you use.
Greyness
Incorrect wash times and using
insufficient detergent which can
cause redepositing of detergent
on clothes.
Using incorrect type or too much
detergent can cause poor rinsing
and poor spin performance.
Mixing whites with very dirty
clothes, eg work clothes.
1. Re-sort load, then re-wash
using wash program selections
suitable for the fabric.
2. If the water is very dirty or
very sudsy, repeat 1 above
reducing the amount of detergent you use.
Yellowing
A build-up of oils in clothes that
come into close contact with the
skin, eg underwear, T-shirts.
Ageing of clothes.
Iron deposits in the wash water.
Use of chlorine bleaches on fabrics
with resin finishes.
Incorrect drying.
TROUBLESHOOTING
Before call for servicing if you notice the problem as guidance on the table
below. It will be helpful your solution with some temporary symptom. You
washing machine will comeback to work as normal before service people
coming or waiting any queueing from service provider.
For some problems you will get a message in the display screen accompanied by
‘Beeps’. The message will be brief information about the problem and what you can
do to try and rectify it.
Problem
Machine not working.
LD
Possible CausesDisplay Code
Power not switched on.
No electricity supply
through the power point.
Machine not switched on.
Water taps not turned on.
Out of balance switch off.
Lid not fully closed.
What to do
Switch on power point.
Check power point with
another appliance.
Press On-Off switch ON.
Turn on taps.
Open lid, redistribute load
and close lid.
Close lid.
26
Page 27
Problem
Machine has washed
load but will not spin
Water in washbowl.
Will not fill with water.
Water flowing into
washbowl indefinitely.
Machine goes out of
balance or vibrates
excessively when
spinning.
Water on floor.
The Stain Wand
does not start.
No water goes out
of the Stain Wand.
LD
E20
EF0
Possible CausesDisplay Code
Out of balance.
Lid not fully closed.
Drain hose blocked.
Too much suds causing
motor temperature
overload.
Water taps not turned on.
Inlet hoses blocked.
Drain hose too low.
Machine not level.
Levelling feet not adjusted.
Clothes not evenly
distributed.
Too much water for load
size.
Loose inlet hose
connections.
Incorrect water level for
size of load.
The Washer’s plug is not
connected to the socket.
Stain Wand is not activated.
The Washer lid is open.
The tap is closed.
The water hose filter is
clogged.
No water goes out of the
tap.
The water inlet hose is
folded or squashed.
The Stain Wand water
button was not pressed.
What to do
Open lid, redistribute load,
close lid.
Close lid.
Check drain hose for blockage.
Wait a short while, the wash
will continue.
In future, reduce detergent
dose or use low sudsing
(front load) detergent.
Turn taps on.
Clean tap filters/washers.
Raise drain hose or fit a
syphon break.
Refer to installation
instructions for correct
positioning of hose.
Make the machine level.
Adjust feet to touch the floor.
Redistribute clothes evenly.
Check connections at taps
and rear of machine.
Use low water level.
Connect the Washer’s
plug in the socket.
Activate the Stain Wand.
Press the “Delay End” and
“ ” keys at the same time
during 3 seconds, until the
Stain Wand buttons turn on.
Close the Washer lid.
Open the tap.
Clean the filter.
Check the house’s hydraulic
installation.
Unclog the tap.
Press the Stain Wand water
button.
27
Page 28

Problem Possible CausesDisplay Code What to do
Check detergent use and
rewash clothes.
Remove some clothes and
rewash.
Reselect program or
temperature and rewash.
Use a higher water level.
If the item is visible, remove
it with pliers.
Use a wash bag in future.
Normal noise.
Normal noise.
Clothes still dirty after
wash program.
Scraping noise on
spin.
Humming, clicking
and other noises.
Not enough or no detergent.
Too many clothes in load.
Incorrect wash program or
temperature selected.
Incorrect water level
selected.
Bra wire or other thin items
caught between inner and
outer washbowls.
Bowl rotation at start of
wash.
Brake activation when
stopping after spin.
TROUBLESHOOTING FAULT DISPLAYS
Fault information and a guide for when you should call for service.
If you have a problem with your washing machine and before you call service, make
sure you have followed ALL of the instructions that may remedy the problem. You will
find instructions in the ‘Troubleshooting’ section and in the table below.
When the washing machine detects a problem that requires your attention, you will be
alerted. The machine will warn you of this problem by displaying a fault code in the
digital display, accompanied by “Beeping”.
Fault information and the action you should take are described in the following table.
Description
Not filling with
water
Flood
Display Code
E30
Customer action (Summary)
Press and hold the “Start/Hold To Pause” button
for 1.2 seconds to PAUSE machine.
Make sure wall tap is on and hose filter are not
blocked. Raise drain hose if water is flowing out of
drain hose. Press ‘Start/Hold To Pause’ to re-start
wash.
If problem remains, call Service.
If the water is pouring onto the floor, turn OFF
both wall taps. Wait a few minutes to see if the
fault is corrected.
If not, call Service.
28
Page 29

Description Customer action (Summary)
Draining problem
Loss of water,
while washing
Water level problem
Motor fault
Display Code
E20
E30
E50
Wait a few minutes to see if the fault is corrected.
If not, press ‘Start/Hold To Pause’ then check the
drain hose for blockage. Press ‘Start/Hold To Pause’
to continue the wash.
If problem remains, call Service.
If water level in wash bowl is low
and water is flooding the floor,
select program ‘Drain + Spin ’ position,
then press ‘Start/Hold To Pause’.
Should this make things worse, press the power
switch and call Service.
Otherwise, press ‘Start/Hold To Pause’ to continue
the wash
Wait, this fault may clear itself. If not,
select program ‘Drain + Spin ’ position,
then press ‘Start/Hold To Pause’ to drain
the wash bowl.
If this problem is repeated, call Service.
Wait, this fault may clear itself. If not,
select program ‘Drain + Spin ’ position,
position to drain the wash bowl.
You may have to press ‘Start/Hold To Pause’ to
commence draining.
If this problem is repeated, call Service.
Communication
error
Machine in pause
mode
Incorrect option
selection
Out of balance
interruption
Power down
recovery
SP
ERR
PR
Call Service.
Press Start/Hold To Pause.
Choose the correct option.
Make the machine level.
Adjust feet to touch the floor.
Redistribute clothes evenly, then close the lid to continue.
Wait, this fault may clear itself.
29
Page 30

ENVIRONMENT CONCERNS
Packaging materials
The materials marked with the symbol
are recyclable.
>PE<=polyethylene
>PS<=polystyrene
>PP<=polypropylene
This means that they can be recycled by
disposing of them properly in appropriate
collection containers.
Old machine
Use authorised disposal sites for your
old appliance. Help to keep your country
tidy!
The symbol on the product or on
its packaging indicates that this product
may not be treated as household waste.
Instead it shall be handed over to the
applicable collection point for the
recycling of electrical and electronic
equipment.
Ecological hints
To save water, energy and to help
protect the environment, we recommend
that you follow these tips:
Normally soiled laundry may be
washed without prewashing in order
to save detergent, water and time
(the environment is protected too!).
The machine works more
economically if it is fully loaded.
With adequate pre-treatment, stains
and limited soiling can be removed;
the laundry can then be washed at a
lower temperature.
Measure out detergent according to
the water hardness, the degree of
soiling and the quantity of laundry
being washed.
By ensuring this product is disposed of
correctly, you will help prevent potential
negative consequences for the
environment and human health, which
could otherwise be caused by
inappropriate waste handling of this
product.
For more detailed information about
recycling of this product, please contact
your local city office, your household
waste disposal service or the shop
where you purchased the product.
30
Page 31

Chào mừng đến với thế giới Electrolux
Cám ơn bạn đã chọn một sản phẩm hạng nhất của Electrolux, hy vọng rằng sẽ mang
lại cho bạn nhiều thú vị trong tương lai. Electrolux có tham vọng cung cấp nhiều sản
phẩm chất lượng khác nhau giúp cuộc sống của bạn thoải mái hơn. Bạn sẽ tìm thấy
một số ví dụ trên trang bìa của tài liệu hướng dẫn này. Vui lòng dành ra vài phút tìm
hiểu tài liệu hướng dẫn này để bạn có thể tận dụng những lợi ích của chiếc máy mới
của mình. Chúng tôi cam kết nó sẽ mang lại một Trải Nghiệm Người Dùng cao cấp
giúp bạn An Tâm. Chúc may mắn!
Các biểu tượng bạn sẽ thấy ở một số đoạn của tập sách này có ý nghĩa sau đây:
Hình tam giác cảnh báo và/hoặc các từ khóa (Cảnh báo!, Thận trọng!) nhấn
mạnh đến thông tin đặc biệt quan trọng đối với sự an toàn của bạn hoặc hoạt
động phù hợp của thiết bị.
Thông tin được đánh dấu bằng biểu tượng này cung cấp thêm hướng dẫn và
những mẹo thực tế về cách sử dụng thiết bị.
Mẹo và thông tin về cách sử dụng tiết kiệm và thân thiện với môi trường đối với
thiết bị có đánh dấu bằng biểu tượng này.
MỤC LỤC
Thông tin về an toàn ...............................................................................................................
Mô tả sản phẩm ........................................................................................................................
Gián Đoạn vì Mất Cân Bằng ................................................................................................
Bảng điều khiển ........................................................................................................................
Sử dụng .......................................................................................................................................
Gợi ý giặt .....................................................................................................................................
Chương trình giặt .....................................................................................................................
Chăm sóc và vệ sinh ................................................................................................................
Mẹo hữu ích để giải quyết các vấn đề giặt ........................................................................
Xử lý sự cố ...................................................................................................................................
Xử lý màn hình hiển thị có lỗi ...............................................................................................
Các vấn đề về môi trường ......................................................................................................
31
32
34
36
37
38
48
50
51
53
54
56
58
Page 32

THÔNG TIN VỀ AN TOÀN
Để đảm bảo sự an toàn của bạn và sử
dụng đúng cách, trước khi lắp đặt và
sử dụng thiết bị lần đầu, hãy đọc kỹ tài
liệu hướng dẫn sử dụng này, gồm có
các gợi ý và cảnh báo của nó. Để tránh
nhầm lẫn và tai nạn không cần thiết,
việc quan trọng là phải đảm bảo rằng
tất cả những ai sử dụng thiết bị này
cũng hoàn toàn quen với hoạt động và
các tính năng an toàn của nó. Hãy cất
những hướng dẫn này và đảm bảo
rằng chúng vẫn đi kèm thiết bị nếu di
dời hoặc bán thiết bị, để mọi người sử
dụng thiết bị trong suốt tuổi thọ của
nó có thông tin thích hợp về cách sử
dụng thiết bị và vấn đề an toàn.
An toàn chung
Việc thay đổi thông số hay tìm cách
điều chỉnh sản phẩm này dưới bất kỳ
hình thức nào sẽ gây nguy hiểm.
Hãy đảm bảo rằng vật nuôi nhỏ không
leo vào bên trong thùng giặt. Để tránh
tình huống này, hãy kiểm tra thùng
giặt trước khi sử dụng thiết bị.
Bất kỳ đồ vật nào chẳng hạn như đồng
xu, ghim an toàn, đinh, ốc vít, đá hay
bất kỳ vật nào cứng, sắc đều có thể gây
ra hư hỏng lớn và không được bỏ vào
máy.
Chỉ sử dụng lượng chất làm mềm vải và
bột giặt theo khuyến cáo. Nếu bạn cho
quá nhiều các chất này, vải có thể bị
hỏng. Hãy tham khảo khuyến cáo số
lượng của hãng sản xuất.
Thiết bị này không được thiết kế để sử
dụng bởi các cá nhân (kể cả trẻ em) có
khuyết tật về thể chất, cảm giác hoặc
thần kinh, hoặc thiếu kinh nghiệm và
kiến thức, trừ phi họ được giám sát hoặc
chỉ dẫn sử dụng thiết bị bởi một người
chịu trách nhiệm về sự an toàn của họ.
Giặt những đồ vật nhỏ chẳng hạn như
vớ, dây buộc, dây lưng giặt được, v.v.
trong túi giặt hoặc bao gối vì những đồ
vật đó có thể trôi xuống giữa bồn và
máy khuấy.
Không được sử dụng máy giặt để giặt
những thứ có chứa xương cá voi, vải
không có viền hoặc vải bị rách.
Luôn rút phích cắm của thiết bị và tắt
nguồn nước sau khi sử dụng, vệ sinh và
bảo dưỡng.
Bạn không được tìm cách tự sửa máy
trong bất kỳ trường hợp nào. Công việc
sửa chữa do những người thiếu kinh
nghiệm thực hiện có thể gây ra thương
tích hoặc hư hỏng nghiêm trọng. Hãy
liên hệ Trung Tâm Bảo Trì tại địa
phương của bạn. Luôn đòi hỏi sử dụng
bộ phận dự phòng chính hãng.
Lắp đặt
Thiết bị này có trọng lượng lớn. Cần
phải cẩn thận khi di chuyển thiết bị.
Khi mở gói thiết bị, hãy kiểm tra xem
nó có bị hư hỏng không. Nếu có nghi
ngờ, không được sử dụng thiết bị và
liên hệ Trung Tâm Bảo Trì.
Sau khi lắp đặt thiết bị, hãy kiểm tra để
đảm bảo thiết bị không đè lên ống dây
nạp và xả.
Nếu máy được đặt trên sàn trải thảm,
hãy điều chỉnh các chân để cho không
khí lưu thông tự do.
Hãy luôn đảm bảo rằng không có nước
rò rỉ từ các ống dây và các mối nối sau
khi lắp đặt.
32
Page 33

Bất kỳ công việc lắp ống nào cần để lắp
đặt thiết bị này cũng phải được tiến
hành bởi một thợ ống nước có năng lực.
Bất kỳ công việc lắp điện nào cần để lắp
đặt thiết bị này cũng phải được tiến
hành bởi một thợ điện có năng lực.
Không được đổ nước trực tiếp lên máy
tẩy Stain Wand và không bao giờ được
nhúng máy xuống nước nếu không bạn
sẽ làm hỏng máy. (*)
(*)
Thông tin an toàn cho cho máy
STAIN WAND
Nguy cơ bỏng. Không sử dụng máy tẩy
vết bẩn Stain Wand trực tiếp trên tay,
mặt, mắt, hoặc bất kỳ phần nào khác
của cơ thể. KHÔNG BAO GIỜ ĐƯỢC SỬ
DỤNG MÁY TẨY VẾT BẨN STAIN WAND
trên vải vóc mà đang được mặc trên cơ
thể người. (*)
Nhiệt độ của đầu máy tẩy vết bẩn Stain
Wand có thể tăng lên trong khi nó hoạt
động. KHÔNG CHẠM VÀO PHẦN ĐẦU
MÁY khi máy đang hoạt động. (*)
Trong trường hợp nhiệt độ tăng quá
cao, ngừng sử dụng thiết bị ngay lập tức
và đợi cho tới khi nó nguội, trước khi sử
dụng trở lại. (*)
Không sử dụng máy tẩy Stain Wand khi
vết bẩn không ướt. (*)
Không bao giờ được sử dụng máy tẩy
Stain Wand trên các dung môi dễ cháy
như (rượu, thiếc, xăng, dầu .v.v) (*)
Không bao giờ được sử dụng máy tẩy
Stain Wand trên các động vật hoặc vật
nuôi. (*)
Để máy tẩy Stain Wand xa tầm với của
trẻ nhỏ. (*)
Ngừng sử dụng máy tẩy Stain Wand
ngay lập tức nếu thấy bất kỳ sự khó chịu
nào về thể chất xảy ra. Việc sử dụng máy
tẩy Stain Wand được khuyến cáo với
người sử dụng máy điều hòa nhịp tim.
(Người dử dụng máy điều hòa nhịp tim
được khuyến cáo không nên sử dụng
máy tẩy Stain Wand). (*)
Sử dụng
Thiết bị này được thiết kế cho mục đích
gia dụng. Không được sử dụng thiết bị
cho các mục đích khác với mục đích
thiết kế của nó.
Chỉ được giặt các loại vải có thể giặt
bằng máy giặt. Tuân thủ các hướng dẫn
trên từng nhãn quần áo.
Không được để thiết bị quá tải. Xem
mục liên quan trong tài liệu hướng dẫn
sử dụng.
Trước khi giặt, hãy đảm bảo rằng tất cả
các túi quần áo đều rỗng và các nút áo,
khóa kéo đã được kéo. Tránh giặt các
món đồ bị sờn hay rách và xử lý các vết ố
chẳng hạn như sơn, mực, gỉ, và cỏ trước
khi giặt. KHÔNG được giặt áo ngực bằng
máy giặt.
Không được giặt quần áo đã tiếp xúc
với các sản phẩm xăng dầu dễ bay hơi
bằng máy. Nếu dùng nước tẩy dễ bay
hơi, phải cẩn thận để đảm bảo rằng
nước tẩy đã được loại bỏ khỏi quần áo
trước khi bỏ vào máy.
Không được kéo dây điện để rút phích
cắm ra khỏi ổ cắm; hãy luôn cầm vào
phích cắm.
Không được sử dụng máy giặt nếu dây
nguồn, bảng điều khiển, bề mặt làm
việc hay bệ máy bị hư hỏng đến mức
có thể tiếp cận phía bên trong của
máy giặt.
33
Page 34

Sự an toàn của trẻ em
Máy giặt này được thiết kế không phải
để trẻ em hoặc người có sức khỏe yếu
sử dụng mà không có sự giám sát.
Trẻ nhỏ phải được giám sát để đảm
bảo chúng không nghịch phá thiết bị
này.
MÔ TẢ SẢN PHẨM
Các bộ phận đóng gói (ví dụ như các
tấm nhựa, polystyrene) có thể gây
nguy hiểm cho trẻ em - nguy hiểm
nghẹt thở! Để xa tầm với của trẻ em.
Để tất cả bột giặt ở nơi an toàn tránh
xa tầm với trẻ em.
Hãy đảm bảo rằng trẻ em hoặc vật nuôi
không leo vào bên trong thùng giặt.
14 15 16
11
12
13
1
2
3
4
5
Máy tẩy vết bẩn Stain Wand
1
Bảng Điều Khiển
2
Kính Chắn An Toàn
3
Nắp đậy
4
5
Các Chân Trước
Công Tắc BẬT- TẮT
6
Ống Nạp Nước
7
Dây Cáp Điện
8
Ống Xả
9
Các Chân Sau
10
Ngăn Định Lượng Chất Làm Mềm Vải
11
Bộ lọc xơ vải
12
Thùng giặt
13
Ngăn Định Lượng chất tẩy
14
15
Ngăn định lượng bột giặt
16
Trục khuấy
1
6
7
8
9
10
34
Page 35

Hướng Dẫn Vận Hành Máy Tẩy Vết Bẩn – Stain Wand
Hệ thống này được phát triển đặc biệt để hỗ trợ
trong công việc hằng ngày loại bỏ các vết bẩn
trên quần áo của bạn. Nó hoạt động với công
nghệ siêu âm kết hợp với nước phát ra rung
động giúp nới lỏng các vết bẩn từ vải, khiến loại
bỏ chúng dễ dàng hơn khi giặt.
Để sử dụng mày tẩy vết bẩn (Stain Wand), Hãy
chắc chắn rằng cả hai nút chức năng Điện và
Nước của máy đã được bật .
Trước khi sử dụng máy tẩy vết bẩn, đầu tiên
1.
để xác định tính toàn vẹn màu sắc vải, bằng
cách chạy kiểm tra sơ bộ dưới đây:
Phun một lượng nước nhỏ trong một
1.1
khu vực ẩm của vải;
Đổ một lượng nhỏ chất tẩy rửa lỏng
1.2
không màu;
Áp dụng máy tẩy vết bẩn Stain Wand
1.3
(theo hướng dẫn dưới đây) vào phần
vài này;
Chờ cho đến khi vải khô và tìm kiếm
1.4
bất cứ dấu hiệu phai màu của vải nếu
có. Nếu màu sắc vải không thay đổi, thì
bạn có thể sử dụng máy tẩy vết bẩn
(Stain Wand).
Với nắp máy giặt đã đóng, bấm nút
2.
" " và nút “Delay End" nhấn đồng
thời trong 3 giây cho đến khi hai nút
“WATER” và “ON” được bật sáng.
Lúc này máy tẩy vết bẩn Stain Wand
đã sẵn sàng để sử dụng.
3.
Dây cáp có một vị trí khóa khi được kéo ra
hoàn toàn. Lấy nó ra khỏi hộp
đựng và kéo dây cáp ra đến
hết, sau đó thả lỏng để
cho nó tự quấn lại và
khóa tại vị chí khóa
đã định.
4.
Loại bỏ tất cả phần còn lại của các vết bẩn
bằng cách sử dụng một bàn chải nhỏ. Đặt
một tờ giấy thấm hoặc một miếng vải sạch
dưới vết bẩn (giấy này hoặc vải sẽ hấp thụ
các bụi bẩn). Khi nắp máy giặt được đóng
lại,nó có thể được sử dụng như một khu vực
làm việc.
Đổ giọt chất tẩy rửa lỏng không màu lên
5.
trên các vết bẩn. Thêm chất tẩy rửa hơn
nếu cần thiết (trong trường hợp vết bẩn
bám dai).
Nhấn nút và điều chỉnh việc phun nước vào
6.
các vết bẩn. Nhấn nút “WATER” nhiều lần
nếu cần thiết để làm ướt các vết bẩn. Lặp lại
quá trình này mỗi khi
vết bẩn khô lại.
Đèn
Đầu lỗ phun
Nước phun
Để loại bỏ các vết bẩn được tốt hơn, bạn
phải luôn luôn giữ độ ướt cho các vết bẩn
khi sử dụng máy tẩy vết bẩn này.
7.
Đặt đầu trên các vết bẩn. Trong khi bấm và
giữ nút “ON”, nhẹ nhàng kéo
đầu rà trên các vết bẩn theo
vòng tròn hoặc đường
"zig-zag".
Đặt đầu trên
vết bẩn
Miếng vải dính
vết bẩn
Giấy thấm hoặc
vải sạch
Bạn có thể nghe thấy một âm thanh đặc
biệt phát ra khi bộ phận siêu âm của máy
làm việc, điều này là bình thường. Để có kết
quả tốt nhất nên để máy tẩy vết bẩn Stain
Wand làm việc theo chiều thẳng đứng.
8.
Để các vết bẩnđược tẩy đi"nhẹ nhàng
hơn", loại bỏ bất tất cả các vết bẩn và nước
vẫn còn trên vải bằng cách sử dụng một
giấy thấm hoặc một miếng vải sạch. Thay
đổi miếng giấy, hoặc vải sạch khi chúng đã
quá ướt.
9.
Lặp lại bước 5 và 7 nếu cần thiết.
Xin lưu ý : Một số vết bẩn không thể tẩy
hết được 100%.
35
Page 36

Sau khi sử dụng, trả lại máy tẩy vết bẩn Stain
10.
Wand về lại hộp bằng cách kéo cáp nhẹ
nhàng cho đến khi nó được mở ra. Khi giây
cáp được thu lại ,đặt máy Stain Wand vào lại
trong hộp đựng của nó. Bạn có thể tắt nó đi
bằng cách nhấn nút “ ” và “Delay End”
cùng một lúc.
CHÚ Ý !
Sử dụng máy tối đa 5 phút một lần để tránh
nhiệt độ quá cao, và luôn luôn giữ ướt cho
vết bẩn bằng cách phun nước trong khi sử
dụng máy. Việc phun nước này vừa làm ướt
vết bẩn cần tẩy vừa làm mát đầu của máy
tẩy Stain Wand. Vì sự an toàn của bạn, Stain
Wand sẽ tắt sau 5 phút sử dụng liên tục,
nhưng bạn có thể bật lại bằng cách nhấn
nút ON.
Chỉ Sử dụng chất tẩy rửa lỏng không màu.
Không sử dụng chất tẩy rửa có màu hoặc
chất làm mềm vải. Màu sắc của chất tẩy rửa
hoặc chất làm mềm có thể làm vải của bạn
bị ố và bẩn hơn.
Quần áo mang biểu tượng:
(Không được giặt), (Không được
tẩy), (Không được là), (Giặt khô)
không phù hợp với tiền xử lý Stain Wand.
CHÚ Ý
Tùy thuộc vào áp lực nước được cấp,bạn có
thể cần phải bấm nút “WATER” nhiều lần để
tiêm nước ,để làm cho vết bẩn đủ ướt.
Để kiểm tra máy tẩy vết bẩn Stain Wand, xin
vui lòng phun một số nước trên nắp bằng
cách nhấn nút “WATER” và sau đó sử dụng
đầu máy trên nó bằng cách nhấn nút “ON”.
Nếu nước bắn racó nghĩa là máy tẩy vết bẩn
Stain Wand hoạt động tốt. Nếu không, xin
vui lòng liên hệ với dịch vụ khách hàng.
Gián Đoạn vì Mất Cân Bằng
Máy giặt có thể dừng trong giai đoạn quay vì
mất cân bằng. Màn hình sẽ hiển thị “ ” và
mỗi phút bạn sẽ nghe một tiếng bíp ngắn.
Mất cân bằng trong khi quay là do phân bố
quần áo không đều trong thùng giặt. Để khắc
phục vấn đề mất cân bằng, hãy mở nắp và
phân bố lại quần áo cho đồng đều ở khoảng
giữa máy khuấy và vách thùng giặt. Đóng nắp
sẽ làm máy khởi động và tiếp tục giai đoạn
quay.
Nếu bạn thường xuyên gặp tình trạng gián
đoạn vì mất cân bằng, có thể là do máy giặt
không được đặt trên sàn nhà chắc chắn và cân
bằng. Có thể khắc phục vấn đề này bằng cách
điều chỉnh chân của máy giặt như mô tả trong
Hướng Dẫn Lắp Đặt được cung cấp kèm theo
máy.
Phục hồi sau khi mất điện
Mất điện khi máy đang giặt hoặc xả hoặc
quay. Máy sẽ lưu lại thiết lập ở giai đoạn đang
thực hiện và sau đó khi có điện trở lại máy sẽ
hiển thị chữ " " trên màn hình kỹ thuật số.
Nếu nút Chương trình hoặc bất kỳ thiết lập
nào khác không được đổi trong 5 giây, máy sẽ
bắt đầu giặt từ giai đoạn còn dở.
Phản Ứng của Nút và Đèn
Hãy luôn nhấn nút nhẹ nhàng. Quan sát
các đèn trên bảng điều khiển để thấy
hiệu ứng khi nhấn một nút hoặc xoay
núm chọn chương trình, và chờ nghe
tiếng 'BÍP'.
Khi bạn nhấn một nút, bạn sẽ nghe một tiếng
'BÍP' ngắn để xác nhận thông tin nhập. Nếu
không có tùy chọn này vào lúc đó, máy sẽ
không cho phép bạn chọn, và bạn sẽ nghe
tiếng 'BÍP' dài để nhắc bạn biết tùy chọn đó
không khả dụng.
Sau khi máy đã khởi động, toàn bộ nút tùy
chọn giặt sẽ bị vô hiệu và máy sẽ hiển thị chữ
" " trên màn hình cùng với ba tiếng bíp
ngắn để cho biết nút này đã bị vô hiệu. Nút
khởi động sẽ vẫn hoạt động nhưng bạn cần
phải nhấn và giữ nút đó trong 1 - 2 giây để
tạm dừng máy giặt.
Thao tác này là để xác nhận rằng bạn thực sự
muốn tạm dừng máy. Khi ở chế độ tạm dừng,
tất cả các tùy chọn sẽ đều có thể được đổi lại.
36
Page 37

Tất cả các chức năng của máy giặt sẽ dừng
khi mở nắp.
Bật/Tắt Chế Độ Bíp Khi Giặt
Xong
Chế độ này cho phép bạn bật hoặc tắt tiếng
bíp (4 tiếng bíp mỗi 4 phút) khi giặt xong. Ví
dụ như, bạn có thể muốn tắt tiếng bíp này khi
bạn khởi động một chu kỳ giặt lúc chuẩn bị đi
ngủ, để khi máy giặt xong khoảng 1 giờ sau,
nó sẽ không làm phiền bạn.
LƯU Ý: Tất cả các tiếng bíp báo lỗi sẽ không
bị tắt bằng tính năng này, chẳng hạn như lỗi
nghiêm trọng, hoặc mở nắp trong khi
nạp/khuấy/quay, hoặc mất cân bằng trong
khi quay.
BẢNG ĐIỀU KHIỂN
2 23 3
Để đổi lựa chọn "bíp", hãy thực hiện như sau:
Khi máy giặt ở CHẾ ĐỘ CHỜ hoặc CHẾ ĐỘ
1.
TẠM DỪNG, hãy nhấn và giữ nút "Bắt
Đầu/Giữ Để Tạm Dừng" cùng lúc trong
khoảng 3 giây để chuyển sang chế độ
Bật/Tắt Tiếng Bíp Khi Giặt Xong.
Màn hình kỹ thuật số sẽ hiển thị " "
khi tiếng bíp sau khi giặt xong được bật
(đây là thiết lập mặc định tại nhà máy).
Màn hình kỹ thuật số sẽ hiển thị “ ”
khi tiếng bíp sau khi giặt xong bị tắt.
2.
Nhấn nút "Điều Chỉnh Tùy Chọn ( , )"
để thay đổi lựa chọn, sau đó nhất nút Bắt
Đầu/Giữ Để Tạm Dừng để lưu lựa chọn mới.
LƯU Ý: Nếu bạn không nhấn nút nào trong 5
giây, máy giặt sẽ chuyển về thiết lập trước
đó. Để lập trình lại, chỉ cần lặp lại quy trình
bên trên.
1
Núm Chọn Chương Trình
2
Các nút chọn tùy chọn
3
Các nút Điều Chỉnh Tùy Chọn
4
Nút giảm thời gian
5
Nút lưu chương trình riêng
4 5 6 891 7
6
Nút Hoãn Kết Thúc
7
Màn hình hiển thị
8
Bắt Đầu/Giữ Để Tạm Dừng
9
Tùy chọn máy tẩy vết bẩn Stain Wand ,
xem trang 35
37
Page 38

Công Tắc BẬT- TẮT
Công tắc Bật/Tắt được
dùng để Bật và Tắt
máy giặt.
SỬ DỤNG
Hãy thực hiện theo các hướng dẫn ở mục
này để có kết quả giặt tốt nhất.
Phân loại Quần Áo Giặt Thành
Các Loại Quần Áo Cần Giặt
Riêng
Mỗi lượng quần áo cần giặt phải có quần
áo cần điều kiện giặt như nhau. Ví dụ
như, bạn không được giặt quần áo mỏng
với quần áo lao động rất bẩn.
Quần áo bền màu và không bền màu
phải được tách riêng. Việc nắm rõ loại vải
bạn có và mức bẩn của quần áo sẽ có ích
khi bạn chọn tùy chọn chương trình.
Một số loại vải có tính hút xơ và có thể
quấn theo xơ, bụi bẩn và màu từ các loại
vải khác sinh ra xơ. Một số ví dụ được ghi
bên dưới:
Các loại vải
hút xơ
Nhung kẻ
Vải tổng hợp
Vải ép vĩnh viễn
Các loại vải
tạo xơ
Khăn tắm
Tã
Dây Viền/Vải
Bông Xù
Công tắc Bật/Tắt nằm ở phía sau của
bảng điều khiển ở phía bên trên bảng
thẩm định.
Kiểm tra quần áo để tránh hư
hỏng
Lấy đồ vật ra khỏi tất cả các túi. Đóng tất
cả các móc và khóa kéo để tránh làm
vướng quần áo.
Giặt áo ngực, quần chật ống và các đồ
vật mỏng khác trong túi lưới, bạn có thể
mua túi này ở siêu thị.
Chất xử lý sơ và các chất
tẩy ố
Phun chất xử lý sơ và chất tẩy ố có thể
làm hỏng các bộ phận bằng nhựa trên
máy giặt.
Nếu bạn sử dụng các chất xử lý sơ hoặc
chất tẩy ố, hãy phun vào quần áo cách
xa máy giặt.
Bỏ quần áo vào máy giặt
Khi bỏ quần áo vào
máy giặt, có bốn
thứ cần ghi nhớ:
Đảm bảo bạn giặt tách riêng các loại
vải hút xơ với các loại vải tạo xơ.
38
Page 39

Quần áo phải được bỏ vào đồng đều
quanh trục khuấy. Để có kết quả tốt
nhất, hãy bỏ những món đồ nhỏ trước,
sau đó là các món đồ lớn.
Quần áo phải không được quấn quanh
trục khuấy.
Không được để máy giặt quá tải. Quần
áo phải có thể di chuyển xung quanh
trong khi giặt.
Mỗi mẻ giặt chỉ được có ba đến bốn
món đồ lớn, ví dụ như các tấm vải.
Phần còn lại của mẻ giặt phải là các
món đồ nhỏ. Mẻ giặt gồm có các món
đồ lớn và nhỏ sẽ giặt sạch hơn so với
mẻ giặt chỉ gồm tất cả các món đồ lớn.
Thêm bột giặt
Khi sử dụng máy giặt lần đầu, hãy đảm
bảo ngăn định lượng được thiết lập cho
loại bột giặt bạn sẽ sử dụng. Để thực
hiện việc này, hãy thực hiện như sau:
Kéo ngăn định lượng ra phía trước
1.
đến khi nó dừng lại.
Nâng mặt trước của ngăn định lượng
2.
lên và kéo ra phía trước để tháo nó ra
khỏi rãnh dẫn.
Kiểm tra vị trí của cửa nạp ở phía sau
3.
của ngăn đựng bột giặt trong ngăn
định lượng. (Thiết lập tại nhà máy là
mở cửa nạp để bỏ bột giặt).
Sử dụng bột giặt và chất làm
mềm vải
Không sử dụng sai loại bột giặt. Bạn
phải sử dụng bột giặt ít bọt được thiết
kế cho máy giặt.
Không sử dụng các sản phẩm làm từ xà
phòng trong máy giặt.
Đo đúng lượng bột giặt hoặc nước giặt
theo các khuyến cáo trên bao bì.
Tốt nhất là sử dụng bộ giặt có nhãn là ít
bọt. Bột giặt chất lượng tốt sẽ có hiệu
quả cao trong máy giặt này.
Không sử dụng quá nhiều bột giặt. Điều
này sẽ tạo ra quá nhiều bọt làm chậm
tốc độ quay, chất lượng xả kém và làm
quá tải môtơ trong giai đoạn quay của
chương trình giặt.
Không được đổ chất làm mềm vải vào
quần áo vì có thể làm ố quần áo.
Kéo cửa
nạp lên để
bỏ bột giặt
Kéo cửa nạp xuống nếu bạn sắp sử
4.
dụng nước giặt.
Kéo cửa
nạp xuống
để bỏ nước
giặt
Lắp lại ngăn nạp vào rãnh dẫn.
5.
Ghi nhớ: Nếu bạn đổi loại bột giặt,
cần thay đổi vị trí của cửa nạp.
Bây giờ bạn đã sẵn sàng bỏ bột giặt
6.
vào. Đo lượng bột giặt và đổ vào
ngăn bột giặt của ngăn định lượng.
39
Page 40

Khi sử dụng nước giặt, một lượng ít có
thể rò rỉ từ ngăn định lượng vào quần
áo sớm hơn dự kiến qua các lỗ nhỏ ở
phía sau của ngăn định lượng. Những
lỗ này là để giúp súc xả bột giặt.
7.
Nếu bạn muốn sử dụng chất làm
mềm vải, hãy xem phần "Thêm chất
làm mềm vải".
Đóng ngăn định lượng bằng cách để
8.
nó trở lại vào bảng trên của máy giặt
khi bạn đã thêm bột giặt xong.
Thêm Chất Làm Mềm Vải
Đo đúng lượng chất làm mềm vải
1.
theo các khuyến cáo trên bao bì.
2.
Pha chất làm mềm với đúng lượng
nước ấm nhưng chỉ pha đủ để đổ đến
vạch bên trong tách. Tách chứa 75ml
chất làm mềm.
Đổ chất làm mềm đã pha vào tách lên
3.
trên đỉnh của máy khuấy.
Không đổ quá đầy vào tách.
Không được đổ chất làm mềm vải
4.
trực tiếp vào quần áo vì có thể làm ố
quần áo.
QUAN TRỌNG: Nếu bạn sắp sử
dụng chất làm mềm vải, bạn phải
chọn tùy chọn xả KỸ (DEEP), có
nghĩa là bỏ chọn tùy chọn xả THÊM
(EXTRA) hoặc ECO hoặc NHANH
(FAST). Ngoài ra nếu thường xuyên
sử dụng chất làm mềm, phải súc xả
máy thường xuyên.
LƯU Ý: Bạn không cần phải sử dụng
chất làm mềm vải, máy giặt sẽ giặt
quần áo rất tốt mà không cần chất làm
mềm vải.
40
Page 41

Thêm Chất Tẩy
Việc tẩy quần áo có thể giúp loại bỏ vết ố,
vết bẩn nặng và diệt khuẩn.
Loại ôxi - Đây thường là chất tẩy dạng
bột. Pha lượng chất tẩy cần thiết với
nước và đổ vào lỗ ở bảng trên khi có một
ít nước trong thùng giặt. Tham khảo
hướng dẫn trên vật đựng chất tẩy.
Loại clo - Không được pha loạt chất tẩy
này với bột giặt. Pha chất tẩy với nước
theo hướng dẫn trên vật đựng.
Lúc này bạn có thể giặt quần áo, sử
6.
dụng bột giặt và chương trình giặt đã
chọn.
LƯU Ý: Không được sử dụng chất tẩy
trên lụa, len, tơ nhân tạo hoặc quần áo
không cần ủi.
Vận Hành Máy Giặt
Khởi động máy giặt
Mở vòi nước và bật nguồn ở công tắc
1.
nguồn.
Nhấn các nút công tắc Bật-Tắt để BẬT
2.
máy.
Đóng nắp.
3.
Máy sẽ sáng đèn. Chờ cho đèn sáng hết
trước khi vận hành máy.
Máy giặt lúc này ở Chế Độ Chờ và sẵn
sàng giặt quần áo.
Để thực hiện việc này, hãy thực hiện như
sau:
Vặn NÚM CHỌN CHƯƠNG TRÌNH đến
1.
vị trí “Giặt Bình Thường”.
Nhấn nút "Bắt Đầu/Giữ Để Tạm Dừng"
2.
để bắt đầu đổ nước.
Đổ dung dịch chất tẩy vào lỗ ở bên
3.
trên khi có một ít nước trong thùng
giặt.
Chờ máy khuấy trong vài phút, sau đó
4.
để máy đứng yên trong thời gian cần
thiết bằng cách nhấn và giữ nút "Bắt
Đầu/Giữ Để Tạm Dừng trong 1 - 2 giây
để tạm dừng máy.
Vặn NÚM CHỌN CHƯƠNG TRÌNH đến
5.
vị trí Xả Nước & Quay và nhấn nút
"Bắt Đầu/Giữ Để Tạm Dừng" để xả
thùng giặt.
Nếu các thiết lập được hiển thị trên bảng
điều khiển là thiết lập bạn muốn sử dụng
và NÚM CHỌN CHƯƠNG TRÌNH được đặt
chính xác chương trình giặt cho quần áo
của bạn, hãy nhấn nút "Bắt Đầu/Giữ Để
Tạm Dừng" để bắt đầu quá trình giặt.
Nắp đậy
Khi nắp đậy được mở hoàn toàn, để
đóng nắp lại như ban đầu, chỉ cần kép
nắp xuống thì nắp sẽ tự động đóng lại
từ từ.
Nắp sẽ không tự động đóng nếu nắp
được mở dưới 800 độ (Nhớ bỏ tay ra
khỏi cửa ngay vì cửa sẽ đóng rất nhanh
và dễ làm kẹt tay của bạn).
41
Page 42

Chọn Chương Trình Cần Thiết
Nhấn BIỂU TƯỢNG Chương Trình nhiều
lần để chọn chương trình giặt bạn muốn.
Đèn tương ứng sẽ sáng.
Núm chọn chương trình được chia thành
các phần sau.
Regular Wash (Giặt Thường) ,
Fast Wash (Giặt Nhanh) và
Favourite (Giặt theo bộ nhớ) ;
Colours (Màu) ,
Delicates (Mỏng) ,
Heavy Soil (Rất Bẩn) ,
Woollens (Len) ,
Handwash (Giặt Tay) ,
Bedding (Đồ trải giường) ,
Rinse+Spin (Xả+Vắt) ,
Drain+Spin (Tháo Nước+Vắt) và
Tub Cleaning (Vệ Sinh Lồng giặt) .
Sau khi bạn chọn một chương trình giặt,
Chương Trình Đã Chọn sẽ vẫn ở vị trí đó
trong toàn bộ chu kỳ giặt.
Nếu bạn đã bắt đầu giặt và muốn thay
đổi chương trình, hãy nhấn nút "Bắt
Đầu/Giữ Để Tạm Dừng" và giữ trong 1 - 2
giây để chuyển sang chế độ TẠM DỪNG,
chọn BIỂU TƯỢNG chương trình sang
một vị trí chương trình mới sẽ khiến cho
máy giặt lại bắt đầu chương trình mới.
LƯU Ý: Khi bạn chọn chương trình
WOOLLENS (LEN) và BEDDING (ĐỒ TRẢI
GIƯỜNG), tùy chọn DEEP RINSE (XẢ KỸ)
được tự động chọn cho bạn. Bạn sẽ không
thể chọn và sử dụng tùy chọn Xả Eco và Xả
Nhanh bằng hai chương trình này.
Khi bạn chọn chương trình DRAIN+SPIN
(THÁO NƯỚC+VẮT), sẽ có sự trì hoãn ít
nhất 2 phút trước khi máy giặt bắt đầu vắt.
Thời gian trì hoãn này là thời gian bơm
nước ra (DRAIN - THÁO NƯỚC) để đảm
bảo thùng giặt không còn nước, điều kiện
này là cần thiết trước khi bắt đầu vắt.
Ngay cả khi bạn có thể chỉ bỏ quần áo ướt
vào thùng giặt rỗng, thời gian trì hoãn
trước khi quay vẫn sẽ diễn ra để đảm bảo
an toàn và bảo vệ máy giặt.
Các Nút Tùy Chọn Chương
Trình
Tùy vào chương trình, có thể kết hợp các
chức năng khác nhau. Phải chọn các chức
năng này sau khi chọn chương trình
mong muốn và trước khi nhả nút "Bắt
Đầu/Giữ Để Tạm Dừng".
42
Page 43

Tùy Chọn Lượng Quần Áo Cần
Giặt
Nhấn nút TÙY CHỌN ( , ) để chọn
biểu tượng Tải, sau đó nhấn nút điều
chỉnh tùy chọn ( , ) để chọn lượng
quần áo cần giặt. Máy sẽ đổ lượng nước
cần sử dụng đối với lượng quần áo cần
giặt.
Bạn có thể chọn:
Chúng tôi khuyên bạn sử dụng mức tải
TỰ ĐỘNG bất kỳ khi nào có thể. Mức tải
TỰ ĐỘNG đảm bảo lượng nước phù hợp
được sử dụng đối với lượng quần áo cần
giặt.
Chỉ sử dụng lượng nước cần thiết đối với
lượng quần áo cần giặt.
Nếu bạn muốn thêm nước sau khi chu kỳ
giặt đã bắt đầu, nhấn và giữ nút “Bắt
Đầu/Giữ Để Tạm Dừng” trong 1 - 2 giây để
tạm dừng máy và chọn mức mới cao hơn
mà bạn muốn, nhấn nút "Bắt Đầu/Giữ Để
Tạm Dừng" lần nữa để vận hành máy giặt.
Máy giặt sẽ thêm nước đến mức mới đã
chọn và tiếp tục chương trình giặt.
Lựa chọn
AUTO
(TỰ ĐỘNG)
HIGH
(CAO)
X-MED
(Rất Nhiều Trung Bình)
MED
(Trung
bình)
LOW
(THẤP)
X-LOW
(Rất Thấp)
Mô Tả Mức Nước
Mức nước chính xác cần
để giặt quần áo một
cách hiệu quả được xác
định và thiết lập tự
động cho bạn, đảm bảo
không lãng phí nước.
Máy sẽ đổ lượng nước
Đầy đối với tải ĐẦY.
Máy sẽ đổ lượng nước
Rất Nhiều - Trung
đối với tải GẦN
Bình
ĐẦY.
Máy sẽ đổ lượng nước
trung bình đối với NỬA
tải.
Máy sẽ đổ lượng nước
Thấp đối với tải NHỎ.
Máy sẽ đổ lượng nước
Rất Thấp đối với tải RẤT
NHỎ.
Lượng
Quần Áo
-
9-12 kg.
6-9 kg.
4-6 kg.
2-4 kg.
0-2 kg.
Tùy Chọn Mức Bẩn
Nhấn nút TÙY CHỌN ( , ) để chọn
biểu tượng Bẩn, sau đó nhấn nút điều
chỉnh tùy chọn ( , ) để chọn mức
bẩn cần sử dụng đối với quần áo của bạn.
Có 3 mức bẩn để chọn:
CAO đối với quần áo rất bẩn ví dụ như
quần áo lao động rất bẩn.
BÌNH THƯỜNG đối với quần áo bẩn
mặc hàng ngày ví dụ như quần áo gia
đình, các tấm vải, v.v.
NHẸ & NHANH đối với quần áo ít bẩn,
chỉ cần giặt sơ.
43
Page 44

Tùy chọn Mức Bẩn đã chọn sẽ ảnh hưởng
đến thời gian giặt của chương trình giặt
đã chọn.
Đối với cùng một chương trình giặt, Mức
Bẩn Cao sẽ có thời gian giặt lâu hơn Mức
Bẩn Bình Thường, và Mức Bẩn Bình
Thường có thời gian giặt lâu hơn Mức Bẩn
Nhẹ & Nhanh.
Tùy Chọn Xả
Chọn Tùy Chọn Thời Gian Ngâm
Tùy chọn này cho phép bạn ngâm quần
áo rất bẩn khi bắt đầu giặt.
Để chọn tùy chọn nàn, nhấn nút Tùy
Chọn ( , ) để chọn biểu tượng
Ngâm, sau đó nhấn nút Điều Chỉnh Tùy
Chọn ( , ) để chọn thời gian ngâm
cần sử dụng đối với quần áo của bạn.
Phải đóng nắp để chức năng Ngâm hoạt
động, gồm cả ngâm 6 phút trong
chương trình giặt Rất Bẩn. Đôi khi quần
áo được ngâm.
Nhấn nút TÙY CHỌN ( , ) để chọn
biểu tượng Xả, sau đó nhấn nút điều
chỉnh tùy chọn ( , ) để chọn kiểu xả
cho lượng quần áo cần giặt.
Đối với hầu hết các quy trình giặt, máy
sẽ tự động chọn tùy chọn xả "Kỹ" cho
bạn.
Có bốn kiểu xả để chọn:
Xả Rất Kỹ, máy đổ nước hai lần, cho
phép bạn xả kỹ hai lần.
Xả Kỹ, máy đổ nước một lần, cho phép
bạn xả kỹ một lần.
Xả Eco là xả phun giúp bạn tiết kiệm
nước tối đa.
Xả Nhanh ít tốn thời gian hơn xả Eco
bằng cách chỉ thực hiện 3 lần phun Eco
nhưng tăng lượng nước mỗi lần phun
Cách hoạt động của Xả Eco?
Khi sử dụng tính năng xả Eco, nước để xả
được phun vào thùng giặt thành từng
đợt. Sau mỗi đợt thùng giặt sẽ quay để
loại bỏ nước có bột giặt ra khỏi quần áo.
44
Quay nhanh
Chậm lại
Phun nước để xả theo từng đợt
Quay lâu lần cuối
Page 45

Máy sẽ hực hiện một loạt chu kỳ phun tối
đa sáu đợt và quay ngắn theo cách này,
tùy vào lựa chọn chương trình, sau đó là
một lần quay lâu cuối cùng để loại bỏ
nước ra khỏi quần áo để hoàn tất chương
trình giặt đầy đủ.
So sánh tính năng này với tùy chọn xả
Kỹ, trong đó sử dụng nhiều nước hơn
nhiều.
Xả Kỹ, nước được đổ vào máy giặt đến
mức nước giặt đã chọn. Máy giặt sẽ
khuấy và cuối cùng xả nước để xả qua
ống xả.
Xả Rất Kỹ, đây là tùy chọn đặc biệt
dành cho người bị dị ứng, tùy chọn xả
rất kỹ này sẽ cho phép xả kỹ hai lần để
đảm bảo tất cả bột giặt còn sót lại bị
loại bỏ.
KHÔNG THỂ chọn tùy chọn Xả Eco và
Xả Nhanh với các chương trình Len và
Ra trải giường.
Xả thêm/Eco/Nhanh không được
thiết kế để sử dụng với chất làm
mềm vải.
Chọn xả Kỹ nếu bạn muốn sử dụng
chất làm mềm vải.
Xả kỹ đảm bảo chất làm mềm vải được
định lượng chính xác và được loại bỏ
kỹ ra khỏi quần áo trong khi xả.
Tùy Chọn Giảm Thời Gian
Tùy chọn này cho phép bạn giảm thời
gian giặt trong quy trình giặt.
Khi nhấn nút Giảm Thời Gian, sau đó nhấn
các nút điều chỉnh tùy chọn ( , ) để
giảm thời gian của chương trình giặt.
Lưu Thiết Lập Bộ nhớ
Để chạy lại chương trình giặt Ưa thích,
bạn bấm và nhả nút Ưa thích một lần.
Trên màn hình hiển thị, bạn sẽ nhận được
thong báo Chương trình Ưa thích đã
được nạp.
Bạn Chỉ có thể chạy lại chương trình giặt
Ưa thích của mình KHI máy giặt ở chế độ:
Trong chương trình lựa chọn chế độ
giặt, hoặc
Ở bất kỳ trạng thái nào của chương
trình giặt khi nó đang trong chế độ tạm
dừng.
Nếu không, việc bấm và nhả nút chế độ
Ưa thích sẽ không có tác dụng.
Lần đầu tiên bạn bấm nút Ưa thích,
chương trình giặt Ưa thích mặc định của
máy sẽ được khởi động cho bạn. Nếu
bạn muốn sử dụng chương trình giặt Ưa
thích được hiển thị trên màng hình mà
không cần bất kỳ sự thay đổi nào, bạn
chỉ cần bấm nút Bắt đầu/và Giữ để Tạm
dừng ( ) để khởi động chương trình
giặt của bạn.
Để thiết lập cho chương trình Ưa thích
của riêng bạn, bạn chỉ cần lựa chọn chế
độ giặt của bạn sau đó lưu chúng lại,
thực hiện bằng cách đưa máy giặt về chế
độ tạm dừng và làm theo các chỉ dẫn
dưới đây:
45
Page 46

Bấm vào nút Ưa thích để vào chế độ
thiết lập.
Lựa chọn tất cả những chức năng mong
muốn trên tất cả những nút khác.
Để thoát khỏi chế độ thiết lập và
KHÔNG lưu lại những thay đổi, bấm nút
Bắt đầu/và Giữ để Tạmdừng ( ).
Để lưu lại những giá trị đã được bạn lựa
chọn (thayđổi), bấm nút Lưu giữ Ưa
thích một lần.
Bạn có thể sao lưu những chương trình
khác vào chương trình Ưa thích bằng cách
bấm lựa chọn một chương trình để sao
lưu sau đó bấm tiếp vào nút Lưu giữ
chương trình Ưa thích.
Bạn cũng có thể sao lưu, chương trình
đang chạy vào chương trình Ưa thích của
bạn bằng cách bấm vào nút Lưu giữ Ưa
thích trong chế độ máy tạm dừng.
Tùy Chọn Hoãn Kết Thúc
Trước khi bắt đầu chương trình, tùy
chọn này giúp bạn có thể xác định lúc
kết thúc chương trình giặt theo 2, 4, 6 và
8 giờ.
Khi nhấn nút Hoãn Kết Thúc, sau đó nhấn
các nút điều chỉnh tùy chọn ( , ) để
chọn thời gian kết thúc mong muốn.
Phải chọn tùy chọn này sau khi chọn
chương trình giặt, và trước khi nhấn nút
"Bắt Đầu/Giữ Để Tạm Dừng".
Nếu sau khi đã đặt tùy chọn Hoãn Kết
Thúc (và đã nhấn nút "Bắt Đầu/Giữ Để
Tạm Dừng"), bạn muốn hủy hay điều
chỉnh, hãy thực hiện theo các bước bên
dưới:
đặt máy giặt sang chế độ TẠM DỪNG
1.
bằng cách nhấn và giữ nút "Bắt
Đầu/Giữ Để Tạm Dừng" trong 1 - 2 giây
bỏ chọn tùy chọn Hoãn Kết Thúc, thay
2.
đổi trạng thái
nhấn nút "Bắt Đầu/Giữ Để Tạm Dừng"
3.
để bắt đầu chương trình.
Bắt Đầu/Giữ Để Tạm Dừng
Để bắt đầu chương trình
đã chọn, nhấn nút "Bắt
Đầu/Giữ Để Tạm Dừng".
Nếu bạn đã bắt đầu giặt và muốn dừng
vì bất kỳ lý do gì, hãy nhấn nút "Bắt
Đầu/Giữ Để Tạm Dừng" và giữ trong 1 - 2
giây để chuyển sang chế độ TẠM DỪNG
Khóa Nắp ( )
Biểu tượng khóa được hiển thị trên
màn hình để thông báo cho bạn biết khi
nắp máy giặt được khóa vào vị trí đóng.
Nắp sẽ được khóa tự động khi thùng giặt
đang quay trong một chương trình giặt.
Để cho nước vào và giặt, nắp máy phải
đóng, nhưng sẽ không tự động khóa.
Nếu nắp máy mở và máy đang chờ đóng
nắp để tiếp tục chương trình giặt, bạn sẽ
thấy ' ' trên màn hình kỹ thuật số kèm
LD
theo tiếng 'bíp'.
Nếu bạn cần tiếp cận thùng giặt trong khi
quay, nhấn nút "Bắt Đầu/Giữ Để Tạm
Dừng". ( ). Bạn sẽ phải chờ một lúc để
thùng giặt dừng quay trước khi nắp được
mở khóa và biểu tượng khóa trên màn
hình biến mất.
Nếu sau đó bạn mở và đóng nắp, máy sẽ
vẫn ở giai đoạn quay của chương trình giặt,
nắp sẽ khóa và máy sẽ tiếp tục hoàn tất giai
đoạn quay.
46
Page 47

Sau khi chương trình đã bắt đầu, thời gian
còn lại được cập nhật một lần mỗi phút.
KHÔNG ĐƯỢC cho bất kỳ thứ gì vào
khe khóa nắp ở bảng điều khiển của
máy giặt.
KHÔNG ĐƯỢC can thiệp vào cơ chế khóa
nắp để tìm cách tắt khóa hay thay đổi
cách hoạt động của nó.
KHÔNG ĐƯỢC tìm cách dùng sức mở nắp
khi nắp bị khóa.
Màn hình hiển thị
Màn hình sẽ hiển thị thông tin sau đây:
Máy Ở Chế Độ Tạm Dừng
Bạn có thể biết khi nào máy giặt ở chế độ
TẠM DỪNG. Thông báo " " sẽ xuất hiện.
SP
Kết Thúc Chương Trình
Khi chương trình hoàn tất, 4 số không sẽ
sáng lên.
Mã Cảnh Báo
Trong trường hợp có trục trặc vận hành,
một số mã cảnh báo có thể được hiển thị,
ví dụ như (xem phần "Xử lý sự cố" và
"Xử lý sự cố màn hình có lỗi" ở các trang
55, 56).
Thời gian ước tính của chương trình
đã chọn
Sau khi chọn một chương trình, thời gian
ước tính được hiển thị bằng giờ và phút
(ví dụ như ).
Thời gian ước tính được tự động tính toán
dựa trên lượng tải tối đa theo khuyến cáo
đối với từng loại vải.
2.05
Lựa Chọn Tùy Chọn Không Chính
Xác
Nếu một tùy chọn không tương thích
với chương trình giặt đã chọn, thông
báo " " sẽ xuất hiện trong khoảng
ERR
2 giây và có 3 tiếng bíp ngắn liên tiếp.
47
Page 48

GỢI Ý GIẶT
Phân Loại Quần Áo
Thực hiện theo các biểu tượng mã giặt
trên từng nhãn quần áo và hướng dẫn
giặt của hãng sản xuất.
Phân loại quần áo như sau: quần áo
màu trắng, quần áo màu, vải tổng hợp,
mỏng, bằng len.
Trước Khi Bỏ Quần Áo Vào
Không bao giờ bỏ quần áo màu trắng
cùng với quần áo màu. Quần áo màu
trắng có thể mất màu "trắng" khi giặt.
Quần áo màu mới có thể phai màu khi
giặt lần đầu; do đó chúng phải được
giặt riêng vào lần đầu.
Đảm bảo không có vật kim loại còn
sót trong quần áo (ví dụ như kẹp tóc,
ghim an toàn, ghim quần áo).
Đóng nút bao gối, kéo khóa kéo, móc
và khuy bấm.
Buộc dây lưng hay băng dài.
Loại bỏ vết ố khó giặt trước khi giặt.
Chà những chỗ bị bẩn bằng bột giặt
đặc biệt.
Xử lý cẩn thận với màn cửa.
Tháo móc hoặc buộc vào túi hoặc lưới.
Loại Bỏ Vết Ố
Các vết ố khó giặt có thể không loại bỏ
được chỉ bằng nước và bột giặt. Do đó
bạn nên xử lý trước khi giặt.
Máu: xử lý vết ố còn mới bằng nước lạnh.
Đối với vết ố đã khô, hãy ngâm qua đêm
trong nước, có bột giặt đặc biệt, sau đó
dùng và phòng và nước để chà.
Sơn có dầu: làm ẩm bằng chất tẩy ố bằng
ét xăng, đặt quần áo lên một tấm vải mềm
và chà vết ố; xử lý vài lần.
Vết ố dầu mỡ đã khô: làm ẩm bằng dầu
thông, đặt quần áo lên một bề mặt mềm
và chà vết ố bằng đầu ngón tay và một
miếng vải cotton.
Gỉ: axit oxalic hòa tan trong nước nóng
hoặc một sản phẩm tẩy gỉ được sử dụng
lạnh. Cẩn thận với vết gỉ cũ vì cấu trúc
xenlulo đã bị hỏng và vải có xu hướng dễ
thủng.
Vết ố là mốc: xử lý bằng chất tẩy, xả kỹ
(chỉ đối với quần áo màu trắng và quần
áo màu).
Cỏ: chà nhẹ xà phòng và xử lý bằng chất
tẩy (chỉ đối với quần áo màu trắng và
quần áo màu).
Mực bút bi và keo: làm ẩm bằng axêtôn
(*), đặt quần áo lên một tấm vải mềm và
chà vết ố.
Son môi: làm ẩm bằng axêtôn (*) như bên
trên, sau đó xử lý vết ố bằng cồn mêtylat.
Loại bỏ bất kỳ vết nào còn lại ra khỏi vải
trắng bằng chất tẩy.
Rượu vang đỏ: ngâm trong nước và bột
giặt, xả và xử lý bằng axit axêtic hoặc
xitric, sau đó xả. Xử lý bất kỳ vết nào còn
lại bằng chất tẩy.
Mực: tùy vào loại mực, trước tiên làm ẩm
vải bằng axêtôn (*), sau đó bằng axit
axêtic; xử lý bất kỳ vết nào còn lại trên vải
trắng bằng chất ẩy và sau đó xả kỹ.
48
Page 49

Vết ố là nhựa đường: trước tiên xử lý
bằng chất tẩy ố, cồn mêtylat hoặc ét xăng,
sau đó chà bằng bột giặt.
(*) không sử dụng axêtôn đối với lụa nhân
tạo.
Lời Khuyên Cho Việc Tẩy Các Vết Bẩn
Nước cà chua / Sốt đậu nành / Bùn đất:
Làm nóng một lượng nhỏ nước vào
khoảng 40°C, làm ướt các vết bẩn, đổ hai
hoặc nhiều giọt chất tẩy rửa lỏng trên các
vết bẩn và để cho nó ngấm trong khoảng
5 phút. Sau thời gian này, sử dụng máy tẩy
Stain Wand theo các hướng dẫn trên và
tiếp tục đổ nước ấm lên vết bẩn khi cần
thiết.
Sốt cà chua/Nước cà chua/ Súp đỗ:
Chuẩn bị một dung dịch theo tỉ lệ hai dấm
trắng với một nước. Ví dụ: đối với mỗi
muỗng canh nước thêm hai muỗng canh
giấm. Lấy dung dịch này làm ướt toàn bộ
vết bẩn. Sau đo sử dụng máy tẩy Stain
Wand theo hướng dẫn điều hành và làm
ướt các vết bẩn bằng dung dịch trên khi
cần thiết.
Rượu vang đỏ:
Làm ướt toàn bộ vết bẩn với nước lạnh; đổ
hai hoặc nhiều giọt chất lỏng chất tẩy rửa
đều trên các vết bẩn và để cho nó ngấm
trong khoảng 5 phút. Sau thời gian này, sử
dụng máy tẩy Stain Wand theo các hướng
dẫn trên.
Kết quả tốt nhất trên:
-
Các vết bẩn vẫn còn trong trạng thái
tươi, chưa bị khô lại;
-
Các vết bẩn đã được giặt nhưng vẫn
chưa khô khi sấy khô, hoặc chưa là khô;
-
Các vết bẩn nhỏ, trong các khu vực nhỏ
của quần áo.
Ví dụ: Như các giọt hoặc hoặc các vết bẩn
do đồ ăn uống vấy ra, hoặc các vết bẩn
nhỏ do sơ xuất khi quần áo dính phải trên
các bề mặt không sạch.
Kém hiệu quả trên:
-
Các vết bẩn rất đậm, hoặc rất cũ;
-
Các vết ố của các vết bẩn mà trước đây
đã được giặt sạch và sấy khô trong máy
sấy hoặc là ủi;
-
Các vết bẩn lớn, trải rộng trên một khu
vực rộng lớn của quần áo.
Bột Giặt và Chất Phụ Gia
Kết quả giặt tốt cũng phụ thuộc vào lựa
chọn bột giặt và việc sử dụng đúng lượng
để tránh lãng phí và bảo vệ môi trường.
Mặc dù có tính thoái biến sinh học, bột
giặt chứa các chất, khi ở lượng lớn, có thể
làm ảnh hưởng đến sự cân bằng của tự
nhiên. Việc lựa chọn bột giặt sẽ tùy vào
loại vải (vải mỏng, bằng len, cotton, v.v.),
màu sắc, nhiệt độ giặt và mức độ bẩn.
Lượng Bột Giặt Cần Sử Dụng
Loại và lượng bột giặt sẽ tùy vào loại vải,
lượng quần áo, mức độ bẩn và độ cứng
của nước được sử dụng.
Độ cứng của nước được phân loại thành
"độ" cứng.
Có thể tìm thấy thông tin về độ cứng của
nước trong khu vực của bạn ở công ty
cấp nước liên quan, hoặc ở chính quyền
địa phương của bạn.
Thực hiện theo hướng dẫn của hãng sản
xuất sản phẩm về lượng cần sử dụng.
Sử dụng ít bột giặt hơn nếu:
bạn giặt ít quần áo,
quần áo ít bẩn,
lượng bọt lớn hình thành trong khi giặt
49
Page 50

CÁC CHƯƠNG TRÌNH GIẶT
Biểu
tượng
Chương
trình
Giặt bình
thường
Giặt
nhanh
Bộ nhớ
Đồ màu
Đồ mõng
Đồ bẩn
Đồ len
Mô tả
Đối với lượng quần áo hỗn hợp
trung bình dùng trong gia đình.
Đối với lượng quần áo hỗn
hợp rất nhỏ.
Chương trình giặt yêu thích
của bạn
Đối với quần áo màu có loại
vải hỗn hợp.
Đối với đồ lót, ren, quần áo có
trang trí và thêu.
Đối với quần áo rất bẩn bằng
cotton.
Đối với quần áo bằng len có
nhãn "Có Thể Giặt Bằng Máy".
Tùy chọn
Wash Load / Dirt Level / Soak Time /
Rinse Option / Delay End
Wash Load / Dirt Level /
Soak Time (chỉ có ‘No Soak’) /
Rinse Option (Tùy Chọn Xả không thể
chọn ‘Extra’) / Delay End
-
Wash Load / Dirt Level /
Soak Time (chỉ có ‘No Soak’) /
Rinse Option / Delay End
Wash Load / Dirt Level / Soak Time /
Rinse Option / Delay End
Wash Load / Dirt Level / Soak Time /
Rinse Option / Delay End
Wash Load / Dirt Level / Soak Time /
Rinse Option (chỉ có ‘Deep’ & ‘Extra’) /
Delay End
Giặt tay
Ra trải
giường
Xã+Vắt
Tháo nước
+Vắt
Vệ Sinh
Lồng giặt
Lựa chọn chế độ “
bông bẩn thông thường.
Giặt bình thường” được khuyên dùng cho một mẻ giặt đầy những loại vải
Chương trình đặc biệt dành
cho những món quần áo có
nhãn cho biết phải giặt bằng
tay.
Đối với vải trải giường có nhãn
"Có Thể Giặt Bằng Máy".
Đối với quần áo bạn muốn xả và
quay ví dụ như quần áo bạn đã
giặt bằng tay trong chậu giặt.
Đối với quần áo rất ướt cần
vắt nước.
Để vệ sinh thùng giặt.
50
Wash Load / Dirt Level / Soak Time /
Rinse Option / Delay End
Wash Load / Dirt Level / Soak Time /
Rinse Option (chỉ có ‘Deep’ & ‘Extra’) /
Delay End
Wash Load / Rinse Option /
Delay End
Delay End
Delay End
Page 51

CHĂM SÓC VÀ VỆ SINH
Việc Phải Làm Sau Khi Giặt
Xong.
Nhấn 'TẮT' Ở Công Tắc BẬT- TẮT.
Tắt nguồn điện tại công tắc nguồn.
Tắt vòi nước.
Để mở nắp một lúc. Điều này cho phép
có thời gian cho hơi ẩm bên trong máy
giặt bốc hơi và phát tán mùi.
Bạn phải NGẮT KẾT NỐI thiết bị ra khỏi
nguồn điện trước khi có thể thực hiện
bất kỳ công việc vệ sinh hay bảo dưỡng
nào.
Vệ Sinh Ngăn Định Lượng
Ngăn định lượng cần được vệ sinh
thường xuyên, nên vệ sinh sau mỗi lần
giặt. Kiểm tra ngăn định lượng sau mỗi
lần giặt để xem có còn bột giặt sót lại hay
không.
Để thực hiện việc này, hãy thực hiện như
sau:
Kéo ngăn định lượng ra phía trước đến
khi nó dừng lại.
Nâng mặt trước của ngăn định lượng
lên và kéo ra phía trước để tháo nó ra
khỏi rãnh dẫn.
Trước khi lắp ngăn định lượng vào
chỗ của nó, hãy vệ sinh bên trong
ngăn bằng bàn chải đánh răng cũ.
Lắp lại ngăn nạp vào rãnh dẫn và
đóng ngăn.
Vệ Sinh Bộ Lọc Xơ
Xơ là phần sợi chỉ và bụi xơ rời ra từ
quần áo trong khi giặt.
Máy giặt sẽ gom xơ này trong bộ lọc xơ.
Việc quan trọng là phải vệ sinh bộ lọc xơ
này, nên thực hiện sau mỗi lần giặt.
Cách vệ sinh bộ lọc xơ:
Tháo thân bộ lọc ra khỏi phần giữa
của trục khuấy.
Vệ sinh ngăn định lượng bằng nước
nóng và bàn chải, ví dụ như bài chải
đánh răng cũ.
Để khô ngăn định lượng.
51
Page 52

Tháo túi lọc ra khỏi thân bộ lọc.
Lộn túi từ trong ra ngoài và lấy xơ ra.
Rửa túi lọc bằng nước nóng. Vệ sinh túi
lọc bằng bàn chải cũ, đảm bảo nước có
thể chảy qua lưới túi.
Lắp lại bộ lọc vào thân bộ lọc và đặt
trở lại giữa máy khuấy.
Vệ Sinh Các Vết Ố Trong Thùng
Giặt
Các vết ố và mảng bám trong thùng giặt
có thể là do:
Những vật kim loại chẳng hạn như
ghim kẹp, ghim áo đầm và đinh.
Muối.
Dầu và mỡ trên cơ thể từ quần áo rất
bẩn hoặc có mồ hôi tích tụ quanh
phần trên của thùng giặt.
Lượng bọt quá nhiều trong khi giặt
nếu dùng lượng bột giặt không đúng
hoặc quá nhiều.
Kiểm tra tất cả túi trước khi bỏ quần
áo vào máy giặt.
Vệ Sinh Máy Giặt
Để vệ sinh bên trong và bên ngoài máy
giặt bạn phải:
Dùng một loại nước rửa chén tẩy nhẹ
và nước ấm lau bề mặt máy.
Lau khô bằng một miếng vải mềm.
Không được sử dụng dung môi, chất tẩy
dùng bình phun, chất tẩy phun xịt, chất
tẩy thủy tinh, chất đánh bóng kim loại,
vật liệu ăn da, vật cọ rửa hay chất tẩy
gia dụng thông thường trên hoặc gần
bảng trên và nắp, bảng điều khiển hoặc
các bộ phận khác của máy giặt.
Không được để quần áo ướt (đặc
biệt là quần áo bơi) vào thùng giặt
quá lâu trước khi giặt.
Cách vệ sinh thùng giặt:
Lau bằng một sản phẩm vệ sinh thích
hợp với thép không gỉ.
Có thể loại bỏ những chỗ tích tụ dầu
bằng cách dùng một loại nước rửa
chén tẩy nhẹ và nước ấm lau các bề
mặt.
Không được sử dụng chất tẩy trắng hay
bùi nhùi thép để vệ sinh thùng giặt
bằng thép không gỉ.
52
Page 53

MẸO HỮU ÍCH ĐỂ GIẢI QUYẾT CÁC VẤN ĐỀ GIẶT
Cặn Bám Trên Quần Áo Đã Giặt Quần Áo Có Vết Ố
Nếu bạn thấy còn cặn bám trên quần áo,
hãy thực hiện theo những mẹo sau đây:
Pha trước bột giặt thật kỹ trong nước
ấm để giúp hòa tan tốt hơn.
Giảm lượng bột giặt từ 1/2 đến 2/3
lượng khuyến cáo của hãng sản xuất để
tránh hàm lượng quá cao (mức sử dụng
nước thấp hơn đòi hỏi phải sử dụng ít
bột giặt hơn).
Một số cặn bám có thể là xơ đã bám từ
trước, do đó hãy cẩn thận không để
những đồ vật tạo xơ vào quần áo sẫm
màu hơn.
Chọn tùy chọn xả Kỹ hoặc Rất Kỹ và
KHÔNG CHỌN xả Eco hoặc Nhanh để
giúp giũ sạch nhiều hơn.
Một số bột giặt có các thành phần
không hòa tan hoàn toàn và do đó, có
thể để lại cặn màu trắng hoặc các phần
tử nhìn thấy trên bề mặt của quần áo
sẫm màu hơn ở quần áo đã giặt xong.
Xử lý mọi vết ố càng sớm càng tốt. Bạn để
vết ố càng lâu, càng khó tẩy ố. Trước tiên
hãy thử máy ngâm rửa và chất tẩy ố.
Nếu bạn sử dụng các chất phun tiền xử lý
hoặc chất tẩy ố, hãy phun vào quần áo ở
nơi thông thoáng, cách xa máy giặt.
Phun nhẹ và không chà chất tẩy ố vào
vải.
Nếu bạn sử dụng chất tẩy clo, hãy thực
hiện theo hướng dẫn trên chai và pha
loãng trước khi phun lên quần áo.
Kiểm tra quần áo có màu trên đường
may bên trong để xem độ bền màu
trước khi sử dụng bất kỳ chất tẩy ố hay
tẩy trắng nào.
Kiểm tra quần áo bằng vải tổng hợp
trên đường may bên trong trước khi
sử dụng bất kỳ hóa chất hay tẩy trắng
nào.
LƯU Ý: Các hóa chất dùng để tẩy ố có
bán ở siêu thị địa phương, cửa hàng thiết
bị hay nhà thuốc.
Tương tự, một số loại dầu có thể không
hòa tan hoàn toàn, dẫn đến cặn nhìn
thấy trên quần áo có màu nhạt hơn.
Phun chất tiền xử lý và chất tẩy ố có thể
làm hỏng các bộ phận bằng nhựa trên
máy giặt.
Không được sử dụng các loại nước tẩy
khô hay dung môi gần máy giặt. Những
loại nước này sẽ làm hỏng máy giặt và
có thể gây nổ.
53
Page 54

Quần Áo Ngả Vàng Hoặc Xám
Vấn đề Nguyên nhân có thể Những điều cần làm
1. CHỈ sử dụng bột giặt ít bọt được
thiết kế cho máy giặt.
2. Phân loại lại quần áo cần giặt, sau
đó giặt trước bằng các lựa chọn
chương trình phù hợp cho loại vải đó.
3. Nếu nước rất bẩn hoặc có nhiều
bọt, hãy lặp lại bước 2 bên trên, giảm
lượng bột giặt bạn dùng.
Độ xám
Thời gian giặt không đúng và
sử dụng không đủ bột giặt có
thể làm cho bột giặt bám lại
trên quần áo.
Sử dụng không đúng loại bột
giặt hoặc quá nhiều bột giặt
có thể làm giảm hiệu quả xả
và quay.
Giặt quần áo màu trắng
chung với quần áo rất bẩn, ví
dụ như quần áo lao động.
1. Phân loại lại quần áo cần giặt, sau
đó giặt trước bằng các lựa chọn
chương trình phù hợp cho loại vải đó.
2. Nếu nước rất bẩn hoặc có nhiều
bọt, hãy lặp lại bước 1 bên trên, giảm
lượng bột giặt bạn dùng.
Ngả vàng
Dầu bám trên quần áo tiếp
xúc với da, ví dụ như đồ lót,
áo thun tròng cổ.
Quần áo cũ đi.
Cặn sắt trong nước giặt.
Sử dụng chất tẩy clo trên quần
áo có bề ngoài bằng nhựa.
Sấy không đúng cách.
XỬ LÝ SỰ CỐ
Trước khi gọi cho bộ phận bảo trì hãy kiểm tra xem vấn đề có nằm trong bảng
bên dưới hay không. Điều này có thể giúp bạn tìm ra giải pháp cho các vấn đề tạm
thời. Máy giặt sẽ hoạt động trở lại bình thường mà không cần nhân viên bảo trì đến
giải quyết, tránh sự chậm trễ của nhà cung cấp dịch vụ.
Đối với một số vấn đề, bạn sẽ nhận được thông báo trên màn hình hiển thị kèm theo
tiếng 'Bíp'. Thông báo này cho biết thông tin ngắn gọn về vấn đề đó và bạn có thể làm gì
để khắc phục.
Vấn đề
Máy không hoạt động
LD
Nguyên Nhân Có ThểMã Hiển Thị
Chưa bật nguồn
Không có nguồn điện đi
qua công tắc nguồn
Chưa bật máy
Chưa mở vòi nước
Công tắc tắt vì mất cân bằng
Chưa đóng nắp kỹ
Những điều cần làm
Bật công tắc nguồn
Kiểm tra công tắc nguồn bằng
một thiết bị khác
Nhấn công tắc Bật-Tắt đến vị trí BẬT
Mở vòi nước
Mở nắp, phân bố lại quần áo và
đóng nắp
Đóng nắp
54
Page 55

Vấn đề
Máy có quần áo đã
giặt nhưng không quay.
Có nước trong thùng
giặt.
Không nạp nước
Nước chảy vào thùng
giặt không ngừng
Máy mất cân bằng hoặc
rung quá nhiều khi quay
Có nước trên sàn
Máy tẩy vết bẩn
Stain Wand không chạy:
Không có nước chảy ra
khỏi máy tẩy vết bẩn
Stain Wand.
LD
E20
EF0
Nguyên Nhân Có ThểMã Hiển Thị
Mất cân bằng
Chưa đóng nắp kỹ
Ống xả bị tắc
Quá nhiều bọt khiến cho
nhiệt độ môtơ tăng cao
Chưa mở vòi nước
Ống nạp bị tắc
Ống xả quá thấp
Máy không cân bằng
Chưa điều chỉnh cân bằng
các chân
Quần áo không phân bố đều
Quá nhiều nước đối với
lượng quần áo
Nới lỏng các mối nối ống
nạp
Mức nước không chính xác
đối với lượng quần áo
Hơi nước ngưng tụ từ nước
nóng
Phíc cắm của máy giặt không
được kết nối với ổ cắm.
Kích hoạt Stain Wand.
Nắp máy giặt mở.
Vòi nước đang ở trạng thái
đóng.
Các bộ lọc ống nước bị tắc. Làm sạch các bộ lọc.
Không có nước chảy ra khỏi
vòi nước.
Ống hút nước bị gấp hoặc
bị đè nén.
Nút nước của máy tẩy vết
bẩn Stain Wand chưa được
bấm.
Những điều cần làm
Mở nắp, phân bố lại quần áo,
đóng nắp
Đóng nắp
Kiểm tra ống xả xem có bị tắc không
Chờ một lúc, quy trình giặt sẽ tiếp tục
Trong tương lai, hãy giảm lượng bột
giặt hoặc sử dụng bột giặt ít bọt
Mở vòi nước
Vệ sinh bộ lọc/máy giặt
Nâng ống xả lên hoặc thiết bị ngắt
chữ u.
Tham khảo hướng dẫn lắp đặt để biết
cách đặt ống dây chính xác.
Cân bằng máy
Điều chỉnh chân cho chạm sàn
Phân bổ lại quần áo cho đều
Kiểm tra các mối nối ở vòi nước và
phía sau máy
Sử dụng mức nước thấp
Kết nối phích cắm của máy giặt trong
ổ cắm.
Bấm phím “Delay End” và phím
" " cùng một lúc trong thời gian 3
giây, cho đến khi các nút của máy tẩy
vết bẩn Stain Wand bật.
Mở vòi nước.
Kiểm tra cài đặt hệ thống thủy lực của
hệ thống nước.
Thông tắc vòi nước.
Bấm nút nước của máy Stain Wand.
55
Page 56

Vấn đề Nguyên Nhân Có ThểMã Hiển Thị Những điều cần làm
Kiểm tra mức sử dụng bột giặt
và giặt lại quần áo
Lấy một số quần áo ra và
giặt lại
Chọn lại chương trình hay
nhiệt độ và giặt lại
Sử dụng mức nước cao hơn
Nếu nhìn thấy đồ vật đó, hãy
dùng kìm lấy ra. Trong tương
lai hãy sử dụng túi giặt
Tiếng động bình thường
Tiếng động bình thường
Quần áo vẫn bẩn sau
khi giặt
Tiếng ồn khi quay
Có tiếng ù, tiếng lách
cách và tiếng ồn khác
Không đủ hoặc không có
bột giặt
Có quá nhiều quần áo
Đã chọn chương trình giặt
hoặc nhiệt độ không chính xác
Đã chọn mức nước không
chính xác
Dây áo ngực hoặc những đồ
vật mỏng khác bị kẹt giữa các
thùng giặt bên trong và bên
ngoài
Thùng quay khi bắt đầu giặt
Kích hoạt phanh khi dừng
sau khi quay
XỬ LÝ MÀN HÌNH HIỂN THỊ CÓ LỖI
Thông tin lỗi và hướng dẫn khi nào cần gọi cho bộ phận bảo trì.
Nếu bạn gặp sự cố với máy giặt và trước khi gọi cho bộ phận bảo trì, hãy đảm bảo bạn đã
thực hiện theo TẤT CẢ hướng dẫn có thể khắc phục vấn đề. Bạn sẽ tìm thấy hướng dẫn ở
phần 'Xử lý sự cố' và trong bảng bên dưới.
Khi máy giặt phát hiện có sự cố cần chú ý, bạn sẽ được cảnh báo. Máy sẽ cảnh báo cho
bạn biết vấn đề này bằng cách hiển thị một mã lỗi trên màn hình kỹ thuật số, kèm theo
tiếng "Bíp".
Thông tin lỗi và biện pháp cần thực hiện được mô tả trong bảng sau đây.
Mô tả
Không nạp nước
Nước tràn
Mã Hiển Thị
E30
Biện pháp của khách hàng (Tóm tắt)
Đảm bảo đã mở vòi nước và bộ lọc ống dây không bị
tắc. Nâng ống xả lên nếu nước chảy ra từ ống xả.
Nhấn nút "Bắt Đầu/Giữ Để Tạm Dừng" để bắt đầu
giặt lại.
Nếu sự cố vẫn còn, hãy gọi cho bộ phận Bảo Trì.
Nếu nước tràn xuống sàn nhà, hãy TẮT vòi nước.
Chờ vài phút để xem lỗi có được khắc phục hay không.
Nếu không, hãy gọi cho bộ phận Bảo Trì.
56
Page 57

Mô tả Biện pháp của khách hàng (Tóm tắt)
Vấn đề xả nước
Mất nước trong
khi giặt
Vấn đề về mức nước
Lỗi môtơ
Mã Hiển Thị
E20
E30
E50
Chờ vài phút để xem lỗi có được khắc phục hay không.
Nếu không, hãy nhấn nút 'Bắt Đầu/Giữ Để Tạm Dừng'
để kiểm tra xem ống xả có bị tắc không. Nhấn nút
'Bắt Đầu/Giữ Để Tạm Dừng' để tiếp tục giặt.
Nếu sự cố vẫn còn, hãy gọi cho bộ phận Bảo Trì.
Nếu mức nước trong thùng giặt còn thấp và nước
chảy ra sàn nhà, hãy chọn chương trình đến vị trí 'Xả
Nước & Vắt', sau đó nhấn nút 'Bắt Đầu/Giữ Để Tạm
Dừng'.
Nếu không, hãy nhấn nút 'Bắt Đầu/Giữ Để Tạm Dừng'
để tiếp tục giặt.
Hãy chờ, lỗi này có thể tự khắc phục. Nếu không, hãy
vặn núm chương trình đến vị trí 'Xả Nước & Vắt', sau
đó nhấn nút "Bắt Đầu/Giữ Để Tạm Dừng" để xả thùng
giặt.
Nếu vấn đề này xuất hiện lại, hãy gọi cho bộ phận Bảo
Trì.
Hãy chờ, lỗi này có thể tự khắc phục. Nếu không, hãy
vặn núm chương trình đến vị trí 'Xả Nước & Vắt', để xả
thùng giặt.
Bạn có thể phải nhấn nút 'Bắt Đầu/Giữ Để Tạm Dừng'
để bắt đầu xả nước.
Nếu vấn đề này xuất hiện lại, hãy gọi cho bộ phận Bảo
Trì.
Truyền thông báo lỗi
Máy ở chế độ tạm
dừng
Lựa chọn tùy chọn
không chính xác
Mất cân bằng bị
gián đoạn
Công suất xuống
phục hồi
SP
ERR
PR
Gọi cho Dịch vụ.
Nhấn nút ‘Start/Hold To Pause’.
Chọn lựa chọn chính xác.
Cân bằng máy
Điều chỉnh chân cho chạm sàn
Phân bổ lại quần áo cho đều, đóng nắp.
Hãy chờ, lỗi này có thể tự khắc phục.
57
Page 58

CÁC VẤN ĐỀ VỀ MÔI TRƯỜNG
Vật liệu đóng gói
Vật liệu được đánh dấu bằng biểu tượng
là vật liệu có thể tái chế.
>PE<=polyethylene
>PS<=polystyrene
>PP<=polypropylene
Điều này có nghĩa là có thể tái chế các vật
liệu đó bằng cách vứt bỏ đúng cách trong
thùng chứa phù hợp.
Máy cũ
Sử dụng các địa điểm vứt bỏ được phép
để vứt bỏ thiết bị cũ. Hãy giúp giữ gìn
ngăn nắp cho đất nước của bạn!
Biểu tượng trên sản phẩm hoặc bao bì
của nó cho biết rằng không được xử lý
sản phẩm này như rác thải gia đình.
Thay vào đó, phải chuyển thiết bị đến
điểm thu gom để tái chế thiết bị điện và
điện tử.
Gợi ý về sinh thái
Để tiết kiệm nước, năng lượng và giúp bảo
vệ môi trường, chúng tôi khuyến cáo bạn
nên thực hiện theo những mẹo sau đây:
Có thể giặt quần áo bẩn bình thường
mà không cần giặt trước để tiết kiệm
bột giặt, nước và thời gian (môi trường
cũng được bảo vệ!).
Máy hoạt động tiết kiệm hơn nếu
được bỏ đủ quần áo cần giặt vào.
Khi được xử lý trước đầy đủ, các vết ố
và vết bẩn hạn chế có thể được loại bỏ;
quần áo có thể được giặt ở nhiệt độ
thấp hơn.
Đo lượng bột giặt theo độ cứng của
nước, mức độ bẩn và lượng quần áo
cần giặt.
Khi đảm bảo vứt bỏ đúng cách sản phẩm
này, bạn sẽ giúp phòng tránh những hậu
quả tiêu cực có thể có đối với môi trường
và sức khỏe con người, là những hậu quả
do việc xử lý rác thải không đúng cách đối
với sản phẩm này.
Để biết thêm thông tin chi tiết về việc tái
chế sản phẩm này, vui lòng liên hệ văn
phòng thành phố địa phương của bạn,
cơ quan phụ trách vứt bỏ rác thải gia
đình hoặc cửa hàng nơi bạn đã mua sản
phẩm.
58
Page 59

Selamat datang di dunia electrolux
Terima kasih telah memilih produk kelas satu dari Electrolux, semoga produk ini
banyak memberikan manfaat dan kenyamanan bagi Anda. Electrolux berambisi
untuk menawarkan serangkaian produk berkualitas yang membuat kehidupan Anda
lebih nyaman. Ada sejumlah contoh pada sampul buku panduan ini. Mohon
luangkan waktu beberapa menit untuk mempelajari buku panduan ini sehingga
Anda dapat memperoleh banyak manfaat dari mesin baru Anda. Kami yakin,
produk ini akan menghadirkan Pengalaman Pengguna yang tiada tara yang
memberikan Ketenteraman Pikiran. Selamat menggunakan!
Simbol-simbol yang terdapat pada beberapa paragraf di dalam buklet ini memiliki arti
sebagai berikut:
Segitiga peringatan dan/atau kata kunci (Awas!, Hati-hati!) menekankan
informasi yang penting khususnya demi keselamatan Anda atau agar mesin
berfungsi dengan benar.
Informasi yang ditandai dengan simbol ini memberikan petunjuk tambahan
dan kiat praktis mengenai penggunaan mesin.
Saran dan informasi mengenai penggunaan mesin secara ekonomis dan
ramah lingkungan ditandai dengan simbol ini.
DAFTAR ISI
Informasi Keselamatan ...................................................................................
Deskripsi Produk .............................................................................................
Gangguan Ketidakseimbangan .....................................................................
Panel Kontrol ...................................................................................................
Penggunaan .....................................................................................................
Petunjuk Mencuci ............................................................................................
Program Pencucian .........................................................................................
Merawat Dan Membersihkan ..........................................................................
Kiat Yang Berguna Untuk Mengatasi Masalah Mencuci ..............................
Pemecahan Masalah .......................................................................................
Pemecahan Masalah Tampilan Kesalahan ....................................................
Kepedulian Lingkungan ..................................................................................
59
60
62
64
65
66
75
78
79
81
83
84
86
Page 60

INFORMASI KESELAMATAN
Demi keselamatan Anda dan untuk
menjamin penggunaan yang benar,
sebelum memasang dan menggunakan
alat untuk pertama kalinya, bacalah buku
petunjuk ini dengan seksama, termasuk
semua petunjuk dan peringatannya.
Untuk menghindari kesalahan dan
kecelakaan yang tidak perlu, sangatlah
penting untuk memastikan bahwa semua
orang yang menggunakan alat ini
betul-betul memahami semua fitur
pengoperasian dan keselamatan.
Simpanlah petunjuk ini dan pastikan
selalu disertakan dengan alat jika alat ini
dipindahkan atau dijual, agar siapa pun
yang menggunakannya akan mengetahui
informasi mengenai cara menggunakan
alat dengan benar dan informasi tentang
keselamatan.
Keselamatan Umum
Mengubah spesifikasi atau berusaha
untuk memodifikasi produk ini dengan
cara apa pun adalah hal yang berbahaya.
Jangan biarkan binatang piaraan kecil
masuk ke dalam bak cuci. Untuk
menghindari hal ini, periksa bak cuci
sebelum Anda menggunakan alat.
Jangan memasukkan benda apa pun
seperti koin, peniti, paku, sekrup, batu
atau benda keras dan benda tajam
lainnya ke dalam mesin karena dapat
menyebabkan kerusakan parah.
Gunakan pelembut pakaian dan deterjen
sesuai jumlah yang disarankan. Dapat
terjadi kerusakan pada kain apabila Anda
menggunakannya secara berlebihan. Baca
rekomendasi penggunaan yang dianjurkan
oleh produsen.
Alat ini tidak ditujukan untuk digunakan oleh
orang (termasuk anak-anak) yang memiliki
keterbatasan kemampuan secara fisik,
inderawi atau keterbelakangan mental, atau
orang yang kurang berpengalaman dan
kurang berpengetahuan, kecuali mereka
telah mendapatkan pengarahan atau
petunjuk mengenai cara penggunaan oleh
orang yang bertanggung jawab terhadap
keselamatannya.
Cucilah barang-barang kecil, seperti kaos
kaki, renda, sabuk yang dapat dicuci, dsb.
di dalam kantung atau sarung bantal,
karena benda-benda tersebut
kemungkinan dapat menyusup ke dalam
tabung dan bagian pemutar.
Jangan menggunakan mesin cuci untuk
mencuci benda-benda dari tulang ikan,
bahan tanpa kelim atau bahan yang telah
robek.
Selalu cabut steker dan tutup keran air
setelah Anda menggunakan,
membersihkan dan merawat mesin.
Dalam keadaan apa pun, jangan berusaha
memperbaiki sendiri mesin ini. Perbaikan
yang dilakukan oleh orang yang tidak
berpengalaman dapat menyebabkan
cedera atau kerusakan parah. Hubungi
Pusat Servis setempat. Usahakan untuk
selalu menggunakan suku cadang asli.
Pemasangan
Mesin ini cukup berat. Berhati-hatilah saat
Anda memindahkan mesin.
Setelah membuka kemasan, periksa
apakah ada kerusakan mesin. Jika
ragu-ragu, jangan menggunakan mesin
dan segera hubungi Pusat Servis.
Setelah Anda menempatkannya, pastikan
mesin tidak berdiri di atas selang air
masuk dan pembuangan.
Jika mesin ditempatkan di lantai berkarpet,
sesuaikan kaki-kaki mesin agar sirkulasi
udara lancar.
Selalu pastikan tidak ada selang air dan
sambungannya yang bocor setelah mesin
dipasang.
60
Page 61

Setiap pekerjaan yang berkaitan dengan
pipa air yang diperlukan untuk memasang
mesin ini harus dilakukan oleh tukang
ledeng yang berpengalaman.
Setiap pekerjaan yang berkaitan dengan
listrik yang diperlukan untuk memasang
mesin ini harus dilakukan oleh tukang listrik
yang berpengalaman.
Risiko terbakar. Jangan menyentuhkan
Stain Wand langsung ke tangan, muka,
mata, atau bagian tubuh lainnya. JANGAN
MENGGUNAKAN STAIN WAND PADA
KAIN YANG DIPAKAI ATAU MENUTUP
TUBUH.
Suhu ujung Stain Wand bisa memanas
selama penggunaan. JANGAN MENYENTUH UJUNG PERANGKAT selama
penggunaan.
Segera hentikan penggunaan perangkat
tersebut jika suhunya naik terlalu tinggi dan
tunggu sampai dingin sebelum melanjut-
kan penggunaan.
Jangan menggunakan Stain Wand tanpa
membasahi kainnya.
Jangan menggunakan Stain Wand pada
cairan yang mudah terbakar (alkohol, tiner,
bensin, dll...).
Jangan menggunakan Stain Wand pada
binatang.
Jauhkan Stain Wand dari jangkauan
anak-anak.
Segera hentikan penggunaan Stain Wand
jika terjadi gangguan fisik. Pengguna alat
pacu jantung dilarang menggunakan Stain
Wand.
Jangan menuangkan air langsung ke
Staind Wand dan jangan mencelupkannya
ke dalam air karena akan merusak
perangkat tersebut.
(*)
(*)
(*)
(*)
(*)
(*)
(*)
(*)
(*)
(*)
Informasi Keselamatan untuk hanya
STAIN WAND.
Penggunaan
Mesin ini dirancang untuk penggunaan
rumah tangga. Mesin ini tidak boleh
digunakan untuk tujuan lain di luar yang
telah ditentukan.
Hanya cuci pakaian yang memang
dirancang untuk dicuci dengan mesin.
Patuhi petunjuk yang terdapat pada label
pakaian.
Jangan memasukkan terlalu banyak cucian
ke dalam mesin. Baca bagian yang relevan
di panduan bagi pengguna.
Sebelum mencuci, pastikan semua saku
sudah dikosongkan, kancing serta
risleting sudah ditutup. Jangan mencuci
barang-barang dari kain yang sudah usang
atau robek dan bersihkan noda seperti cat,
tinta, karat dan rumput sebelum mencuci.
Bra yang berkawat TIDAK BOLEH dicuci
dengan mesin.
Pakaian yang terkena produk bahan bakar
yang mudah menguap tidak boleh dicuci
dengan mesin. Jika menggunakan cairan
pembersih yang mudah menguap, pastikan
bahwa cairan sudah dihilangkan dari
pakaian sebelum dimasukkan ke dalam
mesin.
Jangan sekali-kali menarik kabel listrik
untuk melepaskan steker dari stopkontak;
selalu pegang dan cabut stekernya.
Jangan sekali-kali menggunakan mesin
cuci jika kabel listrik, panel kontrol,
permukaan atau alas kerja mesin rusak
sehingga Anda dapat menjangkau bagian
dalam mesin cuci.
Keselamatan Anak-Anak
Mesin cuci ini tidak ditujukan untuk
digunakan oleh anak-anak atau orang
yang memiliki keterbatasan fisik tanpa
pengawasan.
Anak-anak harus diawasi agar mereka
tidak bermain-main dengan alat ini.
61
Page 62

Komponen pengemas (misalnya lapisan
plastik, polistirena) dapat berbahaya bagi
anak-anak - risiko mati lemas! Jauhkan
bahan pengemas dari jangkauan anak-anak.
DESKRIPSI PRODUK
Simpanlah deterjen di tempat yang aman
dan jauh dari jangkauan anak-anak.
Jangan biarkan anak-anak atau binatang
piaraan masuk ke dalam bak cuci.
14 15 16
11
12
13
1
2
3
1
6
7
4
8
9
5
Stain Wand
1
Panel Kontrol
2
Kaca Pelindung
3
Tutup
4
5
Kaki Depan
Saklar HIDUP-MATI
6
Selang Air Masuk
7
Kabel Listrik
8
Selang Pembuangan
9
Kaki Belakang
10
Dispenser Pelembut Pakaian
11
Filter Serabut
12
Bak Cuci
13
Dispenser Pemutih
14
15
Laci Dispenser
16
Pemutar
10
62
Page 63

Petunjuk Penggunaan - Stain Wand
Sistem ini dikembangkan secara khusus
untuk membantu dalam pekerjaan sehari-hari
menghilangkan noda dari pakaian Anda.
Sistem ini bekerja dengan teknologi
ultrasound yang dikombinasikan dengan air
se hingga menghasilkan getaran yang
membantu menggugurkan noda dari kain
dan membuat menghilangkan noda lebih
mudah dibandingkan pencucian.
Untuk menggunakan Stain Wand, pastikan
sakelar daya dan air pada mesin cuci Anda
HIDUP.
1.
Sebelum menggunakan Stain Wand,
periksa kelunturan warna kain Anda
dengan melakukan pengujian awal
berikut ini:
1.1
Percikkan sedikit air di balik kain
yang bernoda;
Tuangkan sedikit deterjen cair yang
1.2
tidak berwarna.
1.3
Gunakan Stain Wand (sesuai petunjuk
di bawah ini) pada bagian ini;
1.4
Tunggu sampai kain mengering dan
lihat apakah ada tanda-tanda luntur.
Kalau warna kain tidak berubah, Anda
bisa menggunakan Stain Wand.
2.
Tutup penutup mesin cuci, tekan “ ”
dan tombol “Delay End” bersamaan
selama 3 detik sampai tombol
“WATER” dan “ON” menyala. Stand
Wand siap digunakan.
3.
Kabel memiliki posisi mengunci ketika
sepenuh nya ditarik. Lepaskan Stain
Wand dari tempat nya dan tarik
kabel sepenuhnya, lalu
lepaskan sehingga
kembali ke asal dan
mengunci pada
posisi penguncian
nya.
4.
5.
6.
7.
8.
63
Bersihkan sisa-sisa noda menggunakan
sikat kecil. Letakkan kertas penyerap
atau kain bersih di bawah noda (kertas
atau kain ini akan menyerap noda
tersebut). Karena penutup mesin cuci
tersebut tertutup, maka Anda bisa
menggunakannya sebagai alas.
Tuangkan dua tetes deterjen cair yang
tidak berwarna ke permukaan noda.
Tambahkan deterjennya jika diperlukan
(untuk noda membandel).
Tekan tombol “WATER” dan arahkan
penyemprot air ke noda. Tekan tombol
“WATER” sesering mungkin jika diperlukan
untuk membasahi noda. Ulangi langkah ini
setiap kali noda mengering.
Lampu
Ujung Stain Wand
Penyemprot Air
Untuk mengoptimalkan pembersihan,
noda harus tetap basah saat menggunakan perangkat ini.
Letakkan ujung perangkat pada noda.
Saat menekan dan menahan tombol
“ON”, tarik ujung F secara perlahan pada
noda dengan gerakan memutar atau
"zig-zag".
Letakkan ujung
pada noda
Kain yang bernoda
Kertas penyerap atau
kain yang bersih
Anda mungkin akan mendengar suara
aneh yang muncul saat ultrasonik bekerja,
dan ini normal. Untuk mendapatkan hasil
terbaik, gunakan Stain Wand dalam posisi
vertikal.
Saat nodanya mulai bisa dihilangkan,
hilangkan sisa-sisa kotoran dan air yang
tersisa pada kain menggunakan kertas
penyerap atau kain bersih. Ganti kertas
penyerap/ kain yang berada di bawah
noda jika sudah sangat basah.
Page 64

9.
Ulangi langkah ke-5 sampai ke-7 jika
diperlukan. Perhatikan: Beberapa
noda tidak bisa dibersihkan 100%.
Setelah digunakan, kembalikan Stain
10.
Wand ke dalam wadahnya dengan
menarik kabelnya pelan-pelan sampai
kuncinya terbuka. Saat kabel tertarik,
letakkan Stain Wand kembali pada
wadahnya. Anda bisa mematikannya
dengan menekan tombol “ ” dan
“Delay End” bersamaan.
PERHATIAN!
Jangan menggunakan Stain Wand terus
menerus lebih dari 5 menit untuk menghindari panas berlebih dan selalu basahi
nodanya dengan menyemprotkan air
selama penggunaan Stain Wand yang
juga bisa membantu pendinginan ujung
Stain Wand. Untuk keselamatan Anda,
Stain Wand akan mematikan setelah 5
menit terus digunakan, tetapi Anda dapat
menghidupkan kembali dengan menekan
tombol ON.
Jangan menggunakan cairan deterjen
yang berwarna.
Jangan menggunakan deterjen atau
pelembut yang berwarna karena warna
tersebut dapat memperparah noda pada
kain Anda.
Pakaian yang membawa simbol:
(jangan dicuci), (jangan diberi
pemutih), (jangan disetrika), dan
(dry cleaning/cuci kering)
tidak cocok untuk Wand Stain prapengobatan.
CATATAN
Tergantung tekanan pasokan air, kamu
mungkin perlu menekan tombol “WATER”
beberapa kali untuk memasukkan air demi
membuat noda cukup basah.
Untuk menguji Stain Wand, semprotkan air
ke tutup dengan menekan tombol “WATER”,
dan lalu operasikan ujung Stain Wand
padanya dengan menekan tombol “ON”.
Jika air memercik itu tandanya Stain
Wand berfungsi dengan baik. Jika tidak,
hubungi Layanan Pelanggan.
Gangguan Ketidakseimbangan
Mesin cuci dapat berhenti selama tahap
memutar cucian karena kondisi yang tidak
seimbang. Tampilan akan menunjukkan
“ ” dan Anda akan mendengar nada bip
pendek setiap menit. Ketidakseimbangan
selama memutar disebabkan karena sebaran
cucian yang tidak merata di dalam bak cuci.
Untuk mengatasi kondisi ketidakseimbangan
ini, buka tutup bak cuci dan ratakan beban
cucian di dalam ruang di antara pemutar dan
dinding bak cuci. Setelah ditutup, mesin akan
aktif dan kembali ke tahap memutar cucian.
Apabila Anda sering mengalami gangguan
ketidakseimbangan, mungkin karena mesin
cuci Anda tidak diletakkan di lantai yang kuat
dan rata. Hal ini dapat diatasi dengan menyetel kaki-kaki mesin cuci seperti dijelaskan di
dalam Petunjuk Pemasangan yang disertakan
dengan mesin.
Listrik mati dan hidup kembali
Apabila listrik mati saat mesin masih
digunakan untuk mencuci, membilas atau
memutar. Mesin akan berusaha menyimpan
pengaturan pada tahap yang dilakukan mesin
kemudian setelah listrik kembali hidup mesin
akan menampilkan “ ” di layar digital.
Apabila panggilan Program atau pengaturan
lainnya tidak berubah selama 5 detik, maka
mesin akan mulai mencuci dari tahap saat
listrik mati.
Respons Tombol dan Lampu
Tekan tombol dengan perlahan-lahan.
Perhatikan lampu pada panel kontrol untuk
melihat pengaruh menekan suatu tombol
atau mengaktifkan kenop pemilih program,
dan dengarkan nada ‘BIP’.
Saat menekan tombol, Anda akan
mendengar nada ‘BIP’ pendek untuk
mengkonfirmasi entri.
64
Page 65

Apabila pada saat itu suatu opsi tidak
tersedia, mesin tidak akan mengizinkan Anda
memilihnya, dan Anda akan mendengar nada
‘BIP’ panjang untuk mengingatkan bahwa
opsi tersebut tidak tersedia.
Setelah mesin dihidupkan, seluruh tombol opsi
pencucian akan dinonaktifkan dan mesin akan
menampilkan “ ” di layar dengan tiga kali
nada bip pendek sebagai indikasi bahwa
tombol dinonaktifkan. Tombol Start masih aktif
namun Anda harus menekan terus tombol ini
selama 1 - 2 detik untuk jeda mesin.
Ini untuk mengkonfirmasi bahwa Anda
benar-benar ingin menjeda mesin. Saat
berada dalam mode jeda, semua opsi akan
dapat diubah lagi.
Semua fungsi mesin cuci akan
berhenti saat tutupnya dibuka.
Mode Mengaktifkan/
Menonaktifkan Bip Setelah
Selesai Mencuci
Mode ini memungkinkan Anda mengaktifkan
atau menonaktifkan nada bip (4 bip setiap 4
menit) setelah selesai mencuci. Misalnya,
Anda dapat menonaktifkan nada bip ini saat
mulai mencuci sebelum tidur, sehingga
setelah selesai mencuci sekitar 1 jam kemudian, nada tersebut tidak akan mengganggu
saat Anda tidur.
CATATAN: Semua nada bip untuk
kesalahan tidak dinonaktifkan oleh fitur
ini, seperti kesalahan kritis, atau membuka tutup selama memasukkan/
menutup/memutar, atau ketidakseimbangan selama pengeringan.
Untuk mengubah pilihan nada “bip”, lakukan
prosedur berikut ini:
Saat mesin cuci berada dalam MODE
1.
SIAGA atau MODE PAUSE, tekan terus
tombol “Start/Hold To Pause” bersamasama selama sekitar 3 detik untuk masuk
ke mode Mengaktifkan/Menonaktifkan Bip
Setelah Selesai Mencuci.
Layar digital akan menampilkan
“ ” apabila bip setelah selesai
mencuci diaktifkan (ini adalah pengaturan
default pabrik).
Layar digital akan menampilkan “ ”
apabila bip setelah selesai mencuci
dinonaktifkan.
Tekan tombol “Modify Option ( , )”
2.
untuk mengubah pilihan, tekan tombol
Start/Hold To Pause untuk menyimpan
pilihan baru.
CATATAN: Apabila Anda tidak menekan
tombol dalam 5 detik, mesin cuci akan
kembali ke pengaturan sebelumnya. Untuk
memprogram ulang, cukup ulangi
langkah-langkah di atas.
PANEL KONTROL
1
Pemilih Program
2
Tombol pemilih opsi
3
Tombol Pengubah Opsi
2 23 3
4 5 6 891 7
4
Tombol Reduce time
5
Tombol Save favourite
6
Tombol Delay End
65
7
Layar
8
Start/Hold To Pause
9
Stain Wand Opsi, Lihat halaman 63.
Page 66

Saklar HIDUP - MATI
Saklar Hidup/Mati digunakan untuk Menghidupkan dan
Mematikan mesin cuci. Saklar Hidup/Mati terletak di bagian
belakang panel kontrol di sisi LH di atas pelat rating.
PENGGUNAAN
Ikuti petunjuk di bagian ini untuk
mendapatkan hasil pencucian terbaik.
Pilah Cucian untuk
Memisahkan Jenisnya
Pemisahan sebaiknya didasarkan pada
pakaian yang memerlukan kondisi
pencucian yang sama. Misalnya, Anda
sebaiknya tidak mencampur pakaian
yang tipis dengan pakaian kerja yang
sangat kotor.
Pisahkan kain yang luntur dan yang
tidak luntur. Dengan mengetahui jenis
kain dan tingkat kotornya akan
membantu Anda memilih opsi program
pencucian yang tepat.
Beberapa kain bersifat lengket dengan
serabut dapat menyerap serabut, kotoran
dan warna dari kain lain yang mudah
berserabut. Beberapa contohnya
tercantum di bawah ini:
Pastikan saat mencuci, Anda
memisahkan kain yang menyerap
serabut dengan kain yang mudah
berserabut.
Periksa pakaian Anda untuk
menghindari kerusakan
Kosongkan isi saku. Kaitkan kancing
dan risleting agar kain tidak robek.
Cuci bra, celana dalam dan pakaian
yang tipis lainnya di kantung cuci dari
jala, yang dapat Anda beli dari
supermarket terdekat.
Semprotan dan penghilang
noda sebelum mencuci
Semprotan dan penghilang noda
sebelum mencuci dapat merusak
komponen plastik pada mesin cuci.
Apabila Anda menggunakan semprotan
atau penghilang noda sebelum
mencuci, oleskan ke cucian jauh dari
mesin cuci.
Menyerap
Serabut
Corduroy
Sintetis
Kain pres
permanen
Penghasil
Serabut
Handuk
Serbet
Permadani/
Candlewick
Memasukkan cucian ke
dalam mesin
Saat memasukkan cucian
ke dalam mesin cuci, ada
empat hal yang harus
diingat:
66
Page 67

Pakaian harus dimasukkan dengan
merata ke dalam alat pemutar. Untuk
hasil terbaik, masukkan pakaian
berukuran kecil terlebih dulu, kemudian
masukkan yang berukuran besar.
Cucian tidak boleh dikaitkan di
sekeliling alat pemutar.
Jangan memasukkan terlalu banyak
cucian ke dalam mesin. Cucian harus
dapat bergerak bebas saat dicuci.
Beban cucian sebaiknya hanya terdiri
dari tiga atau empat barang yang
berukuran besar, misalnya seprai.
Kemudian sebaiknya masukkan pakaian
yang berukuran kecil. Campuran antara
cucian berukuran besar dan kecil akan
dicuci lebih bersih daripada semuanya
hanya berukuran besar.
Penggunaan deterjen dan
pelembut pakaian
Jangan menggunakan jenis deterjen
yang salah. Anda harus menggunakan
deterjen dengan sedikit buih yang
dirancang untuk mesin cuci.
Jangan menggunakan produk berbahan
dasar sabun untuk mesin cuci.
Takar jumlah deterjen bubuk atau cair
dengan tepat dengan mematuhi saran
penggunaan pada kemasan.
Sebaiknya Anda menggunakan
deterjen yang menghasilkan sedikit
buih. Deterjen yang berkualitas dan
dimasukkan dari arah depan dapat
digunakan dengan baik di mesin ini.
Jangan menggunakan terlalu banyak
deterjen. Apabila buih yang dihasilkan
terlalu banyak akan memperlambat
kecepatan pemutaran, pembilasan
kurang bersih dan menambah beban
motor selama tahap memutar pada
program pencucian.
Jangan menuangkan pelembut
pakaian secara langsung ke cucian
karena dapat meninggalkan noda.
Menuangkan deterjen
Saat menggunakan mesin cuci untuk
yang pertama kalinya, periksa apakah
dispenser telah disetel ke jenis deterjen
yang akan Anda gunakan. Untuk
melakukannya, lakukan prosedur
berikut ini:
1.
Tarik keluar laci dispenser hingga
berhenti.
Angkat bagian depan laci ke arah
2.
atas tarik untuk mengeluarkan dari
wadahnya.
Periksa posisi tutup di bagian
3.
belakang wadah deterjen di dalam
laci dispenser. (Pengaturan pabrik
tutup mengarah ke atas untuk
deterjen bubuk.)
Tutup ke arah
atas untuk
deterjen
bubuk.
Tutup ke arah bawah apabila Anda
4.
akan menggunakan deterjen cair.
Tutup ke arah
bawah untuk
deterjen cair
Pasang kembali dispenser ke
5.
wadahnya.
Ingat: Apabila Anda mengganti
jenis deterjen yang digunakan,
posisi tutup harus diubah.
67
Page 68

Sekarang Anda siap menuangkan
6.
deterjen. Takar jumlah yang ingin
Anda gunakan dan tuangkan ke
dalam wadah deterjen pada laci
dispenser.
Jangan mengisi wadah hingga
tumpah.
Jangan menuangkan pelembut
4.
pakaian secara langsung ke cucian
karena dapat meninggalkan noda.
Apabila menggunakan deterjen cair,
kemungkinan deterjen dari dispenser
akan bocor dan mengalir ke cucian
terlebih dulu melalui lubang kecil di
bagian belakang dispenser. Lubang
ini digunakan untuk membantu
membersihkan deterjen.
Apabila Anda ingin menggunakan
7.
pelembut pakaian, baca
“Menuangkan pelembut pakaian”.
Tutup laci dengan menekannya ke
8.
belakang ke arah panel di bagian
atas mesin cuci setelah Anda selesai
menuangkan deterjen.
Menuangkan Pelembut
Pakaian
Takar jumlah pelembut pakaian
1.
dengan tepat dengan mengikuti
saran pada kemasannya.
Campurkan pelembut pakaian dengan
2.
air hangat secukupnya hanya untuk
mengisi sebatas garis tanda di dalam
takaran. Takaran pelembut pakaian
adalah 75 ml.
Tuangkan campuran pelembut
3.
pakaian ke dalam wadah di bagian
atas pemutar.
PENTING: Apabila Anda ingin
menggunakan pelembut pakaian,
pilih opsi pembilasan DEEP,
misalnya jangan pilih opsi
pembilasan EXTRA atau ECO
atau FAST. Selain itu, apabila
pelembut pakaian sering
digunakan, maka mesin harus
dibilas secara rutin.
CATATAN: Anda tidak perlu
menggunakan pelembut pakaian,
mesin cuci Anda akan mencuci
pakaian dengan sempurna tanpa
pelembut.
Menuangkan Pemutih
Pemutih pakaian dapat membantu
menghilangkan noda, kotoran
membandel dan dapat membunuh
bakteri.
68
Page 69

Tipe oksigen - Ini umumnya adalah
pemutih jenis bubuk. Campurkan
pemutih secukupnya dengan air
kemudian tuang ke lubang di panel
bagian atas selama pengisian saat
masih terdapat sedikit air di dalam bak
cuci. Baca petunjuk pada kemasan
pemutih.
Tipe klorin - Jenis pemutih ini tidak
boleh dicampur dengan deterjen.
Campurkan pemutih dengan air sesuai
petunjuk pada kemasannya.
Untuk melakukannya, lakukan prosedur
berikut ini:
Putar PEMILIH PROGRAM ke posisi
1.
“Regular Wash”.
Tekan tombol “Start/Hold To Pause”
2.
untuk mulai mengisi air.
Tuangkan larutan pemutih ke dalan
3.
lubang di panel bagian atas selama
pengisian saat terdapat sedikit air di
dalam bak cuci.
Mengoperasikan Mesin Cuci
Menghidupkan mesin cuci
Buka keran dan alirkan arus listrik di
1.
stopkontak.
Tekan saklar Hidup-mati untuk
2.
MENGHIDUPKAN mesin.
Tutup mesin cuci.
3.
Mesin akan menampilkan pola cahaya
tertentu. Tunggu hingga lampu menyala
sebelum Anda berusaha mengoperasikan
mesin.
Mesin cuci Anda sekarang berada
dalam Mode Siaga dan siap digunakan
untuk mencuci pakaian.
Apabila pengaturan yang ditampilkan di
panel kontrol sudah sesuai dan PEMILIH
PROGRAM sudah disetel ke program
pencucian yang benar untuk cucian yang
dimasukkan, tekan tombol “Start/Hold To
Pause” untuk mulai mencuci.
Biarkan mesin berputar selama
4.
beberapa menit, kemudian biarkan
selama waktu tertentu dengan cara
menekan terus tombol “Start/Hold
To Pause” selama 1 - 2 detik untuk
menjeda mesin.
Putar PEMILIH PROGRAM ke posisi
5.
Drain + Spin kemudian tekan
tombol “Start/Hold To Pause” untuk
mengosongkan bak cuci.
Sekarang Anda dapat mencuci
6.
pakaian menggunakan deterjen dan
program pencucian yang dipilih.
CATATAN: Pemutih tidak boleh
digunakan untuk sutera, wol, rayon dan
pakaian yang mudah kering.
Penutup yang menutup
dengan perlahan
Ketika penutup ini terbuka , untuk
menutup nya hanya dengan menarik
penutup tersebut , dan kemudian
penutup akan menutup perlahan lahan
dengan sendirinya .
Perangkat penutup yang menutup
dengan perlahan akan tidak berfungsi
bila dibuka kurang dari 80 derajat
(Awas jauhkan tangan anda,
Penutup akan menutup dengan
cepat dan dapat melukai tangan
anda).
69
Page 70

Memilih Program yang
Diinginkan
Tekan IKON Program berulang kali,
untuk memilih program yang diinginkan.
Lampu yang relevan akan menyala.
Pemilih program dibagi ke dalam bagian
berikut ini.
Regular Wash , Fast Wash dan
Favourite ;
Colours , Delicates , Heavy Soil
, Woollens , Handwash ,
Bedding , Rinse+Spin ,
Drain+Spin dan Tub Cleaning .
CATATAN: Apabila Anda memilih
program WOOLLENS dan BEDDING, opsi
DEEP RINSE akan dipilih secara otomatis.
Anda tidak akan dapat memilih dan
menggunakan opsi Eco Rinse dan Fast
Rinse untuk kedua program tersebut.
Apabila Anda memilih program
DRAIN+SPIN, akan diberikan tunda
sekurangnya 2 menit sebelum mesin
cuci mulai berputar.
Waktu tunda ini adalah periode
pemompaan air keluar (DRAIN) untuk
memastikan bahwa bak cuci sudah
kering, yang diperlukan sebelum
dilakukan pemutaran.
Meskipun Anda mungkin memasukkan
cucian basah ke dalam bak cuci yang
telah kosong, waktu tunda sebelum
pemutaran akan tetap berlaku demi
keamanan dan untuk melindungi mesin
cuci.
Tombol Opsi Program
Setelah memilih program mencuci,
Pemilih Program akan tetap berada di
posisi tersebut selama siklus pencucian.
Apabila Anda telah mulai mencuci dan
ingin mengganti program, tekan terus
tombol “Start/Hold To Pause” selama
1 - 2 detik untuk masuk ke mode
JEDA, pilih IKON program ke posisi
program yang baru untuk mereset
mesin ke awal program yang baru.
Tergantung pada program yang dipilih,
Anda dapat mengkombinasikan
sejumlah fungsi yang berbeda.
Kombinasi ini harus dipilih setelah
menentukan program yang dikehendaki
dan sebelum menekan tombol
“Start/Hold To Pause”.
70
Page 71

Opsi Wash Load
Tekan tombol OPTIONS ( , ) untuk
memilih ikon Load, kemudian tekan
tombol pengubah opsi ( , ) untuk
memilih tingkat beban cucian. Mesin
akan mengisikan sejumlah air yang
sesuai dengan beban cucian Anda.
Anda dapat memilih:
Pilihan
AUTO
Deskripsi Level Air
Level air tertentu yang
diperlukan untuk mencuci
secara efektif telah
ditentukan dan ditetapkan
secara otomatis, untuk
memastikan bahwa tidak
ada pemborosan air.
Beban
Cucian
-
Disarankan Anda sedapat mungkin
menggunakan level AUTO. Level beban
AUTO memastikan jumlah air yang tepat
yang digunakan untuk beban cucian
tersebut.
Hanya gunakan air dengan jumlah yang
diperlukan sesuai dengan beban cucian.
Apabila Anda ingin menambahkan lebih
banyak air setelah siklus pencucian
dimulai, tekan terus tombol “Start/Hold To
Pause” selama 1 - 2 detik untuk menjeda
mesin kemudian pilih level yang lebih
tinggi, tekan lagi tombol “Start/Hold To
Pause” untuk kembali mengoperasikan
mesin.
Mesin cuci akan menambahkan air
sesuai level baru yang dipilih dan
melanjutkan program pencucian.
Opsi Dirt Level
HIGH
(tinggi)
X-MED
(Ekstra Sedang)
MED
(Sedang)
LOW
X-LOW
(Ekstra Rendah)
Mesin akan mengisi air
dengan jumlah tinggi
untuk beban cucian
MAKSIMAL.
Mesin akan mengisi air
dengan jumlah Ekstra Sedang untuk beban cucian
MENDEKATI MAKSIMAL.
Mesin akan mengisi air
dengan jumlah sedang
untuk beban cucian
SETENGAH PENUH.
Mesin akan mengisi air
dengan jumlah Sedikit
untuk beban cucian
SEDIKIT.
Mesin akan mengisi air
dengan jumlah Sangat
Sedikit untuk beban cucian
yang SANGAT SEDIKIT.
9-12 kg.
6-9 kg.
4-6 kg.
2-4 kg.
0-2 kg.
Tekan tombol OPTIONS ( , ) untuk
memilih ikon Dirt, kemudian tekan
tombol pengubah opsi ( , ) untuk
memilih tingkat kotoran cucian Anda.
Ada 3 tingkat kotoran yang dapat dipilih:
HIGH: untuk cucian yang sangat kotor,
misalnya pakaian kerja dan overall.
REGULAR: untuk pakaian sehari-hari
misalnya pakaian keluarga, seprai
dsb.
LIGHT & FAST: untuk pakaian yang
tidak terlalu kotor, hanya perlu
dibersihkan.
71
Page 72

Opsi Tingkat Kotoran yang dipilih akan
mempengaruhi waktu pencucian untuk
program yang dipilih.
Untuk program pencucian yang sama,
durasi pencucian High Dirt Level lebih
lama daripada Regular Dirt Level, dan
durasi pencucian Regular Dirt Level
lebih lama daripada Light & Fast Dirt
Level.
Memilih Opsi Soak Time
Opsi ini memungkinkan Anda untuk
merendam pakaian dengan noda
membandel pada saat mulai mencuci.
Tekan tombol Options ( , ) untuk
memilih ikon Soak, kemudian tekan
tombol Pengubah Opsi ( , ) untuk
memilih waktu perendaman untuk
beban cucian Anda.
Mesin harus ditutup rapat agar fungsi
Soak dapat berjalan, termasuk
peremdaman 6 menit untuk program
pencucian Heavy Soil. Di lain waktu,
cucian akan direndam.
Opsi Rinse
Tekan tombol OPTIONS ( , ) untuk
memilih ikon Rinse, kemudian tekan
tombol pengubah opsi ( , ) untuk
memilih jenis beban cucian.
Untuk sebagian besar pencucian,
mesin akan secara otomatis memilih
tipe pembilasan “Deep”.
Ada empat opsi pembilasan yang dapat
dipilih:
Pembilasan Extra, mesin mengisi dua
kali, memberikan dua kali pembilasan
secara menyeluruh.
Pembilasan Deep, mesin mengisi
satu kali, memberikan satu kali
pembilasan secara menyeluruh.
Pembilasan Eco adalah pembilasan
semprot yang memberikan
penghematan air secara maksimal.
Pembilasan Fast memerlukan waktu
lebih singkat daripada pembilasan
Eco dengan hanya 3 kali semprotan
Eco, namun jumlah air semakin
bertambah untuk setiap kali
semprotan
Bagaimana cara kerja Pembilasan
Eco?
Apabila digunakan pembilasan Eco, air
bilasan disemprotkan ke bak cuci
dengan ritme tertentu. Setelah setiap
semprotan, bak cuci akan berputar
untuk menghilangkan deterjen dari
pakaian yang larut bersama air.
Memutar Melambat Putaran akhir yang lama
72
Ritme semprotan air bilasan
Page 73

Mesin akan melalui serangkaian siklus
maksimum enam ritme semprotan dan
putaran singkat dengan cara ini,
tergantung pada pilihan program, diikuti
oleh satu putaran akhir yang lama yang
membuang air dari cucian untuk
menyelesaikan program pencucian.
Bandingkan dengan pembilasan Deep
yang menggunakan lebih banyak air.
Pembilasan Deep, air masuk ke
mesin dan akan terisi hingga level air
yang dipilih. Mesin cuci akan
berputar dan mengosongkan air
bilasan melalui selang pembuangan.
Pembilasan Extra, ini adalah opsi
khusus bagi orang yang mengalami
alergi, pembilasan ekstra ini
memberikan dua kali pembilasan
secara menyeluruh untuk memastikan
bahwa semua residu deterjen telah
dibilas.
Pembilasan Eco dan Pembilasan Fast
TIDAK DAPAT dipilih untuk program
Woollens dan Bedding.
Pembilasan Extra/Eco/Fast tidak
dirancang untuk menggunakan
pelembut pakaian.
Pilih pembilasan Deep apabila Anda
ingin menggunakan pelembut pakaian.
Pembilasan Deep memastikan bahwa
pelembut pakaian disalurkan dengan
benar dan dibilas secara menyeluruh
dari cucian selama pembilasan.
Opsi Reduce Time
Opsi ini memungkinkan Anda
mempersingkat waktu pencucian selama
proses mencuci. Tekan tombol Reduce
Time, kemudian tekan tombol pengubah
opsi ( , ) untuk mengurangi waktu
program pencucian.
Simpan Favorit
Untuk memanggil program pencucian
Favorit, sentuh tombol Favourite sekali
dan lepaskan.
Pada layar, Anda akan mendapatkan
informasi bahwa program Favourite
tersebut telah dimuat.
Anda dapat memanggil ulang program
pencucian Favourite hanya ketika mesin
pencuci:
dalam mode pemilihan program atau
pada tahap program pencucian mana
pun dalam mode jeda.
Jika tidak, menyentuh Favourite tidak
menghasilkan apa pun.
Saat pertama Anda menyentuh tombol
Favourite, program pencucian Favorit
sesuai pengaturan awal akan dimuat
untuk Anda. Jika Anda ingin menggunakan program Favorit yang ditampilkan
pada layar tampilan tanpa membuat
perubahan apa pun tekan Start/Hold To
Pause ( ) untuk memulai pencucian
Anda. Untuk memprogram ulang pilihan
Anda sendiri dan menyimpannya,
lanjutkan dengan memasukkan mesin ke
dalam mode jeda dan ikuti petunjuk
berikut.
tekan tombol Favourite untuk memasuki mode pemrograman ulang.
Lakukan pemilihan yang diinginkan
pada semua tombol lainnya.
73
Page 74

Untuk KELUAR dari mode pemrograman ulang dan TIDAK menyimpan perubahan, tekan tombol
Start/Hold To Pause ( ).
Untuk menyimpan program baru,
tekan Save Favourite sekali.
Anda dapat menyalin program lainnya ke
Favourite dengan menyentuh program
sekali untuk menyalin diikuti satu
sentuhan pada tombol Save Favourite.
Anda juga dapat menyalin program yang
sedang berjalan ke Favourite dengan
menyentuh Save Favourite pada mode
jeda.
Opsi Delay End
Sebelum Anda menjalankan
program, opsi ini memungkinkan Anda
menentukan akhir program pencucian
yaitu 2, 4, 6 dan 8 jam.
Tekan tombol Delay End, kemudian
tekan tombol pengubah opsi ( , )
untuk memilih waktu selesai yang
diinginkan.
Opsi ini harus dipilih setelah memilih
program pencucian, dan sebelum
menekan tombol “Start/Hold To Pause”.
Apabila setelah menetapkan opsi Delay
End (dan menekan tombol “Start/Hold To
Pause”) Anda ingin membatalkan atau
mengubahnya, ikuti langkah-langkah
berikut ini:
tetapkan mesin ke JEDA dengan
1.
menekan terus tombol “Start/Hold To
Pause” selama 1 - 2 detik.
batalkan pilihan opsi Delay End dan
2.
ubah status
tekan tombol “Start/Hold To Pause”
3.
untuk menjalankan program.
Start/Hold To Pause
Untuk menjalankan
program yang dipilih,
tekan tombol “Start/Hold
To Pause”.
Apabila Anda telah mulai mencuci dan
ingin menghentikannya, tekan terus
tombol “Start/Hold To Pause” selama
1 -2 detik untuk masuk ke mode JEDA
Tutup Dikunci ( )
Simbol gembok akan ditampilkan di
layar untuk mengingatkan Anda bahwa
tutup mesin cuci sudah dikunci pada
posisi tertutup. Tutup akan terkunci
secara otomatis saat bak cuci memutar
selama program pencucian.
Untuk dapat mengisi dan memutar tutup
harus rapat, namun tidak akan dikunci
secara otomatis.
Apabila tutup dibuka dan mesin
menunggu hingga ditutup agar program
pencucian dapat dilanjutkan, Anda akan
melihat ‘ ’ di layar digital yang diikuti
dengan nada ‘bip’.
Apabila Anda ingin membuka bak cuci
selama memutar, tekan “Start/Hold To
Pause” ( ). Anda harus menunggu
sejenak hingga bak cuci berhenti memutar
sebelum kunci tutup terbuka dan simbol
gembok di layar menghilang.
Apabila Anda kemudian membuka dan
menutupnya kembali, dan mesin masih
berada dalam tahap memutar pada
program pencucian, tutup akan dikunci
dan mesin akan melanjutkan hingga
menyelesaikan tahap memutar.
LD
74
Page 75

JANGAN memasukkan apa pun ke slot
kunci tutup di panel bagian atas mesin
cuci.
JANGAN menghalangi mekanisme
kunci tutup untuk berusaha dan
menonaktifkannya maupun mengubah
cara kerjanya.
JANGAN berusaha membuka tutup
secara paksa saat dikunci.
Perkiraan waktu dihitung secara
otomatis berdasarkan beban maksimum
yang disarankan untuk setiap jenis kain.
Setelah program dijalankan, sisa waktu
akan berubah setiap menit.
Program Berakhir
Apabila suatu
program telah
selesai, 4 angka nol
akan berkedip.
Layar
Layar menampilkan informasi berikut ini:
Mesin Dalam Mode Jeda
Anda dapat mengetahui saat mesin cuci
berada dalam mode
JEDA. Akan ditampilkan pesan “ ”.
Perkiraan waktu untuk program
yang dipilih
Setelah memilih
program, perkiraan
waktu ditampilkan
dalam jam dan menit
(misalnya, ).
PETUNJUK MENCUCI
Memilah Cucian
Ikuti simbol kode mencuci pada setiap
label pakaian dan petunjuk pencucian
dari produsen.
Pilah cucian seperti di bawah ini: cucian
putih, berwarna, sintetis, bahan halus,
wol.
Kode Alarm
Apabila terjadi
masalah pengoperasian, dapat
ditampilkan
beberapa kode
alarm, misalnya (baca “Pemecahan
Masalah” dan “Pemecahan masalah
tampilan kesalahan” di halaman 83, 84).
Kesalahan Pemilihan Opsi
Apabila dipilih suatu
opsi yang tidak
kompatibel dengan
program pencucian
yang ditetapkan,
pesan “ ” akan ditampilkan selama
sekitar 2 detik dan Anda akan
mendengar 3 kali nada bip pendek.
Sebelum Memasukkan Cucian
Jangan sekali-kali mencampur cucian
putih dan berwarna. Cucian putih dapat
berubah warna menjadi “kusam”.
Pakaian berwarna yang baru mungkin
luntur saat pencucian pertama; oleh
karena itu, harus dicuci secara terpisah.
75
Page 76

Pastikan tidak ada benda logam
yang tertinggal dalam cucian
(misalnya jepit rambut, peniti, bros).
Kancingkan sarung bantal, tutup
risleting, kancing kait dan kancing
tekan.
Kaitkan ikat pinggang atau ikat pita
yang panjang.
Hilangkan noda membandel sebelum
dicuci.
Gosok bagian yang sangat kotor
dengan deterjen khusus atau pasta
deterjen.
Perlakukan tirai dengan hati-hati.
Lepaskan pengait atau masukkan ke
dalam kantung atau jaring.
Karat: asam oksalat yang dilarutkan
dalam air panas atau produk penghilang
karat digunakan dalam keadaan dingin.
Berhati-hatilah dengan noda karat yang
sudah lama karena struktur selulosa
bahan sudah rusak dan bahan
cenderung mudah robek.
Noda jamur: bersihkan dengan
pemutih, bilas hingga bersih (hanya
cucian putih dan cucian berwarna yang
tidak luntur).
Rumput: beri sedikit sabun mandi dan
hilangkan dengan pemutih (hanya cucian
putih dan cucian berwarna yang tidak
luntur).
Tinta pulpen dan lem: lembapkan
dengan aseton (*), letakkan cucian pada
kain yang lembut kemudian tekan-tekan
nodanya.
Menghilangkan Noda
Noda membandel mungkin tidak dapat
dihilangkan hanya dengan air dan deterjen.
Oleh karena itu, disarankan untuk
memberikan perlakuan awal sebelum
mencuci.
Darah: hilangkan noda yang masih baru
dengan air dingin. Untuk noda yang
sudah mengering, rendam semalam
dalam air dengan deterjen khusus,
kemudian gosok dengan air dan sabun
mandi.
Cat minyak: lembapkan dengan
penghilang noda bensin, letakkan
pakaian di atas kain yang lembut,
kemudian tekan-tekan nodanya; lakukan
beberapa kali.
Noda gemuk yang mengering:
lembapkan dengan terpentin, letakkan
pakaian pada permukaan yang lembut
dan tekan-tekan noda dengan ujung jari
yang dibungkus lap katun.
Lipstik: lembapkan dengan aseton (*)
seperti di atas, kemudian hilangkan noda
dengan spiritus alkohol. Hilangkan sisa
noda untuk kain putih dengan pemutih.
Anggur merah: rendam dalam air dan
deterjen, bilas dan hilangkan dengan
asam asetat atau asam sitrat, kemudian
bilas. Hilangkan sisa noda dengan
pemutih.
Tinta: Tergantung pada jenis tintanya,
lembapkan terlebih dulu dengan aseton
(*), kemudian gunakan asam asetat;
hilangkan sisa noda pada kain putih
dengan pemutih, kemudian bilas hingga
bersih.
Noda ter: gunakan penghilang noda
terlebih dulu, spiritus alkohol atau bensin,
kemudian gosok dengan pasta deterjen.
(*) jangan mengunakan aseton pada
sutra sintetis.
76
Page 77

Kiat untuk menghilangkan
noda
Saus Tomat / Kecap / Lumpur:
Hangatkan sedikit air sampai suhu 40°C,
basahi nodanya, beri dua tetes cairan
deterjen atau lebih, ratakan di permukaan
noda dan biarkan cairan tersebut terserap
selama 5 menit. Setelah 5 menit, gunakan
Stain Wand sesuai petunjuk penggunaannya
dan tuangkan air hangat lagi seperlunya.
Kecap / Saus Tomat / Kaldu Kacang:
Siapkan larutan yang terbuat dari dua takar
cuka dan satu takar air. Contohnya: untuk 1
sendok makan air, tambahkan 2 sendok
makan cuka. Campurkan larutan tersebut dan
tuangkan ke seluruh noda. Gunakan Staind
Wand sesuai petunjuk penggunaannya dan
selalu basahi noda tersebut menggunakan
larutan tadi seperlunya saja.
Anggur Merah:
Basahi seluruh nodanya dengan air dingin;
tambahkan dua tetes (atau lebih) deterjen cair;
ratakan di permukaan noda dan biarkan
terserap selama 5 menit. Setelah itu, gunakan
Stain Wand sesuai petunjuk penggunaannya.
Hasil terbaik diperoleh pada:
Noda baru yang belum benar-benar
terserap;
Noda yang sudah dicuci, tetapi tidak
dikeringkan dengan pengering atau
disetrika;
Noda yang sedikit, berada di sebagian
kecil kain.
Contoh: tetesan atau tumpahan minuman
dan/atau makanan; noda kecil yang muncul
karena kain bersentuhan dengan
permukaan yang kotor, dll.
Kurang efisien pada:
Noda pekat atau yang sudah lama;
Noda yang sudah dicuci, tetapi tidak
dikeringkan dengan pengering atau
disetrika;
Noda yang banyak, menyebar banyak di
kain.
Deterjen dan Aditif
Hasil cuci yang baik juga bergantung
pada pemilihan dan penggunaan
deterjen dalam jumlah yang tepat agar
tidak banyak yang terbuang percuma
dan untuk melindungi lingkungan.
Meskipun dapat terurai secara alami,
deterjen mengandung zat yang, dalam
jumlah besar, dapat merusak
keseimbangan alam.
Pemilihan deterjen bergantung pada
jenis bahan (halus, wol, katun, dll.),
warna, suhu pencucian dan tingkat
kekotoran.
Jumlah Deterjen yang
Digunakan
Jenis dan jumlah deterjen tergantung
pada jenis bahan, jumlah cucian, tingkat
kekotoran dan kesadahan air yang
digunakan.
Kesadahan air digolongkan berdasarkan
ukuran yang disebut "derajat"
kesadahan.
Informasi mengenai kesadahan air di
wilayah Anda dapat diperoleh dari
perusahaan air minum (PAM) setempat,
atau dari pihak yang berwenang.
Ikuti petunjuk dari produsen mengenai
jumlah yang harus digunakan.
Kurangi jumlah deterjen jika:
beban yang dicuci hanya sedikit,
cucian tidak terlalu kotor,
menghasilkan banyak buih selama
mencuci
77
Page 78

PROGRAM PENCUCIAN
ProgramIkon Deskripsi Opsi
Regular
Wash
Fast
Wash
Save
Favourite
Untuk cucian rumah tangga
biasa dengan berbagai jenis
kain.
Untuk cucian yang sangat
sedikit dengan berbagai jenis
kain.
Favorit program mencuci -
Wash Load / Dirt Level / Soak Time /
Rinse Option / Delay End
Wash Load / Dirt Level /
Soak Time (hanya ‘No Soak’) /
Rinse Option (tidak dapat memilih
‘Extra’) / Delay End
Colours
Delicates
Heavy Soil
Woollens
Handwash
Bedding
Rinse+
Spin
Drain+
Spin
Tub
Cleaning
Untuk cucian berwarna
dengan berbagai jenis kain.
Untuk pakaian dalam,
pakaian yang berenda dan
bordir.
Untuk cucian katun yang
sangat kotor.
Untuk kain wol yang berlabel
“Dapat Dicuci Dengan Mesin”.
Program khusus untuk
pakaian atau kain yang
berlabel harus dicuci
dengan tangan.
Untuk seprai yang berlabel
“Dapat Dicuci Dengan Mesin”.
Untuk cucian yang hanya
ingin dibilas dan diputar,
misalnya cucian yang telah
Anda kucek di bak cuci.
Untuk cucian yang sangat
basah, untuk mengeringkan
airnya.
Untuk membersihkan
bak cuci.
Wash Load / Dirt Level /
Soak Time (hanya ‘No Soak’) /
Rinse Option / Delay End
Wash Load / Dirt Level / Soak Time /
Rinse Option / Delay End
Wash Load / Dirt Level / Soak Time /
Rinse Option / Delay End
Wash Load / Dirt Level / Soak Time /
Rinse Option (hanya ‘Deep’ & ‘Extra’) /
Delay End
Wash Load / Dirt Level / Soak Time /
Rinse Option / Delay End
Wash Load / Dirt Level / Soak Time /
Rinse Option (hanya ‘Deep’ & ‘Extra’) /
Delay End
Wash Load / Rinse Option /
Delay End
Delay End
Delay End
“Regular Wash” dipilih direkomendasikan untuk muatan penuh katun kotor biasa.
78
Page 79

MERAWAT DAN MEMBERSIHKAN
Apa yang Harus Dilakukan
Setelah Anda Selesai
Mencuci.
Tekan ‘MATI’ di Saklar HIDUP - MATI.
Matikan listrik di stopkontak.
Tutup keran air.
Biarkan tutup terbuka selama
beberapa saat. Ini memberikan waktu
agar kelembapan di dalam mesin
cuci menguap dan bau apek hilang.
Anda harus MENCABUT steker listrik
pada mesin dari stopkontak, sebelum
melakukan pembersihan atau
perawatan.
Membersihkan Dispenser
Dispenser harus dibersihkan secara
rutin, terutama setelah selesai mencuci.
Periksa dispenser setelah Anda selesai
mencuci untuk mengetahui apakah
masih ada residu deterjen.
Untuk melakukannya, lakukan prosedur
di bawah ini:
Tarik keluar laci dispenser hingga
berhenti.
Angkat bagian depan laci ke arah
atas tarik untuk mengeluarkan dari
wadahnya.
Bersihkan laci dispenser dengan air
panas dan sikat, misalnya sikat gigi
bekas.
Keringkan laci.
Sebelum memasang kembali
dispenser ke tempatnya, bersihkan
bagian dalam laci dengan sikat gigi
bekas.
Pasang kembali dispenser ke
wadahnya, dan tutup laci.
Membersihkan Filter Serabut
Serabut adalah sekumpulan benang
dan serat yang terlepas dari pakaian
selama dicuci.
Mesin cuci mengumpulkan serabut di
dalam filter serabut. Anda harus
membersihkan filter serabut ini,
terutama setelah selesai mencuci.
Cara membersihkan filter serabut:
Lepaskan tangkai filter dari bagian
tengah pemutar.
79
Page 80

Lepaskan kantung filter bagi tangkai
tersebut.
Balik kantung dan keluarkan semua
serabut.
Membersihkan Noda di Bak
Cuci
Noda dan residu di dalam bak cuci
dapat disebabkan oleh:
Benda dari logam seperti bros, peniti
dan kancing penjepit baju.
Garam.
Keringat dan gemuk dari pakaian yang
sangat kotor atau berminyak yang
menempel di bagian atas bak cuci.
Cuci kantung filter dengan air panas.
Bersihkan kantung filter dengan sikat
gigi bekas, pastikan air dapat
mengalir keluar melalui anyaman jala
pada kantung.
Pasang kembali filter ke tangkai dan
masukkan lagi ke bagian tengah
pemutar.
Membersihkan Mesin Cuci
Untuk membersihkan bagian dalam dan
luar mesin cuci, Anda harus:
Menyeka permukaannya dengan
deterjen pencuci piring yang lembut
dan air hangat.
Menyeka hingga kering dengan kain
yang lembut.
Jangan sekali-kali menggunakan
pelarut, pembersih aerosol,
pembersih semprot, pembersih kaca,
pemoles logam, bahan kaustik,
penggosok atau pembersih perkakas
rumah tangga lainnya pada atau di
dekat panel bagian atas dan tutup,
panel kontrol atau di bagian lain dari
mesin cuci.
Buih yang terlalu banyak selama
mencuci karena kesalahan pemilihan
atau terlalu banyak deterjen.
Periksa saku sebelum Anda
memasukkan cucian ke dalam
mesin cuci.
Jangan biarkan pakaian basah
(terutama pakaian renang) berada
di dalam bak cuci terlalu lama
sebelum Anda mencucinya.
Cara membersihkan bak cuci:
Seka dengan produk pembersih
yang cocok untuk baja tahan karat.
Endapan minyak dapat dihilangkan
dengan menyeka permukaannya
menggunakan deterjen pencuci
piring yang lembut dan air hangat.
Jangan sekali-kali menggunakan
pembersih dengan pemutih atau
sabut dari baja untuk membersihkan
bak cuci baja tahan karat.
80
Page 81

KIAT YANG BERGUNA UNTUK MENGATASI MASALAH MENCUCI
Residu Pada Cucian
Apabila Anda mengalami masalah residu
pada cucian, tips berikut ini dapat
membantu:
Terlebih dulu, campurkan deterjen
dalam air hangat untuk melarutkannya.
Kurangi takaran deterjen, sekitar 1/2
hingga 2/3 dari standar yang disarankan
produsen untuk menghindari kelebihan
konsentrasi (penggunaan sedikit air
memerlukan lebih sedikit deterjen).
Beberapa residu dapat
mengakumulasikan serabut, jadi
perhatikan, jangan memasukkan
cucian penghasil serabut dicampur
dengan cucian dengan warna gelap.
Pilih pembilasan Deep atau Extra dan
JANGAN Eco atau Fast untuk
membantu membilas lebih banyak
partikel.
Beberapa deterjen memiliki
komposisi yang tidak dapat larut air
seluruhnya dan akibatnya, dapat
meninggalkan residu atau partikel
noda berwarna putih di permukaan
cucian dengan warna gelap setelah
selesai mencuci.
Selain itu, kotoran mungkin tidak
seluruhnya terangkat, sehingga
meninggalkan residu noda pada
cucian berwarna terang.
Pakaian yang Terkena Noda
Usahakan untuk segera membersihkan
noda. Semakin lama noda melekat, akan
semakin sulit membersihkannya.
Cobalah merendam dan menggunakan
penghilang noda.
Apabila Anda menggunakan semprotan
atau penghilang noda sebelum
mencuci, oleskan ke cucian di area
dengan ventilasi udara yang baik dan
jauh dari mesin cuci.
Hanya tekan-tekan dan jangan
menggosokkan penghilang noda ke
kain.
Apabila Anda menggunakan pemutih
klorin, ikuti petunjuk pada botol dan
larutkan sebelum Anda
menuangkannya ke cucian.
Untuk pakaian berwarna, periksa di
sisi keliman bagian dalam apakah
warnanya luntur sebelum Anda
menggunakan penghilang noda atau
pemutih.
Untuk pakaian sintetis, periksa di sisi
keliman bagian dalam sebelum Anda
menggunakan bahan kimia atau
pemutih.
CATATAN: Bahan kimia penghilang
noda tersedia di supermarket, toko
pembersih barang dari logam atau toko
bahan kimia setempat.
Semprotan dan penghilang noda
sebelum mencuci dapat merusak
komponen plastik pada mesin cuci.
Jangan menggunakan cairan atau
pelarut untuk cuci kering di dekat
mesin cuci. Cairan tersebut dapat
merusak mesin dan dapat
menyebabkan mesin meledak.
81
Page 82

Pakaian Menguning atau Kusam
Masalah Kemungkinan penyebab Yang harus dilakukan
Kusam
Kesalahan durasi waktu
pencucian dan deterjen yang
digunakan kurang, sehingga
dapat menyebabkan
redeposisi deterjen pada
cucian.
Kesalahan jenis atau terlalu
banyak deterjen yang digunakan sehingga menyebabkan performa pembilasan dan
pemutaran kurang optimal.
Mencampurkan pakaian putih
dengan pakaian yang sangat
kotor, misalnya pakaian kerja.
1. HANYA gunakan deterjen
dengan sedikit buih untuk mesin
cuci.
2. Pilah kembali cucian, kemudian
cuci lagi dengan program yang
sesuai untuk kain tersebut.
3. Apabila airnya sangat kotor atau
banyak buih, ulangi langkah 2 di atas
dengan mengurangi takaran deterjen
yang digunakan.
Menguning
Adanya timbunan minyak
pada pakaian di bagian yang
bersentuhan dengan kulit,
misalnya pakaian dalam,
kaos.
Pakaian sudah lama.
Endapan besi dalam air
bilasan.
Penggunaan pemutih klorin
untuk kain dengan lapisan
resin.
Kesalahan pengeringan.
1. Pilah kembali cucian, kemudian
cuci lagi dengan program cuci yang
sesuai untuk kain tersebut.
2. Apabila airnya sangat kotor atau
banyak buih, ulangi langkah 1 di
atas dengan mengurangi takaran
deterjen yang digunakan.
82
Page 83

PEMECAHAN MASALAH
Sebelum menghubungi pusat servis, periksa apakah masalah Anda tercantum di tabel
berikut ini. Ini akan membantu Anda menemukan solusi untuk masalah sementara.
Mesin cuci Anda akan kembali berfungsi secara normal tapa perlu diservis oleh
teknisi, sehingga menghindari waktu tunda dari penyedia layanan.
Untuk beberapa masalah, Anda akan menerima pesan di layar tampilan yang diikuti dengan
nada ‘Bip’. Pesan tersebut berisi informasi singkat tentang masalah dan apa yang dapat Anda
lakukan untuk mengatasinya.
Masalah
Mesin tidak
berfungsi
Cucian sudah
dimasukkan,
namun mesin
tidak mau
memutar.
Air sudah
dimasukkan ke
bak cuci.
Tidak terisi air
Air mengalir ke
bak cuci secara
melimpah
Mesin tidak
seimbang atau
bergetar hebat
saat berputar
Air tumpah ke
lantai
Stain Wand tidak
menyala.
Kode yang
Ditampilkan
LD
LD
E20
EF0
Kemungkinan
Penyebab
Power belum ditekan
Tidak ada arus listrik ke
stopkontak.
Mesin belum dihidupkan
Keran air belum dibuka
Mati karena tidak seimbang
Tutup kurang rapat
Tidak seimbang
Tutup kurang rapat
Selang pembuangan tersumbat
Terlalu banyak buih
menyebabkan suhu motor
terlalu panas
Keran air belum dibuka
Selang air masuk tersumbat
Selang pembuangan terlalu
rendah
Mesin miring
Kaki-kakinya tidak disetel
Sebaran cucian tidak merata
Air untuk cucian tersebut
terlalu banyak
Sambungan selang air masuk
renggang
Level air untuk beban cucian
tidak tepat
Kondensasi dari air panas
Konektor Washer tidak
terhubung ke colokan.
Aktifkan Stain Wand.
Tutup Washer terbuka. Tutup penutup Washer.
Yang harus dilakukan
Alirkan arus ke stopkontak listrik
Periksa stopkontak dengan steker
untuk alat lainnya
Tekan saklar Hidup-Mati ke posisi HIDUP
Buka keran
Buka tutup, ratakan beban cucian dan
tutup kembali
Tutup dengan rapat
Buka tutup, ratakan beban cucian,
tutup kembali
Tutup dengan rapat
Periksa apakah selang pembuangan tersumbat
Tunggu sejenak, pencucian akan
dilanjutkan Kali berikutnya, kurangi takaran
deterjen dose or use low sudsing
(front load) detergent
Buka keran
Bersihkan filter/pencuci keran
Naikkan selang pembuangan atau
pasang sifon. Baca petunjuk pemasangan
untuk mengetahui posisi selang yang benar.
Ratakan mesin
Setel kaki-kakinya sehingga menyentuh
lantai
Ratakan sebaran cucian
Periksa sambungan keran dan bagian
belakang mesin
Gunakan level air yang lebih rendah
Hubungkan konektor washer ke colokan.
Tekan tombol "Delay End" dan " "
bersamaan selama 3 detik hingga tombol
Stain Wand menyala.
83
Page 84

Masalah
Tidak ada air yang
keluar dari Stain Wand.
Pakaian masih kotor
setelah program cuci
selesai
Derau saat memutar
Dengung, derik dan
bunyi lainnya
Kode yang
Ditampilkan
Kemungkinan
Penyebab
Keran ditutup. Buka keran.
Filter selang air tersumbat. Bersihkan filter.
Tidak ada air yang keluar dari
keran.
Selang air masuk terlipat atau
tertekan.
Tombol air Stain Wand tidak
ditekan.
Deterjen kurang atau tidak
dituangkan
Cucian terlalu banyak
Program atau suhu
pencucian yang dipilih salah
Level air yang dipilih salah
Kawat bra atau pakaian
yang tipis tersangkut di
antara dinding bak cuci
bagian dalam dan luar
Rotasi bak saat mulai mencuci
Aktivasi rem saat
menghentikan pemutaran
Yang harus dilakukan
Periksa instalasi hidrolik rumah.
Lancarkan keran.
Tekan tombol air Stain Wand.
Periksa penggunaan deterjen
dan cuci ulang
Keluarkan beberapa pakaian
dan cuci ulang
Pilih lagi program atau
suhu dan cuci ulang
Gunakan level air yang lebih banyak
Apabila Anda melihatnya,
segera cabut dengan tang.
Lain kali, masukkan ke dalam
kantung saat mencucinya
Bunyi yang normal
Bunyi yang normal
PEMECAHAN MASALAH TAMPILAN KESALAHAN
Informasi kesalahan dan panduan kapan Anda harus menghubungi pusat servis.
Apabila Anda mengalami masalah dengan mesin cuci dan sebelum menghubungi pusat servis,
pastikan Anda telah mengikuti SEMUA petunjuk yang mungkin dapat menyelesaikan masalah
tersebut. Anda akan menemukan petunjuk di bagian ‘Pemecahan Masalah’ dan tabel di bawah
ini. Apabila mesin cuci mendeteksi suatu masalah yang memerlukan penanganan, Anda akan
diberitahu. Mesin akan memberi peringatan tentang masalah ini dengan menampilkan kode
kesalahan di layar digital, yang diikuti oleh nada “Bip”.
Informasi kesalahan dan tindakan yang dapat Anda lakukan dijelaskan di tabel di bawah ini.
Deskripsi
Tidak terisi air
Banjir
Kode yang
Ditampilkan
E30
Tindakan pelanggan (Ringkasan)
Pastikan keran sudah dibuka dan filter selang tidak
tersumbat. Naikkan selang pembuangan apabila air
mengalir dari selang pembuangan.
Tekan tombol ‘Start/Hold To Pause’ untuk mulai
mencuci.
Apabila masalah masih berlanjut, hubungi Pusat Servis.
Apabila air mengalir ke lantai, TUTUP keran.
Tunggu beberapa menit untuk mengetahui apakah
masalah ini sudah teratasi.
Jika belum, hubungi Pusat Servis.
84
Page 85

Deskripsi
Masalah
pengeringan
Air berkurang
saat mencuci
Masalah level air
Kerusakan motor
Kode yang
Ditampilkan
E20
E30
E50
Tindakan pelanggan (Ringkasan)
Tunggu beberapa menit untuk mengetahui apakah
masalah ini sudah teratasi.
Jika belum, tekan tombol ‘Start/Hold To Pause’
kemudian periksa apakah selang pembuangan
tersumbat. Tekan tombol ‘Start/Hold To Pause’
untuk melanjutkan mencuci.
Apabila masalah masih berlanjut, hubungi Pusat Servis.
Apabila level air di bak cuci rendah dan air mengalir
ke lantai, pilih program ke posisi ‘Drain + Spin ’,
kemudian tekan tombol ‘Start/Hold To Pause’.
Apabila masalah semakin paran, tekan matikan mesin
dan hubungi Pusat Servis.
Atau, tekan tombol ‘Start/Hold To Pause’ untuk
melanjutkan mencuci
Harap tunggu, masalah ini mungkin akan teratasi
secara otomatis. Jika tidak, pilih program ke posisi
‘Drain + Spin ’, kemudian tekan tombol
‘Start/Hold To Pause’ untuk mengeringkan bak cuci.
Apabila masalah masih berlanjut, hubungi Pusat Servis.
Harap tunggu, masalah ini mungkin akan teratasi
secara otomatis. Jika tidak, pilih program ke posisi
‘Drain + Spin ’, untuk mengeringkan bak cuci.
Anda mungkin perlu menekan ‘Start/Hold To Pause’
untuk mengeringkan.
Apabila masalah masih berlanjut, hubungi Pusat Servis.
Komunikasi
kesalahan
Mesin dalam mode
jeda
Pemilihan opsi
yang keliru
Dari gangguan
keseimbangan
Bawah kuasa
pemulihan
SP
ERR
PR
Hubungi Pusat Servis.
Menekan Mulai / Tahan Untuk Jeda.
Pilih pilihan yang benar.
Ratakan mesin.
Setel kaki-kakinya sehingga menyentuh lantai.
Ratakan sebaran cucian, tutup mesin cuci.
Harap tunggu, masalah ini mungkin akan teratasi
secara otomatis.
85
Page 86

KEPEDULIAN LINGKUNGAN
Bahan pengemas
Bahan yang ditandai dengan simbol
dapat didaur-ulang.
>PE<=polietilena
>PS<=polistirena
>PP<=polipropilena
Ini berarti, bahan tersebut dapat didaur
ulang dengan cara dibuang ke tempat
pengumpulan limbah daur-ulang yang
sesuai.
Mesin bekas
Buang di lokasi pembuangan resmi
untuk mesin bekas. Jaga kebersihan di
negara Anda!
Simbol pada produk ini atau
kemasannya menandakan bahwa
produk ini tidak boleh diperlakukan
sebagai limbah rumah tangga.
Kiat lingkungan
Untuk menghemat air, energi dan untuk
melindungi lingkungan, ikutilah
saran-saran berikut ini:
Pakaian yang tingkat kotornya normal
dapat dicuci tanpa tindakan sebelum
mencuci untuk menghemat deterjen,
air dan waktu (juga untuk melindungi
lingkungan!).
Mesin akan bekerja dengan lebih
ekonomis apabila beban cucian
penuh.
Dengan perlaukan sebelum mencuci
yang memadai, noda dan sebagian
kotoran dapat dihilangkan; baru
kemudian pakaian dapat dicuci pada
suhu yang lebih rendah.
Takar deterjen sesuai dengan derajat
kesadahan air, tingkat kekotoran
cucian serta jumlah pakaian yang
dicuci.
Melainkan, produk ini harus diserahkan
ke tempat pengumpulan limbah daur
ulang untuk perangkat listrik dan
elektronik.
Dengan memastikan, bahwa produk ini
dibuang dengan cara yang benar, Anda
akan membantu mencegah timbulnya
konsekuensi negatif terhadap lingkungan
dan kesehatan manusia, yang dapat
terjadi jika limbah produk ini tidak
ditangani secara benar.
Untuk rincian informasi mengenai daur
ulang produk ini, hubungi kantor pemda
setempat, layanan pembuangan limbah
rumah tangga atau toko tempat Anda
membeli produk ini.
86
Page 87

Page 88

www.electrolux.com
A00157702-002-432013
 Loading...