


EVEM645DSD
combination microwave oven
Installation & user manualBuilt-in compact

2 electrolux.com.au 3
WE’RE THINKING OF YOU
CONGRATULATIONS
Dear customer,
Thank you for purchasing an Electrolux microwave oven.
You’ve chosen a product that brings with it decades
of professional experience and innovation. Ingenious
and stylish, it has been designed with you in mind.
So whenever you use it, you can be safe in the
knowledge that you’ll get great results every time.
Welcome to Electrolux.
WARNING
This symbol indicates information concerning your
personal safety.
CAUTION
This symbol indicates information on how to avoid
damaging the cooker or cabinet.
IMPORTANT
This symbol indicates tips and information about
use of the cooker.
ENVIRONMENT
This symbol indicates tips and information about
economical and ecological use of the cooker.
NOTE: Model codes shown in this manual are the generic
code. Your product will also include a two letter suffix
which denotes colour and series level.
CONDITIONS OF USE
This appliance is intended to be used in household and
similar applications such as:
• Staff kitchen areas in shops, offices and other
working environments
• Farm houses
• By clients in hotels, motels and other residential
type environments
• Bed and breakfast type environments
• Catering and similar non-retail applications
Record model and serial number here:
Model number: ____________________________________
Serial number: _____________________________________
CONTENTS
Important instructions _________________________ 3
Product description ___________________________ 6
Before using your appliance for the first time ______ 8
Daily use ____________________________________ 10
Microcombi operation ________________________ 10
Automatic programmes _______________________ 13
Defrosting programmes _______________________ 14
Time setting _________________________________ 15
Cooking guide _______________________________ 16
Care and cleaning ____________________________ 29
Technical data _______________________________ 30
Troubleshooting ______________________________ 31
Energy and environment tips ___________________ 32
Installation __________________________________ 33
Warranty ____________________________________ 35
REGISTER YOUR PRODUCT
Please visit our website www.electrolux.com.au
and register your product if you haven’t done
so already.
The symbols you will see in this booklet have
these meanings:
INFORMATION ON DISPOSAL
FOR USERS
ENVIRONMENT!
• Most of the packaging materials are recyclable.
Please dispose of these materials through your local
recycling depot or by placing them in appropriate
collection containers.
• If you wish to discard this product, please contact
your local authorities and ask for the correct method
of disposal.
IMPORTANT INSTRUCTIONS
Important Information that may impact your
Manufacturer’s Warranty
Adherence to the directions for use in this manual
is extremely important for health and safety. Failure
to strictly adhere to the requirements in this manual
may result in personal injury, property damage and
affect your ability to make a claim under the Electrolux
manufacturer’s warranty provided with your product.
Products must be used, installed and operated in
accordance with this manual. You may not be able to
claim on the Electrolux manufacturer’s warranty in the
event that your product fault is due to failure to adhere
to this manual.
BEFORE USING YOUR APPLIANCE
Before you use the appliance, we recommend that
you read through the relevant sections of this manual,
which provides the description of your appliance and
its functions.
To avoid the risks that are always present when you use
an appliance, it is important that the appliance is installed
correctly and that you read the safety instructions carefully
to avoid misuse and hazards.
We recommend that you keep this instruction booklet for
future reference and pass it on to any future owners.
This appliance complies with the requirements of Australian
Standards AS/NZS 60335.2.6 and AS/NZS 60335.2.25
IMPORTANT
Check for any damage or marks. If you find the
appliance is damaged or marked, you must report
it within 7 days if you wish to claim for damage/
marks under the manufacturer’s warranty. This
does not affect your statutory rights.
IMPORTANT SAFETY INSTRUCTIONS
The microwave oven is intended for heating food and
beverages. Drying of food or clothing and heating of
warming pads , slippers, sponges, damp cloth and similar
may lead to risk of injury, ignition or fire.
Damage caused by incorrect connection is not covered
under warranty.
This appliance is intended for domestic use only. The
appliance must only be used for the preparation of food and
drink. The appliance must be supervised during operation.
Only use this appliance indoors.
This appliance is not intended for use by persons (including
children) with reduced physical, sensory or mental
capabilities, or lack of experience and knowledge, unless
they have been given supervision or instruction concerning
use of the appliance by a person responsible for their safety.
Children should be supervised to ensure that they do not
play with the appliance.
The appliances are not intended to be operated by means
of an external timer or separate remote-control system.
WARNING
Risk of fire!
• Combustible items stored in the cooking
compartment may catch fire. Never store
combustible items in the cooking compartment.
• When heating food in plastic or paper containers,
keep an eye on the oven due to the possibilities
of ignition.
• If smoke is observed, switch off or unplug the
appliance and keep the door closed in order to stifle
any flames
WARNING
Accessible parts may become hot during use
Young children should be kept away.
WARNING
Do not use harsh abrasive cleaners or sharp metal
scrapers to clean the microwave oven door glass
since they can scratch the surface, which may
result in shattering of the glass.
• Do not select a microwave power or time setting
that is higher than necessary. Follow the information
provided in this instruction manual.
• Never use the microwave to dry food.
•
Never defrost or heat food with a low water content, e.g.
bread, at too high a microwave power or for too long.
• Cooking oil may catch fire. Never use the microwave
to heat cooking oil on its own.
WARNING
Risk of explosion!
Liquids and other food may explode when in containers
that have been tightly sealed. Never heat liquids or other
food in containers that have been tightly sealed.
Only use utensils that are suitable for use in microwave ovens
Risk of serious damage to health!
• The surface of the appliance may become damaged
if it is not cleaned properly. Microwave energy may
escape. Clean the appliance on a regular basis, and
remove any food residue immediately. Always keep
the cooking compartment, door seal, door and door
stop clean; see also section Care and cleaning.

4 electrolux.com.au 5
IMPORTANT INSTRUCTIONS (CONTINUED)
WARNING
If the door or door seals are damaged , the oven must
not be operated until it has been repaired by a
competent person.
WARNING
It is hazardous for anyone other than a competent
person to carry out any service or repair operation
that involves the removal of a cover which gives
protection against exposure to microwave energy.
• Microwave energy may escape if the cooking
compartment door or the door seal is damaged.
Never use the appliance if the cooking compartment
door or the door seal is damaged. Contact the aftersales service.
• Microwave energy will escape from appliances that
do not have any casing. Never remove the casing.
For any maintenance or repair work, contact the after
sales service.
WARNING
Risk of electric shock!
Incorrect repairs are dangerous.
Repairs may only be carried out and damaged power
cables replaced by one of our trained aftersales
technicians. If the appliance is defective, switch off the
isolation switch or switch off the circuit breaker in the fuse
box to isolate from the mains power supply. Contact the
after sales service.
• The cable insulation on electrical appliances may
melt when touching hot parts of the appliance. Never
bring electrical appliance cables into contact with hot
parts of the appliance.
• Penetrating moisture may cause an electric
shock. Do not use any high pressure cleaners
or steam cleaners.
WARNING
Ensure that the appliance is switched off before
replacing the lamp to avoid the possibility of
electric shock.
Risk of burns!
• During use the appliance becomes hot. Care should
be taken to avoid touching heating elements inside
the oven.
• Accessories and ovenware become very hot.
Always use e oven gloves to remove accessories or
ovenware from the cooking compartment.
• Alcoholic vapours may catch fire in the hot cooking
compartment. Never prepare food containing large
quantities of drinks with a high alcohol content.
• Foods with peel or skin may burst or explode during,
or even after, heating. Never cook eggs in their shells
or reheat hard-boiled eggs. Never cook shellfish or
crustaceans. Always prick the yoke when baking or
poaching eggs. The skin of foods that have a peel
or skin, such as apples, tomatoes, potatoes and
sausages, may burst. Before heating, prick the peel
or skin.
• The contents of feeding bottles and baby food
jars shall be stirred or shaken and the temperature
checked before consumption, in order to avoid
burns.
• Heated food gives off heat. The ovenware may
become hot. Always use oven gloves to remove
ovenware or accessories from the cooking
compartment.
Risk of scalding!
• When you open the appliance door, hot steam may
escape. Open the appliance door with care. Keep
children at a safe distance.
Risk of injury!
• Unsuitable ovenware may crack. Porcelain or
ceramic ovenware can have small perforations in the
handles or lids. These perforations conceal a cavity
below. Any moisture that penetrates this cavity could
cause the ovenware to crack. Only use microwavesafe ovenware.
CAUTION
In order to avoid a hazard due to inadvertent
resetting of the thermal cut-out, this appliance
must not be supplied through an external
switching device, such as a timer, or connected
to a circuit that is regularly switched on and off by
the utility
GENERAL CAUTIONS
Causes of damage
CAUTION
• Metal - e.g. a spoon in a glass - must be kept at least
2cm from the oven walls and the inside of the door.
Sparks could irreparably damage the glass on the
inside of the door.
NOTE: The wire grill racks supplied with this
appliance are compatible for use on microwave
mode. Please ensure only the supplied wire grill racks
are used, and they must be placed centrally on the
turntable during use.
• Never pour water into the hot cooking compartment.
This will cause steam. The temperature change can
cause damage.
• Do not store moist food in the closed cooking
compartment for long periods. Do not use the
appliance to store food. This can lead to corrosion.
• Only allow the cooking compartment to cool with the
door closed. Do not trap anything in the appliance
door. Even if the door is only slightly ajar, the fronts of
adjacent units may be damaged over time.
• If the seal is very dirty, the appliance door will no
longer close properly during operation. The fronts of
adjacent units could be damaged. Always keep the
seal clean.
• Operating the appliance without food in the cooking
compartment may lead to overloading. Never switch
on the appliance unless there is food in the cooking
compartment. An exception to this rule is a short
crockery test (see the section “Microwave, suitable
crockery”) .
• Do not stand or place anything on the open
appliance door. Do not place ovenware or
accessories on the appliance door.
• Do not carry or hold the appliance by the door
handle. The door handle cannot support the weight
of the appliance and could break.
• Liquid that has boiled over must not be allowed to
run through the turntable drive into the interior of the
appliance. Monitor the cooking process. Choose
a shorter cooking time initially, and increase the
cooking time as required.
• The oven should be cleaned regularly and any food
deposits removed since it will reduce the efficiency of
the microwave.
• Failure to maintain the oven in a clean condition
could lead to deterioration of the surface that could
adversely affect the life of the appliance and possibly
result in a hazardous situation .
INSTALLATION
Fitted units
• This appliance is only intended to be fully built in to
a kitchen.
• This appliance must not be installed behind a
decorative door in order to avoid overheating
• This appliance is not designed to be used as a
tabletop appliance or inside a cupboard.
• The fitted cabinet must not have a back wall behind
the appliance.
• A gap of at least 45mm must be maintained between
the wall and the base or back panel of the unit above.
• The fitted cabinet must have a ventilation opening of
250 cm
base panel or fit a ventilation grille.
• Ventilation slots and intakes must not be covered.
• The safe operation of this appliance can only be
guaranteed if it has been installed in accordance with
these installation instructions.
• The fitter is liable for any damage resulting from
incorrect installation.
• The cabinetry into which the appliance is fitted must
be heat resistant up 90°C.
• If the appliance is installed on a base, measures must
be taken to prevent the appliance from slipping from
the base.
2
on the front. To achieve this, cut back the
6 electrolux.com.au 76
PRODUCT DESCRIPTION
Use this section to familiarise yourself with your
new appliance.
The control panel and the individual operating controls
are explained. You will find information on the cooking
compartment and the accessories.
CONTROL PANEL
Touch keys and display
The touch keys are used to set the various additional
functions. On the display, you can read the values that
you have set.
Symbol Function
Function selector
Parameter adjustment
Select parameter
Clock
Touch and hold: Childproof Lock
Touch briefly: Stop
Touch twice: Cancel
Start
Auto-cook programs
Defrost
Touch briefly: Rapid preheating
Pizza setting
Grill
Microwave+Hot
air
Microwave+Grill
Fan
Microwave+Pizza
For frozen convenience products
and dishes which require a lot of
heat from underneath.
Select between the levels high,
medium or low. This is ideal if
you wish to grill several steaks,
sausages, pieces of fish or slices
of bread.
Use this function to roast meals
quickly. And at the same time use
the function of Hot air.
Poultry goes brown and crispy.
Baked casseroles and grilled dishes
work out best using this setting.
You can also use this function to
roast meals evenly.
Use this function to roast
meals quickly.
And at the same time use the
function of Pizza setting.
Parameter adjustment
Use the adjusting keys to set the parameters.
Parameter Function
Auto menu
Temperature
Weight Set the weight of cooking.
Time Set the time of cooking.
Microwave
Cooling fan
The appliance has a cooling fan that helps to vent the hot
air and steam from inside the cavity. The cooling fan will
continue to run for some time after the end of the cooking
cycle has finished, this is part of the normal cooling cycle
operation.
CAUTION
Do not cover the ventilation slots. Otherwise, the
appliance will overheat.
NOTE:
• Condensation may appear on the door window,
interior walls and floor. This is normal and does not
adversely affect microwave operation. Wipe away the
condensation after cooking.
Select 13 automatic programmes.
From P 01 to P 13.
Select the temperature of cooking
(°C ).
: 50, 100, 105, 110 ... 230
: 100, 105, 110 ... 230
: 100, 105, 110 ... 230
: 50, 100, 105, 110 ... 230
: 100, 105, 110 ... 230
: 100, 105, 110 ... 230
Select microwave power.
100W, 300W, 450W, 700W
and 900W
ACCESSORIES
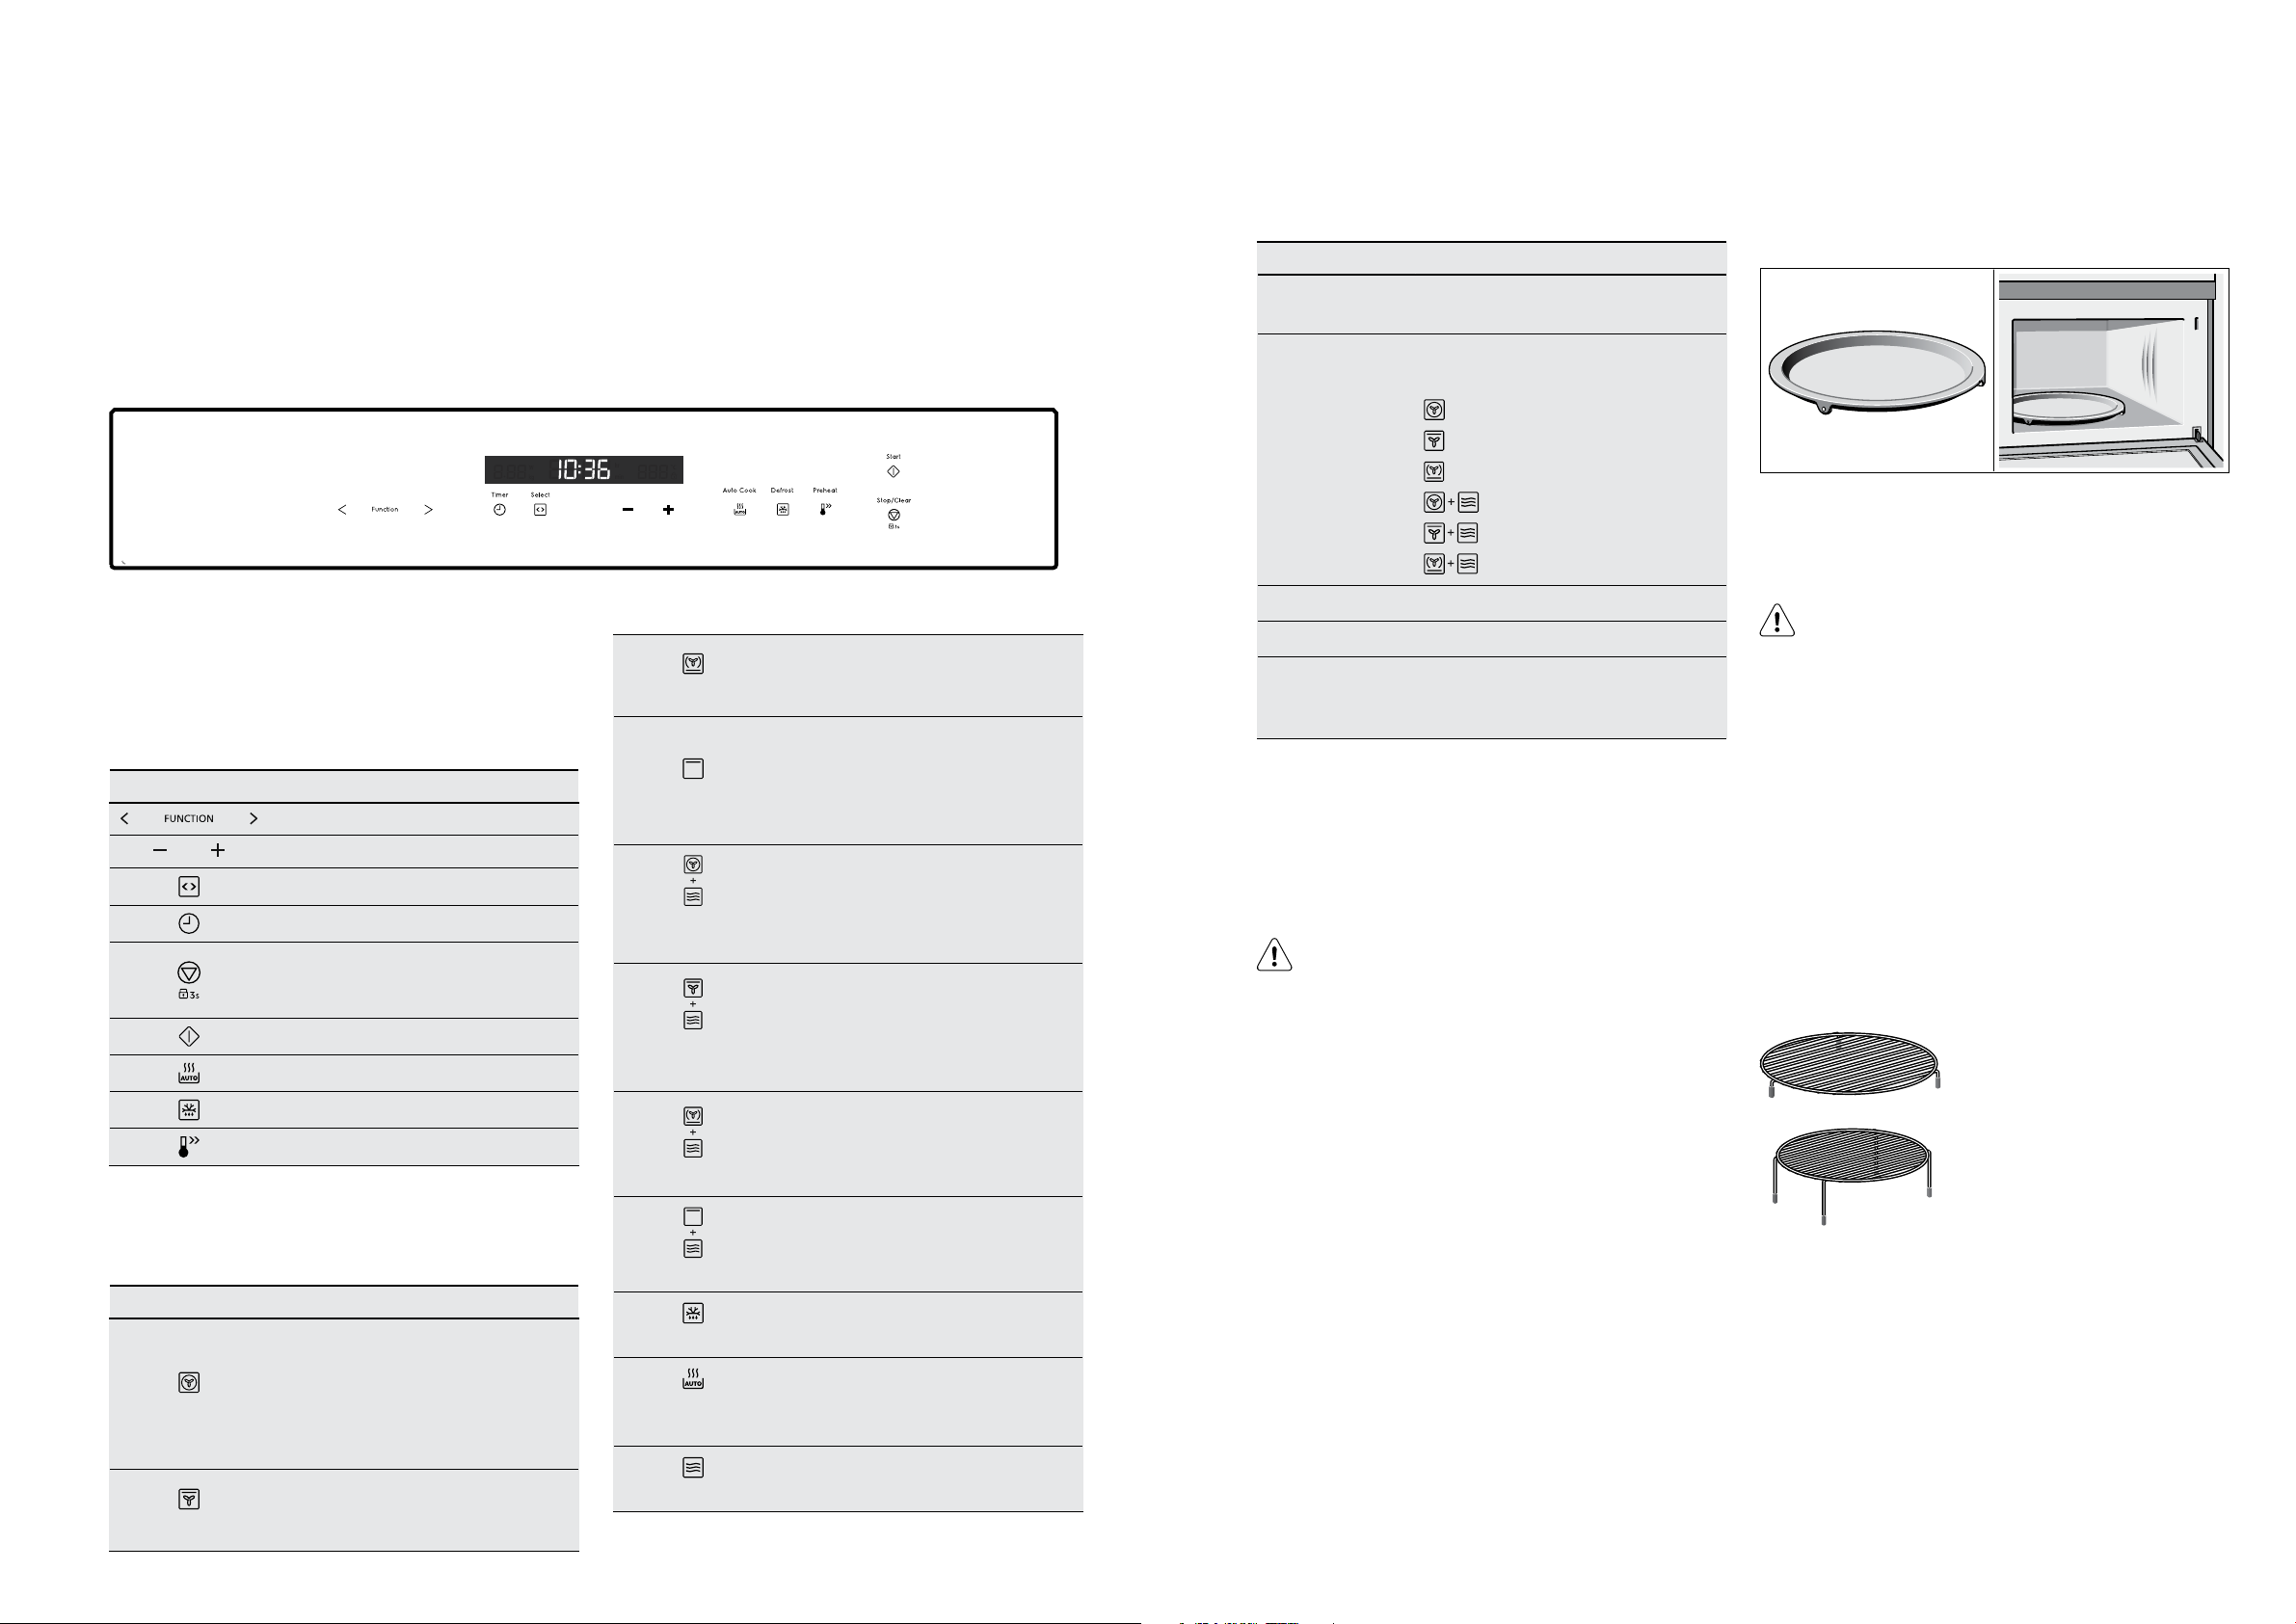
Turntable
The supplied high and low wire racks are suitable for
use with this product on all modes, including microwave
mode. Please ensure that the wire grill rack is placed
centrally on top of the turntable during use.
WARNING
Do not use other wire racks or metal cookware as
they may not be compatible for use on microwave
mode and could damage the appliance.
Food which particularly requires a lot of heat from
underneath can be prepared directly on the turntable.
The turntable can turn clockwise or anti-clockwise.
Place the turntable on the drive in the centre of the cooking
compartment. Ensure that it is properly fitted.
• Never use the microwave without the turntable.
• The turntable can withstand max. 5 kg.
• The turntable must turn when using all types
of heating.
Function selector
Use the function selector to set the type of heating.
Function Use
For baking sponge cakes in baking
tins, flans and cheesecakes as well
Hot air
Grill with fan
as cakes, pizza and small baked
items on the baking tray. 50ºC can
be used to keep cooked food warm
for 1-2 hours.
Poultry goes brown and crispy.
Baked casseroles and grilled dishes
work out best using this setting.
Microwave+Grill
Defrost
Auto-cook
programs
Microwave
Use this function to cook meals
quickly and at the same time give
the meal a brown crust.
2 defrosting programmes
13 cooking programmes. The type
of heating and cooking time are set
by weight.
Defrost, reheat and cooking.
Lower wire rack
For the microwave and for baking and roasting in the oven.
Higher wire rack
For grilling, e.g. steaks, sausages and for toasting bread.
As a support for shallow dishes.
Cleaning the accessories
Before you use the accessories for the first time,
clean them thoroughly with hot soapy water and a
soft dish cloth.

8 electrolux.com.au 9
PRODUCT DESCRIPTION (CONTINUED)
BEFORE USING THE APPLIANCE
FOR THE FIRST TIME
Here you will find everything you need to do before using
your oven to prepare food for the first time. First read the
section on Safety information.
Setting the clock
Once the appliance is connected, “00:00” will blink, buzzer
will ring once. Set the clock.
1. Touch “
2. Touch the key
The time is set.
Changing the clock
1. Touch and hold the
state. The actual time disappear and then the time
will blink in the display.
2. Touch “
key to confirm the setting.
Heating up the oven
To remove the new cooker smell, heat up the oven when it
is empty and closed. One hour with
Ensure that no packaging remnants have been left in the
cooking compartment.
1. Use the function selector to set
2. Touch the key
the temperature to 230 °C.
3. Touch the key. Touch
to 60 minutes.
4. Touch the
” key between 00:00 and 23:59
.
key for 3 seconds in waiting
” key to set the new time and touch the
at 230 °C is ideal.
Hot ai r.
and then touch “ ” key to set
key to set the cooking time
key. The oven begins to heat up.
SETTING THE OVEN
There are various ways in which you can set your oven.
Here we will explain how you can select the desired type
of heating and temperature or grill setting. You can also
select the oven cooking time for your dish. Please refer to
the section on Setting the time setting options .
Setting the type of heating and temperature
Example :
1. Set the function selector to
2. The default temperature 180 °C will light. Touch the
200 °C.
3. Touch the
cooking time to 25 minutes.
4. Touch the
Opening the oven door during operation
Operation is suspended. After closing the door, touch the
key. Operation continues.
Pausing operation
Touch the
key to continue operation .
Changing the cooking time
This can be done at any time. Touch the
Touc h “ “ key to change the cooking time.
Changing the temperature
This can be done at any time.
Touch the
Touc h “ “ key to set the temperature.
Hot air at 200 °C for 25 minutes.
.
key. Touch “ ” key to set the temperature to
key. Touch “ “ key to set the
key. The oven begins to heat up.
key to pause operation. Then touch the
key .
for the new temperature setting.
RAPID PREHEATING
With rapid preheating, your oven reaches the set
temperature particularly quickly .
Rapid Preheating is available for the following types
of heating:
•
•
•
•
•
•
To ensure an oven cooking result, only put your food in
the cooking compartment when the preheating phase
is complete.
1. Setting the type of heating and temperature .
2. Touch the
3. Touch the
The oven begins to heat up.
The preheating process is complete
A signal sounds. The
your dish in the oven.
Cancelling rapid preheating
During setting the rapid preheating function, touch the
can cancel the function.
During rapid preheating, touch the
the function. Also you can open the door to cancel
the function.
Hot air
Grill with fan
Microwave+Hot air
Microwave+Grill Fan
Pizza setting
Microwave+Pizza
key.
The symbol lights up in the display.
key.
symbol in the display blinks. Put
or can cancel
Cancelling operation
Touch the
key twice to cancel operation.
NOTE:
1. The rapid preheating function only works if you have
already chosen one of the modes above. During
preheating, the microwave function is switched off.
2. Only when you can hear alarm and preheating icon is
blinking you can open the door and put food inside.

10 electrolux.com.au 11
DAILY U SE
Microwaves are converted to heat in foodstuffs.
The microwave can be used solo, i.e. on its own,
or in combination with a different type of heating.
You will find information about ovenware and how
to set the microwave.
NOTE: In the Cooking Guide, you will find
examples for defrosting , heating and cooking with
the microwave oven.
NOTE: The time steps when adjusting the time vary
depending on the total cooking time selected, the
adjustment steps increase as the total cooking time
increases as per below:
0-1 min : 1 second
1-5 min : 10 seconds
5-15 min : 30 seconds
15-60 min : 1 minute
60 min : 5 minutes
OVENWARE
Suitable ovenware
Suitable dishes are heat-resistant ovenware made of glass,
glass ceramic, porcelain, ceramic or heat-resistant plastic.
These materials allow microwaves to pass through.
You can also use serving dishes. This saves you having
to transfer food from one dish to another. You should only
use ovenware with decorative gold or silver trim if the
manufacturer guarantees that they are suitable for use
in microwaves.
Unsuitable ovenware
Metal ovenware is unsuitable. Metal does not allow
microwaves to pass through. Food in covered metal
containers will remain cold.
MICROWAVE POWER SETTINGS
Use the key to set the desired microwave power.
100W - Defrosting sensitive/delicate foods
- Defrosting irregularly-shaped foods
- Softening ice cream
- Allowing dough to rise
300 W - Defrosting
- Melting chocolate and butter
450 W - cooking rise, soup
700 W - Reheating
- cooking mushrooms, shell fish
- cooking dishes containing eggs and cheese
900 W - Boiling water, reheating
- cooking chicken, fish, vegetables
NOTE:
• When you touch a key, the selected power lights up.
• The microwave power can be set to 900 watts for
a maximum of 30 minutes. With all other power
settings a maximum cooking time of 1 hour 30
minutes is possible.
SETTING THE MICROWAVE
Example:
Microwave power setting 300 W, cooking time 17 minutes
1. Set the function selector to
microwave power 900W will appear.
2. Touch the
Touc h “ ” key to adjust the cooking time to
17 mi n ute s
3. Touch the
microwave power to 300W.
4. Touch the
Operation begins. The cooking time starts counting
down in the display.
The cooking time has elapsed
A signal sounds. Microwave operation has finished.
Opening the oven door during operation
Operation is suspended. After closing the door, touch the
key. Operation continues.
Changing the cooking time
This can be done at any time. Touch the
Touc h “ ” key to change the cooking time.
Changing the microwave power setting
This can be done at any time.
Touch the
Touc h “ ” key to set the microwave power.
Pausing operation
Touch the
key again to continue operation.
Cancelling operation
key, the default cooking time will blink
key. Touch “ ” key to adjust the
key.
for the new microwave power setting.
key briefly. The oven is paused. Touch the
. The default
key.
NOTE: The wire grill racks supplied with this appliance are
compatible for use on microwave mode. Please ensure
only the supplied wire grill racks are used, and they must
be placed centrally on the turntable during use.
Ovenware test
Do not switch on the microwave unless there is food inside.
The following ovenware test is the only exception to this rule.
Perform the following test if you are unsure whether your
ovenware is suitable for use in the microwave :
1. Heat the empty ovenware at maximum power for½ to
1 minute.
2. Check the temperature occasionally during that time.
The ovenware should still be cold or warm to the touch.
The ovenware is unsuitable if it becomes hot or sparks
are generated.
Touch the
NOTE:
• When you touch the
• If you open the appliance door during cooking, the
key twice to cancel operation.
microwave key, the highest
microwave power setting always lights up as the
suggested setting.
fan may continue to run.

12 electrolux.com.au 13
MICROCOMBI OPERATION
This involves simultaneous operation of the grill and the
microwave. Using the microwave makes your dishes ready
more quickly, but they are still nicely browned.
You can switch on all microwave power settings.
Exception: 900 watts
Setting Microwave Combi operation
Example: microwave 100W, 17 minutes and hot air
190°C.
1. Set the function selector to
2. The default temperature 180°C will blink. Touch the
key. Touch “ ” key to set the temperature to
190 ° C.
3. The default microwave power is 300W. Touch the
key again and then touch “ ” key to set the
microwave power to 100W.
4. Touch the
key. Touch “ ” key to set the
cooking time to 17 minutes.
5. Touch the
key.
Appliance operation begins. The cooking time starts
counting down.
The cooking time has elapsed
A signal sounds. Combination mode has finished.
Opening the oven door during cooking
Operation is suspended. After closing the door, touch the
key briefly. The programme will then continue.
Pausing operation
Touch the
key briefly. The oven is paused. Touch the
key again to continue operation.
Changing the cooking time
This can be done at any time. Touch the
Touc h “ ” key to change the cooking time.
Changing the microwave power setting
This can be done at any time.
Touch the
for the new microwave power setting.
Touc h “ ” key to set the microwave power.
.
key.
AUTOMATIC PROGRAMMES
The automatic programmes enable you to prepare food
very easily. You select the programme and enter the
weight of your food. The automatic programme makes the
optimum setting. You can choose from 13 programmes.
Always place the food in the cold cooking compartment.
Setting a programme
When you have selected a programme, set the oven.
The temperature selector must be in the off position.
Example: Programme 3 with a weight of 1 kilogramme.
1. Touch the
key.
The first programme number appears in the display.
2. Touch “
” or key to select the programme
number PO3.
3. Touch the
4. Touch “
key.
” key to set the weight, cooking time
will shown.
5. Touch the
key. The programme starts. You can
see the cooking time counting down .
AUTO MENU
Programme
no.
P 01** Vegetables Fresh vegetables
P 02** Side dishes Potatoes-peeled /
P 03* Side dishes Potatoes-roasted
P 04 Poultry/Fish Chicken pieces
P 05* Bakery Cake
Category Item
cooked
If you hear a beep,turn the
food. The combi microwave
oven starts the next phase
automatically.
If you hear a beep,turn the
food .The combi microwave
oven starts the next phase
automatically .
P 09** Reheat Plated meal
P 1 0** Reheat Sauce/stew/dish
P 11 * Convenience Frozen - Pizza
P 12* Convenience Frozen - Oven
chips
If you hear a beep,turn the
food. The comb! microwave
oven starts the next phase
automatically.
P 13* Convenience Frozen - Lasagna
NOTE:
• The programmes with a * are preheated. During
preheating, the cooking time pauses and the
preheating symbol is on. After preheating, you will
hear an alarm and the preheating symbol will blink.
• The programmes with ** only use the microwave
function.
Programme has ended
A signal sounds. The oven stops heating.
Changing the programme
Once you have started the programme, the programme
number and weight cannot be changed.
Cancelling the programme
Touch the
key twice to cancel operation.
Changing the cooking time
If using automatic programmes, you cannot change the
cooking time.
Changing the temperature
This can be done at any time.
Touch the
for the new temperature setting.
Touc h “ ” key to set the temperature.
Cancelling operation
Touch the
key twice to cancel operation.
P 06* Bakery Apple pie
P 07* Bakery Quiche
P 08** Reheat Drink/soup

14 electrolux.com.au 15
DEFROSTING PROGRAMMES
You can use the 2 defrosting programmes to defrost meat,
poultry and bread .
1. Touch the
The first programme number appears in the display.
2. Touch “
number .
3. Touch the
4. Touch “
will shown.
5. Touch the
You can see the cooking time counting down .
NOTE:
• Preparing food
Use food that has been frozen at -18°C and stored in
portion sized quantities that are as thin as possible.
Take the food to be defrosted out of all packaging
and weigh it. You need to know the weight to set
the programme.
key.
” or key to select the programme
key.
” key to set the weight, cooking time
key. The programme starts.
TIME-SETTING OPTIONS
Your oven has various time-setting options. You can use
the key to call up the menu and switch between the
individual functions. A time-setting option that has already
been set can be changed directly with the “ ” key.
Setting the cooking time
The cooking time for your meal can be set on the oven.
When the cooking time has elapsed, the oven switches
itself off automatically. This means that you do not have to
interrupt other work to switch off the oven. The cooking
time cannot be accidentally exceeded.
The oven starts. The cooking time counts down in
the display.
The cooking time has elapsed
An audible signal sounds. The oven stops heating.
• Liquid will be produced when defrosting meat or
poultry. Drain off this liquid when turning meat
and poultry and under no circumstances use it
for other purposes or allow it to come into
contact with other foods.
• Ovenware
Place the food in a microwaveable shallow dish, e.g.
a china or glass plate , but do not cover.
• When defrosting chicken and chicken portions
(d 01), an audible signal will sound on two occasions
to indicate that the food should be turned.
• Resting time
The defrosted food should be left to stand for an
additional 10 to 30 minutes until it reaches an even
temperature. Large pieces of meat require a longer
standing time than smaller pieces. Flat pieces of
meat and items made from minced meat should be
separated from each other before leaving to stand.
After this time, you can continue to prepare the food,
even though thick pieces of meat may still be frozen
in the middle. The giblets can be removed from
poultry at this point.
Programme
no.
D 01* meat, poultry and
D 02* bread, cake and
Defrost Weight range
in kg
0.20 - 1.00
fish
0.10 - 0.50
fruit
CHILDPROOF LOCK
The oven has a childproof lock to prevent children
switching it on accidentally.
The oven will not react to any settings. The timer and
clock can also be set when the childproof lock has been
switched on.
Switching on the childproof lock
Requirement: No cooking time should be set .
Touch and hold the
The
is activated.
Switching off the childproof lock
Touch and hold the
The
lock is deactivated.
Childproof lock with other cooking operations
When other cooking programmes have been set, the
childproof lock is not operational.
symbol appears in the display. The childproof lock
symbol on the display goes out. The childproof
key for approx. 3 seconds.
key for approx. 3 seconds.
*During defrosting, place the food on the lower wire rack.

16 electrolux.com.au 17
COOKING GUIDE
Here you will find a selection of recipes and the ideal
settings for them. We will show you which type of heating
and which temperature or microwave power setting is best
for your meal.
You can find information about suitable accessories and
the height at which they should be inserted. There are also
tips about ovenware and preparation methods.
• The values in the table always apply to food placed
into the cooking compartment when it is cold and
empty. Only preheat the appliance if the table
specifies that you should do so. Before using the
appliance, remove all accessories from the cooking
compartment that you will not be using.
• Do not line the accessories with greaseproof paper
until after they have been preheated.
• The times specified in the tables are only guidelines.
They will depend on the quality and composition of
the food.
• Use the accessories supplied. Additional accessories
may be obtained from specialist retailers or from the
after-sales service.
• Always use an oven cloth or oven gloves when
taking accessories or ovenware out of the cooking
compartment.
DEFROSTING, HEATING UP AND
COOKING WITH THE MICROWAVE
The following tables provide you with numerous options
and settings for the microwave .
The times specified in the tables are only guidelines. They
may vary according to the ovenware used, the quality,
temperature and consistency of the food.
Time ranges are often specified in the tables. Set the
shortest time first and then extend the time if necessary.
It may be that you have different quantities from those
specified in the tables. A rule of thumb can be applied:
Double amount - just under double the cooking time, half
amount - half the cooking time.
Defrosting
• Place the frozen food in an open container on the
lower wire rack.
• Delicate parts such as the legs and wings of chicken
or fatty outer layers of roasts can be covered with
small pieces of aluminium foil. The foil must not touch
the cooking compartment walls. You can remove the
foil half way through the defrosting time.
• Turn or stir the food once or twice during the
defrosting time. Large pieces of food should be
turned several times. When turning, remove any liquid
that has resulted from defrosting.
• Leave defrosted items to stand at room temperature
for a further 10 to 60 minutes so that the temperature
can stabilise. The giblets can be removed from
poultry at this point.
Defrost Weight Microwave power setting in watts,
cooking time in minutes
Whole pieces of meat (beef,
veal or pork - on the bone or
boned)
Meat in pieces or slices of
beef, veal or pork
Minced meat, mixed 200 g 10 0 W, 10-15 mins Freeze food flat if possible
Poultry or poultry portions 600 g 300 W, 8 mins + 100 W, 10-15 mins Turn during cooking
Duck 2 kg 300 W, 20 mins + 100 W, 30-40 mins Turn several times
Fish fillet, fish steak or slices 400 g 300 W, 5 mins + 100 W, 10-15 mins Separate any defrosted parts
Whole fish 300 g 300 W, 3 mins + 100 W, 10-15 mins -
Vegetables, e.g. peas 300 g 300 W, 10-15 mins Stir carefully during defrosting.
Fruit, e.g. raspberries 300 g 300 W, 7-10 mins Stir carefully during defrosting
Butter, defrosting 125 g 300 W, 1 mins + 100 W, 2-4 mins Remove all packaging
Loaf of bread 500 g 300 W, 6 mins + 100 W, 5-10 mins Turn during cooking.
800 g 300 W, 15 mins + 100 W, 10-20 mins Turn several times
1 kg 300 W, 20 mins + 100 W, 15-25 mins
1.5 kg 300 W, 30 mins + 100 W, 20-30 mins
200 g 300 W, 3 mins + 100 W, 10-15 mins Separate any defrosted parts
500 g 300 W, 5 mins + 100 W, 15-20 mins
800 g 300 W, 8 mins + 100 W, 15-20 mins
500 g 300 W, 5 mins + 100 W, 10-15 mins
800 g 300 W, 8 mins + 100 W, 15-20 mins
1.2 kg 300 W, 15 mins + 100 W, 25-30 mins
600 g 300 W, 8 mins + 100 W, 10-15 mins
600 g 300 W, 10 mins + 100 W, 10-15 mins
500 g 300 W, 8 mins + 100 W, 5-10 mins
250 g 300 W, 1 min + 100 W, 2-4 mins
1 kg 300 W, 12 mins + 100 W, 15-25 mins
Notes
when turning
Turn several times, remove any
defrosted meat
and separate any defrosted
parts
Cakes, dry, e.g. sponge cake 500 g 100 W, 15-20 mins Only for cakes without icing,
750 g 300 W, 5 mins + 100 W, 10-15 mins
Cakes, moist, e.g. fruit flan,
cheesecake
• Place the food directly on the turntable.
500 g 300 W, 5 mins + 100 W, 10-15 mins Only for cakes without icing,
750 g 300 W, 7 mins + 100 W, 10-15 mins
cream or crème pâtissière,
separate the pieces of cake.
cream or gelatine

18 electrolux.com.au 19
COOKING GUIDE (CONTINUED)
DEFROSTING, HEATING UP OR
COOKING FROZEN FOOD
• Take ready meals out of the packaging. They will
heat up more quickly and evenly in microwaveable
ovenware. The different components of the meal may
not require the same amount of time to heat up .
• Food which lies flat will cook more quickly than food
which is piled high. You should therefore distribute
the food so that it is as flat as possible in the
ovenware. Different foodstuffs should not be placed
in layers on top of one another.
• Always cover the food. If you do not have a suitable
cover for your ovenware, use a plate or special
microwave foil.
• Stir or turn the food 2 or 3 times during cooking.
• After heating, allow the food to stand for a further 2 to
5 minutes so that it can achieve an even temperature.
• Always use an oven cloth or oven gloves when
removing plates from the oven.
• This will help the food retain its own distinct taste, so
it will require less seasoning.
HEATING FOOD
WARNING
Risk of scalding!
There is a possibility of delayed boiling when a liquid
is heated. This means that the liquid reaches boiling
temperature without the usual steam bubbles rising to the
surface. Even if the container only moves a little, the hot
liquid can suddenly boil over and spatter. When heating
liquids, always place a spoon in the container. This will
prevent delayed boiling.
CAUTION
Metal - e.g. a spoon in a glass - must be kept at
least 2 cm from the oven walls and the inside of the
door. Sparks could irreparably damage the glass
on the inside of the door.
• Take ready meals out of the packaging. They will
heat up more quickly and evenly in microwaveable
ovenware. The different components of the meal may
not require the same amount of time to heat up
• Always cover the food. If you do not have a suitable
cover for your container, use a plate or special
microwave foil.
• Stir or turn the food several times during the heating
time. Check the temperature.
• After heating, allow the food to stand for a further 2 to
5 minutes so that it can achieve an even temperature.
• Always use an oven cloth or oven gloves when
removing plates from the oven .
• Place the cookware with food directly on the
turntable, or on the supplied wire grill racks..
Defrost Weight Microwave power setting in watts,
cooking time in minutes
Menu, plated meal,
ready meal
Soup 400-500 g 700 W, 8-10 mins Ovenware with lid
Stews 500 g 700 W, 10-15 mins Ovenware with lid
Slices or pieces of meat
in sauce, e.g. goulash
Fish, e.g. fillet steaks 400 g 700 W, 10-15 mins Covered
Side dishes, e.g. rice,
pasta
Vegetables, e.g. peas,
broccoli, carrots
Creamed spinach 450 g 700 W, 11-16 mins Cook without additional water
300-400 g 700 W, 10-15 mins Take meal out of packaging; cover
1 kg 700 W, 20-25 mins
500 g 700 W, 15-20 mins Ovenware with lid
1 kg 700 W, 25-30 mins
800 g 700 W, 18-20 mins
250 g 700 W, 2-5 mins Ovenware with lid; add liquid
500 g 700 W, 8-10 mins
300 g 700 W, 8-10 mins Ovenware with lid; add 1 tbsp of
600 g 700 W, 15-20 mins
Notes
food to heat
water
Defrost Weight Microwave power setting in watts,
cooking time in minutes
Menu, plated meal,
ready meal
Drinks 150 m l 900 W, 1-2 mins Caution!
Baby food, e.g. baby
bottle
Soup
1 cup
2 cups 175 g each 900 W, 4-5 mins
4 cups 175 g each 900 W, 5-6 mins
Slices or pieces of meat
in sauce, e.g. goulash
Stew 400 g 700 W, 5-10 mins Ovenware with lid
Vegetables 150 g 700 W, 2-3 mins Add a little liquid
350-500 g 700 W, 5-10 mins Take meal out of packaging, cover
300 ml 900 W, 2-3 mins
500 ml 900 W, 3-4 mins
50 ml 300 W, approx. 1 min Place baby bottles on the cooking
100 m l 300 W, 1-2 mins
200 ml 300 W, 2-3 mins
175 g 900 W, 2-3 mins -
500 g 700 W, 10-15 mins Covered
800 g 700 W, 10-15 mins
Notes
food to heat
Place a spoon in the glass. Do not
overheat alcoholic drinks. Check
during heating
compartment floor without the teat
or lid. Shake or stir well after heating.
You must check the temperature
300 g 700 W, 3-5 mins

20 electrolux.com.au 21
COOKING GUIDE (CONTINUED)
COOKING FOOD
• Food which lies flat will cook more quickly than food
which is piled high. You should therefore distribute the
food so that it is as flat as possible in the ovenware.
Different foodstuffs should not be placed in layers on
top of one another.
• Place the food directly on the turntable.
• Cook the food in ovenware with a lid. If you do not
have a suitable lid for your ovenware, use a plate or
special microwave foil.
Defrost Weight Microwave power setting in watts,
cooking time in minutes
Whole chicken, fresh,
1.5 kg 700 W, 30-35 mins Turn halfway through the cooking
no giblets
Fish fillet, fresh 400 g 700 W, 5-10 mins -
Fresh vegetables 250 g 700 W, 5-10 mins Cut into equal-sized pieces; add 1
500 g 700 W, 10-15 mins
Potatoes 250 g 700 W, 8-10 mins Cut into equal-sized pieces; add 1
500 g 700 W, 11-14 mins
750 g 700 W, 15-22 mins
Rice 125 g 700 W, 7-9 mins+ 300 W, 15-20 mins Add double the quantity of liquid and
250 g 700 W, 10-12 mins + 300 W, 20-25
mins
Sweet foods , e.g.
500 ml 700 W, 7-9 mins Stir 2 to 3 times with an egg whisk
blancmange (instant)
Fruit, compote 500 g 700 W, 9-12 mins -
• This will help the food retain its own distinct taste, so
it will require less seasoning.
• After cooking, allow the food to stand for a further
2 to 5 minutes so that it can achieve an even
temperature.
• Always use an oven cloth or oven gloves when
removing plates from the oven.
Notes
time
to 2 tbsp water per 100 g; stir during
cooking
to 2 tbsp water per 100 g; stir during
cooking
use deep ovenware with a lid
while heating
MICROWAVE TIPS
If you cannot find any information about the settings
for the quantity of food you have prepared.
If the food has become too dry. Next time, set a shorter cooking time or select a lower microwave
When the time has elapsed, the food is not
defrosted, hot or cooked.
When the time has elapsed, the food is overheated
at the edge but not done in the middle.
After defrosting , the poultry or meat is defrosted on
the outside but not defrosted in the middle.
Increase or reduce the cooking times using the following rule of
thumb:
Double the amount = almost double the cooking time
Half the amount = half the cooking time
power setting. Cover the food and add more liquid.
Set a longer time. Large quantities and food which is piled high
require longer times.
Stir it during the cooking time and next time, select a lower
microwave power setting and a longer cooking time.
Next time, select a lower microwave power setting. If you are
defrosting a large quantity, turn it several times.
CAKES AND PASTRIES
About the tables
• The times given apply to food placed in a cold oven.
• The temperature and baking time depend on the
consistency and amount of the mixture. This is
why temperature ranges are given in the tables.
Begin with the lower temperature and, if necessary,
use a higher setting the next time, since a lower
temperature results in more even browning.
Baking in tins Accessories Type of
Sponge cake, simple Ring tin/cake tin 17 0 -18 0 100 40-50
• Additional information can be found in the Baking tips
section following the tables.
• Always place the cake tin in the centre of the
lower wire rack. But the food with ** should be
placed in the turntable.
Baking tins
NOTE: It is best to use dark-coloured metal baking tins.
heating
Temperature °CMicrowave
power in
watts
Cooking
time
in minutes
POPCORN FOR THE MICROWAVE
• Use heat-resistant, flat glass ovenware , e.g. the lid of
an ovenproof dish, a glass plate or a glass tray (Pyrex)
• Always place the ovenware on the supplier wire rack.
• Do not use porcelain or overly curved plates.
• Make the settings as described in the table. You can
adjust the timings according to product and amount.
• So that the popcorn doesn’t burn, briefly take the
popcorn bag out of the oven after 1 minute and 30
seconds and shake it. Take care as the bag will
be hot!
Weight Accessories Microwave power in watts,
Popcorn for the
microwave
1 bag,
100 g
Ovenware 700 W, 3-5 mins
WARNING
Risk of scalding!
• Open the popcorn bag carefully as hot steam
may be released.
• Never set the microwave to full power.
Cooking time in minutes
Sponge cake, delicate
(e.g. sandcake)*
Sponge flan base Flan-base cake tin
Delicate fruit flan, sponge Springform/ring tin
Sponge base, 2 eggs Flan-base cake tin
Sponge flan, 6 eggs Dark springform cake tin
Shortcrust pastry base with crust Dark springform cake tin
Fruit tart/cheesecake with
pastry base*
Swiss flan** Dark springform cake tin
Ring cake Ring cake tin
Pizza, thin base, light topping** Round pizza tray
Savoury cakes** Dark springform cake tin
Nut cake Dark springform cake tin
Yeast dough with dry topping Round pizza tray
Ring tin/cake tin
Dark springform cake tin
150 -17 0 - 70-90
16 0 -18 0 - 30-40
170 -18 0 100 35-45
16 0 -170 - 20-25
170 -18 0 - 35-45
170 -19 0 - 30-40
170 -19 0 100 35-45
190-200 - 45-55
170 -18 0 40-50
220-230 - 15-25
200-220 - 50-60
170 -18 0 100 35-45
16 0 -18 0 - 50-60
* Allow cake to cool in the oven for approx. 20 minutes ** The food should be placed in the turntable

22 electrolux.com.au 23
COOKING GUIDE (CONTINUED)
Baking in tins Accessories Type of
heating
Yeast dough with moist topping Round pizza tray
Plaited loaf with 500 g flour Round pizza tray
Stollen with 500 g flour Round pizza tray
Strudel, sweet Round pizza tray
* Allow cake to cool in the oven for approx. 20 minutes
Small baked items Accessories Type of
Biscuits Round pizza tray
Macaroons Round pizza tray
Meringue Round pizza tray
Muffins Muffin tray on wire rack
Choux pastry Round pizza tray
Puff pastry Round pizza tray
Leavened cake Round pizza tray
Bread and bread rolls Accessories Ty p e o f
Sourdough bread with 1 .2 kg flour Round pizza tray
Flatbread Round pizza tray
Bread rolls Round pizza tray
Rolls made with sweet yeast dough Muffin tray on wire rack
Temperature °CMicrowave
power in
watts
170 -19 0 - 55-65
170 -19 0 - 35-45
16 0-18 0 - 60-70
190-210 100 35-45
Temperature
heating
heating
°C
150 -170 25-35
110 -13 0 35-45
100 80-100
16 0-18 0 35-40
200-220 35-45
190-200 35-45
200-220 25-35
Temperature
°C
150 -170 25-35
110 -13 0 35-45
100 80-100
16 0-18 0 35-40
Cooking
time
in minutes
Cooking time
in minutes
Cooking time
in minutes
BAKING TIPS
You want to bake according to your
own recipe.
Use baking tins made of silicone,
glass, plastic or ceramic materials.
How to establish whether sponge
cake is baked through.
The cake collapses. Use less liquid next time or set the oven temperature 10 degrees lower and
The cake has risen in the middle but
is lower around the edge.
The cake is too dark. Select a lower temperature and bake the cake for a little longer.
Use similar items in the baking tables as a guide.
The baking tin must be heat-resistant up to 250 °C. Cakes in these baking tins
will be less brown. When using the microwave, the cooking time will be shorter
than the time shown in the table.
Approximately 10 minutes before the end of the baking time specified in the
recipe, poke the cake with a cocktail stick at its highest point. If the cocktail stick
comes out clean, the cake is ready.
extend the baking time. Observe the specified mixing times in the recipe.
Only grease the base of the springform cake tin. After baking, loosen the cake
carefully with a knife.
The cake is too dry. When it is done, make small holes in the cake using a toothpick. Then drizzle fruit
juice or an alcoholic beverage over it. Next time, select a temperature 10 degrees
higher and reduce the baking time.
The bread or cake (e.g. cheesecake)
looks good, but is soggy on the
inside (sticky, streaked with water).
The cake cannot be turned out of
the dish when it is turned upside
down.
You have measured the temperature
of the oven using your own meat
thermometer and found there is a
discrepancy.
Sparks are generated between the
tin and the wire rack.
Use slightly less fluid next time and bake for slightly longer at a lower temperature.
When baking cakes with a moist topping, bake the base first, cover with almonds
or bread crumbs and then add the topping. Please follow the recipe and follow
the baking times.
After baking, allow the cake to cool for a further 5 to 10 minutes, then it will be
easier to turn out of the tin. If it still sticks, carefully loosen the cake around the
edges using a knife. Turn the cake tin upside down again and cover it several
times with a cold, wet cloth. Next time, grease the tin well and sprinkle some
bread crumbs into it.
The oven temperature is measured by the manufacturer after a specified period
of time using a test rack in the centre of the cooking compartment. Ovenware
and accessories affect the temperature measurement, so there will always be
some discrepancy when you measure the temperature yourself.
Check that the tin is clean on the outside. Change the position of the tin in the
cooking compartment. If this does not help, continue baking but without the
microwave. The baking time will then be longer.
ROASTING AND GRILLING
About the tables
The temperature and roasting time depend on the
type and amount of food being cooked. This is why
temperature ranges are given in the tables. Begin with the
lower temperature and, if necessary, use a higher setting
the next time,
For more information, see the section entitled Tips for
grilling and roasting which follows the tables.
Ovenware
You may use any heat resistant ovenware which is suitable
for use in a microwave. Metal roasting dishes are not
suitable for roasting with microwaves.
The ovenware can become very hot. Use oven gloves to
take the ovenware out of the oven.
Place hot glass ovenware on a dry kitchen towel after they
have been removed from the oven. The glass could crack
if placed on a cold or wet surface.
Tips for roasting
• Use a deep roasting dish for roasting meat
and poultry.
• Check that your ovenware fits in the cooking
compartment. It should not be too big.
• Meat: Cover approx. two thirds of the ovenware base
with liquid. Add slightly more liquid for pot roasts.
Turn pieces of meat halfway through the cooking
time. When the roast is ready, turn off the oven and
allow it to rest for an additional 10 minutes. This
allows better distribution of the meat juices.
2
• Poultry: Turn the pieces of meat after
cooking time has elapsed.
Tips for grilling
• Always keep the oven door closed when grilling and
do not preheat.
• As far as possible, the pieces of food you are grilling
should be of equal thickness. Steaks should be at
least 2 to 3 cm thick. This will allow them to brown
evenly and remain succulent and juicy. Do not add
salt to steaks until they have been grilled.
• Use tongs to turn the pieces of food you are grilling. If
you pierce the meat with a fork, the juices will run out
and it will become dry.
• Dark meat, e.g. beef, browns more quickly than
lighter coloured meat such as veal or pork. When
grilling light-coloured meat or fish, these often only
brown slightly on the surface, although they are
cooked and juicy on the inside.
• The grill element switches off and on again
automatically. This is normal. The grill setting
determines how frequently this will happen.
/3 of the

24 electrolux.com.au 25
COOKING GUIDE (CONTINUED)
Beef
1
• Turn pot-roasted beef after
/3 and 2/3 of the cooking
time. Finally, allow to stand for approx. a further 10
minutes.
• Turn tenderloins and sirloins halfway through the
cooking time. Finally, allow to stand for approx. a
further 10 minutes.
2
• Turn steaks after
/3 of the cooking time.
Beef Accessories Typ e of
heating
Pot-roasted beef, approx. 1 kg Ovenware with lid
Fillet of beef, medium, approx.
Ovenware without lid
1 kg*
Sirloin, medium, approx. 1 kg* Ovenware without lid
Steak, medium, 3 cm thick** Higher wire rack
* Lower wire rack ** Higher wire rack
Veal
• Turn joints and knuckle of veal halfway through the
cooking time. Finally, allow to stand for approx. a
further 10 minutes.
Veal Accessories Ty p e o f
heating
Joint of veal, approx. 1 kg* Ovenware with lid
Knuckle of veal, approx. 1.5 kg* Ovenware with lid
*Lower wire rack
Temperature
°C, grill
setting
Microwave
power in
watts
Cooking
time
in minutes
180-200 - 120 -143
180-200 10 0 30-40
210-230 10 0 30-40
3 - each side:
10 -15
Temperature °CMicrowave
power in
watts
Cooking
time
in minutes
180-200 - 110 -13 0
200-220 - 120 -130
Pork
• Turn lean joints of pork and rindless joints halfway
through the cooking time. Finally, allow to stand for
approx. a further 10 minutes.
• Place the joint in the ovenware rind-side up. Score
the rind. Do not turn the joint. Finally, allow to stand
for approx. a further 10 minutes.
Pork Accessories Ty p e o f
heating
Joint without rind, (e.g. neck),
Ovenware with lid
approx. 750 g*
Joint with rind (e.g. shoulder)
Ovenware without lid
approx. 1.5 kg*
Fillet of pork, approx. 500 g* Ovenware with lid
Joint of pork, lean, approx. 1 kg* Ovenware with lid
Smoked pork on the bone,
Ovenware without lid - - 300 45-50
approx. 1 kg*
Neck of pork, 2 cm thick**
* Lower wire rack ** Higher wire rack
Lamb
• Turn the leg of lamb halfway through the cooking
time.
Lamb Accessories Type of
heating
Saddle of lamb on the bone,
Ovenware without lid
approx. 1 kg*
Leg of lamb, boned, medium,
Ovenware with lid
approx. 1.5 kg*
Temperature
°C, grill
setting
Microwave
power in
watts
Cooking time
in minutes
220-230 100 40-50
190-210 - 130 -15 0
220-230 100 25-30
210-230 10 0 60-80
3 - 1st side:
approx. 15-20
2nd side:
approx. 10-15
Temperature °CMicrowave
power in
watts
Cooking
time
in minutes
210-230 - 40-50
190-210 - 90-95
* Lower wire rack
Miscellaneous
• Finally, allow the meat loaf to stand for approx.
a further 10 minutes.
• Turn the sausages after
2
/3 of the cooking time.
Miscellaneous Accessories Ty p e o f
heating
Meat loaf, approx. 1 kg* Ovenware without lid
4 to 6 sausages for grilling
-
approx. 150 g each**
* Lower wire rack ** Higher wire rack
Temperature
°C, grill
setting
180-200 700 W +
Microwave
power in
watts
Cooking
time
in minutes
-
100 W
3 - each side:
10 -15

26 electrolux.com.au 27
COOKING GUIDE (CONTINUED)
Poultry
• Place whole chickens and chicken breasts breastside down. Turn after
• Place poulard breast-side down. Turn after 30
minutes and set the microwave power to 180 watts.
• Place half chickens and chicken portions skin-side
up. Do not turn.
• Turn the duck and goose breast skin-side up.
Do not turn.
• Turn goose thighs halfway through the cooking time.
Prick the skin.
• Place turkey breast and thighs skin-side down. Turn
Poultry Accessories Type of
Chicken, whole, approx. 1.2 kg* Ovenware with lid
Poulard, whole, approx. 1.6 kg* Ovenware with lid
Chicken, halves, 500 g each* Ovenware without lid
Chicken portions, approx. 800 g* Ovenware without lid
Chicken breast with skin and
bones, 2 pieces, approx. 350450 g*
Duck breast with skin, 2 pieces,
300-400 g each**
Goose breast, 2 pieces, 500 g
each*
Goose legs, 4 pieces, approx.
1.5 kg *
Turkey breast, approx. 1 kg* Ovenware with lid
Turkey drumsticks, approx. 1.3
kg*
* Lower wire rack ** Higher wire rack
Fish
• For grilling, place the whole fish, e.g. trout, onto the
2
/3 of the cooking time.
after
middle of the higher wire rack.
2
/3 of the cooking time.
Ovenware without lid
Ovenware without lid
Ovenware without lid
Ovenware without lid
Ovenware with lid
heating
Temperature
°C, grill
setting
220-230 300 35-45
220-230 300
180-200 300 30-35
210-230 300 20-30
190-210 100 30-40
3 100 20-30
210-230 10 0 25-30
210-230 10 0 30-40
200-220 - 90-100
200-220 100 50-60
Microwave
power in
watts
100
Cooking time
in minutes
30
20-30
TIPS FOR ROASTING AND GRILLING
The table does not contain
information for the weight of the
joint.
How to tell when the roast is ready. Use a meat thermometer (available from specialist shops) or carry out a “spoon
The roast looks good but the juices
are burnt.
The roast looks good but the juices
are too clear and watery.
The roast is not well-done enough. Carve the roast. Prepare the gravy in the roasting dish and place the slices of
For small roasts, select a higher temperature and a shorter cooking time. For
larger roasts, select a lower temperature and a longer cooking time.
test”. Press down on the roast with a spoon. If it feels firm, it is ready. If the spoon
can be pressed in, it needs to be cooked for a little longer.
Next time, use a smaller roasting dish or add more liquid.
Next time, use a larger roasting dish and add less liquid.
roast meat in the gravy. Finish cooking the meat using the microwave only.
BAKES, GRATINS, TOAST WITH
TOPPINGS
• The values in the table apply to food placed in a
cold oven.
• For bakes, potato gratins and lasagne, use a
microwaveable, heat-resistant ovenproof dish 4 to
5cm deep
• Place the bake on the lower wire rack.
• Leave bakes and gratins to cook in the oven for a
further 5 minutes after switching off.
• Cheese on toast: Pretoast slices of bread.
Bakes, gratins, toasts Accessories Ty p e o f
heating
Bake, sweet, approx. 1.5 kg* Ovenware without lid
Savoury bake, made with cooked
ingredients, approx. 1 kg*
Lasagne, fresh* Ovenware without lid
Potato gratin made from raw
ingredients, approx. 1.1 kg*
Toast with topping, 4 slices** -
* Lower wire rack ** Higher wire rack
Ovenware without lid
Ovenware without lid
Temperature
°C, grill
setting
140 -16 0 300 25-35
150 -16 0 700 20-25
200-220 300 25-35
180-200 700 25-30
3 - 8-10
Microwave
power in
watts
Cooking time
in minutes
• Grease the wire rack with oil beforehand.
Fish Accessories Ty p e o f
heating
Fish steak, e.g. salmon, 3 cm thick, grilled Higher wire rack
Whole fish, 23 pieces, 300 g each, grilled Higher wire rack
Grill setting Cooking time
in minutes
3 20-25
3 20-30

28 electrolux.com.au 29
COOKING GUIDE (CONTINUED)
CONVENIENCE PRODUCTS, FROZEN
• Observe the instructions on the packaging.
• The values in the table apply to food placed in a
cold oven.
• Do not lay chips, croquettes or potato röstis on top of
each other. Turn half way through the cooking time.
• Place the food directly on the turntable.
Convenience products Accessories Ty pe o f
Pizza with thin base* Turntable
Pizza with deep-pan base Turntable
Mini pizza* Turntable
Pizza baguette* Turntable
Chips Turntable
Croquettes* Turntable
Rösti, stuffed potato pockets Turntable
Part-cooked rolls or baguette Lower wire rack
Fish fingers Turntable
Chicken goujons, nuggets Turntable
Lasagne, approx. 400 g** Lower wire rack
* Preheat the cooking compartment for 5 minutes.
** Place the food in suitable, heat-resistant ovenware.
heating
Temperature °CMicrowave
power in
watts
220-230 - 10 -15
220-230
220-230 - 10 -15
220-230
220-230 - 8-13
210-230 - 13-18
200-220 - 25-30
170 -18 0 - 13-18
210-230 - 10-20
200-220 - 15-20
220-230 700 12-17
700
-
700
-
Cooking time
in minutes
3
13 -18
2
13 -18
CARE AND CLEANING
With careful care and cleaning your microwave oven will
retain its looks and remain in good order. We will explain
here how you should care for and clean your appliance
correctly.
WARNING
Risk of electric shock!
Penetrating moisture may cause an electric shock. Do not
use any high-pressure cleaners or steam cleaners.
WARNING
Risk of burns!
Never clean the appliance immediately after switching off.
Let the appliance cool down.
WARNING
Risk of serious damage to health!
Microwave energy may escape if the cooking
compartment door or the door seal is damaged. Never
use the appliance if the cooking compartment door or the
door seal is damaged. Contact the after-sales service.
NOTE:
• Slight differences in colour on the front of the
appliance are caused by the use of different
materials, such as glass, plastic and metal.
• Shadows on the door panel which look like streaks ,
are caused by reflections made by the oven light.
• Unpleasant odours, e.g. after fish has been prepared,
can be removed very easily. Add a few drops of
lemon juice to a cup of water. Place a spoon into the
container as well, to prevent delayed boiling. Heat
the water for 1 to 2 minutes at maximum microwave
power.
Cleaning agents
To ensure that the different surfaces are not damaged by
using the wrong cleaning agent, observe the information in
the table. Do not use
• sharp or abrasive cleaning agents,
• metal or glass scrapers to clean the glass in the
appliance door.
• metal or glass scrapers to clean the door seal,
• hard scouring pads and sponges ,
• cleaning agents with high concentrations of alcohol.
Wash new sponge cloths thoroughly before use.
Allow all surfaces to dry thoroughly before using the
appliance again.
Area Cleaning agents
Appliance front Hot soapy water:
Clean with a dish cloth and
dry with a soft cloth. Do not
use glass cleaners or metal or
glass scrapers for cleaning.
Appliance front with
stainless steel
Cooking compartment Hot soapy water or a vinegar
Recess in cooking
compartment
Wire racks Hot soapy water:
Door panels Glass cleaner:
Seal Hot soapy water:
Hot soapy water :
Clean with a dish cloth and
dry with a soft cloth. Remove
flecks of limescale, grease ,
starch and albumin (e.g. egg
white) immediately. Corrosion
can form under such residues.
Special stainless steel cleaning
agents can be obtained from
the after-sales service or from
specialist shops. Do not use
glass cleaners or metal or
glass scrapers for cleaning.
solution:
Clean with a dish cloth and
dry with a soft cloth.
If the oven is very dirty: Do
not use oven spray or other
aggressive oven cleaners or
abrasive materials. Scouring
pads , rough sponges
and pan cleaners are also
unsuitable. These items
scratch the surface. Allow
the interior surfaces to dry
thoroughly .
Damp cloth:
Ensure that no water seeps
through the turntable drive into
the appliance interior.
Clean using stainless steel
cleaning agent or in the
dishwasher.
Clean with a dish cloth. Do not
use a glass scraper.
Clean with a dish cloth, do not
scour. Do not use a metal or
glass scraper for cleaning.

30 electrolux.com.au 31
TECHNICAL DATA TROUBLESHOOTING
Rated Voltage 230-240V ~50Hz
Maximum Power 3350W
Rated Output Power
(Microwave)
Rated Current 15 A
Oven Capacity 44L
Turntable Diameter Ø 360mm
External Dimensions
Without handle
Net Weight Approx. 36kg
900W
595(W) x 568(D) x 458(H) mm
WARNING
Risk of electric shock!
Incorrect repairs are dangerous. Repairs may only be
carried out by one of our trained after-sales engineers.
Problem Possible cause Remedy/information
The appliance does not work. Faulty circuit breaker. Look in the fuse box and check that
the circuit breaker for the appliance is in
working order.
Isolation switch is off Switch on the isolation switch
Power cut Check whether the kitchen light works.
The appliance does not work.
appears in the display panel.
0:00 is in the display panel. Power cut Reset the clock.
The microwave does not switch on. Door not fully closed. Check whether food residue or debris is
It takes longer than before for the
food to heat up in the microwave
Childproof lock is active. Deactivate the childproof lock (see
section: Childproof lock).
trapped in the door.
The selected microwave power level
is too low.
A larger amount than usual has been
placed in the appliance.
The food was colder than usual. Stir or turn the food during cooking.
Select a higher power level.
Double the amount = almost double the
cooking time.
Turntable grates or grinds. Dirt or debris in the area around the
turntable drive.
A particular operating mode or
power level cannot be set.
E 1 appears in the display panel. The thermal safety switch-off function
E 4 appears in the display panel. The thermal safety switch-off function
E 11 appears in the display panel. Moisture in the control panel. Allow the control panel to dry.
E 17 appears in the display panel. Rapid heating has failed. Call the after-sales service.
The temperature, power level or
combined setting is not possible for
this operating mode.
has been activated.
has been activated.
Clean the rollers under the turntable and
the recess in the oven floor thoroughly.
Choose permitted settings.
Call the after-sales service.
Call the after-sales service.

32 electrolux.com.au 33
ENERGY AND ENVIRONMENT TIPS
Here you can find tips on how to save energy when
baking and roasting and how to dispose of your appliance
properly.
Saving energy
• Only preheat the oven if this is specified in the recipe
or in the operating instruction tables.
• Use dark, black lacquered or enamelled baking tins.
They absorb the heat particularly well.
• Open the oven door as infrequently as possible while
you are cooking, baking or roasting.
• It is best to bake several cakes one after the other.
The oven is still warm. This reduces the baking time
for the second cake. You can also place two loaf tins
next to each other.
• For longer cooking times, you can switch the oven off
10 minutes before the end of the cooking time and
use the residual heat to finish cooking.
Environmentally-friendly disposal
Dispose of packaging
in an environmentallyfriendly manner.
INSTALLATION
INSTALLATION FOR COMPACT OVEN
Ventilation openings
behind, min. 250cm
min
100
Back
panels
open
2
600
560
560
+8
466
+8
Flush fit top view
infill panel
350mm max. length
20mm
Cupboard
door
Infill panels are recessed 20mm from the external
cabinet door to accommodate flush fit
600mm
552
458
448
Cupboard
door
20
Min 3.5mm
ventilation gap
below trim
6mm packer
Please note packer must be
set back 20mm from front trim
to avoid obstruction of front
vent. Packer must be secured
to base of cabinet.
mi n 100
min.
570
568
Ventilation area in the base min. 250cm
Building in
• Do not hold or carry the appliance by the door
handle. The door handle cannot hold the weight of
the appliance and may break off.
1. Carefully push the microwave into the box,
making sure that it is in the centre.
2. Open the door and fasten the microwave with
the screws that were supplied.
• Fully insert the appliance and centre it.
• Do not kink the connecting cable.
• Screw the appliance into place.
Ventilation grid
595
Cupboard feet
2
IMPORTANT
Electrical connection
This appliance is supplied with a 15A power cord without
plug. It must be installed by a suitably qualified electrician
in compliance with local regulations and wiring rules. An
accessible all pole isolation switch with contact gap of at
least 3mm must be supplied in installation wiring.
• The gap between the worktop and the appliance
must not be closed by additional battens.

34 electrolux.com.au
INSTALLATION (CONTINUED)
Warranty
35
FOR SALES IN AUSTRALIA AND NEW ZEALAND
APPLIANCE: ELECTROLUX BUILT-IN CONVECTION MICROWAVE
AND BUILT-IN WARMING DRAWER
INSTALLATION FOR COMBINED COMPACT OVEN & WARMING DRAWER
Ventilation openings
behind, min. 250cm
min.
550
min
100
Back
panels
open
+4
590
600
min.
570
Building in
WARNING
The microwave oven is only compatible with
certain Electrolux warming drawers (e.g.
EWD1402DSD), do not install with a warming
drawer that is not approved by Electrolux.
When building in with a compatible Electrolux warming
drawer, please refer to the instructions supplied for the
warming drawer for installation requirements.
The microwave oven can sit directly on top of the warming
drawer (it does not need a separate base), then follow the
installation requirements on the previous page for installing
the microwave oven.
2
560
600
560
+8
Flush fit top view
infill panel
350mm max. length
+8
Cupboard
door
Infill panels are recessed 20mm from the external
cabinet door to accommodate flush fit
20mm
600mm
Cupboard
door
Ventilation grid
595
Ventilation area in the base min. 250cm
2
Cupboard feet
IMPORTANT
Electrical connection
Refer to the instructions supplied with the warming
drawer for electrical installation requirements of the
warming drawer.
For electrical installation requirements of the
microwave oven please refer to the previous page.
mi n 100
This document sets out the terms and conditions of the product
warranties for Electrolux Appliances. It is an important document.
Please keep it with your proof of purchase documents in a safe
place for future reference should there be a manufacturing defect
in your Appliance. This warranty is in addition to other rights you
may have under the Australian Consumer Law.
1. In this warranty:
(a) ‘ACL’ or ‘Australian Consumer Law’ means Schedule 2 to the
Competition and Consumer Act 2010;
(b) ‘Appliance’ means any Electrolux product purchased by you and
accompanied by this document;
(c) ‘ASC’ means Electrolux’s authorised serviced centres;
(d) ‘Westinghouse ’ is the brand controlled by Electrolux Home Products
Pty Ltd of 163 O’Riordan Street, Mascot NSW 2020, ABN 51 004
762 341 in respect of Appliances purchased in Australia and Electrolux
(NZ) Limited (collectively “Electrolux”) of 3-5 Niall Burgess Road, Mount
Wellington, in respect of Appliances purchased in New Zealand;
(e) ‘WarrantyPeriod’meanstheperiodspeciedinclause3ofthis
warranty;
(f) ‘you’ means the purchaser of the Appliance not having purchased
the Appliance for re-sale, and ‘your’ has a corresponding meaning.
2. Application: This warranty only applies to new Appliances, purchased
and used in Australia or New Zealand and is in addition to (and does not
exclude, restrict, or modify in any way) other rights and remedies under
a law to which the Appliances or services relate, including any nonexcludable statutory guarantees in Australia and New Zealand.
3. Warranty Period: Subject to these terms and conditions, this warranty
continues for in Australia for a period of 24 months and in New Zealand
for a period of 24 months, following the date of original purchase of the
Appliance.
4. Repair or replace warranty: Repair or replace warranty: During the
Warranty Period, Electrolux or its ASC will, at no extra charge if your
Appliance is readily accessible for service, without special equipment
and subject to these terms and conditions, repair or replace any parts
which it considers to be defective. Electrolux or its ASC may use
refurbished parts to repair your Appliance. You agree that any replaced
Appliances or parts become the property of Electrolux
5. Travel and transportation costs: Subject to clause 7, Electrolux will
bear the reasonable cost of transportation, travel and delivery of the
Appliance to and from Electrolux or its ASC. Travel and transportation
will be arranged by Electrolux as part of any valid warranty claim.
6. Proof of purchase is required before you can make a claim under this
warranty.
7. Exclusions: You may not make a claim under this warranty unless
the defect claimed is due to faulty or defective parts or workmanship.
This warranty does not cover:
(a) lightglobes,batteries,ltersorsimilarperishableparts;
(b) parts and Appliances not supplied by Electrolux;
(c) cosmeticdamagewhichdoesnotaecttheoperationofthe
Appliance;
(d) damage to the Appliance caused by:
(i) negligence or accident;
Important Notice
Before calling for service, please ensure that the steps listed in clause 8 above have been followed.
ortondtheaddressofyournearest
FOR SERVICE
authorised service centre in Australia
PLEASE CALL 13 13 49
For the cost of a local call (Australia only)
FOR SERVICE
ortondtheaddressofyournearest
authorised service centre in New Zealand
PLEASE CALL 0800 10 66 10
(New Zealand only)
EMW_WD_24m_War_Oct18
ELECTROLUX HOME PRODUCTS
163 O’Riordan Street, Mascot NSW 2020
3-5 Niall Burgess Road, Mount Wellington
AUSTRALIA
electrolux.com.au
NEW ZEALAND
ELECTROLUX (NZ) Limited
electrolux.co.nz
(ii) misuse or abuse, including failure to properly maintain or service;
(iii) improper, negligent or faulty servicing or repair works done by
anyone other than an Electrolux authorised repairer or ASC;
(iv) normal wear and tear;
(v) power surges, electrical storm damage or incorrect power supply;
(vi) incomplete or improper installation;
(vii) incorrect, improper or inappropriate operation;
(viii) insect or vermin infestation;
(ix) failure to comply with any additional instructions supplied with
the Appliance;
In addition, Electrolux is not liable under this warranty if:
(a) the Appliance has been, or Electrolux reasonably believes that the
Appliance has been, used for purposes other than those for which
the Appliance was intended, including where the Appliance has
been used for any non-domestic purpose;
(b) theApplianceismodiedwithoutauthorityfromElectroluxinwriting;
(c) the Appliance’s serial number or warranty seal has been removed
or defaced.
8. How to claim under this warranty: To enquire about claiming under
this warranty, please follow these steps:
(a) carefully check the operating instructions, user manual and the
terms of this warranty;
(b) have the model and serial number of the Appliance available;
(c) have the proof of purchase (e.g. an invoice) available;
(d) telephone the numbers shown below.
9. Australia: For Appliances and services provided by Electrolux in
Australia: Electrolux goods come with guarantees that cannot be
excluded under the Australian Consumer Law. You are entitled to a
replacement or refund for a major failure and for compensation for any
other reasonably foreseeable loss or damage. You are also entitled to
have the Appliance repaired or replaced if the Appliance fails to be of
acceptable quality and the failure does not amount to a major failure.
‘Acceptable quality’ and ‘major failure’ have the same meaning as
referred to in the ACL.
10. New Zealand: For Appliances and services provided by Electrolux
in New Zealand, the Appliances come with a guarantee by Electrolux
pursuant to the provisions of the Consumer Guarantees Act, the Sale
of Goods Act and the Fair Trading Act. Where the Appliance was
purchased in New Zealand for commercial purposes the Consumer
Guarantee Act does not apply.
11.Condentiality: You accept that if you make a warranty claim, Electrolux
and its agents including ASC may exchange information in relation to
you to enable Electrolux to meet its obligations under this warranty.
You accept that if you make a warranty claim, Electrolux and its
agents including ASC may exchange information in relation to you to
enable Electrolux to meet its obligations under this warranty. For more
information on how we handle your personal information, see our privacy
policy at www.electrolux.com.au/other/privacy/ and www.electrolux.
co.nz/other/privacy/
FOR SPARE PARTS
ortondtheaddressofyournearest
spare parts centre in Australia
PLEASE CALL 13 13 50
For the cost of a local call (Australia only)
FOR SPARE PARTS
ortondtheaddressofyournearest
spare parts centre in New Zealand
PLEASE CALL 0800 10 66 20
(New Zealand only)

Electrolux Home Products Australia
telephone: 1300 363 640
fax: 1800 350 067
email: customercare@electrolux.com.au
web: electrolux.com.au
Electrolux Home Products New Zealand
telephone: 0800 436 245
fax: 0800 225 088
email: customercare@electrolux.co.nz
web: electrolux.co.nz
To add a touch of
professional inspiration
to your home, visit
electrolux.com.au
or electrolux.co.nz
shop.electrolux.com.au
electrolux.com.au
or electrolux.co.nz
© 2018 Electrolux Home Products Pty Ltd.
EMAN_EVEM645DSD_Micro_Dec18
 Loading...