

Page 1

ESF2300OW
ESF2300OH
ESF2300OK
ESF2300OS
CS
MYČKA NÁDOBÍ NÁVOD K POUŽITÍ 2
NL AFWASAUTOMAAT GEBRUIKSAANWIJZING 18
EN DISHWASHER USER MANUAL 34
Page 2

www.electrolux.com2
OBSAH
1. BEZPEČNOSTNÍ INFORMACE......................................................................... 3
2. BEZPEČNOSTNÍ POKYNY................................................................................4
3. POPIS SPOTŘEBIČE.........................................................................................6
4. OVLÁDACÍ PANEL.............................................................................................6
5. PROGRAMY.......................................................................................................7
6. NASTAVENÍ....................................................................................................... 8
7. FUNKCE...........................................................................................................10
8. PŘED PRVNÍM POUŽITÍM...............................................................................10
9. DENNÍ POUŽÍVÁNÍ.......................................................................................... 11
10. TIPY A RADY................................................................................................. 13
11. ČIŠTĚNÍ A ÚDRŽBA...................................................................................... 15
12. ODSTRAŇOVÁNÍ ZÁVAD.............................................................................. 15
13. TECHNICKÉ INFORMACE............................................................................ 17
MYSLÍME NA VÁS
Děkujeme, že jste si zakoupili spotřebič značky Electrolux. Vybrali jste si produkt,
se kterým jsou spjaty desítky let profesionálních zkušeností a inovací. Tento
důmyslný a stylový spotřebič byl navržen s ohledem na jeho uživatele. Kdykoliv
jej proto používáte, můžete se spolehnout, že pokaždé dosáhnete skvělých
výsledků.
Vítá Vás Electrolux.
Navštivte naše stránky ohledně:
Rady ohledně používání, brožury, poradce při potížích, servisních informací:
www.electrolux.com
Registrace vašeho spotřebiče, kterou získáte lepší servis:
www.registerelectrolux.com
Nákupu příslušenství, spotřebního materiálu a originálních náhradních dílů pro
váš spotřebič:
www.electrolux.com/shop
PÉČE O ZÁKAZNÍKY A SERVIS
Doporučujeme používat originální náhradní díly.
Při kontaktu se servisním střediskem se ujistěte, že máte k dispozici následující
údaje: Model, výrobní číslo (PNC), sériové číslo.
Tyto informace jsou uvedeny na typovém štítku.
Upozornění / Důležité bezpečnostní informace
Všeobecné informace a rady
Poznámky k ochraně životního prostředí
Zmĕny vyhrazeny.
Page 3

1. BEZPEČNOSTNÍ INFORMACE
Tento návod si pečlivě přečtěte ještě před instalací
spotřebiče a jeho prvním použitím. Výrobce
nezodpovídá za škody a zranění způsobená nesprávnou
instalací či chybným používáním. Návod k použití vždy
uchovávejte spolu se spotřebičem pro jeho budoucí
použití.
1.1 Všeobecné bezpečnostní informace
• Tento spotřebič je určen pro použití v domácnosti a
pro následující způsoby použití:
– ve farmářských domech, v kuchyňkách pro
zaměstnance v obchodech, kancelářích a jiných
pracovních prostředích;
– pro zákazníky hotelů, motelů, penzionů a jiných
ubytovacích zařízení.
• Neměňte technické parametry tohoto spotřebiče.
• Hodnota provozního tlaku vody (minimální a
maximální) musí být mezi 0.8 (0.08) / 10 (1.0) bar
(MPa).
• Dodržujte maximální počet 6 jídelních souprav.
• Jestliže je poškozený přívodní kabel, smí ho vyměnit
pouze výrobce, autorizované servisní středisko nebo
osoba s podobnou příslušnou kvalifikací, jinak by
mohlo dojít k úrazu.
• Nože a další nástroje s ostrými špičkami vkládejte do
košíčku na příbory špičkou dolů nebo vodorovně.
• Nenechávejte dvířka spotřebiče otevřená bez dozoru,
aby na ně nikdo nespadl.
• Před čištěním nebo údržbou spotřebič vždy vypněte a
vytáhněte síťovou zástrčku ze zásuvky.
• K čištění spotřebiče nepoužívejte proud vody nebo
páru.
• Větrací otvory umístěné vespod spotřebiče (jsou-li
součástí spotřebiče) nesmí být zakryté kobercem.
ČESKY 3
Page 4

www.electrolux.com4
• Spotřebič musí být připojen k vodovodnímu potrubí
pomocí nové dodané soupravy hadic. Neinstalujte již
jednou použitou soupravu hadic znovu.
1.2 Bezpečnost dětí a postižených osob
• Tento spotřebič smí používat děti starší osmi let nebo
osoby se sníženými fyzickými, smyslovými nebo
duševními schopnostmi nebo osoby bez patřičných
zkušeností a znalostí, pouze pokud tak činí pod
dozorem nebo vedením, které zohledňuje bezpečný
provoz spotřebiče, a pokud rozumí rizikům spojeným s
provozem spotřebiče.
• Nenechte děti hrát si se spotřebičem.
• Všechny prací prostředky uschovejte z dosahu dětí.
• Jsou-li dvířka spotřebiče otevřená, nedovolte dětem a
domácím zvířatům, aby se k němu přibližovaly.
• Čištění a uživatelskou údržbu spotřebiče by neměly
provádět děti bez dozoru.
2. BEZPEČNOSTNÍ POKYNY
2.1 Instalace
• Odstraňte veškerý obalový materiál.
• Poškozený spotřebič neinstalujte ani
nepoužívejte.
• Neinstalujte nebo nepoužívejte
spotřebič tam, kde může teplota
klesnout pod 0 °C.
• Řiďte se pokyny k instalaci dodanými
spolu s tímto spotřebičem.
• Ujistěte se, že je spotřebič
namontován pod nebo vedle
bezpečných konstrukcí.
2.2 Připojení k elektrické síti
UPOZORNĚNÍ!
Hrozí nebezpečí požáru
nebo úrazu elektrickým
proudem.
• Spotřebič musí být uzemněn.
• Zkontrolujte, zda údaje o napájení na
typovém štítku souhlasí s parametry
elektrické sítě. Pokud tomu tak není,
obraťte se na kvalifikovaného
elektrikáře.
• Vždy používejte správně instalovanou
síťovou zásuvku s ochranou proti
úrazu elektrickým proudem.
• Nepoužívejte rozbočovací zástrčky
ani prodlužovací kabely.
• Dbejte na to, abyste nepoškodili
napájecí kabel a síťovou zástrčku.
Jestliže potřebujete vyměnit přívodní
kabel, musí výměnu provést námi
autorizované servisní středisko.
• Síťovou zástrčku zapojte do síťové
zásuvky až na konci instalace
spotřebiče. Po instalaci musí zůstat
síťová zástrčka nadále dostupná.
• Neodpojujte spotřebič ze zásuvky
tahem za kabel. Vždy tahejte za
zástrčku.
• Tento spotřebič je v souladu se
směrnicemi EHS.
• Pouze pro Velkou Británii a Irsko.
Spotřebič je vybaven 13A síťovou
zástrčkou. Je-li nutné vyměnit pojistku
v síťové zástrčce, použijte pojistku: 13
amp ASTA (BS 1362).
Page 5

2.3 Vodovodní přípojka
• Dbejte na to, abyste hadice
nepoškodili.
• Před připojením spotřebiče k novým
hadicím nebo k hadicím, které nebyly
dlouho používané, nechte vodu na
několik minut odtéct, dokud nebude
čistá.
• Při prvním použití spotřebiče se
ujistěte, že nedochází k únikům vody.
• Jestliže se přívodní hadice poškodí,
okamžitě vytáhněte síťovou zástrčku
ze zásuvky. Zkontaktujte autorizované
servisní středisko, aby vám přívodní
hadici vyměnilo.
2.4 Použití spotřebiče
• Na otevřená dvířka si nesedejte, ani si
na ně nestoupejte.
• Mycí prostředky pro myčky jsou
nebezpečné. Řiďte se
bezpečnostními pokyny uvedenými na
balení mycího prostředku.
• Nepijte ani si nehrajte s vodou ve
spotřebiči.
• Nádobí ze spotřebiče nevyjímejte,
dokud se nedokončí program. Na
nádobí mohou být zbytky mycího
prostředku.
• Pokud během probíhajícího programu
otevřete dvířka spotřebiče, může dojít
k uvolnění horké páry.
ČESKY 5
• Do spotřebiče, do jeho blízkosti nebo
na spotřebič neumísťujte hořlavé
předměty nebo předměty obsahující
hořlavé látky.
2.5 Obsluha
• Pro opravu spotřebiče kontaktujte
autorizované servisní středisko.
Doporučujeme používat pouze
originální náhradní díly.
• Když budete kontaktovat autorizované
servisní středisko, ujistěte se, že máte
poznamenané následující informace,
které lze nalézt na typovém štítku.
Model:
Výrobní číslo (PNC):
Sériové číslo:
2.6 Likvidace
UPOZORNĚNÍ!
Hrozí nebezpečí úrazu či
udušení.
• Odpojte spotřebič od elektrické sítě.
• Odřízněte a vyhoďte síťový kabel.
• Odstraňte dveřní západku, abyste
zabránili uvěznění dětí a domácích
zvířat ve spotřebiči.
Page 6
8
7 6
1 2 4 53
1 32 4 5 6 7 8 9
www.electrolux.com6
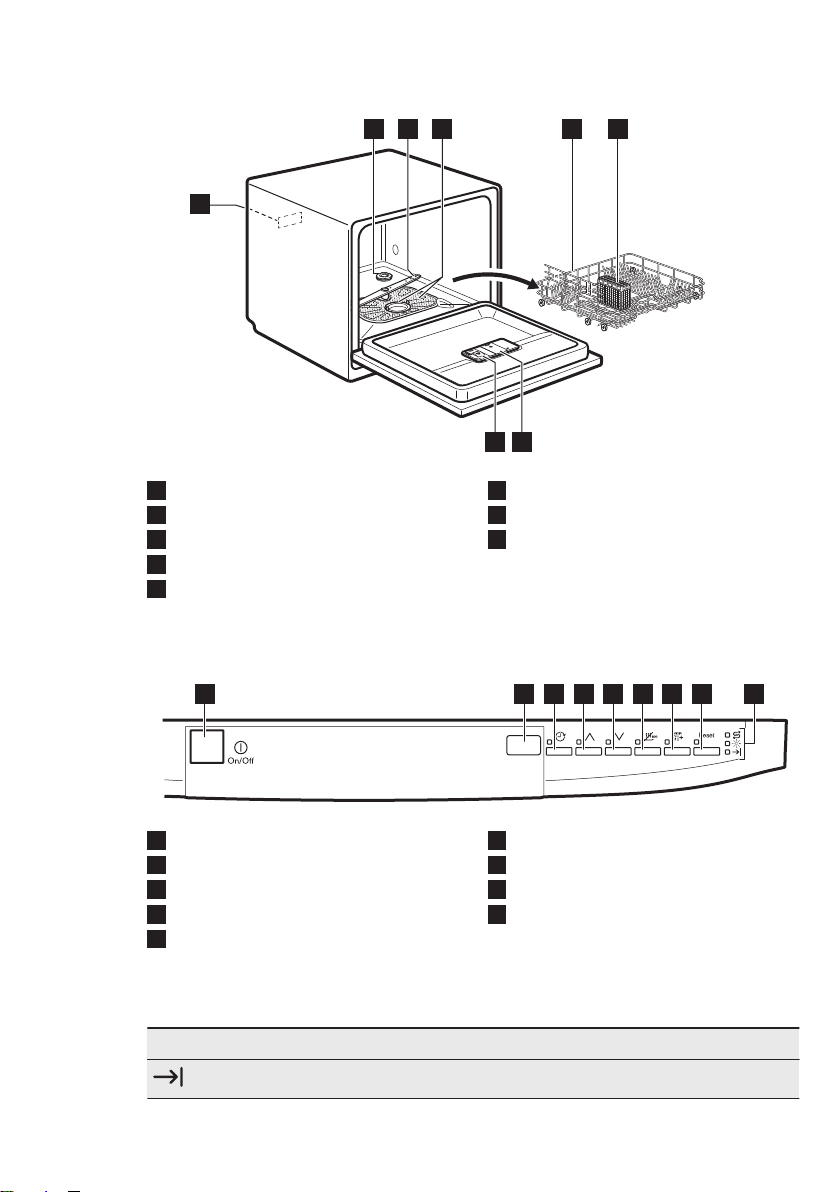
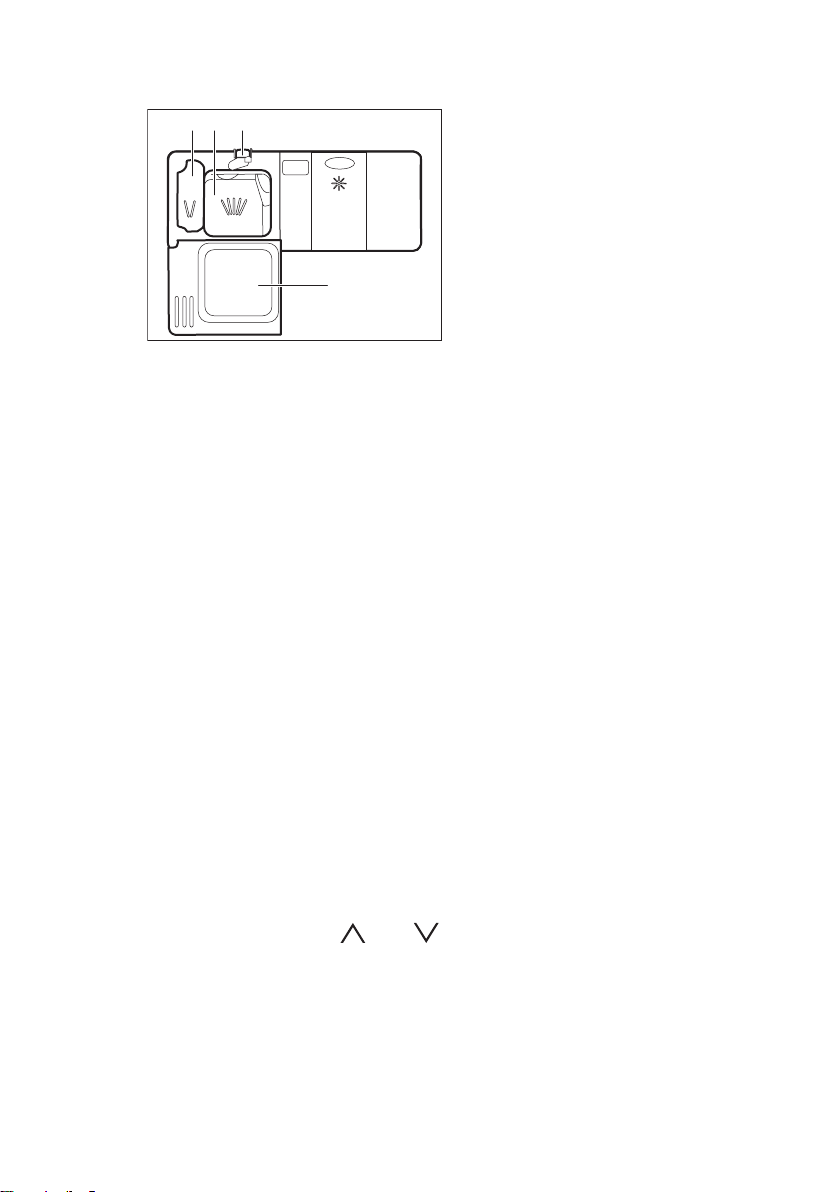
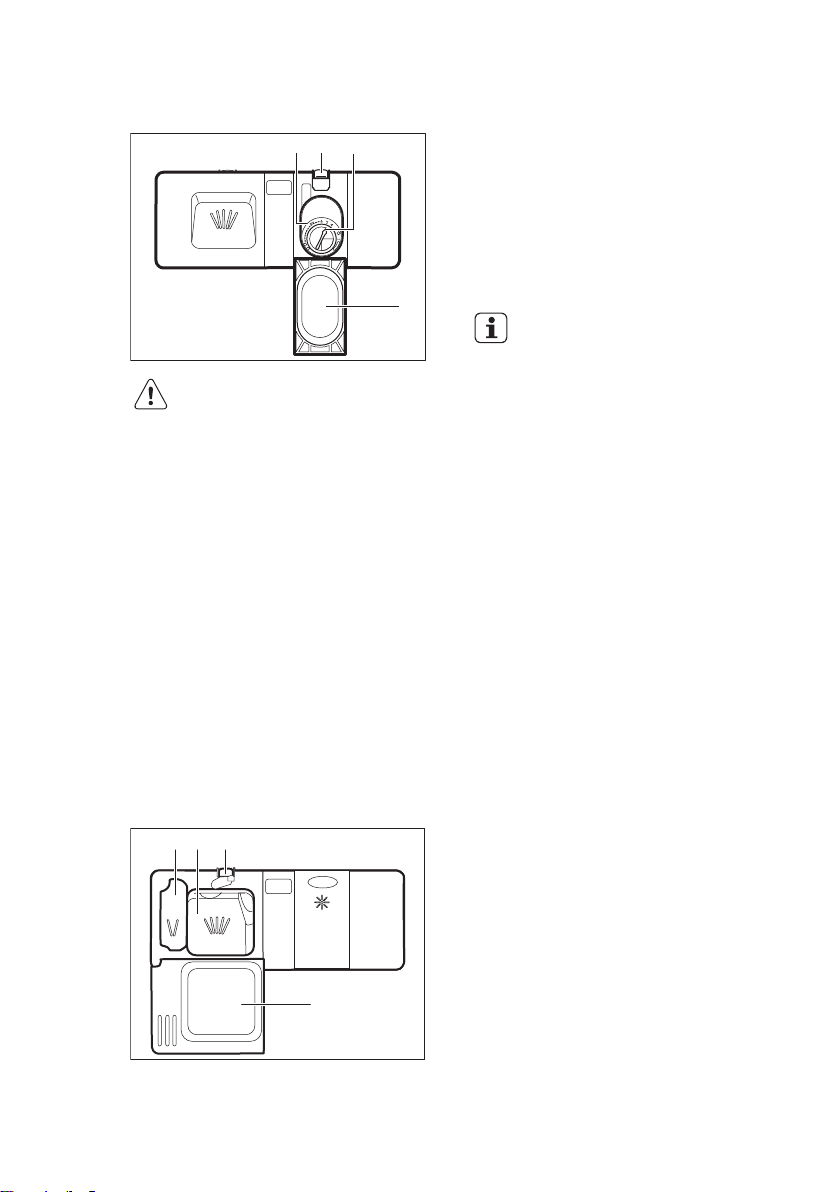
3. POPIS SPOTŘEBIČE
Zásobník na sůl
1
Ostřikovací rameno
2
Filtry
3
Hlavní koš
4
Košíček na příbory
5
Dávkovač leštidla
6
Dávkovač mycího prostředku
7
Typový štítek
8
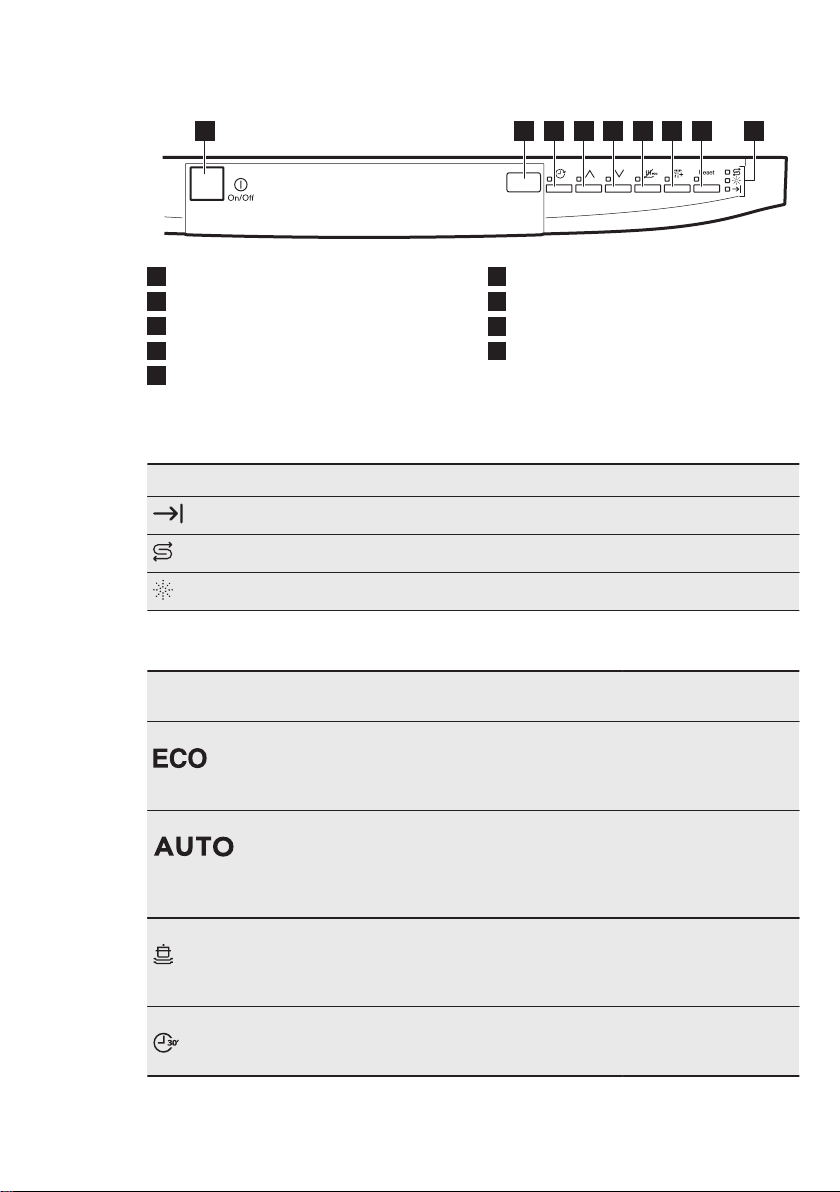
4. OVLÁDACÍ PANEL
Tlačítko Zap/Vyp
1
Displej
2
Tlačítko Delay
3
Tlačítko volby programu (nahoru)
4
Tlačítko volby programu (dolů)
5
4.1 Kontrolky
Kontrolka Popis
Kontrolka konce programu.
Tlačítko EnergySaver
6
Tlačítko Extra oplach
7
Tlačítko Reset
8
Kontrolky
9
Page 7

Kontrolka Popis
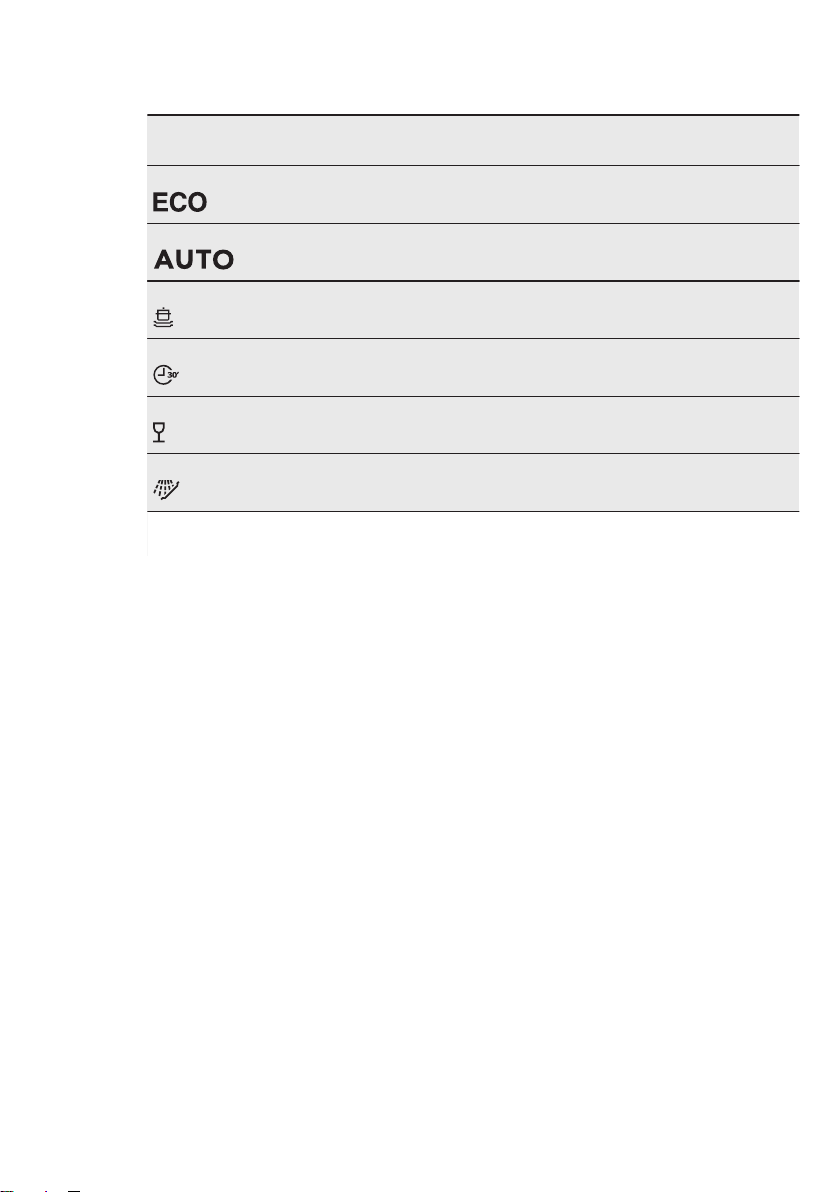
5. PROGRAMY
ČESKY 7
Kontrolka množství soli. Nikdy v průběhu programu nesvítí.
Kontrolka stavu leštidla. Nikdy v průběhu programu nesvítí.
Program Stupeň znečiště‐
Fáze programu Funkce
ní
Druh náplně
P1
P2
1)
• Normálně zaš‐
piněné
• Nádobí a příbo‐
ry
• Vše
• Nádobí, příbo‐
2)
ry, hrnce a
pánve
• Předmytí
• Mytí 55 °C
• Oplachy
• Sušení
• Předmytí
• Mytí od 45 °C do 70
°C
• Oplachy
• EnergySaver
• Extra oplach
• EnergySaver
• Extra oplach
• Sušení
P3 • Velmi zašpi‐
něné
• Nádobí, příbo‐
ry, hrnce a
• Předmytí
• Mytí 70 °C
• Oplachy
• Sušení
• EnergySaver
• Extra oplach
pánve
P5
3)
• Lehce zašpi‐
něné
• Nádobí a příbo‐
• Mytí 50 °C
• Oplachy
• Extra oplach
ry
P4 • Normálně nebo
lehce zašpi‐
• Mytí 40 °C
• Oplachy
• Extra oplach
něné
• Křehké nádobí
a sklo
P6
4)
1)
Tento program nabízí nejúspornější spotřebu vody a energie při mytí normálně zašpině‐
ného nádobí a příborů. (Jedná se o standardní program pro zkušebny.)
2)
Spotřebič zjistí stupeň znečištění a množství nádobí v koši. Automaticky pak nastaví te‐
plotu a množství vody, spotřebu energie a délku programu.
3)
U tohoto programu můžete umýt čerstvě zašpiněné nádobí. Tento program nabízí dobré
výsledky mytí při krátké délce programu.
4)
S tímto programem můžete rychle opláchnout nádobí, aby se zabránilo přilepení zbytků
jídla na nádobí a nepříjemnému zápachu vycházejícímu ze spotřebiče. Pro tento program
nepoužívejte mycí prostředek.
• Vše • Předmytí
Page 8
www.electrolux.com8
5.1 Údaje o spotřebě
Program
P1 7.5 0.64 170
P2 5 - 9 0.5 - 0.8 70 - 110
P3 9 1.0 105
P5 6 0.45 35
P4 6 0.40 30
P6 2 0.10 7
1)
Hodnoty se mohou měnit v závislosti na tlaku a teplotě vody, na kolísání v dodávce prou‐
du, na zvolených funkcích a na množství nádobí.
1)
5.2 Informace pro zkušebny
Pro všechny potřebné informace ohledně
testu výkonnosti zašlete e-mail na:
info.test@dishwasher-production.com
6. NASTAVENÍ
Voda
(l)
Energie
(kWh)
Poznamenejte si výrobní číslo (PNC)
uvedené na typovém štítku.
Délka
(min)
6.1 Režim volby programu a
uživatelský režim
Když se spotřebič nachází v režimu volby
programu, je možné nastavit program a
přejít do uživatelského režimu.
V uživatelském režimu lze změnit
následující nastavení:
• Stupeň změkčovače vody v závislosti
na tvrdosti vody.
• Zapnutí či vypnutí zvukové
signalizace na konci programu.
Tato nastavení se uloží, dokud je opět
nezměníte.
Jak nastavit režim volby programu
Spotřebič se nachází v režimu volby
programu, když se na displeji zobrazí
dvě vodorovné stavové čárky.
Když zapnete spotřebič, obvykle se
přepne do režimu volby programu.
Nicméně pokud se tak nestane, můžete
režim volby programu aktivovat
následujícím způsobem:
Stiskněte a podržte Reset, dokud se
spotřebič nepřepne do režimu volby
programu.
Page 9

6.2 Změkčovač vody
Tvrdost vody
Německé
stupně (°dH)
>24 >40 >4,2 28 5
18 - 24 32 - 40 3,2 - 4,2 22 - 28 4
12 - 18 19 - 32 2,1 - 3,2 13 - 22
4 - 12 7 - 19 0,7 - 2,1 5 - 13 2
<4 <7 <0,7 < 5
1)
Nastavení z výroby.
2)
Při tomto stupni sůl nepoužívejte.
Francouzské
stupně (°fH)
mmol/l Clarkovy
stupně
ČESKY 9
Nastavení změk‐
čovače vody
1)
3
2)
1
Jak nastavit stupeň změkčovače vody
Spotřebič musí být v režimu volby
programu.
1. Do uživatelského režimu přejdete
současným stisknutím a podržením
a , dokud nezačnou blikat
kontrolky , a s prázdným
displejem.
2. Stiskněte
• Kontrolky a zhasnou.
• Kontrolka dále bliká.
• Na displeji se zobrazí aktuální
nastavení: např. = stupeň 5.
3. Opětovným stisknutím změňte
nastavení.
4. Potvrďte nastavení stisknutím tlačítka
Zap/Vyp.
.
6.3 Zvuková signalizace
Zvuková signalizace zazní, když dojde k
poruše spotřebiče. Tyto zvukové signály
nelze vypnout.
Další zvuková signalizace se také spustí
po dokončení programu. Tato zvuková
signalizace je ve výchozím nastavení
vypnutá, ale je možné ji zapnout.
Jak zapnout zvukovou signalizaci na konci programu
Spotřebič musí být v režimu volby
programu.
1. Do uživatelského režimu přejdete
současným stisknutím a podržením
a , dokud nezačnou blikat
kontrolky
displejem.
2. Stiskněte .
• Kontrolky a zhasnou.
• Kontrolka dále bliká.
• Na displeji se zobrazí aktuální
nastavení:
–
– = Zvuková signalizace
3. Stisknutím změňte nastavení.
4. Potvrďte nastavení stisknutím tlačítka
Zap/Vyp.
, a s prázdným
= Zvuková signalizace
zapnuta.
vypnuta.
Page 10
www.electrolux.com10
7. FUNKCE
Před spuštěním programu je
nutné pokaždé navolit
požadované funkce.
Během spuštěného
programu již není možné
funkce vypnout či zapnout.
Ne všechny funkce jsou
vzájemně slučitelné. Pokud
zvolíte neslučitelné funkce,
spotřebič automaticky jednu
nebo více z nich vypne.
Zůstanou svítit pouze
ukazatele těch funkcí, které
jsou stále zapnuty.
7.1 EnergySaver
Tato funkce snižuje teplotu poslední
oplachovací fáze a tím i spotřebu energie
(přibližně o 25 %).
Nádobí může být po dokončení
programu stále vlhké.
Délka programu se zkrátí.
Jak zapnout EnergySaver
Stiskněte , příslušná kontrolka se
rozsvítí.
Pokud tuto funkci nelze s daným
programem použít, příslušná kontrolka
se nerozsvítí nebo bude několik sekund
rychle blikat a poté zhasne.
Na displeji se zobrazí aktualizovaná
délka programu.
7.2 Extra oplach
Tato funkce přidá k mycímu programu
fázi studeného oplachu. Tato funkce
prodlouží délku programu a zvýší
spotřebu vody.
Jak zapnout Extra oplach
Stiskněte Extra oplach, příslušná
kontrolka se rozsvítí.
Pokud lze tuto funkci použít s daným
programem, rozsvítí se příslušná
kontrolka. Na displeji můžete vidět
aktualizaci délky programu.
8. PŘED PRVNÍM POUŽITÍM
1. Ujistěte se, zda aktuální stupeň
změkčovače vody odpovídá
tvrdosti vaší vody. Pokud ne,
nastavte stupeň změkčovače
vody.
2. Naplňte zásobník na sůl.
3. Naplňte dávkovač leštidla.
4. Otevřete vodovodní kohoutek.
5. Spusťte program k odstranění všech
možných zbytků uvnitř spotřebiče.
Nepoužívejte mycí prostředek a
nevkládejte nic do košů.
Při spuštění programu může spotřebiči
trvat až pět minut, než se zregeneruje
pryskyřice ve změkčovači vody. Během
této chvíle spotřebič vypadá, že
nepracuje. Mycí fáze se spustí až po
dokončení této procedury. Tato
procedura se pravidelně opakuje.
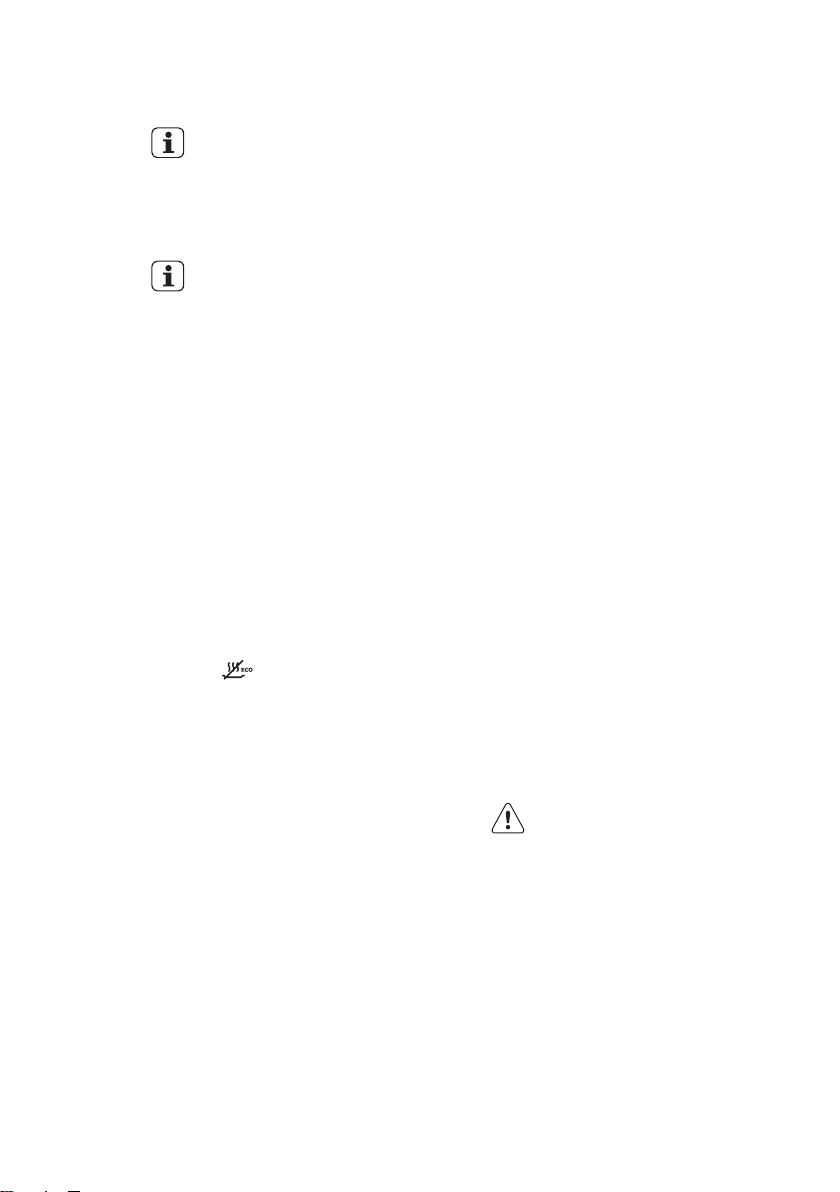
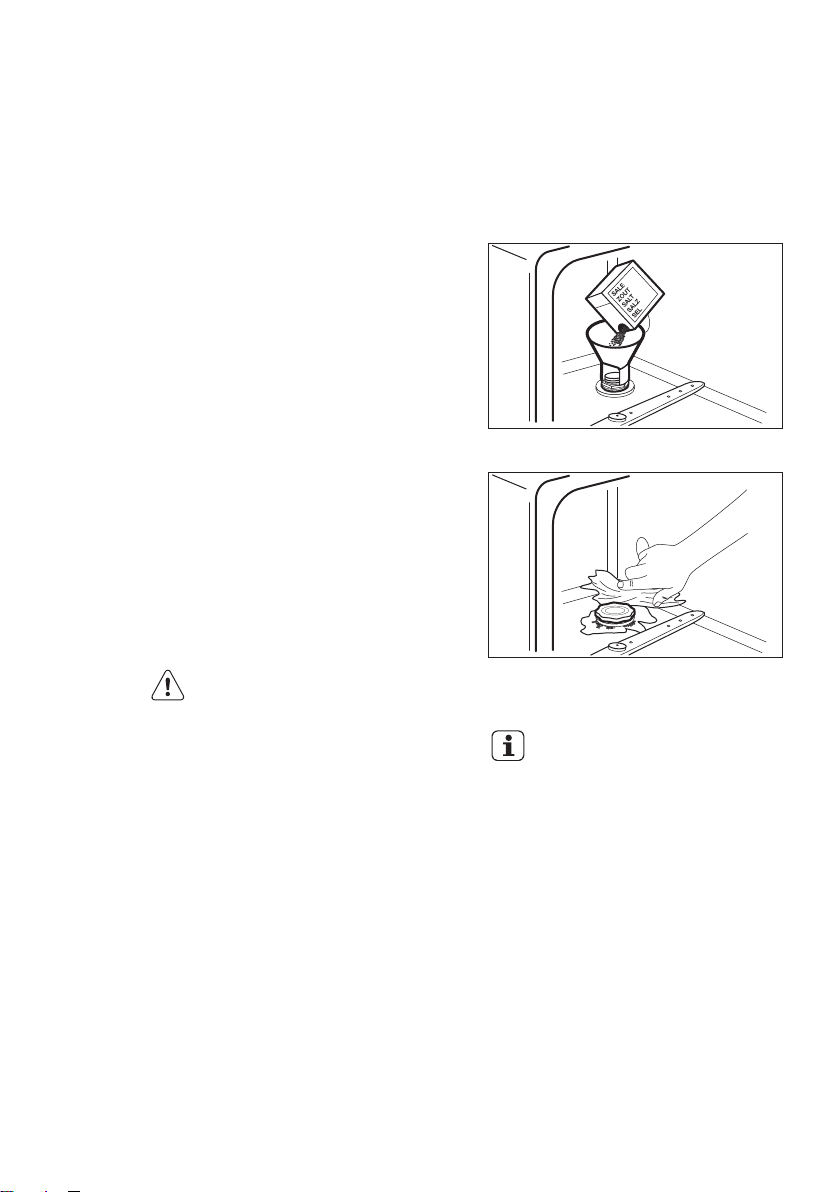
8.1 Zásobník na sůl
POZOR!
Používejte pouze sůl pro
myčky nádobí.
Sůl se používá k regeneraci pryskyřice
ve změkčovači vody a k zajištění dobrých
mycích výsledků při každodenním
používání.
Page 11
A
B
C
D
ČESKY 11
Jak doplnit zásobník na sůl
1. Otočením víčka proti směru
hodinových ručiček otevřete
zásobník na sůl.
2. Do zásobníku na sůl nalijte 1 l vody
(pouze při prvním plnění).
3. Naplňte zásobník na sůl solí do
myčky.
4. Odstraňte sůl, která se vysypala
okolo zásobníku na sůl.
5. Zavřete zásobník na sůl otočením
jeho víčka po směru hodinových
ručiček.
Při plnění může ze
zásobníku na sůl unikat
voda nebo sůl. Nebezpečí
koroze. Po naplnění
zásobníku na sůl jí zabráníte
spuštěním programu.
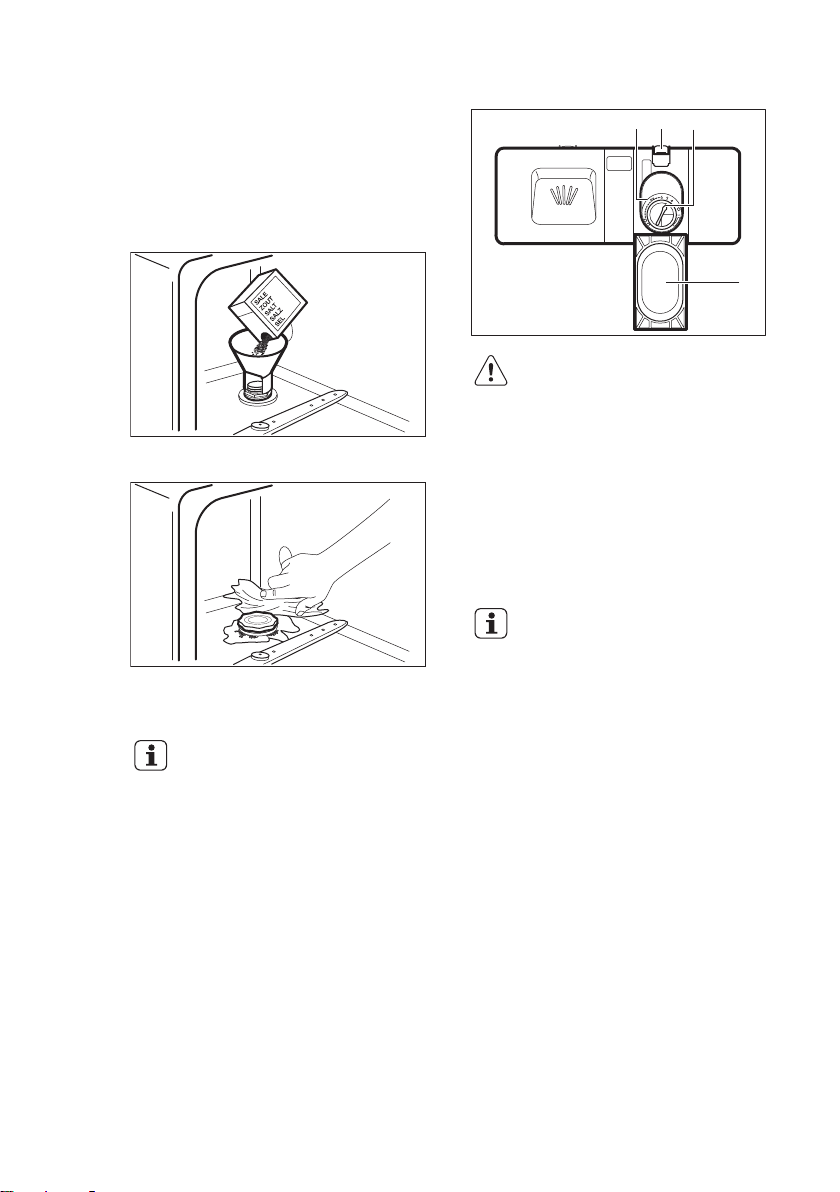
8.2 Jak plnit dávkovač leštidla
POZOR!
Používejte pouze leštidlo pro
myčky nádobí.
1. Stiskněte uvolňovací tlačítko (D) a
otevřete víko (C).
2. Nalijte leštidlo (A), dokud kapalina
nedosáhne hladiny „max“.
3. Rozlité leštidlo setřete savým
hadříkem, aby se netvořilo přílišné
množství pěny.
4. Zavřete víko. Ujistěte se, že se
uvolňovací tlačítko zaklapne zpět.
Voličem můžete nastavit
dávkované množství (B)
jeho otočením do polohy 1
(nejmenší množství) až 6
(největší množství).
9. DENNÍ POUŽÍVÁNÍ
1. Otevřete vodovodní kohoutek.
2. Stisknutím tlačítka Zap/Vyp zapněte
spotřebič.
Zkontrolujte, zda je spotřebič v režimu
volby programu.
• Pokud kontrolka stavu soli svítí,
doplňte zásobník na sůl.
• Pokud kontrolka stavu leštidla
svítí, doplňte dávkovač leštidla.
3. Naplňte koše.
4. Přidejte mycí prostředek.
5. Nastavte a spusťte správný program
pro daný druh náplně a stupeň
znečištění.
Page 12
30
20
A BD
C
www.electrolux.com12
9.1 Použití mycího prostředku
Spuštění programu s odloženým startem
1. Nastavte program.
2. Opakovaně stiskněte Delay, dokud
se na displeji nezobrazí čas
odloženého startu, který chcete
nastavit (1 – 19 hodin).
Rozsvítí se kontrolka odloženého startu.
3. Odpočet spustíte zavřením dvířek
spotřebiče.
Při spuštěném odpočtu je možné
prodloužit čas prodlevy, ale nezle měnit
volbu programu a funkce.
1. Stiskněte uvolňovací tlačítko (B) a
otevřete víko (C).
2. Mycí prostředek či tabletu vložte do
komory (A).
3. Pokud program zahrnuje fázi
předmytí, přidejte trochu mycího
prostředku do komory (D).
4. Zavřete víko. Ujistěte se, že se
uvolňovací tlačítko zaklapne zpět.
Použití kombinovaných tablet
Když používáte tablety, které obsahují
sůl a leštidlo, zásobník na sůl a
dávkovač leštidla neplňte.
1. Nastavte změkčovač vody na
nejnižší stupeň.
2. Nastavte dávkovač leštidla do
nejnižší polohy.
9.2 Nastavení a spuštění
Po dokončení odpočtu se spustí
nastavený program.
Otevření dvířek za chodu spotřebiče
Pokud otevřete dvířka během
probíhajícího programu, spotřebič
přeruší svůj chod. Když dvířka opět
zavřete, bude spotřebič pokračovat od
okamžiku přerušení.
Zrušení odloženého startu během jeho odpočítávání
Když zrušíte odložený start, musíte opět
nastavit program a jeho funkce.
Stiskněte a podržte Reset, dokud se
spotřebič nepřepne do režimu volby
programu.
programu
Zrušení programu
Spuštění programu
1. Ponechte dvířka spotřebiče otevřená.
2. Stisknutím tlačítka Zap/Vyp zapněte
spotřebič. Zkontrolujte, zda je
spotřebič v režimu volby programu.
3. Opakovaně stiskněte nebo ,
dokud se na displeji nezobrazí číslo
programu, který chcete spustit. Na
displeji se zobrazí číslo programu na
cca tři sekundy a poté se zobrazí
délka programu.
4. Zvolte použitelné funkce.
5. Program spustíte zavřením dvířek
spotřebiče.
Stiskněte a podržte Reset, dokud se
spotřebič nepřepne do režimu volby
programu.
Před spuštěním nového programu
zkontrolujte, zda je v dávkovači mycí
prostředek.
Page 13

ČESKY 13
Konec programu
Po dokončení programu se na displeji
zobrazí 0 a rozsvítí se kontrolka konce
programu.
1. Stisknutím tlačítka Zap/Vyp spotřebič
vypněte.
2. Zavřete vodovodní kohoutek.
10. TIPY A RADY
10.1 Obecné informace
Následující rady zajistí optimální
výsledky mytí a sušení při každodenním
používání a také pomohou chránit životní
prostředí.
• Z nádobí odstraňte větší zbytky jídla,
které dejte do odpadu.
• Nádobí neoplachujte ručně. V případě
potřeby použijte program předmytí (jeli dostupný) nebo zvolte program s
fází předmytí.
• Vždy využijte celý objem košů.
• Při plnění spotřebiče se ujistěte, že na
nádobí všude dosáhne voda
vycházející z trysek ostřikovacího
ramene. Ujistěte se, že se kusy
nádobí nedotýkají nebo nepřekrývají.
• Můžete používat odděleně mycí
prostředek, leštidlo a sůl nebo můžete
používat kombinované tablety (např.
„3 v 1“, „4 v 1“, „Vše v 1“). Řiďte se
pokyny na balení.
• Nastavte a program pro daný druh
náplně a stupeň zašpinění. Program
ECO nabízí nejúspornější spotřebu
vody a energie při mytí normálně
znečištěného nádobí a příborů.
Pokud spotřebič nevypnete,
po třech minutách od konce
programu:
• Všechny kontrolky
zhasnou.
• Na displeji se zobrazí
jedna vodorovná
stavová čárka.
Snižuje se tak spotřeba
energie.
Stiskněte některé z tlačítek
(kromě tlačítka Zap/Vyp) a
displej a kontrolky se opět
rozsvítí.
do 21 °dH. V oblastech přesahujících
tento limit je nutné použít kromě
kombinovaných tablet také leštidlo a
sůl. V oblastech s tvrdou nebo velmi
tvrdou vodou však doporučujeme k
dosažení nejlepších výsledků mytí a
sušení používat samostatný mycí
prostředek (prášek, gel, tablety bez
doplňujících funkcí), leštidlo a sůl
odděleně.
• Pokud používáte kombinované
tablety, můžete zvolit funkci Multitab
(je-li dostupná). Tato funkce zlepšuje
při použití kombinovaných tablet
výsledky mytí a sušení.
• Mycí tablety se u krátkých programů
zcela nerozpustí. Abyste zabránili
usazování zbytků mycího prostředku
na nádobí, doporučujeme používat
tablety s dlouhými programy.
• Nepoužívejte větší množství mycího
prostředku, než je správné. Řiďte se
pokyny na balení mycího prostředku.
10.2 Použití soli, leštidla a mycího prostředku
• Používejte pouze sůl, leštidlo a mycí
prostředek určený pro myčky nádobí.
Jiné výrobky by mohly spotřebič
poškodit.
• Kombinované tablety jsou obvykle
vhodné v oblastech s vodou o tvrdosti
Page 14

230 mm
max 260 mm
190 mm
www.electrolux.com14
10.3 Co dělat, pokud chcete
přestat používat mycí tablety
Než začnete odděleně používat mycí
prostředek, sůl a leštidlo, proveďte
následující postup.
1. Nastavte nejvyšší stupeň
změkčovače vody.
2. Ujistěte se, že je zásobník na sůl a
dávkovač leštidla plný.
3. Nastavte nejkratší program s
oplachovací fází. Nepoužívejte mycí
prostředek a nevkládejte nic do košů.
4. Po dokončení programu nastavte
změkčovač vody na stupeň tvrdosti
vody v místě vašeho bydliště.
5. Seřiďte dávkování leštidla.
10.4 Plnění košů
• Nevkládejte do spotřebiče předměty,
které sají vodu (houby, hadry).
• Z nádobí odstraňte větší zbytky jídla,
které dejte do odpadu.
• Připálené zbytky jídel na nádobí
nechte změknout.
• Duté nádobí (např. šálky, sklenice,
hrnce) pokládejte dnem vzhůru.
• Přesvědčte se, že se sklenice
vzájemně nedotýkají.
• Malé kusy nádobí a příbory vložte do
košíčku na příbory.
• Lehké kusy vložte do hlavního koše.
Dbejte na to, aby se jednotlivé kusy
nádobí nehýbaly.
• Před spuštěním programu
zkontrolujte, zda se ostřikovací
rameno může volně otáčet.
10.5 Před spuštěním programu
Zkontrolujte, zda:
• Filtry jsou čisté a správně
nainstalované.
• Víčko zásobníku na sůl je dotažené.
• Ostřikovací ramena nejsou zanesená.
• Je doplněna sůl do myčky a leštidlo
(pokud nepoužíváte kombinované
mycí tablety).
• Rozmístění nádobí v koších je
správné.
• Program je vhodný pro daný druh
náplně a stupeň znečištění.
• Používá se správné množství mycího
prostředku.
• Spotřebič používejte pouze k mytí
nádobí, které je bezpečné mýt v
myčce.
• Do spotřebiče nevkládejte předměty
vyrobené ze dřeva, rohoviny, hliníku,
mědi nebo cínu.
10.6 Vyprazdňování košů
Nádobí před vyjmutím z myčky nechte
vychladnout. Horké nádobí se snadněji
poškodí.
Na konci programu může být
na stěnách a dvířkách
spotřebiče voda.
Page 15
11. ČIŠTĚNÍ A ÚDRŽBA
B
A
ČESKY 15
UPOZORNĚNÍ!
Před čištěním nebo údržbou
spotřebič vždy vypněte a
vytáhněte síťovou zástrčku
ze zásuvky.
Špinavé filtry a ucpaná
ostřikovací ramena snižují
výsledky mytí. Pravidelně je
kontrolujte a v případě
potřeby je vyčistěte.
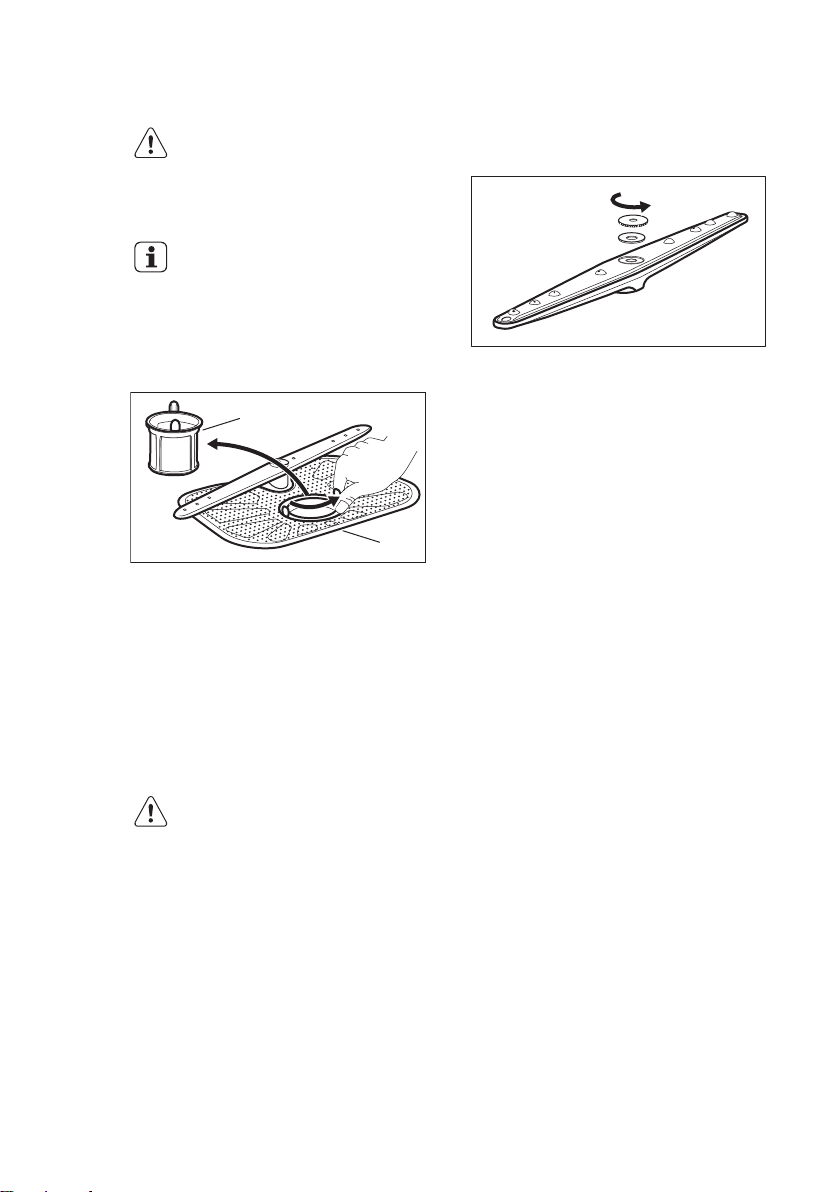
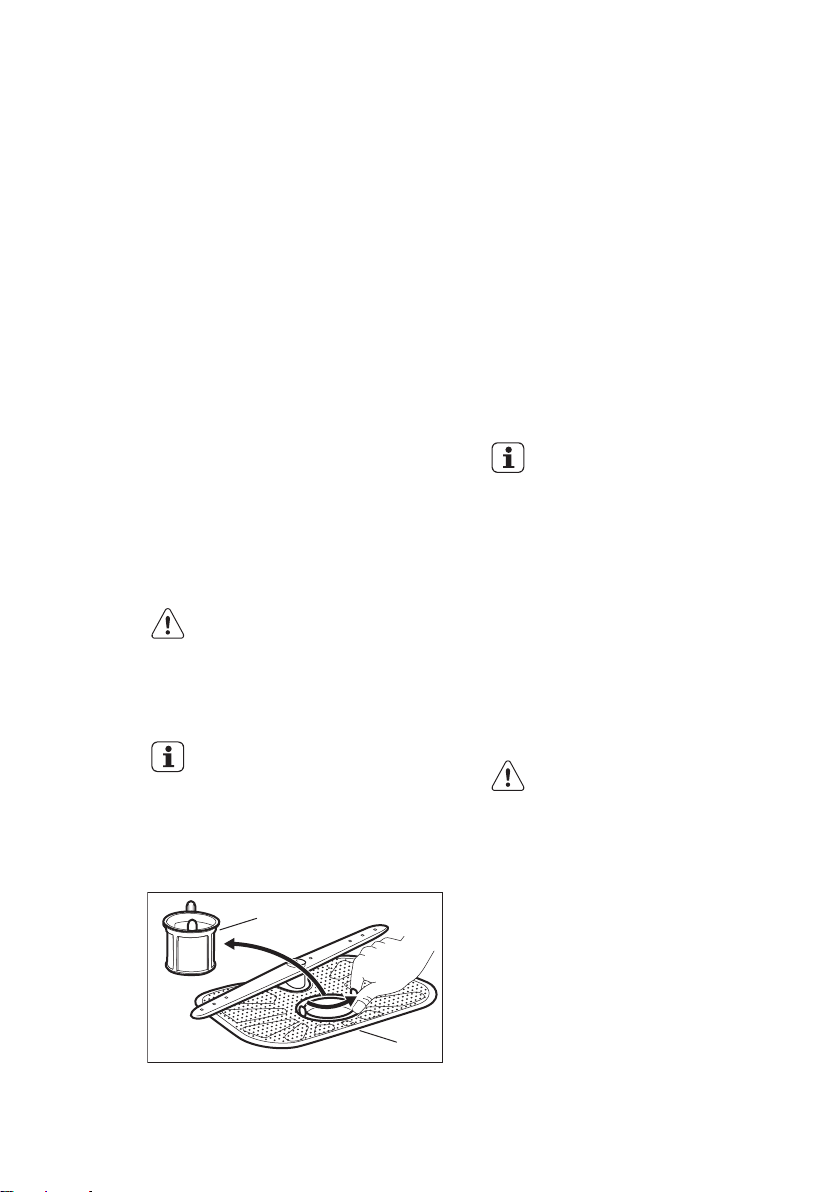
11.1 Čištění filtrů
1. Otočte filtrem (A) proti směru
hodinových ručiček a vyndejte jej.
2. Vyjměte filtr (B).
3. Filtry vyčistěte vodou.
4. Než vložíte filtr (B) zpět, zkontrolujte,
zda ve sběrné jímce nebo kolem ní
nejsou žádné zbytky jídel a nečistot.
5. Filtr (A) umístěte zpět na jeho místo
ve filtru (B). Otočte jím po směru
hodinových ručiček, dokud se
nezajistí.
POZOR!
Nesprávné umístění filtrů
může mít z následek špatné
výsledky mytí a poškození
spotřebiče.
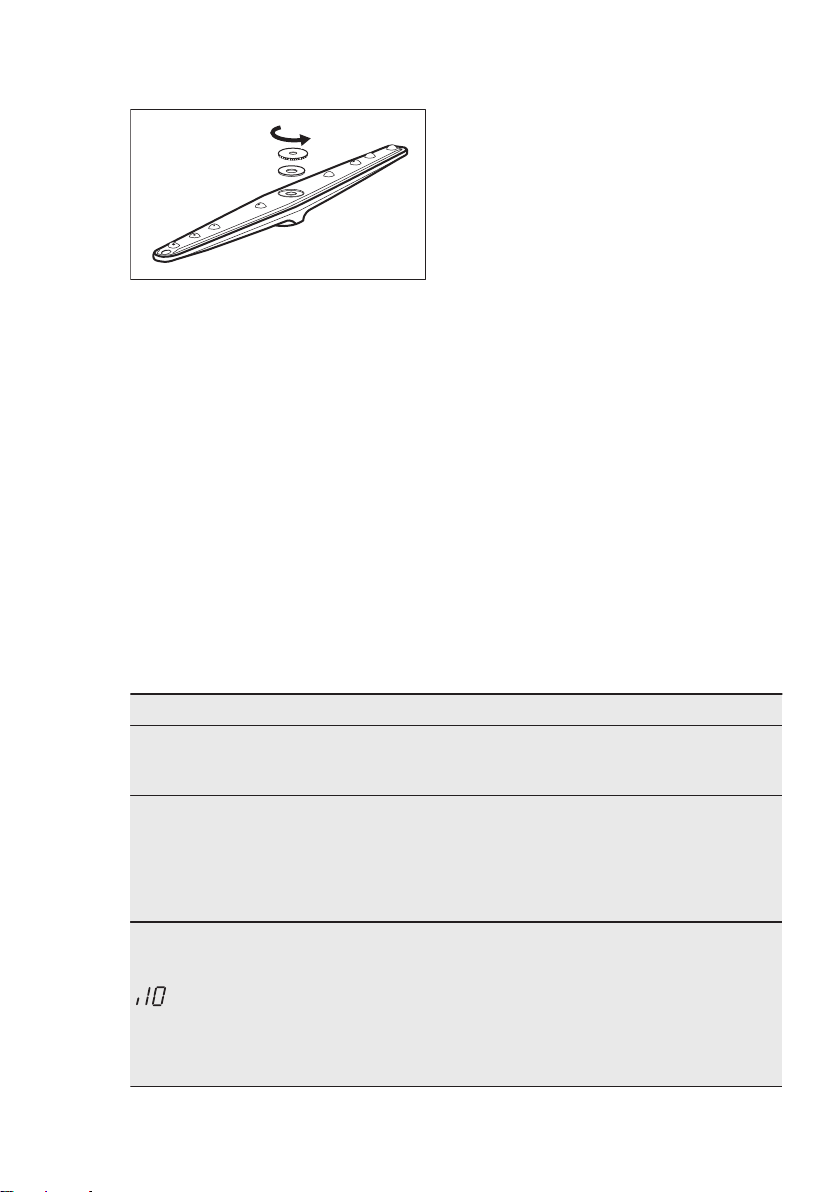
11.2 Čištění ostřikovacích ramen
1. Otočte maticí proti směru hodinových
ručiček.
2. Odstraňte ostřikovací rameno.
3. Vyčistěte otvory.
Jestliže se otvory v ostřikovacím ramenu
zanesou nečistotami, odstraňte je úzkým
špičatým předmětem.
11.3 Čištění vnějších ploch
• Vyčistěte spotřebič vlhkým měkkým
hadrem.
• Používejte pouze neutrální mycí
prostředky.
• Nepoužívejte prostředky s drsnými
částicemi, drátěnky nebo
rozpouštědla.
11.4 Čištění vnitřního prostoru
• Pečlivě očistěte spotřebič včetně
pryžového těsnění dvířek vlhkým
měkkým hadříkem.
• Pokud pravidelně používáte krátké
programy, může uvnitř spotřebiče
dojít k usazování mastnoty a vodního
kamene. Aby k tomu nedocházelo,
doporučujeme nejméně dvakrát
měsíčně spustit dlouhý program.
12. ODSTRAŇOVÁNÍ ZÁVAD
Pokud spotřebič nezačne pracovat nebo
se během provozu zastavuje. Než se
obrátíte na autorizované servisní
středisko, ověřte si, zda dokážete
problém vyřešit sami pomocí informací
uvedených v tabulce.
U některých poruch se na displeji
zobrazí výstražný kód.
Page 16
www.electrolux.com16
Problém a výstražný kód Možné řešení
Nelze zapnout spotřebič. • Ujistěte se, že je zástrčka zapojená do síťové zásuv‐
Nespustil se program. • Přesvědčte se, že jsou dvířka spotřebiče zavřená.
Spotřebič se neplní vodou.
Na displeji se zobrazí .
Spotřebič nevypouští vodu.
Na displeji se zobrazí .
Je aktivován bezpečnostní
systém proti vyplavení.
Na displeji se zobrazí .
ky.
• Ujistěte se, že není poškozená domovní pojistka či
jistič.
• Pokud je nastaven odložený start, zrušte jej nebo
vyčkejte do konce odpočítávání.
• Spotřebič spustil regeneraci pryskyřice ve změkčova‐
či vody. Délka této procedury je přibližně pět minut.
• Zkontrolujte, zda je vodovodní kohoutek otevřený.
• Ujistěte se, že není příliš malý tlak na přívodu vody.
Ohledně těchto informací se obraťte na místní vodár‐
enský podnik.
• Ujistěte se, že není zanesený vodovodní kohoutek.
• Ujistěte se, že není zanesený filtr v přívodní hadici.
• Ujistěte se, že přívodní hadice není přehnutá či
přiskřípnutá.
• Ujistěte se, že není zanesený sifon.
• Ujistěte se, že vypouštěcí hadice není přehnutá či
přiskřípnutá.
• Zavřete vodovodní kohoutek a obraťte se na autori‐
zované servisní středisko.
Po kontrole spotřebiče jej vypněte a
znovu zapněte. Pokud se problém objeví
znovu, obraťte se na autorizované
servisní středisko.
Při výskytu výstražných kódů, které
nejsou uvedené v tabulce, se obraťte na
autorizované servisní středisko.
12.1 Nádobí není dostatečně umyté nebo suché
Problém Možné řešení
Na nádobí a skle jsou bílé
šmouhy nebo modravý po‐
tah.
Na sklenicích a nádobí jsou
skvrny a zaschlé vodní kap‐
ky.
Nádobí je mokré. • Program neobsahuje sušicí fázi nebo obsahuje
Ostatní možné příčiny viz
„Tipy a rady“.
• Uvolňuje se příliš velké množství leštidla. Nastavte
volič leštidla na nižší stupeň.
• Nadměrné množství mycího prostředku.
• Uvolňuje se příliš malé množství leštidla. Nastavte
volič leštidla na vyšší stupeň.
• Příčinou může být kvalita leštidla.
pouze sušicí fázi při nízké teplotě.
• Dávkovač leštidla je prázdný.
• Příčinou může být kvalita leštidla.
Page 17

13. TECHNICKÉ INFORMACE
ČESKY 17
Rozměry Šířka / výška / hloubka
Připojení k elektrické síti
Tlak přívodu vody Min. / max. bar (MPa) 0.8 (0.08) / 10 (1.0)
Přívod vody Studená nebo teplá vo‐
Kapacita Jídelní soupravy 6
Příkon Režim zapnuto (W) 0.99
Příkon Režim vypnuto (W) 0.10
1)
Ohledně ostatních údajů viz typový štítek.
2)
Pokud odebíráte horkou vodu z alternativních zdrojů (např. solární panely, větrná ener‐
gie), použijte tuto horkou vodu ke snížení spotřeby energie.
(mm)
Napětí (V) 220 - 240
1)
Frekvence (Hz) 50
2)
da
545 / 474 / 515
max. 60 °C
14. POZNÁMKY K OCHRANĚ ŽIVOTNÍHO PROSTŘEDÍ
Recyklujte materiály označené
symbolem . Obaly vyhoďte do
příslušných odpadních kontejnerů k
recyklaci. Pomáhejte chránit životní
prostředí a lidské zdraví a recyklovat
elektrické a elektronické spotřebiče
určené k likvidaci. Spotřebiče označené
příslušným symbolem nelikvidujte
spolu s domovním odpadem. Spotřebič
odevzdejte v místním sběrném dvoře
nebo kontaktujte místní úřad.
Page 18

www.electrolux.com18
INHOUDSOPGAVE
1. VEILIGHEIDSINFORMATIE.................................................................................19
2. VEILIGHEIDSVOORSCHRIFTEN........................................................................ 20
3. BESCHRIJVING VAN HET PRODUCT............................................................... 21
4. BEDIENINGSPANEEL........................................................................................22
5. PROGRAMMA’S................................................................................................22
6. INSTELLINGEN..................................................................................................24
7. OPTIES..............................................................................................................25
8. VOORDAT U HET APPARAAT VOOR DE EERSTE KEER GEBRUIKT................ 26
9. DAGELIJKS GEBRUIK....................................................................................... 27
10. AANWIJZINGEN EN TIPS................................................................................ 28
11. ONDERHOUD EN REINIGING......................................................................... 30
12. PROBLEEMOPLOSSING.................................................................................31
13. TECHNISCHE INFORMATIE............................................................................ 32
WE DENKEN AAN U
Bedankt voor het kopen van een Electrolux-apparaat. U koos voor een product dat
jaren professionele ervaring en innovatie bevat. Ingenieus en stijlvol, het werd
ontworpen met u in het achterhoofd. Wanneer u het gebruikt, kunt u er op
vertrouwen dat u keer op keer fantastische resultaten zult krijgen.
Welkom bij Electrolux.
Ga naar onze website voor:
Advies over gebruik, brochures, het oplossen van problemen en
onderhoudsinformatie:
www.electrolux.com
Registreer uw product voor een betere service:
www.registerelectrolux.com
Koop accessoires, verbruiksartikelen en originele reserveonderdelen voor uw
apparaat:
www.electrolux.com/shop
KLANTENSERVICE
Gebruik altijd originele onderdelen.
Als u contact opneemt met de klantenservice zorg dat u de volgende gegevens bij
de hand hebt: model, productnummer, serienummer.
Deze informatie wordt vermeld op het typeplaatje.
Waarschuwing / Belangrijke veiligheidsinformatie
Algemene informatie en tips
Milieu-informatie
Wijzigingen voorbehouden.
Page 19

1. VEILIGHEIDSINFORMATIE
Lees zorgvuldig de meegeleverde instructies voor
installatie en gebruik van het apparaat. De fabrikant is niet
verantwoordelijk voor letsel en schade veroorzaakt door
een foutieve installatie. Bewaar de instructies van het
apparaat voor toekomstig gebruik.
1.1 Algemene veiligheid
• Dit apparaat is bedoeld voor huishoudelijk gebruik of
gelijksoortige toepassingen zoals:
– boerderijen, personeelskeukens in winkels, kantoren
of andere werkomgevingen
– door gasten in hotels, motels, bed&breakfasts en
andere woonomgevingen.
• De specificatie van het apparaat mag niet worden
veranderd.
• De waterdruk (minimaal en maximaal) moet liggen
tussen 0.8 (0.08) / 10 (1.0) bar (Mpa)
• Houd rekening met het maximale aantal 6 plaatsen.
• Als de voedingskabel beschadigd is, moet de fabrikant,
een erkende serviceverlener of een gekwalificeerd
persoon deze vervangen teneinde gevaarlijke situaties te
voorkomen.
• Doe messen en bestek met scherpe punten in het
bestekmandje met de punten omlaag in horizontale
positie.
• Laat de deur van het apparaat niet open staan zonder
toezicht om te voorkomen dat er iemand over struikelt.
• Schakel het apparaat uit en trek de stekker uit het
stopcontact voordat u onderhoudshandelingen verricht.
• Gebruik geen waterstralen of stoom om het apparaat te
reinigen.
• De ventilatie-openingen in de onderkant (indien van
toepassing) mogen niet worden afgedekt door tapijt.
• Het apparaat moet met de nieuwe slangset worden
aangesloten op een kraan. Oude slangsets mogen niet
opnieuw worden gebruikt.
NEDERLANDS
19
Page 20

www.electrolux.com20
1.2 Veiligheid van kinderen en kwetsbare mensen
• Dit apparaat kan worden gebruikt door kinderen van 8
jaar en ouder en door mensen met beperkte
lichamelijke, zintuiglijke of verstandelijke vermogens of
een gebrek aan ervaring en kennis, indien zij onder
toezicht staan of instructies hebben gekregen over het
veilig gebruiken van het apparaat en indien zij de
eventuele gevaren begrijpen.
• Laat kinderen niet met het apparaat spelen.
• Houd alle reinigingsmiddelen uit de buurt van kinderen.
• Houd kinderen en huisdieren uit de buurt van het
apparaat als de deur open is.
• Reiniging en onderhoud mag niet worden uitgevoerd
door kinderen zonder toezicht.
2. VEILIGHEIDSVOORSCHRIFTEN
2.1 Montage
• Verwijder alle verpakkingsmaterialen.
• Installeer en gebruik geen beschadigd
apparaat.
• Installeer of gebruik het apparaat niet
op een plek waar de temperatuur
onder de 0 °C komt.
• Volg de installatie-instructies op die zijn
meegeleverd met het apparaat.
• Zorg ervoor dat het apparaat onder en
naast veilige installaties wordt
geïnstalleerd.
2.2 Aansluiting op het
elektriciteitsnet
WAARSCHUWING!
Gevaar voor brand en
elektrische schokken.
• Dit apparaat moet worden aangesloten
op een geaard stopcontact.
• Controleer of de elektrische informatie
op het typeplaatje overeenkomt met de
stroomvoorziening. Zo niet, neem dan
contact op met een elektromonteur.
• Gebruik altijd een correct ge?stalleerd,
schokbestendig stopcontact.
• Gebruik geen meerwegstekkers en
verlengsnoeren.
• Zorg dat u de hoofdstekker en kabel
niet beschadigt. Indien de
voedingskabel moet worden
vervangen, dan moet dit gebeuren
door onze Klantenservice.
• Steek de stekker pas in het
stopcontact als de installatie is
voltooid. Zorg ervoor dat het netsnoer
na installatie bereikbaar is.
• Trek niet aan het netsnoer om het
apparaat los te koppelen. Trek altijd
aan de stekker.
• Dit apparaat voldoet aan de EUrichtlijnen.
• Alleen voor VK en Ierland. Het apparaat
heeft een stekker van 13 ampère. Als
de zekering van de stekker verwisseld
moet worden, gebruik dan zekering: 13
amp ASTA (BS 1362).
2.3 Aansluiting aan de
waterleiding
• Zorg dat u de waterslangen niet
beschadigt.
• Laat het water stromen tot het schoon
is voordat u het apparaat aansluit op
nieuwe leidingen of leidingen die lang
niet zijn gebruikt.
• Zorg dat er geen lekkages zijn als u het
apparaat de eerste keer gebruikt.
Page 21

• Als de watertoevoerslang beschadigd
8
7 6
1 2 4 53
is, haal dan onmiddellijk de stekker uit
het stopcontact. Neem contact op met
de service-afdeling om de
watertoevoerslang te vervangen.
2.4 Gebruik
• Ga niet op de open deur zitten of
staan.
• Vaatwasmiddel is gevaarlijk. Volg de
veiligheidsinstructies op de verpakking
van het vaatwasmiddel op.
• Speel niet met het water van het
apparaat en drink het niet op.
• Verwijder de borden pas uit het
apparaat als het programma is
voltooid. Er kan vaatwasmiddel op de
borden zitten.
• Het apparaat kan hete stoom laten
ontsnappen als u de deur opent terwijl
er een programma wordt uitgevoerd.
• Plaats geen ontvlambare producten of
items die vochtig zijn door ontvlambare
producten in, bij of op het apparaat.
2.5 Servicedienst
• Contact opnemen met de
klantenservice voor reparatie van het
apparaat. Wij raden uitsluitend het
gebruik van originele onderdelen aan.
• Zorg er als u contact opneemt met de
klantenservice voor dat u de volgende
informatie heeft van het typeplaatje.
Model:
PNC:
Serienummer:
2.6 Verwijdering
• Haal de stekker uit het stopcontact.
• Snij het netsnoer van het apparaat af
en gooi dit weg.
• Verwijder de deurgreep om te
voorkomen dat kinderen en huisdieren
opgesloten raken in het apparaat.
3. BESCHRIJVING VAN HET PRODUCT
NEDERLANDS
WAARSCHUWING!
Gevaar voor letsel of
verstikking.
21
Zoutreservoir
1
Sproeiarm
2
Filters
3
Bovenrek
4
Bestekkorf
5
Glansmiddeldoseerbakje
6
Wasmiddeldoseerbakje
7
Typeplaatje
8
Page 22

1 32 4 5 6 7 8 9
www.electrolux.com22
4. BEDIENINGSPANEEL
Aan/uit-toets
1
Weergave
2
Delay-toets
3
Programmakeuzetoets (omhoog)
4
Programmakeuzetoets (omlaag)
5
4.1 Indicatielampjes
Aanduiding Omschrijving
Einde-indicatielampje.
Zoutindicatielampje. Dit indicatielampje is altijd uit als het programma in
werking is.
Glansmiddelindicatielampje. Dit indicatielampje is altijd uit als het programma in werking is.
5. PROGRAMMA’S
Programma Mate van vervuil-
P1
1)
P2
P3 • Sterk bevuild
ing
Type wasgoed
• Normaal bevuild
• Serviesgoed en
• Alle
• Serviesgoed,
2)
• Serviesgoed,
bestek
bestek en pannen
bestek en pannen
EnergySaver-toets
6
Spoelen +-toets
7
Reset-toets
8
Indicatielampjes
9
Programmafasen Opties
• Voorspoelen
• Wassen 55 °C
• Spoelgangen
• Drogen
• Voorspoelen
• Wassen van 45 °C tot
70 °C
• Spoelgangen
• Drogen
• Voorspoelen
• Wassen 70 °C
• Spoelgangen
• Drogen
• EnergySaver
• Spoelen +
• EnergySaver
• Spoelen +
• EnergySaver
• Spoelen +
Page 23

NEDERLANDS
23
Programma Mate van vervuil-
Programmafasen Opties
ing
Type wasgoed
P5
3)
P4 • Normaal of licht
• Licht bevuild
• Serviesgoed en
bestek
bevuild
• Wassen 50 °C
• Spoelgangen
• Wassen 40 °C
• Spoelgangen
• Spoelen +
• Spoelen +
• Teer servies-
goed en glaswerk
P6
4)
1)
Dit programma biedt het meest efficiënte water- en energieverbruik voor normaal vervuild
serviesgoed en bestek. (Dit is het standaard programma voor testinstituten).
2)
Het apparaat detecteert de mate van vervuiling en de hoeveelheid serviesgoed in de korf.
De temperatuur en hoeveelheid water, het energieverbruik en de programmaduur worden automatisch aangepast.
3)
Met dit programma kunt u een pas vervuilde lading afwassen. Het biedt goede afwasresultaten in een kort tijdsbestek.
4)
Met dit programma kunt u snel serviesgoed afspoelen om te voorkomen dat etensresten
vastkoeken en het apparaat gaat stinken. U hoeft voor dit programma geen afwasmiddel te
gebruiken.
• Alle • Voorspoelen
5.1 Verbruiksgegevens
Programma
1)
Water
(l)
P1 7.5 0.64 170
Energie-
(kWh)
Programmaduur
(min)
P2 5 - 9 0.5 - 0.8 70 - 110
P3 9 1.0 105
P5 6 0.45 35
P4 6 0.40 30
P6 2 0.10 7
1)
De druk en temperatuur van het water, de variaties in stroomtoevoer, de opties en de hoeveelheid vaat kan de verbruikswaarden veranderen.
Page 24

www.electrolux.com24
5.2 Aanwijzingen voor
testinstituten
Stuur voor alle benodigde informatie over
testprestaties een e-mail naar:
6. INSTELLINGEN
info.test@dishwasher-production.com
Schrijf het productnummer (PNC) op dat u
op het typeplaatje vindt.
6.1 Programmakeuzemodus en
gebruikersmodus
Als het apparaat in de
programmakeuzemodus staat, kan een
programma worden ingesteld en de
gebruikersmodus worden ingevoerd.
In de gebruikersmodus kunnen de
volgende instellingen worden
gewijzigd:
• Het niveau van de waterverzachter
afgestemd op de waterhardheid.
• De activering of de deactivering van het
geluidsignaal voor het programmaeinde.
Deze instellingen worden opgeslagen
tot u ze weer wijzigt.
Hoe de programmakeuzemodus in te stellen
Het apparaat staat in de
programmaselectiemodus als het display
2 horizontale statusbalkjes weergeeft.
Als u het apparaat activeert, staat deze
doorgaans in de programmakeuzemodus.
Als dit niet het geval is, kunt u de
programmakeuzemodus op de volgende
manier instellen:
Houd tegelijkertijd Reset ingedrukt tot het
apparaat in de programmakeuzemodus
staat.
6.2 De waterontharder
Waterhardheid
Duitse graden
(°dH)
>24 >40 >4.2 28 5
18 - 24 32 - 40 3.2 - 4.2 22 - 28 4
12 - 18 19 - 32 2.1 - 3.2 13 - 22
4 - 12 7 - 19 0.7 - 2.1 5 - 13 2
<4 <7 <0.7 < 5
1)
Fabrieksinstelling.
2)
Gebruik geen zout op dit niveau.
Franse graden
(°fH)
mmol/l Clarke-
graden
Wateronthar-
dingsniveau
1)
3
2)
1
Het waterontharderniveau instellen
Het apparaat moet in de
programmakeuzemodus staan.
1. Houd om de gebruikersmodus in te
voeren tegelijkertijd en
ingedrukt tot de indicatielampjes ,
en gaan knipperen en het
display blanco is.
2. Druk op .
• De indicatielampjes en
gaan uit.
Page 25

3. Druk herhaaldelijk op om de
4. Druk op de knop aan/uit om de
6.3 Geluidssignalen
Er klinken geluidssignalen als het apparaat
een storing heeft. Het is niet mogelijk deze
geluidssignalen uit te schakelen.
Na het beëindigen van het programma
klinkt er tevens een geluidssignaal. Dit
geluidssignaal is standaard uitgeschakeld,
maar kan worden geactiveerd.
Het geluidssignaal voor het einde van het programma inschakelen
Het apparaat moet in de
programmakeuzemodus staan.
7. OPTIES
• Blijft het indicatielampje
knipperen
• Het display toont de huidige
instelling: bijv. = niveau 5.
instelling te wijzigen.
instelling te bevestigen.
NEDERLANDS
1. Om de gebruikersmodus in te voeren,
drukt u tegelijkertijd en totdat
de lampjes , en gaan
knipperen en het display leeg is.
2. Druk op .
• De indicatielampjes en
gaan uit.
• Het indicatielampje blijft
knipperen.
• Het display toont de huidige
instelling:
– = Geluidssignaal aan.
– = Geluidssignaal uit.
3. Druk op om de instelling te
wijzigen.
4. Druk op de knop aan/uit om de
instelling te bevestigen.
25
De gewenste opties moeten
elke keer dat u een
programma start worden
geactiveerd.
De opties kunnen niet
worden in- of uitgeschakeld
als een programma in
werking is.
Niet alle opties kunnen met
elkaar worden gecombineerd.
Als u opties hebt
geselecteerd die niet met
elkaar te combineren zijn, dan
schakelt het apparaat
automatisch één of meerdere
opties uit. Alleen de
indicatielampjes van de
actieve opties blijven aan.
7.1 EnergySaver
Deze optie verlaagt de temperatuur van de
laatste spoelfase en verlaagt ook het
energieverbruik (ongeveer -25%).
De vaat kan nog nat zijn als het
programma klaar is.
De duur van het programma zal korter zijn.
EnergySaver activeren
Druk op . Het bijbehorende
indicatielampje gaat nu branden.
Als de optie niet van toepassing is op het
programma, dan gaat het bijbehorende
indicatielampje niet branden of het
knippert even en gaat dan uit.
Het display geeft de bijgewerkte
programmaduur weer.
7.2 Spoelen +
Deze optie voegt een koude spoelfase toe
aan het wasprogramma. De optie verlengt
de programmaduur en verhoogt het
waterverbruik.
Page 26
www.electrolux.com26
Hoe Spoelen + te activeren
Druk op Spoelen +, het bijbehorende
indicatielampje gaat nu branden.
Als de optie van toepassing is voor het
programma, dan gaat het lampje branden.
In het display kunt u de update van de
programmaduur zien.
8. VOORDAT U HET APPARAAT VOOR DE EERSTE KEER GEBRUIKT
1. Controleer of het ingestelde
niveau van de waterontharder juist
is voor de waterhardheid in uw
omgeving. U kunt het niveau van
de waterontharder instellen.
2. Vul het zoutreservoir.
3. Vul het glansmiddeldoseerbakje.
4. Draai de waterkraan open.
5. Start een programma om resten te
verwijderen die misschien nog in het
apparaat zijn achtergebleven. Gebruik
geen afwasmiddel en gebruik de
mandjes niet.
Als u een programma start, doet het
apparaat er ongeveer 5 minuten over om
de hars in de waterontharder te herladen.
Het lijkt alsof het apparaat niet werkt. De
wasfase start pas nadat deze procedure
voltooid is. De procedure wordt periodiek
herhaald.
8.1 Het zoutreservoir
LET OP!
Gebruik uitsluitend zout dat
specifiek is bedoeld voor
gebruik in vaatwassers.
Het zout wordt gebruikt om de hars in de
waterontharder te herladen en voor goede
wasresultaten voor dagelijks gebruik.
Het zoutreservoir vullen
1. Draai de dop linksom om het
zoutreservoir te openen.
2. Doe 1 liter water in het zoutreservoir
(alleen de eerste keer).
3. Vul het zoutreservoir met
regenereerzout.
4. Verwijder het zout rond de opening
van het zoutreservoir.
5. Draai de dop van het zoutreservoir
rechtsom om het zoutreservoir te
sluiten.
Water en zout kunnen uit het
zoutreservoir stromen als u
het bijvult. Gevaar voor roest.
Start om dit te voorkomen
een programma nadat u het
zoutreservoir heeft bijgevuld.
Page 27
8.2 Het vullen van het
A
B
C
D
30
20
A BD
C
glansmiddeldoseerbakje
LET OP!
Gebruik alleen glansmiddel
voor afwasautomaten.
9. DAGELIJKS GEBRUIK
NEDERLANDS
1. Druk op de ontgrendelknop (D) om de
deksel te openen (C).
2. Giet het glansmiddel in het
doseervakje (A) tot de vloeistof het
niveau 'max' heeft bereikt.
3. Verwijder gemorst glansmiddel met
een absorberend doekje om te
voorkomen dat er te veel schuim
ontstaat.
4. Sluit het deksel. Zorg ervoor dat het
ontgrendelknopje op zijn plaats
dichtklikt.
U kunt het schuifje voor de
vrij te geven hoeveelheid (B)
instellen tussen stand 1
(laagste hoeveelheid) en
stand 6 (hoogste
hoeveelheid).
27
1. Draai de waterkraan open.
2. Druk op de aan-/uittoets om het
apparaat te activeren.
Zorg dat het apparaat in de
programmakeuzemodus staat.
• Vul het zoutreservoir als het
zoutindicatielampje brandt.
• Vul het glansmiddeldoseerbakje als
het indicatielampje van het
glansmiddel brandt.
3. Ruim de korven in.
4. Voeg vaatwasmiddel toe.
5. U dient het juiste programma in te
stellen en te starten voor het type
lading en de mate van vervuiling.
9.1 Vaatwasmiddel gebruiken
1. Druk op de ontgrendelknop (B) om de
deksel te openen (C).
2. Doe de vaatwastablet of het poeder in
het doseerbakje (A).
3. Als het programma over een
voorspoelfase beschikt, plaats dan
een kleine dosis afwasmiddel in
doseerbakje (D).
4. Sluit het deksel. Zorg ervoor dat het
ontgrendelknopje op zijn plaats
dichtklikt.
Gebruik van multitabletten
Als u tabletten gebruikt die zout en
glansmiddel bevatten, is het niet nodig om
de doseerbakjes voor zout en glansmiddel
te vullen.
1. Stel de waterontharder op het laagste
niveau in.
2. Stel de dosering van het glansmiddel
in op de laagste stand.
9.2 Een programma instellen en
starten
Een programma starten
1. Laat de deur op een kier staan.
2. Druk op de aan-/uittoets om het
apparaat te activeren. Zorg dat het
Page 28

www.electrolux.com28
apparaat in de keuzemodus
Programma staat.
3. Druk op of tot het display het
nummer van het programma
weergeeft dat u wilt starten. Het
nummer en de duur van het
programma worden op het display 3
seconden weergegeven.
4. Stel de bruikbare opties in.
5. Sluit de deur van de afwasmachine
om het programma te starten.
Een programma starten met een uitgestelde start
1. Stel een programma in.
2. Blijf op Delay drukken tot het display
de uitgestelde tijd toont die u wilt
instellen (van 1 tot 19 uur).
Het controlelampje startuitstel gaat
branden.
3. Sluit de deur van het apparaat om het
aftellen te starten.
Als het aftellen loopt, kan de uitsteltijd
worden vergroot maar het programma en
de opties kunnen niet worden gewijzigd.
Als het aftelproces voltooid is, wordt het
programma gestart.
De deur openen als het apparaat in werking is
Als u de deur opent terwijl een programma
loopt, stopt het apparaat. Als u de deur
weer sluit, gaat het apparaat verder vanaf
het punt van onderbreking.
De uitgestelde start annuleren tijdens het aftellen
Als u de uitgestelde start annuleert, moet
u het programma en de opties opnieuw
instellen.
Houd tegelijkertijd Reset ingedrukt tot het
apparaat in de programmakeuzemodus
staat.
Het programma annuleren
Houd tegelijkertijd Reset ingedrukt tot het
apparaat in de programmakeuzemodus
staat.
Controleer of er afwasmiddel in het
afwasmiddeldoseerbakje aanwezig is
voordat u een nieuw programma start.
Einde van het programma
Als het programma voltooid is, is het
indicatielampje einde aan en toont het
display 0 .
1. Druk op de aan/uit-toets om het
apparaat te deactiveren.
2. Draai de waterkraan dicht.
Als u het apparaat niet
uitschakelt, dan gaan 3
minuten na het einde van het
programma:
• Alle indicatielampjes
gaan uit.
• de display geeft één
horizontaal
statusbalkje weer.
Dit helpt het energieverbruik
te verminderen.
Druk op één van de knoppen
(niet de aan/uit knopbutton)
en het display en de
indicatielampjes gaan weer
aan.
10. AANWIJZINGEN EN TIPS
10.1 Algemeen
De volgende tips zorgen voor optimale
schoonmaak- en droogresultaten en
helpen ook het milieu te beschermen.
• Verwijder grotere etensresten van de
borden en gooi ze in de vuilnisbak.
• Spoel de vaat niet eerst af. Gebruik
indien nodig een voorwasprogramma
(indien beschikbaar) of selecteer een
programma met een voorwasfase.
• Gebruik altijd de hele ruimte van de
mandjes.
Page 29

• Zorg er bij het inladen van het apparaat
230 mm
max 260 mm
190 mm
voor dat de vaat helemaal kan worden
bereikt en gewassen door het water uit
de sproeiarmen. Zorg ervoor dat de
vaat elkaar niet raakt of overlapt.
• U kunt apart vaatwasmiddel,
glansmiddel en zout gebruiken of
kiezen voor het gebruik van
multitabletten (bijv. ''3in1'', ''4in1'', ''All
in 1''). Volg de aanwijzing op de
verpakking.
• U dient het juiste programma in te
stellen voor het type lading en de mate
van vervuiling. Het programma ECO
biedt het meest efficiënte water- en
energieverbruik voor normaal vervuild
serviesgoed en bestek.
10.2 Gebruik van zout,
glansmiddel en vaatwasmiddel
• Gebruik enkel zout, glansmiddel en
vaatwasmiddel voor afwasautomaten.
Overige producten kunnen het
apparaat beschadigen.
• Multitabletten zijn doorgaans geschikt
voor een waterhardheid tot 21 °dH. Bij
een hogere waterhardheid moet zout,
glansmiddel en vaatwasmiddel worden
gebruikt naast het gebruik van
multitabletten. Maar in gebieden met
hard en erg hard water raden we het
gebruik aan van enkelvoudig
vaatwasmiddel (poeder, gel, tabletten
zonder extra functies), glansmiddel en
zout apart voor optimale reinigings- en
droogresultaten.
• Als u multitabletten gebruikt kunt u de
optie Multitab selecteren (indien van
toepassing). Deze optie vergroot de
schoonmaak- en droogresultaten met
het gebruik van multitabletten.
• Vaatwasmiddeltabletten lossen bij
korte programma's niet geheel op. Om
te voorkomen dat vaatwasmiddelresten
op het servies achterblijven, raden we
u aan om tabletten enkel bij lange
programma's te gebruiken.
• Gebruik niet meer dan de juiste
hoeveelheid vaatwasmiddel. Zie de
instructies van de
vaatwasmiddelfabrikant.
NEDERLANDS
10.3 Wat moet u doen als u wilt stoppen met het gebruik van multitabletten
Doe het volgende voordat u begint met
het gebruiken van apart wasmiddel, zout
en glansmiddel.
1. Stel het hoogste niveau van de
waterontharder in.
2. Zorg ervoor dat het zout- en het
glansmiddeldoseerbakje gevuld zijn.
3. Start het kortste programma met een
spoelfase. Voeg geen afwasmiddel toe
en ruim de mandjes niet in.
4. Als het programma is voltooid, wijzigt
u de waterontharder in de
waterhardheid van uw omgeving.
5. Stel de hoeveelheid glansmiddel in.
10.4 De korven inruimen
• Gebruik het apparaat alleen om
voorwerpen af te wassen die
vaatwasbestendig zijn.
• Doe geen voorwerpen in het apparaat
die gemaakt zijn van hout, hoorn,
aluminium, tin en koper.
• Plaats geen voorwerpen in het
apparaat die water kunnen absorberen
(sponzen, keukenhanddoeken).
29
Page 30
B
A
www.electrolux.com30
• Verwijder grotere etensresten van de
borden en gooi ze in de vuilnisbak.
• Maak aangebrande voedselresten op
de voorwerpen zachter.
• Plaats holle voorwerpen (bijv. kopjes,
glazen en pannen) met de opening
naar beneden.
• Zorg er voor dat glazen andere glazen
niet aanraken.
• Doe bestek en kleine items in het
bestekmand.
• Leg lichte voorwerpen in het bovenrek.
Zorg ervoor dat de voorwerpen niet
verschuiven.
• Zorg er voor dat de sproeiarm vrij kan
ronddraaien voordat u een programma
start.
10.5 Voor het starten van een
programma
Controleer of:
• De filters schoon zijn en correct zijn
geplaatst.
11. ONDERHOUD EN REINIGING
• De dop van het zoutreservoir goed
dicht zit.
• De sproeiarmen niet zijn verstopt.
• Er regenereerzout en glansmiddel is
toegevoegd (tenzij u gecombineerde
afwastabletten gebruikt).
• De positie van de items in de mandjes
correct is.
• Het programma van toepassing is op
het type lading en de mate van
bevuiling.
• De juiste hoeveelheid afwasmiddel is
gebruikt.
10.6 De rekken uitruimen
Laat de borden afkoelen voordat u deze
uit het apparaat neemt. Hete borden zijn
gevoelig voor beschadigingen.
Aan het einde van het
programma kan er water aan
de zijkanten en de deur van
het apparaat achterblijven.
WAARSCHUWING!
Schakel het apparaat uit en
trek de stekker uit het
stopcontact voordat u
onderhoudshandelingen
verricht.
Vuile filters en verstopte
sproeiarmen verminderen de
wasresultaten. Controleer
regelmatig de filters en reinig
deze zo nodig.
11.1 De filters reinigen
1. Draai de filter (A) linksom en verwijder
het.
2. Verwijder het filter (B).
3. Reinig de filters met water.
4. Zorg ervoor dat als u het filter (B)
terugplaatst er geen etensresten of
vuil in en rond de rand van de
opvangbak zit.
5. Zet filter (A) in filter (B) op zijn plaats.
Rechtsom draaien tot het vastzit.
LET OP!
Een onjuiste plaatsing van de
filters kan leiden tot slechte
wasresultaten en het
apparaat beschadigen.
Page 31
11.2 De sproeiarmen reinigen
1. Draai de moer linksom.
2. Verwijder de sproeiarm.
3. Maak de openingen schoon.
Als etensresten de openingen in de
sproeiarm hebben verstopt, verwijder deze
dan met een smal en puntig voorwerp.
11.3 Buitenkant reinigen
• Maak het apparaat schoon met een
vochtige, zachte doek.
12. PROBLEEMOPLOSSING
NEDERLANDS
• Gebruik alleen neutrale
schoonmaakmiddelen.
• Gebruik geen schuurmiddelen,
schuursponsjes of oplosmiddelen.
11.4 De binnenkant van de
machine reinigen
• Reinig het apparaat zorgvuldig,
inclusief de rubberen afdichting van de
deur, met een zachte, vochtige doek.
• Als u regelmatig korte programma's
gebruikt dan kunnen er vetresten en
kalkaanslag achterblijven in het
apparaat. Om dit te voorkomen raden
we aan minstens 2 keer per maand
progamma's met een lange duur te
gebruiken.
31
Het apparaat start of stopt niet tijdens de
werking. Kijk voordat u contact opneemt
met de klantenservice of u het probleem
zelf kunt oplossen met behulp van de
informatie in de tabel.
Probleem en alarmcode Mogelijke oplossing
U kunt het apparaat niet
activeren.
Het programma start niet. • Zorg dat de deur van het apparaat is gesloten.
Het apparaat neemt geen
water.
Op het display verschijnt
.
• Zorg dat de stekker in het stopcontact zit.
• Zorg dat er geen zekering in de zekeringenkast is
doorgebrand.
• Als de starttijdkeuze start is ingesteld, annuleert u
deze functie of wacht u tot het einde van het aftellen.
• Het apparaat is begonnen met de oplaadprocedure
van de hars in de waterontharder. De duur van de procedure is ongeveer 5 minuten.
• Controleer of de waterkraan is geopend.
• Zorg dat de waterdruk niet te laag is. Neem hiervoor
zo nodig contact op met uw lokale waterleidingbedrijf.
• Controleer of de waterkraan niet verstopt is.
• Controleer of het filter in de toevoerslang niet verstopt
is.
• Controleer of er geen knikken of bochten in de watertoevoerslang aanwezig zijn.
Bij sommige problemen wordt er op
de display een alarmcode
weergegeven.
Page 32

www.electrolux.com32
Probleem en alarmcode Mogelijke oplossing
Het apparaat pompt geen
water weg.
Op het display verschijnt
.
De anti-overstromingsbeveiliging is aan.
Op het display verschijnt
.
• Controleer of de gootsteenafvoer niet verstopt is.
• Controleer of er geen knikken of bochten in de waterafvoerslang aanwezig zijn.
• Draai de waterkraan dicht en neem contact op met de
klantenservice.
Schakel het apparaat na controle aan en
uit. Als het probleem opnieuw optreedt,
neemt u contact op met onze
klantenservice.
12.1 De was- en droogresultaten zijn niet naar tevredenheid
Probleem Mogelijke oplossing
Witte strepen of een blauwe
waas op glazen en serviesgoed
Vlekken en opgedroogde watervlekken op glazen en servies
Het serviesgoed is nat. • Het programma heeft geen droogfase of heeft een
Zie "Aanwijzingen en tips"
voor andere mogelijke
oorzaken.
• De vrijgegeven hoeveelheid glansmiddel is te hoog.
Zet de dosering van het glansmiddel op een lagere
stand.
• Er is te veel vaatwasmiddel gebruikt.
• De vrijgegeven hoeveelheid glansmiddel is te laag.
Zet de dosering van het glansmiddel op een hogere
stand.
• De kwaliteit van het glansmiddel kan de oorzaak zijn.
droogfase met lage temperatuur.
• Het glansmiddeldoseerbakje is leeg.
• De kwaliteit van het glansmiddel kan de oorzaak zijn.
13. TECHNISCHE INFORMATIE
Voor alarmcodes die niet in de tabel
vermeld zijn, neemt u contact op met de
klantenservice.
Afmetingen Breedte / hoogte / diepte
Elektrische aansluiting
Watertoevoerdruk Min. / max. bar (MPa) 0.8 (0.08) / 10 (1.0)
Watertoevoer Koud water of warm wa-
(mm)
Spanning (V) 220 - 240
1)
Frequentie (Hz) 50
2)
ter
545 / 474 / 515
max. 60 °C
Page 33

Vermogen Couverts 6
Energieverbruik Modus aan laten (W) 0.99
Energieverbruik Uit-modus (W) 0.10
1)
Zie het typeplaatje voor andere waarden.
2)
Als het hete water door een alternatieve, milieuvriendelijkere energiebron geproduceerd
wordt (bijv. zonnepanelen en windenergie), gebruik dan een heetwatervoorziening om het energieverbruik te verminderen.
14. MILIEUBESCHERMING
NEDERLANDS
33
Recycle de materialen met het symbool
. Gooi de verpakking in een geschikte
verzamelcontainer om het te recyclen.
Help om het milieu en de volksgezondheid
te beschermen en recycle het afval van
elektrische en elektronische apparaten.
Gooi apparaten gemarkeerd met het
symbool niet weg met het huishoudelijk
afval. Breng het product naar het
milieustation bij u in de buurt of neem
contact op met de gemeente.
Page 34

www.electrolux.com34
CONTENTS
1. SAFETY INFORMATION.................................................................................... 35
2. SAFETY INSTRUCTIONS...................................................................................36
3. PRODUCT DESCRIPTION................................................................................. 37
4. CONTROL PANEL............................................................................................. 38
5. PROGRAMMES.................................................................................................38
6. SETTINGS......................................................................................................... 40
7. OPTIONS...........................................................................................................41
8. BEFORE FIRST USE..........................................................................................41
9. DAILY USE........................................................................................................ 42
10. HINTS AND TIPS............................................................................................. 44
11. CARE AND CLEANING....................................................................................46
12. TROUBLESHOOTING......................................................................................46
13. TECHNICAL INFORMATION............................................................................ 48
WE’RE THINKING OF YOU
Thank you for purchasing an Electrolux appliance. You’ve chosen a product that
brings with it decades of professional experience and innovation. Ingenious and
stylish, it has been designed with you in mind. So whenever you use it, you can be
safe in the knowledge that you’ll get great results every time.
Welcome to Electrolux.
Visit our website for:
Get usage advice, brochures, trouble shooter, service information:
www.electrolux.com
Register your product for better service:
www.registerelectrolux.com
Buy Accessories, Consumables and Original spare parts for your appliance:
www.electrolux.com/shop
CUSTOMER CARE AND SERVICE
Always use original spare parts.
When contacting our Authorised Service Centre, ensure that you have the following
data available: Model, PNC, Serial Number.
The information can be found on the rating plate.
Warning / Caution-Safety information
General information and tips
Environmental information
Subject to change without notice.
Page 35

1. SAFETY INFORMATION
Before the installation and use of the appliance, carefully
read the supplied instructions. The manufacturer is not
responsible if an incorrect installation and use causes
injuries and damages. Always keep the instructions with
the appliance for future reference.
1.1 General Safety
• This appliance is intended to be used in household and
similar applications such as:
– farm houses; staff kitchen areas in shops, offices and
other working environments;
– by clients in hotels, motels, bed & breakfast and
other residential type environments.
• Do not change the specification of this appliance.
• The operating water pressure (minimum and maximum)
must be between 0.8 (0.08) / 10 (1.0) bar (Mpa)
Obey the maximum number of 6 place settings.
•
• If the supply cord is damaged, it must be replaced by
the manufacturer, its Authorised Service Centre or
similarly qualified persons in order to avoid a hazard.
• Put knives and cutlery with sharp points in the cutlery
basket with the points down or in a horizontal position.
• Do not keep the appliance door open without
supervision to prevent to fall on it.
• Before maintenance, deactivate the appliance and
disconnect the mains plug from the mains socket.
• Do not use water spray and steam to clean the
appliance.
• The ventilation openings in the base (if applicable) must
not be obstructed by a carpet.
• The appliance is to be connected to the water mains
using the new supplied hose-sets. Old hose sets must
not be reused.
ENGLISH
35
Page 36

www.electrolux.com36
1.2 Children and vulnerable people safety
• This appliance can be used by children aged from 8
years and above and persons with reduced physical,
sensory or mental capabilities or lack of experience and
knowledge if they have been given supervision or
instruction concerning use of the appliance in a safe
way and understand the hazards involved.
• Do not let children play with the appliance.
• Keep all detergents away from children.
• Keep children and pets away from the appliance door
when it is open.
• Cleaning and user maintenance shall not be made by
children without supervision.
2. SAFETY INSTRUCTIONS
2.1 Installation
• Remove all the packaging.
• Do not install or use a damaged
appliance.
• Do not install or use the appliance
where the temperature is less than 0
°C.
• Obey the installation instruction
supplied with the appliance.
• Make sure that the appliance is
installed below and adjacent to safe
structures.
2.2 Electrical connection
WARNING!
Risk of fire and electrical
shock.
• The appliance must be earthed.
• Make sure that the electrical
information on the rating plate agrees
with the power supply. If not, contact
an electrician.
• Always use a correctly installed
shockproof socket.
• Do not use multi-plug adapters and
extension cables.
• Make sure not to cause damage to the
mains plug and to the mains cable.
Should the mains cable need to be
replaced, this must be carried out by
our Authorised Service Centre.
• Connect the mains plug to the mains
socket only at the end of the
installation. Make sure that there is
access to the mains plug after the
installation.
• Do not pull the mains cable to
disconnect the appliance. Always pull
the mains plug.
• This appliance complies with the E.E.C.
Directives.
• Only for UK and Ireland. The appliance
has a 13 amp mains plug. If it is
necessary to change the fuse in the
mains plug, use fuse: 13 amp ASTA
(BS 1362).
2.3 Water connection
• Make sure not to cause damage to the
water hoses.
• Before you connect the appliance to
new pipes or pipes not used for a long
time, let the water flow until it is clean.
• The first time you use the appliance,
make sure that there is no leakage.
• If the water inlet hose is damaged,
immediately disconnect the mains plug
from the mains socket. Contact the
Authorised Service Centre to replace
the water inlet hose.
Page 37

2.4 Use
8
7 6
1 2 4 53
• Do not sit or stand on the open door.
• Dishwasher detergents are dangerous.
Obey the safety instructions on the
detergent packaging.
• Do not drink and play with the water in
the appliance.
• Do not remove the dishes from the
appliance until the programme is
completed. There can be detergent on
the dishes.
• The appliance can release hot steam if
you open the door while a programme
operates.
• Do not put flammable products or
items that are wet with flammable
products in, near or on the appliance.
2.5 Service
• Contact the Authorised Service Centre
to repair the appliance. We
3. PRODUCT DESCRIPTION
ENGLISH
recommend only the use of original
spare parts.
• When you contact the Authorised
Service Centre, ensure that you have
the following information that is
available on the rating plate.
Model :
PNC :
Serial Number :
2.6 Disposal
WARNING!
Risk of injury or suffocation.
• Disconnect the appliance from the
mains supply.
• Cut off the mains cable and discard it.
• Remove the door catch to prevent
children and pets to get closed in the
appliance.
37
Salt container
1
Spray arm
2
Filters
3
Primary basket
4
Cutlery basket
5
Rinse aid dispenser
6
Detergent dispenser
7
Rating plate
8
Page 38
1 32 4 5 6 7 8 9
www.electrolux.com38
4. CONTROL PANEL
On/off button
1
Display
2
Delay button
3
Programme button (up)
4
Programme button (down)
5
EnergySaver button
6
Extra Rinse button
7
Reset button
8
Indicators
9
4.1 Indicators
Indicator Description
End indicator.
Salt indicator. It is always off while the programme operates.
Rinse aid indicator. It is always off while the programme operates.
5. PROGRAMMES
Programme Degree of soil
P1
1)
P2
P3 • Heavy soil
P5
3)
Type of load
• Normal soil
• Crockery and
cutlery
• All
• Crockery, cut-
2)
lery, pots and
pans
• Crockery, cutlery, pots and
pans
• Light soil
• Crockery and
cutlery
Programme phases Options
• Prewash
• Wash 55 °C
• Rinses
• Dry
• Prewash
• Wash from 45 °C to
70 °C
• Rinses
• Dry
• Prewash
• Wash 70 °C
• Rinses
• Dry
• Wash 50 °C
• Rinses
• EnergySaver
• Extra Rinse
• EnergySaver
• Extra Rinse
• EnergySaver
• Extra Rinse
• Extra Rinse
Page 39

ENGLISH
39
Programme Degree of soil
Programme phases Options
Type of load
P4 • Normal or light
soil
• Wash 40 °C
• Rinses
• Extra Rinse
• Delicate crockery and glassware
P6
4)
1)
With this programme you have the most efficient use of water and energy consumption for
crockery and cutlery with normal soil. (This is the standard programme for test institutes).
2)
The appliance senses the degree of soil and the quantity of items in the basket . It automatically adjusts the temperature and the quantity of water, the energy consumption and the programme duration.
3)
With this programme you can wash a load with fresh soil. It gives good washing results in a
short time.
4)
With this programme you can quickly rinse dishes to prevent remains of food to bond on
dishes and odours to form in the appliance. Do not use detergent with this programme.
• All • Prewash
5.1 Consumption values
Programme
1)
Water
(l)
P1 7.5 0.64 170
P2 5 - 9 0.5 - 0.8 70 - 110
Energy
(kWh)
Duration
(min)
P3 9 1.0 105
P5 6 0.45 35
P4 6 0.40 30
P6 2 0.10 7
1)
The pressure and the temperature of the water, the variations of the mains supply, the options and the quantity of dishes can change the values.
5.2 Information for test institutes
For all the necessary information for test
Write down the product number (PNC)
that is on the rating plate.
performance, send an email to:
info.test@dishwasher-production.com
Page 40

www.electrolux.com40
6. SETTINGS
6.1 Programme selection mode
and user mode
When the appliance is in programme
selection mode it is possible to set a
programme and to enter the user mode.
In user mode, the following settings
can be changed:
• The level of the water softener
according to the water hardness.
• The activation or the deactivation of the
acoustic signal for end of programme.
These settings will be saved until you
change them again.
How to set the programme selection mode
The appliance is in programme selection
mode when the display shows 2 horizontal
status bar.
When you activate the appliance, usually it
is in programme selection mode.
However, if this does not happen, you can
set the programme selection mode in the
following way:
Press and hold Reset until the appliance
is in programme selection mode.
6.2 The water softener
Water hardness
German de-
grees (°dH)
>24 >40 >4.2 28 5
18 - 24 32 - 40 3.2 - 4.2 22 - 28 4
12 - 18 19 - 32 2.1 - 3.2 13 - 22
4 - 12 7 - 19 0.7 - 2.1 5 - 13 2
<4 <7 <0.7 < 5
1)
Factory setting.
2)
Do not use salt at this level.
French degrees (°fH)
mmol/l Clarke de-
grees
Water softener
level
1)
3
2)
1
How to set the water softener level
The appliance must be in programme
selection mode.
1. To enter the user mode, press and
hold simultaneously and until
the indicators , and start to
flash and the display is blank.
2. Press .
• The indicators and go off.
• The indicator continues to
flash.
• The display shows the current
setting: e.g. = level 5.
3. Press again and again to change
the setting.
4. Press the on/off button to confirm the
setting.
6.3 Acoustic signals
Acoustic signals sound when a
malfunction of the appliance occurs. It is
not possible to deactivate these acoustic
signals.
There is also an acoustic signal that
sounds when the programme is
completed. By default this acoustic signal
is deactivated but it is possible to activate
it.
Page 41

ENGLISH
41
How to activate the acoustic signal for the end of programme
The appliance must be in programme
selection mode.
1. To enter the user mode, press and
hold simultaneously and until
the indicators , and start to
flash and the display is blank.
2. Press .
7. OPTIONS
7.1 EnergySaver
This option decreases the temperature of
the last rinsing phase and consequently
also the energy consumption
(approximately -25%).
Dishes can still be wet once the
programme is completed.
The duration of the programme will be
shorter.
Desired options must be
activated every time before
you start a programme.
It is not possible to activate or
deactivate options while a
programme is running.
Not all options are compatible
with each other. If you have
selected non compatible
options, the appliance will
automatically deactivate one
or more of them. Only the
indicators of the options still
active will stay on.
• The indicators and go off.
• The indicator continues to
flash.
• The display shows the current
setting:
– = Acoustic signal on.
– = Acoustic signal off.
3. Press to change the setting.
4. Press the on/off button to confirm the
setting.
How to activate EnergySaver
Press , the related indicator comes
on.
If the option is not applicable to the
programme, the related indicator does not
come on or it flashes quickly for a few
seconds and then goes off.
The display shows the updated
programme duration.
7.2 Extra Rinse
This option adds a cold rinse phase to the
washing programme. The option
increases the programme duration and
water consumption.
How to activate Extra Rinse
Press Extra Rinse, the related indicator
comes on
If the option is applicable to the
programme, the related indicator comes
on. In the display you can see the update
of the programme duration.
8. BEFORE FIRST USE
1. Make sure that the current level of
the water softener agrees with the
hardness of the water supply. If
not, adjust the level of the water
softener.
2. Fill the salt container.
3. Fill the rinse aid dispenser.
4. Open the water tap.
5. Start a programme to remove any
processing residuals that can still be
inside the appliance. Do not use
detergent and do not load the
baskets.
When you start a programme, the
appliance can take up to 5 minutes to
recharge the resin in the water softener. It
Page 42
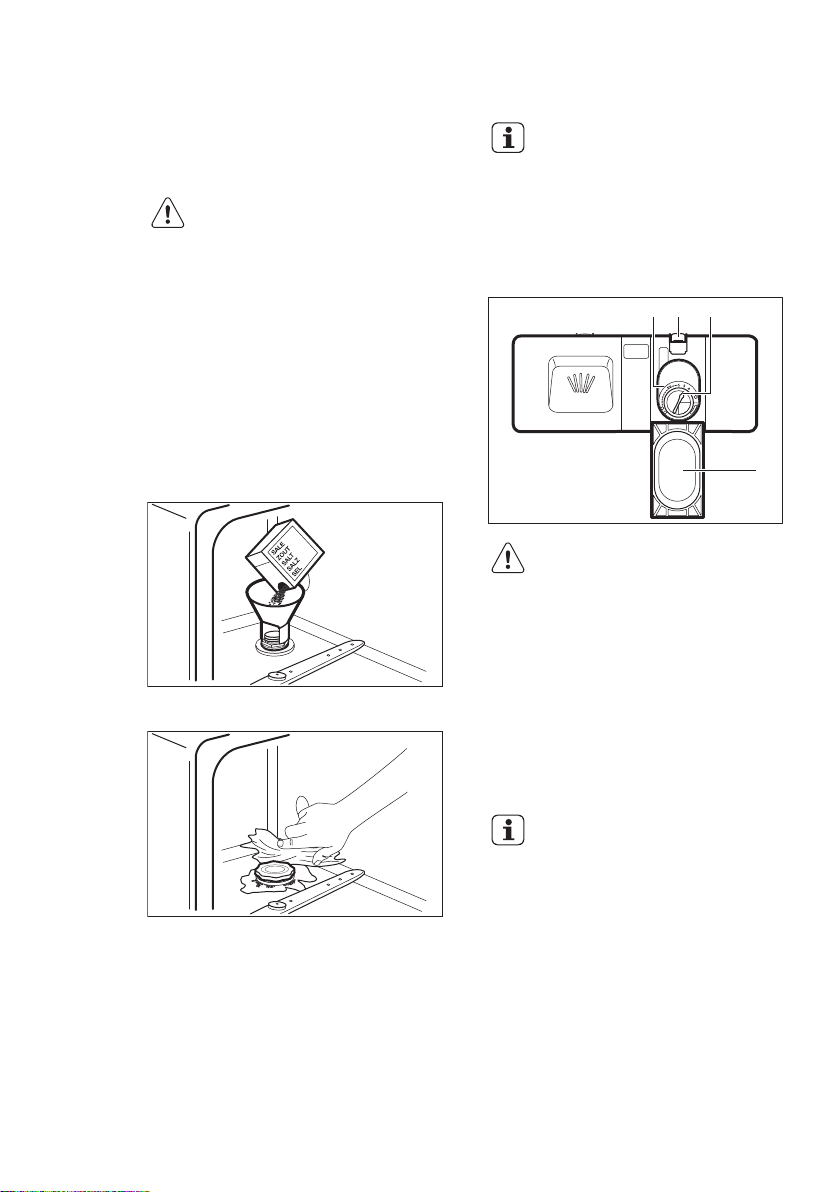
A
B
C
D
www.electrolux.com42
seems that the appliance is not working.
The washing phase starts only after this
procedure is completed. The procedure
will be repeated periodically.
8.1 The salt container
CAUTION!
Only use salt specifically
designed for dishwashers.
The salt is used to recharge the resin in
the water softener and to assure good
washing results in the daily use.
How to fill the salt container
1. Turn the cap of the salt container
counterclockwise and remove it.
2. Put 1 litre of water in the salt container
(Only for the first time).
3. Fill the salt container with dishwasher
salt.
4. Remove the salt around the opening
of the salt container.
5. Turn the cap of the salt container
clockwise to close the salt container.
Water and salt can come out
from the salt container when
you fill it. Risk of corrosion. To
prevent it, after you fill the salt
container, start a programme.
8.2 How to fill the rinse aid
dispenser
CAUTION!
Only use rinse aid specifically
designed for dishwashers.
1. Press the release button (D) to open
the lid (C).
2. Pour the rinse aid in the dispenser (A)
until the liquid reaches the fill level
'max'.
3. Remove the spilled rinse aid with an
absorbent cloth to prevent too much
foam.
4. Close the lid. Make sure that the
release button locks into position.
You can turn the selector of
the released quantity (B)
between position 1 (lowest
quantity) and position 6
(highest quantity).
9. DAILY USE
1. Open the water tap.
2. Press the on/off button to activate the
appliance.
Make sure that the appliance is in
programme selection mode.
• If the salt indicator is on, fill the salt
container.
• If the rinse aid indicator is on, fill
the rinse aid dispenser.
3. Load the baskets.
4. Add the detergent.
5. Set and start the correct programme
for the type of load and the degree of
soil.
Page 43

9.1 Using the detergent
30
20
A BD
C
1. Press the release button (B) to open
the lid (C).
2. Put the detergent, in powder or
tablets, in the compartment (A).
3. If the programme has a prewash
phase, put a small quantity of
detergent in the compartment (D).
4. Close the lid. Make sure that the
release button locks into position.
Using the multi-tablets
When you use tablets, that contain salt
and rinse aid, do not fill the salt container
and the rinse aid dispenser.
1. Adjust the water softener to the lowest
level.
2. Set the rinse aid dispenser to the
lowest position.
9.2 Setting and starting a
programme
ENGLISH
5. Close the appliance door to start the
programme.
Starting a programme with delay start
1. Set a programme.
2. Press Delay again and again until the
display shows the delay time you want
to set (from 1 to 19 hours).
The delay indicator comes on.
3. Close the appliance door to start the
countdown.
While a countdown is running it is possible
to increase the delay time but not to
change the selection of the programme
and options.
When the countdown is completed, the
programme starts.
Opening the door while the appliance operates
If you open the door while a programme is
running, the appliance stops. When you
close the door, the appliance continues
from the point of interruption.
Cancelling the delay start while the countdown operates
When you cancel the delay start you have
to set the programme and options again.
Press and hold Reset until the appliance
is in programme selection mode.
43
Starting a programme
1. Keep the appliance door ajar.
2. Press the on/off button to activate the
appliance. Make sure that the
appliance is in programme selection
mode.
3. Press repeatedly
display shows the number of the
programme you want to start. The
display will show the programme
number for approximately 3 seconds
and then show the programme
duration.
4. Set the applicable options.
or until the
Cancelling the programme
Press and hold Reset until the appliance
is in programme selection mode.
Make sure that there is detergent in the
detergent dispenser before you start a
new programme.
Page 44

www.electrolux.com44
End of the programme
When the programme is completed end
indicator comes on and the display shows
0 .
1. Press the on/off button to deactivate
the appliance.
2. Close the water tap.
10. HINTS AND TIPS
10.1 General
The following hints will ensure optimal
cleaning and drying results in daily use
and also help to protect the environment.
• Remove larger residues of food from
the dishes into the waste bin.
• Do not pre-rinse dishes by hand. When
needed, use the prewash programme
(if available) or select a programme with
a prewash phase.
• Always use the whole space of the
baskets.
• When loading the appliance, make
sure that the dishes can be completely
reached and washed by the water
released from the spray arm nozzles.
Make sure that items do not touch or
cover each other.
• You can use dishwasher detergent,
rinse aid and salt separately or you can
use the multi-tablets (e.g. ''3in1'',
''4in1'', ''All in 1''). Follow the
instructions written on the packaging.
• Select the programme according to the
type of load and degree of soil. With
the ECO programme you have the
most efficient use of water and energy
consumption for crockery and cutlery
with normal soil.
It you do not deactivate the
appliance, after three minutes
from the end of the
programme:
• All the indicators go
off.
• the display shows one
horizontal status bar.
This helps to decrease the
energy consumption.
Press one of the buttons (not
the on/off button), the display
and the indicators come on
again.
• Multi-tablets are usually suitable in
areas with a water hardness up to 21
°dH. In areas exceeding this limit, rinse
aid and salt must be used in addition to
the multi-tablets. However, in areas
with hard and very hard water we
recommend to use solo-detergent
(powder, gel, tablets without additional
functions), rinse aid and salt separately
for optimal cleaning and drying results.
• If you use multi-tablets you can select
the Multitab option (if available). This
option increases the cleaning and
drying results with the use of multitablets.
• Detergent tablets do not fully dissolve
with short programmes. To prevent
detergent residues on the tableware,
we recommend that you use the
tablets with long programmes.
• Do not use more than the correct
quantity of detergent. Refer to the
instructions on the detergent
packaging.
10.2 Using salt, rinse aid and detergent
• Only use salt, rinse aid and detergent
for dishwasher. Other products can
cause damage to the appliance.
Page 45

10.3 What to do if you want to
230 mm
max 260 mm
190 mm
stop using multi-tablets
Before you start to use separately
detergent, salt and rinse aid do the
following procedure.
1. Set the highest level of the water
softener.
2. Make sure that the salt and rinse aid
containers are full.
3. Start the shortest programme with a
rinsing phase. Do not add detergent
and do not load the baskets.
4. When the programme is completed,
adjust the water softener according to
the water hardness in your area.
5. Adjust the released quantity of rinse
aid.
10.4 Loading the baskets
ENGLISH
• Do not put in the appliance items that
can absorb water (sponges, household
cloths).
• Remove larger residues of food from
the dishes into the waste bin.
• Make soft the remaining burned food
on the items.
• Put hollow items (cups, glasses and
pans) with the opening down.
• Make sure that glasses do not touch
other glasses.
• Put cutlery and small items in the
cutlery basket.
• Put light items in the primary basket.
Make sure that the items do not move.
• Make sure that the spray arm can
move freely before you start a
programme.
10.5 Before starting a
programme
Make sure that:
• The filters are clean and correctly
installed.
• The cap of the salt container is tight.
• The spray arms are not clogged.
• There is dishwasher salt and rinse aid
(unless you use multi- tablets).
• The position of the items in the baskets
is correct.
• The programme is applicable for the
type of load and for the degree of soil.
• The correct quantity of detergent is
used.
45
• Only use the appliance to wash items
that are dishwasher-safe.
• Do not put in the appliance items made
of wood, horn, aluminium, pewter and
copper.
10.6 Unloading the baskets
Let the tableware cool down before you
remove it from the appliance. Hot items
can be easily damaged.
At the end of the programme
water can still remain on the
sides and on the door of the
appliance.
Page 46

B
A
www.electrolux.com46
11. CARE AND CLEANING
WARNING!
Before maintenance,
deactivate the appliance and
disconnect the mains plug
from the main socket.
Dirty filters and clogged spay
arms decrease the washing
results. Make a check
regularly and, if necessary,
clean them.
11.1 Cleaning the filters
1. Turn the filter (A) counterclockwise
and remove it.
2. Remove the filter (B).
3. Wash the filters with water.
4. Before you put the filter (B) back,
make sure that there are no residues
of food or soil in or around the edge of
the sump.
5. Put the filter (A) into position in filter
(B). Turn it clockwise until it locks.
CAUTION!
An incorrect position of the
filters can cause bad washing
results and damage to the
appliance.
11.2 Cleaning the spray arms
1. Turn the nut counterclockwise.
2. Remove the spray arm.
3. Clean the holes.
If the holes in the spray arm are clogged,
remove remaining parts of soil with a thin
pointed object.
11.3 External cleaning
• Clean the appliance with a moist soft
cloth.
• Only use neutral detergents.
• Do not use abrasive products, abrasive
cleaning pads or solvents.
11.4 Internal cleaning
• Carefully clean the appliance, including
the rubber gasket of the door, with a
soft moist cloth.
• If you regularly use short duration
programmes, these can leave deposits
of grease and limescale inside the
appliance. To prevent this, we
recommend to run long duration
programmes at least 2 times per
month.
12. TROUBLESHOOTING
If the appliance does not start or it stops
during operation. Before you contact an
Authorised Service Centre, check if you
can solve the problem by yourself with the
help of the information in the table.
With some problems, the display
shows an alarm code.
Page 47

Problem and alarm code Possible solution
You cannot activate the appliance.
• Make sure that the mains plug is connected to the
mains socket.
• Make sure that there is no damaged fuse in the fuse
box.
The programme does not
start.
• Make sure that the appliance door is closed.
• If the delay start is set, cancel the setting or wait for
the end of the countdown.
• The appliance has started the procedure to recharge
the resin inside the water softener. The duration of the
procedure is approximately 5 minutes.
The appliance does not fill
with water.
The display shows .
• Make sure that the water tap is open.
• Make sure that the pressure of the water supply is not
too low. For this information, contact your local water
authority.
• Make sure that the water tap is not clogged.
• Make sure that the filter in the inlet hose is not clogged.
• Make sure that the inlet hose has no kinks or bends.
The appliance does not
drain the water.
• Make sure that the sink spigot is not clogged.
• Make sure that the drain hose has no kinks or bends.
The display shows .
The anti-flood device is on.
The display shows .
• Close the water tap and contact an Authorised Service
Centre.
ENGLISH
47
Once you have checked the appliance,
deactivate and activate the appliance. If
the problem occurs again, contact an
For alarm codes not described in the
table, contact an Authorised Service
Centre.
Authorised Service Centre.
12.1 The washing and drying results are not satisfactory
Problem Possible solution
There are whitish streaks or
bluish layers on glasses and
dishes.
There are stains and dry water drops on glasses and
dishes.
The dishes are wet. • The programme does not have a drying phase or
Refer to "Hints and tips" for
other possible causes.
• The release quantity of rinse aid is too much. Adjust
the rinse aid selector to a lower position.
• The quantity of detergent is too much.
• The released quantity of rinse aid is not sufficient.
Adjust the rinse aid selector to a higher position.
• The quality of the rinse aid can be the cause.
has a drying phase with low temperature.
• The rinse aid dispenser is empty.
• The quality of the rinse aid can be the cause.
Page 48

www.electrolux.com48
13. TECHNICAL INFORMATION
Dimensions Width / height / depth
(mm)
Electrical connection
1)
Voltage (V) 220 - 240
Frequency (Hz) 50
Water supply pressure Min. / max. bar (MPa) 0.8 (0.08) / 10 (1.0)
Water supply
Cold water or hot water
Capacity Place settings 6
Power consumption Left-on mode (W) 0.99
Power consumption Off-mode (W) 0.10
1)
Refer to the rating plate for other values.
2)
If the hot water comes from alternative source of energy, (e.g. solar panels, aeolian energy),
use the hot water supply to decrease energy consumption.
14. ENVIRONMENT CONCERNS
Recycle the materials with the symbol .
Put the packaging in applicable containers
to recycle it. Help protect the environment
and human health and to recycle waste of
electrical and electronic appliances. Do
545 / 474 / 515
max 60 °C
2)
not dispose appliances marked with the
symbol with the household waste.
Return the product to your local recycling
facility or contact your municipal office.
*
Page 49

ENGLISH
49
Page 50

www.electrolux.com50
Page 51

ENGLISH
51
Page 52

www.electrolux.com/shop
100001940-A-352014
 Loading...