

Page 1

user manual
notice d'utilisation
benutzerinformation
Oven
Four
Backofen
EOC69900
Page 2

2 electrolux
Electrolux. Thinking of you.
Share more of our thinking at www.electrolux.com
CONTENTS
Safety information 2
Product description 5
Before first use 5
Control panel 6
Daily use 7
Clock functions 12
Automatic programmes 13
Using the accessories 13
SAFETY INFORMATION
Before the installation and use, read this
manual carefully:
•For your personal safety and the safety of
your property
• For the respect of the environment
• For the correct operation of the appliance.
Always keep these instructions with the appliance also if you move or sell it.
The manufacturer is not responsible if incorrect installation or use results in damage.
Children and vulnerable people safety
• This appliance can be used by children
aged from 8 years and above and persons with reduced physical, sensory or
mental capabilities or lack of experience
and knowledge if they have been given
supervision or instruction concerning use
of the appliance in safe way and understand the hazards involved. Children shall
not play with the appliance.
• Keep all packaging away from children.
There is the risk of suffocation or physical
injury.
• Keep children and animals away from the
appliance when the door is open or the
appliance is in the operation, because it
becomes hot. There is the risk of injury or
other permanent disability.
• If the appliance has Child Lock or Key
Lock (Control Lock) function, use it. It
prevents children and animals from accidental operation of the appliance.
Additional functions 15
Helpful hints and tips 16
Care and cleaning 17
What to do if… 20
Technical data 21
Installation 21
Environment concerns 22
Subject to change without notice
General safety
• Do not change the specifications of this
appliance. There is the risk of injury and
damage to the appliance.
• Do not let the appliance stay unattended
during operation.
• Switch off the appliance after each use.
Installation
• Only an approved electrician can install
and connect the appliance. Contact an
approved service centre. This is to prevent the risks of structural damage or
physical injury.
• Make sure that the appliance is not damaged because of transport. Do not connect a damaged appliance. If necessary,
contact the supplier.
• Remove all packaging, stickers and layers from the appliance before first use.
Do not remove the rating plate. It can invalidate the guarantee.
• Fully obey the laws, ordinances, directives and standards in force in the country where you use the appliance (safety
regulations, recycling regulations, electrical or gas safety rules etc.).
• Make sure that the appliance is disconnected from the power supply during the
installation.
• Be careful when you move the appliance.
The appliance is heavy. Always use safety gloves. Do not pull the appliance by
the handle.
• The electrical installation must have an
isolation device which lets you discon-
Page 3

electrolux 3
nect the appliance from the mains at all
poles. The isolation device must have a
contact opening width of minimum 3
mm.
• You must have correct isolation devices:
line protecting cut-outs, fuses (screw
type fuses removed from the holder),
earth leakage trips and contactors.
• The shock protection parts must be fixed
in such a way that they cannot be undone without tools.
• Before the installation, make sure that the
kitchen cabinet has the recess dimensions applicable.
• Make sure that the appliance is installed
below and adjacent safe structures.
• Keep the minimum distances to the other
appliances and units.
• Install the appliance with its back and
one side close to the higher appliance.
The other side must be close to appliance with the same height.
• The appliance cannot be positioned on a
base.
• Built in ovens and built in cooking surfaces are attached with special connection
system. To prevent damage to the appliance, only use an appliance with the appliances from the same manufacturer.
Electrical connection
• The appliance must be earthed.
• Make sure that the electrical data on the
rating plate agree with your domestic
power supply.
• Information on the voltage is on the rating
plate.
• Always use a correctly installed shockproof socket.
• When you connect electrical appliances
to mains sockets, do not let cables touch
or come near the hot appliance door.
• Do not use multi-way plugs, connectors
and extension cables. There is the risk of
fire.
• Do not replace or change the mains cable. Contact the service centre.
• Make sure not to squash or cause damage to the mains plug (if applicable) and
cable behind the appliance.
• Make sure that the mains connection is
accessible after the installation.
• Do not pull the mains cable to disconnect
the appliance. Always pull the mains plug
– if applicable.
Use
• The appliance is only for domestic use.
Do not use the appliance for commercial
and industrial use.
• Only use the appliance for domestic
cooking tasks. This is to prevent physical
injury to persons or prevent damage to
property.
• Do not use the appliance as a work surface or storage surface.
• Do not put flammable products or items
that are wet with flammable products,
and/or fusible objects (made of plastic or
aluminium) in, near or on the appliance.
There is the risk of explosion or fire.
• The interior of the appliance becomes hot
during use. There is the risk of burns. Do
not touch the heating elements in the appliance. Use gloves when you insert or
remove the accessories or pots.
• Be careful when you remove or install the
accessories to prevent damage to the
oven enamel.
• Always stay away from the appliance
when you open the door while the appliance is in operation. Hot steam can release. There is the risk of skin burns.
• Discoloration of the enamel has no effect
on the performance of the appliance so it
is not a defect in the sense of the warranty law.
• To prevent damage or discoloration to
the enamel:
– do not put any objects directly on the
appliance floor and do not cover it with
aluminium foil;
– do not put hot water directly into the
appliance;
– do not keep moist dishes and food in
the appliance after you finish the cooking.
• Do not use this appliance if it is in contact
with water. Do not operate the appliance
with wet hands.
• Do not apply pressure on the open door.
• Always close the appliance door when
you cook, even while grilling.
Page 4

4 electrolux
Care and cleaning
• Before maintenance, switch off the appliance and disconnect the appliance from
the power supply.
• Before maintenance, make sure that the
appliance is cold. There is the risk of
burns. There is the risk that the glass
panels can break.
• Keep the appliance clean at all times. A
build-up of fats or other foodstuff can result in a fire.
• Regular cleaning prevents the surface
material from deteriorating
•For your personal safety and the safety of
your property, only clean the appliance
with water and a soap. Do not use flammable products or products that can
cause corrosion.
• Do not clean the appliance with steam
cleaners, high-pressure cleaners, sharp
objects, abrasive cleaning agents, abrasive sponges and stain removers
• If you use an oven spray, follow the instructions from the manufacturer. Do not
spray anything on the fat filter (if applicable), the heating elements and the thermostat sensor.
• Do not clean the glass door with abrasive
cleaning agents or metal scraper. Heat
resistant surface of the inner glass can
break and shatter.
• When the door glass panels are damaged they become weak and can break.
You must replace them. Contact the
service centre.
• Be careful when you remove the door
from the appliance. The door is heavy!
• Do not clean catalytic enamel (if applicable).
Pyrolytic cleaning
• Do not leave the appliance unattended
during Pyrolytic cleaning.
• Do not try to open the door and do not
cut the power supply during Pyrolytic
cleaning.
• Keep children away during pyrolytic
cleaning. The appliance becomes very
hot. There is the risk of burns.
• During pyrolytic cleaning, stubborn dirt
can cause discoloration to the enamel.
Discoloration to the enamel has no effect
on the performance of the appliance
Risk of fire
• Open the door carefully. The use of ingredients with alcohol can cause a mixture
of alcohol and air. There is the risk of fire.
• Do not let sparks or open flames come
near the appliance when you open the
door.
• Do not put flammable products or items
that are wet with flammable products,
and/or fusible objects (made of plastic or
aluminium) in, near or on the appliance.
Oven lamp
• Bulb lamps used in this appliance are
special lamps selected for household appliances use only. They cannot be used
for the full or partial illumination of a
household room.
• If it becomes necessary to replace the
lamp use one of the same power and
specifically designed for household appliances only.
• Disconnect the appliance from the power
supply before the replacement of the
oven lamp. There is the risk of electrical
shock.
Service centre
• Only an approved engineer can repair or
work on the appliance. Contact an approved service centre.
• Use only original spare parts.
Disposal of the appliance
• To prevent the risk of physical injury or
damage
– Disconnect the appliance from the
power supply.
– Cut off the mains cable and discard it.
– Discard the door catch. This prevents
children or small animals from being
closed inside of the appliance. There is
the risk of suffocation.
Page 5

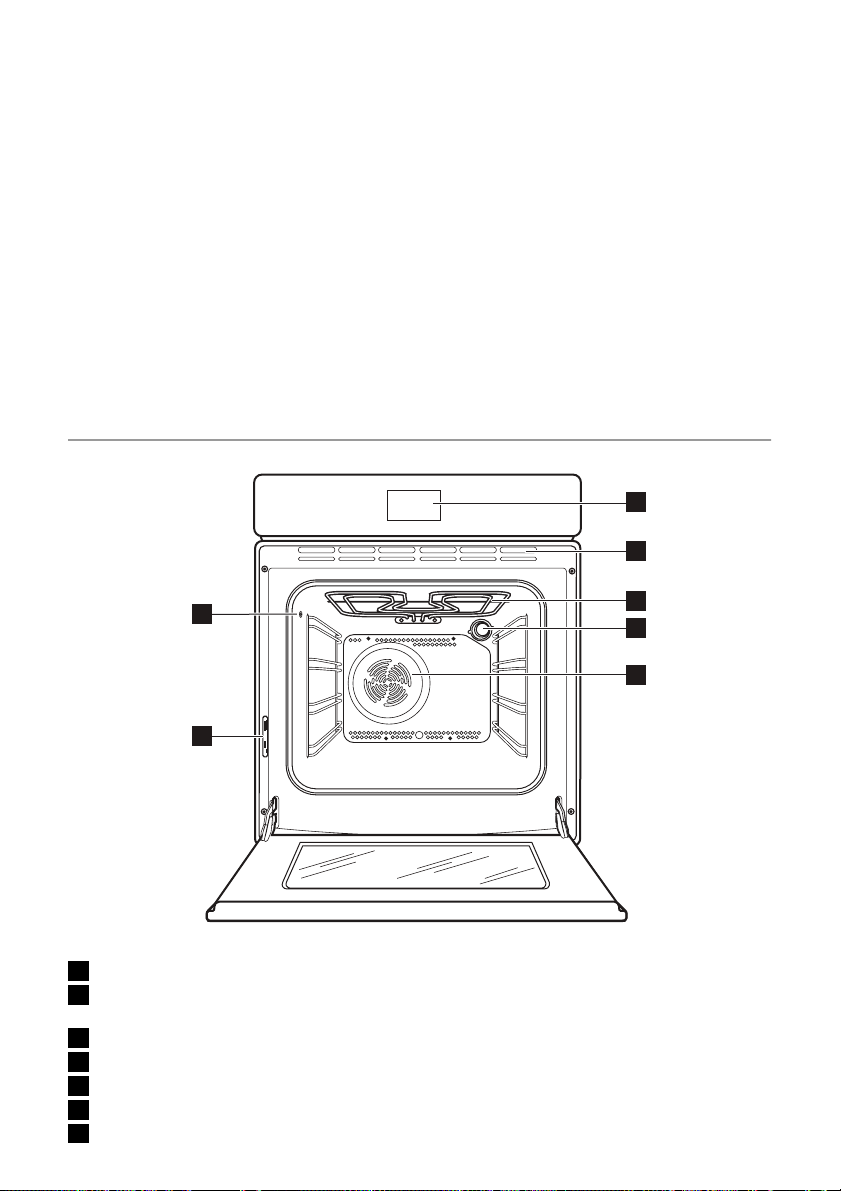
PRODUCT DESCRIPTION
electrolux 5
1
2
7
6
1 Electronic programmer
2 Air Vents for Cooling Fan
3 Grill
4 Oven lamp
5 Fan
6 Rating plate
7 Food probe socket
BEFORE FIRST USE
Warning! Refer to "Safety information"
chapter.
Initial Cleaning
• Remove all parts from the appliance.
• Clean the appliance before first use.
Caution! Do not use abrasive cleaning
agents! This can damage the surface.
Refer to chapter "Care and Cleaning".
First Connection
When you connect the appliance to the
mains or after the power cut the display
shows the welcome text. After that you
3
4
5
Oven shelf
•
For cookware, cake tins, roasts.
• Deep roasting pan
To bake and roast or as pan to collect
fat.
Food probe
•
To measure how far the food is cooked.
have to set the language, date and time of
the day. Touch
tings. Touch OK to confirm.
Pre-heating
1.
Set function
ture.
2. Let the appliance operate without the
food for approximately 1 hour.
3.
Set function
ture.
4. Let the appliance operate without the
food for approximately 10 minutes.
or to adjust the set-
and maximum tempera-
and maximum tempera-
Page 6

6 electrolux
5.
Set function
and maximum tempera-
ture.
6. Let the appliance operate without the
food for approximately 10 minutes.
This is to burn off the residue in the appli-
hot than usually. When you pre-heat the
appliance for the first time, the appliance
can make an odour and smoke. This is the
usual effect. Make sure the airflow is sufficient.
ance. The accessories can become more
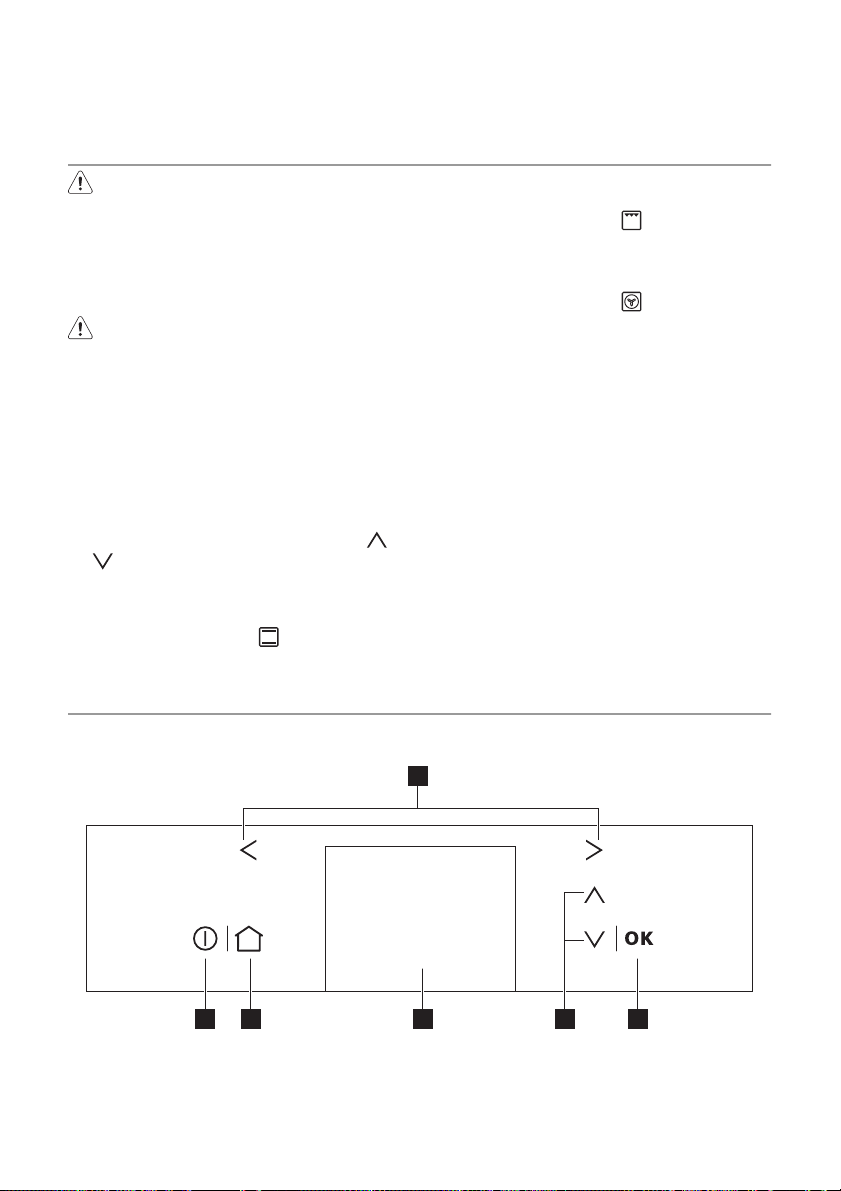
CONTROL PANEL
Electronic programmer
1
Touch the sensor field to operate the appliance.
Sensor
field
Function Comment
23456
1
2
3
4
5
6
,
- Display Shows the current settings of the appliance.
Right, Left
OK To confirm. To start the set function.
Down Up
Home To cancel the selection and go back to the main menu.
On / Off To activate and deactivate the appliance.
To move between the main menus.
It does not interrupt a heating function or programme
which operates.
To move in the submenus. To set the settings in the submenus. (example: temperature, time, weight).
To set the values:
• Touch the sensor field one time: To set the value in slow
steps
• Hold down the sensor field: To set the value in fast steps
Page 7

Display
1
4 3
Area Comment
Main menu area Shows main menu items.
1
Can show:
• Heating function name and symbol
• Automatic program name and symbol
Main content area
2
Clock functions area
3
Time of day area
4
Clock functions and time area
• Temperature(s)
• Food probe status
•Help text
• Name of the day
•Date
Can show:
• Time related information for Clock functions
• Time progress indicator
If there are more than one clock function on at the same time,
the time progress indicator shows the status of the clock function that is longer than others.
Shows:
•Time of day
1 Reminder
1
2 Duration
3 Time progress indicator and uptimer val-
ue
4 Time of day
electrolux 7
2
4 3 2
DAILY USE
Warning! Refer to "Safety information"
chapter.
To operate the appliance you can use:
Page 8

8 electrolux
• manual mode - to set a heating function, the temperature and the cooking
time manually
The menus in overview
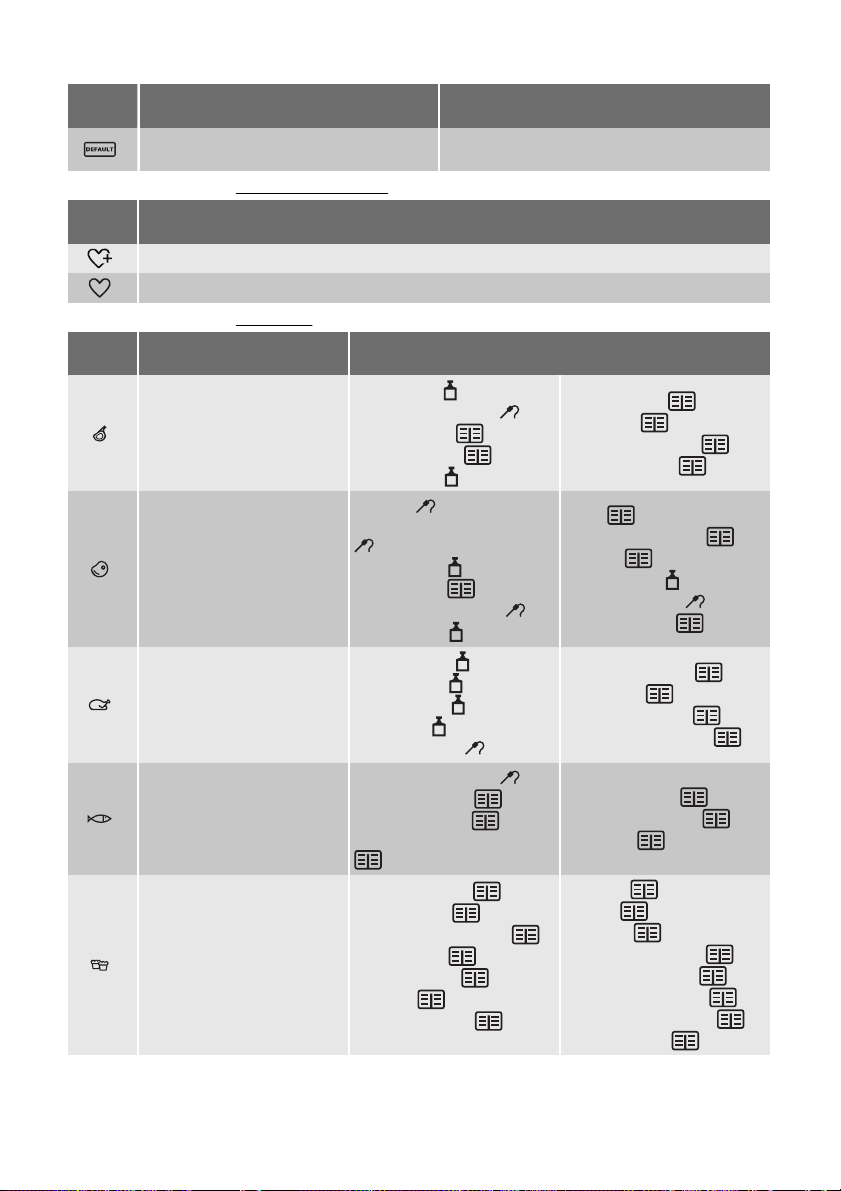
Main menu
Sym-
bol
Functions It contains list of the heating functions.
Timers It contains list of the clock functions.
Food Probe To set the settings for the food probe.
Cleaning It contains the cleaning functions.
Settings To set other settings.
My Programmes
Recipes It contains list of automatic cooking programmes.
Oven On
Oven Off
Menu item Description
Submenus
Submenus for:
Oven function Description
Functions
Fan cooking For baking on up to three oven levels at the same time.
Conventional For baking and roasting on one shelf level.
• automatic programmes (recipes)- to
prepare a dish when you do not have a
knowledge or experience in cooking
It contains list of favourite cooking programmes
made by user.
It shows the settings of the appliance.
Pizza
Turbo Grill
Half Grill
Full Grill For grilling flat foodstuffs in large quantities and for toasting.
Bottom Heat
Slow Cook
Defrost For defrosting food.
Drying Ideal for drying fruit and herbs.
Keep Warm For keeping pre-cooked food warm.
For baking on one oven level dishes that require more intensive
browning and a crispy base.
For roasting larger joints of meat or poultry on one level. The
function is also suitable for gratinating and browning.
For grilling flat foodstufs placed in the middle of the grill and for
toasting.
For baking cakes with crispy or crusty bases. For re-heating
pies and pastries.
For preparing especially tender, succulent roasts. For casseroles and hotpots.
Page 9

Oven function Description
Preserving Ideal for jams and preserves.
Plate Warming For warming plates before serving.
Oven Lamp Lights up without any heating function.
Submenus for: Timers
Sym-
bol
Set duration
Set start time
Set end time
Set+Go
Count up timer
Set reminder
Submenus for: Food Probe
Sym-
bol
Core temp. 30°
Submenus for: Cleaning
Sym-
bol
Pyrolytic Starts the pyrolytic cleaning procedure.
Cleaning reminder Reminds you when to clean the oven.
Submenu Description
Submenus for: Settings
Sym-
bol
Set clock To set the time on the clock.
Set date To set the date.
Show time and date To show the time and date.
Heat and hold
Time extension
Language To set the language for the display.
Key tones
Alarm/error tones It activates and deactivates the alarm tones.
Submenu Description
electrolux 9
Submenu
Submenu
It activates and deactivates the Heat and hold
function.
It activates and deactivates the Time extension function.
It activates and deactivates the touch fields
tone.
Page 10

10 electrolux
Sym-
bol
Service
Highest value
Up key goes
Factory settings
Submenu Description
Submenus for: My Programmes
Sym-
bol
Add new
Name of the favourites
Submenus for: Recipes
Sym-
bol
Pork/Veal
Beef/Game/Lamb
Poultry
Fish
Submenu Dish
It shows the software version and configuration.
To set where the display shows higher value
on the temperature and time areas.
To set if the is to scroll up the list or to go
to upper item.
To set all settings to the factory settings (also
My programmes ).
Submenu
Roast Pork
Loin of Pork
Pork Knuckle
Pork Shoulder
Roast Veal
Top Side Beef
Scandinavian Beef
Roast Beef
Marinated Beef
Loin of Game
Roast Game
Chicken, whole
Turkey, whole
Duck, whole
Goose, whole
Boned Poultry
Whole Fish
Fillet of Fish
Cod Fish
Fish in salt
Veal Knuckle
Ossobuco
Stuffed Veal Breast
Meat Loaf
Rabbit
Mustard Rabbit
Wild Boar
Roast Lamb
Lamb Joint, medium
Leg of Lamb
Chicken Legs
Coq au Vin
Roast Duck with orange
Stuffed Chicken
Stuffed Calamari
Steamed Fish
Jansons Temptation
Page 11

electrolux 11
Sym-
bol
Cake
Pizza/Pie/Bread
Casseroles/Gratins
Convenience
Submenu Dish
Lemon Sponge Cake
Swedish Cake
Biscuit
Cheese Cake
Fruit Cake
Streusel Cake
Rich Yeast Plait
Yeast Plait
Pizza
Onion Tart
Quiche Lorraine
Goatscheese Flan
Cheese Flan
Lasagne
Cannelloni
Potato Gratin
Moussaka
Pizza, frozen
Pizza American, frozen
Pizza, chilled
Pizza Snacks, frozen
French Fries
Wedges/Croquettes
Hash Browns
Operation of the menus
1. Activate the appliance.
2.
3.
Touch
Touch
or to set the menu item.
or to move in the subme-
nu. Touch OK to confirm.
To get back to the previous menu touch
.
Activating a heating function
1. Activate the appliance.
2.
Touch
or to set the heating func-
tion. Touch OK.
3.
Touch
or to set the temperature.
Touch OK. If you do not set the temperature, the appliance starts with the preset temperature.
When you activate a heating function,
the display shows the temperature in
Ring Cake
Savarin Cake
Brownies
Muffins
Sweet Tart
Carrot Cake
Almond Cake
Fruit Tart
Cheese Pastry
White Bread
Farmer Bread
Russian Cake
Pasta Gratin
Chicory Gratin
Casserole
Cabbage Casserole
Bread/Rolls
Bread/Rolls, frozen
Apple Strudel, frozen
Fillet of Fish, frozen
Chicken Wings
Lasagne/Cannelloni, frozen
the appliance (in warm colour) and the
set temperature (in white colour).
Stopping the heating function
Touch
.
Showing the temperature
Touch
or to go to Oven on/off .
The display shows the temperatures. The
temperature in the appliance is in warm colour. The set temperature is in white.
The Residual heat indicator
When you deactivate the appliance, the display shows the message that the temperature in the appliance decreases. You can
use the residual heat to keep the food
warm.
Page 12
12 electrolux
CLOCK FUNCTIONS
Symbol Function Description
Duration
Start time
End time
Set+Go
Count up timer
Reminder
Setting the clock functions
1. Go to Functions menu and set a heating
function and a temperature.
2. Go to Timers menu and set the clock
function.
3.
Touch
or to set the necessary
time. Touch OK.
When the clock function ends, an
acoustic signal sounds. The appliance
deactivates. The colours on display
change and clock function symbol flashes.
4. Touch a sensor field to stop the signals.
When you use Food probe, the func-
tions Duration and End Time do not
operate.
You can set the Reminder function
when the appliance is on or off. To set
the Reminder function when the appli-
ance is off, touch
necessary time. Touch OK.
The Reminder function stays on also
when you deactivate the appliance.
Set+Go
Set the heating function and the temperature. In the Timers menu set the Set+Go
function and touch OK. The appliance is in
the standby mode. Touch any sensor field
to start the set heating function.
Heat and hold
You can activate or deactivate the
function in Settings menu.
To set a count down.
To set when the appliance activates.
To set when the appliance deactivates.
To set the settings for the heating function and activate it later.
To set a count up. It shows how long the appliance operates.
This function has no effect on the operation of the appliance.
To set a countdown. This function has no effect on the operation of the appliance.
The Heat and hold function keeps prepared
food warm at 80° for 30 minutes. It activates after the baking or roasting procedure
ends.
Conditions for the function:
• The set temperature is more than
80°C.
• The Duration function is set.
When the function ends, an acoustic signal
sounds.
The Heat and hold function operates for 30
minutes.
The Heat and hold function stays on if you
change the heating functions.
Time Extension
You can activate or deactivate the
function in Settings menu.
or to set the
The Time Extension function makes the
heating function continue after the set time
ends.
• Applicable for all heating functions with
function Duration or Weight Automatic .
• Not applicable for heating functions with
food probe.
Page 13

AUTOMATIC PROGRAMMES
The automatic programmes give optimum
settings for each type of meat or other recipes. Refer to the recipe book.
• Meat programmes with Weight Automatic ( Recipes menu)
• Meat programmes with Food probe Automatic ( Recipes menu)
• Recipe Automatic ( Recipes menu)
Recipes with Weight Automatic
This function automatically calculates the
roasting time. To use the function, it is necessary to input the food weight.
Activating the function:
1. Activate the appliance.
2. Set the menu Recipes . Touch OK.
3. Set the category and dish. Touch OK.
4. Set the Weight Automatic . Touch OK.
5.
Touch
Touch OK.
The automatic program starts. When time
ends, an acoustic signal sounds. Touch a
sensor field to deactivate the signal.
Recipes with Recipe Automatic
This appliance has a set of recipes you can
use. Recipes are fixed and you cannot
change them.
Activating the function:
1. Activate the appliance.
2. Set the menu Recipes . Touch OK.
3. Set the category and dish. Touch OK.
4. Set the Recipe Automatic . Touch OK.
Recipes with Food Probe Automatic
1. Activate the appliance.
2. Set the menu Recipes . Touch OK.
3. Set the category and dish. Touch OK.
4. Set the Food Probe Automatic .
5. Touch OK.
6. Install the food probe.
When the programme ends, an acoustic
signal sounds.
Use a sensor field to deactivate the
acoustic signal.
or to set the food weight.
electrolux 13
7. Remove the food probe.
When you set the option Manual, the
display shows automatic settings but
you can change them.
My programmes menu
You can store your favourite settings: duration, temperature or heating function.
Storing a programme
1. Activate the appliance.
2. Set a heating function, temperature and
time or an automatic program from Recipes . Touch OK.
3. Set the menu My programmes .
4.
Touch
new . Touch OK. The display shows a
possible name for the programme.
5.
Touch
ber. Touch OK.
6.
To remove the last symbol, touch
OK.
7. Do step 5 again and again to set the
name of the programme.
8.
Touch
Touch OK.
If the memory is full, erase some entries
from the menu.
To change the name of a programme,
use the option Rename . Refer to
"Storing a programme".
Activating the programme
1. Activate the appliance.
2. Set the menu My programmes . Touch
OK.
3. Set the name of the programme. Touch
OK.
4. Set the option Start . Touch OK.
or to set the option Add
or to set the letter or num-
or
to set the option Remove . Touch
or to set the option Save .
USING THE ACCESSORIES
Warning! Refer to "Safety information"
chapter.
Food probe
The food probe measures the core temperature of the food. When the food is at the
Page 14

14 electrolux
set temperature, the appliance deactivates
automatically.
There are two temperatures to be set
• The oven temperature
• The core temperature of the food
The display shows the oven temperature
and the core temperature of the food.
21 3 4
56
1 Heating function
2 Food probe indicator
3 The core temperature of the food
4 The set core temperature of the food
5 The set temperature in the appliance
6 The temperature in the appliance
When the appliance operates at the set
temperature, the current temperatures
go off.
Important! Only use the supplied food
probe and the original spare parts.
1. Activate the appliance.
2. Put the tip of the food probe in the centre of the food.
3. Put the plug of the food probe in the
socket on the side wall of the appliance.
The display shows the menu Food
probe .
If you do step 2 before step 1, touch
or to set the menu Food probe .
4.
Touch
or to set the core tempera-
ture of the food in less than 5 seconds.
5. Go to the menu Functions .
6.
Touch
or to set the heating function and, if necessary, the oven temperature.
The food probe must stay in the food
and in the food probe socket during
the cooking.
7. When the food is at the set core temperature, an acoustic signal sounds.
The heating function deactivates.
Touch one of the sensor fields to stop
the signal.
Warning! Be careful when you remove
the tip and plug of the food probe. The
food probe is hot. There is the risk of
burns.
8. Remove the food probe plug and remove the food from the appliance.
9. Deactivate the appliance.
For meat programmes with the food
probe, refer to the menu Recipes .
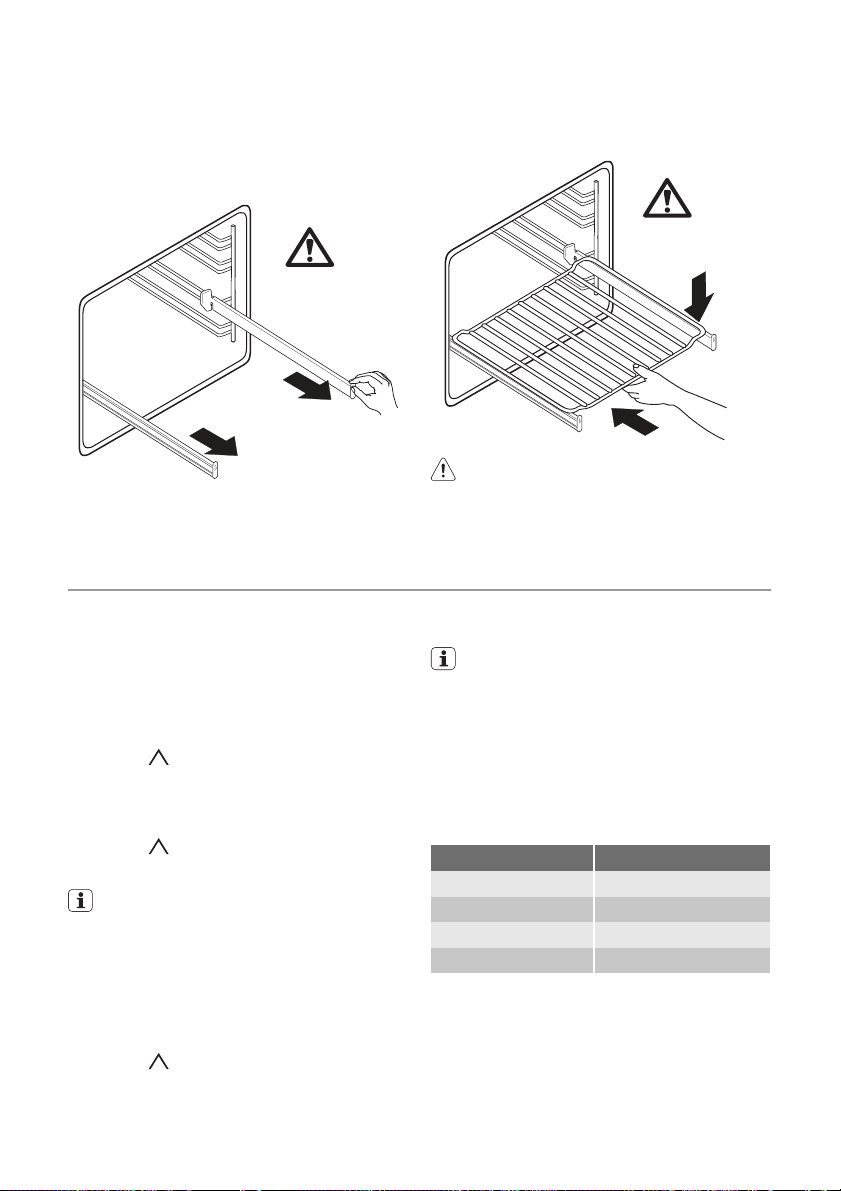
Telescopic runners
Installing telescopic runners
You can put the telescopic runners on each
level.
Make sure that the two telescopic runners
are on the same level.
The stop element that is at one end of the
telescopic runner must point up.
1
2
Page 15
electrolux 15
Using telescopic runners
With telescopic runners you can put and remove the shelves more easily.
1. Pull out the right and left hand telescopic runners.
°C
2. Put the oven shelf on the telescopic runners and carefully push them in the appliance.
ADDITIONAL FUNCTIONS
Key Lock
The Key Lock prevents an accidental
change of the heating function .
Activating the Key Lock
1. Activate the appliance.
2. Set the heating function and temperature.
3.
Touch
The display shows a message.
The Key Lock is active.
Deactivating the Key Lock
1.
Touch
The Key Lock is not active.
If you deactivate the appliance, the Key
Lock deactivates.
Child Lock
The Child Lock prevents an accidental operation of the appliance.
Activating the Child Lock
1. Deactivate the appliance.
2.
Touch
the display shows a message.
and OK at the same time.
and OK at the same time.
and OK at the same time until
Make sure you push back the telescopic
runners fully in the appliance before you
close the oven door.
°C
Caution! Do not clean the telescopic
runners in the dishwasher. Do not
lubricate the telescopic runners.
Deactivating the Child Lock
1. Do the above steps again.
If there is a power failure, the electronic
programmer keeps some of the settings (for example language setting and
the menu My Programmes ).
Automatic switch-off
The appliance deactivates after some time:
• if you do not deactivate the appliance;
• if you do not change the oven tempera-
ture.
Oven temperature Switch-off time
30°C - 115°C 12,5 h
120°C - 195°C 8.5 h
200°C - 245°C 5.5 h
250°C 3.0 h
To operate the appliance after an automatic
switch-off, first deactivate the appliance
fully.
Cooling fan
When the appliance operates, the cooling
fan switches on automatically to keep the
surfaces of the appliance cool. If you switch
Page 16

16 electrolux
off the appliance, the cooling fan continues
to operate until the appliance cools down.
Safety thermostat
To prevent dangerous overheating (due to
incorrect use of the appliance or defective
HELPFUL HINTS AND TIPS
Warning! Refer to "Safety information"
chapter.
• The appliance has four shelf levels. Count
the shelf levels from the bottom of the
appliance floor.
• The appliance has a special system
which circulates the air and constantly recycles the steam. With this system you
can to cook in a steamy environment and
keep the food soft inside and crusty outside. It decreases the cooking time and
energy consumption to a minimum.
• Moisture can condense in the appliance
or on the glass doors. This is normal. Always stand back form the appliance
when you open the appliance door while
cooking. To decrease the condensation,
run the appliance for 10 minutes before
cooking.
• Wipe away moisture after every use of
the appliance.
• Do not put the objects directly on the appliance floor and do not cover the components with aluminium foil when you
cook. This can change the baking results
and damage the enamel coating.
Baking cakes
• The best temperature for baking cakes is
between 150°C and 200°C.
• Preheat the oven for approximately 10
minutes before baking.
• Do not open the oven door before 3/4 of
the set cooking time is up.
• If you use two baking trays at the same
time, keep one level empty between
them.
Cooking meat and fish
• Do not cook meat with weight below 1
kg. Cooking too small quantities makes
the meat too dry.
components), the oven has a safety thermostat, which interrupts the power supply.
The oven switches back on again automatically, when the temperature drops.
• To keep the red meat well cooked outside and juicy inside set the temperature
between 200°C-250°C.
• For white meat, poultry and fish set the
temperature between 150°C-175°C.
• Use a dripping pan for very fatty food to
prevent the oven from stains that can be
permanent.
• Leave the meat for approximately 15 minutes before carving so that the juice
does not seep out.
• To prevent too much smoke in the oven
during roasting, add some water into the
dripping pan. To prevent the smoke condensation, add water each time after it
dries up.
Cooking times
Cooking times depend on the type of food,
its consistency, and volume.
Initially, monitor the performance when you
cook. Find the best settings (heat setting,
cooking time, etc.) for your cookware, recipes and quantities when you use this appliance.
Information on acrylamides
Important! According to the newest
scientific knowledge, if you brown food
(specially the one which contains starch),
acrylamides can pose a health risk. Thus,
we recommend that you cook at the lowest
temperatures and do not brown food too
much.
Page 17

CARE AND CLEANING
Warning! Refer to "Safety information"
chapter.
• Clean the front of the appliance with a
soft cloth with warm water and cleaning
agent.
• To clean metal surfaces use a usual
cleaning agent
• Clean the oven interior after each use.
Thus you can remove dirt more easily
and it does not burn on.
• Clean stubborn dirt with a special oven
cleaner.
• Clean all oven accessories (with a soft
cloth with warm water and cleaning
agent) after each use and let them dry.
• If you have nonstick accessories, do not
clean them using an aggressive agents,
sharp edged objects or dishwasher. It
can destroy nonstick coating!
Pyrolytic cleaning
With the function Pyrolytic , you can clean
the oven using pyrolysis. Set the function in
the menu Cleaning .
Warning! The appliance becomes very
hot. There is the risk of burns.
Important! Before you start the function
Pyrolytic , remove all the removable parts
(the shelf support rails, the accessories,
etc.) from the appliance.
1. Activate the appliance.
2.
Touch
ing . Touch OK.
3.
Touch
lytic . Touch OK.
4.
Touch
the cleaning.
– LIGHT - for a low level of dirt (2:15)
– NORMAL - for a medium level of dirt
– INTENSE - for a high level of dirt
– AUTO - the appliance automatically
5. The display shows the messages.
Touch OK after each message.
When the appliance operates at preset
temperature, the door locks .
or to set the menu Clean-
or to set the function Pyro-
or to set the duration for
(2:45)
(3:15)
calculates which pyrolytic cycle to
use.
electrolux 17
When the pyrolytic cycle starts, the
oven lamp does not work and the cooling fan works at a higher speed.
Do not open the door during the heating up
time. If you open the door, you cancel the
pyrolytic cleaning cycle.
To stop the pyrolytic cleaning cycle, touch
.
Do not use the appliance until the door lock
symbol is off.
Cleaning reminder
It shows you when to do the cleaning. It
shows the message on the display after
some hours of the appliance operation.
Activate and deactivate the Cleaning reminder function in the menu Cleaning . The
Cleaning reminder function deactivates
when you set the appliance to the factory
settings.
Cleaning the oven door
The oven door has four panels of glass.
You can remove the oven door and the internal panels of glass to clean them.
Removing the oven door and the glass
panels
1. Fully open the door and identify the
hinge to the left side of the door.
2. Push the tightening component until it
pulls back.
Page 18

18 electrolux
3. Hold the pushed component with one
hand. Use a screwdriver with the other
hand to lift and turn the left side hinge
lever.
4. Identify the hinge to the right side of the
door.
6. Close the oven door to the first opening
position (halfway). Then pull forward
and remove the door from its seat.
7. Put the door on a soft cloth on a stable
surface.
5. Lift and turn the lever on the hinge.
8. Release the locking system to remove
the panels of glass.
Page 19
9. Turn the two fasteners by 90° and remove them from their seats.
90°
10. Carefully lift (step 1) and remove (step
2) the panels of glass one by one. Start
from the top panel of glass.
2
1
electrolux 19
1 2 3
The middle panels ( 2 - 3 ) have a decorative frame. When you install them, make
sure that the screen-printing zone looks to
the inner side of the door. Make sure that
after the installation the surface of the glass
2
panel frame (
- 3 ) on the screen-printing zones is not rough when you touch it.
Make sure that you install the panels of
glass in the seats correctly (refer to the illustration).
Clean the glass panels with water and
soap. Dry the glass panels carefully.
Installing the door and the glass panels
When the cleaning is completed, install the
glass panels and the oven door. Do the
above steps in the opposite sequence.
Make sure that you put the glass panels (
1
), ( 2 ) and ( 3 ) back in the correct se-
quence (refer to the illustration).
Page 20

20 electrolux
Shelf Support Rails
Removing the shelf support rails
1. Pull the front of the shelf support rail
away from the side wall.
2. Pull the rear shelf support rail away from
the side wall and remove it.
Installing the shelf support rails
Install the shelf support rails in opposite sequence.
The rounded ends of the shelf support
rails must point to the front!
Oven lamp
Warning! Be careful! There is the risk
of electrical shock!
Before you change the oven lamp:
• Switch off the oven.
• Remove the fuses in the fuse box or
switch off the circuit breaker.
Put a cloth on the bottom of the oven
for protection of the oven light and
glass cover.
1. Turn the glass cover anti-clockwise to
remove it.
2. Clean the glass cover.
3. Replace the oven light bulb with appli-
cable 300°C heat-resistant oven light
bulb.
Use the same oven lamp type.
4. Install the glass cover.
WHAT TO DO IF…
Warning! Refer to "Safety information"
chapter.
Problem Possible cause Remedy
The appliance does not
heat up.
The necessary settings are not
The Child lock is on. Refer to "Deactivating the Child
The fuse in the fuse box is re-
The display shows error
message "F....."
The oven lamp does not
operate.
The appliance is deactivated. Activate the appliance.
set .
leased.
Electronic error. Contact Service Center.
The oven lamp is defective. Refer to "Replace the oven lamp".
Do a check of the settings .
lock".
Do a check of the fuse.
If the fuse is released more than
one time, contact a qualified electrician .
Page 21

Problem Possible cause Remedy
Steam and condensation
settle on the food and in
the appliance.
If you cannot find a solution to the problem
yourself, contact your dealer or the service
centre.
You left the dish in the appliance
for too long .
The necessary data for the service centre is
on the rating plate. The rating plate is on
the front frame of the oven cavity.
Do not leave the dishes in the appliance for longer than 15-20 minutes after the cooking ends.
We recommend that you write the data here:
Model (MOD.) .........................................
Product number (PNC) .........................................
Serial number (S.N.) .........................................
TECHNICAL DATA
Voltage 230 V
Frequency 50 Hz
INSTALLATION
Warning! Refer to "Safety information"
chapter.
50
electrolux 21
22
590
594
540
2
560
576
550 min
560÷570
550 min
560-570
593
580
80÷100
Page 22

22 electrolux
Electrical installation
Warning! Only a qualified and
competent person must do the
electrical installation.
The manufacturer is not responsible if
you do not follow safety precautions
from chapter "Safety information".
This appliance is supplied with a main plug
and a main cable.
A
B
ENVIRONMENT CONCERNS
The symbol on the product or on its
packaging indicates that this product may
not be treated as household waste. Instead
it should be taken to the appropriate
collection point for the recycling of electrical
and electronic equipment. By ensuring this
product is disposed of correctly, you will
help prevent potential negative
consequences for the environment and
human health, which could otherwise be
caused by inappropriate waste handling of
this product. For more detailed information
about recycling of this product, please
contact your local council, your household
waste disposal service or the shop where
you purchased the product.
Packaging material
The packaging material is environmentally-friendly and recyclable. Plastic
parts are marked with international abbreviations such as PE, PS, etc. Dispose of the packaging material in the
containers provided for this purpose at
your local waste management facility.
Page 23

Electrolux. Thinking of you.
Partagez notre imagination sur www.electrolux.com
SOMMAIRE
Consignes de sécurité 23
Description de l'appareil 26
Avant la première utilisation 27
Bandeau de commande 27
Utilisation quotidienne 29
Fonctions de l'horloge 33
Programmes automatiques 34
Utilisation des accessoires 36
CONSIGNES DE SÉCURITÉ
Lisez attentivement cette notice d'utilisation
avant l'installation et l'utilisation de l'appareil :
• Pour votre propre sécurité et la sécurité
de votre appareil
• Pour le respect de l'environnement
• Pour le bon fonctionnement de l’appareil.
Conservez cette notice d'utilisation avec
l'appareil. Si l'appareil devait être vendu ou
cédé à une autre personne, assurez-vous
que la notice d'utilisation l'accompagne,
afin que le nouvel utilisateur soit correctement informé du fonctionnement de celui-ci
et des avertissements s'y rapportant.
Le fabricant n'est pas responsable des
dommages liés à une mauvaise installation
ou utilisation.
Sécurité des enfants et des personnes
vulnérables
• Cet appareil peut être utilisé par des personnes âgées de plus de 8 ans, ainsi que
des personnes dont les capacités physiques, sensorielles et mentales sont réduites ou dont les connaissances et l'expérience sont insuffisantes, à condition
d'être surveillées ou d'avoir reçu des instructions concernant l'utilisation sécurisée de l'appareil et de comprendre les
risques encourus. Ne laissez pas les enfants jouer avec l'appareil.
• Ne laissez jamais les emballages à la portée des enfants. Risque d'asphyxie ou de
blessure.
electrolux 23
Fonctions supplémentaires 38
Conseils utiles 38
Entretien et nettoyage 39
En cas d'anomalie de fonctionnement 43
Caractéristiques techniques 44
Installation 44
En matière de protection de
l'environnement 45
Sous réserve de modifications
• Tenez les enfants et les animaux éloignés
de l'appareil lorsque la porte est ouverte
et pendant le fonctionnement de l'appareil, car il devient chaud. Risque de blessure ou d'invalidité permanente.
• Si l'appareil est équipé d'une fonction de
sécurité enfants ou de verrouillage des
touches (blocage des commandes) utilisez-la. Celle-ci empêche les enfants (ou
les animaux) de manipuler l'appareil accidentellement.
Consignes générales de sécurité
• Ne modifiez pas les spécifications de cet
appareil. Vous risqueriez de vous blesser
et d'endommager l'appareil.
• Ne laissez pas l'appareil sans surveillance
en cours de fonctionnement.
• Mettez à l'arrêt l'appareil après chaque
utilisation.
Installation
• Ne confiez l'installation et le raccordement de l'appareil qu'à un électricien
agréé. Contactez votre service aprèsvente. Cela vise à éviter les risques de
dommages structurels ou corporels.
• Vérifiez que l'appareil n'a pas été endommagé au cours du transport. Ne branchez jamais un appareil endommagé. Si
l'appareil est endommagé, veuillez contacter votre magasin vendeur.
• Avant la première utilisation, assurezvous de bien retirer tous les emballages,
les étiquettes et les films protecteurs de
Page 24

24 electrolux
l'appareil. Ne retirez jamais la plaque signalétique. Cela peut annuler la garantie.
• Conformez-vous entièrement aux lois,
décrets, réglementations et normes en vigueur dans le pays d'utilisation de l'appareil (réglementations de sécurité, de recyclage, de l'électricité ou du gaz etc.).
• Veillez à débrancher l'appareil au cours
de l'installation.
• Soyez prudent lorsque vous déplacez
l'appareil. En effet, il est lourd. Portez
toujours des gants de sécurité. Ne tirez
jamais l'appareil par la poignée.
• L'installation électrique doit être équipée
d'un dispositif d'isolement à coupure omnipolaire. Le dispositif d'isolement doit
présenter une distance d'ouverture des
contacts d'au moins 3 mm.
• Vous devez disposer de dispositifs d'isolement appropriés : des coupe-circuits,
des fusibles (les fusibles à visser doivent
être retirés du support), des disjoncteurs
différentiels et des contacteurs.
• Les dispositifs de protection doivent être
fixés de telle sorte qu'ils ne puissent pas
être retirés sans outils.
• Avant l'installation, vérifiez que les dimensions de votre cuisine sont appropriées
(écartement).
• Vérifiez que l'appareil est installé sous et
à proximité de structures sûres.
• Respectez l'écartement minimal requis
avec les autres appareils.
• Installez l'appareil de telle sorte que sa
face arrière et l'une de ses faces latérales
soient installées contre l'appareil supérieur. Seuls d'autres meubles ayant une
hauteur identique à celle du four peuvent
être installés contre l'autre paroi latérale.
• L'appareil ne peut pas être placé sur un
socle.
• Les fours et plaques de cuisson encastrables sont équipés de connexions particulières. Pour éviter d'endommager l'appareil, veillez à utiliser un appareil du même fabricant que les autres appareils.
Branchement électrique
• L'appareil doit être relié à la terre.
• Vérifiez que les données électriques figurant sur la plaque signalétique correspondent à celles de votre réseau.
• Les informations sur la tension se trouvent sur la plaque signalétique.
• Utilisez toujours une prise correctement
installée, protégée contre les chocs.
• Faites attention lors du raccordement
d'appareils électriques aux prises de
courant situées à proximité de l'appareil.
Veillez à ce que les câbles d'alimentation
électrique ne se coincent pas dans la
porte chaude de l'appareil.
• L'appareil ne doit pas être raccordé à
l'aide d'un prolongateur, d'une prise multiple ou d'un raccordement multiple. Risque d'incendie.
• Ne remplacez pas ou ne changez pas le
câble d'alimentation. Contactez votre
service après-vente.
• Attention à ne pas écraser ou endommager la prise (si tel est le cas) et le câble
d'alimentation situés à l'arrière de l'appareil.
• Vérifiez que la prise est accessible après
l'installation.
• Ne tirez pas sur le câble d'alimentation
électrique pour débrancher l'appareil. Retirez, pour ce faire, la fiche de la prise
secteur (si tel est le cas).
Utilisation
• Cet appareil est destiné à un usage domestique normal. N'utilisez jamais l'appareil à des fins commerciales ou industrielles.
• Votre appareil est destiné à la cuisson
des aliments. Cela vise à éviter tout accident matériel ou corporel.
• N'utilisez jamais l'appareil comme plan
de travail ou comme support.
• Ne placez jamais, sur ou à proximité de
l'appareil, des produits inflammables ou
des articles imprégnés de produits inflammables et/ou des objets susceptibles
de fondre (en plastique ou en aluminium).
Risque d'explosion ou d'incendie.
• Au cours de l'utilisation, l'intérieur de
l'appareil devient chaud. Risque de brûlure. Ne touchez pas les éléments chauffants de l'appareil. Utilisez des gants
thermiques de cuisine pour introduire ou
retirer les accessoires et les plats.
• Une grande prudence s'impose lors du
retrait ou de l'installation des accessoires, afin d'éviter d'endommager l'émail
du four.
• Si l'appareil est en fonctionnement, écartez-vous toujours de l'appareil avant
Page 25

electrolux 25
d'ouvrir la porte. De la vapeur brûlante
peut s'en échapper. Cette vapeur risque
de provoquer une brûlure de la peau.
• La décoloration de l'émail n'affecte pas la
performance de l'appareil. Par conséquent, il ne s'agit pas d'un défaut dans le
sens de la garantie.
• Pour éviter tout endommagement ou décoloration de l'émail :
– ne placez jamais d'ustensile, plat ou
accessoire directement sur la sole du
four et ne le recouvrez jamais de papier
aluminium (risque d'endommagement
de l'émail) ;
– ne versez jamais d'eau chaude directe-
ment dans l'appareil ;
– une fois la cuisson terminée, ne laissez
jamais d'aliments ou de plats humides
à l'intérieur de l'appareil.
• N'utilisez jamais cet appareil s'il est en
contact avec de l'eau. N'utilisez jamais
cet appareil avec les mains mouillées.
• N'exercez jamais de pression sur la porte
ouverte.
• Toutes les cuissons, même au gril, doivent être effectuées porte fermée.
Entretien et nettoyage
• Avant toute opération d'entretien, mettez
l'appareil à l'arrêt et débranchez-le de
l'alimentation électrique.
• Avant toute opération d'entretien, vérifiez
que l'appareil est froid. Risque de brûlure ; risque de fêlure des vitres.
• Le four doit être maintenu propre en permanence. L'accumulation de graisses ou
d'autres résidus alimentaires pourrait
provoquer un incendie.
• Veillez à nettoyer le four de façon régulière ; vous contribuerez ainsi à maintenir le
revêtement en bon état.
• Pour votre propre sécurité et la sécurité
de votre appareil, nettoyez l'appareil uniquement à l'eau savonneuse. N'utilisez
pas de produits inflammables ou corrosifs.
• N'utilisez pas d'appareils de nettoyage à
vapeur ou à haute pression, d'objets
tranchants, de produits de nettoyage
abrasifs, d'éponges abrasives ni de détachants pour nettoyer l'appareil.
• Si vous nettoyez votre four à l'aide d'un
spray spécial pour fours, respectez scru-
puleusement les consignes d'utilisation
du fabricant de ce produit. Ne vaporisez
aucun produit sur le filtre à graisse (s'il
est installé), sur les résistances, ni sur la
sonde du thermostat.
• N'utilisez pas de produits abrasifs, de
grattoir métallique ou d'objets tranchants
ou pointus pour nettoyer la vitre ou les
verres de la porte du four. Vous risquez
de briser et de faire éclater la vitre interne
de la porte.
• Lorsque les vitres de la porte sont endommagées, elles se fragilisent et risquent de se briser. Vous devez les remplacer. Contactez votre service aprèsvente.
• Soyez prudent lorsque vous retirez la
porte de l'appareil. La porte est lourde !
• Ne nettoyez pas l'émail catalytique (si tel
est le cas).
Nettoyage par pyrolyse
• Ne laissez pas l'appareil sans surveillance
lors du nettoyage par pyrolyse.
• N'essayez pas d'ouvrir la porte et ne
coupez pas le courant lors du nettoyage
par pyrolyse.
• Au cours d'un nettoyage par pyrolyse,
maintenez les enfants à distance. L’appareil devient très chaud. Risque de brûlure.
• Au cours d'un nettoyage par pyrolyse, les
salissures tenaces peuvent provoquer
une décoloration de l'émail. La décoloration de l'émail n'a aucune incidence sur
les performances de l'appareil
Risque d'incendie.
• Faites attention en ouvrant la porte. Si
vous utilisez des ingrédients contenant
de l'alcool lors d'une cuisson, un mélange d'alcool et d'air facilement inflammable peut éventuellement se former. Risque d'incendie !
• Ne manipulez pas d'objets incandescents ou provoquant des étincelles ou du
feu.
• Ne placez jamais, dans, sur ou à proximité de l'appareil, des produits inflammables ou des articles imprégnés de produits inflammables et/ou des objets susceptibles de fondre (en plastique ou en
aluminium).
Page 26
26 electrolux
Éclairage du four
• Débranchez l'appareil de l'alimentation
électrique pendant le remplacement de
l'éclairage du four. Risque de choc électrique !
• Utilisez une ampoule de puissance similaire et spécifiquement conçue pour les
appareils ménagers pour remplacer celle
usagée.
• Débranchez l'appareil électriquement
avant de remplacer l'éclairage du four.
Risque de choc électrique !
Service après-vente
• Toute intervention ou réparation sur votre
appareil ne doit être effectuée que par un
DESCRIPTION DE L'APPAREIL
7
professionnel qualifié. Contactez votre
service après-vente.
• Utilisez exclusivement des pièces d'origine.
Mise au rebut de l'appareil
• Pour éviter tout risque corporel ou matériel
– Débranchez l'appareil du secteur.
– Coupez le câble d'alimentation au ras
de l'appareil et mettez-le au rebut.
– Éliminez le dispositif de verrouillage de
porte. Il empêche les enfants ou les
petits animaux de s'enfermer à l'intérieur de l'appareil. Risque d'asphyxie.
1
2
3
4
6
1 Programmateur électronique
2 Ouvertures d'aération du ventilateur de
refroidissement
3 Gril
4 Éclairage du four
5 Ventilation
6 Plaque signalétique
7 Fiche sonde à viande
5
• Grille du four
Elle permet de poser les plats (rôtis, gratins), les moules à pâtisserie et de faire
des grillades.
• Lèchefrite
Elle est utilisée pour cuire et rôtir ou recueillir le jus des grillades.
Sonde à viande
•
Page 27
Pour estimer avec précision l'état de
cuisson au cœur des aliments.
AVANT LA PREMIÈRE UTILISATION
Avertissement Reportez-vous au
chapitre « Consignes de sécurité ».
Premier nettoyage
• Retirez tous les accessoires de l'appareil.
• Nettoyez l'appareil avant de l'utiliser pour
la première fois.
Attention N'utilisez pas de détergents
abrasifs ! Vous risqueriez
d'endommager la surface. Reportezvous au chapitre "Entretien et
nettoyage".
Premier raccordement
Lorsque vous branchez l'appareil sur le
secteur, ou après une coupure de courant,
le texte de bienvenue s'affiche à l'écran.
Vous devez ensuite paramétrer la langue, la
date et l'heure. Appuyez sur la touche
ou pour régler les paramètres. Appuyez
sur OK pour confirmer.
Préchauffage
1.
Fonction de réglage
maximale.
et température
electrolux 27
2. Laissez l'appareil fonctionner sans aliments pendant environ 1 heure.
3.
Fonction de réglage
maximale.
4. Laissez l'appareil fonctionner sans aliments pendant environ 10 minutes.
5.
Fonction de réglage
maximale.
6. Laissez l'appareil fonctionner sans aliments pendant environ 10 minutes.
Cela a pour but de brûler les résidus dans
l'appareil. Les accessoires peuvent devenir
plus chauds que d'habitude. Lorsque l'on
préchauffe l'appareil pour la première fois, il
peut y avoir des dégagements d'odeur et
de fumée. Ceci est tout à fait normal. Vérifiez que la ventilation environnante est suffisante.
et température
et température
BANDEAU DE COMMANDE
Programmateur électronique
1
23456
Page 28
28 electrolux
Les touches sensitives permettent de commander l'appareil.
Tou-
che
sensi-
tive
Fonction Description
1
2
3
4
5
6
Écran
,
Droite, gauche
CORRECT Pour confirmer. Pour utiliser les fonctions de réglages.
Bas, haut
- Écran Affiche les réglages actuels de l'appareil.
Accueil Pour annuler la sélection et revenir au menu principal.
Marche/Arrêt Mettre en fonctionnement ou à l'arrêt l’appareil.
Pour se déplacer entre les menus principaux.
Elles n'interrompent pas un mode de cuisson ou un
programme en cours.
Pour vous déplacer dans les sous-menus. Pour régler les paramètres dans les sous-menus. (Exemple : température, durée, poids).
Pour régler les valeurs :
• Appuyez une fois sur la touche sensitive pour régler lentement la valeur.
• Maintenez la touche sensitive appuyée pour régler la valeur
rapidement.
1
4 3
Zone Description
Zone du menu princi-
1
pal
Affiche les éléments inclus dans le menu principal.
2
Page 29

Zone Description
Elle peut afficher :
• Le nom et le symbole du mode de cuisson
• Le nom et le symbole d'un programme automatique
Zone du contenu prin-
2
Zone des fonctions de
3
Zone de l'heure du jour
4
cipal
l'horloge.
Zone des fonctions de l'horloge et
l'heure
• La ou les température(s)
• L'état de la sonde à viande
• Un texte d'aide
• Le jour de la semaine
•La date
Elle peut afficher :
• Des informations relatives au temps pour les fonctions de l'horloge
• Un voyant de progression temporelle
Si plus d'une fonction de l'horloge est active en même temps,
le voyant de progression temporelle indique l'état de la fonction
de l'horloge qui est la plus longue.
Elle affiche :
• L'heure du jour
1 Rappel
2 Durée
1
3 Voyant de progression temporelle et va-
leur du minuteur
4 Heure du jour
electrolux 29
4 3 2
UTILISATION QUOTIDIENNE
Avertissement Reportez-vous au
chapitre « Consignes de sécurité ».
Pour faire fonctionner l'appareil, vous pouvez utiliser :
• le mode manuel - pour régler une fonction de cuisson, la température et le
temps de cuisson manuellement
Présentation générale des menus
Menu principal
Sym-
bole
Modes Contient la liste des modes de cuisson.
Minuteurs Contient la liste des fonctions de l'horloge.
Sonde à viande Pour régler les paramètres de la sonde à viande.
Nettoyage Contient les fonctions de nettoyage.
Élément du menu Description
les programmes automatiques (re-
•
cettes) - pour préparer un plat que vous
ne savez pas cuisiner
Page 30
30 electrolux
Sym-
bole
Réglages de base Pour définir d'autres réglages.
Mes Programmes
Recettes
Four en fonctionnement
Four à l'arrêt
Élément du menu Description
Sous-menus
Sous-menus pour :
Fonction four Description
Chaleur tournante Pour cuire simultanément sur trois gradins maximum.
Convection naturelle Pour cuire et rôtir sur un seul gradin.
Sole pulsée
Turbo gril
Gril
Gril intensif
Sole
Slow Cook
Contient la liste des programmes de cuisson préférés, créée par l'utilisateur.
Contient la liste des programmes de cuisson assistée.
Affiche les réglages de l'appareil.
Modes
Pour cuire sur un niveau de gradin des préparations qui doivent
être fortement dorées au-dessus et très croustillantes au-dessous.
Pour rôtir des morceaux de viande plus gros ou des volailles sur
un seul niveau de gradin. Cette fonction est également appropriée pour dorer et gratiner les aliments.
Pour faire griller des aliments peu épais disposés au centre de la
grille et pour toaster.
Pour griller des aliments peu épais en grandes quantités et pour
faire des toasts.
Pour terminer la cuisson des pâtisseries avec un fond croustillant. Pour réchauffer les tartes et les petites pâtisseries.
Pour préparer des rôtis particulièrement tendres et juteux. Pour
les ragoûts.
Décongélation Pour décongeler les aliments surgelés.
Déshydratation Pour sécher les herbes aromatiques et les fruits.
Maintien au chaud Pour garder les aliments au chaud.
Stérilisation Idéal pour les confitures et les conserves.
Chauffe Plats Pour réchauffer les assiettes et les plats.
Éclairage du four
Il s'allume même si aucune fonction de cuisson n'est sélectionnée.
Page 31
Sous-menus pour : Minuteurs
Sym-
bole
Durée de cuisson
Début de cuisson
Fin de cuisson
Set+Go
Temps écoulé
Minuteur
Sous-menus pour : Sonde à viande
Sym-
bole
Temp. à cœur 30°
Sous-menus pour : Nettoyage
Sym-
bole
Pyrolyse
Nettoyage conseillé Vous rappelle quand le four doit être nettoyé.
Sous-menu Description
Sous-menus pour : Réglages de base
Sym-
bole
Mise à l'heure Pour régler l'heure sur l'horloge.
Régler la date Pour régler la date.
Indique la date et l'heure Pour indiquer l'heure et la date.
Maintien au Chaud
Prolongement de la durée de cuisson
Sélectionner la langue Pour choisir la langue à l'écran.
Sélectionner le type de tonalités
Tonalité pour les alarmes Active/désactive la tonalité des alarmes.
Maintenance
Valeur Maximale
Défiler de bas en haut
Sous-menu Description
electrolux 31
Sous-menu
Sous-menu
Démarre le processus de nettoyage par pyrolyse.
Pour activer et désactiver la fonction Maintien
au Chaud .
Active et désactive la fonction Prolongement
de la durée de cuisson .
Active/désactive la tonalité des touches sensitives.
Affiche la version et la configuration du logiciel.
Pour définir l'endroit où la valeur maximale
s'affichera dans les zones de température et
de l'heure.
Pour définir si sera utilisé pour défiler vers
le haut dans la liste ou pour accéder à l'option supérieure.
Page 32
32 electrolux
Sym-
bole
Réglages usines
Sous-menu Description
Sous-menus pour : Mes Programmes
Sym-
bole
Ajouter un nouveau programme
Nom du programme
Sous-menus pour : Recettes
Sym-
bole
Sous-menu Plat
Rôti de porc
Viande blanche
Bœuf/Gibier/Agneau
Volaille
Poisson
Filet mignon de porc
Jarret de porc
Palette de porc
Rôti de veau
Rosbeef
Bœuf basse température
Rôti de bœuf
Bœuf mariné
Filet mignon de gibier
Rôti de gibier
Volaille entière
Dinde entière
Canard entier
Oie entière
Filets de volaille
Poisson entier > 1kg
Filets de poisson
Morue/Stockfish
Poisson en croûte de sel
Pour revenir aux réglages usine (également
Mes programmes ).
Sous-menu
Jarret de veau
Ossobuco
Paupiettes de veau
Pâté à la viande
Lapin
Lapin à la moutarde
Sanglier
Rôti d'agneau
Épaule d'agneau
Gigot d'agneau
Cuisses de volaille
Coq au Vin
Canard à l'orange
Paupiettes de volaille
Encornets farcis
Poisson (à l’étuvée)
Brandade
Cake
Gâteau au citron
Cake suédois
Biscuits/Gâteaux secs
Cheese cake
Cake aux fruits
Crumble
Tresse au beurre
Tresse briochée
Kugelhof
Savarin
Brownies
Madeleines, muffins
Tarte aux pommes
Gâteau aux carottes
Gâteau aux amandes
Tarte aux fruits
Page 33

electrolux 33
Sym-
bole
Sous-menu Plat
Pizza
Pizza/Tarte/Pain
Ragoût/Gratins
Plats préparés
Tarte à l'oignon
Quiche lorraine
Quiche au chèvre
Tarte au fromage
Lasagnes
Cannelloni
Gratin de pommes de terre
Moussaka
Pizza surgelée
Pizza épaisse surgelée
Pizza fraîche
Parts de pizza surgelées
Frites
Potatoes/Pomme quartier
Pommes de terre sautées
Fonctionnement des menus
1. Mettez en fonctionnement l'appareil.
2.
Appuyez sur la touche
ou pour ré-
gler l'élément du menu.
3.
Appuyez sur la touche
ou pour
vous déplacer dans le sous-menu. Appuyez sur OK pour confirmer.
Pour revenir au menu précédent, appuyez
.
sur
Activation d'un mode de cuisson
1. Mettez en fonctionnement l'appareil.
2.
Appuyez sur la touche
ou pour
régler le mode de cuisson. Appuyez
OK.
3.
Appuyez sur la touche
ou pour
régler la température. Appuyez OK. Si
vous ne réglez pas la température, l'appareil se met en route à la température
préréglée.
Lorsque vous activez un mode de cuisson, la température dans l'appareil
Feuilleté au fromage
Pain blanc
Pain de campagne
Gâteau russe
Gratin de pâtes
Gratin d'endives
Ragoût
Potée
Pain & Petits pains
Pain & Petits pains surgelés
Tourte aux fruits surgelée
Filets de poisson surgelés
Ailes de volaille
Lasagnes surgelées
s'affiche en couleur chaude et la température réglée s'affiche en blanc à
l'écran.
Arrêt du mode de cuisson
Appuyez sur
.
En affichant la température
Appuyez sur la touche
Marche/arrêt four
ou pour aller à
. L'écran affiche les
températures. La température à l'intérieur
de l'appareil s'affiche dans une couleur
chaude. La température réglée est en
blanc.
Voyant de chaleur résiduelle
Lorsque vous éteignez l'appareil, un message indiquant que la température dans
l'appareil baisse s'affiche à l'écran. Vous
pouvez utiliser la chaleur résiduelle pour
conserver les aliments au chaud.
FONCTIONS DE L'HORLOGE
Symbole Fonction Description
Durée
Début de cuisson
Fin de cuisson
Pour lancer le décompte.
Pour régler le moment d'activer l'appareil.
Pour régler le moment de désactiver l'appareil.
Page 34
34 electrolux
Symbole Fonction Description
Set+Go
Temps écoulé
Minuteur
Réglage des fonctions de l'horloge
1. Allez dans le menu Modes de cuisson et
réglez un mode de cuisson et une température.
2. Allez dans le menu Minuteurs et réglez
la fonction de l'horloge.
3.
Appuyez sur la touche
régler la durée nécessaire. Appuyez OK.
À la fin de la fonction de l'horloge, un signal sonore retentit. L'appareil se met à
l'arrêt. Les couleurs à l'écran changent
et le symbole de la fonction de l'horloge
clignote.
4. Appuyez sur une touche sensitive pour
arrêter le signal.
Lorsque vous utilisez la Sonde à viande, les fonctions Durée et Fin ne fonctionnent pas.
Vous pouvez régler la fonction Rappel
que l'appareil soit allumé ou éteint.
Pour régler la fonction Rappel quand
l'appareil est éteint, appuyez sur la tou-
ou pour régler l'heure sou-
che
haitée. Appuyez sur OK.
La fonction Rappel reste active même
quand vous éteignez l'appareil.
Set+Go
Sélectionnez le mode de cuisson et la température. Dans le menu Minuteurs , sélectionnez Set+Go et appuyez sur OK. L'appareil est en veille. Appuyez sur n'importe
quelle touche sensitive pour lancer le mode
Pour définir les paramètres du mode de cuisson et l'activer ultérieurement.
Pour démarrer le décompte progressif. Il montre la durée pendant laquelle l'appareil fonctionne. Cette fonction est sans effet
sur le fonctionnement de l'appareil.
Pour régler la minuterie. Cette fonction est sans effet sur le
fonctionnement de l'appareil.
Maintien au Chaud
Vous pouvez activer ou désactiver la
fonction dans le menu Réglages de base .
La fonction Maintien au chaud conserve au
ou pour
chaud les aliments cuits à 80 °C pendant
30 minutes. Elle s'active à la fin de la cuisson.
Conditions pour la fonction :
• La température réglée doit être d'au
moins 80 °C.
• La fonction Durée est réglée.
À la fin du programme, un signal sonore retentit.
La fonction Maintien au chaud fonctionne
pendant 30 minutes.
La fonction Maintien au chaud reste activée
si vous changez les modes de cuisson.
Prolongement de la durée de cuisson
Vous pouvez activer ou désactiver la
fonction dans le menu Réglages de base .
La fonction Time Extension permet de prolonger le mode de cuisson une fois la durée
programmée écoulée.
• Elle peut être appliquée à tous les modes
de cuisson avec la fonction Durée ou
Cuisson par le poids .
• Elle ne peut être appliquée aux modes de
cuisson avec la fonction sonde à viande.
cuisson sélectionné.
PROGRAMMES AUTOMATIQUES
Les programmes automatiques offrent une
cuisson optimale pour chaque type de viande ou d'autres recettes. Reportez-vous au
livre de recettes.
• Programmes pour la cuisson de la viande
avec la Cuisson par le poids (menu Recettes )
• Programmes pour la cuisson de la viande
avec la sonde à viande automatique (menu Recettes )
• Recettes automatiques (menu Recettes )
Page 35

electrolux 35
Recettes avec Poids automatique
Cette fonction calcule automatiquement le
temps de cuisson. Pour utiliser cette fonction, il est nécessaire de saisir le poids de
l'aliment.
Activation de la fonction :
1. Mettez en fonctionnement l'appareil.
2. Réglez le menu Recettes . Appuyez sur
OK.
3. Sélectionnez la catégorie et la préparation. Appuyez sur OK.
4. Réglez la Cuisson par le poids . Appuyez sur OK.
5.
Appuyez sur la touche
ou pour
régler le poids de l'aliment. Appuyez sur
OK.
Le programme automatique se lance. À la
fin du temps de cuisson, un signal sonore
retentit. Appuyez sur une touche sensitive
pour arrêter le signal.
Recettes avec Recettes automatiques
Cet appareil dispose d'un ensemble de recettes que vous pouvez utiliser. Les recettes sont fixes et vous ne pouvez pas les
modifier.
Activation de la fonction :
1. Mettez en fonctionnement l'appareil.
2. Réglez le menu Recettes . Appuyez sur
OK.
3. Sélectionnez la catégorie et la préparation. Appuyez sur OK.
4. Sélectionnez les Recettes automatiques . Appuyez sur OK.
Recettes avec sonde à viande
automatique
1. Mettez en fonctionnement l'appareil.
2. Réglez le menu Recettes . Appuyez sur
OK.
3. Sélectionnez la catégorie et la préparation. Appuyez sur OK.
4. Sélectionnez les sondes à viande automatiques .
5. Appuyez sur OK.
6. Placez la sonde à viande.
À la fin du programme de cuisson, un
signal sonore retentit.
Appuyez sur une touche sensitive pour
arrêter le signal sonore.
7. Retirez la sonde à viande.
Lorsque vous choisissez l'option Cuis-
sons traditionnelles, les réglages automatiques s'affichent mais vous pouvez
les modifier.
Menu Mes programmes
Vous pouvez garder en mémoire vos réglages de cuisson préférés : durée, température ou mode de cuisson.
Enregistrement d'un programme
1. Mettez en fonctionnement l'appareil.
2. Sélectionnez un mode de cuisson, une
température et une heure ou un programme automatique à partir de Recettes . Appuyez sur OK.
3. Sélectionnez le menu Mes program-
mes .
4.
Appuyez sur
ou pour régler l'option Ajouter un nouveau programme .
Appuyez sur OK. L'écran propose un
nom possible pour le programme.
5.
Appuyez sur la touche
ou pour
sélectionner la lettre ou le chiffre. Appuyez sur OK.
6. Pour supprimer le dernier symbole, appuyez sur
ou pour choisir l'option
Supprimer . Appuyez sur OK.
7. Répétez l'étape 5 pour créer le nom du
programme.
8.
Appuyez sur
ou pour sélectionner
l'option Sauvegarder . Appuyez sur OK.
Si la mémoire est pleine, supprimez
quelques entrées du menu.
Pour changer le nom d'un programme,
utilisez l'option Renommer . Reportezvous à « Enregistrement d'un programme ».
Activation du programme
1. Mettez en fonctionnement l'appareil.
2. Sélectionnez le menu Mes programmes . Appuyez sur OK.
3. Sélectionnez le nom du programme.
Appuyez sur OK.
4. Sélectionnez l'option Démarrer Mes
programmes . Appuyez sur OK.
Page 36

36 electrolux
UTILISATION DES ACCESSOIRES
Avertissement Reportez-vous au
chapitre « Consignes de sécurité ».
Sonde à viande
La sonde à viande permet de mesurer la
température au cœur des aliments. Lorsque
la viande est à la bonne température, l'appareil se désactive automatiquement.
Deux températures doivent être prises
en considération
• La température du four
• la température au cœur des aliments.
La température du four et la température au
cœur des aliments s'affichent à l'écran.
21 3 4
56
1 Mode de cuisson
2 Voyant de la sonde à viande
3 la température au cœur des aliments.
4 La température au cœur des aliments
choisie
5 La température à l'intérieur de l'appareil
choisie
6 La température à l'intérieur de l'appareil
Lorsque l'appareil fonctionne à la température paramétrée, les températures
en cours disparaissent.
Important Utilisez uniquement la sonde à
viande fournie et les pièces de rechange
d'origine.
1. Mettez en fonctionnement l'appareil.
2. Introduisez la pointe de la sonde à viande au centre de la pièce de viande.
3. Enfoncez la tige de la sonde à viande
jusqu'à la butée dans la fiche située sur
la paroi latérale de l'appareil.
Le menu Sonde à viande s'affiche à
l'écran.
Si vous procédez à l'étape 2 avant l'éta-
pe 1, appuyez sur
ou pour sélec-
tionner le menu Sonde à viande .
4.
Appuyez sur
ou pour définir la
température à atteindre au cœur des aliments en moins de 5 secondes.
5. Allez au menu Modes de cuisson .
6.
Appuyez sur
ou pour choisir le
mode de cuisson et, si nécessaire, la
température du four.
Pour le bon fonctionnement du système, il est indispensable que les tiges
de la sonde à viande restent enfoncées
dans les aliments ainsi que dans la prise en début de cuisson et n'en soient
pas retirées en cours de cuisson.
7. Quand les aliments atteignent la température à cœur choisie, un signal sonore
retentit. Le mode de cuisson est désactivé.
Appuyez sur l'une des touches sensitives pour arrêter le signal sonore.
Avertissement Soyez particulièrement
prudent au moment de retirer la tige et
la pointe. La sonde à viande est
brûlante ! Risque de brûlure.
8. Retirez la pointe de la sonde à viande et
retirez les aliments de l'appareil.
9. Mettez à l'arrêt l'appareil.
Pour les programmes pour la cuisson
de la viande faisant intervenir la sonde
à viande, reportez-vous au menu Recettes .
Rails télescopiques
Installation des rails télescopiques
Vous pouvez mettre les rails télescopiques
à chaque niveau.
Assurez-vous d'installer les deux rails télescopiques sur le même niveau.
L'élément d'arrêt situé à une extrémité du
rail télescopique doit être pointé vers le
haut.
Page 37

electrolux 37
2. Placez la grille du four sur les rails téle-
1
scopiques, puis poussez délicatement
ces derniers afin de faire entrer la grille à
l'intérieur du four.
Assurez-vous de bien enfoncer entièrement les rails télescopiques dans l'appareil avant de refermer la porte.
°C
2
Attention Les glissières télescopiques
ne doivent pas être nettoyées dans un
lave-vaisselle. Ne lubrifiez pas les
glissières télescopiques.
Utilisation de rails télescopiques
Grâce aux rails télescopiques, les grilles du
four peuvent être insérées et retirées plus
facilement.
1. Tirez les rails télescopiques de droite et
de gauche comme indiqué.
°C
Page 38

38 electrolux
FONCTIONS SUPPLÉMENTAIRES
Verrouillage des touches
La fonction Verrouillage des touches permet d'éviter une modification involontaire
du mode de cuisson.
Activation de la fonction Verrouillage des
touches
1. Mettez en fonctionnement l'appareil.
2. Sélectionnez le mode de cuisson et la
température.
3.
Appuyez sur
Un message apparaît.
La fonction TOUCHES VERROUIL. est activée.
Désactivation de la fonction Verrouillage
des touches
1.
Appuyez sur
La fonction Verrouillage des touches n'est
pas active.
Si vous mettez l'appareil à l'arrêt, le
verrouillage des touches se désactive.
Sécurité enfant
La fonction Sécurité enfants permet d'éviter
une utilisation involontaire de l'appareil.
Activation de la Sécurité enfants
1. Mettez à l'arrêt l'appareil.
2.
Appuyez sur
jusqu'à ce qu'un message apparaisse
sur l'écran.
Désactivation de la Sécurité enfants
1. Suivez les étapes ci-dessus.
En cas de coupure de courant, le programmateur électronique conserve certains réglages (par exemple la langue
d'affichage et le menu Mes Programmes ).
et OK en même temps.
et OK en même temps.
et OK en même temps
Arrêt Automatique
L'appareil s'arrête automatiquement au
bout d'un certain temps :
• si vous n'arrêtez pas l'appareil ;
• si vous ne modifiez pas la température
du four.
Température du
four
30°C - 115°C 12,5 h
120°C - 195°C 8,5 h
200°C - 245°C 5,5 h
250°C 3 h
Heure d'arrêt auto-
matique
Pour faire fonctionner l'appareil après un arrêt automatique, vous devez d'abord complètement arrêter l'appareil.
Ventilateur de refroidissement
Lorsque le four est mis en fonctionnement,
le ventilateur de refroidissement s'enclenche automatiquement afin de maintenir les
parois de l'appareil froides. Lorsque le four
est mis à l'arrêt, le ventilateur de refroidissement continue à fonctionner jusqu'à ce que
l'appareil refroidisse.
Thermostat de sécurité
Afin d'éviter tout risque de surchauffe (résultant d'une utilisation incorrecte de l'appareil ou d'un composant défectueux), le
four est doté d'un thermostat de sécurité
destiné à couper l'alimentation électrique.
Le four se remet automatiquement en fonctionnement en cas de baisse de température.
CONSEILS UTILES
Avertissement Reportez-vous au
chapitre « Consignes de sécurité ».
• Le four dispose de quatre niveaux de
gradins. Comptez les niveaux de gradins
à partir du bas de l'appareil.
• L'appareil est doté d'un système spécial
qui permet à l'air de circuler et qui recycle perpétuellement la vapeur. Dans cet
environnement, ce système permet de
cuisiner des plats tout en maintenant
ceux-ci tendres à l'intérieur et croquants
à l'extérieur. Le temps de cuisson et la
consommation énergétique sont donc réduits au minimum.
• De l'humidité peut se déposer dans l'enceinte de l'appareil ou sur les vitres de la
porte. Ce phénomène est normal. Veillez
à reculer un peu lorsque vous ouvrez la
porte du four en fonctionnement. Pour diminuer la condensation, faites fonction-
Page 39

electrolux 39
ner l'appareil 10 minutes avant d'enfourner vos aliments.
• Essuyez la vapeur avant et après l'utilisation de l'appareil.
• Ne placez jamais d'aluminium ou tout autre ustensile, plat et accessoire directement en contact avec le bas de votre
four (sole). Ceci entraînerait une détérioration de l'émail et modifierait les résultats de cuisson.
Cuisson de gâteaux
• Pour cuire les gâteaux, réglez la température entre 150 et 200 °C.
• Préchauffez le four pendant environ 10
minutes avant la cuisson.
• N'ouvrez la porte du four qu'aux 3/4 du
temps de cuisson.
• Si vous enfournez simultanément deux
plaques de cuisson, laissez un gradin libre entre les deux.
Cuisson de la viande et du poisson
• Nous vous conseillons de rôtir les viandes et les poissons au four seulement à
partir d'un poids de 1 kg. Des rôtis d'un
poids inférieur risquent de sécher en
cours de cuisson.
• Pour préparer des rôtis tendres et moelleux, réglez la température entre 200 et
250 °C.
• En revanche, pour les viandes blanches,
les volailles et les poissons, réglez la température entre 150 et 175 °C.
• Utilisez une lèchefrite pour éviter que les
sucs et les graisses des aliments qui
s'égouttent laissent des taches indélébiles.
• Laissez reposer la viande pendant environ 15 minutes avant de la couper pour
la laisser s'imbiber de jus.
• Pour réduire la formation de fumées dans
le four, versez un peu d'eau dans la lèchefrite. Versez un peu d'eau à plusieurs
reprises pour empêcher que de la condensation ne se forme.
Temps de cuisson
Les temps de cuisson varient en fonction
de la composition, des ingrédients et de la
quantité de liquide que contient chaque
plat.
Surveillez toujours l'appareil pendant son
fonctionnement. Annotez les meilleurs réglages (niveau de cuisson, temps de cuisson, etc.) en fonction des ustensiles et des
recettes lors de vos expériences de cuisson.
ENTRETIEN ET NETTOYAGE
Avertissement Reportez-vous au
chapitre « Consignes de sécurité ».
• Nettoyez la façade du four à l'aide d'une
éponge humide additionné d'eau savonneuse.
• Utilisez les produits spécifiques vendus
dans le commerce pour l'entretien des
surfaces en métal.
• Nettoyez l'appareil après chaque utilisation. Les salissures s'éliminent alors plus
facilement et ne risquent pas de brûler.
• En cas de salissures importantes, nettoyez à l'aide de produits spécifiques
pour four.
• Lavez tous les accessoires du four avec
un chiffon doux humide additionné d'eau
savonneuse après chaque utilisation et
séchez-les.
• Si vous avez des accessoires anti-adhérents, ne les nettoyez pas avec des produits agressifs, des objets pointus, ou en
lave-vaisselle. Vous risqueriez de détruire
le revêtement anti-adhérent !
Nettoyage par pyrolyse
La fonction Pyrolyse permet de nettoyer le
four par pyrolyse. Sélectionnez la fonction
dans le menu Nettoyage .
Avertissement L’appareil peut devenir
très chaud. Risque de brûlure.
Important Avant de lancer la fonction
Pyrolyse , retirez tous les éléments
amovibles (glissières, accessoires, etc.) de
l'appareil.
1. Mettez en fonctionnement l'appareil.
Page 40

40 electrolux
2.
Appuyez sur la touche
ou pour sélectionner le menu Nettoyage . Appuyez
sur OK.
3.
Appuyez sur la touche
ou pour
sélectionner la fonction Pyrolyse . Appuyez sur OK.
4.
Appuyez sur
ou pour régler la durée du nettoyage.
– ECO : pour un four peu sale (2:15)
– NORMAL : pour un four normale-
ment sale (2:45)
– INTENSE : pour un four très sale
(3:15)
– AUTO - l'appareil détermine automa-
tiquement quel cycle pyrolytique utiliser.
5. L'écran affiche les messages. Appuyez
sur OK après chaque message.
Lorsque l'appareil atteint la température
préréglée, la porte se verrouille.
Lorsque le cycle pyrolytique commence, la lampe du four ne fonctionne pas
et le ventilateur de refroidissement
tourne plus vite.
N'ouvrez pas la porte pendant le temps de
chauffage. Si vous ouvrez la porte, vous annulez le cycle de nettoyage pyrolytique.
Pour arrêter le cycle de nettoyage pyrolyti-
que, appuyez sur
.
N'utilisez pas l'appareil avant que le symbole de verrouillage de la porte soit éteint.
Nettoyage conseillé
Vous rappelle quand nettoyer le four.
L'écran affiche le message après quelques
heures d'utilisation de l'appareil.
Activez et désactivez la fonction Nettoyage
conseillé dans le menu Nettoyage . La fonction Nettoyage conseillé est désactivée lorsque vous réglez l'appareil sur les réglages
usine.
Nettoyage de la porte du four
La porte du four est dotée de quatre panneaux vitrés. Vous pouvez retirer la porte du
four ainsi que les panneaux internes vitrés
afin de les nettoyer.
Retrait de la porte du four et des
panneaux internes vitrés
1. Ouvrez la porte en grand et identifiez la
charnière située à gauche de la porte.
2. Poussez le composant de serrage jusqu'à ce qu'il se retire.
3. Maintenez le composant que vous venez de pousser d'une main. De l'autre
main, servez-vous d'un tournevis pour
soulever et faire pivoter le levier de la
charnière gauche.
Page 41

electrolux 41
4. Identifiez la charnière à droite de la porte.
5. Soulevez le levier sur la charnière et faites-le pivoter.
6. Fermez la porte du four jusqu’à la première position d’ouverture (à mi-chemin). Tirez la porte vers l'avant et retirez-la de son logement.
7. Déposez la porte sur un support stable
non abrasif, par exemple sur une table
recouverte d'un tissu doux, afin d'éviter
tout risque de rayure.
8. Libérez le système de verrouillage afin
de retirer les panneaux internes vitrés.
9. Faites pivoter les deux fixations de 90 °
et retirez-les de leur logement.
90°
Page 42

42 electrolux
10. Soulevez avec précaution (étape 1),
puis sortez (étape 2) un par un les panneaux internes vitrés. Commencez par
le panneau interne vitré du haut.
2
1
Lavez les panneaux internes vitrés avec de
l'eau savonneuse. Séchez soigneusement
les panneaux internes vitrés.
Réinstallation de la porte et des vitres
Une fois le nettoyage terminé, replacez les
panneaux internes vitrés et la porte du four.
Répétez les étapes ci-dessus dans l'ordre
inverse.
Veillez à poser les panneaux internes vitrés (
1
), ( 2 ) et ( 3 ) dans l'ordre et dans leur
logement respectif (voir l'illustration).
1 2 3
cher (le côté rugueux doit être de l'autre côté).
Veillez à poser correctement les panneaux
internes vitrés dans leur logement respectif
(voir l'illustration).
Glissières
Retrait des glissières
1. Ecartez l'avant de la glissière de la paroi
latérale.
Les panneaux vitrés du milieu 2 - 3 ) se
différencient par leur cadre décoratif. Après
les avoir installés, vérifiez que la zone décorée est tournée vers la paroi interne de la
porte. Après avoir installé les panneaux vitrés du milieu, vérifiez que la surface de la
2
zone décorée (
- 3 ) est lisse au tou-
2. Ecartez l'arrière de la glissière de la paroi latérale et retirez-la.
Page 43
electrolux 43
Remontage des glissières
Pour remonter les glissières, procédez dans
le sens inverse du retrait.
Les extrémités arrondies des glissières
doivent être orientées vers l'avant !
Éclairage du four
Avertissement Attention ! Risque de
choc électrique !
Avant de remplacer l'éclairage du four :
• Mettez le four à l'arrêt.
• Retirez les fusibles de la boîte à fusibles
Placez un chiffon sur la sole du four
afin de protéger l'ampoule du four et le
cache en verre.
1. Retirez le diffuseur en verre en le tournant dans le sens inverse des aiguilles
d'une montre.
2. Nettoyez-le.
3. remplacez l'ampoule du four par une
ampoule résistant à une chaleur pouvant atteindre les 300 °C.
Utilisez le même type d'ampoule pour
four.
4. Replacez le diffuseur en verre.
ou coupez le disjoncteur.
EN CAS D'ANOMALIE DE FONCTIONNEMENT
Avertissement Reportez-vous au
chapitre « Consignes de sécurité ».
Problème Cause possible Solution
L'appareil ne chauffe
pas.
Les réglages souhaités n'ont pas
La sécurité enfants est activée. Reportez-vous au chapitre consa-
Le fusible dans la boîte à fusibles a
L'écran affiche le code
d'erreur « F ».
L'éclairage du four ne
fonctionne pas.
De la vapeur et de la
condensation se déposent sur les aliments et
dans l'enceinte du four.
Si l'anomalie persiste, contactez votre service après-vente.
Les informations nécessaires pour le service après-vente figurent sur la plaque signa-
Nous vous recommandons de noter ces informations ici :
Modèle (MOD.) .........................................
Numéro du produit (PNC) .........................................
Numéro de série (S.N.) .........................................
L'appareil est désactivé. Mettez en fonctionnement l'appa-
été effectués.
fondu.
Problème électronique Pour cela, contactez votre service
L'éclairage du four est défectueux. Reportez-vous au paragraphe
Le plat est resté trop longtemps
dans l'appareil.
reil.
Procédez aux réglages nécessai-
res.
cré à la désactivation de la sécurité enfants.
Vérifiez le fusible.
Si les fusibles disjonctent plusieurs
fois, faites appel à un électricien
agréé.
après-vente.
« Remplacement de l'éclairage du
four ».
Une fois la cuisson terminée, ne
laissez pas les plats dans le four
plus de 15 à 20 minutes.
létique. Celle-ci se trouve sur l'encadrement
avant de la cavité du four.
Page 44

44 electrolux
CARACTÉRISTIQUES TECHNIQUES
Tension 230 V
Fréquence 50 Hz
INSTALLATION
Avertissement Reportez-vous au
chapitre « Consignes de sécurité ».
22
590
594
540
550 min
560
560-570
593
80÷100
576
2
50
550 min
560÷570
580
A
B
Page 45

electrolux 45
Installation électrique
Avertissement Le branchement
électrique doit être confié à un
électricien qualifié.
Le fabricant ne peut pas être tenu responsable si vous ne respectez pas les
consignes de sécurité du chapitre
« Consignes de sécurité ».
Cet appareil est fourni avec une fiche principale et un câble principal.
EN MATIÈRE DE PROTECTION DE L'ENVIRONNEMENT
Le symbole sur le produit ou son
emballage indique que ce produit ne peut
être traité comme déchet ménager. Il doit
être remis au point de collecte dédié à cet
effet (collecte et recyclage du matériel
électrique et électronique).
En procédant à la mise au rebut de
l'appareil dans les règles de l’art, nous
préservons l'environnement et notre
sécurité, s’assurant ainsi que les déchets
seront traités dans des conditions
optimum.
Pour obtenir plus de détails sur le recyclage
de ce produit, veuillez prendre contact avec
les services de votre commune ou le
magasin où vous avez effectué l'achat.
Emballage
Les matériaux d'emballage sont conçus dans le respect de l'environnement
et sont recyclables. Les pièces en plastique sont marquées des abréviations
internationales telles que PE, PS, etc.
Eliminez les emballages dans les conteneurs de la commune prévus à cet
effet.
Page 46

46 electrolux
Electrolux. Thinking of you.
Mehr zu unserem Denken finden Sie unter
www.electrolux.com
INHALT
Sicherheitshinweise 46
Gerätebeschreibung 49
Vor der ersten Inbetriebnahme 50
Bedienfeld 50
Täglicher Gebrauch 52
Uhrfunktionen 56
Automatikprogramme 57
Verwendung des Zubehörs 58
SICHERHEITSHINWEISE
Lesen Sie vor der Installation und Anwendung sorgfältig dieses Handbuch:
• Für Ihre persönliche Sicherheit und die
Sicherheit Ihres Eigentums.
• Im Interesse der Umwelt.
• Zur korrekten Bedienung des Geräts.
Bewahren Sie diese Bedienungsanleitung in
der Nähe des Geräts auf, auch wenn Sie
dieses anderswo aufstellen oder verkaufen.
Der Hersteller ist nicht dafür verantwortlich,
wenn eine inkorrekte Installation und Verwendung Schäden verursacht.
Sicherheit von Kindern und
hilfsbedürftigen Personen
• Das Gerät kann von Kindern ab 8 Jahren
und Personen mit eingeschränkten physischen, sensorischen oder geistigen Fähigkeiten oder mit mangelnder Erfahrung
und Unkenntnis verwendet werden, wenn
sie in die sichere Verwendung des Geräts
eingewiesen wurden und sie die mit ihm
verbundenen Gefahren verstanden haben. Kinder dürfen nicht mit dem Gerät
spielen.
• Halten Sie das Verpackungsmaterial von
Kindern fern. Andernfalls besteht Erstickungs- oder Verletzungsgefahr.
• Halten Sie Kinder und Tiere vom Gerät
fern, wenn die Tür geöffnet ist oder wenn
das Gerät in Betrieb ist. Das Gerät wird
heiß. Andernfalls besteht Verletzungsgefahr oder Gefahr einer dauerhaften Behinderung.
• Verfügt das Gerät über eine Kindersicherung oder Tastensperre, machen Sie da-
Zusatzfunktionen 60
Praktische Tipps und Hinweise 61
Reinigung und Pflege 62
Was tun, wenn … 66
Technische Daten 66
Montage 66
Umwelttipps 67
Änderungen vorbehalten
von Gebrauch. Damit wird verhindert,
dass Kinder oder Tiere das Gerät unbeabsichtigt in Betrieb nehmen.
Allgemeine Sicherheitshinweise
• Nehmen Sie keine technischen Änderungen am Gerät vor. Hierdurch besteht Verletzungsgefahr und das Gerät kann beschädigt werden.
• Lassen Sie das Gerät bei Betrieb nicht
unbeaufsichtigt.
• Schalten Sie nach jedem Gebrauch das
Gerät aus.
Montage
• Das Gerät darf nur von einem zugelassenen Elektriker montiert und angeschlossen werden. Wenden Sie sich dazu an einen zugelassenen Kundendienst, damit
Geräteschäden oder Verletzungen vermieden werden.
• Sicherstellen, dass das Gerät beim
Transport nicht beschädigt wurde. Ein
beschädigtes Gerät nicht anschließen.
Wenden Sie sich bei Bedarf an den Hersteller.
• Vor dem ersten Gebrauch alle Verpackungsmaterialien, Aufkleber und Auflagen entfernen. Das Typenschild nicht
entfernen. Dies könnte zum Ausschluss
der Gewährleistung führen.
• Die im Einsatzland des Geräts geltenden
Gesetze, Verordnungen, Richtlinien und
Normen sind einzuhalten (Sicherheitsund Recyclingbestimmungen, Sicher-
Page 47

electrolux 47
heitsregeln für Elektro- oder Gasgeräte
usw.).
• Sicherstellen, dass das Gerät während
der Montage vom Stromnetz getrennt ist.
• Vorsicht beim Transport. Das Gerät ist
schwer. Stets Sicherheitshandschuhe
verwenden. Das Gerät nicht am Handgriff
ziehen.
• Die elektrische Installation muss eine
Trennvorrichtung aufweisen, mit der Sie
das Gerät allpolig von der Stromversorgung trennen können. Die Trennvorrichtung muss mit einer Kontaktöffnungsbreite von mindestens 3 mm ausgeführt sein.
• Geeignete Trenneinrichtungen sind erforderlich: Überlastschalter, Sicherungen
(Schraubsicherungen müssen aus dem
Halter entfernt werden können), Fehlerstromschutzschalter und Schütze.
• Gemäß den bestehenden Vorschriften
müssen alle Teile, die den Berührungsschutz gewährleisten, so befestigt sein,
dass sie nicht ohne Werkzeug abgenommen werden können.
• Die Einbaumöbel bzw. die Einbaunische,
in die das Gerät eingebaut werden soll,
müssen geeignete Abmessungen aufweisen.
• Stellen Sie sicher, dass das Gerät unter
und an angrenzenden sicheren Konstruktionen montiert ist.
• Die Mindestabstände zu anderen Geräten sind einzuhalten.
• Das Gerät mit der Rückwand und mit einer Seite neben einem höheren Gerät
aufstellen. Die andere Seite muss neben
einem Gerät mit gleicher Höhe platziert
werden.
• Das Gerät kann nicht auf einem Sockel
aufgestellt werden.
• Einbaubacköfen und Einbaukochfelder
sind mit einem speziellen Anschlusssystem ausgestattet. Um eine Beschädigung
des Geräts zu vermeiden, verwenden Sie
das Gerät nur zusammen mit Geräten
desselben Herstellers.
Elektrischer Anschluss
• Das Gerät muss geerdet sein.
• Stellen Sie sicher, dass die elektrischen
Daten auf dem Typenschild den Daten
Ihrer Haushaltsstromversorgung entsprechen.
• Informationen zur Spannungsversorgung
finden Sie auf dem Typenschild.
• Schließen Sie das Gerät nur an eine
sachgemäß installierte Schutzkontaktsteckdose an.
• Achten Sie beim Anschließen von Elektrogeräten an Steckdosen darauf, dass
die Anschlussleitungen die heiße Gerätetür nicht berühren und nicht in deren Nähe kommen.
• Verwenden Sie keine Mehrfachsteckdosen, Steckerleisten oder Verlängerungskabel. Es besteht Brandgefahr.
• Ersetzen oder wechseln Sie nicht selbst
das Netzkabel. Wenden Sie sich hierzu
an den Kundendienst.
• Achten Sie darauf, den Netzstecker (sofern zutreffend) und das Netzkabel hinter
dem Gerät nicht zu quetschen oder zu
beschädigen.
• Wählen Sie einen Netzanschluss, der
auch nach der Installation des Gerätes
noch zugänglich ist.
• Ziehen Sie nicht am Netzkabel, wenn Sie
das Gerät vom Stromnetz trennen möchten, sondern immer am Netzstecker (sofern zutreffend).
Gebrauch
• Dieses Gerät ist nur zur Verwendung im
Haushalt bestimmt. Nicht für gewerbliche
oder industrielle Zwecke verwenden.
• Das Gerät ist ausschließlich für die haushaltsübliche Zubereitung von Speisen bestimmt. So werden Verletzungen von
Personen oder Schäden am Eigentum
vermieden.
• Das Gerät nicht als Arbeits- oder Abstellfläche verwenden.
• Keine entflammbaren Produkte oder Gegenstände, die mit entflammbaren Produkten benetzt sind, und/oder schmelzbare Gegenstände (aus Kunststoff oder
Aluminium) in das Gerät, nicht in die Nähe oder auf das Gerät stellen. Es besteht
Explosions- oder Brandgefahr.
• Bei Betrieb wird der Geräteinnenraum
heiß. Es besteht Verbrennungsgefahr.
Berühren Sie nicht die Heizelemente im
Gerät. Verwenden Sie zum Anfassen des
Zubehörs und der Töpfe wärmeisolierende Handschuhe.
Page 48

48 electrolux
• Das Zubehör vorsichtig entfernen oder
einsetzen, um die Emailbeschichtung
nicht zu beschädigen.
• Beim Öffnen der Backofentür während
des Betriebs in sicherer Entfernung zum
Gerät stehen. Es kann heißer Dampf austreten. Es besteht Verbrennungsgefahr.
• Verfärbungen der Emailbeschichtung haben keine Auswirkung auf die Leistung
des Geräts und stellen keinen Mangel im
Sinne des Gewährleistungsrechtes dar.
• Um eine Beschädigung oder die Verfärbung der Emailbeschichtung zu vermeiden:
– Stellen Sie keine Gegenstände direkt
auf den Backofenboden und bedecken
Sie diesen nicht mit Alufolie.
– Stellen Sie kein heißes Wasser direkt in
das Gerät.
– Lassen Sie nach dem Abschalten des
Geräts kein feuchtes Geschirr oder
feuchte Speisen im Backofeninnenraum stehen.
• Das Gerät nicht benutzen, wenn es mit
Wasser in Kontakt ist. Das Gerät nicht
mit nassen Händen bedienen.
• Keinen Druck auf die geöffnete Gerätetür
ausüben.
• Auch beim Grillen die Backofentür stets
geschlossen halten.
Reinigung und Pflege
• Schalten Sie vor Wartungsarbeiten immer
das Gerät aus und trennen Sie es von
der Stromversorgung.
• Vergewissern Sie sich vor Wartungsarbeiten, dass das Gerät abgekühlt ist. Es besteht Verbrennungsgefahr und die Gefahr, dass die Glasscheiben brechen.
• Halten Sie das Gerät jederzeit sauber.
Ablagerungen von Fett oder Lebensmittelresten können einen Brand auslösen.
• Eine regelmäßige Reinigung verhindert
den vorzeitigen Verschleiß des Oberflächenmaterials.
• Für Ihre persönliche Sicherheit und die
Sicherheit Ihres Eigentums, reinigen Sie
das Gerät nur mit Wasser und einer Seifenlösung. Verwenden Sie keine entflammbaren Produkte oder Produkte, die
Korrosion verursachen.
• Reinigen Sie das Gerät nicht mit einem
Dampfstrahl- oder Hochdruckreiniger,
scharfen Gegenständen, Scheuermitteln,
Scheuerschwämmen aus Stahlwolle und
Fleckenentfernern.
• Falls Sie ein Backofenspray verwenden,
bitte unbedingt die Angaben des Herstellers beachten. Sprühen Sie nie auf den
Fettfilter (falls vorhanden), die Heizstäbe
und den Thermostatfühler.
• Reinigen Sie die Glastür nicht mit Scheuermitteln oder Metallschabern. Die hitzebeständige Oberfläche der inneren Glasscheibe kann beschädigt werden und
zerspringen.
• Wenn die Türglasscheiben beschädigt
sind, werden sie brüchig und können zerspringen. Sie müssen ausgetauscht werden. Wenden Sie sich hierzu an den Kundendienst.
• Gehen Sie beim Aushängen der Tür
sorgsam vor. Die Tür ist schwer!
• Reinigen Sie nicht die katalytische Emailbeschichtung (falls vorhanden).
Pyrolytische Reinigung
• Lassen Sie das Gerät während der pyrolytischen Reinigung nicht unbeaufsichtigt.
• Öffnen Sie während der pyrolytischen
Reinigung nicht die Tür und unterbrechen
Sie nicht die Stromversorgung.
• Halten Sie Kinder während der pyrolytischen Reinigung fern. Das Gerät wird
sehr heiß. Es besteht Verbrennungsgefahr.
• Hartnäckige Verschmutzungen können
während der pyrolytischen Reinigung zu
einer Verfärbung der Emailbeschichtung
führen. Verfärbungen der Emailbeschichtung haben keine Auswirkung auf die
Leistung des Geräts.
Brandgefahr
• Öffnen Sie die Tür vorsichtig. Bei der Verwendung von Zutaten, die Alkohol enthalten, kann ein Alkohol-Luftgemisch entstehen. Es besteht Brandgefahr.
• Achten Sie beim Öffnen der Tür darauf,
dass keine Funken oder offenen Flammen in die Nähe des Geräts gelangen.
• Keine entflammbaren Produkte oder Gegenstände, die mit entflammbaren Produkten benetzt sind, und/oder schmelzbare Gegenstände (aus Kunststoff oder
Aluminium) in das Gerät, in die Nähe des
Gerätes oder auf das Gerät stellen.
Page 49

electrolux 49
Backofenlampe
• Die Leuchtmittel in diesem Gerät sind
Speziallampen, die nur für Haushaltsgeräte geeignet sind! Sie können nicht zur
vollständigen oder teilweisen Beleuchtung von Zimmern in Privatgebäuden verwendet werden.
• Falls das Leuchtmittel ausgewechselt
werden muss, setzen Sie eine Lampe mit
derselben Leistung ein, die speziell für
Haushaltsgeräte vorgesehen ist.
• Trennen Sie das Gerät von der Stromversorgung, bevor Sie die Backofenlampe
austauschen. Es besteht die Gefahr eines
elektrischen Schlags!
Kundendienst
• Nur qualifizierte Fachkräfte dürfen an
dem Gerät Reparaturarbeiten durchfüh-
GERÄTEBESCHREIBUNG
7
ren. Wenden Sie sich hierzu an einen zugelassenen Kundendienst.
• Dabei dürfen ausschließlich Originalersatzteile verwendet werden.
Entsorgung des Geräts
• Um das Risiko von Verletzungen oder
Sachschäden zu vermeiden:
– Trennen Sie das Gerät von der Strom-
versorgung.
– Schneiden Sie das Netzkabel ab und
entsorgen Sie es.
– Entsorgen Sie die Türverriegelung. Da-
mit wird verhindert, dass Kinder oder
kleine Tiere im Gerät eingeschlossen
werden können. Es besteht Erstickungsgefahr.
1
2
3
4
6
1 Elektronischer Programmspeicher
2 Lüftungsöffnungen für das Kühlgebläse
3 Grillen
4 Backofenlampe
5
5 Gebläse
6 Typenschild
7 Buchse für Fleischsonde
• Rost
Für Geschirr, Kuchenformen, Braten
Page 50
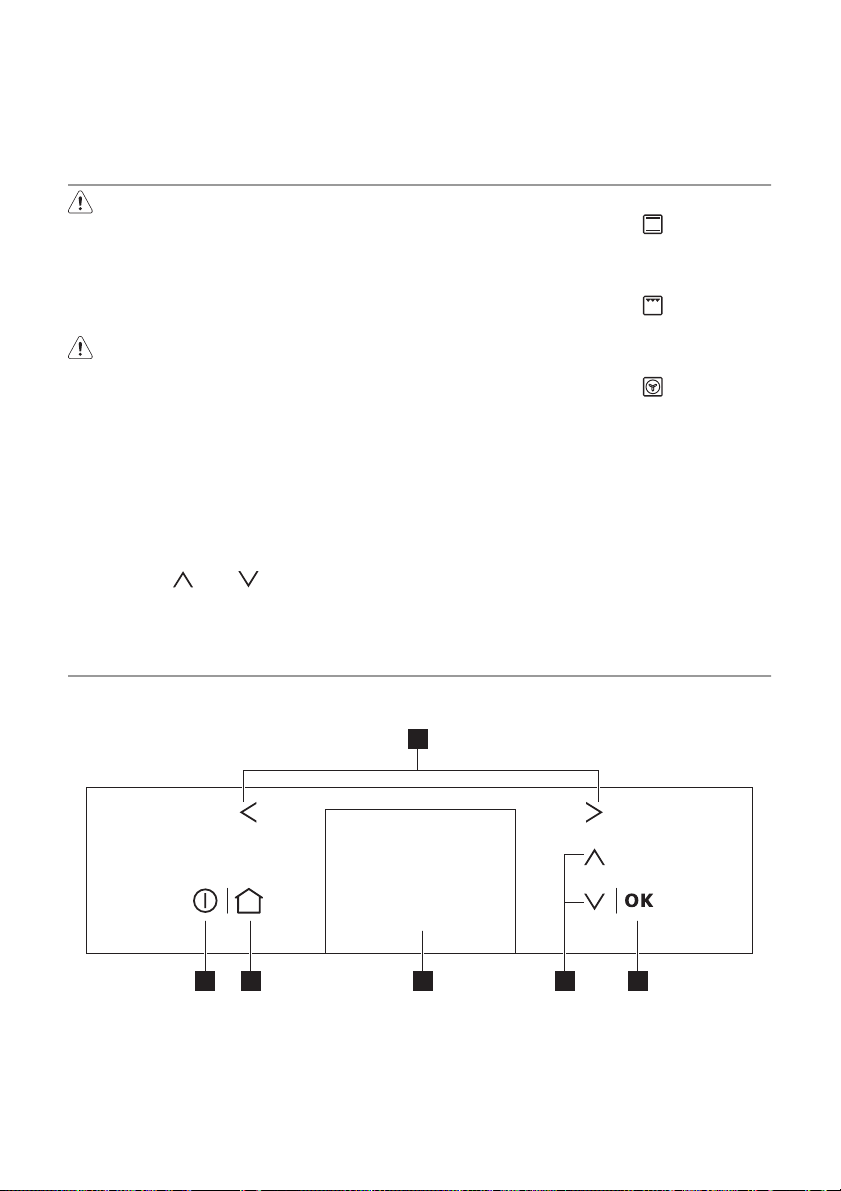
50 electrolux
• Fettpfanne
Zum Backen und Braten oder zum Auffangen von austretendem Fett.
• Fleischsonde
Zum Messen des Garzustands des Garguts.
VOR DER ERSTEN INBETRIEBNAHME
Warnung! Siehe Kapitel
„Sicherheitshinweise“.
Erstes Reinigen
• Entfernen Sie alle Teile aus dem Gerät.
• Reinigen Sie das Gerät vor der ersten
Benutzung.
Vorsicht! Verwenden Sie keine
Scheuermittel! Die Oberfläche kann
beschädigt werden. Weitere
Informationen finden Sie im Kapitel
"Reinigung und Pflege".
Erstanschluss
Wenn Sie das Gerät zum ersten Mal an die
Stromversorgung anschließen oder nach einem Stromausfall wird der Begrüßungstext
abgezeigt. Danach müssen Sie die Sprache, das Datum und die Uhrzeit einstellen.
Berühren Sie
lungen vorzunehmen. Berühren Sie zur Bestätigung OK.
oder , um die Einstel-
Vorheizen
1.
2. Lassen Sie den leeren Backofen ca. 1
3.
4. Lassen Sie den leeren Backofen ca. 10
5.
6. Lassen Sie den leeren Backofen ca. 10
Auf diese Weise werden die Rückstände im
Backofeninnenraum verbrannt. Das Zubehör erhitzt sich stärker, als bei Normalbetrieb. Wenn Sie das Gerät zum ersten Mal
vorheizen, kann sich Geruch und Rauch
entwickeln. Das ist normal. Sorgen Sie für
eine ausreichende Belüftung.
BEDIENFELD
Stellen Sie die Funktion
Höchsttemperatur ein.
Stunde eingeschaltet.
Stellen Sie die Funktion
Höchsttemperatur ein.
Minuten eingeschaltet.
Stellen Sie die Funktion
Höchsttemperatur ein.
Minuten eingeschaltet.
und die
und die
und die
Elektronischer Programmspeicher
1
23456
Page 51
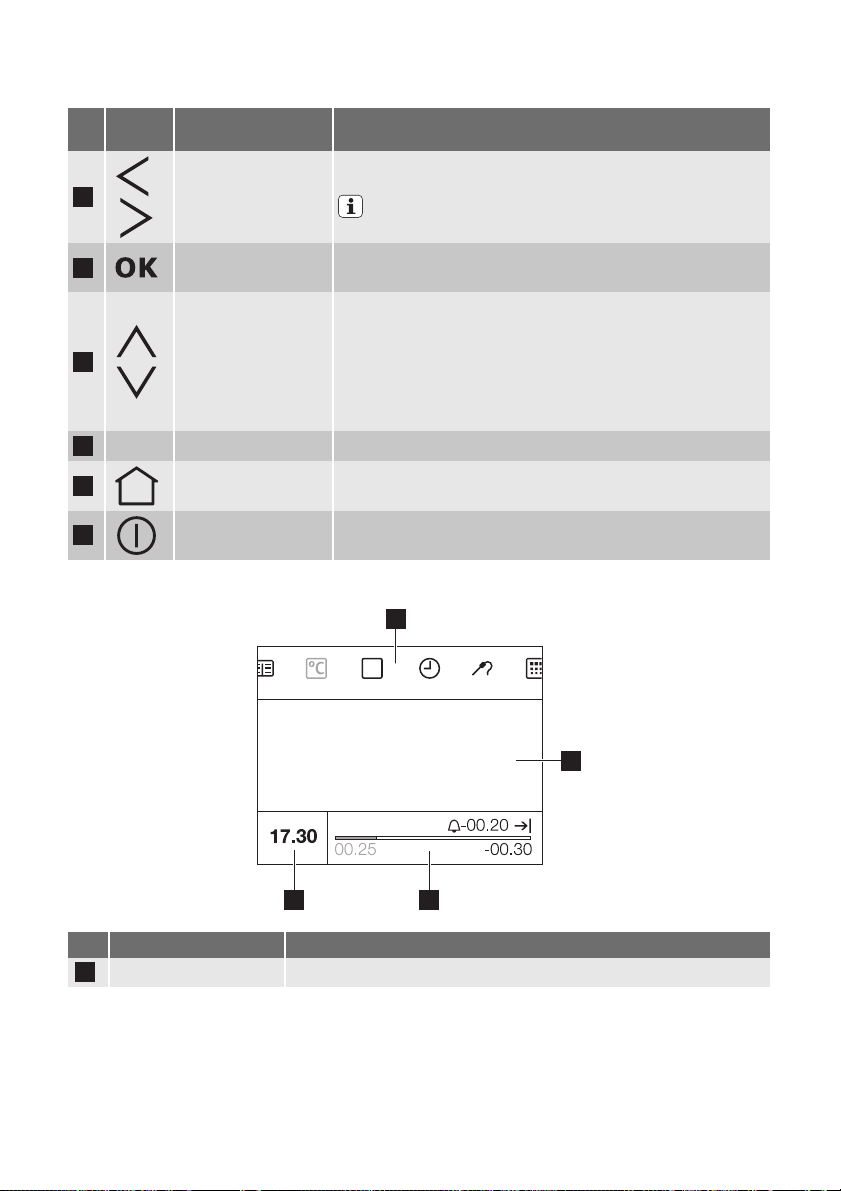
Bedienen Sie das Gerät über die Sensorfelder.
Sen-
sorfeld
Funktion Bemerkung
electrolux 51
1
2
3
4
5
6
Display
,
Rechts, links
RICHTIG Zum Bestätigen. Um die eingestellte Funktion zu starten.
Nach unten/oben
- Display Anzeige der aktuellen Einstellungen des Geräts.
Home Abbrechen der Auswahl und zurück zum Hauptmenü gehen.
Ein/Aus Ein- und Ausschalten des Geräts.
Zur Navigation zwischen den Hauptmenüs.
Damit wird weder eine Ofenfunktionen noch ein Programm im Betrieb unterbrochen.
Navigieren in den Untermenüs. Einrichten der Einstellungen in
den Untermenüs. (Beispiel: Temperatur, Zeit, Gewicht).
So stellen Sie die Werte ein:
• Sensorfeld einmal berühren: Einstellen des Wertes in kleinen Schritten.
• Sensorfeld gedrückt halten: Einstellen des Wertes in
schnellen Schritten.
1
4 3
Bereich Bemerkung
Hauptmenübereich Zeigt die Hauptmenüoptionen.
1
2
Page 52

52 electrolux
Bereich Bemerkung
Anzeigen:
• Ofenfunktions-Name und -Symbol
• Automatikprogramm-Name und -Symbol
Hauptinhaltsbereich
2
Uhrfunktionsbereich
3
Tageszeitbereich
4
Uhrfunktions- und Zeitbereich
• Temperatur(en)
• Fleischsondenzustand
•Hilfetext
• Wochentag
•Datum
Anzeigen:
• Zeitbezogene Informationen für Uhrfunktionen
• Zeitfortschrittsanzeige
Wenn gleichzeitig mehr als eine Uhrfunktion vorhanden ist,
dann zeigt die Zeitfortschrittsanzeige den Stand der Uhrfunktion, die länger als die andere ist.
Zeigt:
•Tageszeit
1 Erinnerungsfunktion
1
2 Dauer
3 Zeitfortschrittsanzeige und Betriebszeit
4 Tageszeit
4 3 2
TÄGLICHER GEBRAUCH
Warnung! Siehe Kapitel
„Sicherheitshinweise“.
Sie können das Gerät auf folgende Weise
bedienen:
•Im Modus Manuell - für die manuelle
Einstellung der Backofenfunktion, der
Temperatur und der Gardauer.
Überblick über die Menüs
Hauptmenü
Sym-
bol
Funktionen Enthält eine Liste der Ofenfunktionen.
Timer Enthält eine Liste der Uhrfunktionen.
Fleischsonde Einstellungen für die Fleischsonde.
Reinigung Enthält die Reinigungsfunktionen.
Einstellungen Einrichten anderer Einstellungen.
Favoriten
Menüpunkt Beschreibung
•Über Automatikprogramme (Rezepte)
- zur Zubereitung von Speisen, die Sie
nicht kennen oder mit denen Sie keine
Erfahrung haben.
Liste der vom Benutzer erstellten Lieblingsgarprogramme.
Page 53

electrolux 53
Sym-
bol
Rezepte Liste mit automatischen Garprogrammen.
Ofen einschalten
Ofen ausschalten
Menüpunkt Beschreibung
Anzeige der Einstellungen des Geräts.
Untermenüs
Untermenüs für:
Backofenfunktion Beschreibung
Ofenfunktionen
Heißluft mit Ringheizkörper
Ober-/Unterhitze Zum Backen und Braten auf einer Ebene.
Pizzastufe
Heißluftgrillen
Grill
Großflächengrill
Unterhitze
Slow Cook
Zum Backen auf bis zu drei Ebenen gleichzeitig.
Zum Backen auf einer Ebene für Gerichte, die eine intensivere
Bräunung und einen knusprigen Boden benötigen.
Zum Braten von größeren Fleischstücken oder Geflügel auf einer Ebene. Die Funktion eignet sich auch zum Gratinieren und
Überbacken.
Zum Grillen flacher Lebensmittel, die in der Mitte des Rostes angeordnet werden und zum Toasten.
Zum Grillen flacher Lebensmittel in größeren Mengen und zum
Toasten.
Zum Backen von Kuchen mit krossen Böden. Zum Aufwärmen
von Kuchen und Pasteten.
Zum Zubereiten von besonders zarten und saftigen Braten. Für
Aufläufe und Eintöpfe.
Auftauen Zum Auftauen von Speisen.
Dörren Ideal zum Dörren von Früchten.
Warmhalten Zum Warmhalten erhitzter Speisen.
Einkochen Ideal für Marmelade und Konserven.
Geschirr wärmen Zum Wärmen von Geschirr.
Backofenbeleuchtung
Untermenüs für: Timer
Sym-
bol
Dauer auswählen
Startzeit auswählen
Leuchtet auch, wenn keine Backofenfunktion eingestellt ist.
Untermenü
Page 54

54 electrolux
Sym-
bol
Endzeit auswählen
Set + Go
Laufzeitanzeige
Kurzzeitwecker
Untermenüs für: Fleischsonde
Sym-
bol
Gewünschte Temp. 30°
Untermenüs für: Reinigung
Sym-
bol
Pyrolyse Startet die Pyrolysereinigung.
Pyrolyse Erinnerungsfunktion
Untermenü Beschreibung
Untermenüs für: Einstellungen
Sym-
bol
Uhrzeit einstellen Aktuelle Tageszeit einstellen.
Datum einstellen Zum Einstellen des Datums.
Datum und Uhrzeit anzeigen Zur Anzeige von Uhrzeit und Datum.
Warmhalten
Zeitverlängerung
Sprache wählen Spracheinstellung für das Display.
Tastentöne
Alarmsignale Aktiviert und deaktiviert die Alarmsignale.
Service
Sortierung
Pfeil nach oben zu
Werkseinstellungen
Untermenü Beschreibung
Untermenüs für: Favoriten
Sym-
bol
Neu hinzufügen
Untermenü
Untermenü
Erinnert Sie daran, wenn der Backofen gereinigt werden muss.
Zum Ein- und Ausschalten der Funktion
Warmhalten .
Aktiviert und deaktiviert die Funktion Zeitverlängerung .
Aktiviert und deaktiviert die Töne der Sensorfelder.
Zeigt die Softwareversion und die Konfiguration an.
Einstellen, wo das Display höhere Werte im
Temperatur- und Zeit-Bereich anzeigt.
Festlegen, ob in der Liste hochblättert
oder zur übergeordneten Option umschaltet.
Alle Einstellungen auf die Werkseinstellungen
zurücksetzen (auch Favoriten ).
Untermenü
Page 55

electrolux 55
Sym-
bol
Name der Favoriten
Untermenüs für: Rezepte
Sym-
bol
Untermenü Speise
Schwein/Kalb
Rind/Wild/Lamm
Geflügel
Fisch
Kuchen
Pizza/Quiche/Brot
Auflauf/Gratin
Untermenü
Schweinebraten
Schweinelende
Schweinshaxe
Schweineschulter
Kalbsbraten
Roastbeef/Filet
Beef Skandinavisch
Rinderbraten
Sauerbraten
Reh-/Hirschrücken
Reh/Hirschbraten
Hähnchen, ganz
Pute, ganz
Ente, ganz
Gans, ganz
Putenbrust
Ganzer Fisch
Fischfilet
Stockfisch
Fisch in Salzkruste
Zitronenkuchen
Schwedischer Kuchen
Bisquitboden
Käsekuchen
Früchtekuchen
Streuselkuchen
Butterzopf
Hefezopf
Blechpizza
Zwiebelkuchen
Quiche Lorraine
Ziegenkäse-Tarte
Käsewähe
Lasagne
Cannelloni
Kartoffelgratin
Moussaka
Kalbshaxe
Ossobuco
Gefüllte Kalbsbrust
Hackbraten
Hasenbraten
Kaninchen in Senf
Wildschwein
Lammbraten
Lammrücken, rosa
Lammkeule
Hühnchenschlegel
Coq au Vin
Ente à l'orange
Gefülltes Hähnchen
Gefüllte Calamari
Gedünsteter Fisch
Fischauflauf
Gugelhupf
Savarin-Kuchen
Brownies
Muffins
Apfelwähe
Rüblitorte
Mandelkuchen
Obst-Tarte
Börek
Weißbrot
Bauernbrot
Piroggen-Kuchen
Nudel-Auflauf
Überbackener Chicoree
Rindfleischauflauf
Krautauflauf
Page 56

56 electrolux
Sym-
bol
Untermenü Speise
Pizza, gefroren
Pizza American, gefroren
Convenience
Pizza, gekühlt
Pizzasnacks, gefroren
Pommes Frites
Kroketten
Röstis
Bedienung der Menüs
1. Schalten Sie das Gerät ein.
2.
Berühren Sie
oder zur Auswahl der
Menüoption.
3.
Berühren Sie
oder zur Navigation
im Untermenü. Berühren Sie zur Bestätigung OK.
Um zur vorherigen Menüberührung zurückzuschalten
Starten einer Ofenfunktion
1. Schalten Sie das Gerät ein.
2.
Berühren Sie
oder , um die Ofenfunktionen auszuwählen. Berühren Sie
OK.
3.
Berühren Sie
oder , um die Temperatur einzustellen. Berühren Sie OK.
Wenn Sie die Temperatur nicht einstellen, startet das Gerät und berücksichtigt
die voreingestellte Temperatur.
Brot/Brötchen
Brot/Brötchen, gefroren
Apfelstrudel, gefroren
Fischfilet, gefroren
Hähnchenflügel
Lasagne/Cannelloni, gefroren
Wenn Sie eine Ofenfunktionen aktivieren, zeigt das Display die Temperatur
im Gerät (in Farbe) und die eingestellte
Temperatur (in weißer Farbe) an.
Ofenfunktion anhalten
Berühren Sie
.
Temperaturanzeige
Berühren Sie
aus
umzuschalten. Das Display zeigt die
oder , um zu Ofen ein/
Temperaturen an. Die Innentemperatur des
Geräts wird farbig und die eingestellte Temperatur weiß angezeigt.
Restwärmeanzeige
Wenn Sie das Gerät ausschalten, zeigt das
Display die Meldung an, dass die Temperatur im Gerät sinkt. Sie können die Restwärme zum Warmhalten der Speisen benutzen.
UHRFUNKTIONEN
Symbol Funktion Beschreibung
Dauer
Startzeit
Endzeit
Set+Go
Laufzeitanzeige
Kurzzeitwecker
Einstellen der Uhrfunktionen
1. Navigieren Sie zum Menü Funktionen
zum Einstellen einer Ofenfunktion und
einer Temperatur.
2. Navigieren Sie zum Menü Timer und
stellen Sie die Uhrfunktion ein.
Einstellung eines Countdowns.
Einstellen der Einschaltzeit für den Backofen.
Einstellen der Abschaltzeit für den Backofen.
Einrichten der Einstellungen für die Ofenfunktionen und späteres
Einschalten.
Zum Hochzählen. Zeigt die Einschaltdauer des Backofens an.
Diese Funktion hat keine Auswirkung auf den Gerätebetrieb.
Einstellung einer Kurzzeit. Diese Funktion hat keine Auswirkung
auf den Gerätebetrieb.
3.
Berühren Sie
wünschte Zeit einzustellen. Berühren Sie
OK.
Nach Ablauf der Uhrfunktion ertönt ein
akustisches Signal. Das Gerät wird ausgeschaltet. Die Farben auf dem Display
ändern sich und das Uhrfunktionssymbol blinkt.
oder , um die ge-
Page 57
electrolux 57
4. Berühren Sie ein Sensorfeld, um den
Signalton abzuschalten.
Wenn Sie die Fleischsonde verwenden,
sind die Funktionen Dauer und Ende
deaktiviert.
Die Erinnerungsfunktion können Sie am
ein- oder ausgeschalteten Gerät einstellen. Um die Erinnerungsfunktion
einzustellen, wenn das Gerät ausge-
schaltet ist, berühren Sie
zur Einstellung der gewünschten Zeit.
Berühren Sie OK.
Die Erinnerungsfunktion bleibt auch bei
abgeschaltetem Gerät aktiv.
Set+Go
Ofenfunktion und die Temperatur auswählen. Wählen Sie im Menü Timer die Funktion
Set+Go aus und berühren Sie OK. Das Gerät befindet sich im Standby-Modus. Berühren Sie ein beliebiges Sensorfeld, um die
eingestellte Ofenfunktion zu aktivieren.
Warmhalten
Sie können die Funktion im Menü Einstellungen aktivieren und deaktivieren.
Die Funktion Warmhalten hält zubereitete
Speisen 30 Minuten bei 80 °C warm. Sie
oder
wird nach Ablauf des Back- oder Bratvorgangs aktiviert.
Voraussetzungen für die Funktion:
• Die eingestellte Temperatur beträgt
mehr als 80 °C.
• Die Funktion Dauer ist eingestellt.
Nach Ablauf der Funktion ertönt ein akustisches Signal.
Die Funktion Warmhalten läuft 30 Minuten
lang.
Die Funktion Warmhalten bleibt aktiv, wenn
Sie zu anderen Ofenfunktionen wechseln.
Zeitverlängerung
Sie können die Funktion im Menü Einstellungen aktivieren und deaktivieren.
Die Funktion Zeitverlängerung bewirkt, dass
die Ofenfunktion nach Ablauf der eingestellten Zeit weiterläuft.
• Anwendbar auf alle Ofenfunktionen mit
der Funktion Dauer oder Gewichtsautomatik .
• Nicht anwendbar auf Backofenfunktionen
mit Fleischsonde .
AUTOMATIKPROGRAMME
Die Automatikprogramme sind optimal für
jede Fleischart oder andere Rezepte geeignet. Beachten Sie das Rezeptbuch.
• Fleischprogramme mit Gewichtsautomatik (im Menü Rezepte )
• Fleischprogramme mit Fleischsonde, automatisch (im Menü Rezepte )
• Automatikrezept (im Menü Rezepte )
Rezepte mit Gewichtsautomatik
Diese Funktion berechnet automatisch die
Gardauer. Um sie verwenden zu können,
muss das Gewicht des Garguts eingegeben
werden.
Aktivieren der Funktion:
1. Schalten Sie das Gerät ein.
2. Navigieren Sie zum Menü Rezepte . Be-
rühren Sie OK.
3. Wählen Sie die Kategorie und das Gar-
gut. Berühren Sie OK.
4. Wählen Sie Gewichtsautomatik . Berühren Sie OK.
5.
Berühren Sie
wicht des Garguts einzustellen. Berühren Sie OK.
Das Automatikprogramm startet. Nach Ablauf der Zeit ertönt ein akustisches Signal.
Berühren Sie ein Sensorfeld, um es abzuschalten.
Rezepte mit Automatikrezept
Das Gerät stellt eine Reihe von Rezepten
zur Verfügung, die Sie verwenden können.
Die Rezepte sind fest einprogrammiert und
können nicht geändert werden.
Aktivieren der Funktion:
1. Schalten Sie das Gerät ein.
2. Navigieren Sie zum Menü Rezepte . Berühren Sie OK.
oder , um das Ge-
Page 58

58 electrolux
3. Wählen Sie die Kategorie und das Gargut. Berühren Sie OK.
4. Wählen Sie Automatikrezept . Berühren
Sie OK.
Rezepte mit Fleischsonde, automatisch
1. Schalten Sie das Gerät ein.
2. Navigieren Sie zum Menü Rezepte . Berühren Sie OK.
3. Wählen Sie die Kategorie und das Gargut. Berühren Sie OK.
4. Wählen Sie Fleischsonde, automatisch .
5. Berühren Sie OK.
6. Schließen Sie die Fleischsonde an der
Buchse an.
Nach Ablauf des Programms ertönt ein
akustisches Signal.
Berühren Sie ein Sensorfeld, um das
akustische Signal auszuschalten.
7. Entfernen Sie die Fleischsonde .
Wenn Sie die Option Manuell wählen,
zeigt das Display automatische Einstellungen an, die Sie aber ändern können.
Menü Favoriten
Sie können Ihre Vorzugseinstellungen speichern: Dauer, Temperatur oder Ofenfunktion.
Speichern eines Programms
1. Schalten Sie das Gerät ein.
2. Wählen Sie die Ofenfunktion, Temperatur und Dauer oder ein Automatikprogramm vom Menü Rezepte aus. Berühren Sie OK.
3. Wählen Sie das Menü Favoriten .
4.
Berühren Sie
oder zur Auswahl
der Option Add new . Berühren Sie OK.
Das Display zeigt einen möglichen Namen für das Programm an.
5.
Berühren Sie
oder zur Einstellung
des Zeichens oder der Zahl. Berühren
Sie OK.
6. Um das letzte Symbol zu entfernen, berühren Sie
oder zur Auswahl der
Option Entfernen . Berühren Sie OK.
7. Führen Sie den Schritt 5 nochmals
durch, um den Namen des Programms
einzustellen.
8.
Berühren Sie
oder zur Auswahl
der Option Speichern . Berühren Sie
OK.
Wenn der Speicher voll ist, löschen Sie
einige Einträge aus dem Menü.
Zur Änderung eines Programmnamens
verwenden Sie die Option Umbenennen . Siehe Abschnitt „Speichern eines
Programms“.
Aktivieren des Programms
1. Schalten Sie das Gerät ein.
2. Wählen Sie das Menü Favoriten . Berühren Sie OK.
3. Stellen Sie dann Namen des Programms ein. Berühren Sie OK.
4. Wählen Sie die Option Start . Berühren
Sie OK.
VERWENDUNG DES ZUBEHÖRS
Warnung! Siehe Kapitel
„Sicherheitshinweise“.
Fleischsonde
Die Fleischsonde misst die Kerntemperatur
eines Garguts Das Gerät wird ausgeschaltet, sobald das Gargut die eingestellte Temperatur erreicht hat.
Zwei Temperaturen sind einzustellen:
• Die Backofentemperatur
• Kerntemperatur des Garguts
Das Display zeigt die Ofentemperatur und
die Kerntemperatur des Garguts an.
21 3 4
56
1 Ofenfunktion
2 Fleischsondenanzeige
3 Die Kerntemperatur des Garguts
Page 59
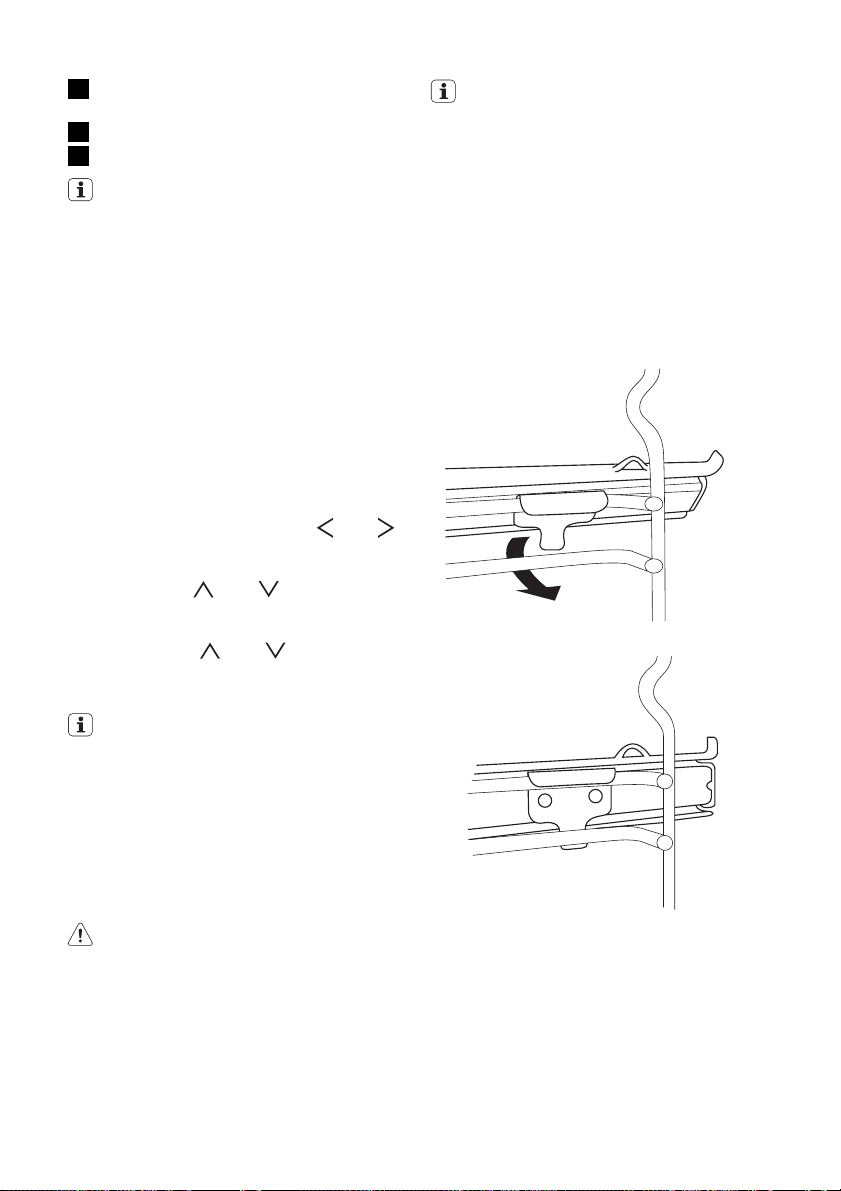
electrolux 59
4 Die eingestellte Kerntemperatur des
Garguts
5 Die eingestellte Temperatur im Gerät
6 Die Temperatur im Gerät
Wenn das Gerät mit der eingestellten
Temperatur arbeitet, erlischt die aktuelle Temperaturanzeige.
Wichtig! Verwenden Sie nur die
mitgelieferte Fleischsonde und
Originalersatzteile.
1. Schalten Sie das Gerät ein.
2. Führen Sie die Spitze der Fleischsonde
so in das Gargut ein, dass sie sich in
der Mitte des Garguts befindet.
3. Stecken Sie den Stecker der Fleischsonde in die Buchse an der Seitenwand
des Backofens.
Im Display erscheint das Menü. Fleischsonde .
Wenn Sie den Schritt 2 vor dem Schritt
1 durchführen, berühren Sie
zur Auswahl des Menüs Fleischsonde .
4. Berühren Sie innerhalb von weniger als
5 Sekunden
temperatur einzustellen.
5. Wählen Sie das Menü Funktionen .
6.
Berühren Sie
der Ofenfunktion und stellen Sie, falls
notwendig, die Backofentemperatur ein.
Die Fleischsonde muss während des
Garvorgangs im Gargut und der
Fleischsondenstecker in der Buchse
bleiben.
7. Sobald das Gargut die eingestellte
Kerntemperatur erreicht hat, ertönt ein
akustisches Signal. Die Ofenfunktion
schaltet ab.
Berühren Sie ein beliebiges Sensorfeld,
um das Signal abzuschalten.
Warnung! Seien Sie beim
Herausziehen der Fleischsonde aus
dem Gargut und des Steckers aus der
Buchse vorsichtig. Die Fleischsonde ist
heiß! Es besteht Verbrennungsgefahr.
8. Ziehen Sie den Fleischsondenstecker ab
und entfernen Sie das Gargut aus dem
Gerät.
9. Schalten Sie das Gerät aus.
oder , um die Kern-
oder zur Auswahl
oder
Fleischprogramme mit der Fleischsonde finden Sie im Menü Rezepte .
Auszüge
Montage der Auszüge
Sie können die Auszüge in jede Einsatzebene einsetzen.
Vergewissern Sie sich, dass die Auszüge
auf beiden Seiten auf derselben Ebene eingesetzt sind.
Das „Anschlagstück“, das sich an einem
Ende des Auszugs befindet, muss nach
oben weisen.
1
2
Verwendung der Auszüge
Die Auszüge erleichtern das Einsetzen und
Herausnehmen der Roste.
1. Ziehen Sie die rechten und linken Auszüge heraus.
Page 60

60 electrolux
°C
2. Setzen Sie den Rost auf die Auszüge
und schieben Sie diese vorsichtig in den
Backofen.
Vergewissern Sie sich, dass Sie die
Auszüge bis zum Anschlag in das Gerät
geschoben haben, bevor Sie die Backofentür schließen.
ZUSATZFUNKTIONEN
Tastensperre
Die Tastensperre verhindert ein versehentliches Verstellen der Ofenfunktion.
Aktivieren der Tastensperre
1. Schalten Sie das Gerät ein.
2. Wählen Sie die Ofenfunktion und die
Temperatur.
3.
Berühren Sie gleichzeitig
Display erscheint eine Meldung.
Die Tastensperre ist aktiv.
Deaktivieren der Tastensperre
1.
Berühren Sie gleichzeitig
Die Tastensperre ist nicht aktiviert.
Wenn Sie das Gerät ausschalten, wird
die Tastensperre deaktiviert.
Kindersicherung
Die Kindersicherung verhindert eine versehentliche Bedienung des Geräts.
Aktivieren der Kindersicherung
1. Schalten Sie das Gerät aus.
2.
Berühren Sie gleichzeitig
bis auf dem Display eine Meldung angezeigt wird.
Deaktivieren der Kindersicherung
1. Wiederholen Sie obige Schritte.
und OK. Im
und OK.
und OK,
°C
Vorsicht! Reinigen Sie die Auszüge
nicht im Geschirrspüler. Ölen oder
fetten Sie die Auszüge nicht.
Bei einem Stromausfall bleiben einige
der Einstellungen (z.B. die Spracheinstellung und das Menü Favoriten ) im
elektronischen Programmspeicher gespeichert.
Automatische Sicherheitsabschaltung
Das Gerät schaltet sich nach einiger Zeit
aus:
• Wenn Sie das Gerät nicht ausschalten
• Wenn Sie die Backofentemperatur nicht
ändern
Backofentempera-
tur
30 °C - 115 °C 12,5 Stunden
120 °C - 195 °C 8,5 Stunden
200 °C - 245 °C 5,5 Stunden
250 °C 3,0 Stunden
Um das Gerät nach der automatischen Abschaltung wieder einzuschalten, müssen
Sie es zuerst vollständig ausschalten.
Kühlgebläse
Wenn das Gerät in Betrieb ist, schaltet sich
das Kühlgebläse automatisch ein, um die
Geräteoberflächen zu kühlen. Nachdem Sie
das Gerät abgeschaltet haben, läuft das
Abschaltzeit
Page 61

electrolux 61
Kühlgebläse weiter, bis das Gerät abgekühlt ist.
Sicherheits-Thermostat
Um eine gefährliche Überhitzung (durch unsachgemäßen Gebrauch des Gerätes oder
defekte Bestandteile) zu vermeiden, ist der
Backofen mit einem Sicherheits-Thermostat
ausgestattet, der die Stromversorgung unterbricht. Die Wiedereinschaltung des Ofens
erfolgt automatisch bei Temperaturabfall.
PRAKTISCHE TIPPS UND HINWEISE
Warnung! Siehe Kapitel
„Sicherheitshinweise“.
• Der Backofen hat vier Einsatzebenen. Sie
werden von unten nach oben gezählt.
• Das Gerät ist mit einem speziellen System ausgestattet, das die Luft umwälzt
und den Dampf kontinuierlich rückführt.
Das Garen mit Dampf macht Ihre Speisen innen weich und außen knusprig. Die
Garzeit und der Energieverbrauch verringern sich auf ein Minimum.
• Es kann sich Feuchtigkeit im Gerät oder
an den Glastüren niederschlagen. Das ist
normal. Stellen Sie sich stets in sicherer
Entfernung zum Gerät, wenn Sie die Tür
während des Betriebs öffnen. Heizen Sie
das Gerät 10 Minuten vor, um die Kondensation zu verringern.
• Wischen Sie die Feuchtigkeit nach jedem
Gebrauch ab.
• Stellen Sie keine Gegenstände direkt auf
den Backofenboden und bedecken Sie
die Bauteile nicht mit Alu-Folie, da sonst
das Garergebnis beeinflusst und die
Emailbeschichtung beschädigt werden
könnte.
Kuchenbacken
• Die optimale Temperatur zum Backen
von Kuchen liegt zwischen 150 °C und
200 °C.
• Heizen Sie den leeren Backofen vor dem
Backen etwa 10 Minuten vor.
• Öffnen Sie die Backofen-Tür nicht, bevor
3/4 der Backzeit abgelaufen ist.
• Werden zwei Backbleche gleichzeitig in
den Backofen eingeschoben, muss zwischen den Blechen eine Einsatzebene frei
gelassen werden.
Garen von Fleisch und Fisch
• Garen oder braten Sie kein Fleisch mit einem Gewicht unter 1 kg. Das Garen in zu
kleinen Mengen trocknet das Fleisch aus.
• Stellen Sie die Temperatur für zartes ro-
• Helles Fleisch, Geflügel, und Fisch erfor-
• Verwenden Sie bitte zum Garen von sehr
• Lassen Sie den Braten vor dem An-
• Geben Sie etwas Wasser in die Fettpfan-
Garzeiten
Die Garzeiten hängen von der Art, Menge
und Konsistenz des Gargutes ab.
Überprüfen Sie die Leistung zu Beginn des
Garens. Finden Sie die besten Einstellungen
(Heizstufe, Garzeit usw.) für Ihre Brat- und
Backformen und Ihre persönlichen Rezepte
und Mengen heraus, wenn Sie das Gerät
benutzen.
Informationen zu Acrylamiden
Wichtig! Nach neuesten
wissenschaftlichen Erkenntnissen kann die
Bräunung von Lebensmitteln, speziell bei
stärkehaltigen Produkten, eine
gesundheitliche Gefährdung durch
Acrylamid verursachen. Daher empfehlen
wir, bei möglichst niedrigen Temperaturen
zu garen und die Speisen nicht zu stark zu
bräunen.
tes Fleisch, das außen gar und innen saftig sein soll auf 200 °C - 250 °C.
dern dagegen eine Temperatur zwischen
150°C und 175°C.
fetten Speisen die Fettpfanne, um den
Backofen vor Spritzern zu schützen, die
dauerhaft einbrennen könnten.
schneiden mindestens 15 Minuten stehen, damit der Fleischsaft nicht ausfließen kann.
ne, um eine zu hohe Rauchbildung im
Backofen beim Braten zu vermeiden. Um
die Rauchbildung zu vermindern, empfiehlt es sich, immer wieder ein wenig
Wasser dazuzugeben.
Page 62

62 electrolux
REINIGUNG UND PFLEGE
Warnung! Siehe Kapitel
„Sicherheitshinweise“.
• Feuchten Sie ein weiches Tuch mit warmem Wasser und etwas Reinigungsmittel
an und reinigen Sie damit die Vorderseite
des Geräts.
• Reinigen Sie die Metalloberflächen mit einem handelsüblichen Reinigungsmittel.
• Reinigen Sie den Innenraum des Backofens nach jedem Gebrauch. Auf diese
Weise lassen sich Verschmutzungen
leicht entfernen und es brennt nichts ein.
• Entfernen Sie hartnäckige Verschmutzungen mit speziellen Backofenreinigern.
• Reinigen Sie nach jedem Gebrauch alle
Zubehörteile mit einem weichen Tuch,
das mit warmem Wasser und Reinigungsmittel angefeuchtet wurde, und lassen Sie sie trocknen.
• Reinigen Sie Zubehörteile mit Antihaftbeschichtung nicht mit aggressiven Reinigungsmitteln, scharfkantigen Gegenständen oder im Geschirrspüler. Die Antihaftbeschichtung kann zerstört werden!
Pyrolytische Reinigung
Mit der Funktion Pyrolyse können Sie den
Backofen mittels des Pyrolyseverfahrens
reinigen. Wählen Sie die Funktion im Menü
Reinigung aus.
Warnung! Das Gerät wird sehr heiß.
Es besteht Verbrennungsgefahr.
Wichtig! Vor dem Starten der Funktion
Pyrolyse müssen alle entnehmbaren Teile
(Einschubgitter, Zubehör usw.) aus dem
Backofen entfernt werden.
1. Schalten Sie das Gerät ein.
2.
Berühren Sie
des Menüs Reinigung . Berühren Sie
OK.
3.
Berühren Sie
der Funktion Pyrolyse . Berühren Sie
OK.
oder zur Auswahl
oder zur Auswahl
4. Berühren Sie zur Auswahl der Reinigungsdauer
– LEICHT - bei einem geringen Ver-
schmutzungsgrad (2:15)
– NORMAL - bei einem mittleren Ver-
schmutzungsgrad (2:45)
– STARK - bei einem hohen Ver-
schmutzungsgrad (3:15)
– AUTO - das Gerät berechnet auto-
matisch den zu verwendenden Pyrolysezyklus.
5. Im Display erscheinen Meldungen. Berühren Sie nach jeder Meldung OK.
Sobald das Gerät die voreingestellte
Temperatur erreicht hat, wird die Tür
verriegelt.
Wenn der Pyrolysezyklus beginnt,
leuchtet die Ofenlampe nicht und der
Kühlventilator läuft mit einer höheren
Drehzahl.
Öffnen Sie die Backofentür nicht während
der Aufheizzeit. Wenn Sie die Tür öffnen,
brechen Sie den pyrolytischen Reinigungszyklus ab.
Um den pyrolytischen Reinigungszyklus zu
stoppen, berühren Sie
Verwenden Sie das Gerät nicht, bis das
Türverriegelungssymbol erlischt.
Pyrolyse Erinnerungsfunktion
Es wird daran erinnert, wenn der Backofen
gereinigt werden muss. Nach einigen Betriebsstunden des Backofens wird im Display eine Meldung angezeigt.
Die Funktion Pyrolyse Erinnerungsfunktion
können Sie im Menü Reinigung aktivieren
oder deaktivieren. Die Funktion Pyrolyse Erinnerungsfunktion wird auch deaktiviert,
wenn die Werkseinstellungen geladen werden.
Reinigung der Backofentür
Die Backofentür ist mit vier Glasscheiben
ausgestattet. Die Backofentür und die inneren Glasscheiben können zur Reinigung
ausgebaut werden.
Ausbau der Backofentür und
Glasscheiben
1. Öffnen Sie vollständig die Backofentür
und finden Sie das Scharnier auf der
linken Seite der Tür.
oder :
.
Page 63

electrolux 63
2. Drücken Sie die Befestigungskomponente, bis sie zurückgezogen werden
kann.
3. Halten Sie die gedrückte Komponente
mit einer Hand und verwenden Sie mit
der anderen Hand einen Schraubendreher, um den Scharnierhebel auf der
linken Seite anzuheben und zu drehen.
4. Finden Sie das Scharnier auf der rechten Seite der Tür.
5. Heben und drehen Sie den Hebel an
dem Scharnier.
6. Schließen Sie die Backofentür bis zur
ersten Raststellung (bis zur Hälfte). Anschließend ziehen Sie sie nach vorn aus
der Halterung heraus.
Page 64
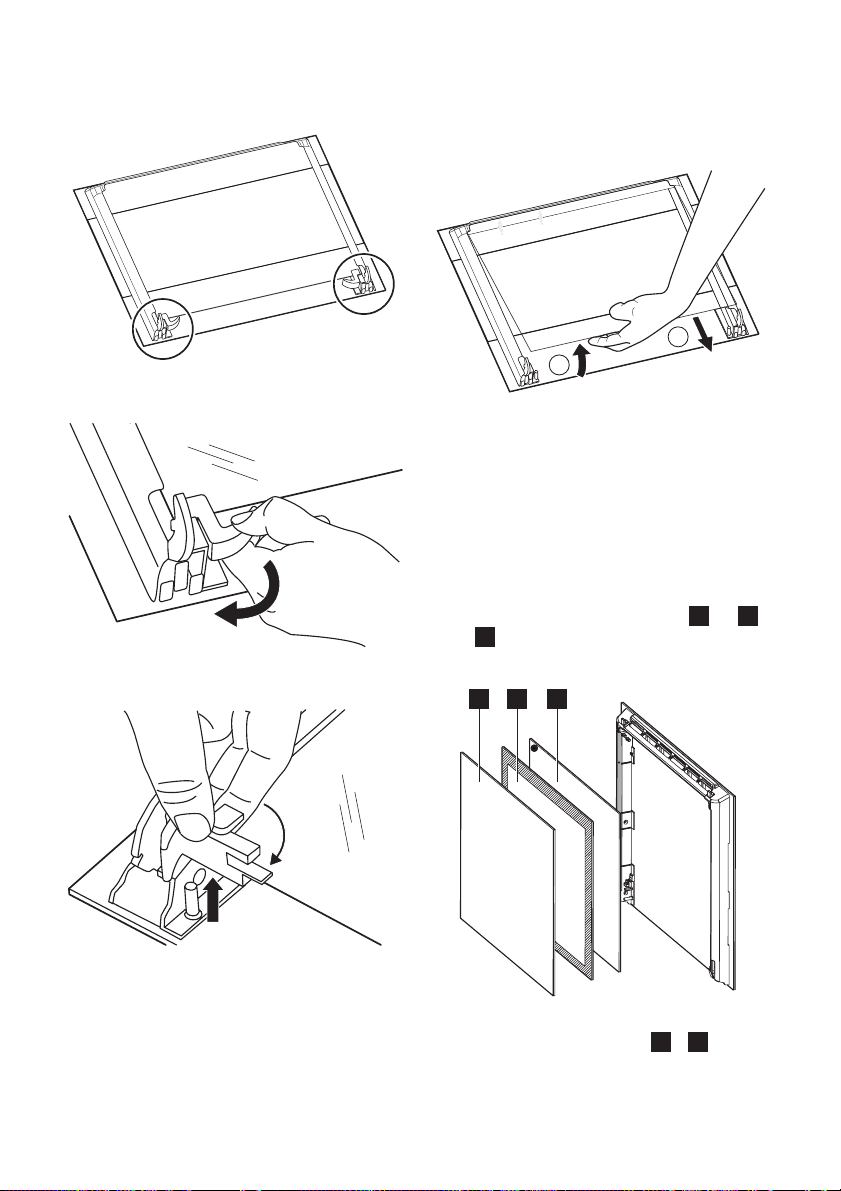
64 electrolux
7. Legen Sie die Backofen-Tür auf einer
ebenen Fläche auf ein weiches Tuch.
8. Lösen Sie das Verriegelungssystem,
um die Glasscheiben zu entfernen.
9. Drehen Sie die 2 Befestigungen um 90°
und nehmen Sie sie aus der Halterung.
10. Heben (Schritt 1) und entfernen (Schritt
2) Sie nacheinander die Glasscheiben .
Beginnen Sie mit der obersten Glasscheibe.
2
1
Reinigen Sie die Glasscheiben mit Wasser
und Spülmittel. Trocknen Sie die Glasscheiben sorgfältig ab.
Einbau der Backofentür und der
Glasscheiben
Nach der Reinigung müssen Backofentür
und Glasscheiben wieder eingebaut werden. Führen Sie die Schritte oben in umgekehrter Reihenfolge durch.
Stellen Sie sicher, dass Sie die Glasschei-
1
ben in der richtigen Reihenfolge (
3
und (
) wieder einbauen (siehe Abbil-
), ( 2 )
dung).
1 2 3
90°
Die mittleren Glasscheiben ( 2 - 3 ) haben
einen Dekorrahmen. Wenn Sie diese montieren, stellen Sie sicher, dass die bedruckte
Zone zur Innenseite der Tür weist. Stellen
Sie sicher, dass die Glasscheibenrahmen (
Page 65

electrolux 65
2
- 3 ) sich an den bedruckten Zonen
nicht rau anfühlen.
Achten Sie darauf, dass Sie die Glasscheiben in die richtige Aufnahme einsetzen (siehe nachfolgende Abbildung).
Einschubgitter
Abnehmen der Einschubgitter
1. Ziehen Sie das Einschubgitter vorne von
der Seitenwand weg.
Einsetzen der Einschubgitter
Führen Sie zum Einsetzen der Einschubgitter die obigen Schritte in umgekehrter Reihenfolge durch.
Die abgerundeten Enden der Einschubgitter müssen nach vorne zeigen!
Backofenlampe
Warnung! Bitte vorsichtig vorgehen!
Es besteht die Gefahr eines
elektrischen Schlags!
Bevor Sie die Backofenlampe
austauschen:
• Backofen ausschalten.
• Sicherungen aus dem Sicherungskasten
entfernen oder den Schutzschalter ausschalten.
Ein Tuch auf den Backofenboden legen, um die Lampe und das Glas zu
schützen.
1. Die Glasabdeckung gegen den Uhrzei-
gersinn drehen und abnehmen.
2. Die Glasabdeckung reinigen.
3. Ersetzen Sie die Backofenlampe durch
eine geeignete 300 °C hitzebeständige
Backofenlampe.
Verwenden Sie dazu eine Backofenlampe mit der gleichen Leistung.
4. Bringen Sie die Glasabdeckung an.
2. Ziehen Sie das Einschubgitter hinten
von der Seitenwand weg und entnehmen Sie es.
Page 66

66 electrolux
WAS TUN, WENN …
Warnung! Siehe Kapitel
„Sicherheitshinweise“.
Problem Mögliche Ursachen Abhilfe
Das Gerät heizt nicht. Das Gerät ist ausgeschaltet. Schalten Sie das Gerät ein.
Die erforderlichen Einstellungen
Die Kindersicherung ist aktiviert. Siehe hierzu „Deaktivieren der Kin-
Die Sicherung im Sicherungskas-
Das Display zeigt die
Fehlermeldung "F....." an.
Die Backofenlampe
leuchtet nicht.
Dampf und Kondenswasser schlagen sich auf
Speisen und im Backofen nieder.
Wenn Sie das Problem nicht selbst lösen
können, wenden Sie sich an Ihren Fach-
wurden nicht vorgenommen.
ten hat ausgelöst.
Elektronikfehler. Wenden Sie sich hierzu an den
Die Backofenlampe ist defekt. Siehe hierzu „Austauschen der
Die Speisen standen zu lange im
Backofen.
findet sich auf dem vorderen Rahmen des
Backofeninnenraums.
händler oder Kundendienst.
Die vom Kundendienst benötigten Daten
finden Sie auf dem Typenschild. Dieses be-
Wir empfehlen, dass Sie folgende Daten hier notieren:
Modell (MOD.) .........................................
Produktnummer (PNC) .........................................
Seriennummer (S.N.) .........................................
Prüfen Sie die Einstellungen.
dersicherung“.
Prüfen Sie die Sicherung.
Falls die Sicherung öfter als einmal
auslöst, wenden Sie sich an einen
qualifizierten Elektriker.
Kundendienst.
Backofenlampe“.
Speisen nach Beendigung des
Gar- oder Backvorgangs nicht länger als 15-20 Minuten im Backofen lassen.
TECHNISCHE DATEN
Spannung 230 V
Frequenz 50 Hz
MONTAGE
Warnung! Siehe Kapitel
„Sicherheitshinweise“.
Page 67

electrolux 67
22
590
594
540
560
576
2
50
A
B
550 min
560÷570
550 min
560-570
593
580
80÷100
Elektrischer Anschluss
Warnung! Der elektrische Anschluss
darf nur von einer qualifizierten
Fachkraft vorgenommen werden.
Der Hersteller haftet nicht für Schäden
aufgrund der Nichtbeachtung der Sicherheitsvorkehrungen des Kapitels
„Sicherheitshinweise“.
Das Gerät wird mit Netzkabel und mit Netz-
stecker geliefert.
UMWELTTIPPS
Das Symbol auf dem Produkt oder
seiner Verpackung weist darauf hin, dass
dieses Produkt nicht als normaler
Haushaltsabfall zu behandeln ist, sondern
Page 68

68 electrolux
an einem Sammelpunkt für das Recycling
von elektrischen und elektronischen
Geräten abgegeben werden muss. Durch
Ihren Beitrag zum korrekten Entsorgen
dieses Produkts schützen Sie die Umwelt
und die Gesundheit Ihrer Mitmenschen.
Umwelt und Gesundheit werden durch
falsches Entsorgen gefährdet. Weitere
Informationen über das Recycling dieses
Produkts erhalten Sie von Ihrem Rathaus,
Ihrer Müllabfuhr oder dem Geschäft, in dem
Sie das Produkt gekauft haben.
Verpackungsmaterial
Das Verpackungsmaterial ist umweltfreundlich und wieder verwertbar.
Kunststoffteile sind mit internationalen
Abkürzungen wie PE, PS usw. gekennzeichnet. Entsorgen Sie das Verpackungsmaterial in den dafür vorgesehenen Behältern der kommunalen Entsorgungsstellen.
Page 69

electrolux 69
Page 70

70 electrolux
Page 71

electrolux 71
Page 72

www.electrolux.com/shop
892940600-B-492010
 Loading...