

Electrolux EOB31002 User Manual [da]

user manual
benutzerinformation
istruzioni per l’uso
Инструкция по
эксплуатации
Oven
Backofen
Forno
Духовой шкаф
EOB31002

2 electrolux
Electrolux. Thinking of you.
Share more of our thinking at www.electrolux.com
CONTENTS
Safety information 2
Product description 5
Before first use 5
Daily use 5
Clock functions 6
Using the accessories 6
SAFETY INFORMATION
Before the installation and use, read this
manual carefully:
•For your personal safety and the safety of
your property
• For the respect of the environment
• For the correct operation of the appliance.
Always keep these instructions with the appliance also if you move or sell it.
The manufacturer is not responsible if incorrect installation or use results in damage.
Children and vulnerable people safety
• This appliance can be used by children
aged from 8 years and above and persons with reduced physical, sensory or
mental capabilities or lack of experience
and knowledge if they have been given
supervision or instruction concerning use
of the appliance in safe way and understand the hazards involved. Children shall
not play with the appliance.
• Keep all packaging away from children.
There is the risk of suffocation or physical
injury.
• WARNING: Keep children and animals
away from the appliance when the door
is open or the appliance is in the operation, because it becomes hot. There is
the risk of injury or other permanent disability.
• If the appliance has Child Lock or Key
Lock (Control Lock) function, use it. It
prevents children and animals from accidental operation of the appliance.
Additional functions 7
Helpful hints and tips 7
Care and cleaning 11
What to do if… 13
Installation 13
Environment concerns 15
Subject to change without notice
General safety
• Do not change the specifications of this
appliance. There is the risk of injury and
damage to the appliance.
• Do not let the appliance stay unattended
during operation.
• Switch off the appliance after each use.
Installation
• Only an approved electrician can install
and connect the appliance. Contact an
approved service centre. This is to prevent the risks of structural damage or
physical injury.
• Make sure that the appliance is not damaged because of transport. Do not connect a damaged appliance. If necessary,
contact the supplier.
• Remove all packaging, stickers and layers from the appliance before first use.
Do not remove the rating plate. It can invalidate the guarantee.
• Fully obey the laws, ordinances, directives and standards in force in the country where you use the appliance (safety
regulations, recycling regulations, electrical or gas safety rules etc.).
• Make sure that the appliance is disconnected from the power supply during the
installation.
• Be careful when you move the appliance.
The appliance is heavy. Always use safety gloves. Do not pull the appliance by
the handle.
• The electrical installation must have an
isolation device which lets you disconnect the appliance from the mains at all
poles. The isolation device must have a

electrolux 3
contact opening width of minimum 3
mm.
• You must have correct isolation devices:
line protecting cut-outs, fuses (screw
type fuses removed from the holder),
earth leakage trips and contactors.
• The shock protection parts must be fixed
in such a way that they cannot be undone without tools.
• Before the installation, make sure that the
kitchen cabinet has the recess dimensions applicable.
• Make sure that the appliance is installed
below and adjacent safe structures.
• Keep the minimum distances to the other
appliances and units.
• Install the appliance with its back and
one side close to the higher appliance.
The other side must be close to appliance with the same height.
• The appliance cannot be positioned on a
base.
• Built in ovens and built in cooking surfaces are attached with special connection
system. To prevent damage to the appliance, only use an appliance with the appliances from the same manufacturer.
Electrical connection
• The appliance must be earthed.
• Make sure that the electrical data on the
rating plate agree with your domestic
power supply.
• Information on the voltage is on the rating
plate.
• Always use a correctly installed shockproof socket.
• When you connect electrical appliances
to mains sockets, do not let cables touch
or come near the hot appliance door.
• Do not use multi-way plugs, connectors
and extension cables. There is the risk of
fire.
• Do not replace or change the mains cable. Contact the service centre.
• Make sure not to squash or cause damage to the mains plug (if applicable) and
cable behind the appliance.
• Make sure that the mains connection is
accessible after the installation.
• Do not pull the mains cable to disconnect
the appliance. Always pull the mains plug
– if applicable.
Use
• The appliance is only for domestic use.
Do not use the appliance for commercial
and industrial use.
• Only use the appliance for domestic
cooking tasks. This is to prevent physical
injury to persons or prevent damage to
property.
• Do not use the appliance as a work surface or storage surface.
• Do not put flammable products or items
that are wet with flammable products,
and/or fusible objects (made of plastic or
aluminium) in, near or on the appliance.
There is the risk of explosion or fire.
• The interior of the appliance becomes hot
during use. There is the risk of burns. Do
not touch the heating elements in the appliance. Use gloves when you insert or
remove the accessories or pots.
• Be careful when you remove or install the
accessories to prevent damage to the
oven enamel.
• Always stay away from the appliance
when you open the door while the appliance is in operation. Hot steam can release. There is the risk of skin burns.
• Discoloration of the enamel has no effect
on the performance of the appliance so it
is not a defect in the sense of the warranty law.
• To prevent damage or discoloration to
the enamel:
– do not put any objects directly on the
appliance floor and do not cover it with
aluminium foil;
– do not put hot water directly into the
appliance;
– do not keep moist dishes and food in
the appliance after you finish the cooking.
• Do not use this appliance if it is in contact
with water. Do not operate the appliance
with wet hands.
• Do not apply pressure on the open door.
• Always close the appliance door when
you cook, even while grilling.
Care and cleaning
• Before maintenance, switch off the appliance and disconnect the appliance from
the power supply.

4 electrolux
• Before maintenance, make sure that the
appliance is cold. There is the risk of
burns. There is the risk that the glass
panels can break.
• Keep the appliance clean at all times. A
build-up of fats or other foodstuff can result in a fire.
• Regular cleaning prevents the surface
material from deteriorating
• Use a deep baking tray for very moist
cakes to prevent that fruit juices cause
stains that can be permanent.
•For your personal safety and the safety of
your property, only clean the appliance
with water and a soap. Do not use flammable products or products that can
cause corrosion.
• Do not clean the appliance with steam
cleaners, high-pressure cleaners, sharp
objects, abrasive cleaning agents, abrasive sponges and stain removers
• If you use an oven spray, follow the instructions from the manufacturer.
• Do not clean the glass door with abrasive
cleaning agents or metal scraper. Heat
resistant surface of the inner glass can
break and shatter.
• When the door glass panels are damaged they become weak and can break.
You must replace them. Contact the
service centre.
• Be careful when you remove the door
from the appliance. The door is heavy!
• Do not clean catalytic enamel (if applicable).
Risk of fire
• Open the door carefully. The use of ingredients with alcohol can cause a mixture
of alcohol and air. There is the risk of fire.
• Do not let sparks or open flames come
near the appliance when you open the
door.
• Do not put flammable products or items
that are wet with flammable products,
and/or fusible objects (made of plastic or
aluminium) in, near or on the appliance.
Oven lamp
• Bulb lamps used in this appliance are
special lamps selected for household appliances use only. They cannot be used
for the full or partial illumination of a
household room.
• If it becomes necessary to replace the
lamp use one of the same power and
specifically designed for household appliances only.
• Disconnect the appliance from the power
supply before the replacement of the
oven lamp. There is the risk of electrical
shock.
Service centre
• Only an approved engineer can repair or
work on the appliance. Contact an approved service centre.
• Use only original spare parts.
Disposal of the appliance
• To prevent the risk of physical injury or
damage
– Disconnect the appliance from the
power supply.
– Cut off the mains cable and discard it.
– Discard the door catch. This prevents
children or small animals from being
closed inside of the appliance. There is
the risk of suffocation.
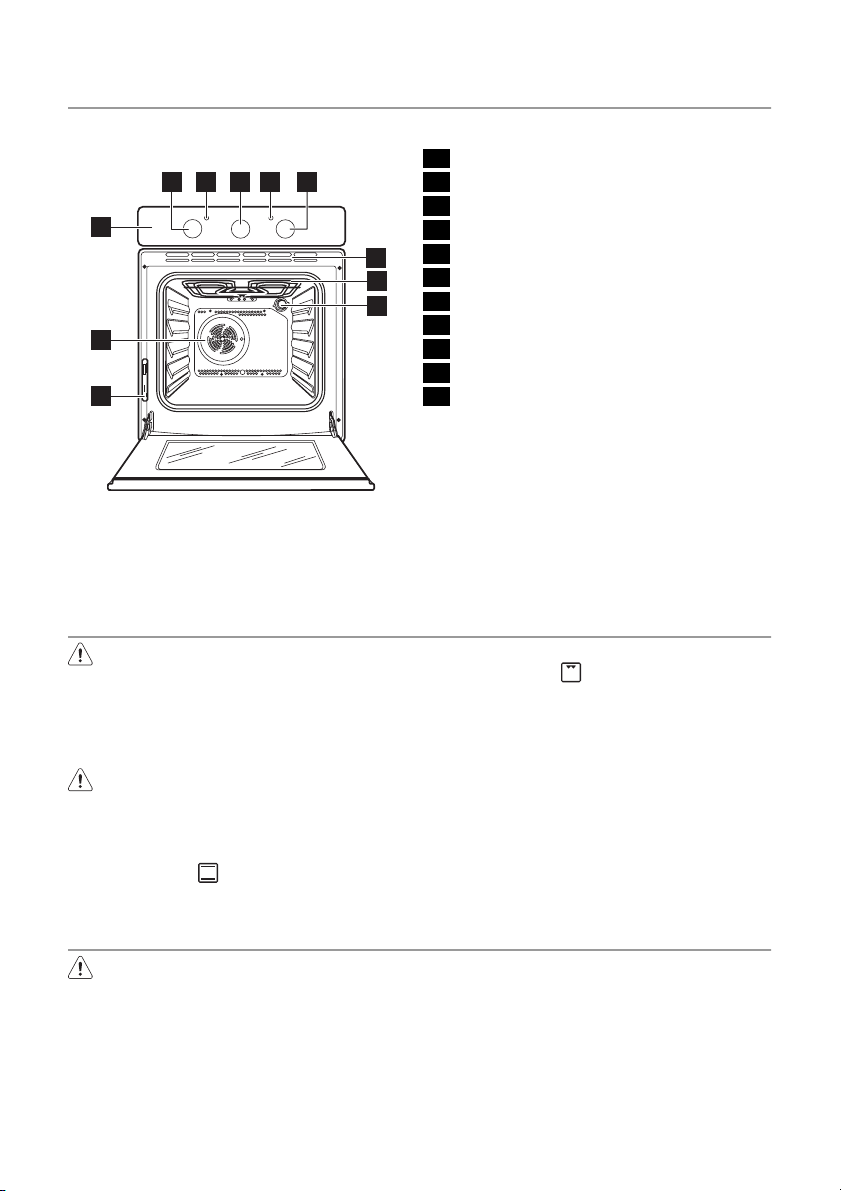
PRODUCT DESCRIPTION
General overview
2 4 63 5
1
11
10
1 Control panel
2 Knob for the temperature
3 Temperature indicator
4 Timer
5 Power indicator
7
6 Knob for the oven functions
8
7 Ventilation openings
9
8 Grill
9 Oven lamp
10 Rating plate
11 Fan
electrolux 5
Oven accessories
• Wire shelf
For cookware, cake tins, roasts.
BEFORE FIRST USE
Warning! Refer to "Safety information"
chapter.
Initial Cleaning
• Remove all parts from the appliance.
• Clean the appliance before first use.
Caution! Do not use abrasive cleaning
agents! This can damage the surface.
Refer to chapter "Care and Cleaning".
Preheating
1.
Set function
ature.
and maximum temper-
DAILY USE
Warning! Refer to "Safety information"
chapter.
Activating and deactivating the
appliance
1. Turn the knob for the oven functions to
an oven function.
• Deep roasting pan
To bake and roast or as pan to collect
fat.
2. Run an empty oven for 45 minutes.
3.
Set function
ature.
4. Run an empty oven for 15 minutes.
This is to burn off any residue from the cavity surface. Accessories can become more
hot than in normal use. During this period
an odour and smoke can be emitted. This
is normal. Make sure the airflow is sufficient.
2. Turn the knob for the temperature to a
temperature.
The power indicator comes on while
the appliance operates.
The temperature indicator comes on
while the temperature in the appliance
increases.
and maximum temper-

6 electrolux
3. To deactivate the appliance, turn the
knob for the oven functions and the
Oven functions
Oven function Application
OFF position The appliance is off.
Conventional
cooking
Grill To grill flat food items in large quantities. To make toasts.
Bottom heating el-
ement
Fan forced cooking
Defrost
Heats from the top and bottom of the oven. To bake and roast on
Heats only from the bottom of the oven. To bake cakes with crispy
To cook different dishes at the same time. To cook home-made fruit
in syrup, and to dry mushrooms or fruit.
Thaws frozen food. The temperature control knob must be on off po-
CLOCK FUNCTIONS
Timer - End of cooking programmer
Use it to set the switch-off time for an oven
function.
1. Set an oven function and a temperature.
2. Turn the knob for the timer (refer to
"Product description") as far as it goes.
After that turn it to necessary time period value.
3. After the time period is completed, a
knob for the temperature to the Off position.
one oven level.
bottoms.
sition.
signal sounds and the appliance deactivates.
To set the appliance on manual operation, turn the knob for the timer to
.
USING THE ACCESSORIES
Installing the oven accessories
Put the slide-in accessories between the
guide bars of one of the oven levels.
4
3
2
1

ADDITIONAL FUNCTIONS
Cooling fan
When the appliance operates, the cooling
fan switches on automatically to keep the
surfaces of the appliance cool. If you switch
off the appliance, the cooling fan stops.
Safety thermostat
To prevent dangerous overheating (due to
incorrect use of the appliance or defective
HELPFUL HINTS AND TIPS
Warning! Refer to "Safety information"
chapter.
• The appliance has four shelf levels. Count
the shelf levels from the bottom of the
appliance floor.
• The appliance has a special system
which circulates the air and constantly recycles the steam. With this system you
can to cook in a steamy environment and
keep the food soft inside and crusty outside. It decreases the cooking time and
energy consumption to a minimum.
• Moisture can condense in the appliance
or on the glass doors. This is normal. Always stand back form the appliance
when you open the appliance door while
cooking. To decrease the condensation,
run the appliance for 10 minutes before
cooking.
• Wipe away moisture after every use of
the appliance.
• Do not put the objects directly on the ap-
pliance floor and do not cover the components with aluminium foil when you
cook. This can change the baking results
and damage the enamel coating.
Baking cakes
• The best temperature for baking cakes is
between 150°C and 200°C.
electrolux 7
components), the oven has a safety thermostat, which interrupts the power supply.
The oven switches back on again automatically, when the temperature drops.
• Preheat the oven for approximately 10
minutes before baking.
• Do not open the oven door before 3/4 of
the set cooking time is up.
• If you use two baking trays at the same
time, keep one level empty between
them.
Cooking meat and fish
• Do not cook meat with weight below 1
kg. Cooking too small quantities makes
the meat too dry.
• To keep the red meat well cooked outside and juicy inside set the temperature
between 200°C-250°C.
• For white meat, poultry and fish set the
temperature between 150°C-175°C.
• Use a dripping pan for very fatty food to
prevent the oven from stains that can be
permanent.
• Leave the meat for approximately 15 minutes before carving so that the juice
does not seep out.
• To prevent too much smoke in the oven
during roasting, add some water into the
dripping pan. To prevent the smoke condensation, add water each time after it
dries up.

8 electrolux
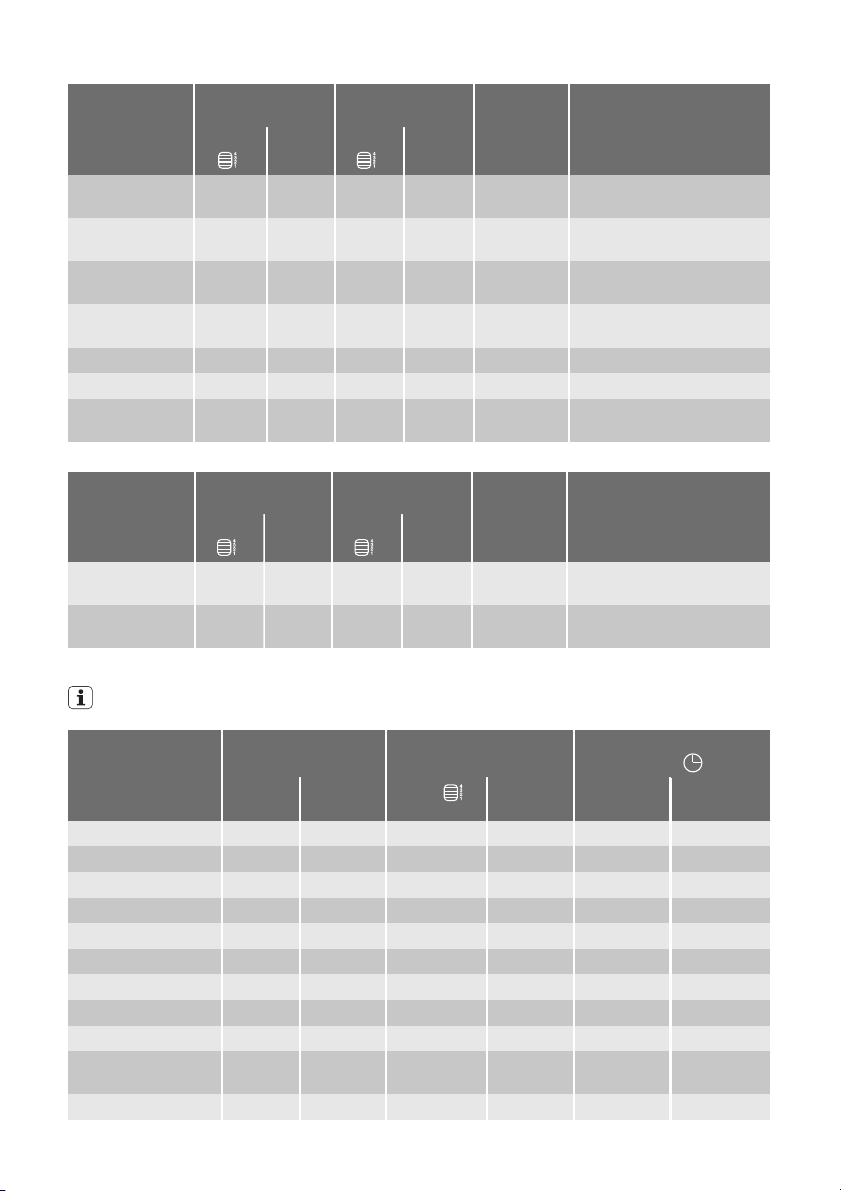
Baking and roasting table
CAKES
Conventional
TYPE OF DISH
cooking
Level
Temp
[°C]
Whisked recip-
2 170 2 (1
ies
Shortbread
2 170 2 (1
dough
Butter-milk
1 170 2 165 60-80 In cake mould 26 cm
cheese cake
Apple cake (Ap-
1 170 2 (1
ple pie)
Strudel 2 175 2 150 60-80 On baking tray
Jam- tart 2 170 2 (1
Fruit cake 2 170 2 155 60-70 In cake mould 26 cm
Sponge cake
2 170 2 160 35-45 In cake mould 26 cm
(Fatless sponge
cake)
Christmas
2 170 2 160 50-60 In cake mould 20 cm
cake/Rich fruit
cake
Plum cake 2 170 2 165 50-60
Small cakes 3 170 3 (1
Biscuits 3 150 3 (1
Meringues 3 100 3 115 90-120 On flat baking tray
Buns 3 190 3 180 15-20
Choux 3 190 3 (1
Plate tarts 3 180 2 170 45-70 In cake mould 20 cm
Victoria sand-
1 or 2 180 2 170 40-55 Left + right in cake mould
wich
1) Preheat for 10 minutes.
Fan forced
cooking
Level
and 3)
and 3)
and 3)
and 3)
and 3)
and 3)
and 3)
Temp
Cooking
time [min]
Notes
[°C]
165 45-60 In cake mould
160 24-34 In cake mould
160 100-120 2 cake moulds of 20 cm
on the wire shelf
160 30-40 In cake mould 26 cm
In bread tin
1)
165 20-30 On flat baking tray
140 20-30
On flat baking tray
On flat baking tray
180 25-35
On flat baking tray
20 cm
BREAD AND PIZZA
Conventional
TYPE OF DISH
cooking
Level
Temp
[°C]
White bread 1 190 1 195 60-70 1-2 pieces, 500 gr one
Rye bread 1 190 1 190 30-45 In bread tin
Fan forced
cooking
Level
Temp
[°C]
Cooking
time [min]
Notes
piece
1)
1)
1)
1)

electrolux 9
Conventional
TYPE OF DISH
cooking
Level
Temp
[°C]
Bread rolls 2 190 2 (1
Pizza 1 190 1 190 20-30
Scones 3 200 2 190 10~20
1) Preheat for 10 minutes.
Fan forced
cooking
Level
and 3)
Temp
Cooking
time [min]
Notes
[°C]
180 25-40 6-8 rolls on flat baking tray
1)
On deep roasting pan
On flat baking tray
1)
FLANS
Conventional
TYPE OF DISH
cooking
Level
Temp
[°C]
Pasta flan 2 180 2 180 40-50 In mould
Vegetable flan 2 200 2 200 45-60 In mould
Quiches 1 190 1 190 40-50 In mould
Lasagne 2 200 2 200 25-40 In mould
Cannelloni 2 200 2 200 25-40 In mould
Yorkshire pud-
2 220 2 210 20-30
ding
1) Preheat for 10 minutes.
Fan forced
cooking
Level
Temp
[°C]
Cooking
time [min]
Notes
6 pudding mould
1)
MEAT
Conventional
TYPE OF DISH
cooking
Level
Temp
[°C]
Beef 2 200 2 190 50-70 On wire shelf and deep
Pork 2 180 2 180 90-120 On wire shelf and deep
Veal 2 190 2 175 90-120 On wire shelf and deep
English roast
2 210 2 200 44-50 On wire shelf and deep
beef rare
English roast
2 210 2 200 51-55 On wire shelf and deep
beef medium
English roast
2 210 2 200 55-60 On wire shelf and deep
beef well done
Shoulder of
2 180 2 170 120-150 On deep roasting pan
pork
Shin of pork 2 180 2 160 100-120 2 pieces on deep roasting
Lamb 2 190 2 190 110-130 Leg
Fan forced
cooking
Level
Temp
[°C]
Cooking
time [min]
Notes
roasting pan
roasting pan
roasting pan
roasting pan
roasting pan
roasting pan
pan
1)
10 electrolux
Conventional
TYPE OF DISH
Chicken 2 200 2 200 70-85 Whole on deep roasting
Turkey 1 180 1 160 210-240 Whole on deep roasting
Duck 2 175 2 160 120-150 Whole on deep roasting
Goose 1 175 1 160 150-200 Whole on deep roasting
Rabbit 2 190 2 175 60-80 Cut in pieces
Hare 2 190 2 175 150-200 Cut in pieces
Pheasant 2 190 2 175 90-120 Whole on deep roasting
cooking
Level
Temp
[°C]
Fan forced
cooking
Level
Temp
[°C]
Cooking
time [min]
Notes
pan
pan
pan
pan
pan
FISH
TYPE OF DISH
Trout/Sea
bream
Tuna fish/Salmon
Conventional
cooking
Level
Temp
[°C]
2 190 2 (1
2 190 2 (1
Fan forced
cooking
Level
and 3)
and 3)
Cooking
Temp
time [min]
[°C]
175 40-55 3-4 fishes
175 35-60 4-6 fillets
Notes
Grilling
Preheat the empty oven for 10 minutes, before cooking.
Quantity Grilling Cooking time in mi-
nutes
TYPE OF DISH Pieces g
Fillet steaks 4 800 3 250 12-15 12-14
Beef steaks 4 600 3 250 10-12 6-8
Sausages 8 / 3 250 12-15 10-12
Pork chops 4 600 3 250 12-16 12-14
Chicken (cut in 2) 2 1000 3 250 30-35 25-30
Kebabs 4 / 3 250 10-15 10-12
Breast of chicken 4 400 3 250 12-15 12-14
Hamburger 6 600 3 250 20-30
Fish Fillet 4 400 3 250 12-14 10-12
Toasted sandwich-
es
Toast 4-6 / 3 250 2-4 2-3
4-6 / 3 250 5-7 /
level
Temp.
(°C)
1st side 2nd side
electrolux 11
Information on acrylamides
Important! According to the newest
scientific knowledge, if you brown food
(specially the one which contains starch),
CARE AND CLEANING
Warning! Refer to "Safety information"
chapter.
• Clean the front of the appliance with a
soft cloth with warm water and cleaning
agent.
• To clean metal surfaces use a usual
cleaning agent
• Clean the oven interior after each use.
Thus you can remove dirt more easily
and it does not burn on.
• Clean stubborn dirt with a special oven
cleaner.
• Clean all oven accessories (with a soft
cloth with warm water and cleaning
agent) after each use and let them dry.
• If you have nonstick accessories, do not
clean them using an aggressive agents,
sharp edged objects or dishwasher. It
can destroy nonstick coating!
Cleaning the door gasket
• Regularly do a check of the door gasket.
The door gasket is around the frame of
the oven cavity. Do not use the appliance
if the door gasket is damaged. Contact
the Service Centre.
• To clean the door gasket refer to the
general information about the cleaning.
Oven lamp
Warning! Be careful! There is the risk
of electrical shock!
Before you change the oven lamp:
• Switch off the oven.
• Remove the fuses in the fuse box or
switch off the circuit breaker.
Put a cloth on the bottom of the oven
for protection of the oven light and
glass cover.
1. Turn the glass cover anti-clockwise to
remove it.
2. Clean the glass cover.
acrylamides can pose a health risk. Thus,
we recommend that you cook at the lowest
temperatures and do not brown food too
much.
3. Replace the oven light bulb with applicable 300°C heat-resistant oven light
bulb.
Use the same oven lamp type.
4. Install the glass cover.
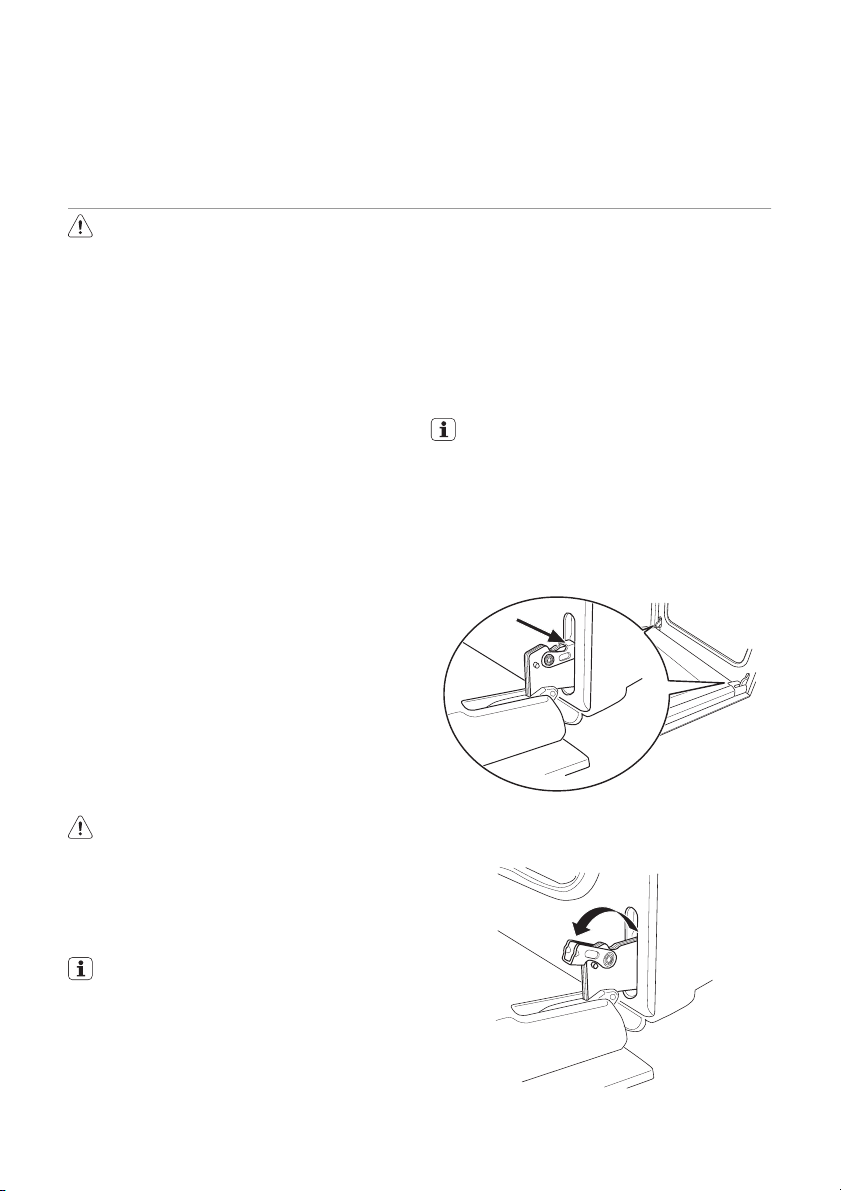
Cleaning the oven door
The oven door has two panels of glass. You
can remove the oven door and the internal
panel of glass to clean it.
The oven door can close if you try to
remove the internal panel of glass before you remove the oven door.
Removing the oven door and the glass
panel
1. Open the door fully and hold the two
door hinges.
2. Lift and turn the levers on the two hinges.
12 electrolux
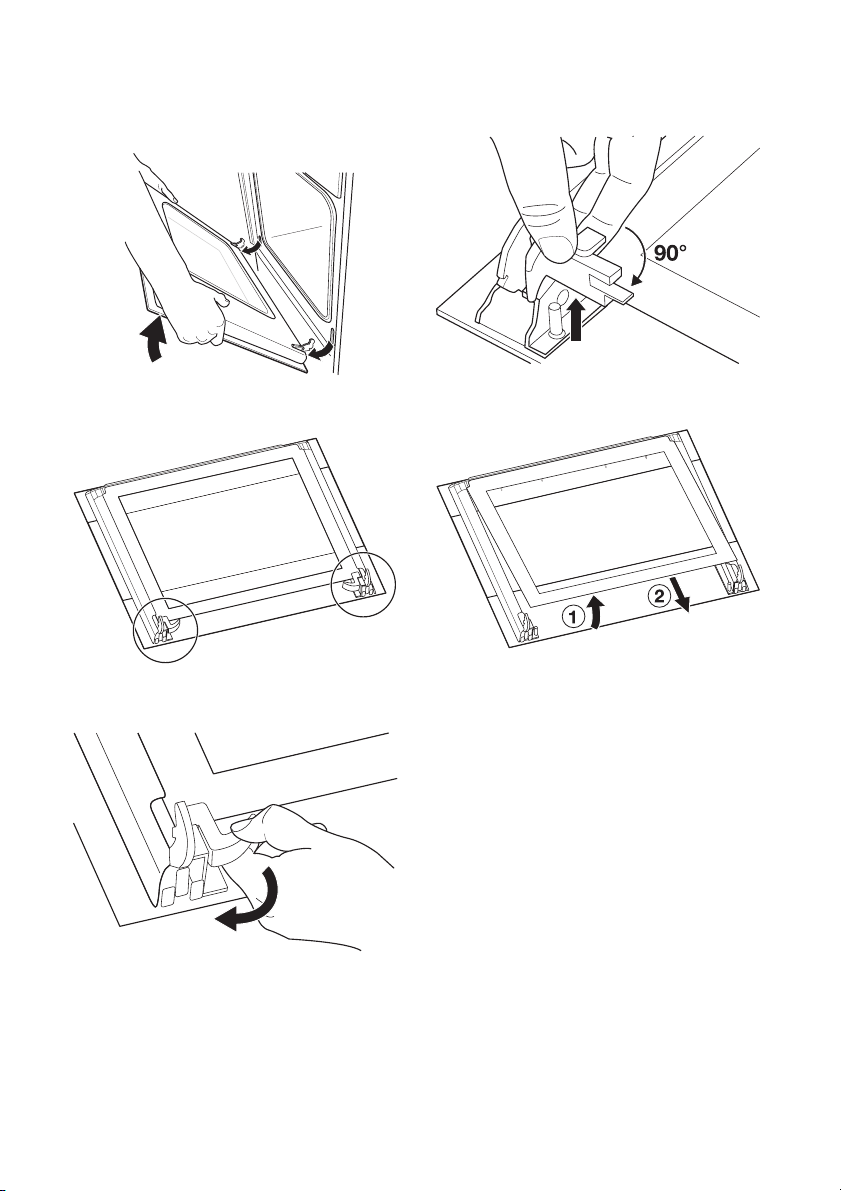
3. Close the oven door to the first opening
position (halfway). Then pull forward
and remove the door from its seat.
4. Put the door on a soft cloth on a stable
surface.
5. Release the locking system to remove
the internal panel of glass.
6. Turn the two fasteners by 90° and remove them from their seats.
7. Carefully lift (step 1) and remove (step
2) the panel of glass.
Clean the glass panel with water and soap.
Dry the glass panel carefully.
Installing the door and the glass panel
When the cleaning is completed, install the
glass panels and the oven door. Do the
above steps in the opposite sequence.
When you install the panel with a decorative
frame, make sure that the screen-printing
zone looks to the inner side of the door.
Make sure that after the installation the surface of the glass panel frame on the
screen-printing zones is not rough when
you touch it.
Make sure that you install the internal panel
of glass in the seats correctly (refer to the illustration).

WHAT TO DO IF…
Warning! Refer to "Safety information"
chapter.
Problem Possible cause Remedy
The appliance does not heat
up.
The fuse in the fuse box is re-
The oven lamp does not operate.
Steam and condensation settle
on the food and in the appliance.
If you cannot find a solution to the problem
yourself, contact your dealer or the service
centre.
We recommend that you write the data here:
Model (MOD.) .........................................
Product number (PNC) .........................................
Serial number (S.N.) .........................................
The appliance is deactivated. Activate the appliance. Refer to
leased.
The oven lamp is defective. Replace the oven lamp.
You left the dish in the appliance for too long .
"Daily use".
Do a check of the fuse. If the
fuse is released more than one
time, contact a qualified electrician .
Do not let the dishes to stay in
the appliance for more than
15-20 minutes after the cooking ends.
The necessary data for the service centre is
on the rating plate. The rating plate is on
the front frame of the oven cavity.
electrolux 13
INSTALLATION
Warning! Refer to "Safety information"
chapter.

14 electrolux
20
590
594
540
560
570
2
50
A
B
550 min
560÷570
550 min
560-570
593
580
80÷100
Electrical installation
Warning! Only a qualified and
competent person must do the
electrical installation.
The manufacturer is not responsible if
you do not follow safety precautions
from chapter "Safety information".
This appliance is supplied with a main plug
and a main cable.
The cable
Cable types applicable for installation or replacement: H07 RN-F, H05 RN-F, H05
RRF, H05 VV-F, H05 V2V2-F (T90), H05
BB-F.
For the section of the cable refer to the total
power (on the rating plate) and to the table:
Total power Section of the cable
maximum 1380 W 3 x 0,75 mm²
maximum 2300 W 3 x 1 mm²

electrolux 15
Total power Section of the cable
maximum 3680 W 3 x 1,5 mm²
ENVIRONMENT CONCERNS
The symbol on the product or on its
packaging indicates that this product may
not be treated as household waste. Instead
it should be taken to the appropriate
collection point for the recycling of electrical
and electronic equipment. By ensuring this
product is disposed of correctly, you will
help prevent potential negative
consequences for the environment and
human health, which could otherwise be
caused by inappropriate waste handling of
this product. For more detailed information
The hearth cord (green/yellow cable) must
be 2 cm longer than phase and neutral cables (blue and brown cables).
about recycling of this product, please
contact your local council, your household
waste disposal service or the shop where
you purchased the product.
Packaging material
The packaging material is environmentally-friendly and recyclable. Plastic
parts are marked with international abbreviations such as PE, PS, etc. Dispose of the packaging material in the
containers provided for this purpose at
your local waste management facility.

16 electrolux
Electrolux. Thinking of you.
Mehr zu unserem Denken finden Sie unter
www.electrolux.com
INHALT
Sicherheitshinweise 16
Gerätebeschreibung 19
Vor der ersten Inbetriebnahme 19
Täglicher Gebrauch 20
Uhrfunktionen 20
Verwendung des Zubehörs 21
SICHERHEITSHINWEISE
Lesen Sie vor der Installation und Anwendung sorgfältig dieses Handbuch:
• Für Ihre persönliche Sicherheit und die
Sicherheit Ihres Eigentums.
• Im Interesse der Umwelt.
• Zur korrekten Bedienung des Geräts.
Bewahren Sie diese Bedienungsanleitung in
der Nähe des Geräts auf, auch wenn Sie
dieses anderswo aufstellen oder verkaufen.
Der Hersteller ist nicht dafür verantwortlich,
wenn eine inkorrekte Installation und Verwendung Schäden verursacht.
Sicherheit von Kindern und
hilfsbedürftigen Personen
• Das Gerät kann von Kindern ab 8 Jahren
und Personen mit eingeschränkten physischen, sensorischen oder geistigen Fähigkeiten oder mit mangelnder Erfahrung
und Unkenntnis verwendet werden, wenn
sie in die sichere Verwendung des Geräts
eingewiesen wurden und sie die mit ihm
verbundenen Gefahren verstanden haben. Kinder dürfen nicht mit dem Gerät
spielen.
• Halten Sie das Verpackungsmaterial von
Kindern fern. Andernfalls besteht Erstickungs- oder Verletzungsgefahr.
• ACHTUNG: Halten Sie Kinder und Tiere
vom Gerät fern, wenn die Tür geöffnet ist
oder wenn das Gerät in Betrieb ist, da
das Gerät heiß wird. Andernfalls besteht
Verletzungsgefahr oder Gefahr einer dauerhaften Behinderung.
• Verfügt das Gerät über eine Kindersicherung oder Tastensperre, machen Sie davon Gebrauch. Damit wird verhindert,
Zusatzfunktionen 21
Praktische Tipps und Hinweise 21
Reinigung und Pflege 25
Was tun, wenn … 27
Montage 28
Umwelttipps 29
Änderungen vorbehalten
dass Kinder oder Tiere das Gerät unbeabsichtigt in Betrieb nehmen.
Allgemeine Sicherheitshinweise
• Nehmen Sie keine technischen Änderungen am Gerät vor. Hierdurch besteht Verletzungsgefahr und das Gerät kann beschädigt werden.
• Lassen Sie das Gerät bei Betrieb nicht
unbeaufsichtigt.
• Schalten Sie nach jedem Gebrauch das
Gerät aus.
Montage
• Das Gerät darf nur von einem zugelassenen Elektriker montiert und angeschlossen werden. Wenden Sie sich dazu an einen zugelassenen Kundendienst, damit
Geräteschäden oder Verletzungen vermieden werden.
• Sicherstellen, dass das Gerät beim
Transport nicht beschädigt wurde. Ein
beschädigtes Gerät nicht anschließen.
Wenden Sie sich bei Bedarf an den Hersteller.
• Vor dem ersten Gebrauch alle Verpackungsmaterialien, Aufkleber und Auflagen entfernen. Das Typenschild nicht
entfernen. Dies könnte zum Ausschluss
der Gewährleistung führen.
• Die im Einsatzland des Geräts geltenden
Gesetze, Verordnungen, Richtlinien und
Normen sind einzuhalten (Sicherheitsund Recyclingbestimmungen, Sicherheitsregeln für Elektro- oder Gasgeräte
usw.).
• Sicherstellen, dass das Gerät während
der Montage vom Stromnetz getrennt ist.

electrolux 17
• Vorsicht beim Transport. Das Gerät ist
schwer. Stets Sicherheitshandschuhe
verwenden. Das Gerät nicht am Handgriff
ziehen.
• Die elektrische Installation muss eine
Trennvorrichtung aufweisen, mit der Sie
das Gerät allpolig von der Stromversorgung trennen können. Die Trennvorrichtung muss mit einer Kontaktöffnungsbreite von mindestens 3 mm ausgeführt sein.
• Geeignete Trenneinrichtungen sind erforderlich: Überlastschalter, Sicherungen
(Schraubsicherungen müssen aus dem
Halter entfernt werden können), Fehlerstromschutzschalter und Schütze.
• Gemäß den bestehenden Vorschriften
müssen alle Teile, die den Berührungsschutz gewährleisten, so befestigt sein,
dass sie nicht ohne Werkzeug abgenommen werden können.
• Die Einbaumöbel bzw. die Einbaunische,
in die das Gerät eingebaut werden soll,
müssen geeignete Abmessungen aufweisen.
• Stellen Sie sicher, dass das Gerät unter
und an angrenzenden sicheren Konstruktionen montiert ist.
• Die Mindestabstände zu anderen Geräten sind einzuhalten.
• Das Gerät mit der Rückwand und mit einer Seite neben einem höheren Gerät
aufstellen. Die andere Seite muss neben
einem Gerät mit gleicher Höhe platziert
werden.
• Das Gerät kann nicht auf einem Sockel
aufgestellt werden.
• Einbaubacköfen und Einbaukochfelder
sind mit einem speziellen Anschlusssystem ausgestattet. Um eine Beschädigung
des Geräts zu vermeiden, verwenden Sie
das Gerät nur zusammen mit Geräten
desselben Herstellers.
Elektrischer Anschluss
• Das Gerät muss geerdet sein.
• Stellen Sie sicher, dass die elektrischen
Daten auf dem Typenschild den Daten
Ihrer Haushaltsstromversorgung entsprechen.
• Informationen zur Spannungsversorgung
finden Sie auf dem Typenschild.
• Schließen Sie das Gerät nur an eine
sachgemäß installierte Schutzkontaktsteckdose an.
• Achten Sie beim Anschließen von Elektrogeräten an Steckdosen darauf, dass
die Anschlussleitungen die heiße Gerätetür nicht berühren und nicht in deren Nähe kommen.
• Verwenden Sie keine Mehrfachsteckdosen, Steckerleisten oder Verlängerungskabel. Es besteht Brandgefahr.
• Ersetzen oder wechseln Sie nicht selbst
das Netzkabel. Wenden Sie sich hierzu
an den Kundendienst.
• Achten Sie darauf, den Netzstecker (sofern zutreffend) und das Netzkabel hinter
dem Gerät nicht zu quetschen oder zu
beschädigen.
• Wählen Sie einen Netzanschluss, der
auch nach der Installation des Gerätes
noch zugänglich ist.
• Ziehen Sie nicht am Netzkabel, wenn Sie
das Gerät vom Stromnetz trennen möchten, sondern immer am Netzstecker (sofern zutreffend).
Gebrauch
• Dieses Gerät ist nur zur Verwendung im
Haushalt bestimmt. Nicht für gewerbliche
oder industrielle Zwecke verwenden.
• Das Gerät ist ausschließlich für die haushaltsübliche Zubereitung von Speisen bestimmt. So werden Verletzungen von
Personen oder Schäden am Eigentum
vermieden.
• Das Gerät nicht als Arbeits- oder Abstellfläche verwenden.
• Keine entflammbaren Produkte oder Gegenstände, die mit entflammbaren Produkten benetzt sind, und/oder schmelzbare Gegenstände (aus Kunststoff oder
Aluminium) in das Gerät, nicht in die Nähe oder auf das Gerät stellen. Es besteht
Explosions- oder Brandgefahr.
• Bei Betrieb wird der Geräteinnenraum
heiß. Es besteht Verbrennungsgefahr.
Berühren Sie nicht die Heizelemente im
Gerät. Verwenden Sie zum Anfassen des
Zubehörs und der Töpfe wärmeisolierende Handschuhe.
• Das Zubehör vorsichtig entfernen oder
einsetzen, um die Emailbeschichtung
nicht zu beschädigen.

18 electrolux
• Beim Öffnen der Backofentür während
des Betriebs in sicherer Entfernung zum
Gerät stehen. Es kann heißer Dampf austreten. Es besteht Verbrennungsgefahr.
• Verfärbungen der Emailbeschichtung haben keine Auswirkung auf die Leistung
des Geräts und stellen keinen Mangel im
Sinne des Gewährleistungsrechtes dar.
• Um eine Beschädigung oder die Verfärbung der Emailbeschichtung zu vermeiden:
– Stellen Sie keine Gegenstände direkt
auf den Backofenboden und bedecken
Sie diesen nicht mit Alufolie.
– Stellen Sie kein heißes Wasser direkt in
das Gerät.
– Lassen Sie nach dem Abschalten des
Geräts kein feuchtes Geschirr oder
feuchte Speisen im Backofeninnenraum stehen.
• Das Gerät nicht benutzen, wenn es mit
Wasser in Kontakt ist. Das Gerät nicht
mit nassen Händen bedienen.
• Keinen Druck auf die geöffnete Gerätetür
ausüben.
• Auch beim Grillen die Backofentür stets
geschlossen halten.
Reinigung und Pflege
• Schalten Sie vor Wartungsarbeiten immer
das Gerät aus und trennen Sie es von
der Stromversorgung.
• Vergewissern Sie sich vor Wartungsarbeiten, dass das Gerät abgekühlt ist. Es besteht Verbrennungsgefahr. Zusätzlich besteht die Gefahr, dass die Glasscheiben
brechen.
• Halten Sie das Gerät jederzeit sauber.
Ablagerungen von Fett oder Lebensmittelresten können einen Brand auslösen.
• Eine regelmäßige Reinigung verhindert
den vorzeitigen Verschleiß des Oberflächenmaterials.
• Verwenden Sie für sehr feuchte Kuchen
ein tiefes Backblech, um bleibende
Fruchtsaftflecken zu vermeiden.
• Reinigen Sie das Gerät nur mit Wasser
und einer Seifenlösung. Dies dient Ihrer
persönlichen Sicherheit und der Sicherheit Ihres Eigentums. Verwenden Sie keine entflammbaren Produkte oder Produkte, die Korrosion verursachen.
• Reinigen Sie das Gerät nicht mit einem
Dampfstrahl- oder Hochdruckreiniger,
scharfen Gegenständen, Scheuermitteln,
Scheuerschwämmen aus Stahlwolle und
Fleckenentfernern.
• Falls Sie ein Backofenspray verwenden,
beachten Sie bitte unbedingt die Angaben des Herstellers.
• Reinigen Sie die Glastür nicht mit Scheuermitteln oder Metallschabern. Die hitzebeständige Oberfläche der inneren Glasscheibe kann beschädigt werden und
zerspringen.
• Wenn die Türglasscheiben beschädigt
sind, werden sie brüchig und können zerspringen. Sie müssen ausgetauscht werden. Wenden Sie sich hierzu an den Kundendienst.
• Gehen Sie beim Aushängen der Tür vorsichtig vor. Die Tür ist schwer!
• Reinigen Sie nicht die katalytische Emailbeschichtung (falls vorhanden).
Brandgefahr
• Öffnen Sie die Tür vorsichtig. Bei der Verwendung von Zutaten, die Alkohol enthalten, kann ein Alkohol-Luftgemisch entstehen. Es besteht Brandgefahr.
• Achten Sie beim Öffnen der Tür darauf,
dass keine Funken oder offenen Flammen in die Nähe des Geräts gelangen.
• Keine entflammbaren Produkte oder Gegenstände, die mit entflammbaren Produkten benetzt sind, und/oder schmelzbare Gegenstände (aus Kunststoff oder
Aluminium) in das Gerät, in die Nähe des
Gerätes oder auf das Gerät stellen.
Backofenlampe
• Die Leuchtmittel in diesem Gerät sind
Speziallampen, die nur für Haushaltsgeräte geeignet sind! Sie können nicht zur
vollständigen oder teilweisen Beleuchtung von Zimmern in Privatgebäuden verwendet werden.
• Falls das Leuchtmittel ausgewechselt
werden muss, setzen Sie eine Lampe mit
derselben Leistung ein, die speziell für
Haushaltsgeräte vorgesehen ist.
• Trennen Sie das Gerät von der Stromversorgung, bevor Sie die Backofenlampe
austauschen. Es besteht die Gefahr eines
elektrischen Schlags!
Kundendienst
• Nur qualifizierte Fachkräfte dürfen an
dem Gerät Reparaturarbeiten durchfüh-
 Loading...