

Electrolux EHO 611 K Operating Instructions Manual

EHO 611 K
OPERATING INSTRUCTIONS
GB
GLASS CERAMIC HOB
INFO
2
WARNINGS
•
This appliance is designed to be operated by adults.
Children should not be allowed to tamper with the
controls or play with the product.
•
Any installation and electrical work must be undertaken by a qualified electrician. The appliance must be
installed according to the instructions.
•
It is dangerous to alter the specifications or modify
the product in any way.
•
Do not use this appliance if it is in contact with water.
Do not operate the appliance with wet hands.
•
Always ensure that the control knobs are in the "OFF"
position when not in use.
•
Hobs become very hot with use and retain their heat
for a long period after use. You must therefore take
great care when using the appliance, supervise children
at ALL times and do NOT allow them to touch the
surface or be in the vicinity of the appliance, until it has
cooled after use. Children also can injure themselves by
pulling pots or pans off the hob.
•
The cooking zones heat up quickly when they are
turned on. Turn them on only when you have placed a
saucepan onto the cooking area.
•
Always ensure that the control knobs are in the "OFF"
position when not in use.
•
The residual heat indicator lights up to show if a
cooking zone is still hot.
•
If you use an electric socket close to the hob, take
care when using an electrical appliance that the cable
does not touch the hot surface of the hob.
•
Do not leave items on the hob surface. Any items you
place on the hob could be damaged if the hob is
accidentally turned on.
•
Unstable or misshapen pans should not be used on
the hob as unstable pans can cause an accident by
tipping or spillage.
•
Never leave the hob unattended when working with
oil and fats because of the danger of fire.
•
Never use plastic or aluminium foil dishes on the hob
surface.
•
Always carefully lift saucepans on and off the hob to
prevent accident caused by spillage. Do not slide them
across the hob as this m ay scratch the surface. Ensure
saucepans and cooking utensils are large enough to
contain the food and prevent spillage.
•
Always remove any spillages from the surface of the
hob immediately, do not allow spills to dry and harden.
•
If you use a saucepan which is smaller than the
heated area of the hob, the handle may become hot.
Please ensure that you protect your hands before
touching the handle.
•
NEVER cook directly on the hob surface without a
saucepan/cooking utensil.
•
Sugar (solid or liquid) as well as plastic should never
get onto the hot surface of the hob, as this could result
in fissures and cracks appearing when the hob cools
down. Spills of sugar or melted plastic material must be
removed while the hob is still warm and before the
remains have set. Scrape off the remains of sugar or
plastic with a scraper. Protect your hands.
•
Use only pans with flat bases without rough edges,
to avoid scratching the surface of the hob.
•
A defective hob surface will allow liquid to penetrate
onto the electrical connections. If any cracks appear on
the hob surface, switch OFF immediately. Isolate the
appliance from the electricity supply and inform your
local Electrolux Service Force.
•
Certain food, plastic items and aerosols can be
affected by heat and should NOT be stored above or
below the hob unit.
•
Under no circumstances should you attempt to
repair the appliance yourself. Repairs carried out by
inexperienced persons may cause injury or serious
malfunctioning.
Refer to your local Electrolux Service Force Centre.
Always insist in genuine Electrolux spare parts.
It is most important that this instruction book should be retained with the appliance for future reference.
Should the appliance be sold or transferred to another owner, or should you move house and leave the
appliance, always ensure that the book is left with the appliance in order that the new owner can get to
know the functioning of the app liance an d the relevant w arning s.
These warnings are provided in the interest of safety. You MUST read them carefully before installing or
using the appliance.
3
CONTENT
Warnings ............................................................... 2
Specifications ........................................................ 4
Installation ............................................................. 4
Electrical Connections........................................... 6
Operation............................................................... 7
How to use your hob ............................................. 9
Cooking equipment................................................ 10
What to do in case of a defekt ............................... 11
Maintenance and cleaning..................................... 12
4
SPECIFICATIONS
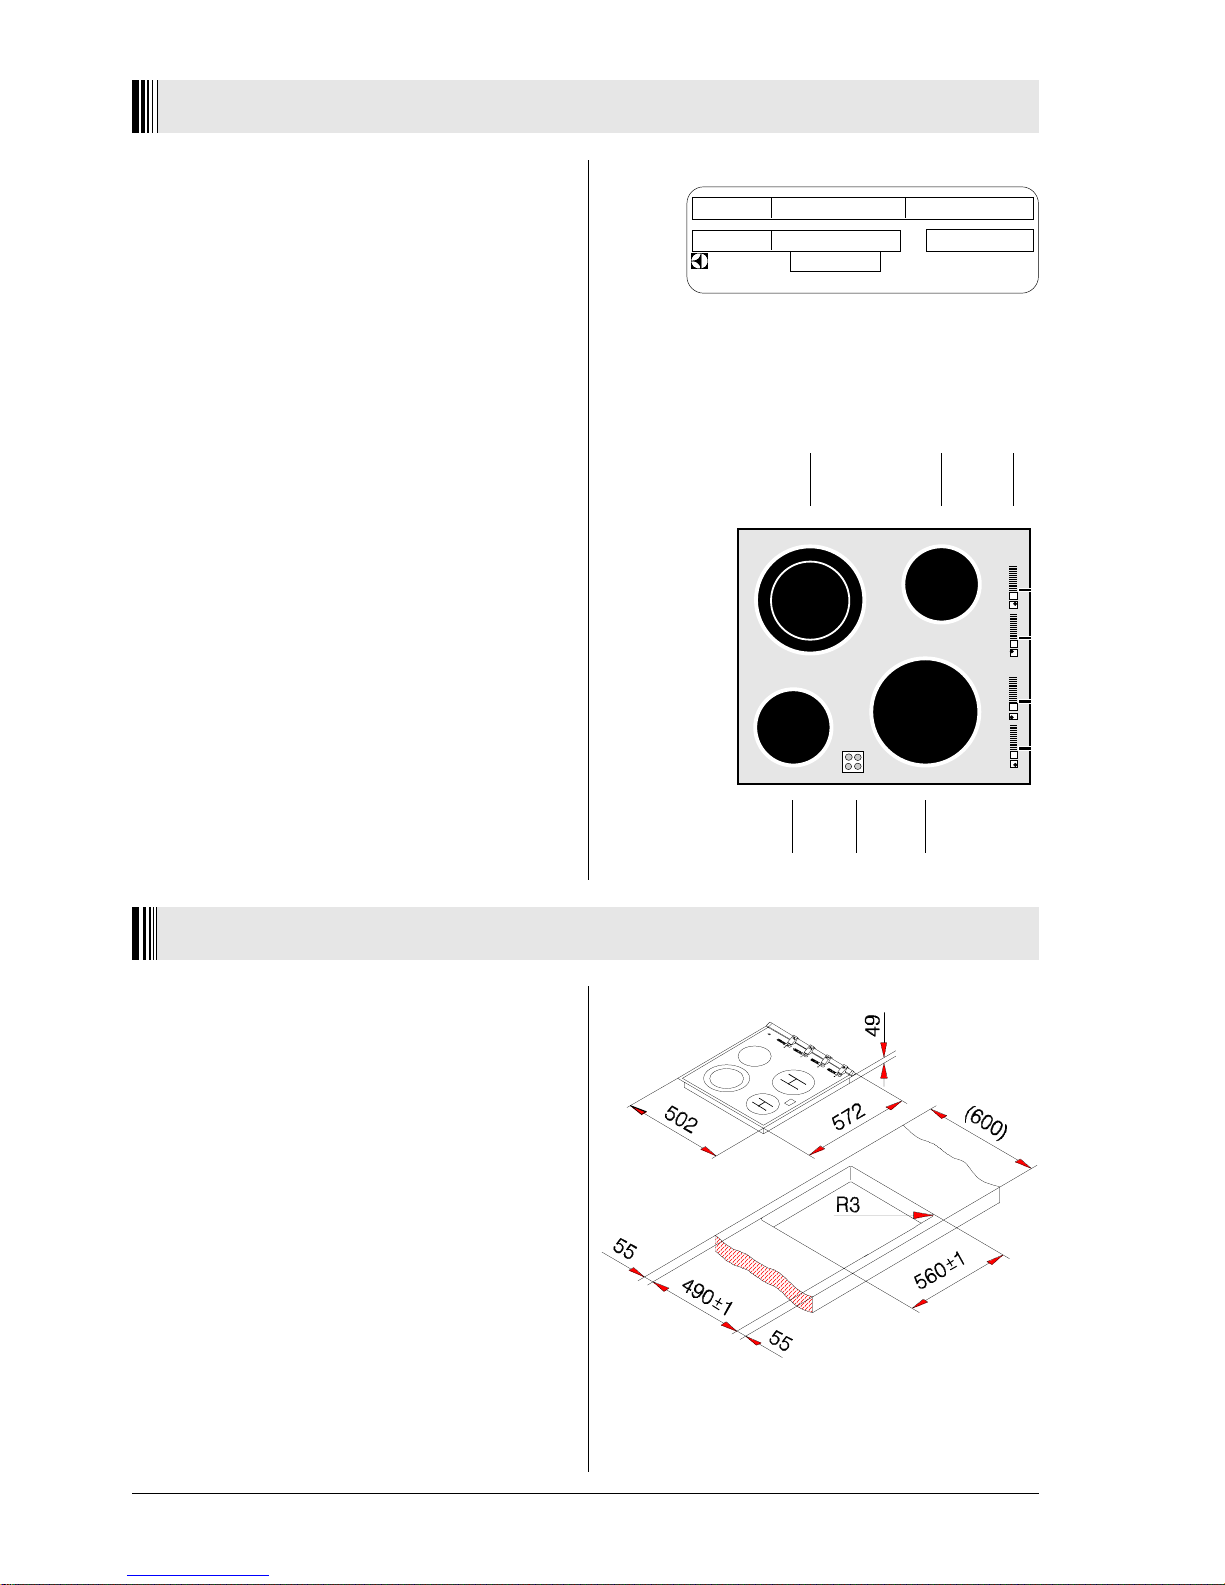
Dimensions: EHO 611 K DIGITRONIC
Length 572 mm
Width 502 mm
Height 49 mm
Cut out dimensions
Length 560 mm
Width 490 mm
Voltag e 240 V ~ 50 Hz
Total Power 6.1 kW
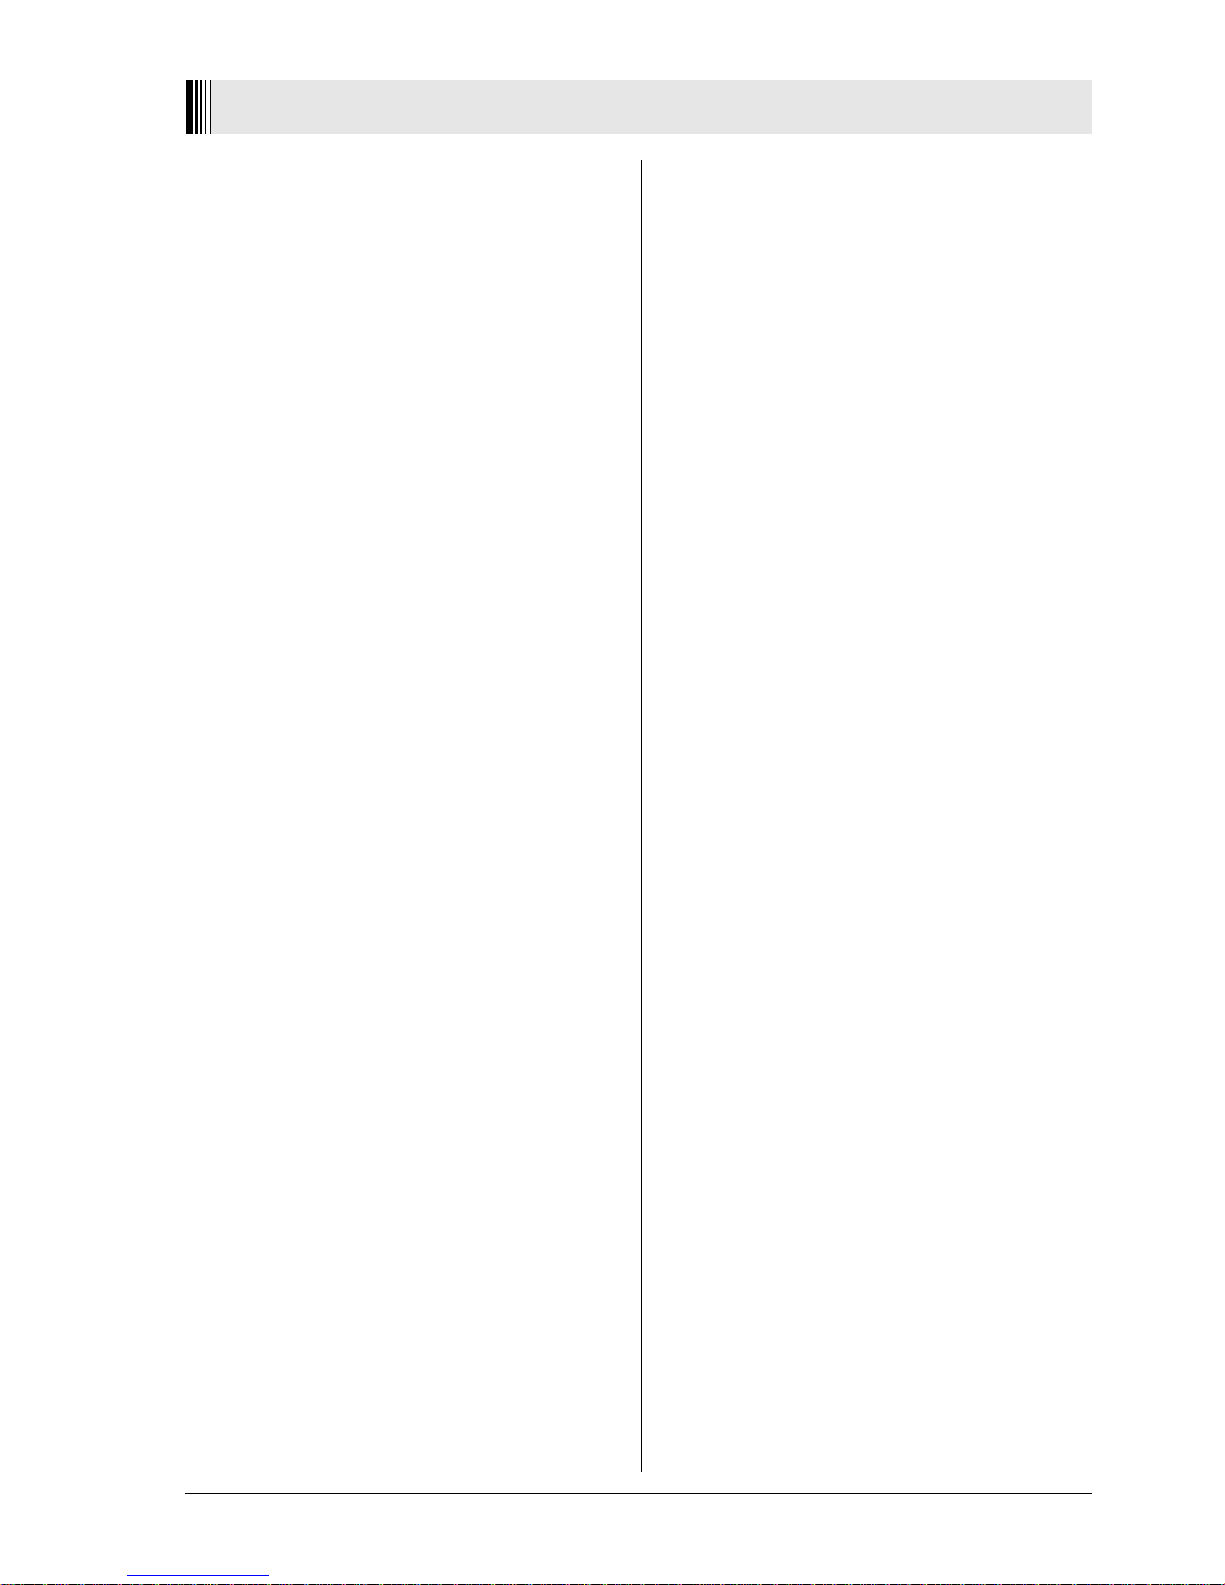
1. Halogen cooking zone
∅
145 mm 1200 W
2. Cooking zone 195 / 135 mm 1900 W
(two-circuits zone)
3. Cooking zone
∅
145 mm 1200 W
4. Halogen cooking zone
∅
180 mm 1800 W
5. Residual heat indicator
6. Heat control sliders
Rating plate:
INSTALLATION
Unpacking
Please examine the appliance for any damage sustained
during transportation!
If the appliance is damaged please inform the installer
or retailer immediately, before the appliance is connected. The packing material should be disposed of properly.
Before using your hob
Clean your ceramic hob thouroughly bef ore its first use.
Ceramic hobs are treated and cleaned the same way as
glass. When you use the ceramic hob for the first time
it can give off a smell for a short time as the manufacturing
deposits burn off.
This Electrolux hob may be installed into any kitchen
worktop with a depth of 600 mm or more. The worktop
must be constructed of material resistant to 100°C.
Fig.1
1 5 4
2 3 6
H
H
Typ 021.0 EHO 611 K Prod.No. 941 592 664
Instr. No. Ser.No. 6.1 kW
Electrolux
240 V ~ 50 Hz
SWISS MADE
5
worktop bracket
INSTALLATION
The cut out in the worktop should be to the dimensions
shown in
fig.1
. Before making the cut out ensure that
the edges of the hob, that are to be adjacent to either a
side or rear wall, have a minimum distance of 55 mm
between the edge of the hob and the wall
(fig.5)
.
When the cut out to the worktop is complete, lower the
hob into position to ensure that it fits.
Remove the hob from the worktop and carry out the
electrical connection as described under the Electrical
Connection section.
Check that the foam seal along the underside of the hob
is fitted correctly.
Refit the hob into the worktop and align correctly.
Using a Phillips screwdriver tighten the fixing clamps
onto the underside of worktop starting at the centre and
moving diagonally until all the clamps are tightened.
Do NOT overtighten.
Do NOT use Power Driven Screwdrivers.
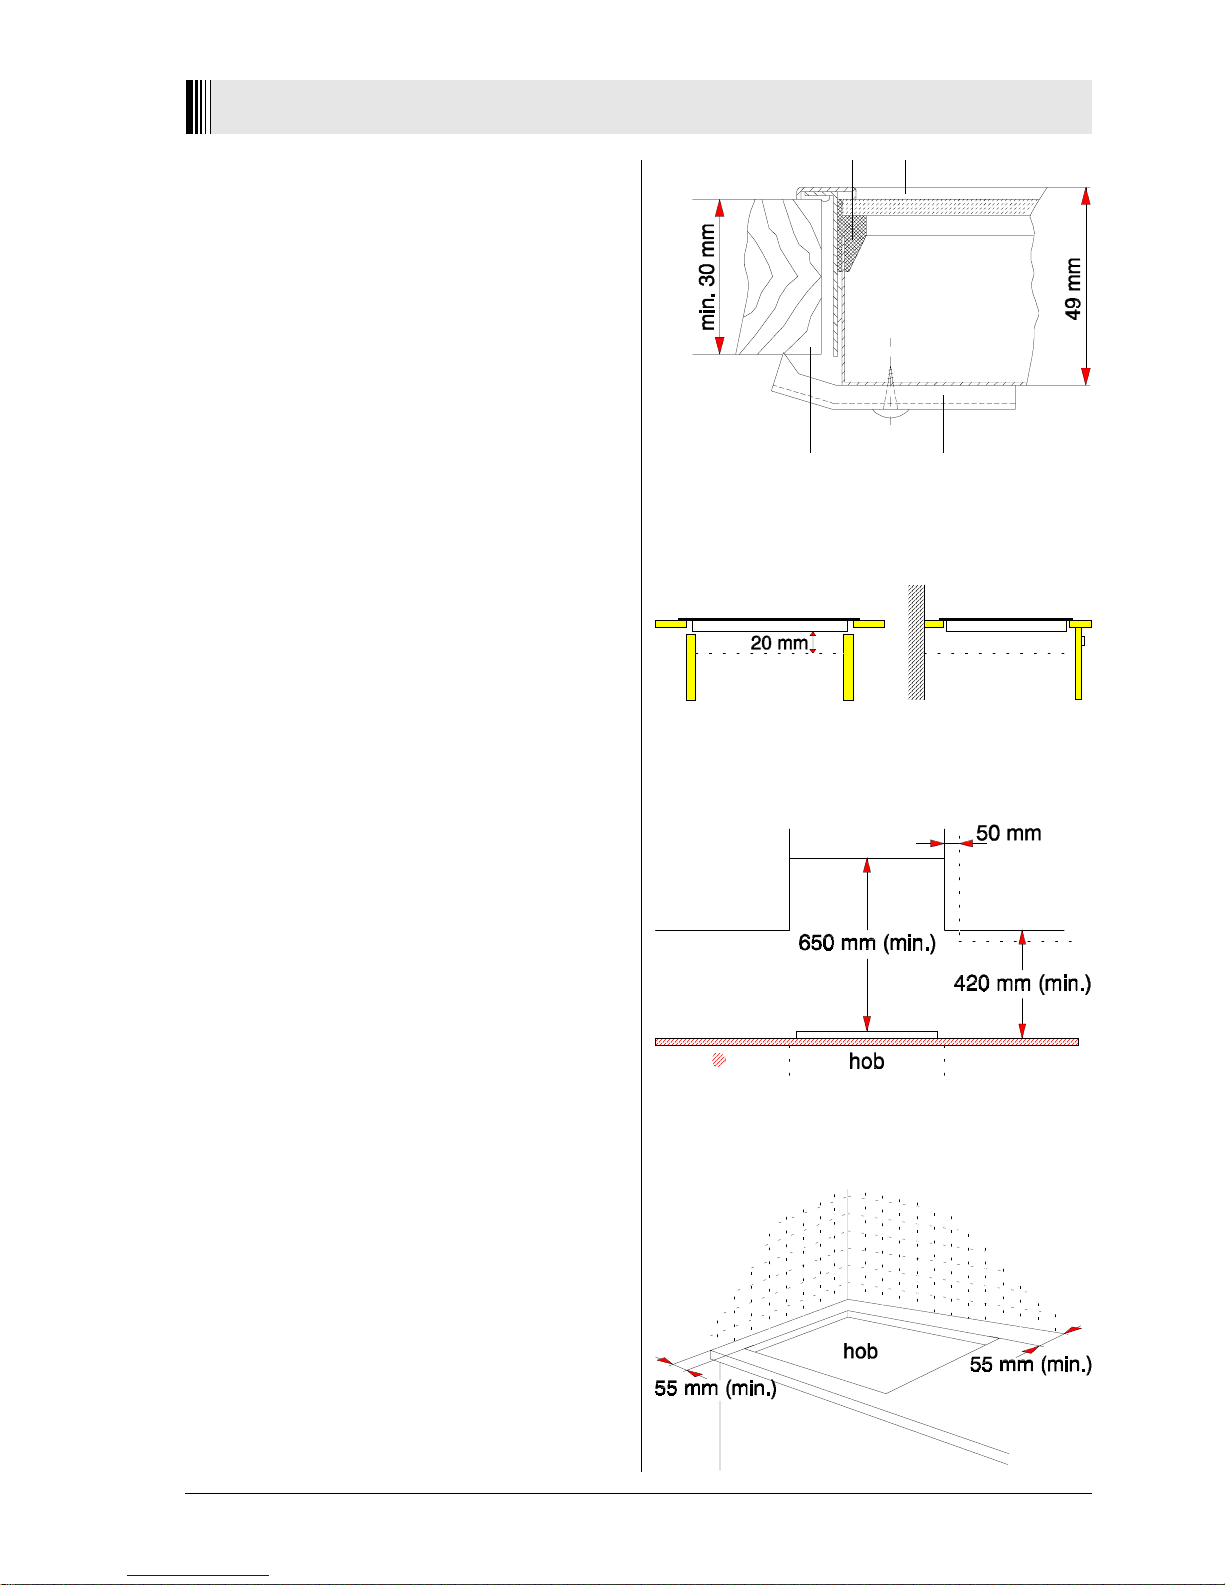
The distance between the underside of the hob and the
furniture beneath must be
at least 20 mm (Fig.3)
.
The minimum distance combustible material or a cooker
hood can be fitted directly above the hob is
650 mm
(fig.4).
The minimum distance combustible material can be
fitted above the hob in line with the edges of the hob, is
420 mm
. If it is fitted below
420 mm
, a space of
50 mm
must be allowed from the edges of the hob up to the level
of
650 mm (fig.4)
.
There must be a clearance of
55 mm
free of combustible
material to the side and back of the hob
(fig.5)
.
In terms of fire protection, the appliance conforms
to type Y (IEC 335-2-6). Only appliances of this type
may be installed on one side of adjacent upright
furniture housings or walls.
Fig.2
sealing ceramic
Fig. 5
Fig. 4
Fig. 3
 Loading...