

Page 1

user manual
manual de instrucciones
Iron Aid
EDI 96150
Page 2

We were thinking of you
when we made this product
Page 3

electrolux 3
Welcome to the world of Electrolux
Thank you for choosing a first class
product from Electrolux, which hopefully
will provide you with lots of pleasure in
the future. The Electrolux ambition is to
offer a wide variety of quality products
that make your life more comfortable.
You will find some examples on the cover in this manual. Please take a few minutes to study this manual so that you
can take advantage of the benefits of
your new machine. We promise that it
will provide a superior User Experience
delivering Ease-of-Mind. Good luck!
Page 4

T
1
4 electrolux
Contents
Safety 5
Disposal 7
Environmental tips 8
Appliance description 9
Control panel 10
Prior to using for the first time 12
Sorting and preparing laundry 12
Starting up for the first time 13
Iron Aid
Overview of Iron Aid
Starting an Iron Aid
Drying 23
Overview of drying programmes 23
Starting a drying programme 27
Cleaning and maintenance 28
What to do if… 36
Technical data 38
Consumption values 38
TM
- Steam-System 14
TM
programmes 16
TM
programme 21
Installation safety instructions 39
Removing transport safety
equipment 40
Special accessories 41
Guarantee/Customer Service 42
Service 43
he following symbols are used in this user manual:
Important information concerning your personal safety and information on
how to avoid damaging the appliance.
3 General information and tips
2 Environmental information
Page 5

safety electrolux 5
Important: Only operate the Iron Aid programmes with distilled water!
Mains water causes damage to the appliance.
Safety
Before first starting up
•Note the ”Installation and con-
nection instructions”
• Important! The appliance must be
moved in vertical position for transport.
• Before first starting up, check the
machine for any damage incurred
during transport. Never connect up a
damaged machine. If parts are damaged, contact your supplier.
Intended use
• The appliance is intended for drying
and iron aid treatment of standard
laundry in domestic applications.
• This appliance is not intended for
use by persons (including children)
with reduced physical, sensory or
mental capabilities, or lack of experience and knowledge, unless they
have been given supervision or instruction concerning use of the appliance by a person responsible for
their safety.
• Do not dry unwashed items with drying programmes.
• Conversions or modifications to the
appliance are not permitted.
• When using dry-cleaning sets: Only
use those products which are declared as suitable for the appliance
by the manufacturer.
• Items such as foam rubber (latex
foam) shower caps, waterproof textiles, rubber backed articles and
clothes or pillows fitted with foam
rubber pads should not be dried in
the appliance.
• Fabric softeners, or similar products,
should be used as specified by the
fabric softener instructions.
• Do not place heavily worn laundry
items in the appliance. Risk of fire!
• Do not place laundry items with
loose fillings (e.g. cushions) in the
appliance. Risk of fire!
• Parts with rigid components (e.g.
door mats) may cover the air holes.
Risk of fire! Do not place such items
in the appliance.
• Do not overfill the appliance. Risk of
fire! Observe max. loading volume of
6 kg.
• Ensure that explosive objects (e.g.
cigarette lighters, spray cans, etc.)
do not enter the appliance with the
laundry. Risk of fire and/or explosion!
• Items that have been soiled with
substances such as cooking oil, acetone, alcohol, petrol, kerosene,
spot removers, turpentine, waxes
and wax removers should be
washed in hot water with an extra
amount of detergent before being
dried in the appliance.
• Clean micro filter and fine filter after
every drying or Iron Aid programme:
• Never operate the appliance without
fluff filters or with damaged or
blocked fluff filters. Risk of fire!
Page 6

6 electrolux safety
• Only fill the water reservoir with distilled water. Do not use tap water or
any additives! The condensed water
from this appliance’s condensed water container can also be used, if it is
filtered first (e. g. with a coffee filter).
• Clean the heat exchanger regularly.
• With stacked washer and Iron Aid
appliance: Do not place objects on
the appliance. These may fall off during operation.
• The covering bonnet of the bulb for
the drum light must be screwed
down tightly.
Child safety
• Keep packaging away from children.
There is a risk of suffocation!
• Children often do not recognise the
hazards associated with electrical
appliances. Children should be supervised to ensure that they do not
play with the appliance.
• Make sure that children and small
animals cannot climb into the appliance’s drum. Could endanger life!
Keep the appliance door shut whenever it is not being used.
General safety
• Only specialists may undertake repairs on the appliance.
• Never start up the appliance if the
mains cable is damaged or if the operating screen, operating plate or
base area are damaged so that the
inside of the machine is open and
accessible.
• Should the appliance power supply
cable need to be replaced, this must
be carried out by our Service Centre.
• Switch off the appliance before all
cleaning, care or maintenance work.
Also disconnect the mains plug from
the socket or – with permanent connections – switch off the LS switch in
the fuse box and/or fully unscrew the
screwed-in fuse.
• Disconnect the machine from the
power supply during long pauses in
operations.
• When removing from the socket,
never pull the mains plug by the cable, instead take a hold of the plug.
• Manifold plugs, couplings and extension cables must not be used. Risk
of fire from overheating!
• The height adjustable screw feet
must never be removed.
• Do not spray down the appliance
with jets of water. Risk of electric
shock!
• Do not lean on the open door. The
appliance may tip over.
• If you interrupt the drying or Iron Aid
programme laundry or drum may be
hot. Risk of burns! Take care when
removing the laundry.
• Take care when interrupting the Iron
Aid programme: Do not open the
door of the appliance during the
evaporation phase: Hot steam can
cause burns. The evaporation phase
is indicated by the animation of the
steam symbol in the display.
• Never stop the appliance before the
end of the drying cycle unless all
items are quickly removed and
spread out so that the heat is dissipated.
• The final part of a drying cycle occurs
without heat (cool down cycle) to ensure that the items are left at a temperature that ensures that the items
will not be damaged.
• Caution - hot surface:
Do not touch the surface while the
appliance is running.
Page 7

disposal electrolux 7
Disposal
Packaging material
The packaging materials are envi-
ronmentally friendly and can be recycled. The plastic components are
identified by markings, e.g. >PE<,
>PS<, etc. Please dispose of the
packaging materials in the appropriate container at the community
waste disposal facilities.
Old appliance
The symbol
its packaging indicates that this
product may not be treated as
household waste. Instead it shall be
handed over to the applicable collection point for the recycling of
electrical and electronic equipment.
By ensuring this product is disposed of correctly, you will help prevent potential negative
consequences for the environment
and human health, which could otherwise be caused by inappropriate
waste handling of this product. For
more detailed information about recycling of this product, please contact your local city office, your
household waste disposal service
or the shop where you purchased
the product.
W on the product or on
Warning! Remove mains plug from
socket when you have no further
use for the machine. Cut off mains
cable and dispose of together with
plug.
Destroy loading door lock. Children
cannot then lock themselves in the
machine and put their lives at risk.
Page 8
8 electrolux environmental tips
Environmental tips
• During the drying process, laundry
becomes fluffy and soft. Fabric softeners are not therefore needed
when washing.
• Condensed water can be used for
iron aid programmes after beeing filtered.
• Your appliance will function most
economically if you:
– spin the laundry well before drying.
Example: Consumption data – depending on spinning speed – for
6kg of laundry, dried using the
COTTON
CUPBOARD (ALGODÓN SECO ARMARIO) programme.
Pre-draining Drying cycle
Revolutions per minute Residual dampness Energy
in litres as a %
800 4.2 70 4.0
1000 3,6 60 3,7
1200 3.2 53 3.3
1400 3.0 50 3.1
1800 2.5 42 2.6
in kWh
– always keep the ventilation slots
on the base of the appliance unobstructed;
– use the loading volumes specified
in the programme overview;
– ensure you have good ventilation
in the installation room;
– clean the micro-fine filter and fine
strainer after each drying or Iron
Aid cycle;
Page 9
appliance description electrolux 9
Appliance description
Filler neck for
water tank
Drawer with
condensed water
container
Steam nozzle
Micro-fine filter
(lint filter)
Type plate
Heat exchanger
Door in
plinth
Drainage hose
for water tank
Air slots
Control panel
Fine strainer
(lint filter)
Lamp for inside
light
Large mesh filter
(lint filter)
Button for opening
door in plinth
Loading door
(interchangeable
stop)
Screwed feet
(with height adjustment)
Page 10
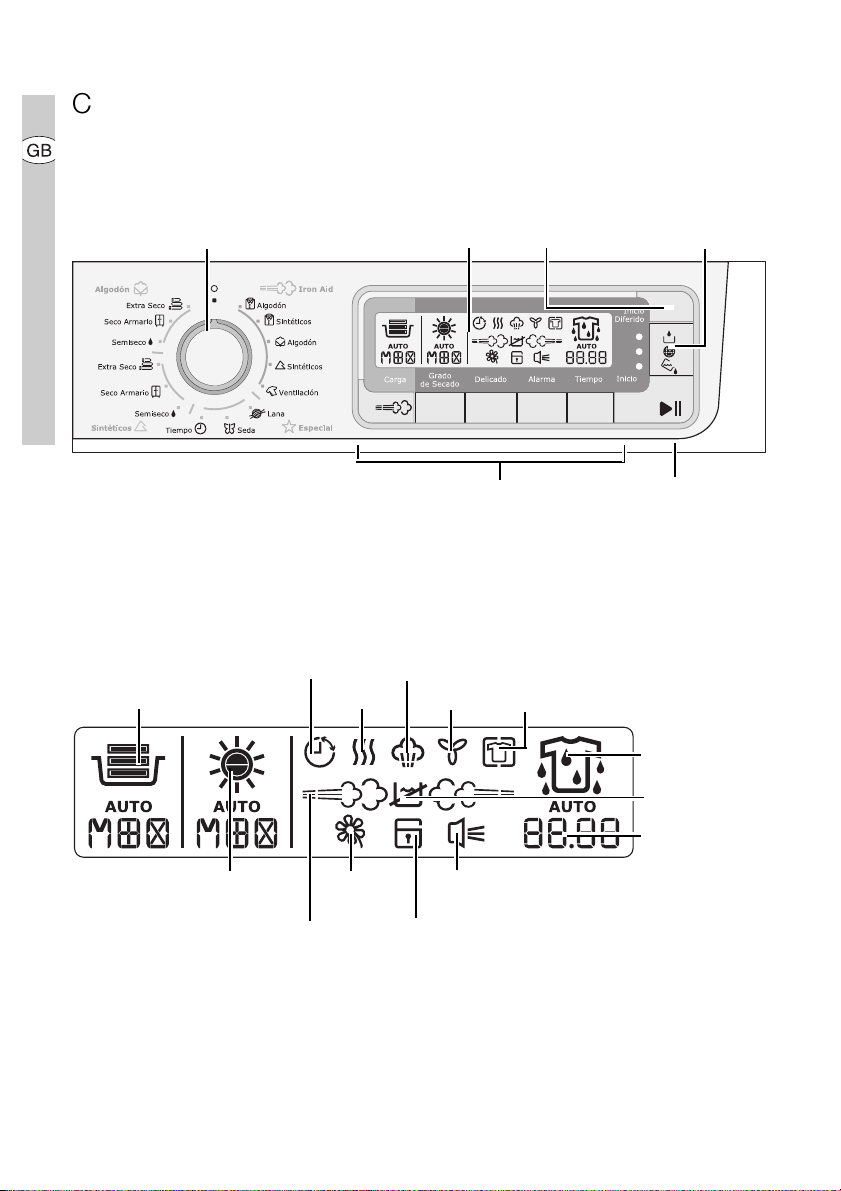
10 electrolux control panel
Control panel
Programme knob and
On/Off switch
What is shown in the display
Maintenance displays
- HEAT EXCHANGER
- CLEAN FILTER
- CONTAINER
Display
DELAY
TIMER
button
Function buttons START/PAUSE-button
LOAD (CARGA)
DRYNESS (GRADO
DE SECADO)
Start time
preselection
Drying
DELICATE
(DELICADO)
Steam display
Iron Aid
programme
Cooling
BUZZER
(ALARMA)
Child safety device
Anticrease
Degree of
dryness
Display
Water tank
indicator
Start time /
programme
duration
display
Page 11
control panel electrolux 11
Function overview: Iron AidTM Steam System
This appliance can be used both as a
dryer and to condition clothes (Iron Aid)
to treat garments using steam.
When it is operating as a dryer, there are
9 available programmes.
When it is operating as a steam appliance, there are 4 available programmes
for smoothing and removing odours
from wet and dry laundry and the
REFRESH (VENTILACIÓN) pro-
gramme for smoothing and removing
Programmes
Cotton EXTRA
(Algodón EXTRA SECO)
Cotton CUPBOARD
(Algodón SECO ARMARIO)
Cotton HAND IRON
(Algodón SEMISECO)
Synthetics EXTRA
(Sintéticos EXTRA SECO)
DRYING
Synthetics CUPBOARD
(Sintéticos SECO ARMARIO)
Synthetics HAND IRON
(Sintéticos SEMISECO)
WOOL (LANA) wet
SILK (SEDA) wet
TIME (TIEMPO) wet
COTTON (ALGODÓN)
SYNTHETICS
(SINTÉTICOS)
COTTON (ALGODÓN)
IRON AID
SYNTHETICS
(SINTÉTICOS)
REFRESH
(VENTILACIÓN)
wet/
wet/
wet/
wet/
odours from dry outerwear. Garments
are softened and smoothed and require
a lot less ironing. If laundry is wet, a drying programme is automatically activated before the Iron Aid programme
starts.
Exception: The REFRESH (VENTI-
LACIÓN) programme must only be used
for dry laundry.
Iron Aid
washed
type
garments
Laundry
wet
wet
wet
wet
wet
wet
dry
dry
dry
dry
dry X X
X X X
X X X
X X X
X X X
Smoothes
worn
clothing
Odour
removal
worn
clothing
Page 12
12 electrolux prior to using for the first time
Prior to using for the first time
IIn order to remove any residues which
may have been produced during production, wipe the dryer drum with a
damp cloth or carry out a brief drying cycle ( TIME (TIEMPO) programme of
30 min.) with damp cloths in the machine.
Sorting and preparing laundry
Sorting laundry – general
• Sorting by fabric type:
– Cotton/linen for programmes in
the COTTON (ALGODÓN) programme group.
– Mixed fibres and synthetics for
programmes in the
SYNTHETICS (SINTÉTICOS)
programme group.
n m l k
Drying in the tumble dryer
possible in principle
Dry at normal
temperature
Dry at reduced temperature
1. Turn the programme knob to
TIME (TIEMPO).
2. Press the TIME (TIEMPO) button re-
peatedly until 0.30 appears in the display.
3. Press the START/PAUSE (INICIO/
PAUSA) button.
• Sorting by care label. The care labels
mean:
(press SPECIAL CARE
(DELICADO) button!)
Drying in the
tumble dryer
possible
not
Important: Do not place in the appliance any wet laundry which is not
specified on the care label as being
suitable for tumble-drying.
This appliance can be used for all wet
laundry items which are labelled as suitable for tumble-drying.
• Do not dry new, coloured textiles together with light-coloured laundry
items. Textile colours may bleed.
• Do not dry cotton jersey and knitwear with the EXTRA (EXTRA
SECO) programme. Items may
shrink!
• Wool and wool-like textiles can be
dried using the WOOL (LANA)
programme. Before the drying cycle
spin the woollen textiles as well as
possible (max. 1200 rpm). Only dry
woollen textiles together which are
similar or the same with respect to
material, colour and weight. Please
dry heavy laundry items made of
wool separately.
Page 13
starting up for the first time electrolux 13
Special notes about Iron Aid
• The following textiles cannot be
treated using an Iron Aid programme:
woollen knitwear, leather, textiles
with large metal, wooden or plastic
parts, textiles with rusting metal
parts, oilskins or wax cotton garments.
• To smooth or freshen laundry with an
Iron Aid programme, sort laundry by
size, weight, material and colour.
Only smooth textiles together that
are similar in terms of size, weight,
material and colour.
• Do not dry new, coloured textiles together with light-coloured laundry
items. Colours may fade (check colour fastness of fabric when damp in
an inconspicuous area).
• Do not use dry cleaning sets such as
dryel in combination with Iron Aid
programmes.
Preparing laundry - general
• To avoid laundry becoming tangled:
close zips, button up duvet covers
and tie loose ties or ribbons (e.g. of
aprons).
• Empty pockets. Remove metal items
(paper clips, safety pins, etc).
• Turn items with double-layered fabrics inside out (e.g. with cotton-lined
anoraks, the cotton layer should be
outermost). These fabrics will then
dry better.
Special notes about Iron Aid
• Before treating garments with an Iron
Aid programme, remove stains by
washing or using localised stain re-
Starting up for the first time
Switching machine on / switching
light on
Turn the programme knob to any programme. The machine has been
switched on. When the loading door is
opened, the drum is illuminated.
Opening loading door / loading
laundry
1. Open loading door:
Push against the loading door (push
point )
2. Load your laundry (do not force it in/
overload the machine).
Caution! Be careful not to trap laundry in between the loading door and
rubber seal.
3. Close loading door securely. Lock
must audibly lock.
Page 14
14 electrolux iron aidTM - steam-system
Iron AidTM - Steam-System
Fill water tank
You must fill up the water tank before
using an Iron Aid programme for the first
time. Use the distilled water provided if
there is not yet any condensed water
from previous drying programmes (see
chapter on ‘Cleaning and Maintenance,
Emptying condensed water container’).
If, after an Iron Aid programme is selected, the water tank indicator on the
display lights up, you will need to fill up
the water tank with distilled water. Otherwise, you will not be able to start any
Iron Aid programme.
Important Only fill the water tank
with distilled or fully desalinated
water. Do not use tap water or additives! You can also use the condensed water from the condensed
water container, as long as you filter
it first (use the canister supplied
with the filter fitted: see figure opposite).
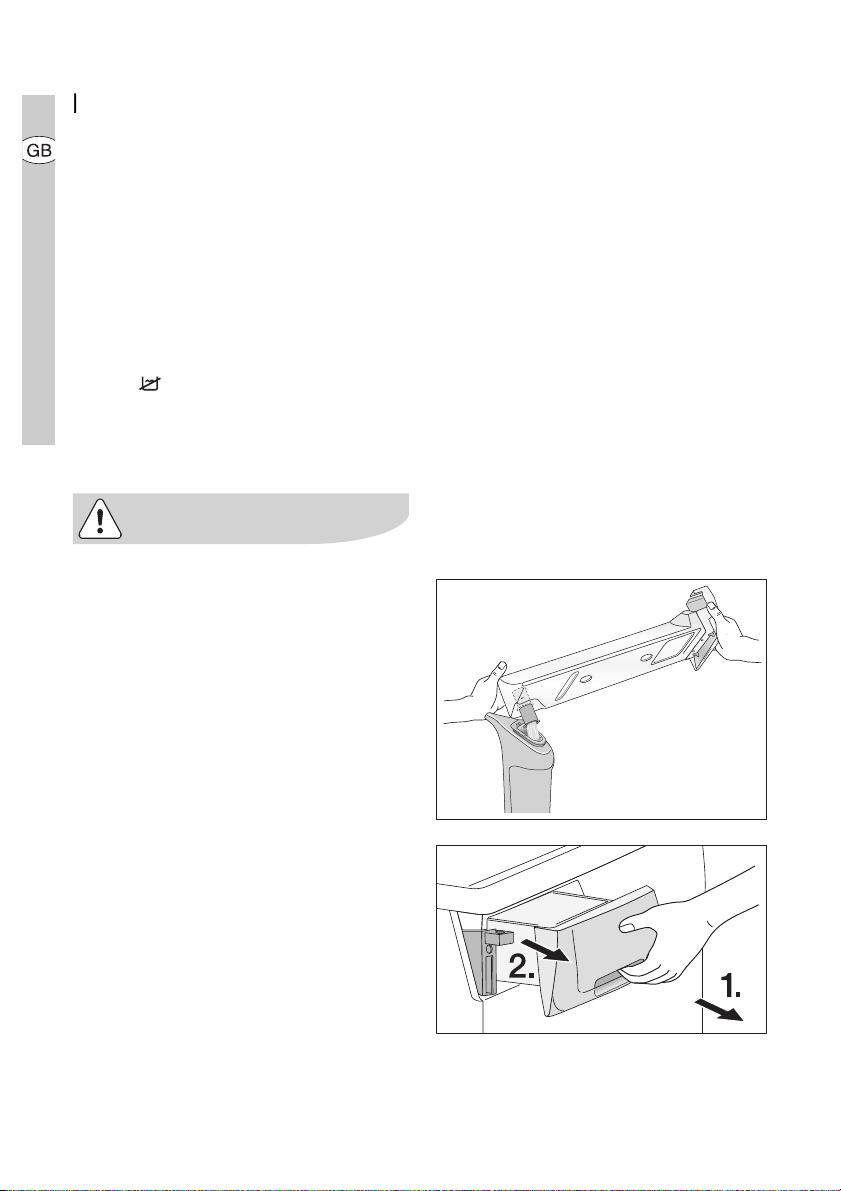
1. Pull drawer containing condensed
water container out a little (1), then
pull out the water tank’s filler neck
(2).
Page 15

iron aidTM - steam-system electrolux 15
2. Fill with distilled water from the canister provided, up to the MAX mark
inside the container.
3. Push filler neck and drawer with condensed water container back in.
When dry, all textiles not specifically
prohibited in the chapter ‘Sorting
and preparing laundry’ may be
treated with the Iron Aid Steam System. Wet textiles may only be treated if they are labelled as suitable for
dry programmes.
Page 16

16 electrolux overview of iron aidtm programmes
Overview of Iron AidTM programmes
Additional
functions
Programmes
Max. load *
(Weight when dry)
LOAD
(CARGA)
BUZZER
(ALARMA)
COTTON
(ALGODÓN)
SYNTHETICS
(SINTÉTICOS)
COTTON
(ALGODÓN)
SYNTHETICS
(SINTÉTICOS)
REFRESH
(VENTILACIÓN)
1,0kg • •
1.0kg • •
3,0kg • •
1.5kg • •
• •
Application/properties
For 1- 5 cotton shirts. Min. 80% natural
fibres (cotton, linen etc).
For 1- 5 synthetic shirts. Max. 20% natural fibres (cotton, linen etc).
For smoothing cotton garments. Min.
80% natural fibres (cotton, linen etc).
For smoothing easy-care garments.
Max. 20% natural fibres (cotton, linen
etc).
For one suit or up to two suit jackets or
pairs of trousers or similar garments.
Also suitable for removing odours. For
dry garments only
wet,
dry
wet,
dry
wet,
dry
wet,
dry
dry
All information on applications is for
guidance only. Smoothing results
may vary depending on the selected
programme and especially the fittings and material properties of the
textile. The results can be improved
if necessary by using different programmes and steam volumes. For
example, some textiles containing
more than 20% synthetics but with
the right fittings may behave more
like cotton textiles in an Iron Aid
programme. You may therefore get
better smoothing results by selecting a cotton Iron Aid programme.
Given the wide range of different
textile grades and properties that
can be manufactured today using
different mechanical and chemical
processes, we recommend running
the first few Iron Aid programmes at
low steam levels and with a small
number of garments that are as similar as possible. Later, you can carefully start to vary the conditions of
Iron Aid programmes to learn from
experience how to get the best results from the volume of laundry
loaded, the quality of the textiles
and the most suitable steam levels
and Iron Aid programmes.
Please also note the accompanying
‘Textile Guide’.
Page 17

overview of iron aidtm programmes electrolux 17
Programme
COTTON
(ALGODÓN)
SYNTHETICS
(SINTÉTICOS)
COTTON
(ALGODÓN)
SYNTHETICS
(SINTÉTICOS)
REFRESH
(VENTILACIÓN)
LOAD
(CARGA)
MIN 1 - 2 items
MAX 5 items
MIN 1 - 2 items
MAX 5 items
MIN 0.5 - 1 kg
MAX 2 - 3 kg
MIN 0,2 - 0,5 kg
MAX 1 – 1.5 kg
MIN 1 pair of trousers
MAX 1 suit
Loading
volume
DURATION
dry*
[min.]
19 +/-3 +40 +/- 10MED 3 - 4 items
21 +/-3 +30 +/- 10MED 3 - 4 items
20 +/-3 +40 +/- 10MED 1 - 2 kg
21 +/-3 +30 +/- 10MED 0.5 - 1 kg
19 +/-3MED 1 jacket
DURATION
wet*
[min.]
All information provided on selecting the steam level and corresponding load are suggestions only. In
some cases, using a higher steam
level or smaller load may give better
results.
The REFRESH (VENTILACIÓN)
programme is a gentle Iron Aid programme for non-washable textiles.
Any distortion to the shape of a garment which might occur in few cases, can be remedied by ironing.
* exact programme times appear in the
display once the machine has performed wet/dry recognition (approx. 2
min.)
Page 18

18 electrolux overview of iron aidtm programmes
Selecting the programme
Use the programme selector to set the
programme you require. The estimated
programme duration without drying cycle (in minutes) appears in the display.
Select steam level (LOAD - CARGA)
To achieve the best results, different steam levels are required for different volumes of laundry.
The LOAD (CARGA) button is used
to set the required steam level: MIN,
MED or MAX.
All Iron Aid programmes, apart from the
REFRESH (VENTILACIÓN) programme, automatically recognise the remaining dampness in clothes. When
laundry is wet, a drying cycle is activated
first if required.
The programme chart shows the steam
levels appropriate for the selected load,
under LOAD (CARGA).
1. Press the LOAD (CARGA) button re-
peatedly until the desired steam level
(MIN, MED or MAX) is shown in the
display.
If the LOAD (CARGA) button is not
pressed after an Iron Aid programme is
selected, the medium steam level (MED)
is selected automatically. If you select
the REFRESH (VENTILACIÓN) programme, MIN is selected automatically.
Page 19

Important: If in doubt, always select
a lower steam level first until you
have more experience with load volumes, fabric types and the corresponding optimum steam level.
If too high a steam level is selected,
garments may lose their shape. If
too low a steam level is selected,
creases may remain.
Selecting additional functions
The additional functions available for the
Iron Aid programmes are BUZZER
(ALARMA), TIME DELAY (INICIO DIFERIDO) and the CHILD SAFETY DEVICE.
overview of iron aidtm programmes electrolux 19
BUZZER (ALARMA)
The appliance is supplied with the
BUZZER (ALARMA) function activated.
When the drying cycle has finished, an
intermittent acoustic signal will sound.
Each time a button is pressed or a programme is changed using the programme knob, an audible signal is also
set to sound.
The button is used to switch the function on or off. When the function is active, the BUZZER (ALARMA)
symbol appears in the display.
Page 20

20 electrolux overview of iron aidtm programmes
Delay timer
With the DELAY (INICIO DIFERIDO)
button, you can delay the start of a
programme by between 30 minutes
(30') and a maximum of 20 hours
(20h).
1. Select the programme and addition-
al functions.
2. Press the DELAY (INICIO DIFERIDO)
button as many times as necessary
until the required start delay appears
on the display, e.g. 12h if the programme is to be started in 12 hours.
If the display is showing 20h and you
press the button again, the time delay will be cancelled. The display will
show 0'and then the duration of the
selected programme.
3. To activate the delay timer, press the
START/PAUSE (INICIO/PAUSA) button. The amount of time remaining
until the programme is set to start is
continuously displayed (e.g. 15h,
14h, 13h, … 30
' etc).
Child safety device
(
The child lock can be set to prevent a
programme being accidentally started
or a programme in operation being accidentally changed.
The child safety device locks all buttons
and the programme knob.
The child safety device can be activated
or deactivated by holding down the
BUZZER (ALARMA) and TIME (TIEMPO)
buttons simultaneously for 5 seconds.
– Before programme is started: Appli-
ance cannot be used
– After programme is started: Pro-
gramme in operation cannot be
changed
The ( symbol appears in the display to
indicate that the child safety device is
activated.
The child safety device is not deactivated once the programme comes to an
end.
If you want to set a new programme,
you must first deactivate the child safety
device.
Page 21

starting an iron aidtm programme electrolux 21
Starting an Iron AidTM programme
Press the START/PAUSE (INICIO/PAUSA) button. The programme is started.
First, the drying phase indicator appears
in the display.
The display will also show the programme duration for the selected Iron
Aid programme, not including the additional drying phase.
With wet laundry, after a few minutes the
appliance will show the correct programme duration for the Iron Aid programme including the preceding drying
programme.
As soon as the right level of dryness is
reached, the Iron Aid programme will
start automatically. The steam indicator
shows the progress of the Iron Aid programme in the display. The individual
steam phases are shown by
animated clouds of steam.
Important: During the steam phases
that form part of the Iron Aid programme and also the anti-crease
phase (represented by animated
clouds of steam in the display), the
loading door cannot be opened.
Risk of burns!
If the water tank indicator lights up
when you select an Iron Aid programme,
the programme cannot be started. You
will need to fill the water tank first (see
section on ‘Cleaning and maintenance,
filling water tank’.)
It is normal for the appliance to make
noises during an Iron Aid or drying programme if garments with hard parts,
such as metal buttons, are put in the
drum.
Changing a programme
To change a programme which has
been selected by mistake once the programme has started, first turn the programme selector to O OFF and then
reset the programme.
The programme can no longer be
changed directly once the programme has started. If you nevertheless attempt to change the
programme with the programme
knob or an additional function button (except the BUZZER (ALARMA)
button), the START/PAUSE (INICIO/
PAUSA) button and Err will flash in
the display. The drying programme
is not however affected by this.
Putting in extra items or taking
items out before end of programme
1. Open door.
2. Load or remove laundry items.
3. Close door securely.
4. Press the START/PAUSE (INICIO/
PAUSA) button to continue the dry-
ing cycle.
Page 22

22 electrolux starting an iron aidtm programme
Iron Aid programme complete /
removing laundry
After the Iron Aid phase has ended, 0.00
is illuminated and the message
ANTICREASE appears in the display.
If the BUZZER (ALARMA) has been
activated, an audible signal sounds at
regular intervals.
The Iron Aid programme is automatically followed by an anti-crease
phase, including brief steam phases, which lasts around 90 minutes.
The drum rotates during the anti-crease
phase. This keeps the laundry loose and
free of creases. It can be removed at any
point during the anti-crease phase, except during steam phases (look for
steam animation in the display!). Laundry should be removed as quickly as
possible.
1. Open the loading door to remove the
laundry.
2. Before removing the laundry, remove
fluff from the micro-fine filter. It is best
to use a damp hand for this purpose.
(See “Cleaning and maintenance”
section.)
3. Remove laundry one garment at a
time.
To retain the effects of the Iron Aid
treatment, clothes must be removed
one garment at a time during the
anti-crease phase and hung immediately on a clothes hanger to dry
(for at least 5-15 mins, depending on
fabric and selected steam level). Do
up the buttons and tug the garment
into shape, paying particular attention to cuffs and seams.
4. Turn the programme knob to O OFF.
Important! After each drying cycle
– Clean the micro-fine filter and fine fil-
ter
– Drain the condensed water contain-
er
(See section “Cleaning and maintenance”.)
5. Close door.
Page 23

drying electrolux 23
Drying
Overview of drying programmes
Additional-
functions
Programmes
Max. load
(Weight when dry)
BUZZER
(ALARMA)
DELICATE
(DELICADO)
DRYNESS
(GRADO DE S.)
EXTRA
(EXTRASECO)
CUPBOARD
COTTON
SECO
(ALGODÓN)
ARMARIO)
DAMP
(SEMISECO)
EXTRA
EXTRA SECO)
CUPBOARD
(SECO
SYNTHETICS
ARMARIO)
(SITÉTICOS)
DAMP
(SEMISECO)
TIME
(TIEMPO)
SILK
(SEDA)
SPECIAL
WOOL
(ESPECIAL)
(LANA)
1) Press the DELICATE button.
6kg • • •
6kg • • •
6kg • • •
3kg • • •
3kg • • •
3kg • • •
1kg • •
1kg •
1kg •
AUTO
AUTO
AUTO
•
•
Application/properties
Thorough drying of thick or multilayered fabrics, e.g. terry towelling
items, bathrobes.
Thorough drying of fabrics of even
thicknesses, e.g. terry towelling
items, knitwear, towels.
For normal thickness cotton or linen laundry, e.g. bedding, table linen
Thorough drying of thick or multilayered fabrics, e.g. pullovers, bedding, table linen.
For thin fabrics which are not
ironed, e.g. easy care shirts, table
linen, baby clothes, socks, lingerie
with bones or wires.
For thin textiles which are still to be
ironed, e.g. knitted items, shirts.
For further drying of individual items
of laundry or for small volumes of
less than 1kg. You can select a
programme duration from 10 mins
to 3 hrs in 10-minute steps.
Special programme for drying silk
using warm air and gentle movement.
Special programme, for drying
woollen fabrics with minimum
physical stress. “Sorting and preparing washing”.) Recommendation: Remove fabrics immediately
after drying, as no anti-crease programme follows.
Care
sym-
bols
m n
m n
m n
m l1)
n
1)
m l
n
1)
m l
n
m l
n
Page 24

24 electrolux overview of drying programmes
Selecting the programme
Use the programme selector to set the
programme you require.
The probable programme run time is
displayed (in minutes) on the multidisplay.
Selecting additional functions
You can choose from the additional
functions DRYNESS (GRADO DE SECADO), DELICATE (DELICADO), BUZZER
(ALARMA) and TIME (TIEMPO) (if a
TIME (TIEMPO) programme has
been selected). The symbols of the
functions available for the selected programme are shown in the display.
DRYNESS (GRADO DE SEC.)
If laundry comes out of the machine too
damp after a standard drying programme, you can increase the drying result by using the DRYNESS (GRADO DE
SEC.) function. Laundry becomes drier
as you move from MIN to MAX.
1. Press the DRYNESS (GRADO DE
SEC.) button repeatedly until the desired dryness level (MIN, MED or
MAX) is shown in the display. If another programme has been selected, AUTO flashes in the display.
If wool or silk comes out of the machine
too damp at the end of a WOOL
(LANA) or SILK (SEDA) programme,
you can dry it again by restarting the appropriate programme, this time with the
DRYNESS (GRADO DE SEC.) function
selected and dryness level MIN, MED or
MAX. In the case of a drying cycle with
relatively dry laundry, the length of the
programme cycle displayed at the beginning is corrected after a while.
Page 25

Caution: Make sure that by selecting the DRYNESS (GRADO DE SEC.)
function, you do not over-dry your
wool or silk.
DELICATE (DELICADO)
For especially gentle drying of sensitive
fabrics with the l care label and for
temperature-sensitive textiles (e.g.
acrylic, viscose). Programme is executed with reduced heat.
DELICATE (DELICADO) is only suitable
for use with loads of up to 3kg.
1. Press the DELICATE (DELICADO)
button. The DELICATE symbol appears in the display.
BUZZER (ALARMA)
The appliance is supplied with the
BUZZER (ALARMA) function activated.
When the drying cycle has finished, an
intermittent acoustic signal will sound.
Each time a button is pressed or a programme is changed using the programme knob, an audible signal is also
set to sound.
The button is used to switch the function on or off. When the function is active, the BUZZER (ALARMA)
symbol appears in the display..
overview of drying programmes electrolux 25
Page 26

26 electrolux overview of drying programmes
TIME (TIEMPO)
To select the programme duration after
setting the TIME (TIEMPO) programme. You can select a programme
duration from 10 mins to 3 hrs in 10minute steps.
1. Turn the programme knob to the
TIME (TIEMPO) programme. The
display will show 0.10 (corresponding
to the COOLING programme).
2. Press the TIME button repeatedly
until the desired programme duration
is shown in the display, e.g. 00.20 for
a programme of 20 minutes.
If the programme duration is not selected, the duration is automatically set to
10 mins.
To set the timer delay and the child safety device, please refer to the chapter on
‘Iron Aid, setting the timer delay’ / ‘Setting the child safety device’.
Page 27

starting a drying programme electrolux 27
Starting a drying programme
Press the START/PAUSE (INICIO/PAUSA) button. The programme is started.
The programme progress display shows
drying progress. The symbols for
DRYING and COOLING appear in
the display one after the other. The
number of droplets in the dryness indicator gradually goes down as the drying
process progresses.
Changing a programme
To change a programme which has
been selected by mistake once the programme has started, first turn the programme selector to O OFF and then
reset the programme.
The programme can no longer be
changed directly once the programme has started. If you nevertheless attempt to change the
programme with the programme
knob or an additional function button (except the BUZZER (ALARMA)
button), the START/PAUSE (INICIO/
PAUSA) button and Err will flash in
the display. The drying programme
is not however affected by this.
Putting in extra items or taking
items out before end of programme
1. Open loading door
Warning! Laundry and drumcan bec
ome hot. Risk of burns!
2. Load or remove laundry items.
3. Close loading securely. Lock must
audibly lock.
4. Press the START/PAUSE (INICIO/
PAUSA) button to continue the drying cycle.
Drying cycle complete / removing
laundry
Once the drying programme has finished, ANTICREASE lights up in the
display. If the BUZZER is activated,
an audible signal sounds at regular intervals.
The drying cycle is automatically
followed by a anti-crease phase
which lasts around 30 minutes.
The drum rotates at intervals during this
phase. This keeps the laundry loose and
free of creases. It can be removed at any
time during the anti-crease phase. (The
laundry should be taken out towards the
end of the anti-crease phase at the latest to prevent creases from forming.)
1. Open door.
2. Before removing the laundry, remove
fluff from the micro-fine filter. It is best
to use a damp hand for this purpose.
(See “Cleaning and maintenance”
section.)
3. Remove laundry.
4. Turn the programme knob to O OFF.
Important! After each drying cycle
– Clean the micro-fine filter and fine fil-
ter
– Drain the condensed water contain-
er
(See section “Cleaning and maintenance”.)
5. Close door.
Page 28

28 electrolux cleaning and maintenance
Cleaning and maintenance
Cleaning lint filters
To ensure that the appliance works perfectly, the lint filters in the door and in
front of the drum must be cleaned after
every Iron Aid or drying cycle.
Important Never operate the dryer
without the lint filter or with a damaged or blocked lint filter.
1. Open the door.
2. Use a damp hand to clean the lint filter, which is built into the lower part
of the loading aperture.
3. Remove the lint filter from the door
by pulling the grip upwards.
4. Remove fluff from lint filter, preferably
using a damp hand for this purpose.
5. Replace the filter.
Page 29

cleaning and maintenance electrolux 29
Cleaning the filter area
The filter area does not have to be
cleaned after every drying cycle, but
should be checked regularly and
cleaned of fluff, if necessary.
You will need to undertake the following
(to clean the filter area:
1. Remove lint filter (see chapter on
‘Cleaning lint filters’).
2. Remove fluff from the entire filter area. It is best to use a vacuum cleaner
for this purpose.
3. Replace the filter.
Clean the door seal.
Wipe the door seal using a damp cloth
immediately after the Iron Aid or drying
cycle.
Page 30

30 electrolux cleaning and maintenance
Emptying the condensed water
container
Empty condensed water container after
every drying cycle.
If the condensate tank is full, an active
programme will break off automatically
and the CONTAINER display will light
up. In order to continue the programme,
the condensed water container must
first be emptied.
Warning! The condensate is not
suitable for drinking or for preparing
foodstuffs.
1. Pull drawer containing condensed
water container
all the way out (1) and pull up the
condensed water container’s drainage pipe as far as it will go (2).
2. Pour out the condensate into a basin
or similar container.
3. Push drainage pipe in and refit condensed water container.
If the programme has been interrupted
as a result of the condensed water container being full:
Press the START/PAUSE (INICIO/PAUSA) button to continue the drying cycle.
The condensed water container has
a volume of approx. 4 litres. This is
sufficient for around 6kg of laundry
which has previously been spun at
1000 revolutions/minute.
Page 31

cleaning and maintenance electrolux 31
4. The condensed water be used as
distilled water, e.g. for steam irons.
However, first filter the condensed
water to remove any residues and
small pieces of fluff.
Using the attached canister to filter:
Pour the water out of the container
straight through the filter at the top of
the canister.
Fill water tank
You must fill up the water tank before
using an Iron Aid programme for the first
time. Use the distilled water provided if
there is not yet any condensed water
from previous drying programmes (see
chapter on ‘Cleaning and Maintenance,
Emptying condensed water container’).
If, after an Iron Aid programme is selected, the water tank indicator on the
display lights up, you will need to fill up
the water tank with distilled water. Otherwise, you will not be able to start an
Iron Aid programme.
Important Only fill the water tank
with distilled or fully desalinated
water. Do not use tap water or additives! You can also use the condensed water from the appliance’s
container, as long as you filter it
first.
1. Pull drawer containing condensed
water container
out a little (1), then pull out the water
tank’s filler neck (2).
Page 32

32 electrolux cleaning and maintenance
2. Fill with distilled water from the canister provided, up to the MAX mark
inside the container.
3. Push filler neck and drawer with condensed water container back in.
The water tank has a volume of approx. 1.3 litres. This is sufficient for
around 4 – 10 Iron Aid programmes
with garment steaming, depending
on the selected volume of steam,
programme and the corresponding
steam phases during the crease
guard phase.
You can easily check the level of water in
the tank at any time by looking at the fill
indicator in the viewing window. The
maximum fill level is indicated by the
MAX mark.
An overflow guard prevents the container from being overfilled.
The water tank indicator on the display
lights up as soon as the fill volume in the
tank falls below 500 ml when you start a
programme (this corresponds to the
maximum volume of water required for
the Iron Aid programme that uses the
most steam, including the crease guard
phase). This prevents an Iron Aid programme from being interrupted because of an empty water tank.
Page 33

cleaning and maintenance electrolux 33
Emptying the water tank for long
periods of disuse
If Iron Aid programmes are not run for
more than three weeks, the tank should
be emptied and refilled with fresh distilled water if required.
1. Open door in plinth in front of heat
exchanger (see chapter on ‘Cleaning
the heat exchanger’) and place a collecting container in front of the appliance.
2. Pull out the drainage hose underneath the heat exchanger (1).
3. Remove the plug from the end of the
hose (2) and allow the water to drain
into the collecting container.
4. Then seal the hose again and push it
back into its original position.
5. Close door in plinth.
Page 34

34 electrolux cleaning and maintenance
Cleaning heat exchanger
If the HEAT EXCHANGER display is illuminated, the heat exchanger needs to
be cleaned.
Caution! Operating when the heat
exchanger is clogged with lint can
damage the appliance. This also increases energy consumption.
1. Open loading door
2. Open base door. To do this, press
the release button located beneath
the loading aperture and open the
base door to the left.
3. Remove lint from the inside of the
door and the heat exchange chamber. Wipe the door seal with a damp
cloth.
4. Turn both lock washers inwards.
5. Use the handle to pull the heat exchanger out of the base and carry it
horizontally to prevent any remaining
water from spilling.
6. To empty the heat exchanger, hold
vertically over a washing-up bowl.
Page 35

cleaning and maintenance electrolux 35
Caution! Do not use sharp objects
to clean the heat exchanger. You
could damage it an cause leaks.
7. Clean heat exchanger.
It is best to use a brush or to rinse
thoroughly with a shower head.
8. Replace heat exchanger and lock
into place (turn both lock washers
outwards until they snap into place).
9. Close base door.
The appliance will not operate if the
HEAT EXCHANGER indicator is still
lit.
Caution! Never operate the appliance without the heat exchanger.
Cleaning the drum
Important Do not use scourers or
steel wool to clean the drum.
Lime in the water or laundry care
products may form a barely visible
lining on the inside of the drum. The
degree to which the laundry has
been dried is then no longer detected reliably. The laundry is damper
than expected when removed from
the appliance.
Use a standard domestic cleaner (e.g.
vinegar-based cleaner) to wipe down
the inside of the drum and drum ribs.
Clean control panel and housing
Important Do not use furniture cleaners
or aggressive cleaning agents to clean
the appliance.
Use a damp cloth to wipe down the
control panel and housing.
Changing the light bulb for interior lighting
Important: The bulb for the interior
lighting must be changed by our Customer Care Department.
Page 36

36 electrolux what to do if…
What to do if…
Remedying small malfunctions
If, during operation, the error code (E
plus number or letter) appears on the
multi-display: Switch the appliance off
and on again. Reset programme. Press the
START/PAUSE (INICIO/PAUSA) button.
Problem Possible cause Remedy
If the error appears again, please contact the Customer Care Department,
stating the error code.
Washing machine does
not work.
Drum light is not working.
Iron Aid programme does
not start.
After an Iron Aid programme, garments are
not sufficiently smooth.
After an Iron Aid programme, there are no
creases left in the garments.
Mains plug is not plugged in or
fuse is not working correctly.
Door is open. Close door.
Press the START/PAUSE (INI-
CIO/PAUSA) button.
Programme selector in O OFF
position.
Defective light bulb.
Water tank is empty. Fill water tank.
Wrong programme selected
SYNTHETICS -
(e.g.
SINTÉTICOS instead of
COTTON - ALGODÓN).
Too low a LOAD (CARGA)
steam level set.
Too many garments in machine,
or garments that are too different.
Clothes are not removed until
the anti-crease phase is finished.
Garments not hung on clothes
hangers and/or not tugged into
shape.
Multi-layered garments tend to
lose their shape.
The Iron Aid programme has
the effect of smoothing garments.
Plug in at mains socket. Check
fuse in fuse box (domestic installation).
Press the START/PAUSE (INICIO/
PAUSA) button.
Turn the programme selector to
any programme.
Replace light bulb (see next section).
Note the composition of the fabric.
Set a higher LOAD (CARGA)
steam level.
Load the machine with fewer garments, or only similar ones.
Remove clothes quickly one at a
time from the machine as soon as
possible after the start of the anticrease phase.
Hang garments on clothes hangers, do up buttons and tug garments into shape.
Reshape multi-layered garments
by ironing after they come out of
the machine.
Iron creases in again after the Iron
Aid programme.
Page 37

what to do if… electrolux 37
Problem Possible cause Remedy
Wrong programme selected.
Lint filter blocked. Clean lint filter.
Heat exchanger blocked with
fluff.
Drying results unsatisfactory.
Incorrect amount of washing. Observe recommended loads.
Ventilation slots in base area
covered up.
Residue on inside surface of
drum or drum paddles.
When you press a button
Err
appears in the multi-
display.
Drying cycle ends shortly
after programme starts.
ANTICREASE display illuminated.
Programme inactive,
CONTAINER display illuminated.
PROGRAMME TIME display changes erratically or
stays unchanged for a
long time.
Laundry guard. Additional functions cannot be selected after a
programme has started.
Too little laundry has been loaded for the selected programme,
or laundry that is too dry.
Condensed water container is
full.
Programme time is corrected
automatically depending on
type and volume of laundry and
level of dampness.
Fluff filter blocked. Clean fluff filter.
Drying cycle lasts an unusually long time.
Note: After up to 5 hours
the drying cycle ends automatically
(see ‘End of drying cycle’).
Heat exchanger blocked with
fluff.
DELICATE (DELICADO) button
pressed and load volume too big.
Load volume too big. Reduce load volume.
Laundry insufficiently pre-
drained.
Discoloration Colour fastness of textiles.
Select a different programme the
next time you dry (see section
“Overview of programmes”).
Clean heat exchanger.
Uncover ventilation slots in base
area.
Clean inside surface of drum and
drum paddles.
Adjust using the DRYNESS
(GRADO DE SEC.) additional function (see chapter on ‘Drying, selecting additional functions’).
Turn the programme knob to
O OFF. Reset programme.
Select time programme or higher
drying level (e.g. EXTRA - EXTRA SECO instead of CUPBOARD - SECO ARMARIO).
Empty condensed water container, then start programme with the
START/PAUSE (INICIO/PAUSA)
button.
Automatic process, there is no
fault with the appliance.
Clean heat exchanger.
DELICATE (DELICADO) is only suitable for use with loads of up to 3 kg!
Laundry must be adequately predrained.
Check colour fastness of textiles.
Only treat textiles together if they
are a similar colour.
Page 38

38 electrolux technical data
Technical data
5
This appliance conforms with the
following EU Directives:
– 73/23/EEC dated 19.02.1973 Low
Voltage Directive
Height x width x depth 85 x 60 x 60 cm
Depth with loading door open 109 cm
Height can be adjusted by 1.5 cm
Weight when empty approx. 46kg
Load (depends on programme)
Energy consumption in accordance with IEC 1121
(6kg of cotton, pre-drained at 1000 rpm,
programme COTTON
ALGODÓN SECO ARMARIO)
Area of use Domestic
permissible ambient temperature + 5°C to + 35°C
1) Different load weights may be needed in some countries due to different measuring methods.
1)
CUPBOARD -
– 89/336/EEC dated 03.05.1989 EMC
Directive inclusive of Amending Directive 92/31/EEC
– 93/68/EEC dated 22.07.1993 CE
Marking Directive
max. 6kg
3,7kWh
Consumption values
The consumption values have been established under standard conditions.
Programme
COTTON CUPBOARD
(ALGODÓN SECO ARMARIO)
COTTON HAND IRON
(ALGODÓN SEMISECO)
SYNTHETICS CUPBOARD
(SINTÉTICOS SECO ARMARIO)
1) pre-drained at 1000 rpm
2) pre-drained at 1200 rpm
*) corresponds to COTTON HAND IRON (ALGODÓN SECO PLANCHA) programme
1) *)
1)
2)
They may deviate when the machine is
operated in domestic circumstances.
*
Load
in kg
6 3,7
6 3,0
3 1,4
consumption
Energy
in kWh
Page 39

Installation safety instructions
installation safety instructions electrolux 39
• Important! The appliance must be
moved in vertical position for transport.
• Before first starting up, all parts of
the transport safety equipment must
be removed. The machine may otherwise be damaged.
• The appliance must not be built-in.
• Before starting up for the first time,
ensure that the nominal voltage and
type of current specified on the appliance’s rating plate match the nominal voltage and type of current at the
installation site. The electrical fuse
required can also be found on the
rating plate.
• Always connect the machine to an
earthed socket in accordance with
current wiring regulation.
The manufacturer declines any responsibility for damage or injury
through failure to comply with the
above safety precaution.
• With permanent connections: A permanent connection may only be established by an authorised specialist
electrician.
• Do not install appliance in rooms at
risk of frost.
• Do not install the appliance behind
– a door that locks
– a sliding door
– a door with a hinge that lies oppo-
site the hinge of the appliance.
• The door of the appliance must not
be able to be blocked by house
doors or other appliance doors.
• Do not install on a carpet with a high
pile. Air circulation at the ventilation
holes will be hindered.
• Ensure that the appliance is not
standing on the mains cable.
• Install the machine horizontally.
Page 40

40 electrolux removing transport safety equipment
Removing transport safety
equipment
Caution! Before first starting up, all
parts of the transport safety
equipment must be removed.
1. Open loading door
2. Pull off adhesive strips from inside
machine on top of drum.
3. Remove foil hose and polystyrene
padding from the machine.
Page 41

special accessories electrolux 41
Levelling the appliance
The four feet of the appliance are preadjusted.
Large degrees of unevenness can be
compensated for by individually adjusting the height adjustable screw feet.
To do this lift the appliance and turn the
adjustable feet in or out.
Important Do not use pieces of wood,
cardboard or such like to level out unevenness in the floor, but adjust the
height adjustable screw feet instead.
Special accessories
The following special accessories are
available from your Electrolux Service
Force Centre or your specialist dealer:
Intermediate installation kits for
stacked washer and iron aid appliance:
These intermediate installation kits can
be used to arrange the iron aid appliance and an automatic Electrolux washing machine (60cm wide, front loading)
as a space-saving washer/iron aid
stack. The automatic washing machine
is at the bottom and the iron aid appliance is at the top.
Two versions can be supplied:
Door reversal instructions
To make it easier to load or unload the
laundry the door can be reversed.
Reversing the door is not possible if after
this operation the appliance result installed behind a door with hinge on the
opposite side to that of the appliance.
Warning! The door may only be reversed by qualified personnel. If
necessary, please contact your local Service Force Centre.
– without stacker plate
– with extractable stacker plate
Read the manual supplied with the installation kit carefully.
Page 42

42 electrolux guarantee/customer service
Guarantee/Customer Service
European Guarantee
This appliance is guaranteed by Electrolux in
each of the countries listed at the back of this
user manual, for the period specified in the appliance guarantee or otherwise by law. If you move
from one of these countries to another of the
countries listed below the appliance guarantee
will move with you subject to the following qualifications:-
• The appliance guarantee starts from the date
• The appliance guarantee is for the same pe-
• The appliance guarantee is personal to the
• The appliance is installed and used in ac-
• The appliance is installed in accordance with
The provisions of this European Guarantee do
not affect any of the rights granted to you by law.
you first purchased the appliance which will
be evidenced by production of a valid purchase document issued by the seller of the
appliance.
riod and to the same extent for labour and
parts as exists in your new country of residence for this particular model or range of
appliances.
original purchaser of the appliance and cannot be transferred to another user.
cordance with instructions issued by Electrolux and is only used within the home, i.e. is
not used for commercial purposes.
all relevant regulations in force within your
new country of residence.
Weitere Kundendienststellen
im Ausland
In diesen Ländern gelten die Garantiebedingungen der örtlichen
Partner. Diese können dort eingesehen werden.
Further after-sales service
agencies overseas
In these countries our AEGElectrolux agents’ own guarantee conditions are applicable.
Please obtain further details direct.
Autres agences étrangères assurant le service après-vente
Dans ces pays, les conditions de
garantie des concessionnaires de
la région sont valables. Vous
pouvez les consulter sur place.
Otros puntos de Postventa en
el extranjero
En estos países rigen las condiciones de nuestros representantes
locales. las cuales pueden ser
consultadas allí mismo.
Ulteriori uffici del servizio
tecnico assistenza clienti
all’estero
In questi paesi sono valide le
condizioni di garanzia dei partner locali. Queste condizioni
possono essere esaminante sul
luogo.
Serviços de assistência técnica
no estrangeiro
Nestes países são válidas as condições de garantia dos concessionários locais, podendo aí ser
consultadas.
További vevöszolgálati irodák külföldön
Ezekben az országokban a mi
AEG-Electrolux vevöszolgálatainknál saját jótállási feltételek
alkalmazhatók. A további adatokat kérjük közvetlenül szerezzék be.
Servisne službe
Na garancijskem listu boste
našli seznam pooblašèenih
servisnih služb AEG-Electrolux.
Page 43

service electrolux 43
Service
In the event of technical faults, please
first check whether you can remedy the
problem yourself with the help of the operating instructions (section “What to do
if…”).
If you were not able to remedy the problem yourself, please contact the Customer Care Department or one of our
service partners.
In order to be able to assist you quickly,
we require the following information:
– Model description
– Product number (PNC)
– Serial number (S No.)
(for numbers see rating plate)
– Type of fault
– Any error messages displayed by the
appliance
So that you have the necessary reference numbers from your appliance at
hand, we recommend that you write
them in here:
Model description: .....................................
PNC: .....................................
S No: .....................................
Page 44

www.electrolux.com
www.electrolux.es
125 985 250-01-180806-01
 Loading...