

Page 1
136904090 -00- 26072007
Page 2

Contents
For the user
Safety information 3
Description of the appliance 4-5
Using your appliance 6
– Before you use the dryer for the first time
– Capacity
– Examples of laundry item weights
Program chart 7
– Consumption
Maintenance 8-9
– The filters
– The condenser
– Emptying the water tank
General information 10
If the machine is not working 11
Service 12
– Service and spare parts
For the installer
Technical data 12
Installation 13-14
– Positioning
– Electrical supply
– Wall mounting
Rukowodstwo po \kspluatacii 15
Unpacking the machine
Damages
If the dryer has been damaged during transport, you
should immediately notify the company responsible for
delivering it.
Check that the dryer is undamaged. If you discover any
damage, faults or that anything is missing, you should
notify the dealer immediately.
Never leave packaging material in a place
where children may play with it.
Accessories supplied with the dryer
Console for wall mounting
Optional extra accessories
Mounting kit for installation on top of a washing machine
150 62 99-00
Drain hose 5647 12 28-10
You can ordered the extra accessories from the same
place where you bought the dryer or direct from the
supplier. (Please specify the relevant part number as
shown here).
Identification of materials
All materials used in packaging the dryer are
environmentally-friendly. The various plastics
used are identified and can be recycled:
• PE stands for polyethylene, which is used for the
bag around the dryer and the bag in which these
instructions were supplied.
• PS stands for (moulded) polystyrene, which is used
for the sections of packaging needed to cushion the
dryer.
The cardboard components of the packaging are made
from recyclable paper and should be taken to a collection
point for recycling.
- 2 -
Page 3
Safety information
Before installing and first using the tumble dryer, read this instruction booklet carefully, including
its hints and warnings. To avoid unnecessary mistakes and accidents, it is important to ensure
that all people using the dryer are thoroughly familiar with its operation and safety features.
Save these instructions and make sure they remain with the tumble dryer if it is moved or sold, so
that everyone using it through its life can be properly informed on appliance use and safety.
Installation and servicing
● All installation and service work done on the product
must be carried out by a qualified technician. Work
performed by persons with inadequate knowledge may
adversely affect the satisfactory functioning of the
product and may cause personal injury or damage.
Before any work is carried out on the tumble dryer, it
must be isolated from the electrical supply. To do this
the power plug must be removed from the wall socket.
● The machine is heavy, so take care when moving it.
● If the dryer is installed in a bathroom without fixed
wiring to the electrical supply, an earth leakage circuit
breaker (or RCD) must be used.
● The power cable must be plugged into an earthed
socket, which must be easily accessible. Permanent
installation must only be carried out by an authorized
electrician.
● If the power cord is damaged, it must be replaced
by a special cord or assembly available from the
manufacturer or its service agent.
● Make sure that the power cable is not nipped or other-
wise damaged when moving the machine in connection
with installation or cleaning etc.
● The ventilation opening at the bottom of the door should
not be obstructed if the dryer is on a carpeted floor.
● The adjustable feet must not be removed, these
ensure that the underside of the dryer is ventilated.
● Servicing and repairs must be carried out by a service
company authorised by the supplier. Use only spare
parts supplied by these. Never try to repair the machine
yourself.
Child safety
● The tumble dryer should be used by adults only. Do not
let children play with the controls or other parts of it.
● Keep all packaging well away from children.
● Before loading the machine, check that there are no
foreign objects or pets inside the drum.
During use
● This dryer is intended only for normal domestic drying of
laundry and only in accordance with these instructions.
Using it for other purposes could lead to physical injury
or damage to property and invalidate the guarantee.
● Do not overload the dryer (see “Using your appliance”).
● Never start the dryer unless the fluff filter is clean and
correctly in place, or if the fluff filter is damaged (this
could cause overheating or damage your laundry).
● Get into the habit of cleaning the condenser at regular
intervals. Keeping the condenser as clean as possible
makes the dryer more efficient and means shorter
drying times.
● Laundry which has been in contact with chemicals such
as dry cleaning fluid and similar, should not be dried in
the machine, since volatile chemicals can be a fire risk.
● The following items/materials should not be dried in
the machine either:
– Pillows, cushions, down-filled items etc. (these
cause a build-up of heat and can make the dryer
overheat)
– Wool, on account of its tendency to mat
– Especially sensitive textiles, such as synthetic
curtains, silk etc.
– Garments made of foam rubber or rubber-like
materials must not be dried in the machine.
● Always switch off and unplug the appliance after use.
When removing the electrical plug, grip the plug, not
the lead.
At the end of the dryer’s life
The symbol on the product or on its packaging indicates
that this product may not be treated as household waste.
Instead it shall be handed over to the applicable collection
point for the recycling of electrical and electronic equipment.
By ensuring this product is disposed of correctly, you will
help prevent potential negative consequences for the
environment and human health, which could otherwise be
caused by inappropriate waste handling of this product.
For more detailed information about recycling of this product,
please contact your local city office, your household waste
disposal service or the shop where you purchased the
product.
- 3-
822 61 13-69
Page 4
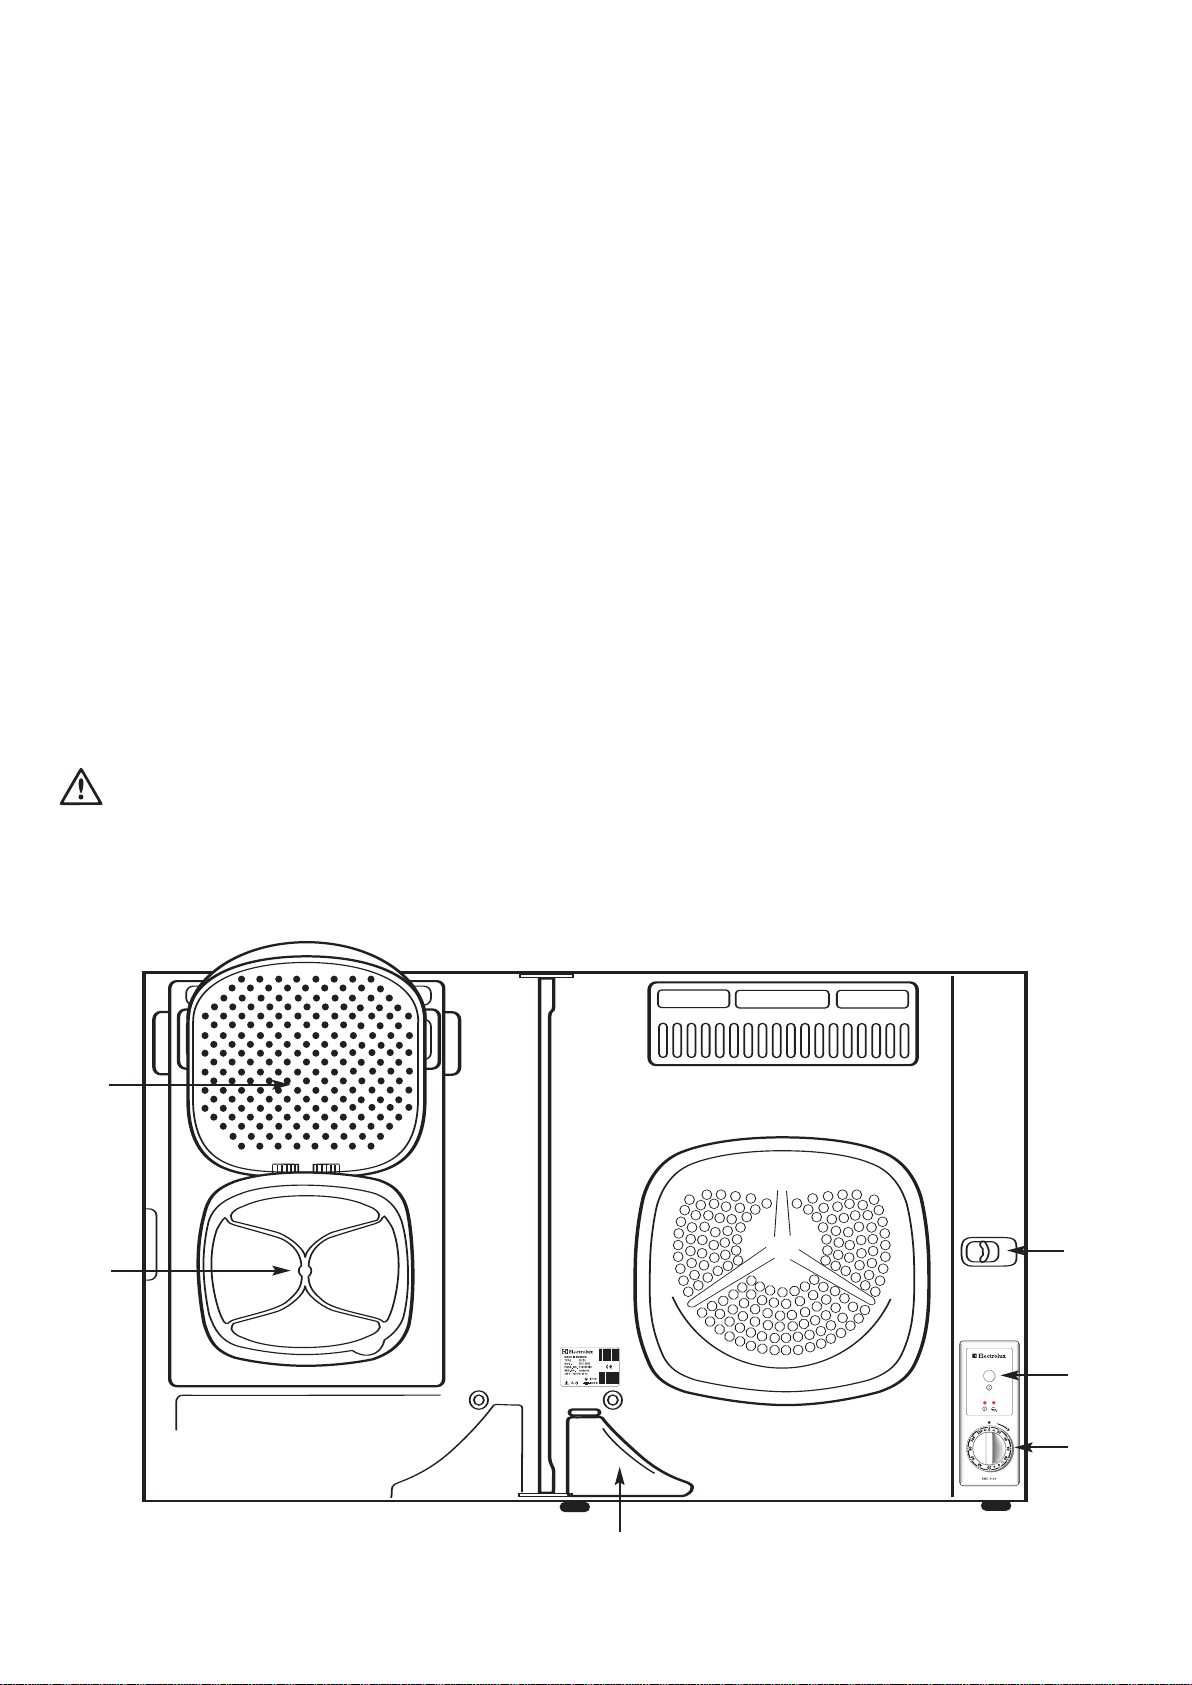
Description of the appliance
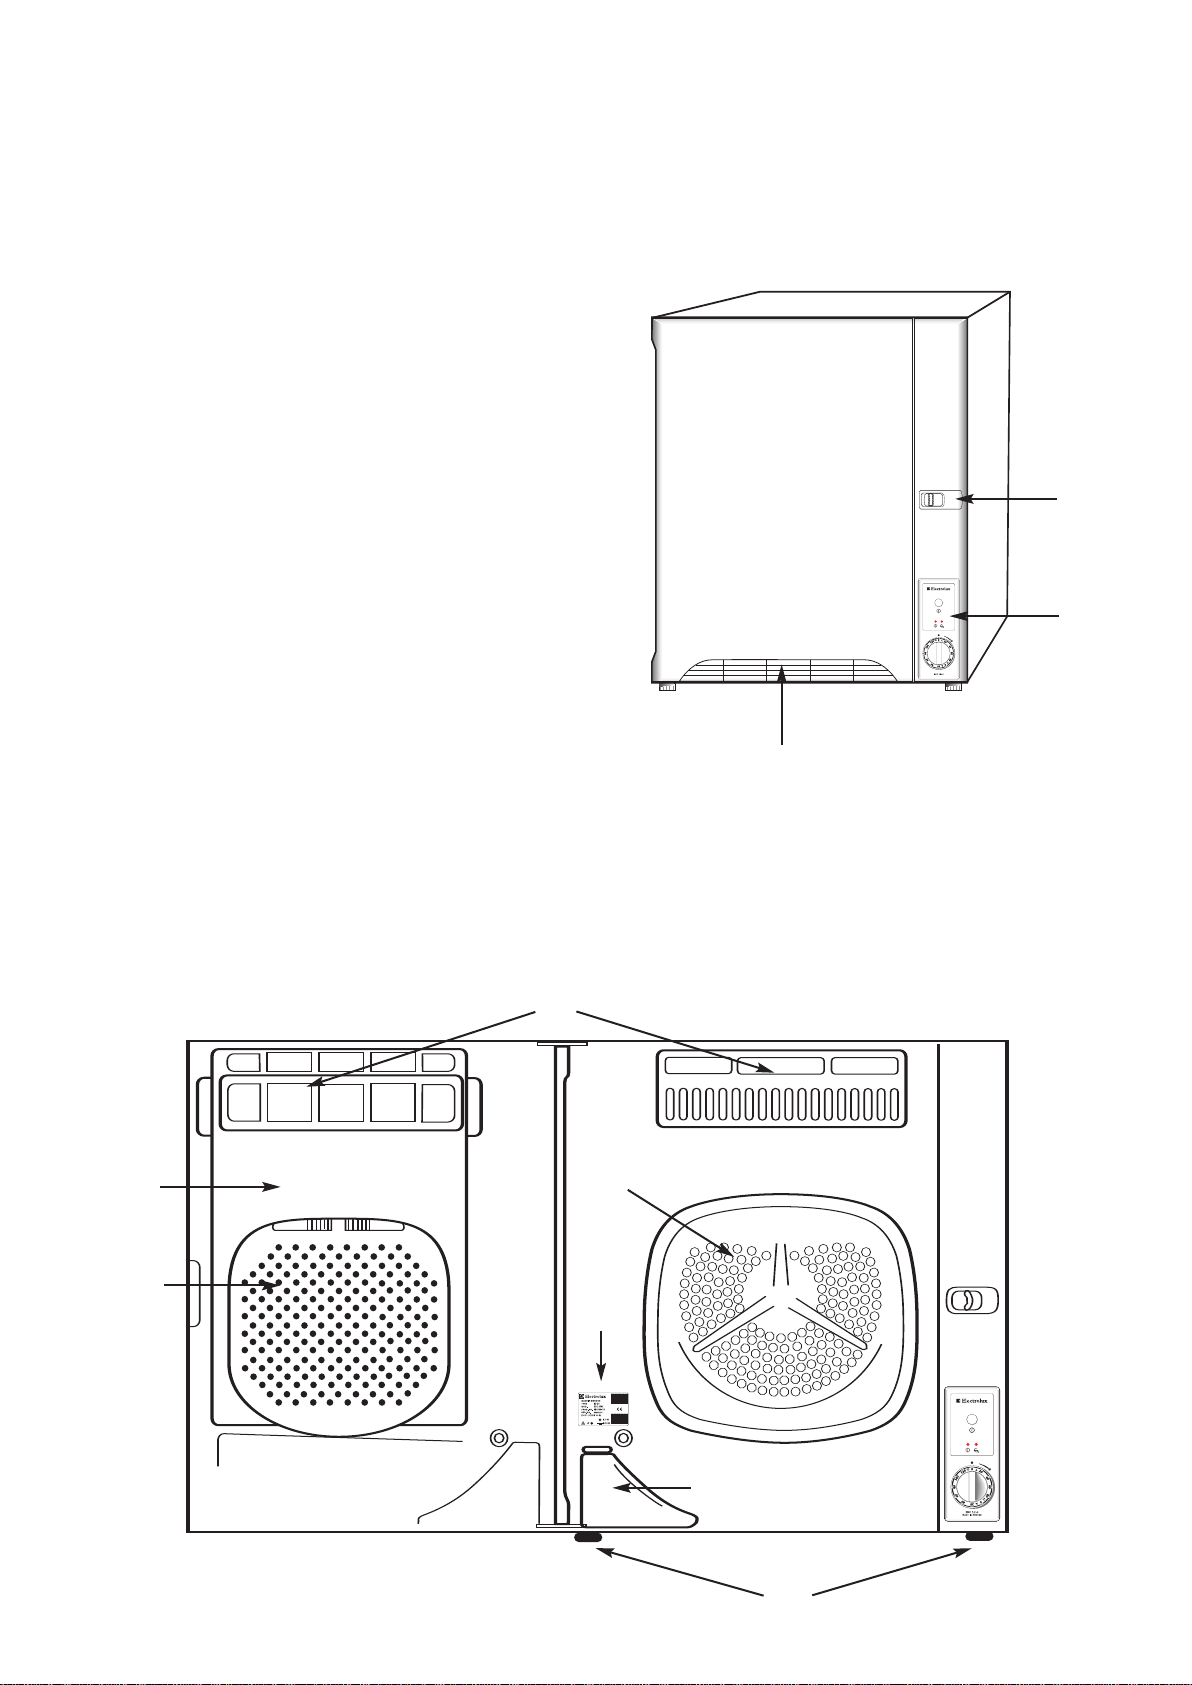
1. Door Latch (push the knob to the right to open)
Avoid opening the door while a program is in
progress.
2. Space for programme chart
(Self-adhesive label)
3. Control panel
4. Warm air discharge
5. Air ducts
6. Condenser
This is built into the door and needs to be cleaned
at regular intervals.
7. Filters
Should be cleaned before or after each load. The
fluff filter is behind the coarse filter and can be
removed for cleaning.
8. Adjustable feet
If the dryer is not being wall mounted the feet need
to be adjusted so that the dryer is level.
9. Water tank for condensed water
This fills up with the water condensed by the dryer
and should be emptied before or after each load.
When the tank is full, warning light (B) will come on
and the dryer will stop automatically. It cannot be
restarted until the tank has been emptied.
- These should not be obstructed.
2
1
3
4
5
6
11
7
10
9
2
- 4 -
8
Page 5
Description of the appliance
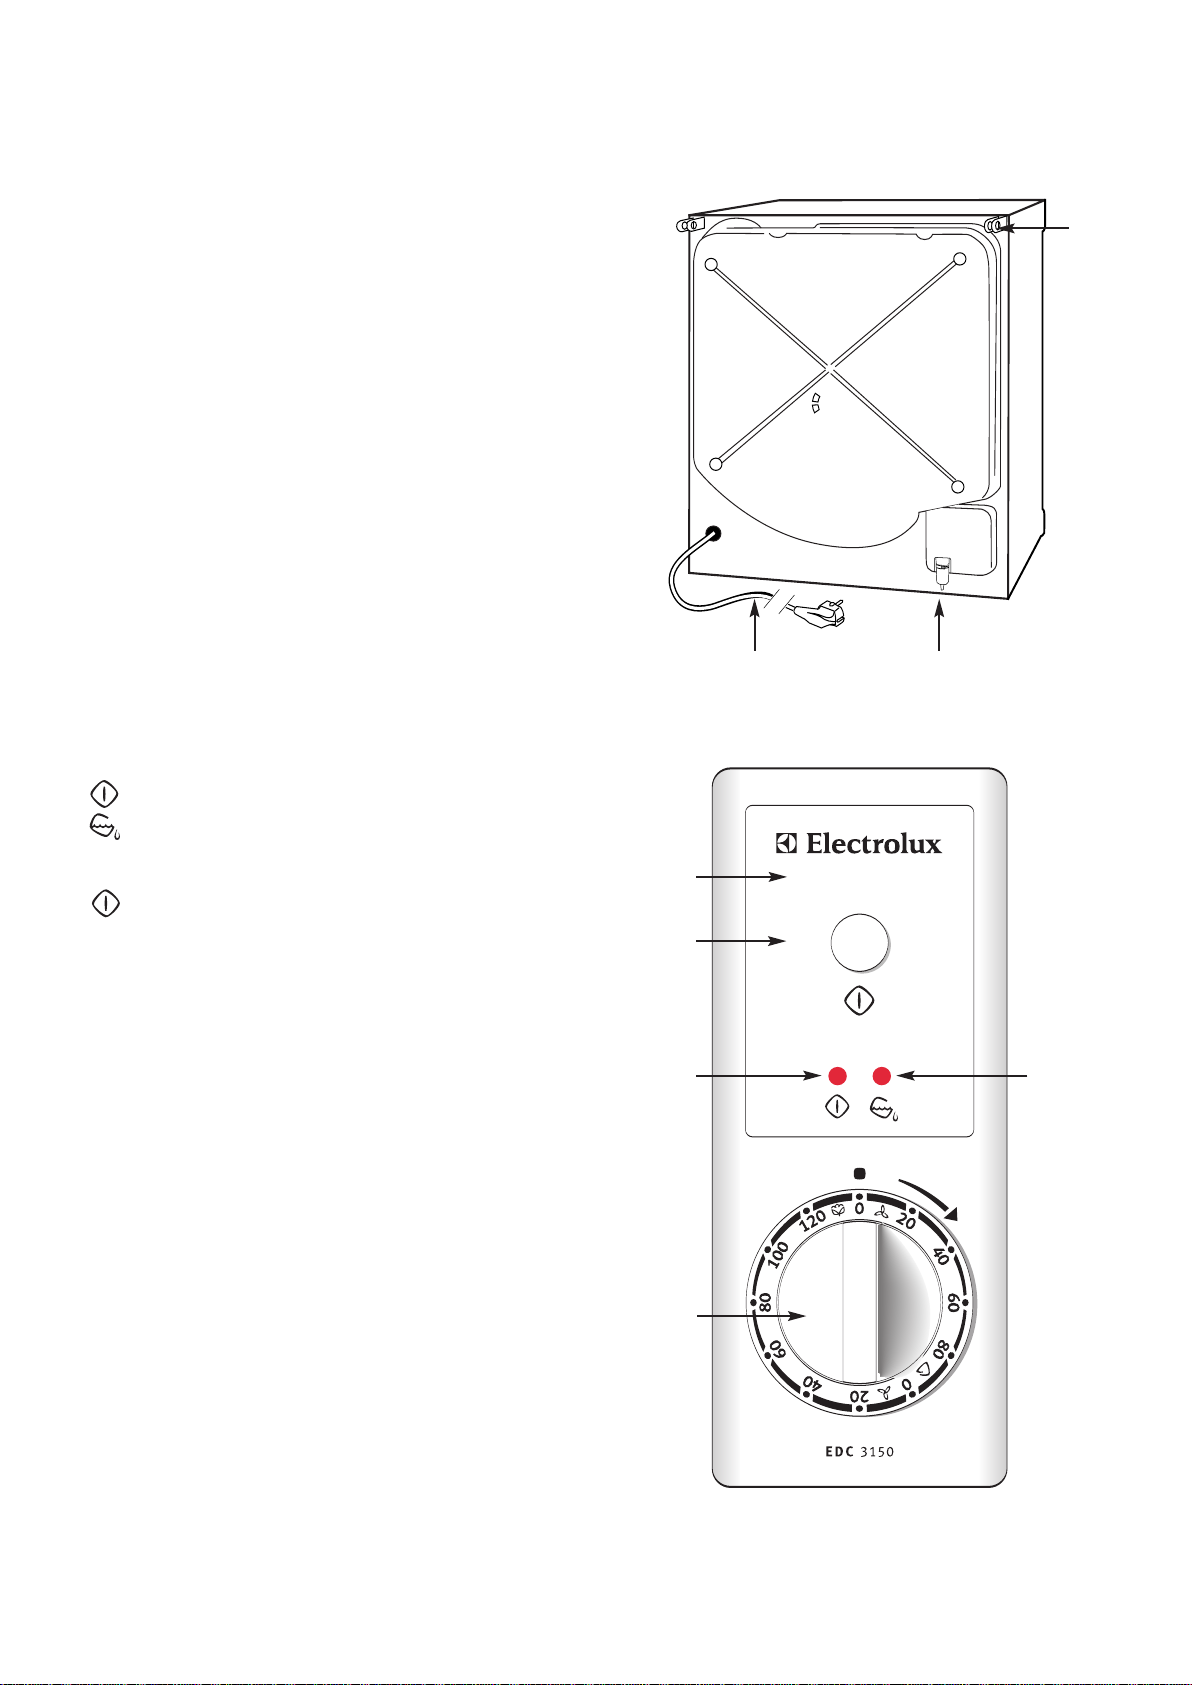
10. Rating plate
11. Drum
12. Electrical lead
13. Connector for drain hose
There is a drain hose as an extra accessory for you
who want and can connect the tumble dryer directly
to a drain outlet. Fix the hose to the connector (13)
after releasing the hose clip and removing the plug.
When a drain hose is fitted, the water tank will not
be filled with water.
14. Holder for wall mounting console
• Lights
A. Lit during drying stage.
14
12 13
B. Lit when water tank is full.
• Start button
C. After selecting the program and drying time,
press this button to start the dryer.
• Timer knob
D. This knob is used to set both the drying time
and the drying temperature required.
Separate time scales and temperatures for
Cotton (max 120 min) and
Synthetics (max 80 min).
3
C
A
D
B
- 5 -
Page 6
Using your appliance
Before using the dryer for the first time
Dampen some clean pieces of unwanted cloth and dry
them for about 15 minutes the very first time, to make
sure that there is no dust or dirt in the dryer.
1. Check that the dryer is connected to the electrical
supply.
2. Open the door by pushing the knob to the right (A).
3. Check that the fluff filter (B) is clean and that the
coarse filter (C) is lowered and has snapped into
place.
4. Check that the water tank (D) is empty and pushed
correctly into place.
5. Put the load for drying into the machine. Make sure
that it is right inside the drum. Do not mix synthetics
with natural materials.
6. Close the door.
7. According to the type of load, turn the timer knob
(E) to a suitable drying time on either the Cotton
or the Synthetics time scale.
8. Press the start button (F) inwards.
It is advisable not to open the door during a
programme as this could cause water to leak
from the machine.
Capacity (dry items)
Cotton max. 3,4 kg
Synthetics max. 1,5 kg
Examples of laundry item weights
(dry items)
To help you load your tumble dryer correctly, here are
some examples of average garment or item weights.
These are based on cotton goods.
Bathrobe ~1.2 kg
Duvet cover ~0.7 kg
Sheet ~0.5 kg
Blouse ~0.1 kg
Towel (Terry) ~0.2 kg
Shirt ~0.2 kg
Nightdress ~0.2 kg
Pyjamas ~0.2 kg
Underpants ~0.1 kg
Underpants (long) ~0.3 kg
Pillow-case ~0.2 kg
Socks ~0.1 kg
C
B
A
F
E
D
- 6-
Page 7
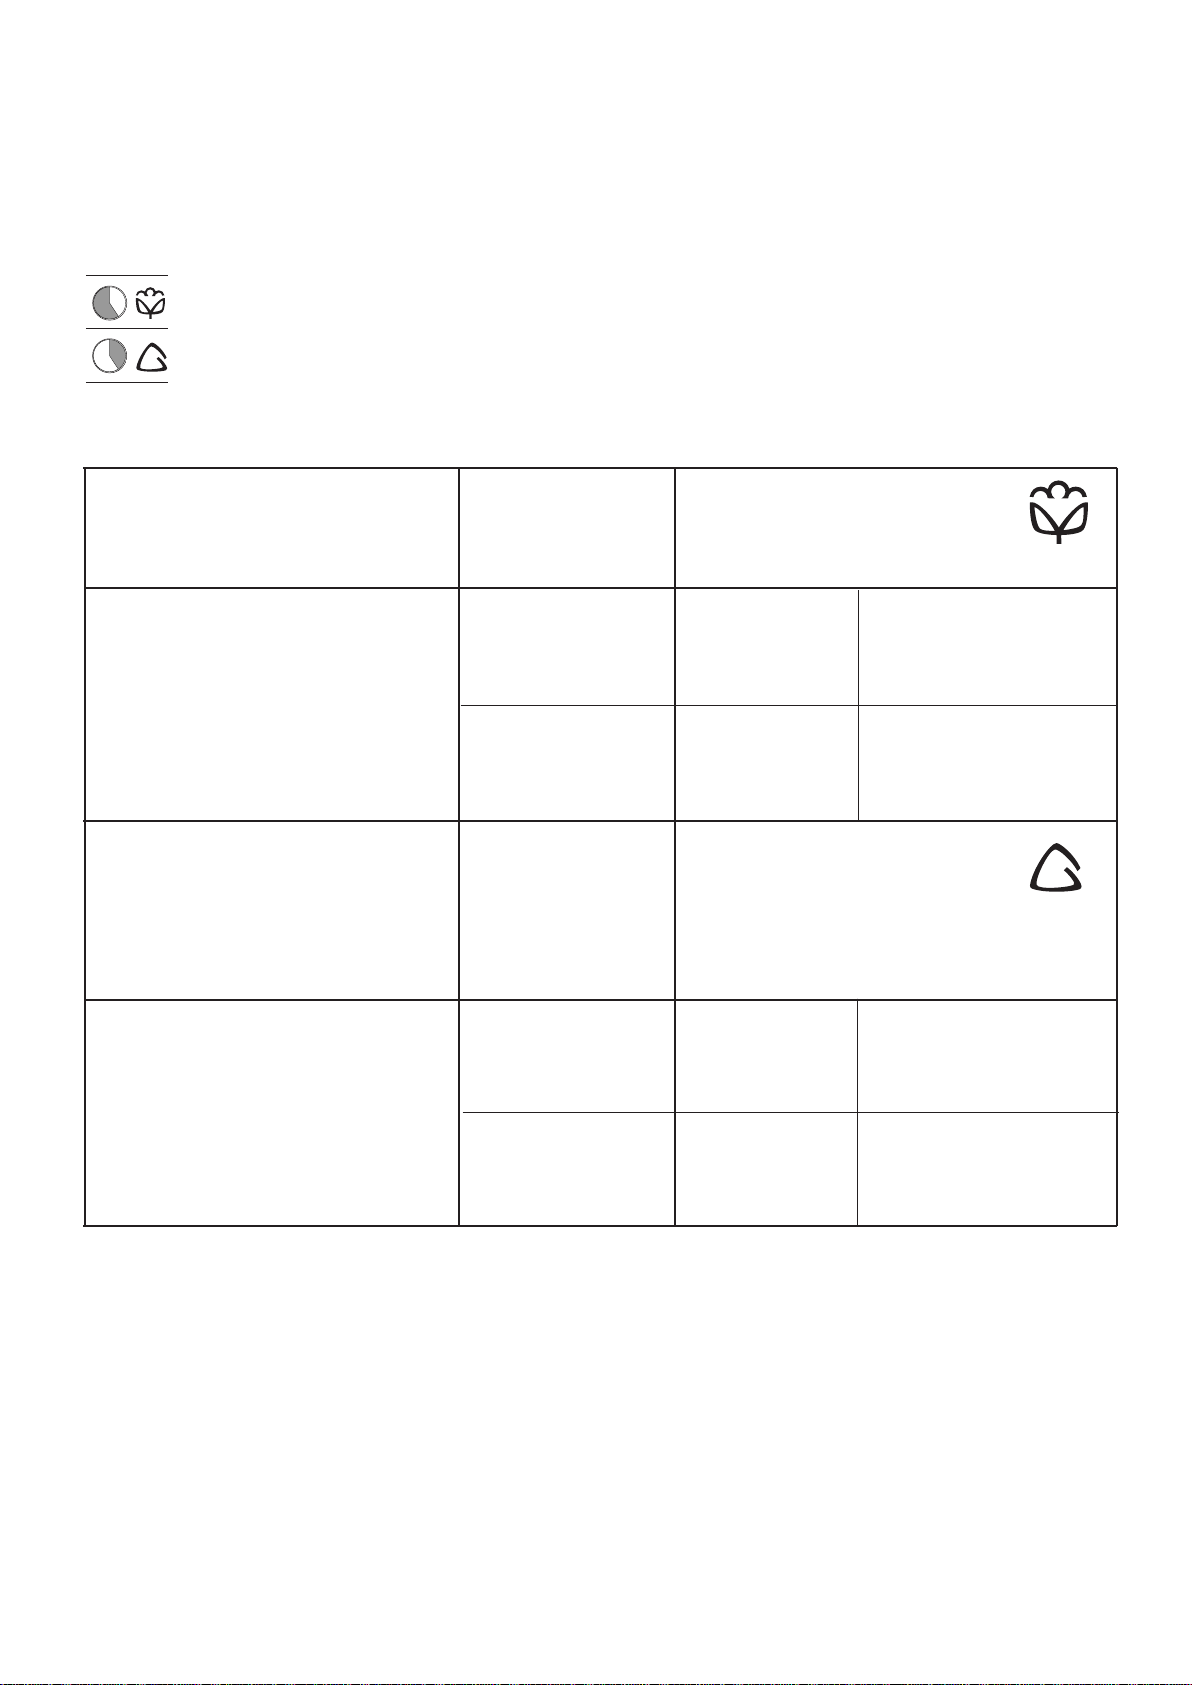
Program chart
Which program should I use?
Timed drying
This program chart is designed to help you dry your laundry correctly. The program/timer knob has two
different sections, each with its own drying temperature and time scale:
is used to represent cotton. Here you can set the dryer for up to 120 minutes, because cotton
and thick non-synthetic fabrics need longer to dry.
is used to represent synthetic fabrics and delicate items. Because these are more sensitive than
cotton, they need a lower drying temperature. Here you can set the dryer for up to 80 minutes.
Do not overdry your laundry. It can make it difficult to iron, and harsher to the touch, besides wasting
energy. During the last 8-12 minutes of each program, the load is cooled to reduce the risk of creasing.
COTTON DRYING TIME max 120 min
Spun at approx. 800 rpm
Type of laundry How dry? before drying
Cottons Dry 3,4 kg 95 - 110 min
Towelling (Terry) 2,0 kg 70 - 80 min
Sheets 1,0 kg 50 - 60 min
Towels
Damp dry 3,4 kg 80 - 95 min
2,0 kg 55 - 75 min
1,0 kg 45 - 55 min
SYNTHETICS DRYING TIME max 80 min
Short spun before drying
Type of laundry How dry?
Items which need a reduced
drying temperature
Delicate items Dry 1,5 kg 65 - 75 min
Heat-sensitive items 1,0 kg 45 - 55 min
(see garment care label) 0,7 kg 40 - 50 min
Damp dry 1,5 kg 50 - 60 min
1,0 kg 35 - 40 min
0,7 kg 30 - 35 min
Consumption according to the EN 61121 Europa standard
Energy 2,47 kWh/3,4 kg cotton
The consumer information on the energy declaration is in accordance with directive EEC 92/75
and refers to the 90 minute programme.
- 7 -
Page 8
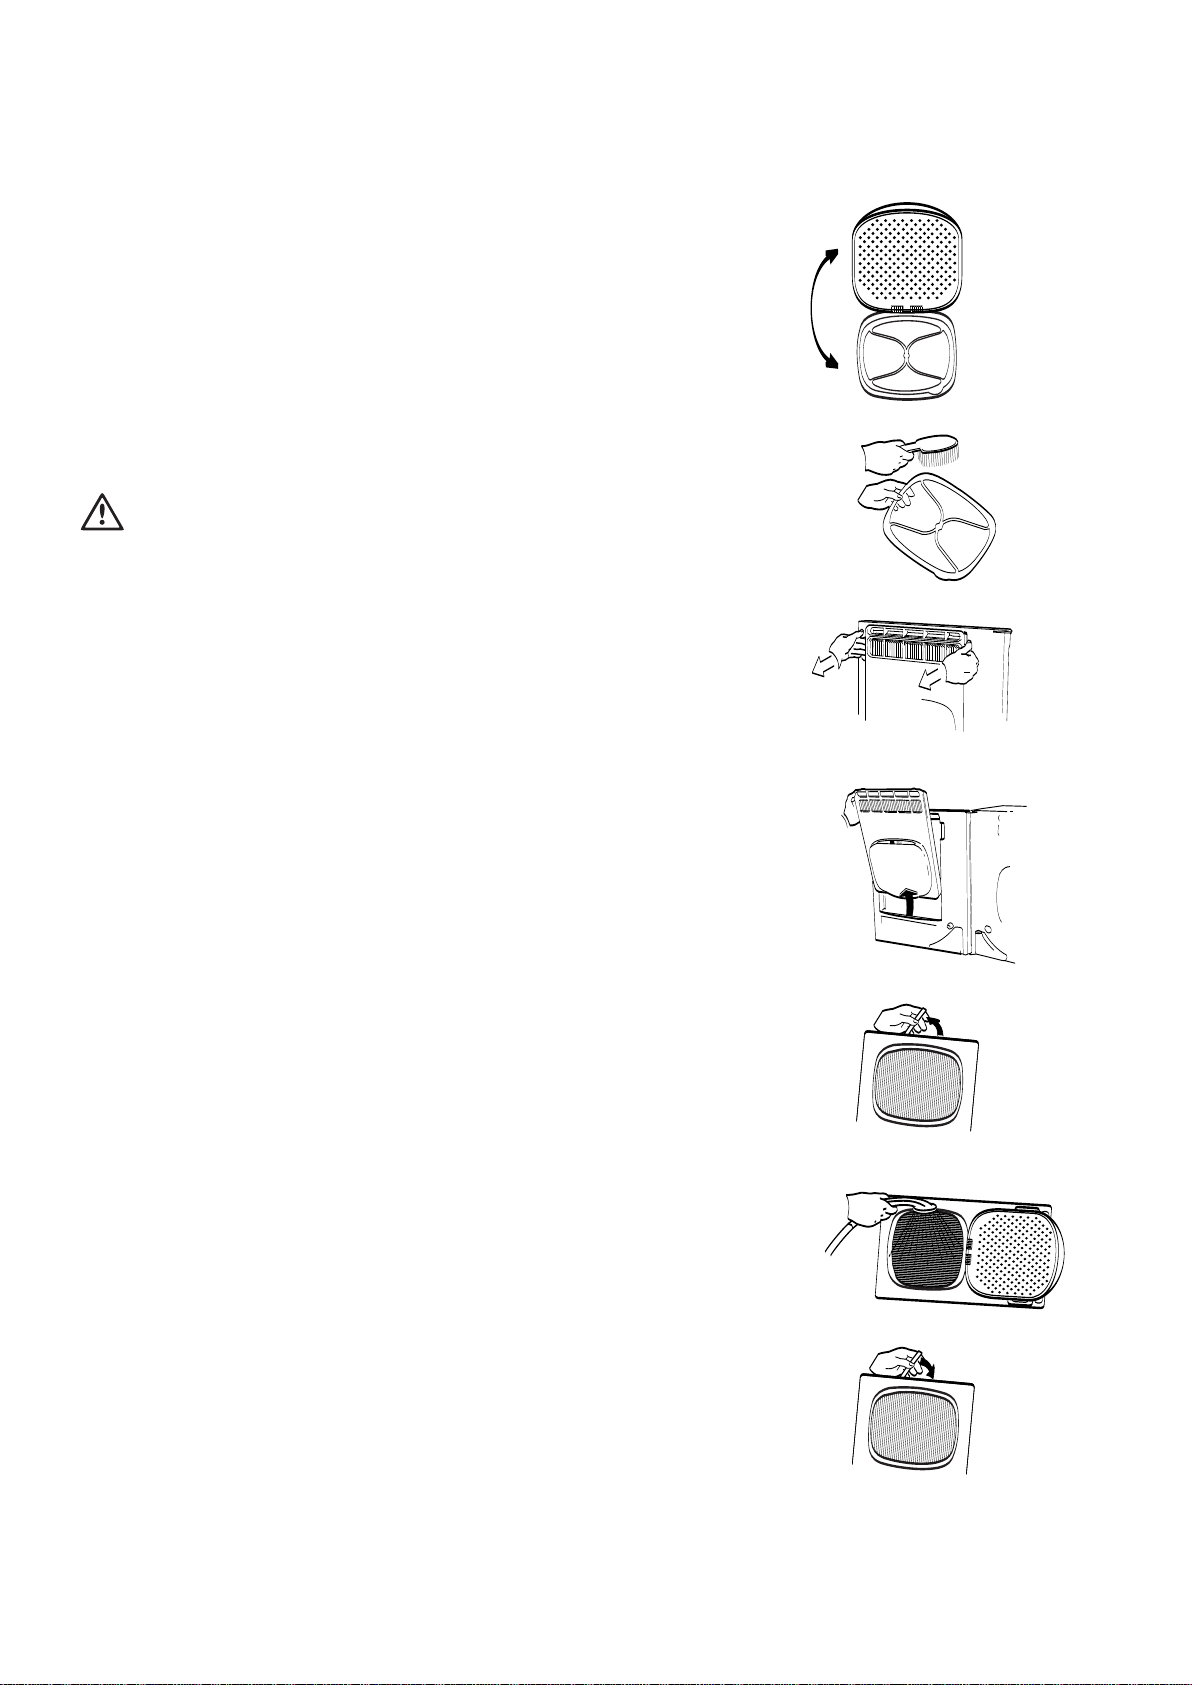
Maintenance
The filters
For your tumble dryer to function correctly, the filters need
to be cleaned before or after every load dried.
To clean them:
1. Open the door.
2. Open the coarse filter upwards (Fig. A).
3. Brush the fluff off the fluff filter, which is under the
coarse filter (Fig. B). Sometimes you may need to
remove the fluff filter to clean it on both sides.
Make sure that you put the fluff filter back correctly
after cleaning, before closing the coarse filter.
Never start the dryer unless the fluff filter
is clean and correctly in place, or if the
fluff filter is damaged (this could cause
overheating).
A
B
The condenser
As in all types of tumble dryer, the air circulated through the
dryer picks up fluff. As a result, some fluff will accumulate
in the condenser, so it needs to be cleaned occasionally.
To clean the condenser:
1. Open the door and open the coarse filter upwards.
2. Remove the fluff filter and close the coarse filter
again.
3. Grasp the recesses at the top of the condenser
with your fingers and use your thumbs to press
against the door (Fig. C & D).
The condenser will come free, allowing you to lift
it outwards/upwards. Be careful not to damage
the sensitive aluminium section.
4. Turn it upside down and clean it on both sides,
using a vacuum cleaner. Remove the red drain
plug on the lower edge of the condenser (Fig E).
Lay the condenser flat and fill it with water through
the filter opening. Now leave the condenser to
soak in water for about 5 minutes, then shower
both sides with hot water. (Fig. F).
Dry the condenser carefully afterwards. Don’t
forget to put back the red drain plug (Fig. G).
C
D
E
F
5. Put the condenser back in the dryer. Make sure
that its base is lined up in the slots in the condenser
cavity inside the dryer door.
Press the condenser carefully into place until you
feel and hear a gentle “snap”. Put back the fluff
filter and close the coarse filter.
G
- 8 -
Page 9
Maintenance
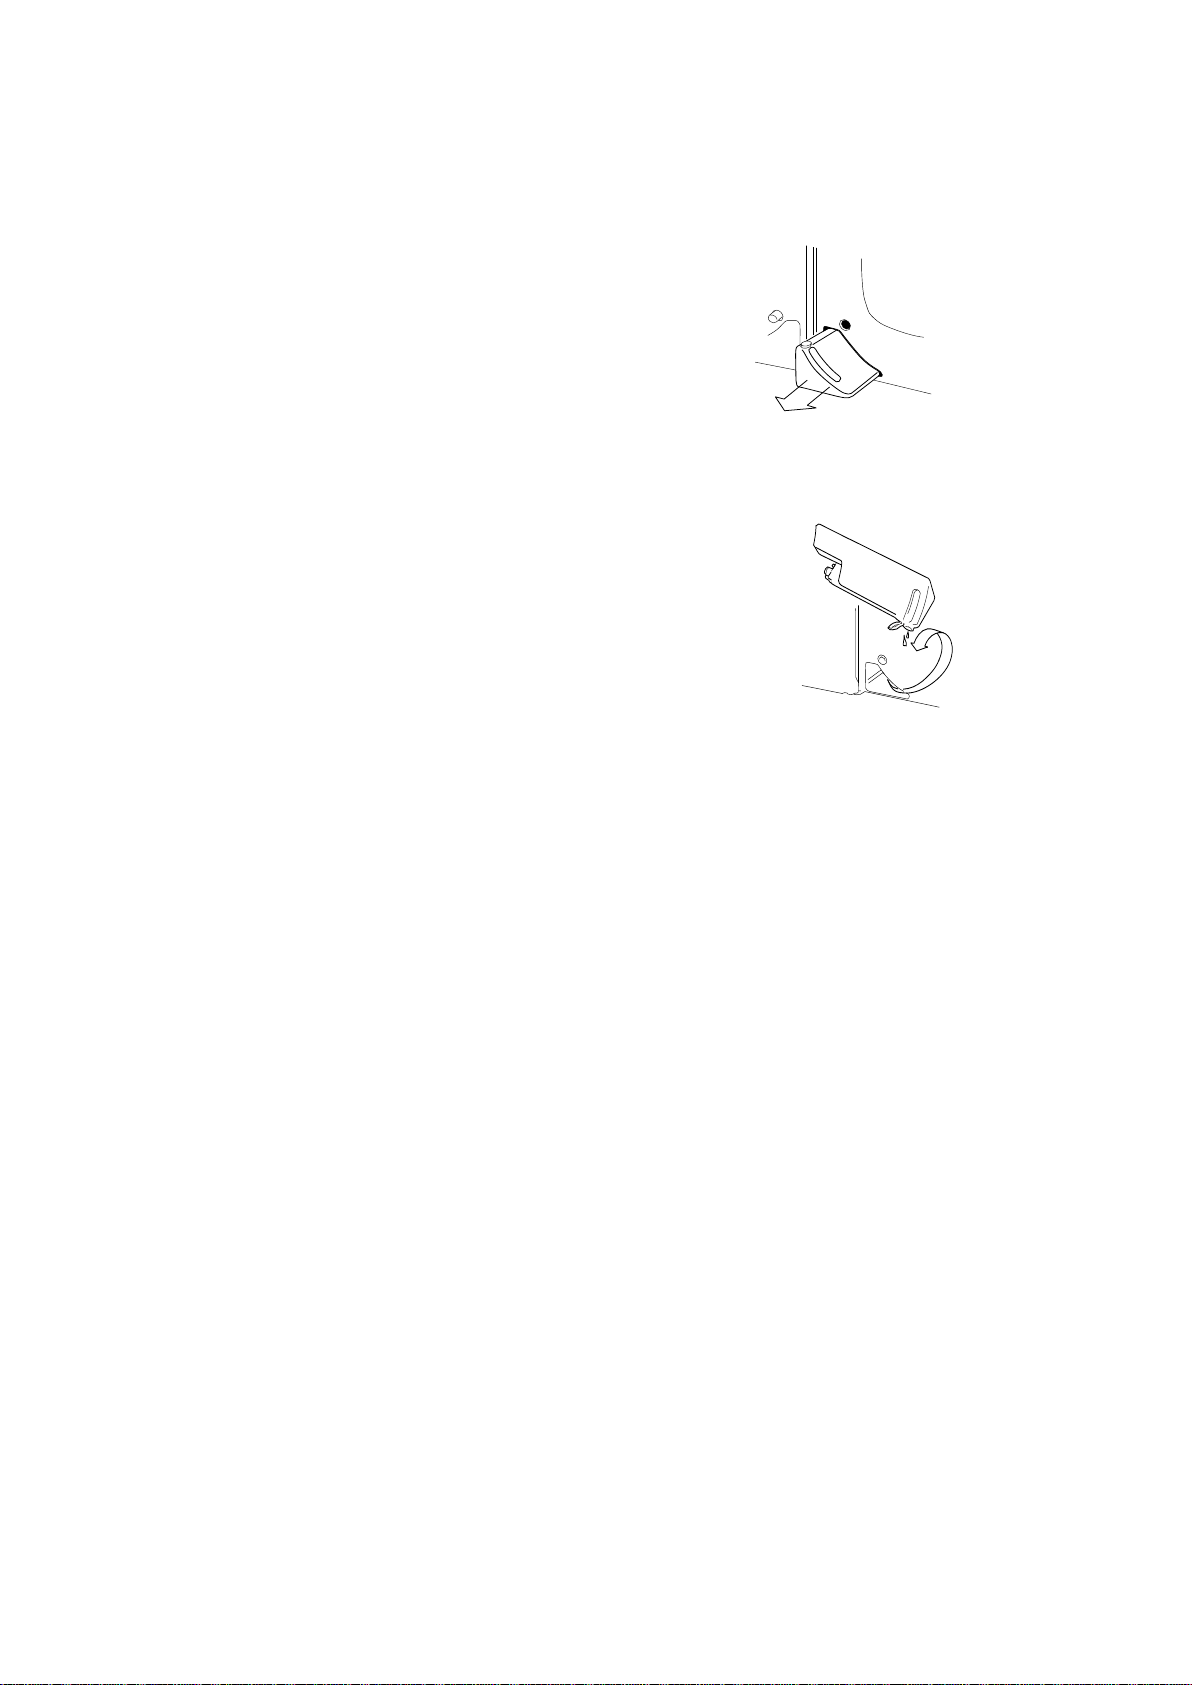
Emptying the water tank
If you have connected the tumble dryer directly to a
waste pipe with the accessory hose, you can ignore
this section.
A warning light on the control panel will come on when
it is time to empty the water tank. If it is operating when
this happens, the dryer will stop automatically until the
tank is emptied.
It is a good idea to get into the habit of emptying the
tank either before or after each load.
To empty the tank:
1. Open the door.
A
2. Pull out the tank (Fig. A).
3. Open the tank lid and pour the water out
(Fig. B).
4. Close the lid and push the tank back into
place. Press it home until you can feel that
it is properly in place.
B
- 9 -
Page 10

General washing and drying information
Sorting
Always sort loads for drying according to the type of fabric
(check the care labels) and how much you want to dry them.
Load items loosely into the drum. Do up zip fasteners and
tie loose ribbons, tapes or fabric belts. Close any tapes
or fasteners on duvet covers and pillow cases to prevent
smaller items from getting trapped inside.
Spinning (water extraction)
Loads should be well spun. We recommend that you use
a washing machine with a minimum spin speed of 800
rpm, or a separate spin-dryer (“Hydro-extractor”) if
available. The higher the spin speed, the faster your
tumble dryer will dry the load and the more energyefficient the whole process will be.
Even permanent press garments such as shirts should
be spun for 10 to 30 seconds before tumble drying.
Getting the load size right
An overloaded tumble dryer will cause creasing. Drying
loads which are too small is uneconomical.
Fluff
The first time you use the tumble dryer, you will probably
be surprised at the amount of fluff produced. This is
perfectly normal, and does not mean that your tumble
dryer is wearing out your clothes. When garments are
worn and washed by hand or machine, fibres and fluff
are released, but remain on the surface of the material.
If dried outdoors on a line these fibres will be blown away
by the wind. In a tumble dryer the fluff is collected in the
filter and accumulates through the drying process. This
is very significant to those who suffer from asthma or
allergies.
Starched items
Laundry which has been starched can also be dried in a
tumble dryer. For best results you should choose a
drying time which ensures that the items are still slightly
damp, e.g. by following the recommendations to achieve
“damp dry (for ironing)”. After removing the load, wipe
the drum clean with a damp cloth. Then dry the drum to
remove any last traces of starch.
Items which should not be tumble dried
Items which are especially delicate, such as curtains of
synthetic fabric, woollen garments, silk, textiles with a
metal component, nylon socks/stockings. Garments made
mostly from foam rubber or rubber-like materials must
NOT be dried in the tumble dryer.
Obviously, you must not dry garments in the
machine which are unsuitable for tumble
drying. These are usually labelled with this
symbol.
Garments which have been treated with
flammable liquids (benzine, alcohol, stain
removal products) should not be dried in the
tumble dryer on account of the risk of fire.
Always follow the recommendations of the
garment/item manufacturer.
Tumble drying beneficial
Dry flat
Shrinkage
Depending on their quality, tricot fabrics in particular vary
considerably in their tendency to shrink. To avoid
shrinking, garments should not be overdried. Where it
occurs, shrinkage can sometimes be rectified by
stretching. We recommend that you bear possible
shrinkage in mind when choosing the size of new tricot
garments.
- 10 -
Page 11

If the machine is not working
Before calling out an engineer, please check through the details below because some faults can be rectified
easily without the need to call out an engineer. If service is called to resolve a problem listed below or to repair
a fault caused by incorrect installation or mis-use, there is a risk that you will be responsible for the cost.
● Fault ● Check
● The dryer will not start. ● Is the door closed properly?
● Is there power to the machine?
● Has the fuse blown?
● Have you set the timer knob properly?
● Is the water tank full?
● Is the Start button pressed in?
● The load is not drying properly, ● Was the time set not long enough?
or is taking too long to dry. ● Is the load too large?
Cotton max. 3,4 kg
Synthetics max. 1,5 kg
● Is the fluff filter clogged?
● Is the condenser clogged?
● Was the load not spun enough in the washing
machine?
● Have you been using the ”Synthetics” setting
on the timer (lower drying temperature)?
Provided the load is suitable for the higher
temperature, use a “Cotton” setting.
● Is the temperature in the room too high?
Must not exceed +35° C.
● The area around the dryer is hot. ● Is the room too small?
(Improve the room ventilation, open a door or
window, or choose another site for the dryer.
Never attempt to repair the tumble dryer yourself.
Repairs carried out by unauthorised or inexperienced
persons can cause injury or serious malfunctioning.
This appliance complies with the requirements of the following EU directives:
– 73/23/EEC, dated 19.02.1973 – low-voltage directive.
– 89/336/EEC, dated 03.05.1989 (incl. amendment
92/31/EEC) – directive on electromagnetic compatibility.
- 11 -
Page 12

Service
Service and Spare Parts
Before calling service, use the trouble shooting table «If
the machine is not working» to try to attend to the fault
yourself.
Servicing and repairs must be carried out by a service
company authorised by the supplier. Use only spare
parts supplied by these.
Note that electrical faults should always be rectified by
a certified electrician.
Please make sure you give the product and serial number
of the appliance. This information can be found on the
rating plate on the appliance.
You can note these details here:
TYPE: ............................................................
MOD: ............................................................
PROD.NO: ............................................................
SER.NO: ............................................................
Date of purchase .....................................................
Installation instructions
Technical data
Dimensions Height 686 mm
Width 595 mm + hinge
Depth 420 mm (with door closed)
Depth 900 mm (with door opened 90°)
Weight Net 32 kg
Capacity Cotton 3,4 kg
Synthetics 1,5 kg
Electrical data Power supply 230 V - 50 Hz
Fuse 10 A
Motor 170 W
Power rating 21000 W
- 12 -
Page 13

Installation
Positioning
You can install this dryer in a number of different ways.
We will show you the most suitable of these. Whichever
way you install it, here are some points to bear in mind:
● Always ensure that the dryer is level for optimum
functioning.
● The temperature in the room should not exceed
+35° C when the dryer is operating. If it does,
open a door or window while the dryer is on. The
dryer uses the air in the room for cooling.
● The area around the dryer should be as dust-free
as possible.
● If you install the dryer with its door hinge side
towards a wall, or next to a cupboard or wall unit
which is more than 370 mm deep, you will need
to leave a space on the hinge side at least 30 mm
wide. This is to allow the door to open wide enough
for removing the water tank.
● Ensure the air ducts are not obstructed.
● The dryer must not be installed above a bath or
in a shower area.
The adjustable feet must not be removed,
they ensure that there is adequate ventilation
underneath the dryer.
Electrical supply
The dryer is supplied with a lead and electrical plug for
connection to an earthed wall socket 230 V 10 A.
If the dryer is installed in a bathroom without
fixed wiring to the electrical supply, an earth
leakage circuit breaker (or RCD) must be
used.
Permanent electrical installation must be
carried out by an authorized electrician.
- 13 -
Page 14

Installation
3
Wall mounting
Different wall materials require different types of mounting
hardware. Purchase mounting hardware suited to the walls
in your home. Use a minimum of 3 suitable fasteners to
attach your mounting console to the wall.
Before deciding on the wall mounting site, it is important
to check that the electrical lead will reach the wall socket
once the dryer is in place.
All electrical work performed on the dryer
should be done by a qualified electrician or
competent person.
If you are installing the dryer between wall-mounted cupboards, you should use the wall mounting console. If the
adjacent cupboards are more than 370 mm deep, don’t
forget to leave a space at least 30 mm wide on the left of
the dryer so that the door can open wide enough.
There should be a clear space at least 200 mm high between the top of the dryer and the ceiling or any cupboard
above the dryer, to ensure adequate ventilation at the top.
- 14 -
Page 15

Sodervanie
Dlq polxzowatelq
Informaciq po bezopasnosti 16
Ob]aq informaciq 17
Opisanie pribora 18-19
Instrukcii po ispolxzowani@ 20
– Pered perwym ispolxzowaniem
– Wmestimostx
– Primery wesa nekotoryh widow belxq
Tablica programm 21
– |nergopotreblenie
Uhod i o^istka 22-23
– ~istka filxtrow
– ~istka kondensatora
– Oporovnenie emkosti dlq wody
Esli su[ilxnyj baraban ne
rabotaet 24
Tehni^eskoe obsluviwanie 25
– Tehni^eskoe obsluviwanie i zap^asti
Dlq ustanow]ika
Tehni^eskie dannye 25
Ustanowka 26-27
– Raspolovenie pribora
– Podsoedinenie k seti
– Kreplenie k stene
Raspakowka
Powrevdeniq
Esli su[ilxnyj baraban byl powrevden pri transportirowke, wam nuvno nemedlenno postawitx ob \tom w izwestnostx postaw]ika.
Prowerxte, ne powrevden li su[ilxnyj baraban. Esli wy
obnaruvili kakoe-libo powrevdenie, defekt ili nedosta^u, wam nuvno nemedlenno izwestitx ob \tom prodawca.
Nikogda ne ostawlqjte upakowo^nyj
material w mestah, gde deti mogut
wospolxzowatxsq im kak igru[koj.
Aksessuary k su[ilxnomu barabanu
Montavnyj komplekt dlq ustanowki na stenu
Dopolnitelxnye aksessuary
(priobreta@tsq otdelxno)
Montavnyj nabor dlq ustanowki su[ilxnogo barabana na
stiralxnu@ ma[inu 150 62 99-00
Sliwnoj [lang 5647 12 28-10
Wy movete zakazatx dopolnitelxnye aksessuary w magazine,
gde priobreli su[ilxnyj baraban. Povalujsta, ukavite
pri \tom sootwetstwu@]ij nomer detali.
Obozna^enie materialow
Upakowka dannogo pribora sostoit iz \kologi^eski
bezopasnyh materialow. Plastikowye ^asti ime@t
sledu@]ie obozna^eniq i mogut bytx pererabotany
dlq wtori^nogo ispolxzowaniq:
● PE ozna^aet poli\tilen, iz nego izgotowlen me[ok,
nadetyj na pribor, i paket, w kotorom levit instrukciq.
● PS ozna^aet polistirol (pressowannyj), ispolxzuetsq
dlq sekcij upakowki, neobhodimyh dlq amortizacii
pribora pri transportirowke.
Kartonnye ^asti upakowki izgotowleny iz bumagi, prigodnoj
dlq pererabotki, i ih sleduet sdatx na specialxnyj punkt
sbora wtorsyrxq.
- 15 -
Page 16

Informaciq po bezopasnosti
Pered ustanowkoj i ispolxzowaniem su[ilxnogo barabana wnimatelxno pro^itajte instrukci@, w tom
^isle prawila i sowety po bezopasnosti. Znanie instrukcii pozwolit wam ispolxzowatx pribor
maksimalxno \ffektiwno i prodlitx srok ego \kspluatacii. Kavdyj polxzowatelx su[ilxnogo
barabana dolven t]atelxno oznakomitxsq s instrukciqmi po ispolxzowani@ i bezopasnosti. Hranite
instrukci@ w nadevnom meste i prosledite za tem, ^toby instrukciq w slu^ae prodavi pribora
pere[la wmeste s priborom k nowomu wladelxcu.
Ustanowka i tehni^eskoe
obsluviwanie
● Wse raboty po ustanowke i podkl@^eni@ dolvny
prowoditxsq tolxko kwalificirowannym tehnikom.
Raboty, prowedennye nekwalificirowannym personalom,
mogut neblagopriqtno otrazitxsq na rabote pribora i
powle^x za soboj trawmy i u]erb.
● Pribor imeet zna^itelxnyj wes, budxte ostorovny,
kogda wy ego podnimaete.
● Esli su[ilxnyj baraban ustanowlen w wannu@ bez
fiksirowannogo \lektri^eskogo podkl@^eniq, to
neobhodimo ispolxzowatx ustrojstwo za]itnogo
otkl@^eniq (UZO).
● Wilku setewogo [nura nuvno wkl@^atx w zazemlennu@
rozetku \lektroseti, raspolovennu@ w legkodostupnom
meste. Fiksirowannoe podkl@^enie pribora dolvno
osu]estwlqtxsq tolxko upolnomo^ennym na \to \lektrikom.
● Esli kabelx pitaniq powrevden, on dolven bytx zamenen
specialxnym kabelem pitaniq, rekomendowannym
proizwoditelem wa[ego pribora. Obra]ajtesx w
awtorizowannye centry.
● Pribor ni w koem slu^ae ne dolven stoqtx na \lektro-
prowode. W slu^ae, esli su[ilxnyj baraban stoit na
pokrytom kowrom polu, sledite za tem, ^toby wentilqcionnye otwerstiq wnizu dwercy ne byli zablokirowany.
● Ne snimajte regulirowo^nye novki, oni sluvat dlq
obespe^eniq wentilqcii nivnej ^asti su[ilxnogo
barabana.
● Tehni^eskoe obsluviwanie i remont dolvny osu]es-
twlqtxsq serwisnoj kompaniej, upolnomo^ennoj na \to
postaw]ikom pribora. Ispolxzujte tolxko firmennye
zapasnye ^asti, predostawlennye postaw]ikom. Nikogda
ne pytajtesx otremontirowatx pribor samostoqtelxno.
Bezopasnostx detej
● Pomnite, ^to plastikowye ^asti upakowki pribora
predstawlq@t serxeznu@ opasnostx dlq igra@]ih detej.
● Tolxko wzroslye mogut ispolxzowatx su[ilxnyj baraban.
Ne pozwolqjte detqm igratx s barabanom ili prikasatxsq
k ego regulqtoram i podwivnym ^astqm.
● Pered zagruzkoj belxq w baraban prowerxte, net li w
nem postoronnih predmetow ili doma[nih viwotnyh.
- 16 -
Ispolxzowanie pribora
● Dannyj su[ilxnyj baraban prednazna^en dlq oby^noj
su[ki belxq w doma[nih uslowiqh i tolxko w sootwetstwii
s dannymi instrukciqmi. Ispolxzowanie w l@byh drugih
celqh wle^et za soboj risk powrevdeniq pribora i
trawm dlq polxzowatelq.
● Ne peregruvajte baraban (sm. instrukcii po ispolx-
zowani@).
● Nikogda ne wkl@^ajte su[ilxnyj baraban, esli worsowyj
filxtr ne o^i]en i ne ustanowlen na mesto, ili esli
worsowyj filxtr powrevden (\to movet wyzwatx peregrew
ili por^u belxq).
● Wozxmite za prawilo ^istitx kondensator ^erez
opredelennye promevutki wremeni. Sodervanie
kondensatora w ^istote pozwolit priboru rabotatx
\ffektiwnee i bystree prowoditx su[ku.
● Belxe, obrabotannoe kakimi-libo himi^eskimi sredstwami
kak, naprimer, pqtnowywoditelx i t.p., nelxzq su[itx w
su[ilxnom barabane, poskolxku ispareniq \tih himikatow
ogneopasny.
● Sledu@]ie izdeliq ne sleduet su[itx w su[ilxnom
barabane:
– Podu[ki, l@bye izdeliq nabitye perom, puhom i
t.p. (su[ka \tih izdelij trebuet bolx[ih zatrat
tepla, ^to movet priwesti k peregrewu pribora).
– {erstqnye izdeliq, tak kak oni swaliwa@tsq pod
wozdejstwiem wysokih temperatur
– Osobenno delikatnye tkani, takie kak
sinteti^eskie zanaweski, [elk i t.d.
– Izdeliq iz wspenennoj reziny i rezinopodobnyh
materialow
● Wsegda wykl@^ajte su[ilxnyj baraban posle ispolxzowaniq.
Utilizaciq otsluviw[ego swoj
srok pribora
Simwol na izdelii ili na ego upakowke ukazywaet, ^to
ono ne podlevit utilizacii w ka^estwe bytowyh othodow.
Wmesto \togo ego sleduet sdatx w sootwetstwu@]ij punkt
priemki \lektronnogo i \lektpooboru dowaniq dlq
posledu@]ej utilizacii. Sobl@daq prawila utilizacii
izdeliq, Wy pomovete predotwratitx pri^inenie
okruva@]ei srede i zdorowx@ l@dej potencialxnogo
u]erba, kotoryj wozmoven, w protiwnom slu^ae,
wsledstwie nepodoba@]ego obra]eniq s podobnymi
othodami. Za bolee podrobonj informaciej ob utilizacii
\togo izdeliq prosxba obra]atxsq k mestnym wlastqm, w
sluvbu po wywozu i utilizacii othodow ili w magazii, w
kotorom Wy priobreli izdelie.
Page 17

Ob]aq informaciq po stirke i su[ke belxq
Sortirowka
Wsegda sortirujte belxe w zawisimosti ot materiala
(prowerqjte po qrlyku na izdelii) i wremeni, kotoroe wy
namereny ego su[itx. Belxe dolvno swobodno levatx w
barabane. Zastegnite zastevki molnii i zawqvite wse
tesemki, lqmki i lento^ki. Na pododeqlxnikah i nawolo^kah
zastegnite wse zastevki, ^toby w nih ne nabilisx bolee
melkie we]i.
Otvim (udalenie wody)
Belxe dolvno bytx t]atelxno otvato. My rekomenduem
ispolxzowatx dlq \togo stiralxnu@ ma[inu so skorostx@
otvima minimum 800 oborotow w minutu ili specialxnu@
centrifugu (gidro\kstraktor). ~em wy[e skorostx otvima,
tem bystree wa[ su[ilxnyj baraban wysu[it belxe i
bolee \ffektiwnym s to^ki zreniq rashoda \nergii
budet wesx process su[ki.
Dave izdeliq s detalqmi vestkoj formy (naprimer,
ruba[ki) nuvno otvatx pered su[koj w te^enie 10-30 sek.
Opredelenie wesa zagruvaemogo
belxq
W perepolnennom barabane belxe silxno mnetsq. W to ve
wremq su[ka sli[kom malenxkogo koli^estwa belxq ne
\konomi^na.
Wors
Pri perwom ispolxzowanii was, wozmovno, udiwit koli^estwo
obrazu@]egosq w processe su[ki worsa. |to absol@tno
normalxno i ne zna^it, ^to su[ilxnyj baraban portit
wa[u odevdu.
No[enaq odevda, postirannaq wru^nu@ ili w ma[ine,
terqet wors, no on ostaetsq na powerhnosti materiala.
Esli wy wysu[ite belxe na ulice, to wors budet unositxsq
wetrom. W su[ilxnom barabane wors popadaet na filxtr
i skapliwaetsq tam w processe su[ki.
L@di, strada@]ie allergiej ili astmoj, osobenno
^uwstwitelxny k nali^i@ worsa.
Nakrahmalennye izdeliq
Nakrahmalennoe belxe movno su[itx w su[ilxnom barabane.
Dlq polu^eniq bezupre^nogo rezulxtata wyberite revim,
pri kotorom belxe ostaetsq ^utx wlavnym posle su[ki,
naprimer, wyberite programmu awtomati^eskoj su[ki
”wlavnoe (Dlq glavki)”. Posle su[ki wytrite wnutrenn@@
powerhnostx barabana wlavnoj tkanx@, ^toby udalitx
wozmovnye sledy krahmala na stenkah barabana.
~to nelxzq su[itx w su[ilxnom
barabane
Osobenno delikatnye izdeliq, takie kak zanaweski iz
sintetiki, izdeliq iz [ersti, [elk, tkani s
metalli^eskimi nitqmi, nejlonowye ^ulki i kolgotki,
izdeliq izgotowlennye iz wspenennoj reziny ili
rezinopodobnyh materialow.
O^ewidno, ne sleduet su[itx w ma[ine
izdeliq, kotorye dlq \togo ne prednazna^eny.
Oby^no \ti izdeliq pome^eny dannym
simwolom.
Izdeliq, obrabotannye legko wosplamenqemymi vidkostqmi (benzin, spirt,
pqtnowywoditeli i t.p.), ne sleduet
su[itx w su[ilxnom barabane - estx
risk wosplameneniq. Wsegda sledujte
instrukciqm izgotowitelq odevdy.
Rekomendowana su[ka w barabane
Su[itx w razlovennom sostoqnii
Usadka
W zawisimosti ot ka^estwa trikotavnye tkani osobenno
razli^a@tsq po swoej sposobnosti k usadke. ~toby izbevatx
usadki, trikotavnye izdeliq ne sleduet peresu[iwatx.
Inogda usadka kompensiruetsq sposobnostx@ rastqgiwatxsq.
My sowetuem wam imetx w widu \tu osobennostx trikotavnyh
izdelij pri pokupke nowoj odevdy.
- 17 -
Page 18

Opisanie pribora
1. Dwernaq za]elka (^toby otkrytx dwercu
podwinxte za]elku wprawo). Izbegajte otkrywatx
dwerx wo wremq su[ki.
2. Mesto dlq shemy programm
(samokle@]aqsq \tiketka)
3. Panelx uprawleniq
4. Wypusk teplogo wozduha
5. Wentilqcionnye otwerstiq - ne dolvny
bytx zablokirowany.
6. Kondensator
Kondensator wstroen w dwercu, ego nuvno periodi^eski
^istitx.
7. Filxtry
Filxtry nuvno pro^i]atx do ili posle kavdogo
ispolxzowaniq. Worsowyj filxtr raspoloven za
filxtrom gruboj o^istki, i ego movno snqtx i
po^istitx.
8. Reguliruemye novki
Esli pribor ne wisit na stene, to polovenie pribora
movno wyrownqtx s pomo]x@ reguliruemyh novek.
9. Emkostx dlq kondensata
Dannaq emkostx zapolnqetsq wodoj, kotoraq kondensiruetsq w su[ilxnom barabane. Emkostx nuvno
oporovnqtx do ili posle kavdogo ispolxzowaniq.
Esli emkostx napolnena, zagoraetsq signalxnaq lampa
(
B) i su[ilxnyj baraban awtomati^eski ostanawliwaetsq. Wypolnenie su[ki nelxzq prodolvitx do teh
por, poka emkostx ne budet oporovnena.
2
1
3
4
5
6
11
7
10
9
2
8
- 18 -
Page 19

Opisanie pribora
10. Tabli^ka s tehni^eskimi dannymi
11. Baraban
12. |lektri^eskij kabelx
13. Otwod dlq podkl@^eniq sliwnogo
[langa
Esli wy hotite podkl@^itx su[ilxnyj baraban
naprqmu@ k sliwu, wy movete dopolnitelxno
priobresti sliwnoj [lang. Udalite so [langa
zavim, wynxte zaglu[ku i podsoedinite [lang k
otwodu (13). Posle togo, kak wy prisoedinite
sliwnoj [lang, woda bolx[e ne budet skapliwatxsq
w emkosti.
14. Kreplenie kron[tejna pri ustanowke
na stene
• Indikatory
14
12 13
A. Gorit w te^enie fazy su[ki.
B. Ukazywaet na to, ^to emkostx dlq sbora wody
napolnena.
• Knopka starta
C. Posle wybora programmy i wremeni su[ki,
navmite na \tu knopku dlq zapuska su[ilxnogo
barabana.
• Selektor programm
D. Selektor ispolxzuetsq dlq wybora wremeni i
temperatury su[ki. Na selektore ime@tsq
raznye [kaly wremeni i temperatury su[ki dlq
hlopka (maks. 120 minut) i dlq sintetiki (maks.
80 minut).
3
C
A
D
B
- 19 -
Page 20

Instrukcii po ispolxzowani@
Pered perwym ispolxzowaniem
Pered perwym ispolxzowaniem pribora namo^ite wodoj
kaku@-nibudx nenuvnu@ odevdu i prosu[ite ee w
barabane w te^enie 15 minut, ^toby proweritx, net li
wnutri grqzi ili pyli.
1. Prowerxte, podkl@^en li pribor k seti.
2. Otkrojte dwercu, podwinuw za]elku (A) wprawo.
3. Prowerxte, o^i]en li worsowyj filxtr (B), opu]en
li filxtr gruboj o^istki (
mesto.
4. Prowerxte, ^to emkostx (D) dlq sbora kondensirowannoj
wody oporovnena i zadwinuta na mesto.
5. Akkuratno ulovite belxe dlq su[ki w baraban. Ne
su[ite wmeste naturalxnye i sinteti^eskie tkani.
6. Zakrojte dwercu.
7. W zawisimosti ot tipa belxq selektorom programm
(
E) wyberite nuvnoe wremq su[ki - po [kale wremeni
dlq hlopka ili dlq sintetiki.
8. Navmite na knopku starta (F).
Rekomenduetsq ne otkrywatx dwercu zagruzo^nogo l@ka wo wremq raboty ma[iny, poskolxku
w \tot moment iz nee movet pote^x woda.
C) i za]elknut li on na
Wmestimostx (suhoe belxe)
Hlopok Maks. 3,4 kg
Sintetika Maks. 1,5 kg
Primery wesa nekotoryh widow belxq
(suhoe belxe)
~toby pomo^x wam prawilxno zagruvatx belxe, ne peregruvaq
pribor, priwodim neskolxko primerow orientirowo^nogo
wesa nekotoryh izdelij. Za osnowu wzqty izdeliq iz hlopka.
Bannyj halat
Pododeqlxnik
Prostynx ~0.5 kg
Bluzka
Mahrowoe polotence ~0.2 kg
Ruba[ka ~0.2 kg
No^naq ruba[ka ~0.2 kg
Pivama ~0.2 kg
Nivnee belxe ~0.1 kg
Kalxsony ~0.3 kg
Nawolo^ka ~0.2 kg
Noski ~0.1 kg
~1.2 kg
~0.7 kg
~0.1 kg
C
B
A
F
E
D
- 20 -
Page 21

Tablica programm
Su[ka po zadannomu wremeni
Dannaq tabpica programm pomovet wam prawilxno wysu[itx wa[e belxe. Selektor programm/wremeni
razdelen na 2 sektora, kavdyj iz kotoryh imeet swo@ temperaturu su[ki i [kalu wremeni:
ispolxzuetsq dlq obozna^eniq hlopka.
minut, tak kak dlq su[ki hlopka i tolstyh nesinteti^eskih tkanej trebuetsq bolx[e wremeni.
ispolxzuetsq dlq obozna^eniq sintetiki i tonkih tkanej. Poskolxku \ti tkani bolee
^uwstwitelxny, ^em hlopok, dlq nih trebuetsq bolee nizkaq temperatura su[ki. W \tom sektore wy
movete ustanowitx wremq su[ki do 80 minut.
Ne peresu[iwajte belxe, ina^e belxe budet trudnee gladitx i ono budet bolee vestkim na o]upx, krome
togo, \to priwedet k naprasnomu rashodu \lektro\nergii. W te^enie 8 - 12 minut w konce kavdoj programmy
proizwoditsq ohlavdenie belxq dlq predotwra]eniq obrazowaniq zamqtin.
HLOPOK WREMQ SU{KI maks. 120 min
Stepenx Pered su[koj belxe
Tip belxq su[ki otvato pri 800 ob/min
Hlopok Suhoe 3,4 kg 95 - 110 min
Mahrowye polotenca,
Prostyni, skaterti
Kuhonnye polotenca
Wlavnoe 3,4 kg 80 - 95 min
B \tom sektore wy movete ustanowitx wremq su[ki do 120
2,0 kg 70 - 80 min
1,0 kg 50 - 60 min
2,0 kg 55 - 75 min
1,0 kg 45 - 55 min
SINTETIKA WREMQ SU{KI maks. 80 min
Stepenx Korotkij otvim pered
Tip belxq su[ki su[koj
Izdeliq, ktorye trebu@t bolee
nizkoj temperatury su[ki
Delikatnye izdeliq Suhoe 1,5 kg 65 - 75 min
Teplo^uwstwitelxnye izdeliq
(sm. \tiketku po uhodu za
1,0 kg 45 - 55 min
0,7 kg 40 - 50 min
izdeliem)
Wlavnoe 1,5 kg 50 - 60 min
1,0 kg 35 - 40 min
0,7 kg 30 - 35 min
|nergopotreblenie w sootwetstwii s ewropejskim standartom EN 61121
|lektro\nergiq 2,47 kWt^/3,4 kg hlopka
Dannye po \nergopotrebleni@ opredeleny w sootwetstwii s direktiwoj EES 92/75, dlq opredeleniq ispolxzowalasx
programma su[ki dlitelxnostx@ 90 minuty.
- 21 -
Page 22

Uhod i o^istka
~istka filxtrow
~toby su[ilxnyj baraban rabotal normalxno, neobhodimo
pro^i]atx filxtry pered ili posle kavdogo ispolxzowaniq.
Dlq \togo:
1. Otkrojte dwerx.
2. Podnimite wwerh filxtr gruboj o^istki (ris. A).
3. }etkoj o^istite wors s worsowogo filxtra,
nahodq]egosq pod filxtrom gruboj o^istki
(ris.
B). Inogda wam pridetsq wynimatx worsowyj
filxtr, ^toby pro^istitx ego s dwuh storon.
Neobhodimo prawilxno ustanowitx filxtr na
mesto, prevde ^em opuskatx filxtr gruboj
o^istki.
Nikogda ne ispolxzujte su[ilxnyj baraban,
esli worsowyj filxtr ne pro^i]en i ne
ustanowlen na mesto. Ne ispolxzujte baraban,
esli worsowyj filxtr powrevden (\to movet
priwesti k peregrewu).
A
B
C
~istka kondensatora
Wo wseh widah su[ilxnyh barabanow wozduh, cirkuliru@]ij
wnutri, podnimaet ^asti^ki worsa s belxq. W rezulxtate
nekotoroe koli^estwo worsa sobiraetsq na kondensatore,
tak ^to kondensator nuvno periodi^eski pro^i]atx.
~toby pro^istitx kondensator:
1. Otkrojte dwerx i podnimite wwerh filxtr gruboj
o^istki.
2. Wynxte worsowyj filxtr i opustite na mesto
filxtr gruboj o^istki.
3. Wozxmitesx za otwerstiq w werhnej ^asti kondensatora i bolx[imi palxcami nadawite na dwerx
(ris.
C i D). Kondensator wyswoboditsq, teperx
ego movno podnqtx wwerh i wynutx naruvu. Budxte
ostorovny - ne powredite hrupku@ al@miniewu@
^astx.
4. Powernite filxtr wwerh dnom i pro^istite s
obeih storon pylesosom. Wynxte krasnu@ sliwnu@
zaglu[ku na nivnem krae kondensatora (ris.
Polovite kondensator gorizontalxno na plosku@
powerhnostx i zapolnite wodoj ^erez otwerstie.
Teperx ostawxte ego otmoknutx w wode na 5 minut,
zatem promojte obe storony kondensatora gorq^ej
wodoj iz du[a (ris.
Zatem akkuratno prosu[ite kondensator. Ne zabudxte
wstawitx na mesto krasnu@ zaglu[ku (ris.
F).
E).
G).
D
E
F
G
5. Ustanowite kondensator nazad w su[ilxnyj baraban.
Osnowanie dolvno popastx w sootwetstwu@]ie
prorezi w uglublenii dlq kondensatora s wnutrennej
storony dwercy. Ostorovno wstawxte kondensator
na mesto, dolven razdastxsq legkij ]el^ok.
Ustanowite na mesto worsowyj filxtr i zakrojte
filxtr gruboj o^istki.
- 22 -
Page 23

Uhod i o^istka
Oporovnenie emkosti dlq wody
Esli wy podkl@^ili su[ilxnyj baraban ^erez [lang
(dopolnitelxnyj aksessuar) naprqmu@ k sliwnoj trube,
to wy movete ne ^itatx \tot razdel.
Signalxnyj indikator na paneli uprawleniq budet migatx,
kogda nuvno oporovnitx emkostx dlq sbora wody. Esli
emkostx napolnqetsq wo wremq raboty pribora, su[ilxnyj
baraban awtomati^eski ostanawliwaetsq i emkostx nuvno
oporovnitx. Sowetuem wzqtx za prawilo oporovnqtx emkostx
do ili posle kavdogo ispolxzowaniq barabana.
~toby oporovnitx emkostx:
1. Otkrojte dwerx.
2. Wyta]ite emkostx (ris. A)
3. Otkrojte kry[ku emkosti i wylejte wodu
(ris.
B).
4. Zakrojte kry[ku i zadwinxte emkostx na mesto.
Navimajte na emkostx do teh por, poka ne
po^uwstwuete, ^to ona wstala na mesto.
A
B
- 23 -
Page 24

Esli su[ilxnyj baraban ne rabotaet
Nekotorye nepoladki w rabote su[ilxnogo barabana mogut wozniknutx iz-za naru[eniq prawil uhoda ili neprawilxnoj
zkspluatacii izdeliq, nekotorye iz ztih nepoladok movno legko ustranitx samostoqtelxno, bez pomo]i specialista
iz serwisnogo centra. Prevde, ^em obratitxsq w serwisnyj centr, povalujsta, prowedite neobhodimye prowerki po
priwedennomu nive spisku.
● Nepoladka ● ~to proweritx
● Baraban ne wkl@^aetsq. ● T]atelxno li zakryta dwerx?
● Wkl@^en li prowod w rozetku?
● Ne peregoreli li probki w dome?
● Prawilxno li ustanowlen selektor programm?
● Ne zapolnena li emkostx dlq wody?
● Navali li wy na knopku Start?
● Belxe nedostato^no suhoe, ● Prawilxnaq li programma wybrana?
ili su[itsq sli[kom dolgo. ● Ne peregruven li baraban?
Hlopok maks. 3,4 kg
Sintetika maks. 1,5 kg
● Ne zabit li worsowyj filxtr?
● Ne zasorilsq li kondensator?
● Dostato^no li t]atelxno bylo otvato belxe?
● Ne ispolxzowali li wy sektor selektora programm
”Sintetika”? Esli belxe wyderviwaet bolee wysoku@
temperaturu, ispolxzujte sektor ”Hlopok”.
● Ne sli[kom li wysokaq temperatura w pome]enii?
Temperatura ne dolvna prewy[atx +35°S.
● Prostranstwo wokrug su[ilxnogo ● Wozmovno, pome]enie, w kotorom ustanowlen
barabana silxno nagrewaetsq. su[ilxnyj baraban, sli[kom malenxkoe?
(Usilxte wentilqci@, otkrojte okno ili dwerx ili
wyberite drugoe mestopolovenie dlq pribora).
Ni w koem slu^ae ne pytajtesx otremontirowatx
su[ilxnyj baraban samostoqtelxno.
Nekwalificirowannyj remont movet powle^x za
soboj serxeznye sboi w rabote pribora i trawmy
dlq polxzowatelej.
Dannyj pribor sootwetstwuet sledu@]im direktiwam ewropejskogo So@za:
-73/23/EES ot 19.02.1973 - direktiwa po priboram nizkogo naprqveniq.
-89/336/EES ot 03.05.1989 (wkl@^aq poprawki
-92/31/EES) - direktiwa po \lektromagnitnoj sowmestimosti.
- 24 -
Page 25

Tehni^eskoe obsluviwanie
2000
Tehni^eskoe obsluviwanie i
zap^asti
Esli woznik kakoj-libo sboj w rabote pribora, sna^ala
pro^itajte glawu ”Esli su[ilxnyj baraban ne rabotaet”
i popytajtesx i ubeditesx, ^to wy ne movete ustranitx
nepoladku samostoqtelxno. Esli wy wyzowite tehnika
serwisnogo centra po pri^ine, ukazannoj w spiske razdela,
wam pridetsq oplatitx \tot wyzow. |to ve otnositsq k
sboqm, woznik[im po pri^ine ispolxzowaniq su[ilxnogo
barabana ne po nazna^eni@.
Obratite wnimanie na to, ^to \lektri^eskie nepoladki
dolvny ustranqtxsq tolxko kwalificirowannym \lektrikom.
Remont i tehni^eskoe obsluviwanie dolvny osu]estwlqtxsq
serwisnoj kompaniej, upolnomo^ennoj na \to izgotowitelem
(sm. otdelxnyj spisok awtorizowannyh serwisnyh centrow),
pri \tom dolvny ispolxzowatxsq tolxko firmennye
zapasnye ^asti.
Pri obra]enii w centr obqzatelxno ukavite modelx i
serijnyj nomer pribora. |ta informaciq ukazywaetsq w
tabli^ke s tehni^eskimi dannymi na pribore.
Rekomenduem wam zapisatx dannye w nivepriwedennu@
tabli^ku:
TYPE. (TIP) ............................................................
MOD. (
PROD.NO. ............................................................
(
SER.NO. ............................................................
(
Data pokupki .....................................................
Modelx)............................................................
Towarnyj nomer)
Serijnyj nomer)
Instrukcii po ustanowke
Tehni^eskie dannye
Razmery Wysota 686 mm
{irina 595 mm + dwernaq petlq
Glubina 420 mm (s zakrytoj dwerx@)
Glubina 900 mm (s dwerx@, otkrytoj na 90
Wes Netto 32 kg
Zagruzka Hlopka 3,4 kg
Sintetiki 1,5 kg
|lektri^eskie dannye Isto^nik pitaniq 230 W - 50 Gc
Predohranitelx 10 A
Mo]nostx@ dwigatelq 170 Wt
Nominalxnaq mo]nostx 2170 Wt
°)
- 25 -
Page 26

Ustanowka
Raspolovenie pribora
Wy movete raspolovitx su[ilxnyj baraban razli^nymi
sposobami. My prodemonstriruem wam naibolee priemlemye
iz nih. Kak by wy ne raspolovili pribor, nekotorye
aspekty wsegda nado imetx w widu:
● Dlq normalxnogo funkcionirowaniq pribor
dolven obqzatelxno bytx wyrownen.
● Wo wremq raboty pribora temperatura w pome]enii
ne dolvna prewy[atx +35
wy[e, otkrojte okno ili dwerx. Su[ilxnyj baraban
ispolxzuet wozduh w pome]enii dlq ohlavdeniq.
● Prostranstwo wokrug pribora dolvno bytx po
wozmovnosti swobodno ot pyli.
● Esli wy ustanawliwaete pribor dwernoj petlej k
stene, ili wblizi [kafa bolee 370 mm glubinoj,
wam nuvno ostawitx prostranstwo so storony
dwernoj petli, po krajnej mere, 30 mm [irinoj.
|togo rasstoqniq wpolne dostato^no, ^toby dwerx
otkrywalasx nastolxko [iroko, ^toby movno bylo
wynutx emkostx dlq sbora wody.
°S. Esli temperatura
● Ubeditesx, ^to wentilqcionnye otwerstiq ne
zablokirowany.
● Su[ilxnyj baraban nelxzq ustanawliwatx nad
wannoj ili du[ewoj.
Ne snimajte regulirowo^nye novki, oni
neobhodimy dlq obespe^eniq adekwatnoj
wentilqcii nivnej ^asti su[ilxnogo
barabana.
Podsoedinenie k seti
Su[ilxnyj baraban osna]en prowodom i \lektrowilkoj
dlq podkl@^eniq k zazemlennoj rozetke na 230 Wolxt, 10 A.
Esli su[ilxnyj baraban ustanowlen w wannoj
komnate bez fiksirowannogo podkl@^eniq k
\lektroseti, sleduet ispolxzowatx ustrojstwo
za]itnogo otkl@^eniq (UZO).
Fiksirowannoe podkl@^enie k \lektroseti
dolvno proizwoditxsq kwalificirowannym
tehnikom.
- 26 -
Page 27

Ustanowka
3
Kreplenie k stene
Dlq sten iz razli^nyh materialow trebuetsq raznoe montavnoe oborudowanie. Priobretite montavnoe oborudowanie,
podhodq]ee dlq sten w wa[em dome. Ispolxzujte minimum
3 podhodq]ih krepleniq dlq Ustanowki montavnogo
kron[tejna na stene.
Prevde ^em prikrepitx pribor k stene, posmotrite,
dotqgiwaetsq li \lektri^eskij kabelx pribora ot mesta
ustanowki do rozetki.
Wse \lektri^eskie raboty, swqzannye s
su[ilxnym barabanom, dolvny prowoditxsq
kwalificirowannym \lektrikom.
Esli wy namereny ukrepitx su[ilxnyj baraban na stenu
mevdu [kafami, wam ponadobitsq montavnyj komplekt
dlq ustanowki na stenu. Esli prilega@]ij k priboru
[kaf bolee 370 mm glubinoj, ne zabudxte ostawitx
prostranstwo, po krajnej mere, w 30 mm slewa ot pribora,
^toby dwerx mogla dostato^no [iroko otkrywatxsq. Nad
priborom dolvno bytx ostawleno prostranstwo, kak
minimum, 200 mm dlq obespe^eniq adekwatnoj
wentilqcii.
- 27 -
Page 28

Technical changes possible
Prawo na izmeneniq sohranqetsq
 Loading...