

Page 1
OPERATOR’S MANUAL
with Illustrated Parts List
COMPACT SERIES
SHAKE FREEZER
Model CS705-M2
184592-01 - 7/17
H. C. Duke & Son, LLC P/N 184592-01 - July 2017 Printed in U.S.A.
Page 2

Page 3

Operator’s Manual
for the
Electro Freeze Model CS705-M2
Compact Series
Soft Serve Freezer
All contents © Copyright 2016 H.C. Duke & Son, LLC, 2116 Eighth Avenue, East Moline, Illinois 61244
i
Page 4
ELECTRO FREEZE Shake Model CS705-M2
SAFETY FIRST!
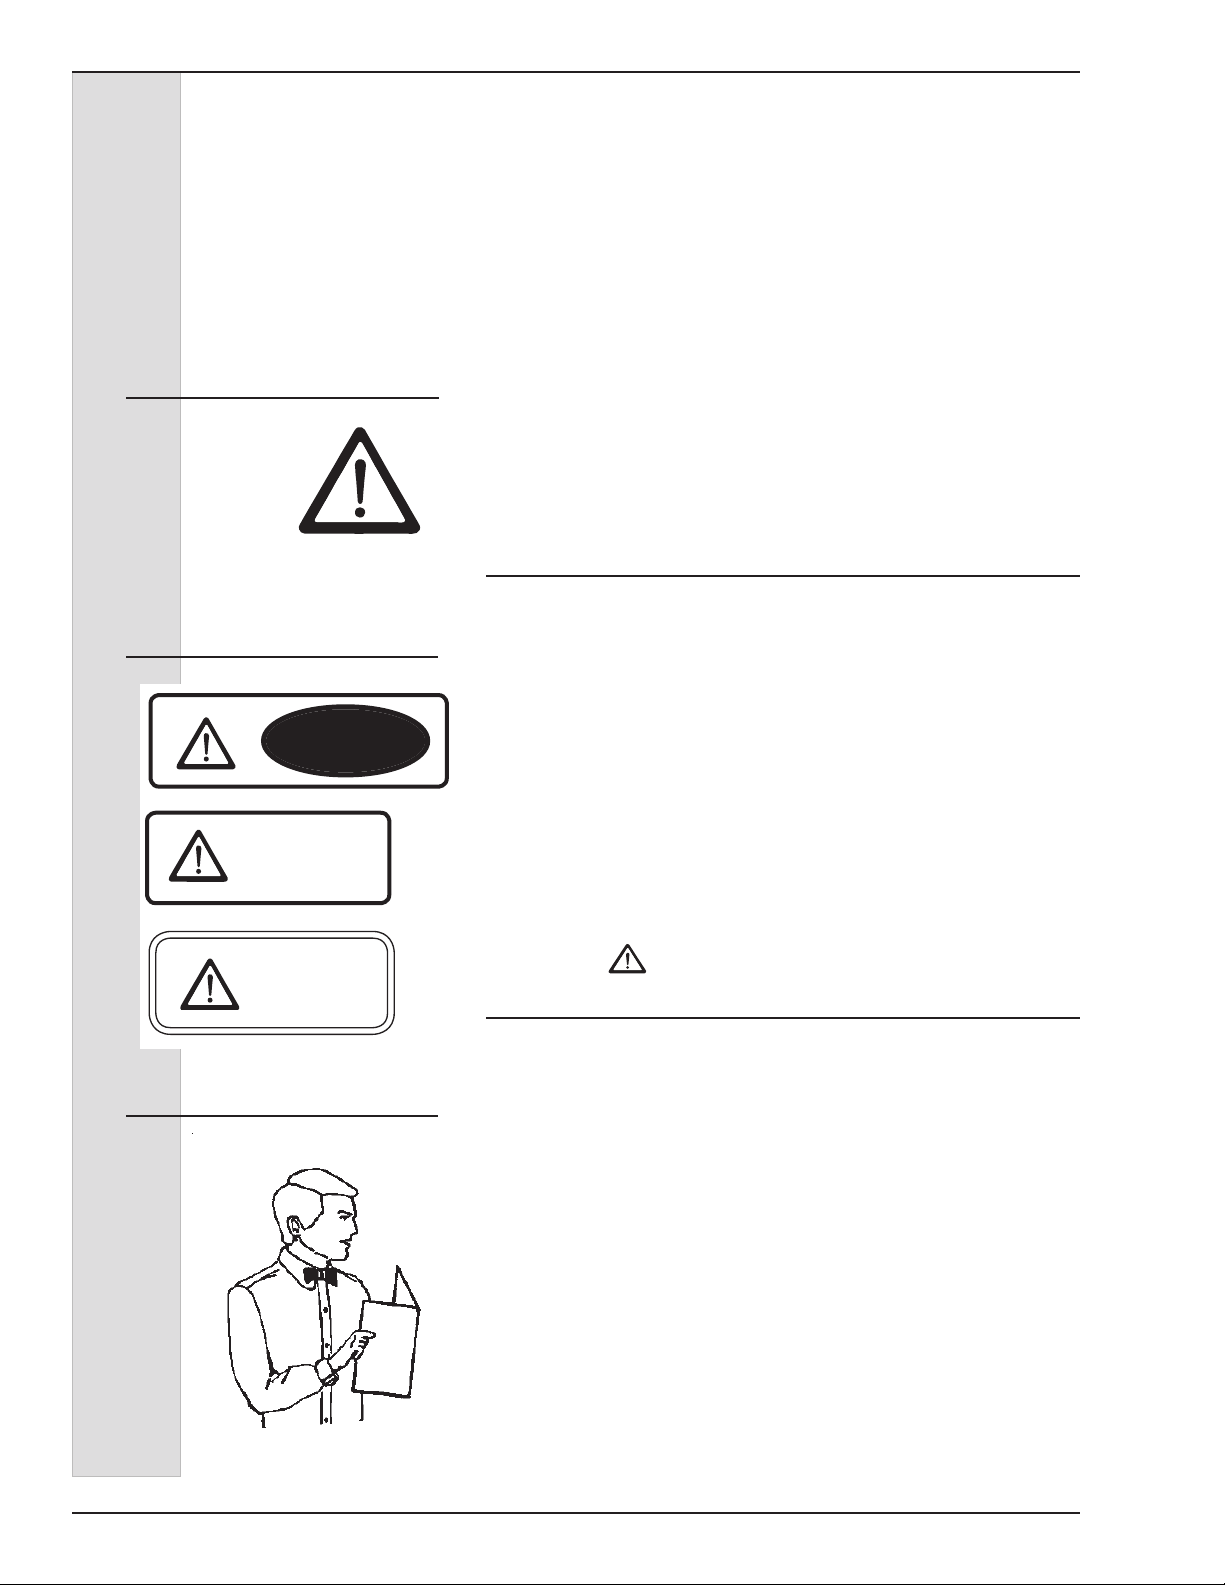
Follow these four steps to safety ....
1. Recognize Safety Information ....Look for this
safety alert symbol throughout this manual.
When you see this symbol on your freezer or in this
manual, be alert to the potential for personal injury. Follow
recommended precautions and safe operating practices.
2. Understand Signal Words ....
The signal words — DANGER, WARNING and CAUTION —
DANGER
WARNING
CAUTION
are used with the safety alert symbol (DANGER decals on
the freezer may or may not have the safety alert symbol, but
the message is the same). Decals with the words DANGER,
WARNING or CAUTION appear on the freezer. DANGER
identies the most serious hazard. Decals with the words
DANGER or WARNING are typically near specic hazards
on the freezer. General precautions are listed on CAUTION
safety decals.
In this manual, CAUTION messages with the safety
alert symbol
call attention to safety messages.
3. Follow Safety Instructions ....
Read and understand all safety messages in this manual.
Read and understand the decal safety messages on your
freezer. Take notice of the location of all decals on the
freezer and keep the safety decals in good condition. Check
them periodically and replace missing, damaged or illegible
safety decals. The safety decals must remain in place and
legible for the life of the freezer. If you need new decals, use
the information and illustrations on pages iv and v of this
manual to identify the decal and order replacement parts.
DO NOT attempt to operate the CS705-M2 freezer until you
read and understand all safety messages and the operating
instructions in this manual.
184592-01ii
Page 5
ELECTRO FREEZE Shake Model CS705-M2
SAFETY FIRST!
4. Definitions ....
Trained person (or Operator): A person who has been trained in the basic operation of
the freezer. This person is knowledgeable in the operation of machine startup, stopping,
lling, and basic cleaning, disassembly, washing, and sanitation of the freezer.
Freezer Technician: A person who has been trained by a factory representative, or
an experienced and qualied service person, to perform more complicated operations
such as freezer installation, maintenance repairs, component replacement , is aware of
hazards associated with electricity, moving parts, and takes necessary steps to protect
against injury to themselves and other people.
5. Operate Safely ....
IMPORTANT: Store Managers,owners, and supervisors must be aware of staff
capabilities and that they do not perform freezer operations outside their level of
knowledge or responsibility.
DO NOT allow untrained personnel to maintain or service
this machine. Failure to follow this instruction may result in
severe personal injury. DO NOT operate the freezer unless
all service panels and access doors are secured with screws.
DO NOT attempt to maintain or repair the freezer until the
main power supply has been disconnected. Contact your
local Electro Freeze Distributor for authorized service.
6. Caution ....
• This Freezer is to be operated by trained persons. The Dispense
feature, if used by public in self-serve applications, shall be monitored
by trained persons able to assist people with physical, sensory or mental
impaired capabilities.
• Children should not be allowed to play around this equipment.
• Do not store explosive substances such as aerosol cans with a ammable propellant
in freezer.
• This appliance is not designed for outdoor weather conditions and shall not be
exposed to rain.
• Do not wash machine with power sprayer. Do not install machine next to a power
sprayer where splash of freezer can occur.
• Machine is designed for use in areas of normal atmosphere. It is not to be used in
areas subject to explosion-proof standards.
184592-01 iii
Page 6
ELECTRO FREEZE Shake Model CS705-M2
Safety Decal Locations
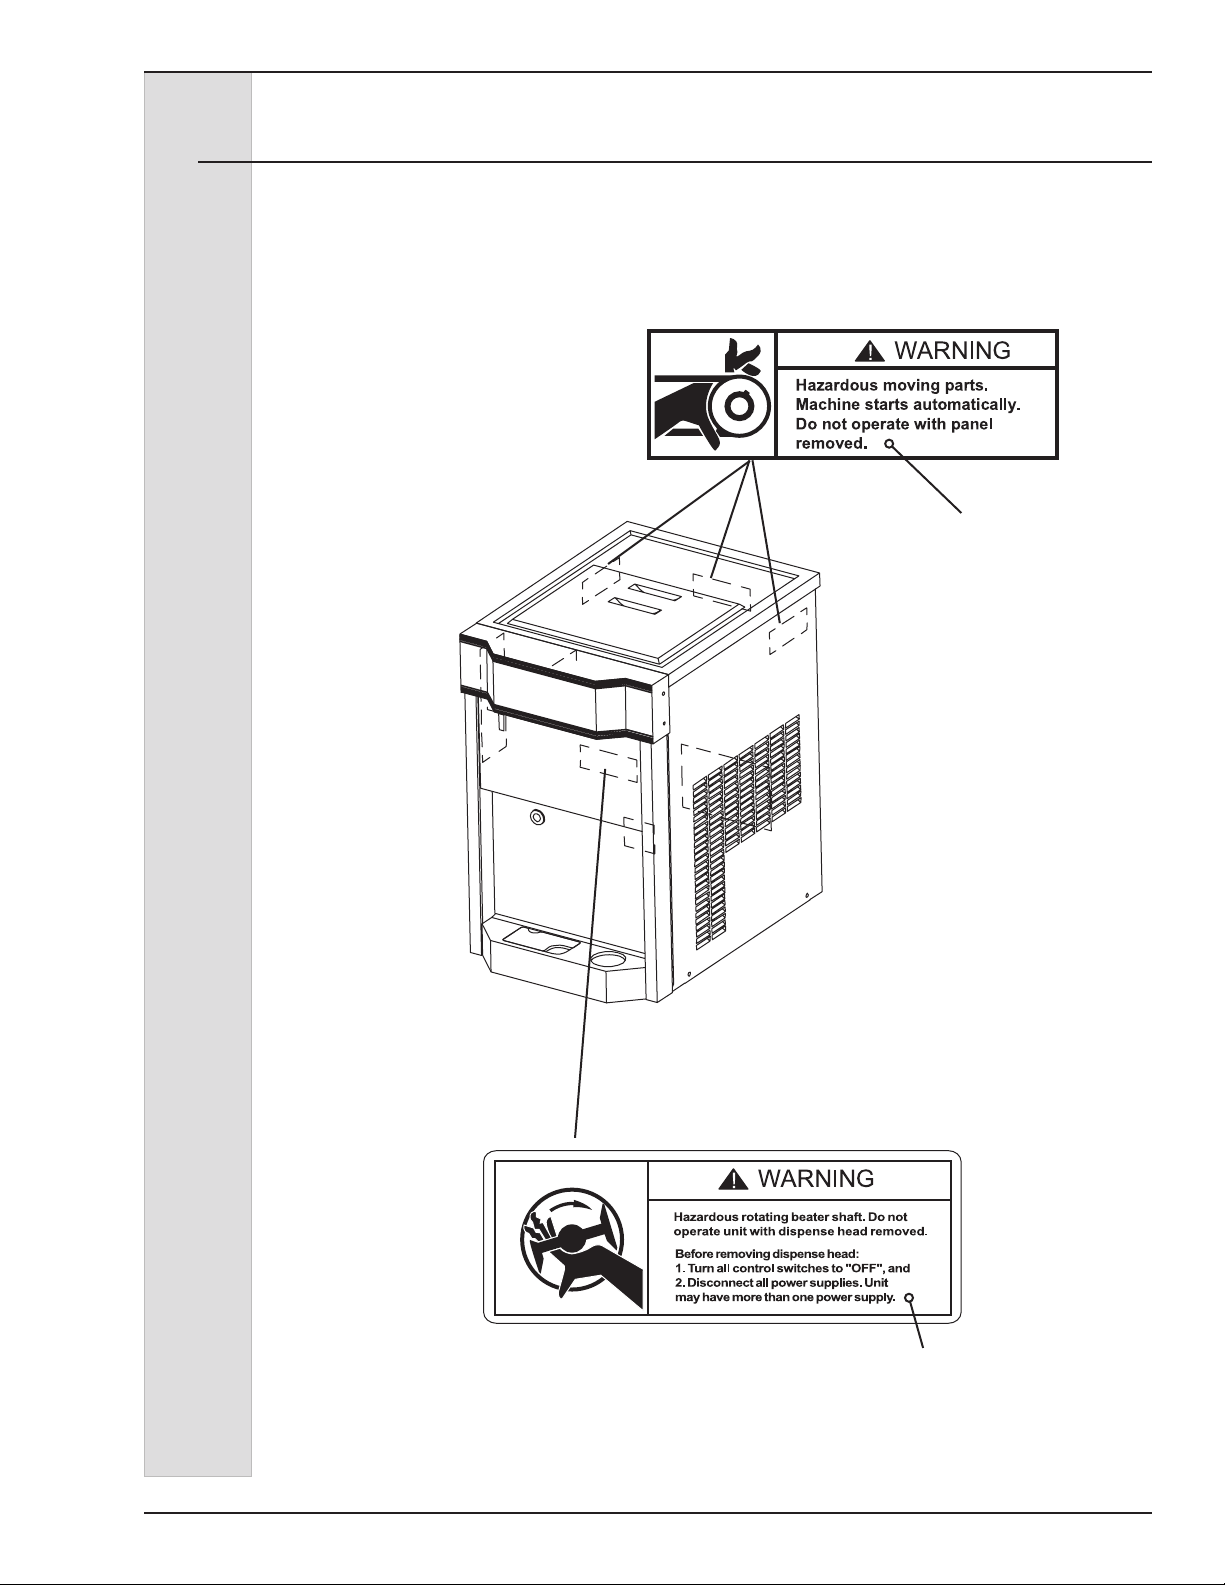
Do not attempt to operate the freezer
until all safety precautions and operating
instructions in this manual are read and
understood.
Take notice of all warning, caution,
instruction and information decals (or
labels) on the freezer as shown in the
gure on the following page. The labels
have been put there to help maintain a
safe working environment.
The labels have been designed to
withstand washing and cleaning. All
labels must remain legible for the life of
the freezer. Check labels periodically
to be sure they can be recognized as
warning labels.
If it is necessary to replace any label,
please contact your local authorized
Electro Freeze Distributor or H. C. Duke &
Son. When ready to order you will need to
determine the (1) part number, (2) type of
label, (3) location of label, and (4) quantity
required, and include a return shipping
address.
You may contact your local authorized
Electro Freeze Distributor, as follows:
Name:
Address:
Phone:
or — for factory service assistance —
contact H. C. Duke & Son, LLC. Electro
Freeze Service Department by phone or
FAX:
Phone: 309-755-4553
800-755-4545
FAX: 309-755-9858
E-mail: [email protected]
(The decals on the next page are
numbered 1 and 2. Those numbers
correspond to the numbers in the table
below. The table provides the part
number, description, and quantity for each
decal.)
No. Part No. Description (Qty)
1 HC165126 Decal — Panel Removal Warning (3)
2 HC165025 Decal — Beater Warning (1)
184592-01iv
Page 7
ELECTRO FREEZE Shake Model CS705-M2
Safety Decal Locations
1 P/N HC165126
Hazardous moving parts.
Machine starts automatically.
Do not operate with panel
removed.
2 P/N HC165025
Hazardous rotating beater shaft. Do not
operate unit with dispense head removed.
Before removing dispense head:
1. Turn all control switched to “OFF”, and
2. Disconnect all power supplies. Unit
may have more than one power supply.
184592-01 v
Page 8

ELECTRO FREEZE Shake Model CS705-M2
Table of Contents
SECTION DESCRIPTION PAGE
SAFETY ...........................................................................................ii
PART I
1. INTRODUCTION .............................................................................1
2. NOTE TO INSTALLER ...................................................................1
3. ELECTRICAL REQUIREMENTS ................................ 2
4. SPECIFICATIONS ...........................................................................2
4.1 Particulars. ......................................................................................2
4.2 Data Plate ........................................................................................3
4.3 Reference Information .....................................................................3
4.4 Installation Date ..............................................................................3
4.5 Dimensions. ..................................................................................... 4
5. PART NAMES AND FUNCTIONS .............................................5
6. OPERATOR CONTROLS & INDICATORS ................... 7
6.1 Selector Switch ...............................................................................7
6.2 Day-Night Switch .............................................................................7
6.3 “ADD MIX” Indicator Light ................................................................7
6.4 Mix Float ..........................................................................................8
6.5 Mix Feed Tube & Regulator ..............................................................8
7. DISASSEMBLY AND CLEANING .............................................9
7.1 Accessories ....................................................................................9
7.2 Disassembly Instructions ...............................................................10
7.3 Cleaning Instructions ....................................................................11
8. ASSEMBLY .......................................................................................13
9. START-UP INSTRUCTIONS .....................................................15
9.1 Sanitizing ......................................................................................15
9.2 Priming ...........................................................16
vi
184592-01vi
Page 9

ELECTRO FREEZE Shake Model CS705-M2
Table of Contents - continued
SECTION DESCRIPTION PAGE
10. CLOSING PROCEDURES .............................................. 18
10.1 Night Switch Operation ................................................................. 18
10.2 Draining Product From Freezer ..................................................... 19
11. SOFT SERVE INFORMATION ........................... 20
11.1 Overrun ........................................................................................ 20
11.2 Rerun ............................................................................................20
12. ROUTINE MAINTENANCE ............................................ 21
13. TROUBLESHOOTING TABLE .......................... 24
PART II
MODEL CS705-M2 REPLACEMENT PARTS WITH ILLUSTRATIONS
*
* Refer to Part II Table of Contents for help with locating part numbers and illustrations.
vii
184592-01 vii
Page 10

Page 11

1 Introduction
ELECTRO FREEZE Shake Model CS705-M2
The CS705-M2 Freezer is designed to
produce soft serve ice cream, ice milk,
yogurt, and similar frozen dairy products,
with a product serving temperature
range of 15° to 25ºF (-9° to -4°C). If such
products are prepared from powdered
concentrate, they should be precooled
to 40ºF (4°C) prior to introduction to
the freezer. Use of other products in
this machine is considered misuse (see
Warranty).
This manual has been prepared to assist
you in the proper operation and general
maintenance of the Electro Freeze Model
CS705-M2 freezer.
Make sure all personnel responsible for
equipment operation completely read and
understand this manual before operating
the freezer. When properly operated and
maintained the freezer will produce a
consistent quality product.
If you require technical assistance, please
contact your local authorized Electro
Freeze Distributor, as follows:
Name: ________________________
Address: ______________________
Phone: ________________________
For factory service
assistance — contact H.C. Duke & Son,
LLC, Electro Freeze Service Department
as follows.
Phone: 309-755-4553
800-755-4545
FAX: 309-755-9858
2 Note to Installer
This freezer must be installed and
serviced by an Electro Freeze Distributor
or authorized service technician
in accordance with the installation
instructions in this manual.
Verify the weight of the freezer. Ensure
a counter or table of sufcient strength
is used to hold this weight and prevent
excessive vibration.
Air cooled models require a minimum of
3-inches (7.6 cm) air space on both sides
and back of the freezer for adequate
ventilation.
If this freezer is to be used in a selfservice application, it is recommended
that the machine be tted with a self-
service kit. Contact your Electro Freeze
Distributor or H. C. Duke & Son, LLC for
this kit.
Test the operation of the head safety
switch prior to placing the freezer
in service. See Section 12, Routine
Maintenance, Monthly.
After installation the warranty registration
card must be completed and returned to
validate the warranty.
184592-01 1
Page 12
ELECTRO FREEZE Shake Model CS705-M2
2.1 Uncrating and Inspection
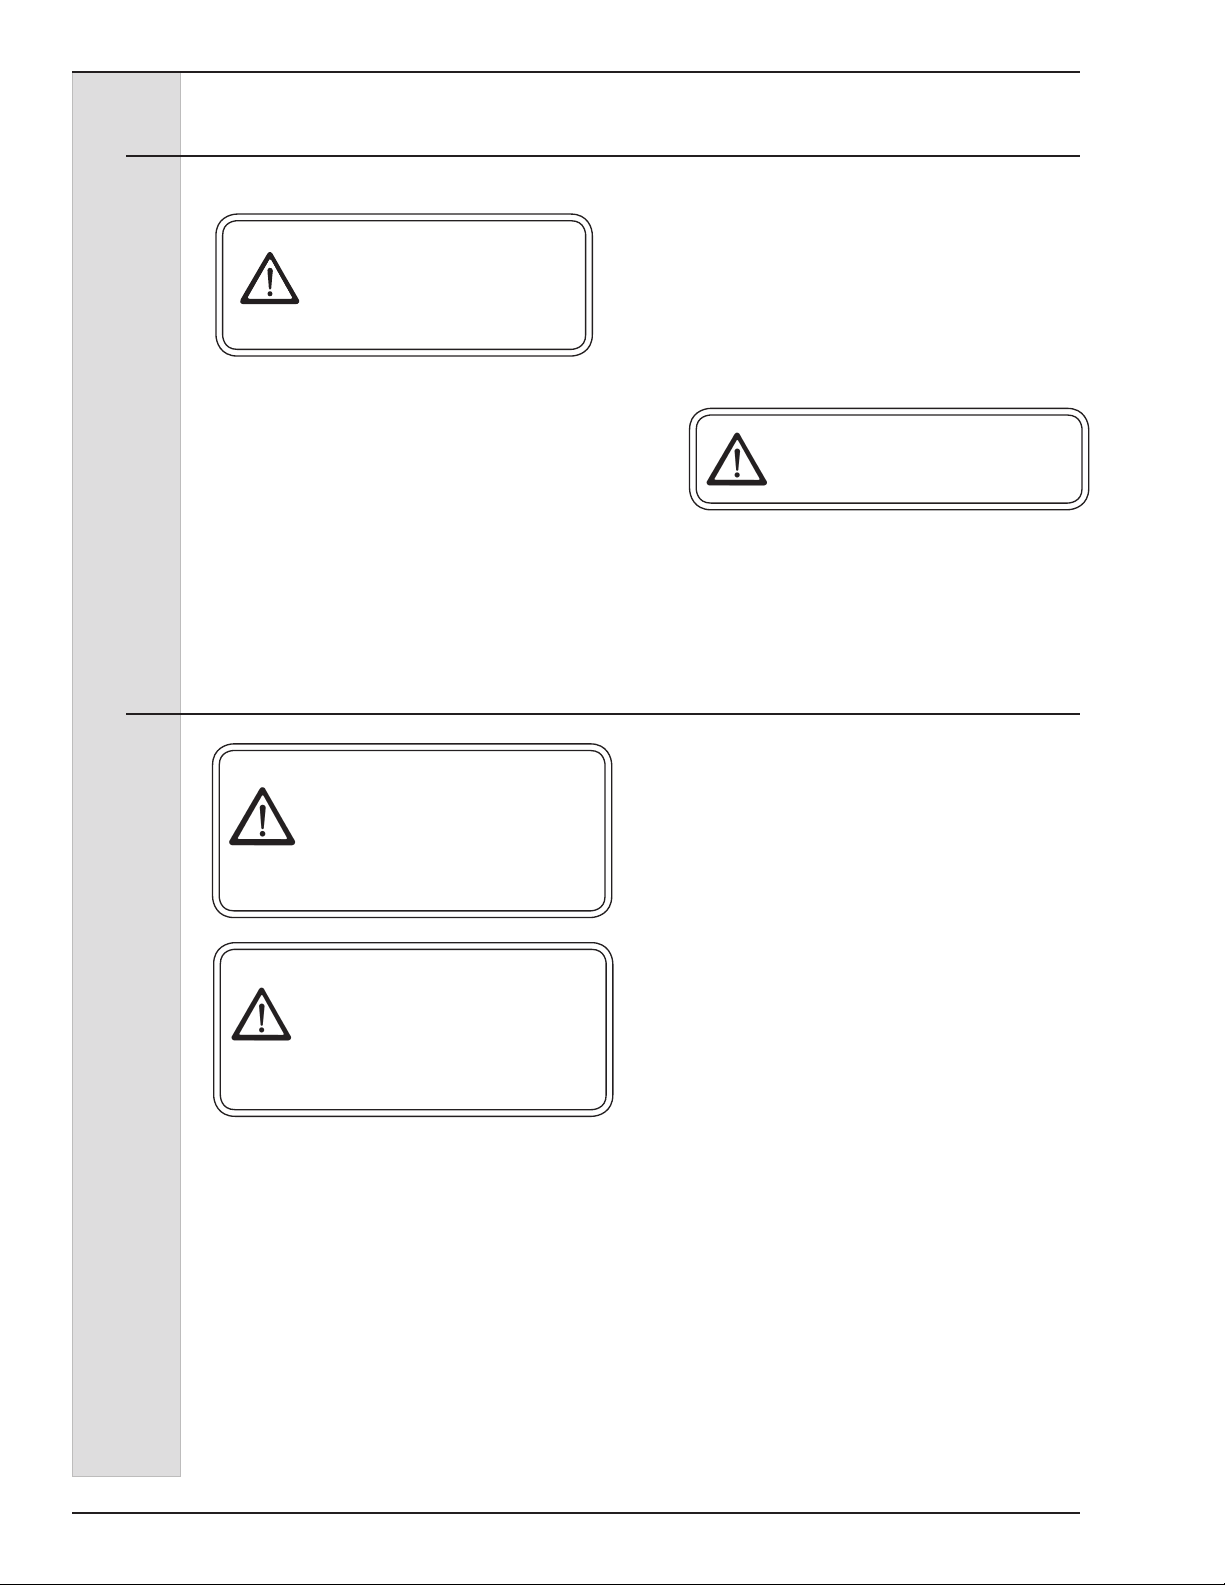
CAUTION
Be sure to properly support
the machine when removing
bolts and installing legs or
casters.
When the unit is received and while
the carrier is still present, inspect the
shipping carton for any damage that
may have occurred in transit. If the
SHOCKWATCH® label indicates red and/
or the carton is broken, torn, or punctured
note the damage on the carrier’s freight
bill and notify the carrier’s local agent
immediately. Also note on the freight bill.
2.2 Installation
CAUTION
All materials and connections
must conform to local
requirements and be in
compliance with the National
Electrical Code (NEC).
CAUTION
Tip Hazard. Front side of
freezer must remain positioned
on door side of cart. DO NOT
reverse position of freezer on
cart.
1. Remove the carton from the pallet,
and move the machine as close as
possible to the permanent location.
2. Remove the shipping bolts on the
bottom of the freezer and remove the
freezer from the pallet.
CAUTION
Use caution when moving the
freezer to avoid a tip hazard.
3. A minimum 3-inch (7.6 cm) air space
is required on both sides and back of
the freezer for adequate ventilation.
4. Test the operation of the head and
ex shaft cover safety switches prior
to placing the freezer in service. See
Section 12, Routine Maintenance,
Monthly.
1. This freezer is designed for indoor use
and must be protected from outdoor
weather conditions.
2. This freezer requires a potable water
connection for the rinse line. The
water inlet is located at the back of
the freezer next to the power supply. A
3/8” MPT water inlet connector will be
needed.
184592-012
Page 13
ELECTRO FREEZE Shake Model CS705-M2
2.3 Electrical Requirements
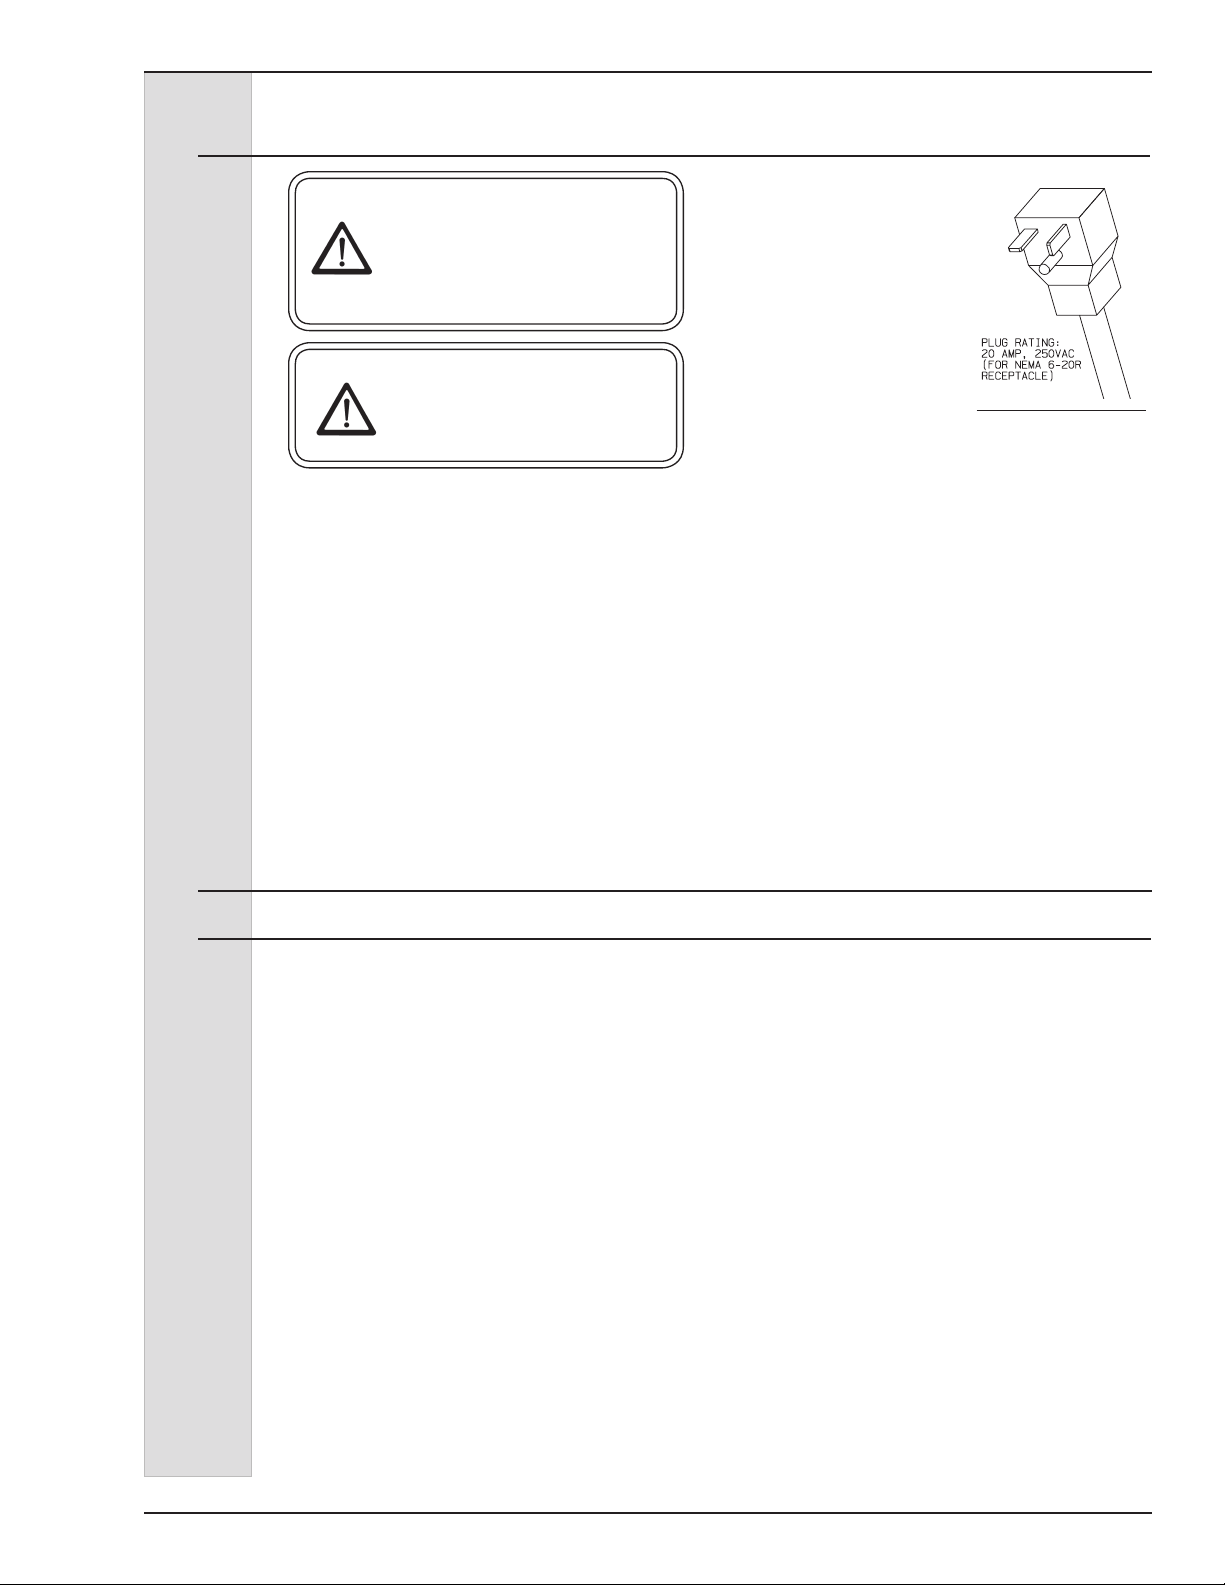
CAUTION
All materials and connections
must conform to local
requirements and be in
compliance with the National
Electric Code (NEC).
CAUTION
To prevent accidental electrical
shock, a receptacle with
a positive earth ground is
required.
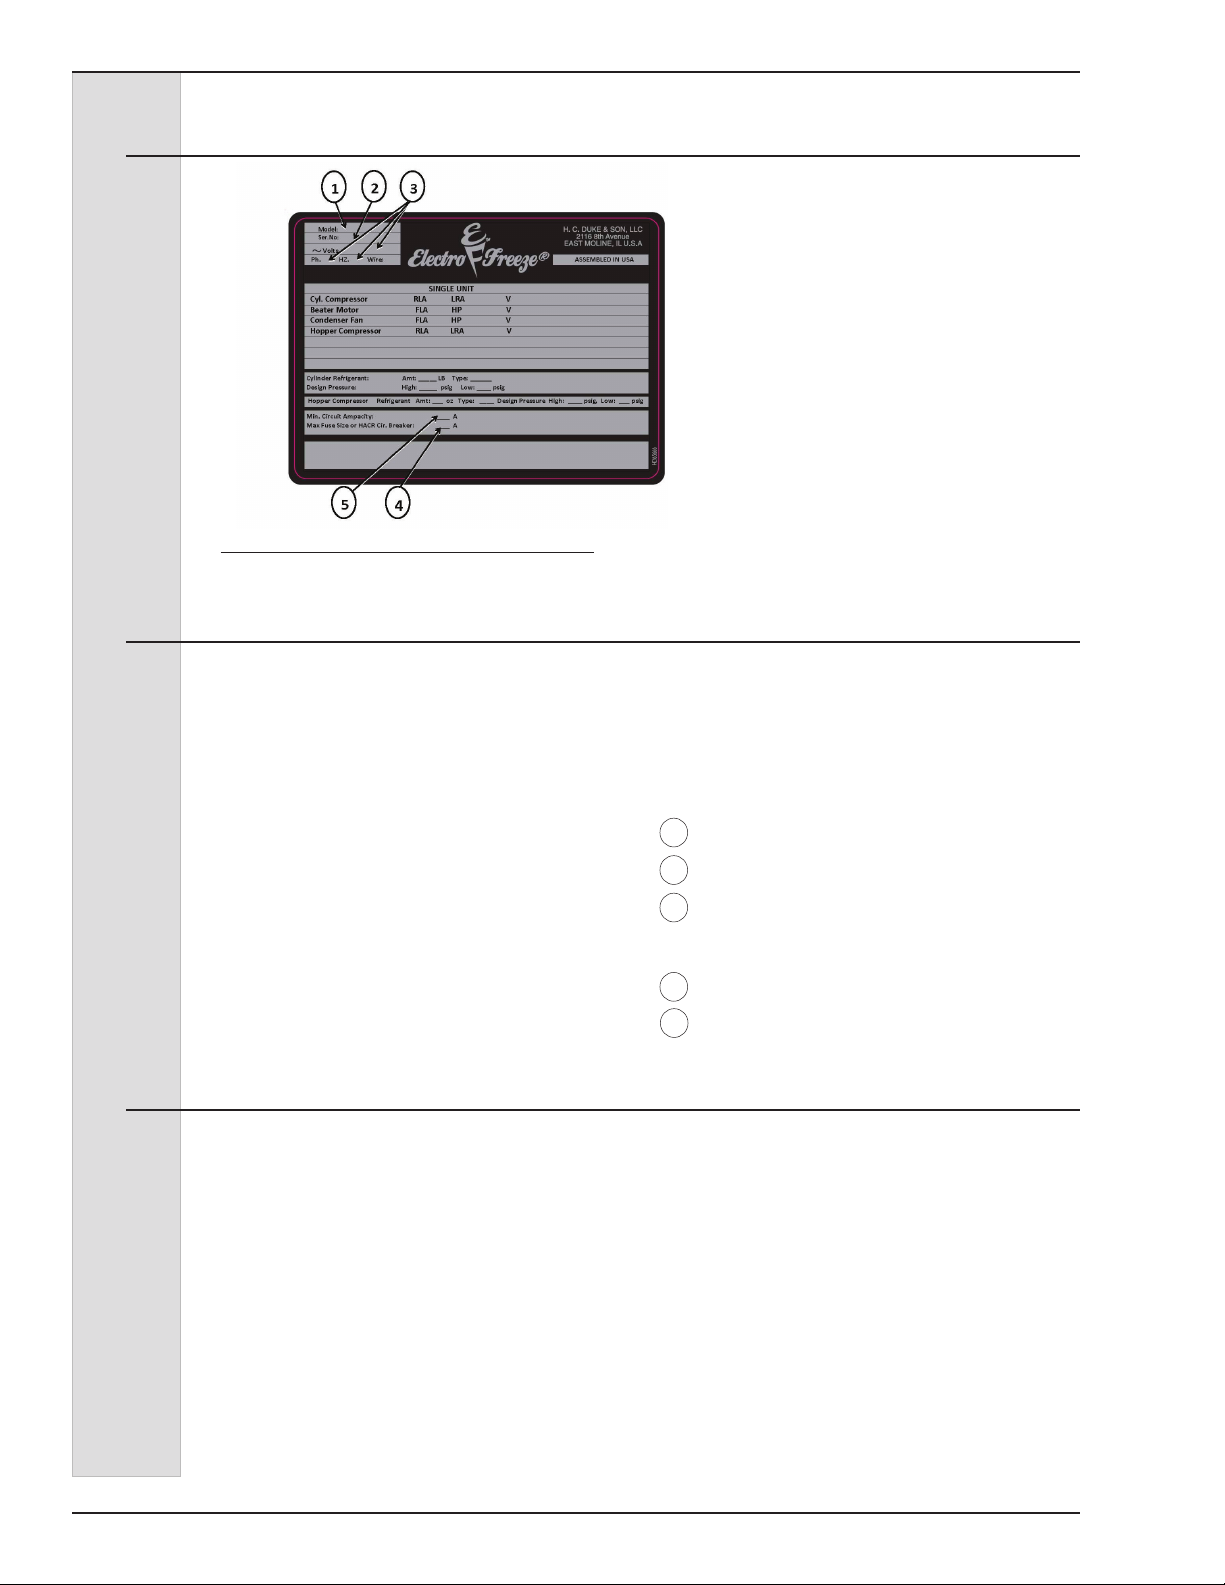
1. Always verify electrical specications
on the data plate (gure 4-1) of
each individual freezer. Data plate
specications will always supersede
the information in this manual.
2. This freezer requires a protected 20
amp 230 volt circuit. Connect the
freezer to a circuit separate from any
other electrical equipment. The power
cord on this freezer connects to a
NEMA 6-20R receptacle. See Figure
3-1.
3. Supply voltage
must be within
±10% of voltage
indicated on
the nameplate.
Request your
local power
company
to correct
Figure 2-1
any voltage
problem.
4. The control transformer in the
electrical box is factory wired to 208
volts (red) wire tap for 208V nominal
power supply. If power supply is
between 230-240 volts use 240V
(orange) wire tap on transformer.
5. Beater Shaft Rotation - Freezers are
designed for clockwise rotation when
viewed from front of freezer. 1ph
machines are pre-wired for proper
rotation. On 3phase machines,
phase wires to freezer should be
connected to produce proper beater
rotation. This is to be done by a
freezer technician.
3 Specifications
3.1 Particulars
Width (in/cm) 18.4/46.7
Height (in/cm) 58.9/149.7
Depth (in/cm) 28.1/71.4
Weight (lbs/kg) 250/113.4
Voltage* 208-230/60/1
Min. Circuit Ampacity 20.0
Compressor 1 HP/8000 (BTUH)
.75 kw (Motor)
2.3 kw (Cooling)
Beater Motor 1/2 HP/.37 kw
Refrigerant R-404a
Charge 32.0 oz/.91 kg
Cooling Air
Hopper 20 qts/18.8 liters
Cylinder 7 qts/7.1 liters
*Contact factory for other voltages.
Noise: The Steady acoustic pressure level, for both air cooled and
water cooled freezers, is less than 70dB(A).
184592-01 3
Page 14
ELECTRO FREEZE Shake Model CS705-M2
3.2 Data Plate
Figure 4-1
3.3 Reference Information
The data plate provides important
information that the operator should
record and have available for parts
ordering, warranty inquiries and service
requests.
Write in Reference
Information HERE!
3.4 Installation Date
Fill in the date of installation, and the name, address, and phone number of the
installer in the space provided below. This information will be needed when ordering
parts or service for the CS705-M2 Freezer.
Date of installation: _____________________________________
Installed by: _____________________________________
Address: _____________________________________
_____________________________________
Phone: _____________________________________
Fill in the following information as soon as
you receive the Electro Freeze CS705-M2.
(The item numbers — encircled, below —
correspond with the call-out numbers in
gure 4-1.)
1 Model Number: ________________
2 Serial Number: _________________
3 Electrical Spec: Voltage _______
Phase _______ Hertz ___________
4 Maximum Fuse Size: __________
5 Minimum Circuit Ampacity: ______
184592-014
Page 15
3.5 Dimensions
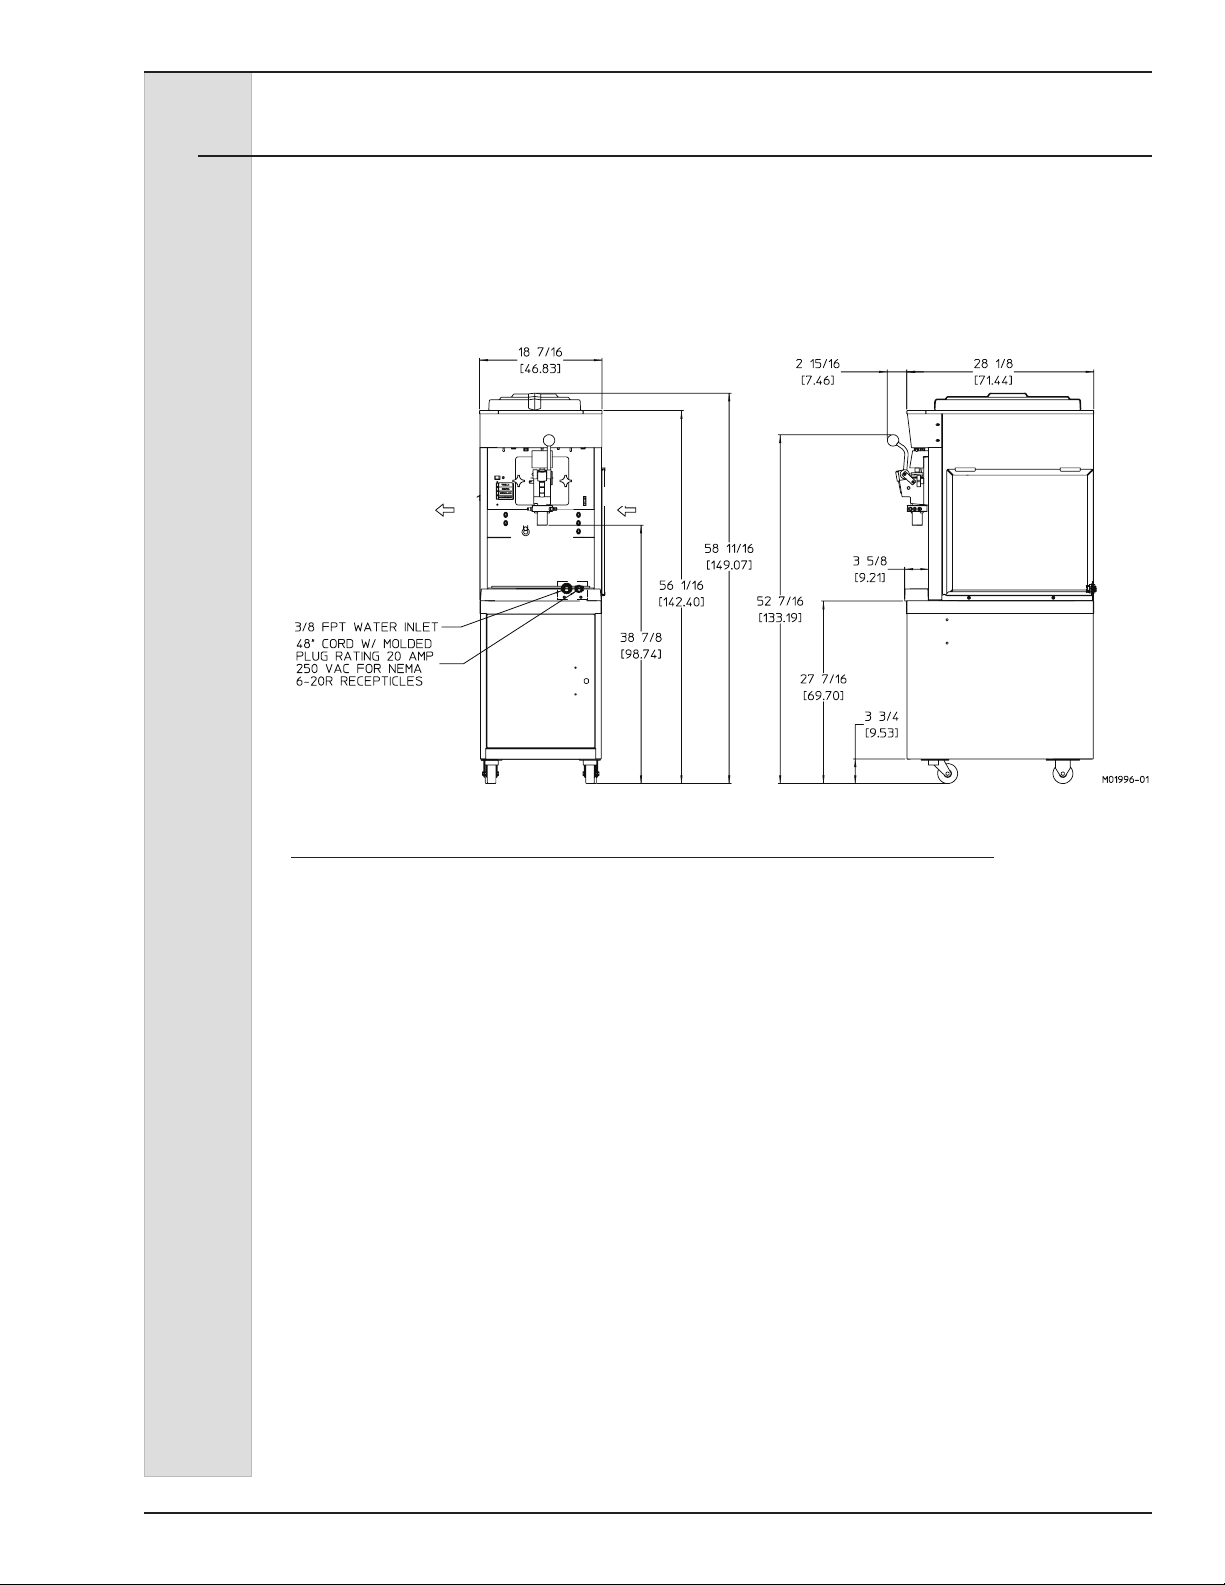
The dimensions of the CS705-M2
Freezer are provided in gure 4-2, below.
ELECTRO FREEZE Shake Model CS705-M2
AIR OUT
AIR IN
Figure 4-2 Electro Freeze Model CS705-M2 Dimensions
184592-01 5
Page 16
ELECTRO FREEZE Shake Model CS705-M2
4 Part Names and Functions
184592-016
Page 17

ELECTRO FREEZE Shake Model CS705-M2
4 Part Names and Functions
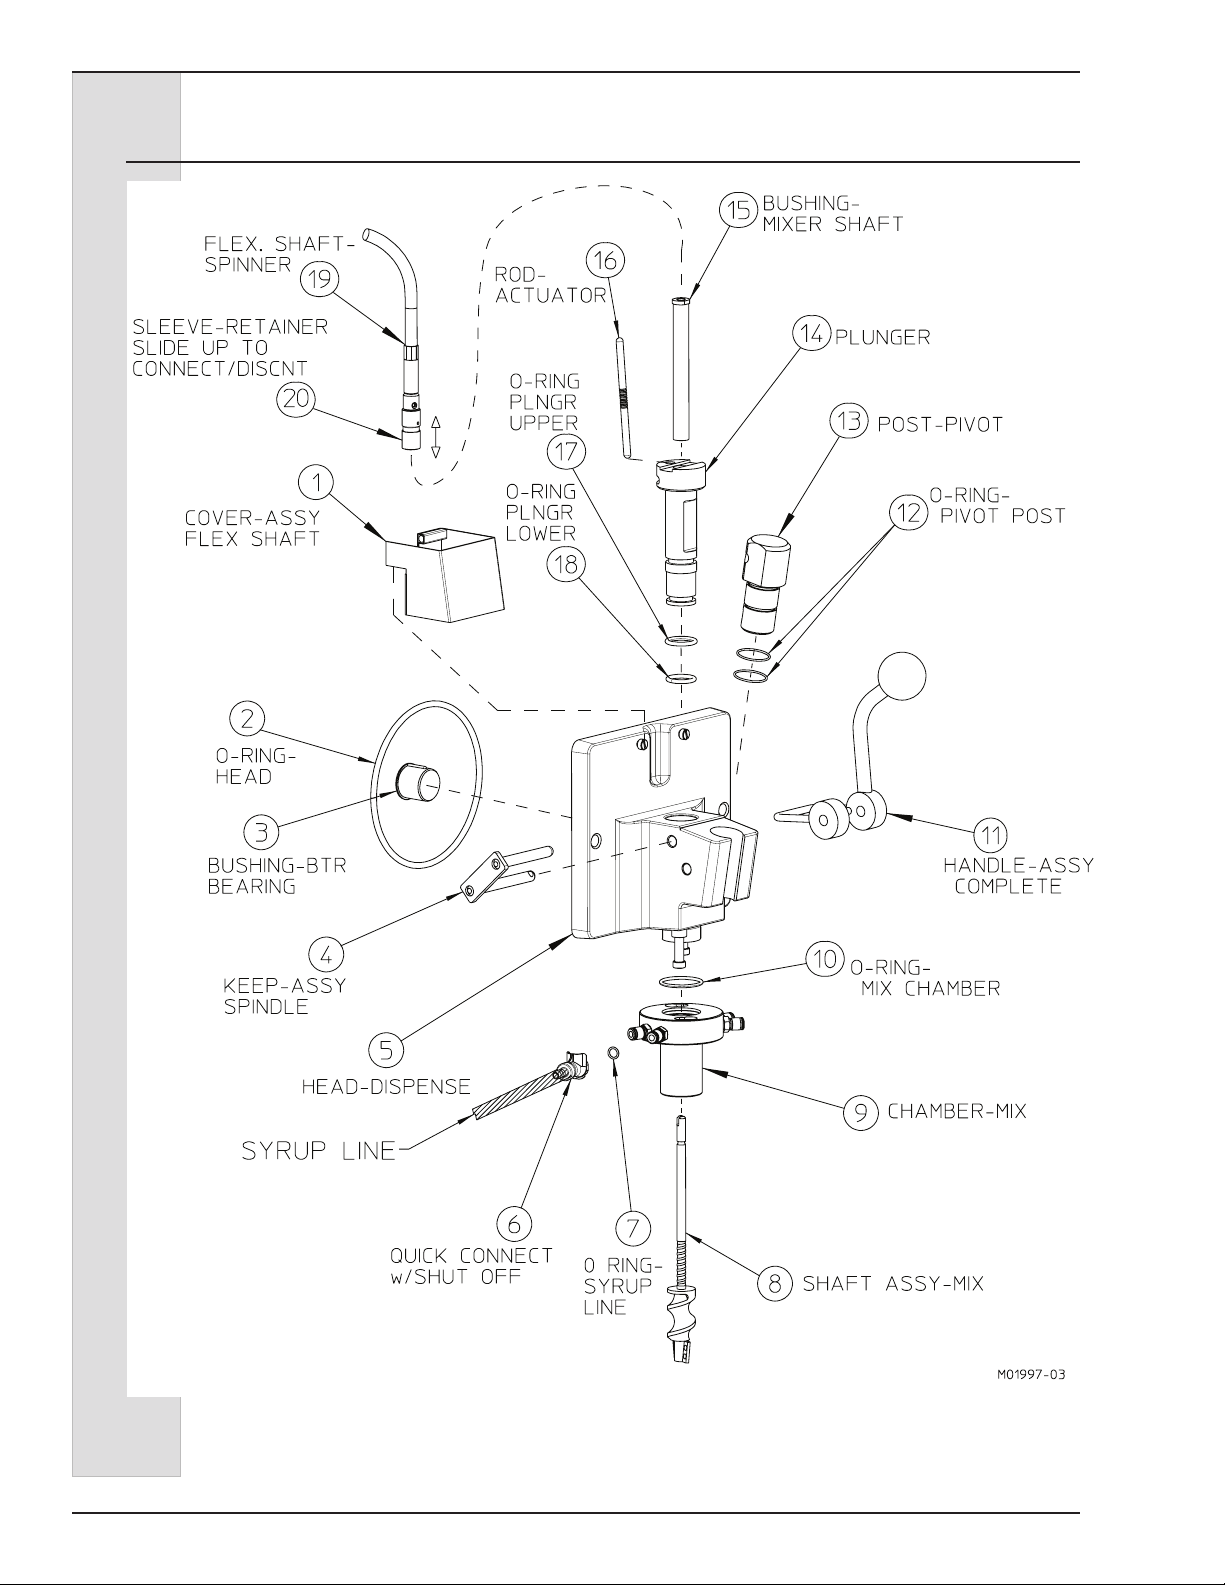
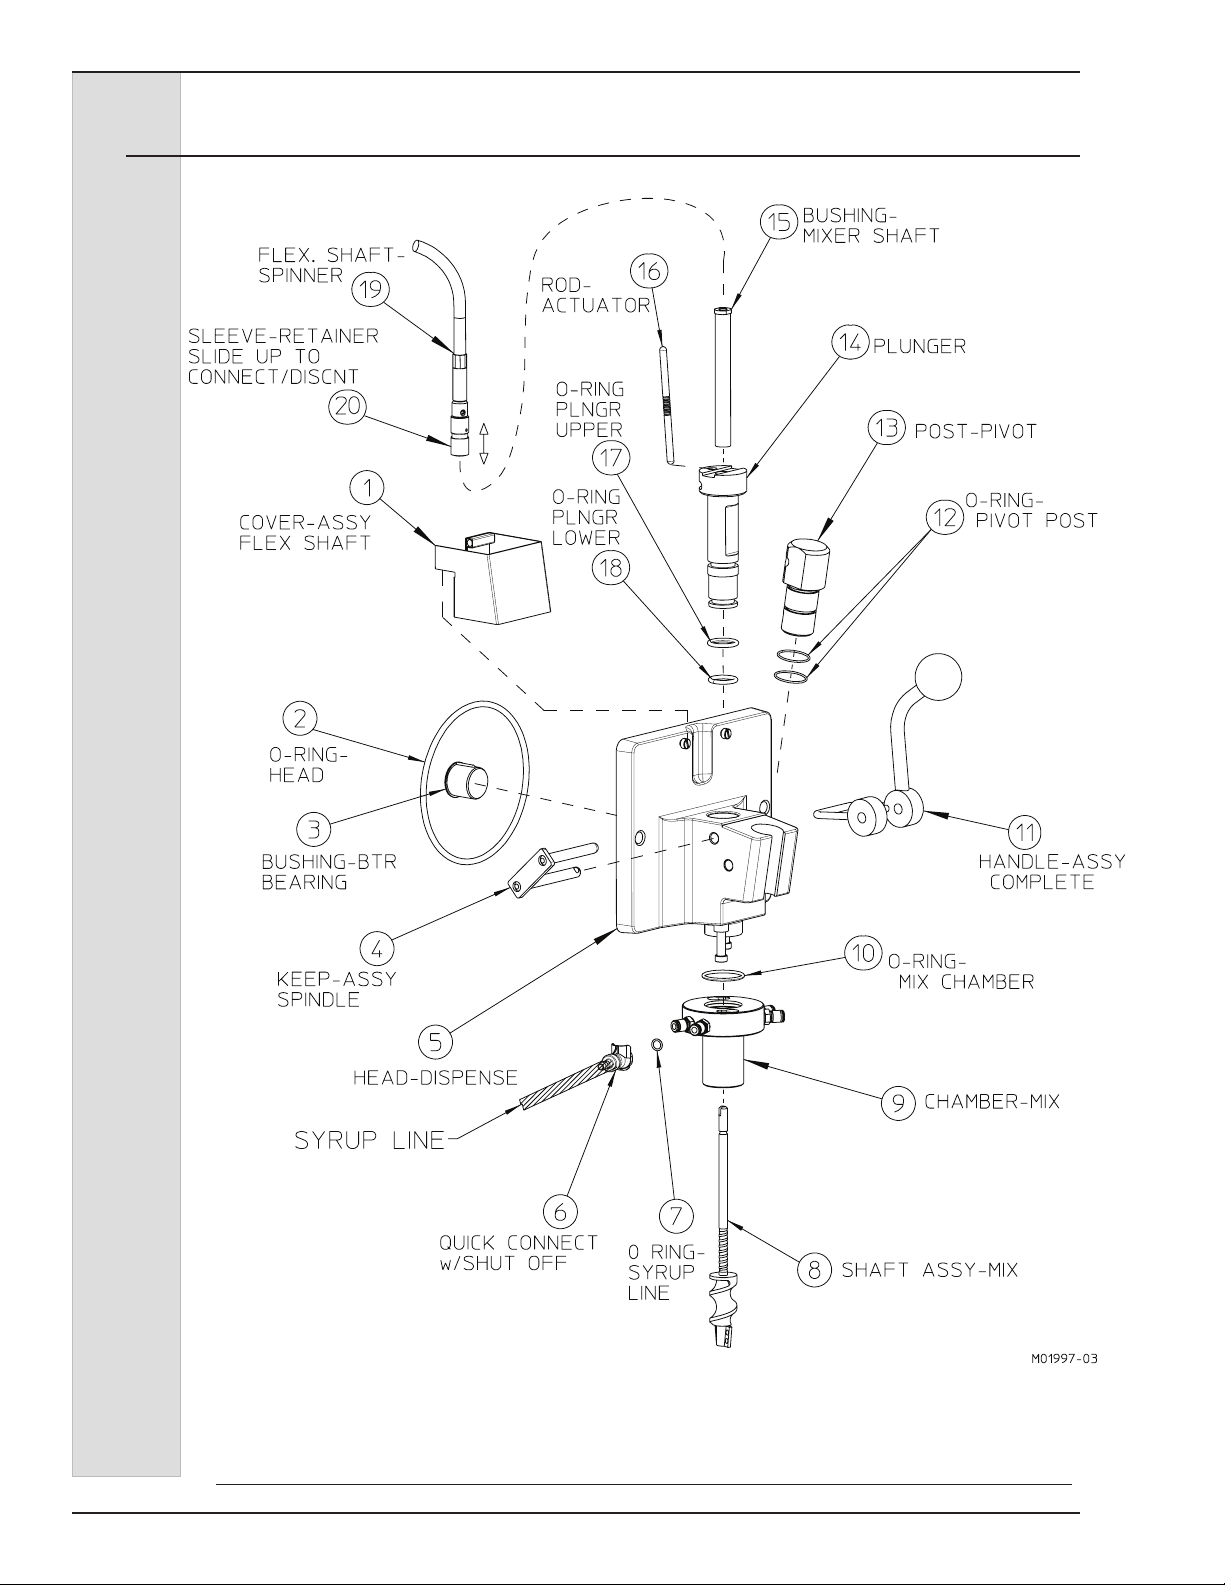
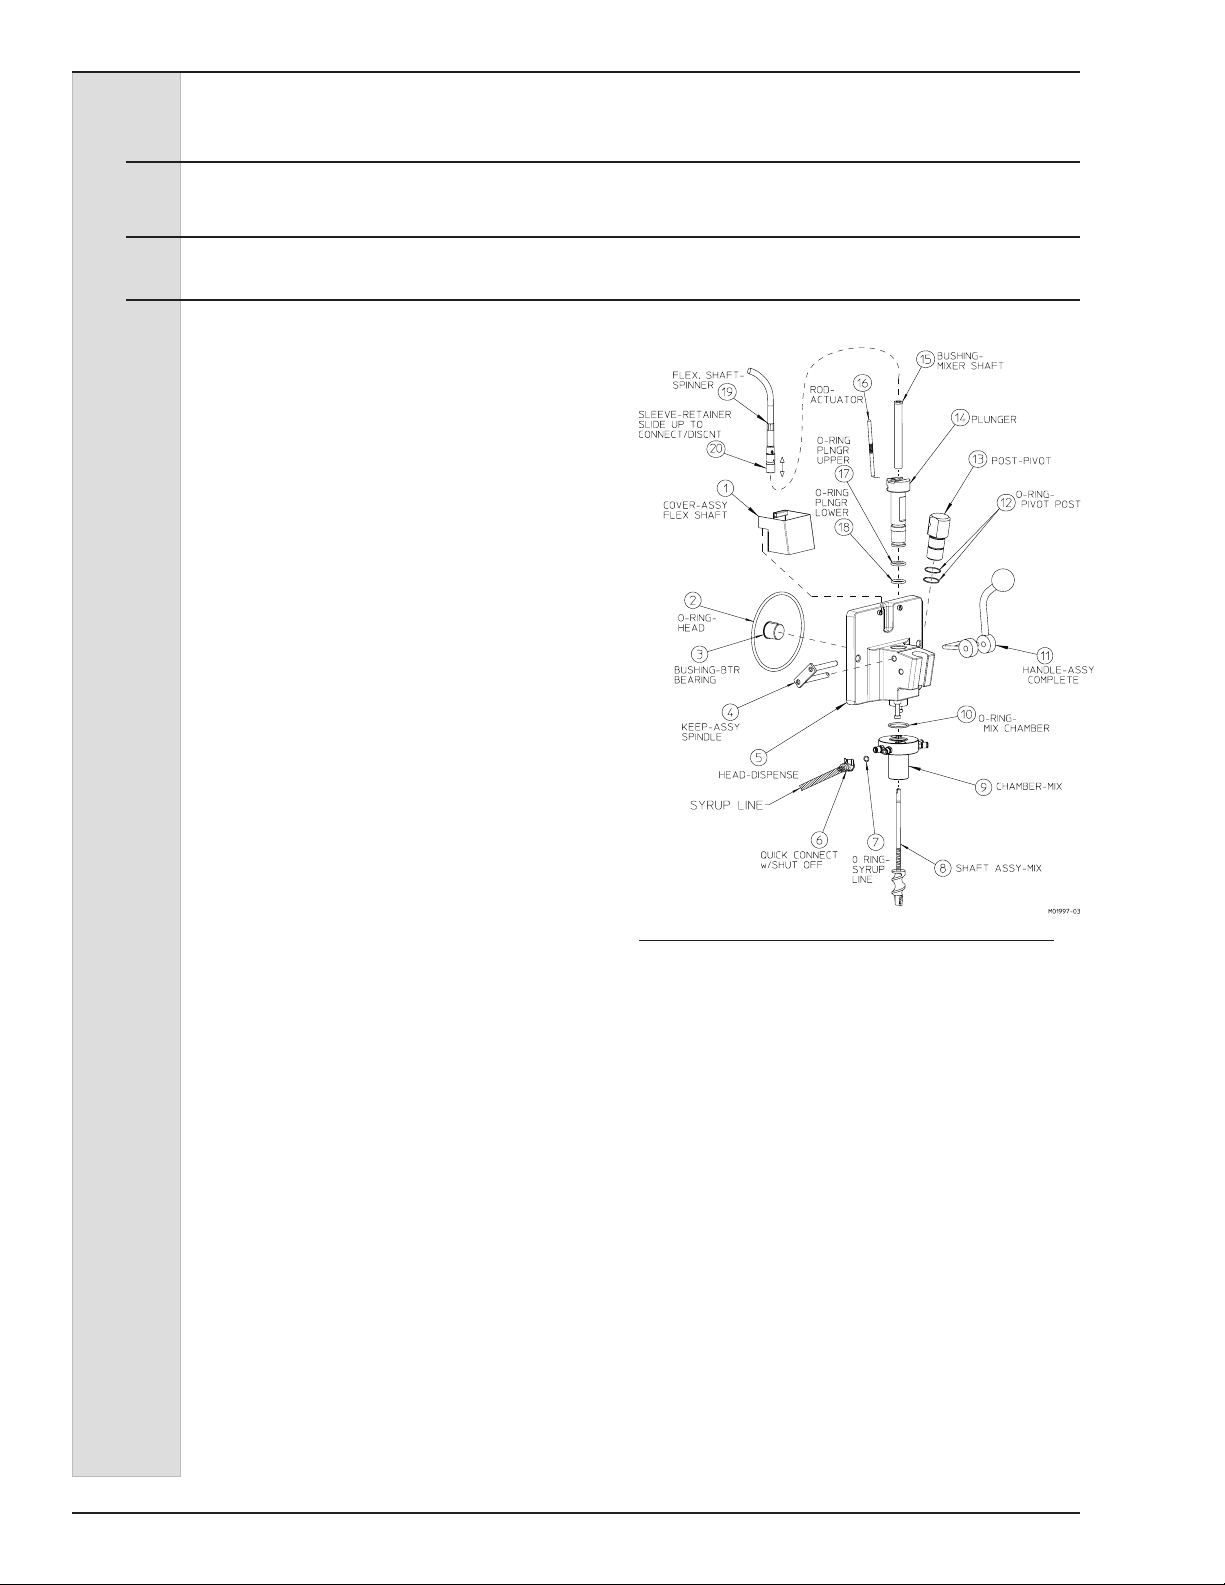
The following part names and descriptions refer to gure 4-1.
1.) COVER - ASSY FLEX SHAFT:
Protects from accidental contact with
rotating shaft. Must be in place to
operate.
2.) O-RING - HEAD:
Seals the head to the freezing cylinder.
Must be lubricated.
3.) BUSHING - BEATER BEARING:
Holds the beater in place at the front
of the cylinder. Must be inserted
into the head and lubricated
before assembly.
4.) KEEPER - ASSY SPINDLE:
Secures the handle to the head.
5.) HEAD - DISPENSE:
Encloses the freezing cylinder and
provides an opening for product to
be dispensed.
6.) QUICK CONNECT WITH SHUT
OFF:
Allows syrup line to be removed from
the mix chamber.
7.) O-RING - SYRUP LINE:
Prevents syrup from leaking.
14.) PLUNGER - DISPENSING:
Seals the product opening in the head
when closed. Allows product to ow
when open.
15.) BUSHING - MIXER SHAFT:
Holds the mixing shaft in place.
Prevents wear on plunger.
16.) ROD - ACTUATOR:
Starts the freezer when dispensing.
Must be in place before product can
be dispensed.
17.) O-RING - PLUNGER-UPPER
18.) O-RING - PLUNGER-LOWER:
Seals the plunger in the head.
Must be lubricated to seal and slide
properly.
19.) SHAFT - FLEXIBLE W/CASING
16-1/2:
Spins the mix shaft.
20.) CONNECT - ASSY DRIVE:
Quick connector used to connect or
disconnect the exible shaft from the
mix shaft.
8.) SHAFT - ASSY MIX:
Mixes avor into shake mix.
9.) CHAMBER - MIX:
Delivers syrup to the shake mix.
10.) O-RING - CHAMBER:
Prevents mix from leaking. Lightly
lubricate.
11.) HANDLE - ASSY COMPLETE:
Opens and closes the plunger to start
and stop the ow of product from the
freezer.
12.) O-RING - PIVOT POST:
Holds the pivot post in place. Lightly
lubricate.
13.) POST - PIVOT:
Holds the handle in place.
184592-01 7
Page 18

ELECTRO FREEZE Shake Model CS705-M2
4 Part Names and Functions
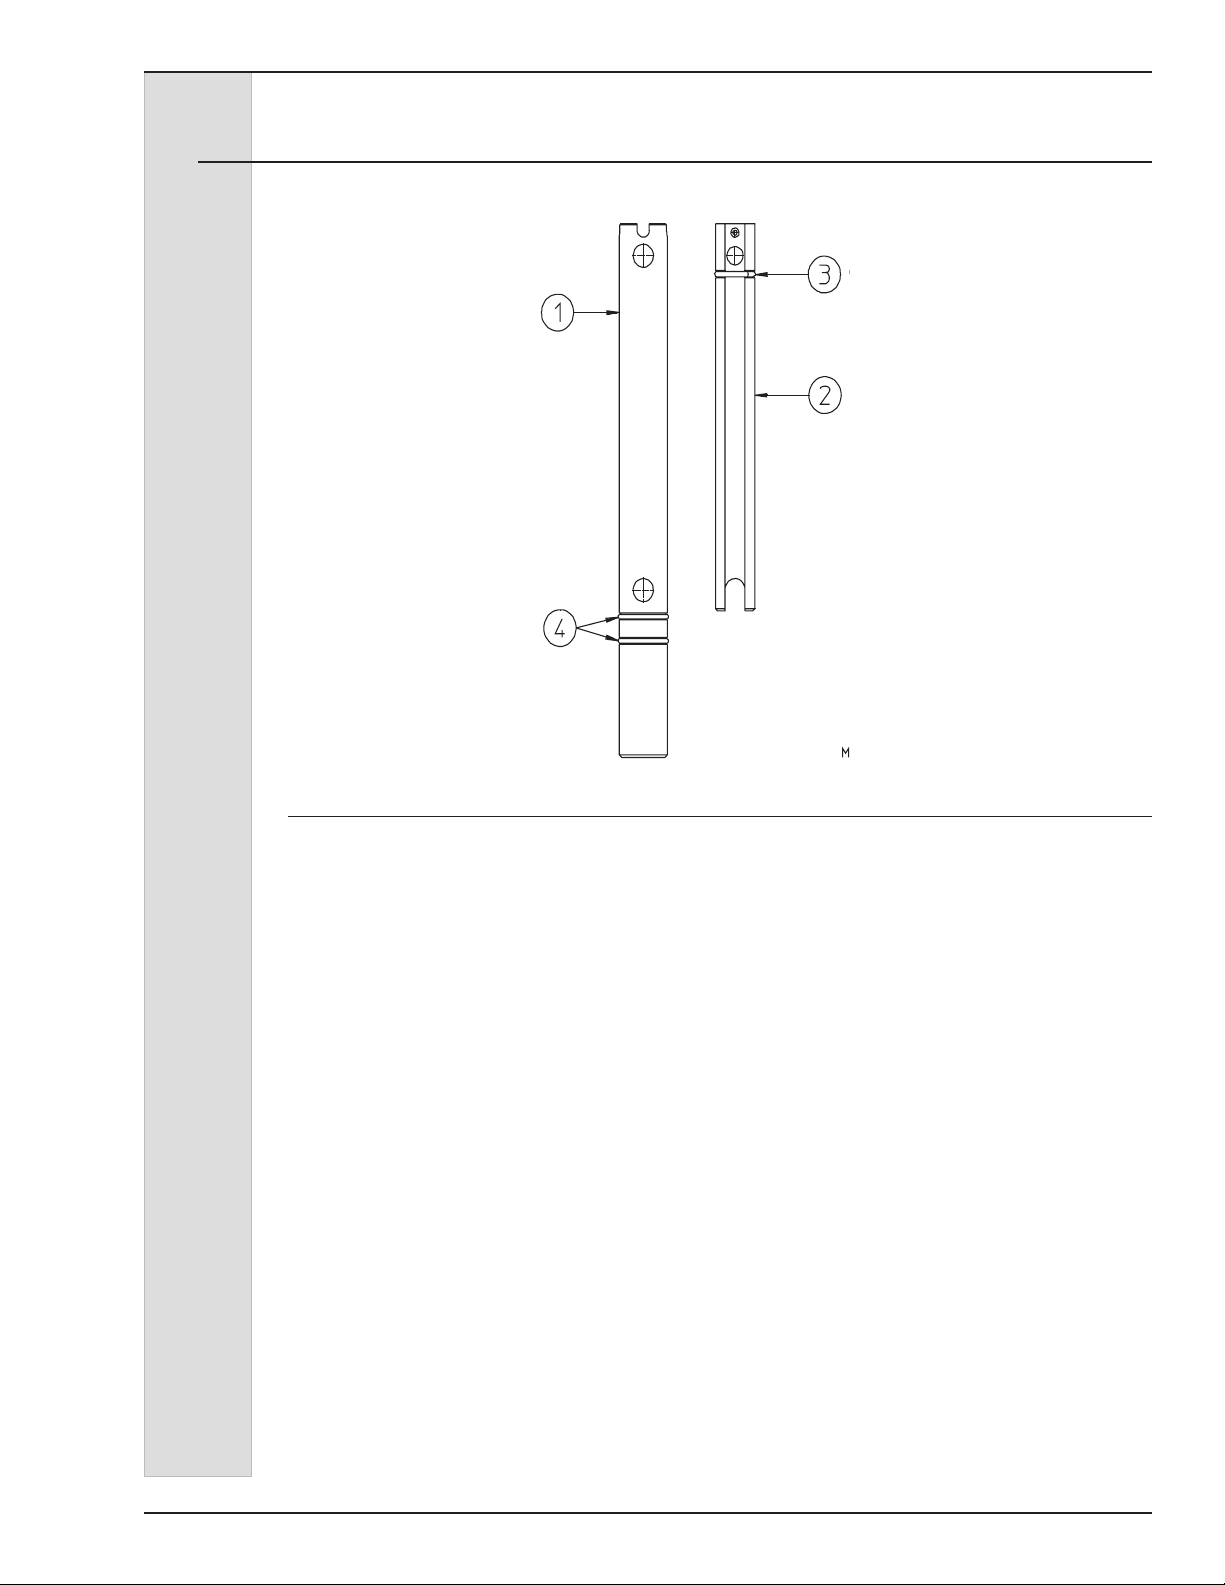
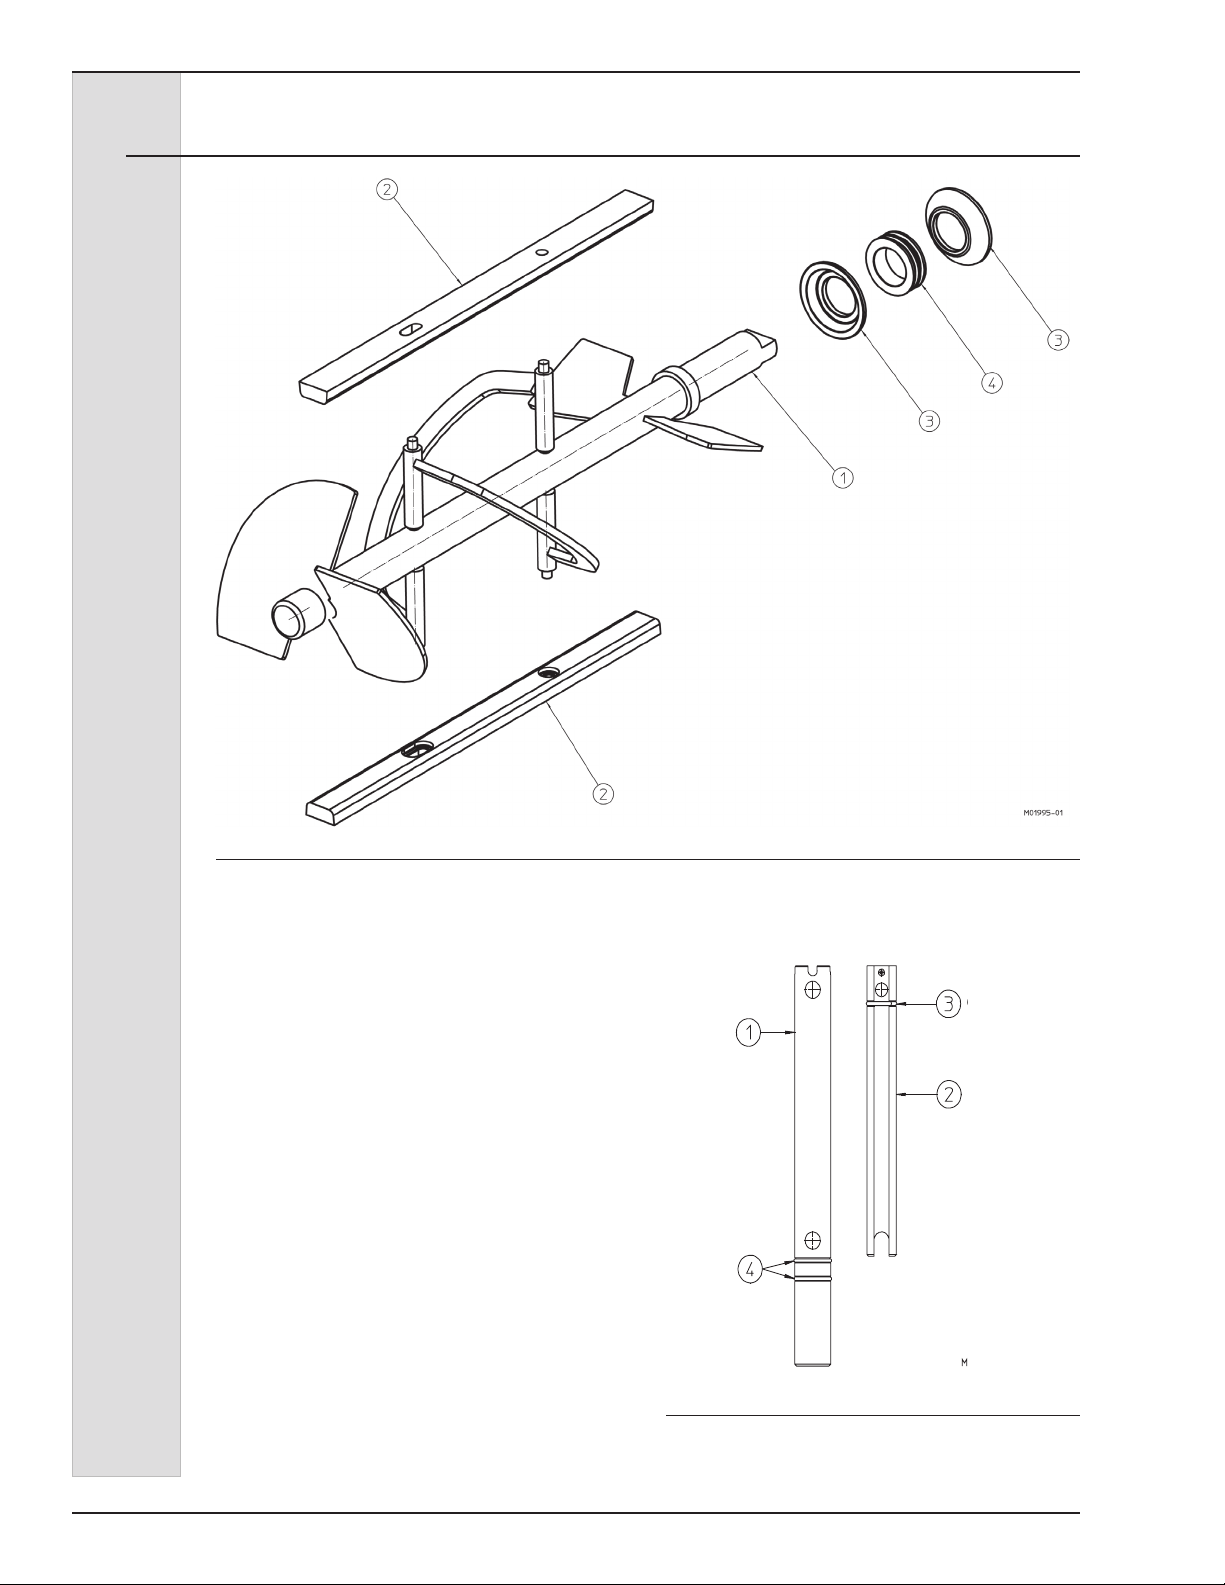
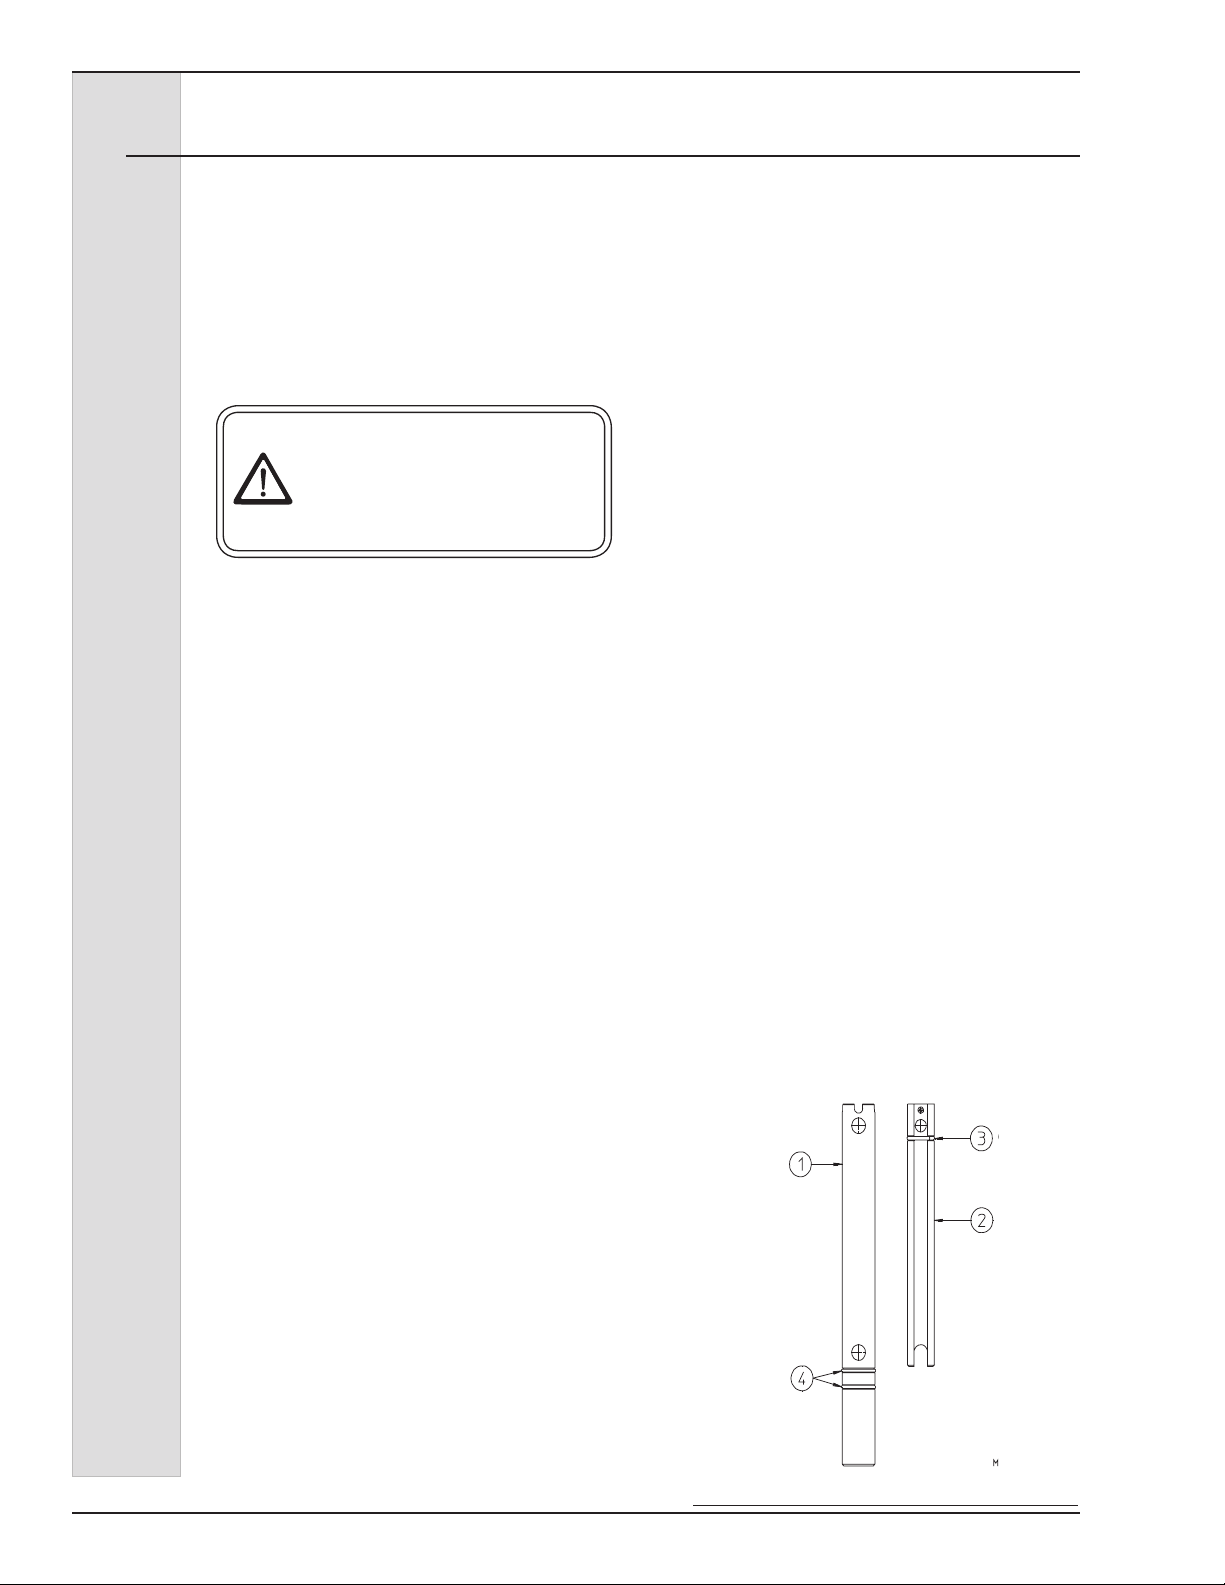
Figure 4-2 Beater Shaft Assembly
The following part names and descriptions
refer to gure 4-2.
1.) SHAFT-BEATER:
Rotates in the freezing cylinder,
blending air and mix and ejecting
product.
2.) BLADE-SCRAPER:
Scrapes the frozen product from
the freezing cylinder wall.
3.) SEAL (CUP) - BEATER SHAFT:
Seals the opening between the
freezing cylinder and the beater.
DO NOT LUBRICATE.
4.) WASHER - SHAFT SEAL:
Holds the shaft seals together.
Must be lubricated.
184592-018
Page 19
ELECTRO FREEZE Shake Model CS705-M2
O-Ring
Insert-Assy. Mix
Feed
4 Part Names and Functions - continued
O-RING
TUBE-MIX FEED
INSERT - ASSY.
MIX FEED
O-RING
Figure 4-3 Mix Feed Tube
The following part names and descriptions refer to gure 4-3.
1.) TUBE-MIX FEED:
Meters the correct amount of mix
and air into the freezing cylinder from
the hopper.
2.) INSERT-ASSEMBLY MIX FEED
(Regulator):
Regulates mix ow. Open position for
day operation and closed position for
night.
3.) O-RING-INSERT ASSEMBLY:
Holds the insert in place in the mix
tube. Must be lubricated.
4.) O-RING-MIX FEED ASSEMBLY:
Seals the opening between the hopper
and mix feed tube. O-rings do not need
lubrication.
184592-01 9
Page 20
ELECTRO FREEZE Shake Model CS705-M2
5 Operator Controls
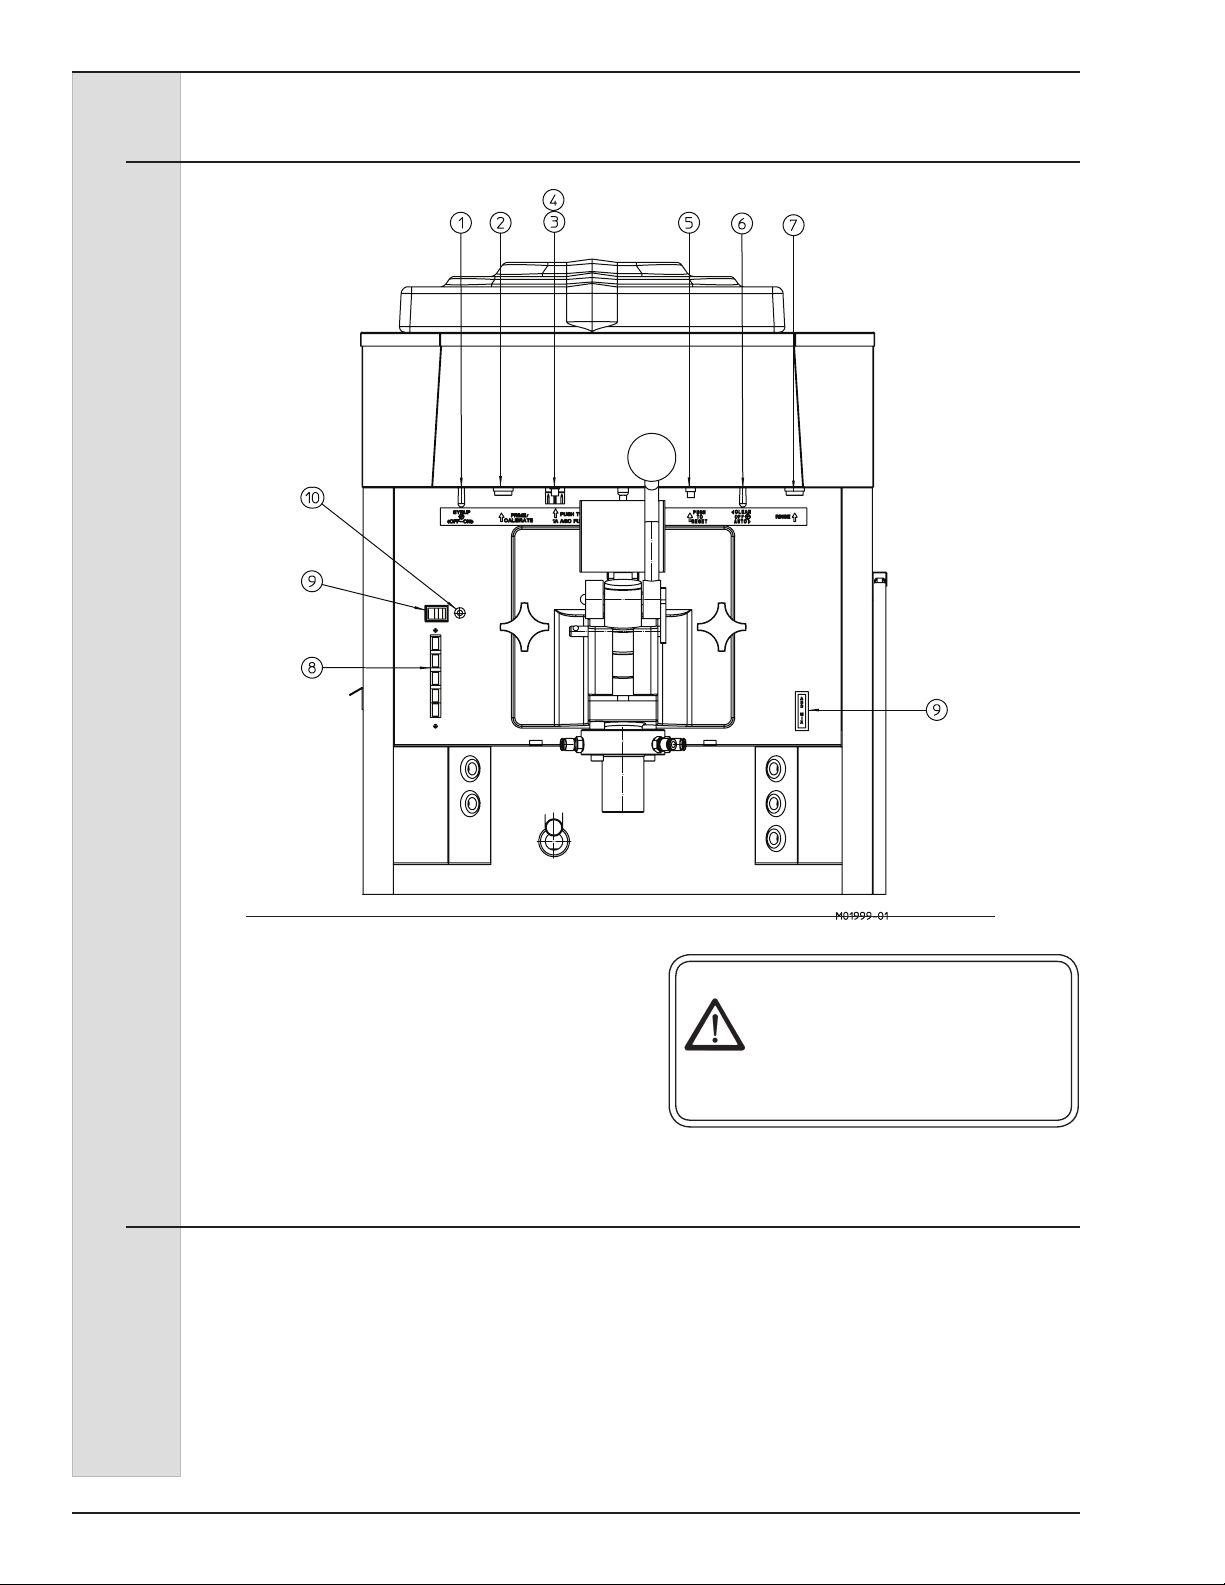
Figure 5-1
The following paragraphs describe
the operator controls and indicators.
Refer to gure 5-1 for location of these
controls and indicators on the freezer.
NOTE: The head, actuator rod, and metal
cover must be in place before the beater
will operate.
5.1 Syrup Pump Switch (1)
This two-position switch controls the
operating mode of your freezer.
a. “ON” (right) — This position
operates the syrup motor. Always use
this mode when operating the syrup
system.
b. “OFF” (left) — In this position the
syrup motors do not run.
—continued
CAUTION
Test operation of the head switch
prior to placing the freezer in
service. See Section 12, Routine
Maintenance, Monthly.
184592-0110
Page 21

ELECTRO FREEZE Shake Model CS705-M2
5 Operator Controls — continued
5.2 Prime / Calibrate (2)
This push button switch is used for
priming and calibrating the avor syrups.
With the syrup switch in the “ON” position,
the selector switch (5) in “AUTO” and
a avor selection (8) made, pressing
this button will activate the pump for
that avor to ush and prime the avor
delivery line and to allow calibration of the
syrup ow.
5.3 Reset - Circuit Breaker Spinner Motor (3)
This control protects the spinner motor
against failure from an overload condition
by automatically shutting it down. To
restart wait 2-3 minutes, then depress the
reset button.
If the circuit breaker trips frequently,
your spinner mechanism and circuitry
should be checked. Contact your
Electro Freeze Distributor.
5.4 Syrup Pump Fuse (4)
This holds the AGC fuse for the syrup &
malt pumps.
5.5 Reset — Circuit Breaker Beater Motor (5)
This control protects the beater motor
against failure from an overload condition
by automatically shutting down the
freezer. To restart properly, turn the
SELECTOR switch (5) to “OFF”, wait 2-3
minutes, then depress the reset button
and turn the SELECTOR switch back to
the “AUTO” or “CLEAN” position.
Important:
If the circuit breaker trips frequently,
your freezer should be checked for
proper product temperature, overrun
and voltage. Contact your Electro
Freeze Distributor.
Important:
5.6 Selector Switch (6)
This three-position switch controls the
operating mode of your freezer.
a. “CLEAN” (left) — This position
operates the beater only (no
refrigeration). Always use this mode
when performing cleaning and
sanitizing operations.
b. “OFF” (center) — In this position
the beater motor and refrigeration
system will not operate.
184592-01 11
Important:
Do not use the “FREEZE” position with
water or sanitizer in the cylinder — the
freezer will be damaged.
c. “AUTO” (right) — This position
activates both the beater motor and
refrigeration unit. This is the normal
operating position which will maintain
a cylinder temperature of 26° to 28°F
(-3° to -2°C).
Page 22
ELECTRO FREEZE Shake Model CS705-M2
5 Operator Controls — continued
5.7 Rinse Switch (7)
This momentary switch activates the rinse
water solenoid valve and the spinner
motor to rinse the mixing chamber
between avor changes to eliminate avor
carryover.
5.8 Flavor Selection Buttons (8)
T
hese push buttons are used to select the
avor of shake to be dispensed. Press
the button for the desired avor. Selection
of another button will cancel the previous
selection. ‘Vanilla’ provides product
from the cylinder only, with no added
avoring. When ‘Chocolate’, Strawberry’,
‘Banana’ , or ‘Special’ are selected, that
corresponding pump will operate when
product is dispensed.
5.9 Malt Switch (9)
When the malt switch is turned on the
malt pump will operate when the handle is
pulled.
5.10 Malt Light (10)
This light indicates when the Malt switch
is turned on.
5.11 Indicator Light - “ADD MIX” (11)
This light indicates the mix in the mix
hopper is at a low level and should be
relled as soon as possible. Always
maintain at least 2 inches (5.1 cm) of mix
in the hopper. For best operating results
keep hopper full.
5.12 Mix Float (not shown)
When this oat is mounted on the oat
stem inside the hopper it automatically
senses the mix level. It activates the “Add
Mix” light.
184592-0112
Page 23

ELECTRO FREEZE Shake Model CS705-M2
6 Disassembly and Cleaning
CAUTION
To avoid electrical shock or
contact with moving parts,
make sure all switches are in
the “OFF” position and that
the main power supply is
disconnected.
It is important that the freezer be
disassembled, washed, lubricated and
sanitized before operation.
6.1 Cleaning Accessories
The following accessories shipped with the freezer are necessary for cleaning, sanitizing,
and disassembly/assembly:
1. BRUSH - HC158010. 6-inch diameter
used to clean the cylinder.
2. HANDLE - HC158012. 36-inch handle
used with brush p/n HC15010.
3. BRUSH - HC158077. 9/16-inch in
diameter with 36-inch handle used to clean
drain tube.
4. BRUSH - DOUBLE END - HC158003.
1-1/8-inch diameter and 7/16-inch diameter
used for cleaning mix feed tube and general
cleaning.
5. TOOL - O-RING REMOVAL.
HC169374. Aids in removing O-rings from
plunger, head, air relief plug, and spindle.
6. LUBRICANT - COMPOUND 7
(SEVEN) HC158066. Approved lubricant for
moving parts, peristolic tubes and O-rings.
7. BRUSH - HC158026. 1-inch in
diameter 12 inches long used to clean the
hopper walls.
The cleaning and sanitizing instructions
explained in this manual are required to
maintain a clean, sanitary freezer. The
freezer should be disassembled, cleaned,
reassembled, lubricated and sanitized to
ensure the best possible product quality
and freezer operation.
Persons assembling, cleaning, or
sanitizing the freezer must wash and
sanitize hands and forearms with an
approved sanitizer.
8. WASH BOTTLE - HC196103. used to
ush the plunger and hopper walls.
9. BRUSH - HC158028. 3/8 inch
diameter x 1/2-inch 21 inch handle used to
clean mix chamber ports and syrup hoses.
9. BEAKER - 150 ML HC196109. Used
in syrup calibration. (not shown)
10. KIT - O-RING. Contains all O-rings
and seals needing replacement on a regular
basis. (not shown)
HC158066 LUBRICANT-COMPOUND 7 (SEVEN)
5.3 OZ TUBE
Figure 6-1 Accessories
184592-01 13
Page 24
ELECTRO FREEZE Shake Model CS705-M2
6.2 Disassembly Instructions
Figure 6-2 Dispense Head Assembly
184592-0114
Page 25
ELECTRO FREEZE Shake Model CS705-M2
6.2 Disassembly Instructions — continued
CAUTION
To avoid electrical shock or
contact with moving parts,
make sure all switches are in
the “OFF” position and that
the main power supply is
disconnected.
CAUTION
To prevent bacteria growth,
remove ALL O-rings when
disassembling for cleaning.
Failure to do so could create a
health hazard.
1. If there is product in the freezer
refer to Section 9.2, CLOSING
PROCEDURES - DRAINING
PRODUCT.
2. Remove ex shaft cover (1). (Refer to
gure 6-2).
3. Place an empty bucket under the
dispensing head.
4. Remove the syrup lines from the
freezer by pressing the metal clip next
to the mix chamber. Twist and pull
the mix chamber (9) off of the head.
Remove the chamber o-ring (10).
Remove o-rings (7) from the quick
connect tting on the mix chamber.
5. Remove the actuator rod (16) by
lifting up and swing out.
6. Hold onto the bottom of the dispense
head (5) and release the mixer shaft
(8) from the exible spinner tube by
lifting up the retainer sleeve on the
ex shaft.
Important:
Mixing shaft will fall out of the mix
chamber and could be damaged if
dropped.
FRAGILE. DO NOT DROP.
7. Pull the keeper (4) out of the head.
Remove the pivot post (13). Turn the
handle (11) and remove from plunger
slot.
8. Remove the hand knobs and pull the
head straight out.
9. Remove the plunger (14) from the
head. Remove the mixer bushing (17)
from the plunger.
10. Remove O-rings (2,12,17,18) from the
head (5), pivot post (12) and plunger
(14).
—continued
184592-01 15
Page 26
ELECTRO FREEZE Shake Model CS705-M2
O-Ring
Insert-Assy. Mix
Feed
6.2 Disassembly Instructions — continued
Figure 6-3 Beater Shaft Assembly
11. Remove the beater bearing bushing
(gure 6-2, 3) and beater shaft
(gure 6-3) from the cylinder. Then
remove the scraper blades (2) and
shaft seal (3,4) from the beater shaft
(1). Remove the cup seals (3) from
the washer (4) on the shaft seal
assembly. Remove the drip tray.
12. Remove the mix feed tube assembly
from the hopper, as shown in gure
6-4 and remove the o-rings (2).
13. Remove the oat from the hopper.
14. Wipe off all lubricants with paper
towel.
O-RING
TUBE-MIX FEED
INSERT - ASSY.
MIX FEED
O-RING
Figure 6-4 Disassemble Mix Feed Tube
184592-0116
Page 27
ELECTRO FREEZE Shake Model CS705-M2
FRONT
BACK
6.3 Cleaning Instructions
CAUTION
To prevent bacteria growth,
remove all O-rings when
cleaning. Failure to do so
could create a health hazard.
CAUTION
Electrical shock hazard. Do
not splash water on switches
or allow water to ow onto
electrical components inside
the machine.
The cleaning instructions explained in
this section are procedures to remove
bacteria. The shake freezer must be
disassembled, washed, and sanitized
according to the instructions in this
manual before start-up to ensure the best
possible cleanliness.
Important:
Do not use unapproved sanitizer
or laundry bleach. These materials
may contain high concentrations of
chlorine and will chemically attack
freezer components.
2. Wash all parts removed from the
freezer thoroughly with a dish
detergent solution. Clean the following
parts with the appropriate supplied
brush:
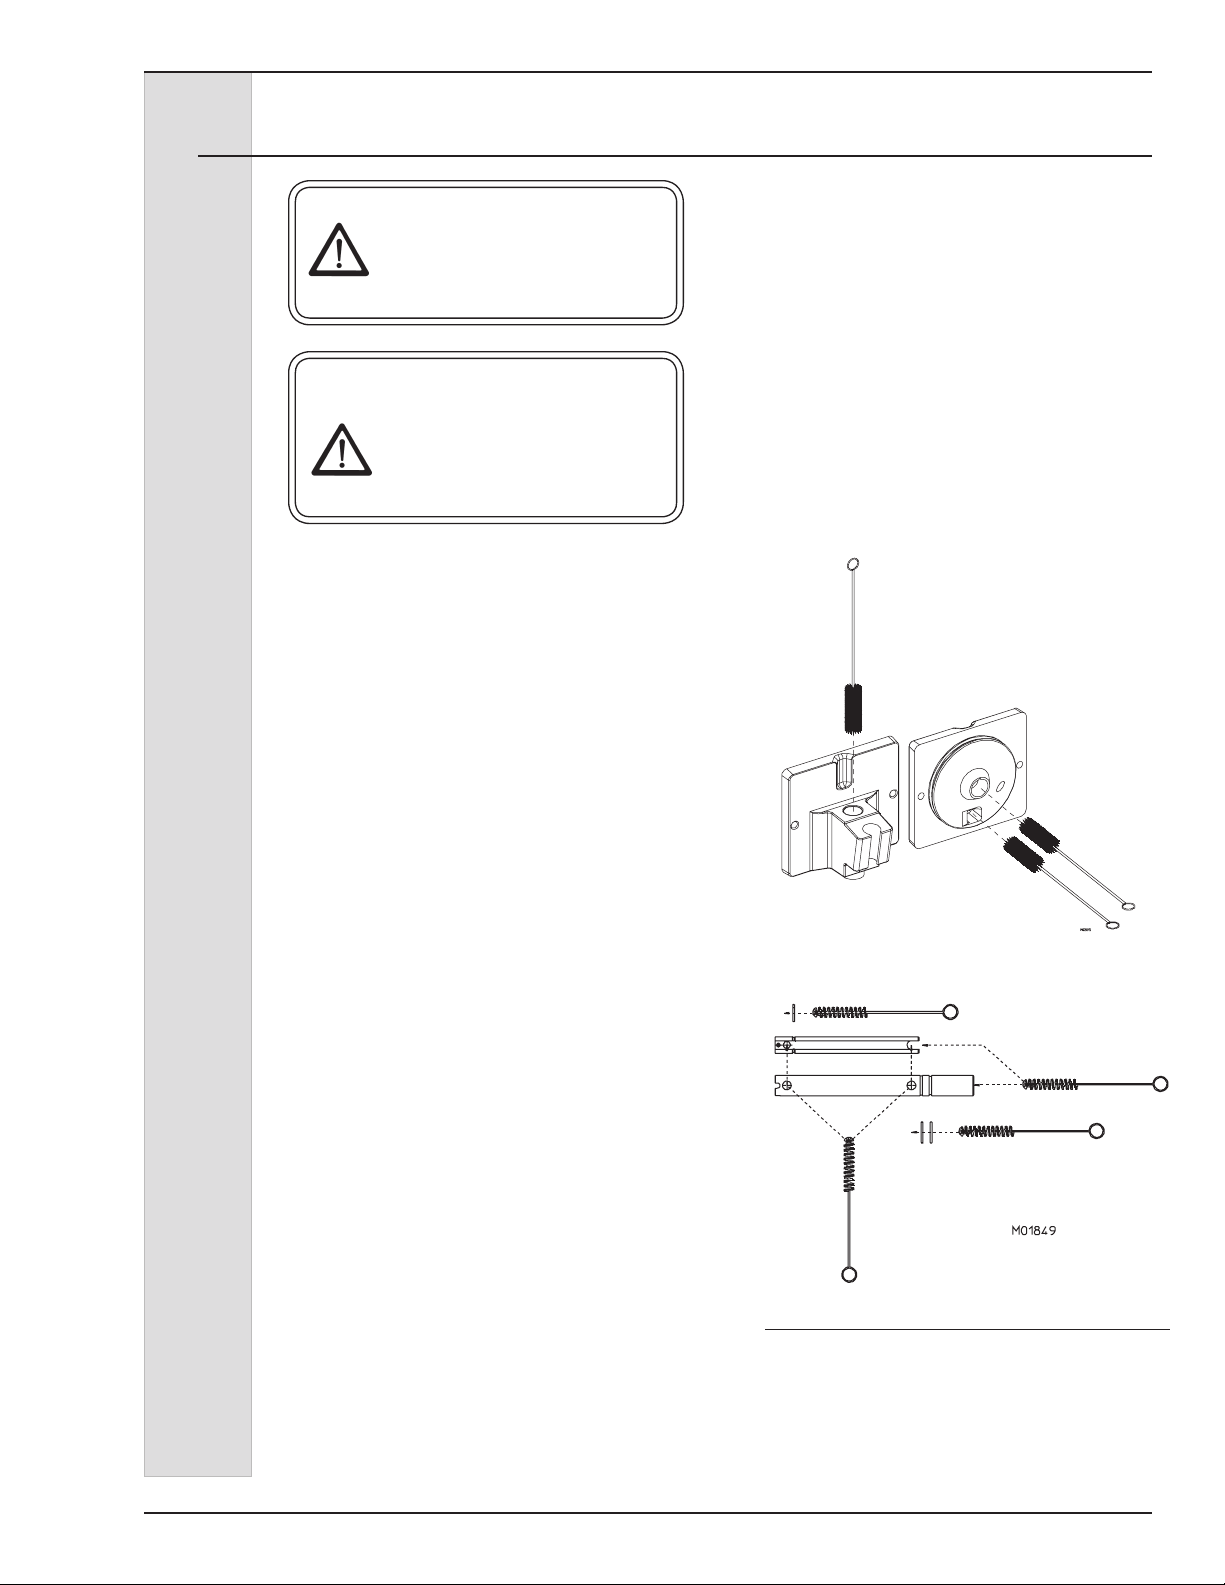
a. The head assembly, o-ring
grooves, plunger, key and dispense
openings as shown in gure 6-5.
b. The mix feed tube, insert and
o-rings as shown in gure 6-6.
—continued
NOTE: It is your responsibility to
be aware of, and conform to, the
requirements for meeting federal, state
and local laws concerning the frequency
of cleaning and sanitizing the freezer.
1. Prepare a three-compartment sink
in accordance with local health
regulations. The sink will be used to
wash, rinse, and sanitize the freezer
components which will be removed
later. Also, prepare a clean surface to
air-dry all parts.
NOTE: The sanitizer should be mixed
according to the manufacturer’s
instructions to yield 100 PPM strength
chlorine solution (example: Stera Sheen
Green Label®). Use warm water (100° to
110°F or 38° to 43°C) to wash, rinse, and
sanitize.
Figure 6-6
184592-01 17
Page 28
ELECTRO FREEZE Shake Model CS705-M2
Cylinde
r
6.3 Cleaning Instructions — continued
Figure 6-7 Clean shaft seal and plunger
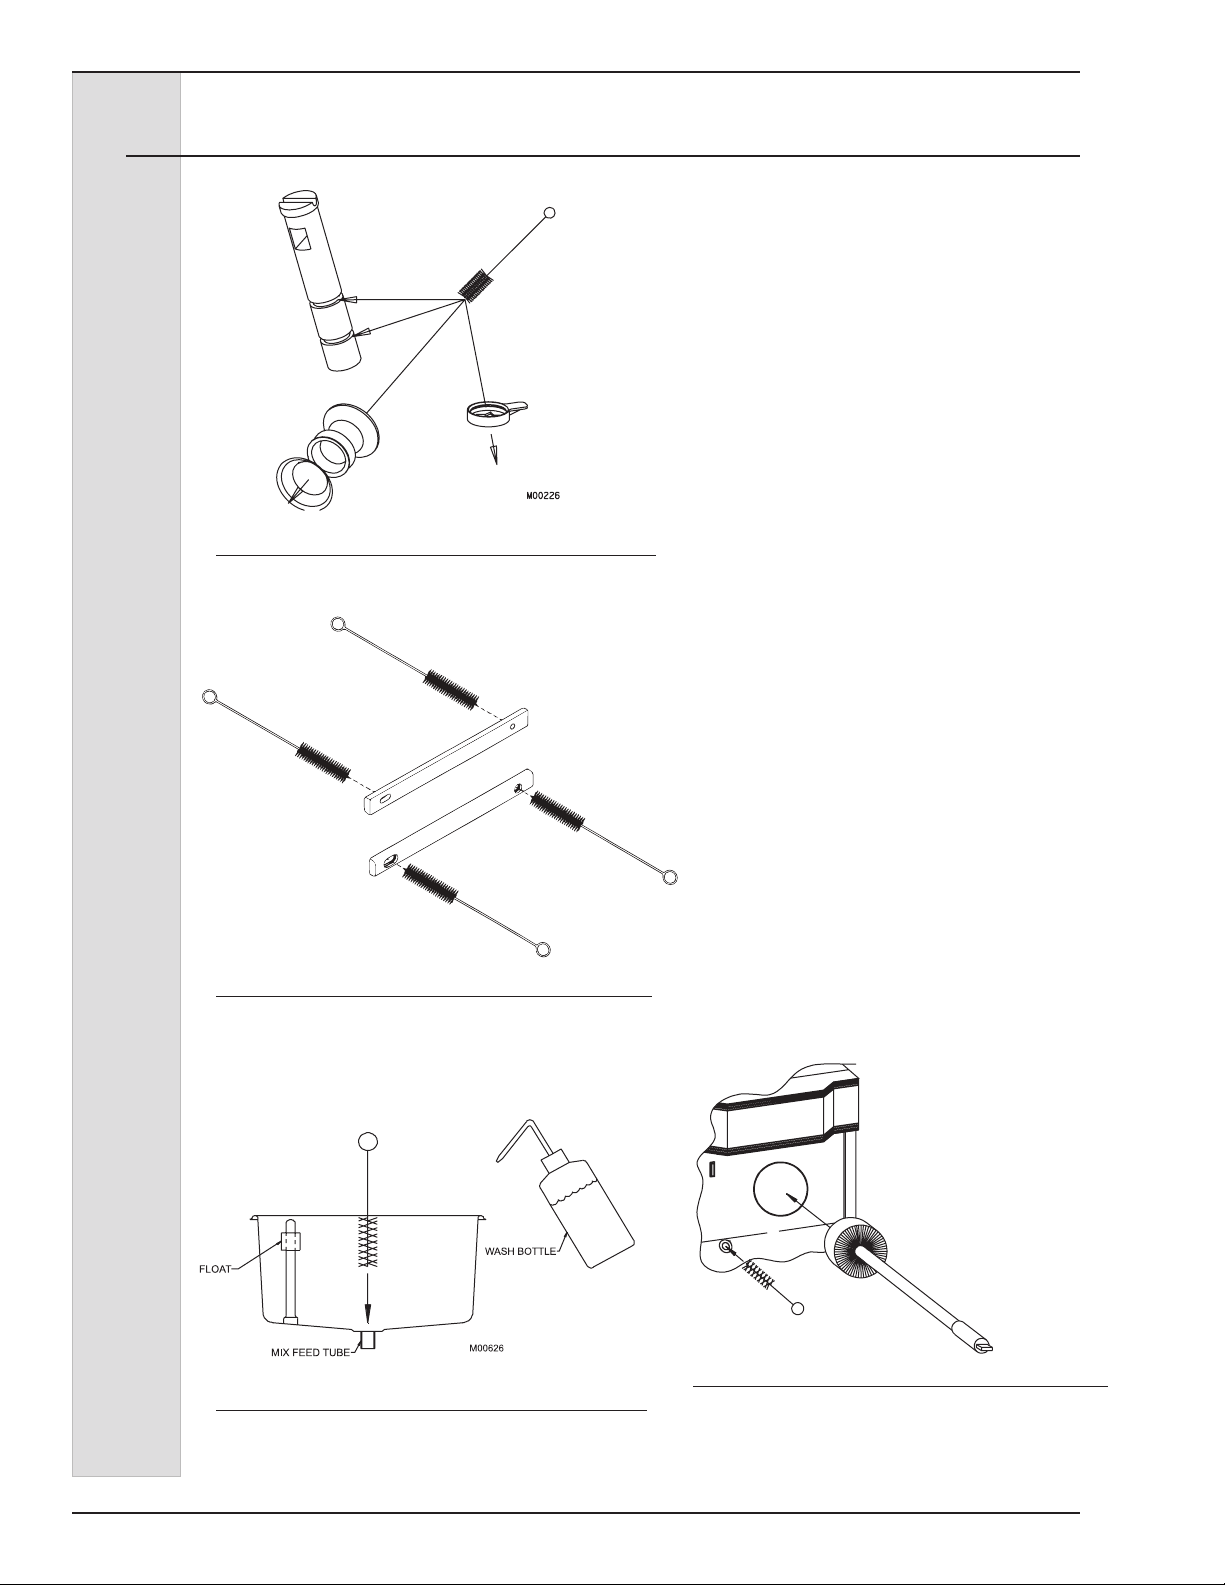
c. The shaft cup seal, washer,
and plunger O-ring grooves (gure
6-7).
d. The beater shaft and the
scraper blade pin holes, shown in
gure 6-8.
e. The mixer shaft and bushing.
g. Mix chamber and tubes.
3. After all parts are washed, rinse and
place them in the sanitizing solution.
For proper sanitizing, all parts
must remain fully immersed in the
sanitizer for 5 minutes. Allow parts
to air-dry after sanitizing.
Important:
Do not leave parts in sanitizer for more
than 15 minutes.
Figure 6-8 Clean scraper blades
M00968
4. Wash hopper walls and all soiled
surfaces on the freezer with a clean
disposable towel.
5. Using the spray bottle lled with
sanitizing solution spray out the end
of each syrup line and the water line
connector.
6. Using proper brush, brush the hopper
inlet tube (gure 6-9), the drain tube,
the cylinder, and cylinder back wall
(gure 6-10), thoroughly with dish
detergent solution. Rinse using rinse
bottle. Using sanitizing solution,
repeat brushing procedure making
sure all surfaces contact sanitizer.
Figure 6-9 Clean hopper and mix feed port
Drain Tube
Figure 6-10 Clean drain tube & cylinder
Replace worn brushes. Use only
Electro Freeze original or authorized
replacement parts. See Accessories
Parts List in Part II of this manual to
order new brushes.
184592-0118
Page 29
7 Assembly
Figure 7-1 Shaft Seal Lubrication
ELECTRO FREEZE Shake Model CS705-M2
Correct assembly of the freezer is
essential to prevent leakage of the
product and damage to the freezer. To
assemble the freezer, you will need an
approved lubricant (such as Compound
7). Make sure all parts of the assemblies
have been washed and sanitized before
assembling. Persons assembling the
freezer must rst wash and sanitize their
hands and forearms with an approved
sanitizer.
CAUTION
To avoid electrical shock or
contact with moving parts,
make sure all switches are in
the “OFF” position and that
the main power supply is
disconnected.
Figure 7-2 Beater Shaft Assembly
1. Persons assembling the freezer must
rst wash and sanitize their hands and
forearms with an approved sanitizer.
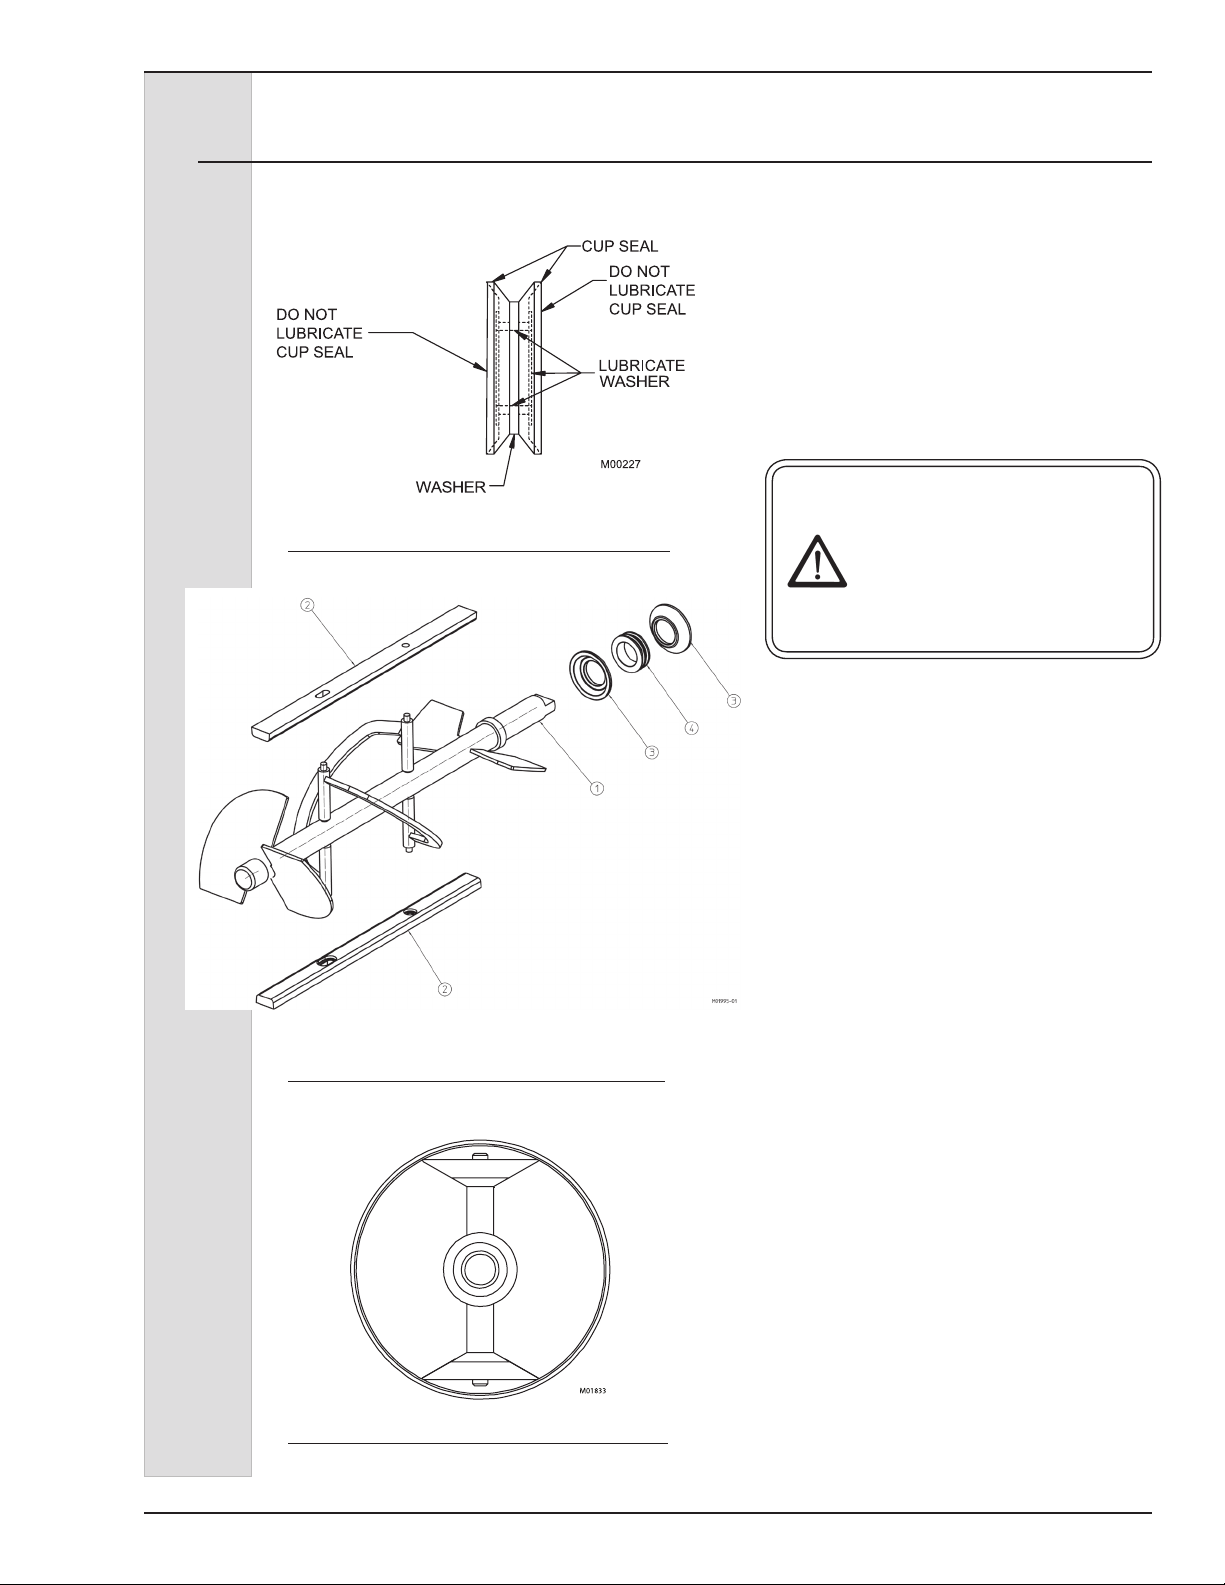
2. Assemble the shaft seal by installing
the cup seals (3) on the plastic
washer (4). Apply a moderate amount
of approved sanitary lubricant (such
as Compound 7) to the washer. Do
not allow any lubricant to come in
contact with the bell-shaped rubber
portions of the seal (gure 7-1).
3. See gure 7-2. Install the shaft seal
over the rear of the beater shaft. Wipe
off excess lubricant from the beater
shaft.
4. Place the scraper blades on the
beater shaft, making sure the blades
are installed properly.
5. See gure 7-3. Insert the assembled
beater shaft into the cylinder by
placing one blade on the bottom of the
cylinder. This will center the beater
and allow alignment with the drive
shaft. Rotate the beater assembly
while pushing, until the shank has
engaged the drive shaft.
—continued
Figure 7-3 Scraper Blade Installation
184592-01 19
Page 30
ELECTRO FREEZE Shake Model CS705-M2
7 Assembly — continued
Figure 7-4 Head Assembly
184592-0120
Page 31
ELECTRO FREEZE Shake Model CS705-M2
7 Assembly — continued
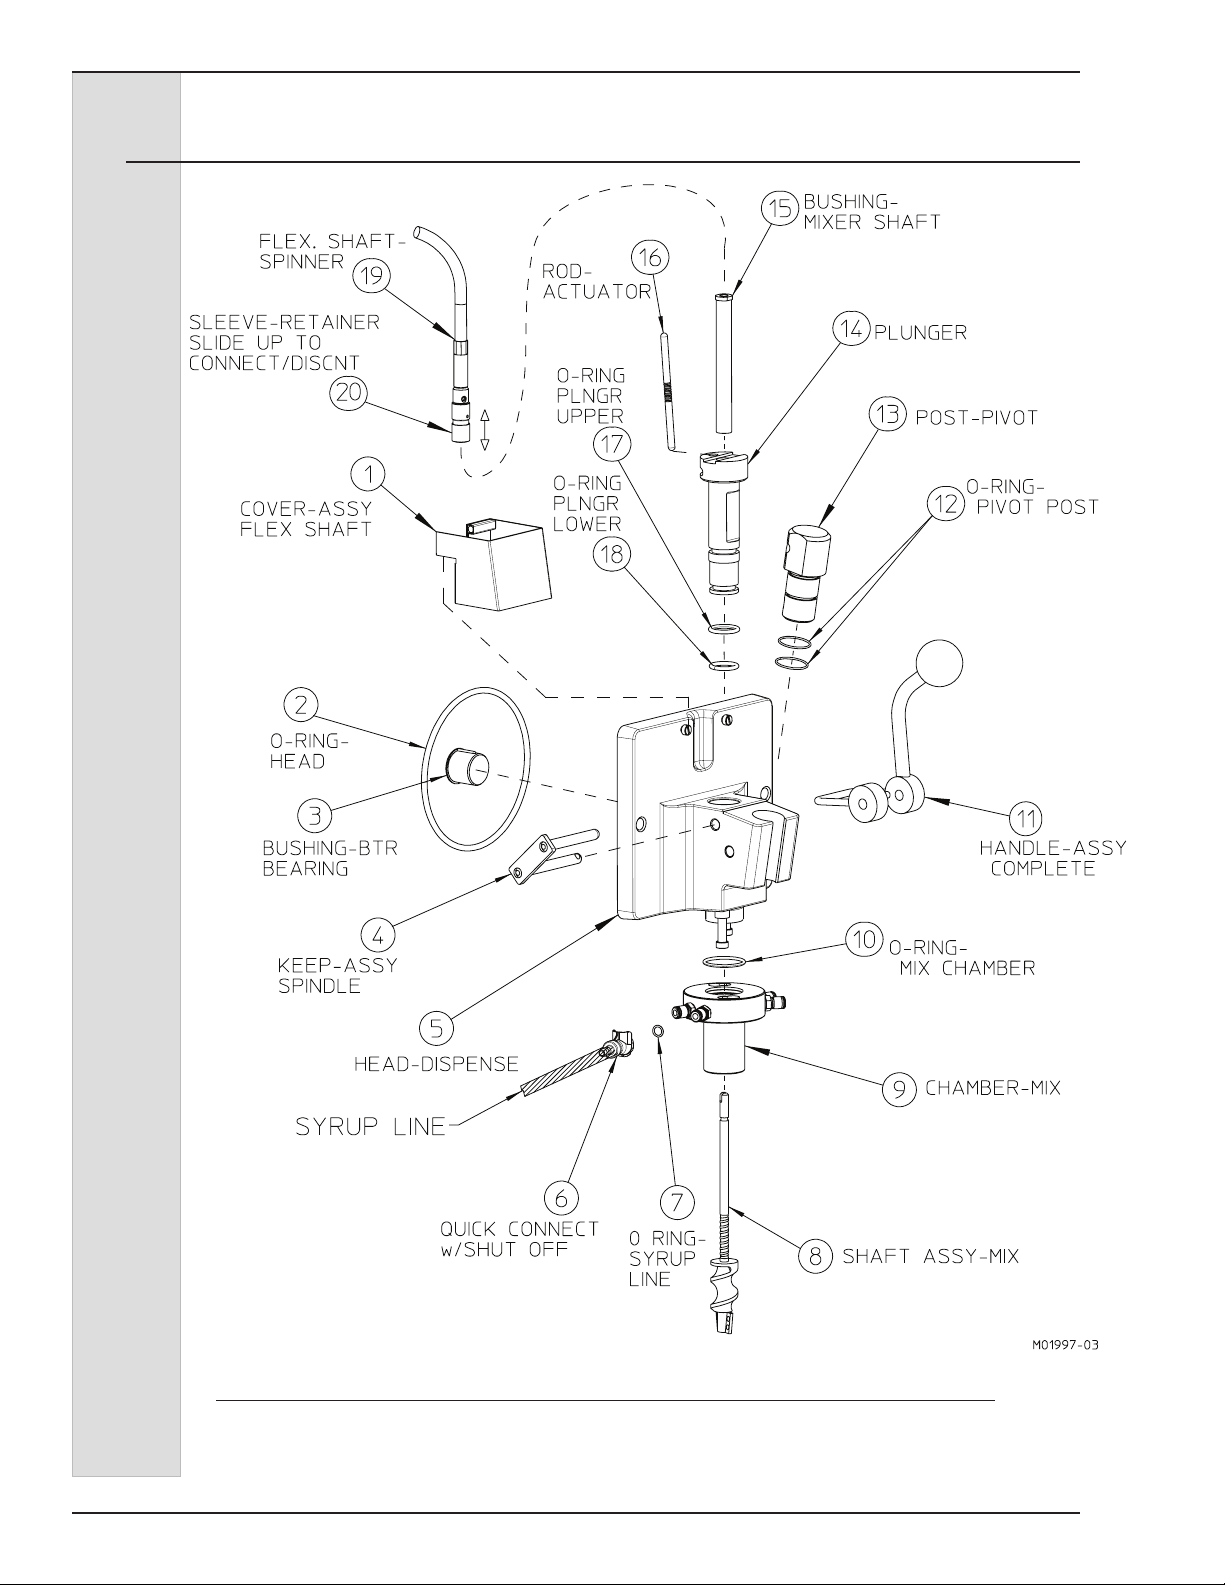
6. See gure 7-4 and o-ring chart in
the replacement parts section of this
manual. Install the head o-ring (2) into
the groove on the back of the dispense
head (5),
7. (Install the o-rings (17, 18) on the
plunger (14). Lubricate the o-rings.
8. Install the o-rings (12) onto the pivot
post (13). Lubricate o-rings lightly. Insert
pivot post into the head so the holes are
toward the back.
9. Install the mixer shaft bushing (15) into
the plunger (14).
10. Install the plunger (14) into the head
(5) just past the top o-ring with the slot
facing back. Turn slot slightly to the left
and hook handle (11) into the slot. With
handle in the slot turn the slot to the
back.
11. Place the keeper (4) through the handle
(11), pivot post (13) and head (5) until it
locks in place.
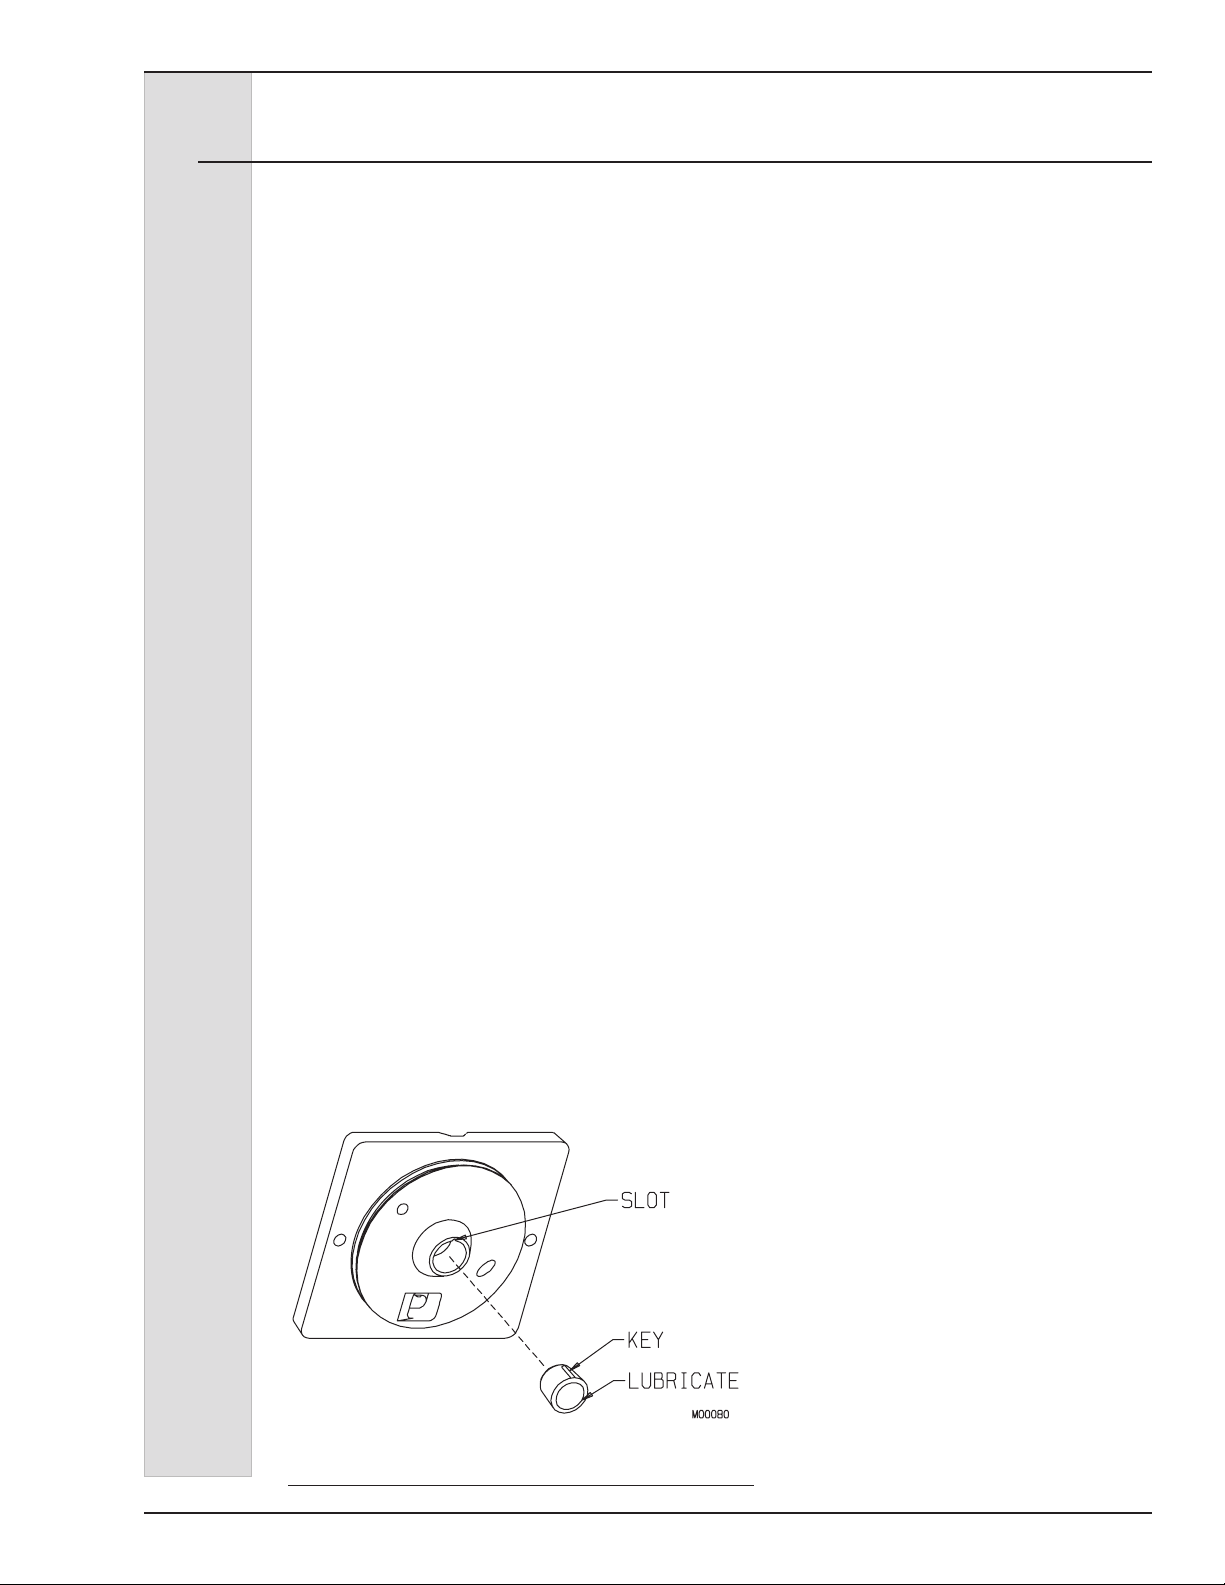
12. Lubricate the inside surface of the
beater bearing bushing (3) and place
in the head (5) making sure to align
bushing key into head slot, as shown in
gure 7-5.
Important:
Match the key on the bushing. Make
sure the key aligns with the slot. Failure
to install the bushing properly in the
dispensing head will damage the head.
13. Install the dispensing head onto the
freezer by tilting the top of the head
towards you, aligning the studs with the
holes in the head, and sliding toward
the freezer. As you push the head
towards the freezer, carefully rock it
into place.
14. Tighten the hand knobs simultaneously,
nger-tight only.
Important:
Excessive force will damage the head.
Do not use tools to tighten.
15. Insert mixing shaft (8) into the bottom
of the head (5) with mixer paddle
towards the bottom. Pull back the
sleeve on the end of the exible
spinner tube in the switch box and
insert mixing shaft into tube, turning
until it snaps into place.
16. Install the o-ring (10) by pushing it
into groove in the mixing chamber (9).
Lightly lubricate the o-ring. Install the
mix chamber on to the bottom of the
head by placing over bolts and turn to
lock in place.
17. Install the actuator rod (16) by placing
one end into hole in the bottom of the
switch box and the other end in the
indent in the plunger behind the ex
shaft.
18. Place ex shaft cover (1) on top of
head using bolts to lock in place.
Important:
The freezer will not dispense product
without the ex shaft cover in
place.
19. Install the ve o-rings (7) on quick
connect ttings (6) on the mix chamber.
Lightly lubricate o-rings..
20. Push each syrup line quick connect (6)
onto tting of the mixing chamber (10).
—continued
Figure 7-5 Head Bushing
184592-01 21
Page 32
ELECTRO FREEZE Shake Model CS705-M2
O-Ring
Insert-Assy. Mix
Feed
7 Assembly — continued
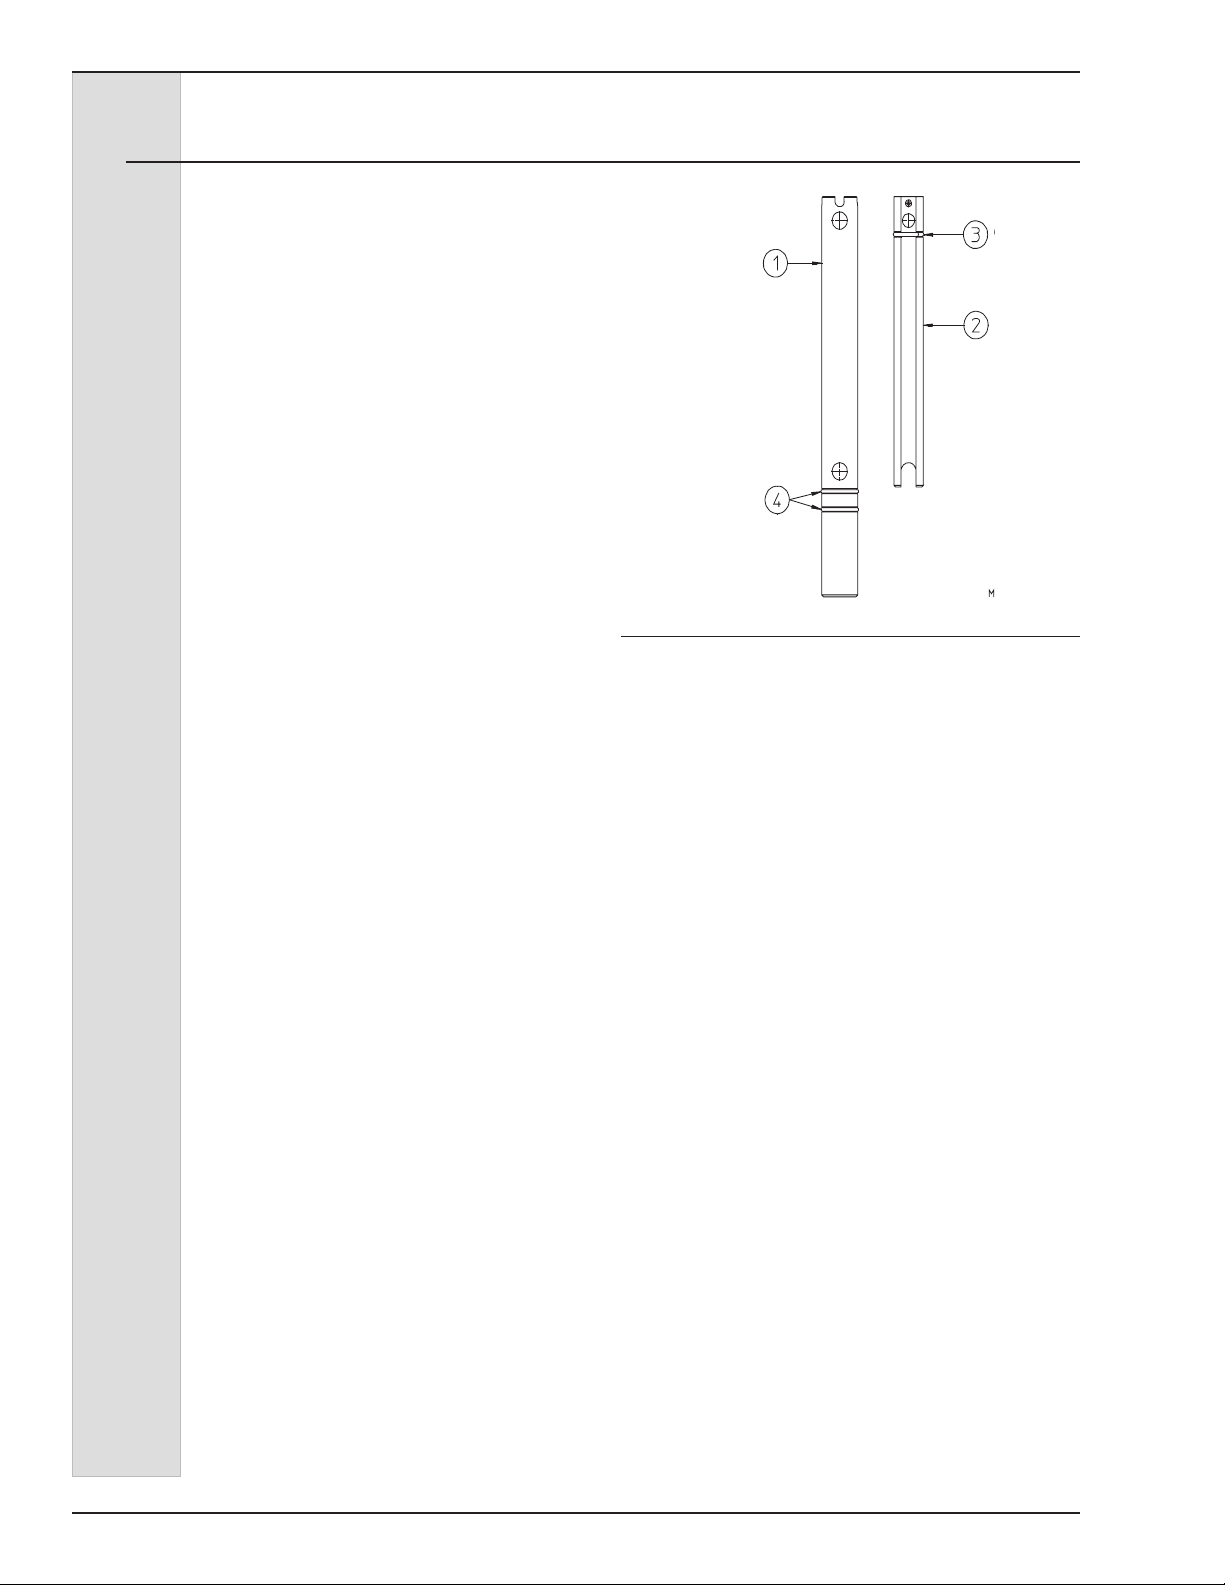
21. See Figure 7-6. Install the o-ring
(3) on the mix feed insert (2) and
lubricate. Then install the o-rings
(4) on the mix feed tube (1) lightly
lubricate. Place the insert inside the
mix feed tube.
22. Lay the mix feed tube assembly in the
hopper pan. (Do not install in the mix
feed port in the hopper at this time.)
O-RING
TUBE-MIX FEED
INSERT - ASSY.
MIX FEED
O-RING
Figure 7-6
184592-0122
Page 33
ELECTRO FREEZE Shake Model CS705-M2
8 Start-up Instructions
8.1 Sanitizing
The sanitizing instructions explained in this
section are procedures to remove bacteria
and maintain a clean, sanitary freezer.
The shake freezer must be disassembled,
washed, and sanitized according to the
instructions in this manual before start-up
to insure the best possible cleanliness.
CAUTION
To prevent bacteria growth,
use only approved sanitizers to
sanitize the freezer. Sanitizing
must be done just prior to
starting the freezer. Failure to
do so could create a health
hazard.
Important:
Do not use unapproved sanitizer or
laundry bleach. These materials may
contain high concentrations of chlorine
and will chemically attack freezer
components.
NOTE: It is your responsibility to be
aware of and conform to the requirements
for meeting federal, state and local laws
concerning the frequency of cleaning and
sanitizing the freezer.
1. Prepare 2 gallons (7.6 liters) of
sanitizing solution in a container.
Sanitizing solution must be mixed
according to manufacturer’s
instructions to yield 100 PPM strength
chlorine solution. (example: SteraSheen Green Label). Use warm water
(100-110°F or 37-43°C) to wash, rinse,
and sanitize.
Important:
Do not insert any tools or objects into
the mix feed port or head dispensing
hole while the freezer is running.
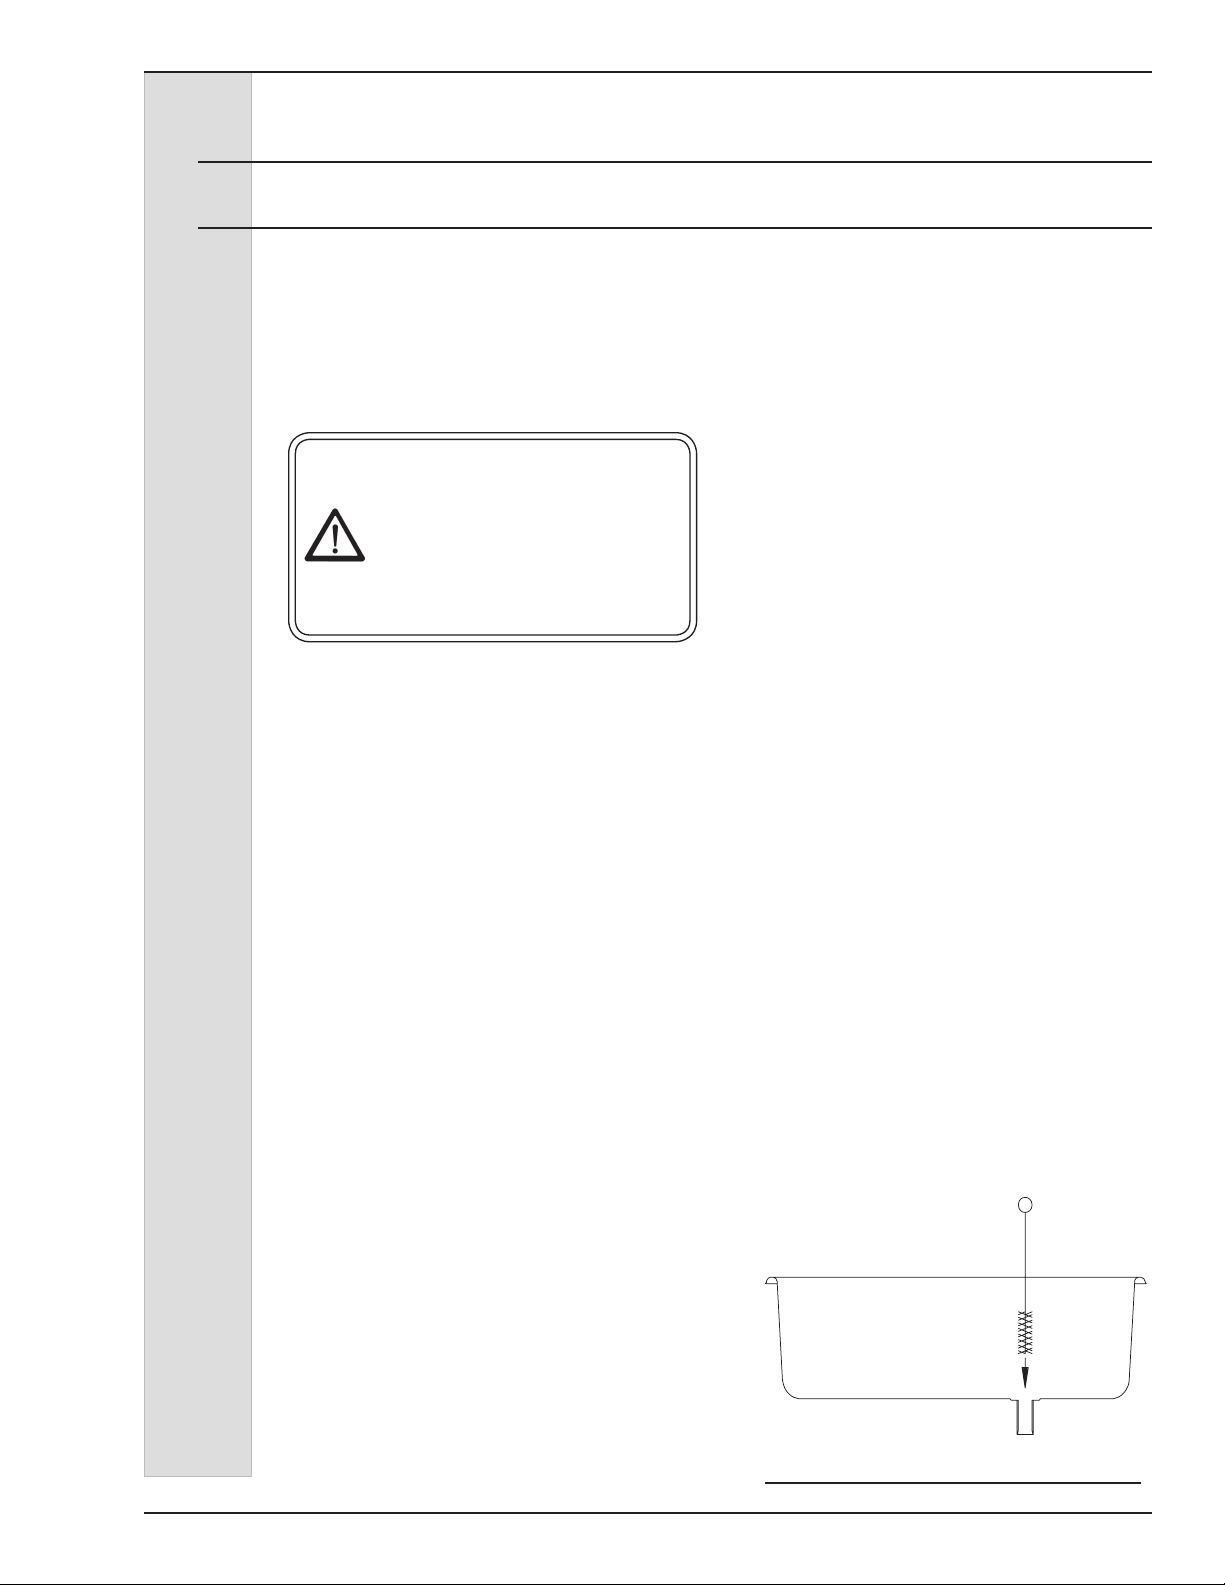
4. Pour sanitizing solution into the
hopper pan. Using a clean brush,
scrub the hopper walls, the mix feed
port from the hopper to the cylinder,
the inside of the mix feed tube and
adapter (see gure 8-1), and the
inside of the hopper cover.
5. Insert mix oat on mix level sensor.
6. Allow sanitizer to ll the cylinder.
7. Connect the main power supply.
8. The syrup switch should be in the
“OFF” position. Place the selector
switch to the “CLEAN” position and
allow the beater to run for 5 minutes.
During this time period check for leaks
around the head, plunger and drain
tube.
9. Place an empty container under
the dispensing head and drain the
sanitizing solution from the cylinder by
slowly pulling down on the dispense
handle. Open and close the handle
approximately 10 times during
draining to sanitize the port area of
the dispense head.
10. With most of the sanitizing solution
drained, turn the selector switch to the
“OFF” position and drain remaining
solution from the hopper and cylinder
and close the plunger.
2. Wash and sanitize your hands and
forearms.
3. The mix feed tube assembly should be
laying in the bottom of the hopper pan.
Do not install.
Important:
Never let the sanitizer remain in the
freezer for more than 15 minutes.
Figure 8-1 Sanitize hopper and its
components
184592-01 23
Page 34
ELECTRO FREEZE Shake Model CS705-M2
CLOSED
8.2 Priming
Priming the freezer removes all excess
air and sanitizer from the freezing cylinder
and sets the proper overrun for the rst
cylinder of product. Always have clean,
sanitized hands when handling mix feed
assemblies. Handle only the top 1”. Make
sure the mix feet tube assembly and the
inside of the hopper cover are cleaned
with sanitizer.
1. Wash and sanitize your hands and
forearms.
2. Place an empty container under the
dispense head. Install the mix feed
tube assembly in the closed position,
as shown in gure 8-2, into the mix
feed drain in the hopper. Pour a
minimum of 2-1/2 gallons of mix into
the hopper.
3. Hold the plunger open and remove
the mix feed tube to allow mix to push
out the sanitizer. When pure mix
ows from the dispense head close
the plunger.
Important:
Failure to completely remove sanitizer
or water from the freezing cylinder
before placing in “AUTO” will damage
the freezer.
5. Fill the hopper with mix and Install the
hopper cover.
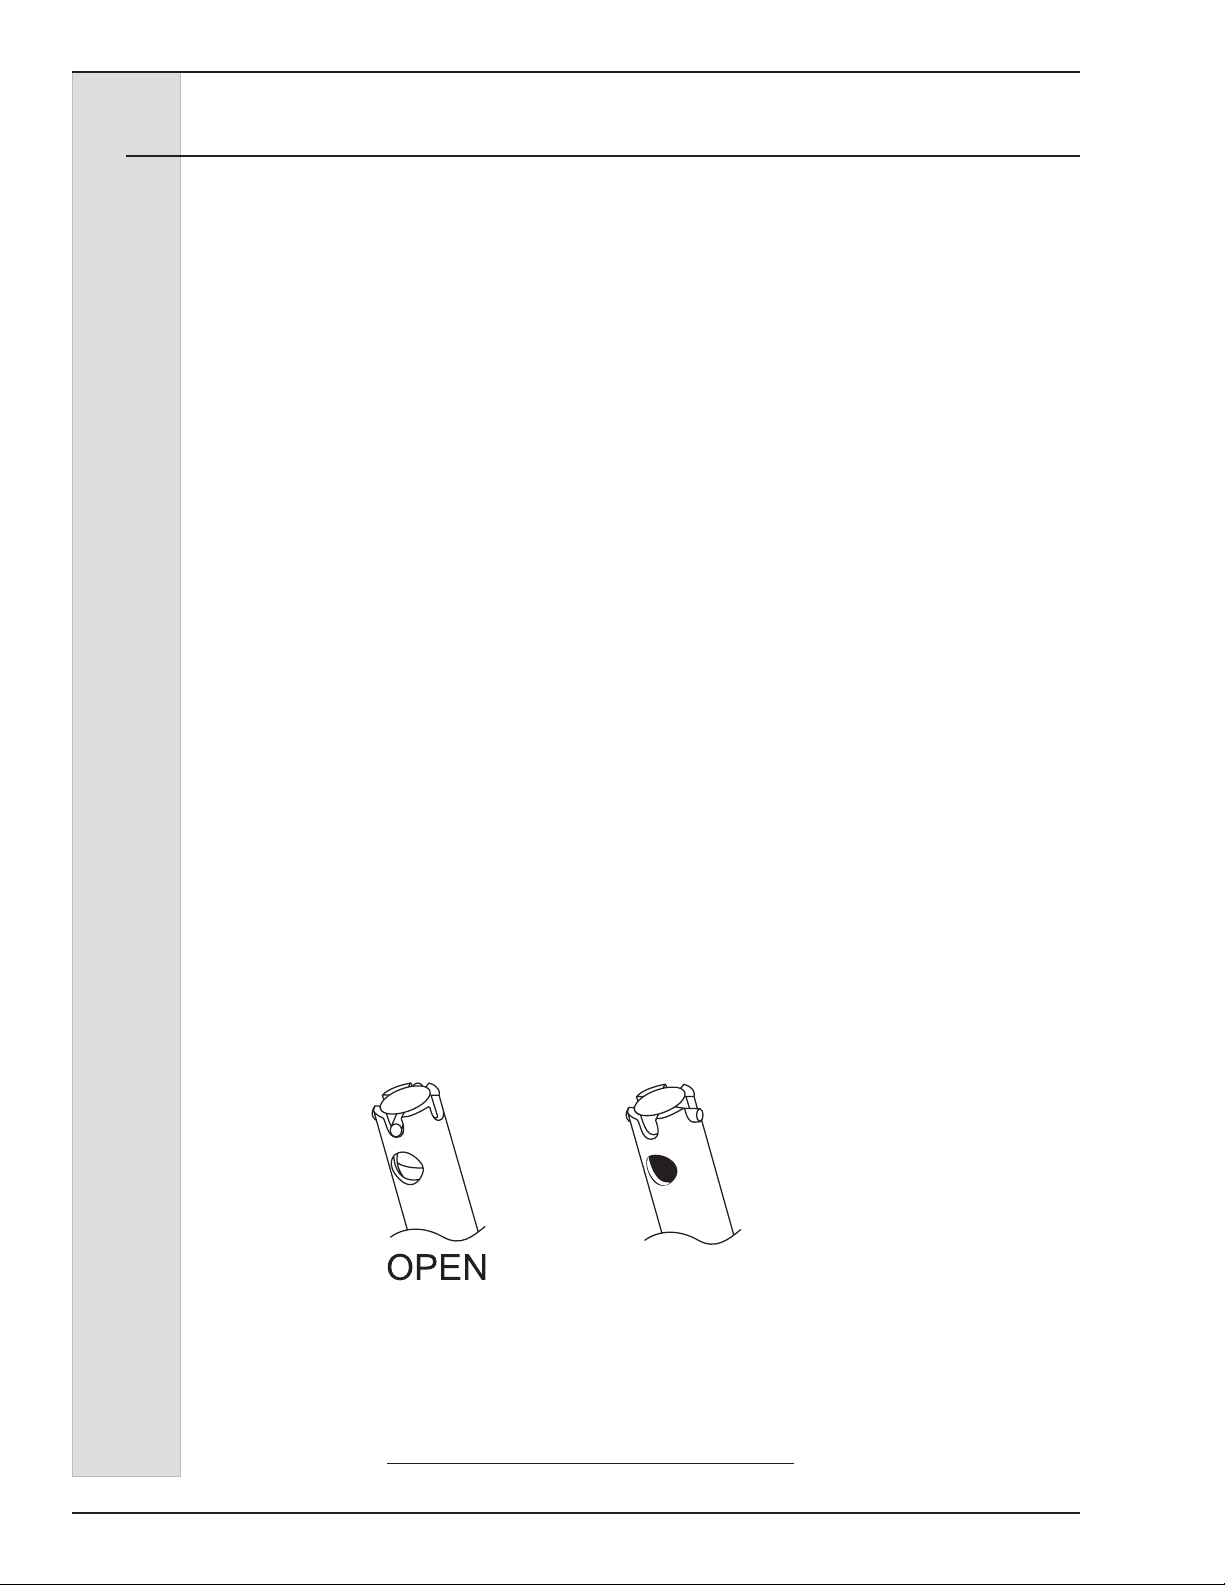
6. During long idle periods, the regulator
should be closed — but remember —
when dispensing product, ensure
that the mix feed regulator is
“OPEN” at all times. If not open,
the ow of mix will be restricted. If
lubricant blocks the inlet hole in the
tube it would also restrict the ow of
mix.
4. When the mix stops bubbling install
the mix feed tube into the mix feed
hopper drain in the “open” position.
Place the selector switch to the
“AUTO” position.
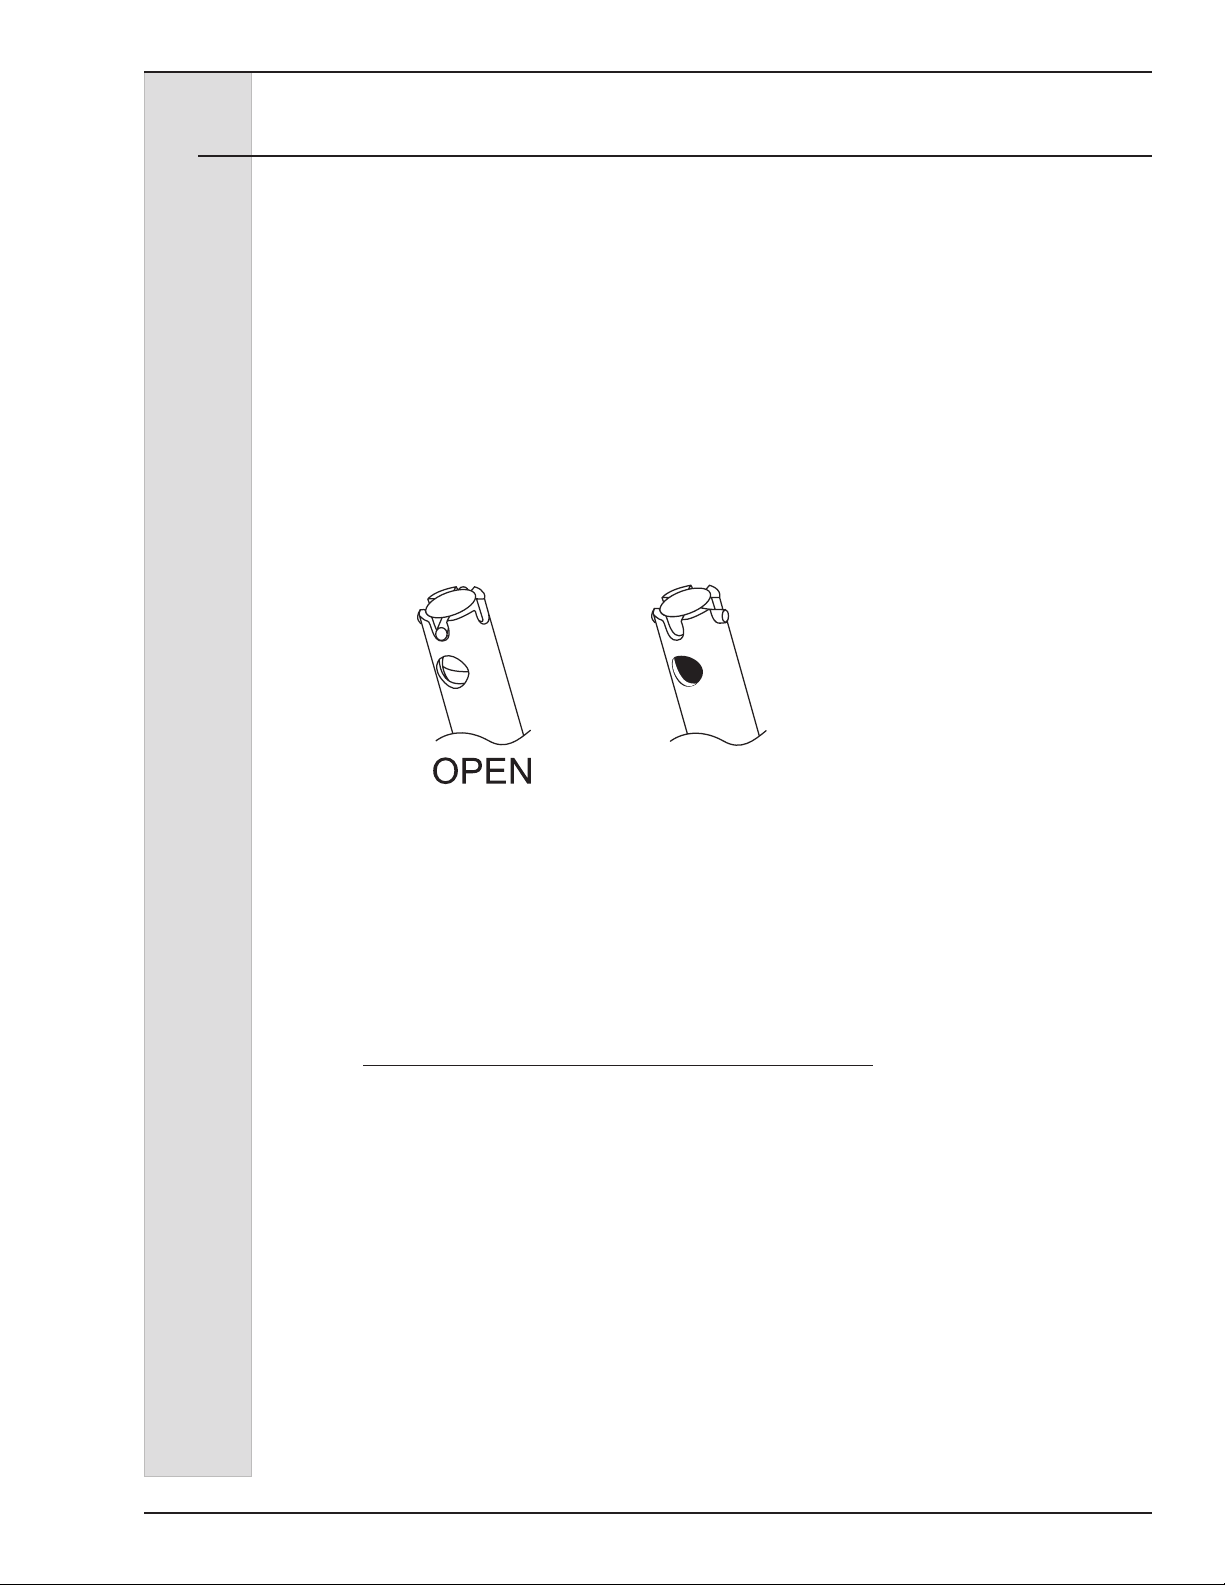
Pin is in line with hole.
Look through top hole
in tube — you should
see clear through.
Pin is not in line with hole.
Look through top hole in
tube — you should see the
inner white plastic insert
tube (regulator) blocking the
opening.
Figure 8-2 Mix Feed Tube Positions
184592-0124
Page 35
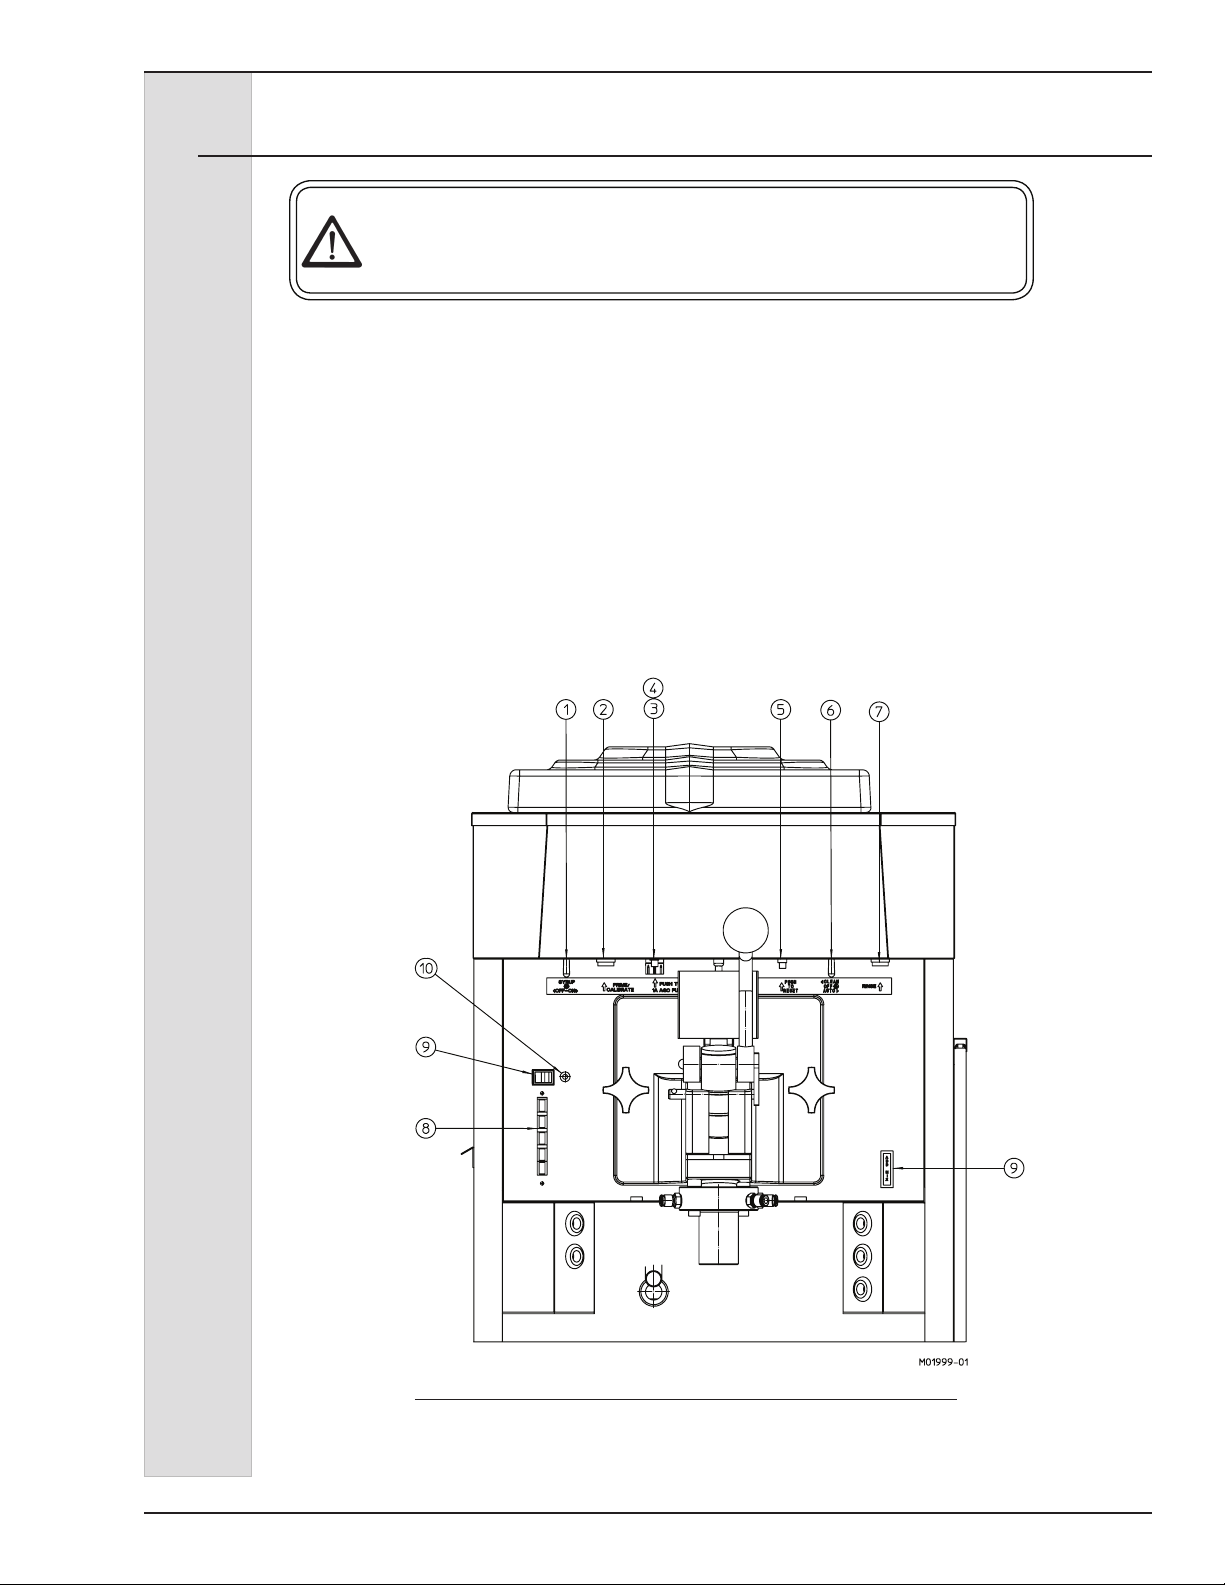
ELECTRO FREEZE Shake Model CS705-M2
8.2 Dispensing Milk Shakes
CAUTION
DO NOT touch or get too close to moving parts. Clothing, jewelry,
hair or other body parts may become caught in the machine and
result in personal injury.
1. Place the syrup pump switch (1) to
the “ON” position. See gure 8-3
2. To dispense malt turn on the malt
switch (9) and select desired avor (8)
on the front panel.
3. Place cup under mixing chamber.
4. Pull down on handle to dispense
shake mix and blend in avoring. Turn
cup as shake dispenses.
5. When cup is lled push handle up to
stop dispensing and remove cup.
6. Product is ready to serve.
7. To clean mixing chamber before a
different avor is selected, place an
empty cup under the mixing chamber
and push the rinse button (7) to clean
mixing chamber before next serving.
Figure 8-3
184592-01 25
Page 36
ELECTRO FREEZE Shake Model CS705-M2
9 Daily Procedures
9.1 Night or Idle Operation
9.1.1 General Cleaning
1. Remove the spinner ex shaft
cover assembly (1) in preparation to
disassemble the shake mix chamber
(9).
SAFETY NOTE: Removal of the ex shaft
cover disables the spinner motor.
2. Disconnect the syrup lines and water
rinse line from the mix chamber.
3. Remove the mix chamber and set
aside for cleaning.
4. Disconnect the ex-shaft from the
spinner shaft (taking care not to drop
the spinner shaft which will fall out of
the plunger), remove the spinner shaft
from the shake head.
5. Prepare a container of sanitizing
solution. Sanitizing solution must be
mixed according to manufacturer’s
instructions to yield 100 PPM strength
chlorine solution. (example: SteraSheen Green Label). Use warm water
(100-110°F or 37-43°C). Fill the wash
bottle with sanitizing solution.
6. Using a brush and bottle of sanitizing
solution wash down the bottom of the
shake head and plunger, being sure
to clean the plunger spinner shaft hole
with a brush.
7. Using the bottle of sanitizing solution.
a. rinse down the head, end of the
plunger, and plunger spinner shaft
hole
c. spray out the ends of each syrup
line connector. Also spray the end of
the connector for the water line.
d. wash the mix chamber using a
brush to clean the center bore as well
as each of the syrup holes.
Figure 9-1
f. rinse off the cleaned mix chamber
and spinner shaft with clean sanitizing
solution.
8. Set parts aside to dry.
9. Leave shake mix system disassembled overnight and re-assemble
prior to the next use. See Assembly
Section 7.
10. If your location is open 24 hours,
system must be cleaned once a day,
we recommend cleaning steps 1
through 11 in the morning or other
slow period.
e. wash the spinner shaft using a
brush to clean the paddle holes.
184592-0126
Page 37
9.1.2 Operation
CLOSED
ELECTRO FREEZE Shake Model CS705-M2
1. In areas where state and local health
codes allow, product may remain
in the freezer overnight, leave the
Selector Switch in the “AUTO”
position and the syrup switch to the
“OFF” position.
Note: The plunger rod and cover must
be in place for the unit to operate.
2. Clean all soiled surfaces with a warm
dish detergent solution.
3. Turn the mix feed regulator to the
“CLOSED” position as shown in gure
9-2.
Pin is in line with hole.
Pin is not in line with hole.
4. Check mix level in hopper to ensure
that there is enough mix to keep
the indicator light off, add mix if
necessary. Do not dispense
product when the mix feed
regulator is in the “CLOSED”
position.
5. Before serving from the machine use
the wash bottle and spray the plunger
and mix chamber opening with
sanitizing solution and “OPEN” the
mix feed regulator and ll the hopper
with mix (gure 9-2).
DAY NIGHT
Look through top hole
in tube — you should
see clear through.
Figure 9-2 Mix Feed Tube Positions
Look through top hole
in tube — you should
see the inner white
plastic tube (regulator)
blocking the opening.
184592-01 27
Page 38
ELECTRO FREEZE Shake Model CS705-M2
O-Ring
Insert-Assy. Mix
Feed
9.2 Draining Product from Freezer
NOTE: It is your responsibility to be
aware of and conform to the requirements
for meeting local, state, and federal laws
concerning the frequency of cleaning and
sanitizing the freezer.
To remove frozen product from the
cylinder, perform the following steps:
1. Remove the ex shaft cover.
CAUTION
To avoid contact with moving
parts, deactivate spinner by
removing ex shaft cover.
Spinner will not operate with
cover removed.
2. Place the selector switch in the
“CLEAN” position.
3. Place a clean, sanitized container
under the dispensing nozzle on the
drip tray.
4. Remove the mix feed tube from the
hopper. (See gure 9-3).
5. Disconnect the syrup lines.
6. Twist and pull down the mixing
chamber removing it from the head.
7. Disconnect the mixer shaft by
releasing the coupling while pulling on
the bottom.
8. Take parts to sink.
9. Place a clean, sanitized container
under the dispensing nozzle on the
drip tray. Dispense the product until
the mix is removed. Place the selector
and syrup switches to “OFF” and
continue dispensing product until it
quits owing. Close the plunger. If local
health codes permit, cover the rerun
product container and place it in the
cooler. (See 10.2 General Information Rerun).
11. Follow with 2 gallons of warm water
and repeat until the freezer dispenses
clear water. With most of the water
dispensed, place selector switch in the
“OFF” position and drain off remaining
water.
12. Prepare 2 gallons (7.6 liters) of
sanitizing solution in a container.
Sanitizing solution must be mixed
according to manufacturer’s
instructions to yield 100 ppm available
chlorine solution (example: SteraSheen Green Label).
13. Pour all the sanitizing solution into the
hopper pan. Using a clean brush scrub
the hopper walls.
14. Place the selector switch to the
“CLEAN” position and allow the beater
to run for 5 minutes.
15. Place an empty container under the
dispensing head. Drain the sanitizing
solution from the cylinder by slowly
pulling down on the dispense handle.
Open and close the handle several
times while draining.
16. With most of the sanitizing solution
drained, Place the selector switch to
the “OFF” position and drain remaining
solution from the freezer and close the
plunger.
17. Proceed to sections 6 DISASSEMBLY
AND CLEANING, 7 ASSEMBLY AND
8 STARTUP INSTRUCTIONS.
O-RING
TUBE-MIX FEED
INSERT - ASSY.
MIX FEED
10. Pour 2 gallons of cold water into the
hopper. Place the selector switch to
“CLEAN” and dispense the cold water.
Important:
DO NOT use hot water. Damage to the
freezer could occur.
O-RING
Figure 9-3
184592-0128
Page 39

ELECTRO FREEZE Shake Model CS705-M2
10 Product Information
10.1 Overrun
As mix is frozen in the freezing cylinder,
air is incorporated into the mix to increase
its volume, as well as enhance the taste
and texture of the nished product. The
increase in volume is called overrun. Fifty
percent overrun means a volume increase
of 50%—10 gallons of liquid mix has
become 15 gallons of nished product.
Controlled overrun is important to
maintain consistency in product quality.
Too much overrun (air) results in a light,
uffy product lacking the cold, refreshing
appeal of a quality product. Too little
overrun results in a wet, heavy product.
To correctly measure the overrun, perform
the following steps:
a. Place an empty pint container on
the scale* and adjust your scale to
zero.
b. Remove the container from the
scale and ll with liquid mix. Measure
and record the weight.
c. Remove the liquid mix and ll the
same container with frozen product.
Be sure there are no voids or air
spaces in the container.
d. Strike off the excess product so it
is even with the top of the container
and measure the weight.
e. Use the following formula to gure
overrun percentage:
“Weight of liquid mix minus weight of
frozen product/divided by the frozen
weight.” See example.
Example:
Weight of one pint of mix = 18 oz.
Weight of one = 12 oz.
pint frozen product
Difference = 6 oz.
6.0 oz. divided by 12 oz. = .5
.5 x 100 = 50% overrun
* Your Electro Freeze Distributor can
provide a scale (P/N HC158049) that is
graduated in overrun percentage.
10.2 Rerun
If local health codes permit the use
of rerun make sure to follow these
procedures:
1. Store rerun mix in a clean, sanitized
container.
2. Store in a cooler with a temperature
below 40ºF (4.4ºC).
3. DO NOT prime the machine with
rerun. Always skim off and discard
foam. Then combine the rerun with
fresh mix in a ratio of 50/50 and add
to the hopper during operation.
4. Once a week run the mix as low as
possible and discard after closing.
This will break the rerun cycle and
reduce the possibility of high bacteria
and coliform counts.
184592-01 29
NOTE: Rerun product is unable to
accept the same amount of air as fresh
product. As a result, the quality will
be affected and product may appear
grainy and icy.
For further information contact your local
Electro Freeze distributor or the Service
Department of H. C. Duke & Son, LLC,
phone (309) 755-4553 or (800) 755-4545.
Page 40
ELECTRO FREEZE Shake Model CS705-M2
MALT
11 Syrup Flavor System
The syrup avor system is included with
all CS705 shake freezers. This system
allows you to serve a vanilla shake and
3 other avors with or without malt avor
with the press of a button.
11.1 Syrup Line Disassembly and Sanitizing
Important:
Do not use the “AUTO” position with
sanitizer or water in the cylinder. The
freezer will be damaged.
The syrup line system should be
cleaned every 30 days. The freezer
should be fully cleaned prior to syrup
line cleaning. Records should be
maintained to record last cleaning of
freezer and syrup lines.
Sanitizer noted in this section must be
prepared according to manufacturer’s
instructions to yield 100ppm strength
chlorine solution (Example: SteraSheen® Green Label) Use warm water
(100-110°F or 37- 43°C)
NOTE: It is your responsibility to be aware
of, and conform to, the requirements for
meeting local, state, and federal laws
concerning the frequency of cleaning and
sanitizing the syrup lines.
1. Wash and sanitize your hands and
forearms before cleaning syrup lines.
2. With the syrup pickup tube in the
syrup bottle, disconnect syrup hose
from the pump by pushing on the
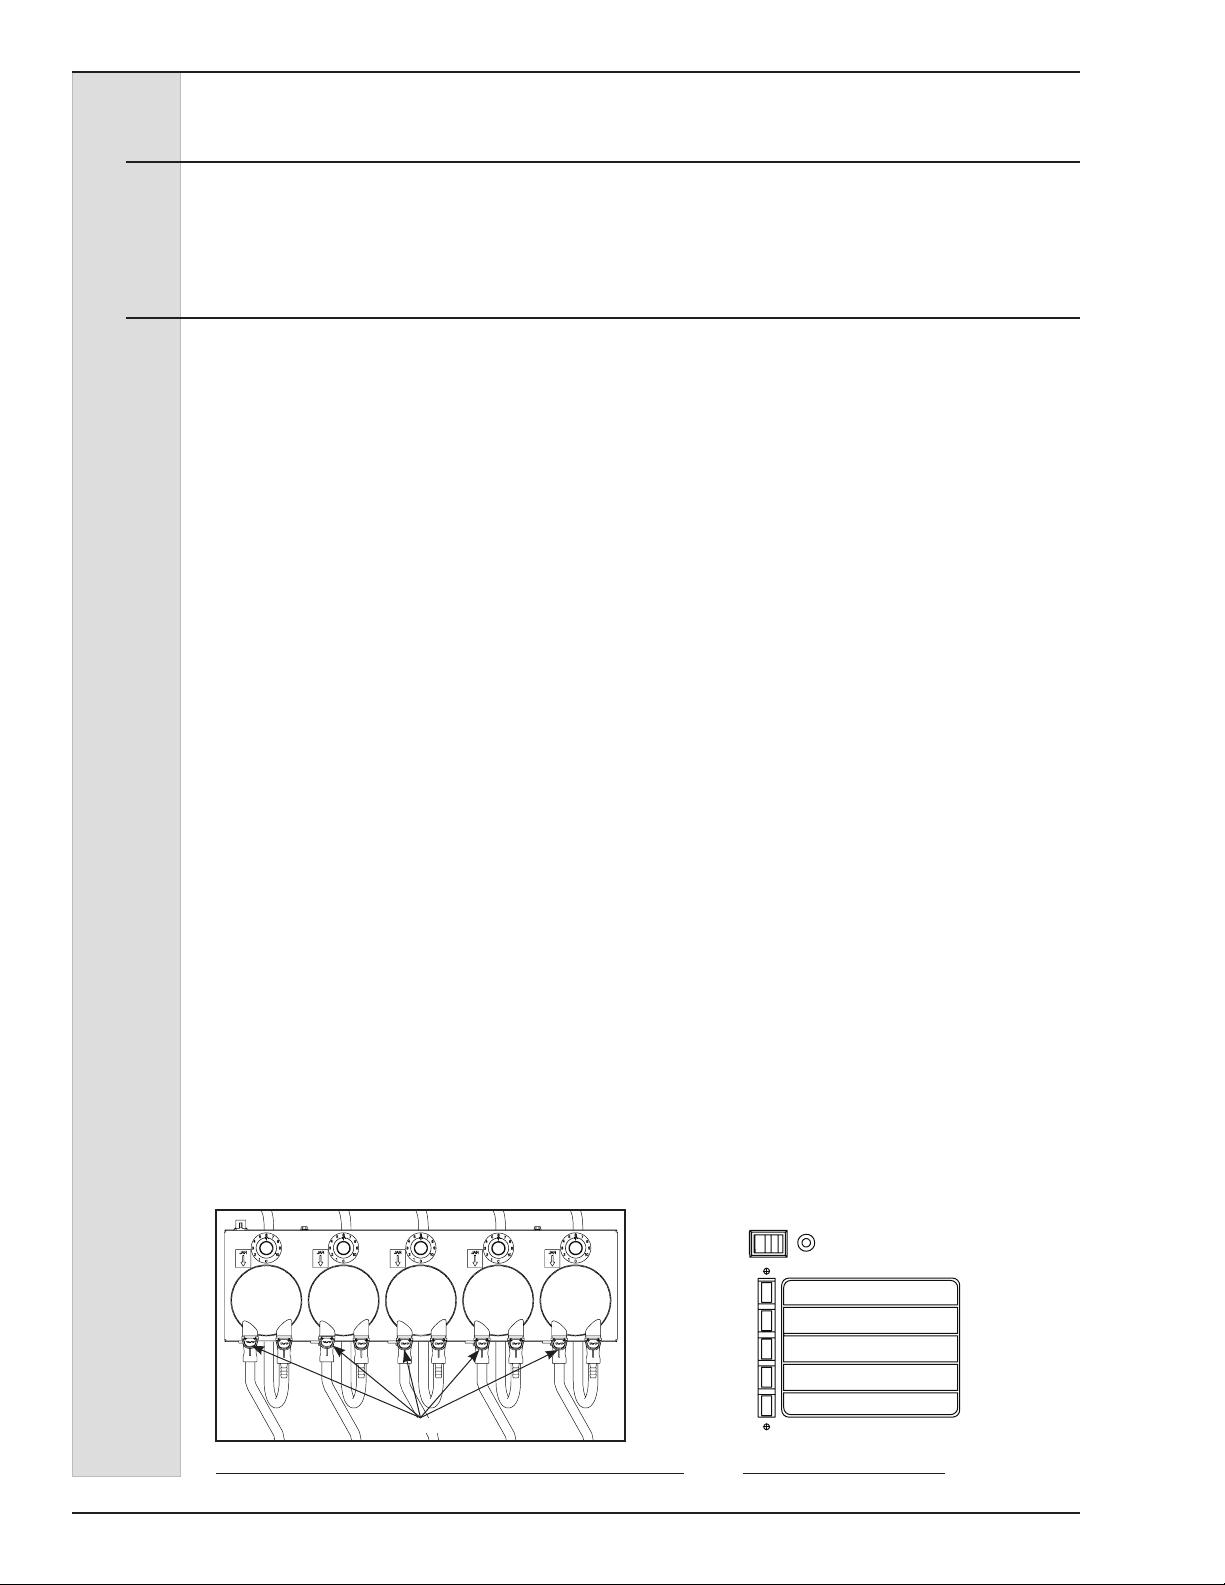
metal clip of the connector. (see gure
11-1). Slowly pull the pickup tube out
of the syrup bottle allowing the syrup
from the tube and hose to drain back
into the bottle. Place the stainless
steel pickup tube in an empty bucket.
Repeat for each avor and take
hoses to sink and ush with hot water
(122°-140°F or 50°-60°C). Remove
syrup bottles from the cabinet. Fill the
bucket with hot water and reconnect
the syrup hoses to the pumps.
3. Place an empty container under the
mix chamber. Turn the syrup pump
switch to the “ON” position. Select a
syrup avor or malt by pushing the
proper button (see gure 11-2) and
then press the syrup prime/calibrate
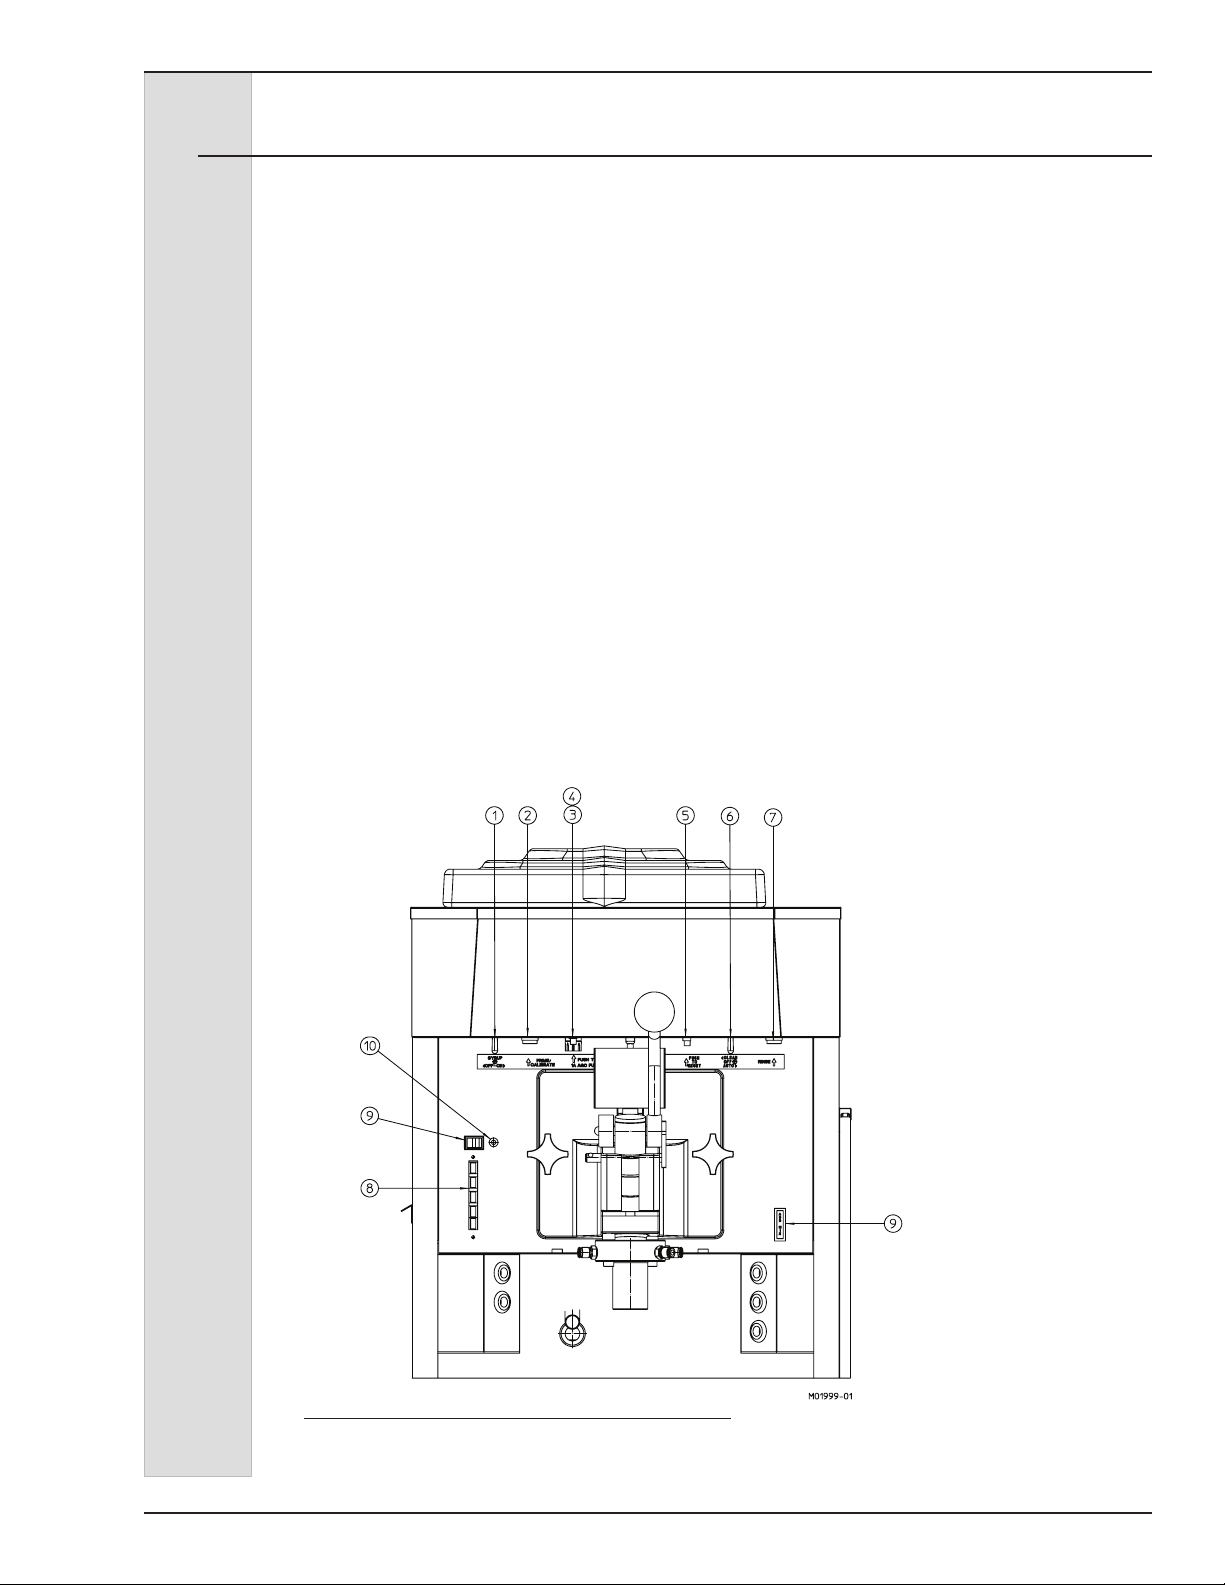
button (see gure 11-3, item 2) to
purge syrup from the line. Hold the
button and allow at least 1-1/2 cups of
hot water to ow through the tube and
mix chamber. Continue until the water
runs clear.
4. Repeat step 3 with the remaining
three syrup avors and malt avor.
Note: At every cleaning or when a new
syrup bottle is opened, the cap with
hole for the syrup tube must be washed,
rinsed, and soaked in sanitizer for 5
minutes before installing on bottle.
5. With a container under the mix
chamber turn the selector switch to
clean and press the rinse button for 5
seconds. Spinner should be engaged
splashing water in mixing chamber.
OFF ON
VANILLA
BANANA
CHOCOLATE
STRAWBERRY
SPECIAL
CLIPS
Figure 11-1 Removal of syrup lines to bottles Figure 11-2
184592-0130
Page 41
ELECTRO FREEZE Shake Model CS705-M2
11.1 Syrup Line Disassembly and Sanitizing - continued
7. Disconnect each outlet hose from
pump. Remove each pump head
from the body by twisting 15°
counterclockwise and pull straight
out. Remove the hose assembly
from pump head and o-rings from
connectors. Wash, rinse, and soak in
sanitizer for 5 minutes. Use 3/8” brush
to clean the inside of tubes.
Important:
The peristaltic, pickup and syrup tubes
for the chocolate line are larger and
must be used only for the chocolate
syrup.
8. Remove the mixer safety cover above
the dispense head.
9. Take a clean sanitized cloth and wash
all soiled surfaces inside cabinet.
Disconnect the syrup and water lines
from the mix chamber. Remove the
mix chamber and mixing shaft from
the dispense head. Take parts to
the sink, remove the o-ring and then
wash, rinse and soak in sanitizer for
5 minutes. Wash and spray sanitizer
on the bottom of the plunger in the
dispense head.
10. Fill a small cup with sanitizer. Dip the
syrup line quick connects in sanitizer
for 30 seconds ushing residue out
of connector. Use a small brush
if necessary to remove hardened
syrup. Repeat dipping on outlet quick
connect on syrup pump. Reassemble
mixing shaft and mix chamber to
dispense head. Reconnect syrup
lines.
11. Reinstall the mixer safety cover.
Figure 11-3
184592-01 31
Page 42
ELECTRO FREEZE Shake Model CS705-M2
11.2 Syrup Line Assembly And Sanitizing
Important:
The chocolate syrup is a different
viscosity and requires different
hoses. Always be aware of this when
assembling.
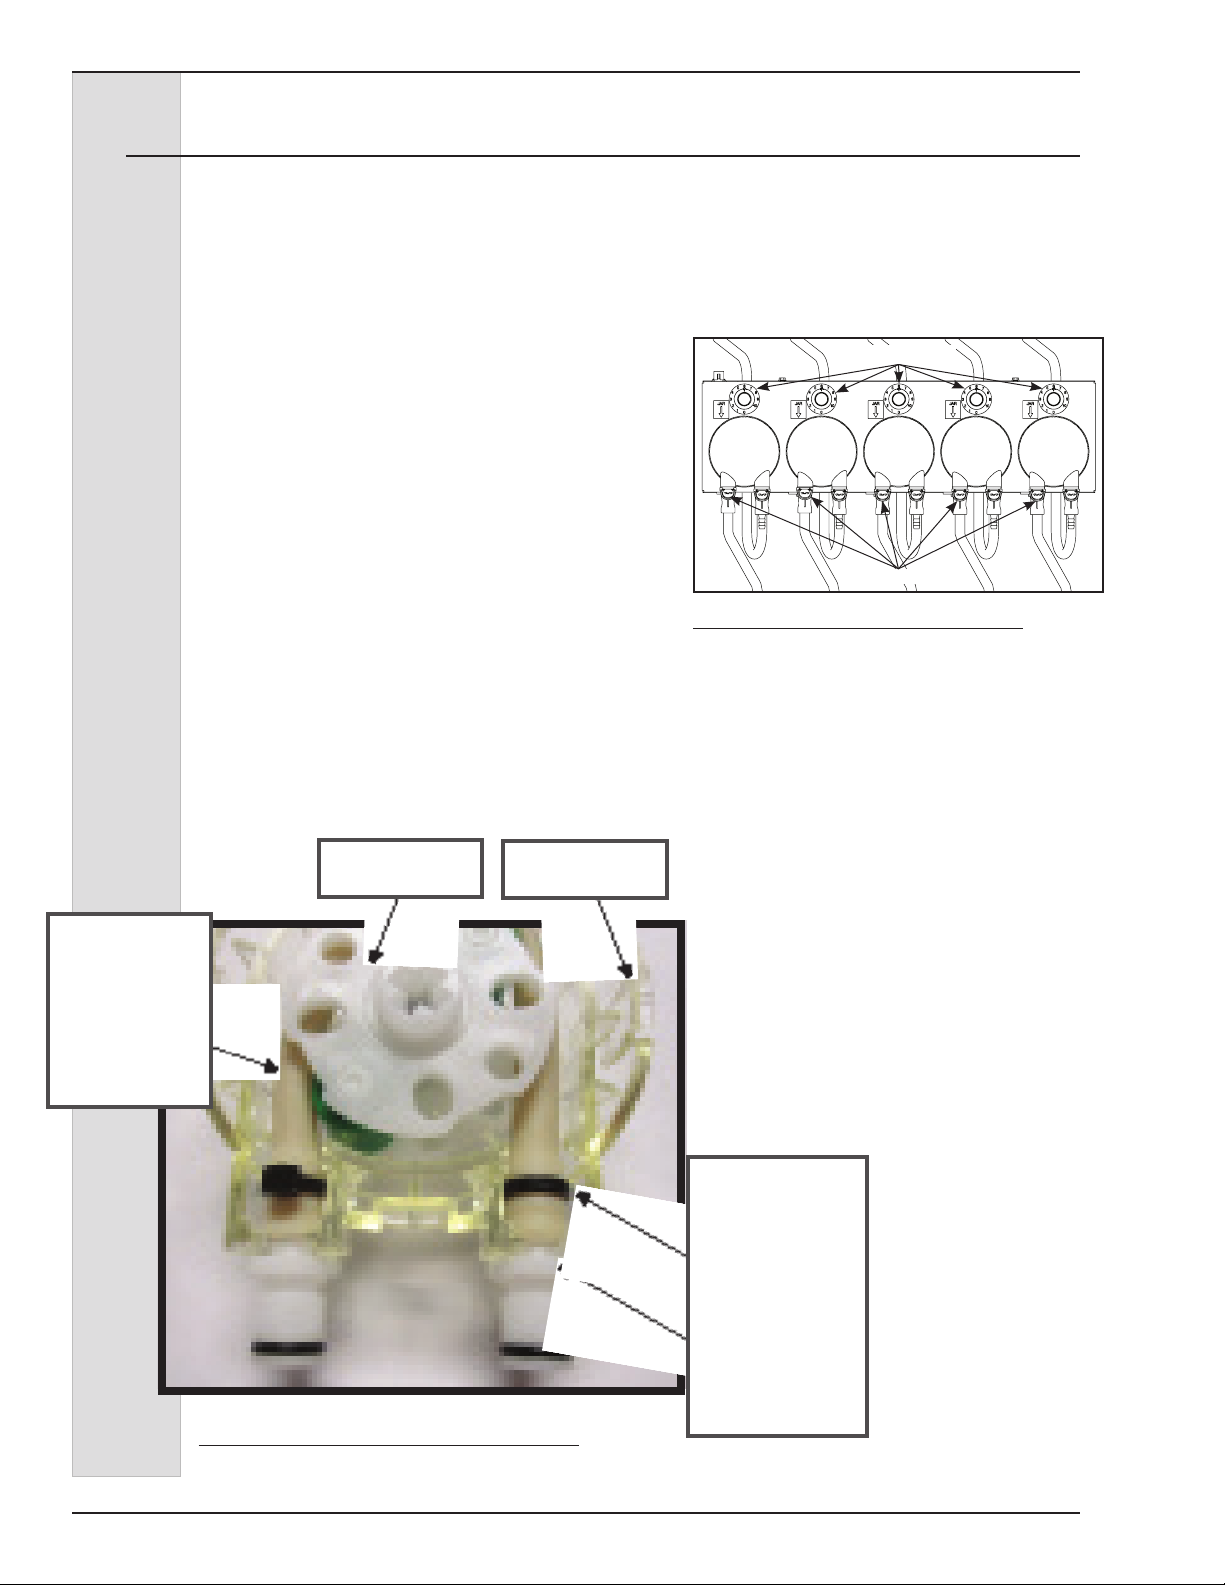
1. Spread a silicone bead of a lubricant
[i.e. Dow Corning Compound 7,
HC158066] evenly on the outside of
each pump peristaltic tube. Wrap the
peristaltic tube around the pump head
centering it on the rollers. Place the
head in the housing making sure the
white plastic coupling is outside of the
housing and the black tie wrap is inside
as shown in gure 11-4.
2. Open the cabinet below the freezer to
install the pump housings. The pump
housing with the clear peristaltic tube is
to be used on the pump with the brown
colored potentiometer dial (see gure
11-5).
Important:
The clear larger hose is to be used only
for the chocolate syrup.
Line up the center of the pump head to t
into the pump drive housing mounted on
the cabinet back wall, turn until it snaps into
place.
3. Place the three (3) remaining pump
Potentiometers
CLIPS
Figure 11-5
heads on the mix pumps in the cabinet.
4. Connect the syrup lines from the
freezer to the pumps. The color coded
hoses need to be matched to the
corresponding color coded on the
potentiometer dials above the mix
pumps.
Pump
Peristalic Tube
Must be
lubricated when
installing.
Pump Head
Figure 11-4 Syrup Pump Housing
Pump Housing
—continued
Proper Hose
Installation
Note position of
the black tie wrap
in the housing
and the white
plastic coupling
below the
housing
184592-0132
Page 43
ELECTRO FREEZE Shake Model CS705-M2
11.2 Syrup Line Assembly and Sanitizing - continued
5. Sanitize the syrup line system.
a. Prepare 2 gallons (7.6 liters) of
sanitizing solution in a container.
Sanitizing solution must be mixed
according to manufacturer’s
instructions to yield 100 PPM strength
chlorine solution. (example: SteraSheen Green Label). Use warm water
(100-110°F or 37-43°C) to wash,
rinse, and sanitize. Fill a clean empty
bucket with 2 gallons of sanitizing
solution.
Important:
Do not use unapproved sanitizer
or laundry bleach. These materials
may contain high concentrations of
chlorine and will chemically attack
freezer components.
b. Wash and sanitize your hands
and forearms.
c. Place the bucket of sanitizing
solution on the oor by the cabinet.
Place the syrup bottle caps with
the holes in the lid, the black cap
boots and the stainless steel ends of
the pickup tubes into the bucket of
sanitizer. Be sure there is no loop in
pickup tube so sanitizer will contact all
surfaces of tubes.
d. Place an empty bucket or
container under the dispensing head.
Reconnect all syrup hoses to the
mixing chamber and reinstall the
mixer safety cover. Turn syrup system
switch to the “ON” position. (see gure
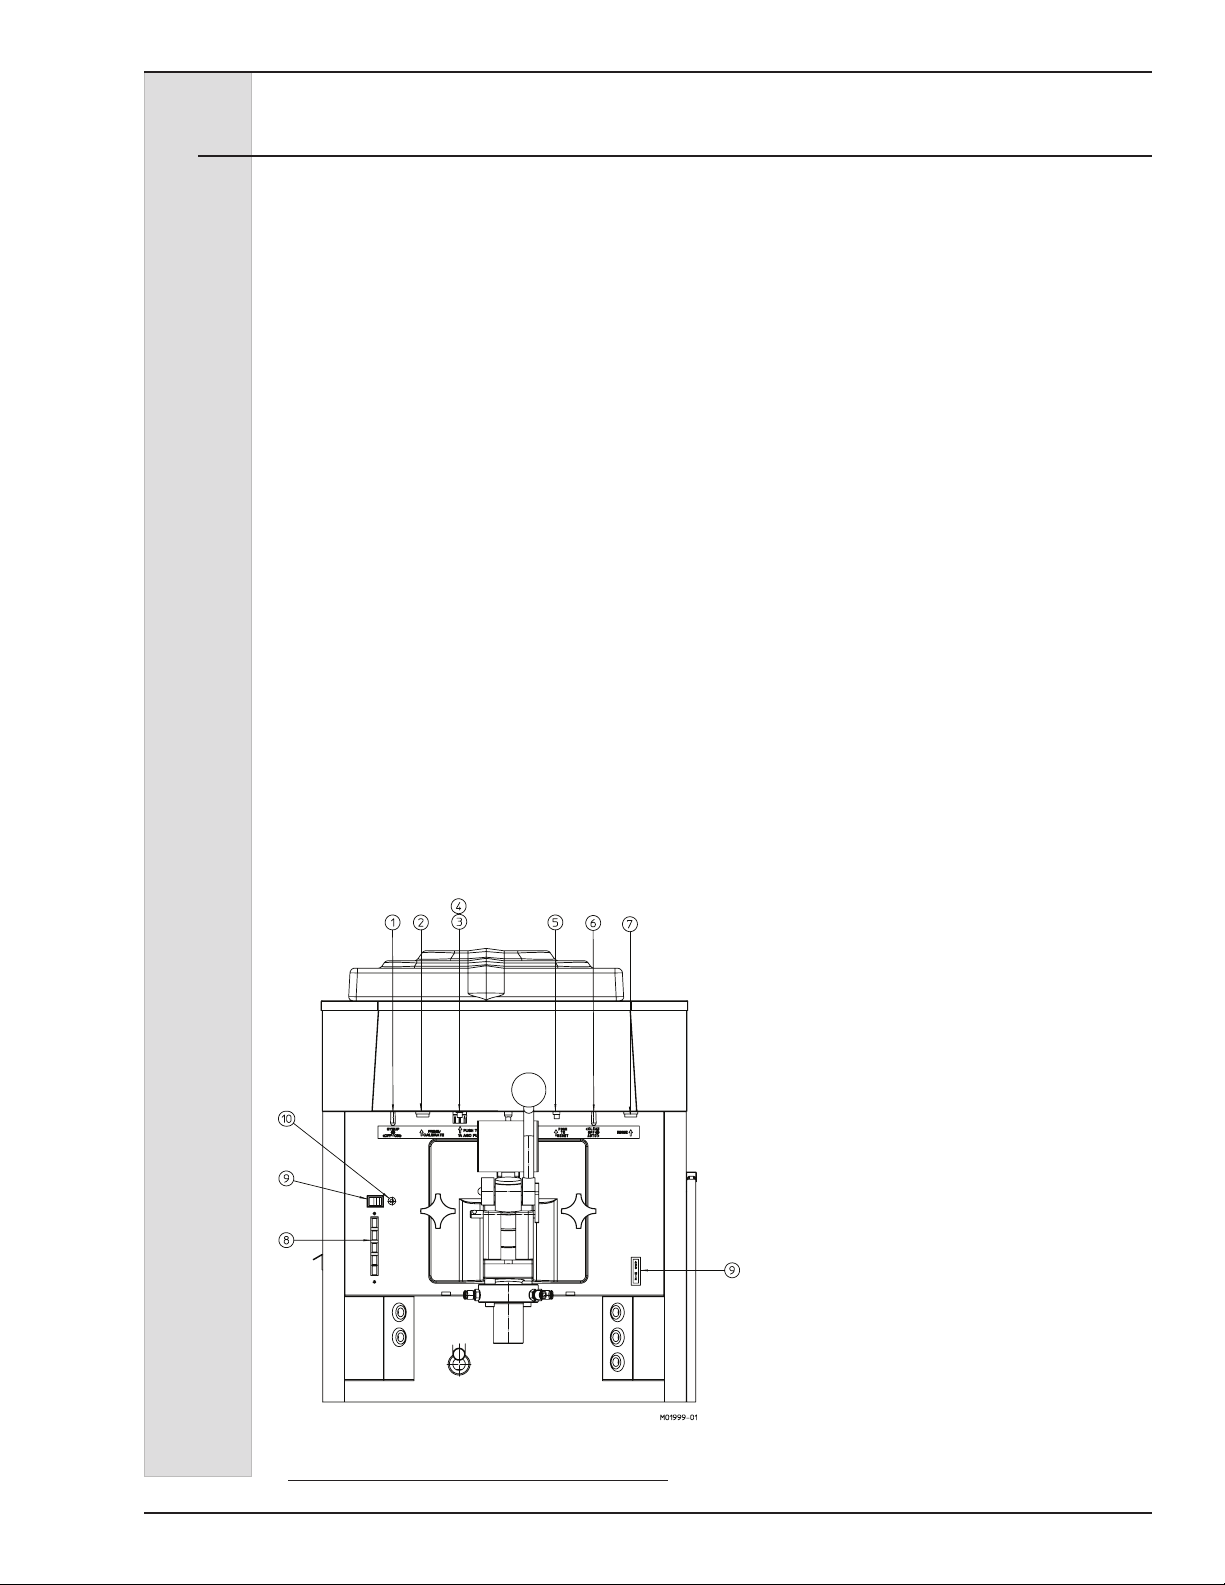
11-6, item 1)
e. Select a syrup avor by pushing
the proper button then press the syrup
prime/calibrate button (see gure 11-4
item 2). Hold the button until sanitizer
is owing into bucket. Continue
holding button for one (1) minute.
f. Repeat step 5e with the remaining
three syrup lines.
g. Allow sanitizer to soak in syrup
lines for 5 minutes.
h. Place each syrup bottle cap from
the sanitizing solution onto the syrup
bottles. Then place a black boot cover
on each bottle cap.
i. Disconnect a hose from the pump
by pushing on the metal clip of the
connector (see gure 11-5). Remove
the pickup tube from the bucket of
sanitizer, draining sanitizer back into
the bucket. Reconnect hose to pump.
Important:
The largest pickup tube into the
chocolate syrup bottle.
j. Repeat step 5i with the remaining
three syrup lines. Refer to the
potentiometers or door decal to
connect the proper avor to the proper
pump.
k. Select one avor, press the syrup
prime/calibrate button until the syrup
line has been purged of sanitizer.
Pure mix should appear at the mixing
chamber on dispense head.
l. Press water button (7 gure 11-5)
to clear line.
Figure 11-6
184592-01 33
m. Repeat step 5j and 5k for
remaining syrup avors.
Page 44
ELECTRO FREEZE Shake Model CS705-M2
11.3 Syrup Calibration
1. Sanitize and prime each syrup line as
described in section 11.2.
2. Select a syrup avor or malt by
pushing the proper button on the front
of the freezer. Disconnect that mix
chamber syrup tube from the front
panel connector by pushing the metal
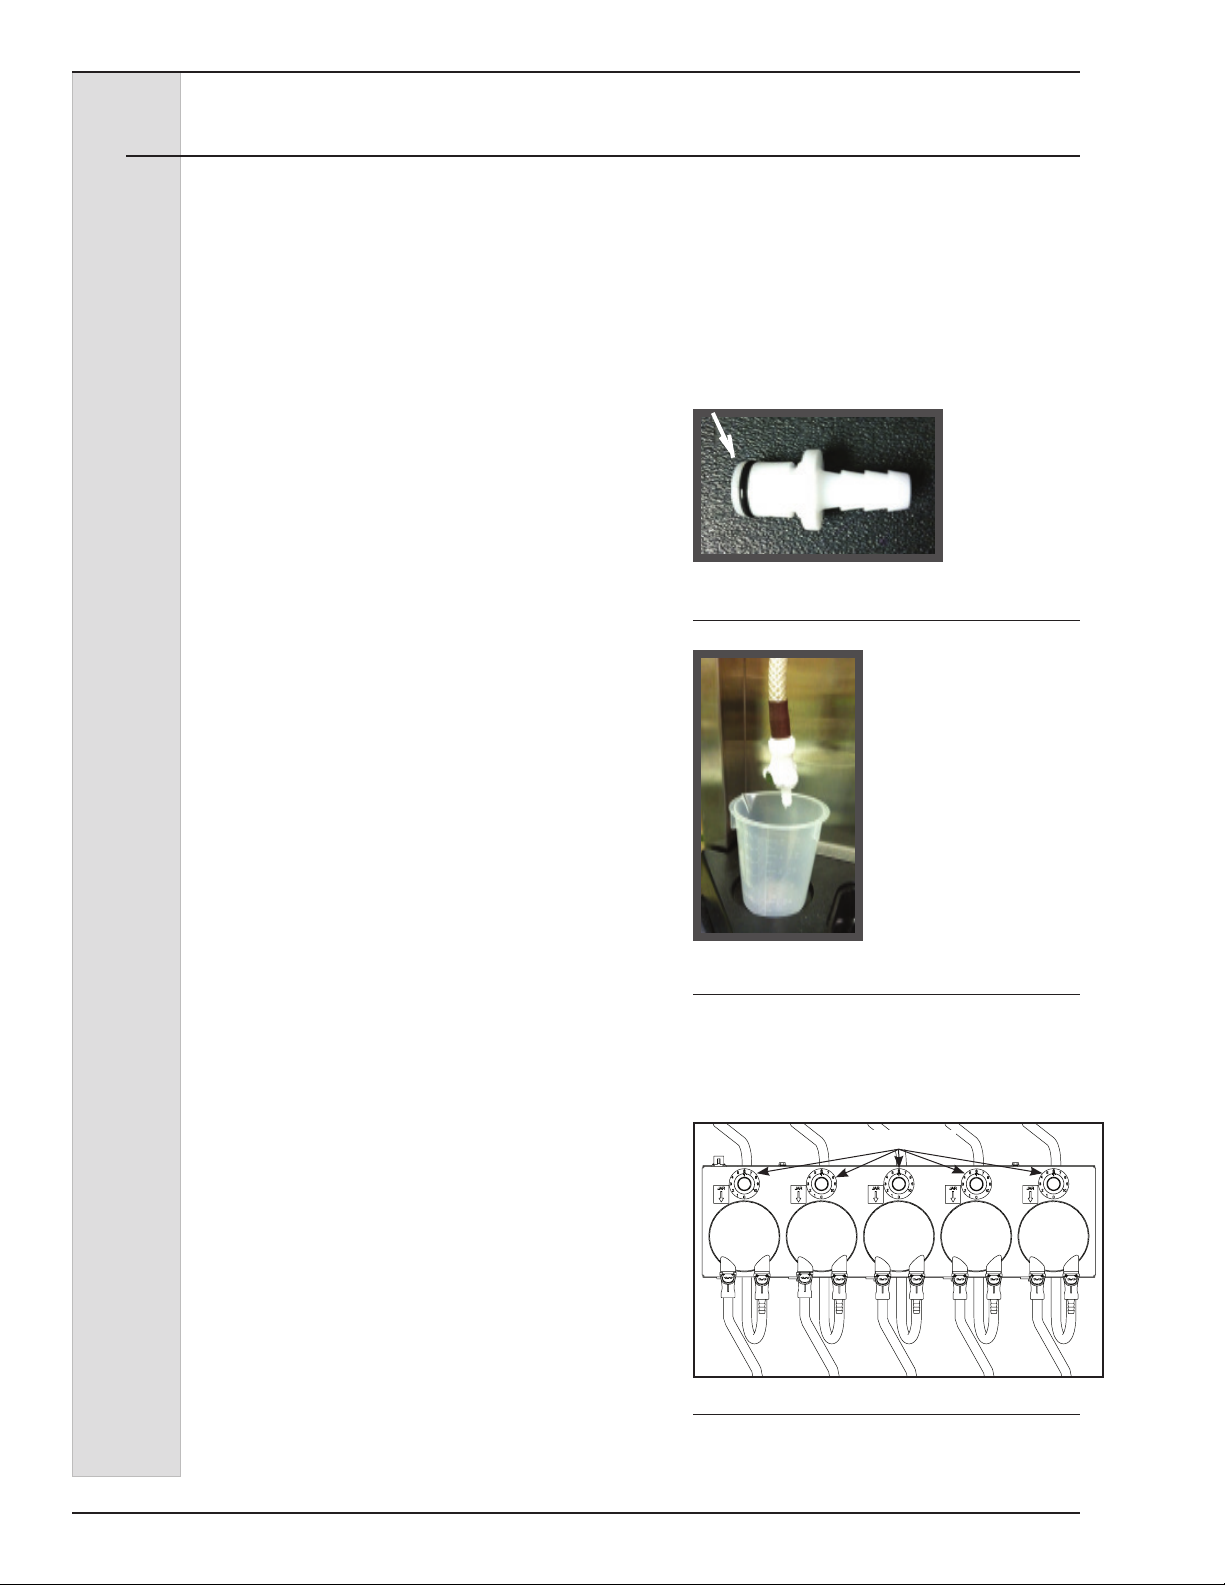
clip in. Attach the coupling insert
(see gure 11-7) to the tting by
pushing the mating end into the panel
connector unit it clicks. Place the barb
end of the coupling insert into the
beaker as shown in gure 11-8.
3. Press the syrup prime/calibrate button
for 5 seconds using a stop watch or
second hand. The measure of syrup
dispensed into the beaker should be
½ oz. If it is not you will have to adjust
the potentiometer.
4. Repeat steps 2 and 3 for other avors.
5. Turn the syrup pump switch to “OFF”.
11. Repeat steps 2 and 3 to check
calibration. If further adjustment is
needed repeat steps 5 through 10.
12. When desired syrup dispense rate is
achieved, remove the coupling insert
and reconnect the mix chamber syrup
tube.
Mating End
Figure 11-7 Coupling Insert
Part No. HC121061
6. Open the cabinet door to allow
access to the four avor adjustment
potentiometers located above the mix
pumps. See gure 11-9. From left
to right they are banana, chocolate,
strawberry and special avor.
7. Approximate setting for the
adjustment potentiometers is 7.
8. Calibration levels for each avor of
syrup should be adjusted to ½ oz.
9. Select the proper potentiometer for
the avor to be adjusted.
a. If the amount of syrup dispensed
into the beaker is less than ½ oz. turn
the potentiometer of that syrup line
a few degrees clockwise for MORE
SYRUP.
b. If the amount of syrup dispensed
into the beaker is more than ½
oz. turn the potentiometer of that
syrup line a few degrees counter-
clockwise for LESS SYRUP.
10. Close the cabinet door. Place the
syrup pump switch in the “ON”
position.
Figure 11-8 Calibration Beaker
Part No. HC196109
Potentiometers
Figure 11-9
184592-0134
Page 45
ELECTRO FREEZE Shake Model CS705-M2
12 Routine Maintenance
Electro Freeze recommends the following
schedule to help maintain your equipment
in like-new operating condition. Take the
time to learn and perform these routine
procedures and receive in return many
years of valuable service from your
freezer. Protect your investment.
WEEKLY
1. Carefully inspect all parts for wear
including, seals, O-rings, mix transfer
tube and blades.
2. Replace as required.
DAILY
1. Disassemble, wash, rinse, sanitize, air
dry, reassemble and sanitize all parts
that come into contact with the mix or
product.
CAUTION
To prevent bacteria growth,
remove all O-rings when
cleaning. Failure to do so could
create a health hazard.
2. Clean and sanitize syrup lines with
sanitizing solution.
3. Clean the cylinder and drain tube with
the appropriate brushes.
4. Upon cleaning, inspect and lubricate
all seals and O-rings as instructed that
come into contact with mix. Replace
any O-ring that is worn, torn, or loose-
tting.
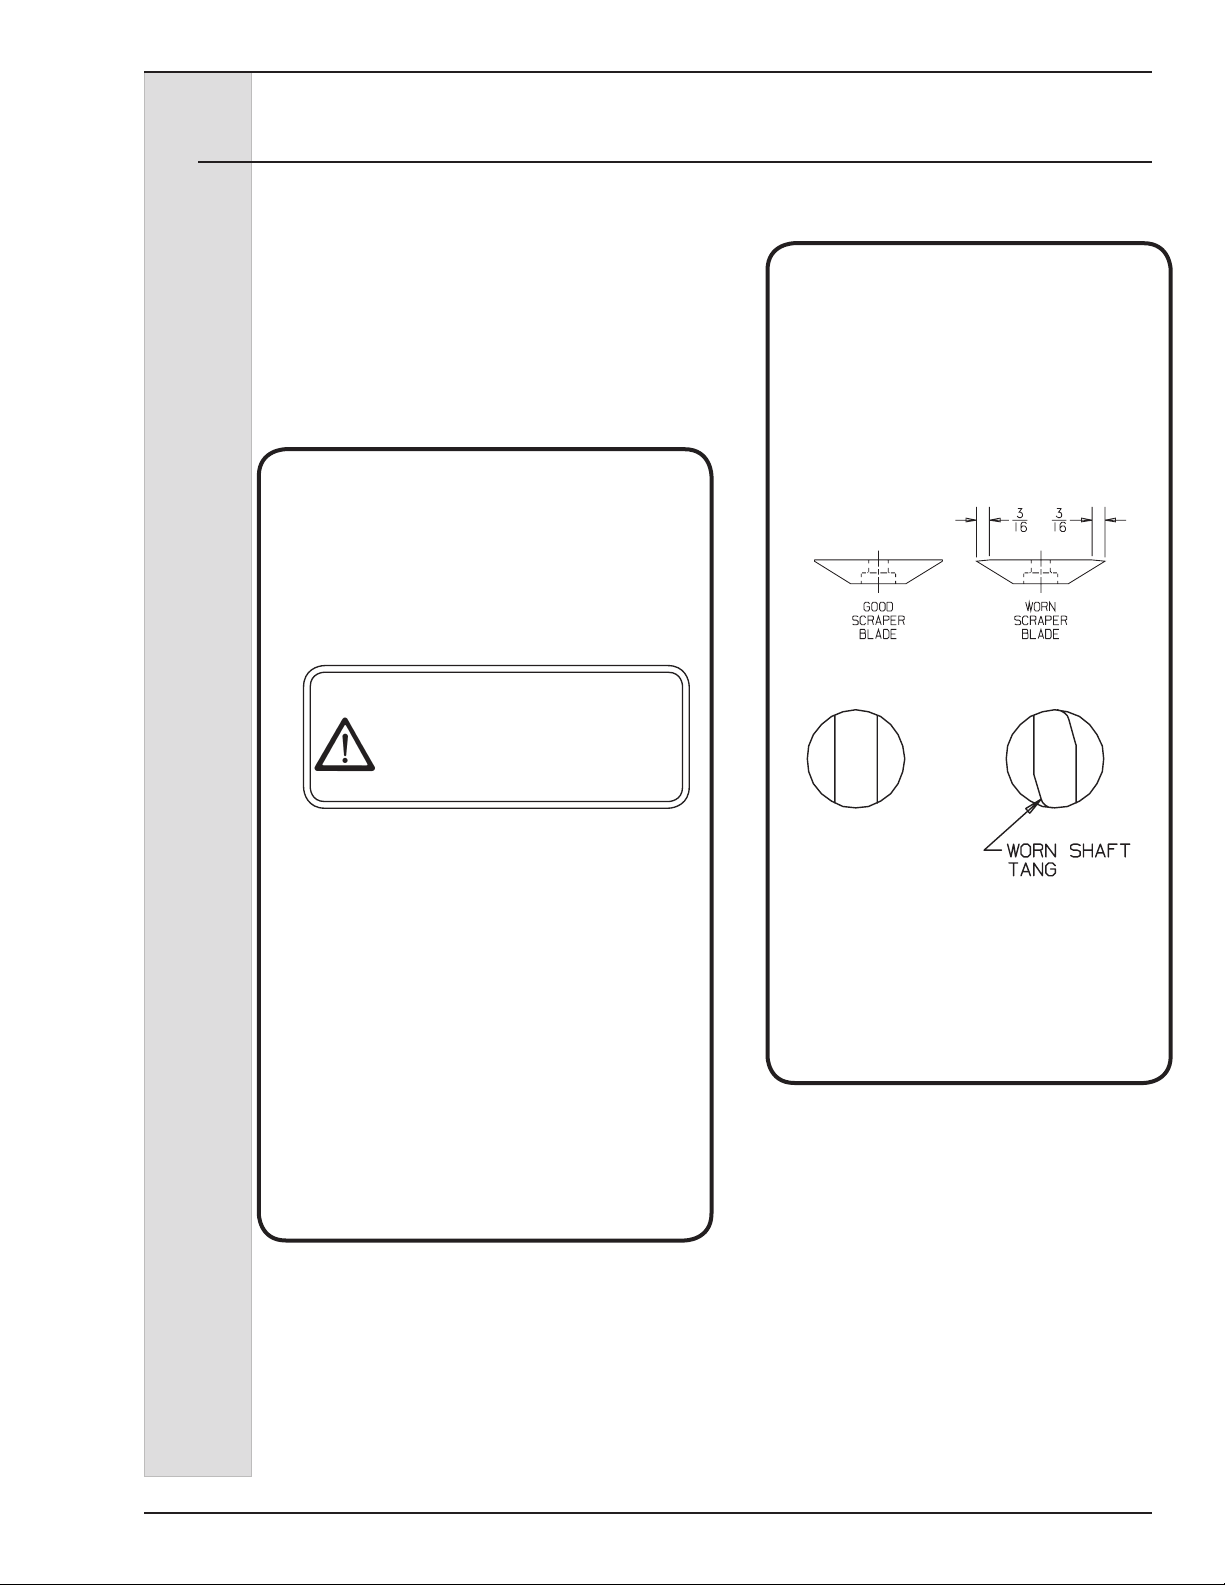
Replace blades if worn 3/16” or more.
3. Check the beater tangs and drive
shaft for wear.
GOOD SHAFT
TANG
A worn coupling will have a nonparallel
shape on the drive opening.
4. Check the air lter and clean as
necessary. After cleaning apply spray
adhesive, p/n HC162548.
5. Wipe all exterior surfaces of the
freezer to remove any splattered mix.
6. Check overrun and temperature of the
product.
184592-01 35
Page 46
ELECTRO FREEZE Shake Model CS705-M2
12 Routine Maintenance — continued
MONTHLY
A. Test Head Switch.
The head switch feature is designed
to prevent the beater shaft from being
accidentally activated. It is essential that the
proper operation of this switch be veried on a
routine basis. Use the following instructions to
test for proper operation:
1. Be sure all switches are in the “OFF”
position.
2. Disconnect the main power supply.
3. Remove the dispense head and beater
shaft assembly.
4. Connect the main power supply.
5. Turn the selector switch to the “CLEAN”
position.
CAUTION
Moving parts. Do not place hands
in the freezing cylinder. Severe
personal injury could result.
6. Look inside the freezing cylinder toward
the rear. The drive shaft coupling should
NOT be turning. Turn the selector switch
to “OFF” and disconnect the main power
supply.
7. If the drive shaft coupling is turning, or you
are unable to determine whether or not
the shaft is turning, turn the switch to the
“OFF” position, disconnect the main power
supply, and contact your Electro Freeze
distributor for service. DO NOT place the
freezer in service until the problem has
been xed.
MONTHLY
B. Test Flex Cover Switch.
The ex cover switch feature is designed to
prevent the spinner shaft from being accidentally
activated. It is essential that the proper operation
of this switch be veried on a routine basis.
Use the following instructions to test for proper
operation:
1. Be sure all switches are in the “OFF” position.
2. Disconnect the main power supply.
3. Remove the ex shaft cover.
4. Connect the main power supply.
5. Turn the selector switch to the “CLEAN”
position.
CAUTION
DO NOT touch or get too close to
moving parts. Clothing, jewelry, hair or
other body parts may become caught
in the machine and result in personal
injury.
6. Place a container under the dispensing
plunger.
7. Push the rinse switch button. The spinner
shaft should NOT be turning. Water will be
dispensed. Turn the selector switch to “OFF”
and disconnect the main power supply.
8. If the spinner shaft is turning, or you are
unable to determine whether or not the shaft
is turning, turn the selector switch to the “OFF”
position, disconnect the main power supply,
and contact your Electro Freeze distributor for
service. DO NOT place the freezer in service
until the problem has been xed.
C. Air Condenser.
Call your Electro Freeze Distributor for service to clean air condenser
ns.
184592-0136
Page 47
ELECTRO FREEZE Shake Model CS705-M2
12 Routine Maintenance -— continued
QUARTERLY
A. Air Condenser.
Important:
Never use a screwdriver or sharp
object to clean between ns.
Both air and water cooled freezers have
an air condenser. The condenser ns
need to be cleaned by your Electro
Freeze Distributor to remove dirt, lint and
dust.
WARNING!
Failure to properly
maintain/clean your air
condenser can cause
premature compressor failure.
Compressor failure due to
improper condenser care will
void the compressor warranty.
B. Refrigeration System
Have your Electro Freeze Distributor
check the refrigeration system and make
any necessary adjustments.
1. Contact your Electro Freeze
2. Contact your Electro Freeze
3. Contact your Electro Freeze
ANNUALLY
CAUTION
To avoid electrical shock or
contact with moving parts,
make sure all switches are in
the “OFF” position and that
the main power supply is
disconnected.
Distributor for service to replace drive
belts.
Distributor to have the inside of the
freezer cleaned, including base, side
panels, condenser, etc.
Distributor to check water-cooled
condenser and ush clean to remove
scale and deposits if necessary.
USE ORIGINAL OR AUTHORIZED REPLACEMENT PARTS ONLY
WITH THIS FREEZER.
Should you have any questions on items which are not included in this schedule or problems
where service assistance is needed, please call your local Distributor or H. C. Duke & Son,
LLC, Electro Freeze, Service Department for factory service assistance.
Phone number: (309) 755-4553 Fax number : (309) 755-9858
184592-01 37
Page 48
ELECTRO FREEZE Shake Model CS705-M2
12 Routine Maintenance -— continued
Winter Storage
To protect the unit during seasonal shutdown, it is important to store the
CS705 Shake Freezer properly. Please use the following procedures:
1. Disconnect all power to the freezer.
2. Disassemble and wash all parts that come into contact with the mix
with a warm, mild detergent solution. Rinse in clear water and dry all
parts thoroughly.
3. Store the loose parts, such as the head assembly, beater assembly,
and pump parts in a safe, dry place.
4. Do not lay heavy objects on the plastic or rubber parts.
5. Cover the freezer and all loose parts to protect them from dust or other
elements that could contaminate them while in storage. Place the
freezer in a dry location.
6. On air-cooled freezers, have condenser ns cleaned.
184592-0138
Page 49
REPLACEMENT PARTS MANUAL
with Illustrations
Quality Parts
PROTECT
YOUR
EQUIPMENT
COMPACT SERIES
SOFT SERVE
FREEZER
Model CS705-M2
184592-01 7/17
K
eep Your Freezer In excellent condItIon. AlwAYs contAct
Your electro Freeze dIstrIbutor For replAcement pArts.
H. C. Duke & Son, LLC P/N 184592-01 - March 2016 Printed in U.S.A.
Page 50

Page 51

ELECTRO FREEZE Shake Model CS705-M2
Replacement Parts Orders
You must have the serial number of your
freezer when ordering parts — parts may
differ with a particular serial number of
the same model.
Parts are listed using terminology that
best ts the function of the part. The
illustrations in this section will help you
to nd the correct part number and
description. The alphabetized parts
list can be used to verify part numbers
pertaining to the serial number of your
unit.
Important:
All parts in this section are for a
standard model 208-230/60/1phase.
For models with another conguration
order by freezer serial number.
Place your parts order through your local
authorized Electro Freeze distributor.
Name: ________________________
Address: ______________________
______________________
Phone: ________________________
If you require any further assistance contact:
H.C. Duke & Son, LLC., Electro Freeze as
follows:
Table of Contents
ILLUSTRATIONS
Figure 1 Head Assembly ..............................................1
Figure 2 Beater Shaft Assembly ...................................2
Figure 3 Mix Feed Tube Assembly ................................3
Figure 4 Switch Box .....................................................4
Figure 5 Capacitor/Relay Box ....................................... 5
Figure 6 Model CS705-M2 Assembly.............................6
Figure 7 Idler Pulley Assembly .....................................8
Figure 8 Panel View .....................................................9
OTHER LISTS and INFORMATION
Accessories ................................................................10
O-Ring Chart ............................................................... 11
Alphabetized Parts List ................................................13
PART II
184592-01 iii
Page 52

Page 53
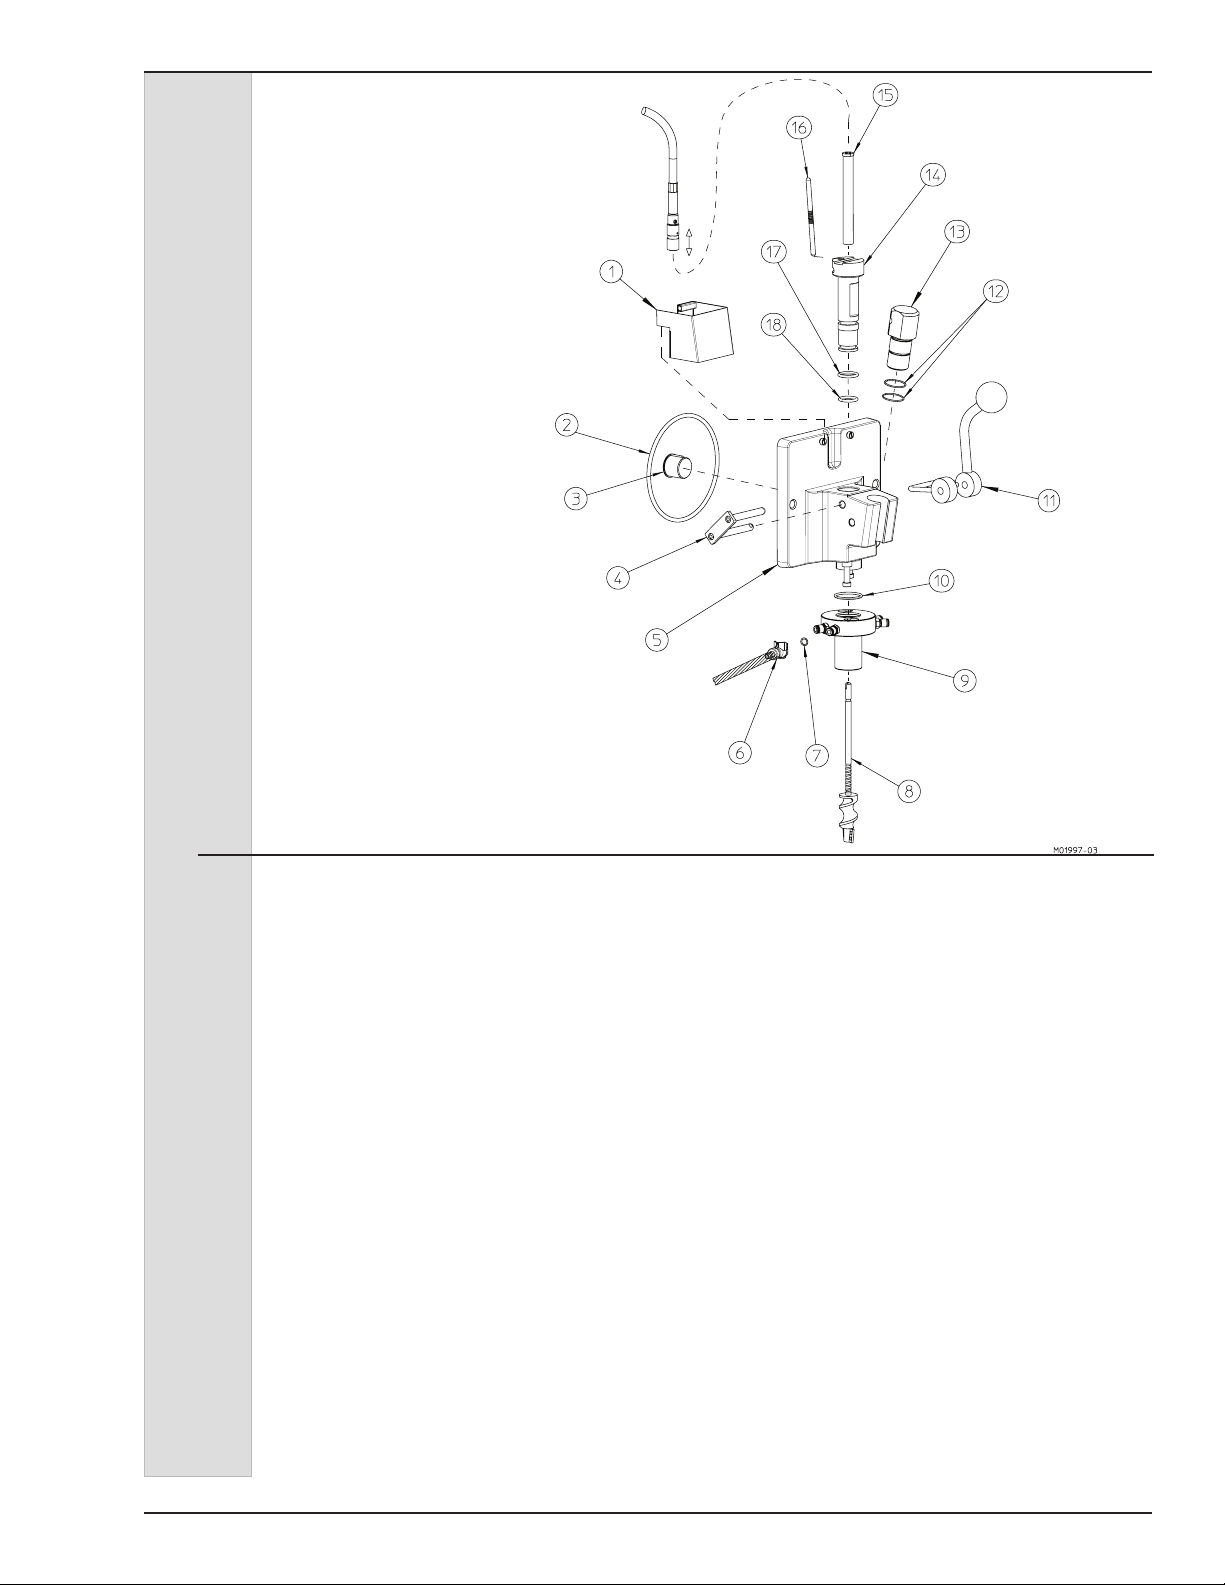
ELECTRO FREEZE Shake Model CS705-M2
Figure 1 Head Assembly
Item Part No. Description
* ...... HC121006-02 ........Head - Assy. Complete 5 Flavor Malt
1 ...... HC121020 ............. Cover - Assy Flex Shaft
2 ...... HC160622 ............. O-ring (Head)
3 ...... HC196072 ............. Bushing - Beater Bearing
4 ...... HC113435 .............Keeper - Assy. Spindle
5 ...... HC121005 ............. Head - Assy. w/Posts 5 FL SH
6 ...... HC160771 ............. Coupling - Body 1/4 Flow 1/4 Barb Shutoff
7 ...... HC160632 ............. O-ring (Syrup Line)
8 ...... HC196291 ............. Shaft - Assy. Mix
9 ...... HC121106-01 ........Chamber - Assy. Mix Includes:
HC141148-01 ....Chamber - Mix 5FL Malt
HC121061 ......... Coupling - Assy (Qty 5)
HC121061-01 .... Coupling - Assy 90°(Qty 1)
HC160650 ......... O-ring
10 ..... HC160650 .............O-ring (Mix Chamber)
11 ..... HC121019-01 ........Handle - Assy. Disp. Complete Includes:
HC162629 ........Knob - Ball 3/8
12 ..... HC160555 .............O-ring (Pivot Post)
13 ..... HC135182 .............Post - Pivot
14 ..... HC141150 .............Plunger - Dispensing 5 Flavor
15 ..... HC141151 .............Bushing - Mixer Shaft
16 ..... HC138611 .............Rod - Actuator
17 ..... HC160582 .............O-ring (Plunger - Upper)
18 ..... HC160582 .............O-ring (Plunger - Lower)
19 ..... HC153422-01 ........Shaft - Flexible w/Casing 17-1/2” Ball Bearing. Does not include item #20.
20 ..... HC121008-01 ........Connect - Assy Shake Drive
Not Shown:
HC162625 ......... Knob - Hand
184592-01 1
Page 54
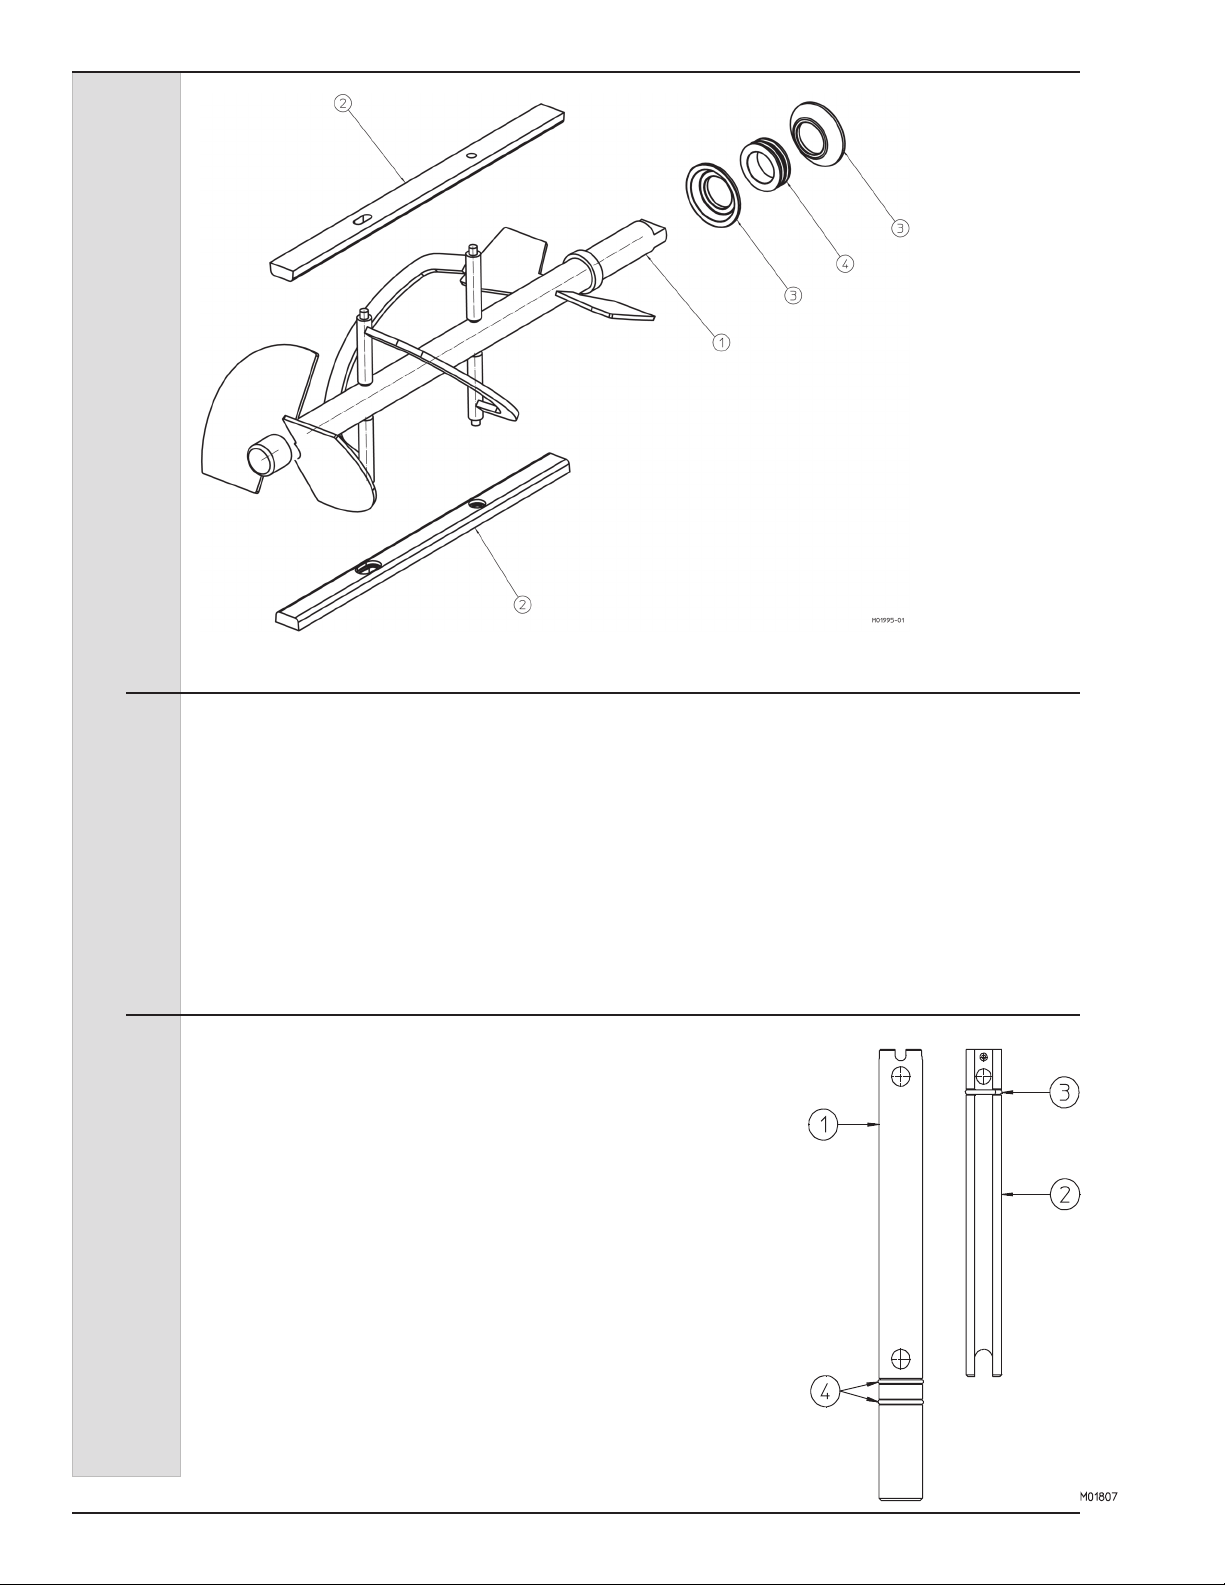
ELECTRO FREEZE Shake Model CS705-M2
Figure 2 Beater Shaft Assembly
Item Part No. Description
1 .................. HC118708 .............Beater - Assy. Shake Short
2 .................. HC140900 .............Blade - Scraper Shake Non Rev
3* ................. HC137593 .............Washer - Double Shaft Seal
4* ................. HC160557 .............Seal - Beater Shaft
* Can be ordered together as
HC115525 .............Seal - Assy. Shaft Double
Figure 3 Mix Feed Tube Assembly
Item Part No. Description
* .......HC120666 ...... Tube - Assy. Mix Feed .313
1 ......HC140721 ...... Tube - Mix Feed .313 Orice
2 ......HC120664 ...... Insert - Assy. Mix Feed (Regulator)
3 ......HC160611 ...... O-ring (Insert - Regulator)
4 ......HC160621 ...... O-ring (Mix Feed Tube)
* Includes items 1 through 4.
184592-012
Page 55
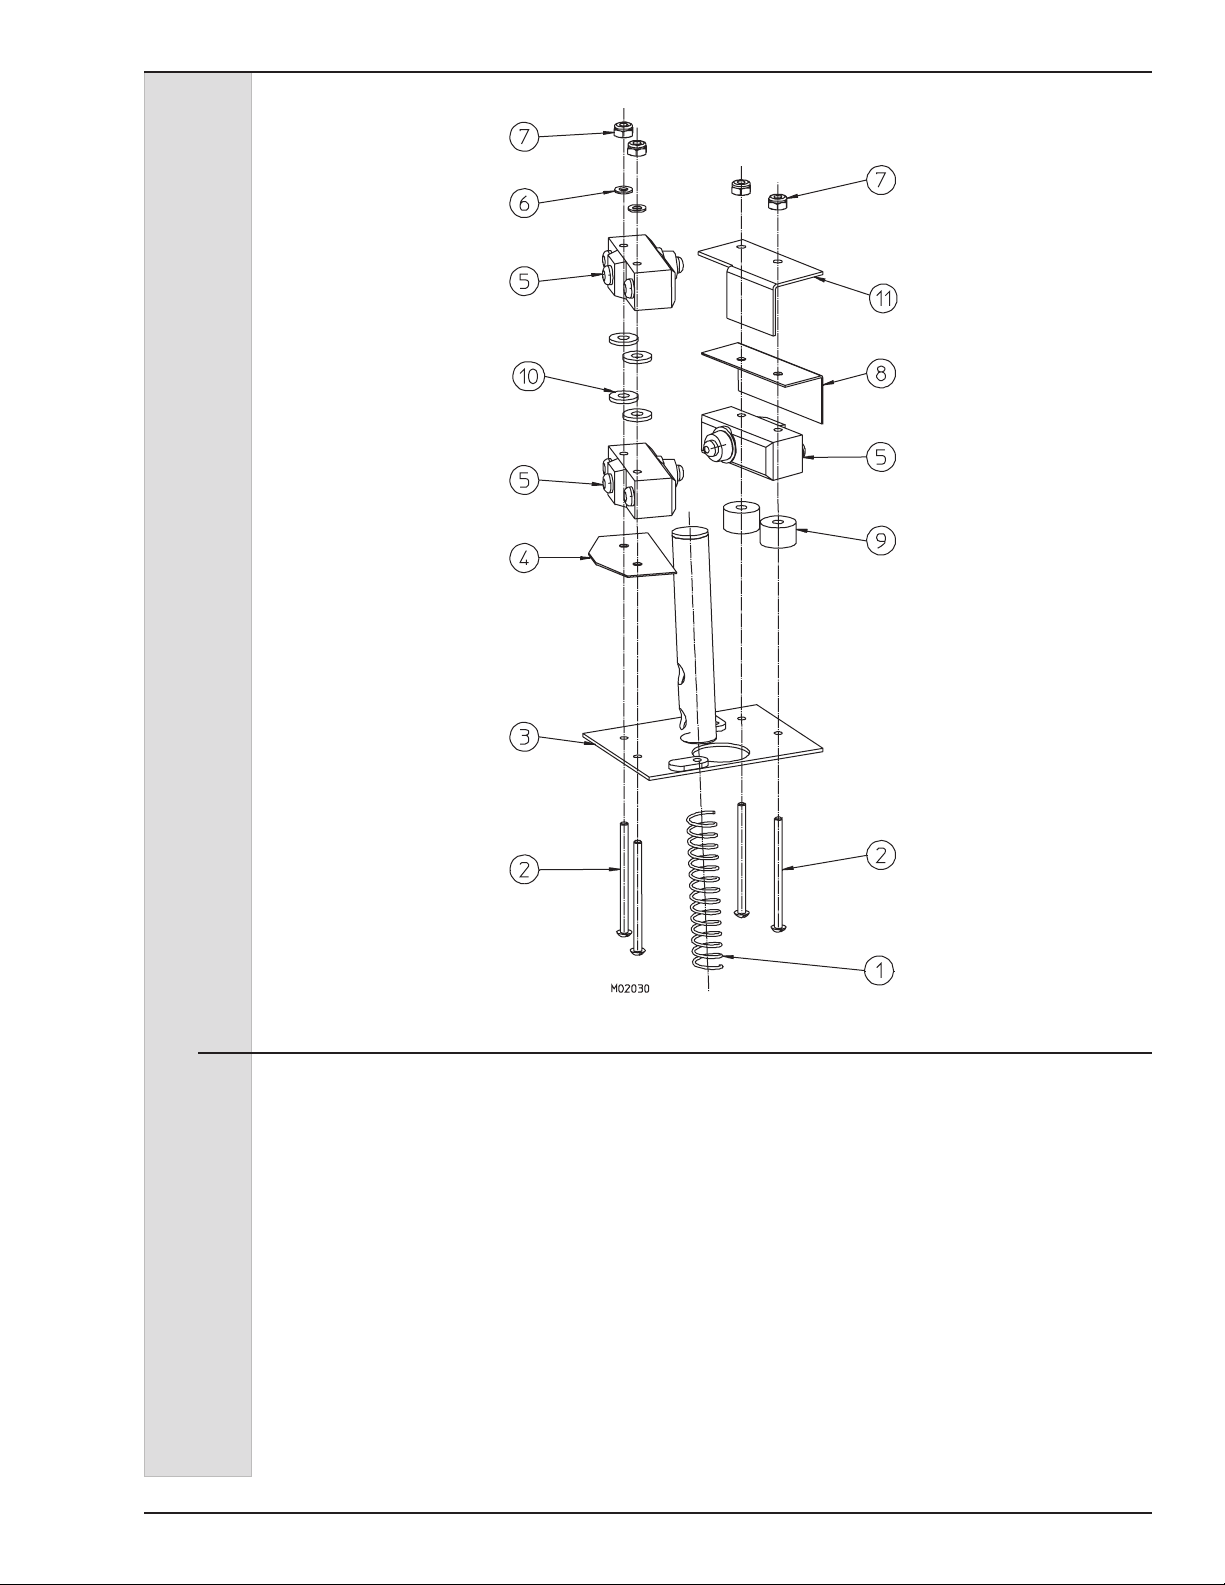
ELECTRO FREEZE Shake Model CS705-M2
Figure 4 Capacitor/Relay Box
Item Part No. Description
1 .................. HC161202 .............Thermostat - 5° Fixed Diff. (Hopper)
2 .................. HC150778 .............Bushing - Insulator
3 .................. HC150286 .............Transformer - 60 120PRI/24V
4 .................. HC150795 .............Strip - Terminal
5 .................. HC150294 .............Capacitor - Start (Beater Motor)
6 .................. HC150293 .............Capacitor - Run (Beater Motor)
7 .................. HC160743 .............Clamp - Hose 3-1/4 to 4
8 .................. HC151451 .............Relay - Compressor Start
9 .................. HC151421 .............Capacitor - Run (Compressor)
10 ................ HC151450 .............Capacitor - Start w/Bleed (Compressor)
Not Shown:
HC115797 .............Cover - Assy. Capacitor/Relay Box
184592-01 3
Page 56
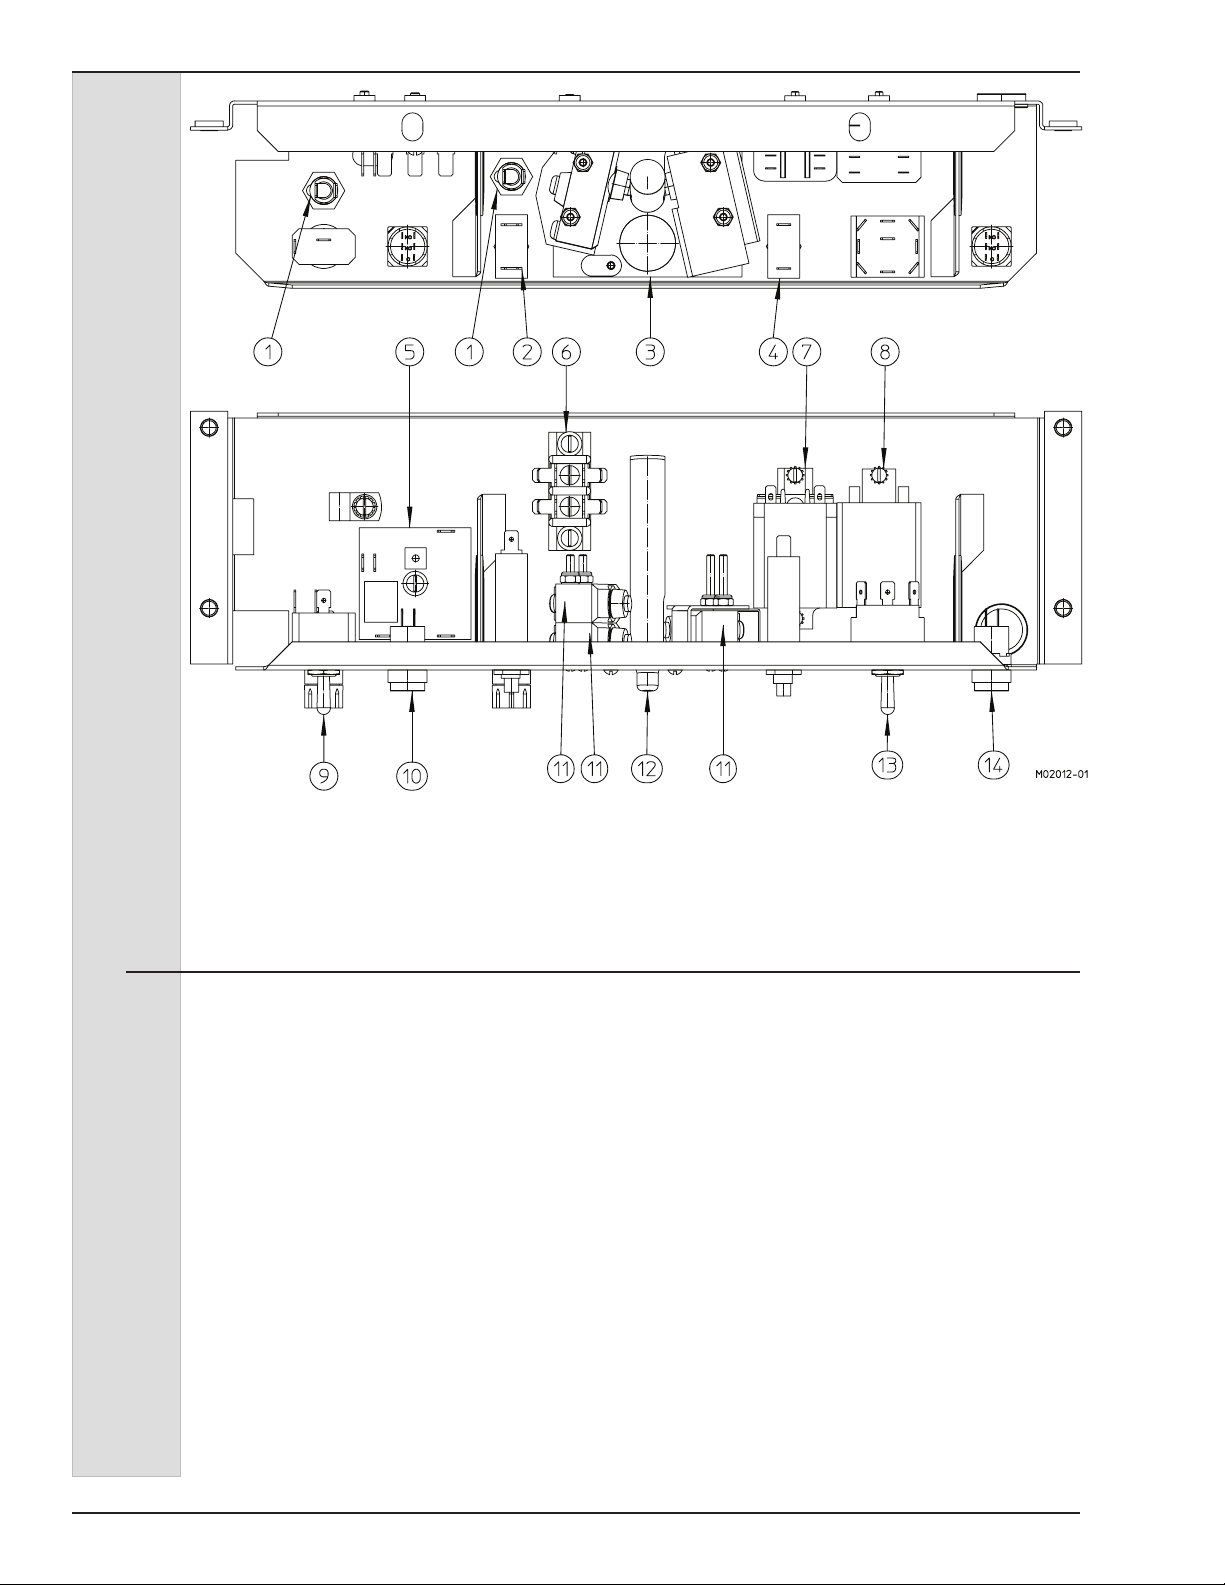
ELECTRO FREEZE Shake Model CS705-M2
Figure 5 Plunger Box
Item Part No. Description
1 .................. HC150985 .............Fuse - Fast AGC 1.0A 1/4 x 1-1/4
2 .................. HC150984 .............Breaker - Circuit 0.7A
3 .................. HC121011 .............Switch - Assy. Plunger (See Figure 5)
HC162303 ...Spring - Plunger Rod
HC150456 ...Switch-Snap Button
4 .................. HC150452 .............Breaker - Circuit 4.5A
5 .................. HC150188 .............Timer - DOB .5-60 Sec
6 .................. HC150798 .............Terminal - Strip
7 .................. HC150381 .............Relay - Flange Base w/Cover
8 .................. HC150343 .............Relay - Control Flange 3PDT 24VAC
9 .................. HC159235 .............Switch - Toggle SPST
10 ................ HC150971 .............Switch - Push DPDT MOM Black
11 ................. HC150456 .............Switch - Snap Button
12 ................ HC137760 .............Rod - Plunger Switch (Actuator Button)
13 ................ HC150465 .............Switch - Toggle 3PDT Center Off
14 ................ HC150971 .............Switch - Push DPDT Mom Black
184592-014
Page 57
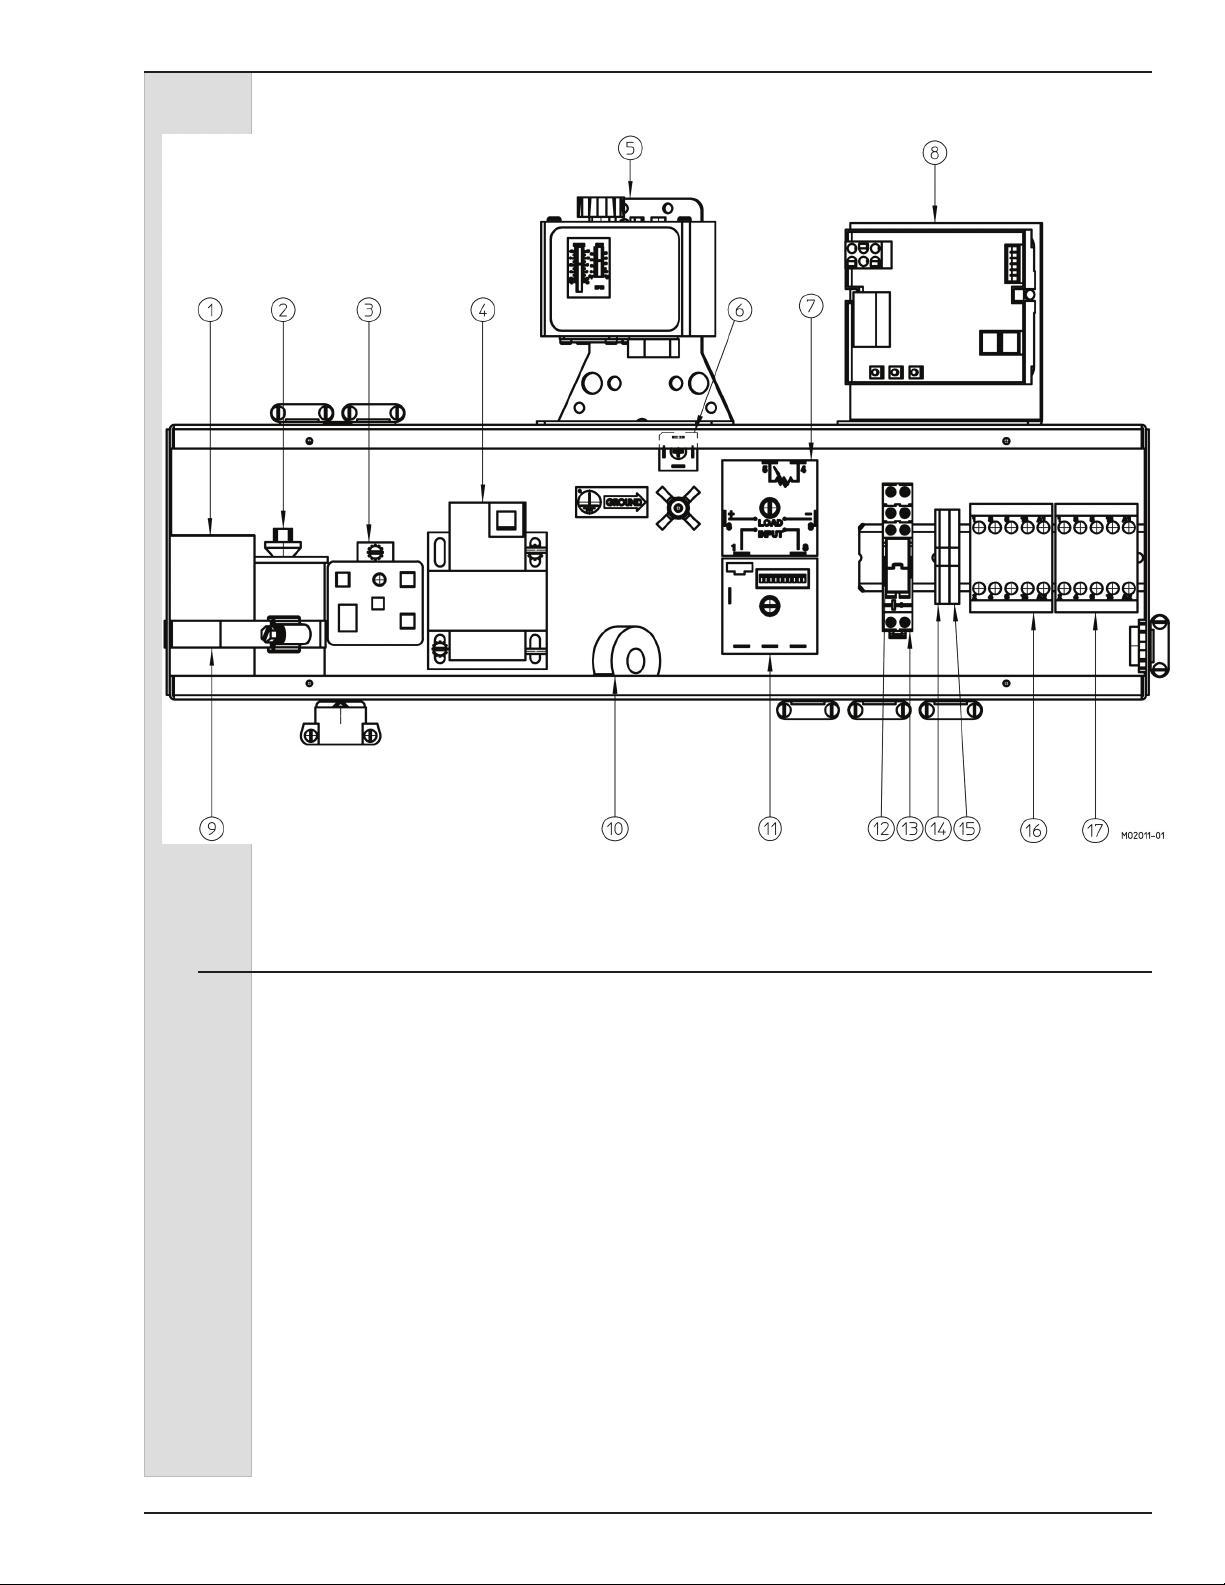
ELECTRO FREEZE Shake Model CS705-M2
Figure 6 Electrical Box
Item Part No. Description
1 .................. HC151414 .............Capacitor - Start
2 .................. HC150244 .............Capacitor - Run
3 .................. HC151474 .............Relay - Compressor Start
4 .................. IC574100325 ........Transformer - 75VA / 24VAC / MURD
5 .................. HC119989 .............Kit - Thermostat & Retainer
6 .................. HC150890 .............Rectier - Bridge
7 .................. HC150967-01 ........Control - Speed 230VAC to DC Motor
8 .................. HC120603 .............Board - Assy. Torque Monitor Shake
9 .................. HC160743 .............Clamp - Hose 3-1/6 to 4
10 ................ IC574100349 ........Transformer - Current
11 ................. HC120095 .............Kit - Recycle Timer Wiring Instructions
12 ................ HC150097-01 ........Relay - Miniature DPDT 230V Coil
13 ................ HC150098 .............Socket - Miniature Relay DPDT
13A ..............HC150166 .............Clip - Miniature Relay Retaining
14 ................ HC150594 .............Stop - Terminal Block End (Cover)
15 ................ HC150591 .............Block - Terminal
16 ................ HC150095 .............Contactor - Mini 3P (Beater Motor)
17 ................ HC150095 .............Contactor - Mini 3P (Compressor)
184592-01 5
Page 58
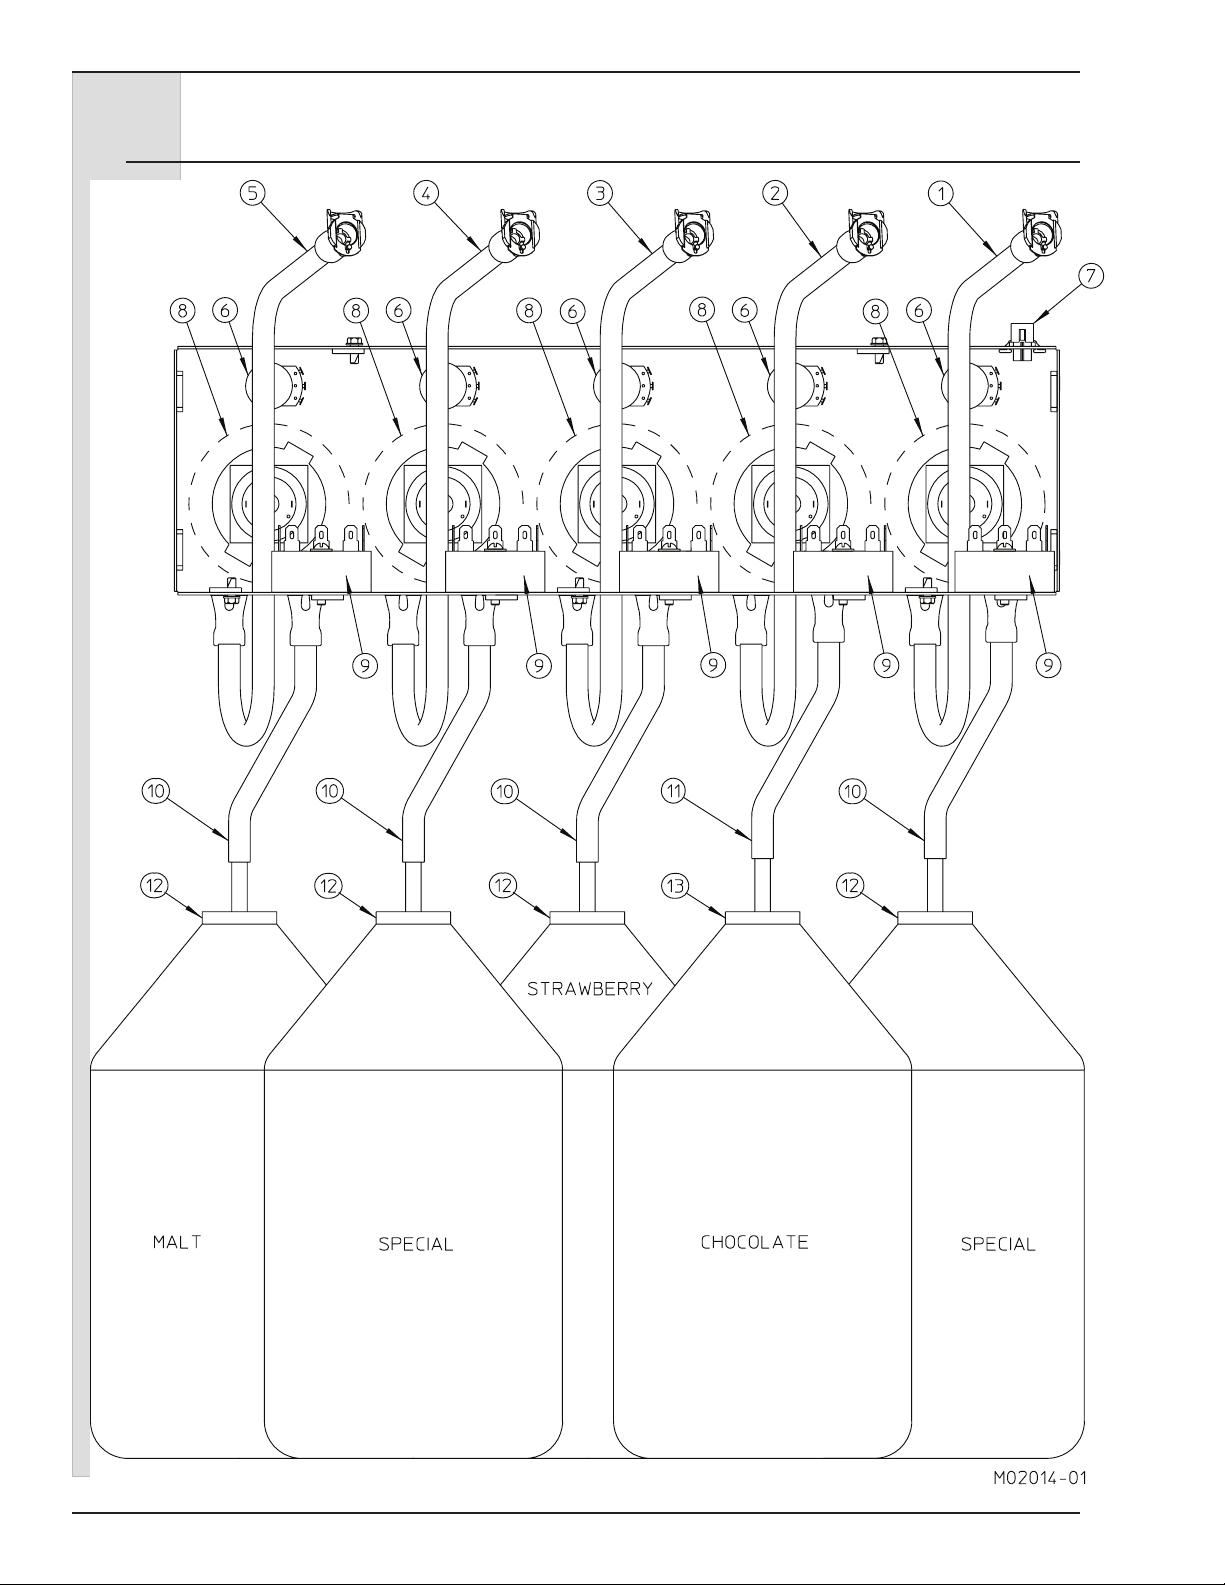
ELECTRO FREEZE Shake Model CS705-M2
Figure 7 Syrup System View (Sheet 1 of 2)
184592-016
Page 59
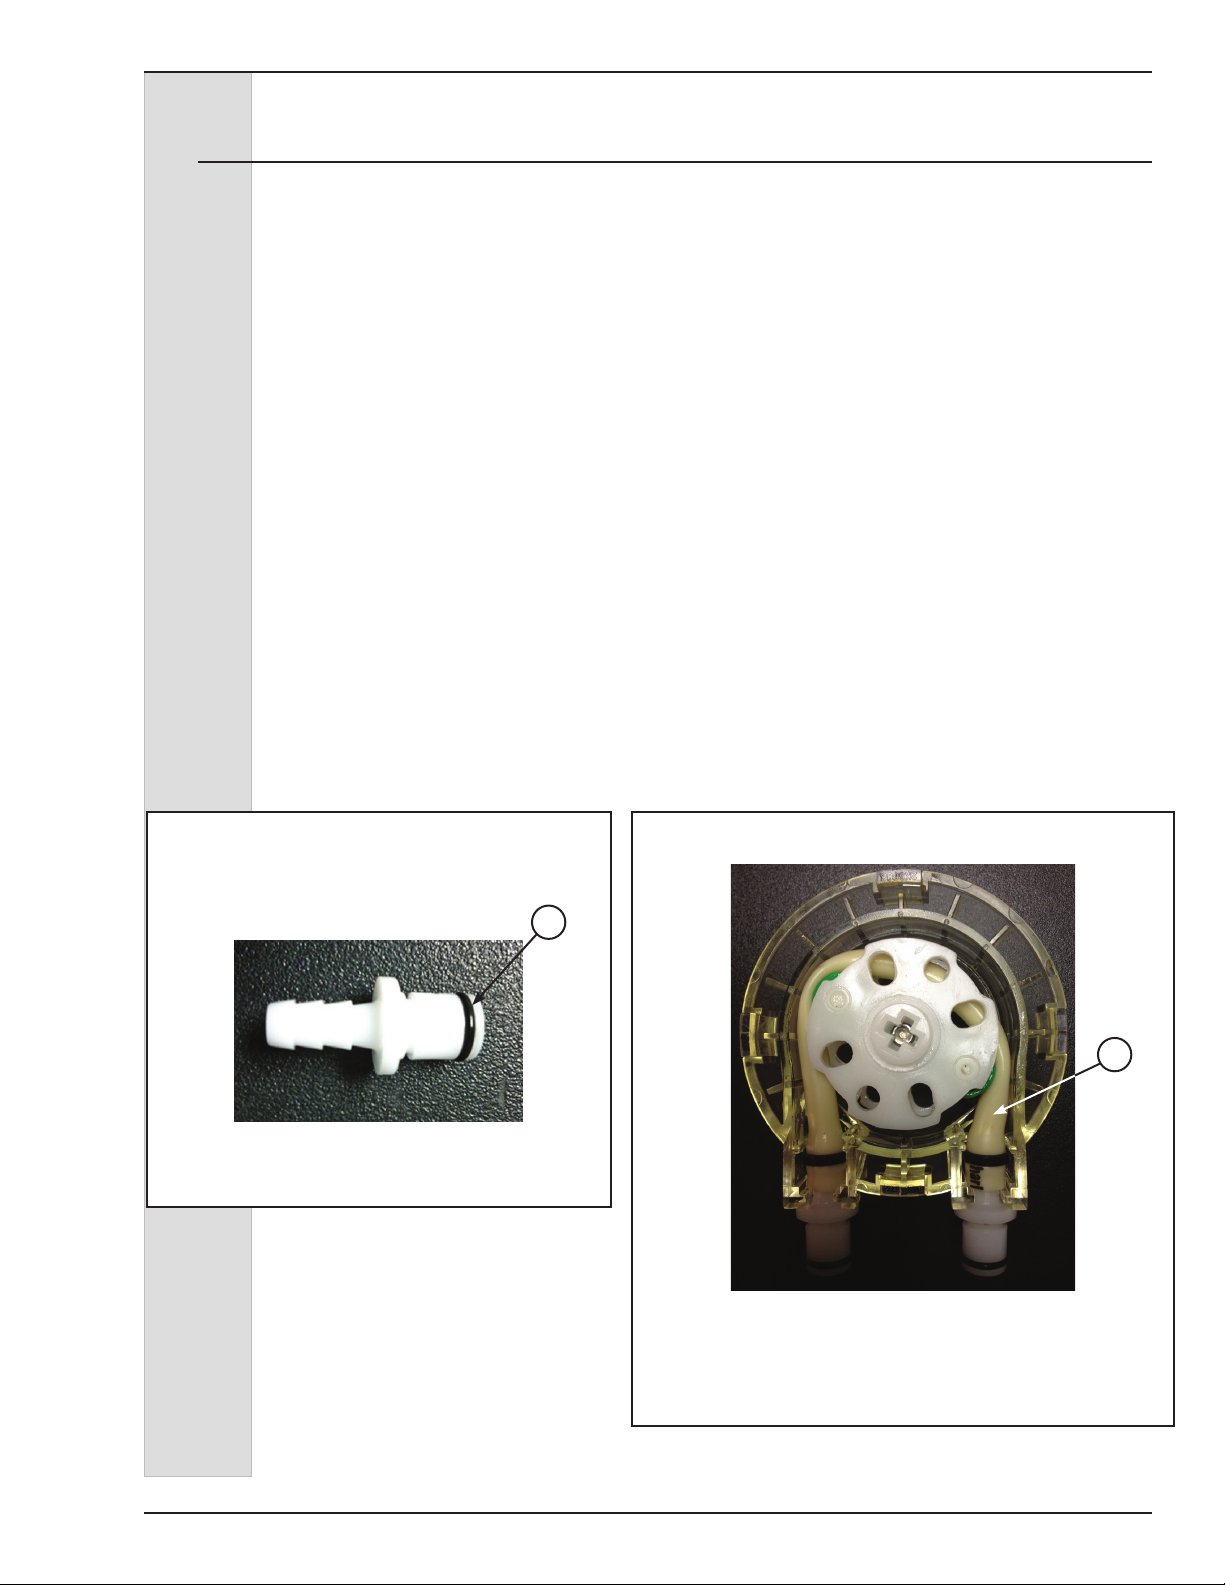
ELECTRO FREEZE Shake Model CS705-M2
Figure 7 Syrup System View (Sheet 2 of 2)
Item Part No. Description
1 .................... HC121100 .............Kit - Tube Assy. Syrup Yellow and Coupling
2 .................... HC121101 .............Kit - Tube Assy. Syrup Brown and Coupling
3 .................... HC121102 .............Kit - Tube Assy. Syrup Red and Coupling
4 .................... HC121103 .............Kit - Tube Assy. Syrup Blue and Coupling
5 .................... HC121662 .............Kit - Tube Assy. Malt and Coupling
6 .................... HC150966 .............Potentiometer - 100K OHM 1-Turn
7 .................... HC150982-08 ........Housing - Plug Ears 6 Circuit
8 .................... HC169101 .............Pump - Peristaltic Syrup 24VDC
9 .................... HC150967 .............Control - Speed 24VAC to DC Motor
10 .................. HC121039 .............Tube - Assy. Syrup Pick-up
11 .................. HC121039-01 ........Tube - Assy. Syrup Pick-up 3/8 (Chocolate)
12 .................. HC141173 .............Cap - Bottle Gal Punched
12A ................ HC199050 .............Boot - Syrup Bottle (Black) (not shown)
13 .................. HC141173-01 ........Cap - Bottle Gal Punched 7/16 (Chocolate)
13A ................ HC199050 .............Boot - Syrup Bottle (Black) (not shown)
Not Shown:
HC121094 .............Tube - Assy Water Line
HC161032 .............Filter - In Line 3/8NPT Wtr 100 Mesh
HC160720 .............Clamp - Hose 7/32 to 5/8 (Water line)
HC196109 .............Beaker - 150ml
HC162642 .............Knob - Syrup Pot
Coupling - Assy. Insert - 1/4 Flow
1/8 NPT (also used in calibration
process) HC160770
1
Item Part No. Description
1 ........... HC160632 ....... O-ring
Pump Peristaltic Tube Assembly
1
Item Part No. Description
1 ........... HC120983 ....... Tube - Assy Small Peristaltic
HC120983-01 .. Tube - Assy Large Peristaltic
(Chocolate)
184592-01 7
Page 60
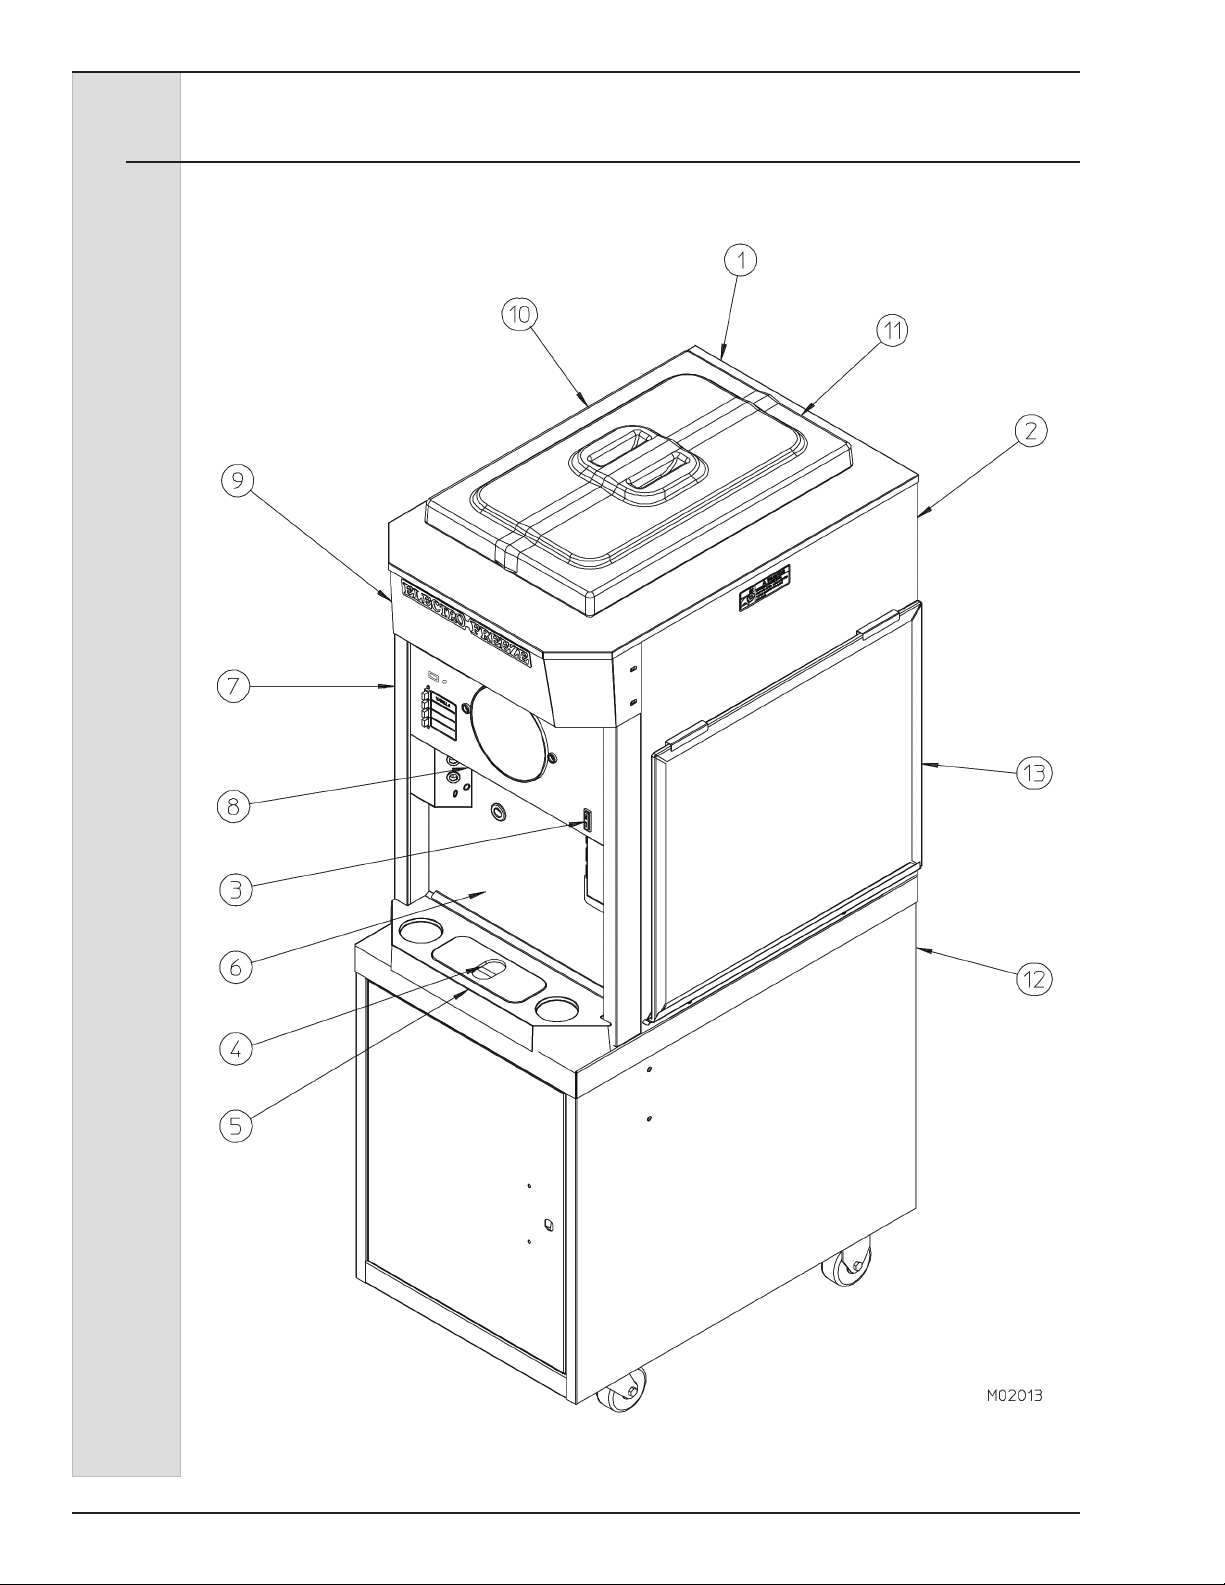
ELECTRO FREEZE Shake Model CS705-M2
Figure 8 Panel View (Sheet 1 of 2)
184592-018
Page 61
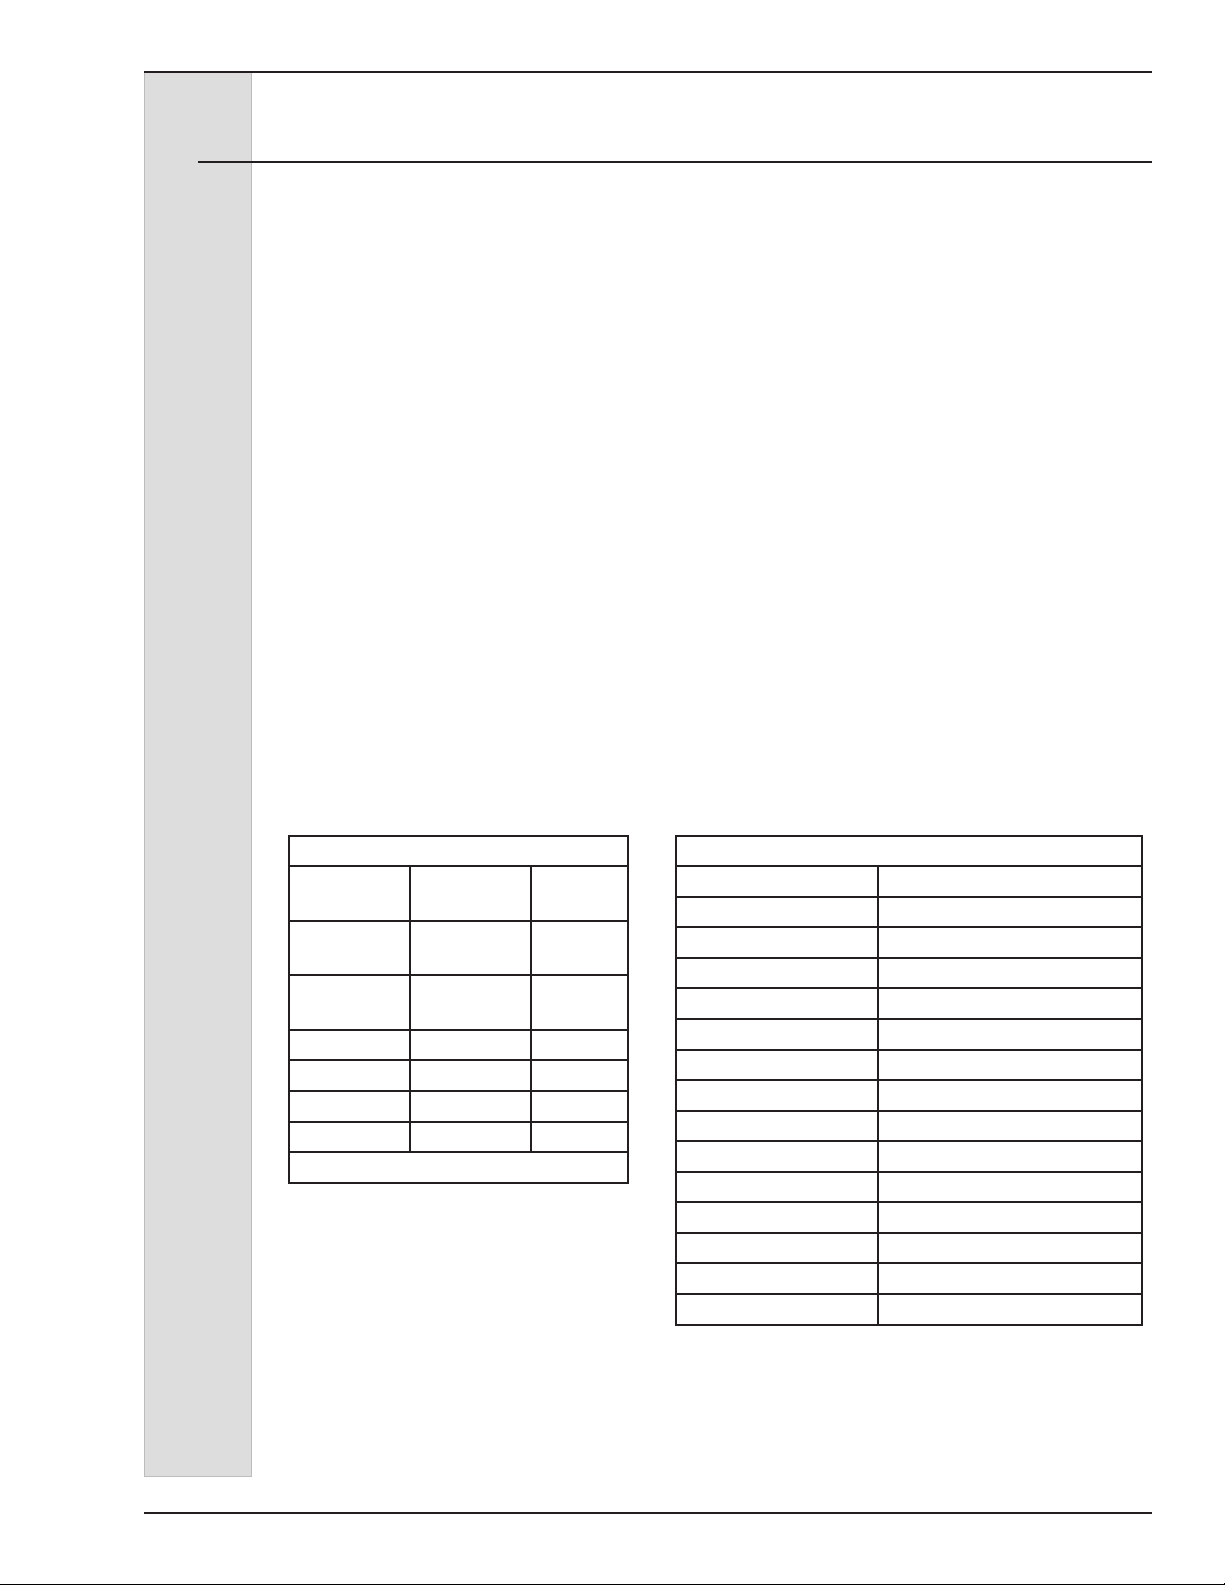
ELECTRO FREEZE Shake Model CS705-M2
Figure 8 Panel View (Sheet 2 of 2)
Item Part No. Description
1 .................. HC141185 .............Panel - Rear
2 .................. HC121041 .............Panel - Assy Weldment RH
3 .................. HC150541 .............Light - Indicator 28v ADD MIX
4 .................. HC196261 .............Cover - Drip Tray
5 .................. HC196260 .............Tray - Drip
6 .................. HC121017-01 ........Panel - Assy. Front 5 Flavor Malt
6A ................HC159064 ............. Grommet - 1.1 OD 7/8 GD x 5/8 ID (Drain Tube)(Not Shown)
7 .................. HC140659 .............Panel - Side LH CS705
8 .................. HC141161-02 ........Panel - Dispense 5 Flavor + Malt
9 .................. HC121018-01 ........Trimstrip - Assy. Tapered Malt
10 ................ HC120804 .............Panel - Assy. Hopper & Top
11 ................. HC118691 .............Cover - Assy. Hopper Insulate
12 ................ HC162200 .............Cart - CS Stainless
HC162200-11 ....... Latch - CS Cart
13 ................ HC155143 .............Filter - 22 x 19 x 3/8
Not Shown:
HC161300 ....... Switch - Level Float Sensor
HC161301 ....... Float - Level Sensor
HC139230 ....... Deector - Panel (Left side)
HC114341 ....... Stud - Assy. Cylinder 1-15/16”
Hardware for Panels
Panel Screw Nut -
Speed
Dispense Top
Dispense Bottom
Front HC160048 n/a
Rear HC160048 n/a
Side HC159219 n/a
Trimstrip HC160076 n/a
*N/A - Not Applicable
HC160025 n/a
HC160076 n/a
CS705-M2 Panel Decals & Labels
Part No. Description
HC165025 Beater Warning
HC165250 Cleaning Instructions
HC165093 Clear Overlay
HC164215-02 Flavor - Malt
HC164232 Malt
HC165414 Nameplate-Electro Freeze
HC165126 Panel Removal
HC164220 Pump Potentiometer
HC164220-01 Pump Potentiometer Brown
HC164220-02 Pump Potentiometer Red
HC164220-03 Pump Potentiometer Blue
HC164216 Syrup Pump
HC164217 Trimstrip
HC169052 Ventilation 3 in.
184592-01 9
Page 62
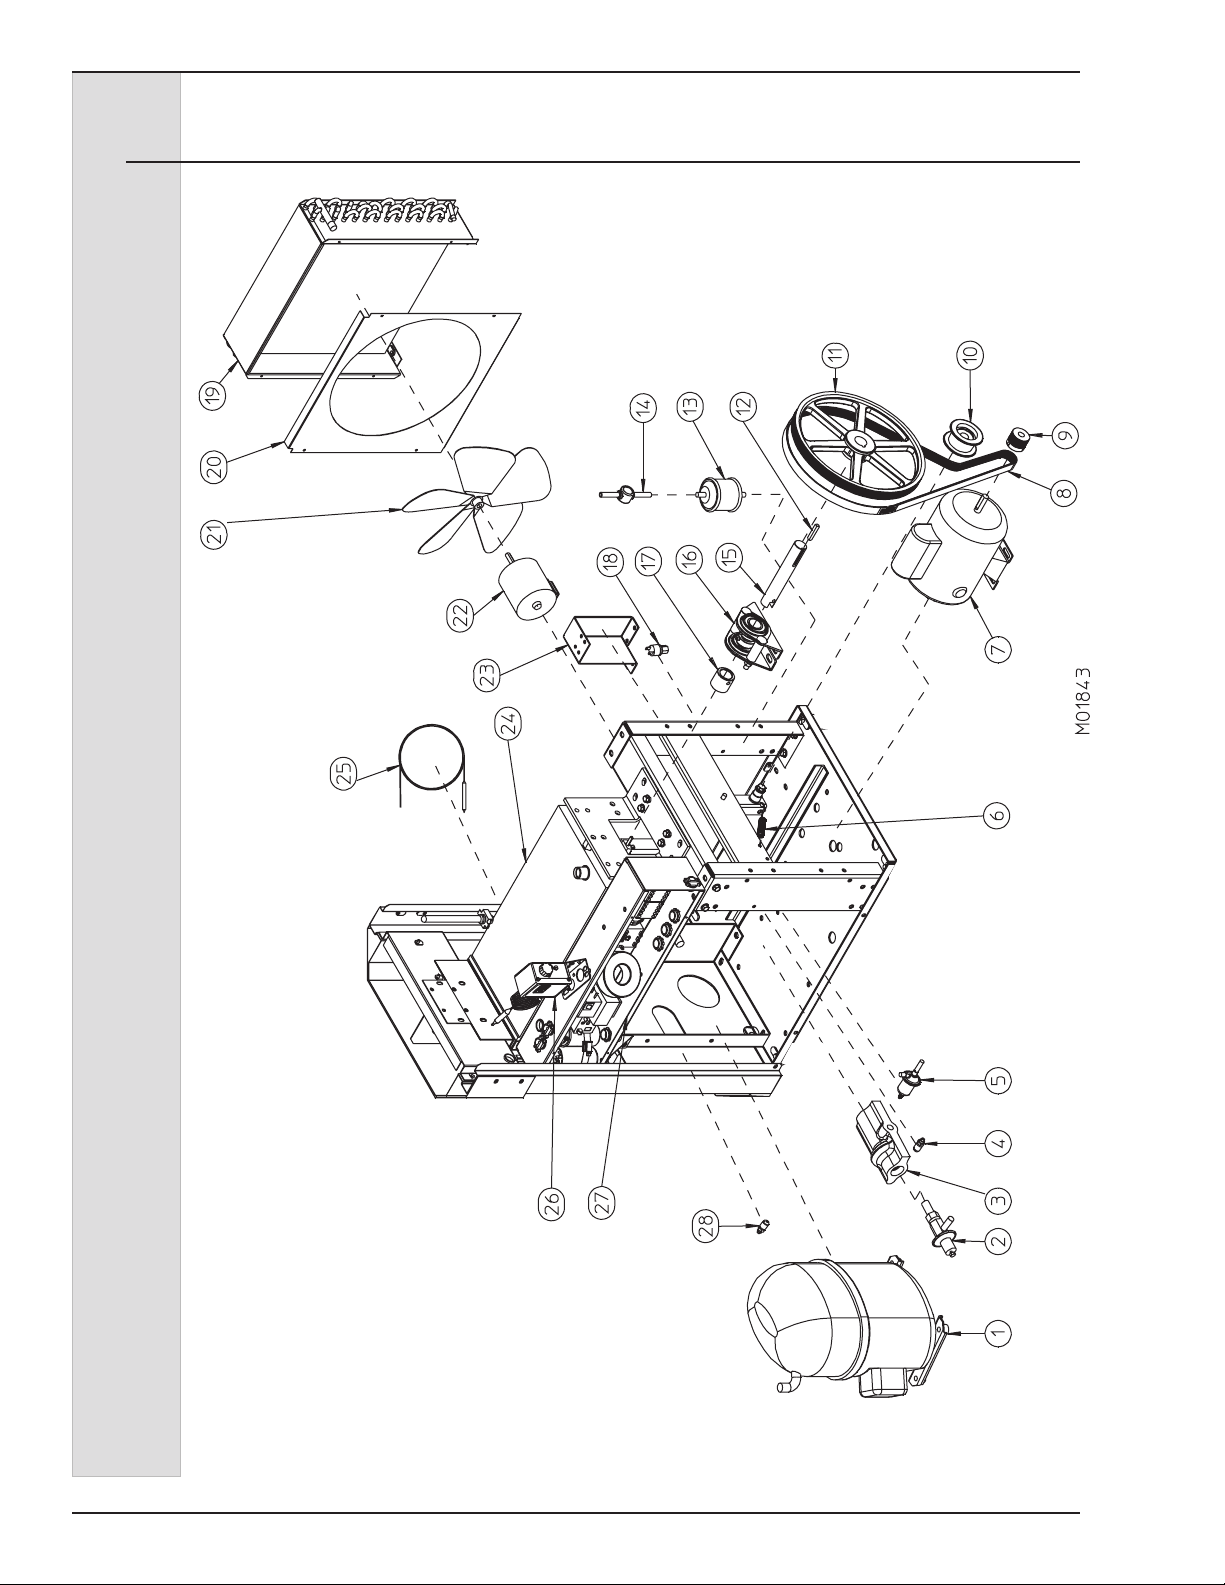
ELECTRO FREEZE Shake Model CS705-M2
Figure 8 Side View (Sheet 1 of 2)
184592-0110
Page 63

ELECTRO FREEZE Shake Model CS705-M2
Figure 8 Side View (Sheet 2 of 2)
19 .......HC155140 ....... Condenser - Air 14 x 14
Item Part No. Description Item Part No. Description
20 .......HC140656 ....... Shroud - Fan .....
21 .......HC159033 ....... Blade - Fan 12 in. 24º
22 .......HC151077 - 01 Motor - Fan 50W 230V 50/60 HZ
and:
23 .......HC120580 ....... Bracket - Assy. Fan Mount
24 .......HC120417 ....... Cylinder - Assy. Complete
25 .......HC155397 ....... Tube - Capillary w/Strainer
26 .......HC119989 ....... Kit - Thermostat & Retainer
27 ...... - - - - - - - .. Electric Box (See Figure 5)
28 .......HC155497 ....... Valve - Access (Suction)
29 .......HC120603 ....... Board - Assy. Torque Monitor Shake
30 .......HC155708 ....... Valve - Solenoid 1/4 NPT 240V
Not Shown:
HC120606 ....... Tube - Assy. Drain
HC161032 ....... Filter - In line 3/8 NPT WTR 100 Mesh
HC151149 ....... Motor - Shake 44W 230v FWR
Motor - 1/2 HP 115/208 - 230 /1/60 (Beater Motor)
Screw - SK Set 5/16 - 18 x 3/8 (not shown)
1 .........HC120602 ...... Compressor - Assy. 208-230/1/60 includes compressor
HC150244 ........Capacitor - Run
HC151414 ........Capacitor - Start
HC155063 ........Drier - Filter 3 cu. in. Sweat
HC151478 ........Grommet - Comp. Mtg.
HC151474 ........Relay - Compressor Start
HC151479 ........Sleeve - Comp. Mtg.
2 .........HC155490 ...... Valve - Automatic Expansion
3 .........HC165531 ...... Insulator - Expansion Valve
4 .........HC155497 ...... Valve - Access (EPR)
5 .........HC155398 ...... Valve - EPR
184592-01 11
8 .........HC153185 ...... Belt - Poly V
9 .........HC140654 ...... Sheave - Drive 1.438 PD J8
9A .......HC153323 ...... Key - Drive 1/4” Sq. x 1-1/2” (not shown)
6 .........HC162331 ...... Spring - Extension
7 .........HC151143 ......
10 .......HC120588 ...... Pulley - Assy. Idler Tensioner
11 ........HC153614 ...... Sheave - Driven
11A .....HC160033 ......
12 .......HC153323 ...... Key - Drive 1/4” Sq. x 1 - 1/2”
13 .......HC155063 ...... Drier - Filter 3 cu in Sweat
14 .......HC155059 ...... Glass - Sight
15 .......HC140824 ...... Shaft - Drive
15B .....HC160056 ...... Screw - Set 1/4-20 x 1/4 (not shown)
16 .......HC120946 ...... Bearing - Assy Rear (See Figure 7)
HC153024 ........Bearing - Ball 1.00ID x 2.0472 OD
17 .......HC140823 ...... Cap - Coupling
18 .......HC155450 ...... Cut Out - High Pressure 450 PSI
18A .....HC155419 ...... Valve - Access
18B .....HC155649 ...... Valve - Core
Page 64
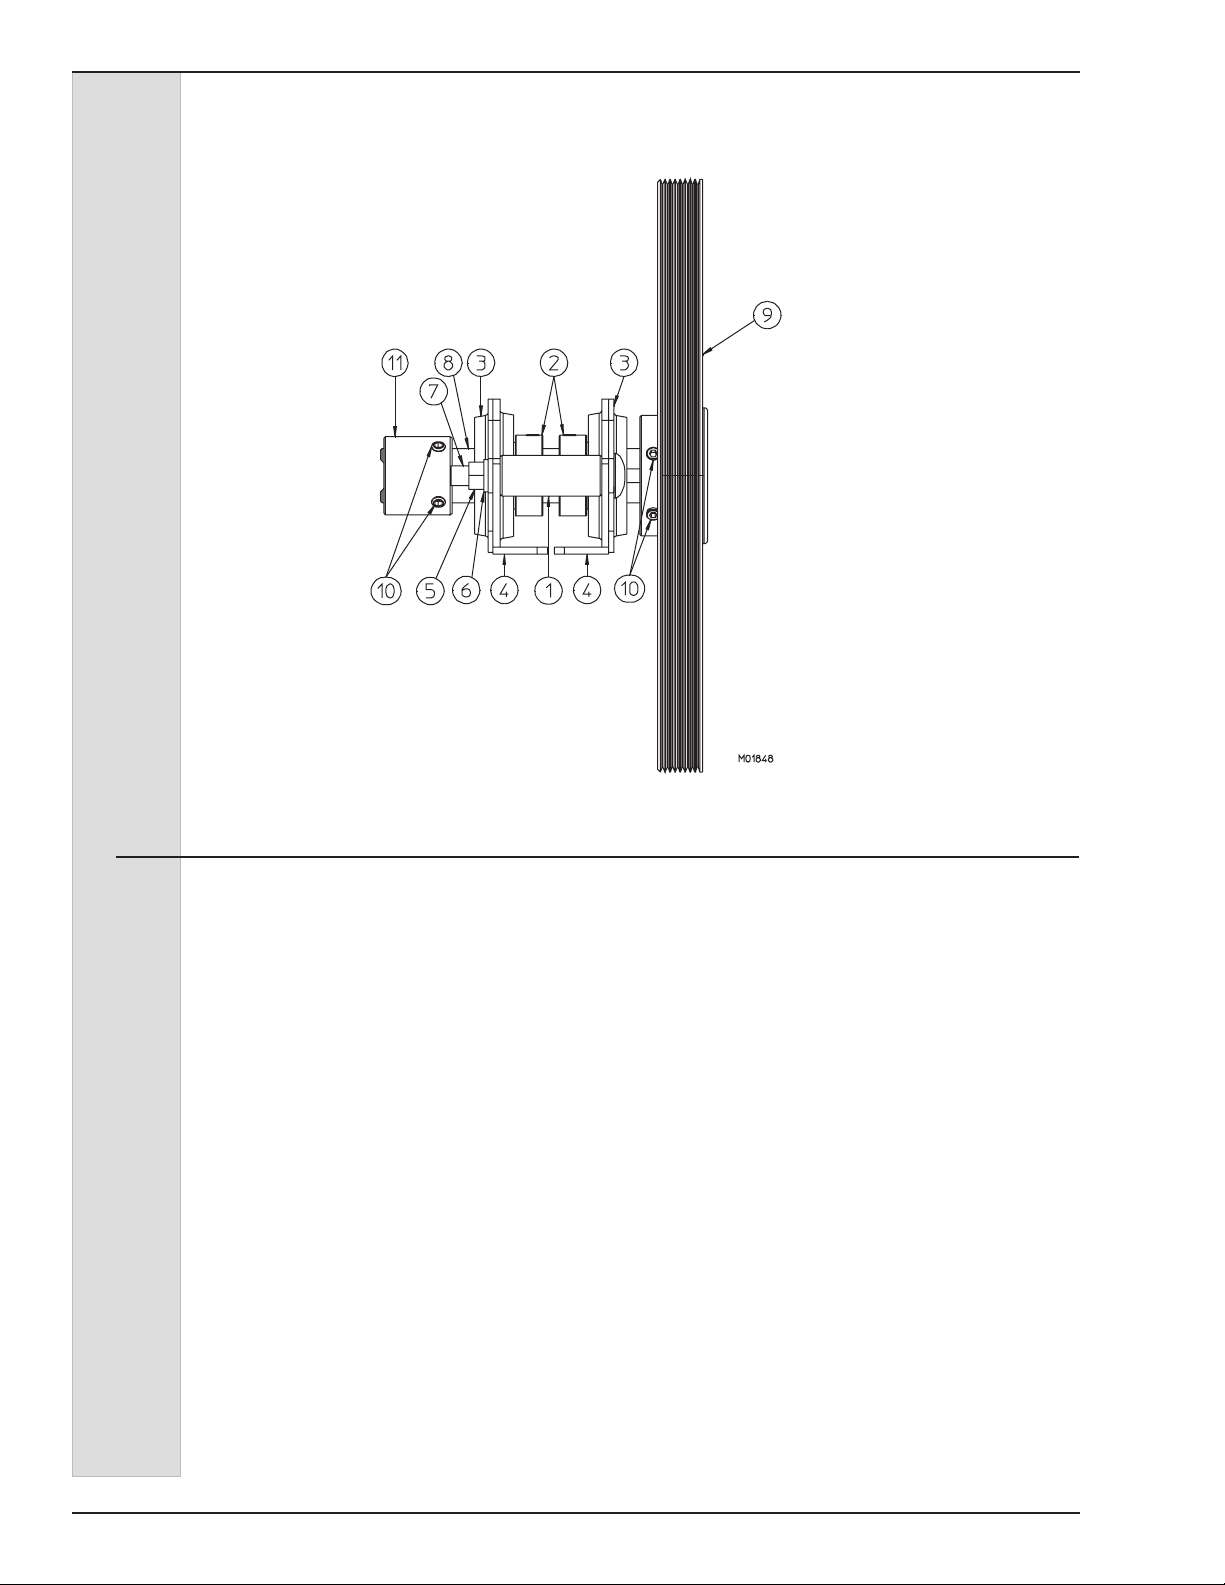
ELECTRO FREEZE Shake Model CS705-M2
Figure 9 Drive Shaft and Bearing Assembly
Item Part No. Description
* ................... HC120946 .............Bearing - Assy. Rear
1 .................. HC130189 .............Spacer - Rear Bearing
2 .................. HC153024 .............Bearing - Ball 1.00 ID x 2.0472 OD
3 .................. HC153025 .............Stamping - Retainer Plate
4 .................. HC153026 .............Stamping - Main
5 .................. HC160105 .............Nut - Hex 5/16-18 ZN
6 .................. HC160142 .............Washer - Lock 5/16 ZN
7 .................. HC160415 .............Bolt - Carriage 5/16-18 x 3 ZN
8 .................. HC140824 .............Shaft - Drive
9 .................. HC153614 .............Sheave - Driven
10 ................ HC160056 .............Screw - SK Set
11 ................. HC140823 .............Cap - Coupling
* Includes items 1 through 7.
Not Shown:
HC113948 ......... Bar - Alignment (Loaner) (used to align bearings to
cylinder)
HC113948-01 .... Bar - Alignment (Purchase)
184592-0112
Page 65

Accessories
Part No. Description
HC162548 .............. Adhesive - Filter Spray
HC196109 .............. Beaker - 150ML
HC196103 .............. Bottle - Wash 500ML
HC158003 .............. Brush - 7/16 x 1-1/8 Double Handle
HC158010 .............. Brush - 6 inch w/o Handle (Use with Handle HC158012)
HC158026 .............. Brush - 1 inch Diameter 12 inches Long
HC158028 .............. Brush - 3/8 Dia x 1/2 21inch Handle
HC158077 .............. Brush - 9/16 inch with 36 inch Handle
HC184291 .............. Chart - O-ring (Laminated)
HC121061 .............. Coupling - Assy. Insert 1/4 Flow 1/8 NPT
HC160632 O-ring
HC158051 .............. Cup - Overrun Measuring 1 Pint (Use with P/N 158049 scale)
HC158012 .............. Handle - Brush 36 inch Fiberglass (Use with Brush HC158010)
HC158066 .............. Lubricant - Compound 7 5.3 oz. tube (per tube)
HC158014 .............. Sanitizer - Stera-Sheen Case/4 Jars
HC158014A ............Sanitizer - Stera-Sheen 4 lb. jar
HC158049 .............. Scale - Overrun
HC184589 .............. Sheet - Clean & Sanitize CS705
HC184590 .............. Sheet - Clean & Sanitize Syrup System CS705
HC169374 .............. Tool - O-Ring Removal
ELECTRO FREEZE Shake Model CS705-M2
(Used in Calibration Process) includes
184592-01 13
Page 66

ELECTRO FREEZE Shake Model CS705-M2
184592-0114
Page 67
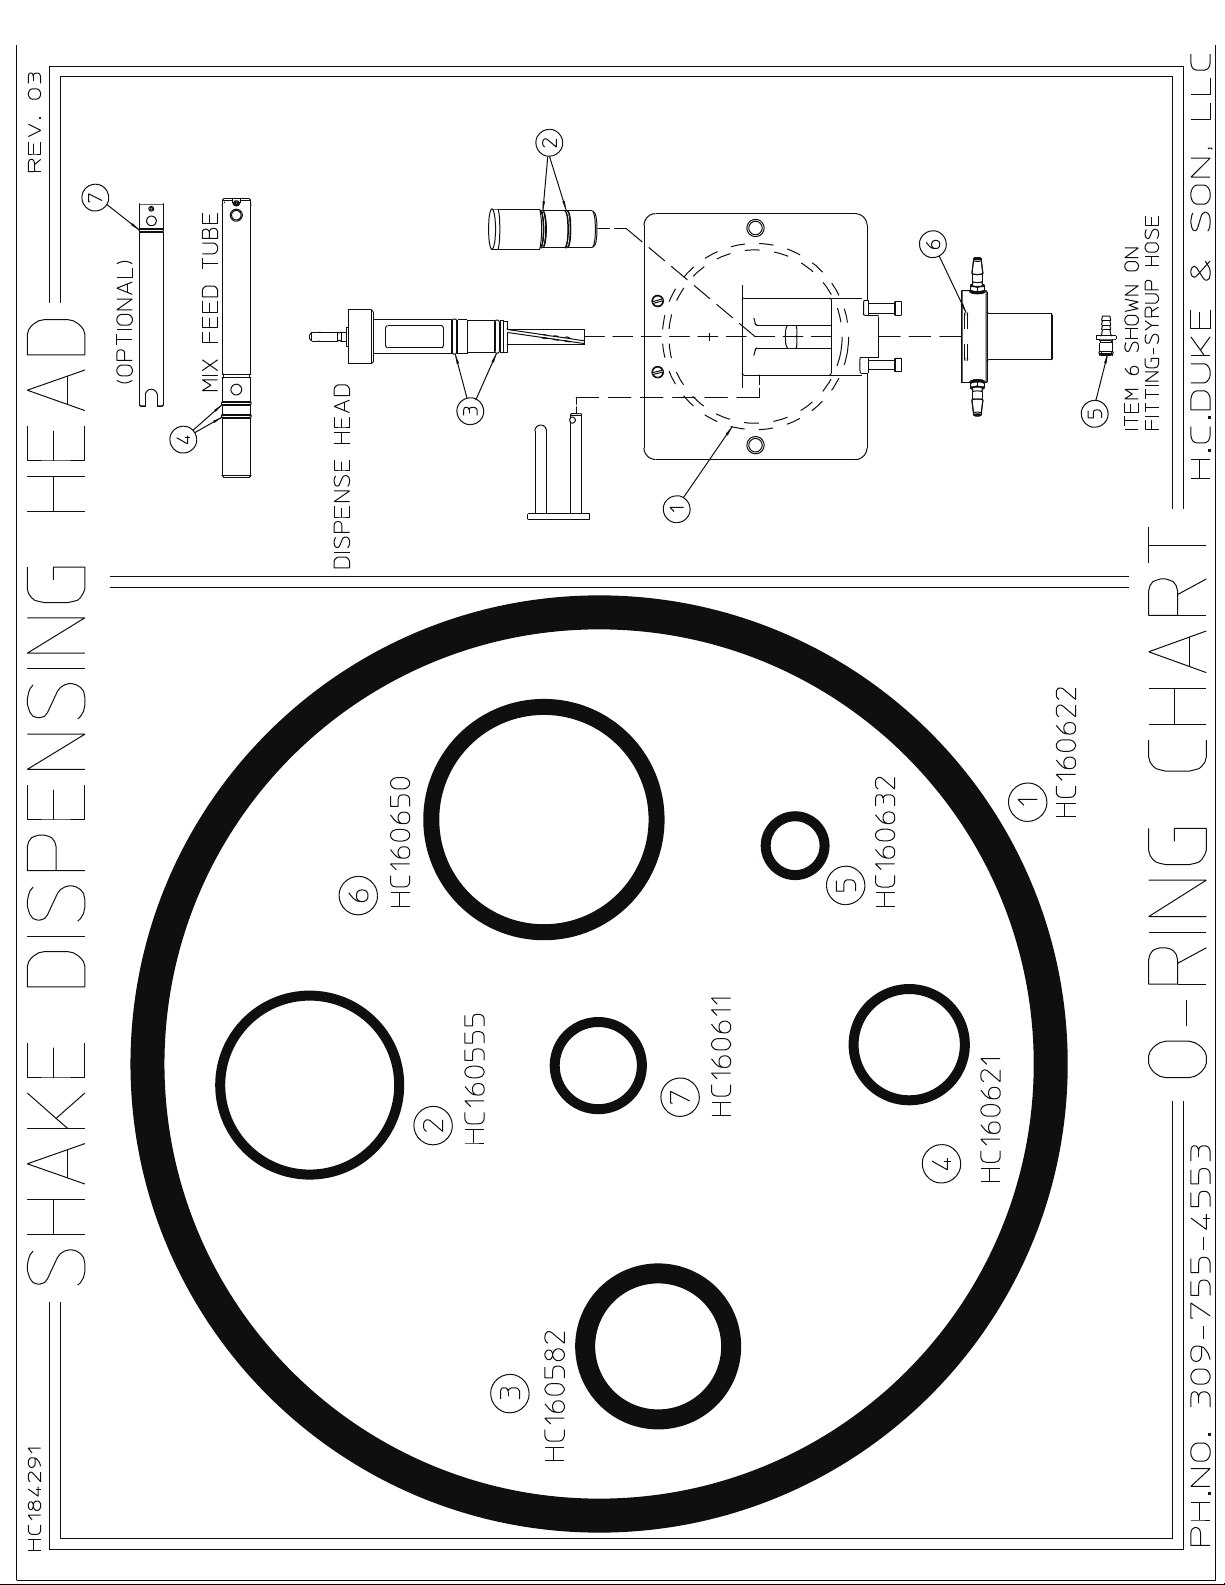
ELECTRO FREEZE Shake Model CS705-M2
184592-01 15
Page 68
ELECTRO FREEZE Shake Model CS705-M2
Notes
184592-0116
Page 69
ELECTRO FREEZE Model CS705-M2
Alphabetized Parts List for Model CS705-M2
IMPORTANT:
All parts shown are for standard models designed for 220v/60Hz/1phase.
PART PART SERIAL NUMBER
DESCRIPTION NUMBER QTY (FROM – TO)
Adhesive-Filter Spray .................................... HC162548.......... * ....... J2O-2935 -
Bar-Alignment (Loaner) .................................. HC113948 ..........1 ...... J2O-2935 -
Bar-Alignment (Purchase) ............................... HC113948-01 .....1 ...... J2O-2935 -
Beaker-150ML (Calibration) ............................ HC196109..........1 ......J2O-2935 -
Bearing-Assy. Rear ........................................ HC120946..........1 ...... J2O-2935 -
Bearing-Ball 1.00 ID x 2.0472 OD............. HC153024..........2 ...... J2O-2935 -
Bolt-Carriage 5/16-18 x 3 ZN ......................... HC160415 ........... 2 .......J2O-2935 -
Nut-Hex 5/16-18 ZN .................................. HC160105..........2 ......J2O-2935 -
Spacer-Rear Bearing ................................ HC130189.......... 2 ...... J2O-2935 -
Stamping-Main .......................................... HC153026..........2 ...... J2O-2935 -
Stamping-Retainer Plate ........................... HC153025..........2 ......J2O-2935 -
Washer-Lock 5/16 ZN ............................... HC160142..........2 ...... J2O-2935 -
Bearing-Ball 1.00 ID x 2.0472 OD ................. HC153024.......... 2 ...... J2O-2935 -
Beater-Assy. Shake Short ........................... HC118708 .......... 1 ...... J2O-2935 -
Belt-Poly V ..................................................... HC153185..........1 ...... J2O-2935 -
Blade-Fan 12 in. 24º ...................................... HC159033..........1 ...... J2O-2935 -
Blade-Scraper Shake Non Rev ..................... HC140900..........2 ...... J2O-2935 -
Block-Terminal ............................................... HC150591.......... 2 ...... J2O-2935 -
Board-Assy. Torque Monitor Shake ............... HC120603..........1 ...... J2O-2935 -
Bolt-Carriage 5/16-18 x 3 ZN......................... HC160415..........2 ...... J2O-2935 -
Boot-Syrup Bottle .......................................... HC199050..........4 ...... J2O-2935 -
Bottle-Wash 500ML ....................................... HC196103.......... 1 ...... J2O-2935 -
Bracket-Assy. Fan Mount .............................. HC120580..........1 ...... J2O-2935 -
Breaker-Circuit 0.7A ..................................... HC150984..........1 ...... J2O-2935 -
Breaker-Circuit 4.5A ...................................... HC150452..........1 ...... J2O-2935 -
Brush-1 inch Diameter 12 inches Long ......... HC158026..........1 ...... J2O-2935 -
Brush-3/8 Dia x 1/2 21inch Handle ................ HC158028..........1 ...... J2O-2935 -
Brush-6 inch w/o Handle
(Use with Handle HC158012)
Brush-7/16 x 1-1/8 Double Handle ................ HC158003.......... 1 ...... J2O-2935 -
........................ HC158010..........1 ...... J2O-2935 -
* As Required
** LH or RH — Left or right hand is determined as you face the front of the freezer.
NLA No Longer Available
Use only original or authorized replacement parts with this freezer.
Use of unapproved parts will void warranty.
184592-01 4/1 17
Page 70
ELECTRO FREEZE Model CS705-M2
Alphabetized Parts List for Model CS705-M2
IMPORTANT:
All parts shown are for standard models designed for 220v/60Hz/1phase.
PART PART SERIAL NUMBER
DESCRIPTION NUMBER QTY (FROM – TO)
Brush-9/16 inch with 36 inch Handle ............. HC158077..........1 ...... J2O-2935 -
Bushing-Beater Bearing ................................ HC196072..........1 ...... J2O-2935 -
Bushing-Mixer Shaft ...................................... HC141151 .......... 1 ...... J2O-2935 -
Capacitor-Run ............................................... HC150244..........1 ...... J2O-2935 -
Capacitor-Start ............................................. HC151414..........1 ...... J2O-2935 -
Cap-Bottle Gal Punched ................................ HC141173 ..........3 ...... J2O-2935 -
Cap-Bottle Gal Punched 7/16 (Chocolate) .... HC141173-01 .....1 ...... J2O-2935 -
Cap-Coupling................................................. HC140823..........1 ...... J2O-2935 -
Cart-CS Stainless .......................................... HC162200..........1 ...... J2O-2935 -
Chamber-Assy Mix ........................................ HC121006-01 .... 1 ...... J2O-2935 -
Chamber-Mix ............................................ HC141148-01 ..... 1 ...... J2O-2935 -
Coupling-Body 1/4 Flow 1/8 NPT .............. HC121061..........5 ...... J2O-2935 -
O-ring ........................................................ HC160650..........1 ...... J2O-2935 -
Chart-O-ring (Laminated) .............................. HC184291..........1 ...... J2O-2935 -
Clamp-Hose 3-1/6 to 4 (Electric Box-Capacitor) HC160743..........1 ......J2O-2935 -
Clamp-Hose 4/32 to 5/8 (Wate Line) ............ HC160720.......... 1 ...... J2O-2935 -
Clip-Miniature Relay Retaining ...................... HC150166..........1 ...... J2O-2935 -
Compressor-Assy. 208-230-1-60
includes compressor and: ......................... HC120602..........1 ...... J2O-2935 -
Capacitor-Run .......................................... HC150244..........1 ...... J2O-2935 -
Capacitor-Start .................................................. HC151414 ...........1 .......J2O-2935 -
Drier-Filter 3 cu. in. Sweat ........................... HC155063..........1 ...... J2O-2935 -
Grommet-Comp.Mtg. .................................... HC151478..........4 ......J2O-2935 -
Relay-Compressor Start ............................... HC151474..........1 ...... J2O-2935 -
Sleeve-Comp.Mtg. ........................................ HC151479..........4 ...... J2O-2935 -
Condenser-Air 14 x 14 .................................. HC155140..........1 ...... J2O-2935 -
Connect- Assy Drive ...................................... HC121008-01 ....1 ...... J2O-2935 -
Contactor-Mini 3P (Beater Motor & Compressor) HC150095..........2 ...... J2O-2935 -
Control-Speed 230VAC to DC Motor ............. HC150967-01 ....1 ...... J2O-2935 -
Control-Speed 24VAC to DC Motor ............... HC150967..........1 ...... J2O-2935 -
Coupling-Assy. Insert 1/4 Flow 1/8 NPT
(Used in Calibration Process) ........................ HC121061..........1 ...... J2O-2935 -
* As Required
** LH or RH — Left or right hand is determined as you face the front of the freezer.
NLA No Longer Available
Use only original or authorized replacement parts with this freezer.
Use of unapproved parts will void warranty.
18 184592-01 10/13
Page 71
ELECTRO FREEZE Model CS705-M2
Alphabetized Parts List for Model CS705-M2
IMPORTANT:
All parts shown are for standard models designed for 220v/60Hz/1phase.
PART PART SERIAL NUMBER
DESCRIPTION NUMBER QTY (FROM – TO)
O-ring ........................................................ HC160632..........1 ...... J2O-2935 -
Cover-Assy Flex Shaft ................................... HC121020..........1 ...... J2O-2935 -
Cover-Assy. Hopper Insulate ......................... HC118691 ..........1 ...... J2O-2935 -
Cover-Drip Tray ............................................. HC196261..........1 ...... J2O-2935 -
Coupling-Body ¼ Flow ¼ Barb Shut off ........ HC160771..........5 ...... J2O-2935 -
Cup-Overrun Measuring 1 Pint
(Use with P/N 158049 scale)
Cut Out-High Pressure 450 PSI .................... HC155450..........1 ...... J2O-2935 -
Cylinder-Assy. Complete ............................... HC120417.......... 1 ...... J2O-2935 -
Decal-Beater Warning ................................... HC165025..........1 ...... J2O-2935 -
Decal-Cleaning Instructions........................... HC165250..........1 ...... J2O-2935 -
Decal-Clear Overlay ...................................... HC165093.......... 1 ...... J2O-2935 -
Decal-Flavor .................................................. HC164215.......... 1 ...... J2O-2935 -
Decal-Panel Removal .................................... HC165126..........7 ...... J2O-2935 -
Decal-Pump Potentiometer ........................... HC164220..........1 ...... J2O-2935 -
Decal-Pump Potentiometer Blue ................... HC164220-03 .... 1 ......J2O-2935 -
Decal-Pump Potentiometer Brown ................ HC164220-01 .... 1 ......J2O-2935 -
Decal-Pump Potentiometer Red .................... HC164220-02 ....1 ...... J2O-2935 -
Decal-Syrup Pumps....................................... HC164216..........1 ...... J2O-2935 -
Decal-Ventilation 3 in. .................................... HC169052..........1 ...... J2O-2935 -
Deector-Panel (Left side top) ....................... HC139230..........1 ...... J2O-2935 -
Drier-Filter 3 cu in Sweat ............................... HC155063..........1 ...... J2O-2935 -
......................... HC158051..........1 ...... J2O-2935 -
Filter-22 x 19 x 3/8 ......................................... HC155143..........1 ...... J2O-2935 -
Filter-In Line 3/8NPT Wtr 100 Mesh .............. HC161032..........1 ...... J2O-2935 -
Float-Level Sensor ........................................ HC161301..........1 ...... J2O-2935 -
Fuse-Fast AGC 1.0A 1/4 x 1-1/4.................... HC150985..........2 ...... J2O-2935 -
Glass-Sight .................................................... HC155059..........1 ...... J2O-2935 -
* As Required
** LH or RH — Left or right hand is determined as you face the front of the freezer.
NLA No Longer Available
Use only original or authorized replacement parts with this freezer.
Use of unapproved parts will void warranty.
184592-01 4/1 19
Page 72
ELECTRO FREEZE Model CS705-M2
Alphabetized Parts List for Model CS705-M2
IMPORTANT:
All parts shown are for standard models designed for 220v/60Hz/1phase.
PART PART SERIAL NUMBER
DESCRIPTION NUMBER QTY (FROM – TO)
Grommet-1.1 OD 7/8 GD x 5/8 ID Drain Tube HC159064..........1 ...... J2O-2935 -
Grommet-Comp.Mtg. ..................................... HC151478..........4 ...... J2O-2935 -
Guard-Switch Assy. ....................................... HC141209..........1 ...... J2O-2935 -
Handle-Assy.Disp. Complete ......................... HC121019..........1 ...... J2O-2935 -
Handle-Brush 36 inch Fiberglass
(Use with Brush HC158010) .......................... HC158012..........1 ...... J2O-2935 -
Head-Assy. Complete 5 Flavor ...................... HC121006-02 ....1 ...... J2O-2935 -
Bushing-Beater Bearing ............................ HC196072..........1 ......J2O-2935 -
Bushing-Mixer Shaft .................................. HC141151 .......... 1 ...... J2O-2935 -
Chamber-Mix ............................................ HC141148-01 ..... 1 ...... J2O-2935 -
Coupling-Assy. Insert 1/4 Flow 1/8NPT .... HC121061.......... 5 ...... J2O-2935 -
Handle-Assy. Disp. Complete ................... HC121019-01 ....1 ...... J2O-2935 -
Head-Assy. w/Posts 5 FL SH .................... HC121005..........1 ...... J2O-2935 -
Keeper-Assy. Spindle ................................ HC113435 .......... 1 ...... J2O-2935 -
Knob-Ball 3/8 ............................................ HC162629..........1 ...... J2O-2935 -
O-ring (Head) ............................................ HC160622..........1 ......J2O-2935 -
O-ring (Mix Chamber) ............................... HC160650..........1 ...... J2O-2935 -
O-ring (Pivot Post) .................................... HC160555..........2 ...... J2O-2935 -
O-ring (Plunger-Lower) ............................. HC160582..........1 ...... J2O-2935 -
O-ring (Plunger-Upper) ............................. HC160501..........1 ...... J2O-2935 -
O-ring (Syrup Line) ................................... HC160632..........6 ...... J2O-2935 -
Plunger-Dispensing 5 Flavor ..................... HC141150 .......... 1 ...... J2O-2935 -
Post-Pivot ................................................. HC135182..........1 ...... J2O-2935 -
Housing-Plug Ears 6 Circuit ...............................HC150982-08 ...... 1 .......J2O-2935 -
Insert-Assy. Mix Feed (Regulator) ................. HC120664..........1 ...... J2O-2935 -
Insulator-Expansion Valve ............................. HC165531..........1 ...... J2O-2935 -
Insulator-Switch ............................................. HC137798..........1 ...... J2O-2935 -
Insulator-Switch ............................................. HC139175..........1 ...... J2O-2935 -
Keeper-Assy. Spindle .................................... HC113435 ..........1 ...... J2O-2935 -
Key-Drive 1/4” Sq. x 1-1/2” ........................... HC153323..........1 ...... J2O-2935 -
Kit-Recyle Timer Wiring Instructions.............. HC120095..........1 ...... J2O-2935 -
Kit-Thermostat & Retainer ............................. HC119989 ..........1 ...... J2O-2935 -
* As Required
** LH or RH — Left or right hand is determined as you face the front of the freezer.
NLA No Longer Available
Use only original or authorized replacement parts with this freezer.
Use of unapproved parts will void warranty.
20 184592-01 10/13
Page 73
ELECTRO FREEZE Model CS705-M2
Alphabetized Parts List for Model CS705-M2
IMPORTANT:
All parts shown are for standard models designed for 220v/60Hz/1phase.
PART PART SERIAL NUMBER
DESCRIPTION NUMBER QTY (FROM – TO)
Kit-Tube Assy. Syrup Blue and Coupling ....... HC121103 .......... 1 ...... J2O-2935 -
Kit-Tube Assy. Syrup Brown and Coupling .... HC121101 .......... 1 ...... J2O-2935 -
Kit-Tube Assy. Syrup Red and Coupling........ HC121102 .......... 1 ...... J2O-2935 -
Kit-Tube Assy. Syrup Yellow and Coupling .... HC121100 ..........1 ...... J2O-2935 -
Kit-Tube Assy. Malt and Coupling .................. HC121662..........1 ......J2O-2935 -
Knob-Ball 3/8 ................................................. HC162629..........1 ...... J2O-2935 -
Knob-Hand .................................................... HC162625..........2 ...... J2O-2935 -
Knob-Syrup Pot ............................................. HC162642.......... 5 ...... J2O-2935
Label-Trimstrip ............................................... HC164217..........1 ...... J2O-2935 -
Latch-CS Cart ................................................ HC162200-11 .....1 ...... J2O-2935 -
Light-Indicator 28v ADD MIX ......................... HC150541..........1 ...... J2O-2935 -
Lubricant-Compound 7 5.3 oz tube (per tube) HC158054A .......1 ...... J2O-2935 -
Motor-1/2 HP 115/208-230-1-60 (Beater Motor) HC151143 .......... 1 ...... J2O-2935 -
Motor-Fan 50W 230V 50/60 HZ .................... HC151077-01 ....1 ...... J2O-2935 -
Motor-Shake 44W 230v FWR........................ HC151149 .......... 1 ...... J2O-2935 -
Nameplate-EF Large ..................................... HC165414.......... 1 ...... J2O-2935 -
Nut-El Stop #6-32 ZN .................................... HC160199.......... 4 ...... J2O-2935 -
Nut-Hex 5/16-18 ZN ...................................... HC160105..........2 ...... J2O-2935 -
O-ring (Calibration Coupling) ......................... HC160632..........1 ...... J2O-2935 -
O-ring (Head)................................................. HC160622..........1 ...... J2O-2935 -
O-ring (Insert-Regulator) ............................... HC160611 .......... 1 ...... J2O-2935 -
O-ring (Mix Chamber) .................................... HC160650..........1 ...... J2O-2935 -
O-ring (Mix Feed Tube) ................................. HC160621..........2 ...... J2O-2935 -
O-ring (Pivot Post) ......................................... HC160555..........2 ...... J2O-2935 -
O-ring (Plunger) ............................................. HC160582..........1 ...... J2O-2935 -
O-ring (Syrup Line) ........................................ HC160632..........5 ...... J2O-2935 -
* As Required
** LH or RH — Left or right hand is determined as you face the front of the freezer.
NLA No Longer Available
Use only original or authorized replacement parts with this freezer.
Use of unapproved parts will void warranty.
184592-01 4/1 21
Page 74
ELECTRO FREEZE Model CS705-M2
Alphabetized Parts List for Model CS705-M2
IMPORTANT:
All parts shown are for standard models designed for 220v/60Hz/1phase.
PART PART SERIAL NUMBER
DESCRIPTION NUMBER QTY (FROM – TO)
Panel-Assy. Front 5 Flavor Malt .................... HC121017-01 ....1 ......J2O-2935 -
Panel-Assy. Hopper & Top ............................. HC120804..........1 ...... J2O-2935 -
Panel-Dispense 5 Flavor Malt ...................... HC141161-02 .....1 ...... J2O-2935 -
Panel-Rear .................................................... HC141185 .......... 1 ...... J2O-2935 -
Panel-Side LH CS705 ................................... HC121041..........1 ...... J2O-2935 -
Panel-Side RH ............................................... HC140658..........1 ...... J2O-2935 -
Plunger-Dispensing 5 Flavor ......................... HC141150 .......... 1 ...... J2O-2935 -
Post-Pivot ..................................................... HC135182.......... 1 ...... J2O-2935 -
Potentiometer-100K OHM 1-Turn .................. HC150966..........1 ...... J2O-2935 -
Pulley-Assy. Idler Tensioner .......................... HC120588..........1 ...... J2O-2935 -
Pump-Peristaltic Syrup 24VDC ..................... HC169101..........4 ...... J2O-2935 -
Rectier-Bridge .............................................. HC150890..........1 ...... J2O-2935 -
Relay-Compressor Start ................................ HC151474..........1 ...... J2O-2935 -
Relay-Control Flange 3PDT 24VAC .............. HC150341..........1 ...... J2O-2935 -
Relay-Flange Base w/Cover .......................... HC150381..........1 ...... J2O-2935 -
Relay-Miniature DPDT 230V Coil .................. HC150097-01 ....1 ...... J2O-2935 -
Retainer-Drip Tray ........................................ HC140738..........1 ...... J2O-2935 -
Rod-Actuator ................................................. HC138611 .......... 1 ...... J2O-2935 -
Rod-Plunger Switch (Actuator Button)........... HC137760..........1 ...... J2O-2935 -
Sanitizer-Stera-Sheen 4 lb. jar ..................... HC158014A .......* ....... J2O-2935 -
Sanitizer-Stera-Sheen Case/4 Jars ............... HC158014..........* ....... J2O-2935 -
Scale-Overrun .............................................. HC158049..........1 ...... J2O-2935 -
Screw-RDHM #6-32 x 2 Zn ........................... HC159973..........1 ...... J2O-2935 -
Screw-SK Set 1/4-20 x 1/4 ........................... HC160056.......... 6 ...... J2O-2935 -
Screw-SK Set 5/16-18 x 3/8 ......................... HC160033.......... 2 ...... J2O-2935 -
Screw-TRPM #10- 24 x 1/2 SST
(Dispense-Bottom & Trimstrip) ....................... HC160076..........* ....... J2O-2935 -
Screw-TRPM #8 32 x 3/8 SST (Dispense-Top) HC160025..........* ....... J2O-2935 -
* As Required
** LH or RH — Left or right hand is determined as you face the front of the freezer.
NLA No Longer Available
Use only original or authorized replacement parts with this freezer.
Use of unapproved parts will void warranty.
22 184592-01 10/13
Page 75
ELECTRO FREEZE Model CS705-M2
Alphabetized Parts List for Model CS705-M2
IMPORTANT:
All parts shown are for standard models designed for 220v/60Hz/1phase.
PART PART SERIAL NUMBER
DESCRIPTION NUMBER QTY (FROM – TO)
Screw-TRPM 1/4-20 x 1 SST (Side) ............... HC159219..........* ....... J2O-2935 -
Screw-TRPM 1/4-20 x 1/2 SST
Seal-Assy. Shaft Double ................................ HC115525 ..........1 ...... J2O-2935 -
Seal-Beater Shaft ...................................... HC160557..........1 ......J2O-2935 -
Washer-Double Shaft Seal ....................... HC137593..........2 ...... J2O-2935 -
Seal-Beater Shaft .......................................... HC160557.......... 1 ...... J2O-2935 -
Shaft-Assy. Mix .............................................. HC196291..........1 ...... J2O-2935 -
Shaft-Drive..................................................... HC140824..........1 ...... J2O-2935 -
Shaft-Drive 1.438PD J8 ................................. HC140654..........1 ...... J2O-2935 -
Shaft-Flexible w/Casing 17-1/2” .................... HC153422-01 ....1 ...... J2O-2935 -
Sheave-Drive 1.438 PD J8 ............................ HC140654..........1 ...... J2O-2935 -
Sheave-Driven ............................................... HC153614..........1 ...... J2O-2935 -
Sheet-Clean & Sanitize CS705 ..................... HC184589..........1 ...... J2O-2935 -
Sheet-
Shroud-Fan.................................................... HC140656..........1 ...... J2O-2935 -
Sleeve-Comp.Mtg. ......................................... HC151479..........4 ...... J2O-2935 -
Socket-Miniature Relay DPDT ....................... HC150098..........1 ...... J2O-2935 -
Spacer-.375 Long .......................................... HC137765-01 ....2 ...... J2O-2935 -
Spacer-Rear Bearing ..................................... HC130189..........1 ...... J2O-2935 -
Spring-Extension ........................................... HC162331.......... 1 ...... J2O-2935 -
Spring-Plunger Rod ....................................... HC162303..........1 ...... J2O-2935 -
Stamping-Main .............................................. HC153026..........2 ...... J2O-2935 -
Stamping-Retainer Plate ............................... HC153025..........2 ...... J2O-2935 -
Stop-Terminal Block End (Cover) .................. HC150594.......... 1 ...... J2O-2935 -
Stud-Assy. Cylinder 1-15/16” ........................ HC114341 ..........2 ...... J2O-2935 -
Switch-Assy. Plunger Shake Pres ................. HC121011 ..........1 ...... J2O-2935 -
Guard-Switch Assy. ................................... HC141209..........1 ...... J2O-2935 -
Insulator-Switch ........................................ HC137798..........1 ......J2O-2935 -
Insulator-Switch ........................................ HC139175..........1 ......J2O-2935 -
Nut-El Stop #6-32 ZN ................................ HC160199..........4 ......J2O-2935 -
Screw-RDHM #6-32 x 2 Zn ....................... HC159973..........4 ......J2O-2935 -
Spring-Plunger Rod .................................. HC162303..........1 ...... J2O-2935 -
Switch-Snap Button .................................. HC150456..........3 ...... J2O-2935 -
** LH or RH — Left or right hand is determined as you face the front of the freezer.
NLA No Longer Available
Clean & Sanitize Syrup System CS705 .... HC184590.......... 1 ...... J2O-2935 -
* As Required
(Front & Rear) HC160048.......... * ....... J2O-2935 -
Use only original or authorized replacement parts with this freezer.
Use of unapproved parts will void warranty.
184592-01 4/1 23
Page 76
ELECTRO FREEZE Model CS705-M2
Alphabetized Parts List for Model CS705-M2
IMPORTANT:
All parts shown are for standard models designed for 220v/60Hz/1phase.
PART PART SERIAL NUMBER
DESCRIPTION NUMBER QTY (FROM – TO)
Washer-1/2 x .196 x 1/16 .......................... HC160157..........8 ...... J2O-2935 -
Washer-Flat #6 Brass ............................... HC160393..........2 ...... J2O-2935 -
Switch-Level Float Sensor ............................. HC161300..........1 ...... J2O-2935 -
Switch-Push DPDT Mom Black ..................... HC150971..........2 ...... J2O-2935 -
Switch-Snap Button ....................................... HC150456..........3 ...... J2O-2935 -
Switch-Toggle 3PDT Center Off ................... HC150465..........1 ...... J2O-2935 -
Switch-Toggle SPST ...................................... HC159235..........1 ...... J2O-2935 -
Terminal-Strip ................................................ HC150798..........1 ...... J2O-2935 -
Timer-DOB .5-60 Sec .................................... HC150188..........1 ...... J2O-2935 -
Tool-O-Ring Removal .................................... HC169374.......... 1 ...... J2O-2935 -
Transformer-75VA / 24VAC / MURD .............. IC574100325 ..... 1 ...... J2O-2935 -
Transformer-Current ...................................... IC547100349 .....1 ...... J2O-2935 -
Tray-Drip ....................................................... HC196260..........1 ...... J2O-2935 -
Trimstrip-Assy. Tapered Malt ......................... HC121018-01 ....1 ...... J2O-2935 -
Tube-Assy Large Peristaltic (Chocolate) ....... HC120983-01 .... 1 ...... J2O-2935 -
Tube-Assy Small Peristaltic ........................... HC120983..........3 ...... J2O-2935 -
Tube-Assy Water Line .................................. HC121094.......... 1 ...... J2O-2935 -
Tube-Assy. Drain ........................................... HC120606.......... 1 ...... J2O-2935 -
Tube-Assy. Mix Feed .313 ............................. HC120666.......... 1 ...... J2O-2935 -
Insert-Assy. Mix Feed ............................... HC120664..........1 ...... J2O-2935 -
O-ring ........................................................ HC160611 ..........1 ...... J2O-2935 -
O-ring ........................................................ HC160621..........2 ...... J2O-2935 -
Tube-Mix Feed .313 Orice ...................... HC140721..........1 ...... J2O-2935 -
Tube-Assy. Syrup Pick-up ............................. HC121039..........1 ...... J2O-2935 -
Tube-Assy. Syrup Pick-up 3/8 (Chocolate) .... HC121039-01 .... 1 ...... J2O-2935 -
Tube-Capillary w/Strainer .............................. HC155397.......... 1 ...... J2O-2935 -
Tube-Mix Feed .313 Orice (Tube ONLY) ..... HC140721..........1 ...... J2O-2935 -
Valve-Access ................................................. HC155419..........1 ...... J2O-2935 -
Valve-Access ................................................ HC155497..........3 ...... J2O-2935 -
* As Required
** LH or RH — Left or right hand is determined as you face the front of the freezer.
NLA No Longer Available
Use only original or authorized replacement parts with this freezer.
Use of unapproved parts will void warranty.
24 184592-01 10/13
Page 77
ELECTRO FREEZE Model CS705-M2
Alphabetized Parts List for Model CS705-M2
IMPORTANT:
All parts shown are for standard models designed for 220v/60Hz/1phase.
PART PART SERIAL NUMBER
DESCRIPTION NUMBER QTY (FROM – TO)
Valve-Automatic Expansion ........................... HC155490..........1 ...... J2O-2935 -
Valve-Core ..................................................... HC155649..........1 ...... J2O-2935 -
Valve-EPR ..................................................... HC155398..........1 ...... J2O-2935 -
Valve-Solenoid 1/4 NPT 240V ....................... HC155708.......... 1 ...... J2O-2935 -
Washer-1/2 x .196 x 1/16 (Plunger Switch Assy.) HC160157..........4 ...... J2O-2935 -
Washer-Double Shaft Seal ............................ HC137593.......... 1 ...... J2O-2935 -
Washer-Flat #6 Brass .................................... HC160393..........2 ...... J2O-2935 -
Washer-Lock 5/16 ZN .................................... HC160142..........2 ...... J2O-2935 -
* As Required
** LH or RH — Left or right hand is determined as you face the front of the freezer.
NLA No Longer Available
Use only original or authorized replacement parts with this freezer.
Use of unapproved parts will void warranty.
184592-01 4/1 25
 Loading...