

Einhell TE-AC 36/8 Li OF Set-Solo Manual

TE-AC 36/8 Li OF Set
D Originalbetriebsanleitung
Akku-Koff er-Kompressor
GB Original operating instructions
Cordless portable compressor
F Instructions d’origine
Coff ret compresseur sans fi l
I Istruzioni per l’uso originali
Compressore a valigetta a batteria
DK/ Original betjeningsvejledning
N Akku-kuff ert-kompressor
S Original-bruksanvisning
Portabel batteridriven kompressor
CZ Originální návod k obsluze
Akumulátorový kufříkový kompresor
SK Originálny návod na obsluhu
Akumulátorový kufríkový kompresor
NL Originele handleiding
Accu koff er compressor
E Manual de instrucciones original
Compresor de maletín inalámbrico
FIN Alkuperäiskäyttöohje
Akkukäyttöinen laukkukompressori
SLO Originalna navodila za uporabo
Prenosni akumulatorski kompresor
H Eredeti használati utasítás
Akku-koff er-kompresszor
RO Instrucţiuni de utilizare originale
Compresor valiză cu acumulator
GR Πρωτότυπες Οδηγίες χρήσης
Βαλιτσακι με συμπιεστη
μπαταριας
P Manual de instruções original
Compressor portátil com bateria
HR/ Originalne upute za uporabu
BIH Baterijski prijenosni kompresor
RS Originalna uputstva za upotrebu
Akumulatorski prenosni kompresor
PL Instrukcją oryginalną
Akumulatorowy kompresor walizkowy
TR Orijinal Kullanma Talimatı
Akülü taşinabilir hava kompresörü
EE Originaalkasutusjuhend
Akuga kohver-kompressor
13
Art.-Nr.: 40.204.40 I.-Nr.: 21010
Anl_TE_AC_36_8_Li_OF_Set_SPK13.indb 1Anl_TE_AC_36_8_Li_OF_Set_SPK13.indb 1 28.02.2022 08:08:2728.02.2022 08:08:27
1
8
2
1
11
3 9
45
8
10
9
Anl_TE_AC_36_8_Li_OF_Set_SPK13.indb 2Anl_TE_AC_36_8_Li_OF_Set_SPK13.indb 2 28.02.2022 08:08:2828.02.2022 08:08:28
2
9
e
11
6
- 2 -
21a
3
4
7
6
5 6
7
8a
2.
1.
- 3 -
Anl_TE_AC_36_8_Li_OF_Set_SPK13.indb 3Anl_TE_AC_36_8_Li_OF_Set_SPK13.indb 3 28.02.2022 08:08:3128.02.2022 08:08:31
8b
11 c
10
9
c
b
d
11
a
12 3 4
56
- 4 -
Anl_TE_AC_36_8_Li_OF_Set_SPK13.indb 4Anl_TE_AC_36_8_Li_OF_Set_SPK13.indb 4 28.02.2022 08:08:3328.02.2022 08:08:33

D
Gefahr!
Beim Benutzen von Geräten müssen einige Sicherheitsvorkehrungen eingehalten werden, um
Verletzungen und Schäden zu verhindern. Lesen
Sie diese Bedienungsanleitung / Sicherheitshinweise deshalb sorgfältig durch. Bewahren Sie diese gut auf, damit Ihnen die Informationen jederzeit
zur Verfügung stehen. Falls Sie das Gerät an andere Personen übergeben sollten, händigen Sie
diese Bedienungsanleitung / Sicherheitshinweise
bitte mit aus. Wir übernehmen keine Haftung für
Unfälle oder Schäden, die durch Nichtbeachten
dieser Anleitung und den Sicherheitshinweisen
entstehen.
Erklärung der verwendeten Symbole
(siehe Bild 11)
1. Gefahr! - Zur Verringerung des Verletzungsri-
sikos Bedienungsanleitung lesen.
2. Vorsicht! Tragen Sie einen Gehörschutz.
Die Einwirkung von Lärm kann Gehörverlust
bewirken.
3. Warnung vor elektrischer Spannung!
4. Warnung vor heißen Teilen!
5. Warnung! Die Einheit ist ferngesteuert und
darf ohne Warnung anlaufen
6. Hinweis! Verwenden Sie nur Akkus mit glei-
chem Füllstand, kombinieren Sie nie volle
und halbvolle Akkus miteinander.
1. Sicherheitshinweise
Die entsprechenden Sicherheitshinweise fi nden
Sie im beiliegenden Heftchen!
Gefahr!
Lesen Sie alle Sicherheitshinweise und Anweisungen. Versäumnisse bei der Einhaltung der
Sicherheitshinweise und Anweisungen können
elektrischen Schlag, Brand und/oder schwere
Verletzungen verursachen. Bewahren Sie alle
Sicherheitshinweise und Anweisungen für
die Zukunft auf.
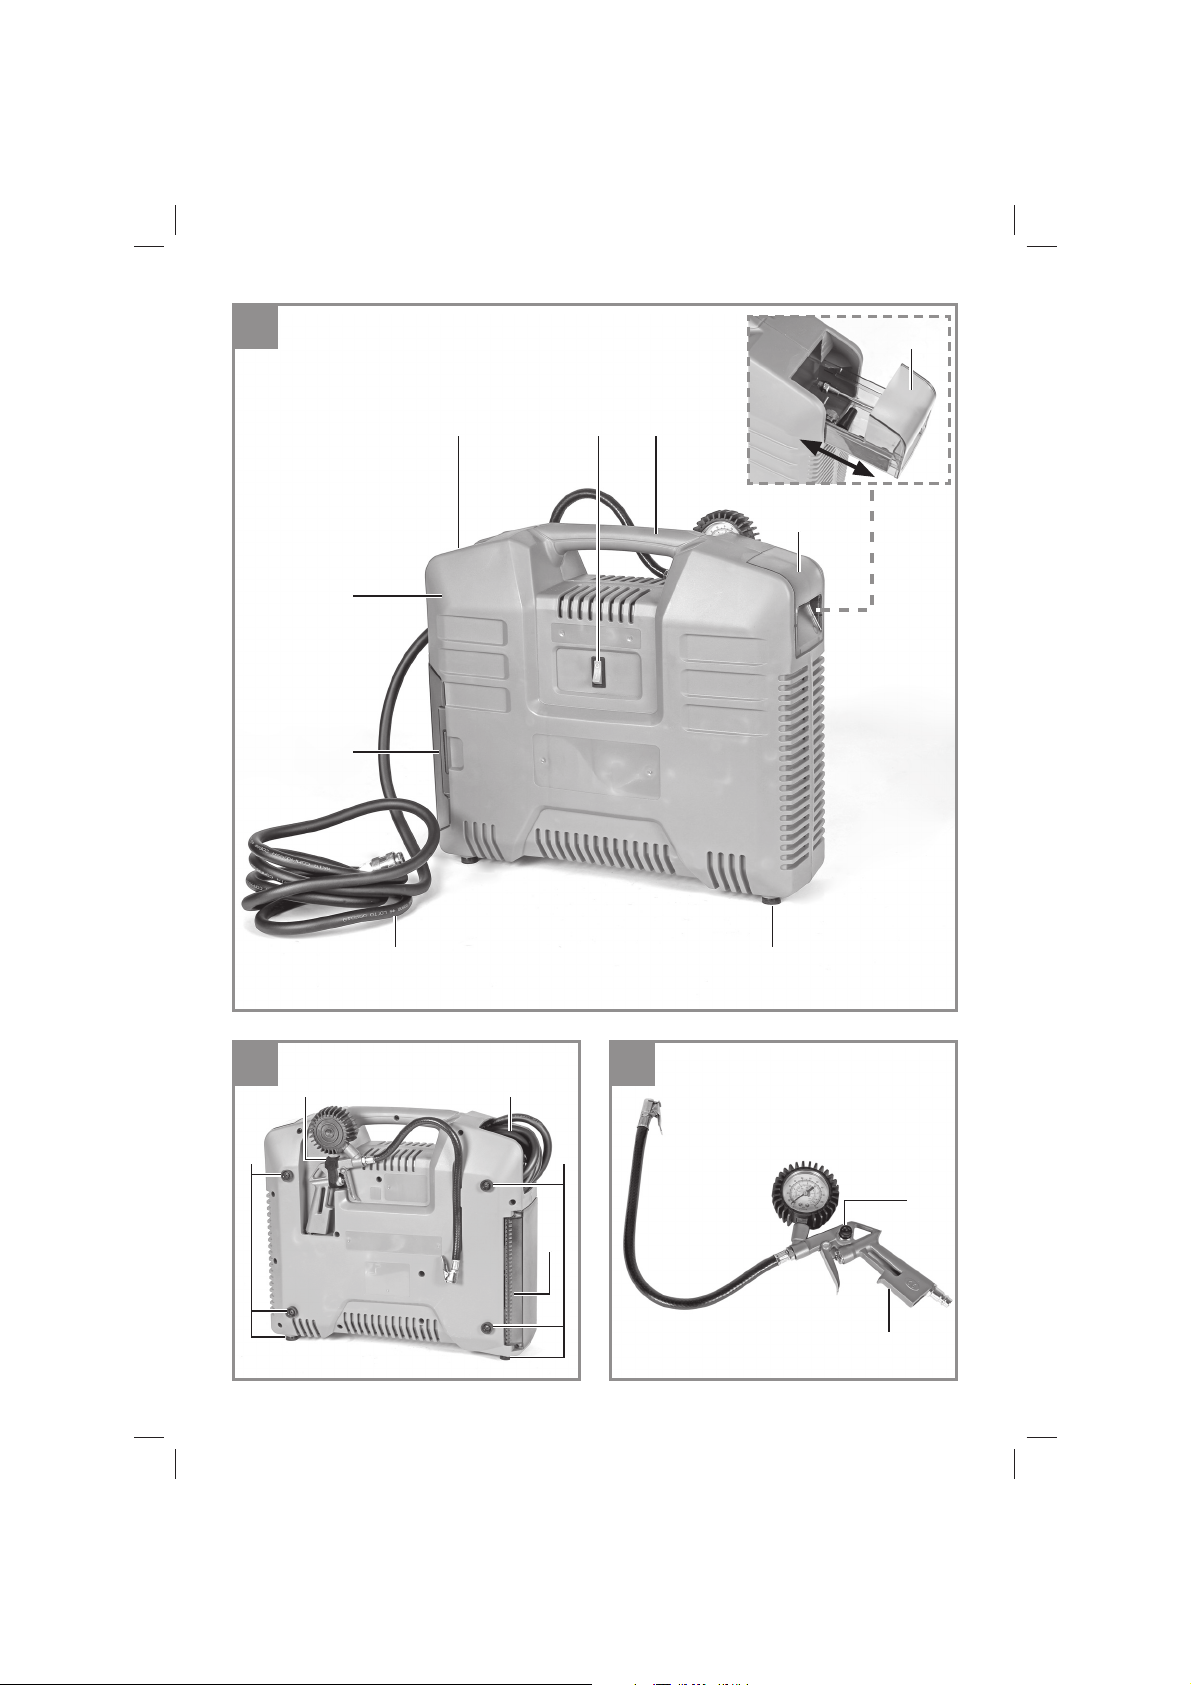
6. Reifenfüllmesser
7. Ausblasadapter
8. Zubehörfach Adapterset
9. Standfuß
10. Halter Reifenfüllmesser
11. Akkudeckel
2.2 Lieferumfang
Bitte überprüfen Sie die Vollständigkeit des Artikels anhand des beschriebenen Lieferumfangs.
Bei Fehlteilen wenden Sie sich bitte spätestens
innerhalb von 5 Arbeitstagen nach Kauf des Artikels unter Vorlage eines gültigen Kaufbeleges an
unser Service Center oder an die Verkaufstelle,
bei der Sie das Gerät erworben haben. Bitte
beachten Sie hierzu die Gewährleistungstabelle
in den Service-Informationen am Ende der Anleitung.
Öffnen Sie die Verpackung und nehmen Sie
•
das Gerät vorsichtig aus der Verpackung.
Entfernen Sie das Verpackungsmaterial so-
•
wie Verpackungs-/ und Transportsicherungen
(falls vorhanden).
Überprüfen Sie, ob der Lieferumfang vollstän-
•
dig ist.
Kontrollieren Sie das Gerät und die Zubehör-
•
teile auf Transportschäden.
Bewahren Sie die Verpackung nach Möglich-
•
keit bis zum Ablauf der Garantiezeit auf.
Gefahr!
Gerät und Verpackungsmaterial sind kein
Kinderspielzeug! Kinder dürfen nicht mit
Kunststoff beuteln, Folien und Kleinteilen
spielen! Es besteht Verschluckungs- und Erstickungsgefahr!
Kompressor
•
Reifenfüllmesser
•
Ausblasadapter
•
3-teiliges Adapterset
•
Originalbetriebsanleitung
•
Sicherheitshinweise
•
2. Gerätebeschreibung und
Lieferumfang
2.1 Gerätebeschreibung (Bild 1-3)
1. Gehäuse
2. Zubehörfach
3. Druckluftschlauch mit Schnellkupplung
4. Ein-/Aus-Schalter
5. Transportgriff
- 5 -
Anl_TE_AC_36_8_Li_OF_Set_SPK13.indb 5Anl_TE_AC_36_8_Li_OF_Set_SPK13.indb 5 28.02.2022 08:08:3528.02.2022 08:08:35

D
3. Bestimmungsgemäße
Verwendung
Der Kompressor dient zum Erzeugen von
Druckluft für druckluftbetriebene Werkzeuge.
Die Maschine darf nur nach ihrer Bestimmung
verwendet werden. Jede weitere darüber hinausgehende Verwendung ist nicht bestimmungsgemäß. Für daraus hervorgerufene Schäden oder
Verletzungen aller Art haftet der Benutzer/Bediener und nicht der Hersteller.
Bitte beachten Sie, dass unsere Geräte bestimmungsgemäß nicht für den gewerblichen, handwerklichen oder industriellen Einsatz konstruiert
wurden. Wir übernehmen keine Gewährleistung,
wenn das Gerät in Gewerbe-, Handwerks- oder
Industriebetrieben sowie bei gleichzusetzenden
Tätigkeiten eingesetzt wird.
4. Technische Daten
Spannungsversorgung Motor: ...................36 V dc
Leerlaufdrehzahl n
Leerlaufdrehzahl n0 (Motor)................16000 min
Betriebsdruck bar: ......................................max. 8
Theo. Ansaugleistung l/min.: .......................... 130
Abgabeleistung (Druckluft)
bei 7 bar: ...........................................38 Liter/min
Abgabeleistung (Druckluft)
bei 4 bar: ............................................55 Liter/min
Schalleistungspegel L
Unsicherheit K
Schalldruckpegel L
Unsicherheit K
Schutzart: ......................................................IP20
Gerätegewicht in kg: ............................. ca. 5,5 kg
Gefahr!
Geräusch und Vibration
Die Geräusch- und Vibrationswerte wurden entsprechend EN ISO 3744 ermittelt.
(Pumpe) ...............3200 min
0
in dB: ......................... 94
WA
........................................... 3 dB
WA
in dB: .............................. 83
pA
............................................ 3 dB
pA
5. Vor Inbetriebnahme
Überzeugen Sie sich vor dem Anschließen, dass
die Daten auf dem Typenschild mit den Daten der
Akkus übereinstimmen.
Überprüfen Sie das Gerät auf
•
Transportschäden. Etwaige Schäden sofort
dem Transportunternehmen melden, mit dem
der Kompressor angeliefert wurde.
Die Aufstellung des Kompressors sollte in der
•
Nähe des Verbrauchers erfolgen.
Auf trockene und staubfreie Ansaugluft ach-
•
ten.
Den Kompressor nicht in feuchtem oder
•
nassem Raum aufstellen.
Der Kompressor darf nur in geeigneten
•
Räumen (gut belüftet, Umgebungstemperatur
+5°C bis 40°C) betrieben werden. Im Raum
dürfen sich keine Stäube, keine Säuren,
Dämpfe, explosive oder entflammbare Gase
befinden.
Der Kompressor ist geeignet für den Einsatz
•
in trockenen Räumen. In Bereichen, in denen
mit Spritzwasser gearbeitet wird, ist der
-1
-1
Einsatz nicht zulässig.
Betreiben Sie das Gerät nur auf festem,
•
ebenem Untergrund
Legen Sie den Kompressor während des
•
Betriebes auf die Gummifüße an der
Kompressor-Rückwand.
Achtung! Beim Ausschalten des Kompres-
•
sors entweicht überschüssige Luft am Sicherheitsventil. Dies ist baubedingt und kein
Fehler.
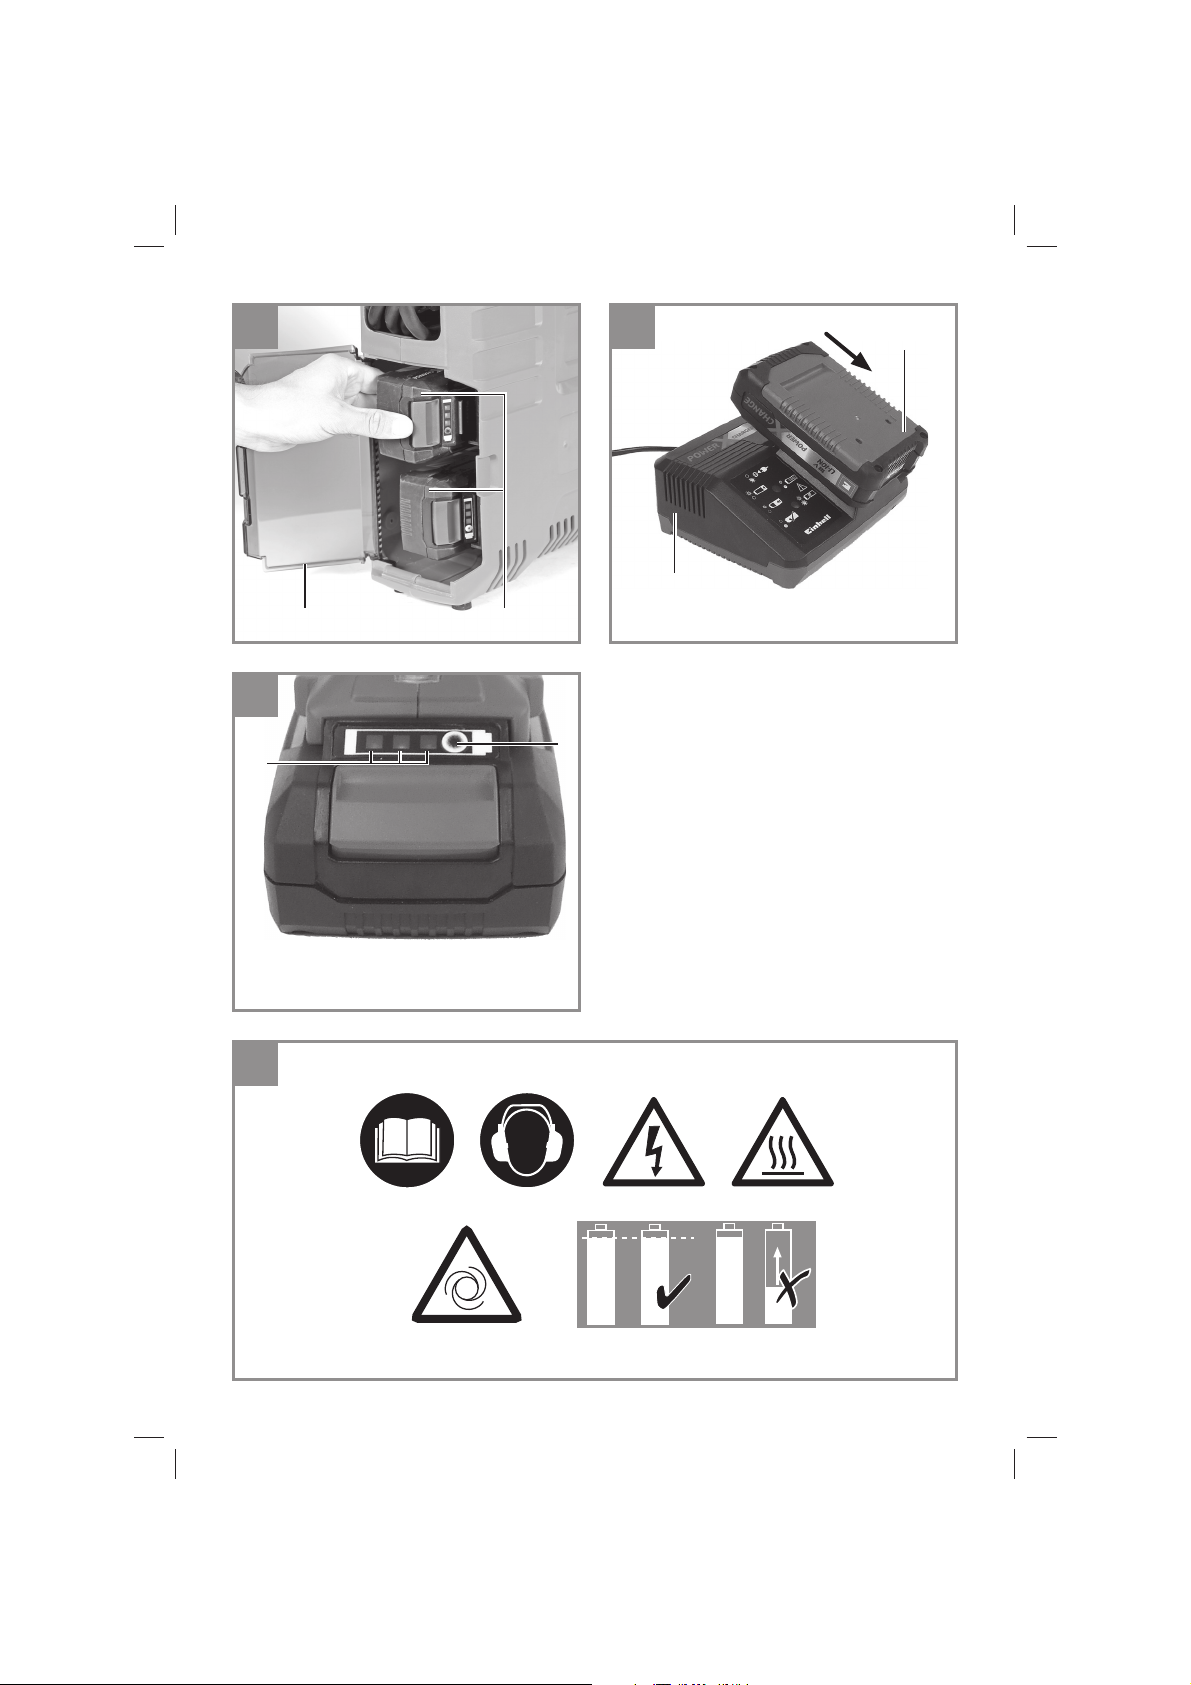
5.1 Laden des Akkus (Abb. 9)
1. Akku-Pack aus dem Gerät nehmen. Dazu die
seitliche Rasttaste drücken.
2. Vergleichen, ob die auf dem Typenschild
angegebene Netzspannung mit der vorhandenen Netzspannung übereinstimmt. Stecken
Sie den Netzstecker des Ladegeräts (c) in die
Steckdose. Die grüne LED beginnt zu blinken.
3. Stecken Sie den Akku (b) auf das Ladegerät
(c).
4. Unter Punkt „Anzeige Ladegerät“ fi nden Sie
eine Tabelle mit den Bedeutungen der LED
Anzeige am Ladegerät.
Während des Ladens kann sich der Akku etwas
erwärmen. Dies ist jedoch normal.
- 6 -
Anl_TE_AC_36_8_Li_OF_Set_SPK13.indb 6Anl_TE_AC_36_8_Li_OF_Set_SPK13.indb 6 28.02.2022 08:08:3528.02.2022 08:08:35

D
Sollte das Laden des Akku-Packs nicht möglich
sein, überprüfen Sie bitte,
ob an der Steckdose die Netzspannung vor-
•
handen ist
ob ein einwandfreier Kontakt an den Lade-
•
kontakten vorhanden ist.
Sollte das Laden des Akku-Packs immer noch
nicht möglich sein, bitten wir Sie,
das Ladegerät
•
und den Akku-Pack
•
an unseren Kundendienst zu senden.
Für einen fachgerechten Versand kontaktieren Sie bitte unseren Kundendienst oder die
Verkaufsstelle, bei der das Gerät erworben
wurde.
Beachten Sie beim Versand oder Entsorgung
von Akkus bzw. Akkugerät, dass diese einzeln in Kunststoff beutel verpackt werden, um
Kurzschlüsse und Brand zu vermeiden!
Im Interesse einer langen Lebensdauer des AkkuPacks sollten Sie für eine rechtzeitige Wiederaufladung des Akku-Packs sorgen. Dies ist auf jeden
Fall notwendig, wenn Sie feststellen, dass die
Leistung des Geräts nachlässt. Entladen Sie den
Akku-Pack nie vollständig. Dies führt zu einem
Defekt des Akku-Packs!
Hinweis!
Die besten Ergebnisse bzgl. Ausdauer und Saugleistung erreichen Sie stets wenn Akkus mit gleicher Kapazität ab 3,0 Ah verwendet werden.
Hinweis!
Verwenden Sie nur Akkus mit gleichem Füllstand,
kombinieren Sie nie volle und halbvolle Akkus
miteinander. Laden Sie immer beide Akkus
gleichzeitig auf.
Der Akku mit schwächerem Ladezustand bestimmt die Laufzeit des Gerätes. Vor Betrieb müssen immer beide Akkus vollgeladen werden.
Schließen Sie den Akkudeckel durch Zuklappen
des Deckels und achten Sie auf korrektes Einrasten.
5.2 Montage der Akkus (Abb. 8a/b)
Klappen Sie den Akkudeckel (Pos. 11) wie in Abb.
8a dargestellt durch drücken (1) und nach außen ziehen (2) auf. Stecken Sie dann die beiden
Akkus (c) wie in Abb. 8b in die Aufnahmen und
schließen Sie den Deckel.
5.3 Akku-Kapazitätsanzeige (Abb. 10)
Drücken Sie auf den Schalter für AkkuKapazitätsanzeige (a). Die Akku-Kapazitätsanzeige (d) signalisiert Ihnen den Ladezustand des
Akkus anhand von 3 LED`s.
Alle 3 LED’s leuchten:
Der Akku ist voll aufgeladen.
2 oder 1 LED(’s) leuchten
Der Akku verfügt über ausreichende Restladung.
1 LED blinkt:
Der Akku ist leer, laden Sie den Akku auf.
Alle LED’s blinken:
Die Temperatur des Akkus ist unterschritten. Entfernen Sie den Akku vom Gerät und lassen Sie
den Akku einen Tag bei Raumtemperatur liegen.
Tritt der Fehler wieder auf, so wurde der Akku tiefentladen und ist defekt. Entfernen Sie den Akku
vom Gerät. Ein defekter Akku darf nicht mehr verwendet bzw. geladen werden.
6. Bedienung
6.1 Ein-/Aus-Schalter (4)
Stellen Sie den Ein-/Aus-Schalter (4) zum Einschalten auf die Position 1.
Zum Ausschalten Ein-/Aus-Schalter (4) in Position 0 bringen.
6.2 Druckluftschlauch mit
Schnellkupplung (3)
Anschließen:
Schieben Sie den Nippel Ihres
Druckluftwerkzeuges in die Schnellkupplung,
Hülse springt automatisch nach vorn.
Trennen:
Ziehen Sie die Hülse zurück und entfernen Sie
das Werkzeug. Vorsicht! Beim Lösen der
Schnellkupplung ist das Kupplungsstück
festzuhalten, um Verletzungen durch den
zurückschnellenden Schlauch zu vermeiden.
- 7 -
Anl_TE_AC_36_8_Li_OF_Set_SPK13.indb 7Anl_TE_AC_36_8_Li_OF_Set_SPK13.indb 7 28.02.2022 08:08:3528.02.2022 08:08:35

D
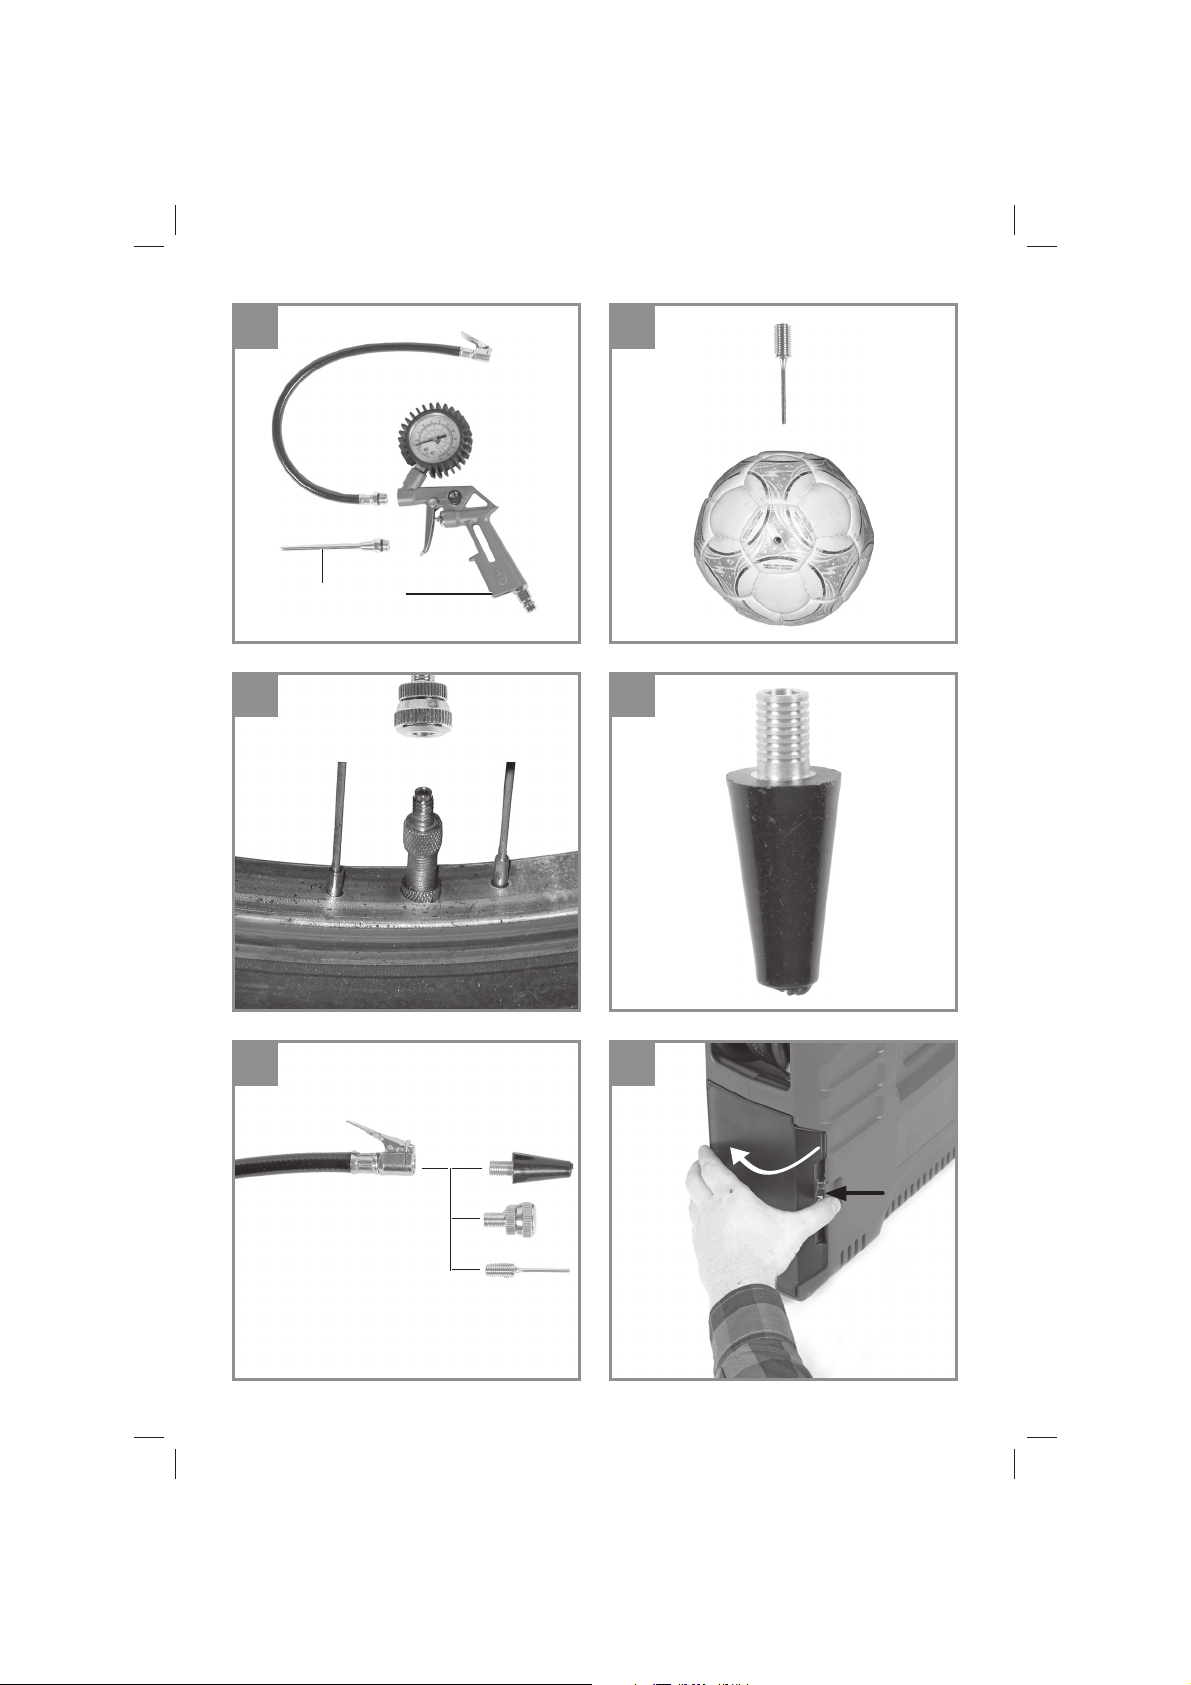
6.3 Reifenfüllmesser mit Adaptern
(Abb. 2)
Arbeitsdruck in bar: 0-8
Einsatzbereich:
Der Reifenfüllmesser ermöglicht ein einfaches
und genaues Befüllen von Reifen. Das Manometer dient zur Kontrolle des Reifendrucks. Mit dem
integrierten Ablassventil (e) ist es möglich einen
zu hohen Reifendruck zu senken.
Überprüfen Sie nach dem Befüllen den eingestellten Reifendruck mit einem geeichten Messgerät,
z.B. an einer Tankstelle.
Der Reifenfüllmesser ist mit einem Ventiladapter
für Autoreifenventile ausgestattet.
Mit Hilfe der beiliegenden Adapter, können auch
andere Ventiltypen befüllt werden.
Verwendung als Ausblaspistole (Abb. 3)
Um den Reifenfüllmesser als Ausblaspistole zu
verwenden muss zuerst der Schlauch mit dem
Ventiladapter für Autoreifen abgeschraubt werden. Nun kann der Ausblasadapter (7) am Reifenfüllmesser verschraubt werden.
Einsatzbereich:
Zum Reinigen/Ausblasen von Hohlräumen oder
schwer zugänglichen Stellen, sowie zum Reinigen von verschmutzten Arbeitsgeräten. Der stufenlos bedienbare Abzugshebel ermöglicht eine
exakte Dosierung der Druckluft.
Ventil-Adapter (Bild 5)
•
Einsatzbereich: Passt für Blitz- und Presta-
Ventile von Fahrradreifen.
Der Ventil-Adapter ermöglicht ein einfaches
Befüllen von Fahrradreifen.
Konischer Universaladapter (Bild 6)
•
Einsatzbereich: Der Universaladapter kann
zum Befüllen für Luftmatratzen und ähnlichem verwendet werden.
Gefahr! Richten Sie den Druckstrahl niemals auf
sich selbst oder auf andere Personen oder Tiere!
Vorsicht! Gegenstände über den empfohlenen
Druck aufzublasen kann Schäden an den Gegenständen oder umstehenden Personen verursachen!
6.5 Verhalten in Ausnahme-/Notfallsituationen
1. Stoppen Sie den Arbeitsvorgang
2. Schalten Sie das Gerät aus.
3. Ziehen Sie den Netzstecker
6.6 Nach dem Gebrauch
1. Schalten Sie das Gerät aus.
2. Ziehen Sie die Akkus heraus.
3. Demontieren Sie sämtliche Zubehörteile vom
Gerät wie z.B. Schlauch, Reifenfüllmesser,
etc.
4. Lassen Sie das Gerät vor einer Reparatur
oder dem Reinigen abkühlen.
5. Überprüfen Sie das Gerät auf mögliche Schäden.
Überschreiten Sie nicht den maximalen Betriebsdruck 8 bar (auch gekennzeichnet an der Rückseite des Reifenfüllmessers).
6.4 Anleitung für das Adapterset
Aus der folgenden Übersicht entnehmen Sie die
richtige Benutzung der Adapter für die verschiedenen Ventile (Zum Anschluss der Adapter am
Kompressor siehe Bild 7!).
Ballnadel (Bild 4)
•
Einsatzbereich: Zum Aufpumpen von Bällen.
Die Ballnadel kann zum Aufpumpen von un-
terschiedlichen Bällen verwendet werden.
TIPP: Um Beschädigungen des Ventils zu
vermeiden, sollten Sie die Ballnadel vor dem
Einführen etwas anfeuchten.
Anl_TE_AC_36_8_Li_OF_Set_SPK13.indb 8Anl_TE_AC_36_8_Li_OF_Set_SPK13.indb 8 28.02.2022 08:08:3528.02.2022 08:08:35
7. Reinigung, Wartung und
Ersatzteilbestellung
Gefahr!
Ziehen Sie vor allen Reinigungs- und Wartungsarbeiten die Akkus heraus.
Gefahr!
Warten Sie bis der Verdichter vollständig
abgekühlt ist! Verbrennungsgefahr!
Gefahr!
Schalten Sie nach der Benutzung das Gerät
immer aus und ziehen Sie die Akkus heraus.
- 8 -

D
7.1 Reinigung
Halten Sie Schutzvorrichtungen, Luftschlitze
•
und Motorengehäuse so staub- und
schmutzfrei wie möglich. Reiben Sie das
Gerät mit einem sauberen Tuch ab oder
blasen Sie es mit Druckluft bei niedrigem
Druck aus.
Wir empfehlen, dass Sie das Gerät direkt
•
nach jeder Benutzung reinigen.
Reinigen Sie das Gerät regelmäßig mit einem
•
feuchten Tuch und etwas Schmierseife.
Verwenden Sie keine Reinigungs- oder
Lösungsmittel; diese könnten die
Kunststoffteile des Gerätes angreifen.
Achten Sie darauf, dass kein Wasser in das
Geräteinnere gelangen kann. Das Eindringen
von Wasser in ein Elektrogerät erhöht das
Risiko eines elektrischen Schlages.
Schlauch und Spritzwerkzeuge müssen vor
•
Reinigung vom Kompressor getrennt werden.
Der Kompressor darf nicht mit Wasser,
Lösungsmitteln o. Ä. gereinigt werden.
7.2 Lagerung
Gefahr!
Ziehen Sie die Akkus heraus, entlüften Sie das
Gerät und alle angeschlossenen Druckluftwerkzeuge. Stellen Sie den Kompressor so ab, dass
dieser nicht von Unbefugten in Betrieb genommen werden kann.
7.5 Ersatzteilbestellung:
Bei der Ersatzteilbestellung sollten folgende Angaben gemacht werden;
Typ des Gerätes
•
Artikelnummer des Gerätes
•
Ident-Nummer des Gerätes
•
Ersatzteilnummer des erforderlichen Ersatz-
•
teils
Aktuelle Preise und Infos fi nden Sie unter
www.Einhell-Service.com
8. Entsorgung und
Wiederverwertung
Das Gerät befi ndet sich in einer Verpackung um
Transportschäden zu verhindern. Diese Verpackung ist Rohstoff und ist somit wieder verwend-
bar oder kann dem Rohstoff kreislauf zurückge-
führt werden. Das Gerät und dessen Zubehör
bestehen aus verschiedenen Materialien, wie
z.B. Metall und Kunststoff e. Defekte Geräte ge-
hören nicht in den Hausmüll. Zur fachgerechten
Entsorgung sollte das Gerät an einer geeigneten
Sammelstellen abgegeben werden. Wenn Ihnen
keine Sammelstelle bekannt ist, sollten Sie bei
der Gemeindeverwaltung nachfragen.
Gefahr!
Den Kompressor nur in trockener und für
Unbefugte unzugänglicher Umgebung aufbewahren. Nicht kippen, nur stehend aufbewahren!
7.3 Transport
Transportieren Sie das Gerät nur am Trans-
•
portgriff.
Schützen Sie das Gerät gegen unerwartete
•
Schläge bzw. Vibrationen.
7.4 Wartung
Im Geräteinneren befi nden sich keine weiteren zu
wartenden Teile.
- 9 -
Anl_TE_AC_36_8_Li_OF_Set_SPK13.indb 9Anl_TE_AC_36_8_Li_OF_Set_SPK13.indb 9 28.02.2022 08:08:3628.02.2022 08:08:36

D
9. Mögliche Ausfallursachen
Problem Ursache Lösung
Kompressor läuft
nicht
Kompressor läuft,
jedoch kein Druck
Kompressor
läuft, Druck wird
am Manometer
angezeigt, jedoch
Werkzeuge laufen
nicht.
1. keine Stromversorgung
2. Außentemperatur zu niedrig
3. Motor überhitzt
1. Rückschlagventil undicht
2. Dichtungen kaputt.
1. Schlauchverbindungen undicht.
2. Schnellkupplung undicht.
1. Akkus überprüfen.
2. Nicht unter +5° C Außentemperatur
betreiben.
3. Motor abkühlen lassen ggf. Ursache der Überhitzung beseitigen.
1. Rückschlagventil austauschen.
2. Dichtungen überprüfen, kaputte
Dichtungen bei einer Fachwerkstatt
ersetzen lassen.
1. Druckluftschlauch und Werk-
zeuge überprüfen, ggf. aus tauschen.
2. Schnellkupplung überprüfen,
ggf. ersetzen.
- 10 -
Anl_TE_AC_36_8_Li_OF_Set_SPK13.indb 10Anl_TE_AC_36_8_Li_OF_Set_SPK13.indb 10 28.02.2022 08:08:3628.02.2022 08:08:36

10. Anzeige Ladegerät
D
Anzeigestatus
Rote LED Grüne LED
Bedeutung und Maßnahme
Aus Blinkt Betriebsbereitschaft
Das Ladegerät ist an das Netz angeschlossen und betriebsbereit,
Akku ist nicht im Ladegerät
An Aus Laden
Das Ladegerät lädt den Akku im Schnellladebetrieb.
Die entsprechenden Ladezeiten fi nden Sie direkt am Ladegerät.
Hinweis! Je nach vorhandener Akkuladung können die tatsächlichen
Ladezeiten von den angegebenen Ladezeiten etwas abweichen.
Aus An Der Akku ist aufgeladen und einsatzbereit. (READY TO GO)
Danach wird bis zur vollständigen Ladung auf eine Schonladung umgeschaltet.
Lassen Sie hierzu den Akku etwa 15 min. länger am Ladegerät.
Maßnahme:
Entnehmen Sie den Akku aus dem Ladegerät. Trennen Sie das Ladegerät vom Netz.
Blinkt Aus Anpassungsladung
Das Ladegerät befi ndet sich im Modus für schonende Ladung.
Hierbei wird der Akku aus Sicherheitsgründen langsamer geladen
und benötigt mehr Zeit. Dies kann folgende Ursachen haben:
- Akku wurde sehr lange Zeit nicht mehr geladen.
- Die Akkutemperatur liegt nicht im Idealbereich zwischen 10° C und
45° C.
Maßnahme:
Warten Sie bis der Ladevorgang abgeschlossen ist, der
Akku kann trotzdem weiter geladen werden.
Blinkt Blinkt Fehler
Ladevorgang ist nicht mehr möglich. Der Akku ist defekt.
Maßnahme:
Ein defekter Akku darf nicht mehr geladen werden.
Entnehmen Sie den Akku aus dem Ladegerät.
An An Temperaturstörung
Der Akku ist zu heiß (z. B. direkte Sonnenbestrahlung) oder zu kalt
(unter 0° C)
Maßnahme:
Entnehmen Sie den Akku und bewahren Sie diesen
1 Tag bei Raumtemperatur (ca. 20° C) auf.
- 11 -
Anl_TE_AC_36_8_Li_OF_Set_SPK13.indb 11Anl_TE_AC_36_8_Li_OF_Set_SPK13.indb 11 28.02.2022 08:08:3628.02.2022 08:08:36

D
Nur für EU-Länder
Werfen Sie Elektrowerkzeuge nicht in den Hausmüll!
Gemäß europäischer Richtlinie 2012/19/EU über Elektro- und Elektronik-Altgeräte und Umsetzung in
nationales Recht müssen verbrauchte Elektrowerkzeuge getrennt gesammelt werden und einer umweltgerechten Wiederverwertung zugeführt werden.
Recycling-Alternative zur Rücksendeauff orderung:
Der Eigentümer des Elektrogerätes ist alternativ anstelle Rücksendung zur Mitwirkung bei der sachgerechten Verwertung im Falle der Eigentumsaufgabe verpfl ichtet. Das Altgerät kann hierfür auch einer
Rücknahmestelle überlassen werden, die eine Beseitigung im Sinne der nationalen Kreislaufwirtschafts- und Abfallgesetze durchführt. Nicht betroff en sind den Altgeräten beigefügte Zubehörteile und
Hilfsmittel ohne Elektrobestandteile.
Bitte beachten Sie bei der Entsorgung, dass Akkus und Leuchtmittel (z. B. Glühbirne) dem Gerät entnommen werden.
Der Nachdruck oder sonstige Vervielfältigung von Dokumentation und Begleitpapieren der Produkte,
auch auszugsweise, ist nur mit ausdrücklicher Zustimmung der Einhell Germany AG zulässig.
Technische Änderungen vorbehalten
- 12 -
Anl_TE_AC_36_8_Li_OF_Set_SPK13.indb 12Anl_TE_AC_36_8_Li_OF_Set_SPK13.indb 12 28.02.2022 08:08:3628.02.2022 08:08:36

D
Ser vice-Informationen
Wir unterhalten in allen Ländern, welche in der Garantieurkunde benannt sind, kompetente ServicePartner, deren Kontakte Sie der Garantieurkunde entnehmen. Diese stehen Ihnen für alle ServiceBelange wie Reparatur, Ersatzteil- und Verschleißteil-Versorgung oder den Bezug von Verbrauchsmaterialien zur Verfügung.
Es ist zu beachten, dass bei diesem Produkt folgende Teile einem gebrauchsgemäßen oder natürlichen
Verschleiß unterliegen bzw. folgende Teile als Verbrauchsmaterialien benötigt werden.
Kategorie Beispiel
Verschleißteile* Keilriemen, Luftfi lter, Akku
Verbrauchsmaterial/ Verbrauchsteile*
Fehlteile
* nicht zwingend im Lieferumfang enthalten!
Bei Mängel oder Fehlern bitten wir Sie, den Fehlerfall im Internet unter www.Einhell-Service.com anzumelden. Bitte achten Sie auf eine genaue Fehlerbeschreibung und beantworten Sie dazu in jedem Fall
folgende Fragen:
Hat das Gerät bereits einmal funktioniert oder war es von Anfang an defekt?
•
Ist Ihnen vor dem Auftreten des Defektes etwas aufgefallen (Symptom vor Defekt)?
•
Welche Fehlfunktion weist das Gerät Ihrer Meinung nach auf (Hauptsymptom)?
•
Beschreiben Sie diese Fehlfunktion.
- 13 -
Anl_TE_AC_36_8_Li_OF_Set_SPK13.indb 13Anl_TE_AC_36_8_Li_OF_Set_SPK13.indb 13 28.02.2022 08:08:3628.02.2022 08:08:36

D
Garantieurkunde
Sehr geehrte Kundin, sehr geehrter Kunde,
unsere Produkte unterliegen einer strengen Qualitätskontrolle. Sollte dieses Gerät dennoch einmal nicht
einwandfrei funktionieren, bedauern wir dies sehr und bitten Sie, sich an unseren Servicedienst unter
der auf dieser Garantiekarte angegebenen Adresse zu wenden. Gerne stehen wir Ihnen auch telefonisch über die angegebene Servicerufnummer zur Verfügung. Für die Geltendmachung von Garantieansprüchen gilt folgendes:
1. Diese Garantiebedingungen richten sich ausschließlich an Verbraucher, d. h. natürliche Personen,
die dieses Produkt weder im Rahmen ihrer gewerblichen noch anderen selbständigen Tätigkeit
nutzen wollen. Diese Garantiebedingungen regeln zusätzliche Garantieleistungen, die der u. g.
Hersteller zusätzlich zur gesetzlichen Gewährleistung Käufern seiner Neugeräte verspricht. Ihre
gesetzlichen Gewährleistungsansprüche werden von dieser Garantie nicht berührt. Unsere Garantieleistung ist für Sie kostenlos.
2. Die Garantieleistung erstreckt sich ausschließlich auf Mängel an einem von Ihnen erworbenen neuen Gerät des u. g. Herstellers, die auf einem Material- oder Herstellungsfehler beruhen und ist nach
unserer Wahl auf die Behebung solcher Mängel am Gerät oder den Austausch des Gerätes beschränkt. Bitte beachten Sie, dass unsere Geräte bestimmungsgemäß nicht für den gewerblichen,
handwerklichen oder berufl ichen Einsatz konstruiert wurden. Ein Garantievertrag kommt daher nicht
zustande, wenn das Gerät innerhalb der Garantiezeit in Gewerbe-, Handwerks- oder Industriebetrieben verwendet wurde oder einer gleichzusetzenden Beanspruchung ausgesetzt war.
3. Von unserer Garantie ausgenommen sind:
- Schäden am Gerät, die durch Nichtbeachtung der Montageanleitung oder aufgrund nicht fachgerechter Installation, Nichtbeachtung der Gebrauchsanleitung (wie durch z.B. Anschluss an eine
falsche Netzspannung oder Stromart) oder Nichtbeachtung der Wartungs- und Sicherheitsbestimmungen oder durch Aussetzen des Geräts an anomale Umweltbedingungen oder durch mangelnde
Pfl ege und Wartung entstanden sind.
- Schäden am Gerät, die durch missbräuchliche oder unsachgemäße Anwendungen (wie z.B. Überlastung des Gerätes oder Verwendung von nicht zugelassenen Einsatzwerkzeugen oder Zubehör),
Eindringen von Fremdkörpern in das Gerät (wie z.B. Sand, Steine oder Staub, Transportschäden),
Gewaltanwendung oder Fremdeinwirkungen (wie z. B. Schäden durch Herunterfallen) entstanden
sind.
- Schäden am Gerät oder an Teilen des Geräts, die auf einen gebrauchsgemäßen, üblichen oder
sonstigen natürlichen Verschleiß zurückzuführen sind.
4. Die Garantiezeit beträgt 24 Monate und beginnt mit dem Kaufdatum des Gerätes. Garantieansprüche sind vor Ablauf der Garantiezeit innerhalb von zwei Wochen, nachdem Sie den Defekt erkannt
haben, geltend zu machen. Die Geltendmachung von Garantieansprüchen nach Ablauf der Garantiezeit ist ausgeschlossen. Die Reparatur oder der Austausch des Gerätes führt weder zu einer
Verlängerung der Garantiezeit noch wird eine neue Garantiezeit durch diese Leistung für das Gerät
oder für etwaige eingebaute Ersatzteile in Gang gesetzt. Dies gilt auch bei Einsatz eines Vor-OrtServices.
5. Für die Geltendmachung Ihres Garantieanspruches melden Sie bitte das defekte Gerät an unter:
www.Einhell-Service.com. Halten Sie bitte den Kaufbeleg oder andere Nachweise Ihres Kaufs des
Neugeräts bereit. Geräte, die ohne entsprechende Nachweise oder ohne Typenschild eingesendet
werden, sind von der Garantieleistung aufgrund mangelnder Zuordnungsmöglichkeit ausgeschlossen. Ist der Defekt des Gerätes von unserer Garantieleistung erfasst, erhalten Sie umgehend ein
repariertes oder neues Gerät zurück.
Selbstverständlich beheben wir gegen Erstattung der Kosten auch gerne Defekte am Gerät, die vom
Garantieumfang nicht oder nicht mehr erfasst sind. Dazu senden Sie das Gerät bitte an unsere Serviceadresse.
Für Verschleiß-, Verbrauchs- und Fehlteile verweisen wir auf die Einschränkungen dieser Garantie gemäß den Service-Informationen dieser Bedienungsanleitung.
Einhell Service · Eschenstraße 6 · 94405 Landau/Isar (Deutschland)
- 14 -
Anl_TE_AC_36_8_Li_OF_Set_SPK13.indb 14Anl_TE_AC_36_8_Li_OF_Set_SPK13.indb 14 28.02.2022 08:08:3628.02.2022 08:08:36

D
Sehr geehrte Kundin,
sehr geehrter Kunde,
LIEBE MÖGLICHMACHER,
wir haben das Ziel, alles dafür zu tun, damit Sie mit Einhell all Ihre Projekte möglich machen können. Aus diesem
Grund ist Ser vice bei uns gelebter Anspruch: mit über 20 Jahren Erfahrung und mehr als 120 kompetenten und
persönlichen Ansprechpar tnern hat es sich der Einhell Service auf die Fahnen geschrieben, Sie bei allen Fragen
zu Ihrem Produkt zu unterstützen. Dazu gehört ein beratendes Technikerteam, bis zu 10 Jahre Ersat zteilver fügbarkeit, 24 Stunden Versandser vice, eine leistungsfähige Reparatur-Organisation und ein fl ächendeckendes
Service-Partnernetz.
Über unser Onlineportal www.Einhell-Service.com sind viele unserer ver fügbaren Services jetz t noch
schneller und einfacher für Sie erreichbar – rund um die Uhr, sieben Tage die Woche.
ERSATZTEILE
PREISINFORMATIONEN
GARANTIEVERLÄNGERUNGEN
Einhell Service
Eschenstraße 6
944 05 Landau an der Isar
ZUBEHÖR
VERFÜGBARKEITEN
REPARATURSERVICE
Telefon: 09951 - 959 20 00
Telefax: 09951 - 959 1700
E-Mail: Service-DE@Einhell.com
Wir freuen uns auf Ihren Besuch unter
PRODUKTINFORMATIONEN
TRACK & TRACE
SERVICE-STELLEN
VOR ORT
Einhell-Service.com
>>>
- 15 -
Anl_TE_AC_36_8_Li_OF_Set_SPK13.indb 15Anl_TE_AC_36_8_Li_OF_Set_SPK13.indb 15 28.02.2022 08:08:3728.02.2022 08:08:37

GB
Danger!
When using the equipment, a few safety precautions must be observed to avoid injuries and
damage. Please read the complete operating
instructions and safety regulations with due care.
Keep this manual in a safe place, so that the information is available at all times. If you give the
equipment to any other person, hand over these
operating instructions and safety regulations as
well. We cannot accept any liability for damage
or accidents which arise due to a failure to follow
these instructions and the safety instructions.
Explanation of the symbols used (see Fig. 11)
1. Danger! - Read the operating instructions to
reduce the risk of injury.
2. Caution! Wear ear-muff s. The impact of noi-
se can cause damage to hearing.
3. Beware of electrical voltage!
4. Beware of hot parts!
5. Warning! The equipment is remote-controlled and may start-up without warning.
6. Important! Use only batteries which are
charged to the same level. Never combine full
and half-full batteries.
1. Safety regulations
The corresponding safety information can be
found in the enclosed booklet.
WARNING!
Read all safety warnings, instructions, illustrations and specifi cations provided with this
power tool. Failure to follow all instructions listed
below may result in electric shock, fi re and/or
serious injury.
Save all warnings and instructions for future
reference.
10. Holder for tire pressure gauge
11. Battery cover
2.2 Items supplied
Please check that the article is complete as
specifi ed in the scope of delivery. If parts are
missing, please contact our service center or the
sales outlet where you made your purchase at
the latest within 5 working days after purchasing
the product and upon presentation of a valid bill
of purchase. Also, refer to the warranty table in
the service information at the end of the operating
instructions.
Open the packaging and take out the equip-
•
ment with care.
Remove the packaging material and any
•
packaging and/or transportation braces (if
available).
Check to see if all items are supplied.
•
Inspect the equipment and accessories for
•
transport damage.
If possible, please keep the packaging until
•
the end of the guarantee period.
Danger!
The equipment and packaging material are
not toys. Do not let children play with plastic
bags, foils or small parts. There is a danger of
swallowing or suff ocating!
Compressor
•
Tire inflation meter
•
Blow-out adapter
•
3-piece adapter set
•
Original operating instructions
•
Safety instructions
•
3. Proper use
The compressor is designed to generate com-
2. Layout and items supplied
2.1 Layout (Fig. 1-3)
1. Housing
2. Accessory compartment
3. Compressed air hose with quick-lock coupling
4. On/Off switch
5. Transport handle
6. Tire infl ation meter
7. Blow-out adapter
8. Accessory compartment for adapter set
9. Foot
Anl_TE_AC_36_8_Li_OF_Set_SPK13.indb 16Anl_TE_AC_36_8_Li_OF_Set_SPK13.indb 16 28.02.2022 08:08:5128.02.2022 08:08:51
pressed air for compressed air driven tools.
The equipment is to be used only for its prescribed purpose. Any other use is deemed to be a
case of misuse. The user / operator and not the
manufacturer will be liable for any damage or injuries of any kind caused as a result of this.
Please note that our equipment has not been designed for use in commercial, trade or industrial
applications. Our warranty will be voided if the
machine is used in commercial, trade or industrial
businesses or for equivalent purposes.
- 16 -

4. Technical data
Motor power supply: ............................... 36 V DC
Idling speed n
Idling speed n0 (motor) .......................16000 min
Operating pressure bar: ............................max. 8
Theoretical suction rate l/min.: ..................... 130
Output (compressed air) at 7 bar: ....38 liters/min
Output (compressed air) at 4 bar: ....55 liters/min
Sound power level L
Uncertainty K
Sound pressure level L
Uncertainty K
Protection type: ........................................... IP20
Weight of the unit in kg: ................ approx. 5.5 kg
(pump) ........................3200 min
0
in dB: .......................... 94
WA
............................................ 3 dB
WA
............................................. 3 dB
pA
in dB: ...................... 83
pA
GB
Important! When you switch off the com-
•
pressor, excess air will escape at the safety
valve. This is not a fault, but arises in connec-
-1
-1
tion with the equipment‘s construction.
5.1 Charging the battery (Fig. 9)
1. Take the battery pack out of the tool. Do this
by pressing the pushlock button on the side.
2. Check that your mains voltage is the same as
that marked on the rating plate of the battery
charger. Insert the power plug of the charger
(c) into the socket outlet. The green LED will
then begin to blink.
3. Place the battery (b) onto the charger (c).
4. In the section entitled „Charger indicator“ you
will fi nd a table with an explanation of the LED
indicator on the charger.
Danger!
Noise and vibration
Sound and vibration values were measured in
accordance with EN ISO 3744.
5. Before starting the equipment
Before you connect the equipment to the power
supply make sure that the data on the rating plate
are identical to those of the rechargeable battery.
Check the equipment for damage which may
•
have occurred in transit. Report any damage
immediately to the transport company which
was used to deliver the compressor.
Install the compressor in the vicinity of the
•
point of consumption.
Make sure that the intake air is dry and dust-
•
free.
Do not install the compressor in a damp or
•
wet room.
The compressor may only be used in suitable
•
rooms (with good ventilation and an ambient
temperature from +5 °C to 40 °C). There must
be no dust, acids, vapors, explosive gases or
inflammable gases in the room.
The compressor is designed to be used in dry
•
rooms. It is prohibited to use the compressor
in areas where work is conducted with sprayed water.
Operate the equipment only on a firm, level
•
surface.
During operation place the compressor on the
•
rubber feet on the back of the compressor.
The battery can become a little warm during the
charging. This is normal.
If the battery pack fails to charge, check:
whether there is voltage at the socket outlet.
•
whether there is good contact at the charging
•
contacts.
If the battery pack still fails to charge, please send
the charger
•
and the battery pack
•
to our customer service center.
To ensure that items are properly packaged
and delivered when you send them to us,
please contact our customer service or the
point of sale at which the equipment was
purchased.
When shipping or disposing of batteries and
cordless tools, always ensure that they are
packed individually in plastic bags to prevent
short circuits and fi res.
To ensure that the battery pack provides long service, you should take care to recharge it promptly.
You must recharge the battery pack when you
notice that the performance of the device drops.
Never allow the battery pack to become fully discharged. This will cause it to develop a defect.
Important!
For the best results in terms of endurance and
performance you should always use batteries with
the same capacity of 3.0 Ah or higher.
- 17 -
Anl_TE_AC_36_8_Li_OF_Set_SPK13.indb 17Anl_TE_AC_36_8_Li_OF_Set_SPK13.indb 17 28.02.2022 08:08:5128.02.2022 08:08:51

GB
Important!
Use only batteries which are charged to the same
level. Never combine full and half-full batteries.
Always charge the two batteries simultaneously.
The machine‘s operating time depends on the
battery with the lower charge level. The two batteries must always be fully charged before use.
Close the battery cover by swinging it down, and
make sure that it latches in place correctly.
5.2 Fitting the batteries (Fig. 8a/b)
Swing open the battery cover (Item 11) as shown
in Fig. 8a by pressing (1) and pulling outwards (2).
Then insert the two batteries (c) in the mounts as
shown in Fig. 8b and close the cover.
5.3 Battery capacity indicator (Fig. 10)
Press the button for the battery capacity indicator
(a). The battery capacity indicator (d) shows the
charge status of the battery using 3 LEDs.
All 3 LEDs are lit:
The battery is fully charged.
2 or 1 LED(s) are lit:
The battery has an adequate remaining charge.
1 LED fl ashes:
The battery is empty, recharge the battery.
All LEDs blink:
The battery temperature is too low. Remove the
battery from the equipment, keep it at room temperature for one day. If the fault reoccurs, this means that the rechargeable battery has undergone
exhaustive discharge and is defective. Remove
the battery from the equipment. Never use or
charge a defective battery.
6. Operation
6.1 On/Off switch (4)
To switch on the equipment, set the On/Off switch
(4) to position 1.
To switch off the equipment, move the On/Off
switch (4) to position 0.
6.2 Compressed air hose with quick-lock
coupling (3)
Connecting:
Insert the nipple of the air tool into the quick-lock
coupling, the sleeve will spring forward automatically.
Disconnecting:
Pull back the sleeve and remove the tool. Caution! When releasing the quick-lock coupling,
be sure to hold the coupling piece to protect
yourself against injury from the rebounding
hose.
6.3 Tire pressure gauge with adapters (Fig. 2)
Working pressure in bar: 0-8
Range of applications:
The tire pressure gauge allows you to infl ate tires
easily and exactly. Use the pressure gauge to
check the tire pressure. If the tire pressure is too
high, you can reduce the pressure with the integrated relief valve (e).
After fi lling with air, please check the set tire
pressure with a calibrated gauge, for example at a
petrol station.
The tire pressure gauge comes with a valve adapter for car tire valves.
You can also fi ll other valve types by using the
supplied adapters.
Using the equipment as a blow-out pistol
(Fig. 3)
To use the tire pressure gauge as a blow-out
pistol you must fi rst unscrew and remove the
hose with the valve adapter for care tires. Now the
blow-out adapter (7) can be screwed to the tire
pressure gauge.
Range of applications:
For cleaning and blowing out hollow spaces or
hard-to-reach areas, as well as for cleaning soiled
- 18 -
Anl_TE_AC_36_8_Li_OF_Set_SPK13.indb 18Anl_TE_AC_36_8_Li_OF_Set_SPK13.indb 18 28.02.2022 08:08:5228.02.2022 08:08:52

GB
equipment. The infi nitely variable trigger lever al-
lows an exact dosing of compressed air.
Do not exceed the maximum permissible operating pressure of 8 bar (also shown on the back of
the tire pressure gauge).
6.4 Instructions for the adapter set
For information on the correct use of the adapters
for the various valves, please refer to the following
overview (see Fig. 7 which shows how to connect
the adapter to the compressor).
Ball needle (Figure 4)
•
Range of applications: For inflating balls. The
•
ball needle can be used to inflate a variety of
different balls.
TIP: To avoid damaging the valve, moisten
the needle slightly before inserting it.
Valve adapter (Figure 5)
•
Range of applications: For Dunlop and Presta
cycle tire valves.
This valve adapter is designed for inflating
cycle tires.
Conical universal adapter (Fig. 6)
•
Range of applications: The universal adapter
can be used for inflating airbeds and other
similar items.
Danger! Never direct the jet of compressed air at
yourself or at any other persons or animals.
Caution! Infl ating objects to above the recom-
mended pressure level may cause damage to the
objects or harm to bystanders!
6.5 What to do in case of an abnormal/emergency situation
1. Stop the operation
2. Switch off the equipment.
3. Pull the power plug
6.6 After using
1. Switch off the equipment.
2. Take out the batteries.
3. Remove all accessories from the equipment
such as, e.g. hose, tire pressure gauge, etc.
4. If the equipment is going to be cleaned or
repaired, allow it to cool down fi rst.
5. Check the equipment for signs of damage.
7. Cleaning, maintenance and
ordering of spare parts
Danger!
Remove the rechargeable batteries before
doing any cleaning and maintenance work.
Danger!
Wait until the compressor has completely
cooled down. Risk of burns!
Danger!
After use, always switch off the equipment
immediately and pull out the rechargeable
batteries.
7.1 Cleaning
Keep all safety devices, air vents and the
•
motor housing free of dirt and dust as far as
possible. Wipe the equipment with a clean
cloth or blow it with compressed air at low
pressure.
We recommend that you clean the device
•
immediately each time you have finished
using it.
Clean the equipment regularly with a moist
•
cloth and some soft soap. Do not use
cleaning agents or solvents; these could attack the plastic parts of the equipment. Ensure that no water can seep into the device. The
ingress of water into an electric tool increases
the risk of an electric shock.
You must disconnect the hose and any
•
spraying tools from the compressor before
cleaning. Do not clean the compressor with
water, solvents or the like.
7.2 Storage
Danger!
Pull out the rechargeable batteries and ventilate
the equipment and all connected pneumatic tools.
Switch off the compressor and make sure that it is
secured in such a way that it cannot be started up
again by any unauthorized person.
Danger!
Store the compressor only in a dry location
which is not accessible to unauthorized persons. Always store upright, never tilted!
- 19 -
Anl_TE_AC_36_8_Li_OF_Set_SPK13.indb 19Anl_TE_AC_36_8_Li_OF_Set_SPK13.indb 19 28.02.2022 08:08:5228.02.2022 08:08:52

7.3 Transport
Transport the equipment only by carrying it by
•
the transport handle.
Protect the equipment against unexpected
•
knocks and vibrations
GB
For EU countries only
7.4 Maintenance
There are no parts inside the equipment which
require additional maintenance.
7.5 Ordering replacement parts:
Please quote the following data when ordering
replacement parts:
Type of machine
•
Article number of the machine
•
Identification number of the machine
•
Replacement part number of the part required
•
For our latest prices and information please go to
www.Einhell-Service.com
8. Disposal and recycling
The equipment is supplied in packaging to prevent it from being damaged in transit. The raw
materials in this packaging can be reused or
recycled. The equipment and its accessories are
made of various types of material, such as metal
and plastic. Never place defective equipment in
your household refuse. The equipment should
be taken to a suitable collection center for proper
disposal. If you do not know the whereabouts of
such a collection point, you should ask in your
local council offi ces.
Never place any electric power tools in your
household refuse.
To comply with European Directive 2012/19/EC
concerning old electric and electronic equipment
and its implementation in national laws, old electric power tools have to be separated from other
waste and disposed of in an environment-friendly
fashion, e.g. by taking to a recycling depot.
Recycling alternative to the return request:
As an alternative to returning the equipment to
the manufacturer, the owner of the electrical
equipment must make sure that the equipment
is properly disposed of if he no longer wants to
keep the equipment. The old equipment can be
returned to a suitable collection point that will
dispose of the equipment in accordance with the
national recycling and waste disposal regulations.
This does not apply to any accessories or aids
without electrical components supplied with the
old equipment.
Please note that batteries and lamps (e.g. light
bulbs) must be removed from the tool before it is
disposed of.
The reprinting or reproduction by any other means, in whole or in part, of documentation and
papers accompanying products is permitted only
with the express consent of the Einhell Germany
AG.
Subject to technical changes
- 20 -
Anl_TE_AC_36_8_Li_OF_Set_SPK13.indb 20Anl_TE_AC_36_8_Li_OF_Set_SPK13.indb 20 28.02.2022 08:08:5228.02.2022 08:08:52

GB
9. Possible causes of failure
Problem Cause Solution
The compressor
does not start.
The compressor
starts but there is no
pressure.
The compressor
starts, pressure is
shown on the pressure gauge, but the
tools do not start.
1. No power supply
2. The outside temperature is too low
3. The motor is overheated
1. The non-return valve has a leak.
2. The seals are damaged.
1. Loose hose connections.
2. Leak in a quick-lock coupling.
1. Check the batteries
2. Do not use at an outside temperature below +5° C.
3. Allow the motor to cool down. If
necessary, remedy the cause of the
overheating.
1. Replace the non-return valve.
2. Check the seals and have any damaged seals replaced by a service
center.
1. Check the compressed air hose
and tools and replace if necessary.
2. Check the quick-lock coupling and
replace if necessary.
- 21 -
Anl_TE_AC_36_8_Li_OF_Set_SPK13.indb 21Anl_TE_AC_36_8_Li_OF_Set_SPK13.indb 21 28.02.2022 08:08:5328.02.2022 08:08:53

GB
10. Charger indicator
Indicator status Explanations and actions
Red LED Green LED
Off Flashing Ready for use
On Off Charging
Off On The battery is charged and ready for use. (READY TO GO)
Flashing Off Adapted charging
Flashing Flashing Fault
On On Temperature fault
The charger is connected to the mains and is ready for use; there is no
battery pack in the charger
The charger is charging the battery pack in quick charge mode. The charging times are shown directly on the charger.
Important! The actual charging times may vary slightly from the stated
charging times depending on the existing battery charge.
The unit then changes over to gentle charging mode until the battery is
fully charged.
To do this, leave the rechargeable battery on the charger for approx. 15
minutes longer.
Action:
Take the battery pack out of the charger. Disconnect the charger from the
mains supply.
The charger is in gentle charging mode.
For safety reasons the charging is performed less quickly and takes more
time. The reasons can be:
- The rechargeable battery has not been used for a very long time.
- The battery temperature is outside the ideal range.
Action:
Wait for the charging to be completed; you can still continue to charge the
battery pack.
Charging is no longer possible. The battery pack is defective.
Action:
Never charge a defective battery pack.
Take the battery pack out of the charger.
The battery pack is too hot (e.g. due to direct sunshine) or too cold
(below 0° C).
Action:
Remove the battery pack and keep it at room temperature (approx. 20° C)
for one day .
- 22 -
Anl_TE_AC_36_8_Li_OF_Set_SPK13.indb 22Anl_TE_AC_36_8_Li_OF_Set_SPK13.indb 22 28.02.2022 08:08:5328.02.2022 08:08:53

GB
Ser vice information
We have competent service partners in all countries named on the guarantee certifi cate whose contact
details can also be found on the guarantee certifi cate. These partners will help you with all service re-
quests such as repairs, spare and wearing part orders or the purchase of consumables.
Please note that the following parts of this product are subject to normal or natural wear and that the
following parts are therefore also required for use as consumables.
Category Example
Wear parts* V-belt, air fi lter, Battery
Consumables*
Missing parts
* Not necessarily included in the scope of delivery!
In the eff ect of defects or faults, please register the problem on the internet at www.Einhell-Service.com.
Please ensure that you provide a precise description of the problem and answer the following questions
in all cases:
Did the equipment work at all or was it defective from the beginning?
•
Did you notice anything (symptom or defect) prior to the failure?
•
What malfunction does the equipment have in your opinion (main symptom)?
•
Describe this malfunction.
- 23 -
Anl_TE_AC_36_8_Li_OF_Set_SPK13.indb 23Anl_TE_AC_36_8_Li_OF_Set_SPK13.indb 23 28.02.2022 08:08:5328.02.2022 08:08:53

GB
Warranty certifi cate
Dear Customer,
All of our products undergo strict quality checks to ensure that they reach you in perfect condition. In the
unlikely event that your device develops a fault, please contact our service department at the address
shown on this guarantee card. You can also contact us by telephone using the service number shown.
Please note the following terms under which guarantee claims can be made:
1. These guarantee terms apply to consumers only, i.e. natural persons intending to use this product
neither for their commercial activities nor for any other self-employed activities. These warranty
terms regulate additional warranty services, which the manufacturer mentioned below promises to
buyers of its new products in addition to their statutory rights of guarantee. Your statutory guarantee
claims are not aff ected by this guarantee. Our guarantee is free of charge to you.
2. The warranty services cover only defects due to material or manufacturing faults on a product which
you have bought from the manufacturer mentioned below and are limited to either the rectifi cation of
said defects on the product or the replacement of the product, whichever we prefer.
Please note that our devices are not designed for use in commercial, trade or professional applications. A guarantee contract will not be created if the device has been used by commercial, trade or
industrial business or has been exposed to similar stresses during the guarantee period.
3. The following are not covered by our guarantee:
- Damage to the device caused by a failure to follow the assembly instructions or due to incorrect
installation, a failure to follow the operating instructions (for example connecting it to an incorrect
mains voltage or current type) or a failure to follow the maintenance and safety instructions or by exposing the device to abnormal environmental conditions or by lack of care and maintenance.
- Damage to the device caused by abuse or incorrect use (for example overloading the device or the
use or unapproved tools or accessories), ingress of foreign bodies into the device (such as sand,
stones or dust, transport damage), the use of force or damage caused by external forces (for example by dropping it).
- Damage to the device or parts of the device caused by normal or natural wear or tear or by normal
use of the device.
4. The guarantee is valid for a period of 24 months starting from the purchase date of the device. Guarantee claims should be submitted before the end of the guarantee period within two weeks of the
defect being noticed. No guarantee claims will be accepted after the end of the guarantee period.
The original guarantee period remains applicable to the device even if repairs are carried out or
parts are replaced. In such cases, the work performed or parts fi tted will not result in an extension
of the guarantee period, and no new guarantee will become active for the work performed or parts
fi tted. This also applies if an on-site service is used.
5. To make a claim under the guarantee, please register the defective device at:
www.Einhell-Service.com. Please keep your bill of purchase or other proof of purchase for the new
device. Devices that are returned without proof of purchase or without a rating plate shall not be
covered by the guarantee, because appropriate identifi cation will not be possible. If the defect is co-
vered by our guarantee, then the item in question will either be repaired immediately and returned to
you or we will send you a new replacement.
Of course, we are also happy off er a chargeable repair service for any defects which are not covered by
the scope of this guarantee or for units which are no longer covered. To take advantage of this service,
please send the device to our service address.
Also refer to the restrictions of this warranty concerning wear parts, consumables and missing parts as
set out in the service information in these operating instructions.
- 24 -
Anl_TE_AC_36_8_Li_OF_Set_SPK13.indb 24Anl_TE_AC_36_8_Li_OF_Set_SPK13.indb 24 28.02.2022 08:08:5328.02.2022 08:08:53

F
Danger !
Lors de l’utilisation d’appareils, il faut respecter
certaines mesures de sécurité afi n d’éviter des
blessures et dommages. Veuillez donc lire attentivement ce mode d’emploi/ces consignes de
sécurité. Veillez à le conserver en bon état pour
pouvoir accéder aux informations à tout moment.
Si l’appareil doit être remis à d’autres personnes,
veillez à leur remettre aussi ce mode d’emploi/
ces consignes de sécurité. Nous déclinons toute
responsabilité pour les accidents et dommages
dus au non-respect de ce mode d’emploi et des
consignes de sécurité.
Explication des symboles utilisés
(voir fi gure 11)
1. Danger! - Lisez ce mode d’emploi pour diminuer le risque de blessures.
2. Prudence! Portez une protection de
l’ouïe. L’exposition au bruit peut entraîner
une perte de l’ouïe.
3. Attention à la tension électrique !
4. Attention aux pièces brûlantes !
5. Avertissement ! L’unité est commandée à
distance et peut démarrer sans avertissement
6. Remarque ! Utilisez exclusivement des accumulateurs avec le même niveau de charge,
ne combinez jamais un accumulateur plein
avec un accumulateur partiellement déchargé.
1. Consignes de sécurité
Vous trouverez les consignes de sécurité correspondantes dans le cahier en annexe.
Avertissement !
Veuillez lire toutes les consignes de sécurité,
instructions, illustrations et caractéristiques
techniques de cet outil électrique. Toute omis-
sion lors du respect des instructions ci-après peut
entraîner des décharges électriques, un incendie
et/ou de graves blessures.
Conservez toutes les consignes de sécurité
et toutes les instructions pour l’avenir.
2. Description de l’appareil et
volume de livraison
2.1 Description de l’appareil (fi gure 1-3)
1. Boîtier
2. Compartiment accessoires
3. Tuyau d’air comprimé avec raccord rapide
4. Interrupteur marche/arrêt
5. Poignée de transport
6. Pistolet de gonfl age à manomètre
7. Adaptateur de souffl age
8. Compartiment accessoires kit adaptateur
9. Pied d’appui
10. Support pistolet de gonfl age à manomètre
11. Couvercle du bloc accumulateur
2.2 Volume de livraison
Veuillez contrôler si l‘article est complet à l‘aide
de la description du volume de livraison. S‘il
manque des pièces, adressez-vous dans un délai
de 5 jours maximum après votre achat à notre
service après-vente ou au magasin où vous avez
acheté l‘appareil muni d‘une preuve d‘achat valable. Veuillez consulter pour cela le tableau des
garanties dans les informations service aprèsvente à la fi n du mode d‘emploi.
Ouvrez l’emballage et prenez l’appareil en le
•
sortant avec précaution de l’emballage.
Retirez le matériel d’emballage tout comme
•
les sécurités d’emballage et de transport (s’il
y en a).
Vérifiez si la livraison est bien complète.
•
Contrôlez si l’appareil et ses accessoires ne
•
sont pas endommagés par le transport.
Conservez l’emballage autant que possible
•
jusqu’à la fin de la période de garantie.
Danger !
L’appareil et le matériel d’emballage ne sont
pas des jouets ! Il est interdit de laisser des
enfants jouer avec des sacs et des fi lms en
plastique et avec des pièces de petite taille.
Ils risquent de les avaler et de s’étouff er !
Compresseur
•
Pistolet de gonflage à manomètre
•
Adaptateur de soufflage
•
Kit adaptateur 3 pièces
•
Mode d’emploi d’origine
•
Consignes de sécurité
•
- 25 -
Anl_TE_AC_36_8_Li_OF_Set_SPK13.indb 25Anl_TE_AC_36_8_Li_OF_Set_SPK13.indb 25 28.02.2022 08:08:5428.02.2022 08:08:54

F
3. Utilisation conforme à
l’aff ectation
Le compresseur sert à produire de l’air comprimé
pour les outils fonctionnant à l’air comprimé.
La machine doit exclusivement être employée
conformément à son aff ectation. Chaque uti-
lisation allant au-delà de cette aff ectation est
considérée comme non conforme. Pour les
dommages en résultant ou les blessures de tout
genre, le producteur décline toute responsabilité
et l’opérateur/l’exploitant est responsable.
Veillez au fait que nos appareils, conformément
à leur aff ectation, n’ont pas été construits, pour
être utilisés dans un environnement professionnel, industriel ou artisanal. Nous déclinons toute
responsabilité si l’appareil est utilisé professionnellement, artisanalement ou dans des sociétés
industrielles, tout comme pour toute activité
équivalente.
4. Données techniques
Alimentation en tension du moteur : ....... 36 V DC
Vitesse de rotation à vide n
Vitesse de
rotation à vide n
Pression de service en bars : ....................max. 8
Puissance d’aspiration théorique l/min : ........ 130
Puissance de sortie (air comprimé)
à 7 bars : .......................................... 38 litres/min
Puissance de sortie (air comprimé)
à 4 bars : .......................................... 55 litres/min
Niveau de puissance acoustique L
Imprécision K
Niveau de pression acoustique L
Imprécision K
Type de protection : ...................................... IP20
Poids de l’appareil en kg : ....................env. 5,5 kg
Danger !
Bruit et vibration
Les valeurs de bruits et de vibrations ont été déterminées conformément à EN ISO 3744.
(moteur) ................16000 tr/min
0
............................................3 dB
WA
............................................3 dB
pA
(pompe) 3200 tr/min
0
en dB : .. 94
WA
en dB : ...... 83
pA
5. Avant la mise en service
Assurez-vous, avant de brancher la machine,
que les données se trouvant sur la plaque signalétique correspondent bien aux données des
accumulateurs.
Contrôlez si l’appareil n’a pas subi de dom-
•
mages de transport. Signalez immédiatement
tout dommage au transporteur qui a livré le
compresseur.
Le compresseur doit être mis en place à pro-
•
ximité du consommateur.
Veillez à ce que l’air aspiré soit sec et sans
•
poussière.
N’installez pas le compresseur dans un end-
•
roit humide ou mouillé.
Le compresseur doit être utilisé uniquement
•
dans des endroits adéquats (bonne ventilation, température ambiante +5 °C à 40 °C).
La pièce doit être exempte de poussières,
d’acides, de vapeurs, de gaz explosifs ou
inflammables.
Le compresseur est adapté pour être em-
•
ployé dans des endroits secs. Il ne peut être
utilisé dans des zones où l’on travaille avec
des projections d’eau.
Exploitez l’appareil uniquement sur un sup-
•
port solide et plat
Pendant l’utilisation, placez le compresseur
•
sur les pieds en caoutchouc situés sur sa paroi arrière.
Attention ! Lors de la mise hors circuit du
•
compresseur, l’air en surplus s’échappe
par la soupape de sécurité. Cela est dû à la
structure de l’appareil et ne constitue pas un
défaut.
5.1 Charge de l’accumulateur (fi g. 9)
1. Sortez le bloc accumulateur de l’appareil.
Pour cela, appuyez sur la touche
d’enclenchement latérale.
2. Comparez si la tension réseau indiquée sur la
plaque signalétique correspond à la tension
réseau disponible. Branchez la fi che de con-
tact du chargeur (c) dans la prise de courant.
Le voyant LED vert commence à clignoter.
3. Mettez l’accumulateur (b) sur le chargeur (c).
4. Au point « Affi chage chargeur », vous trou-
verez un tableau avec les signifi cations des
affi chages LED sur le chargeur.
- 26 -
Anl_TE_AC_36_8_Li_OF_Set_SPK13.indb 26Anl_TE_AC_36_8_Li_OF_Set_SPK13.indb 26 28.02.2022 08:08:5428.02.2022 08:08:54

F
Pendant la charge, il est possible que
l’accumulateur chauff e quelque peu. C’est cepen-
dant normal.
S’il est impossible de charger le bloc accumulateur, veuillez contrôler
si la tension réseau est présente au niveau de
•
la prise de courant
si un contact correct est présent au niveau
•
des contacts de charge.
Si la charge du bloc accumulateur reste impossible, nous vous prions de bien vouloir renvoyer
le chargeur
•
et le bloc accumulateur
•
à notre service après-vente.
Pour un envoi correct, nous vous prions de
contacter notre service après-vente ou le
point de vente où vous avez acheté l’appareil.
Veillez à ce que, lors de l’envoi ou de la mise
au rebut, les accumulateurs ou les appareils
sans fi l soit emballés séparément dans des
sacs en plastique afi n d’éviter les courts-
circuits ou un incendie !
Dans l‘intérêt d‘une longue durée de fonctionnement du bloc accumulateur, vous devez prendre
soin de recharger le bloc accumulateur en temps
voulu. Ceci est dans tous les cas indispensable
lorsque vous constatez une diminution de la
puissance de l‘appareil. Ne déchargez jamais
complètement le bloc accumulateur. Ceci cause
l‘endommagement du bloc accumulateur !
5.2 Montage des accumulateurs (fi g. 8a/b)
Ouvrez le couvercle du bloc accumulateur (pos.
11) comme illustré sur la fi g. 8a en poussant (1)
et en tirant vers l’extérieur (2). Insérez ensuite les
deux accumulateurs (c) comme indiqué sur la fi g.
8b dans les logements et fermez le couvercle.
5.3 Indicateur de charge de l’accumulateur
(fi g. 10)
Appuyez sur l’interrupteur pour l’indicateur de
charge de l’accumulateur (a). L’indicateur de
charge de l’accumulateur (d) vous indique l’état
de charge de l’accumulateur à l’aide de trois voyants LED.
Les 3 voyants LED sont allumés :
L’accumulateur est complètement rechargé.
2 ou 1 voyant LED est (sont) allumé(s)
L‘accumulateur dispose encore d‘un résidu de
charge suffi sant.
1 voyant LED clignote :
L’accumulateur est vide, il faut le recharger.
Tous les voyants LED clignotent :
La température de l’accumulateur est trop faible.
Retirez l’accumulateur de l’appareil et laissez-le
reposer pendant un jour à température ambiante.
Si l’erreur survient à nouveau, cela signifi e que
l’accumulateur est en décharge profonde et défectueux. Retirez l’accumulateur de l’appareil. Un
accumulateur défectueux ne doit plus être utilisé
ou chargé.
Remarque !
Vous obtiendrez toujours les meilleurs résultats en termes d’endurance et de puissance
d’aspiration en utilisant des accumulateurs de
même capacité à partir de 3,0 Ah.
Remarque !
Utilisez exclusivement des accumulateurs avec
le même niveau de charge, ne combinez jamais
un accumulateur plein avec un accumulateur
partiellement déchargé. Mettez toujours les deux
accumulateurs à charger simultanément.
L’accumulateur le moins chargé déterminera
la durée de fonctionnement de l’appareil. Les
deux accumulateurs doivent toujours être complètement chargés avant utilisation. Fermez le
couvercle du bloc accumulateur en le rabattant et
vérifi ez que le verrouillage est bien emboîté.
Anl_TE_AC_36_8_Li_OF_Set_SPK13.indb 27Anl_TE_AC_36_8_Li_OF_Set_SPK13.indb 27 28.02.2022 08:08:5428.02.2022 08:08:54
6. Commande
6.1 Interrupteur marche/arrêt (4)
Mettez l’interrupteur marche/arrêt (4) en position
1 pour la mise en circuit.
Pour la mise hors circuit, mettez l’interrupteur
marche/arrêt (4) en position 0.
6.2. Tuyau d’air comprimé avec raccord rapide (3)
Raccordement :
Poussez l’embout de votre outil pneumatique
dans le raccord rapide, la douille saute automatiquement vers l’avant.
- 27 -

F
Séparation :
Tirez la douille en arrière et retirez l’outil. Prudence ! Lorsque vous défaites le raccord
rapide, tenez bien la pièce de raccord afi n
d’éviter toute blessure en raison du tuyau qui
rebondit.
6.3 Pistolet de gonfl age à manomètre avec
adaptateurs (fi g. 2)
Pression de service en bars : 0-8
Domaine d’application :
Le pistolet de gonfl age à manomètre permet
de remplir les pneus avec précision et en toute
simplicité. Le manomètre sert au contrôle de la
pression de gonfl age. La soupape d’évacuation
intégrée (e) permet de diminuer la pression de
gonfl age lorsqu’elle est trop importante.
Contrôlez la pression de gonfl age réglée direc-
tement après le remplissage en utilisant un manomètre calibré, par ex. dans une station-service.
Le pistolet de gonfl age à manomètre est équipé
d’un adaptateur de valve pour valves de pneus.
L’adaptateur joint permet aussi de remplir d’autres
types de valves.
Utilisation comme pistolet de souffl age
(fi g. 3)
Pour utiliser le pistolet de gonfl age à manomètre
comme pistolet de souffl age, commencez par
dévisser le tuyau avec l’adaptateur de valve pour
pneus. L’adaptateur de souffl age (7) peut être à
présent vissé sur le pistolet de gonfl age à ma-
nomètre.
6.4 Mode d’emploi du kit adaptateur
Veuillez consulter les instructions d’utilisation correcte de l’adaptateur pour les diff érentes valves
dans le récapitulatif suivant (pour raccorder
l’adaptateur au compresseur, cf. fi gure 7 !).
Embout pour ballons (figure 4)
•
Domaine d’application : Pour le gonflage de
ballons. L’embout pour ballons peut être utilisé pour le gonflage de différents ballons.
CONSEIL : Pour éviter un endommagement
de la valve, il convient d’humidifier légèrement l’embout pour ballons avant de l’insérer.
Adaptateur de valve (figure 5)
•
Domaine d’application : Adapté pour les
valves Dunlop et Presta de pneus de vélos.
L’adaptateur de valve permet de remplir les
pneus de vélos en toute simplicité.
Adaptateur universel conique (figure 6)
•
Domaine d’application : L’adaptateur universel peut être utilisé pour les matelas gonflables et objets similaires.
Danger ! Ne dirigez jamais le jet de pression
sur vous-même ou sur d’autres personnes ou
animaux !
Prudence ! Souffl er sur des objets avec une
pression supérieure à la pression recommandée
peut causer des dommages aux objets ou aux
personnes se trouvant à proximité !
6.5 Comportement dans les situations
d’urgence et exceptionnelles
1. Arrêtez le processus de travail
2. Éteignez l’appareil.
3. Débranchez la fi che de contact
Domaine d’application :
Pour nettoyer/nettoyer par souffl age des creux
ou des endroits diffi cilement accessibles et pour
nettoyer les appareils encrassés. Le levier de
détente à commande continue permet de doser
avec précision l’air comprimé.
Ne dépassez pas la pression de service maximale de 8 bars (elle est également indiquée au dos
du pistolet de gonfl age à manomètre).
Anl_TE_AC_36_8_Li_OF_Set_SPK13.indb 28Anl_TE_AC_36_8_Li_OF_Set_SPK13.indb 28 28.02.2022 08:08:5528.02.2022 08:08:55
6.6 Après utilisation
1. Éteignez l’appareil.
2. Retirez les accumulateurs.
3. Démontez tous les accessoires de l’appareil
comme par ex. le tuyau, le pistolet de gonfl a-
ge à manomètre, etc.
4. Laissez refroidir l’appareil avant de le réparer
ou de le nettoyer.
5. Vérifi ez que l’appareil n’a pas subi de dom-
mages.
- 28 -

F
7. Nettoyage, maintenance et
commande de pièces de
rechange
Danger !
Retirez les accumulateurs avant tout travail
de nettoyage et de maintenance.
Danger !
Attendez que le compresseur soit complètement refroidi ! Risque de brûlure !
Danger !
Éteignez toujours l’appareil après utilisation
et retirez les accumulateurs
7.1 Nettoyage
Maintenez les dispositifs de protection, les
•
fentes à air et le carter de moteur aussi propres (sans poussière) que possible. Frottez
l’appareil avec un chiffon propre ou soufflez
dessus avec de l’air comprimé à basse pression.
Nous recommandons de nettoyer l’appareil
•
directement après chaque utilisation.
Nettoyez l’appareil régulièrement à l’aide d’un
•
chiffon humide et un peu de savon. N’utilisez
aucun produit de nettoyage ni détergeant;
ils pourraient endommager les pièces en
matières plastiques de l’appareil. Veillez à
ce qu’aucune eau n’entre à l’intérieur de
l’appareil. La pénétration de l’eau dans un
appareil électrique augmente le risque de
décharge électrique.
Détachez le tuyau et les outils de pulvérisati-
•
on du compresseur avant de commencer le
nettoyage. Le compresseur ne doit pas être
lavé à l’eau, avec des solvants ou autres produits du même genre.
7.3 Transport
Transportez l’appareil uniquement par la
•
poignée de transport.
Protégez l’appareil contre les chocs ou les
•
vibrations inattendus.
7.4 Maintenance
Aucune pièce à l’intérieur de l’appareil n’a besoin
de maintenance.
7.5 Commande de pièces de rechange :
Pour les commandes de pièces de rechange,
veuillez indiquer les références suivantes:
Type de l’appareil
•
No. d’article de l’appareil
•
No. d’identification de l’appareil
•
No. de pièce de rechange de la pièce requise
•
Vous trouverez les prix et informations actuelles à
l’adresse www.Einhell-Service.com
8. Mise au rebut et recyclage
L‘appareil se trouve dans un emballage permettant d‘éviter les dommages dus au transport.
Cet emballage est une matière première et peut
donc être réutilisé ultérieurement ou être réintroduit dans le circuit des matières premières.
L‘appareil et ses accessoires sont en matériaux
divers, comme par ex. des métaux et matières
plastiques. Les appareils défectueux ne doivent
pas être jetés dans les poubelles domestiques.
Pour une mise au rebut conforme à la réglementation, l‘appareil doit être déposé dans un centre
de collecte approprié. Si vous ne connaissez pas
de centre de collecte, veuillez vous renseigner
auprès de l‘administration de votre commune.
7.2 Stockage
Danger !
Retirez les accumulateurs, ventilez l’appareil et
tous les outils pneumatiques raccordés. Rangez
le compresseur de façon à ce qu’aucune personne non autorisée ne puisse le mettre en service.
Danger !
Stockez le compresseur uniquement au sec
et hors de portée des personnes non autorisées. Ne le renversez pas, stockez-le uniquement en position debout !
- 29 -
Anl_TE_AC_36_8_Li_OF_Set_SPK13.indb 29Anl_TE_AC_36_8_Li_OF_Set_SPK13.indb 29 28.02.2022 08:08:5528.02.2022 08:08:55

F
9. Pannes possibles
Problème Origine Solution
Le compresseur ne
fonctionne pas
Le compresseur
fonctionne, cependant aucune pression n’est présente
Le compresseur
fonctionne, la pression est affi chée sur
le manomètre, mais
les outils ne fonctionnent pas.
1. Pas d’alimentation électrique
2. Température extérieure trop faible
3. Moteur en surchauff e
1. Le clapet anti-retour n’est pas
étanche
2. Joints défectueux
1. Les raccords des tuyaux ne sont
pas étanches.
2. Le raccord rapide n’est pas
étanche.
1. Contrôlez les accumulateurs.
2. Ne pas s’en servir à une température inférieure à +5 °C.
3. Laissez refroidir le moteur, le cas
échéant, éliminez la cause de la
surchauff e.
1. Remplacez le clapet anti-retour.
2. Contrôlez les joints, faites remplacer les joints cassés dans un
atelier.
1. Contrôlez le tuyau d’air comprimé
et les outils, le cas échéant, remplacez-les.
2. Contrôlez le raccord rapide, le cas
échéant, remplacez-le.
- 30 -
Anl_TE_AC_36_8_Li_OF_Set_SPK13.indb 30Anl_TE_AC_36_8_Li_OF_Set_SPK13.indb 30 28.02.2022 08:08:5528.02.2022 08:08:55
 Loading...