

Page 1

D Originalbetriebsanleitung
Akku-Bohrschrauber
GB Original operating instructions
Cordless drill/screwdriver
F Mode d’emploi d’origine
Perceuse sans fi l
I Istruzioni per l’uso originali
Trapano avvitatore a batteria
CZ Originální návod k obsluze
Akumulátorový vrtací šroubovák
SK Originálny návod na obsluhu
Akumulátorový vŕtací skrutkovač
NL Originele handleiding
Accuboorschroefmachine
E Manual de instrucciones original
Taladro atornillador con batería
TC-CD 18-2 Li
P Manual de instruções original
Berbequim-aparafusador sem fi o
GR Πρωτότυπες Οδηγίες χρήσης
Δράπανο μπαταρίας
7
Art.-Nr.: 45.138.20 I.-Nr.: 11014
Anl_TC_CD_18_2_Li_SPK7.indb 1Anl_TC_CD_18_2_Li_SPK7.indb 1 07.06.16 08:5707.06.16 08:57
Page 2
1
1
9
4
7
3
10
6
2
a
2
2.
Anl_TC_CD_18_2_Li_SPK7.indb 2Anl_TC_CD_18_2_Li_SPK7.indb 2 07.06.16 08:5707.06.16 08:57
8
5
3
a
1.
8
5
5
- 2 -
Page 3
4 5
1
7
1
3
4
2
6
9
a
- 3 -
Anl_TC_CD_18_2_Li_SPK7.indb 3Anl_TC_CD_18_2_Li_SPK7.indb 3 07.06.16 08:5707.06.16 08:57
Page 4
D
Gefahr! - Zur Verringerung des Verletzungsrisikos Bedienungsanleitung lesen
Vorsicht! Tragen Sie einen Gehörschutz. Die Einwirkung von Lärm kann Gehörverlust bewirken.
Vorsicht! Tragen Sie eine Staubschutzmaske. Beim Bearbeiten von Holz und anderer Materialien
kann gesundheitsschädlicher Staub entstehen. Asbesthaltiges Material darf nicht bearbeitet werden!
Vorsicht! Tragen Sie eine Schutzbrille. Während der Arbeit entstehende Funken oder aus dem Gerät
heraustretende Splitter, Späne und Stäube können Sichtverlust bewirken.
Um eine Beschädigung des Getriebes zu vermeiden, darf die Gangumschaltung nur im
Stillstand umgeschaltet werden.
Lagerung der Akkus nur in trockenen Räumen mit einer Umgebungstemperatur von +10°C - +40°C.
Akkus nur in geladenem Zustand lagern (mind. 40% geladen).
Schutzklasse II
Nur für den Gebrauch in trockenen Räumen.
- 4 -
Anl_TC_CD_18_2_Li_SPK7.indb 4Anl_TC_CD_18_2_Li_SPK7.indb 4 07.06.16 08:5707.06.16 08:57
Page 5

D
Gefahr!
Beim Benutzen von Geräten müssen einige Sicherheitsvorkehrungen eingehalten werden, um
Verletzungen und Schäden zu verhindern. Lesen
Sie diese Bedienungsanleitung / Sicherheitshinweise deshalb sorgfältig durch. Bewahren Sie diese gut auf, damit Ihnen die Informationen jederzeit
zur Verfügung stehen. Falls Sie das Gerät an andere Personen übergeben sollten, händigen Sie
diese Bedienungsanleitung / Sicherheitshinweise
bitte mit aus. Wir übernehmen keine Haftung für
Unfälle oder Schäden, die durch Nichtbeachten
dieser Anleitung und den Sicherheitshinweisen
entstehen.
1. Sicherheitshinweise
Die entsprechenden Sicherheitshinweise fi nden
Sie im beiliegenden Heftchen!
Gefahr!
Lesen Sie alle Sicherheitshinweise und Anweisungen. Versäumnisse bei der Einhaltung der
Sicherheitshinweise und Anweisungen können
elektrischen Schlag, Brand und/oder schwere
Verletzungen verursachen. Bewahren Sie alle
Sicherheitshinweise und Anweisungen für
die Zukunft auf.
2. Gerätebeschreibung und
Lieferumfang
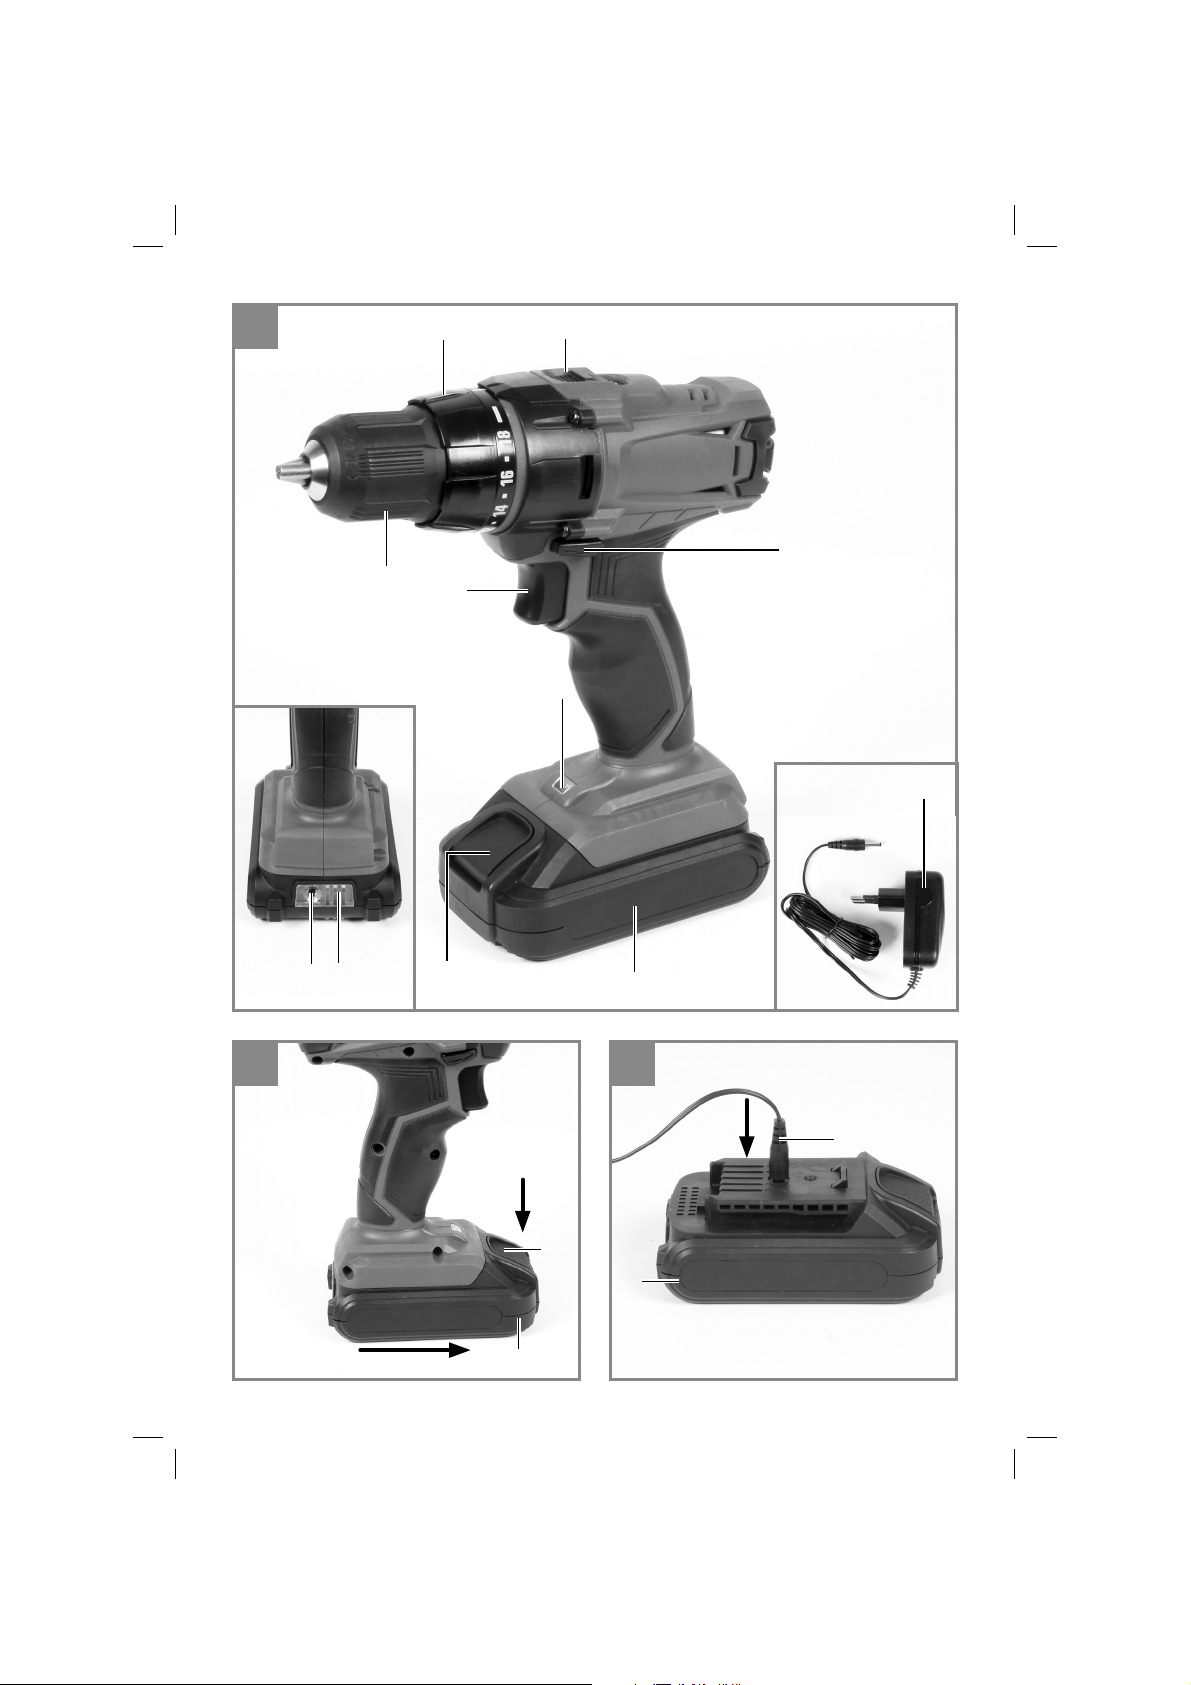
2.1 Gerätebeschreibung (Bild 1)
1. Drehmomenteinstellung
2. Akku-Kapazitätsanzeige
3. Drehrichtungsschalter
4. Ein-/ Ausschalter
5. Akku
6. Ladegerät
7. Umschalter 1. Gang – 2. Gang
8. Rasttaste
9. Schnellspannbohrfutter
10. LED-Licht
2.2 Lieferumfang
Bitte überprüfen Sie die Vollständigkeit des Artikels anhand des beschriebenen Lieferumfangs.
Bei Fehlteilen wenden Sie sich bitte spätestens
innerhalb von 5 Arbeitstagen nach Kauf des Artikels unter Vorlage eines gültigen Kaufbeleges an
unser Service Center oder an die Verkaufstelle,
bei der Sie das Gerät erworben haben. Bitte
beachten Sie hierzu die Gewährleistungstabelle
in den Service-Informationen am Ende der Anleitung.
Öffnen Sie die Verpackung und nehmen Sie
•
das Gerät vorsichtig aus der Verpackung.
Entfernen Sie das Verpackungsmaterial so-
•
wie Verpackungs-/ und Transportsicherungen
(falls vorhanden).
Überprüfen Sie, ob der Lieferumfang vollstän-
•
dig ist.
Kontrollieren Sie das Gerät und die Zubehör-
•
teile auf Transportschäden.
Bewahren Sie die Verpackung nach Möglich-
•
keit bis zum Ablauf der Garantiezeit auf.
Gefahr!
Gerät und Verpackungsmaterial sind kein
Kinderspielzeug! Kinder dürfen nicht mit
Kunststoff beuteln, Folien und Kleinteilen
spielen! Es besteht Verschluckungs- und Erstickungsgefahr!
Akku-Bohrschrauber
•
Ladegerät
•
Akku
•
Originalbetriebsanleitung
•
Sicherheitshinweise
•
3. Bestimmungsgemäße
Verwendung
Der Akku-Bohrschrauber ist geeignet zum Eindrehen und Lösen von Schrauben, sowie zum
Bohren in Holz, Metall und Kunststoff .
Die Maschine darf nur nach ihrer Bestimmung
verwendet werden. Jede weitere darüber hinausgehende Verwendung ist nicht bestimmungsgemäß. Für daraus hervorgerufene Schäden oder
Verletzungen aller Art haftet der Benutzer/Bediener und nicht der Hersteller.
- 5 -
Anl_TC_CD_18_2_Li_SPK7.indb 5Anl_TC_CD_18_2_Li_SPK7.indb 5 07.06.16 08:5707.06.16 08:57
Page 6

D
Bitte beachten Sie, dass unsere Geräte bestimmungsgemäß nicht für den gewerblichen, handwerklichen oder industriellen Einsatz konstruiert
wurden. Wir übernehmen keine Gewährleistung,
wenn das Gerät in Gewerbe-, Handwerks- oder
Industriebetrieben sowie bei gleichzusetzenden
Tätigkeiten eingesetzt wird.
4. Technische Daten
Spannungsversorgung Motor: .................18 V d.c.
Leerlauf-Drehzahl:............... 0-350 / 0-1250 min-1
Drehmomentstufen: .....................................18+1
Rechts- Links-Lauf: ............................................ja
Spannweite Bohrfutter: .....................max. 10 mm
Ausgangsspannung Ladegerät: ..............23 V d.c.
Ausgangsstrom Ladegerät: .........................0,5 A
Netzspannung Ladegerät: .100-240 V ~ 50/60 Hz
Akku-Typ: .................................................... Li-Ion
Anzahl der Akkuzellen: ....................................... 5
Akkukapazität: ...........................................1,3 Ah
Gewicht: ......................................................1,6 kg
Max. Schraubendurchmesser: .................... 6 mm
Der max. Schraubendurchmesser beschreibt den
maximalen Durchmesser der Schraube, die in
Holz eingeschraubt werden kann. Je nach Holzart
kann der Durchmesser der Schraube variieren.
Schrauben ohne Schlag
Schwingungsemissionswert ah ≤ 2,5 m/s
Unsicherheit K = 1,5 m/s
2
2
Der angegebene Schwingungsemissionswert ist
nach einem genormten Prüfverfahren gemessen
worden und kann sich, abhängig von der Art und
Weise, in der das Elektrowerkzeug verwendet
wird, ändern und in Ausnahmefällen über dem
angegebenen Wert liegen.
Der angegebene Schwingungsemissionswert
kann zum Vergleich eines Elektrowerkzeuges mit
einem anderen verwendet werden.
Der angegebene Schwingungsemissionswert
kann auch zu einer einleitenden Einschätzung der
Beeinträchtigung verwendet werden.
Beschränken Sie die Geräuschentwicklung
und Vibration auf ein Minimum!
Verwenden Sie nur einwandfreie Geräte.
•
Warten und reinigen Sie das Gerät regelmä-
•
ßig.
Passen Sie Ihre Arbeitsweise dem Gerät an.
•
Überlasten Sie das Gerät nicht.
•
Lassen Sie das Gerät gegebenenfalls über-
•
prüfen.
Schalten Sie das Gerät aus, wenn es nicht
•
benutzt wird.
Tragen Sie Handschuhe.
•
Gefahr!
Geräusch und Vibration
Die Geräusch- und Vibrationswerte wurden entsprechend EN 60745 ermittelt.
Schalldruckpegel L
Unsicherheit K
Schallleistungspegel L
Unsicherheit K
......................... 70,88 dB(A)
pA
............................................ 3 dB
pA
WA
................... 81,88 dB(A)
WA
........................................... 3 dB
Tragen Sie einen Gehörschutz.
Die Einwirkung von Lärm kann Gehörverlust bewirken.
Schwingungsgesamtwerte (Vektorsumme dreier
Richtungen) ermittelt entsprechend EN 60745.
Bohren in Metall
Schwingungsemissionswert a
Unsicherheit K = 1,5 m/s
Anl_TC_CD_18_2_Li_SPK7.indb 6Anl_TC_CD_18_2_Li_SPK7.indb 6 07.06.16 08:5707.06.16 08:57
2
≤ 2,5 m/s
h
2
Vorsicht!
Restrisiken
Auch wenn Sie dieses Elektrowerkzeug
vorschriftsmäßig bedienen, bleiben immer
Restrisiken bestehen. Folgende Gefahren
können im Zusammenhang mit der Bauweise
und Ausführung dieses Elektrowerkzeuges
auftreten:
1. Lungenschäden, falls keine geeignete Staub-
schutzmaske getragen wird.
2. Gehörschäden, falls kein geeigneter Gehör-
schutz getragen wird.
3. Gesundheitsschäden, die aus Hand-Arm-
Schwingungen resultieren, falls das Gerät
über einen längeren Zeitraum verwendet wird
oder nicht ordnungsgemäß geführt und gewartet wird.
- 6 -
Page 7

D
Begrenzen Sie die Arbeitszeit.
Dabei sind alle Anteile des Betriebszyklus zu
berücksichtigen (beispielsweise Zeiten, in denen das Elektrowerkzeug abgeschaltet ist, und
solche, in denen es zwar eingeschaltet ist, aber
ohne Belastung läuft).
5. Vor Inbetriebnahme
Lesen Sie vor der Inbetriebnahme Ihres Akkuschraubers unbedingt diese Hinweise:
1. Laden Sie den Akku mit dem mitgelieferten
Ladegerät. Ein leerer Akku ist nach
ca. 3-5 Stunden aufgeladen.
2. Nur scharfe Bohrer sowie einwandfreie und
geeignete Schrauberbits verwenden.
3. Beim Bohren und Schrauben in Wänden und
Mauern diese auf verborgene Strom-, Gasund Wasserleitung überprüfen.
6. Bedienung
6.1 Laden des LI-Akku-Packs (Abb. 2-3)
1. Akku-Pack (5) aus dem Handgriff heraus
ziehen, dabei die Rasttaste (8) nach unten
drücken.
2. Vergleichen Sie, ob die auf dem Typenschild
angegebene Netzspannung mit der vorhandenen Netzspannung übereinstimmt.
3. Stecken Sie das Ladegerät (6) in die Steckdose und verbinden Sie das Ladekabel (a)
mit dem Akku (5). Die 3 LED‘s an der AkkuKapazitätsanzeige (10) signalisieren, dass
der Akku geladen wird.
- Akku entladen: Alle 3 LED’s blinken im
Wechsel
- 1/3 aufgeladen: linke LED leuchtet, mittlere
und rechte LED blinken im Wechsel
- 2/3 aufgeladen: linke und mittlere LED
leuchten, rechte LED blinkt
4. Wenn der Ladevorgang nach ca. 3-5 h beendet ist, leuchten alle 3 LED’s für etwa 10 min.
Entfernen Sie das Ladegerät vom Akku.
5. Blinken alle 3 LED’s gleichzeitig, so ist die
Temperatur des Akkus unter bzw. überschritten. Entfernen Sie das Ladegerät vom Akku,
lassen Sie den Akku einen Tag bei Raumtemperatur liegen und versuchen Sie es erneut.
6. Wird der Fehler immer noch angezeigt, so ist
der Akku defekt. Ein defekter Akku darf nicht
mehr verwendet bzw. geladen werden. Entfernen Sie das Ladegerät vom Akku.
Sollte das Laden des Akku-Packs nicht möglich
sein, überprüfen Sie bitte
ob an der Steckdose die Netzspannung vor-
•
handen ist.
ob ein einwandfreier Kontakt an den Lade-
•
kontakten des Ladegerätes vorhanden ist.
Sollte das Laden des Akku-Packs immer noch
nicht möglich sein, bitten wir Sie,
das Ladegerät und Ladeadapter
•
und den Akku-Pack
•
an unseren Kundendienst zu senden.
Im Interesse einer langen Lebensdauer des AkkuPacks sollten Sie für eine rechtzeitige Wiederaufladung des LI-Akku-Packs sorgen. Dies ist auf
jeden Fall notwendig, wenn Sie feststellen, dass
die Leistung des Akku-Schraubers nachlässt.
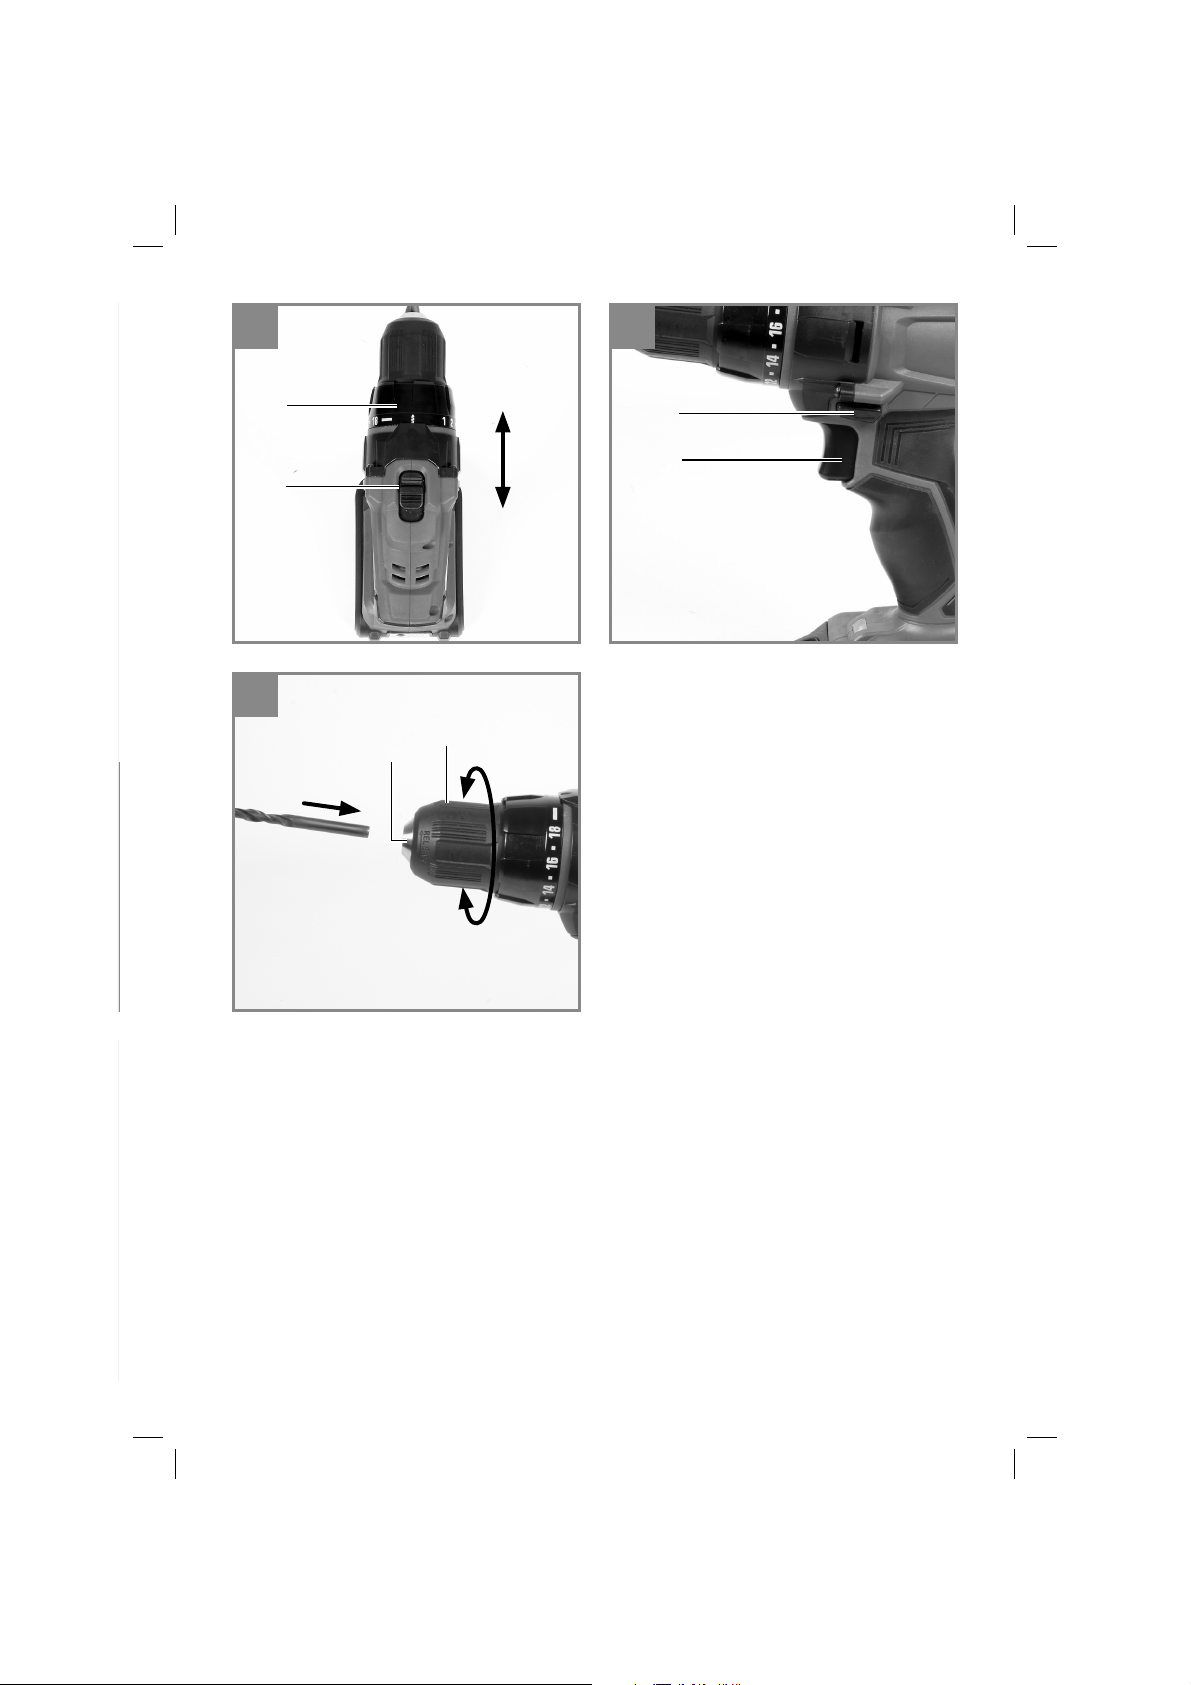
6.2 Drehmoment-Einstellung (Abb. 4/Pos. 1)
Achtung! Stellring für das Drehmoment nur
bei Stillstand einstellen.
Der Akkuschrauber ist mit einer mechanischen
Drehmomenteinstellung ausgestattet.
Das Drehmoment für eine bestimmte Schraubengröße wird am Stellring (1) eingestellt. Das Drehmoment ist von mehreren Faktoren abhängig:
von der Art und Härte des zu bearbeitenden
•
Materials.
von der Art und der Länge der verwendeten
•
Schrauben.
von den Anforderungen, die an die Schraub-
•
verbindung gestellt werden.
Das Erreichen des Drehmoments wird durch das
ratschende Ausrücken der Kupplung signalisiert.
6.3 Bohren (Abb. 4/Pos. 1)
Zum Bohren stellen Sie den Einstellring für das
Drehmoment auf die letzte Stufe „Bohrer“. In der
Stufe Bohren ist die Rutschkupplung außer Betrieb. Beim Bohren ist das maximale Drehmoment
verfügbar.
- 7 -
Anl_TC_CD_18_2_Li_SPK7.indb 7Anl_TC_CD_18_2_Li_SPK7.indb 7 07.06.16 08:5707.06.16 08:57
Page 8

D
6.4 Drehrichtungsschalter (Abb. 5/Pos. 3)
Mit dem Schiebeschalter über dem Ein/AusSchalter können Sie die Drehrichtung des AkkuSchraubers einstellen und den Akku-Schrauber
gegen ungewolltes Einschalten sichern. Sie können zwischen Links- und Rechtslauf wählen. Um
eine Beschädigung des Getriebes zu vermeiden,
darf die Drehrichtung nur im Stillstand umgeschaltet werden. Befi ndet sich der Schiebeschal-
ter in der Mittelstellung, ist der Ein/Aus-Schalter
blockiert.
6.5 Ein-/Aus-Schalter (Abb. 5/Pos. 4)
Mit dem Ein-/Aus-Schalter können Sie die Drehzahl stufenlos steuern. Je weiter Sie den Schalter
drücken, desto höher ist die Drehzahl des Akkuschraubers.
6.6 Umschaltung Gang 1 - Gang 2
(Abb. 4/Pos. 7)
Je nach Stellung des Umschalters können Sie mit
einer höheren oder niedrigeren Drehzahl arbeiten.
Um eine Beschädigung des Getriebes zu vermeiden, darf die Gangumschaltung nur im Stillstand
umgeschaltet werden.
6.7 Akku-Kapazitätsanzeige (Abb. 1/Pos. 2)
Drücken Sie auf den Schalter für AkkuKapazitätsanzeige (a). Die Akku-Kapazitätsanzeige (2) signalisiert ihnen den Ladezustand des
Akkus anhand von 3 LED`s.
Alle 3 LEDs leuchten:
Der Akku ist voll aufgeladen.
2 oder 1 LED(’s) leuchten
Der Akku verfügt über ausreichende Restladung.
6.8 LED-Licht (Abb. 1/Pos. 10)
Das LED-Licht (10) ermöglicht das Ausleuchten
der Schraub- bzw. Bohrstelle bei ungünstigen
Lichtverhältnissen. Das LED-Licht (10) leuchtet
automatisch, sobald Sie den Ein-/Ausschalter (4)
drücken.
6.9 Werkzeugwechsel (Bild 6)
Achtung! Stellen Sie bei allen Arbeiten (z.B.
Werkzeugwechsel; Wartung; usw.) am Akkuschrauber den Drehrichtungsschalter (3) in
Mittelstellung.
Der Akkuschrauber ist mit einem Schnell-
•
spanbohrfutter (9) mit automatischer Spindelarretierung ausgestattet.
Drehen Sie das Bohrfutter (9) auf. Die Bohr-
•
futteröffnung (a) muss groß genug sein, um
das Werkzeug (Bohrer bzw. Schrauberbit)
aufzunehmen.
Wählen Sie das geeignete Werkzeug aus.
•
Schieben Sie das Werkzeug soweit wie möglich in die Bohrfutteröffnung (a) hinein.
Drehen Sie das Bohrfutter (9) fest zu, und
•
prüfen Sie anschließend den festen Sitz des
Werkzeuges.
6.10 Schrauben
Verwenden Sie am besten Schrauben mit Selbstzentrierung (z. B. Torx, Kreuzschiltz), welches ein
sicheres Arbeiten gewährleistet. Achten Sie darauf, dass der verwendete Bit und die Schraube
in Form und Größe übereinstimmen. Nehmen Sie
die Drehmomenteinstellung, wie in der Anleitung
beschrieben, entsprechend der Schraubengröße
vor.
1 LED blinkt:
Der Akku ist leer, laden Sie den Akku auf.
Alle LED’s blinken:
Die Temperatur des Akkus ist überschritten. Entfernen Sie den Akku vom Gerät und lassen Sie
den Akku einen Tag bei Raumtemperatur liegen.
Tritt der Fehler wieder auf, so wurde der Akku tiefentladen und ist defekt. Entfernen Sie den Akku
vom Gerät. Ein defekter Akku darf nicht mehr verwendet bzw. geladen werden.
- 8 -
Anl_TC_CD_18_2_Li_SPK7.indb 8Anl_TC_CD_18_2_Li_SPK7.indb 8 07.06.16 08:5707.06.16 08:57
Page 9
D
7. Reinigung, Wartung und
Ersatzteilbestellung
Gefahr!
Ziehen Sie vor allen Reinigungsarbeiten den
Netzstecker.
7.1 Reinigung
Halten Sie Schutzvorrichtungen, Luftschlitze
•
und Motorengehäuse so staub- und schmutzfrei wie möglich. Reiben Sie das Gerät mit
einem sauberen Tuch ab oder blasen Sie es
mit Druckluft bei niedrigem Druck aus.
Wir empfehlen, dass Sie das Gerät direkt
•
nach jeder Benutzung reinigen.
Reinigen Sie das Gerät regelmäßig mit einem
•
feuchten Tuch und etwas Schmierseife. Verwenden Sie keine Reinigungs- oder Lösungsmittel; diese könnten die Kunststoffteile des
Gerätes angreifen. Achten Sie darauf, dass
kein Wasser in das Geräteinnere gelangen
kann. Das Eindringen von Wasser in ein Elektrogerät erhöht das Risiko eines elektrischen
Schlages.
7.2 Wartung
Im Geräteinneren befi nden sich keine weiteren zu
wartenden Teile.
7.3 Ersatzteil- und Zubehörbestellung:
Bei der Ersatzteilbestellung sollten folgende Angaben gemacht werden;
Typ des Gerätes
•
Artikelnummer des Gerätes
•
Ident-Nummer des Gerätes
•
Ersatzteilnummer des erforderlichen Ersatz-
•
teils
Aktuelle Preise und Infos fi nden Sie unter
www.isc-gmbh.info
8. Entsorgung und
Wiederverwertung
Das Gerät befi ndet sich in einer Verpackung um
Transportschäden zu verhindern. Diese Verpackung ist Rohstoff und ist somit wieder verwend-
bar oder kann dem Rohstoff kreislauf zurückge-
führt werden. Das Gerät und dessen Zubehör
bestehen aus verschiedenen Materialien, wie
z.B. Metall und Kunststoff e. Defekte Geräte ge-
hören nicht in den Hausmüll. Zur fachgerechten
Entsorgung sollte das Gerät an einer geeigneten
Sammelstellen abgegeben werden. Wenn Ihnen
keine Sammelstelle bekannt ist, sollten Sie bei
der Gemeindeverwaltung nachfragen.
9. Lagerung
Lagern Sie das Gerät und dessen Zubehör an
einem dunklen, trockenen und frostfreiem sowie
für Kinder unzugänglichem Ort. Die optimale
Lagertemperatur liegt zwischen 5 und 30 ˚C.
Bewahren Sie das Elektrowerkzeug in der Originalverpackung auf.
Tipp! Für ein gutes Arbeitsergebnis empfehlen wir
hochwertiges Zubehör von
! www.kwb.eu
welcome@kwb.eu
- 9 -
Anl_TC_CD_18_2_Li_SPK7.indb 9Anl_TC_CD_18_2_Li_SPK7.indb 9 07.06.16 08:5707.06.16 08:57
Page 10

D
Nur für EU-Länder
Werfen Sie Elektrowerkzeuge nicht in den Hausmüll!
Gemäß europäischer Richtlinie 2012/19/EU über Elektro- und Elektronik-Altgeräte und Umsetzung in
nationales Recht müssen verbrauchte Elektrowerkzeuge getrennt gesammelt werden und einer umweltgerechten Wiederverwertung zugeführt werden.
Recycling-Alternative zur Rücksendeauff orderung:
Der Eigentümer des Elektrogerätes ist alternativ anstelle Rücksendung zur Mitwirkung bei der sachgerechten Verwertung im Falle der Eigentumsaufgabe verpfl ichtet. Das Altgerät kann hierfür auch einer
Rücknahmestelle überlassen werden, die eine Beseitigung im Sinne der nationalen Kreislaufwirtschafts- und Abfallgesetze durchführt. Nicht betroff en sind den Altgeräten beigefügte Zubehörteile und
Hilfsmittel ohne Elektrobestandteile.
Der Nachdruck oder sonstige Vervielfältigung von Dokumentation und Begleitpapieren der Produkte,
auch auszugsweise, ist nur mit ausdrücklicher Zustimmung der iSC GmbH zulässig.
Technische Änderungen vorbehalten
Diese Sendung enthält Lithium-Ionen-Batterien.
Gemäß Sondervorschrift 188 unterliegt diese Sendung nicht den Vorschriften des ADR. Sorgsam
behandeln. Entzündungsgefahr bei Beschädigung des Versandstücks. Bei Beschädigung des Versandstücks: Kontrolle und erforderlichenfalls erneutes Verpacken.
Für zusätzliche Informationen rufen Sie bitte: 0049 1807 10 20 20 66 (Festnetzpreis: 14 ct/min, Mobilfunkpreise maximal: 42 ct/min) Außerhalb Deutschlands fallen stattdessen Gebühren für ein reguläres
Gespräch ins dt. Festnetz an.
- 10 -
Anl_TC_CD_18_2_Li_SPK7.indb 10Anl_TC_CD_18_2_Li_SPK7.indb 10 07.06.16 08:5707.06.16 08:57
Page 11

D
Ser vice-Informationen
Wir unterhalten in allen Ländern, welche in der Garantieurkunde benannt sind, kompetente ServicePartner, deren Kontakte Sie der Garantieurkunde entnehmen. Diese stehen Ihnen für alle ServiceBelange wie Reparatur, Ersatzteil- und Verschleißteil-Versorgung oder den Bezug von Verbrauchsmaterialien zur Verfügung.
Es ist zu beachten, dass bei diesem Produkt folgende Teile einem gebrauchsgemäßen oder natürlichen
Verschleiß unterliegen bzw. folgende Teile als Verbrauchsmaterialien benötigt werden.
Kategorie Beispiel
Verschleißteile* Bohrfutter, Akku
Verbrauchsmaterial/ Verbrauchsteile* Bit-Einsätze/Bohrer
Fehlteile
* nicht zwingend im Lieferumfang enthalten!
Bei Mängel oder Fehlern bitten wir Sie, den Fehlerfall im Internet unter www.isc-gmbh.info anzumelden.
Bitte achten Sie auf eine genaue Fehlerbeschreibung und beantworten Sie dazu in jedem Fall folgende
Fragen:
Hat das Gerät bereits einmal funktioniert oder war es von Anfang an defekt?
•
Ist Ihnen vor dem Auftreten des Defektes etwas aufgefallen (Symptom vor Defekt)?
•
Welche Fehlfunktion weist das Gerät Ihrer Meinung nach auf (Hauptsymptom)?
•
Beschreiben Sie diese Fehlfunktion.
- 11 -
Anl_TC_CD_18_2_Li_SPK7.indb 11Anl_TC_CD_18_2_Li_SPK7.indb 11 07.06.16 08:5707.06.16 08:57
Page 12

D
Garantieurkunde
Sehr geehrte Kundin, sehr geehrter Kunde,
unsere Produkte unterliegen einer strengen Qualitätskontrolle. Sollte dieses Gerät dennoch einmal nicht
einwandfrei funktionieren, bedauern wir dies sehr und bitten Sie, sich an unseren Servicedienst unter
der auf dieser Garantiekarte angegebenen Adresse zu wenden. Gerne stehen wir Ihnen auch telefonisch über die angegebene Servicerufnummer zur Verfügung. Für die Geltendmachung von Garantieansprüchen gilt folgendes:
1. Diese Garantiebedingungen richten sich ausschließlich an Verbraucher, d. h. natürliche Personen,
die dieses Produkt weder im Rahmen ihrer gewerblichen noch anderen selbständigen Tätigkeit
nutzen wollen. Diese Garantiebedingungen regeln zusätzliche Garantieleistungen, die der u. g.
Hersteller zusätzlich zur gesetzlichen Gewährleistung Käufern seiner Neugeräte verspricht. Ihre
gesetzlichen Gewährleistungsansprüche werden von dieser Garantie nicht berührt. Unsere Garantieleistung ist für Sie kostenlos.
2. Die Garantieleistung erstreckt sich ausschließlich auf Mängel an einem von Ihnen erworbenen neuen Gerät des u. g. Herstellers, die auf einem Material- oder Herstellungsfehler beruhen und ist nach
unserer Wahl auf die Behebung solcher Mängel am Gerät oder den Austausch des Gerätes beschränkt. Bitte beachten Sie, dass unsere Geräte bestimmungsgemäß nicht für den gewerblichen,
handwerklichen oder berufl ichen Einsatz konstruiert wurden. Ein Garantievertrag kommt daher nicht
zustande, wenn das Gerät innerhalb der Garantiezeit in Gewerbe-, Handwerks- oder Industriebetrieben verwendet wurde oder einer gleichzusetzenden Beanspruchung ausgesetzt war.
3. Von unserer Garantie ausgenommen sind:
- Schäden am Gerät, die durch Nichtbeachtung der Montageanleitung oder aufgrund nicht fachgerechter Installation, Nichtbeachtung der Gebrauchsanleitung (wie durch z.B. Anschluss an eine
falsche Netzspannung oder Stromart) oder Nichtbeachtung der Wartungs- und Sicherheitsbestimmungen oder durch Aussetzen des Geräts an anomale Umweltbedingungen oder durch mangelnde
Pfl ege und Wartung entstanden sind.
- Schäden am Gerät, die durch missbräuchliche oder unsachgemäße Anwendungen (wie z.B. Überlastung des Gerätes oder Verwendung von nicht zugelassenen Einsatzwerkzeugen oder Zubehör),
Eindringen von Fremdkörpern in das Gerät (wie z.B. Sand, Steine oder Staub, Transportschäden),
Gewaltanwendung oder Fremdeinwirkungen (wie z. B. Schäden durch Herunterfallen) entstanden
sind.
- Schäden am Gerät oder an Teilen des Geräts, die auf einen gebrauchsgemäßen, üblichen oder
sonstigen natürlichen Verschleiß zurückzuführen sind.
4. Die Garantiezeit beträgt 24 Monate und beginnt mit dem Kaufdatum des Gerätes. Garantieansprüche sind vor Ablauf der Garantiezeit innerhalb von zwei Wochen, nachdem Sie den Defekt erkannt
haben, geltend zu machen. Die Geltendmachung von Garantieansprüchen nach Ablauf der Garantiezeit ist ausgeschlossen. Die Reparatur oder der Austausch des Gerätes führt weder zu einer
Verlängerung der Garantiezeit noch wird eine neue Garantiezeit durch diese Leistung für das Gerät
oder für etwaige eingebaute Ersatzteile in Gang gesetzt. Dies gilt auch bei Einsatz eines Vor-OrtServices.
5. Für die Geltendmachung Ihres Garantieanspruches melden Sie bitte das defekte Gerät an unter:
www.isc-gmbh.info. Halten Sie bitte den Kaufbeleg oder andere Nachweise Ihres Kaufs des Neugeräts bereit. Geräte, die ohne entsprechende Nachweise oder ohne Typenschild eingesendet werden, sind von der Garantieleistung aufgrund mangelnder Zuordnungsmöglichkeit ausgeschlossen.
Ist der Defekt des Gerätes von unserer Garantieleistung erfasst, erhalten Sie umgehend ein repariertes oder neues Gerät zurück.
Selbstverständlich beheben wir gegen Erstattung der Kosten auch gerne Defekte am Gerät, die vom
Garantieumfang nicht oder nicht mehr erfasst sind. Dazu senden Sie das Gerät bitte an unsere Serviceadresse.
Für Verschleiß-, Verbrauchs- und Fehlteile verweisen wir auf die Einschränkungen dieser Garantie gemäß den Service-Informationen dieser Bedienungsanleitung.
iSC GmbH · Eschenstraße 6 · 94405 Landau/Isar (Deutschland)
- 12 -
Anl_TC_CD_18_2_Li_SPK7.indb 12Anl_TC_CD_18_2_Li_SPK7.indb 12 07.06.16 08:5707.06.16 08:57
Page 13

D
Sehr geehrte Kundin, sehr geehrter Kunde,
um Ihnen noch mehr Service zu bieten, haben Sie die Möglichkeit auf unserem Onlineportal weitere
Informationen abzurufen.
Sollten einmal Probleme oder Fragen zu Ihrem Produkt auftreten, können Sie schnell und einfach unter
www.isc-gmbh.info viele Aktionen durchführen. Hier einige Beispiele:
Ersatzteile bestellen
•
Aktuelle Preisauskünfte
•
Verfügbarkeiten der Ersatzteile
•
Servicestellen Vorort für Benzingeräte
•
Defekte Geräte anmelden
•
Garantieverlängerungen (nur bei bestimmten Geräten)
•
Bestellverfolgung
•
Wir freuen uns auf Ihren Besuch online unter www.isc-gmbh.info!
Telefon: 09951 / 95 920 00 ·Telefax: 09951/95 917 00
E-Mail: info@einhell.de · Internet: www.isc-gmbh.info
iSC GmbH · Eschenstraße 6 · 94405 Landau/Isar (Deutschland)
- 13 -
Anl_TC_CD_18_2_Li_SPK7.indb 13Anl_TC_CD_18_2_Li_SPK7.indb 13 07.06.16 08:5707.06.16 08:57
Page 14

GB
Danger! - Read the operating instructions to reduce the risk of inquiry
Caution! Wear ear-muff s. The impact of noise can cause damage to hearing.
Caution! Wear a breathing mask. Dust which is injurious to health can be generated when working on
wood and other materials. Never use the device to work on any materials containing asbestos!
Caution! Wear safety goggles. Sparks generated during working or splinters, chips and dust emitted
by the device can cause loss of sight.
Change the gear only when the drill is at a standstill. If you fail to observe this point, the gearing may be
damaged.
Store the battery only in dry rooms with an ambient temperature of +10°C to +40°C. Place only charged
batteries in storage (charged at least 40%).
Safety class II
For use in dry rooms only.
- 14 -
Anl_TC_CD_18_2_Li_SPK7.indb 14Anl_TC_CD_18_2_Li_SPK7.indb 14 07.06.16 08:5707.06.16 08:57
Page 15

GB
Danger!
When using the equipment, a few safety precautions must be observed to avoid injuries and
damage. Please read the complete operating
instructions and safety regulations with due care.
Keep this manual in a safe place, so that the information is available at all times. If you give the
equipment to any other person, hand over these
operating instructions and safety regulations as
well. We cannot accept any liability for damage
or accidents which arise due to a failure to follow
these instructions and the safety instructions.
1. Safety regulations
The corresponding safety information can be
found in the enclosed booklet.
Danger!
Read all safety regulations and instructions.
Any errors made in following the safety regulations and instructions may result in an electric
shock, fi re and/or serious injury.
Keep all safety regulations and instructions
in a safe place for future use.
2. Layout and items supplied
2.1 Layout (Fig. 1)
1. Torque selector
2. Battery capacity indicator
3. Changeover switch
4. ON/OFF switch
5. Battery pack
6. Battery charger
7. Selector switch for 1st/2nd gear
8. Pushlock button
9. Quick-change drill chuck
10. LED lamp
2.2 Items supplied
Please check that the article is complete as
specifi ed in the scope of delivery. If parts are
missing, please contact our service center or the
sales outlet where you made your purchase at
the latest within 5 working days after purchasing
the product and upon presentation of a valid bill
of purchase. Also, refer to the warranty table in
the service information at the end of the operating
instructions.
Open the packaging and take out the equip-
•
ment with care.
Remove the packaging material and any
•
packaging and/or transportation braces (if
available).
Check to see if all items are supplied.
•
Inspect the equipment and accessories for
•
transport damage.
If possible, please keep the packaging until
•
the end of the guarantee period.
Important!
The equipment and packaging material are
not toys. Do not let children play with plastic
bags, foils or small parts. There is a danger of
swallowing or suff ocating!
Cordless drill/screwdriver
•
Battery charger
•
Battery
•
Original operating instructions
•
Safety instructions
•
3. Proper use
The cordless drill/screwdriver is designed for tightening and undoing screws, as well as for drilling
in wood, metal and plastic.
The equipment is to be used only for its prescribed purpose. Any other use is deemed to be a
case of misuse. The user / operator and not the
manufacturer will be liable for any damage or injuries of any kind caused as a result of this.
Please note that our equipment has not been designed for use in commercial, trade or industrial
applications. Our warranty will be voided if the
machine is used in commercial, trade or industrial
businesses or for equivalent purposes.
- 15 -
Anl_TC_CD_18_2_Li_SPK7.indb 15Anl_TC_CD_18_2_Li_SPK7.indb 15 07.06.16 08:5707.06.16 08:57
Page 16

GB
4. Technical data
Voltage supply ........................................18 V d.c.
Idling speed: ............................0-350/0-1250 rpm
Torque settings: ........................................... 18+1
Forward and reverse rotation ..........................yes
Chuck clamping width ....................... max. 10 mm
Battery charger output voltage: ............. 23 V d. c.
Battery charger output current: .................... 0,5 A
Mains voltage for charger ...100-240 V ~ 50/60 Hz
Battery type: .......................................Lithium-ion
Number of battery cells: .................................... 5
Battery capacitance: .................................1.3 Ah
Weight.........................................................1.6 kg
Max. screw diameter: .................................. 6 mm
The maximum screw diameter indicates the maximum diameter of the screw that can be screwed
into wood. The screw diameter can vary depending on the type of wood.
Sound and vibration
Sound and vibration values were measured in
accordance with EN 60745.
L
sound pressure level ................... 70,88 dB(A)
pA
K
uncertainty .............................................3 dB
pA
L
sound power level ..................... 81,88 dB(A)
WA
K
uncertainty .............................................3 dB
WA
Wear ear-muff s.
The impact of noise can cause damage to hearing.
Total vibration values (vector sum of three directions) determined in accordance with EN 60745.
Drilling in metal
Vibration emission value a
K uncertainty = 1.5 m/s
2
≤ 2.5 m/s
h
2
The specifi ed vibration value can be used to
compare the equipment with other electric power
tools.
The specifi ed vibration value can be used for initi-
al assessment of a harmful eff ect.
Keep the noise emissions and vibrations to a
minimum.
Only use appliances which are in perfect wor-
•
king order.
Service and clean the appliance regularly.
•
Adapt your working style to suit the appliance.
•
Do not overload the appliance.
•
Have the appliance serviced whenever ne-
•
cessary.
Switch the appliance off when it is not in use.
•
Wear protective gloves.
•
Caution!
Residual risks
Even if you use this electric power tool in
accordance with instructions, certain residual risks cannot be rules out. The following
hazards may arise in connection with the
equipment’s construction and layout:
1. Lung damage if no suitable protective dust
mask is used.
2. Damage to hearing if no suitable ear protection is used.
3. Health damage caused by hand-arm vibrations if the equipment is used over a prolonged period or is not properly guided and
maintained.
Limit the operating time.
All stages of the operating cycle must be considered (for example, times in which the electric tools
are switched off and times in which the tool is
switched on but operates without load).
Screwing without hammer action
Vibration emission value ah ≤ 2.5 m/s
K uncertainty = 1.5 m/s
2
2
The specifi ed vibration value was established in
accordance with a standardized testing method. It
may change according to how the electric equipment is used and may exceed the specifi ed value
in exceptional circumstances.
- 16 -
Anl_TC_CD_18_2_Li_SPK7.indb 16Anl_TC_CD_18_2_Li_SPK7.indb 16 07.06.16 08:5707.06.16 08:57
Page 17

GB
5. Before starting the equipment
Be sure to read the following information before
you use your cordless screwdriver for the fi rst
time:
1. Charge the battery pack with the charger
supplied. An empty battery pack requires a
charging period of approximately 3 to 5 hours.
2. Only ever use sharp drill bits and screwdriver
bits which are suitable for the purpose and in
faultless condition.
3. Always check for concealed electric cables
and gas and water pipes when drilling and
screwing in walls.
6. Operation
6.1 Charging the Li battery pack (Fig. 2-3)
1. Remove the battery pack (5) from the handle,
pressing the pushlock button (8) downwards
to do so.
2. Check that your mains voltage is the same as
that marked on the rating plate.
3. Plug the battery charger (6) into the power
socket and connect the charging cable (a) to
the battery (5). The three LEDs on the battery
capacity indicator (10) indicate that the battery is being charged.
- Battery empty: All three LEDs fl ash alterna-
tely
- 1/3 charged: The LED on the left lights up
and the LEDs in the middle and on the right
fl ash alternately
- 2/3 charged: The LEDs on the left and in
the middle light up and the LED on the right
fl ashes
4. When charging is fi nished after approx. 3-5
hours, all three LEDs light up for approx. 10
minutes. Remove the charger from the battery.
5. If all three LEDs fl ash at the same time, the
battery temperature is either too low or too
high. Remove the charger from the battery,
keep the battery at room temperature for a
day and try again.
6. If the fault is still indicated, the battery is
defective. Do not use or charge a defective
battery. Remove the charger from the battery.
If the battery pack fails to become charged, please check
whether there is voltage at the socket-outlet
•
whether there is proper contact at the char-
•
ging contacts on the charger.
If the battery still fails to become charged, please
return
the charger
•
the battery pack
•
to our Customer Service Department.
To ensure that the LI battery pack provides
long service you should take care to recharge
it promptly. You must recharge the battery pack
when you notice that the power of the cordless
screwdriver drops.
6.2 Torque setting (Fig. 4 / Item 1)
Important! The tool must be at a standstill
when you set the torque with the setting ring.
The cordless screwdriver is fi tted with a mechani-
cal torque selector.
The torque for a specifi c size of screw is selected
with the set-collar (1). The correct torque depends
on several factors:
on the type and hardness of material in ques-
•
tion
on the type and length screws used
•
on the requirements needing to be met by the
•
screwed joint.
The clutch disengages with a grating sound to
indicate when the set torque is reached.
6.3 Drilling (Fig. 4 / Item 1)
For drilling purposes, move the set-collar to the
last step „Drill“. In this setting the slip clutch is inactive. The maximum torque is available in drilling
mode.
6.4 Forward/Reverse switch (Fig. 5 / Item 3)
With the slide switch above the On/Off switch you
can select the direction of rotation of the batterypowered drill/screwdriver and secure it against
being switched on accidentally. You can choose
between clockwise and anticlockwise rotation. To
avoid causing damage to the gearing it is advisable to change the direction of rotation only when
the tool is at a standstill. The On/Off switch is blo-
cked when the slide switch is in centre position.
6.5 On/Off switch (Fig. 5 / Item 4)
Infi nitely variable speed control is possible with
the On/Off switch. The further you press the
switch, the higher the speed of the battery-powered drill/screwdriver.
- 17 -
Anl_TC_CD_18_2_Li_SPK7.indb 17Anl_TC_CD_18_2_Li_SPK7.indb 17 07.06.16 08:5707.06.16 08:57
Page 18

GB
6.6 Changing over from 1st gear to 2nd gear
(Fig. 4 / Item 7)
You can work at a higher or lower speed depending on the position of the selector switch. To avoid damaging the gear unit you should only change
over gears when the tool has stopped.
6.7 Battery capacity indicator (Fig. 1 – Item 2)
Press the battery capacity indicator switch (a).
The battery capacity indicator (2) shows the charge status of the battery using 3 LEDs.
All 3 LEDs are lit:
The battery is fully charged.
2 or 1 LED(s) are lit:
The battery has an adequate remaining charge.
1 LED blinks:
The battery is empty, recharge the battery.
All LEDs blink:
The battery temperature is too high. Remove the
battery from the device and keep the battery at
room temperature for a day. If the fault occurs
again, the battery has undergone exhaustive
discharge and is defective. Remove the battery
from the device. Do not use or charge a defective
battery.
6.8 LED lamp (Fig. 1 / Item 10)
The LED lamp (10) can be used in poor lighting
conditions to illuminate the area where you want
to drill or screw. The LED lamp (10) will be lit
automatically as soon as you press the ON/OFF
switch (4).
6.9 Changing the tool (Fig. 6)
Important. Set the changeover switch (3) to its
centre position whenever you carry out any work
(for example changing the tool, maintenance
work, etc.) on the cordless screwdriver.
The cordless screwdriver is fitted with a
•
quick-action chuck (9) with an automatic
spindle stop.
Open the chuck (9). The chuck opening (a)
•
must be large enough to hold the tool (drill bit
or screwdriver bit).
Select the suitable tool. Push the tool as far
•
as possible into the chuck opening (a).
Tighten the chuck (9) and then check that the
•
tool is secure.
6.10 Screwdriving
We recommend using self-centering screws (e.g.
Torx screws, recessed head screws) designed for
reliable working. Be sure to use a bit that matches
the screw in shape and size. Set the torque, as
described elsewhere in these operating instructions, to suit the size of screw.
7. Cleaning, maintenance and
ordering of spare parts
Danger!
Always pull out the mains power plug before starting any cleaning work.
7.1 Cleaning
Keep all safety devices, air vents and the
•
motor housing free of dirt and dust as far as
possible. Wipe the equipment with a clean
cloth or blow it with compressed air at low
pressure.
We recommend that you clean the device
•
immediately each time you have finished
using it.
Clean the equipment regularly with a moist
•
cloth and some soft soap. Do not use
cleaning agents or solvents; these could attack the plastic parts of the equipment. Ensure that no water can seep into the device. The
ingress of water into an electric tool increases
the risk of an electric shock.
7.2 Maintenance
There are no parts inside the equipment which
require additional maintenance.
7.3 Ordering spare parts and accessories
Please provide the following information when
ordering spare parts:
Type of unit
•
Article number of the unit
•
ID number of the unit
•
Spare part number of the required spare part
•
For our latest prices and information please go to
www.isc-gmbh.info
Tip! For good results we
recommend high-quality accessories from !
www.kwb.eu
welcome@kwb.eu
- 18 -
Anl_TC_CD_18_2_Li_SPK7.indb 18Anl_TC_CD_18_2_Li_SPK7.indb 18 07.06.16 08:5707.06.16 08:57
Page 19

8. Disposal and recycling
The equipment is supplied in packaging to prevent it from being damaged in transit. The raw
materials in this packaging can be reused or
recycled. The equipment and its accessories are
made of various types of material, such as metal
and plastic. Never place defective equipment in
your household refuse. The equipment should
be taken to a suitable collection center for proper
disposal. If you do not know the whereabouts of
such a collection point, you should ask in your
local council offi ces.
9. Storage
Store the equipment and accessories out of
children’s reach in a dark and dry place at above
freezing temperature. The ideal storage temperature is between 5 and 30 °C. Store the electric
tool in its original packaging.
GB
- 19 -
Anl_TC_CD_18_2_Li_SPK7.indb 19Anl_TC_CD_18_2_Li_SPK7.indb 19 07.06.16 08:5707.06.16 08:57
Page 20

GB
For EU countries only
Never place any electric power tools in your household refuse.
To comply with European Directive 2012/19/EU concerning old electric and electronic equipment and
its implementation in national laws, old electric power tools have to be separated from other waste and
disposed of in an environment-friendly fashion, e.g. by taking to a recycling depot.
Recycling alternative to the return request:
As an alternative to returning the equipment to the manufacturer, the owner of the electrical equipment
must make sure that the equipment is properly disposed of if he no longer wants to keep the equipment.
The old equipment can be returned to a suitable collection point that will dispose of the equipment in
accordance with the national recycling and waste disposal regulations. This does not apply to any accessories or aids without electrical components supplied with the old equipment.
The reprinting or reproduction by any other means, in whole or in part, of documentation and papers
accompanying products is permitted only with the express consent of the iSC GmbH.
Subject to technical changes.
This consignment contains lithium-ion batteries.
In accordance with special provision 188 this consignment is not subject to the ADR regulations. Handle
with care. Danger of ignition in case of damage to the consignment package. If the consignment package is damaged: Check and if necessary repackage. For further information contact: 0049 1807 10 20 20
66 (fi xed network 14 ct/min, mobile phone max. 42 ct/min) Outside Germany charges will apply instead
for a regular call to a landline number in Germany.
- 20 -
Anl_TC_CD_18_2_Li_SPK7.indb 20Anl_TC_CD_18_2_Li_SPK7.indb 20 07.06.16 08:5707.06.16 08:57
Page 21

GB
Ser vice information
We have competent service partners in all countries named on the guarantee certifi cate whose contact
details can also be found on the guarantee certifi cate. These partners will help you with all service re-
quests such as repairs, spare and wearing part orders or the purchase of consumables.
Please note that the following parts of this product are subject to normal or natural wear and that the
following parts are therefore also required for use as consumables.
Category Example
Wear parts* Drill chuck, Battery
Consumables* Bit inserts/drill bits
Missing parts
* Not necessarily included in the scope of delivery!
In the eff ect of defects or faults, please register the problem on the internet at www.isc-gmbh.info. Ple-
ase ensure that you provide a precise description of the problem and answer the following questions in
all cases:
Did the equipment work at all or was it defective from the beginning?
•
Did you notice anything (symptom or defect) prior to the failure?
•
What malfunction does the equipment have in your opinion (main symptom)?
•
Describe this malfunction.
- 21 -
Anl_TC_CD_18_2_Li_SPK7.indb 21Anl_TC_CD_18_2_Li_SPK7.indb 21 07.06.16 08:5707.06.16 08:57
Page 22

GB
Warranty certifi cate
Dear Customer,
All of our products undergo strict quality checks to ensure that they reach you in perfect condition. In the
unlikely event that your device develops a fault, please contact our service department at the address
shown on this guarantee card. You can also contact us by telephone using the service number shown.
Please note the following terms under which guarantee claims can be made:
1. These guarantee terms apply to consumers only, i.e. natural persons intending to use this product
neither for their commercial activities nor for any other self-employed activities. These warranty
terms regulate additional warranty services, which the manufacturer mentioned below promises to
buyers of its new products in addition to their statutory rights of guarantee. Your statutory guarantee
claims are not aff ected by this guarantee. Our guarantee is free of charge to you.
2. The warranty services cover only defects due to material or manufacturing faults on a product which
you have bought from the manufacturer mentioned below and are limited to either the rectifi cation of
said defects on the product or the replacement of the product, whichever we prefer.
Please note that our devices are not designed for use in commercial, trade or professional applications. A guarantee contract will not be created if the device has been used by commercial, trade or
industrial business or has been exposed to similar stresses during the guarantee period.
3. The following are not covered by our guarantee:
- Damage to the device caused by a failure to follow the assembly instructions or due to incorrect
installation, a failure to follow the operating instructions (for example connecting it to an incorrect
mains voltage or current type) or a failure to follow the maintenance and safety instructions or by exposing the device to abnormal environmental conditions or by lack of care and maintenance.
- Damage to the device caused by abuse or incorrect use (for example overloading the device or the
use or unapproved tools or accessories), ingress of foreign bodies into the device (such as sand,
stones or dust, transport damage), the use of force or damage caused by external forces (for example by dropping it).
- Damage to the device or parts of the device caused by normal or natural wear or tear or by normal
use of the device.
4. The guarantee is valid for a period of 24 months starting from the purchase date of the device. Guarantee claims should be submitted before the end of the guarantee period within two weeks of the
defect being noticed. No guarantee claims will be accepted after the end of the guarantee period.
The original guarantee period remains applicable to the device even if repairs are carried out or
parts are replaced. In such cases, the work performed or parts fi tted will not result in an extension
of the guarantee period, and no new guarantee will become active for the work performed or parts
fi tted. This also applies if an on-site service is used.
5. To make a claim under the guarantee, please register the defective device at: www.isc-gmbh.info.
Please keep your bill of purchase or other proof of purchase for the new device. Devices that are
returned without proof of purchase or without a rating plate shall not be covered by the guarantee,
because appropriate identifi cation will not be possible. If the defect is covered by our guarantee,
then the item in question will either be repaired immediately and returned to you or we will send you
a new replacement.
Of course, we are also happy off er a chargeable repair service for any defects which are not covered by
the scope of this guarantee or for units which are no longer covered. To take advantage of this service,
please send the device to our service address.
Also refer to the restrictions of this warranty concerning wear parts, consumables and missing parts as
set out in the service information in these operating instructions.
- 22 -
Anl_TC_CD_18_2_Li_SPK7.indb 22Anl_TC_CD_18_2_Li_SPK7.indb 22 07.06.16 08:5707.06.16 08:57
Page 23

F
Danger ! - Lisez ce mode d’emploi pour diminuer le risque de blessures
Prudence ! Portez une protection de l’ouïe. L’exposition au bruit peut entraîner une perte de l’ouïe.
Prudence ! Portez un masque anti-poussière. Lors de travaux sur su bois et autres matériaux, de
la poussière nuisible à la santé peut être dégagée. Ne travaillez pas sur du matériau contenant de
l’amiante !
Prudence ! Portez des lunettes de protection. Les étincelles générées pendant travail ou les éclats,
copeaux et la poussière sortant de l’appareil peuvent entraîner une perte de la vue.
Afi n d‘éviter d‘endommager l‘engrenage, le changement de vitesse doit se faire uniquement à l‘arrêt
Charger l’accumulateur uniquement dans des salles sèches avec une température environnante de
+10°C à - +40°C. Stockez uniquement les accumulateurs chargés (charge mini. 40%).
Catégorie de protection II
A employer uniquement dans des endroits secs.
- 23 -
Anl_TC_CD_18_2_Li_SPK7.indb 23Anl_TC_CD_18_2_Li_SPK7.indb 23 07.06.16 08:5707.06.16 08:57
Page 24

F
Danger !
Lors de l’utilisation d’appareils, il faut respecter
certaines mesures de sécurité afi n d’éviter des
blessures et dommages. Veuillez donc lire attentivement ce mode d’emploi/ces consignes de
sécurité. Veillez à le conserver en bon état pour
pouvoir accéder aux informations à tout moment.
Si l’appareil doit être remis à d’autres personnes,
veillez à leur remettre aussi ce mode d’emploi/
ces consignes de sécurité. Nous déclinons toute
responsabilité pour les accidents et dommages
dus au non-respect de ce mode d’emploi et des
consignes de sécurité.
1. Consignes de sécurité
Vous trouverez les consignes de sécurité correspondantes dans le cahier en annexe.
Danger !
Veuillez lire toutes les consignes de sécurité
et instructions. Tout non-respect des consignes
de sécurité et instructions peut provoquer une
décharge électrique, un incendie et/ou des blessures graves.
Conservez toutes les consignes de sécurité
et instructions pour une consultation ultérieure.
2. Description de l’appareil et
volume de livraison
2.1 Description de l’appareil (fi gure 1)
1. Réglage du couple de serrage
2. Affi chage de la capacité de l’accumulateur
3. Interrupteur de sens de rotation
4. Interrupteurs marche/arrêt
5. Accumulateur
6. Chargeur
7. Commutateur 1e vitesse – 2e vitesse
8. Touche à cran
9. Mandrin à serrage rapide
10. Lampe DEL
2.2 Volume de livraison
Veuillez contrôler si l‘article est complet à l‘aide
de la description du volume de livraison. S‘il
manque des pièces, adressez-vous dans un délai
de 5 jours maximum après votre achat à notre
service après-vente ou au magasin où vous avez
acheté l‘appareil muni d‘une preuve d‘achat valable. Veuillez consulter pour cela le tableau des
garanties dans les informations service aprèsvente à la fi n du mode d‘emploi.
Ouvrez l’emballage et prenez l’appareil en le
•
sortant avec précaution de l’emballage.
Retirez le matériel d’emballage tout comme
•
les sécurités d’emballage et de transport (s’il
y en a).
Vérifiez si la livraison est bien complète.
•
Contrôlez si l’appareil et ses accessoires ne
•
sont pas endommagés par le transport.
Conservez l’emballage autant que possible
•
jusqu’à la fin de la période de garantie.
Danger !
L’appareil et le matériel d’emballage ne sont
pas des jouets ! Il est interdit de laisser des
enfants jouer avec des sacs et des fi lms en
plastique et avec des pièces de petite taille.
Ils risquent de les avaler et de s’étouff er !
Perceuse-visseuse sans fil
•
Chargeur
•
Piles
•
Mode d’emploi d’origine
•
Consignes de sécurité
•
3. Utilisation conforme à
l’aff ectation
La vis-perceuse à accumulateur convient à visser
et à dévisser des vis tout comme au perçage
dans le bois, le métal et les matières plastiques.
La machine doit exclusivement être employée
conformément à son aff ectation. Chaque uti-
lisation allant au-delà de cette aff ectation est
considérée comme non conforme. Pour les
dommages en résultant ou les blessures de tout
genre, le producteur décline toute responsabilité
et l’opérateur/l’exploitant est responsable.
- 24 -
Anl_TC_CD_18_2_Li_SPK7.indb 24Anl_TC_CD_18_2_Li_SPK7.indb 24 07.06.16 08:5707.06.16 08:57
Page 25

F
Veillez au fait que nos appareils, conformément
à leur aff ectation, n’ont pas été construits, pour
être utilisés dans un environnement professionnel, industriel ou artisanal. Nous déclinons toute
responsabilité si l’appareil est utilisé professionnellement, artisanalement ou dans des sociétés
industrielles, tout comme pour toute activité
équivalente.
4. Données techniques
Alimentation en courant, moteur .............18 V d.c.
Vitesse de rotation
de marche à vide : .............. 0-350 / 0-1250 tr/min
Niveau de couple de rotation : ..................... 18+1
Rotation vers la droite et vers la gauche ......... oui
Capacité du serrage du mandrin ........max 10 mm
Tension de sortie du chargeur : ............. 23 V d. c.
Courant de sortie du chargeur : ................... 0,5 A
Tension secteur,chargeur ...100-240 V ~ 50/60 Hz
Type d’accumulateur : .................................Li-ion
Nombre de piles de l’accumulateur : ................. 5
Capacité de l’accumulateur : .....................1,3 Ah
Poids ...........................................................1,6 kg
Diamètre max. de vis : ................................. 6 mm
Le diamètre max. de vis décrit le diamètre maximum de la vis pouvant être vissée dans le bois.
En fonction du type de bois, le diamètre de la vis
peut varier.
Bruit et vibration
Les valeurs de bruit et de vibration ont été déterminées conformément à la norme EN 60745.
Niveau de pression acoustique L
Imprécision K
............................................3 dB
pA
Niveau de puissance acoustique L
Imprécision K
............................................3 dB
WA
Portez une protection acoustique.
L’exposition au bruit peut entraîner la perte de
l’ouïe.
Les valeurs totales des vibrations (somme des
vecteurs de trois directions) ont été déterminées
conformément à EN 60745.
Percer le métal
Valeur d’émission de vibration a
Insécurité K = 1,5 m/s
2
.. 70,88 dB(A)
pA
81,88 dB(A)
WA
≤ 2,5 m/s
h
2
Visser sans percussion
Valeur d’émission de vibration ah ≤ 2,5 m/s
Insécurité K = 1,5 m/s
2
2
La valeur d’émission de vibration a été mesurée
selon une méthode d’essai normée et peut être
modifi ée, en fonction du type d’emploi de l’outil
électrique ; elle peut dans certains cas exceptionnels être supérieure à la valeur indiquée.
La valeur d’émission de vibration indiquée peut
être utilisée pour comparer un outil électrique à
un autre.
La valeur d’émission de vibration indiquée peut
également être utilisée pour estimer l’altération
au début.
Limitez le niveau sonore et les vibrations à
un minimum !
Utilisez exclusivement des appareils en ex-
•
cellent état.
Entretenez et nettoyez l’appareil régulière-
•
ment.
Adaptez votre façon de travailler à l’appareil.
•
Ne surchargez pas l’appareil.
•
Faites contrôler l’appareil le cas échéant.
•
Mettez l’appareil hors circuit lorsque vous ne
•
l’utilisez pas.
Portez des gants.
•
Risques résiduels
Même en utilisant cet outil électrique conformément aux prescriptions, il reste toujours
des risques résiduels. Les dangers suivants
peuvent apparaître en rapport avec la construction et le modèle de cet outil électrique :
1. Lésions des poumons si aucun masque anti-
poussière adéquat n’est porté.
2. Défi cience auditive si aucun casque anti-bruit
approprié n’est porté.
3. Atteintes à la santé issues des vibrations
main-bras, si l’appareil est utilisé pendant une
longue période ou s’il n’a pas été employé ou
entretenu dans les règles de l’art.
Limitez votre temps de travail.
Toutes les parts du cycle de fonctionnement doivent être alors prises en considération (par exemple les temps pendant lesquels l’outil électrique
est hors circuit et ceux pendant lesquels il est en
circuit, mais sans charge en cours).
- 25 -
Anl_TC_CD_18_2_Li_SPK7.indb 25Anl_TC_CD_18_2_Li_SPK7.indb 25 07.06.16 08:5707.06.16 08:57
Page 26

F
5. Avant la mise en service
Avant la mise en service de votre tournevis électrique sans fi l, lisez ces remarques :
1. Chargez l‘accumulateur avec le chargeur cijoint. Un accumulateur vide se charge en à
peu près 3 à 5 heures.
2. Utilisez uniquement des forets pointus tout
comme des embouts de tournevis irréprochables et adéquats.
3. Lors du perçage et du vissage dans des parois et murs, controlez s’il y a des conduites
de courant, de gaz ou d’eau cachées.
6. Commande
6.1 Chargement du bloc accumulateur lithium
(fi g. 2-3)
1. Tirez le bloc accumulateur (5) hors de sa
poignée, en appuyant sur les touches à cran
(8) vers le bas.
2. Comparez si la tension du secteur indiquée
sur la plaque signalétique correspond à la
tension réseau disponible.
3. Branchez le chargeur (6) sur la prise électrique et raccordez le câble de chargement
(a) à l‘accumulateur (5). Les 3 voyants LED
de l‘indicateur de charge de l‘accumulateur
(10) signalent que l‘accumulateur est en charge.
- accumulateur déchargé : tous les voyants
LEDs clignotent par intermittence
- chargé au 1/3 : le voyant LED jaune est
allumé, les voyants LEDs du milieu et droit
clignotent par intermittence
- chargé au 2/3 : les voyants LEDs gauche et
du milieu sont allumés, le voyant LED droit
clignote
4. Lorsque le processus de charge est terminé au bout de 3 à 5 h, les 3 voyants LEDs
s‘allument pendant environ 10 min. Retirez le
chargeur de l‘accumulateur.
5. Si tous les voyants LEDs clignotent en même
temps, cela signifi e que la température est
trop faible ou trop élevée. Retirez le chargeur
de l‘accumulateur, laissez l‘accumulateur
reposer pendant un jour à température ambiante et essayez à nouveau.
6. Si l‘erreur continue à s‘affi cher, cela signi-
fi e que l‘accumulateur est défectueux. Un
accumulateur défectueux ne doit plus être
utilisé ou chargé. Retirez le chargeur de
l‘accumulateur.
Si la charge du paquet accumulateur n’est pas
possible, vérifi ez
que la prise de courant est sous tension
•
que les contacts du chargeur sont fiables.
•
S’il n’est toujours pas possible de charger le paquet accumulateur, nous vous prions d’envoyer
le chargeur
•
et le paquet accumulateur
•
à notre station de service après-vente.
Il faut recharger à temps le bloc accumulateur
LI afi n de lui assurer une longue durabilité. Ceci
est de toute manière nécessaire, lorsque vous
constatez que la puissance du tournevis sans fi l
diminue.
6.2 Réglage du couple de rotation
(fi g. 4/pos. 1)
Attention ! Ne réglez la bague de réglage
pour le couple de serrage qu’à l’arrêt de la
machine.
Le tournevis sans fi l est doté d’un réglage méca-
nique du couple de rotation.
Le couple de rotation pour une taille défi nie de
vis est réglable par la molette de réglage (1). Le
couple de rotation dépend de plusieurs facteurs:
de la sorte et dureté du matériau à traiter
•
de la sorte et longueur des vis utilisées
•
des exigences auxquelles doivent répondre
•
les unions vissées
Si le couple de rotation est atteint, un grincement
indique que le désaccouplement est eff ectué.
6.3 Perçage (fi g. 4/pos. 1)
Pour pouvoir percer, mettez la molette de réglage
pour le couple de rotation sur le dernier gradin
“perceuse“, sur le gradin “percer“ l’accouplement
patinant est hors service. Lors du perçage le
couple de rotation maximal est disponible.
6.4 Commutateur de sens de rotation
(fi g. 5/pos. 3)
L’interrupteur à coulisse au-dessus de
l’interrupteur Marche/Arrêt vous permet de choisir
le sens de rotation de la perceuse-visseuse à accumulateur et d’éviter un démarrage intempestif.
Vous pouvez sélectionner la rotation vers la gauche ou vers la droite. Pour prévenir un endommagement de l’engrenage, ne commutez le sens de
rotation qu’à l’arrêt. Dans le cas où l’interrupteur
à coulisse se trouve dans la position centrale,
l’interrupteur Marche/Arrêt est bloqué.
- 26 -
Anl_TC_CD_18_2_Li_SPK7.indb 26Anl_TC_CD_18_2_Li_SPK7.indb 26 07.06.16 08:5707.06.16 08:57
Page 27

F
6.5 Interrupteur Marche/Arrêt (fi g. 5/pos. 4)
L’interrupteur Marche/Arrêt permet le réglage en
continu de la vitesse. Le plus fort vous appuyez
sur l’interrupteur.
6.6 Commutation de vitesse 1 à vitesse 2
(fi g. 4/pos. 7)
Selon la position du commutateur, vous pouvez
travailler à une vitesse élevée ou réduite. Pour
éviter une détérioration de l’engrenage, il est
conseillé de commuter la vitesse uniquement
pendant l’arrêt de l’appareil.
6.7 Affi chage de la capacité de la batterie
(fi g. 1/pos. 2)
Appuyez sur l’interrupteur pour affi cher la capa-
cité de l’accumulateur (a). L’affi chage de la capa-
cité de l’accumulateur (2) vous indique l’état de
charge de l’accumulateur au moyen de 3 DEL.
Toutes les 3 DEL sont allumées :
L’accumulateur est entièrement chargé.
2 ou 1 voyant LED est (sont) allumé(s)
L‘accumulateur dispose encore d‘un résidu de
charge suffi sant.
1 voyant LED clignote :
L‘accumulateur est vide, il faut le recharger.
Tous les voyants LED clignotent :
La température de l‘accumulateur est trop élevée.
Retirez l‘accumulateur de l‘appareil et laissez-le
reposer pendant un jour à température ambiante.
Si l‘erreur survient à nouveau, cela signifi e que
l‘accumulateur est en décharge profonde et défectueux. Retirez l‘accumulateur de l‘appareil. Un
accumulateur défectueux ne doit plus être utilisé
ou chargé.
6.8 Voyant DEL (fi gure 1/pos. 10)
La lampe DEL (10) permet d’éclairer la zone
de vissage et de perçage en cas de conditions
de luminosité défavorables. La lampe DEL (10)
s’allume automatiquement, dès que vous appuyez sur l’interrupteur marche/arrêt (4).
6.9 Changement d’outils (fi gure 6)
Attention ! Pour tous travaux (p. ex. changement
d’outils ; maintenance ; etc.) sur le tournevis sans
fi l, placez l’interrupteur de sens de rotation (3) en
position médiane.
Le tournevis sans fil est équipé d’un mandrin
•
à serrage rapide (9) avec blocage de broche
automatique.
Dévissez le mandrin (9). L’ouverture du man-
•
drin (a) doit être suffisamment grande pour
pouvoir loger l’embout (foret ou encore bit de
vissage).
Sélectionnez l’outil adéquat. Poussez
•
l’embout le plus loin possible dans l’ouverture
du mandrin (a). Refermez à fond le mandrin
(9) et vérifiez ensuite si l’embout tient bien.
6.10 Vissage:
Utilisez de préférence des vis à centrage
automatique (p.ex. Torx, à tête cruciforme) ce qui
assure le travail en toute sécurité. Veillez à ce
que la forme et la taille du bit et de la vis utilisés
soient conformes. Eff ectuez le réglage du couple
de rotation comme décrit dans l’instruction - en
fonction de la taille des vis.
7. Nettoyage, maintenance et
commande de pièces de
rechange
Danger !
Retirez la fi che de contact avant tous travaux de
nettoyage.
7.1 Nettoyage
Maintenez les dispositifs de protection, les
•
fentes à air et le carter de moteur aussi propres (sans poussière) que possible. Frottez
l’appareil avec un chiffon propre ou soufflez
dessus avec de l’air comprimé à basse pression.
Nous recommandons de nettoyer l’appareil
•
directement après chaque utilisation.
Nettoyez l’appareil régulièrement à l’aide d’un
•
chiffon humide et un peu de savon. N’utilisez
aucun produit de nettoyage ni détergeant;
ils pourraient endommager les pièces en
matières plastiques de l’appareil. Veillez à
ce qu’aucune eau n’entre à l’intérieur de
l’appareil. La pénétration de l’eau dans un
appareil électrique augmente le risque de
décharge électrique.
7.2 Maintenance
Aucune pièce à l’intérieur de l’appareil n’a besoin
de maintenance.
- 27 -
Anl_TC_CD_18_2_Li_SPK7.indb 27Anl_TC_CD_18_2_Li_SPK7.indb 27 07.06.16 08:5707.06.16 08:57
Page 28
7.3 Commande de pièces de rechange et
d‘accessoires :
Veuillez indiquer ce qui suit pour toute commande
de pièces de rechange ;
Type de l‘appareil
•
Référence de l‘appareil
•
Numéro d‘identification de l‘appareil
•
Numéro de la pièce de rechange requise
•
Vous trouverez les prix et informations actuelles à
l‘adresse www.isc-gmbh.info
Astuce ! Pour un bon résultat, nous recommandons les
accessoires haut de gamme
de ! www.kwb.eu
welcome@kwb.eu
8. Mise au rebut et recyclage
L‘appareil se trouve dans un emballage permettant d‘éviter les dommages dus au transport.
Cet emballage est une matière première et peut
donc être réutilisé ultérieurement ou être réintroduit dans le circuit des matières premières.
L‘appareil et ses accessoires sont en matériaux
divers, comme par ex. des métaux et matières
plastiques. Les appareils défectueux ne doivent
pas être jetés dans les poubelles domestiques.
Pour une mise au rebut conforme à la réglementation, l‘appareil doit être déposé dans un centre
de collecte approprié. Si vous ne connaissez pas
de centre de collecte, veuillez vous renseigner
auprès de l‘administration de votre commune.
F
9. Stockage
Entreposez l’appareil et ses accessoires dans
un endroit sombre, sec et à l’abri du gel tout
comme inaccessible aux enfants. La température
de stockage optimale est comprise entre 5 et 30
°C. Conservez l’outil électrique dans l’emballage
d’origine.
- 28 -
Anl_TC_CD_18_2_Li_SPK7.indb 28Anl_TC_CD_18_2_Li_SPK7.indb 28 07.06.16 08:5707.06.16 08:57
Page 29

F
Uniquement pour les pays de l’Union Européenne
Ne jetez pas les outils électriques dans les ordures ménagères!
Selon la norme européenne 2012/19/EU relative aux appareils électriques et systèmes électroniques
usés et selon son application dans le droit national, les outils électriques usés doivent être récoltés à
part et apportés à un recyclage respectueux de l’environnement.
Possibilité de recyclage en alternative à la demande de renvoi :
Le propriétaire de l’appareil électrique est obligé, en guise d’alternative à un envoi en retour, à contribuer à un recyclage eff ectué dans les règles de l’art en cas de cessation de la propriété. L’ancien appareil
peut être remis à un point de collecte dans ce but. Cet organisme devra l’éliminer dans le sens de la Loi
sur le cycle des matières et les déchets. Ne sont pas concernés les accessoires et ressources fournies
sans composants électroniques.
Toute réimpression ou autre reproduction de la documentation et des papiers joints aux produits, même
sous forme d’extraits, est uniquement permise une fois l’accord explicite de l’ISC GmbH obtenu.
Sous réserve de modifi cations techniques
- 29 -
Anl_TC_CD_18_2_Li_SPK7.indb 29Anl_TC_CD_18_2_Li_SPK7.indb 29 07.06.16 08:5707.06.16 08:57
Page 30

F
Informations service après-vente
Nous disposons dans tous les pays mentionnés dans le bon de garantie de partenaires de service
après-vente compétents dont vous trouverez les coordonnées dans le bon de garantie. Ceux-ci se
tiennent à votre disposition pour tout ce qui concerne le service après-vente comme les réparations,
l‘approvisionnement en pièces de rechange et d‘usure ou l‘achat de pièces de consommation.
Il faut tenir compte du fait que pour ce produit les pièces suivantes sont soumises à une usure liée à
l‘utilisation ou à une usure naturelle ou que les pièces suivantes sont nécessaires en tant que consommables.
Catégorie Exemple
Pièces d‘usure* mandrin de perceuse, accumulateur
Matériel de consommable/
pièces de consommable*
Pièces manquantes
*Pas obligatoirement compris dans la livraison !
En cas de vices ou de défauts, nous vous prions d‘enregistrer le cas du défaut sur internet à l‘adresse
www.isc-gmbh.info. Veuillez donner une description précise du défaut et répondre dans tous les cas aux
questions suivantes :
est-ce que l‘appareil a fonctionné une fois ou était-il défectueux dés le départ ?
•
avez-vous remarqué quelque chose avant la panne (symptôme avant la panne) ?
•
quel est le défaut de fonctionnement de l‘appareil à votre avis (symptôme principal) ?
•
Décrivez ce défaut de fonctionnement.
embouts bit/forets
- 30 -
Anl_TC_CD_18_2_Li_SPK7.indb 30Anl_TC_CD_18_2_Li_SPK7.indb 30 07.06.16 08:5707.06.16 08:57
Page 31

F
Bon de garantie
Chère cliente, cher client,
nos produits sont soumis à un contrôle de qualité très strict. Si toutefois, il arrivait que cet appareil ne
fonctionne pas parfaitement, nous en sommes désolés et nous vous prions de vous adresser à notre
service après-vente à l‘adresse indiquée sur le bon de garantie. Nous nous tenons également volontiers
à votre disposition par téléphone au numéro de service après-vente indiqué. La garantie est valable
dans les conditions suivantes :
1. Ces conditions de garantie s‘adressent uniquement à des consommateurs, c‘est à dire à des personnes physiques qui ne souhaitent ni utiliser ce produit dans le cadre de leur activité industrielle ou
artisanale, ni dans le cadre de toute autre activité indépendante. Les conditions de garantie réglementent les prestations de garantie supplémentaires que le fabricant mentionné ci-dessous promet
aux acheteurs de ses appareils en supplément de la prestation de garantie légale. Vos droits légaux
en matière de garantie restent inchangés. Notre prestation de garanti est gratuite pour vous.
2. La prestation de garantie s‘étend exclusivement aux défauts résultant d‘une erreur de fabrication ou
de matériau d‘un appareil neuf du fabricant mentionné ci-dessous et acheté par vos soins. La prestation de garantie se limite selon notre décision soit à la résolution de tels défauts sur l‘appareil, soit
à l‘échange de l‘appareil.
Veillez au fait que nos appareils, conformément au règlement, n‘ont pas été conçus pour être utilisés dans un environnement professionnel, industriel ou artisanal. Il n‘y a donc pas de contrat de
garantie quand l‘appareil a été utilisé professionnellement, artisanalement ou par des sociétés industrielles ou exposé à une sollicitation semblable pendant la durée de la garantie.
3. Sont exclus de notre garantie :
- les dommages liés au non-respect des instructions de montage ou en raison d‘une installation
incorrecte, au non-respect du mode d‘emploi (en raison par ex. du branchement de l‘appareil sur la
tension de réseau ou le type de courant incorrect), au non-respect des dispositions de maintenance
et de sécurité ou résultant d‘une exposition de l‘appareil à des conditions environnementales anormales ou d‘un manque d‘entretien et de maintenance.
- les dommages résultant d‘une utilisation abusive ou non conforme (comme par ex. une surcharge
de l‘appareil ou une utilisation d‘outils ou d‘accessoires non autorisés), de la pénétration d‘objets
étrangers dans l‘appareil (comme par ex. du sable, des pierres ou de la poussière), de l‘utilisation
de la force ou de la violence (comme par ex. les dommages liés aux chutes).
- les dommages sur l‘appareil ou des parties de l‘appareil résultant de l‘usure normale liée à
l‘utilisation de l‘appareil ou de toute autre usure naturelle.
4. La durée de garantie est de 24 mois et débute à la date d‘achat de l‘appareil. Les droits à la garantie
doivent être revendiqués avant l‘expiration de la durée de garantie dans un délai de deux semaines
après avoir constaté le défaut. La revendication de droits à la garantie après expiration de la durée
de garantie est exclue. La réparation ou l‘échange de l‘appareil n‘entraîne ni une extension de la durée de garantie ni le début d‘une nouvelle durée de garantie pour cet appareil ou toute autre pièce
de rechange installée sur l‘appareil. Cela est valable également dans le cas d‘une intervention du
service après-vente à domicile.
5. Pour faire valoir vos droits à la garantie, veuillez enregistrer l‘appareil défectueux à l‘adresse suivante : www.isc-gmbh.info. Veuillez garder à disposition la preuve d‘achat ou tout autre justifi catif
de l‘achat de votre nouvel appareil. Les appareils envoyés sans les justifi catifs correspondants ou
sans plaque signalétique sont exclus de la prestation de garantie en raison de l‘impossibilité de les
enregistrer. Si le défaut de l‘appareil est inclut dans la garantie, vous recevrez sans délai un appareil
réparé ou un nouvel appareil.
Bien entendu, nous réparons volontiers les défauts de votre appareil qui ne sont pas ou plus compris
dans l‘étendue de la garantie contre le remboursement des frais de réparation. Pour cela, veuillez envoyer l‘appareil à notre adresse de service après-vente.
Pour les pièces d‘usure, de consommation et manquantes, nous renvoyons aux restrictions de cette garantie conformément aux informations du service après-vente de ce mode d‘emploi.
- 31 -
Anl_TC_CD_18_2_Li_SPK7.indb 31Anl_TC_CD_18_2_Li_SPK7.indb 31 07.06.16 08:5707.06.16 08:57
Page 32

I
Pericolo! - Per ridurre il rischio di lesioni leggete le istruzioni per l’uso
Attenzione! Portate cuffi e antirumore. L’ e ff etto del rumore può causare la perdita dell’udito.
Attenzione! Mettete una maschera antipolvere. Facendo lavori su legno o altri materiali si può crea-
re della polvere nociva alla salute. Non lavorate materiale contenente amianto!
Attenzione! Indossate gli occhiali protettivi. Scintille createsi durante il lavoro o schegge, trucioli e
polveri scaraventate fuori dall’apparecchio possono causare la perdita della vista.
Per evitare danni al meccanismo, il cambio di marcia deve essere azionato solo ad utensile fermo.
Conservazione delle batterie solo in luoghi asciutti con una temperatura ambiente di +10°C - +40°C.
Conservate le batterie solo se sono cariche (almeno al 40%).
Grado di protezione II
Utilizzate l‘apparecchio soltanto in ambienti asciutti.
- 32 -
Anl_TC_CD_18_2_Li_SPK7.indb 32Anl_TC_CD_18_2_Li_SPK7.indb 32 07.06.16 08:5707.06.16 08:57
Page 33

I
Pericolo!
Nell’usare gli apparecchi si devono rispettare
diverse avvertenze di sicurezza per evitare lesioni e danni. Quindi leggete attentamente queste
istruzioni per l’uso/le avvertenze di sicurezza.
Conservate bene le informazioni per averle a
disposizione in qualsiasi momento. Se date
l’apparecchio ad altre persone, consegnate queste istruzioni per l’uso/le avvertenze di sicurezza
insieme all’apparecchio. Non ci assumiamo alcuna responsabilità per incidenti o danni causati
dal mancato rispetto di queste istruzioni e delle
avvertenze di sicurezza.
1. Avvertenze sulla sicurezza
Le relative avvertenze di sicurezza si trovano
nell’opuscolo allegato.
Pericolo!
Leggete tutte le avvertenze di sicurezza e le
istruzioni. Dimenticanze nel rispetto delle avver-
tenze di sicurezza e delle istruzioni possono causare scosse elettriche, incendi e/o gravi lesioni.
Conservate tutte le avvertenze e le istruzioni
per eventuali necessità future.
2. Descrizione dell’apparecchio ed
elementi forniti
2.1 Descrizione dell’apparecchio (Fig. 1)
1. Impostazione del momento torcente
2. Indicatore di carica della batteria
3. Commutatore del senso di rotazione
4. Interruttore ON/OFF
5. Batteria
6. Carica batteria
7. Commutatore 1° marcia/2° marcia
8. Tasto di arresto
9. Mandrino per punte da trapano a serraggio
rapido
10. Luce LED
2.2 Elementi forniti
Verifi cate che l‘articolo sia completo sulla base
degli elementi forniti descritti. In caso di parti
mancanti, rivolgetevi al nostro Centro Servizio
Assistenza presentando un documento di acquisto valido entro e non oltre i 5 giorni lavorativi
dall‘acquisto o al centro fai-da-te competente
più vicino. Al riguardo fate attenzione alla Tabella
Garanzia nelle disposizioni di garanzia alla fi ne
delle istruzioni.
Aprite l’imballaggio e togliete con cautela
•
l’apparecchio dalla confezione.
Togliete il materiale d’imballaggio e anche i
•
fermi di trasporto / imballo (se presenti).
Controllate che siano presenti tutti gli elemen-
•
ti forniti.
Verificate che l’apparecchio e gli accessori
•
non presentino danni dovuti al trasporto.
Se possibile, conservate l’imballaggio fino
•
alla scadenza della garanzia.
Pericolo!
L’apparecchio e il materiale d’imballaggio
non sono giocattoli! I bambini non devono
giocare con sacchetti di plastica, fi lm e pic-
coli pezzi! Sussiste pericolo di ingerimento e
soff ocamento!
Trapano avvitatore a batteria
•
Caricabatterie
•
Batteria
•
Istruzioni per l’uso originali
•
Avvertenze di sicurezza
•
3. Utilizzo proprio
Il trapano avvitatore a batteria è adatto sia per
avvitare e svitare viti che per perforare legno, metallo e plastica.
L’apparecchio deve venire usato solamente per lo
scopo a cui è destinato. Ogni altro tipo di uso che
esuli da quello previsto non è un uso conforme.
L’utilizzatore/l’operatore, e non il costruttore, è
responsabile dei danni e delle lesioni di ogni tipo
che ne risultino.
Tenete presente che i nostri apparecchi non sono
stati costruiti per l’impiego professionale, artigianale o industriale. Non ci assumiamo alcuna
garanzia quando l’apparecchio viene usato in
imprese commerciali, artigianali o industriali, o in
attività equivalenti.
- 33 -
Anl_TC_CD_18_2_Li_SPK7.indb 33Anl_TC_CD_18_2_Li_SPK7.indb 33 07.06.16 08:5707.06.16 08:57
Page 34

I
4. Caratteristiche tecniche
Tensione alimentazione motore ..............18 V d.c.
Numero di giri a vuoto: .........0-350 / 0-1250 min
Livelli del momento torcente: ....................... 18+1
Rotazione sinistra/destra ...................................si
Apertura bocca mandrino portapunta max. 10 mm
Tensione in uscita del caricabatterie: ....23 V d. c.
Corrente in uscita del caricabatterie: ...........0,5 A
Tensione di rete
per caricaaccumulatori.......100-240 V ~ 50/60 Hz
Tipo di batteria: .......................................... Li-Ion
Numero delle celle della batteria: ...................... 5
Capacità della batteria: .............................1,3 Ah
Peso ............................................................1,6 kg
Diametro massimo vite: ............................... 6 mm
Il diametro massimo della vite indica il diametro
massimo della vite che può essere avvitata nel
legno. Il diametro della vite può variare a seconda
del tipo di legno.
Rumore e vibrazioni
I valori del rumore e delle vibrazioni sono stati
rilevati secondo la norma EN 60745.
Livello di pressione acustica L
Incertezza K
..............................................3 dB
pA
Livello di potenza acustica L
Incertezza K
..............................................3 dB
WA
Portate cuffi e antirumore.
L’ e ff etto del rumore può causare la perdita
dell’udito.
Valori complessivi delle vibrazioni (somma vettoriale delle tre direzioni) rilevati secondo la norma
EN 60745.
Trapano su metallo
Valore emissione vibrazioni a
Incertezza K = 1,5 m/s
2
Avvitare senza colpi
Valore emissione vibrazioni ah ≤ 2,5 m/s
Incertezza K = 1,5 m/s
2
...... 70,88 dB (A)
pA
........ 81,88 dB (A)
WA
≤ 2,5 m/s
h
2
2
Il valore di emissione di vibrazioni indicato è stato
misurato secondo un metodo di prova normalizzato e può variare a seconda del modo in cui
l’elettroutensile viene utilizzato e, in casi eccezio-
-1
nali, può essere superiore al valore riportato.
Il valore di emissione di vibrazioni indicato può
essere usato per il confronto tra elettroutensili di
marchi diversi.
Il valore di emissione di vibrazioni può essere
utilizzato anche per una valutazione preliminare
dei rischi.
Limitate al minimo lo sviluppo di rumore e le
vibrazioni!
Utilizzate soltanto apparecchi in perfetto sta-
•
to.
Eseguite regolarmente la manutenzione e la
•
pulizia dell’apparecchio.
Adattate il vostro modo di lavorare
•
all’apparecchio.
Non sovraccaricate l’apparecchio.
•
Fate eventualmente controllare l’apparecchio.
•
Spegnete l’apparecchio se non lo utilizzate.
•
Indossate i guanti.
•
Attenzione!
Rischi residui
Anche se questo elettroutensile viene utilizzato secondo le norme, continuano a sussistere rischi residui. In relazione alla struttura
e al funzionamento di questo elettroutensile
potrebbero presentarsi i seguenti pericoli:
1. Danni all’apparato respiratorio nel caso in cui
non venga indossata una maschera antipolvere adeguata.
2. Danni all’udito nel caso in cui non vengano
indossate cuffi e antirumore adeguate.
3. Danni alla salute derivanti da vibrazioni mano-braccio se l’apparecchio viene utilizzato a
lungo, non viene tenuto in modo corretto o se
la manutenzione non è appropriata.
Limitate il tempo di lavoro.
Al riguardo si devono prendere in considerazione
tutte le fasi del ciclo di esercizio (ad esempio i
periodi in cui l’elettroutensile è disinserito e quelli
in cui è inserito, ma funziona a vuoto).
- 34 -
Anl_TC_CD_18_2_Li_SPK7.indb 34Anl_TC_CD_18_2_Li_SPK7.indb 34 07.06.16 08:5707.06.16 08:57
Page 35

I
5. Prima della messa in esercizio
Prima di mettere in esercizio il vostro avvitatore
a batteria leggete assolutamente le seguenti avvertenze.
1. Ricaricate la batteria con il caricabatterie in
dotazione. Una batteria scarica si ricarica in
ca. 3-5 ore.
2. Utilizzate solo punte affi late e inserti per cac-
ciavite adatti ed in perfetto stato.
3. In caso di perforazione e avvitamento su muri
e pareti, verifi cate che non siano presenti
condutture nascoste di corrente, gas e acqua.
6. Uso
6.1 Ricarica della batteria LI (Fig. 2-3)
1. Estraete la batteria (5) dall’impugnatura premendo verso il basso il tasto di arresto (8).
2. Controllate che la tensione di rete indicata
sulla targhetta corrisponda alla tensione di
rete a disposizione.
3. Inserite il caricabatterie (6) nella presa e collegate il cavo di ricarica (a) alla batteria (5). I
3 LED sull‘indicazione di carica della batteria
(10) segnalano che la batteria viene ricaricata.
- Batteria scarica: tutti e 3 i LED lampeggiano
alternatamente
- Ricaricata di 1/3: il LED a sinistra è illuminato, il LED centrale e quello a destra lampeggiano alternatamente
- Ricaricata di 2/3: il LED a sinistra e quello
centrale sono illuminati, il LED a destra lampeggia
4. Una volta terminato il processo di ricarica,
dopo ca. 3-5 ore, tutti e 3 i LED si illuminano
per circa 10 min. Togliete il caricabatterie dalla batteria.
5. Se tutti e 3 i LED lampeggiano contemporaneamente, la temperatura della batteria è
superiore ovvero inferiore al valore limite. Togliete il caricabatterie dalla batteria, lasciatela
un giorno a temperatura ambiente e quindi
riprovate.
6. Se l‘errore viene indicato di nuovo, la batteria
è difettosa. Una batteria difettosa non deve
più venire usata ovvero ricaricata. Togliete il
caricabatterie dalla batteria.
Se non fosse possibile caricare il pacchetto di
accumulatori, verifi cate che
la presa di corrente disponga della tensione
•
di rete richiesta
i contatti del caricaaccumulatori abbiano un
•
contatto elettrico perfetto.
Se malgrado tutto non fosse ancor possibile caricare gli accumulatori, Vi preghiamo di fare pervenire al nostro Servizio clientela quanto segue
caricaaccumulatori
•
pacchetto di accumulatori.
•
Per una lunga durata della batteria si deve provvedere a una puntuale ricarica della batteria LI.
Ciò è comunque necessario quando ci si accorge
della diminuzione delle prestazioni dell’avvitatore
a batteria.
6.2 Impostazione del momento torcente
(Fig. 4/Pos. 1)
Attenzione! Impostare l’anello di regolazione per il
momento torcente solo con l’utensile fermo.
L’avvitatore a batteria è dotato di un’impostazione
meccanica del momento torcente.
Il momento di rotazione relativo ad una determinata misura di vite, scelto sull’anello di regolazione (1). Il momento di rotazione dipende da più
fattori:
da tipo e durezza del materiale da sottoporre
•
a lavorazione
da tipo e lunghezza delle viti da utilizzare
•
dai requisiti richiesti al collegamento a vite da
•
effettuare.
Il raggiungimento del momento di rotazione è
segnalato mediante disinnesto cricchettante
dell’innesto stesso.
6.3 Trapanatura (Fig. 4/Pos. 1)
Per eseguire una trapanatura portate l’anello di
regolazione momento di rotazione sull’ultima
posizione “Bohren”, trapanatura,. In tale posizione
l’innesto slittante è disattivato.
6.4 Commutadirezione di rotazione
(Fig. 5/Pos. 3)
Azionando il selettore scorrevole sopra
all’interruttore acceso/spento potete regolare il
senso di rotazione dell’Avvitatore ad accumulatore, proteggendo allo stesso tempo l’Avvitatore ad
accumulatore contro un avviamento involontario.
Per evitare di danneggiare la trasmissione, il
senso di rotazione dovrebbe essere regolato con
- 35 -
Anl_TC_CD_18_2_Li_SPK7.indb 35Anl_TC_CD_18_2_Li_SPK7.indb 35 07.06.16 08:5707.06.16 08:57
Page 36

I
attrezzo fermo. Se il selettore scorrevole si trovasse in posizione centrale, in tal caso l’interruttore
acceso/spento è bloccato.
6.5 Interruttore acceso/spento (Fig. 5/Pos. 4)
Con l’interruttore acceso/spento si può progressivamente comandare il numero dei giri. Più che si
preme l’interruttore e più aumenterà il numero di
giri dell’Avvitatore ad accumulatore.
6.6 Commutazione foratura - foratura battente (Fig. 4/Pos. 7)
Per eseguire una foratura portate la ghiera anteriore sul simbolo „trapano“. Per eseguire una foratura a percussione portate la ghiera anteriore sul
simbolo „martello“ e la ghiera per la regolazione
della coppia di serraggio sul simbolo „trapano“.
6.7 Indicazione di carica della batteria
(Fig. 1/Pos. 2)
Premete l’interruttore per l’indicazione di carica
della batteria (a). L’indicazione di carica della
batteria (2) segnala lo stato di carica per mezzo
di 3 spie.
Le 3 spie sono illuminate
La batteria è completamente carica.
1 spia o 2 spie sono illuminate
La batteria dispone di una suffi ciente carica re-
sidua.
sull’avvitatore a batteria in posizione centrale.
L’avvitatore a batteria è dotato di un mandrino
•
(9) a serraggio rapido con bloccaggio automatico.
Allentate il mandrino (9). L’apertura del man-
•
drino (a) deve essere abbastanza grande
da accogliere l’utensile (punta per trapano o
inserto per giraviti).
Scegliete l’utensile appropriato. Inseritelo il
•
più possibile nell’apertura (a) del mandrino.
Avvitate bene il mandrino (9) e verificate quin-
•
di che l’utensile sia ben serrato.
6.10 Avvitamento
Usate preferibilmente viti autocentranti (ad es.
con intaglio a croce), che garantiscono un lavoro
sicuro. Fate attenzione che le punte a cacciavite
utilizzate corrispondano a forma e dimensioni
delle rispettive viti. Eff ettuate la regolazione del
momento di rotazione come descritto nelle istruzioni, corrispondentemente alle dimensioni della
vite da usare.
7. Pulizia, manutenzione e
ordinazione dei pezzi di ricambio
Pericolo!
Prima di qualsiasi lavoro di pulizia staccate la spina dalla presa di corrente.
1 spia lampeggia
La batteria è scaricata, ricaricatela.
Tutti i LED lampeggiano
La temperatura della batteria è superiore al valore limite. Togliete la batteria dall‘apparecchio
e lasciatela un giorno a temperatura ambiente.
Se l‘errore si presenta di nuovo, la batteria si è
scaricata completamente ed è difettosa. Togliete
la batteria dall‘apparecchio. Una batteria difettosa
non deve più venire usata ovvero ricaricata.
6.8 Luce LED (Fig. 1/Pos. 10)
La luce LED (10) permette di illuminare il punto
da avvitare o da perforare in caso di condizioni di
luce sfavorevoli. La luce LED (10) si illumina automaticamente non appena premete l’interruttore
ON/OFF (4).
6.9 Cambio dell’utensile (Fig. 6)
Attenzione! Prima di ogni operazione (per es.
cambio dell’utensile, manutenzione ecc.) portate il commutatore del senso di rotazione (3)
Anl_TC_CD_18_2_Li_SPK7.indb 36Anl_TC_CD_18_2_Li_SPK7.indb 36 07.06.16 08:5707.06.16 08:57
7.1 Pulizia
Tenete il più possibile i dispositivi di protezio-
•
ne, le fessure di aerazione e la carcassa del
motore liberi da polvere e sporco. Strofinate
l’apparecchio con un panno pulito o soffiatelo
con l’aria compressa a pressione bassa.
Consigliamo di pulire l’apparecchio subito
•
dopo averlo usato.
Pulite l’apparecchio regolarmente con un
•
panno asciutto ed un po’ di sapone. Non usate detergenti o solventi perché questi ultimi
potrebbero danneggiare le parti in plastica
dell’apparecchio. Fate attenzione che non
possa penetrare dell’acqua nell’interno
dell’apparecchio. La penetrazione di acqua
in un elettroutensile aumenta il rischio di una
scossa elettrica.
7.2 Manutenzione
All’interno dell’apparecchio non si trovano altre
parti sottoposte ad una manutenzione qualsiasi.
- 36 -
Page 37

7.3 Ordinazione di pezzi di ricambio e
accessori
In caso di ordinazione di pezzi di ricambio è necessario indicare quanto segue:
Tipo di apparecchio
•
Numero di articolo dell‘apparecchio
•
Numero di identificazione dell‘apparecchio
•
Numero del pezzo di ricambio richiesto
•
Per i prezzi e le informazioni attuali si veda
www.isc-gmbh.info
Consiglio! Per un buon risultato di lavoro consigliamo
gli accessori di qualità di
! www.kwb.eu
welcome@kwb.eu
8. Smaltimento e riciclaggio
L‘apparecchio si trova in un imballaggio per evitare i danni dovuti al trasporto. Questo imballaggio
rappresenta una materia prima e può perciò essere utilizzato di nuovo o riciclato. L‘apparecchio
e i suoi accessori sono fatti di materiali diversi,
per es. metallo e plastica. Gli apparecchi difettosi
non devono essere gettati nei rifi uti domestici. Per
uno smaltimento corretto l‘apparecchio va consegnato ad un apposito centro di raccolta. Se non
vi è noto nessun centro di raccolta, rivolgetevi per
informazioni all‘amministrazione comunale.
I
9. Conservazione
Conservate l’apparecchio e i suoi accessori in un
luogo buio, asciutto, al riparo dal gelo e non accessibile ai bambini. La temperatura ottimale per
la conservazione è compresa tra i 5 e i 30 °C.
Conservate l’elettroutensile nell’imballaggio originale.
- 37 -
Anl_TC_CD_18_2_Li_SPK7.indb 37Anl_TC_CD_18_2_Li_SPK7.indb 37 07.06.16 08:5707.06.16 08:57
Page 38

I
Solo per paesi membri dell’UE
Non smaltite gli elettroutensili nei rifi uti domestici!
Secondo la direttiva europea 2012/19/EU sui rifi uti di apparecchiature elettriche ed elettroniche e il suo
recepimento nelle normative nazionali, gli elettroutensili usati devono venire raccolti separatamente e
venire smaltiti in modo ecocompatibile.
Alternativa di riciclaggio alla richiesta di restituzione:
il proprietario dell’apparecchio elettrico è tenuto in alternativa, invece della restituzione, a collaborare in
modo che lo smaltimento venga eseguito correttamente in caso ceda l’apparecchio. L’apparecchio vecchio può anche venire consegnato ad un centro di raccolta che provvede poi allo smaltimento secondo
le norme nazionali sul riciclaggio e sui rifi uti. Non ne sono interessati gli accessori e i mezzi ausiliari sen-
za elementi elettrici forniti insieme ai vecchi apparecchi.
La ristampa o l’ulteriore riproduzione, anche parziale, della documentazione o dei documenti
d’accompagnamento dei prodotti è consentita solo con l’esplicita autorizzazione da parte della
iSC GmbH.
Con riserva di apportare modifi che tecniche
- 38 -
Anl_TC_CD_18_2_Li_SPK7.indb 38Anl_TC_CD_18_2_Li_SPK7.indb 38 07.06.16 08:5707.06.16 08:57
Page 39

I
Informazioni sul Servizio Assistenza
In tutti i Paesi indicati nel certifi cato di garanzia disponiamo di competenti partner per il Servizio Assis-
tenza (per i relativi dati di contatto si veda il certifi cato di garanzia), che sono a vostra disposizione per
tutte le richieste di assistenza come riparazione, fornitura di pezzi di ricambio e parti di usura o vendita
di materiali di consumo.
Si deve tenere presente che le seguenti parti di questo prodotto sono soggette a un‘usura naturale o
dovuta all‘uso ovvero che le seguenti parti sono necessarie come materiali di consumo.
Categoria Esempio
Parti soggette ad usura * Mandrino, Batteria
Materiale di consumo/parti di consumo * Inserti/punte per trapano
Parti mancanti
* non necessariamente compreso tra gli elementi forniti!
In presenza di difetti o errori vi preghiamo di denunciare il caso sul sito internet www.isc-gmbh.info. Vi
preghiamo di descrivere con precisione l‘anomalia e a tal riguardo di rispondere in ogni caso alle seguenti domande:
L‘apparecchio ha già funzionato una volta o era difettoso fin dall‘inizio?
•
Avete notato qualcosa prima che si manifestasse il difetto (sintomo prima del difetto)?
•
A vostro parere che cosa non funziona nell‘apparecchio (sintomo principale)?
•
Descrivete che cosa non funziona.
- 39 -
Anl_TC_CD_18_2_Li_SPK7.indb 39Anl_TC_CD_18_2_Li_SPK7.indb 39 07.06.16 08:5707.06.16 08:57
Page 40

I
Certifi cato di garanzia
Gentili clienti,
i nostri prodotti sono soggetti ad un rigido controllo di qualità. Se l‘apparecchio non dovesse tuttavia
funzionare correttamente, ci scusiamo e vi preghiamo di rivolgervi al nostro servizio di assistenza clienti
all‘indirizzo indicato in questa scheda di garanzia. Siamo a vostra disposizione anche telefonicamente al
numero del Servizio Assistenza indicato. Per la rivendicazione dei diritti di garanzia vale quanto segue:
1. Le presenti condizioni di garanzia si rivolgono esclusivamente a consumatori, vale a dire a persone
fi siche che non intendono utilizzare questo prodotto né in ambito professionale né per altre attività
di lavoro autonomo. Le presenti condizioni di garanzia regolano prestazioni di garanzia supplementari che il produttore su indicato concede in aggiunta alla garanzia legale agli acquirenti di nuovi
apparecchi. La presente garanzia non tocca i vostri diritti al ricorso in garanzia previsti dalla legge.
Le nostre prestazioni di garanzia sono per voi gratuite.
2. La prestazione di garanzia riguarda esclusivamente i difetti di un nuovo apparecchio da voi
acquistato del produttore di cui sopra, riconducibili a errori di materiale o di produzione, ed è limitata, a nostra discrezione, all‘eliminazione di questi difetti dell‘apparecchio o alla sostituzione
dell‘apparecchio stesso.
Tenete presente che i nostri apparecchi non sono stati costruiti per l‘impiego artigianale, professionale o imprenditoriale. Pertanto un contratto di garanzia non viene concluso se l‘apparecchio è stato
usato entro il periodo di garanzia in attività artigianali, imprenditoriali o industriali o se è stato sottoposto a sollecitazioni equivalenti.
3. Sono esclusi dalla nostra garanzia:
- Danni all‘apparecchio causati dalla mancata osservanza delle istruzioni di montaggio o per
un‘installazione non corretta, dalla mancata osservanza delle istruzioni per l‘uso (come ad es. collegamento a una tensione di rete o a un tipo di corrente non corretti), dalla mancata osservanza delle
norme relative alla manutenzione e alla sicurezza, dall‘esposizione dell‘apparecchio a condizioni
ambientali anomale o per la mancata esecuzione di pulizia e manutenzione.
- Danni all‘apparecchio dovuti a usi impropri o illeciti (come per es. sovraccarico dell‘apparecchio
o utilizzo di utensili di ricambio o accessori non consentiti), alla penetrazione di corpi estranei
nell‘apparecchio (come per es. sabbia, pietre o polvere, danni dovuti al trasporto), all‘impiego della
forza o a infl ussi esterni (come per es. danni causati da caduta).
- Danni all‘apparecchio o a parti di esso da ricondurre a un‘usura comune, dovuta all‘uso o di altro
tipo naturale.
4. Il periodo di garanzia è 24 mesi e inizia a partire dalla data di acquisto dell‘apparecchio. I diritti di
garanzia devono essere fatti valere prima della scadenza del periodo di garanzia, entro due settimane dopo avere accertato il difetto. È esclusa la rivendicazione di diritti di garanzia dopo la scadenza
del relativo periodo. La riparazione o la sostituzione dell‘apparecchio non comporta una proroga del
periodo di garanzia e con questa prestazione per l‘apparecchio o per pezzi di ricambio eventualmente installati non inizia un nuovo periodo di garanzia. Ciò vale anche nel caso in cui si ricorra a un
servizio sul posto.
5. Per rivendicare il diritto di garanzia vi preghiamo di comunicare che l‘apparecchio è difettoso tramite
sito internet: www.isc-gmbh.info. Tenete a portata di mano il documento di acquisto o altri documenti
come prova dell‘acquisto del vostro apparecchio nuovo. Apparecchi inviati senza i relativi documenti
o senza targhetta d‘identifi cazione sono esclusi dalla prestazione di garanzia perché non possono
essere classifi cati in modo corrispondente. Se il difetto dell‘apparecchio rientra nella nostra presta-
zione di garanzia, ricevete prontamente l‘apparecchio riparato o un apparecchio nuovo.
Naturalmente eff ettuiamo a pagamento anche riparazioni sull‘apparecchio che non rientrano o non rien-
trano più nella garanzia. A tale scopo inviate l‘apparecchio all‘indirizzo del nostro Centro Assistenza.
Per parti mancanti, di consumo e soggette a usura rimandiamo alle limitazioni di questa garanzia secondo le informazioni sul Servizio Assistenza di queste istruzioni per l‘uso.
- 40 -
Anl_TC_CD_18_2_Li_SPK7.indb 40Anl_TC_CD_18_2_Li_SPK7.indb 40 07.06.16 08:5707.06.16 08:57
Page 41

CZ
Nebezpečí! - Ke snížení rizika zranění si přečíst návod k obsluze
Pozor! Noste ochranu sluchu. Působení hluku může způsobit ztrátu sluchu.
Pozor! Noste ochrannou masku proti prachu. Při zpracování dřeva a jiných materiálů může vznikat
zdraví škodlivý prach. Materiál obsahující azbest nesmí být opracováván!
Pozor! Noste ochranné brýle. Jiskry vznikající při práci nebo odštěpky dřeva, třísky a prachy vystupu-
jící z přístroje mohou způsobit ztrátu viditelnosti.
Aby se zabránilo poškození převodovky, smí být přepínání směru otáčení prováděno pouze ve
vypnutém stavu.
Skladování akumulátorů pouze v suchých místnostech s teplotou okolí od +10°C do +40°C.
Akumulátory skladovat pouze v nabitém stavu (min. 40% nabité).
Třída ochrany II
Pouze pro použití v suchých místnostech.
- 41 -
Anl_TC_CD_18_2_Li_SPK7.indb 41Anl_TC_CD_18_2_Li_SPK7.indb 41 07.06.16 08:5707.06.16 08:57
Page 42

CZ
Nebezpečí!
Při používání přístrojů musí být dodržována určitá
bezpečnostní opatření, aby se zabránilo zraněním
a škodám. Přečtěte si proto pečlivě tento návod
k obsluze / bezpečnostní pokyny. Dobře si ho/
je uložte, abyste měli tyto informace kdykoliv
po ruce. Pokud předáte přístroj jiným osobám,
předejte s ním prosím i tento návod k obsluze/
bezpečnostní pokyny. Nepřebíráme žádné ručení
za škody a úrazy vzniklé v důsledku nedodržování
tohoto návodu k obsluze a bezpečnostních
pokynů.
1. Bezpečnostní pokyny
Příslušné bezpečnostní pokyny naleznete v
přiložené brožurce.
Nebezpečí!
Přečtěte si všechny bezpečnostní pokyny a instrukce. Zanedbání při dodržování
bezpečnostních pokynů a instrukcí mohou mít
za následek úder elektrickým proudem, požár
a/nebo těžká zranění. Všechny bezpečnostní
pokyny a instrukce si uložte pro budoucí
použití.
2. Popis přístroje a rozsah dodávky
2.1 Popis přístroje (obr. 1)
1. Nastavení točivého momentu
2. Indikace kapacity akumulátoru
3. Přepínač směru otáčení
4. Za-/vypínač
5. Akumulátor
6. Nabíječka
7. Přepínač 1. rychl. stupeň – 2. rychl. stupeň
8. Západkové tlačítko
9. Rychloupínací sklíčidlo
10. LED světlo
2.2 Rozsah dodávky
Zkontrolujte prosím úplnost výrobku na základě
popsaného rozsahu dodávky. V případě
chybějících dílů se prosím obraťte nejpozději
během 5 pracovních dnů po zakoupení výrobku
za předložení platného dokladu o koupi na naše
servisní středisko nebo prodejnu, kde jste přístroj
zakoupili. Dbejte prosím na tabulku o záruce v
servisních informacích na konci návodu.
Otevřete balení a přístroj opatrně vyjměte z
•
balení.
Odstraňte obalový materiál a ochrany balení /
•
dopravní pojistky (jsou-li k dispozici).
P řekontrolujte, zda je rozsah dodávky úplný.
•
Zkontrolujte přístroj a příslušenství, zda neby-
•
ly při přepravě poškozeny.
Balení si pokud možno uložte až do uplynutí
•
záruční doby.
Nebezpečí!
Přístroj a obalový materiál nejsou dětská
hračka! Děti si nesmějí hrát s plastovými
sáčky, fóliemi a malými díly! Hrozí nebezpečí
spolknutí a udušení!
Akumulátorový vrtací šroubovák
•
Nabíječka
•
Baterie
•
Originální návod k obsluze
•
Bezpečnostní pokyny
•
3. Použití podle účelu určení
Akumulátorový vrtací šroubovák je vhodný na
za- a vyšroubovávání šroubů a na vrtání do dřeva,
kovu a plastu.
Přístroj smí být používán pouze podle svého
účelu určení. Každé další, toto překračující
použití, neodpovídá použití podle účelu určení. Za
z toho vyplývající škody nebo zranění všeho druhu ručí uživatel/obsluhující osoba a ne výrobce.
Dbejte prosím na to, že naše přístroje nebyly
podle svého účelu určení konstruovány pro
živnostenské, řemeslnické nebo průmyslové
použití. Nepřebíráme proto žádné ručení, pokud
je přístroj používán v živnostenských, řemeslných
nebo průmyslových podnicích a při srovnatelných
činnostech.
- 42 -
Anl_TC_CD_18_2_Li_SPK7.indb 42Anl_TC_CD_18_2_Li_SPK7.indb 42 07.06.16 08:5707.06.16 08:57
Page 43

CZ
4. Technická data
Zásobování motoru napětím ...................18 V d.c.
Otáčky chodu naprázdno: ..... 0-350/0-1250 min
Stupně točivého momentu: .........................18+1
Pravý/levý chod .............................................. ano
Rozsah upínání sklíčidla ...................max. 10 mm
Výstupní napětí nabíječky: ....................23 V d. c.
Výstupní proud nabíječky: ........................... 0,5 A
Síťové napětí nabíječky ...... 100-240 V ~ 50/60 Hz
Typ akumulátoru: ........................................ Li-Ion
Počet akumulátorových článků: ......................... 5
Kapacita akumulátoru: ..............................1,3 Ah
Hmotnost ....................................................1,6 kg
Max. průměr šroubů: ................................... 6 mm
Max. průměr šroubů popisuje maximální průměr
šroubu, který může být zašroubován do dřeva.
Průměr šroubu se může odlišovat podle druhu
dřeva.
Nebezpečí!
Hluk a vibrace
Hluk a vibrace změřeny podle normy EN 60745.
Hladina akustického tlaku L
Nejistota K
................................................. 3 dB
pA
Hladina akustického výkonu L
Nejistota K
................................................3 dB
WA
Noste ochranu sluchu.
Působení hluku může způsobit ztrátu sluchu.
Hodnoty celkových vibrací (vektorový součet tří
směrů) změřeny podle normy EN 60745.
Vrtání do kovů
Emisní hodnota vibrací a
Nejistota K = 1,5 m/s
Šroubování bez příklepu
Emisní hodnota vibrací ah ≤ 2,5 m/s
Nejistota K = 1,5 m/s
........... 70,88 dB(A)
pA
WA
≤ 2,5 m/s
h
2
2
....... 81,88 dB(A)
2
2
Uvedená emisní hodnota vibrací byla změřena
podle normované zkušební metody a může se
měnit v závislosti na druhu a způsobu použití
elektrického přístroje, a ve výjimečných případech
-1
se může nacházet nad uvedenou hodnotou.
Uvedená emisní hodnota vibrací může být použita
ke srovnání jednoho elektrického přístroje s jinými
přístroji.
Uvedená emisní hodnota vibrací může být také
použita k úvodnímu posouzení negativních vlivů.
Omezte tvorbu hluku a vibrace na minimum!
Používejte pouze přístroje v bezvadném sta-
•
vu.
Pravidelně provádějte údržbu a čištění
•
přístroje.
P řizpůsobte Váš způsob práce přístroji.
•
Nepřetěžujte přístroj.
•
V případě potřeby nechte přístroj zkontrolo-
•
vat.
P řístroj vypněte, pokud ho nepoužíváte.
•
Noste rukavice.
•
Pozor!
Zbývající rizika
I přesto, že obsluhujete elektrický přístroj
podle předpisů, existují vždy zbývající rizika. V souvislosti s konstrukcí a provedením
elektrického přístroje se mohou vyskytnout
následující nebezpečí:
1. Poškození plic, pokud se nenosí žádná vhodná ochranná maska proti prachu.
2. Poškození sluchu, pokud se nenosí žádná
vhodná ochrana sluchu.
3. Poškození zdraví, které je následkem vibrací na ruce a paže, pokud se přístroj
používá delší dobu nebo není řádně veden a
udržován.
Omezte pracovní dobu.
Přitom je třeba zohlednit všechny části pracovního cyklu (například doby, ve kterých je
elektrický přístroj vypnut, a takové, ve kterých je
přístroj zapnut, ale běží bez zatížení).
- 43 -
Anl_TC_CD_18_2_Li_SPK7.indb 43Anl_TC_CD_18_2_Li_SPK7.indb 43 07.06.16 08:5707.06.16 08:57
Page 44

CZ
5. Před uvedením do provozu
P řed uvedením akumulátorového šroubováku do
provozu si bezpodmínečně přečtěte tyto pokyny:
1. Akumulátor nabíjejte dodanou nabíječkou.
Prázdný akumulátor je nabitý po cca 3–5 hodinách.
2. Používejte pouze ostré vrtáky a také bezvadné a vhodné bity.
3. Při vrtání a šroubování ve stěnách a zdech
tyto zkontrolovat, zda se v nich nenalézají
skrytá vedení elektrického proudu, plynu a
vody.
6. Obsluha
6.1 Nabíjení LI akumulátorového článku (obr.
2–3)
1. Akumulátorový článek (5) vytáhněte z rukoje-
ti, přitom stlačte postranní západkové tlačítko
(8) směrem dolů.
2. Porovnejte, zda souhlasí síťové napětí uvedené na typovém štítku se síťovým napětím,
které je k dispozici.
3. Zastrčte nabíječku (6) do zásuvky a spojte
nabíjecí kabel (a) s akumulátorem (5). 3 LED
kontrolky na indikaci kapacity akumulátoru
(10) signalizuje, že se akumulátor nabíjí.
- Vybitý akumulátor: Všechny 3 LED střídavě
blikají
- nabito na 1/3: levá LED svítí, prostřední a
pravá LED střídavě blikají
- nabito na 2/3: levá a prostřední LED svítí,
pravá LED bliká
4. Když proces nabíjení po cca 3–5 hodinách
skončí, svítí všechny 3 LED kontrolky po
dobu cca 10 minut. Akumulátor odpojte od
nabíječky.
5. Pokud všechny 3 LED kontrolky najednou
blikají, došlo k podkročení, resp. k překročení
teploty akumulátoru. Odpojte akumulátor od
nabíječky, nechte akumulátor odpočívat jeden
den při pokojové teplotě a zkuste to znovu.
6. Pokud přetrvává signalizace této chyby,
znamená to, že je akumulátor defektní. Defektní akumulátor se již nesmí používat, resp.
nabíjet. Odpojte nabíječku od akumulátoru.
Pokud by nabití akumulátorového článku nebylo
možné, překontrolujte prosím
zda je v zásuvce k dispozici síťové napětí
•
zda je k dispozici bezvadný kontakt na
•
nabíjecích kontaktech nabíječky.
Pokud by nabití akumulátorového článku nebylo i
nadále možné, prosíme Vás
nabíječku
•
a akumulátorový článek
•
zaslat do našeho zákaznického servisu.
V zájmu dlouhé životnosti akumulátoru, byste se
měli starat o včasné nabití akumulátoru. Toto je
v každém případě třeba tehdy, když zjistíte, že
výkon akumulátorového šroubováku klesá.
6.2 Nastavení točivého momentu
(obr. 4/pol. 1)
Pozor! Stavěcí kroužek pro točivý moment
nastavovat pouze u zastaveného stroje.
Akumulátorový šroubovák je vybaven mechanickým nastavováním točivého momentu.
To čivý moment pro určitou velikost šroubu se
nastavuje na nastavovacím kroužku. Točivý moment je závislý na několika faktorech:
na druhu a tvrdosti opracovávaného materiálu
•
na druhu a délce použitých šroubů
•
na nárocích, které jsou kladeny na šroubové
•
spojení.
Dosažení točivého momentu je signalizováno chrastivým vypnutím spojky.
6.3 Vrtání (obr. 4/pol. 1)
K vrtání nastavte nastavovací kroužek pro točivý
moment na poslední stupeň „vrtání“. Ve stupni vrtání je kluzná třecí spojka mimo provoz. Při vrtání
je k dispozici maximální točivý moment.
6.4 Vypínač směru otáčení (obr. 5/pol. 3)
Posuvným vypínačem nad za-/vypínačem
můžete nastavit směr otáčení akumulátorového
šroubováku a akumulátorový šroubovák zajistit
proti nechtěnému zapnutí. Můžete volit mezi
levým/pravým chodem. Aby bylo zabráněno
poškození převodu, je třeba směr otáčení
přepínat pouze ve vypnutém stavu. Pokud se posuvný vypínač nachází ve středové poloze, je za-/
vypínač blokován.
6.5 Za-/vypínač (obr. 5/pol. 4)
Za-/vypínačem můžete počet otáček plynule regulovat. Čím dále vypínač zmáčknete, tím vyšší je
- 44 -
Anl_TC_CD_18_2_Li_SPK7.indb 44Anl_TC_CD_18_2_Li_SPK7.indb 44 07.06.16 08:5707.06.16 08:57
Page 45

CZ
počet otáček akumulátorového šroubováku.
6.6 Přepínání převodový stupeň 1 převodový stupeň 2 (obr. 4/pol. 7)
Podle polohy přepínače můžete pracovat buď s
vyšším nebo s nižším počtem otáček. Aby se zabránilo poškození převodu, měly by být převodové
stupně přepínány pouze ve vypnutém stavu.
6.7 Indikace kapacity akumulátoru
(obr. 1/pol. 2)
Stiskněte spínač indikace kapacity akumulátoru
(a). Indikace kapacity akumulátoru (2) signalizuje
stav nabití pomocí 3 LED.
Všechny 3 LED svítí:
Akumulátor je kompletně nabitý.
2 nebo 1 LED svítí
Akumulátor disponuje dostatečným zbytkovým
nabitím.
1 LED bliká:
Akumulátor je prázdný, akumulátor znovu nabijte.
Všechny LED blikají:
Teplota akumulátoru je překročena. Odpojte akumulátor od přístroje, nechte akumulátor odpočívat
jeden den při pokojové teplotě. Pokud se chyba
objeví znovu, došlo k hlubokému vybití akumulátoru, čímž se stal defektním. Vyjměte akumulátor z přístroje. Defektní akumulátor se již nesmí
používat, resp. nabíjet.
6.10 Šroubování:
Používejte nejlépe samostředicí šrouby (např.
torx, křížová drážka), které zajišťují bezpečnou
práci. Dbejte na to, aby použitý hrot (bit) a šroub
souhlasily tvarem a velikostí. Proveďte nastavení
točivého momentu, jak je uvedeno v návodu, odpovídajíc velikosti šroubu.
7. Čištění, údržba a objednání
náhradních dílů
Nebezpečí!
Před všemi čisticími pracemi vytáhněte síťovou
zástrčku.
7.1 Čištění
Udržujte bezpečnostní zařízení, větrací otvory
•
a kryt motoru tak prosté prachu a nečistot, jak
jen to je možné. Otřete přístroj čistým hadrem
nebo ho profoukněte stlačeným vzduchem při
nízkém tlaku.
Doporučujeme přímo po každém použití
•
přístroj vyčistit.
Pravidelně přístroj čistěte vlhkým hadrem
•
a trochou mazlavého mýdla. Nepoužívejte
čisticí prostředky nebo rozpouštědla; tyto
by mohly narušit plastové díly přístroje.
Dbejte na to, aby se do přístroje nedostala
voda. Vniknutí vody do elektrického přístroje
zvyšuje riziko úderu elektrickým proudem.
6.8 LED světlo (obr. 1/pol. 10)
LED světlo (10) umožňuje osvětlení místa šroubování, resp. vrtání při nepříznivých
světelných poměrech. LED světlo (10) svítí auto-
maticky, jakmile je stisknut za-/vypínač (4).
6.9 Výměna nástroje (obr. 6)
Pozor! Při všech pracích (např. výměna nást-
roje; údržba; atd.) nastavte na akumulátorovém
šroubováku přepínač směru otáčení (3) do
středové polohy.
Akumulátorový šroubovák je vybaven
•
rychloupínacím sklíčidlem (9) s automatickou
aretací vřetena.
Otevřete sklíčidlo (9). Otvor sklíčidla (a) musí
•
být dostatečně veliký, aby bylo možné nástroj
(vrták, resp. bit) upnout.
Zvolte vhodný nástroj. Zastrčte nástroj do ot-
•
voru sklíčidla (a) tak dalece, jak je to možné.
Sklíčidlo pevně utáhněte (9) a poté zkontroluj-
•
te pevné usazení nástroje.
Anl_TC_CD_18_2_Li_SPK7.indb 45Anl_TC_CD_18_2_Li_SPK7.indb 45 07.06.16 08:5707.06.16 08:57
7.2 Údržba
Uvnitř přístroje se nevyskytují žádné další díly
vyžadující údržbu.
7.3 Objednávání náhradních dílů a
příslušenství:
Při objednávce náhradních dílů je třeba uvést
následující údaje:
Typ přístroje
•
Číslo artiklu přístroje
•
Identifikační číslo přístroje
•
Číslo požadovaného náhradního dílu
•
Aktuální ceny a informace naleznete na
www.isc-gmbh.info
- 45 -
Page 46

Tip: Pro dobré pracovní
výsledky doporučujeme
používat vysoce kvalitní
příslušenství značky
! www.kwb.eu
welcome@kwb.eu
8. Likvidace a recyklace
Přístroj je uložen v balení, aby bylo zabráněno
poškození při přepravě. Toto balení je surovina a
tím znovu použitelné nebo může být dáno zpět do
cirkulace surovin. Přístroj a jeho příslušenství jsou
vyrobeny z rozdílných materiálů, jako např. kov
a plasty. Defektní přístroje nepatří do domovního
odpadu. K odborné likvidaci by měl být přístroj
odevzdán na příslušném sběrném místě. Pokud
žádné takové sběrné místo neznáte, měli byste se
informovat na místním zastupitelství.
9. Skladování
Skladujte přístroj a jeho příslušenství na tmavém,
suchém a nezamrzajícím místě a mimo dosah
dětí. Optimální teplota skladování leží mezi 5 a 30
˚C. Uložte elektrický přístroj v originálním balení.
CZ
- 46 -
Anl_TC_CD_18_2_Li_SPK7.indb 46Anl_TC_CD_18_2_Li_SPK7.indb 46 07.06.16 08:5707.06.16 08:57
Page 47

CZ
Jen pro země EU
Elektrické nářadí a přístroje neodhazujte do domovního odpadu!
Podle evropské směrnice 2012/19/EU o odpadních elektrických a elektronických zařízeních (OEEZ) a
při prosazování národního práva musí být spotřebované elektrické nářadí sbíráno samostatně a musí
být dopraveno do odpovídajícího ekologického recyklačního závodu.
Alternativa recyklace k výzvě na zpětné odeslání výrobku:
Vlastník elektrického přístroje je povinen alternativně namísto zpětného odeslání zařízení spolupůsobit
při jeho správném zužitkování v případě, že se vzdá jeho vlastnictví. Starý přístroj lze v takovém případě
odevzdat také ve sběrně, která provede odstranění ve smyslu národního zákona o recyklaci a odpadech. Tyto předpisy se nevztahují na díly příslušenství a pomocné prostředky bez elektrických součástí
přidané ke starým přístrojům.
Patisk nebo jiné rozmnožování dokumentace a průvodních listin, také ve výtažcích, je přípustný pouze s
výslovným souhlasem fi rmy iSC GmbH.
Technické změny vyhrazeny
- 47 -
Anl_TC_CD_18_2_Li_SPK7.indb 47Anl_TC_CD_18_2_Li_SPK7.indb 47 07.06.16 08:5707.06.16 08:57
Page 48

CZ
Ser visní informace
Ve všech zemích uvedených v záručním listu máme kompetentní servisní partnery, jejichž kontaktní
údaje naleznete v záručním listu. Jsou Vám k dispozici pro všechny servisní požadavky jako opravy, objednávání náhradních a rychle opotřebitelných dílů nebo nákup spotřebních materiálů.
Je třeba dbát na to, že u tohoto přístroje podléhají následující díly opotřebení přiměřenému použití nebo
přirozenému opotřebení, resp. jsou potřebné jako spotřební materiál.
Kategorie Příklad
Rychle opotřebitelné díly* Sklíčidlo, Akumulátor
Spotřební materiál/spotřební díly* Šroubovací bity/vrtáky
Chybějící díly
* není nutně obsaženo v rozsahu dodávky!
V případě nedostatků nebo chyb Vás žádame, abyste příslušnou chybu nahlásili na internetové stránce
www.isc-gmbh.info. Dbejte prosím na přesný popis chyby a odpovězte přitom v každém případě na následující otázky:
Fungoval přístroj předtím nebo byl od začátku defektní?
•
Všimli jste si něčeho před vyskytnutím poruchy (příznak před poruchou)?
•
Jakou chybnou funkci přístroj podle Vašeho názoru vykazuje (hlavní příznak)?
•
Popište tuto chybnou funkci.
- 48 -
Anl_TC_CD_18_2_Li_SPK7.indb 48Anl_TC_CD_18_2_Li_SPK7.indb 48 07.06.16 08:5707.06.16 08:57
Page 49

CZ
Záruční list
Vážená zákaznice, vážený zákazníku,
naše výrobky podléhají přísné kontrole kvality. Pokud i přesto tento přístroj bezvadně nefunguje, je
nám to velice líto a prosíme Vás, abyste se obrátili na naši servisní službu na adrese uvedené na tomto
záručním listu. Rádi Vám budeme k dispozici také telefonicky na uvedeném servisním telefonním čísle.
Pro uplatňování požadavků poskytnutí záruky platí následující:
1. Tyto záruční podmínky jsou určeny výlučně pro spotřebitele, tzn. fyzické osoby, které tento výrobek
nebudou používat ani v rámci své profesní, ani jiné výdělečně činné aktivity. Tyto záruční podmínky
upravují dodatečné záruky, které níže uvedený výrobce poskytuje kupujícím nových přístrojů navíc
k zákonné záruce. Vaše zákonem stanovené nároky na záruku zůstanou touto zárukou nedotčeny.
Naše záruka je pro Vás bezplatná.
2. Záruka se vztahuje výhradně na nedostatky na vámi zakoupeném novém přístroji níže uvedeného
výrobce, které jsou způsobené chybou materiálu nebo výrobní chybou, a podle našeho uvážení je
omezena na odstranění těchto nedostatků na přístroji nebo výměnu přístroje.
Dbejte prosím na to, že naše přístroje nebyly podle svého účelu určení konstruovány pro
živnostenské, řemeslnické nebo odborné použití. Záruční smlouva se proto nenaplní, pokud byl
přístroj během záruční doby používán v živnostenských, řemeslnických nebo průmyslových podnicích nebo byl vystaven srovnatelnému zatížení.
3. Z naší záruky jsou vylou
- Škody na přístroji, které vznikly nedodržením montážního návodu nebo na základě neoborné
instalace, nedodržením návodu k použití (jako např. připojení na chybné síťové napětí nebo druh
el. proudu), nebo nedodržením pokynů k údržbě a bezpečnostních pokynů, vystavením přístroje
nepřirozeným povětrnostním podmínkám nebo nedostatečnou péčí a údržbou.
- Škody na přístroji, které vznikly neoprávněným nebo nesprávným použitím (jako např. přetížení
přístroje nebo použití neschválených přídavných nástrojů nebo příslušenství), vniknutím cizích těles
do přístroje (jako např. písek, kameny nebo prach, škody při přepravě), používáním násilí nebo cizím
působením (jako např. škody způsobené pádem).
- Škody na přístroji nebo na dílech přístroje, které jsou způsobeny běžným opotřebením
přiměřeného použití nebo jiným přirozeným opotřebením.
4. Záruční doba činí 24 měsíců a začíná datem koupě přístroje. Požadavky poskytnutí záruky musí
být uplatňovány před uplynutím záruční doby během dvou týdnů poté, co byla vada zjištěna.
Uplatňování požadavků poskytnutí záruky po uplynutí záruční doby je vyloučeno. Oprava nebo
výměna přístroje nevede ani k prodloužení záruční doby, ani nedojde tímto výkonem k zahájení nové
záruční doby pro tento přístroj nebo pro jakékoli zabudované náhradní díly. To platí také při využití
místního servisu.
5. Pro uplatňování požadavků na poskytnutí záruky nahlaste prosím váš defektní přístroj na: www.
isc-gmbh.info. Mějte připravenu nákupní účtenku nebo jiné doklady o vašem nákupu. Přístroje, které
jsou zaslány bez odpovídajících dokladů a bez typového štítku, jsou ze záručního plnění vyloučeny
z důvodu nedostatečné možnosti jednoznačného přiřazení. Pokud je defekt přístroje zahrnut v naší
záruce, obdržíte obratem zpátky opravený nebo nový přístroj.
čeny:
Samozřejmě Vám rádi odstraníme nedostatky na přístroji na Vaše náklady, pokud tyto nedostatky nejsou nebo už nejsou zahrnuty v rozsahu záruky. V takovém případě nám prosím zašlete přístroj na naší
servisní adresu.
V případě rychle opotřebitelných dílů, spotřebních dílů a chybějících dílů poukazujeme na omezení této
záruky podle servisních informací uvedených v tomto návodu k obsluze.
- 49 -
Anl_TC_CD_18_2_Li_SPK7.indb 49Anl_TC_CD_18_2_Li_SPK7.indb 49 07.06.16 08:5707.06.16 08:57
Page 50

SK
Obsah
1. Bezpečnostné pokyny
2. Popis prístroja a objem dodávky
3. Správne použitie prístroja
4. Technické údaje
5. Pred uvedením do prevádzky
6. Obsluha
7. Čistenie, údržba a objednanie náhradných dielov
8. Likvidácia a recyklácia
9. Skladovanie
10. Signalizácia nabíjačky
- 50 -
Anl_TC_CD_18_2_Li_SPK7.indb 50Anl_TC_CD_18_2_Li_SPK7.indb 50 07.06.16 08:5707.06.16 08:57
Page 51

SK
Nebezpečenstvo! - Aby ste znížili riziko poranenia, prečítajte si návod na obsluhu
Pozor! Používajte ochranu sluchu. Pôsobenie hluku môže spôsobiť poškodenie sluchu.
Pozor! Používajte ochrannú masku proti prachu. Pri práci s drevom a inými materiálmi môže vznikať
zdraviu škodlivý prach. Materiál obsahujúci azbest nesmie byť spracovávaný!
Pozor! Noste ochranné okuliare. Iskry vznikajúce pri práci alebo úlomky, triesky a prach vystupujúci z
prístroja by mohli viesť k trvalému poškodeniu zraku.
Aby sa zabránilo poškodeniu prevodovky, smú sa prepínať otáčkové stupne iba vtedy, keď je prístroj v
stave pokoja.
Skladovanie akumulátorov len v suchých miestnostiach s teplotou okolia v rozsahu +10 °C - +40 °C.
Skladovať akumulátory len v nabitom stave (min. 40 % nabité).
Trieda ochrany II
Určené len na použitie v suchých miestnostiach
- 51 -
Anl_TC_CD_18_2_Li_SPK7.indb 51Anl_TC_CD_18_2_Li_SPK7.indb 51 07.06.16 08:5707.06.16 08:57
Page 52

SK
Nebezpečenstvo!
Pri používaní prístrojov sa musia dodržiavať
príslušné bezpečnostné opatrenia, aby bolo
možné zabrániť prípadným zraneniam a vecným
škodám. Preto si starostlivo prečítajte tento návod na obsluhu/bezpečnostné pokyny. Následne
ich starostlivo uschovajte, aby ste mali vždy k
dispozícii potrebné informácie. V prípade, že
budete prístroj požičiavať tretím osobám, prosím
odovzdajte im spolu s prístrojom tento návod na
obsluhu/bezpečnostné pokyny. Nepreberáme
žiadne ručenie za nehody ani škody, ktoré vzniknú nedodržaním tohto návodu na obsluhu a
bezpečnostných pokynov.
1. Bezpečnostné pokyny
Príslušné bezpečnostné pokyny nájdete v
priloženej brožúrke.
Nebezpečenstvo!
Prečítajte si všetky bezpečnostné predpisy a pokyny. Nedostatky pri dodržovaní
bezpečnostných predpisov a pokynov môžu
mať za následok úraz elektrickým prúdom, vznik požiaru a/alebo ťažké poranenia. Všetky
bezpečnostné predpisy a pokyny si odložte
pre budúce použitie.
2. Popis prístroja a objem dodávky
2.1 Popis prístroja (obr. 1)
1. Nastavenie točivého momentu
2. Zobrazenie kapacity akumulátora
3. Prepínač smeru otáčania
4. Vypínač zap/vyp
5. Akumulátor
6. Nabíjačka
7. Prepínač 1. stupeň - 2. stupeň
8. Aretačné tlačidlo
9. Rýchloupínacie skľučovadlo
10. Diódové svetlo LED
Otvorte balenie a opatrne vyberte prístroj von
•
z balenia.
Odstráňte obalový materiál ako aj obalové/
•
transportné poistky (pokiaľ sú obsiahnuté).
Skontrolujte, či obsah dodávky kompletný.
•
Skontrolujte, či nedošlo k poškodeniu prístro-
•
ja a príslušenstva transportom.
Pokiaľ možno, uschovajte si obal až do konca
•
záručnej doby.
Nebezpečenstvo!
Prístroj a obalový materiál nie sú hračky! Deti
sa nesmú hrať s plastovými vreckami, fóliami
ani malými dielmi! Hrozí nebezpečenstvo
prehltnutia a udusenia!
Akumulátorový vŕtací skrutkovač
•
Nabíjačka
•
Akumulátor
•
Originálny návod na obsluhu
•
Bezpečnostné predpisy
•
3. Správne použitie prístroja
Akumulátorový vŕtací skrutkovač je vhodný na
skrutkovanie a uvoľňovanie skrutiek, ako aj na
vŕtanie dreva, kovu a umelej hmoty.
Prístroj smie byť použitý len na ten účel, na ktorý
bol určený. Akékoľvek iné odlišné použitie sa
považuje za nespĺňajúce účel použitia. Za škody
alebo zranenia akéhokoľvek druhu spôsobené
nesprávnym používaním ručí používateľ / obsluhujúca osoba, nie však výrobca.
Prosím berte ohľad na skutočnosť, že naše prístroje neboli svojim určením konštruované na profesionálne, remeselnícke ani priemyselné použitie.
Nepreberáme žiadne záručné ručenie, ak sa
prístroj bude používať v profesionálnych, remeselníckych alebo priemyselných prevádzkach ako
aj na činnosti rovnocenné s takýmto použitím.
2.2 Objem dodávky
Prosím, skontrolujte kompletnosť výrobku na
základe uvedeného objemu dodávky. V prípade
chýbajúcich častí sa prosím obráťte najneskôr
do 5 pracovných dní od zakúpenia výrobku s
predložením platného dokladu o kúpe na naše
servisné stredisko alebo na obchod, v ktorom ste
prístroj zakúpili. Prosím, dbajte pritom na záručnú
tabuľku uvedenú v servisných informáciách na
konci návodu.
- 52 -
Anl_TC_CD_18_2_Li_SPK7.indb 52Anl_TC_CD_18_2_Li_SPK7.indb 52 07.06.16 08:5707.06.16 08:57
Page 53

SK
4. Technické údaje
Napájanie napätím motora: .....................18 V d.c.
Otáčky pri voľnobehu: ...........0-350 / 0-1250 min
Stupne točivého momentu: .......................... 18+1
Pravo-ľavo-točivý chod: ................................. áno
Šírka skľučovadla vrtáka: ..................max. 10 mm
Výstupné napätie nabíjačky: ...................23 V d.c.
Výstupný prúd nabíjačky: ............................. 0,5 A
Sieťové napätie nabíjačky: .100-240 V ~ 50/60 Hz
Typ akumulátora: ......................................... Li-Ion
Počet akumulátorových článkov: ....................... 5
Kapacita akumulátora: ...............................1,3 Ah
Hmotnosť: ...................................................1,6 kg
Max. priemer skrutky: .................................. 6 mm
Max. priemer skrutky popisuje, aký môže mať
maximálny priemer skrutka, ktorú je možné
naskrutkovať do dreva. Podľa druhu dreva sa
môže priemer skrutky odlišovať.
Hlučnosť a vibrácie
Hodnoty hlučnosti a vibrácií boli merané podľa
európskej normy EN 60745.
Hladina akustického tlaku L
Nepresnosť K
............................................3 dB
pA
Hladina akustického výkonu L
Nepresnosť K
...........................................3 dB
WA
Používajte ochranu sluchu.
Pôsobenie hluku môže spôsobiť poškodenie
sluchu.
Celkové hodnoty vibrácií (súčet vektorov troch
smerov) stanovené v súlade s EN 60745.
Vŕtanie do kovu
Emisná hodnota vibrácie a
Faktor neistoty K = 1,5 m/s
.......... 70,88 dB (A)
pA
...... 81,88 dB (A)
WA
≤ 2,5 m/s
h
2
2
Uvedená emisná hodnota vibrácií sa môže použiť
za účelom porovnania elektrického prístroja s
inými prístrojmi.
-1
Uvedená emisná hodnota vibrácií sa môže taktiež
použiť za účelom východiskového posúdenia
vplyvov.
Obmedzte tvorbu hluku a vibráciu na minimum!
Používajte len prístroje v bezchybnom stave.
•
Pravidelne vykonávajte údržbu a čistenie
•
prístroja.
Prispôsobte spôsob práce prístroju.
•
Prístroj nepreťažujte.
•
V prípade potreby nechajte prístroj
•
skontrolovať.
Prístroj vypnite, pokiaľ ho nepoužívate.
•
Používajte rukavice.
•
Pozor!
Zvyškové riziká
Aj napriek tomu, že budete elektrický prístroj
obsluhovať podľa predpisov, budú existovať
zvyškové riziká. V súvislosti s konštrukciou
a vyhotovením elektrického prístroja môže
dôjsť k výskytu týchto nebezpečenstiev:
1. Poškodenie pľúc, pokiaľ sa nenosí žiadna
vhodná ochranná maska proti prachu.
2. Poškodenie sluchu, pokiaľ sa nenosí žiadna
vhodná ochrana sluchu.
3. Poškodenie zdravia, ktoré je následkom vibrácie rúk a ramien, pokiaľ sa prístroj bude
používať dlhšiu dobu alebo sa nevedie a
neudržuje správnym spôsobom.
Obmedzujte Vašu pracovnú dobu.
Pritom sa musia zohľadniť všetky časti prevádzkového cyklu (napríklad čas, počas ktorého je
elektrický prístroj vypnutý, ako aj čas, počas ktorého je síce zapnutý, ale beží bez záťaže).
Skrutkovanie bez príklepu
Emisná hodnota vibrácie ah ≤ 2,5 m/s
Faktor neistoty K = 1,5 m/s
2
2
Uvedená emisná hodnota vibrácií bola nameraná
podľa normovaného skúšobného postupu a môže
sa meniť v závislosti od druhu a spôsobu použitia
elektrického náradia a vo výnimočných prípadoch
sa môže nachádzať nad uvedenou hodnotou.
- 53 -
Anl_TC_CD_18_2_Li_SPK7.indb 53Anl_TC_CD_18_2_Li_SPK7.indb 53 07.06.16 08:5707.06.16 08:57
Page 54

SK
5. Pred uvedením do prevádzky
Pred uvedením Vášho akumulátorového
skrutkovača do prevádzky si bezpodmienečne
prečítajte tieto pokyny:
1. Nabite akumulátor pomocou priloženej
nabíjačky. Prázdny akumulátor sa nabije
približne za 3 až 5 hodín.
2. Používajte len ostré vrtáky ako aj bezchybné
a vhodné skrutkovacie hroty.
3. Pri vŕtaní a skrutkovaní na stenách a múroch
je potrebné skontrolovať, či sa v nich nenachádzajú skryté elektrické vedenia, plynové
rozvody alebo vodovody.
6. Obsluha
6.1 Nabitie LI akumulátora (obr. 2-3)
1. Akumulátor (5) vybrať von z rukoväte, pritom
stlačiť aretačné tlačidlo (8) smerom nadol.
2. Porovnajte, či sieťové napätie uvedené na
typovom štítku zodpovedá prítomnému elektrickému napätiu siete.
3. Zasuňte nabíjačku (6) do zásuvky a spojte
nabíjací kábel (a) s nabíjačkou (5). 3 kontrolky
LED zobrazenia kapacity akumulátora (10) signalizujú, že prebieha nabíjanie akumulátora.
- Akumulátor vybitý: všetky 3 kontrolky LED
striedavo blikajú
- 1/3 nabitá: ľavá kontrolka LED svieti, prostredná a pravá kontrolka striedavo blikajú
- 2/3 nabité: ľavá a prostredná kontrolka svietia, pravá kontrolka bliká
4. Keď sa proces nabíjania po cca 3-5 hodinách
ukončí, svietia všetky tri kontrolky LED ešte
približne 10 minút. Odpojte nabíjačku z akumulátora.
5. Ak všetky 3 kontrolky LED súčasne blikajú,
tak je teplota akumulátora príliš nízka alebo
príliš vysoká. Odpojte nabíjačku zo siete,
nechajte akumulátor jeden deň aklimatizovať
pri izbovej teplote a skúste to znovu.
6. Ak sa chyba zobrazuje aj naďalej, tak je
akumulátor defektný. Defektný akumulátor sa
nesmie naďalej používať resp. nabíjať. Odpojte nabíjačku z akumulátora.
Ak by nemalo byť možné nabitie akumulátora,
skontrolujte prosím
či je v zásuvke prítomné sieťové napätie.
•
či je kontakt na nabíjacích kontaktoch
•
nabíjačky v bezchybnom stave.
Ak by ešte stále nemalo byť možné nabitie akumulátora prosíme Vás, aby ste
nabíjačku a nabíjací adaptér
•
a akumulátor
•
zaslali nášmu zákazníckemu servisu.
V záujme dlhej životnosti akumulátora by ste
sa mali postarať o včasné opätovné nabitie LI
akumulátora. To je potrebné v každom prípade
vtedy, keď zistíte, že sa výkon akumulátorového
skrutkovača začne znižovať.
6.2 Nastavenie točivého momentu
(obr. 4/pol. 1)
Pozor! Nastavovací krúžok točivého momentu nastavovať len, ak je prístroj v stave
pokoja.
Akumulátorový skrutkovač je vybavený mechanickým nastavením točivého momentu.
To čivý moment pre určitú veľkosť skrutky sa
nastavuje na nastavovacom krúžku (1). Točivý
moment je závislý od viacerých faktorov:
od druhu a tvrdosti spracovávaného materiá-
•
lu,
od druhu a dĺžky použitých skrutiek,
•
od požiadaviek, ktoré sú dané pre pevnosť
•
skrutkového spojenia.
Dosiahnutie nastaveného točivého momentu je
signalizované rapkajúcim vypínaním spojky.
6.3 Vŕtanie (obr. 4/pol. 1)
Na vŕtanie nastavte nastavovací krúžok točivého
momentu na posledný stupeň „vrták“. Na stupni
pre vŕtanie nie je klzná spojka aktívna. Pri vŕtaní je
k dispozícii maximálny točivý moment.
6.4 Prepínač smeru otáčania (obr. 5/pol. 3)
Pomocou tohto posuvného spínača umiestneného nad vypínačom zap/vyp môžete
nastaviť potrebný smer otáčania akumulátorového skrutkovača a akumulátorový skrutkovač
zabezpečiť proti samovoľnému zapnutiu. Môžete
voliť medzi ľavotočivým a pravotočivým smerom
otáčania. Aby sa zabránilo poškodeniu prevodovky, smie sa prepínať smer otáčania iba vtedy,
keď je prístroj v stave pokoja. Ak sa nachádza
posuvný vypínač v strednej polohe, je ním zablokovaný vypínač zap/vyp.
- 54 -
Anl_TC_CD_18_2_Li_SPK7.indb 54Anl_TC_CD_18_2_Li_SPK7.indb 54 07.06.16 08:5707.06.16 08:57
Page 55

SK
6.5 Vypínač zap/vyp (obr. 5/pol. 4)
Pomocou vypínača zap/vyp môžete plynulo riadiť
otáčky. Čím viac stlačíte tento vypínač, tým viac
sa zvýšia otáčky akumulátorového skrutkovača.
6.6 Prepnutie stupeň 1 - stupeň 2
(obr. 4/pol. 7)
Podľa polohy prepínača môžete pracovať s
vyššími alebo nižšími otáčkami. Aby sa zabránilo poškodeniu prevodovky, smú sa prepínať
otáčkové stupne iba vtedy, keď je prístroj v stave
pokoja.
6.7 Zobrazenie kapacity akumulátora
(obr. 1/pol. 2)
Zatlačte na vypínač pre zobrazenie kapacity akumulátora (a). Zobrazenie kapacity akumulátora (2)
signalizuje stav nabitia akumulátora pomocou 3
kontroliek LED.
Svietia všetky 3 kontrolky LED:
Akumulátor je úplne nabitý.
Svietia 2 alebo 1 kontrolka LED:
Akumulátor má dostatočné zvyškové nabitie.
1 kontrolka LED bliká:
Akumulátor je prázdny, nabite akumulátor.
Všetky kontrolky blikajú:
Teplota akumulátora je prekročená. Vyberte akumulátor z prístroja a nechajte ho aklimatizovať
jeden deň pri izbovej teplote. Ak sa chyba zobrazí
znovu, tak bol akumulátor hĺbkovo vybitý a je defektný. Odoberte akumulátor z prístroja. Defektný
akumulátor sa nesmie naďalej používať resp.
nabíjať.
6.8 Diódové svetlo LED (obr. 1/pol. 10)
Diódové svetlo LED (10) umožňuje osvetlenie miesta skrutkovania, resp. vŕtania pri
nedostatočných svetelných podmienkach. Diódové svetlo LED (10) sa rozsvieti automaticky, keď
stlačíte vypínač zap/vyp (4).
6.9 Výmena nástrojov (obr. 6)
Pozor! Pri všetkých prácach na akumulátorovom
skrutkovači (napr. výmena nástrojov, údržba atď.)
uveďte prepínač smeru otáčania (3) do prostrednej polohy.
Akumulátorový skrutkovač je vybavený
•
rýchloupínacím skľučovadlom (9) s automatickou aretáciou vretena.
Otáčaním otvorte skľučovadlo (9). Otvor
•
skľučovadla (a) musí byť dostatočne veľký,
aby sa do skľučovadla mohol vložiť nástroj
(vrták resp. skrutkovací hrot).
Zvoľte vhodný nástroj pre daný druh použitia.
•
Zasuňte nástroj čo najhlbšie do otvoru
skľučovadla (a).
Otáčaním pevne zatvorte skľučovadlo (9) a
•
skontrolujte potom pevné usadenie nástroja.
6.10 Skrutkovanie
Používajte, pokiaľ možno, skrutky so samočinným
centrovaním (napr. Torx, krížová skrutka), ktoré
zaručujú bezpečnú prácu. Dbajte na to, aby sa
zhodovali veľkosti a tvary použitého skrutkovacieho hrotu a skrutky. Nastavte točivý moment tak,
ako to je popísané v tomto návode podľa veľkosti
použitej skrutky.
7. Čistenie, údržba a objednanie
náhradných dielov
Nebezpečenstvo!
Pred všetkými údržbovými a čistiacimi prácami
vytiahnite kábel zo siete.
7.1 Čistenie
Udržujte ochranné zariadenia, vzduchové
•
otvory a kryt motora vždy v čistom stave bez
prachu a nečistôt. Utrite prístroj čistou utierkou alebo ho vyčistite vyfúkaním stlačeným
vzduchom pri nastavení na nízky tlak.
Odporúčame, aby ste prístroj čistili priamo po
•
každom použití.
Čistite prístroj pravidelne pomocou vlhkej
•
utierky a malého množstva tekutého mydla.
Nepoužívajte žiadne agresívne čistiace prostriedky ani riedidlá; tieto prostriedky by mohli
napadnúť umelohmotné diely prístroja. Dbajte
na to, aby sa do vnútra prístroja nedostala
voda. Vniknutie vody do elektrického prístroja
zvyšuje riziko úrazu elektrickým prúdom.
7.2 Údržba
Vo vnútri prístroja sa nenachádzajú žiadne ďalšie
diely vyžadujúce údržbu.
- 55 -
Anl_TC_CD_18_2_Li_SPK7.indb 55Anl_TC_CD_18_2_Li_SPK7.indb 55 07.06.16 08:5707.06.16 08:57
Page 56

7.3 Objednávanie náhradných dielov a
príslušenstva:
Pri objednávaní náhradných dielov je potrebné
uviesť nasledovné údaje:
Typ prístroja
•
Výrobné číslo prístroja
•
Identifikačné číslo prístroja
•
Číslo potrebného náhradného dielu
•
Aktuálne ceny a informácie nájdete na stránke
www.isc-gmbh.info
Tip! Pre dobré výsledky
práce odporúčame kvalitné
príslušenstvo značky
! www.kwb.eu
welcome@kwb.eu
8. Likvidácia a recyklácia
Prístroj sa nachádza v obale za účelom zabránenia poškodeniu pri transporte. Tento obal je vyrobený zo suroviny a tým pádom je ho možné znovu
použiť alebo sa môže dať do zberu na recykláciu
surovín. Prístroj a jeho príslušenstvo sa skladajú
z rôznych materiálov, ako sú napr. kovy a plasty.
Poškodené prístroje nepatria do domového odpadu. Prístroj by sa mal odovzdať k odbornej likvidácii na príslušnom zbernom mieste. Pokiaľ Vám
nie je známe takéto zberné miesto, informujte sa
prosím na miestnej samospráve.
SK
9. Skladovanie
Skladujte prístroj a jeho príslušenstvo na tmavom,
suchom a nezamŕzajúcom mieste mimo dosahu
detí. Optimálna teplota pre skladovanie je medzi
5 až 30 °C. Skladujte tento elektrický prístroj v originálnom balení.
- 56 -
Anl_TC_CD_18_2_Li_SPK7.indb 56Anl_TC_CD_18_2_Li_SPK7.indb 56 07.06.16 08:5707.06.16 08:57
Page 57

SK
Len pre krajiny EÚ
Neodstraňujte elektrické prístroje ako domový odpad!
Podľa Európskej smernice 2012/96/EU o odpade z elektrických a elektronických zariadení (OEEZ) a v
súlade s národnými právnymi predpismi sa musia použité elektronické prístroje odovzdať do triedeného
zberu a musí sa zabezpečiť ich špecifi cké spracovanie v súlade s ochranou životného prostredia (recy-
klácia).
Recyklačná alternatíva k výzve na spätné zaslanie výrobku:
Majiteľ elektrického prístroja je alternatívne namiesto spätnej zásielky povinný spolupracovať pri riadnej recyklácii prístroja v prípade vzdania sa jeho vlastníctva. Starý prístroj môže byť za týmto účelom
taktiež prenechaný zbernému miestu, ktoré vykoná odstránenie v zmysle národného zákona o recyklácii
a odpadovom hospodárstve. Netýka sa to dielov príslušenstva, priložených k starým prístrojom a pomocných prostriedkov bez elektronických komponentov.
Dodatočná tlač alebo iné reprodukovanie dokumentácie a sprievodných dokladov výrobkov, taktiež ich
častí, je prípustná len s výslovným súhlasom spoločnosti iSC GmbH.
Technické zmeny vyhradené
- 57 -
Anl_TC_CD_18_2_Li_SPK7.indb 57Anl_TC_CD_18_2_Li_SPK7.indb 57 07.06.16 08:5707.06.16 08:57
Page 58

SK
Ser visné informácie
Vo všetkých krajinách uvedených na záručnom liste máme kompetentných servisných partnerov,
ktorých kontakty je možné prevziať zo záručného listu. Sú Vám k dispozícii pre akékoľvek servisné
požiadavky ako opravy, objednávanie náhradných a opotrebovávaných dielov alebo nákup spotrebných
materiálov.
Je potrebné dbať na to, že v prípade tohto výrobku podliehajú nasledujúce diely bežnému pracovnému
alebo prirodzenému opotrebeniu, resp. sú nasledujúce diely považované za spotrebný materiál.
Kategória Príklad
Diely podliehajúce opotrebeniu* Skľučovadlo, Akumulátor
Spotrebný materiál / spotrebné diely* Bitové násady/vrtáky
Chýbajúce diely
* nie je bezpodmienečne obsiahnuté v objeme dodávky!
V prípade nedostatkov alebo chýb Vás prosíme, aby ste príslušnú chybu nahlásili na adrese www.iscgmbh.info. Prosím, dbajte na presný popis chyby a odpovedzte pritom v každom prípade na nasledujúce otázky:
Fungoval prístroj predtým alebo bol od začiatku chybný?
•
Všimli ste si niečo pred vyskytnutím poruchy (symptóm pred poruchou)?
•
Aké chybné funkcie podľa Vás prístroj vykazuje (hlavný symptóm)?
•
Popíšte túto chybnú funkciu.
- 58 -
Anl_TC_CD_18_2_Li_SPK7.indb 58Anl_TC_CD_18_2_Li_SPK7.indb 58 07.06.16 08:5707.06.16 08:57
Page 59

SK
Záručný list
Vážená zákazníčka, vážený zákazník,
naše výrobky podliehajú prísnej kontrole kvality. V prípade, že nebude prístroj napriek tomu bezchybne
fungovať, je nám to veľmi ľúto a prosíme Vás, aby ste sa obrátili na našu servisnú službu na adrese
uvedenej na tomto záručnom liste. Radi Vám budeme k dispozícii taktiež telefonicky na uvedenom servisnom telefónnom čísle. Pre uplatnenie nárokov na záručné plnenie platia nasledujúce podmienky:
1. Tieto záručné podmienky sa týkajú výlučne štandardných spotrebiteľov, t.j. takých osôb, ktoré tento
výrobok nechcú používať na účely v rámci svojich remeselníckych činností ani na iné samostatne
zárobkové činnosti. Tieto záručné podmienky upravujú dodatočné záručné plnenia, ktoré nižšie
uvedený výrobca poskytuje kupujúcim svojich nových prístrojov dodatočne k zákonnej záruke. Vaše
zákonné nároky na záruku nie sú touto zárukou dotknuté. Naše záručné plnenie je pre Vás zadarmo.
2. Záručné plnenie sa vzťahuje výlučne len na nedostatky na Vami zakúpenom novom prístroji nižšie
uvedeného výrobcu, ktoré sú spôsobené chybami materiálu alebo výrobnými chybami, a podľa
nášho uváženia sa obmedzuje na odstránenie týchto nedostatkov na prístroji alebo výmenu prístroja. Prosím, dbajte na to, že naše prístroje neboli svojim určením konštruované na profesionálne,
remeselnícke ani odborné použitie. Táto záručná zmluva sa preto neuzatvára, ak sa prístroj počas
záručnej doby používal v profesionálnych, remeselníckych alebo priemyselných prevádzkach, alebo
ak bol vystavený namáhaniu rovnocennému s takýmto použitím.
3. Z našej záruky sú vylúčené:
- Škody na prístroji, ktoré boli spôsobené nedodržaním montážneho návodu alebo na základe neodbornej inštalácie, nedodržaním návodu na použitie (ako napr. pripojením na nesprávne sieťové
napätie alebo druh prúdu) alebo nedodržaním pokynov pre údržbu a bezpečnostných pokynov
alebo vystavením prístroja abnormálnym poveternostným podmienkam alebo nedostatočnou
starostlivosťou a údržbou.
- Škody na prístroji, ktoré boli spôsobené zneužívaním alebo nesprávnym používaním (ako napr.
preťaženie prístroja alebo použitie neprípustných pracovných nástrojov alebo príslušenstva),
vniknutím cudzích telies do prístroja (ako napr. piesok, kamene alebo prach, prepravné
poškodenia), použitím násilia alebo cudzieho pôsobenia (napr. škody spôsobené pádom).
- Škody na prístroji alebo na častiach prístroja, ktoré zodpovedajú príslušnému pracovnému,
bežnému alebo inému prirodzenému opotrebeniu.
4. Doba záruky je 24 mesiacov a začína plynúť od dátumu zakúpenia prístroja. Nároky na záruku sa
musia uplatniť pred koncom uplynutia záručnej doby do dvoch týžd
Uplatnenie nárokov na záruku po uplynutí záručnej doby je vylúčené. Oprava alebo výmena prístroja nevedie k predĺženiu záručnej doby ani nedochádza na základe tohto plnenia ku vzniku novej
záručnej doby pre prístroj ani pre akékoľvek inštalované náhradné diely. To platí taktiež pri použití
miestneho servisu.
5. Pre uplatnenie Vášho nároku, prosím nahláste defektný prístroj na adrese: www.isc-gmbh.info.
Prosíme, aby ste mali k dispozícii účtenku alebo iné doklady o zakúpení nového prístroja. Prístroje, ktoré budú zaslané bez príslušných dokladov alebo bez typového štítku, budú vylúčené zo
záručného plnenia kvôli nedostatočnej možnosti identifi kácie. Ak spadá defekt prístroja pod naše
záručné plnenie, dostanete obratom naspäť opravený alebo nový prístroj.
ňov od zistenia nedostatku.
Samozrejme Vám radi opravíme nedostatky na prístroji na Vaše náklady, ak tieto nedostatky nespadajú
alebo už nespadajú do rozsahu záruky. Prosím, pošlite nám v takom prípade prístroj na našu servisnú
adresu.
Ohľadne opotrebovávaných, spotrebných a chýbajúcich dielov poukazujeme na obmedzenia tejto
záruky podľa servisných informácií uvedených v tomto návode na obsluhu.
- 59 -
Anl_TC_CD_18_2_Li_SPK7.indb 59Anl_TC_CD_18_2_Li_SPK7.indb 59 07.06.16 08:5707.06.16 08:57
Page 60

NL
Gevaar! - Handleiding lezen om het letselrisico te verminderen
Voorzichtig! Draag een gehoorbeschermer. Lawaai kan aanleiding geven tot gehoorverlies.
Voorzichtig! Draag een stofmasker. Bij het bewerken van hout en andere materialen kan stof ontsta-
an dat schadelijk is voor de gezondheid. Asbesthoudend materiaal mag niet worden bewerkt!
Voorzichtig! Draag een veiligheidsbril. Vonken die tijdens het werk ontstaan of splinters, spanen en
stof die uit het toestel ontsnappen kunnen leiden tot zichtverlies.
Om een beschadiging van de transmissie te voorkomen mag de versnellingsschakeling enkel in stilstand worden omgeschakeld.
Opbergen van de accu’s enkel in droge ruimtes met een omgevingstemperatuur van +10°C tot +40°C.
Accu’s enkel in geladen toestand opbergen (minstens 40 % geladen).
Beschermingsniveau II
Enkel voor gebruik in droge ruimten.
- 60 -
Anl_TC_CD_18_2_Li_SPK7.indb 60Anl_TC_CD_18_2_Li_SPK7.indb 60 07.06.16 08:5707.06.16 08:57
Page 61

NL
Gevaar!
Bij het gebruik van toestellen dienen enkele
veiligheidsmaatregelen te worden nageleefd om
lichamelijk gevaar en schade te voorkomen. Lees
daarom deze handleiding / veiligheidsinstructies
zorgvuldig door. Bewaar deze goed zodat u de informatie op elk moment kunt terugvinden. Mocht
u dit toestel aan andere personen doorgeven,
gelieve dan deze handleiding / veiligheidsinstructies mee te geven. Wij zijn niet aansprakelijk
voor ongevallen of schade die te wijten zijn aan
niet-naleving van deze handleiding en van de veiligheidsinstructies.
1. Veiligheidsaanwijzingen
De overeenkomstige veiligheidsinstructies vindt u
in de bijgaande brochure.
Gevaar!
Lees alle veiligheidsinstructies en aanwijzingen. Nalatigheden bij de inachtneming van de
veiligheidsinstructies en aanwijzingen kunnen
elektrische schok, brand en/of zware letsels tot
gevolg hebben. Bewaar alle veiligheidsinstruc-
ties en aanwijzingen voor de toekomst.
2. Beschrijving van het gereedschap
en leveringsomvang
2.1 Beschrijving van het gereedschap
(fi g. 1)
1. Koppelafstelling
2. Accucapaciteitsindicator
3. Draairichtingsschakelaar
4. AAN/UIT-schakelaar
5. Accu
6. Lader
7. Omschakelaar 1e versnelling - 2e versnelling
8. Grendelknop
9. Snelspanboorhouder
10. LED-licht
2.2 Leveringsomvang
Gelieve de volledigheid van het artikel te controleren aan de hand van de beschreven leveringsomvang. Indien er onderdelen ontbreken gelieve
zich binnen de 5 werkdagen na aankoop van het
artikel te wenden tot ons servicecenter mits vertoon van een geldig bewijs van aankoop of tot de
dichtstbijzijnde desbetreff ende bouwmarkt..
Gelieve daarvoor de garantietabel in de garantiebepalingen aan het einde van de handleiding in
acht te nemen.
Open de verpakking en neem het toestel
•
voorzichtig uit de verpakking.
Verwijder het verpakkingsmateriaal alsmede
•
verpakkings-/transportbeveiligingen (indien
aanwezig).
Controleer of de leveringsomvang compleet
•
is.
Controleer het toestel en de accessoires op
•
transportschade.
Bewaar de verpakking indien mogelijk tot het
•
verloop van de garantieperiode.
Gevaar!
Het toestel en het verpakkingsmateriaal zijn
geen speelgoed voor kinderen! Kinderen mogen niet met plastic zakken, folies en kleine
stukken spelen! Er bestaat inslik- en verstikkingsgevaar!
Accu boorschroefmachine
•
Lader
•
Batterij
•
Originele handleiding
•
Veiligheidsinstructies
•
3. Reglementair gebruik
De accuboorschroefmachine is geschikt voor het
in- en losdraaien van schroeven alsmede voor het
boren in hout, metaal en kunststof.
De machine mag slechts voor werkzaamheden
worden gebruikt waarvoor ze bedoeld is. Elk
ander verder gaand gebruik is niet reglementair.
Voor daaruit voortvloeiende schade of verwondingen van welke aard dan ook is de gebruiker/
bediener, niet de fabrikant, aansprakelijk.
Wij wijzen erop dat onze gereedschappen overeenkomstig hun bestemming niet geconstrueerd
zijn voor commercieel, ambachtelijk of industrieel
gebruik. Wij geven geen garantie indien het gereedschap in ambachtelijke of industriële bedrijven alsmede bij gelijk te stellen activiteiten wordt
gebruikt.
- 61 -
Anl_TC_CD_18_2_Li_SPK7.indb 61Anl_TC_CD_18_2_Li_SPK7.indb 61 07.06.16 08:5707.06.16 08:57
Page 62

NL
4. Technische gegevens
Spanningsvoorziening motor ..................18 V d.c.
Onbelast toerental: ...............0-350 / 0-1250 t/min
Koppelstanden: ........................................... 18+1
rechts-/linksdraaiend..........................................ja
Opnamevermogen boorkop .............. max. 10 mm
Uitgangsspanning lader: ....................... 23 V d. c.
Uitgangsstroom lader: .................................0,5 A
Netspanning oplader .........100-240 V ~ 50/60 Hz
Accu type: .................................................. Li-Ion
Aantal accucellen: ............................................. 5
Accucapaciteit: .......................................... 1,3 Ah
Gewicht .......................................................1,6 kg
Max. schroefdiameter ................................. 6 mm
Geluid en vibratie
De geluids- en vibratiewaarden werden bepaald
volgens EN 60745.
Geluidsdrukniveau L
Onzekerheid K
Geluidsvermogen L
Onzekerheid K
Draag een gehoorbeschermer.
Lawaai kan aanleiding geven tot gehoorverlies.
Totale vibratiewaarden (vectorsom van drie
richtingen) bepaald volgens EN 60745.
Boren in metaal
Trillingsemissiewaarde a
Onzekerheid K = 1,5 m/s
Schroeven zonder klopfunctie
Trillingsemissiewaarde ah ≤ 2,5 m/s
Onzekerheid K = 1,5 m/s
De opgegeven trillingsemissiewaarde is gemeten
volgens een genormaliseerde testprocedure en
kan veranderen naargelang van de wijze waarop
het elektrische gereedschap wordt gebruikt en
in uitzonderingsgevallen boven de opgegeven
waarde liggen.
De vermelde trillingsemissiewaarde kan worden
gebruikt om elektrische gereedschappen onderling te vergelijken.
..................... 70,88 dB (A)
pA
........................................... 3 dB
pA
...................... 81,88 dB (A)
WA
.......................................... 3 dB
WA
≤ 2,5 m/s
h
2
2
2
2
De vermelde trillingsemissiewaarde kan ook worden gebruikt om voor begin van de werkzaamheden de nadelige gevolgen te beoordelen.
Beperk de geluidsontwikkeling en vibratie tot
een minimum!
Gebruik enkel intacte toestellen.
•
Onderhoud en reinig het toestel regelmatig.
•
Pas uw manier van werken aan het toestel
•
aan.
Overbelast het toestel niet.
•
Laat het toestel indien nodig nazien.
•
Schakel het toestel uit als het niet wordt ge-
•
bruikt.
Draag handschoenen.
•
Voorzichtig!
Restrisico’s
Er blijven altijd restrisico’s over ook al wordt
dit elektrisch gereedschap naar behoren bediend. Volgende gevaren kunnen zich voordoen in verband met de bouwwijze en uitvoering van dit elektrisch gereedschap:
1. Longletsels indien geen gepaste stofmasker
wordt gedragen.
2. Gehoorschade indien geen gepaste gehoorbeschermer wordt gedragen.
3. Schade aan de gezondheid die voortvloeit
uit hand-arm-trillingen indien het toestel lang
zonder onderbreking wordt gebruikt of niet
naar behoren wordt gehanteerd en onderhouden.
Beperk de werktijd.
Daarbij rekening houden met alle aandelen van
het bedrijfscyclus (bij voorbeeld tijden waarin het
elektrogereedschap uitgeschakeld is en tijden
waarin het gereedschap wel ingeschakeld is maar
zonder belasting draait).
5. Vóór inbedrijfstelling
Lees zeker de volgende instructies voordat u uw
accuschroevendraaier in gebruik neemt:
1. Laad de accu m.b.v. het bijgeleverde laadtoestel. Een lege accu is na ca. 1 uur opgeladen.
2. Enkel scherpe boren en intacte en gepaste
schroeverbits gebruiken.
3. Bij het boren en schroeven in muren en wanden dient u die op verborgen stroom-, gas- en
waterleidingen te controleren.
- 62 -
Anl_TC_CD_18_2_Li_SPK7.indb 62Anl_TC_CD_18_2_Li_SPK7.indb 62 07.06.16 08:5707.06.16 08:57
Page 63

NL
6. Bediening
6.1 Laden van de LI-accupack (fi g. 2-3)
1. Accupack (5) uit de handgreep trekken, terwijl u de grendelknop (8) naar beneden drukt.
2. Vergelijk of de netspanning vermeld op het
typeplaatje overeenkomt met de beschikbare
netspanning.
3. Steek de lader (6) in het stopcontact en verbind de laadkabel (a) met de accu (5). De 3
LEDs aan de accu-capaciteitsindicator (10)
signaleren dat de accu wordt geladen.
- Accu ontladen: alle 3 de LEDs knipperen
afwisselend
- 1/3 opgeladen: linker LED brandt, middelste
en rechter LED knipperen afwisselend
- 2/3 opgeladen: linker en middelste LED
branden, rechter LED knippert
4. Als het laden na ca. 3-5 h is beëindigd, dan
branden alle 3 de LEDs gedurende ongeveer
10 min. Verwijder de lader van de accu.
5. Als alle 3 de LEDs gelijktijdig knipperen, dan
is de temperatuur van de accu onder- resp.
overschreden. Verwijder de lader van de
accu, laat de accu één dag bij ruimtetemperatuur liggen en probeer het opnieuw.
6. Als de fout nog steeds verschijnt, dan is de
accu defect. Een defecte accu mag niet meer
gebruikt resp. geladen worden. Isoleer de
lader van de accu.
Als het accu-pack niet kan opgeladen worden,
vergewis U zich dan dat de
netspanning aan het stopcontact voorhanden
•
is
en dat een perfect contact van de laadcon-
•
tacten van de oplader verzekerd is.
Als het laden van het accu-pack nog altijd niet
mogelijk is, gelieve dan
de oplader
•
en het accu-pack
•
aan onze service-afdeling te sturen.
In het belang van een lange levensduur van de
accupack is het aan te raden om tijdig voor het
herladen van de LI accupack te zorgen. Dit is
in ieder geval noodzakelijk wanneer u vaststelt
dat het vermogen van de accuschroevendraaier
vermindert.
6.2 Koppelafstelling (fi g. 4, pos. 1)
Let op! Stelring voor het koppel enkel bij stilstand instellen.
De accuschroevendraaier is voorzien van een
mechanische koppelafstelling.
Het koppel voor een bepaalde schroefgrootte
wordt aan de stelring ingesteld. Het koppel is afhankelijk van meerdere factoren:
van de aard en de hardheid van het te bewer-
•
ken materiaal
van de aard en de lengte van de gebruikte
•
schroeven
van de eisen die aan de schroefverbinding
•
gesteld worden.
Het bereiken van het koppel wordt door het ratelend ontkoppelen van de koppeling gesignaleerd.
6.3 Boren (fi g. 4, pos. 1)
Om te boren brengt U de instelring voor het koppel in de laatste stand ”boor” (fi g. 1). In de stand
”boren” is de slipkoppeling buiten werking. Tijdens
het boren is het maximumkoppel beschikbaar.
6.4 Draairichtingsschakelaar (fi g. 5, pos. 3)
Met behulp van de schuifschakelaar boven de
in-/uitschakelaar kunt U de draairichting van Uw
accu-schroefmachine instellen en de machine
tegen ongewild inschakelen beveiligen. U kunt
kiezen tussen links- en rechtsdraaiend. Teneinde
een beschadiging van het drijfwerk te voorkomen
mag alleen in stilstand op een ander draairichting
omgeschakeld worden. Als de schuifschakelaar
in het midden staat, is de in-/uitschakelaar geblokkeerd.
6.5 In-/uitschakelaar (fi g. 5, pos. 4)
Met de in-/uitschakelaar kunt U de snelheid
traploos regelen. Hoe meer U de schakelaar
indrukt, hoe hoger is het toerental van Uw accuschroefmachine.
6.6 Verschakelen versnelling 1 - versnelling 2
(fi g. 4, pos. 7)
Naargelang van de stand van de omschakelaar
kunt u met een hoger of lager toerental werken.
Het overschakelen naar een ander toerental mag
enkel in stilstand gebeuren teneinde het aandrijfmechanisme niet te beschadigen.
- 63 -
Anl_TC_CD_18_2_Li_SPK7.indb 63Anl_TC_CD_18_2_Li_SPK7.indb 63 07.06.16 08:5707.06.16 08:57
Page 64

NL
6.7 Accucapaciteitsaanduiding (fi g. 1, pos. 2)
Druk op de schakelaar voor accucapaciteitsaanduiding (a). De accucapaciteitsaanduiding (2)
signaleert de laadtoestand van de accu aan de
hand van 3 LEDs.
Alle 3 LED’s branden:
de accu is vol geladen.
2 of 1 LED(s) branden
De accu beschikt over een voldoende restlading.
1 LED knippert:
De accu is leeg, laad de accu.
Alle LEDs knipperen:
De temperatuur van de accu is overschreden.
Verwijder de accu van het apparaat en laat de
accu één dag liggen bij ruimtetemperatuur. Als de
fout opnieuw optreedt, dan werd hij diep ontladen
en is hij defect. Neem de accu van het apparaat.
Een defecte accu mag niet meer gebruikt resp.
geladen worden.
6.8 LED-licht (fi g. 1, pos. 10)
Het LED-licht (10) maakt het verlichten van de
plaats waar u moet schroeven of boren mogelijk
als er niet voldoende licht is. Het LED-licht (10)
gaat automatisch branden zodra u op de AAN/
UIT-schakelaar (4) drukt.
6.9 Verwisselen van gereedschap (fi g. 6)
Let op! Breng bij alle werkzaamheden (zoals ver-
wisselen van gereedschap, onderhoud enz.) op
de accuschroevendraaier de draairichtingsschakelaar (3) naar zijn tussenstand.
De accuschroevendraaier is voorzien van een
•
snelspanboorhouder (9) met automatisch spilarrêt.
Draai de boorhouder (9) open. De boor-
•
houderopening (a) moet groot genoeg zijn om
het gereedschap (boor of schroevendraaierbit) op te nemen.
Kies het gepaste gereedschap. Schuif het
•
gereedschap zo ver mogelijk de boorhouderopening (a) in.
Draai de boorhouder (9) hard aan en contro-
•
leer dan of het gereedschap goed vast zit.
6.10 Schroeven
Gebruik best zelfcentrerende schroeven (b. v.
kruiskop), want daarmee is een veilig werken
verzekerd. Let er op dat de gebruikte bits en
schroeven in vorm en grootte overeenkomen. Stel
het koppel volgens de schroefgrootte in zoals in
deze gebruiksaanwijzing beschreven.
7. Reiniging, onderhoud en
bestellen van wisselstukken
Gevaar!
Trek vóór alle schoonmaakwerkzaamheden de
netstekker uit het stopcontact.
7.1 Reiniging
Hou de veiligheidsinrichtingen, de ventila-
•
tiespleten en het motorhuis zo veel mogelijk
vrij van stof en vuil. Wrijf het toestel met een
schone doek af of blaas het met perslucht bij
lage druk schoon.
Het is aan te bevelen het toestel direct na elk
•
gebruik te reinigen.
Reinig het toestel regelmatig met een vochti-
•
ge doek en wat zachte zeep. Gebruik geen
reinigings- of oplosmiddelen; die zouden de
kunststofcomponenten van het toestel kunnen aantasten. Let er goed op dat geen water
in het toestel terechtkomt. Door binnendringen van water in een elektrische apparatuur
verhoogt het risico van een elektrische schok.
7.2 Onderhoud
In het toestel zijn er geen andere te onderhouden
onderdelen.
7.3 Bestelling van onderdelen en toebehoren:
Gelieve bij de bestelling van onderdelen de volgende gegevens te vermelden:
Type van het apparaat
•
Artikelnummer van het apparaat
•
Ident.-nummer van het apparaat
•
Onderdeelnummer van het benodigde on-
•
derdeel
Actuele prijzen en info vindt u terug onder
www.isc-gmbh.info
Tip! Voor een goed werkresultaat bevelen wij hoogwaardig toeehoren van
aan! www.kwb.eu
welcome@kwb.eu
- 64 -
Anl_TC_CD_18_2_Li_SPK7.indb 64Anl_TC_CD_18_2_Li_SPK7.indb 64 07.06.16 08:5707.06.16 08:57
Page 65

8. Verwijdering en recyclage
Het toestel bevindt zich in een verpakking om
transportschade te voorkomen. Deze verpakking
is een grondstof en bijgevolg herbruikbaar of kan
naar de grondstofkringloop worden teruggevoerd. Het toestel en zijn accessoires bestaan uit
diverse materialen, zoals b.v. metaal en kunststof.
Defecte toestellen horen niet thuis in het huisvuil.
Om zich van het toestel naar behoren te ontdoen
dient het naar een geschikte verzamelplaats te
worden gebracht. Als u geen verzamelplaats kent
gelieve u dan bij de gemeente te informeren.
9. Opbergen
Bewaar het toestel en de accessoires op een
donkere, droge en vorstvrije plaats die voor
kinderen ontoegankelijk is. De optimale opbergtemperatuur ligt tussen 5° C en 30° C. Bewaar
het elektrische gereedschap in de originele verpakking.
NL
- 65 -
Anl_TC_CD_18_2_Li_SPK7.indb 65Anl_TC_CD_18_2_Li_SPK7.indb 65 07.06.16 08:5707.06.16 08:57
Page 66

NL
Enkel voor EU-landen
Elektrisch gereedschap hoort niet bij het huisvuil thuis!
Volgens de Europese richtlijn 2012/19/EU op afgedankte elektrische en elektronische toestellen en
omzetting in nationaal recht dienen afgedankte elektrische gereedschappen afzonderlijk te worden verzameld en milieuvriendelijk te worden gerecycleerd.
Recyclagealternatief i.p.v. het toestel terug te sturen:
De eigenaar van het elektrische toestel is alternatief verplicht, i.p.v. het toestel terug te sturen, mede te
werken bij de behoorlijke recyclage in geval hij zich van het eigendom ontdoet. Het afgedankte toestel
kan hiervoor ook bij een verzamelplaats worden afgegeven die voor een verwijdering als bedoeld in de
wetgeving in zake recyclage en afvalverwerking zorgt. Hieronder vallen niet bij de afgedankte toestellen
gevoegde accessoires en hulpmiddelen zonder elektrische componenten.
Nadruk of andere reproductie van documentatie en geleidepapieren van de producten, geheel of gedeeltelijk, enkel toegestaan mits uitdrukkelijke toestemming van iSC GmbH.
Technische wijzigingen voorbehouden
- 66 -
Anl_TC_CD_18_2_Li_SPK7.indb 66Anl_TC_CD_18_2_Li_SPK7.indb 66 07.06.16 08:5707.06.16 08:57
Page 67

NL
Ser vice-informatie
Wij werken in alle landen die in het garantiebewijs zijn genoemd, samen met competente servicepartners, wier contactgegevens u kunt afl eiden uit het garantiebewijs. Deze staan voor alle diensten zoals
reparatie, het verschaff en van wisselstukken of slijtdelen of voor de aankoop van verbruiksmaterialen te
uwer beschikking.
U moet er rekening mee houden dat bij dit product de volgende delen onderhevig zijn aan een slijtage
door gebruik of een natuurlijke slijtage, resp. dat de volgende delen nodig zijn als verbruiksmaterialen.
Categorie Voorbeeld
Slijtstukken* Boorhouder, Accu
Verbruiksmateriaal/verbruiksstukken* Bit-inzetstukken/boren
Ontbrekende onderdelen
* niet verplicht bij de leveringsomvang begrepen!
Bij gebreken of defecten verzoeken wij u om de fout te melden op het internet onder www.isc-gmbh.info.
Gelieve te zorgen voor een nauwkeurige beschrijving van de fout en daarbij in elk geval de volgende
vragen te beantwoorden:
Heeft het toestel reeds eenmaal gewerkt of was het vanaf het begin defect?
•
Is u iets opgevallen voordat het defect zich voordeed (symptoom vóór het defect)?
•
Welke foutieve werkwijze vertoont het toestel volgens u (hoofdsymptoom)?
•
Beschrijf deze foutieve werkwijze.
- 67 -
Anl_TC_CD_18_2_Li_SPK7.indb 67Anl_TC_CD_18_2_Li_SPK7.indb 67 07.06.16 08:5707.06.16 08:57
Page 68

NL
Garantiebewijs
Geachte klant,
onze producten worden onderworpen aan een strenge kwaliteitscontrole. Mocht dit apparaat echter ooit
niet naar behoren functioneren, spijt dit ons ten zeerste en vragen u zich te wenden tot onze servicedienst onder het adres vermeld op dit garantiebewijs. Wij staan ook graag telefonisch tot uw dienst via
het vermelde servicetelefoonnummer. Voor eisen in verband met het recht garantie geldt het volgende:
1. Deze garantievoorwaarden zijn uitsluitend gericht aan de gebruikers, d.w.z. natuurlijke personen die
dit product niet in het kader van hun ambachtelijke noch van een andere zelfstandige activiteit willen
gebruiken. Deze garantievoorwaarden regelen aanvullende garantieprestaties, die de hieronder genoemde fabrikant kopers van zijn nieuwe apparaten toezegt in aanvulling tot de wettelijke garantie.
Uw wettelijke garantieclaims blijven onaangetast door deze garantie. Onze garantieprestatie is voor
u gratis.
2. De garantieprestatie geldt uitsluitend voor gebreken aan een door u aangekocht nieuw apparaat
van de hieronder genoemde fabrikant die aantoonbaar berusten op een materiaal- of productiefout,
en is naar onze keuze beperkt tot het verhelpen van zulke gebreken aan het apparaat of de vervanging ervan.
Wij wijzen erop dat onze apparaten overeenkomstig hun bestemming niet ontworpen zijn voor commercieel, ambachtelijk of industrieel gebruik. Van een garantiecontract is derhalve geen sprake, als
het apparaat binnen de garantieperiode in commerciële, ambachtelijke of industriële bedrijven werd
ingezet of aan een daarmee gelijk te stellen belasting werd blootgesteld.
3. Van onze garantie zijn uitgesloten:
- Schade aan het apparaat als gevolg van niet-inachtneming van de montagehandleiding of op
grond van ondeskundige installatie, als gevolg van niet-inachtneming van de gebruiksaanwijzing
(zoals bijv. door aansluiting aan een verkeerde netspanning of stroomsoort) of niet-inachtneming
van de onderhouds- en veiligheidsvoorschriften, door blootstelling van het apparaat aan abnormale
omgevingsvoorwaarden of door nalatig onderhoud en verzorging.
- Schade aan het apparaat als gevolg van misbruik of ondeskundige toepassingen (zoals bijv. overbelasting van het apparaat of de inzet van niet toegelaten gereedschappen of toebehoren), binnendringen van vreemde voorwerpen in het apparaat (zoals bijv. zand, stenen of stof, transportschade),
gebruik van geweld of als gevolg van externe invloeden (zoals bijv. schade door vallen).
- Schade aan het apparaat of aan delen van het apparaat die valt te herleiden tot slijtage als gevolg
van gebruik, en als gevolg van normale of andere natuurlijke slijtage.
4. De garantieperiode bedraagt 24 maanden en gaat in op de datum van aankoop van het apparaat.
Garantieclaims dienen voor het verloop van de garantieperiode binnen de twee weken na het vaststellen van het defect geldend te worden gemaakt. Het indienen van garantieclaims na verloop van
de garantieperiode is uitgesloten. De herstelling of vervanging van het apparaat leidt niet tot een
verlenging van de garantieperiode noch wordt door deze prestatie een nieuwe garantieperiode voor
het apparaat of voor eventueel ingebouwde wisselstukken op gang gebracht. Dit geldt ook bij het ter
plaatse uitvoeren van een serviceactiviteit.
5. Gelieve om een garantieclaim in te dienen het defecte apparaat aan te melden onder: www.iscgmbh.info. Houd het aankoopbewijs of een ander bewijs van uw aankoop van het nieuwe apparaat
bij de hand. Apparaten die zonder bijhorende bewijzen of zonder typeplaatje worden teruggestuurd,
worden op grond van de ontbrekende mogelijkheid om het apparaat toe te kennen uitgesloten van
de garantieprestatie. Valt het defect van het apparaat binnen onze garantieprestatie, dan bezorgen
wij u per omgaande een gerepareerd of nieuw apparaat terug.
Uiteraard staan wij ook tot u dienst om, mits betaling van de kosten, defecten van het apparaat te verhelpen die buiten de garantieomvang vallen. Te dien einde stuurt u het apparaat aan ons serviceadres
op.
Voor slijtstukken, verbruiksmateriaal en ontbrekende onderdelen wordt verwezen naar de beperkingen
van deze garantie conform de service-informatie van deze handleiding.
- 68 -
Anl_TC_CD_18_2_Li_SPK7.indb 68Anl_TC_CD_18_2_Li_SPK7.indb 68 07.06.16 08:5707.06.16 08:57
Page 69

E
Peligro! - Leer el manual de instrucciones para reducir cualquier riesgo de sufrir daños
Cuidado! Usar protección para los oídos. La exposición al ruido puede ser perjudicial para el oído.
Cuidado! Es preciso ponerse una mascarilla de protección. Puede generarse polvo dañino para la
salud cuando se realicen trabajos en madera o en otros materiales. ¡Está prohibido trabajar con material que contenga asbesto!
Cuidado! Llevar gafas de protección. Durante el trabajo, la expulsión de chispas, astillas, virutas y
polvo por el aparato pueden provocar pérdida de vista.
Con el fi n de evitar que se dañe el engranaje, cambiar la velocidad únicamente cuando la herramienta
se haya detenido por completo
Almacenamiento de las baterías sólo en espacios secos con una temperatura ambiente de +10°C a
+40°C. Guardar las baterías únicamente cuando estén cargadas (mín. al 40%).
Clase de protección II
Utilizar únicamente en espacios secos.
- 69 -
Anl_TC_CD_18_2_Li_SPK7.indb 69Anl_TC_CD_18_2_Li_SPK7.indb 69 07.06.16 08:5707.06.16 08:57
Page 70

E
Peligro!
Al usar aparatos es preciso tener en cuenta una
serie de medidas de seguridad para evitar lesiones o daños. Por este motivo, es preciso leer
atentamente este manual de instrucciones/advertencias de seguridad. Guardar esta información
cuidadosamente para poder consultarla en cualquier momento. En caso de entregar el aparato
a terceras personas, será preciso entregarles,
asimismo, el manual de instrucciones/advertencias de seguridad. No nos hacemos responsables
de accidentes o daños provocados por no tener
en cuenta este manual y las instrucciones de
seguridad.
1. Instrucciones de seguridad
Encontrará las instrucciones de seguridad correspondientes en el prospecto adjunto.
Peligro!
Lea todas las instrucciones de seguridad e
indicaciones. El incumplimiento de dichas inst-
rucciones e indicaciones puede provocar descargas, incendios y/o daños graves. Guarde todas
las instrucciones de seguridad e indicaciones para posibles consultas posteriores.
2. Descripción del aparato y
volumen de entrega
2.1 Descripción del aparato (fi g. 1)
1. Ajuste de par
2. Indicador de capacidad de batería
3. Interruptor de inversión de marcha
4. Interruptor ON/OFF
5. Batería
6. Cargador
7. Conmutador 1ª marcha - 2ª marcha
8. Dispositivo de retención
9. Portabrocas de sujeción rápida
10. Luz LED
2.2 Volumen de entrega
Sirviéndose de la descripción del volumen de
entrega, comprobar que el artículo esté completo.
Si faltase alguna pieza, dirigirse a nuestro Service Center o a la tienda especializada más cercana en un plazo máximo de 5 días laborales tras
la compra del artículo presentando un recibo de
compra válido. A este respeto, observar la tabla
de garantía de las condiciones de garantía que se
encuentran al fi nal del manual.
Abrir el embalaje y extraer cuidadosamente
•
el aparato.
Retirar el material de embalaje, así como los
•
dispositivos de seguridad del embalaje y para
el transporte (si existen).
Comprobar que el volumen de entrega esté
•
completo.
Comprobar que el aparato y los accesorios
•
no presenten daños ocasionados durante el
transporte.
Si es posible, almacenar el embalaje hasta
•
que transcurra el periodo de garantía.
Peligro!
¡El aparato y el material de embalaje no son
un juguete! ¡No permitir que los niños jueguen con bolsas de plástico, láminas y piezas pequeñas! ¡Riesgo de ingestión y asfi xia!
Taladro atornillador con batería
•
Cargador
•
Pilas
•
Manual de instrucciones original
•
Instrucciones de seguridad
•
3. Uso adecuado
El taladro atornillador a pilas recargables está
previsto para atornillar y desatornillar tornillos, así
como para taladrar en madera, metall y plástico.
Utilizar la máquina sólo en los casos que se indican explícitamente como de uso adecuado. Cualquier otro uso no será adecuado. En caso de uso
inadecuado, el fabricante no se hace responsable
de daños o lesiones de cualquier tipo; el responsable es el usuario u operario de la máquina.
Tener en consideración que nuestro aparato no
está indicado para un uso comercial, industrial o
en taller. No asumiremos ningún tipo de garantía
cuando se utilice el aparato en zonas industriales, comerciales o talleres, así como actividades
similares.
- 70 -
Anl_TC_CD_18_2_Li_SPK7.indb 70Anl_TC_CD_18_2_Li_SPK7.indb 70 07.06.16 08:5707.06.16 08:57
Page 71

E
4. Características técnicas
Alimentación de corriente del motor .......18 V d.c.
Velocidad marcha en vacío: 0-350 / 0-1250 r.p.m.
Niveles de par de giro: ................................ 18+1
Giro a la derecha/izquierda ................................si
Alcance del portabrocas ................... max. 10 mm
Tensión de salida cargador: ..................23 V d. c.
Corriente de salida cargador: ......................0,5 A
Tensión de la red para el cargador
...........................................100-240 V ~ 50/60 Hz
Tipo de batería: ................................iones de litio
Número de celdas de la batería: ....................... 5
Capacidad de la batería: ........................... 1,3 Ah
Peso ........................................................... 1,6 kg
Diámetro máx. del tornillo: ........................... 6 mm
El diámetro máximo del tornillo se refi ere al diá-
metro máximo del tornillo que se va a insertar en
la madera. Puede variar en función del tipo de
madera.
Ruido y vibración
Los valores con respecto al ruido y la vibración se
determinaron conforme a la norma EN 60745.
Nivel de presión acústica L
Imprecisión K
............................................3 dB
pA
Nivel de potencia acústica L
Imprecisión K
............................................ 3 dB
WA
Usar protección para los oídos.
La exposición al ruido puede ser perjudicial para
el oído.
Los valores totales de vibración (suma de vectores en las tres direcciones) se determinaron
conforme a la norma EN 60745.
Empuñadura
Valor de emisión de vibraciones a
Imprecisión K = 1,5 m/s
Empuñadura adicional
Valor de emisión de vibraciones a
Imprecisión K = 1,5 m/s
............ 70,88 dB(A)
pA
......... 81,88 dB(A)
WA
≤ 2,5 m/s
2
2
h
≤ 2,5 m/s
h
2
2
El valor de emisión de vibraciones indicado se
ha calculado conforme a un método de ensayo
normalizado, pudiendo, en algunos casos excepcionales, variar o superar el valor indicado dependiendo de las circunstancias en las que se utilice
la herramienta eléctrica.
El valor de emisión de vibraciones indicado puede utilizarse para comparar la herramienta con
otras.
El valor de emisión de vibraciones indicado también puede utilizarse para una valoración preliminar de los riesgos.
¡Reducir la emisión de ruido y las vibraciones al mínimo!
Emplear sólo aparatos en perfecto estado.
•
Realizar el mantenimiento del aparato y limpi-
•
arlo con regularidad.
Adaptar el modo de trabajo al aparato.
•
No sobrecargar el aparato.
•
En caso necesario dejar que se compruebe
•
el aparato.
Apagar el aparato cuando no se esté utilizan-
•
do.
Llevar guantes.
•
Cuidado!
Riesgos residuales
Incluso si esta herramienta se utiliza adecuadamente, siempre existen riesgos residuales.
En función de la estructura y del diseño de
esta herramienta eléctrica pueden producirse los siguientes riesgos:
1. Lesiones pulmonares en caso de que no se
utilice una mascarilla de protección antipolvo.
2. Lesiones auditivas en caso de que no se utilice una protección para los oídos adecuada.
3. Daños a la salud derivados de las vibraciones de las manos y los brazos si el aparato
se utiliza durante un largo periodo tiempo, no
se sujeta del modo correcto o si no se realiza
un mantenimiento adecuado.
Limitar el tiempo de trabajo.
Al hacerlo deben tenerse en cuenta todas las
partes del ciclo de servicio (por ejemplo los
tiempos en los que la herramienta eléctrica está
desconectada y los tiempos en los que está
conectada pero funciona sin carga).
- 71 -
Anl_TC_CD_18_2_Li_SPK7.indb 71Anl_TC_CD_18_2_Li_SPK7.indb 71 07.06.16 08:5707.06.16 08:57
Page 72

E
5. Antes de la puesta en marcha
Antes de la puesta en marcha del atornillador con
batería, es preciso leer las siguientes advertencias:
1. Cargar la batería con el cargador que se suministra adjunto. Una batería vacía se carga
en aprox. 3 a 5 horas.
2. Utilice únicamente taladros afi lados, así
como puntas portatornillo adecuadas.
3. Cuando taladre o atornille paredes y muros,
compruebe que no exista ningún cable de
electricidad o conducto de gas y agua escondidos.
6. Manejo
6.1 Cargar la batería LI (fi g. 2-3)
1. Sacar la batería (5) de la empuñadura presionando hacia abajo el dispositivo de retención
(8).
2. Comprobar que la tensión de red coincida
con la especifi cada en la placa de identifi ca-
ción del aparato.
3. Enchufar el cargador (6) a la toma de corriente y conectar el cable de carga (a) con la
batería (5). Los 3 LED en el indicador de la
capacidad de la batería (10) indican que la
batería se está cargando.
- Batería descargada: los 3 LED parpadean
alternativamente
- 1/3 cargada: el LED izquierdo se enciende,
el del medio y el de la derecha parpadean
alternativamente
- 2/3 cargada: el LED izquierdo y el del medio
se encienden, el derecho parpadea
4. Una vez terminado el proceso de carga tras
3-5 horas, los 3 LED se encienden unos 10
minutos. Quitar el cargador de la batería.
5. Si los 3 LED parpadean al mismo tiempo, la
temperatura de la batería es demasiado baja
o excesiva. Quitar el cargador de la batería,
dejar la batería durante un día a temperatura
ambiente y volver a intentarlo.
6. Si el fallo se sigue mostrando, entonces la
batería está defectuosa. Está prohibido emplear y cargar una batería defectuosa. Quitar
el cargador de la batería.
Si se presentan difi cultades al cargar el conjunto
de baterías rogamos comprueben:
si el enchufe utilizado se halla bajo tensión
•
si existe un contacto correcto a nivel de los
•
contactos del cargador.
De continuar siendo imposible cargar el conjunto
le rogamos ser sirva a remitir a nuestro servicio
técnico postventa:
el cargador
•
y el conjunto de baterías
•
Realizar siempre recargas de la batería LI a tiempo para procurar que dure lo máximo posible.
Esto es imprescindible en el caso de que note
que se reduce la potencia del atornillador con
batería.
6.2 Ajuste de par (fi g. 4/pos. 1)
¡Atención! Ajuste el anillo para el par de giro
sólo fuera de servicio.
El atornillador con batería está equipado con un
ajuste de par mecánico.
El par requerido por un tornillo de tamaño determinado se ajusta en el anillo de ajuste. La fuerza
de par depende de varios factores:
del tipo de material a trabajar y de su dureza
•
del tipo de tornillos y de su longitud
•
de los requisitos que deba cumplir la atornil-
•
ladura en cuestión.
Tan pronto como se alcanza el par ajustado se
soltará el acoplamiento con un ruido peculiar.
6.3 Taladrar (fi g. 4/pos. 1)
Para taladrar se deberá colocar el anillo de ajuste
del par al último nivel destinado a „taladrar“. En
este nivel de taladro el acoplamiento de resbalamiento no está activado. Se taladra pues con la
fuerza de par máxima.
6.4 Reversión del sentido de giro (fi g. 5/pos.
3)
Con el interruptor deslizante situado encima del
conector/desconector es posible ajustar el sentido del giro des atornillador, al mismo tiempo que
se proteje el aparato de una conexión involuntaria. Es posible elegir entre sentido de giro a la
izquierda o a la derecha. A fi n de evitar daños en
el engranaje se recomienda efectuar el cambio
de velocidad únicamente estando el aparato parado. El botón de conexión/desconexión se halla
bloqueado si el interruptor deslizante está en
posición central.
- 72 -
Anl_TC_CD_18_2_Li_SPK7.indb 72Anl_TC_CD_18_2_Li_SPK7.indb 72 07.06.16 08:5707.06.16 08:57
Page 73

E
6.5 Interruptor de conexión/desconexión
(fi g. 5/pos. 4)
Con el interruptor de conexión/desconexión es
posible regular las revoluciones sin escalas. Un
aumento de presión sobre el interruptor conlleva
un aumento de velocidad del aparato.
6.6 Cambio de la 1ª a la 2ª velocidad
(fi g. 4/pos. 7)
El aparato puede trabajar a una velocidad reducida o elevada, según la posición del conmutador
de velocidades. Para evitar que el engranaje sufra
daños el cambio de una velocidad a otra debería
hacerse siempre estando el aparato desconectado.
6.7 Indicador de capacidad de batería (fi g. 1/
pos. 2)
Pulsar el interruptor para acceder al indicador de
capacidad de la batería (a). El indicador de capacidad de batería (2) le indica el estado de carga
de la batería sirviéndose de 3 LEDs.
Los 3 LED están iluminados:
La batería está completamente cargada.
2 LED están iluminados:
La batería dispone de sufi ciente carga residual.
1 LED parpadea:
La batería está vacía, es preciso cargarla.
Todos los LED parpadean:
La temperatura de la batería es excesiva. Quitar
la batería del aparato y dejarla durante un día a
temperatura ambiente. Si vuelve a aparecer el
fallo, la batería se ha descargado completamente
y está defectuosa. Quitar la batería del aparato.
Está prohibido emplear y cargar una batería defectuosa.
6.8 Luz LED (fi g. 1/pos. 10)
La luz LED (10) ilumina los puntos de trabajo en
caso de que no haya sufi ciente luz natural. La luz
LED (10) se ilumina de forma automática en cuanto se pulsa el interruptor ON/OFF (4).
6.9 Cambio de herramienta (fi g. 6)
¡Atención! Para efectuar cualquier trabajo (p. ej.,
cambio de herramienta; mantenimiento; etc.) en
el atornillador con batería, colocar el interruptor
de inversión de marcha (3) en la posición media.
El atornillador con batería está dotado de un
•
portabrocas de sujeción rápida (9) con blo-
queo automático de husillo.
Desenroscar el portabrocas (9). El orificio del
•
portabrocas (a) debe ser lo suficientemente
grande como para poder alojar la herramienta (broca o portatornillos).
Elegir la herramienta adecuada. Introducir la
•
herramienta al máximo posible en el orificio
del portabrocas (a).
Girar cerrando bien el portabrocas (9) y
•
comprobar a continuación que la herramienta
esté correctamente encajada.
6.10 Atornillar:
Se recomienda el uso de tornillos autocentrantes,
(por ej. Torx, ranura en cruz) los cuales garantizan un seguridad de trabajo. Compruebe que el
portatornillos y el tornillo utilizado coincidan en
forma y tamaño. Ajuste el par según el tamaño
del tornillo y como se indica en el manual de instrucciones.
7. Mantenimiento, limpieza y pedido
de piezas de repuesto
Peligro!
Desenchufar siempre antes de realizar algún trabajo de limpieza.
7.1 Limpieza
Reducir al máximo posible la suciedad y
•
el polvo en los dispositivos de seguridad,
las rendijas de ventilación y la carcasa del
motor. Frotar el aparato con un paño limpio o
soplarlo con aire comprimido manteniendo la
presión baja.
Se recomienda limpiar el aparato tras cada
•
uso.
Limpiar el aparato con regularidad con un
•
paño húmedo y un poco de jabón blando. No
utilizar productos de limpieza o disolventes ya
que se podrían deteriorar las piezas de plástico del aparato. Es preciso tener en cuenta
que no entre agua en el interior del aparato.
Si entra agua en el aparato eléctrico existirá
mayor riesgo de una descarga eléctrica.
7.2 Mantenimiento
No hay que realizar el mantenimiento a más
piezas en el interior del aparato.
- 73 -
Anl_TC_CD_18_2_Li_SPK7.indb 73Anl_TC_CD_18_2_Li_SPK7.indb 73 07.06.16 08:5707.06.16 08:57
Page 74

7.3 Pedido de piezas de repuesto y accesorios:
A la hora de pasar pedido de piezas de repuesto,
es preciso indicar los siguientes datos:
Tipo de aparato
•
Número de artículo del aparato
•
Número de identificación del aparato
•
Número de la pieza de repuesto requerida
•
Los precios y la información actual se hallan en
www.isc-gmbh.info
¡Consejo! ¡Para obtener un
buen resultado recomendamos accesorios de alta calidad de ! www.kwb.eu
welcome@kwb.eu
8. Eliminación y reciclaje
El aparato está protegido por un embalaje para
evitar daños producidos por el transporte. Este
embalaje es materia prima y, por eso, se puede
volver a utilizar o llevar a un punto de reciclaje. El
aparato y sus accesorios están compuestos de
diversos materiales, como, p. ej., metal y plástico.
Los aparatos defectuosos no deben tirarse a la
basura doméstica. Para su eliminación adecuada, el aparato debe entregarse a una entidad
recolectora prevista para ello. En caso de no
conocer ninguna, será preciso informarse en el
organismo responsable del municipio.
E
9. Almacenamiento
Guardar el aparato y sus accesorios en un
lugar oscuro, seco, protegido de las heladas e
inaccesible para los niños. La temperatura de
almacenamiento óptima se encuentra entre los
5 y 30 ˚C. Guardar la herramienta eléctrica en su
embalaje original.
- 74 -
Anl_TC_CD_18_2_Li_SPK7.indb 74Anl_TC_CD_18_2_Li_SPK7.indb 74 07.06.16 08:5707.06.16 08:57
Page 75

E
Sólo para países miembros de la UE
No tirar herramientas eléctricas en la basura casera.
Según la directiva europea 2012/19/EU sobre aparatos usados electrónicos y eléctricos y su aplicación
en el derecho nacional, dichos aparatos deberán recojerse por separado y eliminarse de modo ecológico para facilitar su posterior reciclaje.
Alternativa de reciclaje en caso de devolución:
El propietario del aparato eléctrico, en caso de no optar por su devolución, está obligado a reciclar adecuadamente dicho aparato eléctrico. Para ello, también se puede entregar el aparato usado a un centro
de reciclaje que trate la eliminación de residuos respetando la legislación nacional sobre residuos y
su reciclaje. Esto no afecta a los medios auxiliares ni a los accesorios sin componentes eléctricos que
acompañan a los aparatos usados.
Sólo está permitido copiar la documentación y documentos anexos del producto, o extractos de los
mismos, con autorización expresa de iSC GmbH.
Nos reservamos el derecho a realizar modifi caciones técnicas.
- 75 -
Anl_TC_CD_18_2_Li_SPK7.indb 75Anl_TC_CD_18_2_Li_SPK7.indb 75 07.06.16 08:5707.06.16 08:57
Page 76

E
Información de servicio
En todos los países mencionados en el certifi cado de garantía disponemos de distribuidores compe-
tentes cuyos datos de contacto podrán consultar en dicho certifi cado. Dichos distribuidores están a su
disposición para cualquier asunto relacionado con el servicio como reparación, suministro de piezas de
repuesto y desgaste, o con respecto a los materiales de consumo.
Es preciso tener en cuenta, que las siguientes piezas de este producto se someten a desgaste natural
o provocado por el uso o que se necesitan las siguientes piezas como materiales de consumo.
Categoría Ejemplo
Piezas de desgaste* Portabrocas, Batería
Material de consumo/Piezas de consumo* Adaptadores portatornillos/brocas
Falta de piezas
*¡no tiene por qué estar incluido en el volumen de entrega!
En caso de defi ciencia o fallo, rogamos que lo registre en la página web www.isc-gmbh.info. Describa
exactamente el fallo y responda siempre a las siguientes preguntas:
¿Ha funcionado el aparato en algún momento o estaba defectuoso desde el principio?
•
¿Le ha llamado algo la atención antes de surgir el fallo (indicio antes del fallo)?
•
¿Qué fallo de funcionamiento le parece que presenta el aparato (indicio principal)?
•
Describa ese fallo en el funcionamiento.
- 76 -
Anl_TC_CD_18_2_Li_SPK7.indb 76Anl_TC_CD_18_2_Li_SPK7.indb 76 07.06.16 08:5707.06.16 08:57
Page 77

E
Certifi cado de garantía
Estimado cliente:
Nuestros productos están sometidos a un estricto control de calidad. No obstante, lamentaríamos que
este aparato dejara de funcionar correctamente, en tal caso, le rogamos que se dirija a nuestro servicio
de atención al cliente en la dirección indicada en la parte inferior de la presente tarjeta de garantía. Con
mucho gusto le atenderemos también telefónicamente en el número de servicio indicado a continuación. Para hacer válido el derecho de garantía, proceda de la siguiente forma:
1. Estas condiciones de garantía van dirigidas exclusivamente a los consumidores, es decir, personas
naturales que no desean emplear este producto en el marco de su actividad comercial ni autónoma. Estas condiciones de garantía regulan prestaciones adicionales de garantía que el fabricante
abajo mencionado se compromete a otorgar, de manera adicional a la garantía legal, a los compradores de sus nuevos aparatos. Las prestaciones de garantía que le corresponden conforme a ley
no se ven afectadas por la presente. Nuestra prestación de garantía es gratuita para usted.
2. La garantía se extiende exclusivamente a defectos en un aparato nuevo adquirido por usted del
fabricante abajo mencionado, ocasionados por fallos de material o de producción, y está limitada,
según nuestra elección, a la reparación de los defectos o al cambio del aparato.
Es preciso tener en consideración que nuestro aparato no está indicado para un uso comercial,
industrial o en taller. Por lo tanto, no procederá un contrato de garantía cuando se utilice el aparato
dentro del periodo de garantía en zonas industriales, comerciales o talleres, así como actividades
similares.
3. Nuestra garantía no cubre:
- Daños en el aparato ocasionados por la no observancia de las instrucciones de montaje o por una
instalación no profesional, no observancia de las instrucciones de uso (como, p. ej., conexión a una
tensión de red o corriente no indicada) o la no observancia de las disposiciones de mantenimiento
y seguridad o por la exposición del aparato a condiciones anormales del entorno o por la falta de
cuidado o mantenimiento.
- Daños en el aparato ocasionados por aplicaciones impropias o indebidas (como, p. ej., sobrecarga del aparato o uso de herramientas o accesorios no homologados), introducción de cuerpos
extraños en el aparato (como, p. ej., arena, piedras o polvo, daños producidos por el transporte),
uso violento o infl uencias externa (como, p. ej., daños por caídas).
- Daños en el aparato o en piezas del aparato provocados por el desgaste natural, habitual o producido por el uso.
4. El periodo de garantía es de 24 meses y comienza en la fecha de la compra del aparato. El derecho
de garantía debe hacerse válido, antes de fi nalizado el plazo de garantía, dentro de un periodo de
dos semanas una vez detectado el defecto. El derecho de garantía vence una vez transcurrido el
plazo de garantía. La reparación o cambio del aparato no conllevará ni una prolongación del plazo
de garantía ni un nuevo plazo de garantía ni para el aparato ni para las piezas de repuesto montadas. Esto también se aplica en el caso de un servicio in situ.
5. Para hacer efectivo su derecho a garantía, registre su aparato defectuoso en: www.isc-gmbh.info.
Tenga a mano el recibo de compra o cualquier otro comprobante que acredite la compra del aparato nuevo. La garantía no cubre aquellos aparatos que se envíen sin el comprobante pertinente
o sin la placa de identifi cación puesto que resulta difícil clasifi carlos del modo correspondiente. Si
nuestra prestación de garantía incluye el defecto aparecido en el aparato, recibirá de inmediato un
aparato reparado o nuevo de vuelta.
Naturalmente, también solucionaremos los defectos del aparato que no se encuentren comprendidos
o ya no se encuentren comprendidos en la garantía, en este caso contra reembolso de los costes. Para
ello, envíe el aparato a nuestra dirección de servicio técnico.
Para piezas de desgaste, de repuesto y falta de piezas nos remitimos a las limitaciones de esta garantía
conforme a la información de servicio de este manual de instrucciones.
- 77 -
Anl_TC_CD_18_2_Li_SPK7.indb 77Anl_TC_CD_18_2_Li_SPK7.indb 77 07.06.16 08:5707.06.16 08:57
Page 78

P
Perigo! - Para reduzir o risco de ferimentos leia o manual de instruções
Cuidado! Use uma protecção auditiva. O ruído pode provocar danos no aparelho auditivo.
Cuidado! Use uma máscara de protecção para pó. Durante os trabalhos em madeira e outros
materiais pode formar-se pó prejudicial à saúde. Os materiais que contenham amianto não podem ser
trabalhados!
Cuidado! Use óculos de protecção. As faíscas produzidas durante o trabalho ou as aparas, os estilhaços e a poeira que saem do aparelho podem provocar cegueira.
A velocidade só pode ser comutada com a ferramenta parada a fi m de evitar danos na engrenagem
Armazenar os acumuladores apenas em espaços secos com uma temperatura ambiente de +10°C +40°C. Guarde os acumuladores apenas se estiverem carregados (no mín. 40% de carga).
Classe de protecção II
Para utilização apenas em espaços secos.
- 78 -
Anl_TC_CD_18_2_Li_SPK7.indb 78Anl_TC_CD_18_2_Li_SPK7.indb 78 07.06.16 08:5707.06.16 08:57
Page 79

P
Perigo!
Ao utilizar ferramentas, devem ser respeitadas
algumas medidas de segurança para prevenir ferimentos e danos. Por conseguinte, leia
atentamente este manual de instruções / estas
instruções de segurança. Guarde-o num local
seguro, para que o possa consultar sempre que
necessário. Caso passe o aparelho a outras
pessoas, entregue também este manual de instruções / estas instruções de segurança. Não
nos responsabilizamos pelos acidentes ou danos
causados pela não observância deste manual e
das instruções de segurança.
1. Instruções de segurança
As instruções de segurança correspondentes
encontram-se na brochura fornecida.
Perigo!
Leia todas as instruções de segurança e
indicações. O incumprimento das instruções de
segurança e indicações pode provocar choques
eléctricos, incêndios e/ou ferimentos graves.
Guarde todas as instruções de segurança e
indicações para mais tarde consultar.
2. Descrição do aparelho e material
a fornecer
2.1 Descrição do aparelho (fi gura 1)
1. Ajuste do binário
2. Indicação da capacidade do acumulador
3. Comutador do sentido de rotação
4. Interruptor para ligar/desligar
5. Acumulador
6. Carregador
7. Comutador 1.ª / 2.ª velocidade
8. Botão de engate
9. Bucha de aperto rápido
10. Luz LED
2.2 Material a fornecer
Com a ajuda da descrição do material a fornecer,
verifi que se o artigo se encontra completo. Caso
faltem peças, dirija-se num prazo máximo de 5
dias úteis após a compra do artigo a um dos nossos Service Center ou ao ponto de venda onde
adquiriu o aparelho, fazendo-se acompanhar de
um talão de compra válido. Para o efeito, consulte
a tabela da garantia que se encontra nas informações do serviço de assistência técnica no fi m
do manual.
Abra a embalagem e retire cuidadosamente o
•
aparelho.
Remova o material da embalagem, assim
•
como os dispositivos de segurança da embalagem e de transporte (caso existam).
Verifique se o material a fornecer está com-
•
pleto
Verifique se o aparelho e as peças acessóri-
•
as apresentam danos de transporte.
Se possível, guarde a embalagem até ao ter-
•
mo do período de garantia.
Perigo!
O aparelho e o material da embalagem não
são brinquedos! As crianças não devem
brincar com sacos de plástico, películas ou
peças de pequena dimensão! Existe o perigo
de deglutição e asfi xia!
Berbequim-aparafusador sem fio
•
Carregador
•
Pilhas
•
Manual de instruções original
•
Instruções de segurança
•
3. Utilização adequada
O berbequim-aparafusador com acumulador é
adequado para aparafusar e desaparafusar parafusos, bem como para furar madeira, metal e
plástico.
A máquina só pode ser utilizada para os fi ns a
que se destina. Qualquer outro tipo de utilização
é considerado inadequado. Os danos ou ferimentos de qualquer tipo daí resultantes são da
responsabilidade do utilizador/operador e não do
fabricante.
Chamamos a atenção para o facto de os nossos
aparelhos não terem sido concebidos para uso
comercial, artesanal ou industrial. Não assumimos qualquer responsabilidade se o aparelho for
utilizado no comércio, artesanato ou indústria ou
em actividades equiparáveis.
- 79 -
Anl_TC_CD_18_2_Li_SPK7.indb 79Anl_TC_CD_18_2_Li_SPK7.indb 79 07.06.16 08:5707.06.16 08:57
Page 80

P
4. Dados técnicos
Tensão de alimentação do motor ........... 18 V, d.c.
Rotações com marcha em vazio: ........................
.............................................0-350 / 0-1250 r.p.m.
Escalões do binário: .................................... 18+1
Rotação à direita/esquerda .............................sim
Capacidade do mandril porta-broca .max. 10 mm
Tensão de saída do carregador: ............... 23 Vdc
Corrente de saída do carregador: ............... 0,5 A
Tensão da rede para o carregador .......................
...........................................100-240 V ~ 50/60 Hz
Tipo de acumulador: ......................................lítio
Número de células do acumulador: .................. 5
Capacidade do acumulador: ..................... 1,3 Ah
Peso ............................................................1,6 kg
Diâmetro máx. dos parafusos: .................... 6 mm
O diâmetro máx. dos parafusos descreve o diâmetro máximo do parafuso, que pode ser aplicado em madeira. Consoante o tipo de madeira, o
diâmetro dos parafusos pode variar.
Ruído e vibração
Os valores de ruído e de vibração foram apurados de acordo com a EN 60745.
Nível de pressão acústica L
Incerteza K
................................................3 dB
pA
Nível de potência acústica L
Incerteza K
...............................................3 dB
WA
Use uma protecção auditiva.
O ruído pode provocar danos auditivos.
Valores totais de vibração (soma vectorial de três
direcções) apurados de acordo com a EN 60745.
Furar metal
Valor de emissão de vibração a
Incerteza K = 1,5 m/s
........... 70,88 dB(A)
pA
.........81,88 dB(A)
WA
2
h
≤ 2,5 m/s
2
O valor de emissão de vibração indicado foi medido segundo um método de ensaio normalizado,
podendo, consoante o tipo de utilização da ferramenta eléctrica, sofrer alterações e em casos
excepcionais ultrapassar o valor indicado.
O valor de emissão de vibração indicado pode
ser comparado com o de uma outra ferramenta
eléctrica.
O valor de emissão de vibração indicado também
pode ser utilizado para um cálculo prévio de
limitações.
Reduza a produção de ruído e de vibração
para o mínimo!
Utilize apenas aparelhos em bom estado.
•
Limpe e faça a manutenção do aparelho re-
•
gularmente.
Adapte o seu modo de trabalho ao aparelho.
•
Não sobrecarregue o aparelho.
•
Se necessário, submeta o aparelho a uma
•
verificação.
Desligue o aparelho, quando este não estiver
•
a ser utilizado.
Use luvas.
•
Cuidado!
Riscos residuais
Mesmo quando esta ferramenta eléctrica é
utilizada adequadamente, existem sempre
riscos residuais. Dependendo do formato e
do modelo desta ferramenta eléctrica podem
ocorrer os seguintes perigos:
1. Lesões pulmonares, caso não seja utilizada
uma máscara de protecção para pó adequada.
2. Lesões auditivas, caso não seja utilizada uma
protecção auditiva adequada.
3. Danos para a saúde resultantes das vibrações na mão e no braço, caso a ferramenta
seja utilizada durante um longo período de
tempo ou se não for operada e feita a manutenção de forma adequada.
Aparafusar sem percussão
Valor de emissão de vibração ah ≤ 2,5 m/s
Incerteza K = 1,5 m/s
2
2
Limite o tempo de trabalho.
Para tal, é necessário ter em atenção todos os
momentos do ciclo de operação (por exemplo,
os períodos em que a ferramenta eléctrica está
desligada, e aqueles em que está de facto ligada,
mas a funcionar sem carga).
- 80 -
Anl_TC_CD_18_2_Li_SPK7.indb 80Anl_TC_CD_18_2_Li_SPK7.indb 80 07.06.16 08:5807.06.16 08:58
Page 81

P
5. Antes da colocação em
funcionamento
Leia impreterivelmente estas indicações antes
de colocar a aparafusadora sem fi o em funciona-
mento:
1. Carregue o acumulador com o carregador
fornecido. Um acumulador vazio fi ca carrega-
do após aprox. 3-5 horas.
2. Utilize apenas brocas afi adas e pontas
aparafusadoras próprias e em perfeitas condições.
3. Antes de furar e aparafusar em paredes e
muros verifi que se existem condutores eléc-
tricos, canalizações de gás e de água.
6. Operação
6.1 Carregamento do pack de acumuladores
de lítio (fi g. 2-3)
1. Puxe o pack de acumuladores (5) do punho,
premindo, para tal, o botão de engate (8)
para baixo.
2. Verifi que se a tensão de rede indicada na pla-
ca de características corresponde à tensão
de rede existente.
3. Ligue o carregador (6) à tomada e insira o
cabo de carga (a) no acumulador (5). Os 3
LEDs na indicação da capacidade do acumulador (10) assinalam que o acumulador está
a carregar.
- Acumulador descarregado: os 3 LEDs pis-
cam alternadamente
- 1/3 carregado: o LED esquerdo está aceso,
os LEDs central e direito piscam alternadamente
- 2/3 carregado: os LEDs esquerdo e central
estão acesos, o LED direito pisca
4. Quando o carregamento terminar, após
aprox. 3-5 horas, os 3 LEDs acendem-se
durante aprox. 10 min. Retire o carregador do
acumulador.
5. Se os 3 LEDs piscarem em simultâneo, a
temperatura do acumulador encontra-se
abaixo ou acima do valor-limite. Remova o
carregador do acumulador, deixe o acumulador um dia à temperatura ambiente e tente de
novo.
6. Se o erro continuar a ser exibido, o acumula-
dor tem defeito. Um acumulador com defeito
nunca mais pode voltar a ser usado ou carregado. Retire o carregador do acumulador.
Se não for possível carregar o acumulador, queira
examinar:
se a tensão da rede está disponível na to-
•
mada
se há um contacto perfeito nos pontos de
•
contacto do aparelho carregador.
Se ainda não for possível carregar o acumulador,
solicitamos enviar
o aparelho carregador
•
e o acumulador
•
ao nosso serviço de assistência técnica.
Tendo em vista uma vida útil longa do pack de
acumuladores, deve providenciar um recarregamento atempado do pack de acumuladores de
lítio. Isto é absolutamente necessário se verifi car
que a potência da aparafusadora sem fi o está a
diminuir.
6.2 Ajuste do binário (fi g. 4/pos. 1)
Atenção! O anel de ajuste para o binário só
deve ser ajustado com o aparelho parado.
A aparafusadora sem fi o está equipada com um
ajuste mecânico do binário.
Ajusta-se o binário para um determinado tamanho de parafusos no anel giratório. O binário depende de vários factores:
do tipo e da dureza do material a trabalhar
•
do tipo e comprimento dos parafusos a usar
•
dos requisitos aos quais a união roscada
•
deve satisfazer.
O ruído de catraca que o acoplamento faz ao desembraiar sinaliza que o binário foi alcançado.
6.3 Furar (fi g. 4/pos. 1)
Para furar, gire o anel de ajuste do binário até a
última posição “Furar”. Na posição de “Furar”, o
acoplamento deslizante não funciona. Ao furar,
está disponível o binário máximo.
6.4 Selector do sentido de rotação (fi g. 5/
pos. 3)
O interruptor de corrediça sobre o interruptor
permite ajustar o sentido de rotação da furadeira
aparafusadora e evitar que ela seja ligada por
descuido. Pode-se seleccionar a rotação à esquerda ou à direita. Para evitar uma danifi cação
da transmissão, só se deve mudar o sentido de
rotação quando a máquina estiver parada. Quando o interruptor de corrediça estiver na posição
central, o interruptor está bloqueado.
- 81 -
Anl_TC_CD_18_2_Li_SPK7.indb 81Anl_TC_CD_18_2_Li_SPK7.indb 81 07.06.16 08:5807.06.16 08:58
Page 82

P
6.5 Interruptor (fi g. 5/pos. 4)
O interruptor permite regular o número de rotações sem escalonamento. Quanto mais V.S.
apertar o interruptor, tanto maior é o número de
rotações da furadeira aparafusadora.
6.6 Comutação entre a 1ª e a 2ª velocidade
(fi g. 4/pos. 7)
Conforme a posição do comutador pode trabalhar com uma velocidade de rotação superior ou
inferior. A comutação entre as duas velocidades
só deve ser executada quando a máquina se
encontra parada para evitar danos nas engrenagens.
6.7 Indicação da capacidade do acumulador
(fi g. 1/pos. 2)
Prima o interruptor para obter a indicação da
capacidade do acumulador (a). O indicador da
capacidade do acumulador (2) indica-lhe o nível
de carga do acumulador através de 3 LEDs.
Acendem os 3 LEDs:
O acumulador está completamente carregado.
Acendem 2 LEDs:
O acumulador dispõe de carga residual sufi ci-
ente.
1 LED a piscar
O acumulador está vazio, carregue-o.
Todos os LEDs a piscar:
A temperatura do acumulador foi ultrapassada.
Remova o acumulador do aparelho e deixe o
acumulador um dia à temperatura ambiente.
Se o erro voltar a ocorrer, o acumulador sofreu
uma descarga total e tem defeito. Remova o
acumulador do aparelho. Um acumulador com
defeito nunca mais pode voltar a ser usado ou
carregado.
6.8 Luz LED (fi gura 1/pos. 10)
A luz LED (10) permite manter iluminado o local
de aparafusamento ou de perfuração se a luminosidade for fraca. A luz LED (10) acende-se automaticamente ao premir o interruptor para ligar/
desligar (4).
6.9 Substituição do acessório (fi gura 6)
Atenção! Coloque o comutador do sentido de rotação (3) na posição central em quaisquer trabalhos efectuados na aparafusadora sem fi o (p. ex.
substituição do acessório; manutenção; etc.).
A aparafusadora sem fi o está equipada com uma
bucha de aperto rápido (9) com bloqueio do veio
automático.
Desaperte a bucha (9). A abertura da bucha (a)
tem de ser sufi cientemente grande, para receber
a ferramenta (broca ou pontas aparafusadoras).
Escolha a ferramenta adequada. Insira a ferramenta o máximo possível na abertura da bucha
(a).
Aperte a bucha (9) e verifi que, em seguida, se a
ferramenta está bem colocada.
6.10 Aparafusar
O melhor é usar parafusos de centragem automática (p.ex. Torx, Philips), o que permite trabalhar com segurança. Observe que o tamanho
e a forma da ponta de chave de parafuso deve
corresponder ao parafuso. Ajuste o binário, conforme descrito nas instruções, de acordo com o
tamanho do parafuso.
7. Limpeza, manutenção
e encomenda de peças
sobressalentes
Perigo!
Retire a fi cha da corrente antes de qualquer tra-
balho de limpeza.
7.1 Limpeza
Mantenha os dispositivos de segurança,
•
ranhuras de ventilação e a carcaça do motor
o mais limpo possível. Esfregue o aparelho
com um pano limpo ou sopre com ar comprimido a baixa pres são.
Aconselhamos a limpar o aparelho directa-
•
mente após cada utilização.
Limpe regularmente o aparelho com um pano
•
húmido e um pouco de sabão. Não utilize
detergentes ou solventes; estes podem
corroer as peças de plástico do aparelho.
Certifique-se de que não entra água para o
interior do aparelho. A entrada de água num
aparelho eléctrico aumenta o risco de choque
eléctrico.
7.2 Manutenção
No interior do aparelho não existem quaisquer
peças que necessitem de manutenção.
- 82 -
Anl_TC_CD_18_2_Li_SPK7.indb 82Anl_TC_CD_18_2_Li_SPK7.indb 82 07.06.16 08:5807.06.16 08:58
Page 83

7.3 Encomenda de peças sobressalentes e
acessórios:
Para encomendar peças sobressalentes, deve
indicar os seguintes dados:
modelo do aparelho
•
número de referência do aparelho
•
número de identificação do aparelho
•
número de peça sobressalente necessária
•
Pode consultar os preços e informações actuais
em www.isc-gmbh.info
Dica! Para bons resultados,
recomendamos acessórios
de alta qualidade da
! www.kwb.eu
welcome@kwb.eu
8. Eliminação e reciclagem
O aparelho encontra-se dentro de uma embalagem para evitar danos de transporte. Esta embalagem é matéria-prima, podendo ser reutilizada
ou reciclada. O aparelho e os respectivos acessórios são de diferentes materiais, como p. ex.
o metal e o plástico. Não deite os aparelhos defeituosos para o lixo doméstico. Para uma eliminação ecologicamente correcta, o aparelho deve
ser entregue num local de recolha adequado.
Se não tiver conhecimento de nenhum local de
recolha, informe-se junto da sua administração
autárquica.
P
9. Armazenagem
Guarde o aparelho e os respectivos acessórios
em local escuro, seco e sem risco de formação
de gelo, fora do alcance das crianças. A temperatura ideal de armazenamento situa-se entre os
5 e os 30 ˚C. Guarde a ferramenta eléctrica na
embalagem original.
- 83 -
Anl_TC_CD_18_2_Li_SPK7.indb 83Anl_TC_CD_18_2_Li_SPK7.indb 83 07.06.16 08:5807.06.16 08:58
Page 84

P
Só para países da UE
Não deite as ferramentas eléctricas para o lixo doméstico!
Segundo a directiva europeia 2012/19/EU relativa aos resíduos de equipamentos eléctricos e electrónicos e a respectiva transposição para o direito interno, as ferramentas eléctricas usadas têm de ser
recolhidas separadamente e entregues nos locais de recolha previstos para o efeito.
Alternativa de reciclagem relativa à solicitação de devolução:
O proprietário do aparelho eléctrico, no caso de não optar pela devolução, é obrigado a reciclar adequadamente o aparelho eléctrico. Para tal, o aparelho usado também pode ser entregue a um ponto
de recolha que trate da eliminação de resíduos, respeitando a legislação nacional sobre resíduos e
respectiva reciclagem. Não estão abrangidos os meios auxiliares e os acessórios sem componentes
electrónicos, que acompanham os aparelhos usados.
A reprodução ou duplicação, mesmo que parcial, da documentação e dos anexos dos produtos carece
da autorização expressa da iSC GmbH.
Reservado o direito a alterações técnicas
- 84 -
Anl_TC_CD_18_2_Li_SPK7.indb 84Anl_TC_CD_18_2_Li_SPK7.indb 84 07.06.16 08:5807.06.16 08:58
Page 85

P
Informações do serviço de assistência técnica
Estamos representados em todos os países mencionados no certifi cado de garantia por agentes auto-
rizados competentes, cujos contactos poderá encontrar no certifi cado de garantia. Estes encontram-se
ao seu dispor para todos os serviços de que necessita, tais como reparações, fornecimento de peças
sobressalentes e peças desgastadas ou a aquisição de consumíveis.
Deve-se ter em atenção que, neste produto, as seguintes peças estão sujeitas a um desgaste natural
ou decorrente da sua utilização, ou então são necessárias como consumíveis.
Categoria Exemplo
Peças de desgaste* Bucha, Acumulador
Consumíveis/peças consumíveis* Insertos de bit/Brocas
Peças em falta
* não incluído obrigatoriamente no material a fornecer!
Em caso de defi ciências ou erros, pedimos-lhe que comunique o problema através da página de In-
ternet www.isc-gmbh.info. Certifi que-se de que faz uma descrição exacta do problema, respondendo
sempre às seguintes questões:
O aparelho já funcionou alguma vez ou possui o defeito desde o início?
•
Antes do surgimento do defeito, apercebeu-se de algo estranho (sintoma antes do defeito)?
•
Na sua opinião, que erro de funcionamento apresenta o aparelho (sintoma principal)?
•
Descreva este erro de funcionamento.
- 85 -
Anl_TC_CD_18_2_Li_SPK7.indb 85Anl_TC_CD_18_2_Li_SPK7.indb 85 07.06.16 08:5807.06.16 08:58
Page 86

P
Certifi cado de garantia
Estimado(a) cliente,
os nossos produtos são submetidos a um rigoroso controlo de qualidade. Se, ainda assim, o aparelho
não funcionar nas devidas condições, lamentamos esse facto e pedimos-lhe que se dirija ao nosso serviço de assistência técnica na morada indicada no presente certifi cado de garantia. Se preferir, também
pode contactar-nos telefonicamente através do número de assistência técnica indicado. O exercício
dos direitos de garantia está sujeito às seguintes condições:
1. As presentes condições de garantia dirigem-se exclusivamente aos consumidores, ou seja, pessoas naturais, que não desejam utilizar este produto quer no âmbito da sua actividade comercial
quer de outra actividade independente. As presentes condições de garantia regem as prestações
de garantia adicionais com que o fabricante abaixo designado se compromete, além dos termos
legais de garantia, para com os compradores dos seus novos aparelhos e não afectam os seus
direitos legais de garantia. O nosso serviço de garantia é prestado gratuitamente.
2. O serviço de garantia cobre exclusivamente as defi ciências num novo aparelho adquirido do fabri-
cante abaixo designado, e que sejam decorrentes de erros de material ou de fabrico comprovados,
e está, por nossa opção, limitado à eliminação de tal falta no aparelho ou à substituição do mesmo.
Chamamos a atenção para o facto de os nossos aparelhos não terem sido concebidos para uso
comercial, artesanal ou profi ssional. Não haverá, por isso, lugar a um contrato de garantia no caso
de o aparelho ter sido utilizado, dentro do período de garantia, em empresas do sector comercial,
artesanal ou industrial ou actividades equiparáveis.
3. Excluídos pela nossa garantia estão:
- Danos no aparelho resultantes da inobservância das instruções de montagem ou de uma instalação incorrecta, da inobservância do manual de instruções (como p. ex. a ligação a uma tensão
de rede ou tipo de corrente errada) ou da inobservância das disposições de segurança ou da
exposição do aparelho a condições ambientais anormais ou de uma conservação e manutenção
insufi cientes.
- Danos no aparelho resultantes de utilizações abusivas ou indevidas (como p. ex. uma sobrecarga
do aparelho ou utilização de ferramentas de trabalho ou acessórios não autorizados), a penetração
de corpos estranhos no aparelho (como p. ex. areia, pedras ou pó, danos de transporte), o uso de
força ou impactos externos (como p. ex. danos resultantes de quedas).
- Danos no aparelho ou nas peças do aparelho associados a um desgaste decorrente do uso, um
desgaste natural habitual ou de outro tipo.
4. O período de garantia é de 24 meses a contar da data de compra do aparelho. Os direitos de garantia devem ser reclamados dentro do período de garantia, no prazo de duas semanas após ter
sido detectado o defeito. Está excluída a reclamação de direitos de garantia após o termo do período de garantia. A reparação ou a substituição do aparelho não implica o prolongamento do período
de garantia nem dá origem à contagem de um novo período de garantia para o aparelho ou para
eventuais peças sobressalentes montadas no mesmo. O mesmo se aplica no caso de a assistência
técnica ter sido prestada no local.
5. Para activar a garantia, denuncie o aparelho defeituoso em: www.isc-gmbh.info. Tenha à disposição
o talão ou outro comprovativo de compra do aparelho novo. Os aparelhos enviados sem o respectivo comprovativo ou sem a placa de características, serão excluídos pelo serviço de garantia devido
à falta de atribuição. Se o defeito do aparelho estiver abrangido pelo nosso serviço de garantia, serlhe-á imediatamente enviado um aparelho novo ou reparado.
Naturalmente, também teremos todo o gosto em efectuar reparações que não estão, ou deixaram de
estar, abrangidas pelo serviço de garantia. Nesse caso, terá de suportar os custos da reparação. Para
este efeito, deverá enviar o aparelho para a morada do nosso serviço de assistência técnica.
Para peças de desgaste, consumíveis e em falta, consulte as restrições desta garantia, de acordo com
as informações do serviço de assistência técnica deste manual de instruções.
- 86 -
Anl_TC_CD_18_2_Li_SPK7.indb 86Anl_TC_CD_18_2_Li_SPK7.indb 86 07.06.16 08:5807.06.16 08:58
Page 87

GR
Κίνδυνος! – Γι α τη μείωση του κινδύνου τραυματισμού διαβάστε την Οδηγία χρήσης
Προσοχή! Να χρησιμοποιείτε ωτοασπίδες. Η επίδραση του θορύβου μπορεί να προκαλέσει την
απώλεια της ακοής.
Προσοχή! Να χρησιμοποιείτε μάσκα προστασίας από σκόνη. Κατά την επεξεργασία ξύλου και
άλλων υλικών δεν αποκλείεται η δημιουργία επιβλαβούς για την υγεία σκόνης. Δεν επιτρέπεται η
επεξεργασία υλικών που περιέχουν αμίαντο!
Προσοχή! Να φοράτε οπωσδήποτε προστατευτικά γυαλιά. Οι σπινθήρες που δημιουργούνται
κατά την εργασία ή τα εκσφενδονιζόμενα κομμάτια, ροκανίδια και σκόνες μπορούν να προκαλέσουν
απώλεια της όρασης.
Προς αποφυγή βλάβης του κιβωτίου ταχυτήτων, η αλλαγή ταχυτήτων να γίνεται μόνο στην
ακινητοποίηση.
Οι συσσωρευτές να φυλάσσονται μόνο σε στεγνούς χώρους και σε θερμοκρασία περιβάλλοντος
+10°C - +40°C. Να αποθηκεύετε τις μπαταρίες μόνο σε φορτισμένη κατάσταση (τουλ. 40%
φορτισμένη)
Κλάση προστασίας ΙΙ
Μόνο για χρήση σε στεγνούς χώρους
- 87 -
Anl_TC_CD_18_2_Li_SPK7.indb 87Anl_TC_CD_18_2_Li_SPK7.indb 87 07.06.16 08:5807.06.16 08:58
Page 88

GR
Κίνδυνος!
Κατά τη χρήση των συσκευών πρέπει, προς
αποφυγή τραυματισμών, να τηρούνται και
να λαμβάνονται ορισμένα μέτρα ασφαλείας.
Διαβάστε για το λόγο αυτό προσεκτικά τις
Οδηγίες χρήσης / Υποδείξεις ασφαλείας.
Φυλάξτε τις καλά για να έχετε τις πληροφορίες
πάντα στη διάθεσή σας. Εάν παραδώσετε τη
συσκευή σε άλλα άτομα, δώστε μαζί και αυτές
τις Οδηγίες χρήσης / Υποδείξεις ασφαλείας. Δεν
αναλαμβάνουμε καμία ευθύνη για ατυχήματα
ή βλάβες που οφείλονται σε μη τήρηση αυτών
των Οδηγιών χρήσης και των Υποδείξεων
ασφαλείας.
1. Υποδείξεις ασφαλείας
Θα βρείτε τις ανάλογες υποδείξεις ασφαλείας
στο επισυναπτόμενο βιβλιάριο!
Κίνδυνος!
Διαβάστε όλες τις Υποδείξεις ασφαλείας
και τις Οδηγίες. Εάν δεν ακολουθήσετε
τις Υποδείξεις ασφαλεία και τις Οδηγίες δεν
αποκλείονται ηλεκτροπληξία, πυρκαγιά και/ή
σοβαροί τραυματισμοί. Φυλάξτε προσεκτικά
όλες τις Υποδείξεις ασφαλεάις και τις
Οδηγίες για το μέλλον.
2. Περιγραφή της συσκευής και
συμπαραδιδόμενα
2.1 Περιγραφή της συσκευής (εικ. 1a/1b)
1. Ρύθμιση ροπής στρέψης
2. Ένδειξη δυναμικότητας μπαταρίας
3. Διακόπτης αλλαγής κατεύθυνσης
4. Διακόπτης ενεργοποίησης/απενεργοποίησης
5. Συσσωρευτής
6. Φορτιστής
7. Μεταγωγέας 1η ταχύτητα - 2η ταχύτητα
8. Πλήκτρο κουμπώματος
9. Υποδοχή ταχείας σύσφιξης
10. Φως LED
2.2 Συμπαραδιδόμενα
Βάσει της περιγραφής των συμπαραδιδόμενων
παρακαλούμε να ελέγξετε την πληρότητα
του προϊόντος. Σε περίπτωση ελλείψεων
τμημάτων παρακαλούμε να αποτανθείτε εντός
5 εργάσιμων ημερών από την ημερομηνία
αγοράς στο Κέντρο Σέρβις (Service Center) της
εταιρείας μας ή στο κατάστημα από το οποίο
αγοράσατε τη συσκευή, προσκομίζοντας την
ισχύουσα απόδειξη αγοράς. Παρακαλούμε να
προσέξετε τον πίνακα εγγύησης στους όρους
εγγύησης στο τέλος των οδηγιών.
Ανοίξτε τη συσκευασία και βγάλτε
•
προσεκτικά τη συσκευή.
Απομακρύντε τα υλικά συσκευασίας
•
καθώς και τα συστήματα προστασίας της
συσκευασίας / μεταφοράς (εάν υπάρχουν).
Ελέγξτε εάν είναι πλήρες το περιεχόμενο.
•
Ελέγξτε τη συσκευή και τα αξεσουάρ για
•
ενδεχόμενες ζημιές από τη μεταφορά.
Φυλάξτε τη συσκευασία αν γίνεται μέχρι την
•
πάροδο της προθεσμάις της εγγύησης.
Προσοχή!
H συσκευή και τα υλικά συσκευασίας δεν είναι
παιχνίδια! Τα παιδιά δεν επιτρέπεται να παίζουν
με πλαστικές σακούλες, πλαστικές μεμβράνες
και μικροαντικείμενα! Υφίσταται κίνδυνος
κατάποσης και ασφυξίας!
Δραπανοκατσάβιδο μπαταρίας
•
Φορτιστής
•
Μπαταρία
•
Πρωτότυπες Οδηγίες χρήσης
•
Υποδείξεις ασφαλείας
•
3. Σωστή χρήση
Ο βιδωτής-τρυπάνι με συσσωρευτή προορίζεται
για βίδωμα και ξεβίδωμαβιδών και για τρύπες σε
ξύλο, μέταλλο και πλαστικό.
Η μηχανή επιτρέπεται να χρησιμοποιηθεί μόνο
για τον σκοπό για τον οποίο προορίζεται. Κάθε
πέραν τούτου χρήση δεν ανταποκρίενται στο
σκοπό για τον οποίο προορίζεται. Γι α βλάβες
που οφείλονται σε παρόμοια χρήση ή για
τραυματισμούς παντός είδους ευθύνεται ο
χρήσητς/χειριστής και όχι ο κατασκευαστής.
- 88 -
Anl_TC_CD_18_2_Li_SPK7.indb 88Anl_TC_CD_18_2_Li_SPK7.indb 88 07.06.16 08:5807.06.16 08:58
Page 89

GR
Παρακαλούμε να προσέξετε πως οι συσκευές
μας δεν προορίζονται και δεν έχουν
κατασκευαστεί για επαγγελματική, βιοτεχνική
ή βιομηχανική χρήση. Δεν αναλαμβάνουμε
εγγύηση σε περίπτωση κατά την οποία η
συσκευή χρησιμοποιήθηκε σε συνεργεία,
βιοτεχνίες ή στη βιομηχανία ή σε εργασίες
παρόμοιες με αυτές.
4. Τεχνικά χαρακτηριστικά
Τροφοδοσία τάσης κινητήρα: ................18 V d.c.
Αριθμός στροφών ραλεντί: .. 0-350/0-1250 min
Βαθμίδες ροπής στρέψης: .......... 18 + 1 βαθμίδα
Δεξιόστροφη-αριστερόστροφη λειτουργία: .. ναι
Εύρος της υποδοχής τρυπανιού: ..... max. 10 mm
Τάση εξόδου φορτιστή: .........................23 V d.c.
Ρεύμα εξόδου φορτιστή: ............................0,5 Α
Τάση δικτύου φορτιστή: ...100-240 V ~ 50/60 Hz
T ύπος συσσωρευτή: ......................λιθίου-ιόντος
Αριθμός κυττάρων συσσωρευτή: ..................... 5
Χωρητικότητα συσσωρευτή: ....................1,3 Ah
Βάρος: .......................................................1,6 kg
Μέγ. Διάμετρος βίδας: ............................... 6 mm
Η μέγιστη διάμετρος βίδας περιγράφει την
μέγιστη διάμετρο της βίδας που μπορεί να
βιδωθεί σε ξύλο.
μπορεί να διαφέρει η διάμετρος της βίδας.
Θόρυβος και δονήσεις
Οι τιμές θορύβων και δονήσεων διαπιστώθηκαν
σύμφωνα με το πρότυπο EN 60745.
Στάθμη ηχητικής πίεσης L
Αβεβαιότητα K
Στάθμη ηχητικής ισχύος L
Αβεβαιότητα K
Να χρησιμοποιείτε ηχοπροστασία.
Η επίδραση θορύβου μπορεί να έχει σαν
συνέπεια την απώλεια της ακοής.
Συνολικές τιμές ταλαντώσεων (σύνολο
διανυσμάτων τριών κατευθύνσεων) σύμφωνα με
το πρότυπο EN 60745.
Τρυπάνι σε μέταλλο
Εκπομπή δονήσεων a
Αβεβαιότητα K = 1,5 m/s
Ανάλογα με το είδος του ξύλου
............ 70,88 dB(A)
..........................................3 dB
pA
.......................................... 3 dB
WA
pA
............ 81,88 dB(A)
WA
≤ 2,5 m/s
h
2
2
Βίδωμα χωρίς κρούση
Εκπομπή δονήσεων ah ≤ 2,5 m/s
Αβεβαιότητα K = 1,5 m/s
2
2
Προσοχή!
Η αναφερόμενη τιμή μετάδοσης δόνησης
μετρήθηκε βάσει τυποποιημένης μεθόδου
ελέγχου και μπορεί να μεταβληθεί ή και σε
εξαιρετικές περιπτώσεις να κυμαίνεται άνω της
αναφερόμενης τιμής, ανάλογα από τον τρόπο
χρήσης του ηλεκτρικού εργαλείου.
H αναφερόμενη μετάδοση δον΄σηεων μπορεί
να χρησιμοποιηθεί και για σύγκριση με άλλο
-1
ηλεκτρικό εργαλείο.
Η αναφερόμενη τιμή μετάδοσης δόνησης
μπορεί επίσης να χρησιμοποιηθεί και για αρχική
εκτίμηση της έκθεσης.
Περιορίστε την δημιουργία θορύβου και τις
δονήσεις στο ελάχιστο!
Να χρησιμοποιείτε μόνο συσκευές σε άψογη
•
κατάσταση.
Να συντηρείτε και να καθαρίζετε τακτικά τη
•
συκσευή.
Να προσαρμόζετε στη συσκευή τον τρόπο
•
εργασίας σας.
Προσέξτε να μην υπερφορτώνετε τη
•
συσκευή.
Αφήστε τη συσκευή νδεχομένως να
•
ελεγχθεί από ειδικό τεχνίτη.
Να απενεργοποιείτε τη συσκευή όταν δεν
•
την χρησιμοποιείτε.
Να φοράτε γάντια.
•
Προσοχή!
Υπολειπόμενοι κίνδυνοι
Aκόμη και σε περίπτωση σωστής και
κανονικής χρήσης αυτού του ηλεκτρικού
εργαλείου, υφίστανται πάντα ορισμένοι
υπολειπόμενοι κίνδυνοι. Oι ακόλουθοι
κίνδυνοι μπορούν να παρουσιαστούν
ανάλογα με το είδος κατασκευής και το
μεντέλο αυτού του ηλεκτρικού εργαλείου:
1. Βλάβες πνευμόνων, εάν δεν
χρησιμοποιηθούν κατάλληλες μάσκες
προστασίας από σκόνη.
2. Bλάβες της ακοής, εάν δεν χρησιμοποιθεί
κατάλληλη ηχοπροστασίας.
3. Βλάβες της υγείας που προκαλούνται από
δονήσεις χεριού-βραχίονα, εάν η συσκευή
χρησιμοποιηθεί για μεγαλύτερο χρονικό
διάστημα ή δεν τηρείται και δεν συντηρείται
σωστά.
- 89 -
Anl_TC_CD_18_2_Li_SPK7.indb 89Anl_TC_CD_18_2_Li_SPK7.indb 89 07.06.16 08:5807.06.16 08:58
Page 90

GR
Περιορίστε το χρόνο εργασίας
Εδώ πρέπει να λάβετε υπόψη σας όλα
τα τμήματα του κύκλου λειτουργίας (για
παράδειγμα χρόνους κατά τους οποίους είναι
σβησμένο το ηλεκτρικό εργαλείο και χρόνους
κατά τους οποίους είναι αναμμένο αλλά χωρίς
φορτίο).
5. Πριν τη θέση σε λειτουργία
Πριν τη θέση σε λειτουργία του κατσαβιδιού
μπαταρίας σας να διαβάσετε οπωσδήποτε αυτές
τις υποδείξεις:
1. Φορτίστε το συσσωρευτή με το
συμπαραδιδόμενο φορτιστή. Ένας κενός
συσσωρευτής φορτίζεται μετά από περ. 3-5
ώρες.
2. Να χρησιμοποιείτε μόνο τροχισμένα
τρυπάνια και κατάλληλες κατσαβιδόλαμες.
3. Όταν βιδώνετε σε εσωτερικούς και
εξωτερικούς τοίχους να ελέγχετε για
ενδεχόμενους μη εμφανείς αγωγούς
ρεύματος, αερίου και νερού.
6. Χειρισμός
6.1 Φόρτιση της μονάδας συσσωρευτή LI
(εικ. 2-3)
1. Βγάλτε τη μονάδα συσσωρευτή (5) από
τη χειρολαβή και πιέστε το πλήκτρο
κουμπώματος (8) προς τα κάτω.
2. Συγκρίνετε εάν συμφωνεί η τάση που
αναφέρεται στην ετικέτα στοιχείων της
συσκευής με την τάση δικτύου σας.
3. Συνδέστε τον φορτιστή (6) με την πρίζα και
το καλώδιο φόρτισης (a) με τον συσσωρευτή
(5). Τα 3 LED στην ένδειξη φόρτισης του
συσσωρευτή (10) δειχνουν πως φορτίζεται ο
συσσωρευτής.
- άδεια μπαταρία: Και τα 3 LED
αναβοσβήνουν εναλλάξ
- φόρτιση κατά 1/3: ανάβει το αριστερό
LED, το μεσαίο και δεξί LED αναβοσβήνουν
εναλλάξ
- φόρτισης κατά 2/3: ανάβουν το αριστερό
και μεσαίο LED, το δεξί LED αναβοσβήνει.
4. Όταν περατωθεί η φόρτιση μετά από περ.
3-5 ώρες, ανάβουν και τα 3 LED για περίπου
10 λεπτά. Αφαιρέστε τον φορτιστή από τον
συσσωρευτή.
5. Εάν αναβοσβήνουν και τα 3 LED
συγχρόνως, τότε υπάρχει υπέρβαση ή
μείωση της θερμοκρασίας του συσσωρευτή
από το κανονικό. Αφαιρέστε τον φορτιστή
από τον συσσωρευτή, αφήστε τον
συσσωρευτή μία ημέρα σε θερμοκρασία
δωματίου και ξαναδοκιμάστε.
6. Εάν συνεχίζεται να προβάλλεται το σφάλμα,
τότε ο συσσωρευτής είναι ελαττωματικός.
Μία ελαττωματική μπαταρία/συσσωρευτής
δεν είναι δυνατόν να επαναχρησιμοποιηθεί ή
να επαναφορτιστεί! Αφαιρείτα τον φορτιστή
από τoν συσσωρευτή.
Εάν δεν είναι δυνατή η φόρτιση του
συσσωρευτή, παρακαλούμε να ελέγξετε
εάν υπάρχει τάση στην πρίζα.
•
εάν υπάρχει άψογη επαφή στις επαφές
•
φόρτισης του φορτιστή (8).
Εάν δεν είναι δυνατή η φόρτιση του
συσσωρευτή, παρακαλούμε να αποστείλετε
τον φορτιστή και τον προσαρμογέα
•
φόρτισης
και την μονάδα του συσσωρευτή
•
στο τμήμα μας εξυπηρέτησης πελατών.
Προς εξασφάλιση μακράς διαρκεάις ζωής
του συσσωρευτή να ροντίσετε για έγκαιρη
επαναφόρτιση της μονάδας του συσσωρευτή
LI. Αυτό είναι οπωσδήποτε απαραίτητο εάν
διαπιστώσετε πως μειώνεται η α΄πόδοση του
κατσαβιδιού μπαταρίας.
6.2 Ρύθμιση ροπής στρέψης (εικ. 4/αρ. 1)
Προσοχή! Ρύθμιση δακτυλίου για τη ροπή
στρέψης μόνο σε ακινητοποίηση.
Το κατσαβίδι είναι εξοπλσιμένο με αυτόματο
σύστημα ρύθμισης της ροπής στρέψης.
Η ροπή στρέψης για ορισμένο μέγεθος βιδών
ρυθμίζεται στον δακτύλιο (1). Η ροπή στρέψης
εξαρτάται από περισσότερους παράγοντες:
από το είδος και τη σκληρότητα του
•
κατεργαζόμενου υλικού.
από το είδος και το μήκος των
•
χρησιμοποιούμενων βιδών.
από τις απαιτήσεις για τους βιδωτούς
•
συνδέσμους.
Η σωστή ροπής στρέψης προκύπτει από την
εξαγωγή της ζεύξης με χαρακτηριστικό θόρυβο.
6.3 Λειτουργία δράπανου (εικ. 4/αρ. 1)
Για τη λειτουργία του τρυπανιού περιστρέψτε
το δακτύλιο ρύθμισης „τρυπάνι“. Στης βαθμίδα
λειτουργίας δράπανου ο συμπλέκτης ολίσθησης
- 90 -
Anl_TC_CD_18_2_Li_SPK7.indb 90Anl_TC_CD_18_2_Li_SPK7.indb 90 07.06.16 08:5807.06.16 08:58
Page 91

GR
είναι εκτός λειτουργίας. Κατά τη λειτουργία
δράπανου έχετε στη διάθεσή σας όλη το ροπή
στρέψης.
6.4 Διακόπτης αλλαγής κατεύθυνσης
(εικ. 5/αρ. 3)
Με το συρτό διακόπτη πάνω από το διακόπτη
ενεργοποίησης/απενεργοποίησης μπορείτε να
ρυθμίσετε την κατεύθυνση του κατσαβιδιού
μπαταρίας και να το ασφαλίσετε κατά αθέλητης
εκκίνησης. Μπορείτε να επιλέξετε μεταξύ
δεξιόστροφης και αριστερόστροφης κίνησης.
Προς αποφυγή βλάβης του κιβωτίου ταχυτήτων,
η αλλαγή κατεύθυνσης να γίνεται μόνο στην
ακινητοποίηση. Εάν ο συρτός διακόπτης
βρίσκεται στη μέση, έχει μπλοκαριστεί ο
διακόπτης ενεργοποίησης/απενεργοποίησης.
6.5 Αφήστε ελεύθερο τον διακόπτη
ενεργοποίησης/απενεργοποίησης
(εικ. 5/αρ. 4)
Με τον διακόπτη ενεργοποίησης/
απενεργοποίησης μπορείτε να ελέγξετε
αδιαβάθμητα τον αριθμό στροφών. Όσο
περισσότερο πιέζετε τον διακόπτη, τόσο
αυξάνεται ο αριθμός στροφών του κατσαβιδιού
μπαταρίας.
6.6 Αλλαγή από 1η σε 2η ταχύτητα
(εικ. 4/αρ. 7)
Ανάλογα με τη θέση του μεταγωγέα μπορείτε να
εργασθείτε με μεγαλύτερο ή μικρότερο αριθμό
στροφών. Προς αποφυγή βλάβης του κιβωτίου
ταχυτήτων, η αλλαγή ταχυτήτων να γίνεται
μόνο στην ακινητοποίηση.
6.7 Ένδειξη δυναμικότητας μπαταρίας
(ει. 1/αρ. 2)
Πιέστε το πλήκτρο για την ένδειξη
δυναμικότητας του συσσωρευτή (a). Η ένδειξη
δυναμικότητας του συσσωρευτή (2) σας δείχνει
την κατάσταση φόρτισης του συσσωρευτή βάσει
των 3 LED.
Είναι αναμμένα και τα 3 LED:
Ο συσσωρευτής έχει φορτιστεί πλήρως.
Αναβοσβήνουν όλα τα LED:
Υπέρβαση της θερμοκρασίας του συσσωρευτή.
Αφαιρέστε τον συσσωρευτή από τη συσκευή
και αφήστε τον επί μία ημέρα σε θερμοκρασία
δωματίου. Εάν επαναπαρουσιαστεί το σφάλμα
τότε ο συσσωρευτής έχει εκφορτιστεί εκ βάθους
και είναιελαττωματικός. Κατόπιν τοποθετείτε
τoν συσσωρευτή. Μία ελαττωματική
μπαταρία/συσσωρευτής δεν είναι δυνατόν να
επαναχρησιμοποιηθεί ή να επαναφορτιστεί!
6.8 Φως LED (εικ. 1/αρ. 10)
Το φως LED (10) κάνει δυνατό το φωτισμό το
σημείου βιδώματος ή τρυπήματος σε περίπτωση
δυσμενών συνθηκών φωτισμού. Το φως
LED (10) ανάβει αυτόματα, μόλις πιέσετε το
διακόπτη ενεργοποίησης/απενεργοποίησης (4).
6.9 Αλλαγή εργαλείων (εικ. 6)
Προσοχή! Σε όλες τις εργασίες (π.χ. αλλαγή
εργαλείων, συντήρηση κλπ.) που εκτελείτε στο
κατσαβίδι με μπαταρία να βάζετε το διακόπτη
αλλαγής κατεύθυνσης (3) στη μεσαία θέση.
Ο διακόπτης είναι εξοπλισμένος με
•
υποδοχή ταχείας σύσφιξης (9) με ασφάλιση
ατράκτου.
Ανοίξτε την υποδοχή (9). Το άνοιγμα της
•
υποδοχής (a) πρέπει να είναι αρκετά μεγάλο
για να υποδεχθεί το εργαλείο (τρυπάνι ή
μπιτ κατσαβιδιού).
Επιλέξτε το κατάλληλο εργαλείο. Σπρώξτε
•
το εργαλείο όσο πιο βαθιά γίνεται στο
άνοιγμα της υποδοχής (a).
Στρίψτε την υποδοχή (9) για να κλείσει
•
καλά και ελέγξτε την καλή στερέωση του
εργαλείου.
6.10 Βίδες
Να χρησιμοποιείτε καλύτερα βίδες με
αυτοκεντράρισμα (π. χ. τορξ, στραυρόβιδες) που
προσφέρουν ασφαλή εργασία. Να προσέχετε να
συμφωνεί το χρησιμοποιούμενο bit και η βίδα ως
προς το σχήμα και το μέγεθος. Να εκτελείτε τη
ρύθμιση της ροπής στρέψης όπως περιγράφεται
στις οδηγίες χρήσης ανάλογα με το μέγεθος της
βίδας.
Ανάβουν/ει 2 ή 1 LED:
Η μπαταρία είναι ακόμη αρκετά φορτισμένη.
Αναβοσβήνει ένα LED:
Ο συσσωρευτής είναι άδειος, φορτίστε τον.
- 91 -
Anl_TC_CD_18_2_Li_SPK7.indb 91Anl_TC_CD_18_2_Li_SPK7.indb 91 07.06.16 08:5807.06.16 08:58
Page 92

GR
7. Καθαρισμός, συντήρηση και
παραγγελία ανταλλακτικών
Κίνδυνος!
Πριν από όλες τις εργασίες τοποθέτησης να
βγάζετε το φις από την πρίζα
7.1 Καθαρισμός
Να κρατάτε όσο πιο ελεύθερα από σκόνη
•
και ακαθαρσίες γίνεται τα συστήματα
προστασίας, τις σχισμές εξαερισμού και το
κέλυφος του μοτέρ. Σκουπίζετε τη συσκευή
με ένα καθαρό πανί, ή καθαρίστε το με
πεπεισμένο αέρα σε χαμηλή πίεση.
Συνιστούμε να καθαρίζετε τη συσκευή
•
αμέσως μετά από κάθε χρήση.
Να καθαρίζετε τη συσκευή τακτικά με ένα
•
νωπό πανί και λίγο μαλακό σαπούνι. Μη
χρησιμοποιείτε καθαριστικά ή διαλύτες,
γιατί δεν αποκλείεται να καταστρέψουν την
επιφάνεια της συσκευής. Προσέξτε να μην
περάσει νερό στο εσωτερικό της συσκευής.
Η διείσδυση νερού σε ηλεκτρική συσκευή
αυξάνει τον κίνδυνο ηλεκτροπληξίας.
7.2 Συντήρηση
Στο εσωτερικό της συσκευής δεν υπάρχουν
εξαρτήματα που χρειάζονται συντήρηση.
7.3 Παραγγελία ανταλλακτικών και
αξεσουάρ:
Κατά την παραγγελία ανταλλακτικών να
αναφέρετε τα εξής:
Τύπος της συσκευής
•
Αριθμός είδους της συσκευής
•
Αριθμός ταύτισης της συσκευής
•
Αριθμός ανταλλακτικού
•
Θα βρείτε τις ισχύουσες τιμές και πληροφορίες
στην ιστοσελίδα www.isc-gmbh.info
8. Διάθεση στα απορρίμματα και
επαναχρησιμοποίηση
Η συσκευή βρίσκεται σε μία συσκευασία προς
αποφυγή ζημιών κατά τη μεταφορά Αυτή η
συσκευασία αποτελείται από πρώτες ύλες
και έτσι μπορεί να επαναχρησιμοποιηθεί ή να
ανακυκλωθεί. Η συσκευή και τα εξαρτήματά της
αποτελούνται από διάφορα υλικά, όπως π.χ.
μέταλλο και πλαστικά υλικά. Δεν επιτρέπεται
η απόρριψη ελαττωματικών συσκευών στα
οικιακά απορρίμματα. Σωστή απόρριψη είναι
η παράδοση σε κατάλληλα κέντρα συλλογής
μεταχειρισμένων συσκευών. Εάν δεν γνωρίζετε
πού βρίσκεται παρόμοιο κέντρο συλλογής
μεταχειρισμένων συσκευών, ρωτήστε στη
διοίκηση της κοινότητάς σας.
9. Φύλαξη
Nα διατηρείτε τη συσκευή και τααξεσουάρ
της σε σκοτεινό, στεγνό χώρο, χωρίς παγετό,
και μακριά από παιδιά. Η ιδανική θερμοκρασία
αποθήκευσης είναι μεταξύ 5 και 30 °C. Να
φυλάξετε την ηλεκτρική σας συσκευή στην
πρωτότυπη συσκευασία της.
Συμβουλή! Για ένα καλό
αποτέλεσμα της εργασίας
σας σάς συνιστούμε
αξεσουάρ ανώτερης
ποιότητας της !
www.kwb.eu
welcome@kwb.eu
- 92 -
Anl_TC_CD_18_2_Li_SPK7.indb 92Anl_TC_CD_18_2_Li_SPK7.indb 92 07.06.16 08:5807.06.16 08:58
Page 93

GR
Μόνο για κράτη-μέλη της Ε.Ε.
Μη πετάτε τις ηλεκτρικές συσκευές στα οικιακάαπορρίμματα!
Σύμφωνα με την ευρωπαϊκή Οδηγία 2012/19/ΕU για απόβλητα ειδών ηλεκτρικού και ηλεκτρονικού
εξοπλισμού και την ενσωμάτωσή της σε εθνικό δίκαιο, πρέπει η παλιές ηλεκτρικές συσκευές να
συγκεντρώνονται και να παραδίδονται για ανακύκλωση φιλική για το περιβάλλον.
Εναλλακτική λύση ανακύκλωσης αντί για επιστροφή
Ο ιδιοκτήτης της ηλεκτρικής συσκευής υποχρεούται αντί της επιστροφής να συμβάλει στη σωστή
ανακύκλωση σε περίπτωση που δεν συνεχίζει να χρησιμοποιεί τη συσκευή. Η παλιά συσκευή μπορεί
να παραχωρηθεί σε κέντρο επιστροφής ηλεκτρικών συσκευών με την έννοια των εθνικών νόμων
ανακύκλωσης και διαχείρισης αποβλήτων. Δεν συμπεριλαμβάνονται τα τμήματα παλιών συσκευών
και τα βοηθητικά στοιχεία χωρίς ηλεκτρικά εξαρτήματα.
Η ανατύπωση ή οποιασδήποτε άλλης μορφής αναπαραγωγή της τεκμηρίωσης ή άλλων
δικαιολογητικών που αναφέρονται στα προϊόντα, ακόμη και αποσπασματικά, επιτρέπεται μόνο με
ρητή συγκατάθεση της iSC GmbH.
M ε επιφύλαξη τεχνικών τροποποιήσεων
- 93 -
Anl_TC_CD_18_2_Li_SPK7.indb 93Anl_TC_CD_18_2_Li_SPK7.indb 93 07.06.16 08:5807.06.16 08:58
Page 94

GR
Ενημέρωση για το σέρβις
Σε όλες τις χώρες που αναφέρονται στην εγγύηση έχουμε αρμόδια συνεργεία που συνεργάζονται
μαζί μας, η διεύθυνση των οποίων προκύπτει από την εγγύηση. Τα συνεργεία αυτά βρίσκονται στη
διάθεσή σας για επισκευές, ανταλλακτικά ή αξεσουάρ ή για την αγορά αναλώσιμων.
Προσέξτε ότι στη συσκευή αυτή τα ακόλουθα εξαρτήματα υπόκεινται σε κοινή
χρειάζονται τα ακόλουθα αναλώσιμα.
Κατηγορία Παράδειγμα
Φθειρόμενα εξαρτήματα* Υποδοχή τρυπανιού, Συσσωρευτής
Αναλώσιμα υλικά/αναλώσιμα τμήματα* Τρυπάνια
Ελλείψεις
* δεν συμπεριλαμβάνονται υποχρεωτικά στο περιεχόμενο της συσκευασίας!
Σε περίπτωση ελαττωμάτων ή σφαλμάτων σας παρακαλούμε να δηλώστε την περίπτωση στο
ίντερνετ στο www.isc-gmbh.info. Προσέξτε να περιγράψετε με ακρίβεια το σφάλμα και απαντήστε
στις ακόλουθες ερωτήσεις:
Λειτούργησε σωστά η συσκευή ή είχε από την αρχή κάποιο ελάττωμα?
•
Μήπως προσέξατε κάτι περίεργο προτού παρουσιαστεί το ελάττωμα (σύμπτωμα ή βλάβη)?
•
Ποια δυσλειτουργία παρατηρείται στη συσκευή (κύριο σύμπτωμα)?
•
Περιγράψετε αυτή τη δυσλειτουργία.
φθροά ή ότι
- 94 -
Anl_TC_CD_18_2_Li_SPK7.indb 94Anl_TC_CD_18_2_Li_SPK7.indb 94 07.06.16 08:5807.06.16 08:58
Page 95

GR
Εγγύηση
Αξιότιμη πελάτισα, αξιότιμε πελάτη,
τα προϊόντα μας υπόκεινται σε αυστηρό έλεγχο ποιότητας. Εάν η συσκευή αυτή παρ΄όλα αυτά
κάποτε δεν λειτουργήσει άψογα, λυπούμαστε πολύ και σας παρακαλούμε να αποτανθείτε προς το
τμήμα μας εξυπηρέτησης πελατών στην διεύθυνση που αναφέρεται στην κάρτα αυτή. Ευχαρίστως
είμαστε και τηλεφωνικά στη διάθεσή σας στον αριθμό
Για την αξίωση της εγγύησης ισχύουν τα εξής:
1. Αυτοί οι όροι εγγύησης ισχύουν μόνο για καταναλωτές, δηλ. για φυσικά πρόσωπα που δεν
χρησιμοποιούν το προϊόν αυτό ούτε για επαγγελματικούς σκοπούς ούτε για άλλη ανεξάρτητη
απασχόληση. Αυτοί οι όροι εγγύησης ρυθμίζουν πρόσθετες παροχές εγγύησης που
πιο κάτω κατασκευαστής πέραν της νόμιμης εγγύησης στους αγοραστές των νέων συσκευών
του. Δεν θίγονται από την εγγύηση αυτή οι νόμιμες αξιώσεις σας εγγύησης. Η εγγύησή μας σας
παρέχεται δωρεάν.
2. Η εγγύηση επεκτείνεται αποκλειστικά και μόνο σε ελαττώματα σε μία συσκευή του πιο κάτω
κατασκευαστή και που αφορούν
ελαττώματα υλικού ή κατασκευής και περιορίζεται ατά την κρίση
μας στην αποκατάσταση αυτών των ελαττωμάτων της συσκευής ή στην αντικατάστασή της.
Παρακαλούμε να προσέξετε πως οι συσκευές μας δεν προορίζονται για επαγγελματική,
βιοτεχνική ή βιομηχανική χρήση. Γι α το λόγο αυτό δεν συνάπτεται σύμβαση εγγύησης σε
περίπτωση κατά την οποία η συσκευή χρησιμοποιήθηκε κατά τη διάρκεια της εγγύησης σε
βιομηχανικές ή βιοτεχνικές επιχειρήσεις ή εάν εκτέθηκε σε παρόμοια εντατική χρήση.
3. Από την εγγύησή μας εξαιρούνται τα εξής:
- Βλάβες της συσκευής που οφείλονται σε μη τήρηση των οδηγιών συναρμολόγησης ή σε
όχι σωστή εγκατάσταση, μη τήρηση των οδηγιών χρήσης (όπως π.χ. σύνδεση σε εσφαλμένη
τάση ή σε λάθος είδος ρεύματος) ή σε μη τήρηση των όρων συντήρησης και ασφαλείας ή σε
περίπτωση έκθεσης της συσκευής σε ασυνήθιστες καιρικές συνθήκες ή σε έλλειψη φροντίδας
και συντήρησης.
- Βλάβες της συσκευής που οφείλονται σε καταχρηστική ή εσφαλμένη χρήση (όπως π.χ.
υπερφόρτωση της συσκευής ή χρήση μη εγκεκριμένων εργαλείων ή αξεσουάρ), σε είσοδο ξένων
αντικειμένων στη συσκευή (όπως π.χ. άμμος, πέτρες ή σκόνη, βλάβες μεταφοράς), άσκηση βίας
ή ξένη επέμβαση (όπως π. χ. βλάβη από πτώση).
- Βλάβες της συσκευής ή τμημάτων της συσκευής που οφείλονται σε συνήθη ή φυσική φθορά.
4. Η διάρκεια της εγγύησης ανέρχεται σε 24 μήνες και αρχίζει από την ημερομηνία της αγοράς της
συσκευής. Οι αξιώσεις εγγύησης πρέπει να εγερθούν πριν τη λήξη της διάρκειας της εγγύησης
εντός δύο εβδομάδων από την διαπίστωση του ελαττώματος. Αποκλείονται αξιώσεις εγγύησης
μετά την πάροδο της διάρκειας της εγγύησης. Η επισκευή ή η αντικατάσταση δεν συνεπάγεται
την επέκταση της διάρκειας της εγγύησης ούτε την νέα έναρξη της διάρκειας της εγγύησης
για τη συσκευή ή για ενδεχομένως χρησιμοποιηθέντα νέα ανταλλακτικά. Αυτό ισχύει και στην
περίπτωση σέρβις επί τόπου.
5. Για την αξίωση της εγγύησης παρακαλούμε να δηλώσετε την ελαττωματική σας συσκευή στο:
www.isc-gmbh.info. Να έχετε μαζί σας την απόδειξη της νέας συσκευής. Οι συσκευές που
αποστέλλονται χωρίς αποδείξεις και χωρίς πινακίδα στοιχείων, αποκλείονται από την εγγύηση
λόγω μη δυνατότητας ταξινόμησης. Εάν το ελάττωμα καλύπτεται από την εγγύηση, θα σας
επιστραφεί αμέσως είτε η επισκευασμένη συσκευή είτε μία καινούργια συσκευή.
σέρβις που αναφέρεται στην κάρτα εγγύησης.
υπόσχεται ο
Ευχαρίστως επισκευάζουμε ελαττώματα της συσκευής έναντι πληρωμής, εάν τα
ελαττώματα αυτά
δεν καλύπτονται από την εγγύηση. Για το σκοπό αυτό παρακαλούμε να στείλετε τη συσκευή στη
διεύθυνση του σέρβις μας.
Για αναλώσιμα και σε περίπτωση που λείπουν εξαρτήματα παραπέμπουμε στους περιορισμούς αυτής
της εγγύησης σύμφωνα με τους πληροφορίες σέρβις αυτών των οδηγιών χρήσης.
- 95 -
Anl_TC_CD_18_2_Li_SPK7.indb 95Anl_TC_CD_18_2_Li_SPK7.indb 95 07.06.16 08:5807.06.16 08:58
Page 96

ISC GmbH · Eschenstraße 6 · D-94405 Landau/Isar
Konformitätserklärung
D erklärt folgende Konformität gemäß EU-Richtlinie und
Normen für Artikel
GB explains the following conformity according to EU directi-
ves and norms for the following product
F déclare la conformité suivante selon la directive CE et les
normes concernant l’article
I dichiara la seguente conformità secondo la direttiva UE e
le norme per l’articolo
NL verklaart de volgende overeenstemming conform EU
richtlijn en normen voor het product
E declara la siguiente conformidad a tenor de la directiva y
normas de la UE para el artículo
P declara a seguinte conformidade, de acordo com a
directiva CE e normas para o artigo
DK attesterer følgende overensstemmelse i medfør af
EU-direktiv samt standarder for artikel
S förklarar följande överensstämmelse enl. EU-direktiv och
standarder för artikeln
FIN vakuuttaa, että tuote täyttää EU-direktiivin ja standardien
vaatimukset
EE tõendab toote vastavust EL direktiivile ja standarditele
CZ vydává následující prohlášení o shodě podle směrnice EU
a norem pro výrobek
SLO potrjuje sledečo skladnost s smernico EU in standardi za
izdelek
SK vydáva nasledujúce prehlásenie o zhode podľa smernice
EÚ a noriem pre výrobok
H a cikkekhez az EU-irányvonal és Normák szerint a
következő konformitást jelenti ki
Akku-Bohrschrauber TC-CD 18-2 Li / Ladegerät für TC-CD 18-2 Li (Einhell)
87/404/EC_2009/105/EC
2005/32/EC_2009/125/EC
2006/95/EC
2006/28/EC
X
2014/30/EC
2004/22/EC
1999/5/EC
97/23/EC
90/396/EC_2009/142/EC
89/686/EC_96/58/EC
X
2011/65/EC
X
2006/42/EC
Annex IV
Notifi ed Body:
Notifi ed Body No.:
Reg. No.:
2000/14/EC_2005/88/EC
Annex V
Annex VI
Noise: measured LWA = dB (A); guaranteed LWA = dB (A)
P = KW; L/Ø = cm
Notifi ed Body:
2004/26/EC
Emission No.:
PL deklaruje zgodność wymienionego poniżej artykułu z
następującymi normami na podstawie dyrektywy WE.
BG декларира съответното съответствие съгласно
Директива на ЕС и норми за артикул
LV paskaidro šādu atbilstību ES direktīvai un standartiem
LT apibūdina šį atitikimą EU reikalavimams ir prekės normoms
RO declară următoarea conformitate conform directivei UE şi
normelor pentru articolul
GR δηλώνει την ακόλουθη συμμόρφωση σύμφωνα με την
Οδηγία ΕΚ και τα πρότυπα για το προϊόν
HR potvrđuje sljedeću usklađenost prema smjernicama EU i
normama za artikl
BIH potvrđuje sljedeću usklađenost prema smjernicama EU i
normama za artikl
RS potvrđuje sledeću usklađenost prema smernicama EZ i
normama za artikal
RUS следующим удостоверяется, что следующие продукты
соответствуют директивам и нормам ЕС
UKR проголошує про зазначену нижче відповідність виробу
директивам та стандартам ЄС на виріб
MK ја изјавува следната сообрзност согласно
ЕУ-директивата и нормите за артикли
TR Ürünü ile ilgili AB direktifl eri ve normları gereğince aşağıda
açıklanan uygunluğu belirtir
N erklærer følgende samsvar i henhold til EU-direktivet og
standarder for artikkel
IS Lýsir uppfyllingu EU-reglna og annarra staðla vöru
Standard references: EN 60745-1; EN 60745-2-1; EN 60745-2-2; EN 55014-1;
EN 55014-2; EN 61000-3-2; EN 61000-3-3; EN 60335-1; EN 60335-2-29; EN 62233
Landau/Isar, den 06.06.2016
First CE: 15 Archive-File/Record: NAPR010120
Art.-No.: 45.138.20 I.-No.: 11014 Documents registrar: Georg Riedel
Subject to change without notice Wiesenweg 22, D-94405 Landau/Isar
- 96 -
Anl_TC_CD_18_2_Li_SPK7.indb 96Anl_TC_CD_18_2_Li_SPK7.indb 96 07.06.16 08:5807.06.16 08:58
Yang/Product-ManagementWeichselgartner/General-Manager
Page 97

- 97 -
Anl_TC_CD_18_2_Li_SPK7.indb 97Anl_TC_CD_18_2_Li_SPK7.indb 97 07.06.16 08:5807.06.16 08:58
Page 98

- 98 -
Anl_TC_CD_18_2_Li_SPK7.indb 98Anl_TC_CD_18_2_Li_SPK7.indb 98 07.06.16 08:5807.06.16 08:58
Page 99

- 99 -
Anl_TC_CD_18_2_Li_SPK7.indb 99Anl_TC_CD_18_2_Li_SPK7.indb 99 07.06.16 08:5807.06.16 08:58
Page 100

EH 06/2016 (02)
Anl_TC_CD_18_2_Li_SPK7.indb 100Anl_TC_CD_18_2_Li_SPK7.indb 100 07.06.16 08:5807.06.16 08:58
 Loading...