

Page 1
RT 450; UK, EX
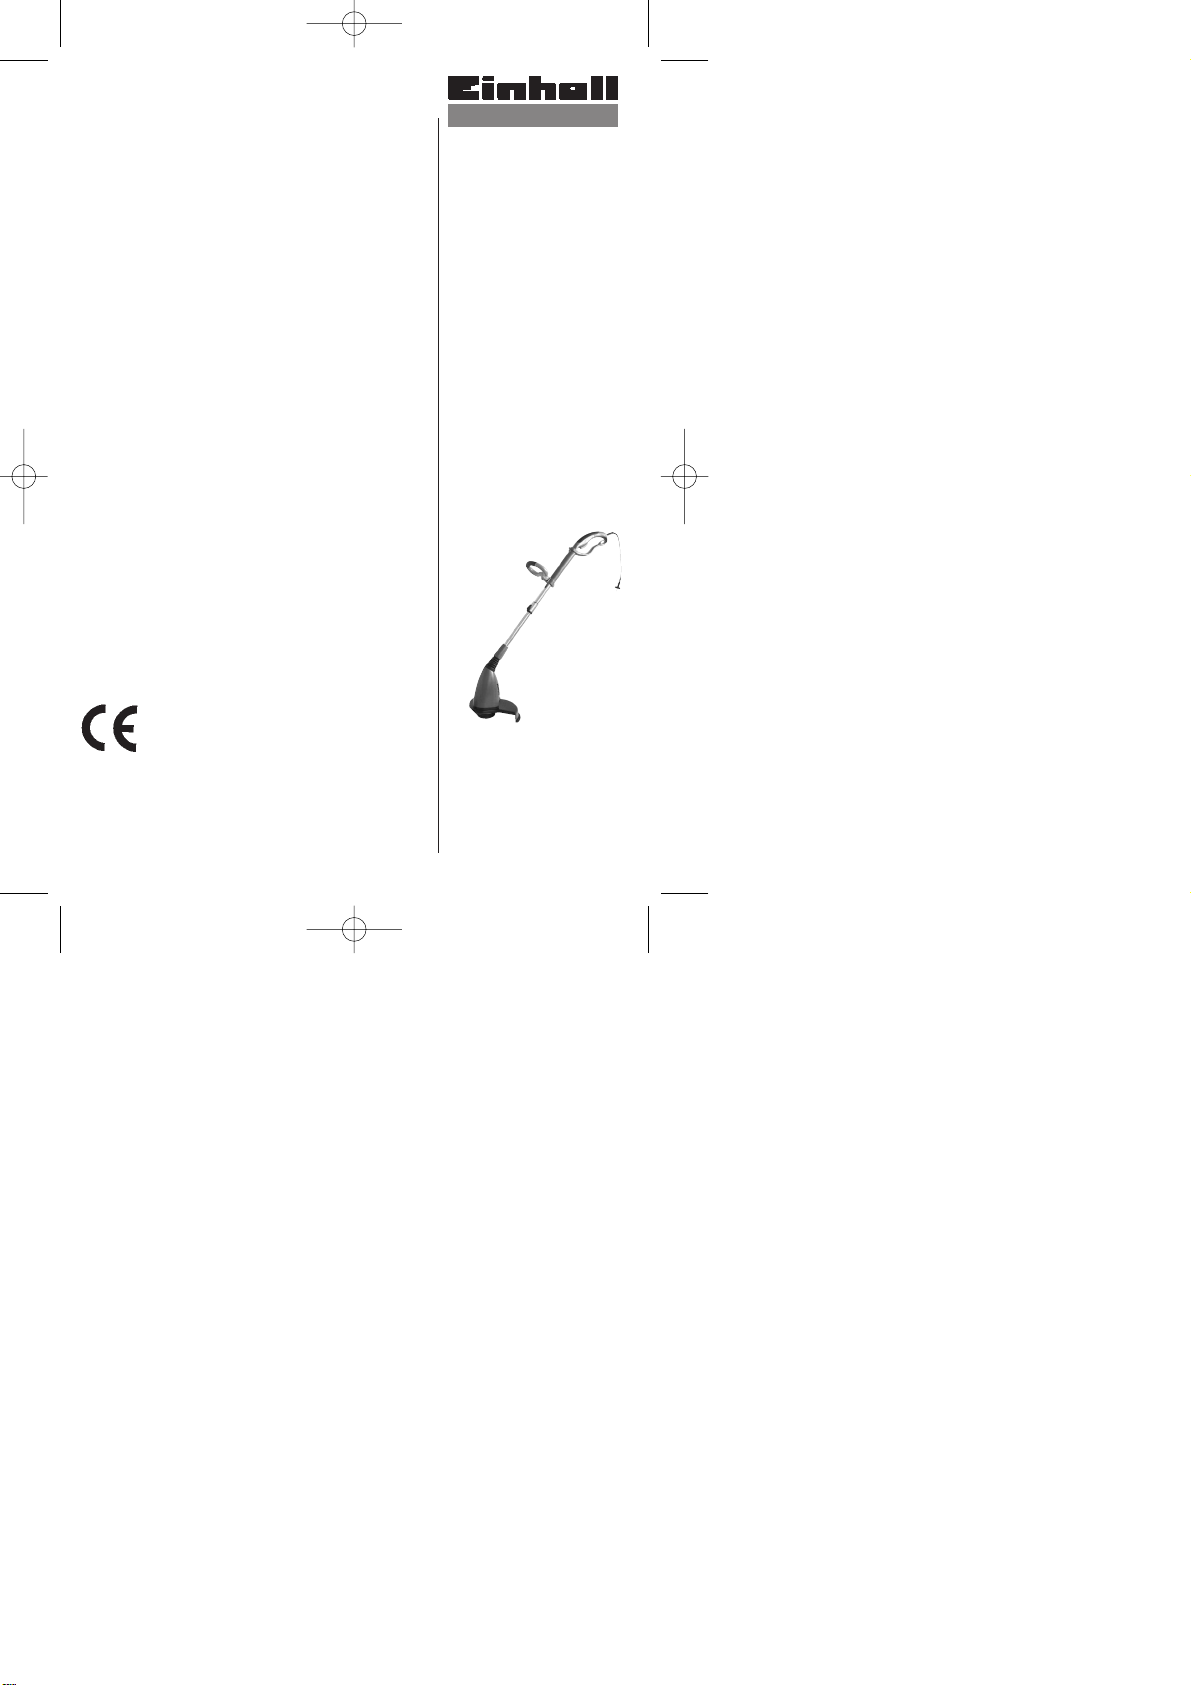
Lawn Trimmer
Artikel-Nr.: 3401532
Ident-Nr.: 01013
Page 2

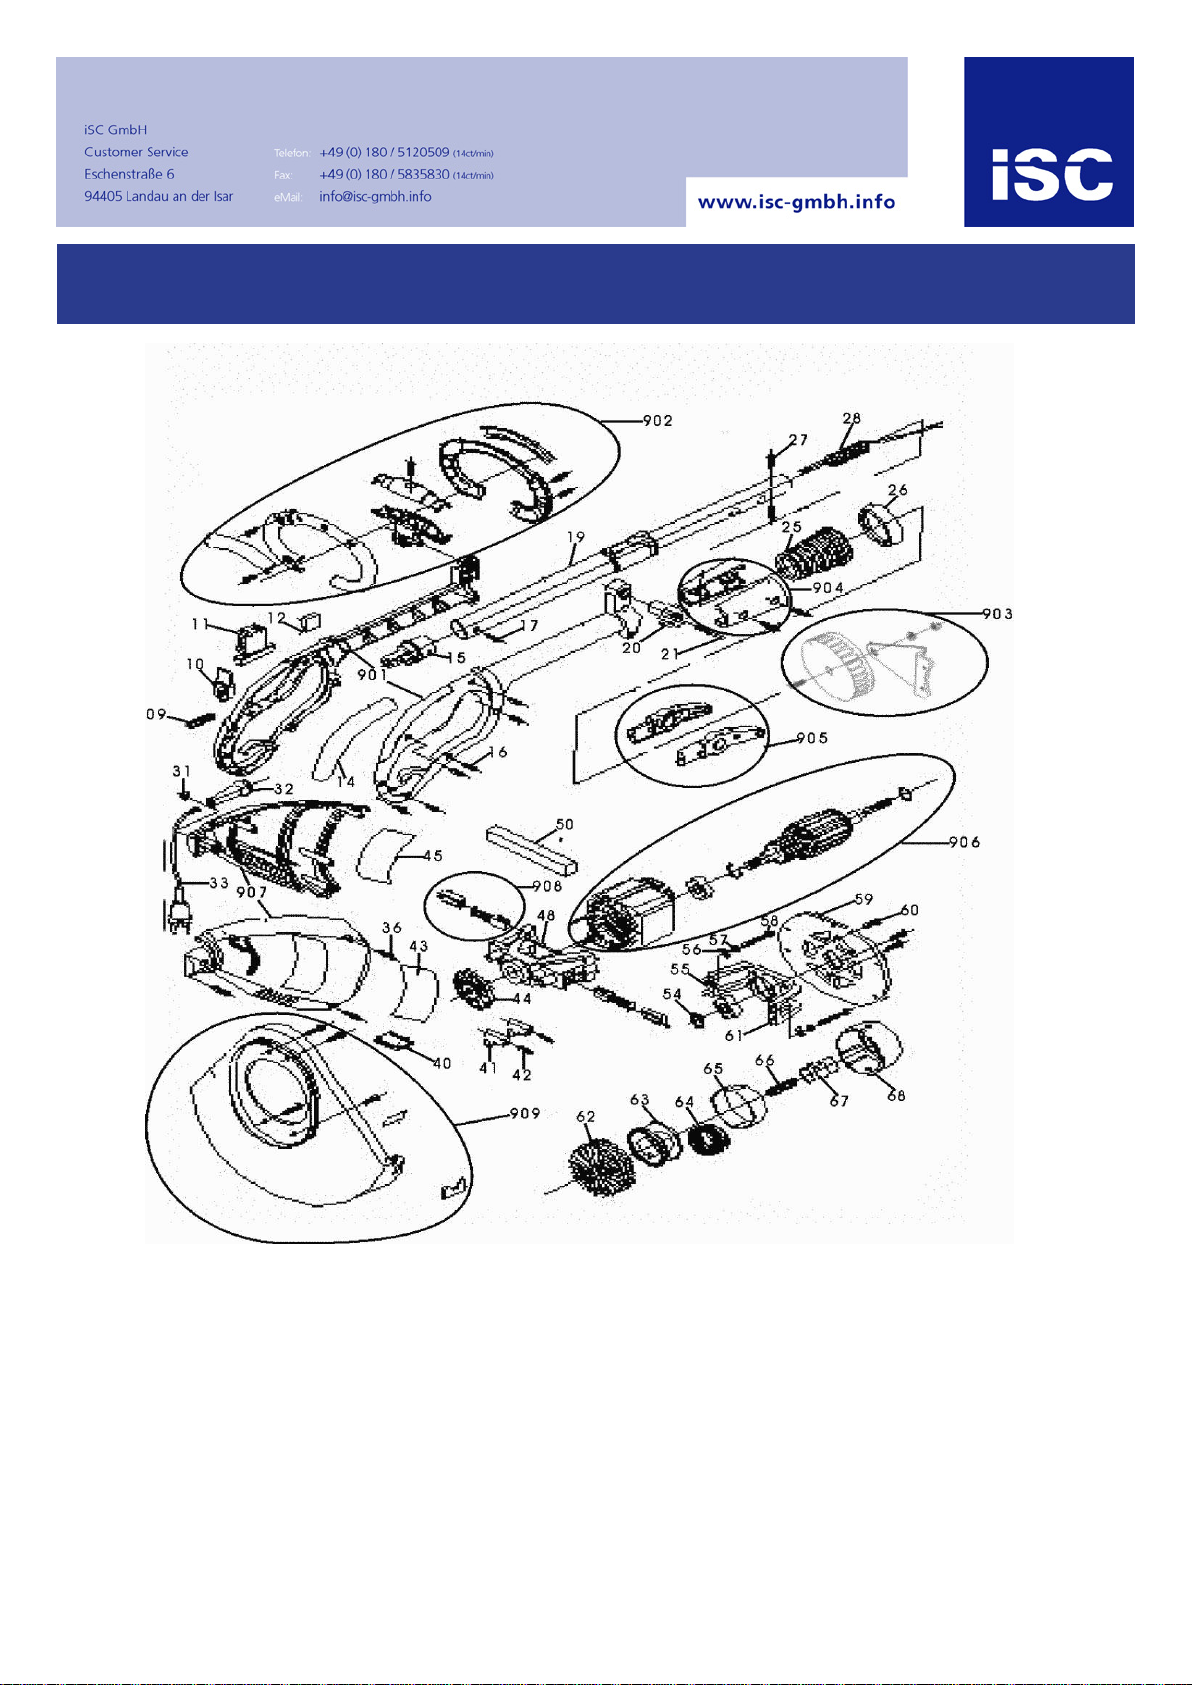
Komponenten / Ersatzteile
Position Artikel-Nr. Beschreibung
9 340148201 pressure spring
10 340148207 select locking
11 340148206 switch
12 340148209 capacitor
14 340148205 cover of Handle
15 340148208 extendable bush
20 340148211 screw knob
25 340148218 rubber cover
26 340148219 PVC-Ring
32 340148204 cord sheatihing
33 340130005 power cable
63 3405120 Ersatzfadenspule RT 300 Lawn Trimmer Accessory
66 340123016 spring
901 340148202 handle case (2 parts) complete
902 340148210 additional handle complete
903 340148213 angle guide
904 340148217 Halterung (2-tlg.)
905 340148220 Verbindungsstück
906 340148221 Antriebseinheit komplett
907 340148223 Motorgehäuse (2-tlg.)
909 340148216 protection cover with knife
Page 3
Art.-No.: 34.015.32 I.-No.: 01013
Instructions for Use
Grass Trimmer
RT 450
Anleitung RT 450 28.10.2003 14:32 Uhr Seite 1
®
Page 4

2
Please unfold page 2
Anleitung RT 450 28.10.2003 14:32 Uhr Seite 2
Page 5
3
1
2
1
2
34
1
2
8
5
6
7
Anleitung RT 450 28.10.2003 14:32 Uhr Seite 3
Page 6

4
3
6
4
5
7 8
Anleitung RT 450 28.10.2003 14:32 Uhr Seite 4
Page 7

5
12
13
14
10
11
9
Anleitung RT 450 28.10.2003 14:32 Uhr Seite 5
Page 8

6
D
F
E
G
Anleitung RT 450 28.10.2003 14:32 Uhr Seite 6
Page 9

GB
7
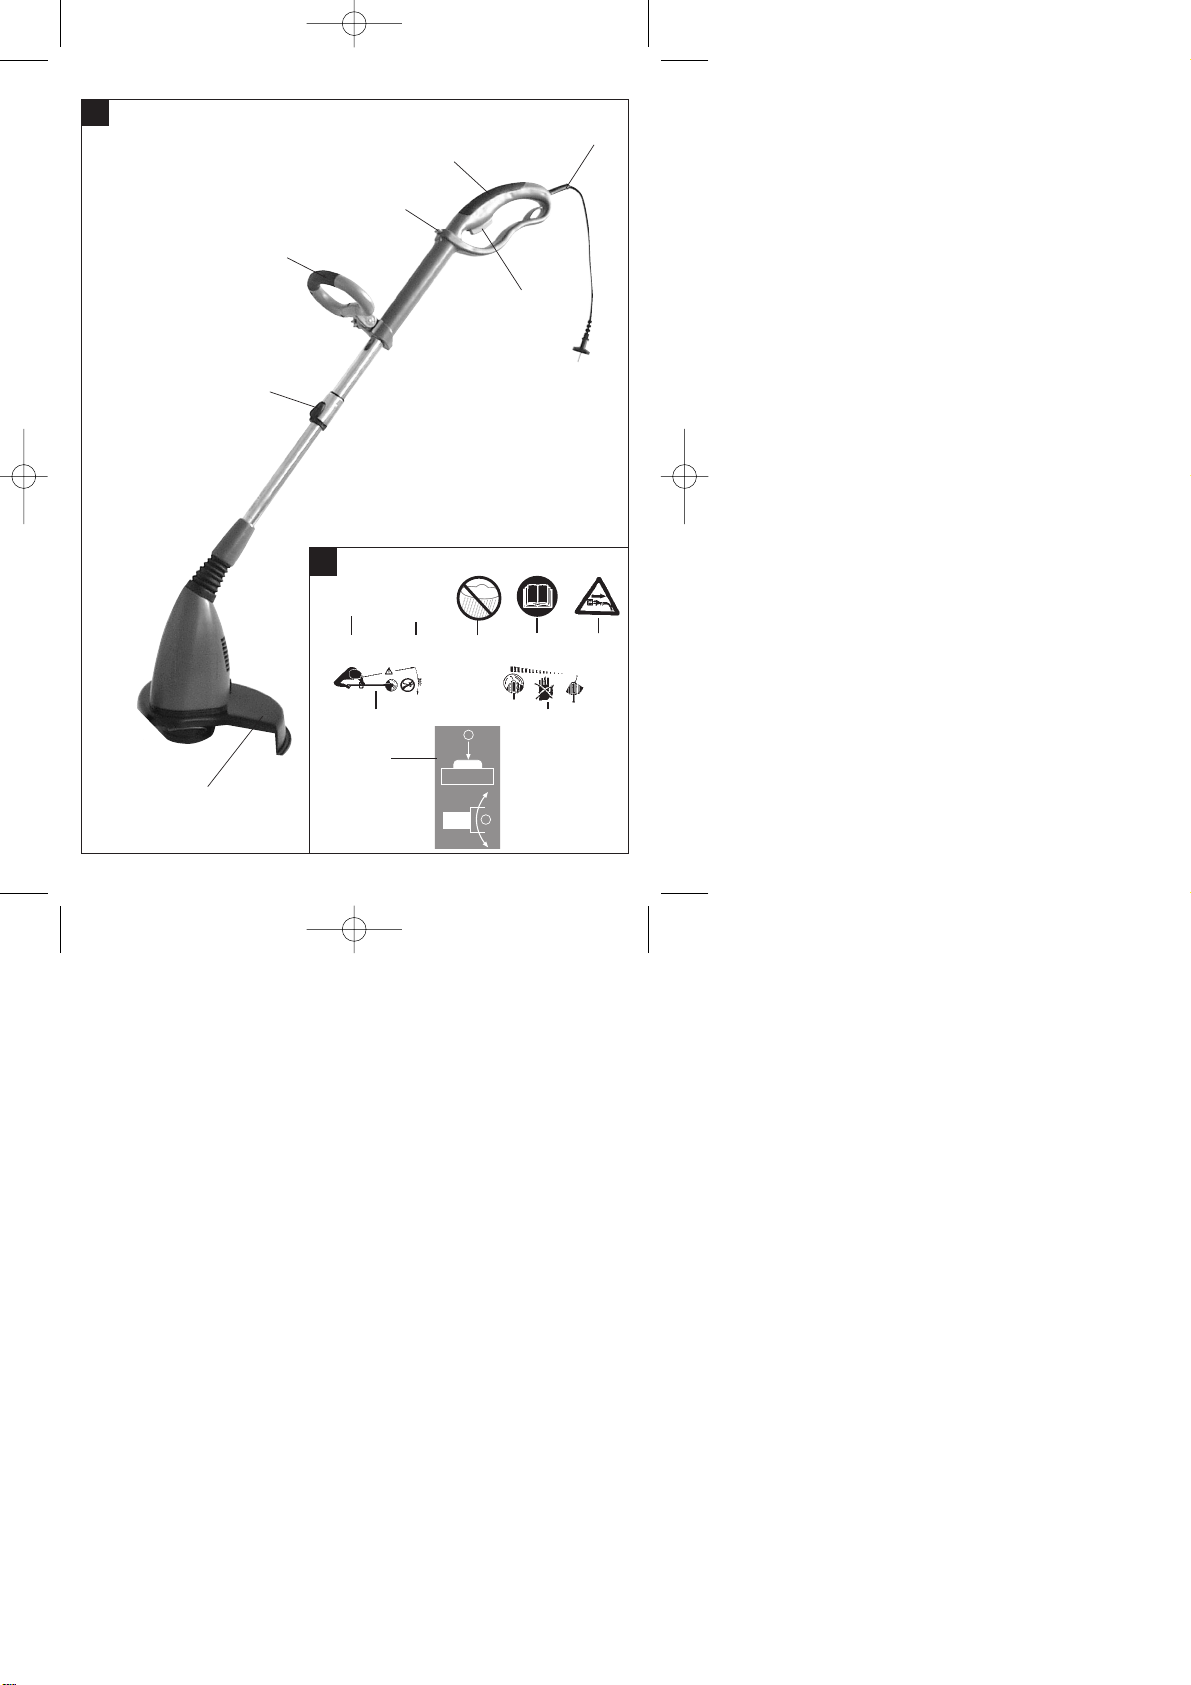
1. Description of tool (see Illustration 1)
1 Mains cable
2 Upper handle
3 On/Off switch
4 Adjustment knob to alter handle position
5 Additional handle
6 Height adjustment
7 Protective cover
2. Important Instructions
These instructions should be read carefully and
followed at all times. Familiarise yourself thoroughly
with the tool, with its use and with all safety
measures.
Caution!
For safety reasons this tool should not be used
by children under the age of 16, or by any person
who has not read the Instructions for Use.
Check the tool visually before using it. Do not
use the trimmer if the safety devices are worn or
damaged. Never deactivate the safety devices.
Only use this tool for the applications described
in these Instructions for Use.
You are responsible for safety within the working
area.
Check the cutting equipment before using the
tool. Remove any foreign bodies. Beware of any
foreign bodies when you are using the tool. If,
despite all precautions, you hit an obstacle while
using the tool, switch off the tool immediately and
remove the obstacle.
Only use the tool in good, clear visibility.
When you are working, ensure that you always
stand on firm ground. Take care when moving
backwards that you do not trip and fall.
Never leave the tool unsupervised at the place of
work. If the work is interrupted for any reason,
place the tool in a secure area.
If you stop work to walk to another location, it is
imperative that you switch off the tool while you
are moving.
Never use the tool in wet, damp conditions or
when it is raining.
Protect the tool from damp and rain.
Before switching the tool on, check to ensure the
nylon thread will not touch any stones or hard
objects.
Always wear appropriate protective clothing
when using the tool, to avoid injuries to head,
hands and feet. You should wear a helmet,
goggles or a visor, long boots (or sturdy shoes
and thick, protective trousers), as well as working
gloves.
When the tool is operating, keep it well away
from your body!
Never switch the tool on if it is turned towards
you or not in a working position.
Switch the power off if you are not using the tool,
wish to leave it unsupervised, are checking it, if
the mains cable is damaged, if you are
attempting to remove or change the nylon spool
or if you are transporting it from one place to
another.
Keep the tool well away from animals and
bystanders, especially children, as unseen
stones and other objects may be thrown up
during trimming.
Keep at least 5 metres away from other people
and animals.
Never cut against hard objects, so that you avoid
injuries to yourself and damage to the tool.
Use the edge of the protective cover to keep the
tool away from walls, other surfaces or fragile
objects.
Never use the tool without its safety device.
CAUTION!
The protective device is there to ensure your
safety and to protect others, as well as ensuring
that the tool functions correctly. Non-compliance
with these instructions could lead to potentially
dangerous situations and will void any guarantee
claims.
Never attempt to stop the cutting mechanism
(nylon thread) with your hands, always wait until
the thread has stopped moving.
Only use the original manufacturer’s nylon thread
and never, under any circumstances, replace the
nylon thread with metal wire.
Take great care not to injure yourself on the
device used to cut the correct length of nylon
thread.
Ensure that all openings are free from blockages
of dirt and waste.
After using the tool, disconnect it from the mains
socket and inspect the tool for damage.
Never attempt to cut grass growing anywhere
else but on the ground, i.e. grass growing on
walls or stones.
The operator is liable for any damage caused to
other parties within the working area when using
Anleitung RT 450 28.10.2003 14:32 Uhr Seite 7
Page 10

GB
8
the trimmer.
Never cross roads or pebbled paths with the tool
in operation.
When the tool is not being used, store it in a dry
area inaccessible to children.
Only use the tool in the manner described in
these instructions and always hold it vertically to
the ground. Any other position is potentially
dangerous.
Check regularly that all screws are fastened
tightly.
The mains voltage must comply with the
recommended voltage shown on the data
specification label on the tool.
The connecting cable must be checked regularly
for signs of damage or ageing. The tool must not
be used if the connecting cable is not in perfect
condition.
The connecting cable used must not be less
robust than the light rubber cable HO7RN-F
according to DIN 57282/VDE 0282 and must
have a minimum diameter of 1.5 mm2. The
socket connection must have protective contacts
and the coupling must be damp proof.
Ensure that there are no cables or other objects
lying in the grass cutting area.
If the tool has to be lifted to be carried
elsewhere, then switch off the power and wait
until the thread is no longer moving before
transporting it. Before leaving the tool, ensure
that the tool is not operating and that the plug
has been removed from the socket.
Before connecting the tool to the mains supply,
check that none of the moving parts are
damaged and that the spool of thread has been
inserted and fastened correctly.
During operation of the tool, ensure that it does
not come into contact with any hard objects, to
avoid injury to the operator and damage to the
tool.
Only original parts must be used during
maintenance and servicing.
Any repairs should only be carried out by
experts.
Caution: When the tool is switched off, the
nylon thread will continue to rotate for a few
seconds!
3. Explanation of the instruction labels
on the tool (See Illustration 2)
Item 1: Warning!
Item 2: Wear eye protection!
Item 3: Protect against damp!
Item 4: Read the instructions before operating the
tool!
Item 5: Before checking for a damaged cable,
disconnect the mains plug!
Item 6: Keep bystanders away from the danger
zone!
Item 7: The tool will continue to run after being
switched off!
Item 8: Use the grass trimmer as an edge trimmer.
4.Technical Specifications: RT450
Mains voltage 230 V - 50 Hz
Performance 450 watts
Cutting circle 30 cms diameter
Revolutions 10,000 rpm
Nylon cutting thread 1.2 mm diameter
Noise pressure level LPA 81 dB(A)
Noise performance level LWA 95 dB(A)
Vibration aw ≤ 2.5 m/s
2
Weight 3 kgs.
The noise of the tool can exceed 85 dB(A). If this
occurs, then the operator must use ear protection.
Noise levels were measured according to IEC 59 CO
11, IEC 704, DIN 45635 Part 21, NFS 31-031
(2000/14 EG).
The vibration level at the handle is ≤ 2.5 m/s2and
was determined according to ISO 5349.
5. Assembly of the protective cover
and the handle
Place the protective cover onto the motor head
and fasten it down using the enclosed screws
(see Illustration 3).
First fasten the screws shown in Illustration 4,
then the remaining 2 screws can be fastened.
Then attach the handle as shown in Illustration 5.
Anleitung RT 450 28.10.2003 14:32 Uhr Seite 8
Page 11

GB
9
6. Before using the tool for the first
time
Adjust the height and the position of the additional
handle to achieve an optimal working position.
Height adjustment
Place the trimmer firmly on the ground. Use the slide
(see Illustration 6 / Item 1) to adjust the height to the
correct position. Ensure that the slide locks firmly into
position.
Adjusting the additional handle
Place the trimmer firmly on the ground. Loosen the
screw (Illustration 7 / Item 1) and place the additional
handle in the optimal position. The handle is locked
into position by tightening the screw.
7. Using the tool for the first time
The trimmer is only intended for cutting grass.
The trimmer possesses a semi automatic thread
extension system. Every time the semi automatic
thread extension system is activated, the thread will
become longer, so that you are always using the
optimal cutting length for your grass.
Please note that you increase the wear on your
thread by frequently activating the automatic thread
extension system.
Note:
If your tool is being used for the very first time,
then any superfluous thread extending beyond
the edge will be cut off by the blade on the
protective cover.
If the thread is too short when the tool is being
used for the first time, just press the button on
the thread spool and pull hard on the thread.
(Illustration F). As soon as the tool is in
operation, the thread will automatically be cut
back to the optimal length.
To maintain the performance of your trimmer, please
adhere to the following instructions:
Never use the trimmer without the safety
mechanism
Never cut grass when it is wet. Best results will
be achieved if the grass is dry
Connect the mains cable to the extension cable
and loop this over the handle (Illustration 8)
To switch your trimmer on, press the On/Off
switch (Illustration 1 / Item 3)
To switch your trimmer off, release the On/Off
switch (Illustration 1/ Item 3)
Only put your trimmer onto the grass once the
tool has been switched on, i.e. when it is in
operation
To cut grass correctly, swing the tool to and fro
and walk forwards. Always hold the trimmer at an
angle of about 30 degrees (see Illustrations 9
and 10)
If the grass is long, it should be cut back in steps
from the top (see Illustration 11)
Always make full use of the protective cover to
keep thread wear down to a minimum
Keep the trimmer away from hard surfaces to
avoid unnecessary thread wear.
Semi automatic thread extension:
If the thread is too short, just press the trimmer
against the ground (Illustration G) and activate the
On/Off switch, then the thread length will be adjusted
automatically.
8. Using the trimmer as an edge-cutter
The trimmer can be adjusted for cutting the edges of
lawns and flowerbeds:
Switch off the mains supply to the trimmer
Depress the adjustment button (Illustration 12)
While keeping the button down, turn the upper
handle through 180 degrees (Illustration 13) until
it clicks into position
The trimmer has now been turned into an edge-
cutter, which allows a vertical cut into the grass
(Illustration 14).
9. Replacing the thread spool
Caution! Before replacing the thread spool
ensure that the mains plug has been removed
from the socket!
Holding the spool bracket (Illustration D / 8) with one
hand, grasp the grooves of the spool cover
(Illustration D / 9) and screw this off, in the direction
shown by the arrow on the side of the cover. After
removing the spool cover, take out the empty spool,
but ensure that you do not lose the adjustment
button and the spring. Place these two back into the
spool bracket. Holding the replacement spool in one
hand, push the ends of the threads through the holes
on the spool cover and insert the spool cover again
(Illustration 10 / E). Turn the spool cover clockwise
until it locks into position.
Anleitung RT 450 28.10.2003 14:32 Uhr Seite 9
Page 12

GB
10
Now depress the adjustment button and pull out
about 15 cm of thread (Illustration 15). When the
trimmer is used for the first time, the cutting thread
will automatically be cut to the correct length.
Caution! Flying parts of nylon thread can lead to
injuries!
10. Maintenance and Cleaning
Before putting the tool down and cleaning the
trimmer, ensure it is switched off and the mains
plug is disconnected from the socket
Any waste stuck on the protective cover should
be removed with a brush
The plastic body and plastic parts should be
cleaned with a mild detergent and a soft damp
cloth
Never use strong cleaning agents or solvents to
clean the trimmer
Never spray the trimmer with water. Any water
penetration is to be avoided.
11. Ordering spare parts
When ordering spare parts (spool) please quote the
article number : Art. No. 34.051.20.
Anleitung RT 450 28.10.2003 14:32 Uhr Seite 10
Page 13

11
Anleitung RT 450 28.10.2003 14:32 Uhr Seite 11
EG Konformitätserklärung
EC Declaration of Conformity
Déclaration de Conformité CE
EC Conformiteitsverklaring
Declaracion CE de Conformidad
Declaração de conformidade CE
EC Konformitetsförklaring
EC Yhdenmukaisuusilmoitus
EC Konfirmitetserklæring
RUS
EC Заявление о конформности
HR
Dichiarazione di conformità CE
Declaraţie de conformitate CE
AT Uygunluk Deklarasyonu
Der Unterzeichnende erklärt in Namen der Firma die Übereinstimmung des Produktes.
The undersigned declares in the name of the company that
the product is in compliance with the following guidelines and
standards.
Le soussigné déclare au nom de l’entreprise la conformité du
produit avec les directives et normes suivantes.
De ondertekenaar verklaart in naam van de firma dat het product overeenstemt met de volgende richtlijnen en normen.
El abajo firmante declara, en el nombre de la empresa, la
conformidad del producto con las directrices y normas
siguientes.
O signatário declara em nome da firma a conformidade do
produto com as seguintes directivas e normas.
Undertecknad förklarar i firmans namn att produkten överensstämmer med följande direktiv och standarder.
Allekirjoittanut ilmoittaa liikkeen nimissä, että tuote vastaa
seuraavia direktiivejä ja standardeja:
Undertegnede erklærer på vegne av firmaet at produktet
samsvarer med følgende direktiver og normer.
Лодлисавшийся лодтверждает от имени фирмыб что
настояшее изделие соответствует требованиям
следующих нормативных документов.
98/37/EG
x
x
73/23/EWG
97/23/EG
89/336/EWG
x
90/396/EWG
DIN EN 786; EN 60335-1; EN 55014; EN 50082-1;EN 60555-3-2; EN 60555-3-3; DIN VDE 0730 T2ZP;DIN VDE 0730 T1;
TÜV Süddeutschland Bau und Betrieb, KBV VI OR/10515/02
EC ¢‹ПˆЫЛ ВЪИ ЩЛ˜ ·УЩ·fiОЪИЫЛ˜
Dichiarazione di conformità CE
EC Overensstemmelseserklæring
CZ
EU prohlášení o konformitě
EU Konformkijelentés
SLO
EU Izjava o skladnosti
Oświadczenie o zgodności z normami
Europejskiej Wspólnoty
SK
Vyhásenie EU o konformite
Rasentrimmer RT 450
Az aláíró kijelenti, a cég nevében a termék megegyezését a
következő irányvonalakkal és normákkal.
Subsemnatul declară În numele firmei că produsul corespunde următoarelor directive și standarde.
∑mzalayan kiµi, firma adına ürünün aµa©ıda anılan yönetmeliklere ve normlara uygun olduµ©unu beyan eder.
∂У ФУ‰М·ЩИ ЩЛ˜ ВЩ·ИЪВ›·˜ ‰ЛПТУВИ Ф ˘ФБВБЪ·ММ¤УФ˜ ЩЛУ
Ы˘МКˆУ›· ЩФ˘ ЪФ˚fiУЩФ˜ ЪФ˜ ЩФ˘˜ ·ОfiПФ˘ıФ˘˜
О·УФУИЫМФ‡˜ О·И Щ· ·ОfiПФ˘ı· ЪfiЩ˘·.
Il sottoscritto dichiara a nome della ditta la conformità del
prodotto con le direttive e le norme seguenti.
På firmaets vegne erklærer under tegnede, at produktet imødekommer kravene i følgende direktiver og normer.
Níže podepsaný jménem firmy prohlašuje, že výrobek odpovídá následujícím sm
Az aláíró kijelenti, a cég nevében a termék megegyezését a
következő irányvonalakkal és normákkal.
Podpisani izjavljam v imenu podjetja, da je proizvod v skladnosti s slede ˇcimi smernicami in standardi.
Niżej podpisany oświadcza w imieniu firmy, że produkt jest
zgodny z następującymi wytycznymi i normami.
Podpisujúci záväzne prehlasuje v mene firmy, že tento
výrobok je v súlade s nasledovnými smernicami a normami.
89/686/EWG
87/404/EWG
R&TTED 1999/5/EG
2000/14/EG:
x
ěrnicím a normám.
LWM93 dB(A); LWA95 dB(A)
®
Einhell AG
Wiesenweg 22
94405 Landau/Isar
Landau/Isar, den 20.10.2003
Brunhölzl
Leiter Produkt-Management
Archivierung / For archives: 3401531-37-4155050-E
Bauer
Produkt-Management
Page 14

12
We reserve the right to technical amendments and alterations without prior notice.
GUARANTEE CERTIFICATE
We guarantee this tool for a period of 2 (two) years under the conditions stated below. The guarantee
period will always start with the delivery date, proof of which is seen as the receipt of purchase, the invoice,
the delivery note or a copy of the same. Within the guarantee period we agree to repair any functional
faults on the tool, which are a proven result of defective manufacture or materials. You will not be invoiced
for the spare parts or the labour costs.
Exceptions:
The guarantee does not cover natural wear and tear, damage in transport or damage caused by noncompliance with the assembly instructions or incorrect installation. The manufacturer does not accept
liability for indirect consequential damage or for material damage. Any repair to the tool does not
automatically extend or renew the guarantee period. For claims, problems or spare parts please contact:
Technical Customer Service: Phone 0151 649 1500
Anleitung RT 450 28.10.2003 14:32 Uhr Seite 12
Page 15

13
Anleitung RT 450 28.10.2003 14:32 Uhr Seite 13
Page 16

EH 10/2003
Anleitung RT 450 28.10.2003 14:32 Uhr Seite 14
ISC GmbH
Eschenstraße 6
D-94405 Landau/Isar
Tel. (0180) 120 509, Fax (099 51) 2610 u. 5250
Hans Einhell Österreich Gesellschaft m.b.H.
Mühlgasse 1
A-2353 Guntramsdorf
Tel. (02236) 53516, Fax (02236) 52369
Fubag International
St. Gallerstraße 182
CH-8405 Winterthur
Tel. (052) 2358787, Fax (052) 2358700
Einhell UK Ltd
Morpeth Wharf
Twelve Quays
Birkenhead, Wirral
CH 41 1NG
Tel.0151 6491500, Fax 0151 6491501
Pour toutes informations ou service après
vente, merci de prendre contact avec votre
revendeur.
Einhell Benelux
Veldsteen 44
NL-4815 PK Breda
Tel.076 5986470, Fax 076 5986478
Einhell Benelux
Veldsteen 44
NL-4815 PK Breda
Tel.076 5986470, Fax 076 5986478
Comercial Einhell S.A.
Antonio Cabezon, N° 83 Planta 3a
E-28034 Fuencarral Madrid
Tel.91 7294888, Fax 91 3581500
Einhell Iberica
Rua da Aldeia , 225 Apartado 2100
P-4405-017 Arcozelo VNG
Tel.022 0917500 Fax 022 0917527
Einhell Italia s.r.l.
Via Marconi, 16
I-22070 Beregazzo (Co)
Tel.031 992080, Fax 031 992084
Einhell Skandinavia
Bergsoevej 36
DK-8600 Silkeborg
Tel.087 201200, Fax 087 201203
Sähkötalo Harju OY
Korjaamokatu 2
FIN-33840 Tampere
Tel.03 2345000, Fax 03 2345040
Einhell Polska sp. Z.o.o.
Ul. Miedzyleska 2-6
PL-50-554 Wroclaw
Tel.071 3346508, Fax 071 3346503
Einhell Hungaria Ltd.
Vajda Peter u.12
H 1089 Budapest
Tel.01 3039401, Fax 01 2101179
Semak
makina ticaret ve sanayi ltd. sti.
Altay Cesme Mah.Yasemin Sok. No: 19
TR 34843 Maltepe - Istanbul
Tel.0216 4594865, Fax 0216 4429325
Novatech S.R.L.
Bd.Lasar Catargiu 24-26
S.C. A Ap. 9 Sector 1
RO 75 121 Bucharest
Tel.021 4104800, Fax 021 4103568
Poker Plus S.R.O.
Areal Vu Bechovice
Budava 10B
CZ-19011 Praha - Bechovice 911
Tel.+Fax 02579 10204
Einhell Bulgarien
34 A,Stefan Stambolov Str.
Apt. 4
BG 9000 Varna
Tel.052 605254, Fax 052 605822
Luma Trading d.o.o.
Ljubljanska 39
SLO-4000 Kranj
Tel- 064 355330, Fax 064 2355333
Einhell Croatia d.o.o.
Velika Ves 2
HR 49224 Lepajci
Tel 049/342 444, Fax 049 342-392
MP Trading d.o.o.
Cika Ljubina 8/IV
YU 11000 Beograd
An. Mavrofidopoulos S.A.
Technical & Commercial company
12, Papastratou & Asklipiou Str.
GR 18545 Piräus
Tel 0210 4136155, Fax 0210 4137692
Bermas
Altufyevskoye shosse, 2A
RUS 127273 Moscowi
Tel 095 3639580, Fax 095 3639581
 Loading...