

Page 1
®
Art.-Nr.: 34.012.31
Directions for Use
Grass Trimmer
RT 300
Anleitung RT300 GB 24.10.2001 13:53 Uhr Seite 1
Page 2

2
Please pull out page 2-5
Anleitung RT300 GB 24.10.2001 13:53 Uhr Seite 2
Page 3
3
A
B
C
D
F G
E
Anleitung RT300 GB 24.10.2001 13:53 Uhr Seite 3
Page 4

4
H
I
K
M
L
1
2
3
4
1
2
5
Anleitung RT300 GB 24.10.2001 13:53 Uhr Seite 4
Page 5

5
N O
P
Q
R
Anleitung RT300 GB 24.10.2001 13:53 Uhr Seite 5
Page 6

6
1. Important notes
m
Please read the directions for use carefully and
observe the information provided. It is important to
consult these instructions in order to acquaint
yourself with the grass trimmer, its proper use and
safety precautions.
Important!
For safety reasons the grass trimmer is not to be
used by children, young people under 16 years of
age, or any other persons who are not
acquainted with these directions for use.
Examine the trimmer each time before you use it.
Do not use the trimmer if any safety devices are
damaged or worn. Never put safety devices out
of operation.
Use the trimmer only for the purpose specified in
these instructions.
You are responsible for safety in your work area.
Inspect the items you want to cut before starting
to work. Remove any foreign objects you find.
Watch out for foreign objects while you work. If
you still hit upon an obstacle while cutting, turn
off the trimmer and remove the obstacle.
Work only in good visibility.
Always make sure of your footing while working.
Be careful when stepping backwards. Risk of
stumbling!
Never leave the trimmer unattended at your work
place. Store the trimmer in a safe place during
interruptions.
If you interrupt your work to move to a different
position it is imperative to switch off the trimmer
while you are moving there.
Never use the trimmer in the rain or in moist or
wet conditions.
Protect the trimmer from the damp and rain.
Before you switch on the trimmer, make sure that
there are no stones or other objects touching the
nylon line.
Always wear suitable clothing to protect your
head, hands and feet from injury. Wear a helmet,
goggles or visor, high boots or strong shoes, long
trousers made of tough material, and work
gloves.
Be sure to hold the trimmer away from your body
when it is switched on!
If the trimmer is turned over or if it is not in
working position, do not switch it on.
Switch off the motor when you are not using the
trimmer, when you leave the trimmer unattended,
when you are checking the trimmer, if the power
cable is damaged, when you want to remove and
replace the reel, and when you are moving the
trimmer to another location.
Keep the trimmer away from other persons,
particularly children and pets. There may be
stones and other objects in the flying cut grass.
Keep at least 5 m away from other persons and
animals when you are working with the trimmer.
To prevent injury to yourself and damage to the
trimmer, never cut against hard objects.
Use the edge of the guard to keep the trimmer
away from walls, changes of surface and fragile
objects.
Never use the trimmer without a guard.
m CAUTION! The guard is vital for your safety
and for the safety of others, and it is also
essential for the trimmer to work correctly.
Failure to observe this instruction will not
only create a potential hazard, it will also
result in the loss of your rights under the
warranty.
Never try to stop the cutter (nylon line) with your
hands. Wait until it stops by itself.
t is imperative to use only the original nylon line.
Never use metal wire instead of the nylon line.
Never attempt to cut grass that is not growing on
the ground. For example, do not try to cut grass
growing on walls, rocks, etc.
Within the working radius of the grass trimmer
the user is responsible for any damage caused to
third persons by use of the trimmer.
Never cross roads or pebble paths with the
trimmer switched on.
When you are not using the trimmer, keep it in a
dry place out of the reach of children.
Use the trimmer only as described in these
directions for use and always hold it vertical to
the ground. All other positions are dangerous.
Check the screws regularly to see that they are
properly tightened.
The mains voltage must be the same as the
voltage specified on the rating plate.
Check the power cable regularly for signs of
damage or ageing. Never use the trimmer if the
the power cable is in less than perfect condition.
Power cables used with the trimmer must not be
of a lighter duty class than HO7RN-F rubberinsulated flexible cables according to DIN 57282 /
VDE 0282 with a minimum diameter of 1.5 mm
2
.
Anleitung RT300 GB 24.10.2001 13:53 Uhr Seite 6
Page 7

7
Plug connectors must be equipped with earthing
contacts and the coupling must be rain-waterprotected.
Keep cables and other objects out of the area
you want to cut.
If you have to lift the trimmer to move it, switch off
the motor and wait for the rotating tool to stop.
Before you leave the trimmer, switch off the
motor and pull out the power plug.
Before you connect the trimmer to the power
supply, make sure that none of its moving parts
are damaged and that the line reel is correctly
inserted and fastened.
Never cut against hard objects when using the
trimmer. This is imperative to avoid causing injury
to the user and damage to the trimmer.
Use only original replacement parts for repair and
maintenance purposes.
Have repairs carried out only by a qualified
electrician.
m Caution! The nylon line will run on for a few
seconds after the tool is switched off!
2. Technical data RT 300
Voltage 230V ~ 50 Hz
Power rating 300 W
Cutting width Ø 25 cm
Speed 10.800 rpm
Nylon cutting line Ø 1.2 mm
Sound pressure level LPA 81 dB(A)
Sound power level 92 dB(A)
Vibration aw 1.2 m/s2
Weight 2,2 kg
Art. No. 34.012.31
The noise level of this machine may exceed 85
dB(A). In this case, noise protection measures need
to be introduced for the user. The machine’s noise
was measured in accordance with IEC 59 CO 11,
IEC 704, DIN 45635 Part 21, NFS 31-031
(84/538/EEC).
The level of vibrations emitted from the handle is 1.2
m/s. Measurements were taken in accordance with
ISO 5349.
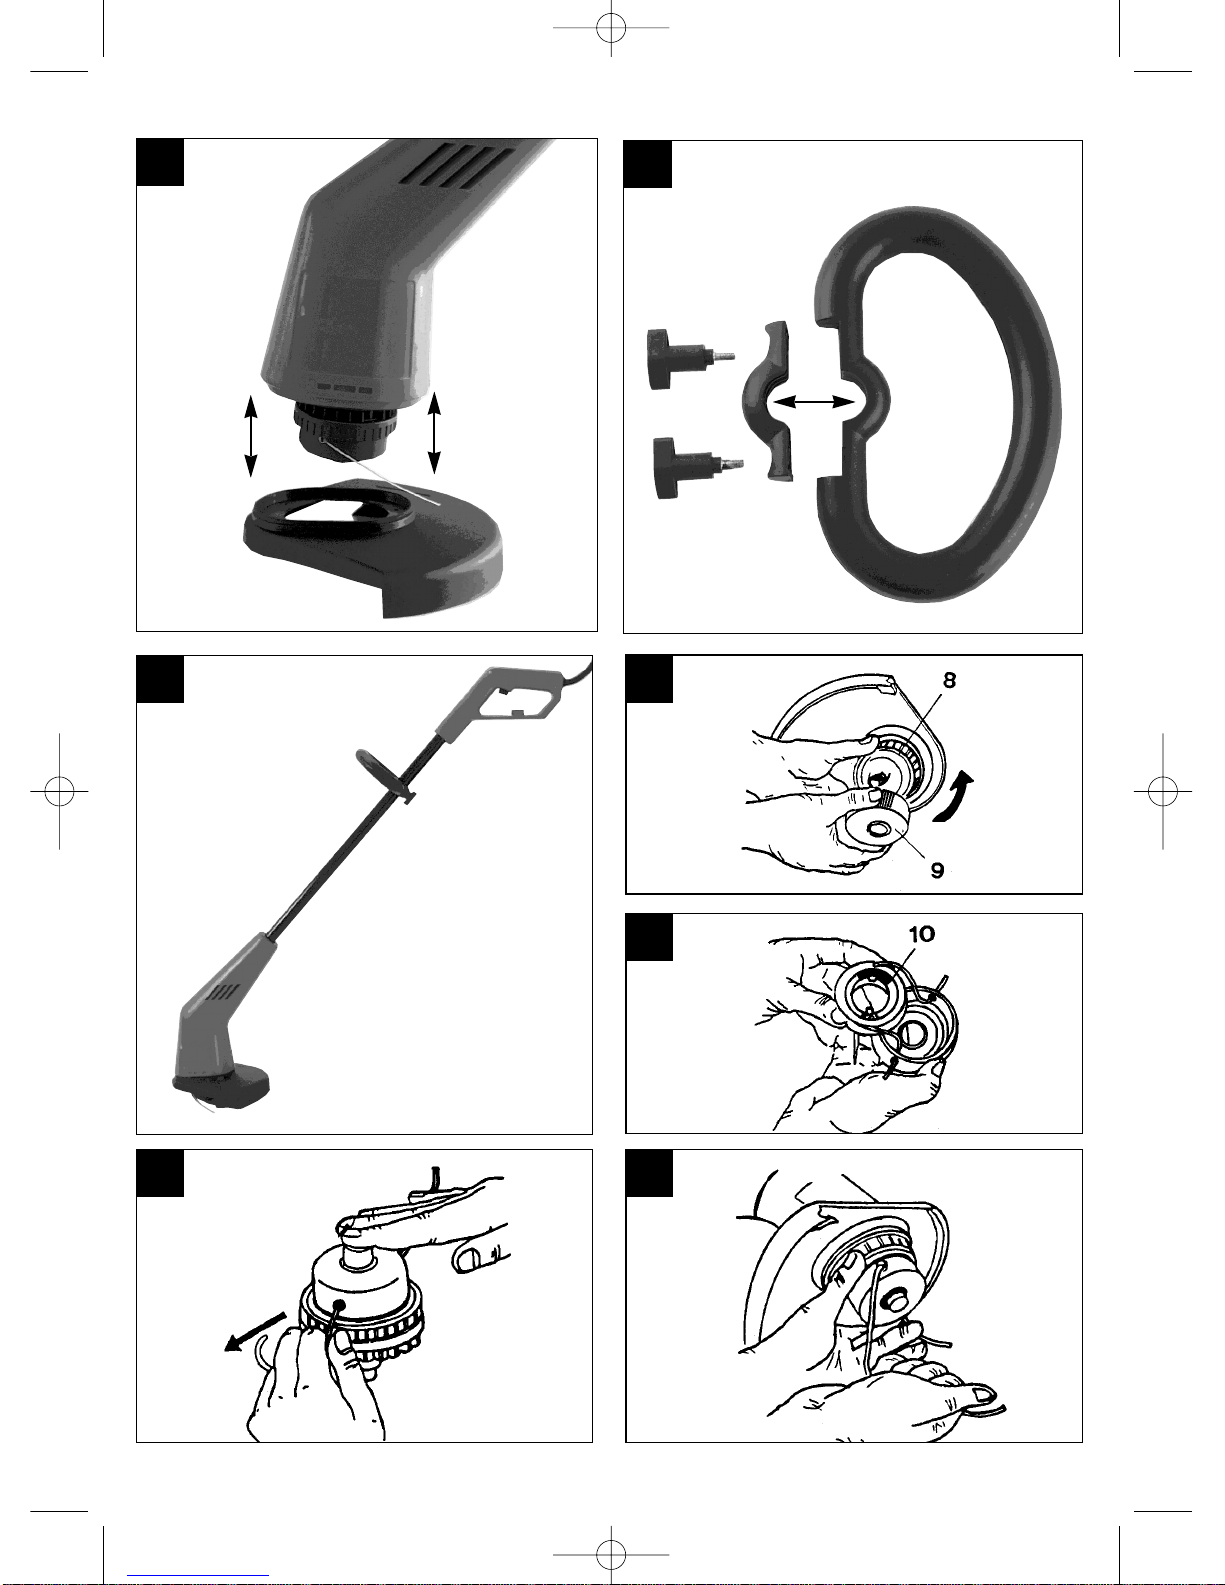
3. Assembling the guard hood and the
handle
Plug the guard hood on the housing and fasten
with the 4 screws supplied (Figure A).
Fit the handle as shown in Figure B and C.
4. Replacing the nylon line reel
Caution! Be sure to unplug the grass trimmer
before you replace the nylon line reel!
Holding the reel holder (Figure D / 8) in the one
hand, use the other hand to depress the grooves on
the side of the reel cover (Figure D / 9) and unscrew
the reel cover as indicated by the arrow on the reel
cover itself. After you have taken off the reel cover,
remove the empty line reel, taking care not to lose
the setting button and the spring. Insert the button
and spring in the reel holder. Take the new line reel,
push the ends of the lines through the holes in the
reel cover, and refit the reel cover (Figure E).
Turn the reel cover clockwise until it latches home.
Now press the setting button and pull out the lines to
a length of approx. 15 cm (Figure F/G). The cutting
line will be shortened automatically to the correct
length the first time the trimmer is restarted.
Caution! Catapulted pieces of nylon line may cause
injury!
5. Using the grass trimmer as an edge
cutter
The grass trimmer has to be adapted in the following
way in order to be able to use it to cut the edges of
lawns and flower beds:
Disconnect the grass trimmer from the power
supply!
Holding the upper handle with the one hand and
the bottom part (motor housing) with the other,
press both toward each other and turn the bottom
part 180° in clockwise direction as far as the stop
(Figure H).
Let go of the bottom part, pulling it outwards as
you do so (Figure I).
The grass trimmer has now been converted into
an edge cutter suitable for vertical cutting (Figure
K).
Anleitung RT300 GB 24.10.2001 13:53 Uhr Seite 7
Page 8

8
6. Symbols on the plate (see Figure L)
No. 1: Important! read the directions for use
carefully before you use the trimmer.
No. 2: Wear goggles and a visor.
No. 3: Do not use the trimmer in the rain, in damp
conditions or on wet grass.
No. 4: Keep a safe distance of at least 5 m away
from other persons.
7. Operation
When using the grass trimmer for the first time
you will have to apply some force to pull out the
nylon lines. If you fail to pull out the required length,
i.e. the full width of the cutting radius, press with your
finger on the setting button and pull on the two line
ends simultaneously (Figure F/G).
Connect the power plug to the extension cable and
hook the cable on the handle (Figure M).
Press the grass trimmer against the ground so that
the setting button is pressed (Figure N). Now switch
on the trimmer and allow it to run in idle. The length
of the line will be adjusted automatically as this
happens.
Do not move the trimmer up against the grass you
want to cut until the button is pressed, i.e. until the
trimmer is running.
For the correct cutting action, swing the trimmer to
the side as you walk forward, holding it at an angle of
approx. 30° as you do so (Figure O / P). This method
produces perfect results.
Make several passes to cut the grass shorter step by
step (Figure Q). Never cut wet or very damp grass.
Use the edge of the guard to prevent rapid wear
caused by solid obstacles (Figure R). Keep the grass
trimmer away from hard surfaces. A short or worn
line will result in poor cutting performance. To restore
the line to its optimum length, press the trimmer
against the ground so that it is running. The length of
the line will then be adjusted automatically.
8. Cleaning and maintenance
Switch off and unplug the grass trimmer before
putting it away or cleaning it.
Remove deposits from the guard hood with a
brush.
Clean the plastic body and plastic parts with a
mild household detergent and a damp cloth.
Never use aggressive agents or solvents for
cleaning purposes!
Never spray down the grass trimmer with water.
Prevent water getting into the trimmer at all cost.
Anleitung RT300 GB 24.10.2001 13:53 Uhr Seite 8
Page 9

9
Explosion Diagram RT 300 Art.-No.: 34.012.31 I.-No.: 91019
Anleitung RT300 GB 24.10.2001 13:53 Uhr Seite 9
Page 10

10
Replacement Parts List RT 300 Art.-Nr.: 34.012.31 I.-Nr.: 91019
Item Description Replacement Part No.
01 ON/OFF switch 34.012.30.01
02 Handle housing, complete 34.012.30.02
03 Auxiliary handle, complete 34.012.30.03
03a Clamping screw 34.012.30.04
03b Clamping lug 34.012.30.05
03c Screw 34.012.30.06
03d Square nutr 34.012.30.07
03e Handle, bottom partl 34.012.30.08
03f Handle, top part 34.012.30.09
04 Tube 34.012.30.10
05 Motor housing, completet 34.012.30.11
06 Tube lock 34.012.30.12
07 Guard hood 34.012.30.13
08 Motor, complete 34.012.30.14
09 Set of screwst 34.012.30.15
10 Compression spring 34.012.30.16
11 Setting button 34.012.30.17
12 Replacement line 34.051.20
13 Power cable with cable grip 34.012.30.18
Anleitung RT300 GB 24.10.2001 13:53 Uhr Seite 10
Page 11

11
EG Konformitätserklärung
Der Unterzeichnende erklärt im
Namen der
Firma
RT 300
®
– Seriennummer auf
dem Produkt –
der
EG Maschinenrichtlinie
89/392/EWG mit
Änderungen
EG Niederspannungs-
richtlinie 73/23 EWG
EG Richtlinie Elektro-
magnetische Verträglichkeit
89/336 EWG mit
Änderungen entspricht.
Landau/Isar, den
16.08.2000
Weichselgartner
Produkt-Management
Typ
Marke
daß die
Maschine/Produkt
EC Declaration of Conformity
The Undersigned declares, on
behalf of
– Serial number specified on
the product -
is in accordance with the
EC Directive regarding
machinery 89/392 EEC, as
amended;
EC Directive regarding
low-voltage equipment
73/23 EEC;
EC Directive regarding
electromagnetic compatibility
89/336 EEC, as amended.
Landau/Isar, den
16.08.2000
Weichselgartner
Produkt-Management
Landau/Isar, den
16.08.2000
Weichselgartner
Produkt-Management
Landau/Isar, den
16.08.2000
Weichselgartner
Produkt-Management
Landau/Isar, den
16.08.2000
Weichselgartner
Produkt-Management
Type
produced by:
that the
Machine / Product
Déclaration de Conformité CE
Le soussigné déclare, au nom
de
– no. série indiqué sur le
produit -
correspond(ent) à la
Directive CE relative aux
machines 89/392 CEE avec
les modifications y
apportées;
Directive CE relative aux
basses tensions 73/23 CEE;
Directive CE relative à la
compatibilité électro-
magnétique 89/336 CEE
avec les modifications y
apportées.
– serienummer op het produkt-
conform de volgende
richtlijnen is:
EG machinerichtlijn
89/392/EWG met wijzigingen
EG laagspanningsrichtlijn
73/23 EWG
EG richtlijn Elektro-
magnetische compatibiliteit
89/336 EWG met wijzigingen
Type
du fabricant
que
la machine / le produit
EC Conformiteitsverklaring
De ondertekenaar verklaart in
naam van de
firma
type
merk
dat de
machine/produkt
Declaracion CE de
Conformidad
Por la presente, el abajo
firmante declara en nombre de
la empresa
– No. de serie en el producto:
satisface las disposiciones
pertinentes siguientes:
Disposición de maquinaria
de la CE 89/392/CEE con
modificaciones
Disposición de baja tensión
de la CE 73/23 CEE
Disposición de la
compatibilidad electro-
magnética de la CE 89/336
CEE con modificaciones.
tipo
marca
que el/la
máquina/producto
Hans Einhell AG · Wiesenweg 22 · D-94405 Landau/Isar
Rasentrimmer
Trimmer Taille-bordures Grastrimmer Recortador de cesped
prEN 786; EN 60335-1; EN 55014; EN 50082-1; EN 60555-2; EN 60555-3; DIN VDE 0730 T2ZP; DIN VDE 0730 T1;
Achivierung / For archives: RT 300: RT-0613-24-832-E RT 500: RT-0330-13-832-E
Landau/Isar, den
16.08.2000
Weichselgartner
Produkt-Management
EC Overensstemmelses-
erklæring
Undertegnede erklærer på
vegne af firmaet
– Serienummer på produktet -
opfylder
EU-maskindirektiv
89/392/EØF med ændringer
EU-lavspændingsdirektiv
73/23/EØF
EU-direktiv vedr.
elektromagnetisk støj (EMC)
89/336/EØF med ændringer.
type
mærke
at
maskine/produkt
Græstrimmer
Anleitung RT300 GB 24.10.2001 13:53 Uhr Seite 11
Page 12

EINHELL-WARRANTY CERTIFICATE
The guarantee period begins on the sales date and is valid
for 1 year.
Responsibility is assumed for faulty construction or material
or funcitional defects.
Any necessary replacement parts an necessary repair work
are free of charge.
We do not assume responsibility for consequential damage.
Your customer service partner
Einhell UK Ltd.
Brook House
Brookway
North Cheshire Trading Estate
Prenton
Wirral
Cheshire
Ch43 3 DS
Tel. 0151/ 3 36 8246
Fax 0151/ 3 36 3233
Technical changes subject to change
wegm. 08/00
Anleitung RT300 GB 24.10.2001 13:53 Uhr Seite 12
 Loading...