

Page 1

Bedienungsanleitung
Regenfasspumpe
t
Operating Instructions
Rain Barrel Pump
p
Mode d’emploi
Pompe pour collecteur de pluie
C
Istruzioni per l’uso
Pompa per fusti di acqua piovana
lL
Betjeningsvejledning
Pumpe til regnvandsbeholder
A
Használati utasítás
Esővízgyüjtőszivattyú
Bf
Upute za uporabu
Pumpa za kišnicu
j
Návod k obsluze
Čerpadlo do sudu s dešťovou vodou
W
Návod na obsluhu
Čerpadlo pre sudy s dažďovou vodou
Art.-Nr.: 41.703.03 I.-Nr.: 01018
BG-SP
400 RB
Anleitung_BG_SP_400_RB_SPK1:_ 04.07.2008 11:03 Uhr Seite 1
Page 2

2
Vor Inbetriebnahme Bedienungsanleitung und
Sicherheitshinweise lesen und beachten
Read and follow the operating instructions and safety information
before using for the first time.
Avant la mise en service, lisez le mode dʼemploi et les consignes
de sécurité et respectez-les.
Prima della messa in esercizio leggete e osservate le istruzioni
per lʼuso e le avvertenze di sicurezza.
Betjeningsvejledningen og sikkerhedsanvisningerne skal læses,
inden maskinen tages i brug. Alle anvisninger skal følges.
Üzembehelyezés előtt elolvasni és figyelembe venni a használati
utasítást és a biztonsági utasításokat.
Bf Prije puštanja u rad pročitajte i pridržavajte se ovih uputa za uporabu
i sigurnosnih napomena.
j Před uvedením do provozu si přečíst návod k obsluze a bezpečnostní
předpisy a oboje dodržovat.
W Pred uvedením do prevádzky si prečítajte a dodržiavajte návod na
obsluhu a bezpečnostné pokyny.
Anleitung_BG_SP_400_RB_SPK1:_ 04.07.2008 11:03 Uhr Seite 2
Page 3

3
21
2
1
5
3
4
7
10
8
9
6
3
5
4
6
9
6
7
10
8
6
7
A
10
8
6
10
7
A
Anleitung_BG_SP_400_RB_SPK1:_ 04.07.2008 11:04 Uhr Seite 3
Page 4
4
87
5
A
B
5
Anleitung_BG_SP_400_RB_SPK1:_ 04.07.2008 11:04 Uhr Seite 4
Page 5

5
D
Achtung!
Beim Benutzen von Geräten müssen einige
Sicherheitsvorkehrungen eingehalten werden, um
Verletzungen und Schäden zu verhindern. Lesen Sie
diese Bedienungsanleitung / Sicherheitshinweise
deshalb sorgfältig durch. Bewahren Sie diese gut
auf, damit Ihnen die Informationen jederzeit zur
Verfügung stehen. Falls Sie das Gerät an andere
Personen übergeben sollten, händigen Sie diese
Bedienungsanleitung / Sicherheitshinweise bitte mit
aus. Wir übernehmen keine Haftung für Unfälle oder
Schäden, die durch Nichtbeachten dieser Anleitung
und den Sicherheitshinweisen entstehen.
1. Sicherheitshinweise
Vorsicht!
An stehenden Gewässern, Garten- und
Schwimmteichen und in deren Umgebung ist die
Benutzung des Gerätes nur mit FehlerstromSchutzschalter mit einem auslösenden
Nennstrom bis 30 mA (nach VDE 0100 Teil 702
und 738) zulässig.
Das Gerät ist nicht zum Einsatz in
Schwimmbecken, Planschbecken jeder Art und
sonstigen Gewässern geeignet, in welchen sich
während des Betriebs Personen oder Tiere
aufhalten können. Ein Betrieb des Gerätes
während des Aufenthalts von Mensch oder Tier
im Gefahrenbereich ist nicht zulässig. Fragen Sie
Ihren Elektrofachmann!
Dieses Gerät ist nicht dafür bestimmt, durch
Personen (einschließlich Kinder) mit
eingeschränkten physischen, sensorischen oder
geistigen Fähigkeiten oder mangels Erfahrung
und/oder mangels Wissen benutzt zu werden, es sei
denn, sie werden durch eine für ihre Sicherheit
zuständige Person beaufsichtigt oder erhielten von
ihr Anweisungen, wie das Gerät zu benutzen ist.
Kinder sollten beaufsichtigt werden, um
sicherzustellen, dass sie nicht mit dem Gerät spielen.
Achtung!
Bevor Sie das Gerät in Betrieb nehmen, lassen
Sie fachmännisch prüfen, ob die
- Erdung
- Nullung
- Fehlerstromschutzschaltung
den Sicherheitsvorschriften der EnergieVersorgungsunternehmen entsprechen und
einwandfrei funktionieren.
Die elektrischen Steckverbindungen sind vor
Nässe zu schützen.
Bei Überschwemmungsgefahr die
Steckverbindungen im überflutungssicheren
Bereich anbringen.
Die Förderung von aggressiven Flüssigkeiten,
sowie die Förderung von abrasiven
(schmirgelnden) Stoffen ist auf jeden Fall zu
vermeiden.
Das Gerät ist vor Frost zu schützen.
Das Gerät ist vor Trockenlauf zu schützen.
Der Zugriff von Kindern ist durch geeignete
Maßnahmen zu verhindern.
WARNUNG
Lesen Sie alle Sicherheitshinweise und
Anweisungen. Versäumnisse bei der Einhaltung der
Sicherheitshinweise und Anweisungen können
elektrischen Schlag, Brand und/oder schwere
Verletzungen verursachen.
Bewahren Sie alle Sicherheitshinweise und
Anweisungen für die Zukunft auf.
2. Gerätebeschreibung (Bild 1 u. 2)
1. Tragegriff
2. Neztleitung
3. Druckanschluss
4. Schwimmschalter
5. Ansaugkorb
6. Druckschlauch
7. Verteiler
8. Entnahmeschlauch
9. Schlauchanschluss
10. Absperrhahn
3. Bestimmungsgemäße Verwendung
Das von Ihnen erworbene Gerät ist für die Förderung
von Wasser mit einer maximalen Temperatur von
35° C bestimmt. Das Gerät darf nicht für andere
Flüssigkeiten, insbesondere nicht für
Motorenkraftstoffe, Reinigungsmittel und sonstige
chemische Produkte verwendet werden! Eingebaut
in einen Schacht gibt das Gerät Sicherheit vor
Überschwemmungen. Sie findet aber auch überall
dort Anwendung, wo Wasser umgefördert werden
muss, z.B. im Haushalt, im Garten, und vielen
Anwendungen mehr. Das Gerät darf nicht für den
Betrieb von Schwimmbecken verwendet werden!
Bei Benutzung des Gerätes in Gewässern mit
natürlichem, schlammigem Boden stellen Sie das
Gerät leicht erhöht auf, z.B. auf Ziegelsteinen.
Anleitung_BG_SP_400_RB_SPK1:_ 04.07.2008 11:04 Uhr Seite 5
Page 6

6
D
Für Dauerbenutzung, z.B. als Umwälzpumpe im
Teich, ist das Gerät nicht bestimmt. Die zu
erwartende Lebenszeit des Gerätes wird sich
dadurch deutlich verkürzen, da das Gerät nicht für
eine andauernde Belastung konstruiert wurde.
Das Gerät darf nur nach seiner Bestimmung
verwendet werden. Jede weitere darüber
hinausgehende Verwendung ist nicht
bestimmungsgemäß. Für daraus hervorgerufene
Schäden oder Verletzungen aller Art haftet der
Benutzer/Bediener und nicht der Hersteller.
Bitte beachten Sie, dass unsere Geräte
bestimmungsgemäß nicht für den gewerblichen,
handwerklichen oder industriellen Einsatz konstruiert
wurden. Wir übernehmen keine Gewährleistung,
wenn das Gerät in Gewerbe-, Handwerks- oder
Industriebetrieben sowie bei gleichzusetzenden
Tätigkeiten eingesetzt wird.
4. Technische Daten
Netzanschluss 230V ~50 Hz
Aufnahmeleistung 400 Watt
Fördermenge max. 4.200 l/h
Förderhöhe max. 11 m
Eintauchtiefe max. 5 m
Wassertemperatur max. 35°C
Schlauchanschluss 3/4” AG
Fremdkörper max.: Ø 3 mm
Schaltpunkthöhe: EIN max. ca. 50 cm
Schaltpunkthöhe: AUS min. ca. 5 cm
5. Vor Inbetriebnahme
5.1. Montage (Abb.3 u. 4)
1. Schrauben Sie den Schlauchanschluss (9) auf
das Gerät.
2. Stecken Sie den Druckschlauch (6) und den
Entnahmeschlauch (8) auf den Verteiler (7). Bitte
beachten Sie, dass der Entnahmeschlauch (8) auf
der Seite des Absperrhahns (10) montiert ist!
3. Stecken Sie nun den Druckschlauch (6) auf den
Schlauchanschluss (9) des Gerätes.
5.2 Anbringung der Pumpe in der Regentonne
(Abb. 5)
1. Stellen sie das Gerät in die Regentonne.
2. Befestigen Sie den Verteiler am Rand der
Regentonne. Verdrehen Sie bitte dazu die
exzentrisch gelagerten Gummibefestigungen (A)
so, dass der Verteiler (7) am Rand der
Regentonne festgeklemmt werden kann.
Zu beachten!
Bei der Installation ist zu beachten, dass das Gerät
niemals freihängend an die Druckleitung oder am
Stromkabel montiert werden darf. Das Gerät muss an
dem dafür vorgesehenen Tragegriff aufgehängt
werden, bzw. auf dem Schachtboden aufliegen. Um
eine einwandfreie Funktion des Gerätes zu
gewährleisten, muss der Schachtboden immer frei
von Schlamm oder sonstigen Verunreinigungen sein.
Bei zu geringem Wasserspiegel kann der im Schacht
befindliche Schlamm schnell eintrocknen und das
Gerät am Anlaufen hindern. Deshalb ist es
notwendig, das Gerät regelmäßig zu prüfen
(Anlaufversuche durchführen).
Hinweis:
Der Pumpenschacht sollte mindestens die
Abmessungen von 40 x 40 x 50 cm haben, damit
sich der Schwimmschalter frei bewegen kann.
5.3 Der Netzanschluss
Das von Ihnen erworbene Gerät ist bereits mit einem
Schutzkontaktstecker versehen. Das Gerät ist
bestimmt für den Anschluss an eine
Schutzkontaktsteckdose mit 230 V ~ 50 Hz.
Vergewissern Sie sich, dass die Steckdose
ausreichend abgesichert ist (mind. 6 A), und
einwandfrei in Ordnung ist. Führen Sie den
Netzstecker in die Steckdose ein und das Gerät ist
somit betriebsbereit.
Achtung!
Diese Arbeit ist nur von einem Fachmann des
Elektrohandwerks oder vom Kundendienst
durchzuführen, um Gefährdungen zu vermeiden.
6. Bedienung
Nachdem Sie diese Installations- und
Betriebsanweisung genau gelesen haben, können
Sie unter Beachtung folgender Punkte das Gerät in
Betrieb nehmen:
Prüfen Sie, dass das Gerät sicher aufgestellt ist.
Prüfen Sie, dass die Druckleitung
ordnungsgemäß angebracht wurde.
Vergewissern Sie sich, dass der elektrische
Anschluss 230 V ~ 50 Hz beträgt.
Überprüfen Sie den ordnungsgemäßen Zustand
der elektrischen Steckdose.
Vergewissern Sie sich, dass niemals Feuchtigkeit
Anleitung_BG_SP_400_RB_SPK1:_ 04.07.2008 11:04 Uhr Seite 6
Page 7

7
D
oder Wasser an den Netzanschluss kommt.
Vermeiden Sie, dass das Gerät trocken läuft.
Zur Wasserentnahme öffnen Sie bitte den
Absperrhahn (10).
Zum Ausschalten des Gerätes ziehen Sie bitte
den Netzstecker aus der Steckdose.
Einstellung des Ein/Aus-Schaltpunktes:
Der Ein- bzw. Ausschaltpunkt des Schwimmschalters
kann stufenlos eingestellt werden. Dies
geschieht durch Verschieben des Schwimmerkabels
in der Kabelhalterung (Abb. 6).
Bitte prüfen Sie vor Inbetriebnahme folgende Punkte:
Der Schwimmschalter muss so angebracht sein,
dass die Schaltpunkthöhe: EIN und die
Schaltpunkthöhe: AUS leicht und mit wenig
Kraftaufwand erreicht werden kann. Prüfen Sie
dies, indem Sie das Gerät in ein Gefäß, gefüllt
mit Wasser, stellen und den Schwimmschalter
mit der Hand vorsichtig hochheben und
anschließend wieder senken. Dabei können Sie
sehen ob das Gerät sich ein bzw. ausschaltet.
Achten Sie auch darauf , dass der Abstand
zwischen dem Schwimmschalterkopf und der
Kabelhalterung nicht zu gering ist. Bei zu
geringem Abstand wird die einwandfreie Funktion
nicht gewährleistet.
Achten Sie bei der Einstellung des
Schwimmschalters darauf, dass der
Schwimmschalter nicht vor dem Ausschalten des
Gerätes den Boden berührt. Achtung! Gefahr des
Trockenlaufes.
7. Austausch der Netzanschlussleitung
Wenn die Netzanschlussleitung dieses Gerätes
beschädigt wird, muss sie durch den Hersteller oder
seinen Kundendienst oder eine ähnlich qualifizierte
Person ersetzt werden, um Gefährdungen zu
vermeiden.
8. Reinigung, Wartung und
Ersatzteilbestellung
Achtung!
Vor jeder Wartungsarbeit den Netzstecker
ziehen.
Bei transportabler Verwendung sollte das Gerät
nach jedem Gebrauch mit klarem Wasser
gereinigt werden.
Bei stationärer Installation empfiehlt sich alle 3
Monate die Funktion des Schwimmschalters zu
überprüfen.
Fusseln und faserige Partikel, die sich im
Gehäuse eventuell festgesetzt haben, mit einem
Wasserstrahl entfernen.
Alle 3 Monate Schachtboden von Schlamm
befreien und auch die Schachtwände reinigen.
Den Schwimmschalter mit klarem Wasser von
Ablagerungen reinigen.
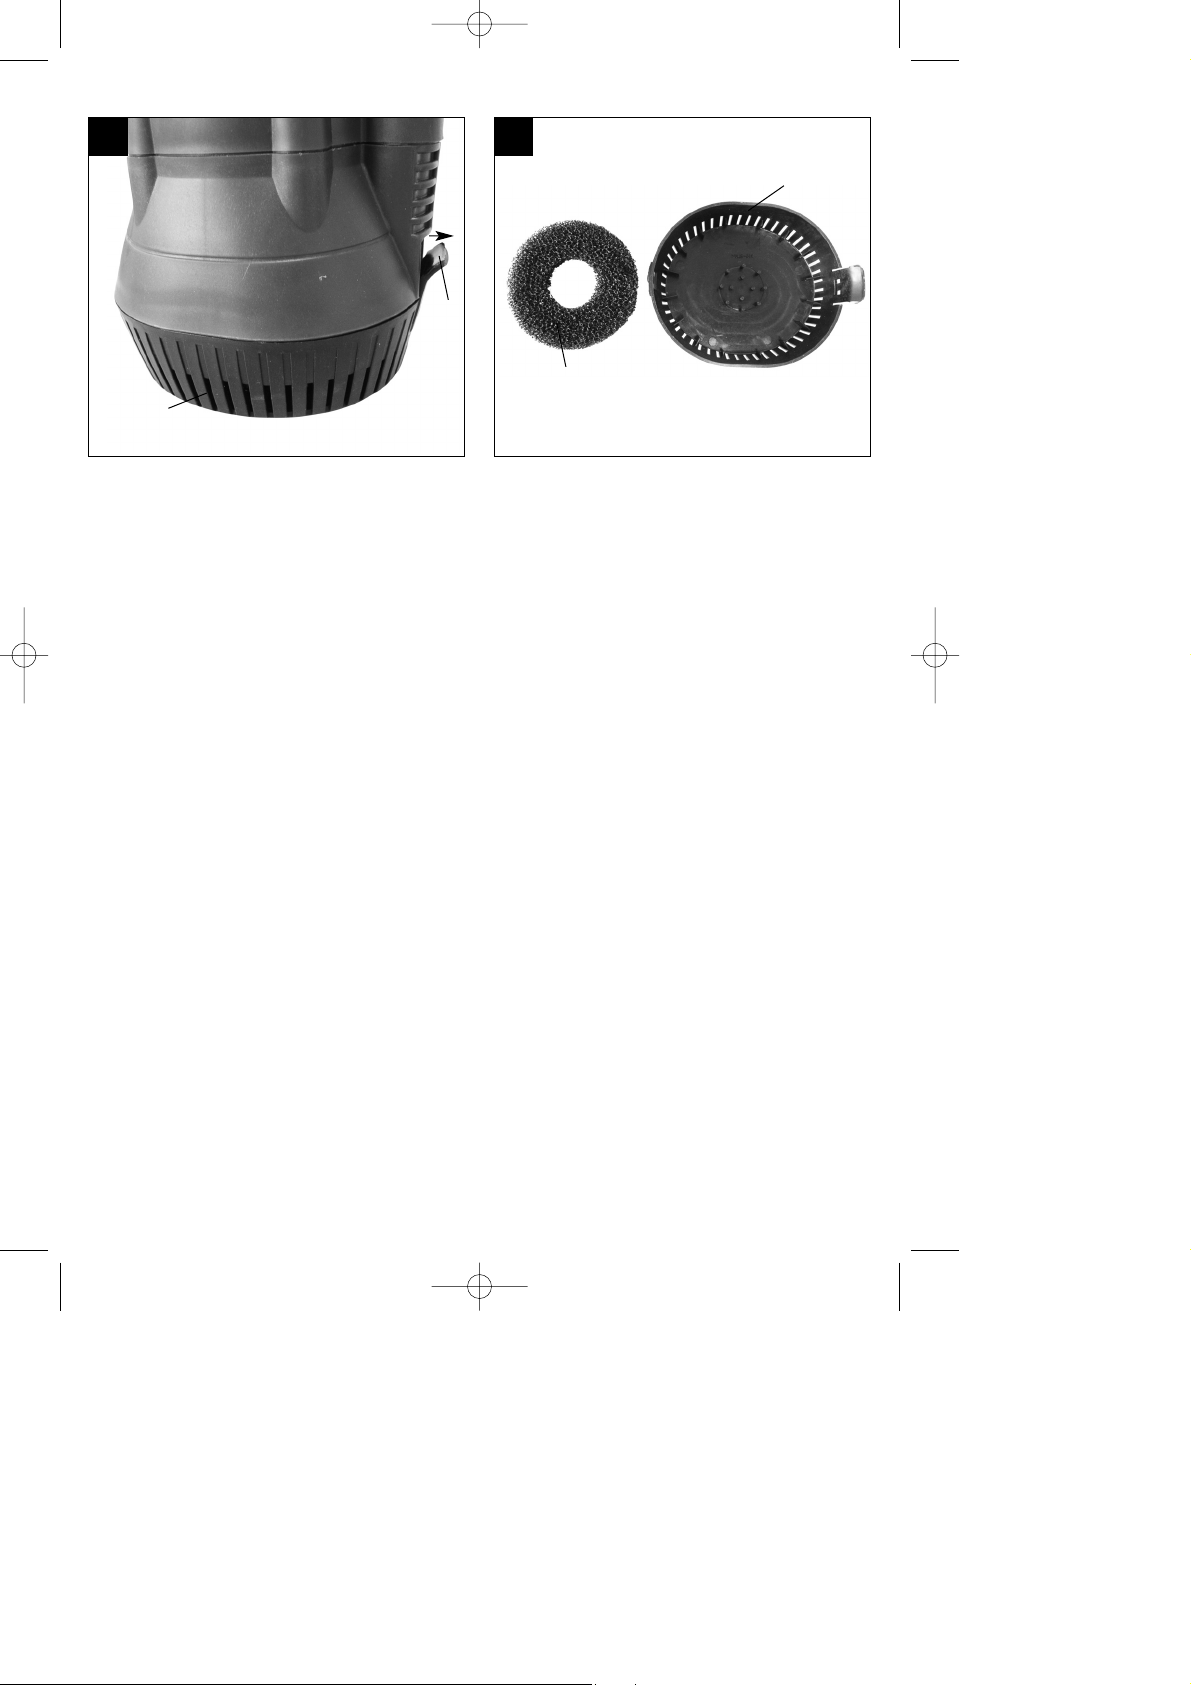
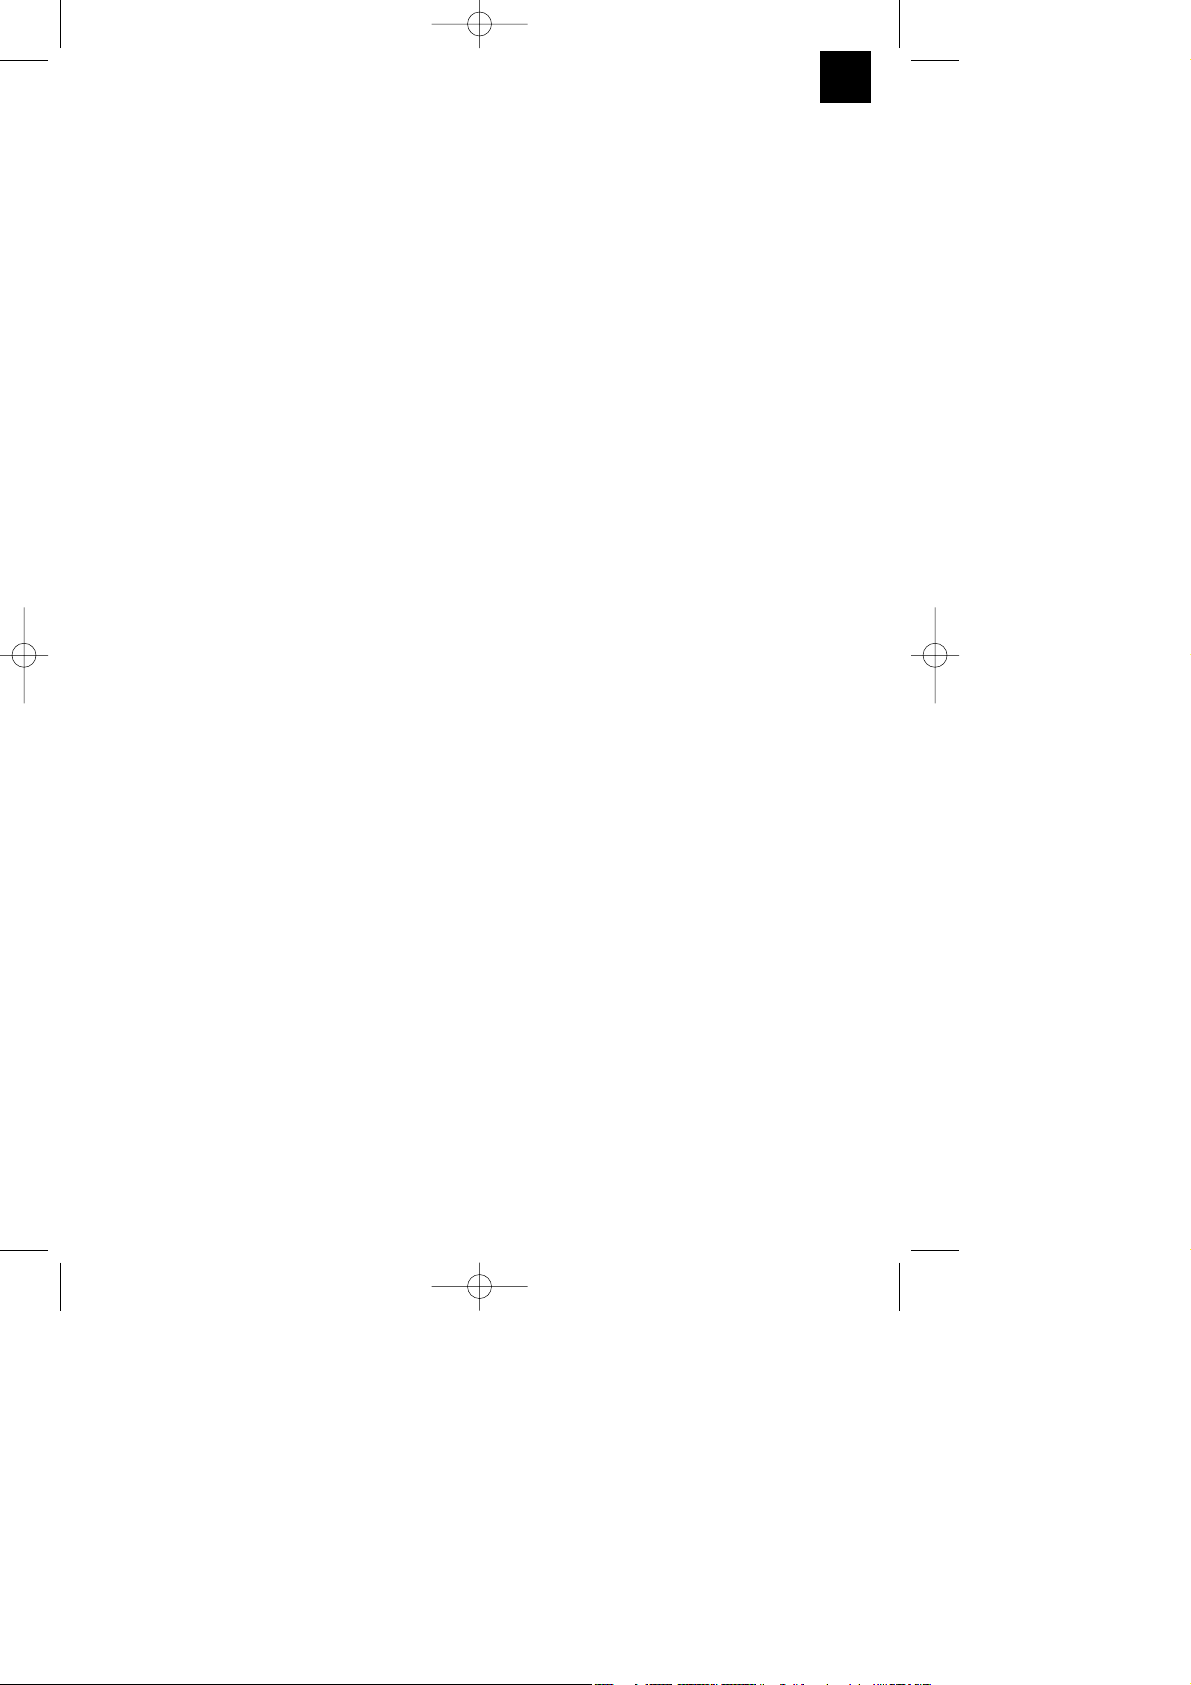
8.1Reinigung des Filters (Abb.7 u. 8)
Um das Gerät und das Pumpenrad vor größeren
Verschmutzungen zu schützen, befindet
sich im unteren Saugkorb ein zusätzlicher Filter. Bitte
gehen sie bei der Reinigung des Filters wie folgt vor:
1. Drücken Sie die seitliche Lasche (A) leicht in
Pfeilrichtung bis sich der Ansaugkorb (5) von dem
Gerät abnehmen lässt.
2. Entnehmen Sie den Filter (B) und waschen Sie
ihn unter fließendem Wasser aus.
3. Setzen sie anschließend den Filter wieder in den
Ansaugkorb und stecken Sie den Ansaugkorb
wieder auf das Gerät.
8.2 Wartung
Im Geräteinneren befinden sich keine weiteren zu
wartenden Teile.
8.3 Ersatzteilbestellung:
Bei der Ersatzteilbestellung sollten folgende Angaben
gemacht werden;
Typ des Gerätes
Artikelnummer des Gerätes
Ident-Nummer des Gerätes
Ersatzteilnummer des erforderlichen Ersatzteils
Aktuelle Preise und Infos finden Sie unter
www.isc-gmbh.info
9. Entsorgung und Wiederverwertung
Das Gerät befindet sich in einer Verpackung um
Transportschäden zu verhindern. Diese Verpackung
ist Rohstoff und ist somit wieder verwendbar oder
kann dem Rohstoffkreislauf zurückgeführt werden.
Das Gerät und dessen Zubehör bestehen aus
verschiedenen Materialien, wie z.B. Metall und
Kunststoffe. Führen Sie defekte Bauteile der
Sondermüllentsorgung zu. Fragen Sie im
Fachgeschäft oder in der Gemeindeverwaltung nach!
Anleitung_BG_SP_400_RB_SPK1:_ 04.07.2008 11:04 Uhr Seite 7
Page 8

D
8
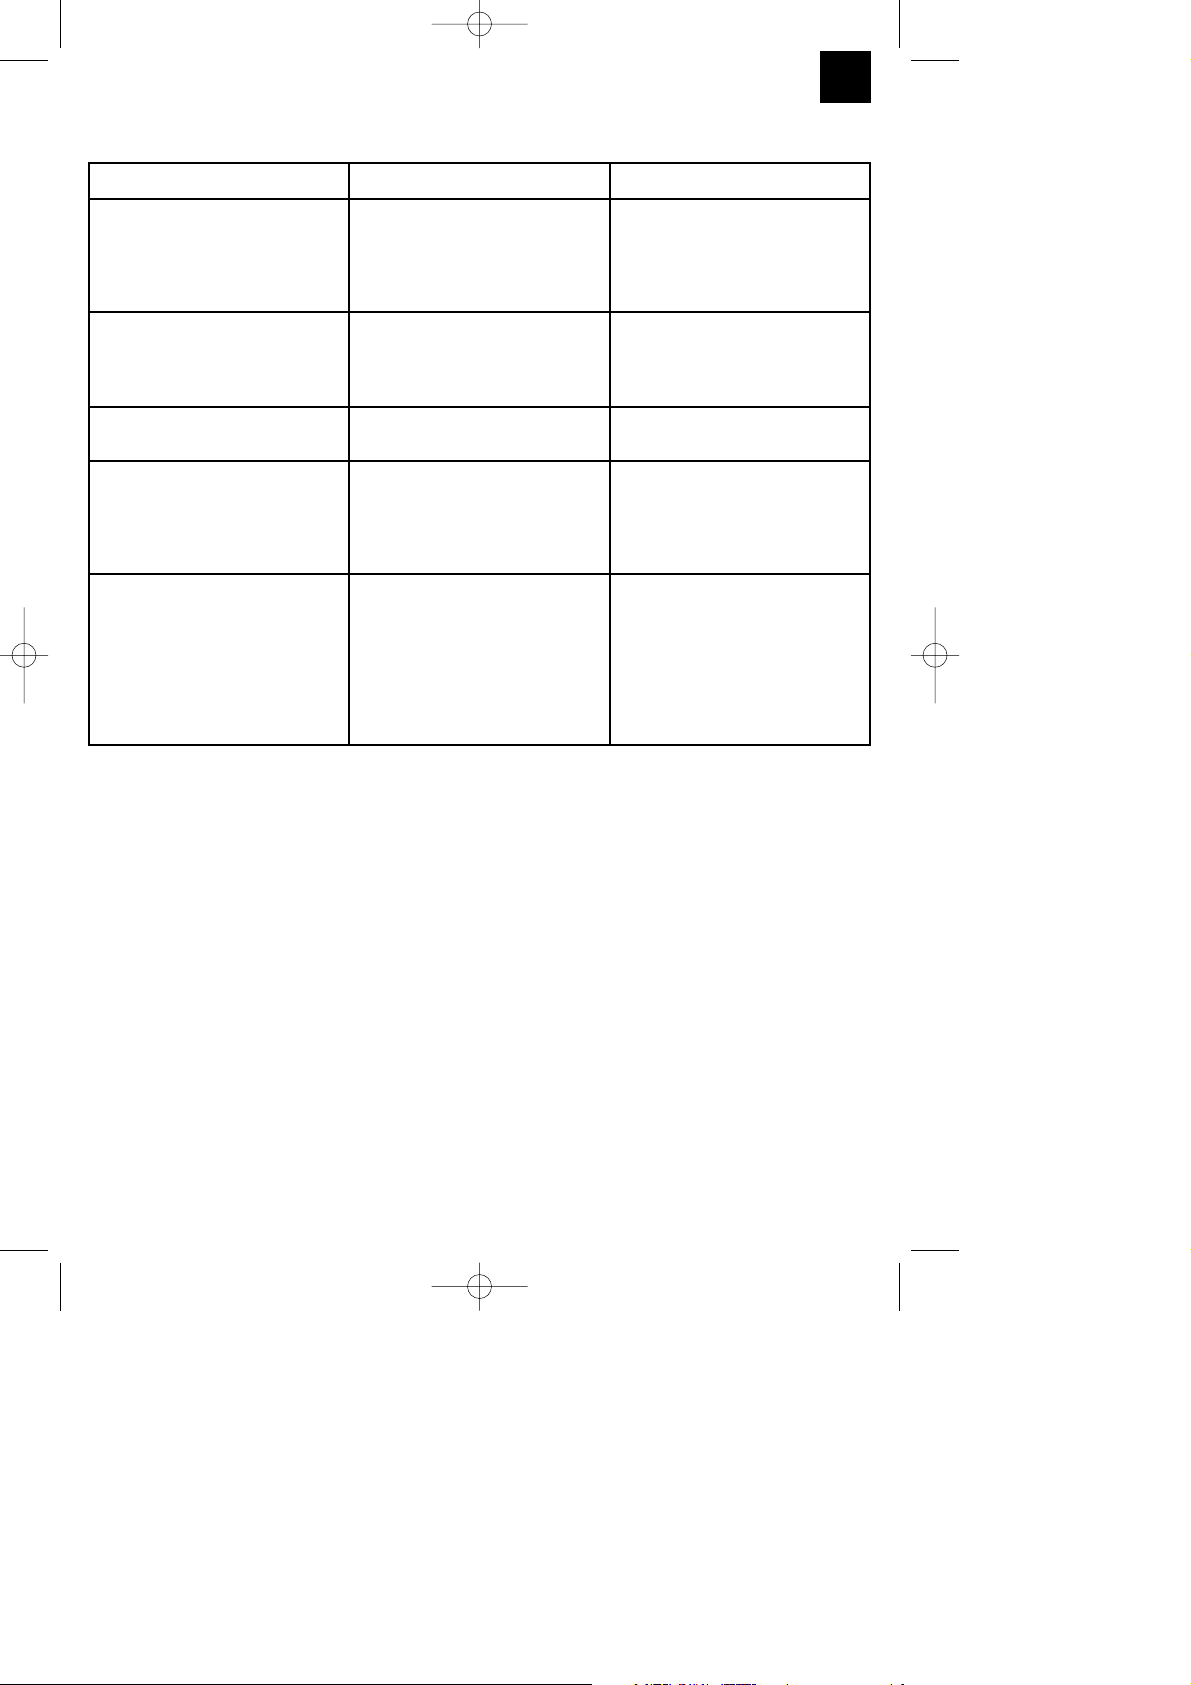
Störungen Ursachen Abhilfe
Gerät läuft nicht an - Netzspannung fehlt
- Schwimmschalter schaltet nicht
- Netzspannung überprüfen
- Schwimmschalter in höhere
Stellung bringen
Gerät fördert nicht - Einlaufsieb verstopft
- Druckschlauch geknickt
- Einlaufsieb mit Wasserstrahl
reinigen
- Knickstelle beheben
Gerät schaltet nicht aus - Schwimmschalter kann nicht
absinken
- Gerät auf dem Schachtboden
richtig aufstellen
Fördermenge ungenügend - Einlaufsieb verstopft
- Leistung verringert, durch stark
verschmutzte und schmirgelnde
Wasserbeimengungen
- Einlaufsieb reinigen
- Gerät reinigen und
Verschleißteile ersetzen
Gerät schaltet nach kurzer Laufzeitab- Motorschutz schaltet das Gerät
wegen zu starker Wasserverschmutzung ab
- Wassertemperatur zu hoch,
Motorschutz schaltet ab
- Netzstecker ziehen und Gerät
sowie Schacht reinigen
- Auf maximale Wassertemperatur
von 35° C achten!
10. Fehlersuchplan
Anleitung_BG_SP_400_RB_SPK1:_ 04.07.2008 11:04 Uhr Seite 8
Page 9

GB
9
Important!
When using equipment, a few safety precautions
must be observed to avoid injuries and damage.
Please read the complete operating manual with due
care. Keep this manual in a safe place, so that the
information is available at all times. If you give the
equipment to any other person, give them these
operating instructions as well.
We accept no liability for damage or accidents which
arise due to non-observance of these instructions
and the safety information.
1. Safety regulations
Caution!
In stagnant water bodies, garden ponds,
swimming ponds and their surrounding areas
the unit may only be used with an earth-leakage
circuit breaker with an actuating rated current of
up to 30 mA (according to VDE 0100 Part 702
and 738).
The equipment is not designed for use in
swimming pools and paddling pools of any kind
or other bodies of water in which people or
animals may be present during operation. It is
prohibited to operate the equipment if a person
or animal is in the danger area. Ask your
electrician!
This equipment is not designed to be used by people
(including children) with limited physical, sensory or
mental capacities or those with no experience and/or
knowledge unless they are supervised by a person
who is responsible for their safety or they have
received instructions from such a person in how to
use the equipment safely. Children must always be
supervised in order to ensure that they do not play
with the equipment.
Important!
Before you put the equipment into operation,
arrange for a specialist to check that the
- earthing
- protective multiple earthing
- residual-current operated circuit-breaker circuit
comply with the safety regulations of the power
supply company and work correctly.
The electrical plug-in connections must be
protected from wet conditions.
If there is a risk of flooding, place the plug-in
connections in an area which is safe from
flooding.
Strictly avoid pumping aggressive liquids and
abrasive substances.
Protect the equipment from frost.
Protect the equipment from dry running.
Take suitable measures to keep the equipment
out of the reach of children.
CAUTION!
Read all safety regulations and instructions.
Any errors made in following the safety regulations
and instructions may result in an electric shock, fire
and/or serious injury.
Keep all safety regulations and instructions in a
safe place for future use.
2. Layout (Figs. 1 and 2)
1. Carry handle
2. Mains cable
3. Pressure connection
4. Floating switch
5. Intake cage
6. Pressure hose
7. Distributor
8. Draw-off hose
9. Hose connection
10. Stopcock
3. Proper use
The equipment you have purchased is designed to
pump water with a maximum temperature of 35 °C.
This equipment must never be used for other liquids,
especially engine fuels, cleaning agents and other
chemically-based products! Installed in a shaft, the
equipment provides protection from flooding.
However, it can be used wherever you want to move
water, e.g. in the house, in the garden, and for many
other applications. The equipment must not be used
to operate swimming pools!
If you want to use the equipment in bodies of water
with a natural, muddy bottom, place the equipment in
a slightly elevated position, e.g. on bricks.
The equipment is not designed for continuous
operation, e.g. as a circulating pump in a pond. In this
case the equipment’s anticipated life will be greatly
shortened because the equipment was not designed
for continuous loading.
The equipment is to be used only for its prescribed
purpose. Any other use is deemed to be a case of
Anleitung_BG_SP_400_RB_SPK1:_ 04.07.2008 11:04 Uhr Seite 9
Page 10

10
GB
misuse. The user / operator and not the
manufacturer will be liable for any damage or injuries
of any kind caused as a result of this.
Please note that our equipment has not been
designed for use in commercial, trade or industrial
applications. Our warranty will be voided if the
machine is used in commercial, trade or industrial
businesses or for equivalent purposes.
4. Technical data
Mains connection 230V ~ 50 Hz
Power rating 400 W
Max. pumping rate 4,200 l/h
Max. delivery head 11 m
Max. immersion depth 5 m
Max. water temperature 35 °C
Hose connection 3/4“ AG
Max. size of foreign bodies: Ø 3 mm
Switching point height: ON max. approx. 50 cm
Switching point height: OFF min. approx. 5 cm
5. Before putting the equipment into
operation
5.1. Assembly (Figs. 3 and 4)
1. Screw the hose connection (9) onto the
equipment.
2. Connect the pressure hose (6) and the draw-off
hose (8) to the distributor (7). Please make sure
that the draw-off hose (8) is mounted on the side
of the stopcock (10).
3. Now connect the pressure hose (6) to the hose
connection (9) of the equipment.
5.2 Inserting the pump into the rain barrel (Fig. 5)
1. Place the equipment in the rain barrel.
2. Secure the distributor to the rim of the rain barrel.
To do so, twist the eccentrically mounted rubber
fasteners (A) such that the distributor (7) can be
clamped to the rim of the rain barrel.
Note!
When installing, never hang the equipment by the
discharge line or by the power cable. The equipment
must be hung up with the provided carry handle or it
must rest on the bottom of the shaft. To ensure that
the equipment works properly, the bottom of the shaft
always must be free of sludge and other
accumulations of dirt. If the water level is too low, the
sludge in the shaft can quickly dry out and hinder the
equipment from starting. It is necessary therefore to
check the equipment regularly (carry out trial startups).
Note:
The pump shaft should measure at least
40 x 40 x 50 cm so that the floating switch can move
freely.
5.3 Mains connection
The equipment you have purchased comes with an
earthing-pin plug. The equipment is designed for
connection to a socket outlet with earthing contact for
230 V ~ 50 Hz. Make sure that the socket-outlet is
sufficiently fused (at least 6 A) and in good working
order. Insert the power plug in the socket-outlet and
the equipment is ready for operation.
Important!
To rule out danger, this work must be left strictly to a
specialist electrician or Customer Service.
6. Operation
You can put the equipment into operation after you
have thoroughly read the installation and operating
instructions. Pay attention to the following points:
Make sure that the equipment is set up securely.
Check that the discharge line is fitted correctly.
Make sure that the electrical connection is 230 V
~ 50 Hz.
Check that the electrical socket-outlet is in good
working order.
Make sure that no moisture or water can ever
reach the power connection.
Make sure that the equipment does not run dry.
To withdraw water, open the stopcock (10).
To switch off the equipment, pull the power plug
out of the socket outlet.
Setting the ON/OFF switching point:
The ON/OFF switching point of the floating switch can
be infinitely adjusted. This is done by moving the
floating switch cable in the cable holder (Fig.
6).Check the following points before putting the
equipment into operation:
The floating switch must be fitted so that the
switching point height: ON and the switch point
height: OFF can be reached easily and with little
force. Check this by placing the equipment in a
container filled with water and carefully raising
and lowering the floating switch with your hand.
Anleitung_BG_SP_400_RB_SPK1:_ 04.07.2008 11:04 Uhr Seite 10
Page 11
GB
11
You can then see whether the equipment
switches on and off.
Make sure that the distance between the floating
switch head and the cable holder is not too small.
If the distance is too small, there is no guarantee
that the equipment will work correctly.
When adjusting the floating switch, make sure
that the floating switch does not touch the bottom
before the equipment is switched off. Important!
Risk of dry running.
7. Replacing the power cable
If the power cable for this equipment is damaged, it
must be replaced by the manufacturer or its aftersales service or similarly trained personnel to avoid
danger.
8. Cleaning, maintenance and
ordering of spare parts
Important!
Unplug the power plug prior to any maintenance
work.
For mobile applications, the equipment should be
cleaned with clear water after every usage.
For stationary installation, it is recommended that
you check the floating switch for proper
functioning every three months.
Use a water jet to remove any lint or fibrous
particles that may have become trapped in the
housing.
Remove sludge from the shaft bottom and clean
the shaft walls every 3 months.
Use clear water to remove deposits from the
floating switch.
8.1 Cleaning the filter (Figs. 7 and 8)
In order to protect the equipment and the impeller
from severe soiling, an additional filter has been
installed in the bottom intake cage. Please proceed
as follows when cleaning the filter:
1. Gently press the lateral tab (A) in the direction of
the arrow until the intake cage (5) can be
disconnected from the pump.
2. Remove the filter (B) and wash it out under
running water.
3. Now insert the filter back into the intake cage and
reconnect the intake cage to the equipment.
8.2 Maintenance
There are no parts inside the equipment which
require additional maintenance.
8.3 Ordering replacement parts:
Please quote the following data when ordering
replacement parts:
Type of machine
Article number of the machine
Identification number of the machine
Replacement part number of the part required
For our latest prices and information please go to
www.isc-gmbh.info
9. Disposal and recycling
The unit is supplied in packaging to prevent its being
damaged in transit. This packaging is raw material
and can therefore be reused or can be returned to
the raw material system.
The unit and its accessories are made of various
types of material, such as metal and plastic.
Defective components must be disposed of as
special waste. Ask your dealer or your local council.
Anleitung_BG_SP_400_RB_SPK1:_ 04.07.2008 11:04 Uhr Seite 11
Page 12

12
GB
Faults Cause Remedy
The equipment does not start
- Power supply not connected
- Floating switch does trigger
- Check power supply
- Raise position of floating switch
The equipment does not pump
- Intake sieve clogged
- Discharge hose kinked
- Clean intake sieve with water jet
- Unkink the hose
The equipment does not cut out
- Floating switch cannot sink - Place equipment correctly on
shaft bottom
Insufficient pumping rate
- Intake sieve clogged
- Performance reduced due to
heavily contaminated and
abrasive water impurities
- Clean intake sieve
- Clean equipment and replace
wear parts
The equipment switches off after
briefly running
- Motor circuit-breaker switches
the equipment off due to
excessive water contamination
- Water temperature too high;
motor circuit-breaker switches
the equipment off
- Unplug power plug and clean
equipment and shaft
- Ensure that maximum
permissible water temperature
(35 °C) is not exceeded
10. Troubleshooting guide
Anleitung_BG_SP_400_RB_SPK1:_ 04.07.2008 11:04 Uhr Seite 12
Page 13

13
F
Attention !
Lors de lʼutilisation dʼappareils, il faut respecter
certaines mesures de sécurité afin dʼéviter des
blessures et dommages. Veuillez donc lire
attentivement ce mode dʼemploi. Conservez-le bien
de façon à pouvoir disposer à tout moment de ces
informations. Si lʼappareil doit être remis à dʼautres
personnes, remettez-leur aussi ce mode dʼemploi.
Nous déclinons toute responsabilité pour les
accidents et dommages dus au non-respect de ce
mode dʼemploi et des consignes de sécurité.
1. Consignes de sécurité
Attention !
Sur des eaux dormantes, des pièces d’eau de
jardin et des piscines et dans leur proximité, il
est uniquement autorisé d’utiliser l’appareil avec
un disjoncteur à courant de défaut dont le
courant nominal déclencheur ne dépasse pas 30
mA (conformément à VDE 0100, parties 702 et
738).
L’appareil ne convient pas à l’emploi dans les
piscines, les pataugeoires de tous genres et
toutes autres pièces d’eaux dans lesquelles des
personnes ou des animaux peuvent se trouver
pendant son fonctionnement. Il est interdit de
faire fonctionner l’appareil pendant la présence
de personnes ou d’animaux dans la zone
dangereuse. Consultez votre spécialiste en
électricité!
Cet appareil ne convient pas aux personnes (y
compris les enfants) qui en raison de leurs capacités
physiques, sensorielles ou intellectuelles ou leur
manque dʼexpérience et/ou de connaissances ne
peuvent pas lʼutiliser de manière sûre, à moins dʼêtre
surveillées et de recevoir les instructions relatives à
lʼutilisation de lʼappareil par une personne
responsable de leur sécurité. Surveillez les enfants
pour vous assurer quʼils ne jouent pas avec
lʼappareil.
Attention!
Avant de mettre lʼappareil en service, faites
vérifier par un(e) spécialiste si
- la mise à la terre
- la mise au neutre
- la protection contre les courants de courtscircuits
satisfont bien aux prescriptions de sécurité des
distributeurs dʼénergie et fonctionnent bien
irréprochablement.
Les connecteurs enfichables électriques doivent
être préservés de lʼhumidité.
En cas de risques dʼinondation, placez les
connecteurs enfichables dans un endroit à lʼabri
des inondations.
Il faut éviter à tout prix de refouler des liquides
agressifs ainsi que des substances abrasives (à
effet de gel lubrifiant).
Protégez lʼappareil du gel.
Protégez lʼappareil contre le fonctionnement à
sec.
Il faut interdire lʼaccès aux enfants par des
mesures adéquates.
AVERTISSEMENT !
Veuillez lire toutes les consignes de sécurité et
instructions.
Tout non-respect des consignes de sécurité et
instructions peut provoquer une décharge électrique,
un incendie et/ou des blessures graves.
Conservez toutes les consignes de sécurité et
instructions pour une consultation ultérieure.
2. Description de lʼappareil (fig. 1 et. 2)
1. Poignée
2. Conduite réseau
3. Raccord de pression
4. Interrupteur à flotteur
5. Panier dʼaspiration
6. Tuyau de refoulement
7. Boîtier de distribution
8. Tuyau de soutirage
9. Raccord de tuyau flexible
10. Robinet dʼarrêt
3. Utilisation conforme à lʼaffectation
Lʼappareil que vous venez dʼacheter est destiné au
refoulement de lʼeau à une température maximale de
35° C. Cet appareil ne doit pas être utilisé pour
dʼautres liquides, en particulier pas pour carburants
pour moteurs, produits nettoyants et autres produits
chimiques ! Monté dans une cuve, lʼappareil est en
sécurité contre les inondations. Il peut être
également employé partout où lʼon a besoin de
transporter de lʼeau, par exemple à la maison, dans
le jardin et bien dʼautres applications encore. Il est
interdit dʼutiliser lʼappareil pour exploiter des bassins
de piscine !
Lorsque vous employez lʼappareil dans des eaux
comprenant naturellement un fond boueux, placez
Anleitung_BG_SP_400_RB_SPK1:_ 04.07.2008 11:04 Uhr Seite 13
Page 14

14
F
lʼappareil en le relevant légèrement, par exemple, sur
des briques.
Lʼappareil ne convient pas à une utilisation continue,
par exemple comme pompe de circulation dans une
pièce dʼeau. La durée de vie attendue de lʼappareil
serait alors essentiellement raccourcie, étant donné
que lʼappareil nʼest pas construit pour une charge
permanente.
La machine doit exclusivement être employée
conformément à son affectation. Chaque utilisation
allant au-delà de cette affectation est considérée
comme non conforme. Pour les dommages en
résultant ou les blessures de tout genre, le
producteur décline toute responsabilité et
lʼopérateur/lʼexploitant est responsable.
Veillez au fait que nos appareils, conformément à
leur affectation, nʼont pas été construits, pour être
utilisés dans un environnement professionnel,
industriel ou artisanal. Nous déclinons toute
responsabilité si lʼappareil est utilisé
professionnellement, artisanalement ou dans des
sociétés industrielles, tout comme pour toute activité
équivalente.
4. Données techniques
Branchement secteur 230V ~50 Hz
Puissance absorbée 400 watts
Refoulement maxi. 4.200 l/h
Hauteur manométrique maxi. 11 m
Profondeur dʼimmersion maxi. 5 m
Température de lʼeau maxi. 35°C
Raccord de tuyau flexible 3/4” AG
Corps étranger maxi.: Ø 3 mm
Hauteur de point de commutation: MARCHE
max. env. 50 cm
Hauteur de point de commutation : ARRET
min. env. 5 cm
5. Avant la mise en service
5.1. Montage (fig. 3 et 4)
1. Vissez le raccord de tuyau flexible (9) sur
l’appareil.
2. Enfichez le tuyau de refoulement (6) et le tuyau
de soutirage (8) sur le multiple (7). Veillez à ce
que le tuyau de soutirage (8) soit bien monté côté
robinet d’arrêt (10) !
3. Enfichez à présent le tuyau de refoulement (6)
sur le raccord de tuyau flexible (9) de l’appareil.
5.2 Montage de la pompe dans le fût à eau de
pluie (fig. 5)
1. Placez l’appareil dans le fût à eau de pluie.
2. Fixez le multiple sur le bord du fût à eau de
pluie. Tordez pour ce faire la fixation élastique
logée de façon excentrique (A) de telle manière
que le multiple (7) puisse être collé fixement sur
le bord du fût à eau de pluie.
A respecter!
Lors de lʼinstallation, faites attention à ne jamais
suspendre lʼappareil librement à la conduite de
pression ni à le monter à un câble électrique.
Lʼappareil doit être suspendu à la poignée prévue à
cet effet ou être placé sur le fond de la cuve. Dans le
but de garantir un fonctionnement irréprochable de
lʼappareil, le fond de la cuve doit toujours être
exempt de boue ou dʼautres impuretés. Lorsque le
niveau de lʼeau est trop faible, la boue qui se trouve
dans la cuve peut rapidement sécher, ce qui est un
obstacle au bon démarrage de lʼappareil. Raison
pour laquelle il est nécessaire de contrôler lʼappareil
régulièrement (en effectuant des essais de
démarrage).
Remarque:
Le puits de pompe doit au moins mesurer 40 x 40 x
50 cm pour que lʼinterrupteur à flotteur puisse se
mouvoir librement.
5.3 Branchement secteur
Votre appareil est déjà pourvu dʼune fiche à contact
de protection. Lʼappareil est destiné à être raccordé
à une prise de courant de sécurité 230 V ~ 50 Hz.
Assurez-vous que la prise de courant est
suffisamment protégée (mini. 6 A), et est dans un
état irréprochable. Engagez la fiche secteur dans la
prise de courant et lʼappareil est prêt au
fonctionnement.
Attention!
Ce travail doit uniquement être effectué par un
spécialiste électricien ou du service après-vente afin
dʼéviter tout risque.
Anleitung_BG_SP_400_RB_SPK1:_ 04.07.2008 11:04 Uhr Seite 14
Page 15

15
F
6. Commande
Après avoir lu attentivement les présentes
instructions dʼinstallation et de service, vous pouvez
mettre lʼappareil en service en respectant les points
suivants:
Vérifiez que lʼappareil est placé de manière sûre.
Vérifiez que la conduite de pression est montée
dans les règles de lʼart.
Assurez-vous que lʼalimentation électrique est de
230 V ~ 50 Hz.
Vérifiez que la prise de courant électrique est en
bon état.
Assurez-vous que lʼhumidité ou lʼeau nʼentre
jamais en contact avec le branchement secteur.
Assurez-vous que lʼappareil fonctionne à sec.
Pour soutirer de l’eau, ouvrez le robinet d’arrêt
(10).
Pour la mise hors circuit de l’appareil, retirez la
fiche de contact de la prise de courant.
Réglage du point de contact de mise en / hors
circuit :
On peut régler en continu le point de contact de mise
en / hors circuit de l’interrupteur à flotteur. Pour ce
faire, déplacez le câble du flotteur dans l’attache de
câbles (fig. 6). Avant la mise en service, vérifiez les
points suivants:
Lʼinterrupteur à flotteur doit être fixé pour que la
hauteur de point de commutation : MARCHE et
la hauteur de point de commutation : ARRET
puissent être atteintes facilement et avec peu
dʼefforts. Vérifiez ce point en plaçant lʼappareil
dans un récipient, rempli dʼeau, et levez
lʼinterrupteur à flotteur précautionneusement
avec la main puis abaissez-le à nouveau. Vous
pouvez voir si lʼappareil se met en ou hors
circuit.
Veillez également à ce que lʼécart entre la tête
du flotteur et le support de câble ne soit pas trop
faible. En cas dʼécart trop faible, un
fonctionnement irréprochable nʼest pas garanti.
Veillez lors du réglage de lʼinterrupteur à flotteur
que ce dernier ne touche pas le fond avant la
mise hors service de lʼappareil. Attention !
Risque de fonctionnement à sec.
7. Remplacement de la ligne de
raccordement réseau
Si la ligne de raccordement réseau de cet appareil
est endommagée, il faut la faire remplacer par le
producteur ou son service après-vente ou par une
personne de qualification semblable afin dʼéviter tout
risque.
8. Nettoyage, maintenance et
commande de pièces de rechange
Attention!
Avant chaque travail de maintenance, débranchez la
prise secteur.
Lorsque vous lʼutilisez en la transportant, nettoyez
lʼappareil après chaque emploi avec de lʼeau claire.
En cas dʼinstallation fixe, il est recommandé de
contrôler tous les 3 mois la fonction de lʼinterrupteur
à flotteur.
Eliminez les particules de peluches et fibres
éventuellement déposées dans le boîtier à lʼaide dʼun
jet dʼeau.
Tous les 3 mois, débarrassez le fond de la boue et
nettoyez également les parois de la cuve.
Eliminer les dépôts de lʼinterrupteur à flotteur avec
de lʼeau claire.
8.1 Nettoyage du filtre (fig. 7 et 8)
Pour protéger l’appareil et la roue de pompe des
impuretés importantes, un filtre supplémentaire se
trouve dans le panier d’aspiration inférieur. Pour le
nettoyage du filtre, veuillez procéder comme suit :
1. Appuyez légèrement sur l’attache latérale (A)
dans le sens de la flèche jusqu’à ce que le panier
d’aspiration (5) se détache de l’appareil.
2. Retirez le filtre (B) et lavez-le sous de l’eau
courante.
3. Replacez ensuite le filtre dans le panier
d’aspiration et replacez le panier d’aspiration sur
la pompe.
8.2 Maintenance
Aucune pièce à lʼintérieur de lʼappareil nʼa besoin
de maintenance.
Anleitung_BG_SP_400_RB_SPK1:_ 04.07.2008 11:04 Uhr Seite 15
Page 16

16
F
8.3 Commande de pièces de rechange :
Pour les commandes de pièces de rechange,
veuillez indiquer les références suivantes:
Type de lʼappareil
No. dʼarticle de lʼappareil
No. dʼidentification de lʼappareil
No. de pièce de rechange de la pièce requise
Vous trouverez les prix et informations actuelles à
lʼadresse www.isc-gmbh.info
9. Mise au rebut et recyclage
Lʼappareil se trouve dans un emballage permettant
dʼéviter les dommages dus au transport. Cet
emballage est une matière première et peut donc
être réutilisé ultérieurement ou être réintroduit dans
le circuit des matières premières.
Lʼappareil et ses accessoires sont en matériaux
divers, comme par ex. des métaux et matières
plastiques. Eliminez les composants défectueux
dans les systèmes dʼélimination des déchets
spéciaux. Renseignez-vous dans un commerce
spécialisé ou auprès de lʼadministration de votre
commune !
Anleitung_BG_SP_400_RB_SPK1:_ 04.07.2008 11:04 Uhr Seite 16
Page 17
17
F
Dérangements Origines Remède
L'appareil ne démarre pas - Tension secteur manque
- Interrupteur à flotteur ne
commute pas
- Vérifier la tension secteur
- Placer l'interrupteur à flotteur
dans une position plus élevée
L'appareil ne refoule pas - Filtre d'entrée bouché
- Tuyau de refoulement flambé
- Nettoyer le filtre d'entrée au jet
d'eau
- Défaire le point de pliage
L'appareil ne se met pas hors
circuit
- L'interrupteur à flotteur ne peut
pas s'abaisser
- Monter correctement l'appareil
sur le fond de la cuve
Refoulement insuffisant - Filtre d'entrée bouché
- Puissance diminuée par des
produits mélangés à l'eau très
encrassés et graissants
- Nettoyer le filtre d'entrée
- Nettoyer l'appareil et remplacer
les pièces d'usure
L'appareil se déconnecte après
une brève durée de
fonctionnement
- La protection du moteur
déconnecte l'appareil à cause
d'un trop grand encrassement
de l'eau
- Température de lʼeau trop élevée,
la protection du moteur
déconnecte
- Débrancher la prise secteur et
nettoyez l'appareil ainsi que la
cuve
- Veillez à la température
maximale de lʼeau de 35° C!
10. Plan de recherche des erreurs
Anleitung_BG_SP_400_RB_SPK1:_ 04.07.2008 11:04 Uhr Seite 17
Page 18

18
I
Attenzione!
Nellʼusare gli apparecchi si devono rispettare diverse
avvertenze di sicurezza per evitare lesioni e danni.
Quindi leggete attentamente queste istruzioni per
lʼuso. Conservatele bene per avere a disposizione le
informazioni in qualsiasi momento. Se date
lʼapparecchio ad altre persone consegnate loro
queste istruzioni per lʼuso insieme allʼapparecchio!
Non ci assumiamo alcuna responsabilità per incidenti
o danni causati dal mancato rispetto di queste
istruzioni e delle avvertenze di sicurezza.
1. Avvertenze di sicurezza
Attenzione!
Nel caso di stagni, laghetti di giardini o piccole
vasche e nelle loro vicinanze l’uso
dell’apparecchio è consentito solo con
interruttore di sicurezza per correnti di guasto
con una corrente nominale di intervento fino a 30
mA (secondo la norma VDE 0100 parte 702 e
parte 738).
L’apparecchio non è adatto all’uso in piscine,
piscine per bambini di ogni tipo e vasche in cui
possano essere presenti persone o animali
mentre essa è in funzione. È vietato l’uso
dell’apparecchio in presenza di persone o
animali nella zona di pericolo. Rivolgetevi al
vostro elettricista specializzato!
Questo apparecchio non è destinato ad essere usato
da persone (bambini compresi) con capacità fisiche,
sensoriali o mentali limitate o che manchino di
esperienza e/o conoscenze, a meno che non
vengano sorvegliati da una persona responsabile per
la loro sicurezza o abbiano ricevuto da essa
istruzioni su come usare lʼapparecchio. I bambini
devono essere sorvegliati per assicurarsi che non
giochino con lʼapparecchio.
Attenzione!
Prima di mettere in funzione una nuova pompa
per acque reflue fate controllare da uno
specialista che
- la messa a terra,
- la messa a terra del neutro e
- il circuito di sicurezza per correnti di guasto
corrispondano alle norme di sicurezza dell’ente
responsabile della fornitura di energia elettrica e
funzionino in modo corretto.
I collegamenti elettrici ad innesto devono essere
protetti dall’umidità.
In caso di pericolo di inondazioni collocate i
collegamenti ad innesto in un’area che non ne
venga interessata.
Si deve comunque evitare in ogni caso di
convogliare liquidi aggressivi e sostanze
abrasive.
L’apparecchio deve essere protetto dal gelo.
L’apparecchio deve essere protetto da un
funzionamento a secco.
Adottate misure atte a tenere l’apparecchio
lontano dalla portata dei bambini.
2. Descrizione dellʼapparecchio
(Fig. 1 e 2)
1. Maniglia
2. Cavo di alimentazione
3. Attacco di mandata
4. Interruttore a galleggiante
5. Cesto di aspirazione
6. Tubo a pressione
7. Distributore
8. Tubo di prelievo
9. Attacco del tubo
10. Rubinetto di chiusura
3. Utilizzo proprio
L’apparecchio che avete acquistato è destinato a
convogliare acqua con una temperatura massima di
35° C. L’apparecchio non deve essere assolutamente
usato per altri liquidi, in particolare se si tratta di
carburanti per motori, detergenti ed altri prodotti
chimici! Se montato in un punto basso, l’apparecchio
protegge dalle inondazioni. Il suo impiego è però
possibile ovunque si debba pompare dell’acqua, per
es. in casa, nel giardinaggio e in molti altri settori.
L’apparecchio non deve essere usato nel caso di
vasche di piscine!
Per usare l’apparecchio in acqua con fondo naturale
e fangoso, mettetelo in un posto un po’ sollevato, per
es. su dei mattoni.
L’apparecchio non è adatto per l’uso continuo, per es.
come pompa di circolazione nel laghetto. La durata
utile prevista dell’apparecchio si ridurrà
notevolmente, poiché l’apparecchio non è stato
costruito per una sollecitazione continua.
Lʼapparecchio deve venire usato solamente per lo
scopo a cui è destinato. Ogni altro tipo di uso che
esuli da quello previsto non è un uso conforme.
Lʼutilizzatore/lʼoperatore, e non il costruttore, è
responsabile dei danni e delle lesioni di ogni tipo che
Anleitung_BG_SP_400_RB_SPK1:_ 04.07.2008 11:04 Uhr Seite 18
Page 19

I
19
ne risultino.
Tenete presente che i nostri apparecchi non sono
stati costruiti per lʼimpiego professionale, artigianale
o industriale. Non ci assumiamo alcuna garanzia
quando lʼapparecchio viene usato in imprese
commerciali, artigianali o industriali, o in attività
equivalenti.
4. Caratteristiche tecniche
Allacciamento alla rete 230V ~ 50 Hz
Potenza assorbita 400 Watt
Portata max. 4.200 l/h
Prevalenza max. 11 m
Profondità di immersione max. 5 m
Temperatura max. dell’acqua 35°C
Attacco del tubo flessibile 3/4” AG
Corpi estranei max. Ø 3 mm
Altezza del punto di commutazione ON
max. ca. 50 cm
Altezza del punto di commutazione OFF
min. ca. 5 cm
5. Prima della messa in esercizio
5.1. Montaggio (Fig. 3 e 4)
1. Avvitate l’attacco del tubo (9) sull’apparecchio.
2. Inserite il tubo di mandata (6) e quello di prelievo
(8) nel distributore (7). Badate che il tubo di
prelievo (8) sia montato dalla parte del rubinetto
di chiusura (10)!
3. Inserite ora il tubo di mandata (6) sul relativo
attacco (9) dell’apparecchio.
5.2 Montaggio della pompa nel fusto di acqua
piovana (Fig. 5)
1. Mettete l’apparecchio nel fusto di acqua piovana.
2. Fissate il distributore sul bordo del fusto
dell’acqua piovana. A questo scopo ruotate i
dispositivi di gomma per il fissaggio (A),
posizionati in modo eccentrico, cosi da bloccare il
distributore (7) sul bordo del fusto dell’acqua
piovana.
Da osservare!
Durante l’installazione fate attenzione a non montare
mai l’apparecchio appeso al tubo di mandata o al
cavo della corrente. L’apparecchio deve essere
agganciato alla maniglia prevista o deve essere
appoggiata sul fondo del pozzo. Per garantire un
perfetto funzionamento dell’apparecchio, il fondo del
pozzo deve essere sempre libero da fango o da altro
sporco. In caso di un livello d’acqua insufficiente, il
fango nel pozzo può asciugarsi rapidamente e
impedire all’apparecchio di avviarsi. Perciò è
necessario controllare regolarmente l’apparecchio
(eseguite tentativi di avviamento).
Avvertenza
Il pozzetto della pompa deve avere dimensioni di
almeno 40 x 40 x 50 cm perché l’interruttore a
galleggiante possa muoversi liberamente.
5.3 Collegamento alla rete
L’apparecchio da voi acquistato è già dotato di una
spina con messa a terra. L’apparecchio è concepito
per essere collegato ad una presa di corrente con
messa a terra da 230 V ~ 50 Hz. Assicuratevi che la
presa di corrente sia sufficientemente protetta
(almeno 6 A) ed in perfetto stato. Inserite la spina
nella presa di corrente. In tal modo l’apparecchio è
pronto all’esercizio.
Attenzione!
Al fine di evitare rischi, tale operazione deve essere
eseguita da un elettricista specializzato o da un
servizio di assistenza.
6. Uso
Dopo aver letto attentamente queste istruzioni di
installazione ed uso, potete mettere in esercizio
l’apparecchio tenendo presente i seguenti punti.
Accertatevi che l’apparecchio sia installato in
modo sicuro.
Verificate che il tubo di mandata sia stato
montato in modo corretto.
Assicuratevi che il collegamento elettrico sia di
230 V ~ 50 Hz.
Verificate che la presa elettrica sia in perfetto
stato.
Assicuratevi che umidità e acqua non
raggiungano in nessun caso l’allacciamento alla
rete.
Evitate che l’apparecchio funzioni a secco.
Per il prelievo dell’acqua aprite il rubinetto di
chiusura (10).
Per spegnere l’apparecchio staccate la spina
dalla presa di corrente.
Anleitung_BG_SP_400_RB_SPK1:_ 04.07.2008 11:04 Uhr Seite 19
Page 20

20
I
Impostazione del punto di commutazione
ON/OFF:
Il punto di commutazione ON/OFF dell’interruttore a
galleggiante può venire impostato in continuo. Ciò
avviene spostando il cavo del galleggiante nel
supporto cavi (Fig. 6). Prima della messa in esercizio
controllate i seguenti punti:
Lʼinterruttore a galleggiante deve essere montato
in modo tale che lʼaltezza del punto di attivazione
ON e quella del punto di disattivazione OFF
possano essere raggiunte facilmente e con un
impiego di forza ridotto. Accertatevene
collocando lʼapparecchio in un recipiente pieno
dʼacqua e sollevando e poi abbassando a mano
con cautela lʼinterruttore a galleggiante. Facendo
ciò potete constatare se lʼapparecchio si attiva e
disattiva.
Assicuratevi anche che la distanza fra la parte
superiore dell’interruttore a galleggiante ed il
supporto del cavo non sia troppo ridotta. In caso
di distanza insufficiente non viene garantito il
perfetto funzionamento.
Nel regolare l’interruttore a galleggiante fate
attenzione che quest’ultimo non venga a contatto
del fondo prima della disattivazione
dell’apparecchio. Attenzione! Pericolo di
funzionamento a secco.
7. Sostituzione del cavo di
alimentazione
Se il cavo di alimentazione di questo apparecchio
viene danneggiato deve essere sostituito dal
produttore, dal suo servizio di assistenza clienti o da
una persona al pari qualificata al fine di evitare
pericoli.
8. Pulizia, manutenzione e ordinazione
dei pezzi di ricambio
Attenzione!
Prima di ogni lavoro di manutenzione staccate la
spina dalla presa di corrente.
In caso di impiego mobile, l’apparecchio deve
ogni volta essere lavato con acqua pulita dopo
l’uso.
In caso di un utilizzo fisso si consiglia di
controllare il funzionamento dell’interruttore a
galleggiante ogni 3 mesi.
Togliete con un getto d’acqua filetti, peluzzi e
particelle fibrose che si siano eventualmente
depositati nella carcassa.
Ogni 3 mesi togliete il fango dal fondo del vano in
cui si trova la pompa e pulitene anche le pareti.
Pulite l’interruttore a galleggiante e liberatelo dai
depositi.
8.1 Pulizia del filtro (Fig. 7 e 8)
Per proteggere l’apparecchio e la girante della pompa
da sporco grossolano, nella griglia inferiore si trova
un filtro addizionale. Per la pulizia del filtro procedete
nel modo seguente.
1. Spingete leggermente la linguetta laterale (A)
nella direzione della freccia finché la griglia (5)
non si lasci staccare dall’apparecchio.
2. Estraete il filtro (B) e lavatelo sotto acqua
corrente.
3. Rimettete poi il filtro nella griglia e reinserite
quest’ultima sull’apparecchio.
8.2 Manutenzione
Allʼinterno dellʼapparecchio non si trovano altre parti
sottoposte ad una manutenzione qualsiasi.
8.3 Ordinazione di pezzi di ricambio:
Volendo commissionare dei pezzi di ricambio, si
dovrebbe dichiarare quanto segue:
modello dellʼapparecchio
numero dellʼarticolo dellʼapparecchio
numero dʼident. dellʼapparecchio
numero del pezzo di ricambio del ricambio
necessitato.
Per i prezzi e le informazioni attuali si veda
www.isc-gmbh.info
9. Smaltimento e riciclaggio
Lʼapparecchio si trova in una confezione per evitare i
danni dovuti al trasporto. Questo imballaggio
rappresenta una materia prima e può perciò essere
utilizzato di nuovo o riciclato.
Lʼapparecchio e i suoi accessori sono fatti di
materiali diversi, per es. metallo e plastica.
Consegnate i pezzi difettosi allo smaltimento di rifiuti
speciali. Per informazioni rivolgetevi ad un negozio
specializzato o allʼamministrazione comunale!
Anleitung_BG_SP_400_RB_SPK1:_ 04.07.2008 11:04 Uhr Seite 20
Page 21

21
I
Anomalie Cause Rimedio
Il motore non si avvia - Manca la tensione di rete
- L'interruttore a galleggiante non
funziona
- Controllate la tensione di rete
- Portate l'interruttore a
galleggiante in una posizione più
elevata
L'apparecchio non convoglia - Filtro in entrata ostruito
- Tubo di mandata piegato
- Pulite con un getto d'acqua il filtro
in entrata
- Eliminate la piega
La pompa non si disinserisce - L'interruttore a galleggiante non
può abbassarsi
- Installate bene l'apparecchio sul
fondo del pozzo
Portata insufficiente - Filtro in entrata ostruito
- Prestazioni ridotte a causa di
impurità e corpi estranei abrasivi
nell'acqua
- Pulite il filtro in entrata
- Pulite l'apparecchio e sostituite le
parti usurate
La pompa si spegne dopo un
breve periodo di esercizio
- Il salvamotore spegne
l'apparecchio a causa del
notevole sporco presente
nell'acqua
- Temperatura dell'acqua troppo
alta, il salvamotore spegne
l'apparecchio
– Staccate la spina e pulite
l'apparecchio e il pozzo
– Tenete presente la temperatura
massima dell'acqua di 35°C!
10. Tabella per l’eliminazione delle anomalie
Anleitung_BG_SP_400_RB_SPK1:_ 04.07.2008 11:04 Uhr Seite 21
Page 22

22
DK/N
Vigtigt!
Ved brug af el-værktøj er der visse
sikkerhedsforanstaltninger, der skal respekteres for
at undgå skader på personer og materiel. Læs derfor
betjeningsvejledningen grundigt igennem. Opbevar
vejledningen et praktisk sted, så du altid kan tage
den frem efter behov. Husk at lade
betjeningsvejledningen følge med maskinen, hvis du
overdrager den til andre!
Vi fraskriver os ethvert ansvar for skader på personer
eller materiel, som måtte opstå som følge af, at
anvisningerne i denne betjeningsvejledning, navnlig
vedrørende sikkerhed, tilsidesættes.
1. Sikkerhedsanvisninger
Forsigtig!
Til stillestående vand, have- og badedamme er
brug af pumpen kun tilladt med fejlstrømsrelæ
med en udløsende mærkestrøm på op til 30 mA
(i henhold til VDE 0100 del 702 og 738).
Pumpen egner sig ikke til brug til
svømmebassiner, soppebassiner o.lign. eller
andre vandreservoirer, hvor der kan opholde sig
personer eller dyr i vandet, mens pumpen
arbejder. Det er forbudt at lade pumpen køre,
hvis der befinder sig personer eller dyr i
fareområdet. Spørg din elektriker!
Maskinen må ikke betjenes af personer (inkl. børn)
med begrænsede fysiske eller sensoriske
færdigheder, eller personer, der ikke er i psykisk
balance. Manglende erfaring og kendskab til
maskinens anvendelse fratager ligeledes en person
retten til at arbejde med maskinen, med mindre
arbejdet sker under opsyn eller efter grundig
instruktion. Pas på, at børn ikke leger med maskinen.
Vigtigt!
Før du tager pumpen i brug, skal du lade en
fagmand kontrollere
- jording
- nulling
- fejlstrømsrelæ
Alt skal fungere korrekt og være i
overensstemmelse med
forsyningsvirksomhedens sikkerhedsforskrifter.
De elektriske stikforbindelser skal beskyttes mod
fugt.
Ved fare for oversvømmelse skal
stikforbindelserne anbringes i vandsikkert
område.
Pumpning af aggressive væsker og pumpning af
abrasive (smøregel-virkende) stoffer må ikke
finde sted.
Pumpen skal beskyttes mod frost.
Pumpen skal beskyttes mod tørløb.
Sørg for, at børn ikke kan få adgang til
apparaturet.
2. Oversigt over maskinen (fig. 1 og 2)
1. Bæregreb
2. Netledning
3. Tryktilslutning
4. Svømmekobler
5. Indsugningskurv
6. Trykslange
7. Fordeler
8. Indtagsslange
9. Slangetilslutning
10. Spærrehane
3. Formålsbestemt anvendelse
Pumpen er beregnet til pumpning af vand med en
maksimal temperatur på 35° C. Pumpen må ikke
anvendes til andre flydende medier, navnlig ikke
motorbrændstof, rengøringsmiddel eller øvrige
kemiske produkter! Indbygget i en sump giver
pumpen sikkerhed mod oversvømmelser. Men den
finder også anvendelse alle steder, hvor vand skal
transporteres fra et sted til et andet, f.eks. i
husholdninger, haver osv. Pumpen må ikke anvendes
til svømmebassiner.
Anvendes pumpen til vand med en naturlig, mudret
bund skal pumpen opstilles en anelse forhøjet, f.eks.
oven på mursten.
Pumpen er ikke beregnet til vedvarende brug, f.eks.
som cirkulationspumpe i havedamme. Det ville
reducere pumpens forventede levetid markant, da
den ikke er konstrueret til at modstå konstant
belastning.
Saven må kun anvendes i overensstemmelse med
dens tiltænkte formål. Enhver anden form for
anvendelse er ikke tilladt. Vi fraskriver os ethvert
ansvar for skader, det være sig på personer eller
materiel, som måtte opstå som følge af, at maskinen
ikke er blevet anvendt korrekt. Ansvaret bæres alene
af brugeren/ejeren.
Bemærk, at vore produkter ikke er konstrueret til
erhvervsmæssig, håndværksmæssig eller industriel
Anleitung_BG_SP_400_RB_SPK1:_ 04.07.2008 11:04 Uhr Seite 22
Page 23

23
DK/N
brug. Vi fraskriver os ethvert ansvar, såfremt
produktet anvendes i erhvervsmæssigt,
håndværksmæssigt, industrielt eller lignende
øjemed.
4. Tekniske data
Nettilslutning 230V ~50 Hz
Optagen effekt 400 watt
Ydelse maks. 4.200 l/h
Pumpehøjde maks. 11 m
Nedsænkningsdybde maks. 5 m
Vandtemperatur maks. 35°C
Slangetilslutning 3/4” AG
Fremmedlegemer maks.: Ø 3 mm
Højde for koblingspunkt: TIL Maks. ca. 50 cm
Højde for koblingspunkt: FRA Min. ca. 5 cm
5. Før ibrugtagning
5.1. Samling (fig. 3 og 4)
1. Skru slangetilslutningen (9) på pumpen.
2. Sæt trykslangen (6) og indtagsslangen (8) på
fordeleren (7). Bemærk, at indtagsslangen (8) er
monteret på siden af spærrehanen (10)!
3. Sæt nu trykslangen (6) på pumpens
slangetilslutning (9).
5.2 Placering af pumpen i regntønden (fig. 5)
1. Stil pumpen ned i regntønden.
2. Fastgør fordeleren til kanten af regntønden. For at
gøre dette skal du dreje de excentrisk lejrede
gummifastgøringer (A) således, at fordeleren (7)
kan klemmes fast på kanten af regntønden.
Vigtigt!
Pumpen må ikke installeres frithængende på
trykledningen eller strømkablet. Pumpen skal hænges
op på bæregrebet eller ligge på bunden af sumpen.
For at sikre, at pumpen fungerer fejlfrit, skal bunden
af sumpen holdes fri for slam og andre urenheder.
Hvis vandspejlet bliver for lavt, kan slam, som
befinder sig i pumpesumpen, hurtigt tørre ind og
hindre pumpen i at starte. Pumpen skal derfor
regelmæssigt efterses (foretag starttests).
Bemærk:
Pumpesumpen skal som et minimum have målene 40
x 40 x 50 cm, så svømmekobleren kan bevæge sig
frit.
5.3 Nettilslutning
Pumpen er allerede forsynet med et
beskyttelseskontakt-stik ved leveringen. Pumpen er
konstrueret for tilslutning til en forskriftsmæssigt
isoleret jordkontakt med 230 V ~ 50 Hz. Forvis dig
om, at stikdåsen er tilstrækkeligt sikret (min. 6 A) og i
øvrigt er i orden. Sæt netstikket i stikdåsen. Pumpen
er nu klar til drift.
Vigtigt!
Dette arbejde skal af sikkerhedsgrunde udføres af en
fagmand inden for elektroteknik eller af kundeservice.
6. Betjening
Når du har læst installations- og
betjeningsvejledningen, kan du tage pumpen i brug,
idet du er opmærksom på nedenstående anvisninger.
Kontroller, at pumpen er opstillet sikkert.
Kontroller, at trykledningen er placeret korrekt.
Kontroller, at den elektriske tilslutning udgør 230
V ~ 50 Hz.
Kontroller, at den elektriske stikdåse er i ordentlig
stand.
Sørg for, at der ikke kan komme fugt eller vand til
nettilslutningen.
Undgå, at pumpen løber tør.
Luk op for spærrehanen (10), så
vandindtagningen kan begynde.
Pumpen slukkes ved at trække stikket ud af
stikkontakten.
Indstilling af Til/Fra-koblingspunkt:
Svømmekoblerens til- og frakoblingspunkt kan
indstilles trinløst. Dette gøres ved at flytte
svømmerkablet i kabelholderen (fig. 6).
Før idriftsættelse skal følgende kontrolleres:
Svømmekobleren skal være anbragt således, at
koblingspunkthøjden: TIL og
koblingspunkthøjden: FRA kan nås nemt og uden
kraftanstrengelse. Afprøv dette, idet du stiller
pumpen i et kar fyldt med vand og forsigtigt løfter
op i svømmekobleren med hånden, og herefter
sænker den ned igen. Så kan du se, om pumpen
tænder og slukker, som den skal.
Afstanden mellem hovedet på svømmekobleren
og kabelholderen må ikke være for kort. Er
afstanden for kort, er en fejlfri funktionsevne ikke
garanteret.
Når du indstiller svømmekobleren, skal du passe
på, at svømmekobleren ikke berører jorden, før
pumpen slukker. Vigtigt! Fare for tørløb.
Anleitung_BG_SP_400_RB_SPK1:_ 04.07.2008 11:04 Uhr Seite 23
Page 24

24
DK/N
7. Udskiftning af nettilslutningsledning
Hvis produktets nettilslutningsledning beskadiges,
skal den skiftes ud af producenten eller dennes
kundeservice eller af person med lignende
kvalifikationer for at undgå fare for personskade.
8. Rengøring, vedligeholdelse og
reservedelsbestilling
Vigtigt!
Træk stikket ud af stikkontakten inden
vedligeholdelse.
Ved mobil anvendelse skal pumpen rengøres
med klart vand hver gang efter brug.
Ved stationær installation anbefales det at
afprøve svømmekoblerens funktion hver 3.
måned.
Fnug, trævler og andre restpartikler, som har sat
sig fast i pumpehuset, fjernes med en vandstråle.
Hver 3. måned skal bunden af sumpen befries for
slam, ligesom også væggene skal rengøres.
Aflejringer på svømmekobleren fjernes med klart
vand.
8.1 Rensning af filtret (fig. 7 og 8)
Til at beskytte pumpen og pumpehjulet mod
genstridigt snavs findes et ekstra filter i den nederste
sugekurv. Sådan renser du filtret:
1. Tryk forbindelsesstykket i siden (A) forsigtigt i
pilens retning, indtil indsugningskurven (5) kan
tages af pumpen.
2. Tag filtret (B) ud, og vask det under rindende
vand.
3. Sæt herefter filtret tilbage i indsugningskurven, og
sæt denne på pumpen igen.
8.2 Vedligeholdelse
Der findes ikke yderligere dele, som skal
vedligeholdes inde i maskinen.
8.3 Reservedelsbestilling:
Ved bestilling af reservedele skal følgende oplyses:
Savens type.
Savens artikelnummer.
Savens identifikationsnummer.
Nummeret på den nødvendige reservedel.
Aktuelle priser og øvrige oplysninger finder du på
internetadressen www.isc-gmbh.info
9. Bortskaffelse og genanvendelse
Maskinen er pakket ind for at undgå transportskader.
Emballagen består af råmaterialer og kan således
genanvendes eller indleveres på genbrugsstation.
Maskinen og dens tilbehør består af forskellige
materialer, f.eks. metal og plast. Defekte
komponenter skal kasseres ifølge miljøforskrifterne
og må ikke smides ud som almindeligt
husholdningsaffald. Hvis du er i tvivl: Spørg din
forhandler, eller forhør dig hos din kommune!
Anleitung_BG_SP_400_RB_SPK1:_ 04.07.2008 11:04 Uhr Seite 24
Page 25

25
DK/N
Driftsforstyrrelser Årsager Afhjælpning
Pumpen starter ikke - Netspænding mangler
- Svømmekobleren kobler ikke
- Kontroller netspændingen
- Bring svømmekobleren i en
højere position
Pumpen pumper ikke - Indtagssien er tilstoppet
- Trykslangen er bøjet om
- Sprøjt på indtagssien med en
vandstråle
- Ret slangen ud
Pumpen slukker ikke - Svømmekobleren kan ikke
synke ned
- Stil pumpen rigtigt på bunden af
sumpen
Utilstrækkelig ydelse - Indtagssien er tilstoppet
- Ydelsen er nedsat, p.g.a. kraftigt
tilsmudsede og gelagtige
vandblandinger
- Rens indtagssien
- Rengør pumpen, og udskift
sliddelene
Pumpen kobler fra efter kort tid - Motorværn slår pumpen fra
p.g.a. for kraftig
vandtilsmudsning
- Vandtemperatur for høj,
motorværn slår fra
- Træk stikket du af stikkontakten,
og rengør pumpen og sumpen.
- Husk, at vandtemperaturen ikke
må overstige 35° C!
10. Fejlsøgningsskema
Anleitung_BG_SP_400_RB_SPK1:_ 04.07.2008 11:04 Uhr Seite 25
Page 26

H
26
Figyelem!
A készülékek használatánál be kell tartani egy pár
biztonsági intézkedéseket, azért hogy sérüléseket
és károkat megakadályozzon. Olvassa ezért ezt a
használati utasítást alaposan át. Őrizze jól meg,
azért hogy mindenkor rendelkezésére álljonak az
információk. Ha átadná más személyeknek a
készüléket, akkor kézbesítseki vele ezt a használati
utasítást is.
Nem vállalunk felelőséget olyan balesetekért és
károkért, amelyek ennek az utasításnak és a
biztonsági utasításoknak a figyelmen hagyása által
keletkeznek.
1. Biztonsági utasítások
Vigyázat!
A készülék üzemeltetése állóvízeken, kertbeni és
kerti tavakon valamint azoknak a környezetében
csak egy 30 mA-ig terjedő kioldó névleges
áramú hibaáram-védőkapcsolóval engedélyezett.
(a VDE 0100 702-es és 738-as rész szerint).
A készülék nem alkalmas olyan
úszómedencében, bármilyen fajta pancsoló
medencében és egyébb vízekben történő
használatra, amelyekben az üzem ideje alatt
személyek vagy állatok tartózkodhatnak. Tilos a
készülék üzemeltetése amig személyek vagy
állatok tartózkodnak a veszélyeztetett
környezetben. Érdeklődjön a villamossági
szakemberénél!
Ez a készülék nem lett olyan személyek (gyerekeket
is beleértve) általi használatra meghatározva, akik
csak egy korlátozott testi, érzéki vagy szellemi
képeséggel rendelkeznek vagy nem rendelkeznek
elegendő tapasztalattal és/vagy tudással, kivéve, ha
egy a biztonságukért felelős személy által felügyelve
vannak, vagy ha utasításokat kaptak tőle, hogy
hogyan kell a készüléket használni. Gyerekeket felül
kellene ügyelni, azért hogy biztosítva legyen, hogy
nem játszanak a készülékkel.
Figyelem!
Mielőtt üzembe helyezné a készüléket,
ellenőriztesse le szakszerűen, hogy
- a földelés
- a nullázás
- a hibaáram védőkapcsoló az energia-ellátó
vállalat biztonsági előírásainak megfelel és
kifogástalanul működik:
A villamossági dugós csatlakozásokat védeni kell
a nedvességtől.
Elöntési veszély esetén a dugós kapcsolatokat az
elöntési veszélyen kívülálló helyre felszerelni.
Minden esetre el kell kerülni az agresszív
folyadékok szállítását, valamint abráziós
(smirgliként ható) anyagok szállítását.
Óvni kell a készüléket fagy elöl.
Óvni kell a készüléket szárazfutás elöl.
Megfelelő intézkedések által meg kell
akadályozni a gyerekek hozzányúlását.
2. A készülék leírása (1/2-es kép)
1. Hordozófogantyú
2. Hálózati vezeték
3. Nyomáscsatlakozó
4. Úszókapcsoló
5. Beszívókosár
6. Nyomástömlő
7. Elosztó
8. Kivevő tömlő
9. Tömlőcsatlakoztatás
10. Elzárócsap
3. Rendeltetésszerűi használat
Az Ön által vásárolt készülék egy maximálissan 35 C°
hőmérsékletű víz szállítására lett meghatározva. Ezt a
készüléket nem szabad más folyadékok, különössen
nem a motorüzemanyagok, tisztítószerek és egyébb
kémia termékek szállítására felhasználni! Egy aknába
való beépítés után ez a készülék biztonságot ad az
elárasztások elöl. De úgyszintén mindenhol ott
használható, ahol vízet kell átszállítani, mint pédául a
háztartásban, a kertészetben és még sokkal több
alkamazási helyen. A készüléket nem szabad
úszómedence üzemeltetésére felhasználni.
A készüléknek a természetes, mocsaras talajú
vízekben levő használatánál állítsa a készüléket
enyhén megemelve fel, mint például téglákra.
A készülék nem lett tartós üzemre tervezve, mint
például keringtető szivattyú tavakban. A készűlék
várható élettartama azáltal mérvadóan lerövidül,
mivel a készülék nem lett egy állandó megterhelésre
konstruálva.
A gépet csak rendeltetése szerint szabad használni.
Ezt túlhaladó bármilyen használat, nem számít
rendeltetésszerűnek. Ebből adódó bármilyen kárért
vagy bármilyen fajta sérülésért a használó ill. a kezelő
felelős és nem a gyártó.
Anleitung_BG_SP_400_RB_SPK1:_ 04.07.2008 11:04 Uhr Seite 26
Page 27

H
27
Kérjük vegye figyelembe, hogy a készülékeink a
meghatározásuk szerint nem kisipari, kézműipari
vagy ipari üzemek területén történő bevetésre lettek
tervezve. Ezért a nem vállalunk szavatosságot, ha a
készülék kisipari, kézműipari vagy ipari üzemek
területén valamint egyenértékű tevékenységek
területén van használva.
4. Technikai adatok
Hálózati csatlakozás 230V ~50 Hz
Teljesítményfelvétel 400 Watt
Szállított mennyiség max. 4 200 l/ óra
Szállítási magasság max. 11 m
Bemerülési mélység max. 5 m
Vízhőmérséklet max. 35°C
Tömlőcsatlakoztatás 3/4” AG
Idegen test max.: Ø 3 mm
Kapcsolópontmagasság: BE max. cca. 50 cm
Kapcsolópontmagasság: KI min. cca. 5 cm
5. Beüzemeltetés előtt
5.1. Összeszerelés (3-as és 4-es ábra)
1. Csavarozza a tömlőcsatlakoztatást (9) a
készülékre.
2. Dugja a nyomástömlőt (6) és a kivevőtömlőt (8)
az elosztóra (7). Kérjük vegye figyelembe, hogy a
kivevőtömlő (8) a lezárócsap (10) oldalán van
felszerelve!
3. Dugja most a nyomástömlőt (6) a készülék
tömlőcsatlakozására (9).
5.2 A szivattyú beszerelése az esővízgyűjtőbe
(5-ös ábra)
1. Állítsa a készüléket az esővízgyűjtőbe.
2. Erősítse az elosztót az esővízgyűjtő szélére.
Kérjük fordítsa ahoz úgy az excentrikusan
fektetett gumirögzítéseket (A), hogy az elosztót
(7) rá lehesen szorítani az esővízgyűjtő szélére.
Figyelembe venni!
Az installációnál figyelembe kell venni, hogy a
késszüléket sohasem szabad a nyomásvezetéken
vagy az áramkábelen szabadon függően felszerelni.
A készüléket az arra előrelátott hordozófogantyúra
muszáj felakasztani illetve az aknatalajra felfektetni. A
készülék kifogástalan működésének a
garantálásához, az aknatlajnak mindig iszap- és
egyébb szennyeződésmentesnek kell lennie. Túl
alacsony vízállás esetén az aknában levő iszap
gyorsan beszáradhat és megakadályozhatja a
készülék beindulását. Ezért szükséges a készüléket
rendszeres leellenőrzése (indulási próbákat
véghezvinni).
Utasítás:
A szivattyúakna méreteinek legalább 40 x 40 x 50
cm-nek kell lennie, azért hogy szabadon tudjon
mozogni az úszókapcsoló.
5.3 Hálózati csatlakoztatás
Az Ön által vásárolt készülék, már egy
védőérintkezős dugóval van felszerelve. A készülék
egy 230 V ~ 50 Hz-es földelt konnektorra levő
rákapcsolásra lett tervezve. Bizonyosodjon meg arról,
hogy a dugaszoló aljzat elegendően le van biztosítva
(legalább 6 A), és kifogástalanul rendben van.
Kapcsolja a hálózati csatlakozót a dugaszoló aljzatba
és ezáltal üzemkész a készülék.
Figyelem!
A veszélyeztetések elkerülése érdekében, ezt a
munkát a csak a villanyszerelési mesterség
szakemberének szabad elvégeznie.
6. Kezelés
Miután figyelmesen elolvasta ezt az installációi és
üzemeltetési utasítást, a következő pontok
figyelembe vétele melett beüzemeltetheti a
készüléket:
Ellenőrizze le, hogy a készülék biztosan van
felállítva.
Ellenőrizze le, hogy a nyomásvezeték
szabályszerűen lett e felszerelve.
Bizonyosodjon meg arról, hogy 230 V ~ 50 Hz-es
a villamos csatlakozás.
Vizsgálja meg a villamos dugaszoló aljzatot
annak szabályszerű állapotára.
Bizonyosodjon meg arról, hogy sohasem tud víz
vagy nedvesség a hálózati csatlakozásba kerülni.
Kerülje el a készülék szárazon levő futását.
A vízkivételhez kérjük nyissaki az elzárócsapot
(10).
A készülék kikapcsolásához kérjük húzza ki a
hálózati csatlakozót a dugaszoló aljzatból.
A be/ki – kapcsolási pont beállítása:
Az úszókapcsoló be- ill. kikapcsolópontját
fokozatmentesen be lehet állítani. Ez az
úszókábelnek a kábeltartóban levő eltolása által
történik (6-os ábra). Kérjük ellenőrizze le az
üzembevétel előtt a következő pontokat:
Az úszókapcsolónak úgy kell felszerelve lennie,
Anleitung_BG_SP_400_RB_SPK1:_ 04.07.2008 11:04 Uhr Seite 27
Page 28

28
H
hogy a kapcsolási magasság: BE és a kapcsolási
magasság: KI könnyen és kevés erőkifejtéssel
elérhető legyen. Ellenőrizze ezt azáltal le, hogy a
készülék egy vízzel töltött edénybe állítja, és az
úszókapcsolót ovatossan kézzel felemeli és
utánna ismét leengedi. Ennél láthatja, hogy a
készülék be- illetve kikapcsol e.
Ügyeljen arra is, hogy az úszókapcsolófej és a
kábeltartó közötti távolság ne legyen túl kicsi. Egy
túl kicsi távolság esetén nincs garantálva a
kifogástalan működés.
Ügyeljen az úszókapcsoló beállításánál arra,
hogy az úszókapcsoló nehogy a készülék
kikapcsolása előtt hozzáérjen a fenékhez.
Figyelem! Szárazfutás veszélye.
7. A hálózati csatlakozásvezeték
kicserélése
Ha ennek a készüléknek a hálózatra csatlakoztató
vezetéke megsérült, akkor ezt a gyártó vagy annak a
vevőszolgáltatása, vagy egy hasonlóan szakképzett
személy által ki kell cseréltetni, azért hogy elkerülje a
veszélyeztetéseket.
8. Tisztítás, karbantartás és
pótalkatrészmegrendelés
Figyelem!
Minden karbantartási munka előtt húzza ki a
hálózati dugaszt.
Hordozható felhasználás esetén a készüléket
minden használat után meg kellene tisztítani
tiszta vízzel.
A helyhez kötött használatnál ajánlatos minden 3
hónapban az úszókapcsoló működésének a
leellenőrzése.
A gépházban esetleg lerakódott fonalakat és
rostos részecskéket egy vízsugárral eltávolítani.
3 havonta az aknatalajt az iszaptól mentesíteni és
az akna oldalait is megtisztítani.
Az úszókapcsolót tiszta vízzel megtisztítani a
lerakódásokotól.
8.1 A szűrő tisztítása (7-es és 8-as ábra)
Ahhoz, hogy védje a készüléket nagyobb
szennyeződések elöl, az alulsó szívókosárban egy
további szűrő. Kérjük járjon a szűrő tisztításánál a
következő képpen el:
1. Nyomja enyhén az oldali rátétet (A) a nyílirányba,
amig a beszívókosarat (5) a kézülékről le nem
lehet venni.
2. Vegye ki a szűrőt (B) és mossa ki foloyó víz alatt,
3. Tegye azután ismét be a szűrőt a beszívókosárba
és dugja a beszívókosarat ismét a készülékbe.
8.2 Karbantartás
A készülék belsejében nem található további
karbantartandó rész.
8.3 A pótalkatrész megrendelése:
A pótalkatrészek megrendelésénél a következő
adatokat kell megadni
A készülék típusát
A kászülékk cikkszámát
A készülék ident-számát
A szükséges pótalkatrész pótalkatrész-számá
Aktuális árak és inforációk a www.isc-gmbh.info
alatt találhatóak.
9. Megsemmisítés és újrahsznosítás
A szállítási károk megakadályozásához a készülék
egy csomagolásban található. Ez a csomagolás
nyersanyag és ezáltal ismét felhasználható vagy
pedig visszavezethető a nyersanyagi körforgáshoz.
A szállítási és annak a tartozékai különböző
anyagokból állnak, mint például fém és műanyagok.
A defekt alkatrészeket vigye a különhulladéki
megsemmisítéshez. Érdeklődjön utánna a
szaküzletben vagy a községi közigazgatásnál!
Anleitung_BG_SP_400_RB_SPK1:_ 04.07.2008 11:04 Uhr Seite 28
Page 29

29
H
Zavarok Okok Elhárítás
Nem indul a készülék - Hiányzik a hálózati feszültség
- Nem kapcsol az úszókapcsoló
- Leellenőrizni a hálózati
feszültséget
- Magasabb állásba tenni az
úszókapcsolót
Nem szállít a készülék - El van dugulva a bevezetési
szita
- Megtörve a nyomástömlő
- Vízsugárral megtisztítani a
beveztési szitát
- Elhárítani a töréshelyet
Nem kapcsol ki a készülék - Nem tud leereszkedni az
úszókapcsoló
- Helyesen felfektetni a készüléket
az aknatalajra
Nem kielégítő a szállított
mennyiség
- El van dugulva a bevezetési
szita
- Lecsökkentve a teljesítmény az
erősen szennyezett és
smirgliként ható vízbekeverések
által
- Megtisztítani a beveztési szitát
- Megtisztítani a készüléket és
kicserélni a gyorsan kopó
részeket
Rövid futási idő után kikapcsol a
készülék
- A motorvédő, a túl erős
vízszennyeződés miatt
lekapcsolja a készüléket
- Túl magas a víz hőmérséklete,
lekapcsol a motorvédő
- Kihúzni a hálózati dugaszt és
megtisztítani a készüléket és az
aknát
- Ügyelni a maximális, 35 C°-ú
vízhőmérsékletre!
10. Hibakeresési terv
Anleitung_BG_SP_400_RB_SPK1:_ 04.07.2008 11:04 Uhr Seite 29
Page 30

30
HR/
BIH
Pažnja!
Da bi se spriječila ozljedjivanja i nastanak šteta
prilikom korištenja uredjaja, treba se pridržavati
sigurnosnih mjera opreza. Zbog toga pažljivo
pročitajte ove upute za uporabu. Dobro ih sačuvajte
tako da Vam informacije u svako doba budu na
raspolaganju. U slučaju da uredjaj trebate predati
drugoj osobi, uručite joj s njime i ove upute za
uporabu.
Ne preuzimamo jamstvo za nesreće ili štete nastale
zbog nepridržavanja ovih uputa i njihovih
sigurnosnih napomena.
1. Sigurnosne napomene
Oprez!
Na vodama stajaćicama, vrtnim jezercima i
jezerima za plivanje kao i njihovoj okolini
korištenje pumpe dopušteno je samo sa
zaštitnom strujnom sklopkom s nazivnom
strujom aktiviranja do 30 mA (prema VDE 0100
dio 702 i 738).
Pumpa nije prikladna za korištenje u bazenima,
plitkim bazenima svake vrste i ostalim vodama u
kojima se tijekom rada mogu nalaziti osobe ili
životinje. Nije dopušten rad pumpe tijekom
zadržavanja ljudi u opasnom području.
Posavjetujte se sa svojim električarom!
Ovaj uređaj ne smiju koristiti osobe (uključujući
djecu) s ograničenim fizičkim, osjetilnim ili psihičkim
osobinama ili one bez iskustva i/ili znanja, već bi
trebale biti pod nadzorom osobe nadležne za
njihovu sigurnost ili od nje primiti upute za korištenje
uređaja. Djeca trebaju biti pod nadzorom, kako
bismo se uvjerili da se ne igraju uređajem.
Pozor!
Prije stavljanja uređaja u pogon neka stručnjak
provjeri da li
- uzemljenje
- nulovanje
- zaštitni strujni sklop besprijekorno funkcioniraju
u skladu sa sigurnosnim propisima poduzeća za
opskrbu energijom.
Električne utične spojeve treba zaštititi od vlage.
Kod opasnosti od poplava utične spojeve
postavite u područje sigurno od poplavljivanja.
U svakom slučaju treba izbjegavati protok
agresivnih tekućina, kao i protok abrazivnih tvari
(učinak brušenja).
Uređaj treba zaštiti od smrzavanja.
Uređaj treba zaštititi od rada na suho.
Odgovarajućim mjerama spriječite pristup djece
uređaju.
UPOZORENJE!
Pročitajte sve sigurnosne napomene i upute.
Propusti kod pridržavanja sigurnosnih napomena i
uputa mogu uzrokovati el. udar, požar i/ili teška
ozljeđivanja.
Sačuvajte sve sigurnosne napomene i upute za
buduće korištenje.
2. Opis uredjaja (sl. 1 i 2)
1. Ručka za nošenje
2. Mrežni kabel
3. Tlačni priključak
4. Sklopka s plovkom
5. Usisna košara
6. Tlačno crijevo
7. Razvodnik
8. Usisno crijevo
9. Priključak crijeva
10. Zaporni ventil
3. Namjenska uporaba
Uređaj koji ste kupili namijenjen je za protok vode s
maksimalnom temperaturom od 35 °C. Uređaj se ne
smije koristiti za druge tekućine, naročito ne za
motorna goriva, sredstva za čišćenje i ostale kemijske
proizvode. Ugradnja u okno pruža uređaju zaštitu od
poplavljivanja. Koristi se, međutim, svugdje gdje je
potreban protok vode, npr. u kućanstvu, u vrtu, i na
mnogim drugim mjestima. Uređaj se ne smije koristiti
za rad u bazenu!
Kod korištenja u vodama s prirodnim, blatnjavim
dnom postavite uređaj malo povišeno npr. na cigle.
Uređaj nije predviđen za trajno korištenje, npr. kao
pumpa u jezercu. Očekivani vijek trajanja uređaja
time se znatno skraćuje, pošto uređaj nije konstruiran
za stalno opterećenje.
Stroj se smije koristiti samo u skladu s namjenom.
Svaka drukčija uporaba izvan ovih okvira nije
namjenska. Za štete ili ozljeđivanja bilo koje vrste
koje bi iz toga proizašle ne odgovara proizvođač
nego korisnik.
Molimo da obratite pažnju na to da naši uređaji nisu
konstruirani za korištenje u komercijalne svrhe kao ni
u obrtu i industriji. Ne preuzimamo jamstvo ako se
uređaj koristi u obrtničkim ili industrijskim pogonima
Anleitung_BG_SP_400_RB_SPK1:_ 04.07.2008 11:04 Uhr Seite 30
Page 31

31
HR/
BIH
i sličnim djelatnostima.
4. Tehnički podaci
Mrežni priključak 230 V ~ 50 Hz
Snaga 400 vata
Protočna količina maks. 4.200 l/h
Protočna visina maks. 11 m
Dubina uranjanja maks. 5 m
Maks. temperatura vode 35 °C
Priključak crijeva 3/4” AG
Strana tijela maks.: Ø 3 mm
Visina uklopne točke: UKLJUČENO maks. oko 50 cm
Visina uklopne točke: ISKLJUČENO min. oko 5 cm
5. Prije puštanja u pogon
5.1 Montaža (sl. 3 i 4)
1. Pričvrstite priključak za crijevo (9) na uređaj.
2. Nataknite tlačno (6) i usisno crijevo (8) na
razvodnik (7). Pripazite da usisno crijevo (8) bude
montirano na strani zapornog ventila (10)!
3. Sad nataknite tlačno crijevo (6) na priključak (9)
pumpe.
5.2 Stavljanje pumpe u cisternu za kišnicu (sl. 5)
1. Stavite uređaj u cisternu.
2. Pričvrstite razvodnik na rub cisterne. U tu svrhu
zakrenite ekscentrično smještena gumena
pričvršćenja (A) tako da se razvodnik (7) može
fiksirati na rub cisterne.
Obratite pozornost!
Kod instalacije treba pripaziti da se uređaj nikad ne
montira tako da rasteže tlačni vod ili strujni kabel.
Uređaj se mora objesiti na za to predviđenu ručku
odnosno položiti u okno. Da bi se zajamčilo
besprijekorno funkcioniranje uređaja u oknu ne smije
biti mulja ili sličnih nečistoća. Kod premale razine
vode mulj se u jami može brzo osušiti i spriječiti rad
pumpe. Zbog toga je potrebna redovita kontrola
uređaja (pokušati pokrenuti uređaj).
Napomena:
Dimenzije okna za pumpu trebaju biti najmanje 40 x
40 x 50 cm, tako da se sklopka s plovkom može
slobodno kretati.
5.3 Mrežni priključak
Uređaj koji ste kupili već posjeduje utikač sa zaštitnim
kontaktom. Uređaj je namijenjen za priključivanje na
utičnicu sa zaštitnim kontaktom s 230 V ~ 50 Hz.
Provjerite je li utičnica dostatno osigurana (najmanje
6 A) i ispravna. Utaknite mrežni utikač u utičnicu i
uređaj je sad spreman za rad.
Pozor!
Ovaj posao trebao bi obaviti samo električar ili
serviser, da bi se izbjegle opasnosti.
6. Rukovanje
Nakon što pažljivo pročitate ove upute za instalaciju i
uporabu, možete uređaj pustiti u rad pridržavajući se
sljedećih točaka:
Provjerite je li uređaj sigurno postavljen.
Provjerite je li tlačno crijevo pravilno montirano.
Utvrdite ima li električni priključak 230 V ~ 50 Hz.
Provjerite je li električna utičnica u ispravnom
stanju.
Pazite da na mrežni priključak nikad ne dolazi
vlaga ili voda.
Izbjegavajte rad uređaja bez vode.
Za uzimanje vode otvorite zaporni ventil (10).
Za isključivanje pumpe izvucite mrežni utikač iz
utičnice.
Podešavanje točke uključivanja/isključivanja:
Točka uključivanja odn. isključivanja sklopke s
plovkom može se kontinuirano podešavati. To se
postiže pomicanjem kabela plovka u držač kabela (sl.
6).Molimo da prije puštanja u rad provjerite sljedeće
točke:
Sklopka s plovkom mora biti postavljena tako da
se visina točke uklapanja: UKLJUČENO i visina
točke isklapanja: ISKLJUČENO može postići uz
malu silu. Provjerite to tako da uređaj stavite u
posudu napunjenu vodom i sklopku s plovkom
pažljivo podignite rukom i zatim opet spustite.
Pritom možete vidjeti da li se pumpa uključuje
odnosno isključuje.
Pripazite na to da ne bude premali razmak
između glave sklopke s plovkom i držača kabela.
Kod premalog razmaka nije zajamčeno
besprijekorno funkcioniranje.
Kod podešavanja sklopke s plovkom pripazite na
to da prije isključivanja uređaja sklopka ne
dodiruje tlo. Pozor! Opasnost od rada bez vode.
Anleitung_BG_SP_400_RB_SPK1:_ 04.07.2008 11:04 Uhr Seite 31
Page 32

32
HR/
BIH
7. Zamjena mrežnog priključka
Ako se ošteti mrežni priključni vod ovog uređaja,
zamijeniti ga mora proizvođač ili njegova servisna
služba ili slična kvalificirana osoba, kako bi se
izbjegle opasnosti.
8. Čišćenje, održavanje i naručivanje
rezervnih dijelova
Pozor!
Prije svakog održavanja izvucite mrežni utikač.
Kod rada s promjenom položaja uređaj bi se
nakon svake uporabe morao oprati čistom
vodom.
Kod stacionarne instalacije preporuča se kontrola
funkcije sklopke s plovkom svaka 3 mjeseca.
Vlakna ili vlaknaste čestice koje se eventualno
nakupe u kućištu uklonite mlazom vode.
Svaka 3 mjeseca uklonite mulj iz okna i očistite
njegove stjenke.
Naslage na sklopci s plovkom uklonite čistom
vodom.
8.1 Čišćenje filtra (sl. 7 i 8)
Da biste pumpu za kišnicu i njezin rotor zaštitili od
većih nečistoća, u donjoj usisnoj košari nalazi se
dodatni filtar. Prilikom čišćenja tog filtra postupite na
sljedeći način:
1. Lagano pritisnite bočnu spojnicu (A) u smjeru
strelice tako da se usisna košara (5) može skinuti
s pumpe.
2. Skinite filtar (B) i isperite ga tekućom vodom.
3. Ponovno umetnite filtar u usisnu košaru i
nataknite košaru u uređaj.
8.2 Održavanje
U unutrašnjosti uredjaja nalaze se dijelovi koje
treba održavati.
8.3 Narudžba rezervnih dijelova:
Prilikom naručivanja rezervnih dijelova su potrebni
slijedeći podaci:
Tip uredjaja
Broj artikla uredjaja
Ident. broj uredjaja
Broj potrebnog rezervnog dijela
Aktualne cijene i informacije potražite na web-adresi
www.isc-gmbh.info
9. Zbrinjavanje i recikliranje
Uredjaj se nalazi u pakovanju koje ga štiti od
oštećenja prilikom transporta. Ovo pakovanje je
sirovina i zato se može ponovno upotrijebiti ili poslati
na reciklažu.
Uredjaj i njegov pribor izradjeni su od različitih
materijala kao npr. metala i plastike. Neispravne
sastavne dijelove otpremite na mjesta za
zbrinjavanje posebnog otpada. Informacije potražite
u specijaliziranoj trgovini ili nadležnoj općinskoj
upravi.
Anleitung_BG_SP_400_RB_SPK1:_ 04.07.2008 11:04 Uhr Seite 32
Page 33

33
HR/
BIH
Smetnje Uzroci Pomoć
Uređaj se ne pokreće - Nema mrežnog napona
- Sklopka s plovkom se ne
uključuje
- Provjerite mrežni napon
- Sklopku s plovkom dovesti u viši
položaj
Uređaj nema protok - Začepljeno ulazno sito
- Savinuto tlačno crijevo
- Očistiti ulazno sito mlazom vode
- Ispraviti savinuto mjesto
Uređaj se ne isključuje - Sklopka s plovkom se ne može
potopiti u vodu
- Uređaj pravilno položiti u okno
Nedovoljna količina protoka - Začepljeno ulazno sito
- Smanjen učin zbog jako
zaprljanih i abrazivnih primjesa u
vodi
- Očistiti ulazno sito
- Očistiti uređaj i zamijeniti
istrošene dijelove
Uređaj se isključuje nakon kratkog
vremena
- Zaštita motora isključuje pumpu
zbog velike zaprljanosti vode
- Previsoka temperatura vode,
zaštita motora isključuje pumpu
- Izvucite mrežni utikač i očistite
pumpu kao i okno
- Obratite pažnju na maksimalnu
temperaturu vode od 35 °C!
10. Plan traženja grešaka
Anleitung_BG_SP_400_RB_SPK1:_ 04.07.2008 11:04 Uhr Seite 33
Page 34

CZ
34
Pozor!
Při používání přístrojů musí být dodržována určitá
bezpečnostní opatření, aby se zabránilo zraněním a
škodám. Přečtěte si proto pečlivě tento návod k
obsluze/bezpečnostní pokyny. Dobře si ho/je uložte,
abyste měli tyto informace kdykoliv po ruce. Pokud
předáte přístroj jiným osobám, předejte s ním
prosím i tento návod k obsluze/bezpečnostní
pokyny. Nepřebíráme žádné ručení za škody a úrazy
vzniklé v důsledku nedodržování tohoto návodu k
obsluze a bezpečnostních pokynů.
1. Bezpečnostní pokyny:
Pozor!
Ve stojatých vodách, zahradních jezírkách a
rybnících a v jejich okolí je používání čerpadla
přípustné pouze s ochranným vypínačem proti
chybnému proudu a vypínacím jmenovitým
proudem až 30 mA (podle VDE 0100 část 702 a
738).
Čerpadlo není vhodné na použití v plaveckých
bazénech, brouzdalištích všeho druhu a
ostatních vodstvech, ve kterých se během
provozu mohou zdržovat osoby nebo zvířata.
Provoz čerpadla během pobytu lidí nebo zvířat v
oblasti ohrožení není přípustný. Informujte se u
odborného elektrikáře!
Tento přístroj není určen k tomu, aby ho obsluhovaly
osoby (včetně dětí) s omezenými fyzickými,
senzorickými nebo duševními schopnostmi nebo s
nedostatkem zkušeností a/nebo s nedostatkem
znalostí, leda že by byly pod dohledem osoby
odpovědné za jejich bezpečnost nebo od ní
obdržely pokyny, jak přístroj používat. Děti by měly
být pod dohledem, aby bylo zaručeno, že si
nebudou s přístrojem hrát.
Pozor!
Než uvedete přístroj do provozu, nechte
odborníkem zkontrolovat, zda
- uzemnění
- nulování
- ochranné vypínání proti chybnému proudu
odpovídá bezpečnostním předpisům
energetického rozvodného podniku a zda
bezvadně funguje.
Elektrické zástrčky chránit před vlhkem.
Při nebezpečí zatopení umístit zástrčky v oblasti
chráněné před zatopením.
V každém případě je třeba se vyhnout čerpání
agresivních kapalin a čerpání abrazivních látek (s
brusnými účinky).
Přístroj je třeba chránit před mrazem.
Přístroj je třeba chránit před chodem nasucho.
Vhodnými opatřeními je třeba zabránit přístupu
dětem.
VAROVÁNÍ!
Přečtěte si všechny bezpečnostní pokyny a
instrukce.
Zanedbání při dodržování bezpečnostních pokynů a
instrukcí mohou mít za následek úder elektrickým
proudem, požár a/nebo těžká zranění.
Všechny bezpečnostní pokyny a instrukce si
uložte pro budoucí použití.
2. Popis přístroje (obr. 1 a 2)
1. Nosná rukojeť
2. Síťové vedení
3. Tlaková přípojka
4. Plovákový spínač
5. Sací koš
6. Tlaková hadice
7. Rozvodka
8. Odběrná hadice
9. Hadicová přípojka
10. Uzavírací kohout
3. Použití podle účelu určení
Vámi zakoupený přístroj je určen na čerpání vody o
maximální teplotě 35 °C. Přístroj nesmí být používán
pro jiné kapaliny, obzvláště ne pro motorová paliva,
čisticí prostředky a jiné chemické výrobky!
Zabudován v šachtě dodává tento přístroj jistotu před
zatopením. Přístroj najde uplatnění ale všude tam,
kde musí být přečerpána voda, např. v domácnosti,
zahradě, a v dalších použitích. Přístroj nesmí být
používán pro provoz v bazénech!
Při použití přístroje ve vodách s přírodním, bahnitým
dnem postavte přístroj na trochu vyvýšeném místě,
např. na cihly.
Pro trvalý používání, např. jako cirkulační čerpadlo v
rybníku, není přístroj určen. Očekávaná životnost
přístroje se tak výrazně zkrátí, protože přístroj není
konstruován pro trvalé zatížení.
Stroj smí být používán pouze podle svého účelu
určení. Každé další toto překračující použití
neodpovídá použití podle účelu určení. Za z toho
vyplývající škody nebo zranění všeho druhu ručí
Anleitung_BG_SP_400_RB_SPK1:_ 04.07.2008 11:04 Uhr Seite 34
Page 35

CZ
35
uživatel/obsluhující osoba a ne výrobce.
Dbejte prosím na to, že naše přístroje nebyly podle
svého účelu určení konstruovány pro živnostenské,
řemeslnické nebo průmyslové použití. Nepřebíráme
žádné ručení, pokud je přístroj používán v
živnostenských, řemeslných nebo průmyslových
podnicích a při srovnatelných činnostech.
4. Technická data
Síťová přípojka 230 V~ 50 Hz
Příkon 400 W
Dopravované množství max. 4.200 l/h
Dopravní výška max. 11 m
Hloubka ponoření max. 5 m
Teplota vody max. 35°C
Hadicová přípojka 3/4” AG
Cizí tělesa max.: Ø 3 mm
Výška spínacího bodu: ZAP cca 50 cm
Výška spínacího bodu: VYP cca 5 cm
5. Před uvedením do provozu
5.1. Montáž (obr. 3 a 4)
1. Našroubujte hadicovou přípojku (9) na přístroj.
2. Nasaďte tlakovou hadici (6) a odběrovou hadici
(8) na rozdělovač (7). Dbejte prosím na to, aby
byla odběrová hadice (8) namontována na straně
uzavíracího kohoutu (10)!
3. Nasaďte nyní tlakovou hadici (6) na hadicovou
přípojku (9) přístroje.
5.2 Umístění čerpadla v nádobě na dešťovou
vodu (obr. 5)
1. Postavte přístroj do nádoby s dešťovou vodou.
2. Upevněte rozdělovač na okraji nádoby s
dešťovou vodou. Natočte k tomu excentricky
uložená gumová upevnění (A) tak, aby
rozdělovač (7) mohl být upevněn na okraji
nádoby s dešťovou vodou.
Dodržovat!
Při instalaci je třeba dbát na to, že přístroj nesmí být
nikdy namontován volně visící na výtlačném potrubí
nebo na síťovém kabelu. Přístroj musí být zavěšen na
nosné rukojeti, určené pro tyto účely, resp. dosedat
na dno šachty. Aby byla zajištěna bezvadná funkce
přístroje, musí být dno šachty vždy prosté bahna
nebo jiných nečistot.
Při moc nízké vodní hladině může bahno nalézající se
v šachtě rychle zaschnout a bránit přístroji v rozběhu.
Proto je nutné přístroj pravidelně kontrolovat
(provádět zkušební spuštění).
Pokyn:
Šachta pro umístění čerpadla by měla mít rozměry
minimálně 40 x 40 x 50 cm, aby se mohl plovákový
spínač volně pohybovat.
5.3 Připojení na síť
Vámi zakoupený přístroj je již vybaven vidlicí s
ochranným kontaktem. Přístroj je určen pro připojení
na zásuvku s ochranným kolíkem 230 V ~ 50 Hz.
Přesvědčte se, že je zásuvka dostatečně jištěna (min.
6 A) a v bezvadném pořádku. Zastrčte síťovou
zástrčku do zásuvky a přístroj je tím připraven k
provozu.
Pozor!
Tuto práci smí provádět pouze odborný elektrikář
nebo zákaznický servis, aby se zabránilo
nebezpečím.
6. Obsluha
Poté, co jste si pečlivě přečetli tento návod k instalaci
a použití, můžete za dodržení následujících bodů
přístroj uvést do provozu:
Zkontrolujte, zda je přístroj bezpečně postaven.
Zkontrolujte, zda bylo řádně připevněno výtlačné
vedení.
Ubezpečte se, zda elektrická přípojka vykazuje
230 V ~ 50 Hz.
Zkontrolujte řádný stav elektrické zásuvky.
Ubezpečte se, že do připojení na síť nikdy
nemůže vniknout vlhkost nebo voda.
Zabraňte, aby přístroj běžel nasucho.
K čerpání vody prosím otevřete uzavírací kohout
(10).
Na vypnutí přístroje vytáhněte prosím síťovou
zástrčku ze zásuvky.
Nastavení bodu zapínání/vypínání:
Bod zapínání resp. vypínání plovákového spínače
může být plynule nastaven. To se uskutečňuje
posunutím plovákového spínače v držáku kabelu
(obr. 6).
Před uvedením do provozu prosím zkontrolujte
následující body:
Plovákový spínač musí být umístěn tak, aby byla
výška spínacího bodu: ZAP a výška spínacího bodu:
VYP lehce dosažitelná s malým vynaložením síly.
Zkontrolujte toto tak, že přístroj postavíte do nádoby
naplněné vodou a plovákový spínač rukou opatrně
Anleitung_BG_SP_400_RB_SPK1:_ 04.07.2008 11:04 Uhr Seite 35
Page 36

CZ
36
zvednete a poté opět spustíte. Přitom uvidíte, zda se
přístroj zapne resp. vypne.
Dbejte na to, aby vzdálenost mezi hlavou
plovákového spínače a držákem kabelu nebyla moc
malá. Při moc malé vzdálenosti není bezvadná funkce
zaručena.
Při nastavení plovákového spínače dbejte na to, aby
se plovákový spínač před vypnutím přístroje
nedotknul země. Pozor! Nebezpečí chodu nasucho.
7. Výměna síťového napájecího
vedení
Pokud je síťové napájecí vedení poškozeno, musí být
nahrazeno výrobcem nebo jeho zákaznickým
servisem nebo kvalifikovanou osobou, aby se
zabránilo nebezpečím.
8. Čištění, údržba a objednání
náhradních dílů
Pozor!
Před každou údržbou vytáhněte síťovou zástrčku
ze zásuvky.
Při mobilním používání by měl být přístroj po
každém použití vyčištěn čistou vodou.
Při stacionární instalaci doporučujeme každé 3
měsíce překontrolovat funkci plovákového
spínače.
Chlupy a vláknité částečky, eventuálně usazené v
tělese, odstranit proudem vody.
Každé 3 měsíce odstranit ze dna šachty bahno a
vyčistit také stěny šachty.
Plovákový spínač vyčistit čistou vodou od
usazenin.
8.1 Čištění filtru (obr. 7 a 8)
Na ochranu přístroje a lopatkového kola čerpadla
před většími nečistotami je v dolním sacím koši
umístěn dodatečný filtr. Při čištění filtru postupujte
prosím následovně:
1. Stlačte boční úchytku (A) lehce ve směru šipky,
až je možné sací koš (5) z přístroje vyjmout.
2. Vyjměte filtr (B) a umyjte ho pod tekoucí vodou.
3. Nakonec filtr opět vložte do sacího koše a
nasaďte sací koš na přístroj.
8.2 Údržba
Uvnitř přístroje se nevyskytují žádné další, údržbu
vyžadující, díly.
8.3 Objednání náhradních dílů:
Při objednávce náhradních dílů je třeba uvést
následující údaje:
앬 Typ přístroje
앬 Číslo výrobku přístroje
앬 Identifikační číslo přístroje
앬 Číslo náhradního dílu požadovaného náhradního
dílu
Aktuální ceny a informace naleznete na
www.isc-gmbh.info
9. Likvidace a recyklace
Přístroj je uložen v balení, aby bylo zabráněno
poškození při přepravě. Toto balení je surovina a tím
znovu použitelné nebo může být dáno zpět do
cirkulace surovin.
Přístroj a jeho příslušenství jsou vyrobeny z
rozdílných materiálů, jako např. kov a plasty.
Defektní součástky odevzdejte k likvidaci zvláštních
odpadů. Zeptejte se v odborné prodejně nebo na
místním zastupitelství!
Anleitung_BG_SP_400_RB_SPK1:_ 04.07.2008 11:04 Uhr Seite 36
Page 37

CZ
37
Poruchy Příčiny Odstranění
Přístroj nenaskočí - Chybí síťové napětí
- Plovákový spínač nespíná
- Síťové napětí překontrolovat
- Plovákový spínač dát do vyšší
polohy
Přístroj nedopravuje - Sací filtr ucpán
- Tlaková hadice zalomena
- Sací filtr vyčistit proudem vody
- Zalomení odstranit
Přístroj nevypíná - Plovákový spínač nemůže
klesnout
- Přístroj řádně postavit na dno
šachty
Nedostatečné dopravované
množství
- Sací filtr ucpán
- Výkon snížen nečistotami a
brusnými příměsemi ve vodě
- Sací filtr vyčistit
- Přístroj vyčistit a rychle
opotřebitelné díly nahradit
Přístroj se po krátké době vypne - Motorový jistič přístroj vypne
kvůli silnému znečištění vody
- Teplota vody moc vysoká,
motorový jistič vypne
- Vytáhnout síťovou zástrčku a
přístroj a šachtu vyčistit
- Dbát na maximální teplotu vody
35 °C!
10. Plán vyhledávání chyb
Anleitung_BG_SP_400_RB_SPK1:_ 04.07.2008 11:04 Uhr Seite 37
Page 38

Pozor!
Pri používaní prístrojov sa musia dodržiavať
príslušné bezpečnostné opatrenia, aby bolo možné
zabrániť prípadným zraneniam a vecným škodám.
Preto si starostlivo prečítajte tento návod na obsluhu
/ bezpečnostné pokyny. Následne ich starostlivo
uschovajte, aby ste mali vždy k dispozícii potrebné
informácie. V prípade, že budete prístroj požičiavať
tretím osobám, prosím odovzdajte im spolu
s prístrojom tento návod na obsluhu/ bezpečnostné
pokyny. Nepreberáme žiadne ručenie za nehody ani
škody, ktoré vzniknú nedodržaním tohto návodu na
obsluhu a bezpečnostných pokynov.
1. Bezpečnostné pokyny:
Pozor!
V stojatých vodách, záhradných rybníkoch
a rybníkoch na plávanie a v ich okolí je prípustné
prevádzkovanie čerpadla výlučne len s použitím
prúdového chrániča so spínacím nominálnym
prúdom 30 mA (podľa VDE 0100 časť 702 a 738).
Čerpadlo nie je určené pre prevádzku v
plaveckých bazénoch, bazénoch na kúpanie
akéhokoľvek druhu a iných vodách, v ktorých by
sa mohli počas jeho prevádzky nachádzať osoby
alebo zvieratá. Prevádzka čerpadla počas pobytu
človeka alebo zvieraťa v nie je prípustná.
Informujte sa u odborného elektrikára!
Tento prístroj nie je určený na to, aby ho mohli
používať osoby (vrátane detí) s obmedzenými
fyzickými, zmyslovými alebo psychickými
schopnosťami alebo osoby s nedostatočnými
skúsenosťami a/alebo nedostatočnými
vedomosťami, také používanie je možné len v tom
prípade, ak budú pod dozorom osoby zodpovednej
za ich bezpečnosť alebo ak boli zaškolené
o používaní prístroja. Deti by mali byť pod dozorom,
aby bolo možné zabezpečiť, že sa nebudú
s prístrojom hrať.
Pozor!
Pred uvedením prístroja do prevádzky si nechajte
odborne skontrolovať, či
- uzemnenie
- nulovanie
- ochranné spínanie chybového prúdu
spĺňajú bezpečnostné predpisy prevádzkovateľa
zásobovania energiou a sú v bezchybnom stave.
Elektrické zásuvné spojenia sa musia chrániť
pred vlhkom.
V prípade ohrozenia zatopením umiestnite
zásuvné spojenia na bezpečné miesta, kde
nehrozí zatopenie.
V každom prípade sa má zabrániť prečerpávaniu
agresívnych tekutín ako aj tekutín obsahujúcich
abrazívne látky (pôsobiace ako šmirgeľ).
Prístroj chráňte pred mrazom.
Prístroj chráňte pred chodom na sucho.
Prístup deťom je potrebné zamedziť vhodnými
opatreniami.
VÝSTRAHA!
Prečítajte si všetky bezpečnostné predpisy a
pokyny.
Nedostatky pri dodržovaní bezpečnostných
predpisov a pokynov môžu mať za následok úraz
elektrickým prúdom, vznik požiaru a/alebo ťažké
poranenia.
Všetky bezpečnostné predpisy a pokyny si
odložte pre budúce použitie.
2. Popis prístroja (obr. 1 a 2)
1. Nosná rukoväť
2. Sieťové vedenie
3. Tlakové pripojenie
4. Plavákový spínač
5. Nasávací kôš
6. Tlaková hadica
7. Rozdeľovač
8. Odberová hadica
9. Hadicová prípojka
10. Uzatvárací ventil
3. Správne použitie prístroja
Vami zakúpený prístroj je určený na čerpanie vody s
maximálnou teplotou 35 °C. Prístroj sa nesmie
používať na iné tekutiny, predovšetkým nie na
motorové palivá, čistiace prostriedky ani iné
chemické produkty! Keď sa prístroj zabuduje do
šachty, chráni pred zatopením. Použitie je možné aj
všade tam, kde je potrebné prečerpávať vodu, napr.
v domácnosti, v záhrade a v ďalších mnohých
použitiach. Prístroj nesmie byť používaný na
prevádzku plaveckých bazénov!
Pri používaní prístroja vo vodách s prírodným,
bahnitým dnom, postavte prístroj na trochu
vyvýšenom mieste, napr. na tehly.
Prístroj nie je určený na trvalé používanie, napr. ako
obehové čerpadlo v rybníku. Očakávaná životnosť
38
SK
Anleitung_BG_SP_400_RB_SPK1:_ 04.07.2008 11:04 Uhr Seite 38
Page 39

prístroja sa týmto výrazne skráti, keďže prístroj nie je
konštruovaný pre trvalé zaťaženie.
Prístroj smie byť použitý len na ten účel, na ktorý bol
určený. Každé iné odlišné použitie prístroja sa
považuje za nespĺňajúce účel použitia. Za škody
alebo zranenia akéhokoľvek druhu spôsobené
nesprávnym používaním ručí používateľ /
obsluhujúca osoba, nie však výrobca.
Prosím zohľadnite skutočnosť, že správny spôsob
prevádzky našich prístrojov nie je na profesionálne,
remeselnícke ani priemyselné použitie.
Nepreberáme žiadne záručné ručenie, ak sa prístroj
bude používať v profesionálnych, remeselníckych
alebo priemyselných prevádzkach ako aj na činnosti
rovnocenné s takýmto použitím.
4. Technické údaje
Sieťové pripojenie 230 V ~ 50 Hz
Príkon 400 Watt
Prepravované množstvo, max. 4200 l/h
Prepravná výška, max. 11 m
Hĺbka ponorenia, max. 5 m
Teplota vody, max. 35 °C
Prípojka na hadicu 3/4” AG
Cudzie telesá, max.: Ø 3 mm
Výška spínacieho bodu: ZAP cca 50 cm
Výška spínacieho bodu: VYP cca 5 cm
5. Pred uvedením do prevádzky
5.1 Montáž (obr. 3 a 4)
1. Naskrutkujte hadicovú prípojku (9) na prístroj.
2. Nasaďte tlakovú hadicu (6) a odberovú hadicu (8)
na rozdeľovač (7). Prosím dbajte na to, aby bola
odberová hadica (8) namontovaná na strane
uzatváracieho ventilu (10)!
3. Zasuňte teraz tlakovú hadicu (6) na hadicovú
prípojku (9) na prístroji.
5.2 Umiestnenie čerpadla do suda s dažďovou
vodou (obr. 5)
1. Vložte prístroj do dažďového suda.
2. Upevnite rozdeľovač na okraji dažďového sudu.
Natočte prosím excentricky uložené gumové
upevnenia (A) tak, aby sa rozdeľovač (7) mohol
pevne upevniť na okraji dažďového suda.
Dodržiavajte!
Pri inštalácii je potrebné dbať na to, že sa prístroj
nesmie nikdy montovať voľne zavesený na tlakovom
vedení alebo elektrickom kábli. Prístroj sa musí
zavesiť na nosnej rukoväti, resp. musí byť položený
na dno šachty. Aby sa zaručila bezchybná funkcia
prístroja, musí byť dno šachty vždy zbavené kalu
alebo iných nečistôt.
Pri veľmi nízkej hladine vody môže kal nachádzajúci
sa v šachte rýchlo zaschnúť a tým brániť v rozbehu
prístroja. Preto je potrebné pravidelne kontrolovať
prístroj (vykonávať skúšobné rozbehy).
Upozornenie:
Čerpadlová šachta by mala mať minimálne rozmery
40 x 40 x 50 cm, aby sa mohol plavákový spínač
voľne pohybovať.
5.3 Sieťové pripojenie
Vami zakúpený prístroj je už vybavený zástrčkou
s ochranným kontaktom. Prístroj je určený pre
pripojenie na zásuvku s ochranným kontaktom 230 V
~ 50 Hz. Ubezpečte sa, že je zásuvka dostatočne
istená (min. 6 A) a je v bezchybnom stave. Po
zasunutí elektrickej zástrčky do zásuvky je prístroj
pripravený na prevádzku.
Pozor!
Túto prácu smie vykonávať iba odborník z oblasti
elektrotechniky alebo zákazníckeho servisu, aby sa
zabránilo poškodeniu.
6. Obsluha
Po dôkladnom prečítaní návodu na inštaláciu
a obsluhu môžete po dodržaní nasledovných bodov
spustiť prístroj do prevádzky:
Skontrolujte, či je prístroj bezpečne umiestnený.
Skontrolujte, či bolo tlakové vedenie správne
namontované.
Ubezpečte sa, či má elektrické pripojenie 230 V ~
50 Hz.
Skontrolujte bezchybný stav elektrickej zásuvky.
Presvedčte sa o tom, aby sa na sieťové
pripojenie nikdy nedostala vlhkosť alebo voda.
Zabráňte, aby prístroj bežal na sucho.
Pre odber vody otvorte prosím uzatvárací ventil
(10).
Prístroj sa vypne vytiahnutím elektrickej zástrčky
zo zásuvky.
39
SK
Anleitung_BG_SP_400_RB_SPK1:_ 04.07.2008 11:04 Uhr Seite 39
Page 40

Nastavenie bodu zapnutia/vypnutia:
Bod zapnutia resp. vypnutia plavákového spínača sa
môže plynulo nastaviť. To sa uskutočňuje posunutím
plavákového kábla v káblovom držiaku (obr. 6).
Prosím skontrolujte pred uvedením do prevádzky
nasledujúce body:
Plavákový spínač musí byť upevnený tak, aby bola
výška spínacieho bodu: ZAP a výška spínacieho
bodu: VYP ľahko dosiahnuteľná s malou vynaloženou
silou. Skontrolujete to tak, že položíte prístroj do
nádoby naplnenej vodou a rukou opatrne zdvihnete
plavákový spínač a potom ho opäť spustíte nadol.
Pritom môžete vidieť ako sa prístroj zapne a vypne.
Dbajte pritom taktiež na to, aby nebol odstup medzi
hlavou plavákového spínača a držiakom kábla príliš
malý. Ak je odstup príliš malý, nedá sa zaručiť
bezchybná funkcia.
Dbajte pri nastavovaní plavákového spínača na to,
aby sa plavákový spínač pred vypnutím prístroja
nedotýkal dna. Pozor! Nebezpečenstvo chodu
nasucho.
7. Výmena sieťového prípojného
vedenia
V prípade poškodenia sieťového prípojného vedenia
prístroja sa musí vedenie vymeniť výrobcom alebo
jeho zákazníckym zastúpením alebo podobne
kvalifikovanou osobou, aby sa zabránilo rizikám.
8. Čistenie, údržba a objednanie
náhradných dielov
Pozor!
Pred každou údržbovou prácou vytiahnuť
elektrický kábel zo siete.
Pri prenosnom používaní by sa mal prístroj
vyčistiť po každom použití čistou vodou.
Pri stacionárnej inštalácii sa odporúča
skontrolovať každé 3 mesiace funkciu
plavákového spínača.
Chlpy a vláknité častice, ktoré by sa eventuálne
mohli usadiť v telese prístroja, odstráňte
pomocou prúdu vody.
Raz za 3 mesiace vyčistite dno šachty od kalu
a vyčistite tiež steny šachty.
Plavákový spínač vyčistite od usadenín čistou
vodou.
8.1 Čistenie filtra (obr. 7 a 8)
Aby sa prístroj a koleso čerpadla chránilo pred
väčšími nečistotami, nachádza sa pod spodným
odsávacím košom dodatočný filter. Pri čistení filtra
postupujte prosím nasledovne:
1. Zľahka zatlačte na bočnú sponu (A) v smere
šípky, pokým sa nedá odobrať nasávací kôš (5)
z prístroja.
2. Vyberte filter (B) von a vyčistite ho pod tečúcou
vodou.
3. Následne nasaďte filter opäť do nasávacieho
koša a zapojte nasávací kôš znovu na prístroj.
8.2 Údržba
Vo vnútri prístroja sa nenachádzajú žiadne ďalšie
diely vyžadujúce údržbu.
8.3 Objednávanie náhradných dielov:
Pri objednávaní náhradných dielov je potrebné
uviesť nasledovné údaje;
Typ prístroja
Výrobné číslo prístroja
Identifikačné číslo prístroja
Číslo potrebného náhradného dielu
Aktuálne ceny a informácie nájdete na stránke
www.isc-gmbh.info
9. Likvidácia a recyklácia
Prístroj sa nachádza v obale za účelom zabránenia
poškodeniu pri transporte. Tento obal je vyrobený
zo suroviny a tým pádom je ho možné znovu použiť
alebo sa môže dať do zberu na recykláciu surovín.
Prístroj a jeho príslušenstvo sa skladajú z rôznych
materiálov, ako sú napr. kovy a plasty. Poškodené
súčiastky odovzdajte na vhodnú likvidáciu
špeciálneho odpadu. Informujte sa v odbornej
predajni alebo na miestnych úradoch!
40
SK
Anleitung_BG_SP_400_RB_SPK1:_ 04.07.2008 11:04 Uhr Seite 40
Page 41

41
SK
Poruchy Príčiny Pomoc pri odstraňovaní
Prístroj sa nerozbieha - Chýba elektrické napätie
- Plavákový spínač nespína
- Skontrolovať sieťové napätie
- Plavákový spínač premiestniť do
vyššej polohy
Prístroj nepumpuje - Upchaté vstupné sito
- Tlaková hadica prelomená
- Vyčistiť vstupné sito prúdom
vody
- Odstrániť miesto prelomenia
Prístroj sa nevypína - Plavákový spínač nemôže
klesnúť
- Prístroj umiestnite správne na
dno šachty
Nedostatočné prepravované
množstvo
- Upchaté vstupné sito
- Výkon sa znižuje kvôli silne
znečisteným a abrazívnym
vodným prímesiam
- Vyčistiť vstupné sito
- Prístroj vyčistite a vymeňte
opotrebované diely
Prístroj vypína po krátkej dobe
chodu
- Ochrana motora vypína prístroj
kvôli príliš silnému znečisteniu
vody
- Teplota vody príliš vysoká, vypína
ochrana motora
- Vytiahnuť elektrický kábel zo
siete a vyčistiť prístroj a šachtu
- Dodržiavať maximálnu teplotu
vody 35 °C!
10. Plán na hľadanie chyby
Anleitung_BG_SP_400_RB_SPK1:_ 04.07.2008 11:04 Uhr Seite 41
Page 42

42
k
erklärt folgende Konformität gemäß EU-Richtlinie
und Normen für Artikel
t
declares conformity with the EU Directive
and standards marked below for the article
p
déclare la conformité suivante selon la
directive CE et les normes concernant lʼarticle
verklaart de volgende conformiteit in overeenstemming met de EU-richtlijn en normen voor
het artikel
m
declara la siguiente conformidad a tenor de la
directiva y normas de la UE para el artículo
O
declara a seguinte conformidade de acordo
com a directiva CE e normas para o artigo
U
förklarar följande överensstämmelse enl. EUdirektiv och standarder för artikeln
q
ilmoittaa seuraavaa Euroopan unionin direktiivien ja normien mukaista yhdenmukaisuutta
tuotteelle
erklærer herved følgende samsvar med EUdirektiv og standarder for artikkel
T
заявляет о соответствии товара
следующим директивам и нормам EC
B
izjavljuje sljedeću uskladjenost s odredbama i
normama EU za artikl.
Q
declarå urmåtoarea conformitate cu linia directoare CE μi normele valabile pentru articolul.
Z
ürün ile ilgili olarak AB Yönetmelikleri ve
Normlar∂ gere©ince aμa©∂daki uygunluk aç∂kla
mas∂n∂ sunar.
z
‰ЛПТУВИ ЩЛУ ·ОfiПФ˘ıЛ Ы˘МКˆУ›· Ы‡МКˆУ· МВ
ЩЛУ √‰ЛБ›· ∂∂ О·И Щ· ЪfiЩ˘Ф БИ· ЩФ ЪФ˚fiУ
C dichiara la seguente conformità secondo la
direttiva UE e le norme per lʼarticolo
l
attesterer følgende overensstemmelse i
henhold til EU-direktiv og standarder for produkt
j
prohlašuje následující shodu podle směrnice
EU a norem pro výrobek.
A
a következő konformitást jelenti ki a termékekre vonatkozó EU-irányvonalak és normák szerint
X
pojasnjuje sledečo skladnost po smernici EU
in normah za artikel.
deklaruje zgodność wymienionego poniżej
artykułu z następującymi normami na
podstawie dyrektywy WE.
W
vydáva nasledujúce prehlásenie o zhode podľa
smernice EÚ a noriem pre výrobok.
e
деклаpиpа следното съответствие съгласно
диpективите и ноpмите на ЕС за пpодукта.
1
заявляє про відповідність згідно з Директивою
ЄС та стандартами, чинними для даного товару
.
deklareerib vastavuse järgnevatele EL direktiivi
dele ja normidele
G
deklaruoja atitikti pagal ES direktyvas ir normas
straipsniui
4
izjavljuje sledeçi konformitet u skladu s odred
bom EZ i normama za artikl
H
Atbilstības sertifikāts apliecina zemāk minēto preču
atbilstību ES direktīvām un standartiem
E
Samræmisyfirl‡sing sta›festir eftirfarandi samræmi
samkvæmt reglum Evfrópubandalagsins og stö›lum
fyrir vörur
Konformitätserklärung
ISC-GmbH · Eschenstraße 6 · D-94405 Landau/Isar
Regenfasspumpe BG-SP 400 RB
Art.-Nr.: 41.703.03 I.-Nr.: 01018 Archivierung: 4170301-01-4155050
Subject to change without notice
EN 60335-1; EN 60335-2-41;
EN 55014-1; EN 55014-2; EN 61000-3-2; EN 61000-3-3
Landau/Isar, den 10.04.2008
Wang
Product-Management
Weichselgartner
General-Manager
98/37/EC
2006/95/EC
97/23/EC
2004/108/EC
90/396/EEC
89/686/EEC
87/404/EEC
R&TTED 1999/5/EC
2000/14/EC_2005/88/EC:
95/54/EC:
97/68/EC:
X
X
Anleitung_BG_SP_400_RB_SPK1:_ 04.07.2008 11:04 Uhr Seite 42
Page 43

43
k Nur für EU-Länder
Werfen Sie Elektrowerkzeuge nicht in den Hausmüll!
Gemäß europäischer Richtlinie 2002/96/EG über Elektro- und Elektronik-Altgeräte und Umsetzung in
nationales Recht müssen verbrauchte Elektrowerkzeuge getrennt gesammelt werden und einer
umweltgerechten Wiederverwertung zugeführt werden.
Recycling-Alternative zur Rücksendeaufforderung:
Der Eigentümer des Elektrogerätes ist alternativ anstelle Rücksendung zur Mitwirkung bei der sachgerechten Verwertung im Falle der Eigentumsaufgabe verpflichtet. Das Altgerät kann hierfür auch einer
Rücknahmestelle überlassen werden, die eine Beseitigung im Sinne der nationalen Kreislaufwirtschaftsund Abfallgesetze durchführt. Nicht betroffen sind den Altgeräten beigefügte Zubehörteile und Hilfsmittel
ohne Elektrobestandteile.
t For EU countries only
Never place any electric tools in your household refuse.
To comply with European Directive 2002/96/EC concerning old electric and electronic equipment and its
implementation in national laws, old electric tools have to be separated from other waste and disposed of
in an environment-friendly fashion, e.g. by taking to a recycling depot.
Recycling alternative to the demand to return electrical devices:
As an alternative to returning the electrical device, the owner is obliged to cooperate in ensuring that the
device is properly recycled if ownership is relinquished. This can also be done by handing over the used
device to a returns center, which will dispose of it in accordance with national commercial and industrial
waste management legislation. This does not apply to the accessories and auxiliary equipment without
any electrical components which are included with the used device.
p Uniquement pour les pays de l'Union Européenne
Ne jetez pas les outils électriques dans les ordures ménagères.
Selon la norme européenne 2002/96/CE relative aux appareils électriques et systèmes électroniques
usés et selon son application dans le droit national, les outils électriques usés doivent être récoltés à
part et apportés à un recyclage respectueux de l'environnement.
Possibilité de recyclage en alternative à la demande de renvoi :
Le propriétaire de lʼappareil électrique est obligé, en guise dʼalternative à un envoi en retour, à contribuer
à un recyclage effectué dans les règles de lʼart en cas de cessation de la propriété. Lʼancien appareil
peut être remis à un point de collecte dans ce but. Cet organisme devra lʼéliminer dans le sens de la Loi
sur le cycle des matières et les déchets. Ne sont pas concernés les accessoires et ressources fournies
sans composants électroniques.
Anleitung_BG_SP_400_RB_SPK1:_ 04.07.2008 11:04 Uhr Seite 43
Page 44

44
C Solo per paesi membri dell'UE
Non gettate gli utensili elettrici nei rifiuti domestici.
Secondo la Direttiva europea 2002/96/CE sui rifiuti di apparecchiature elettriche ed elettroniche e
l'applicazione nel diritto nazionale gli elettroutensili usati devono venire raccolti separatamente e smaltiti
in modo ecologico.
Alternativa di riciclaggio alla richiesta di restituzione
Il proprietario dellʼapparecchio elettrico è tenuto in alternativa, invece della restituzione, a collaborare in
modo che lo smaltimento venga eseguito correttamente in caso ceda lʼapparecchio. Lʼapparecchio
vecchio può anche venire consegnato ad un centro di raccolta che provvede poi allo smaltimento
secondo le norme nazionali sul riciclaggio e sui rifiuti. Non ne sono interessati gli accessori e i mezzi
ausiliari senza elementi elettrici forniti insieme ai vecchi apparecchi.
Gælder kun EU-lande
Smid ikke el-værktøj ud som almindeligt husholdningsaffald.
I henhold til EF-direktiv 2002/96 om elektroaffald og dets omsættelse til national lovgivning skal brugt
el-værktøj indsamles adskilt og indleveres på genbrugsstation.
Recycling-alternativ til tilbagesendelse af brugt vare:
Ejeren af det elektroniske apparat er forpligtet til – som et alternativ i stedet for tilbagesendelse – at
medvirke til, at relevante dele af apparatet genanvendes ifølge miljøforskrifterne i tilfælde af overdra
gelse af ejerskab til tredjeperson. Det brugte apparat kan også overdrages til et deponeringssted, som vil
varetage bortskaffelsen af apparatets dele i overensstemmelse med nationale bestemmelser vedrørende
skrotning og genbrug. Ikke omfattet heraf er tilbehørsdele og hjælpemidler, som ikke indeholder
elektroniske komponenter.
B
Samo za zemlje Europske zajednice
f
Elektroalate ne bacajte u kućno smeće.
U skladu s europskom odredbom 2002/96/EG o starim električnim i elektroničkim uredjajima i njezinom
primjenom u okviru državnog prava, istrošeni elektroalati moraju se odvojeno sakupiti i zbrinuti na
ekološki način u svrhu recikliranja.
Alternativa s recikliranjem u odnosu na zahtjev za povrat uredjaja:
Vlasnik elektrouredjaja alternativno je obvezan da umjesto povrata robe u slučaju odricanja vlasništva
sudjeluje u stručnom zbrinjavanju elektrouredjaja. Stari uredjaj može se u tu svrhu prepustiti i stanici za
preuzimanje rabljenih uredjaja koja će provesti uklanjanje u smislu državnog zakona o recikliranju i
otpadu. Zakonom nisu obuhvaćeni dijelovi pribora ugradjeni u stare uredjaje i pomoćni materijali bez
električnih elemenata.
A Csak EU-országok
Ne dobja az elektromos szerszámokat a házi hulladék közé.
A villamos készülékekkel és elektromos-öregkészülékekkel kapcsolatos 2002/96/EG-i europai
irányvonalaknak valamint ezeknek a nemzeti jogban történő realizálásának megfelően az elhasznált
villamos szerszámokat külön kell gyüjteni és egy környezetbaráti újraértékesítéshez juttatni.
Újrahasznosítás-alternatíva a viszzaküldési felhíváshoz:
Az elektromos készülék tulajdonosa kötelezve van, a tulajdon feladása esetében, a visszaküldés helyett
alternatív egy szakszerű értékesítésre. Ehhez az öreg készüléket egy visszavevő helynek lehet
átengedni, amely a nemzetközi iparkörfolyamat és hulladéktörvény értelmében elvégzi a
megsemmisítést. Ez nem érrinti az öreg készülékekhez mellékelt villamosalkatrészek nélküli
tartozékrészeket és segítőeszközöket.
Anleitung_BG_SP_400_RB_SPK1:_ 04.07.2008 11:04 Uhr Seite 44
Page 45

45
j Pouze pro členské země EU
Nedávejte elektrické nářadí do domácího odpadu.
Podle Evropské směrnice 2002/96/EG o starých elektrických a elektronických přístrojích (WEEE) a podle
národního práva musí být použité elektrické nářadí odděleně skladováno a odevzdáno k ekologické
recyklaci.
Alternativa recyklace k zaslání zpět:
Vlastník elektrického přístroje je alternativně namísto zaslání zpět povinen ke spolupráci při odborné
recyklaci v případě, že se rozhodne přístroj zlikvidovat. Starý přístroj může být v tomto případě také
odevzdán do sběrny, která provede likvidaci ve smyslu národního zákona o hospodářském koloběhu a
zákona o odpadech. Toto neplatí pro ke starým přístrojům přiložené části příslušenství a pomocné
prostředky bez elektrických součástí.
W Len pre krajiny EÚ
Neodstraňujte elektrické prístroje ako domový odpad.
Podľa Európskej smernice 2002/96/ES o odpade z elektrických a elektronických zariadení (OEEZ) a v
súlade s národnými právnymi predpismi sa musia použité elektronické prístroje odovzdať do triedeného
zberu a musí sa zabezpečiť špecifické spracovanie a recyklácia.
Recyklačná alternatíva k výzve na spätný odber výrobku:
Vlastník elektrického prístroja je alternatívne namiesto spätnej zásielky povinný spolupracovať pri riadnej
recyklácii prístroja voj môže byť za týmto účelom taktiež prenechaný zbernému miestu, ktoré vykoná
odstránenie v zmysle národného zákona o recyklácii a ckých komponentov.
Anleitung_BG_SP_400_RB_SPK1:_ 04.07.2008 11:04 Uhr Seite 45
Page 46

46
Anleitung_BG_SP_400_RB_SPK1:_ 04.07.2008 11:04 Uhr Seite 46
Page 47

47
Der Nachdruck oder sonstige Vervielfältigung von Dokumentation und
Begleitpapieren der Produkte, auch auszugsweise ist nur mit ausdrücklicher Zustimmung der ISC GmbH zulässig.
The reprinting or reproduction by any other means, in whole or in part,
of documentation and papers accompanying products is permitted only
with the express consent of ISC GmbH.
La réimpression ou une autre reproduction de la documentation et des
documents dʼaccompagnement des produits, même incomplète, nʼest
autorisée quʼavec lʼagrément exprès de lʼentreprise ISC GmbH.
La ristampa o lʼulteriore riproduzione, anche parziale, della
documentazione o dei documenti dʼaccompagnamento dei prodotti è
consentita solo con lʼesplicita autorizzazione da parte della ISC GmbH.
Eftertryk eller anden form for mangfoldiggørelse af skriftligt materiale,
ledsagepapirer indbefattet, som omhandler produkter, er kun tilladt
efter udtrykkelig tilladelse fra ISC GmbH.
Az termékek dokumentációjának és kisérô okmányainak az
utánnyomása és sokszorosítása, kivonatosan is csak az ISC GmbH
kifejezett beleegyezésével engedélyezett.
Bf
Naknadno tiskanje ili slična umnožavanja dokumentacije i pratećih
papira ovih proizvoda, čak i djelomično kopiranje, moguće je samo uz
izričito dopuštenje tvrtke ISC GmbH.
j
Dotisk nebo jiné rozmnožování dokumentace a průvodních
dokumentů výrobků, také pouze výňatků, je přípustné výhradně se
souhlasem firmy ISC GmbH.
W
Kopírovanie alebo iné rozmnožovanie dokumentácie a sprievodných
podkladov produktov, a to aj čiastočné, je prípustné len s výslovným
povolením spoločnosti ISC GmbH.
Anleitung_BG_SP_400_RB_SPK1:_ 04.07.2008 11:04 Uhr Seite 47
Page 48

48
Technische Änderungen vorbehalten
Technical changes subject to change
Sous réserve de modifications
Con riserva di apportare modifiche tecniche
Der tages forbehold för tekniske ændringer
Technikai változások jogát fenntartva
Bf Zadržavamo pravo na tehnične izmjene.
j Technické změny vyhrazeny
W Technické změny vyhradené
Anleitung_BG_SP_400_RB_SPK1:_ 04.07.2008 11:04 Uhr Seite 48
Page 49

49
t
GUARANTEE CERTIFICATE
Dear Customer,
All of our products undergo strict quality checks to ensure that they reach you in perfect condition. In the unlikely
event that your device develops a fault, please contact our service department at the address shown on this
guarantee card. Of course, if you would prefer to call us then we are also happy to offer our assistance under
the service number printed below. Please note the following terms under which guarantee claims can be made:
1. These guarantee terms cover additional guarantee rights and do not affect your statutory warranty rights.
We do not charge you for this guarantee.
2. Our guarantee only covers problems caused by material or manufacturing defects, and it is restricted to the
rectification of these defects or replacement of the device. Please note that our devices have not been
designed for use in commercial, trade or industrial applications. Consequently, the guarantee is invalidated
if the equipment is used in commercial, trade or industrial applications or for other equivalent activities. The
following are also excluded from our guarantee: compensation for transport damage, damage caused by
failure to comply with the installation/assembly instructions or damage caused by unprofessional
installation, failure to comply with the operating instructions (e.g. connection to the wrong mains voltage or
current type), misuse or inappropriate use (such as overloading of the device or use of non-approved tools
or accessories), failure to comply with the maintenance and safety regulations, ingress of foreign bodies
into the device (e.g. sand, stones or dust), effects of force or external influences (e.g. damage caused by
the device being dropped) and normal wear resulting from proper operation of the device.
The guarantee is rendered null and void if any attempt is made to tamper with the device.
3. The guarantee is valid for a period of 2 years starting from the purchase date of the device. Guarantee
claims should be submitted before the end of the guarantee period within two weeks of the defect being
noticed. No guarantee claims will be accepted after the end of the guarantee period. The original guarantee
period remains applicable to the device even if repairs are carried out or parts are replaced. In such cases,
the work performed or parts fitted will not result in an extension of the guarantee period, and no new
guarantee will become active for the work performed or parts fitted. This also applies when an on-site
service is used.
4. In order to assert your guarantee claim, please send your defective device postage-free to the address
shown below. Please enclose either the original or a copy of your sales receipt or another dated proof of
purchase. Please keep your sales receipt in a safe place, as it is your proof of purchase. It would help us if
you could describe the nature of the problem in as much detail as possible. If the defect is covered by our
guarantee then your device will either be repaired immediately and returned to you, or we will send you a
new device.
Of course, we are also happy offer a chargeable repair service for any defects which are not covered by the
scope of this guarantee or for units which are no longer covered. To take advantage of this service, please send
the device to our service address.
Anleitung_BG_SP_400_RB_SPK1:_ 04.07.2008 11:04 Uhr Seite 49
Page 50

p
BULLETIN DE GARANTIE
Chère Cliente, Cher Client,
Nos produits sont soumis à un contrôle de qualité très strict. Si cet appareil devait toutefois ne pas fonctionner
impeccablement, nous en serions désolés. Dans un tel cas, nous vous prions de bien vouloir prendre contact
avec notre service après-vente à l‘adresse indiquée sur le bulletin de garantie. Nous restons également
volontiers à votre disposition au numéro de téléphone de service indiqué plus bas. Pour faire valoir une
demande de garantie, ce qui suit est valable :
1. Les conditions de garantie règlent les prestations de garantie supplémentaires. Vos droits de garantie
légaux ne sont en rien altérés par la garantie présente. Notre prestation de garantie est gratuite.
2. La prestation de garantie s’applique exclusivement aux défauts occasionnés par des vices de fabrication ou
de matériau et est limitée à l’élimination de ces défauts ou encore au remplacement de l’appareil. Veillez au
fait que nos appareils, conformément à leur affectation, n’ont pas été construits pour être utilisés dans un
environnement professionnel, industriel ou artisanal. Un contrat de garantie ne peut avoir lieu dès lors que
l’appareil est utilisé à des activités dans des entreprises professionnelles, artisanales ou industrielles ou
toute autre activité du même genre. Sont également exclus de notre garantie : les prestations de
substitution de dommages dus aux transports, les dommages occasionnés par le non-respect des
instructions de montage ou en raison d’une installation non conforme, du non-respect du mode d’emploi
(comme par exemple le raccordement à une mauvaise tension réseau ou à un mauvais type de courant),
les applications abusives ou non conformes (comme par exemple une surcharge de l’appareil ou encore
l’emploi d’accessoires non homologués), le non-respect des prescriptions de maintenance et de sécurité,
l’infiltration de corps étrangers dans l’appareil (comme par exemple du sable, des pierres ou de la
poussière), l’emploi de la force ou l’influence extérieure (comme par exemple les dommages dus à une
chute), ainsi que l’usure normale conforme à l’utilisation.
Le droit à la garantie disparaît dès lors que des interventions ont lieu sur l’appareil.
3. Le délai de garantie s’élève à 2 ans et commence à la date de l’achat de l’appareil. Les demandes de
garanties doivent être présentées avant écoulement du délai de garantie, dans les deux semaines suivant
le moment auquel le défaut a été reconnu. Toute reconnaissance de demande de garantie après
écoulement du délai de garantie est exclue. La réparation ou l’échange de l’appareil n’entraîne nullement
une prolongation de la durée de garantie. Elle ne fait pas non plus commencer un nouveau délai de
garantie, en raison de cette prestation, pour l’appareil ou pour toute autre pièce de rechange intégrée. Ceci
est également valable lorsqu’un service après-vente sur place a été consulté.
4. Pour faire reconnaître votre demande de garantie, veuillez nous envoyer l’appareil défectueux franco de
port à l’adresse indiquée ci-dessous. Ajoutez à l’envoi l’original du bon d’achat ou de tout autre preuve de
l’achat datée. Veuillez donc toujours bien conserver le bon d’achat en guise de preuve ! Décrivez la raison
de la réclamation le plus précisément possible. Si le défaut de l’appareil est compris dans notre prestation
de garantie, nous vous retournerons sans délai un appareil réparé ou encore un nouveau.
Bien entendu, nous sommes prêts également à réparer les appareils défectueux contre remboursement des
frais, dès lors que l’appareil n’est plus ou pas garanti. Pour ce faire, veuillez envoyer l’appareil à notre adresse
de service après-vente.
50
Anleitung_BG_SP_400_RB_SPK1:_ 04.07.2008 11:04 Uhr Seite 50
Page 51

51
C
CERTIFICATO DI GARANZIA
Gentili clienti,
i nostri prodotti sono soggetti ad un rigido controllo di qualità. Se l’apparecchio non dovesse tuttavia funzionare
correttamente, ci scusiamo e vi preghiamo di rivolgervi al nostro servizio di assistenza clienti all’indirizzo
indicato in questa scheda di garanzia. Siamo a vostra disposizione anche telefonicamente al numero del
servizio assistenza sotto indicato. Per la rivendicazione dei diritti di garanzia vale quanto segue:
1. Queste condizioni di garanzia regolano ulteriori prestazioni di garanzia. La presente garanzia non tocca i
vostri diritti al ricorso di garanzia previsti dalla legge. Le nostre prestazioni di garanzia sono per voi gratuite.
2. La prestazione di garanzia riguarda esclusivamente le anomalie riconducibili a difetti del materiale o di
produzione ed è limitata all’eliminazione di queste anomalie o alla sostituzione dell’apparecchio. Tenete
presente che i nostri apparecchi non sono stati costruiti per l’impiego professionale, artigianale o
industriale. Un contratto di garanzia non viene concluso quando l’apparecchio viene usato in imprese
commerciali, artigianali o industriali, o con attività equivalenti. Dalla nostra garanzia sono escluse inoltre le
prestazioni di risarcimento per danni dovuti al trasporto o danni causati dalla mancata osservanza delle
istruzioni per il montaggio o per installazione non corretta, dalla mancata osservanza delle istruzioni per
l’uso (come per es. collegamento a tensione di rete o tipo di corrente non corretto), dall’uso improprio o
illecito (come per es. sovraccarico dell’apparecchio o utilizzo di utensili o accessori non consentiti), dalla
mancata osservanza delle norme di sicurezza e di manutenzione, dalla penetrazione di corpi estranei
nell’apparecchio (come per es. sabbia, pietre o polvere), dall’impiego della forza o dall’influsso esterno
(come per es. danni dovuti a caduta) e dall’usura normale e dovuta all’impiego.
Il diritti di garanzia decadono quando sono già effettuati interventi sull’apparecchio.
3. Il periodo di garanzia è 2 anni e inizia alla data d’acquisto dell’apparecchio. I diritti di garanzia devono
essere fatti valere prima della scadenza del periodo di garanzia, entro due settimane dopo avere accertato
il difetto. È esclusa la rivendicazione di diritti di garanzia dopo la scadenza del relativo periodo. La
riparazione o la sostituzione dell’apparecchio non comporta una proroga del periodo di garanzia e con
questa prestazione per l’apparecchio o per pezzi di ricambio eventualmente installati non inizia un nuovo
periodo di garanzia. Questo vale anche nel caso si ricorra ad un servizio sul posto.
4. Per la rivendicazione dei vostri diritti di garanzia inviate l’apparecchio difettoso franco di porto all’indirizzo
sotto indicato. Allegate lo scontrino di cassa in originale o un’altra prova d’acquisto che riporti la data.
Conservate bene perciò lo scontrino di cassa come prova! Indicate il motivo di reclamo nel modo più
dettagliato possibile. Se il difetto dell’apparecchio rientra nella nostra prestazione di garanzia, ricevete
l’apparecchio riparato o un apparecchio nuovo a stretto giro di posta.
Naturalmente effettuiamo a pagamento anche riparazioni sull’apparecchio che non rientrano o non rientrano più
nella garanzia. A tale scopo inviate l’apparecchio all’indirizzo del servizio assistenza.
Anleitung_BG_SP_400_RB_SPK1:_ 04.07.2008 11:04 Uhr Seite 51
Page 52

GARANTIBEVIS
Kære kunde!
Vore produkter er underlagt streng kvalitetskontrol. Hvis produktet alligevel på et tidspunkt skulle udvise fejl,
beklager vi naturligvis dette og beder dig kontakte vores kundeservice på adressen, som står angivet på dette
garantibevis. Du kan naturligvis også ringe til os på det nedenfor angivne servicenummer. For indfrielse af
garantikrav gælder følgende:
1. Nærværende garanti fastsætter betingelserne for udvidede garantiydelser. Garantibestemmelser fastsat
ved lov berøres ikke af nærværende garanti. Vores garantiydelse er gratis.
2. Garantiydelsen omfatter udelukkende mangler, som kan føres tilbage til materiale- eller produktionsfejl, og
begrænser sig til afhjælpning af disse resp. levering af erstatningsprodukt. Bemærk, at vore produkter ikke
er konstrueret til erhvervsmæssig, håndværksmæssig eller industriel brug. Garantiaftale kan derfor ikke
anses for indgået, såfremt produktet anvendes i erhvervsmæssigt, håndværksmæssigt, industrielt eller
lignende øjemed. Endvidere dækker garantien ikke erstatningsydelser for transportskader, skader som
følge af tilsidesættelse af montagevejledningens anvisninger eller som følge af usagkyndig installation,
tilsidesættelse af brugsanvisningen (f.eks. tilslutning til forkert netspænding eller strømtype), misbrug eller
usagkyndig anvendelse (f.eks. overbelastning eller brug af værktøj eller tilbehør, som ikke er godkendt),
tilsidesættelse af vedligeholdelses- og sikkerhedsforskrifter, indtrængen af fremmedlegemer i apparatet
(f.eks. sand, sten eller støv), brug af vold eller eksterne påvirkninger udefra (f.eks. fordi produktet tabes)
samt skader, der hidrører fra almindelig slitage.
Garantien mister sin gyldighed, hvis der allerede er blevet foretaget indgreb i apparatet.
3. Garantiperioden udgør 2 år at regne fra købsdatoen. Garantikrav skal gøres gældende inden for to uger,
efter at defekten er blevet konstateret. Garantikrav kan ikke gøres gældende efter garantiperiodens udløb.
Reparation eller udskiftning af apparatet medfører ikke forlængelse af garantiperioden, heller ikke for
eventuelt indbyggede reservedele. Dette gælder også servicearbejder, der foretages på stedet.
4. For at kunne gøre garantikrav gældende skal du sende det defekte produkt portofrit til nedenstående
adresse. Original købskvittering eller lignende dateret dokumentation skal vedsendes. Købskvitteringen
skal gemmes som dokumentation! Beskriv venligst så nøjagtigt som muligt grunden til din reklamation. Er
defekten omfattet af garantien, vil produktet omgående blive repareret og returneret, eller du vil modtage et
helt nyt.
Mod betaling udbedrer vi naturligvis også gerne defekter på produktet, som ikke/ikke længere er omfattet af
garantien. Du skal blot indsende produktet til vores serviceadresse.
52
Anleitung_BG_SP_400_RB_SPK1:_ 04.07.2008 11:04 Uhr Seite 52
Page 53

53
GARANCIAOKMÁNY
Tisztelt Vevő,
termékeink szigorú minőségi kontroll alá vannak vetve. Ha ez a készülék mégis egyszer nem működne
kifogástalanul, akkor azt nagyon sajnáljuk és kérjük Önt forduljon a szervízszolgáltatásunkhoz amely ebben a
garanciakártyában megadott cím alatt található. Szívesen állunk a rendelkezésére telefonon is, az alul megadott
szervízszám alatt. A garanciaigények érvényesítésére a következőek érvényesek:
1. Ezek a garanciafeltételek szabályozzák a kiegészítő garanciateljesítményeket. A jogi szavatossági igények,
ez a garnacia által nincsennek érintve. A garanciateljesítményünk az Ön számára ingyenes.
2. A garancaitelyesítmény csak kizárólagosan olyan hibákra terjed ki, amelyek anyag- vagy gyártási hibákra
visszavezethetőek és ezeknek a hibáknak a kiküszöbölésére ill. a készülék kicserélésére van korlátozva.
Kérjük vegye figyelembe, hogy a készülékeink a meghatározásuk szerint nem kisipari, kézműipari vagy ipari
üzemek területén történő bevetésre lettek tervezve. Ezért a garanciaszerződés nem jön létre, ha a készülék
kisipari, kézműipari vagy ipari üzemek területén valamint egyenértékű tevékenységek területén van
használva. Továbbá a következő kárpótlási teljesítmények mint a szállítási károkért, károkért amelyek az
összeszerelési utasítás figyelmen kívül hagyása vagy amelyek a nem szakszerű felszerelés, a használati
utasítás figyelmen kívül hagyása (mint például egy rossz hálózati feszültségre vagy áramfajtára való
rákapcsolás), visszaélésszerű vagy nem szakszerű használatok (mint például a készülék túlterhelése vagy
nem engedélyezett betétszerszámok vagy tartozékok), a karbantartási és biztonsági határozatok figyelmen
kívül hatása, idegen testek behatolása a készülékbe (mint például homok, kövek vagy por)
erőszakbehatolás vagy idegen behatások (mint például leejtés általi károk) úgymint a használat általi,
szokásos kopások által keletkező károk ki vannak zárva.
A készüléken történő előzetes belenyúlás esetén elveszítődik a garanciajogosultság.
3. A garanciaidő érvényessége 2 év és a készülék vásárlási időpontjával kezdődik. A garanciaigények a
garanciaidő lejárása előtt, két héten belűl érvényesíteni kell, miután felismerte a hibát. A garanciajog
érvényesítése a garancia idő lejárása után ki van zárva. A készülék kicserélése vagy megjavítása nem
vezet a garancia időtartamának a meghosszabításához se nem vezet ez a teljesítmény a készülék vagy az
esetleg beépített pótalkatrészek egy új garanciaidőtartamhoz. Ez egy helyszíni szervíz esetében is
érvényes.
4. A garanciajog érvényesítéséhez kérjük küldje a defekt készüléket bérmentesen a lent megadott címre.
Mellélkelje a vásárlási nyugtát erdetiben vagy egyébb módon levő bizonylatot a vásárlás keltéről. Kérjük
őrizze ezért jól meg a pénztári cédulát mind bizonyítékot! Kérjük írja le lehetőleg pontosan a reklamáció
okát. Ha a defekt a garnciateljesítményünk keretén belül van, akkor kap azonnal egy megjavított vagy egy új
készüléket vissza.
Magától érthetődő, hogy a költségek megtérítése ellenében szívesen megjavítsuk azokat a készüléken levő
defekteket amelyek a garancia terjedelme nem vagy már nem érinti. Ehhez küldje kérjük a készüléket a
szervícímünkre.
Anleitung_BG_SP_400_RB_SPK1:_ 04.07.2008 11:04 Uhr Seite 53
Page 54

Bf
JAMSTVENI LIST
Poštovani kupče,
naši proizvodi podliježu strogoj kontroli kvalitete. Žao nam je ako bi ipak došlo do toga da uređaj ne funkcionira
besprijekorno i zamolili bismo Vas da se u tom slučaju obratite na adresu naše servisne službe navedenu ispod
ovog jamstva. Također smo Vam na raspolaganju na dolje navedenom telefonskom broju servisne službe. Za
traženje jamstvenog zahtjeva vrijedi sljedeće:
1. Ovi jamstveni uvjeti reguliraju dodatne jamstvene usluge. Ovo jamstvo ne zadire u Vaše zakonsko pravo
zahtjeva za ostvarenje jamstvenih usluga. Realizacija jamstvenih usluga je besplatna.
2. Jamstvena usluga obuhvaća isključivo nedostatke nastale zbog greške na materijalu ili tijekom proizvodnje i
ograničen je na uklanjanje tih nedostataka odnosno zamjenu uređaja. Molimo da obratite pažnju na to da
naši uređaji nisu konstruirani za korištenje u komercijalne svrhe niti u obrtu i industriji. Prema tome, ugovor o
jamstvu ne može se ostvariti ako se uređaj koristi u obrtničkim ili industrijskim pogonima kao i u sličnim
djelatnostima. Nadalje su iz jamstva isključene usluge zamjene proizvoda u slučaju transportnih oštećenja,
šteta zbog nepridržavanja uputa za montažu ili zbog nestručne instalacije, nepridržavanja uputa za uporabu
(kao npr. zbog priključka na pogrešni mrežni napon ili vrstu struje), zbog zloporaba ili nestručnih primjena
(kao npr. preopterećenje uređaja ili korištenje nedopuštenih alata ili pribora), u slučaju nepridržavanja uputa
za održavanje i sigurnosnih odredbi, zbog prodiranja stranih tijela u uređaj (npr. pijeska, kamenja ili
prašine), nasilne primjene ili vanjskih utjecaja (kao npr. oštećenja zbog pada) kao i zbog uobičajenog
trošenja tijekom korištenja.
Zahtjev za jamstvo prestaje biti valjan ako su na uređaju već izvršeni neki zahvati.
3. Jamstveni rok iznosi 2 godine a započinje s datumom kupnje uređaja. Jamstveni zahtjevi ostvaruju se prije
isteka jamstvenog roka unutar dvije godine nakon što ste uočili kvar. Ostvarenje jamstvenog zahtjeva nakon
isteka jamstvenog roka je isključeno. Popravkom ili zamjenom uređaja ne produljuje se jamstveni rok niti se
tom uslugom ostvarujenovi jamstveni rok za uređaj ili ostale ugrađene rezervne dijelove. To također vrijedi i
kod korištenja servisa na licu mjesta.
4. Da biste ostvarili svoj jamstveni zahtjev, molimo Vas da nam pošaljete neispravan uređaj bez plaćanja
poštarine na dolje navedenu adresu. Priložite originalni računa za kupnju uređaja ili neki drugi dokaz o
kupnji s datumom. Molimo Vas da zbog tog razloga dobro sačuvate račun kao dokaz! Što točnije opišite
razlog reklamacije. Ako naša jamstvena usluga obuhvaća kvar nastao na Vašem uređaju, odmah ćemo
Vam vratiti popravljeni ili novi uređaj.
Razumljivo je da ćemo za naknadu troškova ukloniti i kvarove koje jamstvena usluga ne obuhvaća. U tom
slučaju pošaljite uređaj na adresu našeg servisa.
54
Anleitung_BG_SP_400_RB_SPK1:_ 04.07.2008 11:04 Uhr Seite 54
Page 55

55
j
ZÁRUČNÍ LIST
Vážená zákaznice, vážený zákazníku,
naše výrobky podléhají přísné kontrole kvality. Pokud i přesto tento přístroj bezvadně nefunguje, velice toho
litujeme a prosíme Vás, abyste se obrátili na náš zákaznický servis, jehož adresa je uvedena na tomto záručním
listu. Rádi Vám budeme k dispozici také telefonicky na níže uvedeném servisním čísle. Pro uplatňování nároků
na záruku platí následující:
1. Tyto záruční podmínky upravují dodatečný záruční servis. Vašich zákonných nároků na záruku se tato
záruka netýká. Náš záruční servis je pro Vás bezplatný.
2. Záruční servis se vztahuje výhradně na nedostatky, které lze odvodit z vad materiálu nebo výrobních vad a
je také omezen pouze na odstranění těchto nedostatků, resp. výměnu přístroje. Dbejte prosím na to, že
naše přístroje nebyly podle svého účelu určení konstruovány pro živnostenské, řemeslnické nebo
průmyslové použití. Záruční smlouva tak není realizována, pokud byl přístroj používán v živnostenských,
řemeslných nebo průmyslových podnicích a při srovnatelných činnostech. Z naší záruky je dále vyloučeno
poskytnutí náhrady za dopravní škody, škody způsobené nedodržováním montážního návodu nebo z
důvodů neodborné instalace, nedodržování návodu k použití (jako např. připojení na chybné síťové napětí
nebo druh proudu), nedovoleného nebo neodborného používání (jako např. přetížení přístroje nebo použití
neschválených vložných nástrojů nebo příslušenství), nedodržování pokynů pro údržbu a bezpečnostních
pokynů, vniknutí cizích těles do přístroje (jako např. písek, kameny nebo prach), použití násilí nebo
poškození v důsledku cizích vlivů (jako např. škody způsobené pádem), jakož také běžného opotřebení
způsobeného používáním.
Nárok na záruku zaniká, pokud bylo do přístroje již zasahováno.
3. Záruční doba činí 2 roky a začíná datem koupě přístroje. Nároky na záruku před vypršením záruční doby je
třeba uplatňovat během dvou týdnů od zjištění defektu. Uplatňování nároků na záruku po vypršení záruční
doby je vyloučeno. Oprava nebo výměna přístroje nevede k prodloužení záruční doby, ani k zahájení nové
záruční doby za provedený výkon pro přístroj nebo pro případné zamontované náhradní díly. Toto platí také
v případě servisu v místě Vašeho bydliště.
4. Při uplatňování Vašeho nároku na záruku zašlete prosím přístroj bez poštovného na níže uvedenou adresu.
Přiložte originál prodejního dokladu nebo jiného datovaného potvrzení o koupi. Pokladní lístek si proto
dobře uložte jako důkaz! Popište nám prosím pokud možno přesně důvod reklamace. Je-li defekt přístroje v
našem záručním servisu obsažen, obdržíte obratem opravený nebo nový přístroj.
Samozřejmě rádi za úhradu nákladů odstraníme defekty na přístroji, které nespadají nebo již nespadají do
rozsahu záruky. K tomu nám přístroj prosím zašlete na naši servisní adresu.
Anleitung_BG_SP_400_RB_SPK1:_ 04.07.2008 11:04 Uhr Seite 55
Page 56

56
W
ZÁRUČNÝ LIST
Vážená zákazníčka, vážený zákazník,
naše výrobky podliehajú prísnej kontrole kvality. V prípade, že nebude prístroj napriek tomu bezchybne
fungovať, je nám to veľmi ľúto a prosíme Vás, aby ste sa obrátili na našu servisnú službu na adrese uvedenej
na tomto záručnom liste. Radi Vám budeme k dispozícii taktiež telefonicky na uvedenom servisnom telefónnom
čísle. Pri uplatňovaní nárokov na záručné plnenie platia nasledujúce podmienky:
1. Tieto záručné podmienky upravujú dodatočné záručné plnenie. Vaše zákonné nároky na záruku nie sú
touto zárukou dotknuté. Naše záručné plnenie je pre Vás zadarmo.
2. Záručné plnenie sa vzťahuje výlučne len na nedostatky, ktoré sú spôsobené chybami materiálu alebo
výrobnými chybami, a je obmedzené na odstránenie týchto nedostatkov resp. výmenu prístroja. Prosím,
dbajte na to, že naše prístroje neboli svojim určením konštruované na profesionálne, remeselnícke ani
priemyselné použitie. Táto záručná zmluva sa preto neuzatvára, ak sa prístroj bude používať
v profesionálnych, remeselníckych alebo priemyselných prevádzkach ako aj na činnosti rovnocenné s
takýmto použitím. Z našej záruky sú okrem toho vylúčené náhradné plnenie za škody pri transporte, škody
spôsobené nedodržaním návodu na montáž alebo na základe neodbornej inštalácie, nedodržaním návodu
na použitie (ako napr. pripojením na nesprávne sieťové napätie alebo druh prúdu), zneužívaním alebo
nesprávnym používaním (ako napr. preťaženie prístroja alebo použitie neprípustných pracovných nástrojov
alebo príslušenstva), nedodržaním pokynov pre údržbu a bezpečnostných pokynov, vniknutím cudzích
telies do prístroja (ako napr. piesok, kamene alebo prach), použitím násilia alebo cudzieho pôsobenia
(napr. škody spôsobené pádom), a taktiež je vylúčené bežné opotrebenie primerané použitiu.
Nárok na záruku zaniká, ak už boli na prístroji svojvoľne uskutočnené zásahy.
3. Doba záruky je 2 roky a začína sa dátumom nákupu prístroja. Nároky na záruku sa musia uplatniť pred
koncom uplynutia záručnej doby do dvoch týždňov od zistenia nedostatku. Uplatnenie nárokov na záruku
po uplynutí záručnej doby je vylúčené. Oprava alebo výmena prístroja nevedie k predľženiu záručnej doby
ani nedochádza na základe tohto plnenia ku vzniku novej záručnej doby pre prístroj ani pre akékoľvek
inštalované náhradné diely. To platí taktiež pri nasadení miestneho servisu.
4. Pre uplatnenie nároku na záruku nám prosím zašlite defektný prístroj oslobodený od poštovného na dole
uvedenú adresu. Priložte predajný doklad v origináli alebo iný doklad o zakúpení s dátumom. Prosím,
starostlivo si preto uschovajte pokladničný blok ako doklad o zakúpení! Prosím, popíšte nám čo
najpresnejšie dôvod reklamácie. Ak spadá defekt prístroja pod naše záručné plnenie, dostanete obratom
naspäť opravený alebo nový prístroj.
Samozrejme Vám radi opravíme závady na prístroji na vaše náklady, ak tieto závady nespadajú alebo už
nespadajú do rozsahu záruky. Prosím, pošlite nám v takom prípade prístroj na našu servisnú adresu.
Anleitung_BG_SP_400_RB_SPK1:_ 04.07.2008 11:04 Uhr Seite 56
Page 57

57
k
GARANTIEURKUNDE
Sehr geehrte Kundin, sehr geehrter Kunde,
unsere Produkte unterliegen einer strengen Qualitätskontrolle. Sollte dieses Gerät dennoch einmal nicht einwandfrei funktionieren, bedauern wir dies sehr und bitten Sie, sich an unseren Servicedienst unter der auf dieser Garantiekarte angegebenen Adresse zu wenden. Gern stehen wir Ihnen auch telefonisch über die unten
angegebene Servicerufnummer zur Verfügung. Für die Geltendmachung von Garantieansprüchen gilt Folgendes:
1. Diese Garantiebedingungen regeln zusätzliche Garantieleistungen. Ihre gesetzlichen Gewährleistungsansprüche werden von dieser Garantie nicht berührt. Unsere Garantieleistung ist für Sie kostenlos.
2. Die Garantieleistung erstreckt sich ausschließlich auf Mängel, die auf Material- oder Herstellungsfehler zurückzuführen sind und ist auf die Behebung dieser Mängel bzw. den Austausch des Gerätes beschränkt.
Bitte beachten Sie, dass unsere Geräte bestimmungsgemäß nicht für den gewerblichen, handwerklichen
oder industriellen Einsatz konstruiert wurden. Ein Garantievertrag kommt daher nicht zustande, wenn das
Gerät in Gewerbe-, Handwerks- oder Industriebetrieben sowie bei gleichzusetzenden Tätigkeiten eingesetzt wird.
Von unserer Garantie sind ferner Ersatzleistungen für Transportschäden, Schäden durch Nichtbeachtung
der Montageanleitung oder aufgrund nicht fachgerechter Installation, Nichtbeachtung der Gebrauchsanleitung (wie durch z.B. Anschluss an eine falsche Netzspannung oder Stromart), missbräuchliche oder unsachgemäße Anwendungen (wie z.B. Überlastung des Gerätes oder Verwendung von nicht zugelassenen
Einsatzwerkzeugen oder Zubehör), Nichtbeachtung der Wartungs- und Sicherheitsbestimmungen, Eindringen von Fremdkörpern in das Gerät (wie z.B. Sand, Steine oder Staub), Gewaltanwendung oder
Fremdeinwirkungen (wie z. B. Schäden durch Herunterfallen) sowie durch verwendungsgemäßen, üblichen
Verschleiß ausgeschlossen.
Der Garantieanspruch erlischt, wenn an dem Gerät bereits Eingriffe vorgenommen wurden.
3. Die Garantiezeit beträgt 2 Jahre und beginnt mit dem Kaufdatum des Gerätes. Garantieansprüche sind vor
Ablauf der Garantiezeit innerhalb von zwei Wochen, nachdem Sie den Defekt erkannt haben, geltend zu
machen. Die Geltendmachung von Garantieansprüchen nach Ablauf der Garantiezeit ist ausgeschlossen.
Die Reparatur oder der Austausch des Gerätes führt weder zu einer Verlängerung der Garantiezeit noch
wird eine neue Garantiezeit durch diese Leistung für das Gerät oder für etwaige eingebaute Ersatzteile in
Gang gesetzt. Dies gilt auch bei Einsatz eines Vor-Ort-Services.
4. Für die Geltendmachung Ihres Garantieanspruches übersenden Sie bitte das defekte Gerät portofrei an die
unten angegebene Adresse. Fügen Sie den Verkaufsbeleg im Original oder einen sonstigen datierten Kaufnachweis bei. Bitte bewahren Sie deshalb den Kassenbon als Nachweis gut auf! Beschreiben Sie uns bitte
den Reklamationsgrund möglichst genau. Ist der Defekt des Gerätes von unserer Garantieleistung erfasst,
erhalten Sie umgehend ein repariertes oder neues Gerät zurück.
Selbstverständlich beheben wir gegen Erstattung der Kosten auch gerne Defekte am Gerät, die vom Garantieumfang nicht oder nicht mehr erfasst sind. Dazu senden Sie das Gerät bitte an unsere Serviceadresse.
iSC GmbH • Eschenstraße 6 • 94405 Landau/Isar (Deutschland)
Telefon: +49 [0] 180 5 120 509 • Telefax +49 [0] 180 5 835 830 (Anrufkosten: 0,14 Euro/Minute, Festnetz der T-Com)
E-Mail: info@isc-gmbh.info
• Internet: www.isc-gmbh.info
Anleitung_BG_SP_400_RB_SPK1:_ 04.07.2008 11:04 Uhr Seite 57
Page 58

EH 06/2008 (1)
Anleitung_BG_SP_400_RB_SPK1:_ 04.07.2008 11:04 Uhr Seite 58
Service Hotline kontaktieren oder bei iSC-Webadresse anmelden - es wird Ihnen eine Retourennummer zugeteilt l Ihre Anschrift eintragen l Fehlerbeschreibung
und Art.-Nr. und I.-Nr. angeben l Garantiefall JA/NEIN ankreuzen sowie Kaufbeleg-Nr. und Datum angeben und eine Kopie des Kaufbeleges beilegen
Sehr geehrte Kundin, sehr geehrter Kunde,
bitte beschreiben Sie uns die von Ihnen festgestellte Fehlfunktion Ihres Gerätes als Grund Ihrer Beanstandung möglichst genau. Dadurch können wir
für Sie Ihre Reklamation schneller bearbeiten und Ihnen schneller helfen. Eine zu ungenaue Beschreibung mit Begriffen wie „Gerät funktioniert nicht“
oder „Gerät defekt“ verzögert hingegen die Bearbeitung erheblich.
Welcher Fehler ist aufgetreten (genaue Angabe): Art.-Nr.: I.-Nr.:
PLZ Ort
Straße / Nr.:
Garantie:
JA
NEIN
Kaufbeleg-Nr. / Datum:
Name:
Service Hotline: 01805 120 509 · www.isc-gmbh.info
(0,14 € / min. Festnetz T-Com) - Mo-Fr. 8:00-20:00 Uhr
Mobil:
Telefon:
Retouren-Nr. iSC:
 Loading...