


Basic Operator’s Guide
_______________
QS2000 & QS3200

QS Series Basic Operator's Guide
Copyright © 2002-2012 Electronics for Imaging, Inc. All rights reserved.
All trademarks, registered trademarks, and product names used in this document are the property of
their respective owners.
The information contained in this document is confidential and proprietary to Electronics for Imaging,
Inc (EFI). This information is provided only to authorized representatives of EFI and EFI customers solely for
the purpose of facilitating the use of EFI’s products. No information contained herein may be disclosed
to any unauthorized person for any purpose whatsoever without the prior written consent of EFI.
EFI makes no representations or warranties with respect to the contents of this document. Further, EFI
reserves the right to revise or change this publication and the products it describes without notice.
English is the original language of this document.
This product may be covered by one or more of the following U.S. Patents5,109,241, 5,150,454,
5,170,182, 5,212,546, 5,260,878, 5,276,490, 5,278,599, 5,335,040, 5,343,311, 5,398,107, 5,424,754,
5,442,429, 5,459,560, 5,467,446, 5,506,946, 5,517,334, 5,537,516, 5,543,940, 5,553,200, 5,563,689,
5,565,960, 5,583,623, 5,596,416, 5,615,314, 5,619,624, 5,625,712, 5,640,228, 5,666,436, 5,682,421,
5,729,665, 5,745,657, 5,760,913, 5,799,232, 5,818,645, 5,835,788, 5,859,711, 5,867,179, 5,937,153,
5,940,186, 5,959,867, 5,970,174, 5,982,937, 5,995,724, 6,002,795, 6,025,922, 6,035,103, 6,041,200,
6,065,041, 6,081,281, 6,112,665, 6,116,707, 6,122,407, 6,134,018, 6,141,120, 6,166,821, 6,173,286,
6,185,335, 6,201,614, 6,209,010, 6,215,562, 6,219,155, 6,219,659, 6,222,641, 6,224,048, 6,225,974,
6,226,419, 6,238,105, 6,239,895, 6,256,108, 6,269,190, 6,271,937, 6,278,901, 6,279,009, 6,289,122,
6,292,270, 6,299,063, 6,310,697, 6,321,133, 6,327,047, 6,327,050, 6,327,052, 6,330,071, 6,330,363,
6,331,899, 6,337,746, 6,340,975, 6,341,017, 6,341,018, 6,341,307, 6,347,256, 6,348,978, 6,356,359,
6,366,918, 6,369,895, 6,381,036, 6,400,443, 6,429,949, 6,449,393, 6,457,823, 6,476,927, 6,487,568,
6,490,696, 6,501,565, 6,519,053, 6,539,323, 6,543,871, 6,546,364, 6,549,294, 6,549,300, 6,550,991,
6,552,815, 6,559,958, 6,572,293, 6,590,676, 6,599,325, 6,606,165, 6,616,355, 6,618,157, 6,633,396,
6,636,326, 6,637,958, 6,643,317, 6,647,149, 6,657,741, 6,660,103, 6,662,199, 6,678,068, 6,679,640,
6,687,016, 6,707,563, 6,741,262, 6,748,471, 6,753,845, 6,757,436, 6,757,440, 6,778,700, 6,781,596,
6,786,578, 6,816,276, 6,825,943, 6,832,865, 6,836,342, 6,850,335, 6,856,428, 6,857,803, 6,859,832,
6,866,434, 6,874,860, 6,879,409, 6,885,477, 6,888,644, 6,905,189, 6,930,795, 6,950,110, 6,956,966,
6,962,449, 6,967,728, 6,974,269, 6,977,752, 6,978,299, 6,992,792, 7,002,700, 7,023,570, 7,027,187,
7,027,655, 7,031,015, 7,046,391, 7,054,015, 7,058,231, 7,064,153, 7,073,901, 7,081,969, 7,090,327,
7,093,046, 7,095,518, 7,095,528, 7,097,369, 7,099,027, 7,105,585, 7,116,444, 7,177,045, 7,177,049,
7,177,472, 7,204,484, 7,206,082, 7,212,312, 7,229,225, 7,233,397, 7,233,409, 7,239,403, 7,245,400,
7,248,752, 7,259,768, 7,259,893, 7,280,090, 7,296,157, 7,301,665, 7,301,667, 7,301,671, 7,302,095,
7,302,103, 7,304,753, 7,307,761, 7,342,686, 7,343,438, 7,349,124, 7,365,105, 7,367,060, 7,367,559,
7,389,452, 7,396,119, 7,396,864, 7,397,583, 7,397,961, 7,426,033, 7,431,436, 7,433,078, 7,453,596,
7,460,265, 7,460,721, 7,461,377, 7,463,374, 7,466,441, RE36,947, RE38,732, D341,131, D406,117,
D416,550, D417,864, D419,185, D426,206, D426,206, D439,851, D444,793.
OMM-00038-US English-F

EFI-VUTEk
(A Division of Electronics for Imaging)
United States
One VUTEk Place
Meredith, New Hampshire 03253 USA
Tel 603-279-4635
Fax 603-279-6411
Technical Support, 24 Hours 603-677-3111
http://www.efi.com/products/production/superwide/vutek/
Europe/Middle East
EFI-VUTEk B.V.B.A
Ikaros Business Park
Basic Operator's Guide
Ikaroslaan 9
B-1930
Zaventem, Belgium 1930
Tel 32.2.749.9420
Fax 32.2.749.9465
Internet Support
http://www.vuteksupport.com
This document is published online at the EFI-VUTEk support website at
http://www.vuteksupport.com/doc.php?doc=969
Applications Support
http://www.SuperwideFormatResource.com.
Application tips, material database, white papers, industry contacts, and more.
OMM-00038-F 3 of 71


Contents
Welcome ................................................................. 1
Safety....................................................................... 3
Components ............................................................ 4
Passwords................................................................. 8
Startup...................................................................... 9
Additional information ........................................................1
Front.................................................................................... 4
Rear .................................................................................... 5
Internal................................................................................ 5
Rear control panel.............................................................. 6
Powering up the printer....................................................... 9
Perform your daily maintenance ...................................... 10
Ink purge .......................................................................... 10
Wet wipe the jet packs ..................................................... 11
Print a sample jet test........................................................ 11
Stopping in an emergency............................................... 11
Printing ................................................................... 13
Using the media conveyor belt......................................... 13
Controlling the media conveyor vacuum ........................ 14
Winder attachments .........................................................14
Loading continuous media............................................... 17
Media hold down assembly ............................................. 20
Loading sheet media ....................................................... 21
Installing the tables........................................................... 22
Printing .............................................................................. 23
Adjustments and Calibrations................................. 29
Setting the head gap .......................................................29
Managing jet packs ......................................................... 30
i

QS Series Basic Operator's Guide
Bidirectional (horizontal) alignment test ............................ 35
Step calibration (vertical) test ........................................... 37
Using the curing lamps .....................................................39
Ink and Waste System ............................................ 41
Storing ink .........................................................................41
Replacing ink boxes ......................................................... 41
Preventive Maintenance ........................................ 44
Lockout/tagout.................................................................. 44
Every two hours ................................................................. 45
Every eight hours............................................................... 46
Daily..................................................................................48
Weekly .............................................................................. 48
Monthly ............................................................................. 52
Quarterly ........................................................................... 55
Semi-annually ................................................................... 57
Annually ............................................................................ 60
Shutting Down and Restarting................................. 62
Managing Media................................................... 63
Media storage .................................................................. 63
Handling media................................................................ 64
ii OMM-00038-US English-F

Welcome
Congratulations! You have purchased the finest super-wide
format digital ink jet printing system in the world. EFI
wants to work with you to make sure that you always get the
best possible images from your printer, and that your
printing experience is as safe — and as profitable — as
possible.
QS Series printers are premium output digital ink jet
printers that deliver vivid full color printing on a wide
variety of both rigid and flexible media.
This guide describes how your printer operates and provides
detailed information about daily printing procedures and
preventive maintenance requirements.
Additional information
EFI provides a number of valuable resources to help you use
and maintain your printer.
Documentation
Additional information about your VUTEk printer is
available in the following documents:
VIP Guide, VUTEk Family of Products (D9031-A)
Printer Safety Guide, VUTEk Family of Products
(D9111-A)
Service Guide, QS Series (D9089-A)
Maintenance Log, QS Series (D9090-A)
Training
Operator training is an essential part of preparing for the
installation of your printer.
Along with each printer it sells, EFI provides an educational
support system that helps both new and experienced
operators develop and maintain their skills.
Course descriptions, class schedules, registration, and other
details are available on EFI’s web site.
1

QS Series Basic Operator's Guide
Customer support web site
EFI’s customer support web site contains technical
supplements, advisory bulletins, user and service manuals,
software, and material safety data sheets that are available
for download.
http://www.vuteksupport.com
Customers are encouraged to log onto the EFI customer
support site regularly to stay current with any new
information or advisories that may affect their EFI printer
and its accessories.
Additional support
If you have any questions about your printer, other EFI or
VUTEk products, or this manual please contact EFI’s
customer support staff at (603) 677-3111.
2 OMM-00038-US English-F

Safety
QS Series Basic Operator's Guide
Before working with any VUTEk printer, be sure that you
have read, and understand, the safety precautions and
procedures in your Printer Safety Guide (D1111-A).
Because there are significant safety issues
involved, and printing skills required, EFI requires
customers to have at least one trained and
certified employee in attendance at all times
during printing.
Without the immediate intervention of a trained
operator, small problems and failures during
printing can cause significant damage to your
printer.
EFI cannot be held responsible for injuries, printer damage,
lost productivity, or other damage caused by personnel using
or approaching the QS Series printer without adequate
training and without first reading and understanding your
Printer Safety Guide, VIP Guide, and this User’s Guide.
Ultraviolet light (UV) safety
Ultraviolet light and UV-curable ink can be hazardous to
your eyes and skin. Always observe all applicable safety
precautions when working on and near the QS Series printer.
UV shields protect operators from exposure to harmful
ultraviolet light and ink overspray. If a UV shield is opened
during the printing operation, the printer will close the lamp
shutters and stop the carriage, preventing the operator from
being exposed to the harmful UV lamps.
Each person working on or near the QS Series printer should
complete and sign a copy of the UV Safety Acknowledgement
Form available on the EFI-VUTEk website.
OMM-00038-US English-F 3
QS Series Basic Operator's Guide
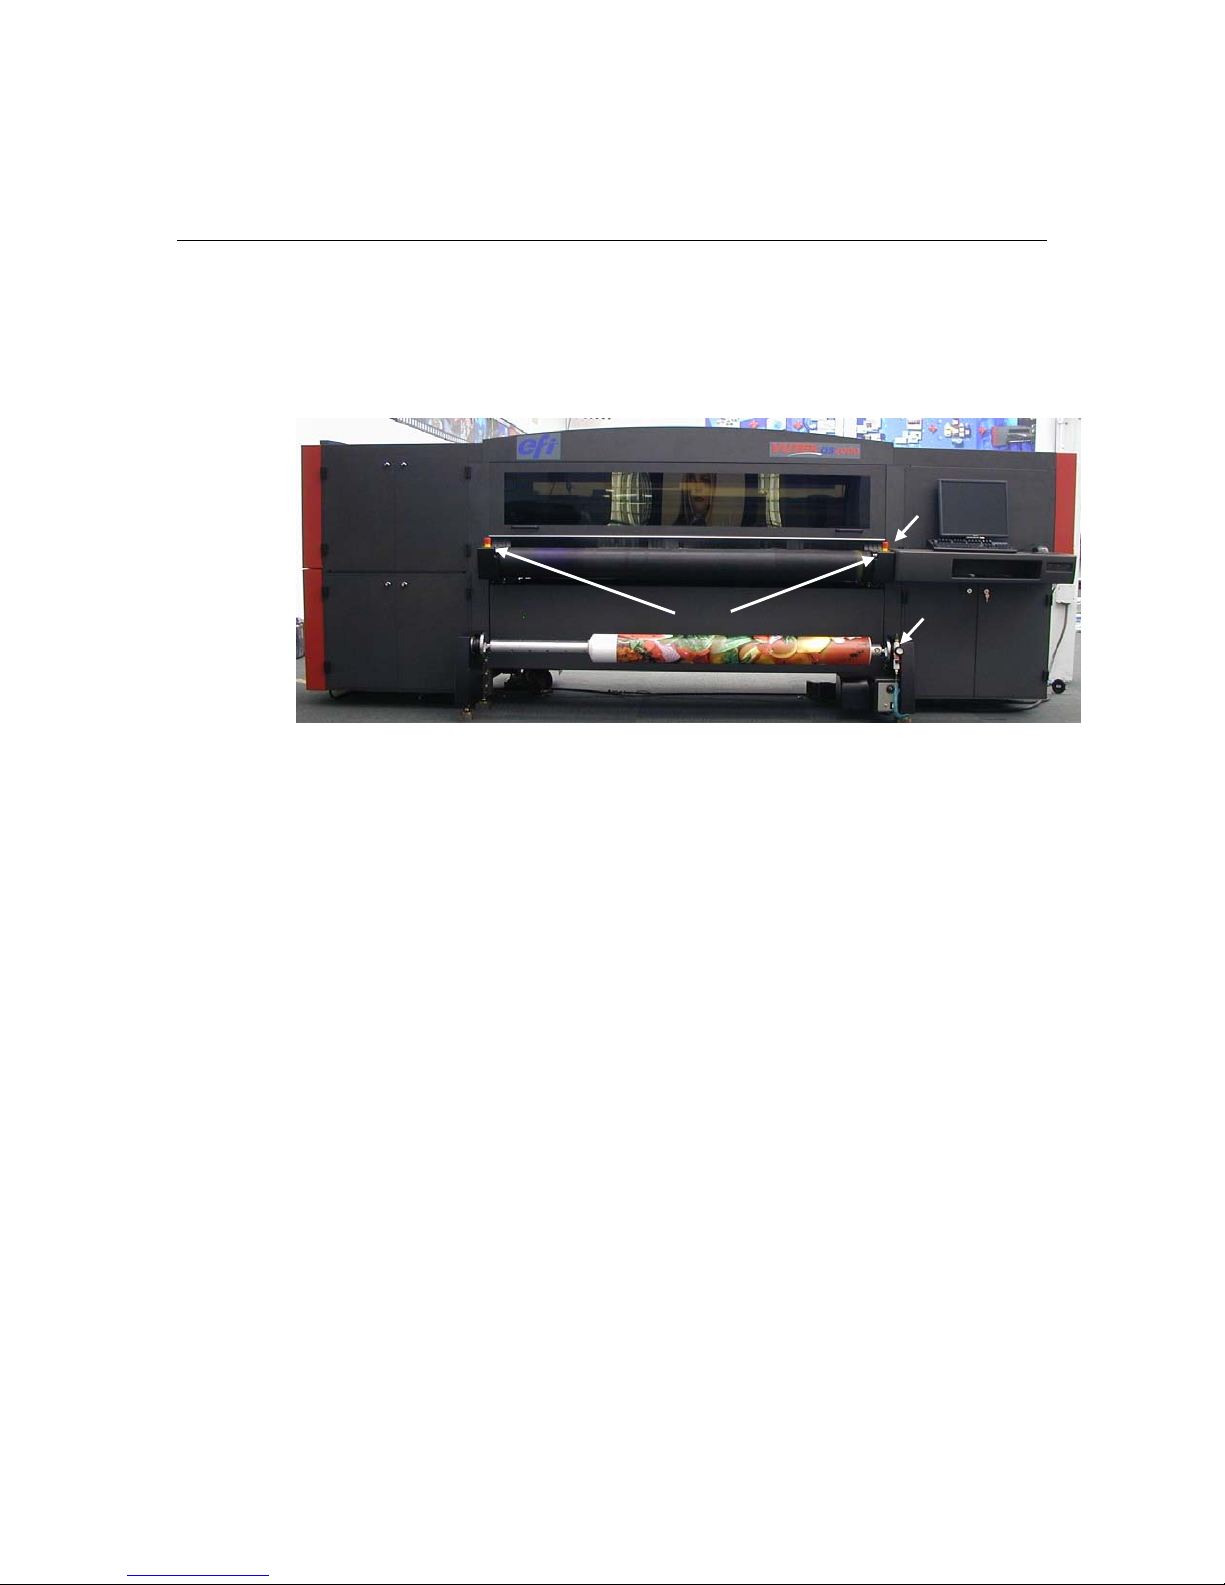
Components
The following figures show the location of the basic printer
components referenced in this guide.
Front
1
7
2
6
Key (front view)
1 Carriage cabinet
2 Front UV shield
3 Power switch
4 Electronics cabinet
5 Rewinder
6 Emergency stop switches
3
5
4
4 OMM-00038-US English-F
7 Ink cabinet

Rear
4
2 2 4 3
QS Series Basic Operator's Guide
2
1
3 5
6
Key (rear view)
1 Main disconnect switch
2 Rear control panel
3 AC power cabinet
Internal
4 Rear UV shield
5 Solvent and waste cabinet
6 Emergency stop switches
1 1
7
6
5
OMM-00038-US English-F 5
QS Series Basic Operator's Guide
Key (internal view)
1 UV lamp assembly (2x)
2 Ink cabinet
3 Vacuum purge wiper
4 Carriage
5 Outfeed media hold down assembly
6 Media conveyor belt
7 Electronics cabinet
Rear control panel
Your QS Series printer has a rear control panel to increase
productivity by allowing you to control printer functions from
the rear of the printer.
Use the rear control panel to move the fence up and down,
move the media roller up and down, advance the media, and
start printing.
6 OMM-00038-US English-F
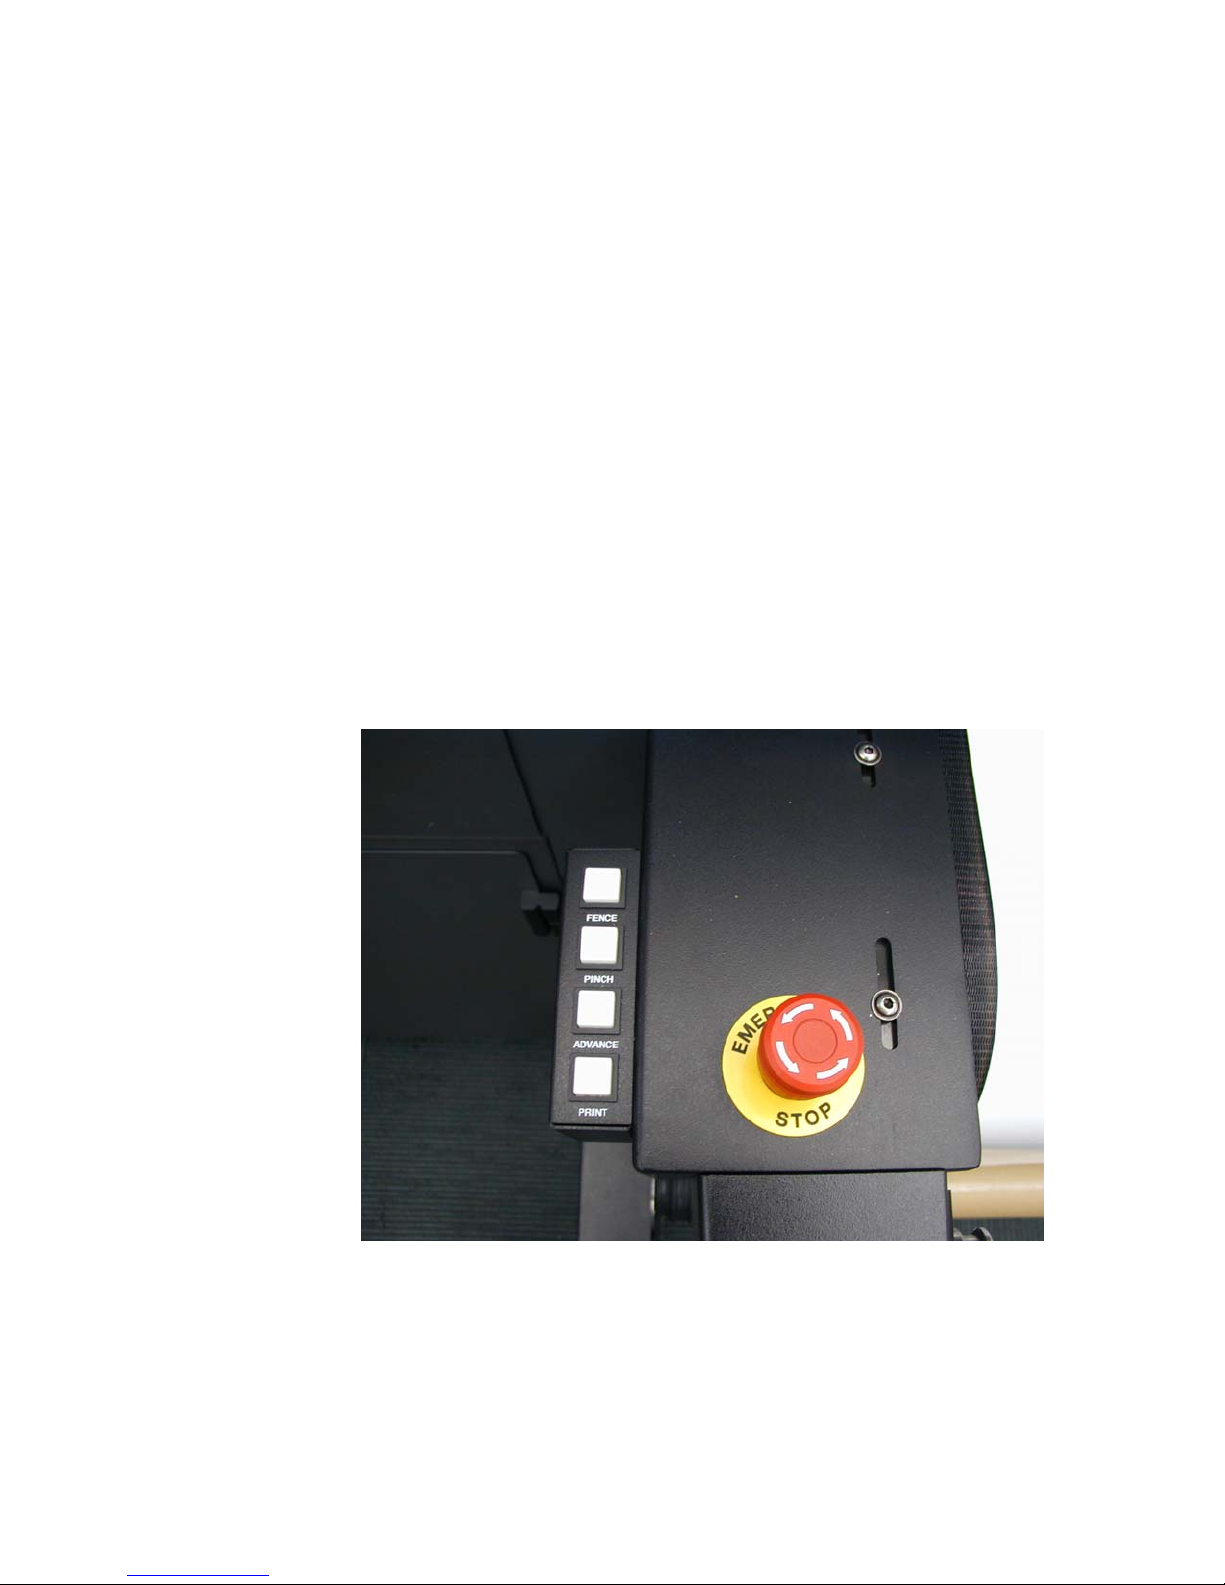
Rear control panel
Fence Press to move the fence up. Press again
to move the fence down.
Pinch Press to move the media roller up. Press

QS Series Basic Operator's Guide
again to move the media roller down.
Advance Press and hold to move the media
conveyor belt forward and feed media
into the printer. Release to stop.
Print In sheet mode, press to begin printing
the next sheet.
Fence +
Pinch
Advance
+ Pinch
Press both buttons to toggle the media
vacuum on and off.
Press and hold both buttons to move the
media conveyor belt backwards and
move the media out of the printer.
Release to stop.
OMM-00038-US English-F 7

QS Series Basic Operator's Guide
Passwords
Your QS Series printer has different passwords that allow
you access to the printer’s different features. Typically your
printer will have,
f A security password
f An ink override password
Security password
Periodically, your printer will prompt you to enter a security
password. The interval at which you will be prompted for a
security password is based on your payment schedule.
Passwords are typically distributed on a monthly basis and
should be entered before they expire at the end of each
period.
To enter your security password, click on the Service tab to
open the Passwords dialog box. Enter your password
(passwords are case sensitive) in the Password box and click
Apply ( ).
Above the Password box are your printer’s serial number,
identification codes, and the security password’s expiration
date. The security password expiration date is updated each
time you enter a new security password.
If you ever have an issue with a password and your printer
becomes inoperable, contact EFI support for a new password.
Ink override password
The ink override password allows you to print in the event
that there is an issue with your ink system. The ink override
password lasts for 100 hours from the time it was created.
To enter your ink override password, click on the Service
tab to open the Passwords dialog box. Enter your ink ID
override password (passwords are case sensitive) in the Ink
ID Override box and click Apply (
).
8 OMM-00038-US English-F

Startup
QS Series Basic Operator's Guide
Before getting started each day, you will want to spend some
time preparing your printer in order to achieve the best
possible print quality.
1. Power-up the printer.
2. Perform your daily printer maintenance.
3. Ink purge all colors to remove the head conditioner.
4. Wet wipe the jet packs with maintenance fluid.
5. Print a sample jet test.
Information about shutting down and restarting your printer
can be found on page 62.
Powering up the printer
1. Ensure that all the emergency stop buttons are reset
(twist the button counter-clockwise until it pops fully out).
2. Press the power button (located to left of the operator
interface panel).
The power button lights up green, indicating that the
power is on.
3. As the printer powers up, the VUTEk User Interface
(VUI) will start.
If the VUTEk User Interface fails to start, see page
Error! Bookmark not defined. for instructions on how
to start it manually.
OMM-00038-US English-F 9

QS Series Basic Operator's Guide
2
1
Key
1 Emergency stop button (two front, two rear)
2 Power button
Perform your daily maintenance
The printer maintenance tasks are described in the
Preventive Maintenance section of this guide.
The daily maintenance procedures are on page 48.
If there are any other regularly scheduled maintenance
procedures (weekly, monthly, quarterly, semi-annual, or
annual) you may want to do them now so they do not
interrupt or interfere with your production schedule.
Be sure to mark the maintenance procedures as completed in
your Maintenance Log.
Ink purge
Ink purge all colors to remove the head conditioner.
f After the VUI opens, from the task list choose Startup
Purge and then click Purge All (
The printer will perform an ink purge of all colors and the
capper will wipe the jets.
10 OMM-00038-US English-F
).

Wet wipe the jet packs
Wet wipe the jet pack faces with SCAQMD maintenance fluid
and a VUTEk-approved wipe.
Print a sample jet test
1. From the VUTEk User Interface, right-click Test ( ), on
the popup menu, click Check Jets.
2. Click Test ( ).
For more information on printing the jet test, as well as
instructions on how to interpret the test, see page 32.
f If the jet test is acceptable, begin printing.
f If the jet test is not acceptable, do another ink purge,
wet wipe the jet packs again, and repeat the jet test.
3. Label the jet test with the date and time. Save the jet test
for your records.
QS Series Basic Operator's Guide
Stopping in an emergency
In case of an emergency, immediately press any of the
emergency stop buttons to stop the printer.
Before operating the printer, familiarize yourself
with the location and operation of the
emergency stop buttons.
You will find emergency stop buttons to the right and left
side of the print area on both the front and rear of the
printer.
When pressed, the emergency stop buttons,
OMM-00038-US English-F 11
An emergency stop button

QS Series Basic Operator's Guide
f Shut off the UV lamps,
f Stop all mechanical movement within the printer,
f Stop the unwinder and rewinder.
The emergency stop buttons do not remove power from the
printer or its electronics.
Never use the emergency stop buttons as an alternative to
powering down the printer when instructed to do so. The
emergency stop buttons are for your personal safety and help
avoid printer damage during extraordinary circumstances.
Restarting the printer after an emergency stop
After eliminating the danger or resolving the problem that
required the emergency stop, you can restart the printer.
1. Ensure that all the emergency stop buttons are reset
(twist the button counter-clockwise until it pops fully out).
2. Press the power button on the back left corner of the
monitor shelf to power down the printer.
3. Press the power button a second time to power up the
printer. The power button lights up green, indicating that
the power is on.
12 OMM-00038-US English-F

QS Series Basic Operator's Guide
Printing
A trained operator must be present at all times
during printing.
Without the immediate intervention of a trained
operator, small problems and failures during
printing can cause significant damage to your
printer.
Using the media conveyor belt
The media conveyor belt moves the media to be printed into,
and out of, the printer.
The step size setting and print mode control the media
conveyor belt’s movement during printing. Loading and
unloading media requires direct control of the media
conveyor belt’s movement.
Stepping the media conveyor belt
Stepping moves the media conveyor belt a preset distance.
Set the step size to a negative value to reverse the media
conveyor belt’s direction.
1 From the VUTEk User Interface, right-click Step Media
( ).
2 In the Set Media Step dialog box, enter the distance you
want the media conveyor belt to move in the Step
Amount box.
f A positive number moves the media conveyor belt
forward.
f A negative number, using a minus sign (–), moves the
media conveyor belt backwards.
3 Click Apply (
4 Click Step Media (
move the media conveyor belt (and the media).
).
) or Step Media Reverse ( ) to
Jogging the media conveyor belt forward
Jogging moves the media conveyor belt continuously forward
(and into the printer). The media continues to move until you
stop it.
OMM-00038-US English-F 13

QS Series Basic Operator's Guide
1. From the VUTEk User Interface, click Advance Media
(
) to move the media forward.
2. Click Advance Media again to stop the media.
Jogging the media conveyor belt backward
You can also use jogging to move the media conveyor belt
continuously backward (this moves the media out of the
printer). The media continues to move until you stop it.
1. From the VUTEk User Interface, right-click Advance
Media (
2. Right-click Advance Media again to stop the media.
) to move the media backward.
Controlling the media conveyor vacuum
Vacuum pumps beneath the media conveyor belt create a
vacuum that holds the media in place as it passes under the
jet packs.
At the beginning of a print, the vacuum will start before the
carriage begins to move.
You’ll need to adjust the media conveyor vacuum as you
change to different width media.
Adjusting the vacuum level
1. From the VUTEk User Interface, right-click Media
Vacuum ( ).
2. In the Vacuum Percentage dialog box, enter a vacuum
percentage.
The vacuum percentage is the percentage of available
vacuum delivered. The higher the percentage the stronger
the vacuum.
3. Click Apply (
4. Click Media Vacuum (
vacuum.
Click Media Vacuum again to turn off the vacuum.
).
) to turn on, or start, the
Winder attachments
QS Series printers can be equipped with unwinder (rear of
the printer) and rewinder (front of the printer) attachments.
14 OMM-00038-US English-F

QS Series Basic Operator's Guide
The unwinder and rewinder attachments are identical in
design and function.
Unwinder/rewinder
The unwinder provides a means of continuously feeding
rolled media into the printer while applying a small amount
of tension to the media via the air core shaft. This tension
helps keep the media feed constant and minimizes media
wrinkling.
The rewinder provides accurate winding of printed images
onto a removable core mounted on an air core shaft.
The winders only have power when printing or
moving the conveyor belt and while the vacuum
is on.
An air nozzle supplies air to fill the aircore to prevent the
media roll from spinning on the aircore shaft.
Winder control panel
The winder control panel supplies power and feed direction
independent of the printer’s controls.
OMM-00038-US English-F 15

QS Series Basic Operator's Guide
5
2
4
1
3
Key
1 Directional toggle switch
2 Tension/speed knob
3 Power switch
4 Air nozzle
5 Air core shaft
The directional toggle switch determines the direction in
which the air core shaft turns (and the direction from which
the media feeds off the air core shaft). The switch’s center
position is “off,” allowing the air core shaft to spin freely.
The tension knob adjusts the amount of tension on the rolled
end of the media. Adjust the speed at which the air core shaft
turns to control the tension.
Slower Reduces tension Counter clockwise
Faster Increases tension Clockwise
The power switch turns power to the winder attachment on
and off.
16 OMM-00038-US English-F
 Loading...