

Page 1

piccollo
S2+T2/C
High Definition Combo Receiver
User’s Guide
+
Page 2

Contents
►Safety ...............................................................................................................4-5
►Remote control ...................................................................................................6
►Description .........................................................................................................7
►Technical Data ....................................................................................................8
►Information bar ...................................................................................................9
►EDIVISION - Program eGuide ......................................................................10-11
►Service ...............................................................................................................12
Organizing Services .............................................................................................................. 12
Organizing Favourites ........................................................................................................... 14
►Installation ......................................................................................................... 16
Satellite installation ...............................................................................................................16
FastScan Satellite .................................................................................................................18
Auto Installation ..................................................................................................................... 18
Satellite Guide ....................................................................................................................... 19
Terrestrial Installation ...........................................................................................................19
Cable Installation ..................................................................................................................19
Netw ID Scan .......................................................................................................................20
►System ...............................................................................................................20
Software update .................................................................................................................... 20
Language ..............................................................................................................................21
A/V Control ............................................................................................................................ 22
Ethernet Setting ...................................................................................................................22
Time Settings ........................................................................................................................23
Timer .....................................................................................................................................24
Parental Control ....................................................................................................................24
Miscellaneous settings .......................................................................................................... 25
Default Setting ...................................................................................................................... 25
Information ............................................................................................................................26
2 Version of 15 November 2017
Page 3

►Conditional Access ...........................................................................................26
Card info ............................................................................................................................... 26
►Media ..................................................................................................................27
Movie .................................................................................................................................... 27
Music ..................................................................................................................................... 27
Images ..................................................................................................................................27
File List / Software ................................................................................................................ 27
Disk management .................................................................................................................29
Remove USB Device Safely! ................................................................................................29
►Application .......................................................................................................31
YouTube ................................................................................................................................31
RSS Reader .......................................................................................................................... 31
Weather forecast ................................................................................................................... 31
Google Maps ......................................................................................................................... 31
Ftp ......................................................................................................................................... 31
Web TV .................................................................................................................................31
Web server ............................................................................................................................ 31
►Game .................................................................................................................. 31
Tetris ......................................................................................................................................31
Snake .................................................................................................................................... 31
Othello ................................................................................................................................... 31
►Edivision ............................................................................................................ 31
Edivision ................................................................................................................................ 31
More ...................................................................................................................................... 31
Schedule ...............................................................................................................................31
Version of 15 November 2017 3
Page 4

► Important safety instructions
1) Read these instructions.
2) Keep these instructions in a safe place.
3) Follow all warnings.
4) Follow all instructions.
5) Do not use the device near water.
6) Only clean with a dry cloth.
7) Do not use near heat sources, such as radiators, heat accumulators, ovens or other
devices (including amplifiers) generating heat.
8) Only operate this product with the type of power source indicated on the label. If you are unsure
about the type of power supply you use at home, ask your electricity supplier. Disconnect the device
from the mains before maintenance or installation procedure.
9) Protect the mains cable from damage.
10) Only use auxiliary devices/accessories specified by the manufacturer.
11) Unplug the device during thunderstorms or extended periods of non-use.
12) All maintenance work should be carried out by qualified service personnel. Maintenance is required
if the device was damaged in some way, including the damage to the mains cable or mains plug, if
the device was exposed to liquids or moisture, was dropped or does not function properly.
13) Make sure that the ventilation slots are always unobstructed.
14) Attention should be paid to the environmental aspect of battery disposal.
15) Only use the device in moderate climate.
WARNING: In order to avoid the risk of fire or electric shock, do not expose this device to rain or moisture.
WARNING: The batteries may not be exposed to excessive heat, such as direct sunlight, fire, etc.
4 Version of 15 November 2017
Page 5

CAUTION
RISK OF ELECTRIC SHOCK
DO NOT OPEN
ATTENTION
RISQUE DE CHOC ELECTRIQUE
NE PAS OUVRIR
This symbol indicates that there is risk of electric shock.
This symbol indicates that the operating instructions contain important operating and maintenance
instructions.
This symbol indicates that there is a double insulation between voltage and user accessible parts
between the product.
This symbol on the product or in the operating instructions indicates that the electrical or electronic
device must be disposed of separately from household waste at the end of the service life. Separate
collection systems exist for recycling.
For further information, please contact your local authorities or your dealer where you purchased the product.
Version of 15 November 2017 5
Page 6

►Remote Control
On/Off button.
Mute On/Off.
Starts recording manually.
Start playing the TimeShift function and /
or a Recording.
Back to normal recording speed.
Finishes TimeShift, a recording or a playback
Pauses playback.
Scrolls listings per page backward.
Fast Possibility backwards.
Scrolls listings per page forward.
Fast-forward capability.
Returns to the start, alternatively
to the previous recording ..
Switches to the end, alternatively
to the next recording.
Displays a le list..
Show bar TimeShift.
Displays a le-list.
Allows you to set the time at which the Receiver
autom. switches to standby mode.
Calls up the Audio menu.
.
Changes the display TV standard.
Calls up the Subtitle/Teletext menu.
Switching between TV and Receiver
Displays the main menu.
Displays the information bar.
With the arrow keys you can scroll
in the lists up and down, left and
right or regulate the volume.
With the OK-key you conrm your
menu-entry or activate the channel-list.
Exits a Menu/Dialogue window
Selection of the electronic program
guide EDIVISION.
Scrolls up (+) or
down (-)
change the volume.
Displays the favourite lists.
Displays the satellite lists (optional).
Scrolls up (+) or
down (-) in
lists of channel lists.
Selection of TV/Radio program.
Input of numbers or letters in
the menus.
Toggles between TV and Radio mode.
Entering the number 0 / enlarges the image..
Returns to the previous program.
6 Version of 15 November 2017
Page 7

►Description
1 3 4
Front Panel
1
POWER button: Activates/Deactivates the device.
2
Exit the window with the menu / dialog.
3
MENU: Show or hide the main menu.
4
OK button: displays the Program list and/or cursor movement in the menus.
5
Up/Down buttons: for moving in the program lists and/or cursor movement in the menus.
6
Left/Right buttons: for volume adjustment and/or cursor movement in the menus.
7
/ USB port: for connecting external USB storage devices.
8
The green LED lights up when the receiver is turned on. The red LED lights up when the receiver is in Standby mode.
9
Display: Display including the time and location of the program.
10
Infrared sensor for the reception of remote control commands.
11
Embedded card reader.
12
Port for Conditional Access Module (CI).
2
Back Panel
13
ANT IN:
Input for connecting to terrestrial
or cable signal from the antenna.
14
LNB IN:
For connecting the coaxial cable from the LNB,
using the proper plug.
15
/ USB: Port for connecting USB memory devices
16
S/PDIF: Audio interface for amplier/audio console.
17
ETHERNET (RJ45): For connection with LAN/INTERNET, for home use.
18
RS 232: For connecting to a PC, using RS-232 cable, for receiver software update.
19
HD OUT:For connection to a TV set, using HDMI cable. For HD TV signals.
20
L / R: Output ampliers Audio.
21
CVBS:
22
Video output.
POWER: ON/OFF of the receiver power supply
13
ANT IN
5
HD OUT
9
19
20
R L VIDEO
6
8
7
18
1614 15
17
11
10
12
AC 100-240V~ 50/60Hz
Power Consumption:
15W
21
Standby < 0.5W
22
Connecting and switching on
Note: For trouble-free TV signal reception,
the installation and calibration should be carried
out by a qualied professional.
•
Connect the receiver using HDMI cable
via the HD OUT output port to your TV’s HDMI input port
•
Now connect the receiver to the satellite
antenna cable via the LNB IN input
•
Insert the batteries into the remote control.
Notes on the remote control can be found on
the back of these instructions
•
Some functions of the receiver increases
comfort during use - but only work
in combination with the Internet connection.
If you wish to use these functions,
connect the device via the Ethernet
interface with LAN cable - (RJ45)
at the entrance
of your internet.
•
Connect the receiver to the mains socket.
• Activate the receiver by pressing
the ON/OFF switch in the back,
to the «ON» position.
The receiver goes into «BOOT» mode
and after a few moments it is ready for use
Antenna cable
ANT IN:
from terrestrial / cable signal
Cable satellite antenna
LNB IN:Connection for the
coaxial cable from the LNB
ANT IN
.
coaxial-wire input
HD OUT:
Line OUT
HD OUT
HDMI
kabel
HDMI cable
R L VIDEO
AC 100-240V~ 50/60Hz
Power Consumption:
Standby < 0.5W
15W
power outlet
TV connection panel
Use an HDMI input!
HDMI in
HD mi
kabel
2
1
Version of 15 November 2017 7
Page 8

►Language Selection
During the initial start, please select your language.
► Features
• Type: Digital Combo Receiver for DVB-S2, DVB-T2 and DVB-C H.265/HEVC
• Full HD H.265/HEVC decoding support
• 1 x Satellite TUNER DVB-S2
• 1 X Hybrid Tuner for DVB-T2 / DVB-C
• 1 x Card Reader
• 1 x Common Interface
• Connection ports: 2x USB, HDMI, RCA, LNB IN, ANT IN, SPDIF, LAN, RS232
• Image resolution: 480p, 576p, 720p_50, 720p_60, 1080i_50, 1080i_60, 1080p_50, 1080p_60
• HDMI Full HD (1080p) Audio/Video output
• Dolby Digital bit-stream Output via HDMI
• USB Wi Dongle connection, with 3G support
• DiSEqC 1.0, 1.1, 1.2, USALS and Unicable compatible
• RTC (Real-Time Clock)
• 6000 TV & Radio channel memory
• True-color Multilingual On-Screen Display
• Channel switching in less than one (1) second
• Channel editor & Favorite lists
• EDIVISION Electronic Programming Guide
• Subtitle support
• Teletext support
• Full Picture In Graphic (PIG) function
• PVR / program recording schedule
• TimeShift function
• Menu Lock / Parental control
• Games: Tetris, Snake, Othello
• Ecological mode StandBy: 0,5 Watt
• Mains Voltage: 100 ~ 240V, 50Hz/60Hz
• Applications: Youtube, RSS, Weather, Google Maps, FTP, Web-TV, DLNA, Big2Small
• Dimensions: (W x H x D): 220x45x175 (mm)
• Weight: 0,8 kg
• Color: black
• Warranty: 2 years
8 Version of 15 November 2017
Page 9

► Information bar (InfoBar)
When in the TV/Radio mode, the 'INFO' button displays an information bar (InfoBar) at the lower edge of the
screen. This bar is faded-in up to 10 seconds.
How to change the duration of fading of the information bar:
1. Press the 'MENU' button to open the main menu.
2. Use the left/right arrow buttons to navigate to the ‘System’ item.
3. Use the up/down arrow buttons to navigate to the ‘Other settings’ menu item and press the OK button.
4. Use the left/right arrow buttons to select the value in seconds you want to set (max. 10s) in the 'OSD
time exceeded' item.
5. Press the EXIT button to exit the menu.
The InfoBar in TV or Radio mode shows the following information about the current program and selected
station:
- the place in the program list
- the name of the station
- the current program (as far as information is available) including start time
- the following program (as far as information is available) including start time
- the name of the favourite list
- the time
- indicates the availability of Teletext for the current program
- indicates if the transmitted program is encrypted
- indicates if subtitles are available
- indicates if the sound broadcasted is in stereo or mono format, left or right balance
- indicates if the program is blocked (parental lock)
- indicates that the station is present in a favourite list
- indicates if the program is transmitted in HD
- indicates if Wi-Fi network connection exists
Functions and settings:
If the InfoBar is displayed, detailed information about the current program can be displayed (if available) by
(repeated) pressing the ‘INFO’ button. If multiple information pages are available, scroll through these pages
by using the ‘PAGE+’/’PAGE-’ buttons. Use the left/right arrow buttons to switch between the information
of the current and next program. Use the red button to display further (technical) information. Use the EXIT
button to exit the menu with the detailed information.
Use the EXIT button again to switch off the InfoBar.
Version of 15 November 2017 9
Page 10

► EDIVISION - Your electronic program guide
Standard: EDIVISION is an electronic program guide with its own OSD menu. EDIVISION presents the
information provided by the service provider in detailed views. In addition, up to 8 time-controlled recordings
(Timer) can be programmed from here. Note that not all channels/program providers provide program-related
information.
Use the EDIVISION button on the remote control to start your program guide.
Functions and settings:
The window of 'EDIVISION' is
structured differently, depending
on in which mode you are.
The mode (now, next, more,
timetable) can be changed with
the green button.
Information can be found at the
top left in the modes 'Now' and
'Next' on the current or next
program and on the channel in
text format, at the top right, the
current TV picture (in TV mode).
In the lower area, the current
program list can be found which
can be navigated with the up /
down arrow buttons and another
channel can be chosen with the
OK button. If the channel provides program-related information, it will be displayed in the list (e.g. duration
of the program in form of bars, program title). Press the OK button to display detailed information about the
program, if available. Use the left/right arrow buttons to switch between ‘Now’ and ‘Next’ EDIVISION modes.
The ‘More’ mode displays program information in chart form and chronological order. Use the left/right arrow
buttons to navigate between a channel’s temporal program information and use the up/down arrow buttons
to move the cursor (yellow
marking) in the channel list. The
OK button may possibly have
to be pressed if another channel
was selected and the program-
related information should be
displayed (if available). If the
cursor is located on the right-
hand side of a program title,
detailed information about this
program can be displayed by
pressing the OK button.
The 'Timetable' mode displays
the currently selected program
list in chart form on the left and
program information in weekly
format on the right. Use the left/
right arrow buttons
EDIVISION window in ‘Timetable’ mode
To navigate between the channel list and the PREV/NEXT buttons to navigate daily overview.
Use the up/down arrow buttons to navigate between the weekdays in the respective list. If the cursor is
located on the right-hand column side of a program title, even more detailed information about this program
can be displayed (if available) by pressing the OK button .
10 Version of 15 November 2017
Page 11

The following functions and
buttons can be used in all
modes:
The red button displays an
overview of the existing channel
lists (groups). Use the arrow
buttons to navigate through this
overview and the OK button to
set the channel list to be used by
EDIVISION.
The green button calls up
a menu allowing to switch
between the different views of
EDIVISION by using the up/
down arrow buttons and the OK
button.
The yellow button calls up a Popup Timer Menu. Select the ‘VCR’ item to program time-based events (e.g.
recordings). Select the item Timer List to see the programmed events.
If you want to make a recording on a certain date in the future, select the item 'USB/HDD Recorder'. Use the
up/down arrow buttons in the following window to navigate between the menu items and the left/right arrow
buttons and OK button to set the values. The following settings can be made in the menu ‘Timer’.
Timer number: Calling up the timer menu automatically switches to the next (available) programmable timer.
Use the left/right arrow buttons the OK button and the up/down arrow buttons to switch between timers. Up
to 8 different events can be programmed.
Timer mode: Set the recording mode here. Choose whether the recording is carried out once, daily,
weekly or monthly.
Timer service: Set the service entry 'Recording TV channel' here for a TV recording and 'Recording
Radio channel' for a radio recording.
Station: Set the channel here.
Date: Set the start date of the recording here.
Start time: Set the start time here.
Duration: Set the duration of the recording here (recording length).
After making changes and in order to keep them, conrm with 'Yes' in the appearing window dialogue. Exit
the timer menu with the EXIT button.
Note: An error message appears under certain circumstances. As a rule, an incorrect start time or start date
was given. Check the information!
Also note that a recording is only possible if a corresponding USB memory device is already connected to
the receiver.
Exit 'EDIVISION' by pressing the EXIT button.
Version of 15 November 2017 11
Page 12

►Menu: Program
► Service
► Installation
► System
► Conditional Access
► Media
► Application
► Game
► Edivision
► Service
► Organizing Services
► Organizing Favourites
Organizing Services
In this menu you can congure your
channel lists for TV or radio channels.
Notes: Check the operation mode of the
receiver. In order to edit a radio channel,
the receiver must be in Radio mode. Using
the TV/Radio button allows switching from
one mode to another.
Tip: In the left column of the menu window,
you can nd the list of channels in the
current channel list, and on the right side
the symbols for ‘Move’, ‘Lock’, ‘Delete’, ‘Rename’ and ‘Skip’.
Menu functions and settings:
Use the left/right arrow buttons to move from one column to another in the menu and the up/down arrow
buttons to move the cursor up or down in the relevant column.
You can select one or more channels in the left column pressing theOK button.
The red button allows you to view a summary of all lists/channel groups and select accordingly. The current
list is displayed in the title-bar of the window.
12 Version of 15 November 2017
Page 13

The green button displays more options. The following options are available:
Select all: All channels are selected.
Deselect all: All channels are deselected.
Select other: All channels, that were not selected previously, are now selected.
Select TP: Here, you can select all channels of a transponder.
The ‘FIND’ button allows you to quickly search for channels (channel names). Press this button to display a
search window. Search eld entries are performed using a text and numbers eld, to which you can navigate
using the arrow buttons and OK button. If the current list contains channels, whose name starts with
the specic rst characters entered, these appear on the left side. Use theEXIT button to exit the search
window.
How to move a channel:
1. Place the cursor (yellow bar) in the channel list, on the channel to be moved.
2. Move to the right side of the menu using the right arrow button and navigate the cursor using the up/down
arrow buttons until you nd the symbol ‘Move’. The symbol is highlighted in color.
3. Press the OK button.
4. Now use theup/down arrow buttons to move the channel in the list. For this purpose, you may also use
the Page buttons.
5. If you press the OK button, the channel will remain in its new position and the ‘Move’ function is
completed.
Note: You can move multiple channels simultaneously, selecting initially the respective channels in the
channels list (left side of the menu) with the OK button, and then following steps 2-5 above.
How to lock a channel:
1. Place the cursor (yellow bar) in the channel list, on the channel which you wish to lock.
2. Then, navigate to the right side of the menu using the right arrow button and move the cursor with the up/
down arrow buttons until you nd the ‘Lock’ symbol. The symbol is highlighted in color.
3. Press the OK button. In the channel list, behind the channel name, a ‘Lock’ symbol will appear.
Note: You can lock multiple channels simultaneously, selecting initially the respective channels from the
channel list (left side on the menu) using the OK button, and then following steps 2-3 above.
When selecting a locked channel, you are prompted to enter a password. Otherwise, the channel is not
displayed.
How to unlock a channel:
1. Place the cursor (yellow bar) in the channel list on the channel which is locked.
2. Navigate to the right side of the menu using the right arrow button and move the cursor on the ‘Lock’
symbol. The symbol is highlighted in color.
3. Press the OK button. Enter the code that you have selected and the channel is unlocked. In the channel
list, the ‘Lock’ symbol disappears.
Note: You can unlock multiple channels simultaneously, selecting initially the respective channels in the
channel’s list (left side of the menu) using the OK button, and then following steps 2-3 above.
Version of 15 November 2017 13
Page 14

How to delete a channel:
1. Place the cursor (yellow bar) in the channel list on the channel you wish to delete.
2. Navigate to the right side of the menu using the right arrow button and move the cursor on the ‘Delete’
symbol. The symbol is highlighted in color.
3. Press the OK button. The channel is removed from the list.
Note: You can delete multiple channels simultaneously, selecting initially the respective channels from the
channel list (left side of the menu) using the OK button, and then following steps 2-3 above.
How to rename a channel:
1. Place the cursor (yellow bar) in the channel list, on the channel which you want to rename.
2. Navigate to the right side of the menu using the right arrow button and move the cursor on the ‘Rename’
symbol. The symbol is highlighted in color.
3. Press the OK button.
4. A window appears with an input eld. Use the arrow buttons and the OK button to select the desired
characters and letters. You can delete the last character (of your entry), by moving the cursor inside the
letter eld, to the ‘<-’ symbol. You can add a space using the arrow buttons to move to the ‘--’ symbol.
Conrm your choice using the arrow buttons to get to the ‘OK’ eld. The new name is entered in the
channel list. You can exit the input window at any time using the EXIT button, and thus stop the process.
Exit the ‘Edit Channel’ menu pressing the EXIT button. If you have made any changes, a dialog box
appears, prompting you to conrm the changes. If you select ‘Yes’, the changes in the settings will be stored.
Note: Channels are deleted, moved, and/or locked only if you conrm the action with ‘Yes’. If you select ‘No’,
NONE of the changes will be saved.
Organizing Favourites
In this menu, you can congure
lists of your favourite TV and
radio programs. Within the
favourite lists, you can organise
your favorite channels, which
can be very convenient.
Tip: This menu is structured
into three columns. On the left
side there is a list of available
channels, according to the
summary list selected. The
right side displays the currently
selected favourite list. In the
middle appear symbols in order
to ‘Add’, ‘Remove’, ‘Move’ and ‘Rename’ items on the lists.
Menu functions and settings:
Use the left/right arrow buttons to switch from one column to another, and the up/down arrow buttons to
move the cursor up or down in the lists.
You can select one or more channels pressing the OK button.
While on the left column, you can use the red button to view a summary of all lists (except the favourite lists)
and select another group/list using the arrow buttons and the OK button. The list currently displayed appears
in the title of the left column.
14 Version of 15 November 2017
Page 15

The green button displays more options. The following options are available:
Select all: All channels are selected.
Deselect all: All channels are deselected.
Select other: All channels, that were not selected previously, are now selected.
Select TP: Here, you can select all channels of a transponder.
While on the left column, you can quickly search for channel names using the‘FIND’ button. Press this
button to display a search window. Search eld entries are performed using a text and numbers eld, to
which you can navigate using the arrow buttons and OK button. If channels with the specic initial letters
are detected in the current list, these shall appear on the left side. Use the EXIT buttonto exit the search
window.
‘FAV’ button allows switching favourite lists in order to view or edit them. Press the‘FAV’ button to display a
summary of the favourite lists. Use the up/down arrow buttons and theOK button to select the favourite list
to be edited. The list appears on the right side of the menu. On the left side, the channels that already exist
in the selected favourite list are marked with a symbol.
How to add a channel to a favourite list:
1. Place the cursor (yellow bar) in the channel list on the left menu window, on the channel to be added.
2. Move to the middle column of the menu and navigate the cursor to the ‘Add’ symbol. The symbol is
highlighted in color.
3. Press theOK button. The channel will be added at the bottom of the favourite list. On the left side of the
menu, the channel will be marked with a symbol.
Note: You can add multiple channels to favourite lists simultaneously, by means of selecting rst the
respective channels from the channel list (left side of the menu) using the OK button, and then following
steps 2-3 above.
How to remove a channel from the favourite list:
1. Place the cursor (yellow bar) in the favourite list on the right window of the menu on the channel to be
removed.
2. Move to the middle column of the menu and navigate the cursor on the ‘Remove’ symbol. The symbol is
highlighted in color.
3. Press theOK button. The channel will be removed from the favourite list. On the left side of the menu, the
channel is no longer marked with the relevant symbol.
Note: You can remove multiple channels from favourite lists simultaneously by means of selecting rst the
respective channels from the favourite list (left side of the menu) using the OK button, and then following
steps 2-3 above.
How to move a channel within the favourite list:
1. Place the cursor (yellow bar) in the favourite list in the right window of the menu on the channel to be
moved.
2. Move to the middle column of the menu and navigate the cursor to the ‘Move’ symbol. The symbol is
highlighted in color.
3. Press theOK button.
4. Use the up/down arrow buttons to move the selected channel. The channel can now move upwards or
downwards within the list.
5. If you press the OK button, the channel will remain in its new position and the ‘Move’ function is
completed.
Note: You can move multiple channels simultaneously by means of selecting rst the respective channels
from the favourite list (left side of the menu) using the OK button, and then following steps 2-5 above.
Version of 15 November 2017 15
Page 16

How to rename a favourite list:
1. Press the‘FAV’ button and select the favourite list you wish to rename.
2. Move to the middle column of the menu and navigate the cursor to the ‘Rename’ symbol. The symbol is
highlighted in color.
3. Press the OK button.
4. A window appears with an input eld. Using the arrow buttons and the OK button choose the desired
characters and letters. You can delete the last character (of your entry), by moving the cursor inside the
letter eld, to the ‘<-’ symbol. You can add a space using the arrow buttons to move to the ‘--’ symbol.
Conrm your choice using the arrow buttons to get to the ‘OK’ eld. You can exit the input window at any
time using the EXIT button, and thus stop the process.
Exit the ‘Edit Favourites’ menu pressing the EXIT button. If you have made any changes, a dialog box
appears, prompting you to conrm the changes. If you select ‘Yes’, the changes in the settings will be stored.
Note: The favourite lists are deleted, moved or/and added only if the action is conrmed by means of
pressing “Yes”. If you select ‘No’, NONE of the changes will be saved.
►Installation
► Satellite installation
► FastScan Satellite
► Auto Installation
► Satellite Guide
► Terrestrial Installation
► Cable Installation
► Netw ID Scan
Satellite installation
Please consider the following notes
before conguring menu settings:
For an HDTV-SAT TV, you need a
satellite dish with minimum diagonal
size of 80 cm. The installation must be
setup by a qualied technician equipped
with a digital device for adjusting the TV
signal strength.
Depending on the settings applied, the
lower side displays the strength and
quality levels of the signal.
Menu functions and settings:
Satellite: Use the left/right arrow buttons to select the satellite to be installed.
LNB Type: Dene the LNB type used.
TP Index: Dene the transponder.
16 Version of 15 November 2017
Page 17

DiSEqC: Set the value for DiSEqC here.
Regulator: If you use a mechanised control system, specify here its mode.
22KHz: This item is available only if you have not selected the ‘Universal’
value in the ‘LNB Type’ menu. Then you can enable/disable the
22KHz connection mode. The 22KHz connection mode is used for
switching the lower and upper frequency band in LNB.
0/12V: If you use a 12V switch, set the value to ‘On’.
Polarity: Here you can set the polarity.
Tone Burst: Tone Burst is another mode option availed by the receivers. This
signal does not include digital commands, but can be recognised and
used by most switches for position toggling. Set the value to ‘On’ or
‘Off’.
LNB Power: Set this parameter to ‘On’ or ‘Off’.
Use the red button to move to the channel scan menu of the installed satellite. In this menu, the following
settings are available:
Scan mode: Select between All (channels) or Free (channels).
Programme Type: Dene the scan for television, or radio, or television and radio
channels.
Select scan mode: Choose between “Manual Scan” or “Blind Scan”.
NIT scan: Decide whether the NIT (Network Information Table) is going to be
used for scanning.
Use the OK button to start the scanning process. You can exit the menu window at any time with the EXIT
button.
Use the green button to switch to the multiple satellite channel scan menu. For this purpose, select using
the OK button in the displayed list the satellites according to which the satellite reception system has been
aligned and installed. Then press the red button and specify (if necessary) the following settings again:
Scan mode: Select between All (channels) or Free (channels).
Programme Type: Dene the scan for television, or radio, or television and radio
channels.
Select scan mode: Choose between “Manual Scan” or “Blind Scan”.
NIT scan: Decide whether the NIT (Network Information Table) is going to be
used for scanning.
Use the OK button to start the scanning process. You can exit the menu window at any time with the EXIT
button
The blue button initiates the automatic recognition of potential satellites via DiSEqC. If any satellites have
been identied on the basis of the installation or the alignment of the satellite reception system, these will
appear on the display. The ‘Scan‘ button provides the following variable settings:
Scan mode: Select between All (channels) or Free (channels).
Programme Type: Dene the scan for television, or radio, or television and radio
channels.
Select scan mode: Choose between “Manual Scan” or “Blind Scan”.
NIT scan: Decide whether the NIT (Network Information Table) is going to be
used for scanning.
Use the OK button to start the scanning process. You can exit the menu window at any time with the EXIT
button.
Use the white button (PLAYMODE button) to start the automatic scan (Blind Scan) according to the above
settings.
Use the ‘MUTE’ button to stop and reset the buzzer.
You can exit the ‘Satellite Setup’ menu with the EXIT button.
Version of 15 November 2017 17
Page 18

FastScan Satellite
Dene the scan of TV and
radio channels using the preset
frequencies of the service
providers.
Select the type, DiseqC, LCN &
press Start Scan.
Auto Installation
Here you can automatically set
the value for DiSEqC. Select
DiSEqC 1.0 4port, DiSEqC 1.1
8port or DiSEqC 1.1 16port and
press OK.
Menu functions and settings:
DVB-C Setup: Use the
OK button to switch to the
DVB-C settings menu (see
below).
Region: Select your region
here.
Tuner Power: Here you can set extra voltage for reception via DVB-C.
Functions and settings in the search and setup menus for DVB-C:
Scan mode: Dene the channel scan by inserting a specic frequency or an entire
frequency band.
This item is available only if you have not selected the ‘Frequency
input’ in the ‘Scan mode’ menu. You can then choose between UHF
and VHF.
Program position number: This item is available only if you have not selected the ‘Frequency
input’ in the ‘Scan mode’ menu.
Here you can set the program position number and its frequency.
Frequency: This item is available only if you have not selected the ‘Frequency
input’ in the ‘Scan mode’ menu. Then enter the desired frequency.
Frequency selection: This item is available only if you have not selected the ‘Frequency
input’ in the ‘Scan mode’ menu. Then enter the frequency here.
LCN: Here you can choose whether the channel names are to be included
in the scan.
Use the red button to switch to the scan menu. In the ‘Scan Mode’ item you can select between ‘All’ and
‘Free’. If you select ‘Manual Scan’ at the next item and press the OK button, the scan process begins
according to the settings made. At this point, if you select ‘Blind Scan’, then some of your settings may not be
taken into account during the scan. ‘Blind Scan’ automatically scans for all available satellites.
Exit the ‘DVB-C Setup’ menu by pressing the EXIT button.
18 Version of 15 November 2017
Page 19

Satellite Guide
This menu item will be helpful when
adjusting the satellite installation.
Menu functions and settings:
Local longitude: Dene the
value for the longitude of the place
where the satellite reception facility
is.
Local latitude: Dene the value
for the latitude of the place where
the satellite reception facility is.
Calculation: Navigate the
cursor using the arrow buttons on this specic item and press the OK button. The
orientation and altitude values are calculated automatically.
Exit the ‘Satellite Guide’ menu pressing the EXIT button.
Terrestrial Installation
Press [OK] key to enter the selected
item.
1. You can select the Bandwidth
by region (country).
2. You can set the Tuner Power
ON/OFF.
3. Press [Red] key can directly into
blind scan mode to scan the
current programs.
4. Press [Green] key to enter
the following menu.
Scan Mode.
1 There are two modes. You can scan channel by channel or by frequency”.
2 When scan band is UHF and region is “France”, the range of Ch No. is from 21 to 69.
3
When scan Band is VHF and region is “France”, the range of Ch No. is from 1 to 9. (it’s according to region)
4 Press [Red] key to enter blind scan menu, or press [Green] key to enter TP scan menu.
5 Press [Exit] key to exit the scanning.
Cable Installation
Press [OK] key to enter the selected
item.
1. You can select the Scan
Mode, Manual Scan or Blind
Scan.
2. You can input the Frequency by
use the numeric button of the
RCU.
3. You can input the Second
Frequency by use the numeric
Version of 15 November 2017 19
Page 20

button of the RCU, if you set the Scan Mode to Blind Scan.
4 You can input the Symbol Rate by use the numeric button of the RCU.
5 You can select the QAM value among 16QAM, 32QAM, 64QAM, 128QAM and 256QAM.
6 You can turn ON or OFF the NIT Search, if you set the Scan Mode to Manual Scan.
7 When you complete your modication, press OK button on Search item to enter Scan menu
and then.
8 Press OK button, it will begin to scan.
With the red button to start automatic scan.
With the green button to start the manual scan.
Press the white button to restart the scanning (up to software version 2.2.70)
Netw ID Scan
For ready-made channels from
cable providers (eg, “11111” and
press the green button). Then
press the red button.
►System
► Software Upgrade
► Language
► A/V Control
► Ethernet Setting
► Time Settings
► Timer
► Parental Control
► Miscellaneous settings
► Default Setting
► Information
Software update
Key point: This menu is available only if a suitable USB memory unit, which is recognised by the receiver,
has been connected. Otherwise you do not have access to this menu.
20 Version of 15 November 2017
Page 21

Another requirement for the
‘USB/HDD Update’ is for the
corresponding software le to be
located in the USB memory unit.
This le with ‘.abs’ le extension
can be downloaded from
the website ‘www.edision.gr’
through a computer with internet
connection:
http://www.edision.gr
Save the downloaded le to
the USB memory unit and plug
this unit into the USB port of
“piccollo S2+T2/C”.
Note: The update speed via USB might depend on the data format in the USB memory. It is recommended
to previously format the USB memory through item ‘HDD Formatting’ in the ‘USB’ menu / ‘Memory Device
information’ (start formatting using the yellow button) and then save the Software le (.abs) in it.
Menu functions and settings:
File opening: If the receiver detects les to be updated in the USB memory device, it displays them. Select
the le to be updated using the arrow buttons and the OK button. If no le is detected, the message ‘No File’
is displayed on the screen.
Update mode: Use the arrow buttons and the OK button to dene the software parts to be updated.
Start: When the software le and the update mode are selected, navigate with the up/down arrow buttons to
item ‘Start’. Press the OK button to begin the update process.
Attention: Software update starts immediately upon pressing the OK button and must not be interrupted.
Exit the ‘USB/HDD Update’ menu pressing the EXIT button.
Language
Menu functions and settings:
Menu language: Here
you can select the menu texts’
display language.
First audio language: Select
the audio language for the rst
channel.
Second audio language:
Select the audio language for
the second channel.
EDIVISION: Dene the
language in which the
EDIVISION electronic program
guide (EDV) will be displayed
(The language must be supported by the provider of the program).
Subtitle Language: Set the display language of the subtitle information (The language
must be supported by the provider of the program).
Teletext: Set the display language of the Teletext/Videotext information (The
language must be supported by the provider of the program).
Exit the ‘Language’ menu pressing the OK button.
Version of 15 November 2017 21
Page 22

A/V Control
Display Settings: Options
Auto, By Native TV, 720p_50,
720p_60, 1080i_50 or 1080i_60
are available.
Display size: Set the
aspect ratio for image display
(16:9l, 4:3PS, 4:3LB, AUTO).
Video Output Type: Choose
the colours of the image
displayed.
Digital audio output:
Here you can set the function of
the digital Audio output.
Menu Transparency: Set the transparency rate of the window on the screen
Brightness: Here you can set the Brightness
Contrast: Here you can set the Contrast
Saturation: Here you can set the Saturation
Exit the ‘A/V Setting’ menu pressing the EXIT button.
Ethernet Setting
Menu functions and settings:
Tip: The items IP Address,
Subnet Mask, Gateway, DNS
Preferred and DNS Alternate are
available only if item ‘DHCP’ is
set to ‘OFF’.
DHCP: If you install a DHCP
server on your network, you
can automatically provide an IP
address to your receiver. For
this purpose, select ‘On’. If you
are not using a DHCP on your
network, you can manually enter the corresponding values in the following points.
IP Address: Type here a free IP address within your network.
Subnet Mask: Enter the subnet mask corresponding to your network.
Gateway: Enter here the IP address of the Internet gateway.
DNS Preferred: Here you can enter the IP address of a DNS server.
DNS Alternate: Enter here the IP address of an alternate DNS server.
Tip: Use the numbered buttons on the remote control to enter the numbers.
Exit the ‘Network Local Settings’ menu pressing the EXIT button.
http Update:
Manual update
22 Version of 15 November 2017
Page 23

Menu functions and settings:
URL: Enter the le address that includes the new software of the receiver. Navigate between letters using
the left/right buttons. In order to enter the information, use the numbered or letter buttons. Access to specic
symbols is provided only through the zero (0) button. Use the green button to select between uppercase and
lowercase letters. To erase a symbol, press the yellow button.
Update mode: At this point, you can determine the software area to be updated. You can choose between
‘Software + Bootloader’, ‘Software with channel list & Settings’, ‘Software without channel list’ or ‘Settings”’
(channel list).
Use the EXIT button to exit the ‘Manual Update’ menu.
Press the red button to update. A dialog box appears. Upon conrmation, the process begins, going through
various stages:
- Connecting…
- Downloading...
- Deleting…
- Registering...
- Restarting...
Auto update
If you select this menu item, the receiver will try to connect with the factory-congured server of EDISION.
Provided that the cables are properly setup and the values that correspond to your network in the ‘Network
Settings’ menu item are correct, the receiver connects and acquires the list of les from the server. In this
case, the File Name, Date, Time and File Size information is displayed. Select Software le ‘argus_miniip.
abs’ and press the red button. Upon selection, the update process begins, going through several phases:
- Connecting…
- Downloading...
- Deleting…
- Registering
- Restarting...
If you did not initiate the update process, you can exit the menu 'Auto Update' pressing the EXIT button.
Time Setting
GMT User: Select ‘On’ and
the receiver will automatically
acquire the current time and
date (via satellite signal). If
you select ‘Off’, you can set
your own date and time at the
following item.
GMT customisation:
This item is available only if the
‘GMT User’ item is set to ‘On’.
Here you can determine the
time difference between your
local time and the GMT time
(Greenwich Mean Time). For
Germany/Austria/Switzerland/Luxembourg the following applies: UTC
+ 01:00. For Athens/Bucharest/Istanbul the following applies: UTC +
02:00. Use the left/right arrow buttons to move to the value that you
wish to congure.
Daylight saving time: Here you can specify whether daylight saving will be taken into
account.
Version of 15 November 2017 23
Page 24

Date: This item is available only if in the ‘GMT User’ item is set to ‘Off’. Enter
the date using the numbered buttons.
Time: This item is available only if in the ‘GMT User’ item is set to ‘Off’. Enter
the time using the numbered buttons.
Exit the ‘Time Setting’ menu pressing the EXIT button.
Timer
In this menu you can schedule
up to 8 time-controlled
recordings (Timer). A lot more
information is provided in
EDIVISION paragraph.
Menu functions and settings:
Timer number: Upon
opening the ‘Timer’ menu, you
are automatically directed to the
next (available) congurable
timer. Use the left/right arrow
buttons or the OK button and the
up/down arrow buttons to move
between the (congured) timers.
Timer function: Dene the recording mode. You may choose whether the recording
will be performed once, or it will take place on a daily, weekly or
monthly basis.
Timer services: Dene the type of program (TV / radio channel) for the recording.
Channel: Select the channel.
Date: Select here the (starting) date of the recording.
Start time: Select the recording start time.
Duration: Set the duration of the recording here (recording length).
Standby mode in the end: Here you can specify whether the receiver will switch to Standby
mode after the recording has ended.
Parental Control
This menu is available only after
entering a PIN code. The default
password (PIN) is: 0000.
Menu functions and settings:
Menu lock: You can choose
whether to allow or deny access
to the menu. If this item is set
to ‘On’, menu access is only
allowed after entering a PIN
code. This excludes the channel
bar, EDIVISION and favourite
lists.
Channel lock: Specify whether channels will be lockable, in general, or not.
New password: Select a new password.
Password conrmation:
Enter the new password again.
Exit the ‘Parental lock’ menu pressing the EXIT button.
Use the EXIT button to exit the timer menu. If you have made any changes and you wish to save them,
24 Version of 15 November 2017
Page 25

conrm your selections with ‘Yes’ in the dialog window.
Note: You may occasionally receive an error message. This usually happens when you have selected the
wrong start time or date. Check your settings!
Note: Please note that the recording is performed successfully only when a suitable USB memory device is
also connected with the receiver at the scheduled time.
Miscellaneous settings
Channel list num: Channel list
number setup
Automatic subtitles: Here you
can set the options for subtitles
display.
Automatic deactivation of
the receiver Here you can set
a time period in minutes, after
which the receiver switches to
standby mode.
Standby Mode: Set ‘Real’ or
‘Fake’
Duration of information
display: Here you can set the
duration of information display
Location: You can dene the location where the information will be displayed.
Default Setting
Select one of the following menu
items with theup/down arrow
buttons and press the OK
button.
Factory default: This item
resets the receiver, in terms of
software, to its factory defaults.
After pressing the OK button,
you are asked to enter your PIN.
Then a window appears with a
warning message.
Delete all channels: This item enables deleting all channels (settings).
VFD display in standby to ‘OFF’ 0.8W mode: Specify whether the receiver’s power consumption will be
just 0.8 Watt when in standby mode. If this item is set to ‘Off’, then the VFD display in standby mode is
deactivated and power consumption is reduced to 0.8 Watt. If you wish the power consumption to be set to
zero, you have to turn off the receiver from the switch in the back.
You can exit the 'Factory Default' menu pressing the EXIT button.
Version of 15 November 2017 25
Page 26

►Conditional Access
► Card Info
Information
Here you are provided with
information about the device.
This information can be useful
when you need to contact
the Technical Department of
EDIVISION or the point of sale.
You are also informed of the
receiver’s software version.
You can exit the ‘Information’
menu, pressing the EXIT button.
Card info
Tip: You are provided with two
Smart Card readers equipped
with CONAX system. If you
insert providers’ cards of various
subscription programs, you
can watch many programs that
have been encrypted using this
system. In this menu you will
nd information on the Smart
Card inserted in any of the ports.
Menu functions and settings:
Port 1: Shows information on an
existing card in port 1.
Port 2: Shows information on an existing card in port 2.
Smart Card Information: Here you can dene whether to display information concerning the inserted card,
or not.
Exit the ‘Smart Card’ menu or the ‘Smart Card Information’ menu pressing the EXIT button.
26 Version of 15 November 2017
Page 27
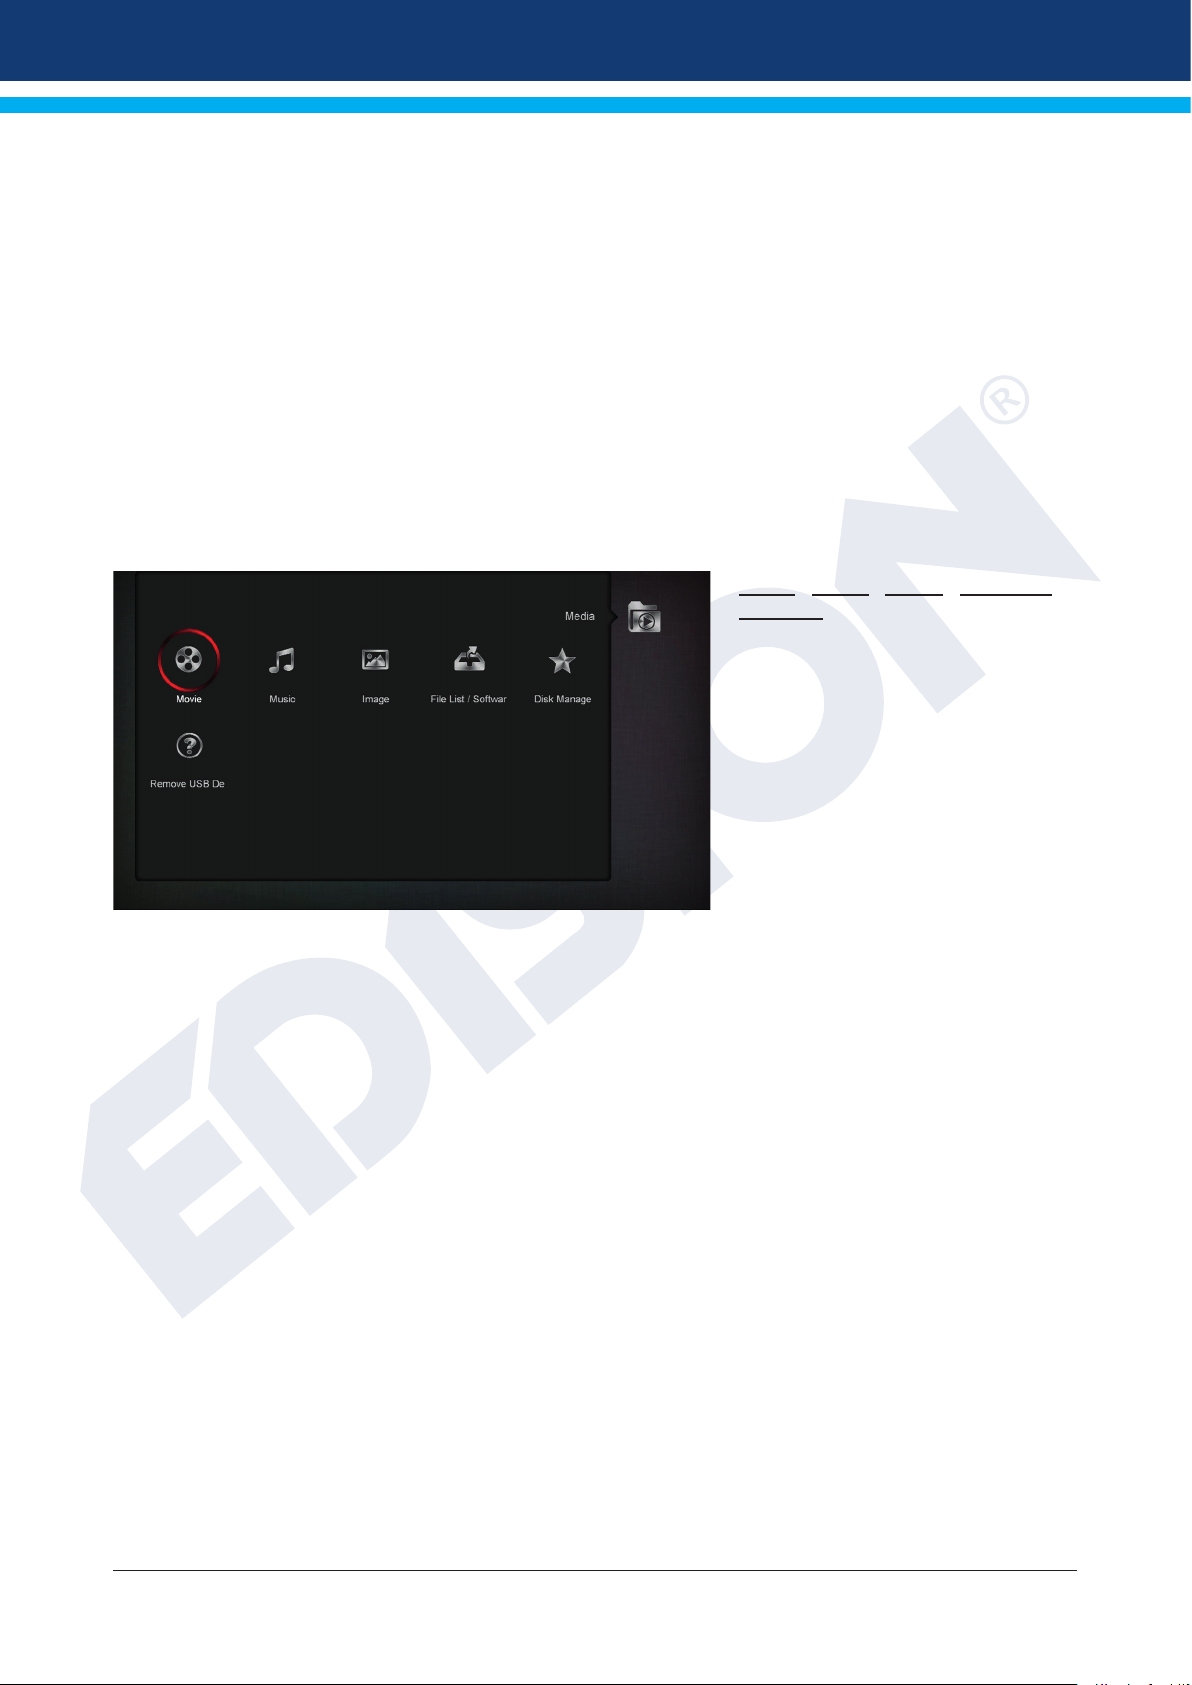
►Media
► Movie
► Music
► Image
► File List / Software
► Disk Management
► Remove USB Device Safely!
Movie Music Image File List /
Software
Key point: This menu displays les
and folders on the USB memory
device. The detected image les
are displayed on the top right as a
preview image; the detected MP3 les
can be played.
Note: This menu item is locked
when one or more recordings are in
process.
Menu functions and settings:
Use the up/down arrow buttons and the OK button to navigate through the folder structure. If images or
MP3 les have been detected, you can view them or listen to them by pressing the OK button. If the folder
contains more image les, pressing the OK button will initiate their presentation in slide show mode. Exit this
mode with the EXIT button. If the folder contains more MP3 les, they are played back in sequence.
Use the red button to specify the time (1-9 seconds) between the images presented in the slide show mode.
If the time item is set to ‘Off’, you can use the up/down arrow buttons in the slide show mode to go to the
next/previous image. Furthermore, you can specify whether the list of images will be presented with loop
mode (On/Off). Use the EXIT button to stop the process.
Use the green button to switch to the options menu, through which you can sort les into folders. Use the
EXIT button to exit the menu.
Use the 'SAT' button to add all images, which are in folders, to a ‘Playlist’ for image les.
Use the blue button to add all the MP3 les that are inside folders to a ‘Playlist’ for music les.
If you created a ‘Playlist’ or added les with the ‘SAT’ button and/or the blue button, you can display them
with the yellow button. In the displayed ‘Playlist Editor’ mode, you can use the up/down arrow buttons to
navigate through the list, the red button (Play) to ‘start’ a recording, the yellow button to select a le from the
Playlist to be deleted and the blue button to select all recordings to be deleted. If you press the blue button
again, all les are deselected.
Exit the Playlist Editor mode pressing the EXIT button. If you have made any changes, a dialog box appears,
through which you can conrm these changes (Yes).
If you start playing an MP3 le or a playlist, you can specify the repetitions using the ‘PLAYMODE’ button.
Version of 15 November 2017 27
Page 28

Use the EXIT button to exit the ‘File List’ menu. If you have created playlists or have made any changes, a
dialog box appears, through which you can save playlists on the USB memory device.
Recorded les
All TV and radio programs recorded on the USB memory device are listed on this menu.
Menu functions and settings:
Use the up/down arrow buttons to scroll through the list of recordings. On the top left part the channel name,
the reception time, the duration and the size of the le are displayed. On the tope right part (if this is a TV
program) a preview window is displayed. Press the PLAY button to play the recording in the preview window.
Use the PAUSE button to pause the playback and the STOP button to stop it. Use the OK button to start
playing in full screen mode.
Use the green button to lock recordings; the recording is then marked with a symbol in the summary list.
Such locked recordings are available only after entering a PIN code (dened in the System Settings /
Parental lock menu). Unlock a recording by pressing the green button and entering the PIN code.
Use the blue button to delete recordings; press it again to deselect the recordings.
Use the red button to rename the recording. In the displayed input eld, select characters and letters using
the arrow buttons and the OK button. You can delete the last character (of your entry), by moving the cursor
inside the letter eld, to the ‘<-’ symbol. You can add a space using the arrow buttons to move to the ‘--’
symbol. Conrm your choice using the arrow buttons to get to the ‘OK’ eld. The new name is registered. You
can exit the input window at any time using the EXIT button, and thus cancel the process.
In the playback mode (full screen) the following buttons (functions) are available:
PREV button: Moves the playback point backwards.
NEXT button: Moves the playback point forward.
PAGE- button: Fast backward playback at a frame rate 2-24 times higher than the
normal one (in TV mode).
PAGE+ button: Fast forward playback at a frame rate 2-24 times higher than normal
rate (in TV mode).
STOP: Stops playback mode.
PAUSE: Pauses playback mode.
Slow motion button (backward): Slow motion backward playback at a frame rate 2-8 times lower than
the normal rate.
Slow motion button (forward): Slow motion forward playback at a frame rate 2-8 times lower than
normal rate.
Use the ‘PLAY’ button to return to normal playback mode.
Exit the ‘Recorded les’ menu pressing the EXIT button. If you have selected recordings to delete, a dialog
box appears. Conrm with ‘Yes’ if you really want to delete the recordings.
Memory device Information
This menu displays information about the connected USB memory device.
Volume: Displays the name.
Total Size: Displays the total storage capacity.
Free Size: Displays the free memory capacity.
Rec Size: Displays the memory used by the recordings.
TMS Size: Displays the possible storage space for the Time Shift function.
File System: Displays the le system used.
28 Version of 15 November 2017
Page 29

You can format the USB memory device using the yellow button (HDD Formatting). In the ‘HDD Formatting’
menu you can specify which le system (FAT/NTFS) will be used to format the USB memory. Please note
that this process deletes all entries from the USB memory device.
The blue button brings up a menu for DVR settings (Digital Video Recording). You can specify whether only
recordings, only Time Shift, or both are going to be possible. Keep in mind that this item only makes sense
after formatting, i.e when there are no data stored in the USB memory device.
Exit the ‘Memory Device Information’ menu pressing the EXIT button.
Disk management
This menu provides information about the connected USB storage device.
Use the yellow button to display the USB/HDD information on
Volume: Displays the name.
Total size: Displays the total memory capacity.
Free Size: Displays free space.
Rec Size: Displays the space available for recording.
TMS Size: Displays the space available for TimeShift.
File System: Displays the le system used.
You can congure the USB memory by pressing the green button (HDD Format). In the ‘HDD Format’
you can specify which le system shall be used on the USB memory that has been formatted (FAT/NTFS).
Please note that this will clear all existing les in this USB memory.
Use the blue button to open a menu and set the DVR mode (Digital Video Recording). You can specify
whether only the images, only TimeShift, or both should be possible. This item is only useful after formatting,
i.e. if there are no data stored on the USB memory device.
You can exit the ‘Recorded les’ menu pressing the EXIT button.
Remove USB Device Safely!
Safely remove the USB device
Version of 15 November 2017 29
Page 30

►Applications
►Games
► YouTube
► RSS Reader
► Weather forecast
► Google Maps
► Ftp
► Web TV
► Web Server
► Tetris
►Edivision
► Edivision
Electronic program schedule (see pages 10-11)
► More
(see pages 10-11)
► Schedule
Viewing or recording settings (see pages 10-11)
► Snake
► Othello
30 Version of 15 November 2017
Page 31

Version of 15 November 2017 31
Page 32

www.edision.gr
 Loading...