


piccoS2
Full HD Sat Receiver
User’s Guide
picco S2
USB CHCH+
USB CHCH+
picco S2

Contents |
|
► Important safety instructions......................................................................................................... |
4 |
► Description.................................................................................................................................... |
7 |
Switching off................................................................................................................................. |
7 |
Language Selection...................................................................................................................... |
8 |
► Features....................................................................................................................................... |
8 |
► Information bar (InfoBar).............................................................................................................. |
9 |
How to change the time for fading in the information bar:............................................................ |
9 |
Functions and settings:................................................................................................................. |
9 |
► EDIVISION - Your electronic program guide.............................................................................. |
10 |
► Program list................................................................................................................................ |
13 |
How to change the fading time of the information bar:............................................................... |
13 |
► Menu program............................................................................................................................ |
15 |
Edit channel................................................................................................................................ |
15 |
How to move a channel:............................................................................................................. |
16 |
How to lock a channel:............................................................................................................... |
16 |
How to unlock a channel:........................................................................................................... |
16 |
How to delete a channel:............................................................................................................ |
16 |
How to name a channel:............................................................................................................. |
17 |
Skip channel............................................................................................................................... |
17 |
How to select a channel to be skipped:...................................................................................... |
17 |
Edit favourites............................................................................................................................. |
18 |
How to add a channel to a favourite list:.................................................................................... |
19 |
How to remove a channel from a favourite list:.......................................................................... |
19 |
How to move a channel in a favourite list:.................................................................................. |
19 |
How to name a favourite list:...................................................................................................... |
20 |
► Menu Conditional........................................................................................................................ |
21 |
Other settings............................................................................................................................. |
21 |
► Menu installation......................................................................................................................... |
23 |
Satellite installation..................................................................................................................... |
23 |
Auto installation.......................................................................................................................... |
25 |
Satellite guide............................................................................................................................. |
25 |
► Menu system settings................................................................................................................. |
26 |
Languages.................................................................................................................................. |
26 |
Functions and settings in the menu:........................................................................................... |
26 |
Minors protection........................................................................................................................ |
27 |
Time setting................................................................................................................................ |
27 |
Timer.......................................................................................................................................... |
28 |
Audio + Video............................................................................................................................. |
29 |
► Menu system.............................................................................................................................. |
30 |
2 |
Version of 20 December 2018 |

Information.................................................................................................................................. |
30 |
Factory setting............................................................................................................................ |
30 |
► Menu/Media/File List.................................................................................................................. |
31 |
► Menu/Media/Memory Information............................................................................................... |
32 |
► Menu/Internet/Ethernet Settings................................................................................................. |
33 |
► Setting up WLAN........................................................................................................................ |
34 |
► Menu/Miscellaneous/Software Update....................................................................................... |
35 |
Http Upgrade.............................................................................................................................. |
35 |
Auto Upgrade............................................................................................................................. |
35 |
Update from USB/HDD............................................................................................................... |
35 |
Backup to USB/HDD.................................................................................................................. |
36 |
► Menu/Applications...................................................................................................................... |
37 |
Weather Forecast....................................................................................................................... |
37 |
RSS Reader............................................................................................................................... |
38 |
Version of 20 December 2018 |
3 |

► Important safety instructions
1)Please read these instructions carefully.
2)Keep these instructions in a safe place for future reference.
3)Pay extra attention to «warning» points.
4)Follow all instructions.
5)Do not use the device near water.
6)Clean with a dry cloth only.
7)Do not use near heat sources, such as radiators, heat accumulators, ovens or other devices (including amplifiers) generating heat.
8)Only operate this product with the type of power source indicated on the label. If you are unsure about the type of power supply you use at home, ask your electricity supplier. Disconnect the device from the mains before maintenance or installation procedure.
9)Protect the mains cable from damage.
10)Only use auxiliary devices/accessories specified by the manufacturer.
11)Disconnect the device during thunderstorms or extended periods of non-use.
12)All maintenance work should be carried out by qualified service personnel. Maintenance is required when the device is damaged in any way, including damage to the mains cable or mains plug. Also in case the device becomes exposed to liquids or moisture, was dropped or does not function properly.
13)Make sure that the ventilation slots are always unobstructed.
14)Attention should be paid to the environmental aspect of battery disposal.
15)Only use the device in moderate climate.
WARNING: In order to avoid the risk of fire or electric shock, do not expose this device to rain or moisture. WARNING: The batteries should not be exposed to excessive heat and heat sources such as direct sunlight, fire, etc.
4 |
Version of 20 December 2018 |

 This symbol indicates that there is risk of electric shock.
This symbol indicates that the operating instructions contain important operating and maintenance  information.
 This symbol indicates that the product has a double insulation between voltage and user accessible
  parts. Only use parts provided by the manufacturer during repair.
 This symbol on the product or in the operating instructions indicates that the electrical or electronic
  device must be disposed of separately from household waste at the end of the service life. Separate collection systems exist for recycling.
For further information, please contact your local authorities or your dealer where you purchased the product.
Version of 20 December 2018 |
5 |

► Remote control
ZOOM
REC
AUDIO |
OPTION |
TXT |
WebTV |
TV/AV
On/Off button.
Mute On/Off.
Selection of TV/Radio program.
...  Input of numbers or letters in the menus.
Toggles between TV and Radio mode.
Returns to the previous program.
Displays the main menu.
Displays the information bar.
Use the arrow buttons to scroll up in lists. Below, scroll left or right or change the volume. Confirm the menu inputs with the OK button or call up the channel list.
Exits a Menu/Dialogue window
Selection of the electronic program guide EDIVISION.
To search for programs in lists.
Displays a file list.
Scrolls up (+) or down (-) in lists of channel lists.
Displays the favourite lists.
Displays the satellite lists.
Changes the screen TV standard.
Allows fast backward.
Allows fast forward.
Skips to the beginning or previous
Recording/Image.
Skips to the beginning or previous
Recording/Image.
Starts recording manually.
Starts Playback/Pauses playback.
Finishes TimeShift, a recording or a playback.
Calls up the Audio menu.


 Option button. Switching between TV/AV TV/AV mode (Not in HDMI mode).
Calls up the Subtitle/Teletext menu. Web TV button.
6 |
Version of 20 December 2018 |

► Description
|
Front Panel |
1 |
/ USB: Connection for USB storage |
2 |
devices |
Display LED, displays current information |
|
3 |
Infrared sensor for the reception of remote |
|
control commands |
4CH- / CH+ buttons: for moving in the program lists
5POWER button: Activates/Deactivates the device
Back Panel
6LNB IN: Connection for the coaxial cable to the signal from the satellite system
7S/PDIF:Audio interface for amplifier/audio console
8HD OUT: Connection to an HDTV quality TV
9SCART: For connecting to a TV set,
using SCART cable [not for HD TV] 10 Connection for an adapter (DC 12V)
Subpages
11Card reader
12IR IN: Infrared connection port
picco S2
1 |
2 |
|
USB |
3 |
CH+ |
CH- |
6 |
7 |
9 |
10 |
|
8 |
||||
|
|
|
11 |
12 |
IR |
|
CA |
|
Connecting and switching on
Note: For interference-free satellite TV reception, a specialist technician must calibrate your satellite TV system with a digital TV level meter
• Connect the receiver using HDMI cable via the HD OUT output port to your TV’s HDMI input port
• Now connect the receiver to the satellite |
|
|
|
antenna cable via the LNB IN input. |
wire-coaxial |
|
|
• Insert the batteries into the remote |
LNB IN: Connecting |
|
|
Antenna |
|
||
control. Notes on the remote control |
the cable to the satellite |
|
|
|
|
||
can be found on the back |
|
signal |
TV set connection panel |
of these instructions. |
|
|
Use an HDMI input! |
|
|
|
|
• Connect the receiver |
|
|
HDMI in |
|
|
2 |
|
to the power supply. |
|
|
1 |
•The receiver starts with the BOOT process and is operational within
a short time
HD OUT:
Output receiver
HDMI kabel
HD mi kabel
Power socket
Switching off
HDMI cable
By pressing the Power button once on your remote control, a pop-up window opens.
You can choose any of these two types of Stand-by mode, according to your preferences. When pressing and holding the Power button of your remote control for more than 2 sec., the device goes into OFF mode. For more settings please refer to page 21
Version of 20 December 2018 |
7 |

►Language Selection
During the initial start, please select your language.
► Features
•Type: Digital Satellite Receiver for DVB-S2
•Full HD H.264 decoding support
•Resolution: 480p, 576p, 720p/50Hz, 720p/60Hz, 1080i/50Hz, 1080i/60Hz, 1080p/50Hz, 1080p/60Hz TV Standard
•DiSEqC 1.2, 13/18V, 0/22K, LNB
•1 x Card Reader
•1 x HDMI output for High definition video/audio.
•1 x Scart
•1 x IR in (jack)
•1 x S/PDIF output
•1 x USB
•1 x LED Display
•LNB in
•6000 TV/Radio channels memory
•PAL/NTSC auto-switch
•Multilingual OnScreenDisplay
•EDIVISION electronic program guide
•Supports Picture In Grafik (PIG)
•Channel Edit and Favourite Lists
•Auto and Manual channel search
•Auto-timer Οn/Off
•Wifi Connection (embedded)
•Wifi Connection (with USB Dongle)
•3G Connection (with USB 3G Modem)
•PVR via USB
•Τime Shift function
•Subtitle support
•Teletext support
•Last channel auto save
•Software upgrade & backup/channel list, via USB.
•Supports FAT 16/32, NTFS
•Parental control
•100 ~ 240V Voltage,50Hz/60Hz
•Media player MP3/ JPEG/BMP/AVI/DivX/ VOB/MKV
•Dimensions: (W x H x D): 125x120x35 (mm)
•Weight: 0,5 kg
•Color: black
•Warranty: 2 years
picco S2
USB |
CH- |
CH+ |
8 |
Version of 20 December 2018 |

► Information bar (InfoBar)
When in the TV/Radio mode, the ‘INFO’ button displays an information bar (InfoBar) at the lower edge of the screen. This bar is faded-in up to 10 seconds.
How to change the duration of fading of the information bar:
1.Press the ‘MENU’ button to open the main menu.
2.Use the left/right arrow buttons to navigate to the ‘System’ item.
3.Use the up/down arrow buttons to navigate to the ‘Other settings’ menu item and press the OK button.
4.Use the left/right arrow buttons to select the value in seconds you want to set (max. 10s) in the ‘OSD time exceeded’ item.
5.Press the EXIT button to exit the menu.
The InfoBar in TV or Radio mode shows the following information about the current program and selected station:
-the place in the program list
-the name of the station
-the current program (as far as information is available) including start time
-the following program (as far as information is available) including start time
-the name of the favourite list
-the time
-indicates the availability of Teletext for the current program
-indicates if the transmitted program is encrypted
-indicates if subtitles are available
-indicates if the sound broadcasted is in stereo or mono format, left or right balance
-indicates if the program is blocked (child protection)
-indicates that the station is present in a favourite list
-indicates if the program is transmitted in HD
-indicates if Wi-Fi network connection exists
Functions and settings:
If the InfoBar is displayed, detailed information about the current program can be displayed (if available) by (repeated) pressing the ‘INFO’ button. If multiple information pages are available, scroll through these pages by using the ‘PAGE+’/’PAGE-’ buttons. Use the left/right arrow buttons to switch between the information of the current and next program. Use the red button to display further (technical) information. Use the EXIT button to exit the menu with the detailed information.
Use the EXIT button again to switch off the InfoBar.
Version of 20 December 2018 |
9 |
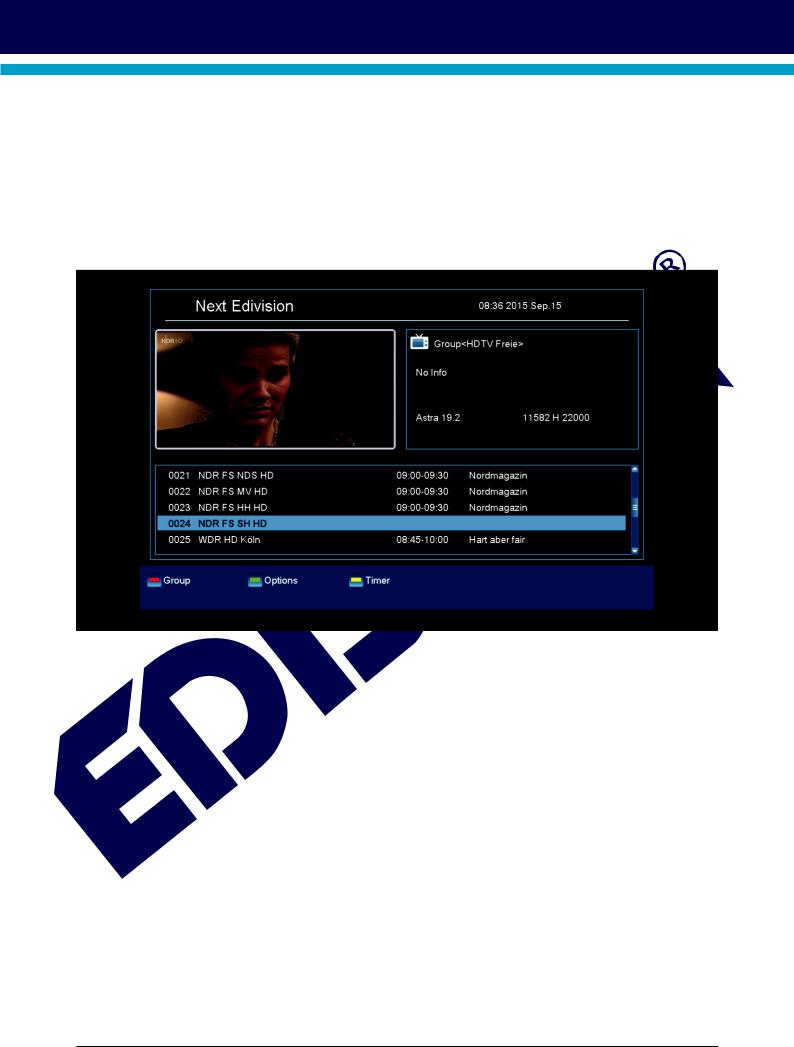
► EDIVISION - Your electronic program guide
Standard: EDIVISION is an electronic program guide with its own OSD menu. EDIVISION presents the information provided by the service provider in detailed views. In addition, up to 8 time-controlled recordings (Timer) can be programmed from here. Note that not all channels/program providers provide program-related information.
Use the EDIVISION button on the remote control to start your program guide.
Functions and settings:
The window of ‘EDIVISION’ is structured differently, depending on in which mode you are. The mode (now, next, more, timetable) can be changed with the green button.
Information can be found at the top left in the modes ‘Now’ and ‘Next’ on the current or next program and on the channel in text format, at the top right, the current TV picture (in TV mode). In the lower area, the current program list can be found which can be navigated with the up/down arrow buttons and another channel can be chosen with the OK button. If the channel provides program-related information, it will be displayed in the list (e.g. duration of the program in form of bars, program title). Press the OK button to display detailed information about the program, if available. Use the left/right arrow buttons to switch between ‘Now’ and ‘Next EDIVISION modes.
10 |
Version of 20 December 2018 |

The ‘More’ mode displays program information in chart form and chronological order. Use the left/right arrow buttons to navigate between a channel’s temporal program information and use the up/down arrow buttons to move the cursor (yellow marking) in the channel list. The OK button may possibly has to be pressed if another channel was selected and the program-related information should be displayed (if available). If the cursor is located on the right-hand side of a program title, detailed information about this program can be displayed by pressing the OK button.
The ‘Timetable’ mode displays the currently selected program list in chart form on the left and program information in weekly format on the right. Use the left/right arrow buttons
EDIVISION window in ‘Timetable’ mode
To navigate between the channel list and the PREV/NEXT buttons to navigate daily overview.
Version of 20 December 2018 |
11 |

Use the up/down arrow buttons to navigate between the weekdays in the respective list. If the cursor is located on the right-hand column side of a program title, even more detailed information about this program can be displayed (if available) by pressing the OK button .
The following functions and buttons can be used in all modes:
The red button displays an overview of the existing channel lists (groups). Use the arrow buttons to navigate through this overview and the OK button to set the channel list to be used by EDIVISION.
The green button calls up a menu allowing to switch between the different views of EDIVISION by using the up/down arrow buttons and the OK button.
The yellow button calls up a Popup Timer Menu. Select the ‘VCR’ item to program time-based events (e.g. recordings). Select the item Timer List to see the programmed events.
If you want to make a recording on a certain date in the future, select the item ‘USB/HDD Recorder’. Use the up/down arrow buttons in the following window to navigate between the menu items and the left/right arrow buttons and OK button to set the values. The following settings can be made in the menu ‘Timer’.
Timer number: Calling up the timer menu automatically switches to the next (available) programmable timer. Use the left/right arrow buttons the OK button and the up/down arrow buttons to switch between timers. Up to 8 different events can be programmed.
Timer mode: Set the recording mode here. Choose whether the recording is carried out once, daily, weekly or monthly.
Timer service: Set the service entry ‘Recording TV channel’ here for a TV recording and ‘Recording Radio channel’ for a radio recording.
Station: Set the channel here.
Date: Set the start date of the recording here.
Start time: Set the start time here.
Duration: Set the duration of the recording here (recording length).
After making changes and in order to keep them, confirm with ‘Yes’ in the appearing dialogue window. Exit the timer menu with the EXIT button.
Note: An error message appears under certain circumstances. As a rule, an incorrect start time or start date was given. Check the information!
Also note that a recording is only possible if a corresponding USB memory device is already connected to the receiver.
Exit ‘EDIVISION’ by pressing the EXIT button.
12 |
Version of 20 December 2018 |
 Loading...