


Countertop Dishwasher
DWP62BL / DWP62WH /
DWP62SV
Owner’s Manual
For more information on other great EdgeStar products on the web, go to https://www.edgestar.com To use the EdgeStar self-diagnostic tool, go to https://support.edgestar.com
V2.0-12292017

IMPORTANT SAFETY INFORMATION
Read all instructions carefully prior to use. For your safety, the information detailed in this manual should be followed. Improper use and/or handling can cause serious damage to the appliance and/or to the user including but not limited to fire, explosion, and/or electric shock, resulting in personal injury, or death. This dishwasher is intended for domestic use only; any other use may invalidate the warranty.
Use this appliance only for its intended purpose as described in this Owner′s Manual.
 Electrical Safety
Connect the dishwasher to a grounded permanent electrical system.
Improper connection of the equipment-grounding conductor can result in a risk of electric shock.
Do not, under any circumstances, cut or remove the third (ground) prong from the power cord.
Check with a qualified electrician or service representative if you are in doubt whether the appliance is properly grounded.
Use only the correct power supply with appropriate amperage. Do not exceed the suggested power ratings.
To minimize the possibility of electric shock, disconnect this appliance from the power supply before attempting any maintenance.
Turning the dishwasher OFF does not disconnect the appliance from the power supply.
If your dishwasher is connected to a wall switch, ensure the switch is ON prior to use.
If you choose to turn the wall switch OFF between wash cycles on dishwashers with electronic controls, allow 5 - 10 seconds after turning the switch ON before touching the START/RESET button. This allows the control system to reboot.
Do not start or stop the dishwasher by switching the circuit breaker’s power on and off.
Never plug or unplug the dishwasher with wet hands.
Do not modify the power cord’s length.
If the power cord is damaged, it must be replaced by the manufacturer, a service agent, or a qualified technician.
Caution: Hydrogen gas is flammable. Under certain conditions, hydrogen gas may be produced in a water heater that has not been used for more than two weeks. To prevent the possibility of damage and/or injury, turn on all hot water faucets and allow them to run for several minutes. Do this before using any electrical appliance connected to the hot water system. This simple procedure will release any built-up hydrogen gas. Since hydrogen gas is flammable, do not smoke, use an open flame, or use any appliance during this process.
i

 General Safety
This dishwasher should be properly installed and placed in a location in accordance with the Installation Instructions prior to operation.
Do not attempt to repair or replace any part of your dishwasher unless it is specifically recommended in this manual.
All other service maintenance should be completed by a qualified technician.
Use this appliance only for its intended purpose as described in this Owner’s Manual.
This dishwasher must be installed indoors.
This appliance is not intended for use by children.
Do not allow children to play with, on, or inside this or any appliance.
Close supervision is necessary if this appliance is used near children.
Use caution when opening or closing the door to avoid injury.
Use only powder, tabs, liquid detergents, or rinse agents recommended for use in a dishwasher and keep them out of the reach of children.
Using a detergent that is not specifically designed for dishwashers may have an undesired result such as excessive suds.
To avoid damage to the door seal, place sharp items strategically.
Load sharp knives handle-side up to reduce the risk of injury.
Do not wash plastic unless it is marked as dishwasher safe. For plastic items not marked as dishwasher safe, refer to the manufacturer’s recommendations.
Do not operate your dishwasher unless everything enclosed is securely in place.
Do not tamper with controls.
Do not sit or stand on the door or dish rack of the dishwasher.
The door should remain closed. Left in the down position, the door presents a tripping hazard.
Do not discard the dishwasher without removing the door.
Do not store or use combustible materials such as gasoline or other flammable vapors and liquids in the vicinity of this or any other appliance.
Contents washed in anti-bacterial mode (if available) may be hot to the touch. Use care before handling.
Do not wash non-dishware items such as furnace filters, paint brushes, etc. in your dishwasher. Discoloration, staining, and/or other damage to dishwasher may result.
Do not touch the heating element during or immediately after use.
Note: This owner’s manual is provided for reference use only. Specifications may change without prior notice. Refer to the product label on the back of your dishwasher for the latest technical information.
ii
Table of Contents |
|
IMPORTANT SAFETY INFORMATION ................................................................................................ |
I |
TABLE OF CONTENTS ...................................................................................................................... |
III |
First Time Operating Instructions ............................................................................................................................................ |
1 |
INTRODUCTION .................................................................................................................................. |
1 |
PARTS IDENTIFICATION .................................................................................................................... |
2 |
Front View ............................................................................................................................................................................... |
2 |
Back View................................................................................................................................................................................ |
2 |
Accessories ............................................................................................................................................................................. |
2 |
PREPARING THE DISHWASHER FOR USE ...................................................................................... |
2 |
INSTALLATION REQUIREMENTS...................................................................................................... |
3 |
Clearance Requirements ........................................................................................................................................................ |
3 |
Water Requirements ............................................................................................................................................................... |
3 |
Electrical Requirements .......................................................................................................................................................... |
4 |
CONNECTING THE DISHWASHER .................................................................................................... |
5 |
DISCONNECTING YOUR DISHWASHER ........................................................................................... |
7 |
OPERATING INSTRUCTIONS............................................................................................................. |
7 |
Control Panel Functions .......................................................................................................................................................... |
8 |
Wash Cycles ........................................................................................................................................................................... |
8 |
Error Codes ........................................................................................................................................................................... |
20 |
Loading the Dishwasher Basket............................................................................................................................................ |
10 |
Detergent and Rinse Aid Dispensers .................................................................................................................................... |
11 |
Starting a Wash Cycle........................................................................................................................................................... |
14 |
Changing a Wash Cycle........................................................................................................................................................ |
14 |
Completing a Wash Cycle..................................................................................................................................................... |
15 |
GENERAL MAINTENANCE ............................................................................................................... |
16 |
Cleaning the Filter System .................................................................................................................................................... |
16 |
Cleaning the Dishwasher ...................................................................................................................................................... |
18 |
Protecting the Dishwasher Against Freezing ........................................................................................................................ |
19 |
Other Maintenance Suggestions........................................................................................................................................... |
19 |
TROUBLESHOOTING ....................................................................................................................... |
20 |
SPECIFICATIONS.............................................................................................................................. |
23 |
iii

First Time Operating Instructions
Before use, make sure all packaging labels and materials are removed from the unit. Be sure to keep track of all included parts and pieces before discarding the packaging materials. It is advised that you keep the original box and packaging materials in case you ever need to move or ship the appliance in the future.
Introduction
Thank you for purchasing this EdgeStar dishwasher. We hope that this purchase will be the beginning of a lasting and rewarding relationship between you and EdgeStar. We will provide the customer support and exemplary products necessary to nurture that relationship.
This manual contains important information regarding the proper installation, use, and maintenance of your dishwasher. Following this manual will ensure that your product will work at its peak performance and efficiency.
Please save the original product packaging in case you need to safely transport your dishwasher.
For Your Records:
Please write down the model number and serial number below for future reference. Both numbers are located on the ratings label on the back of your unit and are needed to obtain warranty service. You may also want to staple your receipt to this manual as it is the proof of your purchase, and is also needed for service under your warranty.
Model Number:
Serial Number:
Date of Purchase:
For a more efficient experience, please do the following before contacting customer service:
If you received a damaged product, immediately contact the retailer or dealer that sold you the product.
Read and follow this instruction manual carefully to help you install, use, and maintain your dishwasher.
Read the troubleshooting section of this manual as it will help you diagnose and solve common issues.
Visit us on the web at https:/www.edgestar.com to register your product, download product guides, and access additional troubleshooting resources and up-to-date information. You can also find an interactive self-diagnostic tool at https://support.edgestar.com
If you need warranty service, our friendly customer service representatives are available via email at service@edgestar.com.
1

Parts Identification
Front View
Cup Shelf
Cutlery Basket
Filter System
Spray Arm
Detergent Dispenser |
Rinse Aid Dispenser |
Back View
Accessories
2

Preparing the Dishwasher for Use
Unpacking the Dishwasher
Use at least two people to move and install the dishwasher to prevent back and other types of injuries. Carefully remove the packaging materials. Remove any shipping tape and glue from your dishwasher before using. Do not use sharp instruments, rubbing alcohol, flammable fluids, or abrasive cleaners to remove tape or glue. These products can damage the surface of your dishwasher. Check to make sure the parts necessary for installation are included. If any parts are missing, please contact our customer service. Put the dishwasher on a level and flat surface that is able to support the entire weight of the dishwasher fully loaded.
Installation Requirements
The dishwasher has been designed for a countertop installation. Please follow the instructions for clearance, water, and electrical requirements.
Clearance Requirements
The minimum height clearance required to install your dishwasher on a counter top surface with overhead cupboards is 17-¾” (45cm).
Water Requirements
Make sure the water supply/faucet connection is within reach of the inlet and drain hose assembly (i.e. 22-¾” / 58 cm). If your sink has a spray wand, it is recommended that the hose be disconnected and the hole plugged.
Water Pressure
For best results, incoming water pressure should be between 15 and 20 pounds per square inch (psi).
Water Temperature
For best results, the water temperature must be at least 120ºF (49ºC). To prevent damage to the dishwasher, the temperature of the incoming water supply should not exceed 149ºF (65ºC).
Caution: A hose that attaches to a spray wand can burst if it is installed on the same water line as the dishwasher.
3

Electrical Requirements
Read all safety precautions listed at the beginning of this manual. It is recommended that you use receptacles that cannot be turned off by a switch or pull chain.
Make sure there is an electrical supply (outlet) within reach of the electrical power supply cord (195 cm / 6’ 3/8”).
The dishwasher is equipped with a power supply cord having a 3-prong grounding plug. To minimize possible shock hazard, the cord must be plugged into a mating 3-pronged and grounding-type wall receptacle providing 110-120V, 60Hz, grounded in accordance with the National Electrical Code and local codes and ordinances. If a mating wall receptacle is not available, it is the personal responsibility of the customer to have a properly grounded, 3- prong wall receptacle installed by a certified electrician. Use a circuit that is rated for at least 10 Amps.
Caution:
Do not, under any circumstances, cut or remove the third (ground) prong from the power cord.
Do not use an extension cord or an adapter plug with this appliance.
4
Connecting the Dishwasher
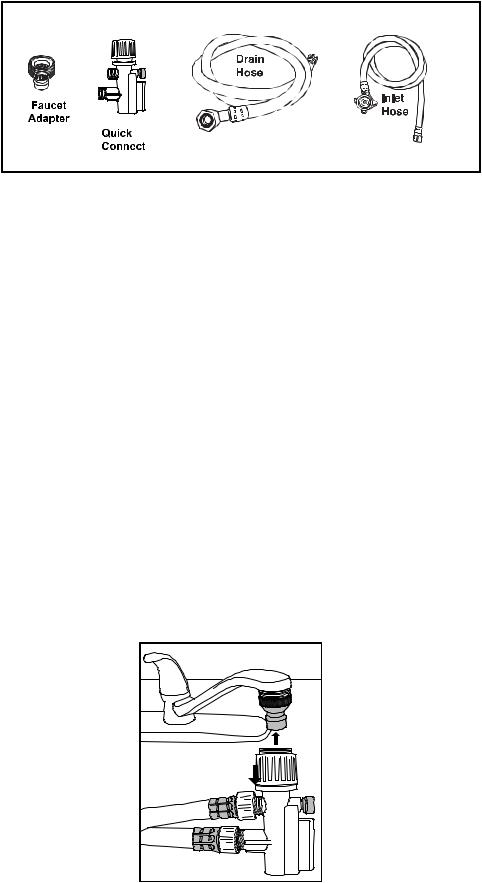
Your dishwasher comes equipped with a Faucet Adapter, Quick Connect, Drain Hose, and Inlet Hose. The Faucet Adapter must be installed on the faucet before you can connect the dishwasher. This adapter comes packaged inside your dishwasher.
The Faucet Adapter is compatible with faucets inclusive of either male (outside) or female (inside) threaded faucet connections.
1.Screw the Faucet Adapter onto (or into) the faucet tap. Check for leaks (use Teflon or plumbers tape to eliminate any leaks if necessary).
2.Connect the six-sided connection of the drain hose to the drain port connection on the back of the dishwasher cabinet. To avoid damage to threads, do not over-tighten.
3.Connect the star-shaped connection of the inlet hose to the inlet port on the back of the dishwasher cabinet. Do not over-tighten.
4.Connect the circular connection of the drain hose onto the longer (bottom) male connection on the Quick Connect.
5.Connect the circular connection of the inlet hose onto the shorter (top) male connection on the Quick Connect.
6.Attach the Quick Connect assembly onto the Faucet Adapter, by pulling down the outer locking collar on the Quick Connect, while pushing the quick connect assembly upward onto the Faucet Adapter.
7.Release the locking collar when the quick-connect assembly snaps onto the Faucet Adapter. Verify the connection is secure.
8.Slowly open the hot water line and check for any sign of water leaks at all connections. If leaks are located, immediately close the water supply and repair the hose connections.
5
 Loading...