

Page 1

EN
Instruction Manual
IW
Page 2

EN
Instruction Manual
................................................................
2
IW
Congratulations on the purchase of your ECOVACS Robotics WINBOT!
We hope it brings you many years of satisfaction. We trust the purchase of your
new robot will help keep your home clean and provide you more quality time to
do other things.
Live Smart. Enjoy Life.
......................................................................20
Should you encounter situations that have not been properly addressed in
this Instruction Manual, please contact our Customer Service Center where a
technician can address your specic problem or question.
For more information, please visit the ECOVACS ofcial website:
The company reserves the right to make technological and/or design changes
to this product for continuous improvement.
www.ecovacs.com
Thank you for choosing WINBOT!
Page 3

Contents
1. Important Safety Instructions
2. Package Contents and Technical Specifications
2.1 Package Contents.....................................................................................4
2.2 Specications............................................................................................4
2.3 Product Diagram........................................................................................5
3. Operating WINBOT 8
3.1 Notes before Cleaning...............................................................................6
3.2 Attach Cleaning Pad.................................................................................8
3.3 Assemble Power Adapter..........................................................................8
3.4 Install Safety Tether...................................................................................8
3.5 Place Safety Pod....................................................................................10
3.6 Spray Cleaning Solution..........................................................................10
3.7 Start.........................................................................................................11
.....................................................................................6
.......................................................................2
.......................................4
3.8 Pause......................................................................................................12
3.9 Stop.........................................................................................................13
4. Maintenance
4.1 Cleaning Pad..........................................................................................14
4.2 Fan, Sensors and Squeegees.................................................................14
4.3 Driving Treads.........................................................................................15
5. Status Indicator Light and Sounds
6. Troubleshooting
.................................................................................................14
............................................................16
..........................................................................................17
EN
Page 4

1. Important Safety Instructions
When using an electrical appliance, basic precautions should always be followed, including
the following:
READ ALL INSTRUCTIONS BEFORE USING THIS APPLIANCE.
SAVE THESE INSTRUCTIONS
1. This Appliance is not intended to be used by children under 8 or anyone lacking knowledge
on proper use. Supervision may be necessary. Do not allow children to play with the
Appliance.
2. Do not use the Appliance in extremely hot or cold environments (below 0˚C/32˚F or above
40˚C/104˚F). The Appliance can be used to clean outside windows if it is properly tethered
to the Safety Pod, winds are calm, and it is not raining or snowing.
3. Please ensure the Appliance is plugged in while it is cleaning. The Appliance has a Back-Up
Battery that charges during use. The Back-Up Battery powers the Appliance if it becomes
unplugged or the electricity fails.
4. Do not leave the Appliance unattended when it is plugged in.
5. For household use ONLY. Do not use the Appliance in commercial or industrial environments.
6. Do not use the Appliance on cracked glass.
7. Only use accessories recommended or supplied by the manufacturer. Only use the Power
Adapter supplied by the manufacturer.
8. Please make sure your power supply voltage matches the power voltage marked on the
Power Adapter.
9. Do not use the Appliance on a framed window with a frame smaller than 5mm (0.2 inches).
10. Do not use the Appliance on wet or greasy windows.
11. Store the Appliance away from heat and ammable materials.
12. Do not use the Appliance if it does not rmly attach to the glass or has visible signs of damage.
13. To reduce the risk of electrical shock, do not put the Appliance in water or other liquid. Do
not place or store Appliance where it can fall or be pulled into a tub or sink.
14. Do not touch power plug or the Appliance with wet hands.
15. Do not charge the Appliance in extremely hot or cold environments, or it may affect battery
life span.
16. When charging the Appliance, do not place it on other electrical appliances and keep it
away from re and liquid.
17. Take care not to damage the power cord. Do not pull on or carry the Appliance by the power
cord, use the power cord as a handle, close a window on the power cord, or put heavy
weights on the power cord. Keep power cord away from hot surfaces.
18. Do not use with a damaged power cord or receptacle. Do not use the Appliance if it is not
working properly, has been dropped, damaged, or come in contact with water. It must be
repaired by the manufacturer or its service agent in order to avoid a hazard.
19. If the supply cord is damaged, it must be replaced by the manufacturer or its service agent
in order to avoid a hazard.
20. The plug must be removed from the receptacle before cleaning or maintaining the Appliance.
Do not unplug the Power Adapter by pulling on the power cord.
21. The Back-Up Battery must be replaced by the manufacturer or its service agent in order
to avoid a hazard.
22. The Back-Up Battery must be removed and discarded according to local laws and regulations
before disposal of the Appliance.
23. The Appliance must be disconnected from the receptacle before removing the battery for
disposal of the Appliance.
2
EN
Page 5

1. Important Safety Instructions
24. Please dispose of used batteries according to local laws and regulations.
25. Do not incinerate the Appliance even if it is severely damaged. The battery can explode in
a re.
26. The Appliance must be used in accordance with the directions in this Instruction Manual.
The company cannot be held liable or responsible for any damages or injuries caused by
improper use.
EN
3
Page 6

2. Package Contents and Technical Specifications
2.1 Package Contents
WINBOT 8
(3) Cleaning Pads Finishing Cloth(1) WINBOT
Power Adapter Instruction Manual
WINBOT
Cleaning Solution
Extension Cord
(1.5m/4’11”)
Safety Pod and
Tether
Remote Control
with Batteries
2.2 Specifications
WINBOT model W850
Working Voltage 24V DC Rated Power 75W
Remote Control
Rated output voltage 3V DC
Power Adapter: EA10952
Input: 100-240V AC 50/60Hz 2.5A Output: 24V DC 3.75A
Technical and design specications may be changed in the course of continuous product improvement.
*
4
EN
Page 7

2. Package Contents and Technical Specifications
2.3 Product Diagram
WINBOT 8
1
2
3
4
5
7
8
9
10
11
12
13
14
6
1. Bumper Rail
2. Speaker
3.
Status Indicator Light and START/PAUSE Button
4. Handle
5. Upgrade Port (for after-sale service)
6. Power Cord
7. Edge Detection Sensors
8. Cleaning Pad
Remote Control
RESET
N Z
15
16
9. Squeegees
10. Bottom Power Switch
11. Driving Treads
12. Fan
13. Bottom Status Indicator Light
14. Suction Sensor
15. Velcro
16. Side Rollers
1
2
3
4
5
6
1. RESET Button
2. Direction Control Buttons
3. START/PAUSE Button
4. “N” Cleaning Mode Button
5. “Z” Cleaning Mode Button
6. Remote Control Pairing Button
EN
5
Page 8

3. Operating WINBOT 8
50
50
3.1 Notes Before Cleaning
Do not use WINBOT 8 on a framed window
with a frame smaller than 5mm (0.2”).
If WINBOT 8’s Status Indicator Light flashes
GREEN after powering ON, the Back-Up
Battery requires charging. Keep WINBOT
8 plugged in to charge the Back-Up Battery
until the Status Indicator Light flashes BLUE.
WINBOT 8 will not clean until the Back-Up
Battery is charged.
WINBOT 8 can clean framed or frameless
glass, larger than 50 x 50cm (19.7’’ x 19.7’’).
If the window is covered with dirt, clean a
small area on the glass before use and place
WINBOT 8 there.
6
EN
Page 9

3. Operating WINBOT 8
Remove the Bumper Rail protection strips on
both sides of WINBOT 8 before rst use.
Please ensure there is a 15cm (5.9”) clearance between the glass and obstacles in the room like
curtains or furniture.
WINBOT 8 can clean horizontally mounted glass but only when using the Direction Control
Buttons on the Remote Control.
WINBOT 8 can clean glass mounted at an angle but may not operate normally; in such a case,
a person should be in the vicinity to assist should there be a problem.
Do not use WINBOT 8 upside down.
WINBOT 8 should only be used with WINBOT Cleaning Solution. Using other cleaners
signicantly reduces WINBOT’s performance and can damage the robot.
Please refer to the manufacturer's care and cleaning instructions before using WINBOT 8 on glass
with an uneven surface, such as frosted, textured, patterned, or coated glass. ECOVACS Robotics
cannot be responsible for damage due to improper use on these surfaces.
3.2 Attach the Cleaning Pad
Turn WINBOT 8 over and attach the Cleaning Pad
to the bottom of WINBOT 8 smoothly. The white
side of the Cleaning Pad attaches to the Velcro,
and the gray microfiber side faces out. Make sure
the Cleaning Pad does not cover the Squeegees or
Edge Detection Sensors.
* The Cleaning Pad is not completely square
and if attached improperly, covers part of the
Squeegees.
EN
7
Page 10

3. Operating WINBOT 8
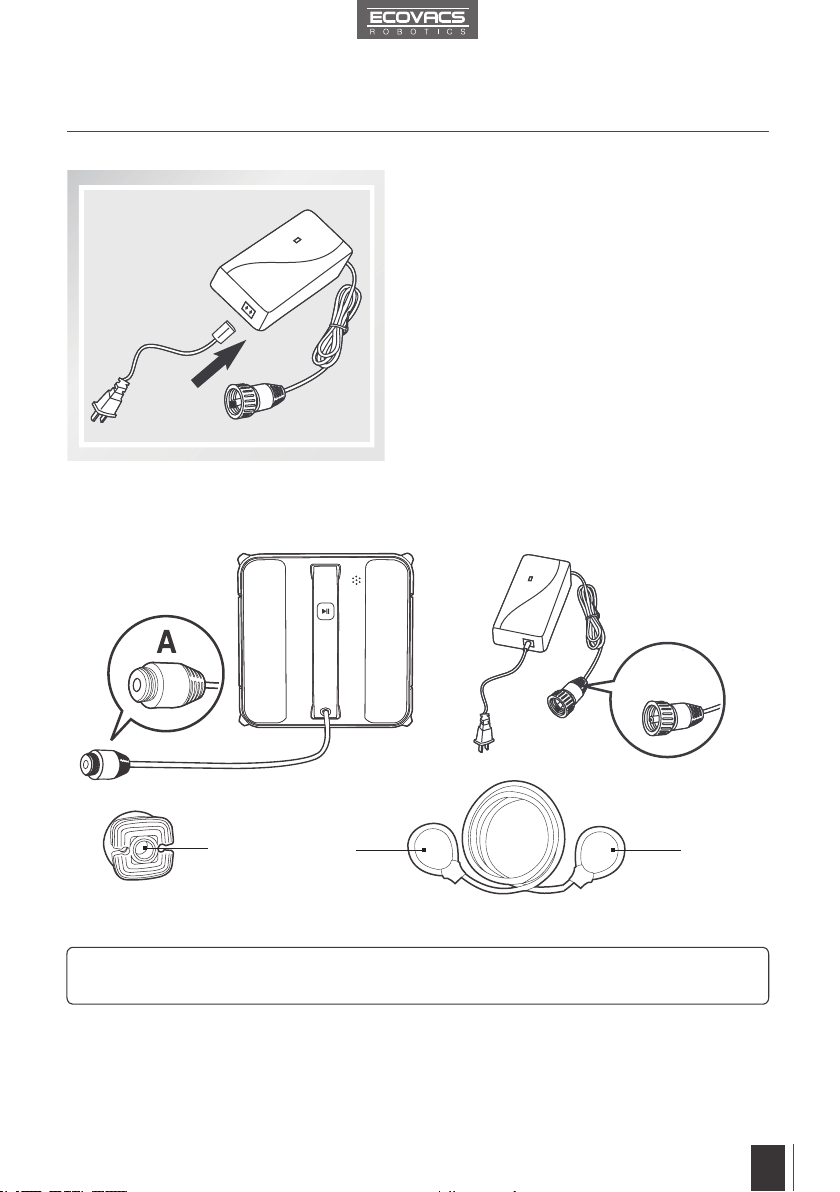
3.3
Assemble the Power Adapter
3.4 Install the Safety Tether
C
End A: WINBOT 8 Power Cord
End C: Safety Pod End D: Safety Tether
8
EN
End B: Power Adapter Power Cord
B
DD
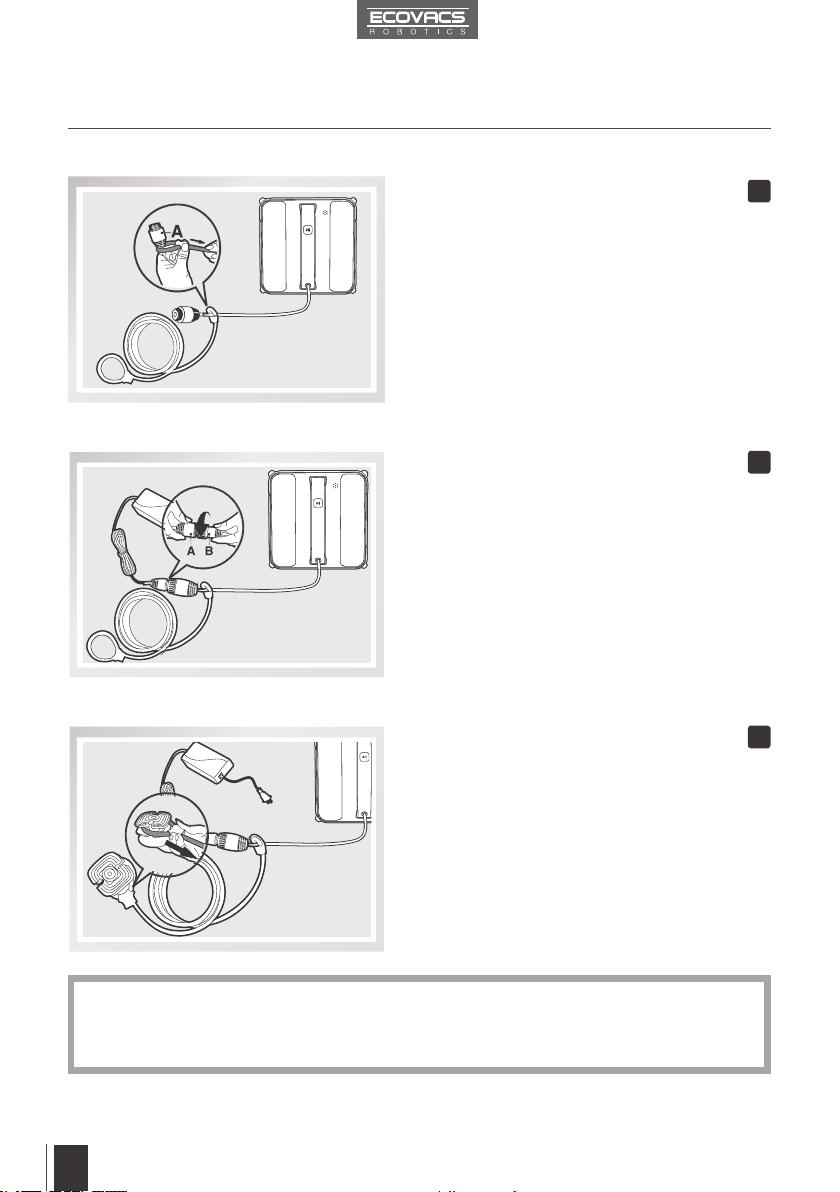
Page 11

Loop one end of the Safety Tether to
1
End A on the WINBOT 8 Power Cord
and tighten.
2
Connect End A and End B and tighten.
3. Operating WINBOT 8
Loop the other end of the Safety
3
Tether around the Safety Pod’s
channel and pull it tight.
* If the length of the power cord restricts WINBOT 8’s movement, a WINBOT Extension Cord can
be used. Disconnect End A and End B, and connect them with both ends of the Extension Cord
respectively and tighten.
* Only one Extension Cord can be used when WINBOT 8.
EN
9
Page 12

3. Operating WINBOT 8
3.5 Place the Safety Pod
Wipe the surface of the Safety Pod’s suction
cup clean with the provided Finishing Cloth.
If WINBOT 8 is being used to clean an inside
window: Press the Safety Pod FIRMLY on
the top corner of the inside window. Make
sure the Safety Pod is attached securely in
place.
If WINBOT 8 is being used to clean an outside
window: Press the Safety Pod FIRMLY on
inside
the
sure the Safety Pod is attached and securely in
place.
3.6 Spray Cleaning Solution
of the window being cleaned. Make
* WINBOT should only be used with WINBOT Cleaning Solution. Using other cleaners signicantly
reduces WINBOT’s performance and can damage the robot.
Spray the upper and lower sides of the
Cleaning Pad with the provided WINBOT
Cleaning Solution 8 times each.
10
EN
After spraying, wipe the bottom of WINBOT 8
with the provided Finishing Cloth.
Page 13

3.7 Start
Plug in WINBOT 8
1
* Do not unplug WINBOT 8 while it is cleaning.
Power ON
2
Move the Power Switch to the “ ” position.
WINBOT 8 is powered ON when the Status
Indicator Light ashes BLUE.
* Keep objects away from WINBOT 8’s Fan to
avoid blockage.
3. Operating WINBOT 8
54
Place on the Glass
3
Place WINBOT 8 on the window at least 10cm
(4”) from window corners or other obstacles.
WINBOT 8 has successfully attached to the
window when the Status Indicator Light glows
a continuous BLUE.
* Please ensure there is a 15cm (5.9”) clearance
between the glass and obstacles in the room
like curtains or furniture.
EN
11
Page 14

3. Operating WINBOT 8
Start
4
Start WINBOT 8 using one of the methods
below.
Press the START/PAUSE button on
WINBOT 8 or on the Remote Control to
begin cleaning. WINBOT 8 automatically
chooses an “N” or “Z” cleaning path.
Choose your own cleaning path by pressing the “N” or “Z” Cleaning Mode Button on the
Remote Control to begin cleaning.
“N” Cleaning Mode is best for tall windows.
WINBOT 8 cleans in an "N" path.
“Z” Cleaning Mode is best for wide windows.
WINBOT 8 cleans in a "Z" path.
3.8 Pause
Pause WINBOT 8 during cleaning by pressing
the START/PAUSE button on the robot or on
the Remote Control.
12
EN
Direct WINBOT 8 to move forward, backward,
left and right using the Direction Control
Buttons on the Remote Control when Paused.
WINBOT 8 cleans when the Direction Control
Buttons are used. Switch to a different Cleaning
Mode using the Cleaning Mode Buttons on the
Remote Control when Paused.
Page 15

3. Operating WINBOT 8
3.9 Stop
When WINBOT 8 completes its cleaning cycle, it returns to the place it started and beeps.
Remove WINBOT 8
1
Grasp WINBOT 8’s Handle. Press and
hold
for approximately 5 seconds and
the fan will stop. Remove WINBOT 8
from the window. Polish away any marks
left on the glass from WINBOT’s removal
with the provided Finishing Cloth.
Power OFF
2
Move the Power Switch to the “
5,,
” position.
o
Remove the Safety Pod.
3
Polish away any marks left on the glass
from the Safety Pod’s removal with the
provided Finishing Cloth.
* If WINBOT 8 has a problem and the indicator Light ashes RED, it can be reset by pressing the
RESET Button on the Remote Control. See “Troubleshooting” for details.
Unplug WINBOT 8
4
EN
13
Page 16

4. Maintenance
Before performing cleaning and maintenance on WINBOT 8, Power OFF and unplug WINBOT 8
from the receptacle.
4.1 Cleaning Pad
Turn WINBOT 8 over and remove the Cleaning
Pad. Soak the Cleaning Pad in cool, clean
water for 2 minutes. Hand wash with mild
detergent and lay flat to dry. Allow it to dry
completely before re-attaching it to WINBOT 8.
* Do NOT use a wet Cleaning Pad on
WINBOT 8 or it may slip on the window.
* Washing the Cleaning Pad regularly can
extend its service life.
* If the Cleaning Pad becomes worn or no
longer fits exactly within the Velcro area,
replace it with a new one to achieve best
cleaning performance.
4.2 Fan, Sensors and Squeegees
Fan Side Rollers
Turn WINBOT 8 over and wipe any debris
from the Fan with the provided Finishing
Cloth to maintain suction.
Turn WINBOT 8 over and wipe the four Side
Rollers with the provided Finishing Cloth to
maintain their effectiveness.
14
EN
Page 17

Edge Detection Sensors Squeegees
Turn WINBOT 8 over and wipe the four Edge
Detection Sensors clean with the provided
Finishing Cloth to maintain their effectiveness.
Turn WINBOT 8 over and wipe the two
Squeegees with the provided Finishing Cloth to
maintain their effectiveness.
4.3 Driving Treads
Turn WINBOT 8 over and move the Power
Switch to “
button for 5 seconds to stop the Fan.
” position. Press and hold the
54
Inspect the Driving Treads by using the
buttons on the Remote Control. Stop the
Driving Treads if dirt is seen on the Treads.
4. Maintenance
and
Move the Power Switch to the “O” position. Clean any dirt on the Driving Treads with the
provided Finishing Cloth.
5,,
EN
15
Page 18

5. Status Indicator Light and Sounds
Indicator Description
Status Indicator Light
ashes GREEN
Status Indicator Light
ashes BLUE
Status Indicator Light
glows a continuous BLUE
Status Indicator Light
ashes RED
Status Indicator Light
glows a continuous RED
WINBOT emits beeps
Back-Up Battery is low and is charging. WINBOT will not clean until
the Back-Up Battery is properly charged.
WINBOT 8 is powered ON and ready to be placed on the glass.
WINBOT 8 has successfully adhered itself to the glass and is ready
to clean.
WINBOT 8 has a problem. Please refer to section 6,
Troubleshooting, for details.
WINBOT 8 has been placed in Manual Override Mode. Please refer
to section 6, Troubleshooting, for details.
WINBOT 8 beeps in following situations:
WINBOT 8 is powered on.
WINBOT 8 nishes cleaning.
WINBOT 8 has a problem.
16
EN
Page 19
6. Troubleshooting
NO.
Malfunction Possible Causes Solutions
Remote Control
1
does not work
Status Indicator
Light ashes BLUE
2
after the product is
placed on the glass
WINBOT 8 is cleaning. When
WINBOT 8 is cleaning, only the
START/PAUSE Button works on
the Remote Control.
The Remote Control is not
paired with WINBOT 8.
WINBOT 8 arrives from the
factory paired with its Remote
Control. If the Remote Control
becomes un-paired or is
replaced, it can be re-paired.
If the Remote Control does not
work and the Status Indicator
Light ashes RED, WINBOT 8
may need to be reset.
The Cleaning Pad is attached
incorrectly and is covering
the Squeegees or the Edge
Detection Sensors.
Edge Detection Sensor
malfunction.
Fan malfunction.
Glass is too dirty for WINBOT 8
to adhere properly.
Pause WINBOT 8 by pressing the
START/PAUSE button on the robot
or Remote Control. Other buttons
on the Remote Control will function
when WINBOT 8 is paused.
Power ON WINBOT 8. At the same
time, press and hold START/PAUSE
Button on WINBOT 8 and Pairing
Button on the Remote Control.
Paring is complete when START/
PAUSE Button blinks RED, BLUE
and GREEN.
Reset WINBOT 8 by pressing the
RESET Button on the Remote
Control.
Remove the Cleaning Pad and reattach it making sure it is placed
exactly within its Velcro area and
does not cover the Squeegees or the
Edge Detection Sensors.
A. Remove the Cleaning Pad and
re-attach it making sure it does not
cover or affect the Edge Detection
Sensors.
B. Clean the Edge Detection
Sensors as described in section 4.
C. If the problem persists, please
contact Customer Service.
A. Clean the Fan as described in
section 4.
B. If the problem persists, please
contact Customer Service.
Clean a small area on the glass
before use and place WINBOT 8
there.
EN
17
Page 20

6. Troubleshooting
NO.
3
4
Malfunction Possible Causes Solutions
Status Indicator
Light of the product
ashes RED
WINBOT 8 moves in
an irregular pattern
during cleaning.
Interruption of electricity while
WINBOT 8 was cleaning due to
power failure, plug displacement,
or loose connection to the Power
Adapter.
WINBOT 8 has moved over a
problem area and is losing suction.
Edge Detection Sensors are dirty
There is too much dirt and debris
on the window.
A.
Connect WINBOT 8 to the Power
Adapter and plug into the wall
receptacle. Press Start/Pause Button on
WINBOT 8 or on the Remote Control.
WINBOT 8 will resume cleaning.
B.
In case of power failure, and the
above solution does not work, please
use the Direction Control Buttons on
the Remote Control to direct WINBOT 8
to a position on the window where you
can safely reach it, turn off the fan and
remove it from the window. If power
has resumed, place WINBOT 8 on the
window again and restart.
A. Press the RESET Button on the
Remote Control. Use the Direction
Control buttons on the Remote
Control to move WINBOT 8 away
from the problem area and at least
10cm/4” from window corners and
obstacles. Restart WINBOT 8.
B. Press the RESET Button on
the Remote Control, then use the
Direction Control Buttons to direct
WINBOT 8 to clean around the
problem area.
Wipe the four Edge Detection Sensors
clean as described in section 4. If
the problem persists, please contact
Customer Service.
A. Spray additional Cleaning Solution
on the upper and lower sides of the
Cleaning Pad.
B. Clean the Driving Treads as
described in section 4.
C. Replace the Cleaning Pad and
restart the cleaning cycle.
D. Clean the window using the
Direction Control Buttons on the
Remote Control.
E. Clean the window by hand rst and
use WINBOT 8 for regular cleaning
after that.
WINBOT 8 is intended to be used
*
for maintenance cleaning on common
windows. The product is NOT
designed to replace heavy duty or rst
time cleaning.
18
EN
Page 21

6. Troubleshooting
NO.
5
Malfunction Possible Causes Solutions
WINBOT 8 is stuck
in the window corner
and cannot move,
be controlled by the
Remote Control, or
be reset by pressing
RESET.
Insufcient suction or Edge
Detection Sensor signal abnormity.
A. Press the RESET Button on the
Remote Control.
B. If WINBOT 8 does not Reset, it
must be placed in Manual Override
Mode. Hold the RESET Button on
the Remote Control until the Status
Indicator Light glows a continuous
RED. In Manual Override Mode,
the Direction Control Buttons on the
Remote Control are activated. Use
the Direction Control Buttons to move
WINBOT 8 to a position away from
edges and where you can safely
reach it. Remove WINBOT 8 from the
window and power OFF. Power ON
and restart.
When using the Manual Override
*
Mode, do not leave WINBOT 8
attached to the glass.
C. If the problem persists, please
contact Customer Service.
EN
19
Page 22

!ECOVACS ROBOTICS תיבמ WINBOT יטובורה קבאה באוש תא םתשכרש לע וניתוכרב
22....................................................................................תובושח תווחיטב תוארוה .1
24.............................................................................םיינכט םיטרפמו הזיראה ןכות .2
24..................................................................................................הזיראה ןכות 2.1
24........................................................................................................םיטרפמ 2.2
25...............................................................................................רצומה םישרת 2.3
26...........................................................................................WINBOT 8 תלעפה .3
26...........................................................................................:יוקינ ינפל תורעה 3.1
27..........................................................................................יוקינ תדיפר רוביח 3.2
28......................................................................................למשחה םאתמ רוביח 3.3
28.......................................................................................תוחיטבה לבכ רוביח 3.4
30.....................................................................................תוחיטבה ןקתה תבצה 3.5
30.........................................................................................יוקינ תסימת סוסיר 3.6
31........................................................................................................הלחתה 3.7
32.........................................................................................................היהשה 3.8
33........................................................................................................הקספה 3.9
34............................................................................................................הקוזחת .4
34...................................................................................................יוקינ תדיפר 4.1
34..................................................................................םיבגמו םינשייח ,ררוואמ 4.2
35..................................................................................................העיסנ ילגלג 4.3
36.................................................................................םילילצו סוטטסל יוויח תירונ .5
37......................................................................................................תויעב ןורתפ .6
םיניינעה ןכות
טובורה לש השיכרה יכ םינימאמ ונחנא .תובר םינש ךשמב ונממ םיצורמ ויהתש םיווקמ ונא
תונהילו םכח תויחל ידכ יונפ ןמז םכל הנקתו יקנ תיבה לע רומשל םכל עייסת םכלש שדחה
.םייחהמ
!WINBOT םתרחבש לע םכל הדות
IW
20
Page 23

םיניינעה ןכות
22....................................................................................תובושח תווחיטב תוארוה .1
24.............................................................................םיינכט םיטרפמו הזיראה ןכות .2
24..................................................................................................הזיראה ןכות 2.1
24........................................................................................................םיטרפמ 2.2
25...............................................................................................רצומה םישרת 2.3
26...........................................................................................WINBOT 8 תלעפה .3
26...........................................................................................:יוקינ ינפל תורעה 3.1
27..........................................................................................יוקינ תדיפר רוביח 3.2
28......................................................................................למשחה םאתמ רוביח 3.3
28.......................................................................................תוחיטבה לבכ רוביח 3.4
30.....................................................................................תוחיטבה ןקתה תבצה 3.5
30.........................................................................................יוקינ תסימת סוסיר 3.6
31........................................................................................................הלחתה 3.7
32.........................................................................................................היהשה 3.8
33........................................................................................................הקספה 3.9
34............................................................................................................הקוזחת .4
34...................................................................................................יוקינ תדיפר 4.1
34..................................................................................םיבגמו םינשייח ,ררוואמ 4.2
35..................................................................................................העיסנ ילגלג 4.3
36.................................................................................םילילצו סוטטסל יוויח תירונ .5
37......................................................................................................תויעב ןורתפ .6
21
IW
Page 24

תובושח תווחיטב תוארוה .1
תובושח תווחיטב תוארוה .1
IW
22
Page 25
תובושח תווחיטב תוארוה .1
23
IW
Page 26
םיינכט םיטרפמו הזיראה ןכות .2
םיינכט םיטרפמו הזיראה ןכות .2
רצומה םישרת 2.3
WINBOT 8
שוגפ .1
לוקמר .2
היהשה/הלחתה ןצחלו סוטטסל יוויח תירונ .3
תידי .4
(הריכמה רחאל תורישל) גורדש רוביח .5
למשח לבכ .6
םיילוש יוהיזל םינשייח .7
יוקינ תדיפר .8
םיבגמ .9
ןותחת הלעפה גתמ .10
העיסנ ילגלג .11
ררוואמ .12
סוטטסל הנותחת יוויח תירונ .13
הביאש ןשייח .14
'ץוקס .15
םיידצ םינולגלג .16
קוחר-טלש
(סופיא) RESET ןצחל .1
םינוויכ תרקב ינצחל .2
היהשה/הלחתה ןצחל .3
"N" יוקינ בצמ ןצחל .4
"Z" יוקינ בצמ ןצחל .5
קוחר-טלשל דומיצ ןצחל .6
1
2
3
6
4
5
N Z
1
2
3
4
5
6
7
9
10
11
12
13
14
15
16
8
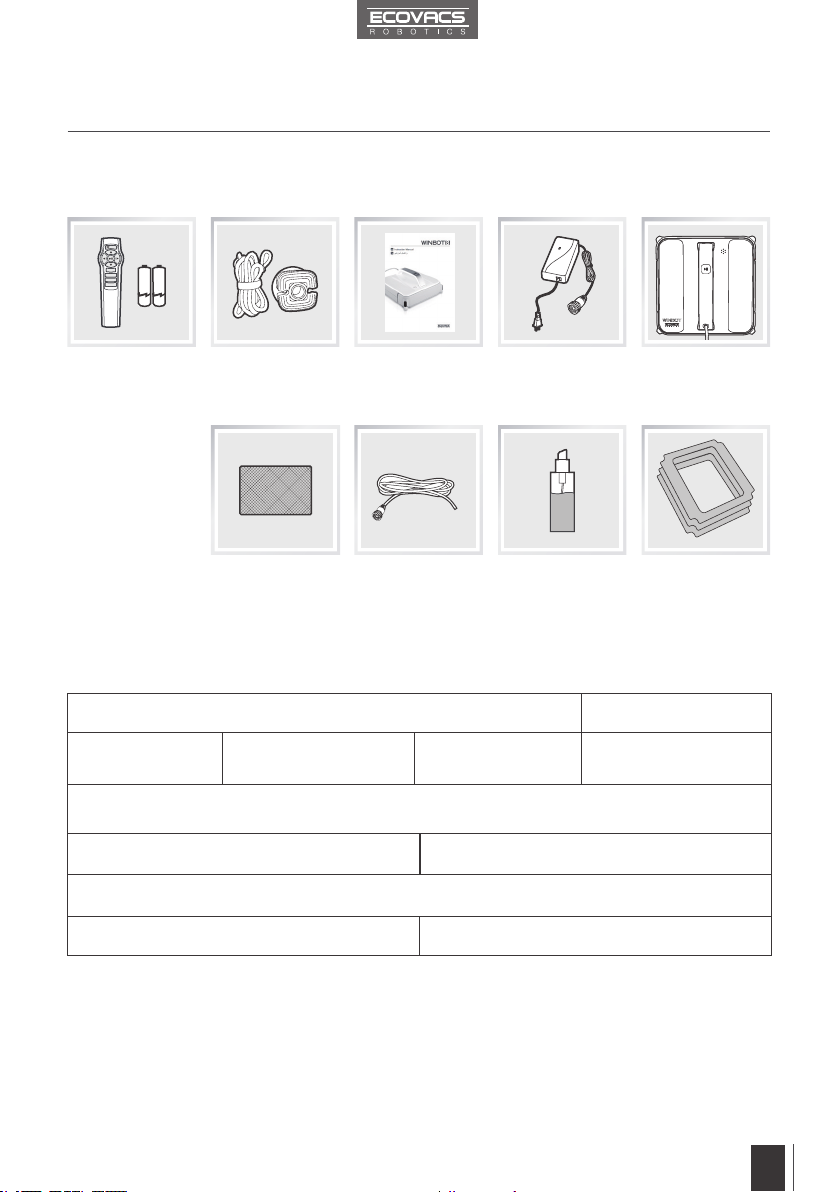
הזיראה ןכות 2.1
םע קוחר טלש
תוללוס
תילטמ
W850
בוקנ קפסה75W
שמתשמל ךירדמ
ךיראמ לבכ
1.5) WINBOT
('ץניא 11 לגר 4/רטמ
קוחר-טלש
למשח םאתמלבכו תוחיטב ןקתה
יוקינ ןורתפ
WINBOT
WINBOT 8
יוקינ תודיפר (3)
םיטרפמ 2.2
WINBOT םגד
הדובע חתמרשי םרז 24V
3.75A רשי םרז 24V :אצומ
.םירצומב ךשמתמה רופישה ךלהמב תונתשהל םייושע בוציעהו םיינכטה םיטרפמה *
EA10952 :למשח םאתמ
2.5A 50/60Hz ןיפילח םרז 100-240V :אובמ
בוקנ אצומ חתמרשי םרז 3V
IW
24
Page 27

םיינכט םיטרפמו הזיראה ןכות .2
1
2
3
6
4
5
רצומה םישרת 2.3
WINBOT 8
1
2
3
4
5
6
םיבגמ .9
ןותחת הלעפה גתמ .10
העיסנ ילגלג .11
ררוואמ .12
סוטטסל הנותחת יוויח תירונ .13
הביאש ןשייח .14
'ץוקס .15
םיידצ םינולגלג .16
היהשה/הלחתה ןצחלו סוטטסל יוויח תירונ .3
(הריכמה רחאל תורישל) גורדש רוביח .5
םיילוש יוהיזל םינשייח .7
לוקמר .2
למשח לבכ .6
יוקינ תדיפר .8
7
8
9
10
11
12
13
14
15
16
שוגפ .1
תידי .4
קוחר-טלש
25
IW
N Z
(סופיא) RESET ןצחל .1
םינוויכ תרקב ינצחל .2
היהשה/הלחתה ןצחל .3
"N" יוקינ בצמ ןצחל .4
"Z" יוקינ בצמ ןצחל .5
קוחר-טלשל דומיצ ןצחל .6
Page 28

WINBOT 8 תלעפה .3
יוקינ תדיפר רוביח 3.2
.םיטיהר וא תונוליו ןוגכ ,רדחב םילושכמו השמשה ןיב ('ץניא 5.9) מ"ס 15 לש חוורמ םייקש אדו
.קוחר-טלשב םינוויכה תרקב ינצחל תועצמאב קר ךא םייקפוא תיכוכז יחטשמ תוקנל לגוסמ WINBOT 8
ראשיהל דחא םדא לע ,הזכ הרקמב ;ליגרכ דקפתמ אל ךא םיעפושמ תיכוכז יחטשמ תוקנל לגוסמ WINBOT 8
.היעבב לקתיי אוהש הרקמב ול עייסל ידכ טובורה תברקב
.ךופה אוהשכ WINBOT 8-ב שמתשת לא
תיתועמשמ תיחפמ םירחא יוקינ ירמוחב שומיש .WINBOT יוקינ תסימת םע קר WINBOT 8-ב שמתשהל שי
.ול קיזהל לולעו WINBOT לש םיעוציבה תא
ןוגכ ,םיקלח םניאש תיכוכז יחטשמ יוקינל WINBOT 8-ב שומיש ינפל ןרציה לש יוקינהו לופיטה תוארוהב ןייע
קזנל תיארחא הניא ECOVACS ROBOTICS. םיפוצמ וא תוינבת ילעב ,םקרמ ילעב ,יופיצב םיסוכמ םיחטשמ
.הלאכ םיחטשמ לע םלוה יתלב שומישמ האצותכ םרגנש
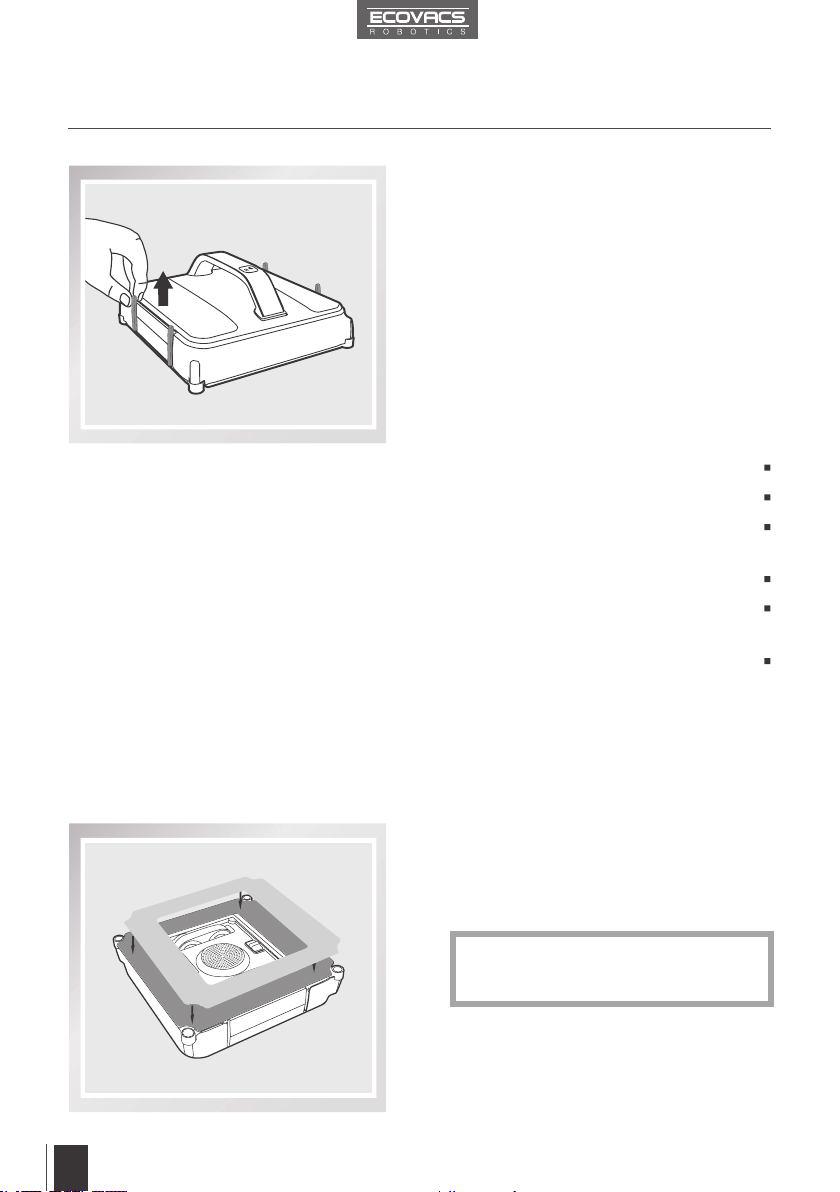
WINBOT 8 תלעפה .3
ותיתחתב יוקינ תדיפר רבחו WINBOT 8 תא ךופה
לש ןבלה דצה .םיטמק אלל הקלח היהת איהש ךכ
רבייפורקימה דצו 'ץוקסל רבחתמ יוקינה תדיפר
יוקינה תדיפרש אדו .ץוח יפלכ תונפל רומא רופאה
.םיילושה יוהיז ינשייח תא וא םיבגמה תא הסכמ אל
איה םאו ןיטולחל תעבורמ הניא יוקינה תדיפר
*
.םיבגמהמ קלח הסכת איה ,יוגש ןפואב תרבוחמ
ידצ ינשב שוגפה לש הנגהה יספ תא רסה
.ןושארה שומישה ינפל WINBOT 8
50
50
:יוקינ ינפל תורעה 3.1
תרגסמ ילעב תונולחב WINBOT 8-ב שמתשת לא
.('ץניא 0.2) מ"מ 5-מ הנטק
תרגסמ תלעב השמש תוקנל לגוסמ WINBOT 8
x 19.7) מ"ס 50 x 50-מ הלודגה ,תרגסמ אלל וא
.('ץניא 19.7
תבהבהמ WINBOT 8 לש סוטטסל יוויחה תירונ םא
.יוביגה תללוס תא ןועטל שי ,ותקלדה רחאל קוריב
ןועטל ידכ למשחל רבוחמ WINBOT 8 תא ראשה
סוטטסל יוויחה תירונש דע יוביגה תללוס תא
תללוסש דע הקני אל WINBOT 8 .לוחכב תבהבהמ
.הנועט יוביגה
השמשב ןטק רוזא הקנ ,ךולכלב הסוכמ ןולחה םא
.םש WINBOT 8 תא חנהו שומישה ינפל
IW
26
Page 29
WINBOT 8 תלעפה .3
ידצ ינשב שוגפה לש הנגהה יספ תא רסה
.ןושארה שומישה ינפל WINBOT 8
.םיטיהר וא תונוליו ןוגכ ,רדחב םילושכמו השמשה ןיב ('ץניא 5.9) מ"ס 15 לש חוורמ םייקש אדו
.קוחר-טלשב םינוויכה תרקב ינצחל תועצמאב קר ךא םייקפוא תיכוכז יחטשמ תוקנל לגוסמ WINBOT 8
ראשיהל דחא םדא לע ,הזכ הרקמב ;ליגרכ דקפתמ אל ךא םיעפושמ תיכוכז יחטשמ תוקנל לגוסמ WINBOT 8
.היעבב לקתיי אוהש הרקמב ול עייסל ידכ טובורה תברקב
.ךופה אוהשכ WINBOT 8-ב שמתשת לא
תיתועמשמ תיחפמ םירחא יוקינ ירמוחב שומיש .WINBOT יוקינ תסימת םע קר WINBOT 8-ב שמתשהל שי
.ול קיזהל לולעו WINBOT לש םיעוציבה תא
ןוגכ ,םיקלח םניאש תיכוכז יחטשמ יוקינל WINBOT 8-ב שומיש ינפל ןרציה לש יוקינהו לופיטה תוארוהב ןייע
קזנל תיארחא הניא ECOVACS ROBOTICS. םיפוצמ וא תוינבת ילעב ,םקרמ ילעב ,יופיצב םיסוכמ םיחטשמ
.הלאכ םיחטשמ לע םלוה יתלב שומישמ האצותכ םרגנש
27
IW
יוקינ תדיפר רוביח 3.2
ותיתחתב יוקינ תדיפר רבחו WINBOT 8 תא ךופה
לש ןבלה דצה .םיטמק אלל הקלח היהת איהש ךכ
רבייפורקימה דצו 'ץוקסל רבחתמ יוקינה תדיפר
יוקינה תדיפרש אדו .ץוח יפלכ תונפל רומא רופאה
.םיילושה יוהיז ינשייח תא וא םיבגמה תא הסכמ אל
איה םאו ןיטולחל תעבורמ הניא יוקינה תדיפר
.םיבגמהמ קלח הסכת איה ,יוגש ןפואב תרבוחמ
*
Page 30
WINBOT 8 תלעפה .3
WINBOT 8 תלעפה .3
A הצק לע תוחיטבה לבכ לש דחא הצק ךורכ
.ותוא קדהו WINBOT 8 לש לבכה לש
.םתוא קדהו B הצקו A הצק תא רבח
תוחיטבה לבכ לש רחאה הצקה תא ךורכ
ידכ ךושמו תוחיטבה ןקתהב הלעתה ביבס
.וקדהל
1
2
3
לש ךיראמ לבכב שמתשהל שי ,WINBOT 8 לש ותעונת תא ליבגמ למשחה לבכ לש וכרוא םא
*
.קדהו המאתהב ךיראמה לבכה לש תווצקה ינשל םתוא רבח ,B הצק תאו A הצק תא קתנ .WINBOT
.WINBOT 8 םע דחא ךיראמ לבכב קר שמתשהל ןתינ *
למשחה םאתמ רוביח 3.3
תוחיטבה לבכ רוביח 3.4
B
C
למשחה םאתמ לש למשחה לבכ :B הצק
תוחיטב לבכ :D הצק
WINBOT 8 לש למשחה לבכ :A הצק
תוחיטב ןקתה :C הצק
DD
IW
28
Page 31
WINBOT 8 תלעפה .3
A הצק לע תוחיטבה לבכ לש דחא הצק ךורכ
.ותוא קדהו WINBOT 8 לש לבכה לש
.םתוא קדהו B הצקו A הצק תא רבח
תוחיטבה לבכ לש רחאה הצקה תא ךורכ
ידכ ךושמו תוחיטבה ןקתהב הלעתה ביבס
.וקדהל
1
2
3
29
לש ךיראמ לבכב שמתשהל שי ,WINBOT 8 לש ותעונת תא ליבגמ למשחה לבכ לש וכרוא םא
.קדהו המאתהב ךיראמה לבכה לש תווצקה ינשל םתוא רבח ,B הצק תאו A הצק תא קתנ .WINBOT
.WINBOT 8 םע דחא ךיראמ לבכב קר שמתשהל ןתינ *
IW
*
Page 32

WINBOT 8 תלעפה .3
הלחתה 3.7
WINBOT 8 תלעפה .3
."-" בצמל תיתחתב הלעפהה גתמ תא טסה
תבהבהמ סוטטסל יוויחה תירונשכ קלוד WINBOT 8
.לוחכב
WINBOT 8 תא רבח
הקלדה
4) מ"ס 10 תוחפל ןולחה לע WINBOT 8 תא חנה
WINBOT .םירחא םילושכמ וא ןולחה תוניפמ ('ץניא
תקלוד סוטטסל יוויחה תירונשכ ןולחל בטיה רבוחמ 8
.לוחכב עובק
:תיכוכזה חטשמ לע חנה
1
2
3
.הקנמ אוהשכ WINBOT 8 תא קתנת לא
*
ידכ WINBOT 8 לש ררוואמהמ םימצע קחרה
*
.המיתס עונמל
ןיב ('ץניא 5.9) מ"ס 15 לש חוורמ םייקש אדו
*
תונוליו ןוגכ ,רדחב םילושכמו תיכוכזה חטשמ
.םיטיהר וא
תוחיטבה ןקתה תבצה 3.5
תוחיטבה ןקתה לש הקיניה עיבג חטשמ תא בגנ
:ימינפ ןולח יוקינל WINBOT 8-ב שומיש השענ םא
הניפה לע הקזוחב תוחיטבה ןקתה תא ץחל
תוחיטבה ןקתהש אדו .ימינפה ןולחה לש הנוילעה
:ינוציח ןולח יוקינל WINBOT 8-ב שומיש השענ םא
לש ימינפה קלחל הקזוחב תוחיטבה ןקתה תא ץחל
רבוחמ תוחיטבה ןקתהש אדו .תוקנל שיש ןולחה
.תפרוצמה תילטמב
יוקינ תסימת סוסיר 3.6
תיתועמשמ תיחפמ םירחא יוקינ ירמוחב שומיש .WINBOT יוקינ תסימת םע קר WINBOT-ב שמתשהל שי
WINBOT 8 לש תיתחתה תא בגנ ,סוסירה רחאל
.תפרוצמה תילטמב
.ול קיזהל לולעו WINBOT לש םיעוציבה תא
יוקינה תדיפר לש ןותחתהו ןוילעה םידדצה תא ססר
םימעפ WINBOT 8 לש תפרוצמה יוקינה תסימתב
.בטיה רבוחמ
.בטיה
*
.דצ לכב
IW
30
Page 33

WINBOT 8 תלעפה .3
הלחתה 3.7
WINBOT 8 תא רבח
.הקנמ אוהשכ WINBOT 8 תא קתנת לא
הקלדה
."-" בצמל תיתחתב הלעפהה גתמ תא טסה
תבהבהמ סוטטסל יוויחה תירונשכ קלוד WINBOT 8
ידכ WINBOT 8 לש ררוואמהמ םימצע קחרה
.המיתס עונמל
:תיכוכזה חטשמ לע חנה
4) מ"ס 10 תוחפל ןולחה לע WINBOT 8 תא חנה
WINBOT .םירחא םילושכמ וא ןולחה תוניפמ ('ץניא
תקלוד סוטטסל יוויחה תירונשכ ןולחל בטיה רבוחמ 8
.לוחכב עובק
1
*
2
.לוחכב
*
3
31
IW
ןיב ('ץניא 5.9) מ"ס 15 לש חוורמ םייקש אדו
תונוליו ןוגכ ,רדחב םילושכמו תיכוכזה חטשמ
.םיטיהר וא
*
Page 34

WINBOT 8 תלעפה .3
הקספה 3.9
WINBOT 8 תלעפה .3
לע הציחל ידי לע וספאל ןתינ ,םודאב תבהבהמ יוויחה תירונו היעבב לקתנ WINBOT 8 םא :תורעה
."תויעב ןורתפ" קרפב ןייע ,םיטרפל .קוחר-טלשב RESET ןצחל
.ףוצפצ עימשמו ליחתה ובש םוקמל רזוח אוה ,יוקינ רוזחמ םילשמ WINBOT 8-שכ
לע תכשוממ הציחל ץחל .WINBOT 8 לש תידיב זוחא
תא רסה .לועפל קיספי ררוואמה .תוינש 5 ךשמב .....
תיכוכזה לע ורתונש םינמיס הקנ .ןולחהמ WINBOT 8
.תפרוצמה תילטמב WINBOT תרסהמ האצותכ
ןקתה תרסהמ האצותכ תיכוכזה לע ורתונש םינמיס הקנ
.תפרוצמה תילטמב תוחיטבה
WINBOT 8 תרסה
.תוחיטבה ןקתה תא רסה
1
3
WINBOT 8 קותינ
."O" בצמל הלעפהה גתמ תא טסה
יוביכ
2
4
.יוקינה תלחתהל קוחר-טלשב "Z" וא "N" יוקינ בצמ ןצחל לע הציחל ידי לע יוצרה יוקינה ביתנ תא רחב
.םיבחר תונולח רובע רתויב בוטה אוה "Z" יוקינ בצמ
."Z" ביתנב הקנמ WINBOT 8
הלאמש ,הרוחא ,המידק העונתל WINBOT 8 תא ןווכ
קוחר-טלשב םינוויכה תרקב ינצחל תועצמאב הנימיו
הקנמ WINBOT 8 .ההשומ טובורה תלועפש תעב
בצמל ףלחה .םינוויכה תרקב ינצחלב שומיש השענשכ
קוחר-טלשה יוקינה יבצמ ינצחל תועצמאב רחא יוקינ
.ההשומ טובורה תלועפשכ
.הלאה תוטישהמ תחאב WINBOT 8 תא לעפה
WINBOT-ב היהשה/הלחתהה ןצחל לע ץחל
WINBOT .יוקינה תלחתהל קוחר-טלשב וא 8
."Z" וא "N" יוקינ ביתנ תיטמוטוא רחוב 8
תונולח רובע רתויב בוטה אוה "N" יוקינ בצמ
."N" ביתנב הקנמ WINBOT 8 .םיהובג
היהשה 3.8
הציחל ידי לע יוקינה ךלהמב WINBOT 8 תא ההשה
.קוחר-טלשב וא טובורב היהשה/הלעפה ןצחל לע
:הלחתה
4
IW
32
Page 35

WINBOT 8 תלעפה .3
הקספה 3.9
.ףוצפצ עימשמו ליחתה ובש םוקמל רזוח אוה ,יוקינ רוזחמ םילשמ WINBOT 8-שכ
2
יוביכ
."O" בצמל הלעפהה גתמ תא טסה
WINBOT 8 קותינ
4
WINBOT 8 תרסה
לע תכשוממ הציחל ץחל .WINBOT 8 לש תידיב זוחא
תא רסה .לועפל קיספי ררוואמה .תוינש 5 ךשמב .....
תיכוכזה לע ורתונש םינמיס הקנ .ןולחהמ WINBOT 8
.תפרוצמה תילטמב WINBOT תרסהמ האצותכ
.תוחיטבה ןקתה תא רסה
ןקתה תרסהמ האצותכ תיכוכזה לע ורתונש םינמיס הקנ
.תפרוצמה תילטמב תוחיטבה
1
3
33
לע הציחל ידי לע וספאל ןתינ ,םודאב תבהבהמ יוויחה תירונו היעבב לקתנ WINBOT 8 םא :תורעה
."תויעב ןורתפ" קרפב ןייע ,םיטרפל .קוחר-טלשב RESET ןצחל
IW
Page 36

הקוזחת .4
-ו םינצחלה תועצמאב העיסנה ילגלג תא קודב
םה םא העיסנה ילגלג תא רוצע .קוחר-טלשב
.םיכלכולמ
הקוזחת .4
העיסנ ילגלג 4.3
הלעפהה גתמ תא טסהו WINBOT 8 תא ךופה
ןצחלה לע תכשוממ הציחל ץחל ."-" בצמל
.ררוואמה תא רוצעל ידכ תוינש 5 ךשמב
םיילוש יוהיזל םינשייח
םינשייחה תעברא תא בגנו WINBOT 8 תא ךופה
לע רומשל ידכ תפרוצמה תילטמב תווצק יוהיזל
.םתוליעי
םיבגמ
םיבגמה ינש תא בגנו WINBOT 8 תא ךופה
.םתוליעי לע רומשל ידכ תפרוצמה תילטמב
תילטמה תועצמאב העיסנה ילגלגמ ךולכל הקנ
.תפרוצמה
."O" בצמל הלעפהה גתמ תא טסה
.עקשהמ ותוא קתנו ותוא הבכ ,WINBOT 8-ב הקוזחתו יוקינ עוציב ינפל
.ןולחה לע קילחי אוהש וא WINBOT 8-ב הבוטר יוקינ תדיפרב שמתשת לא
תא לבקל ידכ השדחב התוא ףלחה ,'ץוקסה םע רוזאל קוידב המיאתמ הניאש וא תקחשנ יוקינה תדיפר םא
.יוקינה תדיפר תא רסהו WINBOT 8 תא ךופה
ךשמב םייקנו םירק םימב יוקינה תדיפר תא לובט
שורפו ןידע יוקינ רמוח םע דיב סבכ .תוקד יתש
הרוביח ינפל ןיטולחל שבייתהל הל חנה .שובייל
.הלש תורישה ייח תא ךיראמ יוקינה תדיפר לש יתרגש סוביכ
יוקינ תדיפר 4.1
.WINBOT 8-ל שדחמ
.רתויב םיבוטה יוקינה יעוציב
םיבגמו םינשייח ,ררוואמ 4.2
םיידצ םינולגלג
םינולגלגה תעברא תא בגנו WINBOT 8 תא ךופה
.םתוליעי לע רומשל ידכ תפרוצמה תילטמב םיידצה
ררוואמהמ ךולכל בגנו WINBOT 8 תא ךופה
.הקיניה תלוכי לע הרימשל תפרוצמה תילטמב
*
*
*
ררוואמ
IW
34
Page 37

הקוזחת .4
םיבגמ
םיבגמה ינש תא בגנו WINBOT 8 תא ךופה
.םתוליעי לע רומשל ידכ תפרוצמה תילטמב
-ו םינצחלה תועצמאב העיסנה ילגלג תא קודב
םה םא העיסנה ילגלג תא רוצע .קוחר-טלשב
.םיכלכולמ
םיילוש יוהיזל םינשייח
םינשייחה תעברא תא בגנו WINBOT 8 תא ךופה
לע רומשל ידכ תפרוצמה תילטמב תווצק יוהיזל
.םתוליעי
העיסנ ילגלג 4.3
הלעפהה גתמ תא טסהו WINBOT 8 תא ךופה
ןצחלה לע תכשוממ הציחל ץחל ."-" בצמל
.ררוואמה תא רוצעל ידכ תוינש 5 ךשמב
35
תילטמה תועצמאב העיסנה ילגלגמ ךולכל הקנ
.תפרוצמה
IW
."O" בצמל הלעפהה גתמ תא טסה
Page 38
םילילצו סוטטסל יוויח תירונ .5
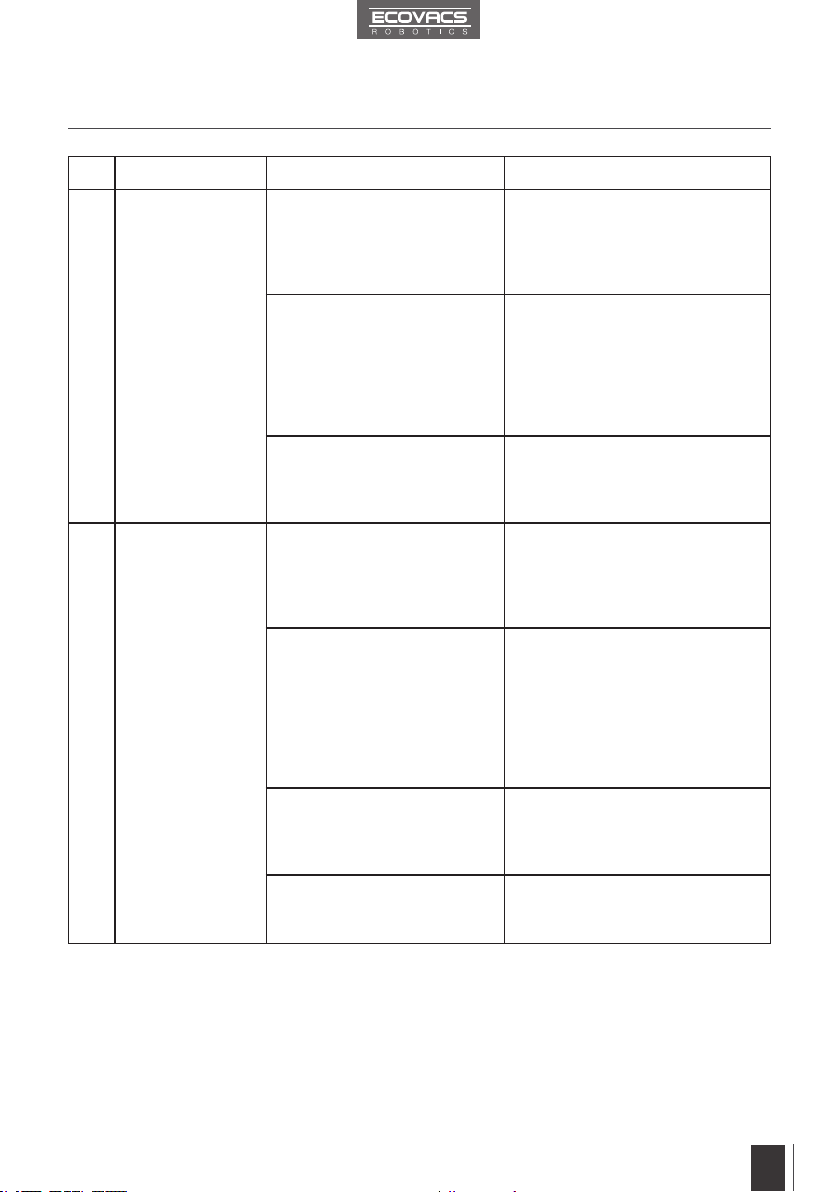
הלקת
'סמ
תוירשפא תוביס תונורתפ
תויעב ןורתפ .6
1
2
קוחר-טלשה
לעופ אל
יוויחה תירונ
סוטטסל
תבהבהמ
רחאל לוחכב
רצומהש
לע חנומ
חטשמ
תיכוכזה
WINBOT-שכ .הקנמ WINBOT 8
ןצחלב קר שמתשהל ןתינ ,הקנמ 8
.קוחר-טלשב היהשה/הלעפה
ןצחל לע הציחל ידי לע WINBOT 8 תא ההשה
ןתינ .קוחר-טלשב וא טובורב היהשה/הלעפהה
קוחר-טלשב םירחאה םינצחלב שמתשהל היהי
.ההשומ WINBOT 8 תלועפשכ קר
דמוצמ וניא קוחר-טלשה
.WINBOT 8-ל
לעפמהמ עיגמ WINBOT 8
.ולש קוחר-טלשל דמוצמ אוהשכ
וא לטבתמ קוחר-טלשה דומיצ םא
.בוש ודמצל ןתינ ,ףלחומ אוהש
ןווחמו לעופ אל קוחר-טלשה םא
ספאל שי ,םודאב בהבהמ סוטטסה
.WINBOT 8 תא
יוגש ןפואב תרבוחמ יוקינה תדיפר
וא םיבגמה דחא תא הסכמו
.םיילוש יוהיזל םינשייחה
.םיילוש יוהיזל ןשייחב הלקת
.ררוואמב הלקת
ךות שדחמ התוא רבחו יוקינה תדיפר תא רסה
אלו 'ץוקסה רוזאב קוידב תחנומ איהש אודיו
יוהיזל םינשייחה תא וא בגמה תא הסכמ
.םיילוש
ךות שדחמ התוא רבחו יוקינה תדיפר תא רסה .א
םיילוש יוהיזל םינשייחה תא הסכמ אל איהש אודיו
.םהילע העיפשמ וא
ראותמכ םיילוש יוהיזל םינשייחה תא הקנ .ב
.4 ףיעסב
.תוחוקלה תורישל הנפ ,תכשמנ היעבה םא .ג
.4 ףיעסב ראותמכ ררוואמה תא הקנ .א
.תוחוקלה תורישל הנפ ,תכשמנ היעבה םא .ב
.4 ףיעסב ראותמכ ררוואמה תא הקנ .א
.תוחוקלה תורישל הנפ ,תכשמנ היעבה םא .ב
ידכמ ךלכולמ תיכוכזה חטשמ
וילא דמציי WINBOT 8-ש
.הכלהכ
שומישה ינפל תיכוכזה חטשמב ןטק רוזא הקנ
.םש WINBOT 8 תא חנהו
ןצחל לע הציחל ידי לע WINBOT 8 תא ספא
.קוחר-טלשב RESET
הציחל ץחל ,תעב-הב .WINBOT 8 תא קלדה
היהשה/הלעפהה ןצחל לע תכשוממ
.קוחר-טלשב דומיצה ןצחל לעו WINBOT 8-ב
היהשה/הלעפהה ןצחלשכ םייתסמ דומיצה
.קוריו לוחכ ,םודאב בהבהמ
דע הקני אל WINBOT .תנעטנ איהו הקיר טעמכ יוביגה תללוס
.'תויעב ןורתפ' ,6 ףיעסב ןייע ,םיטרפל .היעבב לקתנ WINBOT 8
ןורתפ' ,6 ףיעסב ןייע ,םיטרפל .ינדי ףקעמ בצמל רבעוה WINBOT 8
.תיכוכזה חטשמ לע החנהל ןכומו קלדנ WINBOT 8
.יוקינל ןכומו תיכוכזל החלצהב דמצנ WINBOT 8
.הכלהכ הנועט יוביגה תללוסש
.'תויעב
וויחבצמ
סוטטסל יוויחה תירונ
קוריב תבהבהמ
תבהבהמ סוטטסל יוויחה תירונ
תקלוד סוטטסל יוויחה תירונ
לוחכב עובק
סוטטסל יוויחה תירונ
םודאב תבהבהמ
תקלוד סוטטסל יוויחה תירונ
םודאב עובק
לוחכב
:הלאה םיבצמב ףצפצמ WINBOT 8
.תוקנל םייס WINBOT 8
.היעבב לקתנ WINBOT 8
.קלדומ WINBOT 8
ףצפצמ WINBOT
IW
36
Page 39

תויעב ןורתפ .6
ןצחל לע הציחל ידי לע WINBOT 8 תא ההשה
ןתינ .קוחר-טלשב וא טובורב היהשה/הלעפהה
קוחר-טלשב םירחאה םינצחלב שמתשהל היהי
.ההשומ WINBOT 8 תלועפשכ קר
הציחל ץחל ,תעב-הב .WINBOT 8 תא קלדה
היהשה/הלעפהה ןצחל לע תכשוממ
.קוחר-טלשב דומיצה ןצחל לעו WINBOT 8-ב
היהשה/הלעפהה ןצחלשכ םייתסמ דומיצה
.קוריו לוחכ ,םודאב בהבהמ
ןצחל לע הציחל ידי לע WINBOT 8 תא ספא
.קוחר-טלשב RESET
ךות שדחמ התוא רבחו יוקינה תדיפר תא רסה
אלו 'ץוקסה רוזאב קוידב תחנומ איהש אודיו
יוהיזל םינשייחה תא וא בגמה תא הסכמ
.םיילוש
ךות שדחמ התוא רבחו יוקינה תדיפר תא רסה .א
םיילוש יוהיזל םינשייחה תא הסכמ אל איהש אודיו
.םהילע העיפשמ וא
ראותמכ םיילוש יוהיזל םינשייחה תא הקנ .ב
.4 ףיעסב
.תוחוקלה תורישל הנפ ,תכשמנ היעבה םא .ג
.4 ףיעסב ראותמכ ררוואמה תא הקנ .א
.תוחוקלה תורישל הנפ ,תכשמנ היעבה םא .ב
.4 ףיעסב ראותמכ ררוואמה תא הקנ .א
.תוחוקלה תורישל הנפ ,תכשמנ היעבה םא .ב
תוירשפא תוביס תונורתפ
WINBOT-שכ .הקנמ WINBOT 8
ןצחלב קר שמתשהל ןתינ ,הקנמ 8
.קוחר-טלשב היהשה/הלעפה
דמוצמ וניא קוחר-טלשה
.WINBOT 8-ל
לעפמהמ עיגמ WINBOT 8
.ולש קוחר-טלשל דמוצמ אוהשכ
וא לטבתמ קוחר-טלשה דומיצ םא
.בוש ודמצל ןתינ ,ףלחומ אוהש
ןווחמו לעופ אל קוחר-טלשה םא
ספאל שי ,םודאב בהבהמ סוטטסה
.WINBOT 8 תא
יוגש ןפואב תרבוחמ יוקינה תדיפר
וא םיבגמה דחא תא הסכמו
.םיילוש יוהיזל םינשייחה
.םיילוש יוהיזל ןשייחב הלקת
.ררוואמב הלקת
הלקת
קוחר-טלשה
לעופ אל
יוויחה תירונ
סוטטסל
תבהבהמ
רחאל לוחכב
רצומהש
לע חנומ
חטשמ
תיכוכזה
'סמ
1
2
37
שומישה ינפל תיכוכזה חטשמב ןטק רוזא הקנ
.םש WINBOT 8 תא חנהו
IW
ידכמ ךלכולמ תיכוכזה חטשמ
וילא דמציי WINBOT 8-ש
.הכלהכ
Page 40

תויעב ןורתפ .6
הלקת
'סמ
תוירשפא תוביס תונורתפ
5
WINBOT 8
תניפב עוקת
אלו ןולחה
וב טולש ,זז
תועצמאב
קוחר-טלשה
ותוא ספא וא
הציחל ידי לע
ןצחל לע
.RESET
לש תואהש וא הקיני קיפסמ ןיא
.יקוח וניא םיילוש יוהיזל ןשייח
.קוחר-טלשב RESET ןצחל לע ץחל .א
וריבעהל שי ,ספאתמ אל WINBOT 8 םא .ב
ןצחל לע תכשוממ הציחל ץחל .ינדי ףקעמ בצמל
יוויחה תירונש דע קוחר-טלשב RESET
,ינדי ףקעמ בצמב .עובק םודאב תקלוד סוטטסל
.םילעפומ קוחר-טלשב םינוויכה תרקב ינצחל
תזזהל םינוויכה תרקב ינצחלב שמתשה
ןתינ ובש םוקמל םיילושהמ קחרה WINBOT 8
WINBOT תא רסה .יתוחיטב ןפואב וילא עיגהל
.בוש לחתהו ותוא קלדה .ותוא הבכו ןולחהמ 8
תא ריאשת לא ,ינדי ףקעמ בצמב שומיש תעב*
.תיכוכזה חטשמל רבוחמ WINBOT 8
.תוחוקלה תורישל הנפ ,תכשמנ היעבה םא .ג
תויעב ןורתפ .6
למשחה םאתמל WINBOT 8 תא רבח .א
היהשה/הלחתהה ןצחל לע ץח .ריקב עקשלו
WINBOT 8 .קוחר-טלשב וא WINBOT 8-ב
ןורתפה םאו למשח תקספה לש הרקמב .ב
תרקב ינצחלב שמתשה ,רזוע אל ליעלש
WINBOT 8 ןוויכל קוחר-טלשב םינוויכה
ןפואב וילא עיגהל לכות ובש ןולחב םוקימל
.ןולחהמ ותוא רסהו ררוואמה תא הבכ ,יתוחיטב
WINBOT 8 תא חנה ,שדוח למשחה םרז םא
.קוחר-טלשב RESET ןצחל לע ץחל .א
קוחר-טלשב םינוויכה תרקב ינצחלב שמתשה
יתייעבה רוזאהמ WINBOT 8 תקחרהל
ןולחה תוניפמ 'ץניא 4/מ"ס 10 תוחפלו
.WINBOT 8 תא בוש קלדה .םילושכממו
רחאלו קוחר-טלשב RESET ןצחל לע ץחל .ב
ןוויכל םינוויכה תרקב ינצחלב שמתשה ןכמ
.יתייעבה רוזאה ביבס יוקינל WINBOT 8
ףיעסב ראותמכ םיילוש יוהיזל םינשייחה תא בקנ
.תוחוקלה תורישל הנפ ,תכשמנ היעבה םא .4
ןוילעה דצב תפסונ יוקינ תסימת ססר .א
.4 ףיעסב ראותמכ העיסנה ילגלג תא הקנ .ב
רוזחמ תא בוש לחתהו יוקינ תדיפר ףלחה .ג
יוקינב הטילשל קוחר-טלשב שמתשת לא .ד
ןכמ רחאלו דיב ןולחה תא הקנ תישאר .ה
.רידס חרואב יוקינל WINBOT 8-ב שמתשה
.םיליגר תונולח יוקינל דעוימ WINBOT 8 *
םיחטשמ יוקינל דעוימ וניא הזה רצומה
.הנושארה םעפב יוקינל וא דואמ םיכלכולמ
.בוש ותוא קלדהו ןולחה לע
.יוקינה תדיפר לש ןותחתהו
.םינוויכה ינצחל תועצמאב
.יוקינב ךישמי
.יוקינה
תוירשפא תוביס תונורתפ
וא עקתה לש קותינ ,למשח תקספה
למשחה םאתמל ררחושמ רוביח
.הקינ WINBOT 8-ש תעב
יתייעב רוזאל לעמ ענ WINBOT 8
.הקיניה תלוכי תא דבאמו
םיילוש יוהיזל םינשייחה
.םיכלכולמ
.ידמ רתוי ךלכולמ ןולחה
הלקת
יוויחה תירונ
לש סוטטסל
רצומה
תבהבהמ
םודאב
WINBOT 8
תינבתב ענ
הרידס יתלב
ךלהמב
.יוקינה
'סמ
3
4
IW
38
Page 41

תויעב ןורתפ .6
.קוחר-טלשב RESET ןצחל לע ץחל .א
וריבעהל שי ,ספאתמ אל WINBOT 8 םא .ב
ןצחל לע תכשוממ הציחל ץחל .ינדי ףקעמ בצמל
יוויחה תירונש דע קוחר-טלשב RESET
,ינדי ףקעמ בצמב .עובק םודאב תקלוד סוטטסל
.םילעפומ קוחר-טלשב םינוויכה תרקב ינצחל
תזזהל םינוויכה תרקב ינצחלב שמתשה
ןתינ ובש םוקמל םיילושהמ קחרה WINBOT 8
WINBOT תא רסה .יתוחיטב ןפואב וילא עיגהל
.בוש לחתהו ותוא קלדה .ותוא הבכו ןולחהמ 8
תא ריאשת לא ,ינדי ףקעמ בצמב שומיש תעב*
.תיכוכזה חטשמל רבוחמ WINBOT 8
.תוחוקלה תורישל הנפ ,תכשמנ היעבה םא .ג
תוירשפא תוביס תונורתפ
לש תואהש וא הקיני קיפסמ ןיא
.יקוח וניא םיילוש יוהיזל ןשייח
הלקת
WINBOT 8
תניפב עוקת
אלו ןולחה
וב טולש ,זז
תועצמאב
קוחר-טלשה
ותוא ספא וא
הציחל ידי לע
ןצחל לע
.RESET
'סמ
5
39
IW
Page 42
W850-012-IM2014R00
 Loading...