

Page 1

Instruction Manual
EN
Mode d'emploi
Benutzerhandbuch
Manual de instrucciones
FR
DE
ES
Page 2

Instruction Manual
...............................................................2
EN
...................................................................20
...........................................................38
.................................................56
Mode d'emploi
FR
Benutzerhandbuch
DE
Manual de instrucciones
ES
Congratulations on the purchase of your ECOVACS Robotics WINBOT!
We hope it brings you many years of satisfaction. We trust the purchase of your
new robot will help keep your home clean and provide you more quality time to
do other things.
Live Smart. Enjoy Life.
Should you encounter situations that have not been properly addressed in
this Instruction Manual, please contact our Customer Service Center where a
technician can address your specic problem or question.
For more information, please visit the ECOVACS ofcial website:
www.ecovacs.com
The company reserves the right to make technological and/or design changes
to this product for continuous improvement.
Thank you for choosing WINBOT!
Page 3

EN
Contents
1. Important Safety Instructions
......................................................................2
2. Package Contents and Technical Specifications
...................................... 4
2.1 Package Contents .................................................................................... 4
2.2 Specications ...........................................................................................4
2.3 Product Diagram ......................................................................................5
3. Operating the Robot
.....................................................................................6
3.1 Notes Before Cleaning .............................................................................6
3.2 Attach the Cleaning Pad ...........................................................................7
3.3 Assemble the Power Adapter ................................................................... 7
3.4 Install the Safety Tether ...........................................................................7
3.5 Place the Safety Pod ................................................................................ 9
3.6 Spray Cleaning Solution ........................................................................... 9
3.7 Start ........................................................................................................ ..9
3.8 Pause .....................................................................................................10
3.9 Stop ........................................................................................................ 11
4. Maintenance
................................................................................................ 12
4.1 Cleaning Pads ........................................................................................ 12
4.2 Cupule, Side Rollers and Sensors .........................................................12
4.3 Driving Treads ........................................................................................ 13
5. Status Indicator Light and Sounds
........................................................... 14
6. Troubleshooting
.........................................................................................15
Page 4

2
EN
1. Important Safety Instructions
When using an electrical appliance, basic precautions should always be followed, including
the following:
READ ALL INSTRUCTIONS BEFORE USING THIS APPLIANCE.
SAVE THESE INSTRUCTIONS
1. This Appliance is not intended to be used by children under 8 or anyone lacking knowledge
on proper use. Supervision may be necessary. Do not allow children to play with the
Appliance.
2. Do not use the Appliance in extremely hot or cold environments (below 0˚C/32˚F or above
40˚C/104˚F). The Appliance can be used to clean outside windows if it is properly tethered
to the Safety Pod, winds are calm, and it is not raining or snowing.
3. Please ensure the Appliance is plugged in while it is cleaning. The Appliance has a Back-Up
Battery that charges during use. The Back-Up Battery powers the Appliance if it becomes
unplugged or the electricity fails.
4. Do not leave the Appliance unattended when it is plugged in.
5. For household use ONLY. Do not use the Appliance in commercial or industrial environments.
6. Do not use the Appliance on cracked glass.
7. Only use accessories recommended or supplied by the manufacturer. Only use the Power
Adapter supplied by the manufacturer.
8. Please make sure your power supply voltage matches the power voltage marked on the
Power Adapter.
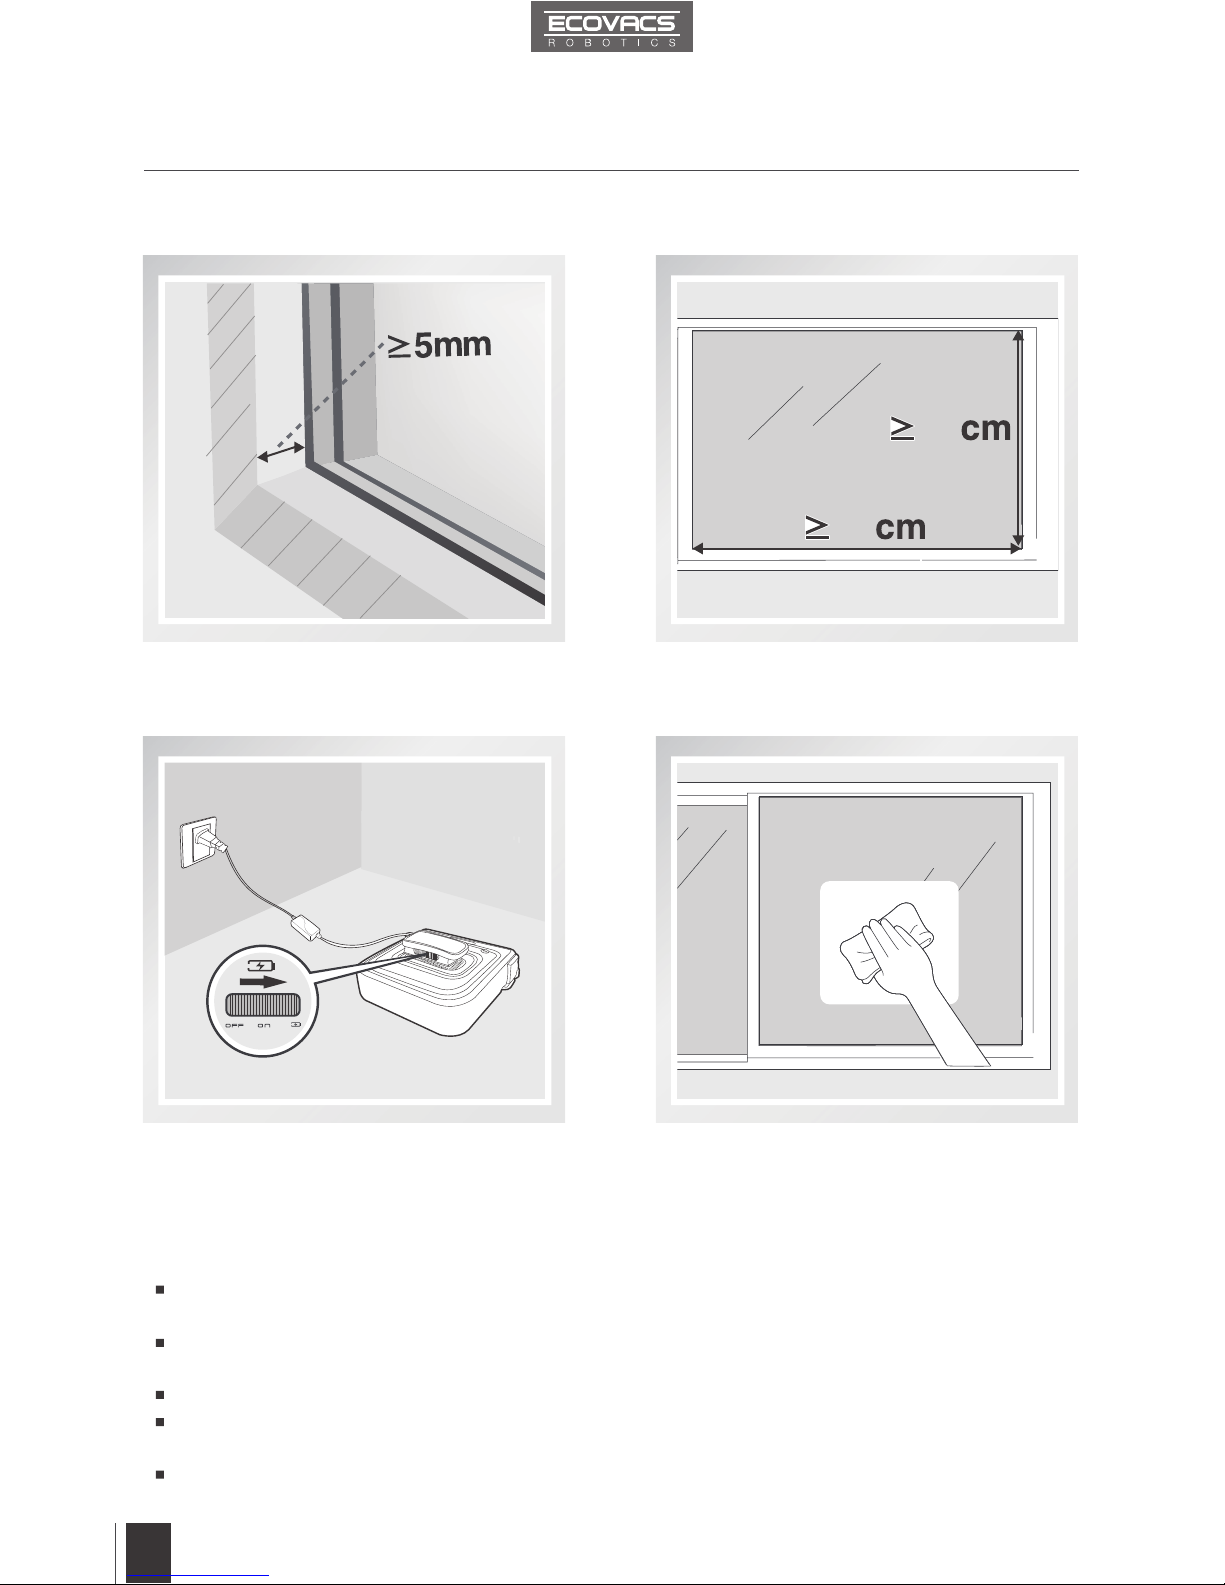
9. Do not use the Appliance on a framed window with a frame smaller than 5mm (0.2 inches).
10. Do not use the Appliance on wet or greasy windows.
11. Store the Appliance away from heat and ammable materials.
12. Do not use the Appliance if it does not rmly attach to the glass or has visible signs of damage.
13. To reduce the risk of electrical shock, do not put the Appliance in water or other liquid. Do
not place or store Appliance where it can fall or be pulled into a tub or sink.
14. Do not touch power plug or the Appliance with wet hands.
15. Do not charge the Appliance in extremely hot or cold environments, or it may affect battery
life span.
16. When charging the Appliance, do not place it on other electrical appliances and keep it
away from re and liquid.
17. Take care not to damage the power cord. Do not pull on or carry the Appliance by the power
cord, use the power cord as a handle, close a window on the power cord, or put heavy
weights on the power cord. Keep power cord away from hot surfaces.
18. Do not use with a damaged power cord or receptacle. Do not use the Appliance if it is not
working properly, has been dropped, damaged, or come in contact with water. It must be
repaired by the manufacturer or its service agent in order to avoid a hazard.
19. If the supply cord is damaged, it must be replaced by the manufacturer or its service agent
in order to avoid a hazard.
20. The plug must be removed from the receptacle before cleaning or maintaining the Appliance.
Do not unplug the Power Adapter by pulling on the power cord.
21. The Back-Up Battery must be replaced by the manufacturer or its service agent in order
to avoid a hazard.
22. The Back-Up Battery must be removed and discarded according to local laws and regulations
before disposal of the Appliance.
23. The Appliance must be disconnected from the receptacle before removing the battery for
disposal of the Appliance.
Page 5
3
EN
1. Important Safety Instructions
24. Please dispose of used batteries according to local laws and regulations.
25. Do not incinerate the Appliance even if it is severely damaged. The battery can explode in
a re.
26. The Appliance must be used in accordance with the directions in this Instruction Manual.
The company cannot be held liable or responsible for any damages or injuries caused by
improper use.
Correct Disposal of this product
This marking indicates that this product should not be disposed of with other household
waste throughout the EU. To prevent possible harm to the environment or human health
from uncontrolled waste disposal, recycle it responsibly to promote the sustainable reuse
of material resources. To recycle your used device, please use the return and collection
systems or contact the retailer where the product was purchased. They can safely recycle
this product.
For EU Countries
Page 6

4EN4
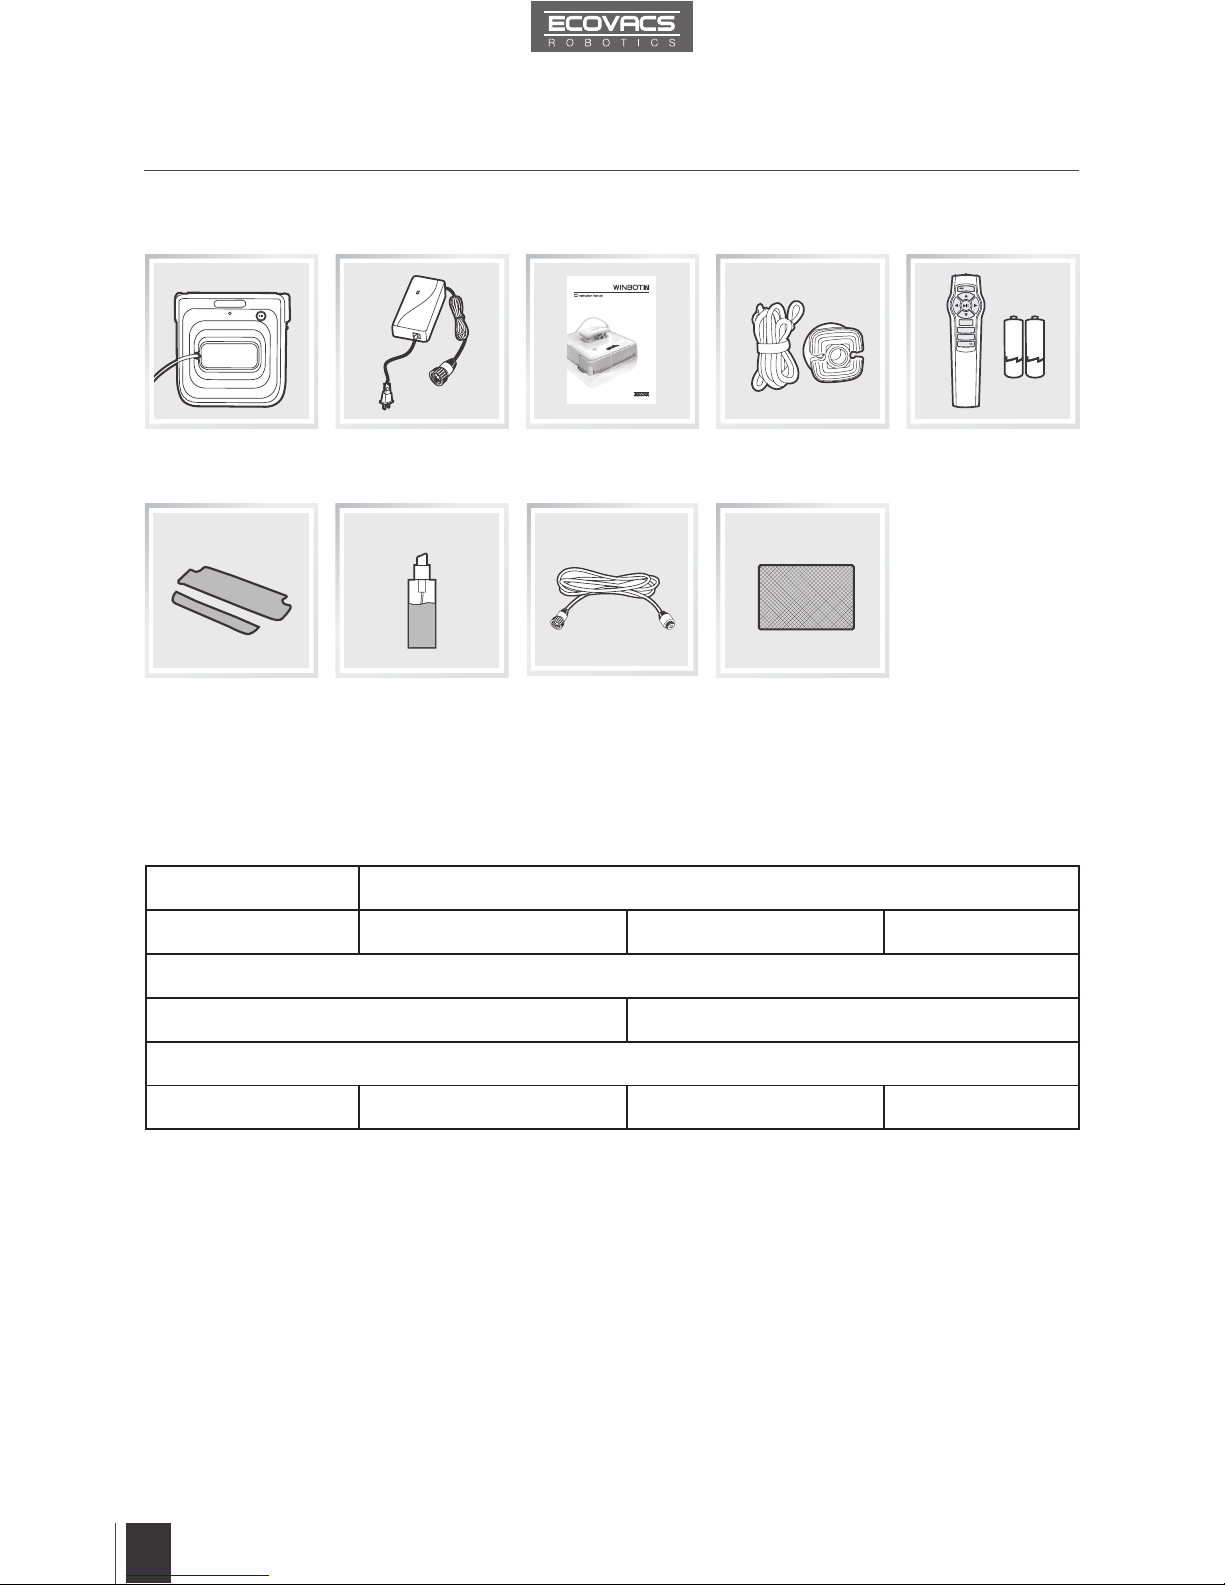
2. Package Contents and Technical Specifications
2.1 Package Contents
2.2 Specifications
Model W730/W710
Working Voltage 15V DC Rated Power 35W
Remote Control
Input Voltage 3V DC
Power Adapter: WT1503000
Input 100-240V AC 50/60Hz 1.6A Output 15V DC 3.0A
*
Technical and design specications may be changed in the course of continuous product improvement.
Finishing Cloth
Safety Pod and
Tether
Power Adapter Remote Control
with Batteries
Robot
(3) Sets of
Cleaning Pads
Instruction Manual
WINBOT
Cleaning Solution
(1) WINBOT
Extension Cord
(1.5m/4’11”)
Page 7

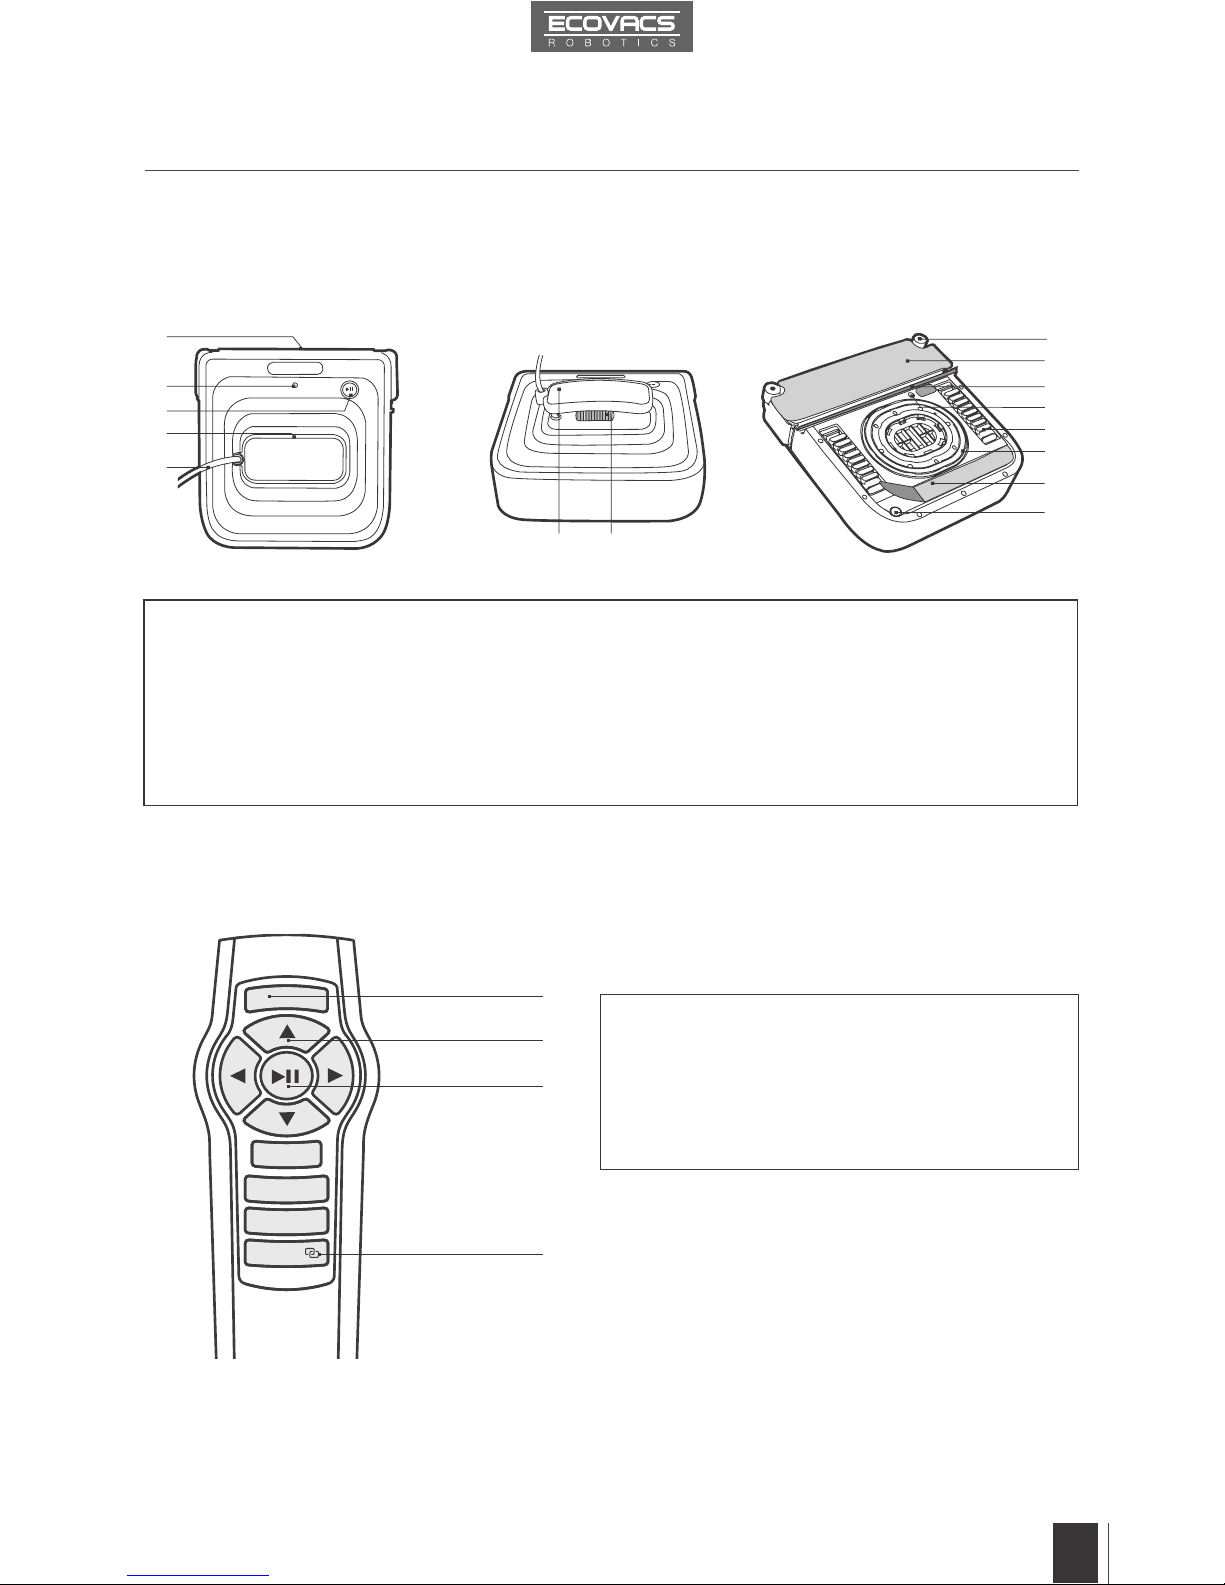
5EN5
2. Package Contents and Technical Specifications
2.3 Product Diagram
Robot
Remote Control
1. Bumper
2. Status Indicator Light
3. START/PAUSE Button
4. Air Release Trigger
5. Power Cord
6. Handle
7. Power Switch
8. Side Rollers
9. Front Cleaning Pad
10. Squeegee
11. Driving Treads
12. Cupule
13. Bottom Status Indicator Light
14. Rear Cleaning Pad
15. Edge Detection Sensors (W730 ONLY)
1
10
11
12
14
13
15
2
3
4
5
6 7
9
8
1. RESET Button
2. Direction Control Buttons
3. START/PAUSE Button
4. Remote Control Pairing Button
1
2
3
4
RESET
Page 8
6EN6
3. Operating the Robot
3.1 Notes Before Cleaning
Do not use WINBOT 7 on a framed window with
a frame smaller than 5mm (0.2").
WINBOT 7 can be used on framed or frameless
windows larger than 45cm x 60cm (17.7’’ x
23.6’’). (*W730 only)
If the window is covered with dirt, clean a
small area on the glass before use and place
WINBOT 7 there.
WINBOT 7’s Back-Up Battery must be fully
charged before use. Plug WINBOT 7 in,
move the Power Switch to the CHARGE
position, and charge until the Status Indicator
Light glows a continuous GREEN.
Please ensure there is a 15cm (5.9”) clearance between the glass and obstacles in the room
like curtains or furniture.
WINBOT 7 can clean horizontally mounted glass, or glass mounted at an angle, using the
Direction Control Buttons on the Remote Control.
Do not use WINBOT 7 upside down.
Do not use WINBOT 7 on windows with an uneven surface, such as decaled, frosted, textured,
patterned, or coated glass.
WINBOT 7 should only be used with WINBOT Cleaning Solution. Using other cleaners
signicantly reduces WINBOT’s performance and can damage the robot.
60
45
Page 9

7EN7
3. Operating the Robot
3.2 Attach the Cleaning Pads 3.3 Assemble the Power Adapter
Turn WINBOT 7 over and attach the Cleaning
Pads to their Velcro areas smoothly. Make
sure the Rear Cleaning Pad is placed exactly
within its Velcro area and does not contact or
cover the Cupule (suction ring).
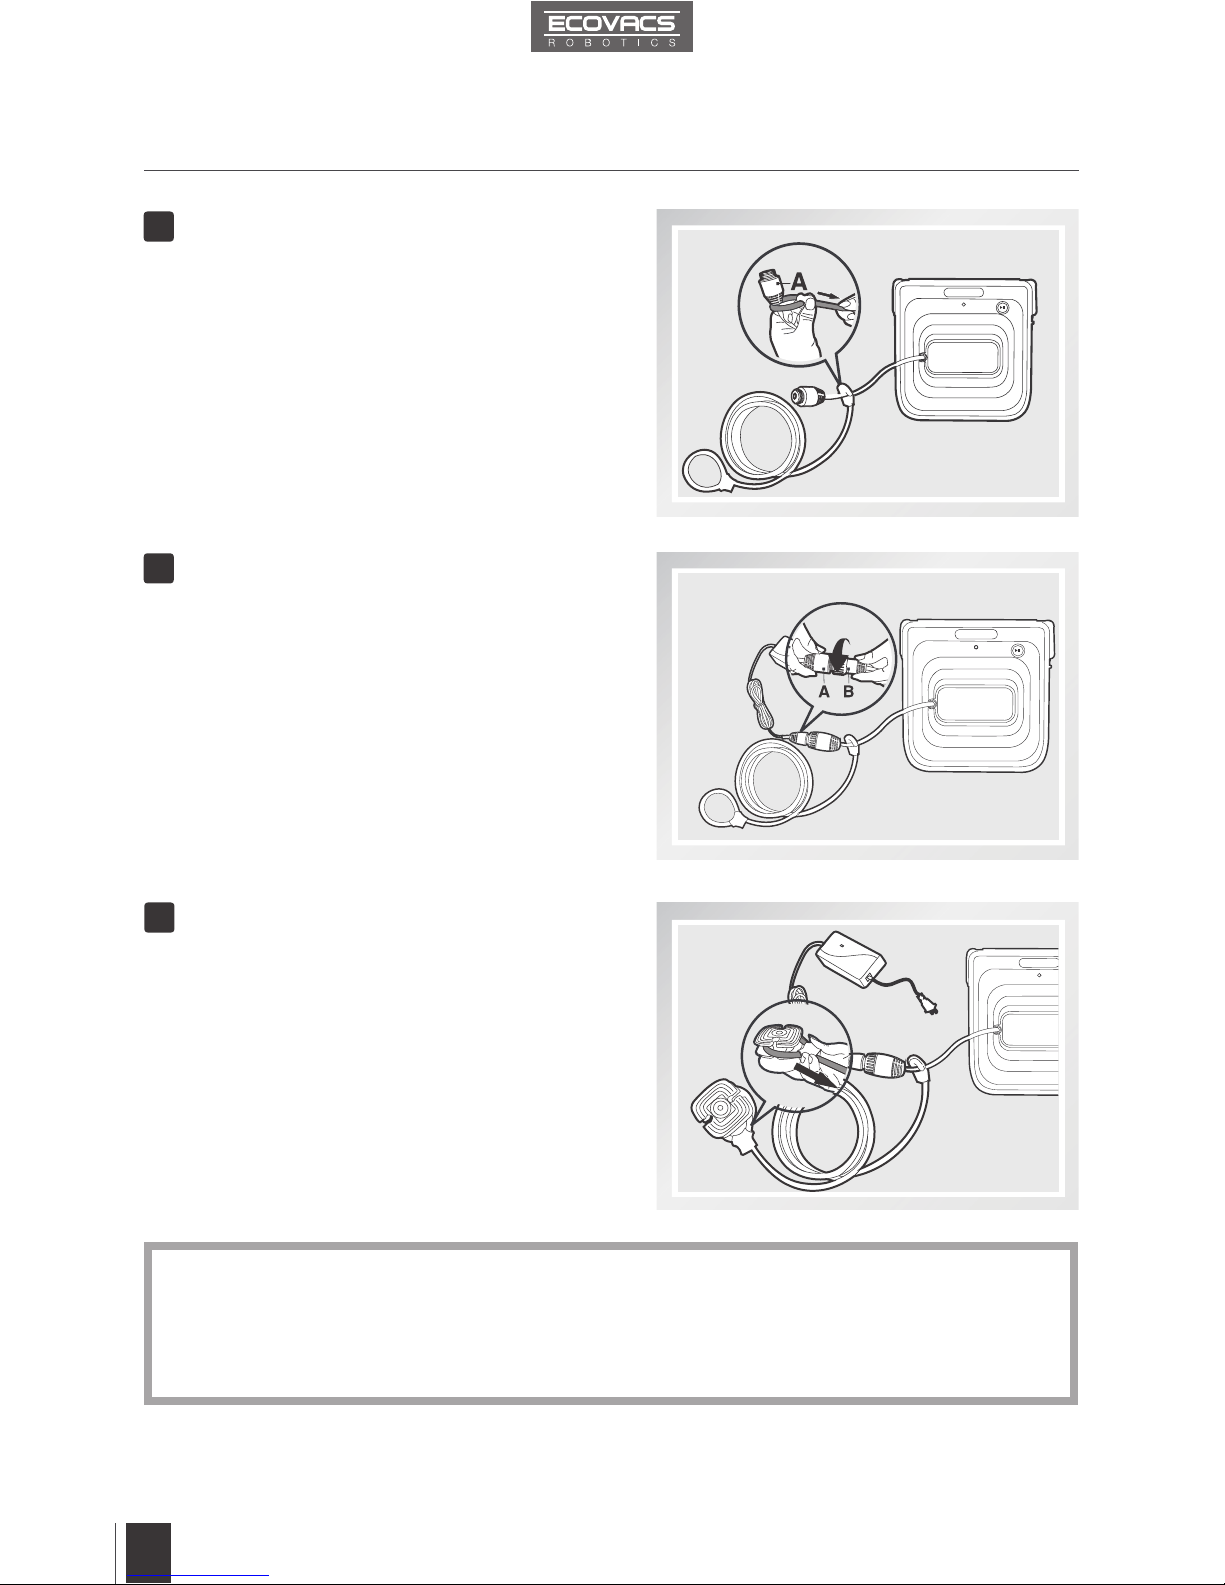
If WINBOT 7 is used to clean an outside window, the Safety Pod and Tether
MUST be used.
B
C
DD
A
*
If WINBOT 7 is being used to clean an inside window, please skip to step 3.6.
3.4 Install the Safety Tether
End A: Robot Power Cord
End B: Power Adapter Power Cord
End C: Safety Pod End D: Safety Tether
Page 10
8EN8
3. Operating the Robot
If the length of power cord restricts WINBOT 7’s movement, a WINBOT Extension Cord can be
used. Disconnect End A and End B, and connect them with both ends of the Extension Cord
respectively and tighten.
Only one Extension Cord can be used when WINBOT 7 is cleaning an outside window.
*
*
Loop one end of the Safety Tether to End
A on the Robot Power Cord and tighten.
Connect End A and End B and tighten.
Loop the other end of the Safety Tether
around the Safety Pod’s channel and pull it
tight.
1
2
3
Page 11
9EN9
3. Operating the Robot
*
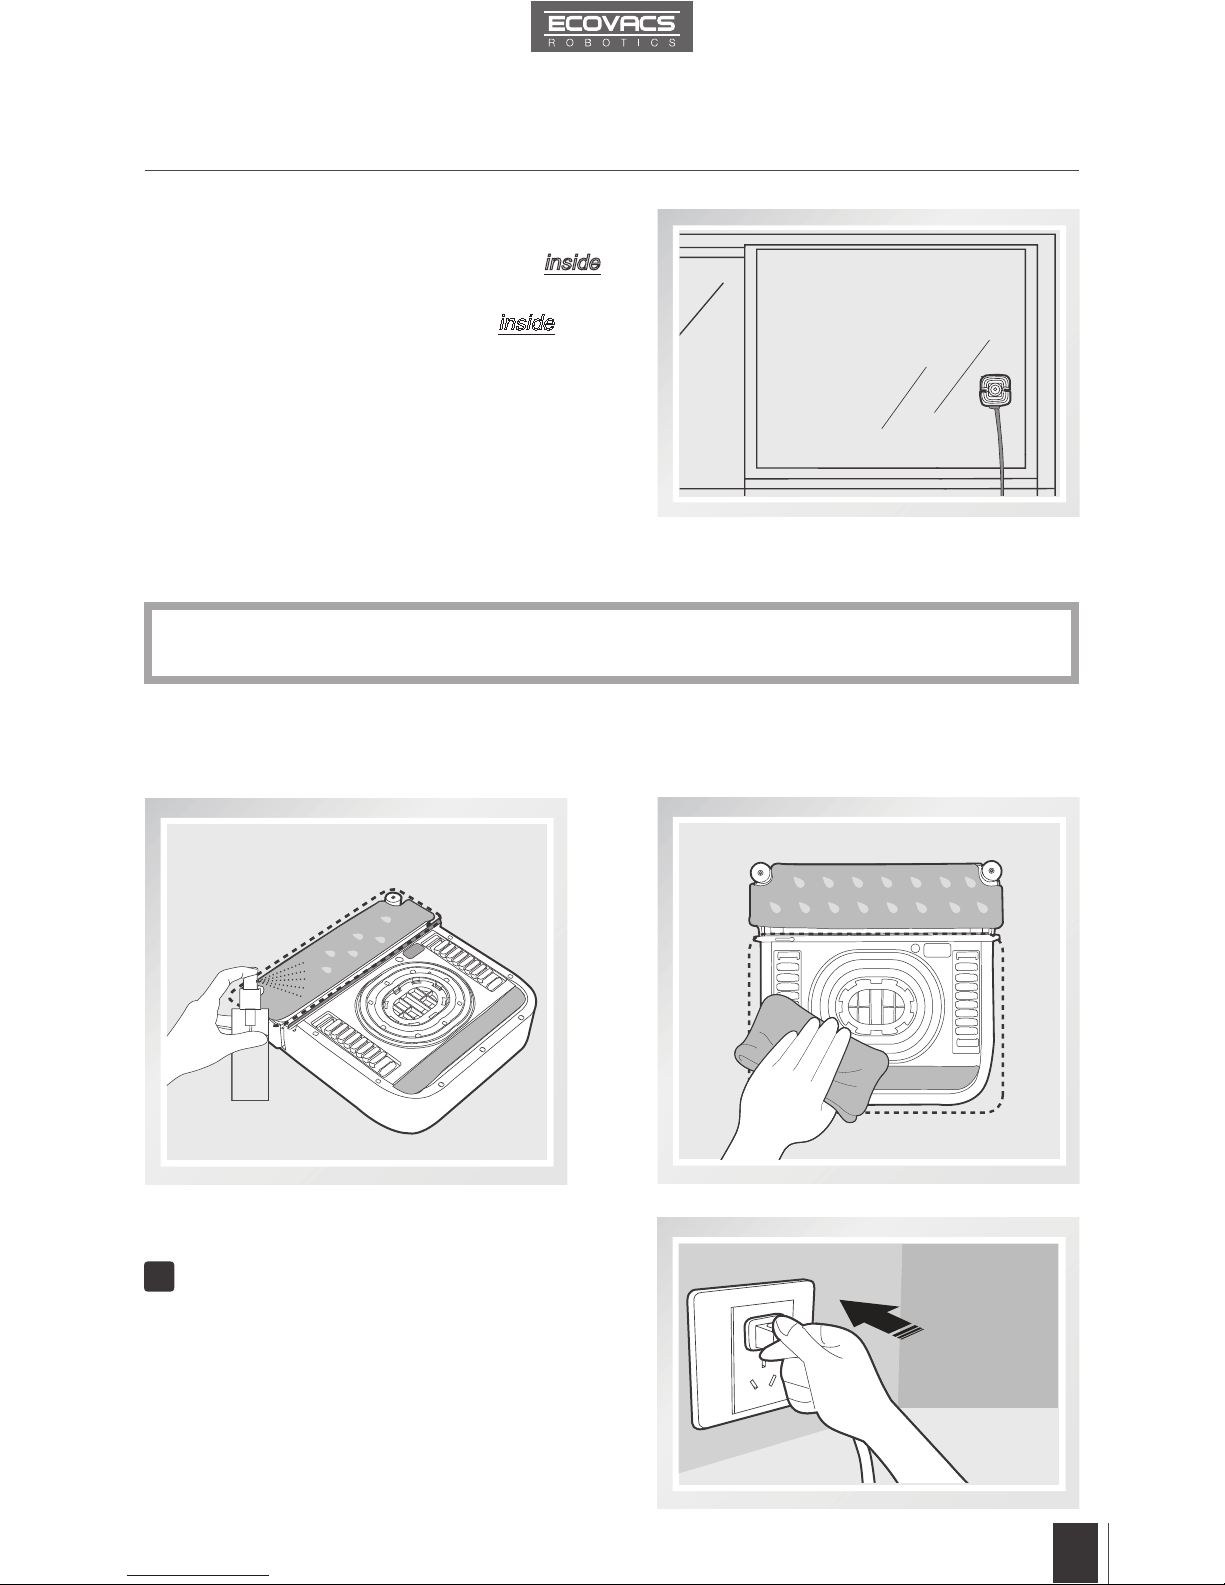
3.5 Place the Safety Pod
3.6 Spray Cleaning Solution
The Safety Pod MUST be placed on the
inside
of the window.
Press the Safety Pod FIRMLY on the
inside of the
window being cleaned. Make sure the Safety Pod is
attached securely in place.
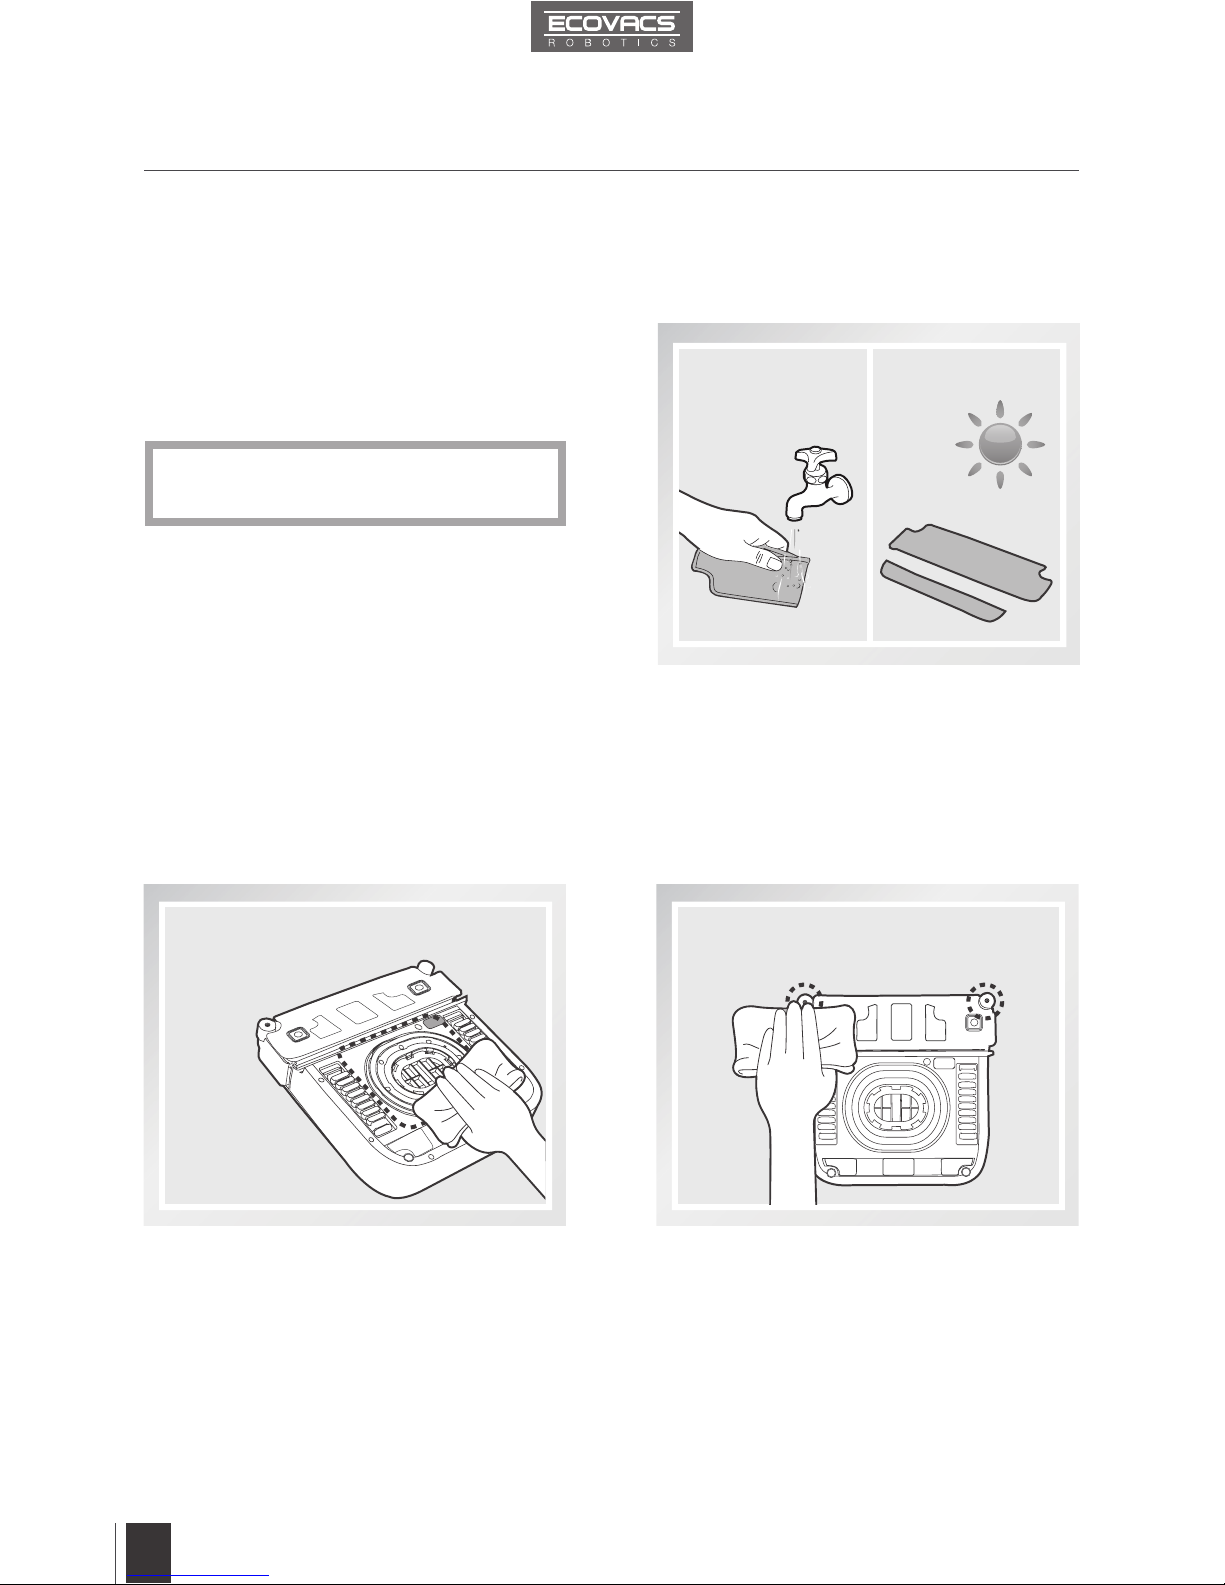
Spray the Front Cleaning Pad with the provided
WINBOT Cleaning Solution 3 times. The Front
Cleaning Pad should be damp, not wet.
After spraying, wipe the bottom of WINBOT 7
with the provided Finishing Cloth.
WINBOT 7 should only be used with WINBOT Cleaning Solution. Using other cleaners signicantly
reduces WINBOT’s performance and can damage the robot.
1
3.7 Start
Plug in WINBOT 7
Page 12
10EN10
3. Operating the Robot
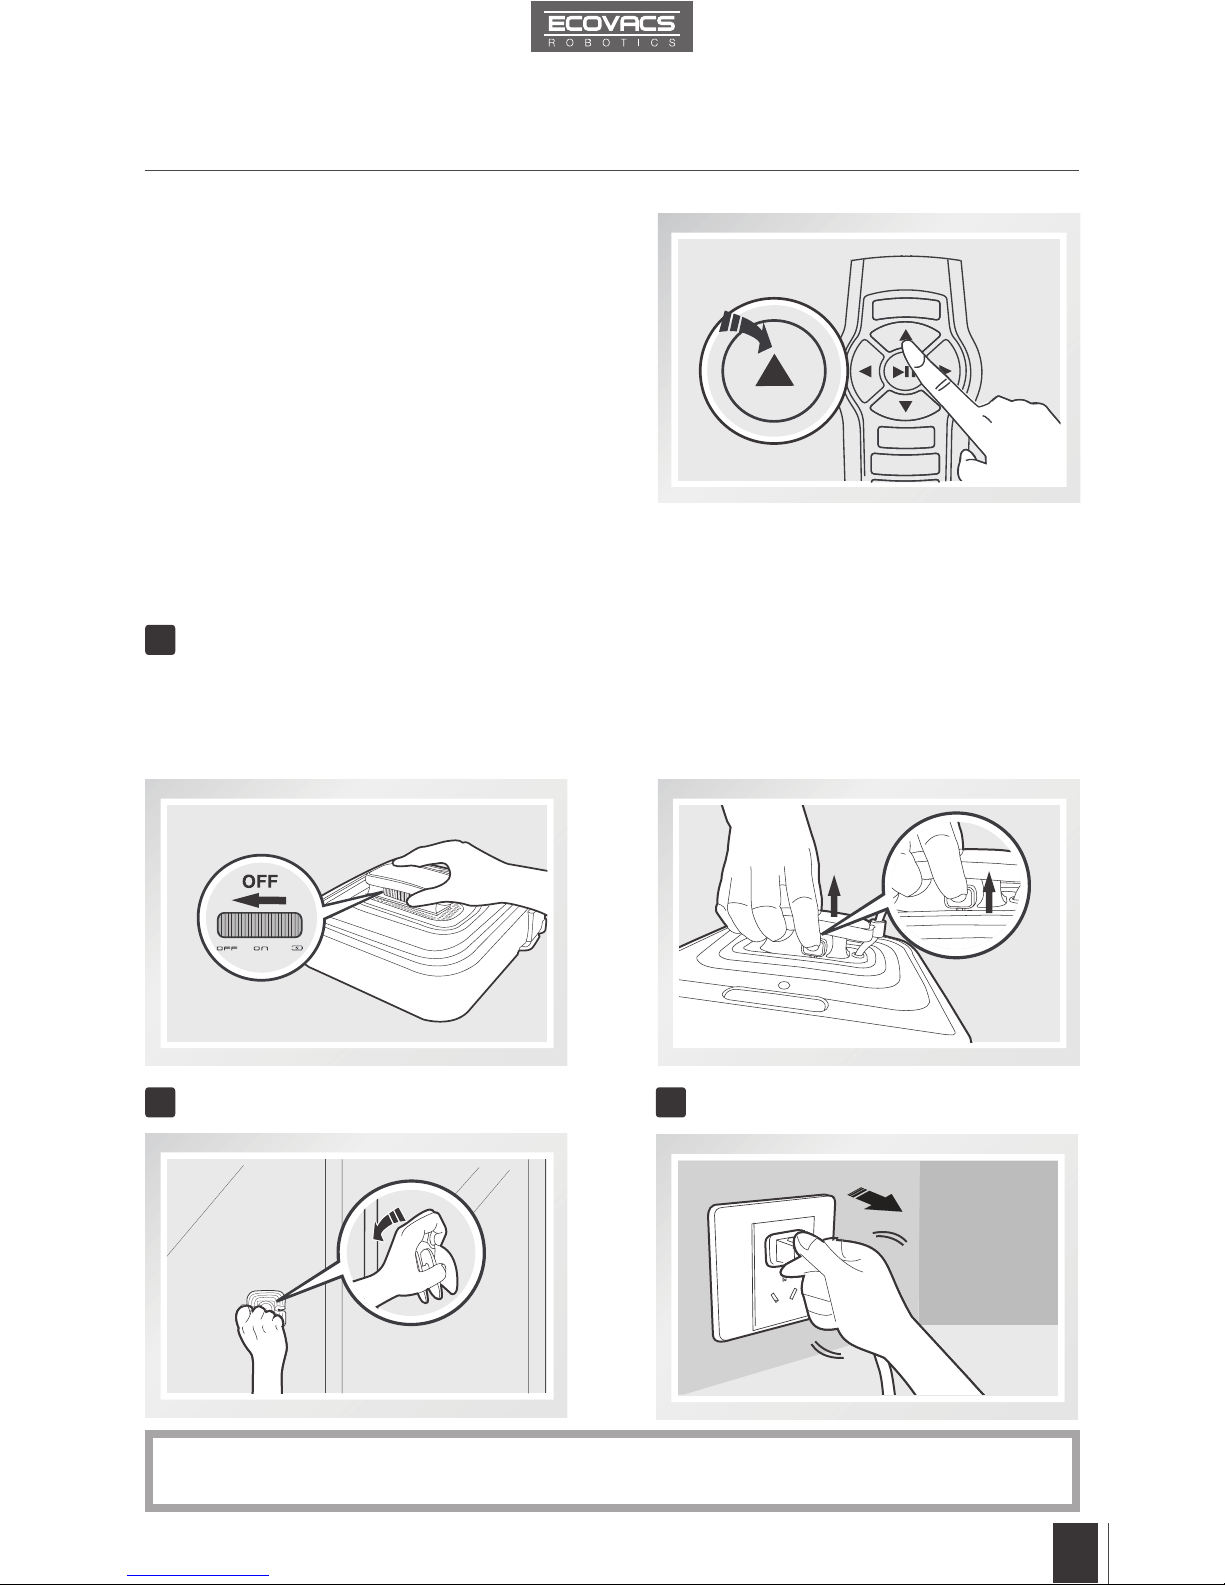
Press the START/PAUSE Button on WINBOT 7
or on the Remote Control to begin cleaning.
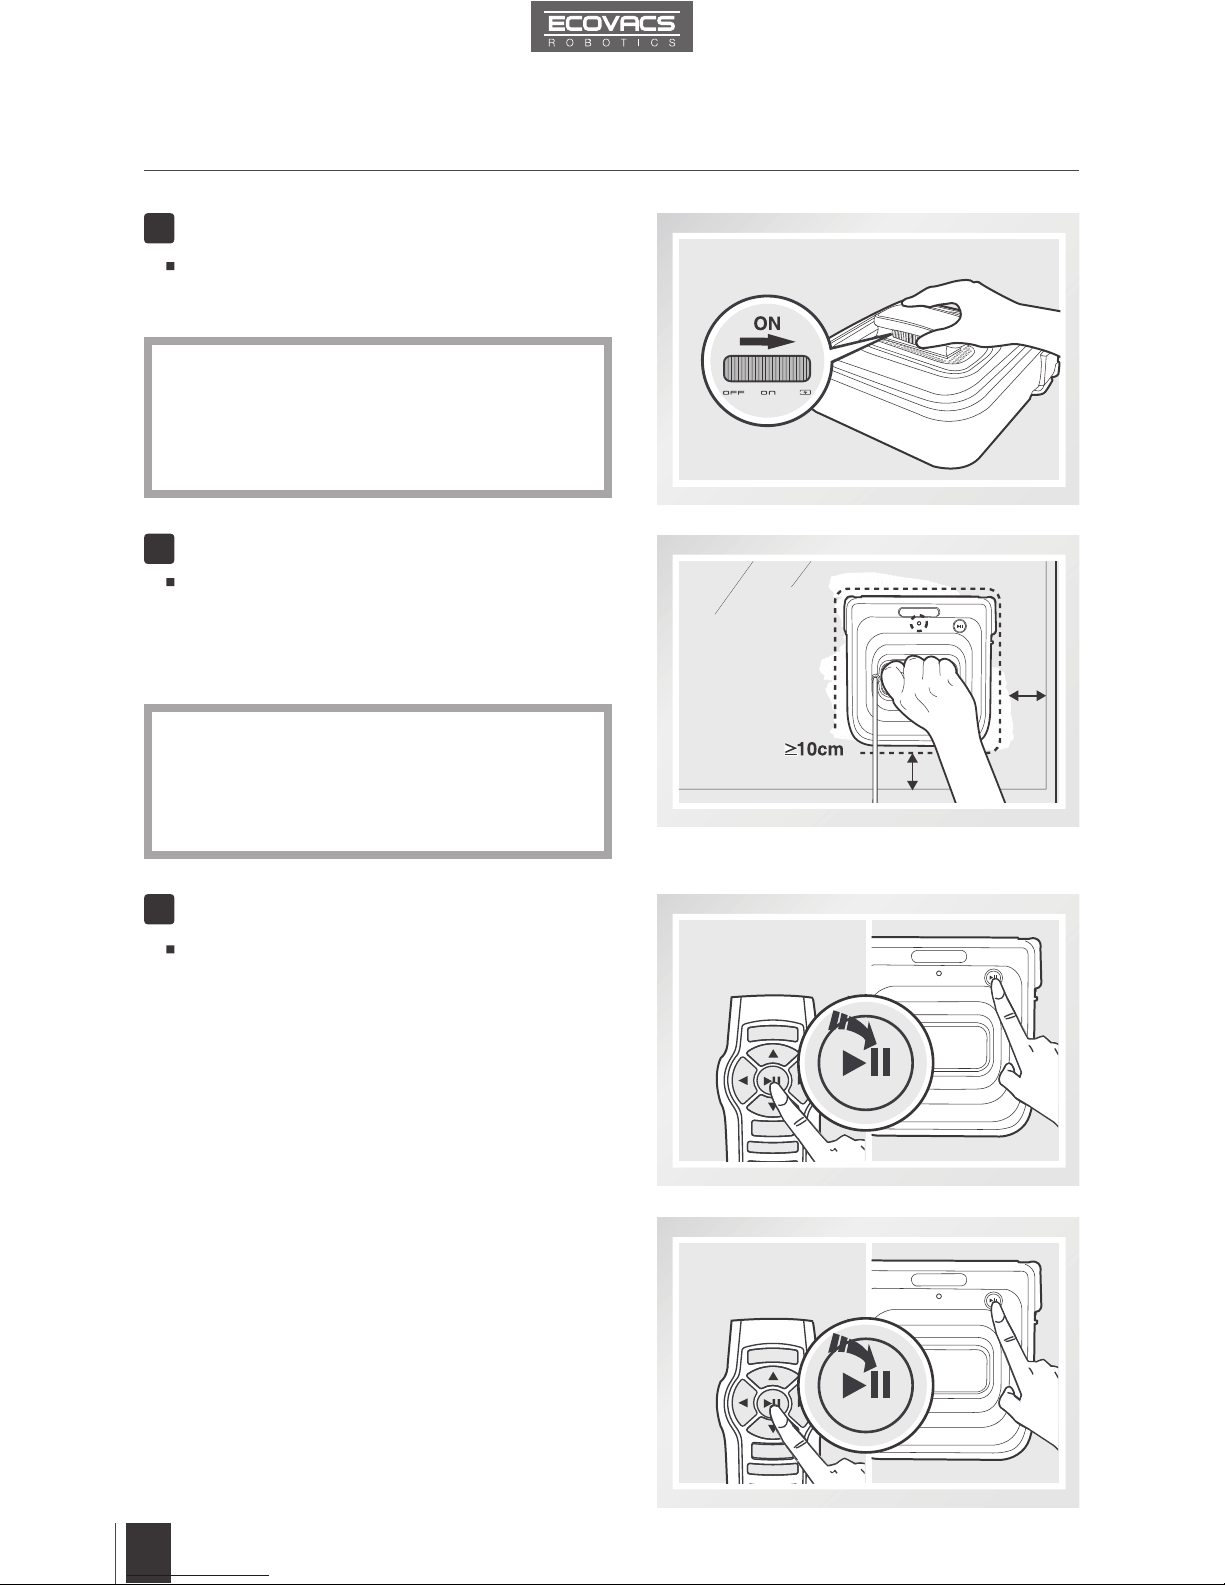
Place WINBOT 7 on the window at least 10cm
(4’’) from the corners and other obstacles and
press it firmly on the window. WINBOT 7 has
successfully attached to the window when the
Status Indicator Light ashes BLUE.
WINBOT 7’s Back-Up Battery must be fully
charged before use. Plug WINBOT 7 in, move
the Power Switch to the CHARGE position until
the Status Indicator Light glows a continuous
GREEN.
Please be careful not to pull the Air Release
Trigger.
Please ensure there is a 15cm (5.9”) clearance
between the glass and obstacles in the room like
curtains or furniture.
Move the Power Switch to the “ON” position.
WINBOT 7 is powered ON when it generates
suction.
3
4
Power ON
Place on the Glass
Start
2
*
*
*
3.8 Pause
Pause WINBOT 7 during cleaning by pressing
the START/PAUSE button on the robot or on the
Remote control.
Page 13
11EN11
3. Operating the Robot
1
3.9 Stop
WINBOT 7 can be directed to move forward,
backward, left and right using the Direction
Control Buttons on the Remote Control when
Paused. WINBOT 7 will clean when Direction
Control Buttons are used.
When WINBOT 7 completes its cleaning cycle, it returns to the place it started and beeps.
Remove WINBOT 7
Unplug WINBOT 7
3
Remove the Safety Pod, if used
2
Pull the Air Release Trigger and remove
WINBOT 7 from the window. Polish away
any marks left on the glass from WINBOT 7’s
removal with the provided Finishing Cloth.
Grasp WINBOT 7’s handle. Move the Power
Switch to “OFF” position.
*
If WINBOT 7 has a problem and the Indicator Light glows RED, it can be reset by pressing the
Reset Button on the Remote Control.
Page 14
12EN12
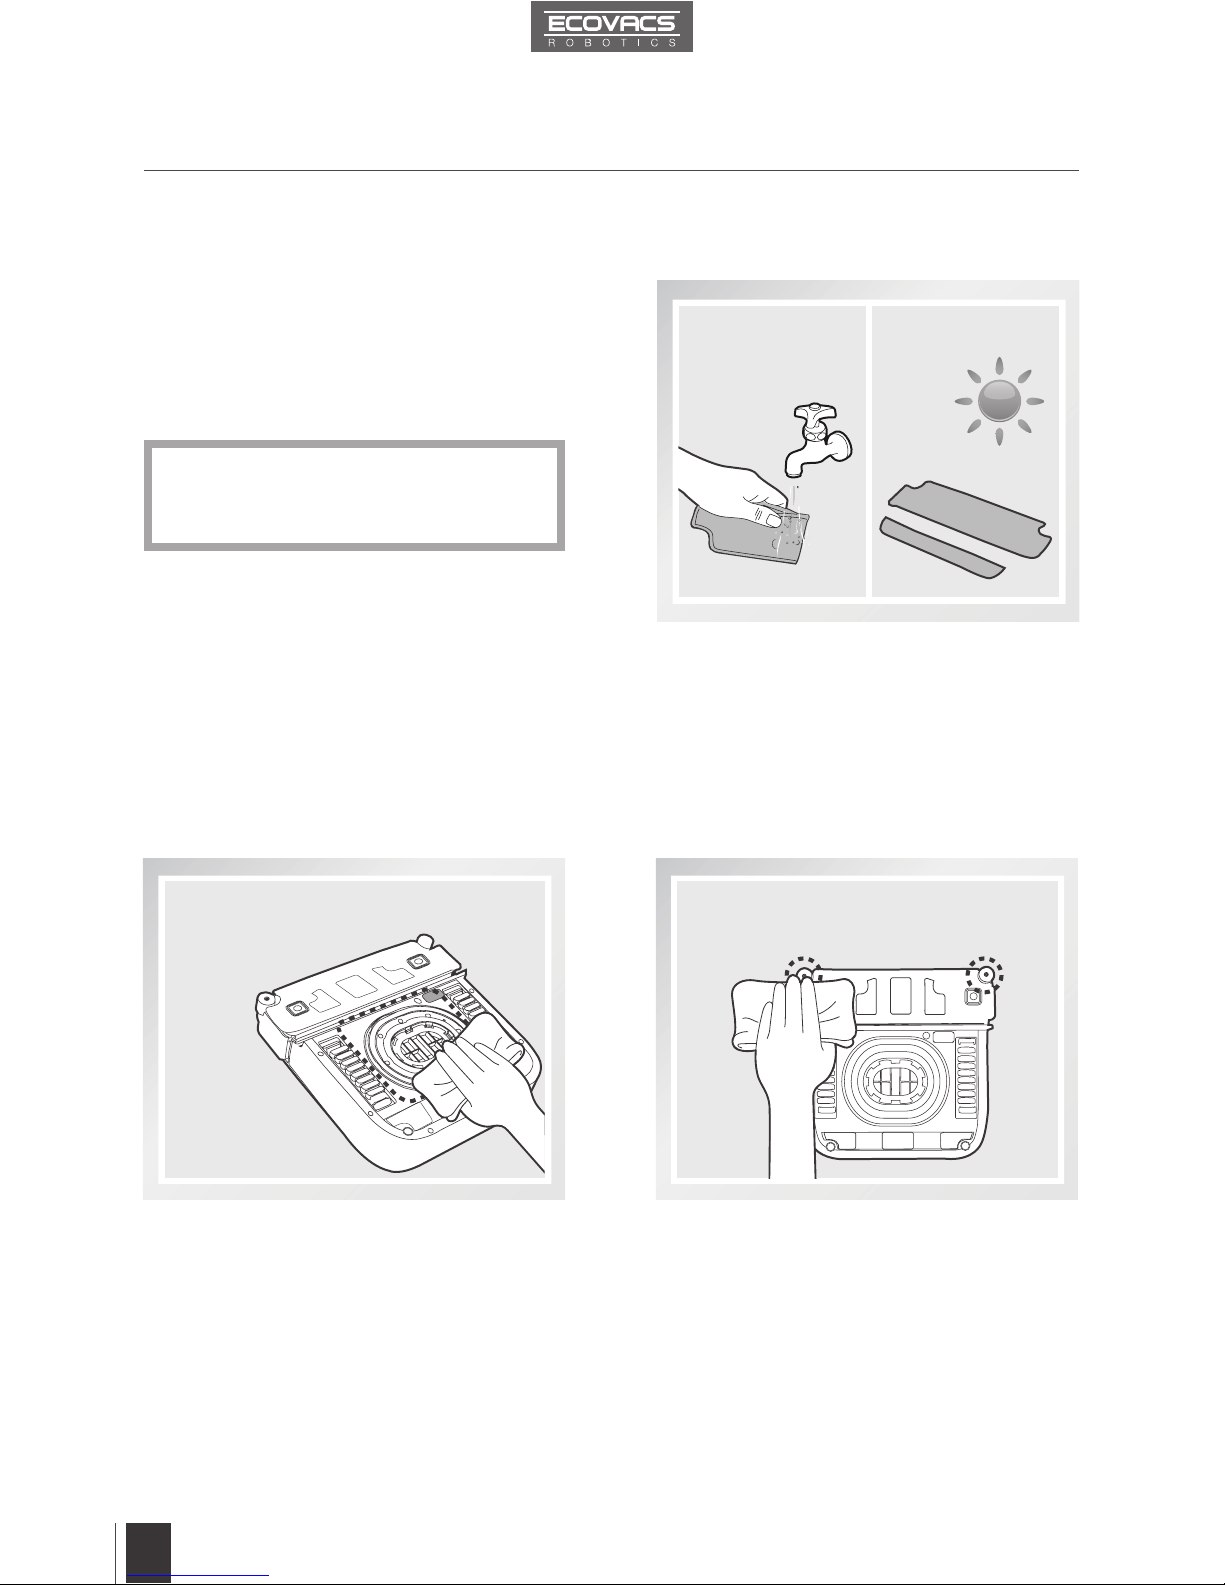
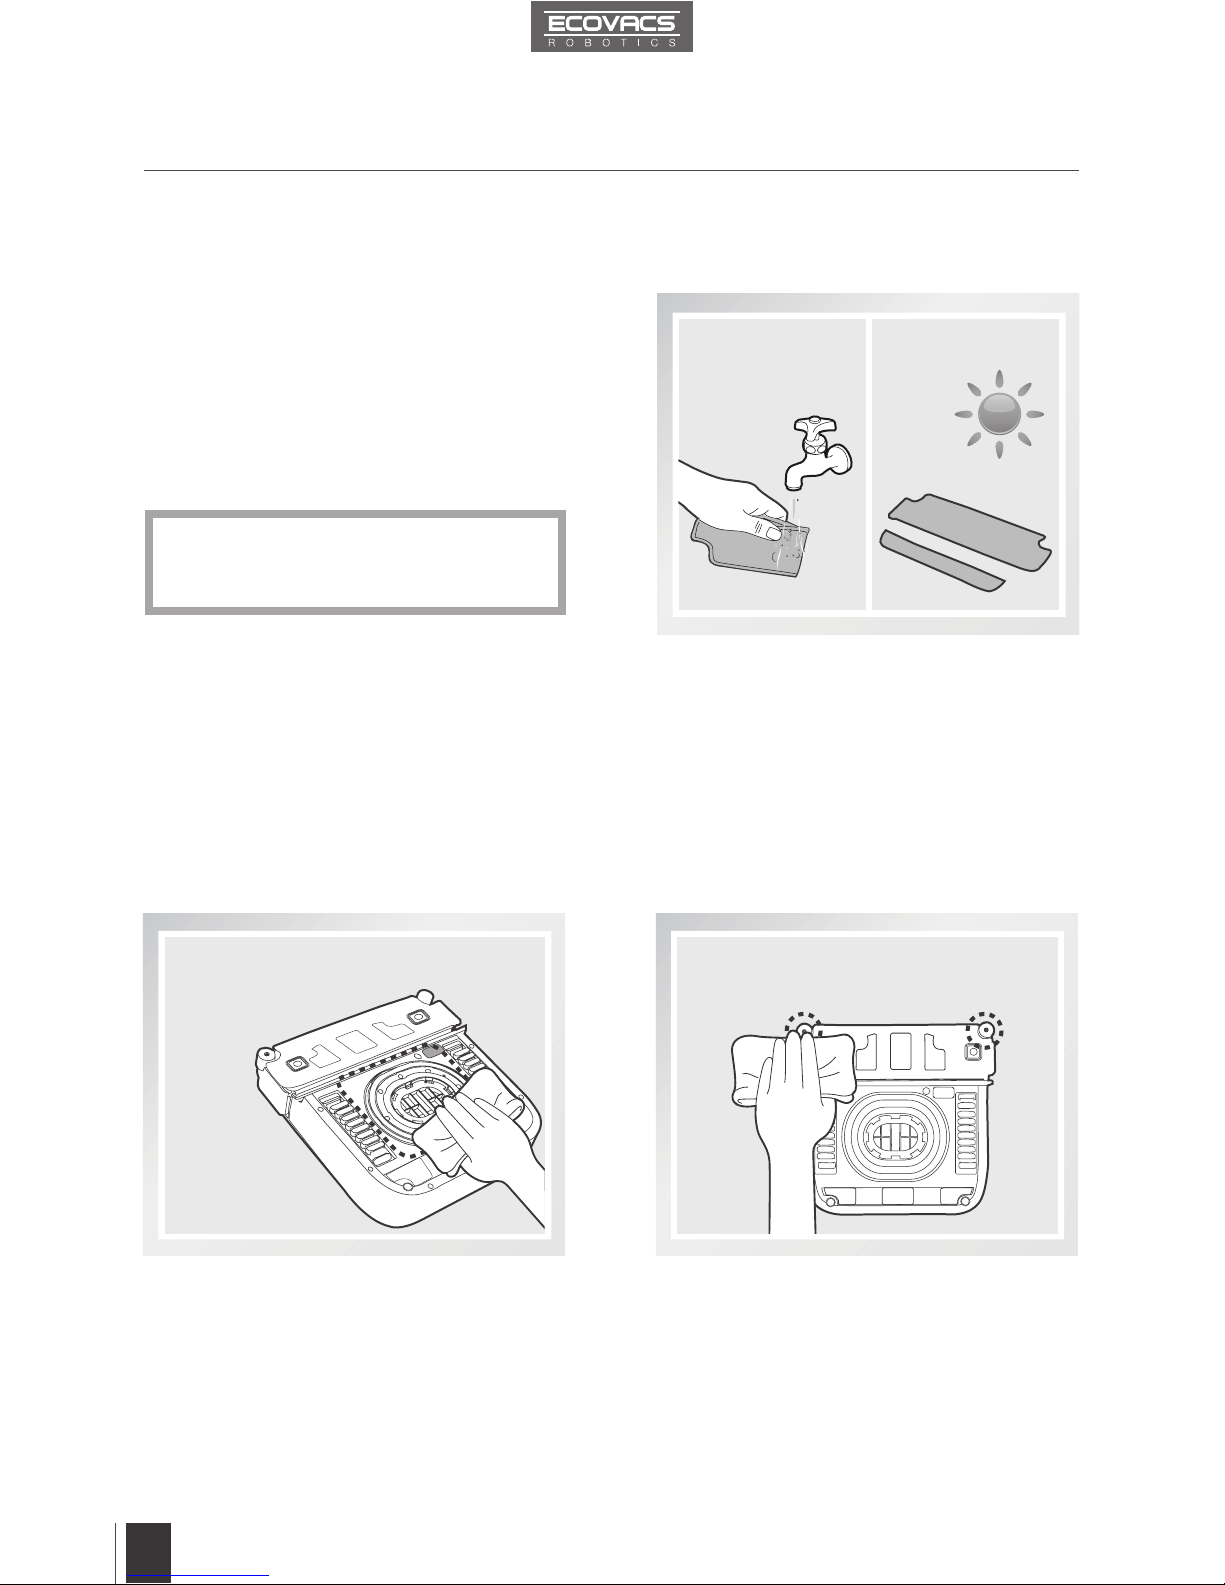
4. Maintenance
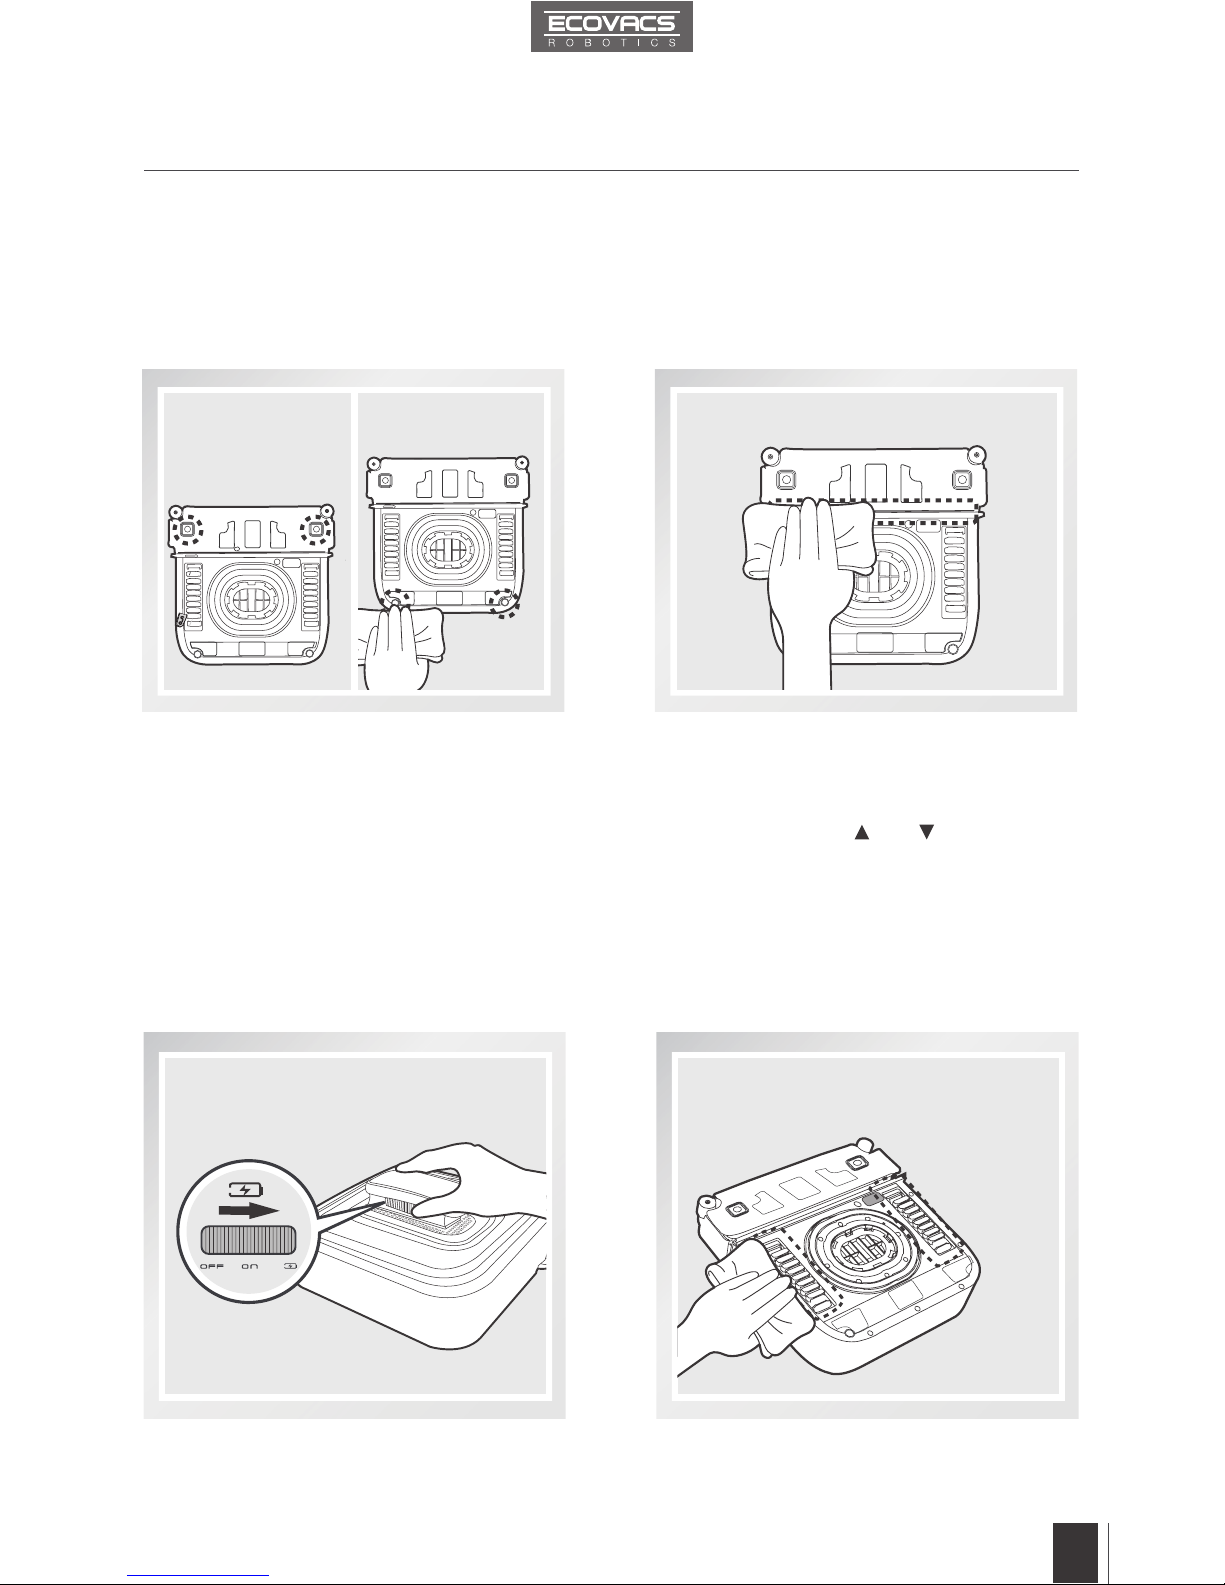
Turn the robot over and remove the Cleaning
Pads. Rinse the Cleaning Pads and allow
them to dry completely before re-attaching it
to the robot.
Turn the robot over and wipe any debris
from the Cupule with the provided Finishing
Cloth to maintain suction.
4.2 Cupule, Side Rollers and Sensors
4.1 Cleaning Pads
Do NOT use wet Cleaning Pads on
WINBOT 7, or it may slip on the window.
*
Cupule
Turn the robot over and wipe the Side
Rollers clean with the provided Finishing
Cloth to maintain their effectiveness.
Side Rollers
Before performing cleaning and maintenance on WINBOT 7, move the Power Switch to the
“OFF” position and unplug it from the receptacle.
Page 15
13EN13
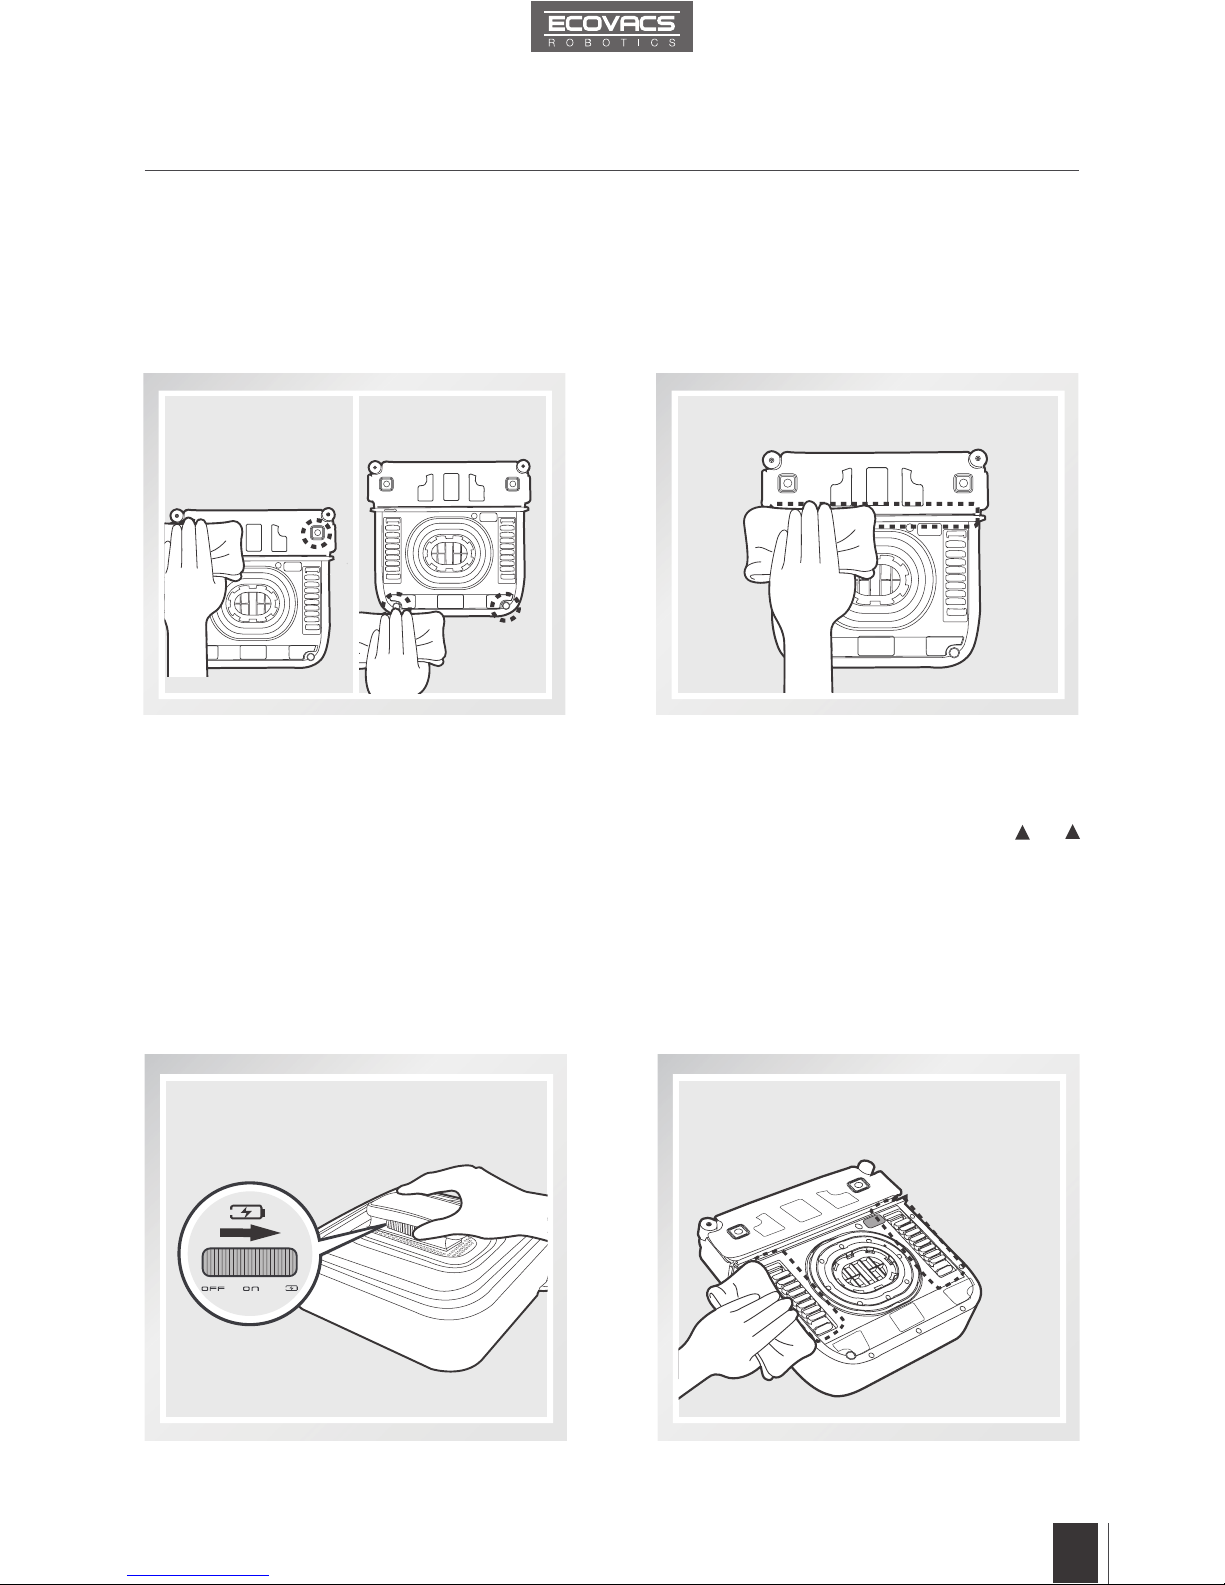
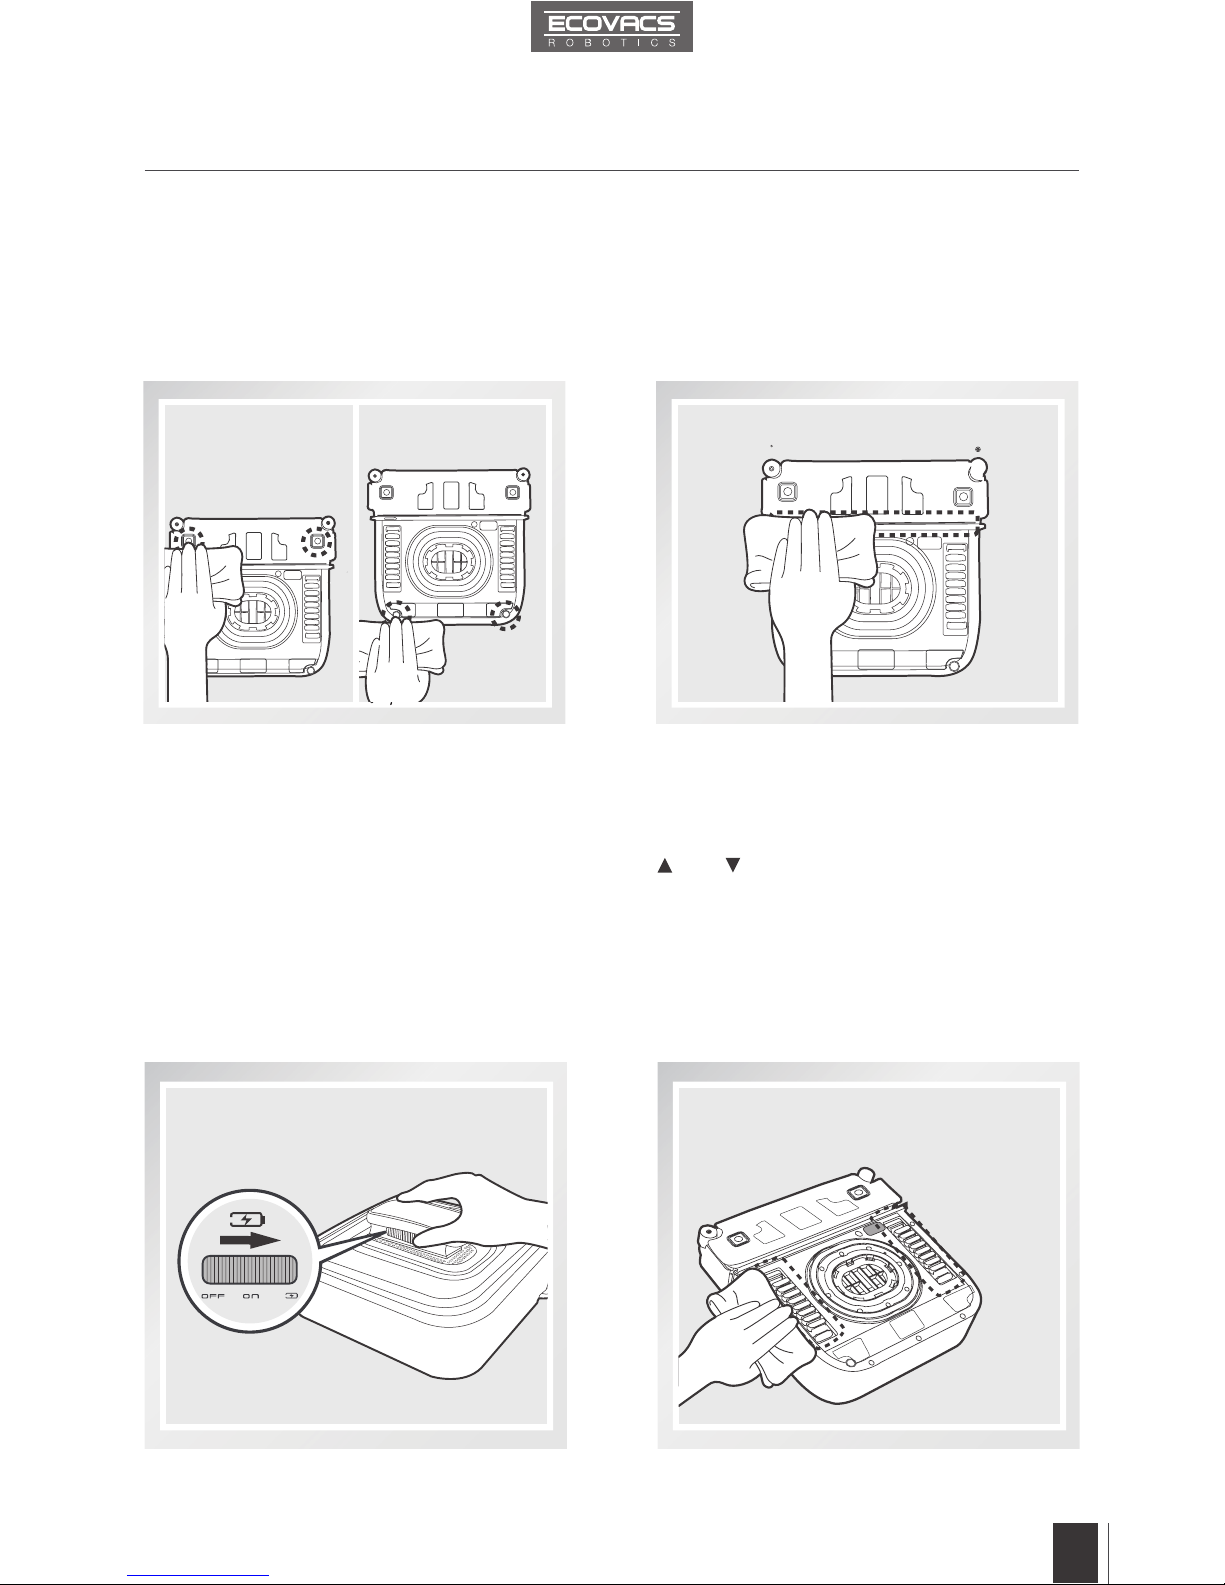
4. Maintenance
Turn the robot over and remove the Cleaning
Pads. Wipe the Edge Detection Sensors
clean with the provided Finishing Cloth to
maintain their effectiveness. (W730 ONLY)
Turn the robot over and wipe the Squeegee
clean with the provided Finishing Cloth to
maintain its effectiveness.
4.3 Driving Treads
Move the Power Switch on WINBOT 7 to the
CHARGE position.
Turn WINBOT 7 over. Inspect the Driving
Treads by using the and buttons on the
Remote Control. Stop the Driving Treads if
dirt is seen on the Treads.
Move the Power Switch on WINBOT 7 to the
OFF position.
Clean any dirt on the Driving Treads with the
provided Finishing Cloth.
Edge Detection Sensors
Squeegee
Page 16

14EN14
EN
5. Status Indicator Light and Sounds
Indicator Description
Status Indicator Light ashes
GREEN
Back-Up Battery is low and is charging.
Status Indicator Light glows a
continuous GREEN
Back-Up Battery is fully charged and WINBOT 7 is ready to use.
Status Indicator Light ashes
BLUE
WINBOT 7 has successfully attached itself to the glass and is
ready to clean.
Status Indicator Light glows a
continuous BLUE
WINBOT 7 is cleaning the window.
Status Light Indicator glows
RED
WINBOT 7 has a problem. Please refer to Section 6,
Troubleshooting, for details.
WINBOT emits beeps
WINBOT 7 beeps in following situations:
WINBOT 7 nishes cleaning.
WINBOT 7 is successfully paired with its Remote Control.
WINBOT 7 has a problem.
Page 17

15EN15
EN
6. Troubleshooting
No. Malfunction Possible Causes Solutions
1
Remote Control
does not work.
WINBOT 7 is cleaning.
When WINBOT 7 is
cleaning, only the START/
PAUSE Button works on
the Remote Control.
Pause WINBOT 7 by pressing
the START/PAUSE Button on the
robot or the Remote Control. Other
buttons on the Remote Control will
function when WINBOT 7 is paused.
The batteries in the Remote
Control are not installed or
need to be replaced.
Install batteries or replace with new
batteries.
The Remote Control is not
paired with WINBOT 7.
WINBOT 7 arrives from
the factory paired with
its Remote Control. If the
Remote Control becomes
un-paired or is replaced, it
can be re-paired.
Power ON WINBOT 7. At the same
time, press and hold
button on
WINBOT 7 and the Pairing Button
on the Remote Control. Paring is
complete when WINBOT 7 beeps.
2
Status Indicator Light
does not ash BLUE
after WINBOT 7 is
placed on the glass.
There is not enough suction
to attach WINBOT 7 to the
glass.
A. Check Cleaning Pads to ensure
proper placement. Remove the
Cleaning Pads and re-attach them
making sure they are placed exactly
within their Velcro areas on WINBOT 7.
B. Check for debris on the Cupule.
Clean the surface of the Cupule
with the provided Finishing Cloth as
described in section 4.
C. Check for accumulated dust or
debris on the glass where WINBOT 7
is placed. Clean a small area on the
glass before use and place WINBOT 7
there.
D. Press WINBOT 7 on the window
a little more rmly.
Page 18

16EN16
EN
6. Troubleshooting
No. Malfunction Possible Causes Solutions
3
Status Light
Indicator ashes
RED after it is
powered ON,
or during cleaning.
WINBOT 7 has
encountered a problem.
A. Power OFF WINBOT 7 and unplug it.
Then plug in again and power ON.
B. Reset WINBOT 7 by pressing the
RESET Button on the Remote Control.
C. Check for stubborn stains on the
window. Clean the stains before using
WINBOT 7.
D. Check the Cupule for dirt or damage.
Clean the Cupule as described in section
4. If Cupule is scratched or damaged,
replace it with a new one.
E. Check the Cleaning Pads. Replace
Cleaning Pads if they are dirty or too wet.
F. Check the Driving Treads for dirt or
grease. Clean the Driving Treads as
described in section 4.
G. Check WINBOT 7’s Bumper. Gently
pat on the Bumper to restore it to its
normal position.
H. Check the window for uneven surface.
Do not use WINBOT 7 on windows with
an uneven surface, such as decaled,
frosted, textured, patterned, or coated
glass.
I. Check the window for thick dirt. Clean
the window by hand rst and use
WINBOT 7 for regular cleaning after that.
*
WINBOT 7 is intended to be used
for maintenance cleaning on common
windows. The product is NOT designed
to replace heavy duty or rst time
cleaning.
4
WINBOT 7 does
not follow its normal
cleaning pattern,
moves erratically or
stops.
The Cleaning Pads are not
placed exactly within their
Velcro areas.
Remove and reattach the Cleaning
Pads making sure they are placed
exactly within their Velcro areas. Make
sure the Rear Cleaning Pad does not
contact or cover the Cupule.
The Cleaning Pads are
dirty.
Replace the Cleaning Pads.
The Cupule is dirty or the
Driving Treads are dirty.
Clean the surface of the Cupule and
Driving Treads with the provided
Finishing Cloth as described in
section 4.
If the problem persists, please
contact Customer Service.
Page 19

17
EN
No. Malfunction Possible Causes Solutions
4
WINBOT 7 stops
at the bottom of
the window being
cleaned and emits
beeps. Status Light
Indicator ashes
RED.
Interruption of electricity
while WINBOT 7 was
cleaning due to power
failure, plug displacement,
or loose connection to the
Power
A. Connect WINBOT 7 to the Power
Adapter and plug into the wall
receptacle. Press START/PAUSE
Button on the robot or on the Remote
Control twice and WINBOT 7 will
resume cleaning.
B. In case of power failure, and the
above solution does not work, please
move the Power Switch to the OFF
position and remove the robot from the
window. If power has resumed, move
the Power Switch back to the ON
position, place the robot on the window
again and restart.
Page 20

Toutes nos félicitations pour l'achat de votre robot WINBOT d'ECOVACS!
Nous espérons qu'il vous apportera de nombreuses années de satisfaction.
Nous sommes persuadés que votre nouveau robot vous aidera à garder
votre maison propre et vous permettra d'économiser du temps pour vivre
intelligemment et apprécier la vie.
Live Smart. Enjoy Life.
Si vous deviez rencontrez des situations qui n'ont pas été correctement
abordées dans ce manuel, veuillez contacter notre service clientèle, un
technicien sera a votre service pour répondre à vos questions.
Pour plus d'informations, veuillez visiter le site ofciel de ECOVACS :
www.ecovacs.com
Dans un souci d’amélioration constante de nos produits, nous nous réservons
le droit de modifications techniques de l'appareil, que nous jugerons
nécessaire à l'évolution constante de cette unité.
Nous vous remercions d'avoir choisi WINBOT !
Page 21

FR
Contenu
1.
Consignes de sécurité importantes
..........................................................20
2.
Contenu de l'emballage et caractéristiques techniques
........................22
2.1 Contenu de l'emballage ..........................................................................22
2.2 Caractéristiques .....................................................................................22
2.3 Schéma du produit .................................................................................23
3. Utilisation du robot
.....................................................................................24
3.1 Indications avant le nettoyage ................................................................ 24
3.2 Fixer le patin de nettoyage ..................................................................... 25
3.3 Monter l'adaptateur secteur ....................................................................25
3.4 Installer le cordon de sécurité ................................................................25
3.5 Placer la nacelle de sécurité ..................................................................27
3.6 Pulvériser la solution de nettoyage ........................................................27
3.7 Démarrage .............................................................................................27
3.8 Pause .....................................................................................................28
3.9 Arrêt ........................................................................................................29
4. Entretien
...................................................................................................... 30
4.1 Patin de nettoyage .................................................................................30
4.2 Cupule, roulettes latérales et capteurs .................................................. 30
4.3 Chenilles .................................................................................................31
5.
Témoin lumineux et avertissements sonores
..........................................32
6.
Dépannage
..................................................................................................33
Page 22

FR
20
1.
Consignes de sécurité importantes
Beim Gebrauch eines elektrischen Gerätes sind einige grundlegende Sicherheitshinweise zu
beachten. Dazu gehören auch die folgenden Hinweise:
LESEN SIE ALLE ANWEISUNGEN VOR GEBRAUCH (DIESES GERÄTES)
BEWAHREN SIE DIESE ANWEISUNGEN AUF
1. Dieses Gerät darf nicht von Kindern unter 8 Jahren oder Personen benutzt werden, die nicht
über die sachgemäße Verwendung des Gerätes informiert sind. Diese Personen müssen
beaufsichtigt werden. Lassen Sie Kinder nicht mit dem Gerät spielen.
2. Verwenden Sie das Gerät nicht bei extrem heißen bzw. kalten Temperaturen (unter 0° C
bzw. über 40° C). Das Gerät kann zum Reinigen von Fenster-Außenflächen verwendet
werden, sofern es über ein Sicherheitsseil mit dem Sicherheitssystem verbunden ist, kein
Wind herrscht und es nicht regnet oder schneit.
3. Stellen Sie sicher, dass der Netzstecker des Gerätes während der Reinigung in der Steckdose
steckt. Das Gerät verfügt über einen Ersatzakku, der sich während des Gebrauchs auädt. So
wird das Gerät mit Strom versorgt, wenn der Netzstecker gezogen wird oder der Strom ausfällt.
4. Lassen Sie das Gerät nicht unbeaufsichtigt, solange es ans Stromnetz angeschlossen ist.
5. Verwenden Sie das Gerät AUSSCHLIESSLICH für den Hausgebrauch. Verwenden Sie das
Gerät nicht für kommerzielle oder industrielle Zwecke.
6. Verwenden Sie das Gerät nicht auf gesprungenen Glasächen.
7. Verwenden Sie nur das vom Hersteller empfohlene oder gelieferte Zubehör. Verwenden Sie
nur den vom Hersteller gelieferten Netzadapter.
8. Stellen Sie sicher, dass die Netzspannung mit der auf dem Netzadapter angegebenen
Netzspannung übereinstimmt.
9. Verwenden Sie das Gerät nicht auf Fenstern mit Rahmen, die schmaler als 5 mm sind.
10. Verwenden Sie das Gerät nicht auf nassen oder fettigen Fensterächen.
11. Lagern Sie das Gerät vor Hitze geschützt und in sicherem Abstand zu brennbaren Materialien.
12. Verwenden Sie das Gerät nicht, wenn es nicht fest an der Fensteräche haftet oder sichtbare
Beschädigungen aufweist.
13. Legen Sie das Gerät nicht in Wasser oder andere Flüssigkeiten, um elektrischen Schlägen
vorzubeugen. Lagern Sie das Gerät immer so, dass es nicht in eine Badewanne oder ein
Waschbecken fallen oder gezogen werden kann.
14. Berühren Sie den Netzstecker oder das Gerät nicht mit nassen Händen.
15. Laden Sie das Gerät nicht bei extrem heißen bzw. kalten Temperaturen auf, da sonst die
Lebensdauer des Akkus beeinträchtigt werden kann.
16. Stellen Sie das Gerät beim Laden nicht auf andere elektrische Geräte und halten Sie es
fern von Feuer und Flüssigkeiten.
17. Achten Sie darauf, dass das Netzkabel nicht beschädigt wird. Ziehen oder tragen Sie das
Gerät nicht am Netzkabel, verwenden Sie das Netzkabel nicht als Griff, klemmen Sie das
Netzkabel nicht versehentlich beim Schließen eines Fensters ein und stellen Sie keine
schweren Gegenstände auf das Netzkabel. Halten Sie das Netzkabel von heißen Flächen fern.
18. Verwenden Sie das Gerät nicht, wenn das Netzkabel oder die Steckdose beschädigt
ist. Verwenden Sie das Gerät nicht, wenn es nicht einwandfrei funktioniert, wenn es
heruntergefallen, beschädigt oder mit Wasser in Berührung gekommen ist. Wenn das
Netzkabel beschädigt ist, muss es durch den Hersteller oder dessen Kundendienst
ausgewechselt werden, damit keine Gefahr davon ausgeht.
19. Wenn das Netzkabel beschädigt ist, muss es durch den Hersteller oder dessen Kundendienst
ausgewechselt werden, damit keine Gefahr davon ausgeht.
20. Vor dem Reinigen oder Warten des Gerätes muss der Stecker aus der Steckdose gezogen
werden. Ziehen Sie nicht am Kabel, um die Verbindung mit dem Netzadapter zu lösen.
Page 23

FR
21
1.
Consignes de sécurité importantes
21. Der Ersatzakku muss durch den Hersteller oder dessen Kundendienst ausgewechselt werden,
damit keine Gefahr davon ausgeht.
22. Vor dem Entsorgen des Gerätes ist der Akku entsprechend den örtlichen Gesetzen und
Vorschriften zu entfernen und zu entsorgen.
23. Bevor der Akku zur Entsorgung des Gerätes aus dem Gerät entfernt wird, muss das Gerät
vom Netz getrennt werden.
24. Gebrauchte Akkus sind entsprechend den örtlichen Gesetzen und Vorschriften zu entsorgen.
25. Verbrennen Sie das Gerät nicht, auch wenn es stark beschädigt ist, da der Akku im Feuer
explodieren könnte.
26. Verwenden Sie das Gerät immer gemäß den Anweisungen in dieser Bedienungsanleitung.
Ecovacs Robotics übernimmt keine Haftung für Verletzungen und Schäden, die durch
unsachgemäße Verwendung entstehen.
Ordnungsgemäße Entsorgung dieses Produkts
Diese Markierung bedeutet, dass das Produkt in der EU nicht mit dem normalen Hausmüll
entsorgt werden darf. Seien Sie verantwortungsbewusst und führen Sie das Produkt der
Wiederverwertung zu, um die nachhaltige Nutzung von Rohstoffen zu unterstützen und
um Umweltschäden bzw. Gesundheitsgefahren durch unkontrollierte Müllentsorgung zu
vermeiden. Nutzen Sie für die Rückführung des Gerätes die entsprechenden Rückgabeund Sammelsysteme oder wenden Sie sich an den Händler, bei dem Sie das Produkt
erworben haben. So wird eine umweltgerechte Wiederverwertung des Produkts
sichergestellt.
Für EU-Länder
Page 24
FR
22
2. Contenu de l'emballage et caractéristiques techniques
2.1 Contenu de l'emballage
2.2 Specications
Modèle
W730/W710
Tension de service 15V DC Puissance nominale 35W
Télécommande
Tension d'entrée 3V DC
Adaptateur secteur: WT1503000
Entrée 100-240V AC 50/60Hz 1.6A Sortie 15V DC 3.0A
*
Les spécications techniques et de conception peuvent changer dans le cadre de l'amélioration continue
du produit.
Chiffon de nition
Nacelle de sécurité
et cordon
Adaptateur secteur Télécommande
avec piles
Robot
(3) Jeux de patins
de nettoyage
Mode d'emploi
Solution de
nettoyage
WINBOT
Cordon d'extension
WINBOT (1,5
m/4’11”)
Page 25
FR
23
2.3
Schéma du produit
Robot
Télécommande
1. Butoir
2. Voyant indicateur d'état
3. Bouton MARCHE/PAUSE
4. Dispositif de purge d'air
5. Cordon d'alimentation
6. Poignée
7. Commutateur d'alimentation
8. Roulettes latérales
9. Patin de nettoyage avant
10. Raclette
11. Chenilles
12. Cupule
13. Témoin lumineux inférieur
14. Patin de nettoyage arrière
15. Capteurs de détection des bords
(
W730 SEULEMENT
)
1
10
11
12
14
13
15
2
3
4
5
6 7
9
8
RESET
1
2
3
4
1. Bouton de réinitialisation (RESET)
2. Boutons de commande de la direction
3. Bouton MARCHE/PAUSE
4. Bouton de synchronisation télécommande
2. Contenu de l'emballage et caractéristiques techniques
Page 26

FR
24
3.1 Indications avant le nettoyage
N'utilisez pas le WINBOT 7 sur une fenêtre avec
un cadre de moins de 5 mm (0,2").
Le WINBOT 7 peut être utilisé sur des vitres
avec ou sans cadre dont les dimensions sont
supérieures à 45cm x 60cm (17.7’’ x 23.6’’).
(W730 uniquement).
Si la fenêtre est recouverte de salissures,
nettoyez au préalable une petite zone de la
vitre avant d'y placer le WINBOT 7.
Veuillez vous assurer que la batterie de secours
du WINBOT 7 est complètement chargée avant
de l'utiliser. Branchez le WINBOT 7, amenez
le commutateur d'alimentation en position
CHARGE et chargez la batterie jusqu'à ce que
le voyant indicateur d'état soit vert et allumé en
permanence.
Vériez que la vitre et les obstacles présents dans la pièce, comme les rideaux ou les meubles,
sont séparés par une distance d'au moins 15 cm (5,9").
Le WINBOT 7 permet de nettoyer une vitre horizontale ou placée en angle en utilisant les
boutons de commande de la direction de la télécommande.
N'utilisez pas le WINBOT 7 à l'envers.
N'utilisez pas le WINBOT 7 sur une vitre présentant une surface inégale, par exemple les vitres
en verre dépoli, texturé, imprimé, revêtu ou recouvert de décalcomanies.
Le WINBOT 7 doit uniquement être utilisé avec la solution de nettoyage WINBOT. L'utilisation
d'autres nettoyants réduit significativement les performances du WINBOT et risque de
l'endommager.
60
45
3. Utilisation du robot
Page 27

FR
25
3.2 Fixer les patins de nettoyage
3.3 Monter l'adaptateur secteur
Retournez le WINBOT 7 et xez doucement
les patins de nettoyage sur les parties
en Velcro. Assurez-vous que le patin de
nettoyage arrière est placé exactement dans
sa zone Velcro, qu'il n'est pas en contact
avec la cupule et qu’il ne la recouvre pas
(anneau d'aspiration).
Si vous utilisez le WINBOT 7 pour nettoyer une fenêtre extérieure, vous
DEVEZ utiliser la nacelle de sécurité et le cordon.
B
C
DD
A
*
Si le WINBOT 7 est utilisé pour nettoyer une fenêtre intérieure, veuillez passer à l'étape 3.6.
3.4
Installer le cordon de sécurité
End A: cordon d'alimentation du robot
End B: cordon d'alimentation de l'adaptateur
End C: nacelle de sécurité End D: cordon de sécurité
3. Utilisation du robot
Page 28

FR
26
3. Utilisation du robot
Si la longueur du cordon d'alimentation restreint le mouvement du WINBOT 7, un cordon d'extension
WINBOT peut être utilisé. Séparez les extrémités A et B, raccordez-les respectivement aux deux
extrémités du cordon d'extension et serrez.
Un seul cordon d'extension peut être utilisé lorsque le WINBOT 7 nettoie une fenêtre extérieure.
*
*
Raccordez les extrémités A et B et serrezles.
2
Enroulez une extrémité du cordon de sécurité
sur l'extrémité A du cordon d'alimentation du
robot et serrez.
1
Enroulez l'autre extrémité du cordon de
sécurité autour du montant de la nacelle de
sécurité, puis serrez.
3
Page 29

FR
27
*
3.5
Placer la nacelle de sécurité
3.6
Pulvériser la solution de nettoyage
La nacelle de sécurité DOIT être placée sur la face
intérieure de la fenêtre.
Appuyez FERMEMENT la nacelle de sécurité sur la
face
intérieure
de la fenêtre à nettoyer. Assurez-vous
que la nacelle de sécurité est attachée et sécurisée
en position.
Pulvérisez trois fois la solution nettoyante WINBOT
fournie sur le patin de nettoyage avant. Le patin de
nettoyage avant doit être humide et non mouillé.
Après avoir pulvérisé la solution, essuyez la partie
inférieure du WINBOT 7 avec le chiffon de nition
fourni.
Le WINBOT doit uniquement être utilisé avec la solution de nettoyage WINBOT. L'utilisation d'autres
nettoyants réduit signicativement les performances du WINBOT et risque d'endommager le robot.
3. Utilisation du robot
1
3.7
Démarrage
Branchez le WINBOT 7
Page 30

FR
28
3. Utilisation du robot
Appuyez sur le bouton MARCHE/PAUSE sur
le WINBOT 7 ou sur la télécommande pour
lancer le nettoyage.
Placez le WINBOT 7 sur la fenêtre à 10 cm (4") au
moins des coins de celle-ci et de tout autre obstacle
et appuyez-le fermement sur la fenêtre. Le WINBOT
7 est correctement fixé sur la fenêtre lorsque le
voyant indicateur d'état est BLEU et clignote.
Veuillez vous assurer que la batterie de secours
du WINBOT 7 est complètement chargée avant
de l'utiliser. Branchez le WINBOT 7, amenez
le commutateur d'alimentation en position
CHARGE et chargez la batterie jusqu'à ce que
le voyant indicateur d'état soit vert et allumé .
Veillez à ne pas tirer sur le dispositif de purge d'air.
Vérifiez que la vitre et les obstacles présents
dans la pièce, comme les rideaux ou les
meubles, sont séparés par une distance d'au
moins 15 cm (5,9").
Placez le commutateur d'alimentation en
position MARCHE. Le WINBOT 7 est mis en
marche lorsqu'il produit une aspiration.
3
4
Mettez-le en marche
Placez le robot sur la vitre
Démarrage
2
*
*
*
3.8 Pause
Pour mettre le WINBOT 7 en pause pendant le
nettoyage, appuyez sur le bouton MARCHE/
PAUSE sur le robot ou sur la télécommande.
Page 31

FR
29
3. Utilisation du robot
1
3.9 Arrêt
Le WINBOT 7 peut être déplacé vers l'avant,
l'arrière, la gauche et la droite à l'aide des
boutons de commande de direction de la
télécommande lorsqu'il est en pause. Il nettoie
lorsque les boutons de commande de la
direction sont utilisés.
Une fois que le WINBOT 7 a terminé son cycle de nettoyage, il retourne à son emplacement de départ et
émet un signal sonore.
Retirer le WINBOT 7
Unplug WINBOT 7
3
Retirez la nacelle de sécurité si
celle-ci a été utilisée.
2
Tirez le dispositif de purge d'air et Éliminez les
marques laissées sur la vitre lorsque vous avez retiré
le WINBOT 7 à l'aide du chiffon de finition fourni.
Saisissez le WINBOT 7 par la poignée. Placez
le commutateur d'alimentation en position
ARRÊT.
*
Remarque : si WINBOT 7 rencontre un problème et que le témoin lumineux est allumé en ROUGE,
il peut être réinitialisé en appuyant sur le bouton de réinitialisation de la télécommande.
Page 32
FR
30
4. Entretien
Retournez le robot et retirez les patins de
nettoyage. Rincez les patins et laissez-les
sécher complètement avant de les fixer à
nouveau sur le robot.
Retournez le robot et enlevez tous les débris
de la cupule à l'aide du chiffon de finition
fourni, pour garantir l'aspiration.
4.2 Cupule, roulettes latérales et capteurs
4.1 Patin de nettoyage
N'utilisez pas de patins de nettoyage mouillés
sur le WINBOT 7, car ce dernier pourrait
glisser sur la fenêtre.
*
Nettoyage de la cupule
Retournez le robot et essuyez les roulettes
latérales à l'aide du chiffon de nition fourni
pour maintenir leur efcacité.
Nettoyage des roulettes latérales
Avant toute opération de nettoyage et d'entretien sur le WINBOT 7, déplacez le commutateur
d'alimentation en position ARRÊT et débranchez-le de la prise.
Page 33
FR
31
Retournez le robot et retirez les patins denettoyage.
Essuyez les capteurs de détection des bords à
l'aide du chiffon de nition fourni pour garantir
leur efcacité. (W730 UNIQUEMENT).
Retournez le robot et essuyez la raclette à l'aide
du chiffon de nettoyage fourni, pour maintenir
son efcacité.
4.3 Chenilles
Comuttez l'interrupteur de la position WINBOT 7
à la position de CHARGE.
Tournez WiNBOT 7. Inspecter la chape
des conduites à l'aide des boutons et
de la télécomande. Arrêtez les bandes de
roulement si vous observez la saleté sur les
chapes.
Deplacez le cordon d'alimentation electrique
de la position WINBOT 7 à la position arrêt.
Nettoyer toute salett sur les bandes de
roulement oul'aide du tissu fourni.
Nettoyage des capteurs de détection
des bords
Nettoyage de la raclette
4. Entretien
Page 34

FR
32
5. Témoin lumineux et avertissements sonores
Indicateur Description
Le témoin lumineux est VERT
et clignote
La batterie de secours est faible et se recharge.
Le témoin lumineux est VERT
et reste allumé
La batterie de secours est complètement chargée et le
WINBOT 7 est prêt à fonctionner
Le témoin lumineux est BLEU
et clignote
Le WINBOT 7 adhère correctement à la vitre et il est prêt à
nettoyer.
Le témoin lumineux est BLEU
et reste allumé
Le WINBOT 7 nettoie la fenêtre.
Le témoin lumineux est
ROUGE et reste allumé
Le WINBOT 7 a rencontré un problème. Veuillez vous référer
à la section 6, Dépannage, pour plus de détails.
Le WINBOT émet un signal
sonore
Le WINBOT 7 émet un signal sonore dans les situations
suivantes :
Le WINBOT 7 termine le nettoyage.
Le WINBOT 7 et la télécommande ont été correctement
synchronisés.
Le WINBOT 7 a rencontré un problème.
Page 35

FR
33
No.
Dysfonctionnement Causes possibles Solutions
1
La télécommande
ne fonctionne pas
Le WINBOT 7 effectue
un nettoyage. Lorsque
le WINBOT 7 nettoie,
seul le bouton MARCHE/
PAUSE fonctionne sur la
télécommande.
Pour mettre le WINBOT 7 en pause,
appuyez sur le bouton MARCHE/
PAUSE sur le robot ou sur la
télécommande. Les autres boutons
de la télécommande ne fonctionnent
que lorsque le WINBOT 7 est mis en
pause.
Les piles ne sont pas
installées dans la
télécommande ou doivent
être remplacées.
Mettez les piles en place ou
remplacez-les par de nouvelles
piles.
La télécommande n'est
pas synchronisée avec le
WINBOT 7.
Le WINBOT 7 est déjà
synchronisé avec sa
télécommande lorsqu'il
sort de l'usine. Si la
télécommande n'est plus
synchronisée ou si elle est
remplacée, elle peut être à
nouveau synchronisée.
Mettez le WINBOT 7 en marche.
Appuyez en même temps sur le
bouton
du WINBOT 7 et sur le
bouton de synchronisation de la
télécommande et maintenez-les
enfoncés. La synchronisation est
terminée lorsque le WINBOT 7 émet
un signal sonore.
2
Le témoin lumineux
ne clignote pas en
BLEU après que
le WINBOT 7 a été
placé sur la vitre
L'aspiration n'est pas
sufsante pour que le
WINBOT 7 s'accroche à la
vitre.
A. Vériez que les patins de
nettoyage sont correctement placés.
Retirez les patins de nettoyage
et xez-les à nouveau en vous
assurant que leurs zones Velcro
sont parfaitement ajustées sur le
WINBOT 7.
B. Vériez la cupule pour détecter
la présence de débris. Nettoyez
la surface de la cupule à l'aide du
chiffon de nition fourni, selon la
description de la section 4.
C. Vériez si de la poussière ou
des débris se sont déposés sur
l'endroit de la vitre où le WINBOT 7
est placé. Nettoyez préalablement
une petite zone de la vitre avant d'y
placer le WINBOT 7.
D. Appuyez un peu plus fortement le
WINBOT 7 sur la fenêtre .
6.
Dépannage
Page 36

FR
34
6.
Dépannage
No.
Dysfonctionnement Causes possibles Solutions
3
Le témoin lumineux
est ROUGE et
clignote après la
mise en marche,
ou pendant le
nettoyage.
Le WINBOT 7 a rencontré
un problème.
A. Arrêtez le WINBOT 7 et
débranchez-le. Branchez-le à
nouveau et remettez-le en marche.
B. Pour réinitialiser le WINBOT 7,
appuyez sur le bouton RESET de la
télécommande.
C. Examinez la fenêtre pour détecter
la présence de taches tenaces.
Nettoyez-les avant d'utiliser le
WINBOT 7.
D. Vériez la cupule pour détecter
la présence de poussière ou de
dommages. Nettoyez la cupule
selon la description de la section 4.
Si elle est rayée ou endommagée,
remplacez-la.
E. Vériez les patins de nettoyage.
Remplacez-les s'ils sont sales ou
trop humides.
F. Vériez que les chenilles ne
sont pas couvertes de salissure ou
de graisse. Nettoyez-les selon la
description de la section 4.
G. Vériez le butoir du WINBOT 7.
Tapotez doucement le butoir pour le
replacer dans sa position normale.
H. Vériez que la vitre ne comporte
pas de surfaces inégales. N'utilisez
pas le WINBOT 7 sur une vitre
présentant une surface inégale, par
exemple les vitres en verre dépoli,
texturé, imprimé, revêtu ou recouvert
de décalcomanies.
I. Vériez si la fenêtre est recouverte
d'une épaisse couche de poussière.
Nettoyez la fenêtre manuellement
avant d'utiliser le WINBOT 7 pour un
nettoyage standard.
* WINBOT 7 est conçu pour
l'entretien domestique des vitres
classiques et NON pour un usage
intensif ou en remplacement d'un
premier nettoyage.
Page 37

FR
35
No.
Dysfonctionnement Causes possibles Solutions
4
WINBOT 7 ne suit
pas son modèle de
nettoyage normal , se
déplace ou s'arrête
de façon erratique.
Les tampons de nettoyage
ne sont pas placage
normal , se déplace ou
s'arrête de façon
Enlevez et remettez les tampons de
nettoyage en vous assurant qu'ils
sont place façon erratique.sif ou
enemplacements Velcro. Assurezvous que le tampon de nettoyage
arri en vous assurant qu'ils sont
place façon erratique.
Les tampons de nettoyage
sont sales.
Remplacez les tampons de
nettoyage.
La cupule est sale ou les
marches d'entraînement
sont sales.
NEttoyer la surface de la cupule
ainsi que celle des bandes de
roulement à l'aide du tissu fourni tel
que décrit à la section 4.
Si le probl surface de la cupule ainsi
que celle des bandes de rou.
5
WINBOT 7 arrête au
bas de la fenêtre en
cours de nettoyage
et émet des signaux
sonores. Indicateur
d'état de la lumière
clignote en rouge.
Interruption de l'électricité
pendant que WINBOT 7
etait en phase de nettoyage,
branchez le déplacement, ou
déconnectez l'alimentation
electrique.
A. Connectez WINBOT 7 à
l'adaptateur electrique puis brancher
au niveau de la prise murale.
Appuyez sur le bouton MARCHE /
ARRET au niveau du robot ou sur
la télécommande à deux reprises et
WINBOT 7 reprendra nettoyage.
B. En cas de panne d'electricité, et
que la solution préconisée ci-dessus
ne fonctionne pas, veuillez déplacer
le commutateur d'alimentation vers
la position ARRET puis retirez
le robot à partir de la fenêtre .
Si l'electricité revient, déplacer
l'interrupteur d'alimentation sur la
position MARCHE, placez le robot
sur la fenêtre puis redémarrer.
6.
Dépannage
Page 38

Herzlichen Glückwunsch zum Kauf Ihres neuen WINBOT-Gerätes von
ECOVACS! Wir hoffen, dass es viele Jahre lang zu Ihrer vollen Zufriedenheit
arbeitet und sind sicher, dass es Ihnen dabei helfen wird, Ihr Zuhause sauber
zu halten, während Sie Ihre wertvolle Zeit für die angenehmen Dinge im Leben
nutzen können.
Live Smart. Enjoy Life.
Wenn Sie auf weitere Probleme stoßen, die in dieser Bedienungsanleitung
nicht zu Ihrer Zufriedenheit behandelt wurden, kontaktieren Sie unseren
Kundendienst. Unsere Kundendiensttechniker stehen Ihnen gern zur Verfügung,
um Ihre speziellen Probleme zu lösen und Ihre Fragen zu beantworten.
Für weitere Informationen besuchen Sie bitte die ECOVACS ofzielle Website:
www.ecovacs.com
Technische und konstruktive Änderungen am Gerät, die aufgrund der ständigen
Weiterentwicklung dieses Gerätes erforderlich sind, behalten wir uns vor.
Vielen Dank, dass Sie sich für WINBOT entschieden haben.
Page 39

DE
Inhaltsverzeichnis
1.
Wichtige Sicherheitshinweise
................................................................... 38
2.
Packungsinhalt und Technische Daten
.................................................... 40
2.1 Packungsinhalt ....................................................................................... 40
2.2 Technische Daten ..................................................................................40
2.3 Produktübersicht ....................................................................................41
3.
Hinweise zum Gebrauch des Roboters
.................................................... 42
3.1 Vor dem Reinigen ...................................................................................42
3.2 Befestigen des Reinigungsbelags .......................................................... 43
3.3 Anschließen des Netzadapters ..............................................................43
3.4 Befestigen des Halteseils ....................................................................... 43
3.5 Anbringen des Sicherheitssystems ........................................................45
3.6 Aufsprühen der Reinigungslösung .........................................................45
3.7 Start ........................................................................................................ 45
3.8 Pause .....................................................................................................46
3.9 Stopp ...................................................................................................... 47
4.
Wartung
....................................................................................................... 48
4.1 Reinigungsbelag .....................................................................................48
4.2 Saugnapf, Seitenrollen und Sensoren ....................................................48
4.3 Antriebsketten ........................................................................................49
5.
Kontrollleuchten und Akustiksignale
....................................................... 50
6.
Fehlerbehandlung
......................................................................................51
Page 40

DE
38
1. Wichtige Sicherheitshinweise
Beim Gebrauch eines elektrischen Gerätes sind einige grundlegende Sicherheitshinweise zu
beachten. Dazu gehören auch die folgenden Hinweise:
LESEN SIE ALLE ANWEISUNGEN VOR GEBRAUCH (DIESES GERÄTES)
BEWAHREN SIE DIESE ANWEISUNGEN AUF
1. Dieses Gerät darf nicht von Kindern unter 8 Jahren oder Personen benutzt werden, die nicht
über die sachgemäße Verwendung des Gerätes informiert sind. Diese Personen müssen
beaufsichtigt werden. Lassen Sie Kinder nicht mit dem Gerät spielen.
2. Verwenden Sie das Gerät nicht bei extrem heißen bzw. kalten Temperaturen (unter 0° C
bzw. über 40° C). Das Gerät kann zum Reinigen von Fenster-Außenflächen verwendet
werden, sofern es über ein Sicherheitsseil mit dem Sicherheitssystem verbunden ist, kein
Wind herrscht und es nicht regnet oder schneit.
3. Stellen Sie sicher, dass der Netzstecker des Gerätes während der Reinigung in der Steckdose
steckt. Das Gerät verfügt über einen Ersatzakku, der sich während des Gebrauchs auädt. So
wird das Gerät mit Strom versorgt, wenn der Netzstecker gezogen wird oder der Strom ausfällt.
4. Lassen Sie das Gerät nicht unbeaufsichtigt, solange es ans Stromnetz angeschlossen ist.
5. Verwenden Sie das Gerät AUSSCHLIESSLICH für den Hausgebrauch. Verwenden Sie das
Gerät nicht für kommerzielle oder industrielle Zwecke.
6. Verwenden Sie das Gerät nicht auf gesprungenen Glasächen.
7. Verwenden Sie nur das vom Hersteller empfohlene oder gelieferte Zubehör. Verwenden Sie
nur den vom Hersteller gelieferten Netzadapter.
8. Stellen Sie sicher, dass die Netzspannung mit der auf dem Netzadapter angegebenen
Netzspannung übereinstimmt.
9. Verwenden Sie das Gerät nicht auf Fenstern mit Rahmen, die schmaler als 5 mm sind.
10. Verwenden Sie das Gerät nicht auf nassen oder fettigen Fensterächen.
11. Lagern Sie das Gerät vor Hitze geschützt und in sicherem Abstand zu brennbaren Materialien.
12. Verwenden Sie das Gerät nicht, wenn es nicht fest an der Fensteräche haftet oder sichtbare
Beschädigungen aufweist.
13. Legen Sie das Gerät nicht in Wasser oder andere Flüssigkeiten, um elektrischen Schlägen
vorzubeugen. Lagern Sie das Gerät immer so, dass es nicht in eine Badewanne oder ein
Waschbecken fallen oder gezogen werden kann.
14. Berühren Sie den Netzstecker oder das Gerät nicht mit nassen Händen.
15. Laden Sie das Gerät nicht bei extrem heißen bzw. kalten Temperaturen auf, da sonst die
Lebensdauer des Akkus beeinträchtigt werden kann.
16. Stellen Sie das Gerät beim Laden nicht auf andere elektrische Geräte und halten Sie es
fern von Feuer und Flüssigkeiten.
17. Achten Sie darauf, dass das Netzkabel nicht beschädigt wird. Ziehen oder tragen Sie das
Gerät nicht am Netzkabel, verwenden Sie das Netzkabel nicht als Griff, klemmen Sie das
Netzkabel nicht versehentlich beim Schließen eines Fensters ein und stellen Sie keine
schweren Gegenstände auf das Netzkabel. Halten Sie das Netzkabel von heißen Flächen fern.
18. Verwenden Sie das Gerät nicht, wenn das Netzkabel oder die Steckdose beschädigt
ist. Verwenden Sie das Gerät nicht, wenn es nicht einwandfrei funktioniert, wenn es
heruntergefallen, beschädigt oder mit Wasser in Berührung gekommen ist. Wenn das
Netzkabel beschädigt ist, muss es durch den Hersteller oder dessen Kundendienst
ausgewechselt werden, damit keine Gefahr davon ausgeht.
19. Wenn das Netzkabel beschädigt ist, muss es durch den Hersteller oder dessen Kundendienst
ausgewechselt werden, damit keine Gefahr davon ausgeht.
20. Vor dem Reinigen oder Warten des Gerätes muss der Stecker aus der Steckdose gezogen
werden. Ziehen Sie nicht am Kabel, um die Verbindung mit dem Netzadapter zu lösen.
Page 41
DE
39
1. Wichtige Sicherheitshinweise
21. Der Ersatzakku muss durch den Hersteller oder dessen Kundendienst ausgewechselt werden,
damit keine Gefahr davon ausgeht.
22. Vor dem Entsorgen des Gerätes ist der Akku entsprechend den örtlichen Gesetzen und
Vorschriften zu entfernen und zu entsorgen.
23. Bevor der Akku zur Entsorgung des Gerätes aus dem Gerät entfernt wird, muss das Gerät
vom Netz getrennt werden.
24. Gebrauchte Akkus sind entsprechend den örtlichen Gesetzen und Vorschriften zu entsorgen.
25. Verbrennen Sie das Gerät nicht, auch wenn es stark beschädigt ist, da der Akku im Feuer
explodieren könnte.
26. Verwenden Sie das Gerät immer gemäß den Anweisungen in dieser Bedienungsanleitung.
ECOVACS Robotics übernimmt keine Haftung für Verletzungen und Schäden, die durch
unsachgemäße Verwendung entstehen.
Ordnungsgemäße Entsorgung dieses Produkts
Diese Markierung bedeutet, dass das Produkt in der EU nicht mit dem normalen Hausmüll
entsorgt werden darf. Seien Sie verantwortungsbewusst und führen Sie das Produkt der
Wiederverwertung zu, um die nachhaltige Nutzung von Rohstoffen zu unterstützen und
um Umweltschäden bzw. Gesundheitsgefahren durch unkontrollierte Müllentsorgung zu
vermeiden. Nutzen Sie für die Rückführung des Gerätes die entsprechenden Rückgabe- und
Sammelsysteme oder wenden Sie sich an den Händler, bei dem Sie das Produkt erworben
haben. So wird eine umweltgerechte Wiederverwertung des Produkts sichergestellt.
Für EU-Länder
Page 42

DE
40
2. Packungsinhalt und Technische Daten
2.1 Packungsinhalt
2.2 Technische Daten
Modell
W730/W710
Arbeitsspannung 15V DC Nennleistung 35W
Fernbedienung
Eingangsspannung 3V DC
Netzadapter: WT1503000
Eingang 100-240V AC 50/60Hz 1.6A Ausgang 15V DC 3.0A
* Technische Daten und Bauweise können sich aufgrund ständiger Weiterentwicklungen des Produktes
verändern.
Poliertuch
Sicherheitssystem
und Halteseil
Netzadapter Fernbedienung mit
Batterien
Roboter
(3) Sets
Reinigungsbeläge
Benutzerhandbuch
WINBOT-
Reinigungslösung
WINBOT-
Verlängerungskabel
(1,5 m)
Page 43

DE
41
2. Packungsinhalt und Technische Daten
2.3
Produktübersicht
Roboter
Fernbedienung
1. Stoßfänger
2. Kontrollleuchte
3. START/PAUSE-Taste
4. Luftablassventil
5. Netzkabel
6. Handgriff
7. Netzschalter
8. Seitenrollen
9. Reinigungsbelag auf der
Vorderseite
10. Gummilippe
11. Antriebsketten
12. Saugnapf
13. Kontrollleuchte auf der Unterseite
14. Reinigungsbelag auf der Rückseite
15. Randsensoren (gilt NUR für Modell
W730)
1. RESET-Taste
2. Richtungssteuerungstasten
3. START/PAUSE-Taste
4. Taste zur Synchronisierung der Fernbedienung
RESET
1
2
3
4
1
10
11
12
14
13
15
2
3
4
5
6 7
9
8
Page 44

DE
42
3. Hinweise zum Gebrauch des Roboters
3.1 Vor dem Reinigen
Verwenden Sie den WINBOT 7 nicht auf Fenstern
mit Rahmen, die schmaler als 5 mm sind.
Mit dem WINBOT 7 lassen sich sowohl
gerahmte als auch rahmenlose * Fenster mit
einer Größe von mindestens 45 cm x 60 cm
reinigen. (gilt nur für Modell W730).
Wenn die Fensterscheibe mit Schmutz bedeckt
ist, reinigen Sie einen kleinen Bereich der
Fensteräche von Hand, bevor Sie das Gerät
dort aufsetzen und in Betrieb nehmen.
Der Reserveakku des WINBOT 7 muss vor
Gebrauch vollständig aufgeladen werden.
Schließen Sie das Gerät ans Netz an,
bringen Sie den Netzschalter in Ladestellung
("CHARGE") und laden Sie das Gerät auf, bis
die Kontrollleuchte dauerhaft GRÜN leuchtet.
Stellen Sie sicher, dass sich Hindernisse wie Vorhänge oder Möbel in einem Abstand von 15
cm zur Fensterscheibe benden.
Mit Hilfe der Richtungssteuerungstasten auf der Fernbedienung lassen sich mit dem WINBOT 7
auch horizontale oder schräge Fensterächen reinigen.
Lassen Sie das Gerät nicht kopfüber arbeiten.
Verwenden Sie das Gerät nicht auf unebenen, z. B. beklebten, gefrosteten, strukturierten,
gemusterten oder beschichteten Glasächen.
Verwenden Sie für das Gerät nur die WINBOT-Reinigungslösung. Durch die Verwendung
anderer Reinigungsmittel kann sich die Reinigungsleistung verschlechtern und möglicherweise
kann es auch zu Schäden am Roboter kommen.
60
45
Page 45

DE
43
3. Hinweise zum Gebrauch des Roboters
3.2 Befestigen des
Reinigungsbelags
3.3 Anschließen des
Netzadapters
Drehen Sie das Gerät um und befestigen Sie
den Reinigungsbelag an den Klettstreifen.
Stellen Sie sicher, dass der Reinigungsbelag
richtig auf den Klettstreifen sitzt und dass er
den Saugnapf nicht berührt oder verdeckt.
Wenn das Gerät zur Reinigung von Fenster-Außenflächen eingesetzt wird,
MÜSSEN Sicherheitssystem und Halteseil verwendet werden.
B
C
DD
A
*
Wenn das Gerät für die Reinigung von Fenster-Innenächen verwendet wird, gehen Sie zu Punkt 3.6.
3.4 Befestigen des Halteseils
End A: Netzkabel Roboter
End B: Netzadapter, Netzkabel
End C: Sicherheitssystem End D: Halteseil
Page 46

DE
44
Verbinden Sie Ende A mit Ende B und sichern
Sie die Verbindung.
2
Wickeln Sie ein Ende des Halteseils am Ende A
um das Netzkabel des Roboters und befestigen
Sie es.
1
Wickeln Sie das andere Ende des Halteseils
um das Mittelteil des Sicherheitssystems und
ziehen Sie es fest.
3
Wenn die Bewegungsfreiheit des WINBOT 7 aufgrund der Länge des Netzkabels eingeschränkt
ist, kann ein WINBOT-Verlängerungskabel verwendet werden. Lösen Sie zu diesem Zweck die Verbindung
zwischen A und B, schließen Sie die beiden Enden jeweils an ein Ende des Verlängerungskabels
an und sichern Sie die Verbindung.
Wenn das Gerät zum Reinigen von Fenster-Außenflächen verwendet wird, darf nur ein
Verlängerungskabel verwendet werden.
*
*
3. Hinweise zum Gebrauch des Roboters
Page 47

DE
45
*
3.5 Anbringen des Sicherheitssystems
3.6 Aufsprühen der Reinigungslösung
Das Sicherheitssystem MUSS an der
Fenster-Innenseite angebracht werden.
Drücken Sie das Sicherheitssystem FEST an
die Innenseite des zu reinigenden Fensters.
Stellen Sie sicher, dass das Sicherheitssystem
fest haftet.
Besprühen Sie den Reinigungsbelag auf der
Vorderseite mit drei Sprühstößen der mitgelieferten
Reinigungslösung. Der Reinigungsbelag
sollte feucht, aber nicht nass sein.
Reiben Sie die Unterseite des Geräts nach
dem Aufsprühen der Reinigungslösung mit dem
mitgelieferten Poliertuch ab.
Verwenden Sie für das Gerät nur die WINBOT-Reinigungslösung. Durch die Verwendung
anderer Reinigungsmittel kann sich die Reinigungsleistung verschlechtern und möglicherweise
kann es auch zu Schäden am Roboter kommen.
3. Hinweise zum Gebrauch des Roboters
1
3.7 Start
Schließen Sie das Gerät ans
Netz an
Page 48

DE
46
3. Hinweise zum Gebrauch des Roboters
Drücken Sie zum Starten desReinigungsvorgangs
die START/PAUSE-Taste am Gerät oder auf der
Fernbedienung.
Setzen Sie das Gerät mit festem Druck in
einem Abstand von mindestens 10 cm zu
den Ecken des Fensters und sonstigen
Hindernissen auf die Fensterscheibe. Wenn
der WINBOT 7 fest am Fenster haftet, blinkt
die Kontrollleuchte BLAU.
Der Reserveakku des WINBOT 7 muss vor
Gebrauch vollständig aufgeladen werden.
Schließen Sie das Gerät ans Netz an,
bringen Sie den Netzschalter in Ladestellung
("CHARGE") und laden Sie das Gerät auf, bis
die Kontrollleuchte dauerhaft GRÜN leuchtet.
Bitte achten Sie dabei besonders darauf,
dass das Luftablassventil nicht betätigt wird.
Stellen Sie sicher, dass sich Hindernisse wie
Vorhänge oder Möbel in einem Abstand von.
Bringen Sie den Netzschalter in "EIN"Stellung. Der WINBOT 7 ist eingeschaltet,
wenn er Saugleistung erzeugt.
3
4
Schalten Sie das Gerät EIN
Setzen Sie das Gerät auf die Fensteräche.
Start
2
*
*
*
3.8 Pause
Drücken Sie zum Unterbrechen des Reinigungsvorgangs
die START/PAUSE-Taste am Gerät oder auf der
Fernbedienung.
Page 49

DE
47
3. Hinweise zum Gebrauch des Roboters
1
3.9 Stop
Während einer Betriebsunterbrechung
lässt sich der WINBOT 7 mit Hilfe der
Richtungssteuerungstasten auf der
Fernbedienung vorwärts, rückwärts, nach links
oder rechts steuern. Das Gerät reinigt, wenn die
Richtungssteuerungstasten betätigt werden.
Am Ende des Reinigungsvorgangs kehrt das Gerät zum Startpunkt zurück und gibt einen Piepton ab.
Nehmen Sie den WINBOT 7 von der Fensteräche ab
Trennen Sie den WINBOT 7
vom Stromnetz
3
Nehmen Sie das Sicherheitssystem
ab, falls es verwendet wurde.
2
Betätigen Sie das Luftablassventil und
nehmen Sie den WINBOT 7 vom Fenster.
Eventuell durch das Abnehmen des
Gerätes verbleibende Spuren lassen sich
mit dem mitgelieferten Poliertuch entfernen.
Fassen Sie das Gerät am Handgriff. Bringen
Sie den Netzschalter in "AUS"-Stellung.
*
Anmerkung: Das Gerät kann durch Drücken der RESET-Taste an der Fernbedienung
zurückgesetzt werden, wenn eine Funktionsstörung vorliegt und die Kontrollleuchte ROT leuchtet.
Page 50
DE
48
4. Wartung
Drehen Sie den Roboter um und nehmen
Sie die Reinigungsbeläge ab. Reinigen Sie
die Reinigungsbeläge unter fließendem
Wasser und lassen Sie sie vollständig
trocknen, bevor Sie sie wieder am Roboter
befestigen.
Drehen Sie den Roboter um und reiben
Sie eventuelle Verunreinigungen mit dem
mitgelieferten Poliertuch vom Saugnapf ab,
um die volle Ansaugkraft zu erhalten.
4.2 Saugnapf, Seitenrollen und Sensoren
4.1 Reinigungsbelag
Verwenden Sie KEINE nassen
Reinigungsbeläge am WINBOT 7, da das
Gerät sonst am Fenster abrutschen kann.
*
Reinigen des Saugnapfes
Drehen Sie den Roboter um und reiben
Sie die Seitenrollen mit dem mitgelieferten
Poliertuch ab, um eine einwandfreie Funktion
zu gewährleisten.
Reinigen der Seitenrollen
Vor dem Reinigen und der Wartung des Roboters ist das Gerät auszuschalten (Netzschalter
in "AUS"-Stellung) und vom Netz zu trennen (Netzkabel aus der Steckdose ziehen).
Page 51
DE
49
4. Wartung
Drehen Sie den Roboter um und nehmen
Sie die Reinigungsbeläge ab. Reiben Sie
die Randsensoren mit dem mitgelieferten
Poliertuch ab, um eine einwandfreie Funktion
zu gewährleisten. (gilt nur für Modell W730)
Drehen Sie den Roboter um und reiben
Sie die Gummilippe mit dem mitgelieferten
Poliertuch ab, um eine einwandfreie Funktion
zu gewährleisten.
4.3 Antriebsketten
Bringen Sie den Netzschalter des WINBOT
7 in Ladestellung ("CHARGE").
Reinigen der Randsensoren
Reinigen der Gummilippe
Drehen Sie den WINBOT 7 um. Untersuchen
Sie die Antriebsketten, indem Sie die Tasten
und auf der Fernbedienung betätigen.
Halten Sie die Antriebsketten an sobald
Schmutz an den Ketten sichtbar ist.
Bringen Sie den Netzschalter des WINBOT
7 in die „OFF“-Position.
Entfernen Sie eventuelle Verschmutzungen
mit dem mitgelieferten Poliertuch.
Page 52

DE
50
5. Kontrollleuchten und Akustiksignale
Anzeige Beschreibung
Die Kontrollleuchte blinkt
GRÜN.
Der Akkuladestand ist niedrig und der Akku wird aufgeladen.
Die Kontrollleuchte leuchtet
dauerhaft GRÜN.
Der Reserveakku ist vollständig aufgeladen und der WINBOT 7
ist einsatzbereit.
Die Kontrollleuchte blinkt
BLAU.
Das Gerät hat sich an der Fensterscheibe festgesaugt und
kann mit dem Reinigungsvorgang beginnen.
Die Kontrollleuchte leuchtet
dauerhaft BLAU.
Der WINBOT 7 reinigt das Fenster.
Die Kontrollleuchte leuchtet
ROT.
Funktionsstörung des Gerätes. Einzelheiten hierzu entnehmen
Sie bitte Abschnitt 6, Fehlerbehandlung.
Das Gerät erzeugt Pieptöne.
In den folgenden Fällen erzeugt das Gerät Pieptöne:
WINBOT 7 hat den Reinigungsvorgang beendet.
WINBOT 7 wurde erfolgreich mit der Fernbedienung synchronisiert.
Funktionsstörung des Geräts.
Page 53

DE
51
No. Funktionsstörung Mögliche Ursachen Fehlerbehebung
1
Fernbedienung
funktioniert nicht
Das Gerät reinigt. Während
des Reinigungsvorgangs
funktioniert nur die START/
PAUSE-Taste an der
Fernbedienung.
Unterbrechen Sie den
Reinigungsvorgang durch Drücken
der START/PAUSE-Taste am
Gerät oder an der Fernbedienung.
Während der Betriebsunterbrechung
des WINBOT 7 lassen sich weitere
Tasten auf der Fernbedienung
betätigen.
In der Fernbedienung
benden sich keine Batterien
oder die Batterien müssen
gewechselt werden.
Batterien einsetzen oder wechseln.
Die Fernbedienung ist
nicht mit dem WINBOT 7
synchronisiert.
Im Lieferzustand ist
der WINBOT 7 mit der
Fernbedienung synchronisiert.
Wenn Fernbedienung und
Gerät nicht aufeinander
abgestimmt sind oder
die Fernbedienung
ausgewechselt wird, kann
sie erneut mit dem Gerät
synchronisiert werden.
Schalten Sie das Gerät ein. Halten
Sie die Taste
am Gerät und
die Synchronisationstaste an der
Fernbedienung gleichzeitig gedrückt.
Bei erfolgreicher Synchronisierung
erzeugt das Gerät einen Piepton.
2
Die Kontrollleuchte
blinkt nicht BLAU,
nachdem das
Gerät auf die
Fensterscheibe
aufgesetzt wurde.
Die Saugkraft reicht nicht
aus, um sicherzustellen,
dass das Gerät an der
Fensterscheibe haftet.
A.Kontrollieren Sie, ob die
Reinigungsbeläge richtig befestigt wurden.
Nehmen Sie sie ab und befestigen Sie sie
erneut. Achten Sie dabei darauf, dass sie
genau innerhalb der durch Klettstreifen
markierten Bereiche am WINBOT 7
befestigt werden.
B.Kontrollieren Sie, ob der Saugnapf
verschmutzt ist. Reinigen Sie die
Oberäche des Saugnapfes wie in
Abschnitt 4 beschrieben mit dem
mitgelieferten Poliertuch.
C.Kontrollieren Sie den Bereich
der Fensterscheibe, in dem
das Gerät aufgesetzt wird, auf
Schmutzansammlungen. Reinigen Sie
vor Gebrauch des Gerätes einen kleinen
Bereich der Fensteräche von Hand und
setzen Sie den WINBOT 7 dann dort auf.
D.Drücken Sie das Gerät ein wenig fester
an die Fensterscheibe.
6. Fehlerbehandlung
Page 54

DE
52
No. Funktionsstörung Mögliche Ursachen Fehlerbehebung
3
Die Kontrollleuchte
blinkt nach dem
Einschalten oder
während des
Reinigungsvorgangs
ROT.
Funktionsstörung des
Geräts.
A. Schalten Sie den WINBOT 7 aus
und trennen Sie ihn vom Stromnetz.
Schließen Sie ihn wieder ans Stromnetz
an und schalten Sie das Gerät ein.
B. Setzen Sie das Gerät durch
Drücken der RESET-Taste auf der
Fernbedienung zurück.
C. Kontrollieren Sie die Fensteräche
auf hartnäckige Verschmutzungen.
Entfernen Sie diese vor Gebrauch des
WINBOT 7.
D. Kontrollieren Sie, ob der Saugnapf
verschmutzt oder beschädigt ist.
Reinigen Sie den Saugnapf wie in
Abschnitt 4 beschrieben. Der Saugnapf
muss ausgewechselt werden, wenn er
zerkratzt oder beschädigt ist.
E. Kontrollieren Sie die
Reinigungsbeläge. Wechseln Sie sie,
wenn diese verschmutzt oder zu nass
sind.
F. Kontrollieren Sie die Antriebsketten
auf Verschmutzungen oder
Fettansammlungen. Reinigen Sie
die Antriebsketten wie in Abschnitt 4
beschrieben.
G. Kontrollieren Sie den Stoßfänger
des Gerätes. Klopfen Sie leicht gegen
den Stoßfänger, um ihn wieder in seine
ursprüngliche Position zu bringen.
H. Kontrollieren Sie die Fensteräche
auf Unebenheiten. Verwenden Sie
das Gerät nicht auf unebenen, z. B.
beklebten, gefrosteten, strukturierten,
gemusterten oder beschichteten
Glasächen.
I. Kontrollieren Sie, ob die
Fensterscheibe mit einer dicken
Schmutzschicht bedeckt ist. Reinigen
Sie das Fenster zunächst von Hand
und verwenden Sie danach für die
regelmäßige Reinigung den WINBOT 7.
* Der WINBOT 7 ist für die Reinigung
handelsüblicher Fenster bestimmt. Das
Gerät ist NICHT für die Entfernung sehr
starker Verschmutzungen oder für die
Erstreinigung geeignet.
6. Fehlerbehandlung
Page 55
DE
53
6. Fehlerbehandlung
No. Funktionsstörung Mögliche Ursachen Fehlerbehebung
4
Der WINBOT 7
folgt nicht
seinen normalen
Reinigungsablauf,
er bewegt
unkontrollierbar
Die Reinigungskissen
sind nicht exakt mit der
Velkroäche ausgerichtet
Entfernen und richted Sie erneut die
Kissen aus, so dass Sie genau die
Velkroäche decken. Versichern Sie
dass das hintere Reinigungs kissen
nicht Kontakt mit- oder die den
Saugnapfen bedeckt.
Die Reinigungskissen sind
verschmutzt
Tauschen Sie die Reinigungskissen
aus.
Es bendet sich Schmutz auf
den Antriebsketten oder den
Saugnapfen.
Reinigen Sie die Oberäche der
Antriebsketten oder der Saugnapfen
mit dem vorgesehenen Poliertuch
wie in Abschnitt 4 beschrieben.
Sollte das Problem ungelöst bleiben,
verbinden Sie sich bitte mit unserem
Kundendienst
5
WINBOT 7 haltet
and der Unterseite
des zu reinigenden
Fensters an und
gibt einen Piepton
aus. Kotrollleuchte
leuchtet ROT auf.
Stromunterbrechung
während des
Reinigungsprozesses
verursacht durch
Netzspannungsverlust,
Steckerverlegung oder
lose Verbinding zum
Stromnetzwerk
A. Verbinden Sie den WINBOT 7 mit
dem Netzteil und stecken Sie dieses in
die Steckdose. Betätigen Sie die START/
PAUSE-Tastatur am Roboter oder an der
Fernbedienung doppelt um den WINBOT
7 wieder in Bewegung zu bringen
B. Sollte eine eine Stromunterbrechung
vorhanden sein und die obere Lösung
funktioniert nicht, bringen Sie dann den
Netzschalter in die OFF-Position und
enfernen Sie den Roboter vom Fenster.
Sobald der Strom wieder vorhanden ist,
bringen Sie den Netzschalter wieder in
die ON-Position, platzieren Sie erneut
den Roboter ans Fenster, und starten Sie
erneut.
Page 56

Le felicitamos por la compra de este WINBOT de ECOVACS Robotics y
esperamos que lo disfrute durante muchos años. Conamos en que este robot
le ayude a mantener su hogar limpio y le proporcione más tiempo para disfrutar
de otras actividades.
Live Smart. Enjoy Life.
En caso de encontrar problemas no descritos en este Manual de Instrucciones,
por favor póngase en contacto con nuestro Centro de Atención al Cliente,
donde un técnico le orientará sobre su problema.
Para más información, por favor visite la web ocial de Ecovacs:
www.ecovacs.com
La compañía se reserva el derecho a realizar cambios tecnológicos y/o de
diseño en sus productos para una continua mejora.
Gracias por conar en WINBOT.
Page 57

ES
Índice
1.
Instrucciones importantes de seguridad
.................................................56
2.
Contenido del embalaje y especicaciones técnicas
............................. 58
2.1 Contenido del embalaje ..........................................................................58
2.2 Especicaciones .....................................................................................58
2.3 Esquema del producto ...........................................................................59
3.
Funcionamiento del robot
.........................................................................60
3.1 Observaciones antes de limpiar ............................................................. 60
3.2 Colocación de la almohadilla limpiadora ................................................ 61
3.3 Montaje del adaptador de red ................................................................61
3.4 Instalación del cable de seguridad ......................................................... 61
3.5 Colocación del soporte de seguridad ..................................................... 63
3.6 Solución limpiadora en spray .................................................................63
3.7 Arranque .................................................................................................63
3.8 Pausa .....................................................................................................64
3.9 Parada .................................................................................................... 65
4.
Mantenimiento
............................................................................................66
4.1 Almohadilla limpiadora ...........................................................................66
4.2 Boca de succión, rodillos laterales y sensores .......................................66
4.3 Bandas de rodadura ............................................................................... 67
5.
Indicador luminoso de estado y sonidos
.................................................68
6.
Solución de problemas
.............................................................................. 69
Page 58

ES
56
1.Instrucciones importantes de seguridad
Al usar un dispositivo eléctrico, observe siempre las precauciones básicas de seguridad,
incluidas las que se enumeran a continuación:
ANTES DE USAR ESTE DISPOSITIVO, LEA ATENTAMENTE TODAS LAS
INSTRUCCIONES
CONSERVE ESTAS INSTRUCCIONES
1. Este aparato no está pensado para ser usado por niños menores de ocho años o por
personas que carezcan de los conocimientos necesarios acerca de un uso adecuado. Es
posible que se requiera supervisión. No permita que los niños jueguen con el dispositivo.
2. No use el dispositivo en entornos extremadamente fríos o calientes (temperatura inferior a
-5°C o superior a 40°C). El dispositivo se puede usar para limpiar el exterior de las
ventanas si está correctamente atado al soporte de seguridad, hace poco viento y no
llueve ni nieva.
3. Asegúrese de que el dispositivo está enchufado mientras limpia. El dispositivo tiene una
batería de reserva que se recarga durante la utilización del mismo. Esta batería entra en
funcionamiento cuando el cable se desenchufa o se interrumpe el suministro eléctrico.
4. Mantenga vigilado el dispositivo mientras está enchufado.
5. Diseñado EXCLUSIVAMENTE para uso doméstico. No utilice el dispositivo en espacios
comerciales o industriales.
6. No utilice el dispositivo en cristales rotos.
7. Utilice únicamente los accesorios recomendados o suministrados por el fabricante. Emplee
únicamente el adaptador de red suministrado por el fabricante.
8. Cerciórese de que su suministro eléctrico coincide con el voltaje de alimentación que
gura en el adaptador de alimentación.
9. No utilice el dispositivo en ventanas con un marco inferior a 5 mm.
10. No utilice el dispositivo en ventanas húmedas o grasientas.
11. Guarde el dispositivo lejos de fuentes de calor y materiales inamables.
12. No utilice el dispositivo si no está rmemente colocado en el cristal o presenta daños visibles.
13. Para reducir el riesgo de descarga eléctrica, no sumerja el dispositivo en agua o en cualquier
otro líquido. No coloque ni guarde el dispositivo en un lugar donde pueda caerse o ser
arrastrado hacia una bañera o lavabo.
14. No toque el enchufe o el dispositivo con las manos húmedas.
15. No cargue el dispositivo en espacios extremadamente calientes o fríos, ya que podría
afectar la vida útil de la batería.
16. Mientras se carga el dispositivo, no lo coloque sobre otros dispositivos eléctricos y manténgalo
alejado del fuego y los líquidos.
17. Tenga cuidado de no dañar el cable de alimentación. No arrastre ni transporte el dispositivo
tirando del cable de alimentación, no utilice este cable como un asa, no cierre la ventana
sobre el cable, ni coloque objetos pesados sobre el mismo. Mantenga el cable de
alimentación alejado de las supercies calientes.
18. No utilice este dispositivo con un cable de alimentación o una toma de corriente dañados.
No utilice este dispositivo si no funciona correctamente, se ha caído, dañado o ha entrado
en contacto con agua. El cable de alimentación deberá ser reparado por el fabricante o
por un técnico de servicio técnico de éste, a n de evitar posibles riesgos.
19. Si el cable de suministro eléctrico está dañado, deberá ser reemplazado por el fabricante
o por un técnico de servicio técnico de éste, a n de evitar posibles riesgos.
20. Extraiga el enchufe de la toma de corriente antes de realizar trabajos de limpieza
y mantenimiento en el dispositivo. No desconecte el adaptador tirando del cable de
alimentación.
Page 59
ES
57
1.Instrucciones importantes de seguridad
21. La batería de reserva debe ser sustituida por el fabricante o por un agente de servicio
técnico del mismo, a n de evitar posibles riesgos.
22. Antes de eliminar el dispositivo, la batería de reserva se debe extraer y eliminar de acuerdo
con la leyes y normativas locales.
23. Antes de extraer la batería para proceder a la eliminación del dispositivo, se deberá
desconectar el dispositivo de la toma de corriente.
24. Elimine las baterías usadas de acuerdo con las leyes y normativas locales.
25. No queme el dispositivo, incluso si éste presenta daños graves, ya que las baterías
pueden explotar.
26. El dispositivo debe utilizarse conforme a las indicaciones que guran en este manual de
instrucciones. Ecovacs Robotics no asume ninguna responsabilidad por los daños o
lesiones causados por un uso inadecuado.
Eliminación correcta de este producto
Esta marca indica que este producto no se debe desechar con otros residuos domésticos
en la UE. Para evitar posibles daños al medio ambiente o a la salud humana derivados
del vertido de residuos sin control, recicle el producto de manera responsable para impulsar
la reutilización sostenible de los recursos materiales. Para desechar el dispositivo usado,
utilice los sistemas de recogida y reciclado o consulte con el proveedor a quien compró
el producto. Allí pueden llevar este producto para su reciclado protegiendo el medio ambiente.
Para países de la UE
Page 60

ES
58
2. Contenido del embalaje y especicaciones técnicas
2.1 Contenido del embalaje
2.2 Especicaciones
Modelo
W730/W710
Voltaje de
funcionamiento
15V DC Potencia nominal(W) 35W
Mando a distancia
Tensión de entrada 3V DC
Adaptador de red: WT1503000
Entrada 100-240V AC 50/60Hz 1.6A Salida 15V DC 3.0A
* Los datos técnicos y el diseño podrán verse modicados debido al continuo desarrollo del producto.
Paño de acabado
Soporte y cable de
seguridad
Adaptador de red Mando a distancia
con pilas
Robot
(3) Juegos de
almohadillas de
limpieza
Manual de
instrucciones
Solución limpiadora
WINBOT
Cable de
prolongación
WINBOT (1,5 m)
Page 61

ES
59
2.3 Product Diagram
Robot
Mando a distancia
1. Paragolpes
2. Indicador luminoso de estado
3. Botón de inicio/pausa
4. Disparador de purga de aire
5. Cable de alimentación
6. Asa
7. Interruptor principal
8. Rodillos laterales
9. Almohadilla limpiadora
delantera
10. Espátula
11. Bandas de rodadura
12. Boca de succión
13. Indicador luminoso de estado inferior
14. Almohadilla limpiadora trasera
15. Sensores de detección de bordes
(SOLO W730)
RESET
1
2
3
4
1. Botón de reinicio (RESET)
2. Botones de control de dirección
3. Botón de inicio/pausa
4. Botón de conexión del mando a distancia
2. Contenido del embalaje y especicaciones técnicas
1
10
11
12
14
13
15
2
3
4
5
6 7
9
8
Page 62

ES
60
3. Funcionamiento del robot
3.1 Observaciones antes de limpiar
No utilice WINBOT 7 en ventanas con un marco
inferior a 5 mm.
WINBOT 7 se puede utilizar en ventanas con
marco o sin marco*, con unas dimensiones
superiores a 45 cm x 60 cm (* solo W730).
Si la ventana está sucia, limpie un área pequeña
del cristal antes de utilizar WINBOT 7 y colóquelo
allí mismo.
Antes de utilizar el robot, la batería de reserva
de WINBOT 7 debe estar completamente
cargada. Enchufe WINBOT 7, coloque el
interruptor en la posición de carga (CHARGE)
y cárguelo hasta que el indicador luminoso de
estado se encienda en VERDE sin parpadear.
Cerciórese de que existe un espacio libre de 15 cm entre el cristal y los obstáculos de la
estancia como cortinas o muebles.
WINBOT 7 puede limpiar cristales horizontales o inclinados utilizando únicamente los botones
de control de dirección del mando a distancia.
No utilice WINBOT 7 al revés.
No utilice WINBOT 7 en ventanas con una supercie irregular, p.ej. en ventanas con adhesivos,
esmeriladas, impresas, texturadas o con recubrimiento.
WINBOT 7 solo debe utilizarse con la solución limpiadora WINBOT. El uso de otros limpiadores
reduce considerablemente el rendimiento de WINBOT y pueden dañarlo.
60
45
Page 63

ES
61
3.2 Colocación de las
almohadillas limpiadoras
3.3 Montaje del adaptador de red
Invierta WINBOT 7 y coloque con cuidado las
almohadillas en las zonas del velcro. Cerciórese
de que la almohadilla limpiadora trasera está
colocada exactamente en el interior de la zona
del velcro y que no está en contacto ni cubre la
boca de succión (anillo de succión).
Si utiliza WINBOT 7 para limpiar el exterior de una ventana, es OBLIGATORIO
utilizar el soporte y el cable de seguridad.
B
C
DD
A
*
Si utiliza WINBOT 7 para limpiar el interior de una ventana, salte al punto 3.6.
3.4 Instalación del cable de seguridad
End A: cable de alimentación del robot
End B: adaptador de red cable de alimentación
End C: soporte de seguridad End D: cable de seguridad
3. Funcionamiento del robot
Page 64

ES
62
Si la longitud del cable de alimentación limita los movimientos de WINBOT 7, es posible utilizar
un cable de extensión WINBOT. Desconecte los extremos A y B, conéctelos con los dos extremos
del cable de extensión respectivamente y ténselos.
Solo se puede utilizar un cable de extensión cuando WINBOT 7 está limpiando el exterior de
una ventana.
*
*
Pase un extremo del cable de seguridad por
el extremo A del cable de alimentación del
robot formando un lazo y ténselo.
Conecte el extremo A y el extremo B y ténselos.
Pase el otro extremo del cable de seguridad
alrededor del orificio del soporte de
seguridad y ténselo.
1
2
3
3. Funcionamiento del robot
Page 65

ES
63
*
3.5 Colocación del soporte
de seguridad
3.6 Solución limpiadora en spray
El soporte de seguridad DEBE estar
ubicado en el interior de la ventana.
Presione CON FIRMEZA el soporte de
seguridad en la parte
interior
de la ventana
que se está limpiando. Cerciórese de que el
dispositivo de seguridad está colocado de
forma correcta y segura.
Rocíe tres veces la almohadilla de limpieza
delantera con la solución limpiadora WINBOT
suministrada. La almohadilla delantera debe
estar ligeramente húmeda, pero no mojada.
Tras aplicar el spray, limpie la parte inferior de
WINBOT 7 con el paño de acabado suministrado.
El robot solo debe utilizarse con la solución limpiadora WINBOT. El uso de otros limpiadores
reduce considerablemente el rendimiento de WINBOT y pueden dañarlo.
3. Funcionamiento del robot
1
3.7 Arranque
Enchufe WINBOT 7
Page 66
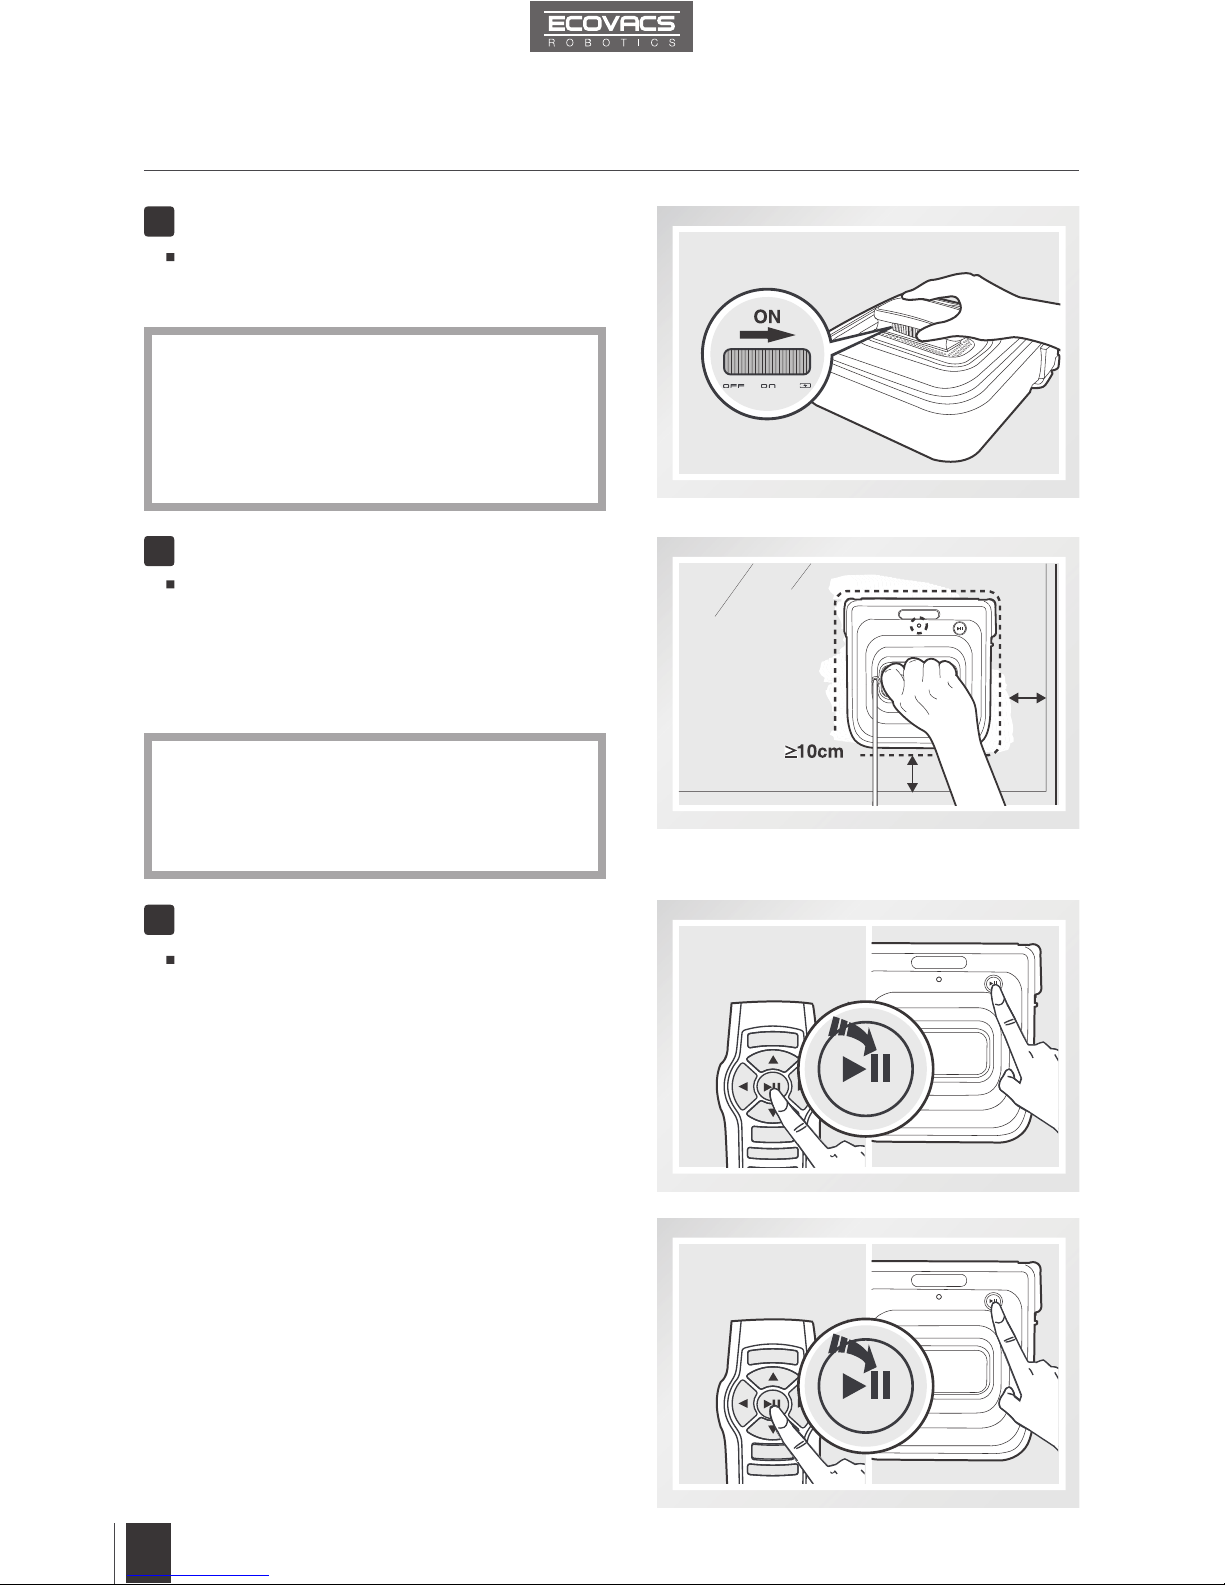
ES
64
3. Funcionamiento del robot
Pulse el botón de inicio/pausa en WINBOT 7 o
en el mando a distancia para iniciar un ciclo de
limpieza.
Coloque WINBOT 7 sobre la ventana a una
distancia de 10 cm como mínimo de las
esquinas de la ventana y de otros obstáculos
y presiónelo con firmeza. WINBOT 7 se ha
adherido correctamente a la ventana cuando el
indicador luminoso parpadea en AZUL.
Antes de utilizar el robot, la batería de reserva
de WINBOT 7 debe estar completamente
cargada. Enchufe WINBOT 7, coloque el
interruptor en la posición de carga (CHARGE)
hasta que el indicador luminoso de estado se
encienda en VERDE sin parpadear.
Preste atención a no presionar el disparador
de purga de aire.
Cerciórese de que existe un espacio libre
de 15 cm entre el cristal y los obstáculos de
la estancia como cortinas o muebles.
Coloque el interruptor en la posición de
encendido "ON". WINBOT 7 está encendido
cuando genera succión.
3
4
Encienda el robot
Coloque el robot sobre el cristal
Arranque
2
*
*
*
3.8 Pausa
Detenga WINBOT 7 durante el ciclo de limpieza
pulsando el botón de inicio/pausa en el robot o
en el mando a distancia.
Page 67
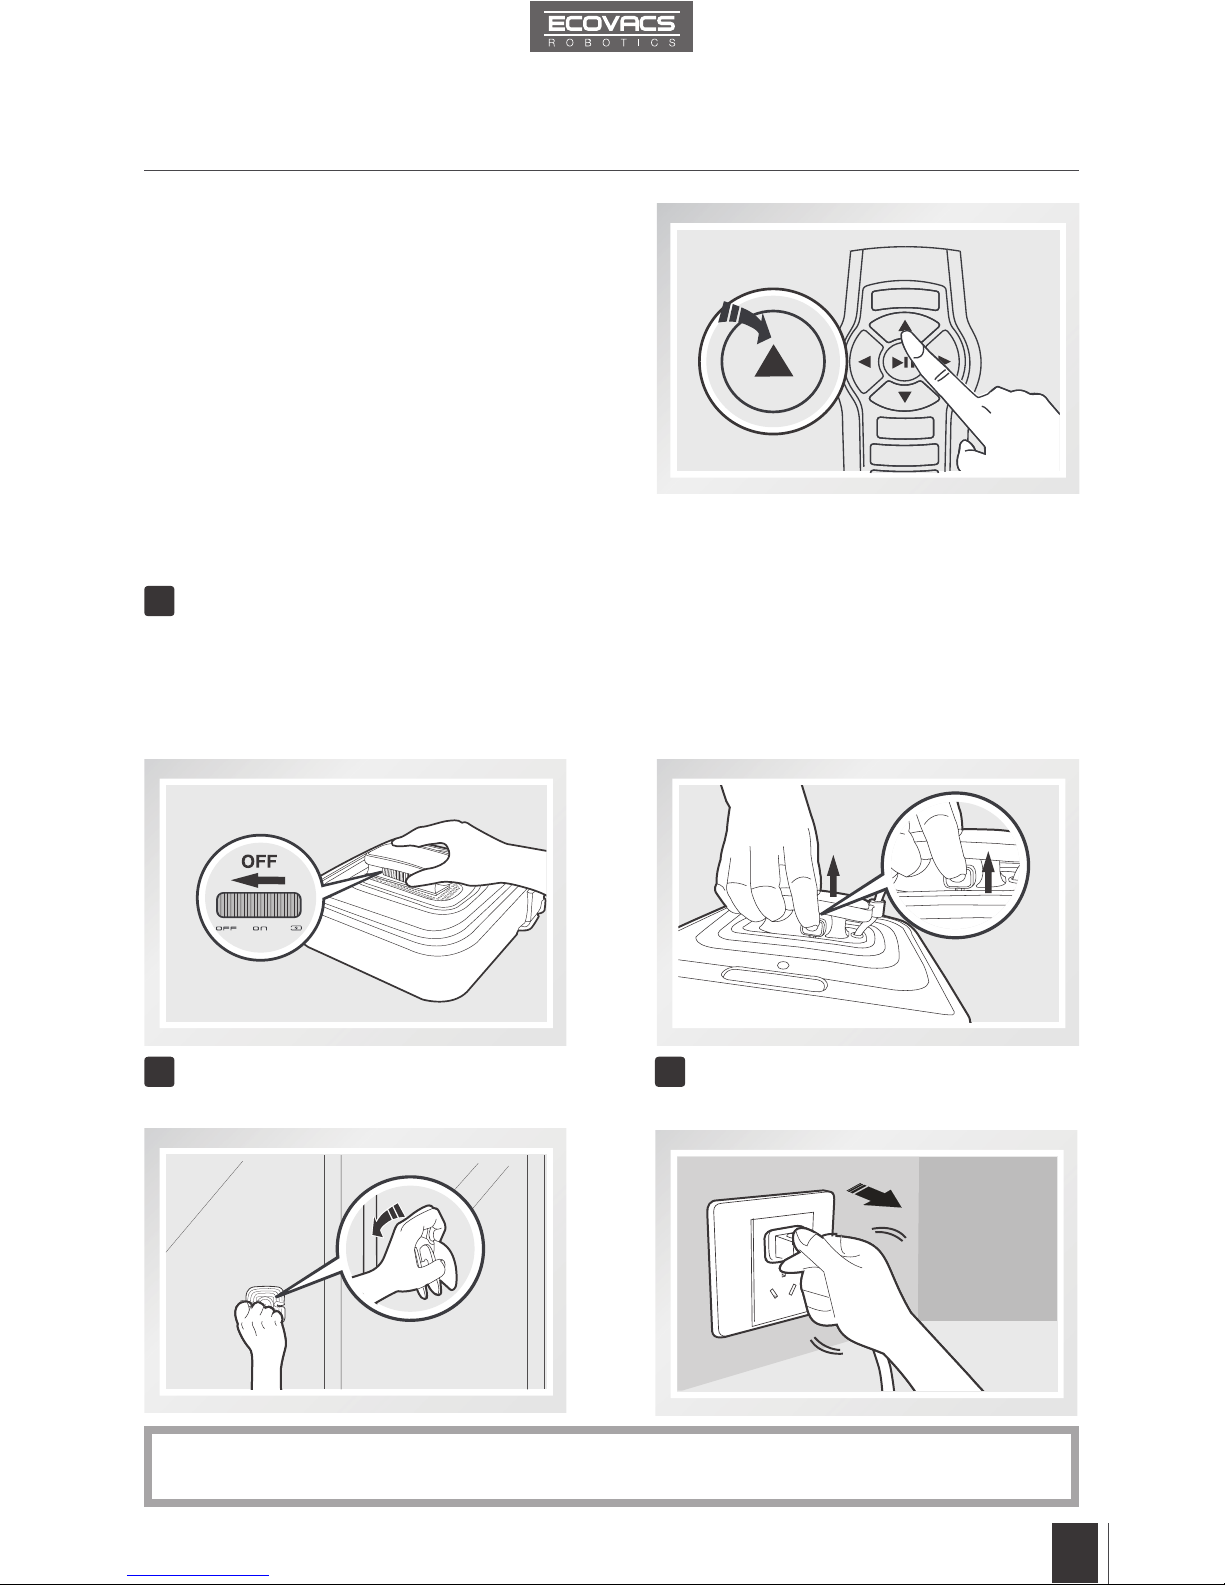
ES
65
3. Funcionamiento del robot
1
3.9 Parada
WINBOT 7 se puede dirigir hacia delante, hacia
atrás, hacia la izquierda o hacia la derecha
utilizando los botones de control de dirección
del mando a distancia cuando está en pausa.
El robot volverá a limpiar al activar los botones
de control de dirección.
Una vez concluido el ciclo de limpieza, WINBOT 7 vuelve a su posición inicial y emite un sonido.
Retire WINBOT 7 de la ventana
Desenchufe WINBOT 7
3
Retire el soporte de seguridad,
en caso de que se utilice.
2
Presione el disparador de purga de aire
y retire WINBOT 7 de la ventana. Limpie
cualquier marca que haya quedado en el
cristal al retirar el dispositivo empleando
para ello el paño de acabado suministrado.
Sostenga WINBOT 7 por el asa. Coloque el
interruptor en la posición de apagado "OFF".
*
Nota: Cuando el WINBOT 7 tiene un problema y el indicador luminoso se enciende en ROJO, es
posible reiniciar el robot pulsando el botón de reinicio del mando a distancia.
Page 68

ES
66
4. Mantenimiento
Invierta el robot y extraiga las almohadillas
limpiadoras. Enjuáguelas y déjelas secar
completamente antes de volver a colocarlas
en el robot.
Invierta el robot y con ayuda del paño de
acabado suministrado, limpie cualquier
resto depositado en la boca de succión para
mantener una buena absorción.
4.2 Boca de succión, rodillos laterales y sensores
4.1 Almohadilla limpiadora
NO utilice almohadillas limpiadoras mojadas
en WINBOT 7 ya que el dispositivo podría
deslizarse por la ventana.
*
Limpieza de la boca de succión
Invierta el robot y con ayuda del paño de
acabado suministrado, limpie los rodillos
laterales para mantener su ecacia.
Limpieza de los rodillos laterales
Antes de realizar cualquier tarea de limpieza y mantenimiento en WINBOT 7, coloque el
interruptor en la posición de apagado "OFF" y desconéctelo de la toma de corriente.
Page 69
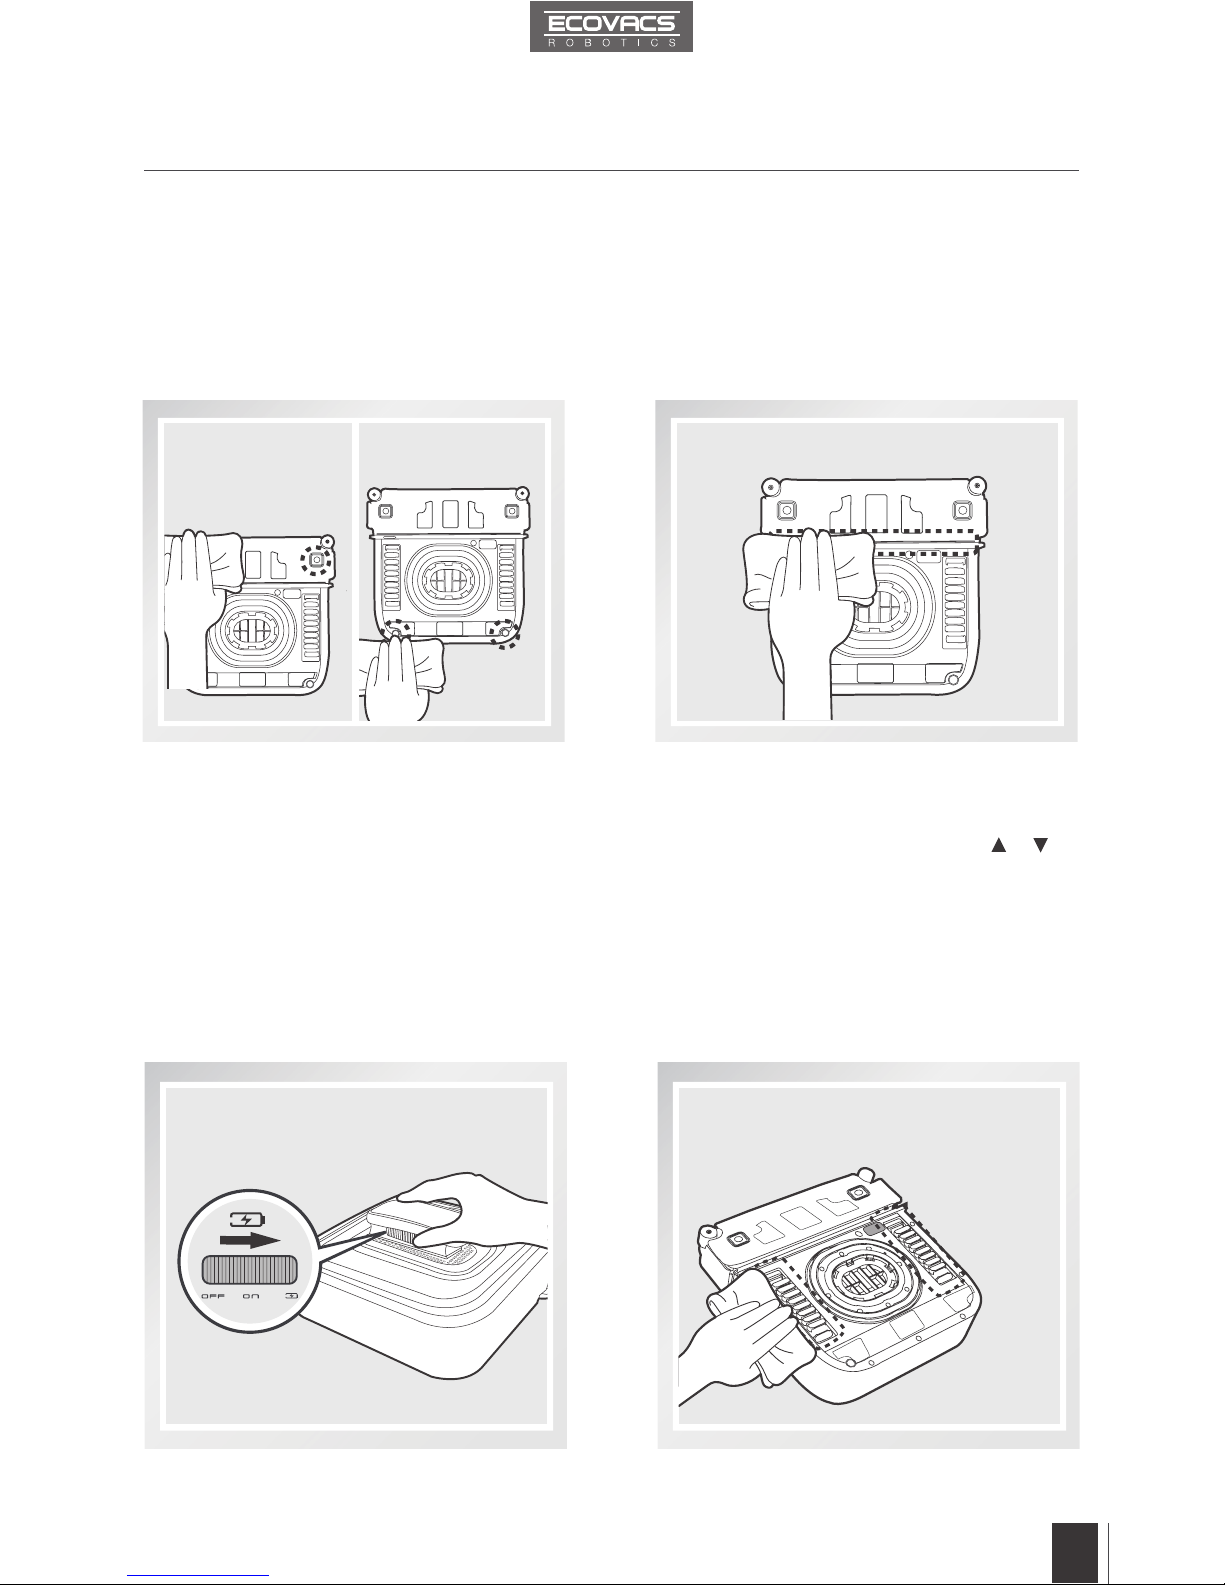
ES
67
Invierta el robot y extraiga las almohadillas
limpiadoras. Con ayuda del paño de acabado
suministrado, limpie los sensores de detección
de bordes para mantener su ecacia (SOLO en
W730).
Invierta el robot y con ayuda del paño de
acabado suministrado, limpie la espátula
para mantener su ecacia.
4.3 Bandas de rodadura
Coloque el interruptor de WINBOT 7 en la
posición de CARGA (CHARGE).
Gire el WINBOT 7. Examine las bandas de
rodadura accionando los botones y en
el mando a distancia. Detenga las bandas
de rodadura y elimine cualquier suciedad
acumulada.
Mueva el interruptor de encendido del WINBOT
7 a la posición OFF.
Elimine cualquier suciedad acumulada con
ayuda del paño de acabado que se suministra.
Limpieza de los sensores de detección
de bordes
Limpieza de la espátula
4. Mantenimiento
Page 70
ES
68
5. Indicador luminoso de estado y sonidos
Indicador Descripción
El indicador de estado parpadea en
VERDE
La batería de reserva está baja y se está cargando.
El indicador luminoso de estado se
enciende en VERDE sin parpadear
La batería de reserva está completamente cargada y
WINBOT 7 está listo para usarse.
El indicador luminoso de estado
parpadea en AZUL
WINBOT 7 se ha adherido correctamente al cristal y
está listo para limpiar.
El indicador luminoso de estado se
enciende en AZUL sin parpadear
WINBOT 7 está limpiando la ventana.
El indicador luminoso de estado se
enciende en ROJO
WINBOT 7 tiene un problema. Consulte el apartado 6
"Solución de problemas" para más información.
WINBOT emite un sonido
WINBOT 7 emite un sonido en las siguientes
situaciones:
WINBOT 7 concluye el proceso de limpieza.
La conexión entre WINBOT 7 y el mando a distancia se
ha realizado correctamente.
WINBOT 7 tiene un problema.
Page 71
ES
69
No. Anomalía Posibles causas Soluciones
1
El mando a distancia
no funciona
WINBOT 7 está limpiando.
Mientras WINBOT 7 está
limpiando, el único botón
que funciona en el mando
a distancia es el de inicio/
pausa.
Detenga WINBOT 7 pulsando el
botón de inicio/pausa en el robot o
en el mando a distancia. Los otros
botones del mando a distancia
funcionan cuando WINBOT 7 está
pausado.
Las pilas del mando
a distancia no se han
colocado o deben
sustituirse.
Coloque las pilas o sustitúyalas por
otras nuevas.
El mando a distancia
no está conectado con
WINBOT 7.
WINBOT 7 y el mando a
distancia están conectados
de fábrica. No obstante,
si la comunicación se
interrumpe o se sustituye
el mando a distancia, es
posible volver a conectarlo
con el robot.
Encienda WINBOT 7. Presione y
mantenga pulsado al mismo tiempo
el botón
en WINBOT 7 y el
botón de conexión en el mando
a distancia. La conexión naliza
cuando WINBOT 7 emite un sonido.
2
Después de colocar
WINBOT 7 sobre el
cristal, el indicador
luminoso de estado
no parpadea en
AZUL
No existe succión suciente
para colocar WINBOT 7 en
el cristal.
A.Compruebe las almohadillas
limpiadoras para garantizar una
colocación correcta. Retire las
almohadillas y vuelva a colocarlas
cerciorándose de que se encuentran
exactamente dentro de las áreas de
velcro de WINBOT 7.
B.Compruebe que no existen
residuos en la boca de succión.
Limpie la supercie de la boca de
succión con el paño de acabado
que se suministra siguiendo
las indicaciones descritas en el
apartado 4.
C.Compruebe que no existe polvo
acumulado o residuos en el cristal
donde está colocado WINBOT 7.
Antes de usar el dispositivo, limpie
un área pequeña del cristal y
colóquelo allí mismo.
D.Presione el WINBOT 7 sobre la
ventana con algo más de rmeza.
6. Solución de problemas
Page 72

ES
70
6. Solución de problemas
No. Anomalía Posibles causas Soluciones
3
Al conectar el
dispositivo o durante
la limpieza, el
indicador luminoso
de estado parpadea
en ROJO.
WINBOT 7 ha detectado
un problema.
A. Desconecte WINBOT 7 y
desenchúfelo. A continuación, vuelva a
enchufarlo y conéctelo.
B. Reinicie WINBOT 7 pulsando el
botón de reinicio (RESET) en el mando
a distancia.
C. Compruebe que no existen manchas
resistentes en la ventana. De ser así,
limpie las manchas antes de utilizar
WINBOT 7.
D. Compruebe que la boca de succión
no presenta suciedad ni daños. Limpie
la boca de succión siguiendo las
indicaciones descritas en el apartado 4.
Si existen arañazos o daños, sustituya
la boca de succión por una nueva.
E. Compruebe las almohadillas
limpiadoras. Sustitúyalas si presentan
suciedad o están mojadas.
F. Compruebe que las bandas de
rodadura no presentan suciedad ni
grasa. Limpie las bandas siguiendo las
indicaciones descritas en el apartado 4.
G. Compruebe el estado del paragolpes
de WINBOT 7. Restablezca la posición
del paragolpes realizando suaves
golpecitos.
H. Compruebe que la supercie de la
ventana es lisa. No utilice WINBOT 7 en
ventanas con una supercie irregular,
p.ej. en ventanas con adhesivos,
esmeriladas, impresas, texturadas o
con recubrimiento.
I. Compruebe que la ventana no
presenta una gruesa capa de suciedad.
Realice a mano la primera limpieza
de la ventana y a continuación, utilice
WINBOT 7 para efectuar la limpieza
periódica.
* WINBOT 7 está concebido para
realizar la limpieza de mantenimiento
de ventanas convencionales. Este
dispositivo NO está diseñado para
sustituir trabajos pesados ni para llevar
a cabo una primera limpieza.
Page 73

ES
71
6. Solución de problemas
No. Anomalía Posibles causas Soluciones
4
WINBOT 7 no sigue
su modelo normal de
limpieza, se mueve
de forma errática o
se detiene.
Las almohadillas
limpiadoras no están
colocadas exactamente
dentro de las zonas del
Velcro.
Retire y vuelva a colocar las
almohadillas limpiadoras
asegurándose que están colocadas
exactamente dentro de las zonas
del Velcro. Asegúrese que la
almohadilla limpiadora posterior no
entra en contacto o cubre la cúpula.
Las almohadillas
limpiadoras están sucias.
Sustituya las almohadillas
limpiadoras.
La cúpula está sucia o las
bandas de rodadura están
sucias.
bandas de rodadura con el paño
de acabado que se suministra tal y
como se describe en la sección 4.
Si el problema persiste, póngase en
contacto con el servicio de atención
al cliente.
5
WINBOT 7 se
detiene en la parte
inferior de la ventana
que está limpiando
y emite pitidos. El
indicador de Luz de
estado parpadea en
color ROJO.
Interrupción de la
electricidad mientras
el WINBOT 7 estaba
limpiando debido a un
fallo de alimentación, mala
colocación del enchufe o
una conexión oja en la
alimentación
A. Conecte el WINBOT 7 al
adaptador de alimentación y al
enchufe del receptáculo de pared.
Pulse el botón INICIO / PAUSA en
el robot o en el mando a distancia
dos veces y WINBOT 7 volverá a
limpiar.
B. En caso de que se produzca
un fallo de corriente, y la solución
propuesta arriba no funciona, por
favor, mueva el interruptor de
alimentación a la posición OFF
y retire el robot de la ventana. Si
vuelve la alimentación, vuelva a
colocar el interruptor de alimentación
en la posición ON, vuelva a colocar
el robot en la ventana y reinícielo.
Page 74

Page 75

Page 76

WINBOT 7-038-IM2014R01
 Loading...