

Page 1
AC/DC DUAL CHARGER
WITH
BALANCING
Quick Reference Guide to Programming
NOTE: This guide does not replace the entire instruction manual as supplied with this charger. Read
the provided manual in its entirety before use, paying particular attention to all safety warnings!!
™
DTXP4255 QRG
1. Output 1 and Output 2 are independent. Connect the battery to one output and use the appropriate screen and controls for that output.
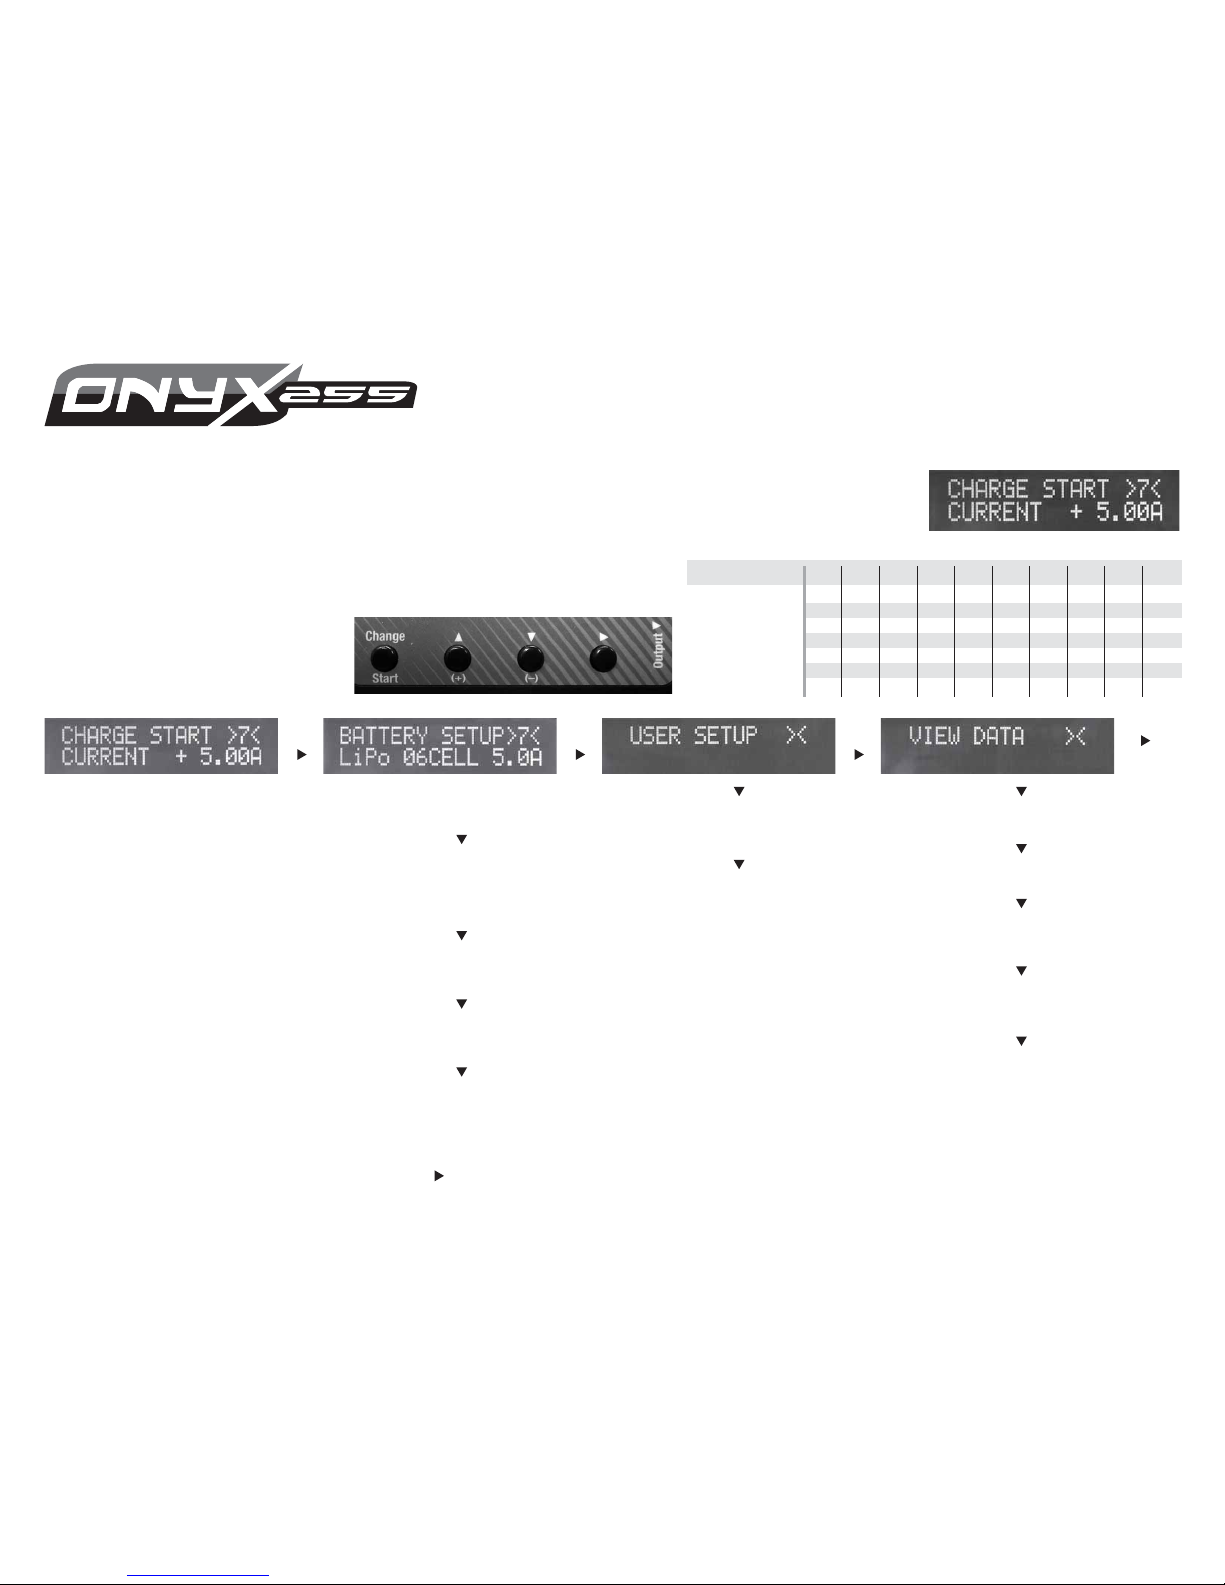
2. START: Connect the charger to power. The CHARGE START screen will appear, with the active battery memory number shown in the
top right corner (>0<). All settings for this memory will automatically scroll across the bottom of this screen or can be scrolled through using
the ▼ and ▲ buttons. If these settings are acceptable for the battery to be charged, press and hold START and charge will begin.
3. SELECT A MEMORY: All ten memory pro les are pre-programmed with charge settings as
shown in the chart. Press CHANGE then ▼ or ▲ to nd the correct pro le. Press CHANGE again
to con rm. Press and hold START and charging will begin.
4. MANUAL SETUP: Follow the steps below
to nd the BATTERY SETUP screen to adjust
the charger settings to match a speci c battery.
PRESS
PRESS
PRESS
PRESS
PRESS
PRESS
PRESS
PRESS
PRESS
PRESS
PRESS
PRESS
PRESS PRESS
PRESS
TO
CHARGE
START
SCREEN
BATTERY TYPE: Press CHANGE,
then ▼ ▲ to find the proper battery type.
Press CHANGE to confirm.
CELL[02]: Press CHANGE, then ▼▲ to
find the proper number of cells in the
battery (confirmed by the voltage shown
at the bottom of the screen). Press
CHANGE to confirm.
CAPACITY: Press CHANGE, then ▼▲
to find the rated capacity value of the
battery. Press CHANGE to confirm.
CURRENT: Press CHANGE, then ▼▲
to find the desired current. Press
CHANGE to confirm.
S_TIMER: Press CHANGE, then ▼▲ to
find the desired backup safety timeout for
char
g
e. Press CHANGE to confirm.
MELODY: Press CHANGE, then ▼▲ to
change the melody type. Press CHANGE
to confirm.
BEEP OFF: Press CHANGE, then ▼▲
to turn ON or OFF. Press CHANGE to
confirm.
INPUT VOLTAGE: Shows the voltage
at the charger’s input.
OUTPUT VOLTAGE: Shows the
voltage at the charger’s output.
PEAK VOLTAGE: Shows the maximum
voltage measured on the battery during
charge.
CHG CAPACITY: Shows how much
energy was delivered to the battery during
charge.
CHG TIME: Shows how many minutes
elapsed during the charge process.
5. START CHARGE: After all settings are made, press until the
CHARGE START screen shows. Press and hold START for 2 seconds
and fast charge will begin.
MEMORY NO.
Battery Type
Cell Count
Capacity (mAh)
Current
Safety Time (minutes)
Delta Peak (mV/C)
Trickle Current (mA)
0
LiPo
2
4000
4.0A
120
–
–
1
LiPo
2
5000
5.0A
120
–
–
2
LiPo
2
5700
5.7A
120
–
–
3
LiPo
3
5000
5.0A
120
–
–
4
LiPo
3
6400
6.4A
120
–
–
5
NiCd
6
1800
1.8A
90
10
200
6
NiMH
6
3000
3.0A
90
8
250
7
NiMH
6
5000
5.0A
90
8
250
8
NiMH
7
3000
3.0A
90
8
250
9
NiMH
7
5000
5.0A
90
8
250
WARNING!! NEVER LEAVE A BATTERY UNATTENDED WHILE BEING CHARGED! REFER
TO THE PROVIDED INSTRUCTION MANUAL FOR FULL DETAILS.
 Loading...