

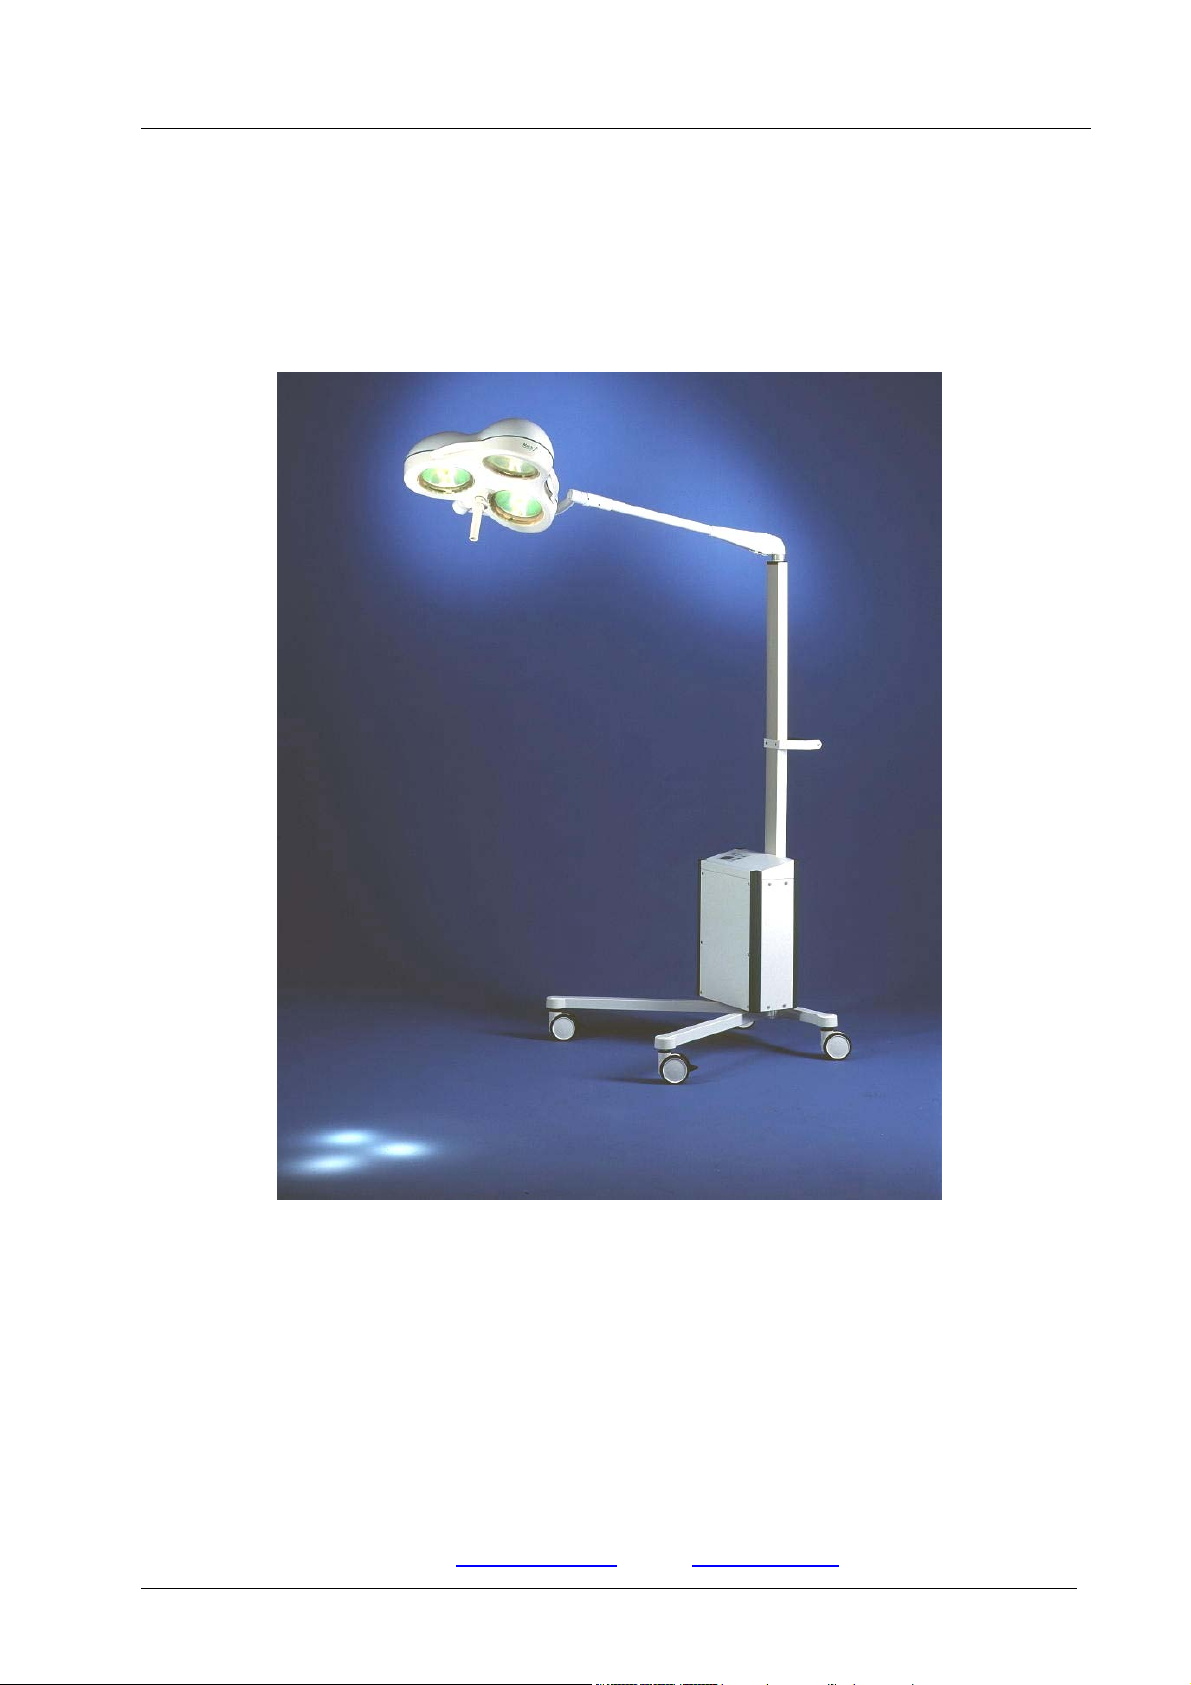
Emergency power lamp
Dr. Mach
Lamps and Engineering
MMoouunnttiinngg iinnssttrruuccttiioonnss DDiirreeccttiioonnss ffoorr uussee
EEMMEERRGGEENNCCYY PPOOW
WEERR LLAAMMPP
Triaflex / Triaflex R96 emergency power lamp
Trigenflex / Trigenflex R96 emergency power lamp
Mach M3 F- / DF- / F/H- / DF/H emergency power lamp
Mach 380 F- / DF- / F/H- / DF/H emergency power lamp
Accessories
Clamp rail ___________________________________________ Order no. 74961002
Table _______________________________________________ Order no. 74961004
Dr. Mach GmbH u. Co., Flossmannstrasse 28, D-85560 Ebersberg
Tel.: +49 (0)8092 2093 0, Fax +49 (0)8092 2093 50
Internet: www.dr-mach.com, E-mail: info@dr-mach.de
Edition 08 17.11.2004 / Bak Page 1/26

Emergency power lamp
Dr. Mach
Lamps and Engineering
Table of content
1. Instructions for use/operating instructions for sealed lead-acid batteries .........Page 3
2. General instructions ...........................................................................................Page 5
3. Wiring diagram..................................................................................................Page 6
4. Controls.............................................................................................................Page 6
5. Key to wiring diagram .......................................................................................Page 7
6. Mounting the stand tube and the battery box to the stand foot.........................Page 8
7. Mounting the lamp to the spring arm ................................................................Page 13
7.1 Mounting the lamp to the regular spring arm ..............................................Page 13
7.2 Mounting the lamp to the central spring arm...............................................Page 15
8. Cleaning............................................................................................................Page 16
9. Adjusting the spring arm ...................................................................................Page 17
10. Properties..........................................................................................................Page 18
11. Location ............................................................................................................Page 18
12. Connecting the user and adjusting the secondary voltage ...............................Page 18
13. First use ............................................................................................................Page 19
14. Mains operation ................................................................................................Page 19
15. Battery operation...............................................................................................Page 20
16. “TEST”-operation ..............................................................................................Page 20
17. Remarks concerning the batteries ....................................................................Page 21
18. “BUZZER OFF” ................................................................................................. Page 21
19. Turning OFF the unit.........................................................................................Page 21
20. Malfunction and possible causes ......................................................................Page 22
21. Technical data...................................................................................................Page 22
22. CE-mark............................................................................................................Page 24
23. Disposal ............................................................................................................Page 24
24. Dimensions .......................................................................................................Page 25
25. Spare parts .......................................................................................................Page 26
Edition 08 17.11.2004 / Bak Page 2/26
Emergency power lamp
Dr. Mach
Lamps and Engineering
1. Instructions for use / operating Instructions for sealed lead - acid batteries
1. Identification, operating data
Type of battery: BTX 12-24 Block voltage: 12 V Length 166 mm Number of blocks: 2 Width: 175 mm Number of cells: 12 Height 125 mm Assembly date: 12-2002
Nominal voltage UN 24 V Capacity* C
Block weight: 9.2 kg Capacity* C Electrolyte density 1.3 kg/l Capacity* C
Nominal temperature 20
Ideal room temperature 20
0
C Capacity* C
0
C Torque on installation.: 4.5 Nm
(1.8 V/cell): 26 Ah#
20
(1.8 V/cell): 24 Ah
10
(1.75 V/cell): 20 Ah Commissioning date:
3
(1.75 V/cell): 16 Ah
1
Antimony content: <<1 % Torque in service: 3.6 Nm
Service interval: see 7.2 Ventilation calculation: DIN/EN 50272-
# = Reference capacity (nominal capacity) according to DIN/EN 60896-1 (x V/cell) = Voltage at end of discharge
2. Safety instructions
2.1 Maintenance free / pressure relief valves
The sealed battery blocks require no maintenance. Topping up with water is not allowed. Pressure relief valves are used
as stoppers. Opening them results in the destruction of the battery.
However, the battery requires regular inspection and maintenance (see Section 7).
2.2 Prohibitions, requirements and disposal instructions
1
2
3
4
5
Delivery date: 12-2002
Assembled by:
Commissioned by:
CE-characteristic by:
6
7
PERL emergency current
PERL emer-
gency current
* = for 25
8
0
C
i
1 Observe the Instructions for Use.
2. When working on batteries wear protective glasses and clothing as
specified in the Accident Prevention Instructions and DIN/EN
50272-2 (VDE 0510).
3. Smoking is forbidden, no naked flames, embers or sparks are
allowed in the vicinity of the battery.
4. There is a danger of explosion and fire so avoid short circuits. Metal
parts of the poles are always live, therefore do not put tools or other
items on the battery.
5. The electrolyte, sulphuric acid, is very corrosive. There is no possibility of contact with the electrolyte unless the battery is damaged
If the casing is defective the electrolyte retained in the
fleece behaves like liquid electrolyte.
6. Any droplets of acid that gets into the eye or on the skin
must be rinsed out or washed off immediately with a
copious supply of water. Then get to a doctor without
delay. If clothing is polluted wash it immediately with
water.
7. Block batteries are heavy. Take care to put them on a
safe base. Only use suitable transport equipment.
8. Old batteries with this sign can be recycled and must be
put through the recycling process. Old batteries, which
are not put through the recycling process should be disposed of in accordance with all the regulations as special waste products.
Pb
3. Storage
All battery blocks are delivered in the charged condition. If they are not to be put into service immediately but are to be put in store
for a long time they should be stored in a dry, clean and frost free place. Sealed lead acid batteries are best given a trickle charge
when stored. If this is not the case, they must be given an equalisation charge (see Section 6.1.4) at the latest when they sink to
12.5 V open circuit voltage, or every 6 months depending on which occurs first.
4. Commissioning
The ideal operating temperature is 200C. Higher temperatures shorten the life of the battery, lower temperatures reduce
the available capacity. The battery blocks must be so set up, that within the same blocks temperature differences of >3
occur. Before commissioning, the batteries should be examined for damage, correct pole connection, solid fit of the connectors (for
torques see table above) and secure contacts. If necessary, pole covers should be fitted. After the charging device and loads are
switched off the correct poles of the battery should be connected to the d.c. supply. Switch on the charging device and charge the
battery as specified in Section 6.1.
The regulations in DIN/VDE 0107, DIN/VDE 0108, DIN/EN 50272-2 (VDE 0510-2) or DIN/VDE 0510-7 as well as IEC 896-2
(DIN/EN 60896-2) should be observed if necessary.
0
C cannot
Edition 08 17.11.2004 / Bak Page 3/26

Emergency power lamp
Dr. Mach
Lamps and Engineering
5. Operation
The regulations of DIN/VDE 0107, DIN/VDE 0108, DIN/EN 50272-2 (VDE 0510-2) or DIN/VDE 0510-7 as well as IEC 896-2
(DIN/EN 60896-2) should be observed when operating static sealed batteries.
6 Charging, discharging
6.1 Charging
Any of the charging procedures with their limits as specified in DIN 41773 (IU-characteristic), DIN 41774 (W-characteristic) or DIN
41776 (I-characteristic) can be used. Depending on the equipment the batteries in this equipment are charged with the IUcharacteristic.
6.1.1 Maintaining the full load condition (maintenance charge)
Equipment with the properties specified in DIN 41773 (IU-characteristic) should be used. The equipment should be so set up, that
the cell voltage
higher or lower environmental temperature, the charging voltage must be adjusted to:
= 2.3 V/cell (permissible deviation: 1%). If the battery temperature is continuously higher or lower due to
(20°C)
Charging voltage
Charging voltage
Example
predominately at 30°C, Charging voltage = 2.3V/cell - 0.040 V/cell = 2.260 V/cell.
: Temperature lies predominately at 15°C, charging voltage = 2.3 V/cell + 0.02V/cell = 2.320 V/cell. Temperature lies
(more than 20°C)
(less than 20°C)
= 2.3 V/cell - 0.004 V • ∆T (∆T = Temperature difference above 20°C)
= 2.3V/cell + 0.004 V • ∆T (∆T = Temperature difference below 20°C)
6.2 Discharging
The correct discharging currents are obtained from the capacities as specified in I
more than the correct capacity can be taken out. In order to avoid a deep discharge and consequent destruction of the battery, it
must be disconnected from the loads before reaching the discharge finishing voltage that is dependent on the bridging time.
Guide values are:
Bridging time Discharge finishing voltage Bridging time Discharge finishing voltage
> 3 h 1,80 V/cell 20 min. – 1 h 1,67 V/cell
1-3 h 1,75 V/cell < 20 min. 1,60 V/cell
The connection of the loads should only be done after the power supply has been restored. After discharge, even partial dis-
charge, the battery should immediately be charged.
= Ct/t. Unless other data is available, not
(Disch..)
7. Battery maintenance, inspection of the battery equipment
7.1 Battery maintenance
The battery should be kept clean and dry in order to prevent leakage currents. The cleaning of the battery should be done in
accordance with the ZVEI-leaflet “Cleaning of batteries“. Plastic parts of the battery may only be cleaned with clean water.
7.2 Inspection of battery equipment
It is recommended that every 3 months the following work should be done and documented:
• Visual inspection of the battery regarding cleanliness, damaged battery blocks and loose contacts
• Measurement of charge maintaining voltage of the battery and the individual battery blocks
• Measurement of the surface temperature of the battery blocks
• Measurement of the temperature in the battery room.
The following work should be carried out and documented at least every 12 months (guarantee condition):
• All connections should be tightened to the recommended values (see table under Item 1) by a torque spanner,
• The tests for 6 months should be repeated
• If possible, measure the voltage of the battery and the individual battery blocks with the charging device switched off.
Only in collaboration with the System Manufacturer or someone authorised by him:
• Record the battery block voltages during the discharge of the battery (capacity test).
When tests are carried out they should be done as specified in IEC 896-2 (DIN/EN 60896-2). Instructions specified in DIN/VDE
0107 and DIN/VDE 0108 should also be observed.
8. Guarantee
Guarantee claims are only accepted if the maintenance and servicing work have been properly carried out. For guarantee claims
at least the following data/documents must be provided: the reason for the complaint, contract number and the last two maintenance reports. Defective battery blocks must be sent back for defect analysis carriage paid.
If the Instructions for Use are not followed, e.g. if the room temperature is too high, the batteries are left discharged for a
long time or stored in unsuitable conditions, trickle charged at the wrong voltage or the service intervals and instructions
are not observed, the guarantee becomes invalid.
Edition 08 17.11.2004 / Bak Page 4/26

Emergency power lamp
Dr. Mach
Lamps and Engineering
Extent of supply:
• Emergency power unit
• Allan key / DIN 911 –5 long –3 and –10
• Spring arm / central spring arm
• Lamp Mach 380 / Mach M3 / Trigenflex /
Triaflex
• Pre-mounted stand tube
• Two long feet with brakes
• Two short feet without brakes
• 1x cable binder 2,7mm
• Spare parts: 1x fuse 6x35, 10A secondary,
and 2x battery fuse 5x20, 1,6A
These installation instructions must be kept in a safe place together with the relevant operating
instructions for the light, so they can be consulted whenever necessary.
2. General instructions
All Dr. Mach emergency lighting systems are supplied with all parts necessary for installation and connection.
The supporting pole is divided into two parts.
The battery box is supplied with a connecting cable and earthed plug.
The plugs used must be installed in accordance with the requirements of IEC or VDE 0107.
A check should be made to ensure that there is a standard electric socket within the working area of the
light.
The light must be kept continuously connected to the mains, as otherwise it will not be permanently available.
Maintenance of the supporting pole and any special installation work on the sliding contacts can
only be carried out by us or by our appointed technicians.
The manufacturer only guarantees the safety of the light if repairs and alterations have been carried out by him or by a technician who adheres to the safety regulations.
The manufacturer shall have no legal liability for injury to persons or damage to property if the
light is operated wrongly or in any other way or used for any other purpose than that for which it
was designed.
Edition 08 17.11.2004 / Bak Page 5/26
Emergency power lamp
Dr. Mach
Lamps and Engineering
3. Wiring diagram
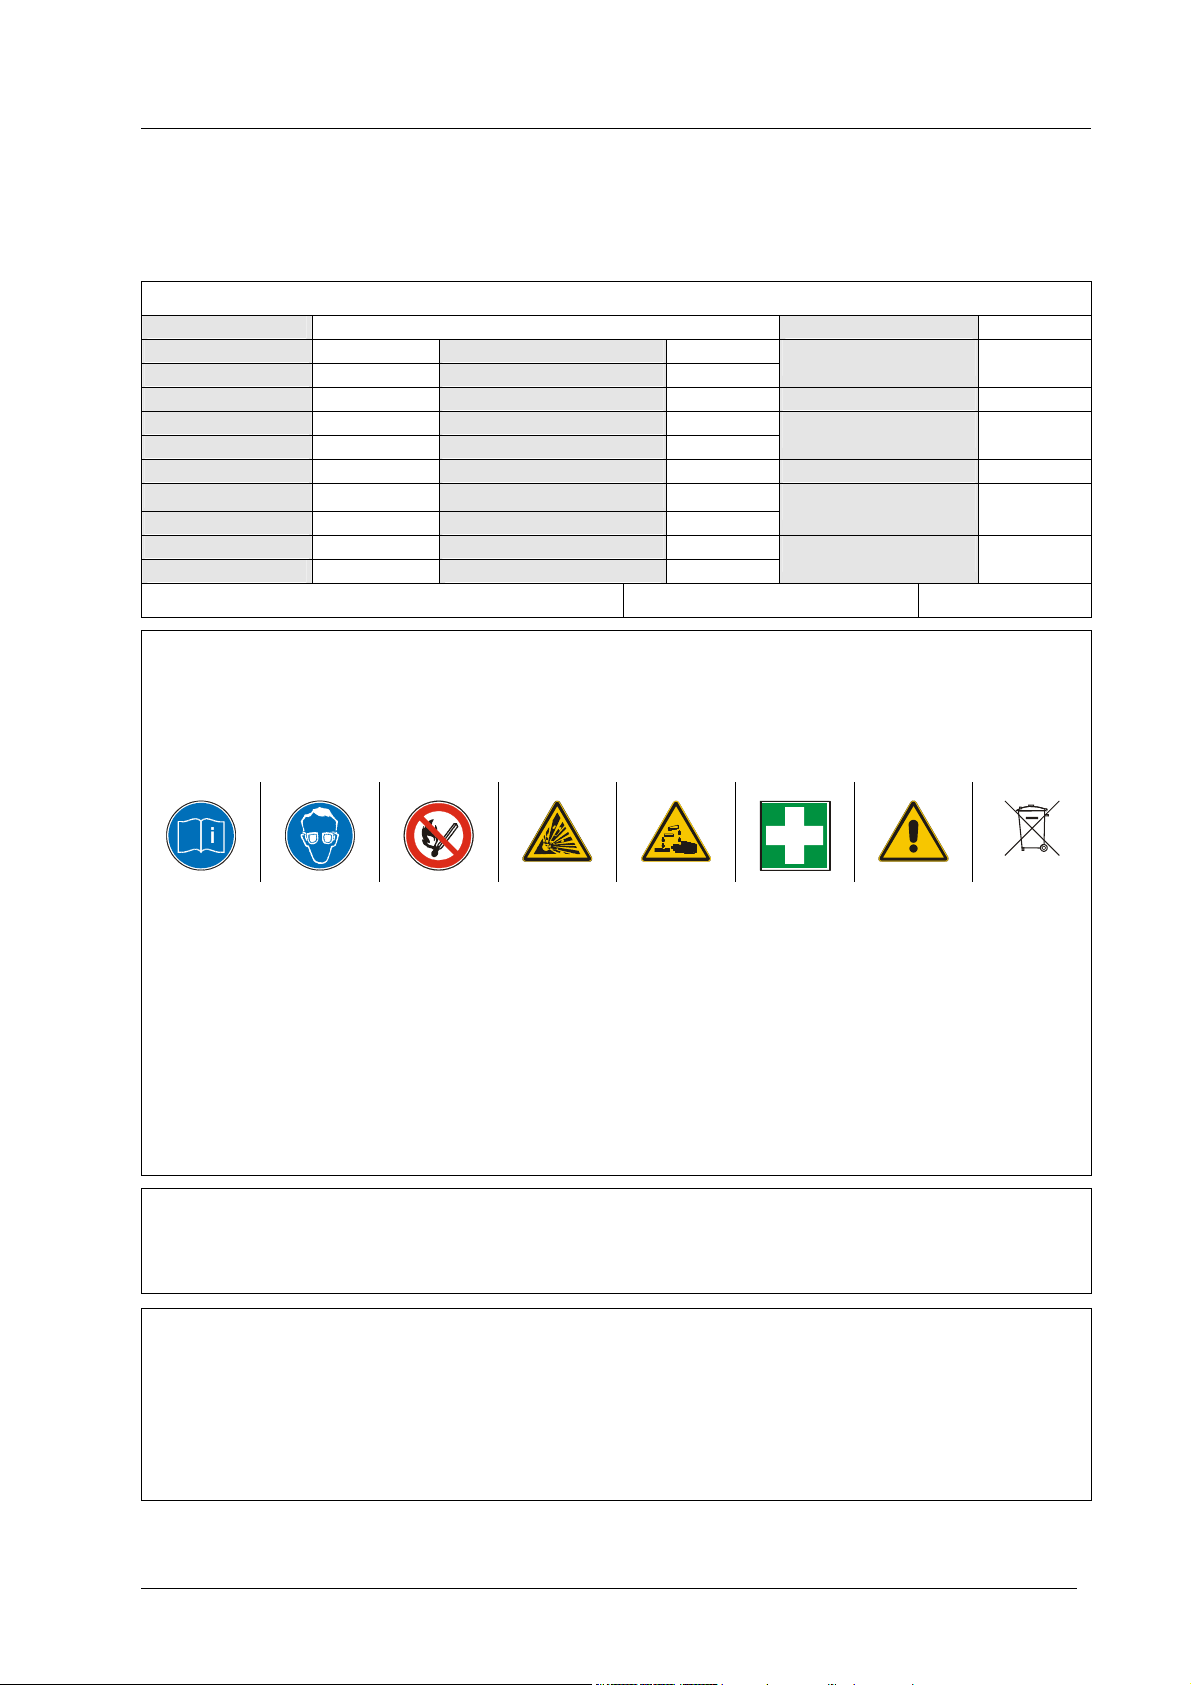
4. Controls
H1
H2
Q1
S1
Edition 08 17.11.2004 / Bak Page 6/26
H5 H4 H3

Emergency power lamp
5. Key to the wiring diagram
A 1 Charge regulator
A 2 Electronic control module
A 3 Output level for charge regulator
F 1 Mains fuse
F 2 Mains fuse
F 3 Battery fuse
H 1 LED green to show mains operation
H 2 LED yellow to show battery operation
H 3 LED green to show battery fully charged
H 4 LED yellow to show battery charged 80% to 20%
H 5 LED red to show battery discharged
Dr. Mach
Lamps and Engineering
S 1 Acknowledgement button
Q 1 ON/OFF switch for testing
T 1 Transformer
V 1 Rectifier
K 1 Switchover protector
Edition 08 17.11.2004 / Bak Page 7/26
Emergency power lamp
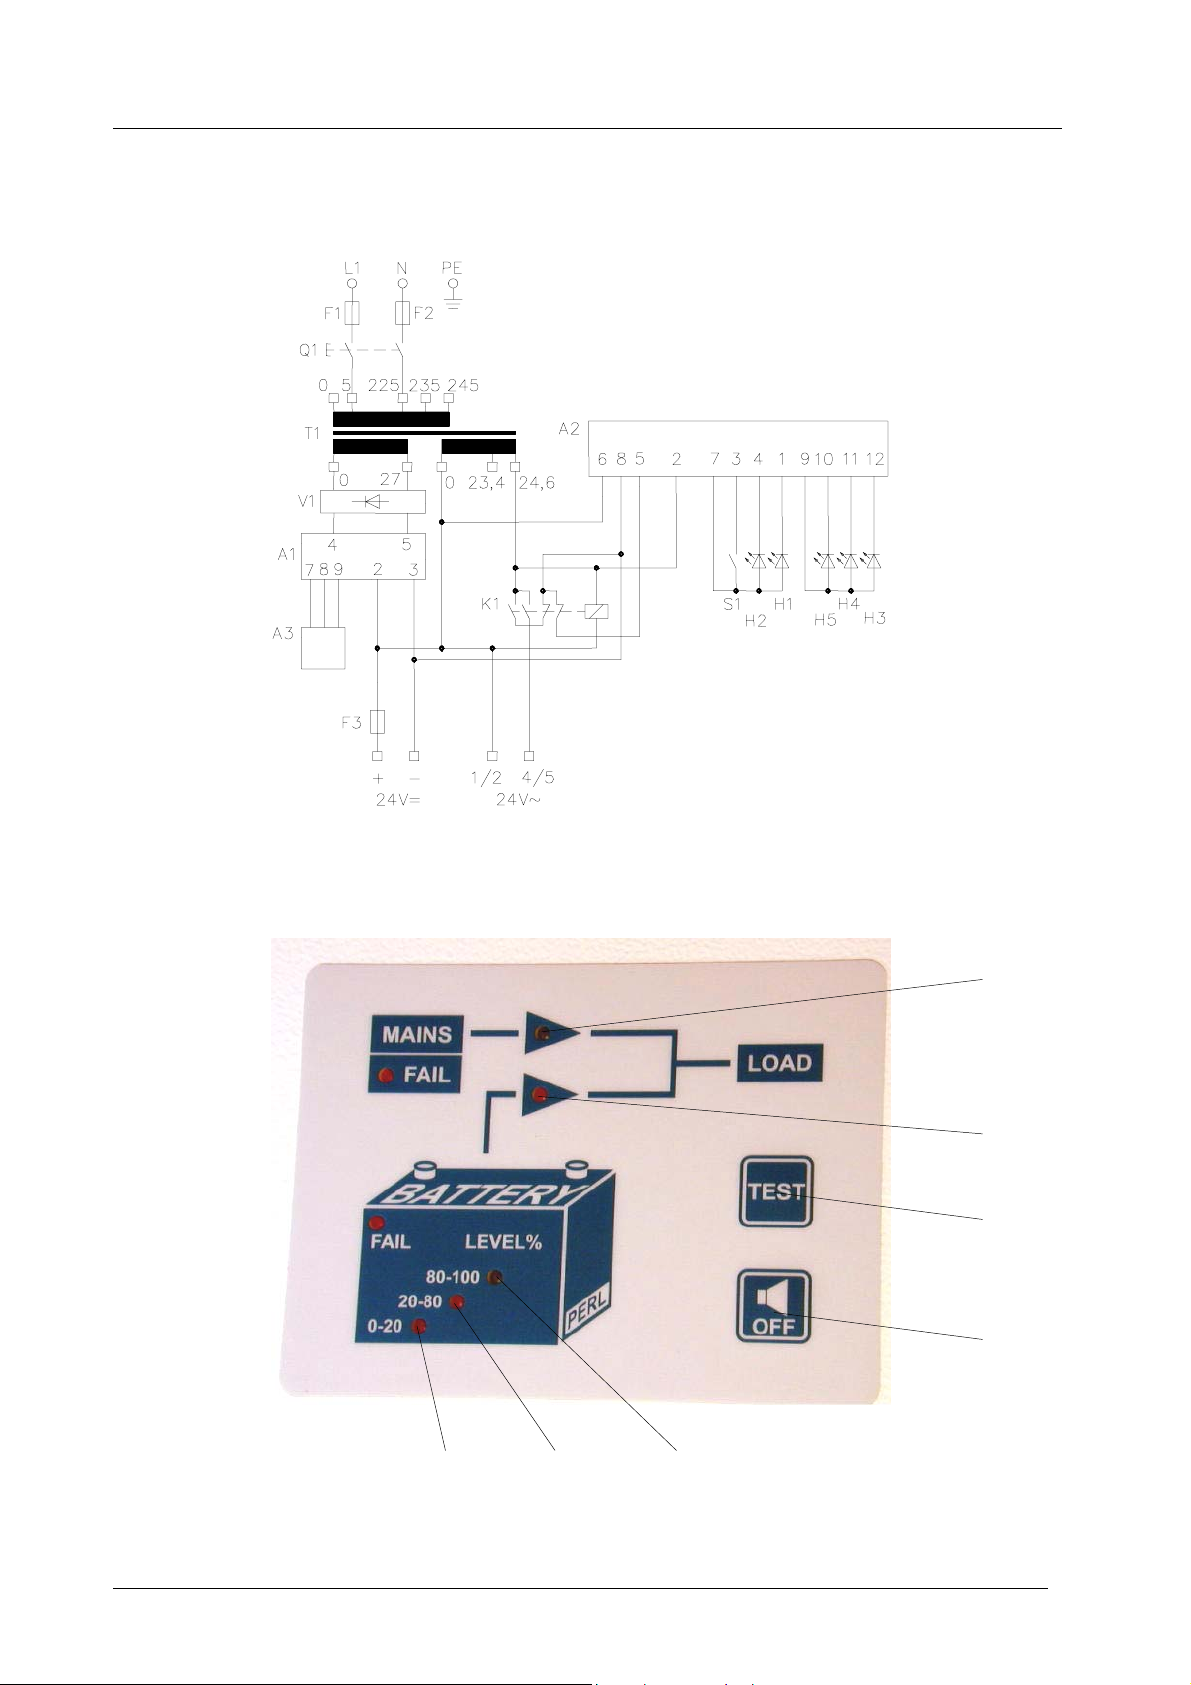
6. Mounting the stand tube and the battery box
L
K
L
to the stand foot
Loosen two screws 1 before mounting each foot.
Then insert the four feet and fix them with the
screws (do not tighten!)
For mounting the stand foot proceed as described
in the enclosed figures and drawings.
K
L = long feet
S = short feet
1
Attention!
After fixing the feet, tighten all sixteen screws
uniformly!
Dr. Mach
Lamps and Engineering
Push together both tubes as shown in the photography.
Connecting the battery box
After mounting the stand foot put the battery box on
the stand foot. Use the pad included in the scope of
supply.
Remark:
Because of the high weight of the battery box it
is recommended that this work is carried out by
two persons to avoid damage.
Edition 08 17.11.2004 / Bak Page 8/26

Emergency power lamp
block of binding posts
Dr. Mach
Lamps and Engineering
Connect the cables of the stand foot to the block of binding posts at the backside of the battery box, using a screw driver.
Connect the cables as shown in the picture according to the markings on the block of binding posts.
plus
minus
earthing
Secure the cables for “+” and “–“ connection with
cable binder.
Edition 08 17.11.2004 / Bak Page 9/26

Emergency power lamp
1
FB
FD
3
3
2
Dr. Mach
Lamps and Engineering
Fixing the battery box
Loosen the six screws 1 at the front plate 2 of the
battery box.
Remove the front plate 2.
The battery box is fixed at the stand with three
screws 3.
Unscrew the three screws 3 for approx. 5mm and
lay the cables of the stand on the fixing device FD
of the battery box.
Hang up the battery box on the two bottom screws,
3
then use the upper borehole FB shown in the left
figure as the third fixation point, so that the battery
box is in vertical position (tool: Allen key included in
the scope of supply).
Attention:
Because of the built-in batteries some assemblies inside the battery box are current-carrying,
although the battery box is switched off.
It is not allowed to touch or even damage the
electronic components inside the battery box.
Then tighten the screws 3.
3
Edition 08 17.11.2004 / Bak Page 10/26

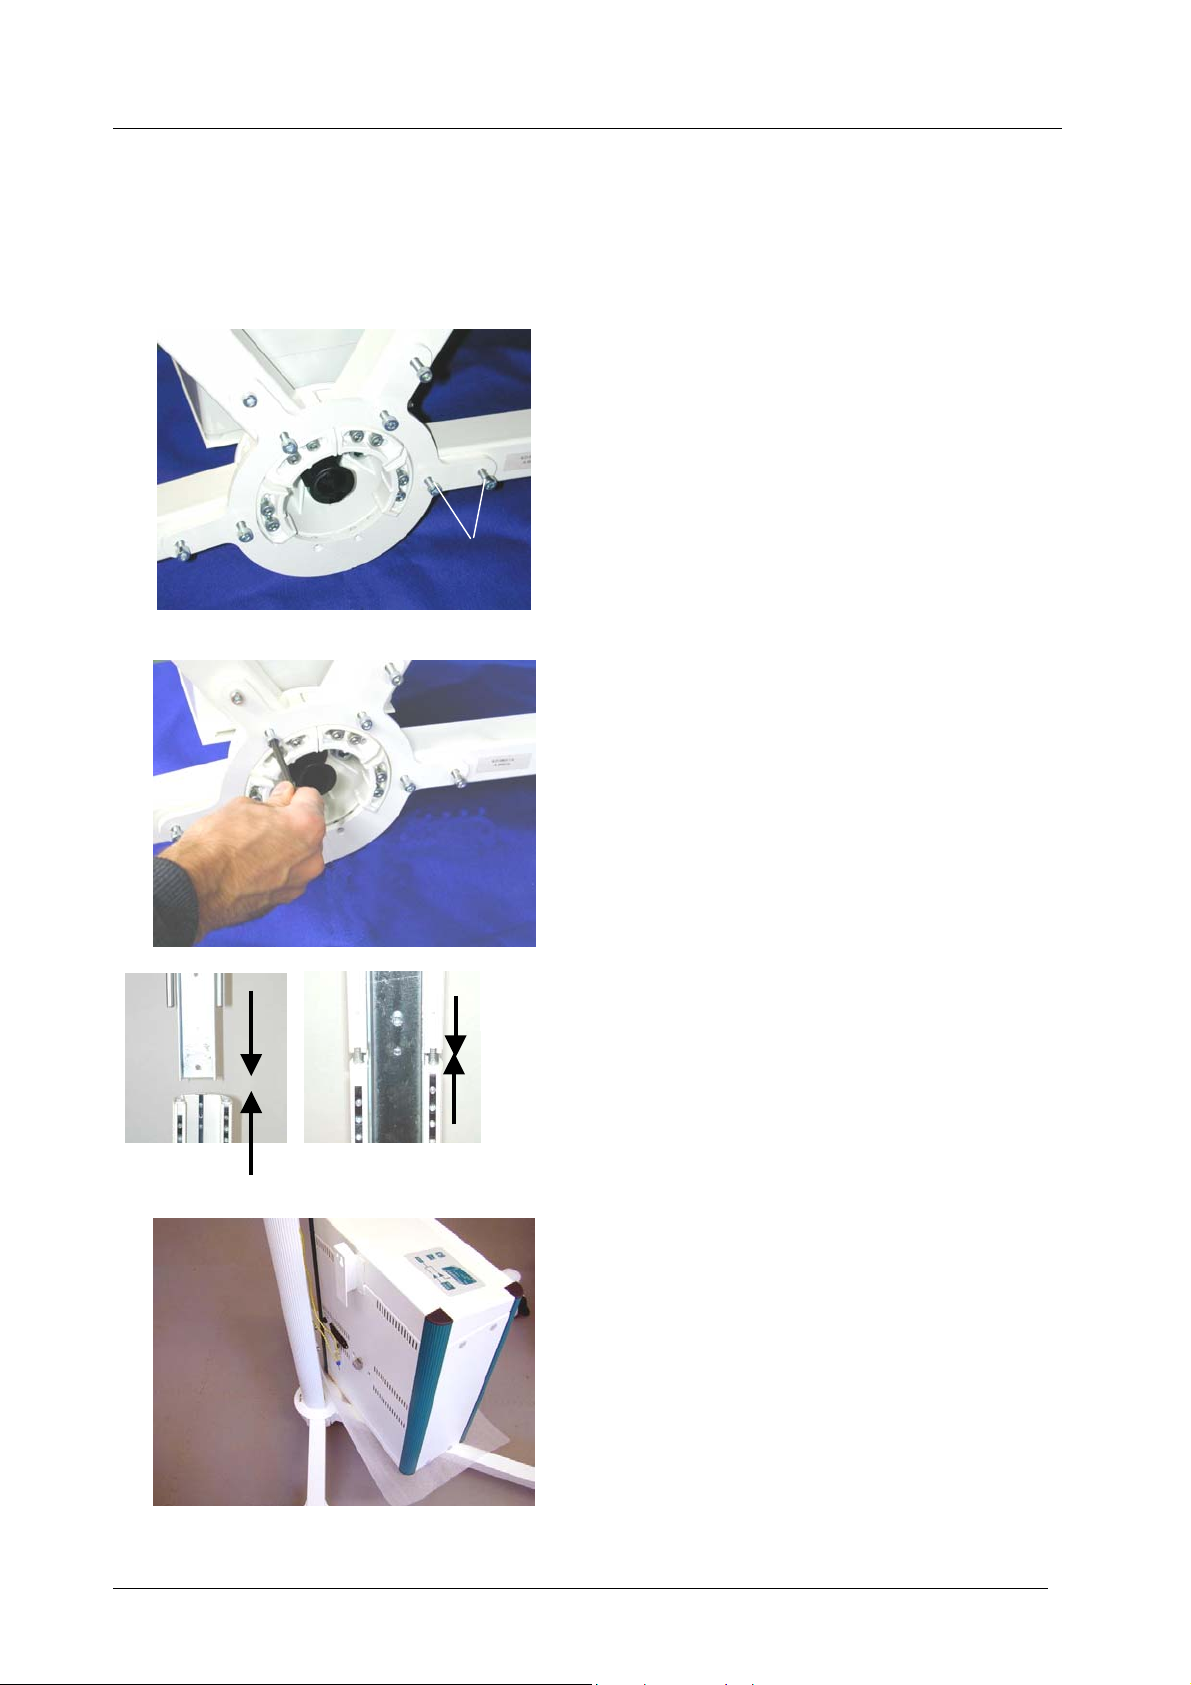
Emergency power lamp
Dr. Mach
Lamps and Engineering
A4
A3
A2
A1
Mounting the covers and accessories
The mounting procedure is described in particular
for covers and accessories.
Remark:
The number of covers can be different depending on the design of the stand.
Slightly tighten the two parts of the stand tube at the
intersecting point by using the two braces.
braces
intersecting
point
Slip the enclosed handle over the stand tube and fix
it with the screws (2 pcs.) and lock washer (1 piece)
included in the scope of supply (see photography).
Put the lower protective cover A2 on the stand tube
and fix it.
If necessary, loosen the screws at the two braces in
order to arrange the handle in horizontal position.
Attention:
Then tighten all six screws.
Now put the upper protective cover A3 on the stand
tube and fix it.
A2
Edition 08 17.11.2004 / Bak Page 11/26

Emergency power lamp
View of the spring arm from below
4
3
Dr. Mach
Lamps and Engineering
Mounting the spring arm / central spring
arm
For mounting the spring arm / central spring arm to
1
the stand tube proceed as follows:
• Insert journal 1 of the spring arm into stand
head 2. The electrical connection is ensured by
a cable with plug inside the stand head.
• Make sure, that stop pin 3 at the spring arm lies
2
in countersinking 4 at the stand head as shown
in the figure.
A3
Insert the spring arm with cable into the stand tube.
Connect the cable of the spring arm with the cable
of the stand tube (see plug-in-connection C in the
left photography).
C
Mount the open cover A4 included in the scope of
supply.
The stand can be ordered optionally with a clamp
rail.
This clamp rail is fixed with the enclosed two
screws above cover A3.
Edition 08 17.11.2004 / Bak Page 12/26

Emergency power lamp
Dr. Mach
Lamps and Engineering
The stand can be ordered optionally with a table.
This table is fixed with the enclosed four screws.
7. Mounting the lamp to the spring arm
7.1 Mounting the lamp to the regular spring arm (Triaflex lamp)
In order to keep the system easy running throughout its life span, we recommend that the hinges
should be greased every two years with an acid-free grease.
Caution:
The lamp may only be dismounted (in reverse order to the mounting procedure) after the
mounting safeguard has been positioned and screwed tight, as the arm is under spring tension.
Never let the spring arm bounce up!
3
Preparatory work
Attention!
Disconnect the on-site power supply and protect it from being switched on again.
• Disconnect the equipment / pull out the power
plug and protect the equipment from being
switched on again.
2
Attention!
1
Danger of injury: When it is pressed down, the
spring arm can jump up suddenly and cause
injury.
During the installation of the lamp / device, do
not allow anyone to be within the swivelling
range of the spring arm.
• Remove the recessed head screw 1 and slide
4
the sleeve 2 up.
• Remove the securing segment 3 with a small-
bladed screw driver.
• Remove the protective cap 4 from the mount-
ing.
Edition 08 17.11.2004 / Bak Page 13/26

Emergency power lamp
3
2
1
5
Dr. Mach
Lamps and Engineering
Mounting
Attention!
Danger of injury: If an incorrect segment is
used, the lamp / device may fall out of the
mounting and cause serious injury.
Use only original securing segments.
Note:
Maximum lamp / device weight: The lamps /
devices must not exceed the weight of the
mounted spring system. For details about the
spring system please refer to the type plate of
your ACROBAT 2000.
Spring versions:
- 1,0 – 3,5 kg;
- 3,5 – 7,0 kg;
- 7,0 – 12,0 kg;
- 12,0 – 18,0 kg
• Insert the bow 5 (with grease) into the mount-
ing of the spring arm, insert the securing segment 3 and slide the sleeve 2 down.
• Install the recessed head screw 1.
• Check the bow 5 with the lamp / device for firm
seating in the spring arm.
• Adjust the spring force as described in chapter
8.
• Adjust the vertical limit as described in chapter
8.
Edition 08 17.11.2004 / Bak Page 14/26

Emergency power lamp
7.2 Mounting the lamp to the central spring arm
(Trigenflex / Mach M3 / Mach 380 lamp)
2
5
1
2
2
4
5
6
Dr. Mach
Lamps and Engineering
Preparatory work
Attention!
Power off the on-site power supply and protect
it from being switched on again.
1
2
3 4
10
Attention!
Danger of injury: The spring arm, when it is
pressed down, can jump up suddenly and cause
injury.
During the installation of the end device, do not
allow anyone to be within the swiveling range of
the spring arm.
• Turn mounting hole 5 in the sleeve 1 down-
wards.
• Remove the brake screw 4 at the bottom side of
sleeve 1.
• Turn sleeve 1 by 90 degrees and remove the
end device securing screw 2.
• Turn sleeve 1 by 180 degrees and remove the
second end device securing screw 2.
• Remove the protective cap 3.
Mounting
Note: Maximum lamp / device weight: The lamps
/ devices must not exceed the weight of the
mounted spring system. For details about the
spring system please refer to the type plate of
your ACROBAT 2000.
Spring version: 10,0 – 15,0 kg
• Insert the end device 6 into the mounting of the
spring arm.
Attention!
Danger of injury: Hold the end device to avoid
its falling down.
• Tighten the first end device securing screw 2.
• Turn sleeve 1 by 180 degrees and tighten the
second end device securing screw 2.
• Turn sleeve 1 by 90 degrees and tighten the
brake screw 4.
• Adjust the brake force so the lamp / the end
device always keeps its set position.
• Check the firm seating of the end device.
• Adjust the spring force as described in chapter
8.
• Adjust the verrtical limit as described in chapter
8.
Edition 08 17.11.2004 / Bak Page 15/26

Emergency power lamp
Alc. ≤ 20 %
DANGER OF INJURY!
During the transport of the stand with lamp
tip the stand for maximum 5° to avoid danger of injury!
Each delivered stand has a sticker with this
warning.
In case the stand is moved when positioning
the OT-lamp, please make sure, that all rollers are moveable (brakes are loosened, no
cables in the movement range of the stand)!
8. Cleaning
The stand has a high-quality surface, which can be
cleaned with conventional cleaning agents.
Pay attention to the following during cleaning:
- Never wipe over the stand with a dry cloth.
- Only use disinfectant with less than 20% alco-
hol.
Dr. Mach
Lamps and Engineering
Edition 08 17.11.2004 / Bak Page 16/26

Emergency power lamp
9. Adjusting the spring arm
X
3 4
5
3
+
SW5
Hole 6
-
Dr. Mach
Lamps and Engineering
Height adjustment
At delivery the spring arm is set in the horizontal
position.
The vertical movement of the spring arm can be
enlarged up to 45 degrees upwards.
Attention!
Power off the on-site power supply and protect
it from being switched on again.
• Power off the pendant system / pull out the
power plug and protect the pendant system
from being switched on again.
• Remove the two Philips screws 4 and take off
the covers 3.
• At the position marked X you can see the ad-
justing nut 5.
• Adjust the nut 5 with the enclosed metal pin.
• Mount the two covers 3 and fix them with the
two Philips screws 4.
• Check the firm seating of the covers 3.
Adjusting the spring force
To adjust the spring force make sure that the spring
arm with the lamp / device can come to rest in any
desired position.
• Insert the Allan key width 5 in the hole 6.
If the spring arm drops, the spring force is too
low:
- Rotate the adjustment screw to the left (counter
clockwise) in the + direction.
If the spring arm rises, the spring force is too
high:
- Rotate the adjustment screw to the right
(clockwise) in the - direction.
If the spring arm with the lamp / device cannot
come to rest in any desired position after the
spring force has been adjusted, the springs
must be replaced by a service technician.
Edition 08 17.11.2004 / Bak Page 17/26

Emergency power lamp
Dr. Mach
Lamps and Engineering
10. Properties
• The device is designed for supplying 24V-consumers, which have to be suitable for alternating current AC and for direct current DC.
• A safety low voltage SELV according to DIN VDE 0100, T. 410 is available for a maximum power
consumption of 170W.
• In case of power failure the device has a service life of approx. 2,5 to 3 hours in conditions of maximum power consumption.
• The functions of the device run automatically, for example the switch-over function between die mains
operation and battery operation and reverse.
• The device is designed and built according to the regulations of the DIN VDE 0107. Due to its
size, power consumption and request for mobility it is not possible to satisfy every parameter
of the DIN VDE 0107. Therefore the range of use is the decision of the client.
11. Location
• The device is designed according to the protection type IP 20. The device is to be used only at dry
and roofed over locations.
• It is not allowed to cover the ventilation slots. It is not allowed that dirt and other foreign substances
infiltrate into the device.
• The environmental temperature should be between 10°C and 25°C.
12. Connecting the user and
adjusting the secondary voltage
Attention! This work is to be done only by special trained personnel!
• The 24V – consumer must be connected to the clamps 24 / 0 / earthing on the rear side of the de-
vice.
• The square section of the cable must be at least 1,5 mm². Make sure that the cable is fixed properly
and is protected against mechanical damage.
• The voltage of the 24V – output can be adjusted (between two limits) with the built in transformer T1.
• If the mains voltage is less than 230V or a higher primary voltage is needed, the cables for the pri-
mary voltage must be connected to the clamps 0 and 220 at the transformer.
• If the mains voltage is higher than 230V or a lower primary voltage is needed, the cables for the primary voltage must be connected to the clamps 0 and 240 at the transformer.
Edition 08 17.11.2004 / Bak Page 18/26

Emergency power lamp
Dr. Mach
Lamps and Engineering
13. First use
• Insert the enclosed fuse 11 T 10 A, 6,3x32 at
the backside of the battery box into the fuse
11
13
12
• The green LED „MAINS“ is burning now. The green or yellow LED of the „LEVEL“ – marking is also
burning. The LED „BATTERY FAIL“ turns off.
• The output of the unit is supplied with 24 V.
• Because of safety reasons this voltage can not be switched off.
• The unit must now be supplied continuously from mains. Do not turn the unit off, except special
cases!
holder and turn clockwise to lock.
• The red LED „BATTERY FAIL“ on the control
panel is burning.
• Connect the enclosed power cable 12 (length
4m) to the battery box and to a appropriate wall
socket (230 V / 50 Hz).
• Turn ON the unit at the ON/OFF switch 13.
14. Mains operation
• As long as the unit is supplied from mains, the lamp will be supplied by the built-in transformer.
• During normal operation status the green LED „MAINS“ is burning, the batteries are charged auto-
matically and they keep their full-charged-status.
Edition 08 17.11.2004 / Bak Page 19/26

Emergency power lamp
Dr. Mach
Lamps and Engineering
15. Battery operation
• If the mains voltage decreases to values under 85% of the rated voltage, the unit automatically
switches over to battery operation, and the lamp is supplied with battery current. This status is shown
as follows:
o The green LED „MAINS“ turns off.
o The red LED „MAINS FAIL“ is burning.
o The yellow LED „BATTERY“ that shows battery current, is burning.
o The acoustic signal is buzzing – this signal can be switched off by pressing touch-button
„BUZZER OFF“.
o The battery’s state-of-charge is shown by the LED’s of the „LEVEL“ – monitor.
• When the batteries are fully charged, the lighting time is approx. 3 hours.
• If there is no mains voltage available until the battery is empty, the built-in low-discharge-protection
disconnects the lamp from the battery. The LED „BATTERY FAIL“ is burning.
• If the mains voltage increases to values over 95% of the rated voltage, the unit automatically switches
over to mains operation and the batteries are charged. The LED „BATTERY FAIL“ turns off.
ATTENTION! After a disconnection by the low-discharge-protection the next battery operation is
possible only after several hours of mains operation and battery charging! It has to
be tested, if the unit is ready for another line failure.
After battery operation / line failure the unit must be supplied with mains voltage
and the batteries must be charged as soon as possible.
16. „TEST“-operation
• Before every use (on every day) the status of the unit must be checked by pushing touch-button
„TEST“. A line failure with battery operation, as described above, will be simulated for approx. 5 seconds.
• During this time the green LED at the „LEVEL“ – monitor must burn continuously and the yellow or
the red LED must remain off. The batteries must be fully charged for this operation.
• If the unit does not function as described above, the cause must be found and the possible damage
must be repaired. It may be necessary to replace the batteries or even to change the whole unit.
• Every three months it is necessary to simulate a longer line failure (1 to 2 hours) by disconnecting the
unit from mains, in order to test the capacity and lighting time of the batteries. The „LEVEL“ – monitor
should be observed during the operation and the parameters should be kept for further comparisons.
• In case the lighting time is under the minimum of 2 hours, the batteries must be replaced.
Edition 08 17.11.2004 / Bak Page 20/26

Emergency power lamp
Dr. Mach
Lamps and Engineering
17. Remarks concerning the batteries
• Avoid low discharges! The red LED „BATTERY FAIL“ should not burn.
• After discharges ensure mains operation as soon as possible, so the batteries can be charged.
• Avoid high operation temperatures.
• Batteries are working parts. They must be replaced after their life time, even if they didn’t function.
• Only use batteries of the same type and the same design. The original batteries can be ordered at the
manufacturer.
18. „BUZZER OFF“
• In case of line failure or TEST- operation the acoustic signal is activated. The signal can be turned off
by pushing touch-button „BUZZER OFF“.
19. Turning OFF the unit
• When the unit is turned OFF for a longer time (without mains voltage), first charge the batteries, so
they are fully charged.
• Then remove the battery fuse at the back side of the battery box, turn OFF the unit at the ON/OFF
switch and unplug from mains. The batteries are no longer charged now.
• The unit can be stored for max. 2 months.
• After max. 2 months the unit must be reconnected to the mains and the batteries must be charged for
min. 24 hours (see also chapter “First use”).
Edition 08 17.11.2004 / Bak Page 21/26

Emergency power lamp
20. Malfunction and possible causes
• No mains operation possible:
Mains voltage not available or too low
Mains cable not plugged in
Mains switch turned OFF
Mains fuses out of order
Malfunction at the light
• No battery / Test operation possible:
Batteries not charged
Batteries out of order
Battery fuse out of order
Malfunction at the light
• At „TEST“ Monitor-LED changes very quick from green to red:
Batteries not charged
Batteries out of order
Dr. Mach
Lamps and Engineering
Edition 08 17.11.2004 / Bak Page 22/26

Emergency power lamp
Dr. Mach
Lamps and Engineering
21. Technical data
Every mounted lamp, that leaves our factory, has
the model name on the lamp housing and a type
plate containing all relevant technical data.
Type ..................................................................... OPSV/WG/24-170/3
Type of protection................................................. IP 20 for use in dry rooms only
Class of protection................................................ I.
Isolation E – A ...................................................... VDE 0551
Power ................................................................... 170W
Suitable for Dr. Mach lamps ................................. Mach 380; Mach M3; Trigenflex; Triaflex
Mains voltage ....................................................... 230 V, 50 Hz
Secondary voltage................................................ 24 V AC/DC, adjustable +/- 5%
Battery .................................................................. 24 V / 27 Ah, Type FG 22703
Life span............................................................... approx. 10 years according to EUROBAT
Max. environmental temperature.......................... -10°C to +25°C
Switch positions.................................................... Regular operation / test operation
Mains fuse ............................................................ 1,6 A delay 5x20
Battery fuse .......................................................... 10 A delay 6,3x32
Overload fuse ....................................................... Thermal fuse 100 °C reversible in transformer
Weight .................................................................. 37 kg
Graphical symbols with details
Graphical
symbol
Type plate
IEC-standard Description
~
!
Edition 08 17.11.2004 / Bak Page 23/26
IEC 417-5032 Alternative current
IEC 417-5031 Direct current
IEC 417-5019 Connection for protective conductor
IEC 348 Attention, notice the documentation
IEC 417-5008 OFF (supply, disconnected from net)
IEC 417-5007 ON (supply, connected with the net)
IEC 417-...
IEC 878-02-02
Degree of protection type B

Emergency power lamp
Dr. Mach
Lamps and Engineering
Controls
Mains operation ................................................................. LED green
Battery operation ............................................................... LED red, acoustic signal
Battery status..................................................................... LED green, fully charged
........................................................................................... LED yellow, charged 80% - 20%
........................................................................................... LED red, battery discharged
Battery capacity ................................................................. 26 Ah
Lighting time with fully charged battery ............................. 3 hours
Environmental conditions
Betrieb
Temperature -10°C +25°C
Relative athmospheric humidity 30 % 75 %
Air pressure 700 hPa 1060 hPa
Transport / Lagerung
Temperature -10°C +25°C
Relative athmospheric humidity 20 % 90 %
Air pressure 700 hPa 1060 hPa
Min. Max.
Min. Max.
22. CE-mark
The products „Emergency lighting“ comply to the standards 93/42/EEC for medical products of the European Community’s Council.
23. Disposal
The OT-lamp doesn’t contain any danger goods.
The components of the OT-lamp should be properly disposed at the end of its shelf-life.
Make sure, that the materials are carefully separated.
The electrical conducting boards should be submitted to an appropriate recycling proceeding.
The rest of the components should be disposed according to the contained materials.
In case the lighting time is under the minimum of 2 hours, the batteries must be replaced.
Batteries are working parts. They must be replaced after their life time, even if they didn’t function.
Battery replacement must be done only by authorized personnel.
Only use batteries of the same type and the same design. The original batteries can be ordered at the
manufacturer.
Edition 08 17.11.2004 / Bak Page 24/26

Emergency power lamp
24. Dimensions
Example: lamp Mach M3
1500
850
Dr. Mach
Lamps and Engineering
1990
1620
Swivelling range of the spring arm
upwards 520mm
downwards 630mm
total 1150mm
1900
Edition 08 17.11.2004 / Bak Page 25/26
880

Emergency power lamp
Dr. Mach
Lamps and Engineering
25. Spare parts
5
6
4
2
3
1
Item Qty. Name EDVNO Remarks
1 1 Stand for OT-lamp 74961001
2 1 Handle 74961003
3 1 Mach emergency power unit NVE 170
Power 170 Watt
4 1 Central spring arm AC2000 12,0 – 18,0kg 74803005
5 1 Sliding contact plug 67330002 Not shown
6 1 Clamp rail 74961002
67581002
Option
Edition 08 17.11.2004 / Bak Page 26/26
 Loading...