

Dremel 1200 User Manual
DM 2610933927 11-05.qxd 4/12/06 4:20 PM Page 1
Model 1200
Instructional Safety
Manual
Dual Temp Glue Gun
1-800-437-3635
http://www
Dremel brand products are manufactured and sold by the
Dremel Division of Robert Bosch
Form No. 2610933927 04/06 Robert Bosch Tool Corporation © 2004
.dremel.com
ool Corporation
T
All Rights Reserved
DM 2610933927 11-05.qxd 4/12/06 4:20 PM Page 2
Glue Gun Safety Instructions
!
injury.
WARNING
Read and understand all instructions. Failure to follow all instructions
listed below may result in electric shock, fire, and/or serious personal
SAVE THESE INSTRUCTIONS
!
WARNING
temperature is 380 deg F.
melted glue or nozzle area. If accidental
contact occurs, do not remove glue.
Immediately put burned area into cold
water. Always wear protective clothing,
safety glasses, gloves, long sleeve shirt
and long pants. Keep out of reach of
children. Keep away from flammables.
Unplug when not in use. No user serviceable parts inside. Manufacturer assumes
no responsibility for consequential or indirect
damages from the use of this product.
!
WARNING
product exposes you to lead, a chemical known to the State of California to
cause cancer, birth defects and other
reproductive harm. Wash hands after
handling.
!
CAUTION
not use any material other than recommended glue sticks. Permanent damage
to the glue gun could result.
The glue gun is on as soon as it is plugged
in. Do not leave unattended.
When glue gun is hot, do not lay on its
side. Always use stand.
Do not use hot melt glue to replace
structural fasteners. The adhesive used
with this glue gun will begin to soften at
140 deg F
that will be subjected to temperatures of
140 deg F or above.
Melted glue will burn
skin; operating nozzle
Do not touch
Handling the coated
electrical wires of this
Do not attempt to melt
crayons or candles.
. Don't use the glue on objects
Do
Avoid accidental discharge. Do not touch
glue stick or trigger except to dispense
glue. Feeding or pushing glue stick with
too much force into heated gun may cause
hot glue to be unexpectedly expelled from
nozzle or to flow back from inlet tube.
Do not pull glue sticks from gun. The feed
mechanism may become damaged or
impaired. If you desire to change types of
glue, cut off protruding end and feed the
remainder through with the new type of
glue.
Do not store the glue gun in direct sunlight
for extended periods.
Never attempt to force cool the gun after
use by immersing any part of it in water or
any other liquid. Allow the gun to air cool
only. Allow glue gun to cool before storing.
Do not change nozzles while glue gun is in
“on” position, plugged in, or warm to the
touch. Before changing nozzles, make
sure glue gun is cool to the touch,
unplugged, and the switch is in the “off”
position.
This appliance has a polarized plug (one
blade is wider than the other.) To reduce
the risk of electric shock, this plug is
intended to fit in a polarized outlet only one
. If the plug does not fit fully in the
way
outlet, reverse the plug. If it still does not
fit, contact a qualified electrician. Do not
modify the plug in any way.
This glue gun contains no user serviceable
parts. Do not use glue gun if cord is
damaged. Damaged cords increase the
risk of electric shock.
2
DM 2610933927 11-05.qxd 4/12/06 4:20 PM Page 3
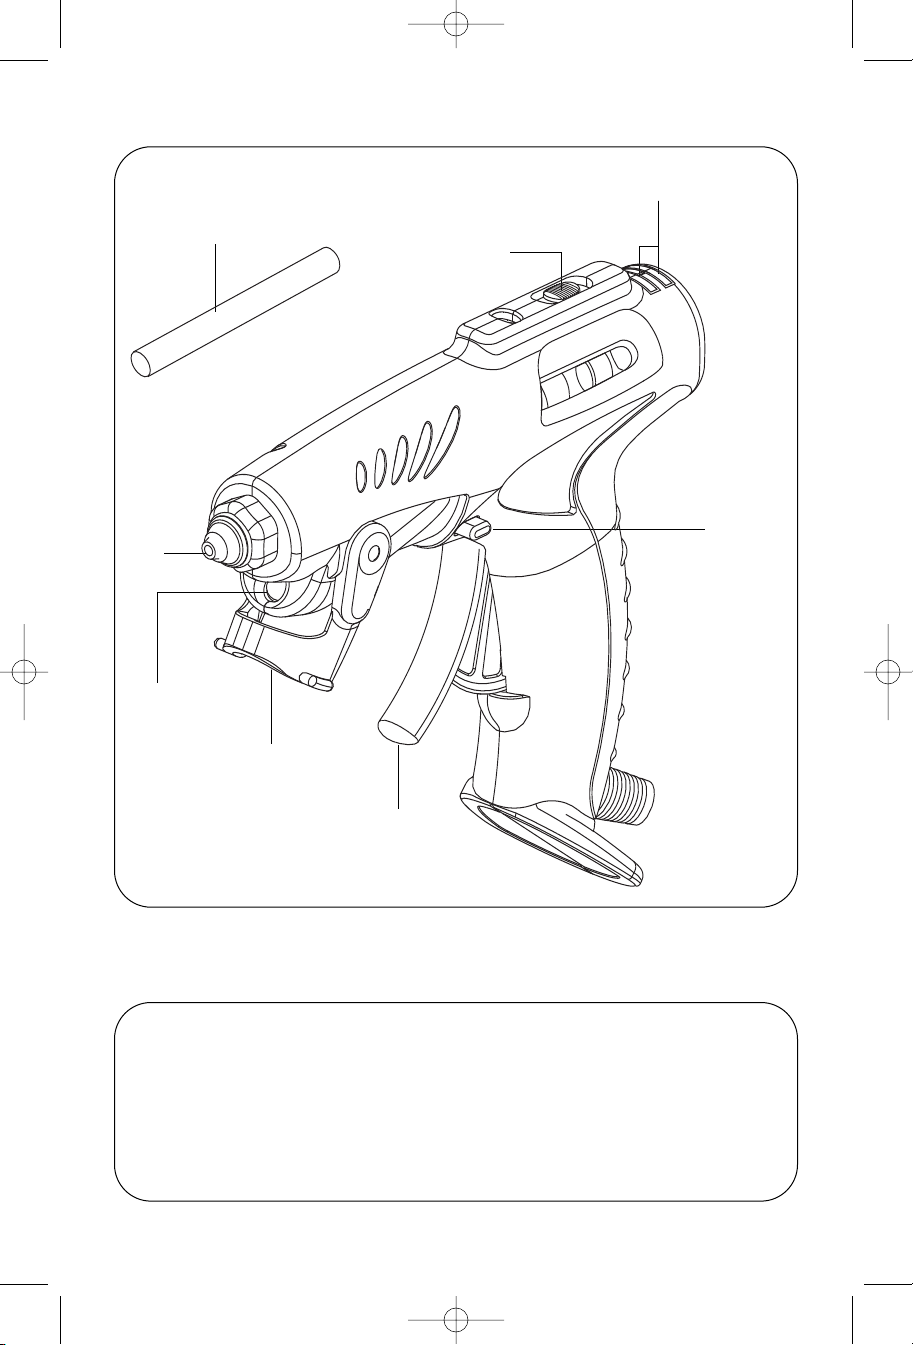
Getting to Know Your Glue Gun
Indicator
Lights
Tip
Headlight
Glue stick
On/Off
Switch
Stand
release button
Pop-Up
Stand
Trigger
Operation
With switch in the “Off” position, plug
Dremel Dual Temp Glue Gun Model 1200
into a standard 120V receptacle.
Adjust switch to low setting or high setting.
Red light will be activated to indicate
power to the unit. Insert the appropriate
glue stick into the rear opening of the glue
gun.
Allow glue gun to reach selected temperature. Green light will illuminate when
selected temperature is reached.
As the glue gun is used, the red light will
again illuminate until the glue gun cycles
back to maximum temperature.
3
NOTE:
DM 2610933927 11-05.qxd 4/12/06 4:20 PM Page 4
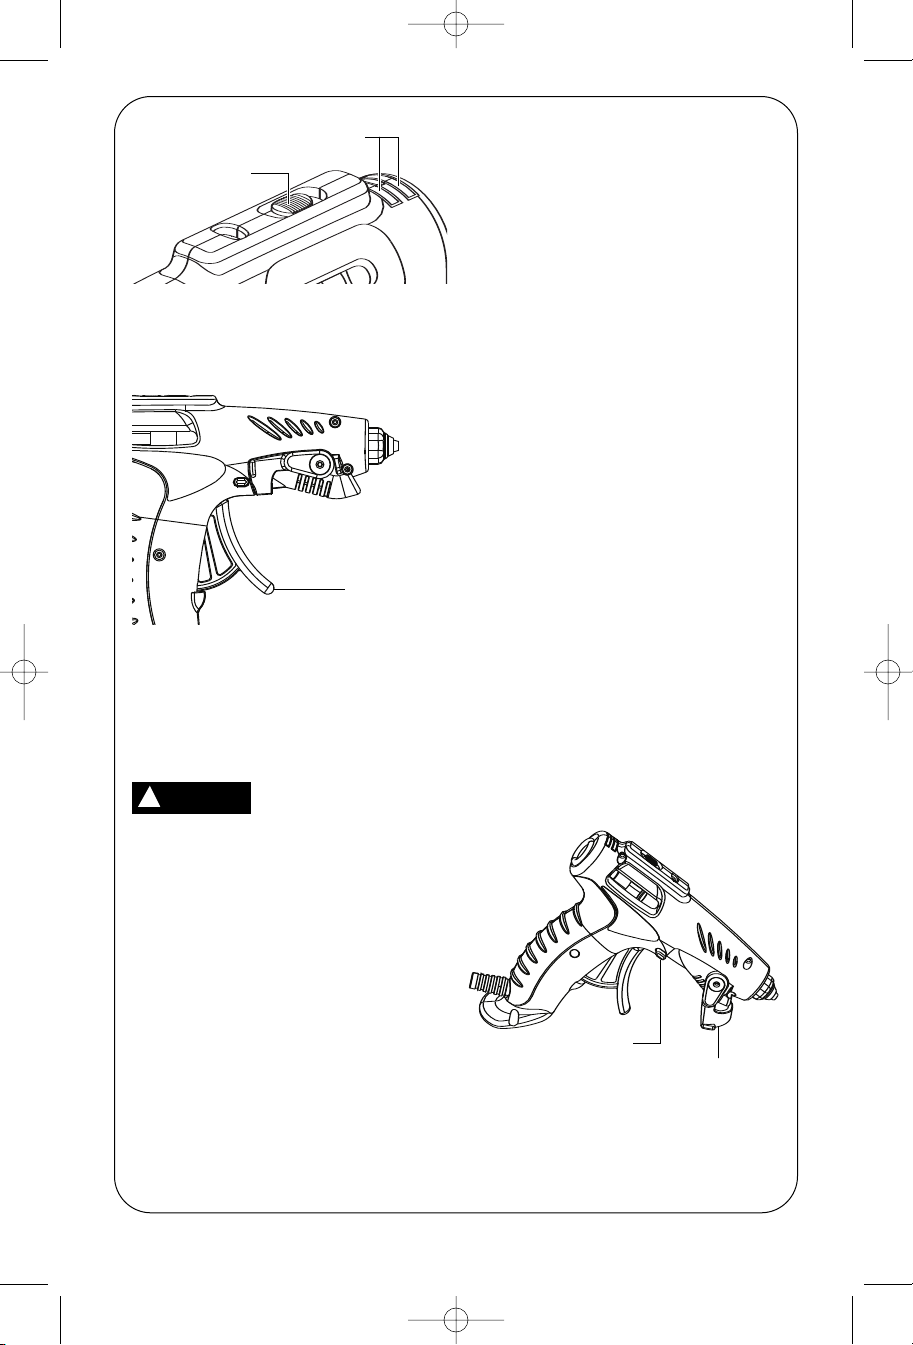
Indicator Lights
On/Off Switch
Squeeze the trigger repeatedly until hot
glue begins to flow from the nozzle.
NOTE: For your first use, you may need
to load up to two full glue sticks before glue
begins to flow.
Trigger
Changing Glue Sticks
Do not attempt to remove the unused portion of the glue stick from your glue gun. If
you need to switch glue stick formulas,
empty the melting chamber by squeezing
the trigger and insert new formula.
Changing Nozzles
!
WARNING
Disconnect the plug
from the power source
and allow the tool to cool before
attempting to change the nozzle. Such
preventative safety measures reduce
the risk of accidental burns.
The Dremel Glue Gun comes with two
additional tips. The first tip is a fine point
tip for laying down very fine lines where a
small amount of glue is needed. The second tip is a spreader tip for laying down a
wider strip of glue. To remove the standard nozzle from the glue gun and replace
it with a different nozzle, start by removing
the silicon safety sleeve. Place a
adjustable wrench around the collar of the
nozzle and turn the wrench counter-clockwise until the nozzle is loose. Using your
hand, pull the nozzle off the threads.
Place the new nozzle on the threads and
begin to tighten by hand. Once the tip is
started on the threads, tighten the remainder with an adjustable wrench until the tip
is secured tightly on the glue gun. Place
the silicon safety sleeve over the new tip.
The glue gun is now ready for use.
A
nti-Drip Feature
The Anti-Drip feature is activated by
releasing the trigger which will cut off the
flow of glue into the channel. A small
amount of glue will remain in the tip when
the trigger is released and this will need to
drain from the tip. To optimize the AntiDrip feature, release the trigger and allow
the small amount of melted glue remaining
in the tip to drain onto project surface
before setting glue gun on stand. If you
would prefer to allow this small amount of
melted glue to drain elsewhere, set your
glue gun a non-porous surface such as a
tile or flat piece of tin. It is recommended
that you use this protective surface at all
times when working with your glue gun.
When the glue gun is not in use, prop the
glue gun on the spring-loaded stand. If the
spring loaded stand is not used, the tool
will lay on it’s side. Do not lay the glue gun
on its side. To open stand, press button on
side of glue gun. To retract stand, carefully fold in to original position.
Pop-Up Stand
To stabilize the glue gun on a flat surface
use the pop-up stand. To release the popup stand, press the button on either side of
the glue gun. To retract the stand, push
back into the locked position with your
forefinger.
Stand release
button
Pop-Up
Stand
Headlight
The headlight will remain on when the glue
gun is in one of the one positions (Lo/Hi).
To turn the light off, slide the glue gun
switch to the off position.
4
DM 2610933927 11-05.qxd 4/12/06 4:20 PM Page 5
Dremel Limited Warranty
Your Dremel product is warranted against defective material or workmanship for a
period of two years from date of purchase. In the event of a failure of a product to
conform to this written warranty, please take the following action:
1. DO NOT return your product to the place of purchase.
2. Carefully package the product by itself, with no other items, and return it, freight
prepaid, along with:
A. A copy of your dated proof of purchase (please keep a copy for yourself).
B. A written statement about the nature of the problem.
C. Your name, address and phone number to:
UNITED STATES
Dremel Service Center
4915 21st Street OR 4631 E. Sunny Dune
Racine, WI 53406 Palm Springs, CA 92264
CANADA OUTSIDE
Giles Tool Agency CONTINENTAL UNITED STATES
6520 Lawrence Av. East See your local distributor or write to
Scarborough, Ont Dremel, 4915 21st Street
Canada M1C 4A7 Racine, WI 53406
We recommend that the package be insured against loss or in transit damage for which
we cannot be responsible.
This warranty applies only to the original registered purchaser. DAMAGE TO THE
PRODUCT RESULTING FROM TAMPERING, ACCIDENT, ABUSE, NEGLIGENCE,
UNAUTHORIZED REPAIRS OR ALTERATIONS, UNAPPROVED ATTACHMENTS OR
OTHER CAUSES UNRELATED TO PROBLEMS WITH MATERIAL OR
WORKMANSHIP ARE NOT COVERED BY THIS WARRANTY.
No employee, agent, dealer or other person is authorized to give any warranties on
behalf of Dremel. If Dremel inspection shows that the problem was caused by
problems with material or workmanship within the limitations of the warranty, Dremel will
repair or replace the product free of charge and return product prepaid. Repairs made
necessary by normal wear or abuse, or repair for product outside the warranty period, if
they can be made, will be charged at regular factory prices.
DREMEL MAKES NO OTHER WARRANTY OF ANY KIND WHATEVER, EXPRESSED
OR IMPLIED, AND ALL IMPLIED WARRANTIES OF MERCHANTABILITY AND
FITNESS FOR A PAR
MENTIONED OBLIGA
FROM THIS LIMITED WARRANTY.
This warranty gives you specific legal rights and you may also have other rights which
vary from state to state. The obligation of the warrantor is solely to repair or replace the
product.
any such alleged defect. Some states do not allow the exclusion or limitation of
incidental or consequential damages, so the above limitations or exclusion may not
apply to you.
For prices and warranty fulfillment in the continental United States, contact your local
Dremel distributor.
The warrantor is not liable for any incidental or consequential damages due to
TICULAR PURPOSE WHICH EXCEED THE ABOVE
TION ARE HEREBY DISCLAIMED BY DREMEL AND EXCLUDED
Dremel Service Center
5
 Loading...