


DreamLine SHEN2444030009, SHEN2436030009, SHEN2452534009, SHEN2435534009, SHEN2443534009 User Manual
...UNIDOOR PLUS (STYLE I)
SHOWER DOOR & GLASS PANEL INSTALLATION INSTRUCTIONS
IMPORTANT
DreamLine® reserves the right to alter, modify or redesign products at any time without prior notice. For the latest up-to-date technical drawings, manuals, warranty information or additional details please refer to your model’s web page on DreamLine.com
STYLE I |
STEP 1: Install Shower Door |
STEP 2: Install Panels |
|
|
|
|
|
|
For more information about DreamLine Shower Doors, Tub Doors and Enclosures, please visit DreamLine.com
“UNIDOOR PLUS (STYLE I)” |
©2017 DreamLine. All Rights Reserved |
©2018 DreamLine. All Rights Reserved
UNIDOOR/UNIDOOR-LS/UNIDOOR LUX/UNIDOOR PLUS
SINGLE SHOWER DOOR INSTALLATION INSTRUCTIONS
IMPORTANT
DreamLine® reserves the right to alter, modify or redesign products at any time without prior notice. For the latest up-to-date technical drawings, manuals, warranty information or additional details please refer to your model’s web page on DreamLine.com
Model #s
SHDR-20237210F-##
SHDR-20247210F-##
SHDR-20257210F-##
SHDR-20267210F-##
SHDR-20277210F-##
SHDR-20287210F-##
SHDR-20297210F-##
SHDR-20307210F-##
## = Finish
01 = Chrome
04 = Brushed Nickel
06 = Oil Rubbed Bronze
09 = Satin Black
HFR=Half-Frosted
NOTE: The glass-to-wall
hinges for this door must be attached into
studs or to preinstalled
2” × 6” wood reinforcement behind the wall.
Right-hand installation shown
Please review this entire manual prior to beginning installation.
ATTENTION: Please see specific installation instructions on page 2 when using the Frosted Band glass option.
For more information about DreamLine® products please visit DreamLine.com
UNIDOOR Single Shower Door manual Ver 2 Rev 6 02/2018
©2018 DreamLine. All Rights Reserved
Style “A” (single door installation shown) with Half-Frosted Glass:
NOTE: This model features the Half-Frosted glass option. The textured surface on the door glass should be installed to face outside of the shower.
The door glass can be flipped for left or right-hand installation.
Hinged Left installation |
Hinged Right installation |
2
UNIDOOR Single Shower Door manual Ver 2 Rev 6 02/2018
|
©2018 DreamLine. All Rights Reserved |
|
|
|
|
|
|
|
Table of Contents |
|
|
|
|
|
|
|
Section Title |
Page # |
|
|
|
|
|
|
Unidoor Styles |
4-7 |
|
|
|
|
|
|
Preparation |
8 |
|
|
|
|
|
|
Tools |
9 |
|
|
|
|
|
|
Required Reinforcement locations |
10 |
|
|
|
|
|
|
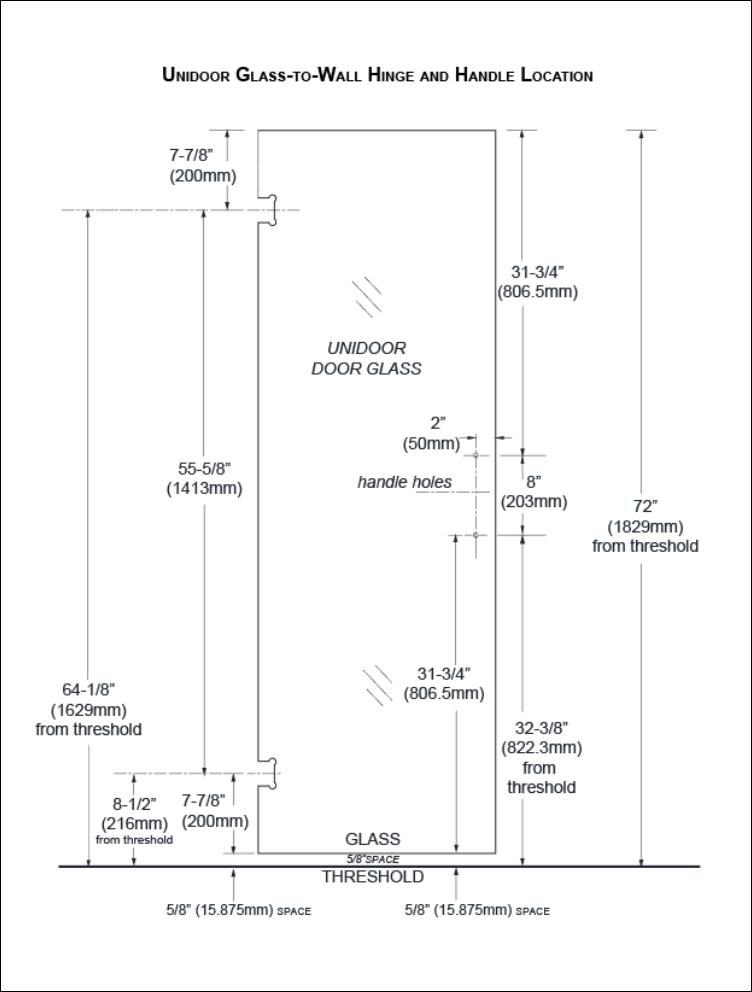
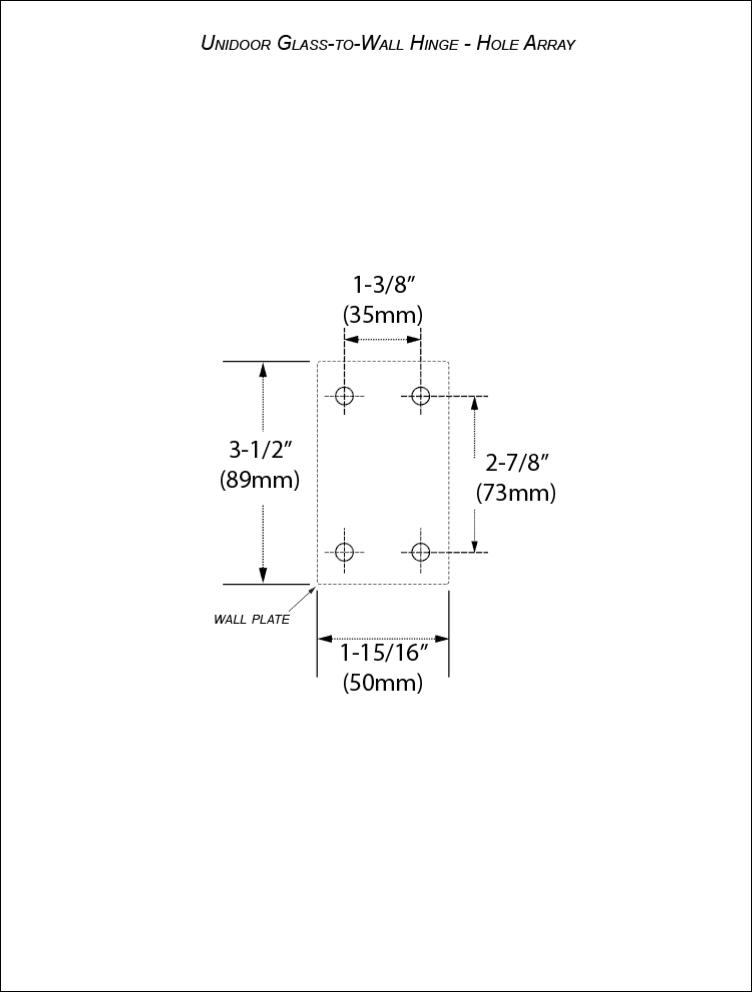
Glass and Hinge hole details |
11-12 |
|
|
|
|
|
|
Detailed Diagram of Shower Door Components and Parts List |
13 |
|
|
|
|
|
|
Installation Instructions |
14-21 |
|
|
|
|
|
|
Adjustable Hinge Details |
17-18 |
|
|
|
|
|
|
Handle |
19 |
|
|
|
|
|
|
Vinyl Seals |
19-20 |
|
|
|
|
|
|
Product Maintenance |
22 |
|
|
|
|
|
|
|
|
|
UNIDOOR Single Shower Door manual Ver 2 Rev 6 02/2018 |
3 |
|

©2018 DreamLine. All Rights Reserved
UNIDOOR STYLES- Models with Glass-to-Wall hinges
UNIDOOR Single Shower Door manual Ver 2 Rev 6 02/2018 |
4 |
|
©2018 DreamLine. All Rights Reserved
Models with Glass-to-Glass Hinge panels: For Glass-to-Glass Hinge Door models:
Use the installation manual that is packaged with the Hinge panel glass first.
UNIDOOR Single Shower Door manual Ver 2 Rev 6 02/2018 |
5 |
|

©2018 DreamLine. All Rights Reserved
STYLE A
UNIDOOR Single shower door 23”- 30”
Refer to detailed diagram on page 12 of this manual to begin the installation.
STYLE B *
UNIDOOR Shower door 23” – 30” with 6” small or 12”-30” large stationary panel with a Support Bar UNIDOOR-LS Shower door 23” – 30” with 12”-30” large stationary panel with an L-Bar™
STYLE C *
UNIDOOR Shower door with 12”-30” large stationary panel with Support shelves
STYLE D *
UNIDOOR LUX Shower door 23”~30” with 6” small or 14”-30” large stationary panel with glass-to- wall brackets
STYLE E *
UNIDOOR LUX Shower enclosure with 30” return stationary panel with glass-to-wall brackets
STYLE F *
UNIDOOR PLUS Shower door 23”~30” with 6”-34” in-line stationary panel secured using u-channel
STYLE G *
UNIDOOR PLUS Shower door 23”~30” with 6”-34” in-line half wall panel secured using u-channel
STYLE I *
UNIDOOR PLUS Shower enclosure with 6”-34” in-line stationary panel and 30”-34” return panel secured using u-channel
STYLE J *
UNIDOOR PLUS Shower enclosure with 12”-36” in-line half wall panel and 30”-34” return panel secured using u-channel
STYLE L *
UNIDOOR PLUS Shower enclosure with 30”- 34” return stationary panel secured using u-channel
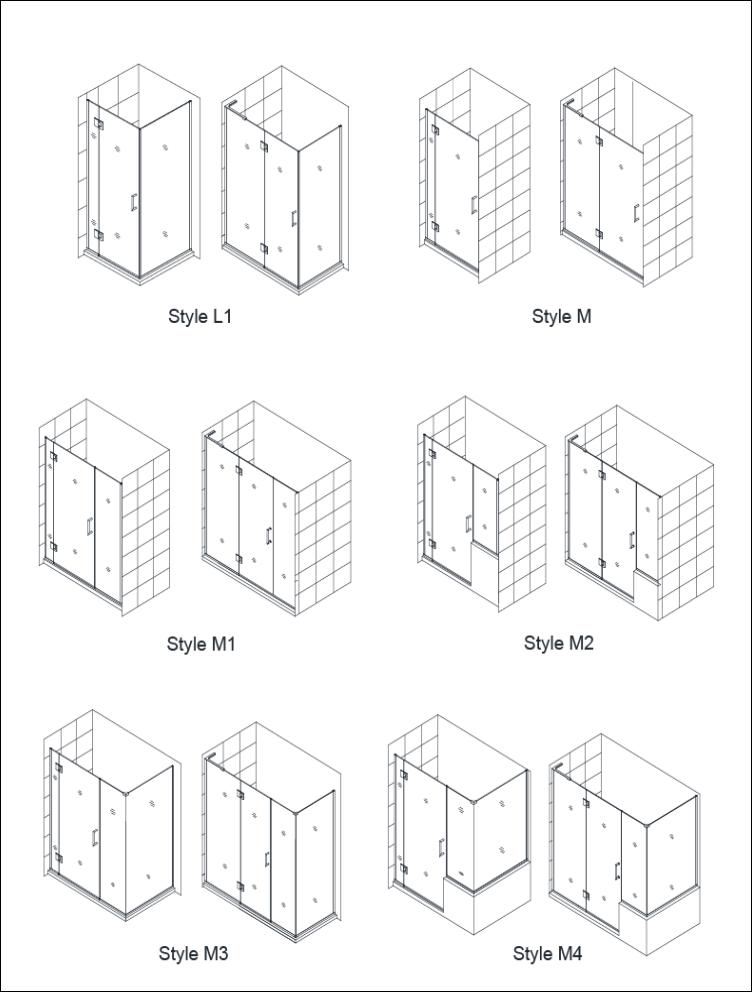
STYLE L1 *^
UNIDOOR X Shower door 23”~30” with 6” or 24” hinge panel and with 30”- 34” full height return panel secured using u-channel
STYLE M *^
UNIDOOR X Shower door 23”~30” with 6” or 24” hinge panel secured using u-channel
STYLE M1 *^
UNIDOOR X Shower door 23”~30” with 6” or 24” hinge panel and
with 6”, 6-1/2”, 14”, 14-1/2”, 22” or 22-1/2” full height inline panel secured using u-channel
UNIDOOR Single Shower Door manual Ver 2 Rev 6 02/2018 |
6 |
|

©2018 DreamLine. All Rights Reserved
STYLE M2 *^
UNIDOOR X Shower door 23”~30” with 6” or 24” hinge panel with 12”, 18”, 24” or 26” inline buttress panel secured using u-channel
STYLE M3 *^
UNIDOOR X Shower door 23”~30” with 6” or 24” hinge panel,
with 6”, 6-1/2”, 14”, 14-1/2”, 22” or 22-1/2” full height inline panel and 30” - 34” full height return panel secured using u-channel
STYLE M4 *^
UNIDOOR X Shower door 23”~30” with 6” or 24” hinge panel,
with 12”, 18”, 24” or 26” in-line buttress panel and 30”- 40” buttress return panel secured using u-channel
* For the panel installation instructions, please refer to the separate manual included in the panel glass packaging.
^ For Glass-to-Glass door installation, please refer to the separate manual included in the hinge panel glass packaging.
NOTE: The Unidoor series doors and enclosures are reversible for left or right-hand installation. This manual will show the right-hand installation. For a left-hand installation, simply begin on the opposite wall and reverse the orientation of the parts as necessary.
UNIDOOR Single Shower Door manual Ver 2 Rev 6 02/2018 |
7 |
|

©2018 DreamLine. All Rights Reserved
Preparation
1.Prior to installation, examine all boxes and packages for shipping damage and compare the piece count with your packing slip. After opening all boxes and packages read this introduction carefully. Check that all of the necessary parts are included in the package(s) by checking off the components on the “Detailed Diagram of Shower Door Components”. If the unit has been damaged, has a finishing defect, or is missing parts, please contact our customer support department within 3 business days of the delivery date. Please note that DreamLine® will not replace any damaged products or missing parts free of charge after 3 business days or if the product has been installed. Please contact DreamLine® if you have any questions and please provide an order number, job name or other proof of purchase to help identify the original order.
2.Please note that you should consult your local building codes with questions about installation compliance standards. Building and plumbing codes may vary by location, and DreamLine® is not responsible for code compliance standards for your project and will not accept any returns.
3.If this unit is going to be installed in a new construction, install all of the required plumbing and drainage before installing the shower. Use a competent and licensed (if required by local code) plumber for all plumbing installation.
4.Make sure that prior to beginning the installation, the surfaces are leveled and solid and will be able to support the total weight of the unit. Also make sure the walls are at right angles. Irregular installation surface level, radius corners or improper angle of side walls will result in serious problems for your installation. Please note that some adjustments and drilling will be necessary during the installation process.
5.Protect all primary surfaces of the product during installation. Never set glass down directly onto a hard surface unless instructed. Leave corner protectors in place until necessary to remove them. Always use a piece of wood or cardboard to protect the bottom edge and corners of the glass prior to and during installation to prevent damage.
6.This unit must be installed upon a level finished threshold and against plumb finished walls.
7.This door is extremely heavy and the hinges on this door must be attached into studs or to preinstalled 2” × 6” wood reinforcement behind the wall. See pages 9, 10 & 11 for details.
8.The single Unidoor installation does NOT have any adjustment for out-of-plumb or out-of-level conditions. Please verify that the walls are plumb and the threshold is level before proceeding with the installation.
9.Professional installation is recommended for this heavy glass frameless shower door.
NOTE: DO NOT attach the handle to the door glass until instructed.
DO NOT use the handle to lift the glass during installation. This may result in damage to the glass and/or serious injury. Always use an assistant and/or a professional grade glass suction cup when handling heavy glass panels.
UNIDOOR Single Shower Door manual Ver 2 Rev 6 02/2018 |
8 |
|
©2018 DreamLine. All Rights Reserved
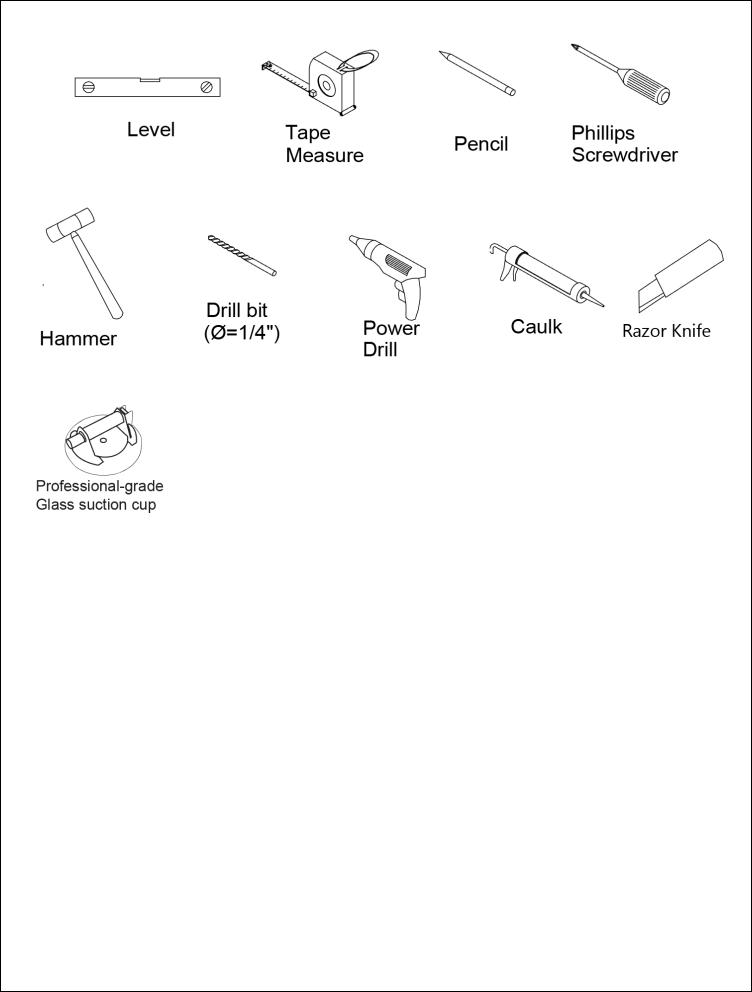
Tools Required
UNIDOOR Single Shower Door manual Ver 2 Rev 6 02/2018 |
9 |
|
©2018 DreamLine. All Rights Reserved
UNIDOOR Single Shower Door manual Ver 2 Rev 6 02/2018 |
10 |
|
©2018 DreamLine. All Rights Reserved
UNIDOOR Single Shower Door manual Ver 2 Rev 6 02/2018 |
11 |
|
©2018 DreamLine. All Rights Reserved
UNIDOOR Single Shower Door manual Ver 2 Rev 6 02/2018 |
12 |
|
©2018 DreamLine. All Rights Reserved
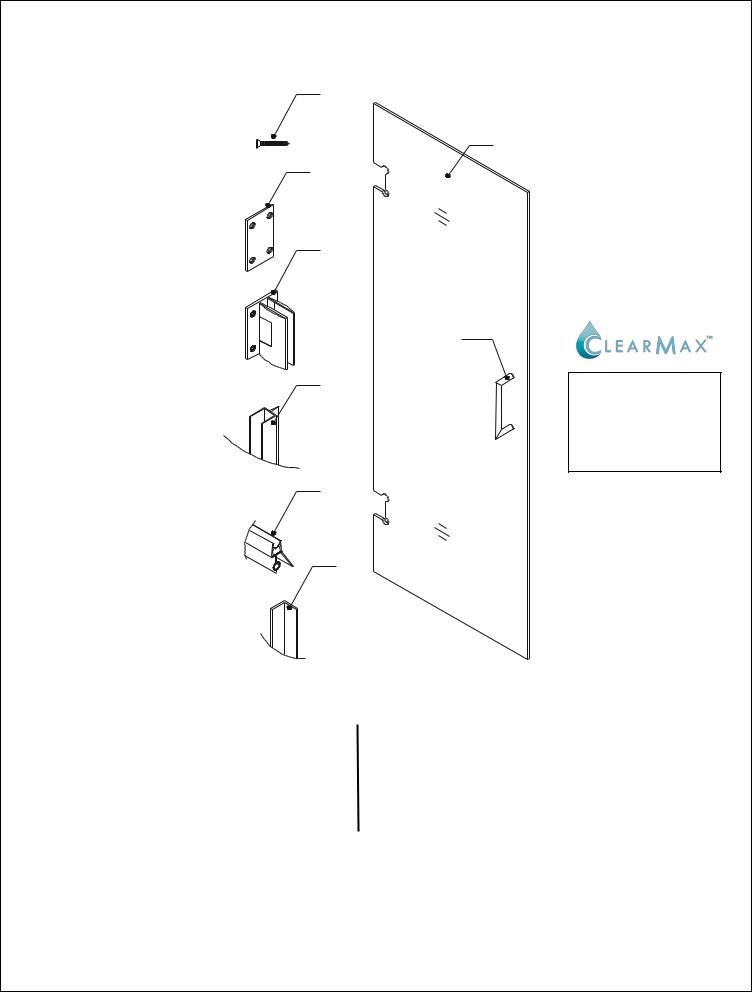
Detailed Diagram of Shower Door Components
4
1
31
5
2
6
7
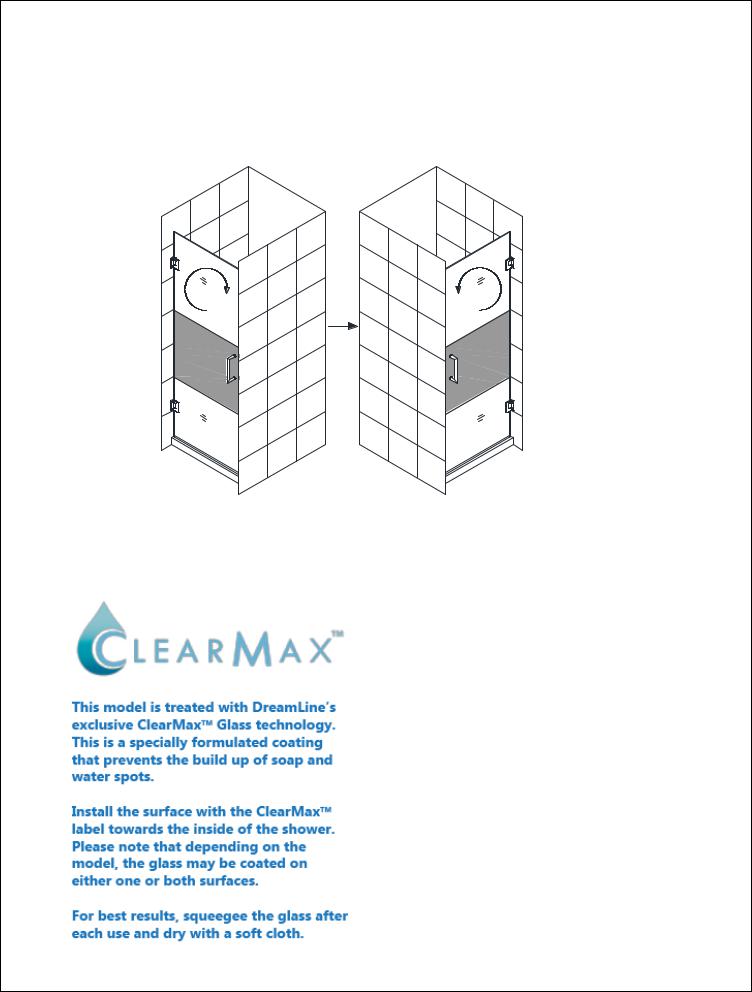
The glass surface with the ClearMax™ label must be installed to face inside of the shower
8
Packing List
Part# |
Description |
Qty |
Part# |
Description |
Qty |
|
|
|
|
|
|
01 |
Door glass |
1pc |
06 |
Side strip (hinge side) |
1pc |
|
|
|
|
|
|
02 |
Handle |
1pc |
07 |
Bottom anti-water strip (sweep) |
1pc |
|
|
|
|
|
|
04 |
Countersunk screw ST5×70 |
8pcs |
08* |
L-shaped strip (strike) |
1pc |
|
|
|
|
|
|
05 |
Hinge with Adjustable angle |
2pcs |
31 |
PVC hinge spacer |
4pcs |
|
|
|
|
|
|
*Part #8 “L-shaped strip” used with single door installation only.
NOTE: Unpack your unit carefully and inspect it. Lay out and identify all parts using the detailed diagram and packing list in this manual as a reference. Before discarding the carton, check for small hardware bags that may have fallen to the bottom of the box. If any parts are damaged or missing, please contact DreamLine® for replacement.
NOTE: Retain these installation instructions for future reference.
UNIDOOR Single Shower Door manual Ver 2 Rev 6 02/2018 |
13 |
|
©2018 DreamLine. All Rights Reserved
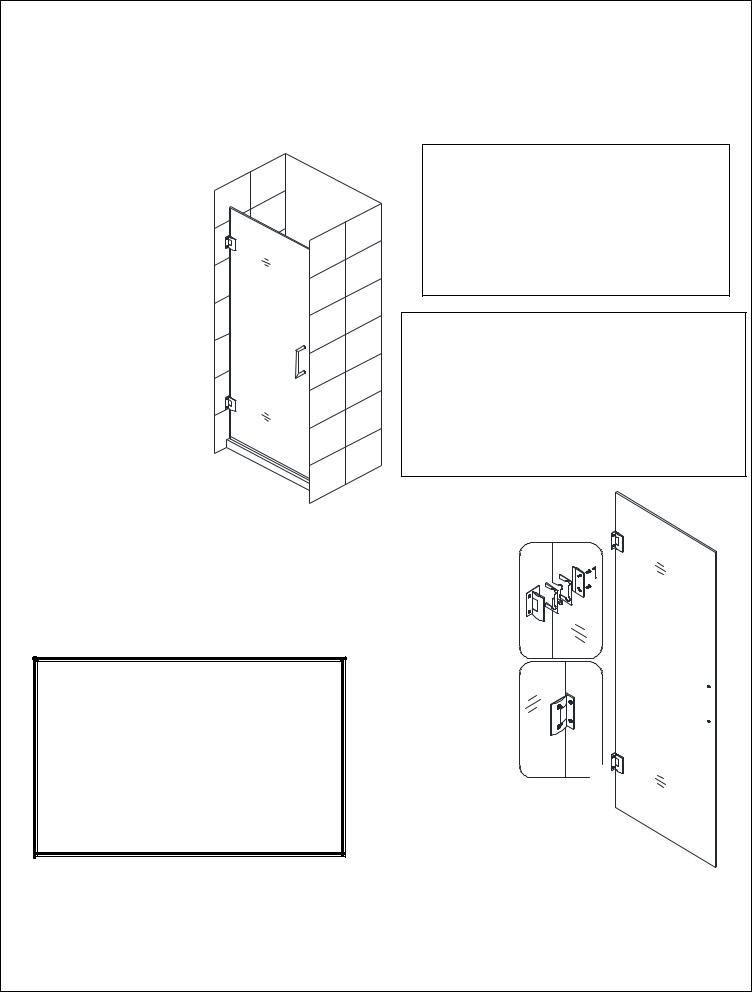
Single Shower Door Assembly and Installation
NOTE: The following shower door installation instructions should be used as a general guide and prerequisite to the installation of the UNIDOOR, UNIDOOR-LS, UNIDOOR LUX and UNIDOOR PLUS models. Before you begin the installation, please check your finished opening size. Specific size information can be found on DreamLine.com
ATTENTION:
This door is extremely heavy and the hinges on this door must be installed into studs or to preinstalled 2×6 wood reinforcement behind the wall.
NOTE: DO NOT attach the handle to the door glass until instructed.
DO NOT use the handle to lift the glass during installation. This may result in damage to the glass and/or serious injury. Always use an assistant or a professional grade glass suction cup when handling the door glass.
1. Attach the Hinges (05) to the Door Glass (01). Use one hinge gasket per side. Attach the hinges centered in the notches and square with the edge of the door glass. Fully tighten the hinge bolts. (Fig 1)
outside
Never set your glass down directly onto a tile or concrete floor.
Always use a piece of wood or cardboard and leave the corner pads and protective shims on the glass until it becomes necessary to remove them. This will protect the bottom edge and corners from damage which could lead to breakage.
inside
Fig. 1
ATTENTION:
For Styles E, I, J & L that have return panels:
Please check the model dimensions for proper placement of the Door Glass (01) so that the door glass will align correctly with the return panel glass.
UNIDOOR Single Shower Door manual Ver 2 Rev 6 02/2018 |
14 |
|
 Loading...