

Page 1
ÉQUIPEMENT DOYON INC.
1255, rue Principale
Linière, Qc, Canada G0M 1J0
Tel.: 1 (418) 685-3431
Canada: 1 (800) 463-1636
US: 1 (800) 463-4273
FAX: 1 (418) 685-3948
Internet: http://www.doyon.qc.ca
e-mail: doyon@doyon.qc.ca
SM302
Product / Produit:
Serial number / Numéro de série:
Page 2

BREAD SLICER
SM-302
120 Volts
IMPORTANT SAFETY INSTRUCTIONS
SAVE THESE INSTRUCTIONS
DANGER
TO REDUCE THE RISK OF FIRE OR ELECTRIC SHOCK,
CAREFULLY FOLLOW THESE INSTRUCTIONS
TABLE OF CONTENTS
DESCRIPTION PAGE
Installation and maintenance . . . . . . . . . . . . . . . . . . . . . . . . . . . . . . . . . . . 1
Construction and shipping . . . . . . . . . . . . . . . . . . . . . . . . . . . . . . . . . . . . . 2
Warnings . . . . . . . . . . . . . . . . . . . . . . . . . . . . . . . . . . . . . . . . . . . . . . . . . . . 3
Installation and operation . . . . . . . . . . . . . . . . . . . . . . . . . . . . . . . . . . . . . . 4
Before calling for service - Answers to most frequent questions . . . . . . . 5
Slicer cleaning and maintenance 5
Slicer description and changing blades . . . . . . . . . . . . . . . . . . . . . . . . . . . 6
For more information, please call our office . . . . . . . . . . . . . . . . . . . . . . . 9
Dimensions . . . . . . . . . . . . . . . . . . . . . . . . . . . . . . . . . . . . . . . . . . . . . . . . . 10
Component parts . . . . . . . . . . . . . . . . . . . . . . . . . . . . . . . . . . . . . . . . . . . . . 13
Electric schematic - 120Volts . . . . . . . . . . . . . . . . . . . . . . . . . . . . . . . . . . . 17
Warranty . . . . . . . . . . . . . . . . . . . . . . . . . . . . . . . . . . . . . . . . . . . . . . . . . . . 19
SM302.DOC
REV. 06-2004
Page 3

1
INSTALLATION AND MAINTENANCE MANUAL
The manufacturer suggests to read this manual carefully.
The bread slicer is manufactured with first quality materials by experienced technicians. Normal use
and adequate maintenance will guarantee a reliable service for years to come.
The SM302 bread slicer is available in four different slice thickness (1/2, 5/8, 3/4 and 1 inch).
A nameplate fixed to the left side of the slicer specifies the serial number, model number, amperage,
voltage and frequency.
Drawings, electrical diagrams and replacement part numbers are included in this manual.
ATTENTION
ÉQUIPMENT DOYON INC. is not responsible for damages to the property or
the equipment caused by non certified personnel. The customer is responsible
for finding a qualified electrician for the installation of the slicer.
Page 4

2
C O N S T R U C T I O N
You have now the most performant bread slicer on the market in its category. This bread slicer is
manufactured using the highest quality components and materials.
S H I P P I N G
For your safety, this equipment has been verified by qualified technicians and carefully crated before
shipment. The freight company takes full responsibility for the delivery of this equipment in good
condition, by accepting to transport it.
IMPORTANT
RECEPTION OF THE MERCHANDISE
Take care to verify that the received equipment is not damaged before signing the delivery receipt. If
damage or loss is noticed, write it clearly on the receipt and have the carrier sign it. If the damage is
noticed after the carrier left, contact the freight company immediately so that they may inspect.
We do not take responsibility for damages or losses that may occur during transportation.
Page 5

3
W A R N I N G
FOR YOUR SAFETY
BEFORE USING THE BREAD SLICER, VERIFY THAT NOTHING OBSTRUCTS THE
CHUTE BLADE AND TIGHTEN THE GUIDE ADJUSTMENT.
IMPORTANT
INSTALLATION AND SERVICE
A qualified technician must do servicing.
The bread slicer must be connected to the utility and electrically grounded in conformity to the
effective local regulations. If these are not established, the oven must be connected according to the
Canadian Electrical Code (CSA-C22.1-XX) or National Electrical Code (NFPA 70-XX). Refer to
last edition year for XX.
Page 6

4
I N S T A L L A T I O N
IN GENERAL
Open the crate and remove all materials used for packing as well as the accessories.
Put the slicer on a stable table or counter and make sure the slicer is on level.
Each unit is set up to be used with the electrical supply specified on the nameplate fixed on the left
side of the slicer.
To the electrician
The electrical supply installation must be in accordance with the electrical rating on the nameplate.
SLICER OPERATION
1. Make sure there are no obstructions in the chute.
2. Adjust the side and top guide a 1/2 inch from each side of the bread and a 1/2 inch from the top.
3. Use only cold bread in the slicer.
4. Start the slicer with the main switch on the left side.
5. Put the bread in the chute and by using the wood bread presser exert pressure on the bread. When
the bread comes out, remove it and put it on the bread support on the top of the slicer. Take a bag
and insert over the support and bread; then remove them and close the bag.
WARNING
NEVER TRY TO PUSH OR PULL OUT THE BREAD WITH YOUR HANDS WHEN
THE SLICER IS ON. ALWAYS DISCONNECT THE ELECTRIC CORD OR MAIN
POWER BREAKER.
POWER FAILURE
When you have a power failure take care to switch off the slicer otherwise it start to work when the
power comes back on.
Page 7

5
BEFORE CALLING FOR SERVICE
ANSWERS TO MOST FREQUENT QUESTIONS
Always cut off the main power before replacing any parts.
Questions Solutions
The slicer does not turn on when powered.
The slicer does not slice properly.
Check if the electric cord is connected.
Check the breaker of the building.
Check the breaker on the side of the slicer.
If the slicer is still not working, call a
technician or us.
Make sure the bread is not hot.
Check if the blade is clean.
Check the guide adjustment.
If the slicer still does not slice properly, change
the blade.
SLICER CLEANING AND MAINTENANCE
We recommend cleaning the slicer every day to prevent accumulation of bread pieces. Use a
small vacuum to clean the breadcrumbs.
Page 8

6
SLICER DESCRIPTION AND CHANGING BLADES
DESCRIPTION
Bread width: 15 inches max.
Bread height: 5 inches max.
Capacity: 240 breads per hour.
Bread slice thickness: 5/8 (optional: 1/2, 3/4 or 1 inch).
Length of the chute: 22 inches.
Motor: 1/4 Hp, 120 Volts, 60 Hz.
Weight: 200 pounds.
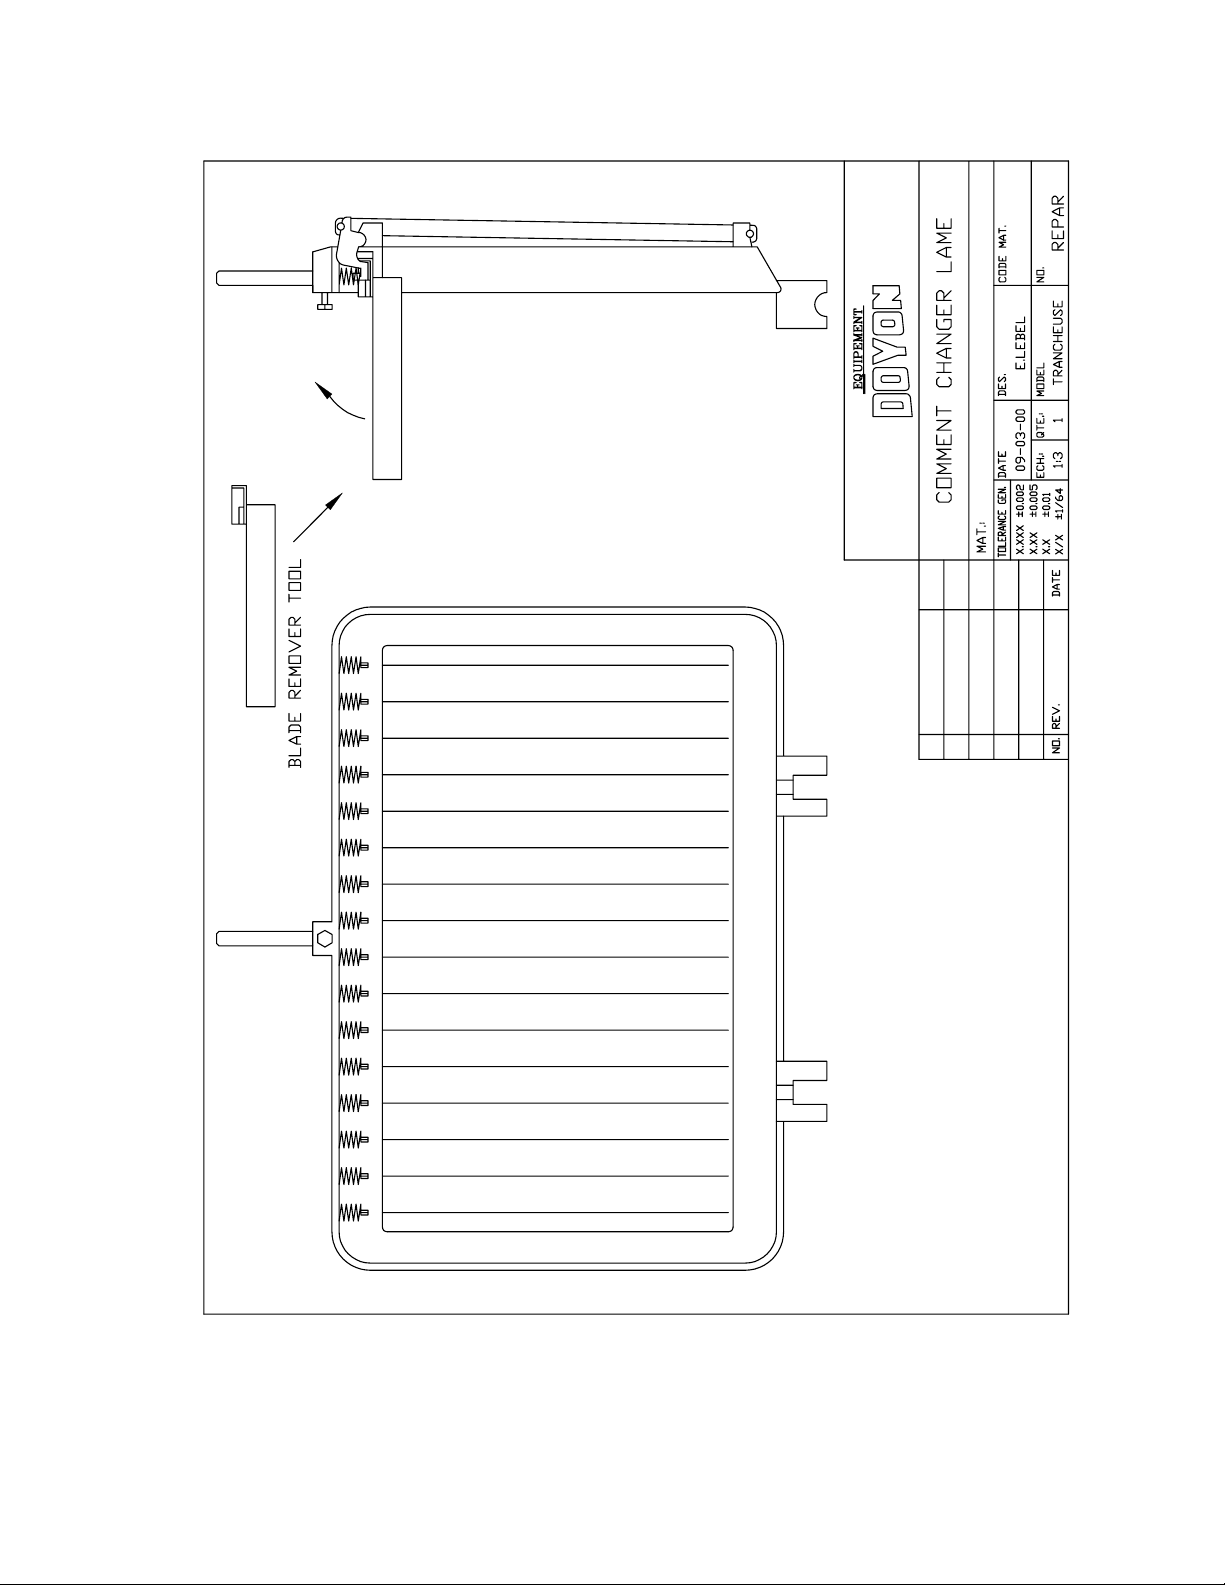
TO REMOVE THE BLADES
1. Remove the top cover (9) and the guide (11).
2. Remove the exit chute (10).
3. Remove the support angle on each side of the chute (10) (10mm key).
4. Unscrew bolt (31).
5. Unscrew the bottom bolt on the blade frame.
6. Turn the frame cam wheel (37 and 41) with the v belt.
7. Use the special tool to remove the blades one by one.
TO INSTALL THE NEW BLADES
1. Use the special tool to install the blades one by one.
2. Install the blade frame (25 and 26) tighten the bottom bolt (31) and make sure the frames are
aligned.
3. Install the angle support on each side of the chute (10) (10mm key).
4. Install the exit chute (10).
5. Install the top cover (9) and the guide (11).
Page 9
789
Page 10
Page 11

FOR MORE INFORMATION,
PLEASE CONTACT OUR OFFICE :
DOYON EQUIPMENT INC.
1255, rue Principale
Linière, QC, Canada G0M 1J0
Tel. : (418) 685-3431
Canada : 1-800-463-1636
U.S. : 1-800-463-4273
FAX : (418) 685-3948
Internet: http://www.doyon.qc.ca
E-mail : doyon@doyon.qc.ca
Page 12

10
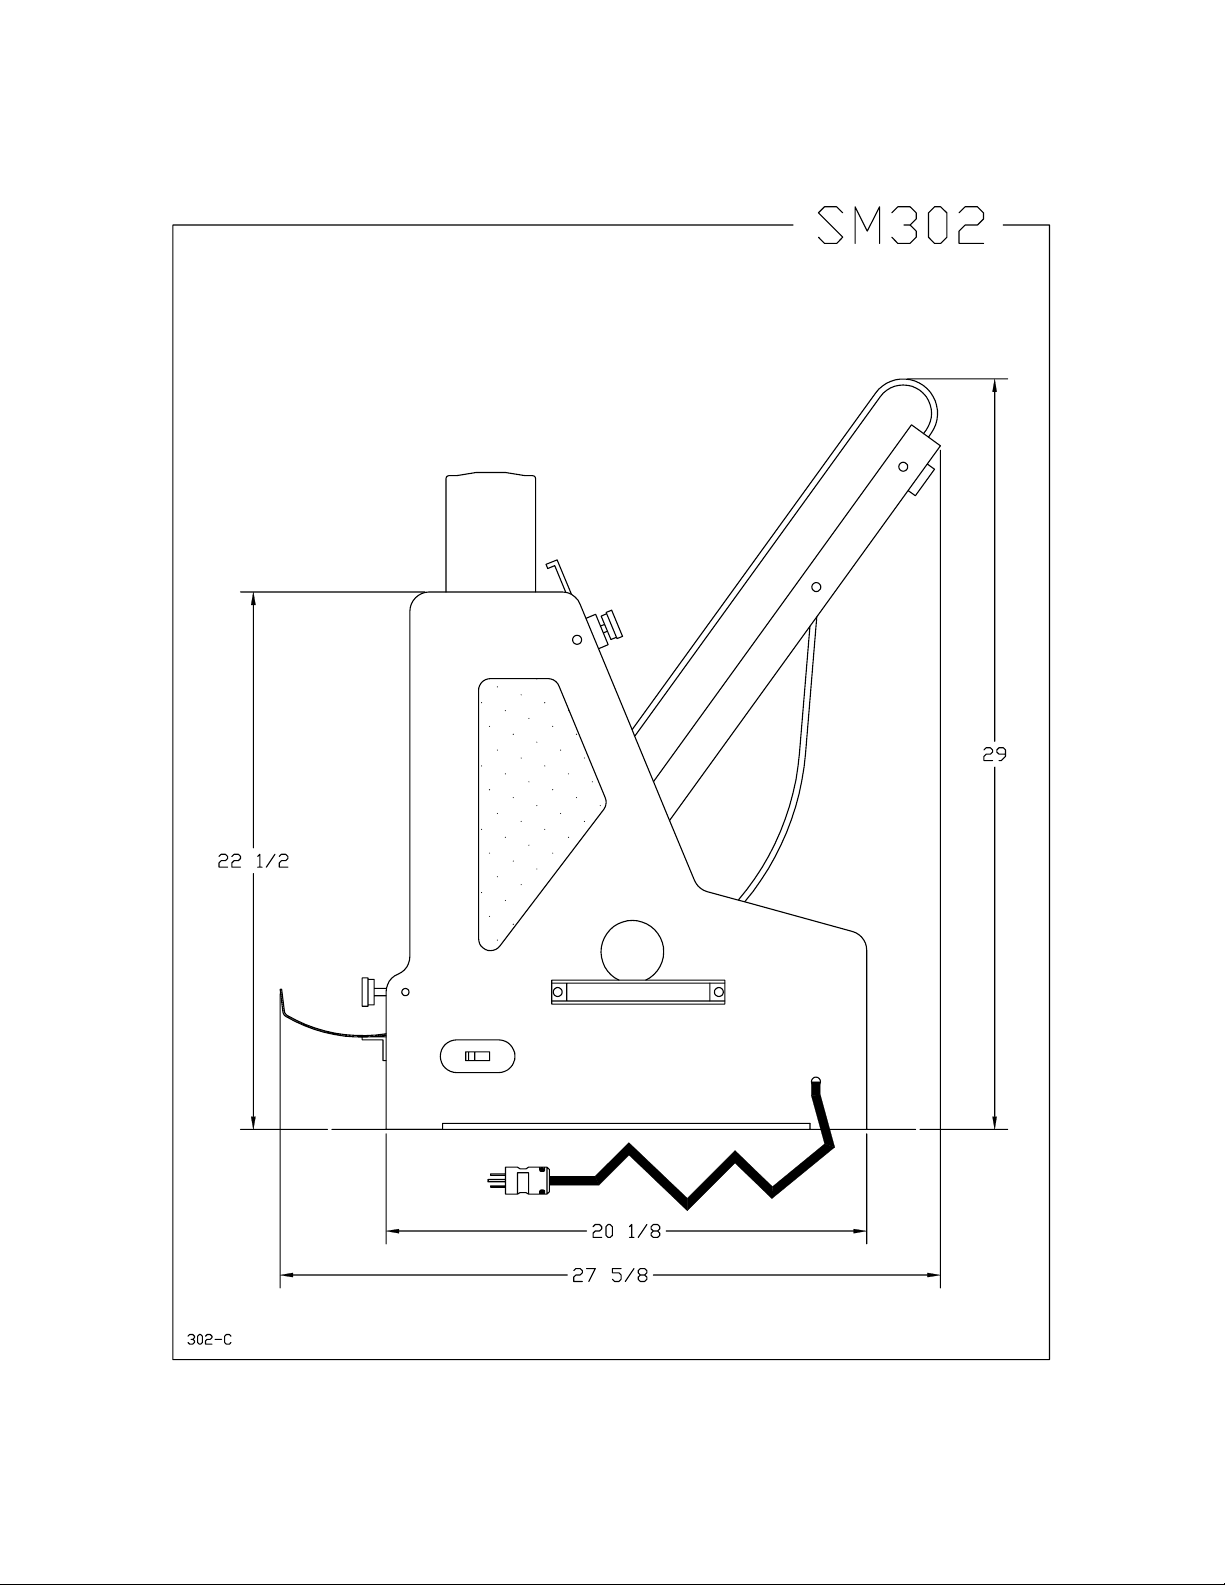
DIMENSIONS
Page 13

111213
Page 14
Page 15

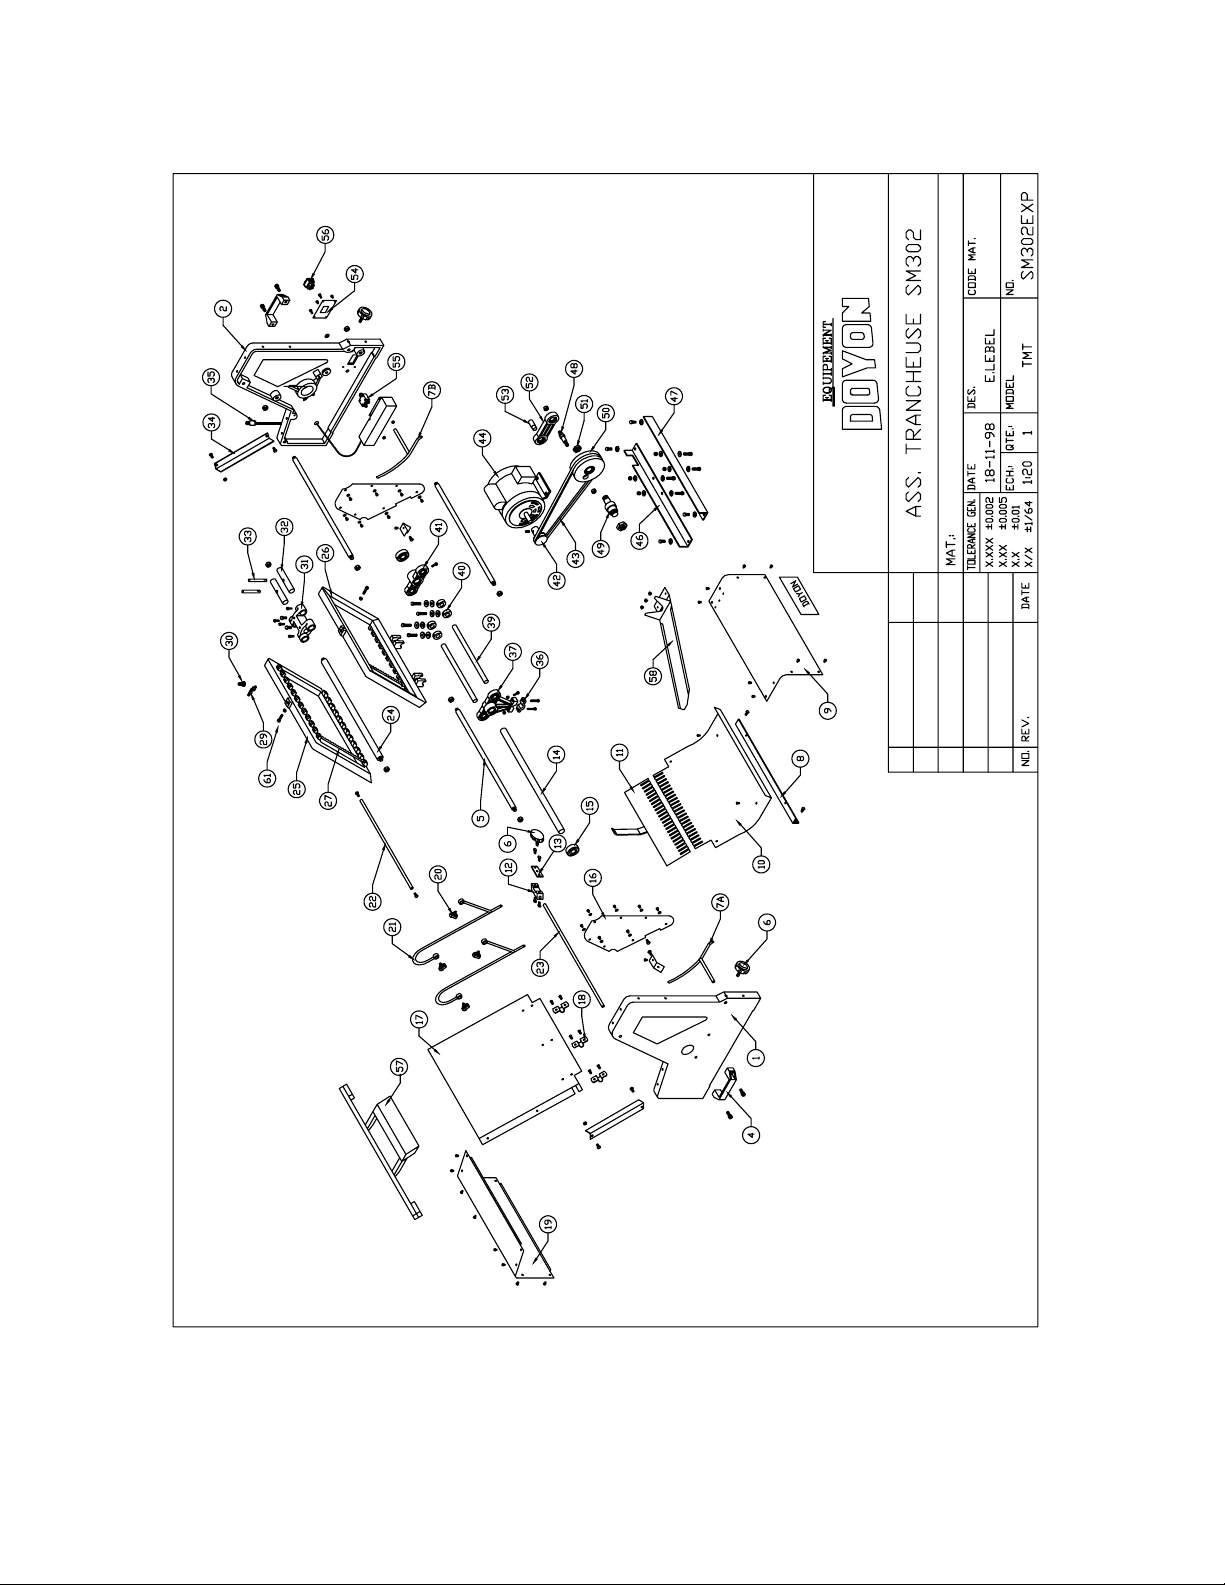
COMPONENT PARTS
Page 16

14
Page 17

15
Item Part Number Description Quantity
1 302001 LEFT FRAME 1
2 302002 RIGHT FRAME 1
4 302004 HANDLE 2
5 302005 LOWER CHUTE SUPPORT ROD 1
6 302006 ADJUSTMENT HANDLE 2
7 302007A OUTGOING GUIDE LEFT 1
& 302007B OUTGOING GUIDE RIGHT 1
8 302008 FIXING ANGLE 1
9 302009 FRONT COVER 1
10 302010 OUTGOING CHUTE (1/2", 5/8", 3/4" OR 1") 1
11 302011 COMB (1/2", 5/8", 3/4" OR 1") 1
12 302012 COMB HOLDER 1
13 302013 PLATE FOR ADJUSTMENT SCREW FOR PRESSER 1
14 302014 CRANK SHAFT 1
15 302015 BEARING (#6204) QURB10 1
16 302016 WINDOW 2
17 302017 CHUTE 1
18 302018 BRAKET FOR CHUTE 3
19 302019 TOP COVER 1
20 302020 ADJUSTMENT SCREW FOR GUIDE 4
21 302021 GUIDE FOR BREAD 2
22 302022 UPPER AJUSTABLE ROD FOR GUIDE 1
23 302023 LOWER AJUSTABLE ROD FOR GUIDE 1
24 302024 FRAME GUIDE SHAFT 1
25 302025 RIGHT SIDE BLADE FRAME (1/2", 3/4", 5/8" OR 1") 1
26 302026 LEFT SIDE BLADE FRAME (1/2", 5/8", 3/4" OR 1") 1
27 302027 BLADES R-347(1/2" 29 blade, 5/8" 23 blade ,3/4" 19 blade,1" 15 blade) 0
29 302029 BLADE FIXING (2 per blade) 2
30 302030 SPRING(per blade) 1
31 302031 GUIDE 1
32 302032 TEFLON FRAME GUIDE 2
33 302033 FRAME GUIDE 2
34 302034 CHUTE SUPPORT 2
35 302035 ELECTRIC PLUG 1
36 302036 BRAKET FOR SHAFT #14 1
37 302037 LEFT CRANK 1
39 302039 SHAFT FOR CRANK 2
40 302040 FRAME FIXING 4
41 302041 RIGHT CRANK 1
42 302042 MOTOR PULLEY 1
43 302043 "V" BELT 4L29 1
44 302044 MOTOR 1
46 302046 MOTOR BRAKET 1
47 302047 MOTOR BRAKET 1
48 302048 ROD WITH PULLEY 1
49 302049 PULLEY SHAFT 1
50 302050 PULLEY 1
51 302051 NUT 1
52 302052 PULLEY GUIDE WITH BEARING 1
53 302053 ROD FOR SHAFT 1
54 302054 SWITCH PLATE 1
Page 18

16
55 302055 10 AMP. BRAKER 1
56 302056 MAIN SWITCH 1
57 PPTMT WOOD BREAD PUSHER 1
58 302058 MANUEL BAGER 1
60 302060 BLADE REMOVER 1
Model : Bread slicer SM302 View : Explode
Page 19

17
ELECTRIC SCHEMATIC
120 VOLTS
Page 20

18
Page 21

19
LIMITED WARRANTY
(Continental United States Of America
And Canada Only)
Doyon Equipment Inc. guarantees to the original purchaser only that
its product are free of defects in material and workmanship, under
normal use.
This warranty does not cover any light bulbs, thermostat calibration or
defects due to or resulting from handling, abuse, misuse, nor shall it
extend to any unit from which the serial number has been removed or
altered, or modifications made by unauthorized service personnel or
damage by flood, fire or other acts of God. Nor will this warranty
apply as regards to the immersion element damaged by hard water.
The extent of the manufacturer’s obligation under this warranty shall
be limited to the replacement or repair of defective parts within the
warranty period. The decision of the acceptance of the warranty will
be made by Doyon Equipment service department, which decision
will be final.
The purchaser is responsible for having the equipment properly
installed, operated under normal conditions with proper supervision
and to perform periodic preventive maintenance.
If any parts are proven defective during the period of one year from
date of purchase, Doyon Equipment Inc. hereby guarantees to replace,
without charge, F.O.B. Linière, Quebec, Canada, such part or parts.
Doyon Equipment Inc will pay the reasonable labor charges in
connection with the replacement parts occurring within one year from
purchase date. Travel over 50 miles, holiday or overtime charges are
not covered. After one year from purchase date, all labor and
transportation charges in connection with replacement parts will be the
purchaser’s responsibility.
Doyon Equipment Inc. does hereby exclude and shall not be liable to
purchaser for any consequential or incidental damages including, but
not limited to, damages to property, damages for loss of use, loss of
time, loss of profits or income, resulting from any breach or warranty.
In no case, shall this warranty apply outside Canada and continental
United States unless the purchaser has a written agreement from
Doyon Equipment Inc.
Page 22

TRANCHEUSE À PAIN
SM-302
120 Volts
IMPORTANT
INSTRUCTIONS DE SÉCURITÉ
CONSERVEZ CE MANUEL D’INSTRUCTIONS
DANGER
AFIN DE RÉDUIRE LES RISQUES D’INCENDIE OU D’ÉLECTROCUTION,
SUIVRE CES INSTRUCTIONS AVEC SOIN.
TABLE DES MATIÈRES
DESCRIPTION PAGE
Installation et entretien . . . . . . . . . . . . . . . . . . . . . . . . . . . . . . . . . . . . . . . . 1
Construction et expédition . . . . . . . . . . . . . . . . . . . . . . . . . . . . . . . . . . . . . 2
Avertissement . . . . . . . . . . . . . . . . . . . . . . . . . . . . . . . . . . . . . . . . . . . . . . . 3
Installation et opération de la trancheuse . . . . . . . . . . . . . . . . . . . . . . . . . . 4
Réponses aux questions les plus fréquentes . . . . . . . . . . . . . . . . . . . . . . . . 5
Entretien et nettoyage . . . . . . . . . . . . . . . . . . . . . . . . . . . . . . . . . . . . . . . . . 5
Description et changement de lames . . . . . . . . . . . . . . . . . . . . . . . . . . . . . 6
Pour plus d'information, appelez à notre bureau . . . . . . . . . . . . . . . . . . . . 9
Dimensions . . . . . . . . . . . . . . . . . . . . . . . . . . . . . . . . . . . . . . . . . . . . . . . . . 10
Pièces composantes . . . . . . . . . . . . . . . . . . . . . . . . . . . . . . . . . . . . . . . . . . . 13
Plan électrique - 120Volts . . . . . . . . . . . . . . . . . . . . . . . . . . . . . . . . . . . . . . 17
Garantie . . . . . . . . . . . . . . . . . . . . . . . . . . . . . . . . . . . . . . . . . . . . . . . . . . . . 19
SM302.DOC
REV.06-2004
Page 23

1
INSTALLATION ET ENTRETIEN
Le fabricant suggère de lire attentivement ce manuel et de suivre avec soin les instructions fournies.
La trancheuse à pain est. fabriquée avec des matériaux de première qualité par des techniciens
d'expérience. Une utilisation normale et un entretien adéquat de l'équipement vous assureront
plusieurs années de bon service.
La trancheuse SM302 est disponible en quatre épaisseurs ( ½, 5/8, 3/4 et 1 pouce).
Une plaque d'identification située sur le coté gauche de l’appareil mentionne le numéro de modèle, le
numéro de série, la tension, l'ampérage et la puissance d'entrée.
Les dessins, les plans électriques et les numéros de pièces de rechange sont inclus dans ce manuel.
ATTENTION
Équipement Doyon Inc. ne peut être tenu responsable pour les dommages
causés à la propriété ou à l'équipement par du personnel non certifié. Le
client a la responsabilité de retenir les services d'un électricien qualifié pour
l'installation de la trancheuse.
Page 24

2
C O N S T R U C T I O N
Vous avez maintenant en votre possession la trancheuse à pain de table fabriqué avec des
matériaux de première qualité la plus performante dans sa catégorie disponible sur le marché.
E X P É D I T I O N
Pour votre protection, cet équipement a été vérifié et emballé avec précaution par des techniciens
qualifiés avant son expédition. La compagnie de transport assume la pleine responsabilité de la
livraison de cet équipement en bon état en acceptant de le transporter.
IMPORTANT
RÉCEPTION DE LA MARCHANDISE
Avant de signer le bon de livraison, prenez soin de vérifier dès la réception si l'équipement n'est pas
endommagé. Si un bris ou une perte est détecté, écrivez-le clairement sur le bon de livraison ou votre
bon de transport et faites signer le livreur. Si le bris est remarqué après le départ du transporteur,
contactez immédiatement la compagnie de transport afin de leur permettre de constater les
dommages causés.
Nous ne pouvons assumer la responsabilité pour les bris ou les pertes qui pourraient survenir pendant
le transport.
Page 25

3
A V E R T I S S E M E N T
POUR VOTRE SÉCURITÉ
AVANT DE DÉMARRER OU D’UTILISER L’APPAREIL,
VÉRIFIEZ QUE LA CHUTE ET LES LAMES SONT BIEN DÉGAGÉES
ET QUE LE SUPPORT D’AJUSTEMENT SOIT BIEN FIXE.
IMPORTANT
INSTALLATION ET SERVICE
Le service doit être fait par un technicien qualifié.
Cet appareil doit être branché et mis à la terre (grounds) conformément aux règlements effectifs de
votre localité.
Si aucune réglementation n'est établie, la trancheuse à pain doit être branchée conformément au Code
Canadien de l’Électricité (CSA 22.1-XX) ou au Code National de l'Électricité (NFPA 70-XX).
Référez-vous à l’année de la dernière édition pour XX.
Page 26

4
I N S T A L L A T I O N
EN GÉNÉRAL
Ouvrir avec soin l'emballage de votre équipement et enlever tous les matériaux utilisés pour
l'envelopper ainsi que les accessoires.
Installez la trancheuse à pain sur une table solide ou un comptoir et s’assurer que les pattes de la
trancheuse sont bien appuyées afin d’éviter toute vibration.
À l'électricien
L'installation de l'alimentation électrique de la trancheuse à pain doit être conforme avec la source
électrique spécifiée sur la plaque d'identification.
OPÉRATION DE LA TRANCHEUSE
1. Vérifier à ce que rien n’obstrue la chute à pain.
2. Prendre un pain et ajuster les supports latéraux et le peigne supérieur à environ 1/2 pouce de
chaque coté et 1/2 pouce sur le dessus.
3. Attendre que le pain soit refroidi avant de le passer dans la trancheuse.
4. Démarrer la trancheuse à l’aide de l’interrupteur sur le coté de l’appareil.
5. Introduire le ou les pain(s) dans la chute et, à l’aide du poussoir à pain, exercer
une pression sur le dernier pain lorsque le pain sort de la trancheuse, le
prendre et le mettre sur l’ensacheuse sur le dessus de l’appareil, prendre un
sac et le glisser sur l’ensacheuse. Sortir le sac et le pain de l’ensacheuse et poser
votre attache.
IMPORTANT
Ne jamais essayer d’enlever ou de pousser un pain avec vos mains dans la chute
lorsque la trancheuse est en fonction. Toujours fermer et débrancher l’appareil
avant de faire des travaux.
PANNE DE COURANT
Au retour du courant, l’appareil se remet en marche automatiquement si elle est en fonction avant
que la panne ne survienne. Il est donc nécessaire de mettre l’interrupteur à "ARRÊT" afin d'éviter
que la trancheuse ne redémarre sans surveillance.
Page 27

5
RÉPONSES AUX QUESTIONS LES PLUS FRÉQUENTES
Toujours couper l’alimentation principale de l’appareil avant le remplacement de pièces.
Questions Solutions
La trancheuse ne démarre pas une fois
l'installation terminée.
La trancheuse ne tranche pas bien.
ENTRETIEN ET NETTOYAGE DE LA TRANCHEUSE
ENTRETIEN DE L'APPAREIL
Vérifiez si le cordon d’alimentation est bien
branché.
Vérifiez le disjoncteur sur le coté de l’appareil.
Vérifiez les disjoncteurs du bâtiment.
Si, après toutes ces vérifications, l’appareil ne
fonctionne toujours pas, communiquez avec un
technicien qualifié.
Assurez-vous que le pain soit bien refroidi.
Vérifiez si les lames sont bien nettoyées.
Vérifiez que l’ajustement des supports latéraux
et supérieurs de la chute soit bien ajustés.
Les lames doivent être changées.
Il est recommandé de nettoyer régulièrement l’appareil afin de réduire les accumulations de
mies de pain.
NETTOYAGE
À l’aide d’un petit balai ou d’un petit aspirateur, enlever les mies de pain régulièrement.
Page 28

6
DESCRIPTION ET CHANGEMENT DE LAMES
DESCRIPTION
Largeur du pain : 15 pouces maximum
Hauteur du pain : 5 pouces maximum
Capacité : 240 pains à l’heure
Épaisseur des tranches : 5/8 (optionnel : 1/2 , 3/4 et 1 pouce)
Longueur de la chute : 22 pouces
Moteur : 1/4 HP, 120 Volts, 60Hz
Poids de l’appareil : 200 lbs
POUR ENLEVER LES LAMES
1. Enlever le couvercle du haut (9) et le guide (11).
2. Enlever la chute de sortie. (10).
3. Dévissez les cornières (33) (fer angle) de chaque côté qui supportent la chute (10) (clé
10mm).
4. Desserrez les boulons (30).
5. Desserrez les boulons (38) du bas sur le cadre (25 et 26) et les faire pivoter.
6. Faire tourner le pivot du cadre (37 et 41) à l’aide de la courroie.
7. Prendre l’outil spécial fourni avec l’appareil et enlever les lames une à une.
POUR REMETTRE LES LAMES
1. Prendre l’outil spécial et reposer les lames neuves une à une.
2. Placer les cadres (25 et 26) en position et resserrer les boulons du bas (38) et les boulons (30).
Assurez-vous que les cadres sont bien alignés avant de serrer tous les boulons.
3. Reposer les deux cornières (33) (fer angle) de chaque côté qui supportent la chute (10) (clé
10mm).
4. Remettre la chute de sortie (10) en place.
5. Replacer le couvercle du haut (9) et le guide (11).
Page 29

7891011
Page 30

Page 31

Page 32

Page 33

POUR PLUS D'INFORMATIONS,
APPELEZ À NOTRE BUREAU :
ÉQUIPEMENT DOYON INC.
1255, rue Principale
Linière, Québec, Canada G0M 1J0
Tél.: (418) 685-3431
Canada : 1 800 463-1636
U.S.: 1 800 463-4273
Fax: (418) 685-3948
Internet: http://www.doyon.qc.ca
E-Mail : doyon@doyon.qc.ca
Page 34

12
DIMENSIONS
Page 35

1314151617
Page 36

Page 37

Page 38

Page 39

PIÈCES COMPOSANTES
Page 40

18
Page 41

19
Item Numéro Pièce Description Quantité
1 302001 CADRE GAUCHE 1
2 302002 CADRE DROIT 1
4 302004 POIGNÉE 2
5 302005 SUPPORT DU BAS DE LA CHUTE 1
6 302006 POIGNÉE D'AJUSTEMENT DU PEIGNE 2
7 302007A AJUSTEMENT GAUCHE DE SORTIE 1
& 302007B AJUSTEMENT DROIT DE SORTIE 1
8 302008 ANGLE DE FIXATION 1
9 302009 COUVERCLE AVANT 1
10 302010 CHUTE DE SORTIE (1/2", 5/8",3/4" OU 1") 1
11 302011 PEIGNE (1/2", 5/8", 3/4" OU 1") 1
12 302012 SUPPORT DE L'AJUSTEMENT DU PEIGNE 1
13 302013 PLAQUE POUR VISSE D'AJUSTEMENT 1
14 302014 ARBRE DE BIELLE 1
15 302015 ROULEMENT À BILLE (#6204) QURB10 1
16 302016 FENÊTRE 2
17 302017 CHUTE 1
18 302018 ATTACHE DE FIXATION DE LA CHUTE 3
19 302019 COUVERCLE DU DESSUS 1
20 302020 VIS D'AJUSTEMENT POUR LE GUIDE 4
21 302021 GUIDE D'ENTRÉE DU PAIN 2
22 302022 TIGE D'AJUSTEMENT POUR GUIDE DU HAUT 1
23 302023 TIGE D'AJUSTEMENT POUR GUIDE DU BAS 1
24 302024 ARBRE DU GUIDE DE CADRE 1
25 302025 CADRE CÔTÉ DROIT POUR LAMES (1/2", 5/8", 3/4" OU 1") 1
26 302026 CADRE CÔTÉ GAUCHE POUR LAMES (1/2", 5/8", 3/4" OU 1") 1
27 302027 LAMES R-347(1/2" 29 lames, 5/8" 23 lames, 3/4" 19 lames ,1" 15 lames) 0
29 302029 FIXATION DE LAME (2 par lames) 2
30 302030 RESSORT(par lame) 1
31 302031 GUIDE 1
32 302032 GUIDE DU CADRE EN TEFLON 2
33 302033 GUIDE DU CADRE 2
34 302034 SUPPORT DE CHUTE 2
35 302035 CORDON D'ALIMENTATION 1
36 302036 ATTACHE POUR ARBRE # 14 1
37 302037 BIELLE GAUCHE 1
39 302039 ARBRE DE BIELLE 2
40 302040 FIXATION POUR CADRE 4
41 302041 BIELLE DROITE 1
42 302042 POULIE DU MOTEUR 1
43 302043 COURROIE EN "V" 4L29 1
44 302044 MOTEUR 1
46 302046 SUPPORT MOTEUR 1
47 302047 SUPPORT MOTEUR 1
48 302048 TIGE AVEC POULIE 1
49 302049 ARBRE DE POULIE 1
50 302050 POULIE 1
51 302051 ÉCROU 1
52 302052 BRAS D'ENTRAÎNEMENT AVEC ROULEMENT À BILLE 1
53 302053 TIGE POUR ARBRE 1
54 302054 PLAQUE DE SWITCH 1
Page 42

20
55 302055 DISJONCTEUR 10 AMP. 1
56 302056 INTERRUPTEUR PRINCIPAL 1
57 PPTMT POUSSOIR À PAIN EN BOIS 1
58 302058 ENSACHEUSE A PAIN MANUEL 1
60 302060 OUTIL POUR ENLEVER LES LAMES 1
Modèle : Trancheuse à pain Vue : démonté
Page 43

21
PLAN ÉLECTRIQUE
120Volts
Page 44

22
Page 45

GARANTIE LIMITÉE
(Pour le Canada et les États continentaux des États-Unis)
Équipement Doyon Inc. garantit ses produits à l'acheteur original, contre tout défaut de matériaux
ou de fabrication, en autant qu'ils aient été utilisés de façon normale.
Cette garantie ne s'applique cependant pas sur les ampoules, les calibrations de température, tout
défaut dû ou résultant d'une mauvaise manipulation, d'un emploi abusif ou d'un mauvais usage.
La garantie ne s'applique pas non plus sur tout équipement dont le numéro de série aurait été
enlevé ou altéré, tout produit modifié par du personnel de service non autorisé, endommagé par
une inondation, un feu ou tout autre acte de Dieu, ni sur les éléments immergés endommagés par
l'eau dure.
L'étendue des obligations du manufacturier, selon cette garantie, est le remplacement ou la
réparation des pièces défectueuses durant la période de garantie. L'acceptation de la garantie sera
faite par le département de service d’Équipement Doyon Inc. Cette décision sera définitive.
L'acheteur est responsable de faire installer son équipement adéquatement, de l'opérer sous des
conditions normales d'utilisation avec une bonne supervision, ainsi que d'effectuer un entretien
préventif périodique.
Dans le cas où les pièces s'avéreraient défectueuses durant une période d'un an à partir de la date
d'achat, Équipement Doyon Inc. s'engage à les remplacer, sans frais, F.O.B. Linière, Québec,
Canada.
Équipement Doyon Inc. couvrira les frais raisonnables de main-d'œuvre reliés au remplacement
des pièces, pour une période d'un an à partir de la date d'achat. Toutefois, les frais encourus pour
les déplacements au-delà de 50 milles, le temps supplémentaire et les jours de congé ne sont pas
couverts. Au-delà d'un an après la date d'achat, tous frais de transport et de main-d'œuvre pour le
remplacement des pièces sont la responsabilité de l'acheteur.
Équipement Doyon Inc. ne se tient pas responsable envers l'acheteur pour toutes conséquences ou
dommages incluant, mais non limités à, dommages à la propriété, dommages pour perte d'usage,
perte de temps, perte de profits ou de revenus, provenant de tout bris de garantie.
En aucun cas, cette garantie ne s'applique à l'extérieur du continent des États-Unis d'Amérique ou
du Canada, à moins que l'acheteur n'ait une entente écrite avec Équipement Doyon Inc.
 Loading...