

Page 1

20
Cordless telephone
User guide
Page 2

Page 3

AUDIOLINE 20 TABLE OF CONTENTS
AUDIOLINE 20
User guide
TABLE OF CONTENTS
Outlook ...................... 2 Settings ....................14
Handset ................... 2 Keypad beep on/off ........14
Base unit .................. 3 Ringsignal type ...........14
Ringsignal level ..........15
Installation ................... 4 Autoanswer ..............15
Un packing ................ 4 Direct call/Baby call .......16
Locate the base unit ......... 4 Barrier code .............16
Connecting ................ 4 Call barrier .............. 17
Battery .................... 5 Interference ..............17
Charge the battery ........... 5
Battery indicator ............ 6 Other ...................... 18
Distance .................. 6 Trouble guide ............ 18
Talk time .................. 6 Erase the unit ............19
Stand-by .................. 6 Warantee ................20
Technical data ............20
Use .......................... 7 Declaration of conformity ...21
The display ............... 7
To answer ................ 8
Making a call .............. 8
Last number redial ......... 9
Volume control ............ 9
Speed memory M1 ......... 9
Memory .................. 10
Mute button ............... 11
Keypad lock .............. 11
Page ..................... 11
Additional network service ... 12
1
Page 4
OUTLOOK AUDIOLINE 20
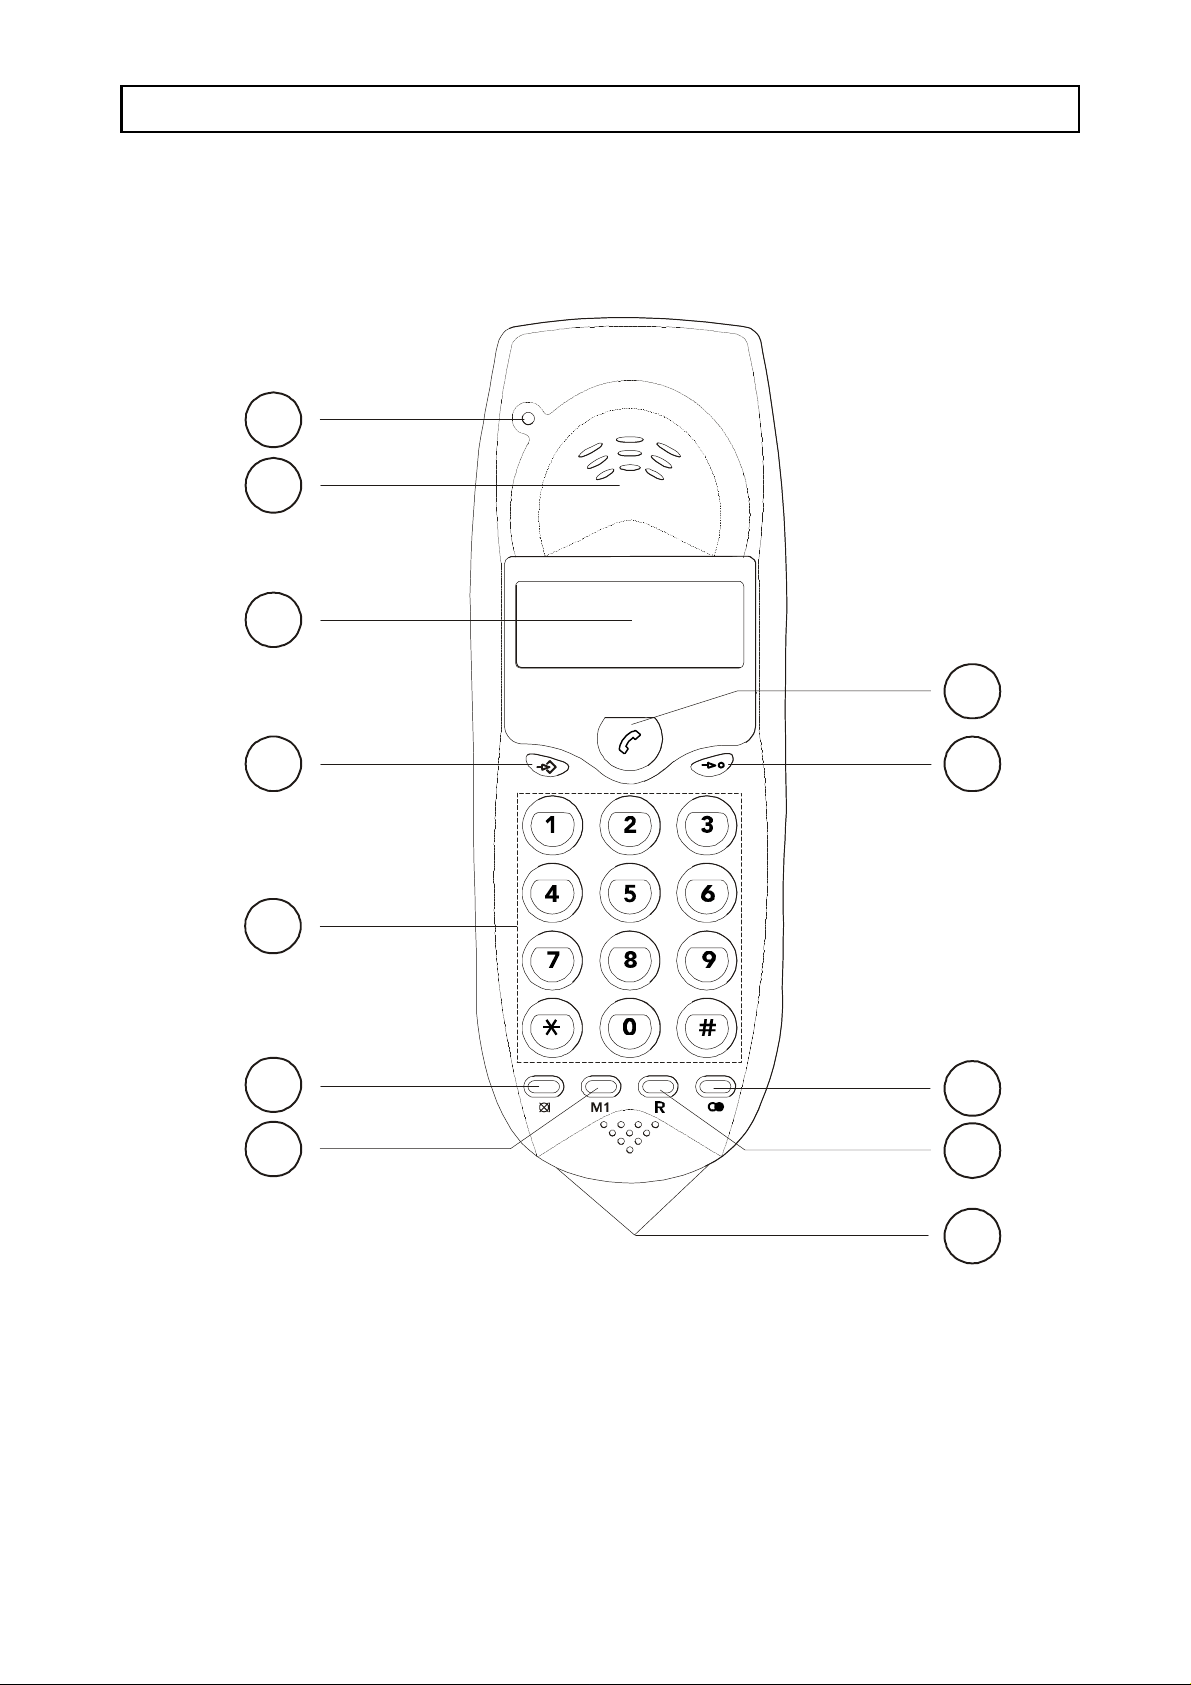
HANDSET
1
2
3
12
4
5
6
7
GHI
PQRS
ABC DEF
JKL MNO
TUV
WXYZ
11
10
9
8
1 In use indicator 7 Speed memory M1
2 Earpice 8 Charge contacts
3 Display 9 Flash
4 Programming button/Volume control 10 Last number redial
5 Keypad 0-9, *, # 11 Memory button
6 Mute button 12 Talk/End button
2
Page 5
AUDIOLINE 20 OUTLOOK
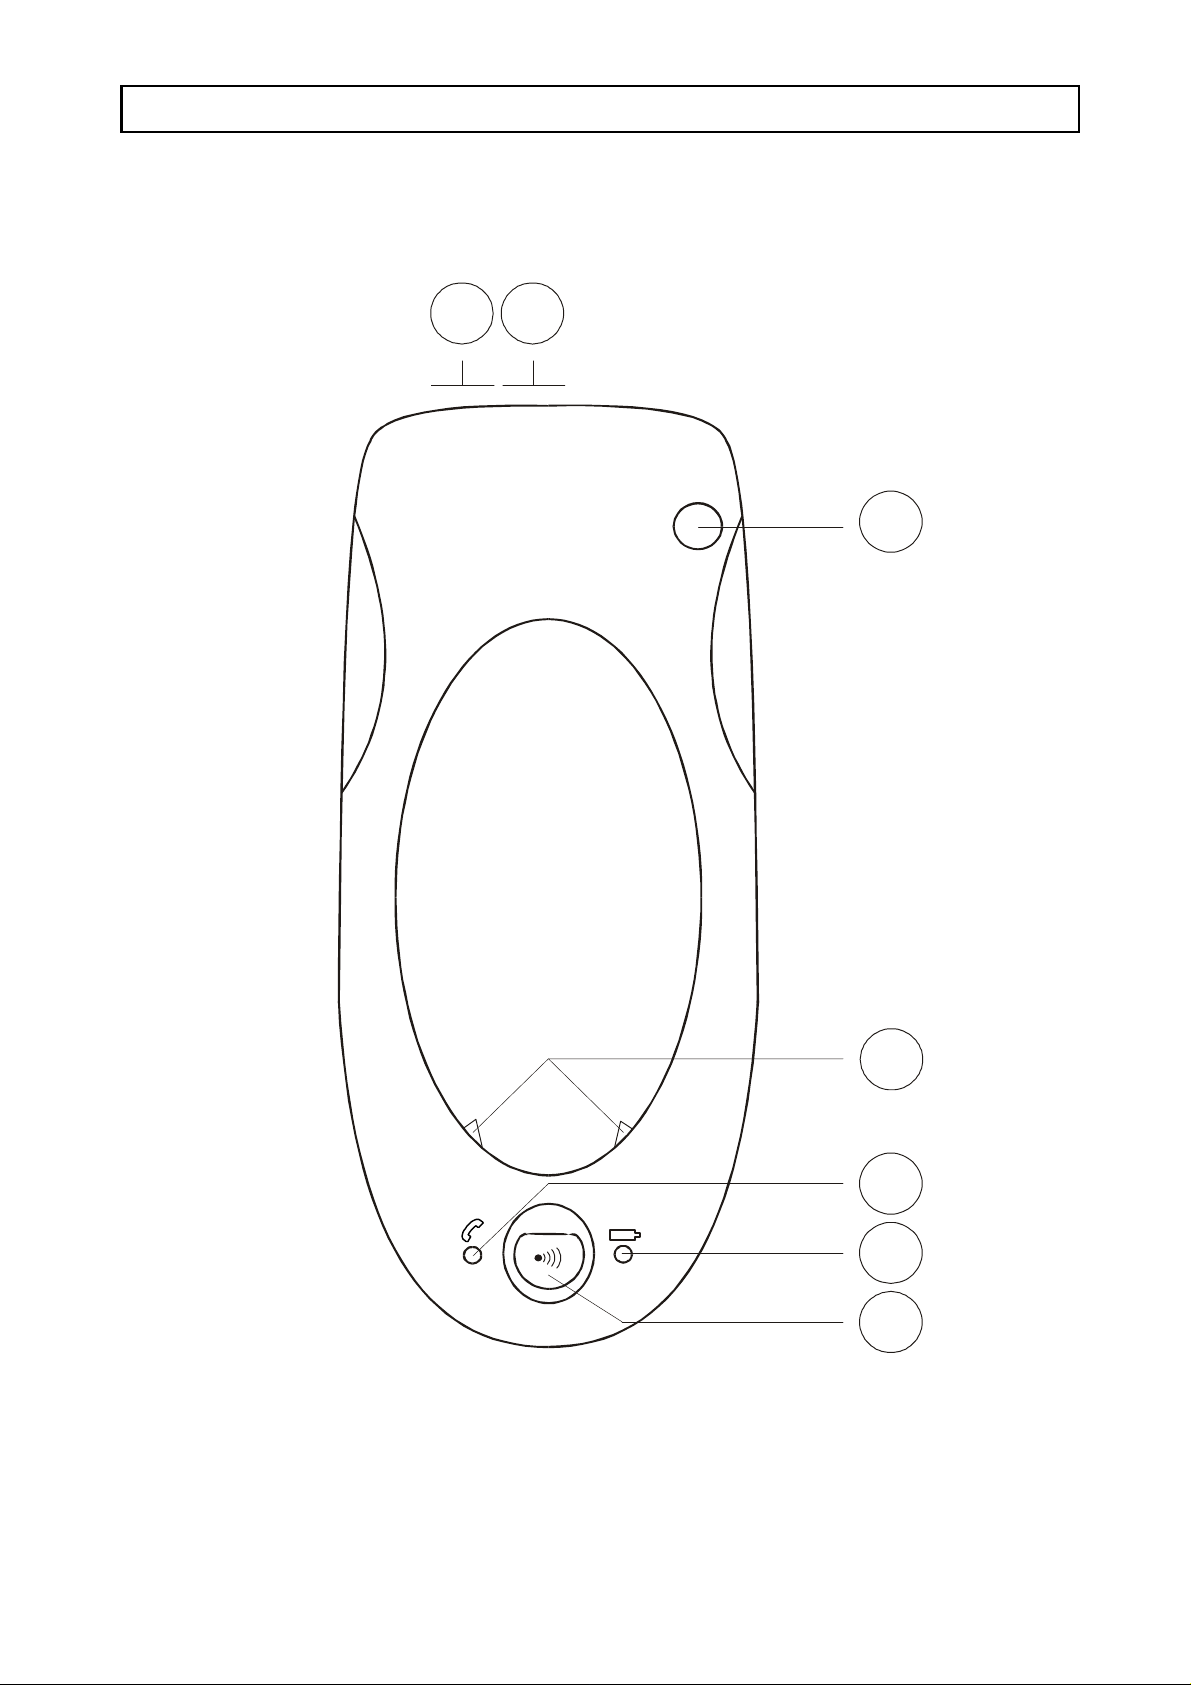
BASE UNIT
21
3
1 Line cord outlet (on the backside) 5 In use LED
2 Power supply outlet (on the backside) 6 Charging LED
3 Antenna 7 Page button
4 Charging contacts
4
5
6
7
3
Page 6

INSTALLATION AUDIOLINE 20
UNPACKING
In the box you should find the following items:
P Handset P Power supply
P Base unit P Line cord
P 3 NiMh batteries (re-chargeable types) P User guide
P Belt clip
LOCATING THE BASE UNIT
P Place the unit close to a telephone network socket and a 13 Amp mains socket. Do not
locate in: direct sunlight, damp or high humidity locations.
P Do not locate close to: electrical equipment such as TV’s, computers, fridges, etc., or
close to radiators, metal pipes or window frames.
P IMPORTANT! you can not change the antenna in length or direction.
For more information about locating the base unit, see page 6.
INKOPPLING
P Connect the supplied line cord to the rear of the base unit and the other end to a
telephone network socket.
P Connect the power adaptor to the rear of the base unit and to a 13 Amp mains socket.
P Remove the battery cover from the bottom of the handset by applying gentle pressure
to the bottom of the cover and pushing away from the unit. Insert the batteries
(supplied), observing correct polarity. Replace the battery cover.
P Place the handset onto the base unit (face up). When the handset is placed on the
baseunit, will the charge LED be present.
4
Page 7
AUDIOLINE 20 INSTALLATION
BATTERY
The phone are delivered with three rechargeable batteries (NiMh).
After initial charging the power adaptor must remain connected to the mains & base unit
and mains power switched on. It is recommended that the handset is left on charge
overnight to ensure maximum in-use time.
The rechargeable batteries (NiMh) are cadmium-free and should be disposed of in a
responsible and environmentally friendly manner.
IMPORTANT!
P From new, the batteries (supplied) must be charged for 15 hours without
interruption.
P Use only DORO original batteries. The guarantee will be invalid if any problems
arise as a result of the use of an incorrectly specified battery.
CHARGING THE BATTERIES
From new, the batteries (supplied) must be charged for 15 hours without
interruption.
Place the handset onto the base unit (face up). When the handset is placed on the base
unit, will the charge LED on the base unit be turned on.
Please note that the charging LED will be turned red as long the handset is onto the
baseunit, this means that the LED will not be turned off then the batteries are fully
charge. The base unit have an inbuilt charging automatic, so the battery can not be over
charged.
5
Page 8

INSTALLATION AUDIOLINE 20
BATTERY INDICATION
When the battery is empty, calls cannot be made or received. There is a bettey indictor
in the handsets display. When the battery is nearly empty the indicator will the
indicator look like this and a warning tone will be heard.
DISTANCE
The telephones distance is depending on many factors in the ambient interior. The
radiowave that transfer the call meets many obstacle in the way. The obstacle can have
reduce effect for the radiowave. The given distance assume that there is nothing between
the handset and base unit. In this condition can the range be up to 300 meter. In
population center, house, tenement, etc will the distance be limit depending on walls,
floor, roof, metal-, concreteconstruction, etc. For best range try to locate the base unit in
different places, becasue the distance can vary. The best location for the base unit is high
and free. .
RANGE WARNING
If you are on a call and accidently walk out of range of the base unit, the sound quality
in the earpiece will de-grade and warning beeps will be heard.
IN USE TIME
It is recommended that the handset is left on charge overnight to ensure maximum in-use
time. The batteries should hold their charge for 110 hours talk time or 4 hours standby
time depending on use.
STANDBY MODE
When the handset is not in use, will the handset enter stand-by mode this means that the
phone is ready to receive incomming calls, make outgoing calls or be programmed. The
phone enter the stand-by mode automatically if no key is been pressed.
6
Page 9

AUDIOLINE 20 HANDHAVANDE
THE DISPLAY
Battery status Ongoing call
Mute Programming
Memory Keypad lock
Numeric/Alpha display
Indicator Function
Memory - Flashes when storing a memory number.
- is on when dialling with the memory.
Mute - Is on when the mute function is activated.
Battery status - Present the battry status.
Ongoing call - Flashes when connecting a call.
- Is on when a call is connected.
- Flashes when a incoming call is ringing.
Programming - Flashes when the phone will be programmed.
Keypad lock - Is on when the keypad lock is activated.
7
Page 10

USE AUDIOLINE 20
ANSWERING INCOMING CALLS
When an external call is received, the base unit will ring first and then the handset. You
can change the ring signal, see pages 14-15.
P According to the cordless connection between the handset and base unit can the
ringsignal be deleay. Wait until the handset begins to ring before you answer the
incoming call.
P The in use indicator in the handsets display will flash when there is an incomming
call. Press the button to answer the call.
P To terminate the call, press on the talk/end button.
If the handset is on the base unit, this feature allows the handset to connect automatically
with a call when lifted off the base unit, without the need to press the Talk button, see
page 15.
MAKING AN EXTERNAL CALL
P Dial the telephone number that you wish to call (the number will be visible on
the display). If you dial an incorrect digit, use the button to erase it.
P Press the Talk/End button (the number will be dialled automatically).
P To terminate the call, press the button.
You can also first press the Talk/End button and then dial the number. See also dial with
memory on page 10.
IMPORTANT!
If the phone can not find a free channel or it can not connect to the base unit, will you
hear two beeps. The problem can be that the batteries are to low or that all channels are
bisy. Try again after a wile.
8
Page 11

AUDIOLINE 20 USE
LAST NUMBER REDIAL
The last dialled number are stored automatically in the memory. The number can be redialled as required.
P Press button, the number you will be visible on the display.
P Press the Talk/End button, the phone will automatically dial the number.
VOLUME CONTROL
The volume level in the earpice can be adjusted into two steps during call. Use the
button to select between the two levels. The display will show following settings:
"Loud Lo" Low volume
"Loud Hi" High volume
DIRECT MEMORY M1
The phone have one memory, there you can store a phonenumber. When a phonenumber
is stored in the mamory can you easally dial it with just using two buttons.
TO STORE THE DIRECT MEMORY
P Press the programming button , and then the M1 button. The display
show "EntEr no".
P Dial the whiched number, max 24 digits. If you dial an incorrect digit, use the
button to erase.
P Press the button to save the number.
DIAL WITH THE DIRECT MEMORY
P Press the M1 button.
P Press the button, the number will now automatically be dialled.
You can also first press the Talk/End button and then on M1.
9
Page 12

USE AUDIOLINE 20
INDIRECT MEMORY
Ten of your most frequently used telephone numbers can be stored in the direct memory,
using the keypad digits 0-9 as the storage locations.
STORE INDIRECT MEMORIES
P Press the programming button , and then the button. The display show
"SEL LocAtion".
P Select the memory location number (keypad digit 0-9)
The displayen show "EntEr no".
P Dial the number, max 24 digits.
P Save the number by press the again.
If you insert an incorrect digit, you can erase it by pressing the button.
DIALLING INDIRECT MEMORY
P Press the button, and then press the appropriate memory location number,
keypad digit 0-9 (the telephone number will be visible on the display).
P Press the Talk/End button, the number will automatically be dialled.
You can also first press the Talk/End button and then select the indirect memory.
10
Page 13

AUDIOLINE 20 USE
MUTE
If during a telephone conversation, you wish to talk privately to a third party without the
caller overhearing: Press the button (the mute symbol will appear on the display).
To resume the conversation, press the button again.
KEYPAD LOCK
The keypad can be locked to prevent accidental operation when the handset is being
carried.
P Press the button.
P Press 7. The display show "HoLd" if the keypad lock is activated.
Press 7 again to deactivate the keypad lock.
PAGE/FIND HANDSET
To page or locate a missing handset, press the button on the base unit. The handset
will ring for 60 seconds approximately.
11
Page 14

USE AUDIOLINE 20
ADDITIONAL NETWORK SERVICE
12
Page 15

AUDIOLINE 20 USE
13
Page 16

SETTINGS AUDIOLINE 20
HANDSET KEYPAD SOUND
From new, the handset keypad is programmed to emit a confirmation beep every time a
key is pressed. This beep can be turned on or off as desired.
P Press the .
P Press 1. the display show "Pro-tonE" and "on" or "oFF" depending
on topically setting.
P Select the setting by press several times on the 1.
P Press the to save the setting.
HANDSET RINGER MELODY
You can choose fromfour different melodies for the telephone ringer
P Press the .
P Press 2 . The display show "Pro-ringtonE" and the topically ringer
melody (digit between 1 and 4) and the topically ringer melody will be heard.
P Select a melody using digits 1-4.
P To save the setting, press the .
14
Page 17

AUDIOLINE 20 SETTINGS
RING SIGNAL LEVEL
You can change the ringer volume level in three levels: off, low and high.
P Press the .
P Press digit 3 . The display show "Pro-ring" and the topically
level (Hi, Lo or oFF).
P Select a level using digits 1 several times.
P To save the setting, press the .
IMPORTANT!
The base unit does not have any ring signal.
AUTO ANSWER
If the handset is on the base unit, this feature allows the handset to connect automatically
with a call when lifted off the base unit, without the need to press the Talk/End button.
P Press the .
P Press digit 4. the display show "Pro-Auto" and "on" or "oFF" depending
on topically setting.
P Select the setting by press the digit 1 several times.
P To store the setting, press the .
15
Page 18

SETTINGS AUDIOLINE 20
DIRECT CALL/BABY CALL
This feature enables the handset to be pre-programmed with an emergency number which
can be dialled automatically by pressing any button (except the programming button). It
is still possible to answer calls even if this feature is implemented.
P Press the .
P Press digit 6. the display show "Pro-bAbY" and "on" or "oFF" depending
on topically setting. beroende
P Select the setting by press the digit 1 several times.
P To store the setting, press the .
PIN-CODE
A four digit PIN code is provide to ensure that some of the programmable settings can not
be changed by unauthorised users. From new the code is set to 0000.
SET PIN CODE
P Press the .
P Press #. the display show "EntEr codE".
P Enter the topically code (from new 0000).
The display will show "EntEr codE" again if the code was correct.
P Enter the new code.
P To store the new code, press .
16
Page 19

AUDIOLINE 20 OTHER
CALL BARRIER
The phone have a call barrier there you can "lock" the phone for different types of
outgoing calls. You barrie the first digits in the number you which to barrie. Ex 00 for
international calls. To activate or deactivate this function must you know the handset PINcode (see page 16).
ACTIVATE THE CALL BARRIER
P Press the .
P Press digit 8. the display show "EntEr codE".
P Enter the PIN-code (from new 0000).
If the code was correct will "bArring" be displayed. If the code was incorrect , will
the handset return to standby mode.
P Enter the number you which to barrie Ex 00 to bar international calls.
P To store the setting, press the .
To deactivate the setting, press several times on instead of enter the number
and then on the memory button.
INTERFERENCE
All cordless telephones are radio transmitters and receivers and as such are subject to
interference from a wide range of sources.
Re-siting of the base unit can improve reception substantially. An upstairs room is usually
the best location.
Electronic equipment like TV’s, computers, etc., emit strong electronic magnetic fields
which can affect the radio signals. Try not to locate your DECT 3055 next to this type of
equipment and ensure that the power and line cords are separated from other electrical
units
17
Page 20

OTHER AUDIOLINE 20
TROUBLE GUIDE
THE TELEPHONE DOES NOT WORK
P Is the power adapter connected correctly?
P Is the line cord connected correctly?
P Are the batteries in the handset charged?
P Connect a different telephone to the same wall socket. If the other telephone does not
work, contact your Network operator.
THE DISPLAY ON THE HANDSET IS BLANK
P Is mains power switched on?
P Are the batteries charged?
THE HANDSET DOES NOT RING
P Is the ringer programmed Off?
WHEN ON A CALL, A WARNING TONE IS HEARD
P The batteries’ power may be low (recharge the handset for 15 hours).
P The handset may be out of range - move closer to the base unit.
NO DIALLING TONE
P Have the handset batteries been charged for 15 hours?
P Is the Base connected to a mains power socket and mains power switched on?
P Is the telephone line cord plugged into a telephone Network wall socket?
THE HANDSET WILL NOT CONNECT WITH AN INCOMING CALL
P Because this is a cordless telephone, the ringing signal has to be transmitted to
the handset which can take a few seconds. It is important that a call is not
picked-up on the handset until the handset rings.
YOU CAN NOT CALL OR PROGRAMME THE PHONE:
P If the display show "BARRING" is the call barring activated
P If the display show "HOLD" is the keypad lock activated.
18
Page 21

AUDIOLINE 20 OTHER
MEMORY DIALLING DOES NOT WORK
P Store a new number and try again.
RESET THE HANDSET
The handset can be reset if required. If this operation is performed all factory settings will
be restored.
! Handset PIN-code restored to 0000 ! Key sound will activate
! Ring signal level restored to high ! Redial memory erased
! Ring signal type restored to type 2 ! All memories will be erased
! Direct call will be deactivated ! Autoanswer will be deactivated
P Press the .
P Press digit 0. the display show "EntEr codE".
P Enter the code (from new 0000).
If the code was correct will the display show "rESEt Y".
P Press the to confirm.
P The handset will return to standby mode after some seconds.
19
Page 22

OTHER AUDIOLINE 20
WARENTEE
TECHNICAL DATA
Standby time : About 110 hour
Talk time : About 4 hour
Range : >300 meter.
Indirect memories : 10 pcs
Power : AC/DC adapter: 2 x 9V DC, 200 mA.
Battery : 3 x 1.2V NiMH type.
Wiegth : Handset : About156 g (Ink. batteries)
Bas unit : About 180 g
Size (BxHxD) : Handset : 53 x 151 x 33 mm
Bas unit: 92 x 58 x 170 mm
20
Page 23

DECLARATION OF CONFORMITY
WE DORO AB
Of SKIFFERVÄGEN 80
SE-224 78 LUND
SWEDEN
AS THE EU/EES/EC/EEA AUTHORISED REPRESENTATIVE DECLARE
UNDER OUR SOLE RESPONSIBILITY THAT THE PRODUCT
MODEL: AUDIOLINE 20
DESCRIPTION: CORDLESS PHONE
IS IN CONFORMITY WITH DIRECTIVE: 1999/5/EC
Authorised by:
Signed________________________________
Name (printed): PETER CULLIN
Position in company: R&D MANAGER
Date of issue:2000-05-24
Copies of this document will be held on file for a period of 10 years after the last production.
Supplier: DORO AB, Skiffervägen 80, SE-224 78 LUND, SWEDEN
Product: AUDIOLINE 20
This product is intended for connection to analogue PSTN lines within
Switzerland.
However, due to differences between the individual PSTN’s provided in the
different countries, the approval does not, of itself, give an unconditional
assurance of successful operation on every PSTN network termination point.
This product contains radio equipment that makes use of non
harmonised frequency bands. This means that it's strictly forbidden
to use it in other countries than those listed above.
ADDITIONAL INFORMATION
Tone-dialling only.
In the event of a mains power failure it will not be possible to dial emergency
services numbers.
http://www.doro.com
Page 24

Page 25

 Loading...