

Dometic SeaLand 711-M28 Owner's Manual
®
SeaLand
GRAVITY DISCHARGE TOILET
OWNER’S MANUAL
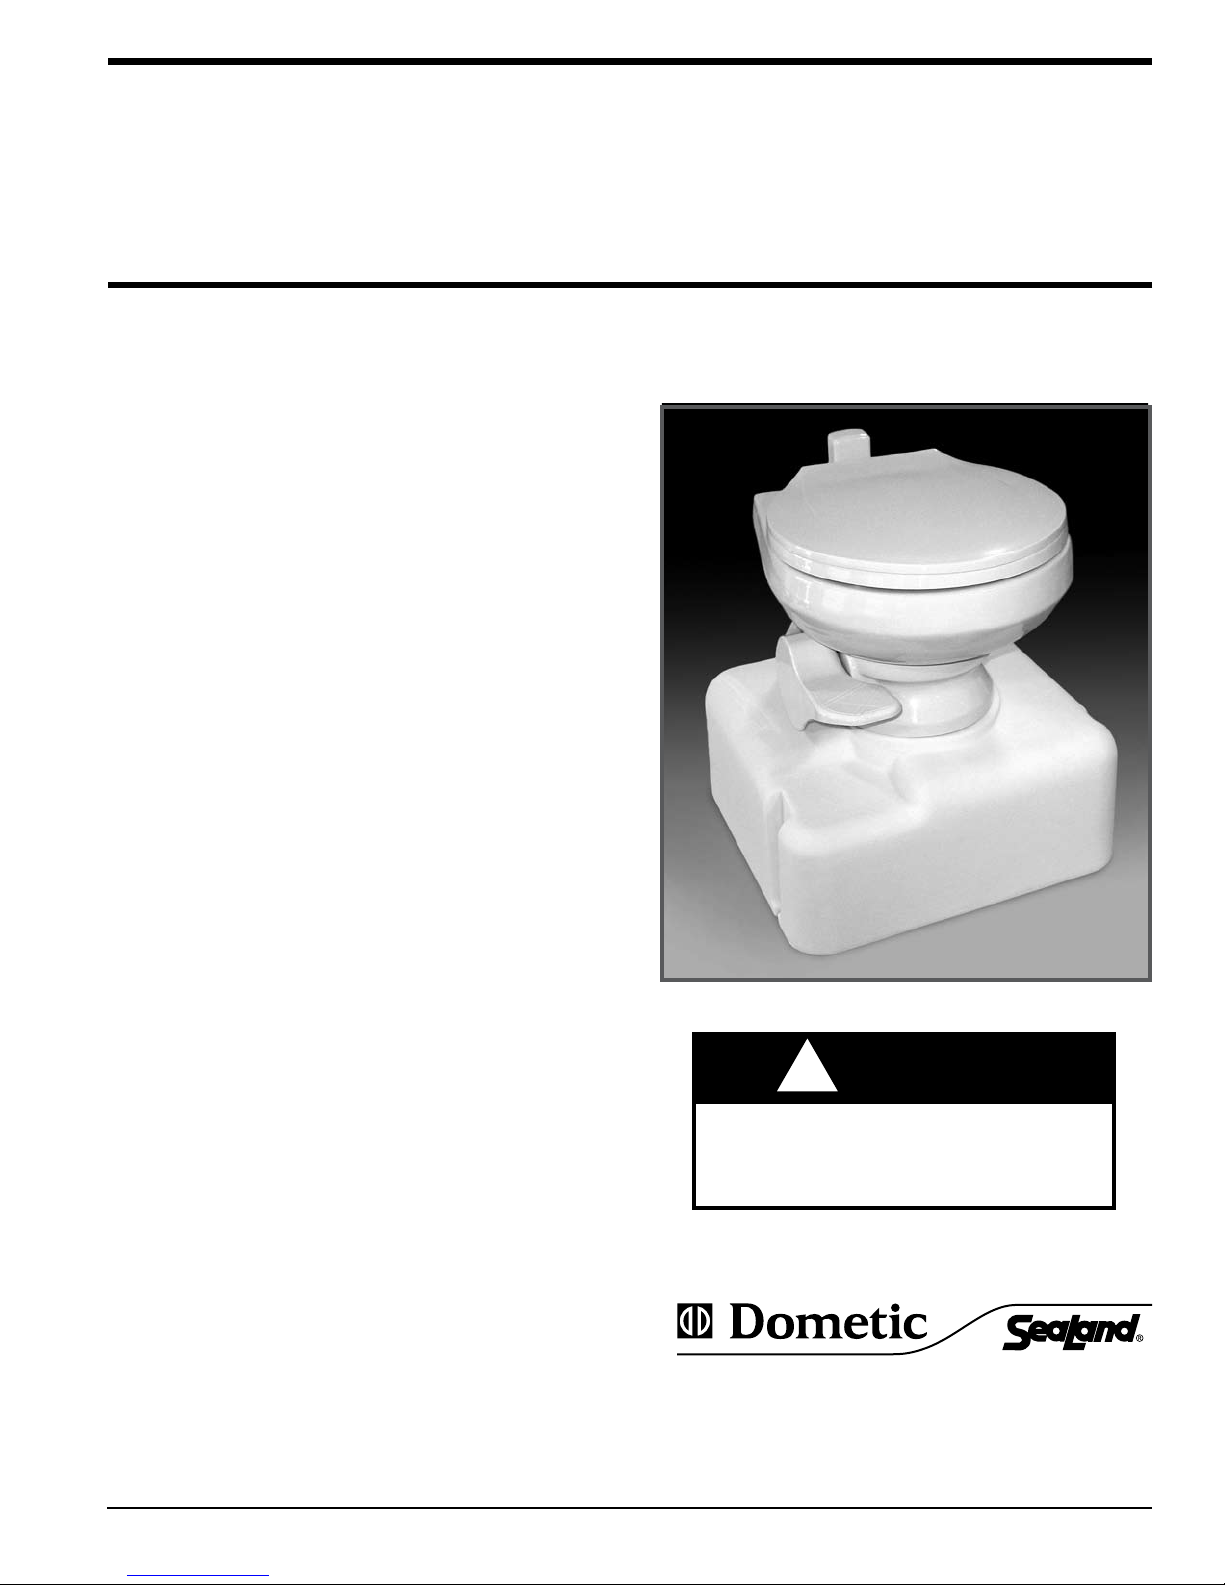
SeaLand® 711-M28 Toilet
!
WARNING
This manual must be read and understood
before adjustment, maintenance, or service
is performed. Modication of this product
can result in property damage.
Dometic Sanitation Corporation
13128 State Rt 226, PO Box 38
Big Prairie, OH 44611
SeaLand Product Customer Service: 1-800-321-9886
(8:00 a.m. - 5:00 p.m. ET)
1
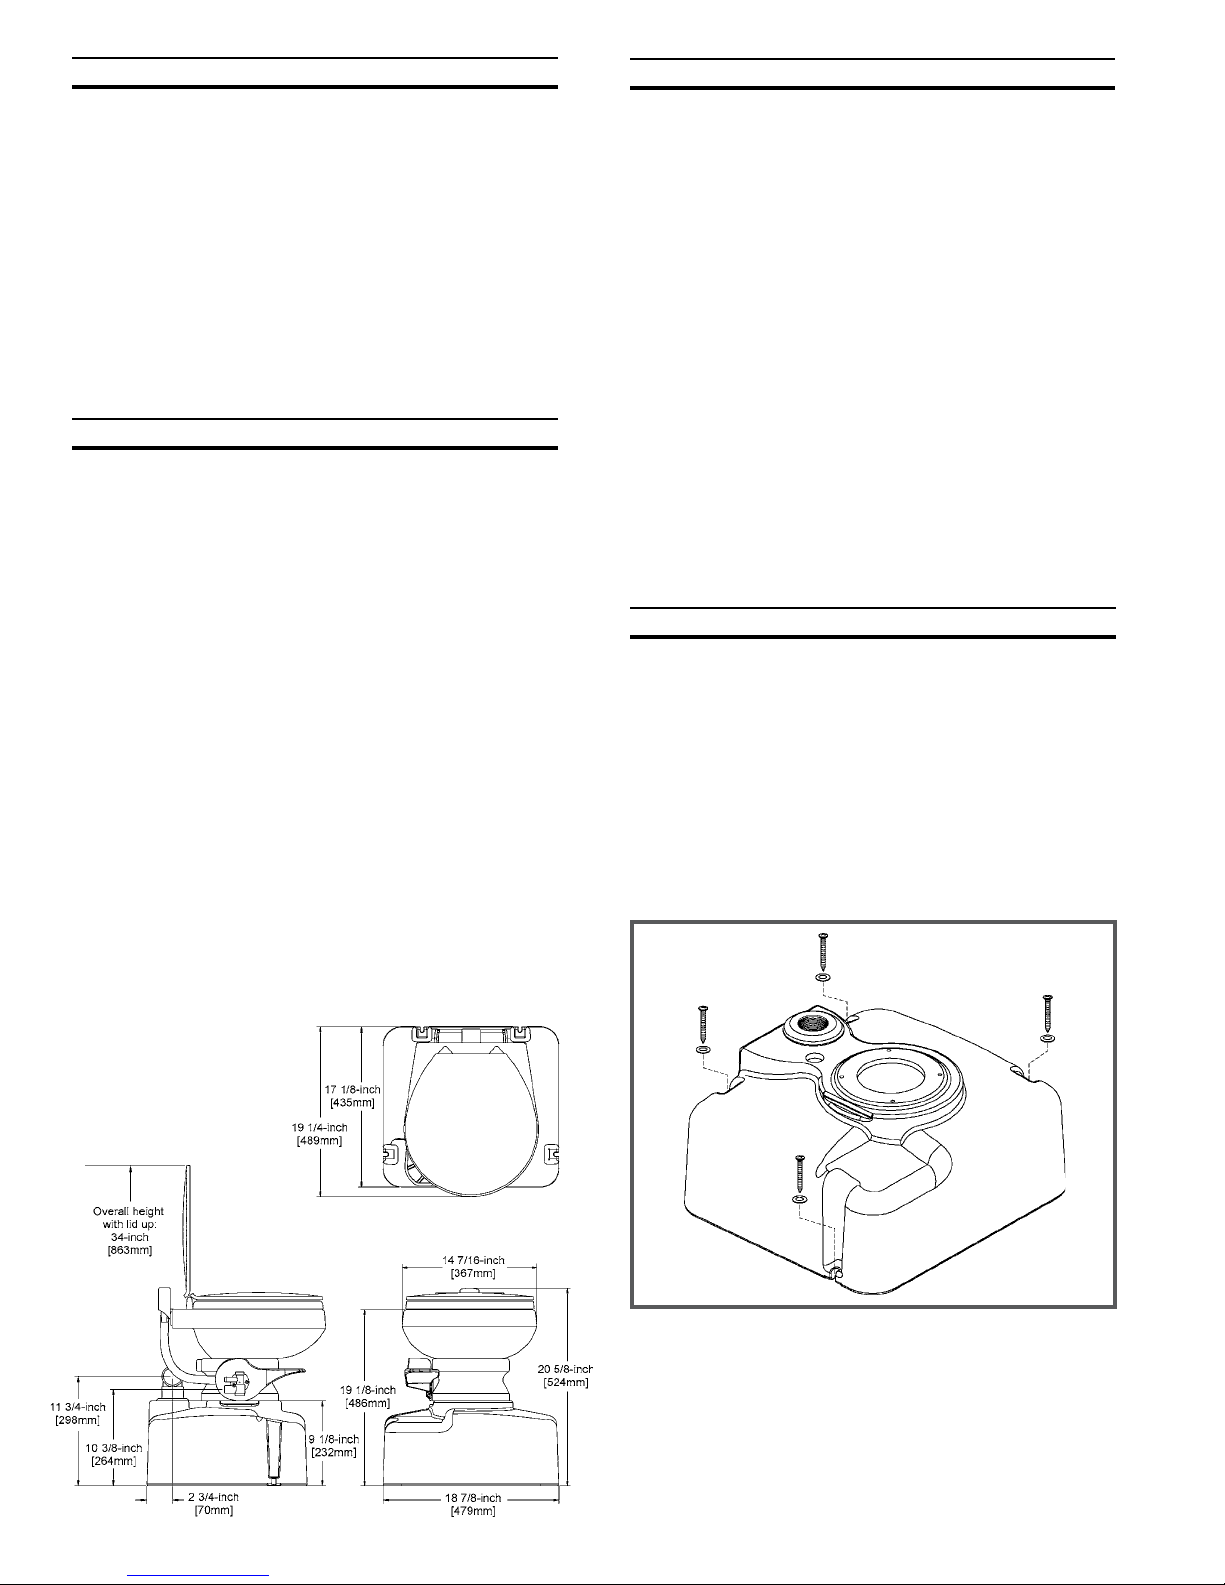
TABLE OF CONTENTS
Specications . . . . . . . . . . . . . . . . . . . . . . . . . 2
Recommendations . . . . . . . . . . . . . . . . . . . . . 2
Installation Instructions . . . . . . . . . . . . . . . 2 - 4
Operating Instructions . . . . . . . . . . . . . . . . . . . 4
Maintenance . . . . . . . . . . . . . . . . . . . . . . . 4 - 5
Preparing for Summer Use . . . . . . . . . . . . . . . 5
Model Identication . . . . . . . . . . . . . . . . . . . . . 5
Spare Parts . . . . . . . . . . . . . . . . . . . . . . . . . . . 5
Customer Service . . . . . . . . . . . . . . . . . . . . . . 5
Troubleshooting Guide . . . . . . . . . . . . . . . . . . 6
Warranty . . . . . . . . . . . . . . . . . . . . . . . . . . . . . 8
SPECIFICATIONS
Product Name: 711-M28 SeaLand Marine Toilet
Shipping Information:
Carton Sizes:
Toilet 21" x 18-1/2" x 13-1/2"
(533mm x 470mm x 343mm)
Tank 19-1/4" x 17-1/2" x 11-1/2"
(489mm x 445mm x 292mm)
Weight Approx. 49 lbs. (22Kg)
System:
Average water consumption per ush 1 Qt. (.95L)
Minimum water consumption per ush 1 Pt. (.47L)
Holding tank capacity . . . . . . . . . . .9.5 Gal. (36 L)
Fresh water supply pressure . . . . . . . . . 5-80 PSI
Water inlet size. . . . . . . . . . . . . . . . . . . .1/2" NPT
Holding tank discharge tting . . . . . . . 1-1/2" NPT
Vent tting. . . . . . . . . . . . . . . . . . . . . . . 5/8" Barb
Unit Weight. . . . . . . . . . . . . . . . . . 41 Lbs. (19Kg)
RECOMMENDATIONS
1. Read the “Operating Instructions” section of the
manual carefully.
2. Make sure all guests understand the operation of
the SeaLand toilet.
3. Carry a few spare parts for the maintenance pur
poses. Dometic has developed several repair kits
that will save you both time and expense should a
problem occur. See “Customer Service” section of
this manual.
4. Use only SeaLand brand
brand Holding Tank Deodorants to maintain a
trouble-free system.
5. Do not use chlorine or caustic chemicals, such as
laundry bleach or drain opening types, in the
system. These products damage the seals in
toilets.
6. Do not ush foreign objects through the toilet.
7. Do not allow small problems to go unsolved. As
soon as a problem is detected, correct it.
®
Tissue and SeaLand®
-
INSTALLATION INSTRUCTIONS
Tank:
1. Select position in bathroom where unit can operate
properly. Allow room for using the ush lever and
clearance for raising the seat and lid.
2. Position the tank 3/4" (19mm) away from the wall.
Mark four holes at mounts on tank base. After holes
are marked, remove tank, and drill pilot holes. Slide
tank back into position. Secure the tank with four
#14 x 2" long pan head screws and washers on all
tank mounts.
Dimensions:
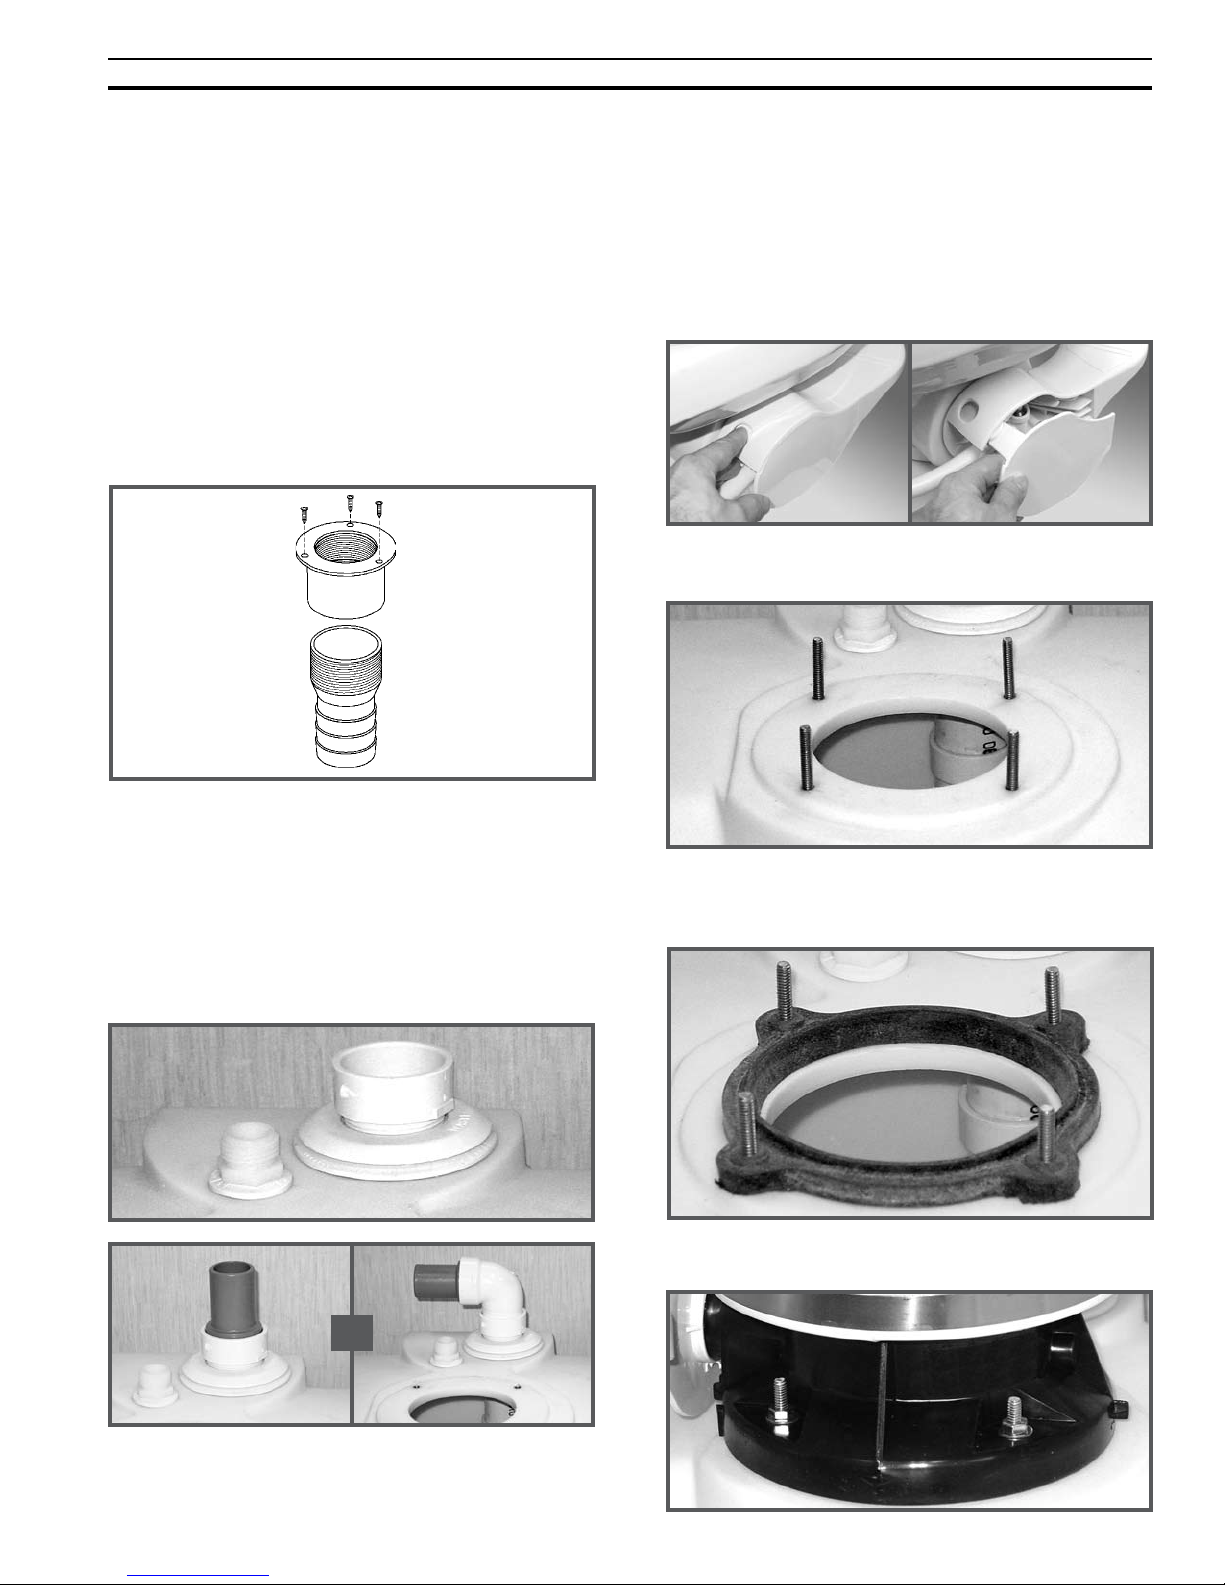
3. Run 5/8" (16mm) I.D. hose to vent tting and secure
with hose clamps.
Install thru-hull vent tting:
(not supplied with unit – SeaLand part number 346368)
4. Drill hole through the hull, well above water line
and directly above SeaLand toilet. Hole location is
determined by routing and length of hose.
2
INSTALLATION INSTRUCTIONS (cont’d)
5. Apply waterproof caulk around underside of thru-hull
vent tting.
6. Install thru-hull vent tting and secure snugly with
nut. Wipe off excess caulk with damp cloth.
7. Attach remaining end of vent hose to thru-hull
tting with hose clamp.
Dockside Discharge Fitting:
(not supplied by SeaLand)
8. Drill hole in deck directly above SeaLand toilet. Hole
location is determined by routing space and length
of hose.
9. Screw 1-1/2" FPT x 1-1/2" hose barb into bottom of
deck tting.
12. Route hose from tank to deck tting and secure with
hose clamp.
Note: The holding tank on the 711-M28 is designed
to withstand discharge by a properly operating
discharge pump.
Toilet Installation:
13. Push button on back of ush pedal, then pull ush
pedal cover away from pedal to expose water valve.
Remove plastic pedestal cover from toilet base.
14. Install the (4) 1/4-20 x 1-3/4" long studs in inserts on
the tank top.
10. Apply waterproof caulk around deck hole and install
deck tting into 2-1/4" (57mm) hole with screws. Wipe
off excess caulk with a damp cloth.
11. Install 1-1/2" MPT x HUB adapter into discharge
tting on holding tank.If necessary, PVC cement
elbow and hose adapter or hose adapter only into
1-1/2" (38mm) adapter. Secure 1-1/2" (38mm) hose
to adapter with hose clamp.
or
15. Place oor ange seal on studs, aligning the studs
with bumps on seat. Note: “THIS SIDE UP” should
face upwards.
16. Place toilet on studs and secure with four washers
and four nuts.
3
 Loading...