

Page 1
Macerator toilet
Installation and
Operating Manual . . . . . . . . . . . 6
Toilette à broyeur
Instructions de montage
et de service . . . . . . . . . . . . . . 23
Inodoro triturador
Instrucciones de montaje
y de uso . . . . . . . . . . . . . . . . . . 42
Sanita de trituração
Instruções de montagem e
manual de instruções. . . . . . . . 61
EN
FR
ES
PT
MasterFlush7640
Page 2

Page 3
MasterFlush7640
3
2
3
12
1
11
10
9
8
7
4
5
6
1
A
B
C
D
E
G
F
2
A
B
C
D
E
F
G
3
Page 4
MasterFlush7640
4
4
1
2
3
4
5
5
6
Page 5
MasterFlush7640
5
7
8
9
0
Page 6

EN
Explanation of symbols MasterFlush7640
6
Please read this instruction manual carefully before installation and
first use, and store it in a safe place. If you pass on the product to
another person, hand over this instruction manual along with it.
Contents
1 Explanation of symbols . . . . . . . . . . . . . . . . . . . . . . . . . . . . . . . . . . . 6
2 Safety instructions. . . . . . . . . . . . . . . . . . . . . . . . . . . . . . . . . . . . . . . 7
3 Intended use . . . . . . . . . . . . . . . . . . . . . . . . . . . . . . . . . . . . . . . . . . . 8
4 Technical description . . . . . . . . . . . . . . . . . . . . . . . . . . . . . . . . . . . . 8
5 Installation. . . . . . . . . . . . . . . . . . . . . . . . . . . . . . . . . . . . . . . . . . . . . 9
6 Operation . . . . . . . . . . . . . . . . . . . . . . . . . . . . . . . . . . . . . . . . . . . . 12
7 Maintenance and winterizing. . . . . . . . . . . . . . . . . . . . . . . . . . . . . . 13
8 Troubleshooting . . . . . . . . . . . . . . . . . . . . . . . . . . . . . . . . . . . . . . . 16
9 Disposal . . . . . . . . . . . . . . . . . . . . . . . . . . . . . . . . . . . . . . . . . . . . . 16
10 Limited warranty . . . . . . . . . . . . . . . . . . . . . . . . . . . . . . . . . . . . . . . 17
11 Technical data. . . . . . . . . . . . . . . . . . . . . . . . . . . . . . . . . . . . . . . . . 20
1 Explanation of symbols
!
I
CAUTION!
Safety instruction: Failure to observe this instruction can lead to
injury.
NOTE
Supplementary information for operating the product.
Page 7

EN
MasterFlush7640 Safety instructions
7
2 Safety instructions
The manufacturer accepts no liability for damage in the following cases:
Faulty assembly or connection
Damage to the product resulting from mechanical influences
Alterations to the product without express permission from the manu-
facturer
Use for purposes other than those described in the operating manual
2.1 Warnings
The following statement must be read and understood before installing,
servicing and/or operating this product. Modification of this product may
result in property damage.
The manufacturer recommends that a qualified RV technician or electrician
install or service this product with regard to all applicable codes and regulations. Equipment damage, personal injury or death could result from
improper installation.
!
CAUTION!
Overfilling the holding tank can create serious damage to the
sanitation system, such as rupturing the holding tank and releasing tank contents into the motorhome. To prevent this possibility,
the manufacturer recommends using the “full tank” shut-down
circuitry in the toilet’s electronic control module. The “full” signal
from the holding tank can be generated by an optional Dometic
DTM01C tank monitor or DTM04 four-level tank monitor system.
Page 8

EN
Intended use MasterFlush7640
8
3 Intended use
The Dometic MasterFlush7640 toilet provides an electric-flush toilet that
macerates waste and pumps it to a holding tank or other effluent storage or
disposal system. Operated by a flush pedal, the toilet allows the user to add
water to the bowl (before using or flushing) and to flush the toilet.
4 Technical description
4.1 Benefits
Convenient electronic flush. Add water or flush by pressing on the flush
pedal.
Choice of two water consumption settings. “Normal” flush uses 0.83 gal.
(3.1 l) per flush and adds water to bowl after flush; “Dry Bowl” setting uses
only 0.21 gal. (0.79 l) per flush and does not add water to the bowl.
Versatile installation. Powerful macerator pump allows toilet to be located
up to 40 ft. (12.2 m) away from holding tank or other discharge line destination.
Automatic “full tank” shut-down. When connected to a holding tank level
indication system (such as Dometic DTM01 system), the MasterFlush7640
toilet will not flush when the holding tank is full. This safety features prevents
overfilling the holding tank, which may cause damage to the motorhome.
Page 9
EN
MasterFlush7640 Installation
9
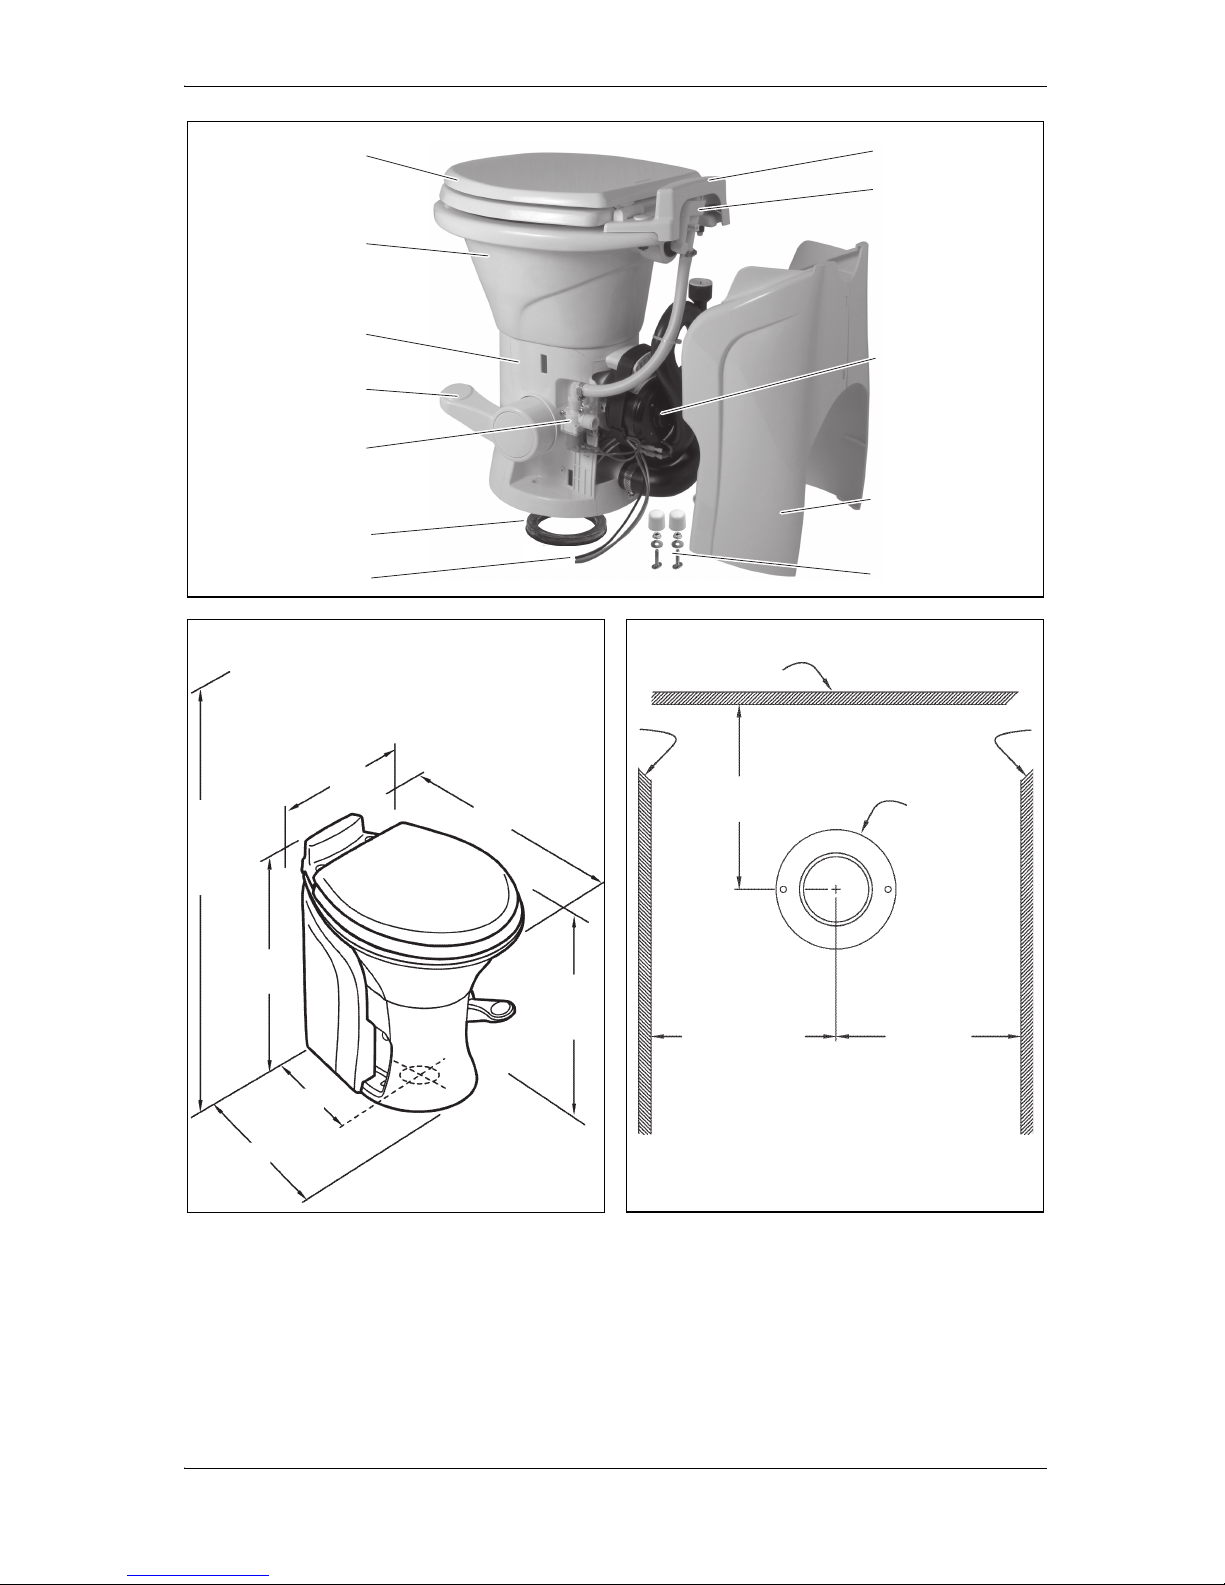
4.2 Components
Please refer to complete parts list (printed separately) for more details.
5 Installation
I
No. in
fig. 1, page 3
Description
1 Vacuum breaker cover
2 Vacuum breaker
3 Macerator pump
4 Pump/base cover
5 Floor flange mounting hardware kit
6 Electrical wires
7 Floor flange seal
8 Water valve
9 Flush pedal
10 Toilet base
11 Toilet bowl
12 Toilet seat
– Remote mounting hardware kit
NOTE
Be sure foot pedal, when pressed, touches same flat surface
on which toilet is installed.
Be sure to follow recommended installation requirements
(chapter “Minimum installation requirements” on page 21).
The toilet is not intended for installation in a shower.
Page 10

EN
Installation MasterFlush7640
10
5.1 Tools required
pliers or adjustable wrench
7/16 in./11 mm wrench
electrical connection tools
5.2 Installation on floor flange
1. To replace an older toilet:
– Turn off water supply to toilet
– Remove and drain water supply line.
– Remove toilet hold-down bolts/screws.
– Remove toilet from floor.
– Remove and discard old floor flange seal and hold-down bolts.
– Verify center of floor flange is at least the recommended rough-in
distance from back wall (fig. 3 A, page 3 and chapter “Rough-in
dimensions” on page 22).
– Make sure top surface of floor flange is clean and free of any debris
or sealant.
2. If installing a new floor flange:
– Make certain that toilet mounting holes are at the correct location
(fig. 3 D, page 3).
– Floor flange must be secured to floor with a minimum of four screws
(eight are preferred).
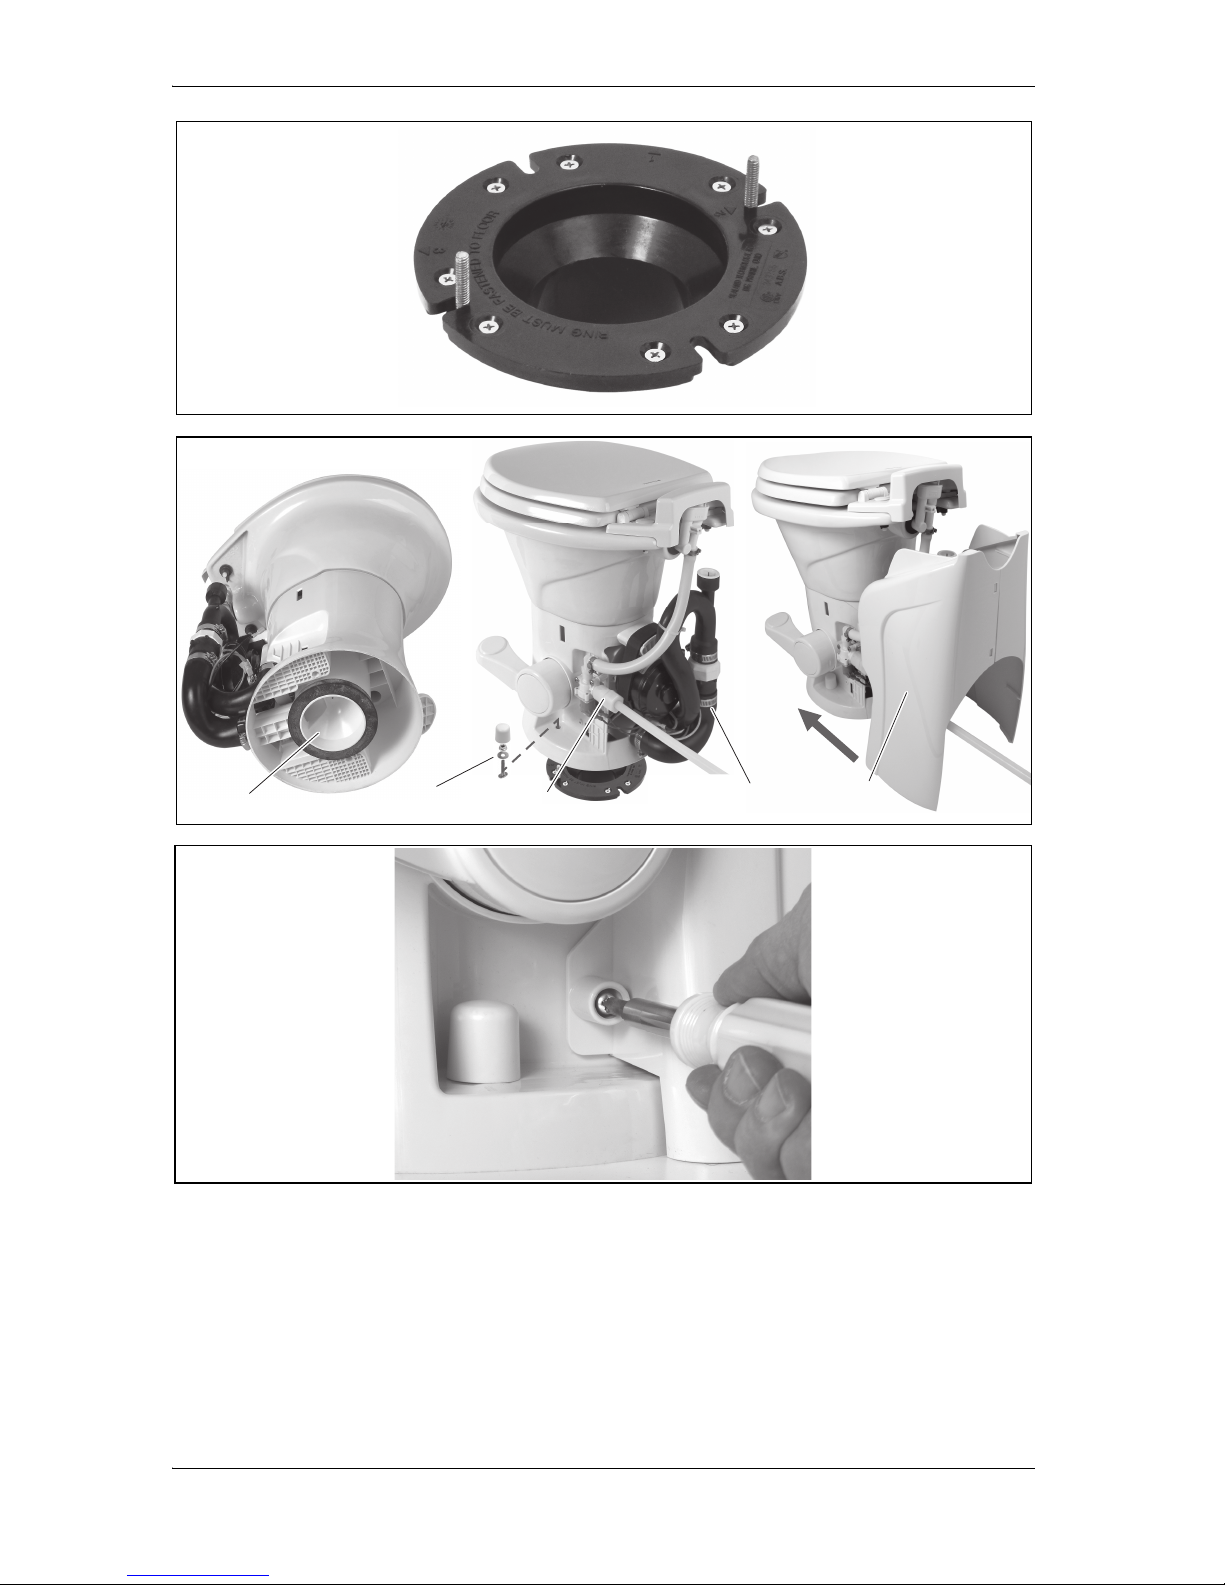
– Insert two supplied T-bolts into slots in floor flange (fig. 4, page 4).
3. Verify that floor flange seal is installed on base of toilet (fig. 5 1,
page 4).
4. Carefully set toilet over floor flange.
5. Align holes in toilet base with T-bolts as toilet is lowered onto floor
flange. Toilet must be aligned so that outlet of base fits inside of floor
flange outlet hole.
I
NOTE
Entire toilet base does not rest completely on floor yet. Floor seal
must be compressed in following steps.
Page 11

EN
MasterFlush7640 Installation
11
6. Install floor mounting nuts and washers onto T-bolts. Carefully torque
nuts to 30 – 40 inch-pounds (3.4 – 4.5 Nm). Do not overtighten. Alternate between sides when tightening to prevent distortion of base. When
tight, base should be securely attached and flat against floor. Attach bolt
covers onto nuts (fig. 5 2, page 4).
7. Connect water supply line and torque connection to 30 – 40 inch-
pounds (3.4 – 4.5 Nm). Do not overtighten (fig. 5 3, page 4).
8. Connect electrical power to toilet according to wiring diagram on toilet’s
parts list (printed separately).
9. Turn on electrical power to toilet.
10. Turn on water supply to toilet.
11. Flush toilet several times and check for leaks.
12. Attach pump/base cover (fig. 5 5, page 4) to base with screws on sides
of toilet base (fig. 6, page 4) and with locking tabs on sides and back.
5.3 Remote installation
1. To install toilet separate from holding tank (not on typical floor flange),
position toilet in location with same clearances as flange mounted toilet
(fig. 3, page 3 and chapter “Rough-in dimensions” on page 22).
2. Mark fastener hole locations through two holes in base.
3. Drill pilot holes for hex screws in Remote Mounting Hardware Kit.
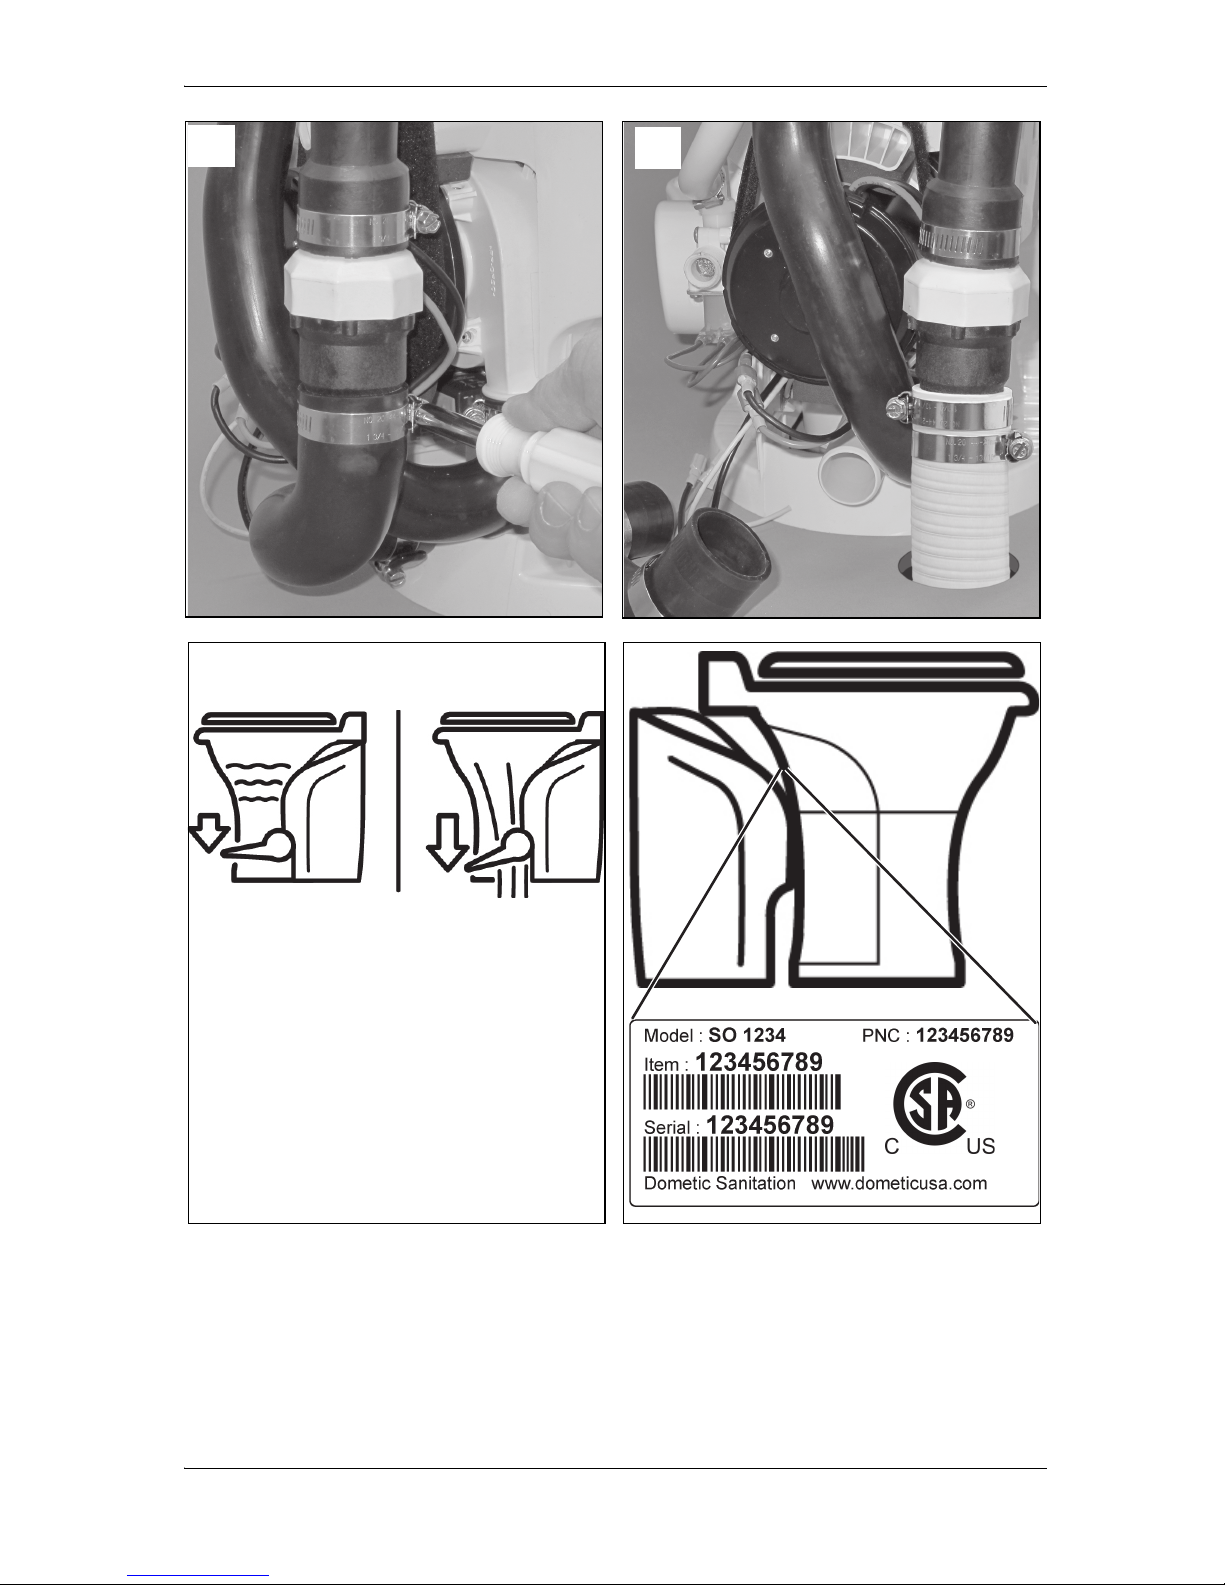
4. Remove black rubber elbow from check valve (fig. 5 4, page 4) in back
of toilet (fig. 7, page 5).
5. Route either 1.5 in. (38 mm) ID flexible sanitation hose or 1.5 in.
(38 mm) ID PVC or ABS pipe from waste tank to check valve. Plumbing
can be routed either above- or below-floor as required. Access holes
may need to be drilled through floor or wall depending on installation
layout (fig. 8, page 5). Flexible sanitation hose can be connected
directly to check valve with two hose clamps.
6. Route and connect appropriate wiring and water line according to
chapter “Installation on floor flange” on page 10.
7. Fasten toilet to floor with hex-head screws on each side of base.
8. Cover fasteners with plastic caps.
9. Turn on water supply to toilet.
Page 12

EN
Operation MasterFlush7640
12
10. Flush toilet several times and check for leaks.
11. Attach pump/base cover (fig. 5 5, page 4) to base with screws on sides
of toilet base (fig. 6, page 4) and with locking tabs on sides and back.
6 Operation
6.1 Add water to bowl
1. To add water to the toilet, press the flush pedal part way down (fig. 9,
page 5).
2. To avoid possible overflow, water flow will stop automatically if pedal is
pressed too long. More water is usually added only when flushing solids.
6.2 Flush toilet
1. To flush, press pedal down completely, then release it (fig. 9, page 5).
2. This activates a powerful macerator pump that siphons water and waste
from the toilet bowl, macerates and propels the effluent to the holding
tank.
!
I
CAUTION!
Flush only water, bodily wastes and rapid-dissolving toilet tissue.
Do not flush wet wipes, sanitary napkins, diapers, paper cups,
cotton swabs, food, hair or liquids such as oils or solvents as
clogging or damage to the toilet or toilet system may occur.
NOTE
Residual water trickle in ceramic bowls: Due to integrated rim
of this toilet bowl, water may continue to slowly trickle into toilet
bowl for up to 20 minutes after flushing. If water trickle
continues after 30 minutes, replace water valve.
Make sure all guests understand toilet operation before use.
Page 13

EN
MasterFlush7640 Maintenance and winterizing
13
6.3 Changing “Flush” modes
MasterFlush7640 toilets offer two flush settings to help manage water
consumption:
Normal flush – Uses 0.83 gal. (3.1 l) per flush. Adds water to bowl after
every flush.
Dry Bowl flush – Uses 0.21 gal. (0.79 l) per flush. Does not add water to
bowl after flush.
1. To change from Normal to Dry Bowl flush setting, press flush pedal for
about 10 seconds.
✓ Flush mode has been changed to Dry Bowl setting.
2. Change mode to Normal flush by following the same procedure.
7 Maintenance and winterizing
7.1 Routine toilet cleaning
For routine cleaning, use Dometic Toilet Bowl Cleaner. If this cleaner cannot
be found in your area, contact the manufacturer for your nearest dealer (see
the back of the manual for the addresses). If the cleaner is not available, use
most any nonabrasive bathroom and toilet bowl cleaner. Please follow label
instructions.
!
CAUTION!
To avoid damaging internal seals, do not clean toilet with abrasive
cleaners, caustic chemicals, or lubricants and cleaners that
contain alcohols or petroleum distillates.
Page 14

EN
Maintenance and winterizing MasterFlush7640
14
7.2 Routine maintenance
Monthly
1. Inspect toilet, plumbing, and plumbing connections, wires, and wire
connections.
2. Open and close all plumbing valves.
3. Check in-line water filters, if any, for blockage.
Yearly
1. Check water valve filter. Also check water valve filter if water flow into
toilet becomes insufficient.
7.3 During extended periods of non-use
The macerator toilet and sanitation system should be protected if toilet will
not be needed for an extended period of time (more than two weeks,
especially in hot weather).
1. Flush toilet in “Normal” mode and add 4 oz. (120 ml) of liquid biodegradable laundry detergent (should NOT contain bleach or environmentally harmful substances).
2. Flush toilet at least five times.
3. Turn off water supply to toilet.
4. Flush the toilet without water. Repeat three times. (This procedure will
minimize any remaining water in the macerator pump.)
5. Turn off power to the toilet.
If system will be subjected to freezing temperatures, please follow above
procedure, and then winterize system as described below.
Page 15

EN
MasterFlush7640 Maintenance and winterizing
15
7.4 Winterizing
At the end of each camping season, or when the vehicle is stored for long
periods of time during which the toilet may be exposed to freezing temperatures, the toilet system should be winterized for storage by using potable
water-safe antifreeze.
!
I
Non-toxic Antifreeze Winterization
1. Drain potable water tank and empty waste holding tank.
2. Add freshwater antifreeze to potable water tank according to mixture
instructions from antifreeze manufacturer.
3. Flush toilet several times until antifreeze mixture has flowed completely
through toilet, macerator pump and holding tank.
4. Turn off power to toilet.
Each installation is different, so antifreeze mixture amounts may vary. User
discretion is required to assure adequate protection.
I
CAUTION!
This toilet is not intended for use when exposed to tempera-
tures below freezing.
Never use automotive-type antifreeze (ethylene glycol) in
freshwater systems.
NOTE
Use nontoxic antifreeze (propylene glycol) designated for potable
water systems. See vehicle owner’s manual.
NOTE
Never leave vehicle unoccupied for extended periods of time with
municipal water supply or onboard water pump turned on when
there is a possibility of freezing temperature.
Page 16
EN
Troubleshooting MasterFlush7640
16
8 Troubleshooting
9 Disposal
1. Place the packaging material in the appropriate recycling waste bins
wherever possible.
M
If you wish to finally dispose of the product, ask your local recycling
centre or specialist dealer for details about how to do this in
accordance with the applicable disposal regulations.
Problem Possible cause Suggested remedy
Flush cycle operates
correctly but water in the
bowl empties slowly or not
at all.
Discharge piping is
pinched or kinked.
Check discharge piping.
The macerator pump or
discharge piping is
blocked.
Clear blockage.
Macerator pump makes
unusually loud noise or
continually trips breaker.
Foreign material in pump
chamber.
Clear foreign material
from pump chamber.
Flush cycle is not
activated after pressing
flush pedal.
Electrical power to toilet is
shut off or disrupted.
Check wiring and circuit
breakers (or fuses).
Flush pedal is malfunctioning.
Replace switch in flush
pedal.
Circuit board is malfunctioning.
Replace circuit board.
Holding tank is full and
signal from tank has shut
down electrical power to
toilet (if tank level monitor
system is installed).
Empty holding tank.
Insufficient or no water
enters the toilet bowl.
Water supply line is
pinched or kinked.
Check water supply line.
Screen in water valve is
blocked.
Clear blockage at water
valve.
Water valve is malfunctioning.
Replace water valve.
Page 17

EN
MasterFlush7640 Limited warranty
17
10 Limited warranty
The seller named below makes the following warranty with respect to
Dometic MasterFlush Model 7640 only.
1. One year limited warranty
1A. This Limited Warranty will be in effect for one year from the date of
purchase.
1B. This Limited Warranty is made only to the First Purchaser (herein-
after called the “Original Purchaser”) who acquired the product for
Original Purchaser’s personal, family, or household-type use. The
Original Purchaser should retain a copy of the sales receipt or
invoice as evidence of the date of purchase because proof of
purchase is required to obtain warranty service.
1C. If this product is placed in commercial or business use, it will be
warranted, to the Original Purchaser only, to be free of defects in
material and workmanship for a period of 90 days from the date of
purchase.
1D. This warranty covers all parts of the Dometic toilet which is
warranted to be free of defects in material and workmanship under
normal use. This warranty does not cover conditions unrelated to
the material and workmanship of the product. Such unrelated
conditions include, but are not limited to, (a) faulty installation and
any damage resulting from such; (b) the need for normal maintenance and any damage resulting from failure to provide such
maintenance; (c) failure to follow Seller’s instructions for use of
this product, including failure which may result from not following
winterization procedures; (d) any accident that results in damage
to this product; (e) scratching or staining of any ceramic or plastic
component; (f) acts of God, or misuse of any part of this product
and any alteration by anyone other than the Seller.
1E. For Original Purchaser (ONLY) to obtain the benefits of this
Warranty during the 1-year period (for personal use) or 90-day
period (for commercial use), the following shall apply:
Page 18
EN
Limited warranty MasterFlush7640
18
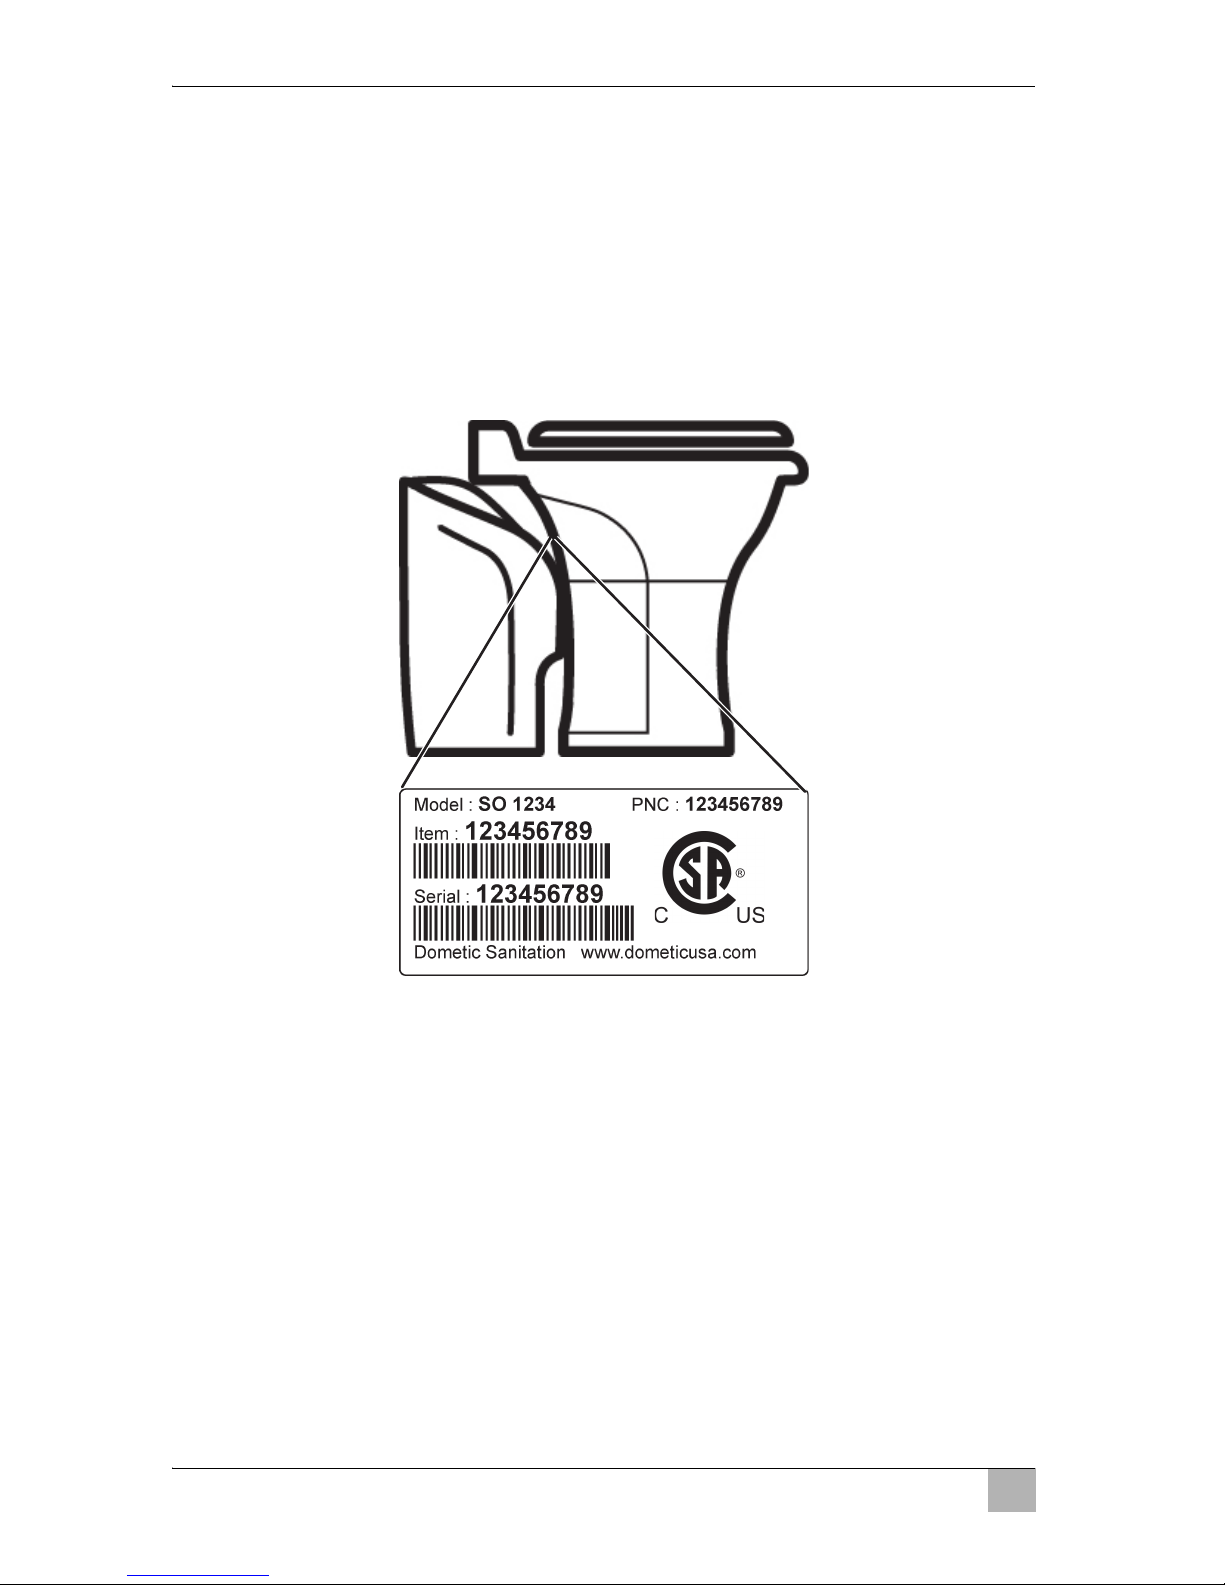
(a) Original Purchaser shall contact the local dealer from whom the
product was purchased; or contact the Seller Customer Service
Department at 1-800-321-9886 (8 a.m.-5 p.m. ET, USA) and
provide the local dealer or Seller Customer Service Department
with sales receipt or invoice, product model and serial number
from product. The product model identification label is located on
the back of the toilet bowl under the pump/base cover (see illustration).
(b) If product, while still under warranty, is returned to local dealer
where purchased, the local dealer will repair, replace or refund the
product per this Warranty and as authorized by the Seller. Seller
will provide necessary replacement parts or product free of charge
to Original Purchaser, including freight on such replacement parts
or product, and Seller will pay direct labor charges for such repair
or replacement.
(c) Under no circumstances will Seller pay or be liable for any of
Original Purchaser’s or dealer’s travel charges or other expenses
associated with bringing the product or recreation vehicle to the
dealer for repair, for providing dealer with access to the product or
vehicle, or for downtime of the product or vehicle.
Page 19

EN
MasterFlush7640 Limited warranty
19
(d) Original Purchaser may be required to return defective product or
parts when requested by Seller; in such event, Seller will pay
related freight costs.
2. THE SELLER DOES NOT AUTHORIZE ANY PERSON OR COMPANY
TO CREATE OR EXTEND ANY WARRANTY OBLIGATIONS OR
LIABILITY ON ITS BEHALF.
3. REPAIR OR REPLACEMENT OF, OR REFUND FOR, DEFECTIVE
PRODUCT, AT SELLER’S OPTION, SHALL BE THE ORIGINAL
PURCHASER’S SOLE REMEDY UNDER THIS LIMITED WARRANTY.
IN NO EVENT SHALL SELLER BE LIABLE FOR PURCHASER’S
INCIDENTAL OR CONSEQUENTIAL DAMAGES. SOME STATES DO
NOT ALLOW THE EXCLUSION OR LIMITATION OF INCIDENTAL OR
CONSEQUENTIAL DAMAGES, SO THE ABOVE LIMITATION OR
EXCLUSION MAY NOT APPLY TO YOU.
4. SELLER DISCLAIMS ALL OTHER WARRANTIES WITH RESPECT TO
THE PRODUCT, WHETHER EXPRESS OR IMPLIED, AND SPECIFICALLY DISCLAIMS THE IMPLIED WARRANTIES OF MERCHANTABILITY AND FITNESS FOR A PARTICULAR PURPOSE. SOME
STATES DO NOT ALLOW LIMITATIONS ON IMPLIED WARRANTIES
OR HOW LONG AN IMPLIED WARRANTY LASTS, SO THE ABOVE
LIMITATION MAY NOT APPLY TO YOU.
5. THIS WARRANTY GIVES YOU SPECIFIC LEGAL RIGHTS, AND YOU
MAY ALSO HAVE OTHER RIGHTS WHICH VARY FROM STATE TO
STATE.
Seller:
Dometic Corporation - Sanitation Div.
13128 SR 226
Big Prairie, Ohio 44611 USA
330-439-5550
Page 20

EN
Technical data MasterFlush7640
20
11 Technical data
11.1 Certificates
11.2 Materials
Toilet bowl: vitreous ceramic
Toilet seat: enameled wood
Toilet base: polypropylene
Macerator pump body: glass-filled polypropylene
Water valve: polypropylene
Foot pedal: polypropylene
Vacuum breaker: ABS/polypropylene
Floor flange seal: nitrile rubber, foam
Page 21
EN
MasterFlush7640 Technical data
21
11.3 Minimum installation requirements
* Water supply that exceeds 5.0 gpm (18.9 l/m) may require a flow restrictor at toilet inlet.
** Check for adequate discharge flow if installation nears this distance.
1. Refer to ANSI 1192 and Z240 RV Series standards, where applicable,
for additional RV toilet installation guidelines.
Specifications are subject to change without notice.
Electrical Power draw 15 A/12 V DC
Circuit breaker/fuse 20 A/12 V DC
Wiring Refer to ANSI/RVIA LV and NFPA 70/NEC
Standards for recommended wire gauge
(USA).
Refer to CEC I and II Standards for recommended wire gauge (Canada).
Water
supply
Fitting 1/2 in. NPT
Flow rate 3.0 – 5.0 gpm (11.4 – 18.9 l/m)
recommended*
2.0 gpm (9.5 l/m) minimum
Static pressure 30 – 100 PSI (206.8 – 689.5 kPa)
Discharge
(2 options)
Remote
(not on flange directly
above waste tank)
Sanitation hose size –
1.5 in. (38 mm) or 1 in. (25 mm) ID
Horizontal hose run –
40 ft. (12.2 m) maximum**
Page 22
EN
Technical data MasterFlush7640
22
11.4 Toilet dimensions
All dimensions may vary ±10 mm (±3/8 inch)
11.5 Rough-in dimensions
Letter in
fig. 2, page 3
Model 7640
A 20 in. (508 mm)
B 15 in. (381 mm)
C 19 in. (483 mm)
D 18.375 in. (467 mm), seat height
E 33.875 in. (860 mm), seat lid up
F 14.75 in. (375 mm), back to front of base
G 10 in. (254 mm), rough-in
Letter in
fig. 3, page 3
Dimensions/Description
A 10 in. (254 mm)
B 11 in. (279 mm)
C 11 in. (279 mm)
D Floor flange
E Left wall
F Back wall
G Right wall
Page 23

FR
MasterFlush7640 Signification des symboles
23
Veuillez lire attentivement cette notice avant le montage et la mise en
service. Veuillez ensuite la conserver. En cas de passer le produit,
veuillez le transmettre au nouvel acquéreur.
Sommaire
1 Signification des symboles . . . . . . . . . . . . . . . . . . . . . . . . . . . . . . . 23
2 Consignes de sécurité. . . . . . . . . . . . . . . . . . . . . . . . . . . . . . . . . . . 24
3 Usage conforme . . . . . . . . . . . . . . . . . . . . . . . . . . . . . . . . . . . . . . . 25
4 Désignation technique. . . . . . . . . . . . . . . . . . . . . . . . . . . . . . . . . . . 25
5 Montage. . . . . . . . . . . . . . . . . . . . . . . . . . . . . . . . . . . . . . . . . . . . . . 26
6 Fonctionnement. . . . . . . . . . . . . . . . . . . . . . . . . . . . . . . . . . . . . . . . 29
7 Maintenance et hivernage . . . . . . . . . . . . . . . . . . . . . . . . . . . . . . . . 31
8 Guide de dépannage. . . . . . . . . . . . . . . . . . . . . . . . . . . . . . . . . . . . 34
9 Retraitement . . . . . . . . . . . . . . . . . . . . . . . . . . . . . . . . . . . . . . . . . . 35
10 Garantie limitée . . . . . . . . . . . . . . . . . . . . . . . . . . . . . . . . . . . . . . . . 35
11 Caractéristiques techniques . . . . . . . . . . . . . . . . . . . . . . . . . . . . . . 39
1 Signification des symboles
!
I
ATTENTION !
Instruction de sécurité : Le non-respect de cette consigne peut
entraîner des blessures.
REMARQUE
Information supplémentaire sur l'utilisation du produit.
Page 24

FR
Consignes de sécurité MasterFlush7640
24
2 Consignes de sécurité
Le fabricant décline toute responsabilité pour des dommages dans les cas
suivants :
des défauts de montage ou de raccordement
des influences mécaniques ayant endommagé le matériel
des modifications apportées au produit sans autorisation explicite de la
part du fabricant
une utilisation différente de celle décrite dans la notice
2.1 Avertissements
La déclaration suivante doit être lue et comprise avant l'installation, l'entretien et/ou l'utilisation de ce produit. Toute modification de ce produit peut
entraîner des dommages des biens matériels.
Le fabricant recommande qu'un technicien ou un électricien qualifié en véhicules de loisirs installe ou répare ce produit en respectant tous les codes et
règlements applicables. Une installation incorrecte pourrait entraîner des
dommages sur l'équipement, des blessures de personnes, voire la mort.
!
ATTENTION !
Un trop-plein du réservoir à matières peut créer de graves dommages au système sanitaire, comme la rupture du réservoir à
matières et l'écoulement du contenu du réservoir dans le camping-car. Afin d'éviter cette éventualité, le fabricant recommande
d'utiliser le circuit d'arrêt « réservoir plein » du module de commande électronique des toilettes. Le signal « plein » du réservoir
à matières peut être généré par un contrôleur de réservoir Dometic DTM01C en option ou un système de contrôle du réservoir à
quatre niveaux DTM04.
Page 25

FR
MasterFlush7640 Usage conforme
25
3 Usage conforme
Les toilettes Dometic MasterFlush 7640 fournit une chasse électrique qui
broie les déchets et les pompe dans une cuve à eaux noires ou un autre système de stockage ou de retraitement des effluents.metic Grâce à une pédale
de chasse d’eau, les toilettes permettent à l'utilisateur d'ajouter de l'eau à la
cuvette (avant l’utilisation ou après le rinçage) et de rincer les toilettes.
4 Désignation technique
4.1 Avantages
Rinçage électronique pratique. Ajout d'eau ou rinçage en appuyant sur la
pédale.
Choix de deux paramètres de consommation d'eau. Le rinçage
« normal » consomme 0,83 gal. (3,1 l) par chasse d’eau et ajoute de l'eau
dans la cuvette après le rinçage ; le réglage « cuvette sèche » consomme
seulement 0,21 gal. (0,79 l) par chasse d’eau et n’ajoute pas d'eau dans la
cuvette.
Installation flexible. Grâce à la puissante pompe broyeuse, les toilettes
peuvent être situées à 40 ft. (12,2 m) de distance du réservoir à matières ou
d'une autre destination de la conduite d'évacuation.
Arrêt automatique « Réservoir plein ». Si les toilettes MasterFlush7640
sont connectées à un système d'indication de niveau de réservoir (tel que le
système Dometic DTM01), elles ne permettent pas le rinçage si la cuve à
eaux noires est pleine. Ces fonctions de sécurité évitent le trop-plein du
réservoir à matières, qui pourrait endommager le camping-car.
Page 26

FR
Montage MasterFlush7640
26
4.2 Composants
Reportez-vous à la liste complète des pièces (imprimée séparément) pour
obtenir de plus amples détails.
5 Montage
I
N° dans
fig. 1, page 3
Description
1 Cache du casse-vide
2 Casse-vide
3 Pompe broyeuse
4 Couvercle de la pompe/de la base
5 Kit de montage au sol par bride
6 Câbles électriques
7 Joint de bride de plancher
8 Vanne d'arrivée d'eau
9 Pédale de rinçage
10 Socle des toilettes
11 Cuvette des toilettes
12 Siège des toilettes
– Kit de montage à distance
REMARQUE
Assurez-vous que la pédale, lorsqu'elle est enfoncée, touche
la même surface plane sur laquelle sont installées les toilettes.
Veillez à respecter les exigences d'installation recommandées
(chapitre « Exigences minimales d'installation », page 40).
Les toilettes ne sont pas prévues pour être installées dans une
douche.
Page 27

FR
MasterFlush7640 Montage
27
5.1 Outils requis
Pince ou clé réglable
Clé 16 in./ 11 mm
Outils de raccordement électrique
5.2 Installation sur bride de plancher
1. Pour remplacer d'anciennes toilettes :
– Coupez l'alimentation en eau des toilettes.
– Retirez et videz la conduite d'alimentation en eau.
– Retirez les boulons/vis de fixation des toilettes.
– Retirez les toilettes du sol.
– Retirez et mettez au rebut l'ancien joint de bride de plancher et les
boulons de fixation.
– Vérifiez que le centre de la bride de plancher est au moins à la dis-
tance recommandée de la paroi arrière (fig. 3 A, page 3 et chapitre
« Dimensions hors tout », page 41).
– Assurez-vous que la surface supérieure de la bride de plancher est
propre et exempte de tout débris ou de produit d'étanchéité.
2. En cas d'installation d'une nouvelle bride de plancher :
– Assurez-vous que les trous de montage des toilettes sont à l'empla-
cement correct (fig. 3 D, page 3).
– La bride de plancher doit être fixée au sol avec un minimum de quatre
vis (huit sont préférables).
– Insérez les deux boulons en T fournis dans les fentes de la bride du
plancher (fig. 4, page 4).
3. Vérifiez que le joint de la bride de plancher est installé sur l'embase des
toilettes (fig. 5 1, page 4).
4. Posez les toilettes avec précaution sur la bride de plancher.
5. Alignez les trous dans l'embase des toilettes avec les boulons en T
lorsque les toilettes sont abaissées sur la bride de plancher. Les toilettes
doivent être alignées de telle sorte que la sortie de l'embase s'adapte à
l'intérieur du trou de sortie de la bride de plancher.
I
REMARQUE
Toute l'embase des toilettes ne repose pas encore entièrement
sur le plancher. Le joint de plancher doit être compressé dans les
étapes suivantes.
Page 28

FR
Montage MasterFlush7640
28
6. Installez les écrous de fixation au plancher et les rondelles sur les boulons en T. Serrez avec précaution les écrous à 30 – 40 livres-pouces
(3,4 – 4,5 Nm). Ne serrez pas trop. Alternez les côtés lors du serrage
afin d'éviter toute distorsion de l'embase. Lorsqu'elle est serrée,
l'embase doit être solidement fixée et à plat contre le plancher. Fixez les
caches des boulons sur les écrous (fig. 5 2, page 4).
7. Branchez la conduite d'alimentation en eau et serrez le raccord avec un
couple de 30 – 40 livres-pouces (3,4 – 4,5 Nm). Ne serrez pas
trop(fig. 5 3, page 4).
8. Brancher l'alimentation électrique aux toilettes selon le schéma du circuit électrique figurant sur la liste des pièces des toilettes (imprimé séparément).
9. Allumez l'alimentation électrique des toilettes.
10. Ouvrez l'alimentation en eau des toilettes.
11. Rincez les toilettes plusieurs fois et vérifiez l'absence de fuites.
12. Fixez le couvercle de la pompe/de l'embase (fig. 5 5, page 4) à
l'embase avec les vis sur les côtés de l'embase des toilettes (fig. 6,
page 4) et avec des languettes de verrouillage sur les côtés et à l'arrière.
5.3 Installation à distance
1. Pour installer les toilettes à distance de la cuve à eaux noires (pas sur
la bride de plancher typique), placez les toilettes à leur emplacement
avec les mêmes distances que les toilettes montées sur bride (fig. 3,
page 3 et chapitre « Dimensions hors tout », page 41).
2. Marquez les emplacements des trous de fixation à travers les deux trous
dans l'embase.
3. Percez des trous pour vis hexagonales dans le kit de matériel de fixation
à distance.
4. Retirez le coude en caoutchouc noir du clapet antiretour (fig. 5 4,
page 4) à l'arrière des toilettes (fig. 7, page 5).
Page 29

FR
MasterFlush7640 Fonctionnement
29
5. Posez le flexible sanitaire ID 1,5 in. (38 mm) ou le tuyau en PVC ou ABS
ID 1,5 in. (38 mm) du réservoir à matière au clapet antiretour. La tuyauterie peut être posée au-dessus du plancher, ou en dessous, selon les
besoins. Il peut être nécessaire de percer des trous d'accès dans le
plancher ou le mur en fonction de la configuration de l'installation
(fig. 8, page 5). Le flexible sanitaire peut être connecté directement au
clapet antiretour avec deux colliers de flexible.
6. Posez et raccordez le câblage et la conduite d'eau appropriés selon chapitre « Installation sur bride de plancher », page 27.
7. Fixez les toilettes au plancher avec des vis à tête hexagonale sur
chaque côté de l'embase.
8. Couvrez les fixations avec des capuchons en plastique.
9. Ouvrez l'alimentation en eau des toilettes.
10. Rincez les toilettes plusieurs fois et vérifiez l'absence de fuites.
11. Fixez le couvercle de la pompe/de l'embase (fig. 5 5, page 4) à
l'embase avec les vis sur les côtés de l'embase des toilettes (fig. 6,
page 4) et avec des languettes de verrouillage sur les côtés et à l'arrière.
6 Fonctionnement
6.1 Ajout d'eau dans la cuvette des toilettes
1. Pour ajouter de l'eau dans les toilettes, appuyez la pédale de rinçage
partiellement vers le bas (fig. 9, page 5).
2. Afin d'éviter tout débordement, l'écoulement de l'eau s'arrête automatiquement si la pédale est enfoncée trop longtemps. En général, on
n'ajoute davantage d'eau que pour le rinçage de matières solides.
Page 30

FR
Fonctionnement MasterFlush7640
30
6.2 Rinçage des toilettes
1. Pour rincer, appuyez la pédale complètement vers le bas, puis relâchezla (fig. 9, page 5).
2. Cela actionne une puissante pompe broyeuse qui siphonne l'eau et les
déchets de la cuvette des toilettes, les broie et propulse les effluents
vers le réservoir à matières.
!
I
ATTENTION !
Évacuer uniquement de l'eau, des déjections corporelles et du
papier toilette à dissolution rapide. Ne pas jeter d'essuie-tout
mouillés, de serviettes hygiéniques, de couches, de gobelets en
papier, de coton-tiges, de nourriture, de cheveux ou de liquides
tels que des huiles ou des solvants dans les toilettes, car cela
pourrait boucher ou endommager les toilettes ou le système de
toilettes.
REMARQUE
De l'eau résiduelle goutte dans les cuvettes en céramique : En
raison de la bordure intégrée de ces cuvettes de toilettes, de
l'eau peut continuer à s'égoutter lentement dans la cuvette
pendant jusqu'à 20 minutes après le rinçage. Si de l'eau continue de s'égoutter après 30 minutes, remplacez le robinet
d'eau.
S'assurer que toutes les personnes qui les utilisent com-
prennent le fonctionnement des toilettes avant leur utilisation.
Page 31

FR
MasterFlush7640 Maintenance et hivernage
31
6.3 Changement des modes de rinçage
Les toilettes MasterFlush 7640 offrent deux réglages de rinçage afin de
contribuer à la gestion de la consommation d'eau :
Rinçage normal – Utilise 0,83 gal. (3,2 litres) par rinçage. Ajoute de l'eau
dans la cuvette après chaque rinçage.
Rinçage cuvette sèche – Utilise 0,21 gal. (1,7 litres) par rinçage.
N'ajoute pas de l'eau dans la cuvette après le rinçage.
1. Pour passer du réglage Normal au réglage Cuvette sèche du bouton,
appuyez sur la pédale de rinçage pendant environ 10 secondes.
✓ Le mode de rinçage est passé au réglage Cuvette sèche.
2. Passez au mode de rinçage Normal en suivant la même procédure.
7 Maintenance et hivernage
7.1 Nettoyage habituel des toilettes
Pour le nettoyage habituel, utilisez le détergent pour cuvette de toilettes
Dometic. Si ce détergent ne peut être trouvé dans votre région, contactez le
fabricant pour connaître votre revendeur le plus proche (voir le dos du
manuel pour obtenir les adresses). Si le détergent n'est pas disponible, vous
pouvez utiliser la plupart des détergents non abrasifs pour salles de bain et
toilettes. Veuillez suivre les instructions de l'étiquette.
!
ATTENTION !
Afin d'éviter d'endommager les joints internes, ne nettoyez pas
les toilettes avec des détergents abrasifs, des produits chimiques
caustiques ou des lubrifiants et détergents contenant des alcools
ou des distillats de pétrole.
Page 32

FR
Maintenance et hivernage MasterFlush7640
32
7.2 Maintenance ordinaire
Chaque mois
1. Inspectez les toilettes, la tuyauterie, les raccords de la tuyauterie, les
câbles et les raccords des câbles.
2. Ouvrez et fermez toutes les vannes de la tuyauterie.
3. Vérifiez que les éventuels filtres d'eau intégrés au circuit ne sont pas
bouchés.
Annuellement
1. Vérifiez la crépine de la vanne d'arrivée d'eau. Vérifiez également la crépine de la vanne d'arrivée d'eau si le flux d'eau dans les toilettes devient
insuffisant.
7.3 Durant les périodes prolongées de non-utilisation
Les toilettes à broyeur et le système sanitaire doivent être protégés si les toilettes ne sont pas utilisées pendant une période prolongée (plus de deux
semaines).
1. Rincez les toilettes en mode « normal » et ajoutez 4 oz. (120 ml) de lessive liquide biodégradable (qui NE doit PAS contenir d'eau de javel ou
de substances nocives pour l'environnement).
2. Rincez les toilettes cinq fois au moins.
3. Coupez l'alimentation en eau des toilettes.
4. Rincez les toilettes sans eau. Répétez l'opération trois fois. (Cette procédure minimise les résidus d'eau dans la pompe broyeuse.)
5. Coupez l'alimentation électrique des toilettes.
Si le système risque d'être soumis à des températures de gel, veuillez suivre
la procédure ci-dessus, puis procéder à l'hivernage du système, comme
décrit ci-dessous.
Page 33

FR
MasterFlush7640 Maintenance et hivernage
33
7.4 Hivernisation
À la fin de chaque saison de camping, ou lorsque le véhicule est entreposé
pendant de longues périodes au cours desquelles les toilettes peuvent être
exposées à des températures inférieures au point de gel, le système des toilettes doit être adapté pour le stockage dans des conditions hivernales en utilisant de l'antigel compatible avec l'eau potable.
!
I
Hivernisation avec antigel non toxique
1. Évacuez l'eau du réservoir d'eau potable et videz le réservoir à matières.
2. Ajouter de l'antigel pour eau douce au réservoir d'eau potable en respectant les instructions du fabricant d'antigel pour le mélange.
3. Rincez les toilettes plusieurs fois jusqu'à ce que le mélange d'antigel se
soit écoulé complètement à travers les toilettes, la pompe broyeuse et
la cuve à eaux noires.
4. Coupez l'alimentation électrique des toilettes.
Chaque installation est différente, de sorte que les quantités de mélange
antigel sont différentes. Le bon sens de l'utilisateur est nécessaire pour assurer la protection adéquate.
I
ATTENTION !
Ces toilettes ne sont pas destinées à être utilisées lorsqu'elles
sont exposées à des températures inférieures au point de gel.
N'utilisez jamais d'antigel pour voiture (éthylène glycol) dans
les systèmes d'eau douce.
REMARQUE
Utilisez un antigel non-toxique (propylèneglycol) conçu pour des
systèmes d'eau potable. Voir le manuel d'utilisation du véhicule.
REMARQUE
Ne laissez jamais le véhicule inoccupé pendant de longues
périodes avec l'approvisionnement municipal en eau ou la pompe
à eau de bord activés s'il y a un risque de gel.
Page 34

FR
Guide de dépannage MasterFlush7640
34
8 Guide de dépannage
Problème Cause possible Solution proposée
Le cycle de rinçage fonctionne correctement, mais
l'eau se vide lentement ou
pas du tout dans la
cuvette.
La tuyauterie de vidange
est comprimée ou coudée.
Vérifiez la tuyauterie de
vidange.
La pompe broyeuse ou
la tuyauterie de vidange
est bloquée.
Supprimez le bouchon.
La pompe broyeuse fait un
bruit inhabituel et important ou déclenche sans
cesse le coupe-circuit.
Matériau étranger dans la
chambre de la pompe.
Retirez le matériau étranger de la chambre de la
pompe.
Le cycle de rinçage n'est
pas activé après une pression sur la pédale de rinçage.
L'alimentation électrique
des toilettes est éteinte ou
interrompue.
Vérifiez le câblage et les
coupe-circuit (ou fusibles).
Il y a un dysfonctionnement de la pédale de rinçage.
Remplacer le contacteur
de la pédale de rinçage.
La carte de circuits imprimés est défectueuse.
Remplacer la carte de circuits imprimés.
Le réservoir à matières est
plein et le signal du réservoir a désactivé l'alimentation électrique des
toilettes (si le système de
surveillance du niveau du
réservoir est installé).
Videz le réservoir à
matières.
Entrée d'eau insuffisante
ou inexistante dans la
cuvette des toilettes.
La conduite d'alimentation en eau est comprimée
ou coudée.
Vérifiez la conduite d'alimentation en eau.
La crépine de la vanne
d'eau est bloquée.
Retirez le bouchon au
niveau de la vanne d'eau.
Il y a un dysfonctionnement de la vanne d'eau.
Remplacez la vanne
d'arrivée d'eau.
Page 35

FR
MasterFlush7640 Retraitement
35
9 Retraitement
1. Si possible, déposer le matériau d'emballage dans les conteneurs se
recyclage appropriés.
M
Si vous souhaitez retraiter votre produit, demander à votre déchetterie locale ou à un spécialiste les informations pour procéder au
retraitement conformément aux dispositions en vigueur.
10 Garantie limitée
Le vendeur nommé ci-dessous apporte la garantie suivante à l'égard du
modèle MasterFlush 7640 de Dometic uniquement.
1. Garantie limitée à un an
1A. Cette garantie limitée sera en vigueur pendant un an à compter de
la date d'achat.
1B. Cette garantie limitée est accordée uniquement au premier acqué-
reur (ci-après appelé « l'acquéreur d'origine ») qui a acquis le produit pour l'utilisation personnelle, familiale ou domestique de
l'acquéreur d'origine. L'acheteur original doit conserver une copie
du reçu de vente ou de la facture comme preuve de la date
d'achat, car la preuve d'achat est obligatoire pour obtenir un service de garantie.
1C. Si ce produit est utilisé commercialement ou professionnellement,
il est garanti à l'acquéreur d'origine uniquement comme étant
exempt de défauts matériels et de main-d'œuvre pour une période
de 90 jours à partir de la date d'achat.
Page 36

FR
Garantie limitée MasterFlush7640
36
1D. Cette garantie s'applique à toutes les parties des toilettes Dome-
tic, qui sont garanties exemptes de vices de matériau et de fabrication dans des conditions normales d'utilisation. Cette garantie
ne couvre pas les états ne concernant pas le matériau ou la fabrication du produit. Ces conditions non apparentées comprennent,
mais ne sont pas limitées à, (a) une installation défectueuse et
tout dommage en résultant ; (b) la nécessité d'un entretien normal
et tout dommage résultant du défaut d'un tel entretien ; (c) l'omission de suivre les instructions du vendeur pour l'utilisation de ce
produit, y compris le défaut qui peut résulter du non-respect des
procédures d'hivernisation ; (d) tout accident qui entraîne des
dommages à ce produit ; (e) les rayures ou la coloration de tout
élément en plastique ou en céramique ; (f) les cas de forces
majeure, ou les usages abusifs d'une partie quelconque de ce produit et toute modification par toute personne autre que le vendeur.
1E. Pour que l'acquéreur d'origine (UNIQUEMENT) bénéficie des
avantages de cette garantie pendant la période de 1 ans (pour
usage personnel) ou de 90 jours (pour un usage commercial), les
dispositions suivantes s'appliquent :
(a) L'acquéreur d'origine doit contacter le revendeur local auquel il a
acheté le produit ; ou bien contacter le service après-vente du
vendeur au 1-800-321-9886 (8h00-17h00 temps européen, USA)
et fournir au revendeur local ou au service après-vente du vendeur le bon d'achat ou la facture, le modèle du produit et le
numéro de série du produit. L'étiquette d'identification du modèle
du produit est située à l'arrière de la cuvette, sous le cache de la
pompe/de l'embase (voir illustration).
Page 37

FR
MasterFlush7640 Garantie limitée
37
(b) Si le produit, encore sous garantie, est retourné au revendeur
local où il a été acheté, le revendeur local réparera, remplacera ou
remboursera le produit en vertu de cette garantie et tel qu'autorisé
par le vendeur. Le Vendeur fournira gratuitement les pièces de
rechange nécessaires ou le produit à l'acheteur initial, y compris le
fret sur ces pièces de remplacement ou le produit, et le vendeur
devra payer les frais directs de main-d'œuvre pour la réparation
ou le remplacement.
(c) En aucun cas, le Vendeur ne paiera ou ne sera tenu responsable
des frais de déplacement de l'acquéreur d'origine ou du revendeur
ou d'autres frais associés à la mise à disposition du produit ou du
véhicule de loisirs chez le revendeur pour les réparations, ou à
l'accès du revendeur au produit ou au véhicule, ou pour les temps
d'immobilisation du produit ou du véhicule.
(d) Il peut être demandé à l'acquéreur initial de retourner un produit
ou des pièces défectueux si cela est requis par le vendeur ; dans
ce cas, le vendeur devra payer les frais de transport connexes.
2. LE VENDEUR N'AUTORISE AUCUNE PERSONNE OU ENTREPRISE
À CRÉER OU ÉTENDRE LES OBLIGATIONS DE GARANTIE OU DE
RESPONSABILITÉ EN SON NOM.
Page 38

FR
Garantie limitée MasterFlush7640
38
3. LA RÉPARATION, LE REMPLACEMENT OU LE REMBOURSEMENT
DU PRODUIT DÉFECTUEUX, AU CHOIX DU VENDEUR, SERA LE
SEUL RECOURS DE L'ACQUÉREUR D'ORIGINE AUX TERMES DE
LA PRÉSENTE GARANTIE LIMITÉE. EN AUCUN CAS, LE VENDEUR
NE POURRA ÊTRE TENU RESPONSABLE DES DOMMAGES INDIRECTS OU ACCESSOIRES DE L'ACHETEUR. CERTAINS ÉTATS
N'AUTORISENT PAS L'EXCLUSION NI LA RESTRICTION DES DOMMAGES INDIRECTS OU ACCESSOIRES, PAR CONSÉQUENT, LES
RESTRICTIONS OU EXCLUSIONS PRÉCÉDENTES PEUVENT NE
PAS S'APPLIQUER.
4. LE VENDEUR DÉCLINE TOUTE AUTRE GARANTIE À L'ÉGARD DU
PRODUIT, QU'ELLE SOIT EXPRESSE OU IMPLICITE, ET DÉCLINE
EXPRESSÉMENT TOUTE GARANTIE IMPLICITE DE QUALITÉ MARCHANDE ET D'ADÉQUATION À UN USAGE PARTICULIER. CERTAINS ÉTATS NE PERMETTENT PAS DE LIMITATIONS SUR LA
VALIDITÉ NI LA LONGUEUR DE GARANTIES IMPLICITES, DANS CE
CAS LA LIMITATION MENTIONNÉE CI-DESSUS PEUT NE PAS
S'APPLIQUER.
5. CETTE GARANTIE VOUS DONNE DES DROITS LÉGAUX SPÉCIFIQUES, ET IL EST POSSIBLE QUE VOUS AYEZ D'AUTRES DROITS,
QUI VARIENT D'UN ÉTAT À L'AUTRE.
Vendeur :
Dometic Corporation - Section sanitaire
13128 SR 226
Big Prairie, Ohio 44611 USA
330-439-5550
Page 39

FR
MasterFlush7640 Caractéristiques techniques
39
11 Caractéristiques techniques
11.1 Certificats
11.2 Matériaux
Cuvette des toilettes : céramique vitrifiée
Siège des toilettes : bois laqué
Socle des toilettes : polypropylène
Corps de la pompe broyeuse : polypropylène rempli de verre
Vanne d'arrivée d'eau : polypropylène
Pédale : polypropylène
Casse-vide : ABS/polypropylène
Joint de bride de plancher : caoutchouc à base de nitrile, mousse
Page 40

FR
Caractéristiques techniques MasterFlush7640
40
11.3 Exigences minimales d'installation
* Une alimentation en eau dépassant 5,0 gpm (18.9 l/m) peut exiger un limiteur de débit au
niveau de l'arrivée d'eau des toilettes.
** Veuillez veiller au bon fonctionnement de la vidange si l'installation s'approche de cette dis-
tance.
1. Se reporter aux normes ANSI 1192 et Z240 série véhicules de loisirs, le
cas échéant, pour d'autres consignes d'installation de toilettes sur des
véhicules de loisirs.
Les spécifications peuvent être modifiées sans avis préalable.
Puissance électrique absorbée 15 A / 12 V CC
Coupe-circuit/fusible 20 A / 12 V CC
Câblage Se reporter à la norme ANSI/DV RVIA et aux
normes NFPA 70/NEC pour le calibre recommandé du fil (USA).
Se reporter aux normes CEC I et II pour le
calibre recommandé du fil (Canada).
Raccord
d'alimentation
en eau 1/2 in. NPT
Débit 3,0 – 5,0 gpm (11,4 – 18,9 l/m) recom-
mandé*
2,0 gpm (9,5 l/m) minimum
Pression statique 30 – 100 PSI (206,8 – 689,5 kPa)
Purge
(2 options)
À distance
(pas sur la bride
directement au-dessus du réservoir à
matières)
Taille du tuyau sanitaire ID 1,5 in. (38 mm) ou 1 in. (25 mm)
Pose horizontale du tuyau 40 ft. (12,2 m) maximum**
Page 41

FR
MasterFlush7640 Caractéristiques techniques
41
11.4 Dimensions des toilettes
Toutes les dimensions peuvent varier de ±10 mm (±3/8 inch)
11.5 Dimensions hors tout
Lettre dans
fig. 2, page 3
Modèle 7640
A 20 in. (508 mm)
B 15 in. (381 mm)
C 19 in. (483 mm)
D 18,375 in. (467 mm), hauteur du siège
E 33,875 in. (860 mm), lunette du siège ouverte
F 14,75 in. (375 mm), de l'arrière vers l'avant de l'embase
G 10 in. (254 mm), hors tout
Lettre dans
fig. 3, page 3
Dimensions/Description
A 10 in. (254 mm)
B 11 in. (279 mm)
C 11 in. (279 mm)
D Bride de sol
E Paroi de gauche
F Paroi arrière
G Paroi de droite
Page 42

ES
Explicación de los símbolos MasterFlush7640
42
Lea detenidamente estas instrucciones antes de llevar a cabo la instalación y puesta en funcionamiento, y consérvelas en un lugar seguro.
En caso de vender o entregar el producto a otra persona, entregue
también estas instrucciones.
Contenido
1 Explicación de los símbolos . . . . . . . . . . . . . . . . . . . . . . . . . . . . . . 42
2 Instrucciones de seguridad . . . . . . . . . . . . . . . . . . . . . . . . . . . . . . . 43
3 Uso previsto . . . . . . . . . . . . . . . . . . . . . . . . . . . . . . . . . . . . . . . . . . 44
4 Descripción técnica . . . . . . . . . . . . . . . . . . . . . . . . . . . . . . . . . . . . . 44
5 Instalación. . . . . . . . . . . . . . . . . . . . . . . . . . . . . . . . . . . . . . . . . . . . 45
6 Funcionamiento. . . . . . . . . . . . . . . . . . . . . . . . . . . . . . . . . . . . . . . . 48
7 Mantenimiento y acondicionamiento para el invierno . . . . . . . . . . . 50
8 Resolución de problemas . . . . . . . . . . . . . . . . . . . . . . . . . . . . . . . . 53
9 Colocación . . . . . . . . . . . . . . . . . . . . . . . . . . . . . . . . . . . . . . . . . . . 54
10 Garantía legal limitada . . . . . . . . . . . . . . . . . . . . . . . . . . . . . . . . . . 54
11 Datos técnicos. . . . . . . . . . . . . . . . . . . . . . . . . . . . . . . . . . . . . . . . . 58
1 Explicación de los símbolos
!
I
¡ATENCIÓN!
Indicación de seguridad: La no observancia de las siguientes
instrucciones puede provocar lesiones.
NOTA
Información suplementaria para el uso del producto.
Page 43

ES
MasterFlush7640 Instrucciones de seguridad
43
2 Instrucciones de seguridad
El fabricante declina toda responsabilidad ante daños ocurridos en los
siguientes casos:
errores de montaje o de conexión
daños en el producto debido a influencias mecánicas
modificaciones realizadas en el producto sin el expreso consentimiento
del fabricante
utilización del aparato para fines distintos a los descritos en las
instrucciones
2.1 Advertencias
Antes de instalar, poner en funcionamiento o utilizar este producto se ha de
haber leído y comprendido la siguiente declaración. Cualquier modificación
de este producto podría ocasionar daños a la propiedad.
El fabricante recomienda que sea un técnico o un electricista cualificado
para vehículos de recreo quien instale o ponga en funcionamiento este producto conforme a todas las normas y disposiciones aplicables. Una instalación incorrecta podría acarrear daños materiales, daños personales o
incluso la muerte.
!
¡ATENCIÓN!
Llenar en exceso el tanque de aguas negras puede ocasionar
graves problemas en el sistema sanitario, como, por ejemplo,
ruptura del tanque y salida de su contenido a la autocaravana.
Para evitar este riesgo, el fabricante recomienda utilizar el circuito
de parada “full tank” en el módulo de control electrónico del inodoro. La señal “full” proveniente del tanque de aguas negras
puede ser generada por un monitor opcional del tanque Dometic
DTM01C o por un sistema de monitoreo del tanque DTM04 de
cuatro niveles.
Page 44

ES
Uso previsto MasterFlush7640
44
3 Uso previsto
El Dometic MasterFlush7640 es un inodoro de cisterna eléctrica que tritura
los residuos y los bombea bien a un tanque de aguas negras o bien a otro
sistema de almacenamiento de efluentes o de gestión de residuos. Un pedal
de descarga permite al usuario añadir agua a la taza (antes de utilizar el inodoro o de descargar la cisterna) y accionar la cisterna.
4 Descripción técnica
4.1 Ventajas
Cómoda descarga electrónica. Se añade agua o se descarga la cisterna
pisando el pedal de descarga.
Posibilidad de seleccionar entre dos ajustes de consumo de agua. La
descarga “Normal” utiliza 0,83 gal. (3,1 l) y seguidamente añade agua a la
taza. La descarga “Dry Bowl” utiliza solo 0,21 gal. (0,79 l) y no añade agua
a la taza.
Instalación versátil. La potente bomba trituradora permite colocar el inodoro a una distancia de hasta 40 ft. (12,2 m) del tanque de aguas negras o
de cualquier otra tubería final de descarga.
Parada automática “full tank”. Si está conectado a un sistema de indicación de nivel en el tanque de aguas negras (como el sistema Dometic
DTM01), el inodoro MasterFlush7640 no realizará ninguna descarga
estando el tanque lleno. Esta función de seguridad evita un llenado excesivo
del tanque de retención, que podría conllevar daños para la autocaravana.
Page 45

ES
MasterFlush7640 Instalación
45
4.2 Componentes
Consulte la lista completa de piezas (impresa por separado) para obtener
información más detallada.
5 Instalación
I
N.º en
fig. 1, página 3
Descripción
1 Cubierta del disyuntor de vacío
2 Disyuntor de vacío
3 Bomba trituradora
4 Cubierta de la bomba/base
5 Juego de tornillos para montaje en el suelo con bridas
6 Cables eléctricos
7 Junta de brida para el suelo
8 Válvula de agua
9 Pedal de descarga
10 Base del inodoro
11 Taza del inodoro
12 Asiento del inodoro
– Juego de tornillos para montaje remoto
NOTA
Asegúrese de que al pisar el pedal, éste toque la misma
superficie plana en la que está instalado el inodoro.
Asegúrese de cumplir los requisitos de instalación que se
recomiendan (capítulo “Requisitos mínimos para la instalación” en la página 59).
El inodoro no está previsto para ser instalado en una ducha.
Page 46

ES
Instalación MasterFlush7640
46
5.1 Herramientas necesarias
Tenazas o llave inglesa
Llave de 7/16 in./11 mm
Herramientas de conexión eléctrica
5.2 Instalación en la brida de suelo
1. Para sustituir un inodoro antiguo:
– Cierre el suministro de agua al inodoro.
– Retire y drene la línea de suministro de agua.
– Retire los pernos o tornillos de sujeción del inodoro.
– Retire el inodoro del suelo.
– Retire y deseche la junta de brida antigua para el suelo y los pernos
de sujeción antiguos.
– Compruebe que la línea de centro de la brida del suelo mantenga la
distancia mínima recomendada respecto a la pared trasera
(fig. 3 A, página 3 y capítulo “Medidas de la línea de centro” en la
página 60).
– Asegúrese de que la cara superior de la brida del suelo está limpia y
exenta de residuos o de material sellante.
2. Al instalar una nueva brida de suelo:
– Asegúrese de que los orificios de montaje del inodoro estén correc-
tamente colocados (fig. 3 D, página 3).
– La brida de suelo tiene que asegurarse al suelo con un mínimo de
cuatro tornillos (mejor ocho).
– Inserte en las escotaduras de la brida del suelo (fig. 4, página 4) los
dos pernos en T suministrados.
3. Compruebe que la junta de la brida del suelo esté instalada en la base
del inodoro (fig. 5 1, página 4).
4. Coloque cuidadosamente el inodoro sobre la brida del suelo.
5. Alinee los orificios de la base del inodoro con los pernos en T al deposi-
tar el inodoro sobre la brida de suelo. El inodoro debe colocarse de
modo que la boca de desagüe de la base quede centrada dentro del
agujero de desagüe de la brida de suelo.
I
NOTA
El inodoro todavía no reposa en el suelo sobre toda la base. La
junta del suelo se debe comprimir en los siguientes pasos.
Page 47

ES
MasterFlush7640 Instalación
47
6. Monte en los pernos en T las tuercas y arandelas para montaje en el
suelo. Apriete cuidadosamente las tuercas a 30 – 40 libras por pulgada
(3,4–4,5Nm). No las apriete en exceso. Apriete alternativamente
cada lado para evitar que se distorsione la base. Una vez apretadas las
tuercas, la base tiene que tener una fijación segura respecto al suelo en
posición plana. Fije las cubiertas de los pernos sobre las tuercas
(fig. 5 2, página 4).
7. Conecte la tubería de suministro de agua y apriete la conexión a entre
30 – 40 libras por pulgada (3,4 – 4,5 Nm). No la apriete en exceso
(fig. 5 3, página 4).
8. Conecte el suministro eléctrico al inodoro conforme al esquema de
conexiones de la lista de piezas del inodoro (impresa por separado).
9. Conecte el suministro eléctrico al inodoro.
10. Conecte el suministro de agua al inodoro.
11. Descargue varias veces la cisterna del inodoro y compruebe si hay
fugas.
12. Fije la cubierta de la bomba/base (fig. 5 5, página 4) atornillándola a
ambos lados de la base del inodoro (fig. 6, página 4) y asegurándola
con lengüetas de bloqueo a los lados y en la parte trasera.
5.3 Instalación remota
1. Para instalar un inodoro separado del tanque de aguas negras (y no
sobre la brida de suelo habitual), coloque el inodoro guardando las mismas distancias que un inodoro montado sobre brida (fig. 3, página 3 y
capítulo “Medidas de la línea de centro” en la página 60).
2. Marque las ubicaciones de los agujeros de fijación a través de dos agujeros en la base.
3. Perfore agujeros piloto para los tornillos hexagonales del juego de tornillos para montaje remoto.
4. Retire el codo de goma negro de la válvula de control (fig. 5 4,
página 4) situada en la parte trasera del inodoro (fig. 7, página 5).
Page 48

ES
Funcionamiento MasterFlush7640
48
5. Tienda una manguera flexible sanitaria con un diámetro interior de
1,5 in. (38 mm) o bien una manguera de PVC con un diámetro interior
de 1,5 in. (38 mm) o bien una tubería ABS desde el tanque de residuos
hasta la válvula de control. Las tuberías se pueden tender por encima o
por debajo del suelo, según se precise. Puede ser necesario perforar los
agujeros de acceso a través del suelo o de la pared dependiendo del
diseño de instalación (fig. 8, página 5). La manguera sanitaria flexible
se puede conectar directamente a la válvula de control con dos abrazaderas de manguera.
6. Tienda y conecte correctamente el cableado y la tubería de agua conforme a capítulo “Instalación en la brida de suelo” en la página 46.
7. Fije el inodoro al suelo con tornillos de cabeza hexagonal a cada lado
de la base.
8. Cubra los tornillos de sujeción con cubiertas de plástico.
9. Conecte el suministro de agua al inodoro.
10. Descargue varias veces la cisterna del inodoro y compruebe si hay
fugas.
11. Fije la cubierta de la bomba/base (fig. 5 5, página 4) atornillándola a
ambos lados de la base del inodoro (fig. 6, página 4) y asegurándola
con lengüetas de bloqueo a los lados y en la parte trasera.
6 Funcionamiento
6.1 Adición de agua a la taza del inodoro
1. Para añadir agua al inodoro, presione parcialmente el pedal de descarga (fig. 9, página 5).
2. Para evitar que el agua rebose del inodoro, el flujo de agua se detendrá
automáticamente si el pedal se presiona durante demasiado tiempo.
Generalmente se añade más agua solo para descargar sólidos.
Page 49

ES
MasterFlush7640 Funcionamiento
49
6.2 Descarga del inodoro
1. Para descargar la cisterna, pise a fondo el pedal y, seguidamente, suéltelo (fig. 9, página 5).
2. Con ello se activa una potente bomba de maceración que drena el agua
y residuos de la taza, macera el efluente y lo propulsa al tanque de
aguas negras.
!
I
¡ATENCIÓN!
Elimine únicamente agua, desechos corporales y papel higiénico
de disolución rápida. No arroje al inodoro toallitas húmedas, compresas higiénicas, pañales, vasos de papel, bastoncillos de algodón, pelos ni líquidos tales como aceites o disolventes, pues ello
podría atascar el inodoro o dañar el sistema.
NOTA
Goteo residual de agua en tazas de cerámica: el reborde de la
taza de este inodoro puede condicionar un lento goteo de
agua en la taza durante un tiempo de hasta 20 minutos después de haber descargado la cisterna. Si el agua continúa
goteando después de 30 minutos, cambie la válvula de agua.
Asegúrese de que todos los usuarios sepan cómo funciona el
inodoro antes de utilizarlo.
Page 50

ES
Mantenimiento y acondicionamiento para el invierno MasterFlush7640
50
6.3 Cambiar entre los modos de descarga
Los inodoros MasterFlush7640 ofrecen dos ajustes de descarga para poder
ahorrar en el consumo de agua:
Descarga Normal: consume 0,83 gal. (3,1 litros) por descarga. Llena
agua en la taza después de cada descarga.
Descarga Dry Bowl: consume 0.21 gal. (0,79 litros) por descarga. No
llena agua en la taza después de la descarga.
1. Para cambiar el ajuste de descarga Normal al de descarga Dry Bowl,
presione durante aproximadamente diez segundos el pedal.
✓ El modo de descarga ha pasado a Dry Bowl.
2. Cambie al modo de descarga Normal siguiendo los mismos pasos.
7 Mantenimiento y acondicionamiento
para el invierno
7.1 Limpieza rutinaria del inodoro
Utilice Dometic Toilet Bowl Cleaner para la limpieza rutinaria. Si no encuentra este limpiador en su región, pregunte al fabricante cuál es el distribuidor
más próximo (ver direcciones en el dorso de este manual). Si no es posible
adquirir este limpiador, utilice cualquier limpiador de baños e inodoros no
abrasivo. Siga las instrucciones expuestas en la etiqueta.
!
¡ATENCIÓN!
Para evitar dañar las juntas internas, no limpie el inodoro con productos de limpieza abrasivos, productos químicos cáusticos ni
lubricantes o limpiadores que contengan alcohol o destilados de
petróleo.
Page 51

ES
MasterFlush7640 Mantenimiento y acondicionamiento para el invierno
51
7.2 Mantenimiento rutinario
Mensualmente
1. Revise el inodoro, las tuberías, los empalmes de tuberías, los cables y
las conexiones de cables.
2. Abra y cierre todas las válvulas de las tuberías.
3. Controle los filtros de agua en línea en cuanto a posibles obstrucciones.
Anualmente
1. Controle el filtro de la válvula de agua. Controle también el filtro de la
válvula de agua si el caudal de agua que entra en el inodoro es insuficiente.
7.3 Durante períodos prolongados de no utilización
El inodoro triturador y el sistema sanitario deberán protegerse en caso de
que no se utilice durante un período prolongado de tiempo (más de dos
semanas, especialmente si hace calor).
1. Descargue el inodoro en modo “Normal” y añada 4 oz. (120 ml) de
detergente líquido biodegradable para ropa (NO debe contener lejía ni
sustancias perjudiciales para el medio ambiente).
2. Descargue el inodoro por lo menos cinco veces.
3. Desconecte el suministro de agua al inodoro.
4. Accione el pedal de la cisterna sin agua. Repita tres veces este procedimiento. (Así se minimizará la cantidad de agua restante en la bomba
maceradora.)
5. Desconecte el suministro eléctrico al inodoro.
Si el sistema va a estar expuesto a temperaturas bajo cero, siga el procedimiento anterior y, a continuación, acondicione el sistema para el invierno
conforme a lo descrito más abajo.
Page 52

ES
Mantenimiento y acondicionamiento para el invierno MasterFlush7640
52
7.4 Preparación para el invierno
Al final de cada temporada de camping o cuando se va a guardar el vehículo
durante un tiempo prolongado en el que el inodoro puede quedar expuesto
a temperaturas bajo cero, se debe acondicionar el sistema de inodoro para
su almacenamiento durante el invierno utilizando anticongelante apto para
agua potable.
!
I
Acondicionamiento para el invierno con anticongelante no tóxico
1. Drene el depósito de agua potable y vacíe el tanque de aguas negras.
2. Añada anticongelante para agua dulce al depósito de agua potable conforme a las instrucciones de mezcla dadas por el fabricante del anticongelante.
3. Accione varias veces la descarga de la cisterna hasta que toda la mezcla anticongelante haya fluido por el inodoro, la bomba maceradora y el
tanque de aguas negras.
4. Desconecte el suministro eléctrico al inodoro.
La proporción de la mezcla puede variar según cada instalación. Se requiere
la discreción del usuario para asegurar una protección adecuada.
I
¡ATENCIÓN!
Este inodoro no está concebido para ser utilizado a tempera-
turas bajo cero.
No utilice nunca anticongelante para automóviles (anticonge-
lante de etilenglicol) en sistemas de agua dulce.
NOTA
Use anticongelante no tóxico (propilenglicol) apto para sistemas
de agua potable. Consulte el manual del vehículo.
NOTA
No deje nunca un vehículo vacío durante un periodo de tiempo
prolongado conectado a un sistema municipal de suministro de
agua o con una bomba de agua de a bordo si existe la posibilidad
de que la temperatura descienda por debajo de cero.
Page 53

ES
MasterFlush7640 Resolución de problemas
53
8 Resolución de problemas
Problema Causa posible Propuesta de solución
El ciclo de descarga de
cisterna funciona correctamente, pero el agua de la
taza se vacía lentamente
o no se vacía en absoluto.
La tubería de descarga
está pillada o retorcida.
Revise la tubería de descarga.
La bomba maceradora o
la
tubería de descarga está
bloqueada.
Elimine los atascos.
La bomba de maceración
hace un ruido inhabitualmente alto o dispara constantemente el disyuntor.
Hay cuerpos extraños en
la cámara de la bomba.
Elimine los cuerpos extraños de la cámara de la
bomba.
El ciclo de descarga no se
activa tras presionar el
pedal de la cisterna.
El suministro eléctrico al
inodoro está apagado o
interrumpido.
Revise el cableado y los
disyuntores (o fusibles).
El pedal de la cisterna no
funciona correctamente.
Cambie el interruptor del
pedal de la cisterna.
La placa de circuitos no
funciona correctamente.
Cambie la placa de circuitos.
El tanque de aguas
negras está lleno y la
señal del tanque ha desconectado el suministro
eléctrico al inodoro (si
está instalado el sistema
de control de nivel del tanque).
Vaciado del depósito de
retención.
No entra agua en la taza o
no es suficiente.
La tubería de suministro
de agua está pillada o
retorcida.
Revise la tubería de suministro de agua.
La rejilla de la válvula de
agua está obstruida.
Desatasque la válvula de
agua.
La válvula de agua no funciona correctamente.
Cambie la válvula de
agua.
Page 54

ES
Colocación MasterFlush7640
54
9 Colocación
1. Deseche el material de embalaje en contenedores adecuados si es
posible.
M
Si desea desechar el producto, consulte al punto limpio local o a
una empresa especializada los detalles para hacerlo en cumplimiento con las disposiciones legales pertinentes.
10 Garantía legal limitada
El distribuidor mencionado más abajo ofrece la siguiente garantía únicamente para Dometic MasterFlush Model 7640.
1. Garantía legal limitada a un año
1A. Esta garantía legal limitada es válida durante un año a partir de la
fecha de compra.
1B. Esta garantía legal limitada solo se aplica al Primer Comprador
(en lo sucesivo se le denominará “comprador original”) que haya
adquirido el producto para darle un uso personal, familiar o
doméstico. El comprador original deberá guardar una copia del
recibo de venta o de la factura como prueba de la fecha de compra, pues para disfrutar de la garantía es necesario presentar tal
recibo o factura.
1C. Si este producto se destina a usos comerciales, únicamente se
garantizará al comprador original que el producto no tiene defectos materiales ni de fabricación por un período de 90 días a partir
de la fecha de compra.
Page 55

ES
MasterFlush7640 Garantía legal limitada
55
1D. Esta garantía cubre todas las piezas del inodoro Dometic del que
se garantiza que, bajo condiciones de uso normales, está exento
de defectos de material y fabricación. Esta garantía no cubre
aspectos no relacionados con el material y fabricación del producto. Entre ellos se encuentran: (a) instalación defectuosa y
cualquier daño que se pudiera derivar de ello; (b) la necesidad de
mantenimiento normal y cualquier daño resultante de no haber
realizado las tareas de mantenimiento; (c) no seguir las instrucciones del vendedor para el uso de este producto, inclusive cualquier
fallo que resulte de no haber seguido el procedimiento de acondicionamiento para invierno; (d) cualquier accidente que provoque
algún daño en el producto; (e) rayadura o mancha de cualquier
componente cerámico o plástico; (f) causas de fuerza mayor o
uso indebido de cualquier parte de este producto o cualquier
modificación realizada por cualquier persona que no sea el fabricante.
1E. Para que el comprador original (ÚNICAMENTE) pueda benefi-
ciarse de esta garantía legal durante el periodo de 1 año (para
uso personal) o de 90 días (para uso comercial), se aplicará lo
siguiente:
(a) El comprador original se pondrá en contacto con el distribuidor
local al que se compró el producto o con el Departamento de Servicio de Atención al Cliente del vendedor llamando al teléfono 1800-321-9886 (entre las 8:00 y las 17:00 h zona horaria del Este
de EE. UU.) y proporcionará al distribuidor local o al Departamento de Servicio al Cliente del vendedor el recibo de la venta o
factura, el modelo del producto y el número de serie del producto.
La etiqueta de identificación del modelo del producto se encuentra
en la parte trasera de la taza del inodoro, debajo de la cubierta de
la bomba/base (ver figura).
Page 56

ES
Garantía legal limitada MasterFlush7640
56
(b) Si, mientras está vigente la garantía legal, se devuelve el producto
al distribuidor local donde se realizó la compra, dicho distribuidor
deberá reparar, sustituir o reembolsar el importe del producto conforme a esta garantía y a lo que haya dispuesto el vendedor. El
vendedor proveerá de forma gratuita las piezas de repuesto necesarias o el producto al comprador original, inclusive flete de dichas
piezas de repuesto o del producto, y correrá además con los gastos de la mano de obra necesaria para la reparación o la sustitución.
(c) El vendedor no abonará ni se hará responsable bajo ninguna cir-
cunstancia de gastos de desplazamiento del comprador original o
del distribuidor, ni de otros gastos asociados con el hecho de llevar el producto o el vehículo de recreo al distribuidor para su reparación, de facilitar al distribuidor el acceso al producto o vehículo,
o por el tiempo de inactividad del producto o vehículo.
(d) El vendedor puede exigir al comprador original devolver el pro-
ducto o las piezas defectuosas, en cuyo caso el vendedor correrá
con los gastos de envío.
Page 57

ES
MasterFlush7640 Garantía legal limitada
57
2. EL VENDEDOR NO AUTORIZA A NINGUNA PERSONA NI EMPRESA
A CREAR O AMPLIAR NINGUNA OBLIGACIÓN DE GARANTÍA
LEGAL NI RESPONSABILIDAD EN SU NOMBRE.
3. LA REPARACIÓN O SUSTITUCIÓN DE, O EL REEMBOLSO POR UN
PRODUCTO DEFECTUOSO, A CRITERIO DEL VENDEDOR, SERÁ LA
ÚNICA COMPENSACIÓN AL COMPRADOR ORIGINAL BAJO ESTA
GARANTÍA LEGAL LIMITADA. EL VENDEDOR NO SERÁ RESPONSABLE EN NINGÚN CASO DE DAÑOS AL COMPRADOR, ACCIDENTALES O DERIVADOS. ALGUNOS ESTADOS NO PERMITEN LA
EXCLUSIÓN O LIMITACIÓN DE DAÑOS ACCIDENTALES O DERIVADOS. POR LO TANTO, ES POSIBLE QUE ESTA LIMITACIÓN O
EXCLUSIÓN NO SEA DE APLICACIÓN EN SU ESTADO.
4. EL VENDEDOR EXCLUYE CUALQUIER OTRA GARANTÍA LEGAL EN
RELACIÓN A ESTE PRODUCTO, YA SEA EXPRESA O TÁCITA; Y DE
FORMA ESPECÍFICA EXCLUYE TODA GARANTÍA IMPLÍCITA DE
COMERCIALIZACIÓN E IDONEIDAD PARA UN FIN CONCRETO.
ALGUNOS ESTADOS NO PERMITEN LIMITACIONES DE GARANTÍAS LEGALES IMPLÍCITAS O DE LA DURACIÓN DE LAS MISMAS.
POR LO TANTO, ES POSIBLE QUE ESTA LIMITACIÓN NO SEA DE
APLICACIÓN EN SU ESTADO.
5. ESTA GARANTÍA LEGAL LE OTORGA DERECHOS ESPECÍFICOS
LEGALES Y ADEMÁS PUEDE DARSE EL CASO DE QUE LE ASISTAN TAMBIÉN OTROS DERECHOS; DEPENDIENDO DEL PAÍS EN
QUE SE ENCUENTRE.
Vendedor:
Dometic Corporation - Sanitation Div.
13128 SR 226
Big Prairie, Ohio 44611 USA
330-439-5550
Page 58

ES
Datos técnicos MasterFlush7640
58
11 Datos técnicos
11.1 Certificados
11.2 Materiales
Taza del inodoro: cerámica vítrea
Asiento del inodoro: madera esmaltada
Base del inodoro: polipropileno
Cuerpo de la bomba maceradora: polipropileno relleno de fibra de vidrio
Válvula de agua: polipropileno
Pedal: polipropileno
Disyuntor de vacío: ABS/polipropileno
Junta de brida del suelo: caucho nitrílico, espuma
Page 59

ES
MasterFlush7640 Datos técnicos
59
11.3 Requisitos mínimos para la instalación
* El suministro de agua que excede los 5,0 gpm (18,9 l/m) puede requerir un restrictor de cau-
dal en la toma de entrada del inodoro.
** Controle que la descarga del caudal se realice adecuadamente si la instalación se aproxima
a esta distancia.
1. Siempre que sean aplicables, consultar las normas de las series
ANSI 1192 y Z240 RV para guías adicionales de instalación de inodoros
en vehículos de recreo.
Las especificaciones están sujetas a cambios sin previo aviso.
Electricidad Consumo eléctrico 15 A/12 V CC
Disyuntor/fusible 20 A/12 V CC
Cableado Consultar las normas ANSI/RVIA LV y NFPA
70/NEC para el calibre de cable recomendado (EE. UU.).
Consultar las normas CEC I y II para el calibre de cable recomendado (Canadá).
Suministro
de agua
Conector NPT de 1/2 pulgadas
Caudal 3,0 – 5,0 gpm (11,4 – 18,9 l/m) recomen-
dado*
2,0 gpm (9,5 l/m) mínimo
Presión estática 30 – 100 PSI (206,8 – 689,5 kPa)
Descarga
(2 opciones)
Remoto
(no en la brida directamente por encima
del tanque de residuos)
Tamaño de la manguera sanitaria –
1,5 in. (38 mm) o 1 in. (25 mm) de diámetro
interior
Tendido horizontal de la manguera –
máximo 40 ft. (12,2 m)**
Page 60

ES
Datos técnicos MasterFlush7640
60
11.4 Medidas del inodoro
Todas las medidas pueden variar ±10 mm
11.5 Medidas de la línea de centro
Letra en
fig. 2, página 3
Modelo 7640
A 20 in. (508 mm)
B 15 in. (381 mm)
C 19 in. (483 mm)
D 18,375 in. (467 mm), altura del asiento
E 33,875 in. (860 mm), tapa del asiento levantada
F 14,75 in. (375 mm), distancia desde la parte trasera hasta la
parte delantera de la base
G 10 in. (254 mm), línea de centro
Letra en
fig. 3, página 3
Medidas/descripción
A 10 in. (254 mm)
B 11 in. (279 mm)
C 11 in. (279 mm)
D Brida del suelo
E Pared izquierda
F Pared trasera
G Pared derecha
Page 61

PT
MasterFlush7640 Explicação dos símbolos
61
Por favor, leia atentamente este manual antes da montagem e colocação em funcionamento do aparelho e guarde-o em local seguro. Em
caso de transmissão do produto, entregue o manual ao novo utilizador.
Índice
1 Explicação dos símbolos . . . . . . . . . . . . . . . . . . . . . . . . . . . . . . . . . 61
2 Instruções de segurança . . . . . . . . . . . . . . . . . . . . . . . . . . . . . . . . . 62
3 Utilização prevista . . . . . . . . . . . . . . . . . . . . . . . . . . . . . . . . . . . . . . 63
4 Descrição técnica . . . . . . . . . . . . . . . . . . . . . . . . . . . . . . . . . . . . . . 63
5 Instalação . . . . . . . . . . . . . . . . . . . . . . . . . . . . . . . . . . . . . . . . . . . . 64
6 Utilização. . . . . . . . . . . . . . . . . . . . . . . . . . . . . . . . . . . . . . . . . . . . . 67
7 Manutenção e preparação para o inverno. . . . . . . . . . . . . . . . . . . . 69
8 Resolução de problemas. . . . . . . . . . . . . . . . . . . . . . . . . . . . . . . . . 72
9 Eliminação. . . . . . . . . . . . . . . . . . . . . . . . . . . . . . . . . . . . . . . . . . . . 73
10 Garantia limitada . . . . . . . . . . . . . . . . . . . . . . . . . . . . . . . . . . . . . . . 73
11 Dados técnicos . . . . . . . . . . . . . . . . . . . . . . . . . . . . . . . . . . . . . . . . 77
1 Explicação dos símbolos
!
I
PRECAUÇÃO!
Instrução de segurança: o incumprimento desta instrução pode
causar ferimentos.
OBSERVAÇÃO
Informação suplementar para a operação do produto.
Page 62

PT
Instruções de segurança MasterFlush7640
62
2 Instruções de segurança
O fabricante não se responsabiliza por danos nos seguintes casos:
Erros de montagem ou de conexão
Danos no produto resultantes de influências mecânicas
Alterações ao produto sem autorização expressa do fabricante
Utilização para outras finalidades que não as descritas no manual de
instruções
2.1 Avisos
A seguinte declaração tem de ser lida e compreendida antes de instalar,
prestar assistência e/ou operar este produto. A modificação deste produto
pode resultar em danos materiais.
O fabricante recomenda que o técnico de autocaravanas autorizado ou o
eletricista instale ou realize a manutenção deste produto respeitando todos
os regulamentos e códigos aplicáveis. De uma instalação incorreta poderão
resultar danos no equipamento, ferimentos pessoais ou a morte.
!
PRECAUÇÃO!
Um enchimento excessivo do depósito de águas residuais pode
criar sérios danos ao sistema sanitário, como a rutura do depósito, soltando o conteúdo do depósito para a autocaravana. Para
evitar esta possibilidade, o fabricante recomenda a utilização do
circuito de bloqueio “depósito cheio” no módulo de controlo eletrónico do sanitário. O sinal de “cheio” a partir do depósito de
águas residuais pode ser gerado por um monitor de depósito
opcional Dometic DTM01C ou por um sistema de monitorização
de depósito de quatro níveis DTM04.
Page 63

PT
MasterFlush7640 Utilização prevista
63
3 Utilização prevista
A sanita Dometic MasterFlush7640 proporciona uma descarga elétrica que
tritura os resíduos e bombeia-os para um depósito de águas residuais ou
para um outro sistema de armazenamento/eliminação de efluentes. Colocada em funcionamento por meio de um pedal de descarga, a sanita permite
ao utilizador adicionar-lhe água (antes da utilização ou da descarga) e efetuar a descarga sanitária.
4 Descrição técnica
4.1 Benefícios
Descarga eletrónica conveniente. Adicionar água ou descarga pressio-
nando o pedal de descarga.
Escolha de dois consumos de água. Descarga “Normal” com 0.83 gal.
(3,1 l ) por descarga e adiciona água após a descarga; “Sanita seca” com
0.21 gal. (0,79 l) por descarga e não adiciona água após a descarga.
Instalação versátil. Bomba de trituração potente que permite a localização
da sanita até a 40 pés (12,2 m) de distância do depósito de águas residuais
ou de outra linha de descarga de destino.
Bloqueio automático “depósito cheio”. Quando conectada a um sistema
de indicação do nível do depósito de águas residuais (como o sistema
Dometic DTM01), a sanita MasterFlush7640 não realiza a descarga quando
o depósito de águas residuais está cheio. Estas funcionalidades de segurança previnem o enchimento excessivo do depósito de águas residuais o
que poderá causar danos na autocaravana.
Page 64

PT
Instalação MasterFlush7640
64
4.2 Componentes
Para obter informações detalhadas, consulte a lista completa de peças
(impressa em separado).
5 Instalação
I
N.º na
fig. 1, página 3
Descrição
1 Tampa da válvula quebra-vácuo
2 Válvula quebra-vácuo
3 Bomba de trituração
4 Cobertura da bomba/base
5 Kit de material para montagem na flange do chão
6 Fios elétricos
7 Vedação da flange do chão
8 Válvula de água
9 Pedal de descarga
10 Base da sanita
11 Sanita
12 Tampa da sanita
– Kit de material para montagem remota
OBSERVAÇÃO
Assegure que o pedal toca na mesma superfície na qual a
sanita está instalada quando estiver pressionado.
Respeite os requisitos de instalação recomendados (capítulo
“Requisitos de instalação mínimos” na página 78).
A sanita não se destina para a instalação num chuveiro.
Page 65

PT
MasterFlush7640 Instalação
65
5.1 Ferramentas necessárias
Alicates ou chave inglesa
Chave de 7/16 pol./11 mm
Ferramentas de conexão elétrica
5.2 Instalação na flange do chão
1. Para substituir uma sanita mais antiga:
– Desligue o fornecimento de água para a sanita
– Remova e esvazie a conduta de fornecimento de água.
– Remova as porcas/parafusos de fixação da sanita.
– Remova a sanita do chão.
– Remova e elimine a vedação da flange do chão antiga e as porcas
de fixação.
– Verifique se a flange do chão está à distância da abertura de escoa-
mento para a parede recomendada (fig. 3 A, página 3 e capítulo
“Dimensões da distância da abertura de escoamento para a parede”
na página 79).
– Certifique-se de que a superfície superior da flange do chão está
limpa e sem resíduos de cola ou vedante.
2. Se instalar uma nova flange do chão:
– Certifique-se de que os furos de montagem da sanita estão no local
correto (fig. 3 D, página 3).
– A flange do chão deve ser fixada ao chão com, no mínimo, quatro
parafusos (são preferidos oito).
– Coloque dois parafusos com cabeça em T fornecidos nas fendas da
flange do chão (fig. 4, página 4).
3. Verifique se a vedação da flange do chão está instalada na base da
sanita (fig. 5 1, página 4).
4. Coloque cuidadosamente a sanita sobre a flange do chão.
5. Alinhe os furos na sanita com os parafusos com cabeça em T enquanto
baixa a sanita até à flange do chão. A sanita deve estar alinhada de
forma que a base encaixa no interior da abertura da flange do chão.
I
OBSERVAÇÃO
Toda a base da sanita ainda não está totalmente assente no
chão. A vedação do chão tem que ser comprimida através dos
seguintes passos.
Page 66

PT
Instalação MasterFlush7640
66
6. Instale as porcas e as anilhas de montagem nos parafusos com cabeça
em T. Aperte cuidadosamente as porcas com 30 – 40 libras por pol.
(3,4–4,5Nm). Não aperte demasiado. Durante o aperto, alterne entre
os lados para prevenir a inclinação da base. Quando as porcas estiverem apertadas, a base deve estar fixada com segurança e encostada ao
chão. Coloque as tampas das porcas (fig. 5 2, página 4).
7. Conecte a conduta de fornecimento de água e aperte a conexão com
30 – 40 libras por pol. (3,4 – 4,5 Nm). Não aperte demasiado
(fig. 5 3, página 4).
8. Conecte a alimentação elétrica à sanita de acordo com o esquema de
ligações da lista de peças da sanita (impressa em separado).
9. Ligue a alimentação elétrica para a sanita.
10. Ligue o fornecimento de água para a sanita.
11. Realize várias descargas e verifique se existem fugas.
12. Fixe a cobertura da bomba/base (fig. 5 5, página 4) à base com os
parafusos existentes na base da sanita (fig. 6, página 4) e coloque as
tampas de bloqueio nos lados laterais e traseiro.
5.3 Instalação remota
1. Para instalar a sanita separada do depósito de águas residuais (flange
do chão não típica), posicione a sanita no local com as mesmas distâncias da sanita com flange do chão (fig. 3, página 3 e capítulo “Dimensões da distância da abertura de escoamento para a parede” na
página 79).
2. Assinale o local dos furos de fixação através dos dois furos na base.
3. Abre os furos para os parafusos sextavados fornecidos com o kit de
material para montagem remota.
4. Remova a curva de borracha preta da válvula de verificação (fig. 5 4,
página 4) localizada na parte traseira da sanita (fig. 7, página 5).
5. Instale um tubo sanitário flexível com 1,5 pol. (38 mm) ou um tubo de
PVC ou ABS com 1,5 pol. (38 mm) desde o depósito de resíduos até à
válvula de verificação. A canalização pode ser instalada por cima ou por
baixo do chão. De acordo com o esquema de instalação, poderá ter que
abrir furos no chão ou na parede (fig. 8, página 5). O tubo sanitário flexível pode ser conectado diretamente à válvula de verificação com duas
braçadeiras.
Page 67

PT
MasterFlush7640 Utilização
67
6. Instale e conecte os fios elétricos adequados e a conduta de fornecimento de água de acordo com a capítulo “Instalação na flange do chão”
na página 65.
7. Fixe a sanita ao chão com os parafusos de cabeça sextavada existentes
em cada um dos lados da sanita.
8. Cubra as porcas com as tampas de plástico.
9. Ligue o fornecimento de água para a sanita.
10. Realize várias descargas e verifique se existem fugas.
11. Fixe a cobertura da bomba/base (fig. 5 5, página 4) à base com os
parafusos existentes na base da sanita (fig. 6, página 4) e coloque as
tampas de bloqueio nos lados laterais e traseiro.
6 Utilização
6.1 Adicionar água à sanita
1. Para adicionar água à sanita, pressione o pedal de descarga parcialmente (fig. 9, página 5).
2. Para evitar um possível transbordamento, o fluxo de água para automaticamente se o pedal for pressionado demasiado tempo. Apenas é
necessário adicionar mais água durante a descarga de resíduos sólidos.
Page 68

PT
Utilização MasterFlush7640
68
6.2 Descarga sanitária
1. Para realizar uma descarga, pressione o pedal até ao fundo e, depois,
solte-o (fig. 9, página 5).
2. Este procedimento ativa uma bomba de trituração potente que drena a
água e os resíduos da sanita, tritura e impulsiona o efluente para o
depósito de águas residuais.
!
I
PRECAUÇÃO!
Efetue apenas a descarga de água, resíduos corporais e papel
higiénico de rápida dissolução. Não efetue a descarga de toalhetes húmidos, pensos higiénicos, fraldas, copos de papel, cotonetes, alimentos, cabelo ou líquidos, como óleos ou solventes, uma
vez que pode ocorrer entupimento ou danos para a sanita ou para
o sistema sanitário.
OBSERVAÇÃO
Fio de água residual nas sanitas cerâmicas: Devido ao aro
integrado nesta sanita, um fio de água pode correr lentamente
para dentro da sanita até 20 minutos depois de realizar a descarga. Se o fio de água continuar após 30 minutos, substitua
a válvula de água.
Certifique-se de que todas as pessoas compreendem a ope-
ração sanitária antes da utilização.
Page 69

PT
MasterFlush7640 Manutenção e preparação para o inverno
69
6.3 Alterar os modos “Descarga”
As sanitas MasterFlush7640 proporcionam dois modos de descarga para
ajudar a gerir o consumo de água:
Descarga normal – utiliza 0,83 gal. (3,1 l) por descarga. Adiciona água
à sanita após cada descarga.
Descarga de sanita seca – utiliza 0,21 gal. (0,79 l) por descarga. Não
adiciona água à sanita após a descarga.
1. Para comutar da descarga normal para a sanita seca, pressione o pedal
de descarga durante 10 segundos.
✓ O modo de descarga foi alterado para sanita seca.
2. Comute novamente para a descarga normal procedendo do mesmo
modo.
7 Manutenção e preparação para o
inverno
7.1 Limpeza regular da sanita
Para a limpeza regular, utilize o produto de limpeza Dometic Toilet Bowl
Cleaner. Se não encontrar este produto de limpeza na sua área, contacte o
fabricante para receber informações sobre o revendedor mais perto (consulte o verso do manual para obter os endereços). Se o produto de limpeza
não estiver disponível, utilize outro produto de limpeza não abrasivo para
casas de banho e sanitas. Por favor siga as instruções da etiqueta.
!
PRECAUÇÃO!
Para evitar danificar as juntas internas, não limpe a sanita com
produtos de limpeza abrasivos, químicos cáusticos ou lubrificantes e produtos de limpeza que contenham álcoois ou destilados
de petróleo.
Page 70

PT
Manutenção e preparação para o inverno MasterFlush7640
70
7.2 Manutenção regular
Mensalmente
1. Inspecione a sanita, a canalização e as conexões da canalização, os
fios e as ligações dos fios.
2. Abra e feche todas as válvulas das canalizações.
3. Se existirem, verifique os filtros de água em linha quanto a bloqueio.
Anualmente
1. Verifique o filtro da válvula da água. Verifique também o filtro da válvula
da água se o fluxo da água para a sanita se tornar insuficiente.
7.3 Durante longos períodos de não utilização
A sanita de trituração e o sistema sanitário deverão ser protegidos se a
sanita não for necessária durante um período de tempo prolongado (mais de
duas semanas, especialmente com o tempo quente).
1. Efetue a descarga no modo “Normal” e adicione 4 oz. (120 ml) de detergente líquido biodegradável para lavar roupa (NÃO deve conter lixívia
ou substâncias nocivas para o ambiente).
2. Efetue a descarga sanitária pelo menos cinco vezes.
3. Desligue o fornecimento de água para a sanita.
4. Realize a descarga sem água. Repita três vezes. (Este procedimento
reduzirá qualquer água restante na bomba de trituração.)
5. Desligue a alimentação elétrica para a sanita.
Se o sistema for exposto a temperaturas de congelação, siga o procedimento supracitado e, depois, prepare o sistema para o inverno, como descrito em baixo.
Page 71

PT
MasterFlush7640 Manutenção e preparação para o inverno
71
7.4 Preparação para o inverno
No fim de cada estação de acampamento ou quando o veículo é guardado
durante um período de tempo prolongado durante o qual a sanita possa
estar exposta a temperaturas de congelação, o sistema sanitário deverá ser
preparada para o inverno mediante a utilização de um anticongelante seguro
para água potável.
!
I
Preparação para o inverno com anticongelante não tóxico
1. Proceda à drenagem do depósito de água potável e esvazie o depósito
de águas residuais.
2. Adicione anticongelante para água potável ao depósito de água potável
de acordo com as instruções de mistura do fabricante do anticongelante.
3. Realize várias descargas até que a mistura anticongelante passe totalmente pela sanita, pela bomba de trituração e pelo depósito de águas
residuais.
4. Desligue a alimentação elétrica para a sanita.
Cada instalação é diferente, por isso as quantidades da mistura anticongelante podem variar. É necessário critério por parte do utilizador de forma a
assegurar uma proteção adequada.
I
PRECAUÇÃO!
Esta sanita não está concebida para a utilização com tempe-
raturas negativas.
Nunca utilize anticongelante para automóveis (etilenoglicol)
em sistemas de água potável.
OBSERVAÇÃO
Utilize anticongelante não tóxico (propilenoglicol) designado para
sistemas de água potável. Consulte o manual de utilizador do veículo.
OBSERVAÇÃO
Nunca deixe o veículo desocupado durante um período de tempo
prolongado com fornecimento de água municipal ou com a
bomba de água ligada quando existe a possibilidade de temperaturas negativas.
Page 72

PT
Resolução de problemas MasterFlush7640
72
8 Resolução de problemas
Problema Causa possível Solução sugerida
Ciclo de descarga funciona corretamente, mas a
água esvazia lentamente
ou não esvazia.
Tubo de descarga está
furado ou dobrado.
Verifique o tubo de descarga.
A bomba de trituração ou
o tubo de descarga está
obstruído.
Desimpeça a obstrução.
Bomba de trituração emite
um ruído alto pouco
comum ou dispara o disjuntor continuamente.
Material estranho na
câmara da bomba.
Remova o material estranho da câmara da bomba.
O ciclo de descarga não é
ativado depois de pressionar o pedal de descarga.
Alimentação elétrica para
a sanita está desligada ou
foi interrompida.
Verifique as ligações elétricas e os disjuntores (ou
fusíveis).
O pedal de descarga não
funciona.
Substitua o interruptor no
pedal de descarga.
A placa de circuitos
impressos está avariada.
Substitua a placa de circuitos impressos.
Depósito de águas residuais está cheio e o sinal
do depósito desligou a alimentação elétrica para a
sanita (se estiver um sistema de monitorização do
nível do depósito instalado).
Esvazie o depósito de
águas residuais.
Água insuficiente ou
nenhuma água entra na
sanita.
Conduta de fornecimento
de água está furada ou
dobrada.
Verifique a conduta de fornecimento de água.
Filtro na válvula de água
está bloqueado.
Elimine o bloqueio na válvula de água.
A válvula de água não
funciona.
Substitua a válvula de
água.
Page 73

PT
MasterFlush7640 Eliminação
73
9 Eliminação
1. Sempre que possível, coloque o material de embalagem nos recipientes
de reciclagem apropriados.
M
Se pretender eliminar definitivamente o produto, consulte o seu
centro de reciclagem local ou o revendedor especializado para
obter mais informações sobre a eliminação de acordo com os regulamentos de eliminação em vigor.
10 Garantia limitada
O vendedor referido em baixo concede a seguinte garantia apenas para a
Dometic MasterFlush Modelo 7640.
1. Um ano de garantia limitada
1A. Esta garantia limitada é concedida durante um ano a partir da
data de aquisição.
1B. Esta garantia limitada é concedida apenas ao primeiro comprador
(designado em seguida por “comprador original”) que adquiriu o
produto para o uso pessoal, familiar ou doméstico do comprador
original. O comparador original deve guardar uma cópia do recibo
de venda ou fatura como prova da data de compra, pois a prova
de compra é necessária para usufruir dos serviços de garantia.
1C. Se este produto for colocado para utilização comercial ou de
negócio, será garantido ao comprador original apenas que o
mesmo é livre de defeitos de material e de fabrico, por um período
de 90 dias a partir da data de compra.
Page 74

PT
Garantia limitada MasterFlush7640
74
1D. Esta garantia cobre todas as peças da sanita Dometic que estão
garantidamente livres de defeitos de material e de fabrico durante
uma utilização normal. Esta garantia não cobre condições que
não estejam relacionadas com o material e o fabrico do produto.
Esse tipo de condições não relacionadas inclui, mas não está limitado a, (a) instalação incorreta e qualquer dano resultante de tal;
(b) a necessidade de manutenção regular e qualquer dano resultante da falta de tal manutenção; (c) falha devido ao incumprimento das instruções do vendedor sobre o uso deste produto,
incluindo a falha resultante da não preparação para o inverno; (d)
qualquer acidente que causa danos neste produto; (e) riscos ou
coloração de qualquer componente cerâmico ou plástico; (f) causas de força maior ou utilização errada de qualquer peça deste
produto e qualquer alteração por outras pessoas a não ser o vendedor.
1E. Para que (APENAS) o comprador original possa usufruir deste
garantia durante o período de 1 ano (para uso pessoal) ou o
período de 90 (para uso comercial), tem que se aplicar o seguinte:
(a) O comprador original deve contactar o revendedor local no qual o
produto foi comprado; ou contactar o Departamento de Assistência ao Cliente através do número 1-800-321-9886 (8.00-17.00 ET,
EUA) e comunicar ao revendedor local ou ao Departamento de
Assistência ao Cliente o recebido de compra ou a fatura, o modelo
do produto e o número de série do produto. O rótulo de identificação do modelo do produto está localizado na parte traseira da
sanita por baixo da cobertura da bomba/base (consulte a ilustração).
Page 75

PT
MasterFlush7640 Garantia limitada
75
(b) Se o produto for entregue, enquanto está abrangido pela garantia,
ao revendedor local onde foi adquirido, o revendedor local irá
reparar, substituir ou reembolsar o produto de acordo com esta
garantia e a autorização do vendedor. O vendedor irá fornecer
gratuitamente peças de substituição necessárias ao comprador
original, incluindo os portes dessas peças de substituição ou do
produto, e o vendedor irá pagar os custos da mão-de-obra direta
por essa reparação ou substituição.
(c) O vendedor nunca será responsável pelas despesas de trans-
porte do comprador original ou do revendedor ou outras despesas
associadas com o transporte do produto ou da autocaravana até
ao revendedor para a reparação, por fornecer ao revendedor
acesso ao produto ou veículo, ou pela imobilização do produto ou
do veículo.
(d) O comprador original poderá ter que entregar o produto avariado
ou peças quando solicitado pelo vendedor; neste caso, o vendedor pagará os respetivos custos de transporte.
2. O VENDEDOR NÃO AUTORIZA QUE QUALQUER PESSOA OU
EMPRESA CRIE OU AMPLIE QUALQUER TIPO DE OBRIGAÇÃO DE
GARANTIA OU DE RESPONSABILIDADE EM SEU NOME.
Page 76

PT
Garantia limitada MasterFlush7640
76
3. A REPARAÇÃO OU SUBSTITUIÇÃO DO, OU REEMBOLSO POR,
PRODUTO AVARIADO, À ESCOLHA DO VENDEDOR, SERÁ A ÚNICA
SOLUÇÃO DO COMPRADOR ORIGINAL TENDO EM CONSIDERAÇÃO ESTA GARANTIA LIMITADA. EM CASO ALGUM O VENDEDOR
É RESPONSÁVEL PELOS DANOS CONSEQUENTES OU INCIDENTAIS DO COMPRADOR. ALGUNS PAÍSES NÃO PERMITEM A
EXCLUSÃO OU LIMITAÇÃO DOS DANOS CONSEQUENTES OU
INCIDENTAIS, ASSIM, A LIMITAÇÃO OU EXCLUSÃO REFERIDA EM
CIMA PODERÁ NÃO SE APLICAR.
4. O VENDEDOR REJEITA TODAS AS OUTRAS GARANTIAS RELACIONADAS COM O PRODUTO, QUER EXPRESSAS QUER IMPLÍCITAS,
E REJEITA ESPECIALMENTEAND AS GARANTIAS IMPLICITAS DE
COMERCIALIZAÇÃO E ADEQUAÇÃO A FIM ESPECÍFICO. ALGUNS
PAÍSES NÃO PERMITEM A LIMITAÇÃO NAS GARANTIA IMPLICITAS
OU O TEMPO DE DURAÇÃO DE UMA GARANTIA IMPLICITA, ASSIM,
A LIMITAÇÃO REFERIDA EM CIMA PODERÁ NÃO SE APLICAR.
5. ESTA GARANTIA CONFERE-LHE DIREITOS LEGAIS ESPECÍFICOS
E PODERÁ TER OUTROS DIREITOS QUE VARIAM DE PAÍS PARA
PAÍS.
Vendedor:
Dometic Corporation - Sanitation Div.
13128 SR 226
Big Prairie, Ohio 44611 USA
330-439-5550
Page 77

PT
MasterFlush7640 Dados técnicos
77
11 Dados técnicos
11.1 Certificados
11.2 Materiais
Sanita: cerâmica vítrea
Tampa da sanita: madeira esmaltada
Base da sanita: polipropileno
Corpo da bomba de trituração: polipropileno com fibra de vidro
Válvula de água: polipropileno
Pedal: polipropileno
Válvula quebra-vácuo: ABS/polipropileno
Vedação da flange do chão: borracha nitrílica, espuma
Page 78

PT
Dados técnicos MasterFlush7640
78
11.3 Requisitos de instalação mínimos
* Fornecimento de água superior a 18,9 l/m (5,0 gpm) pode necessitar de um restritor de fluxo
na entrada da sanita.
** Verifique um fluxo de descarga adequado se a instalação estiver próxima desta distância.
1. Consulte as normas ANSI 1192 e Z240 RV, se aplicáveis, para obter
mais diretivas de instalação de sanitas em autocaravanas.
As especificações estão sujeitas a mudança sem aviso.
Elétrico Consumo de energia 15 A/12 V DC
Disjuntor/fusível 20 A/12 V DC
Circuitos elétricos Consulte as normas ANSI/RVIA LV e NFPA
70/NEC para a medida do fio recomendada
(EUA).
Consulte as normas CEC I e II para a medida
do fio recomendada (Canadá).
Fornecimento de
água
Ajuste NPT 1/2 pol.
Taxa de fluxo 11,4 – 18,9 l/m (3,0 – 5,0 gpm) recomen-
dado*
9,5 l/m (2,0 gpm) mínimo
Pressão estática 206,8 – 689,5 kPa (30 – 100 PSI)
Descarga
(2 opções)
Remota
(sem flange diretamente por cima do
depósito de resíduos)
Dimensão do tubo sanitário –
38 mm (1,5 pol.) ou 25 mm (1 pol.)
Instalação horizontal do tubo –
12,2 m (40 pés) máximo**
Page 79

PT
MasterFlush7640 Dados técnicos
79
11.4 Dimensões da sanita
Todas as dimensões podem variar ±10 mm (±3/8 pol.)
11.5 Dimensões da distância da abertura de escoamento para a parede
Letra na
fig. 2, página 3
Modelo 7640
A 20 pol. (508 mm)
B 15 pol. (381 mm)
C 19 pol. (483 mm)
D 18,375 pol. (467 mm), altura do assento
E 33,875 pol. (860 mm), tampa do assento levantada
F 14,75 pol. (375 mm), profundidade da base
G 10 pol. (254 mm), distância da abertura de escoamento
para a parede
Letra na
fig. 3, página 3
Dimensões/descrição
A 10 pol. (254 mm)
B 11 pol. (279 mm)
C 11 pol.279 mm ()
D Flange do chão
E Parede esquerda
F Parede traseira
G Parede direita
Page 80

DOMETIC CORPORATION, SANITATION
DIVISION
13128 SR 226 | PO BOX 38
BIG PRAIRIE, OHIO 44611 USA
www.Dometic.com
USA
Dometic RV Division
1120 North Main Street
Elkhart, IN 46515
+1 574-264-2131
www.dometic.com
4445101508 600347268 05/2016
 Loading...