

Page 1
EN
DE
FR
IT
NL
SANITATION
TOILETS
CT 4050/4110, CTLP 4050/4110, CTS 4050/4110, CTW 4050/4110
Cassette toilet
Operating manual . . . . . . . . . . . . . . . . . . . . 16
Kassettentoilette
Bedienungsanleitung . . . . . . . . . . . . . . . . .33
Toilettes à cassette
Notice d’utilisation . . . . . . . . . . . . . . . . . . . 51
Toilette a cassetta
Istruzioni per l’uso . . . . . . . . . . . . . . . . . . . .69
Cassettetoilet
Gebruiksaanwijzing. . . . . . . . . . . . . . . . . . .86
Page 2

Page 3
CT4000
1
2
5
4
3
2
6 7
1
8
9
1011
1
2
5
3
4
3
Page 4
1.
3
90°
> 90°
4
CT4000
2.
4
Page 5
CT4000
5
6
5
Page 6
CT4000
1.
3.
2.
7
8
2.
1.
6
Page 7
CT4000
2.
1.
9
1
2
3
0
7
Page 8
CT4000
a
b
8
Page 9
CT4000
c
d
e
1.
2.
9
Page 10

CT4000
f
1.
3.
2.
g
h
10
Page 11
CT4000
i
j
k
11
Page 12
CT4000
l
1
2
m
1.
2.
1
2
12
Page 13
CT4000
n
o
1
1.
6x
2.
13
Page 14
CT4000
CLICK
p
q
1.
2.
1
X2X4X3
7.5
X0
X1
14
Page 15
CT4000
2.
1.
1.
2.
AB
CD
CLICK
r
15
Page 16
EN
CT4000
Please read this instruction manual carefully before first use, and store it in
a safe place. If you pass on the product to another person, hand over this
instruction manual along with it.
Table of contents
1 Explanation of symbols . . . . . . . . . . . . . . . . . . . . . . . . . . . . . . . . . . . . . . .17
2 Safety instructions . . . . . . . . . . . . . . . . . . . . . . . . . . . . . . . . . . . . . . . . . . .17
2.1 General safety . . . . . . . . . . . . . . . . . . . . . . . . . . . . . . . . . . . . . . . . . . .18
2.2 Use of sanitary additives . . . . . . . . . . . . . . . . . . . . . . . . . . . . . . . . . . .18
3 Accessories . . . . . . . . . . . . . . . . . . . . . . . . . . . . . . . . . . . . . . . . . . . . . . . . . .19
4 Intended use. . . . . . . . . . . . . . . . . . . . . . . . . . . . . . . . . . . . . . . . . . . . . . . . .19
5 Technical description . . . . . . . . . . . . . . . . . . . . . . . . . . . . . . . . . . . . . . . . .19
5.1 Description of the components . . . . . . . . . . . . . . . . . . . . . . . . . . . . 20
5.2 Control and display elements. . . . . . . . . . . . . . . . . . . . . . . . . . . . . . 20
6 Using the toilet. . . . . . . . . . . . . . . . . . . . . . . . . . . . . . . . . . . . . . . . . . . . . . .21
6.1 Sanitary accessories . . . . . . . . . . . . . . . . . . . . . . . . . . . . . . . . . . . . . .21
6.2 Preparing the cassette tank. . . . . . . . . . . . . . . . . . . . . . . . . . . . . . . . 22
6.3 Filling the freshwater tank (integrated tank) . . . . . . . . . . . . . . . . . . . 23
6.4 Using the toilet . . . . . . . . . . . . . . . . . . . . . . . . . . . . . . . . . . . . . . . . . 23
6.5 Draining the cassette tank. . . . . . . . . . . . . . . . . . . . . . . . . . . . . . . . . 24
6.6 Positioning the toilet seat . . . . . . . . . . . . . . . . . . . . . . . . . . . . . . . . . 25
6.7 Winter operation . . . . . . . . . . . . . . . . . . . . . . . . . . . . . . . . . . . . . . . . 25
6.8 Shutting down . . . . . . . . . . . . . . . . . . . . . . . . . . . . . . . . . . . . . . . . . . 25
7 Cleaning and maintenance. . . . . . . . . . . . . . . . . . . . . . . . . . . . . . . . . . . 26
7.1 Greasing the slider . . . . . . . . . . . . . . . . . . . . . . . . . . . . . . . . . . . . . . 26
7.2 Releasing the slider from the cassette . . . . . . . . . . . . . . . . . . . . . . . 27
7.3 Greasing the cassette seal . . . . . . . . . . . . . . . . . . . . . . . . . . . . . . . . 27
7.4 Cleaning the bayonet fitting and greasing the bayonet seal. . . . . . 27
7.5 Greasing the O-ring of the cassette vent . . . . . . . . . . . . . . . . . . . . . 28
8Maintenance. . . . . . . . . . . . . . . . . . . . . . . . . . . . . . . . . . . . . . . . . . . . . . . . 28
8.1 Spare parts. . . . . . . . . . . . . . . . . . . . . . . . . . . . . . . . . . . . . . . . . . . . . 28
8.2 Removing and replacing the lid and seat. . . . . . . . . . . . . . . . . . . . . 28
8.3 Replacing the cassette seal. . . . . . . . . . . . . . . . . . . . . . . . . . . . . . . . 29
8.4 Replacing the bayonet seal. . . . . . . . . . . . . . . . . . . . . . . . . . . . . . . . 29
16
Page 17
EN
CT4000 Explanation of symbols
8.5 Replacing the fuse in the operating unit. . . . . . . . . . . . . . . . . . . . . . 30
8.6 Replacing the wheels on the cassette tank . . . . . . . . . . . . . . . . . . . 30
9 What to do in case of problems . . . . . . . . . . . . . . . . . . . . . . . . . . . . . . . 30
10 Warranty . . . . . . . . . . . . . . . . . . . . . . . . . . . . . . . . . . . . . . . . . . . . . . . . . . . .31
11 Disposal . . . . . . . . . . . . . . . . . . . . . . . . . . . . . . . . . . . . . . . . . . . . . . . . . . . . .31
12 Technical data . . . . . . . . . . . . . . . . . . . . . . . . . . . . . . . . . . . . . . . . . . . . . . 32
1 Explanation of symbols
WARNING!
!
Safety instruction: Failure to observe this instruction can cause fatal or
serious injury.
CAUTION!
Safety instruction: Failure to observe this instruction can lead to injury.
!
NOTICE!
A
Failure to observe this instruction can cause material damage and impair
the function of the product.
NOTE
Supplementary information for operating the product.
I
2 Safety instructions
The manufacturer accepts no liability for damage in the following cases:
• Damage to the product resulting from mechanical influences and excess voltage
• Alterations to the product without express permission from the manufacturer
• Use for purposes other than those described in the operating manual
The declaration of conformity can be requested from the manufacturer (contact
information on the back).
17
Page 18

EN
Safety instructions CT4000
2.1 General safety
WARNING!
!
A
• This device can be used by children aged 8 years or over, as well as by
persons with diminished physical, sensory or mental capacities or a
lack of experience and knowledge, providing they are supervised, or
have been taught how to use the device safely and are aware of the
resulting risks.
• Cleaning and user maintenance must not carried out by unsupervised
children.
• Children must be supervised to ensure that they do not play with the
device.
NOTICE!
• Do not shake the cassette tank vigorously.
• Do not hang the cassette tank on a bicycle or other vehicle for trans-
portation.
• Do not use antifreeze. These agents may damage the cassette toilet.
• The toilet is designed for a person weighing no more than 130 kg.
2.2 Use of sanitary additives
CAUTION!
• Store the sanitary accessories so that children cannot access them.
!
NOTICE!
A
• When using sanitary additives for use and cleaning of the toilet, pay
attention to the instructions for use on the packaging.
18
Page 19

EN
CT4000 Accessories
3Accessories
Available as accessories (not included in the scope of delivery):
Description
Freshwater tank
Service door
Tank flap
On the Dometic website (see back page) you can find information about sanitary
accessories.
4 Intended use
The toilet is designed for installation and use in recreational vehicles such as camper
vans or motor caravans.
5 Technical description
The cassette toilet CTx4xxx consists of a toilet permanently installed in the vehicle
and a removable, mobile cassette as a holding tank. The cassette is externally accessible through a door. Depending on the model, the toilet is supplied with rinse water
from the vehicle-side freshwater tank or a tank integrated in the housing.
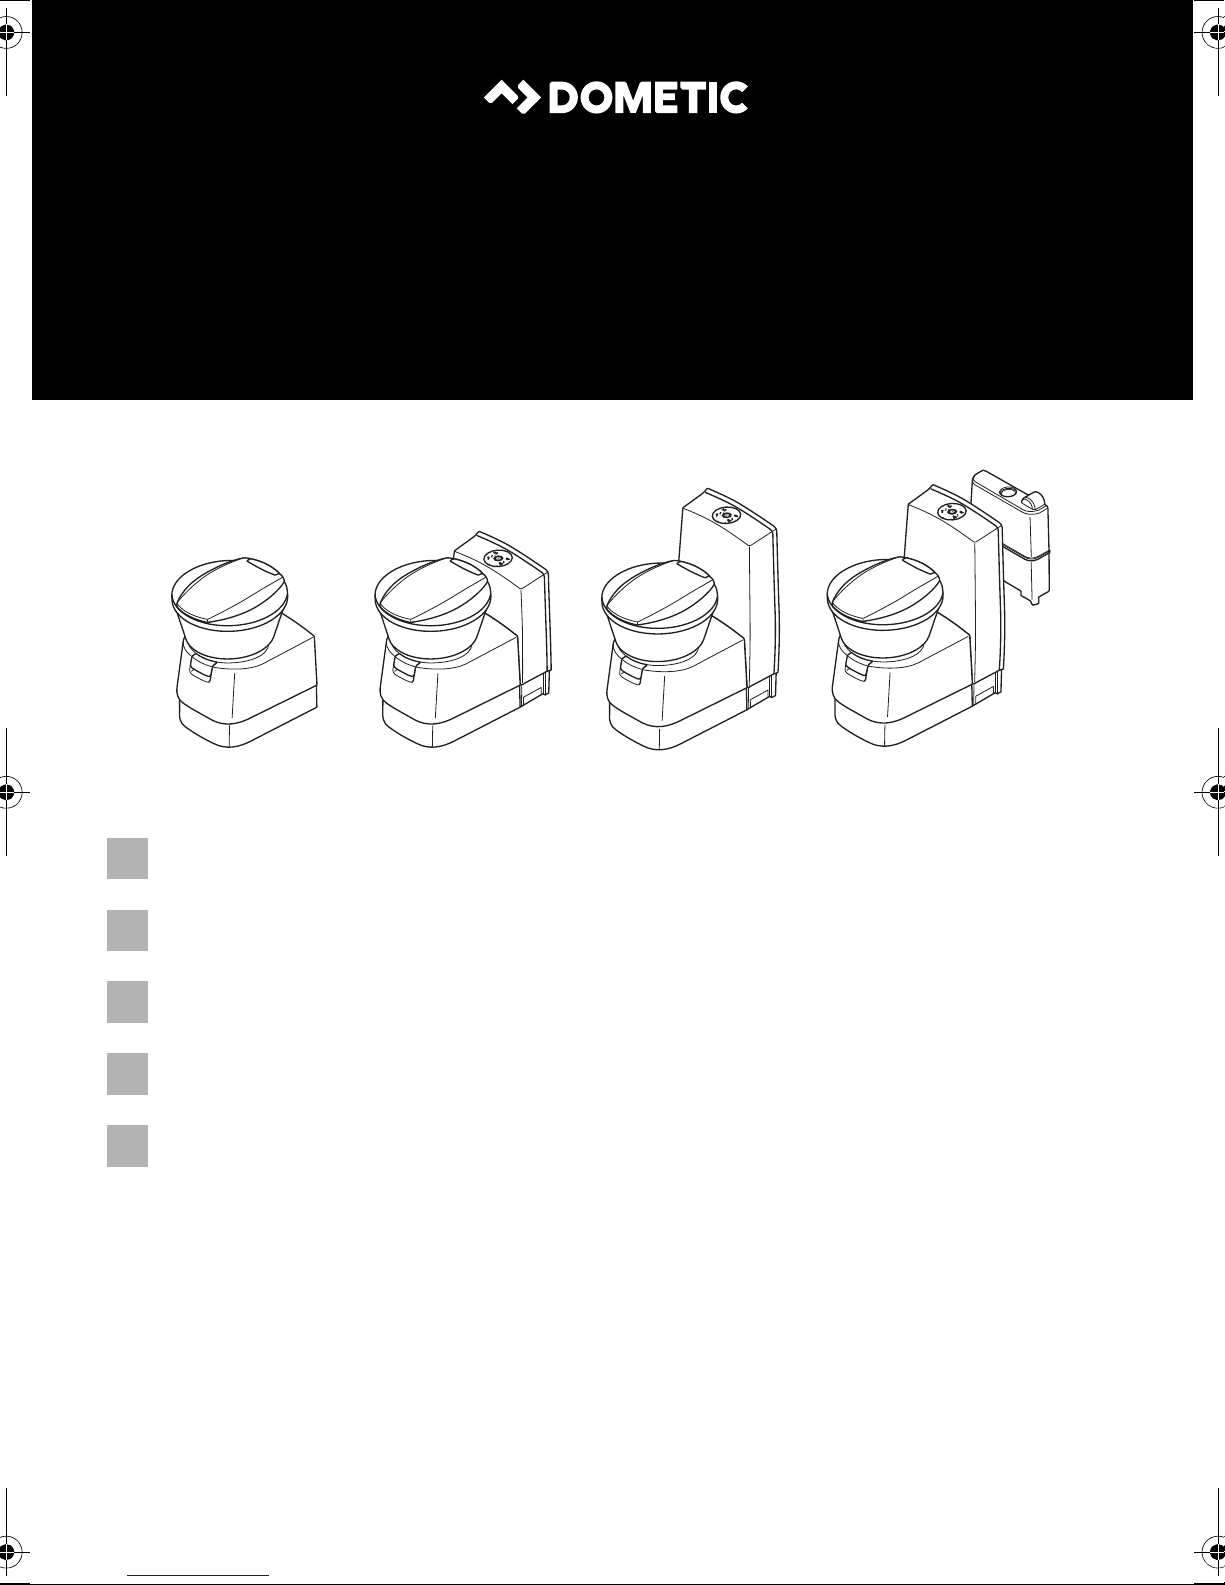
The following model versions of the toilet are available:
• CT4050, CT4110: detached, without water tank, without console
• CTLP4050, CTLP4110: detached, without water tank, low console
• CTS 4050, CTS4110: detached, without water tank, with console
• CTW4050, CTW4110: detached, with water tank in the console
The 4050 models can be installed in a wet room.
19
Page 20
EN
Technical description CT4000
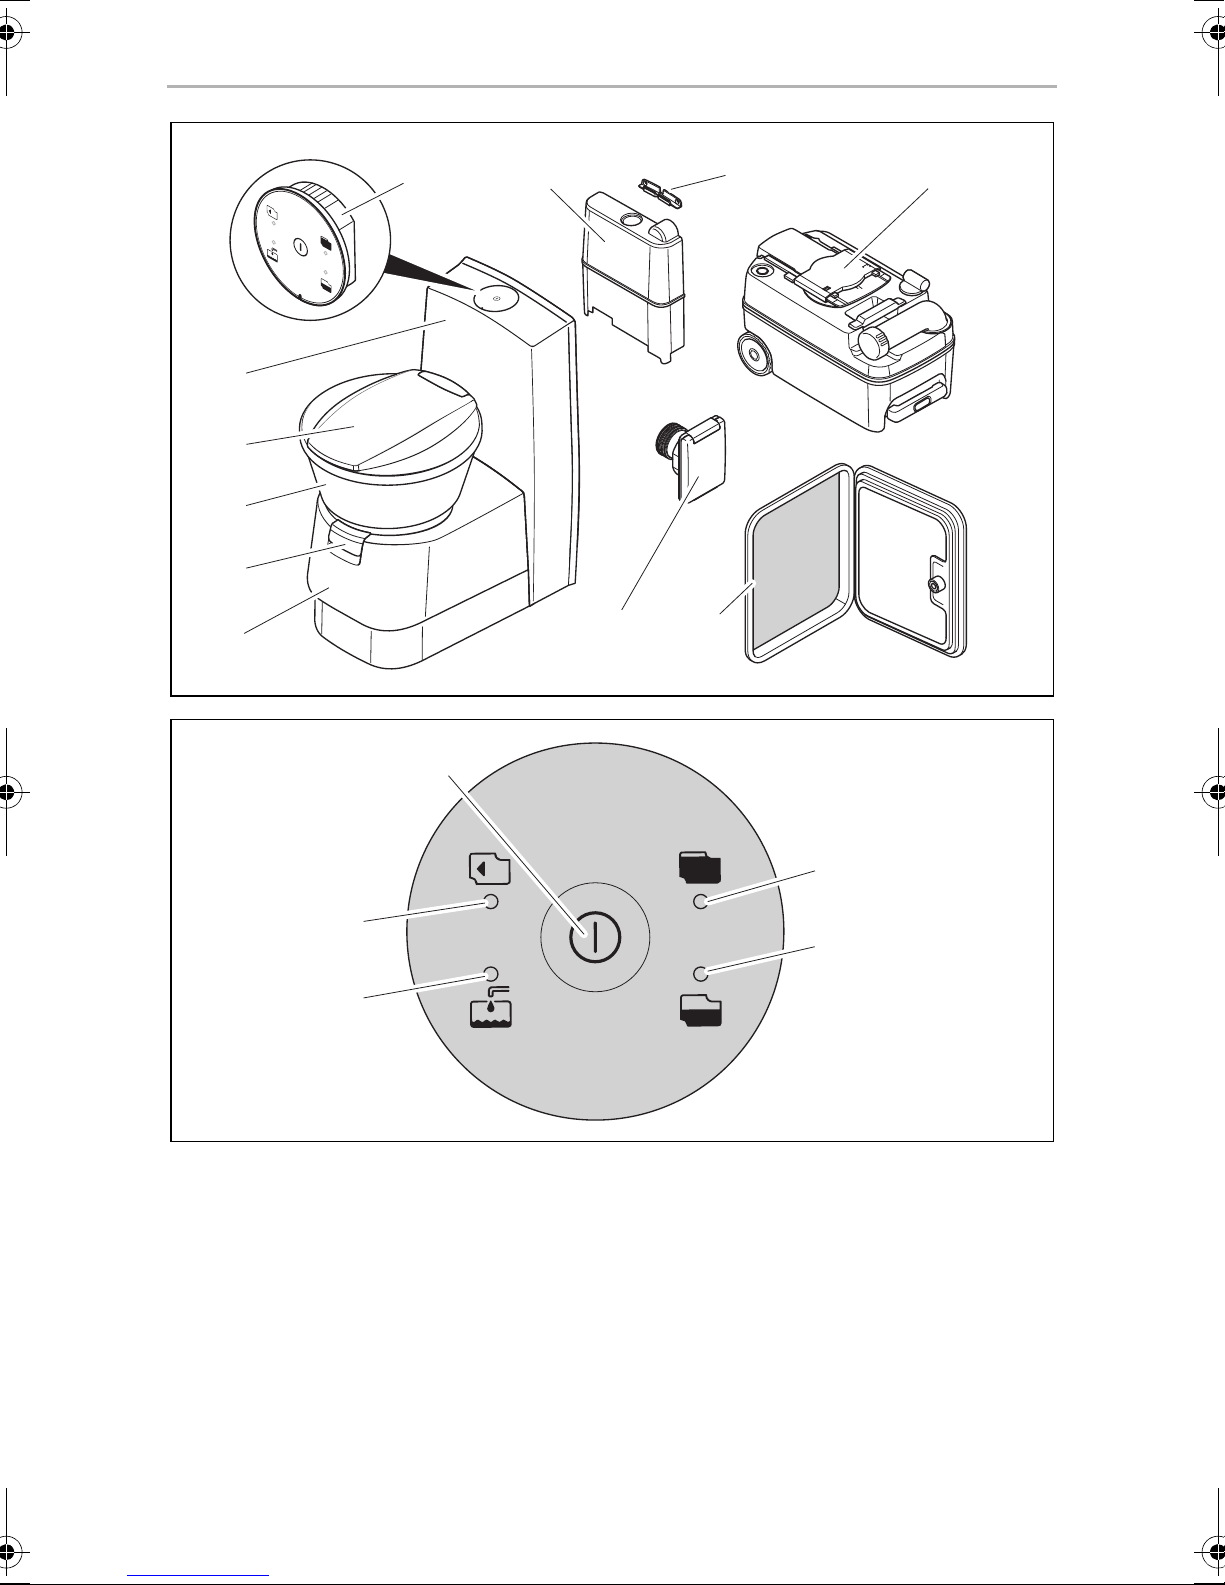
5.1 Description of the components
No. in
fig. 1, page 3
1 Housing for cassette tank
2 Draining slider for toilet bowl
3 Toilet bowl, ceramic
4 Lid and seat, rotatable
5Console
6 Control and operating panel
7 Freshwater tank (optional)
8 CTLP, CTS, CTW only: Wall bracket
9 Cassette tank (capacity 19 l)
10 Service door (accessory)
11 CTW only: Tank flap (lockable tank flap optional)
Label
5.2 Control and display elements
No. in
fig. 2, page 3
1 Flush button
2 “Cassette tank full” indicator
3 “Cassette tank 3/4 full” indicator
4 “Fill freshwater tank” indicator
5 “Cassette tank removed” indicator
Label
(Not always connected when using the on-board tanks)
20
Page 21
EN
CT4000 Using the toilet
6Using the toilet
NOTE
I
6.1 Sanitary accessories
Sanitary additives for the holding tank decompose faeces and prevent unpleasant
odours.
The manufacturer recommends:
• Dometic POWER CARE TABS
• Dometic GREEN CARE TABS
• Before putting the toilet into operation, you should clean inside and
outside with a soft cloth and lukewarm water with a mild cleaning
agent (also refer to chapter “Cleaning and maintenance” on
page 26).
• Clean and grease the seals of your toilet regularly (see chapter
“Cleaning and maintenance” on page 26).
• Conventional toilet paper can clog the toilet. Use a special
fast-dissolving toilet paper.
The manufacturer recommends Dometic COMFORT CARE.
When using sanitary additives, please note the instructions for use on the packaging.
NOTE
I
On the Dometic website (see back page) you can find further information about
sanitary accessories.
Conventional toilet paper can clog the toilet. Use a special
fast-dissolving toilet paper. The manufacturer recommends
Dometic COMFORT CARE.
21
Page 22
EN
Using the toilet CT4000
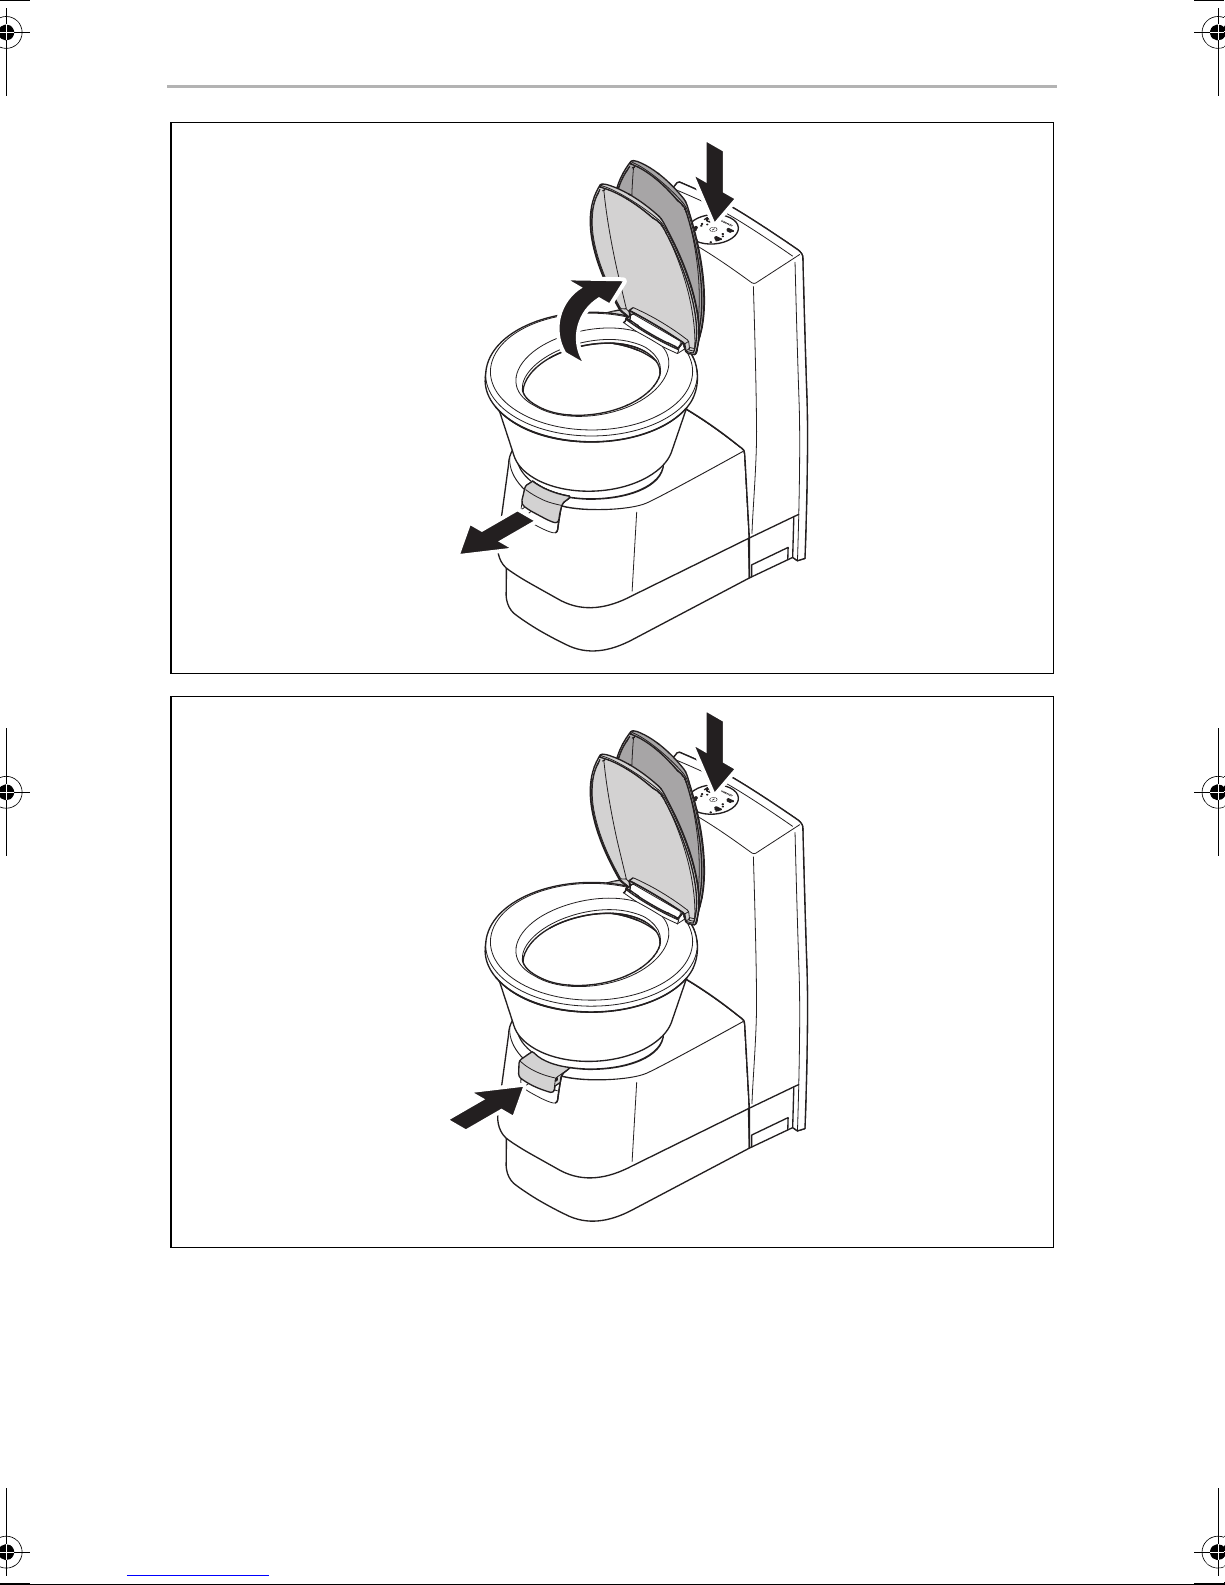
6.2 Preparing the cassette tank
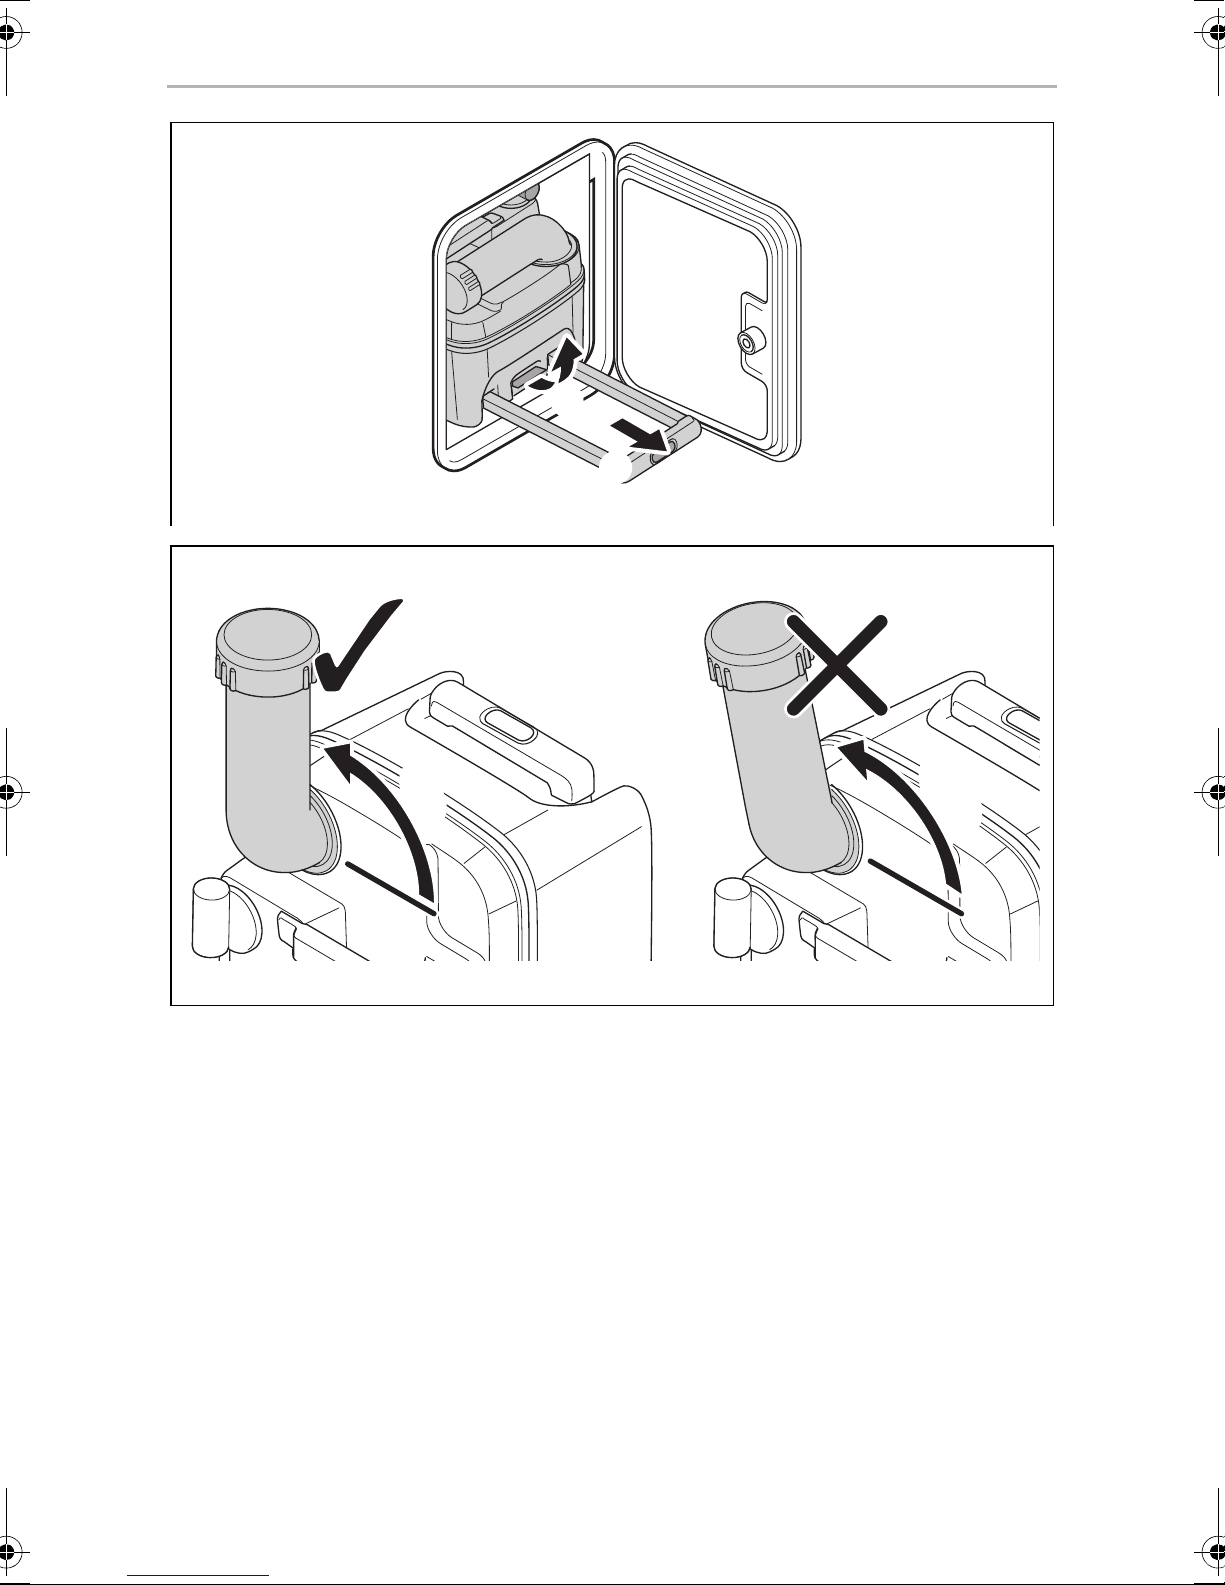
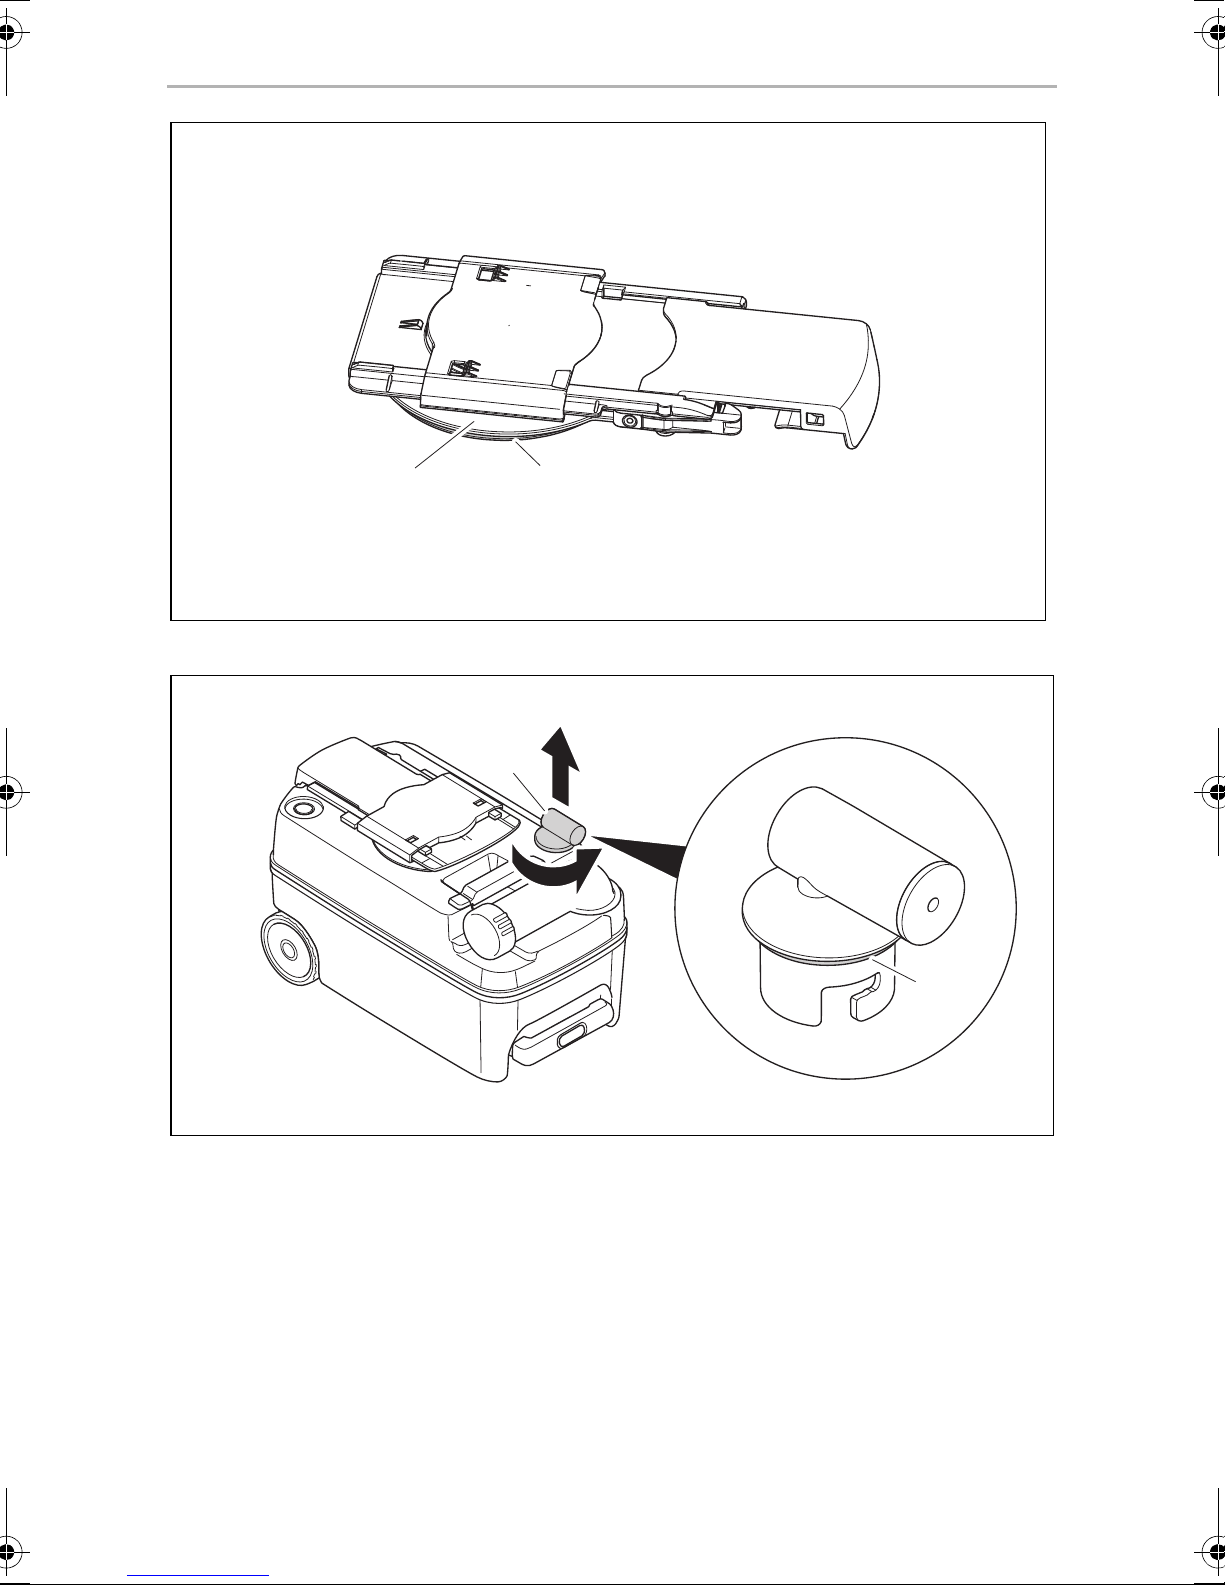
Removing the cassette tank
Proceed as follows (fig. 3, page 4):
➤ Open the service door.
➤ Push the catch upward to unlock the cassette tank.
➤ Pull the cassette tank out of the cassette housing. When pulling out the tank,
resistance has to be overcome.
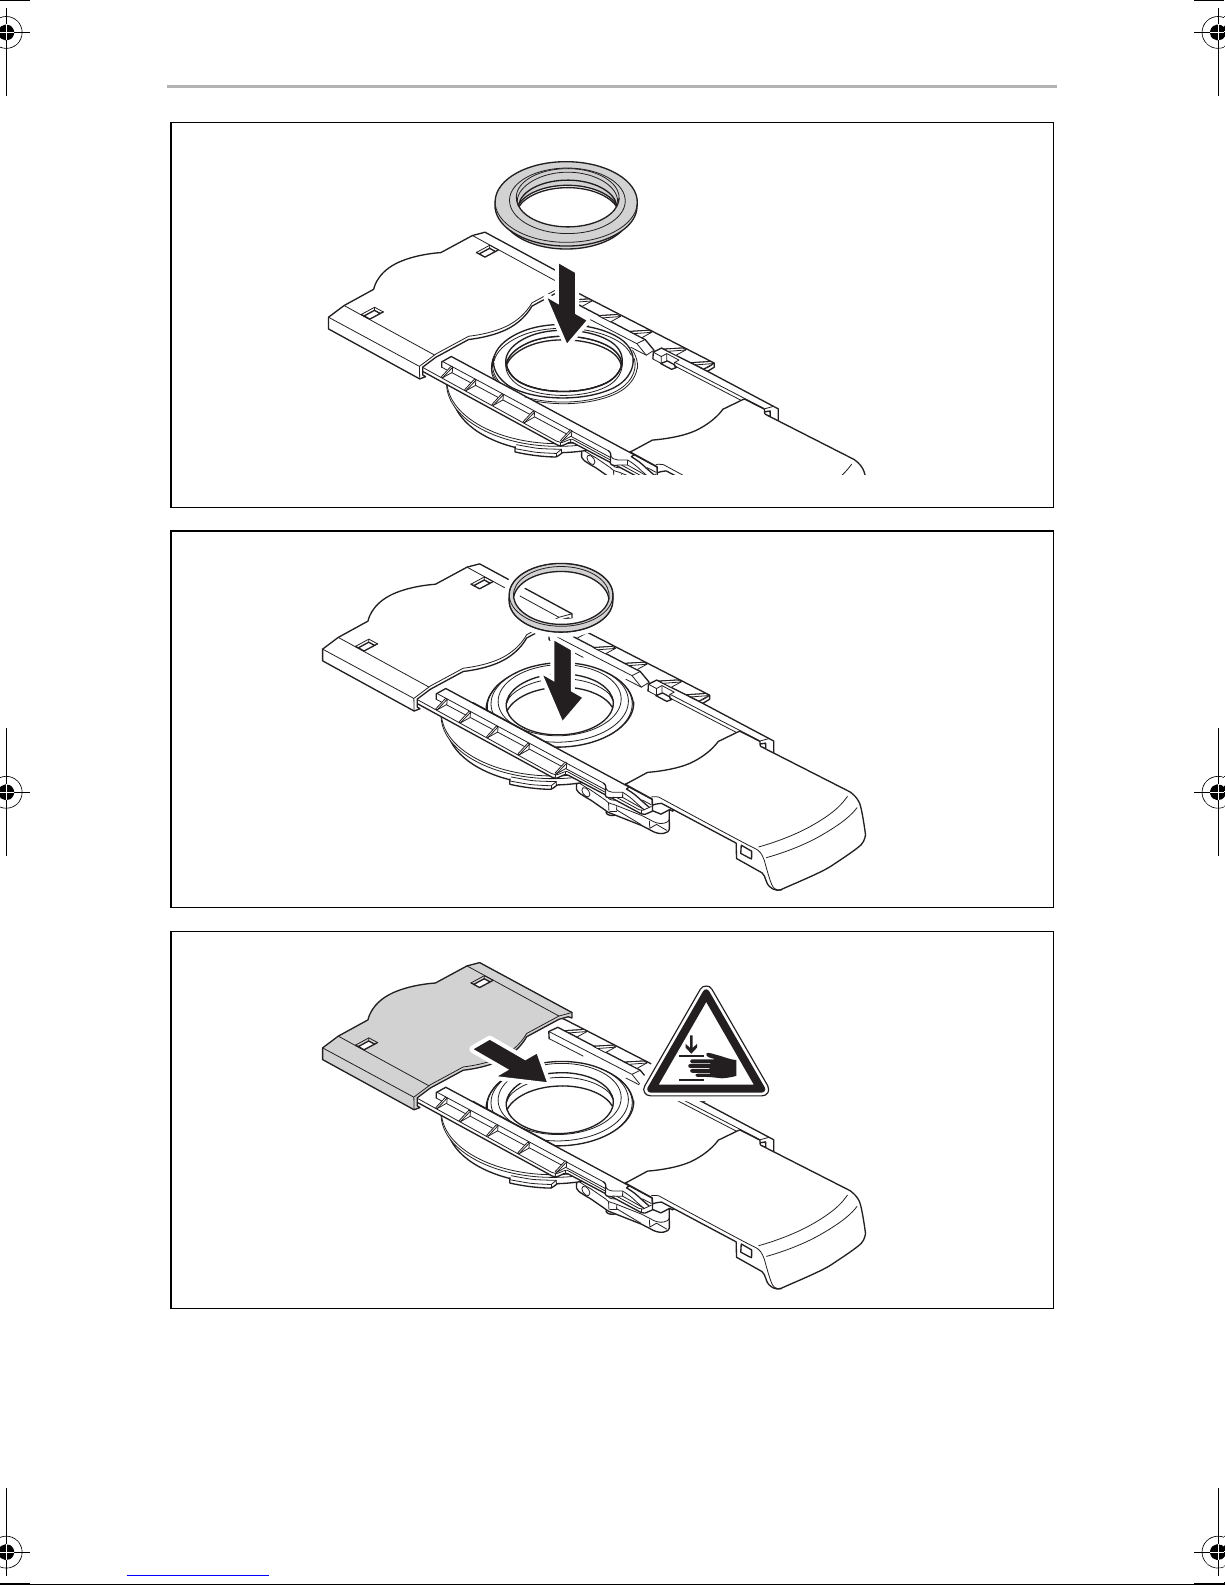
Adding sanitary additive
➤ Position the cassette tank upright.
➤ Rotate the drain pipe approx. 90° upward (fig. 4, page 4).
NOTE
I
Avoid turning the drain pipe more than 90°, as it otherwise can come off
(fig. 4, page 4).
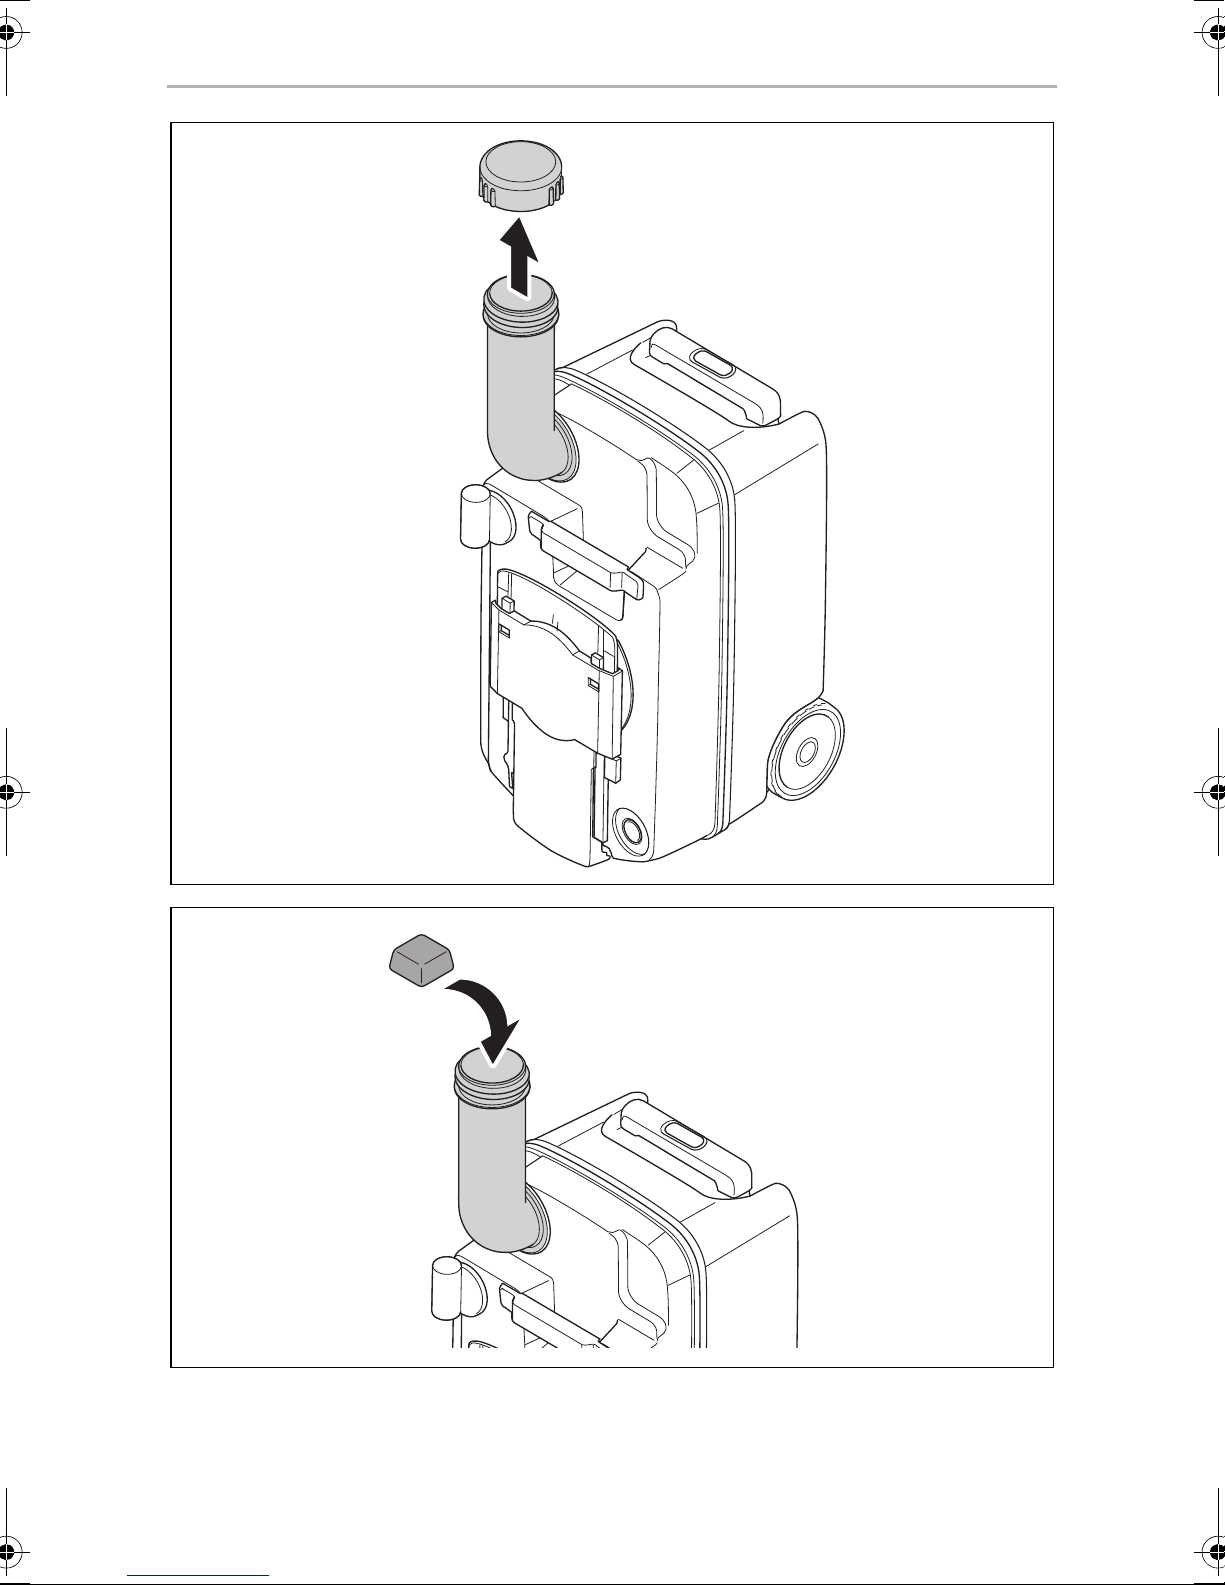
➤ Twist off the cap (fig. 5, page 5).
➤ Add sanitary additive into the cassette tank via the drain pipe (fig. 6, page 5).
Observe the instructions for the sanitary additive.
Pushing the cassette tank into the cassette housing
NOTICE!
A
➤ Slide the cassette tank all the way into the cassette housing.
✓ The cassette tank lock locks by itself upon being pushed in.
➤ Check that the cassette tank is securely installed.
➤ Close and lock the service door.
Ensure that the cassette tank can be pushed into the cassette housing
easily. Make sure that the cassette tank does not bump into other
objects or components.
22
Page 23
EN
CT4000 Using the toilet
6.3 Filling the freshwater tank (integrated tank)
➤ Fill the freshwater tank through the filler neck on the outside of the vehicle. The
amount depends on the tank used (the integrated tank for models CTW4050
and CTW4110 = 7 litres).
6.4 Using the toilet
The toilet lid remains in a position of approximately 70° (fig. 7 1, page 6).
NOTE
I
➤ Before use, press the flush button to allow some water to run into the bowl
(fig. 7 2, page 6).
➤ Pull the slider (fig. 7 3, page 6) forward. Leave the slider open during use.
The slider must be closed while driving, and no liquid should be above
the slider.
➤ After use, press the flush button again to rinse the bowl (fig. 8 1, page 6).
➤ Close the slider (fig. 8 2, page 6).
The cassette tank has a capacity of 19 l. When the indicator lights up, the toilet
can only be used a few more times.
NOTE
I
With a 3/4-filled cassette, use is only possible when the slider is open.
With a tilted position (such as lasting inclination of the vehicle), the
cassette may only be 3/4 full. Overflowing through the vent is possible.
23
Page 24
EN
Using the toilet CT4000
6.5 Draining the cassette tank
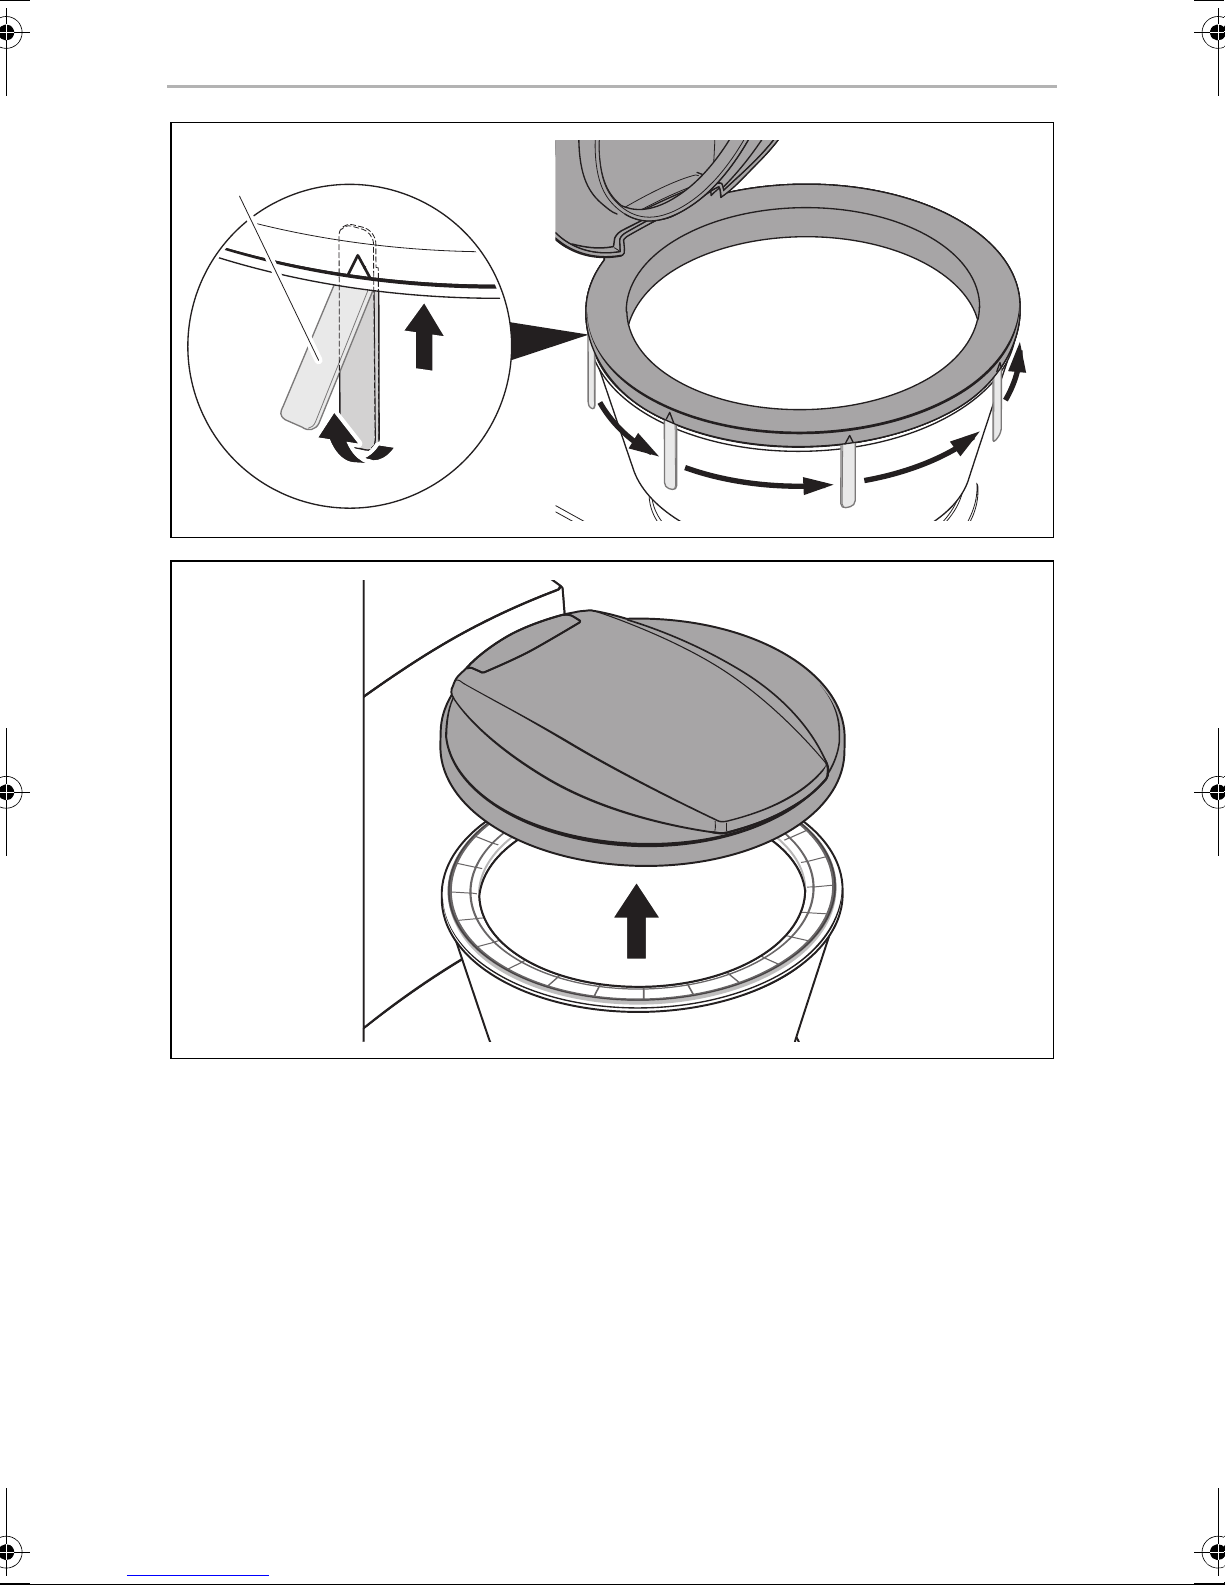
Empty the cassette tank when the indicator lights up.
➤ Remove the cassette tank (chapter “Removing the cassette tank” on page 22).
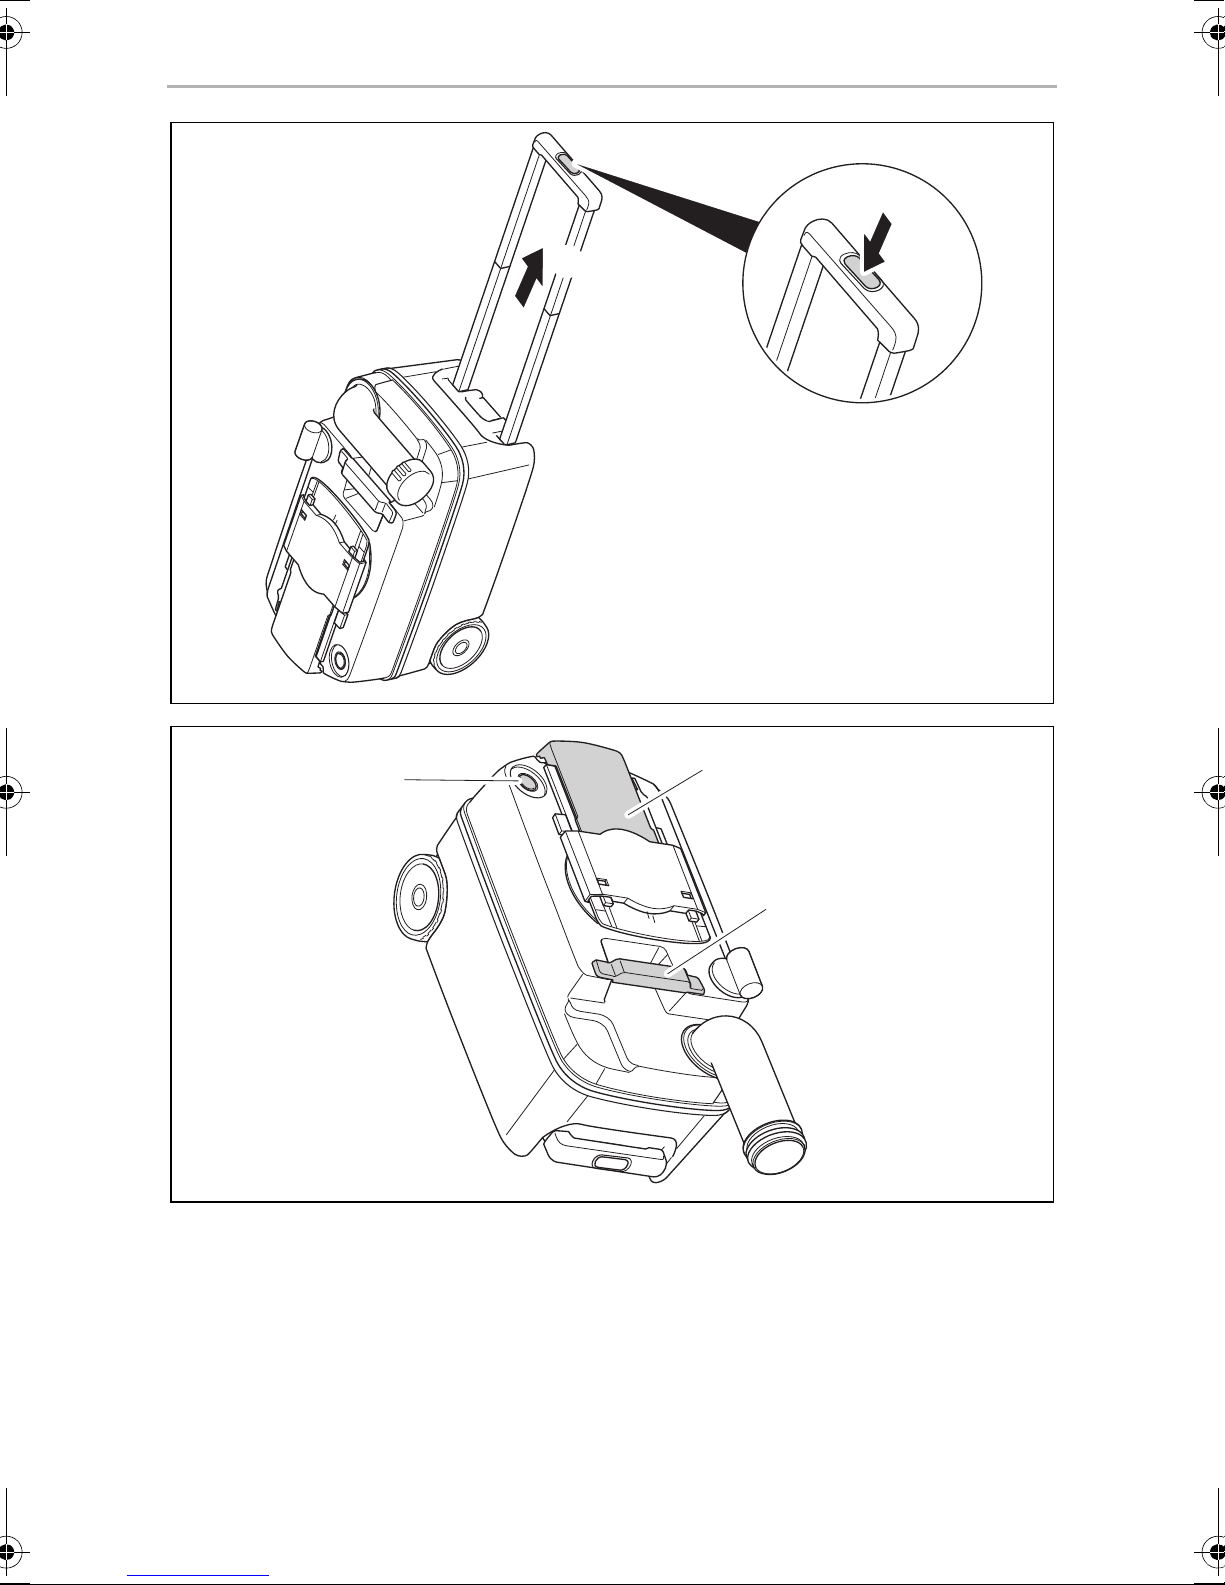
➤ Press the release button in the middle of the handle and pull the handle out to its
end position (fig. 9, page 7).
NOTICE!
A
• Do not shake the cassette tank vigorously.
• Do not hang the cassette tank on a bicycle or other vehicle for trans-
portation.
• Do not place heavy objects on the cassette tank during transport.
This can damage the housing and rollers.
➤ Bring the tank to the nearest designated disposal location.
➤ Press the release button in the middle of the handle and push the handle back
into the cassette.
➤ Set the cassette tank upright and rotate the drain pipe 90° upward (fig. 4,
page 4).
NOTE
I
➤ Twist off the cap (fig. 5, page 5).
Avoid turning the drain pipe more than 90°, as it otherwise can come
off.
➤ Hold the cassette tank by the handle with one hand (fig. 0 3, page 7) and
with the other hand on the slider (fig. 0 2, page 7), so that you can push the
vent button (fig. 0 1, page 7) while it is draining.
➤ Press the vent button when the drain pipe points downwards.
✓ The tank drains steadily and without splashing.
➤ After draining, rinse out the cassette tank carefully.
➤ Add a sanitary additive to the cassette (chapter “Adding sanitary additive” on
page 22).
➤ Clear away course dirt from the wheels of the cassette tank to prevent scratching
of the cassette housing.
24
Page 25
EN
CT4000 Using the toilet
NOTICE!
A
➤ Push the cassette tank into the cassette housing (chapter “Pushing the cassette
tank into the cassette housing” on page 22).
Do not clean the inside of the cassette tank with a high-pressure cleaner.
This can damage the float for the level indicator.
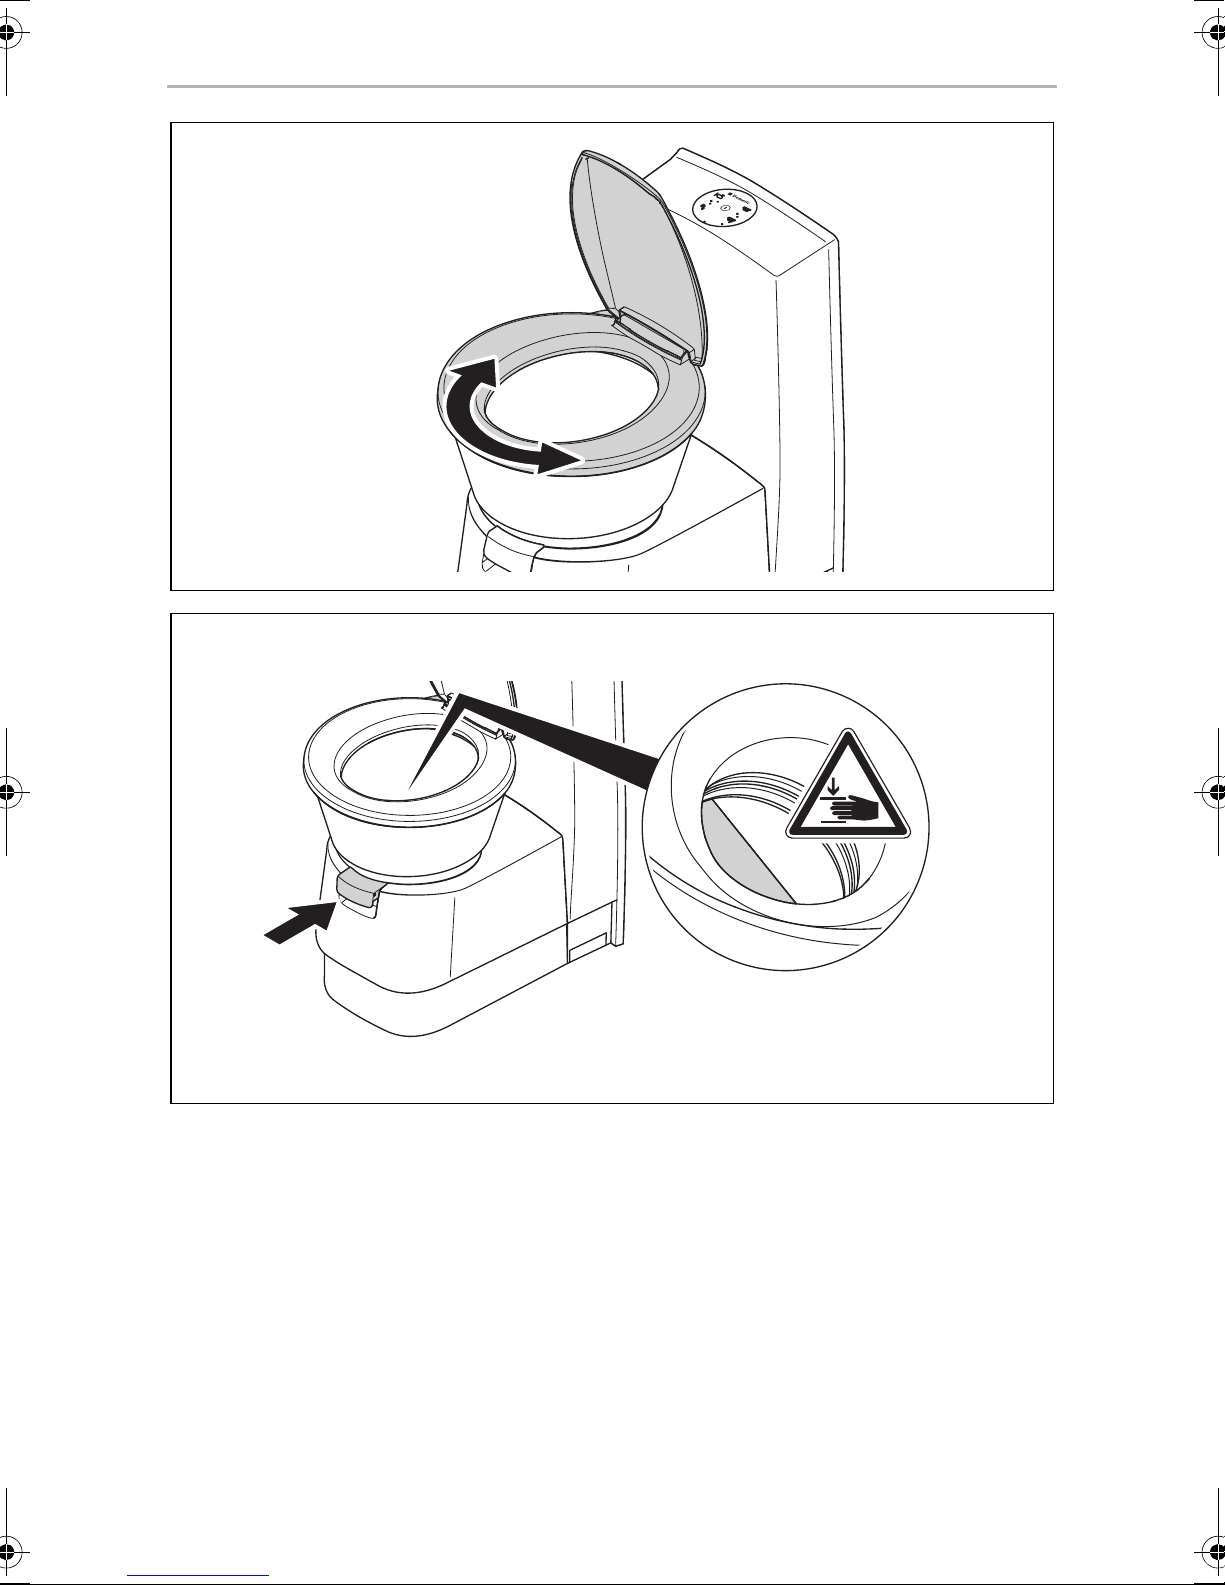
6.6 Positioning the toilet seat
The toilet seat can be swivelled continuously (fig. a, page 8).
6.7 Winter operation
NOTICE!
Do not use antifreeze. Antifreeze may damage the cassette toilet.
A
You can also use the cassette toilet in the winter, as long as the toilet and cassette
tank are in a frost-free area.
If this is not the case, empty the freshwater tank, the cassette tank and the water line
of the freshwater supply.
This will prevent damage by frost (chapter “Shutting down” on page 25).
6.8 Shutting down
Drain the freshwater tank and the water supply system completely if you are going to
take the toilet out of service for an extended period of time.
➤ Clean the toilet carefully (chapter “Cleaning and maintenance” on page 26).
➤ Operate the flush button until no more water is in the pipes.
➤ Interrupt the power supply to the toilet.
➤ Then drain the cassette tank and rinse it out carefully. Clean the cassette. To allow
the cassette tank to dry, do not close the drain pipe.
➤ Clean and grease all seals and moving parts of the toilet and the cassette tank
(chapter “Cleaning and maintenance” on page 26) and repeat this operation
before putting the toilet back into service.
25
Page 26
EN
Cleaning and maintenance CT4000
7 Cleaning and maintenance
CAUTION!
Cleaning agents for the toilet may not contain chlorine or alcohol!
!
NOTICE!
A
I
➤ Clean the toilet regularly inside and out with a soft cloth and lukewarm water with
a mild cleaning agent.
➤ Then wash the surfaces with clear water.
The manufacturer recommends:
• Grease: OKS
• Silicone spray: OKS
• To prevent material changes, do not use hard, abrasive or
soda-based cleaning agents (scouring agents).
• Do not use polish for cleaning.
NOTE
• Clean and grease all seals on the toilet and cassette tank regularly.
In case of frequent use, perform these actions monthly or after
3 – 5 drainings of the cassette. Use grease or silicone-based spray.
• For regular cleaning of the toilet bowl, use a mild colourless cleaning
agent.
®
1110
®
1111
7.1 Greasing the slider
CAUTION!
!
The slide moves smoothly when it is regularly lubricated.
Greasing the slider rods
➤ Spray the rods of the slider with silicone spray (fig. c, page 9).
26
When the slider is closed during cleaning or greasing, there is a risk of
crushing body parts (fig. b, page 8).
Page 27
EN
CT4000 Cleaning and maintenance
7.2 Releasing the slider from the cassette
CAUTION!
!
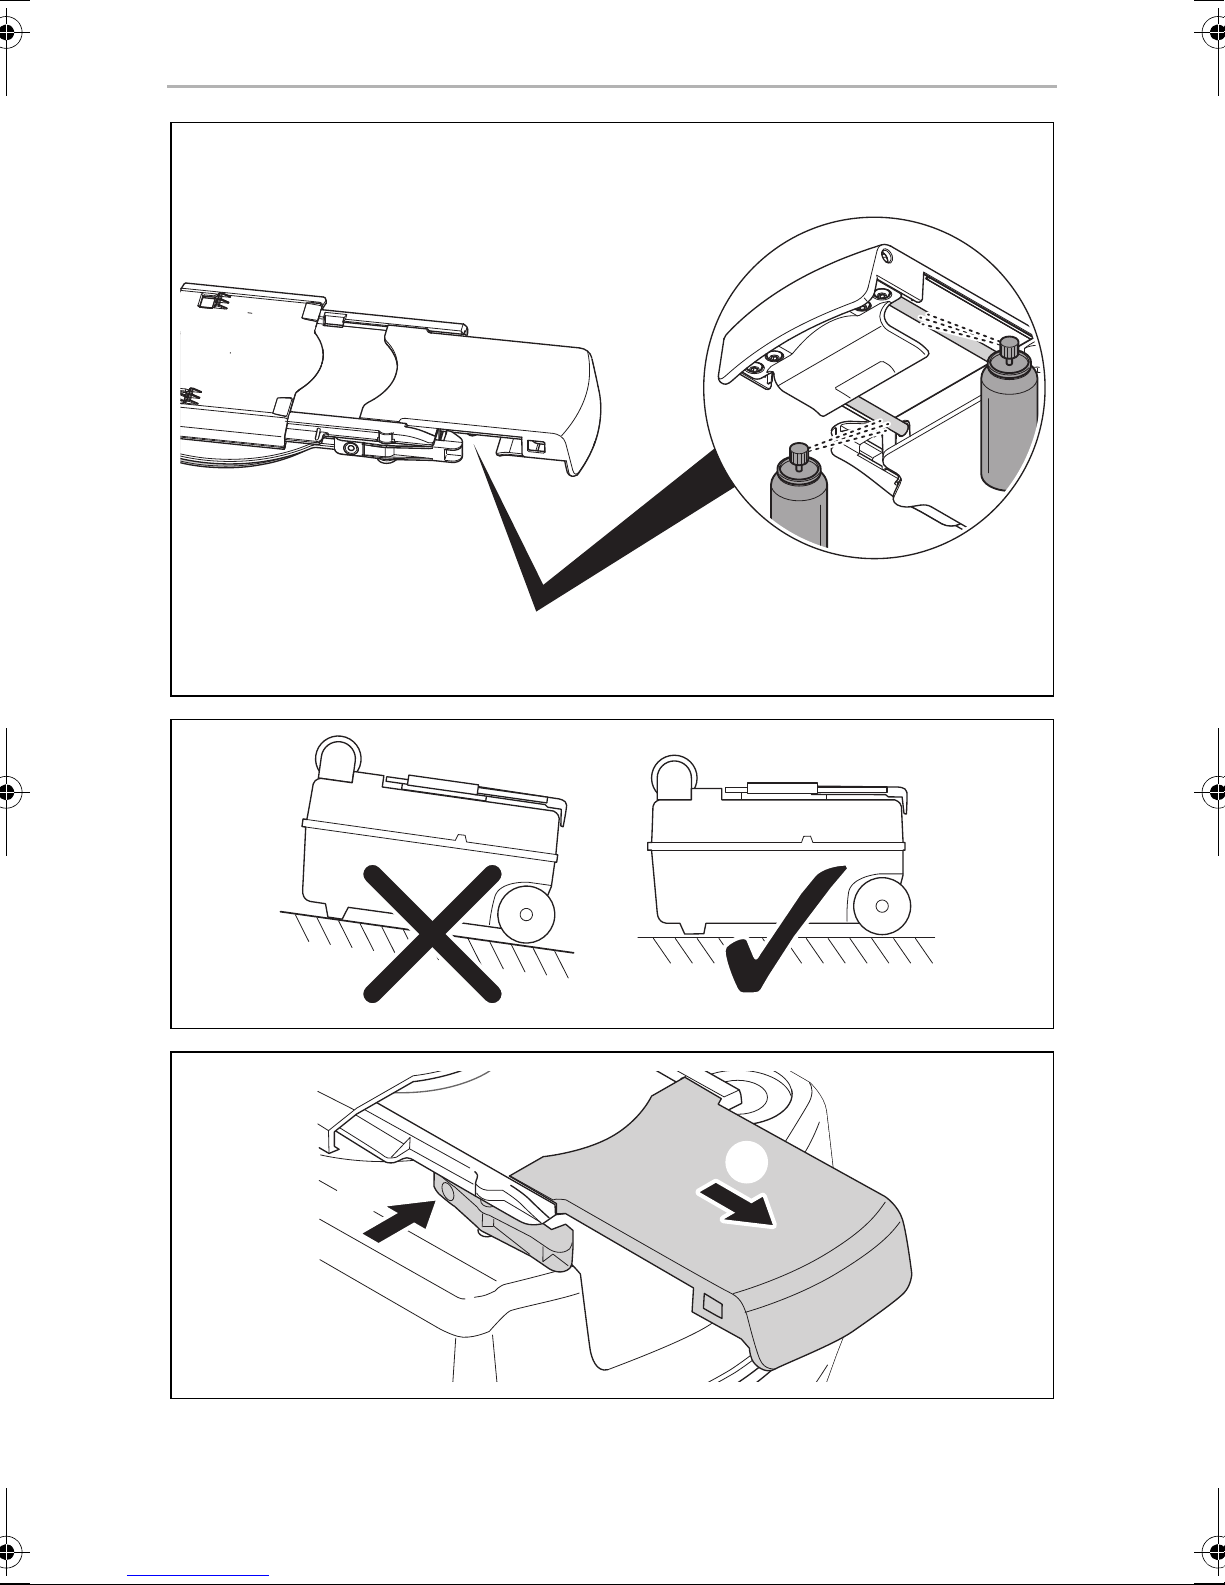
➤ Remove the cassette tank and place it on a firm surface (fig. d, page 9).
➤ Unlatch the slider handle and pull it out. (fig. e, page 9).
➤ Turn the slider anti-clockwise and release it from the cassette (fig. f, page 10).
In the state upon delivery and after extended use, the bayonet fitting can be
loosened only with difficulty.
When the slider is closed during cleaning or greasing, there is a risk of
crushing body parts.
7.3 Greasing the cassette seal
➤ Release the slider from the cassette (chapter “Releasing the slider from the
cassette” on page 27).
➤ Push back the cover so that the seal is accessible (fig. g, page 10).
➤ Clean and grease the seal.
CAUTION! Danger of crushing!
Do not reach into the opening when you close the cover.
!
➤ Close the cover (fig. k, page 11).
➤ Place the slider back on.
7.4 Cleaning the bayonet fitting and greasing the
bayonet seal
➤ Release the slider from the cassette (chapter “Releasing the slider from the
cassette” on page 27).
➤ Clean the bayonet fitting (fig. l 1, page 12) on the slider.
➤ Uniformly grease the bayonet seal (fig. l 2, page 12) with silicone grease.
➤ Place the slider back on.
27
Page 28
EN
Maintenance CT4000
7.5 Greasing the O-ring of the cassette vent
➤ Take the adapter (fig. m 1, page 12) off the cassette.
➤ Grease only the attached O-ring (fig. m 2, page 12) with silicone grease.
8 Maintenance
This chapter describes maintenance that may be performed by the user. Have all
other maintenance and service work performed by qualified personnel.
8.1 Spare parts
Spare parts can be obtained from the customer service of the respective country.
All the accessories are available from specialist dealers. If you have any questions,
please contact the dealer or your service partner directly.
8.2 Removing and replacing the lid and seat
NOTE
I
The required tools are included with the manuals. For the exchange of lid and seat,
use the Dometic Renew Kit for CT3000/CT4000 (item no. 9600000458).
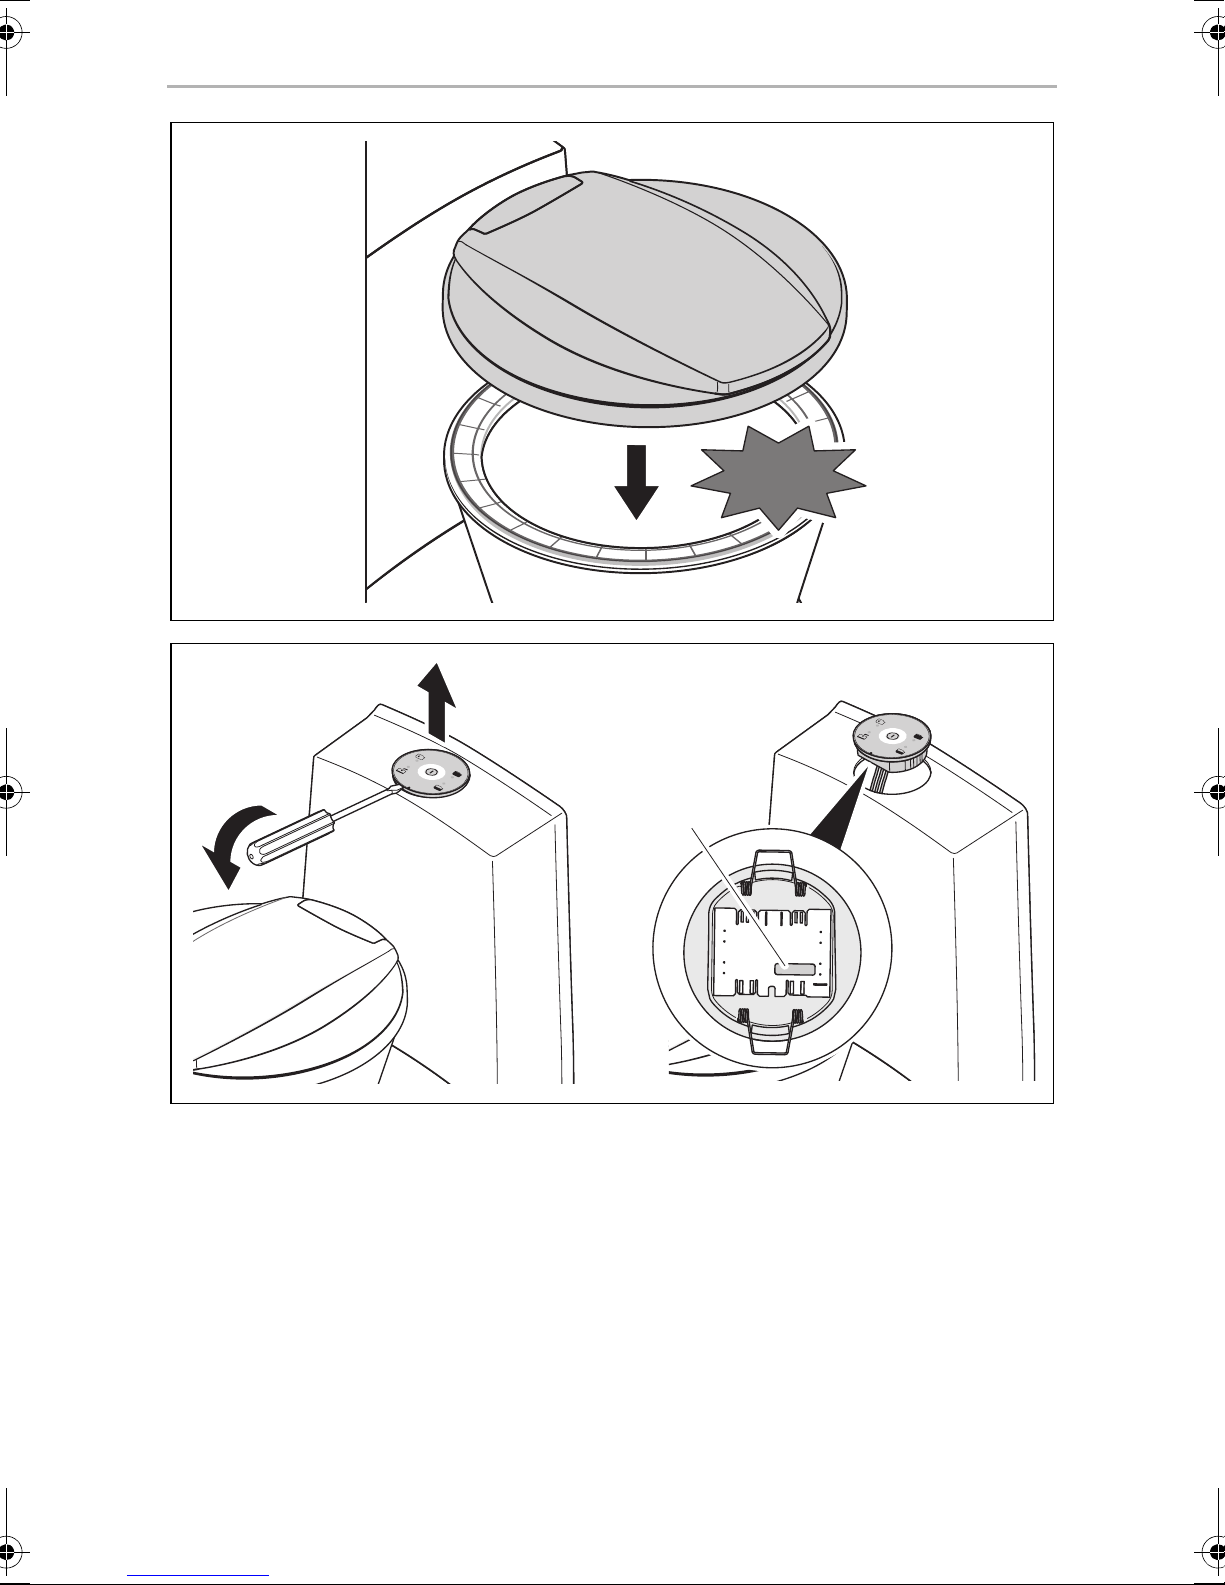
➤ Release the toilet seat (fig. n, page 13).
➤ Remove the toilet seat (fig. o, page 13).
➤ Position the new toilet seat and press it down until it latches in place (fig. p,
page 14).
The manufacturer accepts no liability for damage resulting from
incorrect or faulty installation.
28
Page 29
EN
CT4000 Maintenance
8.3 Replacing the cassette seal
➤ Release the slider from the cassette (chapter “Releasing the slider from the
cassette” on page 27).
➤ Push back the cover so that the seal is accessible (fig. g, page 10).
➤ Remove the support ring and the seal (fig. g, page 10).
NOTICE!
A
➤ Insert the new seal (fig. i, page 11).
➤ Insert the support ring (fig. j, page 11).
➤ Grease all areas.
The seal must be positioned uniformly in the opening (fig. h, page 10)
so that the cassette is sealed and the slider can move easily.
CAUTION! Danger of crushing!
Do not reach into the opening when you close the cover.
!
➤ Close the cover (fig. k, page 11).
➤ Place the slider back on.
8.4 Replacing the bayonet seal
➤ Release the slider from the cassette (chapter “Releasing the slider from the
cassette” on page 27).
➤ Remove the old seal (fig. l 2,page 12 ).
➤ Clean the bayonet fitting.
➤ Insert the new seal.
➤ Ensure uniform seating of the new seal.
➤ Place the slider back on.
➤ Grease all areas.
29
Page 30
EN
What to do in case of problems CT4000
8.5 Replacing the fuse in the operating unit
CAUTION!
!
➤ Lift the control unit with a suitable tool and then pull it out of the bracket or wall
(fig. q, page 14).
➤ Replace the fuse (automotive fuse: 7.5 A) on the bottom of the control unit
(fig. q 1, page 14).
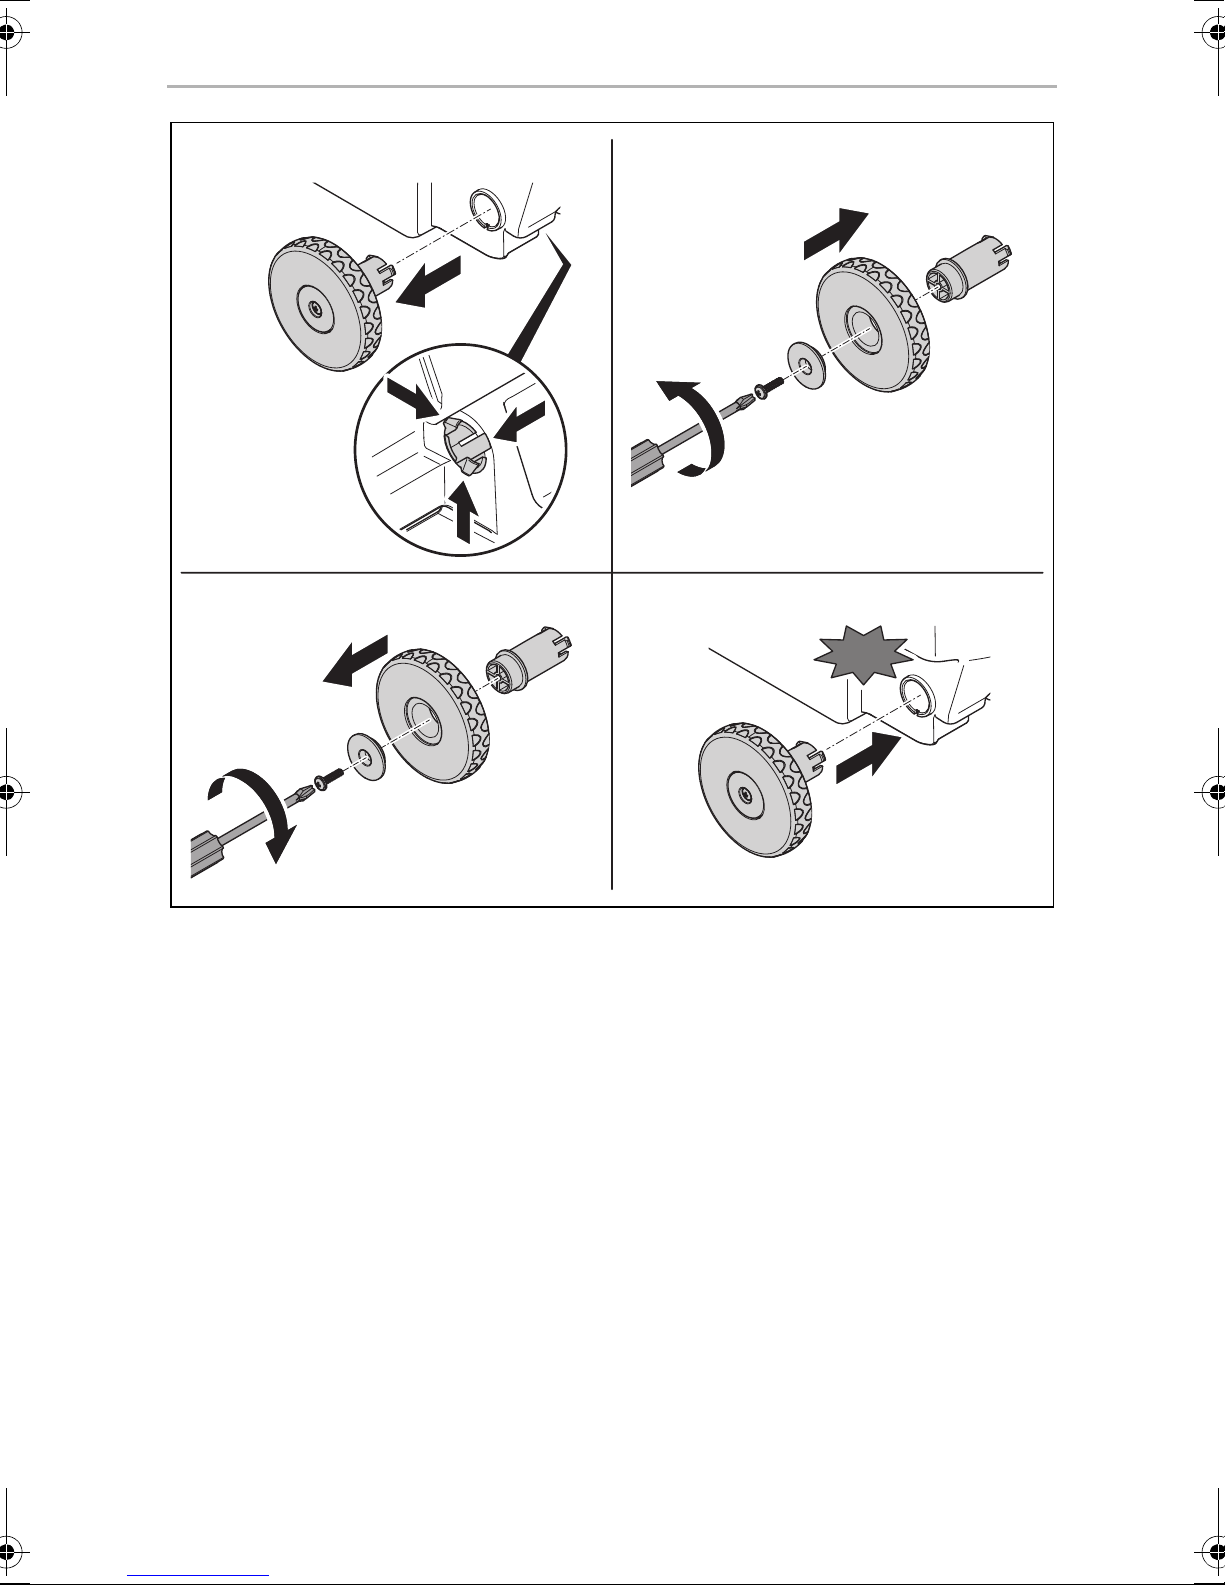
8.6 Replacing the wheels on the cassette tank
The wheels on the cassette tank can be replaced individually if required:
➤ Remove the old wheel as shown (fig. r, page 15).
➤ Mount the new wheel as shown (fig. r, page 15).
➤ Ensure that the wheel moves freely.
• Switch off the voltage supply before you start!
• Carefully pull the control unit out of the wall opening. There is a risk
of injury due to the springs springing back!
9 What to do in case of problems
Dometic offers a Europe-wide service network. Authorized customer service centres
are available on the Internet on the website dometic.com.
When contacting customer service, please make a note of the following information
on the type plate:
• Model Designation
• Product Number
• Serial No.
• MLC
NOTE
I
You can find the type plate in the cassette housing after removal of the
cassette.
30
Page 31

EN
CT4000 Warranty
Fault Possible cause Remedy
Toilet no longer flushes. Faulty fuse.
Cassette not inserted.
Cassette full.
No power supply.
Electronics defective.
Pump defective.
Solenoid valve defective.
Screen of solenoid valve is
dirty.
Cassette tank leaks. Seal worn. Replace the cassette seal
No level indication. The float in the cassette tank is
hung up or jammed by toilet
paper.
Replace the fuse (see chapter
“Replacing the fuse in the
operating unit” on page 30).
If there are repeated failures,
check the electrical connections!
Replace defective parts.
(see chapter “Replacing the
cassette seal” on page 29).
Clean the float in the cassette.
Do not use a high-pressure cleaner!
10 Warranty
The statutory warranty period applies. If the product is defective, please contact your
retailer or the manufacturer's branch in your country (see the back of the instruction
manual for the addresses).
For repair and guarantee processing, please include the following documents when
you send in the device:
• A copy of the receipt with purchasing date
• A reason for the claim or description of the fault
11 Disposal
➤ Place the packaging material in the appropriate recycling waste bins wherever
possible.
If you wish to finally dispose of the product, ask your local recycling centre
or specialist dealer for details about how to do this in accordance with the
M
applicable disposal regulations.
31
Page 32

EN
Technical data CT4000
12 Technical data
CT4000
Input voltage:
Current consumption: Max. 2 A with internal pump
Max. 5 A with external pump
Max. person weight: 130 kg
Operating temperature: 0 °C to +50 °C
Capacity: 19 l (cassette tank)
7 l (freshwater tank, optional)
Test mark:
N1 10 R – 047317
NOTE
I
Water supply (for vehicle-side pump):
The toilet requires a minimum of 7 l/min provided by the vehicle at the
outlet of the toilet hose connection in order to ensure a satisfactory flushing output of 5 l/min.
12 V
g
1
32
Page 33

DE
CT4000
Bitte lesen Sie diese Anleitung vor der Inbetriebnahme sorgfältig durch
und bewahren Sie sie auf. Geben Sie sie im Falle einer Weitergabe des
Produktes an den Nutzer weiter.
Inhaltsverzeichnis
1 Erklärung der Symbole . . . . . . . . . . . . . . . . . . . . . . . . . . . . . . . . . . . . . . 34
2 Sicherheitshinweise . . . . . . . . . . . . . . . . . . . . . . . . . . . . . . . . . . . . . . . . . 34
2.1 Grundlegende Sicherheit . . . . . . . . . . . . . . . . . . . . . . . . . . . . . . . . . 35
2.2 Verwendung von Sanitärzusätzen . . . . . . . . . . . . . . . . . . . . . . . . . . 35
3Zubehör. . . . . . . . . . . . . . . . . . . . . . . . . . . . . . . . . . . . . . . . . . . . . . . . . . . . 36
4 Bestimmungsgemäßer Gebrauch. . . . . . . . . . . . . . . . . . . . . . . . . . . . . 36
5 Technische Beschreibung . . . . . . . . . . . . . . . . . . . . . . . . . . . . . . . . . . . . 36
5.1 Beschreibung der Komponenten. . . . . . . . . . . . . . . . . . . . . . . . . . . 37
5.2 Bedien- und Anzeigeelemente. . . . . . . . . . . . . . . . . . . . . . . . . . . . . 37
6 Toilette benutzen . . . . . . . . . . . . . . . . . . . . . . . . . . . . . . . . . . . . . . . . . . . 38
6.1 Sanitärzusätze . . . . . . . . . . . . . . . . . . . . . . . . . . . . . . . . . . . . . . . . . . 38
6.2 Kassettentank vorbereiten . . . . . . . . . . . . . . . . . . . . . . . . . . . . . . . . 39
6.3 Frischwassertank füllen (integrierter Tank) . . . . . . . . . . . . . . . . . . . . 40
6.4 Toilette benutzen . . . . . . . . . . . . . . . . . . . . . . . . . . . . . . . . . . . . . . . 40
6.5 Kassettentank entleeren . . . . . . . . . . . . . . . . . . . . . . . . . . . . . . . . . . .41
6.6 Toilettensitz positionieren. . . . . . . . . . . . . . . . . . . . . . . . . . . . . . . . . 42
6.7 Winterbetrieb . . . . . . . . . . . . . . . . . . . . . . . . . . . . . . . . . . . . . . . . . . 42
6.8 Außerbetriebnahme . . . . . . . . . . . . . . . . . . . . . . . . . . . . . . . . . . . . . 42
7 Reinigung und Pflege. . . . . . . . . . . . . . . . . . . . . . . . . . . . . . . . . . . . . . . . 43
7.1 Schieber fetten . . . . . . . . . . . . . . . . . . . . . . . . . . . . . . . . . . . . . . . . . 44
7.2 Schieber von der Kassette lösen. . . . . . . . . . . . . . . . . . . . . . . . . . . . 44
7.3 Kassettendichtung fetten . . . . . . . . . . . . . . . . . . . . . . . . . . . . . . . . . 45
7.4 Bajonettverschluss reinigen und Bajonettdichtung fetten . . . . . . . 45
7.5 O-Ring der Kassettenbelüftung fetten . . . . . . . . . . . . . . . . . . . . . . . 45
8 Wartung. . . . . . . . . . . . . . . . . . . . . . . . . . . . . . . . . . . . . . . . . . . . . . . . . . . . 46
8.1 Ersatzteile. . . . . . . . . . . . . . . . . . . . . . . . . . . . . . . . . . . . . . . . . . . . . . 46
8.2 Deckel und Brille abmontieren/tauschen . . . . . . . . . . . . . . . . . . . . 46
8.3 Kassettendichtung ersetzen . . . . . . . . . . . . . . . . . . . . . . . . . . . . . . . 47
8.4 Bajonettdichtung ersetzen . . . . . . . . . . . . . . . . . . . . . . . . . . . . . . . . 47
33
Page 34

DE
Erklärung der Symbole CT4000
8.5 Sicherung in der Bedieneinheit tauschen . . . . . . . . . . . . . . . . . . . . 48
8.6 Räder am Kassettentank tauschen . . . . . . . . . . . . . . . . . . . . . . . . . . 48
9 Verhalten bei Störungen . . . . . . . . . . . . . . . . . . . . . . . . . . . . . . . . . . . . . 48
10 Gewährleistung. . . . . . . . . . . . . . . . . . . . . . . . . . . . . . . . . . . . . . . . . . . . . 49
11 Entsorgung . . . . . . . . . . . . . . . . . . . . . . . . . . . . . . . . . . . . . . . . . . . . . . . . . 50
12 Technische Daten . . . . . . . . . . . . . . . . . . . . . . . . . . . . . . . . . . . . . . . . . . . 50
1 Erklärung der Symbole
WARNUNG!
!
Sicherheitshinweis: Nichtbeachtung kann zu Tod oder schwerer
Verletzung führen.
VORSICHT!
Sicherheitshinweis: Nichtbeachtung kann zu Verletzungen führen.
!
ACHTUNG!
A
Nichtbeachtung kann zu Materialschäden führen und die Funktion des
Produktes beeinträchtigen.
HINWEIS
Ergänzende Informationen zur Bedienung des Produktes.
I
2 Sicherheitshinweise
Der Hersteller übernimmt in folgenden Fällen keine Haftung für Schäden:
• Beschädigungen am Produkt durch mechanische Einflüsse und Über-
spannungen
• Veränderungen am Produkt ohne ausdrückliche Genehmigung vom Hersteller
• Verwendung für andere als die in der Anleitung beschriebenen Zwecke
Die Konformitätserklärung kann beim Hersteller angefordert werden (Kontaktinformationen auf der Rückseite).
34
Page 35

DE
CT4000 Sicherheitshinweise
2.1 Grundlegende Sicherheit
WARNUNG!
!
A
• Dieses Gerät kann von Kindern ab 8 Jahren und darüber sowie von
Personen mit verringerten physischen, sensorischen oder mentalen
Fähigkeiten oder Mangel an Erfahrung und Wissen benutzt werden,
wenn sie beaufsichtigt oder bezüglich des sicheren Gebrauchs des
Gerätes unterwiesen wurden und die daraus resultierenden Gefahren
verstehen.
• Reinigung und Benutzer-Wartung dürfen nicht von Kindern ohne
Beaufsichtigung durchgeführt werden.
• Kinder sollten beaufsichtigt werden, um sicherzustellen, dass sie nicht
mit dem Gerät spielen.
ACHTUNG!
• Schütteln Sie den Kassettentank nicht stark.
• Hängen Sie den Kassettentank zum Transport nicht an ein Fahrrad
oder ein anderes Fahrzeug.
• Verwenden Sie keine Frostschutzmittel. Diese Mittel können die
Kassettentoilette beschädigen.
• Die Toilette ist für ein Personengewicht von max. 130 kg ausgelegt.
2.2 Verwendung von Sanitärzusätzen
VORSICHT!
• Lagern Sie Sanitärzusätze so, dass Kinder keinen Zugriff darauf haben.
!
ACHTUNG!
A
• Beachten Sie vor Verwendung von sanitären Mitteln bei Nutzung und
Reinigung der Toilette die Gebrauchshinweise auf der Verpackung.
35
Page 36

DE
Zubehör CT4000
3Zubehör
Als Zubehör erhältlich (nicht im Lieferumfang enthalten):
Beschreibung
Frischwassertank
Servicetür
Tankklappe
Auf der Dometic-Webseite (siehe Rückseite) finden Sie Informationen über Sanitärzubehör.
4 Bestimmungsgemäßer Gebrauch
Die Toilette ist für den Einbau und die Verwendung in Freizeitfahrzeugen wie Wohnwagen oder Reisemobilen vorgesehen.
5 Technische Beschreibung
Die Kassettentoilette CTx4xxx besteht aus einer im Fahrzeug fest installierten
Toilette und einer herausnehmbaren, fahrbaren Kassette als Abwassertank. Die
Kassette ist von außen durch eine Tür zugänglich. Je nach Modell erhält die Toilette
das Spülwasser aus dem fahrzeugseitigen Frischwassertank oder aus einem im
Gehäuse integrierten Tank.
Es gibt folgende Modellausführungen der Toilette:
• CT4050, CT4110: freistehend, ohne Wassertank, ohne Konsole
• CTLP4050, CTLP4110: freistehend, ohne Wassertank, niedrige Konsole
• CTS 4050, CTS4110: freistehend, ohne Wassertank, mit Konsole
• CTW4050, CTW4110: freistehend, mit Wassertank in der Konsole
Die 4050 Modelle können in eine Nasszelle eingebaut werden.
36
Page 37

DE
CT4000 Technische Beschreibung
5.1 Beschreibung der Komponenten
Pos. in
Abb. 1, Seite 3
1 Gehäuse für Kassettentank
2 Entleerungsschieber für die Toilettenschüssel
3 Toilettenschüssel, Keramik
4 Deckel und Brille, drehbar
5Konsole
6 Kontroll- und Bedienfeld
7 Frischwassertank (optional)
8 Nur CTLP, CTS,CTW: Wandhalter
9 Kassettentank (Kapazität 19 l)
10 Servicetür (Zubehör)
11 Nur CTW: Tankklappe (abschließbare Tankklappe optional)
Bezeichnung
5.2 Bedien- und Anzeigeelemente
Pos. in
Abb. 2, Seite 3
1 Taste „Spülen“
2 Anzeige „Kassettentank voll“
3 Anzeige „Kassettentank 3/4 voll“
4 Anzeige „Frischwassertank auffüllen“
5 Anzeige „Kassettentank entnommen“
Bezeichnung
(bei Verwendung des bordeigenen Tanks nicht grundsätzlich
angeschlossen)
37
Page 38

DE
Toilette benutzen CT4000
6Toilette benutzen
HINWEIS
I
6.1 Sanitärzusätze
Sanitärzusätze für den Abwassertank zersetzten Fäkalien und verhindern unangenehme Gerüche.
Der Hersteller empfiehlt:
• Dometic POWER CARE TABS
• Dometic GREEN CARE TABS
• Bevor Sie die Toilette in Betrieb nehmen, sollten Sie sie innen und
außen mit einem weichen Tuch und lauwarmem Wasser mit einem
milden Reinigungsmittel reinigen (siehe auch Kapitel „Reinigung
und Pflege“ auf Seite 43).
• Reinigen und fetten Sie die Dichtungen Ihrer Toilette regelmäßig
(siehe Kapitel „Reinigung und Pflege“ auf Seite 43).
• Herkömmliches Toilettenpapier kann die Toilette verstopfen.
Verwenden Sie ein spezielles, schnell lösliches Toilettenpapier.
Der Hersteller empfiehlt Dometic COMFORT CARE.
Bei der Verwendung von sanitären Zusätzen beachten Sie bitte die Gebrauchshinweise auf der Verpackung.
HINWEIS
I
Auf der Dometic-Webseite (siehe Rückseite) finden Sie weitere Informationen über
Sanitärzubehör.
Herkömmliches Toilettenpapier kann die Toilette verstopfen. Verwenden Sie ein spezielles, schnell lösliches Toilettenpapier. Der Hersteller
empfiehlt Dometic COMFORT CARE.
38
Page 39

DE
CT4000 Toilette benutzen
6.2 Kassettentank vorbereiten
Kassettentank entnehmen
Gehen Sie wie folgt vor (Abb. 3, Seite 4):
➤ Öffnen Sie die Servicetür.
➤ Drücken Sie die Sicherung nach oben, um den Kassettentank zu entriegeln.
➤ Ziehen Sie den Kassettentank aus dem Kassettengehäuse heraus. Beim Heraus-
ziehen muss ein Widerstand überwunden werden.
Sanitärzusatz hinzufügen
➤ Stellen Sie den Kassettentank aufrecht hin.
➤ Drehen Sie das Ausgussrohr um ca. 90° nach oben (Abb. 4, Seite 4).
HINWEIS
I
Vermeiden Sie es, das Ausgussrohr weiter als 90° zu drehen, da es sich
sonst lösen kann (Abb. 4, Seite 4).
➤ Drehen Sie die Verschlusskappe ab (Abb. 5, Seite 5).
➤ Geben Sie über das Ausgussrohr einen Sanitärzusatz in den Kassettentank
(Abb. 6, Seite 5). Beachten Sie die Gebrauchsanweisung des Sanitärzusatzes.
Kassettentank in das Kassettengehäuse schieben
ACHTUNG!
A
➤ Schieben den Kassettentank bis zum Anschlag in das Kassettengehäuse.
✓ Die Verriegelung des Kassettentanks schließt beim Einschieben automatisch.
➤ Prüfen Sie den festen Sitz des Kassettentanks.
➤ Schließen und verriegeln Sie die Servicetür.
Achten Sie darauf, dass sich der Kassettentank leicht in das Kassettengehäuse einschieben lässt. Stellen Sie sicher, dass der Kassettentank
nicht gegen andere Gegenstände oder Bauteile stößt.
39
Page 40

DE
Toilette benutzen CT4000
6.3 Frischwassertank füllen (integrierter Tank)
➤ Füllen Sie den Frischwassertank über den Einfüllstutzen an der Außenseite des
Fahrzeugs auf. Die Menge ist abhängig vom verwendeten Tank (integrierter Tank
bei den Modellen CTW4050 und CTW4110 = 7 Liter).
6.4 Toilette benutzen
Die Toilettenbrille bleibt in einer ca.70° Position stehen (Abb. 7 1, Seite 6).
HINWEIS
I
➤ Betätigen Sie vor der Nutzung die Spültaste , um etwas Wasser in die
Schüssel laufen zu lassen (Abb. 7 2, Seite 6).
➤ Ziehen Sie den Schieber (Abb. 7 3, Seite 6) nach vorne. Lassen Sie den
Schieber während der Nutzung geöffnet.
Der Schieber muss während der Fahrt geschlossen sein und es darf sich
keine Flüssigkeit oberhalb des Schiebers befinden.
➤ Betätigen Sie nach der Nutzung zum Spülen der Schüssel die Spültaste
erneut (Abb. 8 1, Seite 6).
➤ Schließen Sie den Schieber (Abb. 8 2, Seite 6).
Der Kassettentank hat eine Kapazität von 19 l. Wenn die Anzeige aufleuchtet,
sind nur noch wenige Nutzungen möglich.
HINWEIS
I
Bei 3/4 gefüllter Kassette ist die Verwendung nur noch mit offenem
Schieber möglich. In Schräglage (z. B. dauernde Neigung des Fahrzeugs) darf die Kassette nur 3/4 gefüllt sein. Ein Überlaufen durch die
Entlüftung ist möglich.
40
Page 41

DE
CT4000 Toilette benutzen
6.5 Kassettentank entleeren
Entleeren Sie den Kassettentank, wenn die Anzeige leuchtet.
➤ Entnehmen Sie den Kassettentank (Kapitel „Kassettentank entnehmen“ auf
Seite 39).
➤ Drücken Sie die Entriegelungstaste in der Mitte des Handgriffs und ziehen Sie
den Handgriff bis zum Anschlag heraus (Abb. 9, Seite 7).
ACHTUNG!
A
• Schütteln Sie den Kassettentank nicht stark.
• Hängen Sie den Kassettentank zum Transport nicht an ein Fahrrad
oder ein anderes Fahrzeug.
• Legen Sie keine schweren Gegenstände auf den Kassettentank
während des Transports.
Das Gehäuse und die Rollen werden dadurch beschädigt.
➤ Bringen Sie den Tank zu der nächsten ausgewiesenen Entsorgungsstelle.
➤ Drücken Sie die Entriegelungstaste des Handgriffs und schieben Sie den Hand-
griff zurück in die Kassette.
➤ Stellen Sie den Kassettentank aufrecht hin und drehen Sie das Ausgussrohr 90°
nach oben (Abb. 4, Seite 4).
HINWEIS
I
➤ Drehen Sie die Verschlusskappe ab (Abb. 5, Seite 5).
Vermeiden Sie es, das Ausgussrohr weiter als 90° zu drehen, da er sich
sonst lösen kann.
➤ Halten Sie den Kassettentank mit der einen Hand am Handgriff (Abb. 0 3,
Seite 7) und mit der anderen Hand am Schieber (Abb. 0 2, Seite 7), so dass Sie
den Entlüftungsknopf (Abb. 0 1, Seite 7) während des Entleerens drücken können.
➤ Drücken Sie den Entlüftungsknopf, wenn das Ausgussrohr nach unten zeigt.
✓ Der Tank entleert sich gleichmäßig und ohne Spritzen.
➤ Spülen Sie den Kassettentank nach der Entleerung mit Wasser sorgfältig aus.
➤ Fügen Sie der Kassette einen Sanitärzusatz hinzu (Kapitel „Sanitärzusatz hinzufü-
gen“ auf Seite 39).
41
Page 42

DE
Toilette benutzen CT4000
➤ Reinigen Sie die Räder des Kassettentanks von grobem Schmutz zur Vermeidung
von Kratzern im Kassettengehäuse.
ACHTUNG!
A
➤ Schieben Sie den Kassettentank in das Kassettengehäuse (Kapitel „Kassettentank
in das Kassettengehäuse schieben“ auf Seite 39).
Reinigen Sie den Kassettentank innen nicht mit einem Hochdruckreiniger. Der Schwimmer für die Füllstandsanzeige kann dadurch
Schaden nehmen.
6.6 Toilettensitz positionieren
Der Toilettensitz ist stufenlos drehbar (Abb. a, Seite 8).
6.7 Winterbetrieb
ACHTUNG!
A
Sie können die Kassettentoilette auch im Winter nutzen, solange sich Toilette und
Kassettentank in einem frostfreien Bereich befinden.
Wenn dies nicht der Fall ist, entleeren Sie den Frischwassertank, den Kassettentank
und die Wasserleitung der Frischwasserzufuhr.
Dadurch werden Schäden durch Frost vermieden (Kapitel „Außerbetriebnahme“ auf
Seite 42).
Verwenden Sie keine Frostschutzmittel. Frostschutzmittel können die
Kassettentoilette beschädigen.
6.8 Außerbetriebnahme
Entleeren Sie den Frischwassertank und das Wasserleitungssystem vollständig,
wenn Sie die Toilette für längere Zeit außer Betrieb nehmen.
➤ Reinigen Sie die Toilette sorgfältig (Kapitel „Reinigung und Pflege“ auf Seite 43).
➤ Betätigen Sie den Spülknopf bis sich kein Wasser mehr in den Leitungen
befindet.
➤ Unterbrechen Sie die Stromversorgung zur Toilette.
42
Page 43

DE
CT4000 Reinigung und Pflege
➤ Entleeren Sie anschließend den Kassettentank und spülen Sie ihn sorgfältig aus.
Reinigen Sie die Kassette. Verschließen Sie das Ausgussrohr nicht, um den
Kassettentank trocknen zu lassen.
➤ Reinigen und fetten Sie alle Dichtungen und beweglichen Teile der Toilette und
des Kassettentanks (Kapitel „Reinigung und Pflege“ auf Seite 43) und
wiederholen Sie diese Maßnahme vor der Wiederinbetriebnahme.
7 Reinigung und Pflege
VORSICHT!
!
Reinigungsmittel für die Toilette dürfen weder Chlor noch Alkohol
enthalten!
ACHTUNG!
A
I
➤ Reinigen Sie die Toilette regelmäßig innen und außen mit einem weichen Tuch
und lauwarmen Wasser mit einem milden Reinigungsmittel.
➤ Waschen Sie anschließend die Oberflächen mit klarem Wasser ab.
Der Hersteller empfiehlt:
• Fett: OKS
• Silikonspray: OKS
• Um Materialveränderungen zu vermeiden, verwenden Sie keine
scharfen, körnigen bzw. sodahaltigen Reinigungsmittel (keine
Scheuermittel).
• Verwenden Sie keine Politur zur Reinigung.
HINWEIS
• Säubern und fetten Sie regelmäßig alle Dichtungen an der Toilette
und dem Kassettentank. Führen Sie diese Aktionen bei häufiger
Nutzung monatlich oder nach 3 – 5 Entleerungen der Kassette
durch. Verwenden Sie Fett oder Spray auf Silikonbasis.
• Benutzen Sie für die regelmäßige Reinigung der Toilettenschüssel
ein mildes und farbloses Reinigungsmittel.
®
1110
®
1111
43
Page 44

DE
Reinigung und Pflege CT4000
7.1 Schieber fetten
VORSICHT!
!
Der Schieber lässt sich leicht bewegen, wenn er regelmäßig gefettet wird.
Schieberstangen fetten
➤ Sprühen Sie die Stangen des Schiebers mit Silikonspray ein (Abb. c, Seite 9).
7.2 Schieber von der Kassette lösen
!
Es besteht Quetschgefahr, wenn der Schieber beim Reinigen oder
Fetten geschlossen wird (Abb. b, Seite 8).
VORSICHT!
Es besteht Quetschgefahr, wenn der Schieber beim Reinigen oder
Fetten geschlossen wird.
➤ Entnehmen Sie den Kassettentank und stellen Sie ihn auf einen festen Grund
(Abb. d, Seite 9).
➤ Entrasten Sie den Schiebergriff und ziehen Sie ihn heraus (Abb. e, Seite 9).
➤ Drehen Sie den Schieber gegen den Uhrzeiger und lösen Sie ihn von der
Kassette (Abb. f, Seite 10).
Der Bajonettverschluss lässt sich im Auslieferungszustand und nach längerer
Standzeit nur schwergängig lösen.
44
Page 45

DE
CT4000 Reinigung und Pflege
7.3 Kassettendichtung fetten
➤ Lösen Sie den Schieber von der Kassette (Kapitel „Schieber von der Kassette
lösen“ auf Seite 44).
➤ Schieben Sie die Abdeckung zurück, so dass die Dichtung zugänglich ist
(Abb. g, Seite 10).
➤ Reinigen und fetten Sie die Dichtung.
VORSICHT! Quetschgefahr!
Fassen Sie nicht in die Öffnung, wenn Sie die Abdeckung schließen.
!
➤ Schließen Sie die Abdeckung (Abb. k, Seite 11).
➤ Setzen Sie den Schieber wieder ein.
7.4 Bajonettverschluss reinigen und Bajonettdichtung
fetten
➤ Lösen Sie den Schieber von der Kassette (Kapitel „Schieber von der Kassette
lösen“ auf Seite 44).
➤ Reinigen Sie den Bajonettverschluss (Abb. l 1, Seite 12) am Schieber.
➤ Fetten Sie die Bajonettdichtung (Abb. l 2, Seite 12) gleichmäßig mit Silikonfett
ein.
➤ Setzen Sie den Schieber wieder ein.
7.5 O-Ring der Kassettenbelüftung fetten
➤ Lösen Sie den Adapter (Abb. m 1, Seite 12) von der Kassette.
➤ Fetten Sie den aufgesteckten O-Ring (Abb. m 2, Seite 12) mit Silikonfett.
45
Page 46

DE
Wartung CT4000
8Wartung
In diesem Kapitel sind Wartungsarbeiten beschrieben, die vom Benutzer ausgeführt
werden dürfen. Lassen Sie alle anderen Wartungs- und Servicearbeiten von Fachpersonal ausführen.
8.1 Ersatzteile
Ersatzteile können vom Kundendienst des jeweiligen Landes bezogen werden.
In Deutschland erhalten Sie Ersatzteile auch über den Kundendienst:
• Telefon: 0 180 62 22 444
• Fax: 0 180 53 66 385
• E-Mail: ersatzteile@dometic.de
8.2 Deckel und Brille abmontieren/tauschen
HINWEIS
I
Das benötigte Werkzeug liegt den Anleitungen bei. Für den Austausch von Deckel
und Brille verwenden Sie das Dometic Renew Kit für CT3000/CT4000
(Art.-Nr. 9600000458).
➤ Lösen Sie den Toilettensitz (Abb. n, Seite 13).
➤ Entfernen Sie den Toilettensitz (Abb. o, Seite 13).
➤ Platzieren Sie den neuen Toilettensitz und drücken Sie ihn runter bis er einrastet
(Abb. p, Seite 14).
Der Hersteller übernimmt keine Haftung für Schäden, die durch eine
falsche oder fehlerhafte Montage entstehen.
46
Page 47

DE
CT4000 Wartung
8.3 Kassettendichtung ersetzen
➤ Lösen Sie den Schieber von der Kassette (Kapitel „Schieber von der Kassette
lösen“ auf Seite 44).
➤ Schieben Sie die Abdeckung zurück, so dass die Dichtung zugänglich ist
(Abb. g, Seite 10).
➤ Bauen Sie den Stützring und die Dichtung aus (Abb. g, Seite 10).
ACHTUNG!
A
➤ Setzen Sie die neue Dichtung ein (Abb. i, Seite 11).
➤ Setzen Sie den Stützring ein (Abb. j, Seite 11).
Die Dichtung muss gleichmäßig in der Öffnung anliegen (Abb. h,
Seite 10), damit die Kassette dicht ist und der Schieber leicht bewegt
werden kann.
➤ Fetten Sie alle Bereiche.
VORSICHT! Quetschgefahr!
Fassen Sie nicht in die Öffnung, wenn Sie die Abdeckung schließen.
!
➤ Schließen Sie die Abdeckung (Abb. k, Seite 11).
➤ Setzen Sie den Schieber wieder ein.
8.4 Bajonettdichtung ersetzen
➤ Lösen Sie den Schieber von der Kassette (Kapitel „Schieber von der Kassette
lösen“ auf Seite 44).
➤ Entnehmen Sie die alte Dichtung (Abb. l 2, Seite 12).
➤ Reinigen Sie den Bajonettverschluss.
➤ Setzen Sie die neue Dichtung ein.
➤ Achten Sie auf gleichmäßigen Sitz der neuen Dichtung.
➤ Setzen Sie den Schieber wieder ein.
➤ Fetten Sie alle Bereiche.
47
Page 48

DE
Verhalten bei Störungen CT4000
8.5 Sicherung in der Bedieneinheit tauschen
VORSICHT!
!
➤ Heben Sie die Bedieneinheit mit einem geeigneten Werkzeug an und ziehen Sie
sie anschließend aus der Konsole bzw. Wand (Abb. q, Seite 14).
➤ Tauschen Sie die Sicherung (Automobilsicherung: 7,5 A) auf der Unterseite der
Bedieneinheit (Abb. q 1, Seite 14).
8.6 Räder am Kassettentank tauschen
Die Räder am Kassettentank können bei Bedarf einzeln ausgetauscht werden:
➤ Lösen Sie das alte Rad wie dargestellt (Abb. r, Seite 15).
➤ Montieren Sie das neue Rad wie dargestellt (Abb. r, Seite 15).
➤ Prüfen Sie das Rad auf freien Lauf.
• Vor Beginn Spannungsversorgung ausschalten!
• Ziehen Sie die Bedieneinheit vorsichtig aus der Wandöffnung.
Es besteht Verletzungsgefahr durch zurückspringende Federn!
9 Verhalten bei Störungen
Dometic bietet ein europaweites Kundendienstnetz an. Autorisierte Kundendienststellen erfahren Sie im Internet auf der Webseite dometic.com.
Notieren Sie für den Kontakt mit dem Kundendienst bitte folgende Daten des Typenschilds:
• Modell (Model Designation)
• Produktnummer (Product Number)
• Seriennummer (Serial No.)
• MLC-Code (MLC)
HINWEIS
I
Sie finden das Typenschild im Kassettengehäuse nach Entnahme der
Kassette.
48
Page 49

DE
CT4000 Gewährleistung
Störung Mögliche Ursache Abhilfe
Spülung läuft nicht mehr. Sicherung defekt.
Kassette nicht eingeschoben.
Kassette voll.
Stromversorgung nicht
vorhanden.
Elektronik defekt.
Pumpe defekt.
Magnetventil defekt.
Sieb vom Magnetventil ist
verschmutzt.
Kassettentank undicht. Dichtung verschlissen. Kassettendichtung ersetzen
Keine Füllstandsanzeige. Schwimmer im Kassettentank
hat sich verhakt oder ist durch
Toilettenpapier festgesetzt.
Sicherung erneuern (siehe
Kapitel „Sicherung in der
Bedieneinheit tauschen“ auf
Seite 48).
Bei wiederholtem Aussetzen
elektrische Anschlüsse und
Verbindungen prüfen!
Defekte Teile ersetzten.
(siehe Kapitel „Kassettendichtung ersetzen“ auf Seite 47).
Schwimmer in der Kassette
reinigen.
Keinen Hochdruckreiniger verwenden!
10 Gewährleistung
Es gilt die gesetzliche Gewährleistungsfrist. Sollte das Produkt defekt sein, wenden
Sie sich bitte an Ihren Fachhändler oder an die Niederlassung des Herstellers in
Ihrem Land (Adressen siehe Rückseite der Anleitung).
Zur Reparatur- bzw. Gewährleistungsbearbeitung müssen Sie folgende Unterlagen
mitschicken:
• eine Kopie der Rechnung mit Kaufdatum,
• einen Reklamationsgrund oder eine Fehlerbeschreibung.
49
Page 50

DE
Entsorgung CT4000
11 Entsorgung
➤ Geben Sie das Verpackungsmaterial möglichst in den entsprechenden
Recycling-Müll.
Wenn Sie das Produkt endgültig außer Betrieb nehmen, informieren Sie
sich bitte beim nächsten Recyclingcenter oder bei Ihrem Fachhändler
M
über die zutreffenden Entsorgungsvorschriften.
12 Technische Daten
CT4000
Versorgungsspannung:
Stromaufnahme: max. 2 A bei interner Pumpe
max. 5 A bei externer Pumpe
Max. Personengewicht: 130 kg
Betriebstemperatur: 0 °C bis +50 °C
Fassungsvermögen: 19 l (Kassettentank)
7 l (Frischwassertank, optional)
Prüfzeichen:
HINWEIS
I
Wasserversorgung (bei fahrzeugseitiger Pumpe):
Die Toilette benötigt fahrzeugseitig min. 7 l/min am Ausgang des
Schlauchanschlusses der Toilette, um eine ausreichende Spülleistung
mit min. 5 l/min zu gewährleisten
12 Vg
N1 10 R – 047317
1
50
Page 51

FR
CT4000
Veuillez lire ce manuel attentivement avant de mettre l'appareil en service
et conservez-le. En cas de passer le produit, veuillez le transmettre au
nouvel acquéreur.
Sommaire
1 Explication des symboles . . . . . . . . . . . . . . . . . . . . . . . . . . . . . . . . . . . . 52
2 Consignes de sécurité . . . . . . . . . . . . . . . . . . . . . . . . . . . . . . . . . . . . . . . 52
2.1 Consignes générales de sécurité . . . . . . . . . . . . . . . . . . . . . . . . . . . 53
2.2 Utilisation d'additifs sanitaires. . . . . . . . . . . . . . . . . . . . . . . . . . . . . . 53
3 Accessoires . . . . . . . . . . . . . . . . . . . . . . . . . . . . . . . . . . . . . . . . . . . . . . . . . 54
4Usage conforme . . . . . . . . . . . . . . . . . . . . . . . . . . . . . . . . . . . . . . . . . . . . 54
5 Description technique . . . . . . . . . . . . . . . . . . . . . . . . . . . . . . . . . . . . . . . 54
5.1 Description des composants . . . . . . . . . . . . . . . . . . . . . . . . . . . . . . 55
5.2 Éléments de commande et d'affichage . . . . . . . . . . . . . . . . . . . . . . 55
6 Utilisation des toilettes . . . . . . . . . . . . . . . . . . . . . . . . . . . . . . . . . . . . . . 56
6.1 Produits sanitaires . . . . . . . . . . . . . . . . . . . . . . . . . . . . . . . . . . . . . . . 56
6.2 Préparation du réservoir à cassette. . . . . . . . . . . . . . . . . . . . . . . . . . 57
6.3 Remplissage du réservoir d'eau douce (réservoir intégré) . . . . . . . 58
6.4 Utilisation des toilettes . . . . . . . . . . . . . . . . . . . . . . . . . . . . . . . . . . . 58
6.5 Vidange du réservoir à cassette . . . . . . . . . . . . . . . . . . . . . . . . . . . . 59
6.6 Positionnement du siège des toilettes . . . . . . . . . . . . . . . . . . . . . . . 60
6.7 Fonctionnement d'hiver . . . . . . . . . . . . . . . . . . . . . . . . . . . . . . . . . . 60
6.8 Mise hors service . . . . . . . . . . . . . . . . . . . . . . . . . . . . . . . . . . . . . . . . 60
7 Nettoyage et entretien . . . . . . . . . . . . . . . . . . . . . . . . . . . . . . . . . . . . . . .61
7.1 Graissage de la glissière . . . . . . . . . . . . . . . . . . . . . . . . . . . . . . . . . . 62
7.2 Détacher la glissière de la cassette. . . . . . . . . . . . . . . . . . . . . . . . . . 62
7.3 Graissage du joint d'étanchéité de la cassette . . . . . . . . . . . . . . . . 63
7.4 Nettoyage de la fermeture à baïonnette et graissage du joint à
baïonnette . . . . . . . . . . . . . . . . . . . . . . . . . . . . . . . . . . . . . . . . . . . . . 63
7.5 Graissage du joint torique de la ventilation de la cassette . . . . . . . 63
8Entretien . . . . . . . . . . . . . . . . . . . . . . . . . . . . . . . . . . . . . . . . . . . . . . . . . . . 64
8.1 Pièces de rechange. . . . . . . . . . . . . . . . . . . . . . . . . . . . . . . . . . . . . . 64
8.2 Démontage/remplacement du couvercle et de la lunette . . . . . . . 64
8.3 Remplacement du joint d'étanchéité de la cassette . . . . . . . . . . . . 65
8.4 Remplacement du joint de la fermeture à baïonnette . . . . . . . . . . . 65
51
Page 52

FR
Explication des symboles CT4000
8.5 Remplacement du fusible dans l'unité de commande . . . . . . . . . . 66
8.6 Remplacement des roues sur le réservoir à cassette . . . . . . . . . . . . 66
9 Comportement en cas de panne . . . . . . . . . . . . . . . . . . . . . . . . . . . . . . 66
10 Garantie. . . . . . . . . . . . . . . . . . . . . . . . . . . . . . . . . . . . . . . . . . . . . . . . . . . . 67
11 Retraitement . . . . . . . . . . . . . . . . . . . . . . . . . . . . . . . . . . . . . . . . . . . . . . . 68
12 Caractéristiques techniques. . . . . . . . . . . . . . . . . . . . . . . . . . . . . . . . . . 68
1 Explication des symboles
AVERTISSEMENT !
!
Consigne de sécurité : le non-respect de ces consignes peut entraîner
la mort ou de graves blessures.
ATTENTION !
!
A
Consigne de sécurité : le non-respect de ces consignes peut entraîner
des blessures.
AVIS !
Le non-respect de ces consignes peut entraîner des dommages
matériels et des dysfonctionnements du produit.
REMARQUE
Informations complémentaires sur l'utilisation du produit.
I
2 Consignes de sécurité
Le fabricant décline toute responsabilité pour des dommages dans les cas suivants :
• des influences mécaniques et des surtensions ayant endommagé le matériel
• des modifications apportées au produit sans autorisation explicite de la part du
fabricant
• une utilisation différente de celle décrite dans la notice
La déclaration de conformité peut être demandée auprès du fabricant (coordonnées
au dos).
52
Page 53

FR
CT4000 Consignes de sécurité
2.1 Consignes générales de sécurité
AVERTISSEMENT !
!
A
• Les enfants âgés de 8 ans et plus ainsi que les personnes ayant des
déficiences physiques, sensorielles ou mentales ou un manque
d'expérience ou de connaissances peuvent utiliser ce produit à
condition d'être sous surveillance ou d'avoir reçu des instructions
concernant l'utilisation de l'appareil en toute sécurité et de comprendre les dangers qui en résultent.
• Le nettoyage et la maintenance ne doivent pas être effectués par des
enfants sans surveillance.
• Les enfants doivent être surveillés pour s'assurer qu'ils ne jouent pas
avec l'appareil.
AVIS !
• N'agitez pas fortement le réservoir de la cassette.
• N'accrochez pas le réservoir de la cassette à une bicyclette ou un autre
véhicule pour le transport.
• N'utilisez aucun antigel. Ces produits peuvent endommager les
toilettes à cassette.
• Les toilettes sont conçues pour des personnes pesant jusqu'à 130 kg.
2.2 Utilisation d'additifs sanitaires
ATTENTION !
!
A
• Stockez les additifs sanitaires afin que les enfants ne puissent pas y
accéder.
AVIS !
• Suivez les instructions sur l'emballage avant d'utiliser des produits
sanitaires lors de l'utilisation et du nettoyage des toilettes.
53
Page 54

FR
Accessoires CT4000
3Accessoires
Disponibles en accessoires (non compris dans la livraison) :
Description
Réservoir d'eau douce
Porte de service
Clapet du réservoir
Sur le site Dometic (voir au verso), vous trouverez des informations sur les accessoires sanitaires.
4Usage conforme
Les toilettes sont prévues pour l'installation et l'utilisation dans les véhicules de loisirs
comme les caravanes ou les camping-cars.
5 Description technique
Les toilettes à cassette CTx 4xxx consistent en des toilettes installées dans le véhicule
et une cassette amovible, mobile, servant de réservoir d'eaux usées. La cassette est
accessible depuis l'extérieur par une porte. Selon le modèle, les toilettes reçoivent
l’eau de rinçage du réservoir d’eau douce du véhicule ou d’un réservoir intégré dans
le bâti.
Les modèles de toilettes suivants sont disponibles :
• CT4050, CT4110 : autoportante, sans réservoir d'eau, sans console
• CTLP4050, CTLP4110 : autoportante, sans réservoir d'eau, console basse
• CTS 4050, CTS4110 : autoportante, sans réservoir d'eau, avec console
• CTW4050, CTW4110 : autoportante, avec réservoir d'eau dans la console
Les modèles 4050 peuvent être installés dans une pièce humide.
54
Page 55

FR
CT4000 Description technique
5.1 Description des composants
Pos. dans
fig. 1, page 3
1 Bâti pour réservoir à cassette
2 Glissière de vidange de la cuvette des toilettes
3 Cuvette des toilettes, céramique
4 Couvercle et lunette, pivotant
5Console
6 Panneau de commande et de contrôle
7 Réservoir d’eau fraîche (en option)
8 Uniquement CTLP, CTS, CTW : Fixation murale
9 Réservoir à cassette (capacité 19 l)
10 Porte de service (accessoire)
11 Uniquement CTW : clapet du réservoir (clapet du réservoir
Désignation
refermable en option)
5.2 Éléments de commande et d'affichage
Pos. dans
fig. 2, page 3
1 Touche « Rinçage »
2 Affichage « Réservoir à cassette plein »
3 Affichage « Réservoir à cassette plein aux 3/4 »
4 Affichage « Remplir le réservoir d'eau douce »
5 Affichage « Réservoir à cassette retiré »
Désignation
(n'est pas nécessairement raccordé en cas d'utilisation du
réservoir du bateau)
55
Page 56

FR
Utilisation des toilettes CT4000
6 Utilisation des toilettes
REMARQUE
I
6.1 Produits sanitaires
Les produits sanitaires pour la cuve à eaux noires décomposent les matières et
empêchent les odeurs désagréables.
Le fabricant recommande :
• Dometic POWER CARE TABS
• Dometic GREEN CARE TABS
• Avant de mettre vos toilettes en marche, nous vous recommandons
de les nettoyer à l'intérieur et à l'extérieur avec un chiffon doux et de
l'eau tiède mélangée à un détergent doux (voir aussi chapitre
« Nettoyage et entretien », page 61).
• Nettoyez et graissez les joints de votre toilette régulièrement (voir
chapitre « Nettoyage et entretien », page 61).
• le papier toilette classique peut boucher les toilettes. Utilisez un
papier toilette spécial, rapidement soluble.
Le fabricant recommande Dometic COMFORT CARE.
Lors de l'utilisation d'additifs sanitaires, veuillez respecter les instructions sur l'emballage.
REMARQUE
I
Sur le site Dometic (voir au verso), vous trouverez plus d'informations sur les accessoires sanitaires.
le papier toilette classique peut boucher les toilettes. Utilisez un papier
toilette spécial, rapidement soluble. Le fabricant recommande Dometic
COMFORT CARE.
56
Page 57

FR
CT4000 Utilisation des toilettes
6.2 Préparation du réservoir à cassette
Retrait du réservoir à cassette
Procédez comme suit (fig. 3, page 4) :
➤ Ouvrez la porte de service.
➤ Appuyez le verrouillage vers le haut pour déverrouiller le réservoir à cassette.
➤ Retirez le réservoir à cassette du boîtier de la cassette. Lors du retrait, il faut
surmonter une résistance.
Ajout d'un produit sanitaire
➤ Mettez le réservoir à cassette en position droite.
➤ Tournez le tuyau d'évacuation d'env. 90° vers le haut (fig. 4, page 4).
REMARQUE
I
Évitez de tourner le tuyau d'évacuation de plus de 90°, car il pourrait
sinon se détacher (fig. 4, page 4).
➤ Dévissez le capuchon (fig. 5, page 5).
➤ Ajoutez via le tuyau d'évacuation un produit sanitaire dans le réservoir à
cassette (fig. 6, page 5). Tenez compte des instructions d'utilisation du
produit sanitaire.
Insertion du réservoir à cassette dans le bâti de la cassette
AVIS !
A
➤ Insérez le réservoir à cassette dans le bâti de la cassette, jusqu'à la butée.
✓ Le verrouillage du réservoir à cassette se ferme de lui-même lors de l'insertion.
➤ Contrôlez la fixation correcte du réservoir à cassette.
➤ Fermez et verrouillez la porte de service.
Veillez à ce que le réservoir à cassette s'insère facilement dans le boîtier
de la cassette. Assurez-vous que le réservoir à cassette ne rencontre pas
d'autres objets ou composants.
57
Page 58

FR
Utilisation des toilettes CT4000
6.3 Remplissage du réservoir d'eau douce (réservoir
intégré)
➤ Remplissez le réservoir d'eau douce par la tubulure de remplissage à l'extérieur
du véhicule. La quantité dépend du réservoir utilisé (réservoir intégré sur les
modèles CTW4050 et CTW4110 = 7 litres).
6.4 Utilisation des toilettes
La lunette des toilettes reste bloquée dans une position à 70° env. (fig. 7 1,
page 6).
REMARQUE
I
➤ Avant l'utilisation, appuyez sur le bouton de la chasse d'eau pour faire couler
un peu d'eau dans la cuvette (fig. 7 2, page 6).
La glissière doit être fermée pendant que vous conduisez et il ne doit y
avoir aucun liquide situé au-dessus de la glissière.
➤ Tirez la glissière (fig. 7 3, page 6) vers l'avant. Laissez la glissière ouverte
pendant l'utilisation.
➤ Après utilisation, actionnez de nouveau la touche de la chasse d'eau pour
rincer la cuvette (fig. 8 1, page 6).
➤ Fermez la glissière (fig. 8 2, page 6).
Le réservoir à cassette a une capacité de 19 l. Si le voyant s'allume, seules
quelques utilisations sont encore possibles.
REMARQUE
I
Lorsque la cassette est remplie aux 3/4, l'utilisation n'est plus possible
qu'avec une glissière ouverte. En position inclinée (p. ex. inclinaison
permanente du véhicule), la cassette peut être remplie seulement aux
3/4. Un débordement par l'évent est possible.
58
Page 59

FR
CT4000 Utilisation des toilettes
6.5 Vidange du réservoir à cassette
Videz le réservoir à cassette lorsque le voyant est allumé.
➤ Retirez le réservoir à cassette (chapitre « Retrait du réservoir à cassette »,
page 57).
➤ Appuyez sur le bouton de déverrouillage au centre de la poignée et tirez la
poignée jusqu'à la butée (fig. 9, page 7).
AVIS !
A
• N'agitez pas fortement le réservoir de la cassette.
• N'accrochez pas le réservoir de la cassette à une bicyclette ou un
autre véhicule pour le transport.
• Ne placez pas d'objets lourds sur le réservoir de la cassette pendant
le transport.
Le bâti et les roulettes seraient sinon endommagés.
➤ Emportez le réservoir jusqu'au prochain site désigné pour l'élimination.
➤ Appuyez sur le bouton de déverrouillage de la poignée et poussez la poignée
dans la cassette.
➤ Retournez le réservoir à cassette et tournez le d'évacuation à 90° vers le haut
(fig. 4, page 4).
REMARQUE
I
➤ Dévissez le capuchon (fig. 5, page 5).
Évitez de tourner le tuyau d'évacuation de plus de 90°, car il pourrait
sinon se détacher.
➤ Maintenez le réservoir à cassette d'une main au niveau de la poignée (fig. 0 3,
page 7) tandis que vous tenez le réservoir de l'autre main au niveau de la glissière
(fig. 0 2, page 7) de sorte à pouvoir appuyer sur le bouton de ventilation
(fig. 0 1, page 7) pendant la vidange.
➤ Lorsque le tuyau d'évacuation est orienté vers le bas, appuyez sur le bouton de
ventilation.
✓ Le réservoir se vide uniformément et sans éclaboussures.
➤ Rincez le réservoir de la cassette avec de l'eau après l'avoir vidé.
➤ Ajoutez un produit sanitaire dans la cassette (chapitre « Ajout d'un produit
sanitaire », page 57).
59
Page 60

FR
Utilisation des toilettes CT4000
➤ Nettoyer les roues du réservoir à cassette des impuretés grossières pour éviter
les rayures sur le bâti de la cassette.
AVIS !
A
➤ Insérez le réservoir à cassette dans le bâti de la cassette (chapitre « Insertion du
réservoir à cassette dans le bâti de la cassette », page 57).
Ne nettoyez pas l'intérieur du réservoir de la cassette avec un nettoyeur
haute pression. Le flotteur de l'indicateur de niveau pourrait être
endommagé.
6.6 Positionnement du siège des toilettes
Le siège des toilettes pivote en continu (fig. a, page 8).
6.7 Fonctionnement d'hiver
AVIS !
A
Vous pouvez utiliser aussi les toilettes à cassette en hiver, tant que les toilettes et le
réservoir à cassette sont dans une zone protégée du gel.
Si ce n'est pas le cas, videz le réservoir d'eau douce, le réservoir à cassette et
l'alimentation en eau de l'approvisionnement en eau douce.
Cela évite les dommages dus au gel (chapitre « Mise hors service », page 60).
N'utilisez aucun antigel. Les produits antigel peuvent endommager les
toilettes à cassette.
6.8 Mise hors service
Videz complètement le réservoir d'eau douce et le système d'alimentation en eau, si
vous mettez les toilettes hors service pendant une période prolongée.
➤ Nettoyez soigneusement les toilettes (chapitre « Nettoyage et entretien »,
page 61).
➤ Appuyez sur le bouton de chasse d'eau jusqu'à ce qu'il n'y ait plus d'eau ne soit
plus dans les canalisations.
➤ Couper l'alimentation électrique vers les toilettes.
60
Page 61

FR
CT4000 Nettoyage et entretien
➤ Videz ensuite le réservoir à cassette et lavez-le soigneusement. Nettoyez la
cassette. Ne fermez pas le tuyau d'évacuation afin de laisser sécher le réservoir à
cassette.
➤ Nettoyez et lubrifiez tous les joints et les pièces mobiles des toilettes et du
réservoir à cassette (chapitre « Nettoyage et entretien », page 61) et répétez
l'opération avant la remise en service.
7 Nettoyage et entretien
ATTENTION !
Les nettoyants pour les toilettes ne doivent contenir ni chlore ni alcool !
!
AVIS !
A
I
➤ Nettoyez régulièrement l'intérieur et l'extérieur des toilettes avec un chiffon
doux et de l'eau tiède mélangée à un détergent doux.
➤ Ensuite, rincez les surfaces à l'eau claire.
Le fabricant recommande :
• Graisse : OKS
• Spray de silicone : OKS
• Pour éviter des modifications du matériau, n'utilisez aucun détergent
acide, granulaire ou à base de soude (ne pas utiliser d'abrasifs).
• N'utilisez pas de polish pour le nettoyage.
REMARQUE
• Nettoyez et graissez régulièrement tous les joints des toilettes et du
réservoir à cassette. Effectuez ces actions chaque mois en cas d'utilisation fréquente ou après 3 à 5 vidanges de la cassette. Utilisez de la
graisse ou un spray silicone.
• Utilisez un détergent doux et incolore pour le nettoyage régulier de
la cuvette des toilettes.
®
1110
®
1111
61
Page 62

FR
Nettoyage et entretien CT4000
7.1 Graissage de la glissière
ATTENTION !
!
La glissière se déplace facilement si elle est graissée régulièrement.
Graissage des tiges de la glissière
➤ Pulvérisez les tiges de la glissière avec un spray de silicone (fig. c, page 9)
7.2 Détacher la glissière de la cassette
!
Il existe un risque d'écrasement lorsque la glissière est fermée pendant
le nettoyage ou le graissage (fig. b, page 8).
ATTENTION !
Il existe un risque d'écrasement lorsque la glissière est fermée pendant
le nettoyage ou le graissage.
➤ Retirez le réservoir à cassette et posez-le sur une base solide (fig. d, page 9).
➤ Débloquez la poignée de la glissière et sortez-la. (fig. e, page 9).
➤ Tournez la glissière dans le sens anti-horaire et retirez-la de la cassette (fig. f,
page 10).
La fermeture à baïonnette se détache difficilement à l'état de livraison et après
une longue période.
62
Page 63

FR
CT4000 Nettoyage et entretien
7.3 Graissage du joint d'étanchéité de la cassette
➤ Desserrez la glissière de la cassette (chapitre « Détacher la glissière de la
cassette », page 62).
➤ Repoussez le couvercle pour que le joint soit accessible (fig. g, page 10).
➤ Nettoyez et graissez le joint.
ATTENTION ! Risque d'écrasement!
!
➤ Fermez le cache (fig. k, page 11).
➤ Remettez la glissière en place.
Ne mettez pas les doigts dans l'ouverture lorsque vous fermez le
couvercle.
7.4 Nettoyage de la fermeture à baïonnette et graissage
du joint à baïonnette
➤ Desserrez la glissière de la cassette (chapitre « Détacher la glissière de la
cassette », page 62).
➤ Nettoyez la fermeture à baïonnette (fig. l 1, page 12) au niveau de la glissière.
➤ Avec de la graisse silicone, graissez uniformément le joint de la baïonnette
(fig. l 2, page 12).
➤ Remettez la glissière en place.
7.5 Graissage du joint torique de la ventilation de la
cassette
➤ Desserrez l'adaptateur (fig. m 1, page 12) de la cassette.
➤ Graissez le joint torique enfiché (fig. m 2, page 12) avec de la graisse silicone.
63
Page 64

FR
Entretien CT4000
8Entretien
Ce chapitre décrit les travaux d'entretien qui peuvent être effectués par l'utilisateur.
Faites effectuer tous les autres travaux d'entretien et de réparation par du personnel
qualifié.
8.1 Pièces de rechange
Les pièces de rechange sont disponibles auprès du centre de service après-vente du
pays correspondant.
Tous les accessoires sont disponibles chez les détaillants spécialisés. Si vous avez
des questions, veuillez contacter directement le revendeur ou votre fournisseur de
service après-vente.
8.2 Démontage/remplacement du couvercle et de la
lunette
REMARQUE
I
Les outils requis sont fournis avec les instructions. Pour remplacer le couvercle et la
lunette, utilisez le Dometic Renew Kit pour CT3000/CT4000 (n°
d'art. 9600000458).
➤ Détachez le siège des toilettes (fig. n, page 13).
➤ Retirez le siège des toilettes (fig. o, page 13).
➤ Placez le nouveau siège des toilettes et enfoncez-le jusqu'à ce qu’il s’enclenche
(fig. p, page 14).
Le fabricant décline toute responsabilité pour les dommages résultant
d'une installation incorrecte ou défectueuse.
64
Page 65

FR
CT4000 Entretien
8.3 Remplacement du joint d'étanchéité de la cassette
➤ Desserrez la glissière de la cassette (chapitre « Détacher la glissière de la
cassette », page 62).
➤ Repoussez le couvercle pour que le joint soit accessible (fig. g, page 10).
➤ Démontez la bague d'appui et le joint (fig. g, page 10).
AVIS !
A
➤ Insérez le nouveau joint (fig. i, page 11).
➤ Insérez la bague d'appui (fig. j, page 11).
➤ Graissez toutes les zones.
Le joint d'étanchéité doit être appliqué de manière uniforme dans
l'ouverture (fig. h, page 10) de telle sorte que la cassette soit étanche
et que la glissière puisse être facilement déplacée.
ATTENTION ! Risque d'écrasement!
!
➤ Fermez le cache (fig. k, page 11).
➤ Remettez la glissière en place.
Ne mettez pas les doigts dans l'ouverture lorsque vous fermez le
couvercle.
8.4 Remplacement du joint de la fermeture à baïonnette
➤ Desserrez la glissière de la cassette (chapitre « Détacher la glissière de la
cassette », page 62).
➤ Retirez l'ancien joint (fig. l 2, page 12).
➤ Nettoyez la fermeture à baïonnette.
➤ Insérez le nouveau joint.
➤ Veillez à ce que le nouveau joint repose de manière bien uniforme.
➤ Remettez la glissière en place.
➤ Graissez toutes les zones.
65
Page 66

FR
Comportement en cas de panne CT4000
8.5 Remplacement du fusible dans l'unité de commande
ATTENTION !
!
➤ Soulevez l'unité de commande à l'aide d'un outil approprié et puis sortez-la de
la console ou du mur (fig. q, page 14).
➤ Remplacez le fusible (fusible automobile : 7,5 A) sur la partie inférieure de l'unité
de commande (fig. q 1, page 14).
8.6 Remplacement des roues sur le réservoir à cassette
Les roues sur le réservoir à cassette peuvent être remplacées individuellement si
nécessaire :
➤ démontez l'ancienne roue comme indiqué (fig. r, page 15).
➤ Montez la nouvelle roue comme indiqué (fig. r, page 15).
➤ Vérifiez le bon roulement de la roue.
• Avant de commencer, éteignez l'alimentation en tension !
• Tirez doucement l'unité de commande hors de l'ouverture du mur.
Il existe un risque de blessure si les ressorts se détendent !
9 Comportement en cas de panne
Dometic offre un réseau de service à l'échelle européenne. Vous trouverez les
services après-vente agréés sur Internet, sur le site dometic.com.
Pour le contact avec le service après-vente, veuillez noter les données suivantes de
la plaque signalétique :
• Modèle (Model Designation)
• Numéro de produit (Product Number)
• Numéro de série (Serial No.)
• Code MLC (MLC)
REMARQUE
I
Vous trouverez la plaque signalétique à l'intérieur du logement de la
cassette après avoir enlevé la cassette.
66
Page 67

FR
CT4000 Garantie
Dysfonctionnement Cause possible Remède
La chasse d'eau ne fonctionne plus.
Fuites du réservoir à cassette.
Aucun indicateur de niveau. Le flotteur s'est coincé dans le
Fusible défectueux.
Cassette pas insérée.
Cassette pleine.
Pas d'alimentation électrique.
Électronique défectueuse.
Pompe défectueuse.
Électrovanne défectueuse.
Le tamis de l'électrovanne est
encrassé.
Joint usé. Remplacer le joint d'étan-
réservoir de la cassette ou est
bloqué par du papier toilette.
Remplacer le fusible (voir
chapitre « Remplacement du
fusible dans l'unité de
commande », page 66).
En cas de pannes répétées,
vérifiez les raccordements
électriques et les
connexions !
Remplacer les pièces défectueuses.
chéité de la cassette
(voir chapitre
« Remplacement du joint
d'étanchéité de la cassette »,
page 65).
Nettoyer le flotteur dans la
cassette.
Ne pas utiliser de nettoyeur haute pression !
10 Garantie
Le délai légal de garantie s'applique. Si le produit s'avérait défectueux, veuillez vous
adresser à la filiale du fabricant située dans votre pays (voir adresses au verso du
présent manuel) ou à votre revendeur spécialisé.
Veuillez y joindre les documents suivants pour la gestion des réparations et de la
garantie :
• une copie de la facture avec la date d'achat,
• le motif de la réclamation ou une description du dysfonctionnement.
67
Page 68

FR
Retraitement CT4000
11 Retraitement
➤ Jetez les emballages dans les conteneurs de déchets recyclables prévus à cet
effet.
Lorsque vous mettrez votre produit définitivement hors service, informez-vous auprès du centre de recyclage le plus proche ou auprès de
M
votre revendeur spécialisé sur les prescriptions relatives au retraitement
des déchets.
12 Caractéristiques techniques
CT4000
Tension d’alimentation :
Intensité absorbée : 2 A max. avec la pompe interne
5 A max. avec la pompe externe
Poids max. de la personne : 130 kg
Température de
fonctionnement :
Capacité : 19 l (réservoir à cassette)
7 l (réservoir d'eau douce, en option)
Conformité :
REMARQUE
I
Alimentation en eau (pompe du véhicule) :
Les toilettes nécessitent, du côté du véhicule, min. 7 l/min à la sortie du
tuyau de raccordement des toilettes, afin de garantir des performances
de lavage suffisantes avec min. 5 l/min.
12 Vg
De 0 °C à +50 °C
N1 10 R – 047317
1
68
Page 69

IT
CT4000
Prima di effettuare la messa in funzione, leggere accuratamente questo
manuale di istruzioni, conservarlo e, nel caso in cui il prodotto venga
consegnato ad un altro utente, consegnare anche le relative istruzioni.
Indice
1 Spiegazione dei simboli . . . . . . . . . . . . . . . . . . . . . . . . . . . . . . . . . . . . . 70
2 Indicazioni di sicurezza . . . . . . . . . . . . . . . . . . . . . . . . . . . . . . . . . . . . . . 70
2.1 Sicurezza di base. . . . . . . . . . . . . . . . . . . . . . . . . . . . . . . . . . . . . . . . .71
2.2 Utilizzo dei prodotti sanitari . . . . . . . . . . . . . . . . . . . . . . . . . . . . . . . .71
3 Accessori . . . . . . . . . . . . . . . . . . . . . . . . . . . . . . . . . . . . . . . . . . . . . . . . . . . .71
4Conformità d'uso . . . . . . . . . . . . . . . . . . . . . . . . . . . . . . . . . . . . . . . . . . . 72
5 Descrizione tecnica. . . . . . . . . . . . . . . . . . . . . . . . . . . . . . . . . . . . . . . . . . 72
5.1 Descrizione dei componenti . . . . . . . . . . . . . . . . . . . . . . . . . . . . . . 72
5.2 Elementi di comando e indicazione . . . . . . . . . . . . . . . . . . . . . . . . . 73
6 Utilizzo della toilette . . . . . . . . . . . . . . . . . . . . . . . . . . . . . . . . . . . . . . . . 73
6.1 Prodotti per la pulizia sanitaria . . . . . . . . . . . . . . . . . . . . . . . . . . . . . 74
6.2 Preparazione del serbatoio a cassetta . . . . . . . . . . . . . . . . . . . . . . . 74
6.3 Riempimento del serbatoio di acqua dolce (serbatoio integrato) . 75
6.4 Utilizzo della toilette . . . . . . . . . . . . . . . . . . . . . . . . . . . . . . . . . . . . . 75
6.5 Svuotamento del serbatoio a cassetta . . . . . . . . . . . . . . . . . . . . . . . 76
6.6 Posizionamento della seduta della toilette . . . . . . . . . . . . . . . . . . . 77
6.7 Utilizzo durante l'inverno . . . . . . . . . . . . . . . . . . . . . . . . . . . . . . . . . 78
6.8 Messa fuori servizio . . . . . . . . . . . . . . . . . . . . . . . . . . . . . . . . . . . . . . 78
7 Pulizia e cura. . . . . . . . . . . . . . . . . . . . . . . . . . . . . . . . . . . . . . . . . . . . . . . . 79
7.1 Ingrassaggio del separatore . . . . . . . . . . . . . . . . . . . . . . . . . . . . . . . 79
7.2 Scollegamento del separatore dalla cassetta . . . . . . . . . . . . . . . . . 80
7.3 Ingrassaggio della guarnizione della cassetta . . . . . . . . . . . . . . . . . 80
7.4 Pulizia della chiusura a baionetta e ingrassaggio della
guarnizione a baionetta . . . . . . . . . . . . . . . . . . . . . . . . . . . . . . . . . . 80
7.5 Ingrassatura dell'O-ring dell'aerazione della cassetta. . . . . . . . . . . .81
8Manutenzione . . . . . . . . . . . . . . . . . . . . . . . . . . . . . . . . . . . . . . . . . . . . . . .81
8.1 Pezzi di ricambio . . . . . . . . . . . . . . . . . . . . . . . . . . . . . . . . . . . . . . . . .81
8.2 Smontaggio/sostituzione del coperchio e del cerchio . . . . . . . . . .81
8.3 Sostituzione della guarnizione della cassetta . . . . . . . . . . . . . . . . . 82
8.4 Sostituzione della guarnizione a baionetta . . . . . . . . . . . . . . . . . . . 82
69
Page 70

IT
Spiegazione dei simboli CT4000
8.5 Sostituzione del fusibile nell'unità di comando . . . . . . . . . . . . . . . . 83
8.6 Sostituzione delle rotelle del serbatoio a cassetta. . . . . . . . . . . . . . 83
9 Cosa fare in caso di guasto . . . . . . . . . . . . . . . . . . . . . . . . . . . . . . . . . . . 83
10 Garanzia . . . . . . . . . . . . . . . . . . . . . . . . . . . . . . . . . . . . . . . . . . . . . . . . . . . 84
11 Smaltimento . . . . . . . . . . . . . . . . . . . . . . . . . . . . . . . . . . . . . . . . . . . . . . . . 85
12 Specifiche tecniche. . . . . . . . . . . . . . . . . . . . . . . . . . . . . . . . . . . . . . . . . . 85
1 Spiegazione dei simboli
AVVERTENZA!
!
Avviso di sicurezza: la mancata osservanza di questo avviso può causare
ferite gravi anche mortali.
ATTENZIONE!
!
A
Avviso di sicurezza: la mancata osservanza di questo avviso può
essere causa di lesioni.
AVVISO!
La mancata osservanza di questa nota può causare danni materiali e
compromettere il funzionamento del prodotto.
NOTA
Informazioni integranti relative all'impiego del prodotto.
I
2 Indicazioni di sicurezza
Il produttore non si assume nessuna responsabilità per danni nei seguenti casi:
• danni al prodotto dovuti a influenze meccaniche o a sovratensioni
• modifiche al prodotto senza esplicita autorizzazione del produttore
• impiego per altri fini rispetto a quelli descritti nel manuale di istruzioni
È possibile richiedere la dichiarazione di conformità al produttore (informazioni di
contatto sul retro).
70
Page 71

IT
CT4000 Accessori
2.1 Sicurezza di base
AVVERTENZA!
!
A
• Il presente dispositivo può essere usato sia da bambini dagli 8 anni in
su, sia da persone con ridotte capacità fisiche, sensoriali o mentali o
con poca esperienza o conoscenze, se non lasciati soli o se istruiti
sull’utilizzo sicuro dell’apparecchio e in grado di capire i pericoli che
possono sorgere.
• La pulizia e la manutenzione da parte dell’utente non possono essere
compiute da bambini lasciati soli.
• Controllare che i bambini non giochino con l’apparecchio.
AVVISO!
• Non agitare eccessivamente il serbatoio a cassetta.
• Non appendere il serbatoio a cassetta a una bicicletta o a un altro
veicolo durante il trasporto.
• Non usare antigelo perché potrebbe danneggiare il WC a cassetta.
• La toilette può sostenere il peso di una persona fino a un massimo di
130 kg.
2.2 Utilizzo dei prodotti sanitari
ATTENZIONE!
• Conservare i prodotti sanitari lontano dalla portata dei bambini.
!
AVVISO!
A
3Accessori
Disponibili come accessori (non in dotazione):
Descrizione
Serbatoio di acqua dolce
Porta di servizio
Sportellino del serbatoio
• Prima di utilizzare i prodotti sanitari per l'igiene e la pulizia della
toilette, osservare le istruzioni per l'uso sulla confezione.
Sulla pagina web di Dometic (vedi retro) trovate informazioni su accessori sanitari.
71
Page 72

IT
Conformità d'uso CT4000
4Conformità d'uso
La toilette è studiata per l'installazione e l'utilizzo in veicoli da diporto come camper
e caravan.
5 Descrizione tecnica
Il WC a cassetta CTx4xxx è composto di una toilette fissata nel veicolo e di una cassetta come serbatoio di scarico estraibile e trasportabile. La cassetta è accessibile
dall'esterno attraverso una porta. A seconda del modello, la toilette riceve l'acqua
per lo scarico dal serbatoio di acqua dolce del veicolo o da un serbatoio integrato
nell'alloggiamento.
Esistono i seguenti modelli della toilette:
• CT4050, CT4110: autonomo, senza serbatoio dell'acqua, senza console
• CTLP4050, CTLP4110: autonomo, senza serbatoio dell'acqua, console bassa
• CTS 4050, CTS4110: autonomo, senza serbatoio dell'acqua, con la console
• CTW4050, CTW4110: autonomo, con serbatoio dell'acqua nella console
I modelli 4050 possono essere montati in un angolo bagno.
5.1 Descrizione dei componenti
Pos. in
fig. 1, pagina 3
1 Alloggiamento per il serbatoio a cassetta
2 Separatore per lo svuotamento della tazza del WC
3 Tazza del WC, in ceramica
4 Coperchio e cerchio, ruotabile
5Console
6 Unità di controllo e di comando
Denominazione
7 Serbatoio di acqua dolce (opzionale)
8 Solo CTLP, CTS,CTW: Supporto da parete
72
Page 73

IT
CT4000 Utilizzo della toilette
Pos. in
fig. 1, pagina 3
9 Serbatoio a cassetta (capacità 19 l)
10 Porta di servizio (accessorio)
11 Solo CTW: Sportellino del serbatoio (sportellino richiudibile
Denominazione
opzionale)
5.2 Elementi di comando e indicazione
Pos. in
fig. 2, pagina 3
1 Tasto “Scarico”
2 Indicazione “Serbatoio a cassetta pieno”
3 Indicazione “Serbatoio a cassetta pieno per 3/4”
Denominazione
4 Indicazione “Riempire serbatoio di acqua dolce”
(nel caso del serbatoio del veicolo sostanzialmente non
collegato)
5 Indicazione “Serbatoio a cassetta estratto”
6 Utilizzo della toilette
NOTA
I
• Prima della messa in funzione della toilette, pulirne l’interno e
l’esterno con un panno umido, acqua tiepida e con un detergente
non aggressivo (vedi anche capitolo “Pulizia e cura” a pagina 79).
• Pulire e ingrassare regolarmente le guarnizioni della toilette (vedi
capitolo “Pulizia e cura” a pagina 79).
• La comune carta igienica può intasare la toilette. Utilizzare una carta
igienica speciale a dissoluzione rapida.
Il produttore raccomanda Dometic COMFORT CARE.
73
Page 74

IT
Utilizzo della toilette CT4000
6.1 Prodotti per la pulizia sanitaria
I prodotti sanitari per il serbatoio di scarico decompongono le feci ed evitano odori
sgradevoli.
Il produttore raccomanda:
• Dometic POWER CARE TABS
• Dometic GREEN CARE TABS
Per l'utilizzo dei prodotti sanitari, osservare le istruzioni per l'uso sulla confezione.
NOTA
I
Sulla pagina web di Dometic (vedi retro) trovate ulteriori informazioni sugli accessori
sanitari.
La comune carta igienica può intasare la toilette. Utilizzare una carta
igienica speciale a dissoluzione rapida. Il produttore raccomanda
Dometic COMFORT CARE.
6.2 Preparazione del serbatoio a cassetta
Estrazione del serbatoio a cassetta
Procedere come segue (fig. 3, pagina 4):
➤ Aprire la porta di servizio.
➤ Premere in alto la sicura per sbloccare il serbatoio.
➤ Estrarre il serbatoio a cassetta dall'alloggiamento. All'estrazione deve essere
superata una certa resistenza.
Come aggiungere liquido sanitario
➤ Posizionare il serbatoio a cassetta diritto.
➤ Ruotare il tubo di scarico di circa 90° verso l'alto (fig. 4, pagina 4).
NOTA
I
Evitare di ruotare il tubo di scarico oltre i 90° poiché altrimenti può
staccarsi (fig. 4, pagina 4).
➤ Svitare il cappuccio di chiusura (fig. 5, pagina 5).
➤ Inserire tramite il tubo di scarico un liquido sanitario nel serbatoio a cassetta
(fig. 6, pagina 5). Osservare le istruzioni per l'uso del liquido sanitario.
74
Page 75

IT
CT4000 Utilizzo della toilette
Inserimento del serbatoio a cassetta nell'alloggiamento
AVVISO!
A
➤ Spingere il serbatoio a cassetta nell'alloggiamento fino all’arresto.
✓ Il blocco del serbatoio a cassetta si innesta automaticamente quando il serbatoio
viene spinto dentro.
➤ Controllare che il serbatoio a cassetta sia ben fissato.
➤ Chiudere e bloccare la porta di servizio.
Osservare che il serbatoio deve poter entrare agevolmente nell'alloggiamento. Assicurarsi che il serbatoio a cassetta non colpisca contro altri
oggetti o componenti.
6.3 Riempimento del serbatoio di acqua dolce (serbatoio
integrato)
➤ Riempire il serbatoio di acqua dolce tramite il bocchettone sul lato esterno del
veicolo. La quantità dipende dal serbatoio utilizzato (serbatoio integrato nei
modelli CTW4050 e CTW4110 = 7 litri).
6.4 Utilizzo della toilette
Il cerchio della toilette rimane fermo in una posizione di circa 70° (fig. 7 1,
pagina 6).
NOTA
I
➤ Prima dell'utilizzo del WC, azionare il tasto di scarico , per far scorrere un
po' di acqua nella tazza (fig. 7 2, pagina 6).
➤ Tirare in avanti il separatore (fig. 7 3, pagina 6). Lasciare aperto il separatore
durante l'utilizzo del WC.
Il separatore deve essere chiuso durante la marcia del veicolo e non
devono trovarsi liquidi al di sopra di esso.
75
Page 76

IT
Utilizzo della toilette CT4000
➤ Al termine dell'utilizzo del WC, per pulire la tazza, azionare nuovamente il tasto
di scarico (fig. 8 1, pagina 6).
➤ Chiudere il separatore (fig. 8 2, pagina 6).
Il serbatoio a cassetta ha una capacità di 19 l. Se si accende l'indicazione , sono
possibili solo pochi utilizzi del WC.
NOTA
I
6.5 Svuotamento del serbatoio a cassetta
Svuotare il serbatoio a cassetta quando si accende l'indicazione .
Con la cassetta piena per 3/4 è possibile solo l'utilizzo con il separatore
aperto. In posizione inclinata (ad es. con il veicolo in pendenza) è possibile riempiere la cassetta solo per 3/4 perché è possibile che l'acqua
fuoriesca attraverso lo sfiato.
➤ Estrarre il serbatoio a cassetta (capitolo “Estrazione del serbatoio a cassetta” a
pagina 74).
➤ Premere il tasto di sblocco al centro della maniglia ed estrarre la maniglia fino
all'arresto (fig. 9, pagina 7).
AVVISO!
A
➤ Portare il serbatoio al più vicino punto di smaltimento segnalato.
➤ Premere il tasto di sblocco della maniglia e spingere la maniglia dentro la
cassetta.
➤ Mettere in piedi il serbatoio a cassetta e ruotare il tubo di scarico di 90° verso
l'alto (fig. 4, pagina 4).
• Non agitare eccessivamente il serbatoio a cassetta.
• Non appendere il serbatoio a cassetta a una bicicletta o a un altro
veicolo durante il trasporto.
• Non appoggiare oggetti pesanti sul serbatoio a cassetta durante il
trasporto.
L'alloggiamento e le rotelle ne verrebbero danneggiati.
NOTA
I
➤ Svitare il cappuccio di chiusura (fig. 5, pagina 5).
76
Evitare di ruotare il tubo di scarico oltre i 90° poiché altrimenti può
staccarsi.
Page 77

IT
CT4000 Utilizzo della toilette
➤ Tenere il serbatoio a cassetta con una mano per la maniglia (fig. 0 3, pagina 7),
mentre con l'altra sostenere il serbatoio per il separatore (fig. 0 2, pagina 7) in
modo tale da poter premere il pulsante di sfiato (fig. 0 1, pagina 7) durante lo
svuotamento.
➤ Premere il pulsante di sfiato quando il tubo di scarico è rivolto verso il basso.
✓ Il serbatoio si svuota regolarmente e senza spruzzi.
➤ Risciacquare accuratamente con acqua il serbatoio a cassetta dopo lo svuota-
mento.
➤ Aggiungere nella cassetta un liquido sanitario (capitolo “Come aggiungere
liquido sanitario” a pagina 74).
➤ Pulire le rotelle del serbatoio a cassetta dallo sporco più grossolano per evitare
graffi nell'alloggiamento della cassetta.
AVVISO!
A
Non pulire l'interno del serbatoio a cassetta con un'idropulitrice.
Il galleggiante per l'indicazione del livello di riempimento potrebbe
danneggiarsi.
➤ Spingere il serbatoio a cassetta nell'alloggiamento (capitolo “Inserimento del
serbatoio a cassetta nell'alloggiamento” a pagina 75).
6.6 Posizionamento della seduta della toilette
La seduta della toilette è ruotale in modo continuo (fig. a, pagina 8).
77
Page 78

IT
Utilizzo della toilette CT4000
6.7 Utilizzo durante l'inverno
AVVISO!
Non usare antigelo L'antigelo può danneggiare il WC a cassetta.
A
Potete utilizzare la toilette a cassetta anche d'inverno fintanto che la toilette e
il serbatoio a cassetta si trovano in zone non esposte al gelo.
In caso contrario, svuotare il serbatoio di acqua dolce, il serbatoio a cassetta e il tubo
dell'alimentazione di acqua dolce.
In questo modo si evitano danni per congelamento (capitolo “Messa fuori servizio”
a pagina 78).
6.8 Messa fuori servizio
Svuotare completamente il serbatoio di acqua dolce e il sistema di tubi di acqua
se non si utilizza la toilette per molto tempo.
➤ Pulire accuratamente la toilette (capitolo “Pulizia e cura” a pagina 79).
➤ Attivare il pulsante di scarico fino a che non si trova più acqua nei tubi.
➤ Interrompere l'alimentazione di acqua verso la toilette.
➤ Svuotare quindi il serbatoio a cassetta e risciacquarlo accuratamente. Pulire la
cassetta. Non chiudere il tubo di scarico per permettere al serbatoio a cassetta di
asciugarsi.
➤ Pulire e ingrassare tutte le guarnizioni e le parti mobili della toilette e del serba-
toio a cassetta (capitolo “Pulizia e cura” a pagina 79) e ripetere quest'operazione
prima di rimettere in funzione il WC a cassetta.
78
Page 79

IT
CT4000 Pulizia e cura
7 Pulizia e cura
ATTENZIONE!
I detergenti per la toilette non devono contenere né cloro né alcol!
!
AVVISO!
A
I
➤ Pulire regolarmente l'interno e l’esterno della toilette con un panno umido,
acqua tiepida e con un detergente non aggressivo.
➤ Risciacquare quindi le superfici con acqua pulita.
Il produttore raccomanda:
• Grasso: OKS
• Spray al silicone: OKS
• Per evitare alterazioni al materiale, non utilizzare oggetti per la pulizia
appuntiti, granulosi o con contenuto di soda (nessun abrasivo).
• Per la pulizia non utilizzare prodotti per lucidare.
NOTA
• Pulire e ingrassare regolarmente tutte le guarnizioni della toilette e
del serbatoio a cassetta. Eseguire queste operazioni una volta al
mese in caso di frequente utilizzo o dopo 3 – 5 svuotamenti della
cassetta. Utilizzare grasso o spray a base di silicone.
• Per la regolare pulizia della tazza del WC utilizzare un detergente
non aggressivo e incolore.
®
1110
®
1111
7.1 Ingrassaggio del separatore
ATTENZIONE!
!
Il separatore è facile da muovere se viene ingrassato regolarmente.
Ingrassaggio delle aste del separatore
➤ Spruzzare le aste del separatore con spray al silicone (fig. c, pagina 9).
C'è pericolo di schiacciamento se il separatore viene chiuso durante la
pulizia o l'ingrassaggio (fig. b, pagina 8).
79
Page 80

IT
Pulizia e cura CT4000
7.2 Scollegamento del separatore dalla cassetta
ATTENZIONE!
!
➤ Estrarre il serbatoio a cassetta e posizionarlo su una base solida (fig. d,
pagina 9).
➤ Sbloccare la maniglia del separatore e tirarla fuori (fig. e, pagina 9).
➤ Ruotare il separatore in senso antiorario e scollegarlo dalla cassetta (fig. f,
pagina 10).
La chiusura a baionetta è difficile da allentare quando il dispositivo è ancora
nuovo o dopo un lungo periodo di inutilizzo.
C'è pericolo di schiacciamento se il separatore viene chiuso durante la
pulizia o l'ingrassaggio.
7.3 Ingrassaggio della guarnizione della cassetta
➤ Scollegare il separatore dalla cassetta (capitolo “Scollegamento del separatore
dalla cassetta” a pagina 80).
➤ Spingere indietro la copertura per poter accedere alla guarnizione (fig. g,
pagina 10).
➤ Pulire e ingrassare la guarnizione.
ATTENZIONE! Pericolo di schiacciamento!
Non toccare l'apertura quando si chiude la copertura.
!
➤ Chiudere la copertura (fig. k, pagina 11).
➤ Rimontare il separatore.
7.4 Pulizia della chiusura a baionetta e ingrassaggio della
guarnizione a baionetta
➤ Scollegare il separatore dalla cassetta (capitolo “Scollegamento del separatore
dalla cassetta” a pagina 80).
➤ Pulire la chiusura a baionetta (fig. l 1, pagina 12) del separatore.
➤ Ingrassare omogeneamente la guarnizione della baionetta (fig. l 2, pagina 12)
con grasso al silicone.
➤ Rimontare il separatore.
80
Page 81

IT
CT4000 Manutenzione
7.5 Ingrassatura dell'O-ring dell'aerazione della cassetta
➤ Scollegare l'adattatore (fig. m 1, pagina 12) dalla cassetta.
➤ Ingrassare l'O-ring inserito (fig. m 2, pagina 12) con grasso al silicone.
8Manutenzione
In questo capitolo sono descritti i lavori di manutenzione che possono essere
eseguiti dall'utente. Far eseguire tutti gli altri lavori di manutenzione e assistenza
da personale specializzato.
8.1 Pezzi di ricambio
I pezzi di ricambio possono essere acquistati presso il Servizio Assistenza Clienti del
rispettivo paese.
Tutti gli accessori sono disponibili presso i rivenditori specializzati. In caso di
domande rivolgetevi direttamente ai rivenditori specializzati o al vostro partner per
l’assistenza.
8.2 Smontaggio/sostituzione del coperchio e del cerchio
NOTA
I
L'attrezzo necessario è allegato al manuale di istruzioni. Per la sostituzione del
coperchio e del cerchio utilizzare il Dometic Renew Kit per CT3000/CT4000
(n. art. 9600000458).
➤ Scollegare la seduta della toilette (fig. n, pagina 13).
➤ Rimuovere la seduta della toilette (fig. o, pagina 13).
➤ Posizionare la nuova seduta della toilette e premerla in basso finché non si innesta
(fig. p, pagina 14).
Il produttore non si assume responsabilità per danni causati da un
montaggio errato o difettoso.
81
Page 82

IT
Manutenzione CT4000
8.3 Sostituzione della guarnizione della cassetta
➤ Scollegare il separatore dalla cassetta (capitolo “Scollegamento del separatore
dalla cassetta” a pagina 80).
➤ Spingere indietro la copertura per poter accedere alla guarnizione (fig. g,
pagina 10).
➤ Smontare l'anello di sostegno e la guarnizione (fig. g, pagina 10).
AVVISO!
A
➤ Inserire la nuova guarnizione (fig. i, pagina 11).
➤ Inserire l'anello di sostegno (fig. j, pagina 11).
La guarnizione deve poggiare in modo uniforme sull'apertura (fig. h,
pagina 10), in modo tale che la cassetta si chiuda ermeticamente e sia
facile muovere il separatore.
➤ Ingrassare tutte le aree.
ATTENZIONE! Pericolo di schiacciamento!
Non toccare l'apertura quando si chiude la copertura.
!
➤ Chiudere la copertura (fig. k, pagina 11).
➤ Rimontare il separatore.
8.4 Sostituzione della guarnizione a baionetta
➤ Scollegare il separatore dalla cassetta (capitolo “Scollegamento del separatore
dalla cassetta” a pagina 80).
➤ Rimuovere la guarnizione vecchia (fig. l 2, pagina 12).
➤ Pulire la chiusura a baionetta.
➤ Inserire la nuova guarnizione.
➤ Fare attenzione che la nuova guarnizione sia posizionata in modo uniforme nella
sede.
➤ Rimontare il separatore.
➤ Ingrassare tutte le aree.
82
Page 83

IT
CT4000 Cosa fare in caso di guasto
8.5 Sostituzione del fusibile nell'unità di comando
ATTENZIONE!
!
➤ Sollevare l'unità di comando con un attrezzo adeguato ed estrarla dalla console
o parete (fig. q, pagina 14).
➤ Sostituire il fusibile (fusibile auto: 7,5 A) sul lato inferiore dell'unità di comando
(fig. q 1, pagina 14).
8.6 Sostituzione delle rotelle del serbatoio a cassetta
Le rotelle del serbatoio a cassetta, se necessario, possono essere sostituite singolarmente:
➤ Scollegare la rotella vecchia nel modo rappresentato (fig. r, pagina 15).
➤ Montare la rotella nuova nel modo rappresentato (fig. r, pagina 15).
➤ Controllare che la rotella giri liberamente.
• Prima di iniziare, scollegare la tensione di alimentazione!
• Estrarre con cautela l'unità di comando dall'apertura nella parete.
Esiste il pericolo di lesioni per molle di rimbalzo!
9 Cosa fare in caso di guasto
Dometic offre un Servizio Assistenza Clienti in tutta Europa. Per conoscere i punti del
Servizio Assistenza Clienti, consultare in internet il sito dometic.com.
Per il contatto con il Servizio Assistenza Clienti, prendere nota dei seguenti dati nella
targhetta:
• Modello (Model Designation)
• Numero del prodotto (Product Number)
• Numero di serie (Serial No.)
• Codice MLC (MLC)
NOTA
I
Trovate la targhetta nell'alloggiamento della cassetta quando questa
viene estratta.
83
Page 84

IT
Garanzia CT4000
Guasto Possibile causa Soluzione
Lo scarico non funziona più. Fusibile guasto.
Cassetta non inserita.
Cassetta piena.
Alimentazione elettrica non
disponibile.
Elettronica guasta.
Pompa guasta.
Valvola magnetica guasta.
Il filtro della valvola magne-
tica è sporco.
Serbatoio a cassetta non a
tenuta.
Non si accende la spia del
livello di riempimento.
Guarnizione usurata. Sostituire la guarnizione della
Il galleggiante nel serbatoio a
cassetta si è bloccato o si è
intasato con la carta igienica.
Sostituire il fusibile (vedi
capitolo “Sostituzione del
fusibile nell'unità di
comando” a pagina 83).
In caso di disattivazioni
ripetute, controllare i
collegamenti elettrici!
Sostituzione dei componenti
guasti.
cassetta (vedi capitolo “Sostituzione della guarnizione
della cassetta” a pagina 82).
Pulire il galleggiante nella cassetta.
Non utilizzare l'idropulitrice!
10 Garanzia
Vale il termine di garanzia previsto dalla legge. Qualora il prodotto risultasse
difettoso, La preghiamo di rivolgersi al proprio rivenditore specializzato o alla filiale
del produttore del suo Paese (l'indirizzo si trova sul retro del manuale di istruzioni).
Per la riparazione e per il disbrigo delle condizioni di garanzia è necessario inviare la
seguente documentazione:
• una copia della fattura con la data di acquisto del prodotto,
• un motivo su cui fondare il reclamo, oppure una descrizione del guasto.
84
Page 85

IT
CT4000 Smaltimento
11 Smaltimento
➤ Raccogliere il materiale di imballaggio possibilmente negli appositi contenitori di
riciclaggio.
Quando il prodotto viene messo fuori servizio definitivamente, informarsi
al centro di riciclaggio più vicino, oppure presso il proprio rivenditore
M
specializzato, sulle prescrizioni adeguate concernenti lo smaltimento.
12 Specifiche tecniche
CT4000
Tensione di alimentazione:
Corrente assorbita: max 2 A con pompa interna
max 5 A con pompa esterna
Peso massimo della persona: 130 kg
Temperatura di esercizio: da 0 °C a +50 °C
Capacità: 19 l (serbatoio a cassetta)
7 l (serbatoio di acqua dolce, opzionale)
Marchio di collaudo:
NOTA
I
Approvvigionamento di acqua (con pompa del veicolo):
La toilette necessita dal veicolo almeno di 7 l/min. di acqua sull'uscita
del raccordo del flessibile della toilette per poter garantire uno scarico
sufficiente con almeno 5 l/min.
12 Vg
N1 10 R – 047317
1
85
Page 86

NL
CT4000
Lees deze handleiding voor de ingebruikneming zorgvuldig door en
bewaar hem. Geef de handleiding bij het doorgeven van het product aan
de gebruiker.
Inhoudsopgave
1 Verklaring van de symbolen . . . . . . . . . . . . . . . . . . . . . . . . . . . . . . . . . . . . . 87
2 Veiligheidsinstructies . . . . . . . . . . . . . . . . . . . . . . . . . . . . . . . . . . . . . . . . . . 87
2.1 Algemene veiligheid. . . . . . . . . . . . . . . . . . . . . . . . . . . . . . . . . . . . . 88
2.2 Gebruik van sanitaire producten . . . . . . . . . . . . . . . . . . . . . . . . . . . 88
3 Toebehoren. . . . . . . . . . . . . . . . . . . . . . . . . . . . . . . . . . . . . . . . . . . . . . . . . . 89
4 Gebruik volgens de voorschriften . . . . . . . . . . . . . . . . . . . . . . . . . . . . . . . . 89
5 Technische beschrijving . . . . . . . . . . . . . . . . . . . . . . . . . . . . . . . . . . . . . . . . 89
5.1 Beschrijving van de componenten. . . . . . . . . . . . . . . . . . . . . . . . . . 90
5.2 Bedienings- en indicatie-elementen. . . . . . . . . . . . . . . . . . . . . . . . . 90
6 Toilet gebruiken . . . . . . . . . . . . . . . . . . . . . . . . . . . . . . . . . . . . . . . . . . . . . . .91
6.1 Sanitaire producten. . . . . . . . . . . . . . . . . . . . . . . . . . . . . . . . . . . . . . .91
6.2 Cassettetank voorbereiden . . . . . . . . . . . . . . . . . . . . . . . . . . . . . . . 92
6.3 Verswatertank vullen (geïntegreerde tank) . . . . . . . . . . . . . . . . . . . 93
6.4 Toilet gebruiken . . . . . . . . . . . . . . . . . . . . . . . . . . . . . . . . . . . . . . . . 93
6.5 Cassettetank legen . . . . . . . . . . . . . . . . . . . . . . . . . . . . . . . . . . . . . . 94
6.6 Toiletzitting positioneren . . . . . . . . . . . . . . . . . . . . . . . . . . . . . . . . . 95
6.7 Gebruik in de winter . . . . . . . . . . . . . . . . . . . . . . . . . . . . . . . . . . . . . 95
6.8 Buitenbedrijfstelling . . . . . . . . . . . . . . . . . . . . . . . . . . . . . . . . . . . . . 95
7 Reiniging en onderhoud. . . . . . . . . . . . . . . . . . . . . . . . . . . . . . . . . . . . . . . . 96
7.1 Schuif invetten . . . . . . . . . . . . . . . . . . . . . . . . . . . . . . . . . . . . . . . . . . 96
7.2 Schuif van de cassette losmaken . . . . . . . . . . . . . . . . . . . . . . . . . . . 97
7.3 Cassetteafdichting invetten . . . . . . . . . . . . . . . . . . . . . . . . . . . . . . . 97
7.4 Bajonetsluiting reinigen en bajonetafdichting invetten. . . . . . . . . . 97
7.5 O-ring van de cassetteventilatie invetten . . . . . . . . . . . . . . . . . . . . . 98
8 Onderhoud . . . . . . . . . . . . . . . . . . . . . . . . . . . . . . . . . . . . . . . . . . . . . . . . . . 98
8.1 Reserveonderdelen. . . . . . . . . . . . . . . . . . . . . . . . . . . . . . . . . . . . . . 98
8.2 Deksel en bril demonteren/vervangen . . . . . . . . . . . . . . . . . . . . . . 98
8.3 Cassetteafdichting vervangen . . . . . . . . . . . . . . . . . . . . . . . . . . . . . 99
8.4 Bajonetafdichting vervangen . . . . . . . . . . . . . . . . . . . . . . . . . . . . . . 99
86
Page 87

NL
CT4000 Verklaring van de symbolen
8.5 Zekering in de bedieningseenheid vervangen . . . . . . . . . . . . . . . .100
8.6 Wielen van de cassettetank vervangen . . . . . . . . . . . . . . . . . . . . . .100
9 Wat te doen bij storingen? . . . . . . . . . . . . . . . . . . . . . . . . . . . . . . . . . . . . . .100
10 Garantie. . . . . . . . . . . . . . . . . . . . . . . . . . . . . . . . . . . . . . . . . . . . . . . . . . . . . 101
11 Afvoer . . . . . . . . . . . . . . . . . . . . . . . . . . . . . . . . . . . . . . . . . . . . . . . . . . . . . . 101
12 Technische gegevens. . . . . . . . . . . . . . . . . . . . . . . . . . . . . . . . . . . . . . . . . .102
1 Verklaring van de symbolen
WAARSCHUWING!
!
Veiligheidsaanwijzing: Het niet naleven kan leiden tot overlijden of
ernstig letsel.
VOORZICHTIG!
Veiligheidsaanwijzing: Het niet naleven kan leiden tot letsel.
!
LET OP!
A
Het niet naleven ervan kan leiden tot materiële schade en de werking
van het product beperken.
INSTRUCTIE
Aanvullende informatie voor het bedienen van het product.
I
2 Veiligheidsinstructies
De fabrikant kan in de volgende gevallen niet aansprakelijk worden gesteld voor
schade:
• beschadiging van het product door mechanische invloeden en overspanningen
• veranderingen aan het product zonder uitdrukkelijke toestemming van de
fabrikant
• gebruik voor andere dan de in de handleiding beschreven toepassingen
De verklaring van overeenstemming kan bij de fabrikant worden opgevraagd (contactgegevens, zie achterzijde).
87
Page 88

NL
Veiligheidsinstructies CT4000
2.1 Algemene veiligheid
WAARSCHUWING!
!
A
• Dit toestel kan door kinderen vanaf 8 jaar en ouder evenals door per-
sonen met verminderde fysieke, zintuiglijke of geestelijke vermogens
of tekortschietende ervaring en kennis gebruikt worden, als ze worden begeleid of hun is uitgelegd hoe ze het toestel veilig kunnen
gebruiken. Ook dienen ze inzicht te hebben in de gevaren die het
gebruik van het toestel met zich meebrengt.
• Reiniging en gebruikeronderhoud mogen niet door kinderen zonder
begeleiding worden uitgevoerd.
• Er moet toezicht worden gehouden op kinderen om te voorkomen
dat ze met het toestel spelen.
LET OP!
• Schud de cassettetank niet krachtig.
• Hang de cassettetank voor het transport niet aan een fiets of een ander
voertuig.
• Gebruik geen antivriesmiddelen. Deze middelen kunnen het
cassettetoilet beschadigen.
• Dit toilet is voor een personengewicht van max. 130 kg bestemd.
2.2 Gebruik van sanitaire producten
VOORZICHTIG!
• Bewaar sanitaire producten buiten het bereik van kinderen.
!
LET OP!
A
• Neem vóór het gebruik van sanitaire middelen bij het gebruik en de
reiniging van het toilet de gebruiksinstructies op de verpakking in
acht.
88
Page 89

NL
CT4000 Toebehoren
3Toebehoren
Als toebehoren verkrijgbaar (niet inbegrepen in de omvang van de levering):
Beschrijving
Verswatertank
Servicedeur
Ta n k k l e p
Op de website van Dometic (zie achterzijde) vindt u informatie over de sanitaire
producten.
4 Gebruik volgens de voorschriften
Dit toilet is bestemd voor de inbouw en het gebruik in vrijetijdsvoertuigen, zoals
caravans of campers.
5 Technische beschrijving
Het cassettetoilet CTx4xxx bestaat uit een in het voertuig geïnstalleerd toilet en een
uitneembare, verrijdbare cassette als vuilwatertank. De cassette is van buiten door
een deur bereikbaar. Afhankelijk van het model bevat het toilet het spoelwater uit de
verswatertank aan voertuigzijde of uit een in de behuizing geïntegreerde tank.
Het toilet is beschikbaar in de volgende uitvoeringen:
• CT4050, CT4110: vrijstaand, zonder watertank, zonder console
• CTLP4050, CTLP4110: vrijstaand, zonder watertank, lage console
• CTS4050, CTS4110: vrijstaand, zonder watertank, met console
• CTW4050, CTW4110: vrijstaand, met watertank in de console
De 4050 modellen kunnen in een natte cel worden ingebouwd.
89
Page 90

NL
Technische beschrijving CT4000
5.1 Beschrijving van de componenten
Pos. in
afb. 1, pagina 3
1 Behuizing voor cassettetank
2 Afvoerschuif voor de toiletpot
3 Toiletsleutel, keramiek
4 Deksel en bril, draaibaar
5Console
6 Controle- en bedieningsveld
7 Verswatertank (optioneel)
8 Alleen CTLP, CTS,CTW: Wandhouder
9 Cassettetank (capaciteit 19 l)
10 Servicedeur (toebehoren)
11 Alleen CTW: Tankklep (afsluitbare tankklep optioneel)
Omschrijving
5.2 Bedienings- en indicatie-elementen
Pos. in
afb. 2, pagina 3
1 Toets „Spoelen”
2 Indicatie „Cassettetank vol”
3 Indicatie „Cassettetank 3/4 vol”
4 Indicatie „Verswatertank vullen”
5 Indicatie „Cassettetank verwijderd”
Omschrijving
(bij gebruik van de tank van het voertuig niet altijd aangesloten)
90
Page 91

NL
CT4000 Toilet gebruiken
6Toilet gebruiken
INSTRUCTIE
I
6.1 Sanitaire producten
Sanitaire producten voor de vuilwatertank breken fecaliën af en voorkomen onaangename geurtjes.
De fabrikant adviseert:
• Dometic POWER CARE TABS
• Dometic GREEN CARE TABS
• Voordat u het toilet in gebruik neemt, dient u het aan de binnen- en
buitenzijde met een zachte doek en lauwwarm water met een mild
reinigingsmiddel te reinigen (zie ook hoofdstuk „Reiniging en onderhoud” op pagina 96).
• U dient de afdichtingen van uw toilet regelmatig te reinigen en in te
vetten (zie hoofdstuk „Reiniging en onderhoud” op pagina 96).
• Traditioneel toiletpapier kan het toilet verstoppen. Gebruik een spe-
ciaal, snel oplosbaar toiletpapier.
De fabrikant adviseert Dometic COMFORT CARE.
Gelieve bij het gebruik van sanitaire producten de gebruikstips op de verpakking in
acht te nemen.
INSTRUCTIE
I
Op de website van Dometic (zie achterzijde) vindt u meer informatie over het
toebehoren.
Traditioneel toiletpapier kan het toilet verstoppen. Gebruik een
speciaal, snel oplosbaar toiletpapier. De fabrikant adviseert
Dometic COMFORT CARE.
91
Page 92

NL
Toilet gebruiken CT4000
6.2 Cassettetank voorbereiden
Cassettetank verwijderen
Ga als volgt te werk (afb. 3, pagina 4):
➤ Open de servicedeur.
➤ Druk de hendel naar boven om de cassettetank te ontgrendelen.
➤ Trek de cassettetank uit de cassettebehuizing. Bij het uittrekken moet een
weerstand overwonnen worden.
Sanitair product toevoegen
➤ Zet de cassettetank rechtop.
➤ Draai de afvoerpijp ca. 90° naar boven (afb. 4, pagina 4).
INSTRUCTIE
I
Draai de afvoerpijp niet verder dan 90°, anders kan deze losraken
(afb. 4, pagina 4).
➤ Draai de afsluitkap eraf (afb. 5, pagina 5).
➤ Doe via de afvoerpijp een sanitair product in de cassettetank (afb. 6, pagina 5).
Neem de gebruiksinstructies van het sanitaire product in acht.
Cassettetank in de cassettebehuizing schuiven
LET OP!
A
➤ Schuif de cassettetank tot de aanslag in de cassettebehuizing.
✓ De vergrendeling van de cassettetank sluit bij het inschuiven automatisch.
➤ Controleer of de cassettetank goed vastzit.
➤ Sluit en vergrendel de servicedeur.
De cassettetank moet gemakkelijk in de cassettebehuizing kunnen
worden geschoven. Zorg ervoor dat de cassettetank niet tegen andere
voorwerpen of componenten stoot.
92
Page 93

NL
CT4000 Toilet gebruiken
6.3 Verswatertank vullen (geïntegreerde tank)
➤ Vul de verswatertank via de vulaansluiting aan de buitenkant van het voertuig.
De hoeveelheid is afhankelijk van de gebruikte tank (geïntegreerde tank bij de
modellen CTW4050 en CTW4110 = 7 liter).
6.4 Toilet gebruiken
De toiletbril blijft staan in een hoek van ca.70° (afb. 7 1, pagina 6).
INSTRUCTIE
I
➤ Druk voor gebruik op de spoelknop , om weinig water in de pot te laten
stromen (afb. 7 2, pagina 6).
➤ Trek de schuif (afb. 7 3, pagina 6) naar voren. Laat de schuif tijdens het gebruik
geopend.
De schuif moet tijdens het rijden gesloten zijn en er mag zich geen
vloeistof boven de schuif bevinden.
➤ Druk na gebruik om te spoelen opnieuw op de spoelknop (afb. 8 1,
pagina 6).
➤ Sluit de schuif (afb. 8 2, pagina 6).
De cassettetank heeft een capaciteit van 19 l. Als de indicatie gaat branden, zijn
nog slechts enkele bedieningen mogelijk.
INSTRUCTIE
I
Bij een 3/4 gevulde cassette is het gebruik alleen nog met open schuif
mogelijk. In schuine positie (bijv. permanent hellen van het voertuig)
mag de cassette slechts 3/4 gevuld zijn. Overstroming door de ontluchting is mogelijk.
93
Page 94

NL
Toilet gebruiken CT4000
6.5 Cassettetank legen
Leeg de cassettetank als de indicatie brandt.
➤ Verwijder de cassettetank (hoofdstuk „Cassettetank verwijderen” op pagina 92).
➤ Druk op de ontgrendelingstoets in het midden van de handgreep en trek de
handgreep er tot de aanslag uit (afb. 9, pagina 7).
LET OP!
A
• Schud de cassettetank niet krachtig.
• Hang de cassettetank voor het transport niet aan een fiets of een
ander voertuig.
• Leg geen zware voorwerpen op de cassettetank tijdens het
transport.
De behuizing en de wielen worden hierdoor beschadigd.
➤ Breng de tank naar de dichtstbijzijnde afvoerplaats.
➤ Druk op de ontgrendelingstoets van de handgreep en schuif de handgreep
terug in de cassette.
➤ Zet de cassettetank rechtop en draai de afvoerpijp 90° naar boven (afb. 4,
pagina 4).
INSTRUCTIE
Draai de afvoerpijp niet verder dan 90°, anders kan deze losraken.
I
➤ Draai de afsluitkap eraf (afb. 5, pagina 5).
➤ Houd de cassettetank met één hand aan de handgreep vast (afb. 0 3, pagina 7)
en met de andere hand aan de behuizing (afb. 0 2, pagina 7), zodat u de ontluchtingsknop (afb. 0 1, pagina 7) tijdens het legen kunt indrukken.
➤ Druk op de ontluchtingsknop als de afvoerpijp naar beneden wijst.
✓ De tank leegt gelijkmatig en zonder spatten.
➤ Spoel de cassettetank na het legen zorgvuldig met water uit.
➤ Doe een sanitair product in de cassette (hoofdstuk „Sanitair product toevoegen”
op pagina 92).
➤ Verwijder grove verontreinigingen van de wielen van de cassettetank om krassen
in de cassettebehuizing te vermijden.
94
Page 95

NL
CT4000 Toilet gebruiken
LET OP!
A
➤ Schuif de cassettetank in de cassettebehuizing (hoofdstuk „Cassettetank in de
cassettebehuizing schuiven” op pagina 92).
Reinig de cassettetank van binnen niet met een hogedrukreiniger. De
vlotter voor de vulstandindicatie kan hierdoor schade oplopen.
6.6 Toiletzitting positioneren
De toiletzitting kan traploos worden gedraaid (afb. a, pagina 8).
6.7 Gebruik in de winter
LET OP!
A
Gebruik geen antivriesmiddelen. Antivriesmiddelen kunnen het cassettetoilet beschadigen.
U kunt het cassettetoilet ook in de winter gebruiken, zolang toilet en cassettetank
zich in een vorstvrije ruimte bevinden.
Als dit niet het geval is, leeg dan de verswatertank, de cassettetank en de waterleiding van de verswatertoevoer.
Hierdoor wordt schade door vorst vermeden (hoofdstuk „Buitenbedrijfstelling” op
pagina 95).
6.8 Buitenbedrijfstelling
Leeg de verswatertank en het waterleidingsysteem volledig als u het toilet gedurende langere tijd buiten bedrijf stelt.
➤ Reinig het toilet zorgvuldig (hoofdstuk „Reiniging en onderhoud” op pagina 96).
➤ Druk op de spoelknop tot er zich geen water meer in de leidingen bevindt.
➤ Onderbreek de stroomvoorziening naar het toilet.
➤ Leeg vervolgens de cassettetank en spoel deze zorgvuldig uit. Reinig de cas-
sette. Sluit de afvoerpijp niet af om de cassettetank te laten drogen.
➤ Reinig en smeer alle afdichtingen en bewegende delen van het toilet en de cas-
settetank (hoofdstuk „Reiniging en onderhoud” op pagina 96) en herhaal deze
maatregel voordat u het toilet weer in gebruik neemt.
95
Page 96

NL
Reiniging en onderhoud CT4000
7 Reiniging en onderhoud
VOORZICHTIG!
!
Reinigingsmiddelen voor het toilet mogen geen chloor of alcohol
bevatten!
LET OP!
A
I
➤ Reinig het toilet regelmatig aan de binnen- en buitenzijde met een zachte doek
en lauwwarm water met een mild reinigingsmiddel.
➤ Was vervolgens de oppervlakken met helder water af.
De fabrikant adviseert:
• Vet: OKS
• Siliconespray: OKS
• Om veranderingen van het materiaal te voorkomen, geen scherpe,
korrelige of sodahoudende reinigingsmiddelen (geen schuurmiddelen) gebruiken.
• Gebruik geen politoer voor de reiniging.
INSTRUCTIE
• Reinig en smeer regelmatig alle afdichtingen van het toilet en de cas-
settetank. Voer deze acties bij veelvuldig gebruik maandelijks of na
3 - 5 ledigingen van de cassette uit. Gebruik vet of spray op basis van
silicone.
• Gebruik voor de regelmatige reiniging van de toiletpot een mild en
kleurloos reinigingsmiddel.
®
1110
®
1111
7.1 Schuif invetten
VOORZICHTIG!
!
De schuif kan gemakkelijk worden bewogen als hij regelmatig wordt ingevet.
Schuifstangen invetten
➤ Spuit de stangen van de schuif in met siliconespray (afb. c, pagina 9).
96
Er bestaat knelgevaar wanneer de schuif bij het reinigen of invetten
wordt gesloten (afb. b, pagina 8).
Page 97

NL
CT4000 Reiniging en onderhoud
7.2 Schuif van de cassette losmaken
VOORZICHTIG!
!
➤ Verwijder de cassettetank en plaats deze op een stevige ondergrond (afb. d,
pagina 9).
➤ Ontgrendel de schuifgreep en trek deze eruit. (afb. e, pagina 9).
➤ Draai de schuif linksom en maak hem los van de cassette (afb. f, pagina 10).
De bajonetsluiting kan in de toestand bij levering en na langere standtijd slechts
moeilijk losgemaakt worden.
Er bestaat knelgevaar wanneer de schuif bij het reinigen of invetten
wordt gesloten.
7.3 Cassetteafdichting invetten
➤ Maak de schuif van de cassette los (hoofdstuk „Schuif van de cassette losmaken”
op pagina 97).
➤ Schuif de afdekking terug zodat de afdekking toegankelijk is (afb. g,
pagina 10).
➤ Reinig de afdichting, en vet deze in.
VOORZICHTIG! Beknellingsgevaar!
Grijp niet in de opening als u de afdekking sluit.
!
➤ Sluit de afdekking (afb. k, pagina 11).
➤ Plaats de schuif weer.
7.4 Bajonetsluiting reinigen en bajonetafdichting
invetten
➤ Maak de schuif van de cassette los (hoofdstuk „Schuif van de cassette losmaken”
op pagina 97).
➤ Reinig de bajonetsluiting (afb. l 1, pagina 12) van de schuif.
➤ Vet de bajonetafdichting (afb. l 2, pagina 12) gelijkmatig in met siliconevet.
➤ Plaats de schuif weer.
97
Page 98

NL
Onderhoud CT4000
7.5 O-ring van de cassetteventilatie invetten
➤ Maak de adapter (afb. m 1, pagina 12) van de cassette los.
➤ Smeer alleen de erop gestoken O-ring (afb. m 2, pagina 12) met siliconevet in.
8Onderhoud
In dit hoofdstuk zijn onderhoudswerkzaamheden beschreven die door de gebruiker
mogen worden uitgevoerd. Laat alle andere onderhouds- en reparatiewerkzaamheden door geschoold personeel uitvoeren.
8.1 Reserveonderdelen
Reserveonderdelen kunnen bij de klantenservice in het desbetreffende land
verkregen worden.
Al het toebehoren is verkrijgbaar via de vakhandel. Neem bij vragen direct contact
op met uw vakhandel of servicepartner.
8.2 Deksel en bril demonteren/vervangen
INSTRUCTIE
I
Bij het vereiste gereedschap worden handleidingen geleverd. Voor de vervanging
van deksel en bril gebruikt u de Dometic Renew Kit voor CT3000/CT4000
(Art.-nr. 9600000458).
➤ Maak de toiletzitting los (afb. n, pagina 13).
➤ Verwijder de toiletzitting (afb. o, pagina 13).
➤ Plaats de nieuwe toiletzitting en de druk deze omlaag tot hij vergrendelt (afb. p,
pagina 14).
De fabrikant kan niet aansprakelijk gesteld worden voor schade die door
een verkeerde montage ontstaat.
98
Page 99

NL
CT4000 Onderhoud
8.3 Cassetteafdichting vervangen
➤ Maak de schuif van de cassette los (hoofdstuk „Schuif van de cassette losmaken”
op pagina 97).
➤ Schuif de afdekking terug zodat de afdekking toegankelijk is (afb. g,
pagina 10).
➤ Demonteer de steunring en de afdichting (afb. g, pagina 10).
LET OP!
A
➤ Plaats de nieuwe afdichting (afb. i, pagina 11).
➤ Plaats de steunring (afb. j, pagina 11).
De afdichting moet gelijkmatig in de opening liggen (afb. h,
pagina 10), opdat de cassette dicht is en de schuif gemakkelijk kan
worden bewogen.
➤ Vet alle bereiken in.
VOORZICHTIG! Beknellingsgevaar!
Grijp niet in de opening als u de afdekking sluit.
!
➤ Sluit de afdekking (afb. k, pagina 11).
➤ Plaats de schuif weer.
8.4 Bajonetafdichting vervangen
➤ Maak de schuif van de cassette los (hoofdstuk „Schuif van de cassette losmaken”
op pagina 97).
➤ Neem de oude afdichting eruit (afb. l 2, pagina 12).
➤ Reinig de bajonetsluiting.
➤ Plaats de nieuwe afdichting.
➤ Breng de nieuwe afdichting gelijkmatig aan.
➤ Plaats de schuif weer.
➤ Vet alle bereiken in.
99
Page 100

NL
Wat te doen bij storingen? CT4000
8.5 Zekering in de bedieningseenheid vervangen
VOORZICHTIG!
!
➤ Til de bedieningseenheid met een geschikt gereedschap op en trek deze
vervolgens uit de console resp. wand (afb. q, pagina 14).
➤ Vervang de zekering (autozekering: 7,5 A) aan de onderzijde van de bediening-
seenheid (afb. q 1, pagina 14).
8.6 Wielen van de cassettetank vervangen
De wielen van de cassettetank kunnen indien nodig afzonderlijk worden vervangen:
➤ Demonteer het oude wiel zoals weergegeven (afb. r, pagina 15).
➤ Monteer het nieuwe wiel zoals weergegeven (afb. r, pagina 15).
➤ Controleer of het wiel soepel draait.
• Vóór het begin de spanningsvoorziening uitschakelen!
• Trek de bedieningseenheid voorzichtig uit de wandopening.
Er bestaat verwondingsgevaar door terugspringende veren!
9 Wat te doen bij storingen?
Dometic biedt een klantenservicenet over heel Europa aan. Geautoriseerde servicepunten vindt u op het internet op de website dometic.com.
Noteer voordat u contact opneemt met de klantenservice de volgende gegevens
van het typeplaatje:
• Model (Model Designation)
• Productnummer (Product Number)
• Serienummer (Serial No.)
• MLC-code (MLC)
INSTRUCTIE
I
U vindt het typeplaatje in de cassettebehuizing na het uitnemen van de
cassette.
100
 Loading...