

Page 1
®
110
CS
160
200
EN
ES
FR
Type C…
825 12 39-13
USER MANUAL Wine cellar
MANUAL dEL USUARio cava para envejecimiento del vino
MANUEL d’UTiLiSATioN cave à vins de vieillissement
3
7
11
MO-M 0714
Page 2

Page 3
EN
INTRODUCTION
Thank you for choosing the Dometic Wine Cellar.
Please read the following instructions carefully be-
fore installing your new wine cellar. We trust you
will be completely satised with your purchase.
The wine cellar must be installed and used according to these instructions in order for it to operate
correctly and economically.
The appliance is not intended for use by young
children or inrm persons without supervision.
Young children should be supervised to ensure that
they do not play with the appliance.
TRANSIT DAMAGE
Inspect the wine cellar for transit damage. You
must report any damage the company responsible
for the delivery within the legal or stated time for
this type of product. If there is no such established
report time, the damage must be reported within
seven days of delivery.
ACCESSORIES
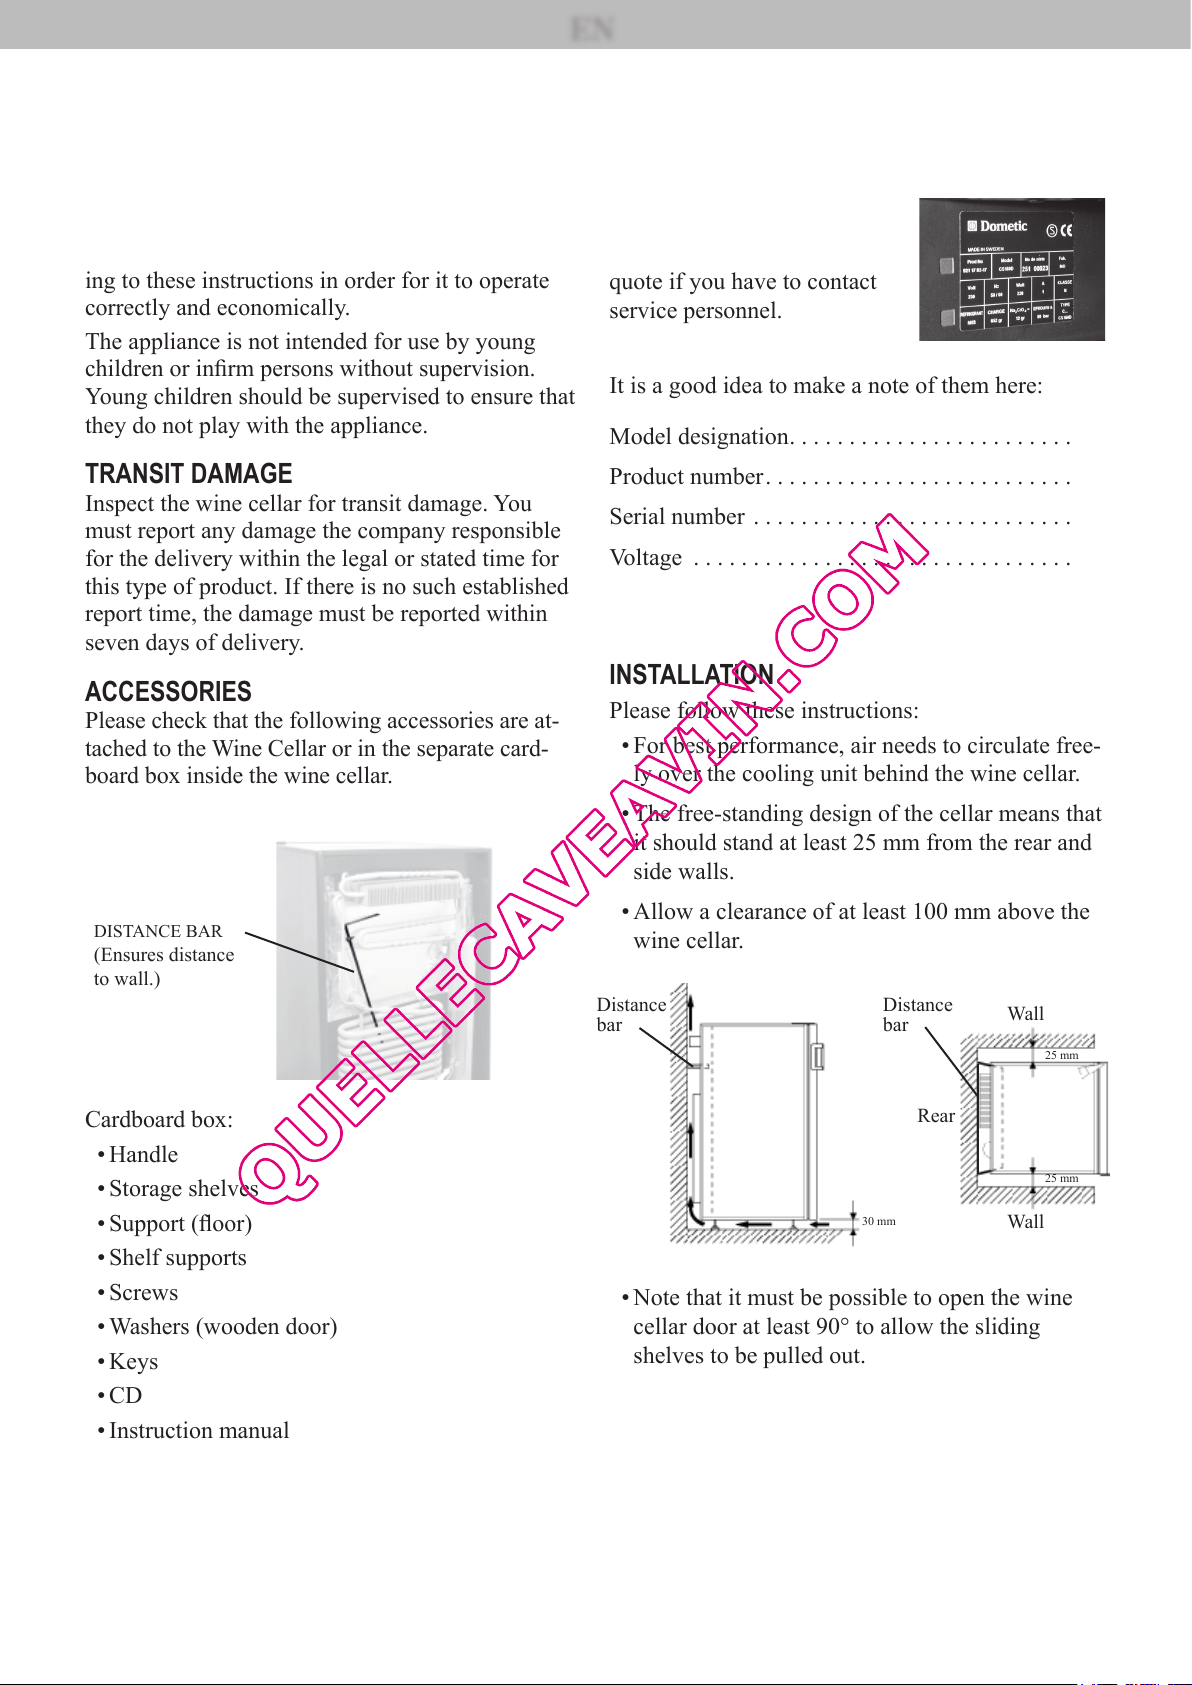
Please check that the following accessories are at-
tached to the Wine Cellar or in the separate card-
board box inside the wine cellar.
DATA PLATE
Check the data plate, inside the wine cellar at
the top left, to ensure you have received the right
model.
The data plate shows de-
tails that you will need to
quote if you have to contact
service personnel.
It is a good idea to make a note of them here:
Model designation . . . . . . . . . . . . . . . . . . . . . . . .
Product number . . . . . . . . . . . . . . . . . . . . . . . . . .
Serial number . . . . . . . . . . . . . . . . . . . . . . . . . . .
Voltage . . . . . . . . . . . . . . . . . . . . . . . . . . . . . . . .
INSTALLATION
Please follow these instructions:
For best performance, air needs to circulate free-
•
ly over the cooling unit behind the wine cellar.
DISTANCE BAR
(Ensures distance
to wall.)
Cardboard box:
Handle
•
Storage shelves
•
Support (oor)
•
Shelf supports
•
Screws
•
Washers (wooden door)
•
Keys
•
The free-standing design of the cellar means that
•
it should stand at least 25 mm from the rear and
side walls.
Allow a clearance of at least 100 mm above the
•
wine cellar.
Distance
bar
Distance
bar
Wall
Rear
Note that it must be possible to open the wine
•
30 mm
Wall
cellar door at least 90° to allow the sliding
shelves to be pulled out.
25 mm
25 mm
CD
•
Instruction manual
•
Necessary additional tools not included:
Screwdriver (star quad)
•
Adjustable spanner or xed spanner (21 mm)
•
- 3 -
Page 4
Remove the transport pallet on which your
WARNING
!
1.
wine cellar rests.
EN
Attach the drip tray on the back. The
7.
screws are already attached at the back.
Adjust the feet to allow a 30 mm clear
2.
ance under the wine cellar and verify
that it stands in a vertical position in both
directions. If necessary, use a spirit level.
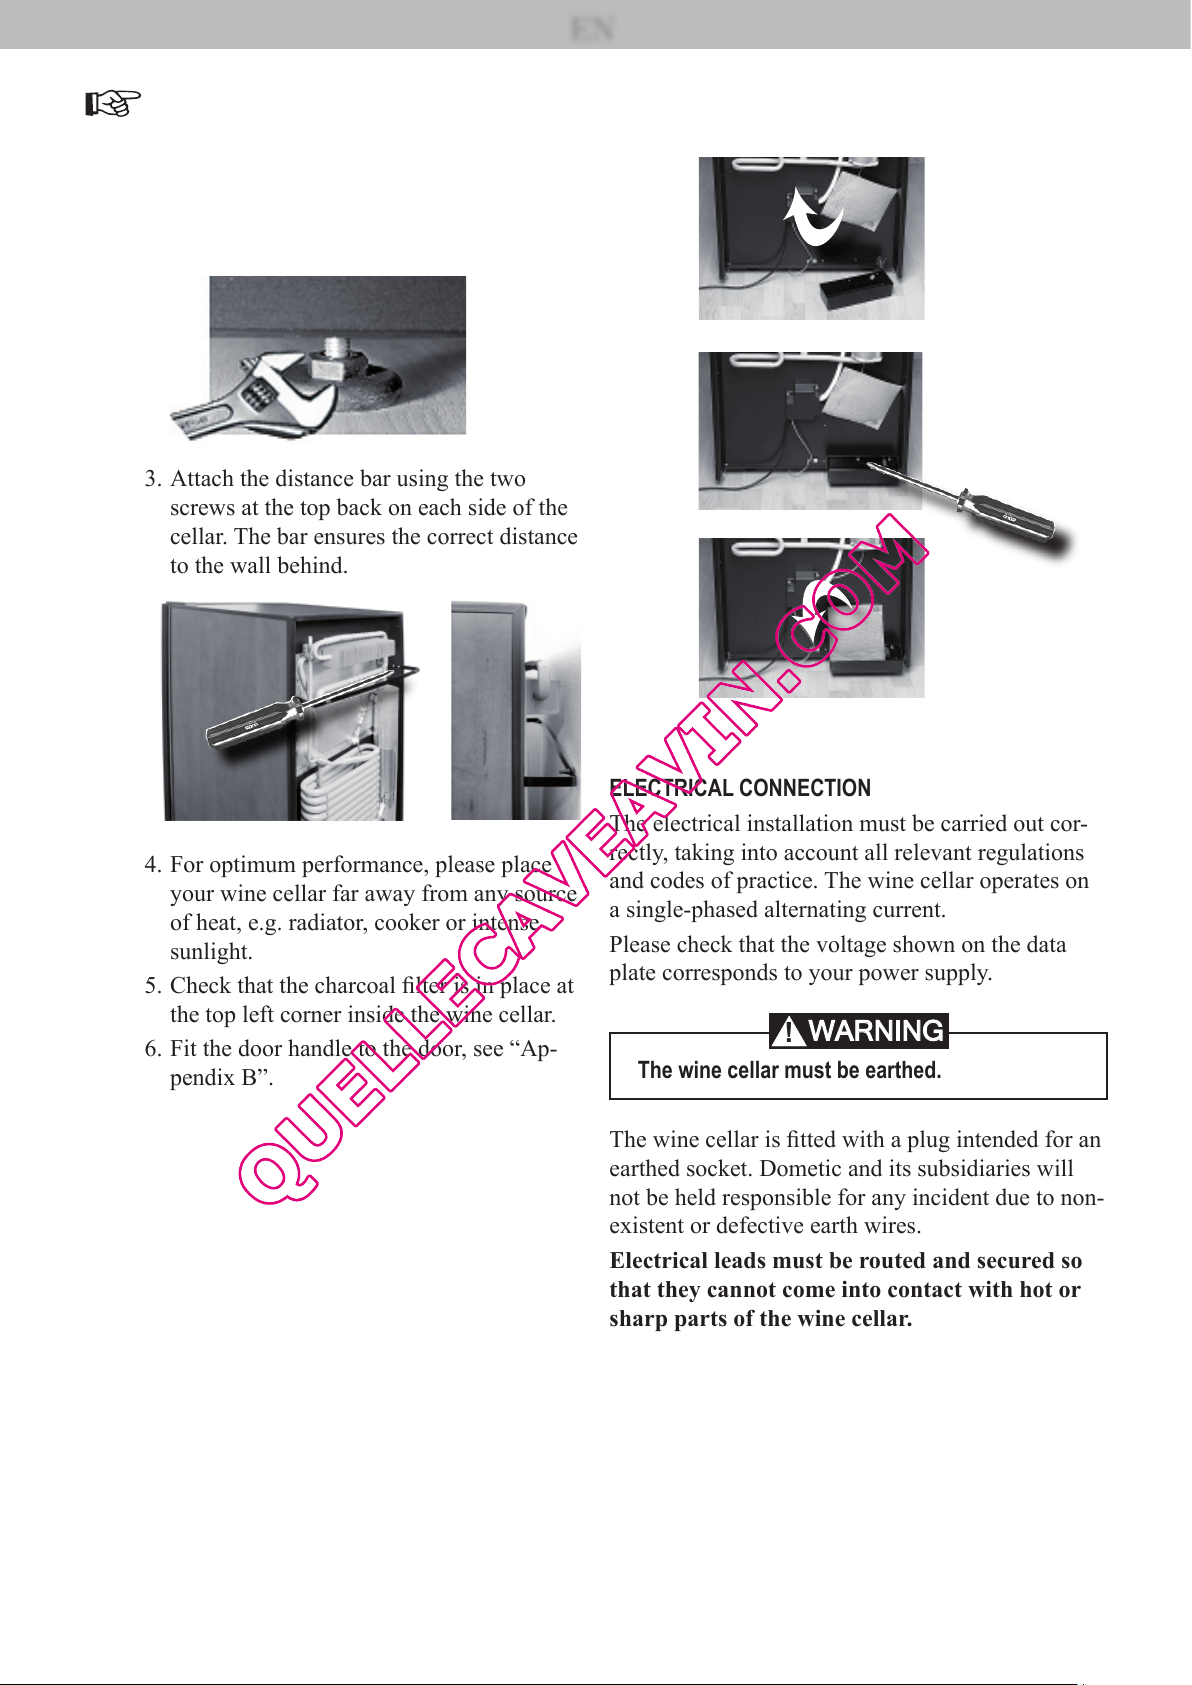
Attach the distance bar using the two
3.
screws at the top back on each side of the
cellar. The bar ensures the correct distance
to the wall behind.
For optimum performance, please place
4.
your wine cellar far away from any source
of heat, e.g. radiator, cooker or intense
sunlight.
Check that the charcoal lter is in place at
5.
the top left corner inside the wine cellar.
-
ELECTRICAL CONNECTION
The electrical installation must be carried out cor-
rectly, taking into account all relevant regulations
and codes of practice. The wine cellar operates on
a single-phased alternating current.
Please check that the voltage shown on the data
plate corresponds to your power supply.
Fit the door handle to the door, see “Ap
6.
pendix B”.
-
The wine cellar must be earthed.
The wine cellar is tted with a plug intended for an
earthed socket. Dometic and its subsidiaries will
not be held responsible for any incident due to non-
existent or defective earth wires.
Electrical leads must be routed and secured so
that they cannot come into contact with hot or
sharp parts of the wine cellar.
- 4 -
Page 5
EN
TEMPERATURE SETTING
Plug in the wine cellar and turn it on with the ON/
OFF switch.
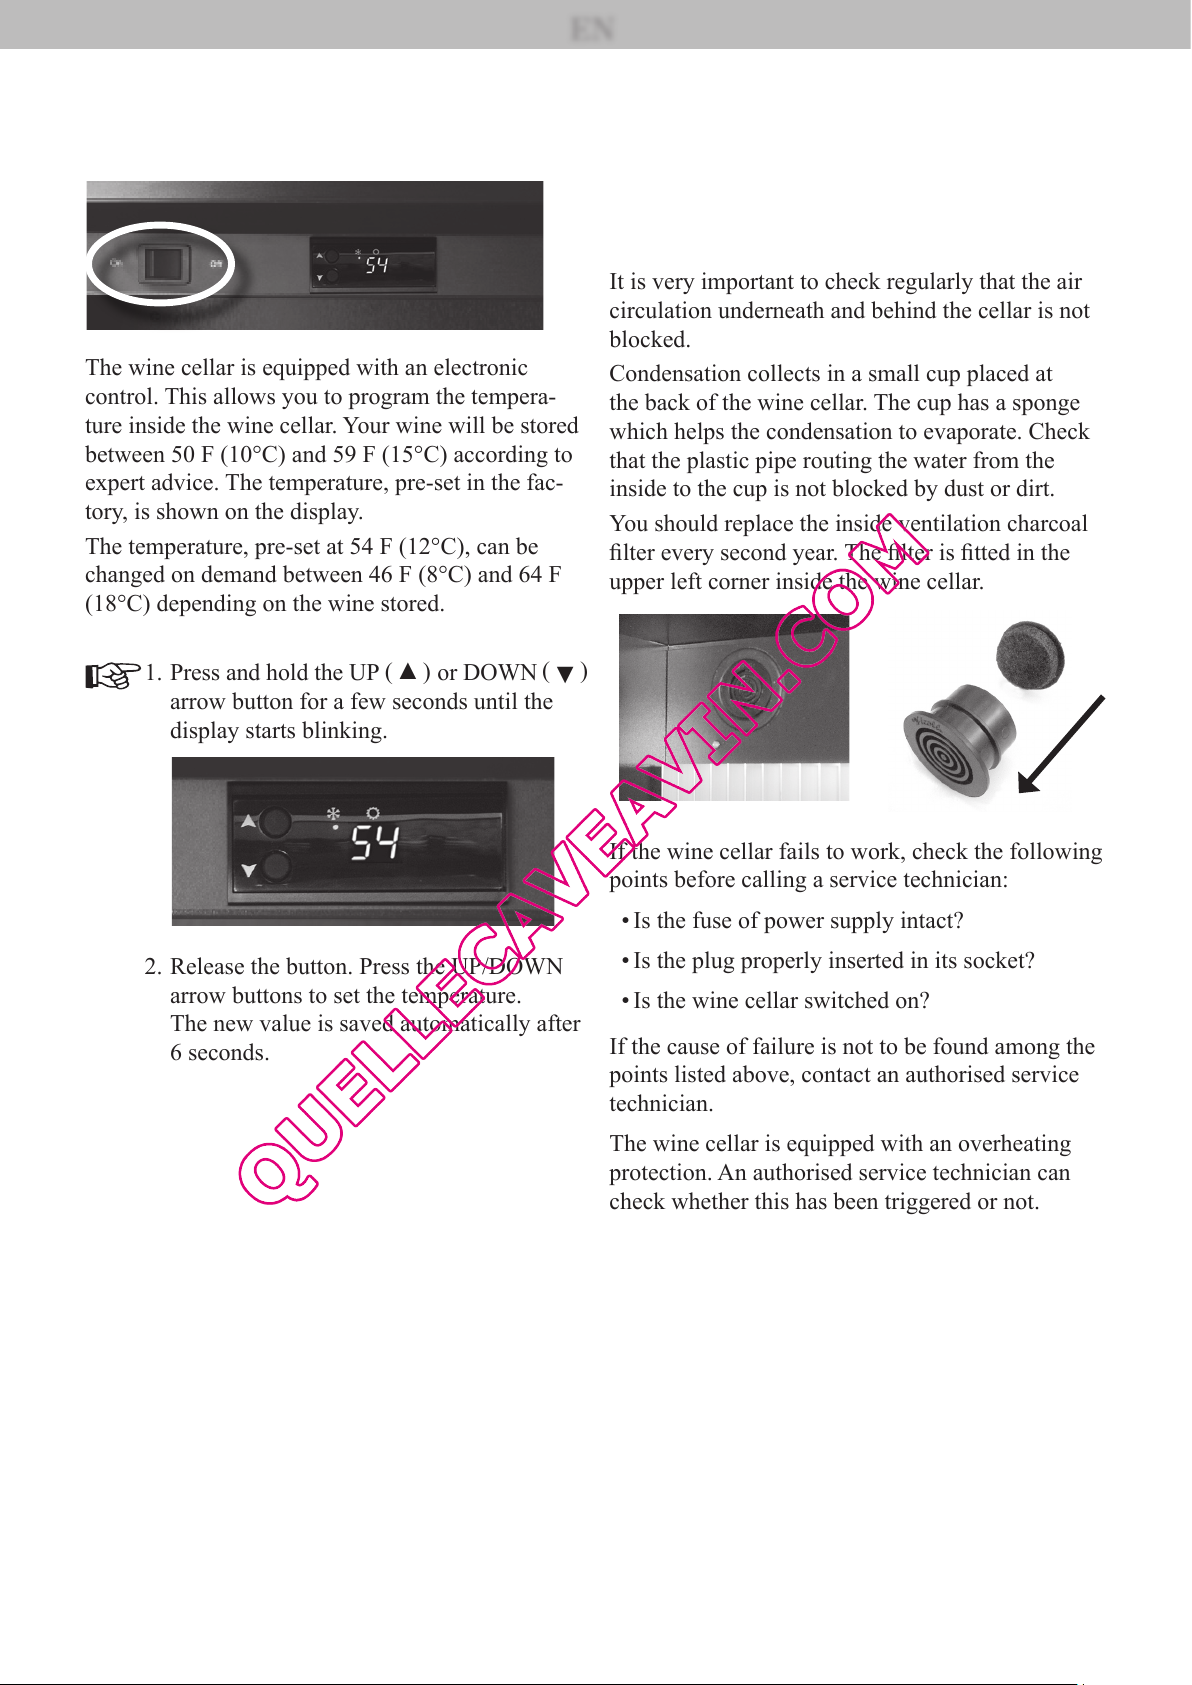
The wine cellar is equipped with an electronic
control. This allows you to program the tempera-
ture inside the wine cellar. Your wine will be stored
between 50 F (10°C) and 59 F (15°C) according to
expert advice. The temperature, pre-set in the fac-
tory, is shown on the display.
The temperature, pre-set at 54 F (12°C), can be
changed on demand between 46 F (8°C) and 64 F
(18°C) depending on the wine stored.
▲
Press and hold the UP or DOWN
1.
arrow button for a few seconds until the
display starts blinking.
( )
( )
▼
MAINTENANCE
We recommend that you keep your wine cellar as
clean as possible. Unplug the cellar before clean-
ing. Do not use any abrasive or strong scented
substances. Use a smooth cloth or sponge and light
detergent.
It is very important to check regularly that the air
circulation underneath and behind the cellar is not
blocked.
Condensation collects in a small cup placed at
the back of the wine cellar. The cup has a sponge
which helps the condensation to evaporate. Check
that the plastic pipe routing the water from the
inside to the cup is not blocked by dust or dirt.
You should replace the inside ventilation charcoal
lter every second year. The lter is tted in the
upper left corner inside the wine cellar.
If the wine cellar fails to work, check the following
points before calling a service technician:
Is the fuse of power supply intact?
•
Release the button. Press the UP/DOWN
2.
arrow buttons to set the temperature.
The new value is saved automatically after
6 seconds.
Is the plug properly inserted in its socket?
•
Is the wine cellar switched on?
•
If the cause of failure is not to be found among the
points listed above, contact an authorised service
technician.
The wine cellar is equipped with an overheating
protection. An authorised service technician can
check whether this has been triggered or not.
- 5 -
Page 6
EN
CAUTION
INSTALLATION OF GUIDES AND SHELF
SUPPORTS
GUIDES FOR SLIDING SHELVES
Place the rear hook of the guide in front of the
desired hole in the rear row and push in direction
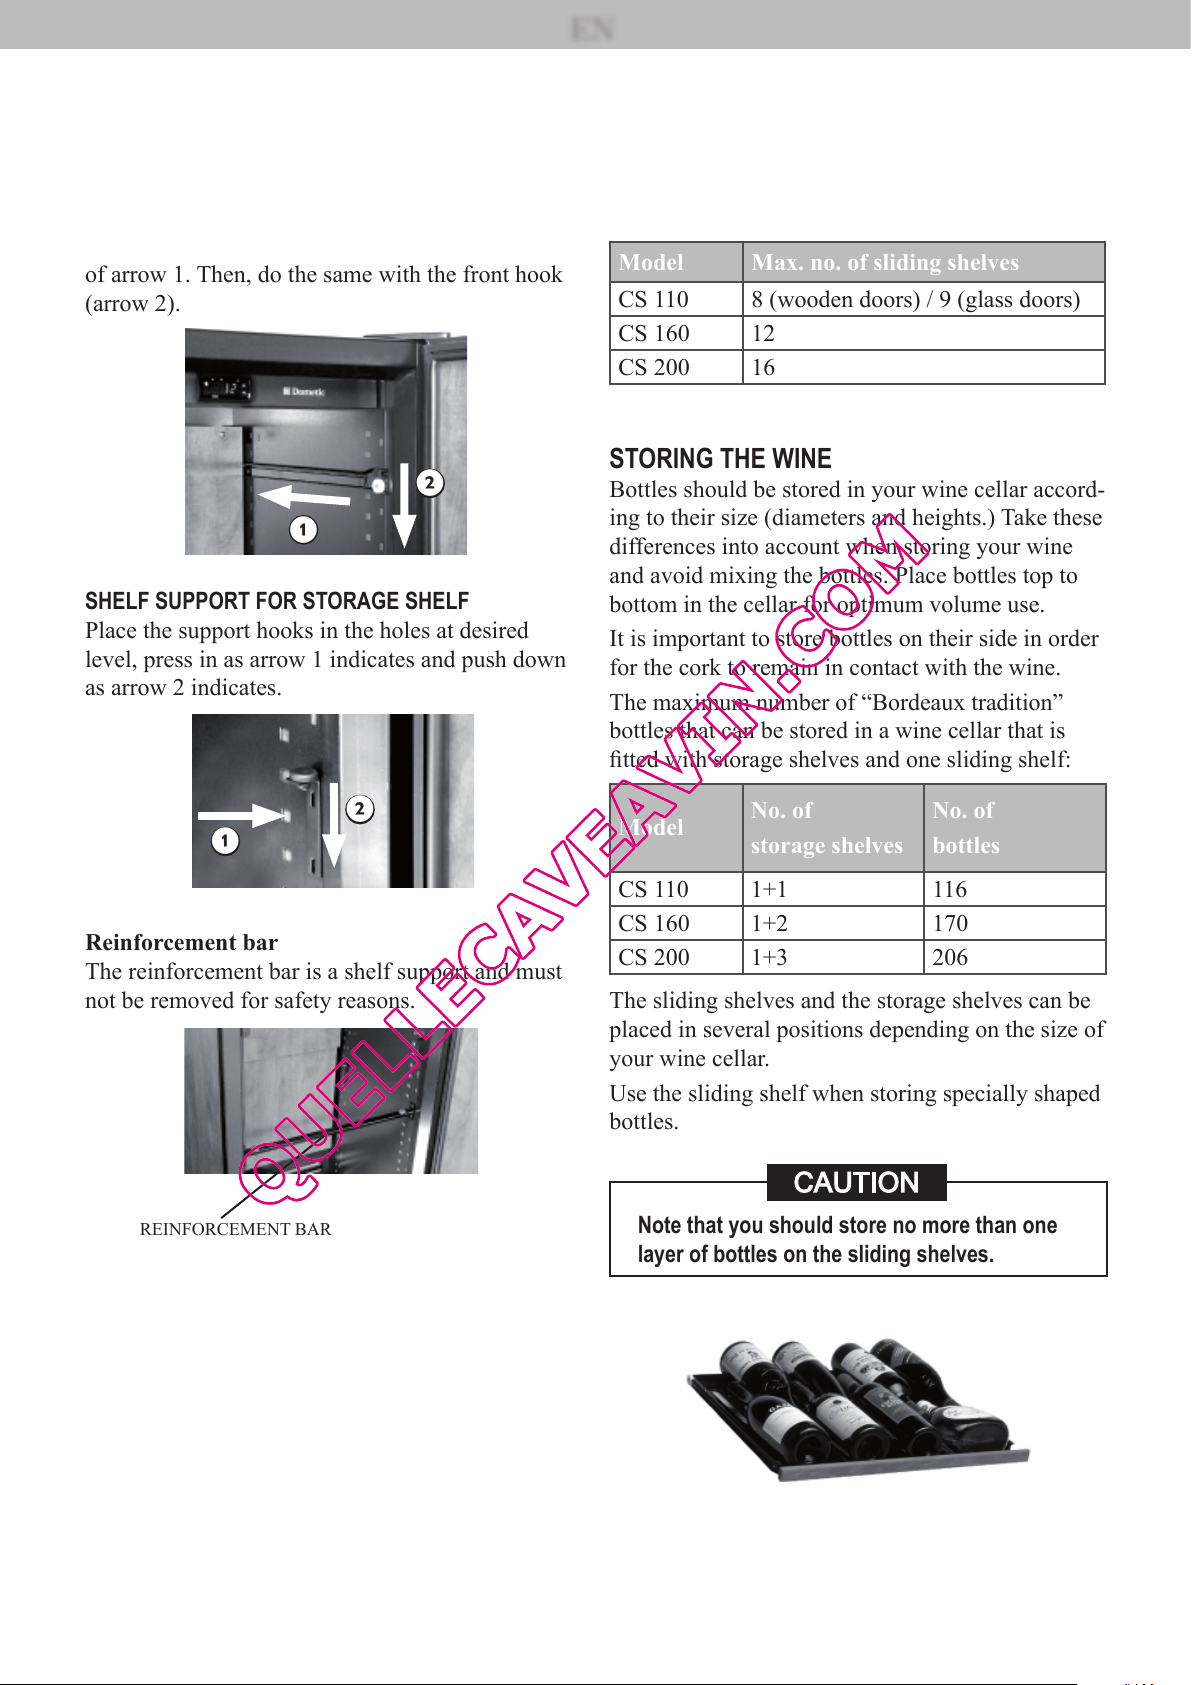
of arrow 1. Then, do the same with the front hook
(arrow 2).
2
1
SHELF SUPPORT FOR STORAGE SHELF
Place the support hooks in the holes at desired
level, press in as arrow 1 indicates and push down
as arrow 2 indicates.
KITS
Each kit contains two shelves and shelf supports.
Sliding shelf kit number: 921 17 81-99
Storage shelf kit number: 921 17 81-98
Model Max. no. of sliding shelves
CS 110 8 (wooden doors) / 9 (glass doors)
CS 160 12
CS 200 16
STORING THE WINE
Bottles should be stored in your wine cellar accord-
ing to their size (diameters and heights.) Take these
differences into account when storing your wine
and avoid mixing the bottles. Place bottles top to
bottom in the cellar for optimum volume use.
It is important to store bottles on their side in order
for the cork to remain in contact with the wine.
The maximum number of “Bordeaux tradition”
bottles that can be stored in a wine cellar that is
tted with storage shelves and one sliding shelf:
2
1
Reinforcement bar
The reinforcement bar is a shelf support and must
not be removed for safety reasons.
REINFORCEMENT BAR
Model
No. of
storage shelves
CS 110 1+1 116
CS 160 1+2 170
CS 200 1+3 206
The sliding shelves and the storage shelves can be
placed in several positions depending on the size of
your wine cellar.
Use the sliding shelf when storing specially shaped
bottles.
Note that you should store no more than one
layer of bottles on the sliding shelves.
No. of
bottles
See “Appendix A” for information about the best
way to stack the “Burgundy” and the “Bordeaux
Tradition” bottles.
- 6 -
Page 7

ES
INTRODUCCIÓN
Deseamos agradecerle la elección de la Cava para
envejecimiento de vinos de Dometic.
Lea las siguientes instrucciones de uso con dete-
nimiento antes de comenzar a instalar su nueva
cava. Estamos seguros que estará satisfecho con la
compra que ha realizado.
La cava debe instalarse y utilizarse del modo des-
crito en estas instrucciones para que funcione de un
modo económico y correcto.
DAÑOS DURANTE EL ENVÍO
Compruebe el estado de la cava y asegúrese de que
no ha sufrido daños durante el envío. Si observa
alguno, informe a la empresa de transportes respon-
sable del envío en el espacio de tiempo legal o esta-
blecido para este tipo de producto. Si no existiera tal
espacio de tiempo para informar de daños, deberá
hacerlo durante los 7 días posteriores a la entrega.
ACCESORIOS
Compruebe que la cava incluye los accesorios
siguientes o bien, busque una caja de cartón in-
dependiente en la que se deben encontrar estos
accesorios en el interior de la cava.
BARRA DE SEPARACIÓN
(Para asegurar que la cava
y la pared quedan separadas.)
Caja de cartón:
Tirador
•
Estanterías
•
Soporte (suelo)
•
Soporte de estanterías
•
PLACA DE DATOS TÉCNICOS
Compruebe la placa de datos técnicos que se encuentra en el interior de la cava, en la parte superior izquierda, para asegurarse de que ha recibido
el modelo correcto.
En la placa de datos técnicos
se especican los detalles
necesarios para solicitar
asistencia técnica.
Le sugerimos que apunte aquí los detalles:
Número de modelo . . . . . . . . . . . . . . . . . . . . . . .
Número de producto . . . . . . . . . . . . . . . . . . . . . .
Número de serie . . . . . . . . . . . . . . . . . . . . . . . . .
Tensión . . . . . . . . . . . . . . . . . . . . . . . . . . . . . . . .
INSTALACIÓN
A continuación se proporcionan las instrucciones
de instalación que debe seguir:
Para obtener el máximo rendimiento, es necesa-
•
rio que el aire circule libremente por la unidad
de refrigeración que hay en la parte posterior de
la cava.
Su diseño noempotrado se ha realizado para que
•
permanezca a 25 mm como mínimo separada de
la pared, por la parte de atrás y los laterales.
Deje un espacio de 100 mm como mínimo en la
•
parte superior.
Barra de
Separación
Barra de
Separación
Parte
Posterior
30 mm
Pared
Pared
25 mm
25 mm
Tornillos
•
Arandelas de presion (puerta de madera)
•
Llaves
•
CD
•
Manual de instrucciones
•
Herramientas adicionales necesarias no incluidas:
Destornillador (estrella cuadrete)
•
Llave de tuercas ajustable o ja (21 mm)
•
Observe que es necesario que la puerta de la
•
cava pueda abrirse 90º como mínimo para que se
puedan sacar las estanterías deslizantes.
- 7 -
Page 8

Retire el palet de transporte en el que se
ADVERTENCIA
!
1.
suministra la cava.
Ajuste los pies de tal modo que quede un
2.
espacio de 300 mm por debajo de la cava
y ajuste los pies para que quede en posición completamente vertical en ambas direcciones. Utilice un nivel si es necesario
para que quede nivelada correctamente.
Coloque la barra de separación, con los
3.
dos tornillos que se suministran, en la par-
te posterior, a cada lado, de la cava. Esta
barra asegura que se mantiene la distancia
correcta entre la cava y la pared.
Para obtener el máximo rendimiento,
4.
coloque la cava lejos de cualquier fuente
de calor (radiadores, cocina o luz directa
del sol).
ES
Coloque la bandeja de desagüe en la parte
7.
posterior. Los tornillos ya se han colocado
en la parte posterior.
CONEXIÓN ELÉCTRICA
Es muy importante que la instalación eléctrica se
realice correctamente y que cumpla con la normati-
va y códigos de prácticas vigentes. La cava funcio-
na con corriente alterna monofásica.
Compruebe que la tensión que se indica en la placa
de datos técnicos es la misma que la del suministro
de energía eléctrica al que se va a conectar.
5.
6.
Compruebe que el ltro de carbón se
encuentra en su posición en la esquina
superior izquierda en el interior de la cava.
Coloque el tirador de la puerta, vea
“Apéndice B”.
La cava debe poseer una conexión a tierra.
La cava se ha equipado con un enchufe para conec-
tar la toma de tierra. Dometic y sus subsidiarias no
se responsabilizarán de ningún tipo de avería por
causa de una mala conexión a tierra o si ésta no se
ha instalado.
Los cables eléctricos deben guiarse y jarse para
que no entren en contacto con partes calientes o
aladas de la cava.
- 8 -
Page 9

ES
AJUSTE DE TEMPERATURA
Enchufe la cava y conéctela con el interruptor.
La cava está equipada con un control electrónico.
Esto le permitirá programar la temperatura del
interior de la cava. El vino debe almacenarse a una
temperatura de entre 50 F (10°C) y 59 F (15°C)
según el consejo de los expertos. La temperatura
preajustada de fábrica se mostrará en la pantalla.
La temperatura, preajustada a 54 F (12°C), puede
cambiarse para adaptarse a las necesidades entre
45 F (8°C) y 64 F (18°C) dependiendo del vino
almacenado.
▲
Pulse el botón de echa hacia arriba
1.
o hacia abajo y manténgalo pulsado
hasta que el valor mostrado en la pantalla
comience a parpadear.
( )
▼
( )
MANTENIMIENTO
Recomendamos que mantenga la cava siempre
limpia. Desenchufe la cava antes de limpiarla. No
utilice sustancias abrasivas o perfumadas. Utilice
un paño suave o una esponja y un limpiador suave.
Es muy importante comprobar regularmente la cir
culación de aire por debajo de la cava y asegurarse
de que no se obstruye.
El agua de condensación se recoge en un pequeño
recipiente en la parte posterior de la cava. El reci-
piente posee una esponja que ayuda a evaporar el
agua de condensación. Compruebe que el tubo de
plástico por el que uye el agua de condensación
desde el interior hasta el recipiente no se bloquea
por la suciedad o el polvo.
El ltro de carbón para la ventilación interior debe
cambiarse cada dos años. El ltro se encuentra en
la esquina superior izquierda, en el interior de la
cava.
Si la cava no funciona, realice las comprobaciones
siguientes antes de llamar a un técnico del servicio:
-
Suelte el botón. Pulse el botón de echa
2.
hacia arriba o el de echa hacia abajo
hasta seleccionar la temperatura deseada.
Pasados seis segundos, el nuevo valor se
guardará automáticamente.
El fusible del suministro de energía debe estar en
•
perfecto estado.
El enchufe debe estar correctamente introducido
•
en el zócalo del suministro de energía.
La cava de estar encendida.
•
Si l causa del fallo no se encuentra entre ninguna
de las posibilidades descritas anteriormente, avise
a un técnico del servicio.
La cava se ha equipado con un sistema de protec-
ción contra sobrecalentamiento. El técnico del ser-
vicio podrá comprobar si éste se ha disparado o no.
- 9 -
Page 10

ES
ATENCIÓN
INSTALACIÓN DE LAS GUÍAS Y DE LOS
SOPORTES DE LAS ESTANTERÍAS
GUÍAS DE LAS ESTANTERÍAS DESLIZANTES
Para instalar las guías de las estanterías deslizantes, coloque el gancho trasero de la guía frente al
agujero que desee de la la de la parte posterior
y empuje la guía en la dirección de la echa 1. A
continuación, realice la misma operación con el
gancho frontal (echa 2).
2
1
LOS SOPORTES DE LAS ESTANTERÍAS
Coloque los ganchos del soporte en los agujeros en
el nivel que desee, presione en la dirección de la
echa 1 y empuje hacia abajo en la dirección de la
echa 2.
Modelo Nº máximo de estanterías deslizantes
CS 110
CS 160 12
CS 200 16
8 (puertas de madera) /
9 (puertas de cristal)
ALMACENAMIENTO DEL VINO
Las botellas deben almacenarse en la cava según
el tamaño (diámetros y alturas). Considere estas
diferencias a la hora de almacenar su vino y evite
mezclar botellas. Coloque las botellas en la cava de
arriba hacia abajo para un óptimo aprovechamiento
de su volumen.
Es importante almacenar las botellas tumbadas
para que el corcho permanezca en contacto con el
vino.
Botellas de tipo Burdeos tradicional que se pueden
almacenar en la cava equipada con estanterías de
almacenamiento y una estantería deslizante:
Modelo
CS 110 1+1 116
Nº de
estanterías
Nº de
botellas
2
1
Barra de refuerzo
La barra de refuerzo es un soporte de estantería y
no debe retirarse por motivos de seguridad.
BARRA DE REFUERZO
JUEGOS
CS 160 1+2 170
CS 200 1+3 206
Las estanterías deslizantes y las estanterías de
almacenamiento pueden colocarse en posiciones
distintas según el tamaño de la cava.
Utilice la estantería deslizante cuando se disponga
a almacenar botellas con formas especiales.
Observe que debe almacenar una única capa de
botellas en cada estantería deslizante.
Cada juego contiene dos estanterías y los soportes
de las estanterías.
Nº de ref. juego de
estantería deslizante: 921 17 81-99
Nº de ref. juego de estantería
de almacenamiento: 921 17 81-98
Vea el “ Apéndice A” para la información sobre la
mejor modo de apilar las botellas “Burgundy” y
“Bordeaux Tradition”.
- 10 -
Page 11

FR
INTRODUCTION
Merci d’avoir choisi cette cave à vin de vieillissement.
Veuillez lire attentivement les instructions suivantes avant d’installer votre nouvelle cave à vin.
Nous sommes convaincus que vous serez entièrement satisfait de votre achat.
La cave à vin de vieillissement doit être installée et
utilisée conformément à ces instructions pour fonc-
tionner correctement et de façon économique.
AVARIES DE TRANSPORT
Vériez la cave à vin lors du déballage. Vous devez
signaler immédiatementauprès de la société respon-
sable de la livraison, tout dommage apparent. S’il
ne vous est pas possible de déballer la cave immé-
diatement, mentionnez vos réserves sur le bon de
livraison avant de le signer. En cas de découverte
d’un dommage après le départ des livreurs, vous
disposez de 72 heures maximum pour adresser
votre recours par lettre recommandée adressée au
transporteur.
ACCESSOIRES
Veuillez vérier la présence des accessoires sui-
vants, certains se trouvent dans la boîte en carton à
l’intérieur de la cave à vin.
PLAQUE D’IDENTIFICATION
Vériez que vous avez bien reçu le modèle souhaité sur la plaque d’identication, en haut à gauche à
l’intérieur de la cave à vin.
Cette plaque contient des
informations nécessaires
lors de l’intervention du
Service Après Vente.
Nous vous conseillons de les noter ci dessous.
Désignation du modèle . . . . . . . . . . . . . . . . . . . .
Numéro de produit . . . . . . . . . . . . . . . . . . . . . . .
Numéro de série . . . . . . . . . . . . . . . . . . . . . . . . .
Tension . . . . . . . . . . . . . . . . . . . . . . . . . . . . . . . .
INSTALLATION
Veuillez suivre ces instructions d’installation :
Pour assurer le meilleur fonctionnement pos-
•
sible, l’air doit pouvoir circuler librement vers
l’unité de refroidissement derrière la cave à vin.
Un espace libre d’au moins 25 mm doit être
•
laissé derrière la cave à vin, ainsi que sur les
côtés.
ENTRETOISE
(Pour assurer une
distance optimale
entre la cave et le mur.)
Boîte en carton:
Poignée
•
Clayettes de stockage
•
Support (sol)
•
Support de clayettes
•
Vis
•
Rondelles (porte en bois)
•
Clés
•
CD
•
Notice d’instructions
•
Laissez un espace libre d’au moins 100 mm
•
au-dessus de la cave à vin.
Entretoise
métallique
Entretoise
métallique
Mur
25 mm
Arrière
Notez que la porte doit pouvoir être ouverte d’au
•
30 mm
25 mm
Mur
moins 90° pour sortir les clayettes coulissantes.
Autres outils nécessaires, non fournis:
Tournevis (cruciforme)
•
Clef à molette ou clef de 21 mm
•
- 11 -
Page 12

Enlevez la palette de transport sur laquelle
AVERTISSEMENT
!
1.
repose la cave à vin.
Ajustez les pieds pour avoir un espace
2.
libre de 30 mm sous la cave à vin. Ajustez
les pieds de la cave à vin pour qu’elle soit
parfaitement de niveau en position ver-
ticale, dans les deux sens. Si nécessaire,
utilisez un niveau à bulle.
Utilisez les deux vis pour xer l’entretoise
3.
des deux côtés à l’arrière de la cave à vin.
L’entretoise assure un espace sufsant
pour une bonne ventilation.
Pour un fonctionnement optimal, veillez à
4.
ce que la cave à vin ne soit pas située trop
près d’une source de chaleur (radiateur,
cuisinière ou lumière directe du soleil).
FR
Montez le bac de condensation à l’arrière.
7.
Les vis sont déjà en place à l’arrière.
BRANCHEMENT ÉLECTRIQUE
Il est primordial que l’installation électrique soit
effectuée correctement et conformément aux régle-
mentations en vigueur. Votre cave à vin fonctionne
avec du courant alternatif monophasé.
Veuillez vérier que la tension indiquée sur la
plaque d’identication correspond à votre alimen-
tation électrique.
Vériez que le ltre à charbon est en
5.
place, dans le coin supérieur gauche à
l’intérieur de la cave à vin.
Montez la poignée sur la porte, voir
6.
« l’Annexe B ».
La cave à vin doit être reliée à la terre.
La cave à vin est munie d’une che électrique avec
prise de terre. Dometic et ses liales se dégagent
de toute responsabilité en cas d’incident dû à
l’absence de prise de terre ou si cette dernières est
défectueuse.
Les câbles électriques doivent être passés et xés
de façon à ce qu’ils ne puissent pas entrer en
contact avec des parties chaudes ou tranchantes
de la cave à vin.
- 12 -
Page 13

FR
RÉGLAGE DE LA TEMPÉRATURE
Branchez la cave à vin à la prise électrique et
mettez la en service avec l’interrupteur.
La cave à vin est équipée d’un programmateur
électronique. Il vous permet de programmer la
température à l’intérieur de la cave à vin. Votre vin
sera idéalement gardé à une température comprise
entre 50 F (10°C) et 59 F (15°C), selon le conseil
des experts. La température pré-réglée d’usine à
54 F (12°C) degre est indiquée sur l’afcheur. La
température, pré-réglée en usine à 54 F (12°C),
peut être modiée à la demande entre 46 F ( 8°C)
et 64 F (18°C).
ENTRETIEN
Nous vous recommandons de maintenir votre cave
à vin le plus propre possible. Débranchez la cave
à vin avant tout nettoyage. N’utilisez pas de substances abrasives ni trop parfumées. Utilisez une
éponge ou un chiffon doux et un détergeant léger.
Il est très important de vérier régulièrement que
la circulation de l’air sous et derrière la cave à vin
n’est pas bloquée. La condensation est récupérée
dans un petit bac à l’arrière de la cave à vin. Le bac
contient une éponge qui facilite l’évaporation de la
condensation.
Vériez que le conduit en plastique qui achemine
l’eau de la cave à vin au bac n’est pas obturé par de
la poussière ou des salissures.
Vous devez remplacer le ltre à charbon tous les
deux ans. Le ltre est situé dans le coin supérieur
gauche, à l’intérieur de la cave à vin.
Maintenir enfoncée la touche èche
1.
HAUT ou BAS pendant
quelques secondes, jusqu’à ce que l’écran
commence à clignoter.
Relâcher la touche. Enfoncer les touches
2.
èches HAUT/BAS pour congurer la
température. La nouvelle valeur est sauve-
gardée automatiquement après 6 secondes.
▲
( )
( )
▼
Si la cave à vin ne fonctionne pas, commencez
par vérier les points suivants avant d’appeler un
technicien :
Que la che électrique est correctement bran-
•
chée à la prise.
Que l’interrupteur de la cave à vin est bien en
•
position de service.
Que le fusible de l’alimentation électrique est
•
intact.
Si la cause n’est pas citée ci-dessus, vous devez
faire appel à un technicien agréé.
La cave à vin est équipée d’une sécurité en cas de
surchauffe. Un technicien agréé peut vérier si elle
S´est déclenché ou pas.
- 13 -
Page 14

ATTENTION
FR
MONTAGE DES GUIDES ET DES SUPPORTS
DE CLAYETTE
GUIDES
Montez les guides pour les clayettes coulissantes
en positionnant le crochet arrière du guide en face
du trou de votre choix, à l’arrière de la rangée, appuyez dans la direction de la èche 1. Procédez de
la même façon avec le crochet avant (èche 2).
2
1
SUPPORTS POUR LES CLAYETTES DE STOCKAGE
Montage des supports pour les clayettes de stock-
age. Positionnez les crochets du support dans les
trous à la hauteur de votre choix, appuyez comme
le montre la èche 1, puis appuyez vers le bas
(èche 2).
KITS
Chaque kit contient deux clayettes et des supports
de clayette.
Numéro du kit de
clayettes coulissantes : 921 17 81-99
Numéro du kit de
clayettes de stockage : 921 17 81-98
Modèle Nb maxi. de clayettes coulissantes
CS 110 8 (portes bois) / 9 (portes verre)
CS 160 12
CS 200 16
STOCKAGE DU VIN
Les bouteilles doivent être rangées en fonction de
leurs tailles (diamètres et hauteurs.) Prenez ces
différences en considération lorsque vous stockez
votre vin et évitez de mélanger des bouteilles des
types différents.
Lorsque vous conservez le vin, il est important que
les bouteilles soient couchées de façon à ce que le
bouchon reste en contact avec le vin.
2
1
Barre de renforcement
La barre de renforcement est un support de clayette
et ne doit pas être enlevée pour des raisons de
sécurité.
BARRE DE RENFORCEMENT
Nombre maximal de bouteilles bordelaises (tra-
ditionnelles) pouvant être stockées dans une cave
à vin comportant des clayettes de stockage et une
clayette coulissante :
Modèle Nb. de clayettes Nb. de bouteilles
CS 110 1+1 116
CS 160 1+2 170
CS 200 1+3 206
Les clayettes coulissantes et les clayettes de stoc-
kage peuvent être placées à différents endroits en
fonction de la taille de votre cave à vin.
Utilisez la clayette coulissante pour stocker des
bouteilles de forme spéciale.
Notez que vous ne devez pas mettre plus d’une
rangée de bouteilles sur les clayettes coulissantes.
Pour optimiser l’utilisation du volume disponible,
nos illustrations dans « l’Annexe A », montrent la
meilleure façon de ranger des bouteilles de Bour
gogne et de Bordeaux.
- 14 -
-
Page 15

appENdix a - appéNdiCE a - aNNExE a
HOW TO STORE DIFFERENT TYPES OF BOTTLES
MODO DE ALMACENAR DISTINTOS TIPOS DE BOTELLAS
COMMENT RANGER DIFFÉRENTS TYPES DE BOUTEILLES
Ejemplo de almacenamiento de distintos tipos de botellas
Exemple de bouteilles mixtes
Bordeaux traditionExample of mix bottle types
Burgundy tradition
Bourgogne tradition
- 15 -
Page 16

appENdix B - appéNdiCE B - aNNExE B
INSTRUCTION FOR MOUNTING THE HANDLE
INSTRUCCIÓN PARA MONTAJE DEL TIRADOR
INSTRUCTIONS POUR LE MONTAGE DE LA POIGNÉE
STAINLESS STEEL DOORS /PUERTA DEL ACERO INOXIDABLE / PORTE D’ACIER INOXYDABLE
1
q
EN
Remove the door gasket behind the two holes
adapted for the handle. Start in the upper
corner and gently pull out the gasket from the
slot. Continue down and pass the two holes.
ES
Retire la junta de la puerta y detrás encon-
trará los dos agujeros practicados para el
tirador. Comience a retirarla por la esquina
superior y tire lentamente de la junta hasta
sacarla de la ranura. Siga sacando la junta
hasta que se vean los dos agujeros.
FR
Enlevez le joint de la porte derrière les deux
trous prévus pour la poignée. Commencez
dans le coin supérieur et retirez doucement
le joint de la rainure. Continuez vers le bas et
dépassez les deux trous.
2
q
EN
From the inside of the door, put the two at-
tached screws (M4x60) rst through the door
frame (1), then through the distance bar (2)
and then tap the screw into the threads in the
vertical handle bar (3).
ES
Coloque los tornillos (M4x60) a través del
bastidor de la puerta (1) y, a continuación,
hágalos pasar a través del separador (2), para
terminar, rosque los tornillos en la barra ver-
tical del tirador (3).
FR
Montez les vis de xation (M4x60), d’abord
dans le cadre de la porte (1) puis faites les
passer dans l’entretoise (2) et vissez les dans
les taraudages de la poignée verticale (3).
- 16 -
2
1
3
Screw
Tornillo
Vis
Page 17

CAUTION
ATENCIÓN
ATTENTION
appENdix B - appéNdiCE B - aNNExE B
3
q
EN
Remount the door gasket by pressing it back
in its slot by hand. Make sure that the gasket
is all the way back in place of origin.
GLASS DOOR / PUERTA DE CRISTAL / PORTE
DE VERRE
1
q
See step 1, Stainless steel doors
Vea paso 1, Puerta del acero inoxidable
Do not use any sharp tools to force the
gasket back. This can damage the gasket
and the winecellar will loose performance.
ES
Coloque la junta de la puerta y apriétela con la
mano hasta que quede encajada en la ranura.
Asegúrese de que la junta queda colocada en
su posición original.
No utilice herramientas aladas para volver
a colocar la junta en su sitio. Podría dañar
la junta y la cava no funcionaría del modo
correcto.
FR
Voir étape 1, Porte d’acier inoxydable
2
q
Remettez le joint de la porte en l’enfonçant,
à la main, dans la rainure. Assurez-vous de
bien l’enfoncer sur toute sa longueur, comme
à l’origine.
N’utilisez pas d’outils tranchants pour
remettre le joint à sa place. Vous risqueriez
d’endommager le joint, ce qui réduirait la
performance de la cave à vin.
3
q
See step 3, Stainless steel doors
Vea paso 3, Puerta del acero inoxidable
Voir étape 3, Porte d’acier inoxydable
- 17 -
Page 18

appENdix B - appéNdiCE B - aNNExE B
WOODEN DOOR / PUERTA DE MADERA / PORTE
EN BOIS
1
q
2
q
- 18 -
Page 19

appENdix C - appéNdiCE C - aNNExE C
ELECTRIC DIAGRAM
DIAGRAMA ELÉCTRICO
SCHÉMA ÉLECTRIQUE
Regulador/ Régulateur
A
Interruptor/Interrupteur
B
Transformador/Transformateur
C
Calentador/Elément chauffant
D
Elemento calentador/ Elément chauffant
E
Condensador de agua del termofusible/
F
Séparateur d’eau à thermofusible /
Cubierta de caldera del termofusible/
G
Enveloppe de la chaudière à thermofusible
Termistor/Thermistance
H
- 19 -
Gris/Gris
1
Blanco/Blanc
2
Negro/Noir
3
Azul/Bleu
4
Rojo/Rouge
5
Marrón/Brun
6
Amarillo/Jaune
7
Page 20

 Loading...