

Page 1
ENDEFRESPT
IT
NLDASVNOFIRUPLSKCS
HU
REFRIGERATION
CRE SERIES
Kompressor-Køleskab
Monterings- og betjeningsvejledning. . . 164
Kylskåp med kompressor
Monterings- och bruksanvisning . . . . . . . 184
Kompressorkjøleskap
Monterings- og bruksanvisning. . . . . . . . 204
Kompressori jääkaappi
Asennus- ja käyttöohje . . . . . . . . . . . . . . . 224
Компрессорный холодильник
Инструкция по монтажу и
эксплуатации . . . . . . . . . . . . . . . . . . . . . . 245
CRE0050, CRE0065, CRE0080
Compressor refrigerator
Installation and Operating Manual. . . . . . . 13
Kompressor-Kühlschrank
Montage- und Bedienungsanleitung. . . . .33
Réfrigérateur à compression
Instructions de montage
et de service . . . . . . . . . . . . . . . . . . . . . . . . .54
Nevera con compresor
Instrucciones de montaje y de uso. . . . . . .77
Frigorífico com compressor
Instruções de montagem e manual de
instruções. . . . . . . . . . . . . . . . . . . . . . . . . .100
Frigorifero con compressore
Istruzioni di montaggio e d’uso . . . . . . . .122
Lodówka kompresorowa
Instrukcja montażu i obsługi. . . . . . . . . . .268
Kompresorová chladnička
Návod na montáž a uvedenie
do prevádzky. . . . . . . . . . . . . . . . . . . . . . .289
Kompresorová chladnička
Návod k montáži a obsluze . . . . . . . . . . . 310
Kompresszoros hűtőszekrény
Szerelési és használati útmutató . . . . . . .330
Compressorkoelkast
Montagehandleiding en
gebruiksaanwijzing . . . . . . . . . . . . . . . . . .144
Page 2

CRE
1
2
3
5
4
CRE 50
1
1
2
3
5
4
CRE 65
2
2
Page 3
CRE
3
1
2
3
7
6
5
4
4
CRE 80
1
5
2
3
4
3
Page 4
CRE
ca. 50 mm
1
3
3
4
2
2
1
BA
5
1
2
6
4
Page 5
CRE
2
1
7
5
Page 6
1.
8
9
CRE
2.
4.
3.
3.
5.
5.
4.
2.
1.
6
Page 7
CRE
0
A
B
C
a
2.
1.
7
Page 8
CRE
b
8
Page 9
CRE
c
d
Ø/mm²
12 V
14
10
6
2
0
0 2 4 6 8 10 12 14 16 18 20 22 24 26 28
24 V
l/m
9
Page 10
CRE
rd
bk
1
e
12 V/24 V
10 A
–
–
+
+
2
1
rd/bk
rd
bk
bk
100 – 240 V~
f
10
Page 11
CRE
1
2
g
h
1
11
Page 12
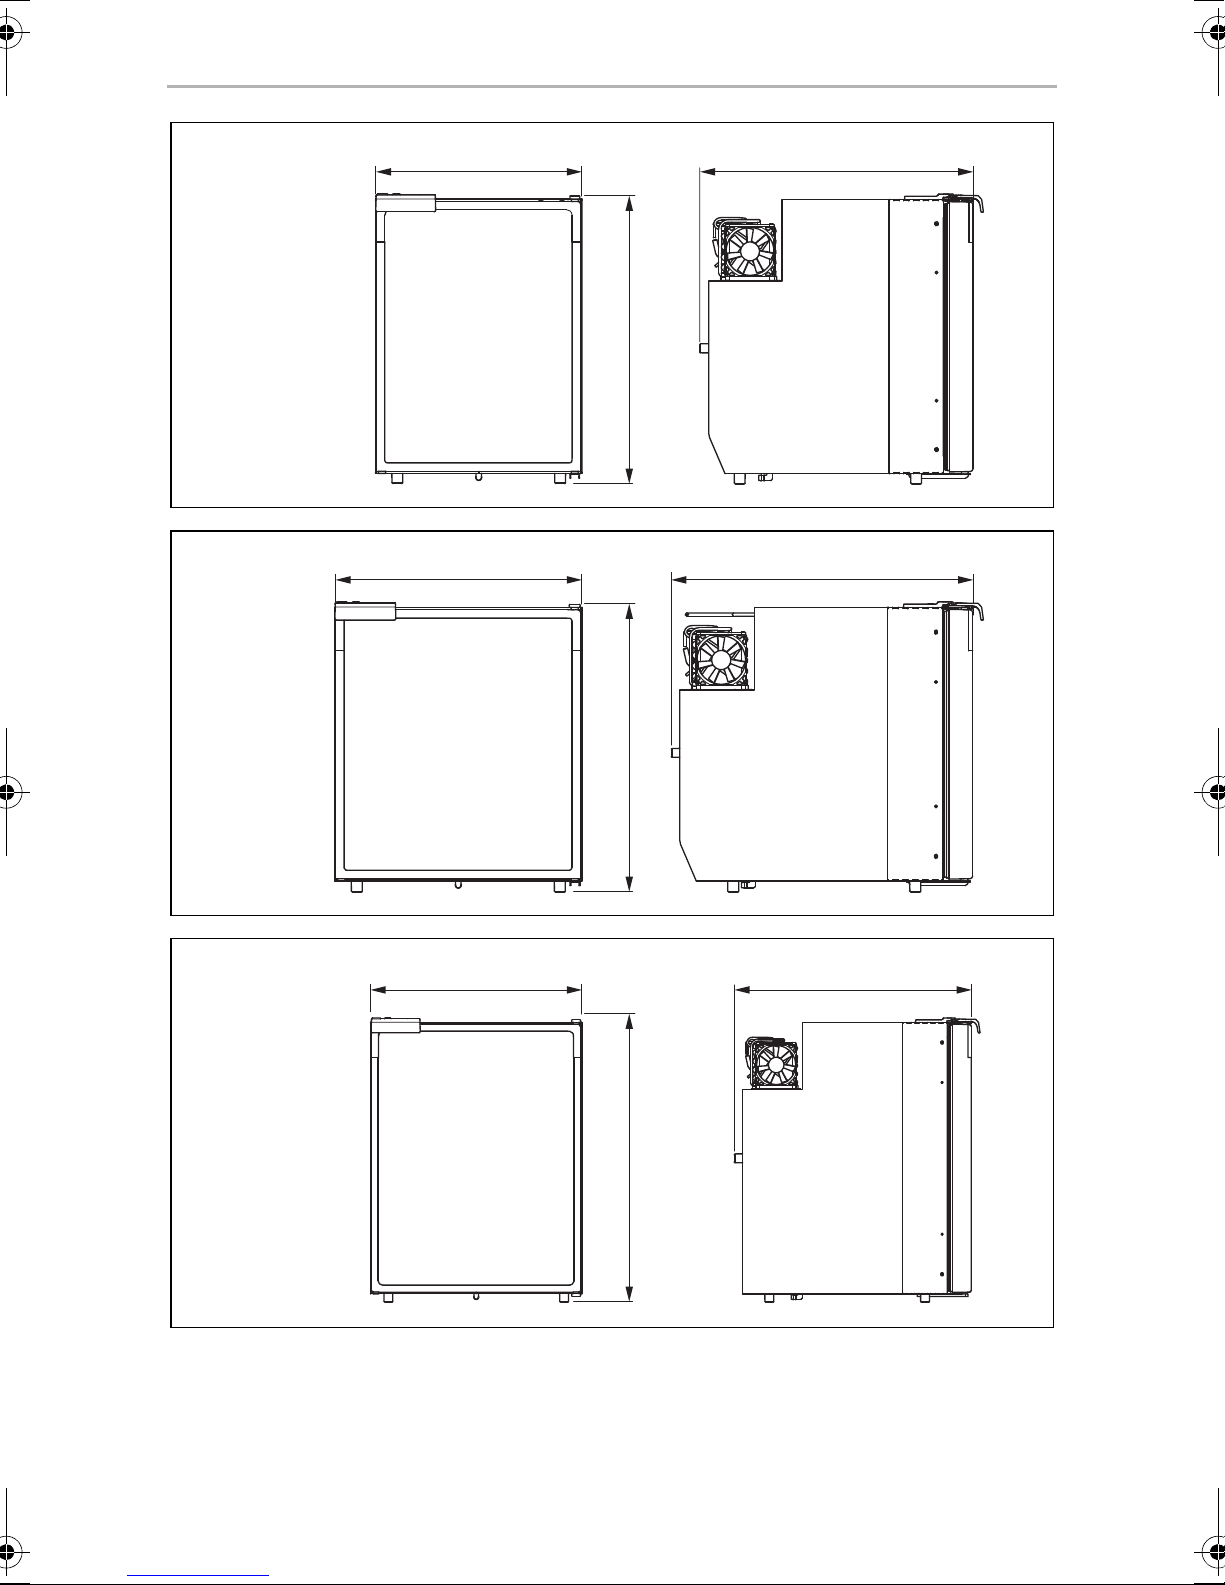
CRE 50
i
j
k
CRE 65
CRE
500380
534
545448
525
528475
CRE 80
640
12
Page 13
EN
CRE
Please read this instruction manual carefully before installation and first
use, and store it in a safe place. If you pass on the product to another
person, hand over this instruction manual along with it.
Table of contents
1 Explanation of symbols . . . . . . . . . . . . . . . . . . . . . . . . . . . . . . . . . . . . . . . . . .14
2 Safety instructions . . . . . . . . . . . . . . . . . . . . . . . . . . . . . . . . . . . . . . . . . . . . . .14
3 Scope of delivery . . . . . . . . . . . . . . . . . . . . . . . . . . . . . . . . . . . . . . . . . . . . . .17
4 Accessories . . . . . . . . . . . . . . . . . . . . . . . . . . . . . . . . . . . . . . . . . . . . . . . . . . .17
5 Intended use . . . . . . . . . . . . . . . . . . . . . . . . . . . . . . . . . . . . . . . . . . . . . . . . . .17
6 Technical description . . . . . . . . . . . . . . . . . . . . . . . . . . . . . . . . . . . . . . . . . . . 18
7 Installing and connecting the refrigerator . . . . . . . . . . . . . . . . . . . . . . . . . . .19
8 Using the refrigerator . . . . . . . . . . . . . . . . . . . . . . . . . . . . . . . . . . . . . . . . . . 24
9 Cleaning and maintenance. . . . . . . . . . . . . . . . . . . . . . . . . . . . . . . . . . . . . . 27
10 Warranty . . . . . . . . . . . . . . . . . . . . . . . . . . . . . . . . . . . . . . . . . . . . . . . . . . . . 28
11 Disposal. . . . . . . . . . . . . . . . . . . . . . . . . . . . . . . . . . . . . . . . . . . . . . . . . . . . . 28
12 Troubleshooting . . . . . . . . . . . . . . . . . . . . . . . . . . . . . . . . . . . . . . . . . . . . . . 29
13 Technical data . . . . . . . . . . . . . . . . . . . . . . . . . . . . . . . . . . . . . . . . . . . . . . . . 32
13
Page 14

EN
Explanation of symbols CRE
1 Explanation of symbols
DANGER!
D
!
Safety instruction: Failure to observe this instruction will cause fatal or
serious injury.
WARNING!
Safety instruction: Failure to observe this instruction can cause fatal or
serious injury.
CAUTION!
Safety instruction: Failure to observe this instruction can lead to injury.
!
NOTICE!
A
Failure to observe this instruction can cause material damage and impair
the function of the product.
NOTE
Supplementary information for operating the product.
I
2 Safety instructions
The manufacturer accepts no liability for damage in the following cases:
•
Faulty assembly or connection
•
Damage to the product resulting from mechanical influences and excess voltage
•
Alterations to the product without express permission from the manufacturer
•
Use for purposes other than those described in the operating manual
2.1 General safety
WARNING!
•
Have a qualified technician perform the installation in wet rooms.
!
•
Do not operate the device if it is visibly damaged.
•
If this device's power cable is damaged, it must be replaced by the
manufacturer, customer service or a similarly qualified person in order
to prevent safety hazards.
14
Page 15

EN
CRE Safety instructions
•
This device may only be repaired by qualified personnel. Inadequate
repairs may cause serious hazards.
•
This device can be used by children aged 8 years or over, as well as by
persons with diminished physical, sensory or mental capacities or a
lack of experience and knowledge, providing they are supervised, or
have been taught how to use the device safely and are aware of the
resulting risks.
•
Cleaning and user maintenance must not be carried out by children
without supervision.
•
Children must be supervised to ensure that they do not play with the
device.
•
Always keep and use the device out of the reach of children under
8 years of age.
•
Do not store any explosive substances, such as spray cans with
propellants, in the device.
!
A
CAUTION!
•
Danger of crushing! Do not put your fingers into the hinge.
•
Foodstuff may only be stored in its original packaging or in suitable
containers.
NOTICE!
•
Check that the voltage specification on the type plate is the same as
that of the power supply.
•
Never pull the plug out of the socket by the connection cable.
•
Disconnect the refrigerator and other electric consumers from the
battery before connecting the quick charging device.
•
Disconnect the refrigerator or switch it off when you turn off the
engine. Otherwise you may discharge the battery.
•
The refrigerator is not suitable for storing substances which are caustic
or contain solvents.
•
Keep the drainage outlet clean at all times.
•
Do not open the refrigerant circuit under any circumstances.
•
Never transport the device in a horizontal position, so that no oil can
leak out of the compressor.
15
Page 16
EN
Safety instructions CRE
•
Make sure that the refrigerator circuit is not damaged during
transportation. The refrigerant in the refrigerator circuit is highly
flammable.
In the event of any damage to the refrigerator circuit:
– Switch off the refrigerator.
– Air the room well.
•
Set up the device in a dry location where it is protected against
splashing water.
2.2 Operating the device safely
DANGER!
•
Do not touch exposed cables with your bare hands.
D
CAUTION!
!
A
•
Before starting the device, ensure that the power supply line and the
plug are dry.
•
If you connect the device to a battery, make sure that no food comes
into contact with the battery acid.
NOTICE!
•
Do not use electrical devices inside the cooling device unless they are
recommended by the manufacturer for that purpose.
•
Do not place it near naked flames or other heat sources (heaters, direct
sunlight, gas ovens etc.)
•
Danger of overheating!
Always ensure sufficient ventilation so that the heat generated during
operation can dissipate. Make sure that the device is sufficiently far
away from walls and other objects so that the air can circulate.
•
Ensure that the ventilation vents are not covered.
•
Do not fill the inner container with ice or fluid.
•
Never immerse the appliance in water.
•
Protect the appliance and the cable against heat and moisture.
•
Make sure that foodstuffs do not touch the walls of the cooling area.
16
Page 17
EN
CRE Scope of delivery
3Scope of delivery
Quantity Description
1 Refrigerator with shelves
1 Outlet port
1 Installation and operating manual
4Accessories
Available as accessories (not included in the scope of delivery):
Description Explanation Ref. no.
Rectifier Transforms an input voltage of 100 to 240 Vw to 12 Vg
or 24 Vg, so that the refrigerator can be connected to
an AC power supply.
9600000445
5 Intended use
The refrigerator is designed for installation in caravans and motorhomes and on
boats. It is only suitable for installation in a fitted niche. Once it is installed, only the
front of the device may be accessible.
The refrigerator is only suitable for cooling, freezing and storing foodstuffs.
WARNING!
The refrigerator is not intended for the proper storage of medicine.
!
CAUTION! Health hazard!
!
Please check if the cooling capacity of the refrigerator is suitable for
storing the food you wish to cool.
17
Page 18

EN
Technical description CRE
6 Technical description
The CoolMatic CRE series cooling devices can cool products and keep them cool.
Products can be deep-frozen in the freezer compartment.
All materials used in the refrigerator are compatible for use with foodstuffs.
The refrigerant circuit is maintenance-free.
When used on boats the refrigerator can be subjected to a short-term inclination
of 30°.
The temperature is set using the control panel on the inside left of the refrigerator.
Four temperature ranges from +0 °C to +12 °C are available for selection.
6.1 Control elements inside the fridge
The various types of refrigerators are shown in the following illustrations:
•
CRE0050: fig. 1, page 2
•
CRE0065: fig. 2, page 2
•
CRE0080: fig. 3, page 3
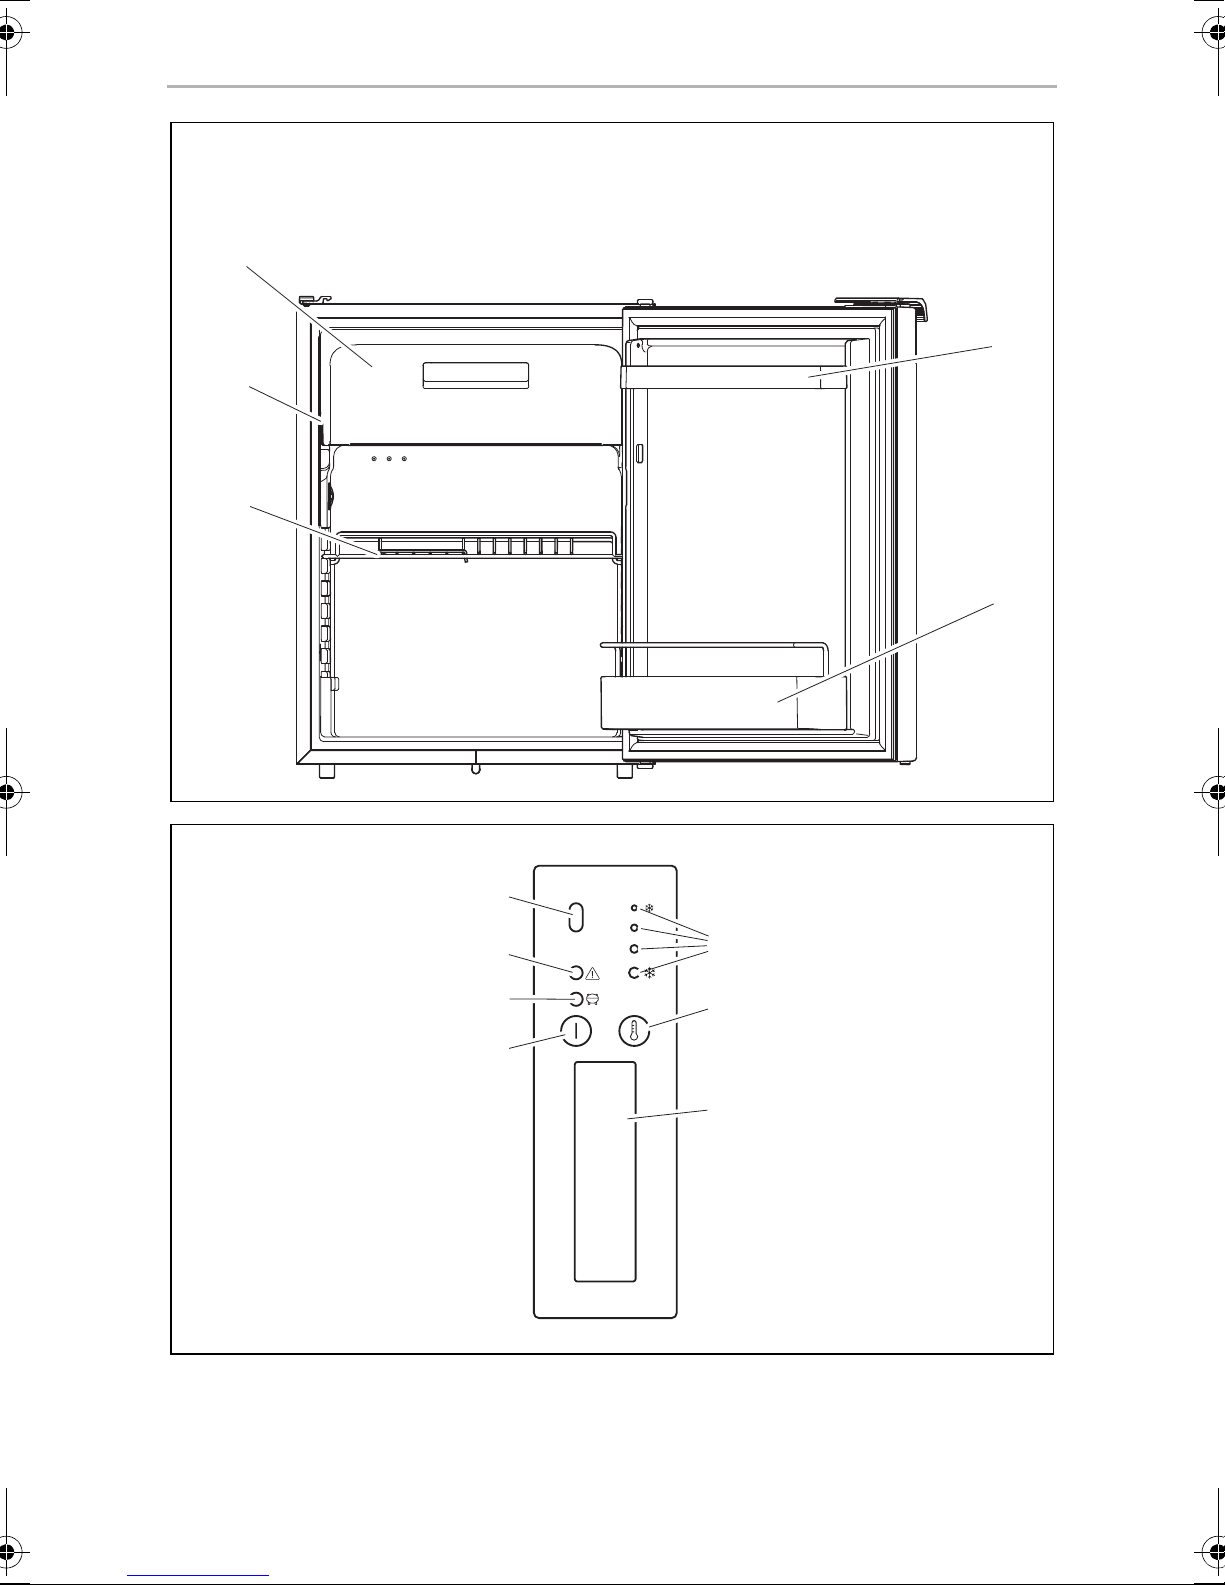
No. Explanation
1 Freezer compartment
2 Control panel
3 Wire shelf (folding, so that bottles can be put in the fridge)
4 Bottle restraint (to hold bottles in the door)
5 Compartment
18
Page 19
EN
CRE Installing and connecting the refrigerator
6.2 Control elements
No. in
fig. 4, page 3
1 IR sensor for switching the interior light
2 Red LED: Fault indication
3 LED Blue: Compressor is running
4 On/off button
5 Inner lighting
6 Temperature selection button
7 LEDs: Temperature levels
Explanation
LED Orange: Compressor is off
7 Installing and connecting the
refrigerator
7.1 Safety instructions for installation on boats
Please note the following instructions for installation on boats:
DANGER!
D
A
If the device is powered by the mains, ensure that the voltage supply has
a residual current circuit breaker.
NOTICE!
•
The device can be for tilted sideways up to 30° for only a short period
of time. When setting up the refrigerator, note that it must be
fastened to take account of this. If you have any questions regarding
installation, consult your specialist dealer.
•
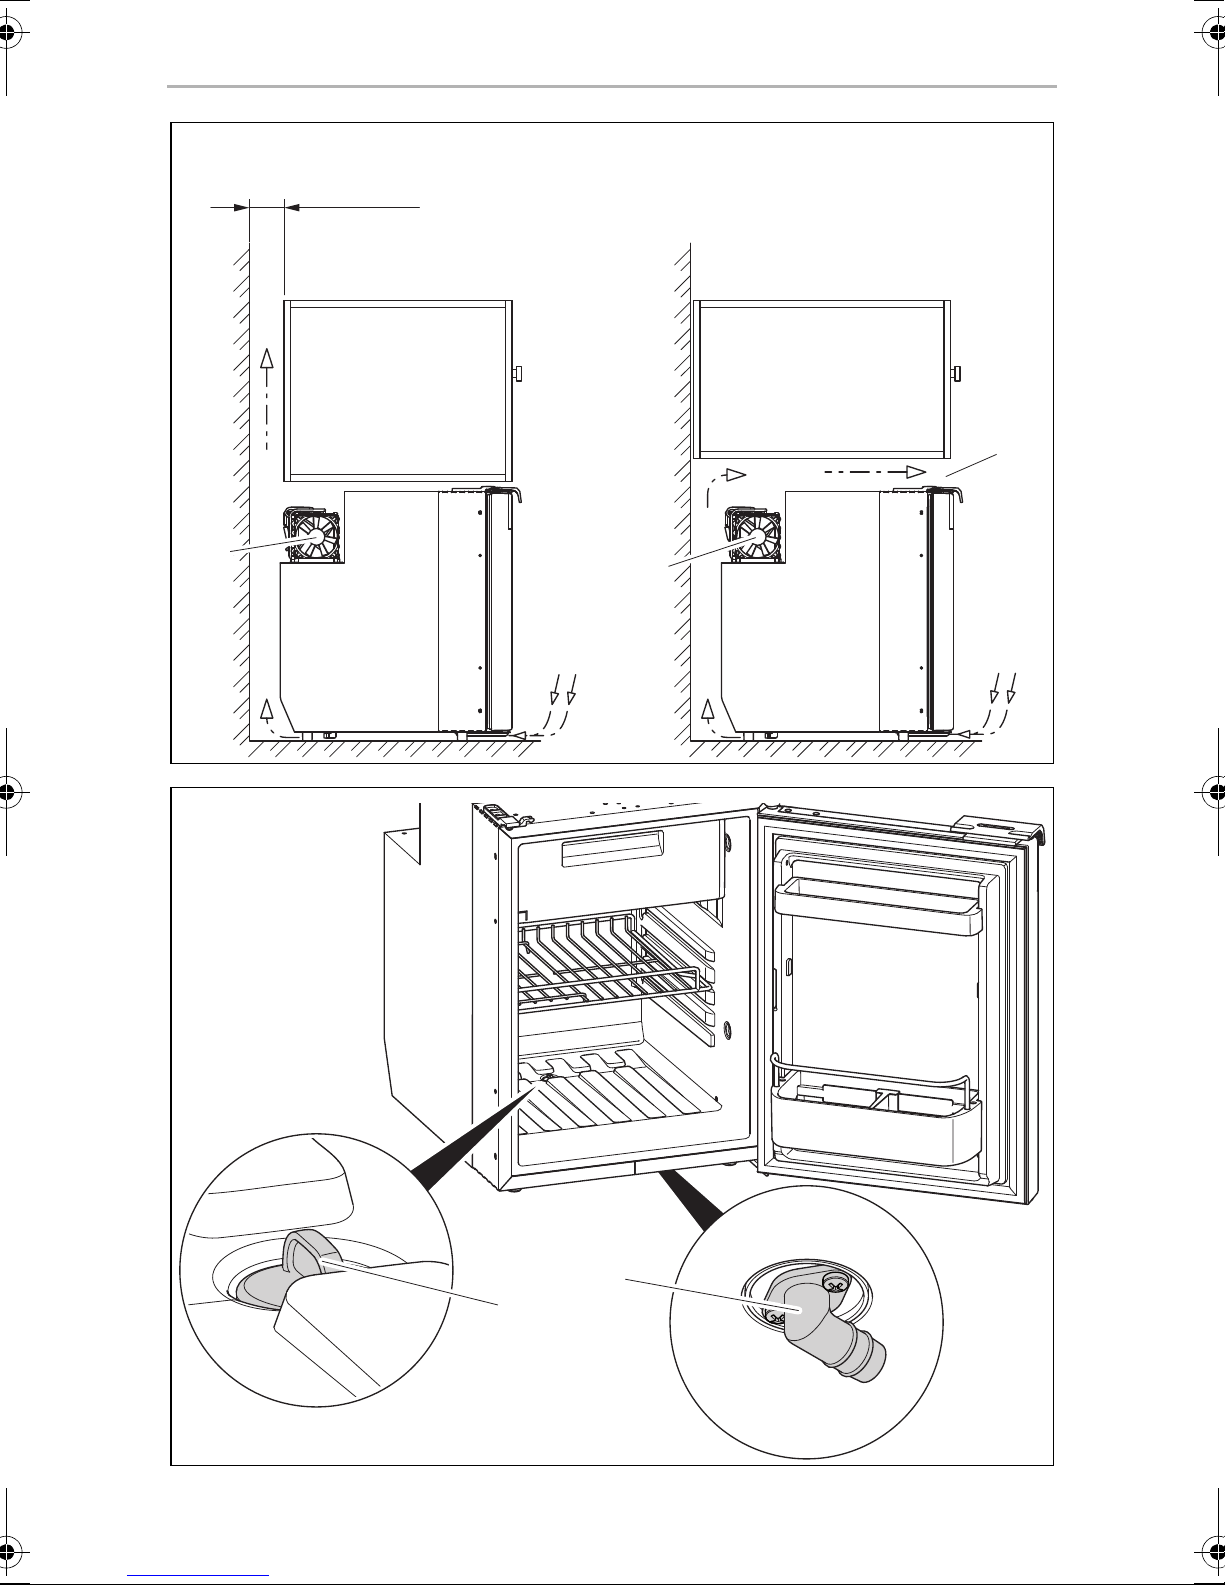
Install the refrigerator so that the warm air produced can easily
escape (either upwards or to the sides, fig. 5, page 4).
•
The device is designed for ambient temperatures between +16 °C
and +38 °C.
19
Page 20
EN
Installing and connecting the refrigerator CRE
7.2 Notes on installing the refrigerator
Observe the following when installing the refrigerator:
•
Install the refrigerator so that the warm air produced can easily escape
(either upwards or to the sides, fig. 5, page 4).
Key for fig. 5, page 4
No. Explanation
1 Cold intake air
2 Hot waste air
3 Condenser
4 Spacing above the refrigerator if there is not sufficient space for the air to
circulate above or at the side.
•
Observe the following installation dimensions:
– CRE0050: 550 x 390 x 544 mm
– CRE0065: 595 x 458 x 535 mm
– CRE0080: 578 x 485 x 650 mm
•
Keep objects clear of openings in the housing or installation structure (such as
ventilation slots, etc.).
•
Condensate is produced when the refrigerator is operating normally. You can
either wipe up the condensate on the floor of the refrigerator in regular intervals,
or drain it through an outlet in the floor of the refrigerator (see chapter “Mounting
the outlet port (optional)” on page 20).
7.3 Mounting the outlet port (optional)
➤ Connect a hose with an inside diameter of 10 mm (not included) to the outlet
port.
➤ Lay the refrigerator on its side in order to access the bottom side.
NOTICE!
A
➤ Mount the outlet port (fig. 6 2, page 4) aligned to the front or to the back
according to the desired outlet direction.
Do not switch on the device until it stood in an upright position for a
period of 4 hours.
➤ Remove the drain plug (fig. 6 1, page 4) inside the refrigerator.
20
Page 21
EN
CRE Installing and connecting the refrigerator
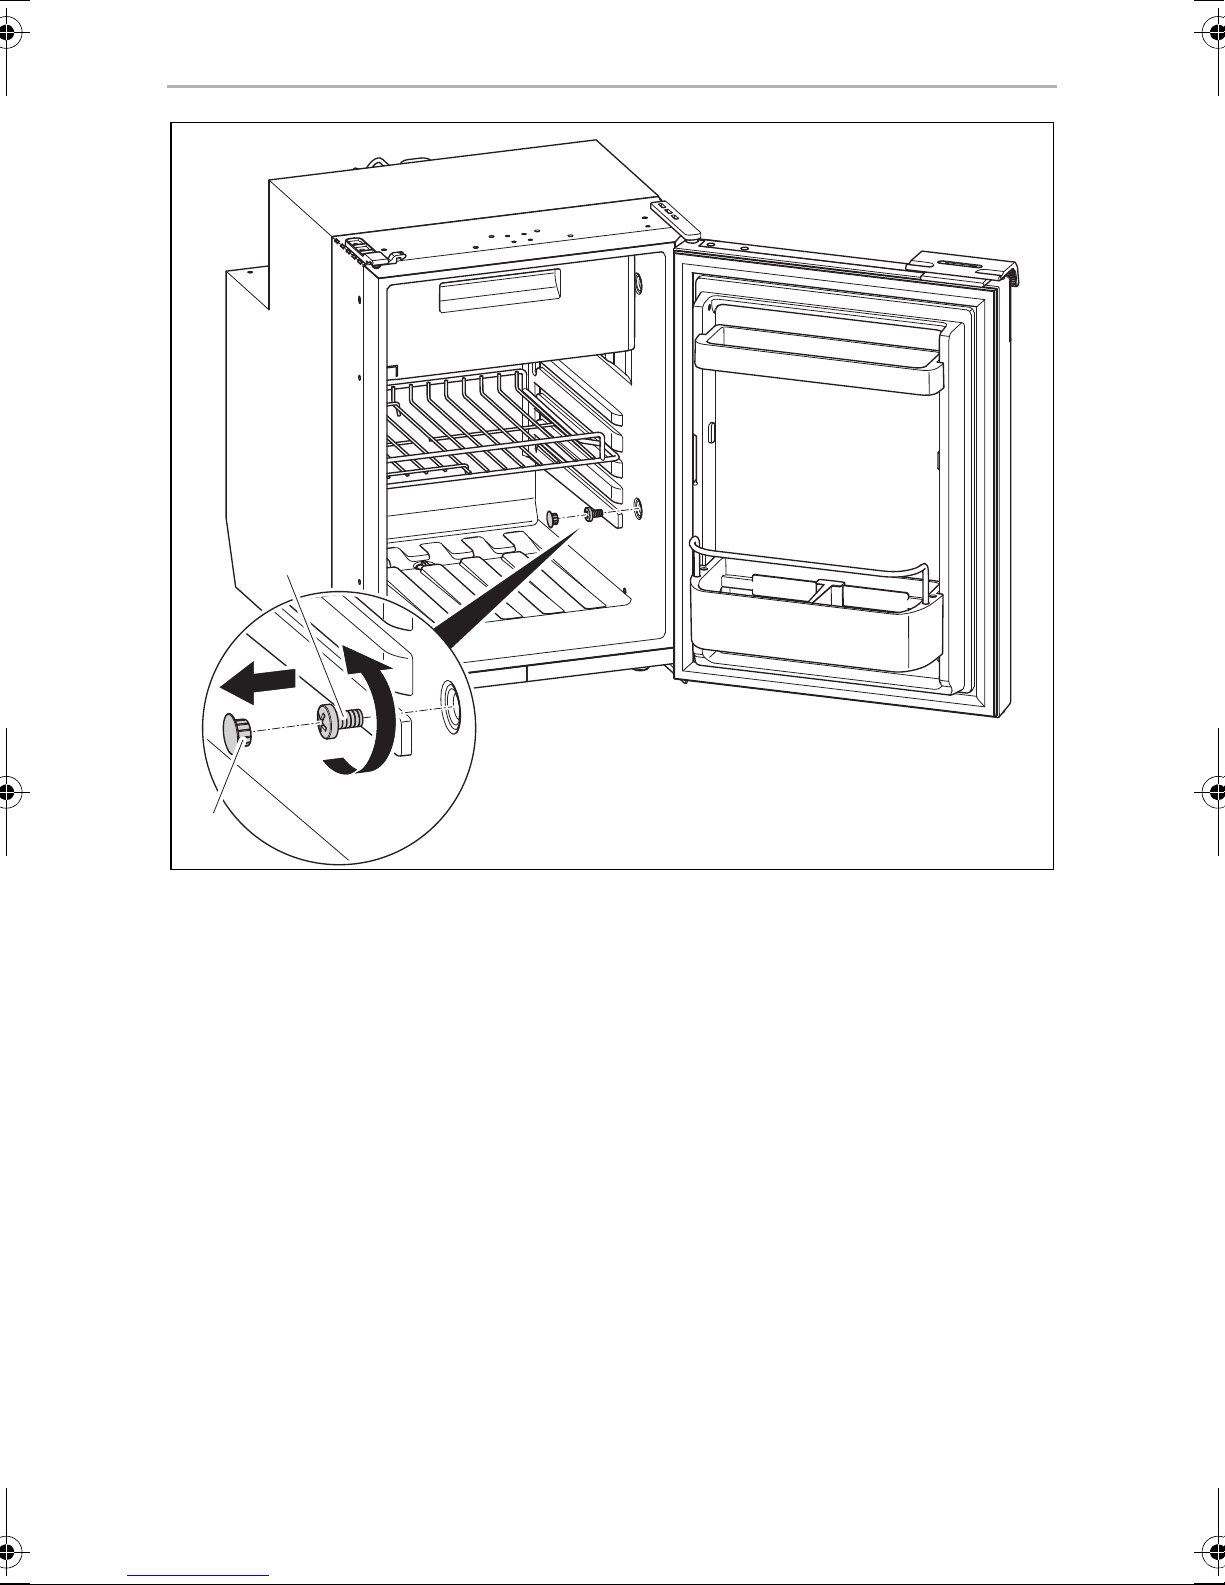
7.4 Installing the refrigerator
Proceed as follows to install the refrigerator:
➤ If you wish to drain the condensate through a hose:
Mount the outlet port (see chapter “Mounting the outlet port (optional)” on
page 20)
➤ Undo the transport lock (chapter “Releasing the lock” on page 26).
➤ Open the refrigerator door.
➤ Remove the blanking plugs (fig. 7 2, page 5).
➤ Push the refrigerator into the recess.
➤ Fix the refrigerator in place using suitable screws (fig. 7 1, page 5).
➤ Press the blanking plugs (fig. 7 2, page 5) into the openings.
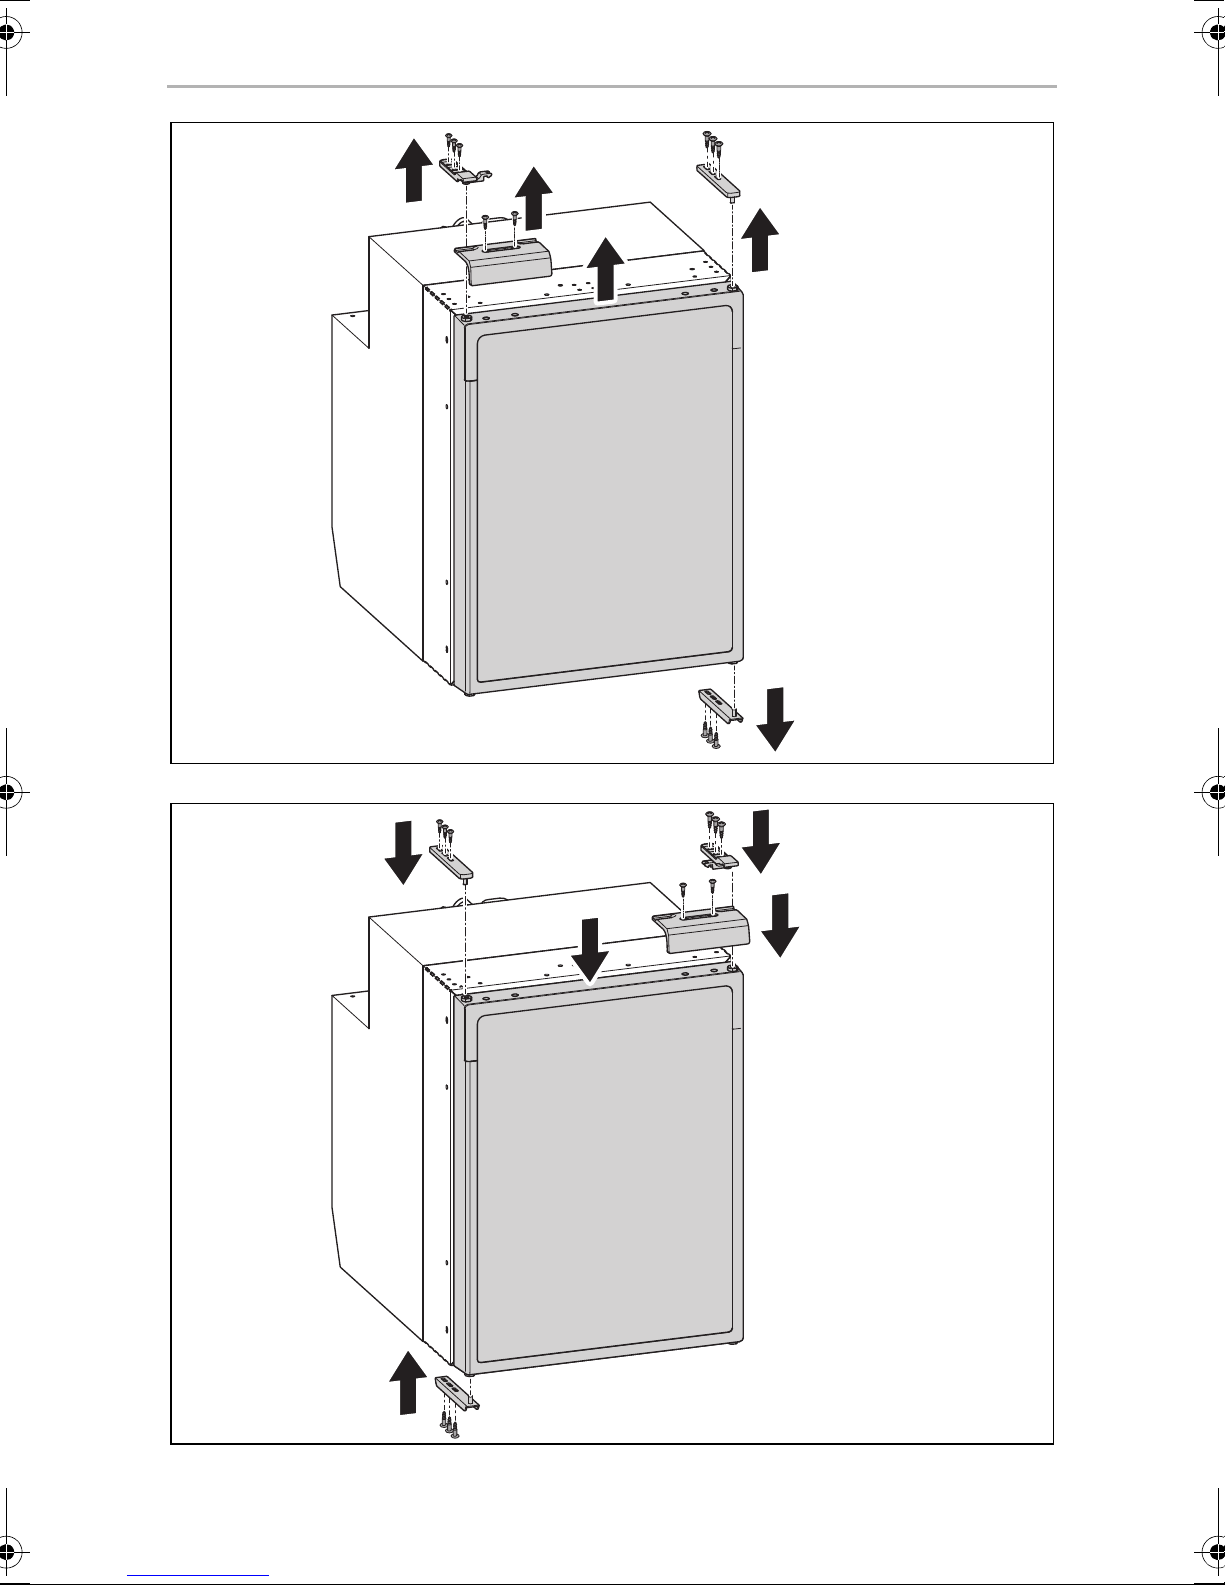
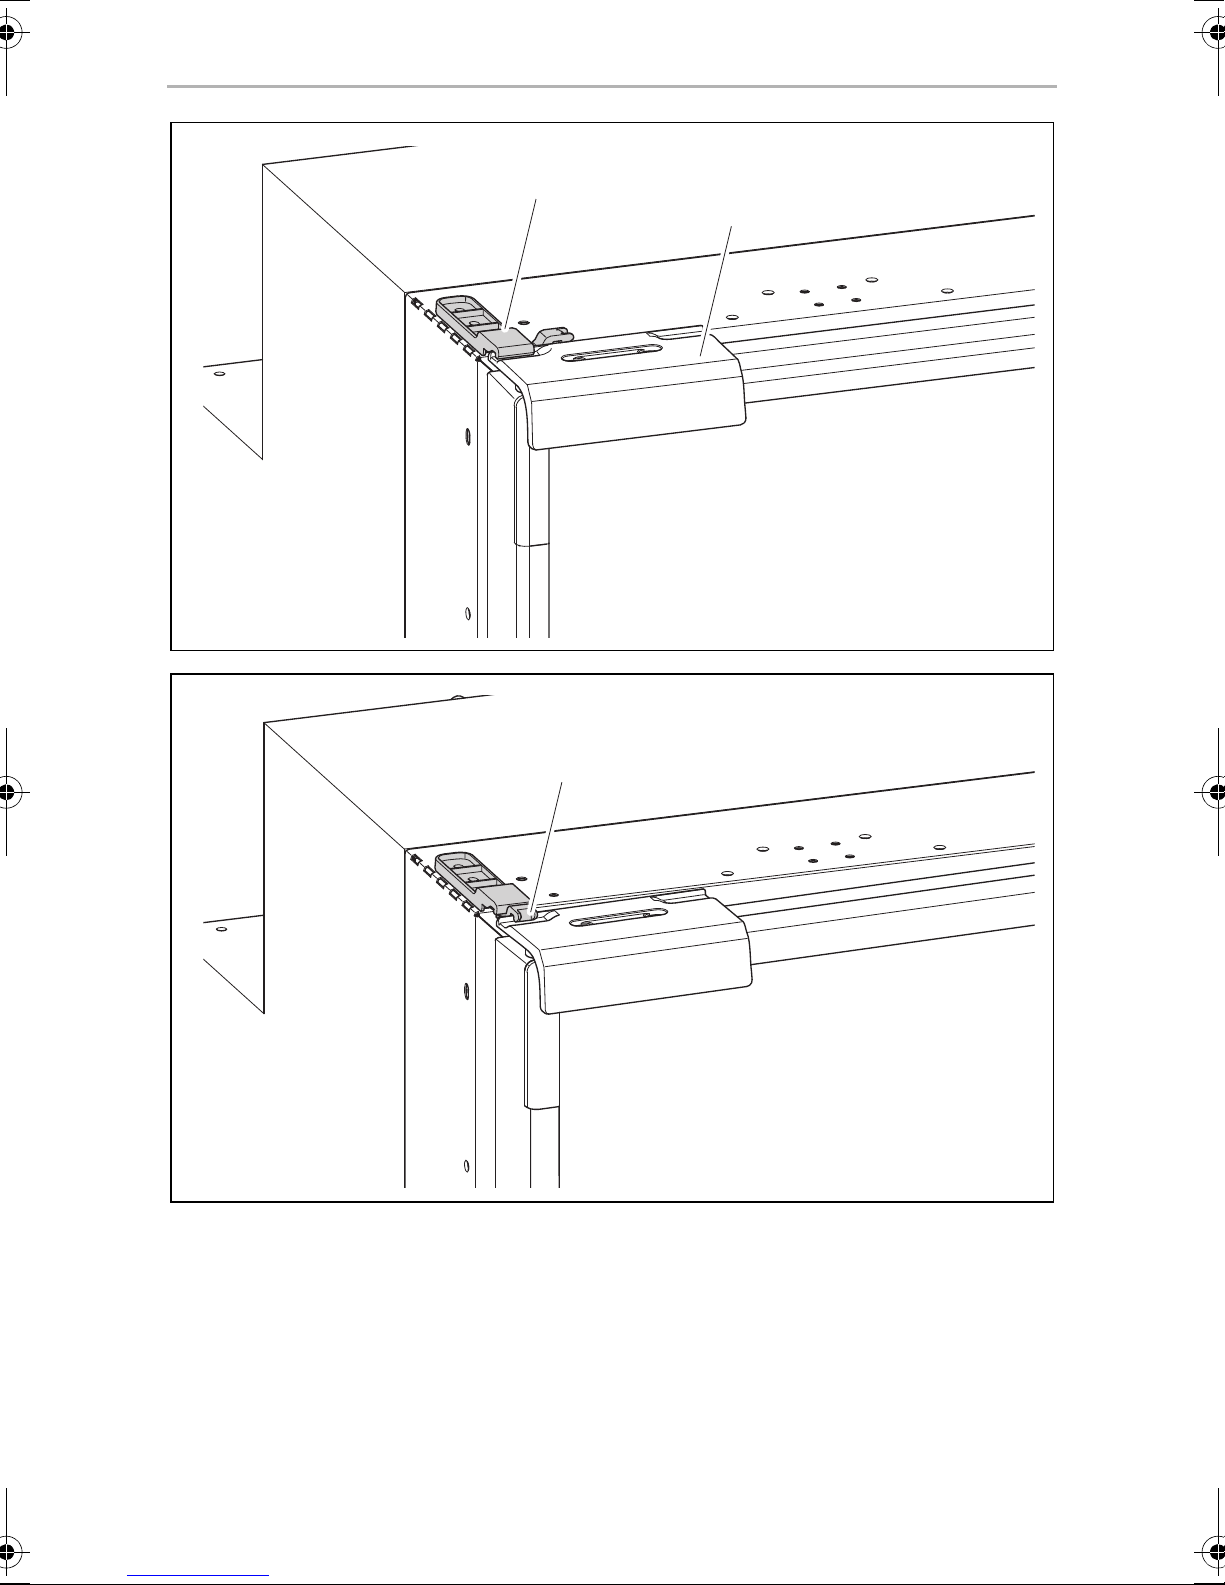
7.5 Changing the door hinge
You can change the hinge of the door, so that it opens to the left rather than the right.
➤ Proceed as shown in fig. 8, page 6 to fig. 9, page 6, to change the hinges.
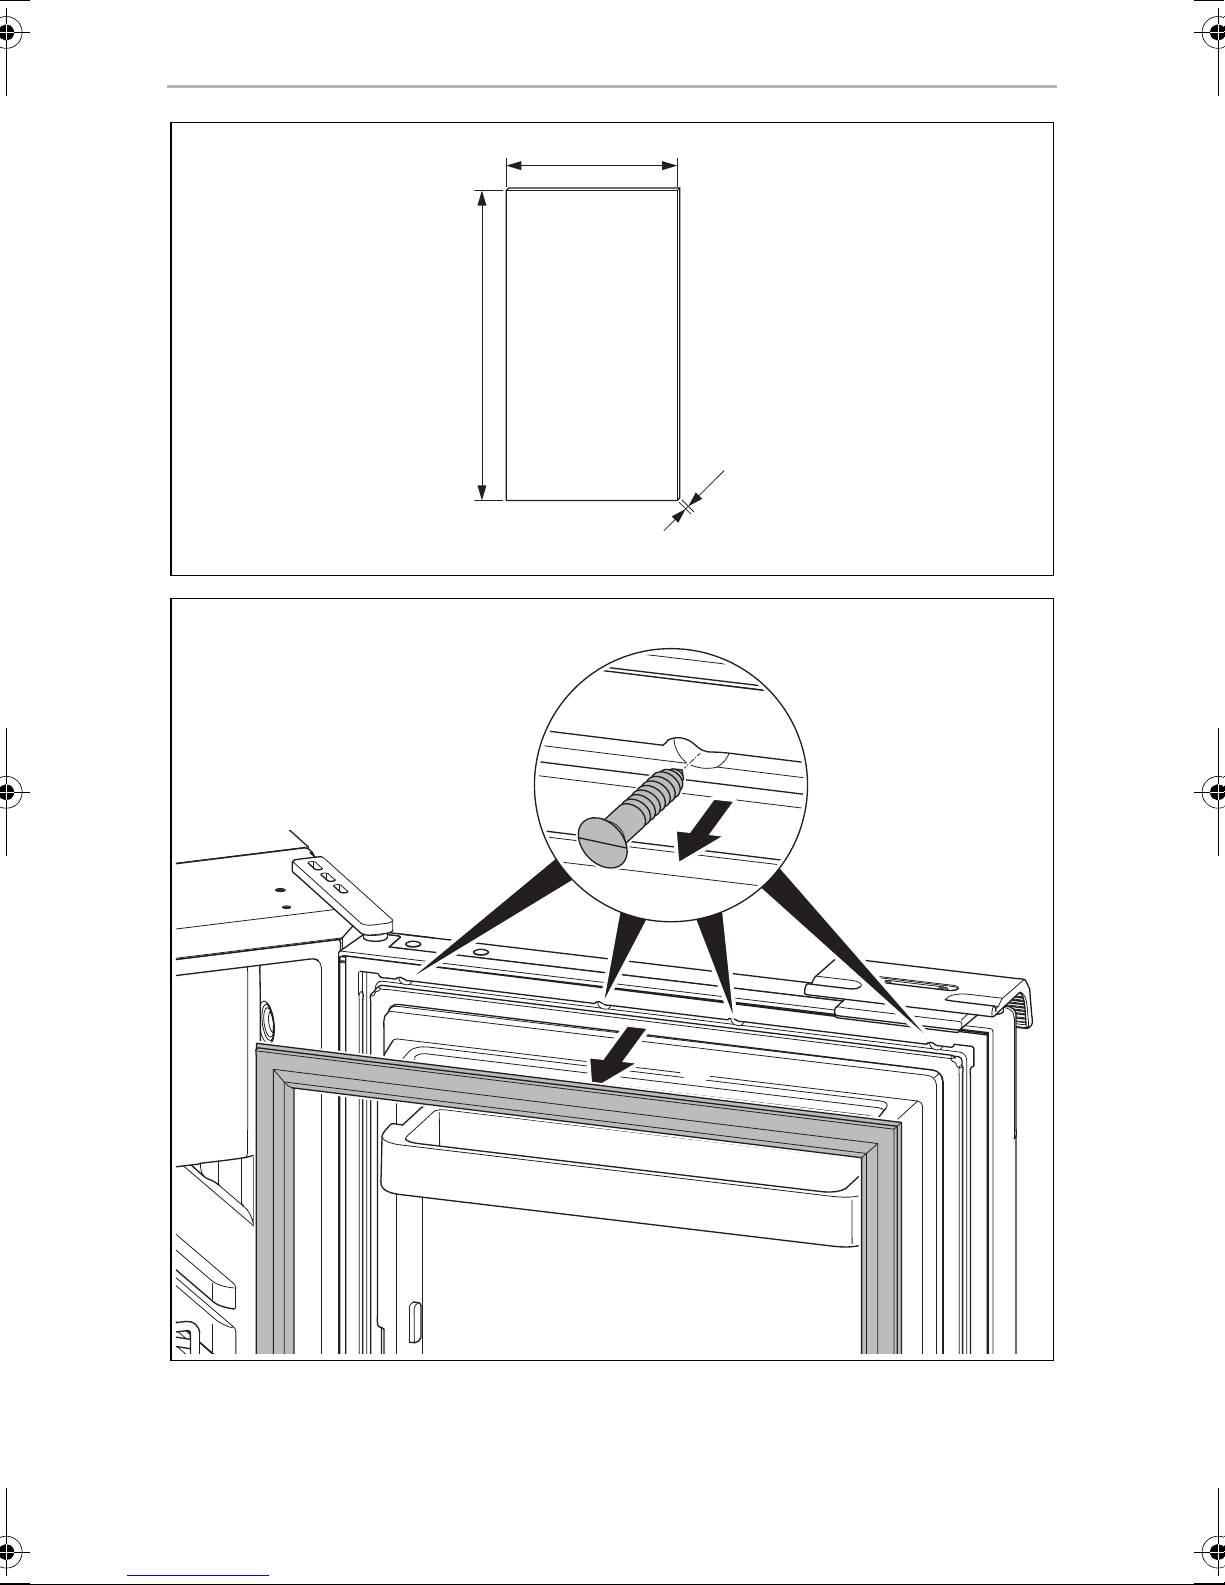
7.6 Replacing the door panel
NOTICE! Risk of damage!
The door panel must be replaced only when the refrigerator is upright.
A
The decorative trim has the following measurements (see fig. 0, page 7):
Model A B C
CRE0050 350 ± 0.5 mm 474 ± 0.5 mm
0.5 mmCRE0065 419 ± 0.5 mm 468 ± 0.5 mm
CRE0080 445 ± 0.5 mm 582 ± 0.5 mm
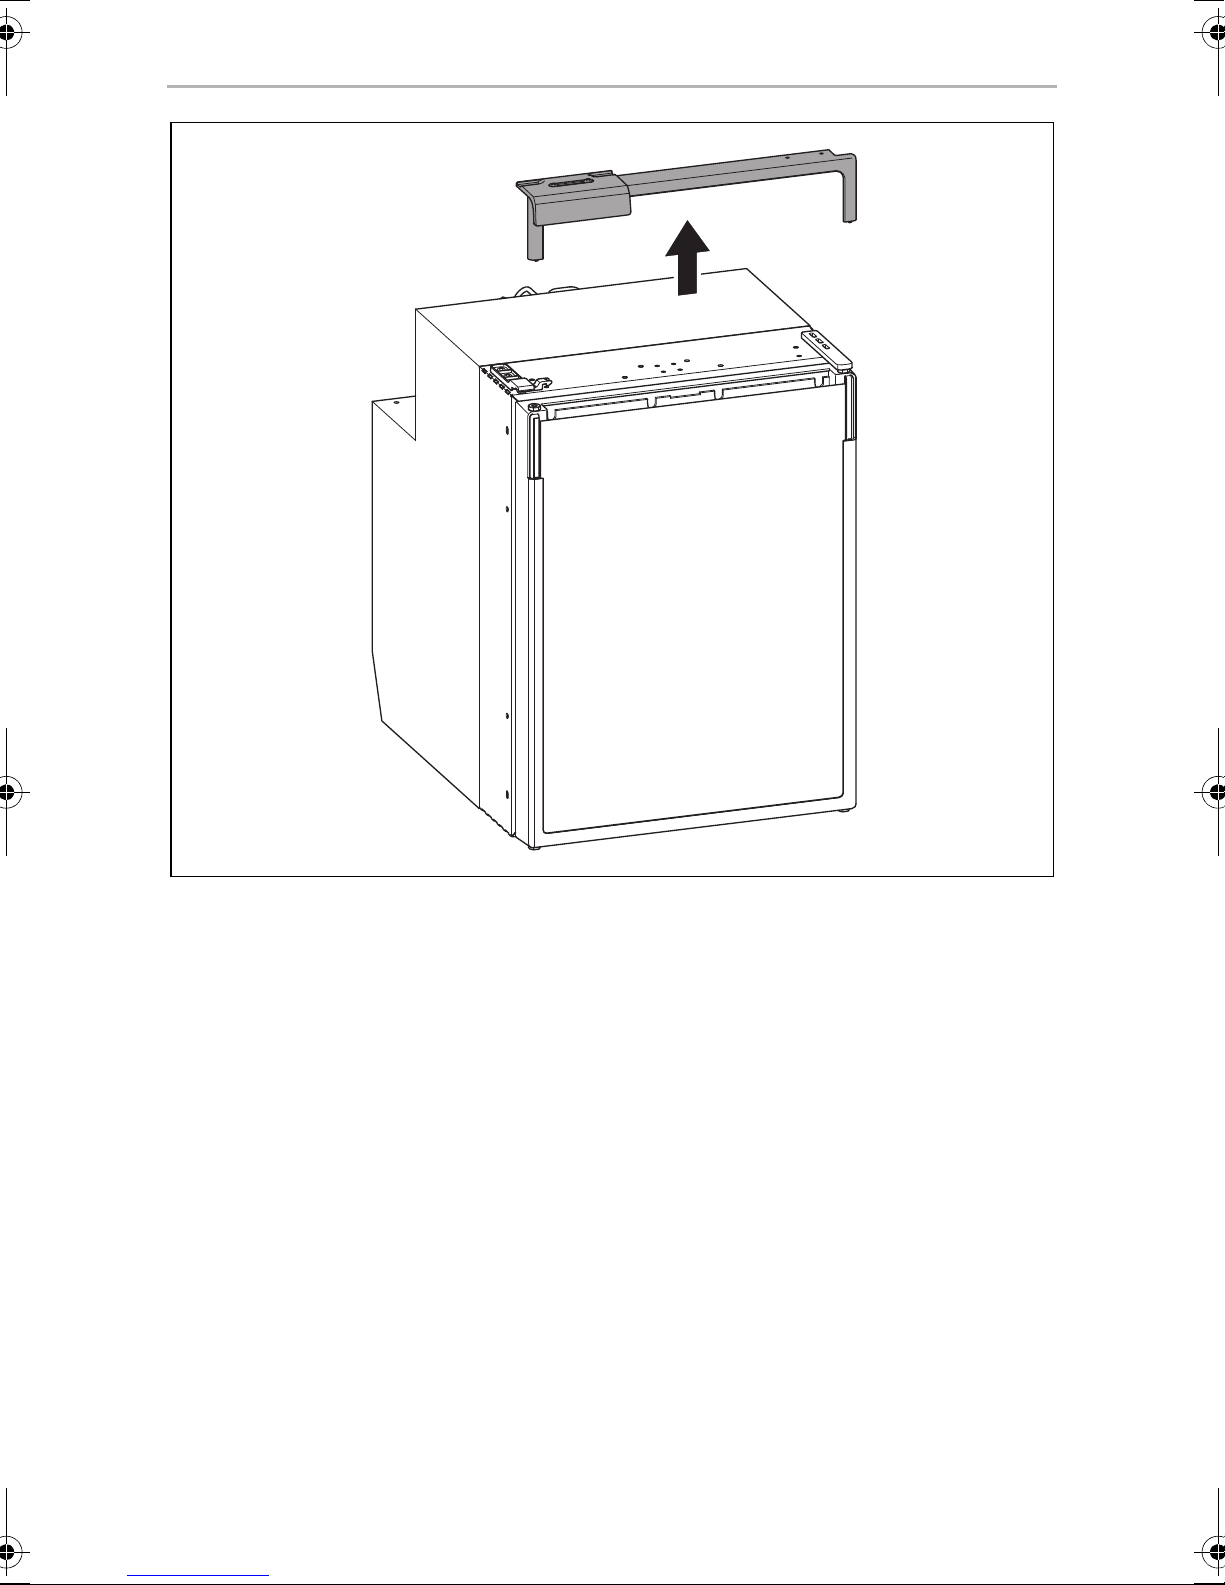
Removing and installing the decorative trim
➤ Proceed as shown (fig. a, page 7 to fig. c, page 9) to remove the decorative
trim.
➤ Proceed in reverse sequence to install the decorative trim.
21
Page 22
EN
Installing and connecting the refrigerator CRE
7.7 Connecting the refrigerator to DC voltage
NOTICE!
•
A
The refrigerator can be operated with DC voltage supply (12/24 Vg).
For safety reasons, the refrigerator is equipped with an electronic system to prevent
the polarity being reversed. This protects the refrigerator against reversed polarity
when connecting to a battery and against short circuiting.
To protect the battery, the refrigerator switches off automatically if the voltage is
insufficient (see table below).
To avoid voltage drops and loss of performance, keep the
connection cable as short as possible.
Avoid additional switches, plugs or power strips.
•
Disconnect the cooling device and other electric consumers from
the battery before you connect the battery to a quick charging
device. Overvoltage can damage the electronics of the device.
12 V 24 V
Cut-off voltage
Cut-in voltage
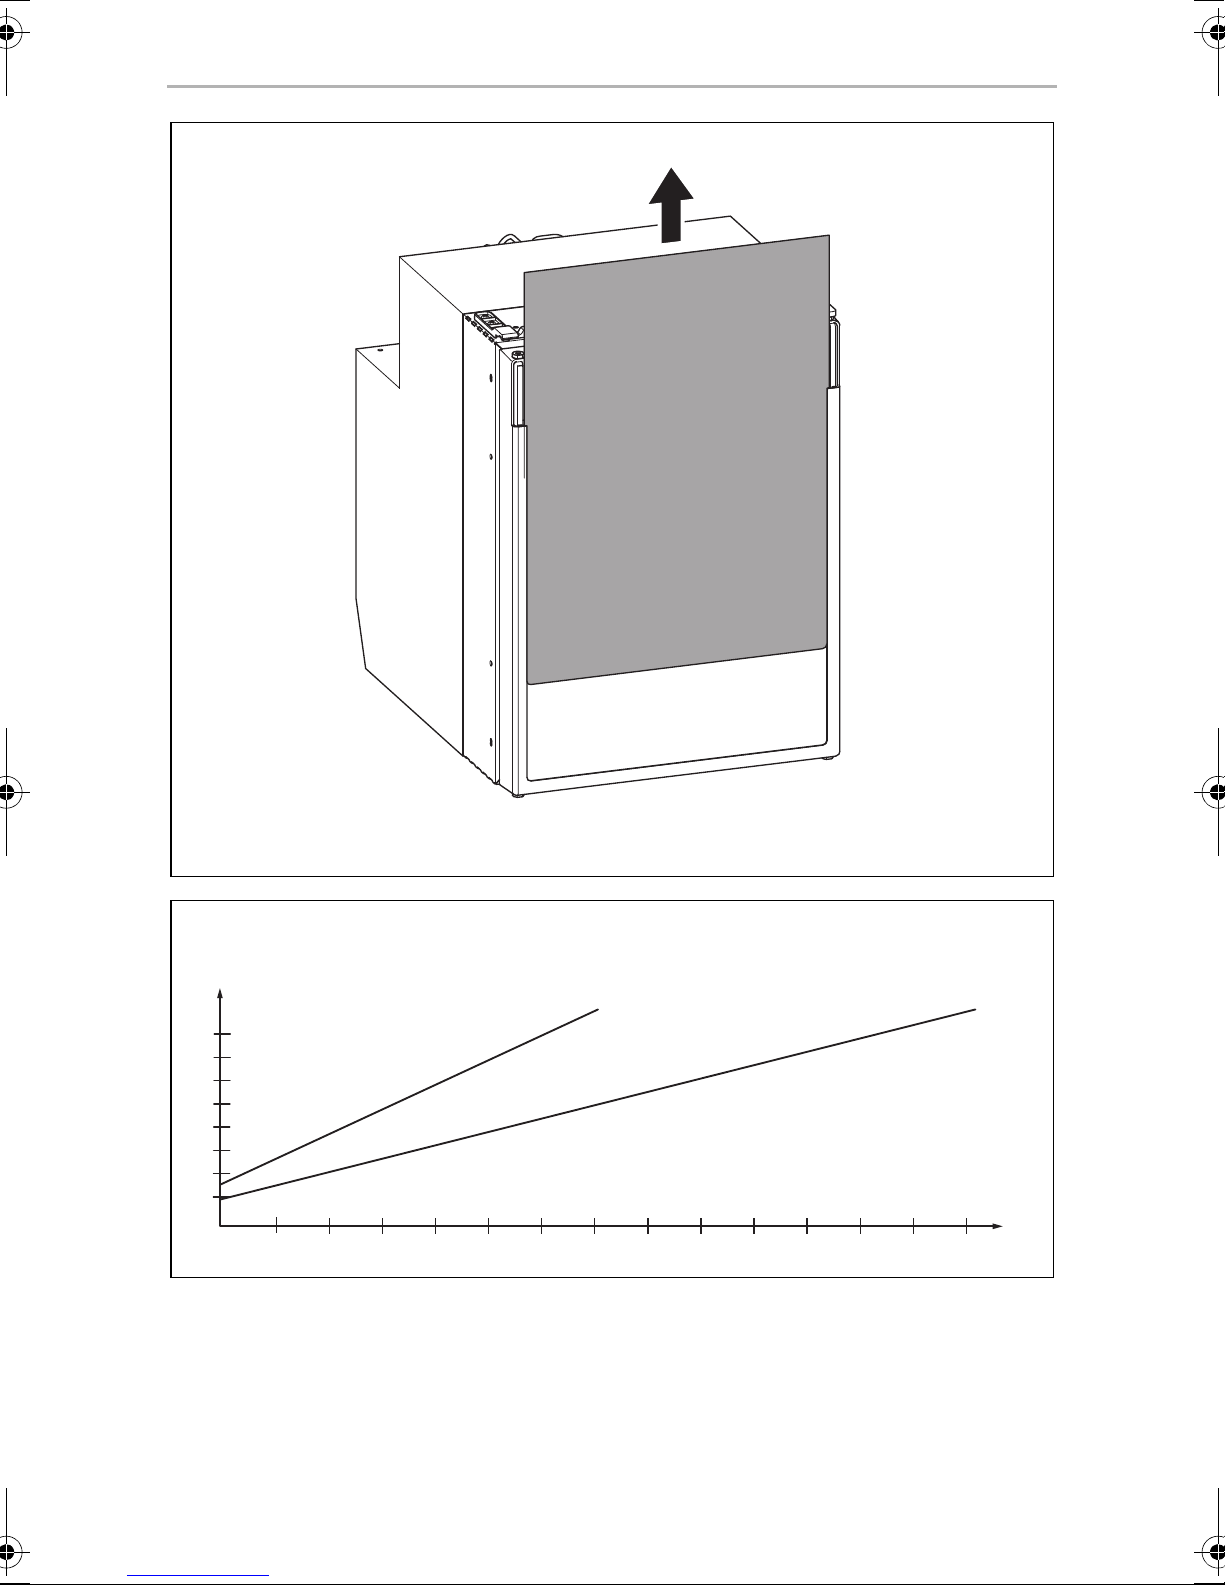
➤ Determine the required cross section of the cable in relation to the cable length
according to fig. d, page 9.
Key to fig. d, page 9:
Coordinate axis Meaning Unit
l Cable length m
∅ Cable cross section mm²
NOTICE!
Make sure the polarity is correct.
10.4 V 22.8 V
11.7 V 24.2 V
A
➤ Before starting up the device for the first time, check whether the operating
voltage and the battery voltage match (see type plate).
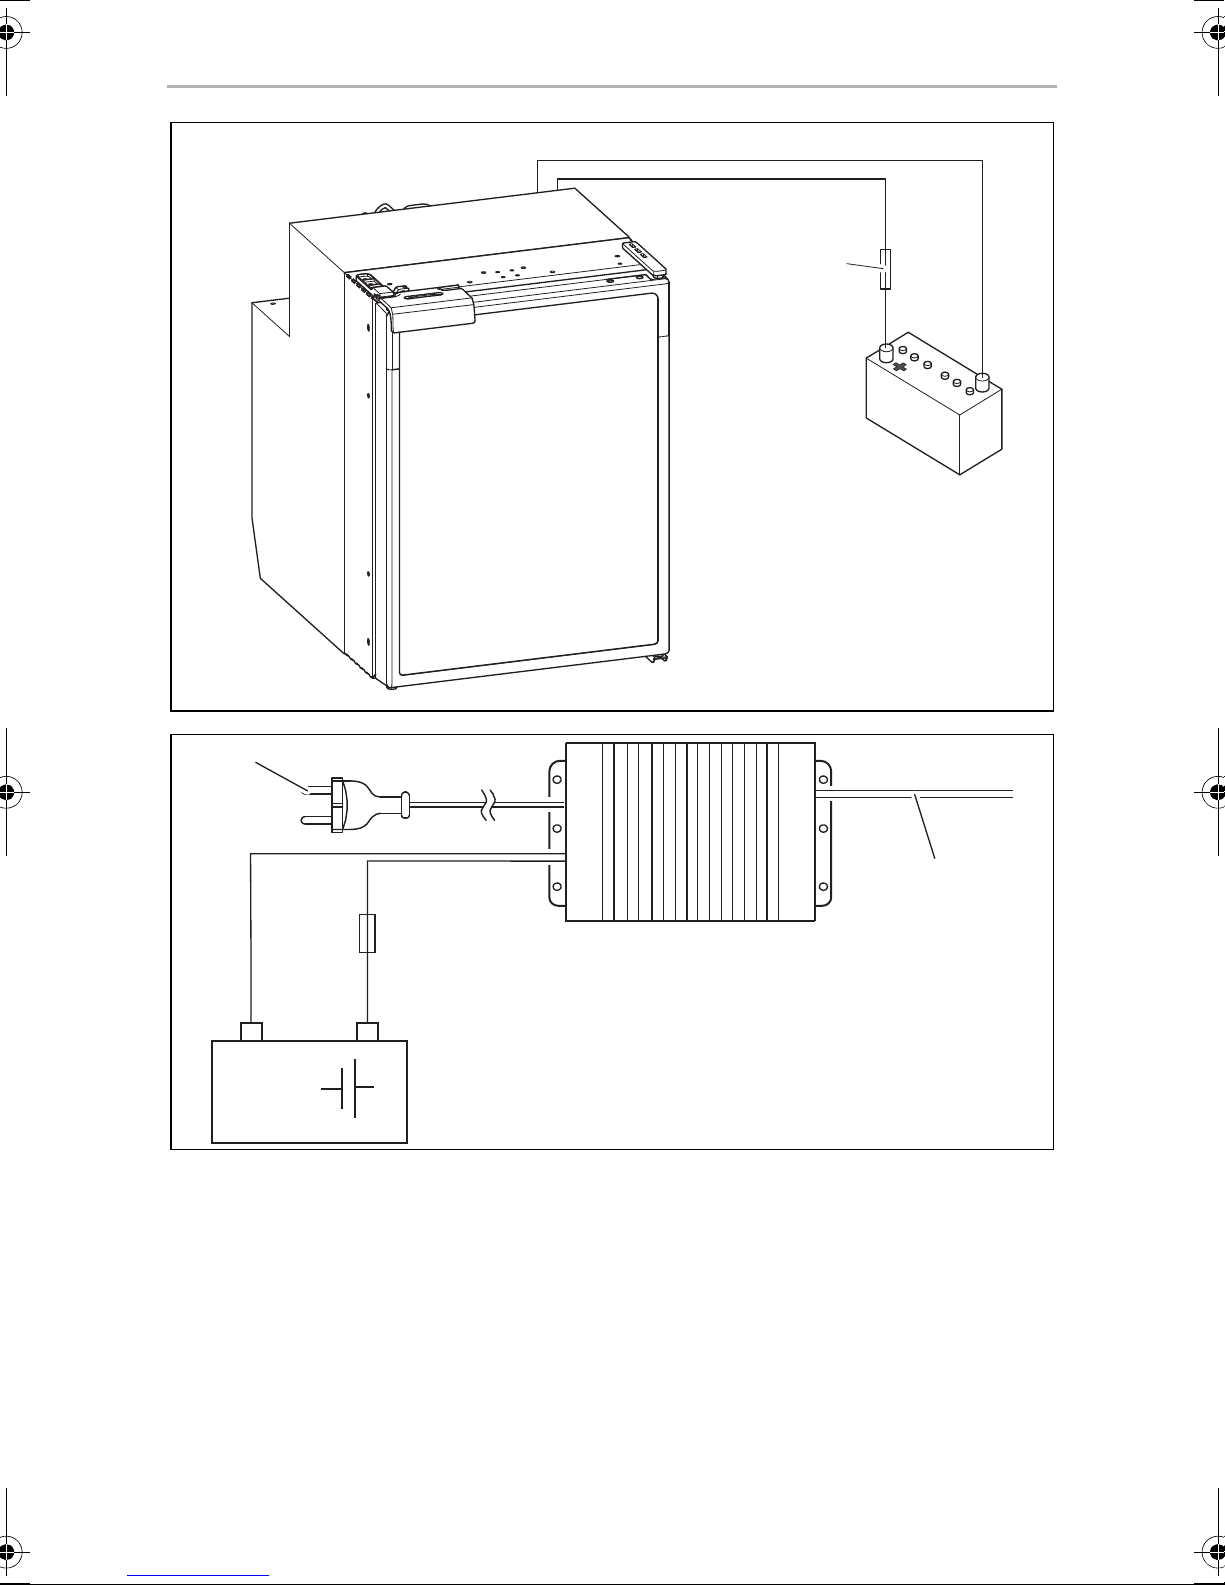
➤ Connect your refrigerator to a plug socket which is fuse-protected with at least
15 A (at 12 Vg) or 7.5 A (at 24 Vg) (fig. e 1, page 10).
22
Page 23
EN
CRE Installing and connecting the refrigerator
➤ Connect the red cable (fig. e rd, page 10) to the positive terminal of the battery.
➤ Connect the black cable (fig. e bk, page 10) to the negative terminal of the
battery.
7.8 Connecting the refrigerator to AC voltage
DANGER! mortal danger!
•
D
You can connect the refrigerator to an AC power if you use the MPS35 rectifier
(accessory).
Never handle plugs and switches with wet hands or if you are
standing on a wet surface.
•
If you are operating your refrigerator on board a boat with an
AC power supply using a shore connection, you must install a
residual current circuit breaker between the AC power supply and
the refrigerator.
Seek advice from a trained technician.
The MPS35 rectifier features a priority circuit which conserves the battery
connected. When an power supply is used, the rectifier automatically switches from
battery to mains operation.
When disconnected from the AC power supply, the rectifier automatically switches
back to battery operation. Mains operation via the rectifier always takes priority over
battery operation.
Proceed as follows when you connect the refrigerator to the AC supply:
➤ Attach the rectifier on the back of the refrigerator.
➤ Connect the rectifier to the battery as shown in fig. f, page 10:
– Red/black cable: positive battery terminal
– Black cable: negative battery terminal
➤ Connect the rectifier to the refrigerator (fig. f 2, page 10):
– Red cable: positive rectifier terminal
– Black cable: negative rectifier terminal
➤ Plug the connector into the AC socket (fig. f 1, page 10).
23
Page 24
EN
Using the refrigerator CRE
8 Using the refrigerator
The refrigerator conserves fresh foodstuffs. The freezer compartment conserves
frozen foodstuffs and freezes fresh foodstuffs.
NOTICE!
•
A
Do not place any electrical devices inside the cooler. The
only exceptions are devices approved for the purpose by the
manufacturer.
•
Ensure that food or liquids in glass containers are not excessively
refrigerated. Liquids expand when they freeze and can therefore
destroy glass containers.
•
Food may only be stored in its original packaging or in suitable
containers.
•
Make sure that you only put items in the cooler which may be kept at
the selected temperature.
NOTE
•
I
Before starting your new refrigerator for the first time, you should
clean it inside and outside with a damp cloth for hygienic reasons
(please also refer to the chapter “Cleaning and maintenance” on
page 27).
•
Do not use force to press the flap of the freezer.
•
Do not pull out the dividing wall if there is ice in the freezer.
•
Do not remove the sticker which covers the control element (fig. 4,
page 3).
8.1 Energy saving tips
•
Choose a well ventilated location which is protected from direct sunlight.
•
Allow hot food to cool down first before you put it in the refrigerator.
•
Do not open the refrigerator more often than necessary.
•
Do not leave the door open for longer than necessary. If the door is left open for
more than 5 minutes, the light starts to flash.
•
Defrost your refrigerator as soon as a layer of ice forms.
•
Avoid unnecessarily low temperature settings.
24
Page 25
EN
CRE Using the refrigerator
8.2 Switching on the refrigerator
➤ Switch the refrigerator on by pressing the button.
8
NOTE
I
8.3 Setting the temperature
➤ Press the button repeatedly until the desired temperature level is set.
The more LEDs light up above the button the lower is the temperature level.
To switch from the last level to the first level press the button again.
I
After switching on, the refrigerator needs some time before the
compressor starts up.
NOTE
The cooling performance can be affected by:
•
the ambient temperature
•
the amount of food to be conserved
•
the frequency with which the door is opened
If the ambient temperature is at 16 °C to 20 °C, set the refrigerator to at
least level 2.
8.4 Conserving foodstuffs
NOTICE!
•
A
I
You can conserve foodstuffs in the refrigerator. The time for which the food can be
conserved in this way is usually stated on the package.
Do not conserve warm foodstuffs in the refrigerator.
•
Do not place glass containers containing liquid in the freezer
compartment.
NOTE
Food which can easily absorb tastes and odours, as well as liquids and
products with a high alcohol content, should be conserved in air-tight
containers.
25
Page 26
EN
Using the refrigerator CRE
The refrigerator is divided in different zones with different temperatures:
•
The colder zones are immediately above the drawers for fruit and vegetables,
near the back wall.
•
Observe the temperature information and best before date on the food
packaging.
•
Observe the following when using the refrigerator:
– Never re-freeze products which have started defrosting or have been
defrosted; consume them as soon as possible.
– Wrap food in aluminium foil or cling film and store it in an airtight container.
This ensures that aromas, the texture and the freshness will be better
conserved.
8.5 Defrosting the freezer
NOTICE!
A
Never use mechanical tools to remove ice or to loosen objects frozen to
the inside of the refrigerator. The only exceptions are devices approved
for the purpose by the manufacturer.
This is how to defrost the refrigerator:
➤ Empty the contents.
➤ If necessary, put them in another cooling device to keep them chilled.
➤ Press the button until the refrigerator switches off.
➤ Leave the door completely open.
8.6 Releasing the lock
The refrigerator has a locking mechanism (fig. g 1, page 11) which is also used to
protect it during transport. The door is secured when it is locked.
➤ To open the door, lift the handle (fig. g 2, page 11) up and open it.
26
Page 27
EN
CRE Cleaning and maintenance
8.7 Switching off and storing the refrigerator
If you do not intend to use the refrigerator for a long time, proceed as follows:
➤ Press the button until the refrigerator switches off.
➤ Disconnect the connection cable from the battery or disconnect the plug on the
AC cable plug from the rectifier.
➤ Clean the refrigerator (see chapter “Cleaning and maintenance” on page 27).
➤ Close the door.
➤ Turn the ventilation lock (fig. h 1, page 11) until it latches in.
✓ The door stays open thus preventing smells from arising.
9 Cleaning and maintenance
NOTICE!
•
A
➤ Always disconnect the device from the power supply before you clean and
service it.
➤ Clean the refrigerator regularly and as soon as it becomes dirty with a damp
cloth.
➤ Make sure that no water drips into the seals. This can damage the electronics.
➤ Wipe the refrigerator dry with a cloth after cleaning.
Do not use abrasive cleaning agents or hard objects during cleaning
as these can damage the refrigerator.
•
Do not use hard or pointed tools to speed up the defrosting process.
27
Page 28
EN
Warranty CRE
10 Warranty
The statutory warranty period applies. If the product is defective, please contact the
manufacturer's branch in your country (see the back of the instruction manual for the
addresses) or your retailer.
For repair and guarantee processing, please include the following documents when
you send in the device:
•
A copy of the receipt with purchasing date
•
A reason for the claim or description of the fault
11 Disposal
WARNING! Children beware!
!
Before disposing of your old refrigerator:
•
Take off the doors.
•
Leave storage surfaces in the refrigerator so that children cannot
climb inside.
➤ Place the packaging material in the appropriate recycling waste bins wherever
possible.
If you wish to finally dispose of the product, ask your local recycling centre
or specialist dealer for details about how to do this in accordance with the
M
applicable disposal regulations.
28
Page 29
EN
CRE Troubleshooting
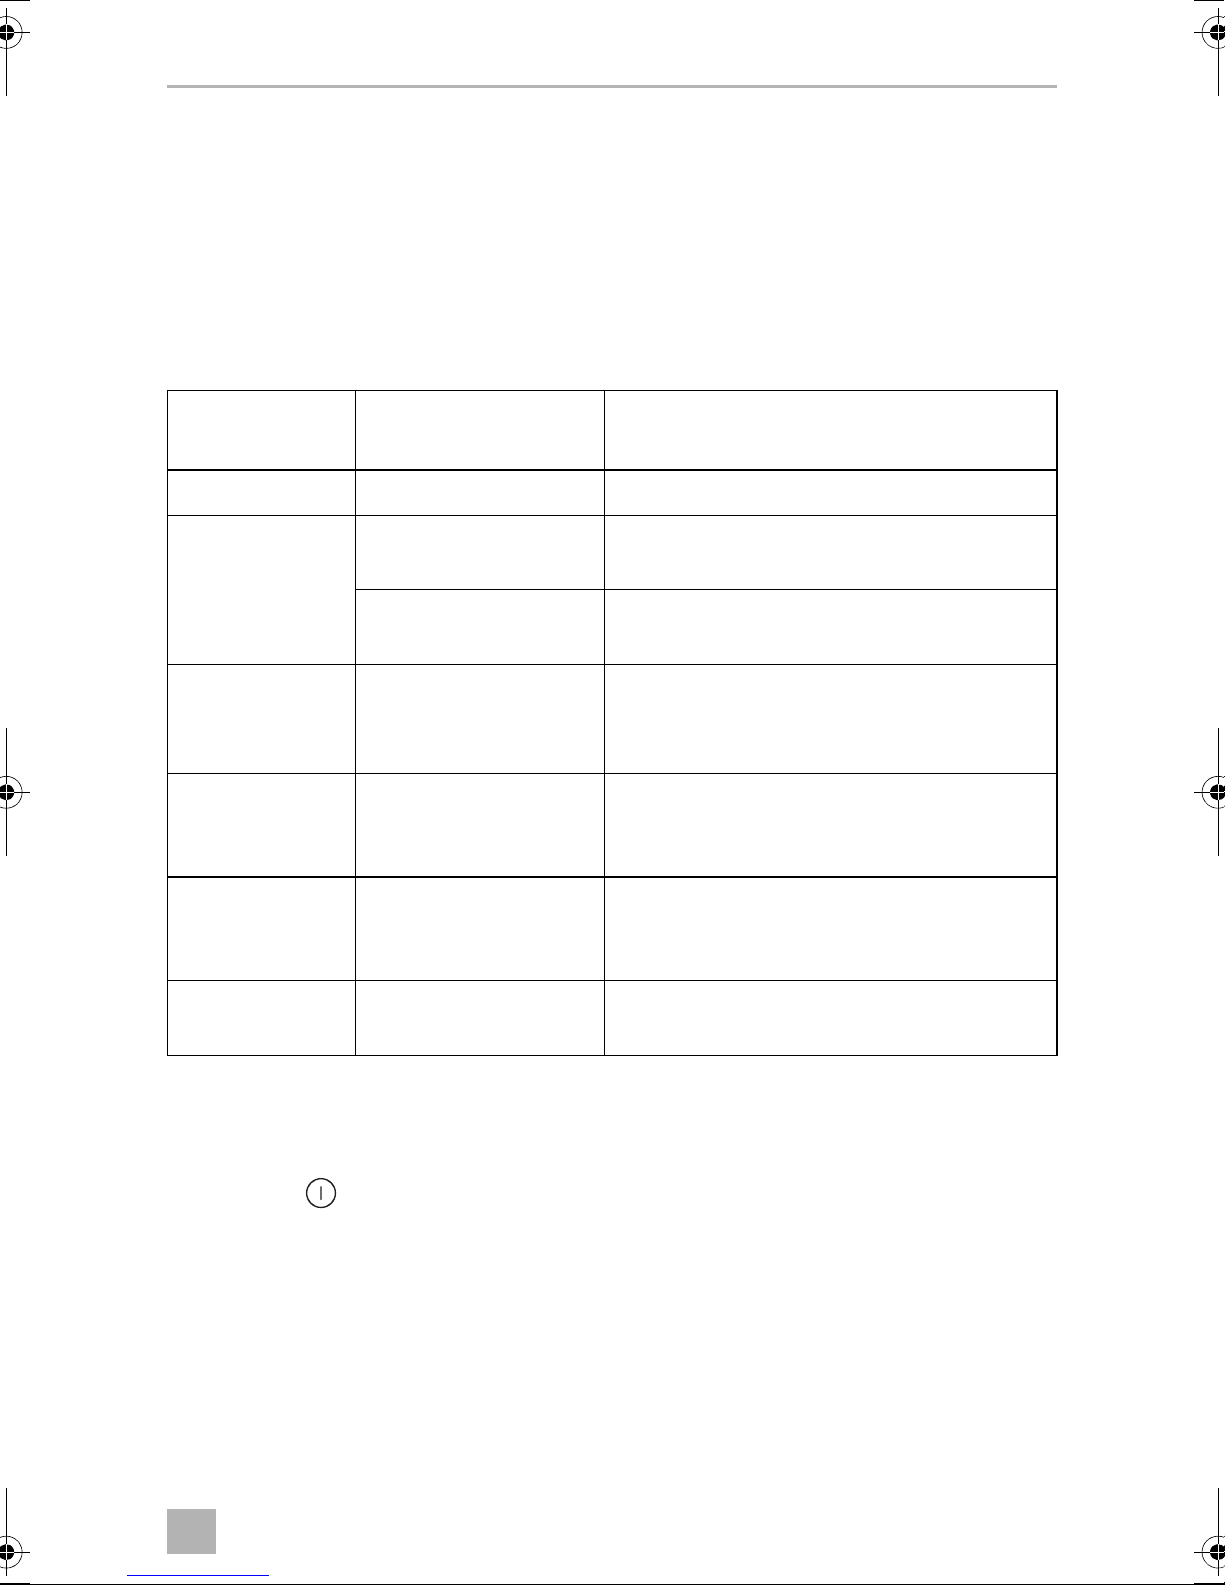
12 Troubleshooting
Red LED flashes (fig. 4 2, page 3)
During operational faults the LED flashes several times. The number of flashes
depends on the type of fault.
Each flash lasts for one quarter of a second. After the series of flashes a pause follows.
The sequence for the fault is repeated every four seconds.
Number of
flashes
1 Line Voltage The supply voltage is outside of the set range.
2 Excessive fan current The fan load on the electronics unit is more
3 The motor doesn't start The rotor is jammed.
4 Speed too low If the cooling system is overloaded, the
5 Over temperature of the
Fault Possible cause
than 1 A.
Too many start attempts The compressor or fan has been started too
often within a short period of time.
The pressure difference in the cooling system
is too high (> 5 bar).
minimum speed of the motor of 1850 rpm
cannot be maintained.
If the cooling system is loaded too heavily or
electronics unit
the temperature is set too high, the
electronics can overheat.
Constantly Temperatur sensor
errors
Orange LED flashes (fig. 4 3, page 3)
If LED flashes constantly fast, proceed as follows.
➤ Press the button until the refrigerator switches off.
➤ Disconnect the connection cable from the battery or disconnect the plug on the
AC cable plug from the rectifier.
➤ Wait one minute, then reconnect the refrigerator to the power supply and switch
it on.
➤ If the orange LED still flashes, contact the customer service.
Temperatur sensor is defective.
29
Page 30
EN
Troubleshooting CRE
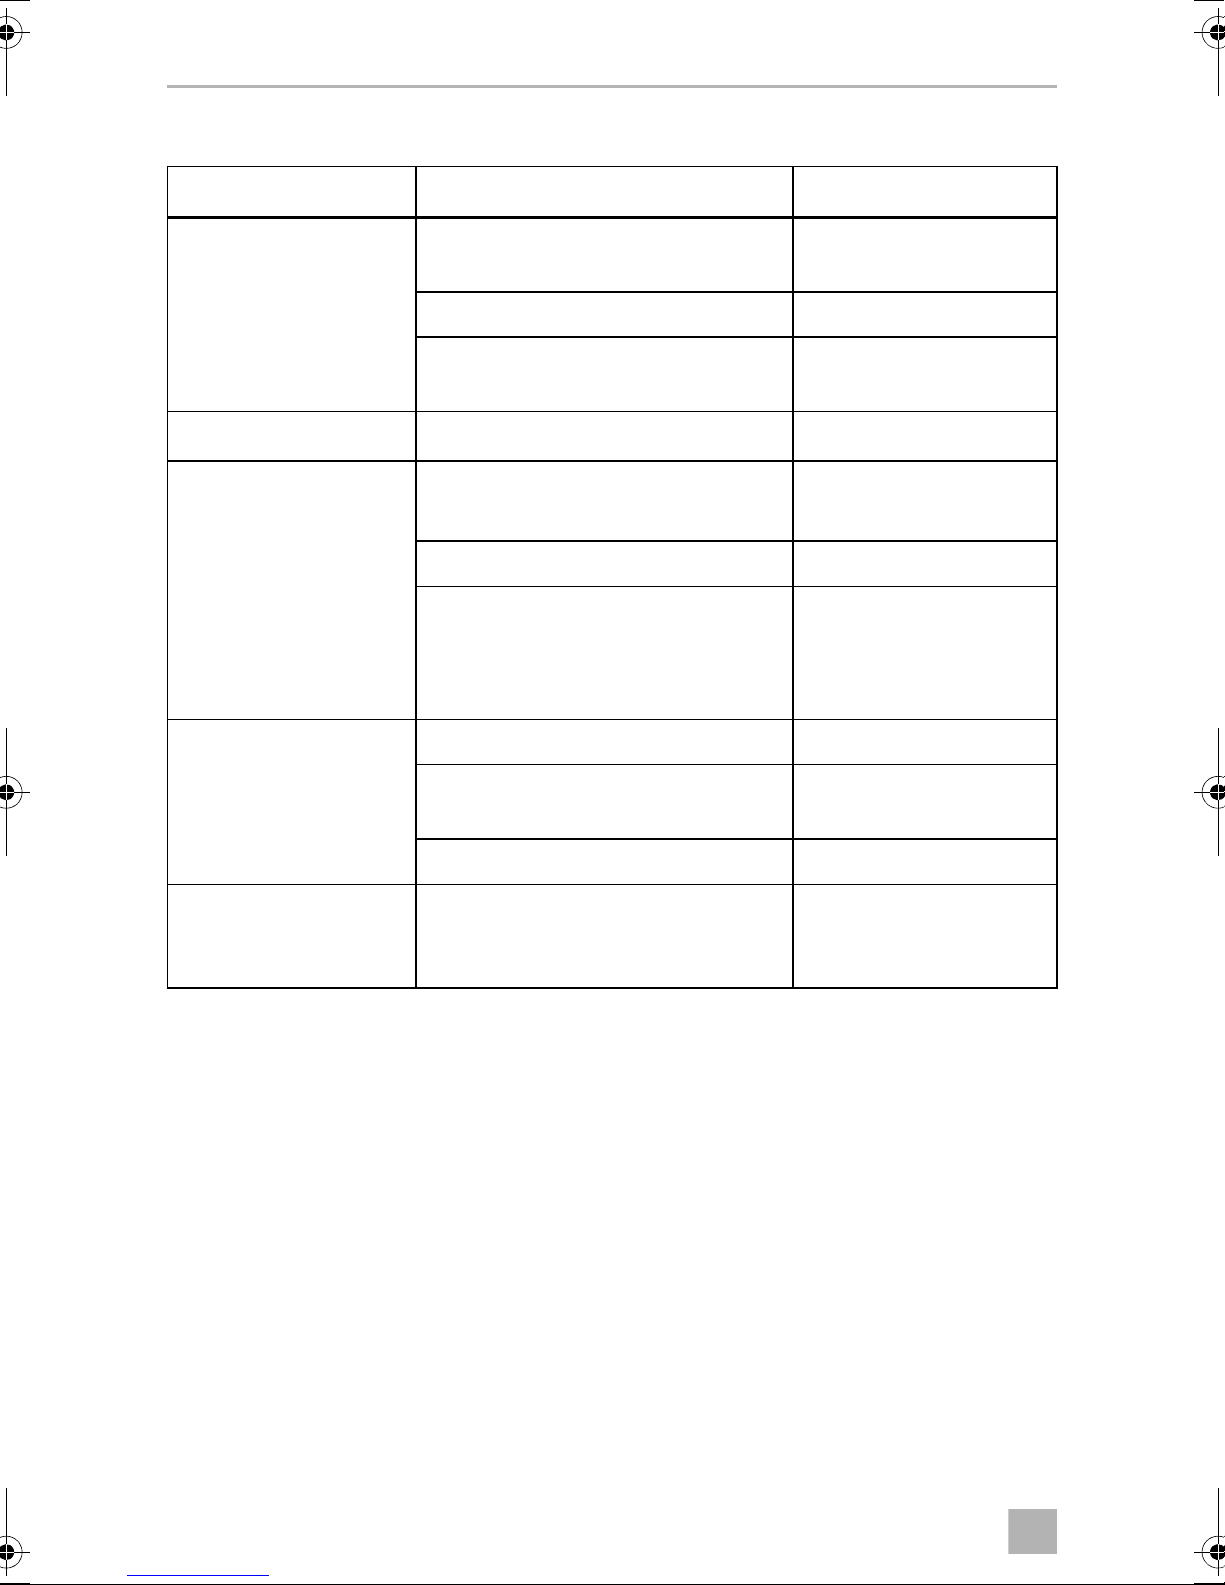
Compressor does not run (battery connection)
Problem Possible cause Remedy
U
U
= 0 V There is an interruption in the
TERM
≤ U
TERM
ON
Start attempt with
U
TERM
≤ U
OFF
Start attempt with
U
TERM
≥ U
ON
Establish a connection
battery – electronics connection
Main switch faulty (if installed) Replace the main switch
Additional supply line fuse has blown
(if installed)
Replace the supply line
fuse
Battery voltage is too low Charge the battery
Loose cables
Establish a connection
Poor contact (corrosion)
Battery capacity too low Replacing the battery
Cable cross section too small Replace the cable
(chapter “Connecting the
refrigerator to DC
voltage” on page 22)
Ambient temperature too high –
Insufficient ventilation Move the refrigerator to
another location
Electric circuit between
the pins in the
compressor interrupted
U
U
U
Voltage between the positive and negative terminals of the electronics
TERM
Cut-in voltage of the electronics
ON
Cut-off voltage of the electronics
OFF
Condenser is dirty Clean the condenser
Defective compressor Replace the compressor
30
Page 31

EN
CRE Troubleshooting
Compressor is not running (connected to AC supply)
Problem Possible cause Remedy
No voltage Connection supply line interrupted Establish a connection
Main switch faulty (if installed) Replace the main switch
Voltage is present but
the compressor doesn't
run
Electric circuit between
the pins in the
compressor interrupted
Additional supply line fuse has blown
(if installed)
Ambient temperature too high –
Insufficient ventilation Move the refrigerator to
Condenser is dirty Clean the condenser
Defective compressor Replace the compressor
Replace the supply line
fuse
another location
Poor cooling, increase in interior temperature
Problem Possible cause Remedy
Compressor runs for a
long time/continuously
Ambient temperature too high –
Insufficient ventilation Move the refrigerator to
another location
Condenser is dirty Clean the condenser
Faulty fan Replace the fan
Compressor does not
run often
Battery capacity exhausted Charge the battery
Unusual noises
Problem Possible cause Remedy
Loud humming A component of the refrigerant circuit
cannot move freely (touching the
wall)
There is a foreign object stuck
between the cooling unit and the wall
Fan noise –
Bend the component
carefully away from the
obstruction
Remove the foreign
object
31
Page 32

EN
Technical data CRE
ID 0000056012
13 Technical data
CRE0050 CRE0065 CRE0080
Refrigerator compartment capacity:
Freezer compartment capacity:
Capacity: 45 l 57 l 78 l
Voltage: 12 Vg or 24 Vg
Rated current
12 Vg:
24 Vg:
Cooling temperature range
Refrigerator:
Freezer:
Climatic class: ST
Relative humidity: maximum 90 %
Short-term inclination: maximum 30°
Maximum pressure: LP 11 bar/HP 25 bar
Propellant: C
41.2 l
4.4 l
5.2 A
2.5 A
50 l
7.0 l
5.8 A
2.8 A
+0 °C to +12 °C
–12 °C to –6 °C
5H10
70.6 l
7.5 l
6.5 A
3.1 A
Refrigerant: R134a
Refrigerant quantity: 40 g 45 g 48 g
CO2 equivalent: 0.057 t 0.064 t 0.069 t
Global warming potential (GWP): 1430
Dimensions: fig. i, page 12 fig. j, page 12 fig. k, page 12
Weight: 12.57 kg 14.15 kg 15.53 kg
Inspection/certification:
E4
Contains fluorinated greenhouse gases
Hermetically sealed equipment
For the current EU declaration of conformity for your device please refer to the
respective product page on dometic.com or contact the manufacturer directly (see
back page).
32
Page 33

DE
CRE
Bitte lesen Sie diese Anleitung vor Einbau und Inbetriebnahme sorgfältig
durch und bewahren Sie sie auf. Geben Sie sie im Falle einer Weitergabe
des Produktes an den Nutzer weiter.
Inhaltsverzeichnis
1 Erklärung der Symbole . . . . . . . . . . . . . . . . . . . . . . . . . . . . . . . . . . . . . . . . . 34
2 Sicherheitshinweise . . . . . . . . . . . . . . . . . . . . . . . . . . . . . . . . . . . . . . . . . . . 34
3 Lieferumfang . . . . . . . . . . . . . . . . . . . . . . . . . . . . . . . . . . . . . . . . . . . . . . . . . 37
4 Zubehör. . . . . . . . . . . . . . . . . . . . . . . . . . . . . . . . . . . . . . . . . . . . . . . . . . . . . 37
5 Bestimmungsgemäßer Gebrauch . . . . . . . . . . . . . . . . . . . . . . . . . . . . . . . . 38
6 Technische Beschreibung . . . . . . . . . . . . . . . . . . . . . . . . . . . . . . . . . . . . . . 38
7 Kühlschrank aufstellen und anschließen . . . . . . . . . . . . . . . . . . . . . . . . . . . 40
8 Kühlschrank benutzen . . . . . . . . . . . . . . . . . . . . . . . . . . . . . . . . . . . . . . . . . 45
9 Reinigung und Pflege . . . . . . . . . . . . . . . . . . . . . . . . . . . . . . . . . . . . . . . . . . 48
10 Gewährleistung. . . . . . . . . . . . . . . . . . . . . . . . . . . . . . . . . . . . . . . . . . . . . . . 49
11 Entsorgung . . . . . . . . . . . . . . . . . . . . . . . . . . . . . . . . . . . . . . . . . . . . . . . . . . 49
12 Störungen beseitigen . . . . . . . . . . . . . . . . . . . . . . . . . . . . . . . . . . . . . . . . . . 50
13 Technische Daten . . . . . . . . . . . . . . . . . . . . . . . . . . . . . . . . . . . . . . . . . . . . . 53
33
Page 34

DE
Erklärung der Symbole CRE
1 Erklärung der Symbole
GEFAHR!
D
!
Sicherheitshinweis: Nichtbeachtung führt zu Tod oder schwerer
Verletzung.
WARNUNG!
Sicherheitshinweis: Nichtbeachtung kann zu Tod oder schwerer
Verletzung führen.
VORSICHT!
Sicherheitshinweis: Nichtbeachtung kann zu Verletzungen führen.
!
ACHTUNG!
A
Nichtbeachtung kann zu Materialschäden führen und die Funktion des
Produktes beeinträchtigen.
HINWEIS
Ergänzende Informationen zur Bedienung des Produktes.
I
2 Sicherheitshinweise
Der Hersteller übernimmt in folgenden Fällen keine Haftung für Schäden:
•
Montage- oder Anschlussfehler
•
Beschädigungen am Produkt durch mechanische Einflüsse und
Überspannungen
•
Veränderungen am Produkt ohne ausdrückliche Genehmigung vom Hersteller
•
Verwendung für andere als die in der Anleitung beschriebenen Zwecke
2.1 Allgemeine Sicherheit
WARNUNG!
•
!
Lassen Sie Installationen in Feuchträumen nur vom Fachmann
verlegen.
•
Wenn der Kühlschrank sichtbare Beschädigungen aufweist, dürfen
Sie ihn nicht in Betrieb nehmen.
34
Page 35

DE
CRE Sicherheitshinweise
•
Wenn das Anschlusskabel dieses Kühlschrankes beschädigt wird,
muss es durch den Hersteller, seinen Kundendienst oder eine ähnlich
qualifizierte Person ersetzt werden, um Gefährdungen zu vermeiden.
•
Reparaturen an diesem Kühlschrank dürfen nur von Fachkräften
durchgeführt werden. Durch unsachgemäße Reparaturen können
erhebliche Gefahren entstehen.
•
Dieser Kühlschrank kann von Kindern ab 8 Jahren und darüber sowie
von Personen mit verringerten physischen, sensorischen oder
mentalen Fähigkeiten oder Mangel an Erfahrung und Wissen benutzt
werden, wenn sie beaufsichtigt oder bezüglich des sicheren
Gebrauchs des Kühlschrankes unterwiesen wurden und die daraus
resultierenden Gefahren verstehen.
•
Reinigung und Benutzer-Wartung dürfen nicht von Kindern ohne
Beaufsichtigung durchgeführt werden.
•
Kinder sollten beaufsichtigt werden, um sicherzustellen, dass sie nicht
mit dem Kühlschrank spielen.
!
A
•
Verwahren und benutzen Sie den Kühlschrank außerhalb der
Reichweite von Kindern unter 8 Jahren.
•
Lagern Sie keine explosionsfähigen Stoffe wie z. B. Sprühdosen mit
brennbarem Treibgas im Kühlschrank.
VORSICHT!
•
Quetschgefahr! Fassen Sie nicht in das Scharnier.
•
Lebensmittel dürfen nur in Originalverpackungen oder geeigneten
Behältern eingelagert werden.
ACHTUNG!
•
Vergleichen Sie die Spannungsangabe auf dem Typenschild mit der
vorhandenen Energieversorgung.
•
Ziehen Sie den Stecker nie am Anschlusskabel aus der Steckdose.
•
Klemmen Sie Ihren Kühlschrank und andere Verbraucher von der
Fahrzeugbatterie ab, bevor Sie ein Schnellladegerät anschließen.
•
Trennen Sie die Verbindung oder schalten Sie den Kühlschrank aus,
wenn Sie den Motor ausschalten. Sonst kann die Fahrzeugbatterie
entladen werden.
•
Der Kühlschrank ist nicht geeignet für die Lagerung ätzender oder
lösungsmittelhaltiger Stoffe.
•
Halten Sie die Abflussöffnung stets sauber.
•
Öffnen Sie auf keinen Fall den Kühlkreislauf.
35
Page 36

DE
Sicherheitshinweise CRE
•
Transportieren Sie den Kühlschrank niemals in waagerechter Stellung,
damit kein Öl aus dem Kompressor auslaufen kann.
•
Achten Sie beim Transport darauf, den Kühlkreislauf nicht zu
beschädigen.
Bei einer Beschädigung des Kühlkreislaufs:
– Schalten Sie den Kühlschrank aus.
–Lüften Sie den Raum gut.
•
Stellen Sie den Kühlschrank an einem trockenen und gegen
Spritzwasser geschützten Platz auf.
2.2 Sicherheit beim Betrieb des Kühlschrankes
GEFAHR!
•
Fassen Sie nie mit bloßen Händen an blanke Leitungen.
D
!
A
VORSICHT!
•
Achten Sie vor der Inbetriebnahme darauf, dass Zuleitung und Stecker
trocken sind.
•
Wenn Sie den Kühlschrank an eine Fahrzeugbatterie anschließen,
stellen Sie sicher, dass Lebensmittel nicht mit Batteriesäure in
Berührung kommen.
ACHTUNG!
•
Benutzen Sie keine Elektrogeräte innerhalb des Kühlschrankes, außer
wenn diese Elektrogeräte vom Hersteller dafür empfohlen werden.
•
Stellen Sie den Kühlschrank nicht in der Nähe von offenen Flammen
oder anderen Wärmequellen (Heizung, starke Sonneneinstrahlung,
Gasöfen usw.) ab.
•
Überhitzungsgefahr!
Achten Sie stets darauf, dass beim Betrieb entstehende Wärme
ausreichend abgeführt werden kann. Sorgen Sie dafür, dass der
Kühlschrank in ausreichendem Abstand zu Wänden oder
Gegenständen steht, sodass die Luft zirkulieren kann.
•
Achten Sie darauf, dass die Lüftungsöffnungen nicht abgedeckt
werden.
•
Füllen Sie keine Flüssigkeiten oder Eis in den Innenbehälter.
36
Page 37

DE
CRE Lieferumfang
•
Tauchen Sie den Kühlschrank nie in Wasser.
•
Schützen Sie den Kühlschrank und die Kabel vor Hitze und Nässe.
•
Achten Sie darauf, dass die Speisen keine Wand des Kühlraums
berühren.
3 Lieferumfang
Menge Bezeichnung
1 Kühlschrank mit Einlegeböden
1 Auslassstutzen
1 Montage- und Bedienungsanleitung
4Zubehör
Als Zubehör erhältlich (nicht im Lieferumfang enthalten):
Bezeichnung Erklärung Art.-Nr.
Gleichrichter Transformiert eine Eingangsspannung von 100 bis
240 Vw auf 12 Vg oder 24 Vg, sodass der Kühlschrank
an ein Wechselstromnetz angeschlossen werden kann.
9600000445
37
Page 38

DE
Bestimmungsgemäßer Gebrauch CRE
5 Bestimmungsgemäßer Gebrauch
Der Kühlschrank ist für den Einbau in Wohnwagen, Wohnmobilen oder Booten
ausgelegt. Er eignet sich ausschließlich zur Installation in einer Einbaunische. Nach
dem Einbau darf ausschließlich die Gerätefront frei zugänglich sein.
Der Kühlschrank eignet sich ausschließlich zum Kühlen, Tiefkühlen und Lagern von
Lebensmitteln.
WARNUNG!
!
!
Der Kühlschrank ist nicht für die fachgerechte Lagerung von
Medikamenten vorgesehen.
VORSICHT! Gesundheitsgefahr!
Prüfen Sie bitte, ob die Kühlleistung des Kühlschranks den
Anforderungen der Lebensmittel entspricht, die Sie kühlen wollen.
6 Technische Beschreibung
Die CoolMatic Kühlgeräte der CRE-Serie können Waren abkühlen und kühl halten.
Im Gefrierfach können Waren tiefgekühlt werden.
Alle im Kühlschrank verwendeten Materialien sind unbedenklich für Lebensmittel.
Der Kühlkreislauf ist wartungsfrei.
Beim Einsatz auf Booten kann der Kühlschrank einer kurzzeitigen Krängung von 30°
ausgesetzt werden.
Die Temperatur wird mit dem Bedienpanel an der linken Innenseite des
Kühlschranks eingestellt.
Zur Auswahl stehen vier Temperaturbereiche von +0 °C bis +12 °C.
38
Page 39

DE
CRE Technische Beschreibung
6.1 Bedienelemente im Innenraum
Die unterschiedlichen Kühlschranktypen sind in folgenden Abbildungen dargestellt:
•
CRE0050: Abb. 1, Seite 2
•
CRE0065: Abb. 2, Seite 2
•
CRE0080: Abb. 3, Seite 3
Nr. Erklärung
1 Gefrierfach
2 Bedienpanel
3 Gitter (klappbar, so dass Flaschen in den Kühlraum gestellt werden
können)
4 Flaschenarretierung (zum Festsetzen von Flaschen im Türfach)
5 Fach
6.2 Bedienelemente
Nr. in
Abb. 4, Seite 3
1 IR-Sensor zum Schalten der Innenbeleuchtung
2 LED Rot: Störungsanzeige
3 LED Blau: Kompressor läuft
4 Ein-/Aus-Taster
5 Innenbeleuchtung
6 Temperaturwahl-Taster
7 LEDs: Temperaturstufen
Erklärung
LED Orange: Kompressor aus
39
Page 40

DE
Kühlschrank aufstellen und anschließen CRE
7 Kühlschrank aufstellen und anschließen
7.1 Sicherheitshinweise zur Installation auf Booten
Bitte beachten Sie speziell bei der Installation auf Booten folgende Hinweise:
GEFAHR!
D
A
Sorgen Sie bei Netzbetrieb unbedingt dafür, dass Ihre
Spannungsversorgung über einen FI-Schalter abgesichert ist!
ACHTUNG!
•
Das Gerät ist für eine kurzzeitige Krängung von bis zu 30° ausgelegt.
Beachten Sie beim Aufstellen des Kühlschrankes, dass das Gerät für
diese Gegebenheiten gesichert sein muss. Wenden Sie sich bei
Fragen zur Installation an einen ausgewiesenen Fachbetrieb.
•
Stellen Sie den Kühlschrank so auf, dass die erwärmte Luft gut
abziehen kann (entweder nach oben oder zu den Seiten, Abb. 5,
Seite 4).
•
Das Gerät ist für Umgebungstemperaturen zwischen +16 °C und
+38 °C vorgesehen.
7.2 Hinweise zum Aufstellen des Kühlschranks
Beachten Sie folgende Hinweise beim Aufstellen:
•
Stellen Sie den Kühlschrank so auf, dass die erwärmte Luft gut abziehen kann
(entweder nach oben oder zu den Seiten, Abb. 5, Seite 4).
Legende zu Abb. 5, Seite 4
Nr. Erklärung
1 kalte Zuluft
2 warme Abluft
3 Kondensator
4 Abstand oberhalb, wenn nach oben oder zur Seite nicht genügend
Abluft zirkulieren kann
•
Beachten Sie die folgenden Einbaumaße:
– CRE0050: 550 x 390 x 544 mm
– CRE0065: 595 x 458 x 535 mm
– CRE0080: 578 x 485 x 650 mm
40
Page 41

DE
CRE Kühlschrank aufstellen und anschließen
•
Halten Sie Öffnungen (Lüftungsschlitze usw.) im Gehäuse oder der
Einbaustruktur frei von Gegenständen.
•
Im Normalbetrieb des Kühlschranks entsteht Kondensat. Sie können das
Kondensat entweder am Boden des Kühlschranks regelmäßig aufwischen oder
durch einen Abfluss im Boden des Kühlschranks ablassen (siehe Kapitel
„Auslassstutzen montieren (optional)“ auf Seite 41).
7.3 Auslassstutzen montieren (optional)
➤ Montieren Sie einen Abflussschlauch mit einem Innendurchmesser von 10 mm,
(nicht im Lieferumfang) auf den Auslassstutzen.
➤ Legen Sie den Kühlschrank auf die Seite, sodass die Unterseite zugänglich ist.
ACHTUNG!
A
Schalten Sie das Gerät erst ein, nachdem es 4 Stunden lang in aufrechter
Position gestanden hat.
➤ Schrauben Sie den Auslassstutzen (Abb. 6 2, Seite 4) nach vorn oder nach
hinten gerichtet an, je nach gewünschter Abflussrichtung.
➤ Entfernen Sie den Dichtungsstopfen (Abb. 6 1, Seite 4) im Inneren des
Kühlschranks.
7.4 Kühlschrank aufstellen
Gehen Sie wie folgt vor, um den Kühlschrank aufzustellen:
➤ Wenn Sie das Kondensat durch einen Schlauch ablassen möchten:
Montieren Sie den Auslassstutzen (siehe Kapitel „Auslassstutzen montieren
(optional)“ auf Seite 41).
➤ Lösen Sie die Transportsicherung (Kapitel „Verriegelung lösen“ auf Seite 47).
➤ Öffnen Sie die Kühlschranktür.
➤ Lösen Sie die Blindkappen (Abb. 7 2, Seite 5).
➤ Schieben Sie den Kühlschrank in die Nische.
➤ Befestigen Sie den Kühlschrank mit geeigneten Schrauben (Abb. 7 1, Seite 5).
➤ Drücken Sie die Blindkappen (Abb. 7 2, Seite 5) in die Öffnungen.
41
Page 42

DE
Kühlschrank aufstellen und anschließen CRE
7.5 Türanschlag ändern
Sie können den Anschlag der Tür ändern, sodass die Tür nach links statt nach rechts
aufschwingt.
➤ Gehen Sie wie folgt vor, um den Türanschlag zu ändern (Abb. 8, Seite 6 bis
Abb. 9, Seite 6).
7.6 Türdekor wechseln
ACHTUNG! Beschädigungsgefahr!
A
Das Türdekor hat folgende Abmessungen (siehe Abb. 0, Seite 7):
Das Türdekor darf nur ausgewechselt werden, wenn der Kühlschrank
aufrecht steht.
Modell A B C
CRE0050 350 ± 0,5 mm 474 ± 0,5 mm
0,5 mmCRE0065 419 ± 0,5 mm 468 ± 0,5 mm
CRE0080 445 ± 0,5 mm 582 ± 0,5 mm
Dekorplatte ausbauen und einbauen
➤ Gehen Sie vor wie dargestellt (Abb. a, Seite 7 bis Abb. c, Seite 9), um die
Dekorplatte auszubauen.
➤ Bauen Sie die neue Dekorplatte in umgekehrter Reihenfolge ein.
7.7 Kühlschrank an Gleichspannung anschließen
ACHTUNG!
•
A
Um Spannungs- und Leistungsverluste zu vermeiden, sollte das
Anschlusskabel möglichst kurz sein.
Vermeiden Sie zusätzliche Schalter, Stecker oder Verteilerdosen.
•
Klemmen Sie das Gerät und andere Verbraucher von der Batterie ab,
bevor Sie die Batterie mit einem Schnellladegerät aufladen.
Überspannungen können die Elektronik der Geräte beschädigen.
Der Kühlschrank kann mit Gleichspannung (12/24 Vg) betrieben werden.
Zur Sicherheit ist der Kühlschrank mit einem elektronischen Verpolungsschutz
ausgestattet, der den Kühlschrank gegen Verpolung beim Batterieanschluss und
gegen Kurzschluss schützt.
42
Page 43

DE
CRE Kühlschrank aufstellen und anschließen
Zum Schutz der Batterie schaltet sich der Kühlschrank automatisch ab, wenn die
Spannung nicht mehr ausreicht (siehe folgende Tabelle).
12 V 24 V
Ausschaltspannung
Wiedereinschaltspannung
➤ Bestimmen Sie den notwendigen Querschnitt des Kabels in Abhängigkeit von
der Kabellänge gemäß Abb. d, Seite 9.
Legende zu Abb. d, Seite 9:
Koordinatenachse Bedeutung Einheit
lKabellänge m
∅ Kabelquerschnitt mm²
ACHTUNG!
Achten Sie auf die richtige Polarität.
10,4 V 22,8 V
11,7 V 24,2 V
A
➤ Kontrollieren Sie vor Inbetriebnahme des Gerätes, ob die Betriebsspannung und
die Batteriespannung übereinstimmen (siehe Typenschild).
➤ Schließen Sie Ihren Kühlschrank an einen Steckplatz an, der mit mindestens 15 A
(bei 12 Vg) bzw. 7,5 A (bei 24 Vg) abgesichert ist (Abb. e 1, Seite 10).
➤ Verbinden Sie das rote Kabel (Abb. e rd, Seite 10) mit dem Pluspol der
Batterie.
➤ Verbinden Sie das schwarze Kabel (Abb. e bk, Seite 10) mit dem Minuspol der
Batterie.
43
Page 44

DE
Kühlschrank aufstellen und anschließen CRE
7.8 Kühlschrank an Wechselspannung anschließen
GEFAHR! Lebensgefahr!
•
D
Sie können den Kühlschrank an Wechselstrom anschließen, wenn Sie den
Gleichrichter MPS35 (Zubehör) verwenden.
Der Gleichrichter MPS35 besitzt eine Vorrangschaltung, die eine angeschlossene
Batterie schont. Bei Anschluss an das Wechselstromnetz schaltet der Gleichrichter
automatisch um von Batteriebetrieb auf Netzbetrieb.
Wenn das Wechselstromnetz abgetrennt wird, schaltet der Netzgleichrichter
automatisch wieder auf Batteriebetrieb um. Netzbetrieb über den Netzgleichrichter
hat immer Vorrang vor Batteriebetrieb.
Hantieren Sie nie mit Steckern und Schaltern, wenn Sie nasse Hände
haben oder mit den Füßen in der Nässe stehen.
•
Wenn Sie Ihr Kühlgerät an Bord eines Bootes per Landanschluss am
Wechselstromnetz betreiben, müssen Sie auf jeden Fall einen FISchutzschalter zwischen Wechselstromnetz und Kühlgerät schalten.
Lassen Sie sich von einem Fachmann beraten.
Gehen Sie wie folgt vor, wenn Sie den Kühlschrank an Wechselspannung
anschließen:
➤ Befestigen Sie den Gleichrichter hinten am Kühlschrank.
➤ Schließen Sie den Gleichrichter an die Batterie an, wie in Abb. f, Seite 10
dargestellt:
– rot/schwarzes Kabel: Pluspol der Batterie
– schwarzes Kabel: Minuspol der Batterie
➤ Schließen Sie den Gleichrichter an den Kühlschrank an (Abb. f 2, Seite 10):
– rotes Kabel: Pluspol des Gleichrichters
– schwarzes Kabel: Minuspol des Gleichrichters
➤ Stecken Sie den Stecker in die Wechselstrom-Steckdose (Abb. f 1, Seite 10).
44
Page 45

DE
CRE Kühlschrank benutzen
8Kühlschrank benutzen
Der Kühlschrank ermöglicht die Konservierung von frischen Nahrungsmitteln.
Außerdem können Sie im Gefrierfach tiefgekühlte Lebensmittel konservieren und
frische Nahrungsmittel einfrieren.
ACHTUNG!
•
A
Im Inneren des Kühlgeräts dürfen keine elektrischen Geräte
eingesetzt werden. Als Ausnahme gelten Geräte, die vom Hersteller
dafür freigegeben sind.
•
Achten Sie darauf, dass Sie Getränke oder Speisen in Glasbehältern
nicht zu stark abkühlen. Beim Gefrieren dehnen sich Getränke oder
flüssige Speisen aus. Dadurch können die Glasbehälter zerstört
werden.
•
Lebensmittel dürfen nur in Originalverpackungen oder geeigneten
Behältern eingelagert werden.
•
Achten Sie darauf, dass sich nur Gegenstände bzw. Waren im
Kühlschrank befinden, die auf die gewählte Temperatur gekühlt
werden dürfen.
HINWEIS
•
I
Bevor Sie den neuen Kühlschrank in Betrieb nehmen, sollten Sie ihn
aus hygienischen Gründen innen und außen mit einem feuchten
Tuch reinigen (siehe auch Kapitel „Reinigung und Pflege“ auf
Seite 48).
•
Drücken Sie die Klappe des Gefrierfachs nicht gewaltsam zu.
•
Ziehen Sie die Trennwand nicht heraus, wenn sich Eis im Gefrierfach
befindet.
•
Entfernen Sie nicht den Aufkleber, der das Bedienelement abdeckt
(Abb. 4, Seite 3).
8.1 Tipps zum Energiesparen
•
Wählen Sie einen gut belüfteten und vor Sonnenstrahlen geschützten Einsatzort.
•
Lassen Sie warme Speisen erst abkühlen, bevor Sie diese einlagern.
•
Öffnen Sie den Kühlschrank nicht häufiger als nötig.
•
Lassen Sie die Tür nicht länger offen stehen als nötig. Steht die Tür länger als
5 Minuten offen, fängt das Licht an zu blinken.
•
Tauen Sie den Kühlschrank ab, sobald sich eine Eisschicht gebildet hat.
•
Vermeiden Sie unnötig tiefe Temperatureinstellungen.
45
Page 46

DE
Kühlschrank benutzen CRE
8.2 Kühlschrank einschalten
➤ Schalten Sie den Kühlschrank ein, indem Sie den Taster drücken.
8
HINWEIS
I
8.3 Temperatur einstellen
➤ Drücken Sie den Taster so oft, bis die gewünschte Temperaturstufe
eingestellt ist.
Je mehr LEDs oberhalb des Tasters leuchten, desto kälter ist die eingestellte
Temperaturstufe.
Von der letzten Temperaturstufe gelangen Sie durch erneutes Drücken des
Tasters wieder zur ersten Temperaturstufe.
Nach dem Einschalten benötigt der Kühlschrank eine gewisse Zeit, bis
der Kompressor anläuft.
HINWEIS
I
8.4 Lebensmittel konservieren
A
I
Die Kühlleistung kann beeinflusst werden von:
•
der Umgebungstemperatur
•
der Menge der zu konservierenden Lebensmittel
•
der Häufigkeit der Türöffnungen
Wenn die Umgebungstemperatur 16 °C bis 20 °C beträgt, stellen Sie
den Kühlschrank mindestens auf Stufe 2.
ACHTUNG!
•
Konservieren Sie keine warmen Lebensmittel im Kühlfach.
•
Stellen Sie keine Glasbehälter mit Flüssigkeiten in das Gefrierfach.
HINWEIS
Konservieren Sie Lebensmittel, die leicht Gerüche und Geschmäcke
aufnehmen sowie Flüssigkeiten und Produkte mit hohem Alkoholgehalt
in dichten Behältern.
Sie können im Kühlfach Lebensmittel konservieren. Die Konservierungszeit der
Lebensmittel ist normalerweise auf der Packung angegeben.
46
Page 47

DE
CRE Kühlschrank benutzen
Das Kühlfach unterteilt sich in verschiedene Zonen, die unterschiedliche
Temperaturen aufweisen:
•
Die kälteren Zonen befinden sich unmittelbar über den Schubladen für Obst und
Gemüse, nahe der Rückwand.
•
Beachten Sie Temperatur- und Haltbarkeitsangaben auf den Verpackungen Ihrer
Lebensmittel.
•
Beachten Sie folgende Hinweise beim Konservieren:
– Frieren Sie Produkte, die gerade auftauen oder aufgetaut wurden, keinesfalls
wieder ein, sondern brauchen Sie diese baldmöglichst auf.
– Wickeln Sie die Lebensmittel in Aluminium- oder Frischhaltefolie und
verwahren Sie sie in Frischhaltedosen auf. Dadurch werden die Aromen, die
Konsistenz und die Frische besser konserviert.
8.5 Gefrierfach abtauen
ACHTUNG!
A
Verwenden Sie keine mechanischen Werkzeuge zum Entfernen von
Eisschichten oder zum Lösen festgefrorener Gegenstände. Als
Ausnahme gelten Geräte, die vom Hersteller dafür freigegeben sind.
Gehen Sie wie folgt vor, um den Kühlschrank abzutauen:
➤ Nehmen Sie das Kühlgut heraus.
➤ Lagern Sie es ggf. in einem anderen Kühlgerät, damit es kalt bleibt.
➤ Drücken Sie den Taster , bis der Kühlschrank abschaltet.
➤ Öffnen Sie die Tür vollständig.
8.6 Verriegelung lösen
Der Kühlschrank verfügt über einen Verriegelungsmechanismus (Abb. g 1,
Seite 11), der auch als Transportsicherung dient. Die Tür ist gesichert, wenn sie
geschlossen ist.
➤ Um die Tür zu öffnen, ziehen Sie den Türgriff (Abb. g 2, S ei te 11) na ch obe n und
öffnen die Tür.
47
Page 48

DE
Reinigung und Pflege CRE
8.7 Kühlschrank ausschalten und stilllegen
Wenn Sie den Kühlschrank für längere Zeit stilllegen wollen, gehen Sie wie folgt vor:
➤ Drücken Sie den Taster , bis der Kühlschrank abschaltet.
➤ Klemmen Sie die Anschlusskabel von der Batterie ab oder ziehen Sie den Stecker
der Wechselstromleitung aus dem Gleichrichter.
➤ Reinigen Sie den Kühlschrank (siehe Kapitel „Reinigung und Pflege“ auf
Seite 48).
➤ Schließen Sie die Tür.
➤ Drehen Sie die Belüftungssicherung (Abb. h 1, Seite 11) bis sie einrastet.
✓ Die Tür bleibt offen und verhindert so, dass sich Gerüche bilden.
9 Reinigung und Pflege
ACHTUNG!
•
A
➤ Trennen Sie das Gerät vom Stromnetz, bevor Sie es reinigen und pflegen.
➤ Reinigen Sie den Kühlschrank regelmäßig und sobald er verschmutzt ist mit
einem feuchten Tuch.
➤ Achten Sie darauf, dass kein Wasser in die Dichtungen tropft. Dies kann die
Elektronik beschädigen.
➤ Wischen Sie den Kühlschrank nach dem Reinigen mit einem Tuch trocken.
Verwenden Sie zur Reinigung keine scharfen Reinigungsmittel oder
harten Gegenstände, da diese den Kühlschrank beschädigen
können.
•
Benutzen Sie keine harten oder spitzen Werkzeuge, um den
Abtauprozess zu beschleunigen.
48
Page 49

DE
CRE Gewährleistung
10 Gewährleistung
Es gilt die gesetzliche Gewährleistungsfrist. Sollte das Produkt defekt sein, wenden
Sie sich bitte an die Niederlassung des Herstellers in Ihrem Land (Adressen siehe
Rückseite der Anleitung) oder an Ihren Fachhändler.
Zur Reparatur- bzw. Gewährleistungsbearbeitung müssen Sie folgende Unterlagen
mitschicken:
•
eine Kopie der Rechnung mit Kaufdatum,
•
einen Reklamationsgrund oder eine Fehlerbeschreibung.
11 Entsorgung
WARNUNG! Kinderfalle!
!
Vor der Entsorgung Ihres alten Kühlschranks:
•
Hängen Sie die Türen aus.
•
Belassen Sie die Abstellflächen im Kühlschrank, damit Kinder nicht
hineinsteigen können.
➤ Geben Sie das Verpackungsmaterial möglichst in den entsprechenden
Recycling-Müll.
Wenn Sie das Produkt endgültig außer Betrieb nehmen, informieren Sie
sich bitte beim nächsten Recyclingcenter oder bei Ihrem Fachhändler
M
über die zutreffenden Entsorgungsvorschriften.
49
Page 50

DE
Störungen beseitigen CRE
12 Störungen beseitigen
Rote LED leuchtet (Abb. 4 2, Seite 3)
Bei Betriebsfehlern leuchtet die LED mehrmals auf. Die Anzahl der Impulse hängt von
der Art des Fehlers ab.
Jedes Aufleuchten dauert jeweils eine Viertelsekunde. lm Anschluss an die
Impulsserie folgt eine Pause. Die Sequenz für den Fehler wird alle vier Sekunden
wiederholt.
Anzahl
Leuchtimpulse
1 Versorgungsspannung Die Versorgungsspannung liegt außerhalb
2 Lüfter-Überstrom Der Lüfter belastet die Elektronikeinheit mit
3 Motor läuft nicht an Der Rotor sitzt fest.
4 Zu niedrige Drehzahl Bei zu stark belastetem Kühlsystem lässt sich
5 Übertemperatur der
Fehler Mögliche Ursache
des eingestellten Bereichs.
mehr als 1 A.
Zu viele Startversuche Kompressor oder Lüfter sind in kurzer Zeit zu
oft gestartet.
Der Differenzdruck im Kühlsystem ist zu hoch
(> 5 bar).
die Mindestdrehzahl des Motors von
–1
nicht aufrecht erhalten.
Elektronikeinheit
1850 min
Bei zu stark belastetem Kühlsystem oder zu
hoher Temperatur wird die Elektronik zu heiß.
Dauernd Fehler Temperaturfühler Temperaturfühler defekt
Orange LED blinkt (Abb. 4 3, Seite 3)
Wenn die LED dauerhaft schnell blinkt, gehen Sie wie folgt vor:
➤ Drücken Sie den Taster , bis der Kühlschrank abschaltet.
➤ Klemmen Sie die Anschlusskabel von der Batterie ab oder ziehen Sie den Stecker
der Wechselstromleitung aus dem Gleichrichter.
➤ Warten Sie eine Minute, schließen Sie den Kühlschrank wieder an die
Stromversorgung an und schalten Sie ihn ein.
➤ Wenn die orange LED immer noch blinkt, kontaktieren Sie den Kundendienst.
50
Page 51

DE
CRE Störungen beseitigen
Kompressor läuft nicht (Batterieanschluss)
Störung Mögliche Ursache Lösung
UKL = 0 V Unterbrechung in der
Anschlussleitung Batterie – Elektronik
Hauptschalter defekt (falls
vorhanden)
Zusätzliche Leitungsabsicherung
durchgebrannt (falls vorhanden)
U
≤ U
KL
EIN
Startversuch mit
U
≤ U
KL
AUS
Batteriespannung zu niedrig Batterie laden
Lose Kabelverbindung
Schlechter Kontakt (Korrosion)
Batteriekapazität zu gering Batterie wechseln
Kabelquerschnitt zu gering Kabel wechseln (Kapitel
Startversuch mit
≥ U
U
KL
EIN
Umgebungstemperatur zu hoch –
Be- und Entlüftung nicht ausreichend Kühlschrank umstellen
Verbindung herstellen
Hauptschalter wechseln
Leitungsabsicherung
wechseln
Verbindung herstellen
„Kühlschrank an
Gleichspannung
anschließen“ auf
Seite 42)
Elektrische
Unterbrechung im
Kompressor zwischen
den Stiften
U
U
U
Spannung zwischen Plus- und Minusklemme der Elektronik
KL
Einschaltspannung Elektronik
EIN
Ausschaltspannung Elektronik
AUS
Kondensator verschmutzt Kondensator reinigen
Kompressor defekt Kompressor wechseln
51
Page 52

DE
Störungen beseitigen CRE
Kompressor läuft nicht (Anschluss an Wechselspannung)
Störung Mögliche Ursache Lösung
Keine Spannung Unterbrechung in der
Anschlussleitung
Hauptschalter defekt (falls
vorhanden)
Zusätzliche Leitungsabsicherung
durchgebrannt (falls vorhanden)
Spannung liegt an, aber
Kompressor läuft nicht
Elektrische
Unterbrechung im
Kompressor zwischen
den Stiften
Umgebungstemperatur zu hoch –
Be- und Entlüftung nicht ausreichend Kühlschrank umstellen
Kondensator verschmutzt Kondensator reinigen
Kompressor defekt Kompressor wechseln
Kühlleistung lässt nach, Innentemperatur steigt
Verbindung herstellen
Hauptschalter wechseln
Leitungsabsicherung
wechseln
Störung Mögliche Ursache Lösung
Kompressor läuft
lange/dauernd
Kompressor läuft selten Batteriekapazität erschöpft Batterie laden
Umgebungstemperatur zu hoch –
Be- und Entlüftung nicht ausreichend Kühlschrank umstellen
Kondensator verschmutzt Kondensator reinigen
Lüfter defekt Lüfter wechseln
Ungewöhnliche Geräusche
Störung Mögliche Ursache Lösung
Lautes Brummen Bauteil des Kältekreislaufes kann nicht
frei schwingen (liegt an Wandung an)
Fremdkörper zwischen Kühlmaschine
und Wand eingeklemmt
Lüftergeräusch –
Bauteil vorsichtig
abbiegen
Fremdkörper entfernen
52
Page 53

DE
CRE Technische Daten
E4
ID 0000056012
13 Technische Daten
CRE0050 CRE0065 CRE0080
Inhalt Kühlfach:
Inhalt Gefrierfach:
Nutzinhalt: 45 l 57 l 78 l
Anschlussspannung: 12 Vg oder 24 Vg
Nennstrom
12 Vg:
24 Vg:
Kühltemperaturbereich
Kühlschrank:
Gefrierfach:
Klimaklasse: ST
Luftfeuchtigkeit: maximal 90 %
Kurzzeitige Krängung: maximal 30°
Max. Druck: ND 11 bar/HD 25 bar
Treibmittel: C
41,2 l
4,4 l
5,2 A
2,5 A
50 l
7,0 l
5,8 A
2,8 A
+0 °C bis +12 °C
–12 °C bis –6 °C
5H10
70,6 l
7,5 l
6,5 A
3,1 A
Kühlmittel: R134a
Kühlmittelmenge: 40 g 45 g 48 g
CO2-Äquivalent: 0,057 t 0,064 t 0,069 t
Treibhauspotential (GWP): 1430
Abmessungen: Abb. i, Seite 12 Abb. j, Seite 12 Abb. k, Seite 12
Gewicht: 12,57 kg 14,15 kg 15,53 kg
Prüfung/Zertifikat:
Enthält fluorierte Treibhausgase
Hermetisch geschlossene Einrichtung
Die aktuelle EU-Konformitätserklärung für Ihr Gerät erhalten Sie auf der jeweiligen
Produktseite auf dometic.com oder direkt über den Hersteller (siehe Rückseite).
53
Page 54

FR
CRE
Veuillez lire attentivement cette notice avant le montage et la mise en
service. Veuillez ensuite la conserver. En cas de passer le produit, veuillez
le transmettre au nouvel acquéreur.
Sommaire
1 Signification des symboles . . . . . . . . . . . . . . . . . . . . . . . . . . . . . . . . . . . . . . 55
2 Consignes de sécurité . . . . . . . . . . . . . . . . . . . . . . . . . . . . . . . . . . . . . . . . . 55
3 Contenu de la livraison . . . . . . . . . . . . . . . . . . . . . . . . . . . . . . . . . . . . . . . . . 58
4 Accessoires . . . . . . . . . . . . . . . . . . . . . . . . . . . . . . . . . . . . . . . . . . . . . . . . . . 58
5 Usage conforme . . . . . . . . . . . . . . . . . . . . . . . . . . . . . . . . . . . . . . . . . . . . . . 58
6 Description technique . . . . . . . . . . . . . . . . . . . . . . . . . . . . . . . . . . . . . . . . . 59
7 Installation et raccordement du réfrigérateur . . . . . . . . . . . . . . . . . . . . . . . 60
8 Utilisation du réfrigérateur . . . . . . . . . . . . . . . . . . . . . . . . . . . . . . . . . . . . . . 65
9 Nettoyage et entretien . . . . . . . . . . . . . . . . . . . . . . . . . . . . . . . . . . . . . . . . . 69
10 Garantie. . . . . . . . . . . . . . . . . . . . . . . . . . . . . . . . . . . . . . . . . . . . . . . . . . . . . 69
11 Élimination des déchets . . . . . . . . . . . . . . . . . . . . . . . . . . . . . . . . . . . . . . . . 70
12 Guide de dépannage . . . . . . . . . . . . . . . . . . . . . . . . . . . . . . . . . . . . . . . . . . .71
13 Caractéristiques techniques . . . . . . . . . . . . . . . . . . . . . . . . . . . . . . . . . . . . . 75
54
Page 55

FR
CRE Signification des symboles
1 Signification des symboles
DANGER !
D
!
!
A
Consigne de sécurité : le non-respect de ces consignes entraîne la
mort ou de graves blessures.
AVERTISSEMENT !
Consigne de sécurité : le non-respect de ces consignes peut entraîner
la mort ou de graves blessures.
ATTENTION !
Consigne de sécurité : le non-respect de ces consignes peut entraîner
des blessures.
AVIS !
Le non-respect de ces consignes peut entraîner des dommages
matériels et des dysfonctionnements du produit.
REMARQUE
Informations complémentaires sur l'utilisation du produit.
I
2 Consignes de sécurité
Le fabricant décline toute responsabilité pour des dommages dans les cas suivants :
•
des défauts de montage ou de raccordement
•
des influences mécaniques et des surtensions ayant endommagé le matériel
•
des modifications apportées au produit sans autorisation explicite de la part du
fabricant
•
une utilisation différente de celle décrite dans la notice
2.1 Sécurité générale
AVERTISSEMENT !
•
!
Seul un technicien qualifié doit procéder à l'installation dans des
endroits humides.
•
Si l'appareil présente des dégâts visibles, ne le mettez pas en service.
55
Page 56

FR
Consignes de sécurité CRE
•
Si le câble de raccordement de l'appareil est endommagé, il doit être
remplacé par le fabricant, son service après-vente ou une personne de
qualification similaire, afin d'éviter tout danger.
•
Seul un personnel qualifié est habilité à effectuer des réparations sur
l'appareil. Toute réparation mal effectuée risquerait d'entraîner de
graves dangers.
•
Cet appareil peut être utilisé par des enfants âgés de 8 ans ou plus,
ainsi que par des personnes ayant des capacités physiques,
sensorielles ou mentales affaiblies ou un manque d'expérience et de
connaissances, à condition qu'ils soient supervisés ou aient été
informés sur la façon d'utiliser le dispositif en toute sécurité et soient au
courant des risques qui en découlent.
•
Le nettoyage et l’entretien ne doivent pas être effectués par des
enfants sans surveillance.
•
Les enfants doivent être surveillés pour s'assurer qu'ils ne jouent pas
avec l'appareil.
!
A
•
Placez et utilisez l'appareil hors de portée des enfants de moins de
8ans.
•
Ne stockez aucune substance explosive comme p. ex. des aérosols
contenant des agents propulseurs dans l'appareil.
ATTENTION !
•
Risque d'écrasement ! Ne touchez pas la charnière.
•
Les produits alimentaires doivent être conservés dans leurs
emballages originaux ou dans des récipients appropriés.
AVIS !
•
Vérifiez que la tension indiquée sur la plaque signalétique correspond
à l'alimentation électrique dont vous disposez.
•
Ne tirez jamais sur le câble de raccordement pour sortir la fiche de la
prise.
•
Débranchez de la batterie le réfrigérateur et les autres consommateurs
d'énergie avant de raccorder un chargeur rapide.
•
Débranchez ou éteignez le réfrigérateur lorsque vous éteignez le
moteur. Dans le cas contraire, il se pourrait que la batterie se
décharge.
•
N'utilisez pas le réfrigérateur pour le sto ckage de produits corr osifs ou
de solvants.
•
Veillez à ce que l'ouverture d'évacuation soit toujours propre.
56
Page 57

FR
CRE Consignes de sécurité
•
N'ouvrez jamais le circuit frigorifique.
•
Ne transportez jamais l'appareil en position horizontale afin que
l'huile ne puisse pas s'écouler du compresseur.
•
Lors du transport, veillez à ne pas endommager le circuit frigorifique.
Le réfrigérant du circuit frigorifique s'enflamme facilement.
En cas d'endommagement du circuit frigorifique :
– Éteignez le réfrigérateur.
– Aérez bien la pièce.
•
Installez l'appareil dans un endroit sec et à l'abri des éclaboussures
d'eau.
2.2 Consignes de sécurité concernant le fonctionnement
de l'appareil
DANGER !
D
!
A
•
Ne touchez jamais les lignes électriques dénudées avec les mains
nues.
ATTENTION !
•
Avant de mettre l'appareil en service, assurez-vous que la ligne
d'alimentation électrique et le connecteur sont secs.
•
Lorsque vous raccordez l'appareil à une batterie, assurez-vous que les
aliments ne sont pas en contact avec les acides de la batterie.
AVIS !
•
N'exploitez pas d'appareils électriques dans le réfrigérateur, sauf s'ils
sont recommandés par le fabricant pour cet usage.
•
Ne placez pas l'appareil près de flammes ou d'autres sources de
chaleur (chauffage, rayons solaires, fours à gaz, etc.)
•
Risque de surchauffe !
Veillez toujours à ce que la chaleur produite lors du fonctionnement
puisse se dissiper suffisamment. Veillez à ce que l'appareil se trouve à
une distance suffisante des murs ou des objets, de sorte que l'air
puisse circuler.
•
Assurez-vous que les orifices d'aération ne sont pas recouverts.
•
Ne remplissez pas le bac intérieur de substances liquides ou de
glace.Ne plongez jamais l'appareil dans l'eau.
•
Tenez l'appareil et les câbles à l'abri de la chaleur et de l'humidité.
57
Page 58

FR
Contenu de la livraison CRE
•
Veillez à ce que la nourriture ne touche pas les parois du
compartiment de réfrigération.
3 Contenu de la livraison
Quantité Description
1 Réfrigérateur à tablettes
1 Tubulure d’évacuation
1 Instructions de montage et de service
4Accessoires
Disponibles en accessoires (non compris dans la livraison) :
Description Explication No de réf.
Redresseur Transforme une tension d’entrée de 100 – 240 Vw en
tension 12 Vg ou 24 Vg, de sorte que le réfrigérateur
peut être raccordé à un secteur alternatif.
9600000445
5Usage conforme
Le réfrigérateur est conçu pour le montage dans les caravanes, camping-cars ou
bateaux. Il est exclusivement conçu pour être installé dans une alcôve. Une fois le
montage effectué, seul l'avant de l'appareil doit pouvoir être accessible.
Le réfrigérateur convient uniquement pour réfrigérer, congeler et stocker des
aliments.
AVERTISSEMENT !
!
Le réfrigérateur n'est pas destiné au stockage conforme des
médicaments.
ATTENTION ! Risque pour la santé !
!
Veuillez vérifier si la puissance frigorifique du réfrigérateur correspond à
la température de conservation recommandée pour les aliments que
vous souhaitez conserver au frais.
58
Page 59

FR
CRE Description technique
6 Description technique
Les réfrigérateurs CoolMatic de la série CRE peuvent réfrigérer et tenir au frais les
aliments. Le compartiment congélateur permet de congeler des aliments.
Tous les matériaux utilisés lors de la construction de la glacière n'altèrent pas la
qualité des aliments. Le circuit frigorifique est sans entretien.
En cas d'utilisation sur les bateaux, le réfrigérateur peut supporter, pendant une
courte période, un angle de gîte de 30°.
La température se règle grâce au panneau de commande situé à l'intérieur du
réfrigérateur, du côté gauche.
Quatre plages de température, de +0 °C à +12 °C, sont disponibles.
6.1 Commandes à l'intérieur du réfrigérateur
Les différents types de réfrigérateurs sont représentés sur les illustrations suivantes :
•
CRE0050 : fig. 1, page 2
•
CRE0065 : fig. 2, page 2
•
CRE0080 : fig. 3, page 3
Pos. Explication
1 Compartiment congélateur
2 Panneau de commande
3 Clayette type grille (repliable pour pouvoir placer des bouteilles dans
le compartiment de réfrigération)
4 Blocage de bouteilles (pour maintenir les bouteilles dans le
balconnet de la contre-porte)
5 Compartiment
59
Page 60

FR
Installation et raccordement du réfrigérateur CRE
6.2 Éléments de commande
Pos. dans
fig. 4, page 3
1 Capteur IR pour la commutation de l'éclairage intérieur
2 LED rouge : indication de panne
3 LED bleue : le compresseur fonctionne
4 Touche Marche/Arrêt
5 Lumière intérieure
6 Touche de sélection de la température
7 LED : niveaux de température
Explication
LED orange : le compresseur est arrêté
7 Installation et raccordement du
réfrigérateur
7.1 Consignes de sécurité relatives à l'installation sur
bateaux
Concernant l'installation sur bateaux, veuillez observer les consignes spéciales
suivantes :
DANGER !
D
A
veillez à ce que votre alimentation électrique soit sécurisée par un
disjoncteur différentiel si l'appareil est branché sur le secteur.
AVIS !
•
L’appareil peut être incliné sur le côté, jusqu’à 30°, pendant un bref
instant. Veillez lors de l'installation du réfrigérateur à ce que sa
fixation soit adaptée à ces conditions. Consultez un professionnel en
cas de questions relatives à l'installation.
•
Installez le réfrigérateur de manière à ce que l'air chaud puisse bien
s'échapper (soit par le haut, soit par les côtés, fig. 5, page 4).
•
Cet appareil est conçu pour des températures ambiantes de +16 °C
à +38 °C.
60
Page 61

FR
CRE Installation et raccordement du réfrigérateur
7.2 Remarques relatives à l'installation du réfrigérateur
Observez les consignes suivantes en ce qui concerne l'installation :
•
installez le réfrigérateur de manière à ce que l'air chaud puisse bien s'échapper
(soit par le haut, soit par les côtés, fig. 5, page 4).
Légende de fig. 5, page 4
Pos. Explication
1 air entrant froid
2 air évacué chaud
3 condenseur
4 espace supérieur si la circulation d'air évacué en haut ou sur le côté est
insuffisante.
•
Observez les dimensions de montage suivantes :
– CRE0050 : 550 x 390 x max 544 mm
– CRE0065 : 595 x 458 x max 535 mm
– CRE0080 : 578 x 485 x max 650 mm
•
Ne bouchez pas les ouvertures (fentes d'aération, etc.) du bâti ou de la structure
d'encastrement.
•
En fonctionnement normal du réfrigérateur, de l'eau de condensation se forme.
Vous pouvez essuyer régulièrement l'eau de condensation au fond du
réfrigérateur ou l'évacuer par un tuyau d'évacuation au fond du réfrigérateur
(voir chapitre « Montage de la tubulure d’évacuation (option) », page 61).
7.3 Montage de la tubulure d’évacuation (option)
➤ Reliez un tuyau, de diamètre intérieur de 10 mm (non fourni), à la tubulure
d’évacuation.
➤ Allongez le réfrigérateur sur le côté afin d’accéder à la partie inférieure.
AVIS !
A
➤ Montez la tubulure d’évacuation (fig. 6 2, page 4) alignée avec l’avant ou
l’arrière, selon le sens d’évacuation souhaité.
Ne branchez pas l’appareil tant qu’il n’est pas resté 4 heures en position
verticale.
➤ Retirez le bouchon (fig. 6 1, page 4) à l'intérieur du réfrigérateur.
61
Page 62

FR
Installation et raccordement du réfrigérateur CRE
7.4 Installation du réfrigérateur
Procédez de la manière suivante pour installer le réfrigérateur :
➤ si vous souhaitez évacuer l'eau de condensation par un flexible :
Montez la tubulure de sortie (voir chapitre « Montage de la tubulure d’évacuation
(option) », page 61)
➤ Retirez la sécurité de transport (chapitre « Déverrouillage », page 68).
➤ Ouvrez la porte du réfrigérateur.
➤ Retirez les caches (fig. 7 2, page 5).
➤ Insérez le réfrigérateur dans l'alcôve.
➤ Fixez le réfrigérateur avec des vis adaptées (fig. 7 1, page 5).
➤ Enfoncez les caches (fig. 7 2, page 5) dans les trous.
7.5 Modification du côté d'ouverture de la porte
Vous pouvez modifier le côté d'ouverture de la porte de sorte que la porte s'ouvre
vers la gauche plutôt que vers la droite.
➤ Procédez comme le montrent les illustrations fig. 8, page 6 à fig. 9, page 6
pour modifier le côté d'ouverture de la porte.
7.6 Changement du décor de la porte
AVIS ! Risque d'endommagement !
A
La plaque de décor présente les mesures suivantes (voir fig. 0, page 7) :
CRE0050 350 ± 0.5 mm 474 ± 0.5 mm
Le décor de la porte doit être remplacé uniquement lorsque le
réfrigérateur est en position droite.
Modèle A B C
0,5 mmCRE0065 419 ± 0.5 mm 468 ± 0.5 mm
CRE0080 445 ± 0.5 mm 582 ± 0.5 mm
62
Page 63

FR
CRE Installation et raccordement du réfrigérateur
Retrait et installation de la plaque de décor
➤ Procédez comme indiqué (fig. a, page 7 à fig. c, page 9) pour retirer la
plaque de décor.
➤ Suivez la procédure inverse pour installer la plaque de décor.
7.7 Raccordement du réfrigérateur à la tension continue
AVIS !
•
A
Pour éviter des pertes de tension et de puissance frigorifique, le
câble de raccordement doit être le plus court possible.
Évitez de placer des interrupteurs, des connecteurs ou des
répartiteurs supplémentaires.
•
Débranchez l'appareil et les autres consommateurs d'énergie de la
batterie avant de recharger la batterie avec un chargeur rapide. Les
surtensions peuvent endommager l'électronique des appareils.
Le réfrigérateur peut fonctionner avec une alimentation en tension continue
(12/24 Vg).
Pour des raisons de sécurité, le réfrigérateur est équipé d’un système électronique
pour empêcher l’inversion de polarité. Cela protège le réfrigérateur des courtscircuits et de l’inversion de polarité lors du branchement sur une batterie.
Pour protéger la batterie, le réfrigérateur s'éteint automatiquement lorsque la
tension n'est plus suffisante (voir tableau suivant).
12 V 24 V
Tension d'arrêt
Tension de remise en marche
➤ Déterminez la section nécessaire du câble en fonction de sa longueur, selon
fig. d, page 9.
Légende de la fig. d, page 9 :
Axe des coordonnées Signification Unité
10,4 V 22,8 V
11,7 V 24,2 V
l Longueur de câble m
∅ Section du câble mm²
63
Page 64

FR
Installation et raccordement du réfrigérateur CRE
AVIS !
Ce faisant, respectez la polarité.
A
➤ Avant de mettre l'appareil en service, vérifiez que la tension de service et celle de
la batterie sont identiques (voir la plaque signalétique).
➤ Raccordez le réfrigérateur à une prise femelle protégée par un fusible d'au moins
15 A (pour une tension de 12 Vg) ou 7,5 A (pour une tension de 24 Vg)
(fig. e 1, page 10).
➤ Raccordez le câble rouge (fig. e rd, page 10) au pôle positif de la batterie.
➤ Raccordez le câble noir (fig. e bk, page 10) au pôle négatif de la batterie.
7.8 Raccordement du réfrigérateur à la tension
alternative
DANGER ! Danger de mort !
•
D
Vous pouvez raccorder le réfrigérateur à une tension alternative si vous utilisez le
redresseur de courant MPS35 (accessoire).
Le redresseur de courant MPS35 possède un raccordement prioritaire qui protège
la batterie raccordée. Lors de l’utilisation d'une alimentation en tension, le
redresseur passe automatiquement du fonctionnement batterie au fonctionnement
secteur.
Si la tension alternative est coupée, le redresseur de courant repasse
automatiquement en mode de fonctionnement sur batterie. Le fonctionnement
secteur via redresseur a toujours priorité sur le fonctionnement batterie.
Ne vous approchez pas de prises ou de commutateurs lorsque vous
avez les mains mouillées ou les pieds dans l'eau.
•
Si vous raccordez votre réfrigérateur à bord d'un bateau à un secteur
alternatif par l'intermédiaire d'une prise de quai, vous devez dans
tous les cas brancher un disjoncteur différentiel entre le secteur de
tension alternative et le réfrigérateur.
Veuillez vous renseigner auprès d'un spécialiste.
Procédez comme suit si vous raccordez le réfrigérateur à une tension alternative :
➤ Fixez le redresseur derrière le réfrigérateur.
➤ Connectez le redresseur à la batterie conformément à fig. f, page 10 :
– Câble rouge/noir : pôle positif de la batterie
– Câble noir : pôle négatif de la batterie
64
Page 65

FR
CRE Utilisation du réfrigérateur
➤ Raccordez le redresseur de courant au réfrigérateur (fig. f 2, page 10) :
– Câble rouge : pôle positif du redresseur
– Câble noir : pôle négatif du redresseur
➤ Introduisez la fiche dans la prise CA (fig. f 1, page 10).
8 Utilisation du réfrigérateur
Le réfrigérateur permet la conservation des aliments frais. Le compartiment
congélateur conserve les aliments congelés et congèle les aliments frais.
AVIS !
•
A
Il est interdit d'utiliser un appareil électrique à l’intérieur du
réfrigérateur. Les seules exceptions sont les appareils autorisés par le
fabricant à cet effet.
•
Veillez à ce que les boissons ou aliments placés dans des récipients
en verre ne soient pas soumis à des températures trop basses. En
gelant, le volume des boissons et aliments liquides augmente, ce qui
peut détruire les récipients en verre.
•
Les produits alimentaires doivent être conservés dans leurs
emballages originaux ou dans des récipients appropriés.
•
Veillez à ne déposer dans la glacière que des objets ou des aliments
qui peuvent être réfrigérés à la température sélectionnée.
I
REMARQUE
•
Avant de mettre en service votre nouveau réfrigérateur, vous devez,
pour des raisons d’hygiène, le nettoyer à l’intérieur et à l’extérieur à
l’aide d’un tissu humide (voir aussi chapitre « Nettoyage et
entretien », page 69).
•
Ne fermez pas le clapet du compartiment congélation en appuyant
violemment dessus.
•
Ne sortez pas la paroi de séparation si de la glace se trouve dans le
compartiment congélation.
•
Ne retirez pas l’autocollant recouvrant l’élément de commande
(fig. 4, page 3).
65
Page 66

FR
Utilisation du réfrigérateur CRE
8.1 Comment économiser de l'énergie?
•
Choisissez un emplacement bien aéré et à l'abri du soleil.
•
Laissez refroidir les aliments chauds avant de les mettre dans le réfrigérateur.
•
N'ouvrez pas le réfrigérateur plus souvent que nécessaire.
•
Ne laissez pas la porte ouverte plus longtemps que nécessaire. Si la porte reste
ouverte plus de 5 minutes, la lumière commence à clignoter.
•
Dégivrez le réfrigérateur dès qu'une couche de glace s'est formée.
•
Évitez une température intérieure inutilement basse.
8.2 Mise en marche du réfrigérateur
➤ Allumez le réfrigérateur en appuyant sur la touche .
8
REMARQUE
I
Après la mise en marche, le réfrigérateur a besoin d'un certain temps
avant que le compresseur ne se mette en marche.
8.3 Réglage de la température
➤ Appuyez plusieurs fois sur la touche jusqu’à ce que le niveau de température
souhaité soit réglé.
Plus il y a de LED allumées au-dessus de la touche, plus la température est basse.
Pour passer du dernier au premier niveau, appuyez à nouveau sur la touche .
REMARQUE
I
La puissance frigorifique peut être influencée par :
•
la température ambiante
•
la quantité des aliments à conserver
•
la fréquence de l'ouverture de la porte
Si la température ambiante est comprise entre 16 °C et 20 °C, placez le
réfrigérateur au minimum sur le niveau 2.
66
Page 67

FR
CRE Utilisation du réfrigérateur
8.4 Conservation des aliments
AVIS !
•
A
I
Vous pouvez conserver des aliments dans le réfrigérateur. Normalement, la durée
de conservation des aliments est indiquée sur l'emballage.
Le compartiment réfrigérateur se répartit en plusieurs zones qui présentent
différentes températures :
Ne conservez pas les aliments chauds dans le réfrigérateur.
•
Ne placez pas de récipients en verre remplis de liquides dans le
compartiment congélateur.
REMARQUE
Conservez les aliments qui ont tendance à absorber les odeurs et les
arômes, ainsi que les liquides et les produits à forte teneur en alcool dans
des conteneurs hermétiques.
•
Les zones les plus froides se trouvent directement au-dessus du bac à légumes,
près de la paroi arrière.
•
Veuillez respecter les indications relatives à la température et à la péremption
figurant sur les emballages des aliments.
•
Observez les consignes suivantes en ce qui concerne la conservation :
– Ne recongelez jamais des produits en cours de décongélation ou
décongelés, consommez-les au plus vite.
– Enveloppez les aliments dans du papier aluminium ou du film étirable, et
conservez-les dans un récipient hermétique. De cette façon, les arômes, la
texture et la fraîcheur se conservent mieux.
67
Page 68

FR
Utilisation du réfrigérateur CRE
8.5 Dégivrage du freezer
AVIS !
A
Procédez de la manière suivante pour dégivrer le réfrigérateur :
➤ Retirez les aliments.
➤ Placez-les éventuellement dans un autre réfrigérateur pour qu'ils restent froids.
➤ Appuyez sur la touche jusqu'à ce que le réfrigérateur s'éteigne.
➤ Laissez la porte entièrement ouverte.
N'utilisez jamais d'outils mécaniques pour enlever les couches de glace
ou pour détacher des objets gelés à l'intérieur du réfrigérateur. Les
seules exceptions sont les appareils autorisés par le fabricant à cet effet.
8.6 Déverrouillage
Le réfrigérateur dispose d'un mécanisme de verrouillage (fig. g 1, page 11) servant
également de protection de transport. La porte est sécurisée lorsqu’elle est
verrouillée.
➤ Pour ouvrir la porte, tirez la poignée (fig. g 2, page 11) vers le haut et ouvrez la
porte.
8.7 Arrêt et mise hors service du réfrigérateur
Lorsque vous voulez mettre le réfrigérateur hors service pendant une période
prolongée, procédez de la façon suivante :
➤ Appuyez sur la touche jusqu'à ce que le réfrigérateur s'éteigne.
➤ Débranchez le câble de raccordement de la batterie ou débranchez la prise de
la ligne de courant alternatif en la retirant du redresseur.
➤ Nettoyez le réfrigérateur (voir chapitre « Nettoyage et entretien », page 69).
➤ Fermez la porte.
➤ Tournez le verrou d’aération(fig. h 1, page 11) jusqu’à ce qu'il s’enclenche.
✓ La porte reste entrouverte et empêche ainsi que de mauvaises odeurs ne se
forment.
68
Page 69

FR
CRE Nettoyage et entretien
9 Nettoyage et entretien
AVIS !
•
A
➤ Avant toute opération de nettoyage ou d'entretien de l'appareil, veillez à
débrancher celui-ci du secteur.
➤ Nettoyez le réfrigérateur régulièrement et dès qu'il est sale, avec un chiffon
humide.
➤ Veillez à ce que de l'eau ne goutte pas sur les joints. Cela risque d'endommager
les composants électroniques.
➤ Essuyez l'appareil avec un chiffon après l'avoir nettoyé.
N'utilisez pas de produits de lavage abrasifs ou d'objets durs pour le
nettoyage car ceux-ci pourraient endommager l’appareil.
•
N'utilisez pas d'outils durs ou pointus pour accélérer le processus de
dégivrage.
10 Garantie
Le délai légal de garantie s'applique. Si le produit s'avérait défectueux, veuillez vous
adresser à la filiale du fabricant située dans votre pays (voir adresses au verso du
présent manuel) ou à votre revendeur spécialisé.
Veuillez y joindre les documents suivants pour la gestion des réparations et de la
garantie :
•
une copie de la facture avec la date d'achat,
•
le motif de la réclamation ou une description du dysfonctionnement.
69
Page 70

FR
Élimination des déchets CRE
11 Élimination des déchets
AVERTISSEMENT ! Risque d’enfermement pour les enfants !
!
➤ Jetez les emballages dans les conteneurs de déchets recyclables prévus à cet
effet.
M
Avant de mettre au rebut votre ancien réfrigérateur :
•
Enlevez les portes de leurs gonds.
•
Laissez les clayettes dans le réfrigérateur, afin que les enfants ne
puissent pas entrer dedans.
Lorsque vous mettrez votre produit définitivement hors service, informezvous auprès du centre de recyclage le plus proche ou auprès de votre
revendeur spécialisé sur les prescriptions relatives au retraitement des
déchets.
70
Page 71

FR
CRE Guide de dépannage
12 Guide de dépannage
La LED rouge clignote (fig. 4 2, page 3)
En cas de défaut, la LED clignote à plusieurs reprises. Le nombre de clignotements
dépend du type de défaut.
Chaque clignotement dure un quart de seconde. Une pause suit la série de
clignotements. La séquence correspondant au défaut est répétée toutes les quatre
secondes.
Nombre
d'impulsions
lumineuses
1 Tension d’alimentation La tension d'alimentation se trouve en dehors
Dysfonctionnement Cause possible
de la plage réglée.
2Surintensité du
ventilateur
Tentatives de
démarrage trop
nombreuses
3 Le moteur ne démarre
pas
4 Vitesse de rotation trop
faible
5 Température excessive
de l’unité électronique
Permanent Erreur du capteur de
température
Le ventilateur exige de l'unité électronique
une intensité de plus d'1 A.
Le compresseur ou le ventilateur ont démarré
trop souvent dans un bref délai.
Le rotor est coincé.
La pression différentielle dans le système
réfrigérant est trop élevée (>5 bar).
Un système de refroidissement subissant des
charges trop élevées empêche le moteur de
tourner au régime minimum requis de
1850 tr/min.
Si le système réfrigérant est trop sollicité ou
atteint une température trop élevée, les
composants électroniques chauffent trop.
Le capteur de température est défectueux.
71
Page 72

FR
Guide de dépannage CRE
La LED orange clignote (fig. 4 3, page 3)
Lorsque la LED clignote rapidement en continu, procédez de la manière suivante :
➤ Appuyez sur la touche jusqu'à ce que le réfrigérateur s'éteigne.
➤ Débranchez le câble de raccordement de la batterie ou débranchez la prise de
la ligne de courant alternatif en la retirant du redresseur.
➤ Patientez une minute, reliez à nouveau le réfrigérateur à l’alimentation électrique
et allumez-le.
➤ Si la LED orange clignote toujours, contactez le service après-vente.
Le compresseur ne fonctionne pas (raccordement sur batterie)
Problème Cause possible Solution
U
BORNES
U
BORNES
Tentative de démarrage
avec U
= 0 V Interruption de la ligne de
≤ U
MARCHE
BORNES
≤ U
ARRET
Établir la connexion
raccordement entre la batterie et
l'électronique
Commutateur principal défectueux
(s'il fait partie des composants)
Le fusible supplémentaire de la ligne
est grillé (s'il fait partie des
composants)
Tension de batterie trop faible Charger la batterie
Les câbles sont débranchés
Mauvais contact (corrosion)
Capacité de batterie trop faible Changement des piles
Section du câble trop petite Changer le câble
Changer l'interrupteur
principal
Changer le fusible de la
ligne
Établir la connexion
(chapitre « Raccordement
du réfrigérateur à la
tension continue »,
page 63)
72
Page 73

FR
CRE Guide de dépannage
Problème Cause possible Solution
Tentative de démarrage
avec
U
BORNES
≥ U
MARCHE
Température ambiante trop élevée –
Ventilation par aspiration et aération
insuffisante
Déplacer l'appareil
Le condenseur est sale Nettoyer le condenseur
Interruption électrique
Compresseur défectueux Changer le compresseur
dans le compresseur
entre les broches
U
BORNES
U
MARCHE
U
ARRET
Tension entre la borne positive et la borne négative de l'électronique
Tension de démarrage de l'électronique
Tension d'arrêt de l'électronique
Le compresseur ne fonctionne pas (raccordement sur tension alternative)
Problème Cause possible Solution
Pas de tension Interruption dans la ligne électrique Établir la connexion
Il y a une tension mais le
compresseur ne
fonctionne pas
Interruption électrique
dans le compresseur
entre les broches
Commutateur principal défectueux
(s'il fait partie des composants)
Le fusible supplémentaire de la ligne
est grillé (s'il fait partie des
Changer l'interrupteur
principal
Changer le fusible de la
ligne
composants)
Température ambiante trop élevée –
Ventilation par aspiration et aération
Déplacer l'appareil
insuffisante
Le condenseur est sale Nettoyer le condenseur
Compresseur défectueux Changer le compresseur
73
Page 74

FR
Guide de dépannage CRE
Diminution de la puissance frigorifique, augmentation de la température
intérieure
Problème Cause possible Solution
Longue durée de
fonctionnement /
fonctionnement continu
du compresseur
Le compresseur
fonctionne rarement
Température ambiante trop élevée –
Ventilation par aspiration et aération
insuffisante
Le condenseur est sale Nettoyer le condenseur
Ventilateur défectueux Changer le ventilateur
Batterie à plat Charger la batterie
Déplacer l'appareil
Bruits inhabituels
Problème Cause possible Solution
Fort ronflement Les mouvements d'un élément du
circuit de refroidissement sont
bloqués (l'élément est coincé contre
la paroi)
Corps étranger coincé entre l'unité
de réfrigération et la paroi
Redresser l'élément avec
précaution
Retirer le corps étranger
Le ventilateur fait du bruit –
74
Page 75

FR
CRE Caractéristiques techniques
ID 0000056012
13 Caractéristiques techniques
CRE0050 CRE0065 CRE0080
Capacité du compartiment
réfrigérateur :
Capacité compartiment
congélateur :
Capacité : 45 l 57 l 78 l
Te n si o n : 1 2 V g ou 24 Vg
Courant nominal
12 Vg :
24 Vg :
Plage de température de
refroidissement
Réfrigérateur :
Congélateur :
Classe climatique : ST
Humidité de l'air : maximum 90 %
Inclinaison à court terme : maximum 30°
41,2 l
4,4 l
5,2 A
2,5 A
50 l
7,0 l
5,8 A
2,8 A
+0 °Cà+12 °C
-12 °Cà-6 °C
70,6 l
7,5 l
6,5 A
3,1 A
Pression maximale : BP 11 bar/HP 25 bar
Fluide moteur : C
Réfrigérant : R134a
Quantité de réfrigérant : 40 g 45 g 48 g
Équivalent CO2: 0,057 t 0,064 t 0,069 t
Potentiel d'effet de serre (GWP) : 1430
Dimensions : fig. i, page 12 fig. j, page 12 fig. k, page 12
Poids : 12,57 kg 14,15 kg 15,53 kg
Contrôle/certificat :
5H10
E4
75
Page 76

FR
Caractéristiques techniques CRE
Contient des gaz à effet de serre fluorés
Equipement hermétiquement scellé
Vous trouverez la déclaration de conformité UE actuelle pour votre appareil sur la
page de produit concernée sur dometic.com ou directement auprès du fabricant
(voir verso).
76
Page 77

ES
CRE
Lea detenidamente estas instrucciones antes de llevar a cabo la instalación
y puesta en funcionamiento, y consérvelas en un lugar seguro. En caso de
vender o entregar el producto a otra persona, entregue también estas
instrucciones.
Índice
1 Explicación de los símbolos . . . . . . . . . . . . . . . . . . . . . . . . . . . . . . . . . . . . . 78
2 Indicaciones de seguridad . . . . . . . . . . . . . . . . . . . . . . . . . . . . . . . . . . . . . . 78
3 Volumen de entrega . . . . . . . . . . . . . . . . . . . . . . . . . . . . . . . . . . . . . . . . . . . .81
4 Accesorios. . . . . . . . . . . . . . . . . . . . . . . . . . . . . . . . . . . . . . . . . . . . . . . . . . . .81
5 Uso adecuado. . . . . . . . . . . . . . . . . . . . . . . . . . . . . . . . . . . . . . . . . . . . . . . . .81
6 Descripción técnica . . . . . . . . . . . . . . . . . . . . . . . . . . . . . . . . . . . . . . . . . . . 82
7 Instalación y conexión de la nevera . . . . . . . . . . . . . . . . . . . . . . . . . . . . . . . 83
8 Uso de la nevera . . . . . . . . . . . . . . . . . . . . . . . . . . . . . . . . . . . . . . . . . . . . . . 88
9 Limpieza y mantenimiento . . . . . . . . . . . . . . . . . . . . . . . . . . . . . . . . . . . . . . 92
10 Garantía . . . . . . . . . . . . . . . . . . . . . . . . . . . . . . . . . . . . . . . . . . . . . . . . . . . . . 93
11 Gestión de residuos . . . . . . . . . . . . . . . . . . . . . . . . . . . . . . . . . . . . . . . . . . . 93
12 Solución de averías . . . . . . . . . . . . . . . . . . . . . . . . . . . . . . . . . . . . . . . . . . . . 94
13 Datos técnicos. . . . . . . . . . . . . . . . . . . . . . . . . . . . . . . . . . . . . . . . . . . . . . . . 98
77
Page 78

ES
Explicación de los símbolos CRE
1 Explicación de los símbolos
¡PELIGRO!
D
!
!
A
Indicación de seguridad: su incumplimiento acarrea la muerte
o graves lesiones.
¡ADVERTENCIA!
Indicación de seguridad: su incumplimiento puede acarrear la
muerte o graves lesiones.
¡ATENCIÓN!
Indicación de seguridad: su incumplimiento puede acarrear
lesiones.
¡AVISO!
Su incumplimiento puede acarrear daños materiales y perjudicar el
correcto funcionamiento del producto.
NOTA
Información adicional para el manejo del producto.
I
2 Indicaciones de seguridad
El fabricante declina toda responsabilidad ante daños ocurridos en los siguientes
casos:
•
errores de montaje o de conexión
•
daños en el producto debido a influencias mecánicas y sobretensiones
•
modificaciones realizadas en el producto sin el expreso consentimiento del
fabricante
•
utilización del aparato para fines distintos a los descritos en las instrucciones
2.1 Seguridad general
¡ADVERTENCIA!
•
!
78
El montaje en recintos húmedos siempre debe ser realizado por un
técnico cualificado.
Page 79

ES
CRE Indicaciones de seguridad
•
No ponga el aparato en funcionamiento si presenta desperfectos
visibles.
•
Si el cable de conexión de este aparato está dañado, el fabricante, su
servicio de atención al cliente o una persona con cualificación similar
debe reemplazarlo para evitar posibles peligros.
•
Solo el personal cualificado podrá realizar reparaciones en el aparato.
Las reparaciones que se realicen incorrectamente pueden dar lugar a
situaciones de considerable peligro.
•
Los niños mayores de 8 años y las personas de capacidad física,
sensorial o mental disminuida, así como aquellas personas con falta de
experiencia y conocimientos suficientes solo podrán utilizar este
aparato bajo vigilancia o si han sido instruidos respecto al uso seguro
del aparato y a los posibles peligros que pueden emanar de él.
•
Los niños sin supervisión tampoco tienen permitido realizar la limpieza
y el mantenimiento de usuarios.
•
Controle a los niños para asegurarse de que no jueguen con el
aparato.
!
A
•
Mantenga y utilice el dispositivo fuera del alcance de los niños
menores de 8 años.
•
No guarde en el aparato sustancias con peligro de explosión tales
como atomizadores con gas.
¡ATENCIÓN!
•
¡Peligro de aplastamiento! No introduzca la mano en el tope de la
tapa.
•
Los alimentos solo se pueden guardar en los envases originales o en
recipientes adecuados.
¡AVISO!
•
Compare el valor de tensión indicado en la placa de características
con el suministro de energía existente.
•
No desenchufe nunca el cable de conexión tirando de él.
•
Desconecte de la batería del vehículo la nevera u otros aparatos
conectados antes de conectar un cargador rápido.
•
Desenchúfela o apáguela cuando apague el motor. De lo contrario,
podría descargarse la batería del vehículo.
•
Esta nevera no es apta para almacenar sustancias corrosivas o que
contengan disolventes.
•
Mantenga siempre limpias las aberturas de descarga.
79
Page 80

ES
Indicaciones de seguridad CRE
•
No abra nunca el circuito de refrigeración.
•
No transporte nunca el aparato en posición horizontal para así evitar
que el aceite salga del compresor.
•
Al transportarla, asegúrese de no dañar el circuito de refrigeración. El
refrigerante del circuito de refrigeración es muy inflamable.
En caso de daños en el circuito de refrigeración:
– Desconecte la nevera.
– Ventile bien la habitación.
•
Coloque el aparato en un lugar seco y protegido contra posibles
salpicaduras de agua.
2.2 Seguridad durante el funcionamiento del aparato
¡PELIGRO!
•
No toque directamente con las manos cables sin aislamiento.
D
!
A
¡ATENCIÓN!
•
Antes de la puesta en funcionamiento, asegúrese de que el cable de
alimentación y la clavija de enchufe estén secos.
•
Si conecta el aparato a una batería, asegúrese de que los alimentos no
entren en contacto con el ácido de la batería.
¡AVISO!
•
No utilice ningún aparato eléctrico dentro del enfriador, a no ser que
el aparato en cuestión haya sido recomendado para ello por el
fabricante.
•
No coloque el aparato cerca de llamas abiertas ni de otras fuentes de
calor (calefacción, radiación directa del sol, estufas de gas, etc.).
•
¡Peligro de sobrecalentamiento!
Asegúrese de que quede garantizada en todo momento una
evacuación adecuada del calor que se genera durante el
funcionamiento. Asegúrese también de que el aparato guarde la
suficiente distancia respecto a paredes u objetos, de forma que el aire
pueda circular.
•
Asegúrese de que los orificios de ventilación no estén obstruidos.
•
No introduzca líquidos ni hielo en el recipiente interior.
80
Page 81

ES
CRE Volumen de entrega
•
No sumerja nunca el aparato en agua.
•
Proteja el aparato y el cable del calor y de la humedad.
•
Preste atención a que los alimentos no toquen ninguna pared del
interior de la nevera.
3 Volumen de entrega
Cantidad Descripción
1 Nevera con bandejas
1 Tubuladura de salida
1 Instrucciones de montaje y de uso
4Accesorios
Disponibles como accesorio (no incluidos en el volumen de entrega):
Descripción Explicación N.º de ref.
Rectificador Transforma una tensión de entrada de 100 - 240 Vw a
12 Vg o 24 Vg, de forma que la nevera puede
conectarse a una red de tensión alterna.
9600000445
5Uso adecuado
La nevera está concebida para su instalación en caravanas, en autocaravanas y en
embarcaciones. Únicamente se puede instalar en un hueco previsto para ello. Tras
haberla montado, solo debe ser accesible la parte frontal.
La nevera es apta únicamente para enfriar, congelar y guardar alimentos.
¡ADVERTENCIA!
La nevera no está prevista para guardar debidamente medicamentos.
!
¡ATENCIÓN! ¡Riesgo para la salud!
!
Compruebe si la potencia de refrigeración de la nevera cumple los
requisitos de los alimentos que desea enfriar.
81
Page 82

ES
Descripción técnica CRE
6 Descripción técnica
Las neveras de la serie CoolMatic CRE pueden enfriar alimentos y mantenerlos fríos.
En el compartimento congelador se pueden congelar alimentos.
Todos los materiales utilizados en el refrigerador son inofensivos para los alimentos.
El circuito de refrigeración no requiere mantenimiento.
Para su uso en embarcaciones, la nevera puede funcionar con un ángulo de escora
a corto plazo de 30°.
La temperatura se ajusta con el panel de mando previsto en el lado interior izquierdo
de la nevera.
Se pueden seleccionar cinco rangos de temperatura entre +0 °C y +12 °C.
6.1 Elementos de mando del interior
En las figuras siguientes se representan los distintos tipos de neveras:
•
CRE0050: fig. 1, página 2
•
CRE0065: fig. 2, página 2
•
CRE0080: fig. 3, página 3
Pos. Explicación
1 Congelador
2 Panel de control
3 Rejilla (abatible, para que se puedan colocar botellas dentro de la
nevera)
4 Bloqueo de botellas (para mantener fijas las botellas en el
compartimento de la puerta)
5 Compartimento
82
Page 83

ES
CRE Instalación y conexión de la nevera
6.2 Elementos de mando
Pos. en
fig. 4, página 3
1 Sensor IR para conmutar la iluminación interior
2 LED rojo: indicación de errores
3 LED azul: compresor en marcha
4 Pulsador de encendido y apagado
5 Iluminación interna
6 Selector de temperatura
7 LEDs: niveles de temperatura
Explicación
LED en naranja: el compresor está apagado
7 Instalación y conexión de la nevera
7.1 Indicaciones de seguridad para instalación en
embarcaciones
En la instalación en embarcaciones, tenga en cuenta especialmente las siguientes
indicaciones:
¡PELIGRO!
D
A
en caso de funcionamiento conectado a la red eléctrica, asegúrese de
que la alimentación de tensión esté protegida con un interruptor
diferencial.
¡AVISO!
•
El aparato puede inclinarse lateralmente hasta 30° únicamente
durante un breve espacio de tiempo. Al instalar la nevera, tenga en
cuenta que debe asegurarse para esta eventualidad. Si tiene alguna
consulta acerca de la instalación, diríjase a un taller especializado
acreditado.
•
Coloque la nevera de manera que se pueda evacuar bien el aire
caliente (hacia arriba o bien hacia los lados, fig. 5, página 4).
•
El aparato está concebido para funcionar en entornos con una
temperatura ambiente entre +16 °C y +38 °C.
83
Page 84

ES
Instalación y conexión de la nevera CRE
7.2 Notas acerca del montaje de la nevera
Al instalar la nevera tenga en cuenta las siguientes indicaciones:
•
Coloque la nevera de manera que se pueda evacuar bien el aire caliente (hacia
arriba o bien hacia los lados, fig. 5, página 4).
Leyenda para fig. 5, página 4
Pos. Explicación
1 Aire de entrada frío
2 Aire de salida caliente
3 Condensador
4 Distancia a la cara superior, cuando no haya espacio suficiente para que el
aire circule hacia arriba o hacia los lados.
•
Tenga en cuenta las siguientes dimensiones de montaje:
– CRE0050: 550 x 390 x máx. 544 mm
– CRE0065: 595 x 458 x máx. 535 mm
– CRE0080: 578 x 485 x máx. 650 mm
•
Preste atención a no obstaculizar con ningún objeto las aperturas (ranuras de
ventilación, etc.) de la carcasa ni el bastidor de montaje.
•
Durante el funcionamiento normal de la nev er a se or igina agu a d e con de nsaci ón.
Se puede eliminar del suelo de la nevera pasando regularmente un paño o bien
a través del desagüe previsto en la parte posterior de la nevera (véase capítulo
“Montaje de la tubuladura de salida (opcional)” en la página 84).
7.3 Montaje de la tubuladura de salida (opcional)
➤ Conecte una manguera con un diámetro interior de 10 mm (no incluida) a la
tubuladura de salida.
➤ Tumbe la heladera sobre un lado para acceder a la parte inferior.
¡AVISO!
A
➤ Monte la tubuladura de salida (fig. 6 2, página 4) alineada hacia adelante o
hacia atrás según la dirección deseada de la tubuladura.
No conecte el aparato hasta que no haya permanecido en posición
vertical durante un período de 4 horas.
➤ Retire el tapón de desagüe (fig. 6 1, página 4) del interior de la nevera.
84
Page 85

ES
CRE Instalación y conexión de la nevera
7.4 Instalación de la nevera
Proceda de la siguiente forma para instalar la nevera:
➤ Si desea dejar salir el agua de condensación a través de una manguera:
Monte la tubuladura de salida (véase capítulo “Montaje de la tubuladura de
salida (opcional)” en la página 84)
➤ Afloje el dispositivo de seguro para el transporte (capítulo “Soltar el bloqueo” en
la página 91).
➤ Abra la puerta de la nevera.
➤ Suelte las tapas obturadoras (fig. 7 2, página 5).
➤ Introduzca la nevera en el nicho.
➤ Fije la nevera con tornillos adecuados (fig. 7 1, página 5).
➤ Encaje las tapas obturadoras (fig. 7 2, página 5) en los orificios.
7.5 Cambiar el lado de apertura de la puerta
Puede cambiar la posición de las bisagras de la puerta permitiendo abrirla hacia la
izquierda en lugar de hacia la derecha.
➤ Siga los pasos mostrados en fig. 8, página 6 hasta fig. 9, página 6 para
cambiar el sentido de apertura de la puerta.
7.6 Cambiar la decoración de la puerta
¡AVISO! ¡Peligro de daños materiales!
A
La placa decorativa posee las siguientes medidas (véase fig. 0, página 7):
CRE0050 350 ± 0,5 mm 474 ± 0,5 mm
La decoración de la puerta debe cambiarse únicamente con la nevera en
posición vertical.
Modelo A B C
0,5 mmCRE0065 419 ± 0,5 mm 468 ± 0,5 mm
CRE0080 445 ± 0,5 mm 582 ± 0,5 mm
85
Page 86

ES
Instalación y conexión de la nevera CRE
Extracción y montaje de la placa decorativa
➤ Siga los pasos mostrados (de fig. a, página 7 a fig. c, página 9) para extraer la
placa decorativa.
➤ Siga el orden inverso para montar la placa decorativa.
7.7 Conexión de la nevera a tensión continua
¡AVISO!
•
A
A fin de evitar pérdidas de tensión y potencia, el cable de conexión
debería ser lo más corto posible.
Evite interruptores, enchufes o cajas de distribución adicionales.
•
Antes de cargar la batería con un cargador rápido, desconéctela del
aparato y de otros consumidores. La sobretensión puede dañar el
sistema electrónico de los aparatos.
La nevera puede funcionar con alimentación de tensión CC (12/24 Vg).
Por razones de seguridad, la nevera está equipada con un sistema electrónico para
evitar que se invierta la polaridad que la protege si no se respeta la polaridad al
conectarla a la batería y también si se produce un cortocircuito.
Para proteger la batería, la nevera se apaga automáticamente cuando la tensión es
insuficiente (véase la tabla siguiente).
12 V 24 V
Tensión de desconexión
Tensión de reconexión
➤ Determine la sección del cable necesaria dependiendo de su longitud según
fig. d, página 9.
Leyenda de la fig. d, página 9:
Eje de coordenadas Significado Unidad
10,4 V 22,8 V
11,7 V 24,2 V
l Longitud de cable m
∅ Sección de cable mm²
86
Page 87

ES
CRE Instalación y conexión de la nevera
¡AVISO!
Preste atención a la polaridad correcta.
A
➤ Antes de poner en funcionamiento el aparato, compruebe si la tensión de
funcionamiento y la tensión de la batería coinciden (véase la placa de
características).
➤ Conecte la nevera a una conexión que esté asegurada como mínimo con 15 A
(para 12 Vg) o con 7,5 A (para 24 Vg) (fig. e 1, página 10).
➤ Conecte el cable rojo (fig. e rd, página 10) al polo positivo de la batería.
➤ Conecte el cable negro (fig. e bk, página 10) al polo negativo de la batería.
7.8 Conexión de la nevera a tensión alterna
¡PELIGRO! ¡Peligro de muerte!
•
D
No manipule los enchufes ni interruptores con las manos mojadas ni
con los pies sobre una superficie mojada.
•
Si la nevera funciona en una embarcación conectada a una red de
corriente alterna a través de una conexión en tierra de 230V, se
deberá conectar un interruptor diferencial entre la red de corriente
alterna y la nevera.
Consulte con un especialista.
El rectificador MPS35 (accesorio) permite conectar la nevera a una red de corriente
alterna.
El rectificador MPS35 dispone de una conexión de prioridad que protege a la
batería conectada. Si se utiliza alimentación de corriente, el rectificador conmuta
automáticamente de funcionamiento por batería a funcionamiento a través de la red.
Cuando se desconecta de la red de corriente alterna, el rectificador vuelve
automáticamente al funcionamiento por batería. El funcionamiento a través de la red
por medio del rectificador de corriente siempre tiene prioridad sobre el
funcionamiento por batería.
87
Page 88

ES
Uso de la nevera CRE
Proceda como sigue para conectar la nevera a la tensión alterna:
➤ Fije el rectificador a la parte trasera de la nevera.
➤ Conecte el rectificador a la batería según se muestra en fig. f, página 10:
– Cable rojo/negro: polo positivo de la batería
– Cable negro: polo negativo de la batería
➤ Conecte el rectificador al refrigerador (fig. f 2, página 10):
– Cable rojo: polo positivo del rectificador
– Cable negro: polo negativo del rectificador
➤ Conecte el enchufe en la caja de enchufe de CA (fig. f 1, página 10).
8Uso de la nevera
La nevera permite conservar los alimentos frescos. El congelador conserva alimentos
congelados y congela alimentos frescos.
A
I
¡AVISO!
•
No coloque ningún aparato eléctrico dentro de la nevera. Las únicas
excepciones son los aparatos aprobados para este propósito por el
fabricante.
•
Asegúrese de que las bebidas o los alimentos envasados en
recipientes de cristal no se enfríen demasiado. Los líquidos se
expanden cuando se congelan y esto podría provocar que los
recipientes de vidrio estallen.
•
Los alimentos solo se pueden introducir envasados en los envases
originales o en recipientes adecuados.
•
Asegúrese de que en la nevera solo se encuentren objetos o
productos que puedan enfriarse a la temperatura seleccionada.
NOTA
•
Por razones de higiene, deberá limpiar la nevera por dentro y por
fuera con un paño húmedo antes de ponerla en funcionamiento por
primera vez (véase también capítulo “Limpieza y mantenimiento” en
la página 92).
•
No cierre violentamente la tapa del congelador.
•
No extraiga la pared divisoria si hay hielo en el congelador.
•
No retire el adhesivo que cubre el elemento de mando (fig. 4,
página 3).
88
Page 89

ES
CRE Uso de la nevera
8.1 Consejos para el ahorro de energía
•
Elija un lugar de emplazamiento bien ventilado y protegido de la radiación solar.
•
Si los alimentos están calientes, deje que se enfríen antes de introducirlos en la
nevera.
•
Evite abrir la nevera más de lo necesario.
•
No deje la puerta abierta más tiempo del necesario. Si se deja abierta la puerta
durante más de 5 minutos, la luz comienza a parpadear.
•
Descongele la nevera cuando se forme una capa de escarcha.
•
No regule una temperatura innecesariamente baja en el interior.
8.2 Encender la nevera
➤ Encienda la nevera pulsando la tecla .
8
NOTA
I
Tras haberla encendido, la nevera necesita cierto tiempo hasta que
arranque el compresor.
8.3 Ajustar la temperatura
➤ Pulse repetidamente la tecla hasta que se haya establecido el nivel de
temperatura deseado.
Cuantos más LEDs se iluminan por encima de la tecla, menor es el nivel de
temperatura.
Para conmutar del último nivel al primer nivel pulse nuevamente la tecla .
NOTA
I
La potencia de refrigeración puede verse afectada por:
•
la temperatura ambiente,
•
la cantidad de alimentos a refrigerar,
•
la frecuencia con la que se abre la puerta de la nevera
Con una temperatura ambiente entre 16 °C y 20 °C, regule la nevera al
menos al nivel 2.
89
Page 90

ES
Uso de la nevera CRE
8.4 Conservación de alimentos
¡AVISO!
•
A
I
Puede conservar alimentos en la nevera. El tiempo de conservación de los alimentos
viene indicado normalmente en el envase.
La nevera está dividida en distintas zonas con distintas temperaturas:
•
Las zonas más frías se encuentran directamente encima de los cajones para
verdura y fruta, cerca de la pared posterior.
No introduzca alimentos calientes en la nevera.
•
No coloque recipientes de cristal con contenidos líquidos en el
congelador.
NOTA
Conserve aquellos alimentos que absorben con facilidad olores y
sabores de otros alimentos, así como líquidos y productos con un alto
contenido en alcohol, en recipientes herméticamente cerrados.
•
Preste atención a las indicaciones de temperatura y conservación indicadas en el
envase de los productos alimenticios.
•
Tenga en cuenta las siguientes indicaciones para la conservación de los
productos:
– En ningún caso vuelva a congelar productos ya descongelados o que hayan
comenzado a descongelarse; consúmalos a la mayor brevedad posible.
– Envuelva los alimentos en papel de aluminio o en lámina de polietileno y
guárdelos en un recipiente hermético. De esta manera conseguirá conservar
mejor el aroma, la sustancia y la frescura de los alimentos.
90
Page 91

ES
CRE Uso de la nevera
8.5 Descongelar el congelador
¡AVISO!
A
Para descongelar la nevera, proceda como se indica a continuación:
➤ Extraiga los productos.
➤ En caso necesario, coloque los productos en otro frigorífico para mantenerlos
fríos.
➤ Presione la tecla hasta que se apague la nevera.
➤ Deje la puerta completamente abierta.
Nunca utilice herramientas mecánicas para retirar capas de hielo o soltar
productos que se hayan adherido al interior de la nevera. Las únicas
excepciones son los aparatos aprobados para este propósito por el
fabricante.
8.6 Soltar el bloqueo
La nevera dispone de un mecanismo de bloqueo (fig. g 1, página 11) que también
sirve como seguro de transporte. La puerta está asegurada cuando está bloqueada.
➤ Para abrir la puerta, empuje el tirador (fig. g 2, página 11) hacia arriba y abra la
puerta.
8.7 Desconexión y parada de la nevera
Si no va a usar la nevera durante un largo período de tiempo, proceda como se
indica a continuación:
➤ Presione la tecla hasta que se apague la nevera.
➤ Desconecte el cable de conexión de la batería o desenchufe el cable de
corriente continua del rectificador de corriente.
➤ Limpie la nevera (véase capítulo “Limpieza y mantenimiento” en la página 92).
➤ Cierre la puerta.
➤ Gire el bloqueo de ventilación (fig. h 1, página 11) hasta que encastre.
✓ La puerta permanece abierta y se evita así que se generen olores.
91
Page 92

ES
Limpieza y mantenimiento CRE
9 Limpieza y mantenimiento
¡AVISO!
•
A
➤ Desconecte siempre el aparato de la red de corriente antes de proceder a la
limpieza o al mantenimiento de la misma.
➤ Con un paño húmedo, limpie la nevera de forma regular y también en cuanto se
ensucie.
➤ Preste atención a que no gotee agua en las juntas, pues ello podría dañar el
sistema electrónico.
➤ Después de haberla limpiado, seque la nevera con un paño.
Para la limpieza no emplee agentes corrosivos ni objetos duros,
pues podrían deteriorar el enfriador.
•
No utilice ningún utensilio duro ni puntiagudo para acelerar el
proceso de descongelación.
92
Page 93

ES
CRE Garantía
10 Garantía
Rige el plazo de garantía legal. Si el producto presenta algún defecto, diríjase a la
sucursal del fabricante de su país (ver direcciones en el dorso de estas instrucciones)
o a su establecimiento especializado.
Para la tramitación de la reparación y de la garantía debe enviar también los
siguientes documentos:
•
una copia de la factura con fecha de compra,
•
el motivo de la reclamación o una descripción de la avería.
11 Gestión de residuos
¡ADVERTENCIA! ¡Peligro para los niños!
!
Antes de desechar su vieja nevera:
•
Desmonte las puertas.
•
Deje las bandejas dentro de la nevera para que los niños no puedan
introducirse en ella.
➤ Deseche el material de embalaje en el contenedor de reciclaje correspondiente.
Cuando vaya a desechar definitivamente el producto, infórmese en el
centro de reciclaje más cercano o en un comercio especializado sobre las
M
normas pertinentes de eliminación de materiales.
93
Page 94

ES
Solución de averías CRE
12 Solución de averías
El LED rojo parpadea (fig. 4 2, página 3)
En caso de averías, el LED parpadea varias veces. El número de pulsos depende del
tipo de avería.
Cada pulso dura un cuarto de segundo. Después de la serie de pulsos hay una
pausa. La secuencia que corresponde a la avería se repite cada cuatro segundos.
Número de pulsos luminosos
1 Tensión de alimentación La tensión de alimentación está fuera del
2 Sobrecorriente del
3 El motor no se enciende El rotor está bloqueado.
4 Número de
5 Sobretemperatura del
Avería Posible causa
rango ajustado.
El ventilador supone una carga para el
ventilador
Demasiados intentos de
puesta en marcha
revoluciones
demasiado bajo
sistema electrónico
sistema electrónico de más de 1 A.
El compresor o el ventilador se han puesto en
marcha con demasiada frecuencia en un
intervalo breve de tiempo.
El diferencial de presión en el sistema de
refrigeración es demasiado alto (> 5 bares).
Si el sistema de refrigeración está
sobrecargado, el número de revoluciones
mínimo del motor de 1.850 rpm no se puede
mantener.
Si el sistema de refrigeración está
sobrecargado o si la temperatura es
demasiado elevada, el sistema electrónico se
calienta demasiado.
Constante Errores de sensor de
temperatura
94
El sensor de temperatura está averiado.
Page 95

ES
CRE Solución de averías
El LED naranja parpadea (fig. 4 3, página 3)
Si el LED parpadea rápidamente de forma constante, proceda de la siguiente
manera:
➤ Presione el pulsador hasta que se apague la nevera.
➤ Desconecte el cable de conexión de la batería o desenchufe el cable de
corriente continua del rectificador de corriente.
➤ Espere un minuto, vuelva a enchufar la nevera al sistema de energía y enciéndala.
➤ Si el LED naranja sigue parpadeando, póngase en contacto con el servicio de
atención al cliente.
El compresor no funciona (conexión a batería)
Avería Posible causa Solución
UBR = 0 V Hay una interrupción en la conexión
entre la batería y el sistema
electrónico
El interruptor principal (si existe) está
averiado
Se ha quemado el fusible adicional
del cable (si existe)
UBR ≤ U
Intento de arranque
U
BR
≤ U
CON
DESC
Tensión de la batería insuficiente Cargue la batería
Cables sueltos
Contacto defectuoso (corrosión)
Capacidad de la batería insuficiente Cambie la batería
Sección del cable insuficiente Cambie el cable (capítulo
Establezca la conexión
Cambie el interruptor
principal
Cambie el fusible del
cable
Establezca la conexión
“Conexión de la nevera a
tensión continua” en la
página 86)
95
Page 96

ES
Solución de averías CRE
Avería Posible causa Solución
Intento de arranque con
UBR≥ U
CON
Temperatura ambiente demasiado
alta
–
Ventilación insuficiente Cambie la ubicación de la
nevera
Suciedad en el condensador Limpie el condensador
Interrupción eléctrica
Compresor averiado Cambie el compresor
entre los pernos del
compresor
U
U
U
Tensión entre el borne positivo y el negativo del sistema electrónico
BR
Tensión de conexión del sistema electrónico
CON
Tensión de desconexión del sistema electrónico
DESC
El compresor no funciona (conexión a corriente alterna)
Avería Posible causa Solución
No hay tensión Interrupción del cable de conexión Establezca la conexión
Hay tensión, pero el
compresor no funciona
El interruptor principal (si existe) está
averiado
Se ha quemado el fusible adicional
del cable (si existe)
Temperatura ambiente demasiado
alta
Cambie el interruptor
principal
Cambie el fusible del
cable
–
Ventilación insuficiente Cambie la ubicación de la
nevera
Suciedad en el condensador Limpie el condensador
Interrupción eléctrica
Compresor averiado Cambie el compresor
entre los pernos del
compresor
96
Page 97

ES
CRE Solución de averías
La potencia de refrigeración disminuye y la temperatura interior aumenta
Avería Posible causa Solución
El compresor
permanece en
funcionamiento
demasiado
tiempo/continuamente
El compresor raramente
funciona
Temperatura ambiente demasiado
alta
Ventilación insuficiente Cambie la ubicación de la
Suciedad en el condensador Limpie el condensador
Ventilador defectuoso Cambie el ventilador
Batería agotada Cargue la batería
–
nevera
Ruidos inusuales
Avería Posible causa Solución
Fuerte zumbido El componente del circuito de
refrigeración no puede vibrar
libremente (contacto con la pared)
Dóblelo cuidadosamente
Cuerpo extraño atrapado entre la
nevera y la pared
Ruido del ventilador –
Retire el cuerpo extraño
97
Page 98

ES
Datos técnicos CRE
ID 0000056012
13 Datos técnicos
CRE0050 CRE0065 CRE0080
Capacidad en el compartimento de
refrigeración:
Capacidad del compartimento de
congelación:
Capacidad: 45 l 57 l 78 l
Te n si ó n : 1 2 V g o 24 Vg
Corriente nominal
12 Vg:
24 Vg:
Rango de temperatura de
enfriamiento
Nevera:
Congelador:
Clase climática: ST
Humedad del aire: máximo 90 %
Inclinación a corto plazo: máximo 30°
41,2 l
4,4 l
5.2 A
2.5 A
50 l
7,0 l
5.8 A
2.8 A
de +0 °C a +12 °C
de -12 °C a -6 °C
70,6 l
7,5 l
6.5 A
3.1 A
Presión máxima: BP 11 bares/AP 25 bares
Agente espumante: C
Refrigerante: R134a
Cantidad de refrigerante: 40 g 45 g 48 g
Equivalente de CO2: 0,057 t 0,064 t 0,069 t
Índice GWP: 1430
Dimensiones: fig. i,
página 12
Peso: 12.57 kg 14,15 kg 15,53 kg
Homologación/certificados:
5H10
fig. j,
página 12
fig. k,
página 12
E4
98
Page 99

ES
CRE Datos técnicos
Contiene gases de efecto invernadero fluorados
Aparato sellado herméticamente
Encontrará la declaración de conformidad UE actual para su aparato en la página
correspondiente al producto en dometic.com o directamente a través del fabricante
(véase la parte posterior).
99
Page 100

PT
CRE
Por favor, leia atentamente este manual antes da montagem e colocação
em funcionamento do aparelho e guarde-o em local seguro. Em caso de
transmissão do produto, entregue o manual ao novo utilizador.
Índice
1 Explicação dos símbolos . . . . . . . . . . . . . . . . . . . . . . . . . . . . . . . . . . . . . . .101
2 Indicações de segurança . . . . . . . . . . . . . . . . . . . . . . . . . . . . . . . . . . . . . . . 101
3 Material fornecido. . . . . . . . . . . . . . . . . . . . . . . . . . . . . . . . . . . . . . . . . . . . .104
4 Acessórios . . . . . . . . . . . . . . . . . . . . . . . . . . . . . . . . . . . . . . . . . . . . . . . . . . .104
5 Utilização adequada . . . . . . . . . . . . . . . . . . . . . . . . . . . . . . . . . . . . . . . . . . .104
6 Descrição técnica . . . . . . . . . . . . . . . . . . . . . . . . . . . . . . . . . . . . . . . . . . . . .105
7 Instalar e conectar o frigorífico . . . . . . . . . . . . . . . . . . . . . . . . . . . . . . . . . . .106
8 Utilizar o frigorífico . . . . . . . . . . . . . . . . . . . . . . . . . . . . . . . . . . . . . . . . . . . . 111
9 Limpeza e manutenção. . . . . . . . . . . . . . . . . . . . . . . . . . . . . . . . . . . . . . . . . 115
10 Garantia . . . . . . . . . . . . . . . . . . . . . . . . . . . . . . . . . . . . . . . . . . . . . . . . . . . . . 115
11 Eliminação . . . . . . . . . . . . . . . . . . . . . . . . . . . . . . . . . . . . . . . . . . . . . . . . . . . 116
12 Resolução de falhas. . . . . . . . . . . . . . . . . . . . . . . . . . . . . . . . . . . . . . . . . . . .116
13 Dados técnicos . . . . . . . . . . . . . . . . . . . . . . . . . . . . . . . . . . . . . . . . . . . . . . .120
100
 Loading...