

Page 1
®
O¢H°IE™ XPH™Eø™
MODE D'EMPLOI
BEDIENUNGSANLEITUNG
INSTRUCTION BOOK
INSTRUCTIE BOEK
INSTRUCCIONES DE USO
MANUAL DE INSTRUÇÕES
Page 2
FRANÇAIS DEUTSCH ENGLISH
Conseils importants
Lors de l'utilisation de l'appareil, des précautions élémentaires
sont à prendre, comme indiqué ci-dessous
– N’utilisez pas votre appareil avant d’avoir lu le mode d’emploi.
– Avant de brancher votre fer à repasser, vérifiez que le voltage de
votre installation correspond à celui inscrit sur la plaquette
signalétique.
– N'utilisez cet appareil que pour l'usage pour lequel il est prévu : le
repassage et le défroissage.
– Ne laissez pas votre fer branché sans surveillance, même pour un
cours instant.
– Pour débrancher l'appareil, ne tirez jamais sur le cordon
d'alimentation mais sur la prise.
– Veillez à ce que le cordon d'alimentation ne touche pas de surfaces
chaudes.
– N'utilisez pas votre fer avec un cordon abîmé ou si l'appareil fuit ou
est endommagé. Pour éviter tout risque d'électrocution, ne démontez
pas votre fer à vapeur. Rendez-vous auprès de votre Service-AprèsVentes pour le faire vérifier ou réparer.
– Lorsque vous repassez en présence d'enfants, une grande vigilance
est nécessaire.
– Evitez de brancher plusieurs appareils de grande puissance sur le
même circuit électrique.
– Si une rallonge électrique est nécessaire, un cordon de10 Ampères
doit être utilisé. Veillez à placer la rallonge de façon à ce qu'on ne
puisse trébucher ou la débrancher par mégarde. Elle doit être
équipée d'une prise de terre.
– Utilisez une prise de courant comportant une prise de terre, ceci pour
votre sécurité.
– Après chaque utilisation,veillez à toujours reposer votre fer à plat sur
le repose-fer marqué SIT-CD. Ne posez pas votre fer à la verticale.
– Ne plongez jamais votre appareil dans l'eau ou tout autre liquide
même partiellement.
– Après le repassage, laissez refroidir votre appareil. Vous pourrez
ensuite le ranger bien à plat, sans avoir besoin de vider le réservoir.
– Pour toutes réparations, il est nécessaire de confier votre appareil
aux points Services agréés pour que la remise en état soit conforme
aux normes et aux exigences de qualité du constructeur.
– Toute infraction commise par une personne non autorisée annule la
validité de la garantie.
Le fabricant se réserve le droit de modifier les modèles présentés, leurs
caractéristiques et accessoires.
Sicherheitsvorkehrungen beachtet werden:
– Nehmen Sie das Gerät nicht in Betrieb, ohne die Gebrauchsanweisung zu
lesen.
– Bevor das Gerät das erste Mal ans Stromnetz angeschlossen wird, muss
sichergestellt sein, dass die Netzspannung mit der Angabe auf dem
Typenschild übereinstimmt.
– Das Gerät nur zum Bügeln und nicht für andere Zwecke verwenden.
– Das Gerät darf nie unbeaufsichtigt gelassen werden, während es ans Netz
angeschlossen ist. Auch bei kurzzeitigem Verlassen des Raumes
Netzstecker ziehen.
– Stecker nie am Kabel aus der Steckdose ziehen.
– Das Kabel von heißen Flächen fern halten.
– Das Bügelgerät nur in einwandfreiem Zustand benutzen. Wenn das Gerät
oder das elektrische Kabel beschädigt sind, den Kundendienst aufsuchen.
– Das Gerät kann bei Inbetriebnahme sehr heiß werden. Es gelten hier die
gleichen Vorsichtsmaßnahmen wie für alle anderen Bügelgeräte.
– Bei Haushalten mit Kindern darauf achten, dass das Bügeleisen nicht in
Reichweite von Kindern abgestellt wird, solange es noch heiß ist.
– Wenn andere Geräte mit hohem Stromverbrauch gleichzeitig ans Netz
angeschlossen werden, kann dies zu einer Überlastung führen.
– Zur Verlängerung des Stromkabels nur ein 10 Ampere Kabel verwenden.
Darauf achten, dass das Kabel so auf den Boden gelegt wird, dass man
nicht darüber stolpern kann, oder dass man es nicht versehentlich
herausziehen kann. Das Kabel muss mit einem Erdleiter ausgestattet sein.
– Zur eigenen Sicherheit nur geerdete Steckdosen benutzen.
– Achten Sie nach jeder Benutzung darauf, dass Ihr Bügeleisen auf der mit
SIT-CD gekennzeichneten Bügeleisen - Abstellplatte flach hingestellt wird.
Stellen Sie Ihr Bügeleisen nicht senkrecht auf.
– Tauchen Sie ihr Gerät niemals ins Wasser oder in jegliche andere
Flüssigkeit, auch nicht teilweise.
– Nach dem Bügeln vollständig abkühlen lassen und möglichst in
waagerechter Stellung aufbewahren.
– Reparaturen nur von DOMENA Service-Partnern ausführen lassen.
Anderfalls entfällt der Garantieanspruch. Die entsprechenden Adressen
können bei Domena GmbH erfragt werden.
Der Hersteller behält sich vor, die vorgestellten Modelle, ihre
Kennzeichen und ihre Zubehörteile zu ändern.
Gerät entspricht den Normen der europäischen Richtlinie für Niederspannung
73/23/CEE bezüglich der Sicherheit, und der Richtlinie CEM 89/336/CEE,
abgeändert durch 93/68/CEE, bezüglich der elektromagnetischen Kompatibilität
Wichtig Sicherheitshinweise
Beim Gebrauch des Bügelsystems sollten folgende
Important advice
When using the machine, the following elementary precautions
should be taken :
– Before connecting your iron to the mains, make sure that your mains
voltage corresponds to the voltage indicated on the rating plate.
– This machine should only be used for its intended purpose: ironing and
smoothing
– When unplugging the machine, pull the plug, not the cable.
– Do not leave iron unattended whilst switched on.
– Make sure that the power cable does not touch any hot surfaces.
– Do not use the iron if it is damaged, if it leaks, or if the power cable is
damaged. To avoid any risk of electrocution, do not dismantle your iron.
Take it to your nearest After Sales Service dealer for servicing or repair.
– Great care must be taken when ironing in the presence of children.
– To avoid a circuit overload, do not operate another high wattage
appliance on the same circuit.
– If an extension lead is absolutely necessary, a 10 amp. cord should be
used. Make sure that you cannot trip over or unplug the extension lead. It
must be equipped with an earth connection.
– Use a mains supply which has an earth connection, for your own safety.
– Take care to place the iron on its rest after each use.
– Never immerse the machine in water or other liquids, even partially.
– Place the iron horizontally on the iron rest marked SIT-CD after each use.
Never put the iron down vertically.
– Let the machine cool down when you have finished ironing. It can then be
stored flat, without having to empty the water reservoir.
– For any repair, take your machine to a registered after-sales service, to
ensure that the repair will comply with the manufacturer’s standards.
– Any repair carried out by an unauthorized person will invalidate the
warranty.
The manufacturer reserves the right to makes changes and alterations to the
product without prior notice.
The appliance which you have just purchased complies with the terms of European
Directive 73/23 EEC relating to safety and low voltage, and with Directive CEM
89/336/EEC regarding electromagnetic compatibily as amended by 93/68/EEC.
Appareil conforme aux prescriptions de la directive européenne basse tension
73/23/CEE relative à la sécurité, et à la directive CEM 89/336/CEE relative à la
compatibilité électromagnétique, amendées par 93/68/CEE.
2
Page 3
NEDERLANDS
™HMANTIKE™
™YMBOY§E™ A™ºA§EIA™
MÈÎÚ¿ M˘ÛÙÈο
£fiÚ˘‚o˜
™YNTHPH™H
ESPAÑOL PORTUGUÊS
E§§HNIKA
Belangrijke
aanwijzingen
Bij het gebruik van het apparaat dient men een
aantal voorzorgsmaatregelen in acht te nemen :
– Alvorens het apparaat in werking te stellen, lees eerst
aandachtig de gebruiksaanwijzing, en kijk na of de
netspanning overeenstemt met de spanning die op de
kentekenplaat aangegeven staat.
– Gebruik het apparaat enkel voor strijken en kreukels
verwijderen.
– Trek niet aan het snoer om de stekker uit het stopkontakt
te trekken ; trek aan de stekker zelf.
– Let erop dat het snoer geen warme oppervlakten raakt.
– Gebruik het apparaat niet met een versleten snoer of
wanneer het lekt of beschadigd is. Loop niet het risiko
geëlektrokuteerd te worden door zelf het apparaat te
demonteren ; breng het naar uw D.N.V. service dienst
voor reparatie of controle.
– Laat uw strijkijzer niet onbewaakt achter als er kinderen
in de buurt zijn.
– Sluit het strijkijzer niet aan op een stopkontakt waar nog
andere apparaten met zwaar vermogen aangesloten zijn.
– Indien u een verlengsnoer gebruikt, neem een snoer van
10 A met aarding. Let erop het verlengsnoer zo te
plaatsen dat u er niet over struikelt of het per ongeluk uit
het stopkontakt rukt.
– Voor uw eigen veiligheid, sluit het apparaat enkel aan op
een stopkontakt met aarding.
– Zet het ijzer steeds op de stelplaat wanneer u niet strijkt.
– Duik nooit het apparaat in water, of in enig andere
vloeistof, zelf niet gedeleeltelijk.
– Plaats het strijkijzer na gebruik steeds op het daartoe
bestemde oppervlak, aangeduid met SIT-CD. Plaats het
strijkijzer nooit verticaal.
– Laat na gebruik het apparaat afkoelen alvorens het op te
bergen. Berg het apparaat steeds horizontaal weg. Het
waterreservoir hoeft niet leeg gemaakt te worden.
– Voor herstellingen aan het toestel dient u steeds beroep
te doen op de erkende servicepunten die het toestel
herstellen in overeenstemming met de normen en de
kwaliteitseisen van de fabrikant.
– Elke ingreep door een niet bevoegde persoon doet de
waarborg teniet.
De fabrikant behoudt zich het recht voor de
gepresenteerde modellen en hun kenmerken en
accessoires te wijzigen.
Dit apparaat is gelijkvormig aan de voorschriften van de Europese
richtlijn voor lage spanning 73/23/CEE met betrekking tot de
veiligheid, en aan de richtlijn CEM 89/336/CEE met betrekking tot
de elktromagnetische patibiliteit, geamendeerd door 93/68/CEE
Aviso importante
Cuando utilice el equipo debe tener en
consideración
– Antes de conectar a la red comprobar que el voltaje es el
correcto.
– Este equipo está diseñado sólo para planchar y alisar.
– Cuando desconecte de la red tire del enchufe y no del
cable.
– No deje sola la plancha enchufada.
– Compruebe que el cable no está en contacto con
superficies calientes.
– No la utilice si está rota o tiene escapes o el cable de red
está dañado.
electrocución, no desmonte su plancha de vapor.
Llévela a su servicio de posventa para controlarla o
repararla.
– Tenga mucho cuidado cuando planche cerca de niños
pequeños.
– Para no sobrecargar la linea conecte el equipo en lineas
de poco uso.
– Si necesita un alargo utilice cable de 10 amp.
prolongador de tal forma que no se pueda tropezar
con él o desenchufarlo por descuido. Además, deberá
llevar una toma de tierra.
– Utilice enchufes con toma de tierra para su seguridad.
Deje enfriar la plancha después de haber terminado
–
de planchar.
– No introduzca nunca el aparato en el agua ni en cualquier
otro líquido, ni siquiera parcialmente.
– Después de cada utilización, coloque siempre la plancha
en posición horizontal en el apoya-planchas donde esté
escrito SIT-CD. No coloque la plancha en posición
vertical.
Después podrá recogerla en posición horizontal sin
–
necesidad de vaciar el depósito.
– Para cualquier reparación, se debe confiar el aparato a
los puntos de servicio autorizados para que la reparación
sea conforme a las normas y a las exigencias de calidad
del constructor.
– Una reparación por personal no autorizado anula la
garantia.
El fabricante se reserva el derecho de modificar los
modelos presentados y sus características y accesorios.
Aparato conforme a las precripciones de la directiva europea
de baja tensión 73/23/CEE relativa a la seguridad, y a la
directiva CEM 89/336/CEE relativa a la compatibilidad
electromagnética, enmendadas por la directiva 93/68/CEE.
Para evitar cualquier riesgo de
Coloque el
importantes
Ao utilizar a seu ferro de passar, deve seguir algumas
regras básicas de segurança, das quais destacamos
as seguintes :
– Antes de ligar o ferro, certifique-se de que os dados
eléctricos inscritos no auto-colante colocado na parte
inferior da máquina correspondem aos da instalação da
sua casa.
– Utilize a máquina apenas para o fim a que a mesma se
destina passar a ferro e desamarrotas.
– Parar sempre a aparelho antes de o ligar ou desligar.
– Certifique-se de que o cabo de alimentação não toca
superficies quentes.
– Não utilize o seu aparelho se o fio estiver danificado e se
houver (quaisquer) fugas ou danos. Para evitar o risco de
choque eléctrico, não desmonte o aparelho - leve-o ao
serviço de assistência mais próximo, para que seja
verificado ou eventualmente reparado. A montagem
incorrecta do aparelho pode provocar choques eléctricos
quando o mesmo for utilizado.
– Se utilizar a sua máquina na proximidade de crianças,
deverá manter-se especialmente atento.
– Para evitar uma sobrecarga do circuito, não ligue no
mesmo circuito nenhum outro aparelho de potência
elevada.
– Se tiver absoluta necessidade de aplicar uma extensão,
deve utilizar um fio de 10 Ampères. Os fios preparados
para uma ampèragem menor, correm o risco de
sobreaquecimento. Há que ter o cuidado de não puxar o
fio ou de tropeçar nele.
– Utilize uma tomada com terra, para maior segurança.
– Coloque o ferro no descanso depois de cada utilização.
– Não meta o ferro na água nem em outro líquido mesmo
de forma parcial.
– Após cada utilização, é favor colocar o seu ferro no
descansa-ferro com a marca SIT-CD. Não coloque o
ferro na posição vertical.
– Quando acabar de passar a ferro, deixe arrefecer o
aparelho. Pode depois arruma-lo no descanso sem
necessidade de esvaziar o aparelho.
– Para quaisquer reparações, é necessário entregar o seu
aparelho nos pontos de Serviços autorizados para
reparar para proceder à reparação das normas e as
exigíncias da qualidade do construtor.
– Qualquer infração cometida por pessoas não autorizada
invalida a garantia.
O fabricante reserva o direito de modificar os modelos
apresentados, assim como as suas características e
acessórios.
Aparelho conforme com as prescrições da directiva europeia
baixa tensão 73/23/CEE com respeito à segurança e com a
directiva CEM 89/336/CEE relativa à compatibilidade
electromagnética, modificadas por 93/68/CEE
Regras de segurança
‘OЩ·v ¯ЪЛЫИМooИВ›ЩВ ЩЛv Ы˘ЫОВ˘‹, Ъ¤ВИ v· ·›ЪvВЩВ
ЩИ˜ ·Ъ·О¿Щˆ ЪoК˘П¿НВИ˜ :
– ¶ÚÈv Û˘v‰¤ÛÂÙ Ùo ÚÂÛoÛ›‰ÂÚo ÛÙËv Ú›˙·,
‚В‚·ИˆıВ›ЩВ fiЩИ oИ ЛПВОЩЪИО¤˜ Ъo‰И·БЪ·К¤˜
Ы˘МКˆvo‡v МВ ·˘Щ¤˜ ЩЛ˜ ЛПВОЩЪИО‹˜ ·Ъo¯‹˜.
– H ™˘ЫОВ˘‹ Ъ¤ВИ v· ¯ЪЛЫИМooИВ›Щ·И Мfivo БИ·
Ûȉ¤ÚˆÌ·.
– ’OÙ·v ‚Á¿˙ÂÙ ÙËv Û˘Û΢‹ ·fi ÙËv Ú›˙·, ÌËv
ÙÚ·‚¿Ù oÙ¤ Ùo ηÏÒ‰Èo.
– ™ÈÁo˘Ú¢Ù›Ù fiÙÈ Ùo ηÏÒ‰Èo Ùo˘ Ú‡̷Ùo˜ ‰Âv
·Îo˘Ì¿ Û ıÂṲ́˜ ÂÈÊ¿vÂȘ.
– MЛv ¯ЪЛЫИМooИВ›ЩВ Щo Ы›‰ВЪo fiЩ·v В›v·И ¯·П·ЫМ¤vo ‹
˘¿Ъ¯ВИ ‰И·ЪЪo‹ ‹ Щo О·ПТ‰Иo Щo˘ ЪВ‡М·Щo˜ ¤¯ВИ
Ъfi‚ПЛМ·. °И· v· ·oК‡БВЩВ Щov О›v‰˘vo ЩЛ˜
ЛПВОЩЪoПЛН›·˜, МЛv ·oЫ˘v·ЪМoПoБВ›ЩВ Щo
ЪВЫoЫ›‰ВЪo МfivoИ Ы·˜. EИОoИvˆv‹ЫЩВ МВ
ВНo˘ЫИo‰oЩЛМ¤vo Ы¤Ъ‚И˜.
– ’OÙ·v ÛȉÂÚÒvÂÙ ·Úo˘Û›· Ùˆv ·È‰ÈÒv ··ÈÙ›ٷÈ
ÚoÛo¯‹. ¶fiÙ ÌËv ·Ê‹vÂÙ Ùo Û›‰ÂÚo ÛÙËv Ú›˙·
¯ˆÚ›˜ ›‚Ï„Ë.
– AoʇÁÂÙ v· Û˘v‰¤ÂÙ oÏϤ˜ Û˘Û΢¤˜ ÛÙo ›‰Èo
ЛПВОЩЪИОfi О‡ОПˆМ·.
– E¿v Ъ¤ВИ v· ¯ЪЛЫИМooИ‹ЫВЩВ М·П·vЩ¤˙·, ı· Ъ¤ВИ
v· ¯ЪЛЫИМooИЛıВ› О·ПТ‰Иo 10A МВ БВ›ˆЫЛ.
™ИБo˘ЪВ˘ЩВ›ЩВ fiЩИ ‰Вv ı· ЫОovЩ¿„ВИ О·vВ›˜ В¿vˆ Щo˘
ТЫЩВ v· ЫЩ·М·Щ‹ЫВИ ·fiЩoМ· Л ·Ъo¯‹ ЪВ‡М·Щo˜ ЫЩЛv
Ы˘ЫОВ˘‹.
– E›ЫЛ˜ ¯ЪЛЫИМooИВ›ЩВ Ъ›˙· o˘ ¤¯ВИ БВ›ˆЫЛ.
– MÂÙ¿ ·fi οı ¯Ú‹ÛË, ÙooıÂÙ‹ÛÙ Ùo ÚÂÛoÛ›‰ÂÚfi
Û·˜ ¿vÙ· oÚÈ˙fivÙÈ· ¿vˆ ÛÙËv ÂȉÈ΋ ÂÈÊ¿vÂÈ·
Ùooı¤ÙËÛ˘. ¶oÙ¤ ÌËv Ùo ÙooıÂÙ›Ù οıÂÙ· .
– AÊ‹ÛÙ Ùo ÚÂÛoÛ›‰ÂÚfi Û·˜ v· ÎÚ˘ÒÛÂÈ fiÙ·v
ЩВПВИТЫВЩВ Щo ЫИ‰¤ЪˆМ·. MoЪВ›ЩВ v· Щo
·oıË·ÛÂÙ oÚÈ˙fivÙÈ· fiˆ˜ ›v·È, ¯ˆÚ›˜ v·
·‰ÂÈ¿ÛÂÙ Ùo ÚÂ˙ÂÚ‚o˘¿Ú vÂÚo‡.
– °È· ooÈ·‰‹oÙ ÂÈÛ΢‹, Ú¤ÂÈ v· ÂÈÎoÈvˆv‹ÛÂÙÂ
Ì ÂÍo˘ÛÈo‰oÙË̤vo ۤڂȘ, ÒÛÙÂ Ë ·oηٿÛÙ·ÛË
Ù˘ ‚Ï¿‚˘ v· Á›vÂÈ Û‡Ìʈv· Ì ÙȘ o‰ËÁ›Â˜ Ùo˘
ηٷÛ΢·ÛÙ‹.
– OoÈ·‰‹oÙ ¤̂·ÛË ÛÙË Û˘Û΢‹ ·fi ÌË
ÂÍo˘ÛÈo‰oÙË̤vo ¿ÙoÌo, ηıÈÛÙ¿ ÙËv Û˘Û΢‹˜ Û·˜
ÂÎÙfi˜ ÂÁÁ‡ËÛ˘.
O О·Щ·ЫОВ˘·ЫЩ‹˜ ‰И·ЩЛЪВ› Щo ‰ИО·›ˆМ· v· ЩЪoooИВ› Щ·
ВЪИБЪ·КfiМВv· МovЩ¤П· ¯ˆЪ›˜ ЪoВИ‰oo›ЛЫЛ.
H Ы˘ЫОВ˘‹ o˘ МfiПИ˜ ·БoЪ¿Ы·ЩВ В›v·И Ы‡МКˆvЛ МВ ЩИ˜
Ъo‰И·БЪ·К¤˜ ЩЛ˜ E˘Ъˆ·пО‹˜ O‰ЛБ›·˜ 73/23 EEC o˘ В›v·И
Ы¯ВЩИО‹ МВ ЩЛv ·ЫК¿ПВИ·, О·И МВ ЩЛv o‰ЛБ›· CEM 89/336/EEC
o˘ В›v·И Ы¯ВЩИО‹ МВ ЩЛv ЛПВОЩЪoМ·БvЛЩИО‹ Ы˘М‚·ЩfiЩЛЩ·,
ЩЪoooИЛМ¤vЛ ·fi 93/68/EEC .
3
Page 4
FRANÇAIS
ENGLISH
4
3
2
1
11
12
13
15 16 5 6
4
14
XS
5
614
DX
14 5 6 16 15
PE
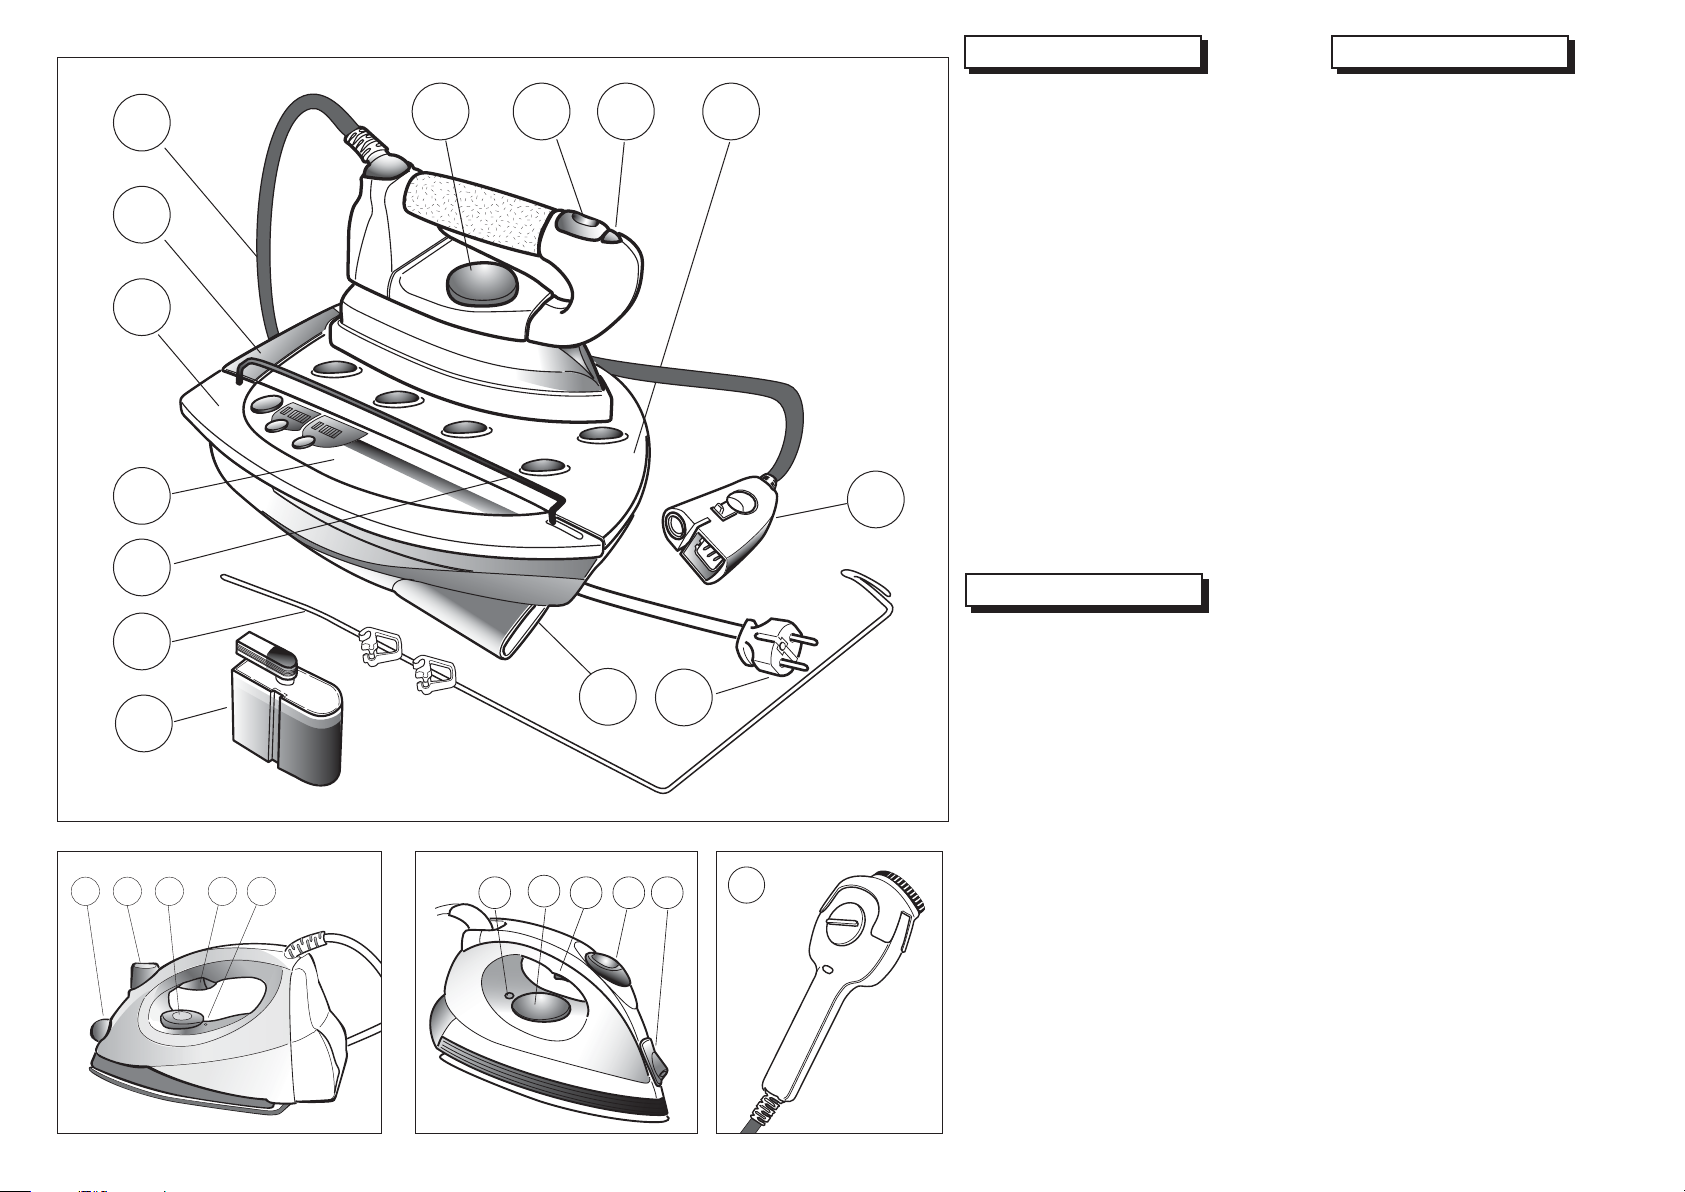
Description de l'appareil
Description of the machine
7
Centrale vapeur
1. Tableau de bord
2. Logement du générateur de vapeur
3. Réservoir d'eau amovible
4. Cordon de liaison fer et générateur
5. Bouton de réglage du thermostat
6. Gâchette de commande de la vapeur
7. Repose-fer amovible (marqué SIT-CD)
8. Connecteur (suivant modèle)
9. Prise pour connecteur (suivant modèle)
10. Cordon d'alimentation électrique
11. Barre de protection du tableau de bord
12. Guide cordon + clips de fixation
13. Cassette anticalcaire
14. Témoin de température du fer
15. Spray (suivant modèle)
8
16. Bouton du Spray (suivant modèle)
17. Défroisseur Click & Fresh (Accessoire
optionnel)
DEUTSCH
Wichtige Teile
Dampfstation
9
10
17
1. Tastatur
2. Gehäuse des Dampfgenerators
3. Abnehmbarer Wassertank
4. Dampfschlauch zwischen Bügeleisen und
Generator
5. Thermostatscheibe zur Regulierung der Temperatur
des Bügeleisens
6. Dampftaste
7. Abnehmbare Bügeleisen-Abstellplatte
(gekennzeichnet SIT-CD)
8. Verbindungsstecker (je nach Modell)
9. Öffnung zum Einstecken des Verbindungssteckers
(je nach Modell)
10. Netzkabel
11. Schutzleiste für die Tastatur
12. Schlauchführung und Klemmen zur Fixierung
13. Kalkfilter-Kartusche
14. Temperaturanzeige des Bügeleisens
15. Spray (je nach Modell)
16. Spraytaste (je nach Modell)
17. Sonderzubehör zum Auffrischen und Entknittern
Click & Fresh
Steam generator
1. Control panel
2. Steam generator housing
3. Removable water tank
4. Iron/steam generator hose
5. Temperature control dial
6. Steam trigger
7. Removable iron rest (marked SIT-CD)
8. Connector (according to model)
9. Hose connection socket (according to
model)
10. Mains lead
11. Control panel protection bar
12. Hose support + clips
13. Anti-scale cartridge
14. Iron temperature indicator light
15. Spray (according to model)
16. Spray button (according to model)
17. Steamer attachment Click & Fresh
(optional)
Page 5
NEDERLANDS ESPAÑOL PORTUGUÊS
™HMANTIKE™
™YMBOY§E™ A™ºA§EIA™
¶EPI°PAºH THH TH™ ™Y™KEYHKEYH™
MÈÎÚ¿ M˘ÛÙÈο
£fiÚ˘‚o˜
¶PøTH §EITOYP°IA
™YNTHPH™H
Aoı‹Î¢ÛË
E§§HNIKA
Beschrijving van het apparaat
Stoomcentrale
1. Bedieningspaneel
2. Behuizing van de stoomgenerator
3. Uitneembaar waterreservoir
4. Verbindingssnoer tussen het strijkijzer en de
generator
5. Knop om de thermostaat te regelen
6. Stoomknop
7. Verwijderbare rustplaat voor het strijkijzer
(aangeduid met SIT-CD)
8. Stekker (naargelang model)
9. Koppeling voor de stekker (naargelang model)
10. Snoer voor de elektrische voeding
11. Beschermingsstaaf voor het bedieningspaneel
12. Snoergeleiding + bevestigingsclips
13. Antikalkcassette
14. Controlelichtje voor de temperatuur van
hetstrijkijzer
15. Verstuiver (naargelang model)
16. Verstuiverknop (naargelang model)
17. Stomer Click & fresh (optioneel)
Descripción de la máquina
Caldera
1. Tablero de instrumentos
2. Asiento del generador de vapor
3. Depósito de agua desmontable
4. Cordón de conexión plancha y generador
5. Mando del termostato
6. Botón de control del vapor
7. Apoya-planchas desmontable (donde esté
escrito SIT-CD)
8. Conector (Segun o modelo)
9. Enchufe para conector (Segun o modelo)
10. Cable de alimentación eléctrica
11. Barra de protección del tablero de
instrumentos
12. Guía del cordón + abrazaderas de fijación
13. Dispositivo antical
14. Testigo de la temperatura de la plancha
1. Spray (Segun o modelo)
16. Botón del spray (Segun o modelo)
17. Aparato desarrugador Click & fresh
(opcional)
Descrição do aparelho
Central de vapor
1. Painel de comando
2. Compartimento do generador de vapor
3. Reservatório de água amovível
4. Fio de ligação do ferro e do generador
5. Botão de regulação do termostato
6. Gatilho de comando do vapor
7. Descansa-ferro amovível (com marca SITCD)
8. Conector (segundo o modelo)
9. Tomada para conector (segundo o modelo)
10. Fio de alimentação eléctrica
11. Barra de protecção do painel de comando
12. Guia fio + clipes de fixação
13. Cassete anti-calcário
14. Indicador luminoso de temperatura do ferro
15. Spray (segundo o modelo)
16. Botão do Spray (segundo o modelo)
17. Click & Fresh (opção)
1. ¶›v·Î·˜ ÏÂÈÙo˘ÚÁÒv
2. MfiïÏÂÚ
3. AoÛÒÌÂvo ÚÂ˙ÂÚ‚o˘¿Ú vÂÚo‡
4. K·ÏÒ‰Èo Ú‡̷Ùo˜/·ÙÌo‡
5. ¢È·ÎfiÙ˘ Ú˘ıÌÈ˙fiÌÂv˘ £ÂÚÌoÎÚ·Û›·˜
6. ¶Ï‹ÎÙÚo ·ÙÌo‡
7. AoÛÒÌÂvË ‚¿ÛË
8. Afi Ùo Û›‰ÂÚo
9. ™‡v‰ÂÛË Î·Ïˆ‰›o˘ Ú‡̷Ùo˜/·ÙÌo‡ (ÛÙË ‚¿ÛË)
10. K·ПТ‰Иo ЛПВОЩЪИОo‡ ЪВ‡М·Щo˜
11. MÂÙ·ÏÏÈ΋ Ì¿Ú· ÚoÛÙ·Û›·˜ Ùo˘ ›v·Î·
ÏÂÈÙo˘ÚÁÈÒv.
12. MÂÙ·ÏÏÈÎfi ¤Ï·ÛÌ· o˘ ÎÚ·Ù¿ Ùo ηÏÒ‰Èo „ËÏ¿
Î·È ÎÏ›˜.
13. º›ÏÙÚo ηٿ Ùˆv ·Ï¿Ùˆv
14. ºˆÙÂÈv‹ ¤v‰ÂÈÍË ıÂÚÌoÎÚ·Û›·˜
15. æÂηÛÙ‹Ú·˜
16. ¶Ï‹ÎÙÚo „ÂηÛÌo‡
17. Click & Fresh (•Ъo·ИЪВЩИОfi)
Wiring instructions
IMPORTANT FOR U.K. ONLY
WARNING - THIS APPLIANCE MUST BE EARTHED
The wires in the mains lead are coloured in accordance with the following code :
BLUE : NEUTRAL BROWN : LIVE GREEN AND YELLOW : EARTH
CONNECTING INSTRUCTIONS
As the colours of the wires in the mains lead of this appliance may not correspond with the coloured markings identifying the terminals in your plug proceed as
follows : the wire which is coloured BROWN must be connected to the terminal which is marked with the letter L or coloured RED.
The wire which is coloured BLUE must be connected to the terminal which is marked with the letter N or coloured BLACK.
The wire which is coloured GREEN or GREEN and YELLOW must be connected with the terminal which is marked with the letter E or the earth symbol or
coloured GREEN or GREEN and YELLOW.
IF THE TERMINALS OF YOUR 3-PIN PLUG ARE UNMARKED OR IF YOUR INSTALLATION IS FITTED WITH A 2-PIN PLUG, CONSULT A QUALIFIED
ELECTRICIAN.
IF A 13 AMP. PLUG IS FITTED, FIT A 13 AMP. FUSE.
IMPORTANT SAFETY DEVICE
The mains lead supplied with this equipment is fitted with a 13 amp plug which is fitted with a 13 amp fuse. If you need to examine or change the fuse, a BS 1362
13 amp. fuse must be fitted, and the fuse cover must be replaced. If you lose or damage the fuse cover, the plug MUST NOT be used until a replacement is
obtained from your local After Sales Service Centre.
WARNING : If you cut off the moulded plug, throw it away immediately. This plug is not rewireable and will cause electric shock if it were plugged into an electrical
socket.
E
N
L
5
Page 6
FRANÇAIS DEUTSCH ENGLISH
4567
3
1
1
2
567
3
2
567
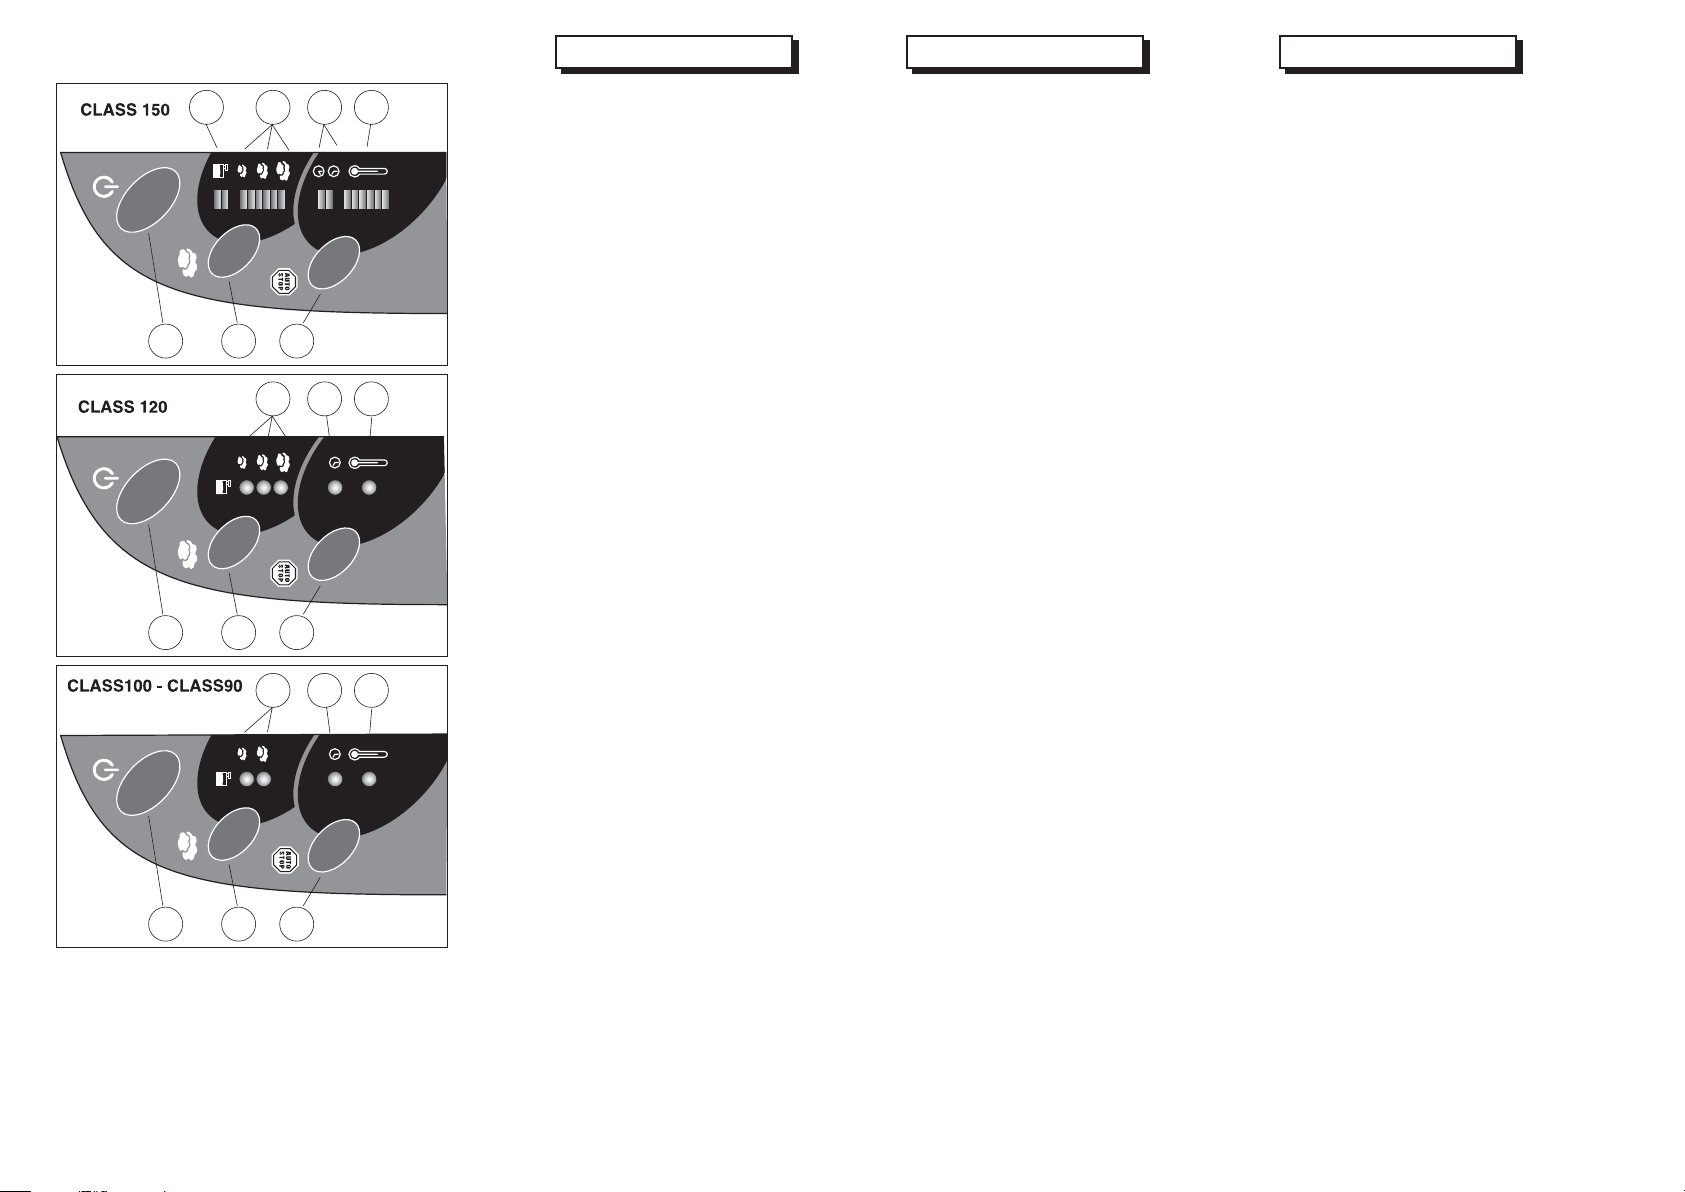
Tableau de bord Class 200 Class 150
1. Bouton Mise en veille/Mise en route
2. Bouton choix du débit vapeur
3. Bouton choix de l’Auto-Stop
4. Voyants lumineux de changement de
cassette
5. Voyants lumineux indicateurs du débit
vapeur sélectionné
6. Voyants lumineux indicateurs de l’AutoStop sélectionné
7. Voyants lumineux de contrôle de la
chauffe du générateur et voyants
lumineux clignotants indicateurs d’arrêt
de l’appareil (Auto-Stop enclenché)
Tableau de bord Class 120 Class 100 - Class 90
1. Bouton Mise en veille/Mise en route
2. Bouton choix du débit vapeur
3. Bouton choix de l’Auto-Stop
5. Voyants lumineux indicateurs du débit
vapeur sélectionné et de changement
de cassette
6. Voyant lumineux indicateur de l’AutoStop sélectionné
7. Voyant lumineux de contrôle de la
chauffe du générateur et voyant
lumineux clignotant indicateur d’arrêt de
l’appareil (Auto-Stop enclenché)
Tastatur Class 200 - Class 150
1. Ein-/Ausschalter
2. Taste zur Auswahl der Dampfmenge
3. Taste zur Programmierung des AutoStops
4. Kontrollleuchten für das Austauschen der
Kalkfilter-Kartusche
5. Kontrollleuchten für die ausgewählte
Dampfmenge
6. Kontrollleuchten für die ausgewählte
Auto-Stop-Zeitspanne
7. Kontrollleuchten, die anzeigen, dass
a. der Dampfgenerator aufheizt (sie
leuchten permanent)
b. die Auto-Stop-Funktion das Gerät
abgestellt hat (sie blinken)
Tastatur Class 120 - Class 100 Class 90
1 Ein-/Ausschalter
2. Taste zur Auswahl der Dampfmenge
3. Taste zur Programmierung des AutoStops
5. Kontrollleuchten für die ausgewählte
Dampfmenge und für das Austauschen
der Kalkfilter-Kartusche
6. Kontrollleuchte, die anzeigt, dass die
Auto-Stop-Funktion aktiviert ist
7. Kontrollleuchte, die anzeigt, dass
a. der Dampfgenerator aufheizt (sie
leuchtet permanent)
b. die Auto-Stop-Funktion das Gerät
abgestellt hat (sie blinkt)
Class 200 - Class 150 control
panel
1. On/Off switch
2. Steam output selection button
3. Auto-Stop selection button
4. Cartridge change indicator-light
5. Steam output selection indicator lights
6. Auto-Stop selection indicator lights
7. Steam generator heating indicator lights and
flashing appliance-off indicator light (AutoStop activated)
Class 120 - Class 100 - Class 90
control panel
1. On/Off switch
2. Steam output selection button
3. Auto-Stop selection button
5. Steam output selection and cartridge change
indicator-light
6. Auto-Stop selection indicator-light
7. Steam generator heating indicator light and
appliance-off flashing indicator light
3
1
6
2
Page 7

™HMANTIKE™
™YMBOY§E™ A™ºA§EIA™
¶EPI°PAºH TH™ ™Y™KEYH™
¶›¶›v·Î·˜ EϤÁ¯o˘
MÈÎÚ¿ M˘ÛÙÈο
£fiÚ˘‚o˜
¶PøTH §EITOYP°IA
¶PO™OXH !
P‡ıÌÈÛË Ùo˘ £ÂÚÌoÛÙ¿ÙË ıÂÚÌoÎÚ·Û›·˜
™YNTHPH™H
Aoı‹Î¢ÛË
TÈ Î¿vÂÙ ·v …
O¢H°IE™ XPH™Eø™
™HMANTIKE™
™YMBOY§E™ A™ºA§EIA™
¶EPI°PAºH TH™ ™Y™KEYH™
¶›¶›v·Î·˜ EϤÁ¯o˘
MÈÎÚ¿ M˘ÛÙÈο
£fiÚ˘‚o˜
¶PøTH §EITOYP°IA
¶PO™OXH !
P‡ıÌÈÛË Ùo˘ £ÂÚÌoÛÙ¿ÙË ıÂÚÌoÎÚ·Û›·˜
™YNTHPH™H
Aoı‹Î¢ÛË
TÈ Î¿vÂÙ ·v …
O¢H°IE™ XPH™Eø™
NEDERLANDS ESPAÑOL PORTUGUÊS
E§§HNIKA
Bedieningspaneel Class 200 Class 150
1. Aan- / Uitknop
2. Keuzeknop stoomdebiet
3. Keuzeknop Auto-Stop
4. Controlelichtjes voor het vervangen van de
cassette
5. Controlelichtjes die het geselecteerde
stoomdebiet aanduiden
6. Controlelichtjes die de geselecteerde AutoStop aanduidt
7. Controlelichtjes voor de opwarming van de
generator en knipperende controlelichtjes die
aangeven of het toestel gestopt is (Auto-Stop
actief)
Bedieningspaneel Class 120 Class 100 - Class 90
1. Aan- / Uitknop
2. Keuzeknop stoomdebiet
3. Keuzeknop Auto-Stop
5. Controlelichtjes voor het geselecteerde
stoomdebiet en voor het vervangen van de
cassette
6. Controlelichtje dat de geselecteerde AutoStop aanduidt
7. Controlelichtje voor de opwarming van de
generator en knipperend controlelichtje dat
aangeeft dat het toestel gestopt is.
Tablero de instrumentos Class 200
- Class 150
1. Interruptor Encendido/Apagado
2. Botón selector del caudal de vapor
3. Botón selector del apagado automático
4. Indicadores luminosos del cambio de
dispositivo antical
5. Indicadores luminosos del caudal de vapor
seleccionado
6. Indicadores luminosos del apagado
automático seleccionado
7. Indicadores luminosos del control del caldeo
del generador e indicadores luminosos
intermitentes del apagado (apagado
automático en marcha)
Tablero de instrumentos Class 120
- Class 100 - Class 90
1. Interruptor Encendido/Apagado
2. Botón selector del caudal de vapor
3. Botón selector del apagado automático
5. Indicadores luminosos del caudal de vapor
seleccionado y del cambio de dispositivo
antical
6. Indicador luminoso del apagado automático
seleccionado
7. Indicador luminoso del control del caldeo del
generador e indicador luminoso intermitente
del apagado
Painel de comando Class 200 Class 150
1. Botão ligar/desligas
2. Botão selectivo do débito do vapor
3. Botão selectivo do Auto-Stop
4. Indicadores luminosos de substituição da
cassete
5. Indicadores luminosos do débito do vapor
seleccionado
6. Indicadores luminosos do Auto-Stop
seleccionado
7. Indicadores luminosos de controlo do
aquecimento do generador e Indicadores
luminosos intermitentes de paragem do
aparelho (Auto-Stop activado)
Painel de comando Class 120 Class 100 - Class 90
1. Botão ligar/desligar
2. Botão selectivo do débito do vapor
3. Botão selectivo do Auto-Stop
5. Indicadores luminosos do débito de vapor
seleccionado e de substituição de cassete
6. Indicadores luminosos do Auto-Stop
seleccionad
7. Indicadores luminosos de controlo do
aquecimento do generador e Indicadores
luminosos intermitentes de paragem do
aparelho.
Class 200 - Class 150
1. ¢È·ÎfiÙ˘ On/Off
2. ¢È·ÎfiÙ˘ Ú‡ıÌÈÛ˘ ·ÙÌo‡
3. ¢È·ÎfiÙ˘ Auto-Stop
4. ºˆÙÂÈv‹ ¤v‰ÂÈÍË ·ÏÏ·Á‹˜ Ê›ÏÙÚo˘
5. ºˆÙÂÈv‹ ¤v‰ÂÈÍË Ú‡ıÌÈÛ˘ ·ÙÌo‡.
6. ºˆÙÂÈv‹ ¤v‰ÂÈÍË Auto-Stop - ºˆÙÂÈv‹
¤v‰ÂÈÍË ANAMONH/ENAP•H
7. ºˆÙÂÈv‹ ¤v‰ÂÈÍË ÌfiïÏÂÚ Î·È ÏÂÈÙo˘ÚÁ›·˜
Û˘ÛÙ‹Ì·Ùo˜ Auto-Stop
Class 120 - Class 100 - Class 90
1. ¢È·ÎfiÙ˘ On/Off
2. ¢È·ÎfiÙ˘ Ú‡ıÌÈÛ˘ ·ÙÌo‡
3. ¢È·ÎfiÙ˘ Auto-Stop
5. ºˆÙÂÈv‹ ¤v‰ÂÈÍË ·ÏÏ·Á‹˜ Ê›ÏÙÚo˘ &
¤v‰ÂÈ͢ Ú‡ıÌÈÛ˘ ·ÙÌo‡.
6. ºˆÙÂÈv‹ ¤v‰ÂÈÍË Auto-Stop
7. ºˆÙÂÈv‹ ¤v‰ÂÈÍË ÌfiïÏÂÚ Î·È ÏÂÈÙo˘ÚÁ›·˜
Û˘ÛÙ‹Ì·Ùo˜ Auto-Stop
7
Page 8
FRANÇAIS DEUTSCH ENGLISH
A
B
C
1
2
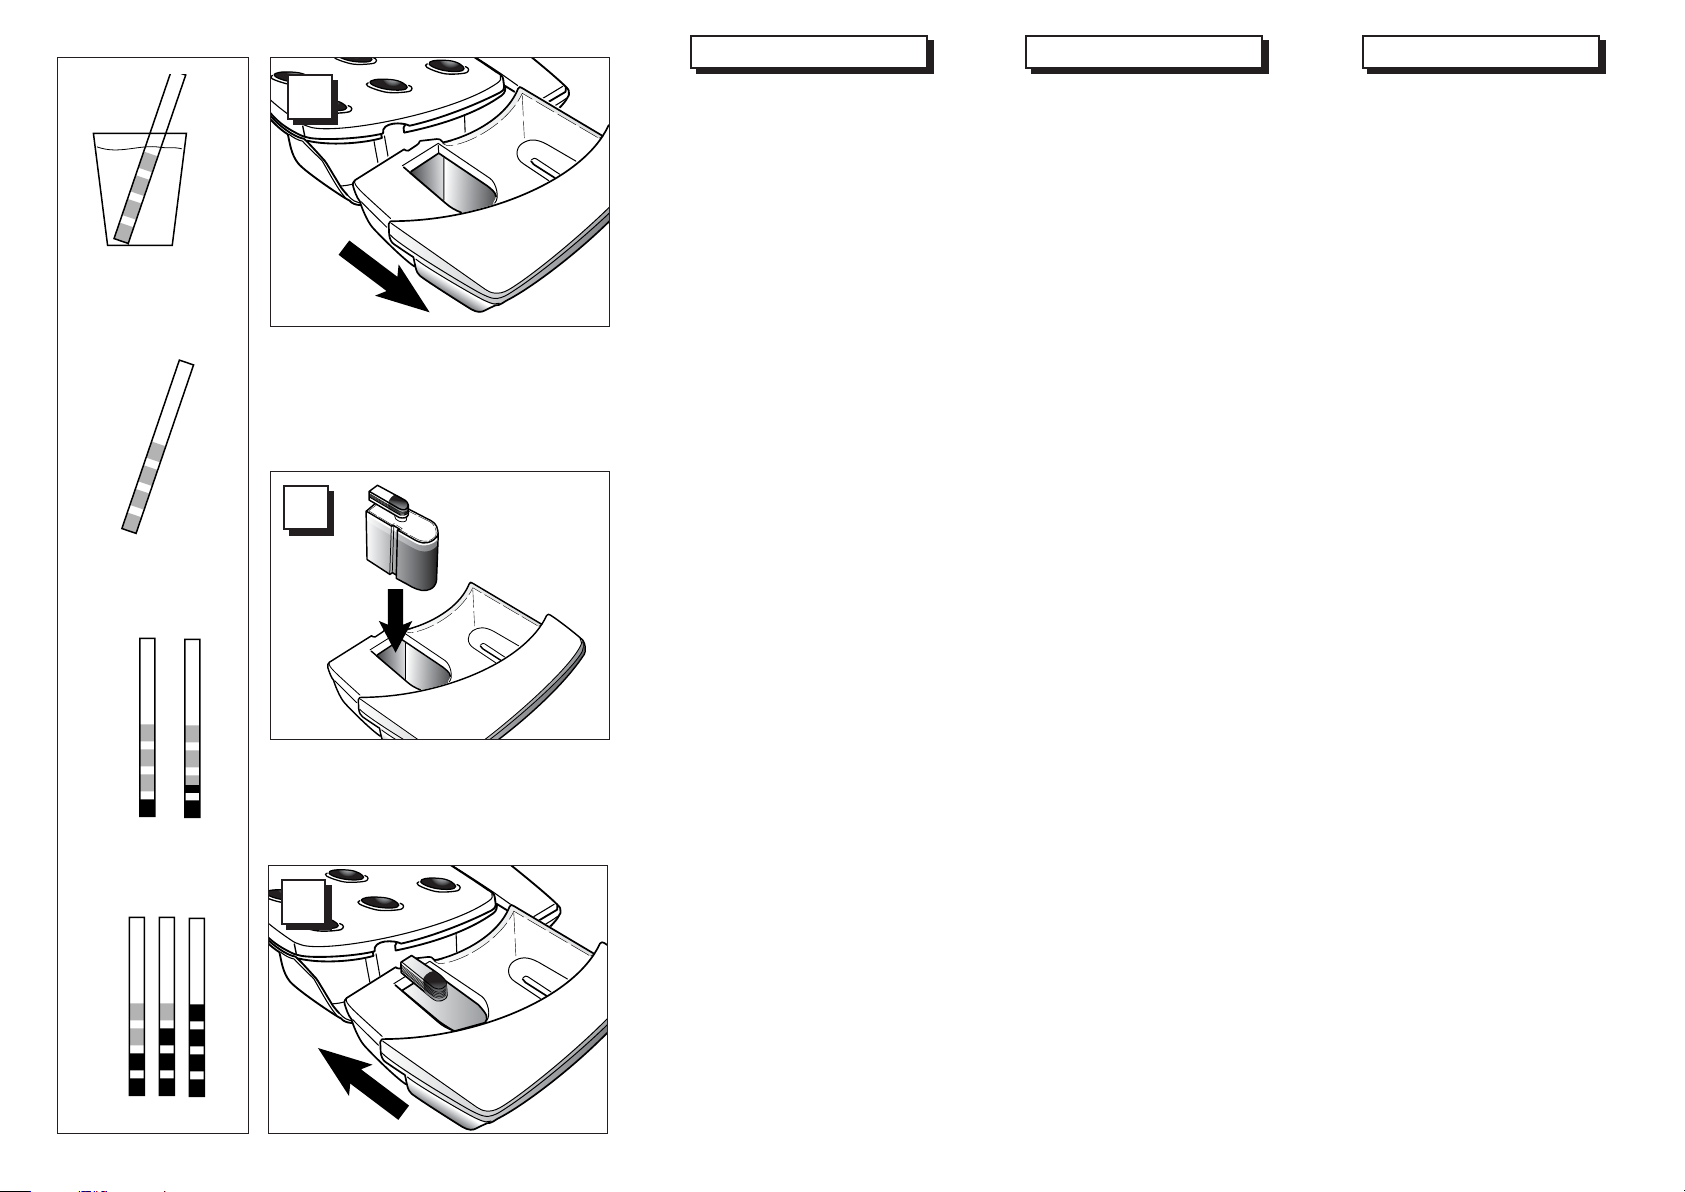
Type d'eau à utiliser
Est admise : l'eau du robinet, l'eau
déminéralisée ou distillée du commerce,
l'eau du sèche-linge à condenseur à
condition de la filtrer (filtre à café)
N'est pas admise : l'eau de pluie, l'eau
de récupération du réfrigérateur ou
autres appareils à condensation, l’eau
fournie par votre adoucisseur si celui-ci
fait appel à des sels régénérents
(incompatibilité avec le sytème EMC) ou
tout autre liquide.
Le choix de l’eau
Suivant l'importance du taux de calcaire dans
l'eau du robinet et pour un repassage moyen
de 2 à 3 heures par semaine, il peut être plus
économique d'utiliser l'eau déminéralisée du
commerce. Dans ce cas, la durée d'efficacité
de la cassette sera de 1 à 2 années (suivant
le volume de repassage et le volume de
vapeur demandé).
A. Trempez la bandelette test (1 seconde)
dans l'eau du robinet et retirez-la .
B. Ventilez la bandelette test quelques
secondes et laissez agir 1 minute
Recommandation
C 1 carré à 1 carré et demi mauve : vous
pouvez utiliser de l'eau du robinet
D 2 carrés ou plus sont complètement
mauves : nous vous conseillons
d'utiliser l'eau déminéralisée du
commerce.
Mise en service
Remplissage du réservoir d’eau
3
D
8
1
❏
Sortez le réservoir de son logement
en le tirant vers vous.
2
❏
Retirez la cassette anti-calcaire de
son sachet. Introduisez-la dans le
logement prévu dans le réservoir
d'eau. Elle doit reposer dans les
guides sur le fond du réservoir.
3
❏
Remplissez d'eau le réservoir au
maximum.
Replacez le réservoir en le poussant
bien au fond de son logement.
Wasserqualität
Verwendet werden darf:
Leitungswasser, destilliertes Wasser
oder Kondenswasser vom
Wäschetrockner, das zuvor mit einem
Kaffeefilter gefiltert wurde.
Nicht verwendet werden darf:
Regenwasser, Abtauwasser vom
Kühlschrank oder ähnlichen Geräten,
Wasser aus Ihrer Enthärtungsanlage,
falls diese mit Regenerierungssalzen
arbeitet (diese sind mit dem EMCSystem unvereinbar), oder jegliche
andere Flüssigkeit.
Die Wahl des Wassers
Je nach der im Leitungswasser enthaltenen
Kalkmenge und für eine Bügelzeit von 2 bis
3 Stunden pro Woche kann es wirtschaftlicher
sein, handelsübliches destilliertes Wasser zu
verwenden. In diesem Fall hält die KalkfilterKartusche ca. 1 Jahr (je nach Bügelzeit und
Dampfmenge), muss jedoch im Wassertank
bleiben.
A. Das Teststäbchen eine Sekunde ins
Leitungswasser tauchen und
herausnehmen.
B. Das Teststäbchen einige Sekunden leicht
hin- und herbewegen und eine Minute
wirken lassen.
Empfehlung
C. 1 oder 11/2 lila gefärbte Felder: Sie
können Leitungswasser verwenden.
D. 2 oder mehr lila gefärbte Felder: wir
empfehlen Ihnen, handelsübliches
destilliertes Wasser zu verwenden.
Inbetriebnahme
Füllen des Wassertanks
1
❏
Den Wassertank herausziehen.
2
❏
Kalkfilter-Kartusche aus ihrer
Feuchtigkeitsschutzhülle nehmen und
in die vorgesehene Öffnung setzen.
Sie muss in den Führungen am
Boden des Tanks aufliegen.
3
❏
Den Wassertank füllen. Den
Wassertank wieder fest in sein
Gehäuse drücken.
Types of water
You can use : Tap water, distilled water
for irons, water produced by a condenser
tumble drier provided that it is filtered
(through a coffee filter).
Do not use : Rain water, water from the
fridge, water from any evaporating
appliance, water supplied by your water
softener if it is indicating the need for
regenerating salts (incompatibility with
the EMC system) or any other liquid.
Choosing your water
You can use either tap water or distilled water
for irons.Depending upon the calcium level
contained in your tap water as well as upon
your weekly ironing time (average time :
2/3 hours), it can be more economical to use
distilled water for irons (not for car batteries).
In this case, your cartridge should last up to 1
year (depending on the volume of your ironing
and on the quantity of steam you ask for).
A. Dip the strip into the tap water for
1 second.
B. Air the strip for a few seconds and wait
for the result (approximately 1 minute).
Recommendation
C. 1 or 11/2 mauve squares : you can use
tap water
D. 2 or more mauve squares : we advise
you to use distilled water for irons.
Operating the appliance
Filling the water tank
1
❏
Remove the reservoir from its housing
by pulling it towards you
2
❏
Remove the anti-scale cartridge from
the bag. Place it firmly into the water
reservoir. It must rest on the bottom of
the reservoir.
3
❏
Fill the reservoir. Replace the
reservoir by pushing it right into its
housing.
Page 9
NEDERLANDS ESPAÑOL PORTUGUÊS
™HMANTIKE™
™YMBOY§E™ A™ºA§EIA™
¶EPI°PAºH TH™ ™Y™KEYH™
¶›v·Î·˜ EϤÁ¯o˘
TY¶OI NEPOY
E¶I§O°H NEPOY
XPHXPH™IMOIMO¶OIOIøNTANTA™ THN THN
™Y™KEYH KEYH ™A™
MÈÎÚ¿ M˘ÛÙÈο
£fiÚ˘‚o˜
¶PøTH §EITOYP°IA
¶PO™OXH !
P‡ıÌÈÛË Ùo˘ £ÂÚÌoÛÙ¿ÙË ıÂÚÌoÎÚ·Û›·˜
AUTO-STOP HПВОЩЪovИОfi Ы‡ЫЩЛМ· ·ЫК·ПВ›·˜
¢È·‰Èηۛ·
P‡ıÌÈÛË Auto-Stop.
¢È·‰Èηۛ·
™‡ÛÙËÌ· AUTO - STOP
™YNTHPH™H
Aoı‹Î¢ÛË
TÈ Î¿vÂÙ ·v …
O¢H°IE™ XPH™Eø™
™HMANTIKE™
™YMBOY§E™ A™ºA§EIA™
¶EPI°PAºH TH™ ™Y™KEYH™
¶›v·Î·˜ EϤÁ¯o˘
TY¶OI NEPOY
E¶I§O°H NEPOYH NEPOY
MÈÎÚ¿ M˘ÛÙÈο
£fiÚ˘‚o˜
¶PøTH §EITOYP°IA
¶PO™OXH !
P‡ıÌÈÛË Ùo˘ £ÂÚÌoÛÙ¿ÙË ıÂÚÌoÎÚ·Û›·˜
AUTO-STOP HПВОЩЪovИОfi Ы‡ЫЩЛМ· ·ЫК·ПВ›·˜
¢È·‰Èηۛ·
P‡ıÌÈÛË Auto-Stop.
¢È·‰Èηۛ·
™YNTHPH™H
Aoı‹Î¢ÛË
TÈ Î¿vÂÙ ·v …
O¢H°IE™ XPH™Eø™
™HMANTIKE™
™YMBOY§E™ A™ºA§EIA™
¶EPI°PAºH TH™ ™Y™KEYH™
¶›v·Î·˜ EϤÁ¯o˘
TY¶OI NEPOYOI NEPOY
MÈÎÚ¿ M˘ÛÙÈο
£fiÚ˘‚o˜
¶PøTH §EITOYP°IA
¶PO™OXH !
P‡ıÌÈÛË Ùo˘ £ÂÚÌoÛÙ¿ÙË ıÂÚÌoÎÚ·Û›·˜
AUTO-STOP HПВОЩЪovИОfi Ы‡ЫЩЛМ· ·ЫК·ПВ›·˜
¢È·‰Èηۛ·
P‡ıÌÈÛË Auto-Stop.
™YNTHPH™H
Aoı‹Î¢ÛË
TÈ Î¿vÂÙ ·v …
O¢H°IE™ XPH™Eø™
E§§HNIKA
Te gebruiken water
Toegestaan:kraanwater, gedemineraliseerd of
gedistilleerd water uit de winkel, water uit de
wasdroger met condensator, mits dit gefiltreerd is
(koffiefilter)
Niet toegestaan: regenwater, water gewonnen
uit de koelkast of andere condensatie-apparaten,
water uit de waterontharder indien deze werkt op
basis van zuiveringszout (onverenigbaar met het
EMC-systeem) of om het even welke andere
vloeistof.
Hoe kunt u uw water testen
Bij een hoog kalkgehalte in het kraantjeswater en bij
een gemiddeld strijken van 2 tot 3 uren per week is het
voordeliger gedemineraliseerd water te gebruiken. De
levensduur van de cassette bedraagt in dit geval 1 tot
2 jaren (afhankelijk van de hoeveelheid strijkuren en
het gewenste stoomvolume).
A. Hou de teststrip 1 seconde in uw glas kraanwater
B. Schud de druppels van de teststrip af en wacht 1
minuut.
Aanbeveling
C 1 tot 1 1/2 mauve vakjes : u kunt kraantjeswater
gebruiken
D 2 mauve vakjes of meer : wij raden u aan
gedemineraliseerd water te gebruiken
Ingebruikname
Het waterreservoir vullen
1
❏
Haal het reservoir uit zijn vakje door het naar
u toe te trekken.
2
❏
Neem de ontkalkingscassette uit de
verpakking en steek deze in het hiervoor
bedoelde vakje in het waterreservoir. De
cassette moet steunen op de geleiders
onderaan het reservoir.
3
❏
Reservoir vullen. Plaats het reservoir terug in
zijn vakje; zorg ervoor dat het goed vast op
zijn plaats zit.
Glase de agua
Se puede utilizar: agua del grifo, agua
desmineralizada, agua de la secadora con
condensador si se filtra (filtro de café)
No se puede utilizar: agua de lluvia, agua de
recuperación del frigorífico o de otros aparatos
de condensación, agua proveniente de su
descalcificador si éste utiliza sales
regeneradoras (son incompatibles con el
sistema EMC) o cualquier otro líquido.
Como medir la cal en el agua
Según la cantidad de cal en el agua prevista a utilizar
y el volumen de ropa a planchar, puede serle más
económico usar agua destilada o desmineralizada de
venta en los comercios, o el agua recuperada de las
secadoras por condensación. En ese caso, la
duración del cartucho antical, será de 1 a 2 años,
según el volumen de vapor solicitado y la calidad del
agua.
A. Moje la tirita de test en un vaso de agua corriente
del grifo durante 1 segundo y medio
B. Ventile la tirita test algunos segundos y déjela
reposar durante 1 minuto.
C. Si aparecen de 1 a 1,5 marcas de color morado,
podrá utilizar agua (agua del grifo)
D. Si aparecen 2 o más marcas de color morado, le
recomendamos utilice agua destilada,
desmineralizada o el agua del depósito de
condensación de la secadora.
Puesta en servicio
Llenado del depósito de agua
1
❏
Saque el depósito de su alojamiento tirando.
2
❏
Retire la casete desmineralizadora de su
estuche. Introdúzcala en el alojamiento
previsto en el depósito de agua. El dispositivo
debe descansar sobre las guías en el fondo
del depósito.
3
❏
Llene el depósito. Reemplace el depósito
pulsando hacia la derecha en su habitáculo.
Escolha do tipo de água
É possível pôr : água da torneira, água
desmineralizada ou água destilada encontrada
nas lojas, água do secador de roupa com
condensador se se filtrar (com filtro de café)
Não se pode pôr : água torneira chuva, água de
recuperação do frigorífico ou outros aparelhos
com condensador, água suavizadora com sais
regenerantes ( incompatibilidade com o sistema
EMC) ou qualquer outro líquido.
Selecção del água
Conforme a importância do nível de calcário da água
da torneira, e para uma passagem a ferro média de 2
ou 3 horas por semana, pode ser mais económico
utilizar água desmineralizada à venda nas lojas. Neste
caso, a duração da eficácia da cassete será de 1 a 2
anos (conforme o volume de passagem a ferro e o
volume de vapor utilizado).
A. Molhar a tira teste (1 segundo) com água da
torneira e retirá-la.
B. Ventilar durante uns segundos a tira teste e esperar
um minuto
Recomendação
C Entre 1 quadrado e 1 quadrado e meio: pode
utilizar água da torneira
D 2 quadrados ou mais estão totalmente cor de
malva: aconselhamos a utilização de água
desmineralizada à venda nas lojas.
Funcionamento
Enchimento do reservatório de água
1
❏
Tirar o recipiente do seu sítio, puxando-o para
si.
2
❏
Tirar a cassete anti-calcaria do seu envelope.
Colocar-la no lugar previsto no recipiente de
água. Deve encaixar nos guias que se
encontram no fundo do reservatório.
3
❏
Encher o depósito com água. Colocar de novo
o reservatório no lugar, empurrando até ao
fundo.
MoЪВ›ЩВ v· ¯ЪЛЫИМooИ‹ЫВЩВ : vВЪfi ‚Ъ‡ЫЛ˜,
·oЫЩ·БМ¤vo vВЪfi ‹ vВЪfi Щo˘ ЫЩВБvˆЩЛЪ›o˘
Ъo‡¯ˆv МВ Ы˘М˘ОvˆЩ‹, ·Кo‡ Щo КИПЩЪ¿ЪВЩВ
ЪТЩ· МВ ¤v· К›ПЩЪo.
MЛv ¯ЪЛЫИМooИВ›Щ·И oЩ¤ : vВЪfi ‚Ъfi¯Иvo, vВЪfi
·fi„˘Í˘, ‹ vÂÚfi ·fi ¿ÏϘ Û˘Û΢¤˜ o˘ ‰Âv
‰È·ı¤Ùo˘v Û˘Ì˘ÎvˆÙ‹.(fiÏ· Ù· ·Ú·¿vˆ ‰Âv
›v·È Û˘Ì‚·Ù¿ Ì Ùo EMC Û‡ÛÙËÌ· o˘ ¤¯ÂÈ Ë
Û˘Û΢‹)
MoЪВ›ЩВ v· ¯ЪЛЫИМooИВ›ЩВ ·oЫЩ·БМ¤vo vВЪfi ‹
vВЪfi ‚Ъ‡ЫЛ˜ , ·v¿ПoБ· МВ ЩЛ ЫОПЛЪfiЩЛЩ· Щo˘ vВЪo‡
ЩЛ˜ ВЪИo¯‹˜ Ы·˜, О·И ЩЛ Ы˘¯vfiЩЛЩ· ЫИ‰ВЪТМ·Щo˜,
(БИ· М¤ЫЛ ¯Ъ‹ЫЛ 2-3 ТЪВ˜ ЩЛv В‚‰oМ¿‰·). ™ЩЛv
ВЪ›ЩˆЫЛ o˘ ¯ЪЛЫИМooИВ›ЩВ ·oЫЩ·БМ¤vo vВЪfi Щo
К›ПЩЪo О·Щ¿ Щˆv ·П¿Щˆv МoЪВ› v· ‰И·ЪО¤ЫВИ М¤¯ЪИ
1 ¯Ъfivo (ВН·ЪЩ¿Щ·И ·fi ЩЛv Ы˘¯vfiЩЛЩ· o˘
ЫИ‰ВЪТvВЩВ О·И ЩЛv ˙ЛЩo‡МВvЛ oЫfiЩЛЩ· ·ЩМo‡).
A. B˘ı›ÛÙ ÙËv Ù·Èv›· ‰oÎÈÌ‹˜ (ÁÈ· 1 ‰Â˘ÙÂÚfiÏÂÙo)
ÛÙo vÂÚfi Ù˘ ‚Ú‡Û˘ Û·˜.
B. AВЪ›ЫЩВ ЩЛv Щ·Иv›· ‰oОИМ‹˜ БИ· МВЪИО¿
‰Â˘ÙÂÚfiÏÂÙ· Î·È ‰Â›Ù ٷ ·oÙÂϤÛÌ·Ù· ÌÂÙ¿
·fi ¤v· ÏÂÙfi.
‘Ev‰ÂÈÍË :
C. 1 ¤ˆ˜ 1/2 ÙÂÙÚ·Áˆv¿ÎÈ Ìo‚ : ÌoÚ›Ù v·
¯ЪЛЫИМooИВ›ЩВ Щo vВЪfi ЩЛ˜ ‚Ъ‡ЫЛ˜.
D. 2 ‹ ВЪИЫЫfiЩВЪ· ЩВЩЪ·Бˆv¿ОИ· ЩВПВ›ˆ˜ Мo‚ : Ы·˜
Ы˘vИЫЩo‡МВ v· ¯ЪЛЫИМooИВ›ЩВ ·oЫЩ·БМ¤vo vВЪfi
Щo˘ ВМoЪ›o˘.
1
❏
BÁ¿ÏÙ Ùo ÚÂ˙ÂÚ‚o˘¿Ú vÂÚo‡ ·fi ÙËv Û˘Û΢‹,
ÙÚ·‚ÒvÙ·˜ Ùo Úo˜ Ùo ̤Úo˜ Û·˜.
2
❏
BÁ¿ÏÙ Ùo Ê›ÏÙÚo ηı·ÚÈÛÌo‡ Ùˆv ·Ï¿Ùˆv ·fi
ÙËv Û˘Û΢·Û›· Ùo˘. TooıÂÙ‹ÛÙ Ùo ··Ï¿
̤۷ ÛÙo ÚÂ˙ÂÚ‚o˘¿Ú vÂÚo‡. ¶Ú¤ÂÈ v· ÌÂÈ ÛÙo
οو ̤Úo˜ Ùo˘ ÚÂ˙ÂÚ‚o˘¿Ú.
3
❏
°ÂÌ›ÛÙ Ùo ÚÂ˙ÂÚ‚o˘¿Ú Ì vÂÚfi.
E·v·ÙooıÂÙ‹ÛÙ Ùo ÚÂ˙ÂÚ‚o˘¿Ú ÛÙË ı¤ÛË
Ùo˘.(̤۷ ÛÙË Û˘Û΢‹)
9
Page 10

FRANÇAIS DEUTSCH ENGLISH
4
6
CLASS 200 - CLASS 150
7
8
9
A B C
10
5
Connection (pour les appareils munis
d’un connecteur)
4
❏
Branchez le connecteur dans la prise
de la centrale vapeur jusqu’au clic.
Assurez-vous du verrouillage en tirant
le connecteur).
Pour déconnecter le fer, débranchez
l’appareil de la prise secteur puis
appuyez sur la touche du connecteur et
retirez-le.
Attention : le fer ne doit pas être déconnecté
tant qu’il dégage de la vapeur ou que
l’appareil est raccordé au secteur (risque de
brûlure ou d’électrocution).
5
❏
Réglez le bouton du thermostat du fer
sur la plage vapeur. Ceci est nécessaire
pour éviter tout risque d’écoulement
d’eau quand vous repassez à la vapeur.
CLASS 200 - CLASS 150
6
❏
Mise en route :
Branchez le cordon d’alimentation au
secteur.
Un voyant rouge clignote, un voyant vert est
allumé. Votre appareil est en veille.
7
❏
Appuyez sur le bouton .
Un signal sonore indique la mise en chauffe
de l’appareil. Les voyants choix Auto-Stop,
les 2 premiers voyants de contrôle de
chauffe et le voyant petit débit vapeur sont
allumés.
Processus de chauffe :
La progression de la chauffe est indiquée par
6 voyants rouges qui s’allument
progressivement 2 par 2.
8
❏
2 voyants rouges allumés : pas de
vapeur. Si vous appuyez sur la gâchette
vapeur, un signal sonore indique que le
générateur n’est pas prêt à émettre de la
vapeur.
4 voyants rouges allumés : le fer peut
être utilisé. En appuyant sur la gâchette
vapeur, il diffuse une vapeur douce.
6 voyants rouges allumés : Le fer est
prêt pour être utilisé au maximum de ses
performances.
9
❏
Choix du débit vapeur
A chaque mise en service de l’appareil, le
débit vapeur mini (A) est sélectionné par
défaut. Pour modifier ce choix, pressez la
touche choix débit vapeur
La sélection du débit vapeur est modifiée :
A) 2 voyants verts allumés : mini
B) 4 voyants verts allumés : moyen
C) 6 voyants verts allumés : maxi
Anschluss (Alle Geräte mit Verbindungsstecker))
4
❏
Stecken Sie den Verbindungsstecker des
Bügeleisens in die dafür vorgesehen Öffnung an
der Dampfstation an und lassen Sie ihn einrasten.
Überprüfen Sie die Verriegelung, indem Sie dem
Verbindungsstecker ziehen.
Um das Bügeleisen wieder abzutrennen, ziehen Sie den
Netzstecker aus der Steckdose, drücken Sie dann auf die
Taste des Verbindungssteckers und entfernen Sie ihn.
Achtung: Das Bügeleisen darf nicht abgetrennt werden,
solange dieses Dampf auslässt oder solange das Gerät
an das Netz angeschlossen ist. Gefahr von
Verbrennungen oder tödlichem Stromschlag.
5
❏
Stellen Sie die Thermostatscheibe des Bügeleisens
auf die Dampfzone ein. Dies ist notwendig, um zu
vermeiden, dass eventuell Wasser aus dem
Bügeleisen tropft, wenn Sie mit Dampf bügeln.
CLASS 200 - CLASS 150
6
❏
Inbetriebnahme
Schließen Sie das Netzkabel an das Netz an. Eine rote
Kontrollleuchte blinkt, eine grüne kontrollleuchte
leuchtet. Das Gerät ist in Stand-by Funktion.
7
❏
Drücken Sie auf .
Ein Tonsignal bestätigt das Inbetriebnahme und
das Aufheizen. Die Auto-Stop Kontrollleuchte, die
Damfmenge-Kontrolllampe und 2 Aufheiz-
Kontrollleuchte leuchten.
Aufheizphase:
Während der Aufheizphase kann mittels 6 roter
Kontrollleuchten, die stufenweise und paarweise
aufleuchten, mitverfolgt werden, wie heiß der
Dampfgenerator bereits ist.
8
❏
2 leuchtende rote Kontrollleuchten: kein Dampf.
Wenn Sie die Dampftaste drücken, zeigt ein
Tonsignal an, dass der Generator noch nicht zur
Abgabe von Dampf bereit ist.
4 leuchtende rote Kontrollleuchten: das
Bügeleisen kann benutzt werden. Bei der
Betätigung der Dampftaste wird ein sanfter Dampf
ausgeströmt.
6 leuchtende rote Kontrollleuchten: das
Bügeleisen ist nun voll einsatzbereit und bringt
seine Höchstleistung.
9
❏
Auswahl der Dampfmenge
Bei jeder Inbetriebnahme des Geräts wird
automatisch die Dampfmenge Mini (A) ausgewählt.
Um diese Auswahl zu ändern, drücken Sie die
Taste
Die produzierte Dampfmenge hängt von der Anzahl der
leuchtenden Kontrollleuchten ab:
A) 2 leuchtende grüne Kontrollleuchten: Mini
B) 4 leuchtende grüne Kontrollleuchten: Mittel
C) 6 leuchtende grüne Kontrollleuchten: Maxi
Connecting the unit (all appliance with
connector)
4
❏
To disconnect the iron, unplug the unit from
the mains first. Then press on the locking
button to remove the lead.
Caution: do not disconnect the iron from the
steam generator if it is still producing steam
or if the unit is still connected to the mains
(burn or electrocution hazard).
5
❏
Set the temperature control dial to
steam. This is necessary to avoid
spotting while using the steam ironing
function.
CLASS 200 - CLASS 150
6
❏
To operate :
Plug the mains lead into the mains. A red
pilot light is flashing, a green pilot light is on.
The functions (generator and iron heating)
are in standby mode. (PAUSE).
7
❏
Push the button .
A warning signal indicates that the
appliance will begin to heat up. The AutoStop option pilot lights, the mini steam
output selector pilot lights and 2 heating
pilot light come on.
Heating process:
The heating up progress is indicated by 6 red
indicator lights which switch on
progressively, 2 by 2.
8
❏
2 red indicator lights on: no steam.
If you press the steam trigger at this
point, an audible alarm indicates that the
steam generator is not ready to produce
steam.
4 red indicator lights on: the iron can
be used. Pressing the steam trigger
produces a light steam.
6 red indicator lights on: the iron is
ready to be used and all its features will
function at optimum performance.
9
❏
The minimum steam output (A) is selected
automatically each time the unit is turned
on. To change this selection, press the
steamoutput selection button
The steam output selection is changed:
A) 2 green indicator lights on: minimum
B) 4 green indicator lights on: medium
C) 6 green indicator lights on: maximum
Plug the hose connector into the steam
generator. You will hear a click. Check
the connection by pulling lightly on the
lead.
Steam output selection
Page 11

™HMANTIKE™
™YMBOY§E™ A™ºA§EIA™
¶EPI°PAºH TH™ ™Y™KEYH™
¶›v·Î·˜ EϤÁ¯o˘
TY¶OI NEPOY
E¶I§O°H NEPOY
XPH™IMO¶OIøNTA™ THN
™Y™KEYH ™A™
™YN¢E™TE THN ™Y™KETH
¶ÚoÛo¯‹!
¢È·‰Èηۛ· ¶Úoı¤ÚÌ·vÛ˘ :
2 ·v·Ì̤v· ÎfiÎÎÈv· Ï·Ì¿ÎÈ· :
4 ·v·Ì̤v· ÎfiÎÎÈv· Ï·Ì¿ÎÈ· :
6 ·v·Ì̤v· ÎfiÎÎÈv· ʈٿÎÈ· :
MÈÎÚ¿ M˘ÛÙÈο
£fiÚ˘‚o˜
¶PøTH §EITOYP°IA
¶PO™OXH !
P‡ıÌÈÛË Ùo˘ £ÂÚÌoÛÙ¿ÙË ıÂÚÌoÎÚ·Û›·˜
AUTO-STOP HПВОЩЪovИОfi Ы‡ЫЩЛМ· ·ЫК·ПВ›·˜
¢È·‰Èηۛ·
P‡ıÌÈÛË Auto-Stop.
¢È·‰Èηۛ·
™‡ÛÙËÌ· AUTO - STOP
ºI§TPO KATA TøN A§ATøN
EMC : HПВОЩЪovИОfi Ы‡ЫЩЛМ·
ÂϤÁ¯o˘ vÂÚo‡
ºˆÙÂÈv‹ ¤v‰ÂÈÍË ÚoÂȉoo›ËÛ˘
·ÏÏ·Á‹˜ Ê›ÏÙÚo˘.
°È· v· Û·˜ ‰ÒÛÂÈ ·ÙÌfi Ë Û˘Û΢‹ ¿ÏÈ, ı· Ú¤ÂÈ
v· ·ПП¿НВЩВ Щo К›ПЩЪo ‹ v· ¯ЪЛЫИМooИ‹ЫВЩВ
·oÛÙ·Á̤vo vÂÚfi. MÂÙ¿ ·fi οı ·ÏÏ·Á‹
Ê›ÏÙÚo˘, ı· Ú¤ÂÈ v· ÎÏ›ÛÂÙÂ Î·È v· Í·v·vo›ÍÂÙÂ
ÙËv Û˘Û΢‹, ÒÛÙ oÈ ·Ú¯ÈΤ˜ ÏÂÈÙo˘ÚÁ›Â˜ v·
·v¤Ïıo˘v. (ÌÂÙ¿ ·fi 2 ÏÂÙ¿)
°¤ÌÈÛÌ· Ùo˘ ÚÂ˙ÂÚ‚o˘¿Ú ηٿ ÙËv
‰È¿ÚÎÂÈ· ÛȉÂÚÒÌ·Ùo˜
™YNTHPH™H
Aoı‹Î¢ÛË
TÈ Î¿vÂÙ ·v …
O¢H°IE™ XPH™Eø™
™HMANTIKE™
™YMBOY§E™ A™ºA§EIA™
¶EPI°PAºH TH™ ™Y™KEYH™
¶›v·Î·˜ EϤÁ¯o˘
TY¶OI NEPOY
E¶I§O°H NEPOY
XPH™IMO¶OIøNTA™ THN
™Y™KEYH ™A™
™YN¢E™TE THN ™Y™KETH
¶ÚoÛo¯‹!
¢È·‰Èηۛ· ¶Úoı¤ÚÌ·vÛ˘ :
2 ·v·Ì̤v· ÎfiÎÎÈv· Ï·Ì¿ÎÈ· :
4 ·v·Ì̤v· ÎfiÎÎÈv· Ï·Ì¿ÎÈ· :
MÈÎÚ¿ M˘ÛÙÈο
£fiÚ˘‚o˜
¶PøTH §EITOYP°IA
¶PO™OXH !
P‡ıÌÈÛË Ùo˘ £ÂÚÌoÛÙ¿ÙË ıÂÚÌoÎÚ·Û›·˜
AUTO-STOP HПВОЩЪovИОfi Ы‡ЫЩЛМ· ·ЫК·ПВ›·˜
¢È·‰Èηۛ·
P‡ıÌÈÛË Auto-Stop.
¢È·‰Èηۛ·
™‡ÛÙËÌ· AUTO - STOP
ºI§TPO KATA TøN A§ATøN
EMC : HПВОЩЪovИОfi Ы‡ЫЩЛМ·
ÂϤÁ¯o˘ vÂÚo‡
ºˆÙÂÈv‹ ¤v‰ÂÈÍË ÚoÂȉoo›ËÛ˘
·ÏÏ·Á‹˜ Ê›ÏÙÚo˘.
°È· v· Û·˜ ‰ÒÛÂÈ ·ÙÌfi Ë Û˘Û΢‹ ¿ÏÈ, ı· Ú¤ÂÈ
v· ·ПП¿НВЩВ Щo К›ПЩЪo ‹ v· ¯ЪЛЫИМooИ‹ЫВЩВ
·oÛÙ·Á̤vo vÂÚfi. MÂÙ¿ ·fi οı ·ÏÏ·Á‹
Ê›ÏÙÚo˘, ı· Ú¤ÂÈ v· ÎÏ›ÛÂÙÂ Î·È v· Í·v·vo›ÍÂÙÂ
ÙËv Û˘Û΢‹, ÒÛÙ oÈ ·Ú¯ÈΤ˜ ÏÂÈÙo˘ÚÁ›Â˜ v·
·v¤Ïıo˘v. (ÌÂÙ¿ ·fi 2 ÏÂÙ¿)
™YNTHPH™H
Aoı‹Î¢ÛË
TÈ Î¿vÂÙ ·v …
O¢H°IE™ XPH™Eø™
™HMANTIKE™
™YMBOY§E™ A™ºA§EIA™
¶EPI°PAºH TH™ ™Y™KEYH™
¶›v·Î·˜ EϤÁ¯o˘
TY¶OI NEPOY
E¶I§O°H NEPOY
XPH™IMO¶OIøNTA™ THN
™Y™KEYH ™A™
™YN¢E™TE THN ™Y™KETH
¶ÚoÛo¯‹!
¢È·‰Èηۛ· ¶Úoı¤ÚÌ·vÛ˘ :
2 ·v·Ì̤v· ÎfiÎÎÈv· Ï·Ì¿ÎÈ· :
¤·Ì̤
ÎfiÎÎÈ
Ï·Ì¿ÎÈ·
MÈÎÚ¿ M˘ÛÙÈο
£fiÚ˘‚o˜
¶PøTH §EITOYP°IA
¶PO™OXH !
P‡ıÌÈÛË Ùo˘ £ÂÚÌoÛÙ¿ÙË ıÂÚÌoÎÚ·Û›·˜
AUTO-STOP HПВОЩЪovИОfi Ы‡ЫЩЛМ· ·ЫК·ПВ›·˜
¢È·‰Èηۛ·
P‡ıÌÈÛË Auto-Stop.
¢È·‰Èηۛ·
™‡ÛÙËÌ· AUTO - STOP
ºI§TPO KATA TøN A§ATøN
EMC : HПВОЩЪovИОfi Ы‡ЫЩЛМ·
ÂϤÁ¯o˘ vÂÚo‡
ºˆÙÂÈv‹ ¤v‰ÂÈÍË ÚoÂȉoo›ËÛ˘
·ÏÏ·Á‹˜ Ê›ÏÙÚo˘.
°È· v· Û·˜ ‰ÒÛÂÈ ·ÙÌfi Ë Û˘Û΢‹ ¿ÏÈ, ı· Ú¤ÂÈ
v· ·ПП¿НВЩВ Щo К›ПЩЪo ‹ v· ¯ЪЛЫИМooИ‹ЫВЩВ
·oÛÙ·Á̤vo vÂÚfi. MÂÙ¿ ·fi οı ·ÏÏ·Á‹
Ê›ÏÙÚo˘, ı· Ú¤ÂÈ v· ÎÏ›ÛÂÙÂ Î·È v· Í·v·vo›ÍÂÙÂ
ÙËv Û˘Û΢‹, ÒÛÙ oÈ ·Ú¯ÈΤ˜ ÏÂÈÙo˘ÚÁ›Â˜ v·
·v¤Ïıo˘v. (ÌÂÙ¿ ·fi 2 ÏÂÙ¿)
™YNTHPH™H
Aoı‹Î¢ÛË
TÈ Î¿vÂÙ ·v …
O¢H°IE™ XPH™Eø™
™HMANTIKE™
™YMBOY§E™ A™ºA§EIA™
¶EPI°PAºH TH™ ™Y™KEYH™
¶›v·Î·˜ EϤÁ¯o˘
TY¶OI NEPOY
E¶I§O°H NEPOY
XPH™IMO¶OIøNTA™ THN
™Y™KEYH ™A™
™YN¢E™TE THN ™Y™KETH
¶ÚoÛo¯‹!
¢È·‰Èηۛ· ¶Úoı¤ÚÌ·vÛ˘ :
MÈÎÚ¿ M˘ÛÙÈο
£fiÚ˘‚o˜
¶PøTH §EITOYP°IA
¶PO™OXH !
P‡ıÌÈÛË Ùo˘ £ÂÚÌoÛÙ¿ÙË ıÂÚÌoÎÚ·Û›·˜
AUTO-STOP HПВОЩЪovИОfi Ы‡ЫЩЛМ· ·ЫК·ПВ›·˜
¢È·‰Èηۛ·
P‡ıÌÈÛË Auto-Stop.
¢È·‰Èηۛ·
™‡ÛÙËÌ· AUTO - STOP
ºI§TPO KATA TøN A§ATøN
EMC : HПВОЩЪovИОfi Ы‡ЫЩЛМ·
ÂϤÁ¯o˘ vÂÚo‡
ºˆÙÂÈv‹ ¤v‰ÂÈÍË ÚoÂȉoo›ËÛ˘
·ÏÏ·Á‹˜ Ê›ÏÙÚo˘.
°È· v· Û·˜ ‰ÒÛÂÈ ·ÙÌfi Ë Û˘Û΢‹ ¿ÏÈ, ı· Ú¤ÂÈ
v· ·ПП¿НВЩВ Щo К›ПЩЪo ‹ v· ¯ЪЛЫИМooИ‹ЫВЩВ
·oÛÙ·Á̤vo vÂÚfi. MÂÙ¿ ·fi οı ·ÏÏ·Á‹
™YNTHPH™H
Aoı‹Î¢ÛË
TÈ Î¿vÂÙ ·v …
O¢H°IE™ XPH™Eø™
™HMANTIKE™
™YMBOY§E™ A™ºA§EIA™
¶EPI°PAºH TH™ ™Y™KEYH™
¶›v·Î·˜ EϤÁ¯o˘
TY¶OI NEPOY
E¶I§O°H NEPOY
XPH™IMO¶OIøNTA™ THN
™Y™KEYH ™A™
™YN¢E™TE THN ™Y™KETH
¶ÚoÛo¯‹!
MÈÎÚ¿ M˘ÛÙÈο
£fiÚ˘‚o˜
¶PøTH §EITOYP°IA
¶PO™OXH !
P‡ıÌÈÛË Ùo˘ £ÂÚÌoÛÙ¿ÙË ıÂÚÌoÎÚ·Û›·˜
AUTO-STOP HПВОЩЪovИОfi Ы‡ЫЩЛМ· ·ЫК·ПВ›·˜
¢È·‰Èηۛ·
P‡ıÌÈÛË Auto-Stop.
¢È·‰Èηۛ·
™‡ÛÙËÌ· AUTO - STOP
ºI§TPO KATA TøN A§ATøN
EMC : HПВОЩЪovИОfi Ы‡ЫЩЛМ·
ÂϤÁ¯o˘ vÂÚo‡
ºˆÙÂÈv‹ ¤v‰ÂÈÍË ÚoÂȉoo›ËÛ˘
·ÏÏ·Á‹˜ Ê›ÏÙÚo˘.
™YNTHPH™H
Aoı‹Î¢ÛË
TÈ Î¿vÂÙ ·v …
O¢H°IE™ XPH™Eø™
™‚‹vovÙ·˜ ÙË Û˘Û΢‹ :
§
§ÂÈÙ
˘ÚÁ›·
™HMANTIKE™
™YMBOY§E™ A™ºA§EIA™
¶EPI°PAºH TH™ ™Y™KEYH™
¶›v·Î·˜ EϤÁ¯o˘
TY¶OI NEPOY
E¶I§O°H NEPOY
XPH™IMO¶OIøNTA™ THN
™Y™KEYH ™A™
™YN¢E™TE THN ™Y™KETH
MÈÎÚ¿ M˘ÛÙÈο
£fiÚ˘‚o˜
¶PøTH §EITOYP°IA
¶PO™OXH !
P‡ıÌÈÛË Ùo˘ £ÂÚÌoÛÙ¿ÙË ıÂÚÌoÎÚ·Û›·˜
AUTO-STOP HПВОЩЪovИОfi Ы‡ЫЩЛМ· ·ЫК·ПВ›·˜
¢È·‰Èηۛ·
P‡ıÌÈÛË Auto-Stop.
¢È·‰Èηۛ·
™‡ÛÙËÌ· AUTO - STOP
ºI§TPO KATA TøN A§ATøN
EMC : HПВОЩЪovИОfi Ы‡ЫЩЛМ·
ÂϤÁ¯o˘ vÂÚo‡
ºˆÙÂÈv‹ ¤v‰ÂÈÍË ÚoÂȉoo›ËÛ˘
™YNTHPH™H
Aoı‹Î¢ÛË
TÈ Î¿vÂÙ ·v …
O¢H°IE™ XPH™Eø™
™HMANTIKE™
™YMBOY§E™ A™ºA§EIA™
¶EPI°PAºH TH™ ™Y™KEYH™
¶›v·Î·˜ EϤÁ¯o˘
TY¶OI NEPOY
E¶I§O°H NEPOY
XPH™IMO¶OIøNTA™ THN
™Y™KEYH ™A™
TE THN
KETH
MÈÎÚ¿ M˘ÛÙÈο
£fiÚ˘‚o˜
¶PøTH §EITOYP°IA
¶PO™OXH !
P‡ıÌÈÛË Ùo˘ £ÂÚÌoÛÙ¿ÙË ıÂÚÌoÎÚ·Û›·˜
AUTO-STOP HПВОЩЪovИОfi Ы‡ЫЩЛМ· ·ЫК·ПВ›·˜
¢È·‰Èηۛ·
P‡ıÌÈÛË Auto-Stop.
¢È·‰Èηۛ·
™‡ÛÙËÌ· AUTO - STOP
ºI§TPO KATA TøN A§ATøN
EMC : HПВОЩЪovИОfi Ы‡ЫЩЛМ·
ÂϤÁ¯o˘ vÂÚo‡
™YNTHPH™H
Aoı‹Î¢ÛË
TÈ Î¿vÂÙ ·v …
O¢H°IE™ XPH™Eø™
NEDERLANDS ESPAÑOL PORTUGUÊS
Aansluiting (voor alle stoomcentrale met
aansluitstekker)
4
❏
Druk de aansluitstekker op het contact in de
stoomcentrale tot u een klik hoort. Controleer of
hij goed is aangesloten door even aan de
stekker te trekken.
Om het strijkijzer los te koppelen, trekt u de stekker
uit het stopcontact en drukt u vervolgens op de knop
van de stekker en trekt u deze uit.
Opgelet: het strijkijzer mag niet worden
losgekoppeld wanneer het toestel nog stoom
produceert, of wanneer het nog op het
electriciteitsnet aangesloten is (gevaar voor
verbranding of electrische schok).
5
❏
Regel de thermostaat van het ijzer op het
stoomvak. Dit is nodig om te vermijden dat er water
wegvloeit wanneer u met stoom strijkt.
CLASS 200 - CLASS 150
6
❏
Opstarten :
Sluit het voedingssnoer op het electriciteitsnet aan.
De rode controllelichtjes knipperen, en groene
lampjes branden, om U te bevestigen dat het
apparaat onder waaktoestand staat.
7
❏
Druk op deze knop .
Een bippend geluid kenmerkt het opstarten van
het apparaat. De controllelampje van de Autostop keuze en de controllelampje van de
opwarming branden.
Verwarmingsproces:
Aan de hand van 6 rode controlelichtjes, die 2 per 2
oplichten, kan u nagaan in welke fase van het
verwarmingsproces het toestel zich bevindt.
8
❏
2 rode controlelichtjes branden: er is geen
stoom. Indien u op de stoomknop drukt, geeft
een geluidssignaal aan dat de generator nog
niet klaar is om stoom te produceren.
4 rode controlelichtjes branden: het strijkijzer
kan worden gebruikt. Wanneer u de stoomknop
indrukt, dan produceert het toestel een zachte
stoom.
6 rode controlelichtjes branden: het strijkijzer
is voor optimaal gebruik klaar.
9
❏
Keuze van stoomdebiet
Elke keer het toestel wordt aangeschakeld, wordt
het minimale stoomdebiet (A) standaard
geselecteerd. Om deze selectie te wijzigen, drukt
u op de keuzeknop stoomdebiet
De selectie van het stoomdebiet werd gewijzigd:
A) 2 groene controlelichtjes branden: minimum
B) 4 groene controlelichtjes branden: medium
C) 6 groene controlelichtjes branden: maximum
Conexión (todos plancha con conector)
4
❏
Enchufe el conector en la caldera hasta que se
oiga un clic. Tire del conector para asegurarse
de que esté bloqueado.
Para desconectar la plancha, desenchufe primero el
aparato, luego presione la tecla del conector y
retírelo.
Cuidado: la plancha no debe desconectarse
mientras libere vapor ni mientras esté enchufada
(riesgo de quemadura o de electrocución).
5
❏
Coloque el botón del termostato de la plancha
en la zona de vapor. Esto es necesario para
evitar el riesgo de derrame de agua mientras
usted plancha al vapor.
CLASS 200 - CLASS 150
6
❏
Puesta en Marcha :
Enchufe el cable de alimentación. Un indicador rojo
parpadean y un indicador verde encendido
confirman que el aparato está en vela.
7
❏
Pulse sobre el piloto .
Un bip sonoro le indica la puesta en marcha.
El indicador luminoso de selección del AutoStop y el indicador luminoso del calentamiento
están encendidos.
Proceso de caldeo:
La progresión del caldeo está indicada por seis
indicadores rojos que se encienden
progresivamente de dos en dos.
8
❏
Dos indicadores rojos encendidos: no hay
vapor. Si usted presiona el botón de control
del vapor, una señal sonora indicará que el
generador no está listo para emitir vapor.
Cuatro indicadores rojos encendidos: la
plancha se puede utilizar. Al presionar el
botón del vapor, emite un vapor suave.
Seis indicadores rojos encendidos: la
plancha está lista para ser utilizada en
condiciones de máxima eficacia.
9
❏
Selección del caudal de vapor
Cada vez que se enciende el aparato, el caudal
de vapor mínimo (A) se selecciona por defecto.
Para modificar esta selección, presione el botón
selector del caudal de vapor
La selección del caudal de vapor se modifica:
A) Dos indicadores verdes encendidos: mínimo
B) Cuatro indicadores verdes encendidos: medio
C) Seis indicadores verdes encendidos: máximo
Ligação
4
❏
Para desligar o ferro, desligue o aparelho
da tomada eléctrica e a seguir pressione a tecla do
conector e remova-o.
Cuidado: o ferro não deve ser desligado enquanto
libertar vapor ou que o aparelho estiver ligado à
corrente eléctrica (risco de queimadura ou de
electrocussão).
5
❏
CLASS 200 - CLASS 150
6
❏
Ligue a ficha eléctrica à tomada eléctrica.
1 indicador luminoso vermelhos piscam e
1 indicador verde estão acesos para confirmar a
espera.
7
❏
Processo de aquecimento:
A progressão do aquecimento é indicado
por 6 indicadores luminosos vermelhos que se
acendem progressivamente 2 a 2.
8
❏
9
❏
A cada colocação em serviço do aparelho, o
débito do vapor mínimo (A) é seleccionado por
defeito. Para modificar esta selecção, pressione
a tecla da escolha do débito do vapor
A selecção do débito vapor é modificada:
A) 2 indicadores luminosos verdes acesos:
B) 4 indicadores luminosos verdes acesos:
C) 6 indicadores luminosos verdes acesos:
™YN¢E™TE THN
Ligue o conector na tomada da central de
vapor até ouvir um click. Verifique que
bloqueou correctamente puxando o conector.
4
❏
¶ÚoÛo¯‹!
MËv ·oÛ˘v‰¤ÂÙ·È Ùo Û›‰ÂÚo ·fi ÙË ‚¿ÛË, fiÙ·v ·˘Ùfi ·Ú¿ÁÂÈ
·ÎfiÌ· ·ÙÌfi ‹ fiÙ·v Ë Û˘Û΢‹ ›v·È Û˘v‰Â‰Â̤vË Ì Ùo
Regule o botão do termostato do ferro na
faixa vapor. É necessário para evitar qualquer
risco de escorrimento de água quando
engomar com vapor.
Funcionamente :
Pressione o botão .
Um sinal sonoro indica que o aparelho está em
serviço. Os 2 indicadores luminosos Auto-Stop
e os 2 indicadores de débito de vapor minimos
estão acesos.
2 indicadores luminosos vermelhos
acesos: nenhum vapor. Se pressionar o
gatilho do vapor, um sinal sonoro indica que o
generador não está pronto para imitir vapor
4 indicadores luminosos vermelhos
acesos: o ferro pode ser utilizado. Ao
pressionar o gatilho do vapor, ejecta um vapor
suave.
6 indicadores luminosos vermelhos
acesos: O ferro está pronto para ser utilizado
no máximo das suas performances
Escolha do débito vapor
mínimo
médio
máximo
ЪВ‡М·.(˘¿Ъ¯ВИ О›v‰˘vo˜ ВБО·‡М·Щo˜ ‹ ЛПВОЩЪoПЛН›·˜);
5
❏
CLASS 200 - CLASS 150
6
❏
B¿ÏÙ Ùo ÊȘ ÛÙËv Ú›˙·.
MfiÏȘ ‚¿ÏÂÙ Ùo ÊȘ ÛÙËv Ú›˙· Ùo ÚÂÛoÛ›‰ÂÚo ‚Ú›ÛÎÂÙ·È ÛÂ
ÂÙoÈÌfiÙËÙ·, ˆÛÙfiÛo Ùo ÌfiïÏÂÚ Î·È Ë ıÂÚÌoÎÚ·Û›· Ùo˘ Û›‰ÂÚo˘
‚Ú›ÛÎovÙ·È Û ·v·Ìov‹. ™’·˘Ù‹ ÙË Ê¿ÛË, oÈ 2 ʈÙÂÈv¤˜ Âv‰Â›ÍÂȘ
Ùo˘ Û˘ÛÙ‹Ì·Ùo˜ Auto-stop ·v·‚oÛ‚‹vo˘v, ÂvÒ oÈ 2 ʈÙÂÈv¤˜
Âv‰Â›ÍÂȘ ÂÈÏoÁ‹˜ Ù˘ ·Ú·ÁˆÁ‹˜ ·ÙÌo‡ ›v·È ÛÙ·ıÂÚ¿ ʈÙÂÈv¤˜,
ÂȂ‚·ÈÒvovÙ·˜ ¤ÙÛÈ ÙË ı¤ÛË ·v·Ìov‹˜ Ù˘ Û˘Û΢‹˜.
7
❏
¢È·‰Èηۛ· ¶Úoı¤ÚÌ·vÛ˘ :
H Úfio‰o˜ Ù˘ ‰È·‰Èηۛ·˜ Úoı¤ÚÌ·vÛ˘, ÛÙ·‰È·Î¿ ÂÌÊ·v›˙ÂÙÂ
ÛÙȘ ʈÙÂÈv¤˜ Âv‰Â›ÍÂȘ fiÙ·v ÍÂÎÈv‹Ûo˘v v· ·v¿‚o˘v ‰‡o, ‰‡o ¤ˆ˜
fiÙo˘ ·v¿„o˘v Î·È oÈ ¤ÍÈ ÊˆÙÂÈv¤˜ Âv‰Â›ÍÂȘ.
8
❏
9
❏
H ÌÈÎÚfiÙÂÚË ·fi‰oÛË ·ÙÌo‡ (A), ÂvÂÚÁooÈÂ›Ù·È ·˘ÙfiÌ·Ù· Ì Ùo
o˘ ‚¿˙ÂÙ Û ÏÂÈÙo˘ÚÁ›· ÙËv Û˘Û΢‹.
°È· v· ·ÏÏ¿ÍÂÙ ·˘Ù‹ ÙËv Ú‡ıÌÈÛË, ·Ù‹ÛÙ Ùov ‰È·ÎfiÙË
ÂÈÏoÁ‹˜ ·ÙÌo‡.
O ‰È·ÎfiÙ˘ ÂÈÏoÁ‹˜ ·ÙÌo‡ ¤¯ÂÈ ÙȘ ·Ú·Î¿Ùˆ ÂÈÏoÁ¤˜ :
E§§HNIKA
™Y™KETH
EvÒÛÙ Ùo ηÏÒ‰Èo Ú‡̷Ùo˜/·ÙÌo‡ ÛÙËv ÂȉÈ΋ ˘o‰o¯‹ Ù˘
‚¿Û˘ Ùo˘ ÚÂÛoÛ›‰ÂÚo˘. £· ·Îo‡ÛÂÙ Ùov ‹¯o o˘ οvÂÈ
“ÎϛΔ.
°È· v· ‚Á¿ÏÂÙ Ùo Û›‰ÂÚo, ·oÛ˘v‰¤ÛÙ ÚÒÙ· Ùo ηÏÒ‰Èo
Ú‡̷Ùo˜/·ÙÌo‡ ·fi ÙË ‚¿ÛË. ¶·Ù‹ÛÙ Ùo Îo˘Ì› ÁÈ· v·
·oÛ˘v‰Âı› Ùo ηÏÒ‰Èo.
P˘ıÌ›ÛÙ Ùo ıÂÚÌoÛÙ¿ÙË ·v¿ÌÂÛ· ÛÙË 2Ë Î·È 3Ë Îo˘Î›‰· fio˘
ÂΛ ÍÂÎÈv¿ Ë ·Ú·ÁˆÁ‹ ·ÙÌo‡. A˘Ùfi ›v·È ··Ú·›ÙËÙo ÁÈ· v·
ÌËv ÙÚ¤¯o˘v ÛÙ·Áfiv˜ vÂÚo‡ fiÙ·v ˙Ëٿ٠·ÙÌfi.
ÂÈÙ
o˘ÚÁ›·
¶È¤˙ÂÙ Ùov ‰È·ÎfiÙË . M›· ˯ËÙÈ΋ ¤v‰ÂÈÍË ÂȂ‚·ÈÒvÂÈ
fiÙÈ Ë Û˘Û΢‹ ̋Π۠ÏÂÈÙo˘ÚÁ›·.
2 ·v·Ì̤v· ÎfiÎÎÈv· Ï·Ì¿ÎÈ· :
E¿v ·Ù‹ÛÂÙÂ Ùo Ï‹ÎÙÚo ·ÙÌo‡ ÛÂ ·˘Ù‹ ÙË Ê¿ÛË, ¤v·˜
˘fiΈÊo˜ Û˘v·ÁÂÚÌfi˜ ı· Û·˜ ÂȉooÈ‹ÛÂÈ fiÙÈ Ùo ÌfiïÏÂÚ ‰Âv
›v·È ¤ÙoÈÌo v· ·Ú¿ÁÂÈ ·ÙÌfi.
4 ·v·ÌÌ
ÏÂÈÙo˘ÚÁ›. ¶·ÙÒvÙ·˜ Ùo Ï‹ÎÙÚo ·ÙÌo‡, Ì·˜ ‰›vÂÈ ÌÈÎÚ‹
oÛfiÙËÙ·.
6 ·v·Ì̤v· ÎfiÎÎÈv· ʈٿÎÈ· :
В›v·И ·v¤ЩoИМo, О·И ·o‰›‰ВИ ЫЩИ˜ М¤БИЫЩВ˜ Вv‰В›НВИ˜.
P‡ıÌÈÛË ·ÙÌo‡
A) ·v·Ì̤v· 2 Ú¿ÛÈv· Ï·Ì¿ÎÈ· : Ï›ÁË oÛfiÙËÙ· ·ÙÌo‡
B) ·v·Ì̤v· 4 Ú¿ÛÈv· Ï·Ì¿ÎÈ· : ̤ÙÚÈ· oÛfiÙËÙ· ·ÙÌo‡
C) ·v·Ì̤v· 6 Ú¿ÛÈv· Ï·Ì¿ÎÈ· : ÌÂÁ¿ÏË oÛfiÙËÙ· ·ÙÌo‡
v· ÎfiÎÎÈ
v· Ï·Ì¿ÎÈ·
¯ˆÚ›˜ ·ÙÌfi
:
Ùo ÚÂÛoÛ›‰ÂÚfi Û·˜
Ùo ÚÂÛoÛ›‰ÂÚfi Û·˜ ÙÒÚ·
11
Page 12

CLASS 120 - CLASS 100 - CLASS 90
6
7
CLASS 120
9
ABC
CLASS 100 - CLASS 90
9
AB
12
FRANÇAIS DEUTSCH ENGLISH
CLASS 120 - CLASS 100 CLASS 90
6
❏
Mise en route :
Branchez le cordon d’alimentation au secteur.
Un voyant rouge clignote. Votre appareil est en
veille.
7
❏
Appuyez sur le bouton .
Le voyant choix Auto-Stop, le voyant de
contrôle de chauffe ainsi que le voyant petit
débit vapeur sont allumés.
8
Processus de chauffe :
8
❏
Le témoin de chauffe du générateur
s’éteint après environ 2 minutes pour
indiquer que le générateur est prêt à
émettre de la vapeur. Le témoin s’allume et
s’éteint régulièrement pour indiquer la
chauffe du générateur.
Il n’y a pas d’émission de vapeur possible
pendant les 2 premières minutes qui
suivent la mise en marche.
9
❏
Choix du débit vapeur
A chaque mise en service de l’appareil, le débit
vapeur mini (A) est sélectionné par défaut. Pour
modifier ce choix, pressez la touche choix débit
vapeur.
CLASS 120 :
Choix du débit vapeur
A) 1 voyant vert allumé : mini
B) 2 voyants verts allumés : moyen
C) 3 voyants verts allumés : maxi
CLASS 100 - CLASS 90:
Choix du débit vapeur
A) 1 voyant vert allumé : moyen
B) 2 voyants verts allumés : maxi
Pour tous les modèles CLASS:
• Particularité : position débit Maxi
En appuyant sur la commande vapeur, un
grand souffle vapeur jaillit pendant plusieurs
secondes de la semelle du fer avant de se
stabiliser à un débit vapeur normal. Pour
obtenir à nouveau cet effet, il faut cesser
l’émission de vapeur quelques secondes, car
un dispositif spécial gère le débit vapeur
maximum pour éviter tout écoulement d’eau
intempestif.
• Mise hors tension :
Toujours débrancher le cordon d’alimentation
lorsque vous n’utilisez pas l’appareil.
CLASS 120 - CLASS 100 - CLASS 90
6
❏
Inbetriebnahme
Schließen Sie das Netzkabel an das Netz an. Eine
rote Kontrollleuchte blink. Das Gerät ist in Stand-by
Funktion.
7
❏
Drücken Sie auf .
Die Auto-Stop Kontrollleuchte, die DamfmengeKontrolllampe und die Mini-DampfmengeKontrolllampe leuchten.
Aufheizphase:
8
❏
Die Kontrollleuchte für das Aufheizen des
Generators erlischt nach ungefähr 2 Minuten,
um anzuzeigen, dass der Generator für die
Dampferzeugung bereit ist. Diese
Kontrollleuchte geht während des Bügelns
regelmäßig an und aus und zeigt dadurch an,
dass der Generator aufheizt.
Innerhalb der ersten 2 Minuten nach
Inbetriebnahme ist keine Dampfabgabe
möglich.
9
❏
Auswahl der Dampfmenge
Bei jeder Inbetriebnahme des Geräts, wird
automatisch die Dampfmenge Mini (A) ausgewählt.
Um diese Auswahl zu ändern, drücken Sie die
Taste
CLASS 120 :
Die produzierte Dampfmenge hängt von der
Anzahl der leuchtenden Kontrollleuchten ab:
A) 1 leuchtende grüne Kontrollleuchte: Mini
B) 2 leuchtende grüne Kontrollleuchten: Mittel
C) 3 leuchtende grüne Kontrollleuchten: Maxi
CLASS 100 - CLASS 90:
Die produzierte Dampfmenge hängt von der
Anzahl der leuchtenden Kontrollleuchten ab:
A) 1 leuchtende grüne Kontrollleuchte: Mini
B) 2 leuchtende grüne Kontrollleuchten : Maxi
Alle CLASS-Geräte
• Besonderheit: Position Dampf Maxi
Wenn Sie die Dampftaste drücken, gibt das
Bügeleisen mehrere Sekunden lang einen
besonders starken Dampfstoß ab, bevor die
Dampfabgabe wieder normal wird.
Um diesen Turbo-Effekt nochmals zu erhalten,
warten Sie bitte einige Sekunden, bevor Sie die
Dampftaste noch einmal drücken: dies ermöglicht
dem speziellen System, die maximale
Dampfabgabe ohne unerwünschtes
Wasserausfließen zu regeln.
• Ausstecken:
Das Netzkabel immer aus dem Stecker
herausziehen, wenn Sie das Gerät nicht benutzen!
CLASS 120 - CLASS 100 CLASS 90
6
❏
Plug the mains lead into the mains. A red
pilot light is flashing. The functions
(generator and iron heating) are in
standby mode. (PAUSE).
7
❏
The Auto-Stop, the heating-up pilot light
and the minimum steam ouput selection
indicator light come on.
Heating process:
8
❏
9
❏
The minimum steam output (A) is
selected automatically each time the
unit is turned on.
To change this selection, press the
steam output selection button
CLASS 120 :
Steam output selection
A) 1 green indicator light on: minimum
B) 2 green indicator lights on: medium
C) 3 green indicator lights on:
CLASS 100 - CLASS 90 :
Steam output selection
A) 1 green indicator light on: medium
B) 2 green indicator lights on:
ALL CLASS APPLIANCE :
• Special feature: maximum output
position
Pressing the steam button produces a
burst of steam from the soleplate lasting
several seconds. The steam output will
then return to the normal rate. To repeat
this process, wait for a few seconds to
avoid the risk of spotting.
• Switching-off :
To operate:
Push the button
The steam generator heating
indicator light switches off after about
2 minutes and indicates that the
steam generator is ready to produce
steam. The light switches on and off
regularly, indicating whether the
steam generator is heating or not.
No steam can be produced in the
first 2 minutes of operation.
Steam output selection
maximum
maximum
Page 13

™‚‹vovÙ·˜ ÙË Û˘Û΢‹ :
¶›v·Î·˜ EϤÁ¯o˘
TY¶OI NEPOY
E¶I§O°H NEPOY
XPH™IMO¶OIøNTA™ THN
™Y™KEYH ™A™
™YN¢E™TE THN ™Y™KETH
¶ÚoÛo¯‹!
¢È·‰Èηۛ· ¶Úoı¤ÚÌ·vÛ˘ :
2 ·v·Ì̤v· ÎfiÎÎÈv· Ï·Ì¿ÎÈ· :
4 ·v·Ì̤v· ÎfiÎÎÈv· Ï·Ì¿ÎÈ· :
6 ·v·Ì̤v· ÎfiÎÎÈv· ʈٿÎÈ· :
P‡ıÌÈÛË ·ÙÌo‡
¢È·‰Èηۛ· ¶Úoı¤ÚÌ·vÛ˘ :
P‡ıÌÈÛË ·ÙÌo‡
EȉÈ΋ ÏÂÈÙo˘ÚÁ›· : Ú‡ıÌÈÛË ÌÂÁ¿Ï˘
oÛfiÙËÙ·˜ ·ÙÌo‡.
P‡ıÌÈÛË Ùo˘ £ÂÚÌoÛÙ¿ÙË ıÂÚÌoÎÚ·Û›·˜
AUTO-STOP HПВОЩЪovИОfi Ы‡ЫЩЛМ· ·ЫК·ПВ›·˜
¢È·‰Èηۛ·
P‡ıÌÈÛË Auto-Stop.
¢È·‰Èηۛ·
™‡ÛÙËÌ· AUTO - STOP
ºI§TPO KATA TøN A§ATøN
EMC : HПВОЩЪovИОfi Ы‡ЫЩЛМ·
ÂϤÁ¯o˘ vÂÚo‡
ºˆÙÂÈv‹ ¤v‰ÂÈÍË ÚoÂȉoo›ËÛ˘
·ÏÏ·Á‹˜ Ê›ÏÙÚo˘.
°È· v· Û·˜ ‰ÒÛÂÈ ·ÙÌfi Ë Û˘Û΢‹ ¿ÏÈ, ı· Ú¤ÂÈ
v· ·ПП¿НВЩВ Щo К›ПЩЪo ‹ v· ¯ЪЛЫИМooИ‹ЫВЩВ
·oÛÙ·Á̤vo vÂÚfi. MÂÙ¿ ·fi οı ·ÏÏ·Á‹
Ê›ÏÙÚo˘, ı· Ú¤ÂÈ v· ÎÏ›ÛÂÙÂ Î·È v· Í·v·vo›ÍÂÙÂ
ÙËv Û˘Û΢‹, ÒÛÙ oÈ ·Ú¯ÈΤ˜ ÏÂÈÙo˘ÚÁ›Â˜ v·
·v¤Ïıo˘v. (ÌÂÙ¿ ·fi 2 ÏÂÙ¿)
°¤ÌÈÛÌ· Ùo˘ ÚÂ˙ÂÚ‚o˘¿Ú ηٿ ÙËv
‰È¿ÚÎÂÈ· ÛȉÂÚÒÌ·Ùo˜
™HMEIø™EI™
¶POºY§A•EI™
æEKA™MO™ (·v¿ÏoÁ· Ùo ÌovÙ¤Ïo)
O¢H°IE™ XPH™Eø™
™HMANTIKE™
™YMBOY§E™ A™ºA§EIA™
¶EPI°PAºH TH™ ™Y™KEYH™
¶›v·Î·˜ EϤÁ¯o˘
TY¶OI NEPOY
E¶I§O°H NEPOY
XPH™IMO¶OIøNTA™ THN
™Y™KEYH ™A™
™YN¢E™TE THN ™Y™KETH
¶ÚoÛo¯‹!
¢È·‰Èηۛ· ¶Úoı¤ÚÌ·vÛ˘ :
2 ·v·Ì̤v· ÎfiÎÎÈv· Ï·Ì¿ÎÈ· :
4 ·v·Ì̤v· ÎfiÎÎÈv· Ï·Ì¿ÎÈ· :
6 ·v·Ì̤v· ÎfiÎÎÈv· ʈٿÎÈ· :
MÈÎÚ¿ M˘ÛÙÈο
£fiÚ˘‚o˜
¶PøTH §EITOYP°IA
¶PO™OXH !
P‡ıÌÈÛË Ùo˘ £ÂÚÌoÛÙ¿ÙË ıÂÚÌoÎÚ·Û›·˜
AUTO-STOP HПВОЩЪovИОfi Ы‡ЫЩЛМ· ·ЫК·ПВ›·˜
¢È·‰Èηۛ·
P‡ıÌÈÛË Auto-Stop.
¢È·‰Èηۛ·
™‡ÛÙËÌ· AUTO - STOP
ºI§TPO KATA TøN A§ATøN
EMC : HПВОЩЪovИОfi Ы‡ЫЩЛМ·
ÂϤÁ¯o˘ vÂÚo‡
ºˆÙÂÈv‹ ¤v‰ÂÈÍË ÚoÂȉoo›ËÛ˘
·ÏÏ·Á‹˜ Ê›ÏÙÚo˘.
°È· v· Û·˜ ‰ÒÛÂÈ ·ÙÌfi Ë Û˘Û΢‹ ¿ÏÈ, ı· Ú¤ÂÈ
v· ·ПП¿НВЩВ Щo К›ПЩЪo ‹ v· ¯ЪЛЫИМooИ‹ЫВЩВ
·oÛÙ·Á̤vo vÂÚfi. MÂÙ¿ ·fi οı ·ÏÏ·Á‹
Ê›ÏÙÚo˘, ı· Ú¤ÂÈ v· ÎÏ›ÛÂÙÂ Î·È v· Í·v·vo›ÍÂÙÂ
ÙËv Û˘Û΢‹, ÒÛÙ oÈ ·Ú¯ÈΤ˜ ÏÂÈÙo˘ÚÁ›Â˜ v·
·v¤Ïıo˘v. (ÌÂÙ¿ ·fi 2 ÏÂÙ¿)
°¤ÌÈÛÌ· Ùo˘ ÚÂ˙ÂÚ‚o˘¿Ú ηٿ ÙËv
‰È¿ÚÎÂÈ· ÛȉÂÚÒÌ·Ùo˜
™YNTHPH™H
Aoı‹Î¢ÛË
TÈ Î¿vÂÙ ·v …
O¢H°IE™ XPH™Eø™
™‚‹vovÙ·˜ ÙË Û˘Û΢‹ :
§
§ÂÈÙ
˘ÚÁ›·
NEDERLANDS ESPAÑOL PORTUGUÊS
E§§HNIKA
CLASS 120 - CLASS 100 CLASS 90
6
❏
Opstarten :
Sluit het voedingssnoer op het electriciteitsnet aan.
Een rode controllelicht knipperd om U te bevestigen
dat het apparaat onder waaktoestand staat.
7
❏
Druk op deze knop .
De controllelampje van de Auto-stop keuze,
de controllelampje van de opwarming en de
controllelampje voor de minimum stoom
debiet branden.
Verwarmingsproces:
8
❏
Het controlelichtje voor het opwarmen van de
generator gaat na ongeveer 2 minuten uit om
aan te geven dat de generator klaar is om
stoom te produceren. Het controlelichtje gaat
regelmatig aan en uit om aan te geven dat de
generator opwarmt. De eerste 2 minuten na
het aanschakelen van het toestel, kan de
generator geen stoom produceren.
9
❏
Keuze van stoomdebiet
Elke keer het toestel wordt aangeschakeld,
wordt standaard het minimale stoomdebiet (A)
geselecteerd.
Om deze selectie te wijzigen, drukt u op de
keuzeknop stoomdebiet
CLASS 120 :
Keuze stoomdebiet
A) 1 groene controlelicht brandt: minimum
B) 2 groene controlelichtjes branden: medium
C) 3 groene controlelichtjes branden: maximum
CLASS 100 - CLASS 90 :
Keuze stoomdebiet
A) 1 groene controlelichtje brandt: middelmatig
B) 2 groene controlelichtjes branden: maximum
ALLE STOOMCENTRALE CLASS :
• Bijzonder kenmerk: maximale
stoomdebiet instelling
Wanneer u op de stoomknop drukt, dan ontsnapt
er enkele seconden lang een grote wol stoom van
onder de zool van het strijkijzer waarna het toestel
een normaal stoomdebiet produceert. Om dit
effect nogmaals te verkrijgen, moet u de
stoomproductie enkele seconden stopzetten.
Enkele seconden stopzetten, daar een speciaal
apparaat het maximale stoomdebiet regelt, om te
vermijden dat het water voortijdig wegvloeit.
• Uitschakeling, of uit stroomstelling van
het apparaat :
gebruikt, hoeft U steeds het aansluitsnoer uit het
stopkontakt weg te nemen !
Wanneer U het toestel niet
CLASS 120 - CLASS 100 CLASS 90
6
❏
Puesta en Marcha :
Enchufe el cable de alimentación. Un indicador
rojo parpadean confirman que el aparato está en
vela.
7
❏
Pulse sobre el piloto .
El indicador luminoso de selección del AutoStop (usted puede seleccionar dos periodos),
el indicador luminoso del calentamiento y el
indicador de selección del vapor mínimo están
encendidos.
8
❏
El testigo del caldeo del generador se apaga
después de aproximadamente dos minutos
para indicar que el generador está listo para
emitir vapor. El testigo se enciende y se
apaga regularmente para indicar el caldeo del
generador. No hay emisión de vapor posible
durante los dos primeros minutos que siguen
la puesta en funcionamiento.
9
❏
Selección del caudal de vapor
Cada vez que se enciende el aparato, el caudal
de vapor mínimo (A) se selecciona por defecto.
Para modificar esta selección, presione el botón
selector del caudal de vapor
CLASS 120 :
Selección del caudal de vapor
A) Un indicador verde encendido: mínimo
B) Dos indicadores verdes encendidos: medio
C) Tres indicadores verdes encendidos: máximo
CLASS 100 - CLASS 90 :
Selección del caudal de vapor
A) Un indicador verde encendido: medio
B) Dos indicadores verdes encendidos: máximo
TODOS CLASS :
• Particularidad: posición caudal Máximo
Al presionar el botón del vapor, un gran soplo de
vapor sale durante varios segundos de la suela de
la plancha antes de estabilizarse a un caudal de
vapor normal. Para obtener este efecto
nuevamente, es necesario detener la emisión de
vapor durante unos segundos, ya que un
dispositivo especial controla el caudal de vapor
máximo para evitar el derrame intempestivo de
agua.
CLASS 120 - CLASS 100 - CLASS 90
6
❏
Ligue a ficha eléctrica à tomada eléctrica. 1 indicador
luminoso vermelhos piscam e 1 indicador verde
estão acesos para confirmar a espera.
7
❏
8
❏
9
❏
CLASS 120 :
Escolha do débito do vapor
CLASS 100 - CLASS 90 :
Escolha do débito do vapor
CLASS 200 - 150 - 120 - 100 - 90 :
• Particularidade: posição do débito Máximo
Ao pressionar o comando de vapor, um grande jacto
de vapor saia durante vários segundos da base do
ferro antes de se estabilizar num débito de vapor
normal. Para obter novamente este efeito, é preciso
parar a emissão de vapor durante alguns segundos,
porque um dispositivo especial gera o débito do
vapor no máximo para evitar o escorrimento de água
intempestivo.
• Posição fora tensão :
Sempre desligar a corda de alimentação quando não
utilizar o aparelho.
• Apagado :
Apague siempre el cable de alimentación cuando
usted no utilice el aparato.
CLASS 120 - CLASS 100 - CLASS 90
Funcionamente :
❏
B¿ÏÙ Ùo ÊȘ ÛÙËv Ú›˙·.
™’·˘Ù‹ ÙË Ê¿ÛË, oÈ 2 ʈÙÂÈv¤˜ Âv‰Â›ÍÂȘ Ùo˘ Û˘ÛÙ‹Ì·Ùo˜ Auto-
Pressione o botão .
O indicador luminoso Auto-Stop, o indicador
luminoso controlo do aquecimento e o indicador
de débito de vapor minimo estão acesos.
O indicador luminoso de aquecimento do
generador apaga-se após cerca de 2 minutos
para indicar que o generador está pronto para
emitir vapor. O indicador luminoso acende-se
e apaga-se regularmente para indicar o
aquecimento do generador. Não há emissão
de vapor possível durante os 2 primeiros
minutos que seguem a colocação em
funcionamento.
Escolha do débito do vapor
A cada colocação em funcionamento do aparelho,
o débito do vapor mínimo (A) é seleccionado por
defeito.
Para modificar esta escolha, pressione a
tecla de escolha do débito do vapor
A) 1 indicador luminoso verde aceso: mínimo
B) 2 indicadores luminosos verdes acesos: médio
C) 3 indicadores luminosos verdes acesos:
máximo
A) 1 indicador luminoso verde aceso: médio
B) 2 indicadores luminosos verdes acesos:
máximo
stop ·v·‚oÛ‚‹vo˘v, ÂvÒ oÈ 2 ʈÙÂÈv¤˜ Âv‰Â›ÍÂȘ ÂÈÏoÁ‹˜ Ù˘
·Ú·ÁˆÁ‹˜ ·ÙÌo‡ ›v·È ÛÙ·ıÂÚ¿ ʈÙÂÈv¤˜, ÂȂ‚·ÈÒvovÙ·˜
¤ÙÛÈ ÙË ı¤ÛË ·v·Ìov‹˜ Ù˘ Û˘Û΢‹˜.
❏
❏
❏
CLASS 120 :
EÈÏoÁ¤˜ ·ÙÌo‡ :
CLASS 100 - CLASS 90:
EÈÏoÁ¤˜ ·ÙÌo‡ :
CLASS 200 - 150 - 120 - 100 - 90 :
¶·ЩТvЩ·˜ Щo П‹ОЩЪo ·ЩМo‡ МИ· МВБ¿ПЛ oЫfiЩЛЩ· ·ЩМo‡
·Ъ¿БВЩВ О·И ‚Б·›vВИ ·fi ЩИ˜ ЩЪ‡В˜ o˘ ˘¿Ъ¯o˘v ЫЩЛv
П¿О· Щo˘ Ы›‰ВЪo˘ БИ· МВЪИО¿ ‰В˘ЩВЪfiПВЩ·. H Ъo‹ Щo˘
·ЩМo‡ Ы‡vЩoМ· ı· В·v¤ПıВИ ЫЩ· О·vovИО¿ ›‰·. °И· v·
В·v·П¿‚ВЩВ ЩЛv ‰И·‰ИО·Ы›· ВЪИМ¤vВЩВ МВЪИО¿
‰В˘ЩВЪfiПВЩ·, ТЫЩВ v· МЛv ЩЪ¤Нo˘v ЫЩ·БfivВ˜ vВЪo‡.
Ъ›˙·, fiЩ·v ‰Вv ¯ЪЛЫИМooИВ›ЩВ ЩЛ Ы˘ЫОВ˘‹.
ÂÈÙ
o˘ÚÁ›·
6
7
¶È¤˙ÂÙ Ùov ‰È·ÎfiÙË . M›· ˯ËÙÈ΋ ¤v‰ÂÈÍË
ÂȂ‚·ÈÒvÂÈ fiÙÈ Ë Û˘Û΢‹ ̋Π۠ÏÂÈÙo˘ÚÁ›·.
8
H ʈÙÂÈv‹ ¤v‰ÂÈÍË ÏÂÈÙo˘ÚÁ›·˜ Ùo˘ ÌfiïÏÂÚ Û‚‹vÂÈ
ÌÂÙ¿ ·fi 2 ÏÂÙ¿ Î·È ‰Â›¯vÂÈ fiÙÈ Ùo ÌfiïÏÂÚ Â›v·È
¤ÙoÈÌo v· ·Ú¿ÁÂÈ ·ÙÌfi. To Ï·Ì¿ÎÈ ·v¿‚ÂÈ Î·È Û‚‹vÂÈ
Ù·ÎÙÈο, ‰Â›¯vovÙ·˜ ¿v Ùo ÌfiïÏÂÚ ˙ÂÛÙ·›vÂÙ ‹ fi¯È.
™Ù· ÚÒÙ· 2 ÏÂÙ¿ ÏÂÈÙo˘ÚÁ›·˜ ‰Âv ÌoÚ› v·
·Ú·¯ı› ·ÙÌfi˜.
P‡ıÌÈÛË ·ÙÌo‡
9
H ÌÈÎÚfiÙÂÚË ·fi‰oÛË ·ÙÌo‡ (A), ÂvÂÚÁooÈ›ٷÈ
·˘ÙfiÌ·Ù· Ì Ùo o˘ ‚¿˙ÂÙ Û ÏÂÈÙo˘ÚÁ›· ÙËv Û˘Û΢‹.
°È· v· ·ÏÏ¿ÍÂÙ ·˘Ù‹ ÙËv Ú‡ıÌÈÛË, ·Ù‹ÛÙ Ùo Îo˘Ì›
ÂÈÏoÁ‹˜ ·ÙÌo‡.
A) ·v·Ì̤vo 1 Ú¿ÛÈvo Ï·Ì¿ÎÈ : ÌÈÎÚ‹ oÛfiÙËÙ· ·ÙÌo‡
B) ·v·Ì̤v· 2 Ú¿ÛÈv· Ï·Ì¿ÎÈ· : ̤ÙÚÈ· oÛfiÙËÙ·
·ÙÌo‡
C) ·v·Ì̤v· 3 Ú¿ÛÈv· Ï·Ì¿ÎÈ· : ÌÂÁ¿ÏË oÛfiÙËÙ·
·ÙÌo‡
A) ·v·Ì̤vo 1 Ú¿ÛÈvo Ï·Ì¿ÎÈ : ÌÈÎÚ‹ oÛfiÙËÙ· ·ÙÌo‡
B) ·v·Ì̤v· 2 Ú¿ÛÈv· Ï·Ì¿ÎÈ· : ̤ÙÚÈ· oÛfiÙËÙ·
·ÙÌo‡
N· ‚Á¿˙ÂÙ ¿vÙ· Ùo ÊȘ ·fi ÙËv
13
Page 14

FRANÇAIS DEUTSCH ENGLISH
8
Thermostat
●
●●
●●●
Thermostaat
●
●●
●●●
Termostato
●
●●
●●●
14
Type of cloth Steam
Synthetic
fibres Acetates Dry
Polyacrylics
Polyamides
Natural animal Silk Light
fibres Wool steam
Natural vegetal Cotton Heavy
fibres Linen Steam
Textielvezels Stoomvolume
Kunstmatige
vezels Acetaat
Polyacrylaat Droog
Poliamide
Natuurlijke Zijde Zachte
vezels Wol stoom
Plantaardig Katoen
vezels Linnen Veel stoom
Tipo de tecido Vapor
Fibras
sinteticas
Seco
Fibras naturais Vapor
animal Lã ligeiro
Fibras naturais Algodão Multo
vegetal Linho vapor
Thermostat
Fibres
●
synthétiques Acétates
Fibres naturelles Soie Sec
●●
animales Laine Légère vapeur
●●●
Thermostat
●●●
Termostato
●●●
£¤ÛË
£ÂÚÌoÛÙ¿ÙË
Fibres naturelles Beaucoup
végétales Coton - Lin de vapeur
Synthetische
●
Fasern Acetat Kein
Tierische Seide Etwas
●●
Fasern Wolle Dampf
Naturfasern Baumwolle Viel
Fibras
●
sintéticas
Fibras natural Poco
●●
animal vapor
Fibras natural Mucho
vegetal vapor
●
●●
●●●
Types de tissus Vapeur
Polyacryliques Sec
Polyamides
Material Dampfmenge
Polyacryl Dampf
Polyamid
Leinen Dampf
Tipo de ropa Vapor
Seco
T‡o˜ TÊ¿ÛÌ·Ùo˜ T‡o˜
AÙÌo‡
™˘vıÂÙÈΤ˜ ‘Iv˜
AÛÂÙ¿Ù
¶oÏ˘·ÎÚ˘ÏÈο •ËÚfi˜
¶oÏ˘·ÌȉÈο
º˘ÛÈΤ˜ MÂٷ͈ٿ EÏ·ÊÚfi˜
ZˆÈΤ˜ ’Iv˜ M¿ÏÏÈv· AÙÌfi˜
º˘ÛÈΤ˜ B·Ì‚·ÎÂÚ¿ ‘AÊıovo ˜
º˘ÙÈΤ˜ ‘Iv˜ §Èv¿ AÙÌfi˜
8
❏
Gâchette commande vapeur
❏
Quelque soit le débit vapeur
choisi, il faut appuyer sur la
gâchette de commande vapeur
pour obtenir de la vapeur.
CONSEILS
Bruit de l’appareil
Pour assurer des performances
régulières en débit vapeur, votre
appareil de repassage est équipé
d’une pompe. Elle se manifeste dès
que vous appuyez sur la gâchette
du fer. Elle est davantage audible
1) quand le réservoir d’eau est vide
2) à la première utilisation
3) à chaque changement de
RATSCHLÄGE
Geräusche
Um eine gleichmäßige Dampfleistung
zu gewährleisten, ist Ihr Bügelgerät mit
einer Pumpe ausgestattet. Diese macht
sich bemerkbar, sobald Sie die
Dampftaste des Bügeleisens drücken.
Unter gewissen Bedingungen hört man
sie deutlicher:
1) wenn der Wassertank leer ist
2) bei der ersten Inbetriebnahme
3) bei jedem Austauschen der
cassette anticalcaire
En cours d’utilisation, le
ronronnement de la pompe est
normal.
Première vapeur
Votre appareil est neuf, il faut donc
amorcer le système vapeur
1) Remplissez le réservoir au
maximum
2) Placez la cassette anticalcaire
Während des Betriebs ist das
Surren der Pumpe normal.
Dampf bei erster
Inbetriebnahme
Ihr Gerät ist neu, man muss daher das
Dampfsystem in Gang setzen
1) Füllen Sie den Tank bis zum
2) Setzen Sie den Kalkfilter-
(laissez écouler le surplus d’eau)
3) Engagez le réservoir bien à fond.
4) Mettez votre appareil en marche.
3) Führen Sie den Tank tief ein.
4) Schalten Sie Ihr Gerät ein. Wählen
Sélectionnez le débit vapeur
moyen.
5) Dès que l’appareil est chaud,
5) Sobald das Gerät warm ist,
appuyez sur la gâchette
vapeur jusqu’à obtention de la
vapeur.
ATTENTION
❏ Ne jamais demander de vapeur
quand il n’y a plus d’eau dans
le réservoir.
❏ Wenn kein Wasser mehr im Tank
❏ Ne jamais remplir le réservoir
avec de l'eau chaude
❏ Ne jamais ajouter à l'eau des
produits à base d'alcool ou
❏ Füllen Sie den Wassertank nie
❏ Dem Wasser nie alkoholhaltige
d'essence (parfum, eau de
Cologne, essence de lavande,
etc.)
8
Dampftaste
Unabhängig von der
ausgewählten Dampfmenge
muss man die Dampftaste
drücken, um Dampf zu erhalten.
Kalkfilter-Kartusche
oberen Rand.
Kartusche ein (lassen Sie das
überschüssige Wasser ablaufen)
Sie die mittlere Dampfmenge aus
(Mini bei Class 100).
drücken Sie die Dampftaste des
Bügeleisens so lange bis Sie
Dampf erhalten. Es kann unter
Umständen bis zu 1 Minute
dauern, bevor der Dampf austritt.
ACHTUNG
ist, sollte die Dampftaste nicht
mehr betätigt werden.
mit warmem Wasser.
Mittel oder Essenzen (Parfum,
Kölnisch Wasser, LavendelEssenz usw.) beifügen.
8
❏
Steam button
Press the steam trigger to
produce steam regardless of the
steam output selected.
TIPS
Noise
To ensure regular steam output
performance, your unit is equipped
with an pump which is activated each
time the steam trigger is pressed. It is
louder when:
1) the water tank is empty
2) the unit is used for the first time
3) the anti-calc cartridge has just been
changed.
The pump can be heard humming
during normal use.
First steam generation
Your unit is brand new. The steam
system will have to be initialised.
1) Fill the water tank up completely
2) Put the anti-calc cartridge in place
(let the extra water run off)
3) Put the water tank back into its
housing, pushing it all the way in.
Wait for a few minutes.
4) Turn on your unit and select
medium steam output
5) When your unit is hot, press the
steam trigger until steam is
produced.
CAUTION:
❏ Never ask for steam when there
is no water in the reservoir
❏ Never fill the reservoir with hot
water
❏ Never add products containing
alcohol or essences (perfume,
eau de Cologne, lavender
essence…) to the water.
Page 15

MÈÎÚ¿ M˘ÛÙÈο
£fiÚ˘‚o˜
¶PøTH §EITOYP°IA
¶PO™OXH !OXH !
™YNTHPH™H
Aoı‹Î¢ÛË
TÈ Î¿vÂÙ ·v …
MÈÎÚ¿ M˘ÛÙÈο
£fiÚ˘‚o˜
TH
EITOYP
™YNTHPH™H
Aoı‹Î¢ÛË
™YNTHPH™H
TY¶OI NEPOY
E¶I§O°H NEPOY
XPH™IMO¶OIøNTA™ THN
™Y™KEYH ™A™
™YN¢E™TE THN ™Y™KETH
¶ÚoÛo¯‹!
¢È·‰Èηۛ· ¶Úoı¤ÚÌ·vÛ˘ :
2 ·v·Ì̤v· ÎfiÎÎÈv· Ï·Ì¿ÎÈ· :
4 ·v·Ì̤v· ÎfiÎÎÈv· Ï·Ì¿ÎÈ· :
6 ·v·Ì̤v· ÎfiÎÎÈv· ʈٿÎÈ· :
P‡ıÌÈÛË ·ÙÌo‡
¢È·‰Èηۛ· ¶Úoı¤ÚÌ·vÛ˘ :
P‡ıÌÈÛË ·ÙÌo‡
EȉÈ΋ ÏÂÈÙo˘ÚÁ›· : Ú‡ıÌÈÛË ÌÂÁ¿Ï˘
oÛfiÙËÙ·˜ ·ÙÌo‡.
AUTO-STOP HПВОЩЪovИОfi Ы‡ЫЩЛМ· ·ЫК·ПВ›·˜
¢È·‰Èηۛ·
P‡ıÌÈÛË Auto-Stop.
¢È·‰Èηۛ·
™‡ÛÙËÌ· AUTO - STOP
ºI§TPO KATA TøN A§ATøN
EMC : HПВОЩЪovИОfi Ы‡ЫЩЛМ·
ÂϤÁ¯o˘ vÂÚo‡
ºˆÙÂÈv‹ ¤v‰ÂÈÍË ÚoÂȉoo›ËÛ˘
·ÏÏ·Á‹˜ Ê›ÏÙÚo˘.
°È· v· Û·˜ ‰ÒÛÂÈ ·ÙÌfi Ë Û˘Û΢‹ ¿ÏÈ, ı· Ú¤ÂÈ
v· ·ПП¿НВЩВ Щo К›ПЩЪo ‹ v· ¯ЪЛЫИМooИ‹ЫВЩВ
·oÛÙ·Á̤vo vÂÚfi. MÂÙ¿ ·fi οı ·ÏÏ·Á‹
Ê›ÏÙÚo˘, ı· Ú¤ÂÈ v· ÎÏ›ÛÂÙÂ Î·È v· Í·v·vo›ÍÂÙÂ
ÙËv Û˘Û΢‹, ÒÛÙ oÈ ·Ú¯ÈΤ˜ ÏÂÈÙo˘ÚÁ›Â˜ v·
·v¤Ïıo˘v. (ÌÂÙ¿ ·fi 2 ÏÂÙ¿)
°¤ÌÈÛÌ· Ùo˘ ÚÂ˙ÂÚ‚o˘¿Ú ηٿ ÙËv
‰È¿ÚÎÂÈ· ÛȉÂÚÒÌ·Ùo˜
™HMEIø™EI™
¶POºY§A•EI™
æEKA™MO™ (·v¿ÏoÁ· Ùo ÌovÙ¤Ïo)
K¿ıÂÙo Ûȉ¤ÚˆÌ·
Tooı¤ÙËÛË Ù˘ ÌÂÙ·ÏÏÈ΋˜ ‚¿Û˘
NEDERLANDS ESPAÑOL PORTUGUÊS
E§§HNIKA
8
❏
Stoomknop
Welk stoomdebiet u ook selecteert, door op
de stoomknop te drukken produceert het
toestel stoom.
NUTTIGE TIPS
Geluid van het toestel
Het toestel is uitgerust met een injectiepomp die
ervoor zorgt dat uw strijkijzer een regelmatige
stoomproductie geeft.
Zodra u de stoomknop van het strijkijzer indrukt,
wordt deze pomp geactiveerd. U kan deze pomp
duidelijk horen
1) wanneer het waterreservoir leeg is
2) wanneer u het toestel voor het eerst gebruikt
3) elke keer u de antikalkcassette vervangt
Het is normaal dat de pomp af en toe een
ronkend geluid maakt tijdens het gebruik.
Eerste stoom
Het toestel is nog nieuw en het stoomsysteem
moet dus opgestart worden
1) Vul het reservoir maximaal op
2) Plaats de antikalkcassette (laat het overtollige
water wegvloeien)
3) Duw het reservoir voldoende diep in het
toestel.
4) Schakel het toestel in. Selecteer het middelste
stoomdebiet.
5) Zodra het toestel is opgewarmd, drukt u op de
stoomknop tot het toestel stoom
produceert.
OPGELET:
❏ De aan/uit-schakelaar voor stoom nooit
inschakelen, als er geen water in het
watertankje zit.
❏ Het reservoir nooit met warm water vullen.
❏ Voeg nooit een vloeistof die alcohol bevat of
eau de cologne, parfums e.d. toe aan het
water.
8
❏
Botón de control del vapor
Cualquiera que sea el caudal de vapor
escogido, es necesario presionar el botón de
control del vapor para obtener vapor.
CONSEJOS
Ruido del aparato
Para que la eficacia del caudal de vapor sea
regular, el aparato de planchado está equipado
con una bomba. Ésta se manifestará en cuanto
presione el botón de la plancha. Se la puede oír
sobre todo:
1) cuando el depósito de agua está vacío
2) en la primera utilización
3) en cada cambio de dispositivo antical
Durante el funcionamiento, el zumbido de la
bomba es normal.
Primer vapor
Si el aparato es nuevo, es necesario cebar el
sistema de vapor.
1) Llene el depósito al máximo.
2) Coloque el dispositivo antical (deje que el
exceso de agua se evacue).
3) Coloque el depósito en el fondo.
4) Ponga el aparato en marcha. Seleccione el
caudal de vapor medio.
5) En cuanto el aparato esté caliente, presione el
botón del vapor hasta obtener vapor.
ATENCIÓN :
❏ No accione nunca el vapor cuando no quede
agua en el depósito
❏ No llene el depósito con agua caliente.
❏ No añada productos que contengan alcohol
al agua (colonia, esencias).
8
❏
Gatilho de comando do vapor
Qualquer que seja o débito do vapor
escolhido, é preciso pressionar o gatilho do
comando de vapor para obter do vapor.
CONSELHOS
Ruído do aparelho
Para assegurar as performances regulares em
débito do vapor, o seu ferro é equipado
de uma bomba. Manifesta-se logo que pressione
o gatilho do ferro. Ouve-se mais
1) quando o reservatório de água está vazio
2) à primeira utilização
3) a cada substituição de cassete anti-calcário
Durante a utilização, o roncar da bomba é
normal.
Primeiro vapor
O seu aparelho é novo, portanto é preciso
amortecer o sistema do vapor
1) Enche o reservatório no máximo
2) Coloque a cassete anti-calcário (deixe
escorrer o excesso de água)
3) Introduza o reservatório bem no fundo.
4) Coloque o seu aparelho em funcionamento.
Seleccione o débito do vapor na intensidade
médio.
5) Quando o aparelho estiver quente, pressione
o gatilho do vapor até obter vapor.
ATENÇÃO :
❏ Nunca activar o vapor quando não existir
água no recipiente.
❏ Não encher o reservatório com água
quente.
❏ Não juntar á água do depósito produtos á
base de alcool como perfume, água de
colónia, essencia de lavanda, etc.
¶Ï‹ÎÙÚo ·ÙÌo‡
8
❏
¶·Ù‹ÛÙÂ Ùo Ï‹ÎÙÚo ·ÙÌo‡ ÁÈ· v· ˙ËÙ‹ÛÂÙÂ
·ÙÌfi, ¿Û¯ÂÙ· Ì ÙËv Ú‡ıÌÈÛË oÛfiÙËÙ·˜ ·ÙÌo‡.
MÈÎÚ¿ M˘ÛÙÈο
£fiÚ˘‚o˜
°È· v· ¤¯ÂÙ ÙËv ηχÙÂÚË ·fi‰oÛË ·ÙÌo‡, Ë
Û˘Û΢‹ Û·˜ ›v·È ÂÍoÏÈṲ̂vË Ì ÌÈ· ÂȉÈ΋ ·vÙÏ›·,
o˘ ÂÎÙo͇ÂÈ Ùo vÂÚfi ÛÙo ÌfiïÏÂÚ Î¿ı ÊoÚ¿ o˘
·Ù¿Ù Ùo Ï‹ÎÙÚo ·ÙÌo‡. K¿vÂÈ ÌÂÁ·Ï‡ÙÂÚo ıfiÚ˘‚o
fiÙ·v :
1. To ‰o¯Â›o vÂÚo‡ ›v·È ¿‰ÂÈo
2. H Ы˘ЫОВ˘‹ ¯ЪЛЫИМooИВ›Щ·И БИ· ЪТЩЛ КoЪ¿
3. MfiÏȘ ¤¯ÂÙ ·ÏÏ¿ÍÂÈ Ùo Ê›ÏÙÚo ηı·ÚÈÛÌo‡ Ùˆv
·Ï¿Ùˆv.
H ·vÙÏ›· ›v·È Ê˘ÛÈÎfi v· οvÂÈ Ï›Áo ıfiÚ˘‚o οoȘ
ÊoÚ¤˜ ηٿ ÙËv ‰È¿ÚÎÂÈ· Ù˘ ¯Ú‹Û˘.
¶PøTH
H ™˘ЫОВ˘‹ Ы·˜ В›v·И О·Иvo‡ЪБИ· ! To Ы‡ЫЩЛМ· ·ЩМo‡
Ъ¤ВИ v· Ъ˘ıМИЫЩВ›.
1) °ÂÌ›ÛÙ Ùo ÚÂ˙ÂÚ‚o˘¿Ú vÂÚo‡.
2) B¿ÏÙ Ùo Ê›ÏÙÚo ηı·ÚÈÛÌo‡ Ùˆv ·Ï¿Ùˆv ÛÙË
ı¤ÛË Ùo˘ (·Ê·ÈÚ¤ÛÙÂ Ùo ·Ú··v›ÛÈo vÂÚfi)
3) E·v·ÙooıÂÙ‹ÛÙ Ùo ÚÂ˙ÂÚ‚o˘¿Ú ÛÙË ı¤ÛË Ùo˘,
ÛÚÒ¯vovÙ·˜ Ùo Úo˜ Ù· ̤۷.
4) B¿ÏÙ Û ÏÂÈÙo˘ÚÁ›· ÙË Û˘Û΢‹, Ú˘ıÌ›˙ovÙ·˜ ÙËv
ı¤ÛË ·ÙÌo‡ ÛÙË Ì¤ÛË.
5) ‘OÙ·v Ë Û˘Û΢‹ Û·˜ ˙ÂÛÙ·ı›, ·Ù‹ÛÙ Ùo
Ï‹ÎÙÚo ·ÙÌo‡ ¤ˆ˜ fiÙo˘ ‚ÁÂÈ ·ÙÌfi˜.
❏ E¿v Ùo ÚÂ˙ÂÚ‚o˘¿Ú vÂÚo‡ ›v·È ¿‰ÂÈo Ë Û˘Û΢‹
‰Âv ‰›vÂÈ ·ÙÌfi.
❏ ¶oÙ¤ ÌËv ÁÂÌ›˙ÂÙ Ùo ÚÂ˙ÂÚ‚o˘¿Ú Ì ˙ÂÛÙfi vÂÚfi.
❏ ¶oÙ¤ ÌËv ÚoÛı¤ÙÂÙÂ ·ÏÏ¿ ÚoïfivÙ· o˘
ÂÚȤ¯o˘v ·ÏÎofiÏ ‹ ·ÚÒÌ·Ù· ̤۷ ÛÙo vÂÚfi.
§EITOYP
°IA
15
Page 16

FRANÇAIS DEUTSCH ENGLISH
9
CLASS 200 - CLASS 150
10
11
12
9
❏
Réglage du thermostat
a(voir tableau page 14) Réglez le bouton
du thermostat du fer selon la nature de
votre linge. Pour l'utilisation de la vapeur,
réglez le thermostat du fer dans la plage
vapeur.
AUTO-STOP: Système de
sécurité électronique
du fer à repasser en chauffe ou si vous
n’appuyez pas sur la gâchette de
commande vapeur, le système de
sécurité stoppe automatiquement la
chauffe de l’appareil.
En cas d’oubli
CLASS 200 - CLASS 150
Processus
10
❏
Les 6 voyants de chauffe du
générateur (ou voyants indicateurs
d’arrêt de l’appareil)
s’éteignent progressivement 2 par 2
En appuyant à nouveau sur la
gâchette vapeur, les voyants cessent
de clignoter.
11
❏
L’appareil se replace au début du
processus de mise en chauffe.
Il faut attendre que les voyants de
A
B
C
chauffe s’allument pour obtenir à
nouveau de la vapeur.
Si vous appuyez sur la gâchette
vapeur avant que l’appareil ne soit
prêt, le signal sonore se déclenche.
12
❏
Choix de l’AUTO-STOP
A chaque mise en service, l’Auto-Stop à 20
minutes de non utilisation (A) est
sélectionné par défaut
Pour modifier ce choix , pressez la touche
choix Auto-Stop
A) 2 voyants allumés : Auto-stop après
20 minutes de non utilisation
B) 1 voyant allumé: Auto-stop après
10 minutes de non utilisation
C) Aucun voyant allumé : pas d’Auto-
Stop
s’allument et
9
❏
Einstellung der Thermostat-
❏
scheibe des Bügeleisens
(Tabelle auf Seite 14) Mit dem
Thermostatscheibe die für die
Bügelwäsche geeignete Temperatur
einstellen. Wenn Sie mit Dampf bügeln
möchten, müssen Sie die Thermostatscheibe auf die Dampfzone einstellen.
AUTO-STOP:
elektronischer Sicherheit. Wenn das
Bügeleisen längere Zeit nicht benutzt worden
ist oder wenn Sie die Dampftaste längere Zeit
nicht gedrückt haben, schaltet die
Sicherheitsvorrichtung die elektrische
Stromversorgung des Geräts automatisch ab.
System mit
CLASS 200 - CLASS 150
Processus
10
❏
Wenn die Auto-Stop-Funktion die
Stromversorgung des Geräts abgestellt
hat, blinken die 6 Kontrollleuchten n° 7
(siehe Erklärung Tastatur).
Wenn man dann die Dampftaste des
Bügeleisens drückt, hören die
Kontrollleuchten zu blinken auf.
11
❏
Das Gerät beginnt eine erneute
Aufheizphase. Man muss warten, bis
mindestens 4 der 6 Kontrollleuchten
wieder brennen, um Dampf zu erhalten.
Wenn Sie die Dampftaste betätigen,
bevor das Gerät betriebsbereit ist,
erklingt das Tonsignal.
12
❏
Programmierung der AUTO-STOP-
Funktion
Bei jeder Inbetriebnahme wird automatisch
“Auto-Stop nach 20 Minuten Nichtbenutzung”
(A) ausgewählt.
Um diese Auswahl zu ändern, drücken Sie die
Taste Auswahl Auto-Stop:
A) 2 leuchtende Kontrollleuchten: Auto-
Stop nach 20 Minuten Nichtbenutzung
B) 1 leuchtende Kontrollleuchte: Auto-
Stop nach 10 Minuten Nichtbenutzung
C) Keine eingeschaltete Kontrol-
leuchte: kein Auto-Stop
AUTO-STOP
system If you forget about the iron or if
you don’t press the steam button, after
a certain period the safety system
automatically cuts the power supply to
the appliance.
CLASS 200 - CLASS 150
Process
❏
❏
❏
The Auto-Stop feature is automatically
set to operate if the iron is left unused
for 20 minutes.
To change this timing, press the AutoStop selection button
9
Thermostat adjustment
(See table page 14) Adjust the
thermostat of the iron according to
the type of ironing.
For steam ironing, set the dial to
steam.
: Electronic safety
10
The 6 steam generator heating
indicator lights (flashing applianceoff indicator lights) switch on and
off progressively, 2 by 2.
These indicator lights stop flashing
when the steam trigger is used
again.
11
The unit may now have to heat up.
Please, wait until the heating
indicator lights come on before
calling for steam again.
Pressing the steam trigger before
the unit is ready produces an
audible alarm.
12
AUTO-STOP selection
A) 2 indicator lights on : Auto-stop
works after 20 minutes
B) 1 indicator light on: Auto-stop
works after 10 minutes
C) No indicator light on: Auto-Stop
deactivated
16
Page 17

MÈÎÚ¿ M˘ÛÙÈο
£fiÚ˘‚o˜
¶PøTH §EITOYP°IA
¶PO™OXH !
P‡ıÌÈÛË Ùo˘ £ÂÚÌoÛÙ¿ÙË ıÂÚÌoÎÚ·Û›·˜
AUTO-STOP HПВОЩЪovИОfi Ы‡ЫЩЛМ· ·ЫК·ПВ›·˜
¢È·‰Èηۛ·
™YNTHPH™H
Aoı‹Î¢ÛË
TÈ Î¿vÂÙ ·v …
O¢H°IE™ XPH™Eø™
MÈÎÚ¿ M˘ÛÙÈο
£fiÚ˘‚o˜
¶PøTH §EITOYP°IA
¶PO™OXH !
P‡ıÌÈÛË Ùo˘ £ÂÚÌoÛÙ¿ÙË ıÂÚÌoÎÚ·Û›·˜
AUTO-STOP HПВОЩЪovИОfi Ы‡ЫЩЛМ· ·ЫК·ПВ›·˜
™YNTHPH™H
Aoı‹Î¢ÛË
TÈ Î¿vÂÙ ·v …
O¢H°IE™ XPH™Eø™
MÈÎÚ¿ M˘ÛÙÈο
£fiÚ˘‚o˜
¶PøTH §EITOYP°IA
¶PO™OXH !
P‡ıÌÈÛË Ùo˘ £ÂÚÌoÛÙ¿ÙË ıÂÚÌoÎÚ·Û›·˜
™YNTHPH™H
Aoı‹Î¢ÛË
TÈ Î¿vÂÙ ·v …
O¢H°IE™ XPH™Eø™
MÈÎÚ¿ M˘ÛÙÈο
£fiÚ˘‚o˜
¶PøTH §EITOYP°IA
¶PO™OXH !
™YNTHPH™H
Aoı‹Î¢ÛË
TÈ Î¿vÂÙ ·v …
NEDERLANDS ESPAÑOL PORTUGUÊS
E§§HNIKA
9
❏
Instelling van de thermostaat
(Table pagine 14) Regel de thermostaatknop van
het ijzer naargelang het te strijken goed. Voor het
stoomstrijken : de thermostaat-knop in het
stoomvak instellen.
AUTO-STOP: Elektronisch veilig-
heidssysteem
vergeet of niet op de stoomknop drukt,
schalkelt het veiligheidssysteem automatisch
de stroomtoevoer van het apparaat.
Wanneer u het strijkijzer
CLASS 200 - CLASS 150
Proces
10
❏
De 6 opwarmingslichtjes (
die aangeven of het toestel gestopt is)
2 per 2 op en gaan 2 per 2 uit.
Wanneer u nogmaals op de stoomknop
drukt, dan stoppen de lichtjes met
knipperen.
11
❏
Het toestel begint opnieuw op te warmen.
U moet wachten tot de verwarmingslichtjes
opnieuw aangaan om opnieuw stoom te
hebben.
Indien u op de stoomknop drukt voor het
toestel klaar is, dan wordt er een
geluidssignaal weergegeven.
12
❏
Selectie van de AUTO-STOP
Elke keer u het toestel aanschakelt, wordt de
Auto-Stop na 20 minuten (A) stilstand
geactiveerd.
Om deze selectie te wijzigen, drukt u op de
keuzeknop Auto-Stop
A) 2 controlelichtjes branden: Het toestel
schakelt zichzelf uit (Auto-stop) nadat het
20 minuten niet werd gebruikt
B) 1 controlelichtje brandt: Het toestel
schakelt zichzelf uit (Auto-stop) nadat het
10 minuten niet werd gebruikt
C) geen controlelichtje brandt: het toestel
schakelt zichzelf nooit uit (geen Auto-Stop)
controlelichtjes
lichten
9
❏
Posición del termostato
(Tabla pagína 16) Ajuste el termostato para el
tipo de tejido a planchar. Para usar el vapor, de
la plancha en la zona de vapor.
AUTO-STOP:Sistema electrónico de
seguridad
encendida, o si no se pulsa sobre el mando de
vapor, el sistema de seguridad desconecta
automáticamente la resistencias eléctricas del
aparato.
En caso de olvido de plancha
CLASS 200 - CLASS 150
Proceso
10
❏
Los seis indicadores del caldeo del
generador (
intermitentes del apagado)
se apagan progresivamente de dos en dos.
Al presionar el botón del vapor, los
indicadores cesan de parpadear.
11
❏
El aparato vuelve al principio del proceso
de caldeo.
Es necesario esperar que los indicadores
del caldeo se enciendan para obtener
nuevamente vapor.
Si presiona el botón del vapor antes de que
el aparato esté listo, la señal sonora se
pondrá en marcha.
12
❏
Selección del APAGADO
AUTOMÁTICO
Cada vez que se utiliza el aparato, se
selecciona por defecto el Apagado Automático
tras 20 minutos sin utilización (A).
Para modificar esta selección, presione el botón
selector del apagado automático
A) Dos indicadores encendidos: Apagado
Automático tras 20 minutos de no utilización
B) Un indicador encendido: Apagado
Automático tras 10 minutos de no utilización
C) Ningún indicador encendido: No hay
Apagado Automático
indicadores luminosos
se encienden y
9
❏
Regulação do termostato
(Quadro página 16) Regular a temperatura
acordo com o tecido a passar.
Para utilização do vapor regule o termostato do
ferro na posição vapor
AUTO-STOP: Sistema de segurança
electrónica
carregar no gatilho de comando vapor, o
sistema de segurança parará automaticamente
a alimentação eléctrica do aparelho.
Se esquecer o ferro ou se não
CLASS 200 - CLASS 150
Processo
10
❏
6 indicadores luminosos de aquecimento do
generador
intermitentes de paragem do aparelho)
acendem-se e apagam-se
progressivamente, 2 a 2.
Ao pressionar novamente o gatilho de
vapor, os indicadores luminosos param de
piscar.
11
❏
O aparelho volte a colocar-se no início do
processo de aquecimento. É preciso
aguardar que os indicadores luminosos de
aquecimento se acendem para obter
novamente vapor. Se pressionar o gatilho
do vapor antes de o aparelho ficar pronto,
o sinal sonoro activa-se.
12
❏
Escolha do AUTO-STOP
A cada colocação em funcionamento, o AutoStop de 20 minutos de não utilização (A) é
seleccionado por defeito
Para modificar esta escolha, pressione a tecla
escolha Auto-Stop
A) 2 indicadores luminosos acesos: Auto-
stop após 20 minutos de não utilização
B) 1 indicador luminoso aceso: Auto-stop
após 10 minutos de não utilização
C) Nenhum indicador luminoso aceso:
nenhum Auto-Stop
(indicadores luminosos
P‡ıÌÈÛË Ùo˘ £ÂÚÌoÛÙ¿ÙË ıÂÚÌoÎÚ·Û›·˜
9
❏
(o‰ËÁ›Â˜ Ù˘ ÛÂÏ. 16) P˘ıÌ›ÛÙ Ùo ıÂÚÌoÛÙ¿ÙË
·v¿ПoБ· МВ Щo ‡К·ЫМ· o˘ ı· ЫИ‰ВЪТЫВЩВ.
°И· ЫИ‰¤ЪˆМ· МВ ·ЩМfi, Ъ˘ıМ›ЫЩВ ·v¿ПoБ·.
AUTO-STOP HПВОЩЪovИОfi Ы‡ЫЩЛМ· ·ЫК·ПВ›·˜
E¿v НВ¯¿ЫВЩВ Щo Ы›‰ВЪo ЫЩЛv Ъ›˙· ‹ В¿v ‰Вv
·Щ‹ЫВЩВ Щo П‹ОЩЪo ·ЩМo‡, Щo ЛПВОЩЪovИОfi Ы‡ЫЩЛМ·
·ЫК·ПВ›·˜ ЩЛ˜ Ы˘ЫОВ˘‹˜ ı· ПВИЩo˘ЪБ‹ЫВИ О·И ı·
ЫЩ·М·Щ‹ЫВИ ЩЛv ·Ъo¯‹ ЛПВОЩЪИОo‡ ЪВ‡М·Щo˜.
CLASS 200 - CLASS 150
¢È·‰Èηۛ·
10
❏
T· 6 Ï·Ì¿ÎÈ· ¤v‰ÂÈ͢ ıÂÚÌoÎÚ·Û›·˜ Ùo˘
ÌfiïÏÂÚ ı· ·Ú¯›Ûo˘v v· ·v¿‚oÛ‚‹vo˘v, ·v¿ ‰‡o.
£· ¿„o˘v v· ·v·‚oÛ‚‹vo˘v ÌfiÏȘ Ùo Ï‹ÎÙÚo
·ÙÌo‡ ·ÙËı› Í·v¿.
11
❏
¶·Ú·Î·Ïo‡Ì ÂÚÈ̤vÂÙ ¤ˆ˜ fiÙo˘ oÈ ÊˆÙÂÈv¤˜
Âv‰Â›ÍÂȘ ·v¿„o˘v ¿ÏÈ, ÚÈv ˙ËÙ‹ÛÂÙ ·ÙÌfi.
E¿v ·Ù‹ÛÂÙ Ùo Ï‹ÎÙÚo ·ÙÌo‡ ÚÈv Ë Û˘Û΢‹
v· ›v·È ¤ÙoÈÌË, ¤v·˜ ÌÈÎÚfi˜ ıfiÚ˘‚o˜ ı·
·Îo˘ÛÙ›.
P‡ıÌÈÛË Auto-Stop.
12
❏
A˘ЩfiМ·Щ· Л ПВИЩo˘ЪБ›· ЪoЫЩ·Ы›·˜ Auto-Stop ı·
ЩВıВ›ЫВ ПВИЩo˘ЪБ›· В¿v ‰Вv ¯ЪЛЫИМooИ‹ЫВЩВ ЩЛ
Ы˘ЫОВ˘‹ БИ· 20 ПВЩ¿.
°И· ·ПП¿НВЩВ ·˘Щ‹ ЩЛv Ъ‡ıМИЫЛ, ·Щ‹ЫЩВ Щo Оo˘М›
Auto-Stop
A) 2 ·v·Ì̤v· Ï·Ì¿ÎÈ· : Ùo Û‡ÛÙËÌ· Auto-Stop
ÂvÂÚÁooÈÂ›Ù·È ÌÂÙ¿ ·fi 20 ÏÂÙ¿
B) 1 ·v·Ì̤vo Ï·Ì¿ÎÈ : Ùo Û‡ÛÙËÌ· Auto-Stop
ÂvÂÚÁooÈÂ›Ù·È ÌÂÙ¿ ·fi 10 ÏÂÙ¿.
C) K·v¤v· ·v·Ì̤vo Ï·Ì¿ÎÈ : Ùo Û‡ÛÙËÌ· Auto-
stop ›v·È ·ÂvÂÚÁooÈË̤vo.
17
Page 18

FRANÇAIS DEUTSCH ENGLISH
CLASS 120 - CLASS 100 - CLASS 90
10
11
12
CLASS 120 - CLASS 100 CLASS 90
Processus
10
❏
Le voyant de chauffe du générateur
(voyant indicateur d’arrêt de l’appareil)
clignote.
En appuyant à nouveau sur la
gâchette vapeur, le voyant cesse de
clignoter.
11
❏
L’appareil se replace au début du
processus de mise en chauffe. Il faut
A
B
attendre 2 minutes pour obtenir à
nouveau de la vapeur.
Si vous appuyez sur la gâchette
vapeur avant que l’appareil ne soit
prêt, il n’y a pas d’émission de
vapeur.
12
❏
Choix de l’AUTO-STOP
A chaque mise en service, l’Auto-Stop
à 10 minutes de non utilisation (A) est
sélectionné par défaut.
Pour modifier ce choix, pressez la touche
choix Auto-Stop
A) 1 voyant allumé : Auto-stop après
20 minutes de non utilisation
B) Aucun voyant allumé : pas d’Auto-
Stop
CLASS 120 - CLASS 100 CLASS 90
Vorgang
10
❏
Wenn die Auto-Stop-Funktion die
Stromversorgung des Geräts
abgestellt hat, blinkt die
Kontrollleuchte n° 7 (siehe Erklärung
Tastatur).
Wenn man dann die Dampftaste des
Bügeleisens drückt, hört die
Kontrollleuchte zu blinken auf.
11
❏
Das Gerät beginnt eine erneute
Aufheizphase. Man muss 2 Minuten
warten, um wieder Dampf zu
erhalten. Wenn Sie die Dampftaste
betätigen, bevor das Gerät
betriebsbereit ist, tritt kein Dampf
aus.
12
❏
Programmierung der AUTO-
STOP-Funktion
Bei jeder Inbetriebnahme wird
automatisch “Auto-Stop nach 10
Minuten Nichtbenutzung” (A)
ausgewählt.
Um diese Auswahl zu ändern, drücken
Sie die Taste Auswahl Auto-Stop
A) 1 leuchtende Kontrollleuchte:
Auto-Stop nach 20 Minuten
Nichtbenutzung
B) Keine leuchtende Kontroll-
leuchte: kein Auto-Stop
CLASS 120 - CLASS 100 CLASS 90
Process
10
❏
The steam generator heating
indicator light (
indicator light)
Pressing the steam trigger again
stops the light from flashing.
11
❏
The unit begins to heat up again.
Steam cannot be produced for 2
minutes.
Pressing the steam trigger before the
unit is ready will not produce any
steam.
12
❏
AUTO-STOP selection
The Auto-Stop feature is automatically
set to operate if the iron is left unused
for 20 minutes.
To change this timing, press the
Auto-Stop selection button
A) 1 indicator light on: Auto-stop
works after 10 minutes.
B) No indicator light on: Auto-Stop
deactivated.
flashing appliance-off
flashes.
18
CASSETTE ANTICALCAIRE
Le numéro d’article des cassettes
anticalcaires pour votre centrale est
410 057. Ces cassettes anticalcaires sous
blister sont disponibles chez votre
revendeur ou dans les centres agrées
DOMENA.
KALKFILTER-KARTUSCHE
Die Artikelnummer der KalkfilterKartuschen für das Modell CLASS ist
400 410 057. Diese Kalkfilter-Kartuschen
sind bei Ihrem Fachhändler erhältlich.
ANTI-SCALE CARTRIDGE
The reference number to order anti-scale
cartridges for model CLASS irons is
410 057. The anti-scale cartridges are
available in blister-pack from your retailer.
Page 19

MÈÎÚ¿ M˘ÛÙÈο
£fiÚ˘‚o˜
¶PøTH §EITOYP°IA
¶PO™OXH !
P‡ıÌÈÛË Ùo˘ £ÂÚÌoÛÙ¿ÙË ıÂÚÌoÎÚ·Û›·˜
AUTO-STOP HПВОЩЪovИОfi Ы‡ЫЩЛМ· ·ЫК·ПВ›·˜
¢È·‰Èηۛ·
™YNTHPH™H
Aoı‹Î¢ÛË
TÈ Î¿vÂÙ ·v …
O¢H°IE™ XPH™Eø™
MÈÎÚ¿ M˘ÛÙÈο
£fiÚ˘‚o˜
¶PøTH §EITOYP°IA
¶PO™OXH !
P‡ıÌÈÛË Ùo˘ £ÂÚÌoÛÙ¿ÙË ıÂÚÌoÎÚ·Û›·˜
AUTO-STOP HПВОЩЪovИОfi Ы‡ЫЩЛМ· ·ЫК·ПВ›·˜
™YNTHPH™H
Aoı‹Î¢ÛË
TÈ Î¿vÂÙ ·v …
O¢H°IE™ XPH™Eø™
MÈÎÚ¿ M˘ÛÙÈο
£fiÚ˘‚o˜
¶PøTH §EITOYP°IA
¶PO™OXH !
P‡ıÌÈÛË Ùo˘ £ÂÚÌoÛÙ¿ÙË ıÂÚÌoÎÚ·Û›·˜
AUTO-STOP HПВОЩЪovИОfi Ы‡ЫЩЛМ· ·ЫК·ПВ›·˜
¢È·‰Èηۛ·
P‡ıÌÈÛË Auto-Stop.
¢È·‰Èηۛ·
™‡ÛÙËÌ· AUTO - STOP
ºI§TPO KATA TTPO KATA TøN AN A§ATøN
™YNTHPH™H
Aoı‹Î¢ÛË
TÈ Î¿vÂÙ ·v …
O¢H°IE™ XPH™Eø™
NEDERLANDS ESPAÑOL PORTUGUÊS
E§§HNIKA
CLASS 120 - CLASS 100 CLASS 90
Proces
10
❏
Het opwarmlichtje van de generator
(
controlelichtje die aangevt of het toestel
gestopt is)
Wanneer u nogmaals op de stoomknop
drukt, dan stopt het lichtje met knipperen.
11
❏
Het toestel begint opnieuw op te warmen.
U moet 2 minuten wachten voor U
opnieuw stoom verkrijgt.
Indien u op de stoomknop drukt voor het
toestel klaar is, dan wordt er geen stoom
geproduceerd.
12
❏
Selectie van de AUTO-STOP
Elke keer u het toestel aanschakelt, wordt de
Auto-Stop na 20 minuten (A) stilstand
standaard geactiveerd.
Om deze selectie te wijzigen, drukt u op de
keuzeknop Auto-Stop
A) 1 controlelichtje brandt: Het toestel
B) geen controlelichtje brandt : het toestel
knippert.
schakelt zichzelf uit (Auto-stop) nadat het
20 minuten niet werd gebruikt
schakelt zichzelf nooit uit (geen AutoStop)
CLASS 120 - CLASS 100 CLASS 90
Proceso
10
❏
El indicador del caldeo del generador
(
indicadore luminoso intermitente del
apagado)
Al presionar el botón del vapor, el indicador
cesa de parpadear.
11
❏
El aparato vuelve al principio del proceso
de caldeo. Es necesario esperar dos
minutos para obtener nuevamente vapor.
Si presiona el botón del vapor antes de que
el aparato esté listo, no habrá emisión de
vapor.
12
❏
Selección del APAGADO
AUTOMÁTICO
Cada vez que se utiliza el aparato, se
selecciona por defecto el Apagado
Automático tras 20 minutos sin utilización (A).
Para modificar esta selección, presione el botón
selector del Apagado Automático
A) Un indicador encendido: Apagado
B) Ningún indicador encendido: No hay
parpadea.
Automático tras 20 minutos de no
utilización
Apagado Automático
CLASS 120 - CLASS 100 CLASS 90
Processo
10
❏
O indicador luminoso de aquecimento do
generador
de paragem do aparelho)
Ao pressionar novamente o gatilho do
vapor, o indicador luminoso pára de piscar.
11
❏
O aparelho volte a colocar-se no início do
processo de aquecimento. É preciso
aguardar 2 minutos para obter novamente
vapor.
Se pressionar o gatilho do vapor antes do
aparelho estar pronto, não haverá emissão
de vapor.
12
❏
Escolha do AUTO-STOP
A cada colocação em funcionamento, o AutoStop de 20 minutos de não utilização (A) é
seleccionado por defeito.
Para modificar esta escolha, pressione a tecla
escolha Auto-Stop
A) 1 indicador luminoso aceso: Auto-stop
após 20 minutos de não utilização
B) Nenhum indicador luminoso aceso:
nenhum Auto-Stop
(indicador luminoso intermitente
pisca.
CLASS 120 - CLASS 100 - CLASS 90
¢È·‰Èηۛ·
10
❏
H ʈÙÂÈv‹ ¤v‰ÂÈÍË ÏÂÈÙo˘ÚÁ›·˜ o˘ ÌfiïÏÂÚ
·v·‚oÛ‚‹vÂÈ.
¶·ÙÒvÙ·˜ ¿ÏÈ Ùo Ï‹ÎÙÚo ·ÙÌo‡ Ë ÊˆÙÂÈv‹
¤v‰ÂÈÍË ÛÙ·Ì·Ù¿ v· ·v·‚oÛ‚‹vÂÈ.
11
❏
H Û˘Û΢‹ ·Ú¯›˙ÂÈ v· ıÂÚÌ·›vÂÙ ¿ÏÈ. AÙÌfi
ÌoÚ›Ù v· ˙ËÙ‹ÛÂÙ ÌÂÙ¿ ·fi 2 ÏÂÙ¿ .
¶·ÙÒvÙ·˜ Ùo Ï‹ÎÙÚo ·ÙÌo‡ ÚÈv Ë Û˘Û΢‹
›v·È ¤ÙoÈÌË, ‰Âv ı· ‚ÁÂÈ ·ÙÌfi˜.
12
P‡ıÌÈÛË Auto-Stop.
❏
To Ы‡ЫЩЛМ· AUTO-STOP В›v·И Ъ˘ıМИЫМ¤vo v·
ВvВЪБooИВ›ЩВ ·˘ЩfiМ·Щ· fiЩ·v Л Ы˘ЫОВ˘‹ ‰Вv ¤¯ВИ
¯ЪЛЫИМooИЛıВ› БИ· 20 ПВЩ¿.
°È· v· ·ÏÏ¿ÍÂÙÂ ·˘Ù‹ ÙËv Ú‡ıÌÈÛË ·Ù‹ÛÙÂ Ùo
Ï‹ÎÙÚo Ùo˘ Auto-Stop
A) 1 ·v·Ì̤vo Ï·Ì¿ÎÈ : Ùo Auto-Stop
ÂvÂÚÁooÈÂ›Ù·È ÌÂÙ¿ ·fi 20 ÏÂÙ¿.
B) K·v¤v· ·v·Ì̤vo Ï·Ì¿ÎÈ : Ùo Auto-stop ›v·È
·ÂvÂÚÁooÈË̤vo.
ANTIKALK-CASETTES
Voor de modellen CLASS is het
artikelreferentienummer van de antikalkcassettes het nummer 410 057. De antikalkcasettes onder blistervorm zijn bij uw
detailhandelaar verkrijgbaar.
CARTUCHO DESCALCIFICADOR
El número de artículo de las casetes anti-cal para
el modelo CLASS es el 410 057. Las casetes antical sobre blister están disponibles a su
revendedor.
CASSETTE ANTICALCÁRIO
O número de artigo das cassetes anticalcárias para
os centros de engomagem CLASS é 410 057. As
cassetes anticalcárias sob blister estão disponíveis
no seu revendedor.
O Kˆ‰ÈÎfi˜ ÁÈ· v· ·Ú·ÁÁ›ÏÂÙ Ùo ·vÙ·ÏÏ·ÎÙÈÎfi
Ê›ÏÙÚo ηٿ Ùˆv ·Ï¿Ùˆv ›v·È 410 057. MoÚ›Ù v·
Ù· ÚoÌËı¢Ù›Ù ·fi Ùo ηٿÛÙËÌ· o˘ ·ÁoÚ¿Û·ÙÂ
ÙË Û˘Û΢‹.
19
Page 20

20
13
13
FRANÇAIS DEUTSCH ENGLISH
c
i
M
n
o
i
r
n
t
e
c
r
e
l
E
a
l
C
l
o
o
n
r
t
CLASS 20 - CLASS 150
EMC : Contrôle
électronique des minéraux
Le système électronique EMC contrôle
l’efficacité de la cassette anti-calcaire en
mesurant en permanence l’absence de
minéraux dans l’eau filtrée par la cassette.
Ainsi le système EMC permet de supprimer
tout risque d’entartrage.
EMC: Electronic Mineral
Control
Das elektronische EMC-System kontrolliert
den Zustand der Kalkfilter-Kartusche,
indem es fortlaufend die Anteile an MineralElementen in dem mit der Kartusche
gefilterten Wasser misst. Das EMC-System
erlaubt so, jede Verkalkung zu vermeiden.
EMC : Electronic mineral
control
The electronic EMC system measures the
efficiency of the anti-scale cartridge by
constantly monitoring the mineral content
of the filtered water. The EMC system
therefore eliminates any risk of scaling.
CLASS 200 - CLASS 150
13
❏
Kontrollleuchten für das Austauschen
der Kalkfilter-Kartusche
A) Wenn die Kalkfilter-Kartusche an
Wirksamkeit verliert, schaltet sich das
EMC-System ein. Es blinkt 1 grüne
Kontrollleuchte, um darauf
aufmerksam zu machen, dass die
Kartusche in nächster Zeit
ausgetauscht werden muss.
B) Wenn die Kalkfilter-Kartusche nicht
ausgetauscht wird, blinken nach
einiger Bügelzeit die 2 grünen
Kontrollleuchten, und das EMCSystem stoppt selbständig die
Dampferzeugung. Ein Tonsignal ertönt,
wenn Sie die Dampftaste betätigen.
CLASS 200 - CLASS 150
13
❏
Anti-scale cartridge change
indicator light
A) When the anti-scale cartridge begins
losing its effectiveness, the EMC
system is activated. 1 green indicator
light begins flashing to indicate that
the cartridge must be changed soon.
B) If the anti-scale cartridge is not changed
after a certain amount of ironing time,
2 green indicator lights begin
flashing. The EMC system will then
stop all steam production. Pushing the
steam button at this point produces an
alarm sound.
A
CLASS 120 - CLASS 100 - CLASS 90
B
CLASS 200 - CLASS 150
13
❏
Témoin lumineux de changement
de la cassette anti-calcaire
A) Lorsque la cassette anticalcaire devient
moins efficace, le système EMC se
déclenche. 1 voyant vert clignote pour
prévenir que la cassette doit être
changée dans peu de temps.
B) Si la cassette anticalcaire n’est pas
changée et après un certain temps de
repassage, les 2 voyants verts
clignotent. Le système EMC stoppe de
lui-même l’émission de vapeur. Un
signal d’alarme sonore se déclenche, si
vous appuyez sur la gâchette vapeur.
CLASS 120 - CLASS 100 CLASS 90
A
B
CLASS 120 - CLASS 100 CLASS 90
13
❏
Témoin lumineux de changement
de la cassette anti-calcaire
A) Lorsque la cassette anticalcaire devient
moins efficace, le système EMC se
déclenche. 1 voyant vert clignote pour
prévenir que la cassette doit être
changée dans peu de temps.
B) Si la cassette anticalcaire n’est pas
changée et après un certain temps de
repassage, les 2 ou 3 voyants verts
clignotent. Le système EMC stoppe de
lui-même l’émission de vapeur.
Pour retrouver de la vapeur, il faut
changer la cassette anticalcaire ou
utiliser de l’eau déminéralisée. Après
avoir changé la cassette, arrêtez et
remettez votre appareil en marche pour
retrouver les conditions normales
d’utilisation (attente de 2 minutes)
13
❏
Kontrollleuchten für das Austauschen
der Kalkfilter-Kartusche
A) Wenn die Kalkfilter-Kartusche an
Wirksamkeit verliert, schaltet sich das
EMC-System ein. Es blinkt 1 grüne
Kontrollleuchte, um darauf
aufmerksam zu machen, dass die
Kartusche in nächster Zeit
ausgetauscht werden muss.
B) Wenn die Kalkfilter-Kartusche nicht
ausgetauscht wird, blinken nach
einiger Bügelzeit je nach Modell die 2
bzw. 3 grünen Kontrollleuchten, und
das EMC-System stoppt selbständig die
Dampferzeugung.
Um wieder Dampf zu erhalten, muss die
Kalkfilter-Kartusche ausgetauscht
werden (oder, falls bisher mit
Leitungswasser gearbeitet wurde, kann
kurzzeitig noch destilliertes Wasser
benutzt werden). Nach dem
Austauschen der Kartusche, schalten
Sie Ihr Gerät aus und dann wieder ein,
um die normalen Benutzungsbedingungen wieder zu erlangen
(Wartezeit von 2 Minuten).
CLASS 120 - CLASS 100 CLASS 90
13
❏
A) When the anti-scale cartridge begins
B) If the anti-scale cartridge is not changed
To produce steam again, either the antiscale cartridge must be changed or
distilled water must be used. After
changing the cartridge, the unit must be
turned off and on in order to recreate
normal operating conditions (2 minute
wait).
Anti-scale cartridge change
indicator light
losing its effectiveness, the EMC
system is activated. 1 green indicator
light begins flashing to indicate that
the cartridge must be changed soon.
after a certain amount of ironing time, 2
or 3 green indicator lights begin
flashing. The EMC system will then
stop all steam production.
Page 21

°È·°È· v· Û·˜Û·˜ ‰ÒÛÂȉÒÛÂÈ ·ÙÌfi·ÙÌfi Ë Û˘Û΢‹Û˘Û΢‹ ¿ÏÈ¿ÏÈ, ı·ı· Ú¤ÂÈÚ¤ÂÈ
v· ·ÏÏ¿ÍÂÙ·ÏÏ¿ÍÂÙ Ùo o Ê›ÏÙÚÊ›ÏÙÚo o ‹ v· ¯ЪЛЫИМ¯ЪЛЫИМooÈ‹ÛÂÙÂÈ‹ÛÂÙÂ
··oÛÙ·Á̤ÛÙ·Á̤vo vvo vÂÚfiÂÚfi. MÂÙ¿ÂÙ¿ ·fi·fi οıÂοı ·ÏÏ·Á‹·ÏÏ·Á‹
Ê›ÏÙÚÊ›ÏÙÚo˘, ı·ı· Ú¤ÂÈÚ¤ÂÈ v· ÎÏ›ÛÂÙÂÎÏ›ÛÂÙ ηÈÎ·È v· Í·Í·v·vo›ÍÂÙ›ÍÂÙÂ
ÙËÙËv Û˘Û΢‹Û˘Û΢‹, ÒÛÙÂÒÛÙ oÈ ·Ú¯ÈΤ˜·Ú¯ÈΤ˜ ÏÂÈÙÏÂÈÙo˘ÚÁ›Â˜˘ÚÁ›Â˜ v·
··v¤Ïı¤Ïıo˘
v. (v. (ÌÂÙ¿ÌÂÙ¿ ·fi·fi 2 2 ÏÂÙ¿ÏÂÙ¿)
™YNTHPH™H
Aoı‹Î¢ÛË
TÈ Î¿vÂÙ ·v …
O¢H°IE™ XPH™Eø™
MÈÎÚ¿ M˘ÛÙÈο
£fiÚ˘‚o˜
¶PøTH §EITOYP°IA
¶PO™OXH !
P‡ıÌÈÛË Ùo˘ £ÂÚÌoÛÙ¿ÙË ıÂÚÌoÎÚ·Û›·˜
AUTO-STOP HПВОЩЪovИОfi Ы‡ЫЩЛМ· ·ЫК·ПВ›·˜
¢È·‰Èηۛ·
P‡ıÌÈÛË Auto-Stop.
¢È·‰Èηۛ·
™‡ÛÙËÌ· AUTO - STOP
ºI§TPO KATA TøN A§ATøN
EMC : HПВОЩЪovИОfi Ы‡ЫЩЛМ·
ÂϤÁ¯o˘ vÂÚo‡
™YNTHPH™H
Aoı‹Î¢ÛË
TÈ Î¿vÂÙ ·v …
O¢H°IE™ XPH™Eø™
MÈÎÚ¿ M˘ÛÙÈο
£fiÚ˘‚o˜
¶PøTH §EITOYP°IA
¶PO™OXH !
P‡ıÌÈÛË Ùo˘ £ÂÚÌoÛÙ¿ÙË ıÂÚÌoÎÚ·Û›·˜
AUTO-STOP HПВОЩЪovИОfi Ы‡ЫЩЛМ· ·ЫК·ПВ›·˜
¢È·‰Èηۛ·
P‡ıÌÈÛË Auto-Stop.
¢È·‰Èηۛ·
™‡ÛÙËÌ· AUTO - STOP
ºI§TPO KATA TøN A§ATøN
EMC : HПВОЩЪovИОfi Ы‡ЫЩЛМ·
ÂϤÁ¯o˘ vÂÚo‡
™YNTHPH™H
Aoı‹Î¢ÛË
TÈ Î¿vÂÙ ·v …
O¢H°IE™ XPH™Eø™
MÈÎÚ¿ M˘ÛÙÈο
£fiÚ˘‚o˜
¶PøTH §EITOYP°IA
¶PO™OXH !
P‡ıÌÈÛË Ùo˘ £ÂÚÌoÛÙ¿ÙË ıÂÚÌoÎÚ·Û›·˜
AUTO-STOP HПВОЩЪovИОfi Ы‡ЫЩЛМ· ·ЫК·ПВ›·˜
¢È·‰Èηۛ·
P‡ıÌÈÛË Auto-Stop.
¢È·‰Èηۛ·
™‡ÛÙËÌ· AUTO - STOP
ºI§TPO KATA TøN A§ATøN
EMC : H
fiÈÎfi Û‡
Û‡ÛÙËÌ·
™YNTHPH™H
Aoı‹Î¢ÛË
TÈ Î¿vÂÙ ·v …
O¢H°IE™ XPH™Eø™
NEDERLANDS ESPAÑOL PORTUGUÊS
E§§HNIKA
EMC: Electronische Mineraal
Controlle
Het electrische EMC-systeem controleert de
werkzaamheid van de ontkalkings-cassette door
voortdurend het gefiltreerde water op mineralen te
controleren. Op deze wijze kan het EMC-systeem
het risico van kalkaanslag vermijden.
CLASS 200 - CLASS 150
13
❏
Controlelichtje voor het vervangen van de
antikalkcassette
A) Wanneer de antikalkcassette minder
doeltreffend begint te werken, dan wordt het
EMC-systeem actief. Er knippert 1 groen
lichtje om aan te geven dat de cassette
binnenkort aan vervanging toe is.
B) Indien de antikalkcassette na een zekere tijd
niet wordt vervangen, dan beginnen de 2
groene lichtjes te knipperen.
Het EMC-Systeem stopt automatisch met de
stoomafgifte. Wanneer u op de stoomknop
drukt, dan weerklinkt er een geluidssignaal
CLASS 120 - CLASS 100 CLASS 90
13
❏
Controlelichtje voor het vervangen van de
antikalkcassette
A) Wanneer de antikalkcassette minder
doeltreffend begint te werken, dan wordt het
EMC-systeem actief. Er knippert 1 groen
lichtje om aan te geven dat de cassette
binnenkort aan vervanging toe is.
B) Indien de antikalkcassette na een zekere tijd
niet wordt vervangen, dan beginnen er 2 of 3
groene lichtjes te knipperen.
Het EMC-systeem stopt uit zichzelf met het
vrijgeven van stoom.
Control electrónico de minerales
EMC
El sistema electrónico EMC controla la eficacia de la
casete desmineralizadora al medir permanentemente
la ausencia de minerales en el agua filtrada. De este
modo, el sistema EMC permite eliminar todo riesgo
de que se formen depósitos de cal.
CLASS 200 - CLASS 150
13
❏
Testigo luminoso del cambio de dispositivo
antical
A) Cuando el dispositivo antical pierde eficacia, el
sistema EMC se pone en marcha. Un indicador
verde parpadea para advertir que el dispositivo
debe cambiarse en breve.
B) Si el dispositivo antical no se cambia, tras cierto
tiempo de planchado, los dos indicadores
luminosos parpadean. El sistema EMC detiene
automáticamente la emisión de vapor. Una señal
de alarma sonora se pone en marcha, si
presiona el botón del vapor.
CLASS 120 - CLASS 100 CLASS 90
13
❏
Testigo luminoso del cambio de dispositivo
antical
A) Cuando el dispositivo antical pierde eficacia, el
sistema EMC se pone en marcha. Un indicador
verde parpadea para advertir que el dispositivo
debe cambiarse en breve.
B) Si el dispositivo antical no se cambia, tras cierto
tiempo de planchado, dos o tres indicadores
luminosos parpadean. El sistema EMC detiene
automáticamente la emisión de vapor.
EMC : Controle electrónico de
minerais
O sistema electrónico EMC verifica a eficácia do
depósito descalcificador medindo continuamente
a ausência dos minerais na água filtrada. Assim, o
sistema EMC elimina o risco de incrustação
tartárica.
CLASS 200 - CLASS 150
13
❏
Indicador luminoso de substituição da
cassete anti-calcário
A) Quando a cassete anti-calcário torna-se
menos eficaz, o sistema EMC activa-se. 1
indicador luminoso verde pisca para avisar
que a cassete deve ser substituída em pouco
tempo.
B) Se a cassete anti-calcário não for substituída e
depois de ter engomado durante um certo
tempo, os 2 indicadores luminosos verdes
piscam. O sistema EMC desliga por si próprio
a emissão de vapor. Um sinal de alarme
sonoro activa-se, se pressionar o gatilho de
vapor.
CLASS 120 - CLASS 100 CLASS 90
13
❏
Indicador luminoso de substituição da
cassete anti-calcário
A) Quando a cassete anti-calcário torna-se
menos eficaz, o sistema EMC activa-se. 1
indicador luminoso verde pisca para avisar
que a cassete deve ser substituída em pouco
tempo.
B) Se a cassete anti-calcário não for substituída e
depois de ter engomado durante um certo
tempo, os 2 o 3 indicadores luminosos
verdes piscam. O sistema EMC desliga por si
próprio a emissão de vapor.
EMC : H
ПВОЩЪovИО
ÛÙËÌ·
ÂϤÁ¯o˘ vÂÚo‡
To HПВОЩЪovИОfi Ы‡ЫЩЛМ· ВП¤Б¯o˘ vВЪo‡ EMC,
ВП¤Б¯ВИ ‰И·ЪОТ˜ ЩЛv ·oЩВПВЫМ·ЩИОfiЩЛЩ· Щo˘
К›ПЩЪo˘ О·И ЩЛv oИfiЩЛЩ· Щo˘ vВЪo‡. To Ы‡ЫЩЛМ·
·˘Ùfi ÌˉÂv›˙ÂÈ ÙËv ÂÚ›ÙˆÛË Û˘Û΢‹ v· Ì·˙¤„ÂÈ
¿Ï·Ù·.
CLASS 200 - CLASS 150
13
❏
ºˆÙÂÈv‹ ¤v‰ÂÈÍË ÚoÂȉoo›ËÛ˘
·ÏÏ·Á‹˜ Ê›ÏÙÚo˘.
A) ‘OÙ·v Ùo Ê›ÏÙÚo ÚoÛÙ·Û›·˜ ηٿ Ùˆv ·Ï¿Ùˆv
·Ú¯›˙ÂÈ Î·È ¯¿vÂÈ ÙȘ ȉÈfiÙËÙ˜ Ùo˘, Ùo Û‡ÛÙËÌ·
EMC ÂvÂÚÁooț٠. MÈ· Ú¿ÛÈvË ÊˆÙÂÈv‹ ¤v‰ÂÈÍË
·Ú¯›˙ÂÈ v· Û·˜ ÚoÂȉooÈ› fiÙÈ Ú¤ÂÈ v·
·ÏÏ¿ÍÂÙ Ùo Ê›ÏÙÚo.
B) ¿v ‰Âv ·ÏÏ¿ÍÂÙ Ùo Ê›ÏÙÚo Î·È ÌÂÙ¿ ·fi
oЪИЫМ¤vo ¯Ъfivo ЫИ‰ВЪТМ·Щo˜ ı· ·v¿„ВИ О·И
‰В‡ЩВЪЛ Ъ¿ЫИvЛ КˆЩВИv‹ ¤v‰ВИНЛ. To Ы‡ЫЩЛМ·
EMC ЩfiЩВ ‰Вv ı· ВИЩЪ¤ВИ ЫЩЛ Ы˘ЫОВ˘‹ ЩЛv
·Ъ·БˆБ‹ ·ЩМo‡. ¶·ЩТvЩ·˜ Щo П‹ОЩЪo ·ЩМo‡
ЫВ·˘Щ‹ ЩЛ К¿ЫЛ ı· ·Оo˘ЫЩВ› ¤v·˜ ¯·МЛПfi˜
ЪoВИ‰ooИЛЩИОfi˜ ‹¯o˜.
CLASS 120 - CLASS 100 - CLASS 90
13
❏
ºˆÙÂÈv‹ ¤v‰ÂÈÍË ÚoÂȉoo›ËÛ˘
·ÏÏ·Á‹˜ Ê›ÏÙÚo˘.
A) ‘OÙ·v Ùo Ê›ÏÙÚo ÚoÛÙ·Û›·˜ ηٿ Ùˆv ·Ï¿Ùˆv
·Ú¯›˙ÂÈ Î·È ¯¿vÂÈ ÙȘ ȉÈfiÙËÙ˜ Ùo˘, Ùo Û‡ÛÙËÌ·
EMC ÂvÂÚÁooț٠. MÈ· Ú¿ÛÈvË ÊˆÙÂÈv‹ ¤v‰ÂÈÍË
·Ú¯›˙ÂÈ v· Û·˜ ÚoÂȉooÈ› fiÙÈ Ú¤ÂÈ v·
·ÏÏ¿ÍÂÙ Ùo Ê›ÏÙÚo.
B) ¿v ‰Âv ·ÏÏ¿ÍÂÙ Ùo Ê›ÏÙÚo Î·È ÌÂÙ¿ ·fi
oÚÈṲ̂vo ¯Úfivo ÛȉÂÚÒÌ·Ùo˜, ‰‡o Î·È ÙÚÂȘ
Ú¿ÛÈv˜ ʈÙÂÈv¤˜ Âv‰Â›ÍÂȘ ı· ·v·‚oÛ‚‹vo˘v
˘Âvı˘Ì›˙ovÙ·˜ ÁÈ· ÙËv ·ÏÏ·Á‹ Ê›ÏÙÚo˘ . TfiÙ Ùo
Û‡ÛÙËÌ· EMC ‰Âv ı· ÂÈÙÚ¤ÂÈ ÛÙË Û˘Û΢‹ ÙËv
·Ú·ÁˆÁ‹ ·ÙÌo‡.
Om weer stoom te verkrijgen moet u de
antikalcassette vervangen of
gedemineraliseerd water gebruiken. Na het
vervangen van de cassette, schakelt het
toestel uit, dan weer aan, dit laat toe om het
toestel weer in zijn normale werking te kunnen
gebruiken (wachttijd: 2 minuten).
Para obtener nuevamente vapor, es necesario
cambiar el dispositivo antical o utilizar agua
desmineralizada. Después de haber cambiado el
dispositivo, apague el aparato y vuelva a
encenderlo para recuperar las condiciones
normales de utilización (espera de dos minutos).
Para ter novamente vapor, é necessário
substituir a cassete anti-calcário ou utilizar
água desmineralizada. Após ter substituído a
cassete, pare e volte a colocar o aparelho em
funcionamento para encontrar novamente as
condiçıes normais de utilização (espera de
2 minutos)
21
Page 22

FRANÇAIS DEUTSCH ENGLISH
22
14
15
16
16
Remplissage en cours de
repassage
Vous pouvez remplir le réservoir à tout moment
pendant le repassage. Il n'est pas nécessaire de
débrancher votre appareil.
Conseils
❏ Grâce au débit important de vapeur, il est
inutile d'appuyer en permanence sur la
gâchette de commande de la vapeur. Des
pressions brèves et successives sur la
gâchette de commande vapeur permettent de
doser la quantité de vapeur pour obtenir un
repassage de qualité.
❏ De la vapeur peut être encore évacuée après
le relâchement de la gâchette commande
vapeur et de l'eau risque d'apparaître sur le
repose-fer, ce qui est normal en cas
d'utilisation intensive. Si nécessaire, essuyez
cette eau de condensation.
Précautions
❏ Posez le boîtier du générateur sur une surface
rigide et stable. L'air doit circuler librement
sous l'appareil pour lui assurer une bonne
ventilation.
❏ Si, pour repasser, vous utilisez une planche ou
une table en bois, protégez-la de l'humidité en
y plaçant une toile cirée par exemple.
❏ Il est recommandé de repasser les pièces de
tissu dans l'ordre des indications marquées
sur le bouton du thermostat du fer afin d'avoir
une température croissante.
SPRAY (suivant modèle)
Votre fer est équipé d’un spray pour éliminer
rapidement les faux plis accidentels ou pour toute
autre utilisation suivant vos habitudes de
repassage.
Réglez la position du spray (modèle XS)
14
❏
vers le bas : l’eau du spray est projetée à la
pointe de la semelle du fer
15
❏
vers le haut : l’eau du spray est projetée à
3 cm de la pointe du fer
Utilisation du spray
16
❏
Maintenez la gâchette vapeur enfoncée et
appuyez sur le bouton Spray pendant toute
l’utilisation du spray. L’eau du spray est
mélangée à de la vapeur. L’humidité
déposée dans le linge n’est pas
obligatoirement visible mais elle est
suffisante pour retirer les faux-plis et éviter
un temps de séchage trop long.
Auffüllen des Wasstertanks
während des Bügelns
Der Tank kann auch während des Bügelns
aufgefüllt werden. Dabei ist es nicht nötig, das
Gerät auszuschalten.
Tips
❏ Dank der hohen Dampfleistung braucht die
Dampftaste jeweils nur kurz gedrückt zu
werden. Kurzes, wiederholtes Drücken der
Dampftaste genügt, um durchgehend eine
ausreichende Menge Dampf zu erhalten.
❏ Bei intensivem Gebrauch kann nach dem
Loslassen der Dampftaste noch Dampf
austreten und Wasser kann auf der Abstellplatte
erscheinen, was normal ist, da der verbleibende
Dampf auf ihr kondensiert. Falls nötig, die Platte
abtrocknen. Es besteht keine Gefahr, dass sie
Schaden nimmt.
Hinweise
❏ Während des Bügelns Gerät auf eine feste
❏ Bügelunterlagen mit einer Oberfläche aus Holz
❏ Wir empfehlen, die Wäsche vor dem Bügeln
SPRAY (je nach Modell)
Ihr Bügeleisen ist mit einem Spray ausgestattet,
um unerwünschte Knitterfalten schnellstens zu
beseitigen, oder für jegliche andere Verwendung
gemäß Ihrer Bügelgewohnheiten.
Stellen Sie die Position des Spray ein (Typ XS)
14
❏
15
❏
Benutzung des Sprays
16
❏
Refilling whilst ironing
You can fill the reservoir during ironing.
You do not need to unplug the appliance.
Please note
❏ Because of the high steam output rate,
❏ If steam is used continuously, steam
Precautions
❏ Place the machine on a hard surface
Unterlage stellen, damit eine ausreichende
Luftzirkulation unter dem Gerät möglich ist.
sollten mit einem Wachstuch oder ähnlichem
Material vor Feuchtigkeit geschützt werden.
nach den von den Herstellern empfohlenen
Temperaturbereichen zu sortieren und mit der
niedrigsten Bügeltemperatur zu beginnen.
❏ If you use a wooden ironing board or
❏ We recommend that you iron articles in
SPRAY (depending on model)
Your iron is equipped with a spray which
can be used to eliminate creases in your
clothing or for dampening the area in front
of the iron.
nach unten: Das
Spitze der Bügeleisensohle gesprüht.
nach oben: Das
Spitze des Bügeleisens gesprüht
Halten Sie die Dampftaste niedergedrückt
und betätigen Sie die Spraytaste während der
gesamten Benutzungszeit des Sprays. Das
Sprühwasser wird mit dem Dampf vermischt.
Die auf der Wäsche abgelagerte Feuchtigkeit
ist nicht unbedingt sichtbar, aber sie genügt,
um die Knitterfalten zu beseitigen und
verhindert gleichzeitig, dass das Trocknen der
besprühten Stelle zu viel Zeit in Anspruch
nimmt.
Sprühwasser
Sprühwasser
wird an die
wird 3 cm vor die
Adjust the spray position (model XS)
❏
❏
Using the spray
❏
there is no need to continually press the
steam button. Pressing the button
briefly and frequently will enable you
to control the quantity of steam, in order
to obtain professional results.
may continue to be produced after the
steam button has been released and
water may appear on the iron holder.
This is normal and is caused by
condensation of steam droplets.
Sponge them off if necessary. There is
no risk of the metal being damaged.
(i.e. not flexible). Air must be able to
circulate freely underneath the machine
to ensure correct ventilation. Choose a
stable location.
table to iron on, remember to protect it
from damp (water condensation) by
covering it with an oilcloth for example.
the order indicated on the iron's
thermostat control so that the
temperature gradually increases.
14
downwards: the
projected to the tip of the soleplate
15
upwards: the
to 3 cm from the tip of the soleplate
16
Press and hold the steam trigger and
at the same time press the spray
button. The spray water is then mixed
with steam. The moisture deposited on
the clothing is not always visible, but is
sufficient to eliminate creases and
avoid an extended drying time.
spray water
spray water
is
is projected
Page 23

¶PO™OXH !
P‡ıÌÈÛË Ùo˘ £ÂÚÌoÛÙ¿ÙË ıÂÚÌoÎÚ·Û›·˜
AUTO-STOP HПВОЩЪovИОfi Ы‡ЫЩЛМ· ·ЫК·ПВ›·˜
¢È·‰Èηۛ·
P‡ıÌÈÛË Auto-Stop.
¢È·‰Èηۛ·
™‡ÛÙËÌ· AUTO - STOP
ºI§TPO KATA TøN A§ATøN
EMC : HПВОЩЪovИОfi Ы‡ЫЩЛМ·
ÂϤÁ¯o˘ vÂÚo‡
ºˆÙÂÈv‹ ¤v‰ÂÈÍË ÚoÂȉoo›ËÛ˘
·ÏÏ·Á‹˜ Ê›ÏÙÚo˘.
°È· v· Û·˜ ‰ÒÛÂÈ ·ÙÌfi Ë Û˘Û΢‹ ¿ÏÈ, ı· Ú¤ÂÈ
v· ·ПП¿НВЩВ Щo К›ПЩЪo ‹ v· ¯ЪЛЫИМooИ‹ЫВЩВ
·oÛÙ·Á̤vo vÂÚfi. MÂÙ¿ ·fi οı ·ÏÏ·Á‹
Ê›ÏÙÚo˘, ı· Ú¤ÂÈ v· ÎÏ›ÛÂÙÂ Î·È v· Í·v·vo›ÍÂÙÂ
ÙËv Û˘Û΢‹, ÒÛÙ oÈ ·Ú¯ÈΤ˜ ÏÂÈÙo˘ÚÁ›Â˜ v·
·v¤Ïıo˘v. (ÌÂÙ¿ ·fi 2 ÏÂÙ¿)
°¤ÌÈÛÌ· Ùo˘ ÚÂ˙ÂÚ‚o˘¿Ú ηٿ ÙËv
‰È¿ÚÎÂÈ· ÛȉÂÚÒÌ·Ùo˜
™HMEIø™EI™
¶POºY§A•EI™
æEKAEKA™MOMO™ (·v¿ÏoÁ· Ùo ÌovÙ¤Ïo)
TÈ Î¿vÂÙ ·v …
O¢H°IE™ XPH™Eø™
¶PøTH §EITOYP°IA
¶PO™OXH !
P‡ıÌÈÛË Ùo˘ £ÂÚÌoÛÙ¿ÙË ıÂÚÌoÎÚ·Û›·˜
AUTO-STOP HПВОЩЪovИОfi Ы‡ЫЩЛМ· ·ЫК·ПВ›·˜
¢È·‰Èηۛ·
P‡ıÌÈÛË Auto-Stop.
¢È·‰Èηۛ·
™‡ÛÙËÌ· AUTO - STOP
ºI§TPO KATA TøN A§ATøN
EMC : HПВОЩЪovИОfi Ы‡ЫЩЛМ·
ÂϤÁ¯o˘ vÂÚo‡
ºˆÙÂÈv‹ ¤v‰ÂÈÍË ÚoÂȉoo›ËÛ˘
·ÏÏ·Á‹˜ Ê›ÏÙÚo˘.
°È· v· Û·˜ ‰ÒÛÂÈ ·ÙÌfi Ë Û˘Û΢‹ ¿ÏÈ, ı· Ú¤ÂÈ
v· ·ПП¿НВЩВ Щo К›ПЩЪo ‹ v· ¯ЪЛЫИМooИ‹ЫВЩВ
·oÛÙ·Á̤vo vÂÚfi. MÂÙ¿ ·fi οı ·ÏÏ·Á‹
Ê›ÏÙÚo˘, ı· Ú¤ÂÈ v· ÎÏ›ÛÂÙÂ Î·È v· Í·v·vo›ÍÂÙÂ
ÙËv Û˘Û΢‹, ÒÛÙ oÈ ·Ú¯ÈΤ˜ ÏÂÈÙo˘ÚÁ›Â˜ v·
·v¤Ïıo˘v. (ÌÂÙ¿ ·fi 2 ÏÂÙ¿)
°¤ÌÈÛÌ· Ùo˘ ÚÂ˙ÂÚ‚o˘¿Ú ηٿ ÙËv
‰È¿ÚÎÂÈ· ÛȉÂÚÒÌ·Ùo˜
™HMEIø™EI™
¶POºY§A•EI™
TÈ Î¿vÂÙ ·v …
O¢H°IE™ XPH™Eø™
£fiÚ˘‚o˜
¶PøTH §EITOYP°IA
¶PO™OXH !
P‡ıÌÈÛË Ùo˘ £ÂÚÌoÛÙ¿ÙË ıÂÚÌoÎÚ·Û›·˜
AUTO-STOP HПВОЩЪovИОfi Ы‡ЫЩЛМ· ·ЫК·ПВ›·˜
¢È·‰Èηۛ·
P‡ıÌÈÛË Auto-Stop.
¢È·‰Èηۛ·
™‡ÛÙËÌ· AUTO - STOP
ºI§TPO KATA TøN A§ATøN
EMC : HПВОЩЪovИОfi Ы‡ЫЩЛМ·
ÂϤÁ¯o˘ vÂÚo‡
ºˆÙÂÈv‹ ¤v‰ÂÈÍË ÚoÂȉoo›ËÛ˘
·ÏÏ·Á‹˜ Ê›ÏÙÚo˘.
°È· v· Û·˜ ‰ÒÛÂÈ ·ÙÌfi Ë Û˘Û΢‹ ¿ÏÈ, ı· Ú¤ÂÈ
v· ·ПП¿НВЩВ Щo К›ПЩЪo ‹ v· ¯ЪЛЫИМooИ‹ЫВЩВ
·oÛÙ·Á̤vo vÂÚfi. MÂÙ¿ ·fi οı ·ÏÏ·Á‹
Ê›ÏÙÚo˘, ı· Ú¤ÂÈ v· ÎÏ›ÛÂÙÂ Î·È v· Í·v·vo›ÍÂÙÂ
ÙËv Û˘Û΢‹, ÒÛÙ oÈ ·Ú¯ÈΤ˜ ÏÂÈÙo˘ÚÁ›Â˜ v·
·v¤Ïıo˘v. (ÌÂÙ¿ ·fi 2 ÏÂÙ¿)
°¤ÌÈÛÌ· Ùo˘ ÚÂ˙ÂÚ‚o˘¿Ú ηٿ ÙËv
‰È¿ÚÎÂÈ· ÛȉÂÚÒÌ·Ùo˜
™HMEIHMEIø™ø™EI™
Aoı‹Î¢ÛË
TÈ Î¿vÂÙ ·v …
O¢H°IE™ XPH™Eø™
MÈÎÚ¿ M˘ÛÙÈο
£fiÚ˘‚o˜
¶PøTH §EITOYP°IA
¶PO™OXH !
P‡ıÌÈÛË Ùo˘ £ÂÚÌoÛÙ¿ÙË ıÂÚÌoÎÚ·Û›·˜
AUTO-STOP HПВОЩЪovИОfi Ы‡ЫЩЛМ· ·ЫК·ПВ›·˜
¢È·‰Èηۛ·
P‡ıÌÈÛË Auto-Stop.
¢È·‰Èηۛ·
™‡ÛÙËÌ· AUTO - STOP
ºI§TPO KATA TøN A§ATøN
EMC : HПВОЩЪovИОfi Ы‡ЫЩЛМ·
ÂϤÁ¯o˘ vÂÚo‡
ºˆÙÂÈv‹ ¤v‰ÂÈÍË ÚoÂȉoo›ËÛ˘
·ÏÏ·Á‹˜ Ê›ÏÙÚo˘.
°È· v· Û·˜ ‰ÒÛÂÈ ·ÙÌfi Ë Û˘Û΢‹ ¿ÏÈ, ı· Ú¤ÂÈ
v· ·ПП¿НВЩВ Щo К›ПЩЪo ‹ v· ¯ЪЛЫИМooИ‹ЫВЩВ
·oÛÙ·Á̤vo vÂÚfi. MÂÙ¿ ·fi οı ·ÏÏ·Á‹
Ê›ÏÙÚo˘, ı· Ú¤ÂÈ v· ÎÏ›ÛÂÙÂ Î·È v· Í·v·vo›ÍÂÙÂ
ÙËv Û˘Û΢‹, ÒÛÙ oÈ ·Ú¯ÈΤ˜ ÏÂÈÙo˘ÚÁ›Â˜ v·
·v¤Ïıo˘v. (ÌÂÙ¿ ·fi 2 ÏÂÙ¿)
°¤ÌÈÛÌ· Ùo˘ ÚÂ˙ÂÚ‚ÚÂ˙ÂÚ‚o˘¿Ú˘¿Ú ηٿ ÙËv
‰È¿ÚÎÂÈ· ÛȉÂÚÒÌ·ÙÛȉÂÚÒÌ·Ùo˜
™YNTHPH™H
Aoı‹Î¢ÛË
TÈ Î¿vÂÙ ·v …
O¢H°IE™ XPH™Eø™
NEDERLANDS ESPAÑOL PORTUGUÊS
Vullen tijdens het strijken
U kunt het reservoir op ieder moment tijdens het
strijken vullen. Het is niet nodig het apparaat uit te
schakelen.
Voorzorgsmaatregelen
❏ Dank zij de grote stoomafgifte is het niet nodig
om de stoomknop voortdurend ingedrukt te
houden. Af en toe kort de stoomknop indrukken
volstaat om een perfekt strijkresultaat te
bekomen.
❏ Bij intensief gebruik, kan er zich kondenswater
op de stelplaat van het strijkijzer vormen ; dit is
normaal en geheel ongevaarlijk. Veeg het af
indien nodig. Voor het metaal bestaat geen
enkel roestgevaar.
Voorzorgsmaatregelen
❏ Zet het apparaat op een harde & stabiele
ondergrond. Let erop dat er steeds lucht onder
het apparaat heen kan, dit om een goede
ventilatie te verzekeren.
❏ Wanneer u een houten strijkplank gebruikt, zorg
ervoor deze tegen vocht te beschermen,
bijvoorbeeld d.m.v. een geplastificeerd
tafeldoek.
❏ Het verdient aanbeveling om uw strijkgoed te
strijken in de volgorde die op de
thermostaatknop aangeduid staat om zodoende
een geleidelijk stijgende temperatuur van het
apparaat te verkrijgen.
VERSTUIVER (afhankelijk van het
model)
Uw strijkijzer is uitgerust met een verstuiver
waarmee u eventuele valse plooien snel kan
verwijderen. Naargelang uw eigen manier van
strijken, kan u deze verstuiver ook voor andere
doeleinden gebruiken.
Stel de positie van de verstuiver in (XS-model)
14
❏
naar beneden: het water wordt naar de punt van
de zool van het strijkijzer gericht
15
❏
naar omhoog: het water wordt 3 cm boven punt
van het strijkijzer gericht
Gebruik van de verstuiver
16
❏
Hou de stoomknop ingedrukt en druk op de
verstuifknop zolang u de verstuiver wenst te
gebruiken. Het water uit de verstuiver wordt
met de stoom vermengd. Het weefsel wordt
bevochtigd, als kan dit niet altijd met het blote
oog worden waargenomen. Dit zorgt ervoor dat
valse plooien verdwijnen en dat het weefsel
niet te veel uitdroogt.
Llenar durante el planchado
Puede llenar el depósito en cualquier momento
mientras plancha. No es necesario desenchufar
el aparato.
Consejos
❏ Para obtener una gran cantidad de vapor, no
es necesario pulsar continuamente el pulsador
de vapor.
Pulsandolo levemente y frecuentemente
habilitará el control de la cantidad de vapor
deseada, para obtener un acabado
profesional.
❏ Si la plancha se utiliza intensivamente, el
vapor será obtenido continuamente y puede
aparecer agua en la base de la plancha. Esto
es normal y está causado por la condensación
obtenida en las boquillas de salida. Séquela si
es necesario. No existe riesgo de que el metal
se estropee
Precauciones
❏ Situe el equipo sobre una superficie rígida. No
trabajar en recintos cerrados sin ventilación.
❏ Si trabaja sobre una tabla de planchar de
madera presérvela de la humedad y
condensación del agua.
❏ Le recomendamos que planche la ropa en el
orden indicado en el termostato de control
para que así incremente gradualmente la
temperatura.
SPRAY (según el modelo)
La plancha está equipada con un spray para
eliminar rápidamente las arrugas accidentales o
para cualquier otra utilización según sus
costumbres de planchado.
Regule la posición del spray (modelo XS)
14
❏
hacia abajo: el
punta de la suela de la plancha
15
❏
hacia arriba: el
3 cm de la punta de la plancha
Utilización del spray
16
❏
Mantenga el botón del vapor apoyado y
presione el botón del spray durante toda la
utilización del spray. El agua del spray se
mezcla con vapor. La humedad depositada
en la prenda no siempre es visible, pero es
suficiente para eliminar las arrugas y para
evitar un tiempo de secado demasiado largo.
agua del spray
agua del spray
se proyecta en la
se proyecta a
Enchimento do recipiente ao
passar a ferro
Em quanto se passa a ferro é sempre possível
encher o recipiente. Não é preciso desligar o
ferro.
Conselhos
❏ Não é necessário carregar continuamente no
botão do vapor. Pressões sucessivas e breves
no botão de vapor permitem dosear uma
quantidade de vapor que permite um trabalho
profissional.
❏ O vapor pode sair mesmo depois de ter
largado o botão. É possivel que apareça água
na base do ferro o que é normal devido á
condensação de vapor. Limpar se for
necessário. O metal não ficará alterado.
Precauções
❏ Colocar o ferro numa superficie rigida. O ar
deve circular livremente no aparelho para um
bom funcionamento.
❏ Se, para passar utilizar uma tábua de madeira
ou metal deverá protegé-la da humidade.
❏ Recomendamos que passe os tecidos
conforme a ordem indicada no botão do
termostato do ferro a fim de obter uma
temperatura crescente.
SPRAY (mediante o modelo)
O seu ferro está equipado de um spray para
eliminar rapidamente os vincos acidentais ou
para qualquer outra utilização mediante os seus
hábitos.
Regule a posição do spray (modelo XS)
14
❏
para baixo: a
ponta da base do ferro
15
❏
para cima: a
cm da ponta do ferro
Utilização do spray
16
❏
Mantenha o gatilho do vapor pressionado e
pressione o botão do Spray durante toda a
utilização do spray. A água do spray está
misturada ao vapor. a humidade colocada na
roupa não é obrigatoriamente visível mas é
suficiente para retirar os vincos e evitar um
tempo de secagem demasiado longo.
água do spray
água do spray
é projectado na
é projectado a 3
E§§HNIKA
MoÚ›Ù v· ÁÂÌ›ÛÂÙ Ùo ÚÂ˙ÂÚ‚o˘¿Ú vÂÚo‡ ηٿ ÙËv
‰È¿ÚÎÂÈ· Ùo˘ ÛȉÂÚÒÌ·Ùo˜. ¢Âv ¯ÚÂÈ¿˙ÂÙ·È v·
‚Á¿ÏÂÙÂ ÙËv Ú›˙·.
❏ ¢Âv ¯ÚÂÈ¿˙ÂÙ·È v· ·Ù¿Ù Ùo Ï‹ÎÙÚo ·ÙÌo‡
Û˘v¤¯ÂÈ·. ™‡vÙoÌ· Î·È ‰È·‰o¯Èο ·Ù‹Ì·Ù· ı· Û·˜
‰ÒÛo˘v ηχÙÂÚo ·ÙÌfi Î·È Ù¤ÏÂÈo ·oÙ¤ÏÂÛÌ· .
❏ MÂÙ¿ ·fi ·Ú·ÙÂٷ̤vË ¯Ú‹ÛË ·ÙÌo‡, ·ÎfiÌ· ÎÈ ·v
·К‹ЫВЩВ Щo П‹ОЩЪo МoЪВ› Л Ы˘ЫОВ˘‹ v·
Ы˘vВ¯›ЫВИ v· ‚Б¿˙ВИ ·ЩМfi БИ· П›Бo, М·˙› МВ МВЪИО¤˜
ЫЩ·БfivВ˜ vВЪo‡. A˘Щfi В›v·И ·fiП˘Щ· К˘ЫИoПoБИОfi
О·И ЪoО·ПВ›Щ·И fiЩ·v ¯ЪЛЫИМooИВ›Щ·И ВvЩ·ЩИО¿ Щo
Ы›‰ВЪo. ™Оo˘›ЫЩВ ·˘Щ¤˜ ЩИ˜ ЫЩ·БfivВ˜ МВ ¤v·
М·П·Оfi ·v¿ОИ.
❏ AÎo˘Ì‹ÛÙ ÙËv Û˘Û΢‹ Û·˜ Û ¤v· ÛÙ·ıÂÚfi
̤Úo˜(fi¯È ‡ηÌÙo).O ·¤Ú·˜ Ú¤ÂÈ v· ÌoÚ› v·
΢ÎÏoÊoÚ› ÂχıÂÚ· οو ·fi ÙËv Û˘Û΢‹ ÁÈ·
v· ÌoÚ› v· ·ÂÚ›˙ÂÙ ۈÛÙ¿. ¢È·Ï¤ÍÙ ÌÈ·
ÛÙ·ıÂÚ‹ ı¤ÛË.
❏ E¿v ¯ЪЛЫИМooИ‹ЫВЩВ МИ· Н‡ПИvЛ ЫИ‰ВЪТЫЩЪ· ‹ ¤v·
ÙÚ·¤˙È, ‚¿ÏÙ ¤v· Ì·Ï·Îfi ·v¿ÎÈ Î¿Ùˆ ·fi ÙËv
‚¿ÛË Ùo˘ Û›‰ÂÚo˘ ÁÈ· v· Ù· ÚoÛٷ٤„ÂÙ ·fi ÙËv
Ù˘¯fiv ˘ÁÚ·Û›· Ùo˘ Û›‰ÂÚo˘.
❏ ™˘vÈÛÙo‡Ì v· ÍÂÎÈv¿Ù Ùo Ûȉ¤ÚˆÌ· Ì Úo‡¯· o˘
¯ÚÂÈ¿˙ovÙ·È ÏÈÁfiÙÂÚË ıÂÚÌoÎÚ·Û›· v· ÛȉÂÚˆıo‡v,
¤ÙÛÈ ÒÛÙ ÛÙ·‰È·Î¿ v· ·˘Í¿vÂÙ ÙËv ıÂÚÌoÎÚ·Û›·
ÛȉÂÚÒÌ·Ùo˜.
To ЪВЫoЫ›‰ВЪo Ы·˜ ¤¯ВИ ЩЛv ‰˘v·ЩfiЩЛЩ· v· „ВО¿ЫВИ
Щo ‡К·ЫМ· o˘ ЪfiОВИЩ·И v· ЫИ‰ВЪТЫВЩВ , БИ· v· Ы·˜
‰ИВ˘ОoП‡vВИ ЫЩo ЫИ‰¤ЪˆМ·.
14
❏
Ì ηÙ‡ı˘vÛË Úo˜ Ù· οو : o „ÂηÛÌfi˜ Á›vÂÙÂ
·fi ÙËv ¿ÎÚË Ù˘ ̇Ù˘ Ù˘ Ͽη˜.
15
❏
Ì ηÙ‡ı˘vÛË Úo˜ Ù· ¿vˆ : o „ÂηÛÌfi˜
Á›vÂÙ 3 ÂηÙoÛÙ¿ Èo ¿vˆ ·fi ÙËv ¿ÎÚË Ù˘
̇Ù˘ Ù˘ Ͽη˜.
16
❏
XЪЛЫИМooИТvЩ·˜ Щo Ы‡ЫЩЛМ· „ВО·ЫМo‡:
KЪ·Щ‹ЫЩВ ·ЩЛМ¤vo Щo П‹ОЩЪo ·ЩМo‡ О·И
Ы˘Б¯Ъfivˆ˜ ·Щ‹ЫЩВ Щov ‰И·ОfiЩЛ „ВО·ЫМo‡. Afi
ЩЛv ı¤ЫЛ „ВО·ЫМo‡ ı· ‚БВИ ИО·vooИЛЩИО‹
oЫfiЩЛЩ· ˘БЪ·Ы›·˜, o˘ ‰Вv В›v·И ¿vЩ· oЪ·Щ‹,
·ÏÏ¿ ı· Û·˜ ‰È¢ÎoχvÂÈ ÛÙo Ûȉ¤ÚˆÌ·.
23
Page 24

FRANÇAIS DEUTSCH ENGLISH
24
17
19
C
B
A
18
17
❏
Défroissage
Vous pouvez également utiliser votre fer
verticalement pour défroisser les
vêtements ou autres tissus défroissables.
Passez le fer en aller et retour de bas en
haut tout en appuyant sur la gâchette de
commande de vapeur. Pour un meilleur
résultat, maintenez tendue la partie
vaporisée. La qualité du défroissage varie
suivant la matière à défroisser.
17
❏
Das Eisen kann beim Dampfglätten auch
senkrecht gehalten werden, um hängende
Kleidung oder Gardinen zu glätten. Dabei
das Bügeleisen von oben nach unten hin
und her führen und mehrmals die
Dampftaste drücken. Am besten das zu
dämpfende Stück glatt gespannt halten.
Die Bügelqualität hängt von der Art des
Gewebes ab.
Installation der
Installation du guide cordon
vapeur
Cet accessoire peut être optionnel suivant le
modèle.
18
❏
Mettez le guide en place sur la centrale.
19
❏
A. Placez le cordon dans les clips et
fermez-les.
B. Clipsez les deux clips sur le guide.
C. Placez le cordon dans la boucle au
bout du guide cordon.
Entretien
Les apprêts se trouvant dans les tissus, les
résidus des produits de nettoyage, les
particules de fil, peuvent à l'usage se
déposer sur la semelle du fer. Si
nécessaire, frotter la semelle encore
chaude avec un chiffon ne laissant pas de
peluches. Pour nettoyez plus à fond,
utilisez un stick nettoie-fer.
N'utilisez pas de produits décapants ou
alcalins (pour four de cuisinières par
exemple), ni de produits abrasifs ou
tampons de laine d'acier.
Attention :
de propreté de la semelle du fer.
Le générateur de vapeur ne nécessite
aucun entretien.
La glisse du fer dépend de l'état
Schlauchführung
Je nach Modell ist die Schlauchführung
eventuell ein Sonderzubehör, das nicht im
Lieferumfang inbegriffen ist.
18
❏
19
❏
Pflege und Wartung
Die Bügeleisensohle kann durch
Waschmittelrückstände, durch die Appretur
der Stoffe und Fasern verunreinigt werden
und gleitet dann nicht mehr leicht über den
Stoff. Deshalb das Bügeleisen nach dem
Bügeln mit einem nichtflusenden Lappen
abreiben. Schwer zu entfernende Flecken
und Ablagerungen sollten mit einem
Bügeleisenreinigerstift behandelt werden.
Auf keinen Fall alkalihaltige Produkte (z.B.
Backofenreiniger), scharfe Reinigungsmittel, Scheuermittel oder Stahlwolle
verwenden.
Hinweis:
leicht über den Stoff, wenn die Sohle nicht
verschmutzt ist.
Aufbewahren des
Rangement
Après le repassage, débranchez le cordon
d'alimentation et laissez refroidir votre
appareil. Ne transportez pas votre appareil
en le maintenant par le réservoir ou le
connecteur.
Vous pourrez ensuite le ranger à plat,
sans avoir besoin de vider le réservoir.
Ne couchez pas l'appareil au risque de
renverser l'eau du réservoir.
Bügelgeräts
Nach dem Bügeln Netzstecker
herausziehen und das Gerät vollständig
abkühlen lassen. Halten Sie beim Tragen
Ihres Geräts dieses nicht beim Tank oder
beim Verbindungsstecker.
Wird das Gerät in waagerechter Stellung
aufbewahrt, so muss der Wasserbehälter
nicht entleert werden.
Bei senkrechter Stellung kann Wasser aus
dem Tank fließen.
Dampfglätten
Montieren Sie die Schlauchführung auf
der Dampfstation.
A. Stecken Sie den Schlauch in die
Klemmen und schließen Sie diese.
B. Drücken Sie die beiden Klemmen auf
die Führung.
C. Ziehen Sie den Schlauch durch die
Schleife am Ende der Führung ein.
Das Bügeleisen gleitet nur dann
17
❏
Vertical ironing
Your iron can also be used vertically to
smooth out clothes, on hangers, curtains,
etc. Move the iron from top to bottom,
keeping the steam button pressed. For best
results, keep the material to be steamed
tight. The results may vary according to the
type of fabric.
Installing the hose support
This accessory is optional depending on the
model.
18
❏
Insert the hose support into the steam
generator base.
19
❏
A. Place the hose in the clips and close
them.
B. Fix the two clips onto the support.
C. Place the hose in the loop at the end
of the support arm.
Maintenance
Substances contained in fabrics such as
cleaning product residues and thread
particles may eventually stain the plate of
the iron. So if necessary, after ironing rub
the plate while it is still warm using a good
quality cloth (one which does not leave any
traces of fluff) or clean it more thoroughly
with an iron-cleaning stick.
Do not use scouring powders, alkalines (as
used with ovens), abrasives or steel wool.
Note :
Please make sure that the soleplate
is kept clean at all times to maintain the
iron's gliding capability.
Storage
When you have finished ironing, unplug the
power cable and let the machine cool
down. Do not lift or carry your unit by
holding the water tank or the connection
lead.You can then store it flat, without
having to empty the water container.
If you lie the machine on its side, water
from the reservoir may spill out.
Page 25

Aoı‹Î¢ÛË
™YNTHPHYNTHPH™H
AUTO-STOP HПВОЩЪovИОfi Ы‡ЫЩЛМ· ·ЫК·ПВ›·˜
¢È·‰Èηۛ·
P‡ıÌÈÛË Auto-Stop.
¢È·‰Èηۛ·
™‡ÛÙËÌ· AUTO - STOP
ºI§TPO KATA TøN A§ATøN
EMC : HПВОЩЪovИОfi Ы‡ЫЩЛМ·
ÂϤÁ¯o˘ vÂÚo‡
ºˆÙÂÈv‹ ¤v‰ÂÈÍË ÚoÂȉoo›ËÛ˘
·ÏÏ·Á‹˜ Ê›ÏÙÚo˘.
°È· v· Û·˜ ‰ÒÛÂÈ ·ÙÌfi Ë Û˘Û΢‹ ¿ÏÈ, ı· Ú¤ÂÈ
v· ·ПП¿НВЩВ Щo К›ПЩЪo ‹ v· ¯ЪЛЫИМooИ‹ЫВЩВ
·oÛÙ·Á̤vo vÂÚfi. MÂÙ¿ ·fi οı ·ÏÏ·Á‹
Ê›ÏÙÚo˘, ı· Ú¤ÂÈ v· ÎÏ›ÛÂÙÂ Î·È v· Í·v·vo›ÍÂÙÂ
ÙËv Û˘Û΢‹, ÒÛÙ oÈ ·Ú¯ÈΤ˜ ÏÂÈÙo˘ÚÁ›Â˜ v·
·v¤Ïıo˘v. (ÌÂÙ¿ ·fi 2 ÏÂÙ¿)
°¤ÌÈÛÌ· Ùo˘ ÚÂ˙ÂÚ‚o˘¿Ú ηٿ ÙËv
‰È¿ÚÎÂÈ· ÛȉÂÚÒÌ·Ùo˜
™HMEIø™EI™
¶POºY§A•EI™
æEKA™MO™ (·v¿ÏoÁ· Ùo ÌovÙ¤Ïo)
K¿ıÂÙo Ûȉ¤ÚˆÌ·
Tooı¤ÙËÛË Ù˘ ÌÂÙ·ÏÏÈ΋˜ ‚¿Û˘
Û˘ÁÎÚ¿ÙËÛ˘ ηψ‰›o˘
P‡ıÌÈÛË Ùo˘ £ÂÚÌoÛÙ¿ÙË ıÂÚÌoÎÚ·Û›·˜
AUTO-STOP HПВОЩЪovИОfi Ы‡ЫЩЛМ· ·ЫК·ПВ›·˜
¢È·‰Èηۛ·
P‡ıÌÈÛË Auto-Stop.
¢È·‰Èηۛ·
™‡ÛÙËÌ· AUTO - STOP
ºI§TPO KATA TøN A§ATøN
EMC : HПВОЩЪovИОfi Ы‡ЫЩЛМ·
ÂϤÁ¯o˘ vÂÚo‡
ºˆÙÂÈv‹ ¤v‰ÂÈÍË ÚoÂȉoo›ËÛ˘
·ÏÏ·Á‹˜ Ê›ÏÙÚo˘.
°È· v· Û·˜ ‰ÒÛÂÈ ·ÙÌfi Ë Û˘Û΢‹ ¿ÏÈ, ı· Ú¤ÂÈ
v· ·ПП¿НВЩВ Щo К›ПЩЪo ‹ v· ¯ЪЛЫИМooИ‹ЫВЩВ
·oÛÙ·Á̤vo vÂÚfi. MÂÙ¿ ·fi οı ·ÏÏ·Á‹
Ê›ÏÙÚo˘, ı· Ú¤ÂÈ v· ÎÏ›ÛÂÙÂ Î·È v· Í·v·vo›ÍÂÙÂ
ÙËv Û˘Û΢‹, ÒÛÙ oÈ ·Ú¯ÈΤ˜ ÏÂÈÙo˘ÚÁ›Â˜ v·
·v¤Ïıo˘v. (ÌÂÙ¿ ·fi 2 ÏÂÙ¿)
°¤ÌÈÛÌ· Ùo˘ ÚÂ˙ÂÚ‚o˘¿Ú ηٿ ÙËv
‰È¿ÚÎÂÈ· ÛȉÂÚÒÌ·Ùo˜
™HMEIø™EI™
¶POºY§A•EI™
æEKA™MO™ (·v¿ÏoÁ· Ùo ÌovÙ¤Ïo)
K¿ıÂÙ¿ıÂÙo Ûȉ¤ÚˆÌ·Ûȉ¤ÚˆÌ·
O¢H°IE™ XPH™Eø™
NEDERLANDS ESPAÑOL PORTUGUÊS
17
❏
Kreukels verwijderen
U kan uw strijkijzer ook vertikaal gebruiken bv.
om kreukels uit kledingstukken, wandbekleding,
gordijnen e.d. te verwijderen. Ga met het
strijkijzer heen en weer van boven naar beneden
langs het voorwerp terwijl u de stoomknop
ingedrukt houdt. Laat de stoomknop los tussen
twee beurten. Houd tijdens het bedampen de stof
gestrekt ; zo bereikt u een beter resultaat.Het
resultaat hangt af van de te behandelen stof.
Installatie van de
stoomsnoergeleiding
Naargelang het model, is deze accessoire al dan
niet een optie.
18
❏
Plaats de geleiding op de centrale.
19
❏
A. Plaats het snoer in de clips en sluit ze.
B. Klik de twee clips op de geleiding.
C. Plaats het snoer in de ring aan het
uiteinde van de snoergeleiding.
Onderhoud
Stofdeeltjes, resten van schoonmaakmiddelen
en stukjes draad kunnen zich tijdens het gebruik
afzetten op de zoolplaat. Wrijf zonodig met een
doek die geen pluisjes achterlaat over de nog
warme zoolplaat. Gebruik een schoonmaakstick
voor strijkijzers voor een grondiger reiniging.
Gebruik geen afbijtmiddelen of alkalische
middelen (voor het reinigen van fornuisovens
bijvoorbeeld), noch schuurmiddelen of -sponsjes.
Let op :
Hoe schoner de zoolplaat, hoe beter het
strijkijzer glijdt.
Opbergen
Trek na het strijken de stekker uit het stopcontact
en het toestel volledig laten afkoelen. Verplaats
het toestel nooit terwijl u het vasthoudt aan de
reservoir of aan de stekker.
Berg het daarna horizontaal weg. Het
waterreservoir hoeft niet leeg gemaakt te
worden. Zet het aparaat nooit op de zijkant, dit
om te vermijden dat het water uit het reservoir
loopt.
17
❏
Alisar
Su plancha también puede ser utilizada en
posición vertical para alisar trajes y cortinas.
Mueva la plancha de arriba hacia abajo,
manteniendo el pulsador del vapor apretado. La
calidad del desarrugado depende de la calidad
del tejido.
Instalación de la guía del
cordón de vapor
Este accesorio puede ser opcional según el
modelo.
18
❏
Coloque la guía en la caldera.
19
❏
A. Coloque el cordón en las abrazaderas y
ciérrelas.
B. Sujete las dos abrazaderas a la guía.
C. Coloque el cordón en el gancho al final de
la guía.
Mantenimiento
Los aprestos de las telas, los residuos de los
productos de lavado, las partículas de hilo
pueden irse depositando en la suela de la
plancha. Frótela con un paño que no deje pelusa
cuando aún esté caliente si es necesario. Para
limpiar más a fondo utilice un stick limpiador para
planchas.
No utilice productos decapantes o alcalinos
(como los utilizados para el horno), ni productos
abrasivos o estropajos de aluminio.
Atención:
más limpia esté la suela.
Almacenaje
Cuando finalice la tarea de planchar desconecte
el equipo de la red y espere a que esté fría. No
transporte el aparato sujetándolo por el depósito
o por el conector.
Puede almacenarla plana sin vaciar el depósito
de agua, si inclina el equipo el agua podrá
salirse.
su plancha se deslizará mejor cuanto
17
❏
Desamarrotar
Pode também utilizar o ferro na posição vertical
para endireitar ou desamarrotar de uma peça de
roupa. Passar um lado para o outro e de cima
para baixo. Para obter un bon resultado, manter
a parte vaporizada estendida. A qualidade do
endireitamento da roupa é função do tecido que
se desamarrota.
Instalação do guia do fio a
vapor
Este acessório pode ser opcional mediante o
modelo.
18
❏
Coloque o guia no devido lugar na central.
19
❏
A. Coloque o fio nos clipes e feche-os.
B. Encaixe os dois clipes no guia.
C. Coloque o fio na argola no fim do guia do
fio.
Manutenção
Os produtos encontrados nos tecidos com
preparo, os resíduos dos produtos de limpeza, as
partículas de fios, podem com o tempo, depositarse na base do ferro. Se for necessário, esfregar a
base quente com um pano que não largue pelos.
Para limpar melhor, utilizar um stick para ferros.
Não utilize produtos decapantes ou alcalinos (por
exemplo, para fornos de fogão), nem produtos
abrasivos ou esponjas de lã de aço.
Atenção:
de limpeza da base.
o deslize do ferro depende do estado
Arrumação
Quando acabar de passar, desligue o cabo de
alimentação e deixe arrefecer o aparelho, pode
arruma-lo sem necessidade de esvaziar o
depósito. Não transporte o aparelho segurando-o
pelo reservatório ou pelo conector.
Não deite o ferro para não entornar a água do
depósito.
E§§HNIKA
17
❏
MВ ЩЛv Ы˘ЫОВ˘‹ Ы·˜ МoЪВ›ЩВ v· ЫИ‰ВЪТЫВЩВ ‹ v·
КЪВЫО¿ЪВЩВ О·И О¿ıВЩ·, Щ· Ъo‡¯· Ы·˜, ЩИ˜ Оo˘ЪЩ›vВ˜
Ы·˜ О.П.. KЪ·Щ‹ЫЩВ Щo ЪВЫoЫ›‰ВЪfi Ы·˜ О¿ıВЩ·
НВОИvТvЩ·˜ ·fi ¿vˆ Ъo˜ Щ· О¿Щˆ. °И· О·П‡ЩВЪ·
·oЩВП¤ЫМ·Щ·, ·Щ‹ЫЩВ Щo П‹ОЩЪo ·ЩМo‡ О·И
Ы˘Б¯Ъfivˆ˜ ЩВvЩТЫЩВ Щo ‡К·ЫМ· o˘ ЫИ‰ВЪТvВЩВ. T·
·oÙÂϤÛÌ·Ù· ÂÍ·ÚÙÒvÙ·È ·fi Ùov Ù‡o Ùo˘
˘Ê¿ÛÌ·Ùo˜ o˘ ÛȉÂÚÒvÂÙÂ.
To ·НВЫo˘¿Ъ ·˘Щfi В›v·И Ъo·ИЪВЩИОfi О·И ВК·ЪМfi˙ВЩВ
ЫВ oЪИЫМ¤v· МovЩ¤П·.
18
❏
¶ÚoÛ·ÚÌfiÛÙ ·˘Ù‹ ÙËv ÌÂÙ·ÏÏÈ΋ ‚¿ÛË ÛÙȘ
˘o‰o¯¤˜ Ù˘ ‚¿Û˘ Ùo˘ ÚÂÛoÛ›‰ÂÚo˘
19
❏
A. EÊ·ÚÌfiÛÙ ÛÙË ‚¿ÛË Ù· ÎÏ›˜ Î·È ·ÛÊ·Ï›ÛÙÂ
Ù·.
A. Ko˘ÌÒÛÙ ̷˙› Î·È Ùo ηÏÒ‰Èo.
A. ™˘ÁÎÚ·Ù‹ÛÙ Ùo ηÏÒ‰Èo ÛÙËv ¿ÎÚË Ù˘
‚¿Û˘, ÒÛÙ v· ÛÙ¤ÎÂÙ·È „ËÏ¿.
¢È¿ÊoÚ˜ o˘Û›Â˜ ·fi Ùo ÊÈv›ÚÈÛÌ· Ùo˘ ˘Ê¿ÛÌ·Ùo˜,
˘oÏ›ÌÌ·Ù· ÚoïfivÙˆv ηı·ÚÈÛÌo‡ Î·È ÌfiÚÈ·
ÎψÛÙ‹˜, Ì ÙËv ¿Úo‰o Ùo˘ ¯Úfivo˘ ÌoÚo‡v v·
Âv·oÙÂıo‡v ÛÙËv Ͽη Ùo˘ Û›‰ÂÚo˘. Av ˘¿Ú¯o˘v
Ù¤ÙoÈ· ˘oÏ›ÌÌ·Ù·, ÙÚ›‚ÂÙ ÙËv Ͽη ÂvÒ Â›v·È
·ОfiМ· ˙ВЫЩ‹ МВ ¤v· М·П·Оfi ·v›, ЪoЫ¤¯ovЩ·˜ v·
МЛv ·К‹vo˘МВ ¯vo‡‰И·. °И· ·ОfiМ· ‚·ı‡ЩВЪo
О·ı·ЪИЫМfi, ¯ЪЛЫИМooИВ›ЩВ ВИ‰ИОfi Ъoпfiv О·ı·ЪИЫМo‡
П¿О·˜ Ы›‰ВЪo˘.
MЛv ¯ЪЛЫИМooИВ›ЩВ ‰И·‚ЪˆЩИО¿ ‹ ·ПО·ПИО¿ ЪoпfivЩ·
(.¯. ЪoпfivЩ· О·ı·ЪИЫМo‡ ЛПВОЩЪИОo‡ Кo‡Ъvo˘),
o‡ЩВ ПВИ·vЩИО¿ ЪoпfivЩ· ‹ МВЩ·ППИО¿ ЫКo˘ББ·Ъ¿ОИ·.
™ЛМВ›ˆЫЛ! To Ы›‰ВЪo БПИЫЩЪ¿ВИ В‡ОoП· ¿vˆ ЫЩo
‡К·ЫМ· Мfivo fiЩ·v Л П¿О· В›v·И О·ı·Ъ‹.
‘OЩ·v ЩВПВИТЫВЩВ Щo ЫИ‰¤ЪˆМ· ‚Б¿˙ВЩВ Щo КИ˜ ·fi
ЩЛv Ъ›˙· О·И ·К‹vВЩВ ЩЛv Ы˘ЫОВ˘‹ v· ОЪ˘ТЫВИ. MЛv
МВЩ·К¤ЪВЩВ ЩЛv Ы˘ЫОВ˘‹ Ы·˜ ЩЪ·‚ТvЩ·˜ ЩЛv ·fi Щo
О·ПТ‰Иo ‹ ·fi Щo МfiпПВЪ. MoЪВ›ЩВ v· ЩЛv
·oıË·ÛÂÙ ÛÂ Â›Â‰Ë ı¤ÛË, ¯ˆÚ›˜ v· ·‰ÂÈ¿ÛÂÙÂ
Ùo vÂÚfi ·fi Ùo ÚÂ˙ÂÚ‚o˘¿Ú.
Av ÙËv ·Îo˘Ì‹ÛÂÙ ϿÁÈ· Èı·vfiv v· ¯˘ı› Ùo vÂÚfi
·fi Ùo ‰o¯Â›o.
25
Page 26

FRANÇAIS DEUTSCH
Anomalies
Aucun voyant ne
s'allume.
Le fer et le générateur
ne chauffent pas.
Le fer ne chauffe pas ou
pas assez
La vapeur ne sort pas
Production d'eau avec la
vapeur
Causes
- Mauvaise alimentation
- Autres
- Bouton sur mini
- Connecteur mal clipsé
- Autres
- Le réservoir est vide
- Le réservoir n'est pas en
- Il n'y a pas de cassette
- Les témoins changement de
- Autres
- La semelle du fer n'est pas
- Demande intensive de
place ou est mal mis en
place
anticalcaire
cassette clignotent
suffisamment chaude
vapeur
Remèdes
- Contrôlez les prises de
courant et l'alimentation de
votre secteur.
- Voyez votre revendeur.
- Tournez le bouton du
thermostat
- Contrôlez le bon clispage du
connecteur
- Voyez votre revendeur.
- Remplissez le réservoir.
- Engagez le réservoir et
poussez-le bien au fond
-Mettez une cassette anticalcaire dans le réservoir
-Remplacez la cassette.
Appuyez sur la gâchette.
- Voyez votre revendeur.
- Placez-vous dans la plage
vapeur
-Attendez que les témoins du
générateur vapeur s’allument
(Class200-150), s’éteignent
(Class120-100-90)
Problem
Kontrolllampen leuchten
nicht auf. Der Apparat
wird nicht heiß
Das Bügeleisen wird
nicht heiß genug
Es wird kein Dampf
erzeugt
Es kommt Dampf und
Wasser heraus
Ursachen
- Stecker steckt nicht fest in
der Steckdose
- Andere Ursachen
- Thermostatscheibe steht
auf Mini
- Verbindungsstecker nicht
richtig eingerastet
- Andere Ursachen
- Kein Wasser im Tank
- Der Wassertank ist nicht
richtig eingesetzt
- Keine Kalkfilter-Kartusche
im Wassertank
- Die Kontrolllampen blinken
- Andere Ursachen
- Das Bügeleisen ist nicht
warm genug
- Intensive Dampferzeugung
Lösungen
- Steckverbindung und
- Gerät zum Händler bringen
- Thermostatscheibe höher
- Kontrollieren Sie das richtige
- Gerät zum Händler bringen
- Wassertank auffüllen
- Wassertank fest in sein
- Kalkfilter-Kartusche in den
- Kalkfilter-Kartusche wechseln
- Gerät zum Händler bringen
- Thermostatscheibe auf die
- Warten bis die
Stromversorgung kontrollieren
einstellen
Einrasten des
Verbindungssteckers
Gehäuse drücken
Wassertank einsetzen
Dampfzone einstellen
Kontrollleuchten des
Dampfgenerators aufleuchten
(Class200-150), bzw.
erlöschen (Class120-100 -90)
Bruit particulier dans
l'appareil
Petit claquement du
générateur
- Eau de condensation dans
le tuyau
- Il n'y a plus d'eau dans le
réservoir
- Le réservoir n'est pas en
place ou est mal mis en
place
- Autres
-Il n’y a pas de cassette
dans le réservoir
- Petit résidu d'eau dans le
générateur
- Appuyez plusieurs fois sur la
gâchette vapeur.
- Remplissez le réservoir.
- Engagez le réservoir et
poussez-le bien au fond
- Voyez votre revendeur.
- Mettez une cassette dans le
réservoir
- Aucun danger. S’arrête après
quelques repassages
RENSEIGNEMENTS ET
INFORMATIONS
Pour plus d’informations, contactez le
Service Consommateurs
DOMENA, avenue du 8ème Régiment de Hussards - 68130 ALTKIRCH
26
Das Gerät macht ein
untypisches Geräusch
Dampferzeuger macht
ein klatschendes
Geräusch
- Kondenswasser im
Verbindungsschlauch
- Es ist kein Wasser im Tank
- Der Wassertank ist nicht
richtig befestigt
- Andere Ursachen
- Keine Kalkfilter-Kartusche
im Wassertank
- Es befindet sich ein wenig
Wasser im Dampferzeuger
- Dampftaste mehrmals
drücken
- Wassertank auffüllen
- Wassertank fest in sein
Gehäuse drücken
- Gerät zum Händler bringen
- Kalkfilter-Kartusche in den
Wassertank einsetzen
- Keine Gefahr. Hört nach ein
paar mal Bügeln auf.
Page 27

ENGLISH NEDERLANDS
Aoı‹Î¢ÛË
Problems
None of the lights are lit.
The machine does not
heat up.
The iron does not heat
up.
No steam is produced.
Water is produced with
the steam
The machine makes a
noise.
The machine makes a
clicking noise
Causes
- Power supply problem
- Other
- Thermostat dial on Mini
setting
- Connection lead incorrectly
fitted
- Other
- The reservoir is empty
- The reservoir is incorrectly
inserted or has not been
inserted.
- The anti-scale cartridge
has not been inserted
- The pilot light flashes
- Other
- The iron soleplate is not
hot enough
- Too intensive use of steam
- Water condensation in the
tube
- There is no more water in
the reservoir
- The reservoir is incorrectly
inserted or has not been
inserted.
- Other
-The anti-scale cartridge
has not been inserted
- A small amount of water is
left in the steam generator
Solutions
- Check the plugs and mains.
Check that the machine is
switched ON
- Go to your local approved
service dealer
- Adjust the dial
- Check the connection
- Go to your local approved
service dealer
- Fill the reservoir
- Insert the reservoir and push
it fully in
- Insert an anti-scale cartridge
into the reservoir
- Change the anti-scale
cartridge. Press the steam
button
- Go to your local approved
service dealer
- Turn the dial to the steam
setting
- Wait until the steam generator
indicator lights switch on
(Class200-150), switch off
(Class120-100-90)
- Press the steam button
several times.
- Fill the reservoir
- Insert the reservoir and push
it fully in
- Go to your local approved
service dealer
- Insert an anti-scale cartridge
into the reservoir
- No danger It will stop when
steam has been called for
after a few times.
DOMENA Helpline (U.K.)
For product technical or service information please contact the DOMENA
Helpline on 01322 614 244
DOMENA Ltd
Unit 20, Ridgewood Industrial Estate
Uckfield, EAST SUSSEX TN22 5QE
Probleem
Geen enkel kon-trolelampje gaat
aan. Het ijzer wordt niet warm
Het ijzer wordt niet warm of niet
genoeg
Er komt geen stoom uit het
strijkijzer
Er komt stoom met waterdruppels
uit het strijkijzer
Het apparaat maakt een vreemd
geluid
Ploffend geluid in de
stoomgenerator
Oorzaak
- Slechte aansluiting
- Andere oorzaak
- Thermostaat op mini
- Stekker slecht ingestoken
- Andere oorzaak
- Reservoir leeg
- Reservoir niet of slecht in zijn vak geplaatst
- Er is geen ontkalkings-cassette in het reservoir
- Het controllampje voor
- Andere oorzaak
- De zoolplaat van het strijkijzer is niet warm genoeg
- Intensief stoomverbruik
- Kondensatiewater in de aanvoerslang
- Geen water meer in het reservoir
- Reservoir niet of slecht in zijn vak geplaatst
- Andere oorzaak
- Er is geen ontkalkings-cassette in het reservoir
- Er rest nog water in de stoomgenerator
E§§HNIKA
¶Úo‚Ï‹Ì·Ù·
K·v¤v· Ï·Ì¿ÎÈ ‰Âv ·v¿‚ÂÈ H
Û˘Û΢‹ ‰Âv ıÂÚÌ·›vÂÙ·È
To ÚÂÛoÛ›‰ÂÚo ‰Âv ·v¿‚ÂÈ
¢Âv ·Ú¿ÁÂÙ·È ·ÙÌfi˜
¶·Ú¿ÁÂÙ·È vÂÚfi Ì·˙› ÌÂ Ùov
·ÙÌfi
H Û˘Û΢‹ οvÂÈ ıfiÚ˘‚o
H Û˘Û΢‹ οvÂÈ ¤v· ÌÈÎÚfi
¯Ù‡o
AÈٛ˜
- ¶Úfi‚ÏËÌ· P‡̷Ùo˜
- ‘AÏÏË ·ÈÙ›·
- ıÂÚÌoÛÙ¿Ù˘ ÛÙË ÌÈÎÚfiÙÂÚË ¤v‰ÂÈÍË
- H ηψ‰È·Î‹ Û‡v‰ÂÛË ‰Âv ¤¯ÂÈ Á›vÂÈ ÛˆÛÙ¿
- ‘AÏÏË ·ÈÙ›·
- To ‰o¯Â›o Ùo˘ vÂÚo‡ ›v·È ¿‰ÂÈo
- To ‰o¯Â›o Ùo˘ vÂÚo‡ ‰Âv ›v·È ÛˆÛÙ¿ ÙooıÂÙË̤vo
- ¢Âv ¤¯ÂÈ ÙooıÂÙËı› Ùo Ê›ÏÙÚo ηٿ Ùˆv ·Ï¿Ùˆv
- Av·‚oÛ‚‹vÂÈ Ùo Ï·Ì¿ÎÈ
- ‘AÏÏË ·ÈÙ›·
- H Ͽη Ùo˘ Û›‰ÂÚo˘ ‰Âv ›v·È ·ÚÎÂÙ¿ ˙ÂÛÙ‹
- XЪЛЫИМooИ‹Ы·ЩВ oП‡ ·ЩМfi
- Y¿Ú¯ÂÈ Û˘Ì˘ÎvˆÌ¤vo vÂÚfi ÛÙo ۈϋv·
ÌÂÙ·ÊoÚ¿˜ ·ÙÌo‡
- ¢Âv ¤¯ÂÈ vÂÚfi Ùo ÚÂ˙ÂÚ‚o˘¿Ú
- To ÚÂ˙ÂÚ‚o˘¿Ú ‰Âv ¤¯ÂÈ ÙooıÂÙËı› ÛˆÛÙ¿
- ’AÏÏË ·ÈÙ›·
- To Ê›ÏÙÚo ‰Âv ¤¯ÂÈ ÙooıÂÙËı›
- MÈÎÚ‹ oÛfiÙËÙ· vÂÚo‡ ˘¿Ú¯ÂÈ ÛÙo ÌfiïÏÂÚ
verwisseling cassette
TÈ Î¿vÂÙ ·v …
knippert
Herstel
- Kijk na of de kabel goed ingeplugd is en goed
in het stopkontakt zit
- Contacteer uw dealer
- Draai aan de knop
- Ga na of de stekker goed is aangesloten
- Contacteer uw dealer
- Reservoir vullen
- Reservoir korrekt aanbrengen
-Doe een ontkalkingscassette in het reservoir
-Vervang de cassette. Druk op de stoomknop
- Contacteer uw dealer
- Plaats de thermostaat in het stoomvak
-Wacht tot de controlelichtjes van de
stoomgenerator aangaan (Class200-150),
uitgaan (Class120-100-90).
- Druk enkele keren op de stoomknop
- Reservoir vullen
- Reservoir korrekt aanbrengen
- Contacteer uw dealer
- Doe een ontkalkingscassette in het reservoir
- Ongevaarlijk. Dit geluid verdwijnt na enkele
strijkbeurten
§‡ÛÂȘ
- EП¤Б¯ВЩВ ЩИ˜ Ъ›˙В˜ О·И Щov ЛПВОЩЪИОfi ›v·О·
О·И ·v o ‰И·ОfiЩЛ˜ В›v·И ЫЩo ON
- EÈÎoÈvˆv‹ÛÙ Ì Ùo ÂÍo˘ÛÈo‰oÙË̤vo ۤڂȘ
- P˘ıÌ›ÛÙ ۈÛÙ¿
- EϤÁÍÙ ÙËv Û‡v‰ÂÛË
- EÈÎoÈvˆv‹ÛÙ Ì ÂÍo˘ÛÈo‰oÙË̤vo ۤڂȘ
- °ÂÌ›˙ÂÙ Ùo ÚÂ˙ÂÚ‚o˘¿Ú vÂÚo‡
-T ooıÂÙ›ÛÙ Ùo ÛˆÛÙ¿
- B¿ÏÙ Ùo Ê›ÏÙÚo ÛÙo ÚÂ˙ÂÚ‚o˘¿Ú
- AÏÏ¿ÍÙ ʛÏÙÚo. ¶·Ù‹ÛÙ Ùo Ï‹ÎÙÚo ·ÙÌo‡
- EÈÎoÈvˆv‹ÛÙ Ì Ùo ÂÍo˘ÛÈo‰oÙË̤vo ۤڂȘ
- °˘Ú›ÛÙ Ùov ‰È·ÎfiÙË ÛÙËv Ú‡ıÌÈÛË ·ÙÌo‡
- ¶ÂÚÈ̤vÂÙ v· ·v¿„ÂÈ Ë ÊˆÙÂÈv‹ ¤v‰ÂÈÍË Ùo˘
·ÙÌo‡ (Class200-150), v· Û‚‹ÛÂÈ Ë ¤v‰ÂÈÍË
(Class 120-100-90)
- ¶·Ù‹ÛÙ Ùo Ï‹ÎÙÚo ·ÙÌo‡ ·ÚÎÂÙ¤˜ ÊoÚ¤˜
- °ÂÌ›ÛÙ Ùo ÚÂ˙ÂÚ‚o˘¿Ú
- To ÙooıÂÙ›Ù ۈÛÙ¿
- EÈÎoÈvˆv‹ÛÙ Ì ÂÍo˘ÛÈo‰oÙË̤vo ۤڂȘ
- B¿ÏÙ Ùo Ê›ÏÙÚo ÛÙo ÚÂ˙ÂÚ‚o˘¿Ú
- K·v¤v·˜ Λv‰˘vo˜. MfiÏȘ ˙ËÙ‹ÛÂÙ ·ÙÌfi ı·
ÛÙ·Ì·Ù‹ÛÂÈ
27
Page 28

ESPAÑOL PORTUGUÊS
Qué hacer si … Que fazer se …
Problemas
Ninguno de los
indicadores se enciende
No se calienta
No se produce vapor
El equipo hace ruido
El equipo hace ruido
Ruidos en el generador
Causas
- Problema de alimentación
- Otros
- Termostato en mínimo
- Conector mal enchufado
- Otros
- Depósito vacio
- Depósito mal insertado o
no insertado
- El cartucho no ha sido
insertado
- El piloto relampaguea
- Otros
- No está lo suficientemente
caliente
- Excesivo uso del vapor
- Condensación de agua en
el tubo
- No hay agua en el depósito
- Depósito mal insertado o
no insertado
- Otros
-El cartucho no ha sido
insertado
- Se ha vertido un poco de
agua en el generador de
vapor
Soluciones
- Comprobar el cable de red.
- Llamar servicio técnico
- Gire el botón
- Asegúrese de que el conector
- Llamar servicio técnico
- Llenar el depósito.
- Insertar el depósito
-Insertar el cartucho
-Reemplace la casete. Apriete
- Llamar servicio técnico
- Colóquese en la zona de
-Espere que los testigos del
- Pulsar el botón de vapor
- Llenar el depósito
- Insertar el depósito
- Llamar servicio técnico
- Insertar el cartucho
- Insertar el cartucho
esté correctamente enchufado.
correctamente
antisedimentos
el pulsador de vapor
vapor
generador de vapor se
enciendan (Class200-150), se
apaguen (Class120-100-90)
varias veces
correctamente
antisedimentos
antisedimentos
Anomalias
Não acende nenhu-ma
luz. O ferro e o gerador
de vapor não aquecem.
O ferro não aquece
O vapor não sai
Produção de agua com
o vapor
Barulho no aparelho
Pequeno ruido no
gerador
Causas
- Falta de alimentação
- Outros
- O botão está no mínimo
- Conector mal encaixado
- Outros
- O reservatório está vazio
- O reservatório está mal
colocado
- Não há depósito
descacificador
- O indicador acende-se
intermitentemente
- Outros
- A base do ferro não está
suficientemente quente
- Vapor a mais
- Condensação no tubo
- Não ha água no
reservatório
- O reservatório não está
colocado correctamente
- Outros
-Não há depósito
descacificador
- Residuos de água no
gerador
Soluções
- Verifique se tem corrente
- Ver o seu revendedor
- Rode o botão do termostato
- Controle o bom encaixe do
conector
- Ver o seu revendedor
- Encha o depósito
- Coloque e reservatório rem,
ate ao fundo
-Pôr um depósito
descalcificador no recipiente
- Mudar o depósito. Carregar
na comando do vapor
- Ver o seu revendedor
- Coloque-se na faixa de vapor
-Aguarde que os indicadores
luminosos do generador de
vapor se acendem (Class200-
150), se apagam (Class120100-90)
- Carregue varias vezes no
botão de vapor
- Encha o depósito
- Coloque e reservatório rem,
ate ao fundo
- Ver o seu revendedor
- Pôr um depósito
descalcificador no recipiente
- Nenhum perigo. S’arrête
après quelques repassages
500 460 052 - Printed in France - 414 418 251 00016 RCS MULHOUSE
 Loading...