


Owner’s Guide
Visit DOD on the World Wide Web at http://www.dod.com

IMPORTANT!
FOR YOUR PROTECTION, PLEASE READ THE FOLLOWING:
WATER AND MOISTURE: Appliance should not be used near water (e.g. near a bathtub, washbowl, kitchen sink, laundry tub, in a wet basement, or near a swimming pool, etc). Care should be taken so that objects do not fall on and liquids are not spilled into the enclosure through openings.
POWER SOURCES: The appliance should be connected to a power supply only of the type described in the operating instructions or as marked on the appliance.
GROUNDING OR POLARIZATION: Precautions should be taken so that the grounding or polarization means of an appliance is not defeated.
POWER CORD PROTECTION: Power supply cords should be routed so that they are not likely to be walked on or pinched by items placed upon or against them, paying particular attention to cords at plugs, convenience receptacles, and the point where they exit from the appliance.
SERVICING: The user should not attempt to service the appliance beyond that described in the operating instructions. All other servicing should be referred to qualified service personnel. FUSING: If your unit is equipped with a fuse receptacle, replace with only same type fuse. Refer to replacement text on the unit for correct fuse type.
Warranty
1.The warranty registration card must be mailed within ten days after purchase date to validate this warranty.
2.DOD warrants this product, when used solely within the U.S., to be free from defects in materials and workmanship under normal use and service.
3.DOD liability under this warranty is limited to repairing or replacing defective materials that show evidence of defect, provided the product is returned to DOD WITH RETURN AUTHORIZATION, where all parts and labor will be covered up to a period of two (2) years. A Return Authorization number may be obtained from DOD by telephone. The company shall not be liable for any consequential damage as a result of the product’s use in any circuit or assembly.
4.Proof-of-purchase is considered to be the burden of the consumer.
5.DOD reserves the right to make changes in design or make additions to or improvements upon this product without incurring any obligation to install the same on products previously manufactured.
6.The foregoing is in lieu of all other warranties, expressed or implied, and DOD neither assumes nor authorizes any person to assume for it any obligation or liability in connection with the sale of this product. In no event shall DOD or its dealers be liable for special or consequential damages or from any delay in the performance of this warranty due to causes beyond their control.
DOD® and VOFX™ are registered trademarks of DOD Electronics Corporation.
The information contained in this manual is subject to change at any time without notification. Some information contained in this manual may also be inaccurate due to undocumented changes in the product or operating system since this version of the manual was completed. The information contained in this version of the owner's manual supersedes all previous versions.
Safety Precautions
Please, by all means, do not attempt to service the unit yourself. Refer all servicing to qualified personnel. Opening the chassis for any reason will void the manufacturer's warranty. Do not get the unit wet. If liquid is spilled on the unit, shut it off immediately and take it to a dealer for
service. Disconnect the equipment during storms to prevent damage.


 Signal Processing
THE VoFX QUICK START GUIDE
Thank you for your purchase of the DOD VoFX vocal processor. Before you begin, read this section so you will be familiar with your VoFX right from the start. The VoFX will quickly become the most important tool you have to make your songs sound like professional studio recordings in any live application. If you are using the VoFX in karaoke applications, you can remove vocals from most ordinary CD's. Be sure to learn more about this feature in the karaoke section located on page 13.
With the VoFX, you have the ability to access several different kinds of effects at the same time. Some types of effects are better suited to a specific style of song. We have already done all the hard work for you and designed effect Programs that have the most popular types of effects grouped together in Banks. A preset can be made up of one or several effects that you access by stepping on any of the preset switches marked 1, 2 or 3. A bank will always have 3 presets in it. There are 10 banks of 3 prrograms (01 through 93) each and you can step through the banks by stepping on the <Bank> switch. It's that simple.
QUICK START
1.Input Connection: Insert either a 1/4” or XLR microphone cable
2.Output Connection: Run from the Left, Right or stereo outputs to the next device in the audio chain.
3.Apply Power: Connect included power supply and power up.
4.Set Input and Output Levels: Set your Input level so the Clip LED occasionally lights. The Output Level should be set at your desired level. NOW YOUR NOW READY TO ROLL !!!
Factory Program List
Following is a list of the factory Programs available in the VoFX. They are divided
into 10 banks of three programs. Take a run through all of them to see just what kind of processing horsepower the VoFX has under the hood. And Go ahead and experiment with different settings to dial-in a sound ideal for you.
BANK 1 |
BANK 6 |
01Vocal Chorus with Delay and Reverb |
51Tremolo with short Reverb |
02Vocal Delay “Slappin’ Elvis” |
52Phaser with short Delay |
03Vocal Flange |
53Chorus with short Delay |
BANK 2 |
BANK 7 |
11Echo with Flange |
61- Multi-Tap Delay and Detune |
12Fifth Down with Pitch Shift |
62Verb |
13Vox Distortion with Detune |
63Fast Chorus |
BANK 3 |
BANK 8 |
21Tremolo with Distortion |
71- “The whole Shebang distorted” |
22DARTH VADER |
72- “The whole Shebang clean” |
23Detuned Echo with Reverb |
73Harmonica Flange |
BANK 4 |
BANK 9 KARAOKE |
31Slapback Distortion |
81Vocal Chorus, Delay, Reverb, and Vocal cancellation |
32Compressor with Chorus |
82Vocal delay “Slappin’ Elvis with Voice cancellation |
33Cavern |
83Vocal BigVerb with Vocal cancellation |
BANK 5 |
BANK 10 |
41Detuned Delay |
91Devil Boy |
42- “The ole’ Distorted Microphone” |
92Robot Ring Modulator |
43Breathy Flange |
93Pixellator |
1

SignalProcesssing |
|
Table of Contents |
|
Warranty .......................................................................................................................................................... |
iv |
Safety Precautions ............................................................................................................................................ |
iv |
Quick Start Guide and Factory Program List .................................................................................................. |
1 |
SECTION 1 - GETTING STARTED ................................................................................................................ |
3 |
Supplying Power .............................................................................................................................................. |
3 |
Front Panel Controls .................................................................................................................................... |
3 |
Program and Bank Selector Footswitches ...................................................................................................... |
4 |
Effect Selector Buttons .................................................................................................................................... |
4 |
Effect Groups .................................................................................................................................................. |
4 |
Effect Selector Buttons (MIC Preamp) ............................................................................................................ |
4 |
Store Button .................................................................................................................................................... |
4 |
Display.............................................................................................................................................................. |
4 |
Data Wheel ...................................................................................................................................................... |
4 |
Clip LED .......................................................................................................................................................... |
4 |
Output Knob .................................................................................................................................................... |
4 |
Input Knob ...................................................................................................................................................... |
4 |
Rear Panel Connections................................................................................................................................ |
5 |
1/4 High impedance input .............................................................................................................................. |
5 |
Karaoke 1/8 input .......................................................................................................................................... |
5 |
XLR low impedance input .............................................................................................................................. |
5 |
XLR Left / Mono Out ........................................................................................................................................ |
5 |
High Impedance Left Out ................................................................................................................................ |
5 |
High Impedance Right Out.............................................................................................................................. |
5 |
Power Adapter Input........................................................................................................................................ |
5 |
SECTION 2 - PROGRAMMING THE VoFX .................................................................................................... |
6 |
Selecting Programs .......................................................................................................................................... |
6 |
Using the Footswitches .................................................................................................................................... |
6 |
Editing Programs.............................................................................................................................................. |
7 |
Storing Programs.............................................................................................................................................. |
8 |
Grouping Programs.......................................................................................................................................... |
9 |
Bypassing the VoFX's Effects .......................................................................................................................... |
9 |
The Effects of the VoFX.................................................................................................................................... |
10 |
Mic Driver ........................................................................................................................................................ |
10 |
Equalizer .......................................................................................................................................................... |
10 |
Choruses .......................................................................................................................................................... |
10 |
Flangers ............................................................................................................................................................ |
10 |
Phasers ............................................................................................................................................................ |
11 |
Tremolo............................................................................................................................................................ |
11 |
Ring Modulator ................................................................................................................................................ |
11 |
Pixellator .......................................................................................................................................................... |
11 |
Echo.................................................................................................................................................................. |
11 |
Pong Delays...................................................................................................................................................... |
12 |
Tap Delays........................................................................................................................................................ |
12 |
Noise Gate........................................................................................................................................................ |
12 |
Karaoke ............................................................................................................................................................ |
13 |
Factory Reset .................................................................................................................................................... |
13 |
Specifications .................................................................................................................................................. |
13 |
2

 SignalProcesssing
SECTION 1 - GETTING STARTED
Supplying Power
The VoFX, is designed to “Plug in and Go”, so connect the included power supply and the VofX will power up and be ready to serve. It is always a good ideas to follow some electrical safety standards, we have listed them below to keep things running smooth.
•Always make sure you have a "clean" power source for connecting to the VoFX. This means that the AC power line you connect to the VoFX should be as free from voltage fluctuations and RF interference as possible. In recording environments, "clean" power is also important in preventing AC hum or buzz from getting to tape.
•Use a good quality spike / surge suppressor (also called a power strip). This is an inexpensive solution to all but the most severe AC line conditions.
•Always make sure that your audio lines are as far as possible from power cables. This will further prevent noise, hum, and stray magnetic fields from entering your signal path. If audio and power lines must run close to each other, try to avoid running them parallel to one another.
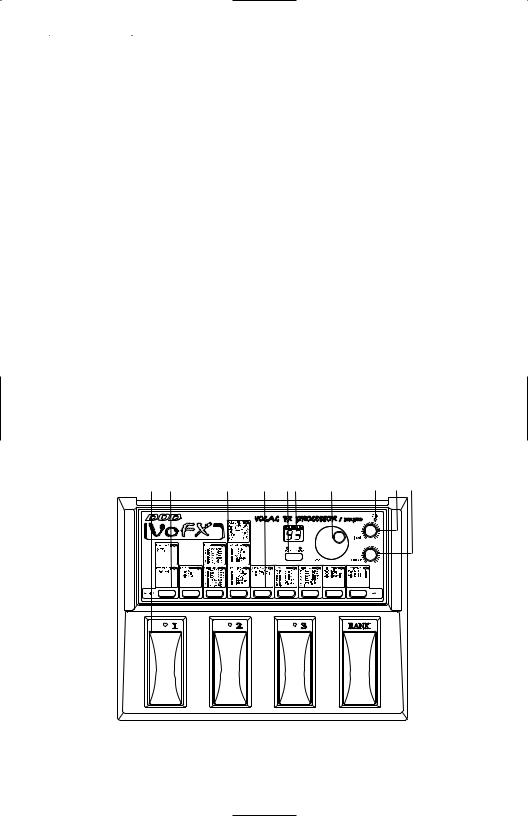
Front Panel Controls of the VoFX
This Front and Rear Panel Guide on the following pages, gives you the simple low down on the VoFX and Shows you just what all the Buttons and Lights do.
1 |
2 |
3 |
4 |
5 6 |
7 |
8 |
9 |
10 |
The front panel of the VoFX is laid out in a simple and straight forward way to make programming as easy as possible. Functions of each section are:
3
 Loading...