

Page 1

This product works with the following
operating system software: Windows
DWL-AG530
XP, Windows 2000, Windows
Me, Windows 98SE
Before You Begin
You must have at least the following:
• A desktop computer with an available PCI 2.2, 32-bit, 5 volt PCI slot
• At least a 500MHz processor and 128MB of memory
• An 802.11a, 802.11b or 802.11g Access Point (for Infrastructure Mode) or
another 802.11a, 802.11b, or 802.11g wireless adapter (for Ad-Hoc;
Peer-to-Peer networking mode.)
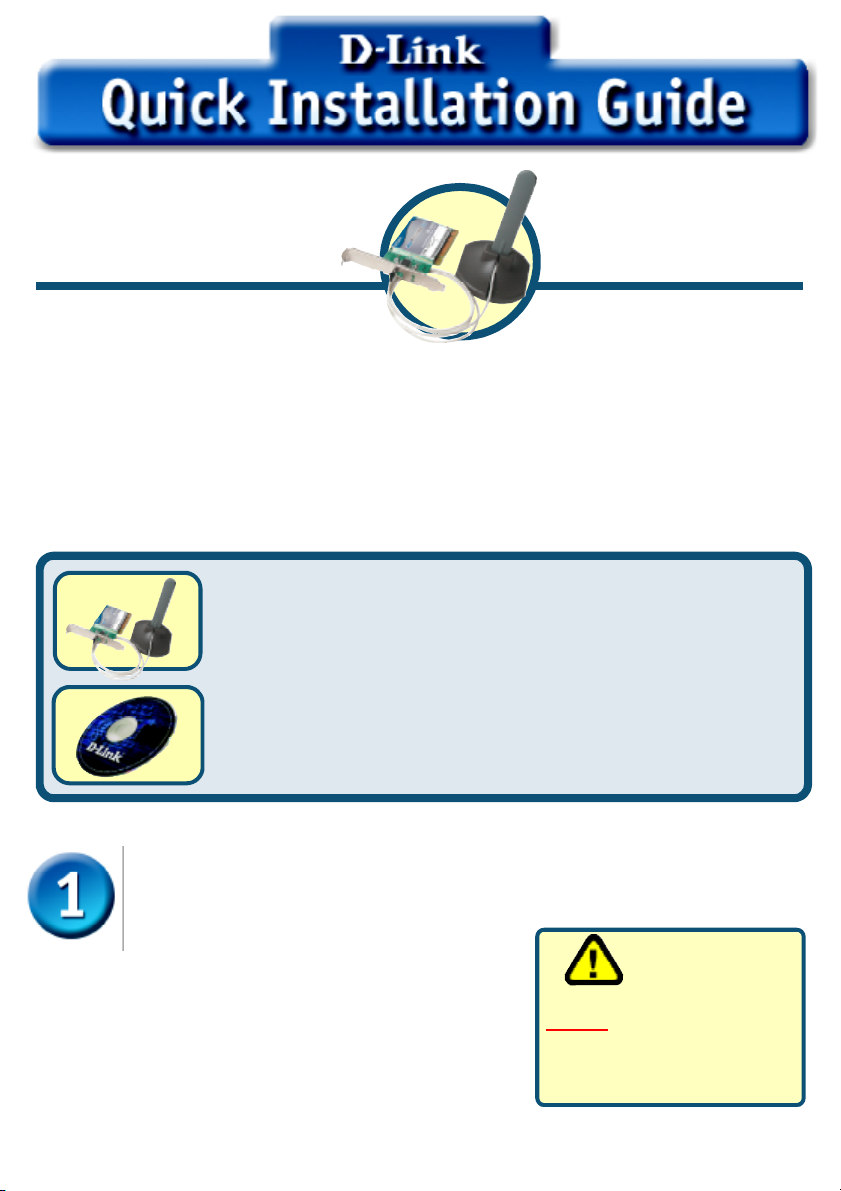
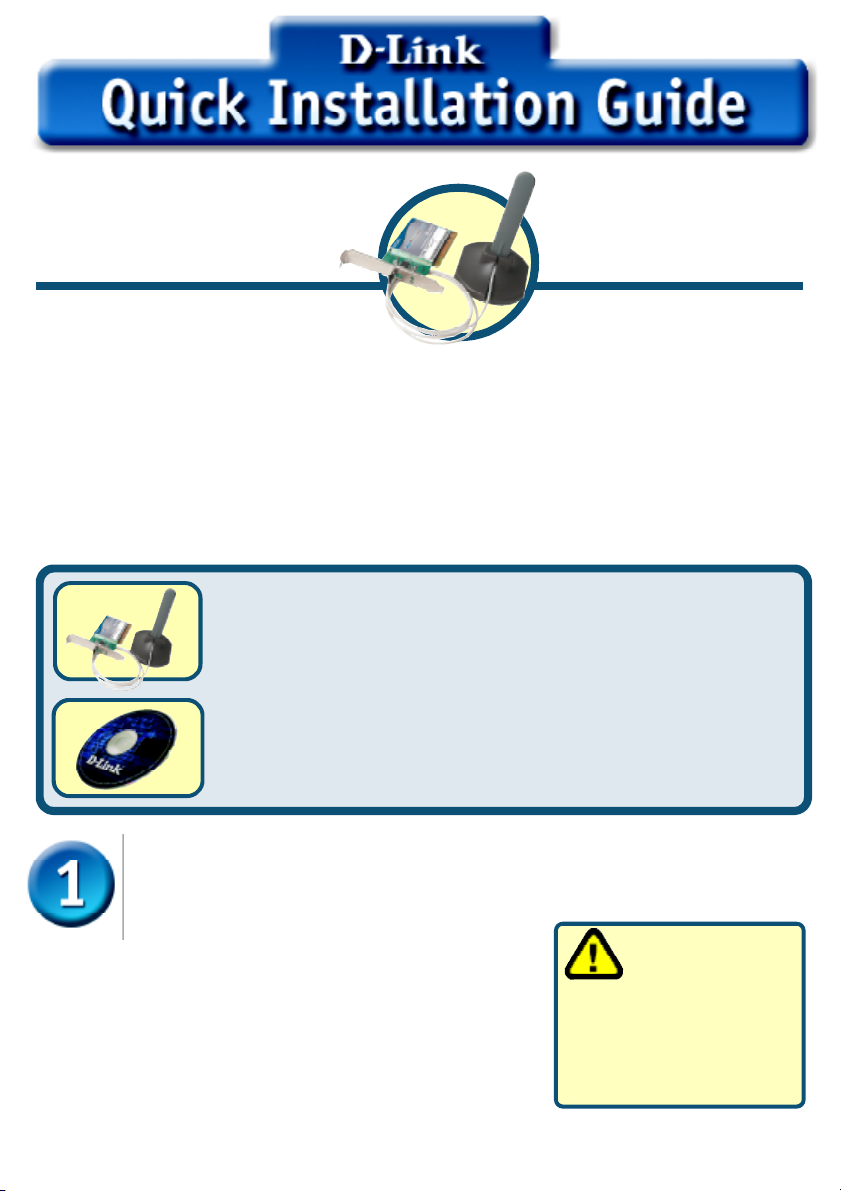
Check Your Package Contents
These are the items included with your DWL-AG530 purchase:
DWL-AG530 Dualband Wireless PCI Adapter
CD-ROM (containing Drivers, Manual and Warranty)
Air Premier Dualband
TM
Wireless PCI Adapter
If any of the above items are missing, please contact your reseller.
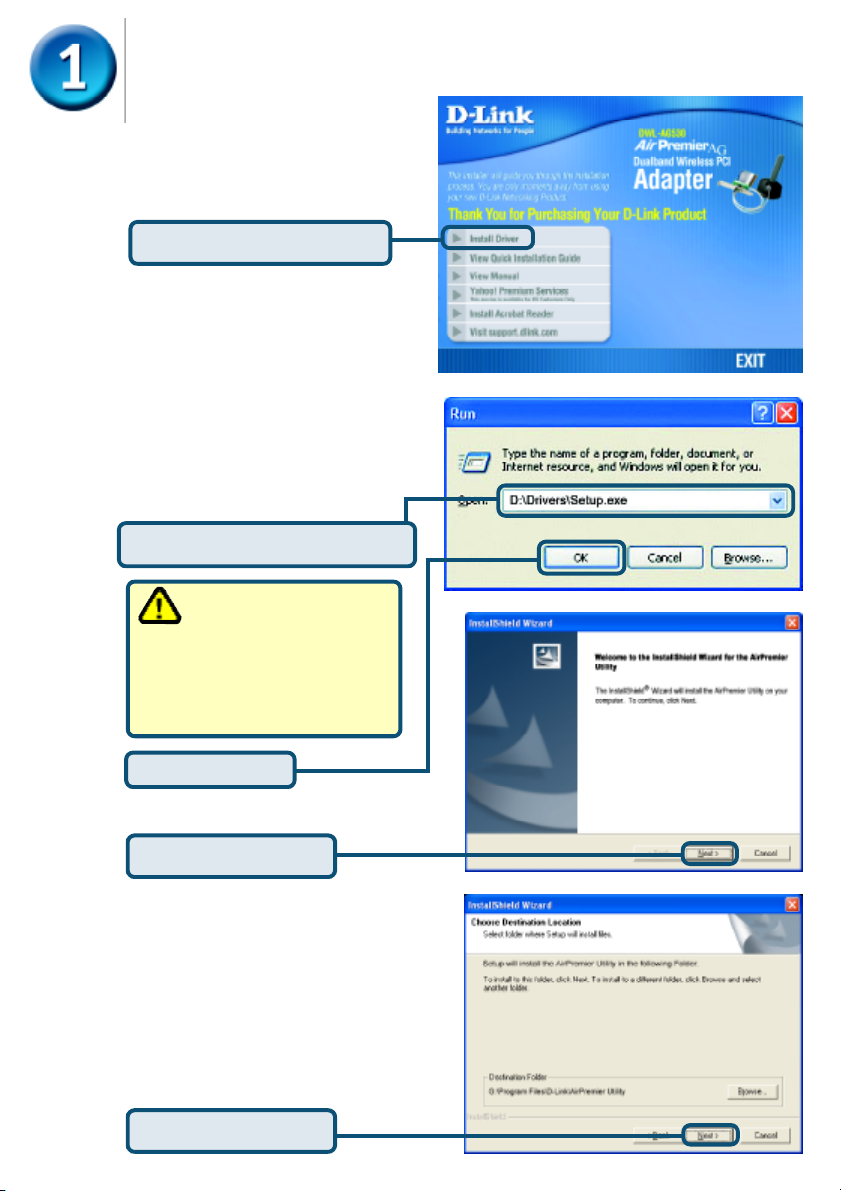
Insert the D-Link CD Into Your Desktop PC
Turn on the computer and
Insert the D- Link Air Premier DWL-AG530
Driver CD in the CD-ROM drive.
The step-by-step instructions that follow are shown in
Windows XP. The steps and screens are similar for
the other Windows operating systems
© 2003 D-Link Systems, Inc. All rights reserved. Trademarks or registered trademarks are the property of their respective
holders. Software and specifications subject to change without notice.
1
1
Do NOT install
the DWL-AG530
Wireless PCI Adapter
into your computer
before installing the
driver software from the
D-Link CD!
Page 2

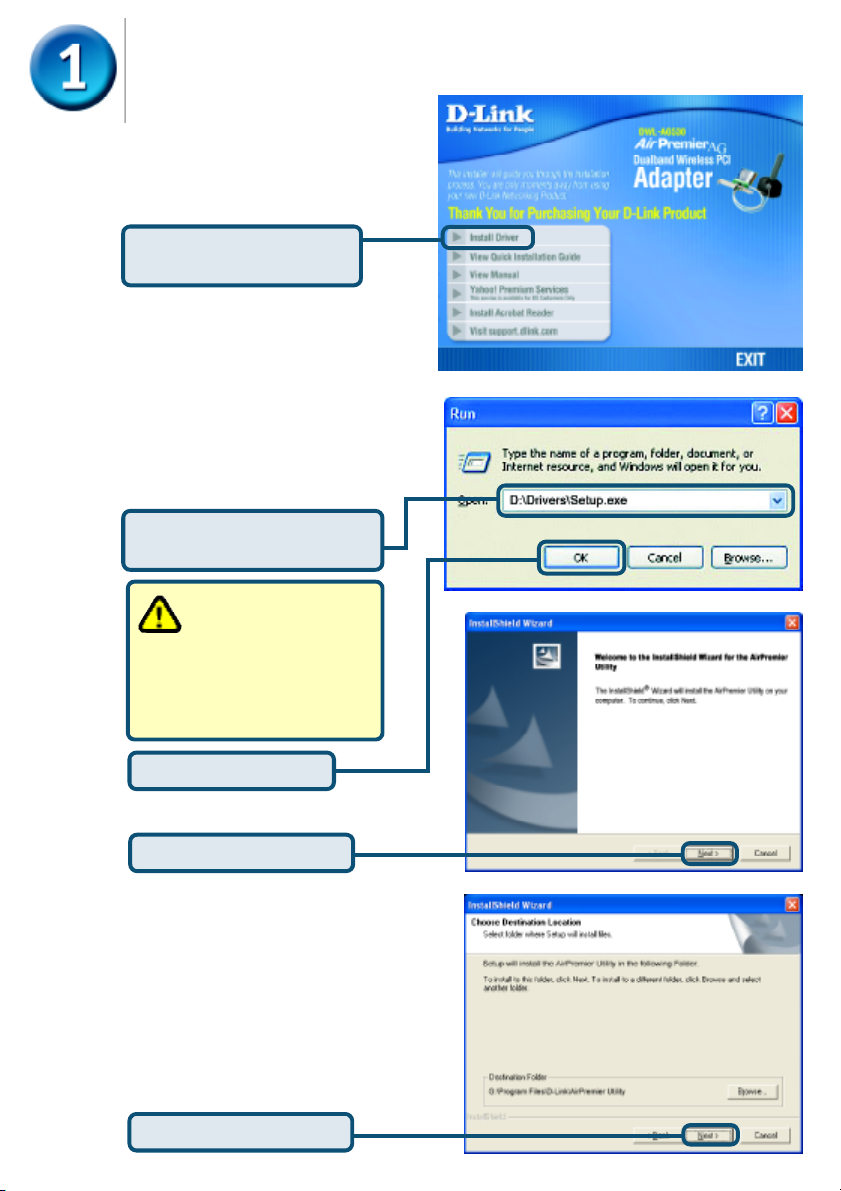
Continued...
The Install Screen will appear.
Click Install Drivers
If the CD Autorun function
does not automatically start
on your computer , go to
Start > Run and type “D:
\Drivers\Setup.exe.” If it does
start, proceed to the next
screen.
Type “D:\Drivers\Setup.exe.”
The letter “D”
represents the
letter of the CD-ROM
drive. Your CD-ROM
drive may be a different
drive letter.
Click OK
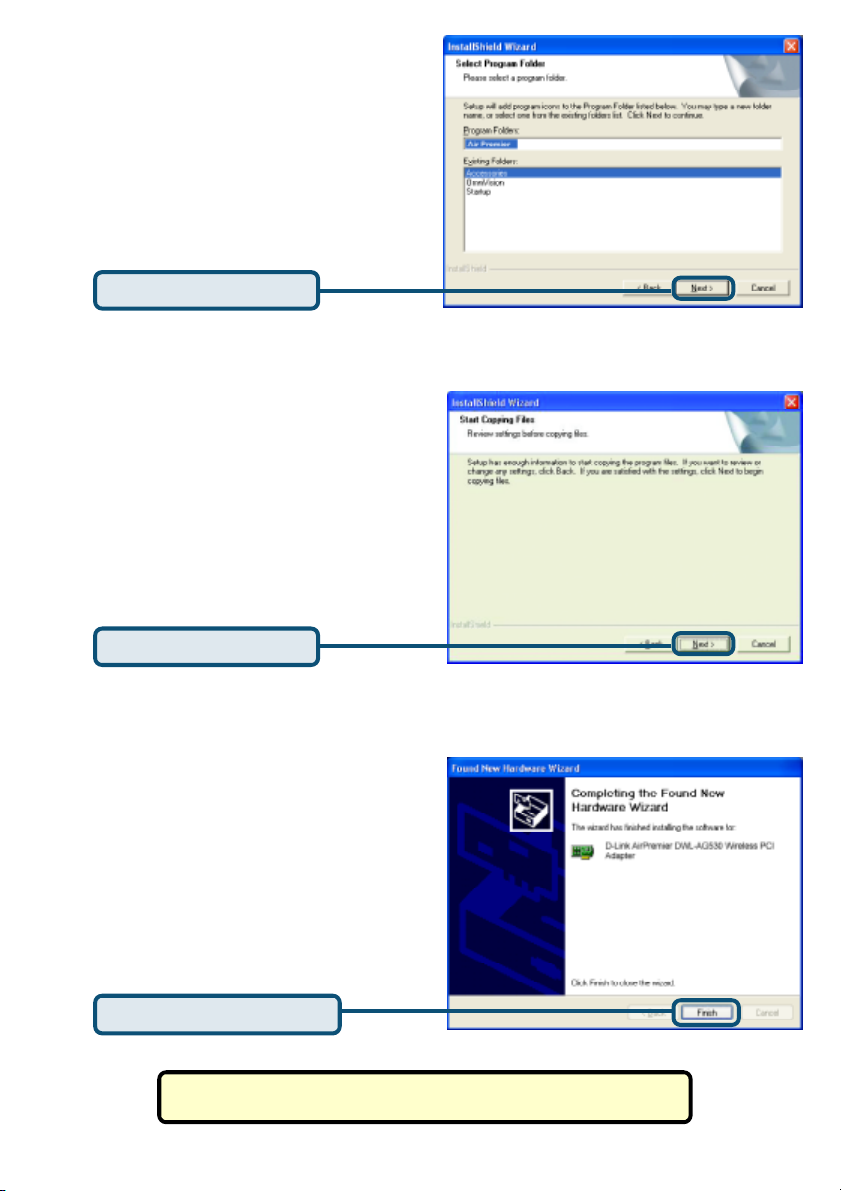
Click Next
Click Next
2
Page 3

Click Next
Click Next
Click Finish
Shut down your computer
3
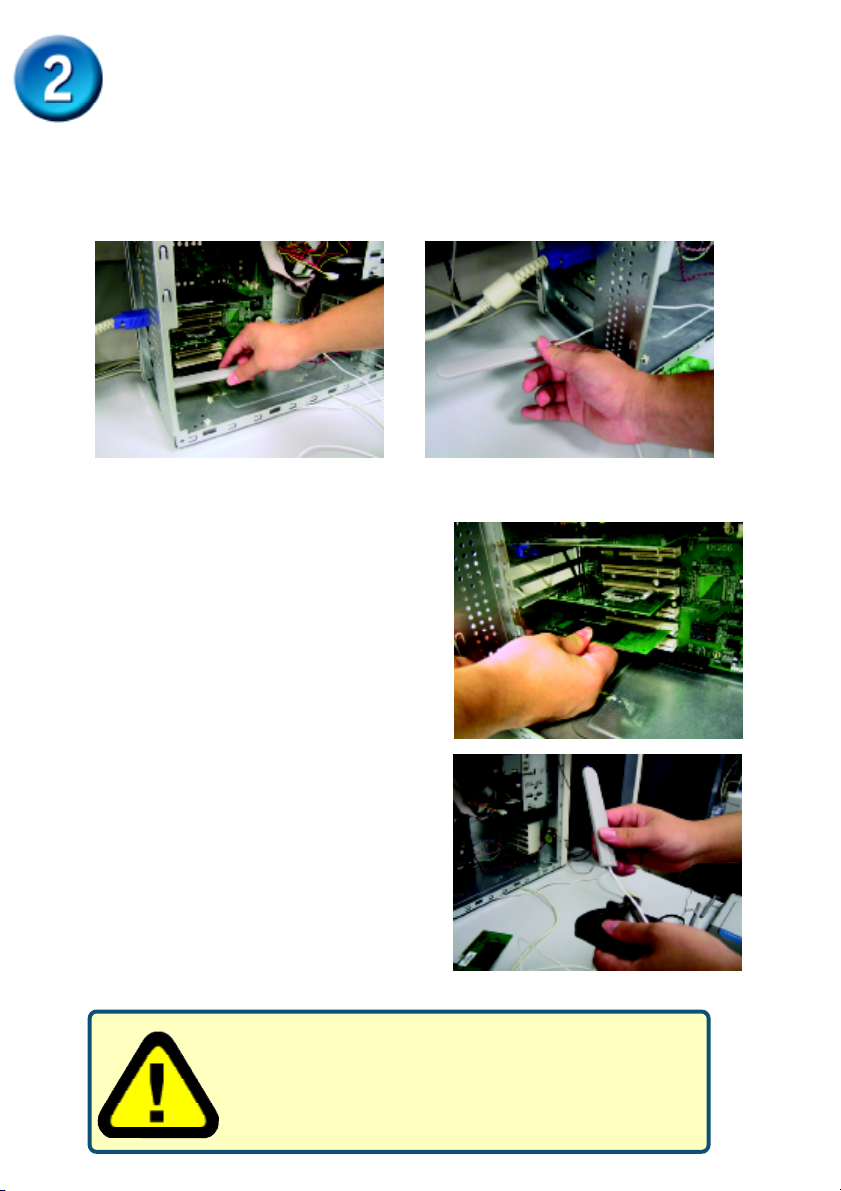
Page 4

Installing the DWL-AG530 Wireless PCI
Adapter in Your Computer
A.Make sure to turn off your computer and unplug the power cord
before you begin. Remove the back or side cover of the
computer.
B.Carefully guide the DWL-AG530’s antenna through the PCI
bracket opening adjacent to the PCI slot you intend to use for the
DWL-AG530.
C.Install the DWL-AG530 carefully,
and firmly set it into the available
PCI slot (which is typically white
or cream-colored).
D.Secure the DWL-AG530’s back
panel bracket with its mounting
screw.
E. Replace the computer’s cover.
To avoid damage caused by static electricity, make
sure to properly ground yourself by first touching a
metal part of your computer to discharge any static
electricity before working with the DWL-AG530.
4
Page 5
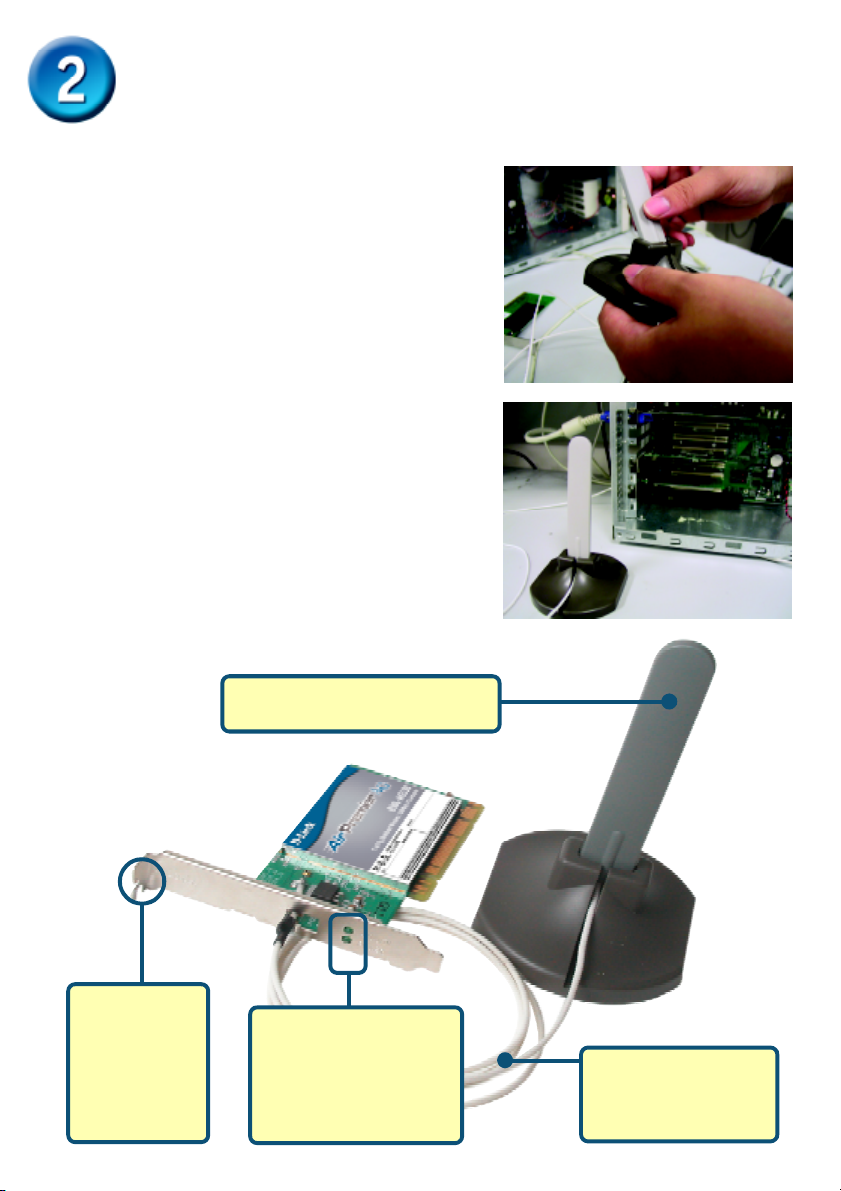
Installing the DWL-AG520 Wireless PCI
Adapter in Your Computer (cont.)
F. Gently connect the antenna to the antenna
stand.
G. Finished!
Screw Mount
The screw that
secures the
adapter to the
back of your
computer fits
into this slot.
Antenna to wirelessly connect to
802.11a and 802.11b networks
Link / Activity LEDs
Indicates that the card is
properly installed when
the computer is on and
blinks when data is
being transmitted.
5
Antenna Cable —
connects the DWLAG530 PCI board to the
external antenna.
Page 6
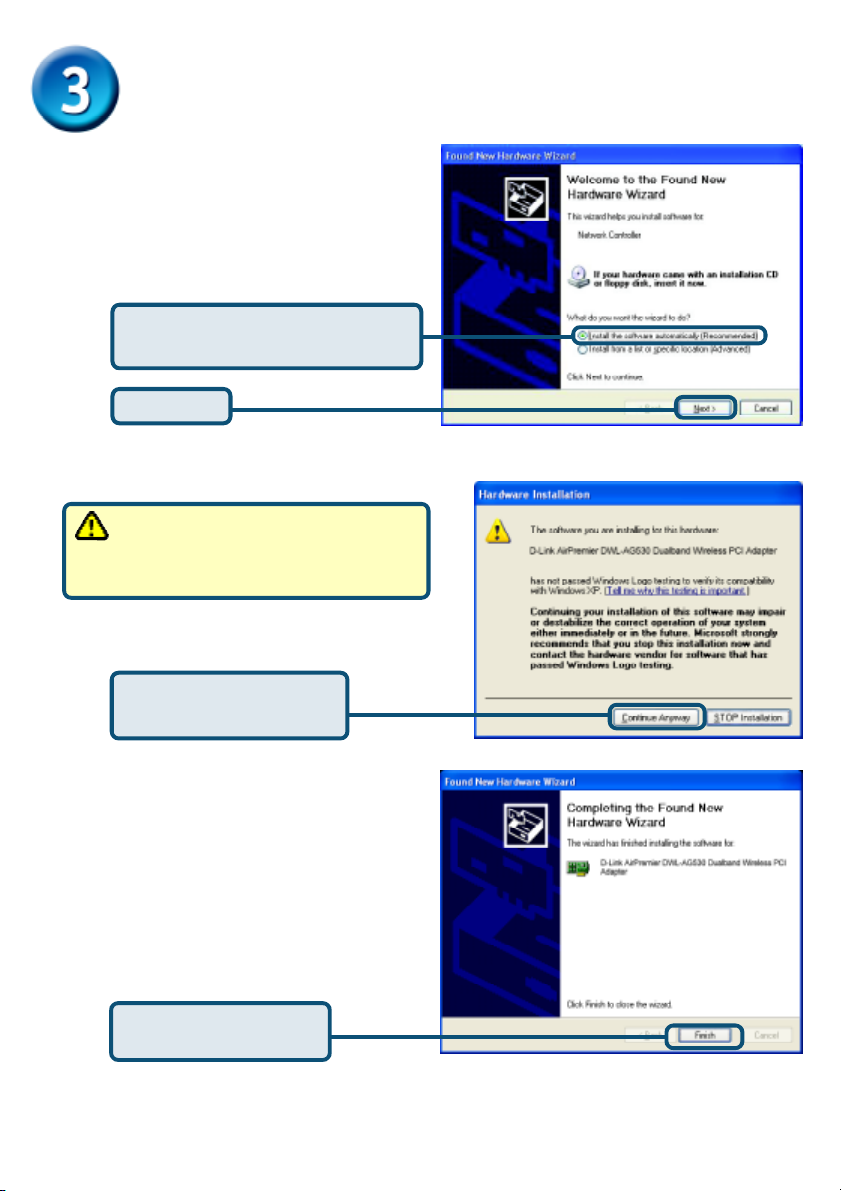
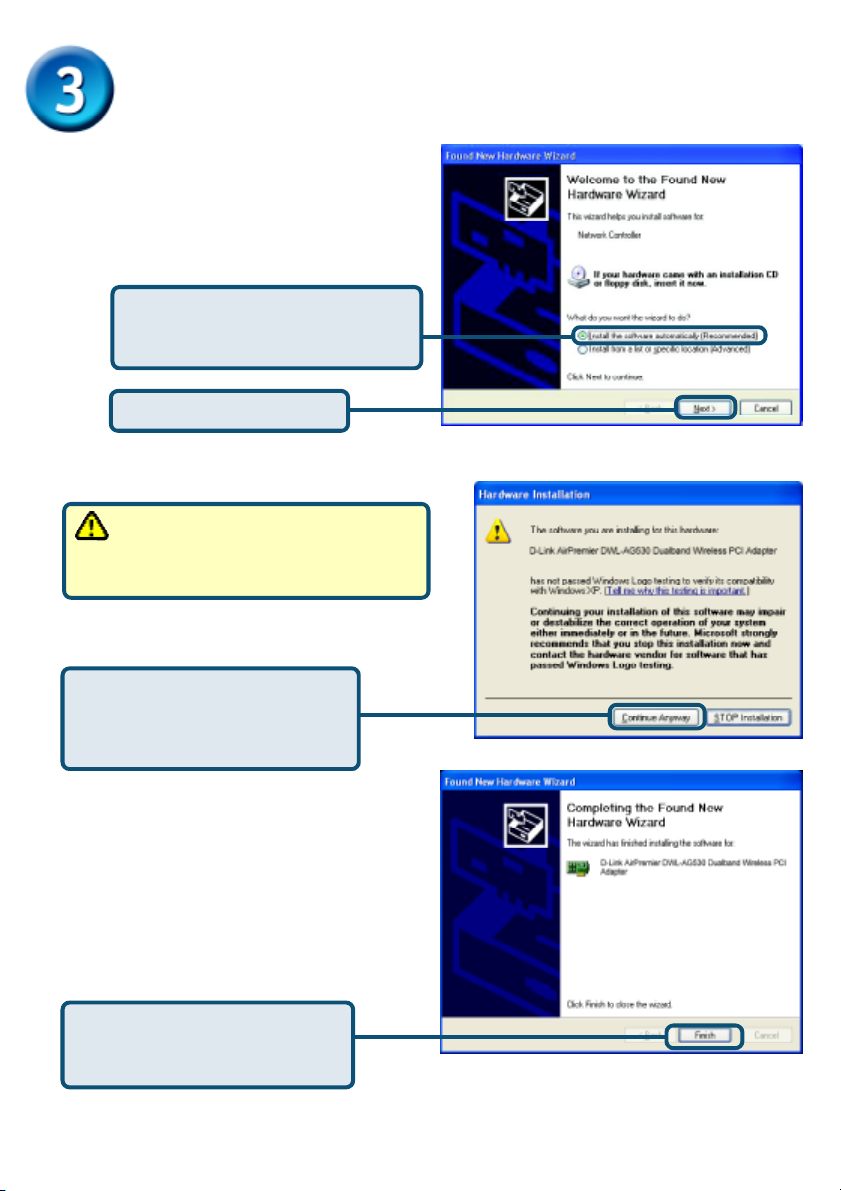
Restart Your Computer
When you restart your computer
this Found New Hardware
Wizard (Windows XP) screen
will appear:
Select Install the software
automatically (Recommended)
Click Next
For Windows XP: This Hardware
Installation alert screen may appear
after the desktop computer restarts.
Click Continue Anyway
to finalize the installation
Click Finish to finalize
the installation.
6
Page 7
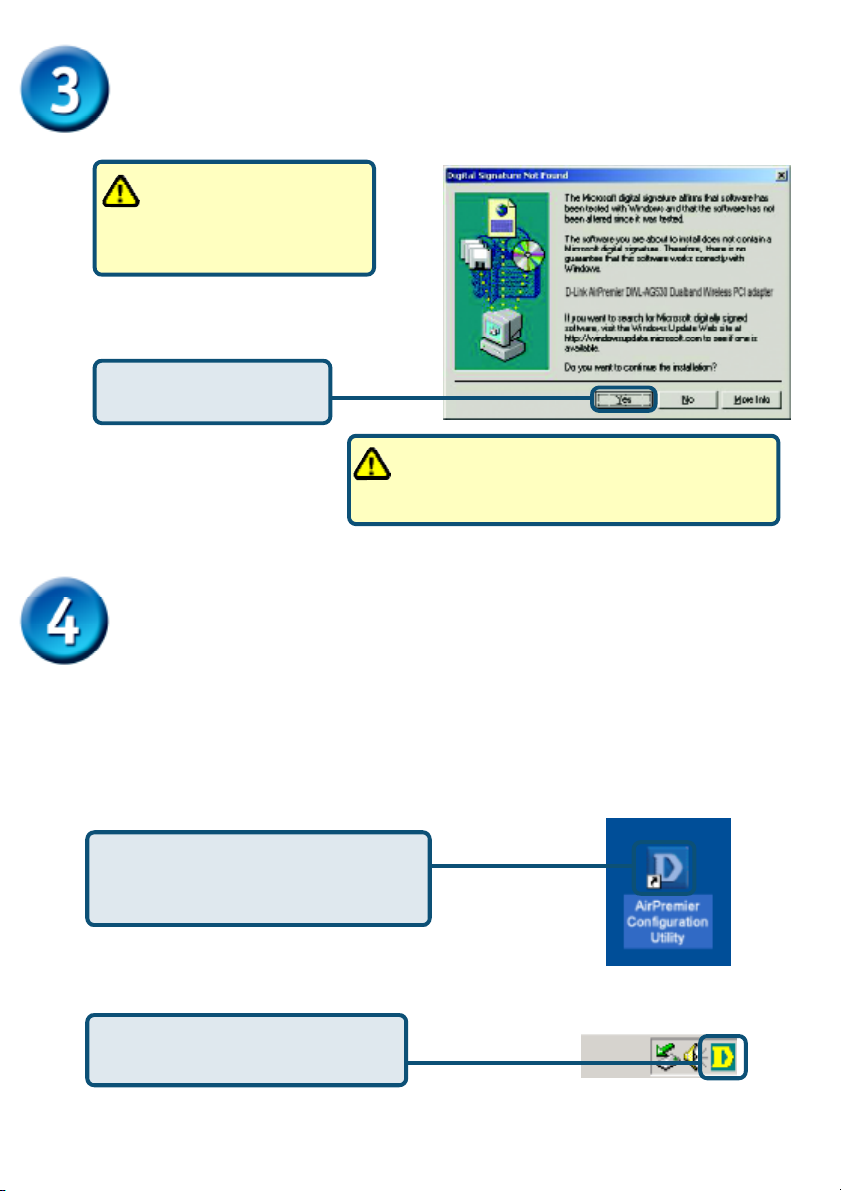
Continued...
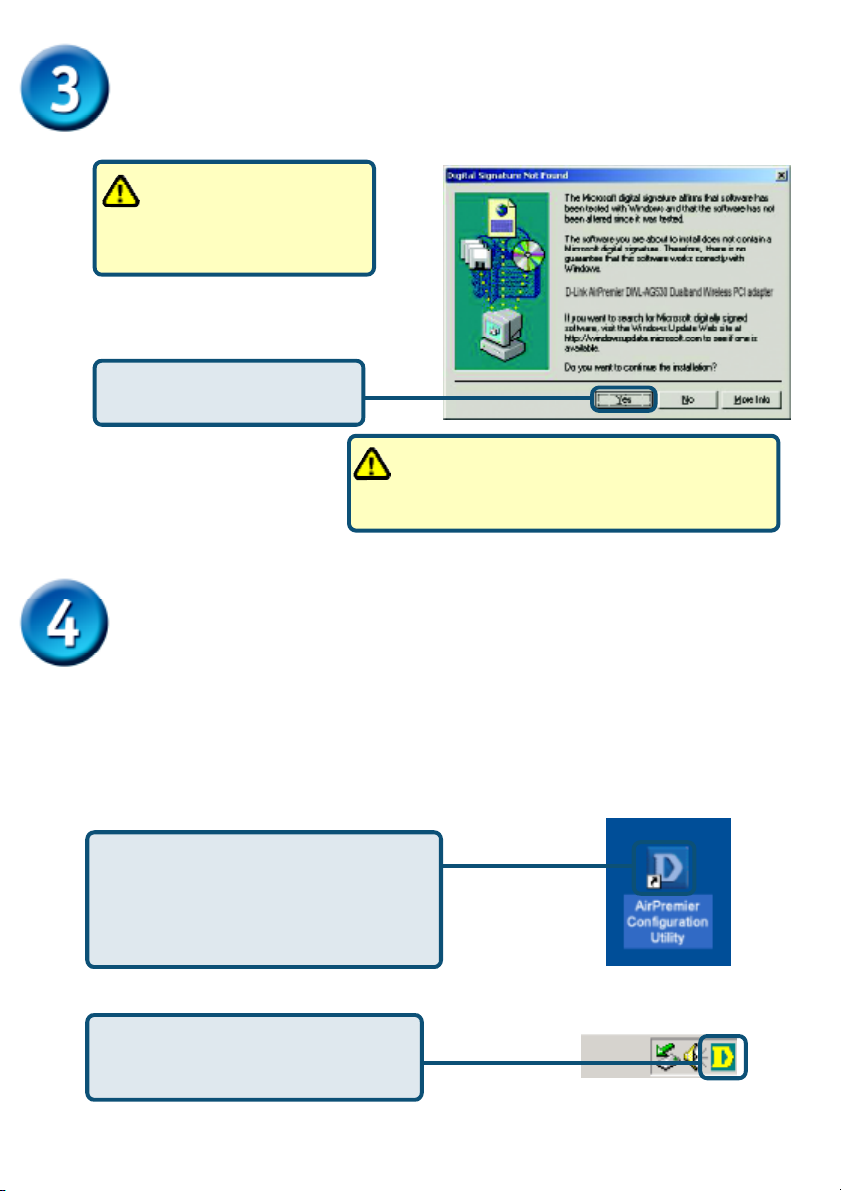
For Windows 2000, this
Digital Signature Not
Found screen may appear
after your computer restarts.
Click Yes to finalize the
installation.
The D-Link driver software for this device is
undergoing Windows Logo testing.
Microsoft certification is pending.
Your Installation is Complete!
After you’ve continued in Windows 2000, Me, or 98SE, the D-Link AirPremier
DWL-AG530 Configuration Utility will automatically start and the utility icon will
appear in the bottom right hand corner of the desktop screen (systray). If this
icon appears GREEN, then you have successfully installed the DWL-AG530,
are connected to a wireless network and are ready to communicate!
If the utility icon does not appear,
double-click the shortcut icon that
has appeared on your desktop.
Double-click the utility icon to
use the configuration utility.
7
Page 8
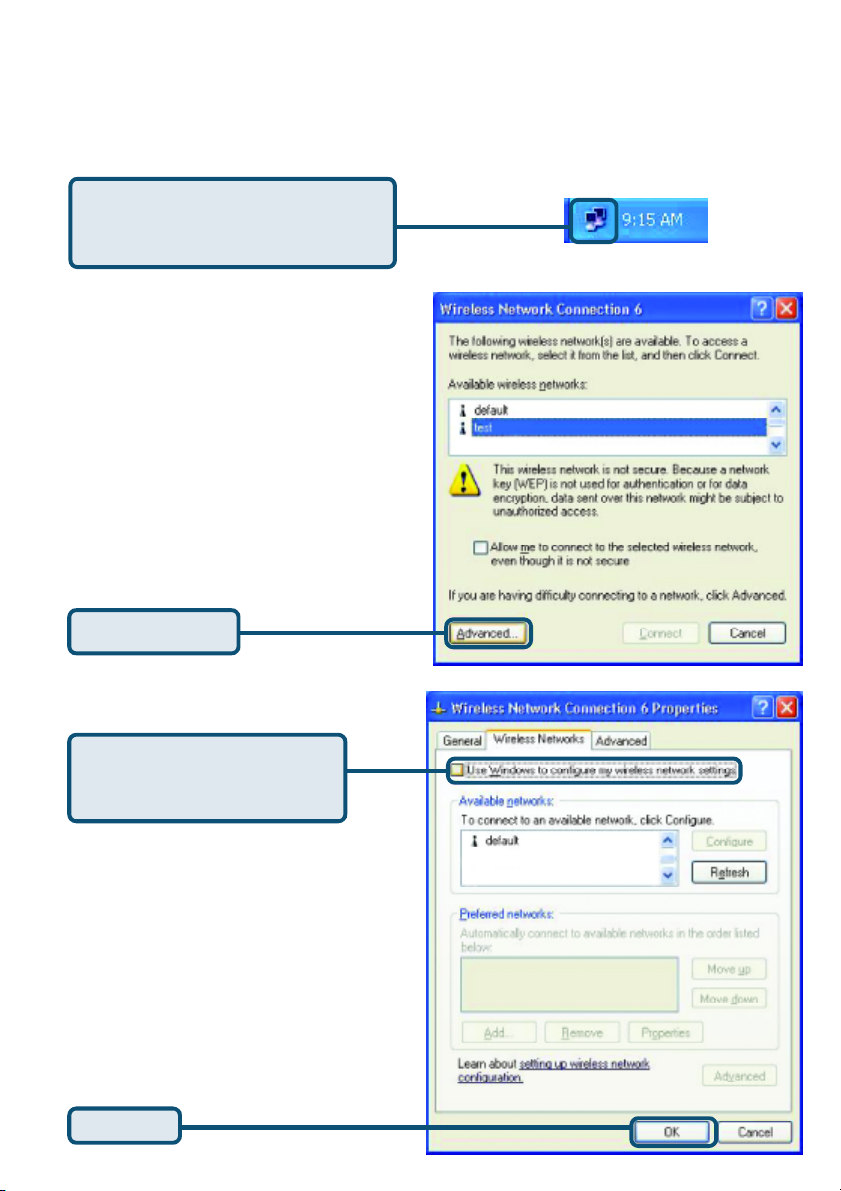
Appendix
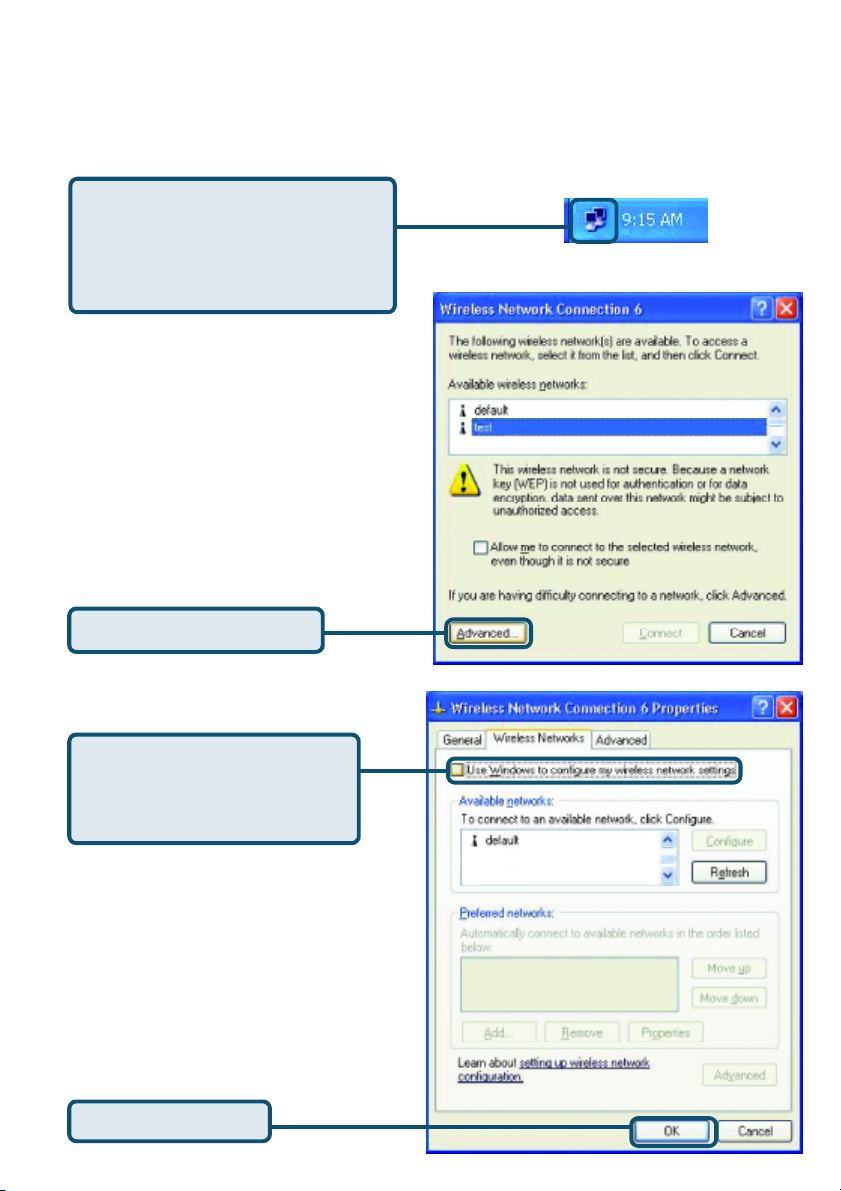
For Windows XP, if you wish to use the AirPremier utility, please do the following
steps.
Click the XP Networking icon
to use the Zero Configuration
Wireless Settings.
Click Advanced
Uncheck “Use Windows to
configure my wireless network settings.”
Click OK
8
Page 9
Appendix (Continued)
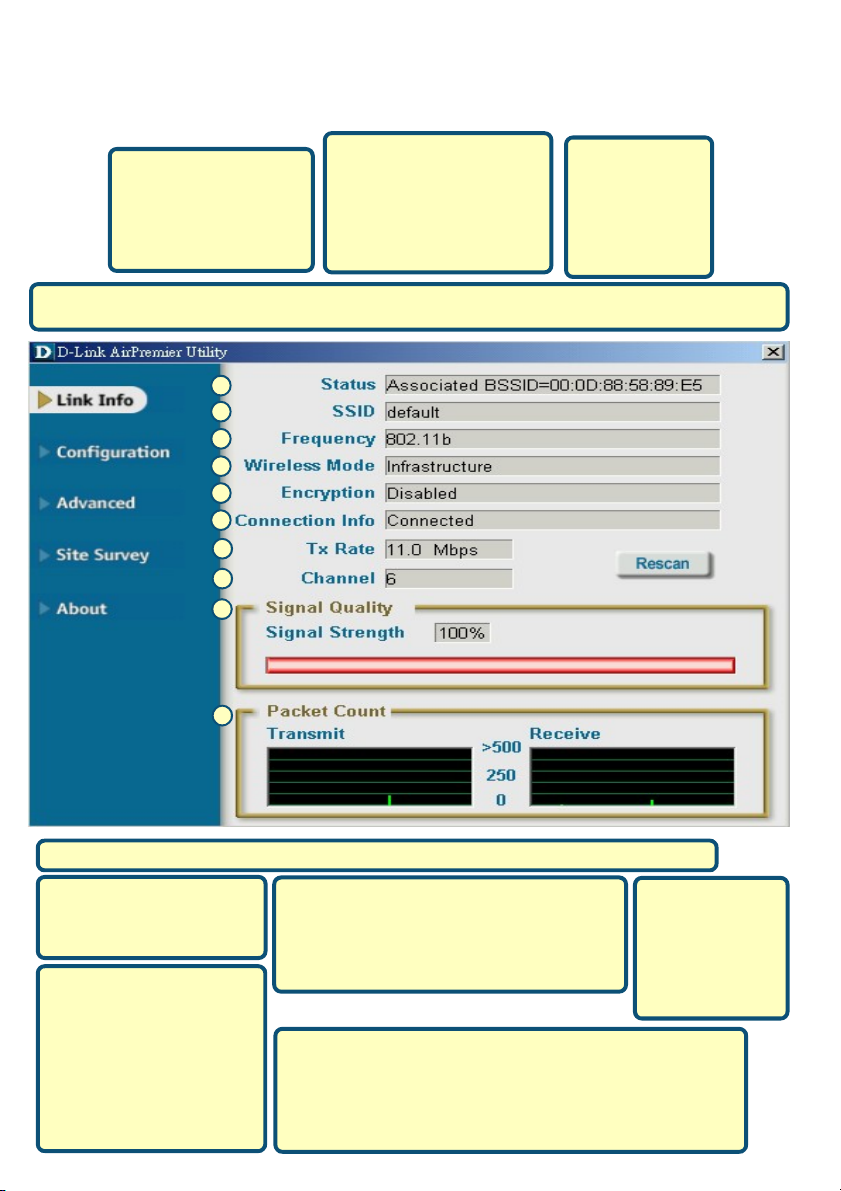
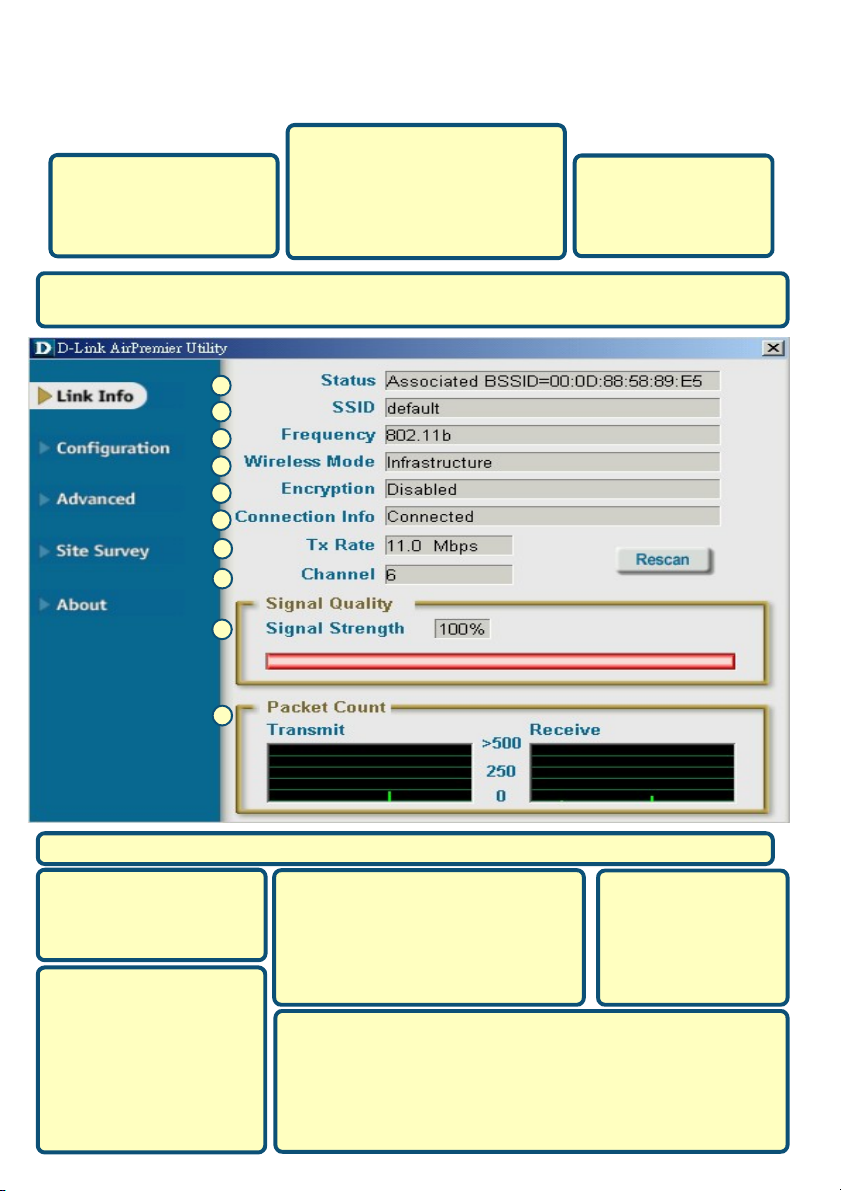
Using the Configuration Utility
A. Status: Displays the
MAC Address of the
Access Point that is
associated with the
DWL-AG530.
D. Wireless Mode: The factory setting is set to Infrastructure. Ad-Hoc mode is used for
peer-to-peer networking.
A
B
C
D
E
F
G
H
I
J
B. SSID: The Service Set
Identifier is the name
assigned to the wireless
network. The factory
SSID setting is set to
default.
C. Frequency:
Displays the
current frequency used
by the adapter.
E. Encryption: Displays the current encryption status of the wireless connection.
F. Connection Info:
Displays connected or
authenticated information.
G. TxRate: The default
setting is Auto; meaning,
TxRate settings are
automatically determined
by the DWL-AG530
depending on the
distance from the access
point.
H. Channel: Displays the channel
information. By default, the channel is
set to 6. Please note that the DWLAG530 will automatically adjust channel
depending on the Access Point.
I. Signal Quality : Displays the Link Quality for the DWL-
AG530 wireless connection to the access point. The
Signal Strength represents the wireless signal between the access point and the DWL-AG530. The
percentage coincides with the graphical bar.
9
J. Packet
Count: Graphi-
cally displays
the statistics of
data transmitted
and received.
Page 10
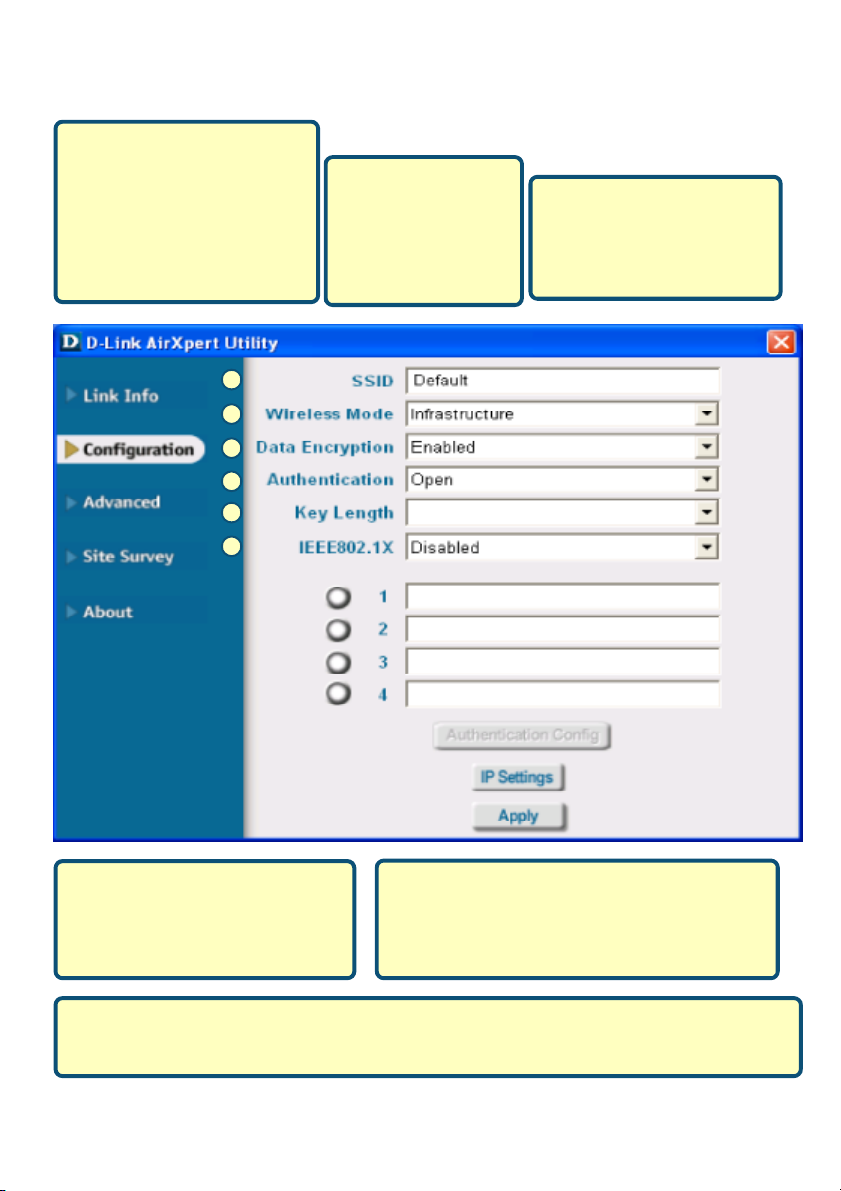
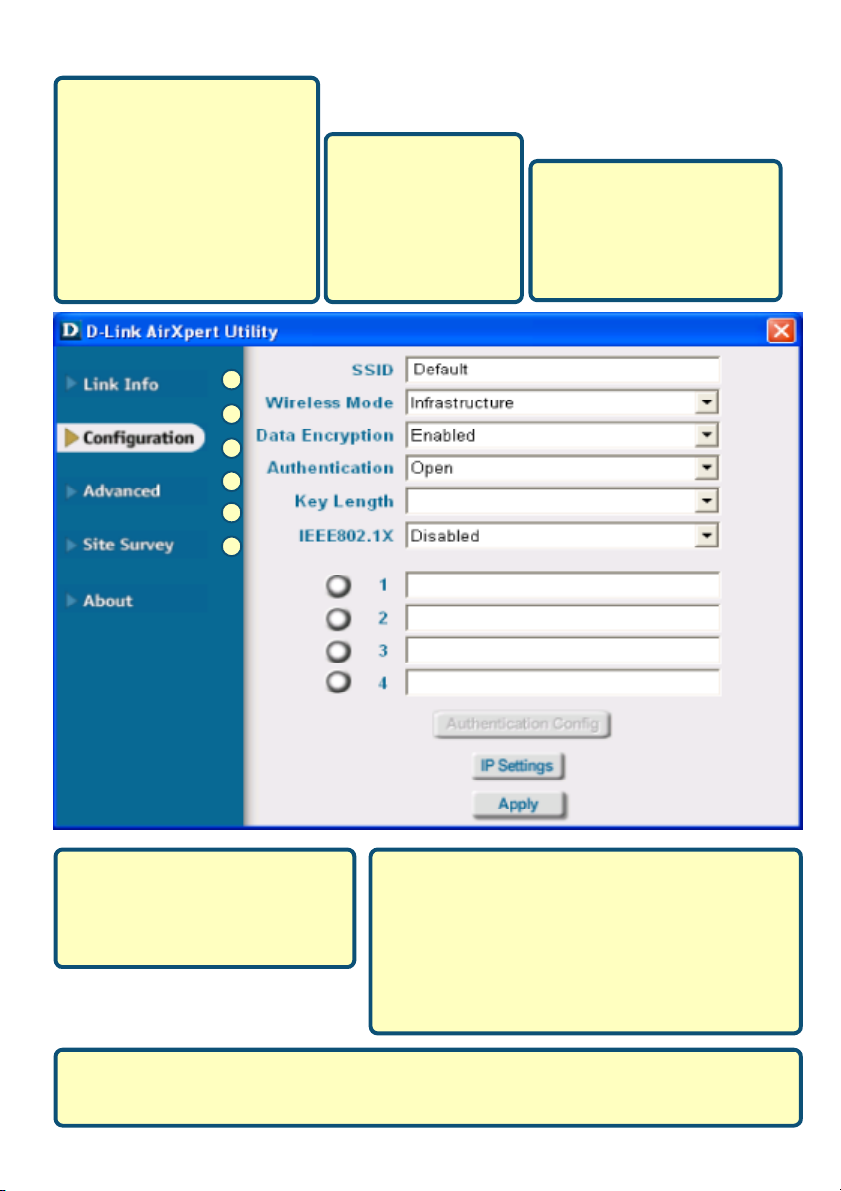
K. SSID: The Service Set
Identifier is the name assigned to the wireless
network. The factory SSID
setting is set to default. Make
changes here to match the
SSID on existing Wireless
Router or Access Point.
K
L
M
N
O
P
L. Wireless Mode:
The factory setting is
set to Infrastructure.
Ad-Hoc mode is used
for peer-to-peer
networking.
M. Data Encryption: The
default setting is set to
Disabled. The adapter
supports WEP and AES
when encryption is enabled.
N. Authentication: You can specify
the authentication mode for the
wireless network. The default
setting is set to Open Authentica-
tion.
P. IEEE 802.1x: When encryption is enabled, you will have the option to specify the level
and key format of the encryption used. Select the appropriate Key Index : 1-4 and enter
ACSII or hexadecimal digits in the appropriate field.
O. Key Length: When encryption is enabled,
you will have the option to specify the level and
key format of the encryption used. Select the
appropriate Key Index : 1-4 and enter ACSII or
hexadecimal digits in the appropriate field.
10
Page 11

Technical Support
You can find software updates and user documentation on the D-Link website.
D-Link provides free technical support for customers within the United States and
within Canada for the duration of the warranty period on this product.
U.S. and Canadian customers can contact D-Link technical support through our
website, or by phone.
Tech Support for customers within the United States:
D-Link Technical Support over the Telephone:
(877) 453-5465
24 hours a day, seven days a week.
D-Link Technical Support over the Internet:
http://support.dlink.com
email:support@dlink.com
Tech Support for customers within Canada:
D-Link Technical Support over the Telephone:
(800) 361-5265
Monday to Friday 8:30am to 9:00pm EST
D-Link Technical Support over the Internet:
http://support.dlink.ca
email:support@dlink.ca
12
Page 12
Dieses Produkt ist für folgende
Betriebssysteme geeignet: Windows
XP, Windows 2000, Windows
Me, Windows 98SE
DWL-AG530
Air Premier Dualband
Wireless PCI Adapter
Bevor Sie anfangen
YAls Mindestausstattung ist erforderlich:
• Ein Desktop-Rechner mit einem freien PCI 2.2-, 32-Bit-, 5-Volt-Slot
• Ein PC mit einem 500 MHz-Prozessor und 128 MB Hauptspeicher (oder mehr)
• Ein 802.11a-, 802.11b- oder 802.11g-Access Point (für Infrastructure Mode)
bzw. ein anderer 802.11a-, 802.11b- oder 802.11g-Wireless Adapter (für Ad-Hoc;
Peer-to-Peer Networking Mode.)
Prüfen Sie den Paketinhalt
Mit dem Kauf Ihres DWL-AG530-Adapters erhalten Sie folgendes Zubehör:
DWL-AG530 Dualband Wireless PCI Adapter
CD-ROM (enthält Treiber, Handbuch und Garantie)
TM
Bei Fehlen einiger der oben aufgeführten Positionen kontaktieren Sie bitte Ihren
Fachhändler.
Legen Sie die D-Link CD-ROM in Ihren
Rechner ein
Starten Sie den Rechner und legen Sie die
D- Link Air Premier DWL-AG530-Treiber-CD
in das CD-ROM-Laufwerk ein.
Die im Folgenden dargestellten Anleitungsschritte
erscheinen unter Windows XP. Alle Arbeitsschritte und
Anzeigen sind in ähnlicher Form auch unter den
anderen Windows-Betriebssystemen vorhanden.
© 2003 D-Link Systems, Inc. Alle Rechte vorbehalten. Warenzeichen oder eingetragene Warenzeichen sind Eigentum der
entsprechenden Inhaber. Änderungen an Software und Spezifikationen vorbehalten.
1
1
Installieren Sie
den DWL-AG530Wireless PCI Adapter
NICHT in Ihrem Rechner
bevor die Treibersoftware
von der D-Link-CD
installiert wurde!
Page 13
Fortsetzung…
Nun wird der
Installationsbildschirm angezeigt.
Klicken Sie auf Install
Drivers
Wird die CD nicht automatisch
gestartet, gehen Sie zu Start >
Ausführen und geben Sie „D:
\Drivers\Setup.exe“ ein. Wenn
die CD danach startet, gehen Sie
weiter zum nächsten Bildschirm.
Geben Sie “D:\Drivers\
Setup.exe” ein.
Der Buchstabe “D”
steht für Ihr CDROM-Laufwerk. Ihr
Laufwerk kann auch
einen anderen
Buchstaben haben.
Klicken Sie auf OK
Klicken Sie auf Next
Klicken Sie auf Next
2
Page 14
Klicken Sie auf Next
Klicken Sie auf Next
Klicken Sie auf Finish
Fahren Sie den Computer
3
Page 15
Installation des DWL-AG530 Wireless
PCI Adapters in Ihrem Rechner
A.Fahren Sie Ihren Rechner herunter und ziehen Sie das Stromkabel ab,
bevor Sie anfangen. Entfernen Sie die Rück- bzw. Seitenabdeckung Ihres
Rechners.
B.Ziehen Sie die Antenne des DWL-AG530-Adapters vorsichtig durch die
Öffnung des PCI-Slots, in dem Sie den Wireless Adapter einsetzen.
C.Schieben Sie den DWL-AG530-
Adapter vorsichtig in einen freien PCISlot (dieser ist in der Regel weiß oder
cremefarben) und lassen Sie diesen
fest einrasten.
D.Schrauben Sie den DWL-AG530-
Adapter an seiner Rückabdeckung
fest.
E. Setzen Sie die Rück- bzw.
Seitenabdeckung des
Rechnergehäuses wieder ein.
Um eine Beschädigung empfindlicher elektronischer
Bauteile durch elektrostatische Entladung zu
vermeiden, sollten Sie sich zuerst durch Berühren
eines frei liegenden Metallstücks am PC-Gehäuse
selber erden, bevor Sie den DWL-AG530-Adapter
einsetzen.
4
Page 16
Installation des DWL-AG520 Wireless
PCI Adapters in Ihren Rechner (Forts.)
F. Befestigen Sie die Antenne vorsichtig an dem
Antennenständer.
G. Fertig!
Antenne für Tisch- oder
Wandbefestigung zur drahtlosen
Verbindung mit einem 802.11a- oder
802.11b-Netzwerk
Schraubbefestigung
Hier wird die
Schraube
angebracht, die
den Adapter auf
der Rückseite
des Rechners
befestigt.
Verbindungs-/ Aktivitäts-LED
Dieses LED zeigt bei
laufendem Computer an, dass
die Karte richtig installiert ist,
und blinkt bei einer
Datenübertragungs-Aktivität.
Antennenkabel —
verbindet den DWLAG530-PCI-Adapter
mit der externen
5
Page 17
Rechner-Neustart
Beim Neustart Ihres Rechners
erscheint das Fenster Neue
Hardware gefunden
(Windows XP):
Wählen Sie die Option Soft-
ware automatisch installieren
(Empfohlen) aus.
Klicken Sie auf Next
Für Windows XP: Nach dem
Neustart kann das Warnfenster Hard-
ware Installation erscheinen.
Klicken Sie auf Installation
fortsetzen, um die Installation
abzuschließen.
Klicken Sie auf
Fertigstellen, um die
Installation abzuschließen.
6
Page 18
Fortsetzung...
Unter Windows 2000 kann
nach dem Neustart das
Fenster Digitale Signatur
Nicht gefunden erscheinen.
Klicken Sie auf Ja, um die
Installation abzuschließen.
Für die D-Link Treibersoftware wird
derzeit das Windows Logo-Testing
durchgeführt. Eine Microsoft Zertifizierung ist
beantragt.
Glückwunsch! Die Installation ist nun
abgeschlossen.
Unter Windows 2000, ME oder 98SE wird dann das D-Link Air Premier
DWLAG530-Konfigurations-Hilfsprogramm automatisch gestartet und das
Programmsymbol erscheint in der rechten unteren Ecke des Desktop-Bildschirms
(Taskleiste). Erscheint das Symbol in GRÜN, ist Ihr DWL-AG530-Adapter
erfolgreich installiert, Sie sind mit einem Wireless-Netz verbunden und
kommunikationsbereit!
Sollte das Programmsymbol nicht
angezeigt werden, doppelklicken
Sie einfach auf das neu
angelegte Verknüpfungssymbol
auf Ihrem Desktop.
Doppelklicken Sie auf das
Symbol, um das Konfigurations-
Hilfsprogramm zu starten.
7
Page 19
Anhang
Um das AirXpert-Hilfsprogramm unter Windows XP einzusetzen, gehen Sie wie
folgt vor:
Klicken Sie auf das Netzwerk-
Symbol in der Taskleiste von
XP, um die Zero Configuration
Wireless Settings zu
verwenden.
Klicken Sie auf Erweitert
Entmarkieren Sie das
Kontrollkästchen Windows
zum Konfigurieren der
Einstellungen verwenden.
Klicken Sie auf OK
8
Page 20
Anhang (Fortsetzung)
Benutzung des Konfigurations-Hilfsprogramms
B. SSID : Der Service Set
A.Status : Zeigt die MAC-
Adresse des Access
Point an, der zum DWLAG530-Adapter gehört.
D. Wireless Mode : Die werksseitige SSID-Einstellung lautet Infrastructure. Ad-Hoc Mode
wird für Peer-to-Peer Networking verwendet.
A
B
C
D
E
F
G
H
I
Identifier ist die
Namensbezeichnung des
Wireless-Netzes. Die
werksseitige SSID-Einstellung
wird als Standard verwendet.
C. Frequency : Zeigt
die gerade vom
Adapter verwendete
Frequenz an.
.
J
E. Encryption : Zeigt den aktuellen Verschlüsselungsstatus der drahtlosen Verbindung an.
F. Connection Info :
Informationen über
Verbindung und
Authentifizierung.
G. TxRate : Die
Standardeinstellung lautet
Auto, d.h. die TxRateEinstellungen werden
vom DWL-AG530-Adapter
je nach Abstand zum
Access Point automatisch
gewählt.
H. Channel: Zeigt die Channel-Daten
an. Der Kanal ist standardmäßig auf
den Wert 6 eingestellt. Beachten Sie,
dass der DWLAG530-Adapter den
Kanal je nach Access Point
automatisch einstellt.
I. Signal Quality : Zeigt die Verbindungsqualität der DWL-
AG530-Wireless-Verbindung zum Access Point an. Durch
den Signal Strength-Wert wird die Stärke des
Verbindungssignals zwischen dem Access Point und dem
DWL-AG530-Adapter angezeigt. Die grafische Anzeige gibt
die prozentuale Signalstärke wieder.
9
J. Packet Count :
Grafische
Übertragungsstatistik
der gesendeten und
empfangenen Daten.
Page 21
K. SSID: Der Service Set
Identifier ist die
Namensbezeichnung des
Wireless-Netzes. Die
werksseitige SSIDEinstellung lautet default.
Änderungen zur Anpassung
an die SSID vorhandener
Wireless Router oder Access
Points hier vornehmen.
K
L
M
N
O
P
L. Wireless Mode:
Die werksseitige
SSID-Einstellung
lautet Infrastructure.
Ad-Hoc Mode wird für
Peer-to-Peer Networking verwendet.
M. Data Encryption: Die
werksseitige Einstellung
lautet Disabled. Der Adapter
unterstützt bei aktivierter
Verschlüsselung WEP und
AES.
N. Authentication: Hier können
Sie den Berechtigungsmodus für
das drahtlose Netz festlegen. Die
Standardeinstellung lautet Open
Authentication.
P. IEEE 802.1x: Bei Aktivierung der Verschlüsselung besteht die Wahl zwischen 4
verschiedenen Schlüsselindizies, die alternativ in ACSII oder hexadecimal eingegeben
werden können.
O. Key Length: Bei aktivierter Verschlüsselung
können Sie die gewünschte
Verschlüsselungsstufe und das zu verwendende
Verschlüsselungsformat auswählen. Wählen Sie
dazu den entsprechenden Schlüssel, d.h. 1-4
aus und tragen Sie die Ziffern im ASCII- oder
Hexdezimal-Format in die entsprechenden
Felder ein.
10
Page 22

Technische Unterstützung
Aktualisierte Versionen von Software und Benutzerhandbuch
finden Sie auf der Website von D-Link.
D-Link bietet kostenfreie technische Unterstützung für Kunden
innerhalb Deutschlands, Österreichs, der Schweiz und
Osteuropas.
Unsere Kunden können technische Unterstützung über unsere
Website, per E-Mail oder telefonisch anfordern.
Web: http://www.dlink.de
E-Mail: support@dlink.de
Telefon: 00800 7250 4000
Telefonische technische Unterstützung erhalten Sie montags bis
donnerstags von 08.00 bis 19.00 Uhr, freitags
von 08.00 bis 17.00 Uhr.
Wenn Sie Kunde von D-Link außerhalb Deutschlands,
Österreichs, der Schweiz und Osteuropas sind, wenden Sie
sich bitte an die zuständige Niederlassung aus der Liste im
Benutzerhandbuch.
12
Page 23
Ce produit fonctionne sous les systèmes
d’exploitation suivants : Windows XP,
DWL-AG530
Windows 2000, Windows Me,
Windows 98SE
Avant de commencer
Vous devez avoir au minimum :
• Un ordinateur de bureau avec un emplacement PCI 2.2, 32 bits, 5V
• Un processeur 500MHz et 128Mo de mémoire
• Un point d’accès 802.11a ou 802.11g (pour le mode Infrastructure) ou un
autre adaptateur sans fil 802.11a, 802.11b ou 802.11g (pour les modes
Ad-Hoc et Peer-to-Peer)
Vérifiez le contenu de l’emballage
Voici les éléments que doit contenir l’emballage du DWL-AG530 :
Carte PCI sans fil bi-bande DWL-AG530
CD-ROM (contenant les pilotes, le manuel et la
garantie)
Air Premier Dualband
Wireless PCI Adapter
TM
Si l’un des éléments ci-dessus manque, contactez votre revendeur.
Placez le CD D-Link dans le lecteur de
CD-ROM de votre ordinateur
Allumez l’ordinateur et placez le CD pilotes
du DWL-AG530 Air Premier D-Link dans le
lecteur de CD-ROM.
Les différentes étapes qui suivent sont illustrées par les
écrans de Windows XP. Les étapes et les écrans sont
semblables pour les autres systèmes d’exploitation
Windows.
© 2003 D-Link Systems, Inc. All rights reserved. Tous droits réservés. Les marques ou les marques enregistrées sont la
propriété de leurs propriétaires respectifs. Le logiciel et les spécifications sont susceptibles d’être modifiés sans préavis.
1
1
N’INSTALLEZ
PAS l’adaptateur
PCI sans fil DWL-AG530
dans votre PC avant
d’avoir installé le
pilote qui se trouve sur
le CD D-Link !
Page 24
Suite…
L’écran d’installation apparaît.
Cliquez sur Install Drivers
Si la fonction Autorun de votre
ordinateur n’est pas activée
automatiquement,
sélectionnez Démarrer >
Exécuter et tapez « D:
\Drivers\Setup.exe. ». Si elle
est activée, passez à l’écran
suivant.
Tapez «D:\Drivers\Setup.exe.»
La lettre « D » est la
lettre d’identification
du lecteur de CD-ROM.
Celle de votre lecteur de
CD-ROM peut être
différente.
Cliquez sur OK
Cliquez sur Suivant
Cliquez sur Suivant
2
Page 25

Cliquez sur Suivant
Cliquez sur Suivant
Cliquez sur Terminer
Éteignez votre ordinateur
3
Page 26

Installation de l’adaptateur PCI sans fil
DWL-AG530 dans votre ordinateur
A. Vérifiez que votre ordinateur est éteint et débranchez le câble
d’alimentation. Retirez le panneau arrière ou latéral de l’ordinateur.
B. Faites passer avec précaution l’antenne du DWL-AG530 à travers
l’ouverture située à côté de l’emplacement PCI que vous destinez au
DWL-AG530.
C. Installez avec précaution le
DWL-AG530 dans l’emplacement PCI
(généralement de couleur « blanche »
ou « crème »).
D. Fixez le panneau arrière du
DWL-AG530 avec sa vis de montage.
E. Remettez en place le panneau arrière
ou latéral de l’ordinateur.
Pour éviter toute détérioration due à l’électricité statique,
mettez-vous à la terre en touchant une partie métallique de
votre ordinateur afin de décharger toute électricité statique
avant d’installer l’adaptateur PCI sans fil DWL-AG530.
4
Page 27

Installation de l’adaptateur PCI sans fil
DWL-AG530 dans votre ordinateur (suite)
F. Placez l’antenne sur son support.
G. Vous avez fini !
Antenne murale ou de bureau pour
la connexion par radio à des réseaux
802.11a et 802.11b.
Vis de fixation.
La vis de fixation
de l’adaptateur
à l’arrière de
votre ordinateur
passe par cette
encoche.
Voyant de liaison/activité.
Indique que la carte est
installée correctement lorsque
l’ordinateur est allumé. Il
clignote lorsque des
données sont émises.
Câble d’antenne - relie la
carte PCI du DWL-AG530
à l’antenne externe.
5
Page 28

Redémarrez votre ordinateur
Lorsque vous redémarrez votre
ordinateur, l’écran de l’Assistant de
mise à jour du matériel (Windows
XP) apparaît :
Sélectionnez « Installer le
logiciel automatiquement
(recommandé)
Cliquez sur Suivant
Dans le cas de Windows XP :
cet écran Installation
matérielle peut apparaître après le
redémarrage de l’ordinateur.
Cliquez sur « Continuer »
pour finaliser l’installation.
Cliquez sur « Terminer »
pour terminer l’installation.
6
Page 29

Suite…
Dans le cas de
Windows 2000, l’écran
« Signature numérique non
trouvée » peut apparaître après
le redémarrage de l’ordinateur.
Cliquez sur Oui pour
finaliser l’installation
Le pilote D-Link de ce périphérique est
actuellement en cours de test de
compatibilité avec Windows. Il est en attente de
certification Microsoft.
L’installation est terminée !
Après le clic sur Continuer (Windows 2000, ME ou 98SE), l’utilitaire de configuration du DWL-AG530 Air Premier D-Link démarre automatiquement et l’icône de
l’utilitaire apparaît dans l’angle inférieur droit du bureau. Si cette icône apparaît
en VERT, c’est que vous avez installé avec succès le DWL-AG530, que vous
êtes connecté à un réseau sans fil et que vous êtes prêt à communiquer !
Si l’icône de l’utilitaire de configuration n’apparaît, double-cliquez
sur l’icône de raccourci qui a été
créée sur votre bureau.
Double-cliquez sur l’icône de
l’utilitaire de configuration pour
l’utiliser.
7
Page 30

Annexe
Sous Windows XP, si vous voulez utiliser l’utilitaire AirXpert, procédez de la façon
suivante.
Cliquez sur l’icône
Connexion au réseau pour
utiliser les paramètres Wireless Zero Configuration.
Cliquez sur Avancé
Désactivez « Utiliser Windows
pour configurer mon réseau
sans fil ».
Cliquez sur OK
8
Page 31

Annexe (suite)
Utilisation de l’utilitaire de configuration
B. SSID : cet
A. Status : affiche
l’adresse MAC du
point d’accès associé
au DWL-AG530.
D. Wireless Mode (mode de fonctionnement) : le mode par défaut est le mode
D. Wireless Mode: The factory setting is set to Infrastructure. Ad-Hoc mode is used for
peer-to-peer networking.
Infrastructure. Ad-Hoc est utilisé pour la communication d’homologue à homologue.
A
B
C
D
E
F
G
H
I
J
identificateur est le
nom attribué au réseau
sans fil. Sa valeur par
défaut est default.
C. Frequency :
affiche la fréquence
actuellement
utilisée par
l’adaptateur.
E. Encryption (cryptage) : affiche l’état de cryptage de la connexion sans fil.
F. Connection Info:
affichage connecté ou
information authentifiée.
G. TxRate (débit) : la
vitesse par défaut est Auto,
ce qui signifie que la vitesse
TxRate est déterminée
automatiquement par le
DWL-AG530 en fonction de
la distance par rapport au
point d’accès.
H. Channel (canal) : la valeur par
défaut de ce paramètre est 6. À
noter que le DWL-AG530 règle
automatiquement le canal en
fonction du point d’accès.
I. Signal Quality : affiche la qualité de la liaison radio
avec le point d’accès pour le DWL-AG530. L’intensité du
signal est l’intensité du signal radio entre le point d’accès
et le DWL-AG530. Une barre graphique indique la valeur
de chacun de ces paramètres.
9
J. Packet Count
(nombre de paquets)
: affiche graphiquement
les statistiques
d’émission et de
réception de données.
Page 32

K. SSID : cet identificateur
est le nom attribué au
réseau sans fil. Sa valeur
par défaut est default.
Tapez ici le SSID du point
d’accès ou du routeur sans
fil existant
K
L
M
N
O
P
L. Wireless Mode
(mode de
fonctionnement) : le
mode par défaut est le
mode Infrastructure.
Ad-Hoc est utilisé
pour la communication d’homologue à
homologue
M. Data Encryption
(cryptage) : par défaut le
cryptage est Disabled.
Lorsque le cryptage est
activé, l’adaptateur prend
en charge les cryptages
WEP et AES.
N. Authentication
(authentification) : vous
pouvez spécifier le mode
d’authentification pour le réseau
sans fil. Par défaut, la valeur de
ce paramètre est Open
Authentication.
O. Key Length (longueur de clé) :
lorsque le cryptage est activé, vous
pouvez préciser le niveau de cryptage et
la longueur de la clé. Sélectionnez l’index
de clé approprié : 1 à 4 et tapez une
valeur en ASCII ou en hexadécimal dans
le champ approprié.
P. IEEE 802.1x: Lorsque l’encryption est permise, vous pourrez spécifier le niveau
et le format de la clé de l’encryption utilisée. Sélectionnez le « Key Index »
approprié : 1-4 et entrez ACSII ou les chiffres hexadécimaux dans le champs
approprié.
10
Page 33

Assistance technique
Vous trouverez la documentation et les logiciels les plus
récents sur le site web D-Link.
Le service technique de D-Link est gratuit pour les clients
aux Etats-Unis durant la période de garantie.
Ceuxci peuvent contacter le service technique de
D-Link par notre site internet ou par téléphone.
Assistance technique D-Link par téléphone :
0 820 0803 03
Assistance technique D-Link sur internet :
Web :http://www.dlink.fr
E-mail :support@dlink.fr
12
Page 34

Este producto funciona con los siguientes
sistemas operativos: Windows XP,
Windows 2000, Windows Me,
Windows 98SE
DWL-AG530
Air Premier Dualband
Wireless PCI Adapter
Antes de empezar
Debe disponerse, al menos, de lo siguiente:
• Ordenador de sobremesa con un slot disponible PCI 2.2, 32-bit, 5 voltios.
• Procesador 500 MHz y 128MB de memoria, como mínimo.
• Punto de acceso 802.11a, 802.11b o 802.11g (para modo infraestructura)
u otro adaptador inalámbrico 802.11a, 802.11b o 802.11g (para modo Ad Hoc o Peer-to-Peer).
Comprobar el contenido del paquete
Estos son los elementos incluidos en el DWL-AG530:
Adaptador PCI inalámbrico de banda dual DWLAG530
CD-ROM (contiene controladores, manual y garantía)
TM
Si falta alguno de estos componentes, por favor contacte con su proveedor.
Introducir el CD D-Link en el PC de
sobremesa
Encender el ordenador e introducir el
D-Link Air Premier DWL-AG530 Driver
CD en la unidad de CD-ROM.
Las instrucciones detalladas que figuran a
continuación están basadas en Windows XP. Los
pasos y pantallas son similares para otros
sistemas operativos Windows.
©2003 D-Link Systems, Inc. Reservados todos los derechos. Las marcas o marcas registradas son propiedad de los
respectivos titulares. El software y las especificaciones pueden ser modificados sin previo aviso.
1
1
NO se debe
instalar el
adaptador PCI inalámbrico
en el ordenador antes de
haber instalado el software del controlador
incluido en el CD D-Link.
Page 35

Continuación...
Se mostrará la pantalla de
instalación.
Hacer click en
Install Drivers
Si la función Autorun del CD
no se ejecuta
automáticamente, ir a Start >
Run, en el ordenador, y luego
escribir “D: \Drivers\Setup.
exe.”. Si se inicia el
programa, pasar a la próxima
pantalla.
Escribir “D:\Drivers\Setup.exe”
La letra “D”
representa la letra
de la unidad del CDROM. La unidad de CDROM puede tener otra
letra de unidad.
Hacer click en OK
Hacer click en Next
Hacer click en Next
2
Page 36

Hacer click en Next
Hacer click en Next
Hacer click en Finish
Apagar el ordenador
3
Page 37

Instalar el adaptador PCI inalá mbrico
DWL-AG530 en el ordenador
A. Comprobar que el ordenador está apagado y desenchufar el cable de
alimentación antes de empezar. Quitar la cubierta del ordenador.
B. Con cuidado pasar la antena del DWL-AG530 a través de la abertura
más cercana al slot que se quiera usar para el DWL-AG530.
C. Instalar el DWL-AG530 con cuidado,
colocándolo en el slot PCI disponible
(generalmente de color blanco o
crema).
D.Fijar el soporte del DWL-AG530 con
su tornillo.
E. Volver a colocar la cubierta del
ordenador.
A fin de evitar daños causados por la electricidad
estática, comprobar que la toma de tierra es la correcta,
para ello, y antes de trabajar con el DWL-AG530, debe
tocarse una parte metálica del ordenador, de este modo
se descarga la posible electricidad estática.
4
Page 38

Instalar el adaptador PCI inalá mbrico
DWL-AG530 en el ordenador (cont.)
F. Conectar la antena al soporte de la antena
G. ¡Terminado!
Antena de sobremesa o pared para
establecer conexiones inalámbricas
con redes 802.11a y 802.11b
Soporte de
montaje El
soporte que
asegura el
adaptador a la
parte trasera del
ordenador al
encajar en el slot.
LED de actividad/enlace
Indican que la tarjeta
está correctamente
instalada cuando el
ordenador está
encendido, y parpadean
al transmitir datos.
Cable de antena —
conecta la placa PCI
del DWL-AG530 a la
antena externa.
5
Page 39

Reiniciar el ordenador
Al reiniciar el ordenador, se
mostrará la pantalla de Found
New Hardware Wizard
(Windows XP):
Seleccionar Install de software
automatically (Recommended)
Hacer click en Next
Para Windows XP: Esta pantalla
de aviso de Hardware Installation
puede mostrarse después de que se
haya reiniciado el ordenador.
Hacer click en
Continue Anyway para
terminar la instalación.
Hacer click en
Finish para terminar
la instalación.
6
Page 40

Continuación...
Para Windows 2000,
esta pantalla de Digital
Signature Not Found puede
mostrarse después de que se
haya reiniciado el ordenador.
Hacer click en Yes para
finalizar la instalación.
El software del controlador D-Link
para este dispositivo está siendo evaluado
por Windows. Está pendiente la certificación de
Microsoft.
La instalación ha finalizado
Si se está en Windows 2000, Me o 98SE, se ejecutará automáticamente la
utilidad de configuración D-Link Air Premier DWL-AG530, y el icono de la
utilidad aparecerá en la parte inferior derecha de la pantalla del escritorio
(systray).Si el icono es VERDE, la instalación del DWL-AG530 es la
correcta, se está conectado a una red inalámbrica y listo para
establecer la comunicación.
Si el icono de la utilidad no
aparece, debe hacerse doble
click en el icono de acceso
directo que se encuentra en el
escritorio.
Hacer doble click en el icono de
la utilidad para utilizar la
utilidad de configuración.
7
Page 41

Apéndice
Para Windows XP, si se desea utilizar la utilidad AirXpert, debe realizarse lo
siguiente:
Hacer click en el icono XP
Networking para utilizar los
parámetros sin necesidad de
configuración (Zero Configuration Wireless Settings).
Hacer click en Advanced.
Desactivar “Use Windows
to configure my wireless
network settings”.
Hacer click en OK
8
Page 42

Apéndice (cont.)
Usar la utilidad de configuración
A. Status : Muestra la
dirección MAC del
punto de acceso que
se encuentra asociada
con el DWL-AG530.
D. Wireless Mode : El parámetro por defecto es modo infrastructura. El modo Ad-Hoc
se usa en la conexión peer-to-peer.
A
B
C
D
E
F
G
H
I
J
B. SSID : El identificador
de red es el nombre
asignado a la red
inalámbrica. Por defecto
el parámetro SSID está
en default.
C. Frequency :
Muestra la
frecuencia
actualmente
utilizada por el
adaptador.
E. Encryption : Muestra el estado actual de la encriptación de la conexión inalámbrica.
F. Connection Info : Muestra
información sobre la conexión
o la autentificación.
G. TxRate : El parámetro
por defecto es Auto; de
este modo, los parámetros
TxRate los determina
automáticamente el DWLAG530 en función de la
distancia al punto de
acceso.
H. Channe l: Muestra la información
del canal. Por defecto, el canal se
enceuntra en 6. El DWL-AG530
ajusta automáticamente el canal
en función del punto de acceso.
I. Signal Quality : Muestra la calidad del enlace de la
conexión inalámbrica del DWL-AG530 con el punto de
acceso. Aquí se representa la señal inalámbrica entre
el punto de acceso y el DWL-AG530. El porcentaje
coincide con la barra gráfica.
9
J. Packet Count :
Muestra
gráficamente las
estadísticas de los
datos transmitidos
Page 43

K. SSID: El identificador de
red es el nombre asignado a
la red inalámbrica. Por
defecto el parámetro SSID
está en default. Aquí pueden
hacerse los cambios
necesarios para que el SSID
coincida con el punto de
acceso o router inalámbricos.
K
L
M
N
O
P
L. Wireless Mode: El
parámetro por defecto
es Infraestructure. El
modo Ad-Hoc se usa
en la conexión peerto-peer.
M. Data Encryption: El
parámetro por defecto
es Disabled. El
adaptador soporta WEP
y AES si la encriptación
está activada.
N. Authentication: Se puede
determinar el modo de
autenticación para la red
inalámbrica. Por defecto, se
encuentra como Open
Authentication.
P. IEEE 802.1x: Si está habilitada la encriptación, se puede especificar el nivel y el
formato de la clave de la encriptación utilizada. Se ha de seleccionar el índice de la
clave apropiado: 1-4, e introducir caracteres ACSII o hexadecimales en el campo
correspondiente.
O. Key Lenght: Cuando la encriptación está
activada, se dispone de la opción de especificar
el nivel y formato de la clave utilizada.
Seleccionar el índice de clave adecuado: 1-4 e
introducir dígitos hexadecimales o ASCII en el
campo correspondiente.
10
Page 44

Asistencia Técnica
Puede encontrar el software más reciente y documentación para el
usuario en el sitio web de D-Link .
D-Link ofrece asistencia técnica gratuita para clientes dentro de
España durante el periodo de garantía del producto.
Los clientes españoles pueden ponerse en contacto con la
asistencia técnica de D-Link a través de nuestro sitio web o por
teléfono.
Asistencia Técnica de D-Link por teléfono:
93 409 0775
de lunes a viernes desde las 9:00 hasta las14:00 y de las
15:30 hasta las 18:30
Asistencia Técnica de D-Link a través de Internet:
http://www.dlink.es/supporto/main/view.html
email: soporte@dlink.es
12
Page 45

Il prodotto funziona con i sistemi
operativi: Windows XP, Windows
DWL-AG530
2000, Windows Me, Windows
98SE
Prima di cominciare
Requisiti minimi:
• Desktop con slot PCI 2.2, 32-bit, 5 volt disponibile
• Processore a 500 MHz e 128MB di memoria, o superiore
• Access Point 802.11a, 802.11b o 802.11g (modalità Infrastructure) o secondo
adattatore wireless 802.11a, 802.11b o 802.11g (modalità Ad-Hoc; connessioni
di rete Peer-to-Peer)
Contenuto del pacchetto
L’adattatore DWL-AG530 viene fornito con i seguenti componenti:
DWL-AG530 Adattaore PCI Wireless Dualband
CD-ROM (con driver, manuale e garanzia)
Air Premier Dualband
TM
Wireless PCI Adapter
Se uno dei componenti dovesse risultare mancante, contattare il rivenditore.
Inserire il CD D-Link nel Desktop
Accendere il computer e inserire il CD D-
Link Air Premier DWL-AG530 nella relativa
unità.
La seguente procedura si riferisce a un ambiente
Windows XP. Le fasi descritte sono simili per altri
sistemi operativi Windows.
© 2003 D-Link Systems, Inc. Tutti i diritti sono riservati. I marchi e i marchi registrati sono dei rispettivi proprietari. Il
software e le specifiche sono soggetti a cambiamenti senza preavviso.
1
1
NON installare
l’adattatore
wireless PCI DWL-AG530
nel computer prima di
avere installato il
software contenuto nel
CD D-Link.
Page 46

Continua...
Il sistema visualizza la finestra
Install.
Cliccare su Install
Se la funzione Autorun non
avvia automaticamente il CD,
selezionare Start > Esegui e
digitare “D:\Drivers\Setup.
exe.” Se il CD viene avviato
automaticamente passare
alla schermata successiva.
Digitare “D:
\Drivers\Setup.exe.”
“D” identifica
l’unità CD-ROM e
può variare da sistema
a sistema.
Cliccare OK
Cliccare Avanti
Cliccare Avanti
2
Page 47

Cliccare Avanti
Cliccare Avanti
Cliccare Fine
Spegnere il computer
3
Page 48

Installazione dell’adattatore wireless PCI
DWL-AG530 nel computer
A. Prima di cominciare, verificare che il computer sia spento e il cavo di
alimentazione scollegato. Rimuovere il pannello posteriore del computer.
B.Inserire delicatamente l’antenna del dispositivo DWL-AG530 attraverso
l’apertura adiacente allo slot PCI che si intende utilizzare.
C. Inserire cautamente l’adattatore DWL-
AG530 e fissarlo saldamente nello
slot PCI (generalmente bianco o color
crema).
D.Fissare il pannello posteriore del
dispositivo DWL-AG530 con le viti.
E. Riposizionare il coperchio del
computer.
Per evitare danni da elettricità elettrostatica, creare
un corretto collegamento a terra, prima di toccare un
componente metallico del computer durante
l’installazione dell’ adattatore DWL-AG530.
4
Page 49

Installazione dell’adattatore wireless PCI
DWL-AG530 nel computer (continua)
F. Montare l’antenna sul relativo supporto.
G. Fine.
Viti di montaggio
Viti utilizzate per
fissare
l’adattatore al
computer, da
inserire nei
presenti fori.
Antenna installabile sulla
scrivania a sul muro Supporta
connessioni wireless a reti
802.11a e 802.11b
LED Link/Activity
Quando il computer è
acceso, indicano la corretta
installazione della scheda.
Lampeggiano durante la
trasmissione dei dati.
5
Cavo dell’antenna
— Connette la scheda
PCI DWL-AG530 all’
antenna esterna
Page 50

Riavvio del computer
Al riavvio del computer, appare la
finestra Installazione guidata
nuovo hardware (Windows
XP):
Selezionare Installa il software
automaticamente (consigliato)
Cliccare Avanti
Per Windows XP:
Dopo il riavvio del computer, potrebbe
apparire la finestra Hardware
Installation.
Cliccare su Continua per
terminare l’installazione
Cliccare su Fine per
terminare l’installazione
6
Page 51

Continua …
Per Windows 2000
Dopo il riavvio del
computer, potrebbe apparire
la finestra Digital Signature
Not Found.
Cliccare su Si per
terminare l’installazione.
I driver D-Link per il presente dispositivo
sono in fase di test per la certificazione
Windows Logo. La certificazione Microsoft
è imminente.
L’installazione è completa
Continuando la procedura in ambiente Windows 2000, Me o 98SE, la Configuration Utility del dispositivo D-Link Air Premier DWLAG530 viene caricata
automaticamente e la relativa icona viene visualizzata nell’angolo in basso a
destra dello schermo (barra delle applicazioni). Se l’icona è VERDE,
l’adattatore DWL-AG530 è correttamente installato, connesso alla rete
wireless e pronto per comunicare.
Se l’icona non viene visualizzata
, fare doppio clic sull’icona posta
sul desktop.
Per utilizzare la Configuration
utility, fare doppio clic sulla
relativa icona.
7
Page 52

Appendice
Per utilizzare la Configuration utility AirXpert in ambiente Windows XP, la
procedura è la seguente.
Cliccare sull’icona XP Networking per utilizzare le Zero
Configuration Wireless
Settings.
Cliccare su Advanced
Deselezionare l’opzione
“Use Windows to
configure my wireless
network settings.”
Cliccare su OK
8
Page 53

Appendice (continua…)
Utilizzo della Configuration Utility
A. Status: Visualizza
l’indirizzo MAC
dell’Access Point
associato all’adattatore
DWL-AG530.
D. Wireless Mode: L’impostazione wireless corrisponde a Infrastructure. La modalità
Ad-Hoc è utilizzata per connessioni di rete peer-to-peer.
A
B
C
D
E
F
G
H
I
J
B. SSID: Il Service Set
Identifier rappresenta il
nome della rete
wireless. Il valore di
default del parametro
SSID è default.
C. Frequency:
Visualizza la
frequenza utilizzata
dall’adattatore.
Microsoft è
imminente.
E. Encryption: Visualizza lo stato corrente della cifratura utilizzata per la connessione.
F. Connection Info: mostra le
informazioni di connessione
o autenticazione.
G. TxRate: L’impostazione
di default corrisponde ad
Auto; il che significa che il
parametro TxRate viene
impostato
automaticamente
dall’adattatore DWL-AG530
in base alla distanza dall’
Access Point.
H. Channel: Visualizza le
informazioni relative al canale. Il
valore di default è 6. L’adattatore
DWLAG530 modifica
automaticamente il canale in
base all’Access Point.
I. Signal Strength: Visualizza la qualità della connessione
wireless tra l’adattatore DWL-AG530 e l’ Access Point.
Il valore Signal Strength rappresenta la potenza del segnale
wireless tra Access Point e adattatore DWL-AG530. La
percentuale è rappresentata anche graficamente.
9
J. Packet Count:
Rappresenta graficamente i
dati statistici sulla ricezione
e la trasmissione dei dati.
certificazione Microsoft è
imminente.
Page 54

K. SSID:Il Service Set Identi-
fier rappresenta il nome della
rete wireless. Il valore di
default del parametro SSID è
default. In questo punto è
possibile modificare il valore
del parametro SSID in base
alle caratteristiche della rete
wireless esistente.
K
L
M
N
O
P
L. Wireless Mode:
L’impostazione
wireless corrisponde
a Infrastructure. La
modalità Ad-Hoc è
utilizzata per
connessioni di rete
peer-to-peer.
M. Data Encryption:
L’impostazione di default è
Disabled. Abilitando la
cifratura, l’adattatore
supporta i protocolli WEP e
AES.
N. Authentication: È possibile
specificare la modalità di
autenticazione. Il valore di default
corrisponde ad Open
Authentication.
P. IEEE 802.1x: Quando la cifratura è abilitata, si potrà specificare come opzione il
livello ed il formato della chiave della cifratura usata. Selezionare l’appropriato indice
della Chiave : 1-4 e poi inserire caratteri ASCII o esadecimali nel campo appropriato.
O. Key Length: Quando la cifratura è abilitata,
è possibile specificare il livello e il formato
delle chiavi. Selezionare l’indice appropriato
da 1 a 4 e inserire i caratteri ACSII o
esadecimali nei relativi campi.
10
Page 55

Supporto tecnico
Le ultime versioni del software e la documentazione aggiornata sono
disponibili al sito D-Link.
D-Link fornisce un supporto tecnico gratuito ai clienti residenti in Italia
per tutto il periodo di validità della garanzia del prodotto.
I clienti italiani possono contattare il supporto tecnico D-Link
telefonicamente o attraverso il Web
Supporto tecnico D-Link telefonico:
02-39607 160
Dal Lunedì al Venerdì dalle 9:00 alle 19.00
Supporto tecnico D-Link via Internet:
http://www.dlink.it/supporto/main/view.html
email: tech@dlink.it
12
Page 56

Устройство совместимо со следующими
операционными системами: Windows
XP, Windows 2000, Windows
Me, Windows 98SE
DWL-AG530
Air Premier Dualband
Wireless PCI Adapter
Прежде чем начать
Необходимо наличие следующего оборудования
• Настольный компьютер со свободным 32-битным слотом PCI 2.2, 5 В
• Как минимум процессор 500 MГц и 128 MБ ОЗУ
• Точка доступа (для режима инфраструктуры) стандарта 802.11a, 802.11b
или 802.11g или другой беспроводной адаптер (для взаимодействия
«точка -точка») стандарта 802.11a, 802.11b или 802.11g
Проверьте содержимое комплекта
В комплект поставки DWL-AG530 включены следующие компоненты:
Беспроводный двухдиапазонный PCI адаптер
DWL-AG530
CD-ROM ((содержит драйвера, руководство
пользователя и гарантию )
TM
Если что -то из перечисленного выше отсутствует, то свяжитесь с поставщиком.
Вставьте CD-ROM D-Link в ваш
настольный компьютер
Включите компьютер и вставьте диск
D-Link Air Premier DWL-AG530 Driver CD
в накопитель CD-ROM
Пошаговые инструкции, представленные ниже,
продемонстрированы на примере Windows XP. Шаги
и экраны в других версиях Windows будут похожими.
©2003 D-Link Systems, Inc. All rights reserved. Trademarks or registered trademarks are the property of their respective
holders. Software and specifications subject to change without notice.
1
1
НЕ
устанавливайте
адаптер в слот PCI до
инсталляции драйвера
с D-Link CD!
Page 57

Продолжение...
Появится экран установки.
Нажмите Install Drivers
Если функция Autorun на
компьютере не запустится
автоматически, нажмите
кнопку Пуск > Выполнить
и наберите “D:\Drivers\Setup.
exe.” В противном случае
переходите к следующему
разделу .
Наберите “D:
\Drivers\Setup.exe.”
“D” – логическое
имя накопителя
CD-ROM. Ваш
накопитель CD-ROM
может называться по
другому.
Нажмите OK
Нажмите Next
Нажмите Next
2
Page 58

Нажмите Next
Нажмите Next
Нажмите Finish
Выключите ваш компьютер
3
Page 59

Установка беспроводного адаптера
DWL-AG530 в компьютер
A . Убедитесь , что компьютер выключен и шнур питания отсоединен от
него . Откройте корпус компьютера.
B.Аккуратно проведите антену DWL-AG530 через токрытый разъем
PCI.
C. Аккуратно установите DWL-AG530 и
плотно вставьте его в свободный
слот PCI (который обычно “белого”
или “кремового” цвета ).
D.Зафиксируйте DWL-AG530 на
задней панели корпуса винтом
E. Установите на место крышку
корпуса компьютера.
Для предотвращения повреждения оборудования
статическим электричеством, убедитесь в Вашем
заземлении. Прикоснитесь к металлической детали
корпуса компьютера перед началом установки
беспроводного адаптера DWL-AG530.
4
Page 60

Установка беспроводного адаптера
DWL-AG530 в компьютер
( продолжение)
F. Аккуратно подключите антенну к разъему
на задней панели адаптера
G. Установка завершена !
Настольная или монтируемая
на стену антенна для
беспроводного подключения к
сети 802.11a и 802.11b
Паз для винта
За этот паз
крепится
адаптер PCI к
задней панели
корпуса
компьютера
Индикатор Link/Activity
Показывает
правильность установки,
моргая (при включенном
компьютере) во время
передачи данных
5
Кабель антенны —
соединяет PCI -
адаптер DWL-AG530 с
внешней антенной
Page 61

Перезагрузите ваш компьютер
После перезагрузки компьютера
появится экран Found New
Hardware Wizard (Windows XP):
Выберите Install the software
automatically (Recommended)
Нажмите Next
Для Windows XP: Этот экран
предупреждения Hardware Installa-
tion может появиться после
перезагрузки компьютера.
Нажмите Continue
Anyway для
продолжения установки
Нажмите Finish для
завершения установки
6
Page 62

Продолжение...
В Windows 2000 после
перезагрузки
компьютера может
появиться экран Digital
Signature Not Found.
Нажмите Yes для
завершения установки.
Драйвер D-Link для этого устройства
проходит сертификацию Windows Logo.
Установка завершена!
После того , как вы продолжите работу в Windows 2000, Me, или 98SE, утилита
настройки D-Link Air Premier DWL-AG530 Configuration Utility стартует
автоматически и появляется ярлык в нижнем правом углу панели задач
рабочего стола . Если этот ярлык окрашен в ЗЕЛЕНЫЙ цвет , то установка
DWL-AG530 прошла успешно, компьютер подключился к беспроводной
сети и готов передавать по ней данные!
Если ярлык утилиты не
появился, то щелкните дважды
по ярлыку на рабочем столе.
Для использования
конфигурационной утилиты
щелкните дважды по ярлыку
7
Page 63

Приложение
Для Windows XP, если вы хотите использовать утилиту AirXpert, выполните
следующие шаги.
Нажмите на иконку Сетевые
подключения для
настройки параметров
беспроводного соединения.
Нажмите Advanced
Снимите галочку с пункта
“Use Windows to configure
my wireless network settings.
Нажмите OK
8
Page 64

Приложение (продолжение)
Использование утилиты настройки
A. Status: Отображает
MAC –адрес точки
доступа, к которой
подключен адаптер
DWL-AG530.
D. Wireless Mode: Режим работы адаптера. Значение установок по умолчанию -
Infrastructure. Режим Ad-Hoc используется в одноранговой сети.
A
B
C
D
E
F
G
H
I
J
B. SSID: Service Set
Identifier (SSID) – имя
беспроводной сети.
Значение по умолчанию
SSID - default.
C. Frequency:
Частота , отображает
текущую частоту,
используемую
адаптером
E. Encryption: Шифрование . Отображает состояние параметров шифрования
F. Connection Info:
Отображается информация
о подключении и
аутентификации .
G. TxRate: Скорость
передачи данных .Значение
по умолчанию Auto; это
означает, что скорость будет
выбираться автоматически в
зависимости от расстояния
от адаптера DWL-AG530 до
точки доступа.
H. Channel: Отображает канал
беспроводного соединения . По
умолчанию выбран канал 6. Адаптер
DWL-AG530 автоматически
подбирает канал, основываясь на
параметрах работы точки доступа.
I. Signal Quality : Отображает качество сигнала
беспроводного соединения между адаптером
DWL-AG530 с точкой доступа. Качество
отображается графически в процентном
отношении.
9
J. Packet Count:
Отображает
статистику по
переданным и
полученным
пакетам.
Page 65

K.SSID: (Service Set Identifier)
– имя беспроводной сети.
Значение заводских
установок SSID - default.
Измените данный параметр
для совпадения с SSID
существующего
беспроводного соединения
с точкой доступа.
K
L
M
N
O
P
L. Wireless Mode:
Значение заводских
установок -
Infrastructure. Режим
Ad-Hoc используется
в одноранговой сети.
M. Data Encryption:
Параметры по умолчанию
Disabled. Адаптер
поддерживает протоколы
шифрования WEP и AES.
N. Authentication: Вы можете
указать тип аутентификации для
беспроводной сети. Настройки
по умолчанию - Open
Authentication.
P. IEEE 802.1x: Когда шифрование включено , дополнительно можно указать
уровень и формат ключа, используемый при шифровании. Выберите
соответствующий индекс ключа (Key Index): 1-4 и введите ACSII или
шестнадцатеричные цифры в соответствующее поле .
O. Key Length: Длина ключа. Когда включено
шифрование данных , вы можете указать
длину и формат ключа шифрования .
Выберите индекс ключа: 1-4 и введите в
нужном поле ключ в шестнадцатиричном
формате или в формате ACSII.
10
Page 66

Техническа поддержка
Вы можете найти последнюю версию програмного обеспечения и
документацию по продуктам на сайте D-Link
D-Link обеспечивает бесплатную техническую поддержку клиентов
в течение гарантийного срока изделия .
Клиенты могут связаться со службой технической поддержки
D-Link через наш web-сайт , или по телефону.
Телефоны службы технической поддержки D-Link:
+7 (095) 744 00 99
Техническая Поддержка D-Link через Internet:
support@dlink.ru
12
Page 67

本產品適用於下列作業系統軟體:
Windows XP, Windows 2000,
Windows Me, Windows 98SE
在開始前
必須至少有下列設備:
• 具有可用的PCI 2.2, 32-位,5伏PCI插槽的桌上型電腦
• 至少有500MHz的處理器和128MB記憶體
• 802.11a,802.11b,或802.11g 基地台(用於Infrastructure模式)或另外的 802.11a,802.11b,
或802.11g 無線網卡(用於Ad-Hoc;對等網路模式)
檢查包裝內容
以下是購買DWL-AG530時包括的配件:
DWL-AG530 雙頻段無線PCI網卡
CD-ROM (包括驅動程式,手冊和保證書)
DWL-AG530
Air Premier 雙頻段
TM
無線PCI網卡
如以上內件有任何遺失,請聯繫經銷商
在PC中插入D-Link CD
啟動電腦, 在光碟機裏放入D-Link AirXpert
DWL-AG530驅動CD
接著的指導會一步接一步顯示在Windows XP上.這些
步驟和螢幕顯示在其他的Windows 作業系統上也是類似
的.
版權所有。D-Link與D-Link商標為友訊科技的商標,其他註冊商標分別隸屬該公司所有。最新規格以原廠通告為準,恕不另行通知.
1
1
在從D-Link CD處
安裝驅動軟體之
前,不要把DWL-AG530無
線PCI網卡安裝在電腦裏.
Page 68

繼續...
安裝螢幕將會顯示
點擊 Install Drivers
如果CD自動運行功能在您的電
腦上不能自動運行,請進入
Start>Run,輸入D:\Drivers\
Setup.exe.若開始運行,繼續到下
一畫面
輸入 “D:\Drivers\Setup.exe.”
字母”D”代表光
碟機, 用戶光碟機
可以是不同的字母
點擊 OK
點擊 Next
點擊 Next
2
Page 69

點擊 Next
點擊 Next
點擊 Finish
關閉電腦
3
Page 70

在電腦裏安裝DWL-AG530無線PCI網卡
A.確認關閉電腦,拔去電源線。卸下電腦後機箱蓋.
B.仔細的將DWL-AG530的天線,從預定安裝DWL-AG530網卡的鄰近PCI插
槽繞出.
C.小心地安裝DWL-AG530,穩固地把它
插在可用的PCI槽上(通常是白色或
黃色)
D.確認已用螺絲固定DWL-AG530擴充槽
檔板。
E. 重新安裝好電腦機箱蓋
為了避免因人體所帶靜電導致的損壞,在接觸DWLAG530 PCI無線網路卡之前,請先觸摸一下您電腦的
金屬部分,以確保經由接地消除了可能存在的靜電。
4
Page 71

在電腦上安裝DWL-AG530無線PCI網卡
(繼續)
F. 輕輕地將天線連接到天線架上
G. .完成!
螺絲安裝:能
將網卡安全地
安裝在適合此
插槽的電腦的
後部上
桌面或牆上安裝天線與802.
11a和802.11b網路的無線連接
Link/Activity LEDs:
電腦在執行時,表示卡
片正確安裝;資料傳送
時, LED閃爍
5
天線電纜-連接
DWL-AG530 PCI板
與外部天線
Page 72

重新啟動電腦
重新啟動電腦時,Found New
Hardware Wizard(Windows XP)
畫面會出現
選擇 自動安裝軟體(建議選
項)
點擊 Next
對於Windows XP: 電腦重新啟動
後, 硬體安裝 警告畫面可能會出現.
點擊 Continue Anyway
完成安裝
點擊 Finish, 完成安裝
6
Page 73

繼續...
對於Windows2000,電腦
重新啟動後,這個 找不到
數位簽章畫面可能會出現
點擊 Yes,完成安裝
完成安裝
D-Link 軟體尚未通過 Windows
標誌測試,微軟認證正在測試中
完成Windows XP,2000,ME,或98SE的安裝後, D-Link Air Premier DWL-AG530設定應
用程式會自動執行,應用程式圖示會顯示在桌面畫面上的右下角.如果這個圖示
是綠色的,那表明已經成功安裝了DWL-AG530,準備連接無線網路,並且準備
開始通信.
如果應用程式圖示沒有出現, 雙
擊出現在桌面上臨近的圖示
雙擊應用程式圖示,
使用設定應用程式
7
Page 74

附錄
對於Windows XP,如果希望使用AirXpert應用程式,請依照下列步驟進行.
單擊XP網路圖示, 使用零組態無
線設定
單擊 進階
不要選擇使用 Windows
來設定我的無線網路
點擊 OK
8
Page 75

附錄( 繼續)
使用配置應用程式
A. Status: 顯示與
DWL-AG530相關
的基地台
的MAC地址.
D.Wireless Mode:出廠設置為Infrastructure. Ad-Hoc用於對等的網路.
A
B
C
D
E
F
G
H
I
J
B. SSID:分配給無線網
路的名稱(Service Set
Identifier)出廠SSID預設
為default.
C.Frequency:
顯示當前與基
地台連線所使
用的頻率.
E. Encryption: 顯示當前無線連接的加密狀態.
F. Connection Info:
顯示連接無線基地台與認
證的相關訊息.
G. TxRate: 預設設定為
Auto,意即TxRate設定是
由DWL-AG530根據離基
地台距離的遠近自動決
定的.
H. Channel: 顯示通道資訊.通
道預設值為1,選項自動由DWLAG530決定.
I. Signal Quality : 顯示DWL-AG530與基地台無線連
接的鏈結屬性.信號強度代表基地台和DWL-AG530之間
的無線信號.百分率與條形圖一致.
9
J. Packet Count: 以圖
形的形式顯示傳送和接
收的資料的統計.
Page 76

K. SSID:分配給無線網路的
名稱.出廠.SSID預設為
default。您可以在此做一些
更改,以配合無線路由器或基
地台上的SSID
K
L
M
N
O
P
L. Wireless mode:
出廠設置為
Infrastructure. AdHoc模式用於對等的
網路
M. Data Encryption:預設設
置為Disabled.允許加密時,
網卡支援WEP和AES
N. Authentication: 用戶可以為
無線網路指定認證模式預設設置
為默認設置為Open Authentica-
tion
O. Key Length: 允許認證時,用戶可以指定
使用加密的標準和密鑰格式.選擇恰當的密鑰
指數:1-4,在合適的框中輸入ACSII或十六進位
數.
P. IEEE 802.1x: 起用加密時,可選擇指定該加密的級別與密鑰格式。 選擇適當的密
鑰指數(Key Index): 1-4並在適當區域輸入ACSII或十六進位數。
10
Page 77

友冠技術支援
台灣地區用戶可以透過我們的網站,電子郵件或電話與友冠資訊
技術支援人員 聯絡。
支援服務時間從週一到週五,上午8:30 a.m. 到 5:30 p.m
Web: http://www.dlinktw.com.tw/
FAQ: http://www.dlinktw.com.tw/faq.html
Email: dssqa@dlinktw.com.tw
Phone: 0800-002-615
如果您是台灣地區以外的用戶,請參考使用手冊中記載的D-Link
全球各地分公司的聯絡資訊取得支援服務。
12
 Loading...