

Page 1
Page 2

Table of Contents
Table of Contents
Product Overview ........................................................5
Package Contents....................................................5
System Requirements .............................................5
Introduction ..............................................................6
Important Considerations ........................................8
Emergency Considerations ................................8
Privacy Considerations ...................................... 9
Security Considerations ...................................11
Performance Considerations ............................13
Setting Passwords ...........................................14
Features .................................................................15
Hardware Overview ...............................................16
Connections .....................................................16
LEDs ................................................................ 17
Installation .................................................................. 18
Hardware Installation .............................................18
Starting Microsoft Response Point Assistant ...40
Getting Started .......................................................... 41
What Is a Phone? .................................................. 41
What Is a User? .....................................................42
What Is an Extension Number? .............................44
What Is a Phone Line? ..........................................44
What Is a Phone Service? .....................................44
Office Scenarios ....................................................45
Margie’s Travel .................................................46
Fourth Coffee ...................................................47
Southridge Video ............................................. 48
Choosing Your Call Routing Plan ..................... 49
Introduction to Microsoft Response Point
Administrator ..........................................................51
Phone System Page ........................................ 62
Base Unit Page ................................................64
Connecting the DVX-2000MS Base Unit .........18
Connecting the DPH-125MS IP Phones ..........19
Connecting the DVG-3104MS Gateway ........... 20
Software Installation ..............................................21
Installing Microsoft Response Point
Administrator ....................................................21
Starting Microsoft Response Point
Administrator ....................................................25
Configure the DPH-125MS IP Phones ......... 27
Configure the DVG-3104MS Gateway ..........32
Installing Microsoft Response Point Assistant .36
Call Routing Page ............................................68
Upgrading Software ......................................... 69
Understanding Information Storage and
Retrieval ...........................................................71
Checking the Status of the Phone System ...... 73
Configuring IPSEC ...........................................73
Using Microsoft Response Point Administrator ..... 74
Phones...................................................................74
Adding a Phone ............................................... 75
Editing a Phone ...............................................76
2D-Link DVX-2000MS User Manual
Page 3

Table of Contents
Removing a Phone .......................................... 77
Users .....................................................................78
Adding a User .................................................. 78
Editing a User .................................................. 79
Removing a User ............................................. 80
User Properties ................................................81
Specifying a Persons Name ......................... 81
Specifying a Job Role Name ........................ 82
Specifying a Location Name ........................83
Specifying a Group Name ............................ 84
Publishing User Information in the Directory 85
Enabling the Directory .................................. 86
Disabling the Directory ................................. 87
Voicemail ...............................................................88
Setting Voicemail Options ................................88
Specifying How You Retrieve Voicemail ...........89
Setting a Voicemail Greeting ............................90
Resetting the Extension Number Password .....91
Phone Service .......................................................92
Adding Phone Service ..................................... 93
Editing Phone Service .....................................94
Removing Phone Service ................................ 95
Base Unit ............................................................... 96
Viewing the Event Log ..................................... 96
Viewing Storage Space Detail .........................97
Changing the Base Unit Password ..................99
Configuring the E-Mail Server ........................100
Change the Date and Time ............................101
Backing Up the Base Unit ..............................102
Restoring a Backup of the Base Unit .............103
Call Routing Plans ...............................................104
Setting Up a Call Routing Plan ......................104
Setting Up an Automated Receptionist
Plan ............................................................ 105
Setting Up a Receptionist Plan ..................106
Setting Up an Operator .............................. 107
Setting Up a Multiple Phones Ring Plan .... 108
Configuring Automated Receptionist
Properties ......................................................111
Setting Greetings for the Automated
Receptionist to Use .................................... 112
Tips For Recording Greetings and Prompts 113
Configure Bypass Receptionist .................. 115
Configuring External Access ...................... 116
Setting Call Forwarding Options .................117
Using Microsoft Response Point Assistant .......... 118
Introduction ..........................................................118
Upgrading Assistant .............................................119
Logging On to Assistant.......................................120
User Properties ....................................................121
Specifying Your Name .................................... 121
Specifying a Group Name ..............................122
Specifying a Job Role Name .........................122
Specifying a Location Name .......................... 123
Changing Your Extension Number Password .123
Publishing Your Name in the Directory ...........124
Phone Calls .........................................................125
3D-Link DVX-2000MS User Manual
Page 4

Table of Contents
Using Manual Dialing .....................................125
Dialing an Internal Call ............................... 125
Dialing an External Call .............................. 125
Using Voice Dialing ........................................126
Voice Dialing an Internal Call ..................... 126
Voice Dialing an External Call .................... 126
Answering a Call ............................................127
Transferring a Call ..........................................127
Parking and Retrieving a Call ........................128
Forward a Call ................................................129
Using the Public Address System ..................130
Call Notifications ............................................ 131
Enabling Call Notifications..........................132
Contacts...............................................................133
Importing Contacts .........................................133
Adding and Editing Contacts .........................134
Deleting Contacts ..........................................135
Troubleshooting ....................................................... 144
Administrator ........................................................144
Assistant .............................................................. 148
Networking Basics .................................................. 152
Check your IP address ........................................152
Statically Assign an IP address ...........................153
Technical Specifications ......................................... 154
Contacting Technical Support ................................ 156
Warranty ...................................................................157
Registration .............................................................. 162
Voicemail .............................................................136
Setting Voicemail Options ..............................136
Specifying How You Retrieve Voicemail ......137
Setting Your Voicemail Greeting ..................... 138
Tips For Recording Your Greeting .............. 139
Reviewing Your Voice Messages ....................141
In the Office ................................................ 141
Out the Office ............................................. 142
From an E-Mail Program ............................ 143
4D-Link DVX-2000MS User Manual
Page 5
Section 1 - Product Overview
• D-Link DVX-2000MS Base Unit
• D-Link DPH-125MS IP Phones (5 or 10)
• D-Link DVG-3104MS 4-Port PSTN Gateway
• CAT5 Ethernet Cables
• Power Adapters
• Phone Cable
• CD-ROM with Installation Wizard, User Manual, and QIG
Note: Using a power supply with a different voltage rating than the ones included
will cause damage and void the warranty for this product.
Product Overview
Package Contents
System Requirements
• Computers with Windows®, Macintosh®, or Linux-based operating systems with an installed Ethernet
adapter
• Internet Explorer Version 6.0, Mozilla 1.7.12 (5.0), or Firefox 1.5 and above (for configuration)
5D-Link DVX-2000MS User Manual
Page 6

Section 1 - Product Overview
Introduction
D-Link® VoiceCenter™, a Microsoft® Response Point™ phone system, is designed for small to medium-sized businesses
with support for up to 50 users. VoiceCenter is an IP-based phone system that provides numerous advantages over
traditional PSTN (analog) phone systems. Unlike previous generations of complicated, hard-to-use IP-based products,
VoiceCenter is easy to install, manage, and maintain. VoiceCenter is also portable - businesses that need to relocate
offices can take the phone system along. In addition, VoiceCenter provides state-of-the-art features such as Voiceactivated Dialing, built-in Automated Attendant for answering and routing calls, Call Logs for managing phone usage,
and Automatic Phone, and Gateway Discovery allowing for a simplified setup process.
VoiceCenter is a scalable solution that supports up to 50 IP Phones and Users on a network. There are no fees or
licenses required for adding more phones to the system. Thus, as your company grows and hires new employees, you
only need to purchases more phones.
There are two different types of VoiceCenter bundles: the DVX-2000MS-5 and DVX-2000MS-10. They both include one
DVX-2000MS PBX/Base Unit and one DVG-3104MS PSTN Gateway. In addition, the DVX-2000MS-5 includes five IP
Phones while the DVX-2000MS-10 includes ten phones. There are no additional fees or licenses required to add more
phones or Gateways to the system. Simply add more as needed - up to 50 phones and 50 PSTN lines*.
The DVX-2000MS PBX/Base Unit is the heart of VoiceCenter that runs the Microsoft Response Point phone system
software. Using a networked PC, the DVX-2000MS can be configured and used to manage an entire phone system.
With the Automatic Phone and Gateway Discovery feature, it automatically detects when IP phones or PSTN gateways
are connected to a network for easy hardware setup. At the same time, the DVX-2000MS routes all inbound/outbound
calls as well as internal calls. It also provides a call log to review and manage phone usage.
The DVG-3104MS PSTN Gateway enables SMBs to connect PSTN lines* to a VoiceCenter IP-based phone system
on a network. The Gateway provides four PSTN (FXO) ports for connecting up to four separate PSTN lines*. More
Gateways can be added to a network to accommodate additional PSTN lines*.
6D-Link DVX-2000MS User Manual
Page 7

Section 1 - Product Overview
The D-Link IP Phones include many standard and advanced features not found in analog phone systems. The Onetouch Voice-activated Dialing feature allows users to reach anyone in the company directory or their Microsoft Outlook
address book by simply saying their name.
Users can also transfer, park, and retrieve calls the same way. Voicemail to e-mail forwarding is another convenient
feature. Installing the IP Phone is a breeze since there is no need to run additional Ethernet cables to desktops. D-Link
phones provide two Ethernet ports for connecting to a network and PC. Setting up new phone extensions is just as
easy and only takes a few simple steps to complete.
By D-Link building a solid, dependable hardware platform, and Microsoft providing an easy-to-use phone software
solution, we have accomplished creating the next generation SMB phone solution. D-Link VoiceCenter, a Microsoft
Response Point phone system, is the clear choice for today’s productivity and efficient minded small to medium-sized
business.
*Requires a third party local phone service plan. D-Link Systems, Inc. is not a Telephone Service Provider or VoIP Phone Service Provider.
7D-Link DVX-2000MS User Manual
Page 8

Section 2 - Installation
Important Considerations
Response Point offers many features, including the ability to manage, monitor, and control your phone system with
Administrator. With those features also comes some responsibility to promote users’ privacy and system security, as
well as to keep a landline phone available for emergency calls.
Emergency Considerations
Please read this information carefully, as it applies to calling for help in emergency situations.
• Power, network, or telephone service outages: If there is an outage, disruption, or other degradation of the power,
network, or telephone services at your location, Response Point will not work.
• How to dial 911: Please inform all of your employees, visitors, and Response Point users that they can either dial
911 or 9-911 to access 911 emergency services.
• Maintain an alternative means of calling 911: You should maintain a backup means of calling 911 emergency
services (for example, by using a phone plugged into a standard telephone line or a cell phone) in case of a power
failure, telephone service outage, or other problem that may inhibit you from using Response Point.
• 811 feature: By dialing 811, you can call back the last phone that was used to dial 911. This information will be
stored for only 24-48 hours after 911 is dialed. Note: This feature may not work if the phone as not been registered
with the Response Point base unit by your phone system administrator.
• 911 location obligations that may apply to certain owners of Response Point: Your telephone company may be
required under applicable law to provide a telephone number and address associated with that telephone number
to emergency services when a caller dials 911. Please note that certain U.S. (state and/or federal) and foreign laws
may require the owner of a multi-line telephone system (MLTS), such as Response Point, to provide emergency
services with the physical location/address of the phone that was used to call 911, in addition to the caller’s telephone
number. Compliance with such MLTS laws is your responsibility as the owner of Response Point. Response Point
does not provide to emergency services the physical location/address of a phone that is used to call 911.
8D-Link DVX-2000MS User Manual
Page 9

Section 2 - Installation
Privacy Considerations
The following considerations describe privacy issues that are unique to Response Point:
Privacy of Users
• The personal information that you enter in the User Properties dialog box is stored on the base unit and is not
encrypted. Any user who has access to the base unit password (for example, the phone system administrator) can
modify this information, which includes:
• Voicemail messages that you configure to be retrieved by phone. (Voice messages sent as e-mail attachments
are not stored on the base unit.)
• Names and nicknames that you think external callers might use when speaking to the Automated Receptionist.
• Personal contact information that you upload from your contact store.
• E-mail addresses that you specify to receive voicemail attachments.
• Bypass Receptionist phone numbers that connect directly to the extension numbers that you specify.
• If you select the Remember logon settings check box when logging on to Assistant, your credentials are encrypted
and are stored on the computer running Assistant.
• The directory is available to external callers. You can choose to add or remove your name and extension number
from this directory. However, the phone system administrator can override your choice without your consent—by
either adding your information to the directory or removing your information from it.
• Your user name and extension number are automatically added to the list displayed in Assistant; there is no way
to override this feature. Any user who logs on to Assistant can view this list.
9D-Link DVX-2000MS User Manual
Page 10

Section 2 - Installation
Privacy of Calls
Various components of the Microsoft® Response Point™ phone system must exchange data so that you can place and
receive calls. Similar to many traditional phone systems, where people with access to the office phone network may be
able to listen to phone calls, people with access to your office LAN may also be able to listen to phone calls that you
place using Response Point.
Calls—which are comprised of data packets that pass between base units, phone line adapters, and phones—travel
over the office LAN and are not encrypted. For example, the caller ID information that is exchanged between the phones
and base unit is not encrypted. Likewise, a conversation that is transmitted from one phone to another phone is not
encrypted.
However, data that is exchanged between the base unit and Administrator or Assistant is encrypted.
Privacy of SMTP Servers
The information that is transmitted from the base unit to your SMTP server (such as, a Microsoft Exchange server on
the LAN or your ISP’s e-mail server on the Internet) will be encrypted or not depending on whether your SMTP server
requires encryption. Information that may not be encrypted includes the user name and password for logging on to the
SMTP server and voice messages sent as e-mail attachments. For more information about your base unit’s connection
to the SMTP server, contact the phone system administrator.
Privacy of Backups
The phone system administrator may choose to make a backup of the data on the base unit. Data saved in the backup
file is not encrypted. Therefore, we recommend that the phone system administrator store backups on a removable
hard drive that can be disconnected from the LAN and stored in a secure location (for example, on a disk that can be
stored in a locked drawer).
10D-Link DVX-2000MS User Manual
Page 11

Section 2 - Installation
Transfer of Base Units
Transfer of Base Units
Before transferring the base unit to another person—for example, if you give it to another small business owner or recycle
it—you may want to permanently delete all information using the Erase Data program (“ResponsePointEraseData.exe”)
that comes on the installation CD.
Security Considerations
Security Considerations
Security and privacy are related topics. Privacy Considerations discusses the handling of users’ personal information.
This topic focuses on the issues involved securing your phone system.
While Voice over Internet Protocol (VoIP) brings the power of the Internet to phone services, it also introduces some
security issues. Unless your LAN is secure, employees or callers could change phone settings, listen to others’ voice
messages, and even access the public address system, if you have one.
Consider the following issues in creating a secure phone system:
Change Default Passwords
The first step toward securing Response Point is to change the default password of the base unit. The default base unit
password is admin, which you use from Administrator to connect to the base unit.
Also, encourage your employees to change their passwords using Assistant. An employee is typically assigned to
one extension number password, which is used to log on Assistant and to retrieve voicemail messages. The default
extension number password is 9999.
11D-Link DVX-2000MS User Manual
Page 12

Section 2 - Installation
System Vulnerabilities
Response Point runs on your office LAN, and your organization may have a wireless LAN. While convenient and popular,
the security features in many wireless default implementations may not be adequate for your needs. Consider whether
your LAN security configuration, especially your wireless LAN security configuration, is correct for your business.
Firewall Issues
It’s a good idea to use firewalls to help protect your office LAN. A firewall blocks requests or communication attempts
from any unspecified programs.
If you use a third-party firewall to provide security, instead of the default Windows Firewall, Assistant and Administrator
may not be able communicate with the base unit. To avoid this problem, create firewall exceptions in your firewall program
for Administrator and Assistant. A firewall exception allows selected programs to connect with your computer.
If you are using a third-party firewall, refer to its documentation for instructions on creating firewall exceptions.
Security Certificates
When you first log on to Administrator and connect to a base unit, you are asked to establish a security relationship
between the base unit and the computer running Administrator.
If you proceed to establish that security relationship, the base unit copies a certificate (a digital document) to the
computer running Administrator. Once the two have the same certificate information, your computer automatically trusts
that the base unit is legitimate.
Security certificates are put on the base unit when manufactured and have a 15-year expiration date. If you think you’re
near the 15-year limit, contact the manufacturer’s customer support service.
Occasionally, when you log on, you might get a security error, which won’t allow you to connect to a base unit. This can
occur if the certificate exchange has been corrupted, for example. In this case, try connecting again, or restart the base
unit so that the certificate can be reinitialized. If you still get an error, a program or other device on the LAN might be
trying to fool you or intercept your base unit data. You will see explanatory messages when these conditions occur.
12D-Link DVX-2000MS User Manual
Page 13

Section 2 - Installation
Security of Backups
Phone system data is not encrypted when a backup is created. Therefore, we recommend that the phone system
administrator store backups on a removable hard drive, which can be disconnected from the LAN.
Performance Considerations
Response Point can handle many calls in a timely and reliable manner. However, there are several configuration and
other practices that can affect performance, including how the phone system handles calls, delivery of voice messages,
and so forth. The following issues may affect performance.
Issue: Slow Performance
There is no absolute limit to the number of phones or phone line adapters that can be added to the phone system.
However, the practical limit is 50 phones and 25 phone line adapters. If these limits are surpassed, performance of the
phone system will be sluggish.
Issue: Voice Recognition Performance
System recognition of the names requested by callers can be affected by the total number of contacts stored on the
base unit. If your phone system is experiencing reduced performance, ask users to reduce the number of contacts to
those names and numbers that are called frequently.
Issue: Administrator and Assistant Can’t Communicate/Firewall Effects?
If you choose to use a third-party firewall instead of the default Windows Firewall, Assistant and Administrator will not
be able communicate with each other. A firewall blocks all requests or communication attempts from any unspecified
programs. To avoid this problem, create firewall exceptions in your firewall program for Administrator and Assistant. A
firewall exception allows selected programs to connect with your computer.
13D-Link DVX-2000MS User Manual
Page 14

Section 2 - Installation
Setting Passwords
Voice over Internet Protocol (VoIP) brings the power of the Internet to phone services. Unless your LAN is secure,
however, phone users or callers could change phone settings, listen to others’ voicemail, and even access the public
address system if you have one. Setting passwords is an important action to take to secure your Microsoft® Response
Point phone™ system.
Base Unit Password (Administrator)
To help protect your phone system, immediately change the base unit password when you set up Response Point. In
Administrator, a message will prompt you to change the default base unit password—”admin”—to a unique password.
Choose a strong password that you will remember.
Logon and Voicemail Passwords (Assistant)
Employees also have a password for logging on and accessing their voicemail messages left at their extension number.
If they have more than one extension number, because they are identified as another type of user, they will have a
different password for each extension number. For example, an employee might log on as “Diane Margheim” at extension
101, or as “Sales” at extension 201. In this case, Diane will have a unique password for “extension 101” and “extension
201.”
The default password for extension numbers, set in Assistant, is 9999. As phone system administrator, you can reset
the password to this default when necessary. Otherwise, it’s a good idea to encourage employees to change their
passwords regularly.
14D-Link DVX-2000MS User Manual
Page 15

Section 1 - Product Overview
• A Microsoft® Response Point™ Phone System
• Designed with Simplicity in Mind - Easy to Install, Use and Manage
• Scalable - Add Up to 50 Phones or Phone Lines* to a Network
• No Fees or Licenses Required for Adding More Phones or Gateways
• Supports traditional PSTN lines and SIP trunking
• One-touch Voice-activated Dialing and Voicemail Access
• Automated Attendant for Directing/Incoming/Transfering/Parking or Retrieving Calls
Features
• Voicemail to E-mail Forwarding
• 3-way Call-conferencing
• Call Log for Tracking Phone Usage
• Assistant program for Incoming Call Notification on a PC and Microsoft Outlook Contact
Integration
• Two-click Backup and Restore and Device Firmware Upgrade Utility
*Requires a third party local phone service plan. D-Link Systems, Inc. is not a Telephone Service Provider or VoIP Phone Service Provider.
15D-Link DVX-2000MS User Manual
Page 16
Section 1 - Product Overview
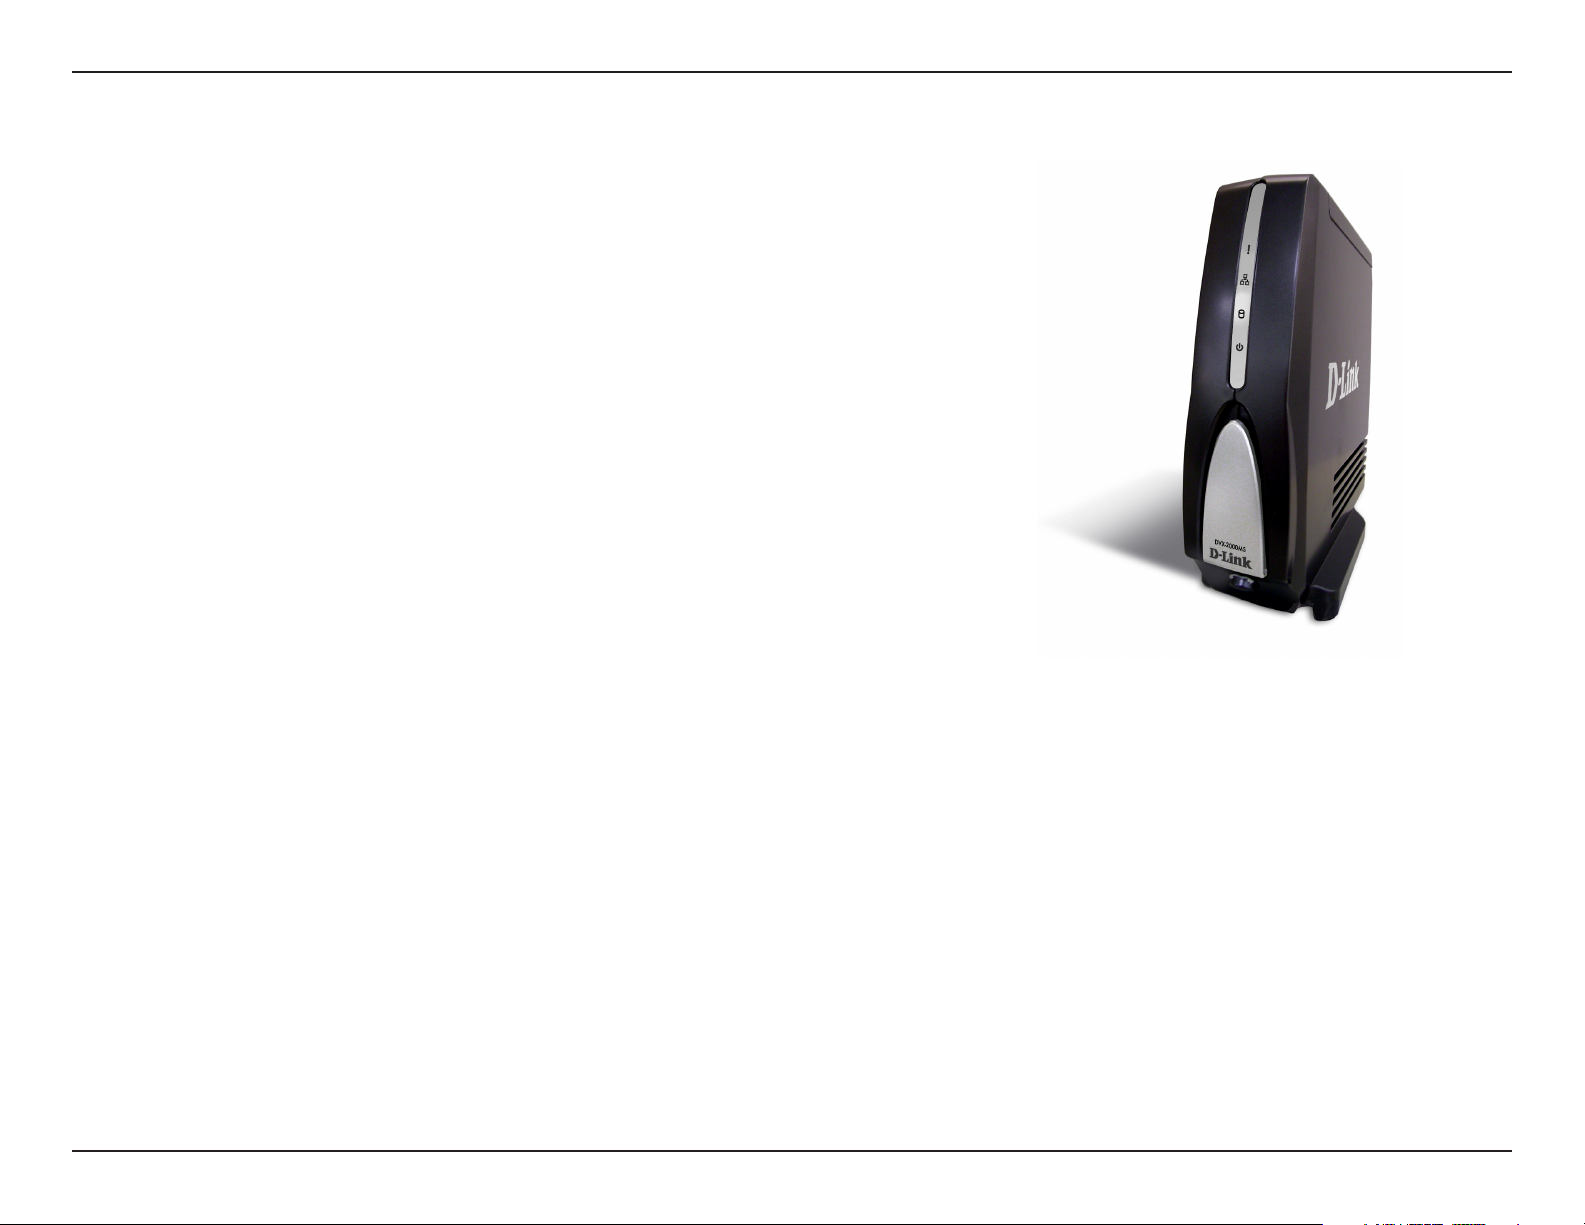
Power Receptor
Receptor for the supplied
power adapter.
Hardware Overview
Connections
Ethernet Port
Used to connect the DVX-2000MS
Base Unit through Ethernet cable
to your Local Area Network.
16D-Link DVX-2000MS User Manual
Page 17
Section 1 - Product Overview
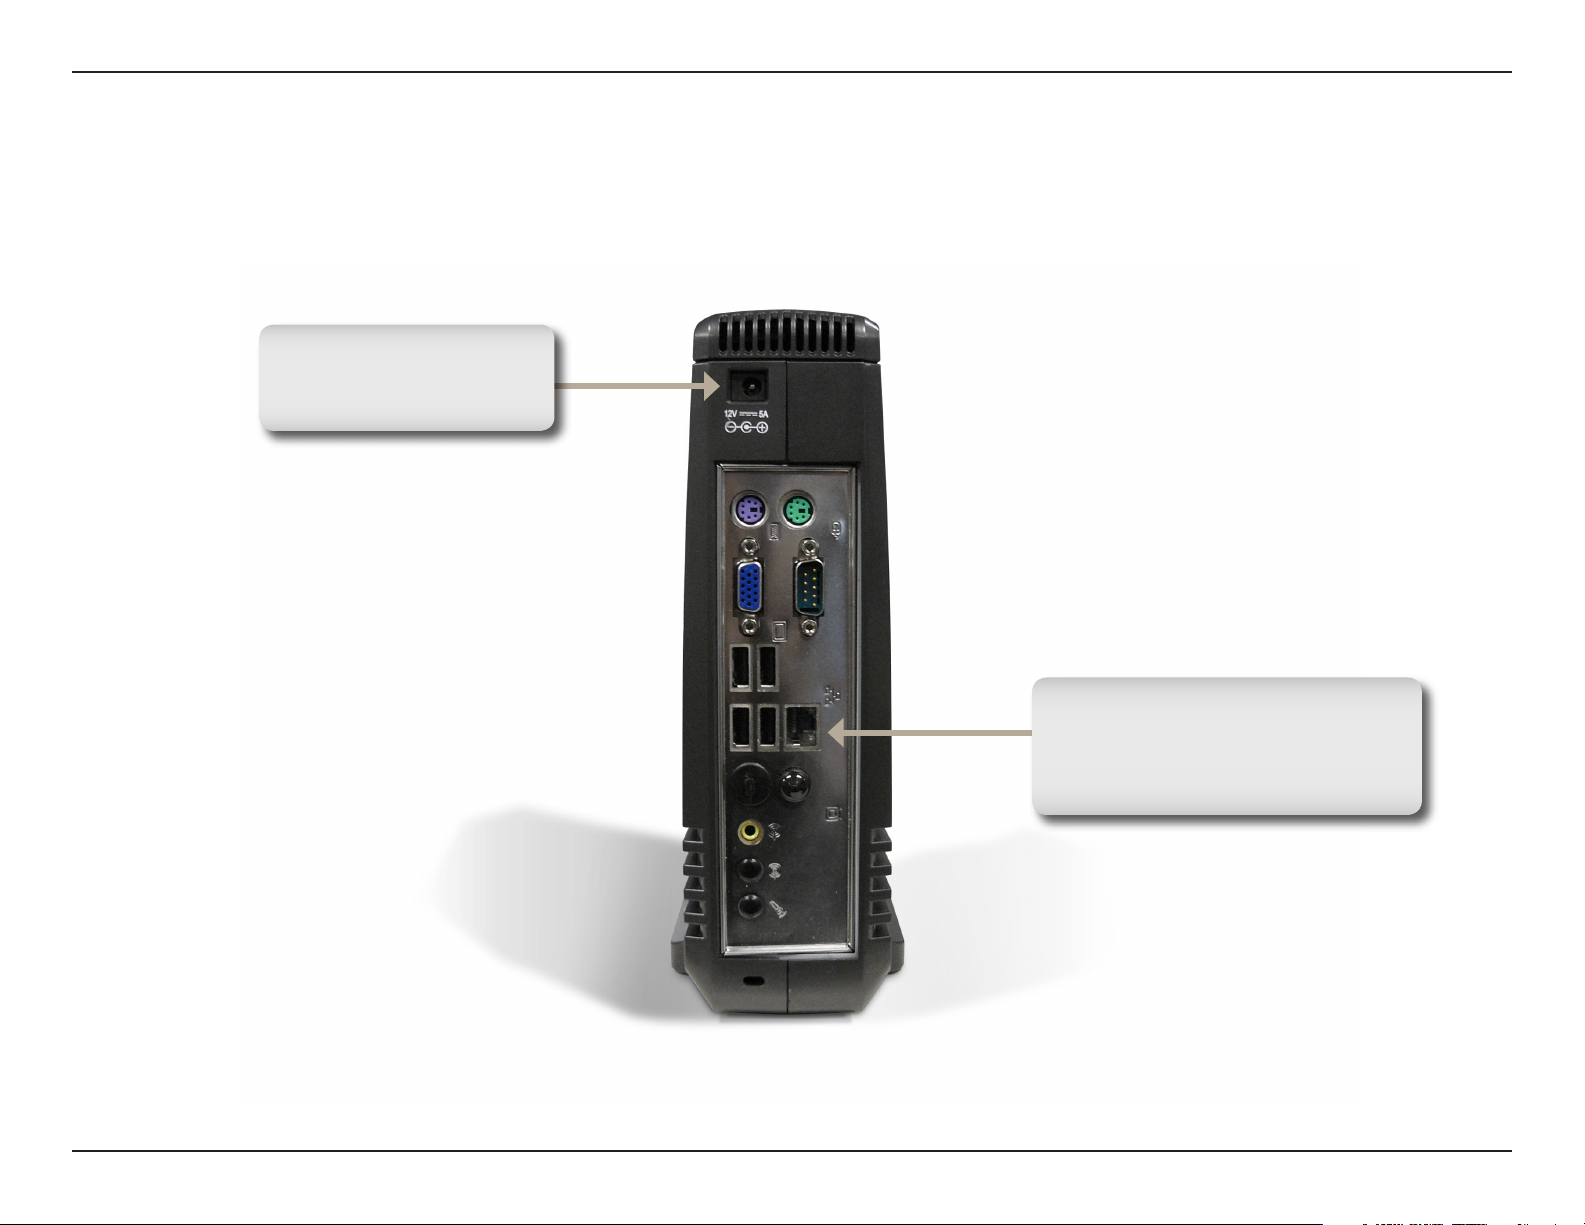
Local Network LEDs
A solid light indicates a connection to
an Ethernet-enabled device on ports
0-4. This LED blinks during data
transmission.
Hardware Overview
LEDs
Alarm LED
A solid red light indicates
an alert in the event viewer.
Compact Flash LED
This LED blinks during data
transmission.
Power LED
A solid light indicates a
proper connection to the
power supply.
Power Button
Used to power ON or OFF the
DVX-2000MS Base Unit.
17D-Link DVX-2000MS User Manual
Page 18
Section 2 - Installation
Hardware Installation
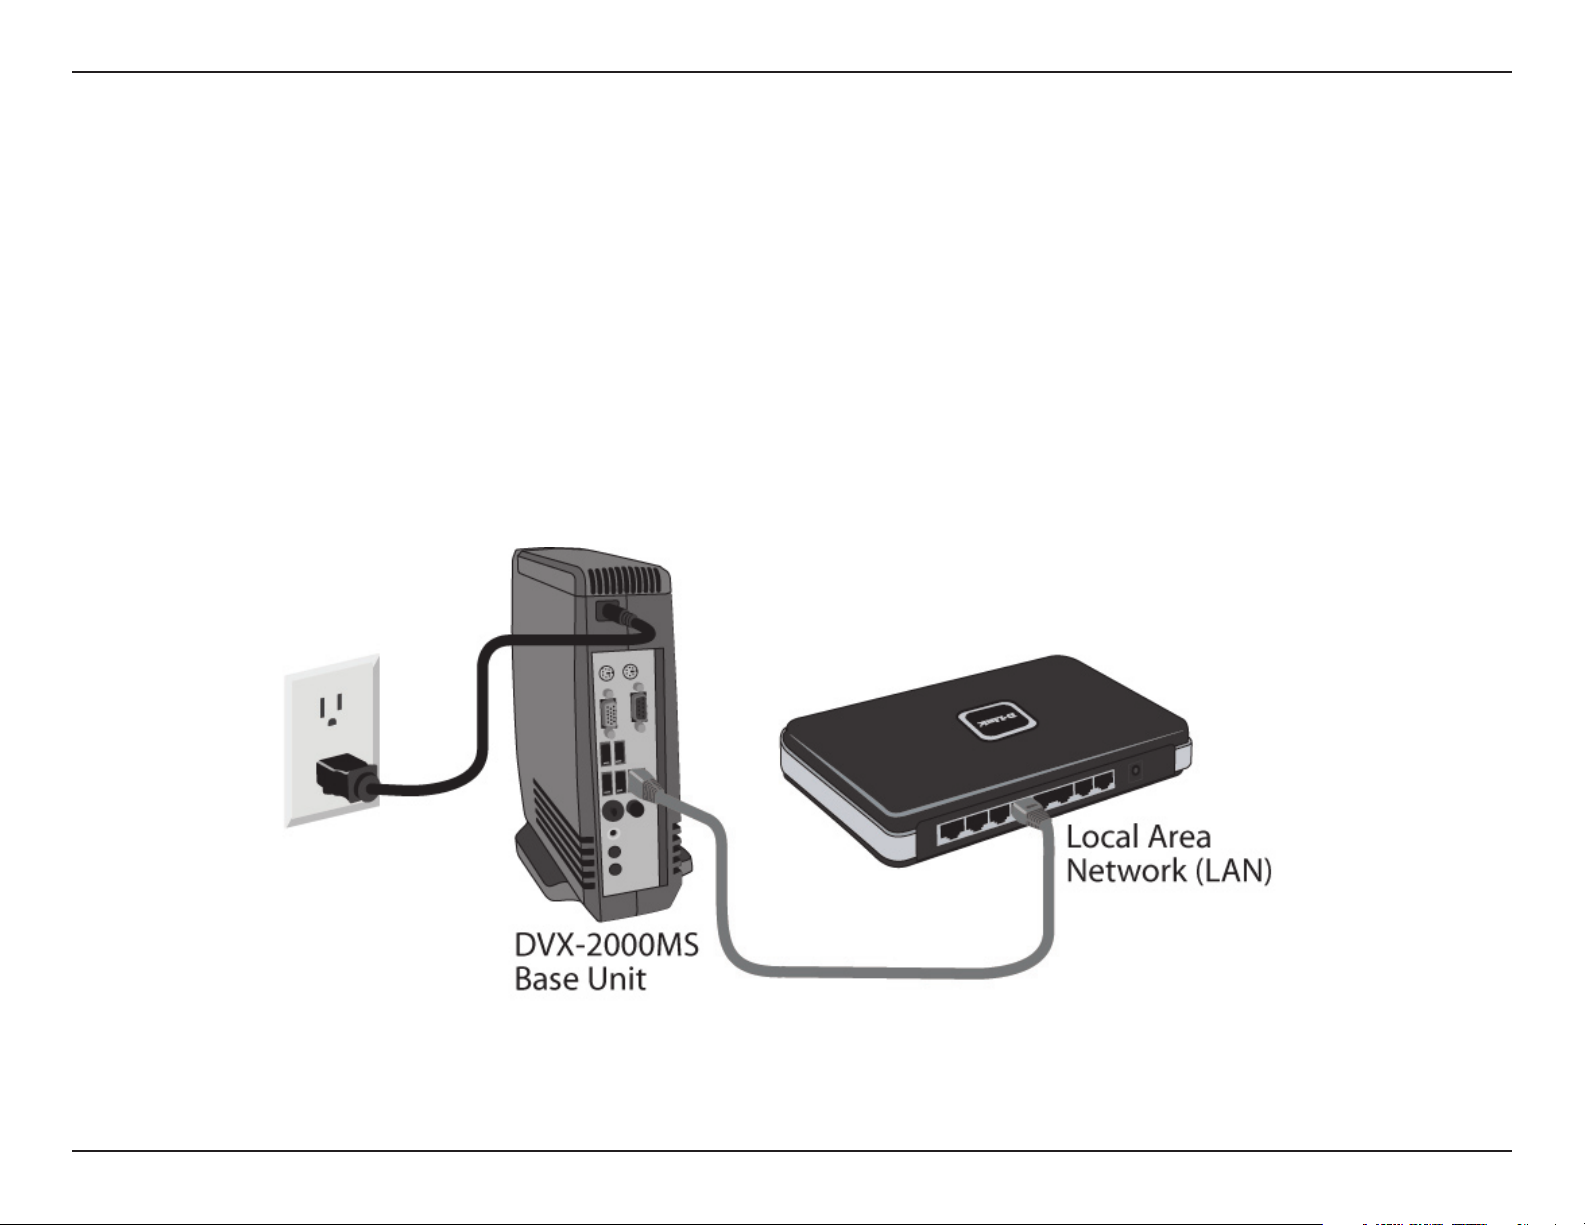
Connecting the DVX-2000MS Base Unit
Plug the power adapter into an AC outlet or power strip and plug the other end into the AC input on the back of the
DVX-2000MS Base Unit. The power LED will light up to indicate proper connection.
Connect one end of the Ethernet cable to the LAN Port on the back of the DVX-2000MS Base Unit and connect the
other end of the Ethernet cable to a Local Area Network via switch or hub. The LAN LED will light up to indicate proper
connection.
When you have connected the DVX-2000MS to your network, it should look like the diagram below:
18D-Link DVX-2000MS User Manual
Page 19
Section 2 - Installation
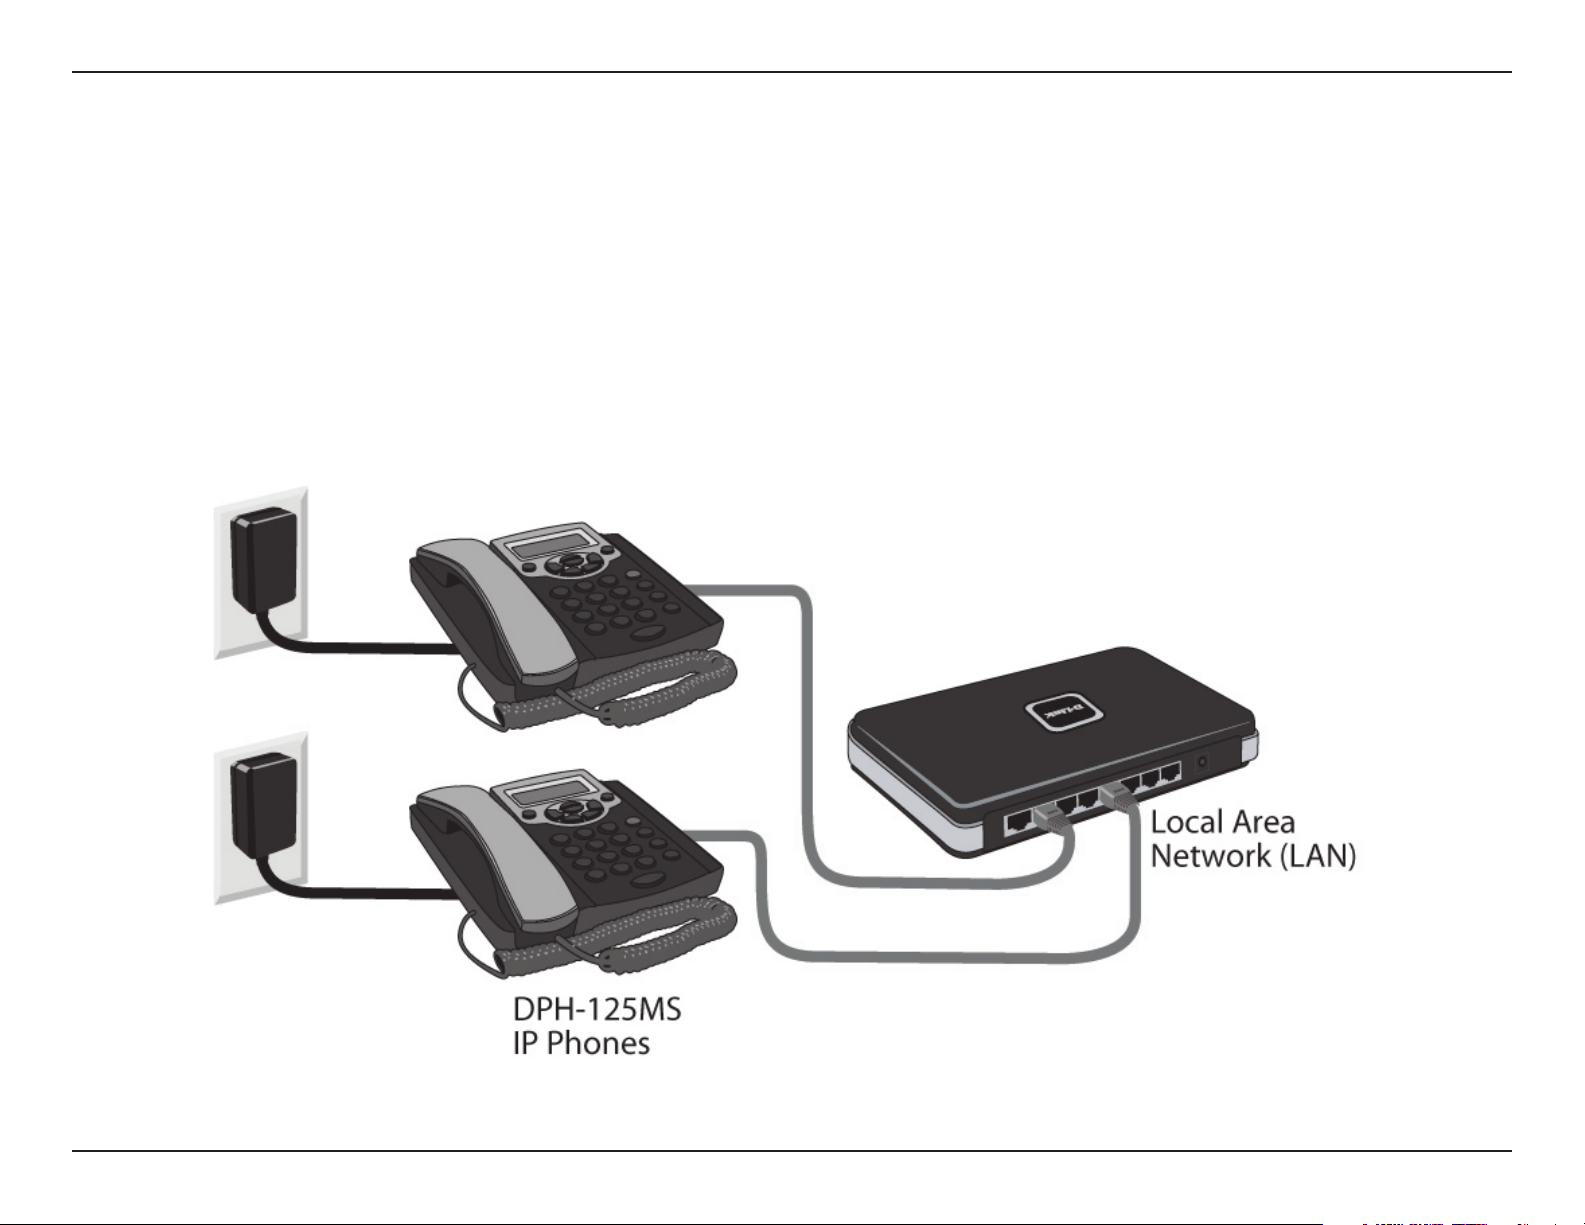
Connecting the DPH-125MS IP Phones
Plug the power adapter into an AC outlet or power strip and plug the other end into the AC input on the DHP-125MS
IP Phone. The Power LEDs will light up to indicate proper connection.
Connect one end of the Ethernet cable to the LAN port on the IP Phone and connect the other end of the Ethernet
cable to your Local Area Network using a switch or hub. Repeats steps for additional DPH-125MS IP Phones.
When you have connected the IP Phones to your network it should look like the diagram below.
19D-Link DVX-2000MS User Manual
Page 20
Section 2 - Installation
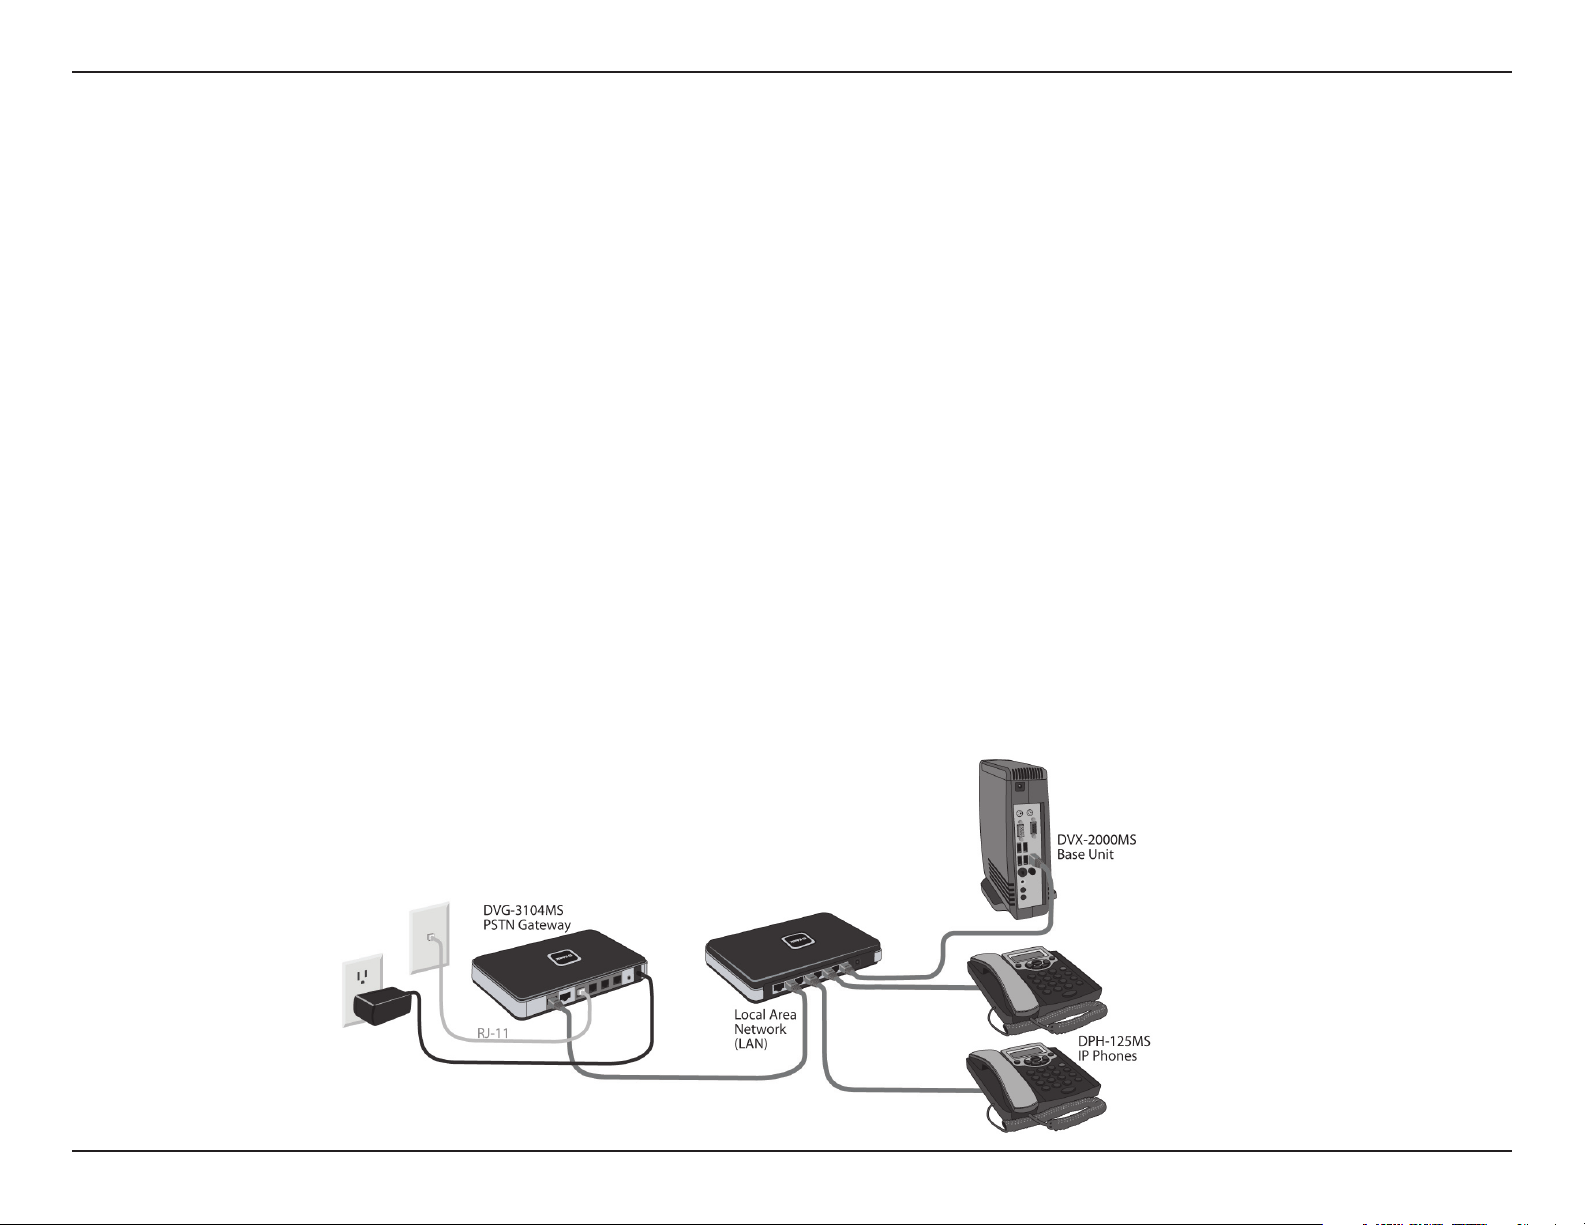
Connecting the DVG-3104MS Gateway
The DVG-3104MS Gateway translates incoming phone calls so they can be sent over your organizations’s LAN, and
translates outgoing calls into the format used by traditional phone service.
Note: Avoid disabling your existing phone service while setting up the VoiceCenter. If you have an alternative jack
available, use it to set up and test the VoiceCenter phone system.
Plug the power adapter into an AC outlet or power strip and plug the other end into the AC input on the back of the
gateway. The power LED will light up to indicate proper connection.
Connect one end of the Ethernet cable to the LAN Port on the back of the gateway and connect the other end of
the Ethernet cable to your Local Area Network using a switch or hub. The LAN LED will light up to indicate proper
connection.
Connect the phone cable to an available PSTN (FXO) Port on the back of the gateway and connect the other end to
a phone jack.
When you have made all the connections to your network, it should look like the diagram below:
20D-Link DVX-2000MS User Manual
Page 21
Section 2 - Installation
Software Installation
Installing Microsoft Response Point Administrator
Insert the VoiceCenter CD in the CD-ROM drive. The step-by-step instructions that follow are shown in Windows®
XP.
If the CD Autorun function does not automatically start on your computer, go to Start > Run. In the run box type
“D:\setup.exe” (where D: represents the drive letter of your CD-ROM drive).
Note: Microsoft® Response Point™ Administrator only operates with Windows® XP SP2 or Windows Vista™.
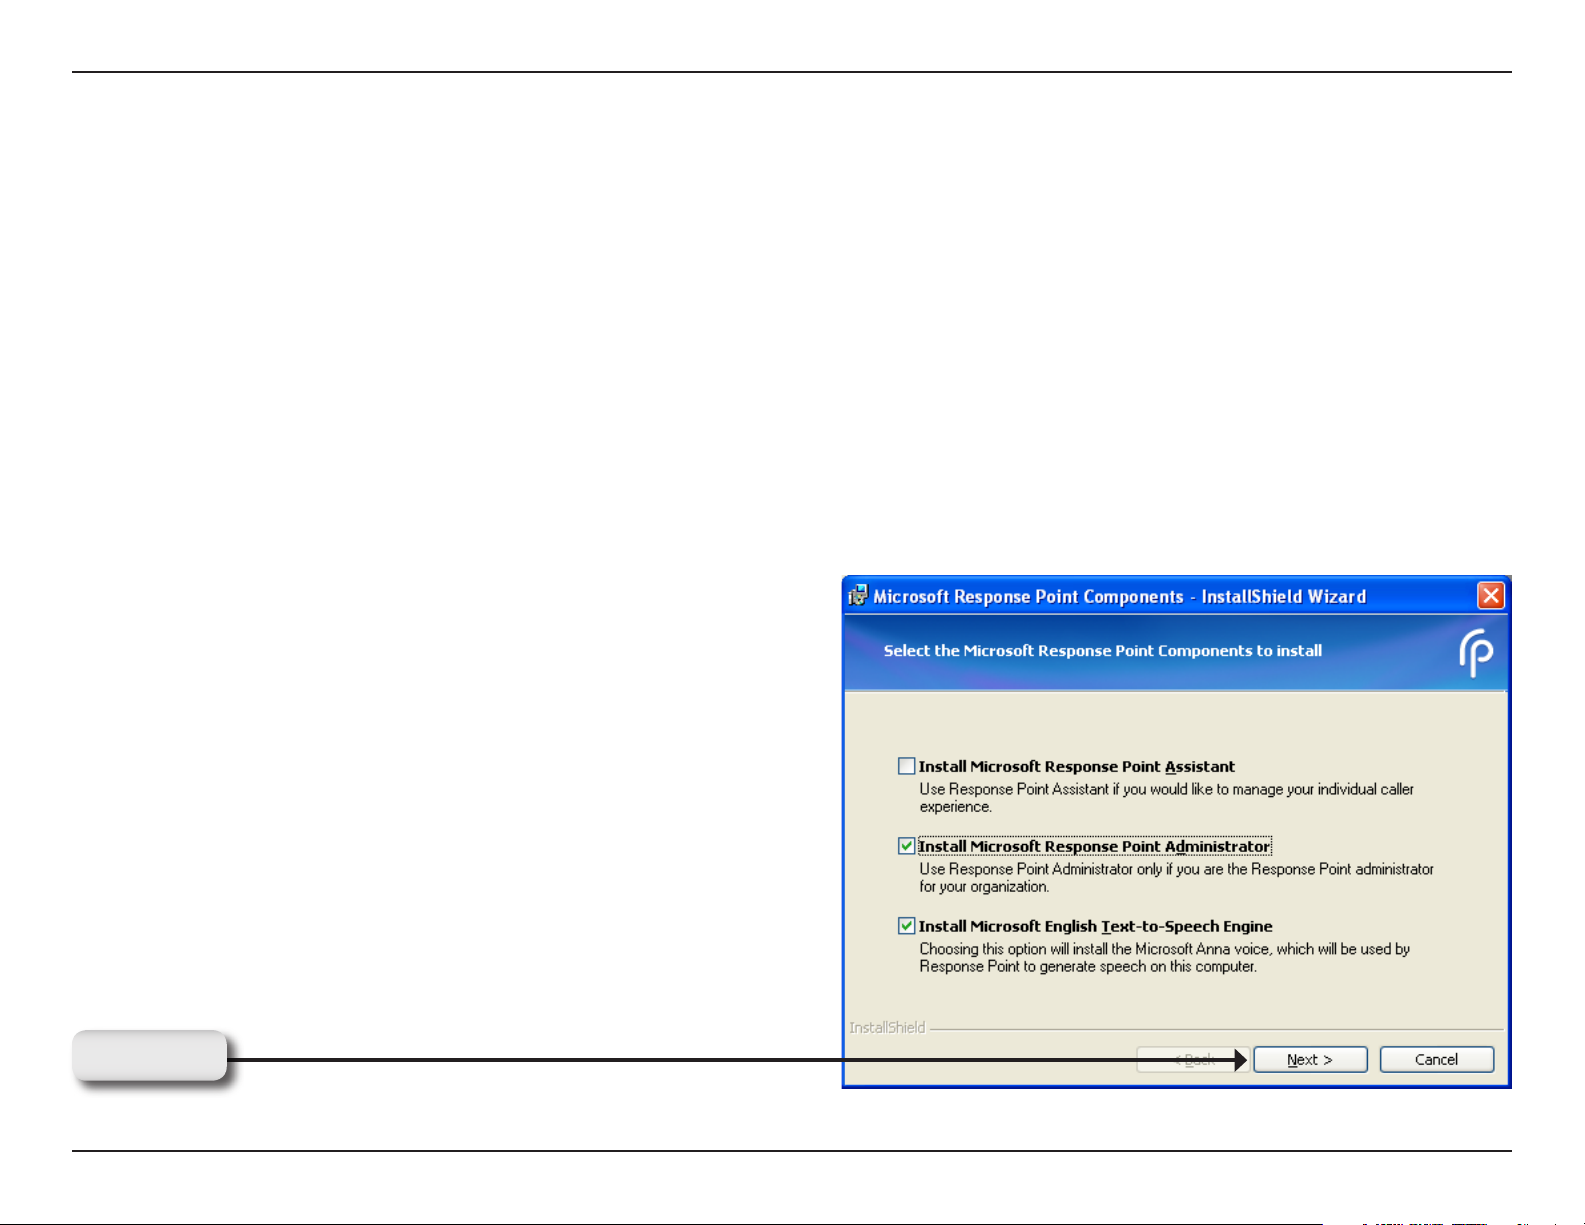
When the autorun screen appears, select Install Microsoft Response Point Administrator and click Next to continue.
Click Next
21D-Link DVX-2000MS User Manual
Page 22

Section 2 - Installation
Click Next to continue.
Click Next
Accept the License Agreement and click Next to continue.
Click Next
22D-Link DVX-2000MS User Manual
Page 23
Section 2 - Installation
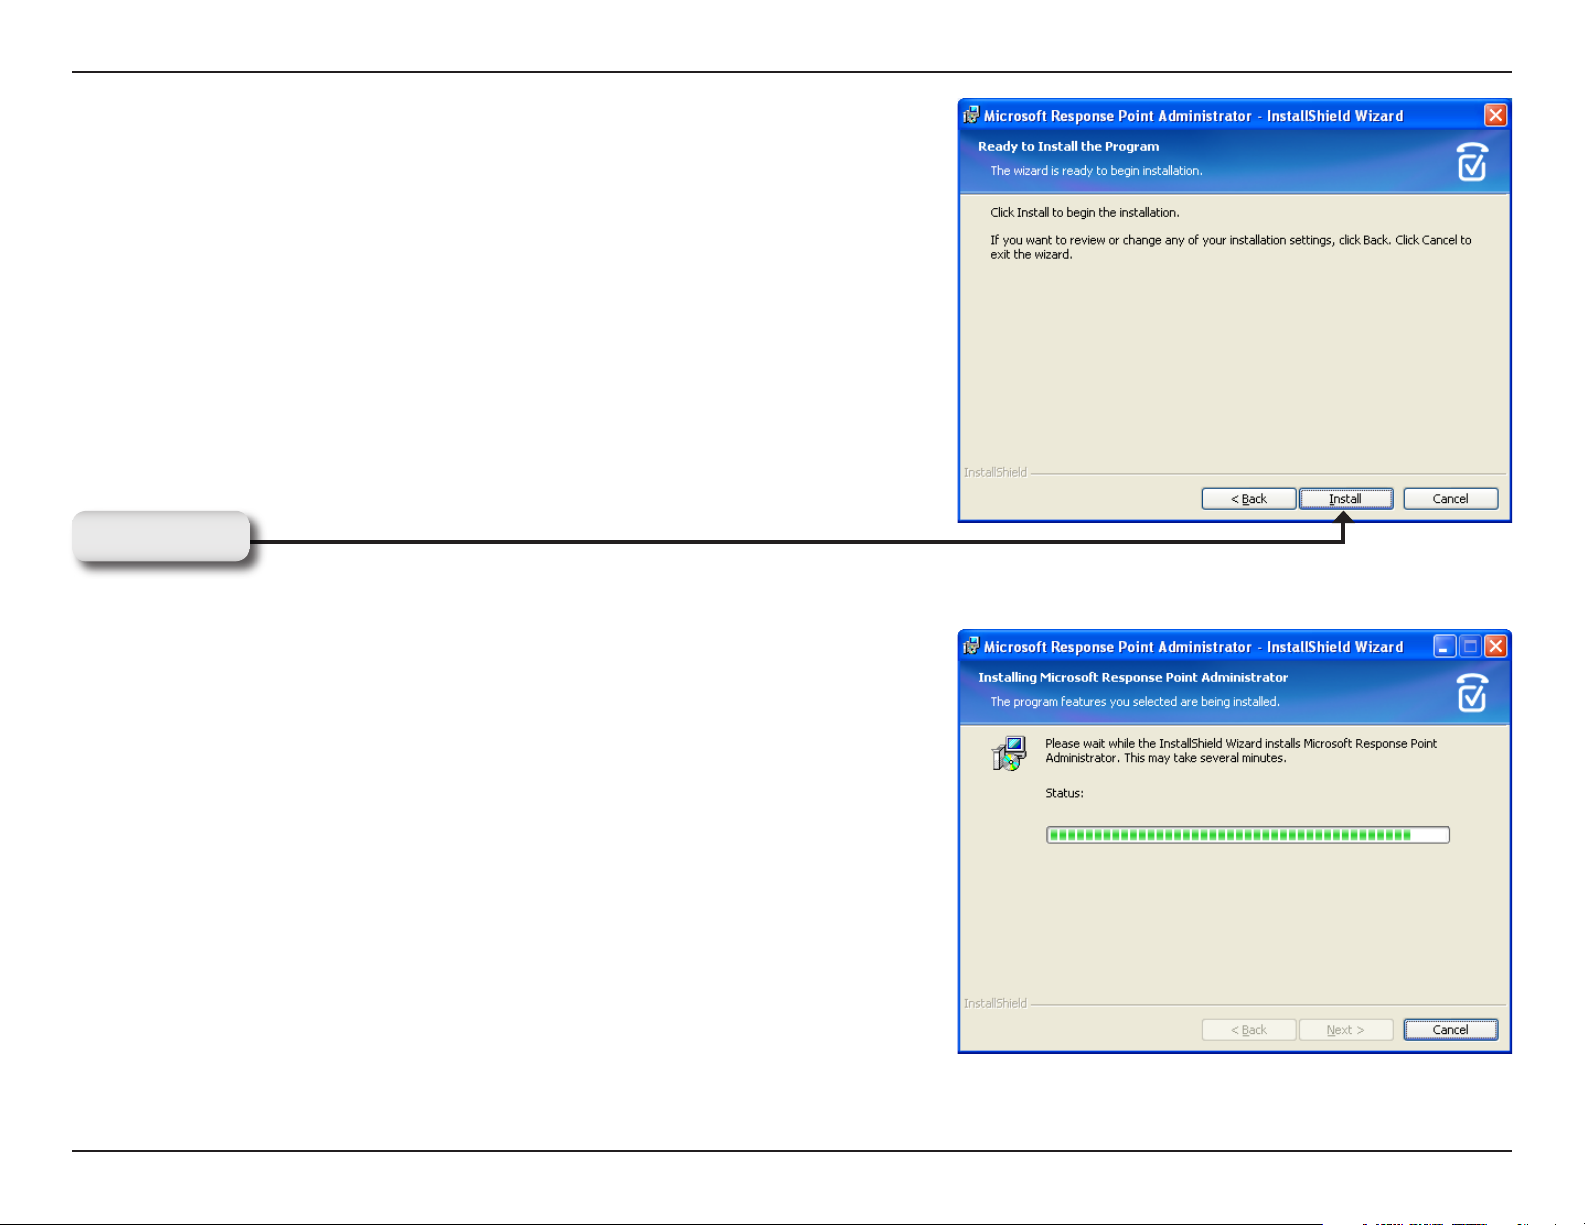
Click Install to begin the installation.
Click Install
Please wait while the InstallShield wizard installs Microsoft® Response
Point™ Administrator.
23D-Link DVX-2000MS User Manual
Page 24
Section 2 - Installation
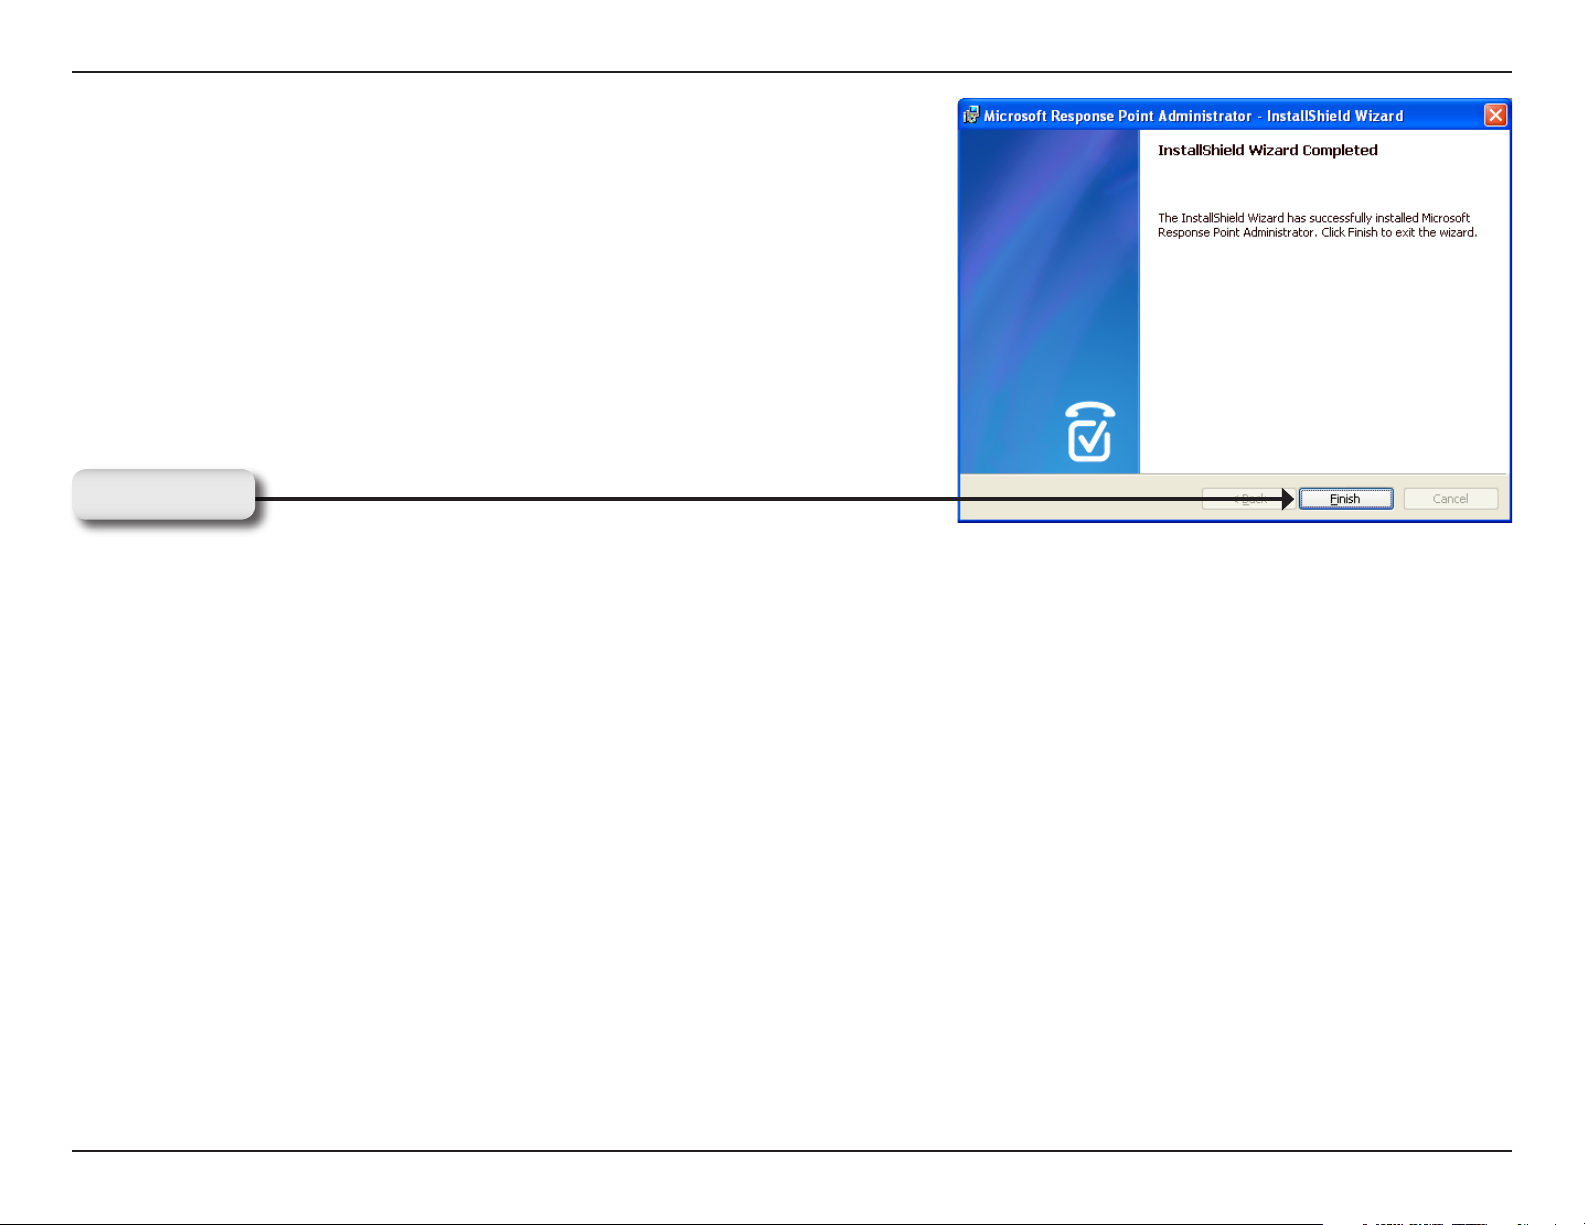
Installation is complete, click Finish to exit the wizard.
Click Finish
24D-Link DVX-2000MS User Manual
Page 25
Section 2 - Installation
Starting Microsoft Response Point Administrator
Use the following steps to start Microsoft® Response Point™ Administrator and log on to the DVX-2000MS Base Unit.
In Windows® XP, click Start > All Programs > and then click Microsoft Response Point Administrator to start the
program.
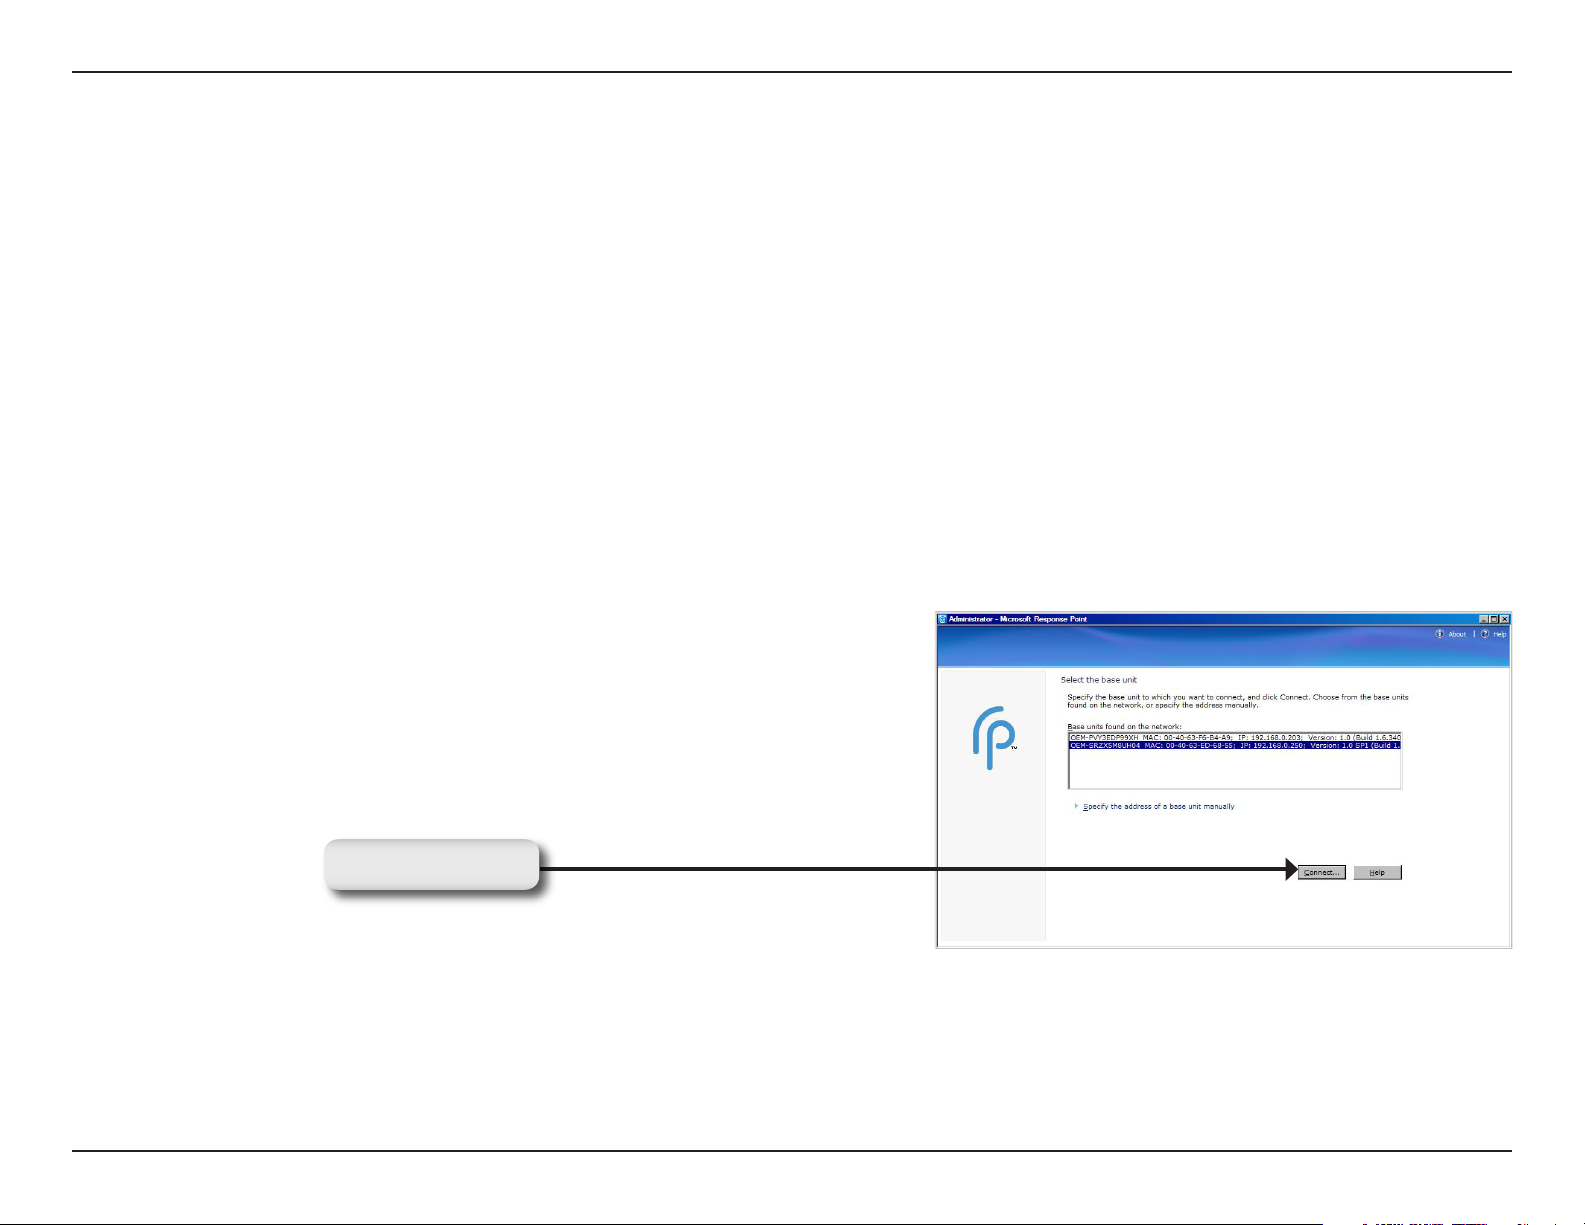
Select the DVX-2000MS base unit you just installed, and click Connect.
Note: A few seconds may pass. If you don’t see the DVX-2000MS base unit listed, it’s likely that the base unit or the
computer on which Administrator program is running, is not connected properly to the LAN. Make sure all cables and
power cords are connected. Another potential problem is that the DVX-2000MS base unit is not turned on.
Note: If a Security Alert dialog box comes up, click Unblock.
Click Connect
25D-Link DVX-2000MS User Manual
Page 26
Section 2 - Installation
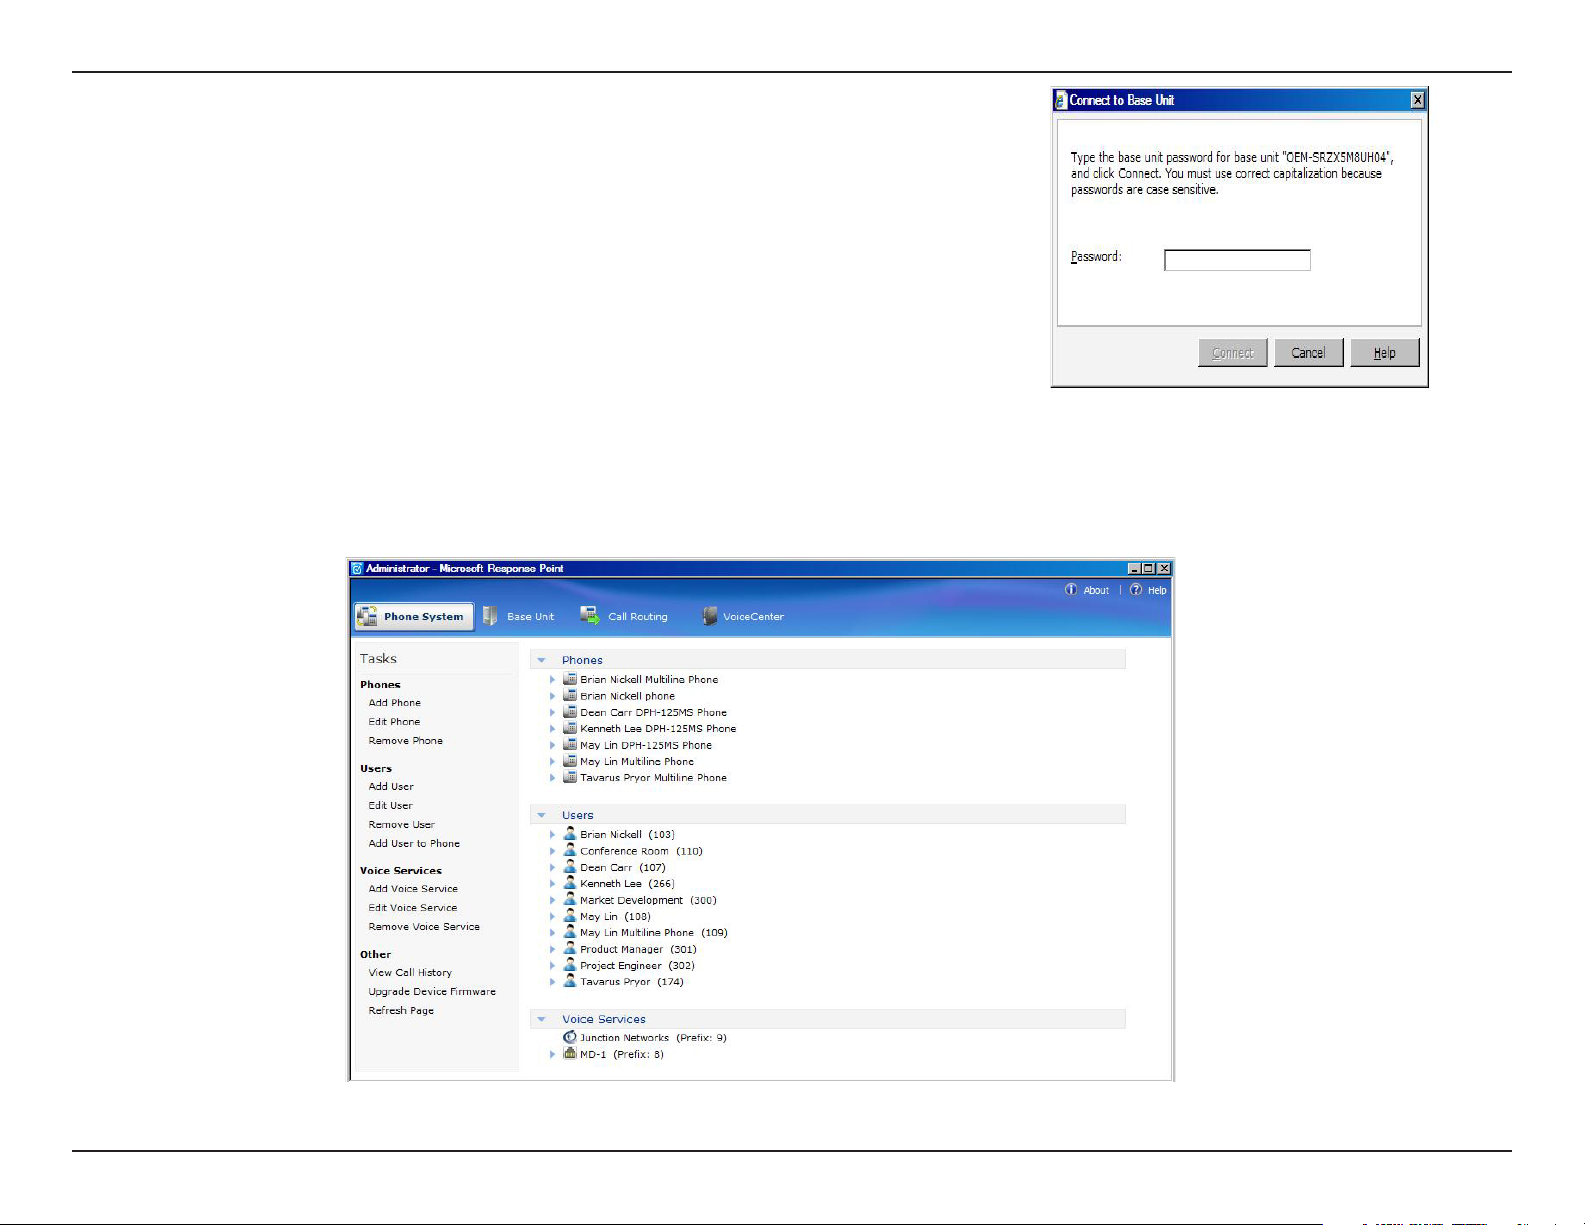
When prompted for a password, type the default password, admin and click
Connect.
Note: It’s recommended that you change this password soon for security
purposes. See page 89 for more information.
You have successfully logged onto the DVX-2000MS base unit. You may now configure your IP Phones and Gateway.
26D-Link DVX-2000MS User Manual
Page 27
Section 2 - Installation
Configure the DPH-125MS IP Phones
In Microsoft® Response Point™ Administrator, use the following steps to configure the DPH-125MS IP Phones.
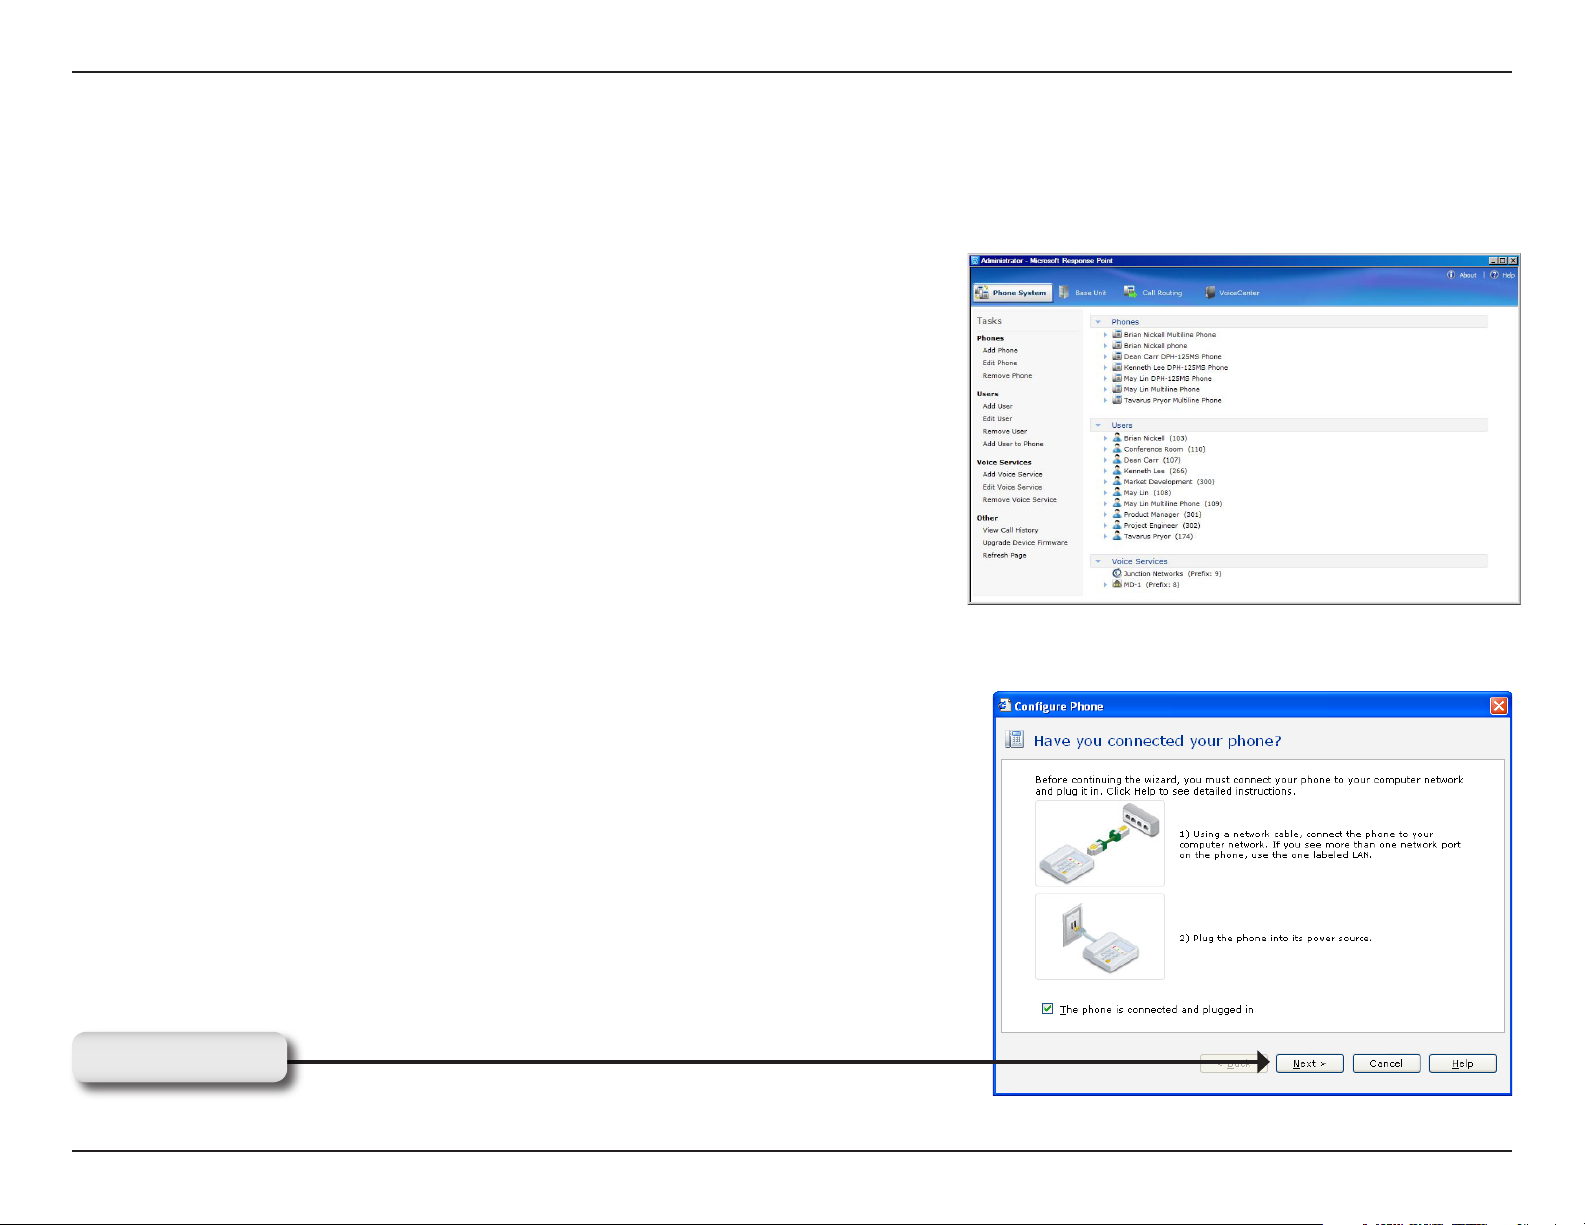
Click the Phone System tab at the top of the screen if necessary.
In the Tasks panel, under Phones, click Add Phone to launch the
Configure Phone Wizard.
Select the check box confirming the IP Phone is connected and plugged
in. Click Next to continue.
Click Next
27D-Link DVX-2000MS User Manual
Page 28
Section 2 - Installation
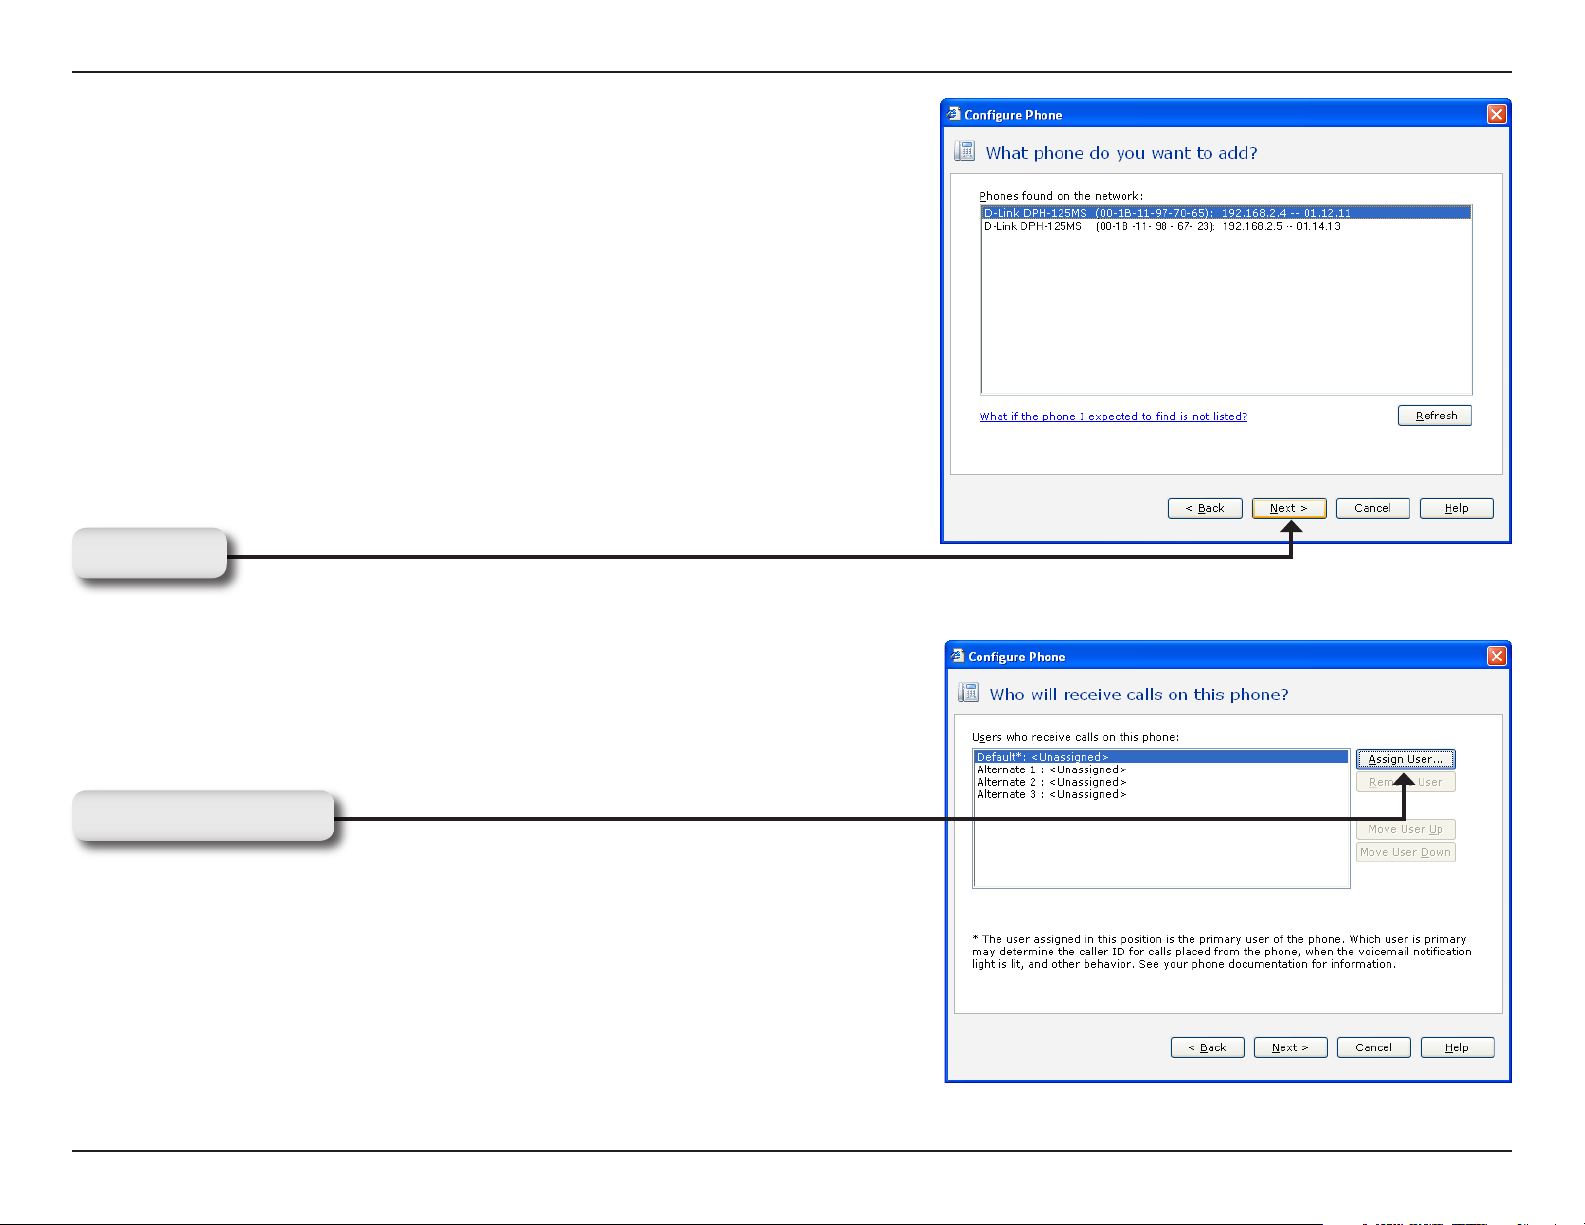
Select one of the D-Link DPH-125MS IP Phones you just connected
and click Next to continue.
Note: If you do not see the phone you just connected, click Refresh
in the Tasks panel. If you still do not see the phone, make sure that the
phone is connected to the LAN, unplug the phone from the electrical
outlet, and plug it back in. After plugging in the phone, you may need
to wait at least sixty seconds before the phone is initialized and ready
to be configured.
Click Next
For this step, you will add a new user and assign that user to the phone
you just selected. Click Assign User to open the New User screen.
Click Assign User
28D-Link DVX-2000MS User Manual
Page 29
Section 2 - Installation
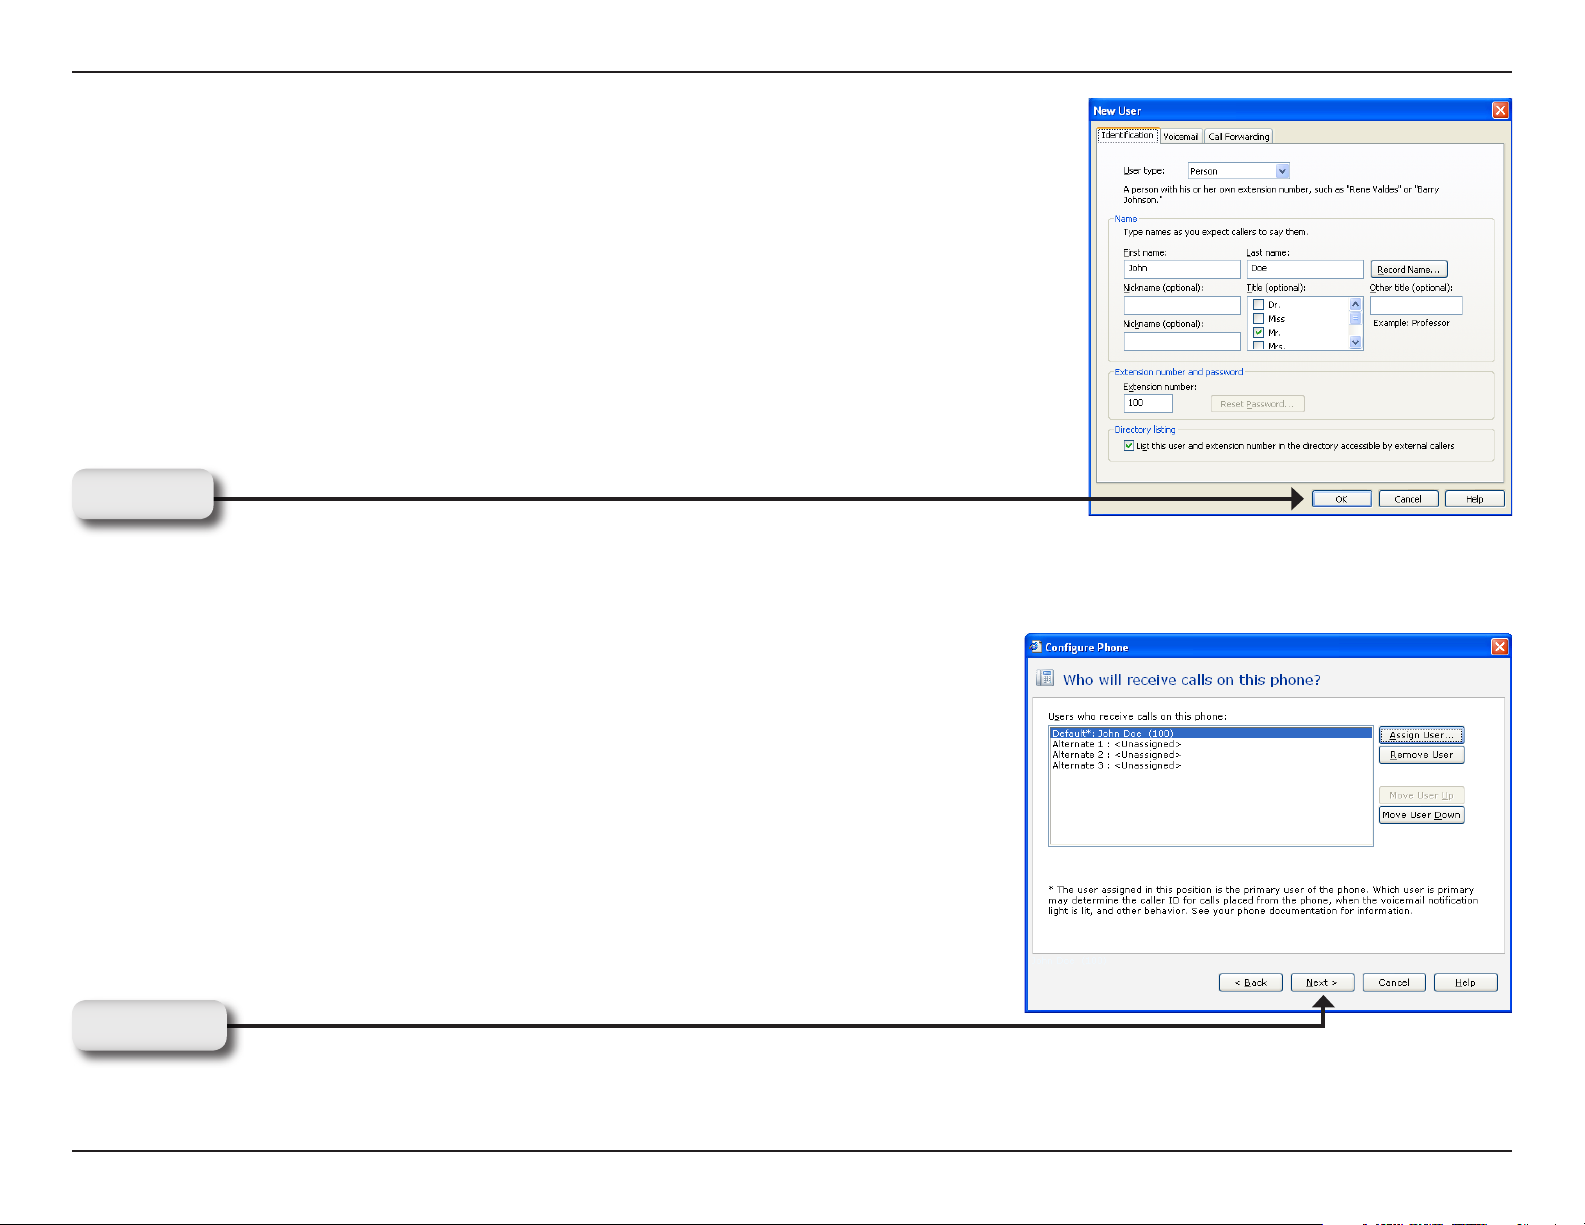
On the Identification tab, in the User Type box, select Person from the drop
down menu if it is not already selected.
In the Name boxes, type the first and last name, and optional nicknames or titles
of the person who will use this phone. You should specify nicknames and titles if
you think callers will use when asking for this user.
In the Extension number box, change the extension number if desired and click
OK to continue.
Click OK
You have now assigned the person’s name to Line 1 with the extension
number you specified. You can assign up to 3 additional users to this phone
or click Next to continue.
Click Next
29D-Link DVX-2000MS User Manual
Page 30
Section 2 - Installation
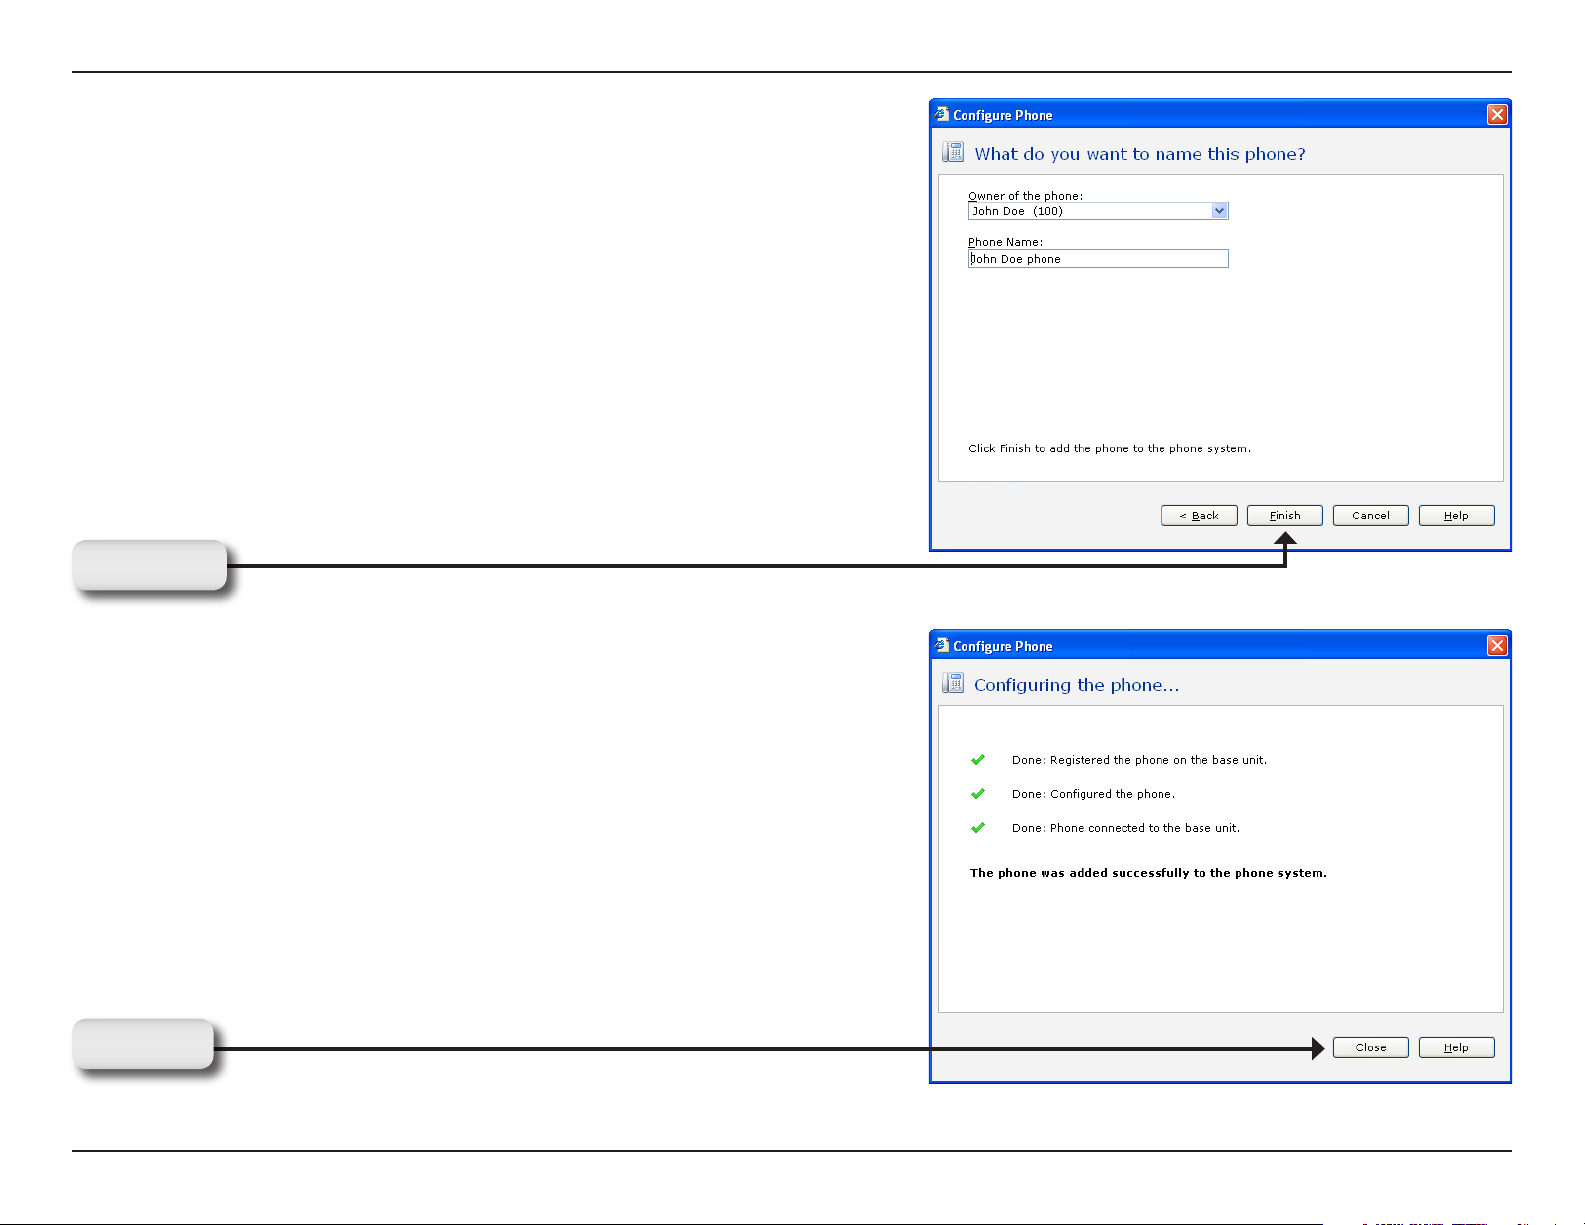
The owner and phone name have automatically been created for
you. Click Finish to continue.
Click Next
The IP Phone has been successfully added to the phone system.
Click Close to exit the configuration wizard. Repeat instructions on
pages 27 through 30 to add additional phones.
Tip: If you continue to configure more phones, write down the last
four digits of the MAC address (located on the bottom or side of
each phone), along with a name for each phone, such as “Diane
Margheim phone.” Having this information will help you recognize
the phone and remember where each one is installed.
Click OK
30D-Link DVX-2000MS User Manual
Page 31

Section 2 - Installation
Testing Two Response Point Phones
Now that you have the phones connected to the LAN and have configured them through Microsoft® Response Point™
Administrator, it’s time to test the connection and configuration to make sure they work.
Note: You can dial extension numbers in several ways:
• Dial the number, and wait for several seconds before the connection is made.
• Dial the number, and press OK on the phone (for a faster connection time).
• Press Response Point button on the phone, and say the name of the person you want to call, in this
case the name of the phone user assigned to the phones you just configured.
To test the phones with the Microsoft Response Point phone system
1. Using the first phone, dial the extension number assigned to the user on the second phone, and confirm
that it rings.
Note: It may take several seconds for the second phone to ring.
2. Go to the second phone and try the extension number of the user on the first phone.
If the phones did not work, the likely cause is a loose connection. Make sure all cables and cords are properly seated
into their
respective ports, jacks, and outlets.
Next, you’re going to configure the DVG-3104MS gateway.
31D-Link DVX-2000MS User Manual
Page 32

Section 2 - Installation
Configure the DVG-3104MS Gateway
In Microsoft® Response Point™ Administrator, use the following
steps to configure the gateway:
Click the Phone System tab at the top of the screen if necessary.
In the Tasks panel, under Phone Service, click Add Phone Service
to launch the Configure Phone Service Wizard.
Select the check box confirming the gateway is connected and plugged in.
Click Next to continue.
Click Next
32D-Link DVX-2000MS User Manual
Page 33

Section 2 - Installation
Select the D-Link DVG-3104MS Gateway you just connected and click
Next to continue.
Click Next
Select the This Port Is Active check box. Enter in a phone number
or name associated with this line in the Description box. Click Next to
continue.
Click Next
33D-Link DVX-2000MS User Manual
Page 34

Section 2 - Installation
Enter a name for the phone line adapter and click Finish to complete the
configuration.
Click Finish
34D-Link DVX-2000MS User Manual
Page 35

Section 2 - Installation
Testing the DVG-3104MS Gateway Connection
Now that the DVG-3104MS Gateway is installed and the phones and phone service are configured, it’s time to test
inbound and outbound calls.
To test the phone system with an outbound call:
1. Using one of the phones you installed, dial 9, then the country code (1 for the United States), and then
an external phone number.
2. Make sure the external number rings and you are connected to a person outside of your office.
To test the phone system with an inbound call:
1. Using a mobile phone or an outside phone line, place an inbound call to your office phone.
2. When prompted, ask for the name of the user assigned to one of the phones you previously installed.
Note: If this step does not work, make sure all cables and cords are properly seated into their respective
ports and outlet.
35D-Link DVX-2000MS User Manual
Page 36

Section 2 - Installation
Installing Microsoft Response Point Assistant
The Microsoft® Response Point™ Assistant program gives you, as a phone user, more options to configure the phone
system, including specifying how calls are forwarded, how voice messages are retrieved (either from the phone or
through attachments to e-mail messages, or both), how you are notified of incoming calls, and so forth. Use the following
steps to install Response Point Assistant.
Insert the VoiceCenter™ CD in the CD-ROM drive on the employee’s computer using Response Point. There
should be a DPH-125MS IP Phone connected to this computer. The step-by-step instructions that follow are
shown in Windows® XP.
If the CD Autorun function does not automatically start on your computer, go to Start > Run. In the run box type “D:\
setup.exe” (where D: represents the drive letter of your CD-ROM drive).
Note: Microsoft Response Point Administrator only operates with Windows® XP SP2 or Windows Vista™.
When the autorun screen appears, select Install Microsoft
Response Point Assistant and click Next to continue.
Click Next
36D-Link DVX-2000MS User Manual
Page 37

Section 2 - Installation
Click Next to continue.
Click Next
Accept the License Agreement and click Next to continue.
Click Next
37D-Link DVX-2000MS User Manual
Page 38

Section 2 - Installation
Click Install to begin the installation.
Click Install
Please wait while the InstallShield wizard installs Microsoft® Response
Point™ Assistant.
38D-Link DVX-2000MS User Manual
Page 39

Section 2 - Installation
Installation is complete, click Finish to exit the wizard.
Click Finish
Now take the VoiceCenter™ CD to various computers, where DPH-125MS IP Phones are located and install Microsoft®
Response Point™ Assistant on them as well.
39D-Link DVX-2000MS User Manual
Page 40

Section 2 - Installation
Starting Microsoft Response Point Assistant
Use the following steps to start Microsoft® Response Point™ Assistant software and log on to your DPH-125MS IP
Phone.
In Windows® XP, click Start > All Programs > and then click Microsoft Response Point Assistant to start the program.
In the Extension box, type the extension number of the person who will use Assistant.
In the Password box, type the password of the user. The default password is 9999.
Click Log On
Note: See page 108 for more information on how to use Microsoft Response Point Assistant.
40D-Link DVX-2000MS User Manual
Page 41

Section 2 - Installation
Getting Started
This section will get you started on configuring some of the Response Point basic features such as Choosing a Call
Distribution Plan, Setting Up a Multiple Rings Plan, Setting Up a Live Operator, Setting Up a Automated Receptionist,
Configure E-mail Delivery of Voice Messages, How to Change the DVX-2000MS Password.
What Is a Phone?
Phones that come with Response Point have a special button called the Response Point button. This button gives you
access to many of the phone system features, including voice dialing, call transferring, parking and retrieving of calls,
and more.
When a phone is configured, the phone system administrator assigns a user, or multiple users, to the phone. Each
phone always has an owner, and might have a primary user and alternative users as well. The owner setting is used
by Response Point to determine which phones belong to which users.
The primary user setting is used by the phone itself and may determine features such as the display of the voice
message light. The features of the phone that are affected by the primary user setting vary from one phone to another.
Some phones do not support the primary user setting at all. Refer to the phone documentation for more information.
For example, if Rebecca Laszlo is an employee in the sales department, you can assign the “Rebecca Laszlo” user as
the primary user of the phone on her desk (which she also owns) and assign the “Sales” user as the alternative user
of that same phone.
41D-Link DVX-2000MS User Manual
Page 42

Section 2 - Installation
What Is a User?
In Response Point™, a user represents someone or something that can receive a phone call. A Response Point user
can be a person, group, job role, or location.
Person
A user most often represents a person, such as the user “Diane Margheim,” representing the person Diane Margheim.
Person users are assigned to one extension number. When a call is directed to a person user, all of the phones to
which that user is assigned will ring.
Group
A user can also represent a group of people, such as everyone in the sales department. If any salesperson can take
calls from customers, calls can be sent to the “Sales” user, meaning that the phone of every salesperson will ring when
a call comes into the department.
42D-Link DVX-2000MS User Manual
Page 43

Section 2 - Installation
Job Role
Similar to group users, you can create job role users. For example, a “Receptionist” user is useful when several people
play the role of receptionist in your business.
Location
The most abstract type of user is one that represents a location. In some cases, a caller may want to reach a location,
such as a break room, regardless of who is in the location at the time. In that case, you would create a location user
called “Break Room” with its own extension number, “Ext. 102,” for example.
43D-Link DVX-2000MS User Manual
Page 44

Section 2 - Installation
What Is an Extension Number?
In other phone systems, an extension number is often used to identify a particular phone; however, in Response Point™,
an extension number is associated with a user.
Because you can assign users to more than one phone, an extension number doesn’t uniquely identify a phone. There
also may be several users assigned to a phone with different extension numbers. Likewise, a user, with his or her own
extension number, may be assigned to more than one phone.
For example, a phone in the warehouse may have a location user called “Floor Crew” with “Extension 200” assigned
as the primary user. However, “Rebecca Laszlo” with “Extension 101” may own the phone and be assigned as an
alternative user. Calls routed to either extension number, 200 or 101, would cause the phone to ring.
What Is a Phone Line?
In Response Point, a phone line refers to the physical component that transmits calls to the phone system from a
traditional phone service provider. In other words, a phone line is the phone cable that you connect to the phone system
and plug into a phone jack. Your office may have multiple phone lines to which Response Point can distribute incoming
calls appropriately.
What Is a Phone Service?
Response Point supports traditional phone service. Phone service that is provided by phone companies, mostly through
landlines, is considered traditional phone service. This type of phone service uses analog signals, which are translated
by a phone line adapter into the Microsoft® Response Point™ phone system.
44D-Link DVX-2000MS User Manual
Page 45

Section 2 - Installation
Office Scenarios
This section outlines three fictitious small businesses and how they might choose to set up their Microsoft® Response
Point™ phone system. These scenarios also detail the Response Point features that could be useful. You can choose
a scenario similar to your office and then consider the set of features that might meet your business needs.
The example scenarios include the following:
• Margie’s Travel, which has one large office space for travel agents who are on the phone for most of their
workday.
• Fourth Coffee, which has a reception area, a warehouse, a shipping area, and other work spaces.
• Southridge Video, which has several employees at a service desk and a number of phones. Any employee
who is free can answer one of the ringing phones.
45D-Link DVX-2000MS User Manual
Page 46

Section 2 - Installation
Margie’s Travel
Margie’s Travel is like many other small businesses. There is one large office where each employee has a desk, phone,
and computer. The travel agents use their phones to place calls to and receive calls from customers.
The phone system administrator for Margie’s Travel might consider configuring the following features with Response
Point™:
• Automated Receptionist Plan to route incoming calls to the appropriate travel agent, and backup plan with an
operator taking calls when callers want to speak to a person or when the Automated Receptionist can’t understand
a caller’s request.
• Using Assistant, add or import contacts into Response Point. This would be useful, for example, so that agents
can voice dial phone numbers that they call frequently, such as repeat customers and travel vendors.
• Bypass Receptionist to allow repeat customers and vendors to reach the extension numbers of familiar agents
directly.
• External Access to allow agents to use Response Point from a remote phone.
• Enable the directory so that incoming callers can hear a list of agents and their extension numbers.
• Voice messages sent as e-mail attachments so that agents can review their voicemail from an e-mail program,
where the messages can be stored indefinitely.
• User types: person (for each individual agent) and group (for the entire team).
46D-Link DVX-2000MS User Manual
Page 47

Section 2 - Installation
Fourth Coffee
Rather than one big office, Fourth Coffee operates in a building with a reception area in the front—which includes a
desk for the receptionist, an office for the owner, and another office for the office manager. Each of these work areas
has a desk, phone, and computer. In the middle of the building is a warehouse, where coffee beans are packaged.
The warehouse is flanked by two rooms with phones—a lunch room for the employees, and a shipping area where the
company tracks inventory and stores shipping information.
The phone system administrator for Fourth Coffee might consider configuring the following features with Response
Point™:
• Receptionist Plan so that the receptionist primarily answers incoming calls, and backup plan with the owner and
office manager answering calls when the receptionist is away. After hours, this business may want to switch
to the Automated Receptionist Plan, where the automated voice answers and routes calls to voicemail.
• Using Assistant, add or import contacts into Response Point. This is useful, for example, so the office manager
can voice dial phone numbers that he calls frequently, such as vendors and suppliers.
• User types: person (for the receptionist, owner, and office manager) and location (for the lunch room and shipping
area).
47D-Link DVX-2000MS User Manual
Page 48

Section 2 - Installation
Southridge Video
Like Margie’s Travel, Southridge Video operates in one large office space. However, instead of individual agents who
have their own desks, phones, and computers, employees share a service desk with two computers and three phones.
Any employee who is not serving a customer can answer incoming calls on one of the ringing phones.
The phone system administrator for Southridge Video might consider configuring the following features with Response
Point™:
• Multiple Phones Ring Plan (a type of Receptionist Plan) so that all phones ring when calls comes in, and all calls
are answered by a person. After hours, this company may want to switch to the Automated Receptionist Plan to
provide callers information about business hours and location.
• Using Assistant, add or import contacts into Response Point. This would be useful, for example, so that the
employees can voice dial the phone numbers they call frequently, such as video suppliers.
• User types: job role (for the service desk), which you assign to each phone at the service desk.
48D-Link DVX-2000MS User Manual
Page 49

Section 2 - Installation
Choosing Your Call Routing Plan
Administrator gives you several options for setting up a call routing plan—in other words, how incoming calls are handled.
A call routing plan determines who gets calls as they come into the Microsoft® Response Point™ phone system. Possible
call routing plans include:
Automated Receptionist Plan: An automated voice answers the calls and directs them appropriately.
Receptionist Plan: An employee in your office answers incoming calls and directs them appropriately.
49D-Link DVX-2000MS User Manual
Page 50

Section 2 - Installation
These basic call routing plans can be customized in various ways. For example:
• You can specify the Receptionist Plan but change it to the Automated Receptionist Plan before your office closes
for the day.
• You can choose the Receptionist Plan and customize it so that if your receptionist is not available to answer,
incoming calls are forwarded to another user or to the Automated Receptionist.
• You can specify that multiple phones ring when a call arrives, but exclude the guest phone in the reception
area.
• You can specify that multiple phones ring when a call arrives, but set call forwarding rules on one of the extension
numbers so that the call is forwarded to voicemail if no one answers it.
50D-Link DVX-2000MS User Manual
Page 51

Section 2 - Installation
Introduction to Microsoft Response Point Administrator
Microsoft® Response Point™ Administrator is the central administration and monitoring program for setting up and
maintaining the Microsoft Response Point phone system. This system gives your employees flexibility and choices, as
well as helps to make your job easier as the phone system administrator.
Microsoft Response Point Administrator includes three main pages, and possibly a fourth page that may be supplied by
the manufacturer of your phone system. (The exact name of that fourth button and page will vary with each manufacturer.)
Click the following links to see information about the three Administrator pages:
• Phone System Page
• Base Unit Page
• Call Routing Page
Microsoft Response Point Administrator, you can do the maintenance yourself (which may save you time and money),
such as:
• Setting up and configuring the phone system.
• In-house managing and monitoring of the phone system.
• Changing phone system settings—for example, adjusting base unit or voicemail options.
51D-Link DVX-2000MS User Manual
Page 52

Section 2 - Installation
What’s New in Service Pack 1
The Microsoft Response Point 1.0 Service Pack 1 (SP1) release includes a variety of new features and functionality:
• VoIP service, offered through Internet Telephony Service Providers (ITSPs), allows you to send and receive calls
over the Internet using cost-saving VoIP technology. Implement VoIP service, analog service, or both phone service
solutions. You can set up direct-dial VoIP numbers, provided by your ITSP, which give your business multiple numbers
without the hassle and cost of setting up new phone lines.
• Upgrade firmware on phones and phone line adapters when hardware manufacturers release the latest upgrade
packages. The configuration wizard automatically detects and provisions applicable devices. Perform batch upgrades
or apply the upgrade package to selected devices only.
• Call history lets you monitor call activity so that you can analyze business trends, patterns, and expenses.
• Click to Click allows you make calls from the Assistant by double-clicking a name in the contact list.
• Status indicators show in-call and parked-call status. These new icons let you know if a user’s phone is available,
in a call, or has no status, and if any parked calls need to be retrieved.
• Park music is the default or custom audio file that callers will hear while they wait “in park,” similar to being “on
hold,” except parked calls can be retrieved from any phone configured with Response Point.
• Record answers to questions that callers frequently ask the Automated Receptionist, such as “What are your
business hours?”
• 1-800-CALL-411 is a free directory assistance service that provides business phone numbers and other quick
information. Voice-dial this service from within the U.S. only.
• Transfer parked calls directly to the voicemail box of any extension number, including your own.
• Restrict outgoing calls on phones for emergency and internal access only.
52D-Link DVX-2000MS User Manual
Page 53

Section 2 - Installation
About Voice Service
Response Point supports two kinds of voice services—analog service and VoIP service. Choose the service the best
suits the needs of your business. Both voice services have VoIP technology in common. VoIP allows phone-system
components to communicate using digital signals. Electronic data packets deliver these signals to the software and
hardware that runs Response Point. However, the hardware, setup, and underlying functionality required by each service
is different. For example, analog service needs extra hardware, such as a phone line adapter (which might be built into
the base unit) or an integrated access device (IAD), whereas VoIP service only needs an Internet connection.
Note: A converter (sometimes called an “integrated access device”) might have come with the VoIP service you
purchased. The IAD translates between digital signals and analog signals. Although your phone company or other
service provider recognizes this as “VoIP service,” it appears to Response Point as “analog service” because the
interface between Response Point and the IAD is an analog one.
Analog service—commonly referred to as “PSTN,” “POTS,” or traditional phone service—is established through a
landline-based connection using standard phone jacks and cables. To use this voice service, you will need at least
one phone line adapter for Response Point to work. (The adapter might be a detached or built-in device, depending
on the manufacturer.) When an external call comes into the phone system, the phone line adapter converts incoming
analog signals to digital ones, and then sends this data to your IP phones. When you place an outgoing call, the adapter
reverses the process by converting digital signals back to analog ones, and then sends this data over your landline.
VoIP service is established by setting up an account with whichever VoIP service provider you choose. Ask your service
provider any if there are any additional requirements that you might need to consider when you deploy, maintain, and
monitor Response Point with VoIP service. After you configure a VoIP connection, your business can place calls through
an Internet connection, which may reduce the cost of long-distance and international calls. Because this service only
requires an Internet connection, no additional hardware is necessary.
Important: Security is an important factor to consider when selecting a VoIP service provider. When deciding between
available service providers, you should select the company that provides the most secure service.
53D-Link DVX-2000MS User Manual
Page 54

Section 2 - Installation
Adding VoIP Service
You can place long-distance calls through an Internet connection if you configure VoIP service. The Configure Voice
Service Wizard guides you through the setup process.
To add VoIP Service
1. Click the Phone System button.
2. In the Tasks pane, under Voice Services, click Add Voice Service.
3. In the Add Voice Service dialog box, select VoIP service that connects through your broadband
connection.
4. Follow the steps of the Configure VoIP Service Wizard, and click Finish.
Editing VoIP Service
Edit VoIP service options by making changes to the appropriate pages of the Configure VoIP Service Wizard. For
example, you can change the direct-dial numbers for this service.
To edit VoIP service
1. Click the Phone System button.
2. In the Tasks pane, under Voice Services, click Edit Voice Service.
To edit VoIP service
1. Click the Phone System button.
2. In the Tasks pane, under Voice Services, click Edit Voice Service.
3. If you have two or more voice services configured, you will be prompted to select which one to edit. If you are
prompted, click the VoIP service you want to edit, and click OK.
4. Complete the steps in the Configure VoIP Service Wizard, and click Finish.
54D-Link DVX-2000MS User Manual
Page 55

Section 2 - Installation
Removing VoIP Service
Remove VoIP service from Response Point by following these instructions.
To remove VoIP service
1. Click the Phone System button.
2. In the Tasks pane, under Voice Services, click Remove Voice Service.
3. If you have two or more voice services configured, you will be prompted to select which one to remove. If you are
prompted, click the VoIP service you want to remove, and click OK.
4. Confirm that you want to remove this service by clicking Yes in the message box.
Note: It’s possible that active calls may remain connected after you remove VoIP service. It may take some VoIP
service providers up to five minutes to disable your service.
Configuring Direct-Dial Numbers
If you want your business to have multiple access points, request extra VoIP phone numbers from your service provider.
Generally, you can purchase these numbers individually or in packages. Configure direct-dial numbers by assigning
them to the Response Point user who should receive the incoming calls associated with these numbers. Calls to directdial numbers go directly to the assigned user without going through the receptionist or Automated Receptionist.
For example, you might want to designate a phone number that you only give to people who are potential clients, which
can help you target new customers. In this case, you can refer these people directly to the Sales team by giving them
a direct-dial number that you have assigned to the Sales user.
Numbers that you don’t specify as direct-dial numbers automatically go to your receptionist or Automated Receptionist,
depending on which call routing plan is configured in your office.
To configure a direct-dial number
1. Contact your VoIP service provider, and obtain VoIP phone numbers to configure as direct-dial numbers.
2. Open the Configure VoIP Service Wizard, and navigate to the Do you want to assign direct-dial numbers to
users page.
3. Click Add. The Direct-Dial Number dialog box opens.
4. In the Phone number box, type a VoIP number.
5. To assign this number to a user, click Yes - calls to this number go directly to the assigned user, choose a
user from the list, and click OK.
55D-Link DVX-2000MS User Manual
Page 56

Section 2 - Installation
6. If you want to edit any information in the table, select the row you want to change, and click Edit. Make the changes
you want in the Direct-Dial Number dialog box, and click OK.
7. If you want to remove a number from the table, select the row you want to delete, and click Remove. Click Yes in
the confirmation message that appears.
8. If you want to remove all numbers from the table, click Remove All. Click Yes in the confirmation message that
appears.
9. Click Finish on the final page of the wizard to save these settings and register this configuration with your service
provider.
Note: To place a call to a direct-dial number, internal users must first dial a 9 and then the number.
About Device Upgrades
Upgrade your phones and phone line adapters when the D-Link releases firmware that can add new features, repair
bugs, and enhance the functionality of your Response Point hardware.
The Upgrade Device Firmware Wizard gives you step-by-step instructions for upgrading all applicable devices configured
in the phone system. Or, you might decide to only upgrade individual phones and adapters. To upgrade all or one device,
you’ll use same wizard, which opens when you click Upgrade Device Firmware on the Phone System page.
Before starting the wizard, go to the D-Link Support site. Download a copy of the upgrade package that you want to
apply. Save the package on your hard disk in a folder that’s easy to locate.
Important
• A series of messages appear if the computer performing the device firmware upgrade is connected to the office
LAN using the pass-through connector on a phone. To complete the upgrade, click OK in each message box.
Upgrading All Devices
Using the upgrade package provided by the D-Link, you can upgrade the firmware of phones and phone line adapters
shown in the table on the What upgrade package do you want to apply page. The table contains detailed information
about the upgrade package you selected. For each type of device in the phone system that can be upgraded with this
package, the table shows the new version number, the release date of the package, and the number of your devices
that apply to this upgrade package. Upgrading all devices is recommended.
56D-Link DVX-2000MS User Manual
Page 57

Section 2 - Installation
To upgrade all devices
1. Click Browse to find the upgrade package (look for an “RPU” file) that you obtained from D-Link, either by
downloading it from a Web site or on a CD.
2. Click Upgrade all devices to which this package applies (recommended), and click Next.
3. On the Confirmation and warnings page, review the devices in the Devices to be upgraded list, and read the
cautionary information regarding the upgrade process.
4. Click Upgrade to start the process. Do not disturb the devices during the upgrade. Each device may take several
minutes for Response Point to upgrade.
5. The Upgrading device firmware page shows you the status of every device—whether the upgrade started,
succeeded, failed, or is still in progress. When the process finishes, if you only want to see devices that failed,
select the Show only failed upgrades in the list check box.
Upgrading Selected Devices Only
You can choose to manually select the devices that you want to upgrade. Be sure to compare the new firmware version
against the current one so that you don’t accidently apply the upgrade to the wrong device. Upgrading selected devices
is an advanced task, so it’s a good idea to do this with the help of a product support specialist.
To upgrade individual devices
1. Click Browse to find the upgrade package (look for an “RPU” file) that you obtained from D-Link, either by
downloading it from a Web site or on a CD.
2. Click Let me choose which devices to upgrade (advanced), and click Next.
3. On the Which of your devices do you want to upgrade page, select the check box for each device that you want to
upgrade, and click Next.
4. On the Confirmation and warnings page, review the devices in the Devices to be upgraded list, and read the
cautionary information regarding the upgrade process.
5. Click Upgrade to start the process. Do not disturb the devices during the upgrade. Each device may take several
minutes for Response Point to upgrade.
6. The Upgrading device firmware page shows you the status of every device—whether the upgrade started,
succeeded, failed, or is still in progress. When the process finishes, if you only want to see devices that failed,
select the Show only failed upgrades in the list check box.
57D-Link DVX-2000MS User Manual
Page 58

Section 2 - Installation
About Call History
Call history can help you evaluate important areas of your business. Using this tool, you can perform the following
administrative tasks:
• Manage employee productivity- You can determine if the call activity of your employees is appropriate. Are they
on the phone too much, not on the phone enough, placing too many personal calls?
• Review phone expenses- You can manage costs by verifying efficient usage patterns. Are employees choosing
the better voice service for local and long distance calls, during the most sensible hours?
• Monitor your customer service- You can identify the customers who are high priority, neglected, or need the
most assistance. Which customers place the most orders, haven’t received routine calls, or call frequently with
problems?
• Look for missed calls or no messages- You can check the log if you or an employee miss a call when you were
unavailable. Did an important client call, but didn’t leave a message, when you were on vacation?
• Calculate billable hours- You can track the length of your phone calls. Did you count all of the hours you spent
on the phone with a particular client?
• Collect marketing information- You can analyze business trends. Which customers called about your latest
promotion or because of an ad you ran?
Viewing Call History
A call-history log records useful information about your business. Use the data to analyze business patterns, trends,
and expenses. After you select the categories to evaluate, Administrator displays the results in the Call information
table. You can filter and sort using different criteria as many times as you want. For example, view the VoIP call activity
of an employee for the month of May. Then, change the search parameters, and view how many minutes you spent on
the phone with a particular client. The default view shows all calls for all users on the current day. For a more complex
view, save the history to a CSV file, and use Microsoft Office Excel to perform further analysis.
Important: Call durations are approximate. Total minutes will include the time a caller spent waiting in park, waiting on
hold, or being transferred.
58D-Link DVX-2000MS User Manual
Page 59

Section 2 - Installation
To view a specific call history log
1. In the Interval to show list, choose a timeframe to view.
2. In the Types of calls to show list, choose the type of call to view.
3. In the Show calls to and from user list, choose a user to view.
4. Wait for Administrator to load your selections and display the results in the Call information table.
5. Click Save to create a CSV file, which displays more advanced information.
6. Review the following table for guidance on analyzing, filtering, and sorting specific call information.
If you want to know Search for Filter lists by View results by
Are employees making
appropriate calls?
Are customers reaching
the appropriate
departments?
Which customers are
being called frequently
or infrequently?
Calls made by a
specific person user
Calls received by a
specific group user
Calls to a specific number All available calls,
All available calls,
Outgoing calls,
<person user>
All available calls,
Incoming calls,
<group user>
Outgoing calls, All users
To and Minute column
From column
From column
59D-Link DVX-2000MS User Manual
Page 60

Section 2 - Installation
Which customers
are calling frequently
or infrequently?
Which PSTN lines are
busy when customers
call? Does my business
need another line?
Which advertising
campaigns are reaching a
target market successfully
or unsuccessfully?
How many minutes
are spent on a call?
Are the longest calls
placed through the most
cost-effective service?
Calls from a
specific number
Calls through a
specific port
All available calls,
Incoming calls, All
All available calls,
Incoming and
outgoing, All calls
Calls from a
specific region
All available calls,
Incoming calls, All users
Calls of a specific duration Today, Incoming
and outgoing calls,
<person user>
Calls of a specific duration
using a VoIP service
All available calls,
Calls through VoIP
service, All users
To column (look
for customer’s
phone number)
Save to CSV file, and
see Error Reason (look
for No available line)
Save to CSV file, and see
Source Name/Number
To/From and
Minute columns
To and Minute column
(see VoIP icon)
Are customers hanging
up before being helped?
Calls disconnected
before reaching a user
All available calls,
All calls, All users
Result column (see
Unanswered icon)
Note: Incoming calls made using External Access phone numbers are treated as Internal. The log will show which
voice service handled the calls because they were made from external phones
60D-Link DVX-2000MS User Manual
Page 61

Section 2 - Installation
Configuring Park Music
Music helps add a professional touch while filling the silence for callers waiting in park. Using a custom feed, you can
broadcast the music you prefer, promotional materials, or other important messages you want callers to hear. Attach
a cable from an analog audio source—such as a radio, CD player, or other sound device—to the audio jack on the
base unit, typically a “line-in” or “mic-in” jack. A custom feed plays on a continuous cycle, without a definite beginning
or ending. When you park a call, the caller will hear the audio file from where it’s currently playing, not from where the
audio file begins. Therefore, callers waiting in park hear the same thing at the same time.
Note: If your hardware doesn’t have analog jack, you will only be able to configure the default audio file.
To configure the built-in audio file
• Click Play the default music.
To configure a custom audio file
1. Use a cable to connect your radio, CD player, or other sound device to the analog jack on the base unit.
2. Click Play input connected to the audio jack on the base unit.
3. In the Input list, click Mono or Stereo, depending on the sound device you’re using. (Radios are usually mono; CD
players are usually stereo.)
4. In the Volume list, adjust the setting to the appropriate level.
Note: To prevent distortion and improve the signal-to-noise ratio of the incoming audio, adjust the volume on the analog
audio source to a medium setting.
61D-Link DVX-2000MS User Manual
Page 62

Section 2 - Installation
Phone System Page
The Phone System page shows which phones, users, and services are configured in Microsoft® Response Point™. If
you want add, edit, or remove these items, you can click the related tasks in the Tasks list. Wizards help guide you
through these tasks, step by step. Alternatively, you can right-click items in the lists that are displayed on the right side
of the page to perform tasks.
To see changes that you’ve recently made, click Refresh at the bottom of the Tasks list. For example, if you just added
a phone and it doesn’t immediately appear on the Phone System page, click Refresh to see it.
Options
Add Phone
Start a wizard to add a phone to Response Point.
Edit Phone
Select a phone to edit, and complete those wizard pages that are displayed for the editing task.
Remove Phone
Displays a list of phones from which you can select one to remove.
Add User
Displays the dialog box from which you can add users to Response Point.
Edit User
Displays the dialog boxes, as necessary, to edit user settings.
Remove User
Displays a list of users from which you can select one to remove.
62D-Link DVX-2000MS User Manual
Page 63

Section 2 - Installation
Add Phone Service
Displays the wizard from which you can add phone service to Response Point™.
Edit Phone Service
Displays some of the wizard pages and dialog boxes as needed to edit the phone service that you’ve already
configured.
Remove Phone Service
Remove the phone service by uninstalling the phone line adapter. If you have more than one phone line adapter on
the phone system, you will be prompted to select the one that you want to remove.
63D-Link DVX-2000MS User Manual
Page 64

Section 2 - Installation
Base Unit Page
The Base Unit page contains information and options related to the base unit. Some of the status options can be
selected directly from the right side of the page. For example, click View event log to see a summary of events recorded
by the base unit.
If you want to change options, you can select them in the Tasks list. At the bottom of the list, click Refresh to get the
latest status on demand.
Options
View Event Log
Displays the event log, where errors, information, and warnings about the base unit appear.
View Storage Space Details
Displays a report on how much total storage space there is, how much space is used by stored voice messages on
the base unit, and how much space is committed to contacts.
Change Password
Change the base unit password.
Change Date and Time
Displays the Change Date and Time on Base Unit dialog box. The values in the base unit date and time options initially
reflect the current settings on the base unit. Because these settings are not updated in real time when the dialog box
is open, they will soon not match the base unit’s current date and time.
Configure E-Mail Server
Specifies account information so that voice messages can be retrieved by e-mail.
64D-Link DVX-2000MS User Manual
Page 65

Section 2 - Installation
Create Backup
Specifies the path and description of the backup of the base unit. This backup will contain the latest configuration
and voicemail files. However, once you start the backup, the backup may not include voice messages saved while the
backup was being created.
Restore Backup
Displays a dialog box, where you select the backup copy of the base unit configuration to restore. The restored copy
will not contain the configuration settings and voicemail files made since the backup was created. Restoring a backup
also results in the phone system being down for a short time. So, it’s best to restore a backup when your business is
not likely to receive calls.
Refresh
Update any changed reporting information on this page, such as the status of the base unit, storage space used, or
base unit properties. The information is automatically refreshed every minute.
Status of Base Unit
The status report of the base unit appears on the right side of the Base Unit page.
Connection
Reports the status of the base unit’s connection to the LAN, as follows:
65D-Link DVX-2000MS User Manual
Page 66

Section 2 - Installation
Storage space
Reports the amount of permanent memory available on the base unit to store voicemail files, contacts, and other
settings, as follows:
Event log
Reports a summary of the event log, as follows:
66D-Link DVX-2000MS User Manual
Page 67

Section 2 - Installation
Space used by voicemail
Reports the amount of space on the base unit used by voicemail files.
Space available for voicemail
Reports the amount of space on the base unit that is available for voicemail files.
Total space available
Reports the amount of free space on the base unit that is available for configuration, contacts, and voicemail files.
Network address (IP address)
Displays the IP address of the base unit.
MAC address
Displays the MAC address of the base unit.
Base unit software version
Displays the version of the base unit software.
Base unit platform version
Displays the version of the base unit platform.
E-mail server
Displays the SMTP server name.
Date and time on base unit
Displays the date and time on the base unit as of the latest refresh. Seconds are not displayed because the time
displayed is not the current time, but only the time as of the last refresh. This setting is not updated in real time.
Time since last refresh
Displays the time since the base unit settings were last refreshed.
67D-Link DVX-2000MS User Manual
Page 68

Section 2 - Installation
Call Routing Page
The Call Routing page contains information and options related to call routing plans, which determine how incoming
calls are handled. Response Point™ supports the Automated Receptionist Plan, Receptionist Plan, and Multiple Phones
Ring Plan.
To see changes that you’ve made to these options, click Refresh at the bottom of the Tasks list, as needed. To see
an explanation of the selections, click the corresponding commands in the Tasks list, and click Help in the respective
dialog boxes for more detailed information.
Note: You can set call forwarding rules for individual users on the Call Forwarding tab in the User Properties dialog
box. In addition, employees can set their own call forwarding rules using the Assistant program.
Options
Choose How to Answer Calls
Specify the Automated Receptionist Plan or the Receptionist Plan for call handling.
Configure Automated Receptionist Properties
Specify settings for the Automated Receptionist. These include specifying that callers can ask for a directory that lists
users and their extension numbers; and greetings, answers, and questions that the Automated Receptionist can say
to callers, such as “Please say the name of the person or group you would like to talk to.”
Configure Bypass Receptionist
Designate the external phone numbers that can bypass the Automated Receptionist or the receptionist and instead go
directly to specified extension numbers.
Configure External Access
Designate the external phone numbers that can access Response Point remotely. When people make calls using these
specified phone numbers, they will be able to access Response Point as if they had pressed the Response Point button
on a phone in the office.
68D-Link DVX-2000MS User Manual
Page 69

Section 2 - Installation
Refresh
Update the display of settings on the right side of this page. After you make changes using commands in the Tasks list,
click this option to update the display.
Upgrading Software
The upgrade process involves three main components of Response Point™: the base unit, Administrator, and
Assistant.
Version Control
Response Point can only be upgraded to larger (or later) version numbers; you can never “downgrade” to a previous
version. It’s best to keep the versions of Administrator and the base unit the same. However, they get out of sync
when:
• The phone system administrator upgrades Administrator and then connects to the base unit for the first time.
• The base unit was upgraded from another computer other than the one on which this copy of Administrator is
currently running.
Depending on the situation, an upgrade of Administrator will be recommended but optional, or it will be necessary to
continue.
Upgrade Process
You may be prompted to upgrade the base unit when connecting to a base unit from Administrator. When it connects,
Administrator compares the versions of the base unit and Administrator, and displays these in the Upgrade Base Unit
dialog box if the base unit is an earlier version than Administrator.
When you click Upgrade in this dialog box, these tasks are performed:
1. A backup of the current phone system configuration and voicemail is created.
69D-Link DVX-2000MS User Manual
Page 70

Section 2 - Installation
2. A copy of the backup is created.
3. The backup is upgraded to the new version.
4. New files are uploaded to the base unit.
5. The base unit software is upgraded.
6. The upgraded configuration is restored to the base unit.
These steps may take several minutes if your phone system has many users and phones. So, don’t be alarmed if
some time passes during an upgrade. In addition, the base unit will restart in the process.
The end result of this process is that both Administrator and the base unit are upgraded to the same version. The
Assistant program must then be upgraded on each computer on which Assistant is installed.
If the version of the base unit is a later version than Administrator, you’ll see a message telling you whether an upgrade
is mandatory or optional.
70D-Link DVX-2000MS User Manual
Page 71

Section 2 - Installation
Understanding Information Storage and Retrieval
It may be important to understand how the Response Point™ base unit stores and retrieves information. The base unit
is the device that manages phone system data. For Response Point to work properly, the base unit must transfer data
between your computers, phones, phone line adapters, the phone system software, and your office LAN. During this
exchange process, the base unit stores and retrieves information. Review this topic to learn how the base unit specifically
handles your information.
What information is stored and for how long?
Voice messages that you retrieve by phone are stored on the base unit for up to 30 days from the time a caller leaves
you a voice message, not from the time you save a voice message. In addition, the base unit must keep a minimum
amount of free space available to function efficiently. Voicemail files older than 15 days may be deleted if the base unit
does not have enough free space. If you would like to guarantee that Response Point will not delete a voice message
after 15 days, you should choose to receive voice messages as e-mail attachments. Voice messages sent as e-mail
attachments are not stored on the base unit, and therefore they are not deleted by the base unit after any period of
time.
• When voice messages are restored from a backup, any voice messages older than 30 days will be deleted. If the
base unit does not have enough free space, voice messages older than 15 days may also be deleted.
• Base unit and extension number passwords are stored on the base unit indefinitely, or until the user who is
associated with this information is removed from the phone system.
• User-entered data is stored on the base unit indefinitely, or until the user who is associated with this information
is removed from the phone system. This data includes names, phone numbers, e-mail addresses, and personal
contact information.
• E-mail server password is stored on the base unit indefinitely, or until the phone system administrator removes
it. (This only applies if the phone system administrator configures Response Point to send voice messages as
e-mail attachments.)
71D-Link DVX-2000MS User Manual
Page 72

Section 2 - Installation
Where is this information stored?
All data is stored on the physical device, which is why it’s important to keep the base unit in a secured location with
restricted access.
What information can I prevent from being stored?
If you do not want your voice messages stored on the base unit, you can configure Response Point™ to send your
voice messages as e-mail attachments. With this configuration, your voice messages are stored in your e-mail program
instead of on the base unit.
How do I erase this information?
The Response Point product CD comes with the Erase Data program (“ResponsePointEraseData.exe”)—a tool that the
phone system administrator can use to permanently delete all data stored on the base unit. You might want to erase
all personal information from the physical device if you are giving it to someone else.
72D-Link DVX-2000MS User Manual
Page 73

Section 2 - Installation
Checking the Status of the Phone System
Phone system information is available on the Base Unit and Phone System pages of Administrator.
On the Base Unit page, you can view the status of the connection; the availability of storage space, particularly for
voicemail storage; and the log of events that occurred on the base unit, including errors, warnings, and information.
To view the status of the phone system:
1. Click the Base Unit button.
2. Review information under the Status of Base Unit, Storage Space Use, and Properties sections.
3. Click available options in these sections, or in the Tasks panel, for more information about the base unit
settings.
Configuring IPSEC
If your office LAN is configured to use Internet Protocol security (IPSec), we recommend that you:
1. Configure the Dynamic Host Configuration Protocol (DHCP) server for the LAN to always assign the same IP
address to the base unit.
2. Configure the IPSec policy on the LAN to allow unsecure inbound and outbound communication with the IP
address of the base unit.
73D-Link DVX-2000MS User Manual
Page 74

Section 2 - Installation
Using Microsoft Response Point Administrator
Microsoft Response Point Administrator is the program used to configure and monitor the Microsoft® Response Point™
phone system. The tasks you may want to do include: adding phones and users to and deleting them from the phone
system; backing up the base unit on a regular basis; changing the password of the base unit; and determining how
incoming calls are handled.
This section gives you in-depth information about phones, users, voicemail, phone service, the base unit, and call
routing plans. You’ll learn step-by-step instructions for managing these components of Response Point and how to set
up a phone system configuration that’s best for your business.
Phones
With Response Point, you’ll use a phone with the special Response Point button. When pressed, this button gives you
access to features, such as parking and retrieving, when you say the voice commands, “Transfer” and “Retrieve.” It also
connects you to the Automated Receptionist and allows you to voice dial your contacts.
The phones listed on the Phone System page of Administrator have been added to the phone system. You can add,
edit, and remove phones using commands in the Tasks panel, or by right-clicking on a phone that is displayed in the
list.
74D-Link DVX-2000MS User Manual
Page 75

Section 2 - Installation
Adding a Phone
When you add a phone to Response Point, you physically connect the device to the LAN and to a power source, as
well as configure it using the Configure Phone Wizard. During the configuration process, you must assign one user to
it. If the phone supports a primary user, the user must be the primary user.
To add a phone
1. Click the Phone System button.
2. In the Tasks panel, under Phones, click Add Phone, which displays the Configure Phone Wizard.
3. Confirm that the phone is connected and plugged in, select the check box at the bottom of the Have you connected
your phone page, and click Next.
4. On the What phone do you want to add page, click the phone you just connected.
Note: If you do not see the phone that you just connected, click Refresh in the Tasks panel. If you still do not see the
phone, make sure that the phone is connected to the LAN, unplug the phone from the power source, and plug it back
in. After plugging in the phone, you may need to wait at least sixty seconds before the phone is initialized and ready
to be configured.
5. Click Next to display the Who will receive calls on this phone page.
To configure a user on the phone that you added
1. Click Assign User to select an existing user, and click OK. Or, to add a new user, click New User at the bottom of
the Administrator - Select dialog box, and type the correct information on the Identification tab.
2. Click Next.
75D-Link DVX-2000MS User Manual
Page 76

Section 2 - Installation
3. On the What do you want to name this phone page, note that the name that has been automatically assigned to
the phone. Also, the owner of the phone has been filled in for you. You can change them both if you want.
4. Click Finish.
5. When the configuration process is complete, click Close.
Editing a Phone
When you edit a phone in the Microsoft® Response Point™ phone system, you can change who is assigned to the
phone, the phone owner, and the phone name.
To edit a phone
1. Click the Phone System button.
2. In the Tasks panel, under Phones, click Edit Phone.
3. In the Select the phone you want to edit list, click the phone that you want to edit, and then click OK. Some pages
of the Configure Phone Wizard will be displayed, starting with Confirm the identity of the phone. If the options
are unavailable, click Next.
4. On the Who will receive calls on this phone page, make any changes that you want, including changing the primary
user of the phone and adding a new user.
5. On the What do you want to name this phone page, change the name if you want to do so.
6. Click Finish.
7. When the configuration process is complete, click Close.
76D-Link DVX-2000MS User Manual
Page 77

Section 2 - Installation
Removing a Phone
You can remove a phone from the Response Point™ phone system. You may want to do this if the phone is no longer
working, for example. Removing a phone does not change the settings on the phone itself; however, the base unit will
no longer recognize it, and it must be reconfigured if you add it to the phone system again.
If you just want to move a phone to another location, do not remove the phone through Administrator; just unplug it
instead. When the phone is unplugged, the base unit reports that it is no longer responding and flags it on the Phone
System page of Administrator. However, the phone configuration is maintained by the base unit so that when it is
plugged back in, the phone is registered with the base unit as before. No additional configuration is needed.
To remove a phone:
1. Click the Phone System button.
2. In the Tasks panel, click Remove Phone.
3. Click the phone you want to remove, and then click OK.
4. Confirm that you want to remove the phone you selected by clicking Yes in the message box.
77D-Link DVX-2000MS User Manual
Page 78

Section 2 - Installation
Users
Response Point users are listed on the Phone System page, where you can use commands in the Tasks panel to
add, edit, or remove them, as necessary. Users are always associated with an extension number.
Adding a User
You add users to Response Point in two ways. First, when you configure a new phone, using the Configure Phone Wizard,
at least one primary user must be assigned to the new phone. You can also add users at any time on the Phone System
page by clicking Add User, and then entering the appropriate information in the User Properties dialog box.
To add a Response Point user:
1. Click the Phone System button.
2. In the Tasks panel, under Users, click Add user. The New User dialog box will appear
3. On the Identification tab, in the User type box, click Person, Group, Job Role, or Location, as appropriate.
4. In the Name boxes, if you chose the user type Person, type the first and last name, and optional nicknames and
titles of the person who will use this phone. You should specify nicknames and titles if you think callers will use them
when asking for this user.
5. If you chose the user type Group, Job Role, or Location, type the applicable name in the Name box, and type any
other names in the Alternate name 1 and Alternate name 2 boxes.
6. Click OK in the User Properties dialog box.
78D-Link DVX-2000MS User Manual
Page 79

Section 2 - Installation
Editing a User
You edit a Response Point user in the User Properties dialog box. You can also change settings such as enabling
voicemail or setting initial call forwarding rules..
To edit a Response Point user:
1. Click the Phone System button.
2. In the Tasks panel, under Users, click Edit user.
3. In the Select a user to edit list, click the name of the user that you want to edit, and then click OK.
4. Click the Identification tab, if necessary, and change options that are available for editing.
5. On the Voicemail and Call Forwarding tabs, make that changes that you want.
6. Click OK in the User Properties dialog box.
79D-Link DVX-2000MS User Manual
Page 80

Section 2 - Installation
Removing a User
You remove users from the phone system, after removing them from phones to which they are assigned as primary
users. For example, if an employee leaves your organization, you will want to remove them from Response Point.
Note: You cannot remove users if they are assigned to a phone. You must first edit the phone to remove the user from
it, and then follow the instructions that follow.
To remove Response Point user:
1. Click the Phone System button.
2. In the Tasks panel, under Users, click Remove User.
3. Click the user that you want to remove, and then click OK.
4. Confirm that you want to remove the user by clicking Yes in the message box.
80D-Link DVX-2000MS User Manual
Page 81

Section 2 - Installation
User Properties
Using Microsoft® Response Point™ Administrator, you can set and change the settings for Response Point users. Some
of the options can also be configured and managed by employees using Microsoft Response Point Assistant. When an
employee cannot edit an option, it is unavailable in Microsoft Response Point Assistant. In this case, employees may ask
you, as the phone system administrator, to make changes at your discretion.
Specifying a Persons Name
Callers may use a variety of names or nicknames when asking to speak with a person in your organization. You can
specify these names so that calls are sent to the individual’s primary extension number.
To specify a person’s name for incoming calls:
1. Click the Phone System button.
2. In the Tasks panel, under Users, click Add User or Edit User, as appropriate.
3. Click the Identification tab.
4. In the First name and Last name boxes, type the names callers will mostly likely use when calling this person.
5. Specify a title if it is possible callers will use.
Note: If the title you prefer is not in the list, type the appropriate title in the Other title box.
6. In the Nickname boxes, type a nickname or other names that this person goes by, if necessary.
Tip: If the Automated Receptionist has difficulty understanding the name, type the name phonetically in one of the
Nickname boxes. For example, if the name is “Rebecca Laszlo,” type “Rebecca Lazlow” instead.
7. Click OK in the User Properties dialog box.
81D-Link DVX-2000MS User Manual
Page 82

Section 2 - Installation
Specifying a Job Role Name
Callers may ask to speak with someone serving in a job role using a variety of names. You can specify these alternative
names so that calls arrive at the correct extension number. For example, callers may ask to speak to the “Receptionist”
or the “Secretary.”
To specify job role name for incoming calls:
1. Click the Phone System button.
2. In the Tasks panel, under Users, click Add User or Edit User, as appropriate.
3. Click the Identification tab.
4. In Name box, type the term callers will mostly likely use when calling this user.
5. Type alternate job role names in Alternate name 1 and Alternate name 2, as appropriate.
6. Click OK in the User Properties dialog box.
82D-Link DVX-2000MS User Manual
Page 83

Section 2 - Installation
Specifying a Location Name
Callers may ask to speak with someone at a location using a variety of names. You can specify these alternative names
so that calls are directed to the correct extension number. For example, callers may ask for “Lunch Room” or “Break
Room.”
To specify a location name for incoming calls:
1. Click the Phone System button.
2. In the Tasks panel, under Users, click Add User or Edit User, as appropriate.
3. Click the Identification tab.
4. In the Name box, type the term callers will most likely use when calling this location.
5. Type other names for this location in Alternate name 1 and Alternate name 2, as appropriate.
6. Click OK in the User Properties dialog box.
83D-Link DVX-2000MS User Manual
Page 84

Section 2 - Installation
Specifying a Group Name
Callers may ask to speak with a group using a variety of names. You can specify these alternatives so that calls arrive
at the group phone. For example, an accounting department may be called “Billing” by some callers.
To specify a group name for incoming calls:
1. Click the Phone System button.
2. In the Tasks panel, under Users, click Add User or Edit User, as appropriate.
3. Click the Identification tab.
4. In the Name box, type the term callers will mostly likely use when calling the group.
5. Type other group names in Alternate name 1 and Alternate name 2, as appropriate.
6. Click OK in the User Properties dialog box.
84D-Link DVX-2000MS User Manual
Page 85

Section 2 - Installation
Publishing User Information in the Directory
You can specify that names and extension numbers are available to people who call your office. You do this when setting
up a new user or editing a user’s settings.
To publish names and extension numbers in the directory:
1. Click the Phone System button.
2. In the Tasks panel, under Users, click Add User or Edit User, as appropriate.
3. Click the Identification tab.
4. Select the List this user and extension number in the directory accessible to external callers check box.
5. Click OK in the User Settings dialog box.
Note: You can enable or disable the entire directory from the Call Routing page in the Automated Receptionist
Properties dialog box.
85D-Link DVX-2000MS User Manual
Page 86

Section 2 - Installation
Enabling the Directory
You can determine if the directory is available, or not, to external callers.
Note: When you add or edit a user of the phone system, you can also specify that the user’s name and extension
number are available, or not, in the directory.
To enable the directory:
1. Click the Call Routing button.
2. In the Tasks panel, click Configure Automated Receptionist Properties.
3. In the Automated Receptionist Properties dialog box, select the Callers can ask for a directory of users and
their extension numbers check box.
4. Click OK.
86D-Link DVX-2000MS User Manual
Page 87

Section 2 - Installation
Disabling the Directory
You can determine if the directory is available, or not, to external callers.
Note: When you add or edit a Response Point user, you can also specify that the user’s name and extension number
are available, or not, in the directory.
To disable the directory:
1. Click the Call Routing button.
2. In the Tasks panel, click Configure Automated Receptionist Properties.
3. In the Automated Receptionist Properties dialog box, clear the Callers can ask for a directory of users and
their extension numbers check box.
4. Click OK.
87D-Link DVX-2000MS User Manual
Page 88

Section 2 - Installation
Voicemail
Response Point supports various configurations for voicemail: You can retrieve voice messages by phone or as e-mail
attachments, or both. You can also specify or record what greetings callers will hear when they reach employees in your
business. Later, individual users can make adjustments to their voicemail settings and greetings using Assistant.
Setting Voicemail Options
You can specify a number of settings to control how employees initially receive voicemail messages, including whether
they’ll listen to messages on their phones or receive them as attachments to e-mail (or both), as well as how callers
will be greeted.
To change voicemail settings:
1. Click the Phone System button.
2. In the Tasks panel, under Users, click Add User or Edit User, as appropriate.
3. Click the Voicemail tab.
4. Select the options that you want to change.
5. Click OK in the User Properties dialog box.
88D-Link DVX-2000MS User Manual
Page 89

Section 2 - Installation
Specifying How You Retrieve Voicemail
You can specify how a user initially retrieves voice messages—either by phone or as attachments to e-mail messages,
or both. Later, the employee can change this setting using Assistant.
To specify how a user retrieves voice messages:
1. Click the Phone System button.
2. In the Tasks panel, under Users, click Add User or Edit User, as appropriate.
3. Click the Voicemail tab.
4. Decide whether the user will receive voice messages by phone or as e-mail attachments, or both.
5. Under Message retrieval, select the option that you want. If you specified sending voicemail as e-mail attachments,
type the e-mail address to which you want the voicemail sent.
6. Click OK in the User Properties dialog box.
89D-Link DVX-2000MS User Manual
Page 90

Section 2 - Installation
Setting a Voicemail Greeting
You can determine how callers who reach a specified user will be greeted. Later, the employee can change the voicemail
greeting using Assistant.
To change voicemail settings:
1. Click the Phone System button.
2. In the Tasks panel, under Users, click Add User or Edit User, as appropriate.
3. Click the Voicemail tab.
4. Under Voicemail greeting callers will hear for this user, click Specify Voicemail Greeting.
5. Select the default greeting, record a custom greeting, or upload a sound file to use for the greeting.
6. Click OK.
7. Click OK in the User Properties dialog box.
90D-Link DVX-2000MS User Manual
Page 91

Section 2 - Installation
Resetting the Extension Number Password
When a user is assigned to a phone and an extension number, a password is automatically assigned to that person.
Employees use this password to log on to the Assistant program and to access their voicemail. The default password
is 9999. Encourage your employees to change the default password, which they can do using Assistant. As the phone
system administrator, you cannot set or change a user’s password, but you can reset it to its default value using
Administrator.
To reset an extension number password:
1. Click the Phone System button.
2. In the Tasks panel, under Users, click Edit User, select a user to edit, and click OK.
3. On the Identification tab, click Reset Password.
4. Confirm that you want to reset the password to the default by clicking Yes.
5. Click OK in the User Properties dialog box.
91D-Link DVX-2000MS User Manual
Page 92

Section 2 - Installation
Phone Service
Response Point supports traditional phone service, which is the landline-based phone service that uses phone jacks
and analog signals to make connections between two calling parties. The phone line adapter, listed on the Phone
System page, translates analog signals to phones, and digital information back to analog signals when calls are sent
out over landline phones. To use traditional phone service, you will need to configure at least one phone line adapter
for Response Point to work.
For access to commands where you can add, edit, and remove phone services, go to the Phone System page in
Administrator.
92D-Link DVX-2000MS User Manual
Page 93

Section 2 - Installation
Adding Phone Service
You can use traditional phone service with Response Point for inbound and outbound calls. It uses hard-wired lines
to connect your business to the worldwide phone system. Your office may have one or more landline phone lines.
To set up phone service, you need a phone line adapter, which translates the analog signal coming from the landline
phone line to Response Point. Likewise, it takes the outgoing digital signals from the phone system and translates
them to analog signals that can be sent over landlines. To place outbound calls, you must first dial 9 and then the
phone number.
To add phone service:
1. Click the Phone System button.
2. In the Tasks panel, under Phone Service, click Add Phone Service.
3. Complete the steps of the Configure Phone Service Wizard, and click Finish.
To edit an existing line of service:
1. Click the Phone System button.
2. In the Tasks panel, under Phone Service, click Edit Phone Service and select the adapter for the service that you
want to edit.
3. Complete the steps of the Configure Phone Service Wizard, and click Finish.
93D-Link DVX-2000MS User Manual
Page 94

Section 2 - Installation
Editing Phone Service
You edit phone service options by using the appropriate pages of the Configure Phone Service Wizard. For example,
you can block outbound calls on a line.
To edit phone service:
1. Click the Phone System button.
2. In the Tasks panel, under Phone Service, click Edit Phone Service.
3. Complete the steps of the Configure Phone Service Wizard, and click Finish.
94D-Link DVX-2000MS User Manual
Page 95

Section 2 - Installation
Removing Phone Service
You can remove a phone service line by following these instructions.
To remove phone service:
1. On the Phone System page, click the phone service or line of service that you want to remove.
2. In the Tasks panel, under Phone Service, and click Remove Phone Service.
3. If you have more than one phone line adapter configured in the phone system, you will be prompted to select which
one to remove. If you are prompted, click the adapter that has the service that you want to remove, and then click
OK.
4. Confirm that you want to remove this service by clicking Yes in the message box.
95D-Link DVX-2000MS User Manual
Page 96

Section 2 - Installation
Base Unit
The base unit is a dedicated device connected to your office LAN. It’s an essential component because it handles the
Microsoft® Response Point™ phone system. The base unit is managed using Administrator, where you can back it up,
change settings, and monitor events and errors, among other tasks.
Viewing the Event Log
The event log details errors, warnings, and information about activity on the base unit. For example, you can see when
an internal error occurred or when a restore or upgrade action was completed. You can also see when an employee
attempted to log on with an incorrect password and other such events.
Some events are monitored in other parts of the program, as well as in the event log. For example, space allocated to
voicemail is reported under Storage Space Use on the Base Unit page.
To view the event log:
1. Click the Base Unit button.
2. In the Tasks panel, under Status, click View Event Log.
3. Review the event summary and list of events.
4. Filter the events, as needed, using options in the Show list.
5. Click Base Unit Performance for more information about the base unit.
Note: To see more details about an event, double-click the row in which it appears.
96D-Link DVX-2000MS User Manual
Page 97

Section 2 - Installation
Viewing Storage Space Detail
You can review how much total space on the base unit is being used for voicemail files and how much is still available.
You can also see how much space is used for voicemail files by each Response Point user.
This information is helpful for determining when the base unit is getting near storage capacity and when you need to
ask users to delete some or all of their voice messages or contacts.
If storage is becoming an issue, ask users to do one or more of the following:
• Delete their voicemail, or switch to receiving voicemail as e-mail.
• Delete contacts that they don’t use often for voice dialing or phone numbers they’ve configured for Bypass
Receptionist.
There is a minimum of 75 MB free space maintained at all times on the base unit. If the base unit detects that it does
not have the minimum required free space, groups of files will be deleted until the minimum required free space is
reached. These files are deleted in this order:
1. All files in the temporary folder on the base unit.
2. All personal contacts.
3. All voicemail older than 15 days.
Note: This information also appears under Storage Space Use in the Base Unit page.
97D-Link DVX-2000MS User Manual
Page 98

Section 2 - Installation
To view storage space detail:
1. Click the Base Unit button.
2. In the Tasks panel, under Status, click View Storage Space Detail.
3. Review Storage Space Summary and Voicemail Storage Used by User to determine if you need to ask employees
to delete voice messages.
4. When finished, click Close.
98D-Link DVX-2000MS User Manual
Page 99

Section 2 - Installation
Changing the Base Unit Password
It’s a good idea to change the password of the base unit regularly to help maintain system security. The base unit
password is used by the person who administers the Microsoft® Response Point™ phone system using Administrator.
Consider changing the default password (admin) right away.
Note: The base unit password can be a maximum of 256 characters. Password-cracking software, given enough time,
can discover any password; however, it can take months to crack a strong password. Consequently, it’s a good idea to
use a strong password and change it regularly.
For a password to be strong, it should be at least seven characters long. Because of the way passwords are encrypted,
the most secure passwords are 7 or 14 characters long. Your password should contain letters (A, B, C, a, b, c…) and
numerals (0, 1, 2, 3, 4, 5, 6, 7, 8, 9) and symbols (` ~ ! @ # $ % ^ & * ( ) _ + -= { } | [ ] \ : “ ; ‘ < > ? , . /).
For a password to be strong, it should:
• Have at least one symbol character in the second through sixth positions.
• Be significantly different from prior passwords.
• Not contain your name or user name.
• Not be a common word or name.
To change the base unit password:
1. Click the Base Unit button.
2. In the Tasks panel, under Properties, click Change Password.
3. In the Current password box, type the current password (the default is admin).
4. In the New password and Confirm password boxes, type the new password.
5. Click OK.
99D-Link DVX-2000MS User Manual
Page 100

Section 2 - Installation
Configuring the E-Mail Server
Your e-mail server can be configured to work with Response Point. Configuring an e-mail server allows you to set up
voicemail so that voice messages can be sent as attachments to e-mail. Before configuring the e-mail server, you’ll
need to establish a high-speed Internet connection with an Internet service provider.
To configure the e-mail server:
1. Click the Base Unit button.
2. In the Tasks panel, under Properties, click Configure E-Mail Server.
3. In the Configure E-Mail Server dialog box, select options or enter information as appropriate, and click OK.
To verify that the server name and connection information is correct:
1. Configure your user account in the Assistant program to send voice messages as e-mail attachments.
2. Call your extension number from another phone, and leave a voice message for yourself.
3. Open your e-mail program, and verify that you received it.
4. Double-click the WAV file to hear your test message.
Note: If you do not receive the e-mail message with attached voicemail file, check the event log to see if there was a
failure in connecting to the e-mail server or sending e-mail. Also, check the junk e-mail folder in your e-mail program to
make sure the message wasn’t filtered as spam. It may be necessary to add the sending e-mail address to your “safe
sender” list.
100D-Link DVX-2000MS User Manual
 Loading...