

Page 1

DSL-300 DSL-300
ADSL Ethernet ModemADSL Ethernet Modem
Quick Install GuideQuick Install Guide
Page 2

Quick Install GuideQuick Install Guide
for Windows 98/SE/ME/2000
DSL-300
ADSL Ethernet Modem
* Please refer to the Manual on the CD-ROM for more detailed information.
11
To setup the DSL-300 begin by connecting it to a power source.
Once the unit power is on, insert one end of the included Ethernet cable
into the DSL-300’s Ethernet port, and the other end into the Ethernet port on
the NIC installed in your PC.
Connecting the DSL-300Connecting the DSL-300
If the cable connection is good, a green LED on the front of the DSL-300
labeled Ethernet/Link will glow steadily.
Page 3
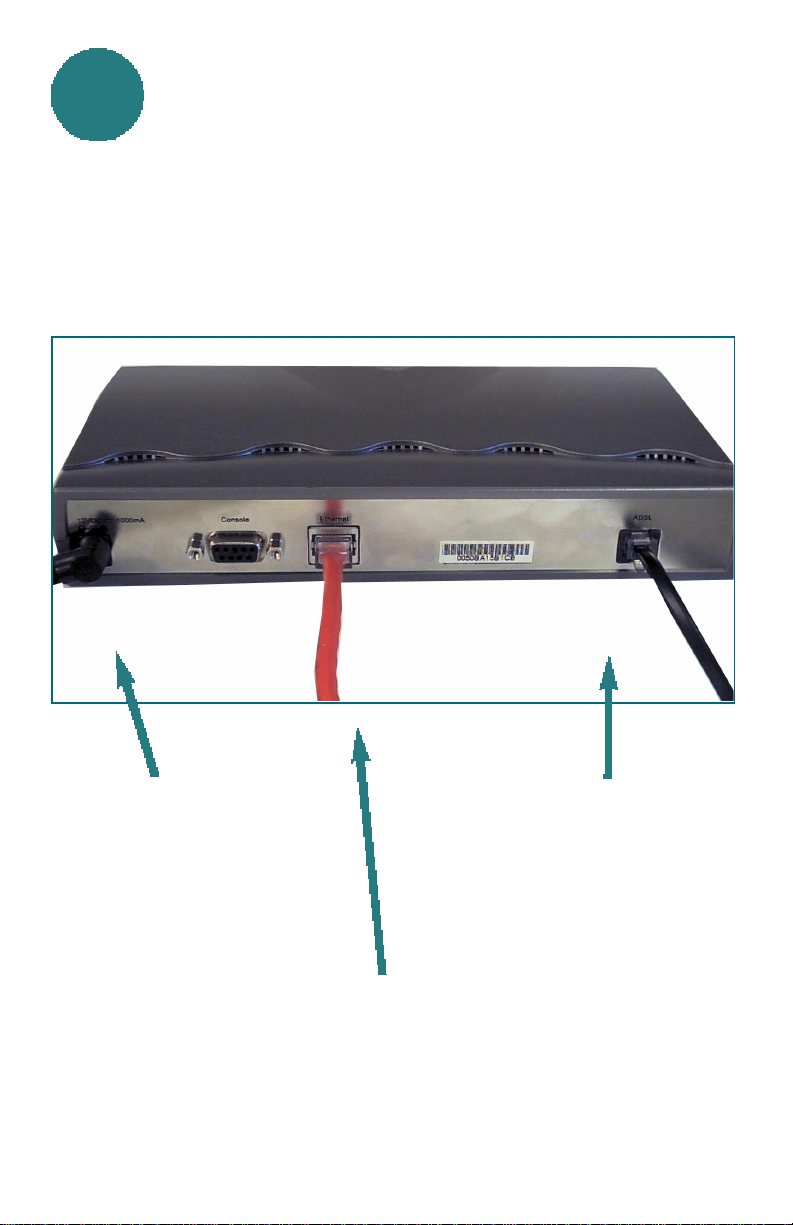
Connecting the DSL-300 Connecting the DSL-300 continuedcontinued
11
Now connect the phoneline cable from the DSL-300 to your phone jack.
If the ADSL Link LED does not glow green within one minute of its being
connected, check all of your cable connections to make sure that they are
correct and securely installed.
When you have completed all the connections, your DSL-300 will look
like this:
Power Cord
(Plug the other end of the
power cord into the power
outlet.)
(Plug the other end of the
Ethernet cable into the
Ethernet port on the NIC,
which is installed in your
Phone line cable
(Plug the other end of the
phone line cable into the
phone jack.)
Ethernet Cable
computer.)
Page 4

22
Installing the Software DriversInstalling the Software Drivers
Step 1 -Turn on your PC and
wait until Windows Operating
System has been fully installed.
Step 2 - Insert the DSL-300
Configuration Utility CD into
the CD drive.
Step 3 - Select START>RUN>
Type in the letter for the CD-ROM drive. If the CD-ROM drive is
“D”, then type “D:\Setup.exe” in the open field.
Click OK
Click Next
Click Next
Page 5

22
Click Next
Installing the Software DriversInstalling the Software Drivers
continued
Click Next
Click Next
Page 6

Installing the Software DriversInstalling the Software Drivers
22
After files have been
loaded, select “Yes,
Launch the program
file.”
continued
Using the Configuration UtilityUsing the Configuration Utility
33
Click Discover
Double click on the MAC
address of the DSL-300.
Page 7

Using the Configuration UtilityUsing the Configuration Utility
33
Type “Admin” for the default
password.
Click OK
Click on the “General ADSL Information” tab and input the proper VPI
settings provided by your DSL provider.
The DSL-300 comes with a default VPI of “0” and a VCI of “35.”
To change these settings, simply highlight the number you wish to change,
and type in a new value in the box.
NOTE: VPI: “0” and VCI: “35” settings are most common among DSL
providers. This will not work for others who have different VPI and VCI
settings. Please contact your service provider for the correct VPI and
continued
VCI settings.
Click OK after you
have input the correct
ADSL settings as
described above.
Page 8

33
Using the Configuration UtilityUsing the Configuration Utility
continued
Click Yes
Click Yes
Note: Do not manually restart the modem. It will automatically restart by
itself. When the DSL-300 has been fully restarted, then it will be ready for use.
Digital Home Solutions
Printed in Taiwan
 Loading...