

Page 1
D-Link VisualStreamTM
2 Mega Dual-mode Digital Camera
Manual
Rev. 101702
Page 2

Contents
1. Product Overview ...........................................................................................................................3
Front/Top.........................................................................................................................................3
Back ................................................................................................................................................3
2. How To Install the D-Link DSC-2000 Camera.............................................................................4
2.1 How To Install the DSC-2000 Driver.............................................................................4
2.2 How To Install the Application Software .......................................................................4
3. How To Use Your D-Link VisualStreamTM Camera .................................................................... 5
3.1 Getting Started ................................................................................................................ 5
3.2 Power Management ........................................................................................................5
3.3 Status LCD Display ........................................................................................................5
3.4 Capturing A Still Picture.................................................................................................6
3.4.1 Setting the Focus..................................................................................................... 6
3.4.2 Setting the Flash...................................................................................................... 6
3.4.3 Taking a Still Picture............................................................................................... 6
3.4.4 Using the Self-Timer...............................................................................................6
3.4.5 Checking the Image Count......................................................................................6
3.4.6 Deleting the Pictures ...............................................................................................7
3.5 Capturing Video ..............................................................................................................7
3.6 Multisnap ........................................................................................................................7
3.7 TV Playback....................................................................................................................7
3.8 TV Video......................................................................................................................... 7
3.9 Getting Your Pictures and Videos into the Computer..................................................... 7
4. Using the DSC-2000 with Photolmpression 3............................................................................... 9
4.1 Getting Started ................................................................................................................ 9
4.2 Using PhotoImpression 3................................................................................................9
5. Using the DSC-2000 with Videolmpression 1.6 ..........................................................................10
5.1 Getting Started .............................................................................................................. 10
5.2 Using VideoImpression 1.6 ..........................................................................................10
6. Using the DSC-2000 with MicroSoft NetMeeting ......................................................................12
6.1 How to Install NetMeeting............................................................................................12
6.2 How to Start with the Camera....................................................................................... 12
Page 2 of 15
Page 3
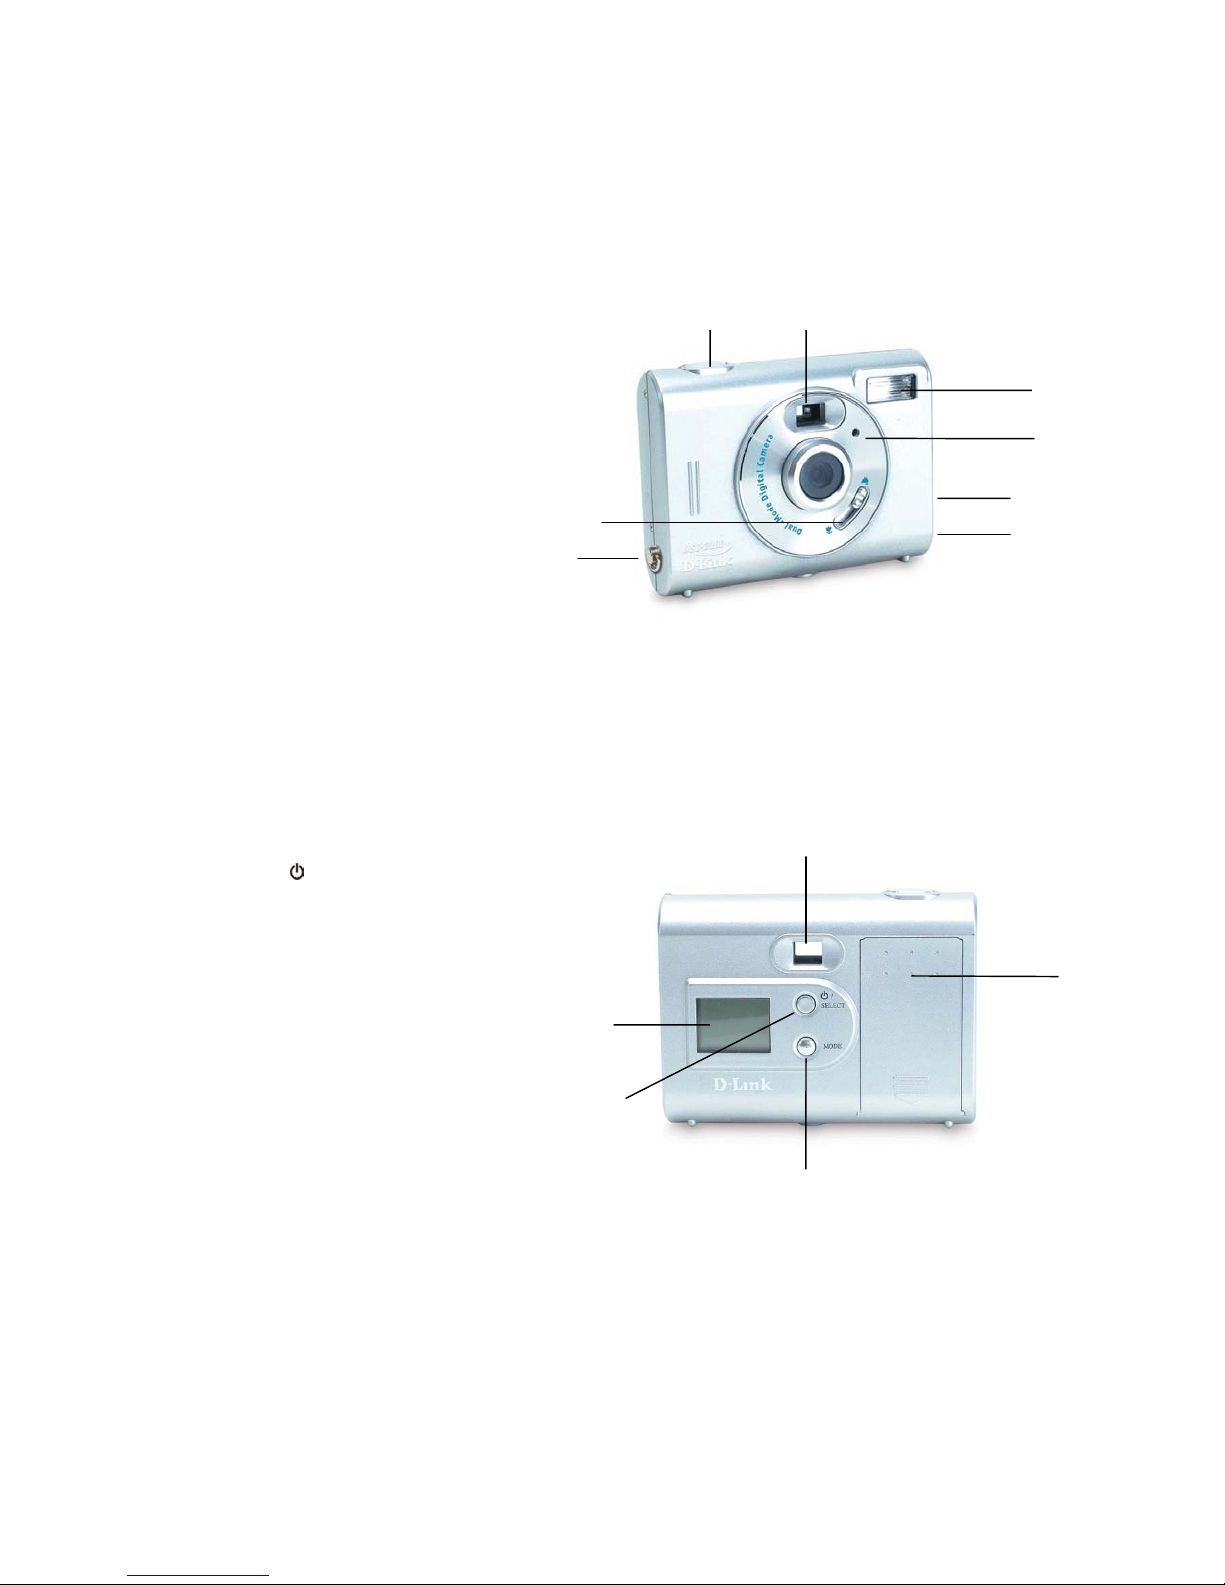
1. Product Overview
FFrroonntt//TToopp
1. Shutter Button
2. Viewfinder
3. Flash
4. Self-timer LED
5. Focus Switch
6. TV output port
7. USB port
8. Hand strap eyelet
BBaacckk
1. Viewfinder
2. Status LCD display
3. Power/Select button
Press the
/Select button to
2
2
6
6
7
7
3
4
4
switch between the option and
confirm your choice.
4. Mode button:
Press the Mode button to cycle
through the options.
5. Battery chamber cover
Page 3 of 15
Page 4

2. How To Install the D-Link DSC-2000 Camera
22..11 HHooww TToo IInnssttaallll tthhee DDSSCC--22000000 DDrriivveerr
(1) Insert the Camera CD into your CD-ROM drive. The installer screen will automatically pop up.
(2) Click the "Install Device Driver" button to start installing.
Note: If the installer screen does not come up automatically, click Start and then run and
execute the file “launch.exe” on the CD to start the installation program.
(3) Once you have finished installing the camera driver, you must restart your computer. Click Start,
Shut Down, and select option Restart to restart.
22..22 HHooww TToo IInnssttaallll tthhee AApppplliiccaattiioonn SSooffttwwaarree
(1) Select the programs you wish to install from the main menu.
(2) Click the "Application Software" button to start installing.
(3) Follow the instructions to processed installation.
(4) When installation completes, the Application Software group will appear as a folder under the
directory of Program Files.
(5) To start the application software, click Start, point to Programs and then click the name of the
application software.
Note: You may also install the camera by means of plug and play installation in Windows.
Once you plug the camera into the PC via the USB cable provided, Windows will
detect the device and search for the driver. Choose “Install from a list or specific
location (Advanced)” and insert the Reference CD into your CD-ROM drive. Click the
Exit button to close the Autorun window while inserting CD into CD-ROM drive.
Follow the onscreen instructions and proceed until the installation is completed.
Page 4 of 15
Page 5
3. How To Use Your D-Link VisualStreamTM Camera
33..11 GGeettttiinngg SSttaarrtteedd
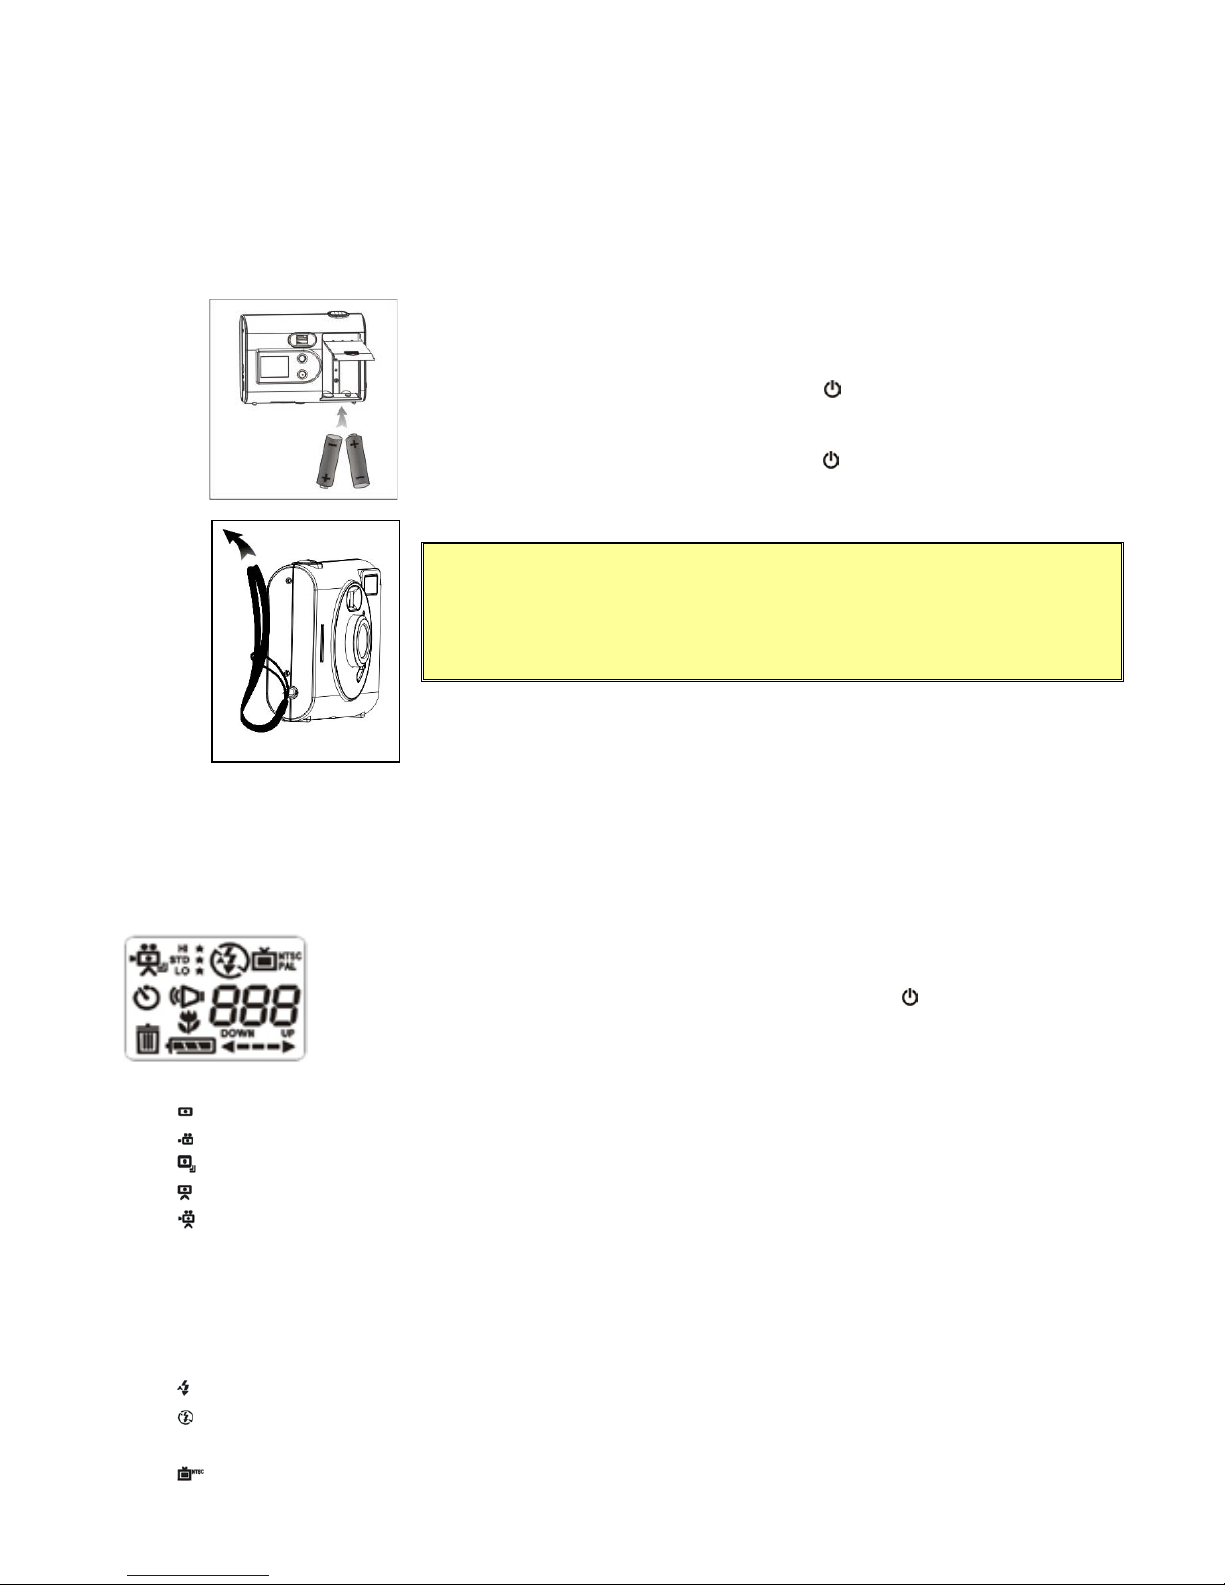
Loading the Batteries: insert two AA alkaline batteries.
1.
Insert hand strap through the strap eyelet.
2.
To turn on the camera, press and hold the
3.
The camera gives a long beep sound when it is turned on.
To turn off the camera, press and hold the
4.
The camera gives a long beep sound when it is turned off.
Note: Before using the camera, be sure to select the proper
33..22 PPoowweerr MMaannaaggeemmeenntt
When not in use, the camera is automatically powered off after 45 seconds to conserve battery power.
/Select button for one second.
/Select button for two seconds.
operation mode (see sections below for detailed description)
and video format (NTSC/PAL) according to local conditions.
33..33 SSttaattuuss LLCCDD DDiissppllaayy
1. Operation Mode
Photo: for taking still pictures.
Video Clip: for recording video clips.
Multisnap: for taking five consecutive still pictures.
TV Playback: for viewing images stored in the camera on a TV monitor.
TV Video: for viewing the live video taken by the camera on a TV monitor.
2. Resolution
HI: High Resolution (1600*1200 pixels; 22 photos).
STD: Standard Resolution (1280*1024 pixels; 50 photos).
LO: Low Resolution (640*480 pixels; 234 photos).
3. Flash
Auto: The flash occurs automatically.
Off: The flash is disabled.
4. Video
NTSC: select this option to connect the camera to the NTSC (60HZ) TV system.
To change any of the camera’s options (e.g. operation mode, resolution, flash, etc.), keep
pressing the Mode button to cycle through the options on the status display.
The icon of the active option will flash. Change it by pressing the
/Select button.
Page 5 of 15
Page 6

PAL: select this option to connect the camera to the PAL (50HZ) TV system.
5. Self-timer
: the icon blinks quickly when Self-timer is active; the icon blinks slowly when Self-timer is disabled.
6. Sound
: Turn camera sound on/off. The icon blinks quickly when Sound is active; the icon blinks slowly when
Sound is disabled.
7. Macro Mode
: The camera is in a close-up region.
8.
9. Delete Last
10. Delete ALL
11. Battery Status
12. Counter-Up/Down
: Number of pictures or seconds of video.
: Press the /Select button to delete the last picture you took.
: Press and hold /Select button for a half second to delete all pictures.
Battery low: you’ll need to replace the batteries soon.
Battery exhausted: turn camera off and replace battery.
Up arrow: showing the number of pictures taken.
Down arrow: showing the number of pictures remaining.
33..44 CCaappttuurriinngg AA SSttiillll PPiiccttuurree
3.4.1 Setting the Focus
Enter the Still Picture mode ( ). Set the focus switch to infinite ( ) mode or macro ( ) mode by
switching toward the marks on the front panel.
Note: To avoid overexposure, the flash is disabled in the MACRO Mode.
3.4.2 Setting the Flash
(1) Press the Mode button until the Flash icon is blinking.
(2) Press the
Note: After the flash is released when you take a picture, the Flash icon blinks until the
3.4.3 Taking a Still Picture
Press the Shutter button to take a picture.
Note: Do not move your camera until it gives a beep.
3.4.4 Using the Self-Timer
(1) Press the Mode button until the Self-Timer icon comes up and blinks.
(2) Press the
(3) Once you have enabled the Self-Timer, press the Shutter button and the picture is taken after 10
seconds.
/Select button to switch between Auto Flash and No Flash.
flash is fully charged.
/Select button to enable or disable the Self-Timer.
3.4.5 Checking the Image Count
The LCD display on the back of the camera shows the number of pictures taken or pictures remaining. To
change the image count, press the Mode button until the icon (
modes and confirm your choice by pressing the
, ) blinks. Switch between the two
/Select button.
Page 6 of 15
Page 7
3.4.6 Deleting the Pictures
To delete the last picture taken:
(1) Press the Mode button until the “
(2) Press and hold the
To delete all pictures taken:
(1) Press the Mode button until the “ " icon blinks.
(2) Press and hold the
/Select button to confirm your choice. The last picture you took is deleted.
/Select button to confirm your choice. All pictures you took are deleted.
” icon blinks.
33..55 CCaappttuurriinngg VViiddeeoo
(1) Entering the Video Clip mode ( ).
(2) Set the resolution as STD (VGA; 640 x 480; shorter recording time) or LO (QVGA: 320 x 240;
longer recording time).
(3) Press and hold the Shutter button to take video frames.
33..66 MMuullttiissnnaapp
In the Multisnap mode, you can take five still pictures on a consecutive basis.
(1) Press the Mode button once; press the
(2) Press the Shutter button. The camera takes five consecutive pictures.
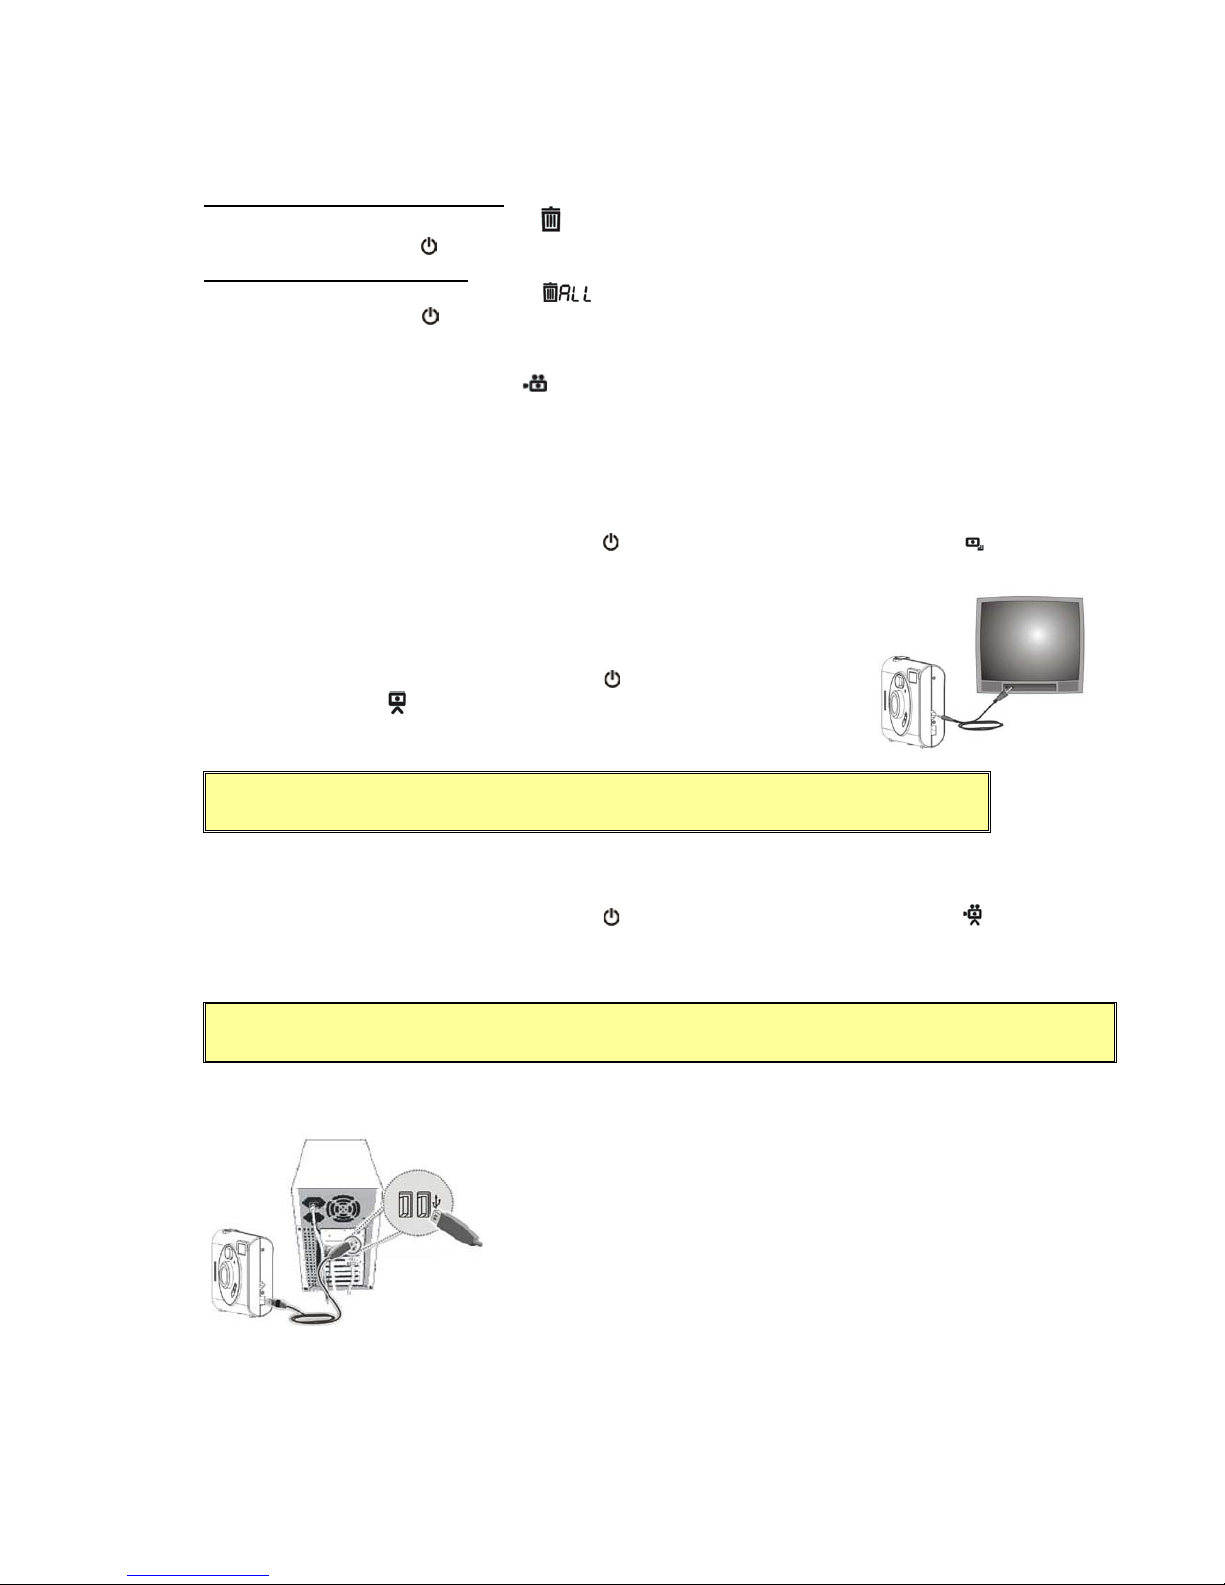
33..77 TTVV PPllaayybbaacckk
In the TV Playback mode, you can view images stored in the camera on a
TV monitor.
(1) Press the Mode button once; press the
Playback icon (
(2) Plug the camera into a television monitor with the TV cable.
(3) Press the Shutter button to view the images.
Note: In the TV Playback mode, power management is not active.
33..88 TTVV VViiddeeoo
In the TV Video mode, you can view the live video taken by the camera on a TV monitor.
(1) Press the Mode button once; press the
(2) Adjust the resolution (STD/HI/LO).
(3) Plug the camera into a television monitor with the TV cable.
Press the Shutter to take live video frames.
) appears.
/Select button until the Multisnap icon (
/Select button until the TV
/Select button until the TV Video icon (
) appears.
) appears.
Note: In the TV Video mode, power management is not active.
33..99 GGeettttiinngg YYoouurr PPiiccttuurreess aanndd VViiddeeooss iinnttoo tthhee CCoommppuutteerr
(1) Connect the USB cable from the USB port of the
camera to your computer USB port.
Page 7 of 15
Page 8
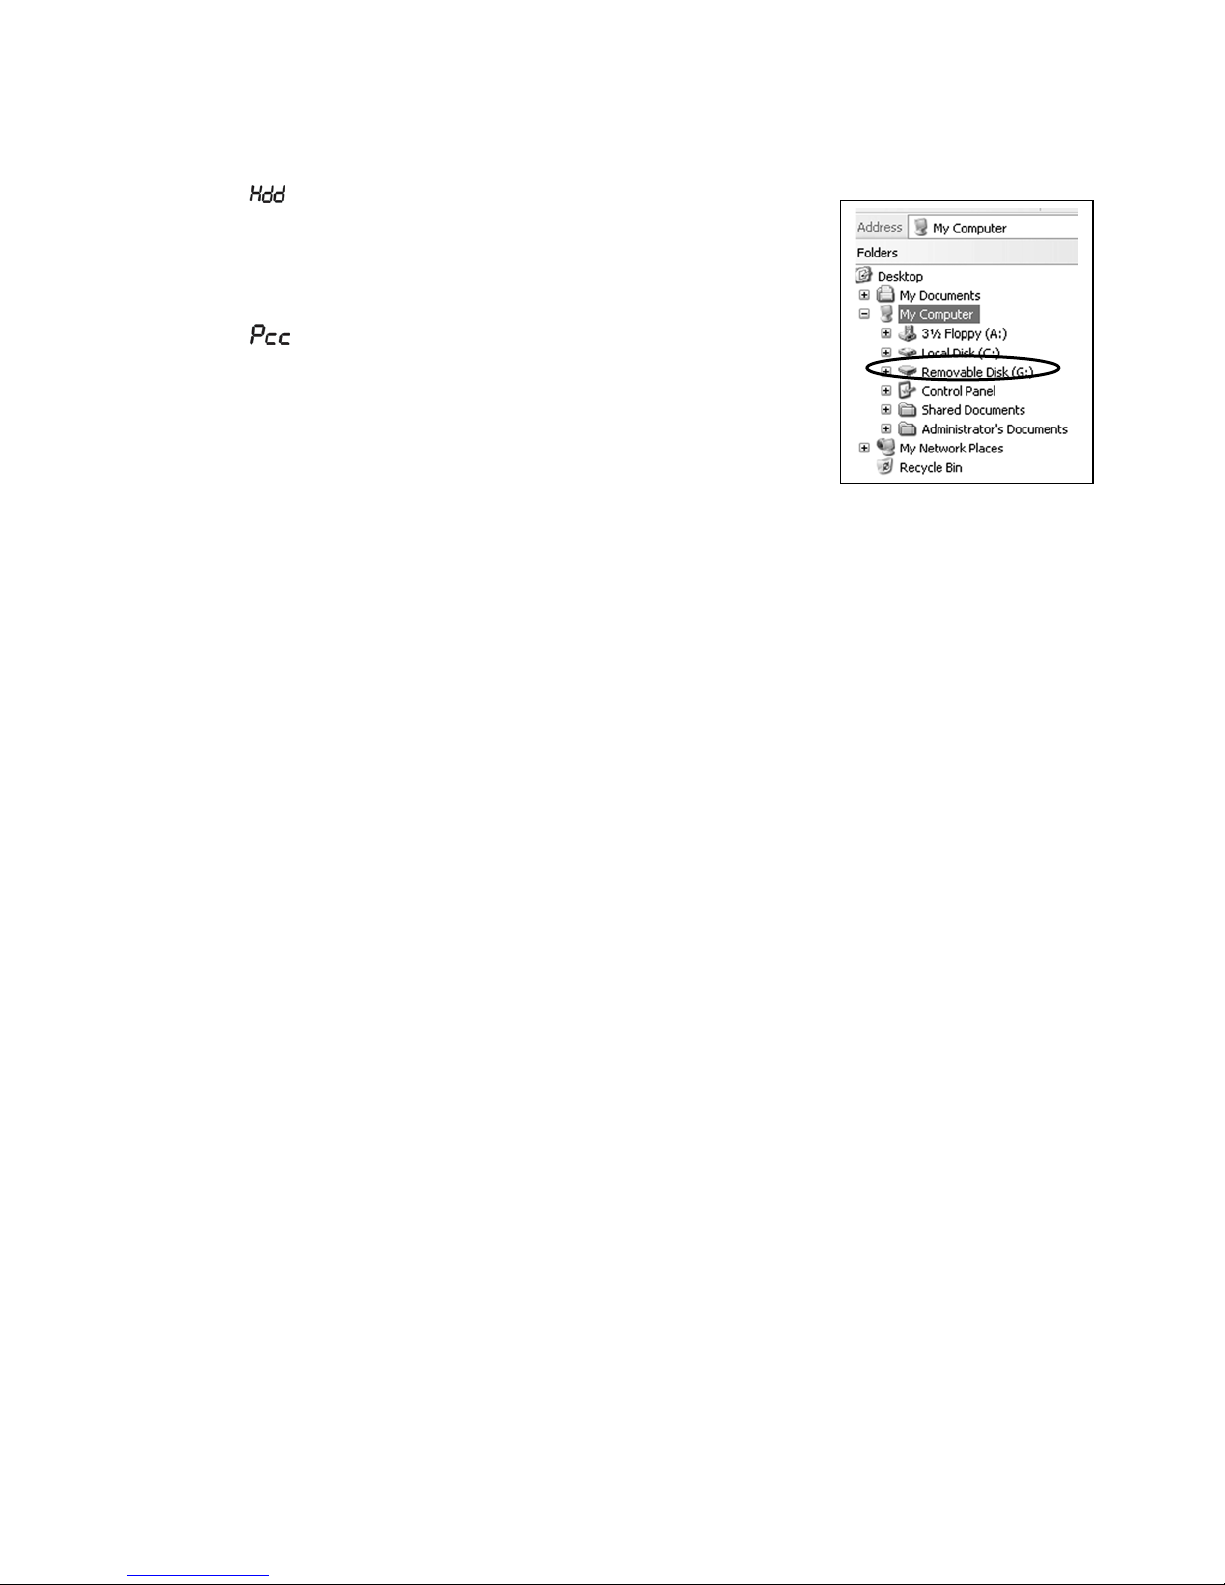
(2) Switch to between the following modes by pressing the Shutter button:
Mass Storage Mode:
A. The status LCD will show ”Hdd” once the camera is
connected to the computer. The camera will function as an
additional drive of the computer.
B. Image files can be found under the directory \DCIM\ on the
drive named “Removable Disk.” You can read, delete,
move, or copy any image files you want.
PC Camera Mode:
A. The status LCD will show ”Pcc” when you press the Shutter
button. The camera will function as a PC camera.
B. With your Digital Camera and camera software, you can do
video calling, video e-mail, or live video broadcasting on the
Internet right from your PC. For more information, see below
sections.
Page 8 of 15
Page 9
4. Using the DSC-2000 with Photolmpression 3
The Camera CD contains application software such as PhotoImpression 3 and VideoImpression 1.6, with which
you can view, edit and replay still pictures and videos taken by the camera.
Note:
1. Make sure you have switched to the mode you want before running the application
software.
2. Once you plug the camera into the PC and launch the application software, all the
buttons on the camera except the Shutter button will be disabled.
44..11 GGeettttiinngg SSttaarrtteedd
(1) Plug the camera into the PC.
(2) Click StartÆGo to ProgramsÆArcSoft PhotoImpression 3.
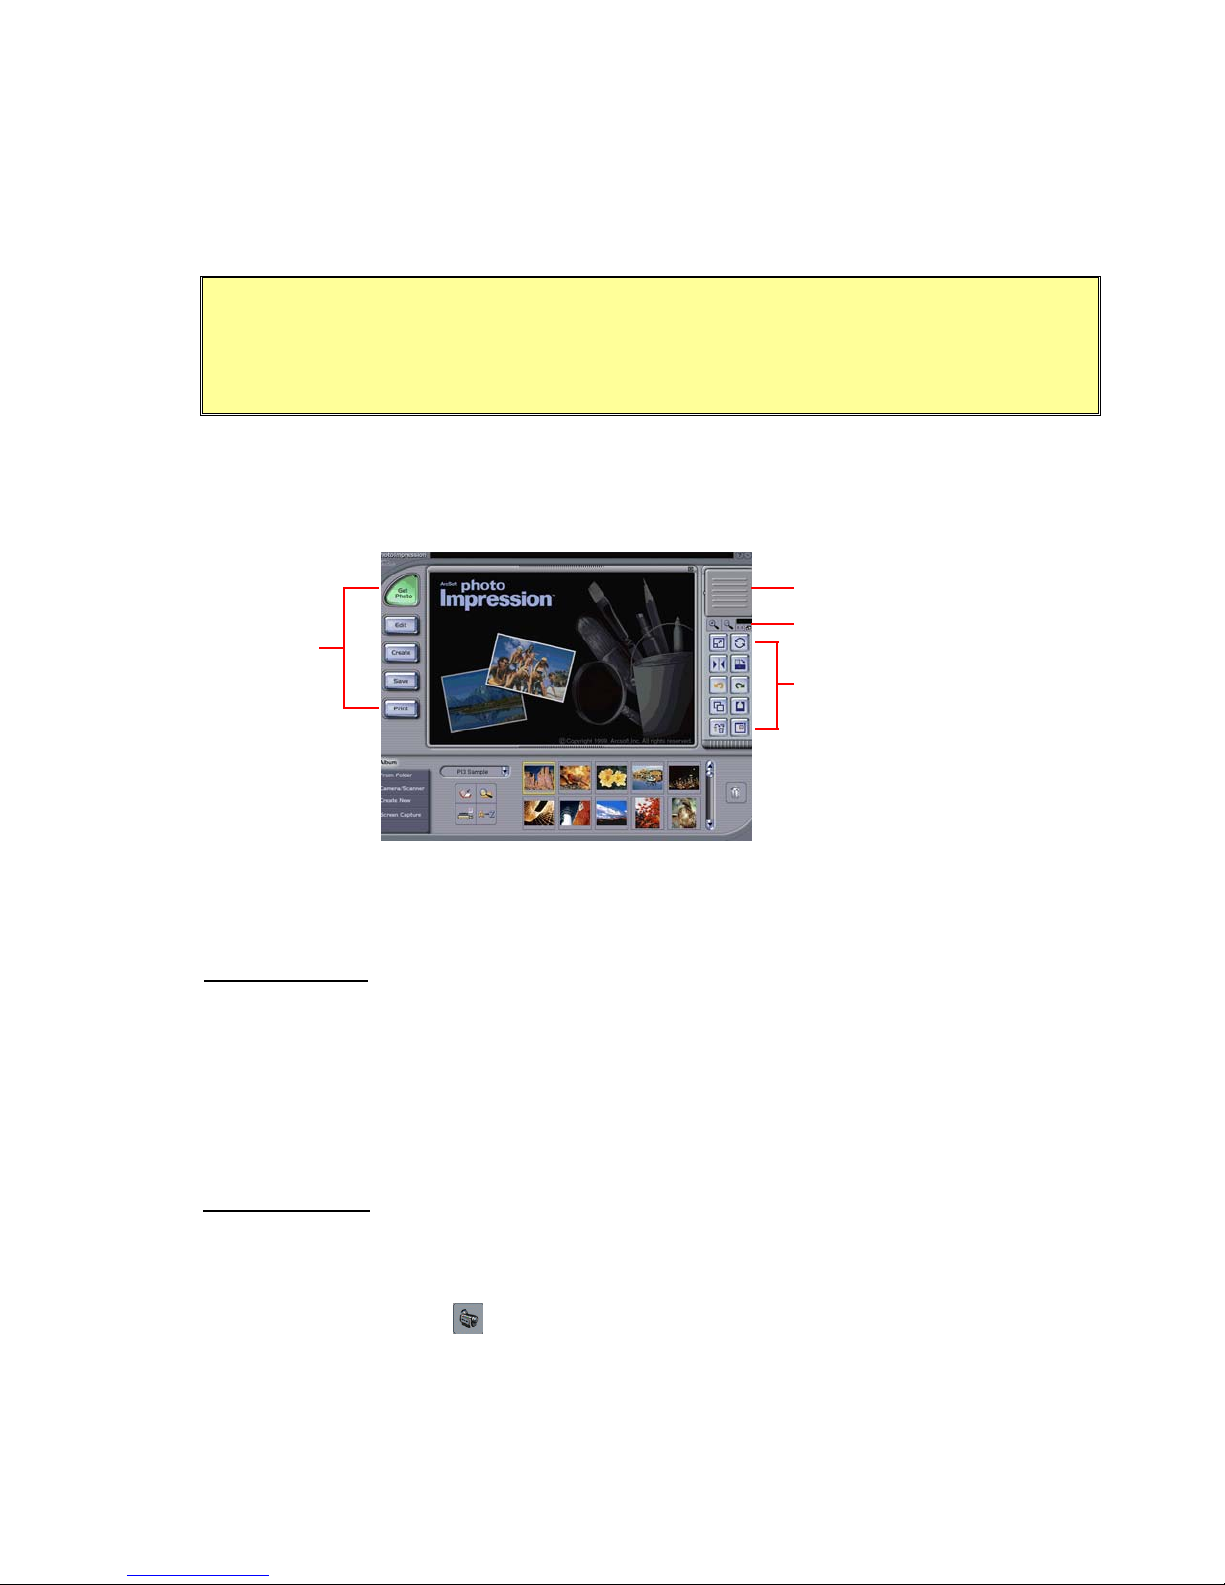
(3) The PhotoImpression Main Screen will appear as follows:
Command
Buttons
Main Screen
44..22 UUssiinngg PPhhoottooIImmpprreessssiioonn 33
Working with the Camera
In the Hdd mode:
The camera also serves as a mobile data storage device that stores images you took. After connecting
the camera to your PC, you can load pictures from the camera into PhotoImpression 3 for preview and
editing.
(1) Select “Get photo” from the main menu.
(2) Select “from folder” to browse the directory and folders to get images you want.
(3) Select “removable disk” from the disk drives in the pop-up window.
(4) Enter the folder named “DCIM” under the directory of “removable disk” and then go to “100Album.”
The images saved on the camera are saved here.
(5) Get the images and load them to your PC for further applications.
In the PCC mode:
After connecting the camera to your PC. You can use it as a PC camera to preview live video and take
still images from the camera.
(1) Select “Get photo” from the main menu.
(2) Select “Camera/Scanner.”
(3) Select “Video Camera”(
options.
(4) Select “Live” to preview live video. Select “Capture” from the dialogue box to take still images from
the video.
Working With Albums
Click on the Get Photo button on the Main Screen, and select Album to view the album options.
) as the image taking device. A dialogue box pops up showing five
Navigation Window
Magnification Controls
Tool Bars
Page 9 of 15
Page 10
Editing and Saving Images
Click on the Edit button on the Main Screen to display the various editing options, including
Crop/Resize, Copy Selection As New Layer, Soft Edge Slider, Apply To All Layers, Crop, Width,
Height, Wscale, Hscale, Resize, Retouch, Text, Enhance, Effects, Layers, etc.
Note: PhotoImpression provides an extensive Help document. If you need more
information or instructions on how to use a specific feature or tool, click the Help (?)
button in the upper right-hand corner of the screen.
5. Using the DSC-2000 with Videolmpression 1.6
55..11 GGeettttiinngg SSttaarrtteedd
1. Plug the camera into the PC.
2. Click Start. Go to Programs>ArcSoft VideoImpression 1.6.
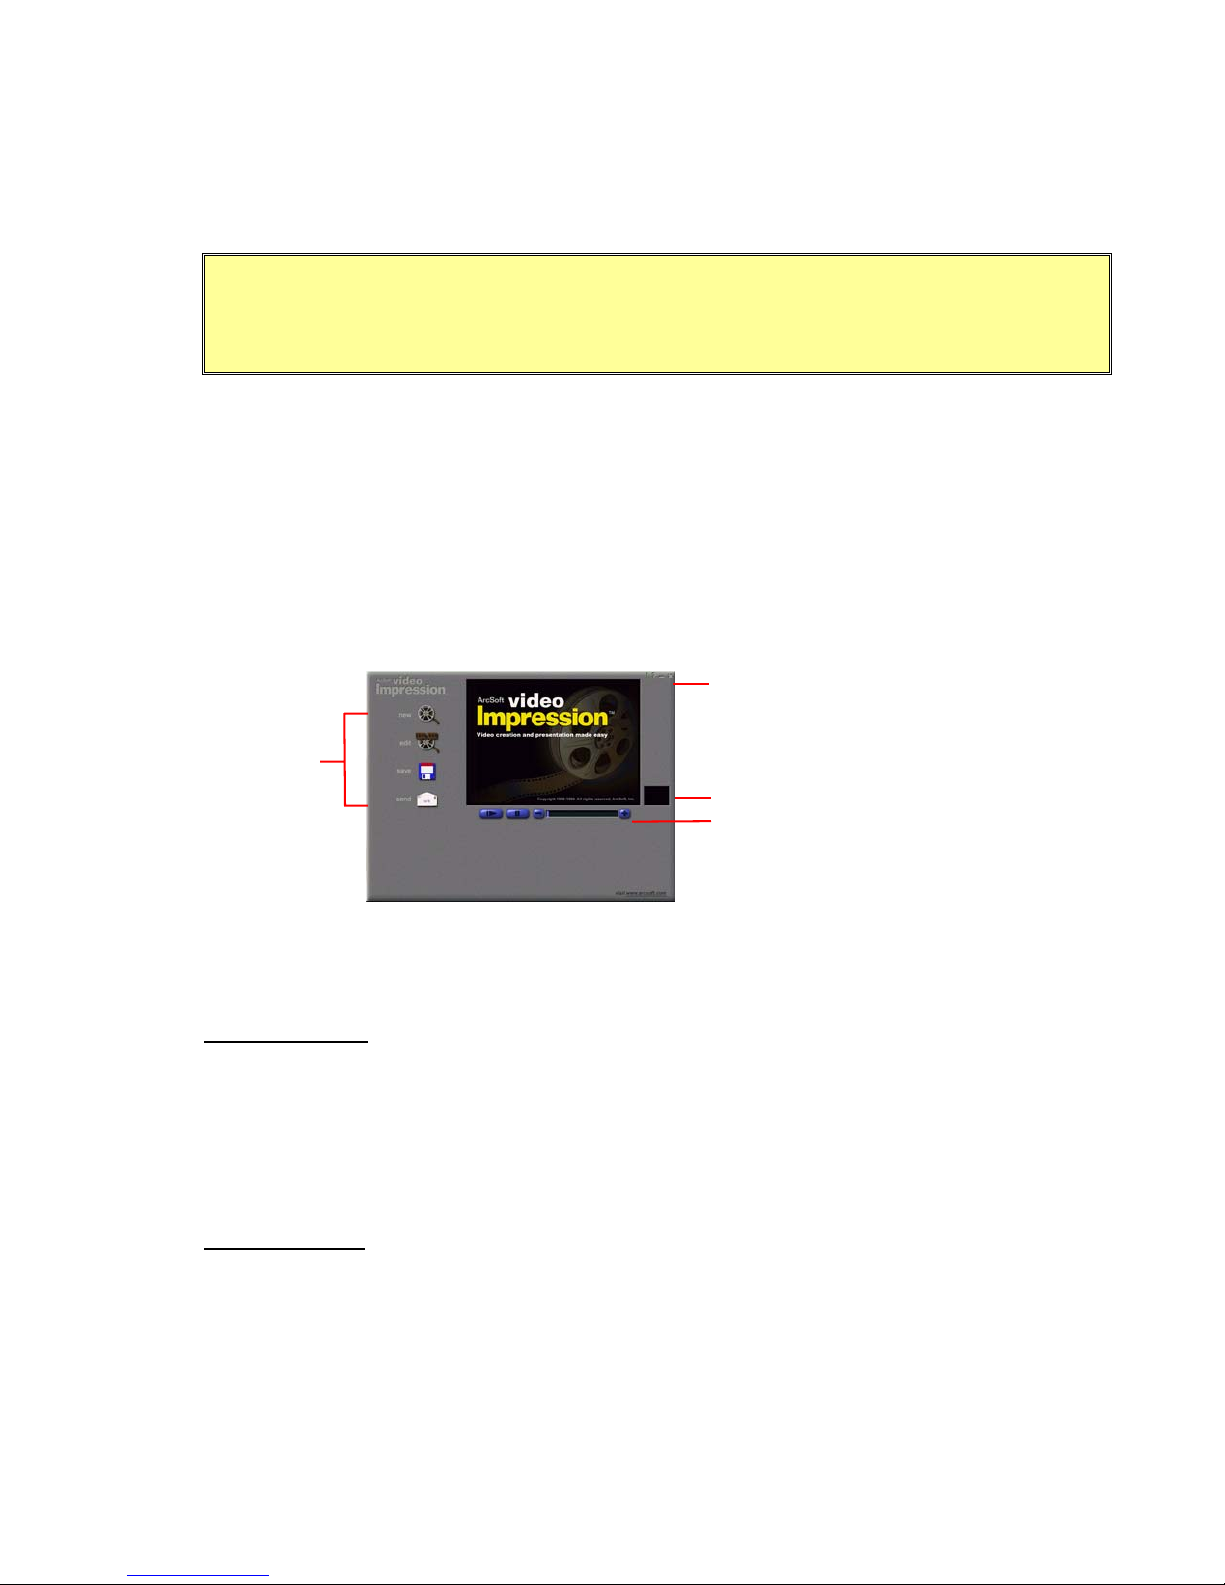
3. The VideoImpression Main Screen will appear as follows:
Option
Buttons
The View Screen
55..22 UUssiinngg VViiddeeooIImmpprreessssiioonn 11..66
Working with the Camera
In the Hdd mode:
The camera also serves as a mobile data storage device that stores images and video frames you took.
After connecting the camera to your PC, you can load video frames from the camera into
VideoImpression 1.6 for preview and editing.
(1) Select “New” from the VideoImpression main screen.
(2) Select “Get” from the menu on the left of the edit screen.
(3) A window pops up. Select “removable disk” from the disk drives in the pop-up window.
(4) Now you can view the image you want.
In the Pcc mode:
After connecting the camera to your PC. You can use it as a PC camera to preview and record live video,
or replay video frames.
(1) Select “New” from the VideoImpression main screen.
(2) Select “Capture” from the menu on the left of the edit screen.
(3) Verify the image-taking device as “Digital Camera Device” by selecting it from the drop-down list.
(4) Now you can preview, record and play video frames.
Editing An Image
(1) Click on New to enter the Album Screen.
(2) Select an album from the Menu on the top of the screen or click on Get to load images from your
own folders.
Control Buttons
Timer Window
Video Playback Control
Page 10 of 15
Page 11
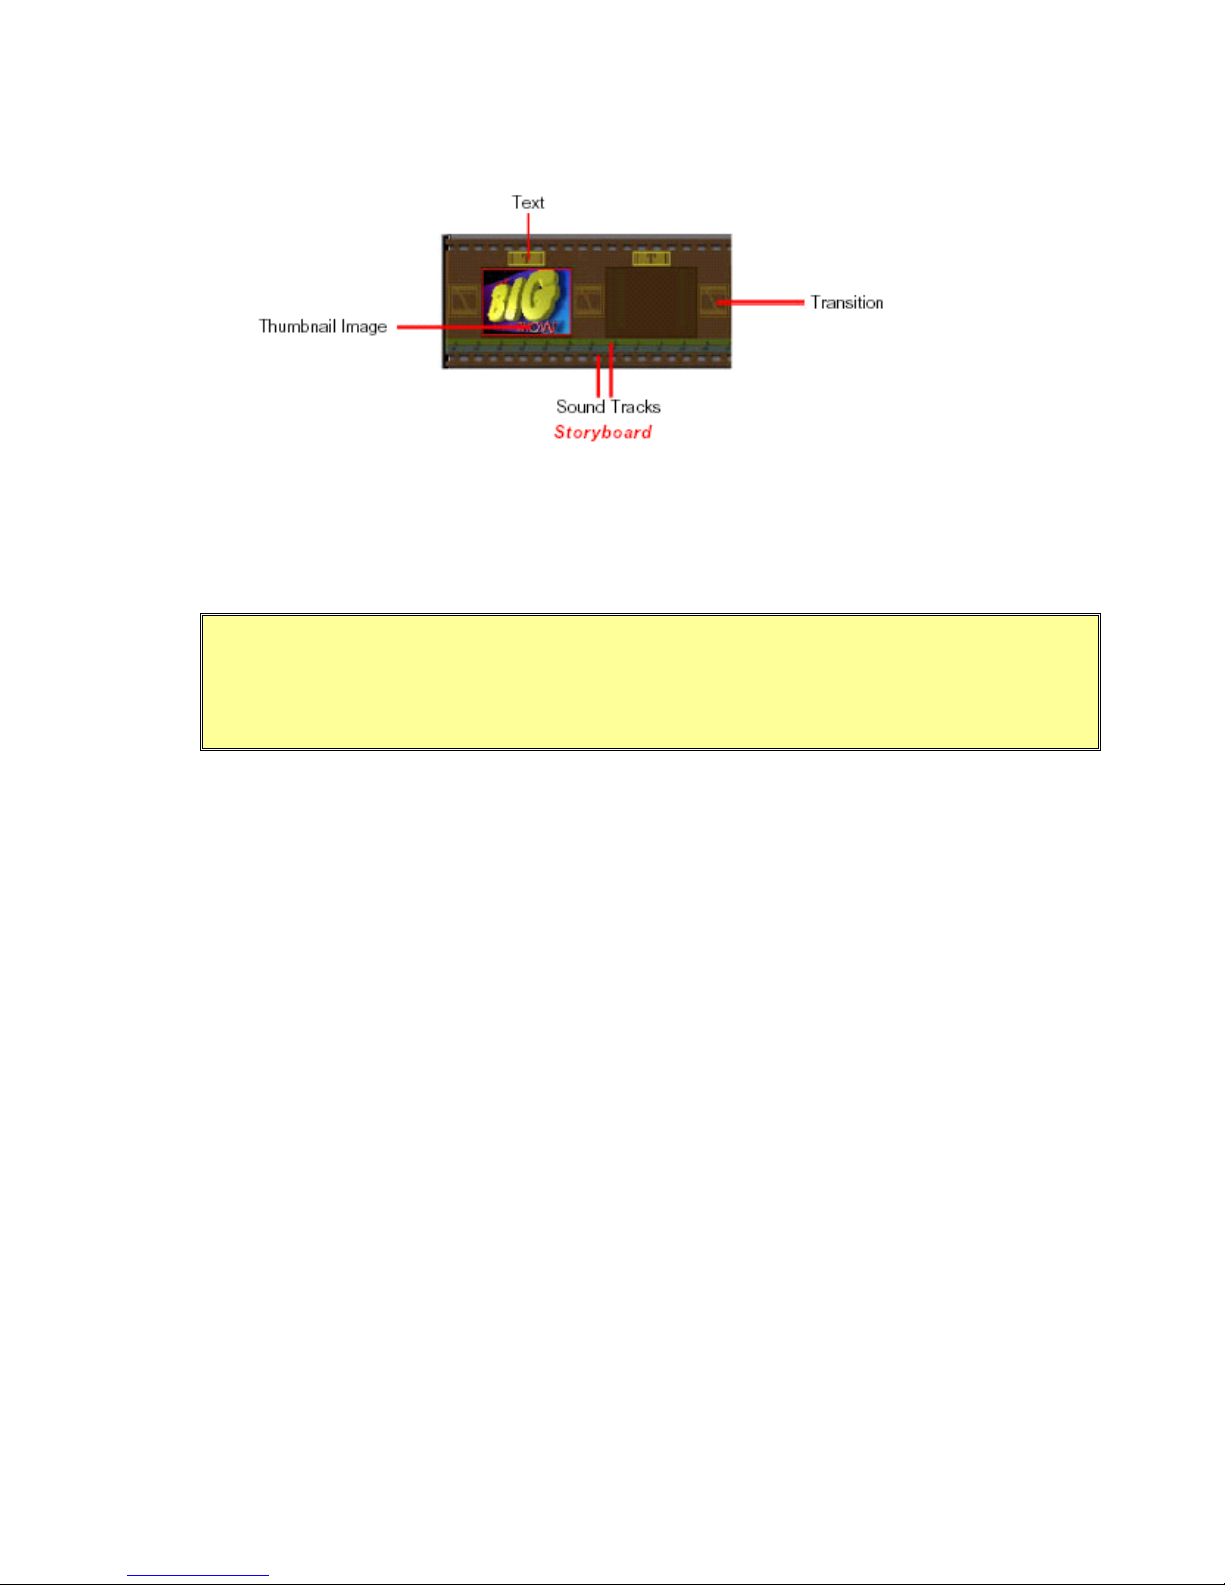
(3) Select images and add a thumbnail to your Storyboard by drag-n-drop or by highlighting a
thumbnail and clicking on the Add to Storyboard icon. This will take you to the edit mode.
(4) In the edit mode, you have options such as “Play Movie,” “Transitions,” “Album” and “Text,” which
allow you to edit various images. You may use the Brightness Slider and Contrast Slider to adjust
the presentation of the image.
See VideoImpression Help Document for details about the options on the Storyboard.
Editing A Video
You can also edit a video or movie in the Edit mode. Options on the Edit Screen for Video Files include
Play, Pause, Previous Frame (-), Next Frame (+), Playback Slider, Starting Mark and Ending Mark.
Note:
1. If you are a PC user, you can adjust the starting/ending frame by right-clicking the video
and selecting Setting in the pop-up window.
2. For other options, applications and tools, see the VideoImpression Help document by
clicking the Help button in the upper right-hand corner of the screen.
Page 11 of 15
Page 12

6. Using the DSC-2000 with MicroSoft NetMeeting
66..11 HHooww ttoo IInnssttaallll NNeettMMeeeettiinngg
6.1.1 For Windows 98/Me Users
6.1.1.1 Click Start, point to Programs, point to Accessories, point to Internet Tools and
then click NetMeeting.
For Windows 2000 Users
6.1.1.2 Click Start, point to Programs, point to Accessories, point to Communications,
and click NetMeeting.
Click Next, type the appropriate information in the First Name, Last Name, E-Mail Address, Location,
6.1.2
and Comments dialog boxes, and then click Next.
NOTE: The Location and Comments information is optional.
6.1.3 Click Next, click to select the Log into a directory server when NetMeeting starts check box (this is
optional), and then type the name of the directory server in the Server Name dialog box. If you do not
want your name to be visible in the directory, click to select the Do not list my name in this directory
check box.
6.1.4 Click Next, and then select the appropriate location for the shortcuts.
6.1.5 Click Next, follow the instructions in the Audio Tuning Wizard, and then click Finish.
After you run NetMeeting for the first time, you can modify the information you entered about yourself or
the directory server name that you want to connect to. To do so, click Options on the Tools menu, click
the General tab, and then enter the appropriate information. Also, you can run the Audio Tuning Wizard
again, and to do so, click Audio Tuning Wizard on the Tools menu.
If you can’t install the NetMeeting from your PC directly, please log on to
www.microsoft.com/netmeeting
to download.
66..22 HHooww ttoo SSttaarrtt wwiitthh tthhee CCaammeerraa
1. Plug the camera into your PC first.
2. Click the “NetMeeting”
you can start working with NetMeeting.
3. If you need more information or instruction on how to use a specific feature or tool, click the “Help”
button in the upper right-hand comer of the screen.
to go to the main screen, and then click “Start Video” button, then
Page 12 of 15
Page 13

LIMITED WARRANTY
D-Link provides this limited warranty for its product only to the person or entity who originally purchased the product from D-Link or its authorized reseller
or distributor.
Limited Hardware Warranty: D-Link warrants that the hardware portion of the D-Link products
described below (“Hardware”) will be free from material defects in workmanship and materials from
the date of original retail purchase of the Hardware, for the period set forth below applicable to the
product type (“Warranty Period”) if the Hardware is used and serviced in accordance with applicable
documentation; provided that a completed Registration Card is returned to an Authorized D-Link
Service Office within ninety (90) days after the date of original retail purchase of the Hardware. If a
completed Registration Card is not received by an authorized D-Link Service Office within such ninety
(90) period, then the Warranty Period shall be ninety (90) days from the date of purchase.
Product Type Warranty
Period
Product (excluding power supplies and fans)
One (1) Year
Power Supplies and Fans One (1) Year
Spare parts and spare kits
Ninety (90)
days
D-Link’s sole obligation shall be to repair or replace the defective Hardware at no charge to the original owner. Such repair or replacement will be rendered
by D-Link at an Authorized D-Link Service Office. The replacement Hardware need not be new or of an identical make, model or part; D-Link may in its
discretion may replace the defective Hardware (or any part thereof) with any reconditioned product that D-Link reasonably determines is substantially
equivalent (or superior) in all material respects to the defective Hardware. The Warranty Period shall extend for an additional ninety (90) days after any
repaired or replaced Hardware is delivered. If a material defect is incapable of correction, or if D-Link determines in its sole discretion that it is not practical
to repair or replace the defective Hardware, the price paid by the original purchaser for the defective Hardware will be refunded by D-Link upon return to
D-Link of the defective Hardware. All Hardware (or part thereof) that is replaced by D-Link, or for which the purchase price is refunded, shall become the
property of D-Link upon replacement or refund.
Limited Software Warranty: D-Link warrants that the software portion of the product (“Software”) will substantially conform to D-Link’s then current
functional specifications for the Software, as set forth in the applicable documentation, from the date of original delivery of the Software for a period of
ninety (90) days (“Warranty Period”), if the Software is properly installed on approved hardware and operated as contemplated in its documentation.
D-Link further warrants that, during the Warranty Period, the magnetic media on which D-Link delivers the Software will be free of physical defects.
D-Link’s sole obligation shall be to replace the non-conforming Software (or defective media) with software that substantially conforms to D-Link’s
functional specifications for the Software. Except as otherwise agreed by D-Link in writing, the replacement Software is provided only to the original
licensee, and is subject to the terms and conditions of the license granted by D-Link for the Software. The Warranty Period shall extend for an additional
ninety (90) days after any replacement Software is delivered. If a material non-conformance is incapable of correction, or if D-Link determines in its sole
discretion that it is not practical to replace the non-conforming Software, the price paid by the original licensee for the non-conforming Software will be
refunded by D-Link; provided that the non-conforming Software (and all copies thereof) is first returned to D-Link. The license granted respecting any
Software for which a refund is given automatically terminates.
What You Must Do For Warranty Service:
Registration Card
each D-Link product within ninety (90) days after the product is purchased and/or licensed. The addresses/telephone/fax list of the nearest Authorized
D-Link Service Office is provided in the back of this manual. FAILURE TO PROPERLY COMPLETE AND TIMELY RETURN THE REGISTRATION
CARD MAY AFFECT THE WARRANTY FOR THIS PRODUCT.
Submitting A Claim
Service Office. The claim must include a written description of the Hardware defect or Software nonconformance in sufficient detail to allow D-Link to
confirm the same. The original product owner must obtain a Return Material Authorization (RMA) number from the Authorized D-Link Service Office and,
if requested, provide written proof of purchase of the product (such as a copy of the dated purchase invoice for the product) before the warranty service is
provided. After an RMA number is issued, the defective product must be packaged securely in the original or other suitable shipping package to ensure that
it will not be damaged in transit, and the RMA number must be prominently marked on the outside of the package. The packaged product shall be insured
and shipped to D-Link, 53 Discovery Drive, Irvine CA 92618, with all shipping costs prepaid. D-Link may reject or return any product that is not packaged
and shipped in strict compliance with the foregoing requirements, or for which an RMA number is not visible from the outside of the package. The product
owner agrees to pay D-Link’s reasonable handling and return shipping charges for any product that is not packaged and shipped in accordance with the
foregoing requirements, or that is determined by D-Link not to be defective or non-conforming.
What Is Not Covered:
. The Registration Card provided at the back of this manual must be completed and returned to an Authorized D-Link Service Office for
. Any claim under this limited warranty must be submitted in writing before the end of the Warranty Period to an Authorized D-Link
This limited warranty provided by D-Link does not cover
Products that have been subjected to abuse, accident, alteration, modification, tampering, negligence, misuse, faulty installation, lack of reasonable care,
repair or service in any way that is not contemplated in the documentation for the product, or if the model or serial number has been altered, tampered with,
:
Page 13 of 15
Page 14

defaced or removed;
Initial installation, installation and removal of the product for repair, and shipping costs;
Operational adjustments covered in the operating manual for the product, and normal maintenance;
Damage that occurs in shipment, due to act of God, failures due to power surge, and cosmetic damage; and
Any hardware, software, firmware or other products or services provided by anyone other than D-Link.
Disclaimer of Other Warranties: EXCEPT FOR THE LIMITED WARRANTY SPECIFIED HEREIN, THE PRODUCT IS PROVIDED “AS-IS”
WITHOUT ANY WARRANTY OF ANY KIND INCLUDING, WITHOUT LIMITATION, ANY WARRANTY OF MERCHANTABILITY, FITNESS
FOR A PARTICULAR PURPOSE AND NON-INFRINGEMENT. IF ANY IMPLIED WARRANTY CANNOT BE DISCLAIMED IN ANY
TERRITORY WHERE A PRODUCT IS SOLD, THE DURATION OF SUCH IMPLIED WARRANTY SHALL BE LIMITED TO NINETY (90) DAYS.
EXCEPT AS EXPRESSLY COVERED UNDER THE LIMITED WARRANTY PROVIDED HEREIN, THE ENTIRE RISK AS TO THE QUALITY,
SELECTION AND PERFORMANCE OF THE PRODUCT IS WITH THE PURCHASER OF THE PRODUCT.
Limitation of Liability: TO THE MAXIMUM EXTENT PERMITTED BY LAW, D-LINK IS NOT LIABLE UNDER ANY CONTRACT, NEGLIGENCE,
STRICT LIABILITY OR OTHER LEGAL OR EQUITABLE THEORY FOR ANY LOSS OF USE OF THE PRODUCT, INCONVENIENCE OR DAMAGES
OF ANY CHARACTER, WHETHER DIRECT, SPECIAL, INCIDENTAL OR CONSEQUENTIAL (INCLUDING, BUT NOT LIMITED TO, DAMAGES
FOR LOSS OF GOODWILL, WORK STOPPAGE, COMPUTER FAILURE OR MALFUNCTION, LOSS OF INFORMATION OR DATA
CONTAINED IN, STORED ON, OR INTEGRATED WITH ANY PRODUCT RETURNED TO D-LINK FOR WARRANTY SERVICE) RESULTING
FROM THE USE OF THE PRODUCT, RELATING TO WARRANTY SERVICE, OR ARISING OUT OF ANY BREACH OF THIS LIMITED
WARRANTY, EVEN IF D-LINK HAS BEEN ADVISED OF THE POSSIBILITY OF SUCH DAMAGES. THE SOLE REMEDY FOR A BREACH OF
THE FOREGOING LIMITED WARRANTY IS REPAIR, REPLACEMENT OR REFUND OF THE DEFECTIVE OR NON-CONFORMING
PRODUCT.
GOVERNING LAW: This Limited Warranty shall be governed by the laws of the state of California.
Some states do not allow exclusion or limitation of incidental or consequential damages, or limitations on how long an implied warranty lasts, so the foregoing
limitations and exclusions may not apply. This limited warranty provides specific legal rights and the product owner may also have other rights which vary from
state to state.
Trademarks
Copyright 1999 D-Link Corporation. Contents subject to change without prior notice. D-Link is a
registered trademark of D-Link Corporation/D-Link Systems, Inc. All other trademarks belong to their
respective proprietors.
Copyright Statement
No part of this publication may be reproduced in any form or by any means or used to make any derivative such as translation, transformation, or adaptation
without permission from D-Link Corporation/D-Link Systems Inc., as stipulated by the United States Copyright Act of 1976.
Page 14 of 15
Page 15

CE Mark Warning
This is a Class B product. In a domestic environment, this product may cause radio interference, in
which case the user may be required to take adequate measures
Warnung!
Dies ist in Produkt der Klasse B. Im Wohnbereich kann dieses Produkt Funkstoerungen verursachen. In diesem Fall kann vom Benutzer
verlangt werden, angemessene Massnahmen zu ergreifen.
Advertencia de Marca de la CE
Este es un producto de Clase B. En un entorno doméstico, puede causar interferencias de radio, en cuyo case, puede requerirse al usuario
para que adopte las medidas adecuadas.
Attention!
Ceci est un produit de classe B. Dans un environnement domestique, ce produit pourrait causer des interférences radio, auquel cas
l`utilisateur devrait prendre les mesures adéquates.
Attenzione!
Il presente prodotto appartiene alla classe B. Se utilizzato in ambiente domestico il prodotto può causare interferenze radio, nel cui caso è
possibile che l`utente debba assumere provvedimenti adeguati.
FCC Warning
This equipment has been tested and found to comply with the limits for a Class B digital device, pursuant to part 15 of the FCC Rules.
These limits are designed to provide reasonable protection against harmful interference in a residential installation. This equipment
generates, uses and can radiate radio frequency energy and, if not installed and used in accordance with the instructions, may cause
harmful interference to radio communications. However, there is no guarantee that interference will not occur in a particular installation. If
this equipment does cause harmful interference to radio or television reception, which can be determined by turning the equipment off and
on, the user is encouraged to try to correct the interference by one or more of the following measures:
-Reorient or relocate the receiving antenna.
-Increase the separation between the equipment and receiver.
-Connect the equipment into an outlet on a circuit different from that to which the receiver is connected.
-Consult the dealer or an experienced radio/ TV technician for help.
The Class B digital apparatus meets all requirements of the Canadian Interference-Causing Equipment Regulation.
Cet appareil numerique de la class B respecte toutes les exigences du Reglement sur le materiel brouilleur du Canada.
Page 15 of 15
 Loading...