

Page 1

DSB-V100
USB Video Capture Device
User’s Manual
Rev.04 (April,2001)
M20010402
Print in Taiwan
Page 2

Page 3

Table of Contents
Introduction…………………………………….
1
System Requirement………………………..
1
USB Video Capture Device Diagram………
1
Hardware Installation………………………
2
Driver and Utility Installation……………...
2
Set Video Capture Filter ,Video Pin & Video
Crosssbar……………………………………….
6
Set Video Crossbar…………………………….
11
Snapshot………………………………………..
13
Uninstalling The USB Video Capture Device
14
Specifications…………………………………
16
Connection Diagram………………………
17
Installing Video Capture Application…………... 18
Page 4

Page 5
1
Introduction
Thank you for the purchase of the USB Video Capture Device.
Applying state of the art technology, the USB Video Capture
Device attached through either RCA jack or S-Video to a
camcorder, VCR, DVD allowing the user to perform basic features
of a USB grabber and comes with a snapshot button to capture
images for multimedia applications. It can be used with any PC
with Windows OS and comes bundled with a full line of software
for video and image editing functions.
System Requir ement
Pentium 133 or above CPU, Pentium II 350 recommended
32 MB of system RAM
One USB port
Microsoft Windows 98 or above
20MB hard disk space
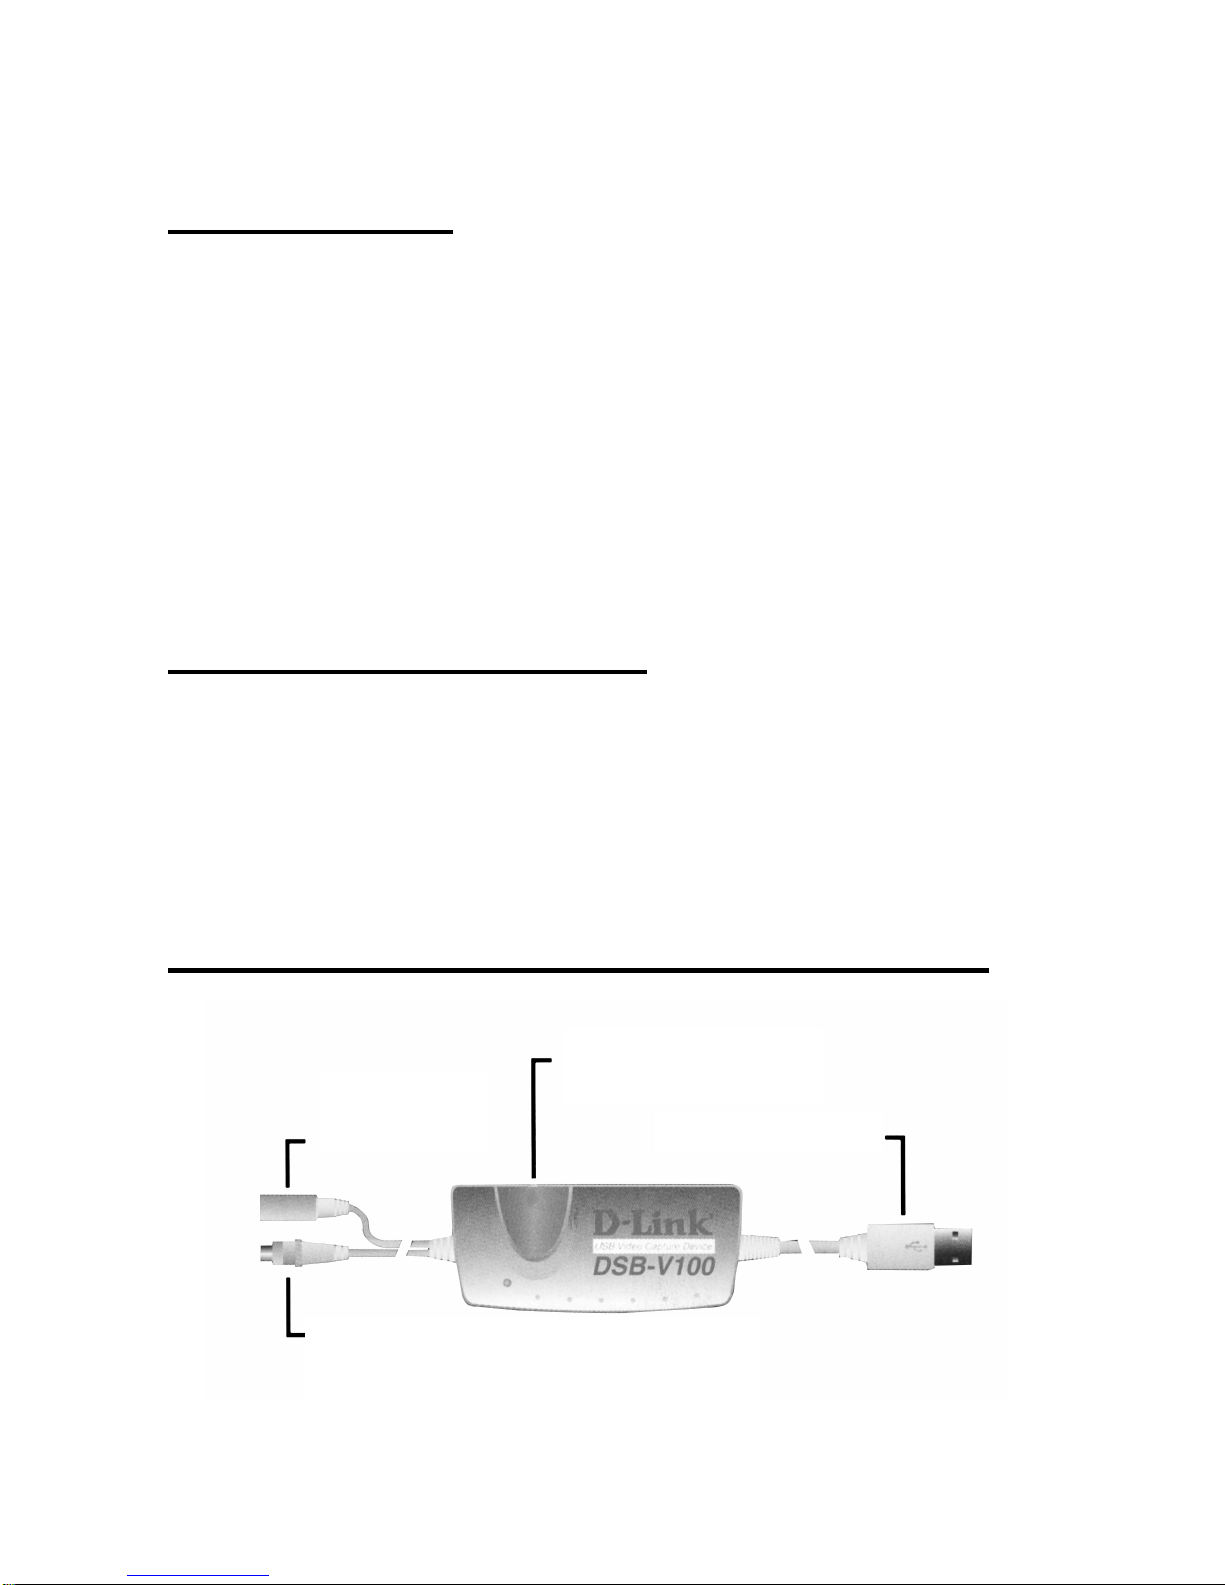
USB Video Capture Device Diagram
Snapshot Button
USB Connector
Composite RCA Connector
S-Video
Connector
Page 6
2
Hardware installation
Plug in the USB adapter of the Video Capture Device into the
USB port on your PC or any USB hub attached to the PC.
Note:
The Add New Hardware Wizard will start automatically once the
Video Capture Device has been plugged in.
The LED indicator of the Video Capture Device will be active
after the USB host controller detects the USB device properly.
Driver and Utility installation
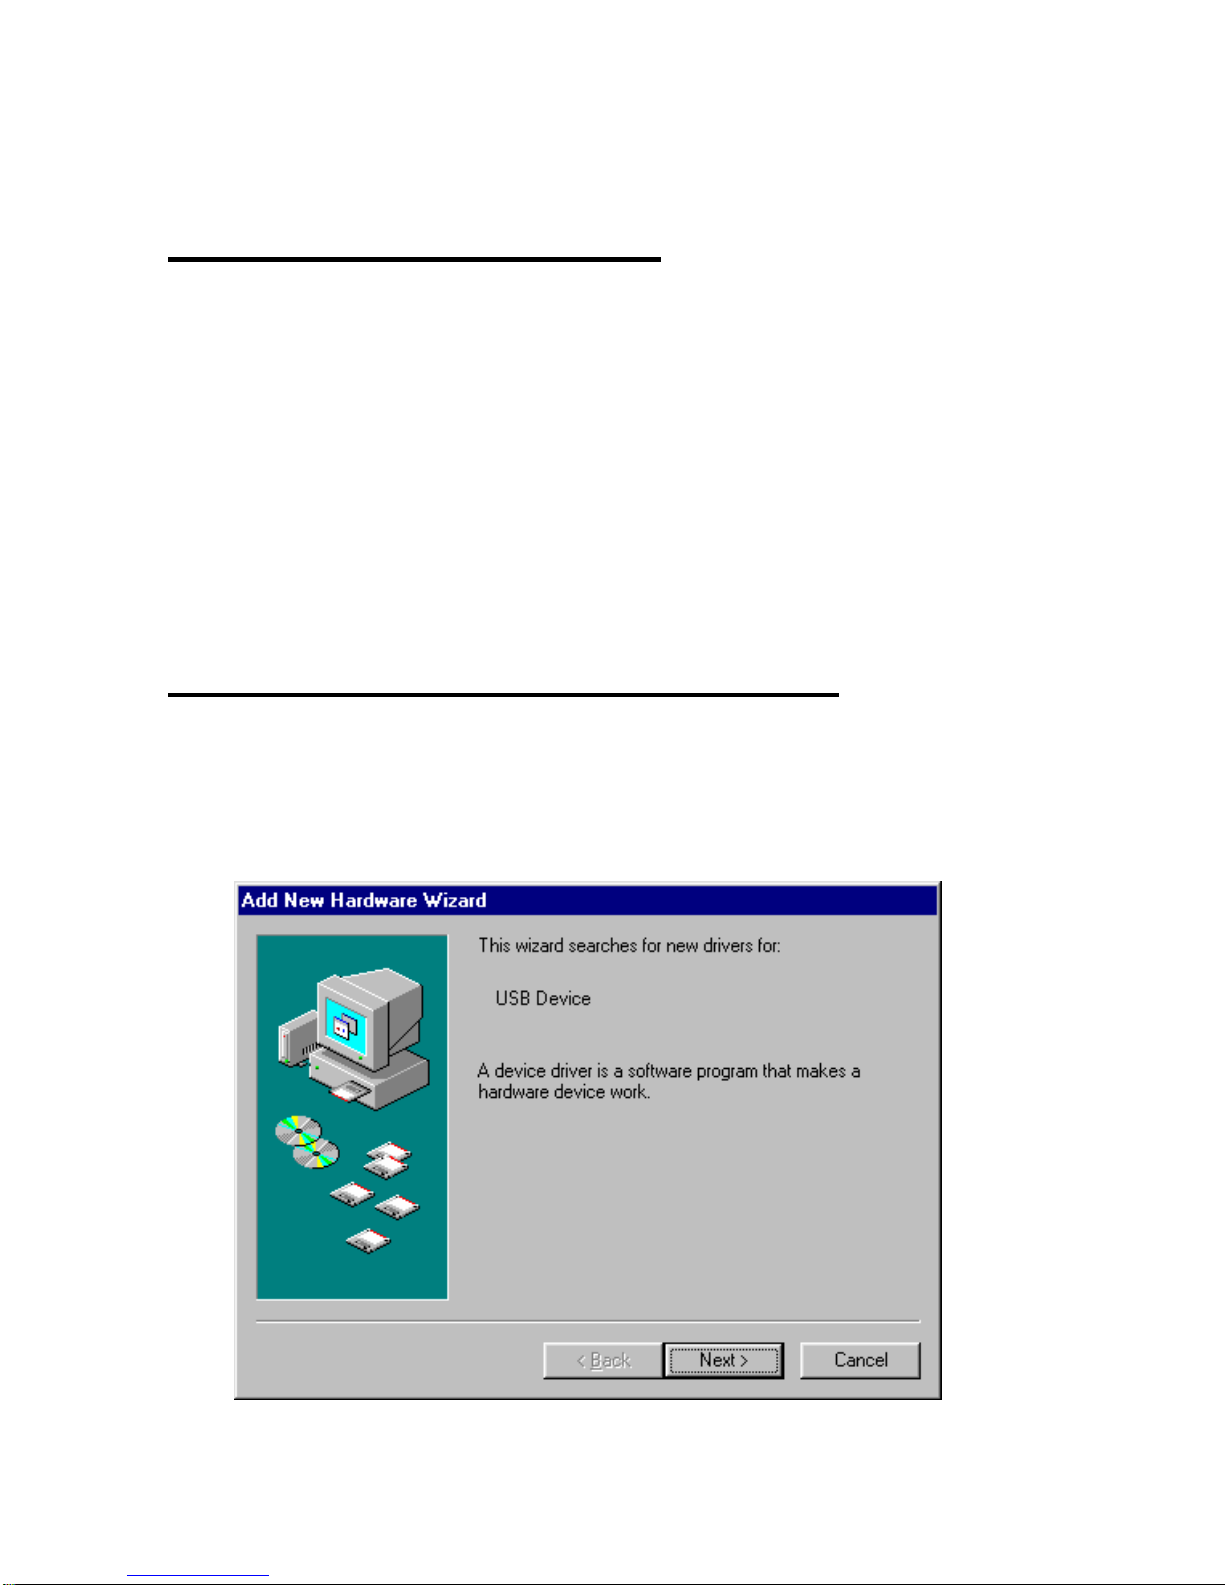
Once the USB Video Capture Device has been installed, Windows
will detect the device and prompt “
Add New Hardware Wizard
”
dialog box on the screen. Click on
Next
button to continue.
Page 7
3
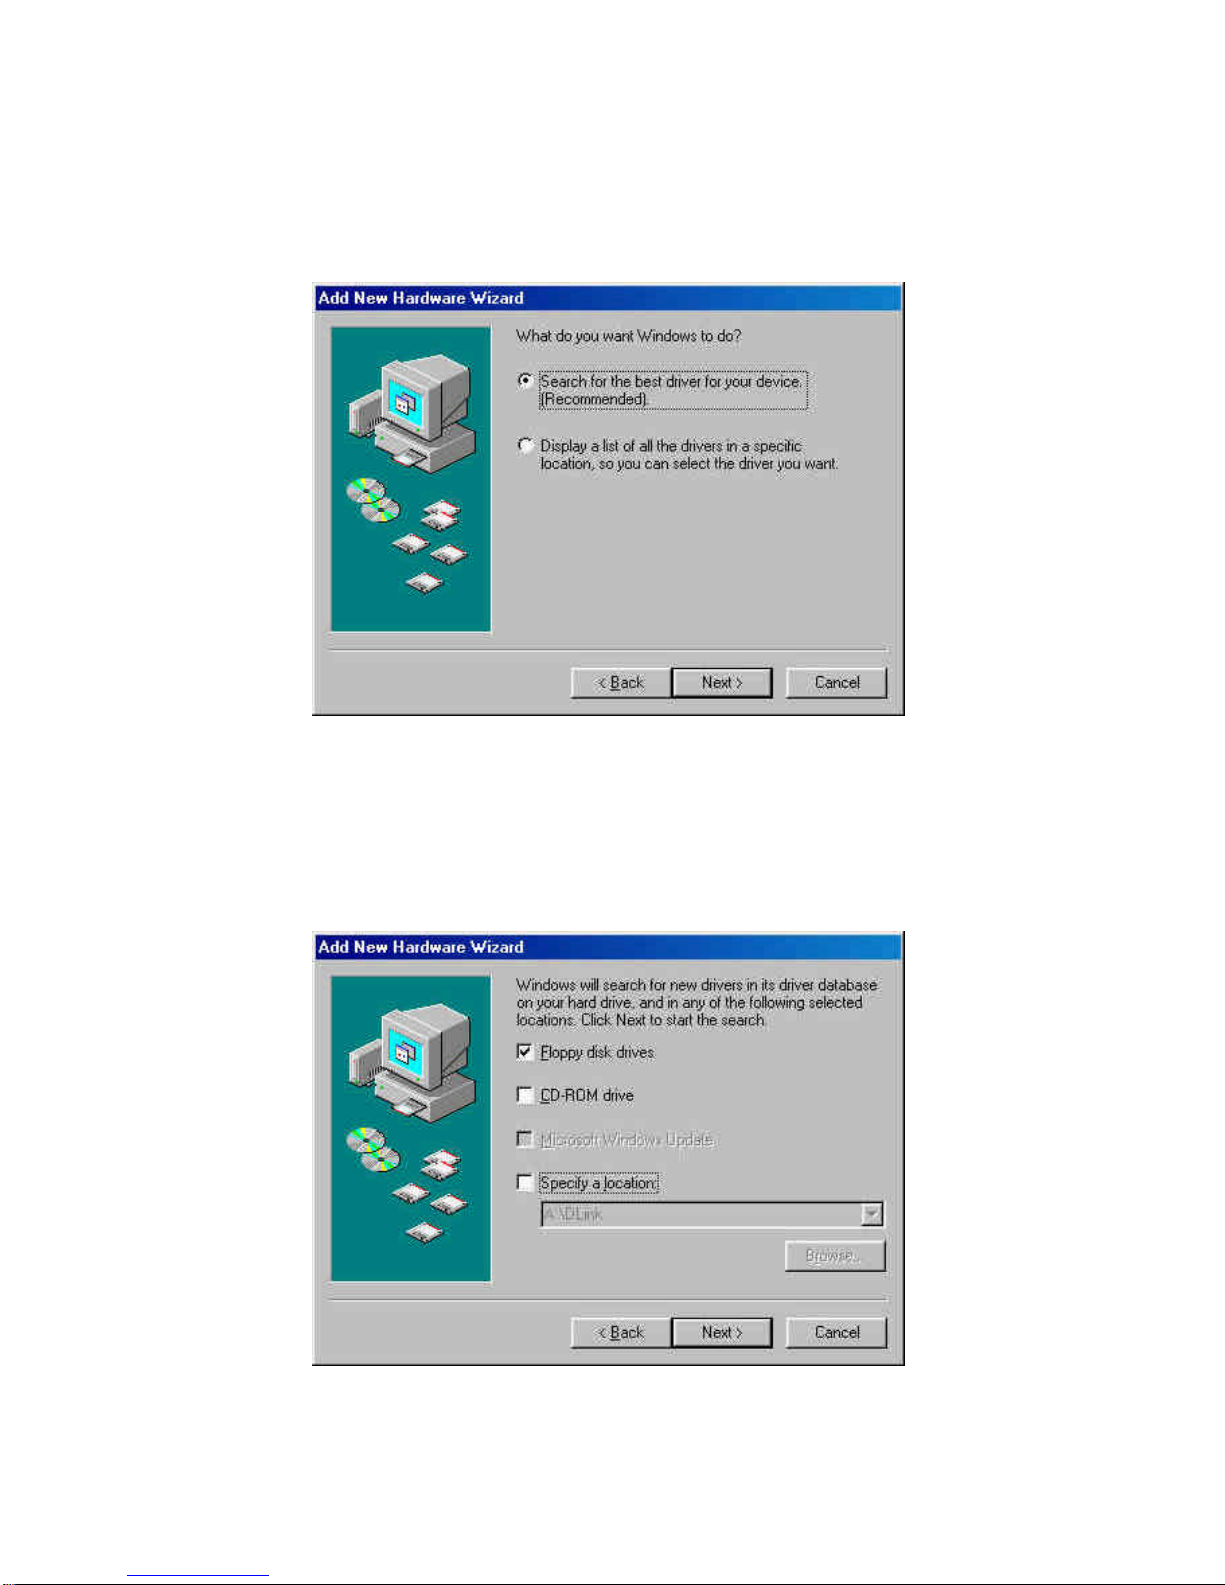
Select the “
Search for the best driver for your device
” and click
on the
Next
button.
Select the
“Floppy disk driver”
and insert the driver diskette that
came with the USB Video Capture Device into the floppy drive.
Then click on the
Next
button.
Page 8
4
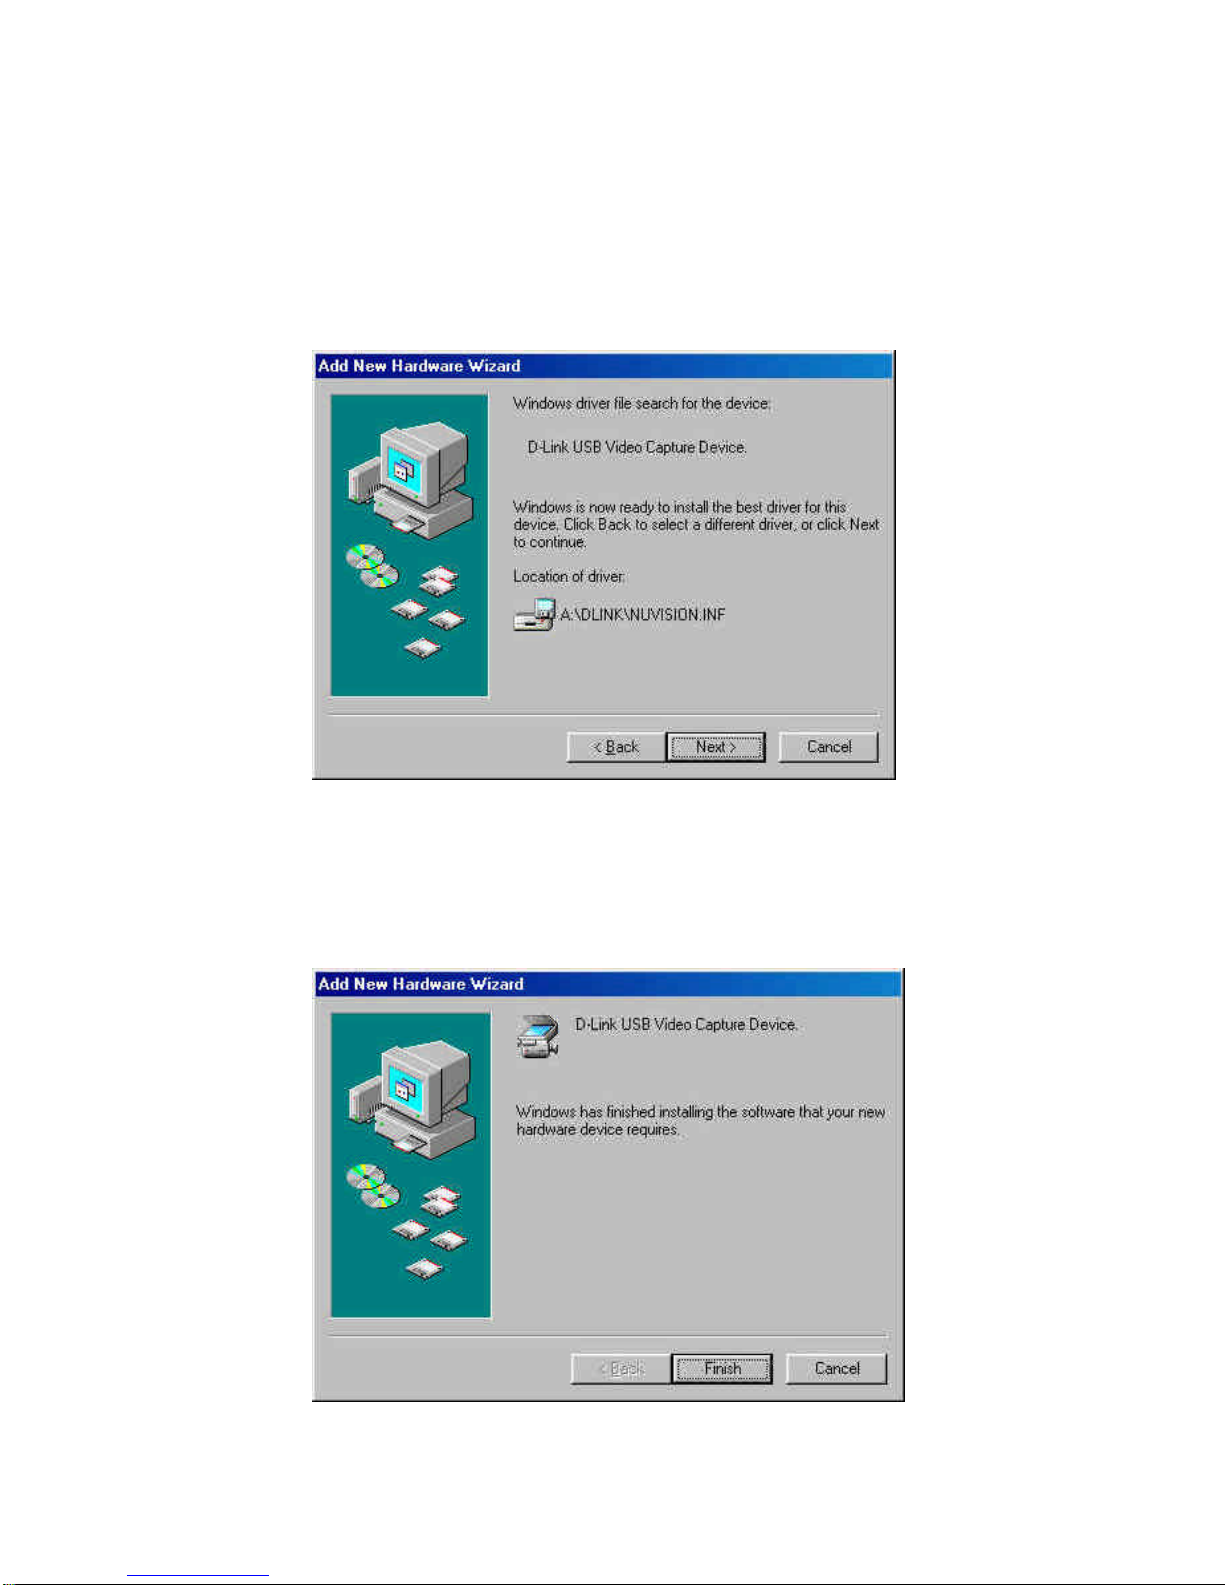
Click on the
Next
button, then Windows will copy all required
files from the driver diskette to the system.
Click on the
Finish
button to complete the driver installation.
Page 9
5
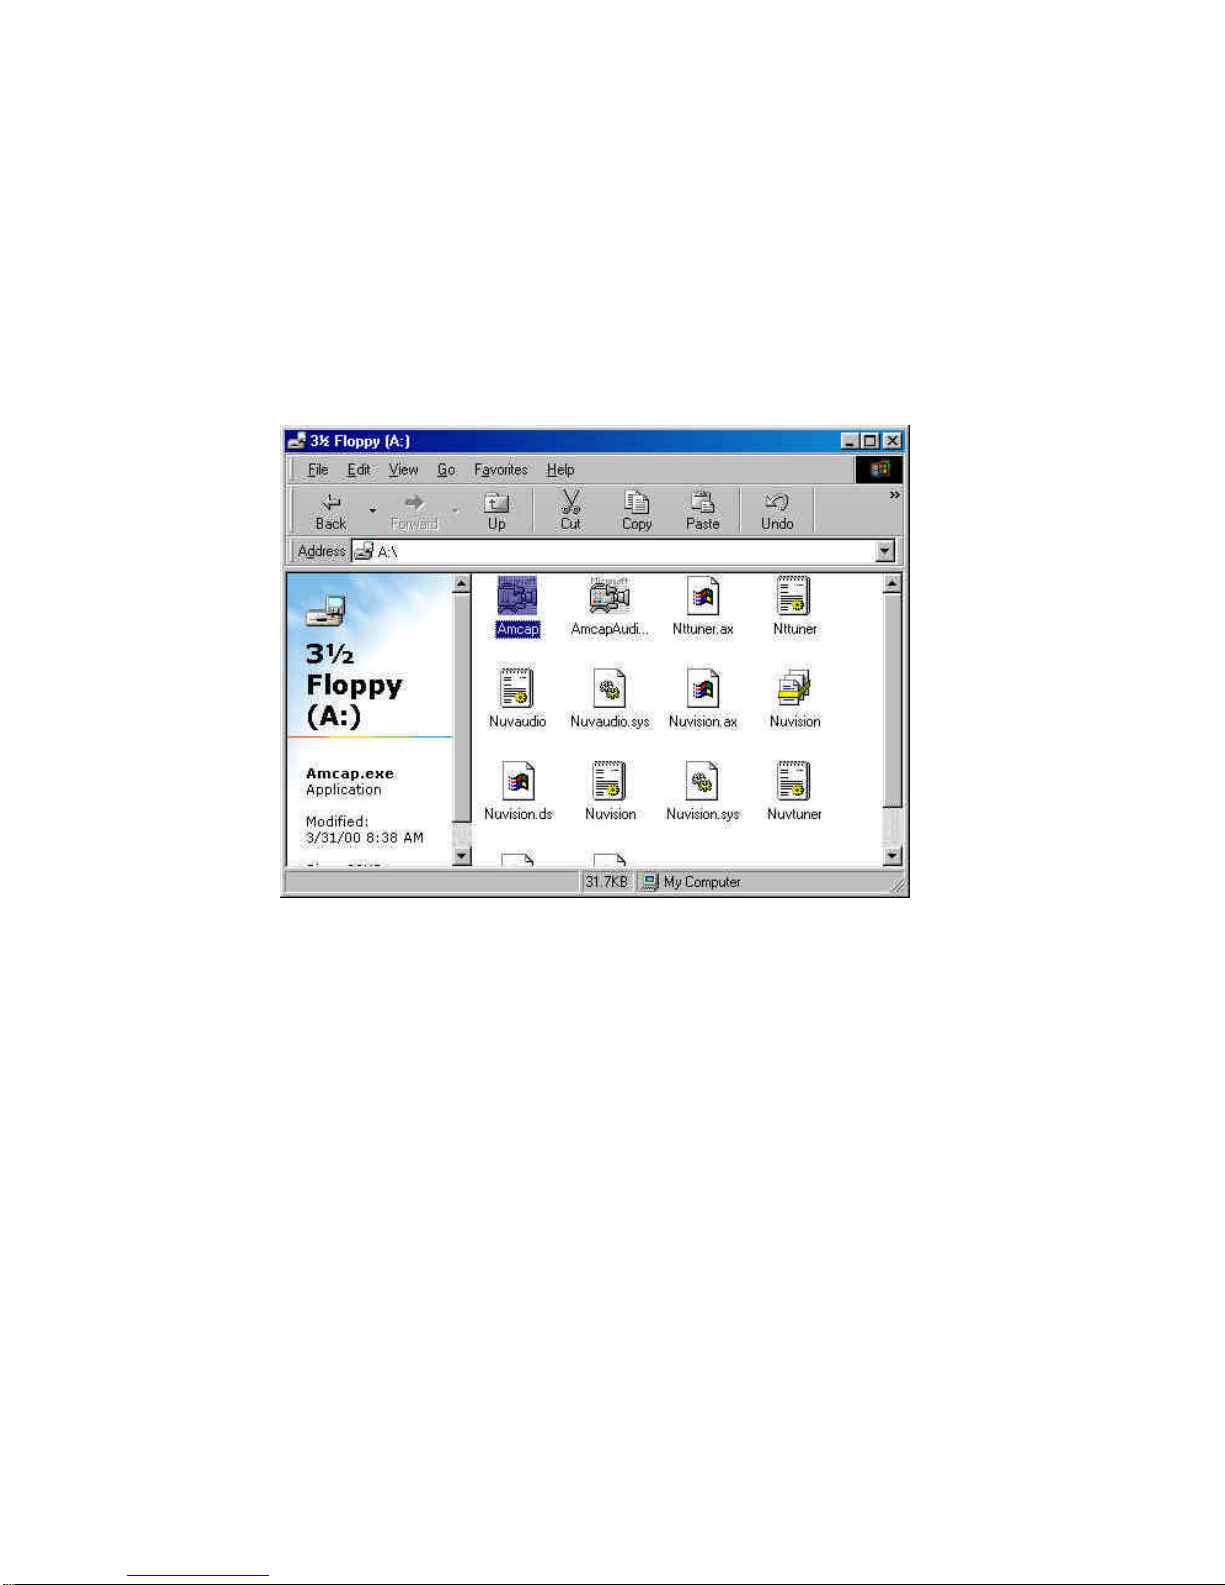
Once the drive r installation is completed, the USB Video Capture
Device can be executed by selecting the
“Amcap”
icon in
Drive
A:
as illustrated below:
Note:
Please be reminded to activate the USB Video Capture Device.
You need to select
“Device”
from the menu bar and in the
selection item choose
“D-Link USB Video Capture Device”
.
Also to initiate preview you need to select
“Options”
from the
menu bar and in the selection item choose
“Preview”
.
It is advisable to create a short-cut on your desk top for easier
access in future usage.
Page 10
6
Set Video Capture Filter, Video Pin &
Crossbar
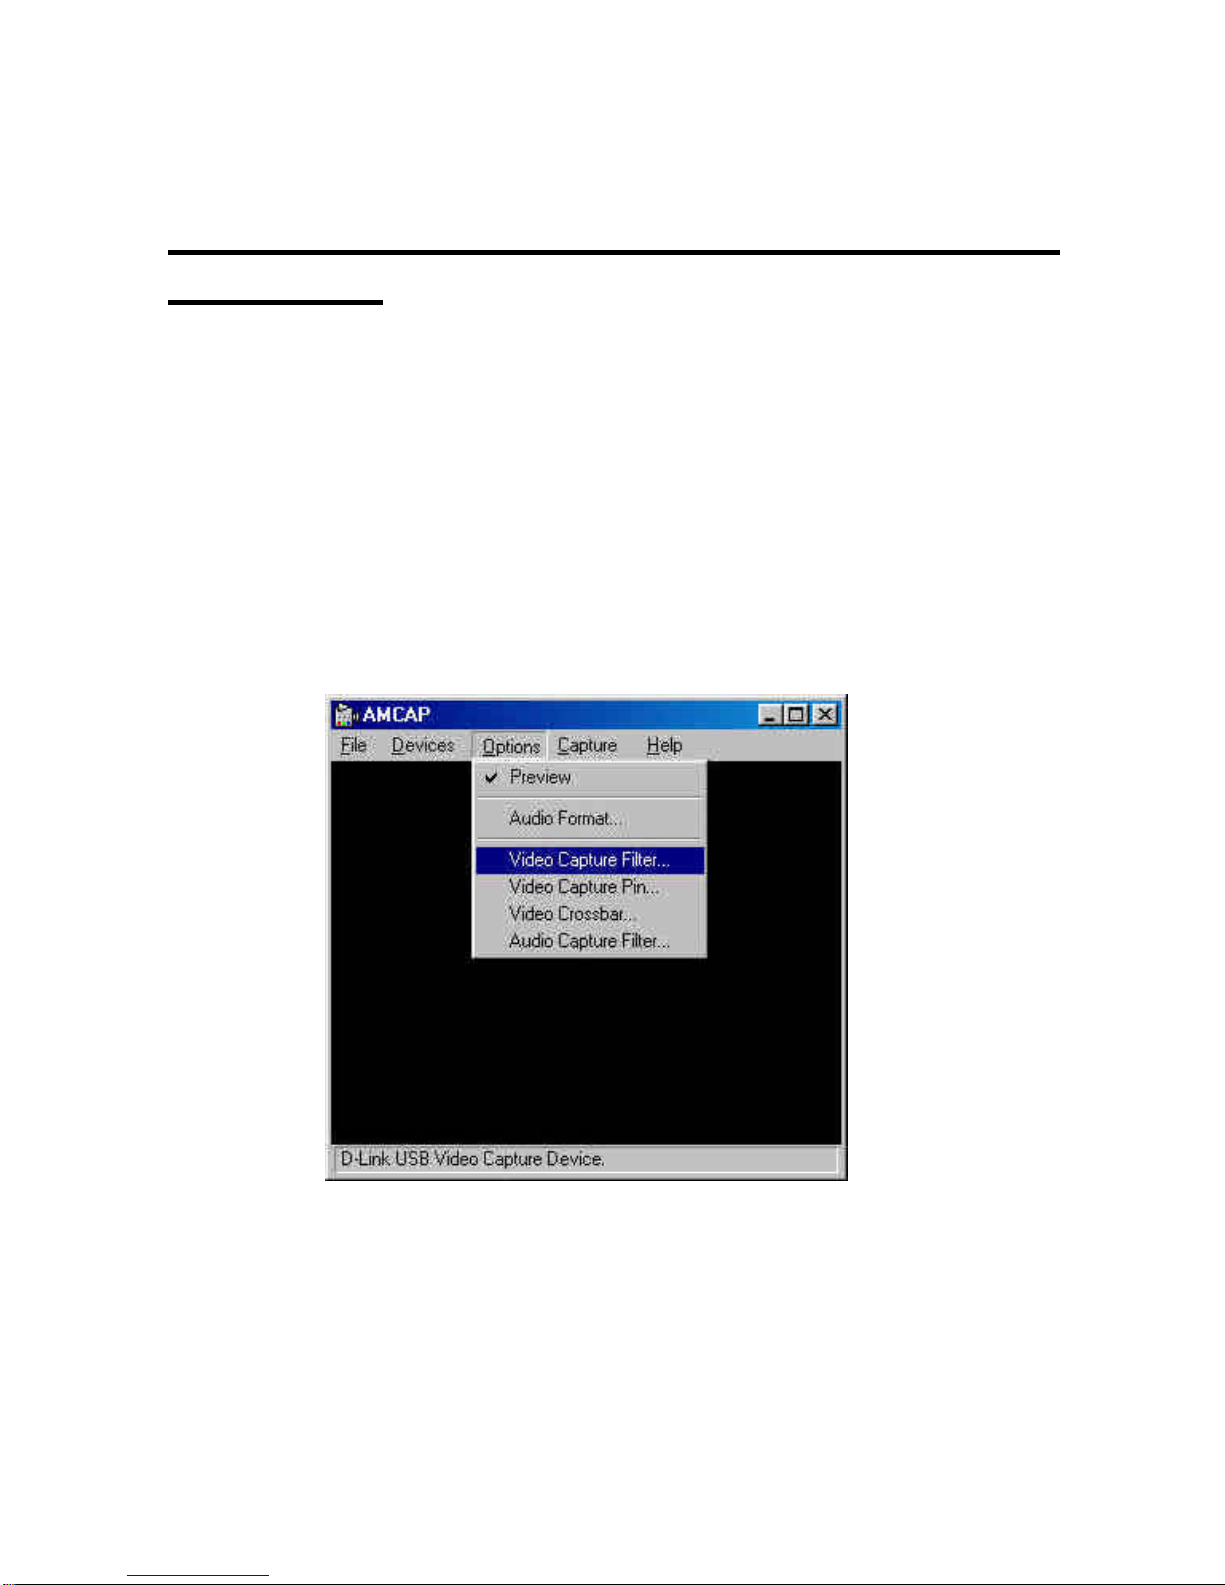
The driver provides “Video Capture Filter” and “Video Capture
Pin” and “Video Crossbar” options to adjust quality, format for
display and video source.
Set Video Capture Filter
When you run the video application software, such as the USB
Video Capture Device, select the “Options” menu then choose
“Video Capture Filter”.
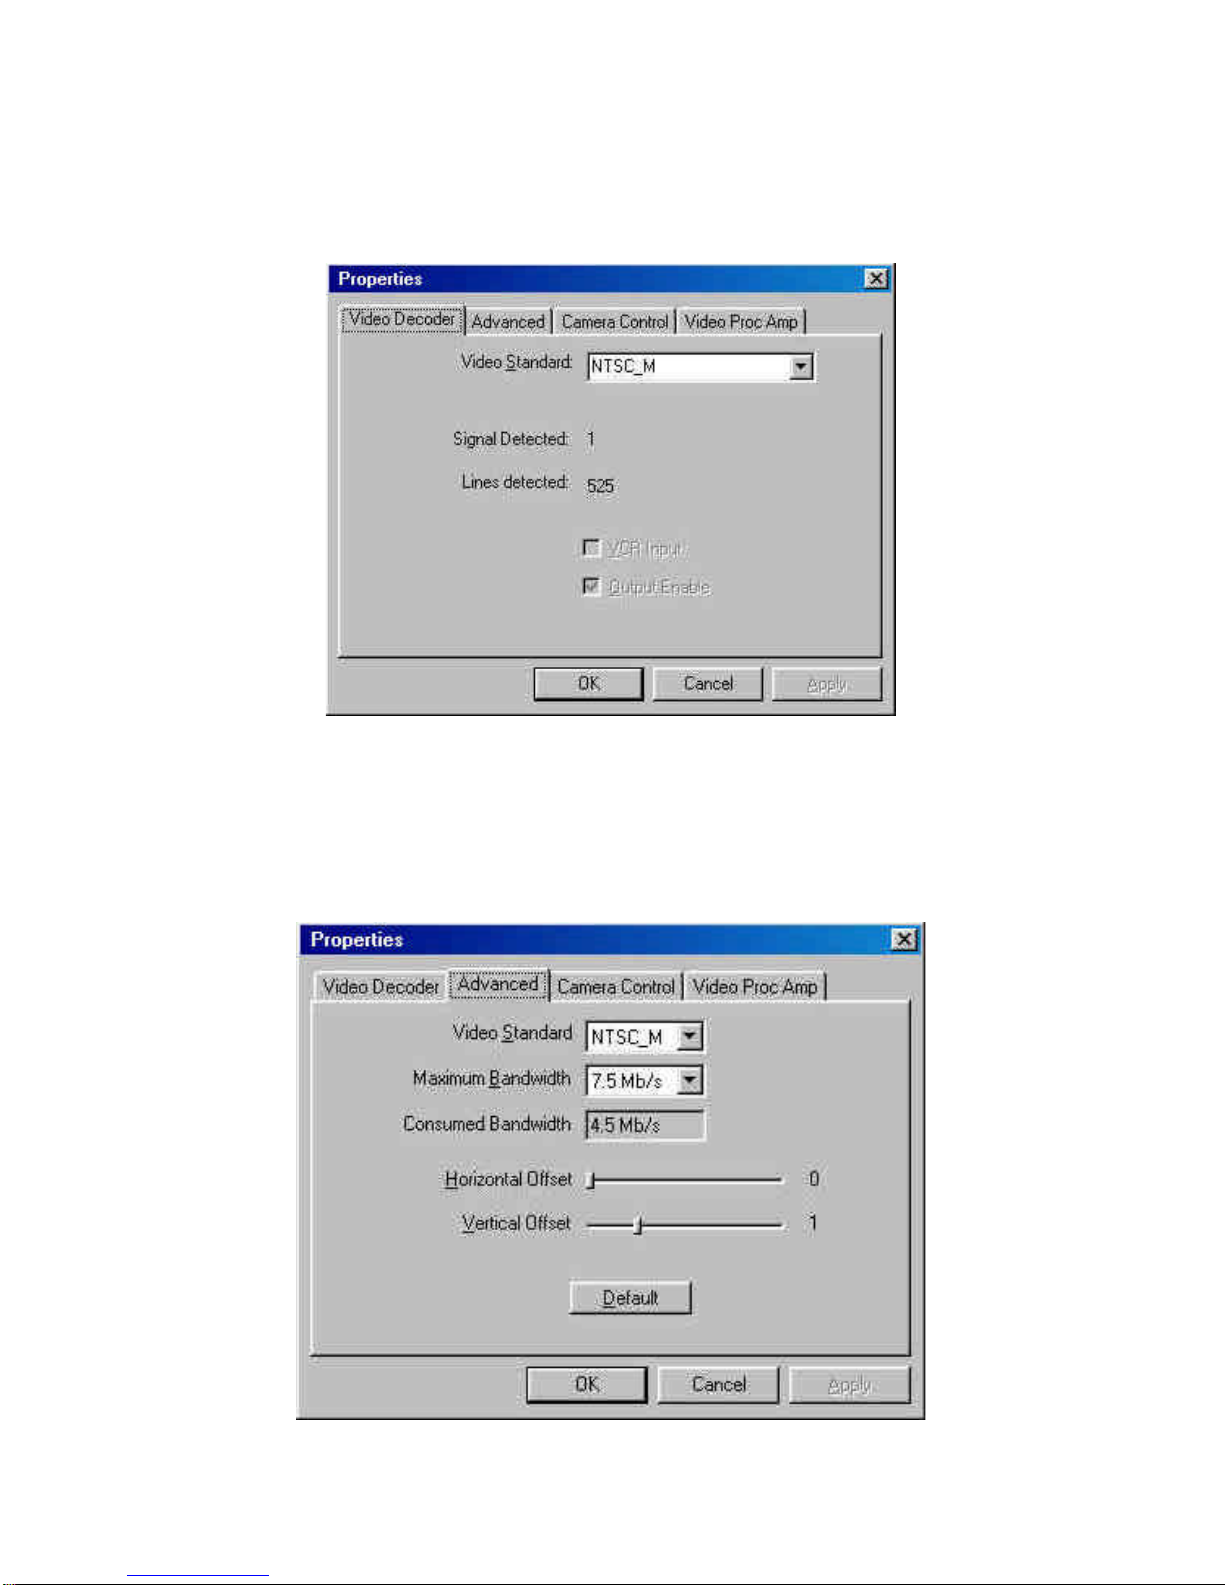
The Properties dialog box appears with 4 different choice of
1. Video Decoder
2. Advanced
3. Camera Control
4. Video Proc Amp
Page 11
7
Under the
“Video Decoder”
tab it allows the options of
NTSC_M
PAL_B
and
SECAM_K
for the Video Standard.
Under the
“Advanced”
tab it allows the options of selecting the
Video Standard and the Maximum Bandwidth of USB transfer
speed. It is advisable to set the Horizontal and Vertical Offset at
default.
Page 12
8
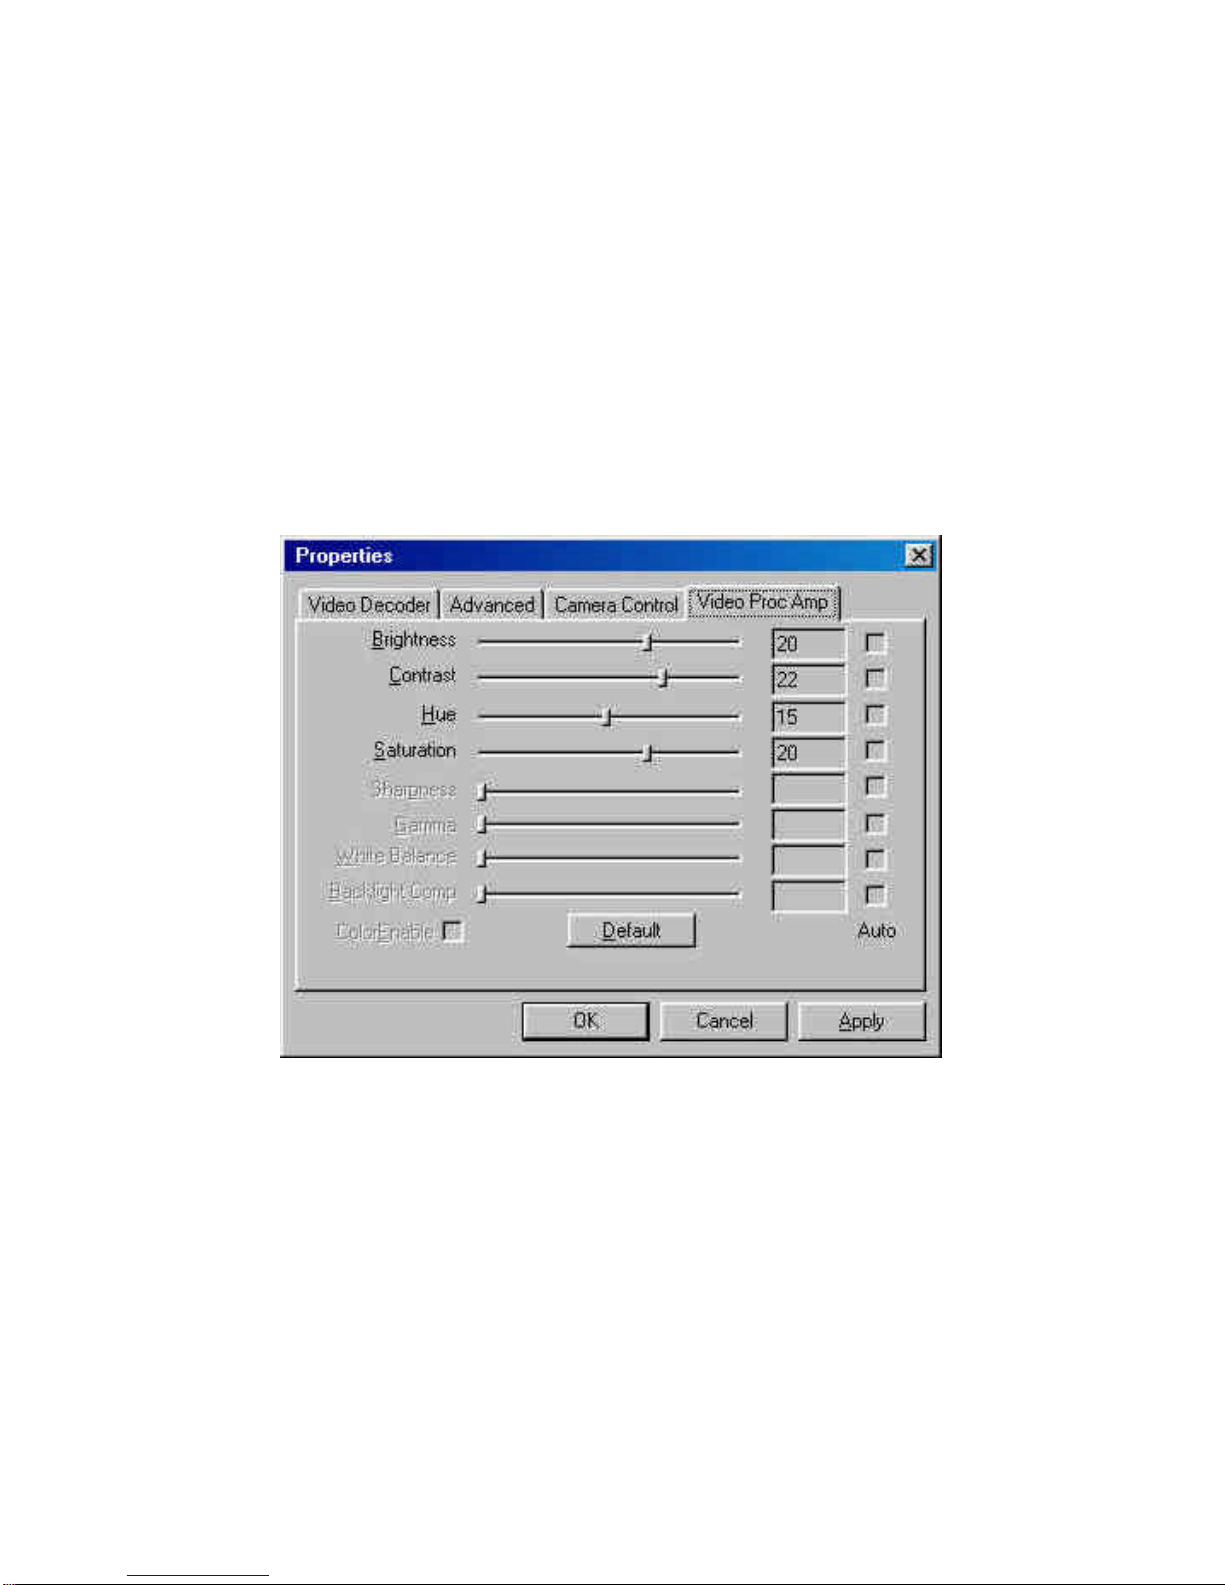
Under the
“Video Proc Amp”
tab it allows adjustment for the
value of the following parameters, Brightness, Contrast, Hue, and
Saturation to obtain the best color for your specific function.
Note:
Keep in mind when changes are made, click the
Apply
button to
refresh all the new details you have set and click
OK
return to the
application.
Page 13
9
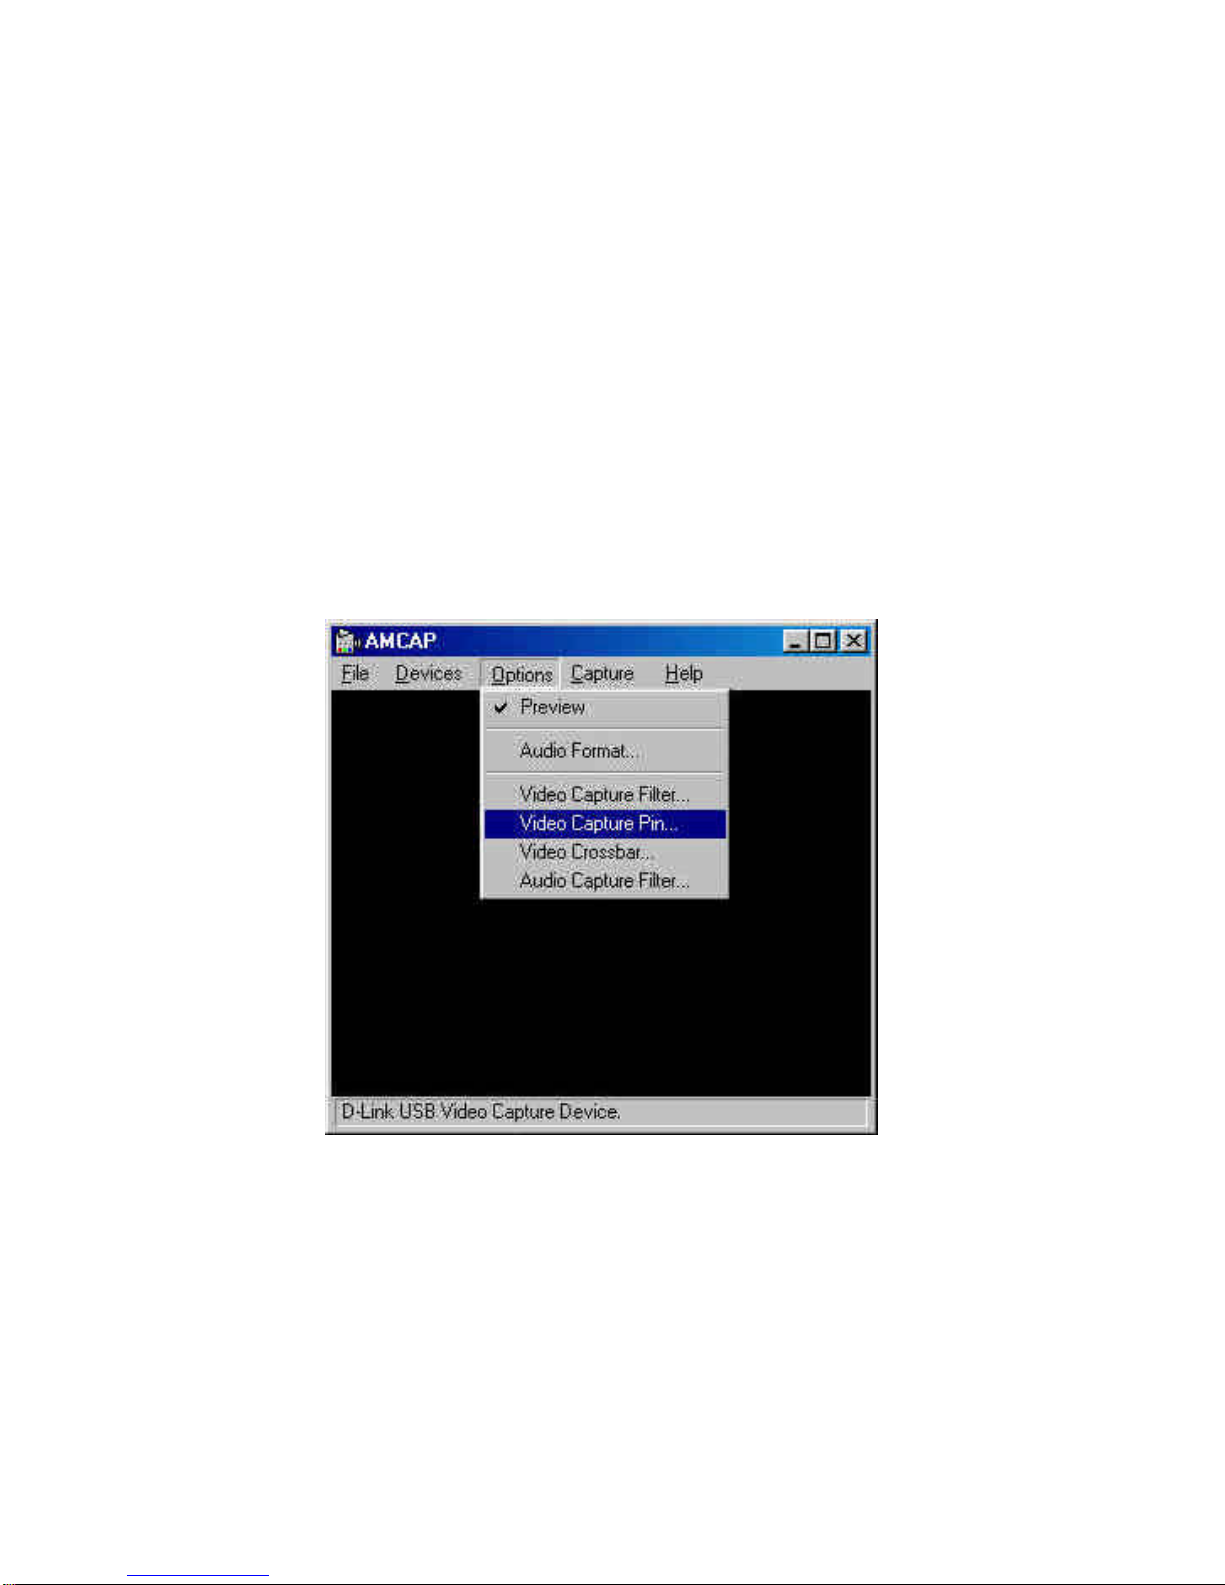
Set Video Capture Pin
When you run the video application software, such as the USB
Video Capture Device, select the
“Options”
menu then choose
“Video Capture Pin”
.
Page 14
10
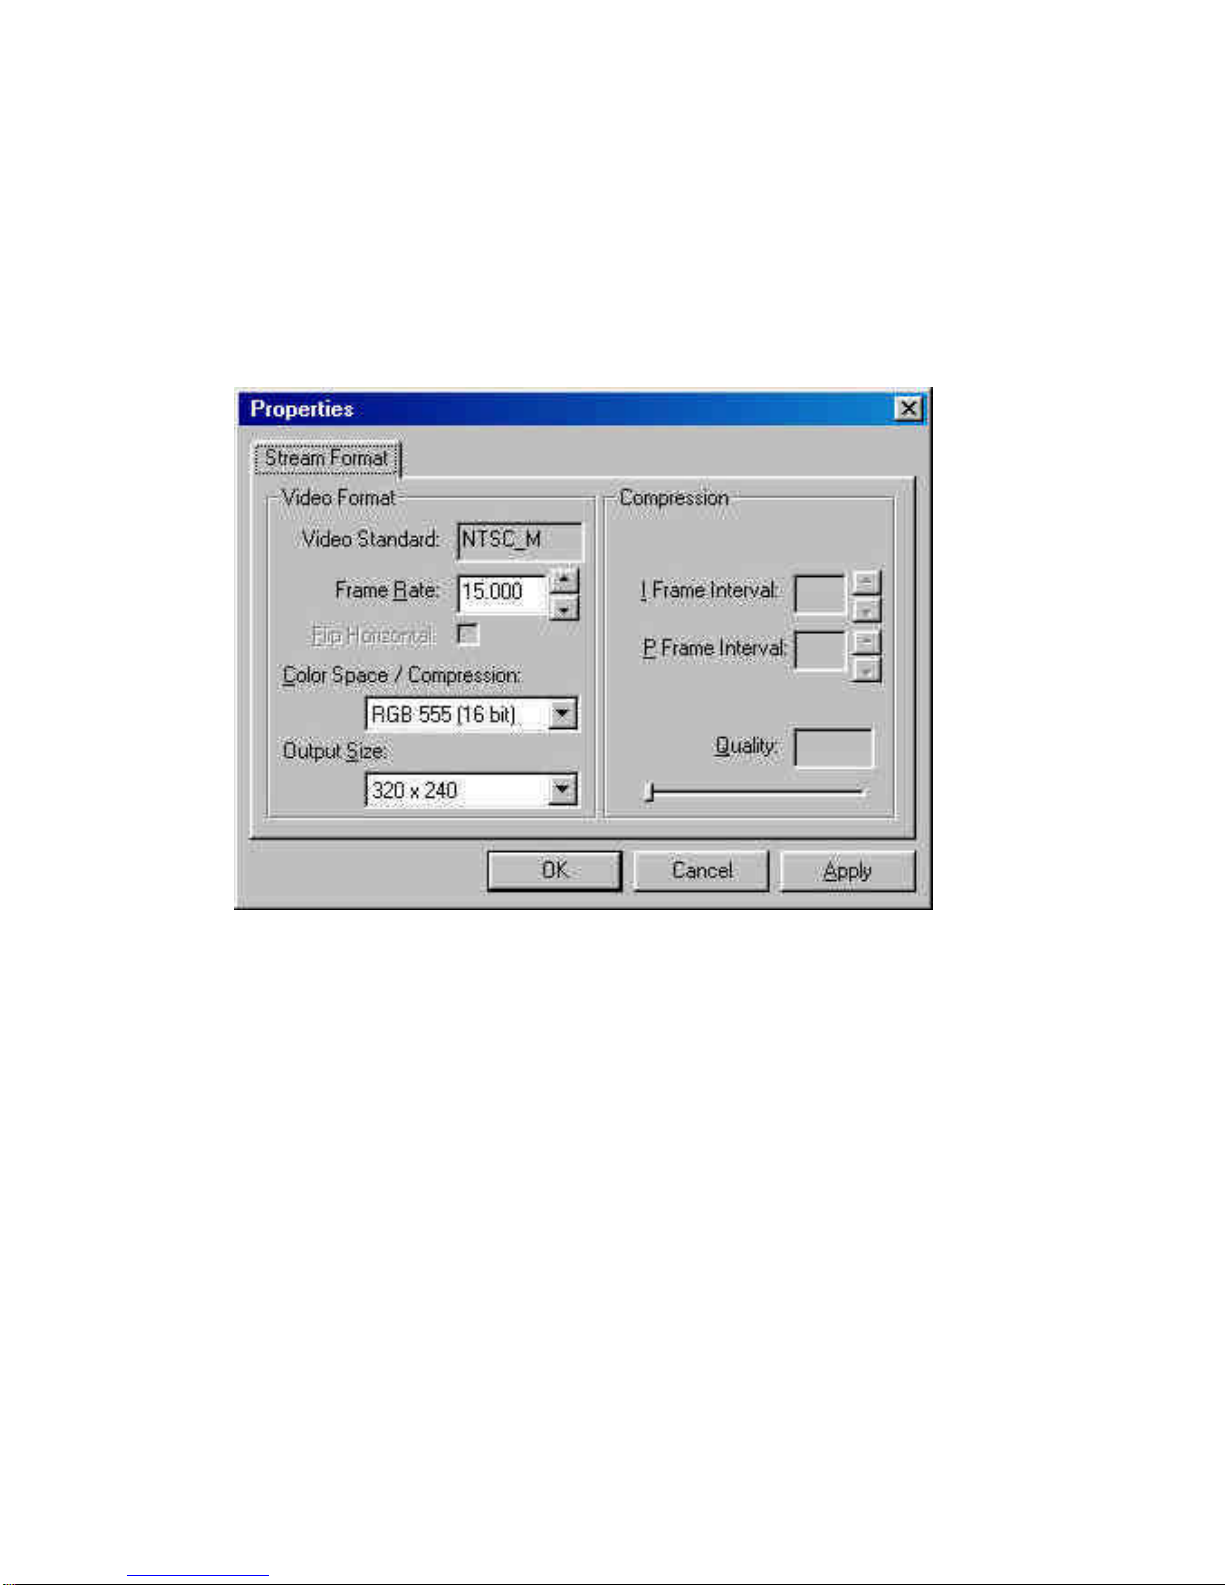
The Properties dialog box appears and under the Stream Format
tab adjustments are allowed for the Frame Rate, Color
Space/Compression, and Output Size for the desired option.
Frame Rate:
Frame rate is available from 1 to 30.
Color Space / Compression:
Select the Color Space / Compression at RGB 555 (16 bit), RGB
24, YUY2, or I420.
Output Size:
Select display frame size in CIF (352x288), QCIF (176x144),
320x240, 240x180 or 160x120.
Page 15
11
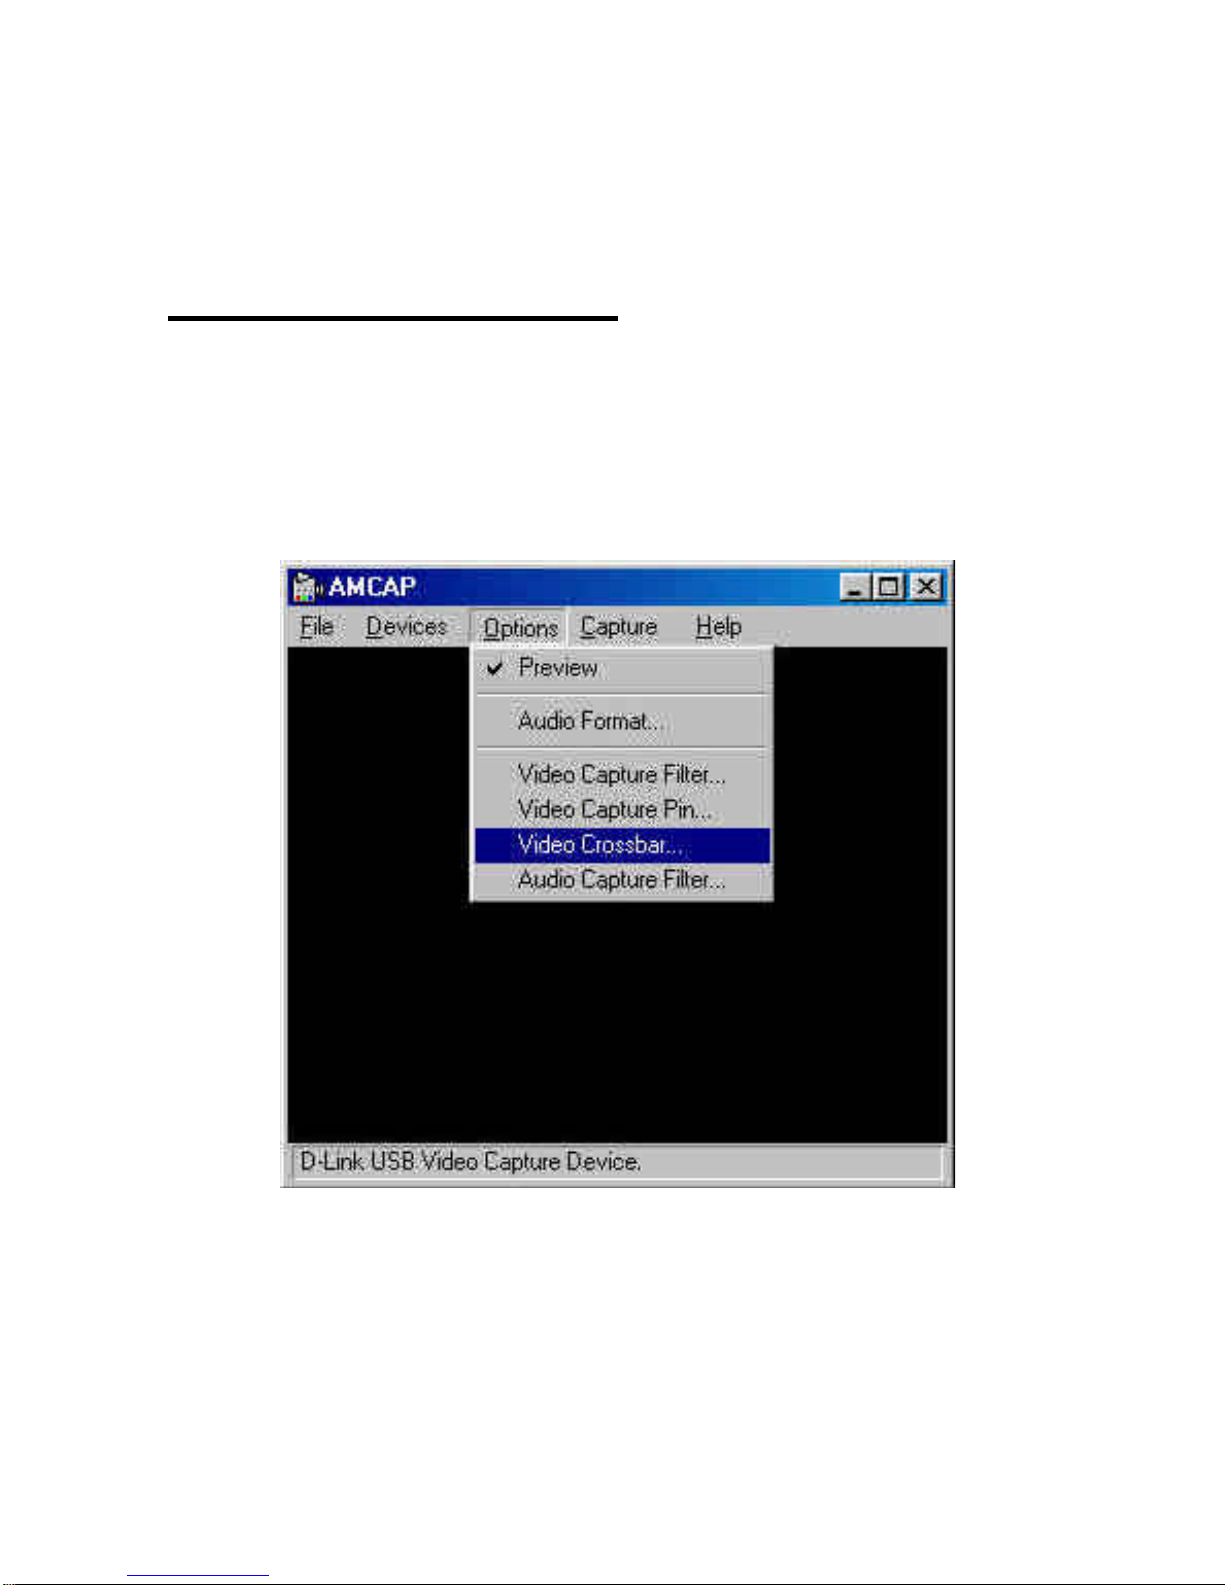
Set Video Crossbar
When you run the video application software, such as the USB
Video Capture Device, select the
“Options”
menu then choose
“Video Crossbar”
.
Page 16
12
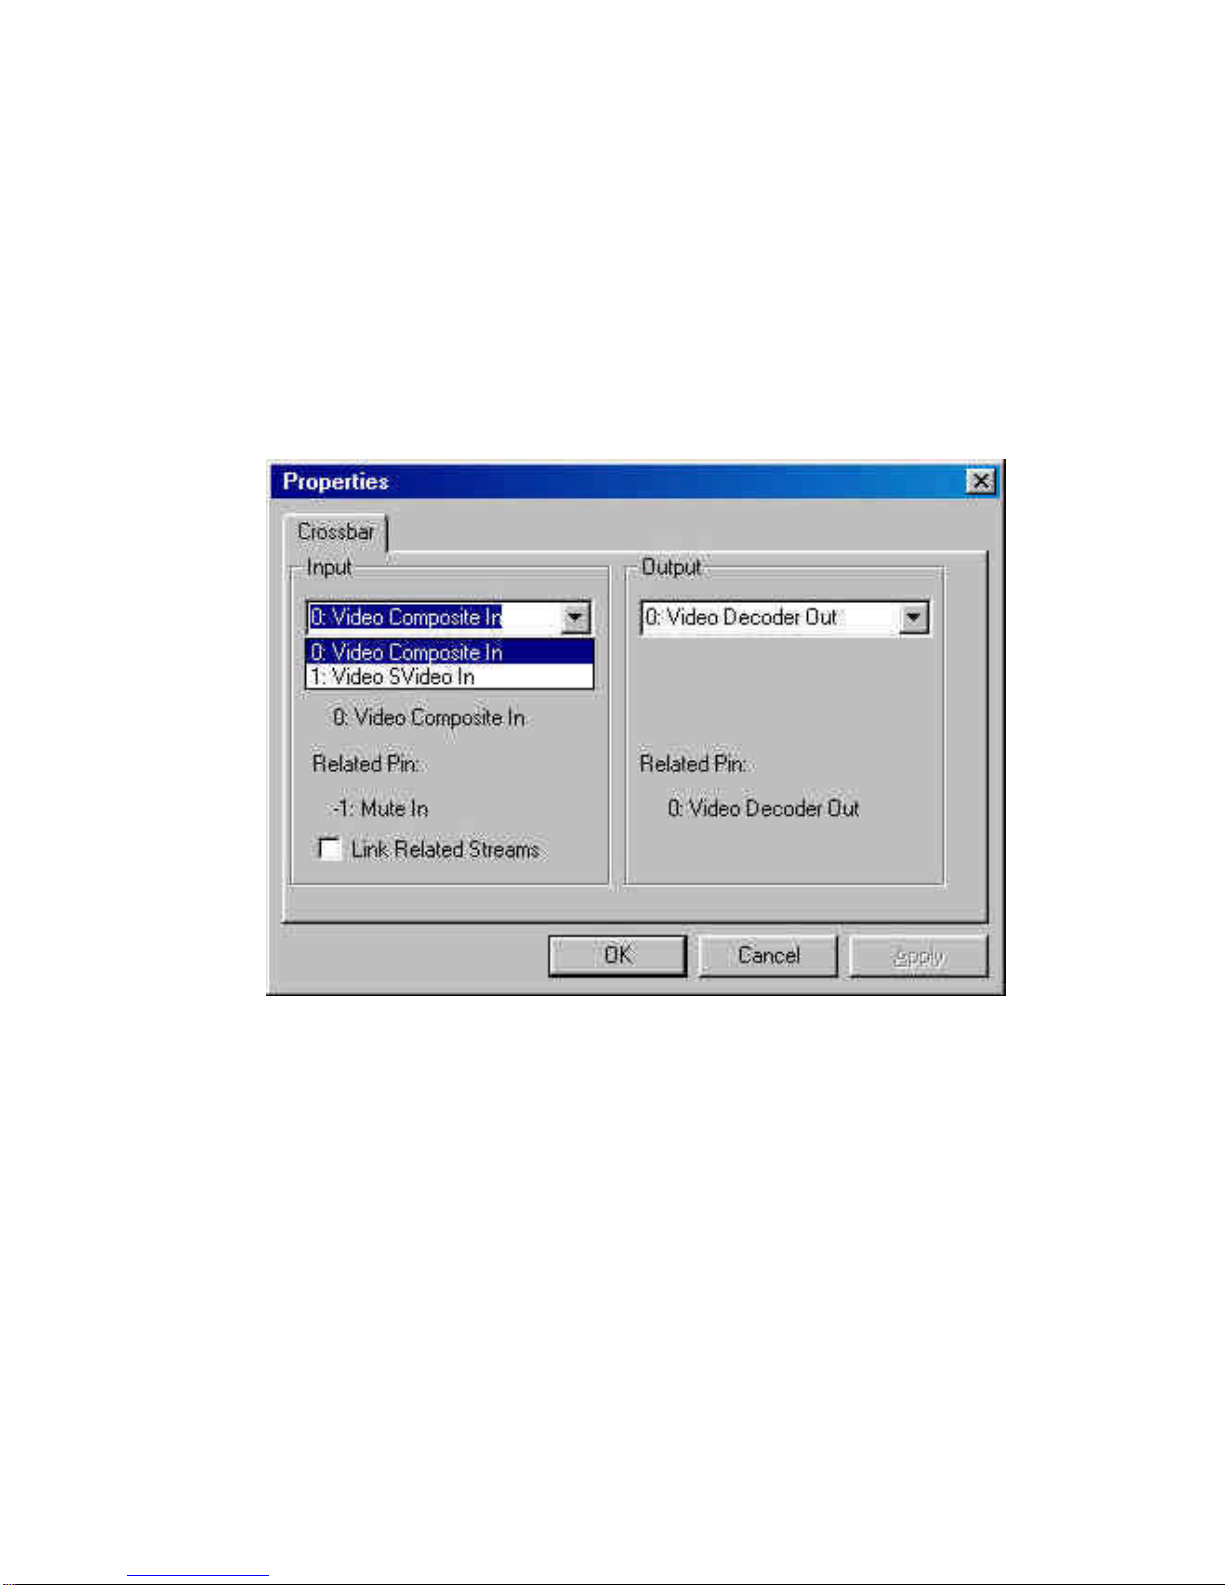
The Properties dialog box appears and under the Crossbar tab
adjustments for video source is allowed and one can specify the
video device which is connected to the USB Video Capture Device
either the C-Video In(composite video) or S-Video In connector.
Page 17

13
Snapshot
Taking a still image from the USB Video Capture Device is as
follows:
The snapshot button on USB Video Capture Device is used to
capture a still picture, this function must be supported by TWAIN
driver. The TWAIN driver can be activ ated by the image editing
software, like Windows Imaging.
In this case, the snapshot button will be enable only when the
image editing software is activated.
Example:
After running Windows Imaging, (start
menu/program/accessory/imaging).
From the “file” on the menu bar, choose
“select scanner”
function
to select the desired device for capturing images. After selecting,
from the “file” menu bar choose
“Scan New”
and the user can
capture still pictures by pressing the snapshot button or click the
capture button on the screen.
Page 18
14
Uninstalling The USB Video Capture
Device
Note:
Make sure the USB Video Capture Device is plugged into the
USB port on your PC or any USB hub attached to the PC when
initiating the uninstall procedure.
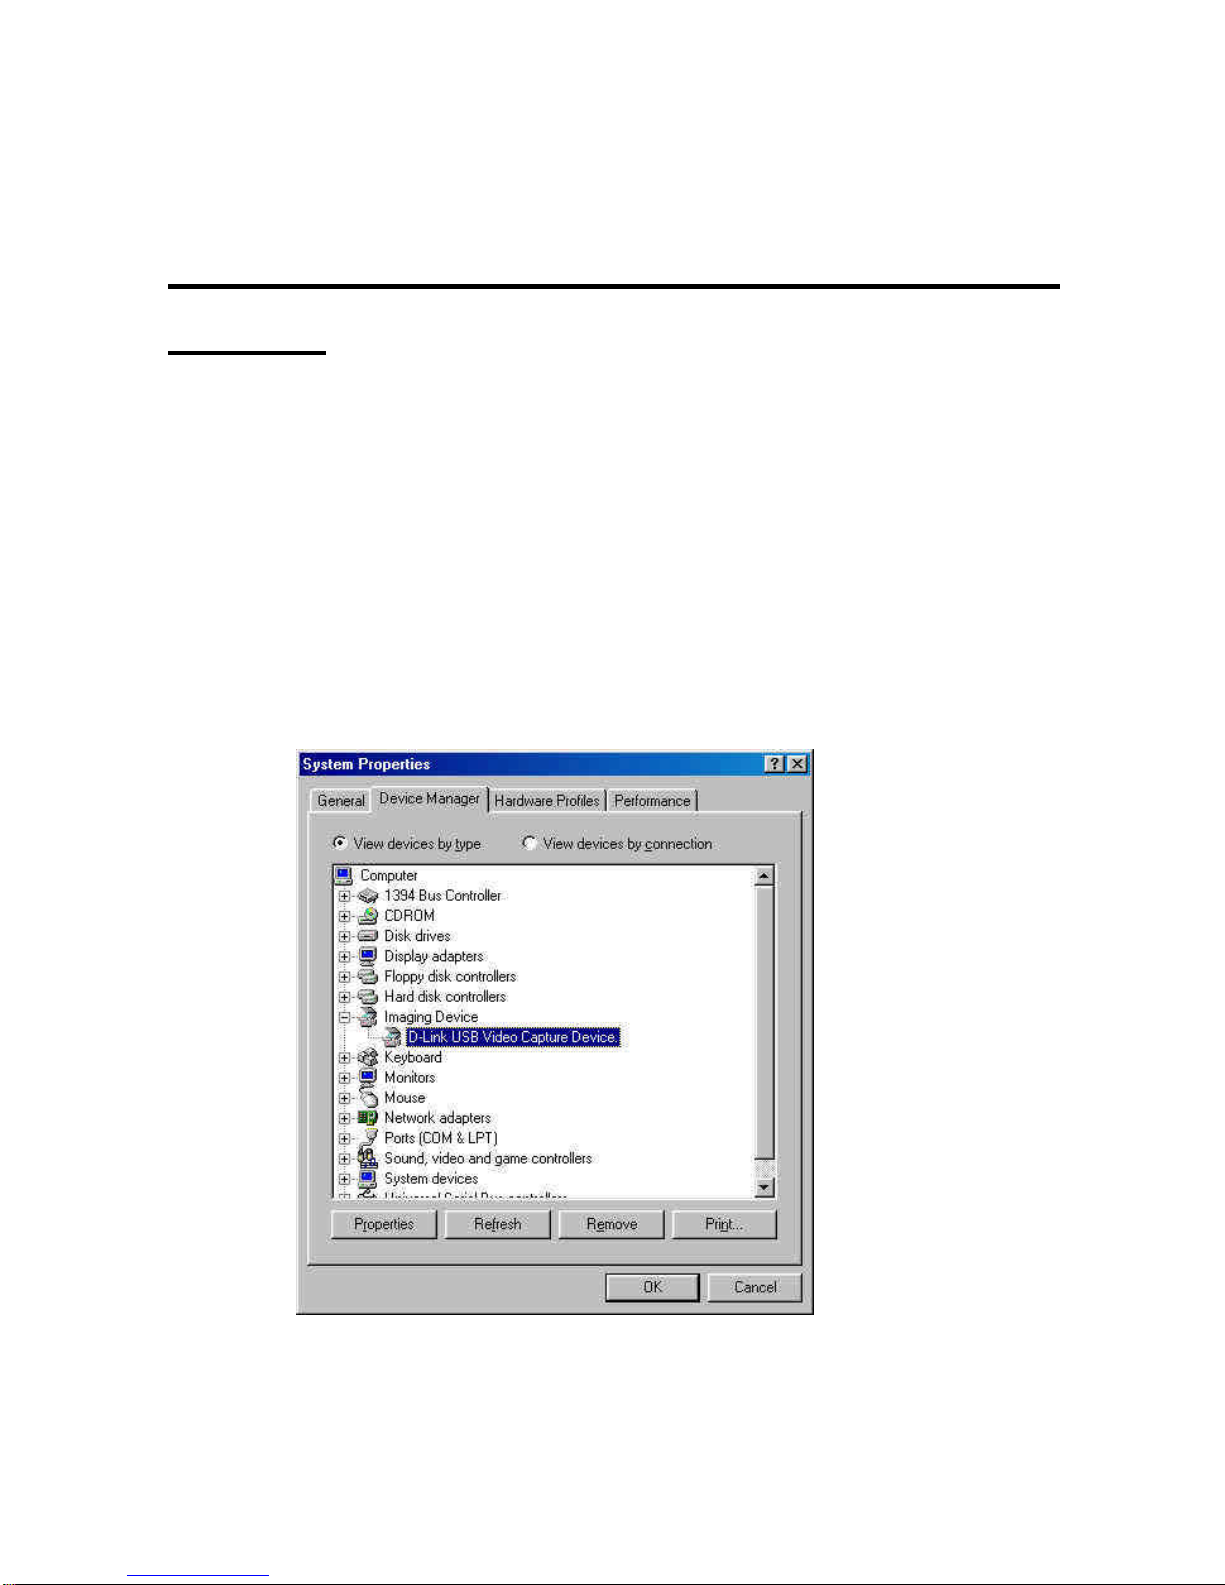
To uninstall your USB Video Capture Device from the Start Menu
/ Settings / Control Panel / System / Device Manager. Under the
Imaging Device select D-Link USB Video Capture Device and
click on the
“Remove”
button.
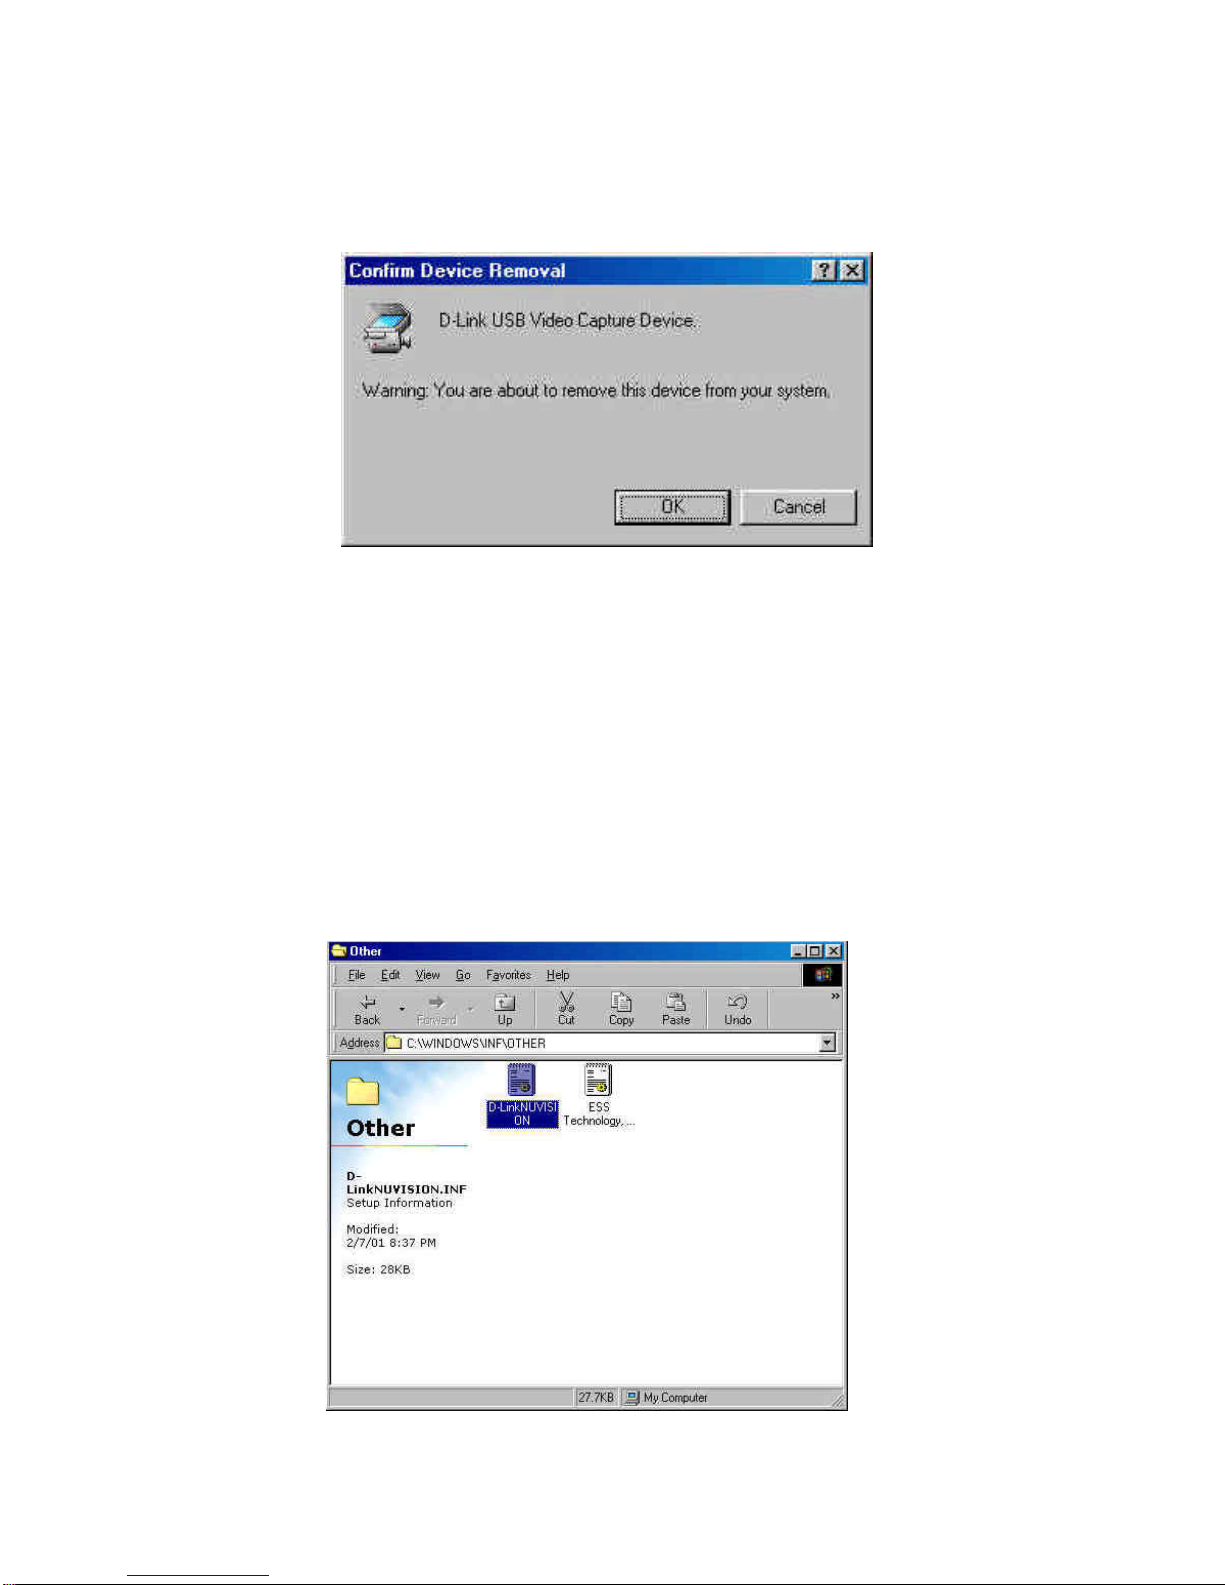
A new prompt will appear to confirm the above request. Click on
the
“O.K”
button.
Page 19
15
Now the USB Video Capture Device has been uninstalled.
Note:
To verify if all systems related to the USB Video Capture Device
have been completely uninstalled, please check
Drive C:
under
the
Windows
directory and under the sub-directory
inf
choose
other
. On the details side just delete the
D-LinkNUVISION
icon
and you are done.
Page 20

16
Specifications
Input Signal NTSC,PAL or SECAM video signal
Output Signal USB interface
Performance 30 fps @ CIF (352x288) resolution
Color Adjustment Brightness, Contrast, Hue, Saturation
Snapshot Button Yes
Driver
Win 98/Me, Windows 2000
Operating Temperature 10? ~ 50?
Storage Temperature 0? ~ 65?
Humidity 10% ~ 90% non-condensing
Page 21
17
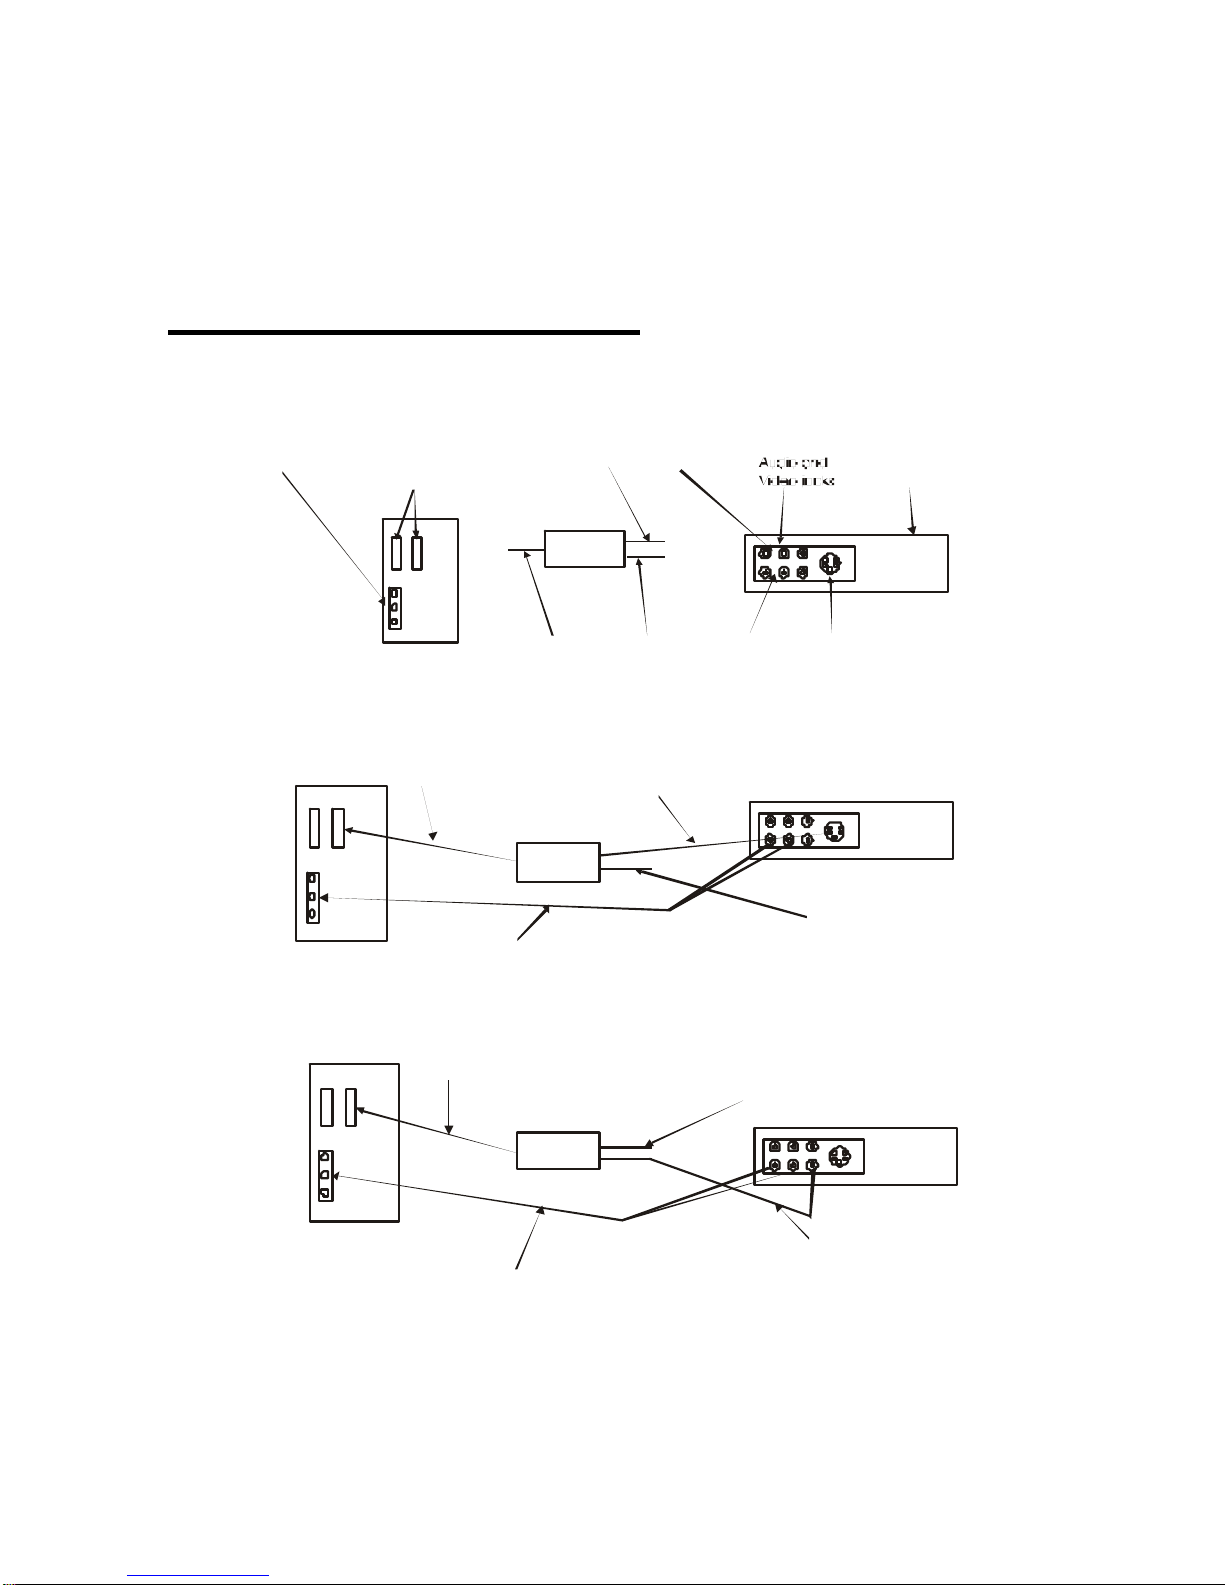
Connection Diagram
Figure 1: Computer, DSB-V00 and VCR
Your computer
USB Ports
Sound Card
VCR
S-Video Jack
S-Video
USB Connector
Out
In
RCA
Computer, D-Link DSB-V100 and VCR
USB
S-Video
RCA jacks to sound card
Connection using S-Video
RCA connector, not used when
connecting with S-Video
RCA jacks to sound card
Video out
Connection using RCA composite video
USB
S-Video connector, not
used when connecting with RCA jack
Page 22
18
Installing Video Capture Application
Insert the CD into the CD-ROM drive and follow the on screen
instructions. VideoStudio has a tutorial on the CD that covers the
basics of using it. The following information is intended to help
you get started using VideoStudio.
Set Audio and Video Source
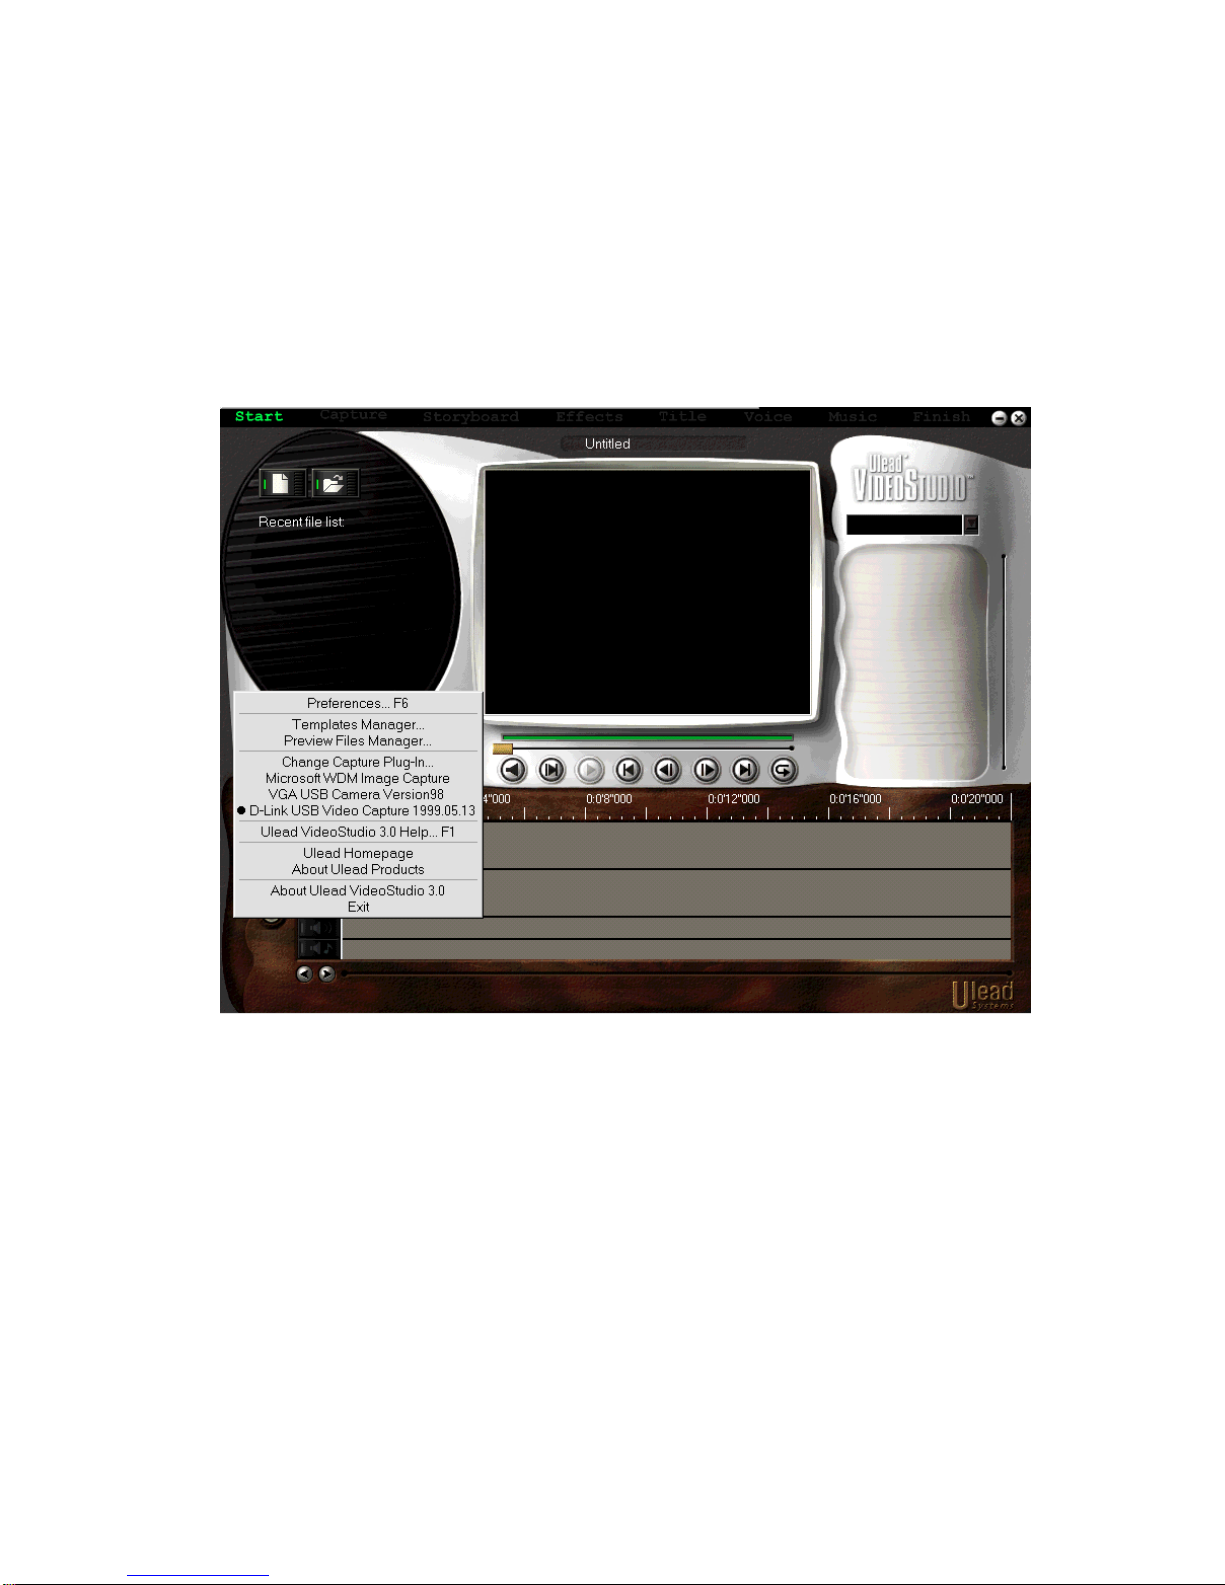
You must set the source. The source is the device the audio and/
or video is coming from. Open VideoStudio and click on the G
icon, shown in
Figure 2, to set the global preferences. Make sure the Global
preferences are set correctly for the source you are using. Select
D-Link DSB-V00, shown in Figure 3.
Figure 2: Global Commands
Page 23
19
Global commands displays a list of preferences. Use the same
procedure to change Global preferences. If a device is not
working, check the Global settings and verify they are compatible
with the device being used.
Figure 3: Global settings
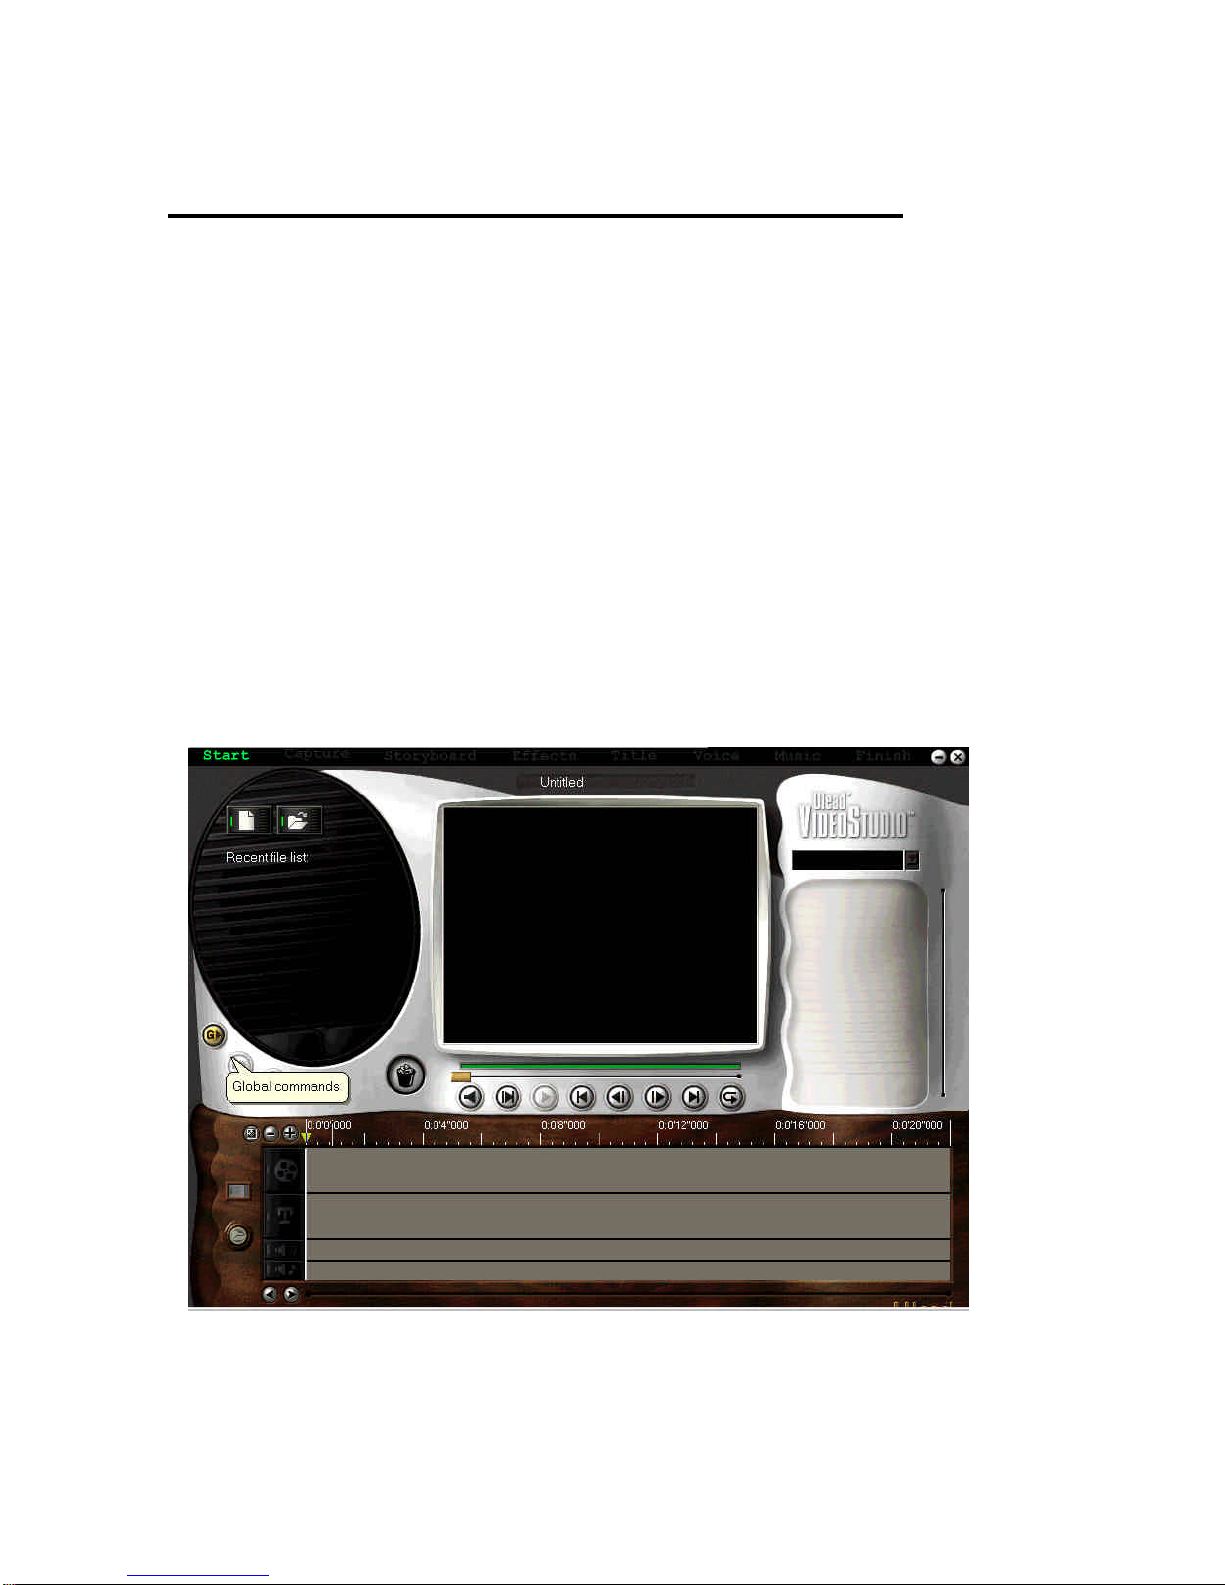
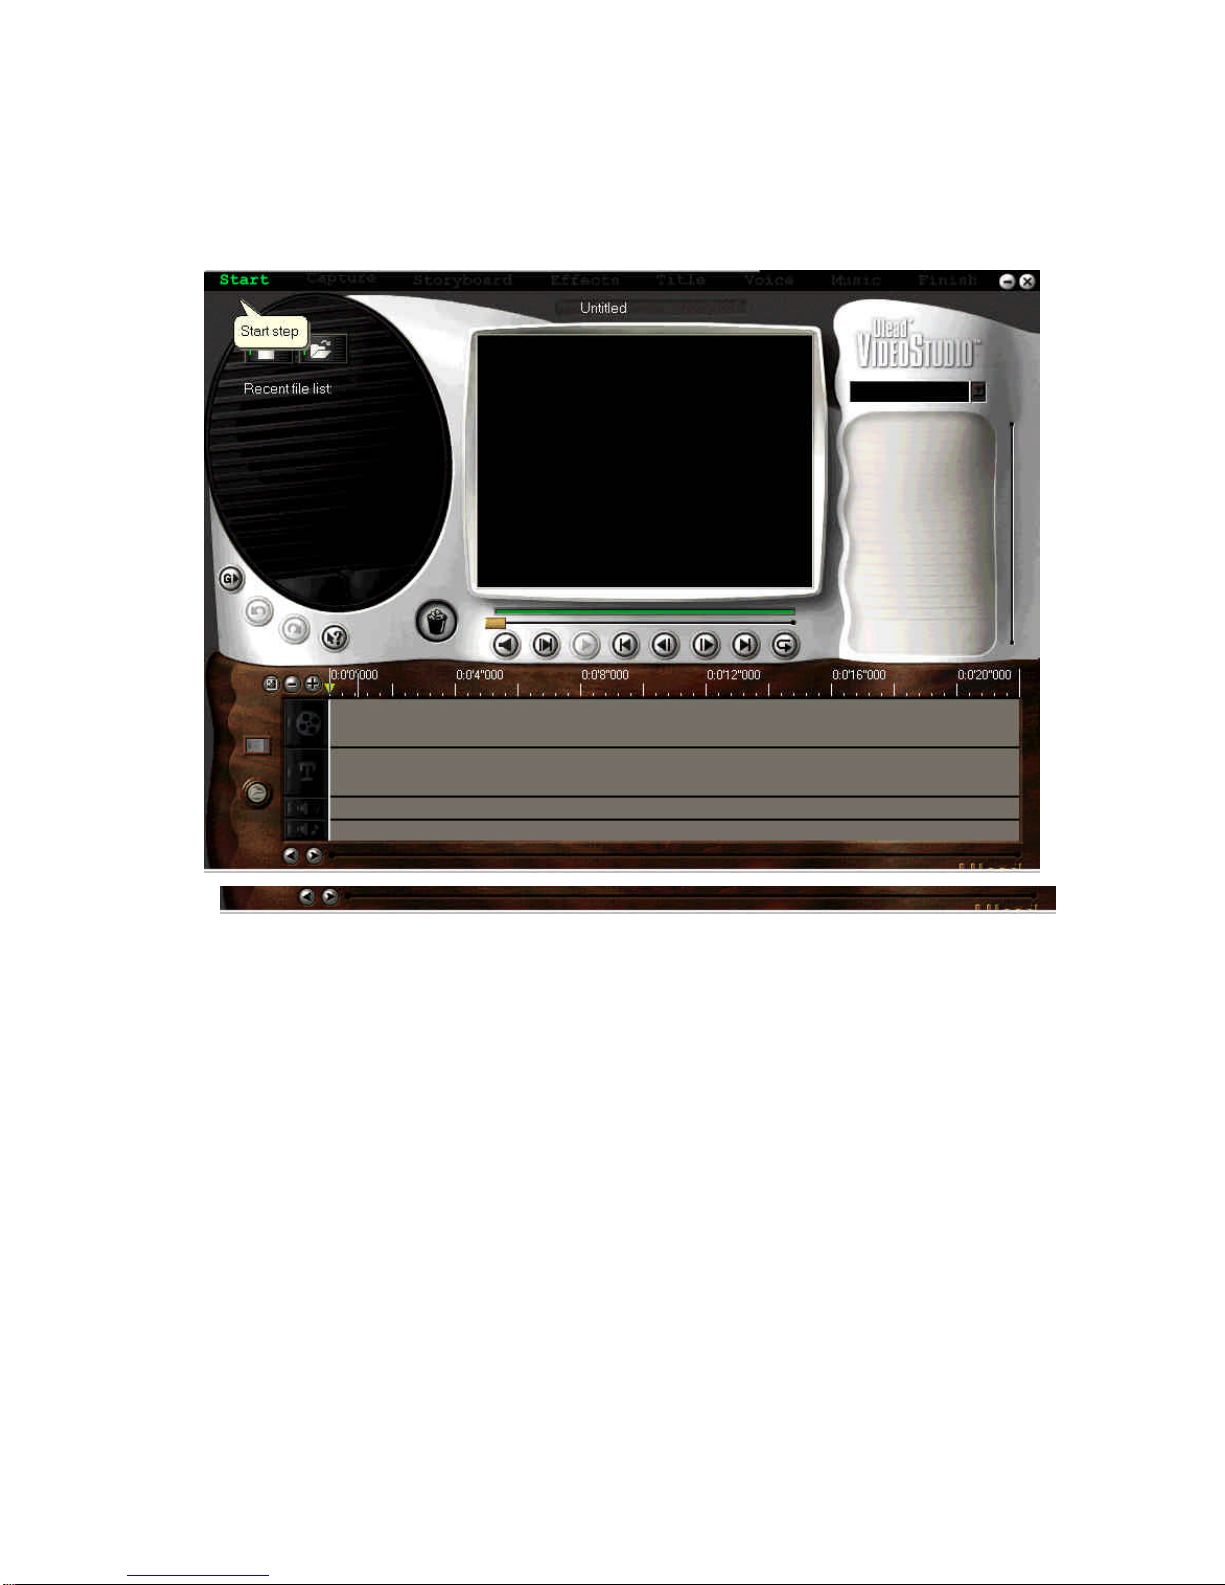
You are now ready to begin creating your own movies. Click on
Start, shown in
Figure 4 and follow the on screen instructions to begin capturing
audio and video.
Page 24
20
Figure 4: Start
Clicking on start brings up the “Starting your first video project”
window, shown in Figure 5.
The other options along the top of the screen become available
after you have made a video capture.
Note: Start the device you are recording from and begin the
capture. The sound is not audible until you play it back
using VideoStudio.
Page 25
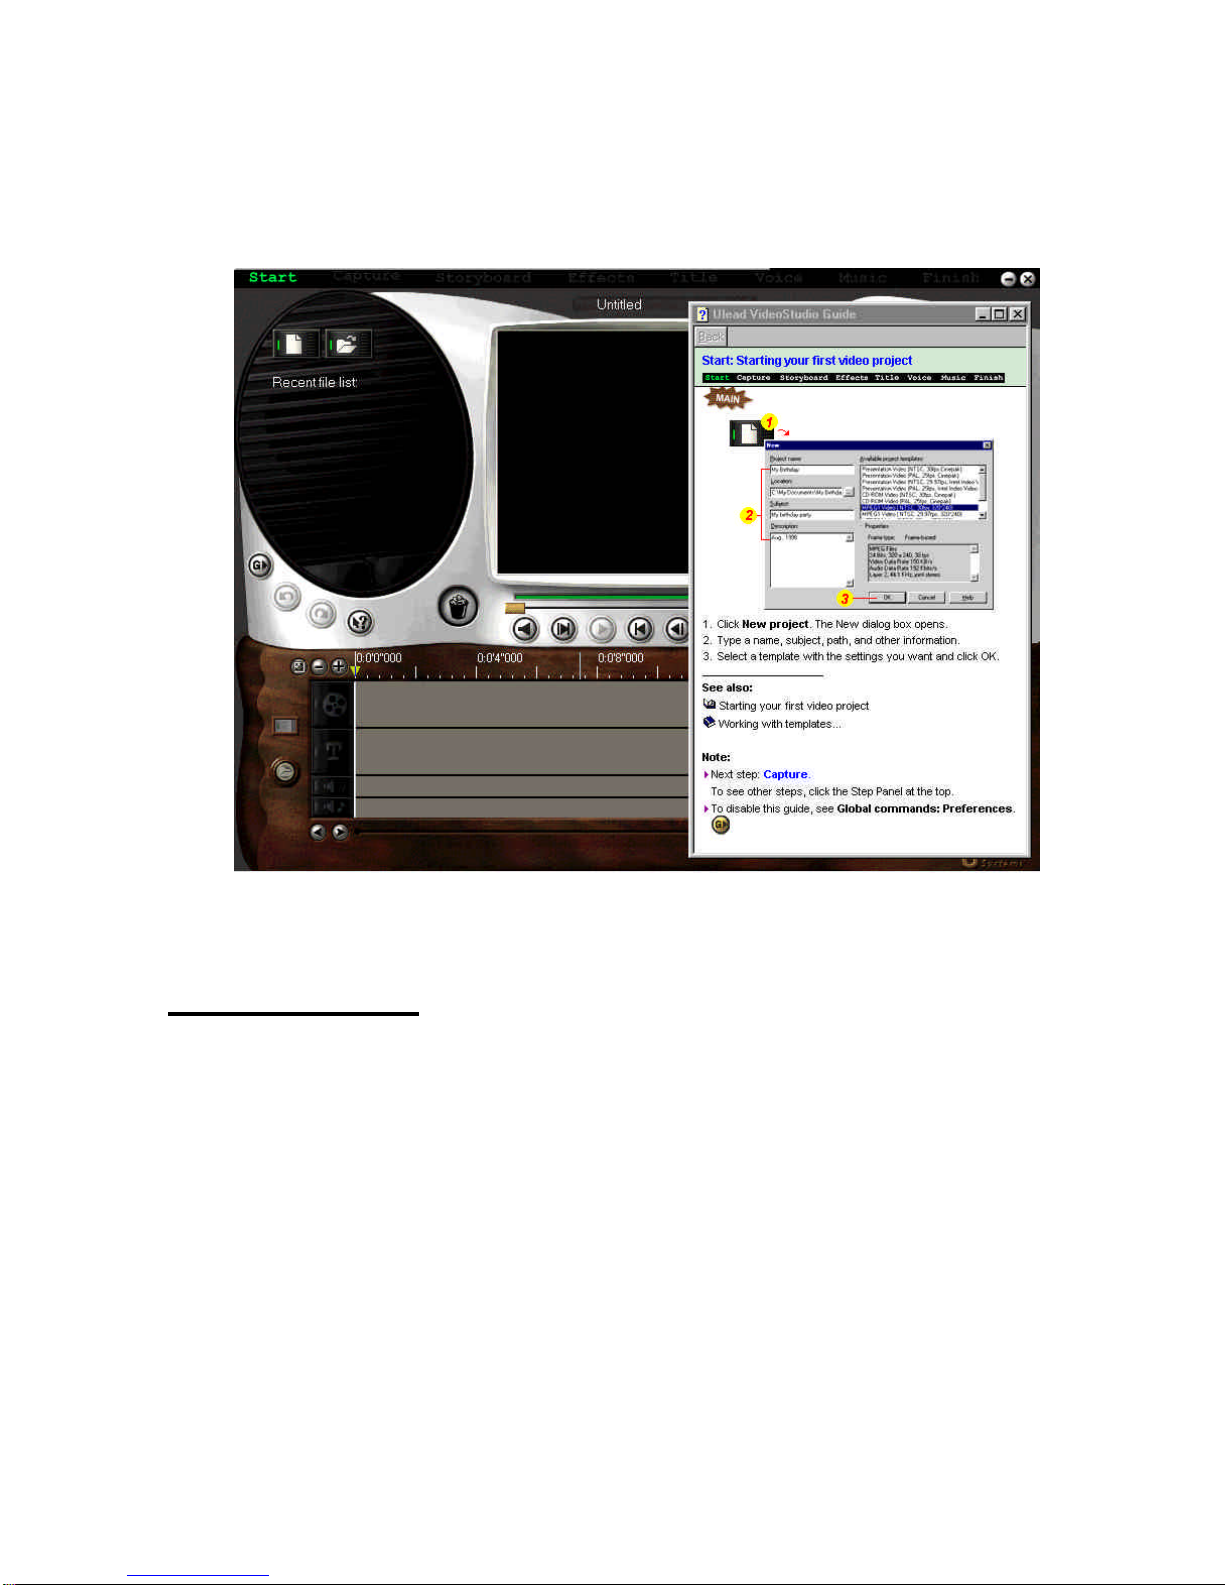
21
Figure 5: Starting your first video project
Troubleshooting
Start Ulead VideoStudio and verify that you can watch the video
on your computer. Make sure the settings are correct. Incorrect
settings will prevent you from seeing any video.
Verify that all cables are plugged in and connected properly.
Verify that the sound card is configured properly. Look at the
settings and verify that nothing has been disabled or muted. If
some settings are disabled or muted you won’t be able to hear
sound. Check the sound card documentation for specific
configurations and adjustments.
 Loading...