

Page 1

DSB-R100
User’s Guide
Page 2

Copyright Statement
No part of this publication may be reproduced in any form or by
any means or used to make any derivative such as translation,
transformation, or adaptation without permission from D-Link
Corporation / D-Link Systems Inc., as stipulated by the United
States Copyright Act of 1976.
FCC Certifications
This equipment has been tested and found to comply with the
limits for a Class B digital device, pursuant to Part 15 of the FCC
Rules. These limits are designed to provide reasonable
protection against harmful interference in a residential
installation. This equipment generates, uses and can radiate
radio frequency energy and, if not installed and used in
accordance with the instructions, may cause harmful
interference to radio communications. However, there is no
guarantee that interference will not occur in a particular
installation. If this equipment does cause harmful interference to
radio or television reception, which can be determined by turning
the equipment off and on, the user is encouraged to try to correct
the interference by one or more of the following measures:
1
Page 3

Reorient or relocate the receiving antenna.
Increase the separation between the equipment and receiver.
Connect the equipment into an outlet on a circuit different from
that to which the receiver is connected.
Consult the dealer or an experienced radio/TV technician for
help.
Shielded interface cables must be used in order to comply with
emission limits.
You are cautioned that changes or modifications not expressly
approved by the party responsible for compliance could void
your authority to operate the equipment.
This device complies with Part 15 of the FCC rules. Operation is
subject to the following two conditions: (1) This device may not
cause harmful interference, and (2) This device must accept any
interference received, including interference that may cause
undesired operation.
2
Page 4

LIMITED WARRANTY
D-Link Systems, Inc. (“D-Link”) provides this limited warranty for its product
only to the person or entity who originally purchased the product from D-Link
or its authorized reseller or distributor.
Limited Hardware Warranty:
D-Link warrants that the hardware portion of
the D-Link products described below (“Hardware”) will be free from material
defects in workmanship and materials from the date of original retail purchase
of the Hardware, for the period set forth below applicable to the product type
(“Warranty Period”) if the Hardware is used and serviced in accordance with
applicable documentation; provided that a completed Registration Card is
returned to an Authorized D-Link Service Office within ninety (90) days after
the date of original retail purchase of the Hardware. If a completed
Registration Card is not received by an authorized D-Link Service Office
within such ninety (90) period, then the Warranty Period shall be ninety (90)
days from the date of purchase.
Product Type Warranty Period
Product (excluding power supplies and fans), if
purchased and delivered in the fifty (50) United
States, or the District of Columbia (“USA”)
Product purchased or delivered outside the USA One (1) Year
Power Supplies and Fans One (1) Year
Spare parts and spare kits Ninety (90) days
As long as the original purchaser still
owns the product
3
Page 5

D-Link’s sole obligation shall be to repair or replace the defective Hardware at
no charge to the original owner. Such repair or replacement will be rendered by
D-Link at an Authorized D-Link Service Office. The replacement Hardware
need not be new or of an identical make, model or part; D-Link may in its
discretion may replace the defective Hardware (or any part thereof) with any
reconditioned product that D-Link reasonably determines is substantially
equivalent (or superior) in all material respects to the defective Hardware. The
Warranty Period shall extend for an additional ninety (90) days after any
repaired or replaced Hardware is delivered. If a material defect is incapable of
correction, or if D-Link determines in its sole discretion that it is not practical to
repair or replace the defective Hardware, the price paid by the original
purchaser for the defective Hardware will be refunded by D-Link upon return
to D-Link of the defective Hardware. All Hardware (or part thereof) that is
replaced by D-Link, or for which the purchase price is refunded, shall become
the property of D-Link upon replacement or refund.
Limited Software Warranty:
product (“Software”) will substantially conform to D-Link’s then current
functional specifications for the Software, as set forth in the applicable
documentation, from the date of original delivery of the Software for a period
of ninety (90) days (“Warranty Period”), if the Software is properly installed on
approved hardware and operated as contemplated in its documentation. D-Link
further warrants that, during the Warranty Period, the magnetic media on which
D-Link warrants that the software portion of the
4
Page 6

D-Link delivers the Software will be free of physical defects. D-Link’s sole
obligation shall be to replace the non-conforming Software (or defective media)
with software that substantially conforms to D-Link’s functional specifications
for the Software. Except as otherwise agreed by D-Link in writing, the
replacement Software is provided only to the original licensee, and is subject to
the terms and conditions of the license granted by D-Link for the Software.
The Warranty Period shall extend for an additional ninety (90) days after any
replacement Software is delivered. If a material non-conformance is incapable
of correction, or if D-Link determines in its sole discretion that it is not
practical to replace the non-conforming Software, the price paid by the original
licensee for the non-conforming Software will be refunded by D-Link;
provided that the non-conforming Software (and all copies thereof) is first
returned to D-Link. The license granted respecting any Software for which a
refund is given automatically terminates.
What You Must Do For Warranty Service:
1. Registration Card
manual must be completed and returned to an Authorized D-Link Service
Office for each D-Link product within ninety (90) days after the product is
purchased and/or licensed. The addresses/telephone/fax list of the nearest
Authorized D-Link Service Office is provided in the back of this manual.
FAILURE TO PROPERLY COMPLETE AND TIMELY RETURN THE
. The Registration Card provided at the back of this
5
Page 7

REGISTRATION CARD MAY AFFECT THE WARRANTY FOR THIS
PRODUCT.
2. Submitting A Claim
submitted in writing before the end of the Warranty Period to an Authorized
D-Link Service Office. The claim must include a written description of the
Hardware defect or Software nonconformance in sufficient detail to allow
D-Link to confirm the same. The original product owner must obtain a Return
Material Authorization (RMA) number from the Authorized D-Link Service
Office and, if requested, provide written proof of purchase of the product (such
as a copy of the dated purchase invoice for the product) before the warranty
service is provided. After an RMA number is issued, the defective product
must be packaged securely in the original or other suitable shipping package to
ensure that it will not be damaged in transit, and the RMA number must be
prominently marked on the outside of the package. The packaged product shall
be insured and shipped to D-Link, 53 Discovery Drive, Irvine CA 92618, with
all shipping costs prepaid. D-Link may reject or return any product that is not
packaged and shipped in strict compliance with the foregoing requirements, or
for which an RMA number is not visible from the outside of the package. The
product owner agrees to pay D-Link’s reasonable handling and return shipping
charges for any product that is not packaged and shipped in accordance with the
foregoing requirements, or that is determined by D-Link not to be defective or
non-conforming.
. Any claim under this limited warranty must be
6
Page 8

What Is Not Covered:
This limited warranty provided by D-Link does not cover
1. Products that have been subjected to abuse, accident, alteration,
modification, tampering, negligence, misuse, faulty installation, lack of
reasonable care, repair or service in any way that is not contemplated in
the documentation for the product, or if the model or serial number has
been altered, tampered with, defaced or removed;
2. Initial installation, installation and removal of the product for repair, and
shipping costs;
3. Operational adjustments covered in the operating manual for the product,
and normal maintenance;
4. Damage that occurs in shipment, due to act of God, failures due to power
surge, and cosmetic damage; and
5. Any hardware, software, firmware or other products or services provided
by anyone other than D-Link.
:
7
Page 9

Disclaimer of Other Warranties:
WARRANTY SPECIFIED HEREIN, THE PRODUCT IS PROVIDED
“AS-IS” WITHOUT ANY WARRANTY OF ANY KIND INCLUDING,
WITHOUT LIMITATION, ANY WARRANTY OF MERCHANTABILITY,
FITNESS FOR A PARTICULAR PURPOSE AND NON-INFRINGEMENT.
IF ANY IMPLIED WARRANTY CANNOT BE DISCLAIMED IN ANY
TERRITORY WHERE A PRODUCT IS SOLD, THE DURATION OF SUCH
IMPLIED WARRANTY SHALL BE LIMITED TO NINETY (90) DAYS.
EXCEPT AS EXPRESSLY COVERED UNDER THE LIMITED
WARRANTY PROVIDED HEREIN, THE ENTIRE RISK AS TO THE
QUALITY, SELECTION AND PERFORMANCE OF THE PRODUCT IS
WITH THE PURCHASER OF THE PRODUCT.
EXCEPT FOR THE LIMITED
Limitation of Liability:
LAW, D-LINK IS NOT LIABLE UNDER ANY CONTRACT, NEGLIGENCE,
STRICT LIABILITY OR OTHER LEGAL OR EQUITABLE THEORY FOR
ANY LOSS OF USE OF THE PRODUCT, INCONVENIENCE OR DAMAGES
OF ANY CHARACTER, WHETHER DIRECT, SPECIAL, INCIDENTAL OR
CONSEQUENTIAL (INCLUDING, BUT NOT LIMITED TO, DAMAGES
FOR LOSS OF GOODWILL, WORK STOPPAGE, COMPUTER FAILURE
OR MALFUNCTION, LOSS OF INFORMATION OR DATA CONTAINED
IN, STORED ON, OR INTEGRATED WITH ANY PRODUCT RETURNED
TO D-LINK FOR WARRANTY SERVICE) RESULTING FROM THE USE
TO THE MAXIMUM EXTENT PERMITTED BY
8
Page 10

OF THE PRODUCT, RELATING TO WARRANTY SERVICE, OR
ARISING OUT OF ANY BREACH OF THIS LIMITED WARRANTY,
EVEN IF D-LINK HAS BEEN ADVISED OF THE POSSIBILITY OF SUCH
DAMAGES. THE SOLE REMEDY FOR A BREACH OF THE
FOREGOING LIMITED WARRANTY IS REPAIR, REPLACEMENT OR
REFUND OF THE DEFECTIVE OR NON-CONFORMING PRODUCT.
GOVERNING LAW
the state of California.
Some states do not allow exclusion or limitation of incidental or consequential
damages, or limitations on how long an implied warranty lasts, so the foregoing
limitations and exclusions may not apply. This limited warranty provides specific
legal rights and the product owner may also have other right
: This Limited Warranty shall be governed by the laws of
9
Page 11

Contents
Contents 10
Chapter 1 Installing the
DSB-R100………………...12
1-1 Hardware
installation…………...………………12
1-2 Software
Installation…………………………….13
Chapter 2 Understanding the DSB-R100
Menus….14
Chapter 3 How to Preset your favorite
stations………17
3-1
Tuning:………………………………………….17
3-2 Preset channel………………………………….17
Chapter 4 How to use “Sleep” and “Wake up”
functions…………………………………..20
4-1. Setting Sleep Time……………………………20
4-2. Setting Wake up time…………………………21
Chapter 5 Recording and playing………………...23
5-1. Specifying Wave Formats…………………….23
5-2. How to record into Wave File…………………24
10
Page 12

5-3. Saving Wave Files…………………………….25
5-4. Preset the Recording…………………………..25
5-5. Opening a Wave File………………………….26
5-6. Playing Wave Files……………………………26
Chapter 6 Converting wave files to MP3…………28
6-1. Selecting the file………………………………28
6-2. Deleting MP3 files…………………………….30
Chapter 7 Using “Help”…………………………...31
Chapter 8 Warning signs …………………………32
8-1. Warning signs appear during installation……..32
8-2. Questions when you are using the software of
DSB-R100……………………………………21
11
Page 13
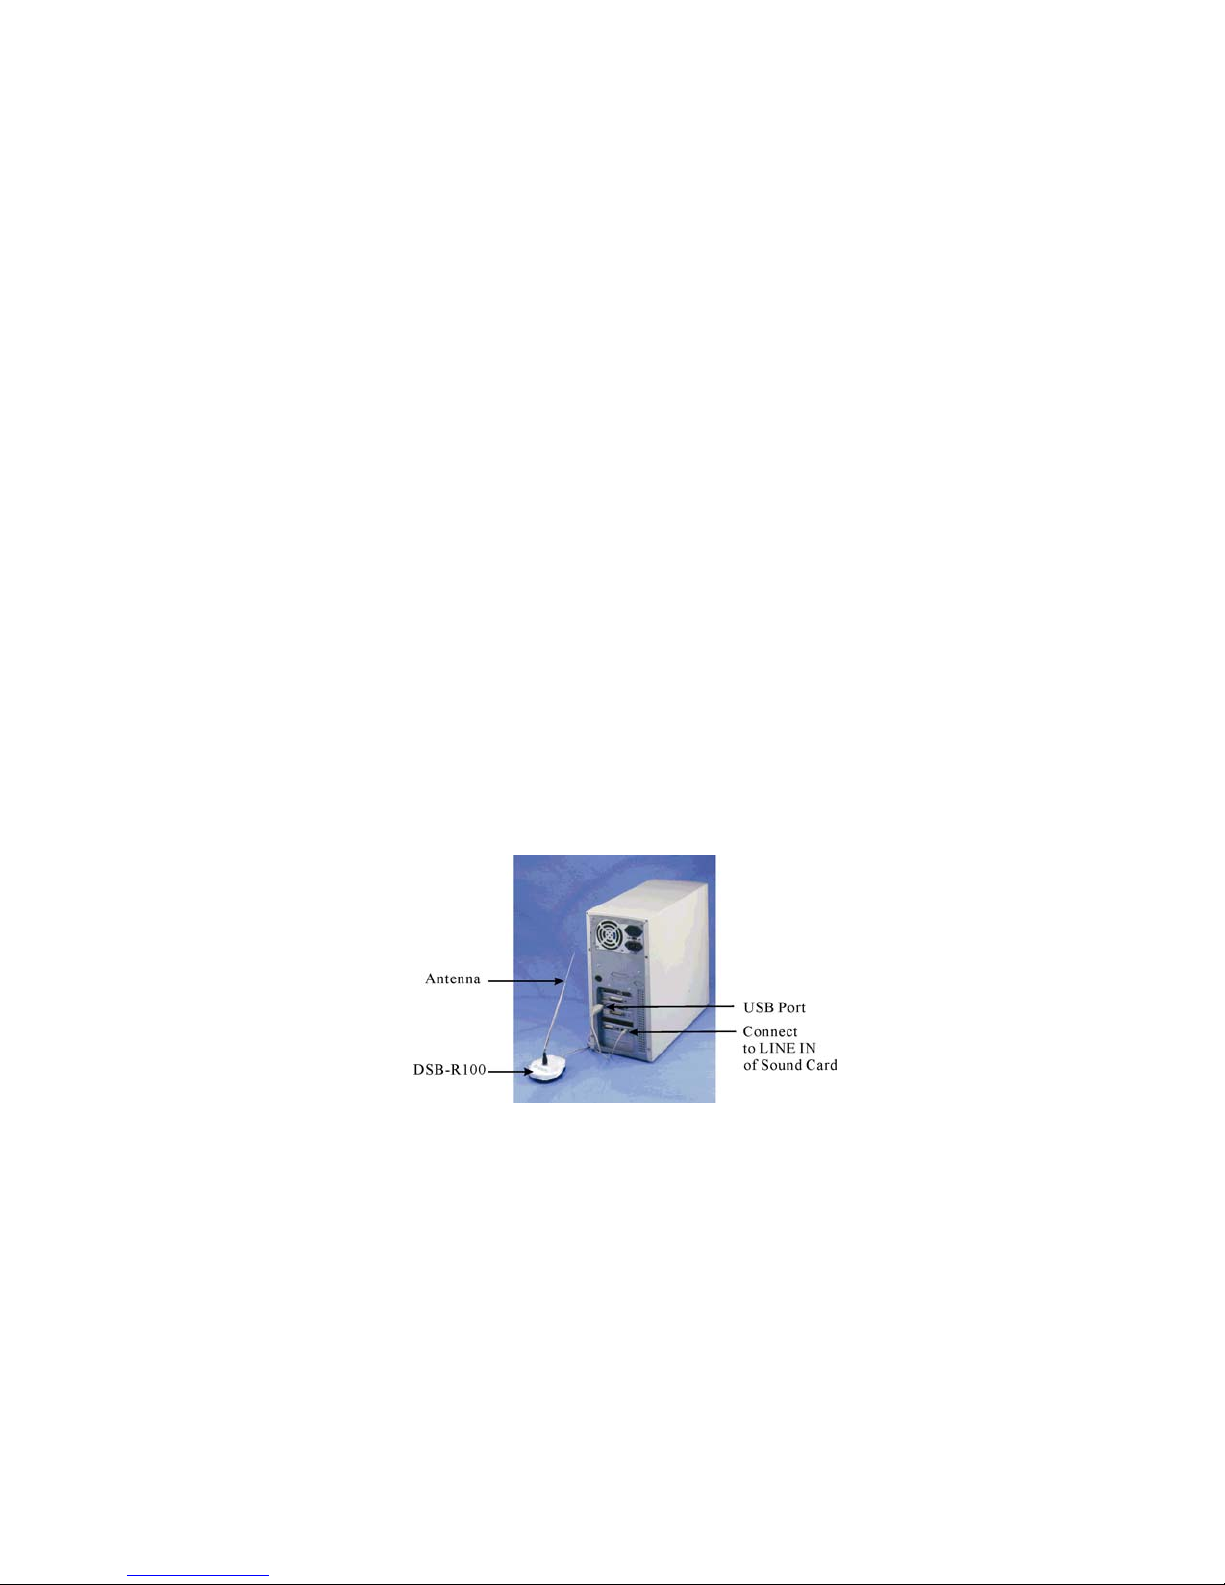
Chapter 1 Installing the DSB-R100
1-1 Hardware installation
(1). Plug DSB-R100 USB flat connector into the USB port
of your PC. If the PC has a sound card, plug the
DSB-R100’s RCA cable into the existing
LINE IN
port of the sound card. If not, plug the RCA jack into
any speakers. Note that the recording function is not
available when running DSB-R100 software in this
way.
(2). The computer will detect DSB-R100 and look for a
driver. If a driver is not found, it will then prompt for
one. At this time, make sure that your DSB-R100
diskette is inserted into your computer floppy drive.
(3). The computer is now ready to install the DSB-R100
driver from floppy the drive.
12
Page 14

1-2 Software Installation
The DSB-R100 comes with user applications for Windows
98. The following installation installs the application into
your PC.
Installing under Windows 98
(1) Insert the DSB-R100 Utility diskette into drive A or B.
(2) Click on
My Computer icon
.
(3) Select Floppy(A: ) (where A: is your selected diskette
drive)
(4) Double click on
(5) After the
Setup
Setup
program of the DSB-R100 pops up,
icon.
simply follow the instructions on the screen to
complete the installation.
13
Page 15
Chapter 2 Understanding the DSB-R100
N
Menus
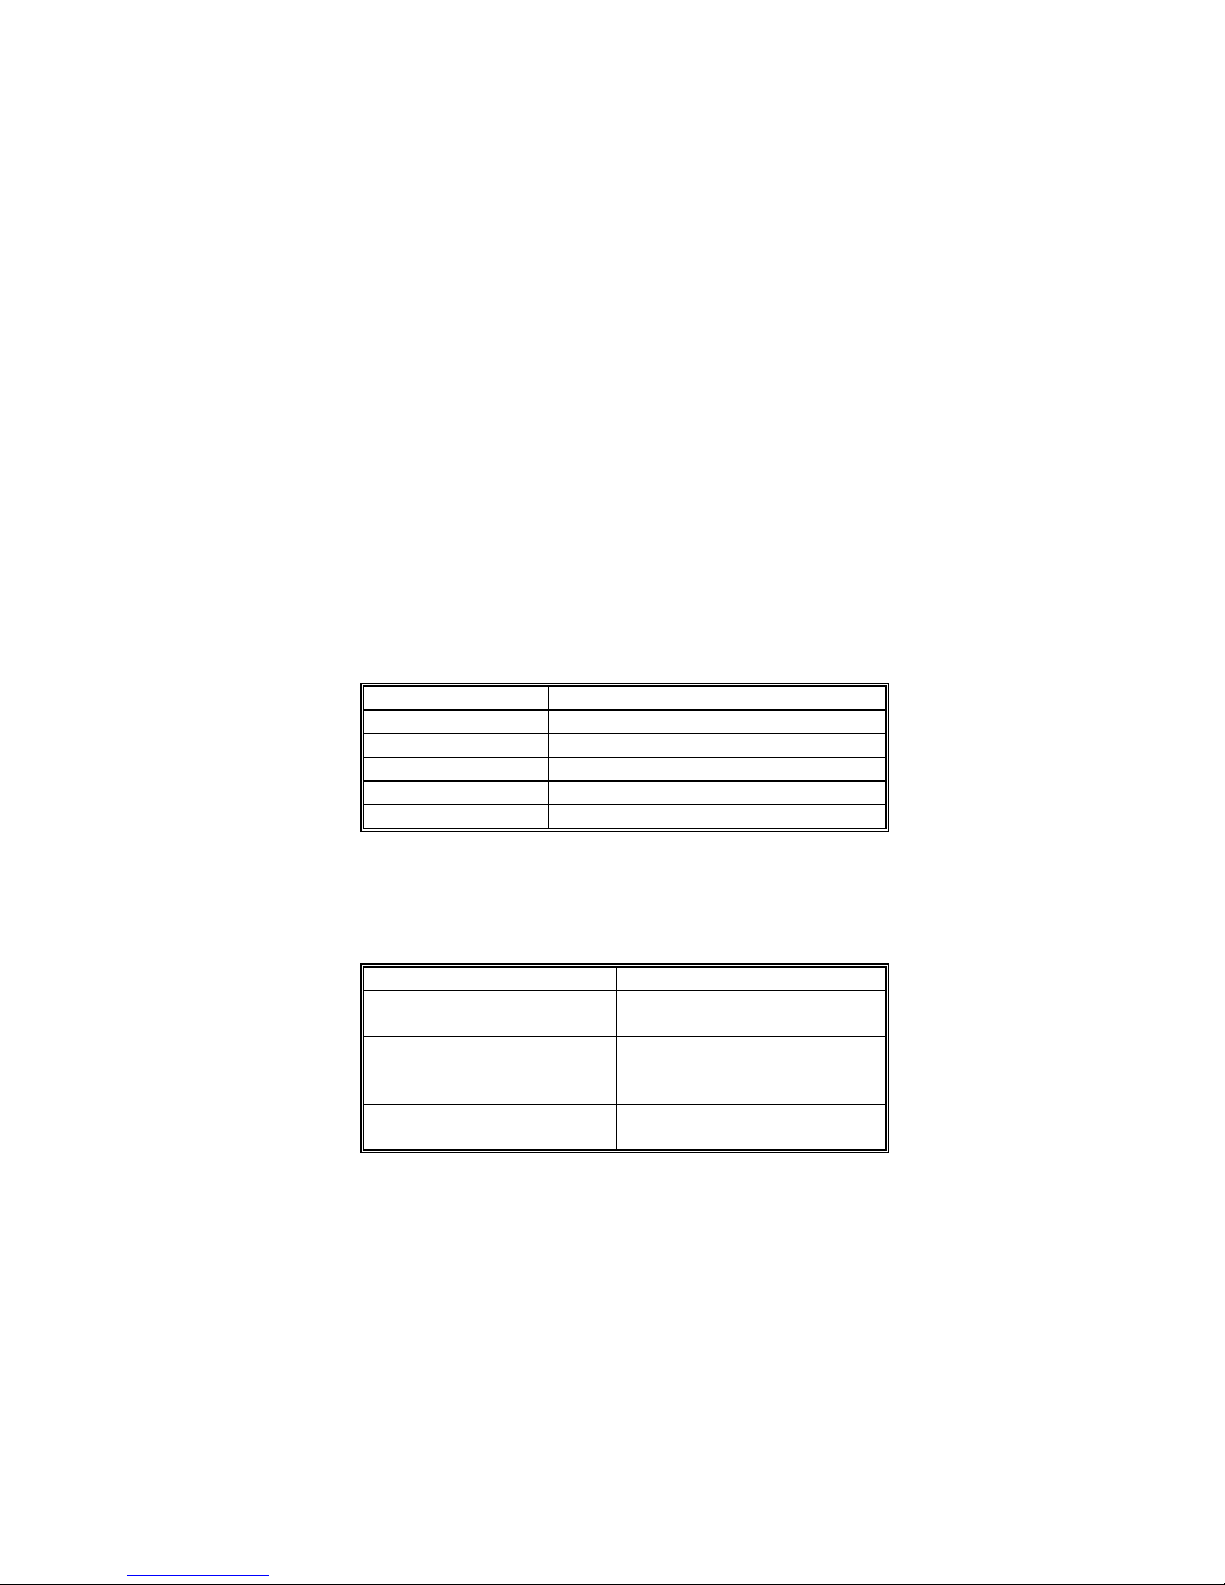
The DSB-R100 has three: WaveFile, Options and Help.
The menus are text sensitive and can be activated easily by
mouse clicks.
WaveFile Menu
The WaveFile Menu contains the following commands:
ew
Open
Save
Save As
Wave to MP3 utility
Exit
Options Menu
The following commands of the Options menu allow you to
change FM DSB-R100’s default settings:
Record Settings
Volume Controllers Setting
Show Station Name
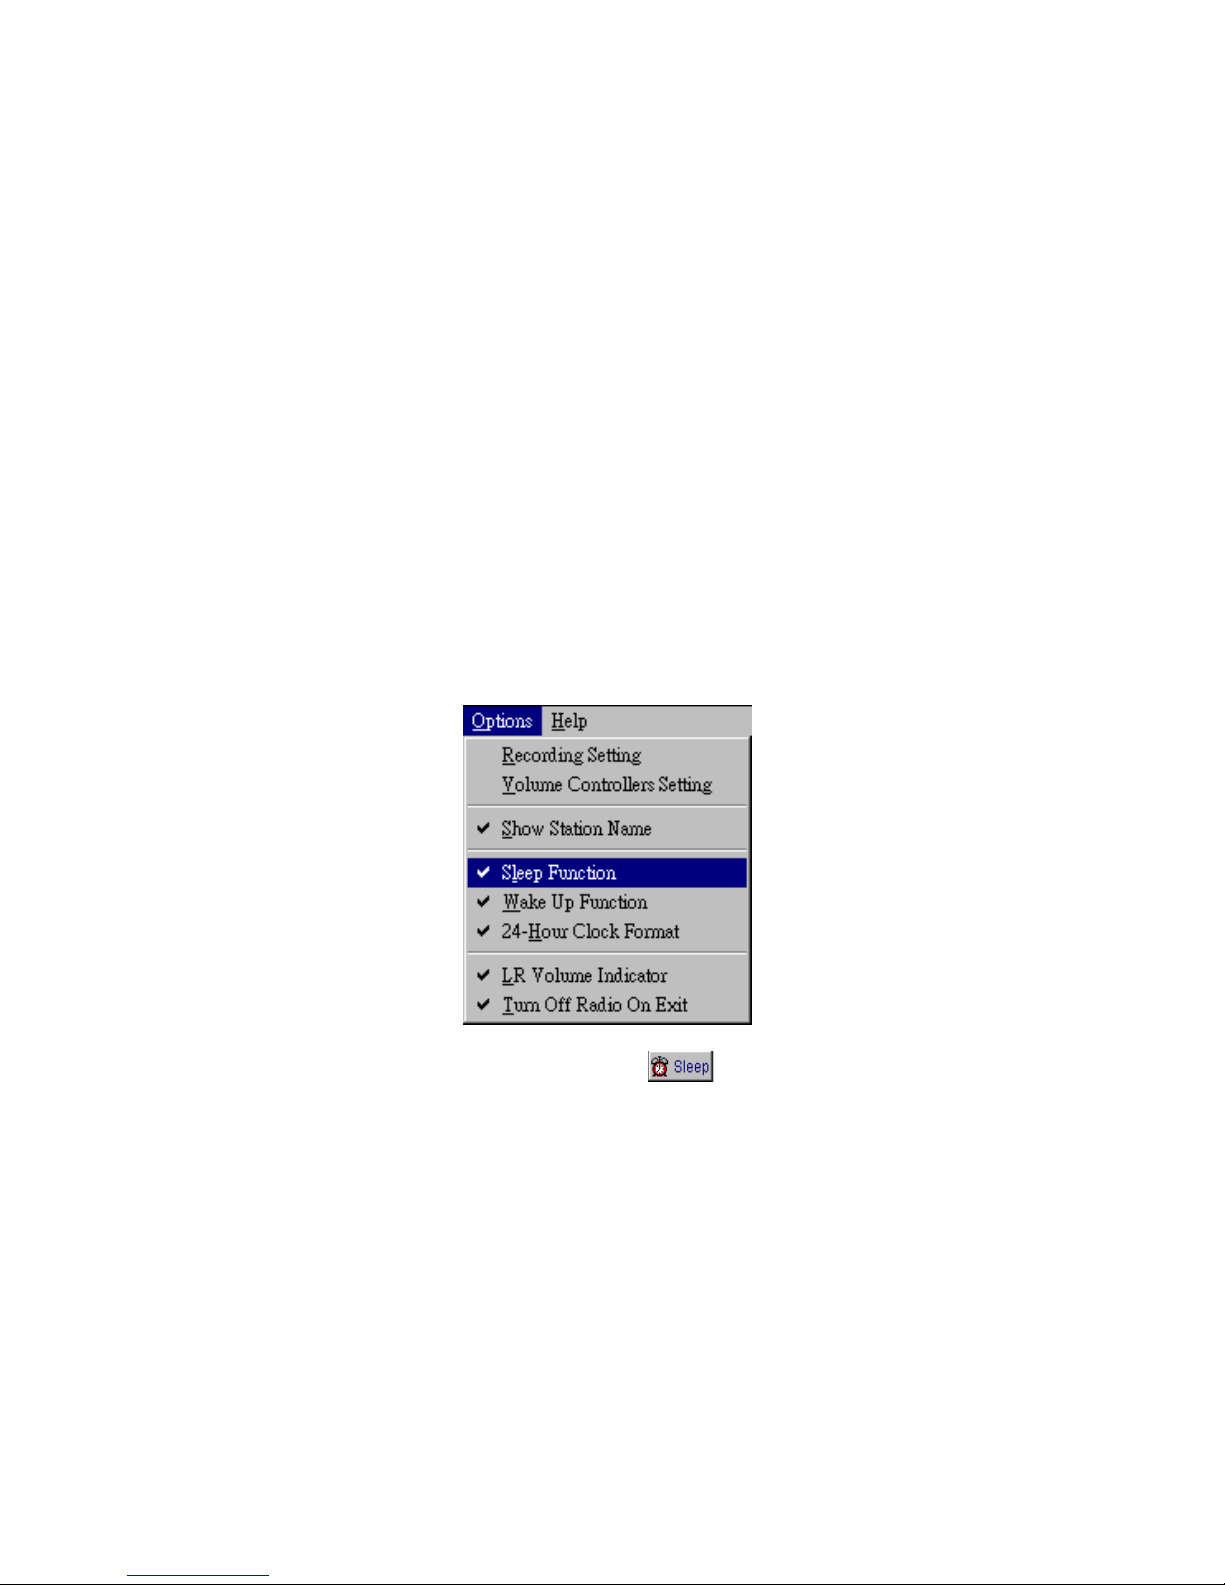
Sleep Function
Creates a new wave file
Loads an existing wave file
Saves a current wave file
Saves the wave file under a new name
Converts the wave file to an MP3 file
Quits the DSB-R100
Sets the default record settings
Controls the playback volume of
the wave file
Shows the Station Name on the
Preset Channel rather than the
frequency
Enables/disables the Sleep
Function
14
Page 16
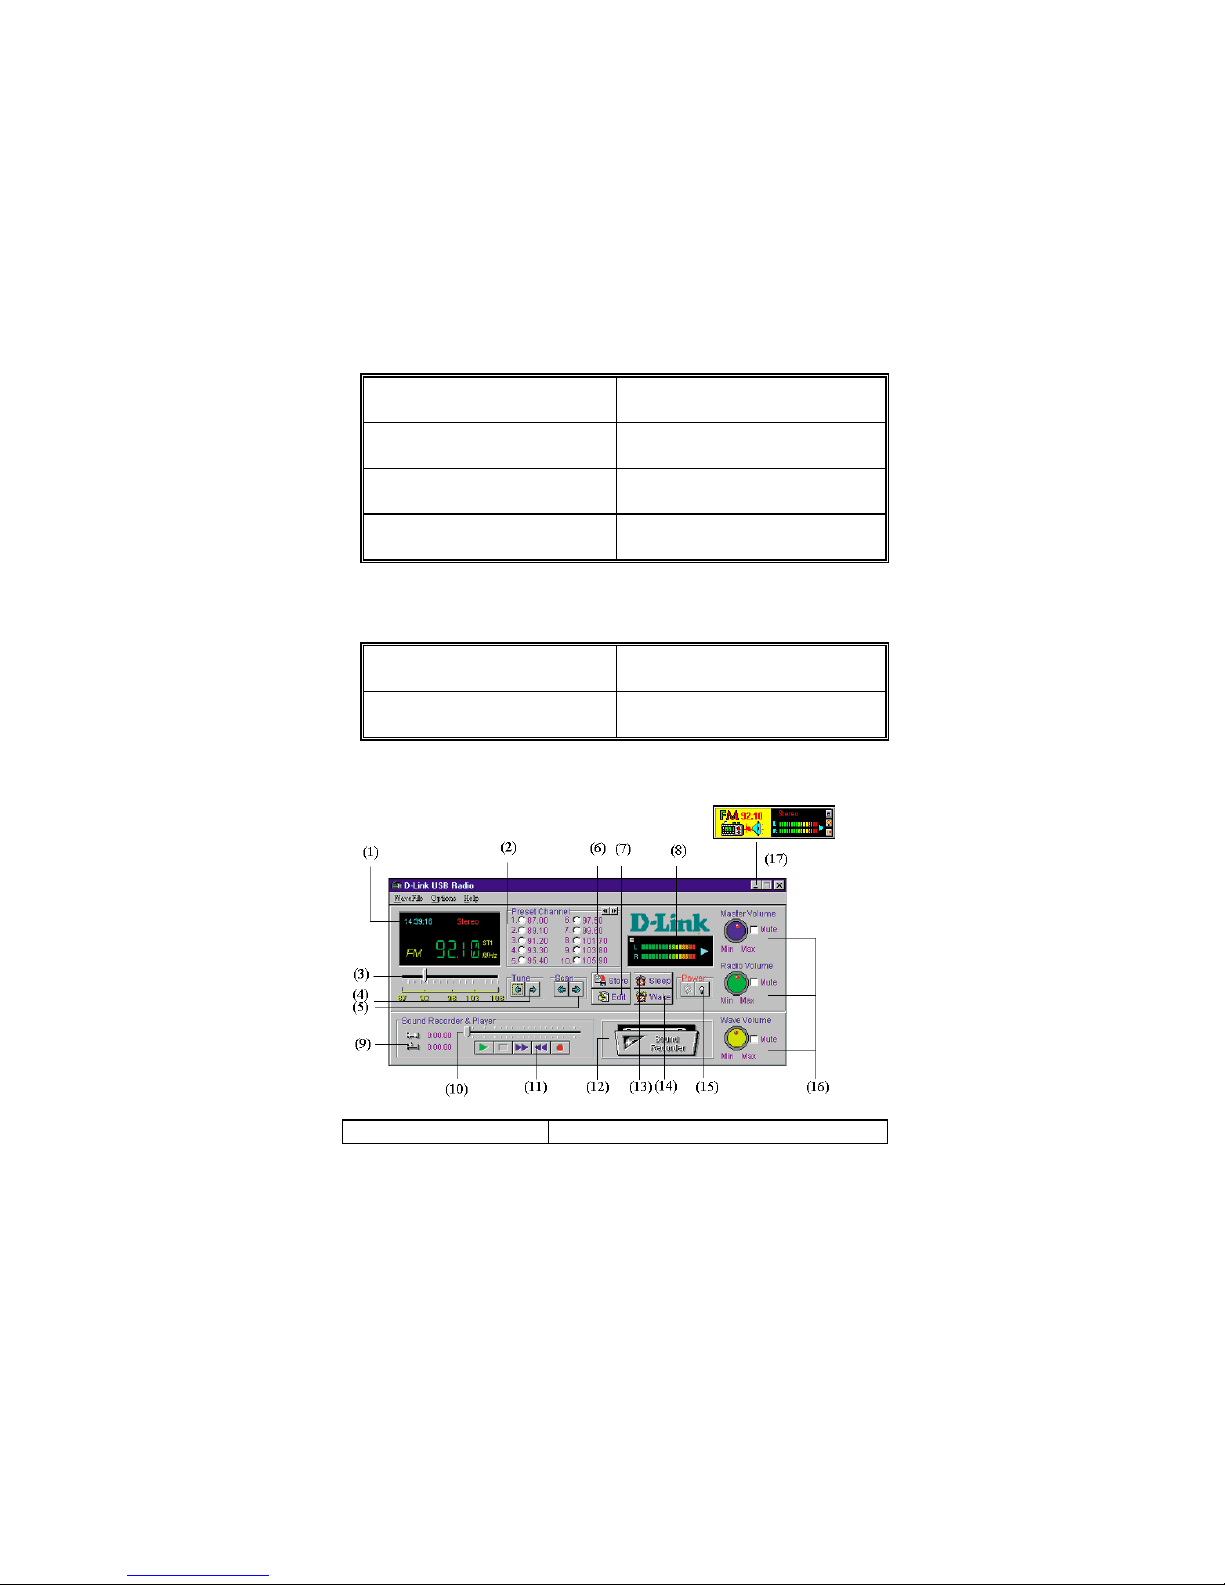
Wake Up Function
A
f
24-Hour Clock Format
LR Volume Indicator
Turn off Radio On Exit
Enables/disables the Wake Up
Function
Displays either 24 hour time or
AM/PM
Displays the sound indicator
function
Radio will stop playing once
DSB-R100 application is closed
Help Menu
Contents
bout
Explains the key functions of the
main panels
Shows the version and copyright o
the DSB-R100
(1) Display box Displays current station, time and radio
15
Page 17
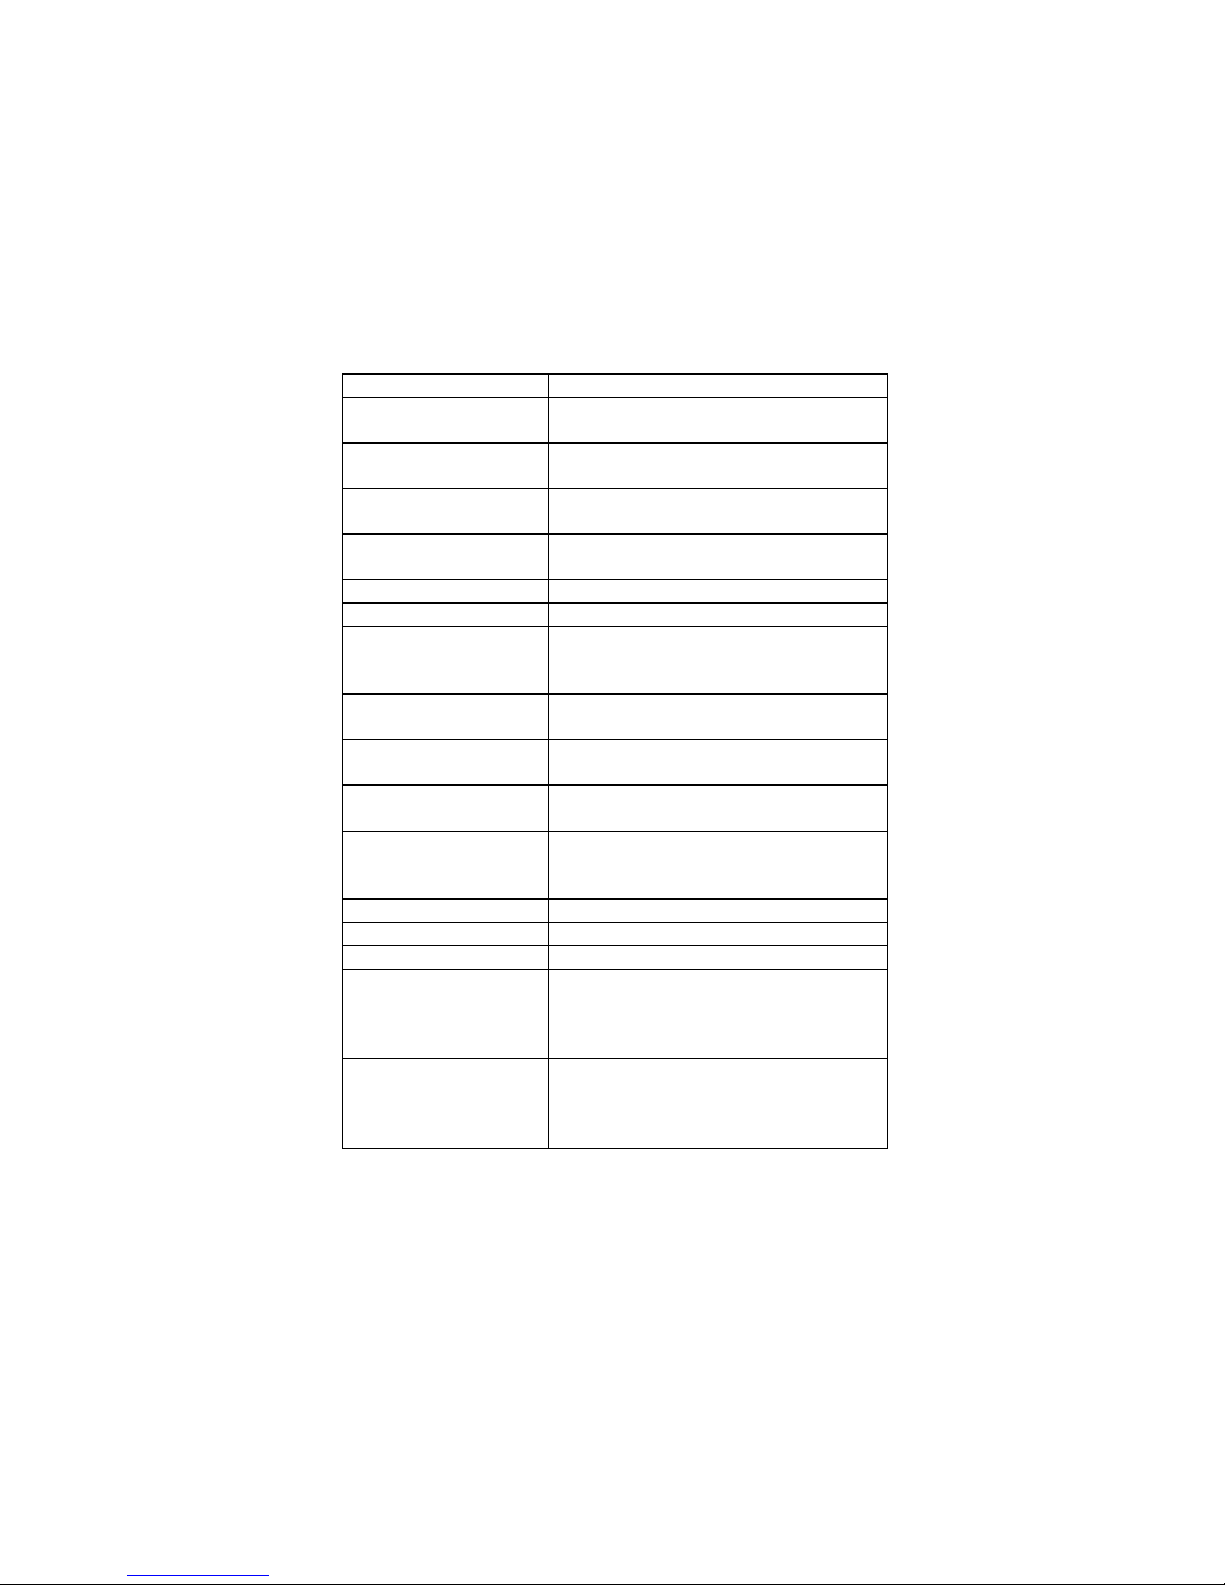
station
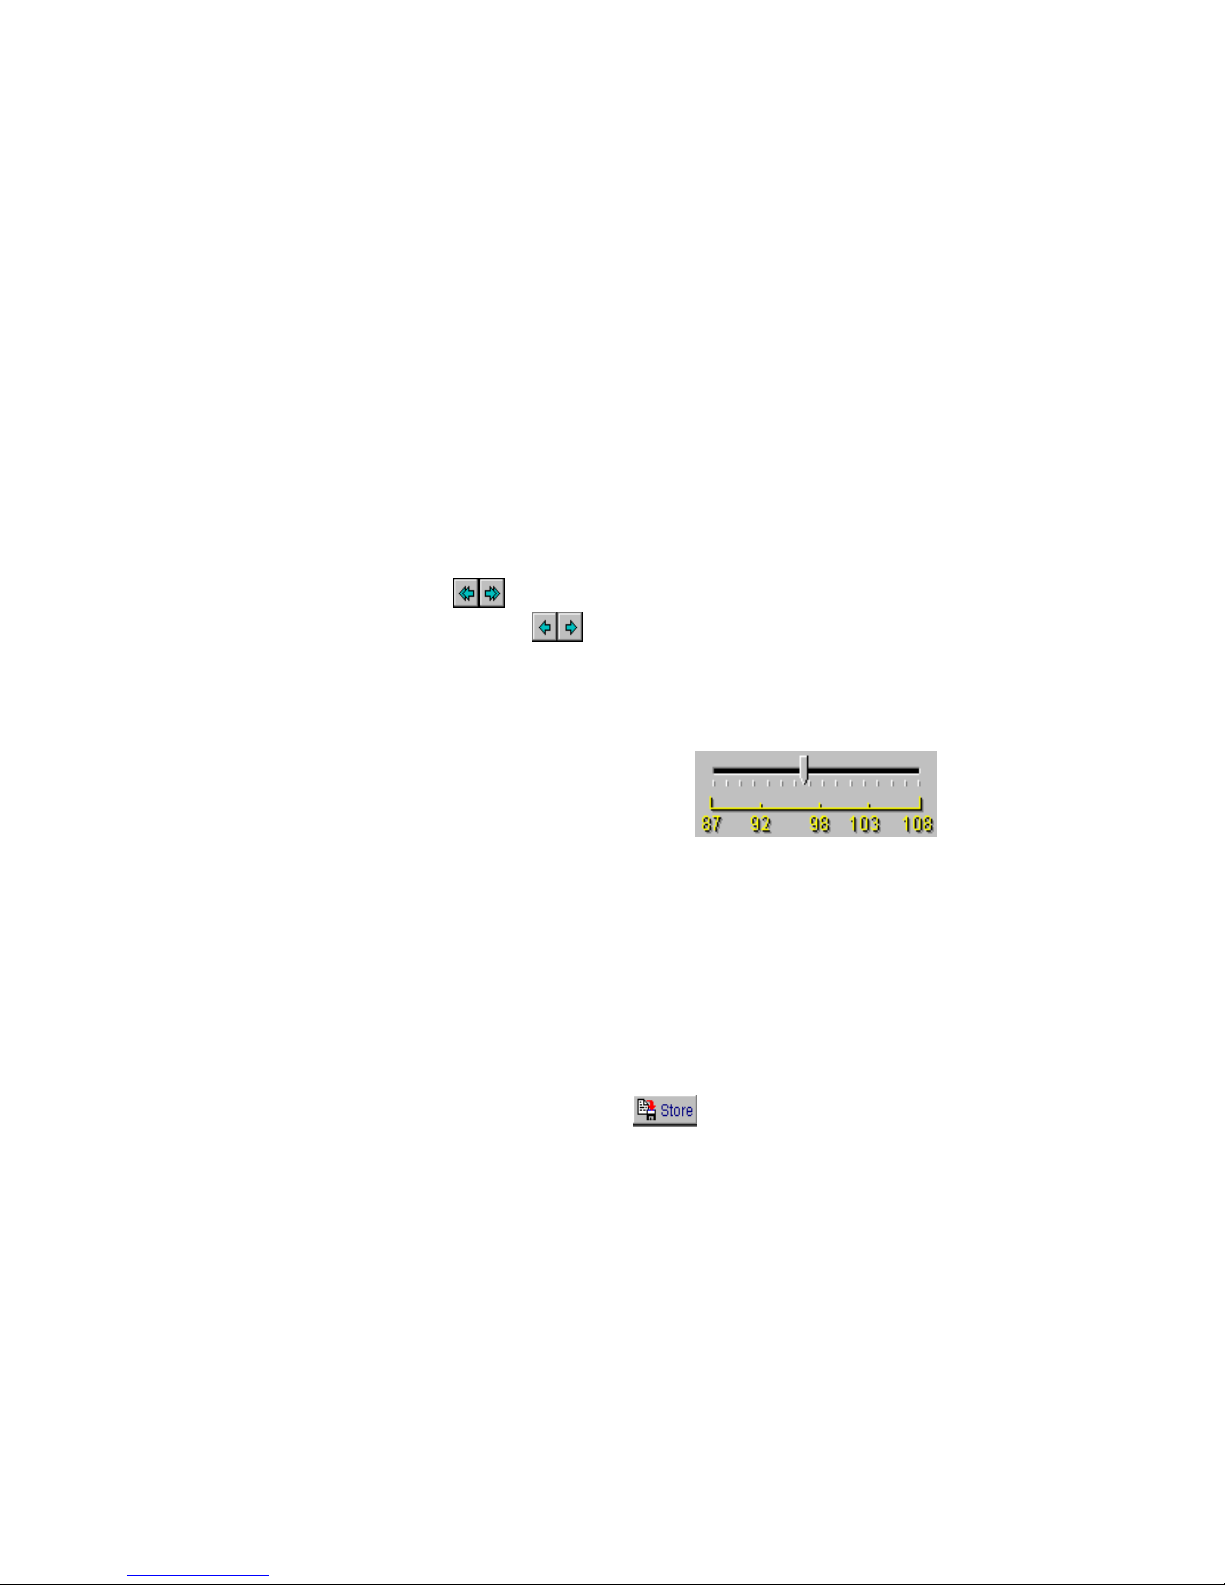
(2) Preset Channel Presets your favorite Radio stations for up to
200 channels
(3) Frequency Slider Allows you to select the desired radio station
by dragging the mouse.
(4) Tuner Allows you to adjust frequency at 0.05 MHz
intervals.
(5) Scan Scans radio stations by clicking mouse
button. Click it again to stop scanning.
(6) Store Stores the preset channel and station name.
(7) Edit Edits the preset channels and station names.
(8) LED display Shows sound intensity of both left and right
speakers. Clicking on this display will
change to wave format.
(9) Length of the recorded
file
(10) Sound Recorder
Displays the length of the recorded file and
current location of the recorded file.
Acts as FF/Rewind by dragging slider
Indictor
(11) Recorder, player
control bar
(12) Animated tape
recorder
Includes Play, Rewind, FF, Stop and
Record functions.
Revolves while you are using the recorder.
You can view free hard disk space by
clicking the left mouse button.
(13)Sleep Sets sleep time. (turns off power)
(14)Wake Sets wake up time. (turns on power)
(15)Power on/off Turns on/off power.
(16)Volume controls Master volume controls speaker volume.
Radio volume controls recording and output
volume. Wave volume controls playback
volume.
(17)Stay On Top Toggles small window as the topmost
window. You can move this small window
anywhere on your desktop by dragging it
with the left mouse button.
16
Page 18
Chapter 3 How to Preset your favorite stations
3-1 Tuning:
There are two ways to select your favorite programs -
Locate your favorite station by clicking the scan
3-1-1
button
Tune
appears on the LED display.
Hold down the left mouse button and drag to
3-1-2
your favorite station.
Click once to fine tune..
3-2 Preset channel
Allows you to preset and customize your favorite programs
by using their names or the frequency. 200 channels (20
groups) are available. The following explains ways to
preset up to 200 channels.
3-2-1. To preset a channel with station name:
1. Select a station.
. Click on
button
to fine tune until “
stereo
”
2. Click on
3. Enter the Channel Number and Station Name
4. Click
Store
button
. Store Preset
Frequency and Station Name dialog box appears.
.
OK
17
Page 19
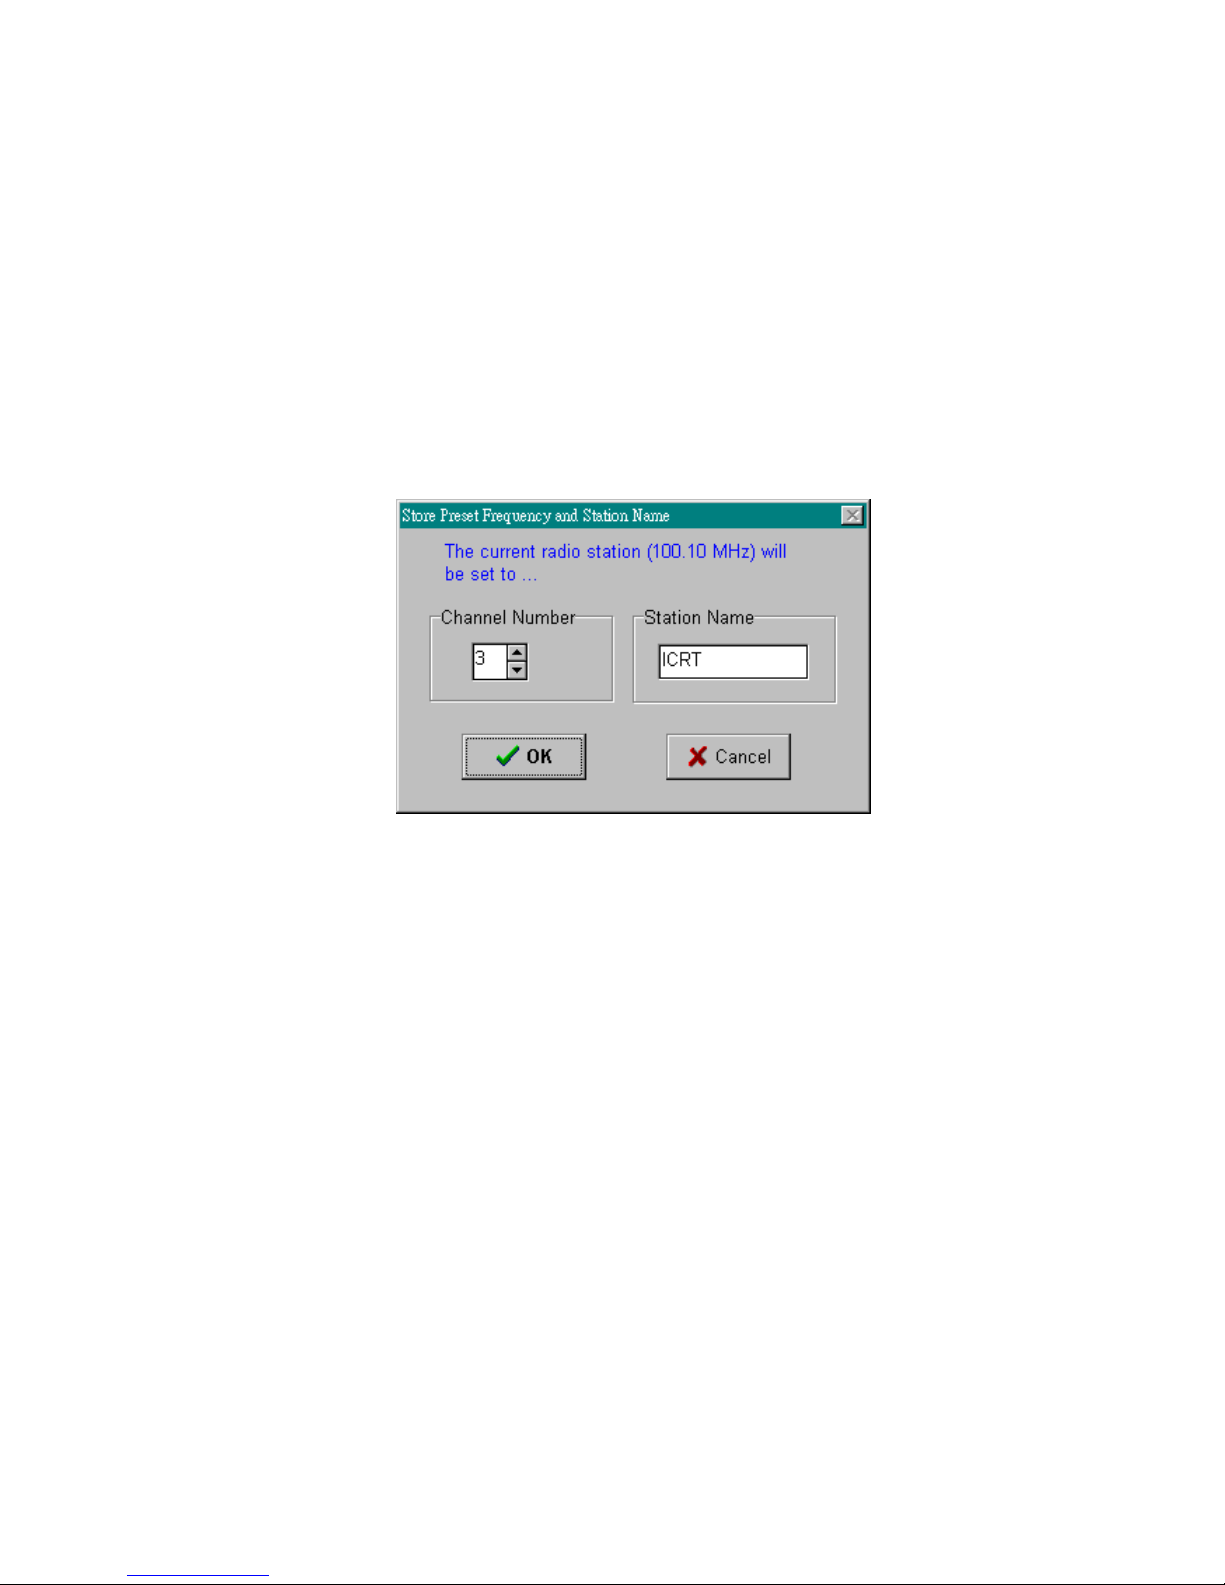
E.g. To set channel 3 to frequency 100.10MHz and
Station Name ICRT. Set Channel Number 3 and enter
“ICRT”. Then click OK.
.
3-2-2 Editing preset channels
18
Page 20
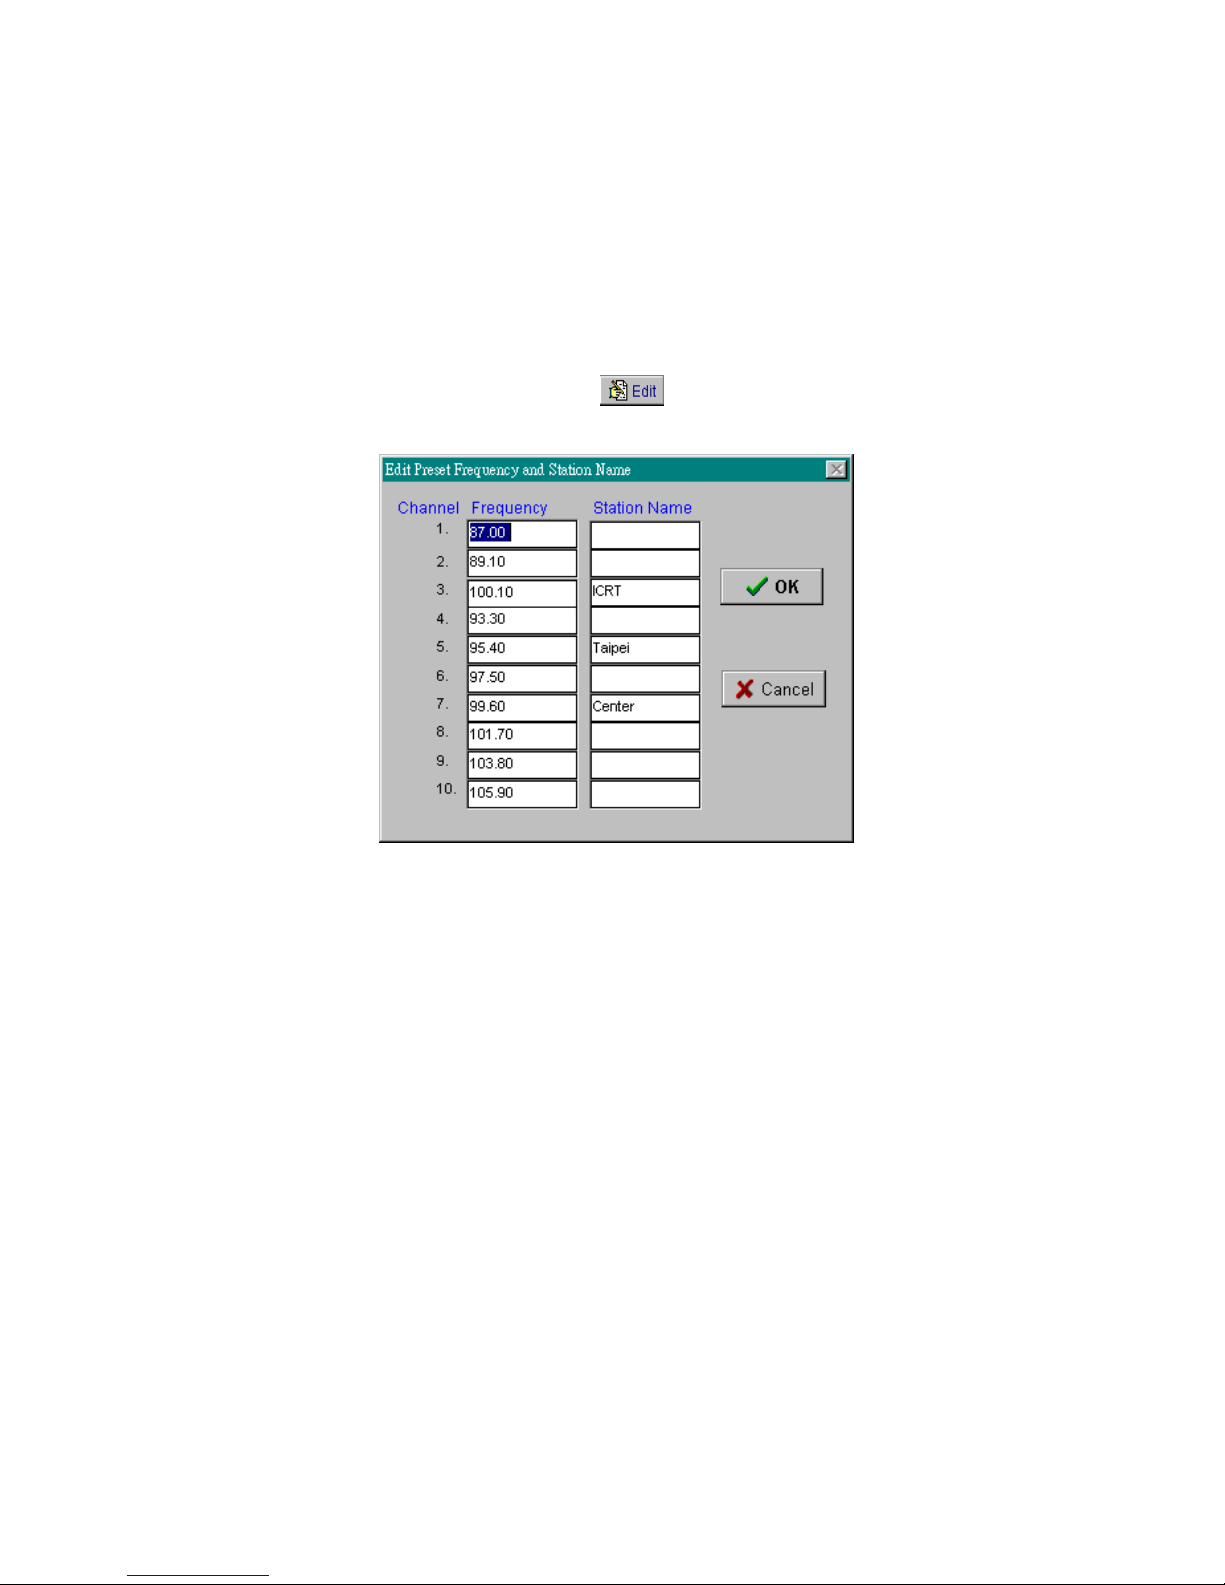
1. Click on
button and edit preset channel
Edit
frequency and their station names.
2.Set the Channel Numbers and enter the desired
Station Names.
3.Click on OK to confirm changes.
19
Page 21
Chapter 4 How to use “Sleep” and “Wake up”
functions
DSB-R100 provide “
save time and catch up with your favorite programs,.
4-1. Setting Sleep Time
To set Sleep time:
1.Choose “
Sleep Function
2. Click on the Sleep button
dialog box appears as follows:
Time
Sleep
” and “
Wake up
” functions to
“ from the Options menu.
. The
Set Sleep
20
Page 22
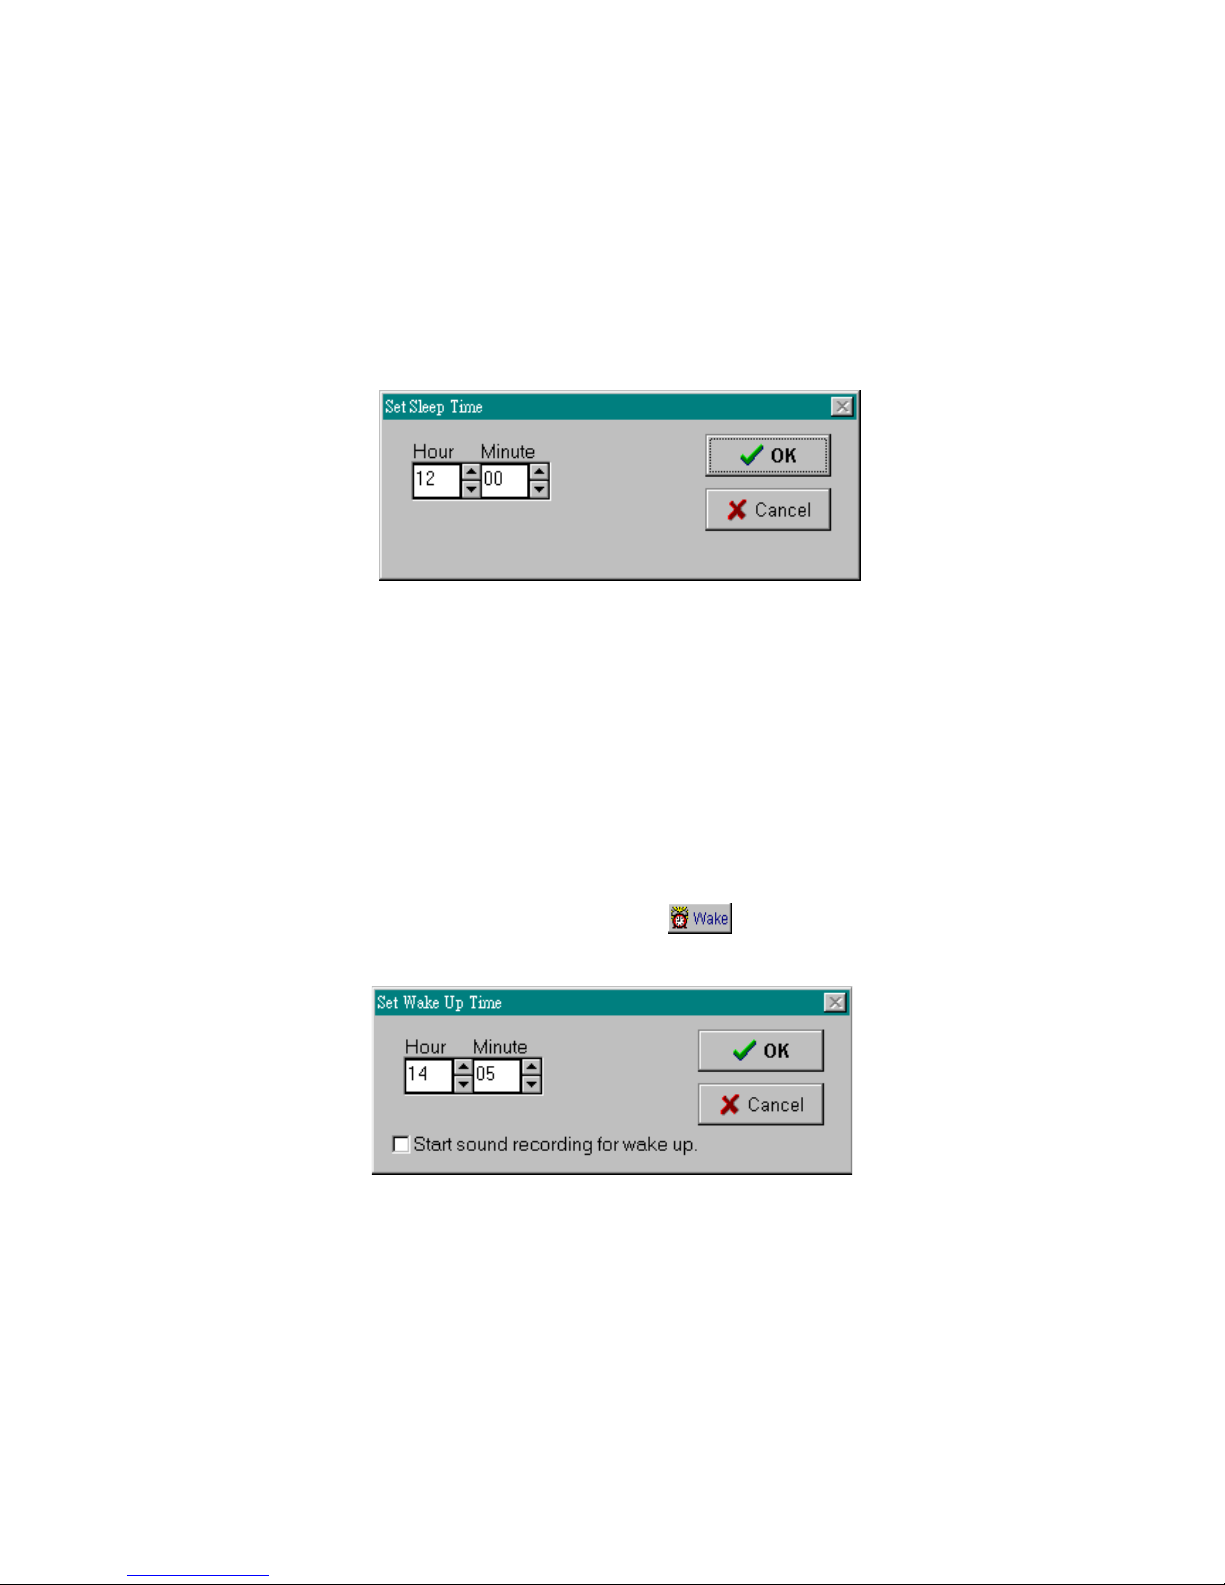
3. Set the time.
4. Click on OK to confirm the setting.
The radio will turn off automatically at the selected
sleep time.
4-2. Setting Wake up time
To set the
Wake up
time
1. Choose “
Wake Up Function Enabled
Options menu.
2. Click on the
Up Time
dialog box appears as follows:
Wake
button
, The
“ from the
Set Wake
21
Page 23

3. Set the Hour and Minute dials to your wake up
time.
4. Click on OK to confirm the setting
The radio turns off automatically at the selected wake
up time. You can also set recording time by using this
function. (Please refer to Chapter 5, Section 4).
IMPORTANT: The
;
Sleep
and
Wake Up
functions are
only available when a PC is turned on and this program is in
use.
22
Page 24
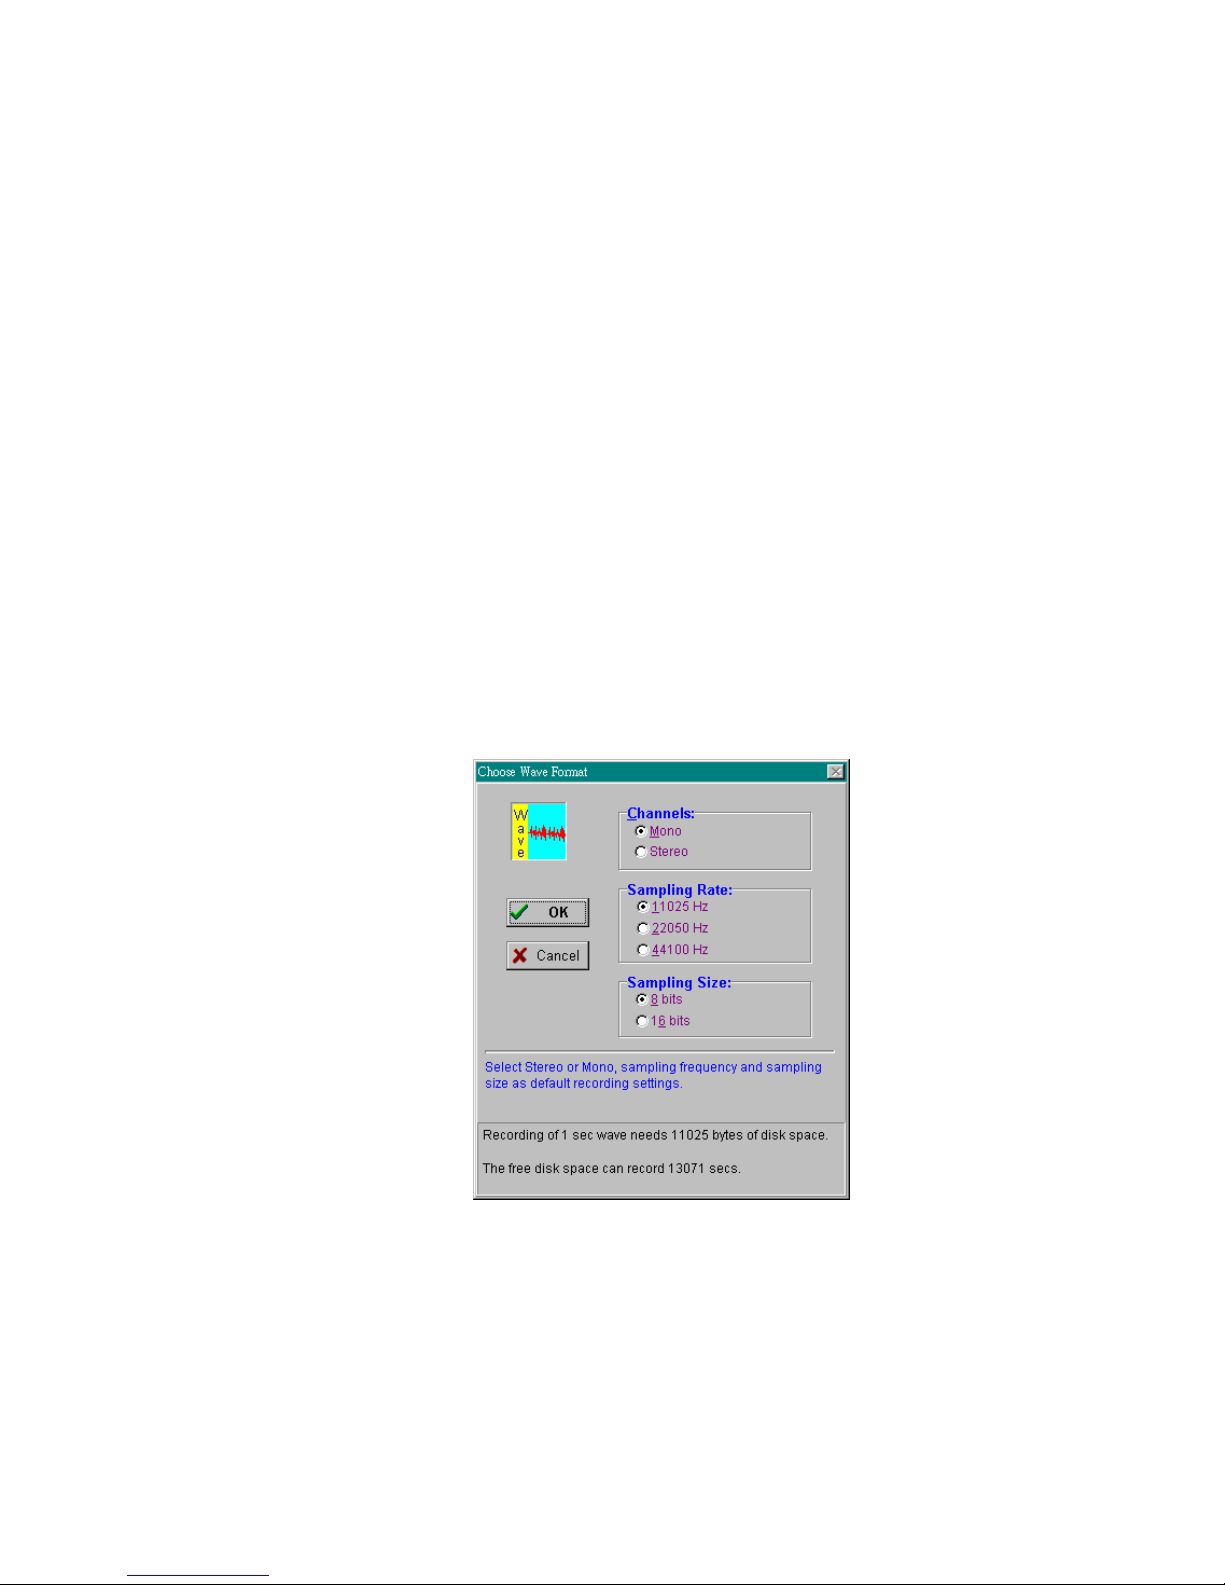
Chapter 5 Recording and playing
5-1. Specifying Wave Formats
Before recording a wave file, make sure the correct format
of the file is specified. Wave format refers to the sound
channel, Sampling Rate and Size of the file.
To specify the wave format:
1. Select
Record Setting
Choose Wave Format
2. Select the format for the wave file.
in the
Options
menu and
dialog box appears.
23
Page 25
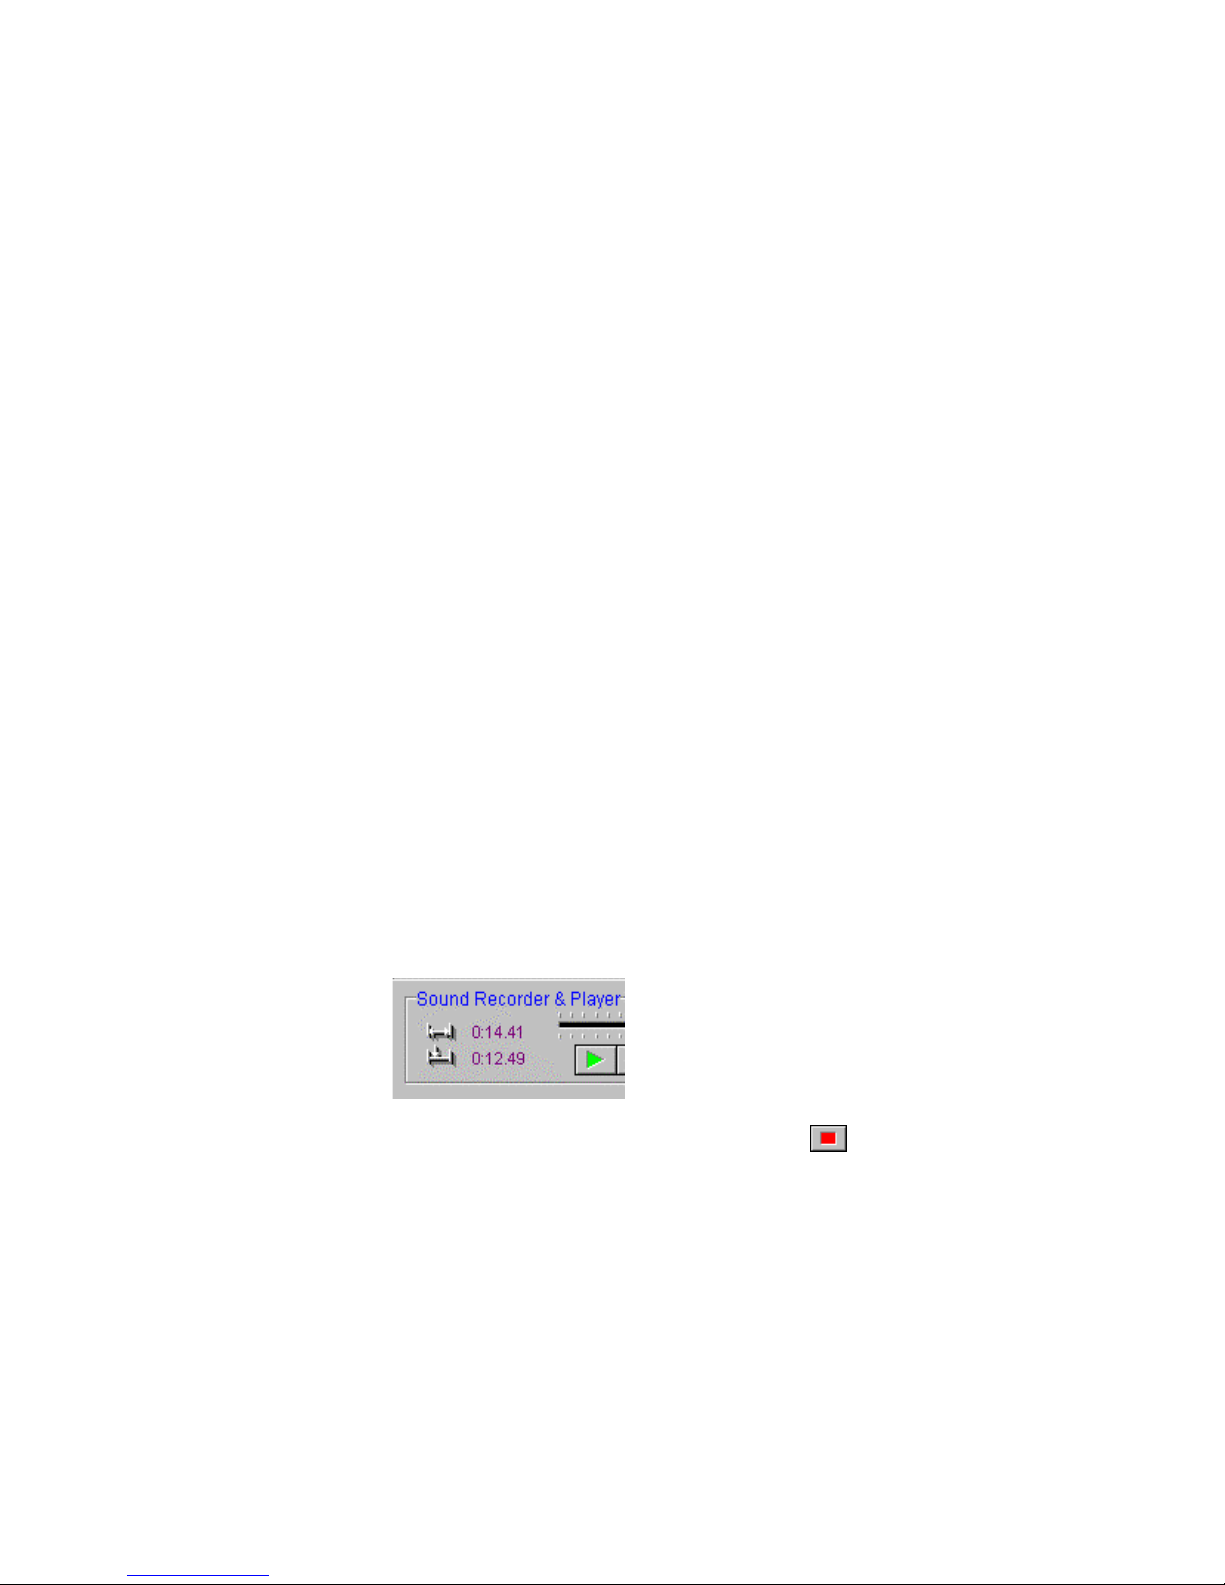
Select Mono for one sound channel and Stereo
for two sound channels.
Select 11025Hz for voice, 22050Hz for cassette
and 44100Hz for CD quality recording.
Select 8 bits for cassette and 16 bits for CD sound
quality.
3. Choose OK.
There is a trade-off between the quality of a wave file
and the amount of storage space required for the file.
A wave file with better sound quality requires a larger
storage space because of its high sampling rate. The
message in the dialog box will inform you how much
free disk space is available for recording.
5-2. How to record into Wave File
To record a wave file:
Click
Record
button. The animated tape recorder will
revolve the length and
current location of recorded file will be displayed.
To stop the recording, choose the
You can listen to the recorded file by pressing the
24
Stop
button
.
Play
Page 26
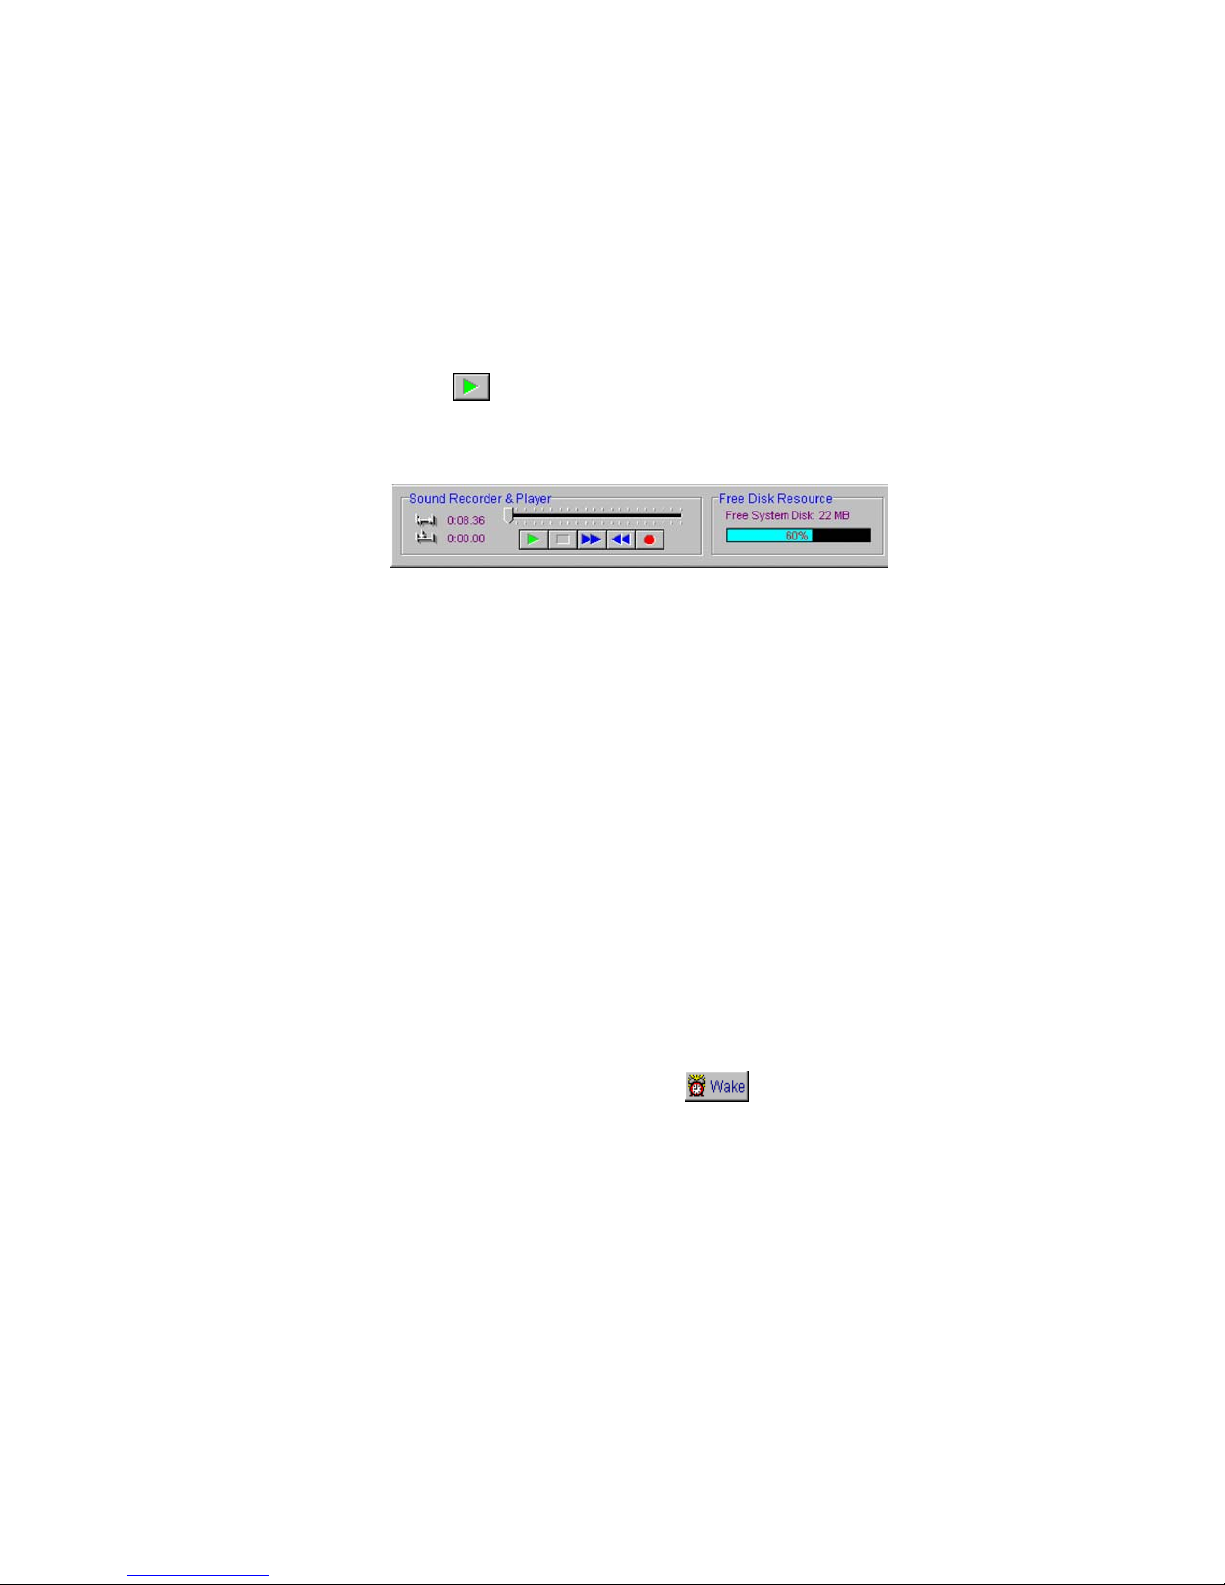
button . If you would like to know the available
free space on your hard disk, just click the Animated
tape recorder and you will see the following figure:
Click on Free Disk Resource and Animated Tape
Recorder will resume.
5-3. Saving Wave Files
To save a wave file:
1. Choose
Save
or
Save as
from Wave File
menu.
2. Enter the name of the file and the path.
3. Choose OK.
5-4. Preset the Recording
You can preset the recording by using the
Wake Up
function.
To preset the recording :
1. Click the Wake button
Wake Up Time
dialog box appear:
, and the
Sleep
and
Set
25
Page 27
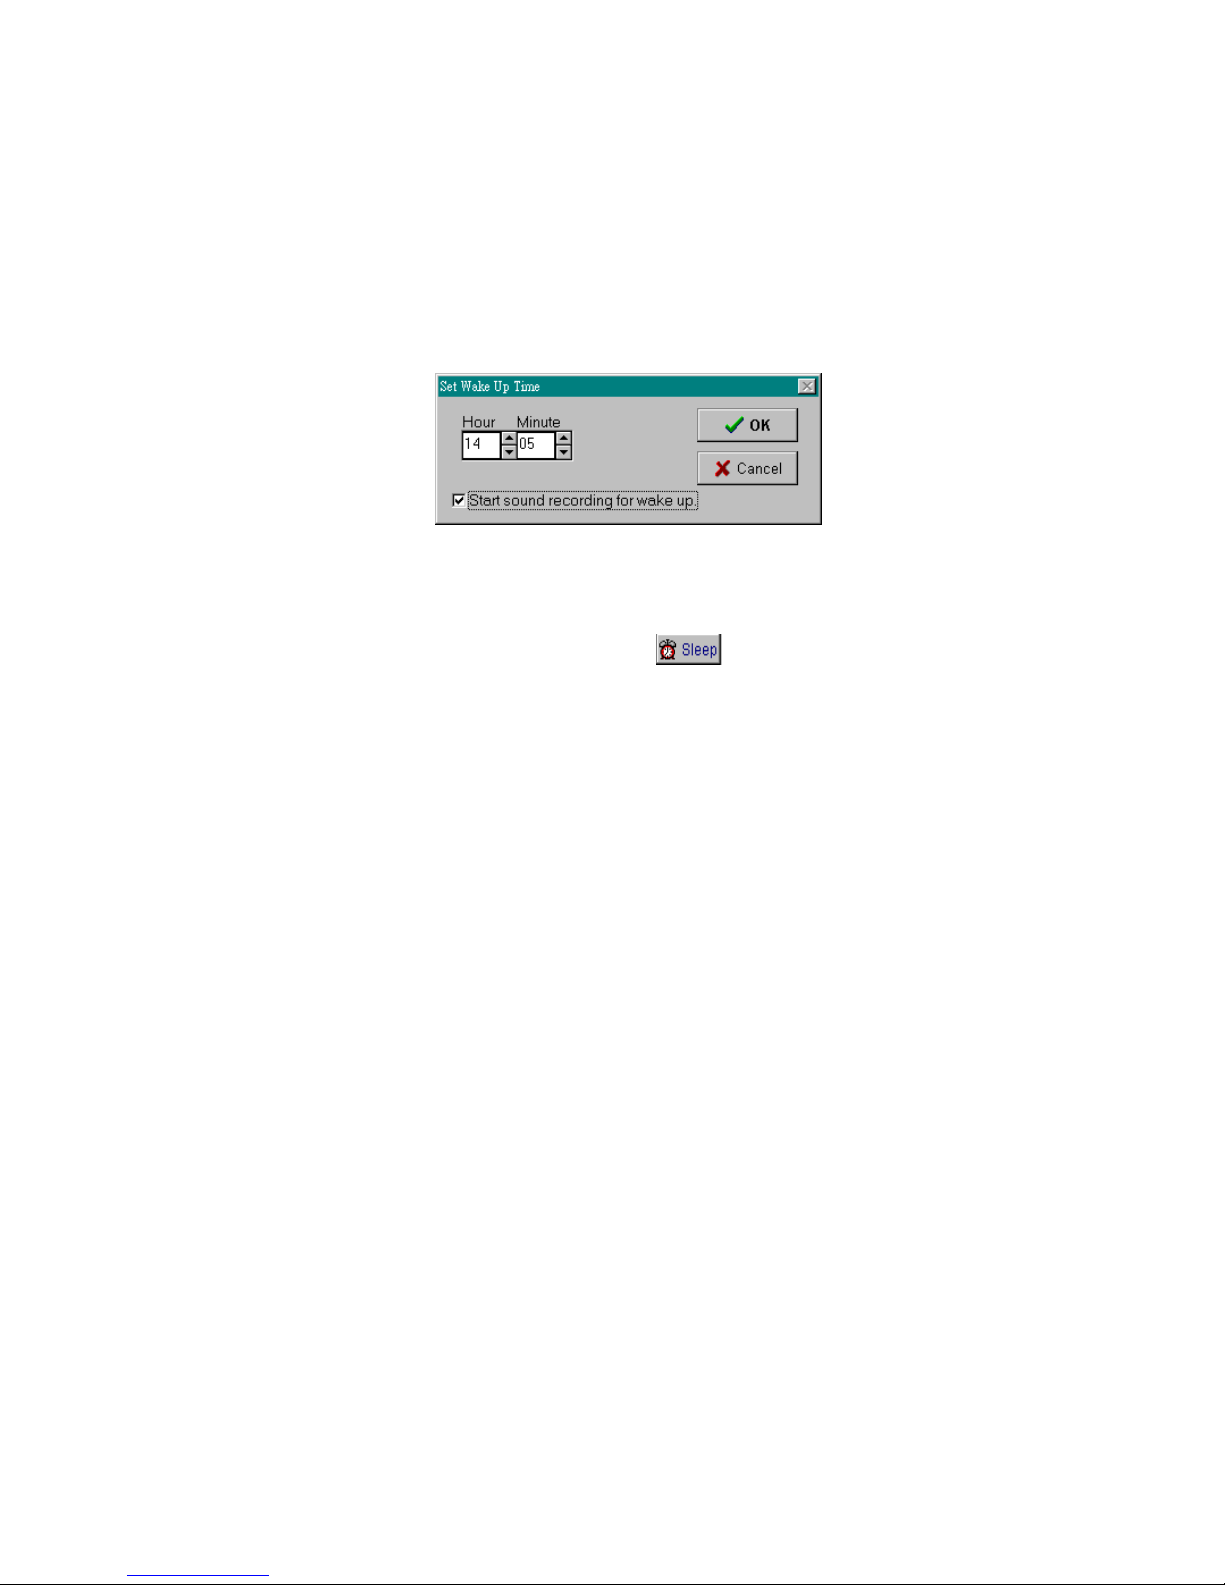
2. Set the time and choose
wake up
.
Start recording for
3. Choose OK.
4. Click
Sleep
button
,set the time to
turn off the power of the DSB-R100 when
the recording is completed.
DSB-R100 will wake up, start and stop recording according
to your procedure.
5-5. Opening a Wave File
To open a wave file:
1. Select
from the Wave File menu.
Open
2. Type or select the wave file you want to open.
3. Choose OK.
5-6. Playing Wave Files
DSB-R100 can play any kind of wave file.
To play a wave file :
1.
the wave file.
Open
26
Page 28

2. Choose
Play
.
You can also drag slider to listen to the recorded wave file
again.
To stop playing the wave file, choose Stop.
27
Page 29
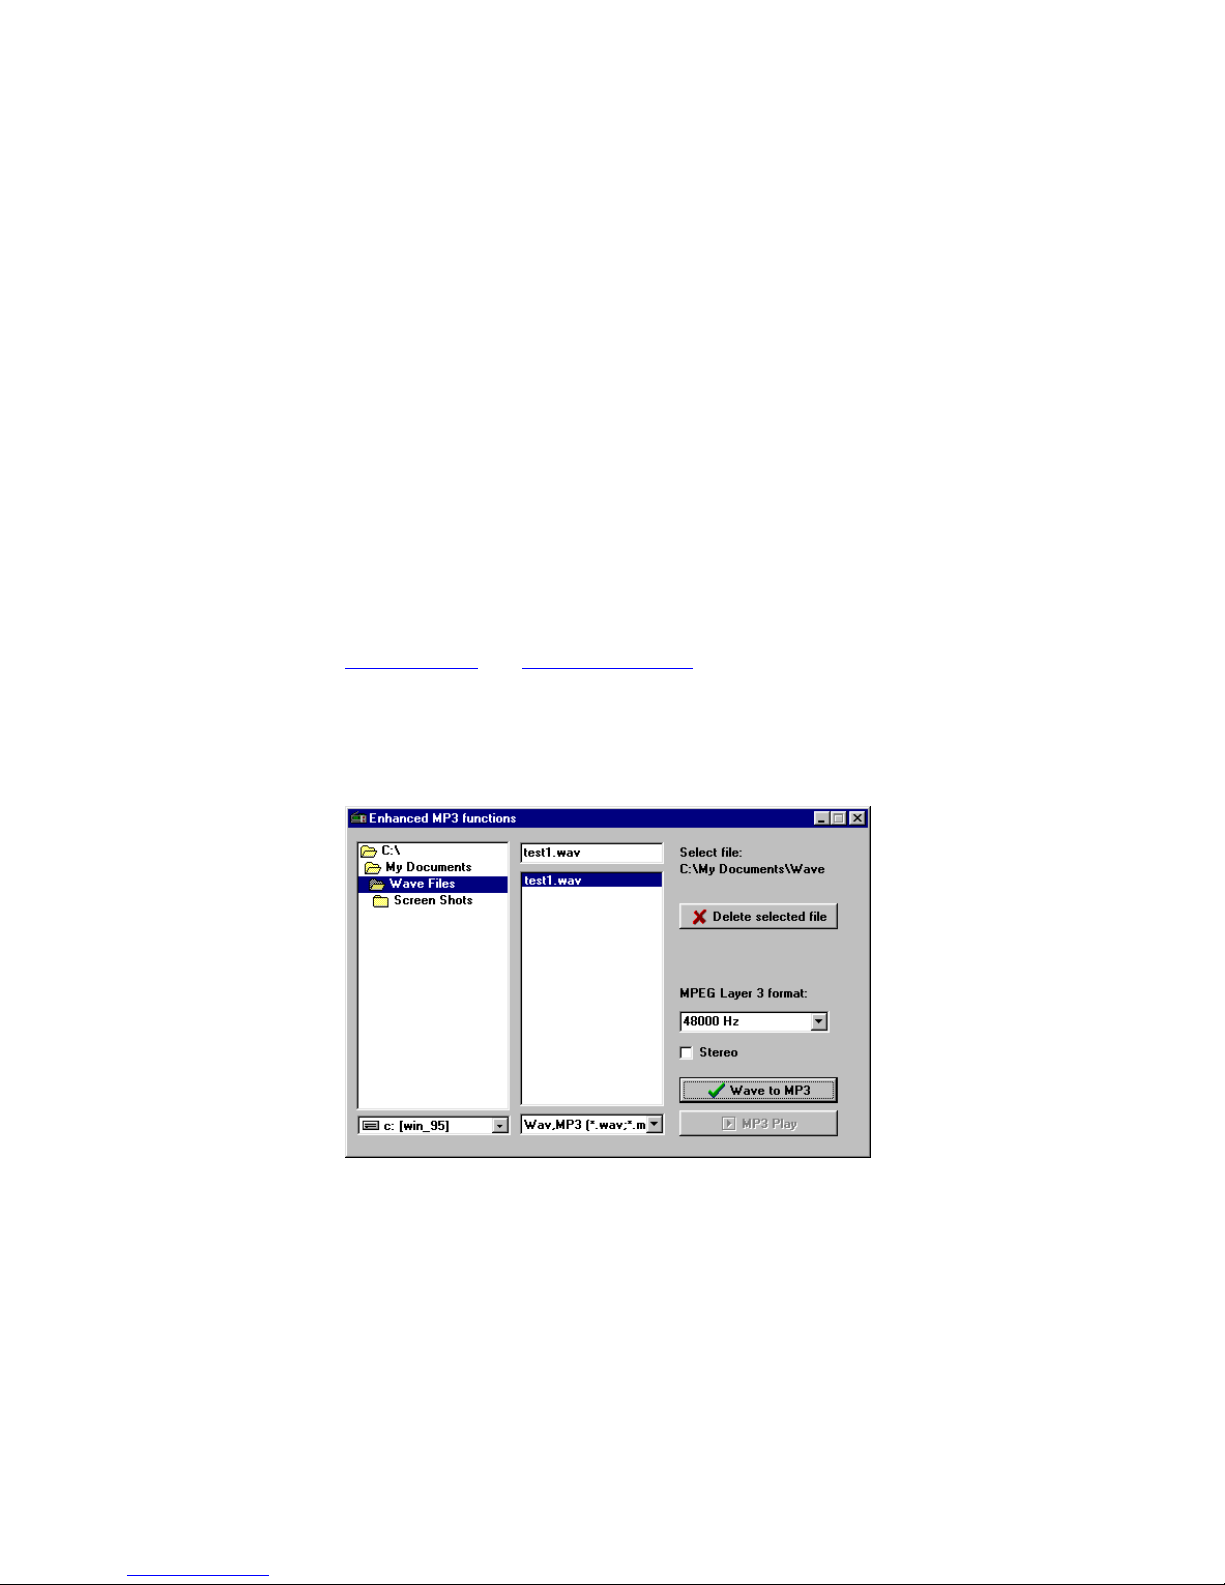
Chapter 6 Converting wave files to MP3
6-1. Selecting the file
Wave files can be converted to MP3 files quickly and
easily. In order to play the wave file you will need to
download and install Real Player© or other applications
that support MP3. You can download the application at
www.real.com
To convert a wave file to an MP3 file:
1. Go to
2. The
and www.winamp.com.
WaveFile
and select
Wave to MP3 utility
Enhanced MP3 functions
panel appears.
.
28
Page 30
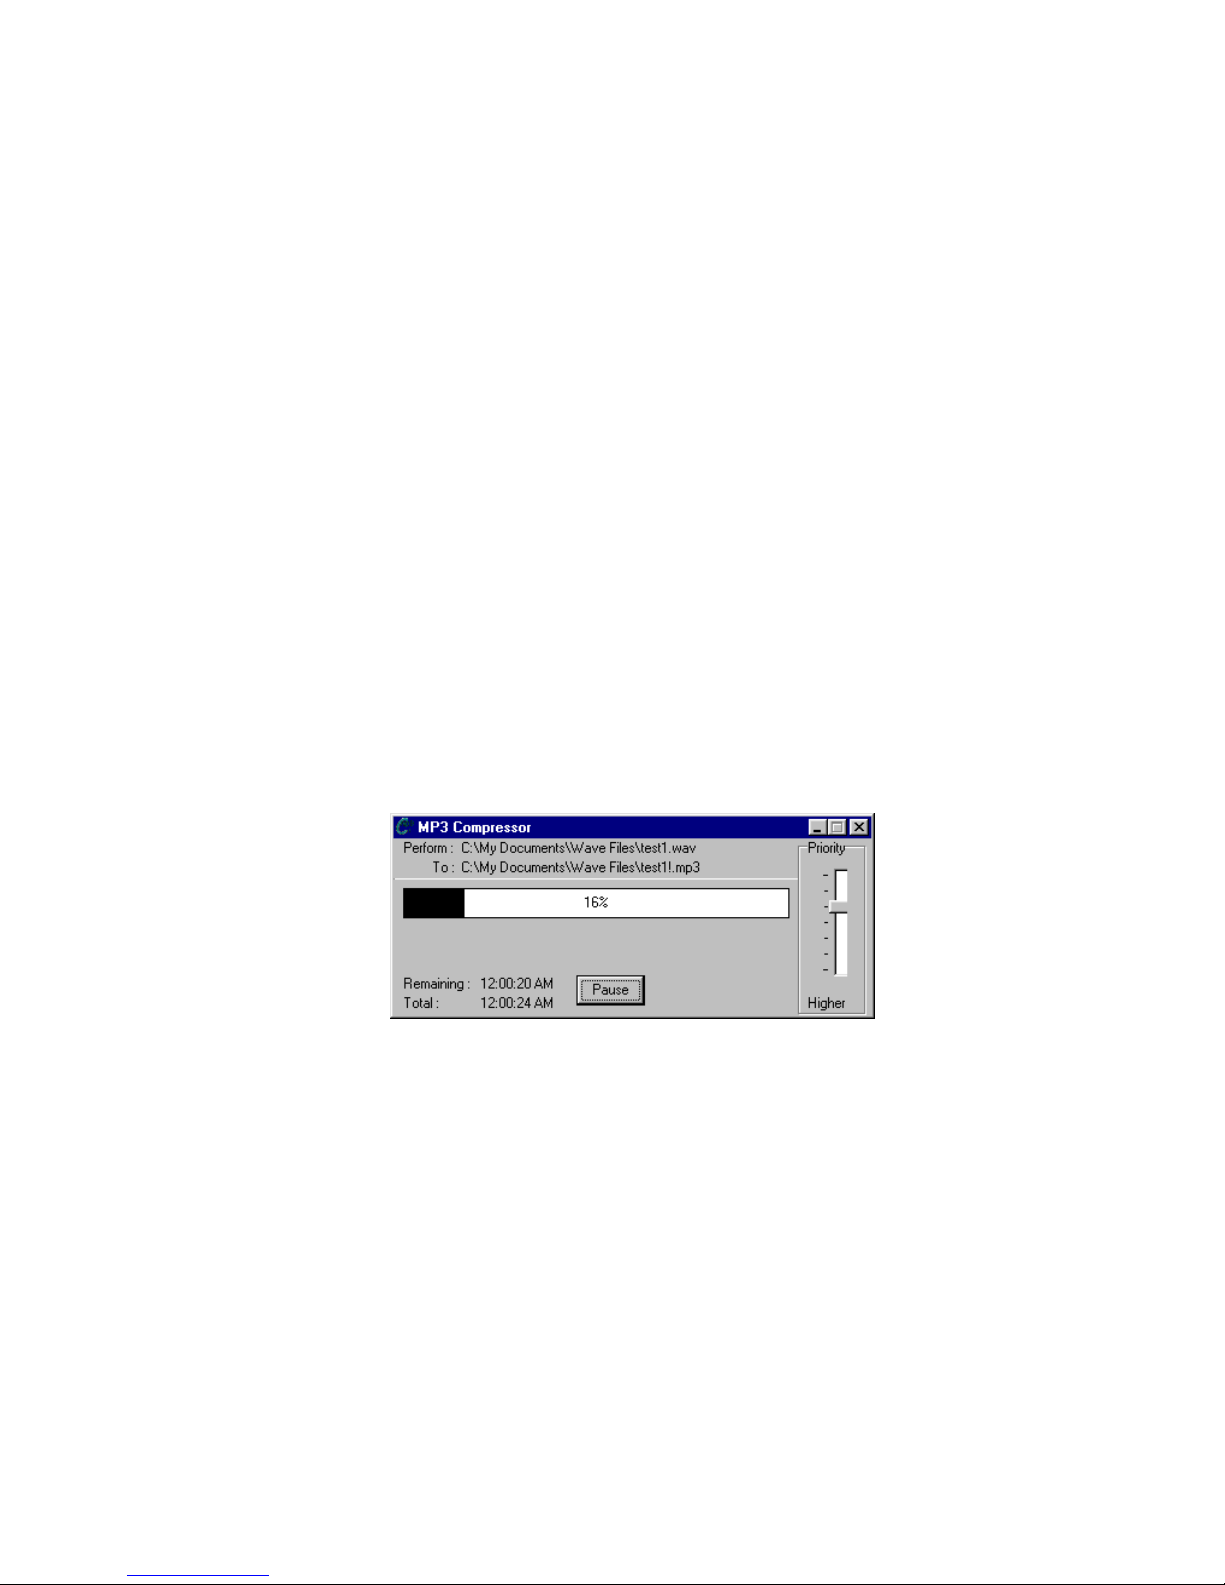
3. Browse to the directory the wave file is in and
select it the on panel to the right.
4.
MPEB Layer 3 format
gives you several ranges
to choose from. Click on the down arrow and
choose the sampling rate. 48000 Hz gives the best
sound but uses the most memory.
5. Click on the
file to
Wave to MP3
.
MP3
6. Check the box marked
button to convert the
Stereo
for stereo sound.
7. The MP3 Compressor panel gives you a status
report on the file conversion.
8. Click Pause to stop the conversion.
9. Play the file using Real Player or other application
to that supports MP3.
29
Page 31

6-2. Deleting MP3 files
Delete MP3 files by selecting the files and clicking on the
Delete selected file button on the Enhanced MP3 functions
panel.
30
Page 32

Chapter 7 Using “Help”
To use help:
1. Choose
Contents
from
Help
menu.
2. Click on the topic that you want to know about then
you will see its function and brief description.
31
Page 33
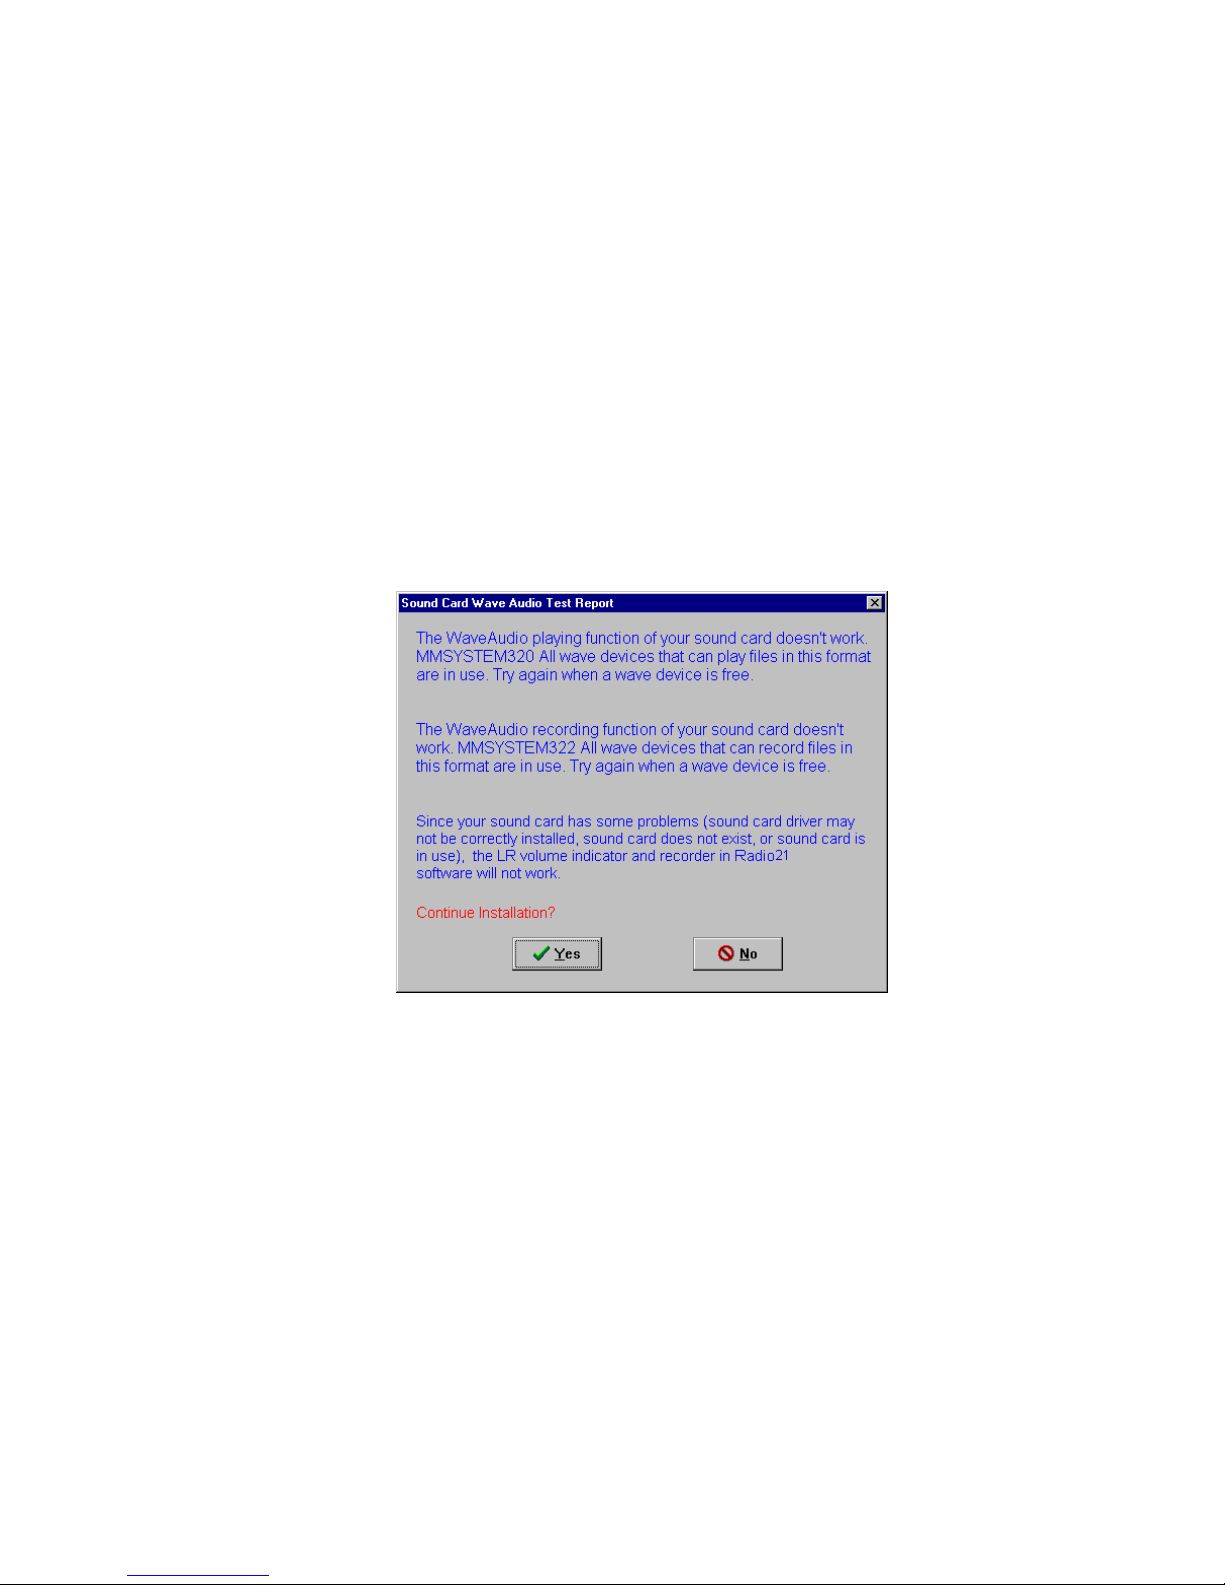
Chapter 8 Warning signs
8-1. Warning signs appear during installation
7-1-1 If your sound card is not installed properly or
wave device is being used by other applications , the
following warning sign will appear during installation.
32
Page 34
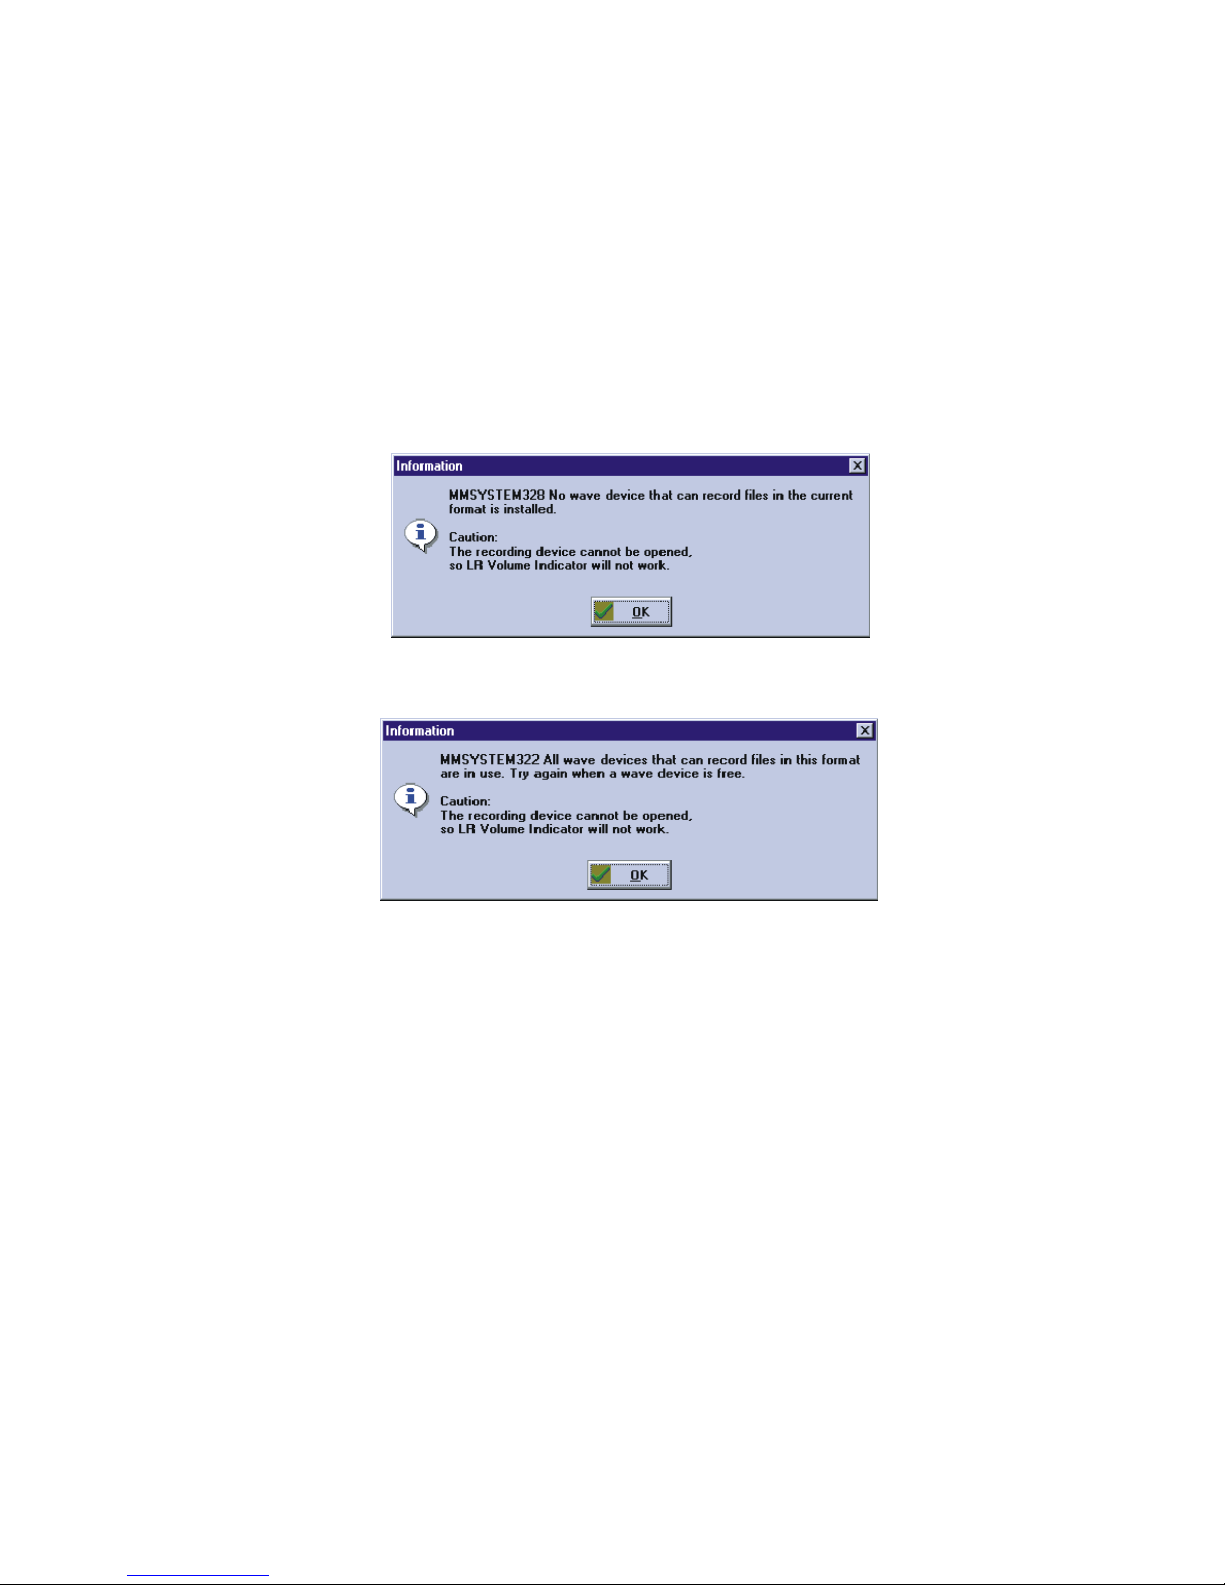
8-1-2. If the following warning sign appears when you
are running the software then
Sound card has not been installed in your PC.
Recording and playing function of wave device
is used by other application software.
Explanations of the above warning signs:
The digitizer will only operate when the sound
card record function is running. If the record
software doesn’t operate, it is impossible for the
LR Volume Indicator to display the volume.
8-2. Questions when you are using the software of
33
Page 35

DSB-R100.
(A) I am running the DSB-R100 software, but I can't
hear anything. What should I do?
ANS:
If your software is already running and you can
z
operate the control panel switches, this shows that
the radio has been installed correctly. If this is not
the case, then the radio receiver/recorder is not
operating properly and you should make sure that
the DSB-R100 Adapter has been installed properly.
If you still can't hear anything even though the
z
DSB-R100 is operating normally, one of the
following situations may be occurring:
A. The RCA jack may not be correctly inserted in
the sound card's Line In socket. Please make
sure it is inserted correctly.
B. The sound card's "Line In" volume may be set
on mute or at the lowest value. Adjust the
volume dial and the mute switch on the right
side of the control panel until you are able to
hear sound. (If adjusting the volume dial has no
effect, you can try opening the Windows 95
Mixer and making adjustments from there.)
C. A problem with the sound card driver may be
making it impossible for the DSB-R100's signal
to enter the computer. Please re-install the driver
software that came with your sound card.
D. If the volume indicator on the control panel is
blinking but no sound is heard, please see the
answer to question B.
34
Page 36

(B). My DSB-R100 's volume indicator is blinking
normally, the switches are all functioning properly,
and the speaker is on, but I don't hear anything.
Why is this?
Try turning off the volume indicator. If you are then
ANS:
able to hear sound, this shows that the sound card was
unable to transmit sound to the speakers while it was
recording a WAVE file. The solution is to turn off the
volume indicator. The reason for this is that the
DSB-R100 must turn on its record function when the
volume indicator is turned on (see question 10 for an
explanation). Another solution is to open Win95's
Mixer (double click on the speaker icon in the lower
right part of the screen to open the Mixer) and change
several of the special record options on the record page;
see if you can simultaneously hear sound and cause the
volume meter to appear. For example, if you use the
ESS sound chip, it should be possible to find the volume
monitor switch in the mixer control program; turning on
this switch will generally solve this problem.
Testing throughout the design process has proven
that the DSB-R100 is completely compatible with
most sound cards on the market.
35
Page 37
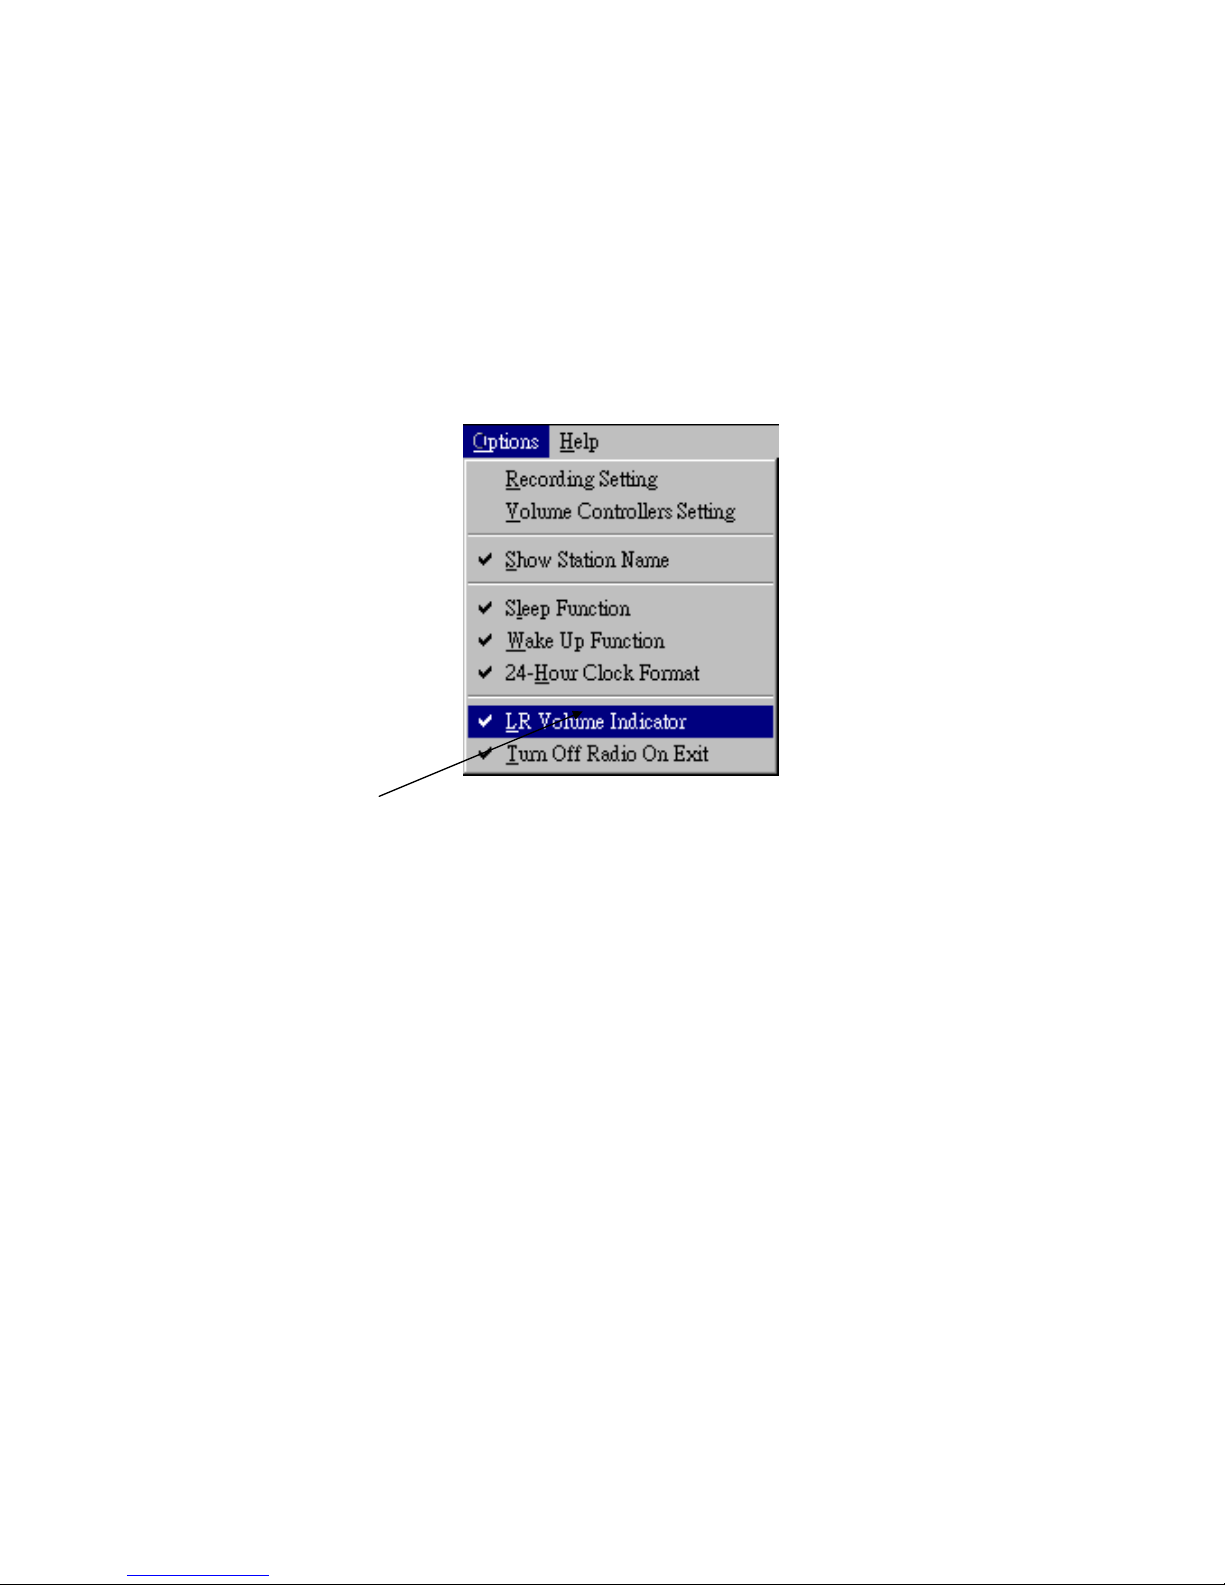
Deleting the check mark will close the volume meter
(C). I can hear sound from my DSB-R100 , but the
volume indicator doesn't move.
ANS:
The volume indicator is able to display the volume
because the radio's sound output is run through a
digitizer and then displayed on the screen. Since the
digitizer will only operate when the sound card's record
function is running, if the DSB-R100 software cannot
operate the sound card's record function, then it will be
impossible for the volume indicator to display the
volume.
36
Page 38

The following are some possible reasons why the volume
indicator will not move:
A. The volume indicator cannot move because the
sound card is already recording (for instance a
multimedia program is in the midst of recording) or
is already playing (see if you have a simplex or a
duplex sound card).
B. Your sound card driver is not installed properly and
other multimedia programs are also unable to use
the record function. In this case the DSB-R100 will
certainly be unable to record or display the volume
level.
C. Because the earphone's RCA wire is not properly
plugged in to the sound card's Line In socket, the
volume meter can't move and you can't hear any
sound either.
D. You haven't turned on the volume meter (set from
the Options menu as shown above).
E. The final reason is also the most important:
The source of the sound to be recorded has been
selected incorrectly. In theory, sound output from
the DSB-R100 will go to the sound card's Line In,
and the source of sound to be recorded should also
be the Line In. Only then will sound from the radio
pass through the recording and digitizing unit and
be displayed. But if Line In (Line) has not been
selected as the sound source, then the sound card
won't receive input from the radio, and the volume
meter won't be able to function normally. However,
because we took this into consideration when
designing the DSB-R100 software, this situation
should seldom occur. Whenever you run the
37
Page 39
DSB-R100 software, it will automatically select the
Line as the sound source. To insure that the situation
mentioned above doesn't make it impossible to view
the volume, we have made our software compatible
with most sound cards on the market. But if this
problem does occur, there is a solution you can try:
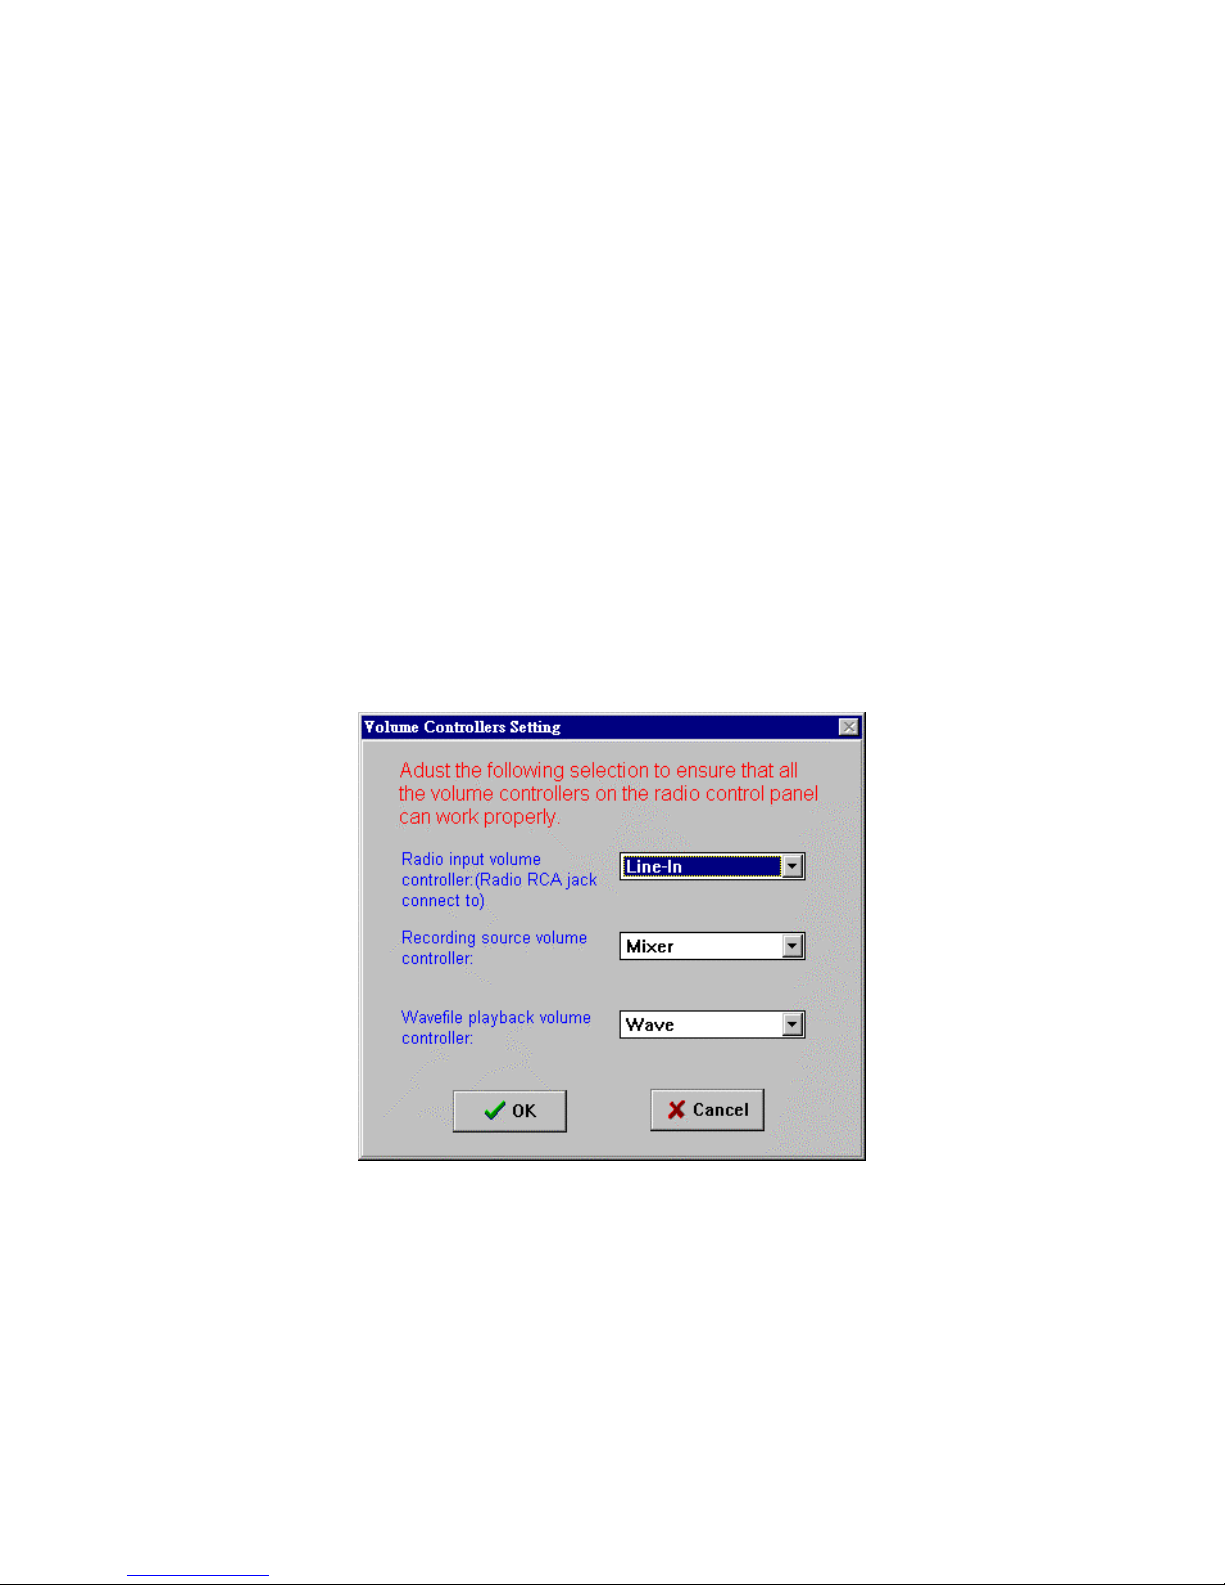
This solution is to manually change the sound
source as follows: Open the "Volume controllers
settings" under the DSB-R100 software's "Options";
you will see the following screen. Change the
settings to resolve the above mentioned problem.
38
Page 40

(D). Why is it that the volume dial on the right side of
my DSB-R100's screen sometimes doesn't move
and sometimes moves but doesn't have any effect?
ANS:
A. As described above, the volume control settings
may be incorrect. You should use the method
described above to change the settings.
B. Another possible cause is incorrect sound card
driver software.
(E). Why can't I use my DSB-R100’s record and play
functions?
ANS:
A. Other applications software may be currently using
the record or play functions. It is then impossible for
the sound card to run the record unit again.
B. Your computer doesn't have a sound card.
C. Your computer has a sound card, but the sound card
driver hasn't been installed correctly.
39
 Loading...